History on Stage Pop-Up Lesson Page 1 of 12 Smithsonian Institution Libraries Grades 5–8 General Overview This lesson introduces students to the variety of mechanisms included in movable books and encourages them to build their own pop-up. Making pop-ups subtly reinforces students’ understanding of mechanical movement and helps budding architects, designers, and engineers begin to envision objects three- dimensionally. The lesson provides students the opportunity to create their own stage in order to apply the pop-up mechanism to a social studies lesson. Objectives By completing this lesson, students will: • Apply mathematics concepts and be exposed to ideas of engineering design. • Employ mathematical thinking and historical research in the creation of a new educational pop-up. • Reinforce social studies content knowledge by creating a historical pop-up. Prerequisite Skills Basic measurement Time Allotment Three forty-five minute class periods Materials • Pop-up books • Scissors • Markers/colored pencils • Rulers • Glue or tape National Standards for History National Center for History in the Schools, grades 5–12 Historical Thinking Standard 4A: Formulate historical questions Historical Thinking Standard 4B: Obtain historical information from a variety of sources NCTM Standards Geometry Apply transformations and use symmetry to analyze mathematical situations Grades 3-5: predict and describe the results of sliding, flipping, and turning two-dimensional shapes; Introduction
Transcript
History on Stage Pop-Up Lesson
Page 1 of 12
Smithsonian Institution Libraries
Grades 5–8
General Overview This lesson introduces students to the variety of mechanisms included in movable books and encourages them to build their own pop-up. Making pop-ups subtly reinforces students’ understanding of mechanical movement and helps budding architects, designers, and engineers begin to envision objects three-dimensionally. The lesson provides students the opportunity to create their own stage in order to apply the pop-up mechanism to a social studies lesson.
Objectives By completing this lesson, students will: • Apply mathematics concepts and be exposed to ideas of engineering design. • Employ mathematical thinking and historical research in the creation of a new educational pop-up. • Reinforce social studies content knowledge by creating a historical pop-up.
Prerequisite Skills Basic measurement
Time Allotment Three forty-five minute class periods
National Standards for History National Center for History in the Schools, grades 5–12 Historical Thinking Standard 4A: Formulate historical questionsHistorical Thinking Standard 4B: Obtain historical information from a variety of sources
NCTM StandardsGeometry Apply transformations and use symmetry to analyze mathematical situations Grades 3-5: predict and describe the results of sliding, flipping, and turning two-dimensional shapes;
Introduction
History on Stage Pop-Up Lesson
Page 2 of 12
Smithsonian Institution Libraries
Grades 6-8: draw geometric objects with specified properties, such as side lengths or angle measures; recognize and apply geometric ideas and relationships in areas outside the mathematics classroom, such as art, science, and everyday life. Measurement Apply appropriate techniques, tools, and formulas to determine measurements Grades 6-8: select and apply techniques and tools to accurately find length, area, volume, and angle measures to appropriate levels of precision
Introduction
History on Stage Pop-Up Lesson
Page 3 of 12
Smithsonian Institution Libraries
Historical Background
The first movable books were created more than 800 years ago following some of the same construction principles that are used to produce movable and pop-up books today. Movables are books with mechanisms such as flaps, pull tabs, and wheels called volvelles, while pop-ups employ V-folds, stage sets, and box and cylinders forms – all to create movement on the page surface. As early as the 13th century, illustrated volvelles or wheels were superimposed on the surface of a page, turning to align data to calculate the position of the stars, dates within the church calendar, and astrological signs. From the 16th century onward, the publishing of illustrated works grew rapidly. Advances in printing made books more accessible, and scholars demanded up-to-date recorded knowledge. Movable and pop-up books were used to demonstrate visually complex systems, particularly relating to medicine, mathematics, and technology. How better to explain the layering and position of organs in the human body – by creating a series of hinged flaps that when opened reveal the multiple valves and muscles of the heart.
In late-18th-century England and America, an educated middle-class population emerged from the Industrial Revolution. They recognized the importance of childhood and had disposable income to purchase books to educate their sons and daughters. As a result, publishers developed books specifically geared to teach religion, manners and the basics, picture books that could be read aloud to children, illustrated arithmetic and ABC primers, as well as stories for pure entertainment. Some of the earliest movables were created in the 1760s. Called “metamorphoses,” “turned-ups,” or “harlequinades,” they consisted of a series of flaps that when lifted revealed an illustrated moral tale featuring a harlequin figure. In the 1820s, a series of flap books taught etiquette to girls and boys. Movable and pop-up versions of books that offer instruction on religion and cultural traditions remain popular. Movables and pop-up books offer enticements to learn when they present the reader the chance to interact by pulling tabs or turning wheels and becoming part of the action. For young readers, visuals can also illustrate abstract concepts such as the opposites of night and day or summer and winter.
Today’s imaginative paper engineers have benefited from advancements in computer aided design, laser printers and cutting devices that made the use of intricate folds and complex paper parts possible for mass market production. Contemporary movables and pop-ups, like earlier works, are remarkable books that calculate, educate, entertain and amaze. To learn more, visit the exhibition website for Paper Engineering: Fold, Pull, Pop, and Turn (http://smithsonianlibraries.si.edu/foldpullpopturn/) or examine the exhibition brochure (http://www.sil.si.edu/pdf/FPPT_brochure.pdf).
Procedure For this lesson, students will follow the steps for invention outlined by Spark!Lab, organized by the Lemelson Center for the Study of Invention at the National Museum of American History (www.sparklab.si.edu) : Think It, Explore It, Sketch it, Create it, Try it, Tweak it, Sell it.
Motivation: Think It!1. Explore your library and find pop-up books, or for homework, have students bring a pop-up book of their
own or one from their school or local library. 2. Once enough have been collected to allow pairs of students to examine a book, divide students up and ask
them to look at the different pop-up books and try to think about how the elements move. Have students consider the following questions:
• Does something pop up? Why do you think that part was chosen to move off of the page? • Are there places to pull or turn? What happens when you do? • Can you lift parts of the book? What is underneath?
Have students take careful notes about the different elements that make the book interactive. 3. Next, provide students copies of the mechanism types, and review the terms together. Have students
create a class list of the types of mechanisms they find in their book. You may also find videos of pop-up books from the Paper Engineering exhibition in action on Flickr (http://www.flickr.com/photos/smithsonianlibraries/sets/72157624731760899/).
Instructions: Explore It!1. Once students have identified their types of moveable books, have one pair who found each type of
mechanism read out its historical purpose. Explain, using the background information, that pop-up and moveable books were originally designed to be educational. Or, provide students the names of the mechanisms and have them explore the Paper Engineering site (http://smithsonianlibraries.si.edu/foldpullpopturn/) to find examples, definitions, and their educational function.
2. Next, introduce the production of pop-up books, in any of a variety of ways: • Watch the Paper Engineering: Fold, Pull, Pop & Turn video on how pop-up books are produced: http://smithsonianlibraries.si.edu/foldpullpopturn/videos.html. • Listen to the podcast with David Carter about how he creates pop-up books. • Read “How We Make Pop-Up Books” from David Hawcock Books: http://www.hawcockbooks. co.uk/how.php. • Examine The Pop Up Book by Paul Johnson or The Pocket Paper Engineer vol. 1 & 2 by Carol Barton for older students or How to Make Pop-Ups by Joan Irvine for younger students, for step-by- step instructions for creating pop-ups.
3. Allow students to practice by creating simple mouth pop-ups! See the sample from paper engineer Robert Sabuda’s website (http://www.robertsabuda.com/popmake/basics/mouth/popmake_mouth-step1.asp)or follow the instructions below:
Step 3Cut along the perpendicular line and fold the paper in along the
slanted lines.
Step 1Fold a sheet of paper in half, then draw a line 1-2
inches long perpendicular to the center fold.
Step 2Draw lines connecting the top of the perpendicular line to the center crease.
Activity suggestion: Paper engineer Carol Barton suggests using the mouth pop-up as follows:Have students choose a historic figure such as a poet, president, or inventor, and find a thought provoking quotation by that person. Using the mouth pop-up, kids can draw their chosen subject with his or her quotation written across the page, or as a text bubble coming from the moving mouth. Children can also find quotations dealing with a chosen theme or specific period in history, and can be encouraged to learn more about the speaker’s life and work. This information can be included as a written text accompanying the pop-up.
Learn more about pop-ups and see samples of student work online (www.popularkinetics.com) or in The Pocket Paper Engineer vol. 1 & 2, by Carol Barton.Or, for a simple introduction to pop-up designs, try the Make Your Own American Eagle Pop-Up, designed for this exhibition(http://www.sil.si.edu/PDF/eagle_popup.pdf) or the “Pop Your Candidate into the White House” activity on Carol Barton’s Popular Kinetics website(http://www.popularkinetics.com/making_page.html).
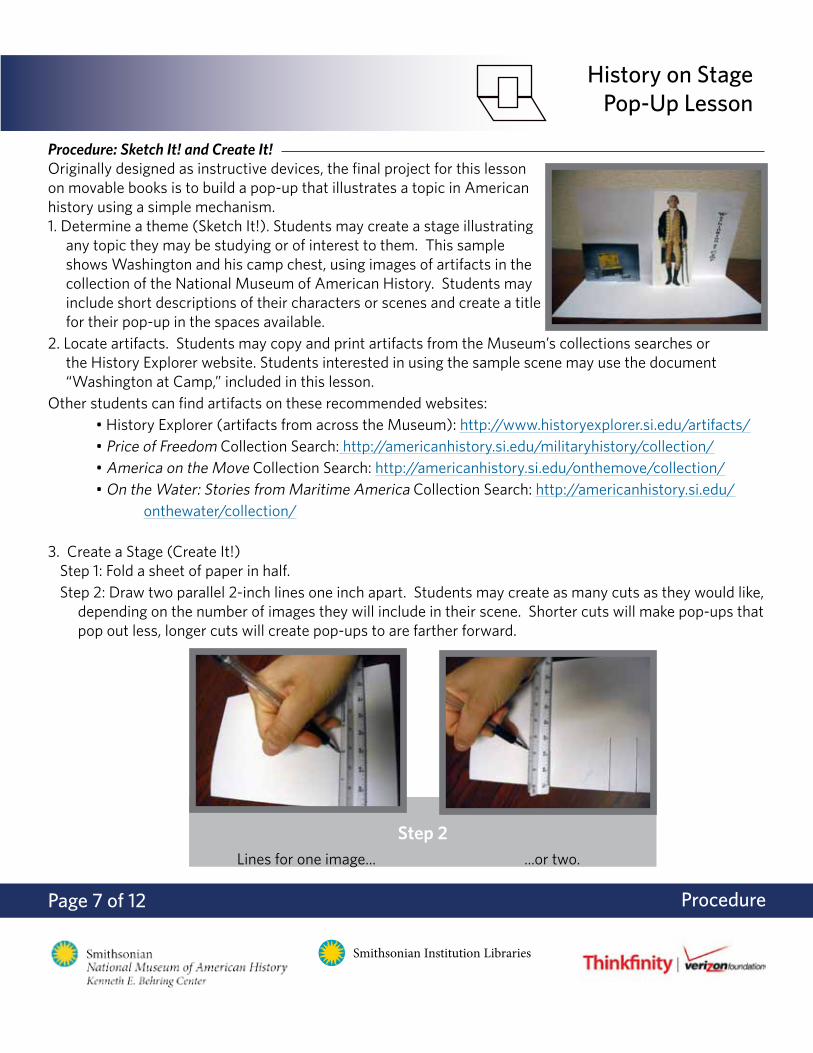
Procedure: Sketch It! and Create It!Originally designed as instructive devices, the final project for this lesson on movable books is to build a pop-up that illustrates a topic in American history using a simple mechanism. 1. Determine a theme (Sketch It!). Students may create a stage illustrating
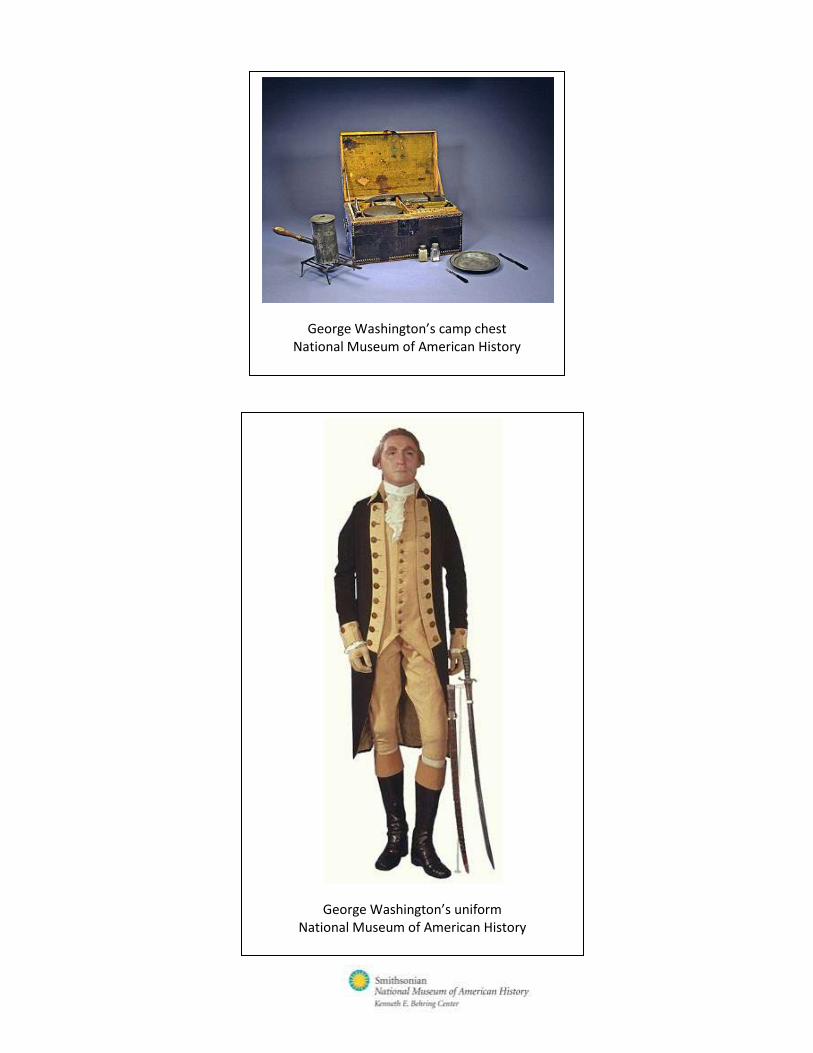
any topic they may be studying or of interest to them. This sample shows Washington and his camp chest, using images of artifacts in the collection of the National Museum of American History. Students may include short descriptions of their characters or scenes and create a title for their pop-up in the spaces available.
2. Locate artifacts. Students may copy and print artifacts from the Museum’s collections searches or the History Explorer website. Students interested in using the sample scene may use the document “Washington at Camp,” included in this lesson.
Other students can find artifacts on these recommended websites: • History Explorer (artifacts from across the Museum): http://www.historyexplorer.si.edu/artifacts/ • Price of Freedom Collection Search: http://americanhistory.si.edu/militaryhistory/collection/ • America on the Move Collection Search: http://americanhistory.si.edu/onthemove/collection/ • On the Water: Stories from Maritime America Collection Search: http://americanhistory.si.edu/ onthewater/collection/
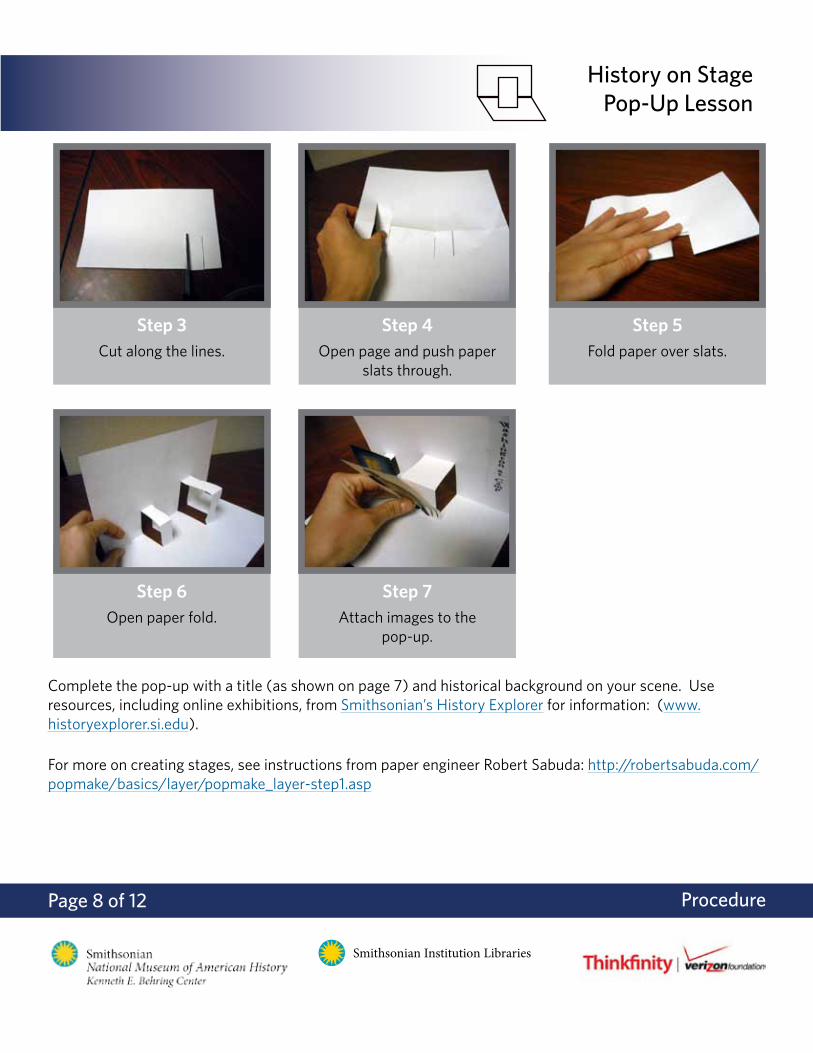
3. Create a Stage (Create It!)Step 1: Fold a sheet of paper in half. Step 2: Draw two parallel 2-inch lines one inch apart. Students may create as many cuts as they would like,
depending on the number of images they will include in their scene. Shorter cuts will make pop-ups that pop out less, longer cuts will create pop-ups to are farther forward.
Complete the pop-up with a title (as shown on page 7) and historical background on your scene. Use resources, including online exhibitions, from Smithsonian’s History Explorer for information: (www.historyexplorer.si.edu).
For more on creating stages, see instructions from paper engineer Robert Sabuda: http://robertsabuda.com/popmake/basics/layer/popmake_layer-step1.asp
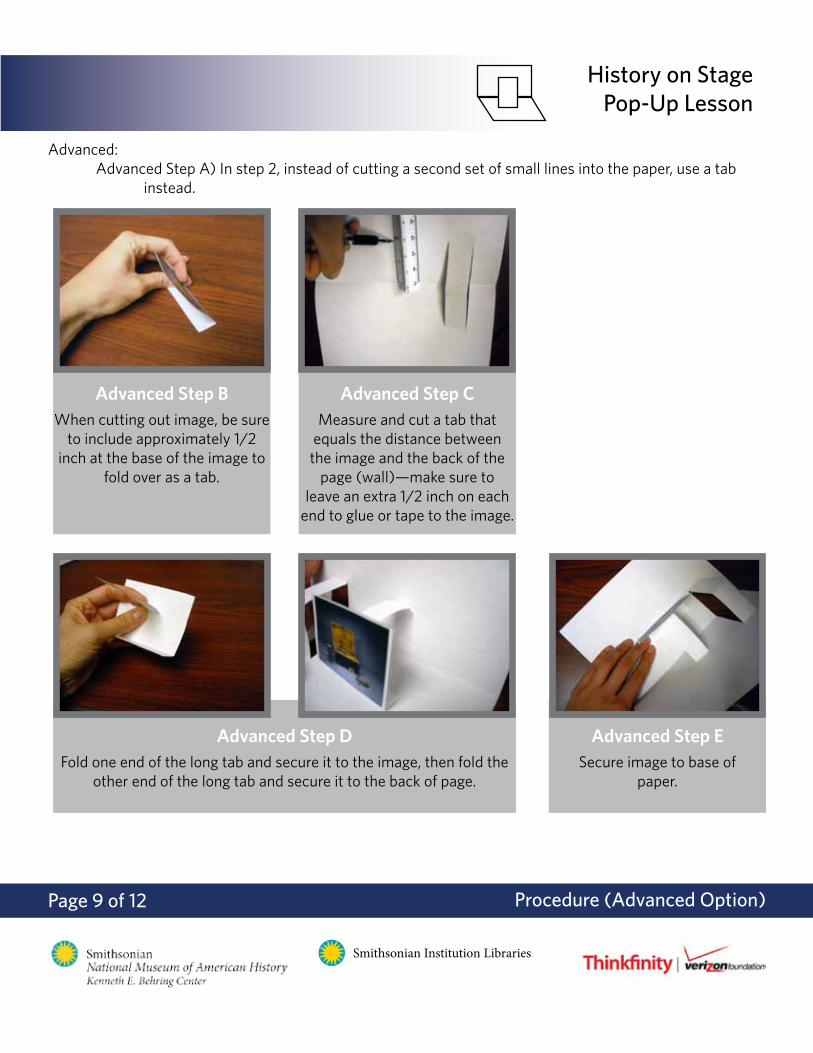
Advanced: Advanced Step A) In step 2, instead of cutting a second set of small lines into the paper, use a tab instead.
Advanced Step BWhen cutting out image, be sure
to include approximately 1/2 inch at the base of the image to
fold over as a tab.
Advanced Step CMeasure and cut a tab that
equals the distance between the image and the back of the
page (wall)—make sure to leave an extra 1/2 inch on each
end to glue or tape to the image.
Advanced Step ESecure image to base of
paper.
Advanced Step DFold one end of the long tab and secure it to the image, then fold the
other end of the long tab and secure it to the back of page.
Procedure (Advanced Option)
History on Stage Pop-Up Lesson
Page 10 of 12
Smithsonian Institution Libraries
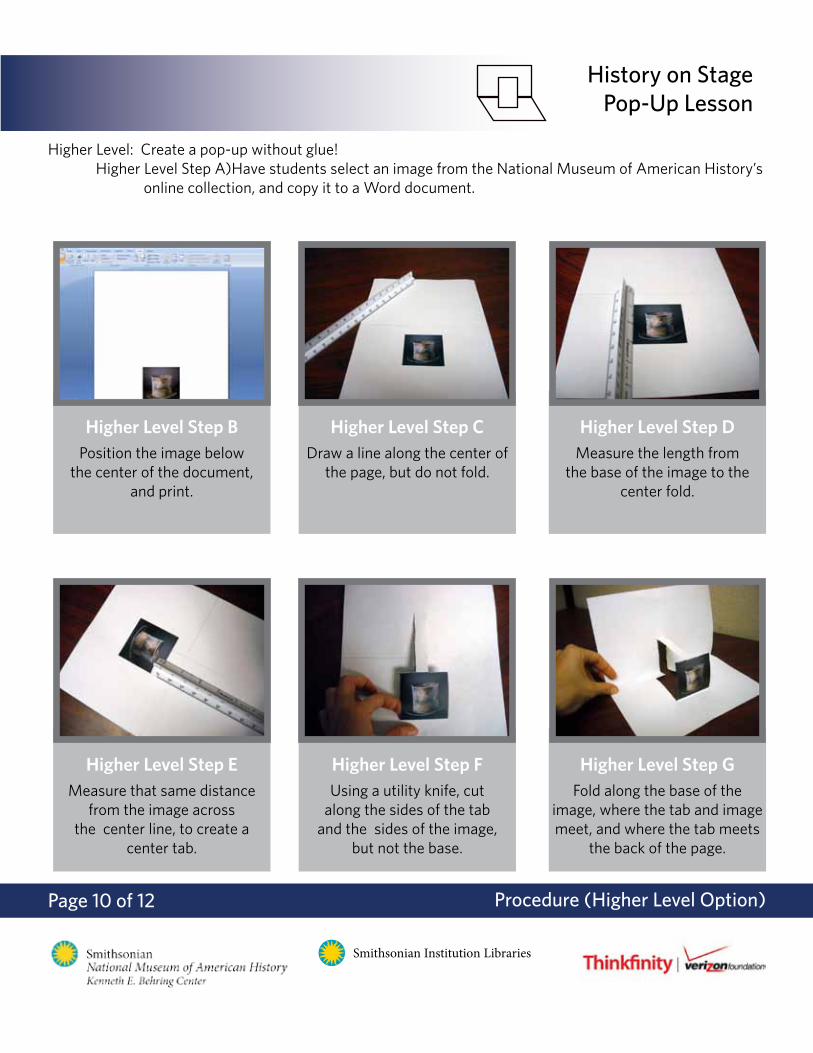
Higher Level: Create a pop-up without glue! Higher Level Step A)Have students select an image from the National Museum of American History’s online collection, and copy it to a Word document.
Higher Level Step BPosition the image below
the center of the document, and print.
Higher Level Step CDraw a line along the center of
the page, but do not fold.
Higher Level Step EMeasure that same distance
from the image across the center line, to create a
center tab.
Higher Level Step DMeasure the length from
the base of the image to the center fold.
Higher Level Step FUsing a utility knife, cut
along the sides of the tab and the sides of the image,
but not the base.
Higher Level Step GFold along the base of the
image, where the tab and image meet, and where the tab meets
the back of the page.
Procedure (Higher Level Option)
History on Stage Pop-Up Lesson
Page 11 of 12
Smithsonian Institution Libraries
Find step-by-step instructions for this and other designs in volume 2 of Carol Barton’s The Pocket Paper Engineer.
Assessment: Try It!Have students exchange pop-ups and evaluate each other using the following guidelines. See page 12 for a suggested rubric.
Extension: Tweak It! and Sell It!Students may make modifications to their designs after receiving feedback from their peers. Students will then present their final stages to their own or a neighboring class, which will choose the winning design.
Related Resources How to Make Pop Ups Bibliography, by Robert Sabuda: http://robertsabuda.com/popupbib.asp Popular Kinetics: http://www.popularkinetics.com Between the Folds: http://www.pbs.org/independentlens/between-the-folds/ Art, Books, and Creativity: Arts Learning in the Classroom: http://www.artbookscreativity.org/ Joan Irvine—how to guides and information on Irvine’s pop-up books: http://joanirvine.com/HowTo.aspx
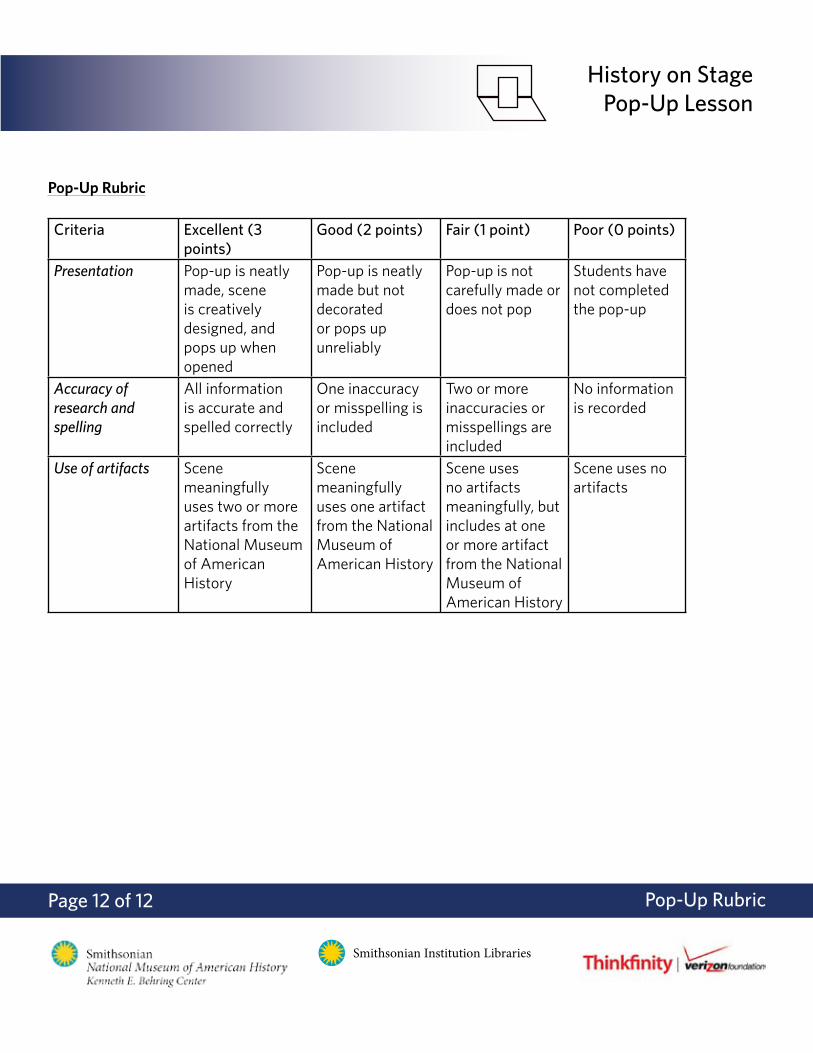
Presentation Pop-up is neatly made, scene is creatively designed, and pops up when opened
Pop-up is neatly made but not decorated or pops up unreliably
Pop-up is not carefully made or does not pop
Students have not completed the pop-up
Accuracy of research and spelling
All information is accurate and spelled correctly
One inaccuracy or misspelling is included
Two or more inaccuracies or misspellings are included
No information is recorded
Use of artifacts Scene meaningfully uses two or more artifacts from the National Museum of American History
Scene meaningfully uses one artifact from the National Museum of American History
Scene uses no artifacts meaningfully, but includes at one or more artifact from the National Museum of American History
Scene uses no artifacts
Pop-Up Rubric
History on Stage Pop-Up Lesson
Page 1 of 3
Smithsonian Institution Libraries
Mechanism Guide
Historical Background
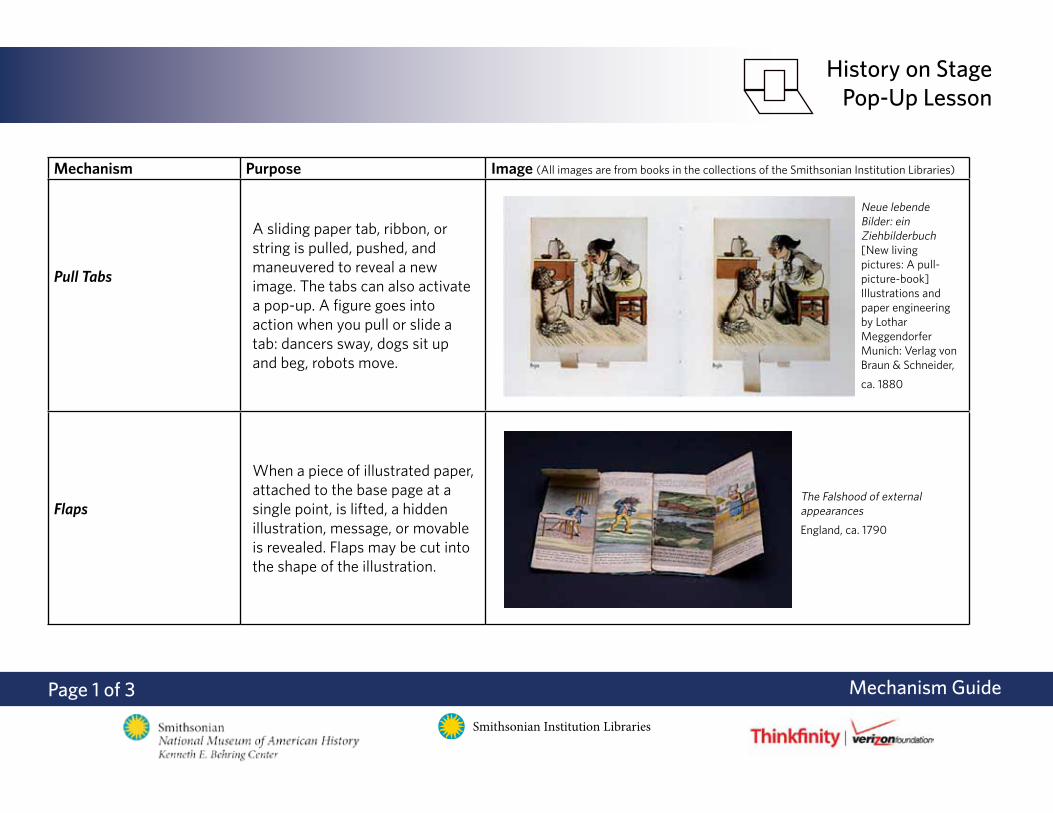
Mechanism Purpose Image (All images are from books in the collections of the Smithsonian Institution Libraries)
Pull Tabs
A sliding paper tab, ribbon, or string is pulled, pushed, and maneuvered to reveal a new image. The tabs can also activate a pop-up. A figure goes into action when you pull or slide a tab: dancers sway, dogs sit up and beg, robots move.
Flaps
When a piece of illustrated paper, attached to the base page at a single point, is lifted, a hidden illustration, message, or movable is revealed. Flaps may be cut into the shape of the illustration.
Neue lebende Bilder: ein Ziehbilderbuch[New living pictures: A pull-picture-book]Illustrations and paper engineering by Lothar MeggendorferMunich: Verlag von Braun & Schneider,
ca. 1880
The Falshood of external appearances
England, ca. 1790
History on Stage Pop-Up Lesson
Page 2 of 3
Smithsonian Institution Libraries
Mechanism Guide
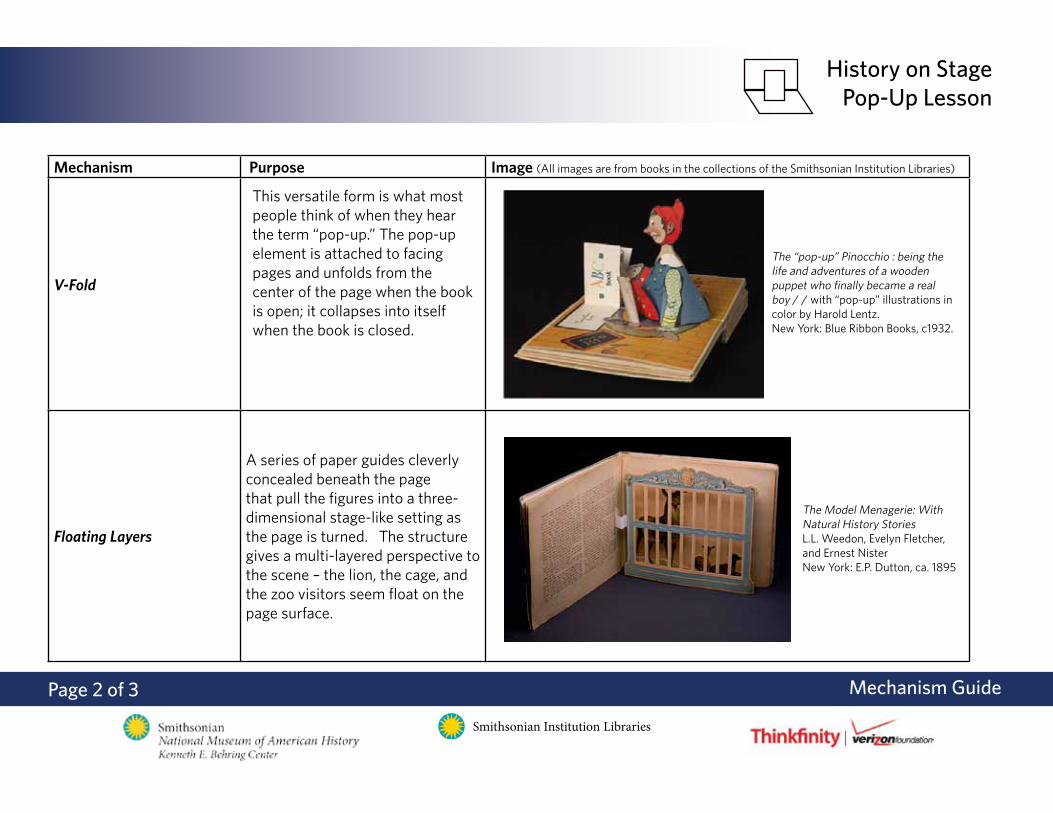
Mechanism Purpose Image (All images are from books in the collections of the Smithsonian Institution Libraries)
V-Fold
This versatile form is what most people think of when they hear the term “pop-up.” The pop-up element is attached to facing pages and unfolds from the center of the page when the book is open; it collapses into itself when the book is closed.
Floating Layers
A series of paper guides cleverly concealed beneath the page that pull the figures into a three-dimensional stage-like setting as the page is turned. The structure gives a multi-layered perspective to the scene – the lion, the cage, and the zoo visitors seem float on the page surface.
The “pop-up” Pinocchio : being the life and adventures of a wooden puppet who finally became a real boy / / with “pop-up” illustrations in color by Harold Lentz.New York: Blue Ribbon Books, c1932.
The Model Menagerie: With Natural History StoriesL.L. Weedon, Evelyn Fletcher, and Ernest Nister New York: E.P. Dutton, ca. 1895
History on Stage Pop-Up Lesson
Page 3 of 3
Smithsonian Institution Libraries
Mechanism Guide
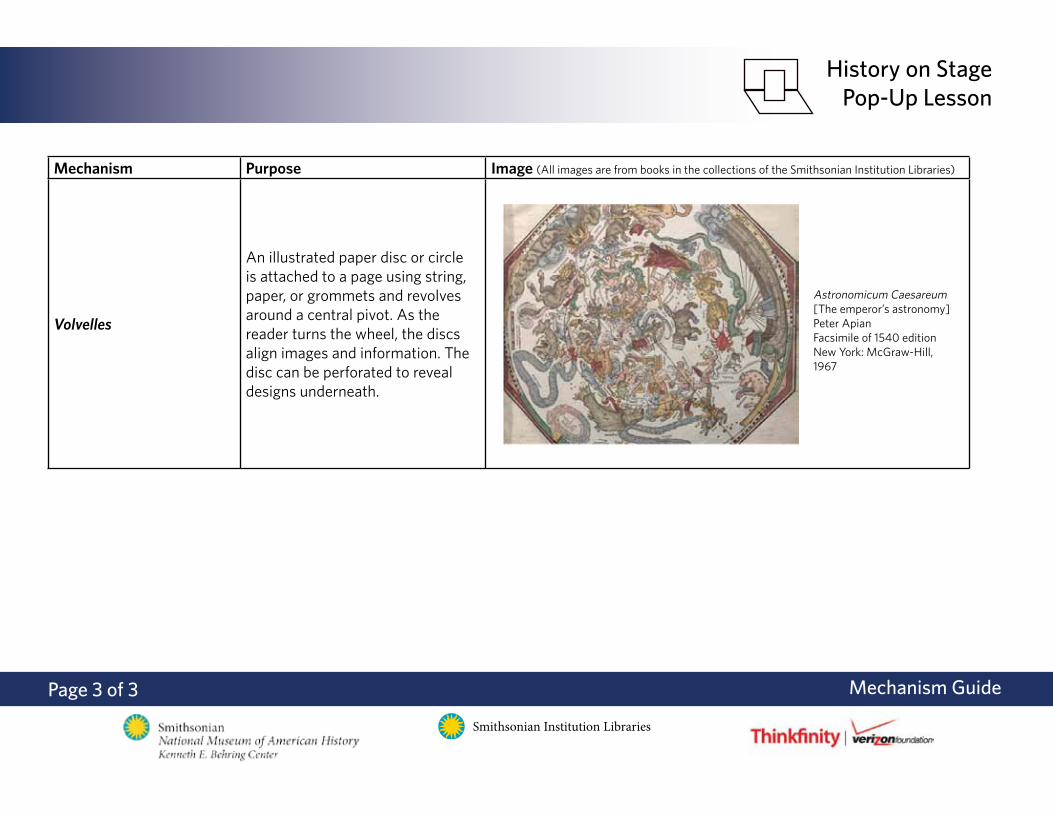
Mechanism Purpose Image (All images are from books in the collections of the Smithsonian Institution Libraries)
Volvelles
An illustrated paper disc or circle is attached to a page using string, paper, or grommets and revolves around a central pivot. As the reader turns the wheel, the discs align images and information. The disc can be perforated to reveal designs underneath.