TEKA PAKISTAN Pvt. Ltd. 92 42 631 2182 42 631 2183Poland Pruszków TEKA POLSKA SP. ZO.O. 48 22 7383270 22 7383278Portugal Ílhavo TEKA PORTUGAL, S.A. 351 234 329 500 234 325 457Russia Moscow TEKA RUS LLC 7 095 737 4690 095 737 4689Singapore Singapore TEKA SINGAPORE PTE. LTD. 65 67342415 67346881Spain Santander TEKA INDUSTRIAL, S.A. 34 942 355050 942 324499Thailand Bangkok TEKA (THAILAND) CO. LTD. 66 2 6933237 2 6933242Turkey Istanbul TEKA TEKNIK MUTFAK 90 212 288 3134 212 274 56 86Ukraine Kiev TEKA UA 380 44 272 33 90 44 279 58 54United Arab Emirates Dubai TEKA KÜCHENTECHNIK
MIDDLE EAST FZE 971 4 887 2912 4 887 2913United Kingdom Milton Abingdon TEKA PRODUCTS LTD. 44 1235 861916 1235 835107USA Tampa TEKA USA, INC. 1 813 2888820 813 2888604Venezuela Caracas TEKA ANDINA, S.A. 58 2 1229 12821 2 1229 12825
K Ü C H E N T E C H N I K
Nue
stra
apo
rtac
ión
a la
pro
tecc
ión
del m
edio
-am
bien
te: u
tiliz
amos
pap
el re
cicl
ado.
A n
ossa
con
trib
ução
par
a a
prot
ecçã
o do
am
bien
te: u
tiliz
amos
pap
el re
cicl
ado.
Our
con
trib
utio
n to
env
irom
enta
l pro
tect
ion:
we
use
recy
cled
pap
er.
Not
re c
ontr
ibut
ion
à la
pro
tect
ion
de l’
envi
ronn
emen
t : n
ous
utili
sons
du
papi
er re
cycl
é.U
nser
Bei
trag
zum
Um
wel
tsch
utz:
wir
verw
ende
n um
wel
tfreu
ndlic
hes
Pap
ier.
Cod
.: 83
1721
15/3
1721
15-0
01
115
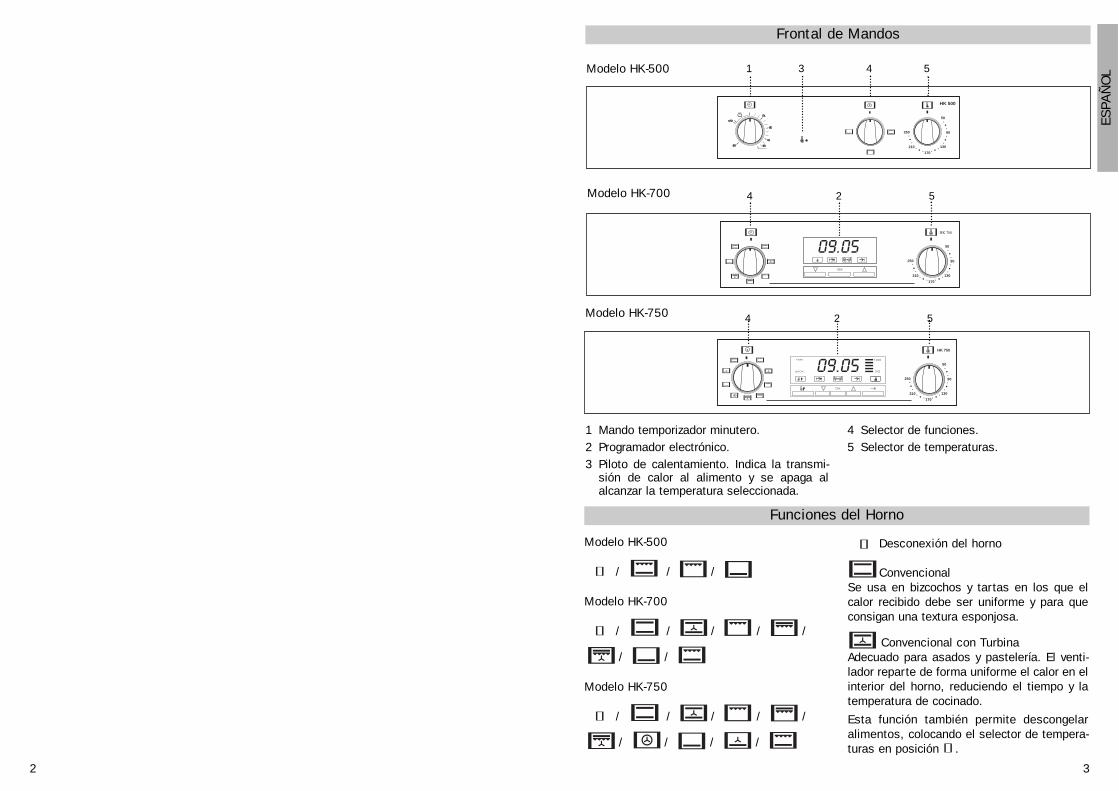
1 Mando temporizador minutero.2 Programador electrónico.3 Piloto de calentamiento. Indica la transmi-
sión de calor al alimento y se apaga alalcanzar la temperatura seleccionada.
4 Selector de funciones.5 Selector de temperaturas.
Modelo HK-500
Modelo HK-700
Frontal de Mandos
Funciones del Horno
50
90
130
170
210
250
HK 500
1 3 4 5
4 2 5
50
90
130
170
210
250
Modelo HK-750 4 2 5
50
90
130
170
210
250
HK 750
32
Modelo HK-500
/ / /
Modelo HK-700
/ / / / /
/ /
Modelo HK-750
/ / / / /
/ / / /
Desconexión del horno
ConvencionalSe usa en bizcochos y tartas en los que elcalor recibido debe ser uniforme y para queconsigan una textura esponjosa.
Convencional con TurbinaAdecuado para asados y pastelería. El venti-lador reparte de forma uniforme el calor en elinterior del horno, reduciendo el tiempo y latemperatura de cocinado.
Esta función también permite descongelaralimentos, colocando el selector de tempera-turas en posición .
ESPA
ÑO
L
4 5
ESPA
ÑO
L
Modelo HK-700
Puesta en Hora del Reloj Electrónico
Al conectar su horno, observará que en elreloj aparece parpadeando la indicación00:00. Pulsando las teclas ó pondráel reloj en hora; a continuación escuchará 2beep seguidos como confirmación de la horaelegida.
Si desea modificar la hora, pulse las teclas óhasta que parpadee la hora actual. A conti-
nuación pulse la tecla . Pulsando las teclasó podrá modificar la hora. Finalmente
escuchará 2 beep seguidos como confirmacióndel cambio realizado.
Funcionamiento Manual
Tras poner el reloj en hora, su horno está listopara cocinar. Seleccione una función de coci-nado y una temperatura.
Durante el cocinado observará que el símbolose ilumina para indicar la transmisión de
calor al alimento. Este símbolo se apaga cuan-do se alcanza la temperatura seleccionada.
Para apagar el horno, ponga los mandos enposición .
Funciones del Reloj Electrónico
Avisador: Genera una señal acústica al cabodel tiempo, para ello no es necesario que elhorno esté cocinando.
Duración del Cocinado: Permite cocinar duran-te un tiempo seleccionado, a continuación elhorno se apagará de forma automática.
Hora de Finalización del Cocinado: Permitecocinar hasta una hora establecida, a conti-nuación el horno se apagará de forma auto-mática.
Duración y Fin del Cocinado: Permite progra-mar la duración y la hora de finalización delcocinado. Con esta función el horno se pondráen marcha de forma automática a la horanecesaria para cocinar durante el tiemposeleccionado (Duración) y finalizando de formaautomática a la hora que le hayamos indicado(Fin del Cocinado).
Programación del Avisador
1 Pulse la tecla hasta que el símbolo se ilumine. A continuación pulse la tecla .
2 Seleccione el tiempo tras el cual desea queel reloj avise, pulsando las teclas ó .
3 Posteriormente sonarán 2 beep seguidos,se mostrará la hora actual y el símbolo permanecerá iluminado, indicando que elavisador ya está programado.
4 Transcurrido el tiempo programado, sonaráuna señal acústica y el símbolo empe-zará a parpadear.
5 Pulse cualquier tecla para detener la señalacústica, en ese momento el símbolo se apagará.
En cualquier momento usted puede visualizarel tiempo restante, pulsando las teclas ó
hasta que el símbolo parpadee y pul-sando luego la tecla . En ese momentousted puede modificar el tiempo seleccionadopulsando las teclas ó . A continuaciónescuchará 2 beep seguidos como confirma-ción del cambio.
Si desea ver de forma permanente el tiemporestante hasta la finalización, pulse las teclas
ó hasta que el símbolo parpadeey luego pulse la tecla de forma prolonga-da. El símbolo estará parpadeando. Paravolver a la hora actual basta con pulsar denuevo la tecla de forma prolongada.
Programación de la Duración del Cocinado
1 Pulse las teclas ó hasta que el sím-bolo se ilumine. A continuación pulsela tecla .
2 Seleccione la duración, pulsando las teclasó .
3 Posteriormente sonarán 2 beep seguidos,se mostrará la hora actual y el símbolo permanecerá iluminado, indicando que suhorno se apagará de forma automática.
4 Seleccione una función y una temperaturade cocinado.
5 Transcurrida la duración del cocinado, elhorno se desconectará, sonará una señalacústica y el símbolo parpadeará.
GrillGratinado y asado superficial. Permite el dora-do de la capa exterior sin afectar al interior delalimento. Indicado para piezas planas comobistec, costillas, pescado, tostadas.
MaxiGrillPermite el gratinado en mayores superficiesque en Grill, así como una mayor potencia degratinado, obteniendo un dorado del alimentode forma más rápida.
MaxiGrill con TurbinaPermite el asado uniforme al mismo tiempoque dora superficialmente. Ideal para parrilla-das. Especial para piezas con gran volumencomo aves, caza,... Se recomienda colocar lapieza de carne sobre la parrilla del horno y labandeja por debajo, para el escurrido de jugoso grasa.
AtenciónDurante el uso de la función Grill, MaxiGrill oMaxiGrill con Turbina la puerta debe mante-nerse cerrada.
Turbo La turbina reparte el calor que proviene deuna resistencia situada en la parte trasera del
horno. Por la uniformidad de la temperaturaque se produce, permite cocinar en 2 alturasal mismo tiempo.
Esta función también permite descongelar ali-mentos, colocando el selector de temperatu-ras en posición .
Solera Calor sólo desde la parte inferior. Apropiadopara calentar platos o levantar masas derepostería y afines.
Solera con Turbina Distribuye el calor que proviene de la parteinferior del horno. Ideal para pasteles conrelleno de mermelada o fruta, los cuales sólorequieren un aporte de calor inferior. Siemprees necesario un precalentamiento anterior.
Grill y Solera Especial para asados. Puede usarse paracualquier pieza, independiente de su tamaño.
Nota
La lámpara permanece encendida en cual-quier función de cocinado.
Manejo del Horno
Modelo HK-500
Funcionamiento Manual del Horno1 Gire el mando del temporizador hacia la
izquierda hasta la posición .
2 Seleccione una temperatura y una funciónde cocinado.
3 Ponga los mandos en posición para apa-gar el horno.
Funcionamiento Temporizado del Horno
Permite cocinar durante un tiempo previamen-te seleccionado. Para ello:1 Elija la función y la temperatura de cocinado.2 Gire el mando del temporizador, en el senti-
do de las agujas del reloj, hasta la posición“120” minutos y después gírelo en sentido
inverso para seleccionar el tiempo de coc-ción deseado.
3 Transcurrido el tiempo programado, sonaráuna señal acústica y el horno dejará decalentar.
4 Ponga los mandos en posición para apa-gar el horno.
7
ESPA
ÑO
L
6
6 Pulse cualquier tecla para detener la señalacústica, encendiéndose el horno de nuevo.
7 Ponga los mandos en posición para apa-gar el horno.
En cualquier momento usted puede visualizarel tiempo restante de cocinado, pulsando lasteclas ó hasta que el símbolo parpadee y pulsando luego la tecla . Enese momento usted puede modificar el tiemposeleccionado pulsando las teclas ó . Acontinuación escuchará 2 beep seguidoscomo confirmación del cambio.
Si desea ver de forma permanente el tiemporestante hasta la finalización, pulse las teclas
ó hasta que el símbolo parpadeey luego pulse la tecla de forma prolonga-da. El símbolo estará parpadeando. Paravolver a la hora actual basta con pulsar denuevo la tecla de forma prolongada.
Programación de la Hora de Finalización delCocinado
1 Pulse las teclas ó hasta que el sím-bolo se ilumine. A continuación pulsela tecla .
2 Seleccione la hora de finalización del coci-nado, pulsando las teclas ó .
3 Posteriormente sonarán 2 beep seguidos,se mostrará la hora actual y el símbolo permanecerá iluminado, indicando que suhorno se apagará de forma automática.
4 Seleccione una función y una temperaturade cocinado.
5 Alcanzada la hora seleccionada el horno sedesconectará, sonará una señal acústica yel símbolo parpadeará.
6 Pulse cualquier tecla para detener la señalacústica, encendiéndose el horno de nuevo.
7 Ponga los mandos en posición para apa-gar el horno.
En cualquier momento usted puede visualizarla hora de finalización del cocinado, pulsandolas teclas ó hasta que el símbolo parpadee y pulsando luego la tecla . Enese momento usted puede modificar la horade finalización seleccionada pulsando lasteclas ó . A continuación escuchará 2beep seguidos como confirmación del cambio.
Puede emplear esta función aunque usted yaesté cocinando con su horno. Para ello sigalas instrucciones indicadas salvo la número 4.
Programación de la Duración y Fin delCocinado
1 Pulse las teclas ó hasta que el sím-bolo se ilumine. A continuación pulsela tecla .
2 Seleccione la duración, pulsando lasteclas ó .
3 Posteriormente sonarán 2 beep seguidos,se mostrará la hora actual y el símbolo
permanecerá iluminado.
4 Pulse las teclas ó hasta que el sím-bolo se ilumine. A continuación pulsela tecla .
5 Seleccione la hora de finalización del coci-nado, pulsando las teclas ó .
6 Posteriormente sonarán 2 beep seguidos,se mostrará la hora actual y el símbolo
permanecerá iluminado.
7 Seleccione una función y una temperaturade cocinado.
8 El horno permanecerá desconectado, que-dándose iluminados los símbolos y
. Su horno está programado.
9 Cuando se alcance la hora de comienzodel cocinado, el horno se pondrá en mar-cha y se realizará el cocinado durante eltiempo seleccionado.
10 Alcanzada la hora de finalización que sehabía programado, el horno se desconec-tará, sonará una señal acústica y los sím-bolos y parpadearán.
11 Pulse cualquier tecla para detener la señalacústica, encendiéndose su horno denuevo.
12 Ponga los mandos en posición para apa-gar el horno.
Si usted desea modificar la hora de finaliza-ción, pulse las teclas ó hasta que se ilu-mine el símbolo y pulse la tecla . Enese momento usted puede modificar la horaseleccionada pulsando las teclas ó . Acontinuación escuchará 2 beep seguidos comoconfirmación del cambio.
Atención
En caso de un corte de suministro eléctrico,se borrará toda la programación de su relojelectrónico y aparecerá parpadeando la indica-ción 00:00 en el reloj. Deberá ponerlo en horay programarlo de nuevo.
Modelo HK-750
Puesta en Hora del Reloj Electrónico
Al conectar su horno, observará que en elreloj aparece parpadeando la palabra yla indicación 00:00. Pulsando las teclas ó
pondrá el reloj en hora; a continuaciónescuchará 2 beep seguidos como confirma-ción de la hora elegida.
Si desea modificar la hora, pulse las teclasó hasta que parpadee la palabra
y la hora actual. A continuación pulse latecla . Pulsando las teclas ópodrá modificar la hora. Finalmente escucha-rá 2 beep seguidos como confirmación delcambio realizado.
Funcionamiento Manual
Tras poner el reloj en hora, su horno está listopara cocinar. Pulsando y girando los mandosdel horno, seleccione una temperatura y unafunción de cocinado.
Al comenzar el cocinado observará que el sím-bolo se ilumina de forma progresivahasta que el horno se caliente 100% a la tem-peratura seleccionada.
Para apagar el horno, ponga los mandos enposición , a continuación pulse los mandosy éstos quedarán ocultos.
El símbolo se apagará de forma progresi-va conforme disminuya la temperatura interiordel horno.
Funciones del Reloj Electrónico
Precalentamiento rápido: Permite acelerar elcalentamiento del horno cuando está frío.
Avisador: Genera una señal acústica al cabodel tiempo, para ello no es necesario que elhorno esté cocinando.
Duración del Cocinado: Permite cocinar duran-te un tiempo seleccionado, a continuación elhorno se apagará de forma automática.
Hora de Finalización del Cocinado: Permitecocinar hasta una hora establecida, a continua-ción el horno se apagará de forma automática.
Duración y Fin del Cocinado: Permite progra-mar la duración y la hora de finalización delcocinado. Con esta función el horno se pon-drá en marcha de forma automática a la horanecesaria para cocinar durante el tiemposeleccionado (Duración) y finalizando deforma automática a la hora que le hayamosindicado (Fin del Cocinado).
Función Seguridad Niños. Esta función blo-quea el horno, evitando la manipulación porparte de niños pequeños.
Precalentamiento rápido
1 Seleccione una función de cocinado y unatemperatura.
2 Pulse la tecla , entonces el símbolo se iluminará y comenzará el precalenta-miento rápido.
Si pulsa de nuevo la tecla , la función pre-calentamiento se desconectará.
Importante
Recomendamos que introduzca el alimento enel horno sólo cuando haya finalizado el preca-lentamiento rápido, el símbolo estaráapagado.
Programación del Avisador
1 Pulse la tecla hasta que el símbolo se ilumine. A continuación pulse la tecla
.
9
ESPA
ÑO
L
8
2 Seleccione el tiempo tras el cual desea queel reloj avise, pulsando las teclas ó .
3 Posteriormente sonarán 2 beep seguidos,se mostrará la hora actual y el símbolo permanecerá iluminado, indicando que elavisador ya está programado.
4 Transcurrido el tiempo programado, sonaráuna señal acústica y el símbolo empe-zará a parpadear.
5 Pulse cualquier tecla para detener la señalacústica, en ese momento el símbolo se apagará.
En cualquier momento usted puede visualizarel tiempo restante, pulsando las teclas ó
hasta que el símbolo parpadee y pul-sando luego la tecla . En ese momentousted puede modificar el tiempo seleccionadopulsando las teclas ó . A continuaciónescuchará 2 beep seguidos como confirma-ción del cambio.
Si desea ver de forma permanente el tiemporestante hasta la finalización, pulse las teclas
ó hasta que el símbolo parpa-dee y luego pulse la tecla de forma pro-longada. El símbolo estará parpadeandoy la palabra se iluminará. Para volver ala hora actual basta con pulsar de nuevo latecla de forma prolongada.
Programación de la Duración del Cocinado
1 Pulse las teclas ó hasta que el sím-bolo se ilumine. A continuación pulsela tecla .
2 Seleccione la duración, pulsando las teclasó .
3 Posteriormente sonarán 2 beep seguidos,se mostrará la hora actual y el símbolo permanecerá iluminado, indicando que suhorno se apagará de forma automática.
4 Seleccione una función y una temperaturade cocinado.
5 Transcurrida la duración del cocinado, elhorno se desconectará, sonará una señalacústica y el símbolo parpadeará.
6 Pulse cualquier tecla para detener la señalacústica, encendiéndose el horno de nuevo.
7 Ponga los mandos en posición para apa-gar el horno.
En cualquier momento usted puede visualizarel tiempo restante de cocinado, pulsando lasteclas ó hasta que el símbolo par-padee y pulsando luego la tecla . En esemomento usted puede modificar el tiemposeleccionado pulsando las teclas ó . Acontinuación escuchará 2 beep seguidos comoconfirmación del cambio.
Si desea ver de forma permanente el tiemporestante hasta la finalización, pulse las teclas
ó hasta que el símbolo parpa-dee y luego pulse la tecla de forma pro-longada. El símbolo estará parpadeandoy la palabra se iluminará. Para volver ala hora actual basta con pulsar de nuevo latecla de forma prolongada.
Programación de la Hora de Finalización delCocinado
1 Pulse las teclas ó hasta que el sím-bolo se ilumine. A continuación pulsela tecla .
2 Seleccione la hora de finalización del coci-nado, pulsando las teclas ó .
3 Posteriormente sonarán 2 beep seguidos,se mostrará la hora actual y el símbolo permanecerá iluminado, indicando que suhorno se apagará de forma automática.
4 Seleccione una función y una temperaturade cocinado.
5 Alcanzada la hora seleccionada el horno sedesconectará, sonará una señal acústica yel símbolo parpadeará.
6 Pulse cualquier tecla para detener la señalacústica, encendiéndose el horno de nuevo.
7 Ponga los mandos en posición para apa-gar el horno.
En cualquier momento usted puede visualizarla hora de finalización del cocinado, pulsandolas teclas ó hasta que el símbolo parpadee y pulsando luego la tecla . Enese momento usted puede modificar la horade finalización seleccionada pulsando lasteclas ó . A continuación escuchará 2beep seguidos como confirmación del cambio.
Puede emplear esta función aunque usted yaesté cocinando con su horno. Para ello sigalas instrucciones indicadas salvo la número 4.
Programación de la Duración y Fin delCocinado
1 Pulse las teclas ó hasta que elsímbolo se ilumine. A continuaciónpulse la tecla .
2 Seleccione la duración, pulsando lasteclas ó .
3 Posteriormente sonarán 2 beep seguidos,se mostrará la hora actual y el símbolo
permanecerá iluminado.
4 Pulse las teclas ó hasta que elsímbolo se ilumine. A continuaciónpulse la tecla .
5 Seleccione la hora de finalización del coci-nado, pulsando las teclas ó .
6 Posteriormente sonarán 2 beep seguidos,se mostrará la hora actual y el símbolo
permanecerá iluminado.
7 Seleccione una función y una temperaturade cocinado.
8 El horno permanecerá desconectado, que-dándose iluminados los símbolos y
. Su horno está programado.
9 Cuando se alcance la hora de comienzodel cocinado, el horno se pondrá en mar-cha y se realizará el cocinado durante eltiempo seleccionado.
10 Alcanzada la hora de finalización que sehabía programado, el horno se desconec-tará, sonará una señal acústica y los sím-bolos y parpadearán.
11 Pulse cualquier tecla para detener la señalacústica, encendiéndose su horno denuevo.
12 Ponga los mandos en posición paraapagar el horno.
Si usted desea modificar la hora de finaliza-ción, pulse las teclas ó hasta que seilumine el símbolo y pulse la tecla .En ese momento usted puede modificar lahora seleccionada pulsando las teclas ó
. A continuación escuchará 2 beep segui-dos como confirmación del cambio.
Función seguridad niños.
Para activar la función, pulse la tecla deforma prolongada, a continuación escuchará2 beep seguidos y el símbolo se ilumi-nará. El reloj está bloqueado.
Si activa la función seguridad niños con elhorno apagado (mando selector de funcionesen ) evitará que su horno se ponga en mar-cha. Si activa esta seguridad con cualquierfunción de cocinado, sólo bloqueará la mani-pulación del reloj electrónico.
Para desactivar la función, pulse la tecla de forma prolongada, a continuación escu-chará 2 beep seguidos y el símbolo seapagará.
Atención
En caso de un corte de suministro eléctrico,se borrará toda la programación de su relojelectrónico y aparecerá parpadeando la indi-cación 00:00 en el reloj. Deberá ponerlo enhora y programarlo de nuevo.
11
PO
RTU
GU
ÉS
Modelo HK-500
Funcionamento Manual do Forno1 Rode o comando do temporizador para a
esquerda até à posição .
2 Seleccione uma temperatura e uma funçãode cozinhado.
3 Coloque os comandos na posição paradesligar o forno.
Funcionamento Temporizado do Forno
Permite cozinhar durante um tempo previa-mente seleccionado. Para tal:
1 Escolha a função e a temperatura de cozin-hado.
2 Rode o comando do temporizador no sentidodos ponteiros do relógio, até à posição
Uso do Forno
GrillGratina e assa superficialmente. Permitealourar a camada exterior sem afectar o inte-rior do alimento. Indicado para pedaços pla-nos como filetes, costelas, peixe, tostas.
MaxiGrillPermite gratinar superfícies maiores que como Grill, bem como gratinar com maior potên-cia, alourando assim o alimento de formamais rápida.
MaxiGrill com TurbinaPermite assar de modo uniforme ao mesmotempo que aloura superficialmente. Ideal parachurrascos. Especial para pedaços com gran-de volume como aves, caça,... Recomenda-secolocar a porção de carne sobre a grelha doforno com a bandeja por baixo, para recolheros molhos ou gorduras.
AtençãoDurante o uso da função Grill, MaxiGrill ouMaxiGrill com Turbina deve-se manter a portafechada.
Turbo A turbina reparte o calor que provém de umaresistência situada na parte de atrás do
forno. Devido à uniformidade da temperaturaproduzida permite cozinhar em 2 alturas aomesmo tempo.
Esta função permite a descongelação leve doalimentos. Para sua utilização coloque oselector de temperatura na posição .
Resistência Inferior
Calor somente na parte inferior. Apropriadopara aquecer pratos ou levantar massas deconfeitaria e semelhantes.
Resistência Inferior com Turbina
Distribui o calor que provém da parte inferiordo forno. Ideal para pastéis com recheio degeleia ou fruta, os quais só necessitam decalor na parte inferior. É sempre necessariorealizar um pré-aquecimento.
Grill e Resistência Inferior
Especial para assados. Pode ser usado paraqualquer porção, independente do seu tamanho.
Nota
A lâmpada permanece acesa em qualquerfunção de cozinhado.
10
1 Comando temporizador de minutos.
2 Relógio electrónico.
3 Piloto de aquecimento. Indica a transmissãode calor ao alimento e desliga-se quando oforno atinge a temperatura seleccionada.
4 Selector de funções.
5 Selector de temperatura.
Painel de Comandos
Funções do Forno
Modelo HK-500
/ / /
Modelo HK-700
/ / / / /
/ /
Modelo HK-750
/ / / / /
/ / / /
Desconexão do forno
ConvencionalUsado em bolos e tartes nos quais o calorrecebido deve ser uniforme para que adqui-ram uma textura esponjosa.
Convencional com TurbinaAdequado para assados e pastelaria. O venti-lador reparte de forma uniforme o calor nointerior do forno.
Esta função permite a descongelação leve doalimentos. Para sua utilização, coloque oselector de temperatura na posição .
Modelo HK-500
Modelo HK-700
50
90
130
170
210
250
HK 500
1 3 4 5
4 2 5
50
90
130
170
210
250
Modelo HK-750 4 2 5
50
90
130
170
210
250
HK 750
“120” minutos e depois rode-o no sentidoinverso para seleccionar o tempo de cozin-hado pretendido.
3 Decorrido o tempo programado, ouvir-se-áum sinal acústico e o forno deixará deaquecer.
4 Coloque os comandos na posição paradesligar o forno.
13
PO
RTU
GU
ÉS
12
Programação do Avisador
1 Prima a tecla até o símbolo ilumi-nar-se. A seguir prima a tecla .
2 Seleccione o tempo após o qual deseja que orelógio avise, premindo as teclas ou .
3 Posteriormente, soarão 2 beeps seguidos,será mostrada a hora actual e o símbolo
permanecerá iluminado, indicando queo avisador já está programado.
4 Decorrido o tempo programado, soará umsinal acústico e o símbolo começará apiscar.
5 Prima qualquer tecla para parar o sinal acús-tico, o símbolo desligar-se-á.
Em qualquer momento, pode visualizar otempo restante, premindo as teclas ouaté o símbolo piscar, e premindo deseguida a tecla . Neste momento, podealterar o tempo seleccionado premindo asteclas ou . A seguir ouvirá 2 beepsseguidos como confirmação da alteração.
Se desejar ver de forma permanente o temporestante até à finalização prima as teclas ou até o simbolo piscar e prima a tecla
de forma prolongada. O símbolo pis-cará. Para voltar à hora actual, basta premir denovo a tecla de forma prolongada.
Programação da Duração do Cozinhado
1 Prima as teclas ou até o símboloiluminar-se. De seguida prima a tecla
.
2 Seleccione a duração, premindo as teclasou .
3 Posteriormente soarão 2 beeps seguidos,será mostrada a hora actual e o símbolo
permanecerá iluminado, indicando queo forno desligar-se-à de forma automática.
4 Seleccione uma função e uma temperaturade cozinhado.
5 Decorrida a duração do cozinhado, o fornodesligar-se-á, soará um sinal acústico e osímbolo piscará.
6 Prima qualquer tecla para parar o sinal acús-tico, ligando-se o forno de novo.
7 Coloque os comandos na posição paradesligar o forno.
A qualquer momento, pode visualizar o temporestante de cozinhado, premindo as teclas ou até o símbolo piscar, e premindode seguida a tecla . Neste momento, podemodificar o tempo seleccionado premindo asteclas ou . A seguir ouvirá 2 beepsseguidos, como confirmação da alteração.
Se desejar ver de forma permanente o temporestante até à finalização prima as teclas ou até o simbolo piscar e prima a tecla
de forma prolongada. O símbolo pis-cará. Para voltar à hora actual, basta premir denovo a tecla de forma prolongada.
Programação da Hora de Finalização doCozinhado
1 Prima as teclas ou até o símbolo iluminar-se. De seguida prima a tecla .
2 Seleccione a hora de finalização do cozinha-do, premindo as teclas ou .
3 Posteriormente soarão 2 beeps seguidos,será mostrada a hora actual e o símbolo
permanecerá iluminado, indicando queo forno desligar-se-à de forma automática.
4 Seleccione uma função e uma temperaturade cozinhado.
5 Alcançada a hora seleccionada, o forno des-ligar-se-á, soará um sinal acústico e o sím-bolo piscará.
6 Prima qualquer tecla para parar o sinal acús-tico, ligando-se o forno de novo.
7 Coloque os comandos na posição paradesligar o forno.
A qualquer momento pode visualizar a hora definalização do cozinhado, premindo as teclas
ou até o símbolo piscar, e pre-mindo de seguida a tecla . Neste momen-to, pode modificar a hora de finalização selec-cionada premindo as teclas ou . Aseguir ouvirá 2 beeps seguidos, como confir-mação da alteração.
Pode usar esta função mesmo que já esteja autilizar o forno. Para tal, siga as instruçõesindicadas, excepto a número 4.
Modelo HK-700
Acerto do Relógio Electrónico
Ao ligar o forno, observará que, no relógio,aparece a piscar a indicação 00:00. Premindoas teclas ou acertará o relógio; aseguir ouvirá 2 beeps seguidos como confir-mação da hora seleccionada.
Se desejar alterar a hora, prima as teclasou até a hora actual começar a piscar. Aseguir prima a tecla . Premindo as teclas
ou poderá modificar a hora.Finalmente, ouvirá 2 beeps seguidos comoconfirmação da alteração realizada.
Funcionamento Manual
Depois de acertar o relógio, o forno está pron-to para cozinhar. Seleccione uma função decozinhado e uma temperatura.
Durante o cozinhado, o símbolo ilumina-se indicando que o forno está a transmitircalor ao alimento, e desliga-se quando é atin-gida a temperatura seleccionada.
Para desligar o forno, coloque os comandosna posição .
Funções do Relógio Electrónico
Avisador: Gera um sinal acústico ao fim dealgum tempo, para tal, não é necessário que oforno esteja a cozinhar.
Duração do Cozinhado: Permite cozinhardurante um tempo seleccionado; de seguida,o forno desligar-se-á de forma automática.
Hora de Finalização do Cozinhado: Permitecozinhar até a uma hora estabelecida, deseguida, o forno desligar-se-á de forma auto-mática.
Duração e Fim do Cozinhado: Permite progra-mar a duração e a hora de finalização do cozin-hado. Com esta função, o forno colocar-se-áem funcionamento de forma automática àhora necessária para cozinhar durante otempo seleccionado (Duração), finalizando deforma automática à hora anteriormente indica-da. (Fim do Cozinhado).
Programação da Duração e Fim doCozinhado
1 Prima as teclas ou até o símboloiluminar-se. De seguida prima a
tecla .
2 Seleccione a duração, premindo asteclas ou .
3 Posteriormente soarão 2 beeps segui-dos, será mostrada a hora actual e osímbolo permanecerá iluminado.
4 Prima as teclas ou até o símbolose iluminar. A seguir prima a tecla
.
5 Seleccione a hora de finalização docozinhado, premindo as teclas ou
.
6 Posteriormente soarão 2 beeps segui-dos, será mostrada a hora actual e osímbolo permanecerá iluminado.
7 Seleccione uma função e uma tempera-tura de cozinhado.
8 O forno permanecerá desligado, ficandoiluminados os símbolos e . Oseu forno está programado.
9 Quando alcançar a hora de início docozinhado, o forno entrará em funciona-mento e realizar-se-á o cozinhado duran-te o tempo seleccionado.
10 Alcançada a hora final que tinha sido pro-gramada, o forno desligar-se-á, soará umsinal acústico e os símbolos e piscarão.
11 Prima qualquer tecla para parar o sinalacústico, ligando-se o seu forno de novo.
12 Coloque os comandos na posição para desligar o forno.
Se desejar modificar a hora de finalização,prima as teclas ou até se iluminar osímbolo , e prima a tecla . A partirdeste momento, pode modificar a hora selec-cionada premindo as teclas ou . Aseguir ouvirá 2 beeps seguidos, como confir-mação da modificação.
15
PO
RTU
GU
ÉS
14
Atenção
No caso de um corte de fornecimento eléctri-co, será eliminada toda a programação dorelógio electrónico e aparecerá a indicação00:00 a piscar no relógio. Deverá acertá-lo eprogramá-lo de novo.
Modelo HK-750
Acerto do Relógio Electrónico
Ao ligar o forno, observará que, no relógio,aparece a piscar a palavra e a indicação00:00. Premindo as teclas ou acerta-rá o relógio; a seguir ouvirá 2 beeps seguidoscomo confirmação da hora seleccionada.
Se desejar alterar a hora, prima as teclas ou até a palavra começar a piscarbem como a hora actual. A seguir prima atecla . Premindo as teclas oupoderá modificar a hora. Finalmente, ouvirá 2beeps seguidos como confirmação da altera-ção realizada.
Funcionamento Manual
Depois de acertar o relógio, o forno está pron-to para cozinhar. Seleccione uma função decozinhado e uma temperatura.
Ao iniciar o cozinhado, observará que o sím-bolo ilumina-se de forma progressiva atéo forno aquecer 100% à temperatura seleccio-nada.
Para desligar o forno, coloque os comandosna posição .
O símbolo desligar-se-á de forma progres-siva à medida que diminui a temperatura inte-rior do forno.
Funções do Relógio Electrónico
Pré-aquecimento rápido: Permite acelerar oaquecimento do forno quando este está frio.
Avisador: Gera um sinal acústico ao fim dealgum tempo, para tal, não é necessário que oforno esteja a cozinhar.
Duração do Cozinhado: Permite cozinhardurante um tempo seleccionado; de seguida,o forno desligar-se-á de forma automática.
Hora de Finalização do Cozinhado: Permitecozinhar até a uma hora estabelecida, deseguida, o forno desligar-se-á de forma auto-mática.
Duração e Fim do Cozinhado: Permite progra-mar a duração e a hora de finalização do cozin-hado. Com esta função, o forno colocar-se-áem funcionamento de forma automática àhora necessária para cozinhar durante otempo seleccionado (Duração), finalizando deforma automática à hora anteriormente indica-da. (Fim do Cozinhado).
Função Segurança para Crianças. Esta funçãobloqueia o forno, evitando o manuseamentopor parte de crianças mais pequenas.
Pré-aquecimento rápido1 Seleccione uma função de cozinhado e uma
temperatura.
2 Prima a tecla , o símbolo iluminar-se-á e iniciará o pré-aquecimento rápido.
Se premir de novo a tecla , a função pré-aquecimento será desligada.
Importante
Recomendamos que introduza o alimento noforno apenas quando tiver finalizado o pré-aquecimento rápido; o símbolo estarádesligado.
Programação do Avisador1 Prima a tecla até o símbolo ilumi-
nar-se. A seguir prima a tecla .
2 Seleccione o tempo após o qual deseja que orelógio avise, premindo as teclas ou .
3 Posteriormente, soarão 2 beeps seguidos,será mostrada a hora actual e o símbolo
permanecerá iluminado, indicando queo avisador já está programado.
4 Decorrido o tempo programado, soará umsinal acústico e o símbolo começará apiscar.
5 Prima qualquer tecla para parar o sinalacústico, o símbolo desligar-se-á.
Em qualquer momento, pode visualizar otempo restante, premindo as teclas ou
até o símbolo piscar, e premindo deseguida a tecla . Neste momento, podealterar o tempo seleccionado premindo asteclas ou . A seguir ouvirá 2 beepsseguidos como confirmação da alteração.
Se desejar ver de forma permanente o temporestante até à finalização, prima as teclas ou até o simbolo piscar e prima atecla de forma prolongada. O símbolo
piscará e a palavra iluminar-se-á.Para voltar à hora actual, basta premir denovo a tecla de forma prolongada.
Programação da Duração do Cozinhado
1 Prima as teclas ou até o símboloiluminar-se. De seguida prima a tecla
.
2 Seleccione a duração, premindo as teclasou .
3 Posteriormente soarão 2 beeps seguidos,será mostrada a hora actual e o símbolo
permanecerá iluminado, indicando queo forno desligar-se-à de forma automática.
4 Seleccione uma função e uma temperaturade cozinhado.
5 Decorrida a duração do cozinhado, o fornodesligar-se-á, soará um sinal acústico e osímbolo piscará.
6 Prima qualquer tecla para parar o sinalacústico, ligando-se o forno de novo.
7 Coloque os comandos na posição paradesligar o forno.
A qualquer momento, pode visualizar otempo restante de cozinhado, premindo asteclas ou até o símbolo piscar,e premindo de seguida a tecla . Nestemomento, pode modificar o tempo seleccio-nado premindo as teclas ou . A seguirouvirá 2 beeps seguidos, como confirmaçãoda alteração.
Se desejar ver de forma permanente o temporestante até à finalização, prima as teclas ou até o simbolo piscar e prima atecla de forma prolongada. O símbolo
piscará e a palavra iluminar-se-á.Para voltar à hora actual basta premir de novoa tecla de forma prolongada.
Programação da Hora de Finalização doCozinhado
1 Prima as teclas ou até o símboloiluminar-se. De seguida prima a tecla
.
2 Seleccione a hora de finalização do cozin-hado, premindo as teclas ou .
3 Posteriormente soarão 2 beeps seguidos,será mostrada a hora actual e o símbolo
permanecerá iluminado, indicando queo forno desligar-se-à de forma automática.
4 Seleccione uma função e uma temperaturade cozinhado.
5 Alcançada a hora seleccionada, o forno des-ligar-se-á, soará um sinal acústico e o sím-bolo piscará.
6 Prima qualquer tecla para parar o sinalacústico, ligando-se o forno de novo.
7 Coloque os comandos na posição paradesligar o forno.
A qualquer momento pode visualizar a hora definalização do cozinhado, premindo as teclas
ou até o símbolo piscar, e pre-mindo de seguida a tecla . Neste momen-to, pode modificar a hora de finalização selec-cionada premindo as teclas ou . Aseguir ouvirá 2 beeps seguidos, como confir-mação da alteração.
Pode usar esta função mesmo que já esteja autilizar o forno. Para tal, siga as instruçõesindicadas, excepto a número 4.
Programação da Duração e Fim do Cozinhado
1 Prima as teclas ou até o símboloiluminar-se. De seguida prima a tecla
.
2 Seleccione a duração, premindo as teclasou .
ENG
LISH
16
3 Posteriormente soarão 2 beeps seguidos,será mostrada a hora actual e o símbolo
permanecerá iluminado.
4 Prima as teclas ou até o símbolose iluminar. A seguir prima a tecla
. 5 Seleccione a hora de finalização do cozin-
hado, premindo as teclas ou .6 Posteriormente soarão 2 beeps seguidos,
será mostrada a hora actual e o símbolopermanecerá iluminado.
7 Seleccione uma função e uma temperatu-ra de cozinhado.
8 O forno permanecerá desligado, ficandoiluminados os símbolos e . O seuforno está programado.
9 Quando alcançar a hora de início do cozin-hado, o forno entrará em funcionamento erealizar-se-á o cozinhado durante o temposeleccionado.
10 Alcançada a hora final que tinha sido pro-gramada, o forno desligar-se-á, soará umsinal acústico e os símbolos e piscarão.
11 Prima qualquer tecla para parar o sinalacústico, ligando-se o seu forno de novo.
12 Coloque os comandos na posição paradesligar o forno.
Se desejar modificar a hora de finalização,prima as teclas ou até se iluminar osímbolo , e prima a tecla . A partirdeste momento, pode modificar a hora selec-cionada premindo as teclas ou . Aseguir ouvirá 2 beeps seguidos, como confir-mação da modificação.
Função segurança para crianças.
Para activar a função, prima a tecla deforma prolongada, a seguir ouvirá 2 beepsseguidos e o símbolo iluminar-se-á. Orelógio está bloqueado.
Se activar a função segurança para criançascom o forno desligado (comando selector defunções no ) evitará que o forno se colo-que em funcionamento. Se activar estasegurança com qualquer função de cozinha-do, só bloqueará o manuseamento do reló-gio electrónico.
Para desactivar a função, prima a tecla deforma prolongada, a seguir ouvirá 2 beepsseguidos e o símbolo desligar-se-á.
Atenção
No caso de um corte de fornecimento eléctri-co, será eliminada toda a programação dorelógio electrónico e aparecerá a indicação00:00 a piscar no relógio. Deverá acertá-lo eprogramá-lo de novo.
Control Panel
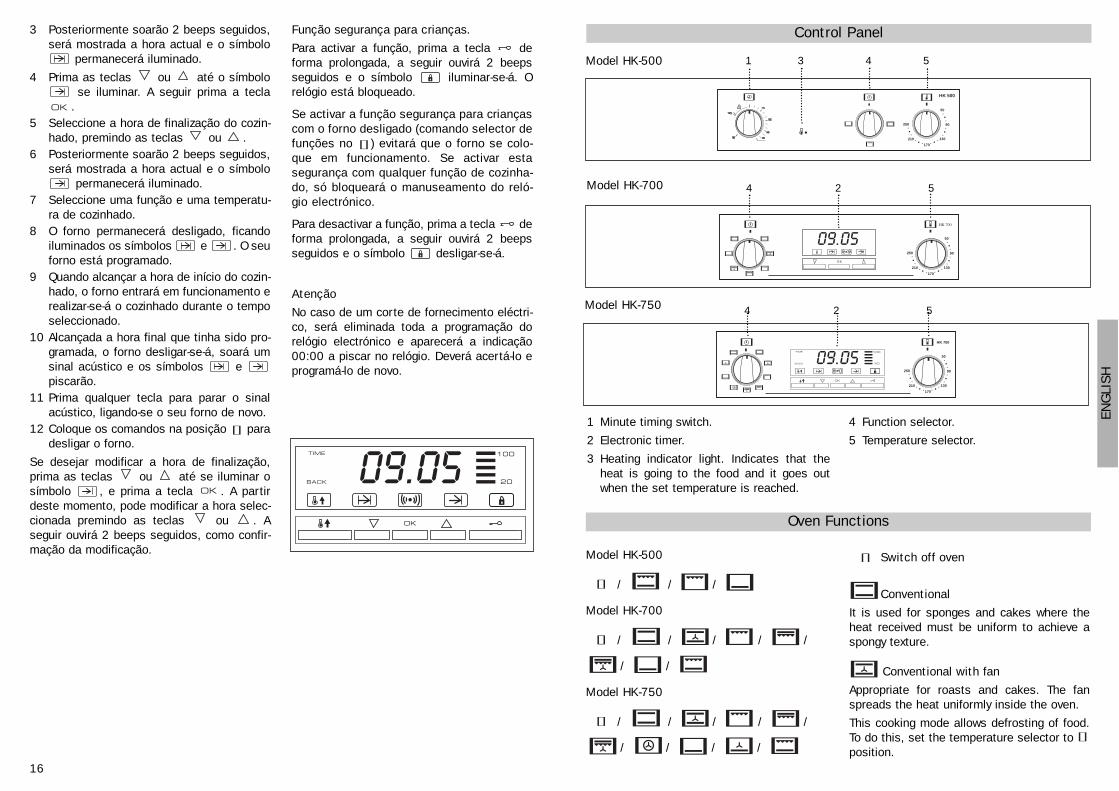
1 Minute timing switch.
2 Electronic timer.
3 Heating indicator light. Indicates that theheat is going to the food and it goes outwhen the set temperature is reached.
4 Function selector.
5 Temperature selector.
Oven Functions
Model HK-500
/ / /
Model HK-700
/ / / / /
/ /
Model HK-750
/ / / / /
/ / / /
Switch off oven
Conventional
It is used for sponges and cakes where theheat received must be uniform to achieve aspongy texture.
Conventional with fan
Appropriate for roasts and cakes. The fanspreads the heat uniformly inside the oven.
This cooking mode allows defrosting of food.To do this, set the temperature selector toposition.
Model HK-500
Model HK-700
50
90
130
170
210
250
HK 500
1 3 4 5
4 2 5
50
90
130
170
210
250
Model HK-750 4 2 5
50
90
130
170
210
250
HK 750
19
ENG
LISH
18
Model HK-500
Manual use of the oven
1 Turn the timing switch to the left to theposition .
2 Select a temperature and a cookingfunction.
3 Set the controls in position to switch offthe oven.
Using the timer switch
Allows cooking during a pre-established time.To do this,
1 Select the function and the cookingtemperature.
Use of the Oven
GrillFor preparing dishes with superficial roasting.It allows the outer layer to be browned withoutaffecting the inside of the food. Ideal for flatfood, such as steaks, ribs, fish, toast.
MaxiGrillAllows greater surfaces to be prepared, thanwith the grill, together with higher powerreducing the time required for browning of thefood.
MaxiGrill with fanAllows uniform roasting at the same time assurface browning. Ideal for grills. Special forlarge volume pieces, such as poultry gameetc. It is recommended to put the item on arack with a tray beneath to collect the stockand juices.
CautionWhile using the Grill, MaxiGrill or MaxiGrill withfan, the door must be kept closed.
Turbo The fan distributes the heat produced by anelement located at the rear of the oven.
Due to the uniform heat distribution, it allowsroasting and baking to take place at twoheights at the same time.
This cooking mode allows defrosting of food.To do this, set the temperature selector to position.
Lower element Heats only from beneath. Suitable for heatingdishes and raising pastry and similar.
Lower element with fanIt distributes the heat from the lower part ofthe oven and is ideal for cakes with jam orfruit filling, which only require heating frombeneath. Pre-heating is always necessary.
Grill and Lower elementSpecial for roasts. It can be used for anypiece, whatever its size.
Note
The pilot light remains on in any cookingfunction.
2 Turn the timer control clockwise as far asthe position “120 minutes” and then turn itbackwards to the required cooking period.
3 When the time has finished, there will be anacoustic signal and the oven will stopheating.
4 Set the controls to the position to switchoff the oven.
3 The clock beeps twice, the current time isdisplayed and symbol lights up perma-nently to indicate that the alarm has beenset.
4 When the set period of time comes to anend, the alarm sounds and symbol starts to flash.
5 Press any button to stop the alarm; symbolgoes out.
You can consult the remaining time at anymoment by pressing or until symbol
flashes and then pressing . You canalso modify the set time at this point by press-ing or . The clock beeps twice to con-firm the change.
If you wish the remaining time to be displayeduntil the end of the set period of time, press
or until symbol flashes and thenpress and keep it pressed in. Symbol
flashes. Keep pressed in again toreturn to the real time.
Setting the Cooking Time
1 Press or until symbol lights up.Press .
2 Select the period of time you wish to cookfor by pressing or .
3 The clock beeps twice, the current time isdisplayed and symbol lights up perma-nently to indicate that the oven will turnitself off automatically.
4 Select a cooking function and temperature.
5 When the cooking time comes to an end, theoven turns itself off, the alarm sounds andsymbol flashes.
6 Press any button to stop the alarm and turnthe oven back on again.
7 Set the controls to to turn the oven off.
You can consult the remaining cooking time atany moment by pressing or until sym-bol flashes and then pressing . Youcan also modify the set time at this point bypressing or . The clock beeps twice toconfirm the change.
Model HK-700
Setting the time on the Electronic Clock
When the oven is connected to the power supply,the indication 00:00 flash on the display. Press
or to set the time on the clock. The clockbeeps twice to confirm the selected time.
If you wish to modify the time, press oruntil the current time flash on the screen.Press . Then press or to modifythe time. The clock beeps twice to confirm themodification.
Manual Operation
The oven is ready to be used when the clockhas been set. Select a cooking function and atemperature.
When you begin cooking, symbol lightsup to indicate that the oven is heating the con-tents; the symbol goes out when theselected temperature is reached.
Set the controls to to turn the oven off.
Functions of the Electronic Clock
Alarm: Creates an alarm signal when the peri-od of time finishes; the oven does not need tobe in use in order to use this function.
Cooking Time: To cook for a selected length oftime; the oven turns itself off automaticallywhen the time finishes.
End Cooking Time: To cook until a set time;the oven turns itself off automatically whenthe time finishes.
Cooking time and End Cooking Time: To cookfor a selected length of time and end at a settime. When this function is set, the ovencomes on automatically at the time required inorder to cook for the set length of time(Cooking time) and end automatically at theindicated time (End Cooking Time)
Programming the Alarm
1 Press until symbol lights up. Press.
2 Set the period of time after which you wishthe alarm to sound by pressing or .
21
ENG
LISH
20
If you wish the remaining time to be displayeduntil the end of the set period of time, press
or until symbol flashes and thenpress OK and keep it pressed in. Symbol flashes. Keep pressed in again to returnto the real time.
Setting the End Cooking Time
1 Press or until symbol lights up.Press .
2 Select the time you wish the cookingprocess to finish at by pressing or .
3 The clock beeps twice, the current time isdisplayed and symbol lights up perma-nently to indicate that the oven will turnitself off automatically.
4 Select a cooking function and temperature.
5 When the set time is reached, the oventurns itself off, the alarm sounds and sym-bol flashes.
6 Press any button to stop the alarm and turnthe oven back on again.
7 Set the controls to to turn the oven off.
You can consult the end cooking time at anymoment by pressing or until symbol
flashes and then pressing . You canalso modify the end cooking time at this pointby pressing or . The clock beeps twiceto confirm the change.
This function can be used even when you arealready using the oven. To do this, follow theinstructions indicated above except pointnumber 4.
Setting the Cooking Time and the EndCooking Time
1 Press or until symbol lightsup. Press .
2 Select the period of time you wish to cookfor by pressing or .
3 The clock beeps twice, the current time isdisplayed and symbol lights up per-manently.
4 Press or until symbol lightsup. Press .
5 Select the time you wish the cookingprocess to finish at by pressing or
.
6 The clock beeps twice, the current timeis displayed and symbol lights uppermanently.
7 Select a cooking function and tempera-ture.
8 The oven remains off with symbols and lit up. Your oven is set.
9 When the time to star t cooking isreached, the oven starts up and cooksfor the set period of time.
10 When the set end cooking time isreached, the oven turns itself off, thealarm sounds and symbols and
flash.
11 Press any button to stop the alarm andturn the oven back on again.
12 Set the controls to to turn the ovenoff.
You can modify the end cooking time by press-ing or until symbol lights up andthen pressing . You can now modify theend cooking time by pressing or . Theclock beeps twice to confirm the change.
Important
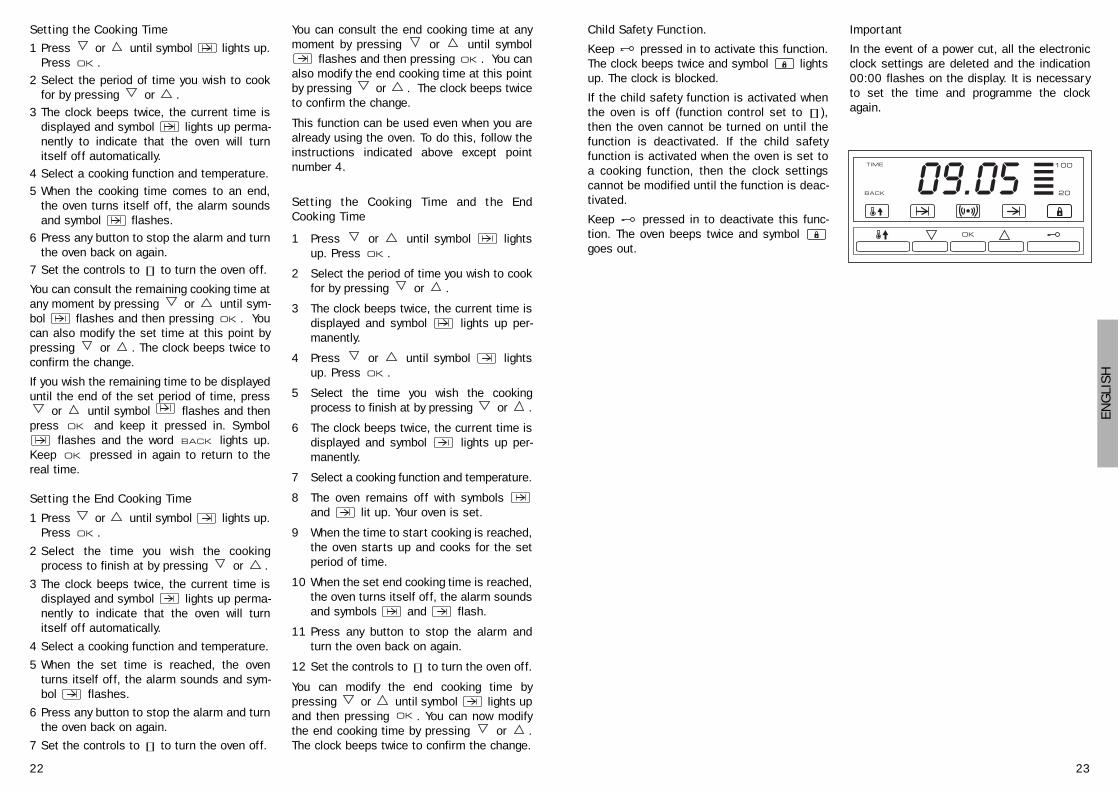
In the event of a power cut, all the electron-ic clock settings are deleted and the indica-tion 00:00 flashes on the display. It is nec-essary to set the time and programme theclock again.
Model HK-750
Setting the time on the Electronic Clock
When the oven is connected to the power sup-ply, the word and the indication 00:00flash on the display. Press or to setthe time on the clock. The clock beeps twiceto confirm the selected time.
If you wish to modify the time, press oruntil the word and the current time
flash on the screen. Press . Then pressor to modify the time. The clock beeps
twice to confirm the modification.
Manual Operation
The oven is ready to be used when the clockhas been set. Select a cooking function and atemperature.
When you begin cooking, symbol lights upgradually until the oven heats up 100% to theselected temperature.
Set the controls to to turn the oven off.
Symbol gradually goes out as the tem-perature inside the oven drops.
Functions of the Electronic Clock
Fast Pre-heating: To heat the oven up quicklyfrom cold.
Alarm: Creates an alarm signal when the peri-od of time finishes; the oven does not need tobe in use in order to use this function.
Cooking Time: To cook for a selected lengthof time; the oven turns itself off automaticallywhen the time finishes.
End Cooking Time: To cook until a set time;the oven turns itself off automatically whenthe time finishes.
Cooking time and End Cooking Time: To cookfor a selected length of time and end at a settime. When this function is set, the ovencomes on automatically at the time requiredin order to cook for the set length of time(Cooking time) and end automatically at theindicated time (End Cooking Time)
Child Safety Function. This function blocksthe oven to prevent small children from inter-fering with the controls.
Fast pre-heating
1 Select a cooking function and a tempera-ture.
2 Press . Symbol lights up and fastpre-heating begins.
If you press for a second time, the pre-heating function is cancelled.
Important
You are recommended not to insert foodinside the oven until the fast pre-heating func-tion finishes; symbol goes out.
Programming the Alarm
1 Press until symbol lights up. Press.
2 Set the period of time after which you wishthe alarm to sound by pressing or .
3 The clock beeps twice, the current time isdisplayed and symbol lights up per-manently to indicate that the alarm hasbeen set.
4 When the set period of time comes to anend, the alarm sounds and symbol starts to flash.
5 Press any button to stop the alarm; symbolgoes out.
You can consult the remaining time at anymoment by pressing or until symbol
flashes and then pressing . You canalso modify the set time at this point by press-ing or . The clock beeps twice to con-firm the change.
If you wish the remaining time to be displayeduntil the end of the set period of time, press
or until symbol flashes and thenpress and keep it pressed in. Symbol
flashes and the word lights up.Keep pressed in again to return to thereal time.
23
ENG
LISH
22
Setting the Cooking Time
1 Press or until symbol lights up.Press .
2 Select the period of time you wish to cookfor by pressing or .
3 The clock beeps twice, the current time isdisplayed and symbol lights up perma-nently to indicate that the oven will turnitself off automatically.
4 Select a cooking function and temperature.
5 When the cooking time comes to an end,the oven turns itself off, the alarm soundsand symbol flashes.
6 Press any button to stop the alarm and turnthe oven back on again.
7 Set the controls to to turn the oven off.
You can consult the remaining cooking time atany moment by pressing or until sym-bol flashes and then pressing . Youcan also modify the set time at this point bypressing or . The clock beeps twice toconfirm the change.
If you wish the remaining time to be displayeduntil the end of the set period of time, press
or until symbol flashes and thenpress and keep it pressed in. Symbol
flashes and the word lights up.Keep pressed in again to return to thereal time.
Setting the End Cooking Time
1 Press or until symbol lights up.Press .
2 Select the time you wish the cookingprocess to finish at by pressing or .
3 The clock beeps twice, the current time isdisplayed and symbol lights up perma-nently to indicate that the oven will turnitself off automatically.
4 Select a cooking function and temperature.
5 When the set time is reached, the oventurns itself off, the alarm sounds and sym-bol flashes.
6 Press any button to stop the alarm and turnthe oven back on again.
7 Set the controls to to turn the oven off.
You can consult the end cooking time at anymoment by pressing or until symbol
flashes and then pressing . You canalso modify the end cooking time at this pointby pressing or . The clock beeps twiceto confirm the change.
This function can be used even when you arealready using the oven. To do this, follow theinstructions indicated above except pointnumber 4.
Setting the Cooking Time and the EndCooking Time
1 Press or until symbol lightsup. Press .
2 Select the period of time you wish to cookfor by pressing or .
3 The clock beeps twice, the current time isdisplayed and symbol lights up per-manently.
4 Press or until symbol lightsup. Press .
5 Select the time you wish the cookingprocess to finish at by pressing or .
6 The clock beeps twice, the current time isdisplayed and symbol lights up per-manently.
7 Select a cooking function and temperature.
8 The oven remains off with symbols and lit up. Your oven is set.
9 When the time to start cooking is reached,the oven starts up and cooks for the setperiod of time.
10 When the set end cooking time is reached,the oven turns itself off, the alarm soundsand symbols and flash.
11 Press any button to stop the alarm andturn the oven back on again.
12 Set the controls to to turn the oven off.
You can modify the end cooking time by pressing or until symbol lights upand then pressing . You can now modifythe end cooking time by pressing or .The clock beeps twice to confirm the change.
Child Safety Function.
Keep pressed in to activate this function.The clock beeps twice and symbol lightsup. The clock is blocked.
If the child safety function is activated whenthe oven is off (function control set to ),then the oven cannot be turned on until thefunction is deactivated. If the child safetyfunction is activated when the oven is set toa cooking function, then the clock settingscannot be modified until the function is deac-tivated.
Keep pressed in to deactivate this func-tion. The oven beeps twice and symbol goes out.
Important
In the event of a power cut, all the electronicclock settings are deleted and the indication00:00 flashes on the display. It is necessaryto set the time and programme the clockagain.
25
FRA
NÇ
AIS
1 Commande de la minuterie.
2 Horlogue électronique.
3 Voyant lumineux de chauffage. Il indiqueque la chaleur est transmise à l'aliment et
s'éteint quand la température choisie estatteinte.
4 Sélecteur de fonctions.
5 Sélecteur de températures.
Panneau Frontal de Commande
Fonctions du Four
Modèle HK-500
/ / /
Modèle HK-700
/ / / / /
/ /
Modèle HK-750
/ / / / /
/ / / /
Arrêt du four
ConventionnelUtiliser pour les gâteaux et les tartes quidoivent recevoir une chaleur uniforme et pourobtenir une texture moelleuse.
Conventionnel avec turbineRecommandé pour les rôtis et la pâtisserie.Le ventilateur répartit la chaleur de façonuniforme à l'intérieur du four.
Cette function permet de décongelerdoucement des mets. Pour l’utilisation, réglez lesélecteur des temperatures sur la position .
24
Modèle HK-500
Modèle HK-700
50
90
130
170
210
250
HK 500
1 3 4 5
4 2 5
50
90
130
170
210
250
Modèle HK-750 4 2 5
50
90
130
170
210
250
HK 750
GrillPour gratiner et rôtir superficiellement. Permetde dorer la couche extérieure sans affecterl'intérieur de l'aliment. Indiqué pour les piècesplates telles que les beefsteaks, les côtelettes,les poissons, les toasts.
MaxiGrillPermet de gratiner des surfaces plus grandesqu'avec le Grill avec une puissance pourgratiner supérieure, qui permet ainsi de dorerl'aliment de façon plus rapide.
MaxiGrill avec turbinePermet en même temps de rôtir de façonuniforme et de dorer superficiellement. Idéalpour les grillades. Spécial pour les piècesvolumineuses telles que les volailles, legibier. Il est recommandé de placer la piècede viande sur la grille du four et la lèchefriteen-dessous pour recueillir les jus de cuissonou la graisse.
AttentionQuand on utilise la fonction Grill, MaxiGrill ouMaxiGrill avec Turbine, la porte doit resterfermée.
Turbo La turbine répartit la chaleur qui provientd’une résistance située à la partie arrière du
four. Grâce à l’uniformité de la chaleurproduite, on peut cuisiner à 2 hauteurs enmême temps.Cette function permet de décongelerdoucement des mets. Pour l’utilisation, réglezle sélecteur des temperatures sur laposition .
Résistance inférieureLa chaleur provient seulement de la partieinférieure. Approprié pour réchauffer des platsou faire lever des pâtes pour pâtisseries etanalogues.
Résistance inférieure avec TurbineElle distribue la chaleur qui provient de lapartie inférieure du four. Idéal pour lesgâteaux fourrés avec de la confiture ou desfruits, qui requièrent seulement un apport dechaleur inférieur. Il est toujours nécessaire depréchauffer.
Grill et résistance inférieureSpécial pour les rôtis. Peut être utilisé pourtoutes sortes de pièces, indépendamment deleur volume.
AttentionLa lampe reste allumée pendant toutes lesfonctions de cuisson.
Maniement du Four
Modèle HK-500
Fonctionnement Manuel du Four
1 Tourner la commande de la minuterie vers lagauche jusqu'à la position .
2 Sélectionner une température et unefonction de cuisson.
3 Mettre les commandes sur la positionpour éteindre le four.
Fonctionnement temporisé du fourCela permet de cuisiner pendant un tempspréalablement sélectionné. Pour cela:
1 Choisir la fonction et la température decuisson.
2 Tourner la commande de la minuterie dansle sens des aiguilles d'une montre jusqu'àla position "120" minutes et la tourner
ensuite en sens inverse pour sélectionnerle temps de cuisson désiré.
3 Une fois passé le temps programmé, unsignal acoustique se fera entendre et lefour arrêtera de chauffer.
4 Mettre les commandes sur la positionpour éteindre le four.
27
FRA
NÇ
AIS
26
2 Sélectionnez le temps au bout duquel voussouhaitez que l’horloge vous avertisse enappuyant sur les touches ou .
3 Vous entendrez alors 2 bips consécutifs,l’heure actuelle sera affichée et le symbole
s’allumera, indiquant que l’avertisseurest programmé.
4 Une fois le temps programmé écoulé, unsignal acoustique sonnera et le symbole
commencera à clignoter.
5 Appuyez sur n’importe quelle touche pourarrêter le signal acoustique, à ce moment lesymbole s’éteindra.
Vous pouvez afficher le temps restant à toutmoment en appuyant sur les touches ou
jusqu’à ce que le symbole clignote,puis en appuyant sur la touche . Vous pou-vez alors modifier le temps sélectionné enappuyant sur les touches ou . Vousentendrez 2 bips consécutifs comme confir-mation de la modification.
Si vous souhaitez afficher de façon permanen-te le temps restant jusqu’à la fin, appuyez surles touches ou jusqu’à ce que le sym-bole clignote and appuyez sur la touche
de façon prolongée. Le symbole cli-gnotera. Pour revenir à l’heure actuelle, il suf-fit d’appuyer à nouveau sur la touche defaçon prolongée.
Programmation de la durée de cuisson1 Appuyez sur la touche ou jusqu’à ce
que le symbole s’allume. Appuyezensuite sur la touche .
2 Sélectionnez la durée en appuyant sur lestouches ou .
3 Vous entendrez alors 2 bips consécutifs,l’heure actuelle sera affichée et le symbole
s’allumera, indiquant que votre fours’éteindra de façon automatique.
4 Sélectionnez une fonction et une températu-re de cuisson.
5 Une fois la durée de cuisson écoulée, le fourse déconnectera, un signal acoustique son-nera et le symbole clignotera.
6 Appuyez sur n’importe quelle touche pourarrêter le signal acoustique; le four s’allu-mera de nouveau.
Modèle HK-700
Mise à l’heure de l’horloge électronique
Lorsque vous branchez votre four, vous observezque l’indication 00:00 clignotent dans l’horloge.Mettez l’horloge à l’heure à l’aide des touches
ou . Vous entendrez 2 bips consécutifscomme confirmation de la mise à l’heure.
Si vous souhaitez modifier l’heure, appuyez surles touches ou jusqu’à ce que l’heureactuelle se mettent à clignoter. Appuyez ensuitesur la touche . À l’aide des touches ou
, vous pouvez alors modifier l’heure. Vousentendrez 2 bips consécutifs comme confirma-tion de la modification réalisée.
Fonctionnement manuel
Une fois l’horloge mise à l’heure, votre fourest prêt à fonctionner. Sélectionnez une fonc-tion de cuisson et une température.
Lors de la cuisson, le symbole s´allumeindiquant que le four est en train de transmettrede la chaleur à l’aliment et s´éteint lorsque latempérature sélectionnée est atteinte.
Pour éteindre le four, mettez les commandessur la position .
Fonctions de l’horloge électronique
Avertisseur: génère un signal acoustique à unmoment donné; pour ce faire, il n’est pasnécessaire que le four soit allumé.
Durée de cuisson: permet de cuire pendantune durée sélectionnée, le four s’éteignant defaçon automatique.
Heure de fin de cuisson: permet de cuire jus-qu’à une heure définie, le four s’éteignant defaçon automatique.
Durée et fin de cuisson: permet de program-mer la durée et l’heure de fin de cuisson. Aveccette fonction, le four se mettra en marche defaçon automatique à l’heure indiquée pourcuire pendant la durée sélectionnée (Durée) ets’éteindre de façon automatique à l’heure indi-quée (Fin de cuisson).
Programmation de l’avertisseur
1 Appuyez sur la touche jusqu’à ce que lesymbole s’allume. Appuyez ensuite surla touche .
7 Mettez les commandes sur la position pour éteindre le four.
Vous pouvez afficher le temps de cuisson res-tant à tout moment en appuyant sur lestouches ou jusqu’à ce que le symbole
clignote, puis en appuyant sur la touche. Vous pouvez alors modifier le temps
sélectionné en appuyant sur les touches ou . Vous entendrez 2 bips consécutifscomme confirmation de la modification.
Si vous souhaitez afficher de façon permanen-te le temps restant jusqu’à la fin, appuyez surles touches ou jusqu’à ce que le sym-bole clignote and appuyez sur la touche
de façon prolongée. Le symbole cli-gnotera. Pour revenir à l’heure actuelle, il suf-fit d’appuyer à nouveau sur la touche defaçon prolongée.
Programmation de l’heure de fin de cuisson
1 Appuyez sur la touche ou jusqu’à ceque le symbole s’allume. Appuyezensuite sur la touche .
2 Sélectionnez l’heure de fin de cuisson enappuyant sur les touches ou .
3 Vous entendrez alors 2 bips consécutifs,l’heure actuelle sera affichée et le symbole
s’allumera, indiquant que votre fours’éteindra de façon automatique.
4 Sélectionnez une fonction et une températu-re de cuisson.
5 Une fois l’heure sélectionnée atteinte, lefour se déconnectera, un signal acoustiquesonnera et le symbole clignotera.
6 Appuyez sur n’importe quelle touche pourarrêter le signal acoustique; le four s’allu-mera de nouveau.
7 Mettez les commandes sur la position pour éteindre le four.
Vous pouvez afficher l’heure de fin de cuissonà tout moment en appuyant sur les touches
ou jusqu’à ce que le symbole cli-gnote, puis en appuyant sur la touche .Vous pouvez alors modifier l’heure de finsélectionnée en appuyant sur les touches ou . Vous entendrez 2 bips consécutifscomme confirmation de la modification.
Vous pouvez utiliser cette fonction même sivous êtes déjà en train d’utiliser votre four.Pour ce faire, suivez les instructions indi-quées sauf la numéro 4.
Programmation de la durée et de la fin decuisson1 Appuyez sur la touche ou jusqu’à
ce que le symbole s’allume.Appuyez ensuite sur la touche .
2 Sélectionnez la durée en appuyant surles touches ou .
3 Vous entendrez alors 2 bips consécutifs,l'heure actuelle sera affichée et le sym-bole s’allumera.
4 Appuyez sur la touche ou jusqu’àce que le symbole s’allume.Appuyez ensuite sur la touche .
5 Sélectionnez l’heure de fin de cuisson enappuyant sur les touches ou .
6 Vous entendrez alors 2 bips consécutifs,l'heure actuelle sera affichée et le sym-bole s’allumera.
7 Sélectionnez une fonction et une tempé-rature de cuisson.
8 Le four restera déconnecté, et les sym-boles et seront allumés. Votrefour est alors programmé.
9 Lorsque l’heure de début de cuisson estatteinte, le four se mettra en marche etla cuisson se fera pendant le tempssélectionné.
10 Une fois l’heure de fin programmée attein-te, le four se déconnectera, un signalacoustique sonnera et les symboles et se mettront à clignoter.
11 Appuyez sur n’importe quelle touchepour arrêter le signal acoustique; le fours’allumera de nouveau.
12 Mettez les commandes sur la positionpour éteindre le four.
Si vous souhaitez modifier l’heure de fin,appuyez sur les touches ou jusqu’àce que le symbole s’allume, puisappuyez sur la touche . Vous pouvezalors modifier l’heure sélectionnée enappuyant sur les touches ou . Vousentendrez 2 bips consécutifs comme confir-mation de la modification.
29
FRA
NÇ
AIS
28
Attention
En cas de coupure de l’alimentation électrique,toute la programmation de votre horloge électro-nique sera effacée et l’indication 00:00 cligno-tera dans l’horloge. Vous devrez la mettre àl’heure et la programmer à nouveau.
Modèle HK-750
Mise à l’heure de l’horloge électronique
Lorsque vous branchez votre four, vous obser-vez que le mot et l’indication 00:00 clignotent dans l’horloge. Mettez l’horloge àl’heure à l’aide des touches ou . Vousentendrez 2 bips consécutifs comme confir-mation de la mise à l’heure.
Si vous souhaitez modifier l’heure, appuyezsur les touches ou jusqu’à ce que lemot et l’heure actuelle se mettent à clignoter. Appuyez ensuite sur la touche .À l’aide des touches ou , vouspouvez alors modifier l’heure. Vous entendrez2 bips consécutifs comme confirmation de lamodification réalisée.
Fonctionnement manuel
Une fois l’horloge mise à l’heure, votre fourest prêt à fonctionner. Sélectionnez une fonc-tion de cuisson et une température.
Lorsque la cuisson commence, vous observezque le symbole s’allume de façon pro-gressive jusqu’à ce que le four atteigne 100%de la température sélectionnée.
Pour éteindre le four, mettez les commandessur la position .
Le symbole s’éteindra de façon progressi-ve au fur et à mesure que la température inté-rieure du four diminue.
Fonctions de l’horloge électronique
Préchauffage rapide: permet d’accélérer lechauffage du four lorsque celui-ci est froid.
Avertisseur: génère un signal acoustique à unmoment donné; pour ce faire, il n’est pasnécessaire que le four soit allumé.
Durée de cuisson: permet de cuire pendantune durée sélectionnée, le four s’éteignant defaçon automatique.
Heure de fin de cuisson: permet de cuire jus-qu’à une heure définie, le four s’éteignant defaçon automatique.
Durée et fin de cuisson: permet de program-mer la durée et l’heure de fin de cuisson. Aveccette fonction, le four se mettra en marche defaçon automatique à l’heure indiquée pourcuire pendant la durée sélectionnée (Durée) ets’éteindre de façon automatique à l’heure indi-quée (Fin de cuisson).
Fonction de sécurité enfants: cette fonctionbloque le four, évitant que de jeunes enfantsne puissent l’utiliser.
Préchauffage rapide
1 Sélectionnez une fonction de cuisson et unetempérature.
2 Appuyez sur la touche ; le symbole s’allume et le préchauffage rapide com-mence.
Si vous appuyez à nouveau sur la touche ,la fonction de préchauffage se déconnectera.
Important
Nous recommandons d’introduire l’alimentdans le four seulement une fois le préchauffa-ge rapide terminé, le symbole étant alorséteint.
Programmation de l’avertisseur
1 Appuyez sur la touche jusqu’à ce que lesymbole s’allume. Appuyez ensuite surla touche .
2 Sélectionnez le temps au bout duquel voussouhaitez que l’horloge vous avertisse enappuyant sur les touches ou .
3 Vous entendrez alors 2 bips consécutifs,l’heure actuelle sera affichée et le symbole
s’allumera, indiquant que l’avertisseurest programmé.
4 Une fois le temps programmé écoulé, unsignal acoustique sonnera et le symbole
commencera à clignoter.
5 Appuyez sur n’importe quelle touche pourarrêter le signal acoustique, à ce moment lesymbole s’éteindra.
Vous pouvez afficher le temps restant à toutmoment en appuyant sur les touches ou
jusqu’à ce que le symbole cli-gnote, puis en appuyant sur la touche .Vous pouvez alors modifier le temps sélec-tionné en appuyant sur les touches ou. Vous entendrez 2 bips consécutifs commeconfirmation de la modification.
Si vous souhaitez afficher de façon perma-nente le temps restant jusqu’à la fin, appuyezsur les touches ou jusqu’à ce que lesymbole clignote and appuyez sur latouche de façon prolongée. Le symbole
clignotera et le mot s’allumera.Pour revenir à l’heure actuelle, il suffit d’ap-puyer à nouveau sur la touche de façonprolongée.
Programmation de la durée de cuisson
1 Appuyez sur la touche ou jusqu’à ceque le symbole s’allume. Appuyezensuite sur la touche .
2 Sélectionnez la durée en appuyant sur lestouches ou .
3 Vous entendrez alors 2 bips consécutifs,l’heure actuelle sera affichée et le symbole
s’allumera, indiquant que votre fours’éteindra de façon automatique.
4 Sélectionnez une fonction et une tempéra-ture de cuisson.
5 Une fois la durée de cuisson écoulée, lefour se déconnectera, un signal acoustiquesonnera et le symbole clignotera.
6 Appuyez sur n’importe quelle touche pourarrêter le signal acoustique; le four s’allu-mera de nouveau.
7 Mettez les commandes sur la position pour éteindre le four.
Vous pouvez afficher le temps de cuisson res-tant à tout moment en appuyant sur lestouches ou jusqu’à ce que le symbole
clignote, puis en appuyant sur la touche. Vous pouvez alors modifier le temps
sélectionné en appuyant sur les touches ou. Vous entendrez 2 bips consécutifs comme
confirmation de la modification.
Si vous souhaitez afficher de façon perma-nente le temps restant jusqu’à la fin, appuyezsur les touches ou jusqu’à ce que lesymbole clignote and appuyez sur latouche de façon prolongée. Le symbole
clignotera et le mot s’allumera.Pour revenir à l’heure actuelle, il suffit d’ap-puyer à nouveau sur la touche de façonprolongée.
Programmation de l’heure de fin de cuisson1 Appuyez sur la touche ou jusqu’à ce
que le symbole s’allume. Appuyezensuite sur la touche .
2 Sélectionnez l’heure de fin de cuisson enappuyant sur les touches ou .
3 Vous entendrez alors 2 bips consécutifs,l’heure actuelle sera affichée et le symbole
s’allumera, indiquant que votre fours’éteindra de façon automatique.
4 Sélectionnez une fonction et une tempéra-ture de cuisson.
5 Une fois l’heure sélectionnée atteinte, lefour se déconnectera, un signal acoustiquesonnera et le symbole clignotera.
6 Appuyez sur n’importe quelle touche pourarrêter le signal acoustique; le four s’allu-mera de nouveau.
7 Mettez les commandes sur la position pour éteindre le four.
Vous pouvez afficher l’heure de fin de cuissonà tout moment en appuyant sur les touches
ou jusqu’à ce que le symbole cli-gnote, puis en appuyant sur la touche .Vous pouvez alors modifier l’heure de finsélectionnée en appuyant sur les touches ou . Vous entendrez 2 bips consécutifscomme confirmation de la modification.
Vous pouvez utiliser cette fonction même sivous êtes déjà en train d’utiliser votre four.
31
DEU
TSC
H
30
1 Bedienknopf der Zeitschaltuhr.
2 Elektronische Schaltuhr.
3 Kontrolleuchte Heizen zeigt die Einschaltungder Heizelemente an und verlischt, wenn dieeingestellte Temperatur erreicht ist.
4 Funktionswahl.
5 Temperaturregler.
Bedienfeld
Funktionen des Herds
Modell HK-500
/ / /
Modell HK-700
/ / / / /
/ /
Modell HK-750
/ / / / /
/ / / /
Ausschalten des Herds
NormalVerwendung für Kuchen und Tortenböden, beidenen die Wärmeeinwirkung gleichmäßig seinmuß, damit diese gut aufgehen.
Normal mit UmluftGeeignet zum Braten und für Gebäck. DerLüfter verteilt die Wärme gleichmäßig imHerd.
Wenn Sie den Temperaturregler auf nullstellen, können Sie mit dieser Funktion dieNahrungsmittel auftauen.
Pour ce faire, suivez les instructions indi-quées sauf la numéro 4.
Programmation de la durée et de la fin decuisson1 Appuyez sur la touche ou jusqu’à
ce que le symbole s’allume. Appuyezensuite sur la touche .
2 Sélectionnez la durée en appuyant sur lestouches ou .
3 Vous entendrez alors 2 bips consécutifs,l'heure actuelle sera affichée et le symbo-le s’allumera.
4 Appuyez sur la touche ou jusqu’àce que le symbole s’allume. Appuyezensuite sur la touche .
5 Sélectionnez l’heure de fin de cuisson enappuyant sur les touches ou .
6 Vous entendrez alors 2 bips consécutifs,l'heure actuelle sera affichée et le symbo-le s’allumera.
7 Sélectionnez une fonction et une tempéra-ture de cuisson.
8 Le four restera déconnecté, et les sym-boles et seront allumés. Votrefour est alors programmé.
9 Lorsque l’heure de début de cuisson estatteinte, le four se mettra en marche et lacuisson se fera pendant le temps sélec-tionné.
10 Une fois l’heure de fin programmée attein-te, le four se déconnectera, un signalacoustique sonnera et les symboles et se mettront à clignoter.
11 Appuyez sur n’importe quelle touche pourarrêter le signal acoustique; le four s’allu-mera de nouveau.
12 Mettez les commandes sur la position pour éteindre le four.
Si vous souhaitez modifier l’heure de fin,appuyez sur les touches ou jusqu’àce que le symbole s’allume, puisappuyez sur la touche . Vous pouvezalors modifier l’heure sélectionnée enappuyant sur les touches ou . Vousentendrez 2 bips consécutifs comme confir-mation de la modification.
Fonction de sécurité enfants
Pour activer la fonction, appuyez sur la touchede façon prolongée. Vous entendrez alors
2 bips consécutifs et le symbole s’allu-mera. L’horloge est alors bloquée.
Si vous activez la fonction de sécurité enfantslorsque le four est éteint (commande desélection de fonctions sur ) vous empêche-rez que votre four ne soit mis en marche. Sivous activez cette sécurité avec n’importequelle fonction de cuisson, vous ne bloquerezque la manipulation de l’horloge électronique.
Pour désactiver la fonction, appuyez sur latouche de façon prolongée. Vous enten-drez alors 2 bips consécutifs et le symbole
s’éteindra.
Attention
En cas de coupure de l’alimentation électrique,toute la programmation de votre horloge élec-tronique sera effacée et l’indication 00:00 cli-gnotera dans l’horloge. Vous devrez la mettre àl’heure et la programmer à nouveau.
Modell HK-500
Modell HK-700
50
90
130
170
210
250
HK 500
1 3 4 5
4 2 5
50
90
130
170
210
250
Modell HK-750 4 2 5
50
90
130
170
210
250
HK 750
33
DEU
TSC
H
32
2 Stellen Sie mit den Tasten oder dieZeit ein, nach der die Schaltuhr das Signalabgeben soll.
3 Anschließend ertönen zwei kurze Signale, eswird die aktuelle Uhrzeit angezeigt und dasSymbol leuchtet und zeigt an, dass derSignalgeber programmiert ist.
4 Nach Ablauf der eingestellten Zeit ertönt einakustisches Signal und das Symbol blinkt.
5 Das akustische Signal wird durch Betätigeneiner beliebigen Taste abgeschaltet und dasSymbol verlischt.
Sie können die Restzeit anzeigen, indem Siedie Taste oder so oft betätigen, bis dasSymbol blinkt, anschließend bestätigenSie mit der Taste . Jetzt können Sie diegewählte Restzeit mit den Tasten oderverändern. Nach Abschluss der Einstellungwerden die Änderungen mit zwei kurzenSignaltönen bestätigt. Wenn Sie eine dauernde Anzeige der Restzeitwünschen, indem Sie die Taste oderso oft betätigen, bis das Symbol blinktund betätigen Sie die Taste etwas länger.Das Symbol blinkt. Wenn Sie die Taste
nochmals etwas länger betätigen, erfolgtdie Rückkehr zur Anzeige der Uhrzeit.
Programmierung der Garzeiten1 Betätigen Sie die Taste oder bis das
Symbol aufleuchtet. Drücken Sieanschließend die Taste .
2 Stellen Sie mit den Tasten oder diegewünschte Dauer ein.
3 Anschließend ertönen zwei kurze Signale, eswird die aktuelle Uhrzeit angezeigt und dasSymbol leuchtet und zeigt an, dass derHerd nach Ablauf der eingestellten Zeitautomatisch abgeschaltet wird.
4 Wählen Sie eine Garfunktion aus und stellenSie die gewünschte Temperatur ein.
5 Nach Ablauf der eingestellten Garzeitschaltet sich der Herd ab, es ertönt einakustisches Signal und die Kontrolleuchtebeginnt zu blinken.
6 Betätigen Sie eine beliebige Taste zumAbstellen des Signaltons, hierdurch wird derHerd erneut eingeschaltet.
7 Zum Abschalten des Herds bringen Sie alleBedienelemente in Stellung .
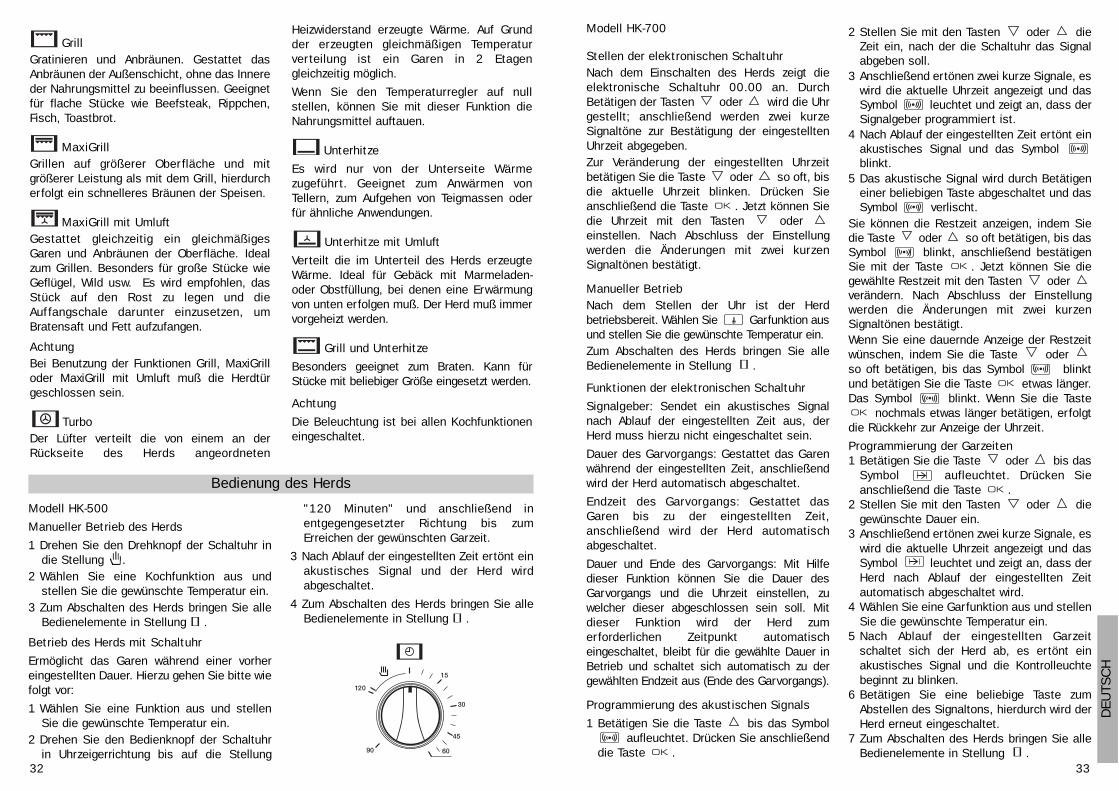
Modell HK-700
Stellen der elektronischen SchaltuhrNach dem Einschalten des Herds zeigt dieelektronische Schaltuhr 00.00 an. DurchBetätigen der Tasten oder wird die Uhrgestellt; anschließend werden zwei kurzeSignaltöne zur Bestätigung der eingestelltenUhrzeit abgegeben. Zur Veränderung der eingestellten Uhrzeitbetätigen Sie die Taste oder so oft, bisdie aktuelle Uhrzeit blinken. Drücken Sieanschließend die Taste . Jetzt können Siedie Uhrzeit mit den Tasten odereinstellen. Nach Abschluss der Einstellungwerden die Änderungen mit zwei kurzenSignaltönen bestätigt.
Manueller BetriebNach dem Stellen der Uhr ist der Herdbetriebsbereit. Wählen Sie Garfunktion ausund stellen Sie die gewünschte Temperatur ein.Zum Abschalten des Herds bringen Sie alleBedienelemente in Stellung .
Funktionen der elektronischen Schaltuhr
Signalgeber: Sendet ein akustisches Signalnach Ablauf der eingestellten Zeit aus, derHerd muss hierzu nicht eingeschaltet sein.
Dauer des Garvorgangs: Gestattet das Garenwährend der eingestellten Zeit, anschließendwird der Herd automatisch abgeschaltet.
Endzeit des Garvorgangs: Gestattet dasGaren bis zu der eingestellten Zeit,anschließend wird der Herd automatischabgeschaltet.
Dauer und Ende des Garvorgangs: Mit Hilfedieser Funktion können Sie die Dauer desGarvorgangs und die Uhrzeit einstellen, zuwelcher dieser abgeschlossen sein soll. Mitdieser Funktion wird der Herd zumerforderlichen Zeitpunkt automatischeingeschaltet, bleibt für die gewählte Dauer inBetrieb und schaltet sich automatisch zu dergewählten Endzeit aus (Ende des Garvorgangs).
Programmierung des akustischen Signals
1 Betätigen Sie die Taste bis das Symbolaufleuchtet. Drücken Sie anschließend
die Taste .
Modell HK-500
Manueller Betrieb des Herds
1 Drehen Sie den Drehknopf der Schaltuhr indie Stellung .
2 Wählen Sie eine Kochfunktion aus undstellen Sie die gewünschte Temperatur ein.
3 Zum Abschalten des Herds bringen Sie alleBedienelemente in Stellung .
Betrieb des Herds mit Schaltuhr
Ermöglicht das Garen während einer vorhereingestellten Dauer. Hierzu gehen Sie bitte wiefolgt vor:
1 Wählen Sie eine Funktion aus und stellenSie die gewünschte Temperatur ein.
2 Drehen Sie den Bedienknopf der Schaltuhrin Uhrzeigerrichtung bis auf die Stellung
Bedienung des Herds
GrillGratinieren und Anbräunen. Gestattet dasAnbräunen der Außenschicht, ohne das Innereder Nahrungsmittel zu beeinflussen. Geeignetfür flache Stücke wie Beefsteak, Rippchen,Fisch, Toastbrot.
MaxiGrillGrillen auf größerer Ober fläche und mitgrößerer Leistung als mit dem Grill, hierdurcherfolgt ein schnelleres Bräunen der Speisen.
MaxiGrill mit UmluftGestattet gleichzeitig ein gleichmäßigesGaren und Anbräunen der Oberfläche. Idealzum Grillen. Besonders für große Stücke wieGeflügel, Wild usw. Es wird empfohlen, dasStück auf den Rost zu legen und dieAuffangschale darunter einzusetzen, umBratensaft und Fett aufzufangen.
AchtungBei Benutzung der Funktionen Grill, MaxiGrilloder MaxiGrill mit Umluft muß die Herdtürgeschlossen sein.
Turbo Der Lüfter verteilt die von einem an derRückseite des Herds angeordneten
Heizwiderstand erzeugte Wärme. Auf Grundder erzeugten gleichmäßigen Temperaturver teilung ist ein Garen in 2 Etagengleichzeitig möglich.
Wenn Sie den Temperaturregler auf nullstellen, können Sie mit dieser Funktion dieNahrungsmittel auftauen.
Unterhitze
Es wird nur von der Unterseite Wärmezugeführ t. Geeignet zum Anwärmen vonTellern, zum Aufgehen von Teigmassen oderfür ähnliche Anwendungen.
Unterhitze mit Umluft
Verteilt die im Unterteil des Herds erzeugteWärme. Ideal für Gebäck mit Marmeladen-oder Obstfüllung, bei denen eine Erwärmungvon unten erfolgen muß. Der Herd muß immervorgeheizt werden.
Grill und Unterhitze
Besonders geeignet zum Braten. Kann fürStücke mit beliebiger Größe eingesetzt werden.
Achtung
Die Beleuchtung ist bei allen Kochfunktioneneingeschaltet.
"120 Minuten" und anschließend inentgegengesetzter Richtung bis zumErreichen der gewünschten Garzeit.
3 Nach Ablauf der eingestellten Zeit ertönt einakustisches Signal und der Herd wirdabgeschaltet.
4 Zum Abschalten des Herds bringen Sie alleBedienelemente in Stellung .
35
DEU
TSC
H
34
Sie können die restliche Garzeit anzeigen, indemSie die Taste oder so oft betätigen, bisdas Symbol blinkt, anschließendbestätigen Sie mit der Taste . Jetzt könnenSie die gewählte Restzeit mit den Tasten oder verändern. Nach Abschluss derEinstellung werden die Änderungen mit zweikurzen Signaltönen bestätigt. Wenn Sie eine dauernde Anzeige der Restzeitwünschen, indem Sie die Taste oderso oft betätigen, bis das Symbol blinktund betätigen Sie die Taste etwas länger.Das Symbol blinkt. Wenn Sie die Taste
nochmals etwas länger betätigen, erfolgtdie Rückkehr zur Anzeige der Uhrzeit.
Programmierung der Uhrzeit für das Ende desGarvorgangs.1 Betätigen Sie die Taste oder bis das
Symbol aufleuchtet. Drücken Sieanschließend .
2 Stellen Sie die gewünschte Uhrzeit für dieBeendigung des Garvorgangs mit denTasten oder ein.
3 Anschließend ertönen zwei kurze Signale, eswird die aktuelle Uhrzeit angezeigt und dasSymbol leuchtet und zeigt an, dass derHerd nach Ablauf der eingestellten Zeitautomatisch abgeschaltet wird.
4 Wählen Sie eine Garfunktion aus und stellenSie die gewünschte Temperatur ein.
5 Bei Erreichen der eingestellten Endzeitschaltet sich der Herd ab, es ertönt einakustisches Signal und das Symbol beginnt zu blinken.
6 Betätigen Sie eine beliebige Taste zumAbstellen des Signaltons, hierdurch wird derHerd erneut eingeschaltet.
7 Zum Abschalten des Herds bringen Sie alleBedienelemente in Stellung .
Sie können die Endzeit des Garvorgangsanzeigen, indem Sie die Taste oder sooft betätigen, bis das Symbol blinkt,anschließend bestätigen Sie mit der Taste .Jetzt können Sie die gewählte Endzeit mit denTasten oder verändern. Nach Abschlussder Einstellung werden die Änderungen mit zweikurzen Signaltönen bestätigt. Sie können die Funktion nutzen, auch wenn Siebereits mit dem Herd kochen. Befolgen Sie hierzudie Anweisungen mit Ausnahme von Punkt 4.
Programmierung der Dauer der Garzeit undder Uhrzeit für dessen Beendigung
1 Betätigen Sie die Taste oder bis dasSymbol aufleuchtet. Drücken Sieanschließend .
2 Stellen Sie mit den Tasten oder diegewünschte Dauer ein.
3 Anschließend werden zwei kurze Signaltöneabgegeben, es wird die aktuelle Uhrzeitangezeigt und das Symbol leuchtet.
4 Betätigen Sie die Taste oder bis dasSymbol aufleuchtet. Drücken Sieanschließend .
5 Stellen Sie die gewünschte Uhrzeit für dieBeendigung des Garvorgangs mit denTasten oder ein.
6 Anschließend werden zwei kurzeSignaltöne abgegeben, es wird die aktuelleUhrzeit angezeigt und das Symbol leuchtet.
7 Wählen Sie eine Garfunktion aus und stellenSie die gewünschte Temperatur ein.
8 Der Herd bleibt abgeschaltet, die Symboleund leuchten weiterhin. Damit
ist Ihr Herd programmiert.
9 Bei Erreichen der Uhrzeit für den Beginndes Garvorgangs schaltet sich der Herdein und führt den Garvorgang während dereingestellten Zeitdauer aus.
10 Nach Erreichen der programmier tenEndzeit wird der Herd abgeschaltet, esertönt ein akustisches Signal und dieSymbol und blinken.
11 Betätigen Sie eine beliebige Taste zumAbstellen des Signaltons, hierdurch wirdder Herd erneut eingeschaltet.
12 Zum Abschalten des Herds bringen Sie alleBedienelemente in Stellung .
Wenn Sie während des Garvorgangs dieEndzeit verändern möchten, betätigen Sie dieTaste oder bis das Symbol aufleuchtet und bestätigen Sie mit der Taste
. Jetzt können Sie die gewählte Endzeitmit den Tasten oder verändern. NachAbschluss der Einstellung werden dieÄnderungen mit zwei kurzen Signaltönenbestätigt.
AchtungBei einem Ausfall der elektrischenStromversorgung wird die gesamteProgrammierung der elektronischen Schaltuhrgelöscht, als Uhrzeit wird 00:00 blinkendangezeigt. Sie müssen diese anschließendstellen und erneut programmieren.
Modell HK-750
Stellen der elektronischen Schaltuhr
Nach dem Einschalten des Herds zeigt dieSchaltuhr das Wort blinkend an, dieUhrzeit steht auf 00:00. Durch Betätigen derTasten oder wird die Uhr gestellt;anschließend werden zwei kurze Signaltönezur Bestätigung der eingestellten Uhrzeitabgegeben.
Zur Veränderung der eingestellten Uhrzeitbetätigen Sie die Taste oder so oft, bisdas Wort und die aktuelle Uhrzeitblinken. Drücken Sie anschließend die Taste
. Jetzt können Sie die Uhrzeit mit denTasten oder einstellen. Nach
Abschluss der Einstellung werden dieÄnderungen mit zwei kurzen Signaltönenbestätigt.
Manueller Betrieb
Nach dem Stellen der Uhr ist der Herdbetriebsbereit. Wählen Sie eine Garfunktionaus und stellen Sie die gewünschteTemperatur ein.
Zu Beginn des Garvorgangs können Siebeobachten, wie das Symbol zunehmendausgeleuchtet wird, bis der Herd auf 100% dereingestellten Temperatur aufgeheizt ist.
Zum Abschalten des Herds bringen Sie alleBedienelemente in Stellung .
Das Symbol verlischt nach und nachentsprechend der Abkühlung desHerdinnenraums.
Funktionen der elektronischen Schaltuhr
Schnelles Vorheizen: Gestattet eineBeschleunigung des Vorheizens des kaltenHerds.
Signalgeber: Sendet ein akustisches Signalnach Ablauf der eingestellten Zeit aus, derHerd muss hierzu nicht eingeschaltet sein.
Dauer des Garvorgangs: Gestattet das Garenwährend der eingestellten Zeit, anschließendwird der Herd automatisch abgeschaltet.
Endzeit des Garvorgangs: Gestattet dasGaren bis zu der eingestellten Zeit,anschließend wird der Herd automatischabgeschaltet.
Dauer und Ende des Garvorgangs: Mit Hilfedieser Funktion können Sie die Dauer desGarvorgangs und die Uhrzeit einstellen, zuwelcher dieser abgeschlossen sein soll. Mitdieser Funktion wird der Herd zumer forderlichen Zeitpunkt automatischeingeschaltet, bleibt für die gewählte Dauer inBetrieb und schaltet sich automatisch zu dergewählten Endzeit aus (Ende desGarvorgangs).
Funktion Kindersicherung: Mit dieser Funktionwird der Herd gesperrt und kann nicht durchKleinkinder in Betrieb gesetzt werden.
Schnelles Vorheizen
1 Wählen Sie eine Garfunktion aus und stellenSie die gewünschte Temperatur ein.
2 Betätigen Sie die Taste , das Symbolleuchtet auf und das schnelle
Vorheizen beginnt.
Durch nochmaliges Betätigen der Taste wird das schnelle Vorheizen abgeschaltet.
Wichtig
Es wird empfohlen, die Speisen erst dann inden Herd zu bringen, wenn das schnelleVorheizen beendet und das Symbol nichtmehr beleuchtet ist.
Programmierung des akustischen Signals
1 Betätigen Sie die Taste bis das Symbolaufleuchtet. Drücken Sie anschließend
die Taste .
37
DEU
TSC
H
36
2 Stellen Sie mit den Tasten oder dieZeit ein, nach der die Schaltuhr das Signalabgeben soll.
3 Anschließend ertönen zwei kurze Signale,es wird die aktuelle Uhrzeit angezeigt unddas Symbol leuchtet und zeigt an,dass der Signalgeber programmiert ist.
4 Nach Ablauf der eingestellten Zeit ertönt einakustisches Signal und das Symbol blinkt.
5 Das akustische Signal wird durch Betätigeneiner beliebigen Taste abgeschaltet und dasSymbol verlischt.
Sie können die Restzeit anzeigen, indem Siedie Taste oder so oft betätigen, bis dasSymbol blinkt, anschließend bestätigenSie mit der Taste . Jetzt können Sie diegewählte Restzeit mit den Tasten oderverändern. Nach Abschluss der Einstellungwerden die Änderungen mit zwei kurzenSignaltönen bestätigt.
Wenn Sie eine dauernde Anzeige der Restzeitwünschen, indem Sie die Taste oderso oft betätigen, bis das Symbol blinktund betätigen Sie die Taste etwas länger.Das Symbol blinkt und das Wort wird angezeigt. Wenn Sie die Taste nochmals etwas länger betätigen, erfolgt dieRückkehr zur Anzeige der Uhrzeit.
Programmierung der Garzeiten
1 Betätigen Sie die Taste oder bis dasSymbol aufleuchtet. Drücken Sieanschließend die Taste .
2 Stellen Sie mit den Tasten oder diegewünschte Dauer ein.
3 Anschließend ertönen zwei kurze Signale,es wird die aktuelle Uhrzeit angezeigt unddas Symbol leuchtet und zeigt an, dassder Herd nach Ablauf der eingestellten Zeitautomatisch abgeschaltet wird.
4 Wählen Sie eine Gar funktion aus undstellen Sie die gewünschte Temperatur ein.
5 Nach Ablauf der eingestellten Garzeitschaltet sich der Herd ab, es ertönt einakustisches Signal und die Kontrolleuchtebeginnt zu blinken.
6 Betätigen Sie eine beliebige Taste zumAbstellen des Signaltons, hierdurch wird derHerd erneut eingeschaltet.
7 Zum Abschalten des Herds bringen Sie alleBedienelemente in Stellung .
Sie können die restliche Garzeit anzeigen,indem Sie die Taste oder so oftbetätigen, bis das Symbol blinkt,anschließend bestätigen Sie mit der Taste
. Jetzt können Sie die gewählte Restzeitmit den Tasten oder verändern. NachAbschluss der Einstellung werden dieÄnderungen mit zwei kurzen Signaltönenbestätigt.
Wenn Sie eine dauernde Anzeige der Restzeitwünschen, indem Sie die Taste oderso oft betätigen, bis das Symbol blinktund betätigen Sie die Taste etwas länger.Das Symbol blinkt und das Wort wird angezeigt. Wenn Sie die Taste nochmals etwas länger betätigen, erfolgt dieRückkehr zur Anzeige der Uhrzeit.
Programmierung der Uhrzeit für das Ende desGarvorgangs.
1 Betätigen Sie die Taste oder bis dasSymbol aufleuchtet. Drücken Sieanschließend .
2 Stellen Sie die gewünschte Uhrzeit für dieBeendigung des Garvorgangs mit denTasten oder ein.
3 Anschließend ertönen zwei kurze Signale,es wird die aktuelle Uhrzeit angezeigt unddas Symbol leuchtet und zeigt an, dassder Herd nach Ablauf der eingestellten Zeitautomatisch abgeschaltet wird.
4 Wählen Sie eine Gar funktion aus undstellen Sie die gewünschte Temperatur ein.
5 Bei Erreichen der eingestellten Endzeitschaltet sich der Herd ab, es ertönt einakustisches Signal und das Symbol beginnt zu blinken.
6 Betätigen Sie eine beliebige Taste zumAbstellen des Signaltons, hierdurch wird derHerd erneut eingeschaltet.
7 Zum Abschalten des Herds bringen Sie alleBedienelemente in Stellung .
Sie können die Endzeit des Garvorgangsanzeigen, indem Sie die Taste oder sooft betätigen, bis das Symbol blinkt,anschließend bestätigen Sie mit der Taste
. Jetzt können Sie die gewählte Endzeitmit den Tasten oder verändern. NachAbschluss der Einstellung werden dieÄnderungen mit zwei kurzen Signaltönenbestätigt.
Sie können die Funktion nutzen, auch wennSie bereits mit dem Herd kochen. BefolgenSie hierzu die Anweisungen mit Ausnahmevon Punkt 4.
Programmierung der Dauer der Garzeit undder Uhrzeit für dessen Beendigung1 Betätigen Sie die Taste oder bis
das Symbol aufleuchtet. Drücken Sieanschließend .
2 Stellen Sie mit den Tasten oderdie gewünschte Dauer ein.
3 Anschließend werden zwei kurzeSignaltöne abgegeben, es wird dieaktuelle Uhrzeit angezeigt und das Symbol
leuchtet.
4 Betätigen Sie die Taste oder bisdas Symbol aufleuchtet. Drücken Sieanschließend .
5 Stellen Sie die gewünschte Uhrzeit für dieBeendigung des Garvorgangs mit denTasten oder ein.
6 Anschließend werden zwei kurzeSignaltöne abgegeben, es wird dieaktuelle Uhrzeit angezeigt und das Symbol
leuchtet.
7 Wählen Sie eine Garfunktion aus undstellen Sie die gewünschte Temperatur ein.
8 Der Herd bleibt abgeschaltet, die Symboleund leuchten weiterhin. Damit
ist Ihr Herd programmiert.
9 Bei Erreichen der Uhrzeit für den Beginndes Garvorgangs schaltet sich der Herdein und führt den Garvorgang während dereingestellten Zeitdauer aus.
10 Nach Erreichen der programmier tenEndzeit wird der Herd abgeschaltet, esertönt ein akustisches Signal und dieSymbol und blinken.
11 Betätigen Sie eine beliebige Taste zumAbstellen des Signaltons, hierdurch wirdder Herd erneut eingeschaltet.
12 Zum Abschalten des Herds bringen Siealle Bedienelemente in Stellung .
Wenn Sie während des Garvorgangs dieEndzeit verändern möchten, betätigen Sie dieTaste oder bis das Symbol aufleuchtet und bestätigen Sie mit der Taste
. Jetzt können Sie die gewählte Endzeitmit den Tasten oder verändern. NachAbschluss der Einstellung werden dieÄnderungen mit zwei kurzen Signaltönenbestätigt.
Funktion Kindersicherung
Zur Aktivierung dieser Funktion betätigen Siedie Taste etwas länger, anschließendwerden zwei Signaltöne abgegeben und dasSymbol leuchtet auf. Die Schaltuhr istdamit blockiert.
Wird die Kindersicherung bei ausgeschaltetemHerd aktivier t, (Funktionswahlschalter inStellung ), dann ist es nicht möglich, dieseneinzuschalten. Durch Aktivieren derKindersicherung in einer beliebigen Funktionwird nur die Bedienung der elektronischenSchaltuhr gesperrt.
Zur Desaktivierung dieser Funktion betätigenSie die Taste etwas länger, anschließendwerden zwei Signaltöne abgegeben und dasSymbol verlischt.
Achtung
Bei einem Ausfall der elektrischenStromversorgung wird die gesamteProgrammierung der elektronischen Schaltuhrgelöscht, als Uhrzeit wird 00:00 blinkendangezeigt. Sie müssen diese anschließendstellen und erneut programmieren.
Clase de eficiencia ener-gética, en una escalaque abarca de A (más eficiente) a G (menoseficiente).
Función decalentamiento.
Calentamientoconvencional.
Convecciónforzada.
Consumo de energía.
Calentamientoconvencional.
Convecciónforzada.
Volumen neto(litros).
Tipo:PequeñoMedioGrande
Tiempo decocción concarga normal.
Calentamientoconvencional.
Convecciónforzada.
Superficie decocción.
Ruido (dB (A)re 1 pW).
Classe de efi-ciência energé-tica, numaescala de A(eficiente) a G(ineficiente).
Função deaquecimento.
Convencional.
Convecção forçada de ar.
Consumo de energia.
Convencional.
Convecção forçada de ar.
Volume útil(litros).
Tipo:PequenoMédioGrande
Tempo decozedura dacarga-padrão.
Convencional.
Convecção forçada de ar.
Zona de cozedura.
Nível de ruídodB(A) re 1 pW.
Energy efficiency class on ascale of A(more efficient)to G (less efficient).
Heating function.
Conventional.
Forced air convection.
Energy consumption.
Conventional.
Forced airconvection.
Usable volume(litres).
Size:SmallMediumLarge
Time to cookstandard load.
Conventional.
Forced airconvection.
Baking area.
Noise (dB (A)re 1 pW).
Classementselon son efficacité énergétiquesur une échelle allant de A (économe) à G(peu économe).
Fonction chauf-fage.
Classique.
Convection forcée.
Consommationd´énergie.
Classique.
Convection forcée.
Volume utile(litres).
Type:Faible volume
Volume moyenGrand volume
Temps de cuisson encharge normale.
Classique.
Convection forcée.
Surface decuisson.
Bruit (dB (A) re1 pW).
Energieeffizienz-klasse aufeiner Skalavon A (niedrigerVerbrauch) bis G (hoherVerbrauch).
Beheizung.
KonventionelleBeheizung.
Umluft /Heißluft.
Energiever-brauch.
KonventionelleBeheizung.
Umluft /Heißluft.
Netto-volumen(liter).
Typ:KleinMittelGroß
Kochzeit beiStandardbela-dung.
KonventionelleBeheizung.
Umluft /Heißluft.
Backfläche
Geräusch (dB(A) re 1 pW).
A
0,73Kwh
- - -
37
38 min.
- - - -
1250 cm2
- - -
A
0,71Kwh
0,76Kwh
35
39 min.
36 min.
1250 cm2
- - -
A
0,79Kwh
0,78Kwh
35
45 min.
48 min.
1250 cm2
- - -
FICHA / FICHA / BROCHURE / FICHE / DATENBLATT
Fabricante Fabricante Manufacturer Fabricant Hersteller TEKA TEKA TEKA
Modelo Modelo Model Modèle Modell HK-500 HK-700 HK-750