18
HOBIE GETAWAY OWNER’S MANUAL HOBIE GETAWAY
HOBIE GETAWAY
1
OWNER’S MANUAL
HOBIE GETAWAY

2
HOBIE GETAWAY
WELCOME TO THEHOBIE WAY OF LIFE
Congratulations on the purchase of your new HOBIE Getaway and welcome to the HOBIE sai-ling family.The HOBIE Getaway cannot be outgrown. It can be sailed by children up through senior citi-zens. A single adult can sail it at top performance - and a crew of four can cruise in comfort.
We offer this manual as a guide to increased safety and enjoyment of your new boat. The pur-pose of this publication is to provide easy, simple and accurate instructions on how to get yourGetaway ready for the water. Please read them carefully and familiarize yourself with the boatand all of the parts spread before you.
Whether you are a new sailor or a veteran of many years, we recommend that you read thisthoroughly before your first sail and TRY IT OUR WAY FIRST! If you are new to sailing, thismanual alone is not intended to teach you how to sail. There are many excellent books, videosand courses on the safe handling of small sailboats. We suggest that you contact your localsailboat dealer, college or Coast Guard Auxiliary for recommendations.
Watch for overhead wires whenever you are rigging, launching, sailing or trailering with themast up. CONTACT OF THE MAST WITH POWER LINES COULD BE FATAL! Be certainthat the rigging area and the area that you will be sailing in are free of overhead power lines.Report any such power lines to your local power authority and sail elsewhere.
We take pride in presenting the Getaway to you and hope that you'll take as much pride in ow-ning her.
Fair winds and good sailing!
Hobie Cat Europe
HOBIE GETAWAY
3
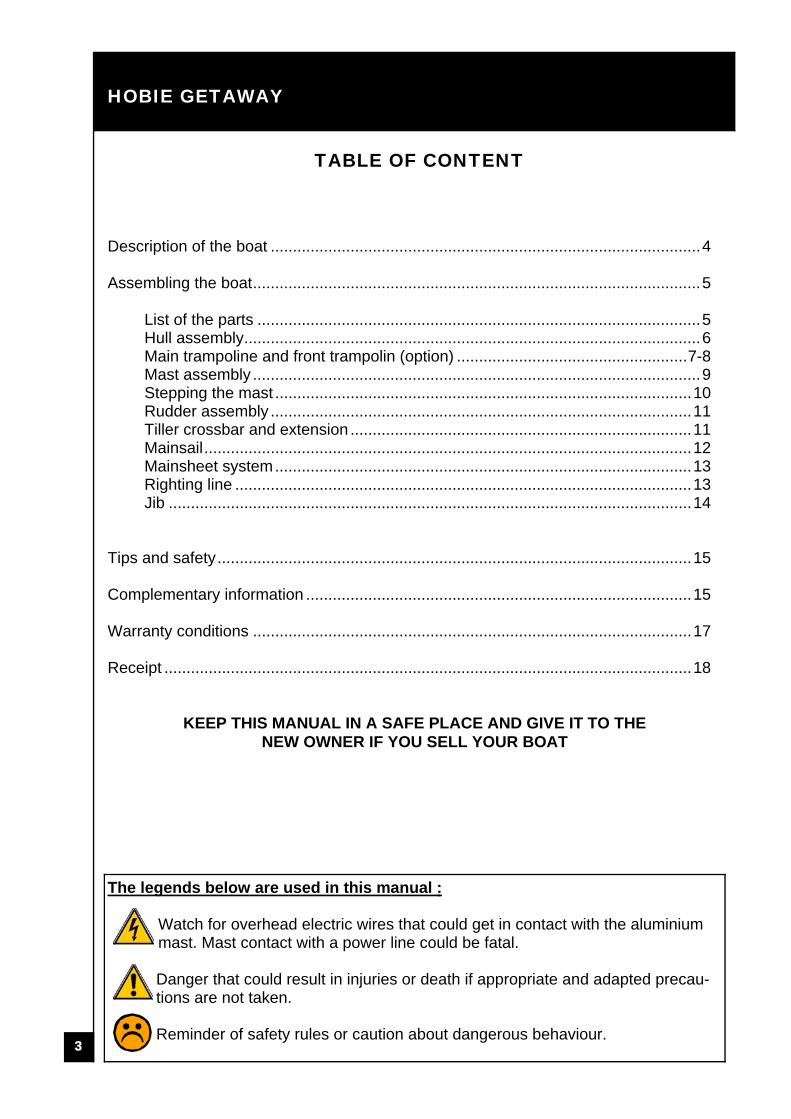
TABLE OF CONTENT
Description of the boat .................................................................................................4
Assembling the boat.....................................................................................................5
List of the parts ....................................................................................................5Hull assembly.......................................................................................................6Main trampoline and front trampolin (option) ....................................................7-8Mast assembly .....................................................................................................9Stepping the mast ..............................................................................................10Rudder assembly ...............................................................................................11Tiller crossbar and extension .............................................................................11Mainsail..............................................................................................................12Mainsheet system..............................................................................................13Righting line .......................................................................................................13Jib ......................................................................................................................14
Tips and safety...........................................................................................................15
Complementary information .......................................................................................15
Warranty conditions ...................................................................................................17
Receipt .......................................................................................................................18
KEEP THIS MANUAL IN A SAFE PLACE AND GIVE IT TO THENEW OWNER IF YOU SELL YOUR BOAT
The legends below are used in this manual :
Watch for overhead electric wires that could get in contact with the aluminiummast. Mast contact with a power line could be fatal.
Danger that could result in injuries or death if appropriate and adapted precau-tions are not taken.
Reminder of safety rules or caution about dangerous behaviour.
4
HOBIE GETAWAYDESCRIPTION OF THE BOAT
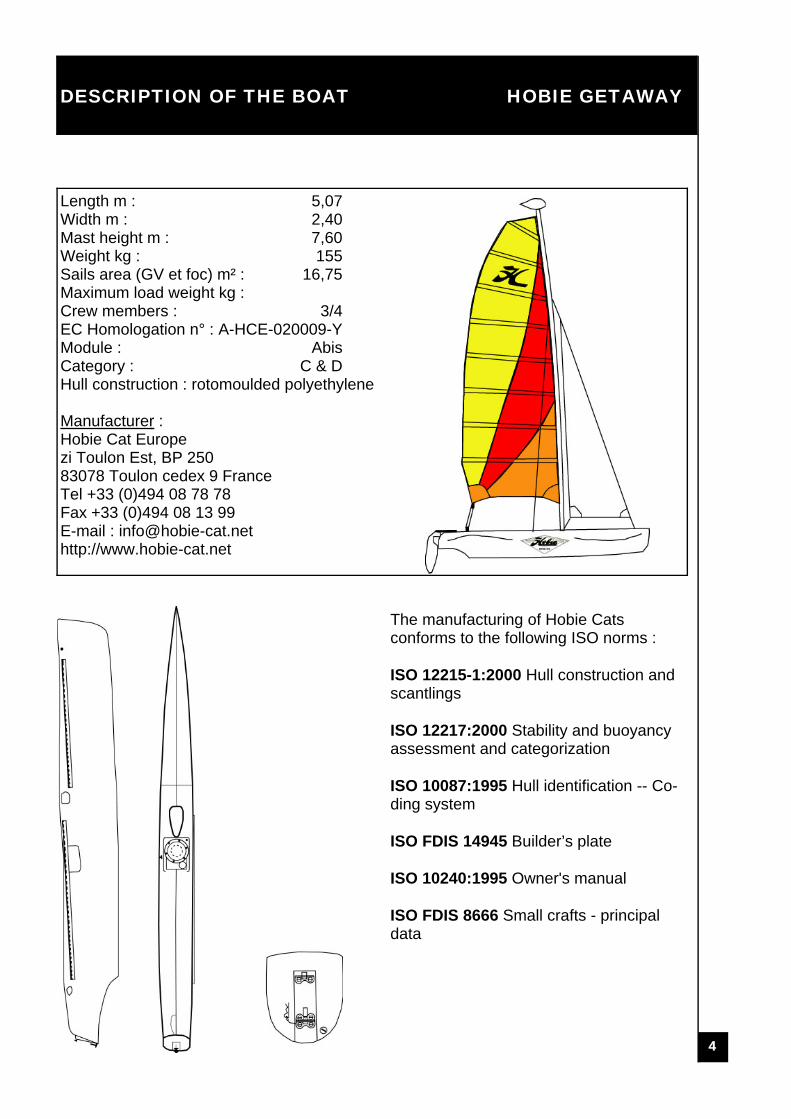
The manufacturing of Hobie Catsconforms to the following ISO norms :
ISO 12215-1:2000 Hull construction andscantlings
ISO 12217:2000 Stability and buoyancyassessment and categorization
ISO 10087:1995 Hull identification -- Co-ding system
ISO FDIS 14945 Builder’s plate
ISO 10240:1995 Owner's manual
ISO FDIS 8666 Small crafts - principaldata
Length m : 5,07Width m : 2,40Mast height m : 7,60Weight kg : 155Sails area (GV et foc) m² : 16,75Maximum load weight kg :Crew members : 3/4EC Homologation n° : A-HCE-020009-YModule : AbisCategory : C & DHull construction : rotomoulded polyethylene
Manufacturer : Hobie Cat Europezi Toulon Est, BP 25083078 Toulon cedex 9 FranceTel +33 (0)494 08 78 78Fax +33 (0)494 08 13 99E-mail : [email protected]://www.hobie-cat.net
HOBIE GETAWAY
5
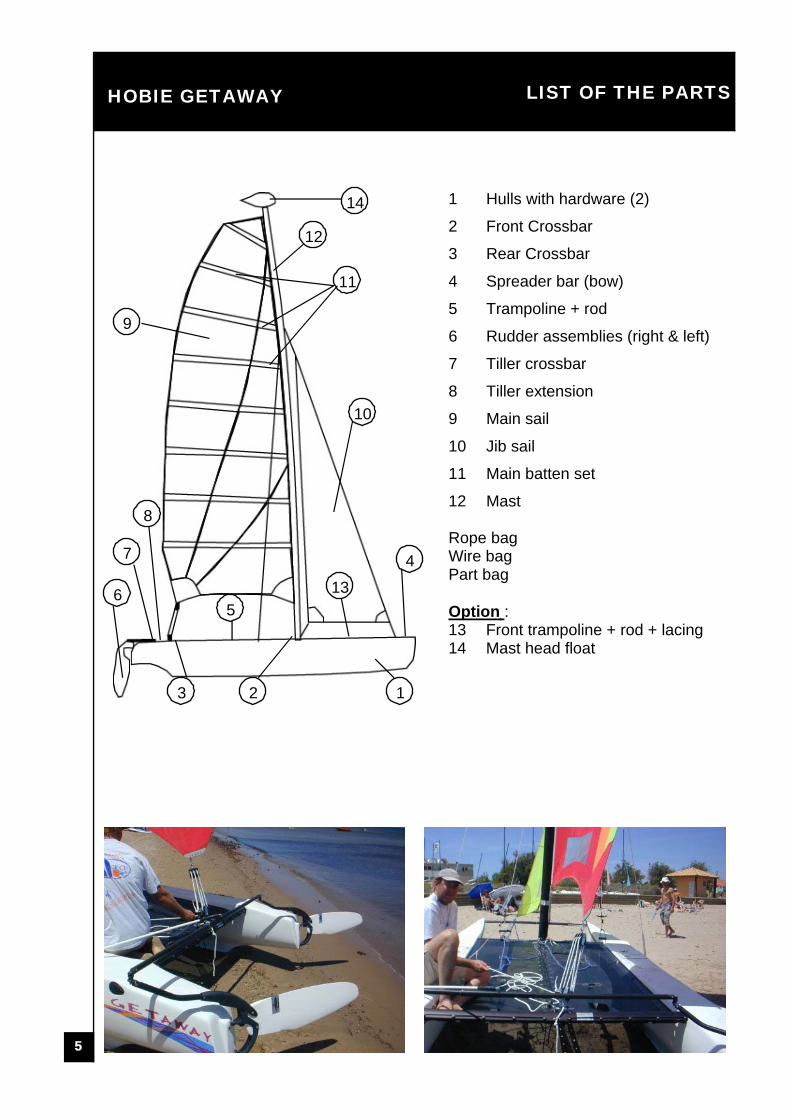
LIST OF THE PARTS
1 Hulls with hardware (2)
2 Front Crossbar
3 Rear Crossbar
4 Spreader bar (bow)
5 Trampoline + rod
6 Rudder assemblies (right & left)
7 Tiller crossbar
8 Tiller extension
9 Main sail
10 Jib sail
11 Main batten set
12 Mast
Rope bagWire bagPart bag
Option :13 Front trampoline + rod + lacing14 Mast head float
13 2
4
56
7
8
9
10
11
12
13
14
6
HOBIE GETAWAYHULL ASSEMBLY
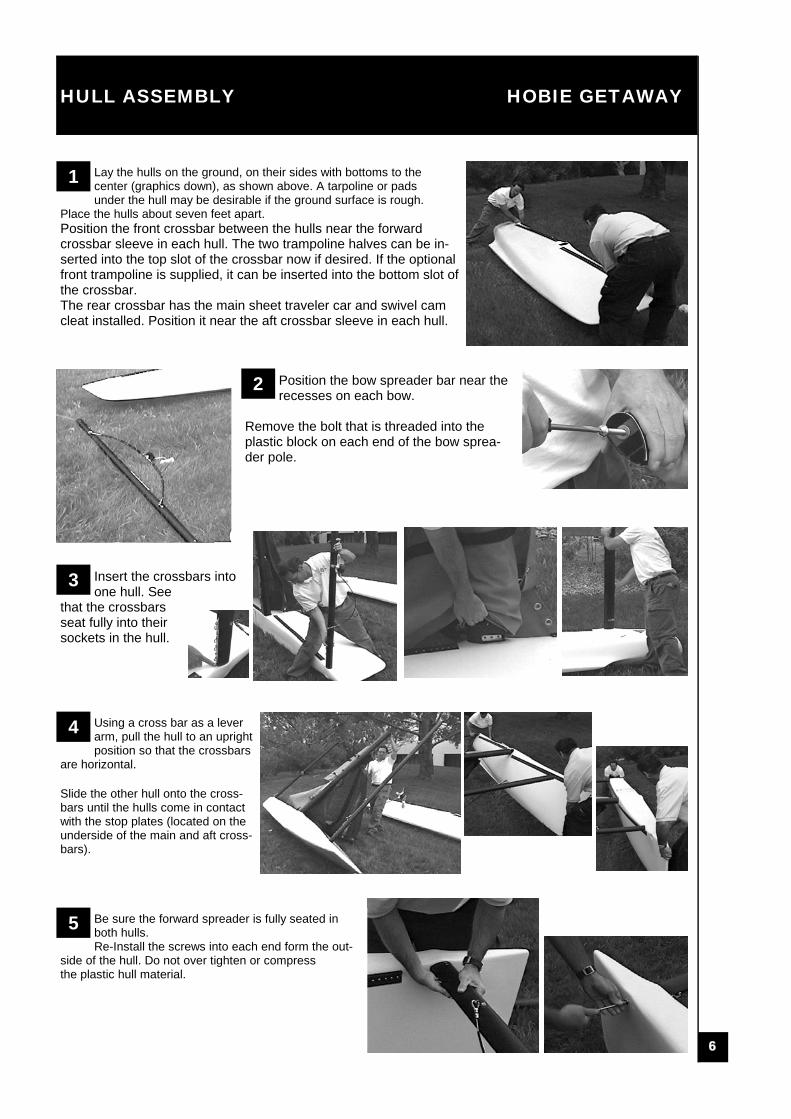
Lay the hulls on the ground, on their sides with bottoms to thecenter (graphics down), as shown above. A tarpoline or padsunder the hull may be desirable if the ground surface is rough.
Place the hulls about seven feet apart.Position the front crossbar between the hulls near the forwardcrossbar sleeve in each hull. The two trampoline halves can be in-serted into the top slot of the crossbar now if desired. If the optionalfront trampoline is supplied, it can be inserted into the bottom slot ofthe crossbar.The rear crossbar has the main sheet traveler car and swivel camcleat installed. Position it near the aft crossbar sleeve in each hull.
1
Position the bow spreader bar near therecesses on each bow.
Remove the bolt that is threaded into theplastic block on each end of the bow sprea-der pole.
2
Insert the crossbars intoone hull. See
that the crossbarsseat fully into theirsockets in the hull.
3
Using a cross bar as a leverarm, pull the hull to an uprightposition so that the crossbars
are horizontal.
Slide the other hull onto the cross-bars until the hulls come in contactwith the stop plates (located on theunderside of the main and aft cross-bars).
4
Be sure the forward spreader is fully seated inboth hulls.Re-Install the screws into each end form the out-
side of the hull. Do not over tighten or compressthe plastic hull material.
5
HOBIE GETAWAY
7
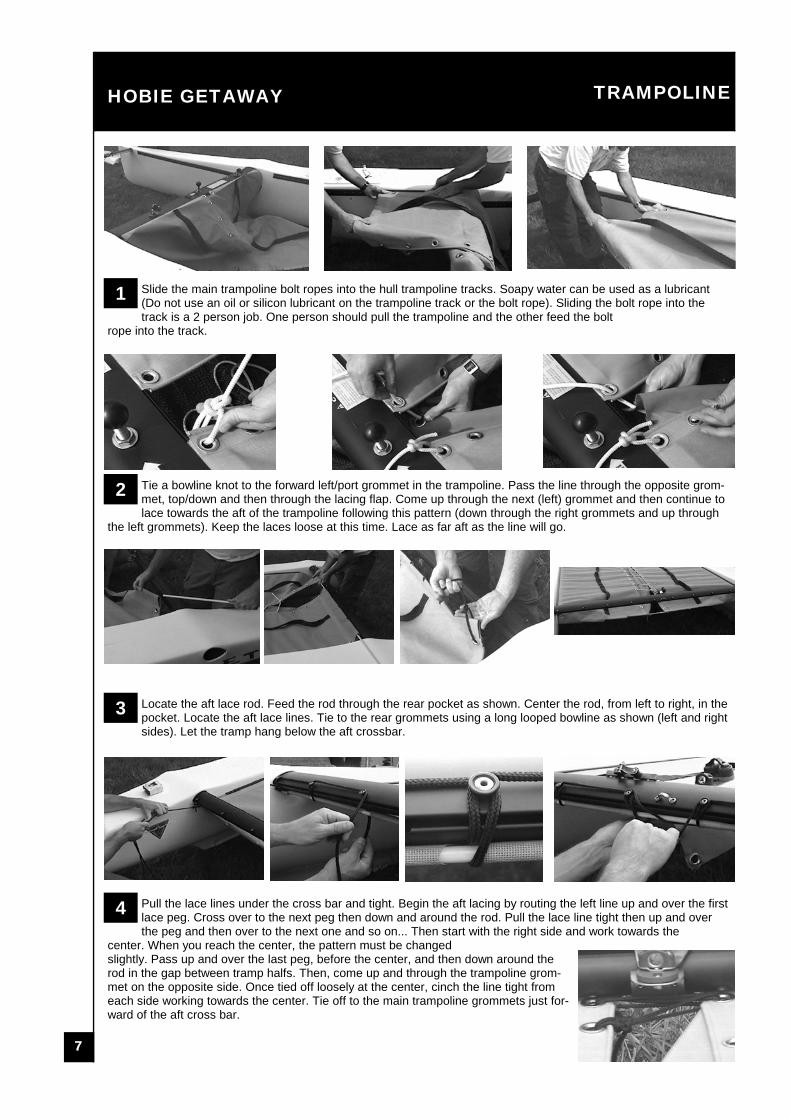
Slide the main trampoline bolt ropes into the hull trampoline tracks. Soapy water can be used as a lubricant(Do not use an oil or silicon lubricant on the trampoline track or the bolt rope). Sliding the bolt rope into thetrack is a 2 person job. One person should pull the trampoline and the other feed the bolt
rope into the track.
TRAMPOLINE
1
Tie a bowline knot to the forward left/port grommet in the trampoline. Pass the line through the opposite grom-met, top/down and then through the lacing flap. Come up through the next (left) grommet and then continue tolace towards the aft of the trampoline following this pattern (down through the right grommets and up through
the left grommets). Keep the laces loose at this time. Lace as far aft as the line will go.
2
Locate the aft lace rod. Feed the rod through the rear pocket as shown. Center the rod, from left to right, in thepocket. Locate the aft lace lines. Tie to the rear grommets using a long looped bowline as shown (left and rightsides). Let the tramp hang below the aft crossbar.
3
Pull the lace lines under the cross bar and tight. Begin the aft lacing by routing the left line up and over the firstlace peg. Cross over to the next peg then down and around the rod. Pull the lace line tight then up and overthe peg and then over to the next one and so on... Then start with the right side and work towards the
center. When you reach the center, the pattern must be changedslightly. Pass up and over the last peg, before the center, and then down around therod in the gap between tramp halfs. Then, come up and through the trampoline grom-met on the opposite side. Once tied off loosely at the center, cinch the line tight fromeach side working towards the center. Tie off to the main trampoline grommets just for-ward of the aft cross bar.
4
8
HOBIE GETAWAYLACING THE TRAMPOLINE
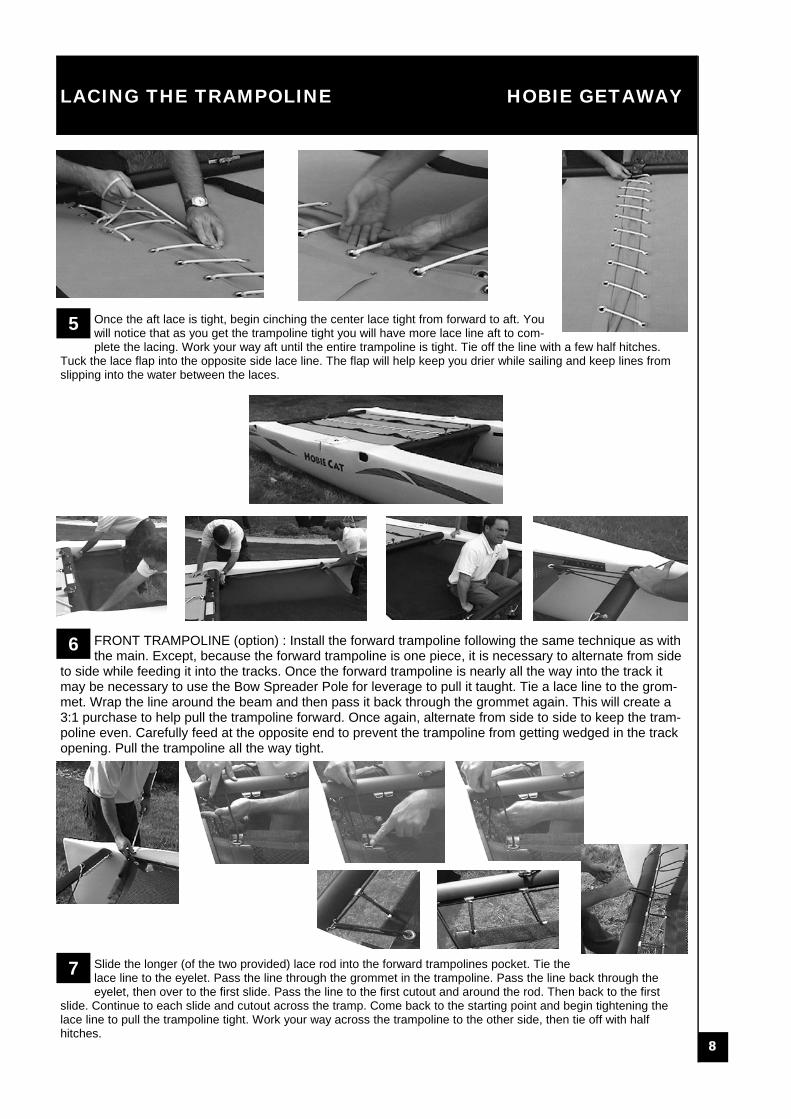
Once the aft lace is tight, begin cinching the center lace tight from forward to aft. Youwill notice that as you get the trampoline tight you will have more lace line aft to com-plete the lacing. Work your way aft until the entire trampoline is tight. Tie off the line with a few half hitches.
Tuck the lace flap into the opposite side lace line. The flap will help keep you drier while sailing and keep lines fromslipping into the water between the laces.
5
FRONT TRAMPOLINE (option) : Install the forward trampoline following the same technique as withthe main. Except, because the forward trampoline is one piece, it is necessary to alternate from side
to side while feeding it into the tracks. Once the forward trampoline is nearly all the way into the track itmay be necessary to use the Bow Spreader Pole for leverage to pull it taught. Tie a lace line to the grom-met. Wrap the line around the beam and then pass it back through the grommet again. This will create a3:1 purchase to help pull the trampoline forward. Once again, alternate from side to side to keep the tram-poline even. Carefully feed at the opposite end to prevent the trampoline from getting wedged in the trackopening. Pull the trampoline all the way tight.
6
Slide the longer (of the two provided) lace rod into the forward trampolines pocket. Tie thelace line to the eyelet. Pass the line through the grommet in the trampoline. Pass the line back through theeyelet, then over to the first slide. Pass the line to the first cutout and around the rod. Then back to the first
slide. Continue to each slide and cutout across the tramp. Come back to the starting point and begin tightening thelace line to pull the trampoline tight. Work your way across the trampoline to the other side, then tie off with halfhitches.
7
HOBIE GETAWAY
9
MAST SET UP
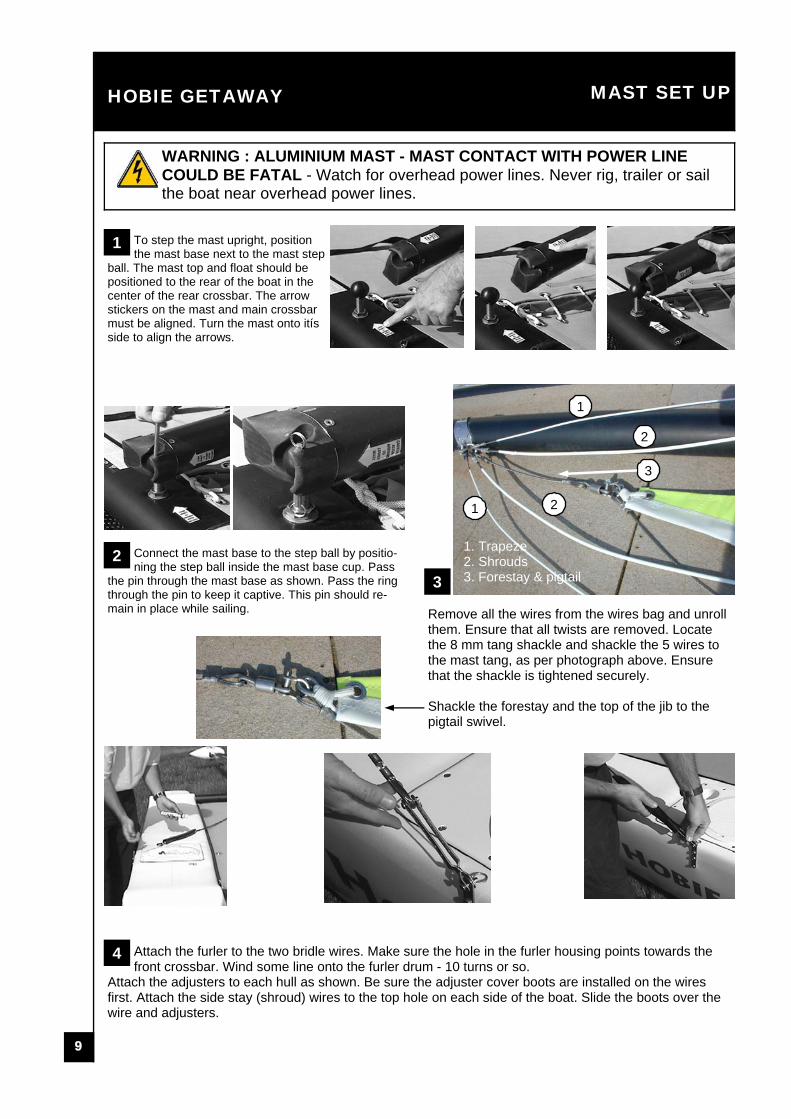
Remove all the wires from the wires bag and unrollthem. Ensure that all twists are removed. Locatethe 8 mm tang shackle and shackle the 5 wires tothe mast tang, as per photograph above. Ensurethat the shackle is tightened securely.
Shackle the forestay and the top of the jib to thepigtail swivel.
3
To step the mast upright, positionthe mast base next to the mast step
ball. The mast top and float should bepositioned to the rear of the boat in thecenter of the rear crossbar. The arrowstickers on the mast and main crossbarmust be aligned. Turn the mast onto itísside to align the arrows.
1
Connect the mast base to the step ball by positio-ning the step ball inside the mast base cup. Pass
the pin through the mast base as shown. Pass the ringthrough the pin to keep it captive. This pin should re-main in place while sailing.
2 1. Trapeze2. Shrouds3. Forestay & pigtail
1
1
2
2
3
Attach the furler to the two bridle wires. Make sure the hole in the furler housing points towards thefront crossbar. Wind some line onto the furler drum - 10 turns or so.
Attach the adjusters to each hull as shown. Be sure the adjuster cover boots are installed on the wiresfirst. Attach the side stay (shroud) wires to the top hole on each side of the boat. Slide the boots over thewire and adjusters.
4
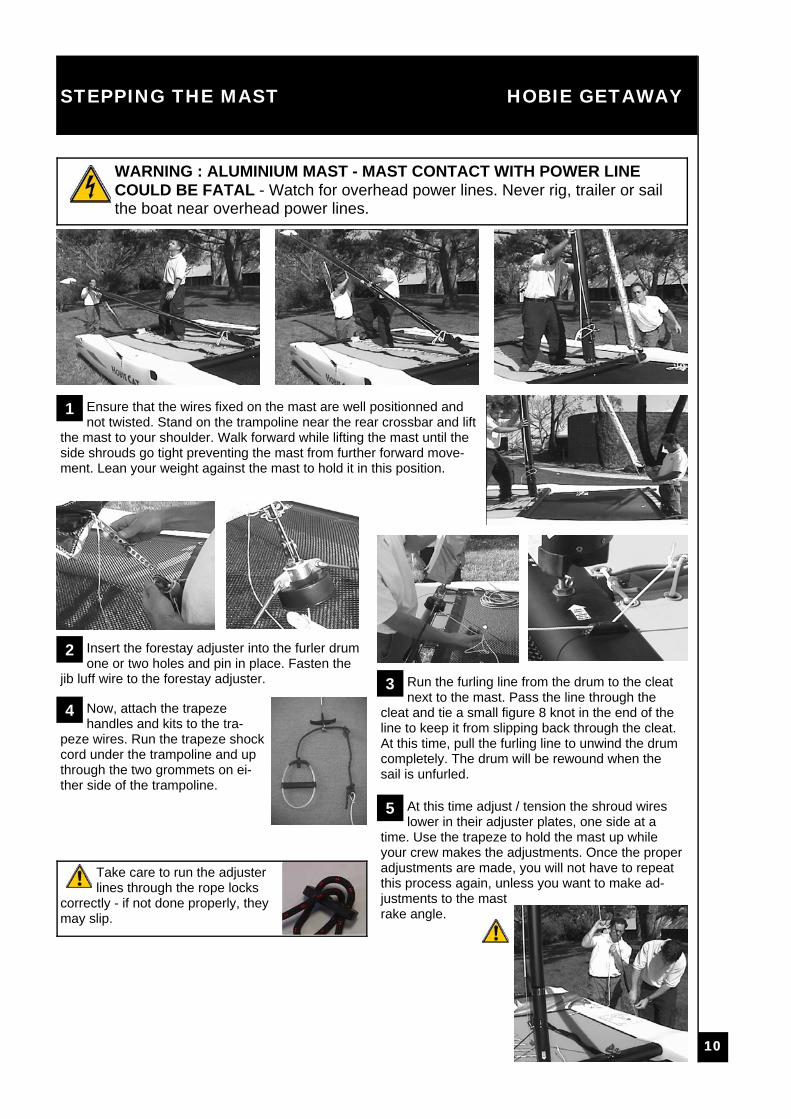
WARNING : ALUMINIUM MAST - MAST CONTACT WITH POWER LINECOULD BE FATAL - Watch for overhead power lines. Never rig, trailer or sailthe boat near overhead power lines.
10
HOBIE GETAWAY
At this time adjust / tension the shroud wireslower in their adjuster plates, one side at a
time. Use the trapeze to hold the mast up whileyour crew makes the adjustments. Once the properadjustments are made, you will not have to repeatthis process again, unless you want to make ad-justments to the mastrake angle.
WARNING : ALUMINIUM MAST - MAST CONTACT WITH POWER LINECOULD BE FATAL - Watch for overhead power lines. Never rig, trailer or sailthe boat near overhead power lines.
STEPPING THE MAST
Ensure that the wires fixed on the mast are well positionned andnot twisted. Stand on the trampoline near the rear crossbar and lift
the mast to your shoulder. Walk forward while lifting the mast until theside shrouds go tight preventing the mast from further forward move-ment. Lean your weight against the mast to hold it in this position.
1
Insert the forestay adjuster into the furler drumone or two holes and pin in place. Fasten the
jib luff wire to the forestay adjuster.
2
Run the furling line from the drum to the cleatnext to the mast. Pass the line through the
cleat and tie a small figure 8 knot in the end of theline to keep it from slipping back through the cleat.At this time, pull the furling line to unwind the drumcompletely. The drum will be rewound when thesail is unfurled.
3Now, attach the trapezehandles and kits to the tra-
peze wires. Run the trapeze shockcord under the trampoline and upthrough the two grommets on ei-ther side of the trampoline.
4
Take care to run the adjusterlines through the rope locks
correctly - if not done properly, theymay slip.
5
HOBIE GETAWAY
11
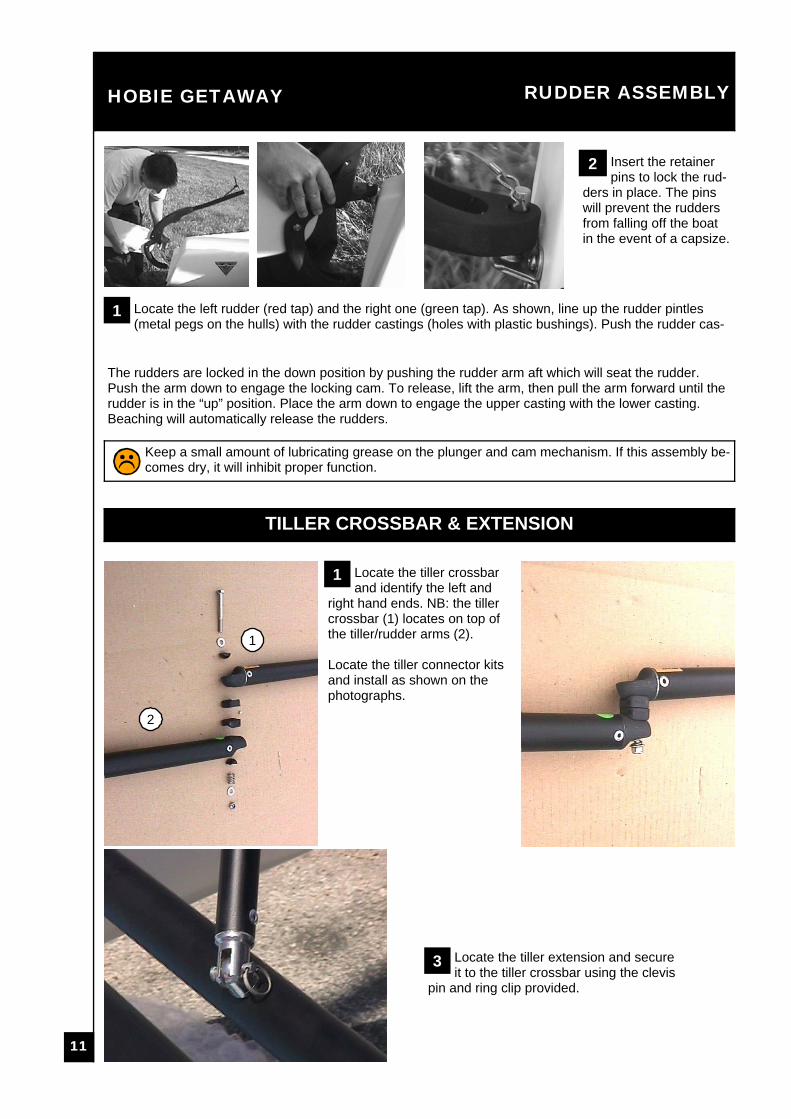
Locate the left rudder (red tap) and the right one (green tap). As shown, line up the rudder pintles(metal pegs on the hulls) with the rudder castings (holes with plastic bushings). Push the rudder cas-
RUDDER ASSEMBLY
1
Insert the retainerpins to lock the rud-
ders in place. The pinswill prevent the ruddersfrom falling off the boatin the event of a capsize.
2
The rudders are locked in the down position by pushing the rudder arm aft which will seat the rudder.Push the arm down to engage the locking cam. To release, lift the arm, then pull the arm forward until therudder is in the “up” position. Place the arm down to engage the upper casting with the lower casting.Beaching will automatically release the rudders.
Keep a small amount of lubricating grease on the plunger and cam mechanism. If this assembly be-comes dry, it will inhibit proper function.
Locate the tiller crossbarand identify the left and
right hand ends. NB: the tillercrossbar (1) locates on top ofthe tiller/rudder arms (2).
Locate the tiller connector kitsand install as shown on thephotographs.
1
TILLER CROSSBAR & EXTENSION
Locate the tiller extension and secureit to the tiller crossbar using the clevis
pin and ring clip provided.
1
2
3
12
HOBIE GETAWAYMAINSAIL
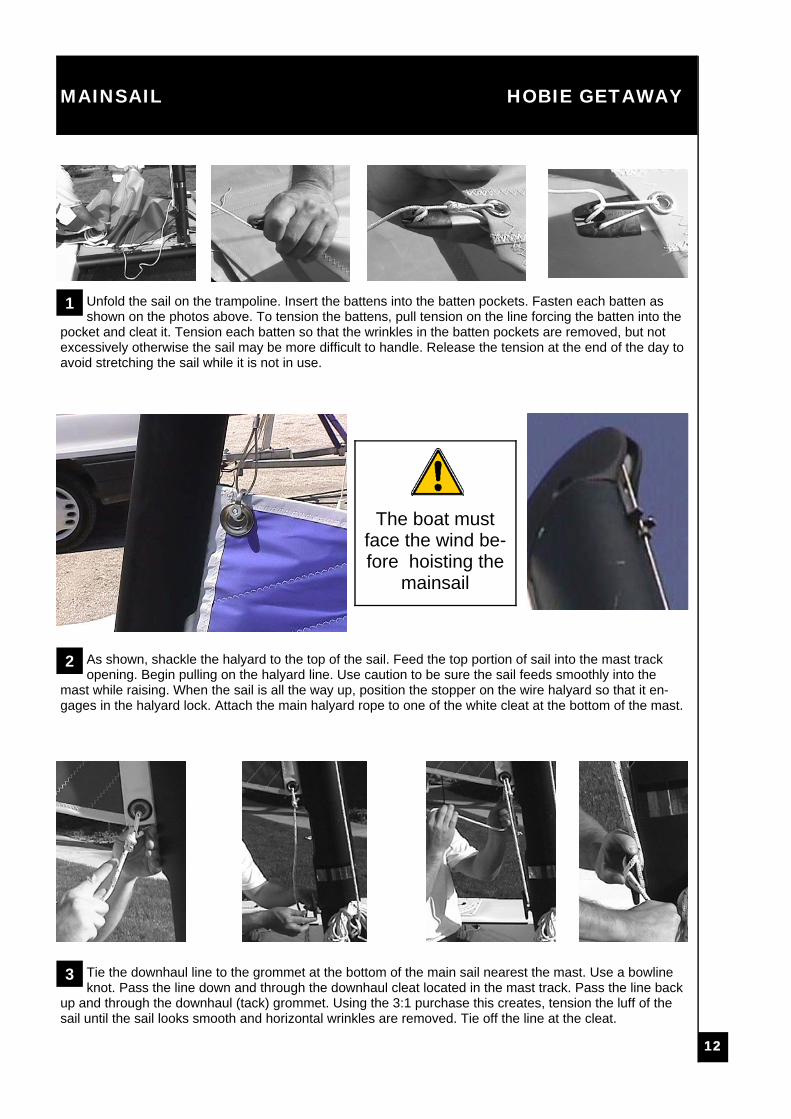
Unfold the sail on the trampoline. Insert the battens into the batten pockets. Fasten each batten asshown on the photos above. To tension the battens, pull tension on the line forcing the batten into the
pocket and cleat it. Tension each batten so that the wrinkles in the batten pockets are removed, but notexcessively otherwise the sail may be more difficult to handle. Release the tension at the end of the day toavoid stretching the sail while it is not in use.
1
As shown, shackle the halyard to the top of the sail. Feed the top portion of sail into the mast trackopening. Begin pulling on the halyard line. Use caution to be sure the sail feeds smoothly into the
mast while raising. When the sail is all the way up, position the stopper on the wire halyard so that it en-gages in the halyard lock. Attach the main halyard rope to one of the white cleat at the bottom of the mast.
2
Tie the downhaul line to the grommet at the bottom of the main sail nearest the mast. Use a bowlineknot. Pass the line down and through the downhaul cleat located in the mast track. Pass the line back
up and through the downhaul (tack) grommet. Using the 3:1 purchase this creates, tension the luff of thesail until the sail looks smooth and horizontal wrinkles are removed. Tie off the line at the cleat.
3
The boat mustface the wind be-fore hoisting the
mainsail
HOBIE GETAWAY
13
The tail end of the main sheet line isused for traveler adjustment. Pass this
line end through the swivel cleat jaws (fromfroward to towards rear of the boat) then eye.
Pass the line through the traveler car and thenthrough the stainless eye on the rear side of thecrossbar. Tie a figure 8 knot in the end of the lineto keep it from coming out of the eye. When sai-ling upwind, cleat the traveler more to the centerof the boat. On a reach across the wind or whensailing downwind adjust and cleat the travelerfurther out the track. When sailing in strong windyou can move the car further out to help keep theboat more level and limit heeling or tipping.
Keep the mainsheet loose when the boat is on the beach to prevent an accidental capsize.
MAINSHEET SYSTEM
Connect the main sheet block to thetraveler car. Attach the shackle that is
part of the block through the clevis pin onthe traveler car. Hook the mainsheet to theclew grommet at the rear of the main sail.
1
2
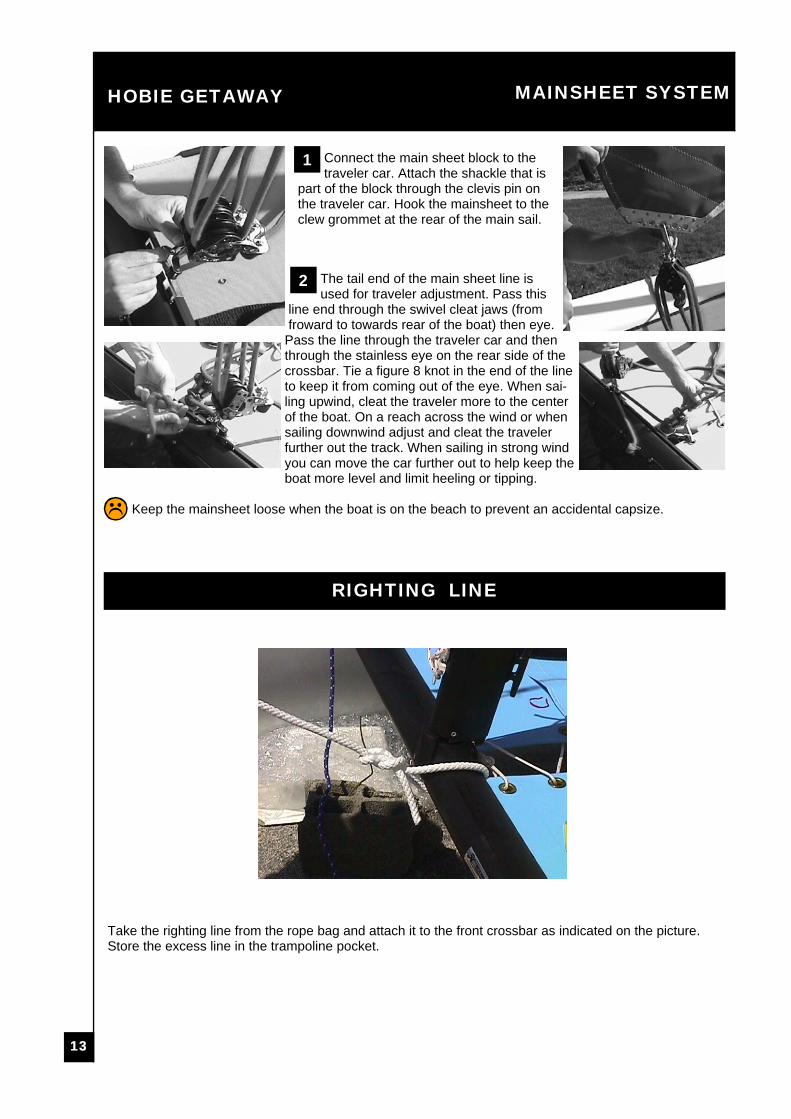
RIGHTING LINE
Take the righting line from the rope bag and attach it to the front crossbar as indicated on the picture.Store the excess line in the trampoline pocket.
14
HOBIE GETAWAY
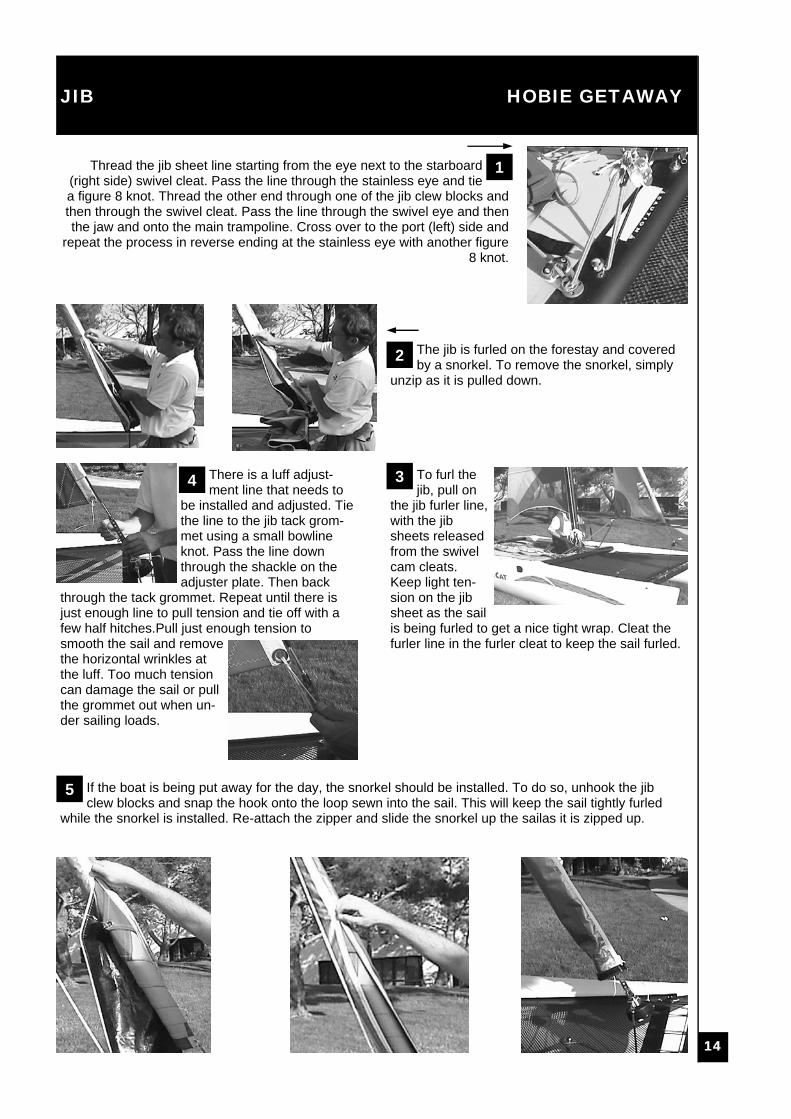
The jib is furled on the forestay and coveredby a snorkel. To remove the snorkel, simply
unzip as it is pulled down.
There is a luff adjust-ment line that needs to
be installed and adjusted. Tiethe line to the jib tack grom-met using a small bowlineknot. Pass the line downthrough the shackle on theadjuster plate. Then back
through the tack grommet. Repeat until there isjust enough line to pull tension and tie off with afew half hitches.Pull just enough tension tosmooth the sail and removethe horizontal wrinkles atthe luff. Too much tensioncan damage the sail or pullthe grommet out when un-der sailing loads.
JIB
Thread the jib sheet line starting from the eye next to the starboard(right side) swivel cleat. Pass the line through the stainless eye and tiea figure 8 knot. Thread the other end through one of the jib clew blocks andthen through the swivel cleat. Pass the line through the swivel eye and thenthe jaw and onto the main trampoline. Cross over to the port (left) side and
repeat the process in reverse ending at the stainless eye with another figure8 knot.
1
2
To furl thejib, pull on
the jib furler line,with the jibsheets releasedfrom the swivelcam cleats.Keep light ten-sion on the jibsheet as the sailis being furled to get a nice tight wrap. Cleat thefurler line in the furler cleat to keep the sail furled.
34
If the boat is being put away for the day, the snorkel should be installed. To do so, unhook the jibclew blocks and snap the hook onto the loop sewn into the sail. This will keep the sail tightly furled
while the snorkel is installed. Re-attach the zipper and slide the snorkel up the sailas it is zipped up.
5
HOBIE GETAWAY
15
♦ Whether on land or on the water, watch for overhead power lines . Contact with power linescan cause serious injury or death.
♦ DO NOT sail while under the influence of alcohol and/or drugs
♦ Only sail in conditions in which you feel comfortable and where you feel confident that you can sa-fely sail the boat. Never go out in conditions beyond your ability .
♦ Everyone on board should wear a life jacket at all times .
♦ If you are in the water, remain in contact with the boat, even if it is capsized. A sailboat can driftaway faster than a person can swim.
♦ Never sail without a righting line.
♦ Wear appropriate clothes . Wear a wet suit or dry suit in cold weather or cold water conditions.Protect yourself against heat and sun.
♦ Learn the right of way rules and when in doubt, give way to others.
♦ When not sailing, always keep the boat pointed into the wind whether in the water or on thebeach.
♦ Read the instruction manual carefully.
♦ Make sure everyone on the boat reads and understnads these safety instructions .
♦ ALWAYS check that the drain plugs are screwed in before launching your catamaran.Remove the plugs after sailing to drain any water that may have leaked into the hulls.Store the boat with the plugs removed to allow for pressure changes due to heating, cooling andaltitude changes. This will prevent warping of the hull surface.
SAFETY TIPS
FURTHER INFORMATIONS
Hobie Cat owners are organised in a world-wide class association : the IHCA(International Hobie Class Association).
In Europe, please contact the EHCA (European Hobie Class Association)Geert Schouten (President)Ambrozijnberg 161NL-4707 MP Roosendaal, NEDPhone : + 31 165 570 223Fax : + 31 165 570 225Email: [email protected]
Visit the EHCA web site : http://www.haveahobieday.com to find the location of the HobieClass association in your country.
16
HOBIE GETAWAYWARRANTY
LIMITED WARRANTY OF HOBIE CAT EUROPE
This warranty applies to customers of Hobie Cat Europe.The boat is warranted to the original retail customer for oneyear from the date of retail purchase against defects in mate-rials and workmanship.The spare parts are warranted for one year.The components coverage applies only to the original retail cus-tomer. The warranty is not transferable.In no case, the repairs made will extend the initial date of thewarranty, except for any replacement or repaired parts.
The Warranty Registration Card is required by law for use in theevent of a product problem notification.The warranty is only effective if the boat is sold by an authorisedHobie Cat dealer.
What is covered?
Replacement parts and labour. According to the decision of Ho-bie Cat Europe, the dealer will make the repairs himself orthrough an external contractor, after presentation of an estimateand written agreement from HCE. The dealer will be then reim-bursed after presentation of the invoice. The warranty coveringthese repairs will no longer be at HCE’s charge but at thecontractor’s charge.
What is not covered?
normal wear and discoloration Transport charges to or from the dealer’s shop to the client charges occurred in case of an on-the-spot repair. Damages caused by abuse or failure to perform normal
maintenance (see assembly manual), by a defective or ab-normal use or by a bad storage.
Discoloration, blistering or grazing of gelcoat caused byboat being moored or stored in salt or fresh water.
The boat is not covered under warranty if the boats are hi-red or placed in commercial service.
Hobie Cat Europe is not responsible for boat damage as aresult of adding additional blocks to the original manufactu-rer’s sheeting arrangement.
Any other expenses: CONSEQUENTIAL DAMAGES, INCI-DENTAL DAMAGES, OR INCIDENTAL EXPENSES, IN-CLUDING DAMAGE TO PROPERTY.
How to obtain warranty performance within 30 days ofdiscovering the defect:
Bring your boat to the nearest authorised Hobie Cat Europedealer (a list of the dealers is available at HCE). Be sure totake proof of date of retail purchase (invoice). All payments forin-warranty expenses shall be made by Hobie Cat Europe tothe Hobie Cat Europe dealer and not to the customer.
Implied warranties:
IMPLIED WARRANTIES, INCLUDING THE IMPLIED WAR-RANTIES OF MERCHANTABILITY AND FITNESS FOR APARTICULAR PURPOSE, SHALL BE NO LONGER THANTHE DURATION OF THIS EXPRESS WARRANTY.Hobie Cat Europe makes no express warranties in addition tothis limited warranty. Hobie Cat Europe’s dealers have no au-thority to make any warranties on behalf of Hobie Cat Europein addition to or inconsistent with those stated herein.To the extent any provision of this warranty is prohibited byfederal, state, or municipal law and cannot be pre-empted, itshall not be applicable.
HOW IT WORKS?
It is essential that for each sold boat, the warranty card becompletely filled in, signed by the dealer and the customer,and that the copy for Hobie Cat Europe be returned to the fac-tory within 8 days of boat delivery .For all claims the warranty department must be contacted.The final decision regarding warranty claims lies with this ser-vice.
SPECIAL NOTES:
All warranty transactions will be handled through the clai-ming dealership and not directly with the customer.
Hobie Cat dealers are responsible for proper diagnosisand completion of all warranty claims.
If in doubts about warranty coverage of a particular pro-blem, contact the Warranty department first.
Warranty work may be carried out by an authorised dea-ler other than the original seller of the boat, however forall warranty requests it is mandatory to fax or mail a copyof the completely filled out warranty card which musthave been registered immediately following delivery tothe customer.
As warranty work is registered following the informationof the warranty card, it is mandatory that the card be fil-led out in detail in all the boxes. Failure to cite a hull, sail,or serial numbers on the warranty will make claims im-possible to process.
HOBIE GETAWAY
17
RECEIPT
Your dealer : (Dealer stamp mandatory)
Your dealer is our representative and will bring you all necessary assistance in order tosolve problems you may encounter.
As soon as you become owner, please date and sign this receipt (below) and give itto your dealer to be covered by our warranty.
Please carefully read the warranty conditions written hereafter in this manual.
Please carefully and thoughroughly read this manual. Keep it in a safe place andgive it to the new owner if you resell your Hobie.
RECEIPT (cut and give to your dealer)
Name :Address :
Owner of the Hobie Cat :
HIN : Sail number :
I am aware of the warranty conditions of this Hobie catamaran and of all safety tips andwarnings contained in this manual.
The warranty begins on ..................................... (date)
Signature :.............................................

18
HOBIE GETAWAY
HOBIE CAT EUROPEZI Toulon Est, BP 250,
83078 Toulon cedex 9, FranceTel : +33 (0)494 08 78 78Fax : +33 (0)494 08 13 99
E-mail : [email protected]://www.hobie-cat.net
Manuel written by :


