Holiday Traditions Holiday Traditions A Free Project Sheet From Finished Quilt Size: 55” x 67” 49 West 37th Street, New York, NY 10018 tel: 212-686-5194 fax: 212-532-3525 Toll Free: 800-294-9495 www.henryglassfabrics.com By Jan Shade Beach Quilt 1 Skill Level: Intermediate
Transcript
Ho l i d ay T r a d i t i o n sHo l i d ay T r a d i t i o n s
A Free Project Sheet FromFinished Quilt Size: 55” x 67”
49 West 37th Street, New York, NY 10018tel: 212-686-5194 fax: 212-532-3525
Toll Free: 800-294-9495www.henryglassfabrics.com
By Jan Shade Beach Quilt 1
Skill Level: Intermediate
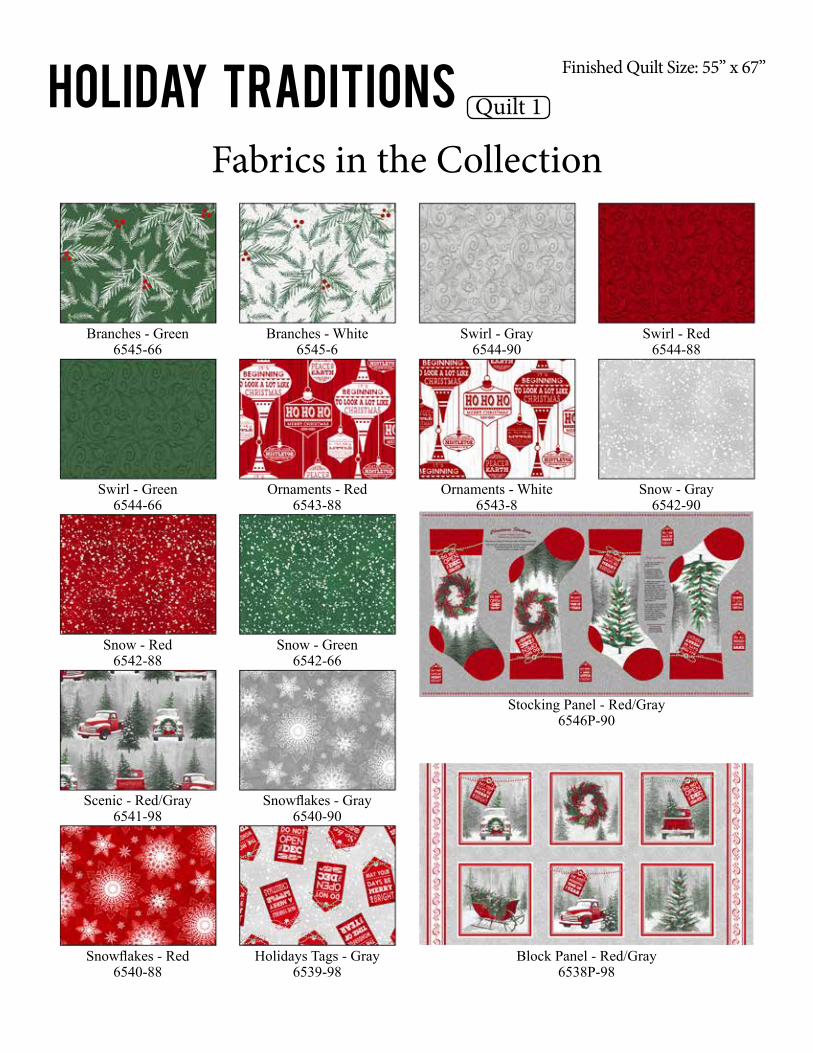
Holiday TraditionsFabrics in the Collection
Finished Quilt Size: 55” x 67”
Quilt 1
Branches - Green6545-66
Branches - White6545-6
Swirl - Gray6544-90
Swirl - Red6544-88
Swirl - Green6544-66
Ornaments - Red6543-88
Ornaments - White6543-8
Snow - Gray6542-90
Snow - Red6542-88
Snow - Green6542-66
Scenic - Red/Gray6541-98
Snowflakes - Gray6540-90
Snowflakes - Red6540-88
Holidays Tags - Gray6539-98
Block Panel - Red/Gray6538P-98
Stocking Panel - Red/Gray6546P-90
Page 1Holiday Traditions Quilt 1Quilt Cutting Instructions Please note: all strips are cut across the width of fabric (WOF) from selvage to selvage edge unless otherwise noted.
From the Block Panel - Red/Gray (A):• Fussy cut (6) 10 ½” blocks.
From the Scenic - Red/Gray (B):• Fussy cut (6) 6 ½” squares, each centered on a truck.
From the Swirl - Green (C), cut:• (1) 13 ½” x WOF strips. Sub-cut strips into (10) 2” x 13 ½” strips and (8) 2” x 10 ½” strips.• (1) 2 ½” x WOF strip. Sub-cut strip into (1) 2 ½” x 10 ½” strip.• (2) 2” x 22 ½” WOF strips.• (7) 2 ½” x WOF strips for the binding. From the Snow - Green (D), cut:• (2) 3 ⅞” x WOF strips. Sub-cut strips into (12) 3 ⅞” squares.
From the Snowflakes - Red (E), cut:• (4) 3 ½” x WOF strips. Sub-cut strips into (48) 3 ½” squares.
From the Swirl - Gray (F), cut:• (2) 6 ½” x WOF strips. Sub-cut strips into (24) 3 ½” x 6 ½” strips.• (3) 3 ⅞” x WOF strips. Sub-cut strips into (24) 3 ⅞” squares.
From the Branches - White (G), cut:• (3) 3 ½” x WOF strips. Sew the strips together end to end with diagonal seams and cut (2) 3 ½” x 48 ½” strips and (2) 3 ½” x 42 ½” strips.
From the Snow - Gray (H), cut:• (3) 2” x WOF strips. Sew the strips together end to end with diagonal seams and cut (2) 2” x 54 ½” strips.• (3) 2” x WOF strips. Sew the strips together end to end with diagonal seams and cut (2) 2” x 45 ½” strips.
From the Ornaments - Red (I), cut:• (2) 5 ½” x 57 ½” LOF strips.• (2) 5 ½” x 45 ½” WOF strips from the remaining fabric, piece as needed.
From the Holiday Tags - Gray (J), cut:• (1) 5 ½” x WOF strip. Sub-cut strip into (4) 5 ½” squares.
From the Branches - Green (Backing), cut:• (2) 63” x WOF strips for the backing. Sew the strips together and trim to make the 63” x 75” back.
Page 2Holiday Traditions Quilt 1
Fig. 2
Fig. 1
Fig. 3 Fig. 4
Fig. 8
Fig. 5
Fig. 9
Fig. 10
Fig. 6 Fig. 7
Sewing Instructions1. Sew (1) 2” x 10 ½” Fabric C strip to each side of (1) 10 ½” Fabric A block. Sew (1) 2” x 13 ½” Fabric C strip to the top and to the bottom of the Fabric A block. Trim the block to measure 12 ½” square to make (1) A block (Fig. 1). Repeat to make (4) A blocks total.
2. Sew (1) 10 ½” Fabric A square to the top and to the bottom of the (1) 2 ½” x 10 ½” Fabric C strip to make the Center Block. Sew (1) 2” x 22 ½” Fabric C strip to each side of the Center Block. Sew (1) 2” x 13 ½” Fabric C strip to the top and to the bottom of the Center Block. Trim the Center Block to measure 12 ½” x 24 ½” to complete the Center Block (Fig. 2).
A
C
C
C C
Trim to measure 12 ½” x 12 ½” after borders
are added
make 4
A
A
C
C
C C
C
Trim to measure 12 ½” x 24 ½” after borders
are added
3. Place (1) 3 ⅞” Fabric F square on top of (1) 3 ⅞” Fabric D square, right sides together. Draw a line across the diagonal of the top square (Fig. 3). Sew ¼” away from each side of the drawn diagonal line (Fig. 3). Cut the two squares apart on the drawn diagonal line (Fig. 4) to make (2) DF units (Fig. 5). Trim the DF units to measure 3 ½” square. Repeat to make (24) DF units total.
make 24
FD
4. Place (1) 3 ½” Fabric E square on the left side of (1) 3 ½” x 6 ½” Fabric F strip, right sides together (Fig. 6). Sew across the diagonal of the square from the upper right corner to the lower left corner (Fig. 6). Flip open the triangle formed and press (Fig. 7). Trim away the excess fabric from behind the triangle, leaving a ¼” seam allowance.
5. Place another 3 ½” Fabric E square on the right side of the 3 ½” x 6 ½” Fabric F strip, right sides together (Fig. 8). Sew across the diagonal of the square from the upper left corner to the lower right corner (Fig. 8). Flip open the triangle formed and press (Fig. 9). Trim away the excess fabric from behind the triangle, leaving a ¼” seam allowance to make (1) EFE unit.
make 24
FE E
6. Repeat Steps 4-5 to make (24) EFE units total.
7. Sew (1) EFE unit to each side of (1) 6 ½” Fabric B square. Sew (1) DF unit to each end of (1) EFE unit. Repeat to make a second strip. Sew the strips to the top and to the bottom of the Fabric B square to make (1) B block (Fig. 10). Repeat to make (6) B Blocks total.
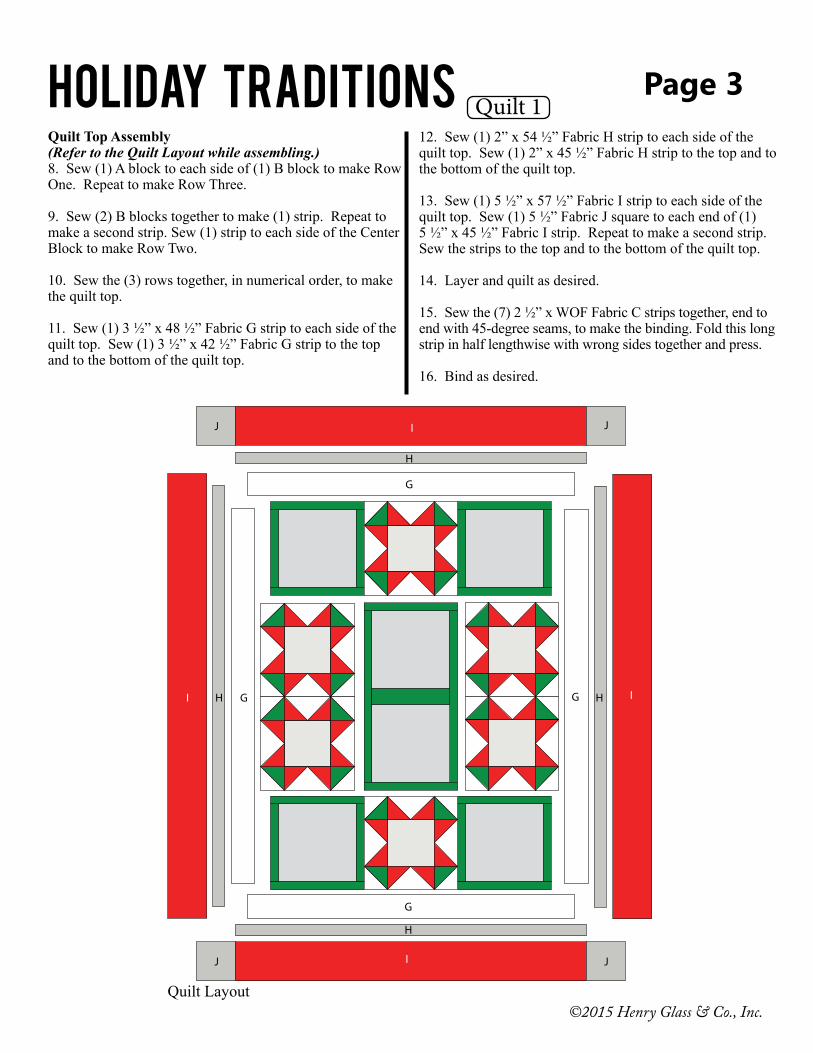
Page 3Quilt Top Assembly (Refer to the Quilt Layout while assembling.)8. Sew (1) A block to each side of (1) B block to make Row One. Repeat to make Row Three.
9. Sew (2) B blocks together to make (1) strip. Repeat to make a second strip. Sew (1) strip to each side of the Center Block to make Row Two.
10. Sew the (3) rows together, in numerical order, to make the quilt top.
11. Sew (1) 3 ½” x 48 ½” Fabric G strip to each side of the quilt top. Sew (1) 3 ½” x 42 ½” Fabric G strip to the top and to the bottom of the quilt top.
12. Sew (1) 2” x 54 ½” Fabric H strip to each side of the quilt top. Sew (1) 2” x 45 ½” Fabric H strip to the top and to the bottom of the quilt top.
13. Sew (1) 5 ½” x 57 ½” Fabric I strip to each side of the quilt top. Sew (1) 5 ½” Fabric J square to each end of (1) 5 ½” x 45 ½” Fabric I strip. Repeat to make a second strip. Sew the strips to the top and to the bottom of the quilt top.
14. Layer and quilt as desired.
15. Sew the (7) 2 ½” x WOF Fabric C strips together, end to end with 45-degree seams, to make the binding. Fold this long strip in half lengthwise with wrong sides together and press.