21
Instruction Book Instructions for installation and use
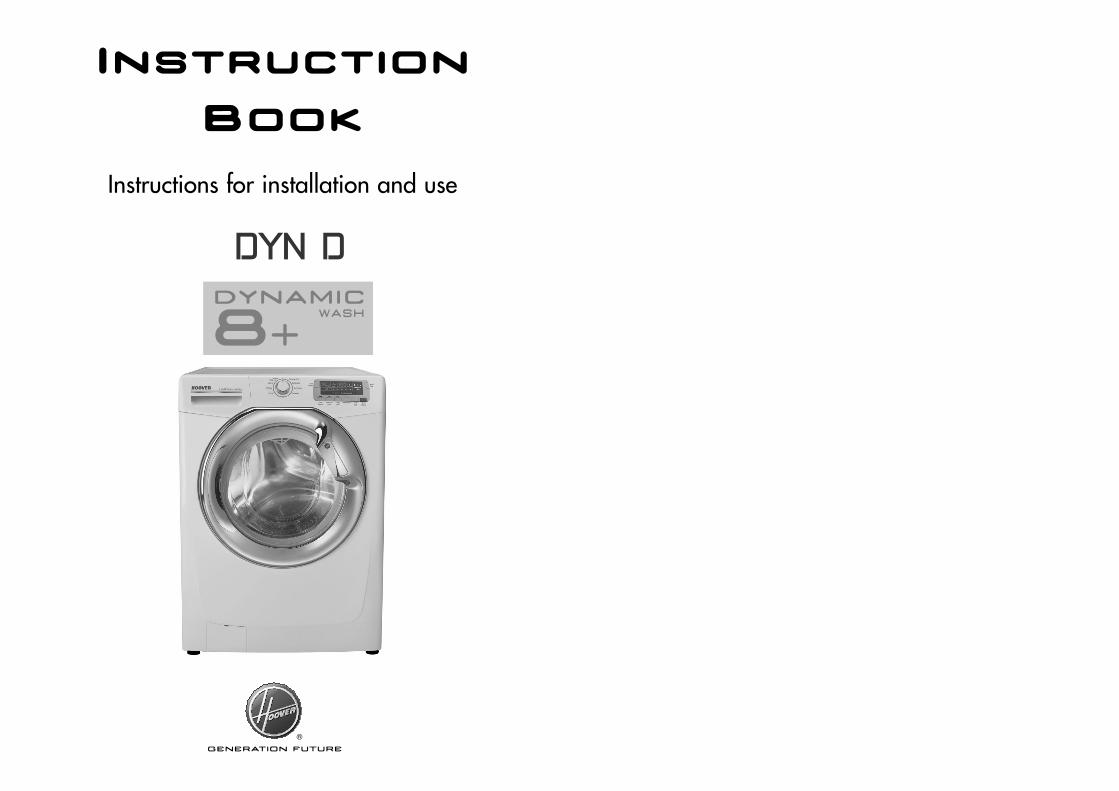
Instruction Book
Instructions for installation and use

Contents
Introduction 3Delivery Information 3Guarantee 3Customer Service 4Caring for the Environment 5Warning and Safety Instructions 6Unpacking the Product 8Installation 9Electricity Supply 9Water Supply 10Connecting the Cold Water Supply 11Connecting the Drainage Pipe 12Levelling the Machine 13Testing the Installation 13Description of the Machine 15The Control Panel 16Digital Display 17Wash Options 18Automatic Features 21Programme Descriptions 22Programme Guide 24Detergent 26Laundry 27Washing Advice 28Running a Wash Cycle 29Care and Maintenance 31Problem Solving Guide 33After Sales Service 37
IntroductionPlease read and follow these instructions carefully and operate the machine accordingly. This booklet provides important guidelines for safe use, installation,maintenance and some useful advice for best results when using your machine.
Please complete the information below referencing your products details found on therating plate that is attached to the porthole of your machine:
Model Number:___________________
Serial Number (16 digits): _ _ _ _ _ _ _ _ _ _ _ _ _ _ _ _
Our customer service advisors will require this information whenever you contactHoover. Please keep all documentation in a safe place for future reference or for anyfuture owners.
Delivery informationPlease check that the following items are delivered with the appliance:● Instruction manual● Guarantee card● Blanking plugs● Inlet hose
Check that no damage has occurred to the machine during transit.
GuaranteeYour new Hoover appliance comes with a 12-month call-out, parts and labour guarantee. Registering your appliance also gives you an additional 4-year parts guarantee absolutely free. To activate both your 12-month and 4 year guarantees, youmust register your appliance within 30 days, quoting your model number, serial number, plus the date and price of you purchase.
Register your appliance now by calling 08444 810 157
or register onlinewww.hoover.co.uk
If you would like to register for an additional 4 years labour protection, please ask ourservice advisor for cost details, or complete the enclosed form.
2 3

Customer Service
At Hoover, we aim to make appliances that are reliable and long lasting. However,should your appliance need to be serviced during its working life, no one is more qualified to maintain your appliance than our own Hoover Service engineers. To booka service call or to ask our customer service advisors for help on using your appliance,please call:
08705 400 600
Alternatively, you can consult our Problem Solving Guide on page 33.
Caring for the environment
Together, we share the responsibility to safeguard our environment for future generations.At Hoover, that means continually developing new, intelligent technologies to produceelectrical appliances that perform more efficiently and use less electricity and lesswater. This significantly reduces the carbon footprint from your appliance.
Our ongoing commitment will ensure that we will continue to develop more intelligent,more efficient appliances for future generations.
European Directive2002/96/EC
This appliance is marked according to the European directive2002/96/EC on Waste Electrical and Electronic Equipment(WEEE).
By ensuring this product is disposed of correctly, you will help prevent potential negative consequences for the environment andhuman health, which could otherwise be caused by inappropriatewaste handling of this product.
The symbol on the product indicates that this product may not betreated as household waste. Instead it shall be handed over to theapplicable collection point for the recycling of electrical and electronic equipment.
Disposal must be carried out in accordance with local environmental regulations for waste disposal.
For more detailed information about treatment, recovery and recycling of this product, please contact your local city office, yourhousehold waste disposal service or the shop where you purchasedthe product.
4 5
Technical data■ Max. load of dry laundry for washing■ Water pressure
Measurements■ Height■ Width■ Depth
NB: For specifications regarding electrical data, see the data panel on the front of thewashing machine (porthole area).
8 kg0.05 ÷ 0.8 MPa
85 cm60 cm52 cm
Warning and SafetyInstructionsThis machine is solely for domestic use, i.e. to wash, rinse and spin dry household textiles and garments.
Do not touch the appliance when hands or feet are damp or wet.
Do not lean on the door when loading the machine or use the door to lift or move themachine.
Do not try to open the door when water is visible in the drum or the door lockedindicator is ON.
Do not touch the drained water as it may reach extremely high temperatures.
Do not use adapters, multiple connectors and / or extensions leads.
Do not pull the power cord or the appliance itself to remove the plug from the socket.
Ensure the appliance mains supply is earthed, and if it is not, seek assistance from aqualified person.
If the power cable is damaged, it must only ever be replaced by an authorised serviceman.
Never force the porthole door: doing so may damage the safety lock mechanism designed to prevent the door being opened accidentally.
This appliance is not intended for use by persons (including children) with reducedphysical, sensory or mental capabilities, or lack of experience and knowledge, unlessthey have been given supervision or instruction concerning use of the appliance by aperson responsible for their safety.
Children should be supervised to ensure that they do not play with the appliance.
When moving the appliance, never lift it by the controls, detergent drawer or door,and never attempt to move it alone as the machine is extremely heavy.
When in transit, never rest the door against the trolley or transport the appliancewithout its polystyrene base.
If the appliance is installed on a carpeted floor ensure that the ventilation holes on thebase of the appliance are not obstructed.
If the appliance is not running properly or breaks down, switch off the power, turn offthe tap and do not tamper with the appliance. Contact an authorised serviceman and ask them to use official Hoover spare parts.
Warning! The company denies all liability if and when these instructions are notrespected.
6 7

Unpacking the Product Remove the machine from its packaging close to the final location of the machine.
Step 1. Remove all outer packaging from themachine. Check there is no damage to the machinebefore continuing the installation process.
Step 2. Carefully cut through the hose-retaining clipat the rear of the machine, taking care not to cutthe hose itself.
Step 3. Remove the 4 retaining screws at the rearof the machine, as indicated in the image on theleft. Use the blanking plugs provided in theinstruction booklet pack to cover the holes once the
screws have been removed.
Step 4. Tilt the machine forward and apply theinsulation base panel (corrugated plastic) to thebase of the machine using the self-adhesive strips.
All packaging materials used are environmentally friendly and recyclable. Please helpdispose of the packaging via environmentally friendly means. Your local council will beable to give you details of current means of disposal.
Installation
Before installing the machine, ensure that the mains plug and water supply valves areeasily accessible from your chosen machine location.
Make sure there is enough space for the machine. Select a space at least 600mm wideand 850mm high. Also leave enough space to open the door fully so you can loadand unload it easily.
Keep the area underneath and around the machine free of combustible materials suchas lint, paper, rags, chemicals etc.
All machines are tested with water prior to leaving the factory, so a small amount ofwater may be present in the drum and the drain hose.
Flooding may occur if any part of the installation process is not completed correctly.
Electricity Supply
Washing machines are supplied to operate at a voltage of 230-240V, 50 Hz singlephase. Please check that the supply circuit is rated to at least 13A.
The plug is already equipped with a 13A fuse, which is BS 1362 ASTA approved. Anyreplacement must be the same rating and specification. If the fuse cover is lost, do notuse the plug until it is replaced.
Electricity can be extremely dangerous. Please take care when connecting yourmachine to the electricity supply.
This washing machine must be earthed.
The socket outlet and the plug on the appliance must be of the same type.
Do not use multiple adapters and/or extension leads.
The wires in the mains lead are coloured in accordance with the following codes:Blue NEUTRALBrown LIVEGreen and Yellow EARTH
Appliance complies with European Directive 73/23/EEC, 89/336/EEC replaced by 2006/95/EC and 2004/108/EC and subsequent amendments.
8 9
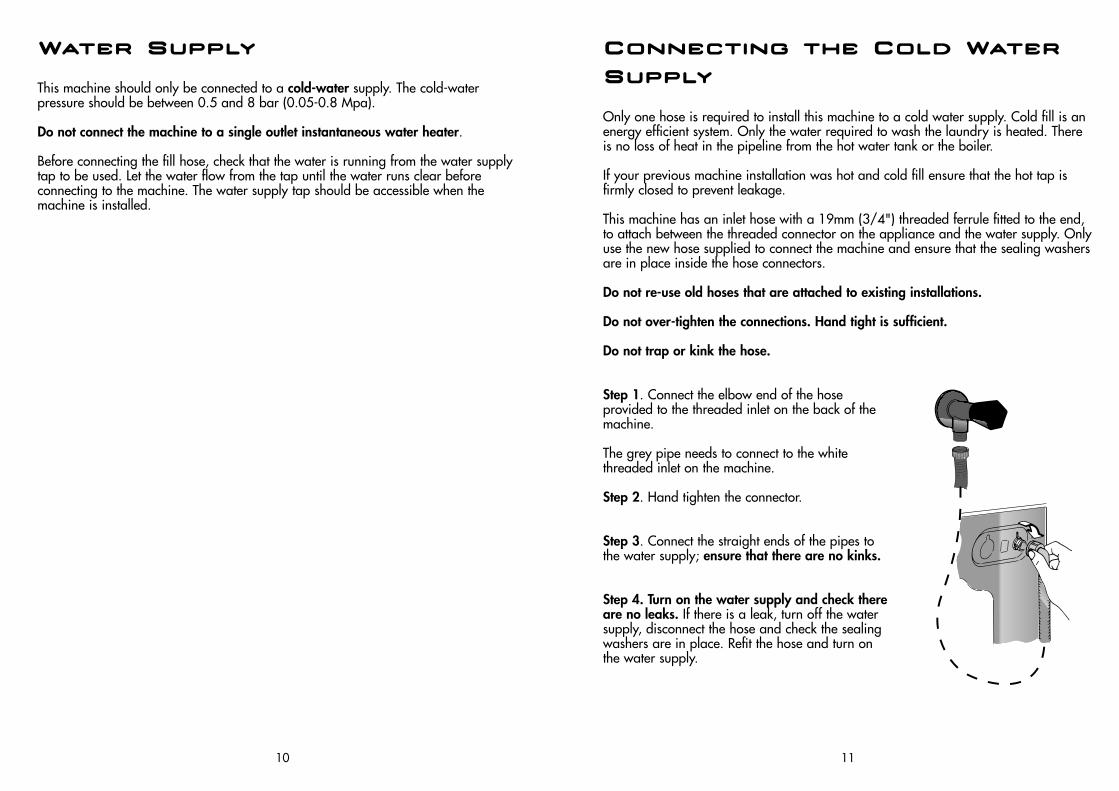
Water Supply
This machine should only be connected to a cold-water supply. The cold-water pressure should be between 0.5 and 8 bar (0.05-0.8 Mpa).
Do not connect the machine to a single outlet instantaneous water heater.
Before connecting the fill hose, check that the water is running from the water supplytap to be used. Let the water flow from the tap until the water runs clear before connecting to the machine. The water supply tap should be accessible when the machine is installed.
Connecting the Cold WaterSupply
Only one hose is required to install this machine to a cold water supply. Cold fill is anenergy efficient system. Only the water required to wash the laundry is heated. Thereis no loss of heat in the pipeline from the hot water tank or the boiler.
If your previous machine installation was hot and cold fill ensure that the hot tap isfirmly closed to prevent leakage.
This machine has an inlet hose with a 19mm (3/4") threaded ferrule fitted to the end,to attach between the threaded connector on the appliance and the water supply. Onlyuse the new hose supplied to connect the machine and ensure that the sealing washersare in place inside the hose connectors.
Do not re-use old hoses that are attached to existing installations.
Do not over-tighten the connections. Hand tight is sufficient.
Do not trap or kink the hose.
Step 1. Connect the elbow end of the hose provided to the threaded inlet on the back of themachine.
The grey pipe needs to connect to the white threaded inlet on the machine.
Step 2. Hand tighten the connector.
Step 3. Connect the straight ends of the pipes tothe water supply; ensure that there are no kinks.
Step 4. Turn on the water supply and check thereare no leaks. If there is a leak, turn off the watersupply, disconnect the hose and check the sealingwashers are in place. Refit the hose and turn onthe water supply.
10 11

Connecting the drainage pipeThis machine must be connected in accordance with the water supply regulations.Water bylaws prohibit connection to a surface water drain.
Decide which plumbing option suits you best then follow the instructions below:
Option 1 - Waste pipe connection (waste trap)Fit the hooked end support to the outlet pipe and position it at least 800mm off thefloor.
After removing the blanking plug, or cutting the membrane from the waste system,securely fix the outlet pipe to the drainage system, using a hose clip.
Secure the hooked end support up to at least 800mm to avoid water being drawnback into the machine.
Option 2 - Into a standpipeEnsure that the standpipe is not located near an electrical socket.
Fit the hooked end support to the outlet pipe. Install the hose into the standpipe ensuring that the pipe is at least 500mm from the floor.
Insert the outlet pipe approximately 100mm into the standpipe.
Levelling The MachineYour machine is heavy so care must be taken when moving it. We recommend that two people move the machine to avoid strain and possible injury.Take care not to damage flooring when moving the machine and do not drag or liftthe machine by its door.
When moving the machine to its final position, take care not to kink or damage thehose at the back of the machine.
Once the machine is in place the feet should be adjusted to ensure that the machine islevel. If the machine is not level it may become very noisy or move during the spincycle.
Step 1. Turn the locking nut clockwise to release the screw adjuster on the feet.
Step 2. Adjust the feet on the corners of the machine by rotating each foot to raise orlower its position until it is firm and level on the ground.
Step 3. When the machine is firm and level, tighten the locking nuts on the feet in ananti-clockwise direction until they reach the base of the machine.
Testing the InstallationRefer to “Selecting the wash programme” for details of how to select programmes.
Step 1. Turn on the water supply and check for leaks from the fill hose.
Step 2. Switch on the electricity supply.
Step 3. Select the spin programme and then press the Start Pause button to start themachine. Allow the programme to continue for one minute and then cancel the programme by returning the selector to the OFF position. This will remove any waterremaining in the machine from factory testing.
Step 4. To check for cold water filling to the machine:
Select the rinse programme and press the Start Pause button to start the machine.
Once the rinse has finished, allow the tumble action to continue until the water haspumped out. Check that the drain outlet is not leaking or overflowing.
12 13

Description of the MachineThe Hoover washing machine details are indicated below:
Step 5. Switch off the machine at the end of the cycle by turning the ProgrammeSelector to the OFF position.
Step 6. Select the spin programme and press the Start Pause button to start the machine. If the machine takes longer than one minute to empty check the drain hosefor kinks.
Installation testing is now complete.
Now you have successfully installed the machine we advise that you run the machineto ensure the drum is thoroughly clean after testing and storage. Select Cottons 90°Cprogramme and run the machine for a complete cycle using only wash detergent andwater.
This programme will take approximately 2 hours to complete.
DetergentDispenser
ControlPanel
DoorHandle
PortholeDoor
Filter
AdjustableFeet
14 15

The Control Panel
Turning the Machine OnTurning the Programme Selector to your chosen programme will turn the machine on. The Programme Selector must be returned to the OFF position between each washcycle in order to reset the controls.
Start Pause ButtonSTARTAfter selecting the programme and the required options press the Start Pause buttononce to start the wash cycle. There will be a short time delay to the start of the programme while the machine sets the wash parameters for the selected programmeand options. The Door Locked and KG Mode indicator lights will also illuminate a fewseconds after pressing the Start Pause button.
PAUSEThe programme may be paused at any time during the wash cycle by holding downthe Start Pause button for about two seconds. The door locked indicator light willremain illuminated for approximately 2 minutes. The door can be opened when thisindicator goes out. To restart the programme, press the Start Pause button once again.
Cancelling and Changing the ProgrammeTo cancel the programme the Programme Selector should be rotated to the OFF position. Select a new programme and start as detailed above.
Digital DisplayThe easy-to-use Digital Display gives you total control of your wash cycle, whether it isadjusting the wash length using our Wash Time Selector, delaying the start of yourwash, or adjusting the temperature and spin speed of your selected programme. Thesimplicity of the Digital Display understates the advanced technology, which clearlydisplays all the wash cycle information, putting you in control.
Wash TemperatureWhen a programme is selected the relevant indicator will light up to show the recommended wash temperature. You can select a different temperature by pressingthe Temperature button. For example: The Cottons programme will default to 40°C.
With this control the temperature can be reduced to 30°C to reduce energy consumption or increased to 60°C for a more intensive wash.
Today, most detergents have been improved to wash efficiently at lower temperatures,therefore we have set the default temperature settings of each programme to a lowerlevel, saving electricity and reducing the carbon footprint of your machine.
Please refer to the Programme Guide for the maximum temperature to which each programme can be set.
Door Locked indicatorThe Door Locked indicator light is illuminated when the door is fully closed and the machineis ON.When Start Pause is pressed on the machine with the door closed the indicator will flashmomentarily and then illuminate. If the door is not closed the indicator will continue to flash.A special safety device prevents the door from being opened immediately after the end ofthe cycle. Wait for 2 minutes after the wash cycle has finished and the door locked light hasgone out before opening the door. As a safety measure, check that there is no water evidentin the drum. At the end of the cycle turn the programme selector to OFF.If the programme is paused, the door locked indicator will go out after 2 minutes and thedoor can be opened. Check there is no water evident in the drum before opening the door.
ProgrammeSelector
Start/PauseButton
Spin Speed Selector
DigitalDisplay
Wash TimeSelector
Door LockIndicator
StainBlaster
SensitiveCare
DelayStart
TemperatureSelector
EasyIron
Wash Cycle Time/Delay Start Indicator Kg Mode
Wash TemperatureIndicator
Spin SpeedIndicator
Wash LengthIndicator
16 17
Door LockedIndicator
Spin SpeedWhen a programme is selected the maximum spin speed allowed for that programmeappears on the display. Pressing the Spin Speed button will reduce the speed by100rpm each time the button is pressed. The minimum speed is 400rpm, or continuingto press the button will eliminate the final spin completely.
Delay StartThis indicator shows the number of hours time delay, once the delay start has been set.
Wash Cycle TimeWhen a programme is selected the display automatically shows the maximum cycleduration for a full load, which can vary, depending on the options selected. Once theprogramme has started you will be kept informed constantly of the time remaining tothe end of the wash.
Wash Length IndicatorOnce the programme has been selected the indicator light will automatically showthe wash time set for that programme. Selecting a different wash time the relevantindicator will light up.
KG Mode IndicatorAvailable on Cotton and Synthetic cycles, during the first 4 minutes of the cycle theindicator lights and wash time will flash. This means the intelligent sensor is weighingthe laundry and will adjust the cycle time, water and electricity consumption accordingly.
Wash OptionsThe following options should be chosen once the required programme has been selected and BEFORE pressing the Start Pause button. The indicator light on eachoption button will illuminate if that option has been selected.
Stain BlasterThe Stain Blaster option, selectable on all Cotton cycles, tackles stubborn stains bymaintaining wash temperatures throughout the programme and adjusting the spinspeed of the drum during critical stages of the wash and rinse cycles. Using this special programme will increase the wash efficiency without increasing the length ofyour wash programme.
Sensitive CareThe Sensitive Care option washes your clothes in a deeper than normal water level toprovide gentler washing for especially delicate fabrics, while detergent is removed thoroughly with five extra rinses. Perfect for people with delicate skin, this option canbe selected on all Cotton and Synthetic cycles.
This option does not need to be selected on the Delicate, Woollen or Silk programmes,as it is already an integrated part of the wash cycles.
Delay StartThis option allows you to delay the start of your wash cycle by up to 24 hours. Bypressing the Delay Start button, the time delay will be shown on the display (h00). Thiswill increase in one-hour intervals each time the Delay Start button is pressed.Continue to press the button until the required time is reached, then press the StartPause button to activate the machine. The machine will start its cycle once the requirednumber of hours has passed.
To cancel the Delay Start option, press and hold the button for 5 seconds until the display shows the settings for the selected programme. To start this programme, pressthe Start Pause button. To cancel the process, turn the Programme Selector to the OFFposition and then select another programme.
TemperatureWhen a programme is selected the relevant indicator will light up to show the recommended wash temperature. The Temperature button can be used to decrease orincrease the temperature of your chosen wash cycle. Each time the button is pressed,the new temperature level is shown on the Wash Temperature Indicator.
Spin SpeedThe spin cycle is used to remove as much water as possible from the laundry withoutdamaging your clothes. The recommended spin speed for each programme is alreadyset to the highest level for that chosen programme. By pressing the Spin Speed buttonyou can reduce the spin speed in 100rpm intervals.
To cancel the spin cycle altogether, set the spin speed to 0.
It is not possible to select a spin speed higher than that suitable for the programmeselected. This feature is designed to avoid damage to your clothes.
It is possible to modify the spin speed at any time without stopping or pausing themachine.
18 19
Automatic Features
KG Mode (Half Load)Available on the Cottons and Synthetics cycles, the intelligent sensor adjusts the waterlevel and programme length throughout each phase of the cycle according to howmuch laundry you load into the machine. The KG Mode indicator will light up whenthe intelligent sensor is weighing the laundry.
The washing machine is fitted with a self-adjusting water level system. This system enables the machine to use the optimum amount of water needed to wash and rinsethe laundry in relation to the particular load. This results in a reduction of the waterand electricity used without in any way compromising the washing and rinsing performance. The amount of water and electricity used will always be appropriate forthe clothes load size.
The washing machine automatically ensures excellent washing results at minimum costwhilst respecting the environment.
Out of Balance protectionThis model is fitted with an electronic sensor device that checks if the load is balancedcorrectly. If the load is slightly unbalanced the machine will re-balance it automaticallyand then carry out the normal spin. If, after several attempts, balance is not restored areduced spin speed will be used. If loads are seriously unbalanced the spin stage willbe cancelled. This helps limit vibration, reduce noise and improve the washing machine's reliability and life.
20 21
Easy IronThis function is designed to reduce creasing of your clothes during your wash cycle,and is tailored to specific fabric types. This option is only available on Synthetics,Delicates, Woolmark and Silk programmes.
Wash Time SelectorOnce the programme has been selected the indicator light will automatically showthe wash time set for that programme. Selecting a different wash time the relevantindicator will light up. For example: Using this button on the Rapid Wash cycle willenable you to select either a 14, 30 or 44 minute wash cycle.
This selection is only available on the Cotton, Synthetic and Rapid programmes.
Programme Easy Iron Function Action Required to Complete theCycle
Mixed & Synth’s
The programme is completed by ashort spin of very low speed.
_
Delicate The machine stops in the final rinsestage and the option indicatorsblink.The load is held in the water in thedrum, thus reducing creasing andenabling easier ironing.
Press the Easy Iron button tocontinue with the programme.The machine will then pump outthe water and the programmewill conclude with a short spin.Finally, the programme carriesout a brief tumbling action toloosen the items in the load.
Wool & Silk
The machine stops in the final rinsestage and the option indicatorsblink. The load is held in the waterin the drum, thus reducing creasingand enabling easier ironing.
Press the Easy Iron button andthe machine will pump out thewater and complete the cyclewith a short spin cycle.

Programme DescriptionsFor handling the various types of fabric and their level of dirtiness in your laundry thewashing machine has different programme groups according to type of wash, temperature, spin speed and duration (see Programme Guide). Once the programme is selected, the intelligent sensor will weigh the laundry using theKG Mode and adjust the critical elements of the wash cycle depending on the weightof the laundry to ensure perfect results (available on Cotton and Synthetic cycle). TheKG Mode is activated during the first 4 minutes of the cycle, which enables the machine to:● adjust the amount of water required;● determine the length of the wash cycle;● control rinsing according to the fabric type selected;● recognises if too much lather is present, adjusting the water level during rinsing if necessary;● adjusts the spin speed according to the load, avoiding any imbalance
Cotton with Pre WashThe Cotton programme is designed for maximum washing and rinsing efficiency. Withspin cycles in between, the programme guarantees the laundry is rinsed perfectly. Thefinal spin cycle ensures laundry is spun dry as much as possible up to the maximum speed.The Cotton programme includes a Prewash cycle. This option is particularly useful for reallydirty loads and can be used independently of the main wash programme. Additional deter-gent for the Prewash part of the programme should be added to the first compartment of thesoap drawer labelled "1" (please refer to the section of this manual entitled “Detergent”). Werecommend you use only 20% of the quantity used for the main wash programme.
ColouredsThe Cottons programme is also designed for maximum washing and rinsing efficiency.With spin cycles in between, the programme guarantees the laundry is rinsed perfectly. The final spin cycle ensures laundry is spun dry as much as possible up tothe maximum speed. This cycle is set to 40°C, but the temperature may be alteredusing the Temperature option button.
SyntheticsWashing and rinsing performance is optimised through using drum rotation speedsand water levels suitable for synthetics and mixed fabrics. The programme will defaultto 40°C, but the temperature may be altered using the Temperature option button. Thedelicate spin action minimises creasing. The final spin speed for the synthetics programme is 800rpm
DelicateThe cycle will consist of alternate periods of activity and pauses. This is particularly suitable for washing very delicate fabrics, as it creates a hand-washing effect.Washing and rinsing are carried out using a high water level to provide the best results.
RinseThis programme carries out three rinses with an intermediate spin (which can be reduced or excluded by using the Spin Speed option). It can be used for rinsing anytype of fabric e.g. use after hand washing.
SpinThe Spin programme completes the spin at the maximum spin speed, this can be reduced by using the Spin Speed option button.
DrainThis programme drains out the water from the machine.
Wool & SilkThis programme allows a complete washing cycle for garments specified as “Machine-Washable” Wool fabrics and laundry items made from silk or specified “Wash as Silk”on the fabric label. The programme has a maximum temperature of 30°C andconcludes with 3 rinses, one for fabric conditioner, and a slow spin.
“A” Wash 59'This specially designed programme maintains the high quality wash performanceidentified with the “A” rating whilst greatly reducing the wash time. The progrramme isdesigned for a maximum load of 3 kg with a temperature of 60°C and concludeswith 2 rinses and a high speed spin sequence.
SportsThis washing machine has a unique Sportswear programme. It is specially designed towash mixed sportswear fabrics that cannot be washed on hotter programmes and isdesigned to remove the dirt and staining created by participation in sports activities.This programme washes at a cool 30°C, rinses twice (one is for fabric conditioner)and spins at 800rpm for the best care of your really dirty, delicate garments.
Rapid The Rapid programme allows a washing cycle to be completed in just 14 minutes! Thisprogramme is particularly suited to slightly dirty cottons and mixed fabrics. Using the Wash Time button on the Rapid cycle will enable you to select either a 14,30 or 44 minute wash cycle.When selecting the rapid programme, please note that we recommend you use only20% of the recommended quantities shown on the detergent pack.
For information about these programmes please refer to the programmes table.
Refer to the programme guide (pag.24)** STANDARD COTTON PROGRAMMES ACCORDING TO (EU) No 1015/2010 andNo 1061/2010COTTON PROGRAMME with a temperature of 60°CCOTTON PROGRAMME with a temperature of 40°CThese programmes are suitable to clean normally soiled cotton laundry and they arethe most efficient programmes in terms of combined energy and water consumptionsfor washing cotton laundry.These programmes have been developed to be compliant with the temperature on thewash label on the garments and the actual water temperature may slightly differ fromthe declared temperature of the cycle.
22 23

Programme Guide
24 25
Programme Fabric Type WaterTemp
Recommended(C°)
WaterTempMAX(C°)
SpinSpeed
MAX(RPM)
MaxLoadSize(kg)
Cottons,Colourfast and
linen
Cottons, Non-fast Coloureds,mixed fabrics
Mixed fabricsand synthetics
Delicate fabrics
-
-
-
Silk and“Machine
washable wool”garments
Cottons,Colourfast and
linen
Mixed fabrics
Lightly dirty cottons andsynthetics
60
40
40
40
-
-
-
30
60
30
303030
1600(DYN 8164 D)
1400(DYN 8144 D)
1600(DYN 8164 D)
1400(DYN 8144 D)
800
400
800
1600(DYN 8164 D)
1400(DYN 8144 D)
-
800
1600(DYN 8164 D)
1400(DYN 8144 D)
800
800800800
90
60
60
40
-
-
-
30
60
30
304040
8
8
4
2.5
-
-
-
1.5
3
2.5
1.52.53.5
Length of Programme Detergent
Short
1:37
1:47
1:10
0:54
0:22
0:10
0:04
0:46
0:59
2:24
0:14--
Med.
1:57
2:07
1:19
-
-
-
-
-
-
-
-0:30
-
Long
2:47
2:57
1:29
-
-
-
-
-
-
-
--
0:44
2
✓
✓
✓
✓
-
-
-
✓
✓
✓
✓
✓
✓
✓
✓
✓
✓
✓
-
-
✓
✓
✓
✓
✓
✓
1
✓
-
-
-
-
-
-
-
-
-
---
** Information for laboratories test (see page 23) 2) Using the Wash Time button on the Rapid cycle will enable you toselect either a 14, 30 or 44 minute wash cycle.
**
2)
DetergentOnly use detergents that are suitable for use in a washing machine. You will obtainthe best results from your wash with the minimum use of chemical products, and thebest care for your laundry if you take into consideration the level of dirtiness as well asthe type of detergent to choose.
The amount of detergent to use depends on:
● Water hardnessDepending on the hardness of the water and the type of detergent used, it is possible to reduce the amount of detergent. The softer the water supply, the less detergent is required.
● The level of dirtinessIt is possible to reduce the amount of detergent used depending on how dirty the laundry is. Use less detergent for items that are not very dirty.
● Amount of laundryIt is possible to reduce the amount of detergent when washing only a small amount of laundry. For smaller loads use less detergent.
The dosages shown on the packaging of detergents for washing delicates often alreadyrefer to a reduced wash size.
Always follow the dosage instructions on the detergent packaging.
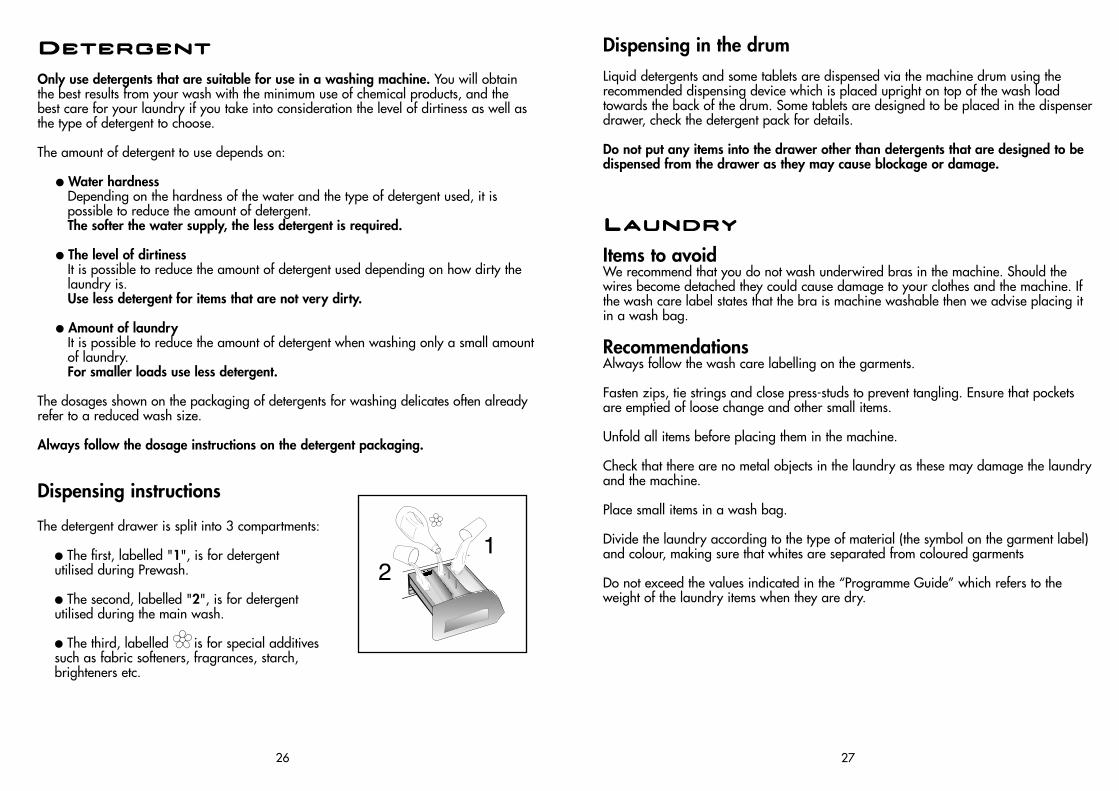
Dispensing instructions
The detergent drawer is split into 3 compartments:
● The first, labelled "1", is for detergent utilised during Prewash.
● The second, labelled "2", is for detergentutilised during the main wash.
● The third, labelled is for special additivessuch as fabric softeners, fragrances, starch,brighteners etc.
Dispensing in the drumLiquid detergents and some tablets are dispensed via the machine drum using therecommended dispensing device which is placed upright on top of the wash loadtowards the back of the drum. Some tablets are designed to be placed in the dispenserdrawer, check the detergent pack for details.
Do not put any items into the drawer other than detergents that are designed to bedispensed from the drawer as they may cause blockage or damage.
LaundryItems to avoidWe recommend that you do not wash underwired bras in the machine. Should thewires become detached they could cause damage to your clothes and the machine. Ifthe wash care label states that the bra is machine washable then we advise placing itin a wash bag.
RecommendationsAlways follow the wash care labelling on the garments.
Fasten zips, tie strings and close press-studs to prevent tangling. Ensure that pocketsare emptied of loose change and other small items.
Unfold all items before placing them in the machine.
Check that there are no metal objects in the laundry as these may damage the laundryand the machine.
Place small items in a wash bag.
Divide the laundry according to the type of material (the symbol on the garment label)and colour, making sure that whites are separated from coloured garments
Do not exceed the values indicated in the “Programme Guide” which refers to theweight of the laundry items when they are dry.
26 27

Washing Advice
The following tips are designed to assist in getting the best results from your machinewhilst using it in the most environmentally friendly and economical way. It is alsoimportant to understand the items to avoid in your laundry, to ensure the continuedsafe and reliable operation of your machine.
Loading your washing machineTo make further reductions of energy, water and detergent consumption, we recommend that you put a full load into your machine. Energy savings of up to 50%can be achieved by washing one full load compared to two half loads.
Do not overload the machine as this will reduce the quality of the wash and maycause damage to the machine and your laundry.
When is prewashing really needed?Only with particularly dirty loads! Energy savings of 5 to 15% are made by not selecting the prewash option for less dirty laundry. Pre-treat awkward stains with awashable stain remover.
Which wash temperature should you choose?Using stain removers before machine washing reduces the need to wash at temperatures over 60°C.
Using a 40°C wash temperature can make energy savings of up to 50%.
Very dirty laundryTo ensure the best performance when washing a particularly dirty load, we recommend that you reduce the amount of items to be put into the machine. Allowing more space in the drum means the items can circulate more freely and willwash better.
Running a Wash Cycle
This section summarises the main points when completing a wash cycle. For detailedexplanations of features, options and details of the machine refer to the relevant section in the instruction manual.
Preparing the laundrySelect and sort the laundry according to the wash care labels found on each garment.
Loading the laundryOpen the door. Put the laundry in the washing machine. Close the door by pushing ituntil it clicks, ensuring that no items of laundry are obstructing the lock or door seal.
Putting detergent in machineOpen the drawer, choose the detergent and put in the recommended amount. Do not exceed the dosage stated below:
Close the drawer again.
Note: Liquid detergents and some concentrated powders and tablets that are to beplaced directly into the drum should be placed in the recommended dispensing device.
Selecting the wash programmeRefer to the Programme Guide or the programme descriptions on the front of themachine to select the most suitable programme. Turning the programme selector andaligning the programme name with the indicator selects the programme. Check thatthe tap is turned on and that the discharge hose is positioned correctly. Select therequired wash options.
Starting the wash cyclePress the Start Pause button. The Door Locked indicator and KG Mode lights willilluminate. After a few seconds the wash cycle will begin. During the first 4 minutes of
Compartment Wash Maximum quantity of powder/liquid
Prewash (option)
Main Wash (all programmes)
Fabric Conditioner
100 ml
200 ml
200 ml
1
2
28 29

the wash cycle, the KG Mode will weigh the clothes and update the wash time remaining on the display every five seconds until the weight has been determined.
Do not try to open the door when the door locked indicator is on, nor open the dispenser drawer during the wash programme.
If you wish to pause the programme press the Start Pause button; after two minutesyou will be able to open the door. To cancel the programme the programme selectorshould be turned to the OFF position. A new programme can be selected aftercancelling the previous programme.
When the programme has finishedWait approximately two minutes for the door lock to be released. When the door locked indicator light goes out it will then be safe to open the door.
Switch off the machine by turning the programme selector to the OFF position so that itwill be ready the next time you use the machine (this action resets the memory in themachine). Open the door and remove the laundry. Disconnect the plug from the mainspower supply and turn off the water supply whenever you finish using it.
Care and Maintenance
The washing machine needs very little maintenance, but regular attention to a few smalldetails will ensure the continued performance of your washing machine.Do not use abrasive cleaners, scouring pads, solvent-based cleaners or polishes; wipingthe outside of the machine with a damp cloth will suffice.
Cleaning the soap dispenserIt is advisable to clean the compartments occasionally to remove detergents and additives. To do this you need to do the following:
Step 1. Pull the drawer out firmly from the machine, but without forcing it.Step 2. Clean the compartments and the siphon cover under warm running water.
Step 3. Clean the outlet of the soap dispenser to remove any residue of soap powder.Step 4. Replace the drawer.
Cleaning the door glassRegularly clean the door glass with a damp cloth. A build up of soiling and residues fromthe water may result in water leaking from the door.
Do not use abrasive cleaners as they can scratch the surface.
Cleaning the filterThe washing machine is fitted with a special filter to prevent items such as coins, buttons,etc. blocking the discharge hose. These may beretrieved by:
Step 1. Opening the filter cover.
Step 2. Pull out the corrugated hose (only available on certain models), remove the stopper and drain the water into a container.
Step 3. Before removing the filter, place anabsorbent towel below the filter cap to collectthe small amount of water that is likely to beinside the pump.
30 31
Step 4. Turn the filter anti-clockwise until it stops in the vertical position. Remove the filter and clean.
Step 5. Replace the filter and turn in a clockwise direction until locked in position.Replace the stopper in the hose and close the filter cover.
We recommend that the filter be cleaned frequently, at least once a month.
Maintenance washUsing small quantities of detergent and low temperature wash programmes can causethe gradual build up of grease, dirt and scale. Over time these deposits can damageyour laundry and your machine. They can also cause your machine to smell. Werecommend that you carry out a maintenance wash a couple of times per year to keepyour machine and pipe work clean and free of these deposits. Simply run the Cottons90°C programme without a load and with the normal quantity of detergent.
Problem Solving Guide
Defects you can remedy yourselfBefore calling Hoover Service for technical advice please run through the followingchecklist. A charge will be made if the machine is found to be working or has beeninstalled incorrectly or used incorrectly. If the problem persists after completing therecommended checks, please call Hoover Service (tel: 08705 400 600); they may beable to assist you over the telephone.
The machine will not start…
● Close the door. Check that there is power to the machine. Select a programmeand press Start Pause. Check if the door locked light is illuminated.
If it is not, check the following:1. Is the machine connected to the electrical supply?2. Is the electrical supply OK? Check another socket.3. Has the fuse on the machine blown? If so, replace it.
● If the door locked light is illuminated and the machine does not start this means that the machine cannot fill with water, check the following:1. Check the programme dial is correctly aligned with the programme.2. Is the water supply to the machine switched on?3. Are the pipes kinked or restricted in any way?
Water does not drain away… (error 3 will be displayed)
● Ensure that there is not a blockage in the drain hose or the hose is not kinked.
● Is the drain hose installed correctly? If connected to the sink waste make sure youhave cut the membrane or removed the bung from the under sink drainage unit.
● Check for foreign bodies in the filter. If present, clean the filter.
● If you have found any of the above problems correct them and run the machinethrough a spin cycle to drain the water.
32 33

Water on the floor around the washing machine...● Is the fill hose tightened? If so, replace the rubber washers and re-tighten.
● Is the standpipe or the household drain blocked? If so, clear the blockage yourselfor call a plumber.
● Is there clothing or dirt between the door gasket and the door glass? Ensure thatthe door glass and gasket are kept clean and free of laundry when loading themachine.
The machine does not spin…● Water has not drained from the machine? Check the points highlighted above.
● Have you selected an option that changes the spin profile (change of spin speedon the selector)? Check the feature in the description of the controls.
● Is the load unbalanced? To reduce noise and vibration and improve the machine’sreliability and life, the machine is fitted with an electronic sensor that detects if theload is unbalanced. To improve the spin performance the load can be re-distributedby hand at the end of the cycle and then re-spun.
The machine is noisy or vibrates a lot during the cycle…● Has the transit system been fully removed? (see Unpacking the Product).
● Are there any loose items in the pockets of clothing that can rattle in the drumand cause damage?
● Is the load unbalanced? Stop the programme, redistribute the load and restart.
The programme takes a long time…● Some programmes do take a long time (over 2.5 hours). Low water pressure canincrease the length of the programme.
The door will not open…● Has the programme finished? Is the END light illuminated? If not the programmeis not complete. Has the door locked light gone out? If not wait a further two minutes and the light will go out and you will be able to open the door.
● Has the programme finished but the door remains locked? The display readsError 2. Turn the machine to OFF to reset the machine and this will allow the doorto open.
● If water remains in the drum refer to 'Water does not drain away…' above.
Problem with the dispenser…● Not all the detergent has been flushed away.
1. Check the water supply tap is fully turned on.2. Check the inlet hose is not kinked.
● The dispenser drawer will not close properly.1. Check the drawer is aligned properly2. Check the drawer is not clogged with detergent (see Care and
Maintenance)
● Steam is coming from the dispenser. The machine is designed to vent through thedrawer, this is nothing to worry about.
Remember, you may be charged for the service call if incorrect installation or misusecauses a problem with your machine.
If the following error codes are displayed, switch OFF the machine and contact HooverService: 0, 1, 4, 5, 7 and 8.
Note: The use of environmentally friendly, phosphate-free detergents (check detergentinformation on pack) can have the following effects:
● Waste water from rinsing may be cloudier because of the presence of a whitepowder (zeolites) held in suspension, without the rinse performance being adverselyaffected.
● Presence of white powder on laundry after washing, which is not absorbed bythe fabric and does not alter the colour of the fabric.
● The presence of foam in the final rinsing water is not necessarily an indication ofpoor rinsing. Carrying out more rinse cycles does not serve any purpose in suchcases.
34 35
Power FailureIf there is a power failure the wash cycle will be interrupted, and the wash programmeand functions will be suspended. When the power is restored, the wash programmeand functions will re-start from the same point and complete the programme.
During a power failure the water can be drained and the load can be removed fromthe machine as follows:
Step 1. Switch off the machine both via the programme dial and the mains powersupply. Remove the plug from the mains power supply socket.
Step 2. Carefully move the machine so the rear of the machine is accessible. Pleasefollow the safety precautions that we recommend under the Warning and SafetyInstructions section of this manual.
Step 3. Unclip the drain hose from the rear panel of the machine and lower the hoseinto a bowl on the floor. When the bowl is full raise the end of the drainpipe to aheight higher than the top of the appliance to stop the flow of water. Empty and replace the bowl and continue draining the machine until empty.
Step 4. Once the machine is fully drained of water, clip the hose to the rear of themachine. Open the door and remove the load.
The door can be opened approximately 2 minutes after the power failure.
Do not force open the door.
Further Problem Solving advice can be found on the After Sales Service pages ofour website www.hoover.co.uk
After Sales Service
Customer Service At Hoover, we aim to make appliances that are reliable and long lasting. However,should your appliance need to be serviced during its working life, no one is more qualified to maintain your appliance than our own Hoover Service engineers. To booka service call or to ask our customer service advisors for help on using your appliance,please call:
08705 400 600or contact us online
www.hoover.co.ukPlease have your model and serial numbers at hand when calling our service department, as they will require this information.
(Telephone lines open: Monday to Friday 8.30am to 5pm, Saturday 9am to 5pm,Sunday 10am to 4pm). We may record your phone calls with our representatives tomonitor and improve the quality of service we provide.
GuaranteeYour new Hoover appliance automatically comes with a 12-month call out, parts andlabour guarantee.
Register your appliance now by calling
08444 810 157or register online
www.hoover.co.uk
Providing that you register your purchase, Hoover guarantees all parts of this productfor 5 years from the date of purchase. During the first year Hoover approved engineers will replace or repair all defective parts free of charge, except for parts subject to fair wear and tear, such as interior lamps.
In years 2-5 replacement parts will be supplied free only if fitted in the UK or Republicof Ireland by Hoover and the appropriate labour charges paid. An extended warrantymay be purchased to also cover the labour costs. Please ask our customer serviceadvisors for cost details or complete the enclosed form.
To qualify for benefits under the guarantee, you must be able to provide proof of dateof purchase and the appliance must have been supplied, maintained and used inaccordance with Hoover instructions.
36 37

The guarantee excludes:● Any faults which occur due to bad installation or misuse of the machine.● Repair of, or interference with, the machine by any person not authorised by themanufacturer.● Any parts which are fitted to the machine that are not original manufacturer’sparts.● Non-domestic use of the machine.● Operation at incorrect voltage.● The result of using this machine for any purpose other than those described in theinstruction book.
Spares and AccessoriesIf any part of your appliances needs replacing during its lifetime, please make surethat you replace them with genuine Hoover spare parts by calling:
01204 556 111or online
www.hoover.co.ukA number of accessories can also be purchased using the above contact details.
BrochuresAt Hoover, we produce a range of home appliances including vacuum cleaners,cooling appliances, washing machines, tumble dryers, dishwashers, cookers and built-in appliances.
If you would like a brochure for any of our product ranges please call our head officeon:
01685 721222or view our full range onlinewww.hoover.co.uk
Our customer service advisors will be able to advise you of any matching appliance,or appropriate replacement product when it is time to replace your purchase.
38 39

11.0
5 - 4
1035
233
- ww
w.gr
afica
esta
mpa
.it -
Prin
ted
in It
aly
- Im
prim
é en
Ital
ie
EN
®
Note: Hoover policy is one of continuous development and accordingly wereserve the right to alter specification without notice. The manufacturer declinesall responsibility for errors printed in this instruction manual.
Hoover Ltd. Pentrebach, Merthyr Tydfil, Mid Glamorgan, CF48 4TU


