36
WWW.GLASSKILNS.COM 6441 SE JOHNSON CREEK BLVD. PORTLAND, OR 97206 (503) 774--6000 [email protected] M ANUAL O PERATING Revised 9/22/05
| Date post: | 13-Feb-2017 |
| Category: |
Documents |
| Upload: | dinhkhuong |
| View: | 236 times |
| Download: | 3 times |
W W W . G L A S S K I L N S . C O M
6441 SE JOHNSON CREEK BLVD. PORTLAND, OR 97206 (503) 774--6000 [email protected]
MANUAL
OPERATING
Revised 9/22/05

2
2 TABLE OF CONTENTS
Glass Master Operating Manual
WELCOME ............................................................................................................4Be Safe ................................................................................ 5
BEFORE YOU START ..............................................................................................5Set Up and Location ........................................................... 6
INSPECT THE KILN .......................................................................................................................6ASSEMBLE THE KILN COMPONENTS .............................................................................................6PRIME THE SHELVES AND KILN FLOOR ........................................................................................6LOCATING THE KILN ...................................................................................................................7TEST FIRING ................................................................................................................................7TEST FIRE PROCEDURE ................................................................................................................7
UNDERSTANDING THE CONTROLLER ........................................................................83 Programming Levels ........................................................ 8
BEGINNER LEVEL ........................................................................................................................8BEGINNER PLUS MGF .................................................................................................................8ADVANCED ...................................................................................................................................8IDLE STATE ...............................................................................................................................8
Five Programming Modes .................................................. 9Key Press Description ....................................................... 10Display Messages ............................................................. 11
BASIC FIRING STEPS ............................................................................................131 - Loading ........................................................................ 13
SHELVES ....................................................................................................................................13THINFIRE SHELF PAPER ............................................................................................................13POSITIONING PIECES ..................................................................................................................13
2 - Auto Mode (GlassFire) ................................................ 14STEP 3- SELECT PROCESS ............................................................14STEP 4 - VERIFY SETTINGS ..........................................................15
4 - Unloading .................................................................... 155 - Visual Inspection ........................................................ 156 - Modifying GlassFire Programs ................................... 16
WHEN TO MODIFY A PROGRAM ...................................................16HOW MUCH TO MODIFY PROGRAMS ............................................16TIME OR TEMPERATURE ...............................................................16CHANGING THE PROCESS TEMPERATURE ........................................16CHANGING THE PROCESS HOLD TIME ...........................................17

3
3TABLE OF CONTENTS
ADVANCED PROGRAMING .....................................................................................18Ramp & Hold Programing (PRO Mode) .......................... 18Checking the Program ...................................................... 20
VIEW SEGMENT ..........................................................................20REVIEW ......................................................................................20
Edit Mode Features ........................................................... 21SKIP SEGMENT ............................................................................21ADD TIME ..................................................................................21ADD TEMPERATURE .....................................................................22
Load Mode ........................................................................ 22Options Mode ................................................................... 22
GLASS 101 .........................................................................................................23What is a Firing Program? ................................................ 23Heatwork ........................................................................... 23Size and Mass .................................................................. 23Critical Temperature Ranges ............................................ 24Firing Processes ................................................................ 24The Basics ......................................................................... 26Frequently Asked Questions ............................................. 27
GENERAL INFORMATION .......................................................................................30Troubleshooting ................................................................ 30How Do I...? ...................................................................... 31GlassFire Programs ........................................................... 32My Programs .................................................................... 33Warranty & Repairs .......................................................... 34Electrical Requirements & Wiring Diagram .................... 35

4
4
STAR
TING
WELCOME TO THE WORLD OF GLASS FUSING!
WELCOME
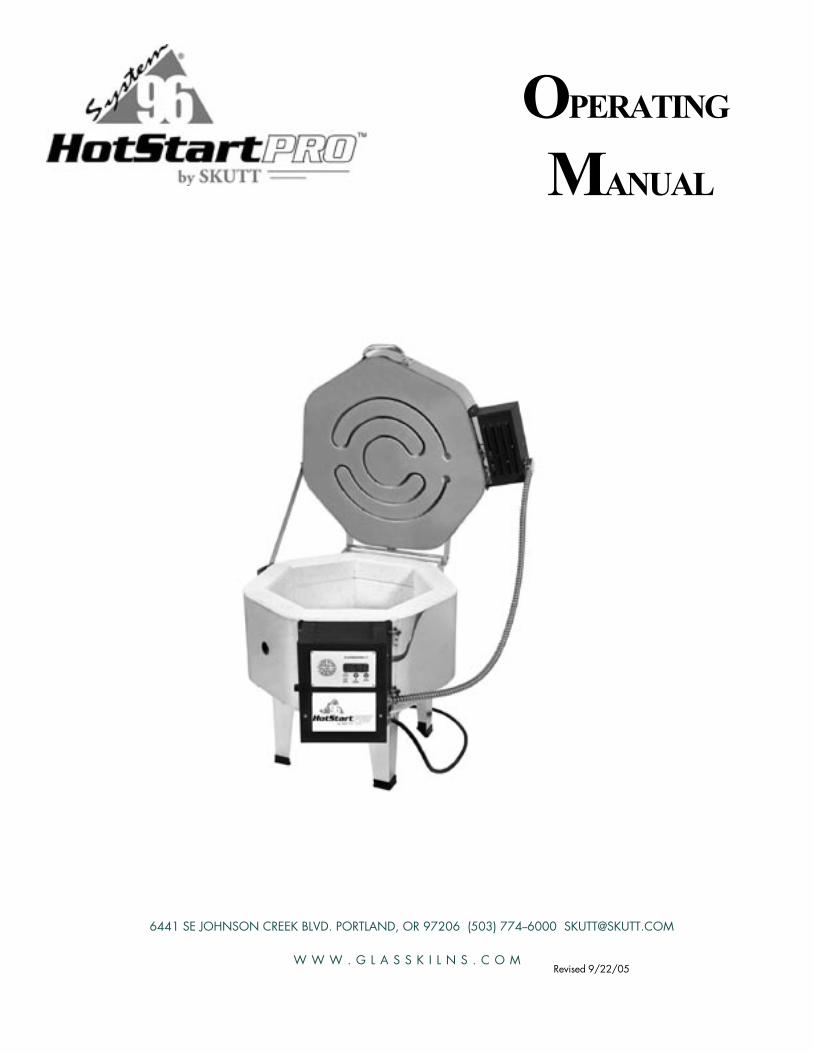
Congratulations on the purchase of your new HotStart PRO glass fusing kiln. Finally a kiln has been developed with the needs of the beginning fuser in mind. We hope you get years of enjoyment with this kiln and it serves as a springboard in developing your skills as a glass artist.
THE COMPANIES Spectrum Glass, the largest manufacturer of art glass in the world has teamed up with Skutt Kilns, the largest manu-
facture of hobby kilns in the world, to produce the HotStart Kiln. Both Skutt and Spectrum have a strong commitment to quality products and outstanding customer service. It is our goal to make entering the hobby of glass fusing both enjoyable and affordable.
THE KILNAll Skutt kilns are made with precision milled, hand selected brick and top-of-the-line electrical components. These
kilns are built to last.
The HotStart is designed to run on standard household voltage. Just unpack it, plug it in and you are ready to go.
The 15” (38 cm) chamber is large enough for most beginning projects and is heated by elements routed in the lid to ensure even heating. Each HotStart comes with a stand and a porcelain viewing hole plug.
THE CONTROLLEROne of the best features of the Hot Start Pro Kiln is the Glass-
Master LT Controller. Now beginners can start fusing glass suc-cessfully right away. With it’s stored factory programs all you need to do is select what you want to do with the glass and how fast you want to fire based on it’s size.
The controller is designed to grow with your needs. As you become more familiar with the glass and take on more advanced projects you can unlock more advanced features. You can design custom programs or edit existing programs to achieve the results you need.
READ THE MANUAL Like the kiln, the manual was developed with the beginning
fuser in mind. There is a lot of good information on how to fire glass, not just operate the kiln. We recommend you read the entire manual before getting started.
We have placed easy access tabs for each section of the manual for your convenience. Some of the description on how to use the features may seem a little confusing at first, espe-cially the advanced features, so give yourself a little time to play around with it. After a while it will seem like second nature to you.
We wish you the best of luck with your new hobby.

5
5
STARTINGTens of thousands of kilns are used safely in homes, schools, and professional studios throughout the world. With a good understanding of your kiln and a little common sense you can avoid mishaps. Please observe the following safety recommendations:
♦ The stainless steel jacket and some of the other fixtures surrounding the kiln will get hot enough to burn your skin when the kiln is heated. Therefore it is important to be extremely careful when working close to the kiln.
♦ Keep small children and pets away from the kiln when it is firing.
♦ Be careful when opening the kiln lid while the kiln is heated. We recommend you use gloves to protect your skin from the hot air that can escape from the chamber of the kiln when opening the lid. Also be aware of any loose clothing or hair too close to the kiln chamber.
♦ The heating coils, also known as elements, inside the kiln chamber will cause an electrical shock if touched. Never insert metal instruments into the kiln while it is firing.
♦ Always be sure to unplug the kiln before working on the electrical components of the kiln.
♦ Plan on being with the kiln when it is scheduled to turn off.
♦ Remove all potentially combustible materials from the kiln area.
♦ Long term viewing inside the kiln chamber can cause damage to your eyes. Therefore, it is recommended that you use IR and UV protective glasses when looking into the kiln for extended pe-riods of time. #3 welders green or gray glasses will protect your eyes.
Be Safe
BEFORE YOU START

6
6
STAR
TING
INSPECT THE KILN
Carefully remove the kiln and accessories from the Hot Start Kiln box. The box should include the following if purchased with an accessory kit.
Hot Start Kiln 2 Stand Halves Operating Manual Lid Brace
8 oz. (.25kg) Kiln Wash* 4 Stand Feet 13” (33cm) Shelf* Fiber Shelf Paper (rolled)*
3 - 1” (2.5cm) Posts* Stand Hardware Pkg. Warranty Card Peep Plug
*Included when HotStart is purchased with Accessory Kit.
Remove the kiln and other components from the box and inspect them for any damage that may have occurred during shipping. If you notice any damage call the HotStart Dealer where you purchased the kiln for information on how to file a freight claim.
Vacuum the inside of the kiln to remove any dust that accumulated during shipment. It is particularly important to vacuum the grooves in the lid that hold the elements.
ASSEMBLE THE KILN COMPONENTS
Align the two halves of the kiln stand and attach them together using the screws, nuts, and lock washers supplied. Place the black plastic stand feet on the stand legs. Place the kiln on top of the stand making sure it is centered. At-tach the lid brace to the lid using the thumbscrew which is shipped screwed into the left side of the lid. Lastly insert the porcelain peep plug into the side of the kiln.
PRIME THE SHELVES AND KILN FLOOR
You will want to apply a shelf primer, also referred to as kiln wash, on your shelves and kiln floor. This will protect them from melted glass adhering to their surfaces. There are a number of different formulations with different instructions for application, so be sure to follow the directions of the brand you choose. If you purchased the accessory kit with your HotStart kiln it will include an 8 ounce bag of kiln wash.
Add 6 tablespoons of kiln wash powder to 1 cup (250 ml) of water and mix it thoroughly. Apply several coats with a fine bristled paint brush to both the top of the kiln floor and the top of the kiln shelf. Four coats applied in oppo-site directions should be sufficient. Allow to dry for several minutes between coats. When you are finished allow them to dry completely before using. When they are completely dry they will have a uniform white appearance. Never kiln wash the walls or lid of your kiln!
It is a good idea to fire the shelf up to around 500 °F (260 °C) to ensure that all of the moisture from the kiln wash has dissipated. If glass is placed on top of wet kiln wash and fired, the residual moisture escapes in the form of gas and can cause bubbles in your glass. For instructions on how to program the kiln to pre-fire the coated shelf consult the “Ramp and Hold” section of this manual.
BEFORE YOU START
Set Up and Location
7
7
STARTING
The test fire ensures you that the kiln is functioning properly and has not been damaged in shipping. Be sure that the coating on the shelves is dry before your first test fire.
TEST FIRE PROCEDURE
• Place a shelf in the kiln chamber on three 1” (2.5cm) posts.
• Place a sample glass project using scrap fusible glass in the kiln and program the kiln using the instructions on page 14. As a precaution you may want to provide a dam or barrier around the glass when fusing more than 2 layers. With more than 2 layers, the glass will spread until it reaches a thickness of 1/4” (6.5 mm).
• Let the kiln fire and then cool to room temperature before opening the lid. If the project is fused or slumped to your satisfaction the kiln is operating correctly. The need for slight adjustments to temperature are not uncom-mon.
The first time the elements are fired they will give off some smoke. This is normal and expected. It is also common for hairline cracks to appear in the floor and lid of a kiln. This is caused by the expansion and contraction of the mortared brick and is considered normal. It will not affect the firing nor the life of the kiln.
TEST FIRING
1. Locate your kiln near a 120V outlet. Position the kiln to the left of your electrical outlet so the cord will have a direct path to the outlet. Never use an extension cord.
2. Install it in a well ventilated, sheltered area such as a carport, garage, utility or hobby room. It should be convenient to where you are working, and out of the way of traffic areas.
3. Allow at least 18” (46 cm) of space between your kiln and adjacent walls.
4. Do not locate the kiln where flammable materials will be stored.
5. Never fire your kiln within a four sided cabinet or closet. The fourth side must always be open to room air to prevent the kiln from overheating surrounding surfaces. It is best to leave at least two sides open for easy access to controls and viewing holes. Fully automatic kilns should not be located in a room that exceeds 105 °F (40.5 °C) or is less than 32 °F (0 °C) as damage to the electronic components may result.
6. The kiln must be placed on a non combustible surface such as cement, brick, metal or ceramic tile.
7. When installing a kiln in a room with a fire control sprinkler system, please check the sprinkler head rating to insure that heat emitted from the kiln will not activate the sprinkler system.
BEFORE YOU START
LOCATING THE KILN

8
8
STAR
TING
UNDERSTANDING THE CONTROLLER
3 Programming LevelsThere are 3 different skill levels that you can set on your Hot Start Pro controller. Each level increases the pro-gramming options as well as the complexity of the controller. As your needs grow your controller can grow with you.
Beginner
Beginner Plus MGF
Advanced
BEGINNER LEVELAll HotStarts are shipped from the factory set in the Beginner Level. In the Beginner Level, Auto Mode and Edit Mode are the only programming modes you will see. This helps by keeping the choices simple. As you progress in your skill level you can explore new levels. For a description of these Modes see the following page. If you ever get lost and want to revert back to the beginner level just press down on the ENTER key until you hear a beep (4 seconds). Then Press down on the DOWN key until you hear a beep (4 seconds).
BEGINNER PLUS MGFThis programming level includes Auto Mode and Edit Mode as well “Modify Glass Fire Mode”. This is a feature that you can toggle on that allows you to change the process temperature and hold time in a GlassFire Program. So now when you run a GlassFire program it will ask you if you want to change these values. This is very help-ful when you want to “tweak” the factory programs a little to get a little more aggressive tack fuse or a deeper slump. See the “OPTIONS MODE” section for instructions on how to toggle on the MGF mode.
ADVANCEDThe Advanced Mode opens up all of the options for programming available to you. At this level you can design your own programs, load stored programs you have written and change factory defaults. Again, if you ever get lost and want to revert back to the beginner level just press down on the ENTER key until you hear a beep (4 sec-onds). Then Press down on the DOWN key until you hear a beep (4 seconds).
Many people will probably never even need to open the Advanced Level of programming. However, it’s nice to know it is there if you need it.
IDLE STATENo matter what programming mode you are in most programming begins when the kiln is in an IdLE state. The kiln is in an IdLE state when “IdLE” is flashing alternately with the temperature in the kiln. You can always get back to an IdLE state by pressing the ENTER key down for 4 seconds. Once in the IdLE state press ENTER to begin programming.
◊
◊
◊

9
9
STARTINGUNDERSTANDING THE CONTROLLER
OPTIONSAUTO LOADPRO
BEGINNER ADVANCED
EDIT
AUTO MODEAuto Mode, more commonly referred to as GlassFire Mode, is an easy and convenient programming mode that allows
you to successfully fuse and slump glass as a beginner. These factory set fi ring programs were designed by professional glass artists to fi re the majority of the projects that will fi t in your HotStart Pro kiln. To access and run one of the 9 programs available, simply select a process (Fuse, Slump or Tack Fuse) and a fi ring speed (Fast, Medium, or Slow ) based on the size of your piece.
PRO MODEPRO Mode, commonly referred to as Ramp and Hold Mode, allows you to input, store and run your own fi r-ing programs. Each program can be up to 8 segments and there is room to store up to 5 programs. Program # 5 comes programed with a casting program already installed
LOAD MODEThe Load Mode allows you to access, review and start your stored Ramp and Hold (PRO) programs.
OPTIONS MODEThe OPTIONS Mode gives you access to change certain factory settings such as Temperature Scale and Modify Glass Fire Mode. It also lets you completely RESET the controller back to original factory settings.
EDIT MODEThe EDIT Mode can be considered a “Live Mode”. It is accessed through the Up Arrow key only when the kiln is fi ring. It allows you to Skip a Segment during any point in a fi ring or Add Time or Add Temperature in the process segment of a GlassFire Mode or Ramp and Hold Program.
Five Programming Modes
The GlassMaster LT now has Five programming modes. Each controller is shipped from the factory in “AUTO” mode. When your skills improve you can access the advanced modes simply by pressing the Up Arrow key for 4 seconds. Press the Down Arrow key while in Idle state for 4 seconds to return to the Beginner Level.

10
10
STAR
TING
Key Press DescriptionThe GlassMaster LT has a 7 segment LED display. This sometimes requires creative ways for representing let-ters. For example the number “5” is also used to represent the letter “S”. See page 11 for a complete list of all the display messages along with a description of their meaning.
Your GlassMaster LT has 3 buttons that are used to access all of the features and settings available. Below is a description of the basic functions of the various key presses.
ENTER - STOP - STARTThis key is used start and stop the kiln as well as to select functions.
UP - VIEW SEGMENTThis key is used to toggle between options and adjust temperatures up. It can also be pressed during a firing to “VIEW” which segment of the program is currently active. It is also possible to access certain EDIT features with this key while the kiln is firing. (See page 21 for details)
DOWN - REVIEWThis key is used to toggle between options and adjust temperatures down. It can also be pressed before or during a firing to “REVIEW” what program is currently active.
SPECIAL KEY PRESSES
+ Start OverHolding the “ENTER” key down for 4 seconds will bring you back to the IDLE MODE wherever you are in the programming or running of the kiln.
+ More OptionsPressing this key down for 4 seconds while in IDLE MODE will open access to the advanced programming modes.
+ Less OptionsPressing this key down for 4 seconds while in IDLE MODE will close access to the advanced programming modes.
+ Rapid UpSingle presses of this key will advance values up by one increment at a time. If you hold the key down the value will begin advancing at a faster rate. As you approach your desired value you may want to release the button and then approach the value slowly with single presses. If you overshoot your value just adjust it back down with the down arrow.
+ Rapid DownSingle presses of this key will advance values down by one increment at a time. If you hold the key down the value will begin decreasing at a faster rate. As you approach your desired value you may want to release the but-ton and then approach the value slowly with single presses. If you overshoot your value just adjust it back up with the up arrow.
UNDERSTANDING THE CONTROLLER

11
11
STARTING
The GlassMaster LT has a 7 segment LED display. This sometimes requires creative ways for representing letters. For ex� -tion of their meaning.
°FThis represents degrees Fahrenheit. When it appears the controller is asking you to enter a Temperature or select a temperature scale.
°cThis represents degrees Celsius. When it appears the controller is asking you to enter a Temperature or select a temperature scale.
Auto, Pro, LoAd, OPtThe controller is asking you to select a programming mode. Use the Up or Down arrow to cycle to the mode you want and press ENTER to select it. If you are in AUTO mode it will be necessary to press the Up arrow for 4 seconds from IDLE to ac-cess the other 3 modes.
CHG°This is displayed when the controller is in OPTIONS Mode and it is asking you to select this feature if you want to “Change” the temperature scale which is currently selected.
CPLtThis indicates that the program is “Complete”. The kiln may still be hot. Wait until the kiln has cooled before opening the lid.
EdItThe controller is asking if you would like to access the Edit Mode features. (See pg. 21)
HLdThis represents HOLD. When it appears the controller is asking you to enter a Hold time in Hours and Minutes.
IdLEThe controller is in Idle Mode. The display will flash “IdLE” alternately with the current temperature of the kiln. This should be the starting point for programming the kiln.
MGFThis message represents Modify Glass Fire Mode. (See “OPTIONS MODE” pg. 22)
ONThis indicates that the program has been started and the kiln is ON.
PFThis message indicates that a Power Failure has occurred. Press to clear it.
rAThis represents Ramp or Rate. The controller is asking you to enter a temperature rate for a Ramp & Hold segment.
rEdI
The controller is in Ready Mode. The controller will display this after a program has been loaded and the kiln is “ready” to start firing.
rSEtThis is a feature found in the OPTIONS Mode that allows you to RESET the controller to factory settings.
SLo, MEd, FAStThe controller is in the process of programming a GlassFire program and is asking for a firing speed: Slow, Medium, or Fast.
SLP, tAC, FULLThe controller is in the process of programming a GlassFire program and is asking for a Process: Slump, Tack Fuse, or Full Fuse.
Display Messages
UNDERSTANDING THE CONTROLLER
12
12
STAR
TING
UNDERSTANDING THE CONTROLLER
Display Messages (continued)
SSEGThis message indicates Skip Segment. (See “Skip Segment” pg. 21)
StOP
This message represents STOP. It indicates that the program has been stopped. It will only briefly show on the display.
tMEThis message represents Add Time. (See “Add Time” pg. 21)
tMPThis message represents Add Temperature. (See “Add Temperature” pg. 22)
13
13
BEG
INNER
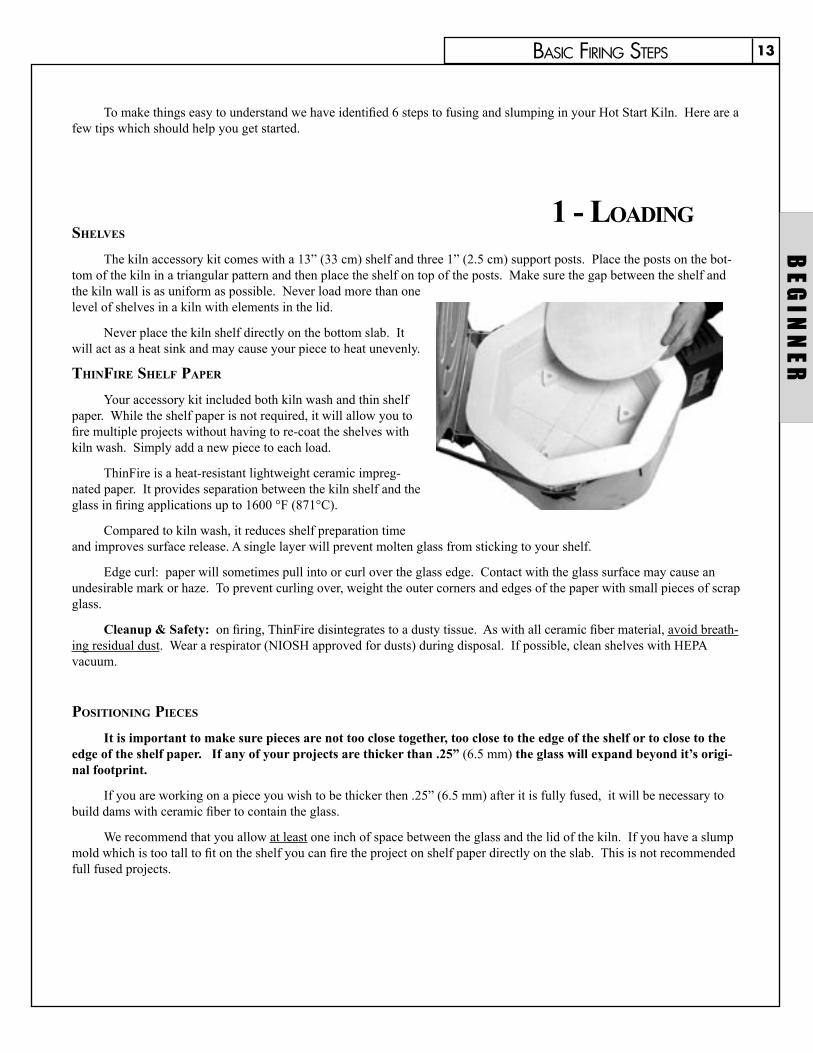
To make things easy to understand we have identified 6 steps to fusing and slumping in your Hot Start Kiln. Here are a few tips which should help you get started.
1 - LOADINGSHELVES
The kiln accessory kit comes with a 13” (33 cm) shelf and three 1” (2.5 cm) support posts. Place the posts on the bot-tom of the kiln in a triangular pattern and then place the shelf on top of the posts. Make sure the gap between the shelf and the kiln wall is as uniform as possible. Never load more than one level of shelves in a kiln with elements in the lid.
Never place the kiln shelf directly on the bottom slab. It will act as a heat sink and may cause your piece to heat unevenly.
THINFIRE SHELF PAPER
Your accessory kit included both kiln wash and thin shelf paper. While the shelf paper is not required, it will allow you to fire multiple projects without having to re-coat the shelves with kiln wash. Simply add a new piece to each load.
ThinFire is a heat-resistant lightweight ceramic impreg-nated paper. It provides separation between the kiln shelf and the glass in firing applications up to 1600 °F (871°C).
Compared to kiln wash, it reduces shelf preparation time and improves surface release. A single layer will prevent molten glass from sticking to your shelf.
Edge curl: paper will sometimes pull into or curl over the glass edge. Contact with the glass surface may cause an undesirable mark or haze. To prevent curling over, weight the outer corners and edges of the paper with small pieces of scrap glass.
Cleanup & Safety: on firing, ThinFire disintegrates to a dusty tissue. As with all ceramic fiber material, avoid breath-ing residual dust. Wear a respirator (NIOSH approved for dusts) during disposal. If possible, clean shelves with HEPA vacuum.
POSITIONING PIECES
It is important to make sure pieces are not too close together, too close to the edge of the shelf or to close to the edge of the shelf paper. If any of your projects are thicker than .25” (6.5 mm) the glass will expand beyond it’s origi-nal footprint.
If you are working on a piece you wish to be thicker then .25” (6.5 mm) after it is fully fused, it will be necessary to build dams with ceramic fiber to contain the glass.
We recommend that you allow at least one inch of space between the glass and the lid of the kiln. If you have a slump mold which is too tall to fit on the shelf you can fire the project on shelf paper directly on the slab. This is not recommended full fused projects.
BASIC FIRING STEPS
14
14
BEG
INNE
R
STEP 1 - START IN IDLE STATETo start programming the kiln must be in an IdLE state. This can be verified by the display alternating between the cur-
rent temperature and the message IdLE. When the kiln is first plugged in it will read “PF” indicating that there was a power interruption. To return to IDLE Mode Press
Press once you are in IDLE Mode to begin the programming process.
STEP 2 - SELECT FIRING MODETo Display Current Firing Mode Press
The display will read either “AUTO” or “PRO”. If the display reads “AUTO” it is currently set in the GlassFire Mode.
Press to select this mode..
If the display reads “PRO” it is currently set in the Ramp and Hold Mode. Press or to scroll to “AUTO”.
Press to select this mode.
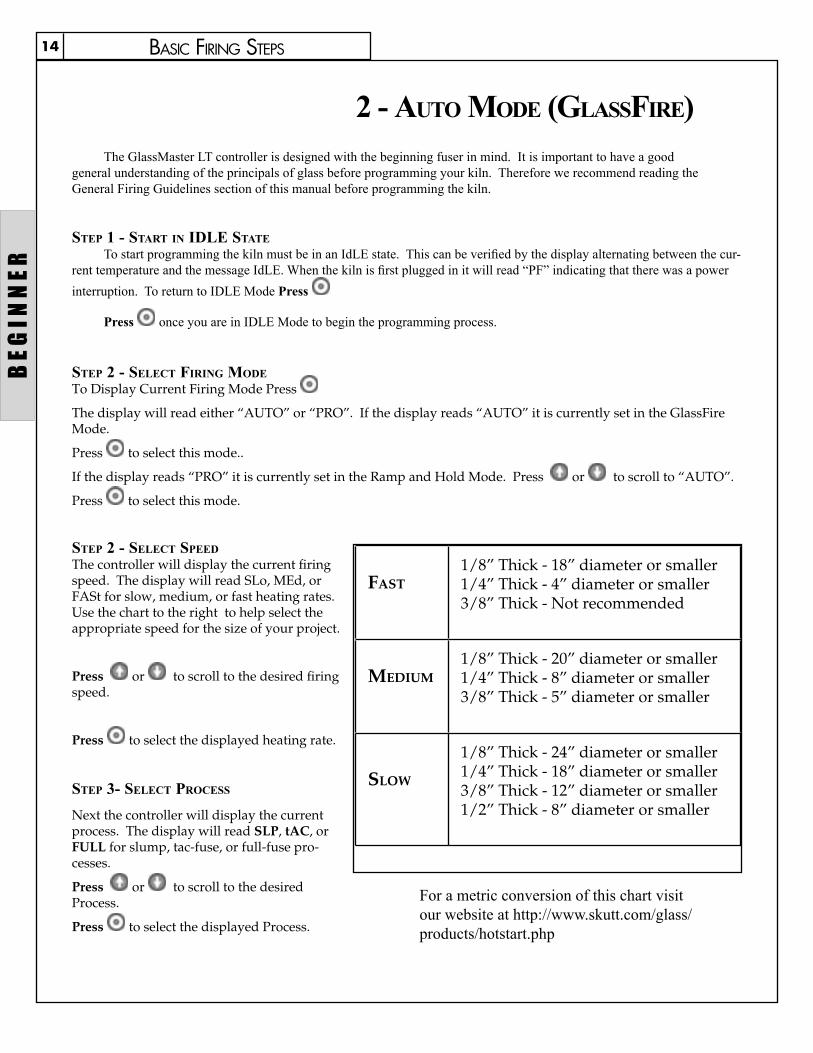
STEP 2 - SELECT SPEEDThe controller will display the current firing speed. The display will read SLo, MEd, or FASt for slow, medium, or fast heating rates. Use the chart to the right to help select the appropriate speed for the size of your project.
Press or to scroll to the desired firing speed.
Press to select the displayed heating rate.
STEP 3- SELECT PROCESS
Next the controller will display the current process. The display will read SLP, tAC, or FULL for slump, tac-fuse, or full-fuse pro-cesses.
Press or to scroll to the desired Process.
Press to select the displayed Process.
FAST1/8” Thick - 18” diameter or smaller 1/4” Thick - 4” diameter or smaller3/8” Thick - Not recommended
MEDIUM1/8” Thick - 20” diameter or smaller1/4” Thick - 8” diameter or smaller3/8” Thick - 5” diameter or smaller
SLOW
1/8” Thick - 24” diameter or smaller 1/4” Thick - 18” diameter or smaller3/8” Thick - 12” diameter or smaller 1/2” Thick - 8” diameter or smaller
BASIC FIRING STEPS
2 - AUTO MODE (GLASSFIRE)The GlassMaster LT controller is designed with the beginning fuser in mind. It is important to have a good
general understanding of the principals of glass before programming your kiln. Therefore we recommend reading the General Firing Guidelines section of this manual before programming the kiln.
For a metric conversion of this chart visit our website at http://www.skutt.com/glass/products/hotstart.php
15
15
BEG
INNERBASIC FIRING STEPS
STEP 4 - VERIFY SETTINGS
The next two entries allow you to modify the ending temperature and hold time of the factory-set programs. For d��Glass Fire Mode)
Press to verify the temperature.
Press to verify the hold time.
STEP 5 - STARTThe kiln is now ready to be started and will flash rEDI.
Press to start the program.
When the program advances or is advanced from the Process phase it enters the Pre- Annealing cooling segment. �e� -mation on programs and program segments see Glass 101).
After Pre-Annealing the program enters the final segment which is the Annealing segment. Again, do not open the kiln lid during this segment. The kiln will shut off and cool at a natural rate after the temperature reaches 800 °F (427 °C). Opening the lid during this period may cause pieces to crack.
When The Firing is Complete
When the program is complete the controller will beep for 15 seconds and flash “CPLt” alternately with the current temperature of the kiln and the amount of time it took to fire the program. Important - The kiln could still be very hot. Be sure to check the internal temperature of the kiln before touching it or opening the lid. We recommend waiting until the kiln temperature is below 100 ˚F. to prevent glass from thermal shocking.
4 - UNLOADING
To be safe you should wait until the kiln is below 100 °F (38 °C) to unload it. If you open the lid prematurely thermal shock may occur causing pieces to crack. Inspect the pieces as you unload them and make note of any changes you may want to make to your next program.
Shelf paper may be stuck to the bottom of some pieces. This can usually be removed with water and light scrubbing.
5 - VISUAL INSPECTION The GlassFire Programs in the GlassMaster LT Controller were designed to Fuse, Tack Fuse and Slump basic System
�possible to get the specific results you want without visually inspecting the glass and making adjustments.
There are two basic ways to inspect the glass and make adjustments, inspecting the glass after it is fired and inspecting it while it is firing.
We recommend that beginners start by looking at the glass after it has fired and has cooled. Adjustments can then be made by changing the Process Temperature or Hold Time on the next firing. The draw back to this method is that you may lose a little glass before perfecting the program so you may want to start with some scrap glass.

16
16
BEG
INNE
RBASIC FIRING STEPS
As mentioned earlier, after visual inspection of your glass you may decide you want to modify your process tempera-ture values to create more or less heatwork in your next firing. In GlassFire Mode you can only change the Process values. The Process Values include the peak temperature and hold time at peak temperature in the program. In order to make these changes you must first toggle the Modify Glass Fire Mode Feature to the on position. For instructions on how to toggle Modify Glass Fire Mode to the on position consult the Options Mode Instructions on pg. 21 of the manual.
You can also modify a GlassFire program while the kiln is firing using the Edit Mode feature. This is covered in the Advanced section of the manual under Edit Mode Features.
WHEN TO MODIFY A PROGRAM
A program should be modified when it consistently results in either too much or too little heatwork.
A Full Fuse program should result with the glass completely fused together to a 0.25” (6.4 mm) thickness. The edges should be rounded yet the shape should not be distorted.
A successful Tack Fuse can have different looks depending on the effect desired. The least aggressive tack fuse, com-monly referred to as a “Fuse to Stick”, will bond the 2 pieces of glass together without rounding the edges. More aggressive Tack Fuses will range from slightly rounded edges to almost completely fused. These are commonly referred to as “Texture Fuses”. Factory programs are set to result in a slightly more aggressive “Fuse to Stick”.
Slumping programs tend to require the most adjusting due to the fact that every slump mold is different and the degree of slump desired can change.
HOW MUCH TO MODIFY PROGRAMS
As you gain experience you will get a feel for how much to adjust programs. It is best to start in small increments, 5 °F or 5 minutes. If you are using Add Time or Add Temp to adjust the programs you can always add more during the same program.
TIME OR TEMPERATURE
To a certain extent both can have the same effect on the finished piece since they both add heatwork. (See General Fir-ing Guidelines - Heatwork). However, they both have different benefits and draw backs.
Increasing Hold Time allows the piece to “soak” in the heat uniformly. This is good for thicker pieces that may have differences in temperature between the outside and the center of the piece. A drawback to long holds is they can contribute to devitrification. (See General Firing Guidelines). When holds exceed 20 minutes or devitrification becomes a problem you should consider increasing the temperature.
CHANGING THE PROCESS TEMPERATURE
After you have entered the Process (Slump, Fuse, or Tac) in a program and have pressed the kiln will flash the cur-rent Process Temperature alternately with °F ( °C).
Press or once. The controller will quit flashing and only show the Process Temperature.
Single presses (pressing and letting go) will now adjust the temperature up or down in 1 °F (1 °C) increments. Holding these keys down will change the temperature at an increasingly faster rate.
After the desired temperature has been reached Press to lock in the temperature and continue programming.
The maximum temperature that can be entered is 1650 °F (899 °C).
6 - MODIFYING GLASSFIRE PROGRAMS

17
17
BEG
INNERBASIC FIRING STEPS
6 - MODIFYING GLASSFIRE PROGRAMS (CONTINUED)
CHANGING THE PROCESS HOLD TIME
After you have entered the Process Temperature in a program and have pressed Enter, the kiln will flash the current Process Hold Time alternately with HLd.
Press or once. The controller will quit flashing and only show the Process Hold Time in hours and minutes. Everything to the left of the decimal is hours and everything to the right is minutes.
Single presses (pressing and letting go) will now adjust the Hold Time up or down .
After the desired Hold Time has been reached Press to lock in the Hold Time and continue programming.
If large changes in time are required you can hold either or down. Holding these keys down will change the time at an increasingly faster rate. The maximum time that can be entered is 99 Hours and 99 Minutes.

18
18
ADVA
NCED
RAMP & HOLD PROGRAMING (PRO MODE)With PRO Mode you can design and run Ramp and Hold programs that meet the specific needs of your glass. You
can program up to 8 segments and store up to 5 programs. For more information regarding defining and designing Ramp and Hold Programs consult the Glass 101 section of this manual.
STEP 1 - SET CONTROLLER TO ADVANCED LEVEL
The Controller ships from the factory set at the beginning level. To unlock the advanced level from IDLE STATE press and hold it down until you hear a beep (around 4 seconds).
STEP 2 - START IN IDLE STATETo start programming the kiln must be in IDLE STATE. This can be verified by the dis-play alternating between the current temperature reading and the message IdLE. When the kiln is first plugged in it will read “PF” indicating that there was a power interrup-tion.
To return to IDLE Mode Press
STEP 3 - SELECT FIRING MODE
To Display Current Firing Mode Press
The display will read either “AUTO” or “PRO”. If the display reads “PRO” it is cur-rently set in the Programmable Mode.
Press to select this mode..
If the display reads “AUTO” it is currently set in the Glass Fire Mode. Press or to scroll to “PRO”.
Press to select this mode..
STEP 4 - SELECT WHERE TO STORE YOUR CUSTOM PROGRAM
The display should be flashing “PRO” alternately with the number of the custom pro-gram currently loaded. Press or to select a number between 1 and 4 to store your new custom program. Be careful not to select a program number that has a program you do not wish to overwrite. You may also choose to use segment 5 how-ever be aware that you will be overwriting a factory program developed for cast-ing.
Press to select the program number.
ADVANCED PROGRAMING

19
19
ADVANC
ED
STEP 5 - SELECT NUMBER OF SEGMENTS
The display should be flashing “SEG” alternately with the current segment setting. Press or to select the number of segment you wish to use in your program. You may choose a value of up to 8 segments
Press to enter the segment number.
STEP 6 - ENTER RATE, TEMPERATURE, AND HOLD TIME FOR EACH SEGMENT
Rate
The display should now be flashing “rA 1” alternately with the value that is currently entered for the temperature rate for segment 1. To change this value Press or to select the desired temperature. Press to enter that value.
Temperature
The display should now be flashing “°F 1” alternately with the value that is currently entered for the temperature value for segment 1. To change this value Press or to select the desired temperature. Press to enter that value.
Hold
The display should now be flashing “°HLd 1” alternately with the value that is currently entered for the Hold time for segment 1. To change this value Press or to select the desired Hold time. Press to enter that value.
STEP 7 - START
If your program has more than one segment repeat these steps for each segment. When the final segment information has been entered the display will read “rEDI”. This indi-cates the program is “ready” to run. Press to start the program. When the program is started the display will read “ON” for a few seconds and then display the current kiln temperature. You should see the temperature begin to rise after a few seconds.
Review
At this time it may be a good idea to Review the program to make sure it was entered correctly. To do this press . The display will step through the information entered for each segment. If this information is not correct stop the firing and reprogram the kiln.
When The Firing is Complete
When the program is complete the controller will beep for 15 seconds and flash “CPLt” alternately with the current temperature of the kiln and the amount of time it took to fire the program. Important - Depending on the program the kiln could still be very hot. Be sure to check the internal temperature of the kiln before touching the kiln or open-ing the lid. We recommend waiting until the kiln temperature is below 100 ˚F (38 ˚C).
ADVANCED PROGRAMING

20
20
ADVA
NCED
CHECKING THE PROGRAMVIEW SEGMENT
The View Segment feature is used to view which segment of the program the kiln is currently running. This feature is particularly useful when used in conjunction with the Skip Segment function to determine that the correct segment is cur-rently running. It is also helpful if you are trying to determine if the kiln is in a heating segment or a cooling segment.
While the kiln is firing Press . If the kiln is in a heating portion of the program the display will read “rA”, which stands for rate, along with the segment number. For example “rA2” would mean that the program is in the heating portion of segment 2.
If the program is in a Hold portion of the segment it will read “HLd” along with the segment number.
Immediately following the segment display will be EdIt (Edit Mode is described in the Advanced Programming sec-tion). This is for accessing the Advanced Edit Mode. The display will then go back to displaying the current kiln tempera-ture.
REVIEW
Review is helpful to verify which program is running or was run last. Press while the kiln is running or in Idle mode to activate the Review Feature. The display will list the Rate, the Process, the Process Temperature, and the Process Hold Time.
When Review is activated while the kiln is firing it will return to displaying the kiln temperature. If Review is acti-vated while in IDLE Mode it will place the controller in Ready Mode after the Review process is complete. At this point you may press start to start the program or wait for the kiln to revert to Idle Mode.
ADVANCED PROGRAMING

21
21
ADVANC
ED
The Edit Mode Features were designed to allow the artist to adjust the program while it is running. These features are �accessed from both a GlassFire program and a Ramp and Hold Program. Inspecting the glass while it is firing allows you to make certain adjustments on the very first firing however there are some precautions that should be observed.
The first is of course safety. Whether you are viewing your project by looking through the peephole or lifting the lid, be sure to observe all of the safety tips on page 5.
When lifting the lid to inspect the glass do not hold the lid open too long. The kiln will lose heat and take time to recover. It is important to note that when you release heat from the kiln during the process phase, the final temperature at which your piece is completed may change.
SKIP SEGMENT
The Skip Segment feature advances the program from the current segment to the next segment in the program. The Skip Segment feature can be used to stop the heatwork and advance the program to the annealing segments of the program. This feature should be used after a visual inspection of the glass indicates the effects you desire.
Skip Segment may also be used to speed up a GlassFire program when a slower firing rate is not required. This should only be used with very small jewelry sized items.
To increase the heating portion of the program you can use Skip Segment to advance from the first segment of any program to the second segment. Since segment 2 in all GlassFire programs has a faster heating rate, it will reach the process temperature faster.
To decrease the amount of time spent during the Annealing segment of the program (segment 4) you may press anytime after the desired process has been achieved
Press while the kiln is firing. The display will first show the current segment and then display EdIt for approxi-mately 2 seconds. Press while EdIt is displayed in the screen. The display will then read SSEG for approximately 6 seconds. While it is displayed Press to advance the program.
You may now use the View Segment feature to verify the segment change.
ADD TIME
The Add Time feature adds time in 5 minute increments to the Hold Time in segment two. This is considered the Pro-cess Hold Time since it is holding at the peak temperature of the program. You will only be able to access this feature when the program is currently in the Segment 2 Hold. To verify the current segment use the View Segment Feature. It should display HLd2.
Press while the program is in Hold 2. The display will read the current segment then display EdIt for approximate-ly 6 seconds. Press while EdIt is displayed. The display will then show SSEG for 6 seconds. Press while SSEG is displayed, to advance it to tME. Press to add 5 minutes to the Hold Time. The display will then return to showing the current temperature alternately with the changed Hold Time.
EDIT MODE FEATURES
ADVANCED PROGRAMMING
22
22
ADVA
NCED
ADVANCED PROGRAMMING
ADD TEMPERATURE
The Add Temperature feature adds temperature in 5 °F (3 °C) increments to the temperature in segment two. This is considered the Process Temperature since it is holding at the peak temperature of the program. You will only be able to ac-cess this feature when the program is currently in the Segment 2 Hold. To verify the current segment, use the View Segment Feature. It should display HLd2.
Press while the program is in Hold 2. The display will read the current segment then display EdIt for approximate-ly 6 seconds. Press while EdIt is displayed. The display will then show SSEG for 6 seconds. Press while SSEG is displayed, to advance it to tME and then Press again to display tMP. Press to add 5 °F (3 °C) to the Process Tem-perature. The display will then return to showing the current temperature alternately with the Hold Time. The Hold Time will not reset so you may need to use the Add Time Feature to allow it enough time to reach the new temperature.
LOAD MODELOADING A STORED RAMP AND HOLD PROGRAM
It is possible to store up to five Ramp and Hold (PRO) programs in the GlassMaster LT. In order to recall a program from memory perform the following steps:
Make sure the controller is in the Advanced State. From Idle Press to access the Mode menu. Use the or keys to select “LOAD” and then Press .
The display will show the last Ramp and Hold (PRO) program selected. Use the or to select a program number and press to Load the program.
The display will now read “REDI”. Press to start the program or to Review it first.
OPTIONS MODEEDITING FACTORY SETTINGS
The Options Mode allows you to toggle on or off Modify Glass Fire Mode and toggle between Fahrenheit and Celsius Temperature Scales. It also allows you to RESET all of the factory settings to their original values. Remember when you use the RESET feature it will clear out all of the Ramp and Hold Programs that you have stored (there is a factory set casting program that will be restored in Program 5), change the temperature scale to Fahrenheit, and reset any adjustments you may have made in Modify Glass Fire Mode. To access these Options features follow these instructions:
Make sure the controller is in the Advanced State. From Idle Press to access the MODE menu. Use the or keys to select “OPt” and then Press .
Use the or to select the feature you wish to edit and press to select it.
Use the or to toggle to your selection and press to select it. For RESET simply press to select it.

23
23
GLASS 101
The following guidelines just scratch the surface of the knowledge base associated with firing glass. We highly suggest you take a firing class from your local dealer. If classes are not available in your area there are numerous books available on the subject that can be found at bookstores and on the internet.
What is a Firing Program? Glass is very sensitive to changes in temperature below 1000 °F. If it
is heated or cooled too quickly through certain temperature ranges it creates stress within the glass which can cause breakage. Firing programs are used to control these temperature rates and limit the amount of stress created within the glass as well as create the desired effect on the glass.
A firing program is composed of one or more firing segments that dic-tate the heating or cooling rate throughout the program. Each one of the lines in the chart represents a segment or hold time within a segment and the slope of the line represents the rate of firing. A firing program is either entered into a kiln controller or on kilns without controllers it is replicated by turning up and down temperature switches .
Type of GlassThe art of firing glass has been around for centuries however, comparatively speaking, it has only been recently
that companies have begun manufacturing glass specifically designed to fuse together. Glass, like most everything on earth, expands when exposed to heat and contracts when it is cooled. It expands at a measurable rate, known as the COE, or coefficient of expansion, and as it becomes liquid it flows at different rates which is referred to as it’s viscosity level.
These variables and a host of others must be carefully managed to create glass that can be fused together without crazing, cracking, warping, or breaking. Always consult with your supplier of glass to determine if the glass you wish to fuse is compatible. All System 96 Glass is compatible.
HeatworkHeatwork is a term used to describe the relationship of time and temperature and their combined effects on glass.
To a certain extent the two are inversely related. This means that the higher the temperature the less time is needed to create the same effect and likewise, the lower the temperature the more time is needed.
This concept becomes most useful at the “Process” temperature range of glass. This is the temperature range where the glass is fused, slumped or sagged. Most fusing glass will fuse between 1450 °F (788 °C) and 1480 °F (804 °C). It is possible to get the same results (or the same amount of heatwork), by bringing the kiln to 1450 °F (788 °C) and holding it at that temperature for 30 minutes as you would by bringing the kiln to 1480 °F (804 °C) and holding it for only 10 minutes. There may be other factors that make you choose one working temperature over the other such as the thickness of the project.
Size and Mass The size of the piece is one of the most influential factors for creating a firing program. One of the keys to suc-
cessful heatwork is having the entire piece go through critical temperature ranges at the same moment. When a piece is thick it takes longer for the center to heat up then it does the outside of the piece. When it is a large diameter, slight differences in temperature throughout the chamber of the kiln can cause the piece to expand at different rates.
The key to firing larger and thicker pieces is to slow the firing rates through critical temperature ranges. Determin-ing how slow is often a trial and error proposition, therefore it is best to start with a conservatively slow program. More projects are ruined by going too fast than too slow.
GLASS 101

24
24
GLA
SS 1
01
Critical Temperature RangesA “Critical Temperature Range” is any temperature or temperature range in the firing cycle that has a high level of
potential for limiting the success of the project. Limited success can be expressed as overfired, underfired, breakage, devitrification or bubbles, just to name a few. It can be argued that there are numerous critical temperature ranges. To keep things simple we are going to discuss the primary four: Heating Range , Process Range, Pre- Annealing Cooling Range, and Annealing Range.
HEATING RANGE
The Heating Range goes from room temperature to the first set of data in the Process Range. The only concern during this range is heating the pieces too fast. Small pieces can normally be heated faster than larger pieces.
PROCESS RANGE
The Process Range is the temperature range where the material begins to visibly change. It is this stage that deter-mines the final shape of the piece. During the Process Range temperatures and hold times are key. If you are unsure of the desired peak temperature you may want to start on the low end of the range with a longer hold time. This will help insure that thicker pieces receive the proper heatwork throughout the entire piece.
PRE-ANNEALING COOLING RANGE
After the process range is through, it is desirable to cool the piece quickly for several reasons. The first reason is to stop the heatwork. This is especially important on a project such as a less then 100% fuse or a drop mold.
The second reason is that an undesirable reaction known as devitrification can occur during this cooling period if the kiln is cooled to slow. Devitrification is a scummy white crystallization on the glass surface that is difficult if not impossible to remove. Be sure to slow down the cooling before you enter the Annealing Range.
Opening the kiln lid to increase the rate of cooling, while practiced, is not always recommended. On certain models the thermocouple is in the rear of the kiln and the temperature from front to back can vary causing one part of the piece to enter the annealing phase before another.
ANNEALING RANGE The final critical range is the Annealing Range. This is the temperature range where it is important to cool the
glass slow so it can even-out in temperature. This process prevents stress from building in the glass which could cause the piece to break.
Our pre-programmed firing schedules anneal from 960 °F (516 °C) to 800 °F (427 °C), which should be adequate for most tested compatible glass. By incorporating such a broad range, the risk of breakage is limited. Be sure to keep the lid or door of the kiln closed until the kiln reaches room temperature. Opening the lid too soon can cause pieces to break.
Firing ProcessesThere are many different processes or techniques used for manipulating glass with heat inside a kiln. In this
manual we will focus on two, Fusing and Slumping. Other techniques include but are not limited to Drop Molds, Pate de Verre, Casting, Painting, and Combing. For more information on using your kiln with these techniques please consult your glass supplier.
GLASS 101

25
25
GLASS 101
FUSING
Fusing is the process of joining 2 or more pieces of glass together by the application of heat. The glass may be in the form of sheets, stringers, frit or a host of other forms. There are different degrees of fusing. You may want to fuse glass so it sticks to another piece of glass without deforming. This is known as a “Fuse to Stick”. If you were to apply more heatwork to the piece the edges would round slightly. This is known as a “Tack Fuse”. A “Full Fuse” is created when the pieces have melted completely together and are 1/4” thick (6.4mm). A “Texture Fuse” is any point in-between a “Fuse to Stick” and a “Full Fuse”.
There is a temperature range at which glass can be fused. The point at which it begins to fuse is influenced by the rate at which the temperature is climbing when it reaches the fusing range. Most fusing glass will begin to fuse at around 1325 °F (718°C).. Remember that heatwork is a function of time and temperature.
Starting with glass that has been determined to be compatible is only the beginning to a successful fusing or slump-ing project. The temperature and various temperature rates in a firing program must be designed to the specific needs of the project you are creating. The size, thickness, shape, and type of glass all must be considered when designing a firing program.
SLUMPING
Slumping can be defined as the controlled bending of glass under the influence of heat and gravity within a kiln. This is generally done over or into a mold. Molds can be made out of a variety of different materials and can be found at art glass supply businesses.
When slumping it is necessary to take into account the shape of the mold, the thickness of the piece, and the degree of heatwork desired.
Gravity plays a very important role in slumping, especially slumping over a mold as opposed to into a mold. If the shape of the mold dictates that the unbent glass is largely unsupported, the weight of the unsupported glass will pull the glass over the mold quicker then if only a small portion is unsupported.
A thin piece of glass will bend quicker than a thick piece of glass. A thick piece of glass requires more Hold time in the final segment of the process phase.
In some cases the artist may want to control the amount of bend by visually inspecting the kiln. Be sure to follow the safety guidelines listed in this manual when using this technique. When the proper amount of heatwork is reached the artist can use the Skip Segment feature to advance the kiln into the cooling cycle. Slumping projects that receive too much heatwork can take on unwanted texture from the mold or in extreme cases fuse to a puddle.
GLASS 101

26
26
GLA
SS 1
01
Glass fusing is simply the process of stacking two or more layers of compatible glass together to make a design. The stacked glass is placed in the super heated environment of a kiln where it melts together.
THE FUSING PROCESS There are two basic fusing stages; heating and cooling. During the heating process the fusible glass is slowly taken from room temperature up to 1300 – 1500 °F, depending upon the finished “look” we desire. When the glass is in this temperature range you can stop the fusing process at any time. This is when you will make the decisions that make your work unique. It’s your opportunity to be the artist.
• At 1300 °F the project will have slightly rounded, polished edges and a textured surface. • At 1500 °F the top layer of glass will sink down into the bottom layer. The project will have a
smooth surface and rounded edges. During the cooling process we control the rate at which the glass cools and slowly bring it back to room temperature. The length of time that this takes is determined by the size of the project and the number of layers being fused. The larger the project and the greater the number of layers the longer this will take. Don’t rush this step it is critical to the success of your work! While the glass is cooling, it is going through an annealing phase, which occurs at approximately 960 °F. I like to call it the “healing” phase. Keep in mind that you have just taken several layers of glass and forced them to become one. They need some time to adjust. Be nice to your glass!
MATERIALS / COMPATIBILITY
Glass expands when it is heated and contracts when it cools. When we fuse, we work within a family of products that have been “tested compatible” to have the same C.O.E (Coefficient of Expansion). These materials are specially formulated and pretested by the manufacturer for consistency. Don’t bother wasting your time working with the stuff you have laying around the garage. If it isn’t marked tested compatible it isn’t! Invest in fusible glass right up front; the success of your project depends on it. This is the best advice you will get today!
Tips for better projects:• Cutting the glass: Take the time to cut the glass accurately. Grind the project pieces where
necessary to improve the fit.• Clean: Wash the glass before assembling the project with a mild detergent and water. Dry the
glass thoroughly.• Pattern Design: Construct your projects with 2 – 2 ½ layers of glass for greater consistency in
size, shape and thickness. Layer 1 is the base. Layer 2 is the design layer and the third “half” layer is the accent.
• Glue: Lightly tack the design layer to the base layer so you can transport the project to the kiln without its shifting. Use a tooth pick or similar tool to apply a pin head or smaller size dab of Elmer’s white glue to the back side of the glass.
• Firing Speed: Slower is usually better. If you are not sure which firing program to use, err on the side of conservative and choose the slower program.
The Basics
GLASS 101
By Lisa Vogt

27
27
GLASS 101
Q. Do you have to re-coat the kiln shelf with primer every time you use it?A. If the shelf primer is in good condition it can be used more than one time. The shelf should be scraped, sanded or washed clean with clear water and re-coated when the primer shows signs of wear. It’s time to re prime when the coating becomes thin (usually where a project rested) has cracks, or begins to flake off.
Q. Why does kiln wash stick to the back of a project?A. This is usually the result of exhausted kiln wash; the shelf should have been re-primed prior to use. It may also occur when the glass has been fired to too high a temperature or kept at full fuse too long. The kiln wash can be removed with fine steel wool or a scraping tool. Stubborn patches can be soaked off with bathroom cleaning products used to remove hard chemical residue.
Q. After the project is fused, how close to room temperature do you have to be before opening the kiln lid?A. How badly do you want the project inside? Room temperature is usually well below 100 °F. If you open the lid prematurely thermal shock can occur; breakage caused by changing temperature too fast. Just a quick peek in to the kiln, done too early can ruin your day. Wait, it will be worth it!
Q. What causes tiny bubbles and how do I get rid of them? A. Air becomes trapped between the layers of glass when it is heated. The number and size of the air bubbles can be reduced by heating the glass more slowly between the temperatures of 1000 – 1465 °F. This gives the air more time to escape before the glass edges become sealed.
Q. How do I avoid big bubbles?A. Large dome shaped bubbles will sometimes rise up in the middle of a medium - large (4” x 4” or bigger) projects. This is usually the result of firing too fast on a ceramic kiln shelf. The outer edges of the project become soft first and form a “seal” on the shelf. Air becomes trapped under the glass. When it expands it lifts the glass. This is less likely to happen when using shelf paper or a fiber board kiln shelf, as the air can escape through the porous materials. Best advice is to slow down the firing process.
Q. Can I stack kiln shelves?A. Not recommended. Unlike ceramics, glass is thin and reacts to heat quickly. Stacking shelves causes uneven heating. The outer edges of the project become molten before the center has a chance to react; your firing results will be inconsistent.
Q. How does the thickness of the glass relate to my target temperature? A. A project made with two layers of thin fusible glass will usually reach the desired “look” before a proj-ect made with two layers of 1/8” glass. When you change project sizes or materials (thin vs. 1/8”) you will want to monitor the first few firings and make any necessary adjustments to your firing schedule.Q. Can more that one project be fired in the kiln at one time?A. Yes, as long as the projects are similar. They should be made from the same thickness glass, have the same number of layers and be close is size. Use a firing speed for the largest project. Small projects will not be harmed by firing slowly but a large project will suffer if rushed.
Frequently Asked Questions
GLASS 101

28
28
GLA
SS 1
01
Q. What causes sharp edges on the project?A. Dragging is usually caused by over firing a project that is resting on fiber paper. As the glass contracts and draws in on itself the paper resists, sharp edges are the result. This edge can be made safe with file a or grinder. After grinding the project can be put back in the kiln and heat until the ground edge is polished.
Q. Why is there debris between the glass layers?A. Too much glue. Small amounts of glue will burn off leaving no trace. (See: Glue above for more info.) If you use an excessive amount of glue it will burn becoming sealed between the layers, leaving dark blotches. Excess glue can also cause small eruptions that will blow a hole through the glass or cause pieces to jump and move in the kiln.
Q. What are the differences between using a ceramic kiln shelf or fiber paper?A. Ceramic Shelf:
• Fused glass will take on the texture/ pattern of whatever it is fired on. If you fire on a ceramic kiln shelf your project will have a smooth back surface. (Great for bowls, plates, fine art pieces; projects where a sleek underside is desired.)
• Ceramic shelf is used over and over again.• A ceramic shelf is dense; it retains heat which allows the glass to pass through the critical stages
slowly. • Ceramic shelves have to be primed frequently, this can be time consuming.
Fiber Paper:• Shelf paper comes in a variety of thickness and finishes. Generally the thinner the material the
smoother the fusing surface. (Great for coasters, pins, wall art; projects where a textured back side will make it easy to glue accessories on like rubber feet, pin backs etc.)
• The thin material can be used only once. The medium material can sometimes be reused; it leaves a matt finish on the back of the project. The thick material can be used multiple times but the texture on the back of the project will be course.
• The fiber paper is porous. Air can circulate, therefore large air bubbles are less likely to form between the glass and the shelf.
• Shelf paper has to be cut to size and can be costly if you are using it every time you fire.
Q. What are the differences between ceramic molds and stainless steel forms?A. Ceramic Molds:
• Ceramic molds come in a wide variety of sizes and shapes. They have to be primed like the ceramic kiln shelf. The primer tends to last longer on a form than on a shelf because slumping temperatures are lower than fusing temperatures. Slumping occurs at approximately 1200-1300 degrees.
• Ceramic molds are inexpensive and durable but they will break if dropped or used unprimed.• Ceramic molds should be sanded and be re-primed if there are pits or cracks in the coating.• Ceramic molds cool more slowly than the glass. Therefore most molds are shaped so the glass
slumps down into the mold, allowing the glass to contract first.
GLASS FUSING 101
Frequently Asked Questions

29
29
GLASS 101
Stainless Steel Forms:• Stainless steel forms come in a variety of shapes and sizes as well. They have to be primed
also. The slick surface makes priming difficult. The form can be sanded, sandblasted or heated to make the priming process easier.
• Stainless steel forms are extremely durable “forever” molds. But they tend to be several times more expensive than ceramic molds.
• Steel forms should also be sanded and re-primed if there are pits or cracks in the coating. • Steel cools more quickly than the glass. The metal contracts underneath the glass which gives
the room needed to slide the draped piece off the form. A bit of advice:Take your time in the beginning. Start with a bunch of small, 2” x 2” or 4” x 4” square, super fast (no time consuming pattern) projects. Use them to establish a relationship with your kiln and with fusing materials. Take accurate notes so you can repeat the successful projects and learn how to avoid the failures. Don’t think you won’t be having any fun. Some of the best work comes from loose design exercises like this. As your confidence builds so will the size and complexity of your projects.
Good Luck! Lisa Vogt
GLASS FUSING 101
Lisa Vogt is a successful glass artist, writer, instructor, and business owner. Her artwork and glass articles have been featured in numerous national magazines. Lisa has authored several books including a beginning glass fusing book called Get Fired Up!
30
30
GEN
ERALGENERAL INFORMATION
TroubleshootingIf you find yourself in this section of the manual please remember that Skutt and your Hot Start Kiln Dealer are here to
help you as long as you own your kiln. If you are unable to determine the problem, or just need to order parts, please let us know.
KILN WILL NOT START
If there is no display, check to see if the kiln is plugged in and the breaker has not tripped. If there is a display, double check your programming instructions. The kiln must be in Idle Mode to start.
KILN WILL NOT REACH TEMPERATURE
Make sure the kiln is connected to the proper voltage. After extended use, the elements in the kiln wear out and eventu-ally need to be replaced. Look for possible breaks in an element. Elements can break if they are contaminated by bits of glass. If an element is out it will not glow. Fire the kiln to at least 500 °F and look in the kiln to see if an element is out.
KILN OVERFIRES OR UNDERFIRES
The thermocouple, which looks like a metal wire protruding into the kiln chamber, measures the temperature in the kiln chamber. As thermocouples began to wear out they slowly drift in the direction of an overfire. If you have noticed that your projects have become increasingly overfired it may be time to change your thermocouple. If you are comparing your results to how they fire in other kilns it is important to remember that every kiln fires slightly different and it may be necessary to adjust your firing programs.
Another possible cause would be that the factory programs have been changed. Look at the programs on page 25 and make sure they match the process temperature and process hold time that is entered in the program you are running. The last program run can easily be checked by pressing the Review key. To check other programs enter them while Modify GlassFire Mode is on. Remember, Process Hold times need to entered with Hours to the left of the decimal and Minutes to the right of the decimal.
ERROR MESSAGES
The following errors messages may appear in the display of your controller.
Err 1Error 1 occurs during a firing segment programmed to increase the temperature. When the kiln is maintaining the
�requires that the kiln maintain a minimum rise of 12°F (4.8°C) per hour.
This usually indicates that the elements or the relay have failed. The kiln will shut off.
Err FError F occurs during a firing segment programmed to decrease the temperature. When the kiln is maintaining the
�requires that the kiln maintain a minimum fall of 12°F (4.8°C) per hour.
This usually indicates that a relay has failed and needs to be replaced. The kiln will shut off.
Err DError D occurs during a firing segment programmed to increase the temperature. If the kiln temperature is 100°F
(38°C) or greater above the set point for 15 seconds then the controller registers an error d situation.
This usually indicates that a relay has failed and needs to be replaced. The kiln will shut off.
FAILThis indicates that the thermocouple has failed and needs to be replaced. The kiln will shut off.
tc--This indicates that the thermocouple has been installed backwards. The thermocouple needs to be removed and rein-
stalled into the thermocouple block with the red wire inserted in the hole stamped “-”.

31
31
GENERAL
GENERAL INFORMATION
HOW DO I...?How Do I Go Back A Step When I Make A Mistake In Programming?You can’t go back a step but you can start over at any point by holding down the ENTER key until it beeps. This will take you back to IDLE MODE. If you have unlocked the Advanced level Press ENTER again and use the ar-rows to select your desired programming mode.
How Do I Make The Kiln Fire Hotter or Cooler In Glass Fire Mode (AUTO)?Follow the instructions in this manual for turning on Modify GlassFire Mode. You will find these instructions under the Options Mode portion of the manual. When MGF is turned on it will give the option of changing the process temperature and hold time as part of the programming process (pg.21).
How Do I Make The Kiln Heat Faster In Glass Fire Mode?If the preset programs in GlassFire Mode are too slow for your liking the most obvious option is to switch to Ramp and Hold Mode in the Advanced Level and design your own faster program. You can use the programs for GlassFire Mode, which are listed in this manual, as a guide and just tweak them to your needs.
Another option is to use the Skip Step Feature (see EDIT MODE instructions pg.20) to skip the first segment of the GlassFire Mode program and move directly to the second segment which has a faster heating rate.
How Do I Make The Kiln Cool Faster?In GlassFire Mode one option is to press STOP to skip the Annealing segments after the kiln has finished the pro-cess segment. Another option is to switch to Ramp and Hold Mode in the Advanced Level and design your own faster annealing portion of the program. You can use the programs for GlassFire Mode (pg.21), which are listed in this manual, as a guide and just tweak them to your needs.
Still another option is to use a box fan to cool the outer shell of the kiln. This can knock up to 4 hours off the cool-ing time depending on the model. Always be careful that you are not cooling too fast and thermal shocking or improperly annealing the glass.
How Do I Start Over And Reset Factory Settings?Follow the instruction under the OPTIONS MODE portion of this manual for Resetting Factory Settings. This will bring it back to the same configuration as it left the factory. Be careful because it will also overwrite any Ramp and Hold Programs you have created.
How Do I Get The Controller To Read Temperature In Celsius?Follow the instructions under the OPTIONS MODE of the manual for changing the temperature scale. When the kiln is reading in Celsius there will be a red led light illuminated in the lower right hand corner of the display.

32
32
Slow Rate Soak Temp Hold Length250°F/Hour 300°F 10 minutes400°F/Hour By Process By Process9999°F/Hour 950°F 60 minutes100°F/Hour 800°F 15 minutes
Medium Rate Soak Temp Hold Length350°F/Hour 300°F 10 minutes600°F/Hour By Process By Process9999°F/Hour 950°F 30 minutes150°F/Hour 800°F 10 minutes
Fast Rate Soak Temp Hold Length500°F/Hour 300°F 5 minutes800°F/Hour By Process By Process9999°F/Hour 950°F 30 minutes175°F/Hour 800°F 10 minutes
Soak Temp Hold Lengthfull 1465°F 10 minutestac 1325°F 10 minutesslump 1225°F 15 minutes
GEN
ERALGENERAL INFORMATION
GlassFire Programs

33
33
GENERAL
My ProgramsGENERAL INFORMATION
RATE
TEMP
HOLD
PROGRAM 1 SEG 1 SEG 2 SEG 3 SEG 4 SEG 5 SEG 6 SEG 7 SEG 8
RATE
TEMP
HOLD
PROGRAM 2 SEG 1 SEG 2 SEG 3 SEG 4 SEG 5 SEG 6 SEG 7 SEG 8
RATE
TEMP
HOLD
PROGRAM 3 SEG 1 SEG 2 SEG 3 SEG 4 SEG 5 SEG 6 SEG 7 SEG 8
RATE
TEMP
HOLD
PROGRAM 4 SEG 1 SEG 2 SEG 3 SEG 4 SEG 5 SEG 6 SEG 7 SEG 8
RATE
TEMP
HOLD
PROGRAM 5 SEG 1 SEG 2 SEG 3 SEG 4 SEG 5 SEG 6 SEG 7 SEG 8
RATE
TEMP
HOLD
SPARE 1 SEG 1 SEG 2 SEG 3 SEG 4 SEG 5 SEG 6 SEG 7 SEG 8
RATE
TEMP
HOLD
SPARE 2 SEG 1 SEG 2 SEG 3 SEG 4 SEG 5 SEG 6 SEG 7 SEG 8
150F/hr 250F/hr 30F/hr1000F/hr250F 1500F 750F950F00:15 00:05 00:2002:30
Factory Set Casting Program

34
34
GEN
ERAL
Warranty & Repairs
All Skutt Kilns come with a 2 year warranty. This warranty is included in the bag that contained this manual. For details regarding what is covered in the warranty and how to obtain warranty service, please consult the warranty.
There are certain repairs that can be done fairly easily. All parts come with a complete set of instructions. The follow-ing are repairs that can be done by most kiln owners. For more complicated repairs please contact your distributor.
ALWAYS UNPLUG THE KILN PRIOR TO DOING ANY REPAIRS.BRICK REPAIRS
Generally brick does not need to be replaced or repaired unless a large portion of the brick has been broken out. Small chips and cracks do not effect the performance of the kiln.
SLAB REPAIRS
Melted glass on a properly kiln washed floor can easily be removed without damage to the surface below by scraping the slab with a putty knife.
Holes in the slab up to 1.5 centimeters deep can be patched. Using a sharp knife or X-Acto tool, undercut the edges of the damaged area. To fill the void use “Kiln Patch”. This can be ordered through Skutt or may be available at your local distributor. Compress the kiln patch into place, and scrape flush with the rest of the floor. Allow to dry well before firing.
LID REPAIRS
A coating of refractory cement will prevent the brick from crumbling and falling on your ware. Some lids without elements have a flip side if ever needed. Just remove the screws holding the hinge leaves, turn the lid over, and reattach the leaves to new holes drilled in the lid’s band.
Major cracks and chips are often times impossible to repair and it will be necessary to replace the lid.
REPINING ELEMENTS
Sagging elements can be re-pinned into the element groove. Reposition the sagging element into the groove and use n�hole to insure a fresh snug fit. Be sure to only use factory pins. Pins made of metal which is different then the material used to make the element will cause the element to burn out.
REPLACING ELEMENTS
As elements grow old they oxidize and produce less power. Eventually the kiln will no longer reach temperature and the elements will need replacing. Please consult your distributor when it becomes necessary to replace the elements in your kiln. They will provide you with the correct replacement parts and comprehensive instructions for replacing them correctly.
REPLACING THERMOCOUPLES
The thermocouple is the twisted wire object that protrude into the kiln chamber. It measure the temperature inside the kiln and relays the information to the controller. Over a period of time thermocouples can degrade and need to be replaced. If not bent or broken, thermocouples will generally slowly drift towards an overfire. If you notice an increasing amount of heatwork to your projects it may be necessary to replace the thermocouple.
REPLACING RELAYS
Relays cycle the power on and off in the kiln. The HotStart Pro utilizes a solid state relay for cycling the power on and off as well as a mechanical relay as a safety. If the relay fails during a cooling segment of the program you will see an error code of Err F. If the relay fails during heating segment of the program you will see an Err D. If the safety relay fails you will see an Err1.
GENERAL INFORMATION
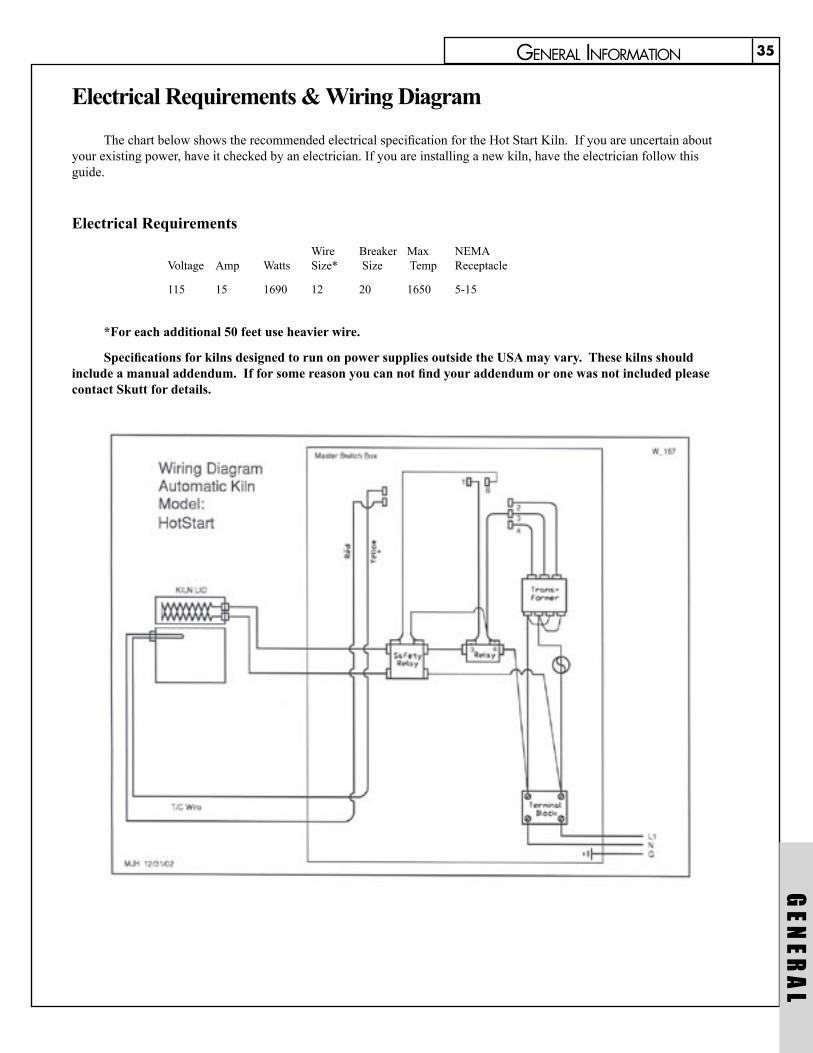
35
35
GENERAL
GENERAL INFORMATION
Electrical Requirements & Wiring Diagram
The chart below shows the recommended electrical specification for the Hot Start Kiln. If you are uncertain about your existing power, have it checked by an electrician. If you are installing a new kiln, have the electrician follow this guide.
Electrical Requirements
Wire Breaker Max NEMA Voltage Amp Watts Size* Size Temp Receptacle
115 15 1690 12 20 1650 5-15
*For each additional 50 feet use heavier wire.
Specifications for kilns designed to run on power supplies outside the USA may vary. These kilns should include a manual addendum. If for some reason you can not find your addendum or one was not included please contact Skutt for details.

6441 SE JOHNSON CREEK BLVD. PORTLAND, OR 97206 (503) 774--6000 [email protected]


