41
HOW-TO GUIDE | EMAIL MARKETING How to Add and Update Your Contacts INSIGHT PROVIDED BY www.ConstantContact.com | 1-866-876-8464 © 2011 Constant Contact, Inc. 10-1724
HOW-TO GUIDE | EMAIL MARKETING
How to Add and Update Your Contacts
INSIGHT PROVIDED BY
www.ConstantContact.com | 1-866-876-8464 © 2011 Constant Contact, Inc. 10-1724

Adding and Updating Contacts | Page 1©Constant Contact, Inc. All rights reserved.
1601 Trapelo Road
Suite 329
Waltham, MA 02451
www.constantcontact.com
Constant Contact, Inc. reserves the right to make any changes to the information contained in this publication without prior notice.
Copyright © 1996-2010, Constant Contact, Inc. All rights reserved. Unpublished – Rights Reserved under Copyright Law of the United States. Use of a copyright notice is precautionary only and does not imply publication or disclosure.
This document contains proprietary and confidential information of Constant Contact, Inc. Use, disclosure, or re-production is prohibited without the prior express written consent of Constant Contact, Inc. For inquiries regarding reproduction or distribution of any Constant Contact material, please contact [email protected].
TrademarksAppConnect, Brush Up, Connect. Inform. Grow., Constant Contact, the Constant Contact Logo, Constant Contact University, Connect Up, Do-It-Yourself Email Marketing, Email Marketing 101, Email Marketing Diva, Email Marketing Hints & Tips, Listen Up, Open Up, SafeSubscribe, SafeUnsubscribe, Speak Up, Survey 101, Survey Hints & Tips and The Smart Way to Reach Your Customers are trademarks, service marks, or registered trade-marks or service marks of Constant Contact, Inc. in the United States and other countries. All other company and product names may be trademarks or service marks of their respective owners.
Restricted Rights LegendUse, duplication, or disclosure by the government is subject to restrictions as set forth in subdivision (c)(1)(ii) of the Rights in Technical Data and Computer Software clauses as DFARS 252.227-7013 (October 1988) and FAR 52.227-19 (c) (June 1987).
©2010 Constant Contact, Inc.
Adding_and_Updating_Contacts_Ver6.2 | Page 2©Constant Contact, Inc. All rights reserved. Updated 10/08/10.
Contents
Preview Your Options and Resources ....................................................................3
What this Guide Covers ..........................................................................................3
Alternative Options not Covered in this Guide ........................................................4
1. Learn and Follow the Contact Permission Policy .............................................5
2. Add New Contacts ................................................................................................7
2a. Type or Copy & Paste New Contacts ................................................................8
2b. Format a File of New or Updated Contacts ....................................................10
2c. Import a Formatted File of New or Updated Contacts ...................................14
3. Update Existing Contacts’ Details ...................................................................16
3a. Type or Copy & Paste Updates .......................................................................17
3b. Import a Formatted File to Update Existing Contacts’ Details ......................18
3c. Ask Contacts to Update their Information .....................................................19
4. Use Contact Details and Custom Fields ...........................................................20
5. Select Contact Data Labels ...............................................................................23
6. Troubleshoot Common Issues...........................................................................25
7. Resources: Collect and Manage Permission-Based Contact Lists ..............30
Appendix .................................................................................................................32
I. Valid Country Names ..........................................................................................32
II. Valid States / Provinces and Abbreviations ......................................................34
III. Add/Import and Update Function Differences ................................................35
IV. Import Contacts from Gmail .............................................................................36
Glossary ...................................................................................................................37
Adding_and_Updating_Contacts_Ver6.2 | Page 3©Constant Contact, Inc. All rights reserved. Updated 10/08/10.
Preview Your Options and Resources
This guide helps you to add new contacts to, and update your existing contacts’ information in, Constant Contact. Here is a summary of everything this guide does and does not cover.
What this Guide Covers
You will find help with several topics related to adding and updating contacts in the following sections.
Learn and follow the contact permission policy •Section 1 provides brief answers to questions about how to:
Follow the permission policy requirements•
Collect permission-based contacts•
Avoid getting spam complaints from contacts who opted into your mailing list•
It also explains why the permission policy is strictly enforced.
Select lists for new contacts before you add them •You cannot add new contacts into your Constant Contact account without first creating and selecting contact lists for them. The beginning of Section 2 explains what you need to keep in mind when creating and selecting lists for your new contacts.
Select and use the method for adding and updating contacts that will be most efficient for you •The best way to add new contacts, or update existing contacts’ details, in Constant Contact depends on:
Where the contact information is currently stored •If your permission-based contact list is currently stored in another software application or database, you may be able to use a contact import tool instead of a standard method explained in this guide. See the next page for details.
The number of email addresses and details you need to add or update • Sections 2 and 3 will help you to select and use the standard method that will be most efficient for you.
Use contact details and custom fields• Section 4 explains what types of information you can add with email addresses, how many characters each detail can have, and more.
Select contact data labels •If you are importing contacts in a file, and you did not label the contact details in the file correctly, you will encounter a ‘Select how to label your data’ page during the import process. Section 5 provides instructions for using this data label matching tool.
Find help with miscellaneous issues• Section 6 provides answers questions about topics such as:
Adding back opted out contacts•
Managing • duplicate email addresses
Resolving import errors•
Adding_and_Updating_Contacts_Ver6.2 | Page 4©Constant Contact, Inc. All rights reserved. Updated 10/08/10.
And more•
Learn technical terms and contact management lingo • If you see a word or technical term that you do not understand, look for a definition in the Glossary at the end
of this guide.
Alternative Options not Covered in this Guide
The following helpful, but non-essential, options for adding and updating contacts are not covered in this guide:
Import Tools• If your permission-based contact list is stored in any of the following applications, you can use an import tool to transfer it directly into your Constant Contact account:
Microsoft• ® Outlook®
Microsoft• ® Outlook Express® and Windows® Mail
Intuit• ® QuickBooks®
ACT!• ® by Sage®
Salesforce• ®
QuickView• ® iPhone Application
To download a contact import tool, click the Contacts tab in your Constant Contact account. Then click the “Import Tools” link in the My Contacts section of the resulting page. To get help installing or using a contact import tool, visit: http://constantcontact.custhelp.com/cgi-bin/constantcontact.cfg/php/enduser/std_adp.php?p_faqid=3798 If your permission-based contact information is in:
Gmail or Google Mail • (My Contacts list only), see Appendix IV at the end of this guide.
A database or email client not listed above• , you may be able to export the list into a file and import the file into Constant Contact (see Section 2 to format and import the file). Need help exporting your contacts from your email client? Visit: http://constantcontact.custhelp.com/cgi-bin/constantcontact.cfg/php/enduser/std_adp.php?p_faqid=2652
Your own application• , you may be able to use an Application Programming Interface (see below).
Join My Mailing List Form •Anyone who joins your list through your online Join My Mailing List form will be added to your account automatically. To create a Join My Mailing List form, select the Contacts tab in your Constant Contact ac-count and click the “Join My Mailing List” link just below the tabs.
Application Programming Interfaces •You can integrate Constant Contact directly into your software program with Constant Contact’s Application Programming Interfaces (APIs) if you have software development skills (or access to a web developer). Visit our AppConnect website at: http://developer.constantcontact.com
Contact Capture Tool •To quickly add or update one contact at a time without opening a web browser, use Contact Capture Tool. Use it to update your contact lists directly from your Macintosh or Windows desktop. Learn more: http://constantcontact.custhelp.com/cgi-bin/constantcontact.cfg/php/enduser/std_adp.php?p_faqid=3293
Adding_and_Updating_Contacts_Ver6.2 | Page 5©Constant Contact, Inc. All rights reserved. Updated 10/08/10.
1. Learn and Follow the Contact Permission Policy
All contacts that you add to your Constant Contact account must be permission-based. To understand how and why you must follow the permission policy requirements, review the answers to the following questions:
How do I • follow the permission policy?
How can I • collect permission-based contacts?
Why do permission-based contacts • report my email as spam?
How can I • avoid getting spam complaints?
What are the • consequences of violating the permission policy?
Why is the permission policy • required and strictly enforced?
How do I Follow the Permission Policy? Only use Constant Contact to send email to contacts that meet all of the following criteria:
They have given you, or your organization, prior consent to send them email.•They are not from a list that has been purchased, rented, appended, or given to you by a third party.•They do not have distribution lists or • role addresses— E.g. email addresses that may be received by more than one individual: sales@, support@, users@, list@, etc. (These are email addresses that can belong to more than one person and have a higher likelihood of being marked as spam).They are not email addresses that you captured from your address book without prior consent •(including but not limited to: user group addresses, transactional addresses or auto-response addresses). Although it may be possible to add these types of addresses (such as Craigslist and Yahoo! Group email addresses) to your contact lists, Constant Contact will not send to them and you must remove them.
How can I Collect Permission-Based Contacts?
Resources you can use to collect permission-based contacts include:
Join My Mailing List• — Create a customizable online Join My Mailing List signup form with Constant Contact. Contacts who sign up through this form, are automatically added to your account. Survey• — Use a “Collect Personal Information” question type in a Constant Contact online survey and allow anonymous participants who access your survey through a webpage to join your mailing list. Paper signup form• — Display a hardcopy signup form in your store front, at meetings, and during events. To download a printable signup form from Constant Contact, go to: http://constantcontact.custhelp.com/cgi-bin/constantcontact.cfg/php/enduser/std_adp.php?p_faqid=1154
To find more in-depth resources that will teach you how to collect permission-based contacts, see Section 7.
Why do Permission-Based Contacts Report my Email as Spam? Even contacts who have asked to sign up for your mailing list may report your email as spam if:
They • do not recognize the name in your email’s From and Subject line
Adding_and_Updating_Contacts_Ver6.2 | Page 6©Constant Contact, Inc. All rights reserved. Updated 10/08/10.
They do not remember opting into your list or they opted in accidentally•They change their mind and no longer want to receive email from you•
How can I Avoid Getting Spam Complaints from my Permission-Based Contacts?
Two ways you can reduce your chances of getting spam complaints from contacts who opted into receiving your emails include:
Turn the “• Permission Reminder” on in every email you send. The Permission Reminder is a standard message that appears at the top of your email. It reminds your contacts why they are receiving your email and makes it easier for them to click an “Unsubscribe” link (instead of the Report Spam button) if they do not want to receive your emails.
Enable • Confirmed Opt-in and/or send targeted Confirmed Opt-in campaigns to lists that don’t perform well. When Confirmed Opt-in is enabled in your account, contacts must confirm their interest in receiving your emails by responding to a confirmation email they receive after sigining up through your Join My Mailing List Form. You can also send confirmation emails manually to contacts that you add or import into your account. To learn more about confirmed opt-in visit: http://constantcontact.custhelp.com/cgi-bin/constantcontact.cfg/php/enduser/std_adp.php?p_faqid=1716
What are the Consequences of Violating the Permission Policy? If your contacts do not meet all of the above criteria:
Y• our account may be subject to analysis by our Compliance Team
The Compliance Team may disable or terminate your account if you receive complaint rates above indus-•try tolerances
Note: To help prevent you from violating the policy, Constant Contact conducts routine list reviews in response to organic list growth. During a list review we explain, and assist with, list maintenance best practices.
Why is the Permission Policy Required and Strictly Enforced? Constant Contact’s permission policy is strictly enforced in an attempt to:
Prevent you from violating the federal CAN-SPAM Act• 1 that protects consumers from receiving unwanted commercial email
Ensure successful delivery rates for all customers•
Protect Constant Contact’s reputation as a trusted email sender•
Prevent Internet Service Providers (ISPs) from blocking or rejecting all mail sent through Constant Contact•
1 To read the Federal Trade Commission’s 2008 updates to the CAN-SPAM act online, please visit: http://www.ftc.gov/os/2008/05/R411008frn.pdf

Adding_and_Updating_Contacts_Ver6.2 | Page 7©Constant Contact, Inc. All rights reserved. Updated 10/08/10.
2. Add New Contacts To add new email addresses, with or without contact details, into Constant Contact, you will use an Add/Import function. The Add/Import functions, located in the Contacts > Manage Contacts section of your Constant Contact account, feature two standard* options:
Type or copy & paste•
Import a file• (.CSV, .XLS, or .TXT)
The guidelines on the next page will help you determine which method to use. Before you select a method, how-ever, you should know how contact lists work in Constant Contact.
* Notes:
To learn about alternative ways to add new contacts not explained in this section, refer to the • Preview Your Options and Resources section at the beginning of this guide.
You can also use both of the above Add/Import methods to update details for contacts that are already in •your Constant Contact account. Section 3, however, explains additional options for updating your existing contacts’ profiles.
For help importing contacts from a Gmail My Contacts list or Gmail Group, see • Appendix IV.
Before You Add Contacts
Before you begin adding new contacts:
Be aware that the contacts you are about to add to your account will 1. not receive a Welcome Email. If you have never sent emails to the contacts you are about to add before, you may send them a test version of your Welcome Email.
Review the list selection criteria belo2. w to understand how contact lists work in Constant Contact.
To choose the method for adding your contacts that will work best for you, use the guidelines on the next page.3.
Learn How Contact Lists Work & Select Lists for Your New Contacts
When you add a group of email addresses to your account, you must add all of the contacts in the group to the same contact lists, at least initially. Before you consider how you will add your new contacts, take a moment to determine how many contact lists you want to add, and how many email addresses each group will contain. As you plan and select contact lists for your new contacts, keep the following things in mind:
When you add a group of email addresses to your account, either by importing a file or typing the •contact information into your account manually, you must add all of the email addresses in that group into the same list(s). You can change contacts’ list subscriptions after you add them into your account. •You can only send emails to entire lists at once. To send an email to just one or two people, create a •separate list for them. It is impossible to add an email address to the same list twice. Constant Contact removes •duplicate email addresses from lists for you. If you send an email to two lists at once, any email addresses that are on both lists will receive only one copy of the email. If you are concerned about duplicate email addresses or the effect on your contact limit for billing purposes, see Section 6.Constant Contact saves your lists. You do not need to re-add contacts to lists each time you send •an email.

Adding_and_Updating_Contacts_Ver6.2 | Page 8©Constant Contact, Inc. All rights reserved. Updated 10/08/10.
Tip: Need a resource to show you how to manage your contact lists in Constant Contact? See Section 7.
Choose a Method for Adding New Contacts
After you select the lists for your new contacts, you will see the following options:
Type or copy • email addresses into Constant Contact (up to one hundred email addresses without contact details at a time)Type my• email addresses and contact details into Constant Contact (add or update up to ten contacts with up to four contact details each at at time)Import contacts from• Gmail or Google Contacts (for help with this option, see Appendix IV)Import my• list from a file2 (add up to 20,000 email addresses with or without contact details)Download import tools (see the • Overview at the beginning of this guide to learn more)
Note: To learn about contact details, see Section 4.
To determine which method will be most efficient for you to use, follow the guidelines in Table 1 below. If you want to update existing contacts’ details without accidentally adding any new contacts in the process, skip ahead to Section 3.
Table 1. Select a Method for Adding New Contacts
Quantity of Information to Add Recommended Method Where to Find Instructions
New email addresses only •(Up to 100 at a time)
Up to ten new* email addresses at a time •with four or fewer details each
Type or copy & paste Section 2a on this page
Eleven or more new* email addresses with •four or fewer details each
Any number of email addresses having five •or more details each (Maximum contact limit per file is 20,000)
Format the contact list* in a file and import it into Constant Contact
Section 2b • to format the file
Section 2c to • import the formatted file
*Note: You can also use both of the Add/Import methods (type or import a formatted file) described in this section to update exist-
ing contacts’ details. See Table 2 in Section 3 for help choosing the appropriate update option for you.
Email Marketing Free Trial Contact Limit Reminder: An Email Marketing Free Trial ends as soon as your account contains greater than 100 contacts (in addition to your own email address). If your trial ends for this reason, or if you have questions about allowing Constant Contact to upload only as many contacts as will fit within this limit, see Section 6.
2a. Type or Copy & Paste New Contacts
Manually typing or copying & pasting new contacts into your account is the fastest method if you are adding:
Up to 100 new email addresses without contact details•
2 Note: If your permission-based contacts list is in your email client’s address book, get help exporting it into a file at:
http://constantcontact.custhelp.com/cgi-bin/constantcontact.cfg/php/enduser/std_adp.php?p_faqid=2652

Adding_and_Updating_Contacts_Ver6.2 | Page 9©Constant Contact, Inc. All rights reserved. Updated 10/08/10.
Up to ten email addresses for new or existing contacts with four or fewer details each •
Tips:
If you frequently add just one contact at a time . . . Try the free, downloadable Contact Capture Tool that allows you to quickly add or update a contact without opening a web browser. Learn more at: http://constantcontact.custhelp.com/cgi-bin/constantcontact.cfg/php/enduser/std_adp.php?p_faqid=3296 If you want to add more than 100 email addresses at a time. . . it will be most efficient to import the list in a file using the instructions in Section 2b – 2c.
Email Addresses Only
If you are adding new email addresses without details, you can type or copy & paste up to 100 at a time. If you are in the Email Marketing Free Trial, you trial will end
To type or copy new email addresses without details into Constant Contact list(s):
Click the 1. Contacts tab.
In the My Contacts section of the resulting page, click the “Add/Import” link.2.
Select a list and click 3. Next. If creating a new list, give it a unique name and click Save. Note: To learn about how contact lists work in Constant Contact, refer back to the beginning of Section 2.
Select “Type or copy my email addresses into Constant Contact” and click 4. Next.
Type or paste one email address per line. 5. Note: Do not type any extra spaces before or after an email address. Addresses containing invalid characters (such as < , > , : , [ , and ] ), or more than 80 characters, cannot be added. Tip: Submit data frequently to avoid losing your work.
Click 6. Submit Data. Note: For help with error messages or Free Trial contact limits, refer to Section 6.
Email Addresses with Contact Details
You can use the type or copy & paste method described below to add up to 100 email addresses having no more than four details each. For efficiency, we only recommend using this method if you have no more than ten* email addresses for new and/or existing contacts with four or fewer details each. You will be able to choose which contact details or custom fields you want to add. You can learn more about contact details in Section 4. If you are adding more than ten new email addresses with details, or each address has five or more details, you can save time by importing the list in a file instead (see Section 2b and 2c).
To manually add new email addresses with contact details and/or new details for existing contacts:
Click the 1. Contacts tab.
In the My Contacts section of the resulting page, click the “Add/Import” link.2.
Adding_and_Updating_Contacts_Ver6.2 | Page 10©Constant Contact, Inc. All rights reserved. Updated 10/08/10.
Select or create a list and click 3. Next. Tip: To find out how contact lists work in Constant Contact, refer back to the beginning of Section 2.
Select “Type my email addresses and contact details into Constant Contact” and click 4. Next.
Select the appropriate detail headings from the drop-down box. 5. Note: If there isn’t a standard detail label for your data, you may assign it to a custom field.
Type a valid email address into the first text box. 6. Note: Do not type any extra spaces before or after the address. Addresses containing invalid characters (such as < , > , : , [ , and ] ), or more than 80 characters, cannot be added.
Type the appropriate contact details into the corresponding text boxes in that row. For ex-7. ample, type “John” under “First Name.” Continue to add up to four contact details per email address. Note: Most contact details have a 50 character limit (only the first 50 characters are saved). See Section 4 to see a complete list of contact detail character limits. Tip: Click the Submit Data button frequently to avoid losing your work.
If you have more email addresses to add, click 8. Submit & Add More.
When you are done, click 9. Submit Data. Note: For help with error messages or Free Trial contact limits, refer to Section 6.
2b. Format a File of New or Updated Contacts
Importing a file containing your contact list into Constant Contact is the most efficient way to add:
Large contact lists with greater than 100 email addresses (although you can import files with smaller •lists, if you prefer)Any list size with • email addresses having five or more details each
Before you import any list of contacts, regardless of whether it contains information for new contacts and/or updates to existing contacts, you must put the information into a spreadsheet (.CSV or .XLS) or a plain text (.TXT) file and for-mat it according to the guidelines in this section. Many email clients allow you to export contacts into a spreadsheet file. To format your contact information:
In a spreadsheet, use the instructions below. •
If your contact information is in a plain text file (such as in Notepad or TextEdit), go to page 13. •
Format a Spreadsheet (.CSV or .XLS) File of New or Updated Contacts
Before you import contact information in a spreadsheet file, you must arrange the information in a format that Constant Contact can recognize.
Important note: The following formatting instructions apply to all contact files you import into Constant Contact regardless of whether they contain new contacts and/or updated details for existing contacts.
To begin, open a blank spreadsheet (or the spreadsheet containing your contact list), and save the file with a .CSV or .XLS extension. We strongly recommend saving as .CSV instead of .XLS to reduce the chance of errors
Adding_and_Updating_Contacts_Ver6.2 | Page 11©Constant Contact, Inc. All rights reserved. Updated 10/08/10.
occurring when you import it. Do not save as .XLSX.
Note: If you are using Microsoft Excel, the 97-2003 version is recommended. If you are using Excel 2007, re-save the file in the Excel 2003 format to avoid creating a .XLSX file. For help converting a .XLSX file to a .XLS file, go to: http://office.microsoft.com/en-us/excel/HA100141071033.aspx#SaveToPreviousVersion
Tip: Save the file with a name that describes the group of contacts you want to import and/or today’s date.
If you need help • exporting contacts from an email client (e.g., Hotmail AOL, Yahoo, etc.) into a file, you can find instructions through this FAQ: http://constantcontact.custhelp.com/cgi-bin/constantcontact.cfg/php/enduser/std_adp.php?p_faqid=2652 To watch a brief online recorded demonstration of how to format a spreadsheet, see the Importing a List tutorial at: http://www.constantcontact.com/display_media.jsp?id=14t
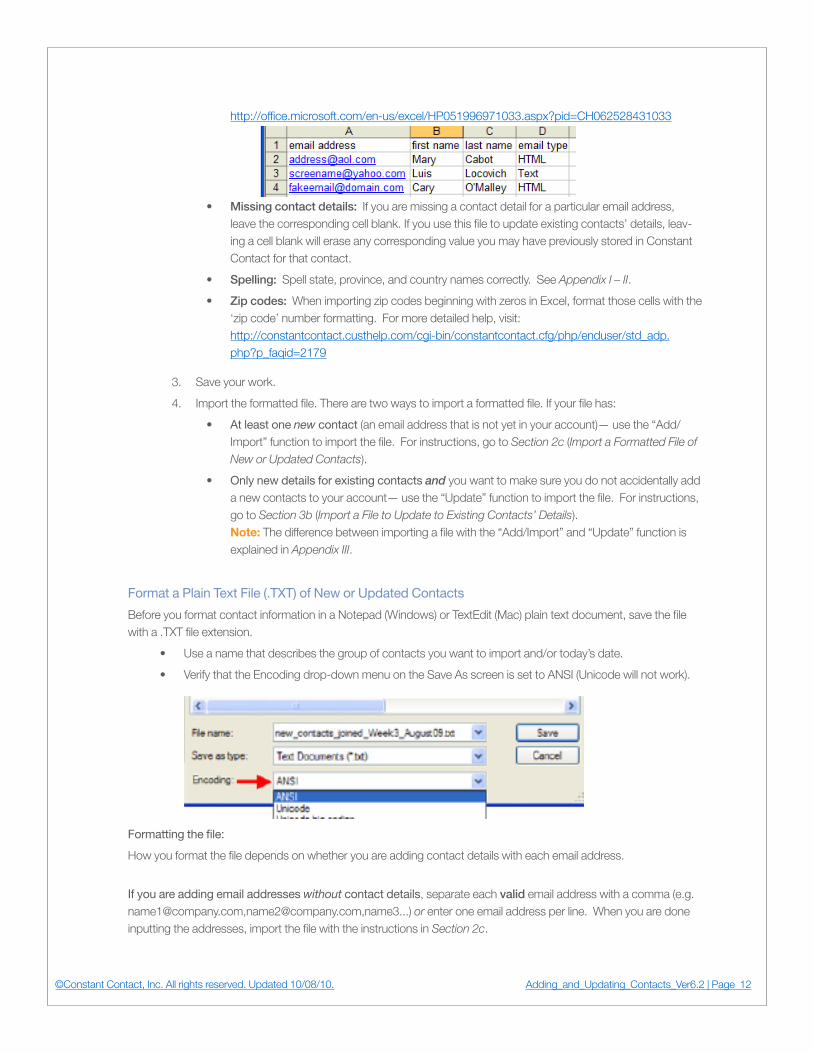
If you are adding new email addresses without contact details, enter one valid email address in each row. Do not type any extra spaces before or after an address. Addresses containing invalid characters (such as < , > , : , [ , and ] ), or more than 80 characters, cannot be added. When you are done adding the addresses, skip to Section 2c (Import a Formatted File of New or Updated Contacts).
If you are adding email addresses with contact details, use the following steps to arrange the information for each contact in a separate row:
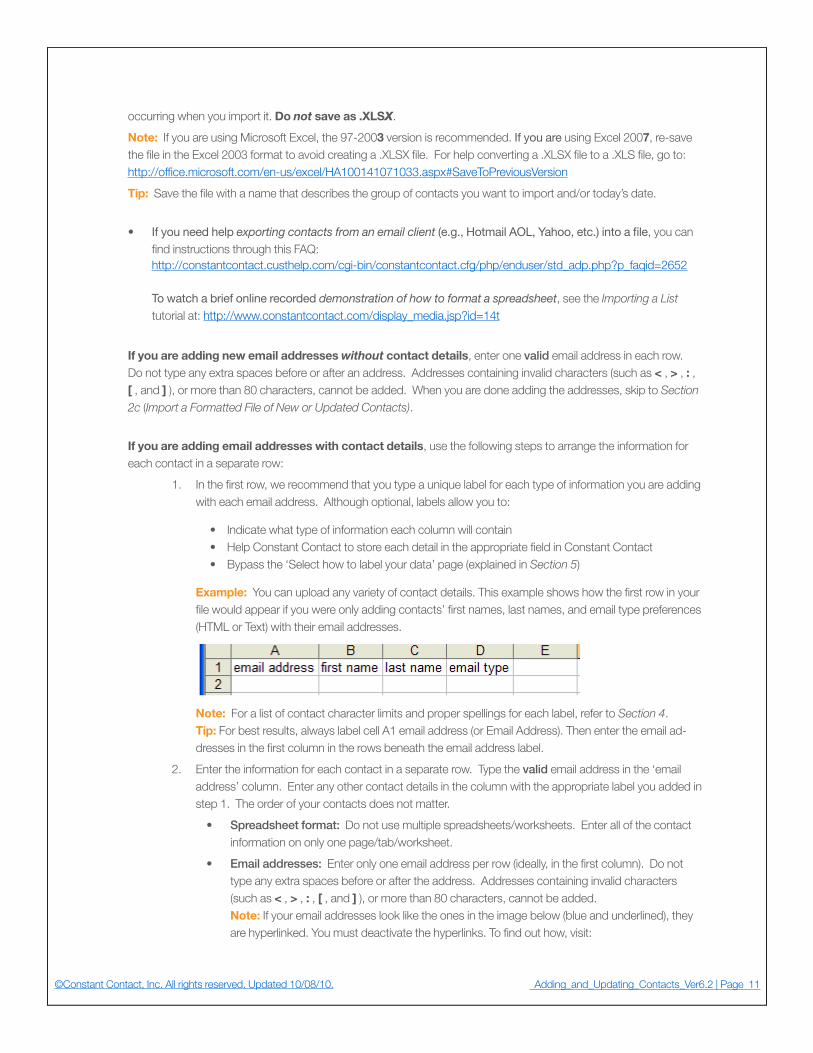
In the first row, we recommend that you type a unique label for each type of information you are adding 1. with each email address. Although optional, labels allow you to: •Indicate what type of information each column will contain •HelpConstantContacttostoreeachdetailintheappropriatefieldinConstantContact • Bypass the ‘Select how to label your data’ page (explained in Section 5) Example: You can upload any variety of contact details. This example shows how the first row in your file would appear if you were only adding contacts’ first names, last names, and email type preferences (HTML or Text) with their email addresses.
Note: For a list of contact character limits and proper spellings for each label, refer to Section 4. Tip: For best results, always label cell A1 email address (or Email Address). Then enter the email ad-dresses in the first column in the rows beneath the email address label.
Enter the information for each contact in a separate row. Type the 2. valid email address in the ‘email address’ column. Enter any other contact details in the column with the appropriate label you added in step 1. The order of your contacts does not matter.
Spreadsheet format: • Do not use multiple spreadsheets/worksheets. Enter all of the contact information on only one page/tab/worksheet.
Email addresses: • Enter only one email address per row (ideally, in the first column). Do not type any extra spaces before or after the address. Addresses containing invalid characters (such as < , > , : , [ , and ] ), or more than 80 characters, cannot be added. Note: If your email addresses look like the ones in the image below (blue and underlined), they are hyperlinked. You must deactivate the hyperlinks. To find out how, visit:
Adding_and_Updating_Contacts_Ver6.2 | Page 12©Constant Contact, Inc. All rights reserved. Updated 10/08/10.
http://office.microsoft.com/en-us/excel/HP051996971033.aspx?pid=CH062528431033
Missing contact details: • If you are missing a contact detail for a particular email address, leave the corresponding cell blank. If you use this file to update existing contacts’ details, leav-ing a cell blank will erase any corresponding value you may have previously stored in Constant Contact for that contact.
Spelling: • Spell state, province, and country names correctly. See Appendix I – II.
Zip codes:• When importing zip codes beginning with zeros in Excel, format those cells with the ‘zip code’ number formatting. For more detailed help, visit: http://constantcontact.custhelp.com/cgi-bin/constantcontact.cfg/php/enduser/std_adp.php?p_faqid=2179
Save your work. 3.
Import the formatted file. There are two ways to import a formatted file. If your file has:4.
At least one • new contact (an email address that is not yet in your account)— use the “Add/Import” function to import the file. For instructions, go to Section 2c (Import a Formatted File of New or Updated Contacts).
Only new details for existing contacts • and you want to make sure you do not accidentally add a new contacts to your account— use the “Update” function to import the file. For instructions, go to Section 3b (Import a File to Update to Existing Contacts’ Details). Note: The difference between importing a file with the “Add/Import” and “Update” function is explained in Appendix III.
Format a Plain Text File (.TXT) of New or Updated Contacts
Before you format contact information in a Notepad (Windows) or TextEdit (Mac) plain text document, save the file with a .TXT file extension.
Use • a name that describes the group of contacts you want to import and/or today’s date.
Verify that the Encoding drop-down menu on the Save As screen is set to ANSI (Unicode will not work). •
Formatting the file:
How you format the file depends on whether you are adding contact details with each email address.
If you are adding email addresses without contact details, separate each valid email address with a comma (e.g. [email protected],[email protected],name3...) or enter one email address per line. When you are done inputting the addresses, import the file with the instructions in Section 2c.
Adding_and_Updating_Contacts_Ver6.2 | Page 13©Constant Contact, Inc. All rights reserved. Updated 10/08/10.
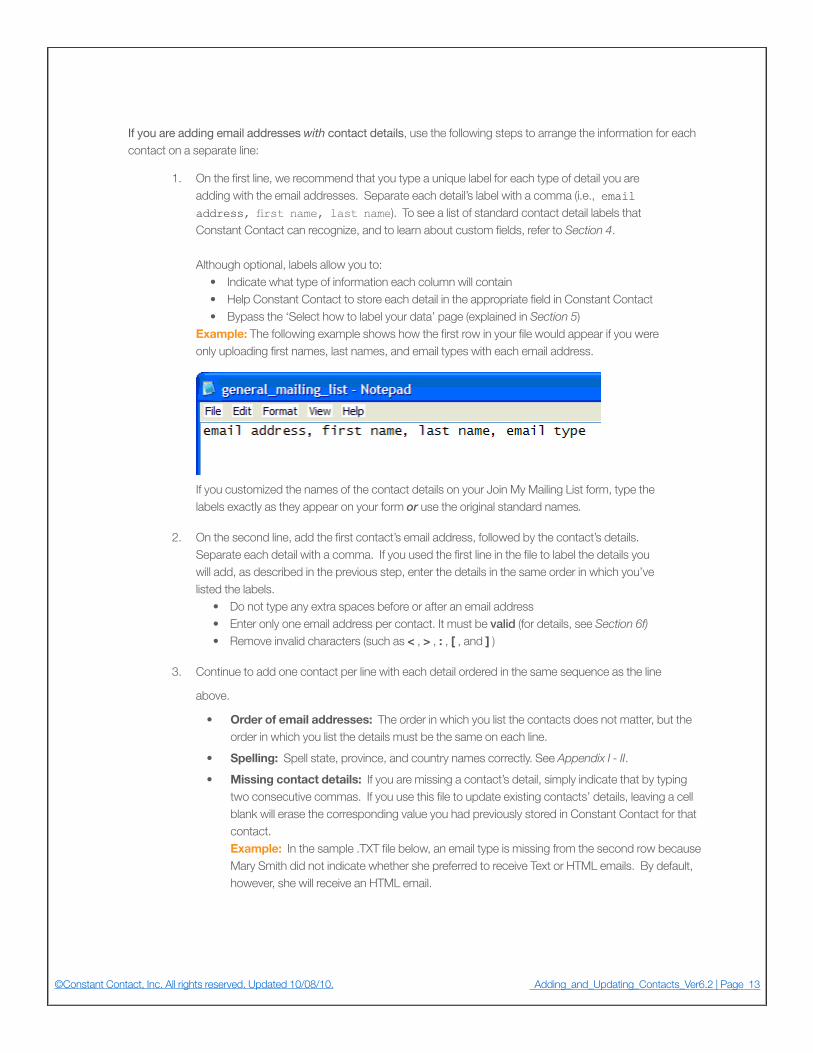
If you are adding email addresses with contact details, use the following steps to arrange the information for each contact on a separate line:
1. On the first line, we recommend that you type a unique label for each type of detail you are adding with the email addresses. Separate each detail’s label with a comma (i.e., email address, first name, last name). To see a list of standard contact detail labels that Constant Contact can recognize, and to learn about custom fields, refer to Section 4. Although optional, labels allow you to: •Indicate what type of information each column will contain •HelpConstantContacttostoreeachdetailintheappropriatefieldinConstantContact • Bypass the ‘Select how to label your data’ page (explained in Section 5) Example: The following example shows how the first row in your file would appear if you were only uploading first names, last names, and email types with each email address.
If you customized the names of the contact details on your Join My Mailing List form, type the labels exactly as they appear on your form or use the original standard names.
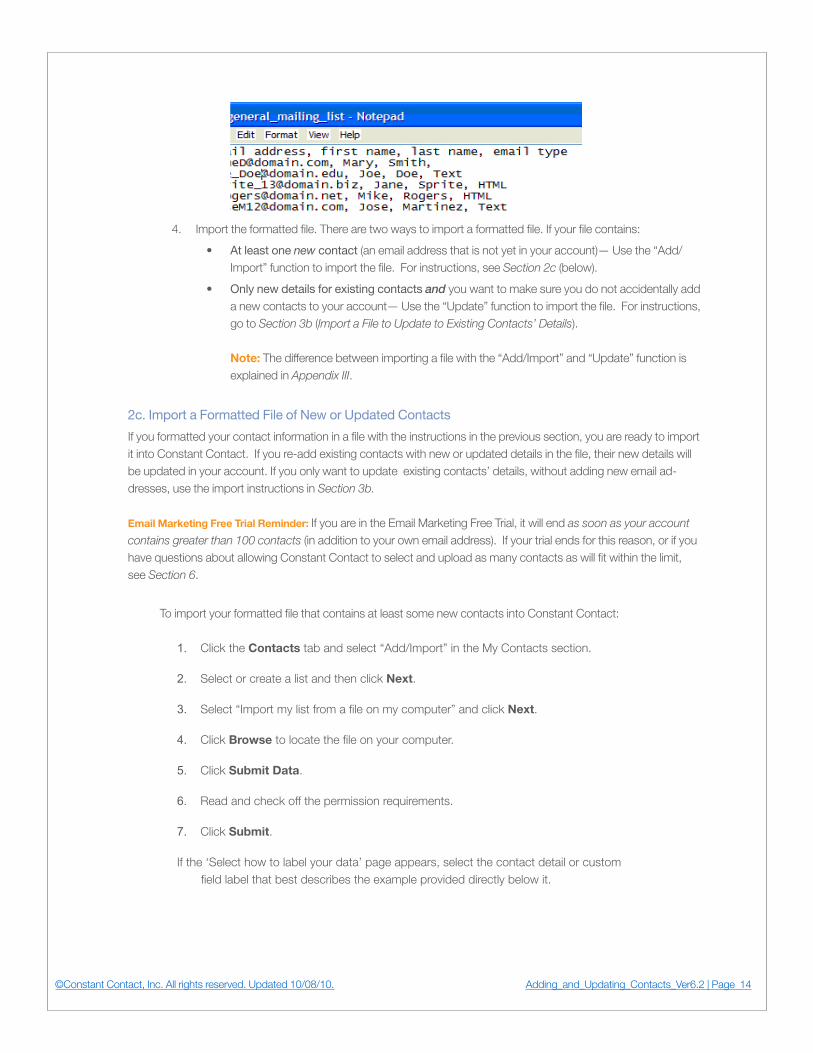
2. On the second line, add the first contact’s email address, followed by the contact’s details. Separate each detail with a comma. If you used the first line in the file to label the details you will add, as described in the previous step, enter the details in the same order in which you’ve listed the labels. •Donottypeanyextraspacesbeforeorafteranemailaddress •Enteronlyoneemailaddresspercontact.Itmustbevalid (for details, see Section 6f) •Removeinvalidcharacters(suchas < , > , : , [ , and ] )
3. Continue to add one contact per line with each detail ordered in the same sequence as the line
above.
Order of email addresses: • The order in which you list the contacts does not matter, but the order in which you list the details must be the same on each line.
Spelling: • Spell state, province, and country names correctly. See Appendix I - II.
Missing contact details: • If you are missing a contact’s detail, simply indicate that by typing two consecutive commas. If you use this file to update existing contacts’ details, leaving a cell blank will erase the corresponding value you had previously stored in Constant Contact for that contact. Example: In the sample .TXT file below, an email type is missing from the second row because Mary Smith did not indicate whether she preferred to receive Text or HTML emails. By default, however, she will receive an HTML email.
Adding_and_Updating_Contacts_Ver6.2 | Page 14©Constant Contact, Inc. All rights reserved. Updated 10/08/10.
4. Import the formatted file. There are two ways to import a formatted file. If your file contains:
At least one • new contact (an email address that is not yet in your account)— Use the “Add/Import” function to import the file. For instructions, see Section 2c (below).
Only new details for existing contacts • and you want to make sure you do not accidentally add a new contacts to your account— Use the “Update” function to import the file. For instructions, go to Section 3b (Import a File to Update to Existing Contacts’ Details). Note: The difference between importing a file with the “Add/Import” and “Update” function is explained in Appendix III.
2c. Import a Formatted File of New or Updated Contacts
If you formatted your contact information in a file with the instructions in the previous section, you are ready to import it into Constant Contact. If you re-add existing contacts with new or updated details in the file, their new details will be updated in your account. If you only want to update existing contacts’ details, without adding new email ad-dresses, use the import instructions in Section 3b. Email Marketing Free Trial Reminder: If you are in the Email Marketing Free Trial, it will end as soon as your account contains greater than 100 contacts (in addition to your own email address). If your trial ends for this reason, or if you have questions about allowing Constant Contact to select and upload as many contacts as will fit within the limit, see Section 6.
To import your formatted file that contains at least some new contacts into Constant Contact:
Click the 1. Contacts tab and select “Add/Import” in the My Contacts section.
Select or create a list and then click 2. Next.
Select “Import my list from a file on my computer” and click 3. Next.
Click 4. Browse to locate the file on your computer.
Click 5. Submit Data.
Read and check off the permission requirements. 6.
Click 7. Submit.
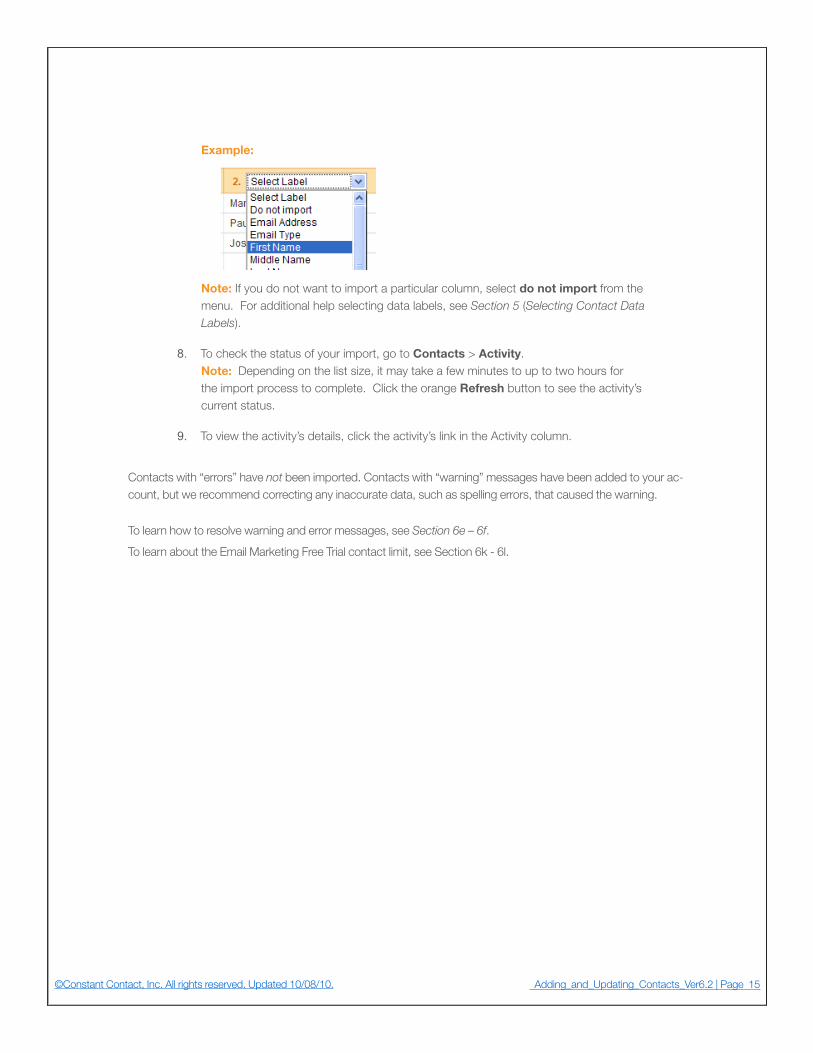
If the ‘Select how to label your data’ page appears, select the contact detail or custom field label that best describes the example provided directly below it.
Adding_and_Updating_Contacts_Ver6.2 | Page 15©Constant Contact, Inc. All rights reserved. Updated 10/08/10.
Example: Note: If you do not want to import a particular column, select do not import from the menu. For additional help selecting data labels, see Section 5 (Selecting Contact Data Labels).
To check the status of your import, go to 8. Contacts > Activity. Note: Depending on the list size, it may take a few minutes to up to two hours for the import process to complete. Click the orange Refresh button to see the activity’s current status.
To view the activity’s details, click the activity’s link in the Activity column.9.
Contacts with “errors” have not been imported. Contacts with “warning” messages have been added to your ac-count, but we recommend correcting any inaccurate data, such as spelling errors, that caused the warning.
To learn how to resolve warning and error messages, see Section 6e – 6f. To learn about the Email Marketing Free Trial contact limit, see Section 6k - 6l.

Adding_and_Updating_Contacts_Ver6.2 | Page 16©Constant Contact, Inc. All rights reserved. Updated 10/08/10.
3. Update Existing Contacts’ Details
This section explains how to update details and email addresses for contacts that are already in your account. If you are not familiar with how to collect and use contact details or custom fields, see Section 4. Here is an overview of your options for updating contact information in Constant Contact. The table on the next page will help you select the method that will be most efficient for you. To update an individual contact’s details you can:
Edit a profile directly in your account• — View and modify an individual contact’s profile and list subscrip-tions (see Section 3a).
Use Contact Capture Tool• — If you frequently need to add or update no more than four contact details for one existing contact at a time, try Contact Capture Tool. Contact Capture Tool is not explained in this sec-tion, but you can find instructions for installation and use at: http://constantcontact.custhelp.com/cgi-bin/constantcontact.cfg/php/enduser/std_adp.php?p_faqid=3293
To update contact details for a group of contacts you can:
Type or copy & paste• — Add or update up to four contact details for up to one hundred existing contacts with the “Add/Import” function (Note: If you are updating more than ten contacts, it is generally more efficient to import the updates in a file).
Import a file• — Format the the new or updated contact details for up to 20,000 existing contacts in a file with the steps in Section 2b. After you carefully format the file, import it with the “Update” function instruc-tions in Section 3b if you want to avoid accidentally adding new contacts.
*Note: If your permission based contact list is currently in another application, you may be able to use a contact import tool or API to add and update your existing contacts’ details. For more information, refer to the Preview Your Options and Resources section at the beginning of this guide.
To update existing contacts’ email addresses, you can:
Remind • contacts to update their profiles— Remind contacts to click the “Update Profile” link at the bot-tom of your emails to give them the chance to update their own email addresses (and other details).
Manually edit email addresses• — Edit an individual contact’s email address when you view their profile in Constant Contact (This method only works with email addresses that have not been confirmed through the Permission Reminder or a Confirmed Opt-in email).
Add the new email addresses and remove the old ones• — Add the new email addresses (and any details associated with each old email address) as new contacts and remove the old email addresses.
Choose a Method for Updating Contacts’ Information
To determine which method you should use and to locate instructions, follow the guidelines in Table 2 (on the next page.
Adding_and_Updating_Contacts_Ver6.2 | Page 17©Constant Contact, Inc. All rights reserved. Updated 10/08/10.
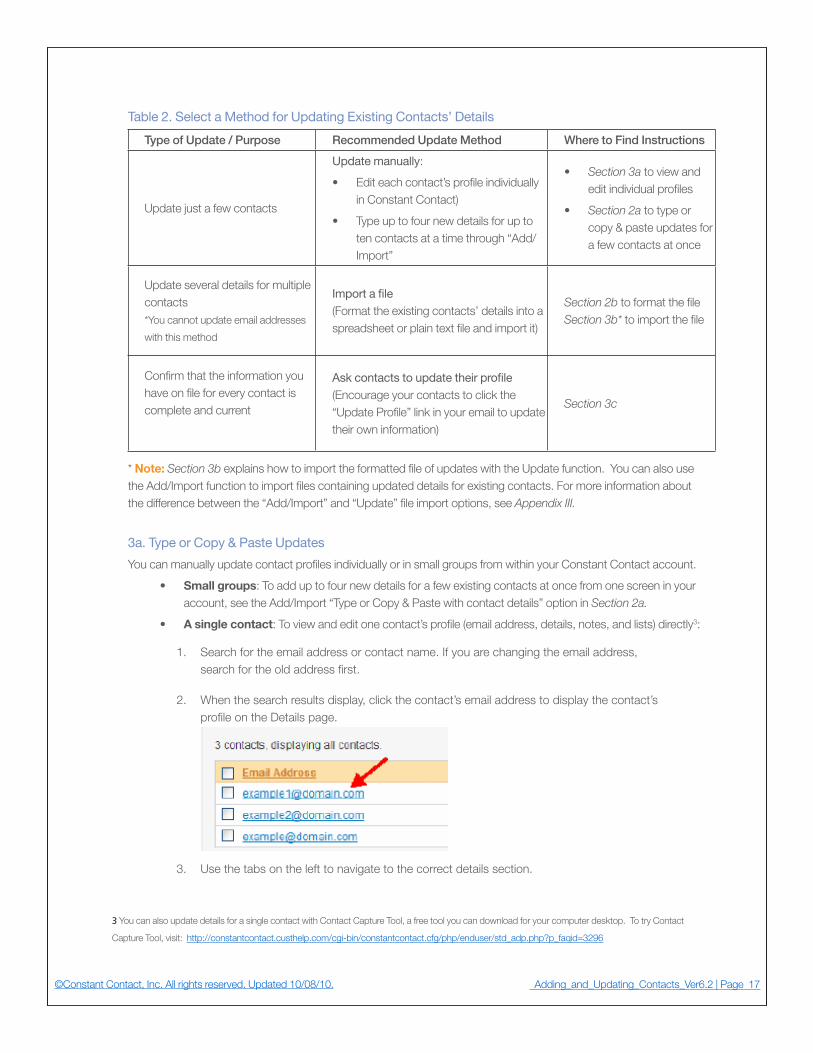
Table 2. Select a Method for Updating Existing Contacts’ Details
Type of Update / Purpose Recommended Update Method Where to Find Instructions
Update just a few contacts
Update manually:
Edit each contact’s profile individually •in Constant Contact)
Type up to four new details for up to •ten contacts at a time through “Add/Import”
Section 3a • to view and edit individual profiles
Section 2a • to type or copy & paste updates for a few contacts at once
Update several details for multiple contacts *You cannot update email addresses
with this method
Import a file (Format the existing contacts’ details into a spreadsheet or plain text file and import it)
Section 2b to format the file Section 3b* to import the file
Confirm that the information you have on file for every contact is complete and current
Ask contacts to update their profile (Encourage your contacts to click the “Update Profile” link in your email to update their own information)
Section 3c
* Note: Section 3b explains how to import the formatted file of updates with the Update function. You can also use the Add/Import function to import files containing updated details for existing contacts. For more information about the difference between the “Add/Import” and “Update” file import options, see Appendix III.
3a. Type or Copy & Paste Updates
You can manually update contact profiles individually or in small groups from within your Constant Contact account.
Small groups• : To add up to four new details for a few existing contacts at once from one screen in your account, see the Add/Import “Type or Copy & Paste with contact details” option in Section 2a.
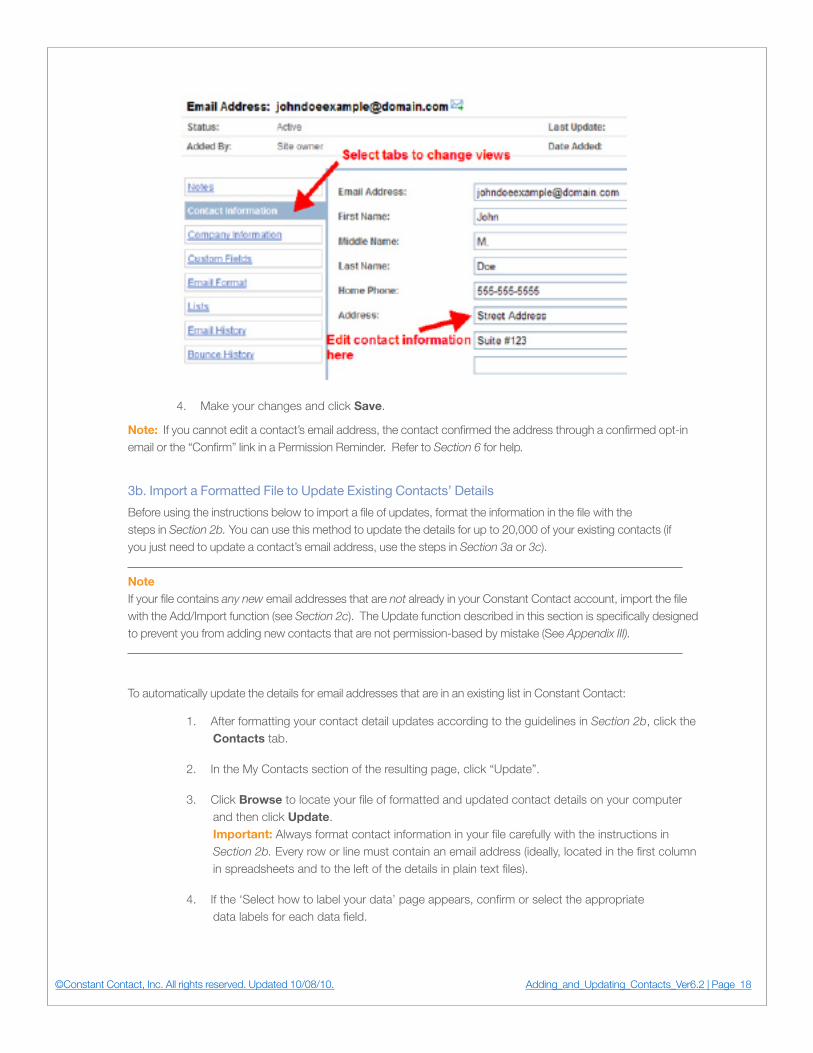
A single contact• : To view and edit one contact’s profile (email address, details, notes, and lists) directly3:
Search for the email address or contact name. If you are changing the email address, 1. search for the old address first.
When the search results display, click the contact’s email address to display the contact’s 2. profile on the Details page.
Use the tabs on the left to navigate to the correct details section. 3.
3 You can also update details for a single contact with Contact Capture Tool, a free tool you can download for your computer desktop. To try Contact
Capture Tool, visit: http://constantcontact.custhelp.com/cgi-bin/constantcontact.cfg/php/enduser/std_adp.php?p_faqid=3296
Adding_and_Updating_Contacts_Ver6.2 | Page 18©Constant Contact, Inc. All rights reserved. Updated 10/08/10.
Make your changes and click 4. Save.
Note: If you cannot edit a contact’s email address, the contact confirmed the address through a confirmed opt-in email or the “Confirm” link in a Permission Reminder. Refer to Section 6 for help.
3b. Import a Formatted File to Update Existing Contacts’ Details
Before using the instructions below to import a file of updates, format the information in the file with the steps in Section 2b. You can use this method to update the details for up to 20,000 of your existing contacts (if you just need to update a contact’s email address, use the steps in Section 3a or 3c).
Note If your file contains any new email addresses that are not already in your Constant Contact account, import the file with the Add/Import function (see Section 2c). The Update function described in this section is specifically designed to prevent you from adding new contacts that are not permission-based by mistake (See Appendix III).
To automatically update the details for email addresses that are in an existing list in Constant Contact:
After formatting your contact detail updates according to the guidelines in 1. Section 2b, click the Contacts tab.
In the My Contacts section of the resulting page, click “Update”. 2.
Click 3. Browse to locate your file of formatted and updated contact details on your computer and then click Update. Important: Always format contact information in your file carefully with the instructions in Section 2b. Every row or line must contain an email address (ideally, located in the first column in spreadsheets and to the left of the details in plain text files).
If the 4. ‘Select how to label your data’ page appears, confirm or select the appropriate data labels for each data field.

Adding_and_Updating_Contacts_Ver6.2 | Page 19©Constant Contact, Inc. All rights reserved. Updated 10/08/10.
If you do not want to import a particular column, select do not import from the menu. If you need additional help selecting data labels, see Select Contact Data Labels (Section 5).
Click 5. Start Import to begin the import.
To check the status of your import, go to 6. Contacts > Activity. If the status is Pending, click the orange Refresh button at the bottom of the activities list to re-check the import’s status every so often until it is complete. Depending on the quantity of data in your file, the import could take anywhere from a few minutes to up to 2 hours to complete.
When the import is complete, click the link in the Activity column to find out if all of the 7. contacts were imported successfully. Note: Contacts listed on the Activity screen with “errors” have not been imported. Contacts with “warning” messages have been imported, but you should correct the invalid data that caused the warning. To learn more about what causes warning messages and errors, refer to Section 6.
3c. Ask Contacts to Update their Information
Your contacts have two options for updating their email addresses, personal information, and list subscriptions:
Click the “Update Profile” link in the footer of your email• . To verify that the “Update Profile” link is included in your emails, click My Settings > Manage My Settings. If the “Update Profile Email Link” option is OFF, click “Edit footer info” to turn it ON.
Re-add their email address into a Join My Mailing List box. •Enter the contact’s email address into a Join My Mailing List signup form link in your email or on your website (as though they were signing up for the first time). Contacts will then receive an email with a link to your email registration page where they can update their existing profile. To customize the contact details you collect on your Join My Mailing List form, click the Contacts tab and the “Join My Mailing List” link. On the resulting page, select (#2) “Edit Join My Mailing List Form”. To watch the Customizing Your Join My Mailing List Form tutorial, go to: http://www.constantcontact.com/display_media.jsp?id=5t

Adding_and_Updating_Contacts_Ver6.2 | Page 20©Constant Contact, Inc. All rights reserved. Updated 10/08/10.
4. Use Contact Details and Custom Fields
Contact details are the pieces of information about each contact, such as name and zip code, you can optionally store with each email address in your Constant Contact account. To see Constant Contact’s list of standard contact details, refer to Table 3 on the next page. This section provides a brief overview of how to collect, update, use, and label contact details, as well as custom fields.
Collecting Contact Details
If you have not collected contact details yet, that’s okay; here are a few ways you can collect information from your existing contacts at any time:
Customized Join My Mailing List Form• Customize which details you collect on your online Join My Mailing List Form and encourage your existing contacts to click the “Update Profile” link in your email (as described in more detail in Section 3). Watch this recorded tutorial: http://www.constantcontact.com/display_media.jsp?id=15t
Constant Contact Online Survey• Invite your contacts to take an online survey with a “Collect Personal Information” question type.
See the recommended resources for collecting permission-based contacts and contact details in Section 7.
Updating Contact Details
To add new details to your existing contacts’ profiles, use any of the update methods listed in Section 3.
Using Contact Details
Contact details, although not required, are primarily useful for personalizing emails. A few of them They are search-able within Constant Contact, helping you to find a specific contact’s profile in more quickly. You can also use con-tact details to look for demographic trends and, in turn, to create targeted lists from your searches.
Personalize emails• - When you insert a contact detail field into the body of an email, each contact will see their own information appear in their email precisely where you inserted the field. It will appear as though you wrote the email specifically for them. Example: Adjust the greeting in the email to say “Dear [Recipient’s Name]” To get help adding contact details to an email, please visit: http://constantcontact.custhelp.com/cgi-bin/
constantcontact.cfg/php/enduser/std_adp.php?p_faqid=2069
Search for contacts - You can also search for contacts in your account. The basic search allows you •to find contacts by Last Name, State/Province, and Zip/Postal code (in addition to email address). The advanced search allows you to find contacts by up to five contact details and custom fields. To find the contact search options in your account, click Contacts > Manage Contacts and look for the search section on the right-hand side.
Segment lists and identify contact demographic trends - When you export your contact information •into a spreadsheet and sort contacts by their details, you can create targeted lists. You can also create targeted lists through the search options in your Contacts screen. To learn more about using

Adding_and_Updating_Contacts_Ver6.2 | Page 21©Constant Contact, Inc. All rights reserved. Updated 10/08/10.
contact details to segment your lists: Tip: Take a free webinar that demonstrates how to use contact details to segment lists: http://www.constantcontact.com/learning-center/webinars/live/details/How-to-Boost-the-Response-to-Your-Emails.jsp
See the following step-by-step segmentation instructions in our knowledgebase at: •http://constantcontact.custhelp.com/cgi-bin/constantcontact.cfg/php/enduser/std_adp.php?p_faqid=2566
Using Custom Fields
If the contact information you want to add is not included in Constant Contact’s list of standard contact details (shown in Table 3 on the next page), you can add it into a custom field if it has fewer than 50 characters.
“This sample sentence contains about fifty characters.”You could, for example, store the names of each contact’s favorite product in custom field #1, membership type in custom field #2, child’s name in field #3, birthday in field #4, etc.
If the special information you need to add is between 50 and 500 characters long, you may add it to the contact’s Notes field. Unlike contact details, however, you cannot insert contact notes into emails. You can view and edit a contact’s notes directly within their individual profile in Constant Contact. Do not use the Type or Copy & Paste method to add contact notes (if you do, it will be truncated at 50 characters).
Labeling Contact Details and Custom Fields in Files
When you format a file containing new or updated contact details (with the instructions in Section 2b), you will assign labels to each contact detail. Contact detail labels help Constant Contact to store each piece of information in the appropriate field in your contacts’ profiles. We recommend that you label the data in your file carefully to:
Bypass the ‘Select how to label your data’ page•Indicate the order in which you will enter the contact details in each row or line•
If you misspell, or do not type the labels correctly, the import wizard will prompt you to select labels. If you are prompted to select labels for the contact details in your file during the import, see Section 5.
Table 3 on the next page provides the correct spellings for each type of data. If you customized the detail names on your Join My Mailing List form, you may use the labels as they appear on your form or use each renamed label’s original name.
Tip: Put email addresses in the first column, at the left of the contact’s details.
Adding_and_Updating_Contacts_Ver6.2 | Page 22©Constant Contact, Inc. All rights reserved. Updated 10/08/10.
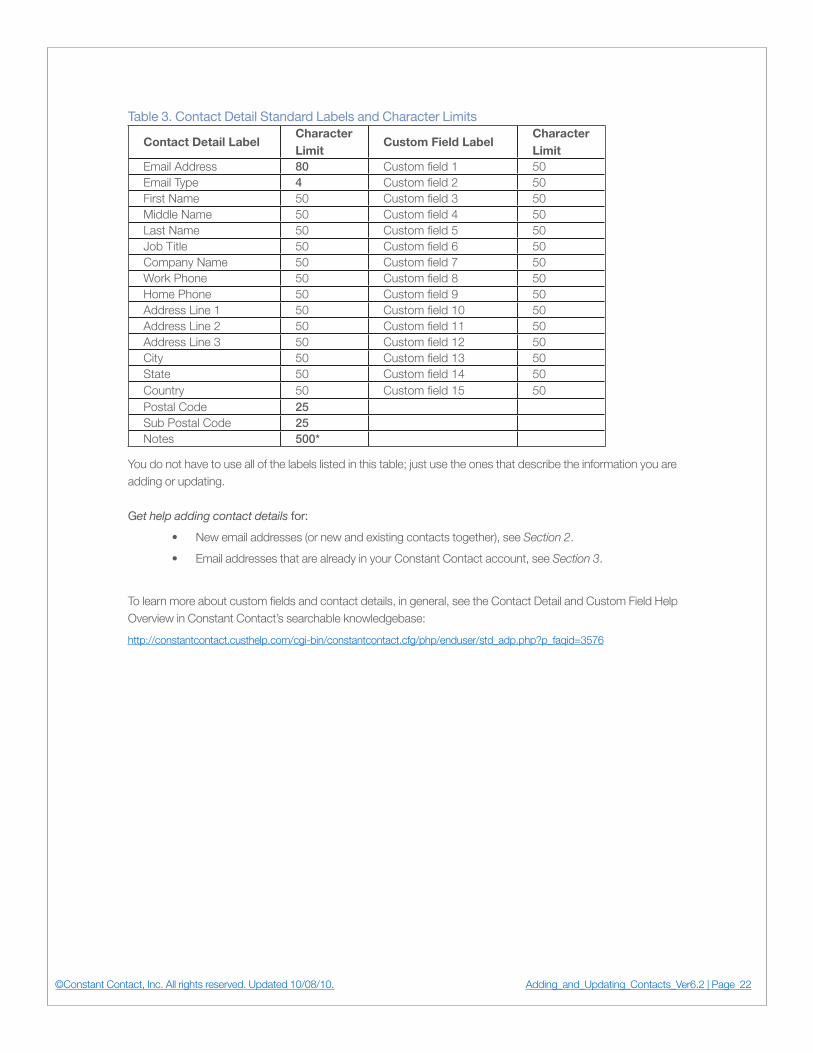
Table 3. Contact Detail Standard Labels and Character Limits
Contact Detail LabelCharacter Limit
Custom Field LabelCharacter Limit
Email Address 80 Custom field 1 50Email Type 4 Custom field 2 50First Name 50 Custom field 3 50Middle Name 50 Custom field 4 50Last Name 50 Custom field 5 50Job Title 50 Custom field 6 50Company Name 50 Custom field 7 50Work Phone 50 Custom field 8 50Home Phone 50 Custom field 9 50Address Line 1 50 Custom field 10 50Address Line 2 50 Custom field 11 50Address Line 3 50 Custom field 12 50City 50 Custom field 13 50State 50 Custom field 14 50Country 50 Custom field 15 50Postal Code 25Sub Postal Code 25Notes 500*
You do not have to use all of the labels listed in this table; just use the ones that describe the information you are adding or updating. Get help adding contact details for:
New email addresses (or new and existing contacts together), see • Section 2.
Email addresses that are already in your Constant Contact account, see • Section 3.
To learn more about custom fields and contact details, in general, see the Contact Detail and Custom Field Help Overview in Constant Contact’s searchable knowledgebase:
http://constantcontact.custhelp.com/cgi-bin/constantcontact.cfg/php/enduser/std_adp.php?p_faqid=3576
Adding_and_Updating_Contacts_Ver6.2 | Page 23©Constant Contact, Inc. All rights reserved. Updated 10/08/10.
5. Select Contact Data Labels
When you add contact details with email addresses, you need to make sure you are adding them to the appropriate field in each contact’s profile. You would not want a contact’s first name, for example, to be added to the Last Name field in their profile.
If you do not type the contact detail labels in your file exactly as they appear in the list (or on your customized Join My Mailing List Form), you will be prompted to select labels with the data label matching tool described below.
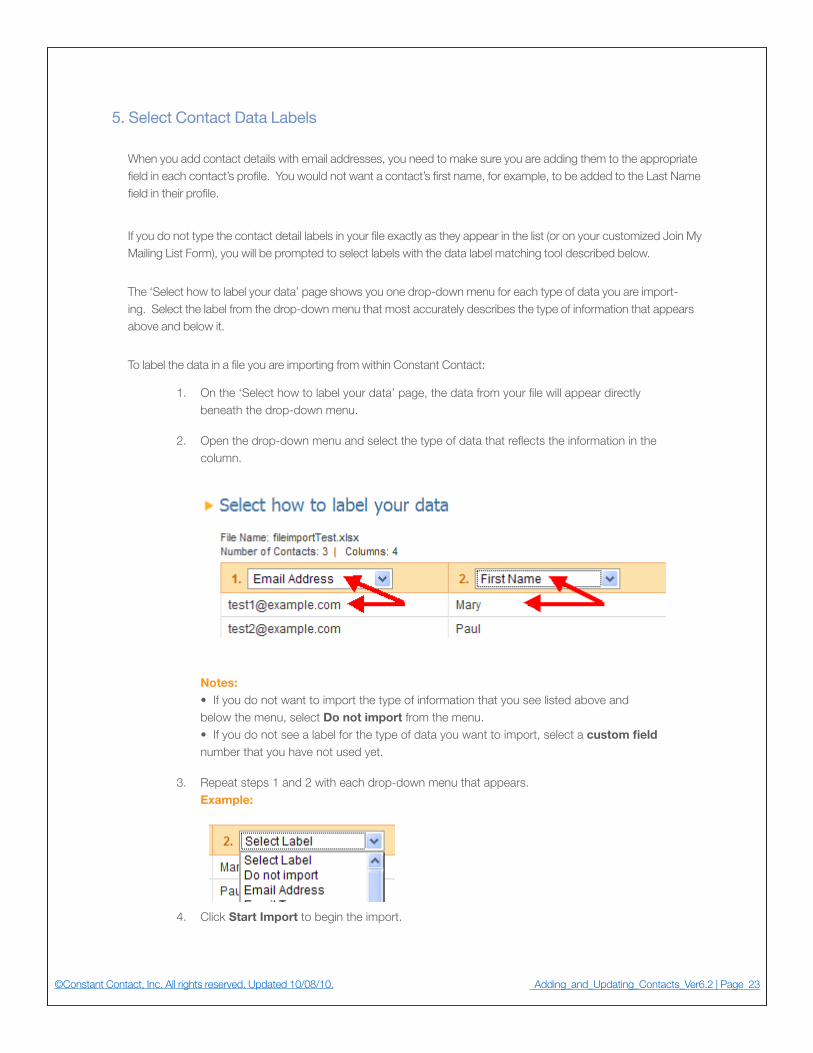
The ‘Select how to label your data’ page shows you one drop-down menu for each type of data you are import-ing. Select the label from the drop-down menu that most accurately describes the type of information that appears above and below it.
To label the data in a file you are importing from within Constant Contact:
On the ‘Select how to label your data’ page, 1. the data from your file will appear directly beneath the drop-down menu.
Open the drop-down menu and select the type of data that reflects the information in the 2. column. Example:
Notes: •Ifyoudonotwanttoimportthetypeofinformationthatyouseelistedaboveandbelow the menu, select Do not import from the menu. •Ifyoudonotseealabelforthetypeofdatayouwanttoimport,selectacustom field number that you have not used yet.
Repeat steps 1 and 2 with each drop-down menu that appears. 3. Example:
Click 4. Start Import to begin the import.

Adding_and_Updating_Contacts_Ver6.2 | Page 24©Constant Contact, Inc. All rights reserved. Updated 10/08/10.
To check the status of your import, go to 5. Contacts > Activity. Because the import could take up to 2 hours to complete, depending on the quantity of data you are importing, click the orange Refresh button at the bottom of the page to re-check the activity’s status every so often until it is complete.
When the import is complete, click the activity name to find out if all of the contacts were 6. imported successfully.
Contacts listed on the Activity screen with “warning” messages have been imported, but you should correct the invalid data that caused the warning. Contacts with “errors” have not been imported. To learn more about what causes warning messages and errors, refer to Section 6.

Adding_and_Updating_Contacts_Ver6.2 | Page 25©Constant Contact, Inc. All rights reserved. Updated 10/08/10.
6. Troubleshoot Common Issues
This section provides help with the following tasks and issues you may encounter while adding and updating con-tacts in Constant Contact:
Add an opted-out contact back to a list • (6a)Cannot edit an email address • (6b)Duplicate email addresses • (6c) • Number of contacts that were added was less than the number of contacts I tried to add • Sending to lists that may contain some of the same contacts
Blank screen displays when adding contacts • (6d)Warnings or errors appear after importing a file • (6e - 6f)Erased contact details from my account when updating contacts’ profiles• (6g)Remove one or more email addresses from some or all of my lists (• 6h)View a contact’s profile (details and list subscriptions) (• 6i)Free trial of Email Marketing ended while adding contacts (• 6j)Figuring out which contacts Constant Contact uploaded to prevent my Email Marketing Free •Trial account from exceeding the 100 contact limit (6k)Choose between Add/Import and Update functions to import a file of contacts (• 6l)
If you have a different question or issue, please refer to Section 7 which provides a list of resources designed to teach you about a variety of contact and list management topics.
6a. Add an opted-out contact back to a list If you cannot add a contact to your list, that contact may have unsubscribed from your list or you may have moved the email address to your Do Not Mail list manually.
To rejoin your list, the contact must use either of the following:
Join My Mailing List form on your website • If you do not have a signup form and wish to create one, click Contacts > Join My Mailing List and follow step 1. Also see Section 7 (Additional Resources).
A “Subscribe me” link or an “Update Profile/Email Address” footer link in one of your emails •If the contact does not have a previous email from you, send a Constant Contact email to your personal address (please do not send a test email because its “Forward Email” link would not be functional). Then use the “Forward Email” link at the bottom of the email (not the Forward button in your email client) to forward it to the contact.
After contacts attempt to sign up again via either of the above methods, they will receive an email with a link to update the “You are already a member of the Constant Contact mailing list. If you would like to update your profile, please click Submit and instructions will be emailed to you.” Your contact must click Submit and Update Profile in the email they receive next.
After opening the email and clicking Update Profile, they will select which mailing lists they want to join. At that time, two things could happen depending on whether Confirmed Opt-in is enabled:
If confirmed opt-in is enabled • (turned on), the contact will receive a confirm subscription email.
Adding_and_Updating_Contacts_Ver6.2 | Page 26©Constant Contact, Inc. All rights reserved. Updated 10/08/10.
When the contact clicks the “Confirm” link in the confirmation email, he or she will receive your welcome letter. If confirmed opt-in is disabled • (turned off), the contact will just receive your welcome letter.
Don’t know if confirmed-opt-in is enabled in your account? Find out by going to My Settings > Manage My Settings and looking for ‘Confirmed Opt-in’. To give your Welcome Letter a personal touch, go to Contacts > Join My Mailing List. In Section 3 of the page that appears next, click “Welcome Email”. If contacts are unable to re-subscribe using any of the previous methods, you may help them to re-join by sending an email with a Join My Mailing List link to yourself and signing up for them. If confirmed opt-in is enabled, they will receive an email in which they must click Confirm Subscription before receiving a welcome letter. If confirmed opt-in is disabled, they will just receive your welcome letter.
To learn why you cannot add opted-out contacts back to your mailing list by yourself, watch the two minute mini-tutorial here: http://www.constantcontact.com/display_media.jsp?id=43t
6b. Contact’s email address is not editable
Normally you can edit a contact’s email address by updating it manually from the Contacts: Details page (as de-scribed in Section 3a). You cannot edit an email address if the contact has confirmed it by:
R• esponding to a confirmed opt-in emailC• licking the “Confirm” link in the Permission Reminder header
To update the email address of a contact who confirmed the old email address you can:
Ask the contact to click the “Update Profile” link in your email’s footer • To verify that your emails are set up to include an “Update Profile” link, click My Settings > Manage My Settings. If the ‘Update Profile Email Link’ option is OFF, click “Edit footer info” to turn it ON. Remove the contact from your lists and add him or her back as a new contact • If have a copy of the contact’s details (if any) to reference after you remove the contact from your account, follow the steps in Section 6h to remove the contact from all of your lists. Add the new contact’s email address (and any details) with the instructions in Section 2.
6c. Duplicate email addresses
You can add one email address to multiple lists, but it is not possible to add the same email address to the same list twice. If an email address appears on multiple lists, it only counts as one contact for Email Marketing contact limit billing purposes. If you attempt to add an email address to a single list more than once, Constant Contact will remove the duplicate from that list for you automatically. Here are some common issues related to duplicate email addresses:
Number of contacts added was less than the number of contacts I tried to add• If you try to add a list of contacts in which an email address appears more than once, the number of contacts you add will be less than the number of contact that may appear to be on the list. This happens because Constant Contact automatically removes the second instance of an email ad-dress on your list automatically. If the number of contacts you added or imported is less than the number of contacts that you tried
Adding_and_Updating_Contacts_Ver6.2 | Page 27©Constant Contact, Inc. All rights reserved. Updated 10/08/10.
to add, but the list you added did not contain duplicate email addresses, errors may have occurred. Click Contacts > Activity and select the link in the Activity column to view error details. To see common causes of error messages, refer to Sections 6e - 6f.
Sending to lists that may contain some of the same contacts• If you send a single email to all of your lists simultaneously, any contact that is on more than one of your lists will only receive that email once. If you send out the same email to different lists at different times, the contact will receive multiple copies of the email; each copy, however, would have a different timestamp.
6d. Blank screen displays when adding contacts
If you see a blank screen when adding contacts, the specific combination of your computer’s operating system and web browser might not be compatible with Constant Contact. Constant Contact is not optimized for dial-up con-nections and is not compatible with AOL software on MAC computers.
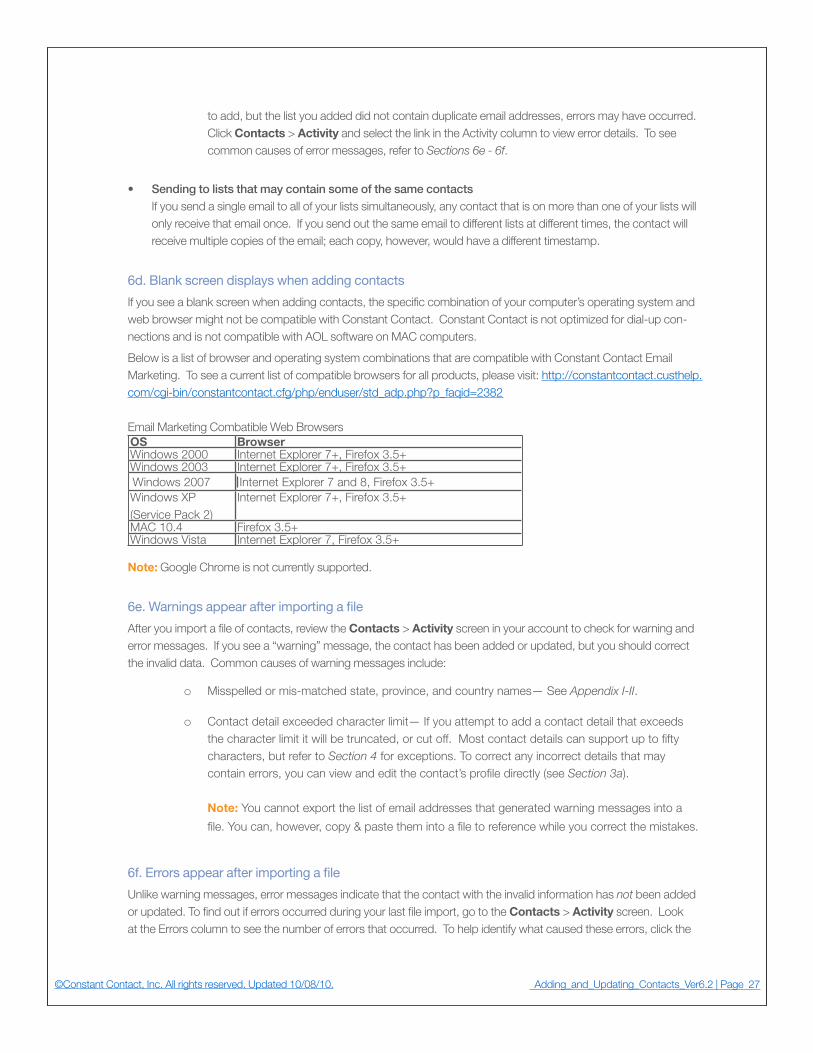
Below is a list of browser and operating system combinations that are compatible with Constant Contact Email Marketing. To see a current list of compatible browsers for all products, please visit: http://constantcontact.custhelp.com/cgi-bin/constantcontact.cfg/php/enduser/std_adp.php?p_faqid=2382 Email Marketing Combatible Web Browsers OS BrowserWindows 2000 Internet Explorer 7+, Firefox 3.5+Windows 2003 Internet Explorer 7+, Firefox 3.5+Windows 2007 Internet Explorer 7 and 8, Firefox 3.5+Windows XP (Service Pack 2)
Internet Explorer 7+, Firefox 3.5+
MAC 10.4 Firefox 3.5+ Windows Vista Internet Explorer 7, Firefox 3.5+
Note: Google Chrome is not currently supported.
6e. Warnings appear after importing a file
After you import a file of contacts, review the Contacts > Activity screen in your account to check for warning and error messages. If you see a “warning” message, the contact has been added or updated, but you should correct the invalid data. Common causes of warning messages include:
Misspelled or mis-matched state, province, and country nameso — See Appendix I-II.
Contact detail exceeded character limito — If you attempt to add a contact detail that exceeds the character limit it will be truncated, or cut off. Most contact details can support up to fifty characters, but refer to Section 4 for exceptions. To correct any incorrect details that may contain errors, you can view and edit the contact’s profile directly (see Section 3a). Note: You cannot export the list of email addresses that generated warning messages into a
file. You can, however, copy & paste them into a file to reference while you correct the mistakes.
6f. Errors appear after importing a file
Unlike warning messages, error messages indicate that the contact with the invalid information has not been added or updated. To find out if errors occurred during your last file import, go to the Contacts > Activity screen. Look at the Errors column to see the number of errors that occurred. To help identify what caused these errors, click the
Adding_and_Updating_Contacts_Ver6.2 | Page 28©Constant Contact, Inc. All rights reserved. Updated 10/08/10.
activity’s link in the Activity column. This takes you to the Activity Details page which includes a more detailed error list. Here are some common causes of errors:
Missing email addresso — You cannot add or update contact information without specifying a valid email address. For best results, list email addresses first on every row or line when importing a file that also contains contact details. In an Excel spreadsheet, for example, put all email addresses in column A, and the contact details associated with each email address in the columns to the right of column A.
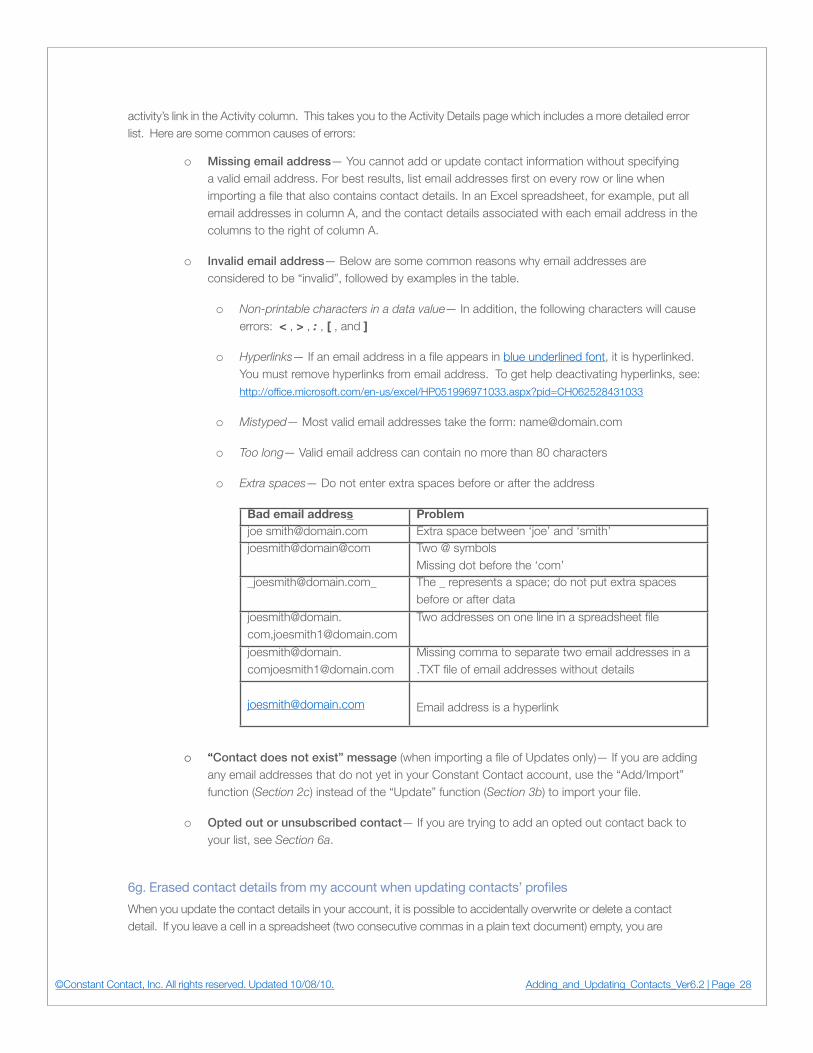
Invalid email addresso — Below are some common reasons why email addresses are considered to be “invalid”, followed by examples in the table.
Non-printable characters in a data valueo — In addition, the following characters will cause errors: < , > , : , [ , and ]
Hyperlinkso — If an email address in a file appears in blue underlined font, it is hyperlinked. You must remove hyperlinks from email address. To get help deactivating hyperlinks, see: http://office.microsoft.com/en-us/excel/HP051996971033.aspx?pid=CH062528431033
Mistypedo — Most valid email addresses take the form: [email protected]
Too longo — Valid email address can contain no more than 80 characters
Extra spaceso — Do not enter extra spaces before or after the address
Bad email address Problem joe [email protected] Extra space between ‘joe’ and ‘smith’joesmith@domain@com Two @ symbols
Missing dot before the ‘com’[email protected]_ The _ represents a space; do not put extra spaces
before or after data
[email protected],[email protected]
Two addresses on one line in a spreadsheet file
[email protected]@domain.com
Missing comma to separate two email addresses in a .TXT file of email addresses without details
[email protected] Email address is a hyperlink
“o Contact does not exist” message (when importing a file of Updates only)— If you are adding any email addresses that do not yet in your Constant Contact account, use the “Add/Import” function (Section 2c) instead of the “Update” function (Section 3b) to import your file.
Opted out or unsubscribed contacto — If you are trying to add an opted out contact back to your list, see Section 6a.
6g. Erased contact details from my account when updating contacts’ profiles
When you update the contact details in your account, it is possible to accidentally overwrite or delete a contact detail. If you leave a cell in a spreadsheet (two consecutive commas in a plain text document) empty, you are

Adding_and_Updating_Contacts_Ver6.2 | Page 29©Constant Contact, Inc. All rights reserved. Updated 10/08/10.
instructing Constant Contact to clear out, or delete, any corresponding value that you had already saved in your account. If you lose or accidentally overwrite a contact’s detail, you can retrieve the correct data if you originally uploaded the information to your account in a file (if you have not deleted the file).
Constant Contact cannot recover data that was lost or overwritten when updating contact details. To recover lost contact information, urge your contacts to click the “Update Profile” link in your email footer.
6h. Remove one or more email addresses from some or all of my lists
To remove a contact (or file containing a list of contacts) from some or all of your lists:
Go to 1. Contacts > Manage Contacts.
In the My Contacts section, click “Remove” (not “Remove2. d”).
Select the names of the lists from which you want to remove the contact. If you want 3. to remove the contact from all of your lists, check the box to the left of “List Name” to select all lists.
Scroll down to Step 2 and either enter the email addresses in the text box provided 4. or click Browse to provide a file containing the list of email addresses you want to remove.
Click 5. Remove.
If you removed the contact because their email address was outdated, and you want to add the contact’s new address to your account, go to Section 2a. If the contact has asked to be removed from your list, add them to your Do Not Mail list to prevent yourself from accidentally re-adding them to your list later.
6i. View and edit a specific contact’s details and list subscriptions
To view and edit a contact’s list subscriptions, navigate to their Details page and select the Lists tab on the left side of the page. For help finding a contact’s Details page, see the instructions in Section 3a.
6j. Free trial of Email Marketing ended while adding contacts If your Email Marketing free trial ended because your account exceeded the 100 contact limit, you can:
Upgrade to a paid Email Marketing account to regain full functionality•
Remove contacts (with the steps in • Section 6h) so that your account contains fewer than 100 contacts, then ask Constant Contact Support to reset your trial. To view your Constant Contact Support options, visit: http://www.constantcontact.com/support/index.jsp
6k. Figuring out which contacts were uploaded to prevent me from exceeding Free Trial limit (6k)
The Email Marketing free trial will end either after 60 days or when your account contains greater than 100 contacts (whichever comes first). If you try to add more than 100 contacts to a free trial Email Marketing account using any of the standard methods (copy and paste, add individual contacts, or import file of contacts), Constant Contact will offer to select and upload as many contacts from the group you are uploading as will fit into your account without end-ing your trial. If you choose this option, Constant Contact selects the contacts at the top of the list you are trying to upload.

Adding_and_Updating_Contacts_Ver6.2 | Page 30©Constant Contact, Inc. All rights reserved. Updated 10/08/10.
You may still have room to add more contacts in your account after you use this option if your original list contained addresses that were already in your account or duplicate email addresses. Constant Contact automatically removes duplicate email addresses during the import process. After it removes the duplicate email address from the contact list while importing it, it will not return to the original list you provided and select another email address to replace it. When the contact upload process is complete, you can view the total number of active contacts in your account in the My Contacts section of the Contacts > Manage Contacts screen in your account.
6l. Choose between Add/Import and Update functions to import a file of contacts If your formatted file of contacts contains:
Only • new contacts, import the file with the Add/Import function explained in Section 2.
New contacts and updated details for existing contacts• , always import the file with the Add/Import func-tion explained in Section 2.
Only updated details for existing contacts• , and you want to make sure you do not accidentally add new contacts, import the file with the Update function explained in Section 3.
For a more detailed comparison of the Add/Import and Update functions, see Appendix III.
7. Additional Resources: Collect and Manage Permission-Based Contact Lists
The following resources will help you learn how to build and manage permission-based contact lists with Constant Contact. The resources are organized categorically in this order:
Follow the Required Permission-Based Contact Policy•
Collect More Contacts•
Manage Contact Lists•
Remove Contacts and Manage Opt-Outs•
Import Contacts from Email Clients and Other Software Applications•
Follow the Required Permission-Based Contact Policy
Building Better Lists (Live webinar)• Find out how to grow your list and get permission to add your contacts to your mailing list in the Building Better Lists live webinar. You can watch, listen, and ask questions. To register, visit: http://www.constantcontact.com/learning-center/webinars/live/details/Building-Better-Lists.jsp
Constant Contact’s Anti-Spam Policy• What constitutes consent? What constitutes a pre-existing business relationship? See Constant Contact’s anti-spam policy, at: http://www.constantcontact.com/uidocs/CCSpamPolicy.jsp
Tips for Getting Permission (Printable whitepaper)• See the top ten tips for getting and keeping permission to send email in this short printable PDF. http://img.constantcontact.com/docs/pdf/10tips_getting_keeping_permission.pdf
Confirmed Opt-In Guide (Printable guide)• This guide explains how to confirm new contacts and why doing so has become an industry best practice. http://img.constantcontact.com/docs/pdf/confirmed_opt_in_v02.pdf
Collect More Contacts
Using Constant Contact to Build My List (FAQ) • See instructions for using a Join My Mailing List box, surveys, social media, a printable signup form, and more to grow your list. http://constantcontact.custhelp.com/cgi-bin/constantcontact.cfg/php/enduser/std_adp.php?p_faqid=1735
Sign Up for my List! (Recorded webinar)• Learn how to create an engaging online signup form, customize your welcome letter, protect your signup form from hackers, and more. Watch the complete class or just fast-forward to the parts you’re interested in! http://www.constantcontact.com/display_media.jsp?id=20t
Creating a Join My Mailing List Box (Recorded tutorial)• Watch this tutorial to see how to select, create, and customize your Join My Mailing List Box. http://www.constantcontact.com/display_media.jsp?id=15t
Printing a Mailing List Signup Form (Printable forms) •Print a signup form to allow visitors to your store, event, or office to sign up for your list. http://constantcontact.custhelp.com/cgi-bin/constantcontact.cfg/php/enduser/std_adp.php?p_faqid=1154

Adding_and_Updating_Contacts_Ver6.2 | Page 31©Constant Contact, Inc. All rights reserved. Updated 10/08/10.
Manage Contact Lists
Manage Contact Lists (FAQ)• This resource is your table of contents to list management help topics. Get instructions for viewing, creating, emptying, renaming, deleting, merging, and organizing your contact lists! http://constantcontact.custhelp.com/cgi-bin/constantcontact.cfg/php/enduser/std_adp.php?p_faqid=2550
Manage Contacts (Recorded tutorial)• To see an overview of your contact management options, check out this five minute tutorial: http://www.constantcontact.com/display_media.jsp?id=6t
Remove Contacts and Manage Opt-Outs
Compliance with Opt Outs (Recorded mini-tutorial)• Constant Contact helps you comply with federal law regarding sending email to unsubscribed contacts. Watch
this two minute tutorial to learn more: http://www.constantcontact.com/display_media.jsp?id=43t
Removing Contacts Versus Adding them to the Do Not Mail List (FAQ)• Learn the difference between contacts on your Removed list and your Do Not Mail list and see steps to add contacts to either list. http://constantcontact.custhelp.com/cgi-bin/constantcontact.cfg/php/enduser/std_adp.php?p_faqid=1717
Import Contacts from Email Clients and Other Software Applications
Import Tools Help Overview (FAQ) •Find out what free contact import tools are available to help you transfer contacts directly into your account and find out how to use them. http://constantcontact.custhelp.com/cgi-bin/constantcontact.cfg/php/enduser/std_adp.php?p_faqid=3798
Exporting Contacts in my Email Client into a File (FAQ) •If you cannot use an import tool, and need help exporting a permission-based contacts list in your email client’s address book into a file, these instructions may come in handy: http://constantcontact.custhelp.com/cgi-bin/constantcontact.cfg/php/enduser/std_adp.php?p_faqid=2652
Importing a List (Tutorial) • After you export your permission-based contacts from your email client into a spreadsheet, you can format the information and import it according to the guidelines in this guide. In addition, you can watch this online recorded demonstration that shows you how to format contact information in a spreadsheet, import the file, and check for errors. To watch the tutorial, go to: http://www.constantcontact.com/display_media.jsp?id=14t
Application Programming Interfaces •You can integrate Constant Contact directly into your own software program if you have software development skills (or have access to a web developer). To learn more about Constant Contact’s Application Programming Interfaces (APIs), visit the Constant Contact AppConnect website at: http://developer.constantcontact.com

Appendix
I. Valid Country Names
To avoid seeing a warning message when importing a list with country names, be careful to use the correct spellings shown in the table below.
Table 4. Country NamesUnited States Cameroon French Polynesia Canada Canada French Southern TerritoriesAfghanistan Cape Verde Gabon Aland Islands Cayman Islands Gambia Albania Central African Republic Georgia Algeria Chad Germany American Samoa Chile Ghana Andorra China Gibraltar Angola Christmas Island Greece Anguilla Cocos (Keeling) Islands Greenland Antarctica Colombia Grenada Antigua and Barbuda Comoros Guadeloupe Argentina Congo Guam Armenia Congo, Democratic Republic of Guatemala Aruba Cook Islands Guernsey Australia Costa Rica Guinea Austria Cote D’Ivoire Guinea-Bissau Azerbaijan Croatia Guyana Bahamas Cyprus Haiti
Bahrain Czech Republic Heard and McDonald Islands
Bangladesh Denmark Honduras Barbados Djibouti Hong Kong Belarus Dominica Hungary Belgium Dominican Republic Iceland Belize East Timor India Benin Ecuador Indonesia Bermuda Egypt Iraq Bhutan El Salvador Ireland Bolivia England Isle of Man Bosnia and Herzegovina Equatorial Guinea Israel Botswana Eritrea Italy Bouvet Island Estonia Jamaica Brazil Ethiopia Japan British Indian Ocean Territory Faroe Islands Jersey Brunei Darussalam Faukland Islands Jordan Bulgaria Fiji Kazakhstan Burkina Faso Finland Kenya Burundi France Kiribati Cambodia French Guyana Kuwait
(Continued on the next page)

Adding_and_Updating_Contacts_Ver6.2 | Page 33©Constant Contact, Inc. All rights reserved. Updated 10/08/10.
Valid country names continued
Kyrgyzstan Palau Suriname Laos Palestinian Territory, Occupied Svalbard and Jan MayenLatvia Panama Swaziland Lebanon Papua New Guinea Sweden Lesotho Paraguay Switzerland Liberia Peru Taiwan Libya Philippines Tajikistan Liechtenstein Pitcairn Tanzania Lithuania Poland Thailand Luxembourg Portugal Togo Macao Puerto Rico TokelauMacedonia Qatar Tonga Madagascar Reunion Trinidad and Tobago Malawi Romania Tunisia Malaysia Russian Federation Turkey Maldives Rwanda Turkmenistan Mali Saint Helena Turks and Caicos Islands Malta Saint Kitts and Nevis Tuvalu Marshall Islands Saint Lucia Uganda Martinique Saint Pierre and Miquelon Ukraine Mauritania Saint Vincent & the Grenadines United Arab Emirates Mauritius Samoa United Kingdom Mayotte San Marino United States
Mexico Sao Tome and Principe United States Minor Outlying Is.
Micronesia Saudi Arabia Uruguay Moldova Scotland Uzbekistan Monaco Senegal Vanuatu Mongolia Saint Helena Vatican City State Montenegro Saint Kitts and Nevis Venezuela Montserrat Saint Lucia Vietnam Morocco Saint Pierre and Miquelon Virgin Islands, BritishMozambique Saint Vincent & the Grenadines Virgin Islands, U.S.Myanmar Samoa Wales Namibia San Marino Wallis and FutunaNauru Sao Tome and Principe Western Sahara Nepal Saudi Arabia Yemen Netherlands Scotland ZambiaNetherlands Antilles Senegal ZimbabweNeutral Zone Serbia New Caledonia Seychelles New Zealand Sierra Leone Nicaragua Singapore Niger Slovakia Nigeria Slovenia Niue Solomon Islands Norfolk Island Somalia

Adding_and_Updating_Contacts_Ver6.2 | Page 34©Constant Contact, Inc. All rights reserved. Updated 10/08/10.
II. Valid States / Provinces and Abbreviations
To avoid seeing a warning message when importing a list with states and provinces, use the proper spellings or ab-breviations listed in the table below.
Table 5. State /Province Abbreviations and Names
AL Alabama NB New Brunswick AK Alaska NE NebraskaAB Alberta NH New Hampshire AZ Arizona NJ New Jersey AR Arkansas NM New Mexico AA Armed Forces Americas NY New York
AE Armed Forces Europe NL Newfoundland and Labrador
AP Armed Forces Pacific NC North Carolina BC British Columbia ND North Dakota CA California NT Northwest Territories CO Colorado NS Nova Scotia CT Connecticut NU Nunavut DE Delaware OH Ohio DC District of Columbia OK Oklahoma FL Florida ON Ontario GA Georgia OR Oregon HI Hawaii PA Pennsylvania ID Idaho PE Prince Edward Island IL Illinois QC Quebec IN Indiana RI Rhode Island IA Iowa SK Saskatchewan KS Kansas SC South Carolina KY Kentucky SD South Dakota LA Louisiana TN Tennessee ME Maine TX Texas MB Manitoba UT Utah MD Maryland VT Vermont MA Massachusetts VA Virginia MI Michigan WA Washington MN Minnesota WV West Virginia MS Mississippi WI Wisconsin MO Missouri WY Wyoming MT Montana YT Yukon Territory NV Nevada

Adding_and_Updating_Contacts_Ver6.2 | Page 35©Constant Contact, Inc. All rights reserved. Updated 10/08/10.
III. Add/Import and Update Function Differences
When you click the Contacts tab after logging into Constant Contact, you will see an “Add/Import” link and an “Update” link in the My Contacts section.
Add/Import
The Add/Import functions (Type/Copy & Paste, Import a Formatted File, or use a Contact Import Tool) allow you to:
Add new contacts•
And/or update details for existing contacts •
Although you can use the Add/Import function to import a file that only contains updated details for existing con-tacts, we do not recommend it. By importing the updated contact information with the Update function instead, you can avoid accidentally adding a new contact that does not belong on your mailing list.
For help selecting and using the method for adding new contacts that will be most efficient for you, see Section 2.
Update The Update function only includes the option to import a formatted file to update existing contacts’ details. The ad-ditional ways to update existing contacts’ details, lists, and email addresses are explained in Section 3.
If you use the Update function to import a file containing a contact that is not already in your Constant Contact ac-count, that contact will not be added.
Before importing a file of contacts with either function: Use the instructions in Section 2b to arrange the con-tact information in a format that Constant Contact will recognize. This is necessary to prevent errors (Section 6e - 6f) and to make sure each contact detail will be stored in the appropriate field in your contacts’ profiles.
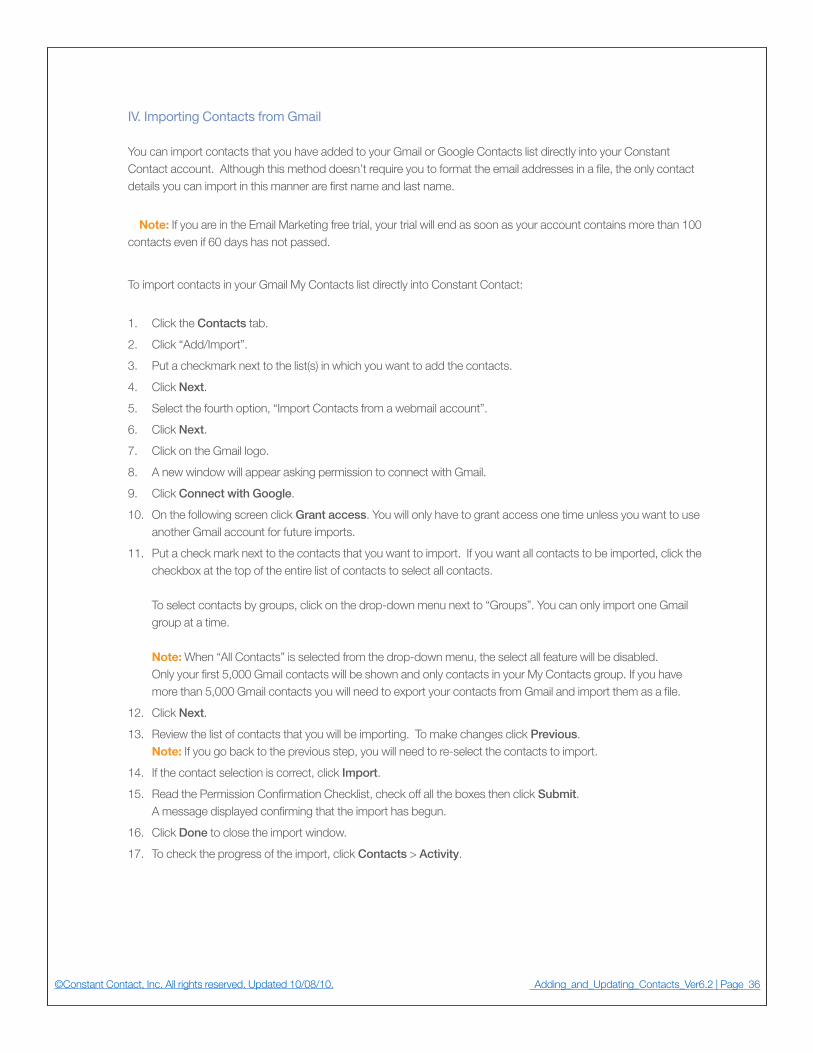
Adding_and_Updating_Contacts_Ver6.2 | Page 36©Constant Contact, Inc. All rights reserved. Updated 10/08/10.
IV. Importing Contacts from Gmail
You can import contacts that you have added to your Gmail or Google Contacts list directly into your Constant Contact account. Although this method doesn’t require you to format the email addresses in a file, the only contact details you can import in this manner are first name and last name.
Note: If you are in the Email Marketing free trial, your trial will end as soon as your account contains more than 100 contacts even if 60 days has not passed.
To import contacts in your Gmail My Contacts list directly into Constant Contact:
Click the 1. Contacts tab.
Click “Add/Import”.2.
Put a checkmark next to the list(s) in which you want to add the contacts.3.
Click 4. Next.
Select the fourth option, “Import Contacts from a webmail account”.5.
Click 6. Next.
Click on the Gmail logo.7.
A new window will appear asking permission to connect with Gmail.8.
Click 9. Connect with Google.
On the following screen click 10. Grant access. You will only have to grant access one time unless you want to use another Gmail account for future imports.
Put a check mark next to the contacts that you want to import. If you want all contacts to be imported, click the 11. checkbox at the top of the entire list of contacts to select all contacts. To select contacts by groups, click on the drop-down menu next to “Groups”. You can only import one Gmail group at a time. Note: When “All Contacts” is selected from the drop-down menu, the select all feature will be disabled. Only your first 5,000 Gmail contacts will be shown and only contacts in your My Contacts group. If you have more than 5,000 Gmail contacts you will need to export your contacts from Gmail and import them as a file.
Click 12. Next.
Review the list of contacts that you will be importing. To make changes click 13. Previous. Note: If you go back to the previous step, you will need to re-select the contacts to import.
If the contact selection is correct, click 14. Import.
Read the Permission Confirmation Checklist, check off all the boxes then click 15. Submit. A message displayed confirming that the import has begun.
Click 16. Done to close the import window.
To check the progress of the import, click 17. Contacts > Activity.
Adding_and_Updating_Contacts_Ver6.2 | Page 37©Constant Contact, Inc. All rights reserved. Updated 10/08/10.
Glossary
Active contact Any email address on at least one contact list in your Constant Contact account to whom you can send an email. Only active contacts count toward your total contact count for Email Marketing billing purposes. Active contacts do not include contacts that are in the “Awaiting confirmation” category or on your Removed or Do Not Mail lists. If an email address is on multiple lists, it only counts as just one active contact.
Activity page The page you should review in Constant Contact to find out if a file of contacts was imported successfully, without errors or warning messages. The page also displays list deletion, list merges, and other contact activity. To view it, click the Contacts tab and the “Activity” link below the tabs. Depending on the size of the list you are importing, the import may take up to two hours to complete. Click the Refresh button at the bottom of the page to view the activity’s most current status. If you see error or warning messages, refer to Section 6e-6f.
Add/Import functions This refers to the following methods for adding new contacts and/or updating existing contacts’ details:
Type or copy and paste new email addresses with or without details •
Import a file containing your contact information (Note: If the file • only contains updates to existing contacts, and you want to make sure no new contacts are added by accident, use the “Update” function instead of the “Add/Import” function).
Download a contact import tool (see definition for • Import Tools).
To access the Add/Import functions, click Contacts > Manage Contacts and click the “Add/Import” link in the My Contacts section. For more information about the difference between the Add/Import and Update functions, see Appendix III.
Confirmed Opt-In When this function is turned “On”, everyone who joins your list through your online Join My Mailing List form receives a confirmation email immediately after signing up. They must respond to the confirmation email to verify their interest in receiving your emails. If the contact does not respond, he or she cannot receive any further email communications from you. We recommend that you turn the Confirmed Opt-in feature in your account “On” to lower your chances of getting spam complaints.
Contacts The people who have given you permission to send them email. They are sometimes referred to as subscribers, email addresses, recipients, or readers. All of your contacts must meet Constant Contact’s permission requirements, as ex-plained in Section 1 of this guide.
Contact details Any piece of information you collect from your contacts that is not an email address. Commonly collected details include first name, last name, address, and preferred email type. When you insert a contact detail field into an email, each contact will see their own information appear in its place in their copy of the email. To see the list of standard contact details you should use to label each detail in a file you are importing, see Section 4. You can search for contacts or groups of contacts by their contact details with Basic and Advanced Search.
Custom field A place to store any contact information that is not included in Constant Contact’s list of standard details. You can use up to 15 custom fields, each of which can contain up to 50 characters. You can customize your Join My Mailing List signup form to collect extra information from new contacts when they sign up. To find out how to label the information you want to store in custom fields when importing a file, see Section 4.
Do Not Mail list The group of contacts that do not want to receive email from you. Contacts are automatically added to this list if they unsubscribe from your emails or report your email as spam. You only need to add them to the list manually if they person-ally request to opt-out of your mailings (such as by replying to your email instead of clicking “Unsubscribe”). Contacts with the Do Not Mail status are not considered “active contacts” and do not count toward your total contact count for Email Marketing billing purposes. Unlike contacts on your Removed contacts list, you cannot re-add them to your lists without their help. If a contact on your Do Not Mail list wants to re-subscribe, see Section 6.
Duplicate email addresses You cannot add an email address to a single list twice. Constant Contact removes duplicate email addresses from lists for you. If you send an email to two lists at once, any email addresses that are on both lists will receive only one copy of the email. Read more about duplicate email address issues in Section 6.
Email type The format in which a contact prefers to receive your email (HTML or text only). By default, all of your contacts’ email types are set to HTML. To change a contact’s preferred email type, go to his or her Contact Details page, as explained in Section 3a. To add several contacts’ email type preferences at once, use any of the methods for adding and updating contact details described in Sections 2 and 3 of this guide. To specify contacts’ email type preference in a file you are preparing to import, name the column heading “Email Type”. You can optionally type “T” for text or “H” for HTML in the rows or lines below.

Adding_and_Updating_Contacts_Ver6.2 | Page 38©Constant Contact, Inc. All rights reserved. Updated 10/08/10.
Existing contact An email address that has already been added to your Constant Contact account. For help updating an email address or contact details for a contact that is already on at least one of your contact lists in Constant Contact, refer to Section 3. Import Tools Free, downloadable software to help you transfer your permission based contacts directly from Microsoft® Outlook®, Outlook Express®, Windows Mail®, QuickBooks®, ACT! by Sage®, or Salesforce® into Constant Contact lists. To download an import tool, click the Contacts tab in your Constant Contact account. Then click the “Import Tools” link in the My Contacts section of the resulting page. Join My Mailing List An online form that you can create with Constant Contact to allow people to sign up to receive your mail-ings. Create links to this form to include in your emails and on webpages. Customize it to collect additional contact details and allow new subscribers to sign up for specific lists. To get started with Join My Mailing List, click Contacts > Join My Mailing List and watch this short online tutorial: http://www.constantcontact.com/display_media.jsp?id=15t List Review A routine phone call to Constant Contact Customer Care in which we discuss the source, type, and age of your email list with you. We also explain how to safely grow and maintain your contact list, remove “role” and illegitimate email address-es, and provide tips for creating emails that your contacts will not confuse with spam. If your list needs a review, you will see a message to call Customer Support when you attempt to log into your account. For more information, read the List Reviews and Campaign Staging Guide http://img.constantcontact.com/docs/pdf/listrev_staging_v02.pdf
Mailing lists A set of contacts, usually called contact lists, to whom you would like to send an email. If you customize your Join My Mailing List form, you can allow your contacts to select the types of emails that they’re interested in receiving. To learn how contact lists work in Constant Contact before you add contacts to your account, see the beginning of Section 2. For help managing lists in Constant Contact, review the resources recommended in Section 7.
Notes field A field in each contact’s profile that supports up to 500 characters. It is a place to store special information about a customer (such as their favorite products, personal preferences, a comment from a survey, etc.) that may not be appropriate for, or cannot be abbreviated into, a custom field. See also: Section 4. Permission-based contacts Individuals who have a previous relationship with you or your business. You can acquire their email addresses through a signup form in a store, an online Join My Mailing List form from Constant Contact, through previous purchases, business acquaintances, or other personal relationships. See also: Section 1.
Permission Reminder A standard message that appears at the top of your email to remind your contacts why they are receiv-ing your email. It gives them the opportunity to click an “Unsubscribe” link rather than report your email as spam. To verify that an email’s Permission Reminder is turned ON before you send it, view its “Edit Email Message Settings/Header” page and choose On next to Permission Reminder.
Removed contact An email address that you deleted from all of your contact lists in Constant Contact with the “Remove” function. Unlike the contacts on your Do Not Mail list, you can re-add removed contacts to your lists at anytime. You can remove contacts individually or, with a .CSV file, in bulk. Constant Contact saves all of your removed email addresses, but they do not count toward your total contact count for billing purposes. To view all of your removed contacts, go to Contacts > Manage Contacts and click the “Removed” link in the My Contacts section. To find out how to remove a contact from your account, see Section 6h.
Role email address An email address that belongs to multiple recipients or a specific group. Adding this type of address to any of your Constant Contact lists is a violation of the Permission Policy (see Section 1). Constant Contact does not send to role email addresses because it is unlikely that all of the recipients would have given their permission to receive your email. Examples of role addresses include [email protected], [email protected], [email protected], etc. If you know that the role address belongs to a single person, ask them to give you another email address. If you added a role address to your account, move it to your Do Not Mail list.
Update function This term usually refers to the process of importing a file to update and add new details for contacts that are already in your account. Although you can use the “Add/Import” function to import updates to existing contacts’ profiles, only the “Update” function can prevent you from accidentally adding email addresses that are not already on your permission-based lists in Constant Contact. There are, however, other ways to update existing contacts’ details, as explained Section 3 of this guide.
Valid email address Constant Contact only accepts email address having all of the following:
The @ symbol•
Fewer than 80 characters•
Four or fewer characters after the dot (e.g. [email protected]) •

Adding_and_Updating_Contacts_Ver6.2 | Page 39©Constant Contact, Inc. All rights reserved. Updated 10/08/10.
Only printable characters•
Important notes:
Addresses containing invalid characters (such as • < , > , : , [ , and ] ) will cause errors and cannot be added.
Do not type an extra space before or after an email address.•
Although role email addresses may be valid, you may• not add them to Constant Contact lists.
If an email address was not added to your account successfully, you will see an error on the • Contacts > Activity page.
Examples: Section 6f provides examples of common email address formatting mistakes.


