How to create a ball that rotates when it moves, even if is scaled, squashed or stretched (by Marti Escageda) In this tutorial we’ll create a ball that can be squashed and stretched, is always on top of the floor when its size changes, and that has rigging so it rotates according to the direction is going. This will save A LOT of work when you’re animating a circular object, and this is coming from someone that used to animate everything without rigging, I know what I’m talking about… The first step is to open 3ds Max and create the ball (obviously XD). You go to the Command Panel -> Create Menu -> Standard Primitives -> Sphere Then create the sphere in the center of the world, and let’s change its name to “Ball”.
Transcript
How to create a ball that rotates when it moves, even if is scaled, squashed
or stretched (by Marti Escageda)
In this tutorial we’ll create a ball that can be squashed and stretched, is always on
top of the floor when its size changes, and that has rigging so it rotates according
to the direction is going.
This will save A LOT of work when you’re animating a circular object, and this is
coming from someone that used to animate everything without rigging, I know what
I’m talking about…
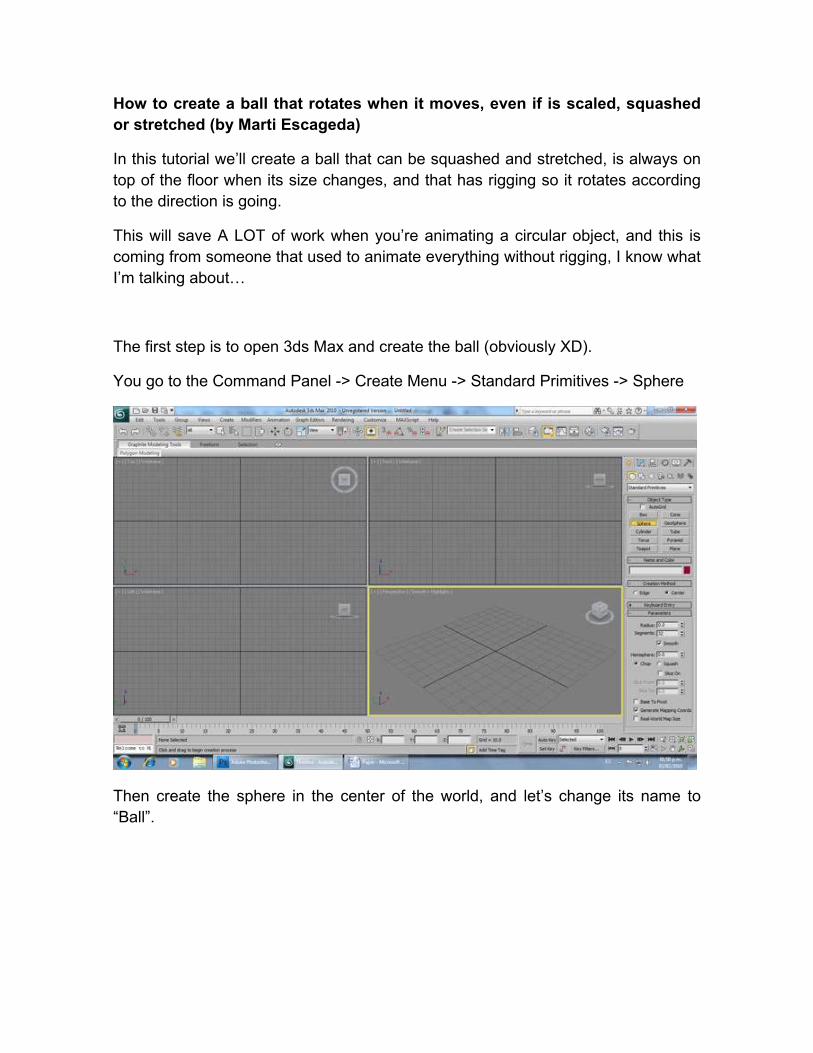
The first step is to open 3ds Max and create the ball (obviously XD).
You go to the Command Panel -> Create Menu -> Standard Primitives -> Sphere
Then create the sphere in the center of the world, and let’s change its name to
“Ball”.
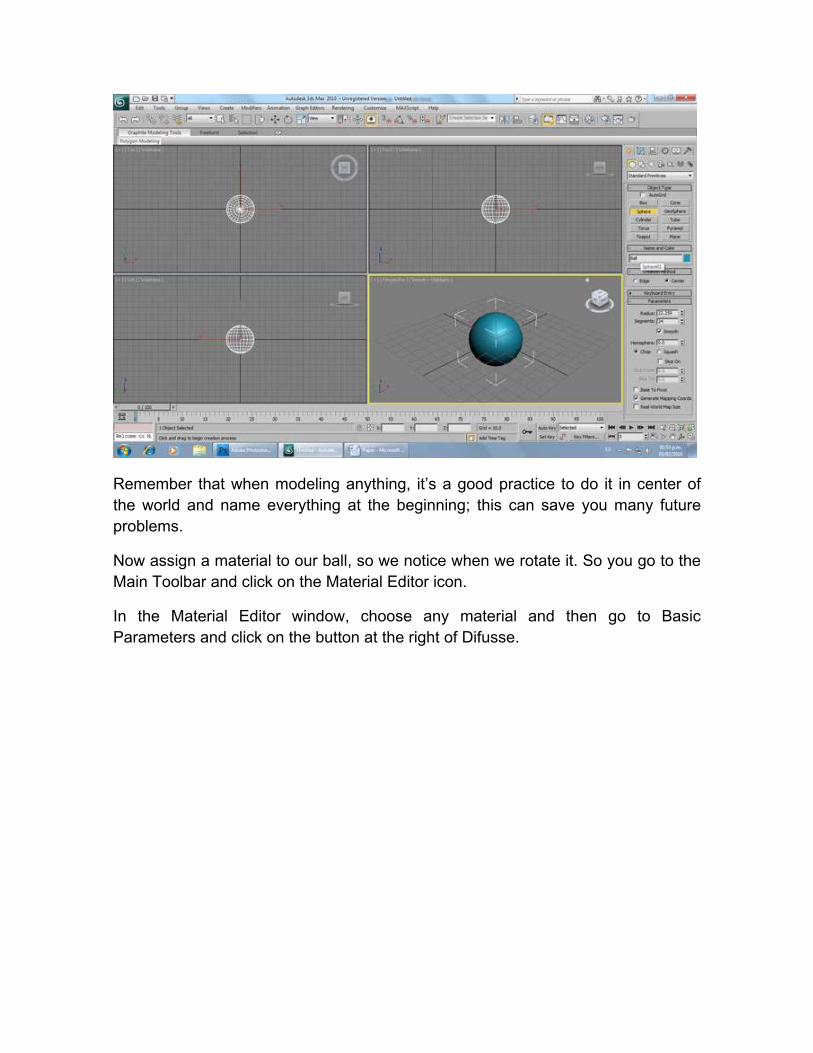
Remember that when modeling anything, it’s a good practice to do it in center of
the world and name everything at the beginning; this can save you many future
problems.
Now assign a material to our ball, so we notice when we rotate it. So you go to the
Main Toolbar and click on the Material Editor icon.
In the Material Editor window, choose any material and then go to Basic
Parameters and click on the button at the right of Difusse.
In the Material Browser you select checker.
Then you select the ball and assign the material clicking on “Asign Material to
Selection”. Remember to have the selected the option of “Show Standard Map in
Viewport” so you can see it.
Now let’s create a “floor” for the ball.
You go to the Command Panel -> Create Menu -> Standard Primitives -> Plane
and create the plane on the center of the stage and name it “Floor”.
Also, let’s move the ball over the floor… All this just so it looks nice ☺
Now, in order to always keep the ball on the floor, you need to use Wire
Parameters. So you select the ball and then go to:
Main Toolbar -> Animation -> Wire Parameters
A menu appears in the viewport, you select
Transform -> Position -> Z Position
Then a dotted line appears. You click on the ball and select
Object (Sphere) -> Radius
A the Parameter Wiring window appears, click on the “<----“ button on the middle,
and then click the connect button.
Close the window and try changing the radius of the ball in the Modify Panel of the
Command Panel. You’ll notice that the ball is still over the floor. This is because its
position in the Z axis depends on its radius, so it’ll change according to it.
If you change the pivot point of the ball in the Hierarchy Menu, you’ll notice that the
ball moves, but the pivot stays in the same place. It’ll be as high as the radius.
Now try moving the ball up or down. You can’t. That’s because the Z Position of
the ball is “wired” to the radius of the ball and will always be in the center of the
ball.
So in order to move the ball up and down, we need a “parent” object, so the ball
moves following its “dad”. That’s why we have the floor!
Just go to the Main Toolbar and click on “Select and Link”.
Click on the ball, keep the mouse button pressed and release it on the floor.
Now the floor is the ball “dad”. You’ll notice that when you move the floor, the ball
also moves, but you still can move the ball independently. Is not “wired” like its Z
Position, only “linked”.
You can still move the ball independently. But of course, when animating you’ll
save yourself a lot of trouble by moving the floor instead of the ball; but you
wouldn’t want the floor showing up on the final render. So right click on the ball and
select Object Properties.
And the uncheck the rendereable option.
Well, you can change the ball radius and move it up and down and to the sides, but
there’s still one problem, it doesn’t rotate like a normal ball would…
Now, there is a way to translate the ball on the X Axis while making it rotate on its
Y Axis and vice versa. This is done adding assigning controllers and using our little
friend Max Script so that a change in X Position makes a change in Y Rotation.
The problem is that when it comes to animating the ball in a rotating in a diagonal
trajectory, both axis move. You see, 3ds Max uses Euler in order to rotate the
objects.
To see how it works, click on the Rotate icon on the Main Menu and click on the
ball.
Now let’s animate the ball spinning. Select the ball, go to the Time Slider menu,
and click on “Auto Key”. Then move the time slider to frame 50, and rotate the ball
while clicking it and moving the mouse while keeping the mouse button pressed.
Rotate it 90° on its X Axis and 90° on its Z Axis.
Now play the movie by clicking the Play button on the time controls.
You’ll see that the ball doesn’t move directly from position A to B. That’s because
both Euler move in order to get that position.
What we need is a quaternion. That’s an imaginary axis that accommodates so the
ball reaches the desired position as soon as possible. In order to do this, you need
to change the ball rotation from Euler XYZ.
As an example to see this, select the ball and open the Mini Curve Editor next to
the Time Slider.
Now, by clicking on the Editor you can go down to the ball Rotation. Right Click on
it and select Assign Controller.
Select TCB Rotation and click OK.
Now you’ll notice that the ball rotates nicely when you play the animation.
What we want is to get that imaginary axis when we move the floor so the ball
rotates according where the ball is going. In reality, a quaternion will be rotating
according to a “vector”. It’s like an arrow pointing where the ball is going, and so
our rotating axis will be perpendicular to that direction.
Also, according to the speed of the vector will be the rotation of the ball. So if you
go a certain distance in an animation, and then you edit it to go farther away in the
same time, the ball will rotate more times. Plain and simple, huh?
For this we need the help of action script. So, go back to the ball rotation in the
Curve Editor, and now assign the Rotation Script Controller.
A window will appear. On the Expression space, type this code (I’ll explain it later):
obj = $Ball timeres = 1f fn getrot t = ( if t<=0f then return quat 0 0 0 1 -- t=0 => no rotation t0 = t-timeres -- previous frame time t1 = t -- current time rot0 = getrot(t0) -- previous rotation: p0 = at time t0 obj.position-- previous position p1 = at time t1 obj.position-- current position if(p0==p1) then return rot0 -- no distance is traveled dif = p1-p0 -- difference in positions len = Length(dif) -- distance that's traveled vec = dif / len -- normalized movement vector. r0 = at time t0 obj.radius -- previous radius r1 = at time t1 obj.radius -- current radius rotax = cross vec [0, 0, 1] -- rotation axis angle = 360*len/((r0+r1)*pi)-- rotation amount (in degs) rotdif = quat angle rotax -- rotation from t0 to t1 rot1 = rot0 + rotdif -- total rotation ) getrot(currentTime)
Click on Evaluate and close the window. Now try animating the floor. When you
move it, noting happens. But press the Auto Key, go to the 50 and move the floor
diagonally.
Play the animation and voila!
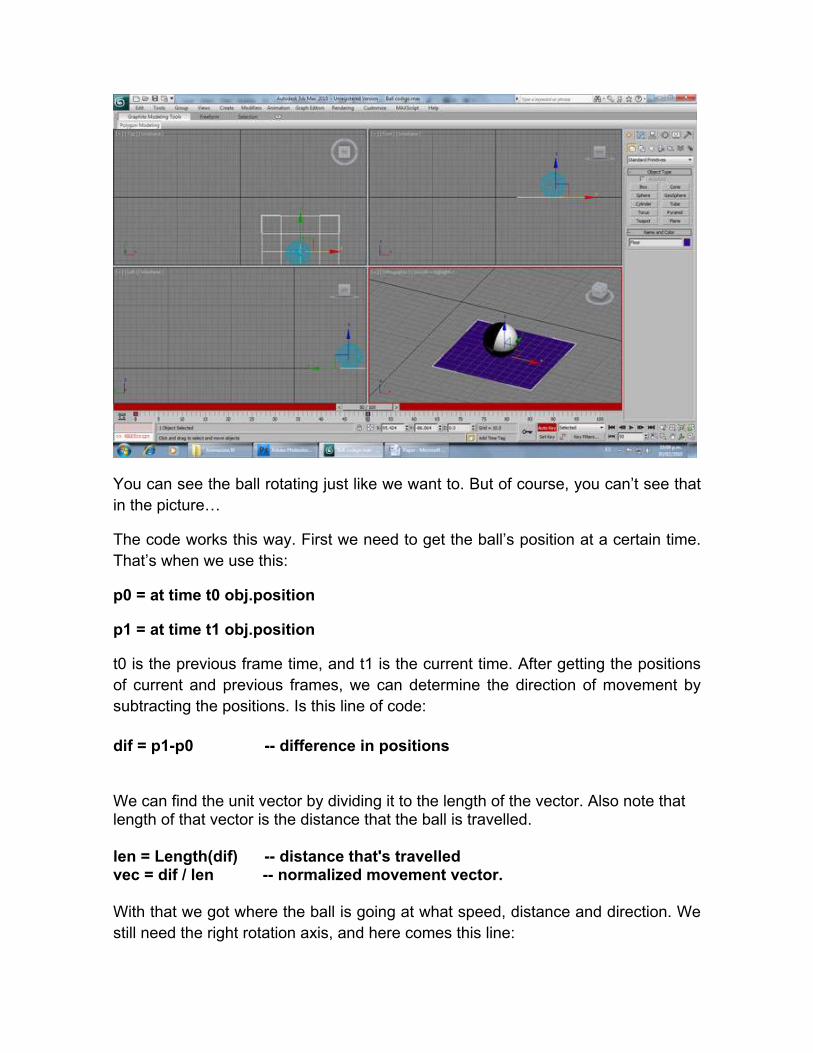
You can see the ball rotating just like we want to. But of course, you can’t see that
in the picture…
The code works this way. First we need to get the ball’s position at a certain time.
That’s when we use this:
p0 = at time t0 obj.position
p1 = at time t1 obj.position
t0 is the previous frame time, and t1 is the current time. After getting the positions
of current and previous frames, we can determine the direction of movement by
subtracting the positions. Is this line of code:
dif = p1-p0 -- difference in positions
We can find the unit vector by dividing it to the length of the vector. Also note that length of that vector is the distance that the ball is travelled.
len = Length(dif) -- distance that's travelled vec = dif / len -- normalized movement vector.
With that we got where the ball is going at what speed, distance and direction. We
still need the right rotation axis, and here comes this line:
rotax = cross vec [0, 0, 1]
We know that the rotation axis is perpendicular to the movement vector; and also,
we can say that the force that the ground applied to the ball is in up direction (+Z
vector). The rotation axis should be perpendicular to that vector too. So we need to
find a vector which is perpendicular to both vec and Z vectors. So if take cross
product of those two vectors we'll find the vector we are seeking.
In order to get how much the ball is rotating, we need to do an operation according
to its circumference. If the ball rotates a full turn, it'd travel a distance equal to its
circumference. As you know the circumference of circle is 2*pi*r. So the rotation
angle (in degrees) that is required to travel len distance is.
angle = 360*len/((r0+r1)*pi) The “r0+r1” operation allows an animation of the ball spinning and changing its size at the same time. How cool is that? Now the quaternion is built with this line: rotdif = quat angle rotax By using the rotation axis (rotax) and the rotation amount (angle). Max Script has a
Quaternion constructor which requires just those two values.
I want to thank Cuneyt Ozdas for this code. A got it here: http://www.cuneytozdas.com/tutorials/maxscript/
So, you have a nice rotating ball that can change its size. But, how about changing its shape?
There are two ways of doing this. One is using the modifier “stretch”. But that one is limited to the modifier in itself, I mean it only stretches in a certain way.
The other one is using morphers, this way you can give the ball any shape you want.
But first, you have to reshape the vertexes of the ball, and that’ll be with the help of a FFD Box.
Go to the Command Panel -> Create Menu -> Space Warps
Choose Geometric/Deformable and the click FFD(Box)
Once you create it, let’s make its size bigger than the ball. But remember, the ball
can change its radius. So, you need to make the FFD Box wired to the radius of
the ball, but making it somewhat bigger.
Select the FFD Box, Open the Mini Curve Editor and go all the way down to the
length, height and width of the ball. Select length, click on assign controller and
choose Float Expression, then OK.
Now, you need to create the variable ballRadius. Create it, and then click on assign
Controller, and go to object ball and click on radius.
Now write the expression (ballRadius*2)+10, this way it’ll always be bigger of the
ball, so we won’t have problems when reshaping and resizing it later.
Click on evaluate, and you’ll notice how it gets that size. Now, copy and paste the
controller to the expression by right clicking on length on the Mini Curve Editor,
select click copy, then select width, right click and paste.
A window will appear, choose paste as copy. Do the same steps for the height
property.
Now align the FFD Box with the ball. Select the FFD Box, then click on the align
button on the Main Toolbar and select the ball.
A window will appear, select all the axis, choose align the pivot points, and click
OK.
The FFD is aligned with the ball, but if you make the ball bigger, you’ll notice that
the FFD Box gets bigger, but doesn’t goes up with the ball. Remember that the Z
Position of the ball is according to the position of the floor. So you need an
expression that tells the FFD Box to go up and down depending on the floor.
Select the FFD Box, Open the Mini Curve Editor, select its Z Position, right click
and select “Assign Controller”. Choose Float Expression and click OK.
Create the variables FloorZPosition and ballRadius. Select the variable ballRadius,
click on Assign to Controller, and go to ball -> Object -> Radius.
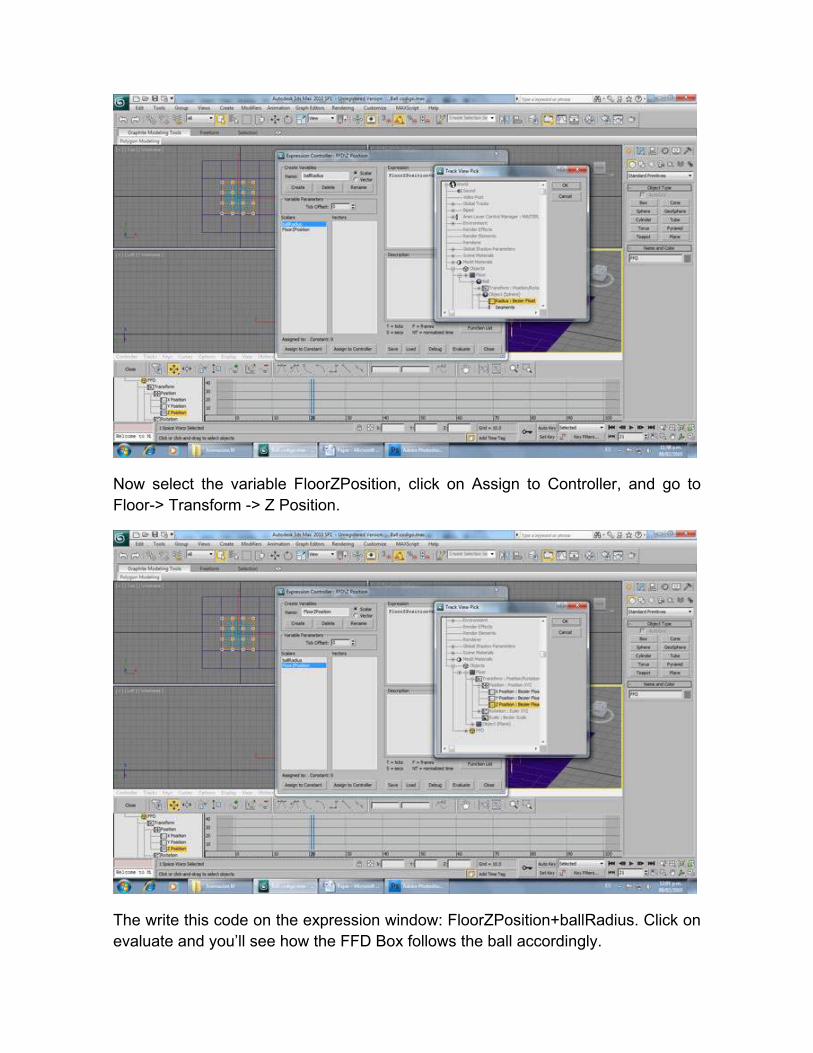
Now select the variable FloorZPosition, click on Assign to Controller, and go to
Floor-> Transform -> Z Position.
The write this code on the expression window: FloorZPosition+ballRadius. Click on
evaluate and you’ll see how the FFD Box follows the ball accordingly.
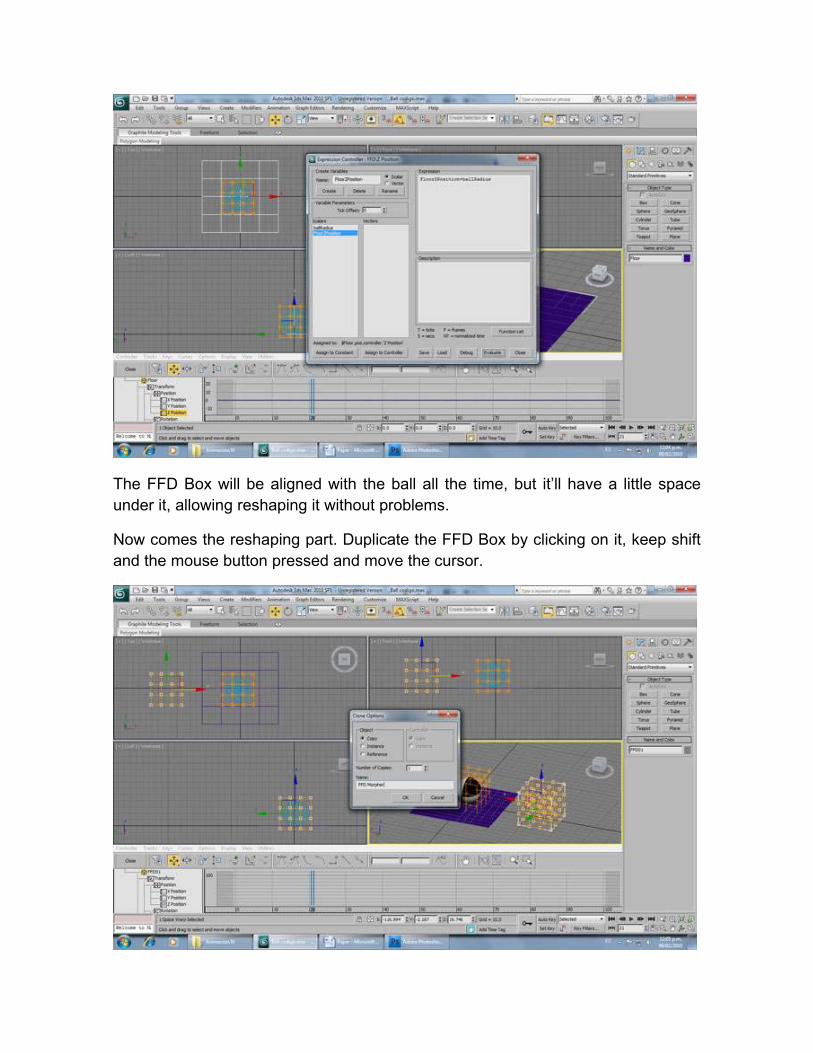
The FFD Box will be aligned with the ball all the time, but it’ll have a little space
under it, allowing reshaping it without problems.
Now comes the reshaping part. Duplicate the FFD Box by clicking on it, keep shift
and the mouse button pressed and move the cursor.
Once you release the button, Select the Copy option, name if FFD Morpher and
click OK.
Now go to the Modify Panel in the Command Panel, Select the FFD Box Control
Points and move them stretching the box.
Now select the original FFD Box, go to the Modify Panel, and scroll down the
modifier list and select Morpher.
Now click on the button “Select Object From Scene” and select the FFD Box clone.
Hey, the ball doesn’t change… Oh, wait a moment, we still haven’t linked the ball
to the FFD Box! This is easy, just click on Bond to Space Warp on the Main
Toolbar, click and hold the button on the ball, and release it on the FFD Box.
Now you’ll see that the ball now stretches changing its value on the Channel List.
In order to squash the ball, go to Global Parameters, and make the minimum limit
“-100”.
There’s still one more thing. The FFD Box must move according to the floor. So
let’s wire it’s X and Y positions. Select the FFD Box, go to Animation -> Wire
Parameters, then choose Transform -> Position -> X Position.
The dotted line appears, click on the floor and choose Transform -> Position -> X
Position.
Now click on the “<----“ button on the middle, and then click the connect button.
Do the same for the Y Position and… That’s it!
Try animating the ball with a weird shape and you’ll see it moving nicely in every
direction.
I hope you like this tutorial, it’s my first one and I try to make it as simple as I could
so anyone could do it, even if it barely knows the tools of 3ds Max.