Page 1
1
© 2015 DNAGedcom.com. May not be reprinted without written permission. Updated 2015-04-13 by Sue Griffith. Additional updates 2015-04-21 by Karin Corbeil
How to Create an ADSA (Autosomal DNA Segment Analyzer) Report from GEDmatch
Last edited: 21 April 2015
Table of Contents
Key Abbreviations and Terms ......................................................................................................... 1
Introduction to GEDmatch-ADSA .................................................................................................... 2
What are GEDmatch and DNAGedcom? ......................................................................................... 2
Tier 1 GEDmatch ............................................................................................................................. 3
Becoming a Tier 1 GEDmatch Member .................................................................................... 5
Step-by-Step Instructions for Creating a GEDmatch-ADSA or JWorks Output ............................... 6
Quick Guide for Creating a GEDmatch-ADSA Record ................................................................... 21
Key Abbreviations and Terms ADSA Autosomal DNA Segment Analyzer
DNAGedcom See Here
FTDNA Family Tree DNA
GEDmatch See Here
ICW In Common With
Tier 1 GEDmatch See Here
Triangulation The process of identifying one or more DNA segments that are in common
among at least 3 people (not including close relatives such as parents/children
and siblings)
Note: In the fast-paced world of genetic genealogy, these instructions may change. We strive to keep them
current, so if you have any issues or find broken links, please let us know at [email protected] .
Introduction to GEDmatch-ADSA
The Autosomal DNA Segment Analyzer (ADSA) was originally developed by Don Worth as a way to organize,
visualize, work with your match list and chromosome data, and determine which of your matches are also
related to each other (that is, ICW = in common with) using information from Family Tree DNA’s (FTDNA)
Family Finder test. Now it can also be used with GEDmatch.
Page 2
2
© 2015 DNAGedcom.com. May not be reprinted without written permission. Updated 2015-04-13 by Sue Griffith. Additional updates 2015-04-21 by Karin Corbeil
If you are a Tier 1 member at GEDmatch (see Here), the GEDmatch Load Tool on DNAGedcom (see Here) will combine the Matching Segment Search and Triangulation outputs from GEDmatch, so you can run various tools on DNAGedcom, including ADSA.
The step-by-step instructions are very detailed, so you may want to take a quick look at the Quick Guide for
Creating a GEDmatch-ADSA Record on the last page before coming back here.
What are GEDmatch and DNAGedcom?
Not infrequently, people seem to mix these up! If you are familiar with both of these, you can skip this section.
• GEDmatch (available at www.gedmatch.com) is a 3rd party website, which was created by
2 volunteers, and accepts uploads of autosomal DNA (+ X-chromosome DNA) from 23andMe,1 FTDNA,
and AncestryDNA. In addition to being able to make ‘One-to-one’ comparisons between pairs of
individuals, running the ‘One-to-many’ tool will give you a list of DNA matches, and these will include
individuals from all of the “Big 3” DNA testing companies, even if you have been tested at only one
company. Kit numbers on GEDmatch start with either an M, F, or A, which indicates the testing
company (23andMe, FTDNA, and AncestryDNA, respectively). Because AncestryDNA doesn’t provide
any matching segment data (they don’t provide a a chromosome browser or any tools to see how you
genetically match someone), GEDmatch is the only way to be able to see the matching segment data
between you and others from AncestryDNA (as well as individuals who have tested at 23andMe and
FTDNA). GEDmatch has a range of utilities and is a fantastic resource for genetic genealogists. The
main part of GEDmatch is totally free (although they accept donations to help with server and other
costs). More recently, Tier 1 GEDmatch was introduced, which requires a minimum donation of $10
per month (more about that Here). Tier 1 Membership provides additional tools (usually those that
put a greater load on their servers than the free tools do), including Matching Segment Search and
Triangulation, and these two tools are currently required for GEDmatch-ADSA.
• DNAGedcom (available at www.dnagedcom.com) is another wonderful 3rd party website for working
with your autosomal DNA data, which was the brainchild of Rob Warthen. The tools and documents
were originally created for the use of adoptees looking for birth family, but are by no means limited to
that purpose. DNAGedcom has a range of data extraction and manipulation tools, including data from
23andMe and FTDNA (and before some of these were available on those websites!) and also from
GEDCOMs [a GEDCOM file (.GED) is a universal format for the exchange of family tree data]. The
autosomal DNA tools include ADSA, JWorks, and KWorks.
1 Unlike transfers of 23andMe data to FTDNA, where only tests based on the Version 3 Illumina DNA Sequencer chip are accepted,
GEDmatch also accepts uploads of more recent 23andMe tests that used the Version 4 chip.
Page 3
3
© 2015 DNAGedcom.com. May not be reprinted without written permission. Updated 2015-04-13 by Sue Griffith. Additional updates 2015-04-21 by Karin Corbeil
In order to create your GEDmatch-ADSA output, you will need to use both GEDmatch (Tier 1) and
DNAGedcom.
Tier 1 GEDmatch
Although most of the GEDmatch tools are free, in October 2014, GEDmatch introduced an enhanced Tier 1
membership, which provides additional, server-intensive tools. If you have donated to GEDmatch in the past,
you will have access to the Tier 1 tools for “a period of time equal to 1 month for every $10 donated.” So
basically, Tier 1 GEDmatch membership costs $120 for a full year. But you can take out membership on a
month-by-month basis (without any commitments), so you can try it out for a month and then come back
again whenever you donate another $10.
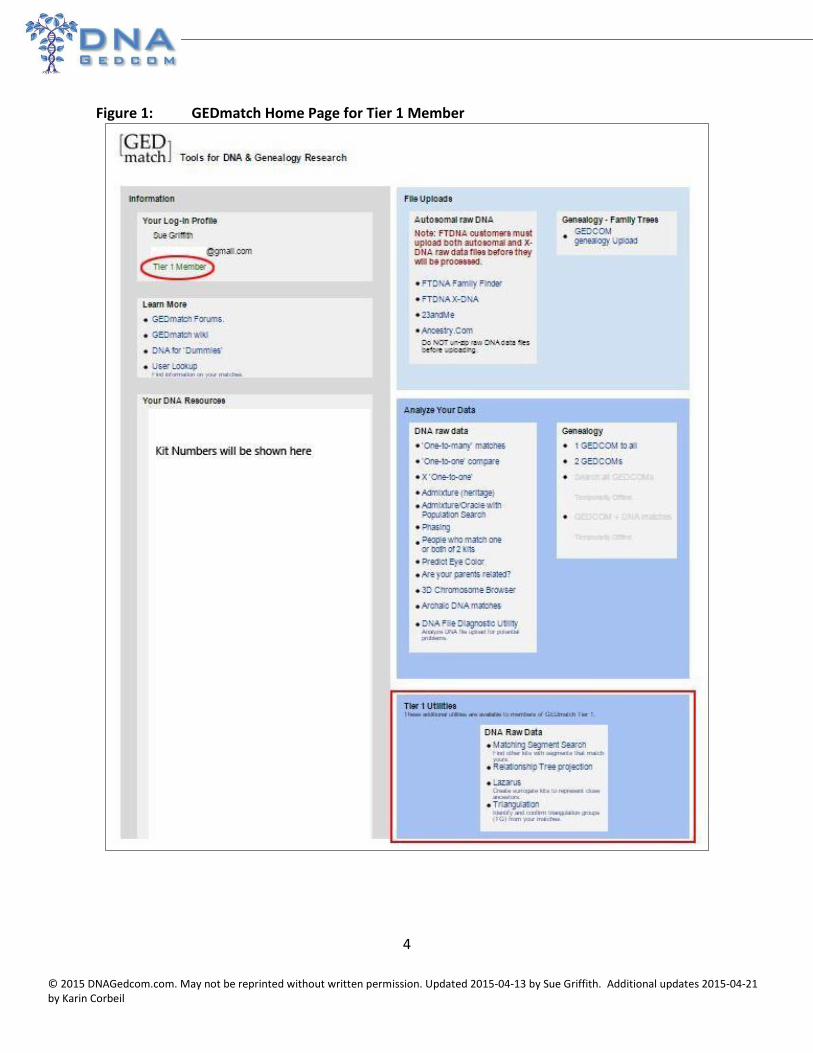
You can tell whether you are a Tier 1 member from your GEDmatch Home page, which is the main page that
opens when you log-in to www.GEDmatch.com. If you are a Tier 1 Member, this will be shown at the top left
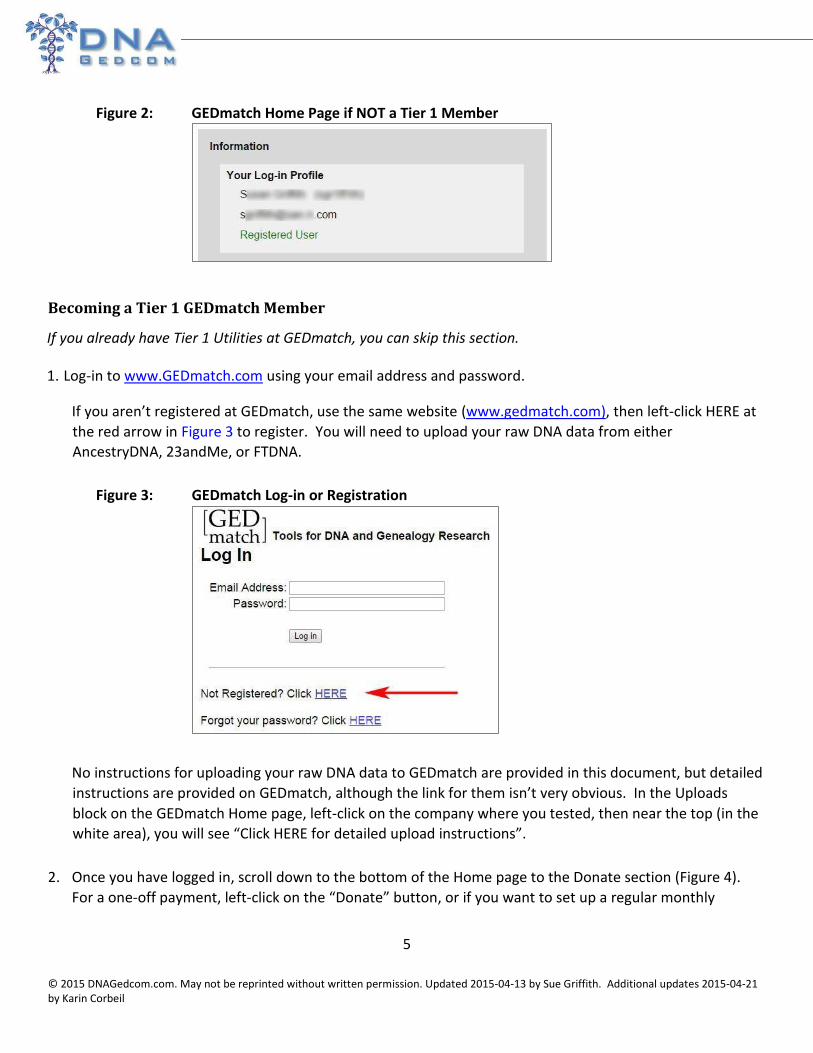
(red oval) and the Tier 1 Utilities are in the box at the bottom right (Figure 1). If you aren’t a Tier 1 Member,
your Home page will instead show you as a Registered User (Figure 2) and the block of Tier 1 Utilities won’t be
shown.
Page 4
4
© 2015 DNAGedcom.com. May not be reprinted without written permission. Updated 2015-04-13 by Sue Griffith. Additional updates 2015-04-21 by Karin Corbeil
Figure 1: GEDmatch Home Page for Tier 1 Member
Page 5
5
© 2015 DNAGedcom.com. May not be reprinted without written permission. Updated 2015-04-13 by Sue Griffith. Additional updates 2015-04-21 by Karin Corbeil
Figure 2: GEDmatch Home Page if NOT a Tier 1 Member
Becoming a Tier 1 GEDmatch Member
If you already have Tier 1 Utilities at GEDmatch, you can skip this section.
1. Log-in to www.GEDmatch.com using your email address and password.
If you aren’t registered at GEDmatch, use the same website (www.gedmatch.com), then left-click HERE at
the red arrow in Figure 3 to register. You will need to upload your raw DNA data from either
AncestryDNA, 23andMe, or FTDNA.
Figure 3: GEDmatch Log-in or Registration
No instructions for uploading your raw DNA data to GEDmatch are provided in this document, but detailed
instructions are provided on GEDmatch, although the link for them isn’t very obvious. In the Uploads
block on the GEDmatch Home page, left-click on the company where you tested, then near the top (in the
white area), you will see “Click HERE for detailed upload instructions”.
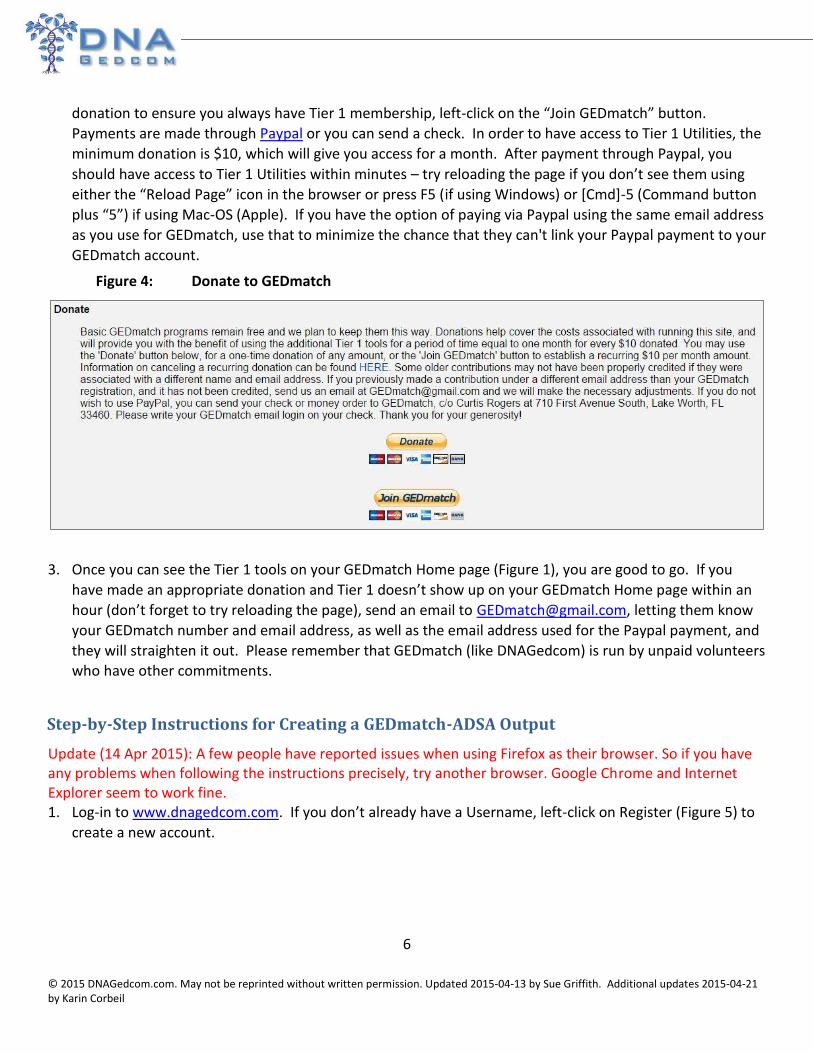
2. Once you have logged in, scroll down to the bottom of the Home page to the Donate section (Figure 4).
For a one-off payment, left-click on the “Donate” button, or if you want to set up a regular monthly
Page 6
6
© 2015 DNAGedcom.com. May not be reprinted without written permission. Updated 2015-04-13 by Sue Griffith. Additional updates 2015-04-21 by Karin Corbeil
donation to ensure you always have Tier 1 membership, left-click on the “Join GEDmatch” button.
Payments are made through Paypal or you can send a check. In order to have access to Tier 1 Utilities, the
minimum donation is $10, which will give you access for a month. After payment through Paypal, you
should have access to Tier 1 Utilities within minutes – try reloading the page if you don’t see them using
either the “Reload Page” icon in the browser or press F5 (if using Windows) or [Cmd]-5 (Command button
plus “5”) if using Mac-OS (Apple). If you have the option of paying via Paypal using the same email address
as you use for GEDmatch, use that to minimize the chance that they can't link your Paypal payment to your
GEDmatch account.
3. Once you can see the Tier 1 tools on your GEDmatch Home page (Figure 1), you are good to go. If you
have made an appropriate donation and Tier 1 doesn’t show up on your GEDmatch Home page within an
hour (don’t forget to try reloading the page), send an email to [email protected] , letting them know
your GEDmatch number and email address, as well as the email address used for the Paypal payment, and
they will straighten it out. Please remember that GEDmatch (like DNAGedcom) is run by unpaid volunteers
who have other commitments.
Step-by-Step Instructions for Creating a GEDmatch-ADSA Output
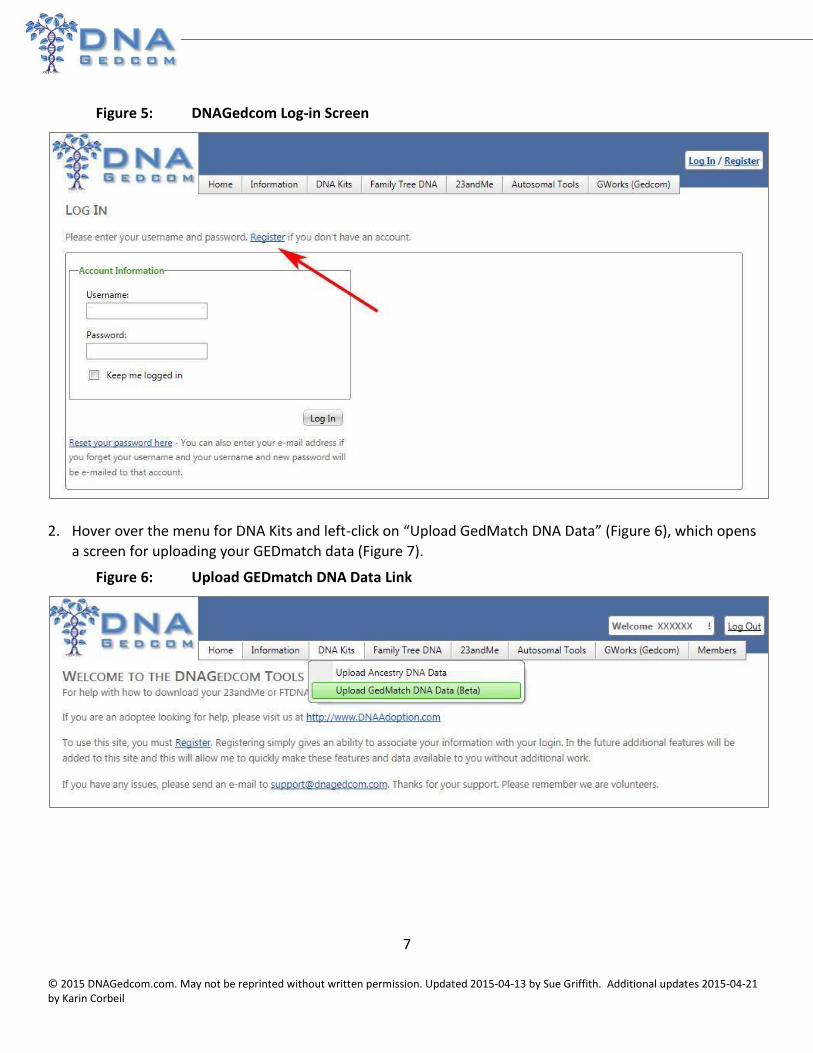
Update (14 Apr 2015): A few people have reported issues when using Firefox as their browser. So if you have any problems when following the instructions precisely, try another browser. Google Chrome and Internet Explorer seem to work fine. 1. Log-in to www.dnagedcom.com. If you don’t already have a Username, left-click on Register (Figure 5) to
create a new account.
Figure 4 : Donate to GEDmatch
Page 7
7
© 2015 DNAGedcom.com. May not be reprinted without written permission. Updated 2015-04-13 by Sue Griffith. Additional updates 2015-04-21 by Karin Corbeil
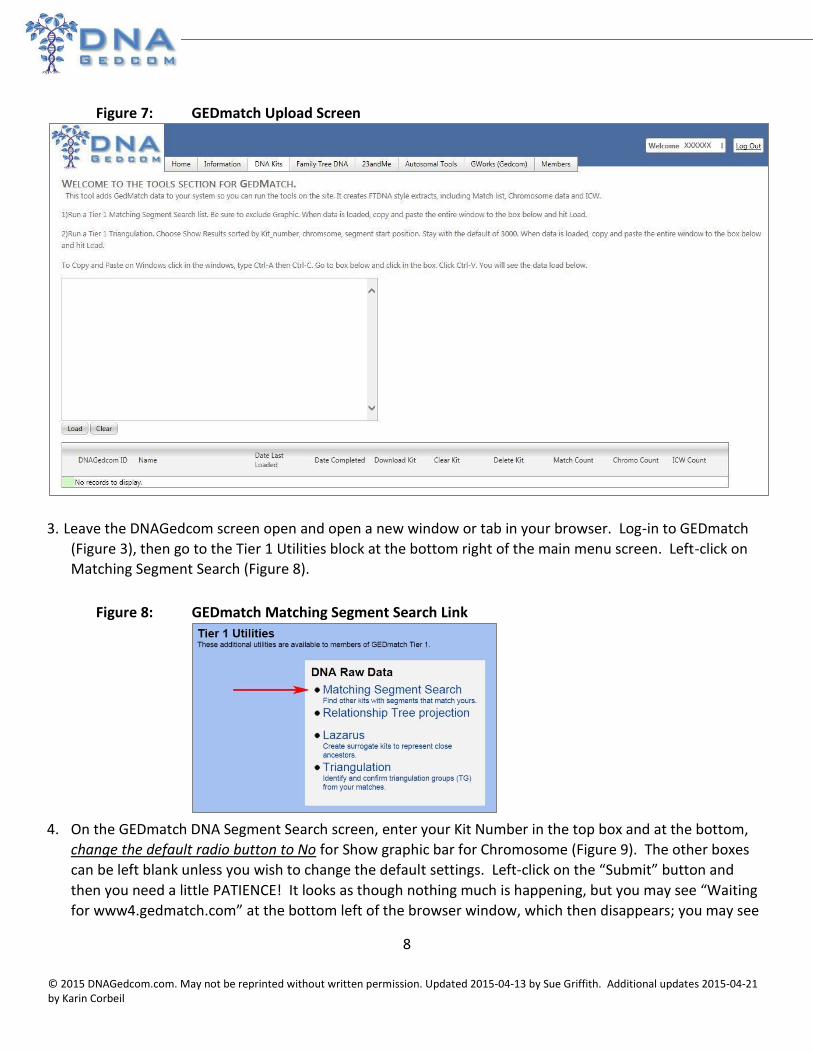
2. Hover over the menu for DNA Kits and left-click on “Upload GedMatch DNA Data” (Figure 6), which opens
a screen for uploading your GEDmatch data (Figure 7).
Figure 5 : DNAGedc om Log - in Screen
Figure 6 : Upload GEDmatch DNA Data Link
Page 8
8
© 2015 DNAGedcom.com. May not be reprinted without written permission. Updated 2015-04-13 by Sue Griffith. Additional updates 2015-04-21 by Karin Corbeil
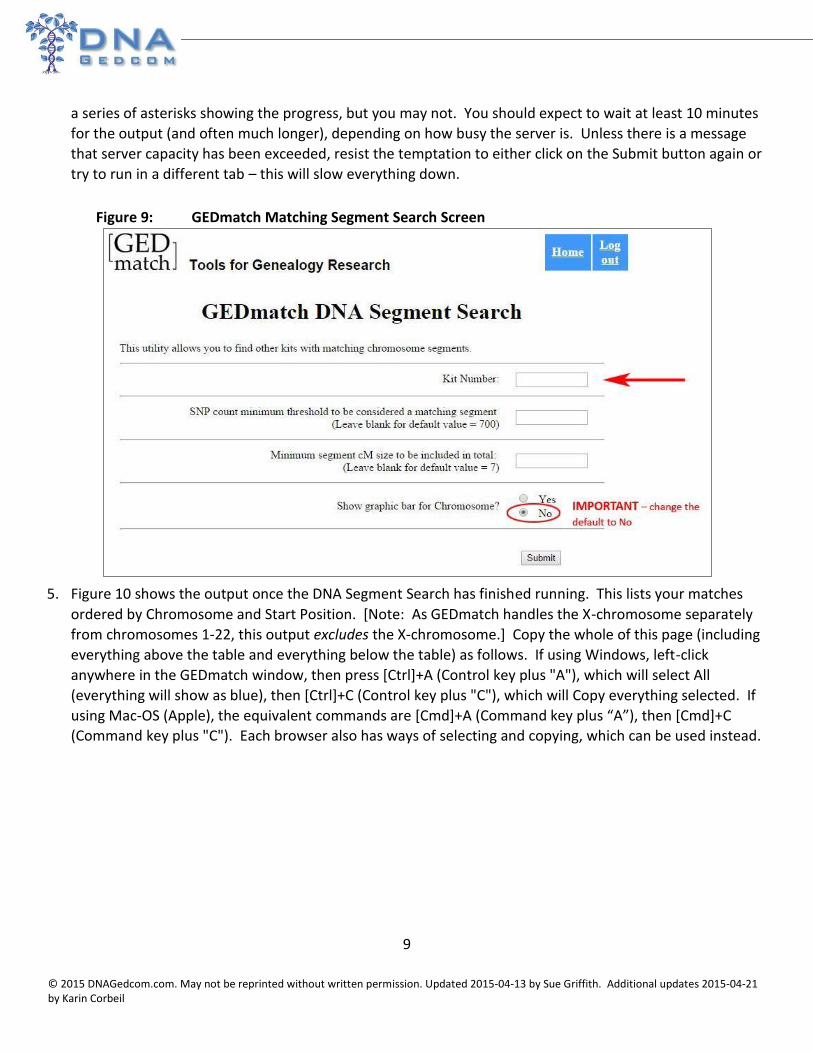
Figure 7: GEDmatch Upload Screen
3. Leave the DNAGedcom screen open and open a new window or tab in your browser. Log-in to GEDmatch
(Figure 3), then go to the Tier 1 Utilities block at the bottom right of the main menu screen. Left-click on
Matching Segment Search (Figure 8).
Figure 8: GEDmatch Matching Segment Search Link
4. On the GEDmatch DNA Segment Search screen, enter your Kit Number in the top box and at the bottom,
change the default radio button to No for Show graphic bar for Chromosome (Figure 9). The other boxes
can be left blank unless you wish to change the default settings. Left-click on the “Submit” button and
then you need a little PATIENCE! It looks as though nothing much is happening, but you may see “Waiting
for www4.gedmatch.com” at the bottom left of the browser window, which then disappears; you may see
Page 9
9
© 2015 DNAGedcom.com. May not be reprinted without written permission. Updated 2015-04-13 by Sue Griffith. Additional updates 2015-04-21 by Karin Corbeil
a series of asterisks showing the progress, but you may not. You should expect to wait at least 10 minutes
for the output (and often much longer), depending on how busy the server is. Unless there is a message
that server capacity has been exceeded, resist the temptation to either click on the Submit button again or
try to run in a different tab – this will slow everything down.
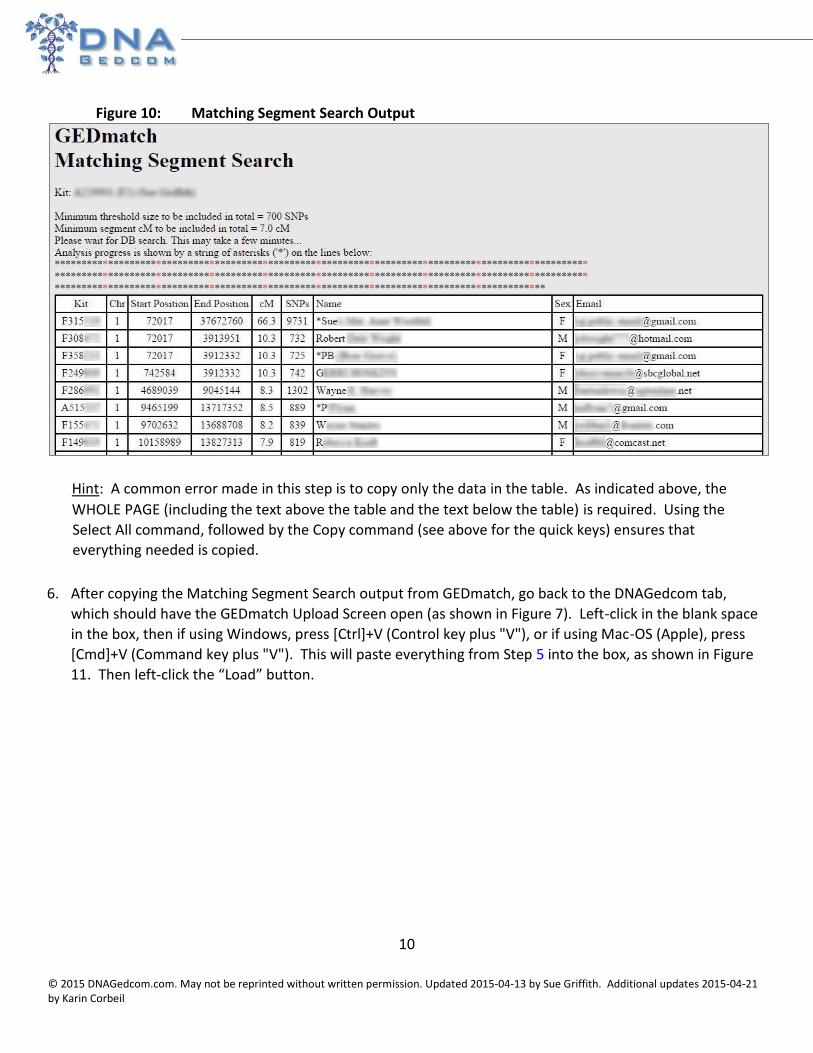
Figure 9: GEDmatch Matching Segment Search Screen
5. Figure 10 shows the output once the DNA Segment Search has finished running. This lists your matches
ordered by Chromosome and Start Position. [Note: As GEDmatch handles the X-chromosome separately
from chromosomes 1-22, this output excludes the X-chromosome.] Copy the whole of this page (including
everything above the table and everything below the table) as follows. If using Windows, left-click
anywhere in the GEDmatch window, then press [Ctrl]+A (Control key plus "A"), which will select All
(everything will show as blue), then [Ctrl]+C (Control key plus "C"), which will Copy everything selected. If
using Mac-OS (Apple), the equivalent commands are [Cmd]+A (Command key plus “A”), then [Cmd]+C
(Command key plus "C"). Each browser also has ways of selecting and copying, which can be used instead.
Page 10
10
© 2015 DNAGedcom.com. May not be reprinted without written permission. Updated 2015-04-13 by Sue Griffith. Additional updates 2015-04-21 by Karin Corbeil
Figure 10: Matching Segment Search Output
Hint: A common error made in this step is to copy only the data in the table. As indicated above, the
WHOLE PAGE (including the text above the table and the text below the table) is required. Using the
Select All command, followed by the Copy command (see above for the quick keys) ensures that
everything needed is copied.
6. After copying the Matching Segment Search output from GEDmatch, go back to the DNAGedcom tab,
which should have the GEDmatch Upload Screen open (as shown in Figure 7). Left-click in the blank space
in the box, then if using Windows, press [Ctrl]+V (Control key plus "V"), or if using Mac-OS (Apple), press
[Cmd]+V (Command key plus "V"). This will paste everything from Step 5 into the box, as shown in Figure
11. Then left-click the “Load” button.
Page 11
11
© 2015 DNAGedcom.com. May not be reprinted without written permission. Updated 2015-04-13 by Sue Griffith. Additional updates 2015-04-21 by Karin Corbeil
Figure 11: GEDmatch Upload Screen in DNAGedcom after Pasting Matching Segment Search
Output
7. It takes <1 minute for the data to load to DNAGedcom – you may see “Waiting for response from
dnagedcom.com” at the bottom left of the browser window. After the upload is complete, the box will
scroll back so that the top of the pasted data is visible and the kit that was loaded will be in the table at the
bottom of the screen, with the Match Count (number of matches from GEDmatch) and Chromo Count
(number of matching segments) shown (red rectangle) – see Figure 12. At this stage, ICW Count (at the
bottom right) shows 0 if this is the first time you have uploaded a particular kit. [Note: If you are
uploading a kit that is already in the system (to add new matches), it will overwrite the previous data. You
don’t need to delete the old kit.]
After you have verified that the Match Count and Chromo Count are in the system, left-click the “Clear”
button (red oval) and the large box will be empty again.
Page 12
12
© 2015 DNAGedcom.com. May not be reprinted without written permission. Updated 2015-04-13 by Sue Griffith. Additional updates 2015-04-21 by Karin Corbeil
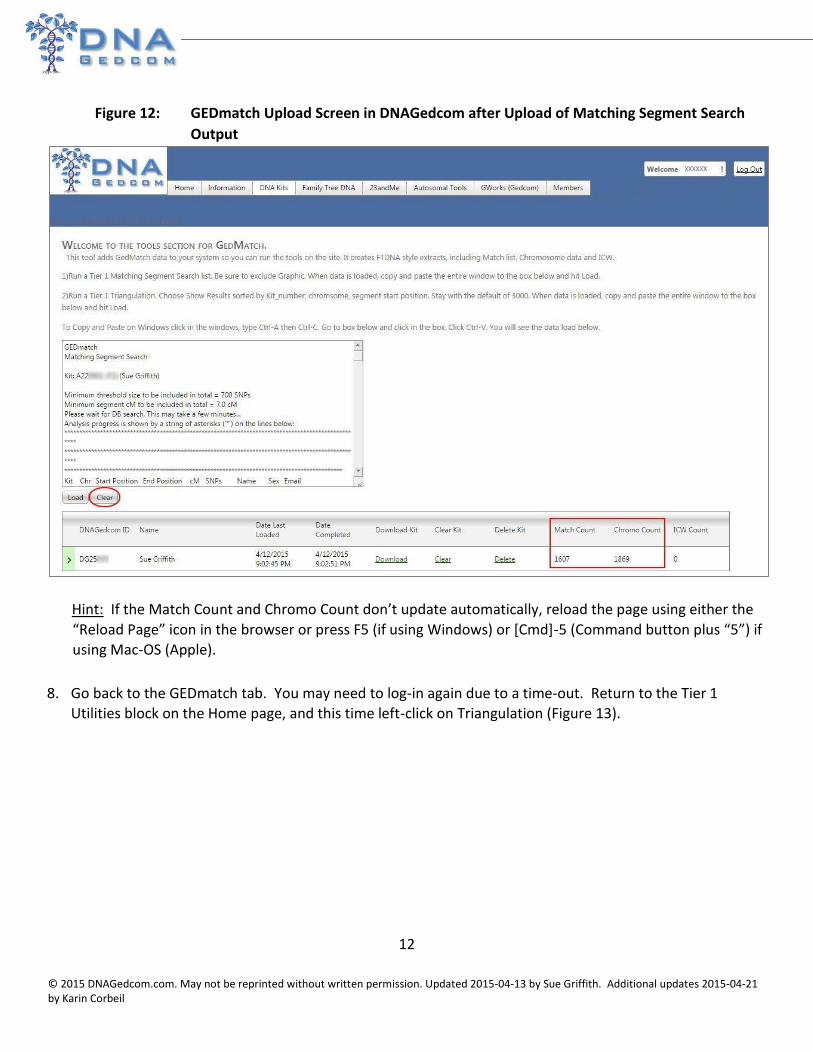
Figure 12: GEDmatch Upload Screen in DNAGedcom after Upload of Matching Segment Search
Output
Hint: If the Match Count and Chromo Count don’t update automatically, reload the page using either the
“Reload Page” icon in the browser or press F5 (if using Windows) or [Cmd]-5 (Command button plus “5”) if
using Mac-OS (Apple).
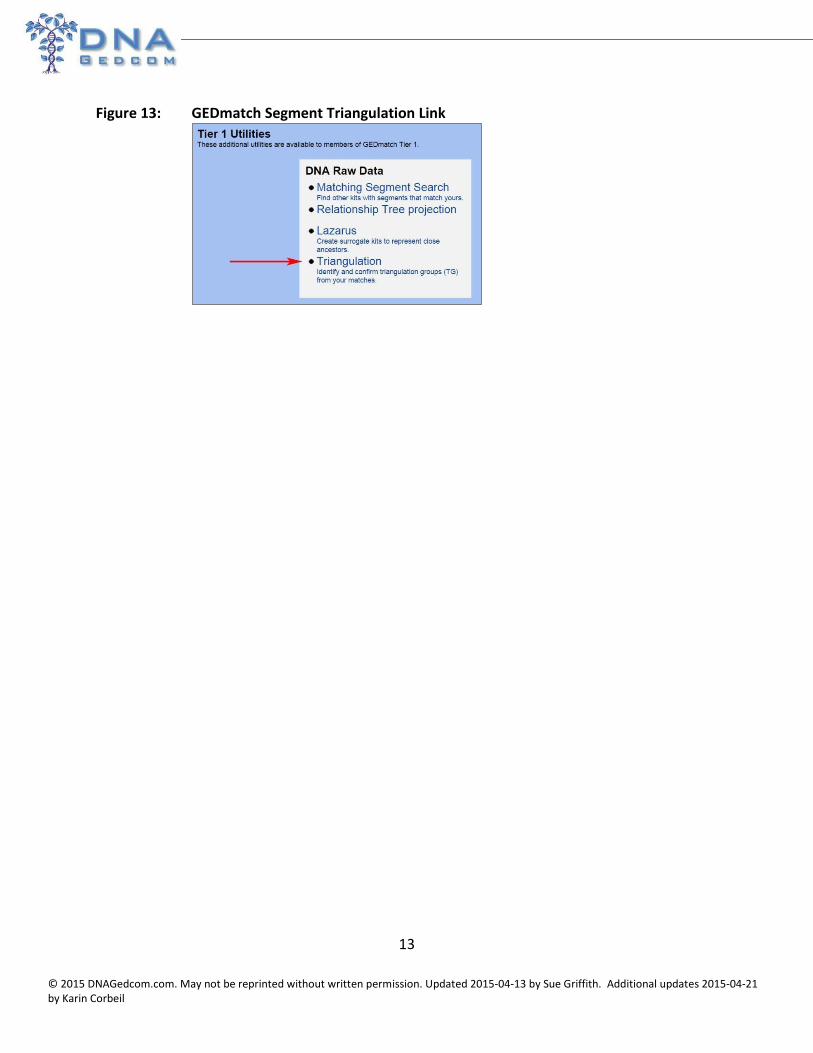
8. Go back to the GEDmatch tab. You may need to log-in again due to a time-out. Return to the Tier 1
Utilities block on the Home page, and this time left-click on Triangulation (Figure 13).
Page 13
13
© 2015 DNAGedcom.com. May not be reprinted without written permission. Updated 2015-04-13 by Sue Griffith. Additional updates 2015-04-21 by Karin Corbeil
Figure 13: GEDmatch Segment Triangulation Link
Page 14
14
© 2015 DNAGedcom.com. May not be reprinted without written permission. Updated 2015-04-13 by Sue Griffith. Additional updates 2015-04-21 by Karin Corbeil
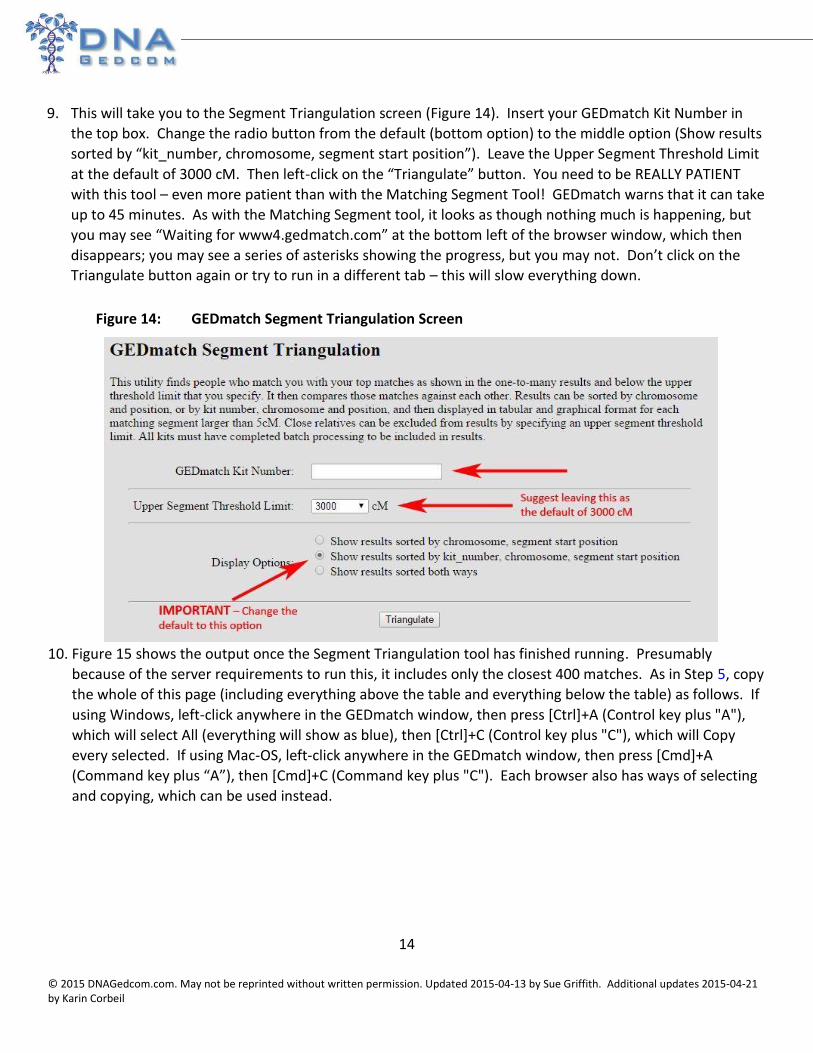
9. This will take you to the Segment Triangulation screen (Figure 14). Insert your GEDmatch Kit Number in
the top box. Change the radio button from the default (bottom option) to the middle option (Show results
sorted by “kit_number, chromosome, segment start position”). Leave the Upper Segment Threshold Limit
at the default of 3000 cM. Then left-click on the “Triangulate” button. You need to be REALLY PATIENT
with this tool – even more patient than with the Matching Segment Tool! GEDmatch warns that it can take
up to 45 minutes. As with the Matching Segment tool, it looks as though nothing much is happening, but
you may see “Waiting for www4.gedmatch.com” at the bottom left of the browser window, which then
disappears; you may see a series of asterisks showing the progress, but you may not. Don’t click on the
Triangulate button again or try to run in a different tab – this will slow everything down.
Figure 14: GEDmatch Segment Triangulation Screen
10. Figure 15 shows the output once the Segment Triangulation tool has finished running. Presumably
because of the server requirements to run this, it includes only the closest 400 matches. As in Step 5, copy
the whole of this page (including everything above the table and everything below the table) as follows. If
using Windows, left-click anywhere in the GEDmatch window, then press [Ctrl]+A (Control key plus "A"),
which will select All (everything will show as blue), then [Ctrl]+C (Control key plus "C"), which will Copy
every selected. If using Mac-OS, left-click anywhere in the GEDmatch window, then press [Cmd]+A
(Command key plus “A”), then [Cmd]+C (Command key plus "C"). Each browser also has ways of selecting
and copying, which can be used instead.
Page 15
15
© 2015 DNAGedcom.com. May not be reprinted without written permission. Updated 2015-04-13 by Sue Griffith. Additional updates 2015-04-21 by Karin Corbeil
Hint: A common error made in this step is to copy only the data in the table. As indicated above, the
WHOLE PAGE (including the text above the table and the text below the table) is required. Using the
Select All command, followed by the Copy command (see above for the quick keys) ensures that
everything needed is copied.
11. After copying the Segment Triangulation output from GEDmatch, go back to the DNAGedcom tab, which
will have the GEDmatch Upload Screen open. If the large box in the center isn’t empty, it means you
forgot to left-click the “Clear” button in Step 7, so go ahead and do that now. Left-click in the blank space
in the box, then if using Windows, press [Ctrl]+V (Control key plus "V"), or if using Mac-OS, press [Cmd]+V
(Command key plus "V"). This will paste everything from Step 10 into the box, as shown in Figure 17.
Then left-click the “Load” button.
Figure 16: GEDmatch Upload Screen in DNAGedcom after Pasting Segment Triangulation Output
Figure 15 : Segment Triangulation Output
Page 16
16
© 2015 DNAGedcom.com. May not be reprinted without written permission. Updated 2015-04-13 by Sue Griffith. Additional updates 2015-04-21 by Karin Corbeil
12. It takes <1 minute for the data to load to DNAGedcom – you may see “Waiting for response from
dnagedcom.com” at the bottom left of the browser window while it is running. After the upload is
complete, the box will scroll back so the top of the pasted data is visible and the record that was loaded
will be in the section at the bottom of the screen, this time with the In Common With (ICW) Count shown
(red rectangle) – see Figure 17. [Note: If you are uploading a kit that is already in the system (to add new
matches), it will overwrite the previous data. You don’t need to delete the old kit.]
Page 17
17
© 2015 DNAGedcom.com. May not be reprinted without written permission. Updated 2015-04-13 by Sue Griffith. Additional updates 2015-04-21 by Karin Corbeil
Figure 17: GEDmatch Upload Screen in DNAGedcom after Upload of Segment Triangulation
Output
13. In order to use the files generated by the Gedmatch downloader in JWorks or KWorks, download them
from the list by clicking on the download link.
14. Now that the Match Count and Chromo Count (from Step 7) and the ICW Count (from Step 0) are in the
DNAGedcom system, ADSA can be run – and you can go back to ADSA whenever you like without having to
run everything again from GEDmatch. (You will want to repeat the steps above from time to time to pick
up new matches that have been added in GEDmatch, however.)
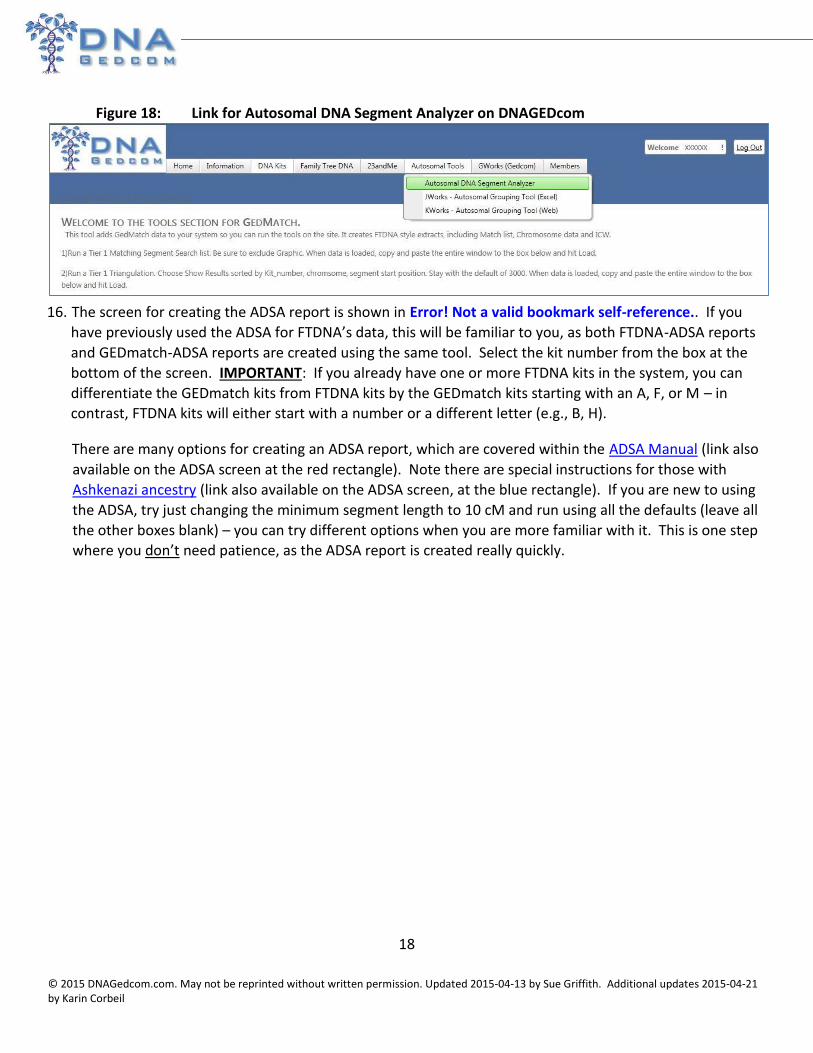
To open the ADSA screen, hover over the menu for Autosomal Tools and left-click on Autosomal DNA
Segment Analyzer (Figure 18).
Page 18
18
© 2015 DNAGedcom.com. May not be reprinted without written permission. Updated 2015-04-13 by Sue Griffith. Additional updates 2015-04-21 by Karin Corbeil
Figure 18: Link for Autosomal DNA Segment Analyzer on DNAGEDcom
16. The screen for creating the ADSA report is shown in Error! Not a valid bookmark self-reference.. If you
have previously used the ADSA for FTDNA’s data, this will be familiar to you, as both FTDNA-ADSA reports
and GEDmatch-ADSA reports are created using the same tool. Select the kit number from the box at the
bottom of the screen. IMPORTANT: If you already have one or more FTDNA kits in the system, you can
differentiate the GEDmatch kits from FTDNA kits by the GEDmatch kits starting with an A, F, or M – in
contrast, FTDNA kits will either start with a number or a different letter (e.g., B, H).
There are many options for creating an ADSA report, which are covered within the ADSA Manual (link also
available on the ADSA screen at the red rectangle). Note there are special instructions for those with
Ashkenazi ancestry (link also available on the ADSA screen, at the blue rectangle). If you are new to using
the ADSA, try just changing the minimum segment length to 10 cM and run using all the defaults (leave all
the other boxes blank) – you can try different options when you are more familiar with it. This is one step
where you don’t need patience, as the ADSA report is created really quickly.
Page 19
19
© 2015 DNAGedcom.com. May not be reprinted without written permission. Updated 2015-04-13 by Sue Griffith. Additional updates 2015-04-21 by Karin Corbeil
Figure 19: Screen for Creating ADSA Report
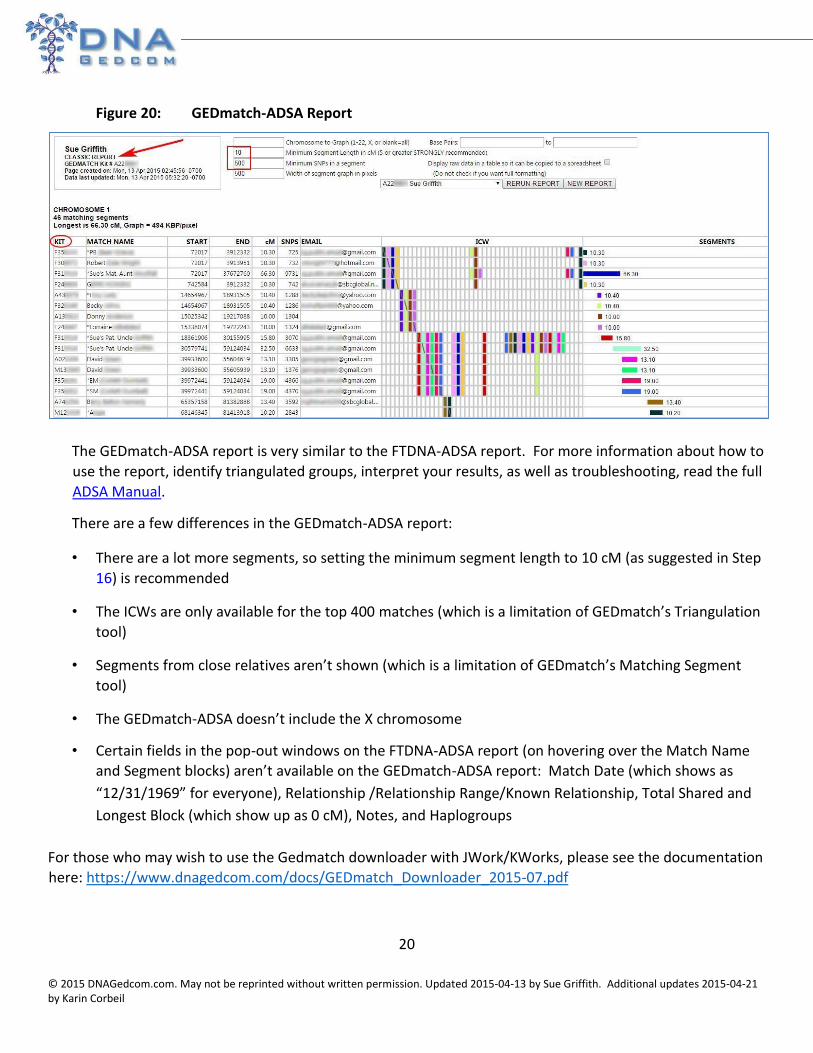
17. Figure 20 shows the top part of the GEDmatch-ADSA Report, which was run to show all chromosomes.
The arrow indicates that this report is from a GEDmatch Kit. The rectangle indicates the minimum
segment length (in cM) that was selected in Step 16. GEDmatch kit number is shown in the left-hand
column (see oval).
Page 20
20
© 2015 DNAGedcom.com. May not be reprinted without written permission. Updated 2015-04-13 by Sue Griffith. Additional updates 2015-04-21 by Karin Corbeil
The GEDmatch-ADSA report is very similar to the FTDNA-ADSA report. For more information about how to
use the report, identify triangulated groups, interpret your results, as well as troubleshooting, read the full
ADSA Manual.
There are a few differences in the GEDmatch-ADSA report:
• There are a lot more segments, so setting the minimum segment length to 10 cM (as suggested in Step
16) is recommended
• The ICWs are only available for the top 400 matches (which is a limitation of GEDmatch’s Triangulation
tool)
• Segments from close relatives aren’t shown (which is a limitation of GEDmatch’s Matching Segment
tool)
• The GEDmatch-ADSA doesn’t include the X chromosome
• Certain fields in the pop-out windows on the FTDNA-ADSA report (on hovering over the Match Name
and Segment blocks) aren’t available on the GEDmatch-ADSA report: Match Date (which shows as
“12/31/1969” for everyone), Relationship /Relationship Range/Known Relationship, Total Shared and
Longest Block (which show up as 0 cM), Notes, and Haplogroups
For those who may wish to use the Gedmatch downloader with JWork/KWorks, please see the documentation
here: https://www.dnagedcom.com/docs/GEDmatch_Downloader_2015-07.pdf
Figure 20 : GEDmatch - ADSA Report
Page 21
21
© 2015 DNAGedcom.com. May not be reprinted without written permission. Updated 2015-04-13 by Sue Griffith. Additional updates 2015-04-21 by Karin Corbeil
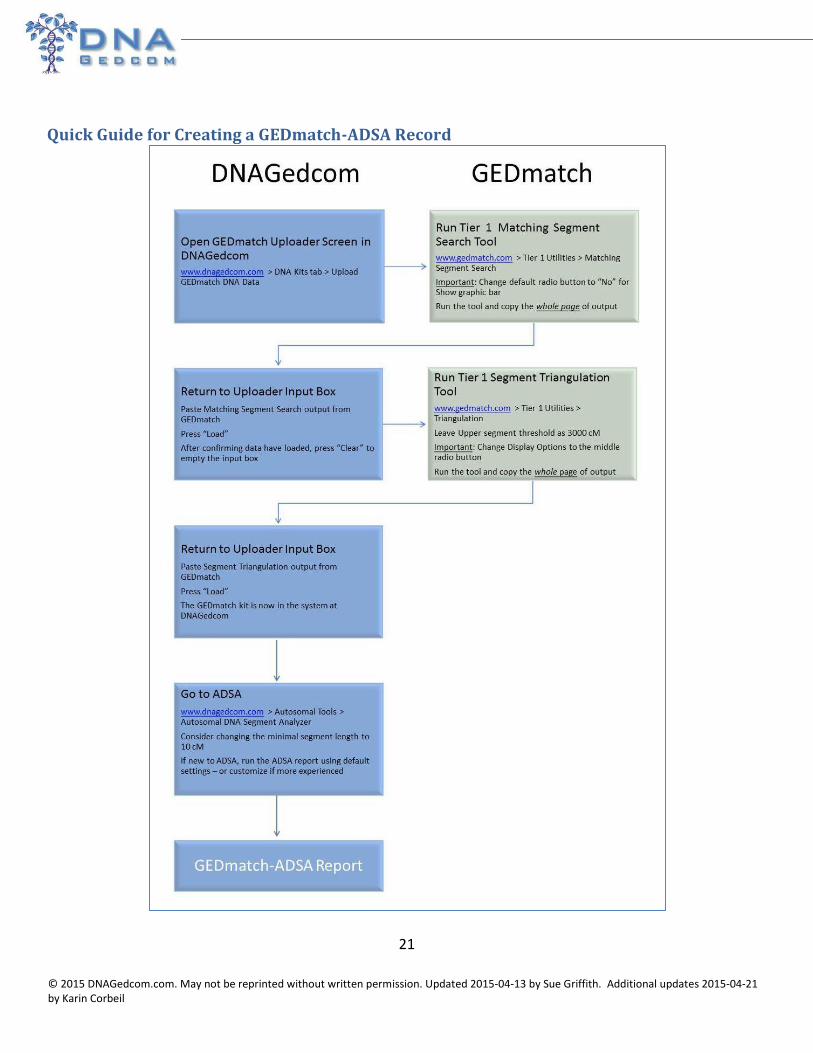
Quick Guide for Creating a GEDmatch-ADSA Record