How to Determine the Condition of Your Piano By David Estey, Registered Piano Technician with the Piano Technicians Guild This section is all about examining the interior of the piano. I will leave the case and the way it looks to you. Check the bottom and the edges of the piano. If veneer is pulling off, the piano has experienced extreme humidity which will also affect the interior of the piano. Any piano can be touched up, cleaned or refinished, just as you can do with any automobile. But you don't want to paint a car with a bad engine or transmission, do you?
Transcript
How to Determine the Condition of Your Piano
By David Estey, Registered Piano Technician with the Piano Technicians Guild
This section is all about examining the interior of the piano. I will leave the case and the way it looks to you. Check the bottom and the edges of the piano. If veneer is pulling off, the piano has experienced extreme humidity which will also affect the interior of the piano. Any piano can be touched up, cleaned or refinished, just as you can do with any automobile. But you don't want to paint a car with a bad engine or transmission, do you?
If the piano is very ornate with carvings, inlays, and the like, it may have intrinsic value no matter what the name or year, as described on this page.
Examining the “Belly” of the piano: Before you open any piano, be certain the lid hinges are attached and functioning. If you are looking at a grand piano, you can ask the client to open up their own piano lid… that would be safest. But before they (or you) attempt to open the lid, look at the hinges on the flat side of the piano. Make sure the pin is in the hinge. 99.9% of the time they are, but just check to make sure before the lid is opened. If the hinges are not properly attached, the result of opening the lid without them is not pretty. On an upright piano, also be mindful of the lid hinges and open the top carefully to look inside.
Once opened, you will want to remove the Music desk.
Evenly slide it forward till it comes off. This will work with most pianos, but there are some that you will have to exert some “up” pressure while moving it. One of the biggest challenges I recall when beginning my career as a piano technician was taking the parts off to expose what I needed to see or to work on. There are hundreds of different makes, models and configurations with variations on the theme. If you cannot see what you need to see, you may have to hire a technician to come out and look at it. You might get lucky, and the piano owner may have seen the tuner take it off and knows how to do it. It is always best if the piano owner does the removing/opening of these parts rather than you.
Music Desk
Once the music desk is off, you will be able to examine the tuning pins, the strings, and see part of the action. If you (or the client) cannot remove the music desk, you might be able to slide it back and forth to see what you need to.
The first thing we want to carefully look at is the tuning pins and the strings. There are visual signs that the tuning pins will be loose and the piano will not hold a tune at all… and you don’t have to play a single note to spot possible tuning issues.
Piano 1 Piano 2 Here is the reason why…..Below is the anatomy of a Pin Block.
Take a close look at how much room there is between the bottom of the sting coil to the top of the plate.
Notice that there is some room on Piano 1, and no room on Piano 2.
That is because the tuning pins have been Tapped down on piano 2, and not Tapped down on Piano 1.
Note the space between the bottom of the coil and the top of the plate.
A common practice among piano tuners is to tap the pin down into the pinblock when the pin becomes loose.
When the pin is hammered deeper into the pin block, the bottom of the tuning pin grips on some fresh wood just enough to keep the pin tight enough to hold without slipping…. Sometimes.
Important Note: Pianos are strung by hand. There may be irregularities from the factory or the rebuilding shop where the pins may have been hammered in a bit too far, and the tuning pins and pin block are perfectly fine. It will take a trained professional technician to tell the difference for certain. I do not want you to pass on a perfectly good piano where the builder/rebuilder might have made an “oops” or two. If most pins have space between the coil and the plate, and a few do not, the red flag should go up. You are looking for inconsistencies.
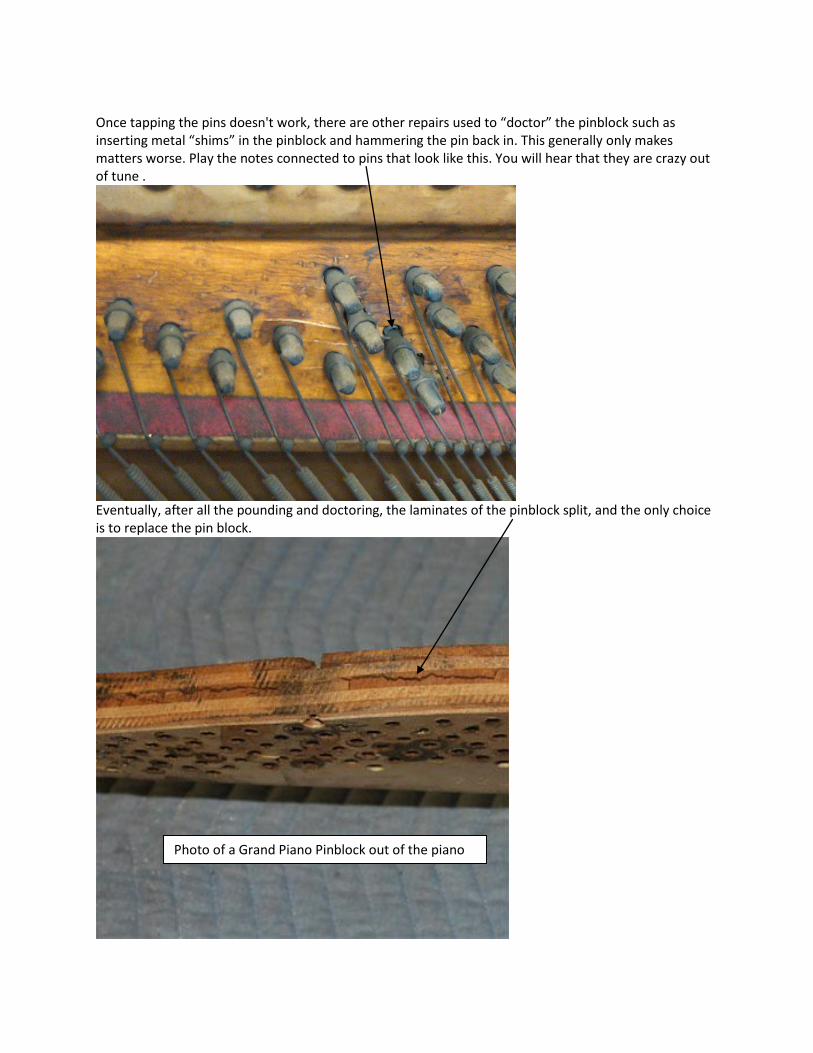
Once tapping the pins doesn't work, there are other repairs used to “doctor” the pinblock such as inserting metal “shims” in the pinblock and hammering the pin back in. This generally only makes matters worse. Play the notes connected to pins that look like this. You will hear that they are crazy out of tune .
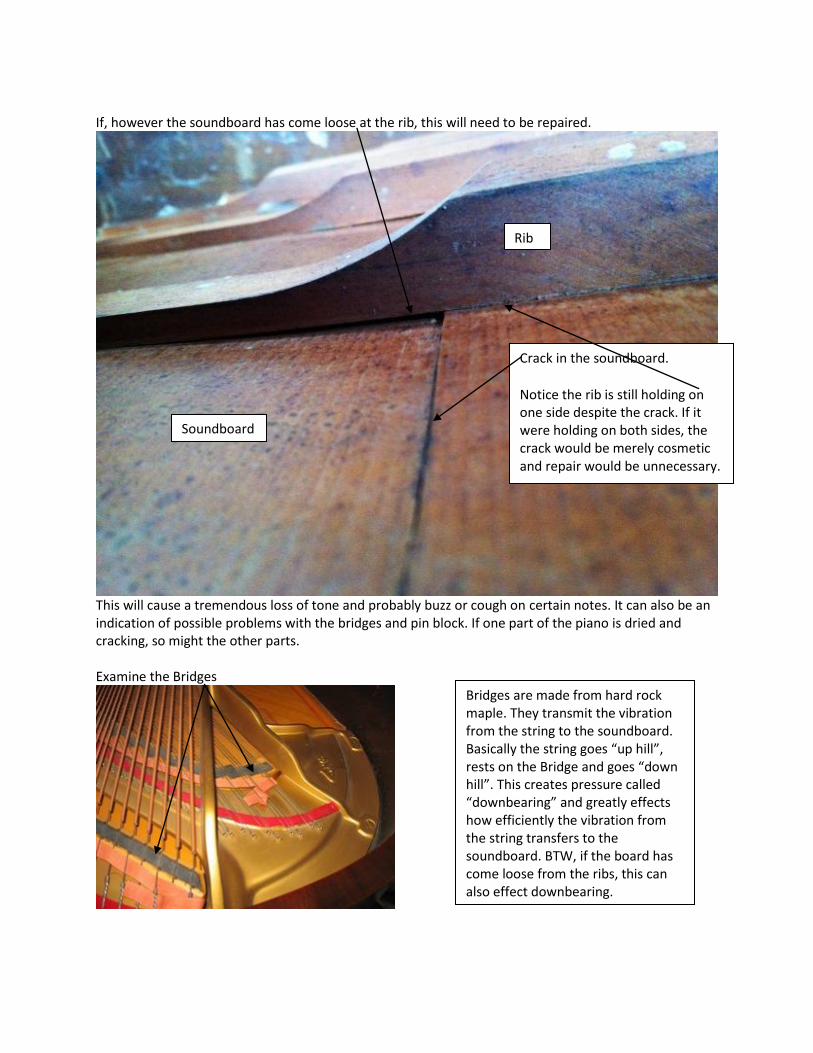
Eventually, after all the pounding and doctoring, the laminates of the pinblock split, and the only choice is to replace the pin block.
Photo of a Grand Piano Pinblock out of the piano
Look carefully around the pins and strings for any signs of rust or corrosion
Look for any signs of fluid near the pins as shown below. There are 2 reasons for marks like this.
1. Someone spilled a beverage in the piano (not good) 2. The fluid is “pin block dope”. It seeps through the pin holes into the pinblock, swells the
wood thus making the pins tight (temporarily) This fluid was generally very black, but there were also solutions without coloring. Look carefully for any fluid marks, or a dark color on the plate around the tuning pins.
What’s with the White Chalk??
White chalk marks on the tips of tuning pins are to remind the tuner of loose tuning pins the next time they return. Play the notes attached with the white chalk. You will hear it. Loose tuning pins = wildly out of tune notes. The only exception to this rule is when you see white chalk on the tuning pins in the bass section running in a specific pattern. That just means that a rookie tuned it last. Look for felts or wedges between the strings. The photo below has 2 tell tale signs that the piano has tuning issues. A slight chalk mark on the pin, and if you follow that string back just a little, you will notice a felt wedge. Why is that there? Because that note will NOT hold a tuning, and has been muted silent. Any sort of wedge in the strings have been left there by the piano tuner who knew the pin was not going to hold, and a red flag for you to know that the piano needs considerable work. It may also be there to mute a replaced string which is still stretching and settling.
One more Tuning pin lesson. You can see that all the pins in the photo have been pounded down to the coils… but there are 2 oddball pins in the photo. This is another tell tale signs of a bad pin block, and a piano that will not hold a tune. Random replaced tuning pins. And.. note the sloppy coils.
This tells you that the hammered down tuning pin trick is no longer working. Larger “oversize” pins had to be smacked in for the note to hold tune. Think the neighboring pins are not too far away from needing replacement? You are right! This piano will not hold a tune.
Pop Quiz! Tell me 2 reasons why this piano is likely to have tuning problems. (and you didn't have to play a note, did you?)
Examine the Strings closely Any Shiny new strings with all the old ones?
You might think that a few new strings are a sign that the piano has been maintained, and that it is a “good thing”. Think again. Most of the time, new strings among the old ones will tell you that the old strings are weak and breaking. Check for rust and corrosion. This would be especially true on older pianos. New strings are easy to spot on older pianos because the older strings have discolored.
Be sure to look carefully and closely at each string
Im not saying that replaced strings are the end of the world. I tune a concert Baldwin in excellent condition which has replaced strings because “Ed the Destroyer” (as I have aptly named him) probably holds the world’s record for breaking strings. He breaks strings on new pianos, old pianos, ALL pianos. I am saying that this is usually a sign of the strings being weak, or the tuning pins being loose. If the pin is loose, and slipping very low, then tuned, then slips again… well you know what happens to a wire when you kink it and bend it over and over again…. It breaks. Remember to also check for missing strings, as the same principles apply. Now, Lets Examine the Soundboard and Bridges
The soundboard sits under the strings. You need to look for cracks. A cracked soundboard is in many cases easily repaired. You may have heard that if the piano has a cracked soundboard, it is beyond repair. This is a fable. A cracked Plate is about the worst thing you can find on a piano and unless the piano is a very valuable name brand, it is not worth repairing.
The soundboard holds its shape by the use of “ribs”.
As long as the ribs are still glued securely on to the soundboard, the crack is nothing more than cosmetic. (This photo is what a soundboard looks like from underneath a Grand Piano or from the back of an Upright Piano.)
You will be able to examine the soundboard and bridges on a grand piano much easier than you can on an upright. The best view of an upright piano soundboard is from the back.
If, however the soundboard has come loose at the rib, this will need to be repaired.
This will cause a tremendous loss of tone and probably buzz or cough on certain notes. It can also be an indication of possible problems with the bridges and pin block. If one part of the piano is dried and cracking, so might the other parts. Examine the Bridges
Rib
Soundboard
Bridges are made from hard rock maple. They transmit the vibration from the string to the soundboard. Basically the string goes “up hill”, rests on the Bridge and goes “down hill”. This creates pressure called “downbearing” and greatly effects how efficiently the vibration from the string transfers to the soundboard. BTW, if the board has come loose from the ribs, this can also effect downbearing.
Crack in the soundboard.
Notice the rib is still holding on one side despite the crack. If it were holding on both sides, the crack would be merely cosmetic and repair would be unnecessary.
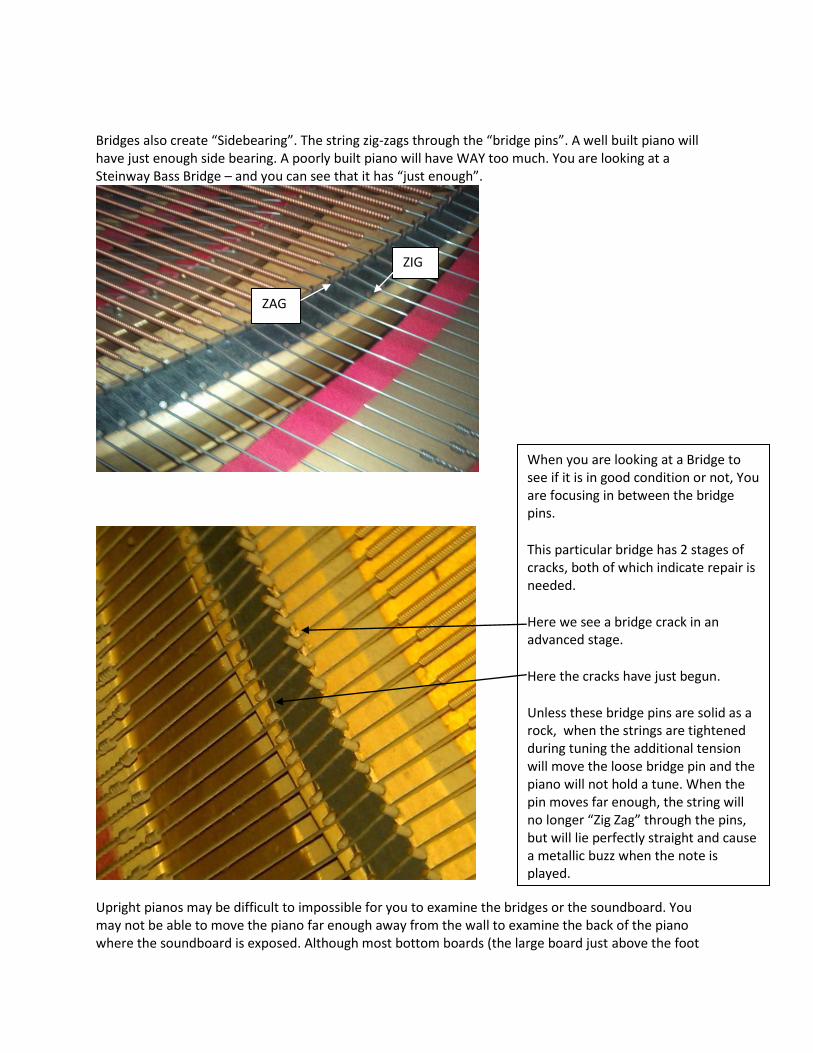
Bridges also create “Sidebearing”. The string zig-zags through the “bridge pins”. A well built piano will have just enough side bearing. A poorly built piano will have WAY too much. You are looking at a Steinway Bass Bridge – and you can see that it has “just enough”.
Upright pianos may be difficult to impossible for you to examine the bridges or the soundboard. You may not be able to move the piano far enough away from the wall to examine the back of the piano where the soundboard is exposed. Although most bottom boards (the large board just above the foot
ZIG
ZAG
When you are looking at a Bridge to see if it is in good condition or not, You are focusing in between the bridge pins.
This particular bridge has 2 stages of cracks, both of which indicate repair is needed.
Here we see a bridge crack in an advanced stage.
Here the cracks have just begun.
Unless these bridge pins are solid as a rock, when the strings are tightened during tuning the additional tension will move the loose bridge pin and the piano will not hold a tune. When the pin moves far enough, the string will no longer “Zig Zag” through the pins, but will lie perfectly straight and cause a metallic buzz when the note is played.
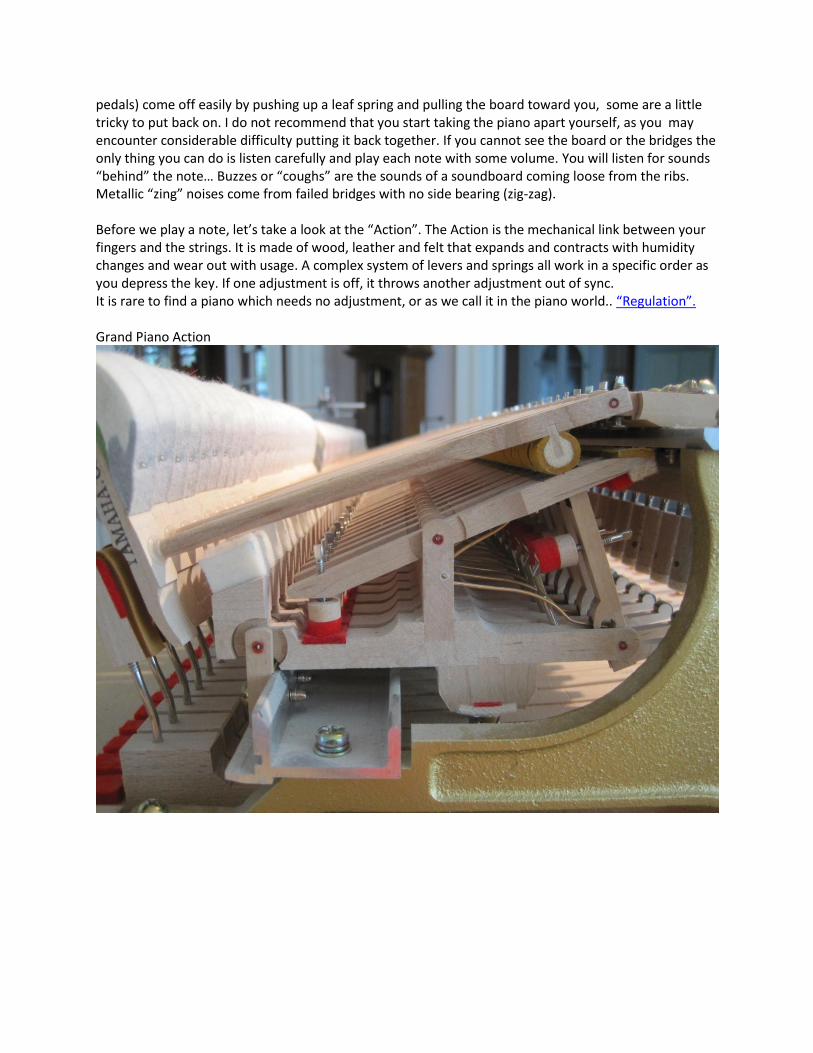
pedals) come off easily by pushing up a leaf spring and pulling the board toward you, some are a little tricky to put back on. I do not recommend that you start taking the piano apart yourself, as you may encounter considerable difficulty putting it back together. If you cannot see the board or the bridges the only thing you can do is listen carefully and play each note with some volume. You will listen for sounds “behind” the note… Buzzes or “coughs” are the sounds of a soundboard coming loose from the ribs. Metallic “zing” noises come from failed bridges with no side bearing (zig-zag). Before we play a note, let’s take a look at the “Action”. The Action is the mechanical link between your fingers and the strings. It is made of wood, leather and felt that expands and contracts with humidity changes and wear out with usage. A complex system of levers and springs all work in a specific order as you depress the key. If one adjustment is off, it throws another adjustment out of sync. It is rare to find a piano which needs no adjustment, or as we call it in the piano world.. “Regulation”. Grand Piano Action
You will not be able to see most of the action from your vantage point. You DO NOT want to remove the action on your own… trust me on this one. You will be able to see what you need to either by lifting the lid of an upright piano or peering through the strings on a grand piano. When we get to the part of the examination where we actually play each note, you will want to watch the action closely. When you either open the lid on an upright piano, or peer through the strings on a grand piano, you are looking for even spacing and uniformity of the “hammers”. The Hammers are the felts which hit the strings. The first question… are they in alignment?
Upright Hammers in nice alignment Upright Hammers way out of alignment
The piano with the nicely aligned hammers might need just a bit of regulation. Translation: $0 - $200 in regulation at the time of tuning, if you want the piano to be fine regulated, playing at top capacity. The piano with the hammers way out of alignment will need not only regulation, but reconditioning, and most likely parts replacement. Translation: Thousands of dollars in parts repair, replacement and regulation. On this grand piano, you can see how badly the hammers are out of alignment. The hammers should line up with each of the strings. On this excmple, some of the hammers are hitting the wrong strings and will need thousands of dollars in regulation and reconditioning – and all you did was look through the strings at the action to know this. Amazing! You are becoming a piano pro!
The next thing to look for is hammer wear. Each time the hammer hits the string, the hammer loses a tiny bit of felt. Over years of playing, eventually the hammer wears down.
Do the hammers need replacement? Look at the highest treble hammers. If they have been worn down to the wood, you can be certain the hammers need replacement. Translation: Thousands of dollars in replacement and regulation.
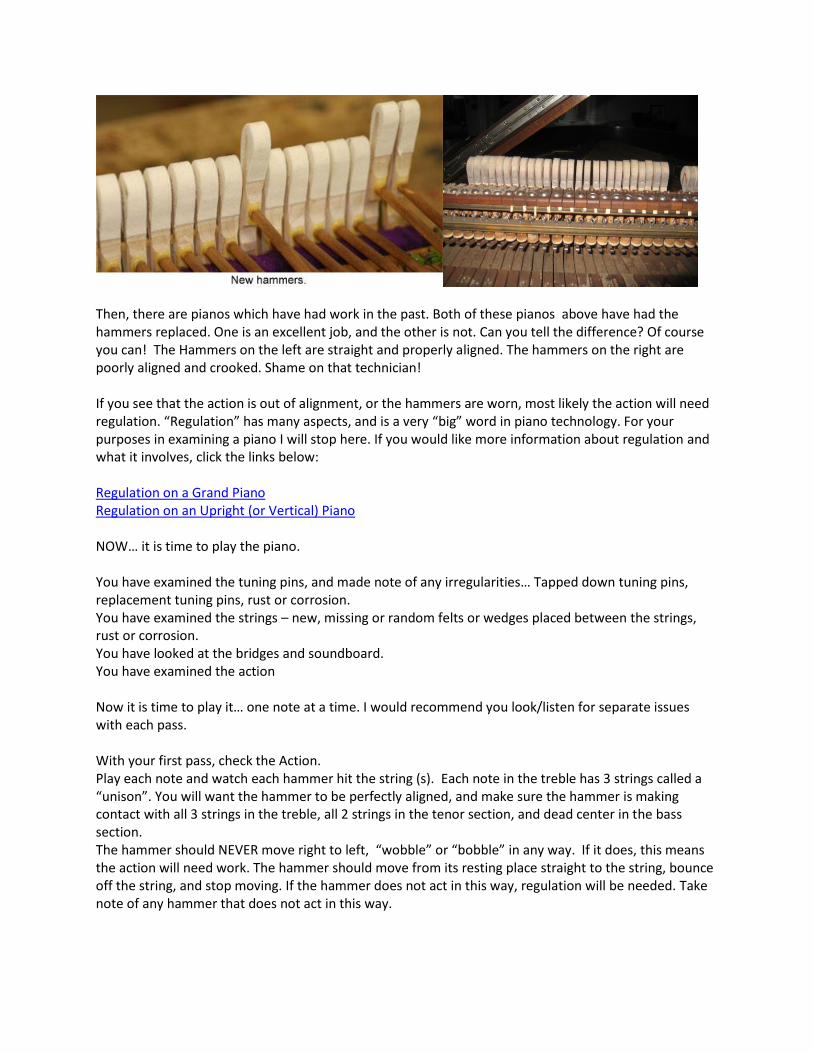
Then, there are pianos which have had work in the past. Both of these pianos above have had the hammers replaced. One is an excellent job, and the other is not. Can you tell the difference? Of course you can! The Hammers on the left are straight and properly aligned. The hammers on the right are poorly aligned and crooked. Shame on that technician! If you see that the action is out of alignment, or the hammers are worn, most likely the action will need regulation. “Regulation” has many aspects, and is a very “big” word in piano technology. For your purposes in examining a piano I will stop here. If you would like more information about regulation and what it involves, click the links below: Regulation on a Grand Piano Regulation on an Upright (or Vertical) Piano NOW… it is time to play the piano. You have examined the tuning pins, and made note of any irregularities… Tapped down tuning pins, replacement tuning pins, rust or corrosion. You have examined the strings – new, missing or random felts or wedges placed between the strings, rust or corrosion. You have looked at the bridges and soundboard. You have examined the action Now it is time to play it… one note at a time. I would recommend you look/listen for separate issues with each pass. With your first pass, check the Action. Play each note and watch each hammer hit the string (s). Each note in the treble has 3 strings called a “unison”. You will want the hammer to be perfectly aligned, and make sure the hammer is making contact with all 3 strings in the treble, all 2 strings in the tenor section, and dead center in the bass section. The hammer should NEVER move right to left, “wobble” or “bobble” in any way. If it does, this means the action will need work. The hammer should move from its resting place straight to the string, bounce off the string, and stop moving. If the hammer does not act in this way, regulation will be needed. Take note of any hammer that does not act in this way.
Your Second Pass- Listen for Buzzes, Coughs and Zings. Buzzes and coughs indicate problems with the soundboard and ribs. “Zings” indicate problems with the bridges and bridge pins. There could also be a ping pong ball or a coin sitting on the soundboard. These subtle noises can be many things, but your main concern is the soundboard and bridges. Make note of any irregularities in tone. Your third pass, check the tuning. “What??” (You might say) “I wouldn't know an in tune piano from an out of tune piano!” Refer to your notes from your tuning pin and string examination, and if you have found irregularities, pay special attention to them. I’ll bet they are the worst sounding notes on the piano. They will sound very “sour”. As you play each note (both black and white keys) there should be an even progression in the tone. If you hear a very “out of progression” note, you may have loose tuning pins. If you have a smart phone, you can go online and download tuning apps. I have an Android, and use “Da Tuner”, which is free. Click Here. There are a number of apps for the iPhone, but I haven’t found any for free. Do a search or you can Click Here for a variety to choose from for the iPhone. You are going to find out if the piano is up to concert pitch. Concert pitch is A440, and was adopted by the US government in 1920. If you care to know the history, Click Here.
Play this “A” note with your smart phone tuner app on.
Your tuner app will tell you if it is close, or way off. Most pianos that have not been tuned in a long time will register an A flat (also a G sharp), or ½ step low. This means the piano will need a minimum of 2 tunings to bring it back up to concert pitch. $$ translation: $320 (2 tunings @ $160 each… depending on what the local technician charges. If the technician is worth his or her salt, and a technician worth hiring, the price will be in this range. You don’t want a “cheap” technician doing “cheap” work, do you? ) This is called a “Pitch Raise”, and the best results are when the piano is tuned twice within a span of about 2-3 weeks. It will need another tuning in 6 months or less, depending on the piano. Factor this into the overall value. If it is a full step low, registering a G note, there may be severe problems with the piano. Since the value of any piano is all about condition, you have made a pretty good assessment all on your own. Congratulations! Now, we go to Google. Find out what that name brand, model and age of this piano sells for brand new or mint restored condition. You will find the highest prices on piano dealer sites, as the pianos sold by a dealer have been tuned, regulated, and come with a guarantee. The prices are higher because the needed regulation and tuning has already been done. You may have determined by your examination that the piano needs a ton of work. If the piano has a valuable name, it will still carry some value. If the piano has a lesser name, it will probably have little to no value. If you have determined through your examination that the piano is in good condition, and holds value, it is time to use a professional technician to verify your findings. This can be done with an onsite visit, or on line. If it is done on line, you will need photos of the piano. “Photos of what?” You ask. The same photos I have taken above, and a couple of the outside case. Most photos I receive tell me absolutely nothing. Most people when examining a piano give me photos of scratches and cosmetic dings. As you have just learned, the real value of the piano is all about the inside and it’s condition. With the proper description and photos, many appraisals can be done on line for much less cost than an onsite visit. Click Here if you would like further assistance Musically, David Estey, Registered Piano Technician