How to lay paving Whether it’s a surface for children to play on or for outdoor seating or dining furniture, a paved patio creates an attractive as well as useful feature for your garden. You can combine it with walling – see our how to plan and build a garden wall project guide. 1 Plan a patio or paved area You can create an attractive feature patio or a paved area in a huge variety of patterns (see Fig. 1 on page 2) and with a straight or curved outline – our Circle Textured Slabs will create a circular design (see Fig. 2 on page 2). A list of tools is opposite, and there’s advice information on materials on pages 7 to 8. Draw a plan Draw the paved area to scale, marking in any immovable objects, such as the rear wall of the house, the garage, your boundary line and large trees. If a patio is to be on raised ground or more than one level, mark the intended location of walling and steps. Lay out the site Transfer your plan into a full-size layout on the site, using string lines and pegs, and check its proportions complement the garden and house. You’ll need to know the size of paving slabs now, so they can be incorporated into the design; wherever possible, plan to use full-size slabs to keep cutting to a minimum. Kit If children are to use the area, make sure any water feature has little or no depth. Ensure you plan any lighting positions, electrical and drainage services early on. All cabling and drain runs will need to be in position, underground and protected before starting. All electrical work must conform to BS 7671, the current IEE Wiring Regulations, and Part P of Building Regulations. You are advised to check with your local authority’s building control department, or an authorised competent person before starting. If in any doubt about electrical work, contact a qualified electrician. Tool List > Lump hammer > Block/stone splitter > Disc grinder > Bolster/cold/ masonry chisels > Plate compactor/ vibrator > Hammer drill > Rubber mallet > Tape measure > String or twine > Spirit level > Trimming knife > Trowel > Shovel > Rake > Watering can > Bucket Safety Equipment > Dust mask > RCD adaptor > Safety specs > Gloves The Wickes Project Guide Assemble the tools If you will be cutting lots of paving slabs, hire or buy a 230mm disc grinder. If there won’t be much cutting, make do with a lump hammer and bolster chisel. Hardcore beneath paving must be well-compacted; hire a plate compactor for this. You will also need a spirit level at least 600mm long. A full tool list is opposite. Skill level required Laying paving slabs and concrete block pavers are not difficult jobs, although cutting them takes some practice to perfect. PLANNING RULES Since October 2008, the permitted development rights that allowed householders to pave over their front garden for hard standing without planning permission have changed. Planning permission is now required to lay traditional impermeable driveways that allow uncontrolled run-off of rainwater from front gardens on to roads. The right option for you will depend on local ground conditions and local authority guidelines. Contact your local authority planning department for advice before you start work.
Transcript
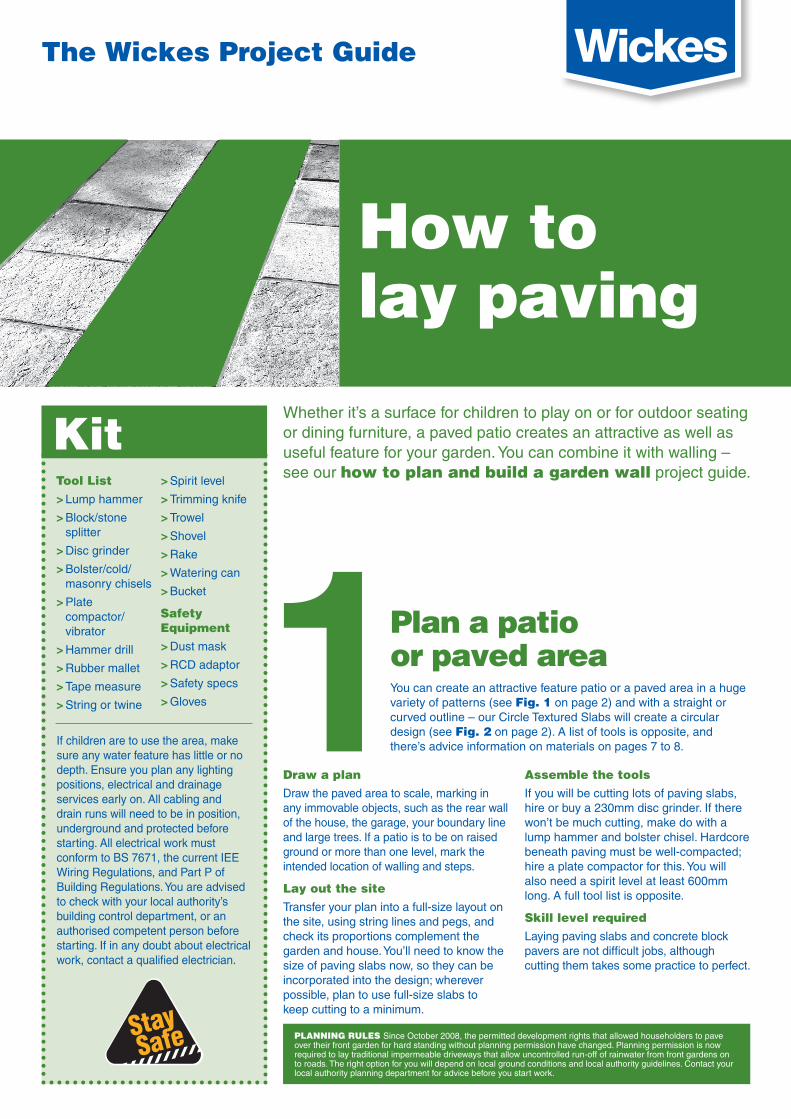
How to lay paving
Whether it’s a surface for children to play on or for outdoor seating or dining furniture, a paved patio creates an attractive as well as useful feature for your garden. You can combine it with walling – see our how to plan and build a garden wall project guide.
1Plan a patio or paved areaYou can create an attractive feature patio or a paved area in a huge variety of patterns (see Fig. 1 on page 2) and with a straight or curved outline – our Circle Textured Slabs will create a circular design (see Fig. 2 on page 2). A list of tools is opposite, and there’s advice information on materials on pages 7 to 8.
Draw a planDraw the paved area to scale, marking in any immovable objects, such as the rear wall of the house, the garage, your boundary line and large trees. If a patio is to be on raised ground or more than one level, mark the intended location of walling and steps.
Lay out the siteTransfer your plan into a full-size layout on the site, using string lines and pegs, and check its proportions complement the garden and house. You’ll need to know the size of paving slabs now, so they can be incorporated into the design; wherever possible, plan to use full-size slabs to keep cutting to a minimum.
Kit
If children are to use the area, make sure any water feature has little or no depth. Ensure you plan any lighting positions, electrical and drainage services early on. All cabling and drain runs will need to be in position, underground and protected before starting. All electrical work must conform to BS 7671, the current IEE Wiring Regulations, and Part P of Building Regulations. You are advised to check with your local authority’s building control department, or an authorised competent person before starting. If in any doubt about electrical work, contact a qualified electrician.
Tool List > Lump hammer
> Block/stone splitter
> Disc grinder
> Bolster/cold/masonry chisels
> Plate compactor/vibrator
> Hammer drill
> Rubber mallet
> Tape measure
> String or twine
> Spirit level
> Trimming knife
> Trowel
> Shovel
> Rake
> Watering can
> Bucket
Safety Equipment> Dust mask
> RCD adaptor
> Safety specs
> Gloves
The Wickes Project Guide
Assemble the toolsIf you will be cutting lots of paving slabs, hire or buy a 230mm disc grinder. If there won’t be much cutting, make do with a lump hammer and bolster chisel. Hardcore beneath paving must be well-compacted; hire a plate compactor for this. You will also need a spirit level at least 600mm long. A full tool list is opposite.
Skill level requiredLaying paving slabs and concrete block pavers are not difficult jobs, although cutting them takes some practice to perfect.
PLANNING RULES Since October 2008, the permitted development rights that allowed householders to pave over their front garden for hard standing without planning permission have changed. Planning permission is now required to lay traditional impermeable driveways that allow uncontrolled run-off of rainwater from front gardens on to roads. The right option for you will depend on local ground conditions and local authority guidelines. Contact your local authority planning department for advice before you start work.
Sand or mortar?It is perfectly acceptable to bed paving slabs on coarse sharp sand, and to fill the joints by brushing-in dry sand. This is quick and easy, and if a slab should sink or tilt later, it is easy to lift it up and put more sand underneath. Also, sand allows surface water to drain away through the joints. However, weeds can grow in the sand-filled joints and sand can get trodden indoors from patios, so you may prefer to point the joints with sand-and-cement. This, however, will break up and allow weeds to grow in the cracks, because the paving slabs can still move slightly. If you want a weed-free and sand-free patio area, bed paving slabs on mortar, and point the joints with mortar. We have mentioned both options in our steps.
1. Dig out the ground Dig out enough to allow for the desired thickness of hardcore (too much is better than too little), the sand or mortar layer (see above) and the slab thickness, leaving the top of the slabs just below turf level (to allow you to mow over the edge of the slabs). If your slabs are strong enough, the ground is firm or even wet (for example, chalk soils), remove any turf and a little topsoil, then dig out to allow for 38mm to 50mm of sand or 25mm of mortar, plus the slab thickness, leaving the
2 Laying pavingIf you are building a walled patio, you will need to construct the wall first. For further advice, pick up our how to plan and build a garden wall project guide. Few areas are flat enough for immediate paving, so will need to be excavated, while others should be built up to create the level. Prepare the ground depending on conditions and the thickness of the slab (see step 2, Prepare the surface, below).
top of the slabs just below turf level. Where the subsoil is less stable – for example clay or peat – dig down to allow for a stabilising 100mm thick layer of very well-compacted hardcore before laying the sand or mortar bed.
2. Prepare the surface After levelling the ground (or made-up hardcore surface), cover the entire area with a layer of landscape fabric (this stabilises the ground and suppresses weed growth, but allows water to drain). Spread 50mm of coarse sharp sand on top of the landscape fabric. If you are laying slabs on to a 25mm layer of mortar over compacted hardcore, remember it will set faster in warm weather.
3. Put down the slabs Carefully lay the slabs, ensuring the first row is laid in a perfectly straight line, which may be alongside the house wall or a wall that you have built around the patio perimeter. There can be some colour and shade variation between packs of slabs, so inter-mix slabs from different packs. Tap them in place using a rubber mallet, and work away from walls, leaving a gap of 10mm for joints. Prepare a good supply of spacers for this – pieces of plywood of the correct thickness will do (see Fig. 3). To prevent cracking, make sure each slab is fully bedded, and not just supported on piles of sand. If you are using mortar, prevent cracking by using a full bed, 25mm thick, rather than just dabs. Remember, too, that the top surface of any slabs to be butted up against the house wall must be at least 150mm below damp-proof course level and the slabs must slope away from the wall.
4. Maintain an even slope To ensure that an even slope is maintained, use 6mm thick pieces of ply or Wickes’ plastic spacers. Place the spacer on the edge of the slab furthest from the house wall, the spirit level on the spacer and on the opposite edge of the slab. When the bubble in the level is central, you have the correct slope (see Fig. 4 on page 3).
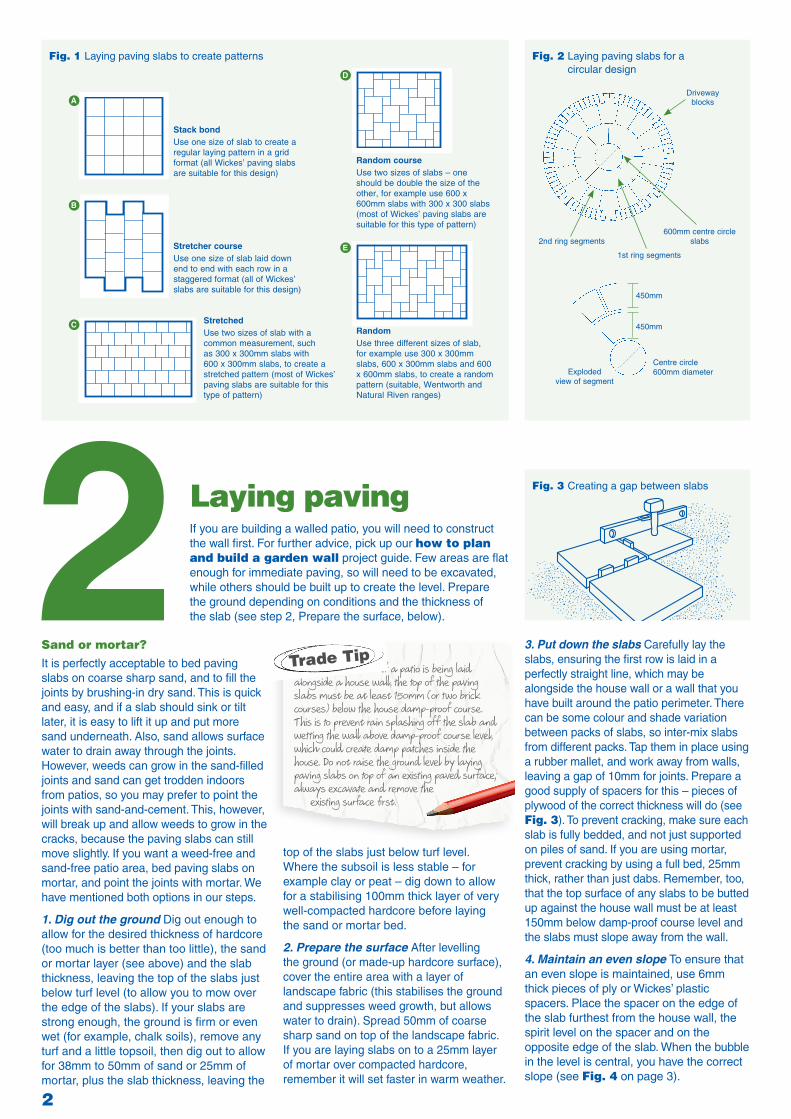
Stack bond Use one size of slab to create a regular laying pattern in a grid format (all Wickes’ paving slabs are suitable for this design)
Stretcher courseUse one size of slab laid down end to end with each row in a staggered format (all of Wickes’ slabs are suitable for this design)
StretchedUse two sizes of slab with a common measurement, such as 300 x 300mm slabs with 600 x 300mm slabs, to create a stretched pattern (most of Wickes’ paving slabs are suitable for this type of pattern)
Random courseUse two sizes of slabs – one should be double the size of the other, for example use 600 x 600mm slabs with 300 x 300 slabs (most of Wickes’ paving slabs are suitable for this type of pattern)
RandomUse three different sizes of slab, for example use 300 x 300mm slabs, 600 x 300mm slabs and 600 x 600mm slabs, to create a random pattern (suitable, Wentworth and Natural Riven ranges)
Fig. 1 Laying paving slabs to create patterns
2nd ring segments600mm centre circle
slabs
Drivewayblocks
1st ring segments
Explodedview of segment
Centre circle 600mm diameter
450mm
450mm
Fig. 2 Laying paving slabs for a circular design
Fig. 3 Creating a gap between slabs
If a patio is being laid alongside a house wall, the top of the paving slabs must be at least 150mm (or two brick courses) below the house damp-proof course. This is to prevent rain splashing off the slab and wetting the wall above damp-proof course level, which could create damp patches inside the house. Do not raise the ground level by laying paving slabs on top of an existing paved surface; always excavate and remove the existing surface first.
Trade Tip
A
B
C
D
E
2
5. Check the paving Ensure that all the slabs are well bedded down on to the mortar/sand and do not pivot on an uneven base. When necessary, add or remove the bedding mix to achieve a firm and stable base.
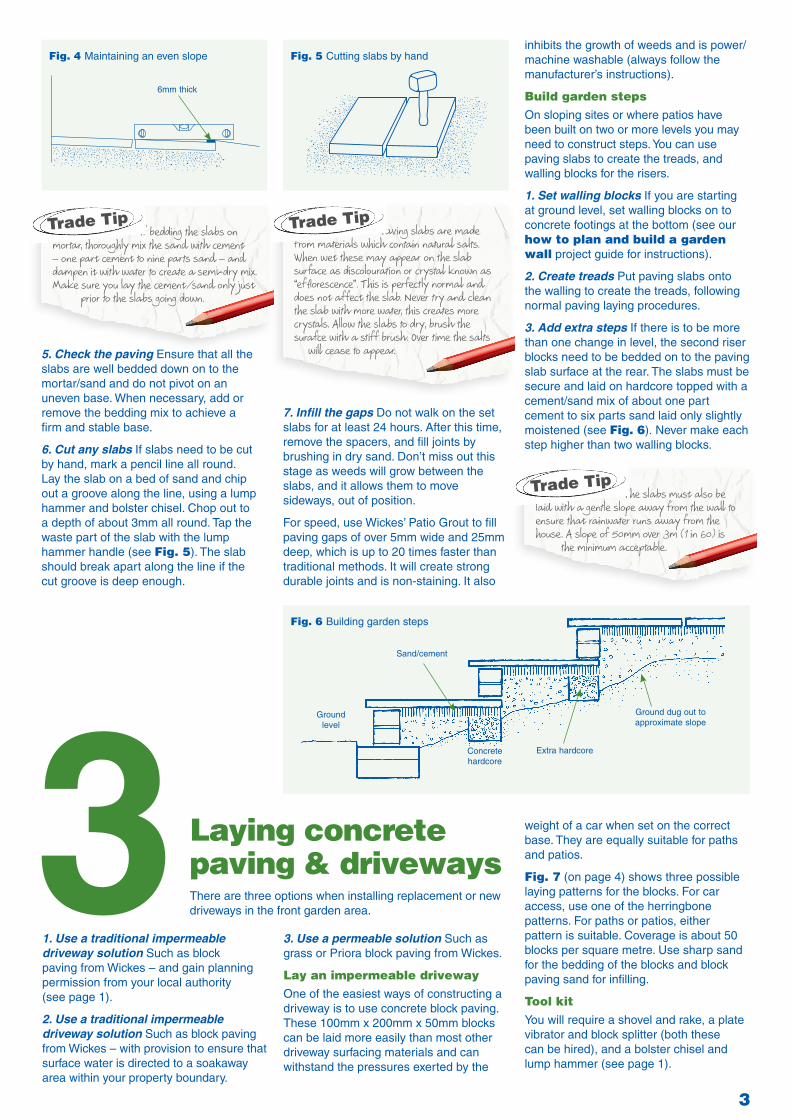
6. Cut any slabs If slabs need to be cut by hand, mark a pencil line all round. Lay the slab on a bed of sand and chip out a groove along the line, using a lump hammer and bolster chisel. Chop out to a depth of about 3mm all round. Tap the waste part of the slab with the lump hammer handle (see Fig. 5). The slab should break apart along the line if the cut groove is deep enough.
6mm thick
Fig. 4 Maintaining an even slope Fig. 5 Cutting slabs by hand
Groundlevel
Sand/cement
Concrete hardcore
Ground dug out to approximate slope
Extra hardcore
Fig. 6 Building garden steps
7. Infill the gaps Do not walk on the set slabs for at least 24 hours. After this time, remove the spacers, and fill joints by brushing in dry sand. Don’t miss out this stage as weeds will grow between the slabs, and it allows them to move sideways, out of position.
For speed, use Wickes’ Patio Grout to fill paving gaps of over 5mm wide and 25mm deep, which is up to 20 times faster than traditional methods. It will create strong durable joints and is non-staining. It also
inhibits the growth of weeds and is power/machine washable (always follow the manufacturer’s instructions).
Build garden stepsOn sloping sites or where patios have been built on two or more levels you may need to construct steps. You can use paving slabs to create the treads, and walling blocks for the risers.
1. Set walling blocks If you are starting at ground level, set walling blocks on to concrete footings at the bottom (see our how to plan and build a garden wall project guide for instructions).
2. Create treads Put paving slabs onto the walling to create the treads, following normal paving laying procedures.
3. Add extra steps If there is to be more than one change in level, the second riser blocks need to be bedded on to the paving slab surface at the rear. The slabs must be secure and laid on hardcore topped with a cement/sand mix of about one part cement to six parts sand laid only slightly moistened (see Fig. 6). Never make each step higher than two walling blocks.
3 Laying concrete paving & driveways There are three options when installing replacement or new driveways in the front garden area.
1. Use a traditional impermeable driveway solution Such as block paving from Wickes – and gain planning permission from your local authority (see page 1).
2. Use a traditional impermeable driveway solution Such as block paving from Wickes – with provision to ensure that surface water is directed to a soakaway area within your property boundary.
3. Use a permeable solution Such as grass or Priora block paving from Wickes.
Lay an impermeable drivewayOne of the easiest ways of constructing a driveway is to use concrete block paving. These 100mm x 200mm x 50mm blocks can be laid more easily than most other driveway surfacing materials and can withstand the pressures exerted by the
If bedding the slabs on mortar, thoroughly mix the sand with cement – one part cement to nine parts sand – and dampen it with water to create a semi-dry mix. Make sure you lay the cement/sand only just prior to the slabs going down.
Trade Tip Paving slabs are made from materials which contain natural salts. When wet these may appear on the slab surface as discolouration or crystal known as “efflorescence”. This is perfectly normal and does not affect the slab. Never try and clean the slab with more water, this creates more crystals. Allow the slabs to dry, brush the surafce with a stiff brush. Over time the salts will cease to appear.
Trade Tip
The slabs must also be laid with a gentle slope away from the wall to ensure that rainwater runs away from the house. A slope of 50mm over 3m (1 in 60) is the minimum acceptable.
Trade Tip
weight of a car when set on the correct base. They are equally suitable for paths and patios.
Fig. 7 (on page 4) shows three possible laying patterns for the blocks. For car access, use one of the herringbone patterns. For paths or patios, either pattern is suitable. Coverage is about 50 blocks per square metre. Use sharp sand for the bedding of the blocks and block paving sand for infilling.
Tool kitYou will require a shovel and rake, a plate vibrator and block splitter (both these can be hired), and a bolster chisel and lump hammer (see page 1).
3
A striking off board is also useful. This is a piece of timber about 100mm wide, and long enough to span the width of the intended drive or path. With other timber strips added at each end, it is used to check the level of any hardcore (see Fig. 8) and then, with the end strips positioned differently, to level off the bedding sand (see Fig. 11). The timber strips are intended to rest on the top edges of a retaining edge structure while levelling is carried out. Any driveway or path needs to be built within a retaining frame to prevent the bedding sand or the blocks from being displaced. Our path edgings set in a concrete bed are ideal, set as in Fig. 9, (see page 1) for the full tool list.
1. Prepare the ground Blocks will be set on sand and hardcore, so dig out the ground to a depth of about 200mm.
2. Set the edging stones Set your retaining edging stones in concrete so that the tops are at the intended level of the finished drive.
3. Infill with hardcore When the concrete has set, infill with hardcore and compact to a depth of about 100mm using your striking-off board to check this (see Fig. 10). Note the position of the timber strips. A plate vibrator may be used to compact the hardcore: but do not disturb the edging stones.
4. Lay sand Starting at one end of the drive, lay sand across the full width but only extend about 3m along the drive, or over an area you can reasonably expect to complete in a working period. Spread the sand to a thickness of 65mm without walking on it or otherwise compacting it. Use your striking-off board with the timbers set as shown in Fig. 11 to achieve the level.
5. Position the blocks Still without walking on the sand, start positioning the blocks on the sand up against the starting point. The in-built spacers on the blocks will keep them the correct distance apart. If you are working to a herringbone pattern, leave cutting blocks to fit edges until later. There can be some colour and shade variation between packs of blocks or slabs, so inter-mix blocks (or slabs) from different packs.
6. Bed down the blocks Once you have laid the blocks over the first 1.5m of the drive – not the complete sanded area – use the plate vibrator to bed them down into the sand. Two or three passes with the vibrator should bed them to the level of the retaining wall. Do not vibrate within 1m of the end of the sand bed.
7. Continue laying blocks Continue spreading sand, laying blocks, and vibrating down in easy stages. Fit cut edge blocks as necessary. Cut them with a splitter, if you have hired one, or with a bolster chisel and lump hammer as for normal paving slabs (see page 3).
8. Spread sand Spread block paving sand over the surface and brush it backwards
and forwards until the spaces between the blocks are completely full. Leaving some sand on the surface, make a couple of passes with the vibrator to compress more sand into the gaps.
9. Tidy the drive Remove excess sand and the drive is ready for use.
Lay a permeable drivewayPermeable driveway solutions include ground base grids and Drivesett permeable block paving.
Ground base grids are made up of a series of interlocking cells that can be infilled with grass or decorative gravel to provide a durable free-draining surface. Each panel easily slots together adding to the speed of installation. The panels have built-in ground spikes to help stabilise each of them during installation (see Fig. 12A).
Permeable block paving allows surface water to pass between the blocks without compromising the structural performance of the driveway (see Fig. 12B).
Fig. 7 Laying patterns for block paving
Parquet patternNot suitable for vehicles
90° herringbone patternSuitable for vehicles
45° herringbone patternSuitable for vehicles
Fig. 8 Checking the height of hardcore for block paving
Square batten
Internal width of framework
To level sand
100mm
35mm
Fig. 9 Positioning of path edgings for block paving (not to scale)
Concrete
EdgingIntended finished
drive level
Excavate to 200mm below
Soil or ground level
Fig. 10 Infilling with hardcore for block paving (not to scale)
100mm striking off board
Compacted hardcore to 100mm below top of perimeter
Fig. 11 Laying sand for block paving (not to scale)
100mm striking off board
Sand to 35mm below top of perimeter
50mm
35mm
Fig. 12 Permeable block paving
GRASS DRIVE
150mm SUB BASE MOT TYPE 1 +
20% HUMUS MATERIAL
25mm BEDDINGLAYER OF
PEA SHINGLE
SOIL FILLED POCKETS SEEDED WITH COARSE RYE GRASS
Permeable block paving
Permeable joint filled with 6mm washed aggregate
Washed 6mm aggregate 50mm depth
Capping layer depth by design (depending on ground conditions) (not to scale).
Sub-base 200mm depth of 20mm clean crushed stone with well defined edges
AB
4
4 Maintaining and repairing paving Restore paving that has broken, sunk or become raised.
Broken or sunken blocksReplacing or raising broken or sunken blocks can be a problem, as they are usually packed together. Depending how tightly packed they are, one of two methods for their removal can be used. Always wear eye protection and gloves.
Remove looser blocks If a block is not too tight, drill a hole in its centre, or in the largest piece, using a hammer drill and masonry bit. Insert a raw wplug and screwed eye bolt of a suitable size, thread a piece of strong cord through the eye and carefully pull upward. If there are several sunken blocks to be raised or replaced, start at the outer edge of the depression where the blocks will be the least tightly packed and the easiest to remove.
Take out a tight block If the above method does not work, or the block is too tight, use a large masonry bit and drill as many holes as possible across the block. Using a sharp cold chisel and lump hammer, chip out the block by cutting across the drilled holes. Repeat if necessary until the block is removed. Once a block (or piece) is out, the adjacent blocks should be easily removed.
Replace a block Add a little sharp sand, levelling it with the edge of a short piece of wood. Carefully drop the new block into place. Protecting the surface with another piece of wood, tamp down until level with the other blocks.
Replace several blocks Follow the method for one block, above, but make sure each is completely level and firmly butted against its neighbour and there aren’t any gaps, or the last one won’t fit. Fit the last one end up so it can be easily removed (this will stop the space closing up). When all the blocks in place, use a long straight edge across the tops to re-check they are level, and tamp down any that are proud. Add sand under any that are low. Fit the last block; you may need to use a piece of wood over the block and gently tap in. Check for level.
Raised blocks or slabs Growing trees roots are usually the cause of raised block pavers and slabs. If this is the case, before attempting a repair, contact your local council (or, in the event of very obvious or serious damage, your
insurance company) for advice about damage caused by trees. Never remove large roots without professional advice.
Broken or sunken paving slabsPaving slabs that have become damaged or sunk can be replaced.
1. Remove mortar Remove any mortar from around the slab by using a narrow bladed masonry chisel – if the mortar is in poor condition, an old, strong screwdriver may do. Take care not to damage the edge of the neighbouring slabs.
2. Take out broken slabs Chisel a hole into the broken part of the slab, then carefully lever out the pieces until all are removed.
3. Take out whole sunken slabs If there is a gap between the slab and the neighbouring slabs, insert a wide chisel, spade or suitable lever. Place a piece of wood over the adjacent slab and lever on to it. Have two or three pieces of wood ready that are strong and thick enough to support and raise the slab sufficiently for you to get your fingers underneath. Lift out the slab and place it on to more pieces of wood, remembering that you’ll need to get your fingers underneath to put it back.
Replace a paving slabOnce you’ve removed a broken or sunken paving slab, fit a new one.
1. Remove old mortar Remove old mortar from the hole and the edges. Add sharp sand, tamp down and level.
2. Add mortar If you are using mortar, allow about 10mm room on top of the sand for it. The slab will need to be raised just enough above the others to allow tamping down and levelling. Add five dobs of mortar – one to each corner and one to the centre, and apply a thin strip of mortar around the edges of the hole.
3. Place the slab in the hole To avoid ruining the sand and mortar base when you place the slab in the hole, carefully place one end into position, making sure the surrounding gaps are equal, then lower it. If you need to centre the slab, use a wide chisel or a spade and gently lever against the sound neighbouring slabs, taking care not to damage them.
Alternatively, lift the slab on two pieces of suitable cord or flat plastic banding and gently lower it into the hole. Use the handle of a lump hammer to tamp the slab into position, making sure it’s level by using a long spirit level.
Cut the cord or banding level with the slab and push down below the surface. Add dry sand into the joints and smooth level with the other slabs.
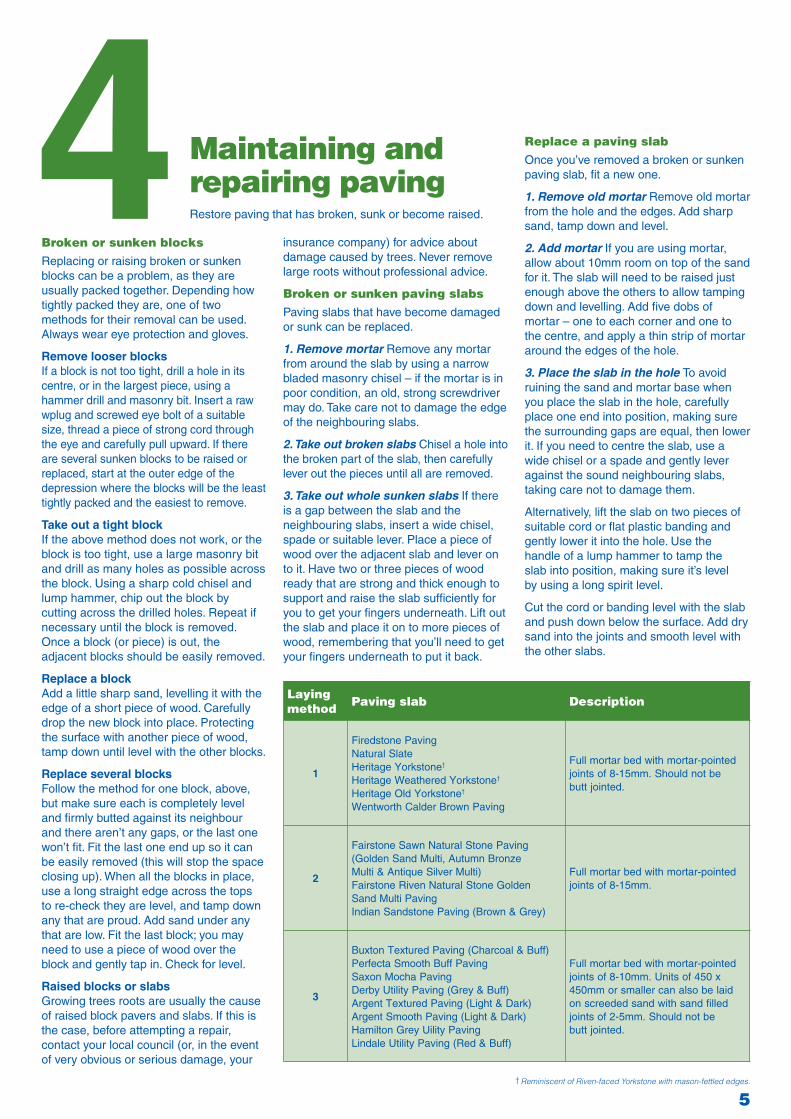
Layingmethod Paving slab Description
1
Firedstone PavingNatural SlateHeritage Yorkstone†
Heritage Weathered Yorkstone†
Heritage Old Yorkstone†
Wentworth Calder Brown Paving
Full mortar bed with mortar-pointed joints of 8-15mm. Should not be butt jointed.
2
Fairstone Sawn Natural Stone Paving(Golden Sand Multi, Autumn Bronze Multi & Antique Silver Multi)Fairstone Riven Natural Stone Golden Sand Multi PavingIndian Sandstone Paving (Brown & Grey)
Full mortar bed with mortar-pointed joints of 8-15mm.
Full mortar bed with mortar-pointed joints of 8-10mm. Units of 450 x 450mm or smaller can also be laid on screeded sand with sand filled joints of 2-5mm. Should not be butt jointed.
† Reminiscent of Riven-faced Yorkstone with mason-fettled edges.
5
BrickworkThe number of bricks needed depends on the style of wall you are building. Use our examples and quick-glance guide: Calculate the bricks, blocks and mortar (see Fig. 13) to make your calculations.
Brick sizes Brick sizes vary slightly because of the way they are made, but for ease of calculation, the size of one brick is taken as 215mm x 102.5mm x 65mm, and for normal brickwork the joint between the bricks both vertically and horizontally is 10mm.
When deciding how many bricks are required, the thickness of the mortar joint is included in the calculations, making the measurement of the brick 225mm x 102.5mm x 75mm. By adjusting the mortar joint thickness any slight variations in size of the bricks are taken into account.
Calculate the number of bricks neededWhen determining how many bricks are required, you should first work out the area of the brickwork. For example, if the length of wall is 4m and the height of wall 0.5m, multiply them together to get the area in square metres (m2 or sq m): 4m x 0.5m = 2 sq m.
For a single skin wall – also known as a half brick wall – allow 60 bricks per square metre. This style is known as stretcher bond with only the long ‘stretcher’ faces of the bricks visible. In the example above of a 2 sq m wall, you will need to multiply 2 sq m (area of brickwork) x 60 (number of bricks per sq m) = 120 bricks.
For a one brick thick solid wall with the visible ends of bricks known as headers on show – allow for 120 bricks per square metre. So, you will need 2 sq m (area of brickwork) x 120 (number of bricks per square metre) = 240 bricks.
These figures do not allow for wastage or breakage, so add 10% extra to the order to make certain you do not run short.
MortarBricklaying mortar comes in 25kg bags – just add water for a perfect mortar mix for about 25 bricks, depending on the thickness of the mortar joints. For a square metre of brickwork (60 bricks), two to three bags will be required.
5 Calculating quantities of building materials bricks and mortar Save time and money by buying the correct quantities of materials for your paving project. We’ve included information on walling quantities here, too, and if you’re building a wall for your patio or a paved area, pick up our how to plan and build a garden wall project guide. All our calculations and quantities are approximate, so use the information for guidance only.
However, if large quantities are required, make your own with 25kg bags of cement and bags of building sand (see Fig. 14 on page 7).
To calculate the number of bags of bricklaying mortar mix for the above example of a single skin wall measuring 4m long by 0.5m high and using 120 bricks, divide the total number of bricks (120) by 25 (coverage of one bag of mortar): 120 ÷ 25 = 4.8, so five bags of bricklaying mortar are needed.
If the wall is to be built one brick thick using 240 bricks you will need: 240 ÷ 25 = 9.6, so 10 bags of bricklaying mortar are needed.
Mix your own mortarTo mix your own mortar, the proportions for most general brick or blockwork laying purposes should be six parts sand to one part cement to one part hydrated lime (or, one bag of sand, mixed with one shovelful of cement and one shovelful of hydrated lime), plus add mortar plasticiser to the mixing water.
The mix may vary slightly depending on the type of structure being built (see Fig. 14 on page 7). The measurements can be by weight or, much more easily, by volume, such as the bucketful, but they must be constant for each batch mixed.
One 25kg bag of cement, one 25kg bag of hydrated lime and six bags of building sand will make a general purpose mortar
of 6:1:1 mortar mix, sufficient to lay about 140 bricks or about 35 concrete blocks.
If you are looking for greater workability and flexibility, Wickes’ Mortar Plasticiser can be added to the mixing water in the amounts shown on the packaging instructions. The plasticiser reduces surface tension and allows the mortar to flow easily; it also produces tiny air bubbles in the mortar, which allow the water to expand in freezing conditions and reduces the possibility of the mortar cracking.
How much water should you use?For a bag of bricklaying mortar, about 2.5 litres of water (half a bucket) will be required.
1. Add water to the mix Introduce water in sufficient quantity to allow it to be absorbed by the mix, then add little by little until the mix has the consistency of butter, slipping easily from the shovel but firm enough for the sides not to collapse when a hollow is made in the centre of the mix.
2. Use mortar quickly Mortar should be used within two hours of mixing, so only mix sufficient to be used within that time. As a rule of thumb, it takes about 2.5 minutes to lay one brick.
3. Deal with mortar problems If the mortar stiffens up as you use it, first try turning it over and mixing with your trowel rather than adding extra water; only add water in small quantities if really necessary.
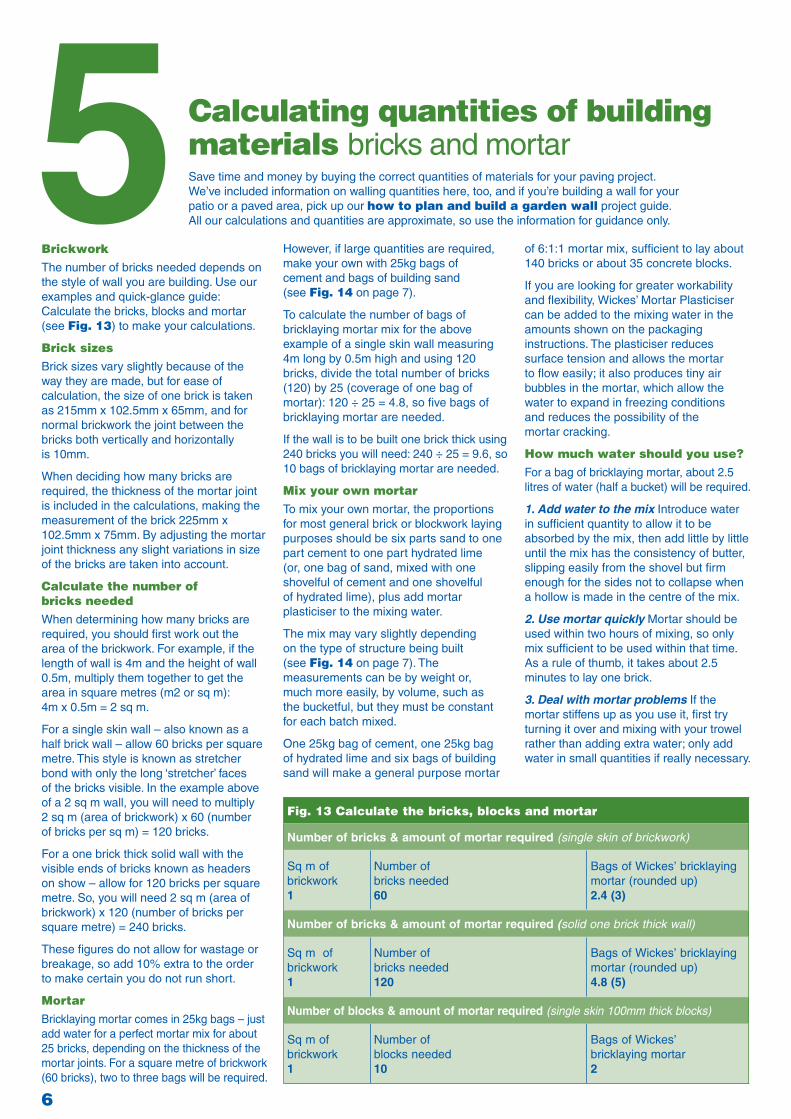
Fig. 13 Calculate the bricks, blocks and mortar
Number of bricks & amount of mortar required (single skin of brickwork)
Sq m of brickwork 1
Number of bricks needed 60
Bags of Wickes’ bricklaying mortar (rounded up) 2.4 (3)
Number of bricks & amount of mortar required (solid one brick thick wall)
Sq m of brickwork 1
Number of bricks needed 120
Bags of Wickes’ bricklaying mortar (rounded up) 4.8 (5)
Number of blocks & amount of mortar required (single skin 100mm thick blocks)
Sq m of brickwork 1
Number of blocks needed 10
Bags of Wickes’ bricklaying mortar 2
6
6 Calculating quantities of building materials mortar mixes, sand and aggregates Work out quantities of sand and aggregates, and find out more about the materials you will be using for hard landscaping. Remember, all our calculations and quantities are approximate, so use the information for guidance only.
Types of sand and aggregatesSand and aggregates are graded by the size and shape of their particles. A well-graded sand, for example, will have particles of different sizes – not all large and not all small. You will need to use different types of sand for different mortar mixes.
Sharp sand A rather coarse and gritty material, sharp sand is normally used for render and floor screeds.
Soft sand Known as builder’s or bricklayer’s sand, soft sand has smoother particles and is of a finer grade than sharp sand. It is mixed with cement and hydrated lime to produce bricklaying mortar.
Coarse aggregate Coarse aggregate is gravel or crushed stone of sufficient size to be retained by a 5mm sieve up to a maximum size of 20mm. It is used to form concrete when mixed with sharp sand and cement.
Ballast Known as ‘combined’ or ‘all-in’ aggregate, this is a mix of sharp sand and coarse aggregate and is used for making concrete. The proportions of sand to gravel are not normally guaranteed but are acceptable for use in a general purpose concrete mix.
Store sand and aggregates in a neat pile on a board or plastic sheet and protect from dirt and rain by covering with a plastic sheet. Weigh the sheet down with bricks or similar heavy objects to prevent it blowing away.
Trade Tip
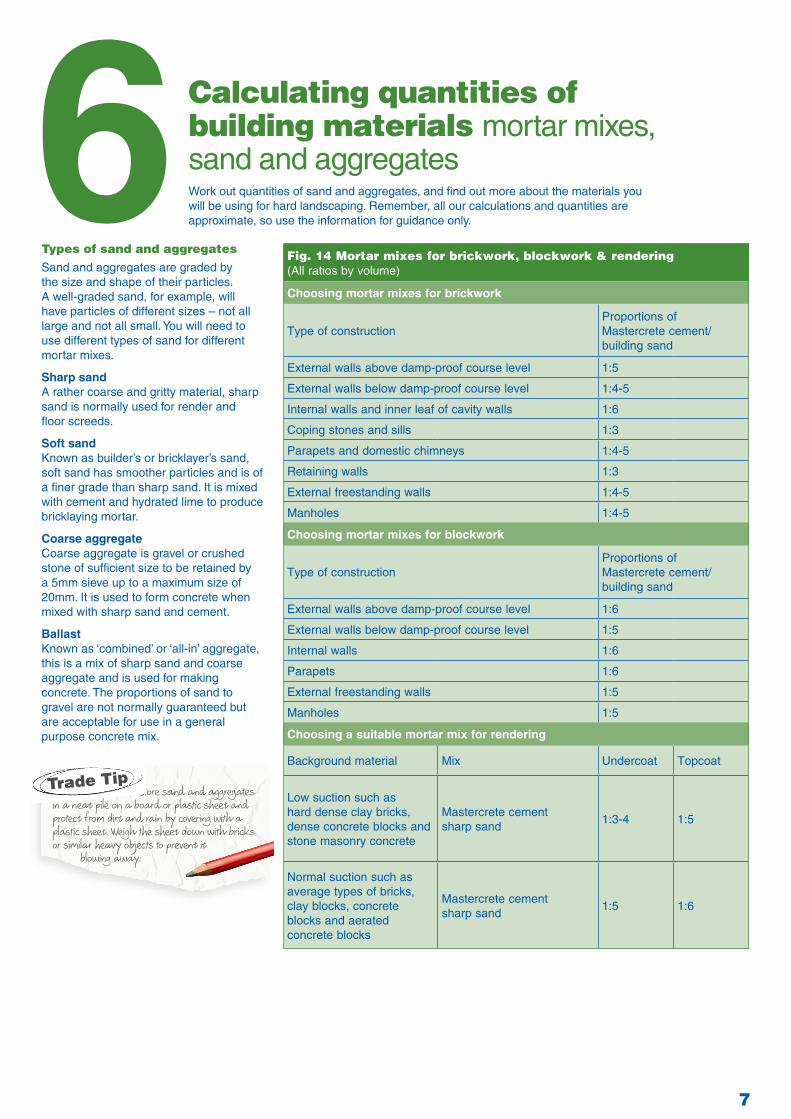
Fig. 14 Mortar mixes for brickwork, blockwork & rendering (All ratios by volume)
Choosing mortar mixes for brickwork
Type of constructionProportions of Mastercrete cement/ building sand
Type of constructionProportions of Mastercrete cement/ building sand
External walls above damp-proof course level 1:6
External walls below damp-proof course level 1:5
Internal walls 1:6
Parapets 1:6
External freestanding walls 1:5
Manholes 1:5
Choosing a suitable mortar mix for rendering
Background material Mix Undercoat Topcoat
Low suction such as hard dense clay bricks, dense concrete blocks and stone masonry concrete
Mastercrete cement sharp sand
1:3-4 1:5
Normal suction such as average types of bricks, clay blocks, concrete blocks and aerated concrete blocks
Mastercrete cement sharp sand
1:5 1:6
7
Bagged mix For convenience and to ensure a perfect mix, bagged concrete mix is available. This has the correct amount of cement and all-in ballast and you’ll just need to add clean water. Between 2 and 3 litres of water will be needed for each bag of concrete mix.
Concrete coverage One bag of concrete mix will generally fill a volume of approximately 0.0125 cu m. It is difficult to give exact figures as the sub-base for concrete work, which is normally hardcore or broken bricks, varies so much in shape and has voids to be filled.
How to gauge concreteFollow our instructions to create the mix. For quantities (see Fig. 15).
1. Mix the ballast Tip a bag of all-in ballast (approx five shovelfuls) on to your mixing board and add one shovelful of cement.
7 Calculating quantities of building materials concrete Concrete can be used as a foundation to support the wall around your patio. It is made from all-in ballast (or all-in aggregate). The mix would be expressed as 1:5, meaning one part cement to five parts all-in ballast.
If the daytime temperature reaches 20oC or more, the concrete should also be given a light spraying of water at least once a day for a week. The concrete should be re-covered with the polythene after spraying, otherwise it may well crack and crumble. In very hot weather, the concrete should be covered in hessian that is kept wet.
Trade Tip
2. Mix the cement Mix in the cement until the dry pile has an even colour. Make a well in the middle, pour in the water and mix until you can make a series of ridges in the top surface by dragging the back of the shovel across. The surface of the concrete should be flat and even and the ridges should keep their shape without filling in.
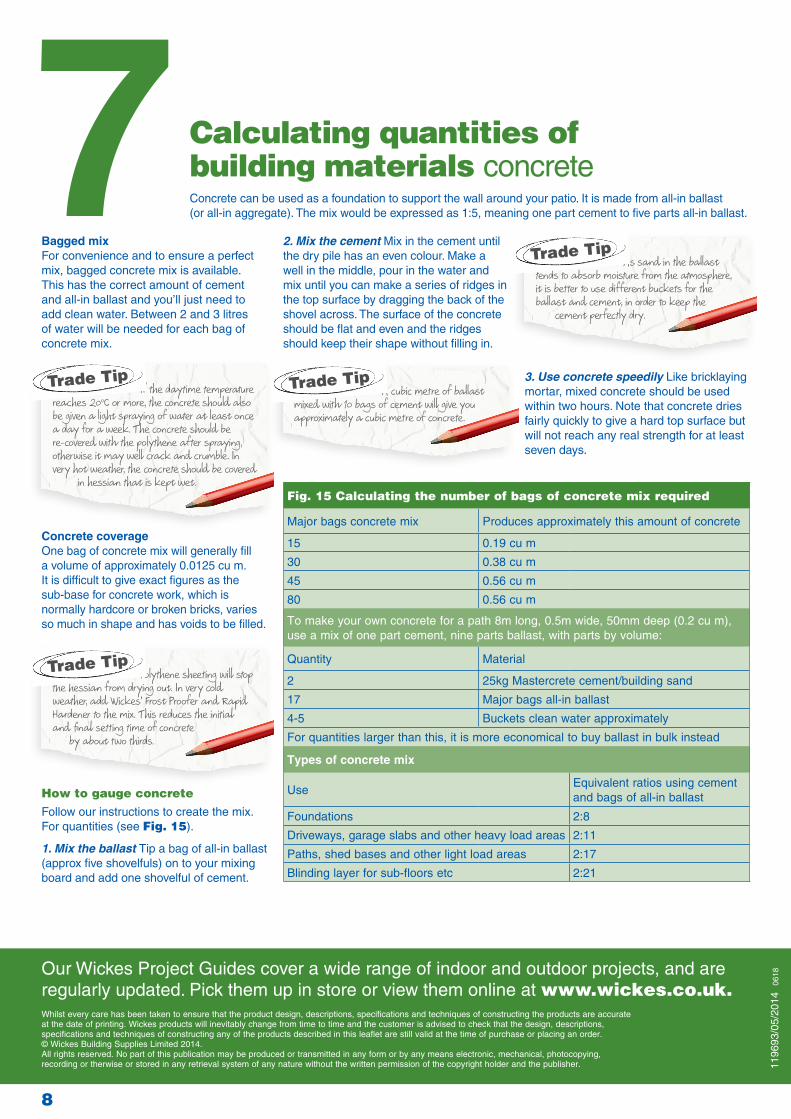
Fig. 15 Calculating the number of bags of concrete mix required
Major bags concrete mix Produces approximately this amount of concrete
15 0.19 cu m
30 0.38 cu m
45 0.56 cu m
80 0.56 cu m
To make your own concrete for a path 8m long, 0.5m wide, 50mm deep (0.2 cu m), use a mix of one part cement, nine parts ballast, with parts by volume:
Quantity Material
2 25kg Mastercrete cement/building sand
17 Major bags all-in ballast
4-5 Buckets clean water approximately
For quantities larger than this, it is more economical to buy ballast in bulk instead
Types of concrete mix
UseEquivalent ratios using cement and bags of all-in ballast
Foundations 2:8
Driveways, garage slabs and other heavy load areas 2:11
Polythene sheeting will stop the hessian from drying out. In very cold weather, add Wickes’ Frost Proofer and Rapid Hardener to the mix. This reduces the initial and final setting time of concrete by about two thirds.
Trade Tip
As sand in the ballast tends to absorb moisture from the atmosphere, it is better to use different buckets for the ballast and cement, in order to keep the cement perfectly dry.
Trade Tip
3. Use concrete speedily Like bricklaying mortar, mixed concrete should be used within two hours. Note that concrete dries fairly quickly to give a hard top surface but will not reach any real strength for at least seven days.
A cubic metre of ballast mixed with 10 bags of cement will give you approximately a cubic metre of concrete.