Default : 1. System : a. IP Address : 192.168.92.246 b. Password : pbxk1064 2. Operator, including General Mailbox a. Password : help1954 3. OHL/OLD Driver a. IP Address : 192.168.92.246 b. Password : kilo1987 4. Web admin : a. URL : https://192.168.92.246/service s/webapp b. Username : installer c. Password : pbxk1064 5. ACD : a. Supervisor Console : help1954 b. Statistic Manager : kilo1987 System Restart : OMC : System Misc. – System Reset – Cold/Warm – Immediately – Reset Set : Operator Key – Expert – Reset – Cold/Warm - OK Parameter : 1. Time Ranges (Normal/Closing hour) o Set Normal/Restricted time o Set Manual NR go to attendant group 2. External lines o List of Access Dialing : DTMF, Set Link COS : 4 o List of Trunk Group – Set Link COS : 4 o Traffic Sharing & Barring, Rest. /Barring Table ( 2 forbid 0; 3 forbid 00) o Account Code (ptct : no; user no; cos 3), 3. Subscriber o For digital sets, features-part 2 enable MF Transparency o To disable Call Waiting tone; Part 1 Warn tone protection o Dynamic Routing (Dyn.Rout) A. Delete all timer 1, timer 2 and destination no for internal and external section. B. Tick Diversion Apply (if untick, all forwarding will not work properly) o By default, all user inhibit time ranges (didn’t follow N/R by time) Part 2 o Set Z (class) for Analog sets which support CLI o Rest/Barring o Features – part 2 – trunk assign (only for authorized user) 4. Dialing Plan
Transcript
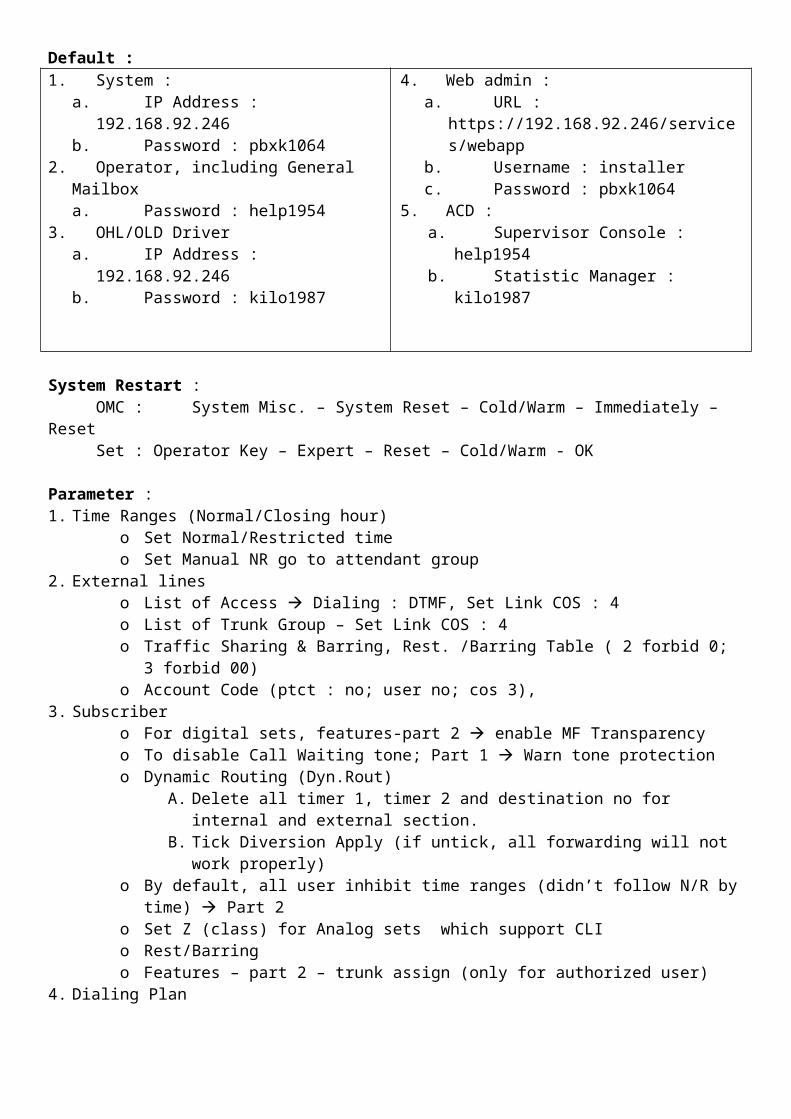
Default :1. System :
a. IP Address : 192.168.92.246b. Password : pbxk1064
2. Operator, including General Mailboxa. Password : help1954
3. OHL/OLD Drivera. IP Address : 192.168.92.246b. Password : kilo1987
System Restart : OMC : System Misc. – System Reset – Cold/Warm – Immediately – ResetSet : Operator Key – Expert – Reset – Cold/Warm - OK
Parameter :1. Time Ranges (Normal/Closing hour)
o Set Normal/Restricted timeo Set Manual NR go to attendant group
2. External lineso List of Access Dialing : DTMF, Set Link COS : 4o List of Trunk Group – Set Link COS : 4o Traffic Sharing & Barring, Rest. /Barring Table ( 2 forbid 0; 3 forbid 00)o Account Code (ptct : no; user no; cos 3),
3. Subscriber o For digital sets, features-part 2 enable MF Transparencyo To disable Call Waiting tone; Part 1 Warn tone protectiono Dynamic Routing (Dyn.Rout)
A. Delete all timer 1, timer 2 and destination no for internal and external section.B. Tick Diversion Apply (if untick, all forwarding will not work properly)
o By default, all user inhibit time ranges (didn’t follow N/R by time) Part 2o Set Z (class) for Analog sets which support CLIo Rest/Barringo Features – part 2 – trunk assign (only for authorized user)
4. Dialing Plano New account code to access account codeo Hunt Group Default 540o Pick Up Group Default 72o Lock/Unlock Default 75 (to unlock add ext. password, default 1515)o Cancel Callback Default 63o User,Attendant Call, Main Trunk Group,Mailing, Programming Mode, Cancel Callback
5. Feature in Conversationo Callbacko Conferenceo Barge Ino Trunk Assign 7 no restriction
6. Attendant group list7. Hunt group (540) Mailbox Group8. Pickup group9. IP address (Hardware and Limits – IP addresses)
o System Misc. – Memory Read/Write – Other Labels – Time Duratio Replace 3rd value with 52 (650 ms)o Increment Hex value multiply by 8mso Need restart after change this value
2. Conference 2 external calls and 1 extentiono System Misc. – Feature Design – Part 3 – Conference Unrestrictedo System Misc. – Memory Read/Write – Other Labels – Conferbip = 00
3. Digital Toneo System Misc. – Memory Read/Write – Other Labels – DialtoMult = 01
4. Save/Backup Softwareo OMC – Comm – Read All from PCX – Voice Prompt and Internet Access o File – Save Aso Comm - Disconnect o File – Backup – Store
5. System Miscelaneous – Memory Read/Write – Other Label Account Code digits checko ACC_Mode = 0 digit by digit checkingo ACC_Mode = x digit checking after x digits where x = the shortest account code
6. System Miscelaneous – Feature Designo Part 1 : Tick “Delayed call back for calls on hold” permanent holdo Part 5 : Timeout for call back for calls on hold ring back permanent hold
7. Central Service Global Infoo Activated Email Notification, fill the mail server addresso User – Details – Cent. Serv – Email Notificationo Enable VM notification and delete mailbox on the system
Additional Setup :1. Automated Attendant
o Add Voice mail hunt group (540) to External lines – list of accesses – detail – call dist.o Configure automated attendant menuo Record necessary message with format PCM 8khz 16bit mono.o System Misc. – Memory Read/Write – Other Labels – AAGrDiaIng = 01 (direct extention
dialing during company greetings)o System Misc. – Memory Read/Write – Other Labels – AAGrTransf = 01 (transfer to operator
when dialing 0 or 9 during company greetings)o Voice Processing – general Parameters – off hook delay = 1 s
2. Music On Holdo System Misc. – Messages & Music – Music On Holdo Transfer .wav with format 8 bit, 8 kHz, single (mono), and max 2 min.o Choose Music Source as Recorded Music
Metering using V24.Plugware and Hyper Terminal1. Connect plugware to UA Port and digital sets to the plugware2. OMC – User/base station lists - <plugware extention> - details
V24 – click default Counting – Tracking All Calls
3. OMC – Counting – Counting – Ext. Accounting Activatation V244. OMC – Counting – Metering Transmission Characteristics – Select plugware extention5. Unplug the plugware cable from UA port,wait 5 seconds than plug it again
Features Installed :Hardware and Limits – Software Key Features
Software Version :Data Saving & Swaping – SW Downloading 410/015.005
After Demo License Expired : Can’t make outgoing call IP Phone will be out of service and forwarded to Voice Mail
Set Replace and RetrieveSyarat utama yang perlu dilakukan adalah ganti password untuk extention asal maupun tujuan. Caranya :- tekan 89 <Programming Mode>- tekan 4 <Personal Options>- tekan 1 <Change Password>- tekan 1515 <Old password> --> defaultnya 1515- tekan 1234 <New password>- tekan # atau tombol OK <confirm new password>
Untuk Set Retrieve hanya bisa dilakukan sesama series. 8 series bisa ditukar dengan 9 series maupun sebaliknya, tetapi yang reflexes hanya bisa sesama reflexes.Caranya :- tekan 878 <set retrieve>- tekan no_ext_tujuan - tekan password_ext_tujuan
Untuk Set Replace digunakan jika pada satu extention digital 9 series ingin merubah jenis handsetnya. Misal dari 4019 ke 4029.Caranya- Cabut Handset lama dan colokan handset baru- tekan 877 <set replace>- tekan password
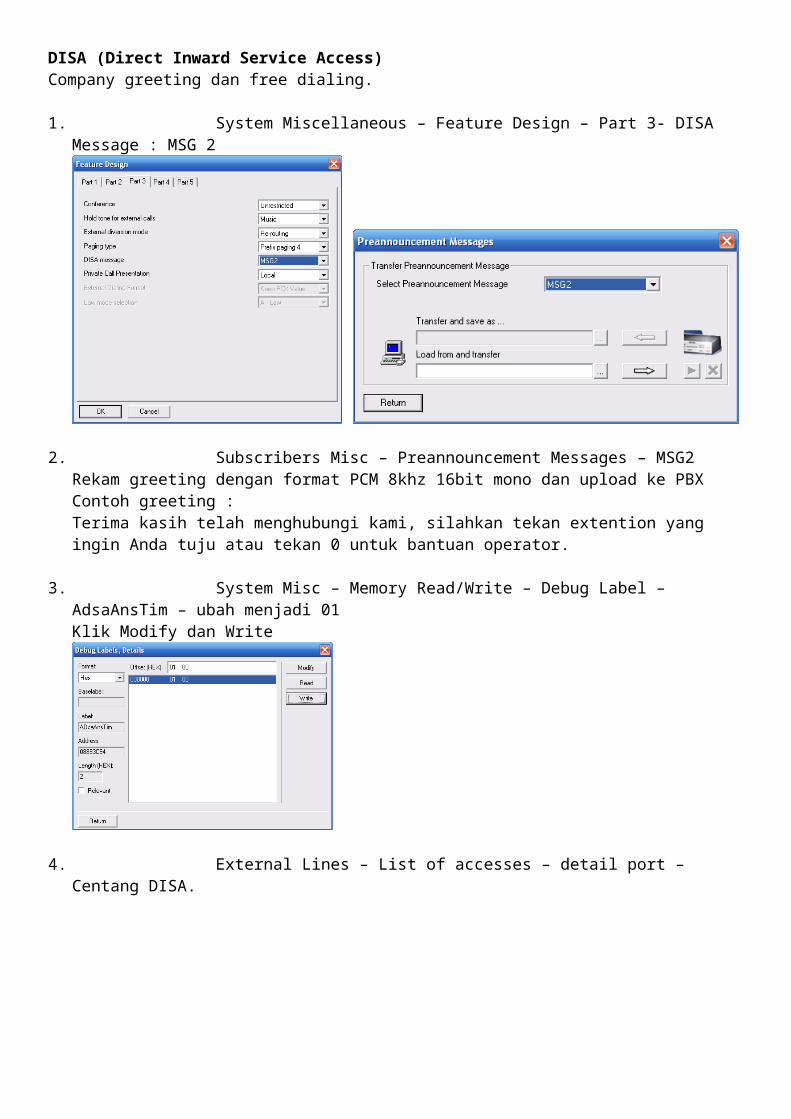
DISA (Direct Inward Service Access)Company greeting dan free dialing.
1. System Miscellaneous – Feature Design – Part 3- DISA Message : MSG 2
2. Subscribers Misc – Preannouncement Messages – MSG2Rekam greeting dengan format PCM 8khz 16bit mono dan upload ke PBX Contoh greeting : Terima kasih telah menghubungi kami, silahkan tekan extention yang ingin Anda tuju atau tekan 0 untuk bantuan operator.
3. System Misc – Memory Read/Write – Debug Label – AdsaAnsTim – ubah menjadi 01Klik Modify dan Write
4. External Lines – List of accesses – detail port – Centang DISA.
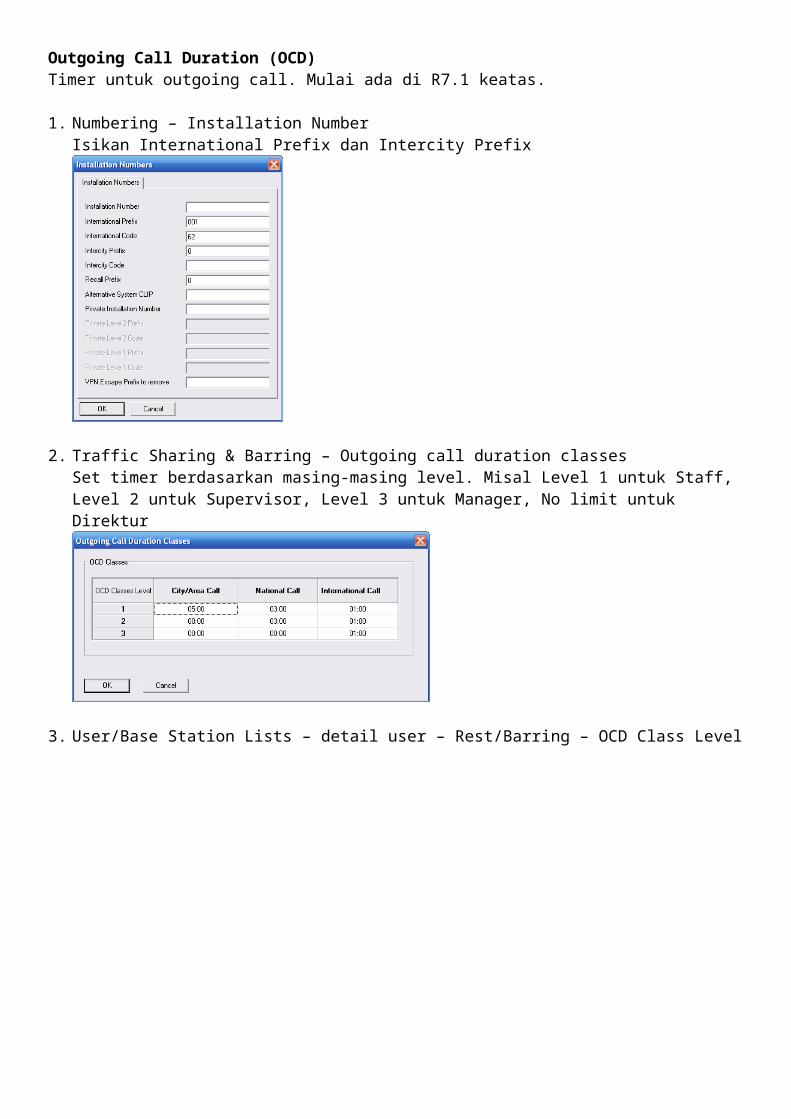
Outgoing Call Duration (OCD)Timer untuk outgoing call. Mulai ada di R7.1 keatas.
1. Numbering – Installation NumberIsikan International Prefix dan Intercity Prefix
2. Traffic Sharing & Barring – Outgoing call duration classesSet timer berdasarkan masing-masing level. Misal Level 1 untuk Staff, Level 2 untuk Supervisor, Level 3 untuk Manager, No limit untuk Direktur
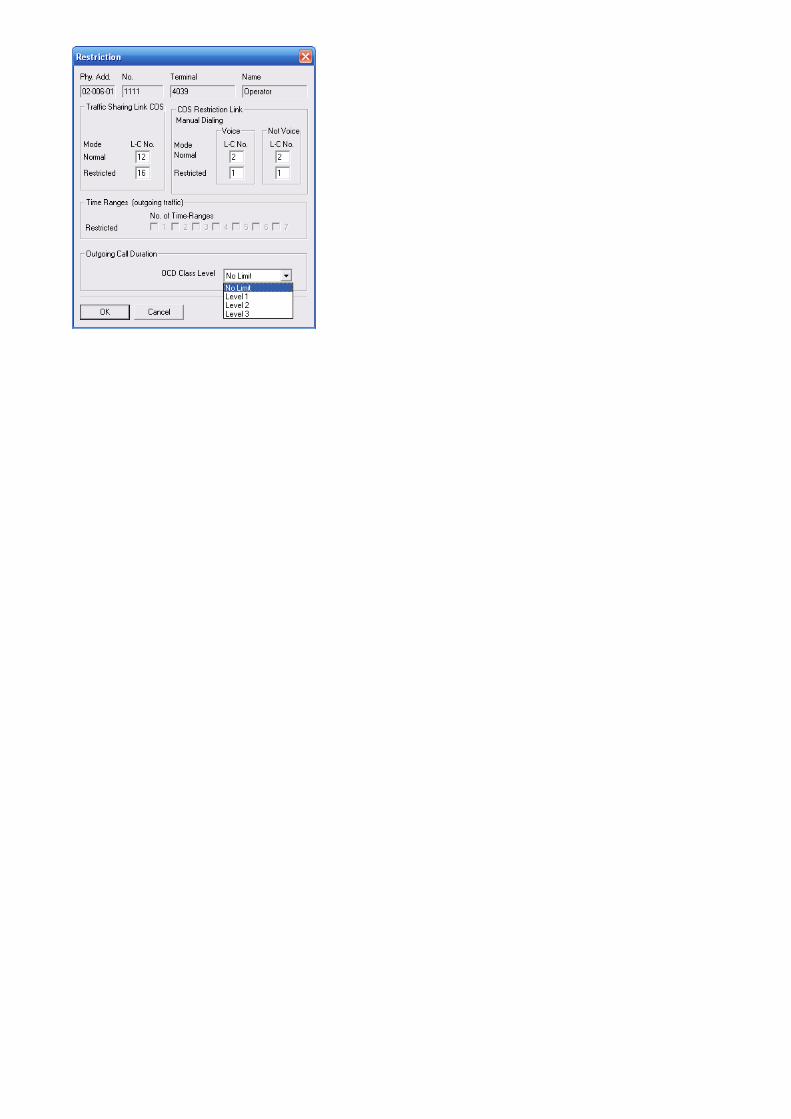
3. User/Base Station Lists – detail user – Rest/Barring – OCD Class Level
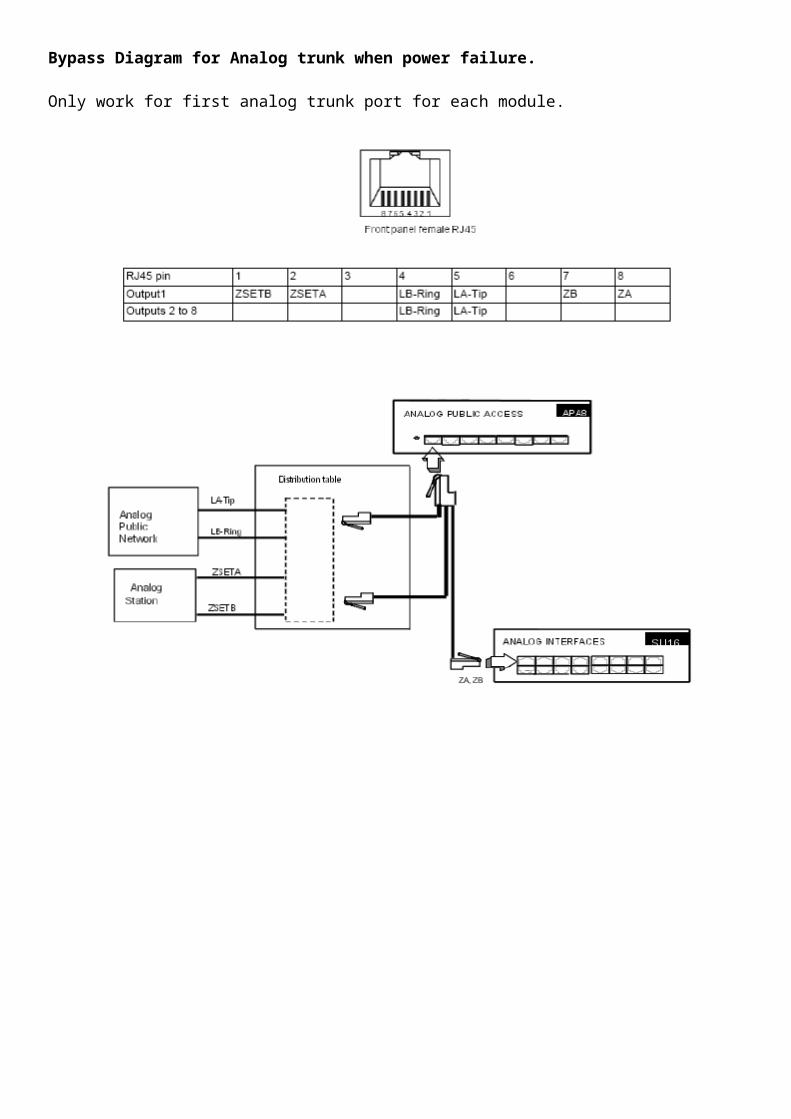
Bypass Diagram for Analog trunk when power failure.
Only work for first analog trunk port for each module.
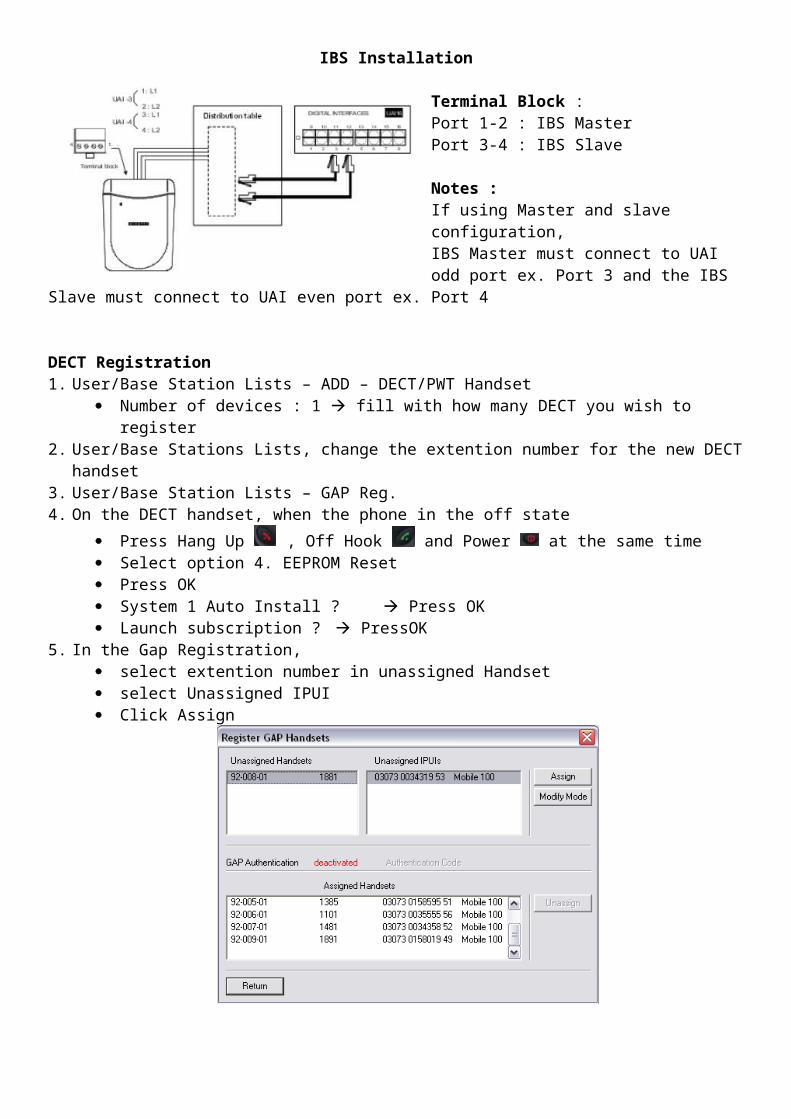
Notes :If using Master and slave configuration,IBS Master must connect to UAI odd port ex. Port 3 and the IBS Slave must connect to UAI even port ex. Port 4
DECT Registration1. User/Base Station Lists – ADD – DECT/PWT Handset
Number of devices : 1 fill with how many DECT you wish to register2. User/Base Stations Lists, change the extention number for the new DECT handset3. User/Base Station Lists – GAP Reg.4. On the DECT handset, when the phone in the off state
Press Hang Up , Off Hook and Power at the same time Select option 4. EEPROM Reset Press OK System 1 Auto Install ? Press OK Launch subscription ? PressOK
5. In the Gap Registration, select extention number in unassigned Handset select Unassigned IPUI Click Assign
6. Repeat Step 3 and 4 until all DECT handsets registered.
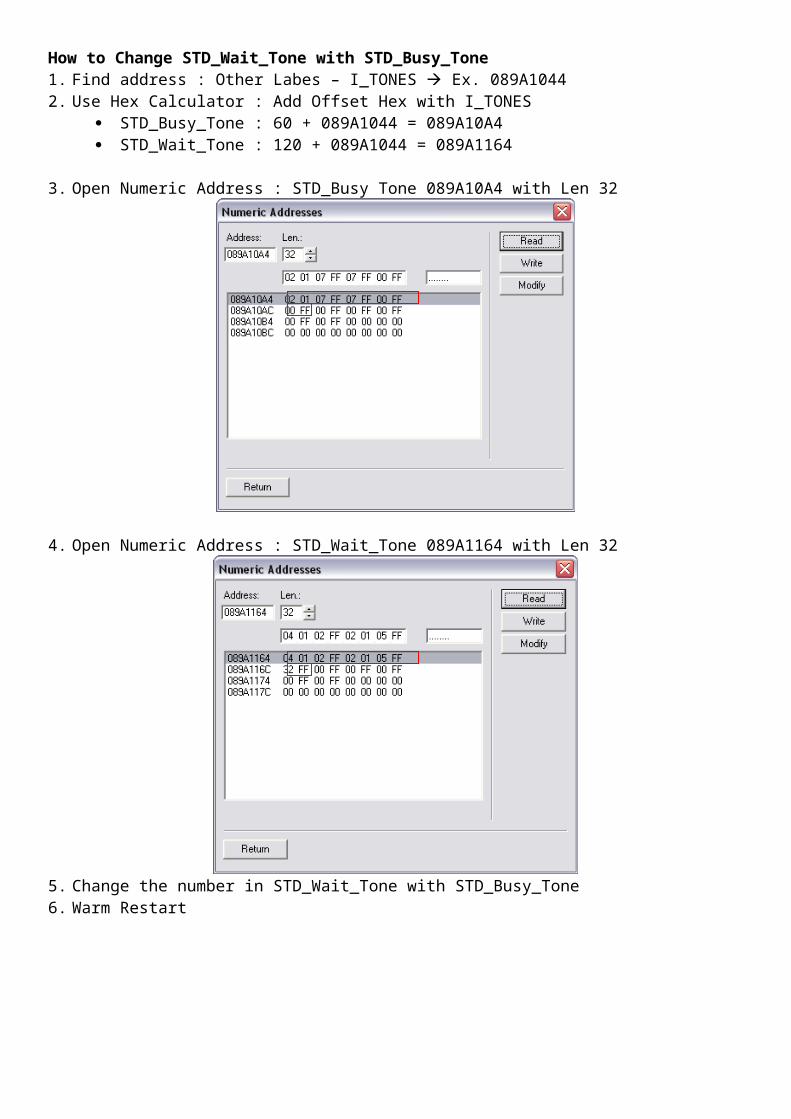
How to Change STD_Wait_Tone with STD_Busy_Tone1. Find address : Other Labes – I_TONES Ex. 089A10442. Use Hex Calculator : Add Offset Hex with I_TONES
3. Open Numeric Address : STD_Busy Tone 089A10A4 with Len 32
4. Open Numeric Address : STD_Wait_Tone 089A1164 with Len 32
5. Change the number in STD_Wait_Tone with STD_Busy_Tone6. Warm Restart
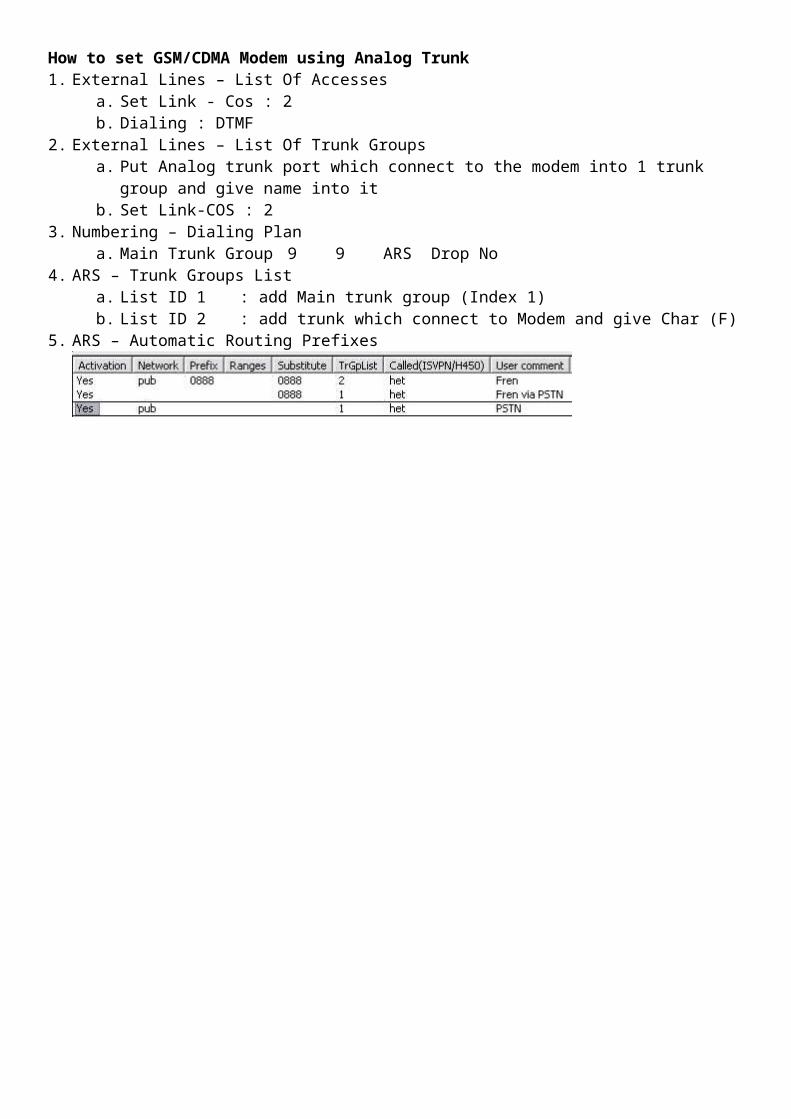
How to set GSM/CDMA Modem using Analog Trunk1. External Lines – List Of Accesses
a. Set Link - Cos : 2b. Dialing : DTMF
2. External Lines – List Of Trunk Groupsa. Put Analog trunk port which connect to the modem into 1 trunk group and give name into itb. Set Link-COS : 2
3. Numbering – Dialing Plana. Main Trunk Group 9 9 ARS Drop No
4. ARS – Trunk Groups Lista. List ID 1 : add Main trunk group (Index 1)b. List ID 2 : add trunk which connect to Modem and give Char (F)
5. ARS – Automatic Routing Prefixes
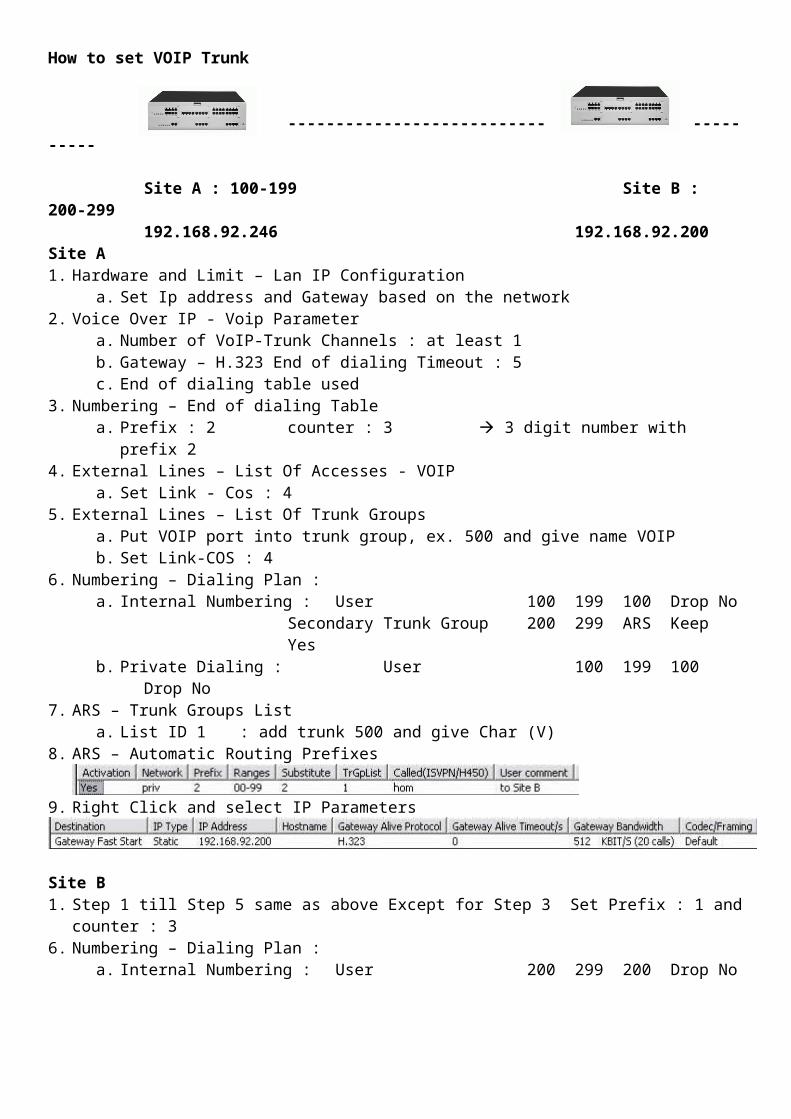
How to set VOIP Trunk
-------------------------------------
Site A : 100-199 Site B : 200-299192.168.92.246 192.168.92.200
Site A1. Hardware and Limit – Lan IP Configuration
a. Set Ip address and Gateway based on the network2. Voice Over IP - Voip Parameter
a. Number of VoIP-Trunk Channels : at least 1 b. Gateway – H.323 End of dialing Timeout : 5c. End of dialing table used
3. Numbering – End of dialing Tablea. Prefix : 2 counter : 3 3 digit number with prefix 2
4. External Lines – List Of Accesses - VOIPa. Set Link - Cos : 4
5. External Lines – List Of Trunk Groupsa. Put VOIP port into trunk group, ex. 500 and give name VOIPb. Set Link-COS : 4
6. Numbering – Dialing Plan :a. Internal Numbering : User 100 199 100 Drop No
Secondary Trunk Group 200 299 ARS Keep Yesb. Private Dialing : User 100 199 100 Drop No
7. ARS – Trunk Groups Lista. List ID 1 : add trunk 500 and give Char (V)
8. ARS – Automatic Routing Prefixes
9. Right Click and select IP Parameters
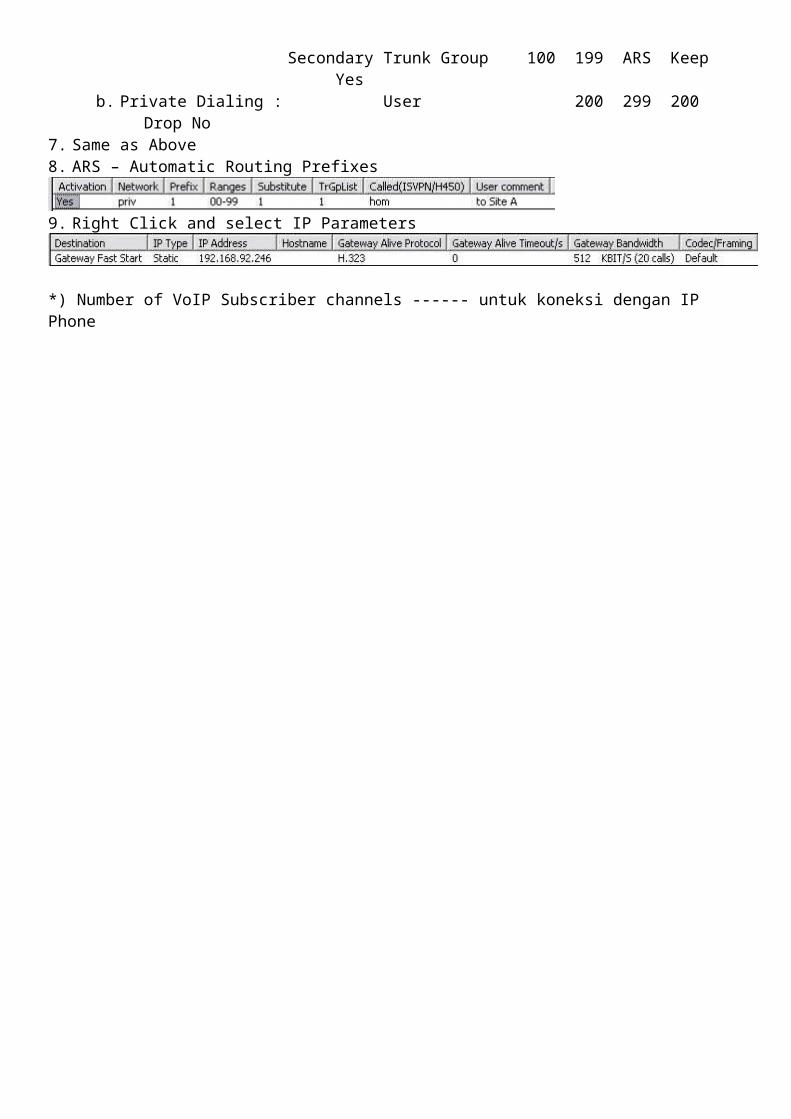
Site B1. Step 1 till Step 5 same as above Except for Step 3 Set Prefix : 1 and counter : 36. Numbering – Dialing Plan :
a. Internal Numbering : User 200 299 200 Drop NoSecondary Trunk Group 100 199 ARS Keep Yes
b. Private Dialing : User 200 299 200 Drop No7. Same as Above8. ARS – Automatic Routing Prefixes
9. Right Click and select IP Parameters
*) Number of VoIP Subscriber channels ------ untuk koneksi dengan IP Phone
How to connect two system with E1 trunk (30 channels) Need 2 boards PRA-T2 or DLT2. For PRA-T2 Board, need to solder on strap 2
Wiring Diagram : Cross Pin 1-2 with 4-5
Dialing Plan : User : System A (Master) : 100 – 199 System B (Slave) : 200 – 299
System A :1. External Lines – List Of Accesses :
a. Set Link-COS – Traffic Sharing :4b. No of B-Channel : 30c. Assignment : Antecendantd. Collision : Mastere. Layer1/Layer2 Mode : Network
2. List Of Trunk Groups : a. Put DLT2 into one of trunk group and give name DLT2 channel 30.b. Link-COS : 4
3. Numbering – Dialing Plan :a. Internal Numbering : Secondary Trunk Group 200 299 ARS Keep Yesb. Private Dialing : User 100 199 100 Drop
4. Numbering - ARS Trunk Group Lists a. List ID 1 : Add the trunk group which have name DLT2
5. Numbering - ARS – Automatic Routing PrefixesActivation Network Prefix Range Substitute TrGrpList CalledYes Priv 2 00-99 2 1 hom
System B :1. External Lines – List Of Accesses :
a. Set Link-COS – Traffic Sharing : 4b. No of B-Channel : 30c. Assignment : Descendantd. Collision : Slavee. Layer1/Layer2 Mode : User
2. External Lines – Protocols - ISVPN : Node Number : below 255 3. List Of Trunk Groups :
a. Put DLT2 into one of trunk group and give name DLT2 and channel 30. b. Link-COS : 4
4. Numbering – Dialing Plan : (Main trunk in System A)a. Internal Numbering :
Secondary Trunk Group 100 199 ARS Keep YesMain Trunk Group 9 9 ARS Keep Yes
b. Private Dialing : User 200 299 200 Drop5. Numbering - ARS Trunk Group Lists
a. List ID 1 : Add the trunk group which have name DLT26. Numbering - ARS – Automatic Routing Prefixes
1. Busy akan overflow ke line berikutnya2. Jalur putus, secondary call akan overflow ke line berikutnya3. ISDN sebagai trunk------ centang public trunk
Multiple Automated Attendant (MLAA)
1. MLAA Setup Hapus Hunt Group di Internal Dialing Plan Masukkan jumlah MLAA port (min 2) Buat Hunting Group MLAA (ex : 548) dan Masukkan DID/DDI Number
2. MLAA Voice Messages
Note :
*Rekam beberapa pesan suara untuk greeting, dan main menu, dan closingFormat suara 8Khz 16bit monoFormat penamaan file <language/kolom>00<fungsi/baris>.wav
Contoh : 1001.wav adalah file untuk Language 1 Greeting 1002.wav adalah file untuk Language 1 Main Menu
3. MLAA Service
a. Isi label untuk Tree 1 dan Klik kanan Add Menub. Masukkan Welcome message (Greeting) dari rekaman Greeting diatas
c. Klik Menu dan isi labelnyad. Masukkan Menu announcement dari rekaman Main menu diatas
e. Klik pada pilihan angka dan pilih Type of Action
4. MLAA Menu Option - Line ParametersPilih Hunt group MLAA dan arahkan ke masing-masing treenya.
5. External Line – List of access – detail port – Call Dist. - isikan hunt group MLAA