How to use Doorbird in Vera, Imperihome and TinyCam Monitor Marc Morisse ([email protected]) – October 2, 2016 – Revision 1 These instructions were written using a Doorbird D10x, but should also work with the surface edition (D20x) or Birdguard (B10x), since they all share the same API (https://www.doorbird.com/api). 1. Preparation / Installation: • Follow Doorbird installation instructions and confirm it works properly with the Doorbird Application • Find out its IP address using https://www.doorbird.com/checkonline: (You can find your MAC address and Token from the Digital Passport delivered with Doorbird) • Alternatively, you can also run an IP scanner software such as Angry IP Scanner and look for the device with a hostname starting with “bha‐“ • In this case, Doorbird_IP is 192.168.178.15
Transcript
How to use Doorbird in Vera, Imperihome and TinyCam Monitor Marc Morisse ([email protected]) – October 2, 2016 – Revision 1
These instructions were written using a Doorbird D10x, but should also work with the surface edition (D20x) or Birdguard (B10x), since they all share the same API (https://www.doorbird.com/api).
1. Preparation / Installation:
• Follow Doorbird installation instructions and confirm it works properly with the Doorbird Application
• Find out its IP address using https://www.doorbird.com/checkonline:
(You can find your MAC address and Token from the Digital Passport delivered with Doorbird)
• Alternatively, you can also run an IP scanner software such as Angry IP Scanner and look for the device with a hostname starting with “bha‐“
• In this case, Doorbird_IP is 192.168.178.15
2. Adding Camera in Vera: • Open Vera UI and select the Camera Tab ‐> Add Camera:
• Select IP Camera (Generic IP Camera), then Next Next Next until Vera tries to find the camera by itself:
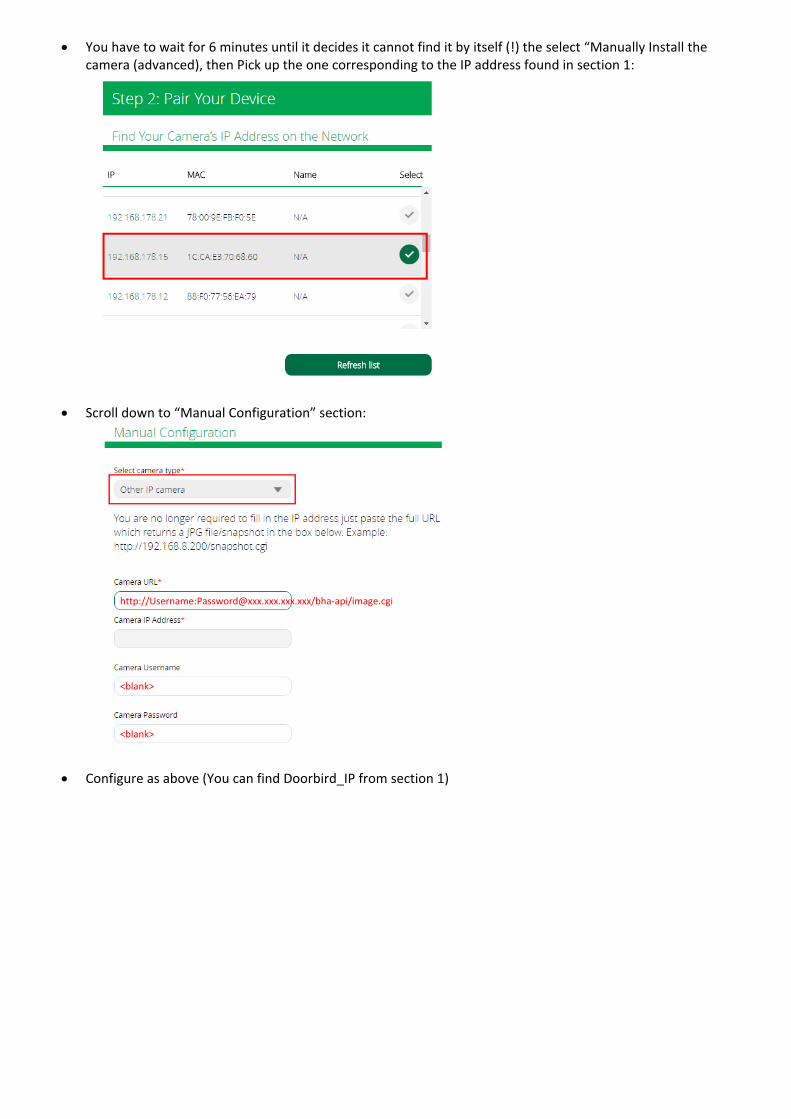
• You have to wait for 6 minutes until it decides it cannot find it by itself (!) the select “Manually Install the camera (advanced), then Pick up the one corresponding to the IP address found in section 1:
• Scroll down to “Manual Configuration” section:
• Configure as above (You can find Doorbird_IP from section 1)
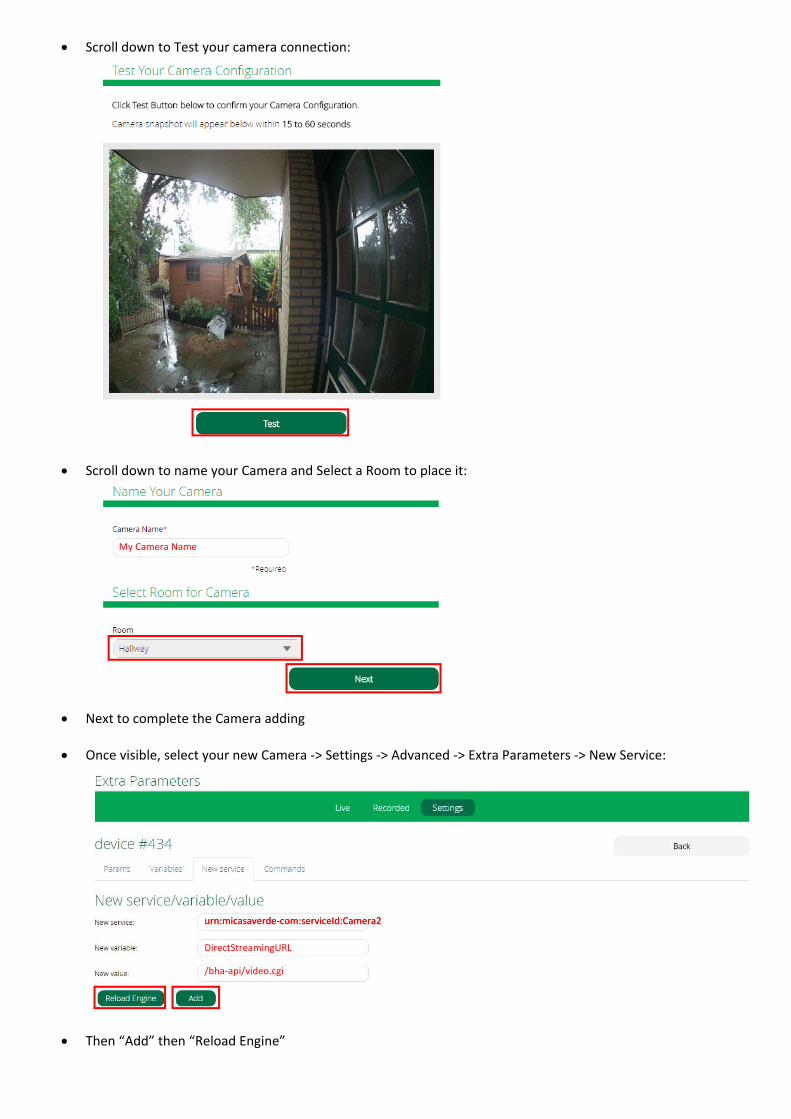
• Scroll down to name your Camera and Select a Room to place it:
• Next to complete the Camera adding
• Once visible, select your new Camera ‐> Settings ‐> Advanced ‐> Extra Parameters ‐> New Service:
• Then “Add” then “Reload Engine”
urn:micasaverde‐com:serviceId:Camera2
DirectStreamingURL
/bha‐api/video.cgi
urn:micasaverde‐com:serviceId:Camera2
My Camera Name
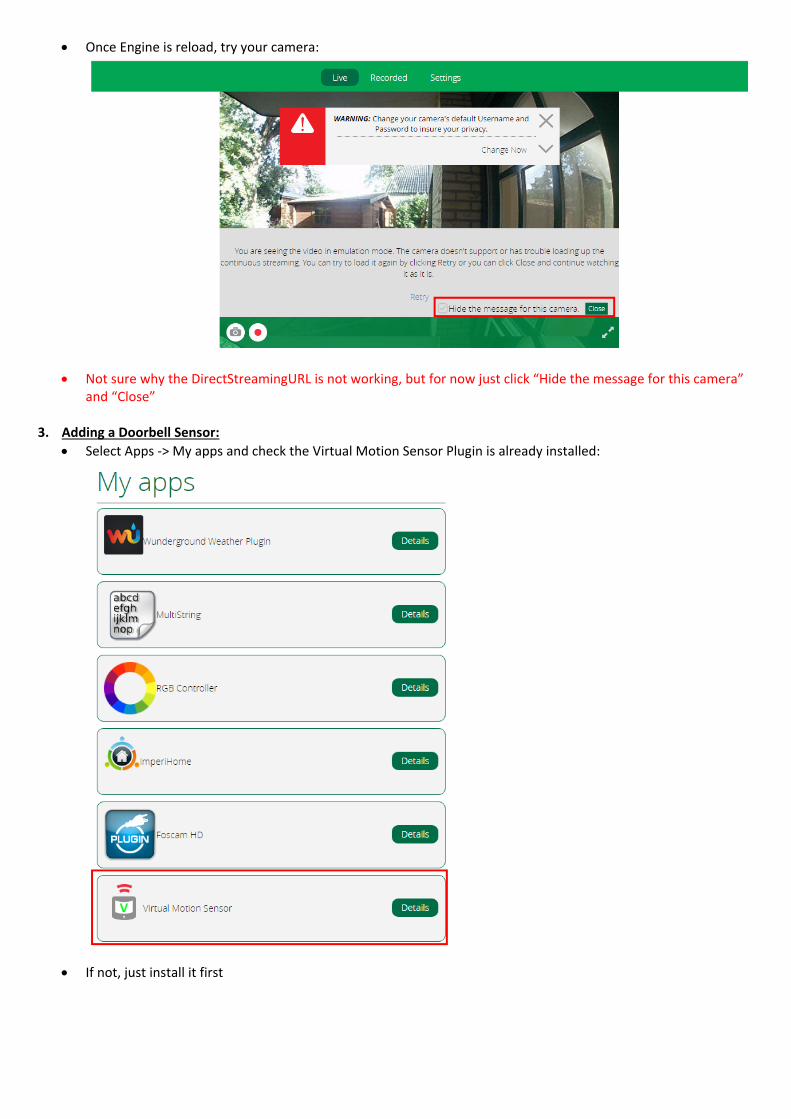
• Once Engine is reload, try your camera:
• Not sure why the DirectStreamingURL is not working, but for now just click “Hide the message for this camera” and “Close”
3. Adding a Doorbell Sensor: • Select Apps ‐> My apps and check the Virtual Motion Sensor Plugin is already installed:
• If not, just install it first
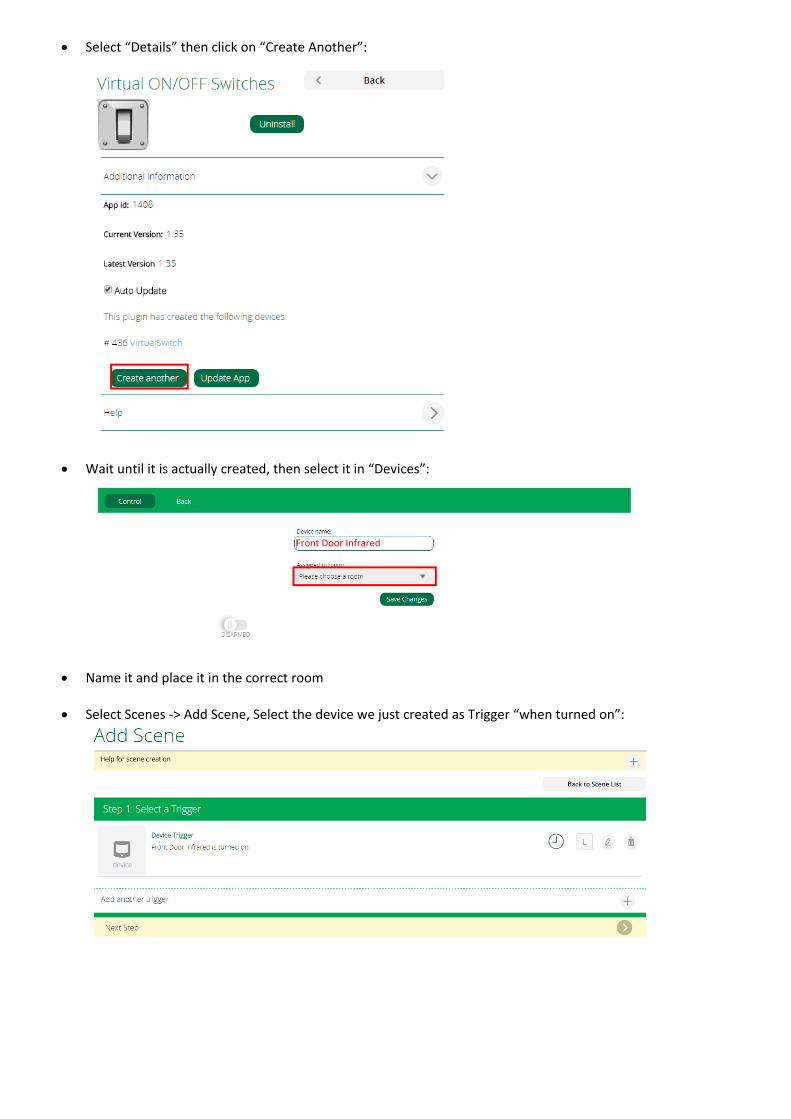
• Select “Details” then click on “Create Another”:
• Wait until it is actually created, then select it in “Devices”:
• Name it and place it in the correct room
• Click on Advanced and check its device ID:
Front Door Bell
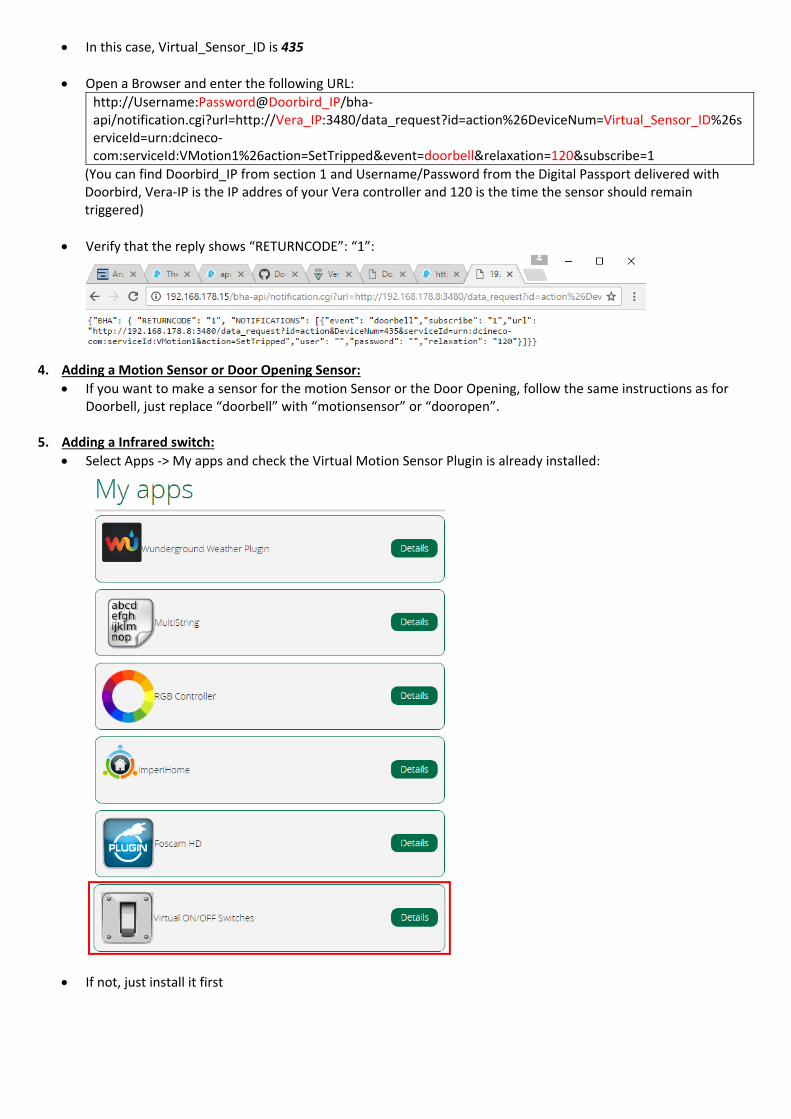
• In this case, Virtual_Sensor_ID is 435
• Open a Browser and enter the following URL: http://Username:Password@Doorbird_IP/bha‐api/notification.cgi?url=http://Vera_IP:3480/data_request?id=action%26DeviceNum=Virtual_Sensor_ID%26serviceId=urn:dcineco‐com:serviceId:VMotion1%26action=SetTripped&event=doorbell&relaxation=120&subscribe=1
(You can find Doorbird_IP from section 1 and Username/Password from the Digital Passport delivered with Doorbird, Vera‐IP is the IP addres of your Vera controller and 120 is the time the sensor should remain triggered)
• Verify that the reply shows “RETURNCODE”: “1”:
4. Adding a Motion Sensor or Door Opening Sensor:
• If you want to make a sensor for the motion Sensor or the Door Opening, follow the same instructions as for Doorbell, just replace “doorbell” with “motionsensor” or “dooropen”.
5. Adding a Infrared switch: • Select Apps ‐> My apps and check the Virtual Motion Sensor Plugin is already installed:
• If not, just install it first
• Select “Details” then click on “Create Another”:
• Wait until it is actually created, then select it in “Devices”:
• Name it and place it in the correct room
• Select Scenes ‐> Add Scene, Select the device we just created as Trigger “when turned on”:
Front Door Infrared
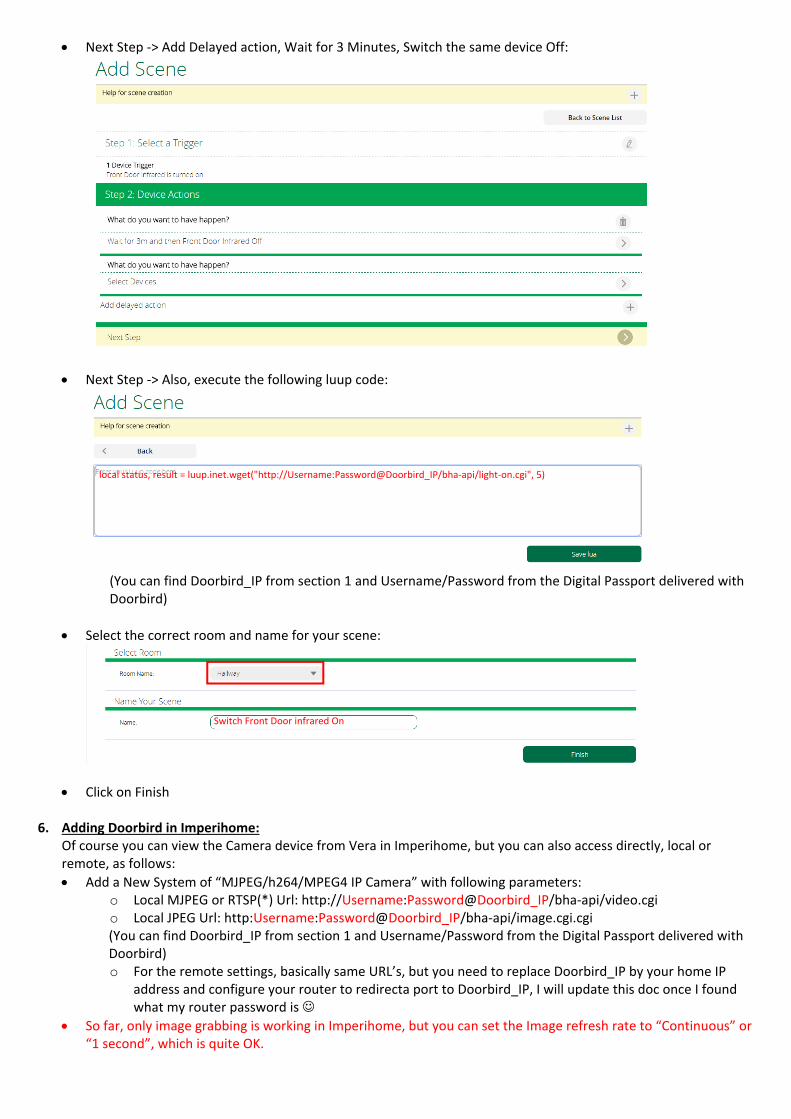
• Next Step ‐> Add Delayed action, Wait for 3 Minutes, Switch the same device Off:
• Next Step ‐> Also, execute the following luup code:
(You can find Doorbird_IP from section 1 and Username/Password from the Digital Passport delivered with Doorbird)
• Select the correct room and name for your scene:
• Click on Finish 6. Adding Doorbird in Imperihome:
Of course you can view the Camera device from Vera in Imperihome, but you can also access directly, local or remote, as follows: • Add a New System of “MJPEG/h264/MPEG4 IP Camera” with following parameters:
o Local MJPEG or RTSP(*) Url: http://Username:Password@Doorbird_IP/bha‐api/video.cgi o Local JPEG Url: http:Username:Password@Doorbird_IP/bha‐api/image.cgi.cgi (You can find Doorbird_IP from section 1 and Username/Password from the Digital Passport delivered with Doorbird) o For the remote settings, basically same URL’s, but you need to replace Doorbird_IP by your home IP
address and configure your router to redirecta port to Doorbird_IP, I will update this doc once I found what my router password is ☺
• So far, only image grabbing is working in Imperihome, but you can set the Image refresh rate to “Continuous” or “1 second”, which is quite OK.
local status, result = luup.inet.wget("http://Username:Password@Doorbird_IP/bha‐api/light‐on.cgi", 5)
Switch Front Door infrared On
7. Adding Doorbird in TinyCam Monitor: This is super easy since TinyCam Monitor supports Doorbird directly! Simply Add a new camera and select the correct Vendor, Camera model and of course do not forget to enter the correct Username/Password from the Digital Passport delivered with Doorbird:
• Once added, you can even trigger the Infrared light of Doorbird directly into TinyCam Monitor:
8. Notes / Future:
• Need to find out why Direct Streaming of the video does not work in both Vera or Imperihome