HOW TO RUN AN AVALANCHE COURSE WHEN YOU HAVE NO SNOW. A PECULIARLY SCOTIISH PERSPECTIVE I!! Steve Blagbrough Glenmore Lodge, National Sports Centre, Aviemore, Inverness-shire, Scotland, PH22 1SN tel. 01479811254, [email protected]ABSTRACT: Scotland can be an exasperating place to run avalanche education courses. One day you can be wading around in thigh deep, highly unstable windslab. The next day a thaw will have stripped the hill bare leaving a very stable but ultimately boring snowpack. A flexible approach, a good imagination and a sense of humour is a pre-requisite for all avalanche instructors working in the Highlands of Scot/and. This paper looks at some of the teaching methods we have adopted to help us run avalanche education courses in Scotland's fickle maritime climate. 1. INTRODUCTION Although Scotland lies very close to the Arctic Circle its Maritime climate produces conditions which are often extremely changeable. It is important to take advantage of favourable teaching conditions when they occur. When they don't, then making use of slides, video footage, props and role play helps us run informative and enjoyable avalanche course. Some ideas are new, some borrowed but all are available for other avalanche educationalists to go away and use themselves. 2. WOOD AND FOAM (Blag Blocks) This practical but simplistic exercise helps demonstrate the concepts of layering in the snowpack and the mechanism of slab release. All you need are two bits of wood a can of shaving foam and an audience. I often describe it; 'the first piece of wood is the bed surface, not necessarily a hard icy layer, but a firmer layer of snow already on the ground. Next a storm comes in. To start with the snow is soft' (put a dollop of foam onto the 551 block and spread out to a depth of one centimetre or so). 'The storm now intensifies and the snow that is deposited is firmer, more cohesive, slabby' (lay on the second piece of wood). 'On the flat its not a problem. Put it at an angle then perhaps it is with most slab avalanches occurring between 30 and 45 degrees' (demonstrate this by tipping the wood and foam to the required angles but holding onto the top piece of wood to prevent a pre- release). 'This unstable snowpack might sit like this for seconds, minutes, hours, days even and then something or someone comes skiing or
Transcript
HOW TO RUN AN AVALANCHE COURSE WHEN YOU HAVE NO SNOW.A PECULIARLY SCOTIISH PERSPECTIVE I!!
Steve BlagbroughGlenmore Lodge, National Sports Centre, Aviemore, Inverness-shire, Scotland, PH22 1SN
ABSTRACT: Scotland can be an exasperating place to run avalanche education courses. One dayyou can be wading around in thigh deep, highly unstable windslab. The next day a thaw will havestripped the hill bare leaving a very stable but ultimately boring snowpack. A flexible approach, agood imagination and a sense of humour is a pre-requisite for all avalanche instructors working inthe Highlands of Scot/and. This paper looks at some of the teaching methods we have adopted tohelp us run avalanche education courses in Scotland's fickle maritime climate.
1. INTRODUCTIONAlthough Scotland lies very close to the
Arctic Circle its Maritime climate producesconditions which are often extremelychangeable. It is important to take advantageof favourable teaching conditions when theyoccur. When they don't, then making use ofslides, video footage, props and role playhelps us run informative and enjoyableavalanche course. Some ideas are new, someborrowed but all are available for otheravalanche educationalists to go away and usethemselves.
2. WOOD AND FOAM (Blag Blocks)This practical but simplistic exercise helps
demonstrate the concepts of layering in thesnowpack and the mechanism of slab release.
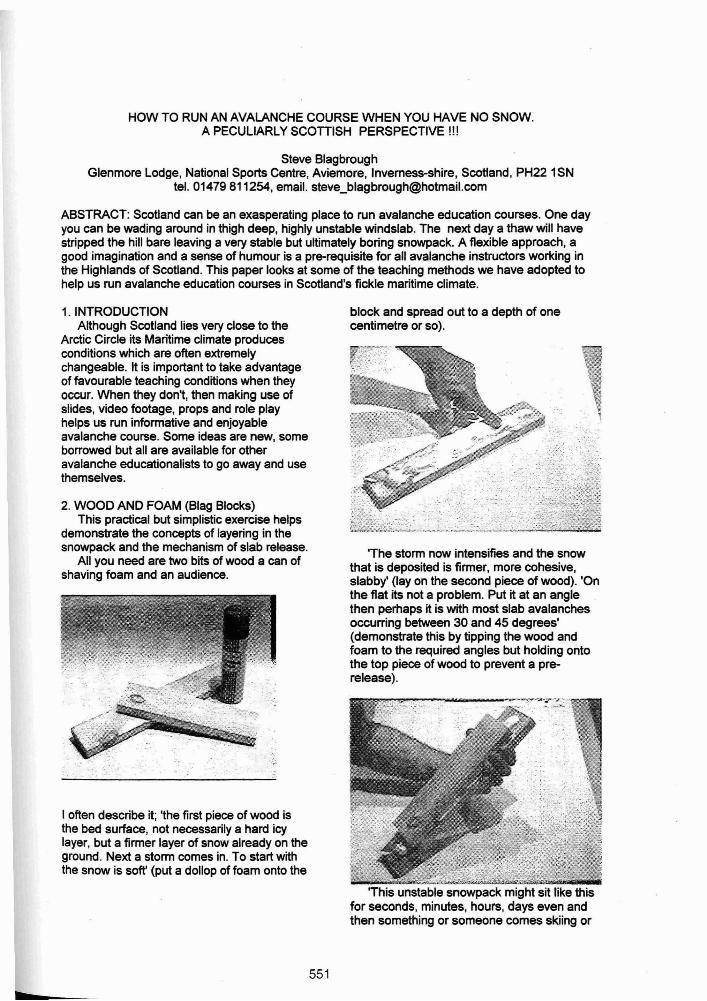
All you need are two bits of wood a can ofshaving foam and an audience.
I often describe it; 'the first piece of wood isthe bed surface, not necessarily a hard icylayer, but a firmer layer of snow already on theground. Next a storm comes in. To start withthe snow is soft' (put a dollop of foam onto the
551
block and spread out to a depth of onecentimetre or so).
'The storm now intensifies and the snowthat is deposited is firmer, more cohesive,slabby' (lay on the second piece of wood). 'Onthe flat its not a problem. Put it at an anglethen perhaps it is with most slab avalanchesoccurring between 30 and 45 degrees'(demonstrate this by tipping the wood andfoam to the required angles but holding ontothe top piece of wood to prevent a prerelease).
'This unstable snowpack might sit like thisfor seconds, minutes, hours, days even andthen something or someone comes skiing or
walking along and their weight is enough tooverload things' (allow block to slide down onshaving foam, this works better if you crankthe angle up a bit).
Other issues that can be raised ifappropriate are;
If the top block is lifted off shaving foam isfound on both bits of wood demonstrating thatthe shear failure has occurred within the weaklayer.
By changing the layering order and statingthat the soft snow lies on the slab which isitself well bonded to the old firm layer thenthere is a low hazard of slab avalanche but inthe right conditions loose snow slides arepossible.
This demonstration is further complimentedby showing video footage of slab avalanchereleases.
This exercise can also be used in the fieldby substituting blocks of wood and foam foryour favourite strawberry jam sandwich andtalking through how the top piece of breadcould slide off if you hold the whole thing at anangle. Take care not to drop your lunch in thesnow. Better still use a sandwich borrowedfrom one of your students.
2. LOOSE PERSON AVALANCHEThis practical demonstration involves the
lecture audience.Briefly describe how a loose snow/single
point release starts with a small amount ofcohesionless snow and picks up more as itslides downhill.
Get everyone to stand up and be snowcrystals with long fragile arms and although allclose together not actually bonded to eachother (you might have to get them to movecloser together if there are any spaces in theaudience). Tell them that all this is takingplace on a steep snow slope and things arelooking quite precarious.
Describe how if anyone is tapped on theshoulder they in tum should tap the shouldersof the people within reach in front of them andthen sit down. Now run round to the back ofthe audience and select someone in thecentre to be first snow crystal to be dislodged.Tap them on the shoulder and 'hey presto' awave of people sitting down should propagatein front of you and with luck should leave awedge of seated people with those 'untapped'folk left standing conspicuously with their armsin the air at the margins.
For anyone who did not understand theinstructions and are left standing within thewedge (probably looking around perplexedand embarrassed by this time) then they canbe said to simulate a stand of trees, rockoutcrop (an island of safety).
552
This demonstration can be conducted inthe field with smaller groups standing closetogether acting like snow crystals. Get oneperson to slowly fall back in to another to startthe process off. Try to encourage theparticipants not to be too over zealousotherwise you may be faced with a law-suitfrom students with broken limbs. Worthreading Steve Congers article (AvalancheReview, December 1999).
3. JIGSAWThis teaching aid was developed from an
idea put forward at the ISSW '94 by JillFredston.
It helps students consider what informationshould be taken into account before venturingonto a snow slope and helps them rationalisea multitude of variables.
Set the scene by giving them thisstatement;
'You have been back country skiing for theday. Irs getting late and you arrive at the top ofa slope that you planned to ski. Make a list ofall the factors that you think you need toconsider before you make your decision'.
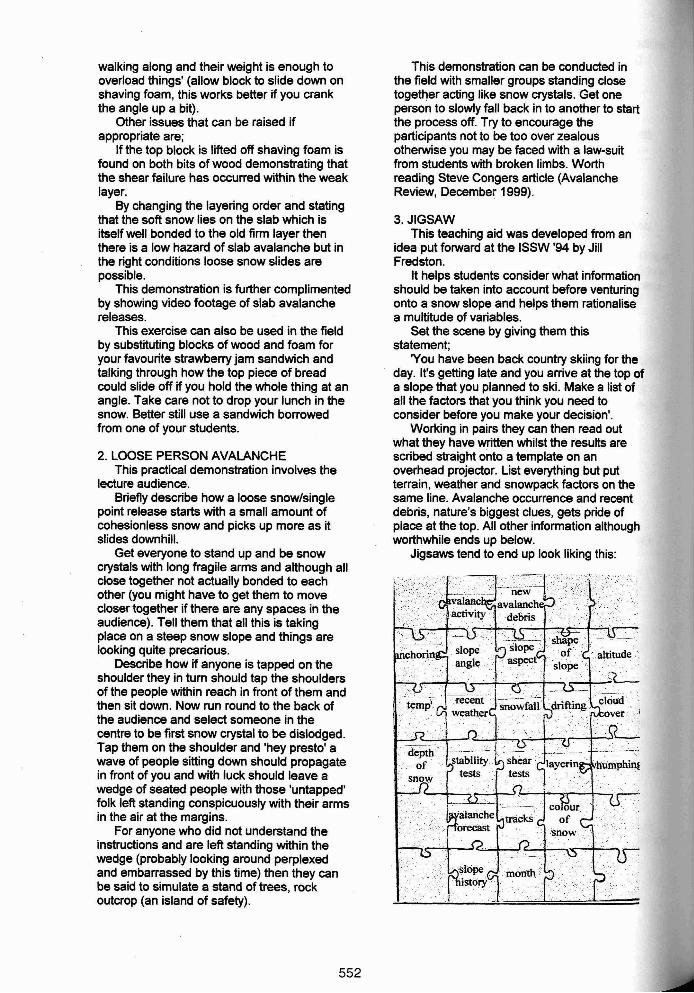
Working in pairs they can then read outwhat they have written whilst the results arescribed straight onto a template on anoverhead projector. List everything but putterrain, weather and snowpack factors on thesame line. Avalanche occurrence and recentdebris, nature's biggest clues, gets pride ofplace at the top. All other information althoughworthwhile ends up below.
Jigsaws tend to end up look liking this:
I then talk through the results and circle therows listing terrain, weather and snowpack.
This exercise seems to help studentsrationalise their thoughts in what initiallyseems quite a complex process. This themecan be continued on the mountain gettingstudents to give yes or noanswer's to the questions;
1. Is the terrain capable of producingavalanches?2. Could the snow slide?3. Is the weather contributing to instability?4. What are your altematives?
4. A ROCK AND A HARD PLACEWe all know that the best but most nerve
racking conditions for running avalanchecourses is when the snowpack is unstable. Anexercise that works well and stops you gettingtoo many grey hairs from having to get yourgroup any where near avalanche start zonesand is also particularly effective when snowconditions are stable is to;
Get onto a slope where the answer toquestion 1. above is yes.
Give the group fictional stability test resultsand weather conditions and let them come upwith solutions to question 4. .
By changing the weightings of theinformation you give, you can vary thescenarios to suit yourself and your group.
This then leads neatly on to a session ongroup dynamics, route choice and safe traveltechniques in an environment where theperceived risk is high but the actual hazard islow.
553
5. VIRTUAL RESCUEAnother classroom exercise which can
proceed a rescue session is by showing theseries of four slides taken by Tom Fankhanelof the skier triggering a slab avalanche.
Show your group the slides at real speedleaving the last slide on. Tell them they areone of the people stood at the top. What arethey going to do now? Tell them you arestarting a stop-watch which helps add someurgency to the proceedings.
If you have done a sketch diagram of thelast slide on a big piece of paper you can markin where they last saw the skier, how they aregoing to get to the debris site, the size of thearea that they are going to search and thesearch technique.
This is a good one as the skier had actuallyskied out of this one but students often forgetto mention to check for tracks leaving thedebris.
SUMMARYI have found all these exercises useful at
various times as teaching aids on courses.Please feel free to steallborrow them for yourown lessons.
Although a serious subject there's no needfor us to be when we're teaching it.