HP Operations Orchestration for the Windows and Linux operating systems Software Version: OO 10.x PowerShell Wizard Guide Document Release Date: February 2014 Software Release Date: February 2014
Transcript
HP Operations Orchestration for the Windows and Linux operating systems
Software Version: OO 10.x
PowerShell Wizard Guide
Document Release Date: February 2014
Software Release Date: February 2014
Legal Notices
Warranty
The only warranties for HP products and services are set forth in the express warranty statements accompanying such products and services. Nothing herein should be construed as constituting an additional warranty. HP shall not be liable for technical or editorial errors or omissions contained herein.
The information contained herein is subject to change without notice.
Restricted Rights Legend
Confidential computer software. Valid license from HP required for possession, use or copying. Consistent with FAR 12.211 and 12.212, Commercial Computer Software, Computer Software Documentation, and Technical Data for Commercial Items are licensed to the U.S. Government under vendor's standard commercial license.
For information on open-source and third-party software acknowledgements, see Open-Source and Third-Party Software Acknowledgements (HPOO_OpenSrc_3rd-PartyAcks.pdf) in the documentation set for this release.
2
Documentation Updates
The title page of this document contains the following identifying information: • Software Version number, which indicates the software version. • Document Release Date, which changes each time the document is updated. • Software Release Date, which indicates the release date of this version of the software.
To check for recent updates or to verify that you are using the most recent edition of a document, go to:
https://hpln.hp.com/
This site requires that you register for an HP Passport and sign-in. To register for an HP Passport ID, go to:
Or click the New users - please register link on the HP Passport login page.
You will also receive updated or new editions if you subscribe to the appropriate product support service. Contact your HP sales representative for details.
This Web site provides contact information and details about the products, services, and support that HP Software offers.
HP Software online support provides customer self-solve capabilities. It provides a fast and efficient way to access interactive technical support tools needed to manage your business. As a valued support customer, you can benefit by using the support Web site to: • Search for knowledge documents of interest • Submit and track support cases and enhancement requests • Download software patches • Manage support contracts • Look up HP support contacts • Review information about available services • Enter into discussions with other software customers • Research and register for software training
Most of the support areas require that you register as an HP Passport user and sign in. Many also require a support contract. To register for an HP Passport ID, go to:
Connection Inputs ...................................................................................................................................... 19 Session and Piping Inputs ......................................................................................................................... 20 Additional Modules and Snapins .............................................................................................................. 21 PowerShell Script and cmdlet Inputs ....................................................................................................... 21 Result Formatting ...................................................................................................................................... 21 Run a PowerShell Script on a Localhost .................................................................................................. 22 Run PowerShell Scripts from a File .......................................................................................................... 23 Load PowerShell Functions from Files ..................................................................................................... 24 Run a PowerShell Script on a Remote Host ............................................................................................. 25 Format the Result ...................................................................................................................................... 26 Run Multiple PowerShell Cmdlets Scripts in the Same PowerShell Session ........................................ 28
5
Assign the Result of One Cmdlet as a Parameter to Another Cmdlet ................................................... 31 Solution 1: Create a New PowerShell Script Step ................................................................................... 34 Solution 2: Run a PowerShell Script in the Generated Flow Context .................................................... 36 Solution 3: Use Generated Flows Only and Minimize the User Effort .................................................. 37
Overview ..................................................................................................................................................... 38 Enable Remoting Using GPO (Group Policy Objects) ............................................................................. 38 Group Policy Configuration for a Single Host .......................................................................................... 39 Group Policy Configuration for a Group of Servers ................................................................................. 41 Enable Remoting for Non-Administrative Users ..................................................................................... 43 Authentication Types ................................................................................................................................. 44
Could not connect to the host .............................................................................................................. 48 The wizard fails to load modules on a x64 localhost. ........................................................................ 48 The user has exceeded the maximum allowed number of remote shells ......................................... 49
6 Contents
1 Introduction With this integration, users can generate OO flows from the selected PowerShell cmdlets found in a list of modules/snapins.
Purpose of the PowerShell Wizard Integration
Its main advantages are:
• Automation. Avoid having to repeat the same time-consuming process of creating flows which execute PowerShell cmdlets. Perform the following steps as an alternative to using the PowerShell Wizard (multiply by the number of cmdlets):
— Create an empty flow
— Drag and drop the PowerShell Script operation
— Search for the cmdlet description
— Set the required input values
— Set the description of the flow. The step inherits its description from the PowerShell Script operation, but this is not available for the flow.
• Authoring ease. The description of each flow contains the default description of the corresponding cmdlet which it executes. Therefore, the user is not forced to open the cmdlet description in a browser and switch between OO and the Internet.
• Module and cmdlet discovery. The wizard discovers the available modules and cmdlets from a target host.
Supported Versions
Table 1 Supported Versions
Operations Orchestration Version PowerShell Wizard Version
OO 10.x with Base Content Pack 10.x
7
2 Getting Started with the PowerShell Wizard Integration
Download the PowerShell Wizard
The PowerShell Wizard Installer is an executable file that can be downloaded from the HP Live Network page
1 From https://hpln.hp.com, click Operations Orchestration Community and log in.
The Operations Orchestration Community page contains links to announcements, discussions, downloads, documentation, help, and support.
2 On the left-hand side, click Operations Orchestration Content Packs.
3 In the Operations Orchestration Content Packs box, click Content. The HP Passport and sign-in page appears.
4 Enter your user ID and Password to access to continue.
5 Click HP Operations Orchestration 10.x, and then select the items that you want to download.
Install the PowerShell Wizard
The wizard is installed if Studio is selected from the Operation Orchestration installer.
Configure Logging Settings
The configure logging settings are no longer supported in the10x wizard.
Uninstall the PowerShell Wizard
The wizard is uninstalled when Studio is uninstalled.
8 PowerShell Wizard Guide
PowerShell Wizard Requirements
System Requirements
The minimum software requirements for systems running the PowerShell Wizard for HP Operations Orchestration are:
• Java SE Runtime Environment (also known as JRE) 7
• .NET Framework 2 or a later version
Target Host
• PowerShell with remoting enabled.
• For the products providing PowerShell cmdlets, the target host must have the modules and snapins available. Run one of the following cmdlets to list the required modules and snapins. Otherwise, it means that the host does not have the cmdlets provided for that product.
Figure 1: How to list the modules and snapins in the PowerShell console
PowerShell Wizard Enhancements from 9.x
• The wizard now has the version (10.x) displayed in the title. • The wizard now appears in the taskbar and can be closed, minimized or brought to the
front.
9
3 The PowerShell Wizard Steps The PowerShell Wizard contains only a few steps. The Welcome page contains a short summary of the wizard. This section describes the steps that you have to perform.
Step 1. Select the Repository
Figure 2: PowerShell Wizard: Select the project location page
• In the Enter the location: field, type in the required project path or click Browse to locate the project location.
• The wizard generates a 10.x studio project, but not a content pack or a repository. The project has a default location: C:\Users\[username]\.oo\Workspace\New Project.
10 PowerShell Wizard Guide
Step 2. Configure the PowerShell Connection
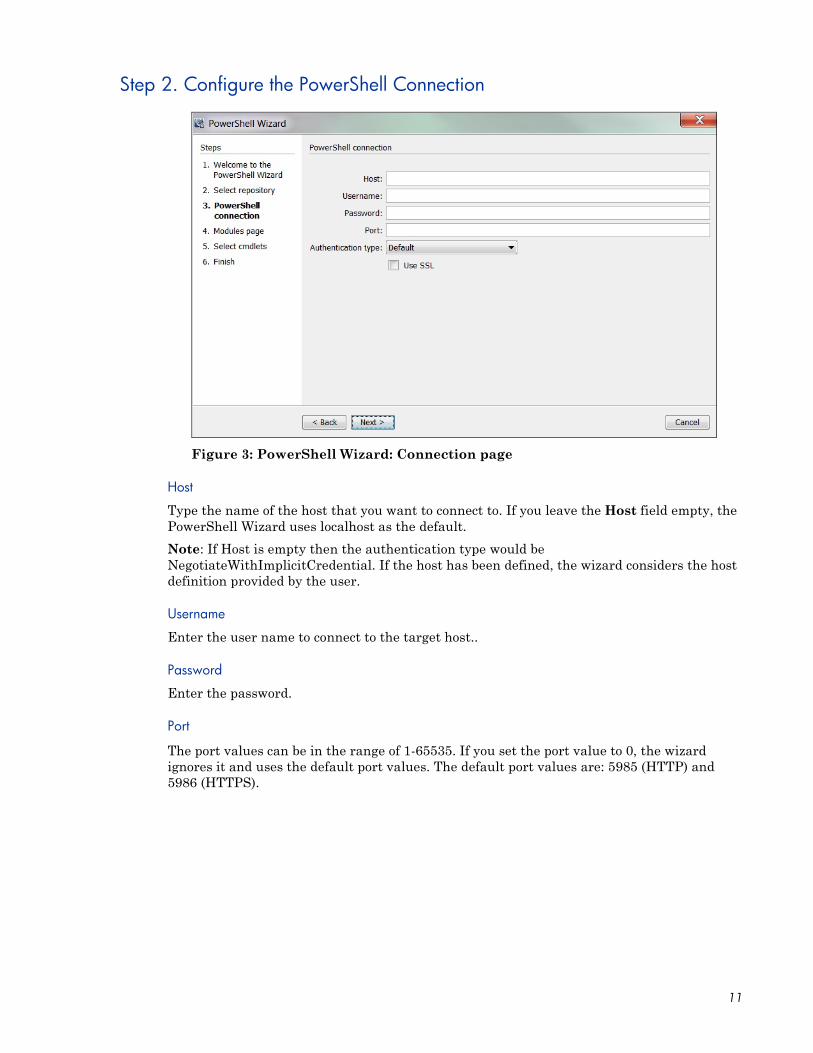
Figure 3: PowerShell Wizard: Connection page
Host
Type the name of the host that you want to connect to. If you leave the Host field empty, the PowerShell Wizard uses localhost as the default. Note: If Host is empty then the authentication type would be NegotiateWithImplicitCredential. If the host has been defined, the wizard considers the host definition provided by the user.
Username
Enter the user name to connect to the target host..
Password
Enter the password.
Port
The port values can be in the range of 1-65535. If you set the port value to 0, the wizard ignores it and uses the default port values. The default port values are: 5985 (HTTP) and 5986 (HTTPS).
11
Step 3. Select the Modules
Figure 4: PowerShell Wizard: Modules page
The wizard detects all the available modules/snapins on the target host and displays them in a list as shown above. You can select/unselect any module and the wizard retrieves only those cmdlets contained in the selected modules.
Cmdlets such as Get-Process and Get-Service are not contained in the list of available modules. These are cmdlets which are available by default in PowerShell. To retrieve the list of default cmdlets, select the checkbox Add default PowerShell cmdlets.
Note: If you select the Add default PowerShell cmdlets checkbox, the lists are disabled.
12 PowerShell Wizard Guide
Step 4. Select Operations (Cmdlets)
Figure 5: PowerShell Wizard: Select cmdlets page
The selected modules are loaded to the PowerShell runspace, and the wizard retrieves the names of the cmdlets from those modules.
You can move the cmdlets from left to right or right to left. Use the search textbox if the list is very large, and you have difficulties finding the required cmdlet. The wizard searches the list for the cmdlets with names containing the search text. In addition, the wizard updates the list while you are typing.
13
4 Using the PowerShell Wizard – OO Integration
PowerShell Wizard Integration Operations and Flows
This section describes the operations and flows in the PowerShell integration.
Generated Flows
Figure 6: Example of a generated flow
The PowerShell wizard generates one flow for each selected cmdlet unless the project already contains the flow. For example, if the flow was generated in a previous run of the wizard.
The name of the flow is obtained from the name of the cmdlet by applying the following rules:
• Replace "-" with " ".
For example, the name of the flow for the cmdlet Get-IScsiHbaTarget is going to be Get IScsi Hba Target.
14 PowerShell Wizard Guide
Inputs
Figure 7: Inputs of a generated flow
Each flow has the following inputs:
• Common inputs. All the inputs of the PowerShell Script operation
15
Descriptions
Figure 8: Description of a generated flow
The description of each generated flow contains the following items:
• A description of the cmdlet as found in its native documentation
• A link where the user can find a detailed description of the cmdlet written by the provider of the module
• The description of the common inputs copied from the PowerShell Script operation’s description.
• The description of the common results
16 PowerShell Wizard Guide
Most of the information included in the description can be obtained from the PowerShell console as shown below:
Figure 9: Obtaining the description from the PowerShell console
PowerShell Script Operation
The operation is used to execute a PowerShell script or cmdlet on a target host, either local or remote. If the operation executes a single cmdlet, the parameters of the cmdlet should be passed to the operation inputs.
17
Inputs
Figure 10: Inputs of the PowerShell Script operation
18 PowerShell Wizard Guide
Connection Inputs
host
The hostname or ip address of the PowerShell host. This input is mutual exclusive with URI and shellURI Default value: localhost
URI
Specifies a Uniform Resource Identifier (URI) that defines the connection endpoint for the interactive session. Value format: <Transport>://<ComputerName>:<Port>/<ApplicationName> Example: http://exch2010CAS1/Powershell?serializationLevel=Full
shellURI
Gets the Uniform Resource Identifier (URI) of the shell that is launched when the connection is made. This input is mutual exclusive with host. Example: http://schemas.microsoft.com/powershell/Microsoft.Exchange
Username
The username to use when connecting to the server. Value format: username@domain or domain\username
password
The password to use when connecting to the server
authType
Specifies the mechanism that is used to authenticate the user's credentials. Valid values: Default, Basic, Credssp, Digest, Kerberos, Negotiate, NegotiateWithImplicitCredential. (case-insensitive). Default value: Default
useSSL
If true, the operation uses the Secure Sockets Layer (SSL) protocol to establish a connection to the remote computer. By default, SSL is not used. WS-Management encrypts all Windows PowerShell content transmitted over the network. UseSSL is an additional protection that sends the data across an HTTPS connection instead of an HTTP connection. Default port for SSL: 5986. Default value: false
skipCACheck
Indicates when connecting over HTTPS that the client does not validate that the server certificate is signed by a trusted certificate authority (CA). Default value: true
Indicates whether the certificate common name (CN) of the server and the hostname of the server are not checked for being the same. Default value: true
port
Specifies the network port on the remote computer that is used for this connection. To connect to a remote computer, the remote computer must be listening on the port that the connection uses. The default ports are 5985 (the WinRM port for HTTP) and 5986 (the WinRM port for HTTPS).
Session and Piping Inputs
keepSessionAlive
If true, the operation will not close the PowerShell runspace (i.e. the PSSession in case of remote connections ) created during the execution and returns the runspaceID as the result of the operation. Actually the PowerShell runspace is saved in the OO session and can be used in other operations using the runspaceID result of previous operation. Default value: false
enablePiping
If true, the operation enables piping the way PowerShell does. This input should be used only when keepSessionAlive input is true. First time the piped objects are null and the scope is to save the objects resulted from the PowerShell script execution. Next time the piped objects can be referred in the script as "$_" objects. Default value: false Example: First, run "Get-Service" script with enablePiping=true and keepSessionAlive=true, then run the script "Select-Object -property name,displayname,status|where-object {$_.Name -lt "C"}" with enablePiping=true keepSessionAlive=true. Observe the use of "$_".
runspaceID
If this is not empty, the operation searches the OO session for keys which equal the runspaceID. If the operation finds the runspace specified by the runspaceID it tries to use it and does not create another PowerShell runspace with provided inputs. If the runspace exists but is broken or unavailable the operation uses its authentication parameters and tries to reconnect and recreate the PowerShell runspace. Note: The operation uses the connection parameters of the runspace identified by runspaceID, not the values provided as user inputs. The operation processes the connection inputs, for example, host, username, password, authType, useSSL that is provided by the user only if the runspaceID does not exist in the OO session.
20 PowerShell Wizard Guide
Additional Modules and Snapins
Modules
A list of PowerShell modules that is loaded after the PowerShell connection is established. Each value from the list specifies the name of the module to import. Enter the name of the module or the name of a file in the module, such as a .psd1, .psm1, .dll, or ps1 file. File paths are optional. Wildcards are not permitted. Specify only the module name whenever possible. When you specify a file name, only the members that are implemented in that file are imported. If the module contains other files, they are not imported, and you might be missing important members of the module. The list of modules should be separated by the comma "," delimiter. Example: FailoverClusters
Snapins
A list of PowerShell snapins loaded after the PowerShell connection is established. Each value from the list specifies the name of a registered snapin, for example, the Name, not the AssemblyName or ModuleName. Example: Microsoft.Exchange.Management.PowerShell.E2010
PowerShell Script and cmdlet Inputs
script
The script to execute on the PowerShell host. If you want to execute a script from a file just provide the file path. Example: C:\PowerShellScripts\GetHost.ps1
Cmdlet
The name of the PowerShell cmdlet to invoke. If the cmdlet has additional parameters, please provide them as inputs to the operation. If the parameter has the same name as one of the operation's inputs just prefix it with "_". This input is intended to be used together with the PowerShell wizard so please use the script input whenever possible.
Result Formatting
returnTable
If true, the operation will return a table containing a row for each PSObject that the script emits. The table's columns represent the properties of these PSObjects, in the propertyName<delimiter>propertyValue format. If false the operation returns a string representation of the result similar to the output from the PowerShell console. Default value: false.
delimiter
The delimiter used to separate each property name from the property value in the output table. Default value: ":".
21
colDelimiter
The delimiter used to separate columns in the output table. Default value: ",".
rowDelimiter
The delimiter used to separate rows in the output table. Default value: newline.
Run a PowerShell Script on a Localhost
The only setting required to execute the PowerShell scripts on the localhost is that the ExecutionPolicy must be RemoteSigned. Use Get-ExecutionPolicy to display the current execution policy and Set-ExecutionPolicy to set the execution policy. In addition, the required input is the script input.
Figure 11: Running the PowerShell Script operation on localhost
If one script requires elevated rights, enter a username and a password.
22 PowerShell Wizard Guide
Run PowerShell Scripts from a File
Figure 12: Running the PowerShell Script operation from a File
To run scripts from a file, just provide the path to that file. This should work in most of the cases, when the path to the file contains whitespaces, the operation fails. To fix this provide the path to that file like in the picture above.
23
Load PowerShell Functions from Files
Figure 13: Using a script to enable all functions from a local file
In certain cases, a PowerShell script depends on functions from other file from the disk. The script from the picture above might help to load this file and enable all functions and cmdlets from it. Get-Parameter cmdlet is defined in the file named Get-Parameter.ps1.
24 PowerShell Wizard Guide
Run a PowerShell Script on a Remote Host
Figure 14: Running the PowerShell Script operation on a remote host
First, execute the script providing only the required inputs: host, username, password and the script. Negotiate is the default authentication type if the host is provided as an IP address and Kerberos for host names. Please refer to PowerShell Remoting and Authentication Types if the connection fails.
25
Format the Result
The result can be formatted as a table or the same way it will be displayed in the PowerShell console. The format is decided by the returnTable input described above. If returnTable is set to false the operation will return the result as in the PowerShell console and like the old operation.
Figure 15: The result if returnTable=false
The result is human readable, but the problem is that it is very difficult to parse, and does not contain properties which could not be displayed on the screen.
The result can be displayed as a table.
PowerShell session considerations results are displayed as a table. Each PowerShell object (in this case each service) is displayed by default on a line. Each line contains different properties of the service (default delimiter is “,”) and the key-value pairs are delimited by “:”. All these delimiters can be changed, refer to the Inputs section for more information.
26 PowerShell Wizard Guide
For example Get-Service returns the following result:
Figure 16: Raw result of the Get-Service flow
The result contains a full list of properties without any additional PowerShell script, for example, Get-Service|fl, Get-Service|Select-Object Status). Therefore, the status of the services appears and can be parsed by writing two types filters on the result.
Figure 17: Filtering the results
27
Run Multiple PowerShell Cmdlets Scripts in the Same PowerShell Session
This section explains how to run multiple PowerShell Script steps in the same PowerShell session. When the PowerShell Script has to execute a single script on a remote server keeping the sessions alive is not necessary. The PowerShell Script connects to the remote host, creates a new PowerShell Runspace, for example, a new PowerShell session, runs the full script on the target and closes the runspace and the connection. If you want to use the PowerShell Wizard and run the generated flows in a different sequence, you need to consider how much effort is required from the user and whether additional PowerShell Scripts need to be created in order to general flows. However, there are situations when you want to keep the PowerShell session alive. For example, one uses the PowerShell Wizard, connects to a host which has PowerCLI installed on it and follows the wizard steps to generate OO flows for the PowerShell cmdlets to execute VMWare tasks. Suppose that after the wizard finishes, the user wants to execute one simple cmdlet like Get VM.
To run cmdlets and keep the sessions alive:
1 Run the OOTB Get Datacenter flow generated with the PowerShell Wizard.
Note: This cmdlet does not have any required inputs, however the flow fails to run as you need to run the Connect VIServer cmdlet. The PowerShell Wizard generates this flow to solve this problem.
2 Create a flow sequence as shown below.
• Do not modify the generated flow.
• The flow tries to execute Connect VIServer before Get VM.
In the flow below, the parameters specific to the cmdlet were added as flow inputs. The names appear in capital letters.
Figure 18: Adding values to specific parameters of the cmdlet
28 PowerShell Wizard Guide
The user runs the flow and provides inputs for the server, user name and password (Connect VIServer). No inputs are required for the Get Datacenter. The Connect VIServer succeeds, however, the Get Datacenter fails.
The Get Datacenter fails for the following reasons:
• Connect VIServer passes successfully and the connection to the VMWare server was established.
• Connect VIServer created a new PowerShell runspace, for example, PowerShell session and executed the cmdlet which established a valid connection to the server, however the runspace is closed after the flow runs and the connection is lost.
• Get Datacenter flow creates another PowerShell runspace which is different from the one created by Connect VIServer flow. Therefore, Get-Datacenter cmdlet fails.
3 The solution to the previous step is to keep the session alive during the execution of the 2 cmdlets.
To do this:
keepSessionAlive=true for the first flow which is Connect VIServer; the runspaceID must be added to the results of the Connect VIServer flow;
Figure 19: Adding a result to the Connect VIServer flow
4 runspaceID of the Get Datacenter flow must get its value from the result of the Connect VIServer. This happens automatically because runspaceID input assigns its value from the flow variable.
29
At this point the flow completes successfully.
Figure 20: The execution of the PSWizard VMWare sample flow
30 PowerShell Wizard Guide
Assign the Result of One Cmdlet as a Parameter to Another Cmdlet
Most of the “get” flows generated through the PowerShell Wizard should work OOTB with minimum effort from the user. But there are some cmdlets, probably the “new” cmdlets, which require as parameters the result of another cmdlet. For example, one would like to create a new virtual machine using the generated flow New VM. Even if the user follows all the steps described in the previous section, the flow can not be executed. The PowerShell Wizard generates the flow, but the user can run OOTB flows only if their parameters have a built-in type (e.g. strings or integers). In case of cmdlets like Get-Help the parameters can be passed as strings (e.g. the name of the cmdlet to search for help information). The New VM flow parameters are below:
Figure 21: The inputs of the New VM flow
New VM has an input named VMHost. What is the type of this parameter? The description of the generated flows contains information about the PowerShell cmdlet, but from size reasons and other considerations we could not include the full description of the cmdlet as it is displayed when someone executes Get-Help New-VM –full. The description of the operation contains the original link where the user can find detailed information about the cmdlet.
31
Figure 22: The description of the New VM flow
If the user opens the link in a browser he can observe the types of the cmdlet parameters. In our case, VMHost is of the same type as the name suggests.
32 PowerShell Wizard Guide
Figure 23: The VMHost object: parameters
The problem is that VMHost is an object, not a built-in type which can be resolved as a string. Following the link provided for the VMHost type the user can find which cmdlets return VMHost objects as it can be observed below. In our case the type suggests that a cmdlet like Get-VMHost would return this kind of objects.
Figure 24: The VMHost object : additional information
In the previous section, we explained how to execute in the same PowerShell session multiple OO flows generated with the PowerShell wizard. At this point we can imagine the following chain of cmdlets which need to be executed to create a new vm:
Connect-VIServer – this must be executed before any VMWare cmdlet;
Get-VMHost – we need the result of this cmdlet as parameter for the next cmdlet;
New-VM – this cmdlet actually creates a new virtual machine.
New VM has other parameters beside VMHost which are not built-in, but we are going to explain how to solve the VMHost parameter, because the process is the same for the other parameters, too.
33
You need to execute 3 cmdlets in the same PowerShell session. You have generated flows for each of the cmdlets and executed them in the same session. The next step is to take the result of the Get-VMHost cmdlet and pass it to the New-VM cmdlet? Select from one of the following solutions:
Solution 1: Create a New PowerShell Script Step
Figure 25: Add a PowerShell script step to the flow
Create a new PowerShell script in addition to the generated flow that you want to run. If you keep the session alive during the execution of the 2 PowerShell script steps, you can use the PowerShell script variables defined in the first step to pass them in the script of the second step or as parameters for the generated flow. In this case, you are not using the generated flows for Connect-VIServer and Get-VMHost, however you need to write the script.
1 Execute the following script, then save the result of the Get-VMHost cmdlet in the PowerShell variable named $vmHost.
Figure 26: Use a variable to save the result of the step
2 The next step is to assign the value of the VMHost input from the $vmHost variable.
34 PowerShell Wizard Guide
Figure 27: Assign the variable to the VMHost input of the flow
This way we managed to pass PowerShell cmdlets results between OO flows generated with the PowerShell wizard. Note: The $var refers to PowerShell variables and ${var} refers to OO flow variables.
35
Solution 2: Run a PowerShell Script in the Generated Flow Context
Figure 28: The NewVM Flow
The second solution is to execute the previous defined script in the context of the generated flow. The PowerShell script operation has two inputs which build the script that is going to be executed: Script – a PowerShell script to execute on target host; Cmdlet – the PowerShell cmdlet name. If the script input is not empty, than the PowerShell script defined by this input is going to be executed before the cmdlet. Although the script is executed in the same PowerShell runspace with no extra settings. The solution is shown in the following flow:
Figure 29: Add a script to the input of the flow
36 PowerShell Wizard Guide
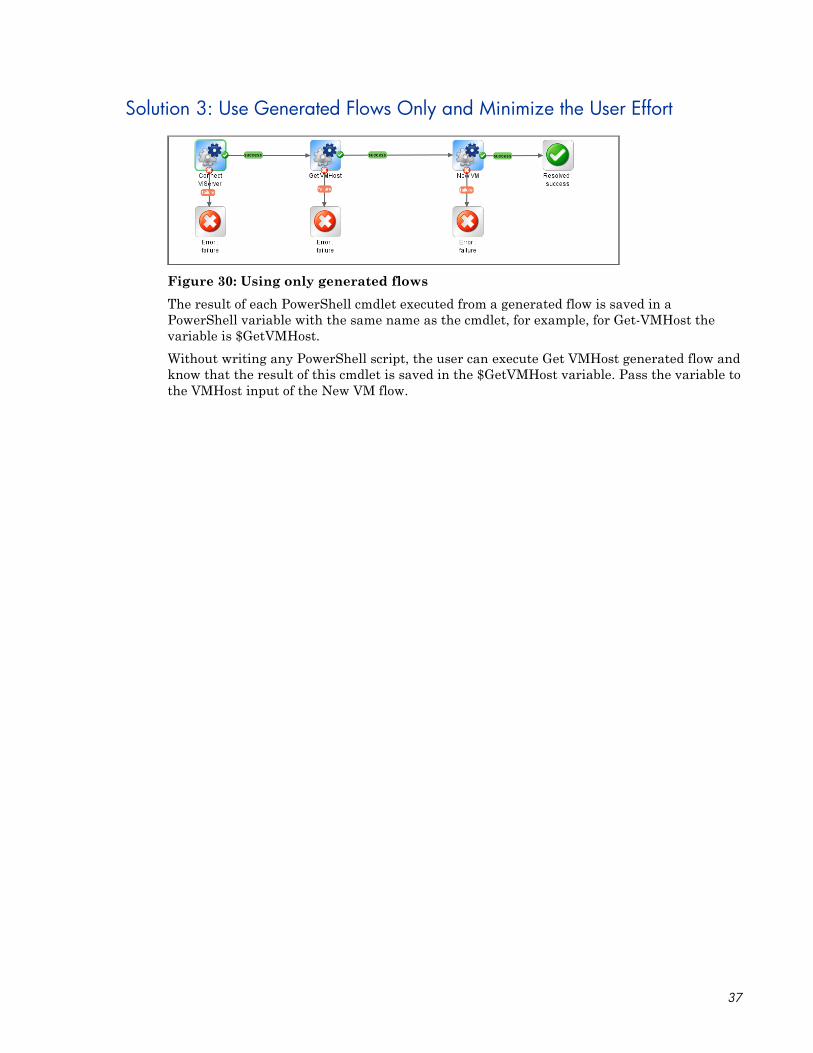
Solution 3: Use Generated Flows Only and Minimize the User Effort
Figure 30: Using only generated flows
The result of each PowerShell cmdlet executed from a generated flow is saved in a PowerShell variable with the same name as the cmdlet, for example, for Get-VMHost the variable is $GetVMHost. Without writing any PowerShell script, the user can execute Get VMHost generated flow and know that the result of this cmdlet is saved in the $GetVMHost variable. Pass the variable to the VMHost input of the New VM flow.
37
5 PowerShell Remoting
Overview
Enable PowerShell remoting, by running the following cmdlet: Enable-PSRemoting. In workgroup environments, enable classic mode authentication for network logons. This can be performed by opening the "Local Security Policy" from Control Panel and selecting "Administrative Tools". Navigate to "Local Policies" → "Security Options", double-click "Network Access: Sharing and Security Model for local accounts" and set it to classic. Modify the WSMan trusted hosts setting, by adding the IP addresses of all remote clients to the list of trusted hosts. This can be done using one of the following commands: Set-item wsman:localhost\client\trustedhosts -value * (adds all computers as trusted hosts) Set-item wsman:localhost\client\trustedhosts -value Computer (only adds Computer to the trusted hosts) Set-item wsman:localhost\client\trustedhosts -value *.domain.com (adds all computers in the specified domain) Set-item wsman:localhost\client\trustedhosts -value 10.10.10.1 (adds the remote computer with the IP address 10.10.10.1 to the trusted hosts list).
Enable Remoting Using GPO (Group Policy Objects)
While remoting can be enabled manually using Enable-PSRemoting, it is recommended to use GPO management tools whenever it is possible. Use GPO to apply policies on a single host (i.e. the target PowerShell host) or a group of servers.
38 PowerShell Wizard Guide
Group Policy Configuration for a Single Host
To enable PowerShell remoting for a single host execute the following steps:
1 Open Group Policy Management console, for example, gpedit.msc.
2 Go to Local Computer Policy – Computer Configuration – Administrative Templates – Windows Components.
Figure 31: Group Policy Configuration : Windows components section
3 From the Windows Components listed in the right pane, we are interested in two of them. The first one is Windows Remote Management (WinRM) and the second one is Windows Remote Shell. The next step will refer to the first one, therefore browse the components and open Windows Remote Management (WinRM).
Figure 32: Group Policy Configuration : WinRM Service section
39
4 WinRM is the service which PowerShell uses for remote sessions. WinRM can be configured as client or service, depending on the role the host is going to have in a PowerShell connection (i.e. request access to execute scripts on other hosts or allow other hosts to execute scripts on the current host). At this point the user can enable different authentication types, specify the trusted hosts, enable HTTP or HTTPS listeners, etc.
5 There are some other default settings the user might want to change in a production environment. These settings can be found in Windows Remote Shell as shown below:
Figure 33: Group Policy Configuration : Windows Remote Shell section
6 You can specify the maximum number of remote shells per user (default is 2) or the maximum amount of memory in MB for shell (default is 150).
7 After configuring the GPO, you might need to restart the computer in order to apply the policies or try to run the command gpupdate.
40 PowerShell Wizard Guide
Group Policy Configuration for a Group of Servers
Sometimes the GPO policies must be applied on multiple server hosts and repeating the above steps on every server might not be the best solution. Therefore, the user can create a new GPO policy, configure it and apply it on a list of servers.
1 Go to the domain controller or on a server where gpmc.msc is available and open it.
2 Right click the Group Policy Object item as in the following picture and choose New. Fill in the name for the new GPO and select the policy to inherit from, then go to the next step.
Figure 34: Using Group Policy Objects - step 1
3 Right-click the new GPO and select Edit.
41
Figure 35: Using Group Policy Objects - step 2
4 Configure the GPO same way as for single hosts.
5 Now that there is a new GPO, you can apply it to a group of servers. The following example shows you how to link it on an existing OU from AD, however this can be applied to other groups either. The GPO interface displays the existing OU’s from the domain controller AD. To link a GPO to an OU, go to that, right click it and select Link an Existing GPO.
Figure 36: Using Group Policy Objects - step 3
6 The GPO settings will be applied to all servers contained in the selected OU. Although a GPO update might be required and also a reboot for the servers before the policies are actually applied.
Note: Local policies overwrite domain policies.
42 PowerShell Wizard Guide
Enable Remoting for Non-Administrative Users
To establish a PSSession or run a command on a remote computer, the user must have permission to use the session configurations on the remote computer. By default, only members of the Administrators group on a computer have permission to use the default session configurations. Therefore, only members of the Administrators group can connect to the computer remotely. To allow other users to connect to the local computer, give the user Execute permissions to the default session configurations on the local computer. The following command opens a property sheet that lets you change the security descriptor of the default Microsoft.PowerShell session configuration on the local computer. Set-PSSessionConfiguration Microsoft.Powershell –ShowSecurityDescriptorUI
Figure 37: Adding a user to the PowerShell session configuration
43
Authentication Types
Basic
Client side steps
• Allow unencrypted communication for the client, by running the following PowerShell command: set-item wsman:\localhost\client\AllowUnencrypted -value true
• Enable Basic authentication for the client, by running the following PowerShell command: set-item wsman:\localhost\client\auth\Basic -value true
Server side steps
• Turn off encryption for the WinRM service, by running the following PowerShell command: set-item wsman:\localhost\service\AllowUnencrypted -value true
• Enable Basic authentication for the service, by running the following PowerShell command: set-item wsman:\localhost\service\auth\Basic -value true
Notes
• The client and server can be in different domains.
• When using Basic authentication, a local user account must be provided for authentication on the remote host.
• Basic can be used when the destination is an IP address.
• Basic can be used when the destination is one of the following: localhost, 127.0.0.1, [::1].
• The cluster name, as well as the hostnames of the cluster nodes can be used for the destination host.
44 PowerShell Wizard Guide
CredSSP
Client side steps
• Enable CredSSP authentication for the client, by running the command: Enable-WSManCredSSP -Role Client -DelegateComputer WSMAN/*.
• Allow delegating fresh credentials by performing the following steps. Open gpedit.msc and go to Computer Configuration → Administrative Templates → System → Credentials Delegation. Enable "Allow Delegating Fresh Credentials" and add the wsman hosts to the server list. Run gpupdate /force from command line to force policy update.
Server side steps
• Enable CredSSP authentication, by running the following PowerShell command: Enable-WSManCredSSP -Role Server
• Create a new https listener by using the following commad: winrm create winrm/config/Listener?Address=*+Transport=HTTPS.
Domain Controller side steps
• If the NETWORK SERVICE doesn't have "Validated write to service principal name", either try running the following command: dsacls "CN=AdminSDHolder,CN=System,DC=domain,DC=com" /G "Sn-1-5-20:WS;Validated write to service principal name" or open ADUC, go to Computers → DC object → Security, select Network Service and give it "Validated write to SPN".
Default
When Default authentication is used, the following situations can occur:
• Kerberos is the method of authentication used if the client is in the same domain as the destination host, and the value specified for that host is not one of the following: localhost, 127.0.0.1, [::1].
• Negotiate is the method of authentication used if the client is not in the same domain as the destination host, or the value specified for that host is one of the following: localhost, 127.0.0.1, [::1].
Digest
• Digest authentication is not supported for remote connections. It cannot be configured for the WinRM server component.
45
Kerberos
Client side steps
• Enable Kerberos authentication for the client, by running the following PowerShell command: set-item wsman:\localhost\client\auth\Kerberos -value true
Server side steps
• Enable Kerberos authentication for the service, by running the following PowerShell command: set-item wsman:\localhost\service\auth\Kerberos -value true
Notes:
• The client and server must be in the same domain.
• Either a local or a domain user account can be provided for authentication on the server host.
• Kerberos cannot be used when the destination is an IP address.
• Kerberos cannot be used when the destination is one of the following: localhost, 127.0.0.1, [::1].
• The cluster name cannot be used to specify the host. Only the hostnames of the cluster nodes can be used for the destination host.
Negotiate
Client side steps
• Enable Negotiate authentication for the client, by running the following PowerShell command: set-item wsman:\localhost\client\auth\Negotiate -value true
Server side steps
• Enable Negotiate authentication for the service, by running the following PowerShell command: set-item wsman:\localhost\service\auth\Negotiate -value true
Notes
• The client and server can be in different domains.
• Either a local or a domain user account can be provided for authentication on the server host. Local accounts can only be provided when connecting to the localhost.
• Negotiate can be used when the destination is an IP address.
• Negotiate can be used when the destination is one of the following: localhost, 127.0.0.1, [::1].
• The cluster name, as well as the hostnames of the cluster nodes can be used for the destination host.
46 PowerShell Wizard Guide
NegotiateWithImplicitCredential
Notes
• When using NegotiateWithImplicitCredentials, no credentials should be provided. The current logged-on user account will be used for authentication. This can either be a local or a domain user account.
• NegotiateWithImplicitCredential can only be used when the destination is one of the following: localhost, 127.0.0.1, [::1].
47
6 Troubleshooting This section provides troubleshooting procedures that you can use to solve problems you may encounter while using the wizard. It also includes an error message you may receive while using the integration and offers descriptions and possible fixes for the error.
Could not connect to the host
The possible reasons are:
• The user credentials are not correct.
• The user does not have permission to execute PowerShell scripts on the target host. Make sure the user has admin rights or refer to the section Enable Remoting for Non-Administrative Users.
• Authentication problems (most common). Refer to Running a PowerShell Script on a Remote Host.
• The WinRM service is stopped on the target host.
• WinRM default ports (5985 and 5986) were changed. You need to provide the correct port in the connection page of the wizard.
The wizard fails to load modules on a x64 localhost.
Some modules cannot be loaded using the wizard, but they are loaded from the PowerShell console. By default, the wizard runs in a x32 process (depends on the OO jre) which ends up calling x32 PowerShell. The x32 version of PowerShell cannot load some modules (e.g. FailoverClusters) therefore the wizard fails. In order to fix this, do not leave the host input empty. Instead, you need to provide the “localhost”. This way, the wizard will try to authenticate the localhost like any other remote host. Note that remoting rules should be satisfied for localhost in this case. If user is left empty, the wizard will connect using the NegotiateWithImplicitCredential. Otherwise, you need to provide user credentials and authentication type as for any other remote host.
48 PowerShell Wizard Guide
The user has exceeded the maximum allowed number of remote shells
The user has exceeded the maximum allowed number of remote shells. This error would probably occur if the user stresses the wizard with too many “back and next” actions without running the wizard from start to end. Refer to Group Policy Configuration sections in order to increase the allowed number of remote shells per user.
Figure 38: Connection Error - number of remote shells has been exceeded