HP Records Manager (HPRM 8.1) Web Client Classic User Guide DOC/14/1652[V2] University of Tasmania Page 1 HP Records Manager (HPRM 8.1) Web Client Classic User Guide Records Management Unit www.utas.edu.au/it/records
Transcript
HP Records Manager (HPRM 8.1) Web Client Classic User Guide DOC/14/1652[V2]
University of Tasmania Page 1
HP Records Manager (HPRM 8.1) Web Client Classic User Guide
2 ACCESS TO HPRM WEB CLIENT ......................................................................................................... 4
3 HP RECORDS MANAGER OVERVIEW .............................................................................................. 5
3.1 Record Types ........................................................................................................................................ 5
4 SCREENS AND FUNCTIONALITY ....................................................................................................... 6
4.1.1 New Tab ......................................................................................................................................... 6
5.1.1 Object Type .................................................................................................................................. 14
5.3.1 Saving a Search ............................................................................................................................ 22
5.3.2 Finding and using a Saved Search ............................................................................................... 23
HP Records Manager (HPRM 8.1) Web Client Classic User Guide DOC/14/1652[V2]
University of Tasmania Page 3
5.3.3 Adding a Saved Search to Favourites .......................................................................................... 24
5.4 Commonly used Search Types ........................................................................................................ 25
6 NAVIGATING AND VIEWING ........................................................................................................... 26
6.1 Navigate to documents attached to a folder .................................................................................. 26
6.2 Navigate to a folder from a document ........................................................................................... 26
6.3 Viewing a document ......................................................................................................................... 27
6.4 Viewing All Parts ............................................................................................................................... 28
8.1 Access Control ................................................................................................................................... 31
8.2 Changing and Applying Access Controls ...................................................................................... 32
9.1 Record Titling Conventions ............................................................................................................. 32
9.2 Registering a Document ................................................................................................................... 33
10 MODIFYING RECORDS ...................................................................................................................... 37
10.1 Changing a Title ............................................................................................................................... 37
10.1.1 Changing the location of a Document to another Folder (Container) ....................................... 38
10.1.2 Modifying/Adding a Note .......................................................................................................... 39
13 APPENDIX 1 – RECORD TYPES ......................................................................................................... 42
HP Records Manager (HPRM 8.1) Web Client Classic User Guide DOC/14/1652[V2]
University of Tasmania Page 4
1 Introduction
The HP Records Manager (HPRM), previously called TRIM, Web Client is available for University staff members who may not require the full functionality associated with the full client or are utilising an alternative environment that may not be compatible.
The Web Client provides browser-based access to the HP Records Manager database. It is designed to be consistent with the look and feel of the full HPRM client and customisable to suit our intranet. Users can register, edit and finalise documents, including email, into HPRM via the Web Client. If you are required to extensively use the system it is recommended that the full HPRM client is utilised.
2 Access to HPRM Web Client
The HPRM Web Client is accessible through most browsers including Internet Explorer, Chrome, Safari and Firefox. (Note: The screen shots in this User Guide originate from Chrome.)
Permissions to access the Web Client are managed through active directory, but if you are using a wireless connection you will be required to enter your username and password in a pop up box.
1. Open your browser and place the following internet address in the internet address field: http://itshprmwgs/hprmwebclientclassic
2. If you need to authenticate your login details with your username and password a pop up box will be presented.
3. HP Records Manager will open.
Tip: Add this to your Bookmarks for easy reference.
HP Records Manager (HPRM 8.1) Web Client Classic User Guide DOC/14/1652[V2]
University of Tasmania Page 5
3 HP Records Manager Overview
HP Records Manager is the Electronic Document and Records Management System used to capture, manage and retrieve records and information for the University. HPRM is used to manage both hardcopy and electronic records.
3.1 Record Types
Record Types are a way to group similar items together. A Record Type is visually distinguished by its icon (shape and colour). It also differs by its numbering pattern, its access requirements and the metadata collected for the records it represents. Record Types have a hierarchical structure to allow certain Record Types to be attached within another, e.g. a document in a folder.
Refer to Appendix 1 – Record types for specific breakdowns applicable to University requirements.
HP Records Manager (HPRM 8.1) Web Client Classic User Guide DOC/14/1652[V2]
University of Tasmania Page 6
4 Screens and Functionality
4.1 Shortcuts Toolbar
Shortcuts allow you quick access to HPRM functionality. Shortcuts are broken up into the following categories: New, Favourites, Recent, Trays and Browse.
4.1.1 New Tab
New Tab: Allows the user to register new Records into HPRM.
Location: Allows the user to register new Locations into HPRM.
Workflow: (Limited use of this function by University).
To Do Item: (Limited use of this function by University).
Shortcuts Toolbars
HP Records Manager (HPRM 8.1) Web Client Classic User Guide DOC/14/1652[V2]
University of Tasmania Page 7
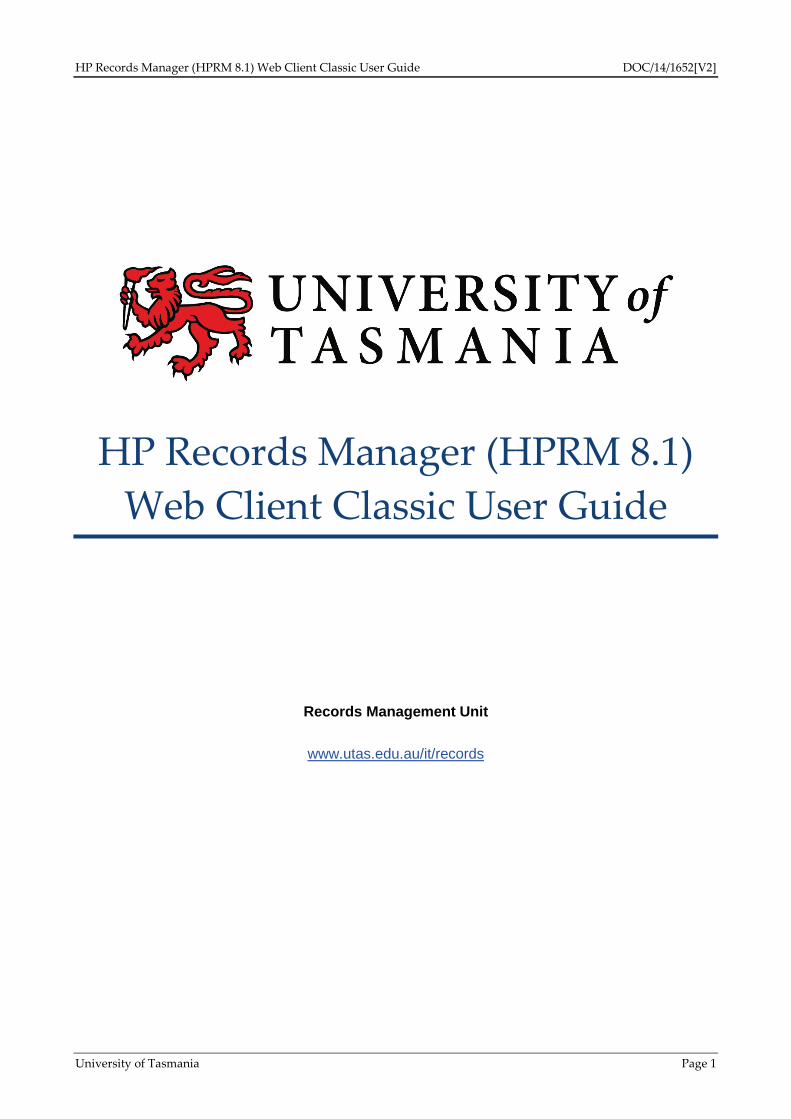
4.1.2 Favourites Tab
Records: Allows the user to view Records they have saved to favourites.
Locations: Allows the user to view Locations they have saved to favourites.
Classifications: Allows the user to view Classifications they have saved to favourites.
Saved Searches: Allows the user to view Saved Searches they have saved to favourites.
4.1.3 Recent Tab
Recent/My Containers: Allows the user to view the last 25 Folders that they have uploaded documents to.
Recent/My Documents: Allows users to view the last 25 documents that they have uploaded or edited.
HP Records Manager (HPRM 8.1) Web Client Classic User Guide DOC/14/1652[V2]
University of Tasmania Page 8
4.1.4 Trays Tab
Records In Tray: Shows records that are assigned to your name.
Record Due Tray: Shows records that are actioned to you via Action Tracking.
Records Work Tray: Allows the user to view records saved to the Work Tray.
Activities Due: Shows records that are actioned to you via the Workflow module.
Records In or Due Tray: Shows records that are assigned or actioned to your name.
My To Do Items: Shows To Do items that are assigned to your name.
Documents Checked Out: Shows documents that you have checked out of HPRM.
4.1.5 Browse Tab
User Labels: this functionality is not currently utilised by the University.
Classifications: Allows you to browse through the classification plan to search for folder titles.
My Requests: Allows you to browse through any requests you have.
HP Records Manager (HPRM 8.1) Web Client Classic User Guide DOC/14/1652[V2]
University of Tasmania Page 9
4.2 Search Results Screen
Action Tabs When each new action is generated a new ‘action tab’ opens on the top of the screen in HP Records Manager.
Search Parameters Refer to chapter on Search Methods for further clarification.
Preview Tab Expands out to display the electronic document highlighted.
List Pane & Column Headings
Listed at the top of the screen are the results based on the Search type and value used.
Tip: You can click on the column headings to sort the order of records listed. (Note this functionality will not work on a large search result - an error message will be generated to alert you to this)
Search Results Provides information about how many records have been returned.
Settings Allows you to alter the number of results shown in the List pane.
Action Tabs Column Headings
Search Count Results
List Pane (top half of screen)
View Pane (Bottom half of screen)
Page Count
Screen Refresh
Settings
View Pane Tabs
Search Parameters
Preview tab
HP Records Manager (HPRM 8.1) Web Client Classic User Guide DOC/14/1652[V2]
University of Tasmania Page 10
Screen Refresh Click on the screen refresh icon to update results on the screen.
Page Count Provides information about how many pages of results have been returned.
View Pane This tab is under the List Pane and provides additional metadata fields depending on which tab is selected (Properties Tab or Notes Tab).
Properties Tab Provides additional metadata fields and links as defined by the Record Type selected.
Notes Tab Provides a view of any metadata placed into the Notes field by users in relation to the Record Type selected.
4.3 Right Click Functionality
4.3.1 Right Mouse Click on the Action tab(s)
Right mouse click on the action tab at the top of the screen and the options available are:
Link Opens a new session of HPRM with the search results for that action tab.
Feed Creates an RSS feed for the current search parameters that can be subscribed to via an RSS reader or a Live Bookmark in Firefox. It also provides a handy way to print the details of the retrieved records.
Close Tab Will close the selected tab.
Close Other Tabs This option is only available when more than one tab is open, and will close all tabs except the highlighted tab.
HP Records Manager (HPRM 8.1) Web Client Classic User Guide DOC/14/1652[V2]
University of Tasmania Page 11
4.3.2 Right Mouse click on a folder or document
Right Mouse Click on a folder or document in the list pane and you will see a list of menu items with the same or similar functionality as in the full client. The options available will depend on the user access you have been given.
Document record type Folder record type
4.3.3 Right Mouse Click in View Pane or blank space
This option relates to internet functions only. Use of these options is not recommended.
Select document or folder to see the
Menu tab
HP Records Manager (HPRM 8.1) Web Client Classic User Guide DOC/14/1652[V2]
University of Tasmania Page 12
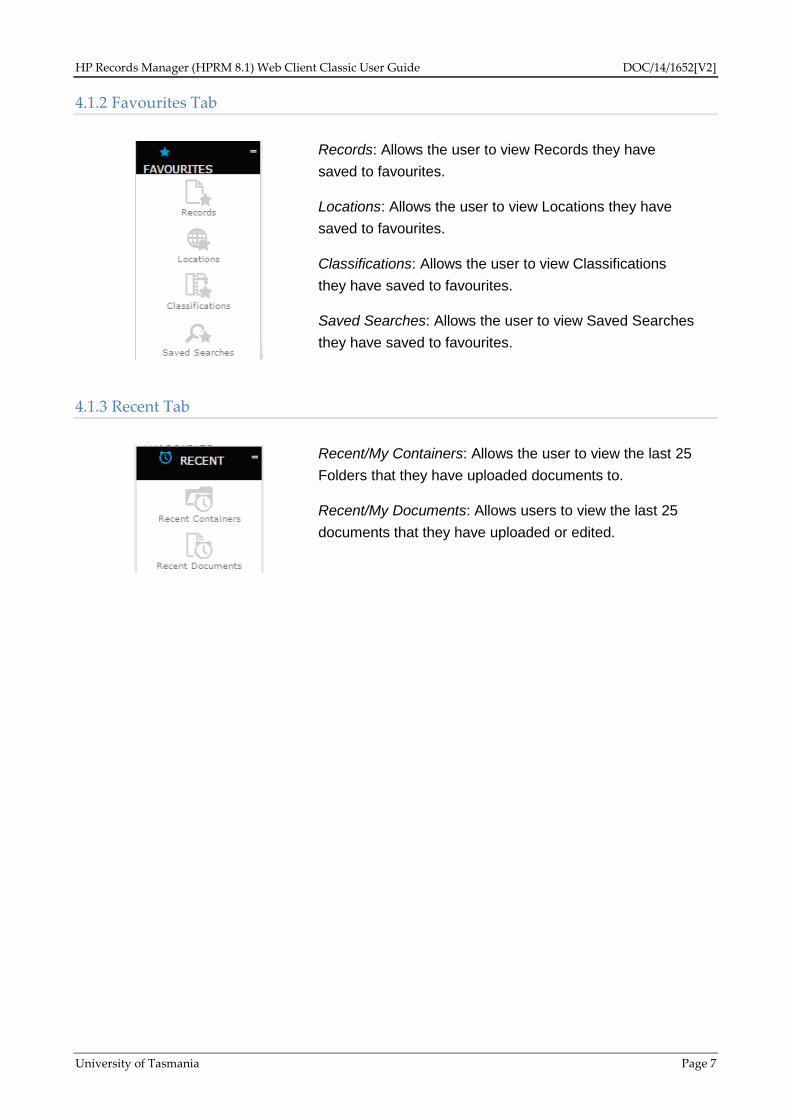
4.4 Viewing Electronic Documents
To view an electronic document from HPRM:
Highlight the record and Right Mouse Click, and then select View from the pop-up menu.
Hint: You may also Preview the Document by expanding the Preview tab.
Click on the back arrows to expand
the window
Download information
HP Records Manager (HPRM 8.1) Web Client Classic User Guide DOC/14/1652[V2]
University of Tasmania Page 13
5 Searching for Records
5.1 Search functionality
To run a search you must select the appropriate Object Type and Search Type and enter the search criteria to generate a search result.
At the end of the Search Criteria field is a Drop Down Arrow and either an ellipsis (…) or a Magnifying Glass icon.
Depending on the Object Type and Search Type selected, there are different methods by which the Search Criteria must be entered to generate the search.
Object Type Dropdown Arrow Search Criteria Dropdown Arrow
HP Records Manager (HPRM 8.1) Web Client Classic User Guide DOC/14/1652[V2]
University of Tasmania Page 14
5.1.1 Object Type
Under the Object Type drop down arrow there are a variety of values that can be selected to generate different types of searches. These are:
• Record • Location • Saved Search • To Do Item • Workflow • Classification • Activity
5.1.2 Search Types
Under the Search Type drop down arrow there are three options you may select. These are:
• Quick Search: this search method allows users to run a simple search using simple search criteria (refer to 5.2.1 for instructions).
• Advanced Search: this search method allows users to run more complex searches (refer to 5.2.3 for instructions).
• Form Search: this search method provides a structured form for searching across multiple search criteria.
5.2 Search Methods
5.2.1 Quick Search – finding a record by Record Number
1. Select Record in the Object Type field. 2. Select Quick Search in the Search Type field. 3. In the Enter Search Criteria field enter the record number. 4. Click on Search or press Enter.
5.2.2 Quick Search – finding a record by Record Title
1. Select Record in the Object Type field. 2. Select Quick Search in the Search Type field. 3. In the Search Criteria field enter the title word/s to search for.
Tip: Users can apply the Advanced Search or the Form Search functions to search for multiple criteria. These may include multiple search combinations such as: Title Word search and By Date Created, or Title Word search and Folders only.
Search
HP Records Manager (HPRM 8.1) Web Client Classic User Guide DOC/14/1652[V2]
University of Tasmania Page 15
4. Click on Search or press Enter.
5.2.3 Advanced Searches – Searching for multiple criteria
1. Select Record in the Object field. 2. Select Advanced Search in the Search Type field. 3. Select the Magnifying Glass or ellipsis (…) icon.
4. On the Search for Records form, highlight the word Record* and click on Add search clause. *Note this will change depending on the Object Type field option selected.
5. In the Record search builder dialogue box highlight the first search option to search by. 6. Select from the list Dates and Times and expand by clicking on the +, select Date Registered
Search and fill in the date range required. 7. Click on OK.
Search
Advanced Search
Add Search Clause
Record is Highlighted
HP Records Manager (HPRM 8.1) Web Client Classic User Guide DOC/14/1652[V2]
University of Tasmania Page 16
8. Click on the Add search clause function again, then select and expand Text Search by using the + button and select Title.
9. Click OK. 10. Click on Search.
Date Registered
Date Range
Tips
Add Search Clause
Title
Tips
Title word
HP Records Manager (HPRM 8.1) Web Client Classic User Guide DOC/14/1652[V2]
University of Tasmania Page 17
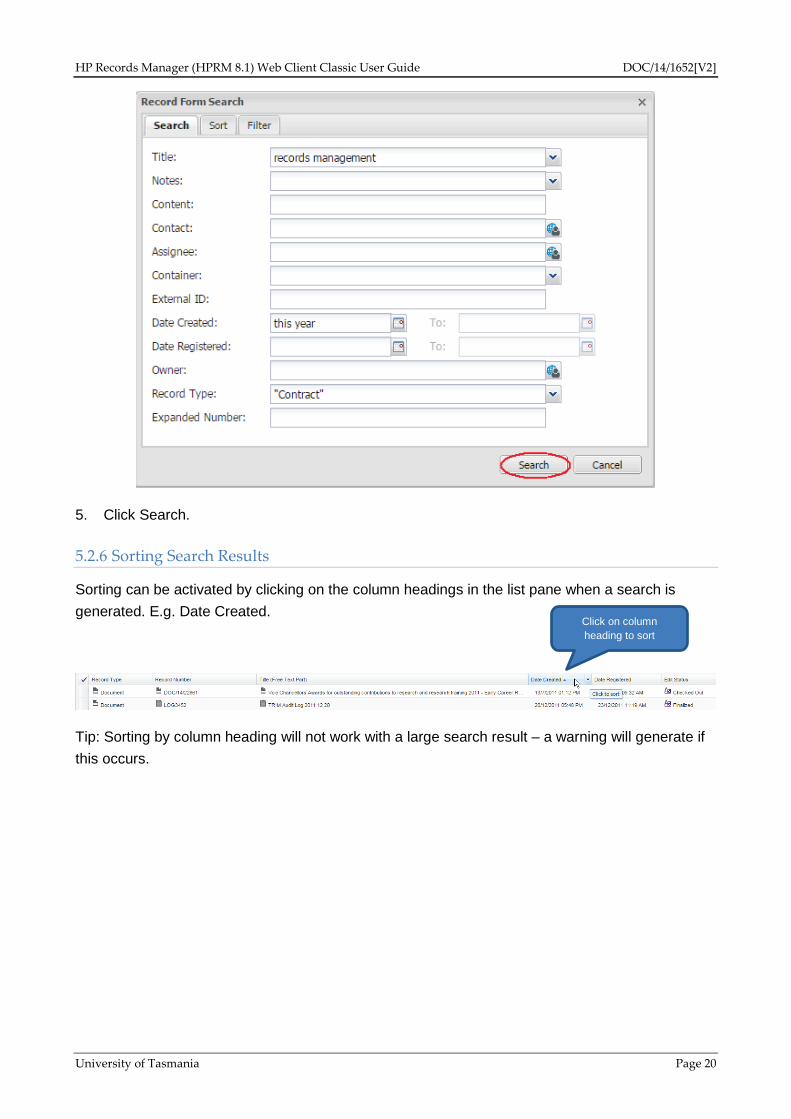
5.2.4 Form Search
The form search allows the user to run a structured search, including multiple criteria such as Title Word and By Date Registered.
1. Leave the Object Type field as Record. 2. Select Form Search from the Search Type field by clicking the down arrow. 3. At the end of the Search Criteria field click on the magnifying glass or ellipsis (…) icon.
4. The entry form will be presented.
5. Fill in the search criteria depending on the search result required, e.g. Title and Date Created. 6. Click on Search or Press Enter.
Form Search
Enter Search Criteria
HP Records Manager (HPRM 8.1) Web Client Classic User Guide DOC/14/1652[V2]
University of Tasmania Page 18
The function of each field in the Form is described below.
Field Description
Title Allows a user to search for any information entered into the Title field of a record type. E.g. Legal Advice
Notes Allows a user to search for any information entered into the Notes field of records.
Content Allows a user to search for any word or phrase within the content of a document that has been scanned using Optical Character Recognition (OCR) or within born digital documents such as Microsoft Word documents, Excel spreadsheets or email.
Assignee Allows a user to search for any documents or folders assigned to a person.
Container Allows a user to search for the containers (folders) they have recently contained documents in.
External ID Allows a user to search for external references applied to records.
Date Created Allows a user to search for the date a record was authored or signed.
Date Registered Allows a user to search for the date records were registered into HP Records Manager.
Owner Location Allows a user to search for records owned by an individual business unit.
Record Type Allows a user to filter searches to specific record types, e.g. Contract.
Expanded Number Allows a user to search for any records by a number, e.g. FOL/2013/01000 to FOL/2013/02000.
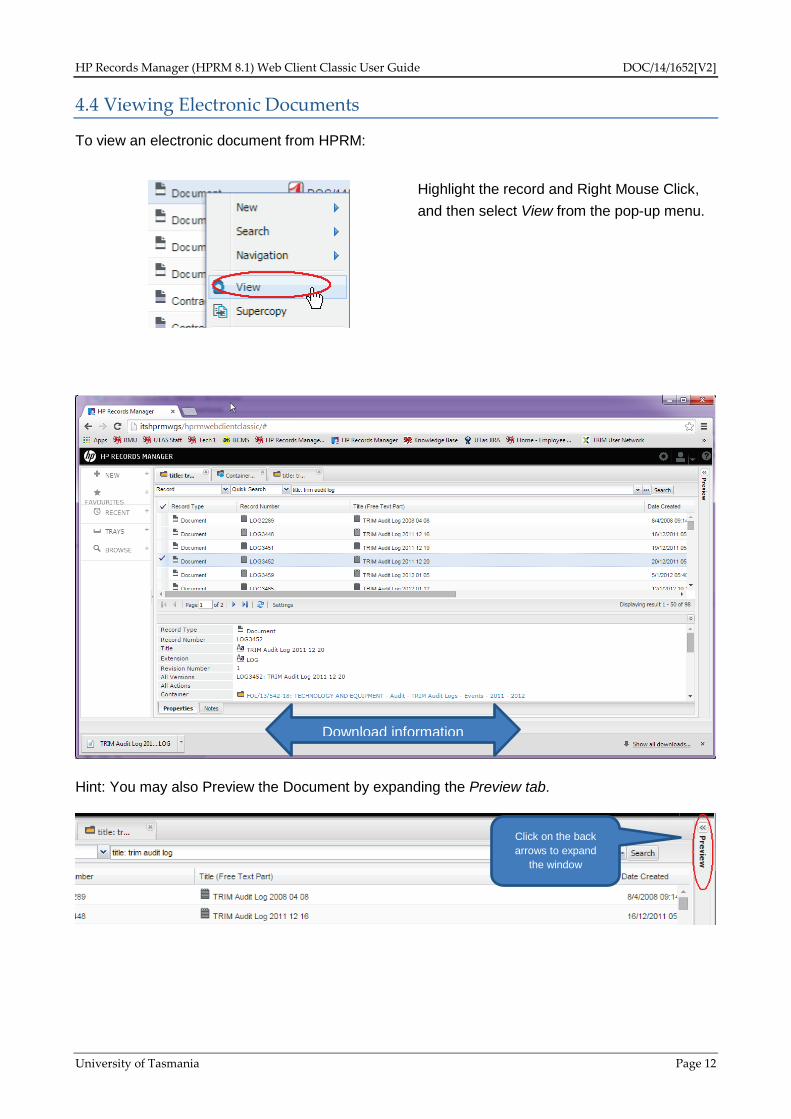
5.2.5 Form Search – Filter by Record Type
1. To filter a form search by Record Type, you first need to enter a search criteria such as the Title field or Date Created.
2. Click on the down arrow at the end of the Record Type field.
HP Records Manager (HPRM 8.1) Web Client Classic User Guide DOC/14/1652[V2]
University of Tasmania Page 19
3. Tick the Record Types required for the search.
4. Click OK.
2. Click on the Down Arrow to
select record type
1.Enter Search Criteria
1. Tick Record types
HP Records Manager (HPRM 8.1) Web Client Classic User Guide DOC/14/1652[V2]
University of Tasmania Page 20
5. Click Search.
5.2.6 Sorting Search Results
Sorting can be activated by clicking on the column headings in the list pane when a search is generated. E.g. Date Created.
Tip: Sorting by column heading will not work with a large search result – a warning will generate if this occurs.
Click on column heading to sort
HP Records Manager (HPRM 8.1) Web Client Classic User Guide DOC/14/1652[V2]
University of Tasmania Page 21
5.2.7 To sort a form search:
1. Click on the Sort tab. 2. Select a sort criteria and either double click or add it to the search criteria by clicking the add
arrow.
3. Click on Search.
5.3 Saved Searches
This functionality allows users to save a search that has been generated in HP Records Manager that may be re-run at any time, e.g. Records created in the last month by a particular business unit.
1. Select Sort tab
2. Criteria 3. Click on arrow to add to search criteria
4 Click Search
HP Records Manager (HPRM 8.1) Web Client Classic User Guide DOC/14/1652[V2]
University of Tasmania Page 22
5.3.1 Saving a Search
1. Run the required search. 2. Right mouse click in the list pane and select Search > Save Search As.
3. In the Name field enter a description for your search.
4. Click on Save.
HP Records Manager (HPRM 8.1) Web Client Classic User Guide DOC/14/1652[V2]
University of Tasmania Page 23
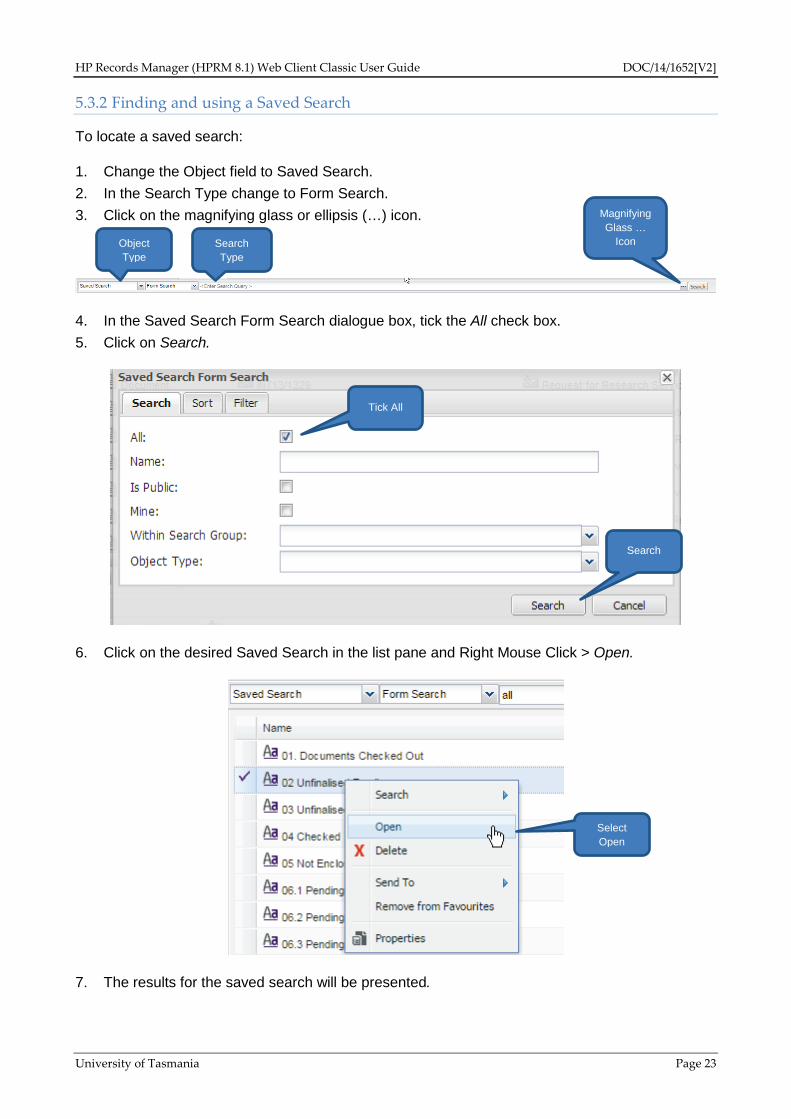
5.3.2 Finding and using a Saved Search
To locate a saved search:
1. Change the Object field to Saved Search. 2. In the Search Type change to Form Search. 3. Click on the magnifying glass or ellipsis (…) icon.
4. In the Saved Search Form Search dialogue box, tick the All check box. 5. Click on Search.
6. Click on the desired Saved Search in the list pane and Right Mouse Click > Open.
7. The results for the saved search will be presented.
Object Type
Search Type
Magnifying Glass …
Icon
Tick All
Search
Select Open
HP Records Manager (HPRM 8.1) Web Client Classic User Guide DOC/14/1652[V2]
University of Tasmania Page 24
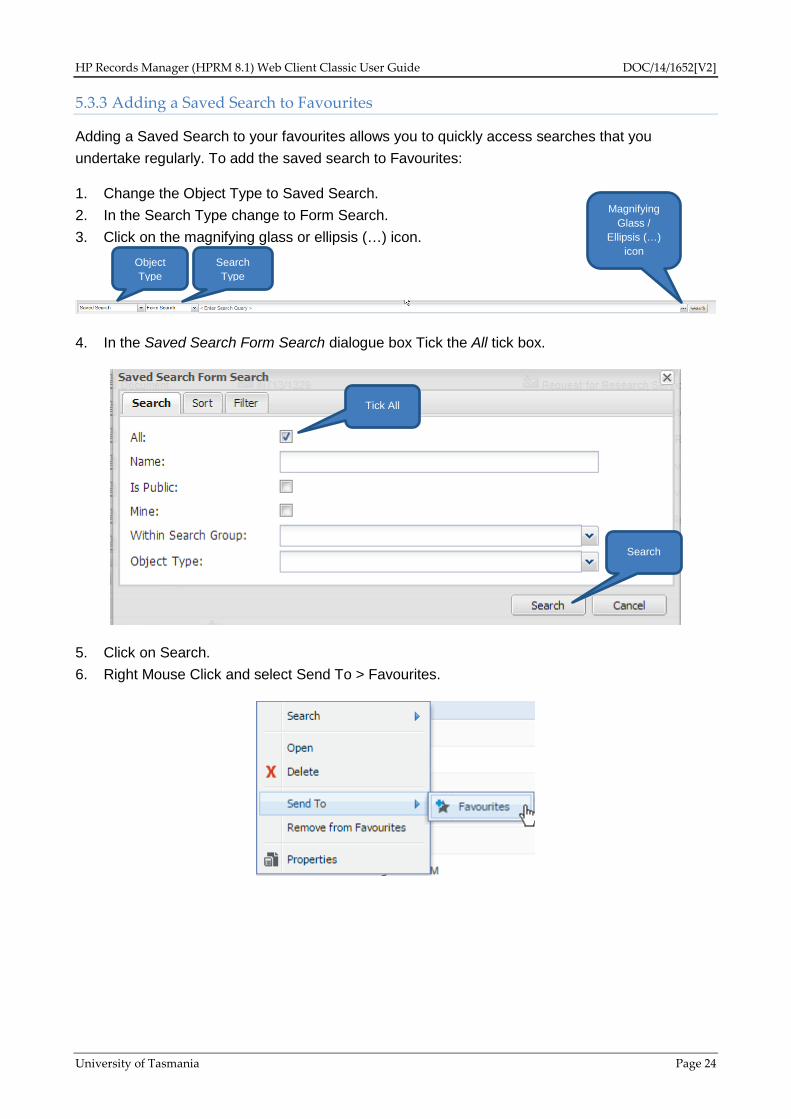
5.3.3 Adding a Saved Search to Favourites
Adding a Saved Search to your favourites allows you to quickly access searches that you undertake regularly. To add the saved search to Favourites:
1. Change the Object Type to Saved Search. 2. In the Search Type change to Form Search. 3. Click on the magnifying glass or ellipsis (…) icon.
4. In the Saved Search Form Search dialogue box Tick the All tick box.
5. Click on Search. 6. Right Mouse Click and select Send To > Favourites.
Object Type
Search Type
Magnifying Glass /
Ellipsis (…) icon
Tick All
Search
HP Records Manager (HPRM 8.1) Web Client Classic User Guide DOC/14/1652[V2]
University of Tasmania Page 25
5.4 Commonly used Search Types
Follow the 5 step process of the advanced search instructions to view the search options available from the record search builder.
The most commonly used Search Types include:
Recent This expands to list the most recently used Object Types you have utilised.
Contacts, People and Places
This expands to include Author, Addressee, Contact and Creator.
Dates and Times This expands to include Date Created and Date Registered.
Reference and Control Numbers
This expands to include Record Number and External ID.
Text Search This expands to include Any Word, Content and Title.
Trays and Labels This expands to include Due Tray, Favourite, My Documents and My Containers.
Description of Search Category
Search Category
HP Records Manager (HPRM 8.1) Web Client Classic User Guide DOC/14/1652[V2]
University of Tasmania Page 26
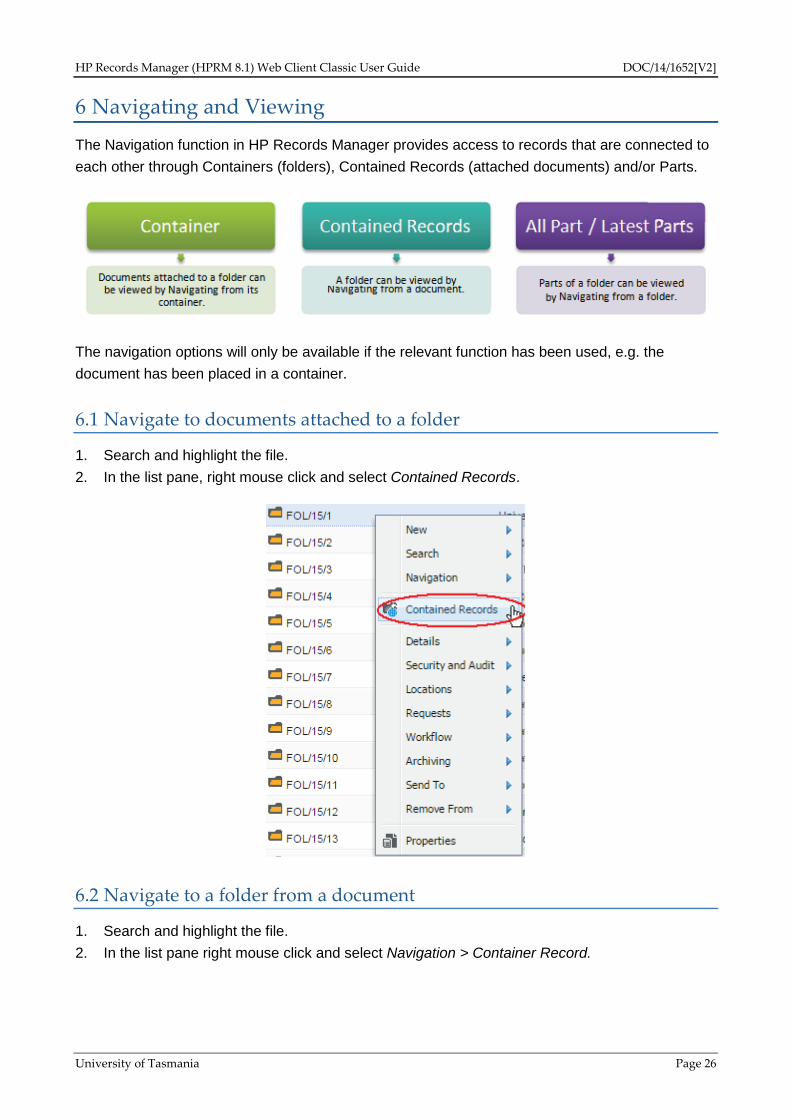
6 Navigating and Viewing
The Navigation function in HP Records Manager provides access to records that are connected to each other through Containers (folders), Contained Records (attached documents) and/or Parts.
The navigation options will only be available if the relevant function has been used, e.g. the document has been placed in a container.
6.1 Navigate to documents attached to a folder
1. Search and highlight the file. 2. In the list pane, right mouse click and select Contained Records.
6.2 Navigate to a folder from a document
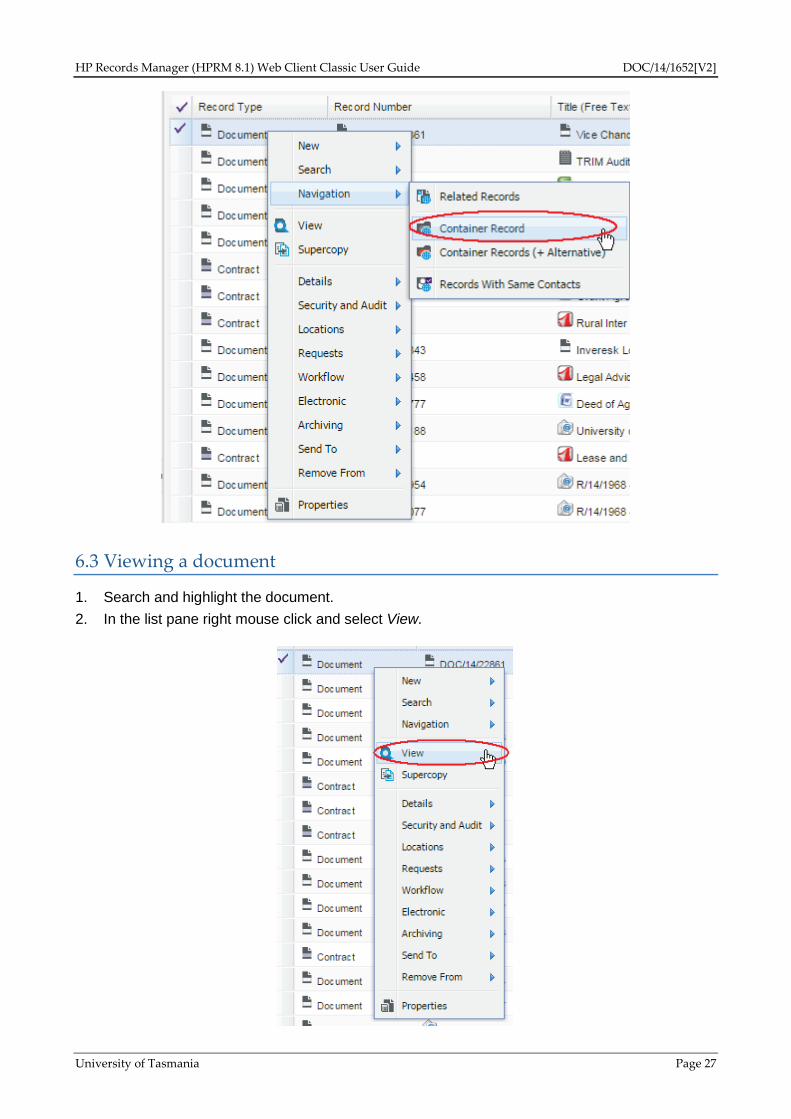
1. Search and highlight the file. 2. In the list pane right mouse click and select Navigation > Container Record.
HP Records Manager (HPRM 8.1) Web Client Classic User Guide DOC/14/1652[V2]
University of Tasmania Page 27
6.3 Viewing a document
1. Search and highlight the document. 2. In the list pane right mouse click and select View.
HP Records Manager (HPRM 8.1) Web Client Classic User Guide DOC/14/1652[V2]
University of Tasmania Page 28
6.4 Viewing All Parts
1. Search and highlight the folder. 2. In the list pane, right mouse click and select Relate.
All parts and other related records will be listed.
7 Locations
Locations (or contacts) are used as an identifier to indicate:
• The assignee of a record • The ownership of a record • The home or storage location of a record • Who registered the record
Parts list
HP Records Manager (HPRM 8.1) Web Client Classic User Guide DOC/14/1652[V2]
University of Tasmania Page 29
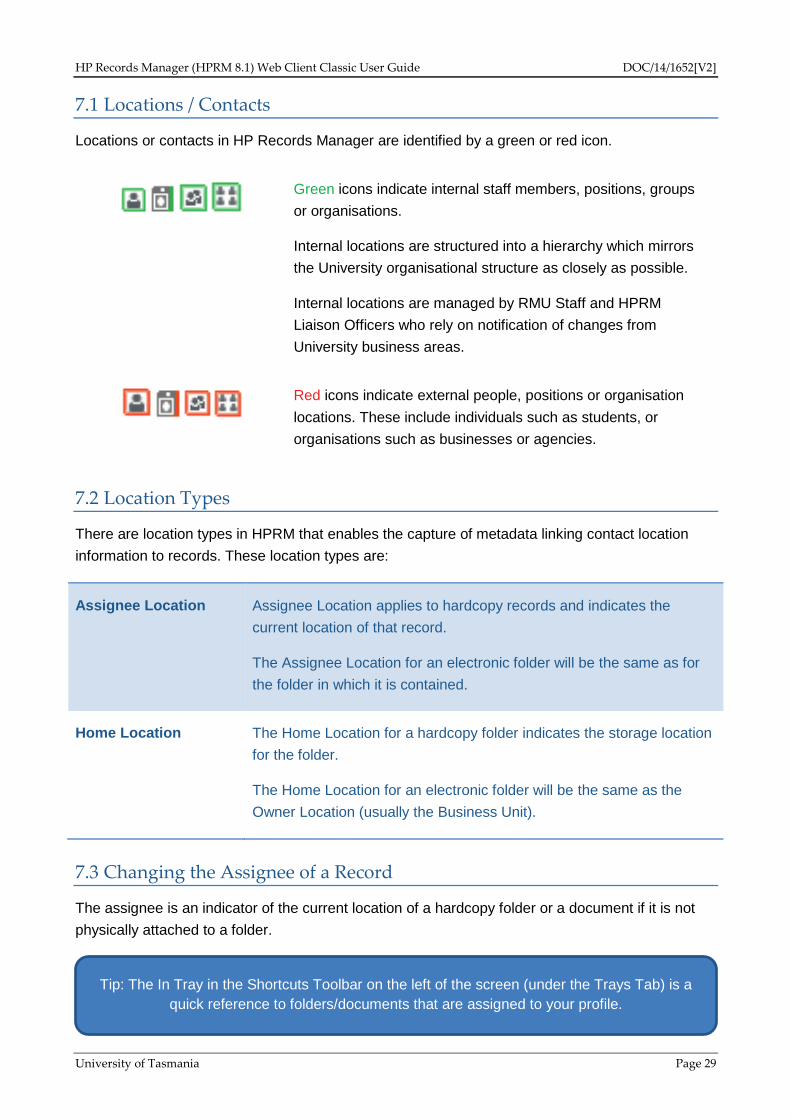
7.1 Locations / Contacts
Locations or contacts in HP Records Manager are identified by a green or red icon.
Green icons indicate internal staff members, positions, groups or organisations.
Internal locations are structured into a hierarchy which mirrors the University organisational structure as closely as possible.
Internal locations are managed by RMU Staff and HPRM Liaison Officers who rely on notification of changes from University business areas.
Red icons indicate external people, positions or organisation locations. These include individuals such as students, or organisations such as businesses or agencies.
7.2 Location Types
There are location types in HPRM that enables the capture of metadata linking contact location information to records. These location types are:
Assignee Location Assignee Location applies to hardcopy records and indicates the current location of that record.
The Assignee Location for an electronic folder will be the same as for the folder in which it is contained.
Home Location The Home Location for a hardcopy folder indicates the storage location for the folder.
The Home Location for an electronic folder will be the same as the Owner Location (usually the Business Unit).
7.3 Changing the Assignee of a Record
The assignee is an indicator of the current location of a hardcopy folder or a document if it is not physically attached to a folder.
Tip: The In Tray in the Shortcuts Toolbar on the left of the screen (under the Trays Tab) is a quick reference to folders/documents that are assigned to your profile.
HP Records Manager (HPRM 8.1) Web Client Classic User Guide DOC/14/1652[V2]
University of Tasmania Page 30
To change the assignee:
1. Search and highlight the folder. 2. Right mouse click and select Locations > Assignee.
3. Select the Set to Location radio button. 4. In the blank field under the Set to Location radio button, enter the last name of the new
Assignee and click on the icon at the end of the field. If the name comes up ‘red’ it means there is someone in the locations/contacts table with that name.
2. Enter the assignees last name (If name comes up in red it is in the contact list)
3. Click on the icon to select the correct person.
1. Select Set to Location
HP Records Manager (HPRM 8.1) Web Client Classic User Guide DOC/14/1652[V2]
University of Tasmania Page 31
5. Search and select the matching (green internal) name from the contact list. Ensure that they are linked to the correct position as some people may have multiple roles.
6. Select required person and Click on OK. 7. Click on OK again in the Set Assignee screen.
8 Access Controls
Only staff members that are included in an access control group can access certain types of records, e.g. only Human Resources staff members have access to Employee folders and documents.
Access restrictions are placed on Folders, and documents contained within those folders inherit the same restrictions.
Access is based on:
• The sensitivity or confidentiality of the content of the record and can be set for individual documents as required.
• Your log on profile.
8.1 Access Control
The access controls in HP Records Manager are grouped into seven functions as listed in the diagram below:
HP Records Manager (HPRM 8.1) Web Client Classic User Guide DOC/14/1652[V2]
University of Tasmania Page 32
These may be different for each Record Type depending on requirements.
8.2 Changing and Applying Access Controls
The Web Client does not enable amendment of Access Controls. When a document needs access control applied which is different to the folder it is contained in, please contact your HPRM Liaison Officer or the Records Management Unit ([email protected]).
9 Registering Documents
9.1 Record Titling Conventions
The advantages to standardising naming conventions for documents include:
• Improving access and sharing of documents • Reducing redundancy or duplication of documents • Avoiding loss of information • Enabling you to identify and find the latest draft or the desired version of a document • Naming documents quickly and easily • Understanding the content of a document without needing to open it
Further information can be found in the ‘TRIM Data Entry Standards’ available on the intranet.
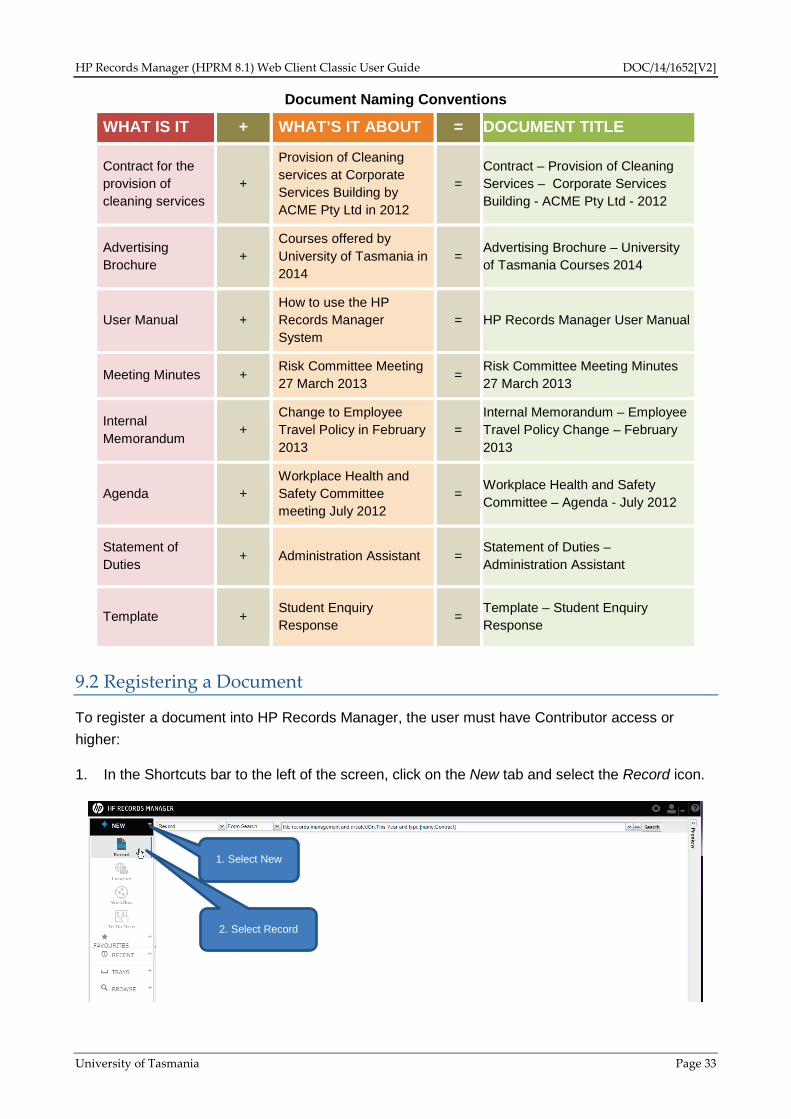
To register a document into HP Records Manager, the user must have Contributor access or higher:
1. In the Shortcuts bar to the left of the screen, click on the New tab and select the Record icon.
1. Select New
2. Select Record
HP Records Manager (HPRM 8.1) Web Client Classic User Guide DOC/14/1652[V2]
University of Tasmania Page 34
2. Select the Document Record Type.
3. Click on OK and the entry form will be presented. 4. Fill in the metadata fields in the Document Information Tab.
* Denotes a Mandatory Field
5. *Document Title: enter the document details in line with any data entry conventions that may be applicable in the TRIM Data Entry Standards or internal procedures
6. Date Written (Date Created): check the date reflects the date of the correspondence, report, or email. (Note that the Date Created will automatically populate for electronic documents so confirm that the date is correct)
7. Security Classification: set security to Public, Unclassified or Confidential. Refer to TRIM Security Guidelines for clarification of which to apply.
8. *Author/Signatory: enter the author of the document, check that you have selected the correct person and that they are linked to the correct position.
9. Addressee: enter the addressee of the document or leave blank if not addressed to anyone. 10. External ID: apply the external reference if supplied. 11. *Folder (Container): Fill in the folder number or search for the folder using the KwikSelect
button.
Tip: some fields will be automatically populated if you attach the electronic document first.
HP Records Manager (HPRM 8.1) Web Client Classic User Guide DOC/14/1652[V2]
University of Tasmania Page 35
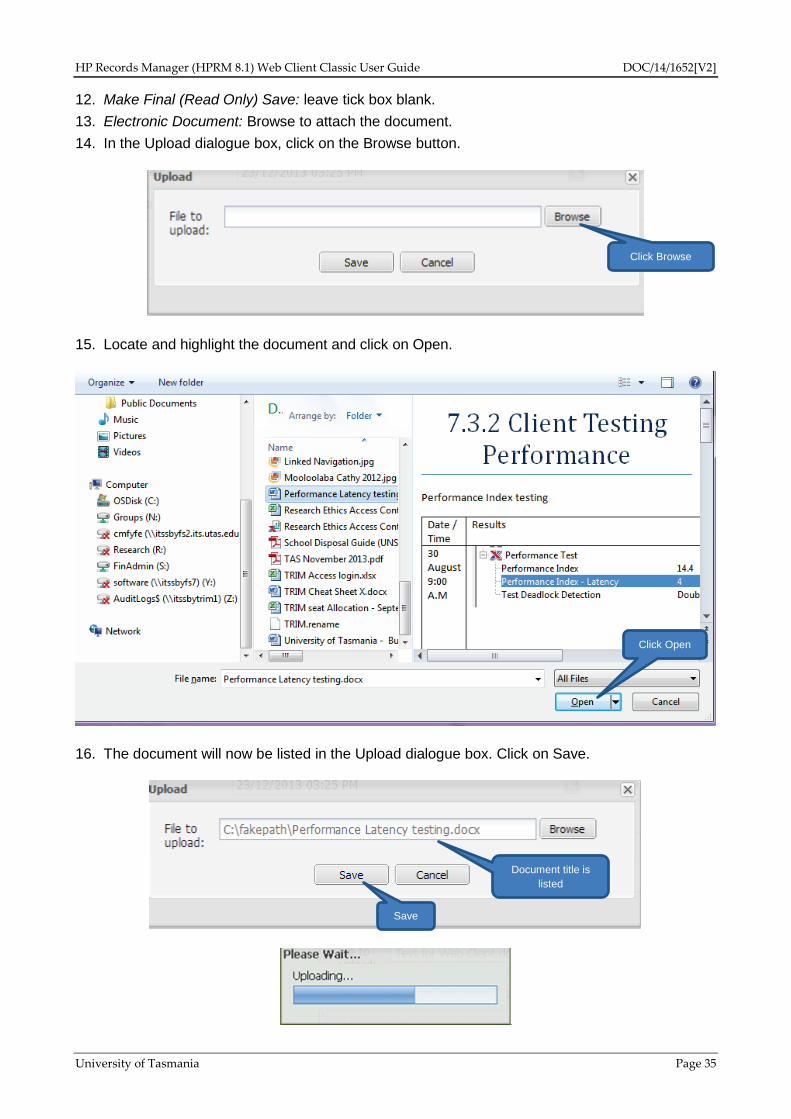
12. Make Final (Read Only) Save: leave tick box blank. 13. Electronic Document: Browse to attach the document. 14. In the Upload dialogue box, click on the Browse button.
15. Locate and highlight the document and click on Open.
16. The document will now be listed in the Upload dialogue box. Click on Save.
Document title is listed
Click Open
Click Browse
Save
HP Records Manager (HPRM 8.1) Web Client Classic User Guide DOC/14/1652[V2]
University of Tasmania Page 36
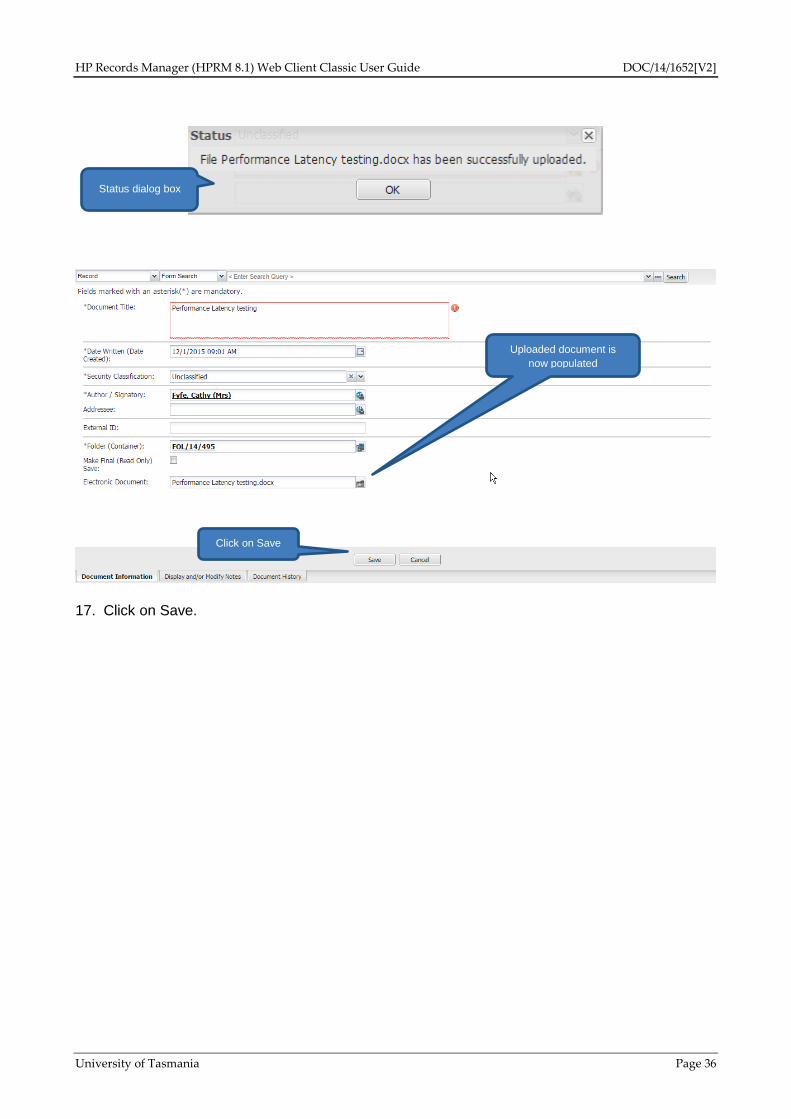
17. Click on Save.
Uploaded document is now populated
Click on Save
Status dialog box
HP Records Manager (HPRM 8.1) Web Client Classic User Guide DOC/14/1652[V2]
University of Tasmania Page 37
10 Modifying Records
10.1 Changing a Title
The title of a document can be changed if necessary, e.g. to correct a typing error.
To change a record title:
1. Search and highlight the record. 2. Right mouse click and select Properties. 3. Edit the Document Title as required. 4. Click on Save.
Click on Save
Edit the title
HP Records Manager (HPRM 8.1) Web Client Classic User Guide DOC/14/1652[V2]
University of Tasmania Page 38
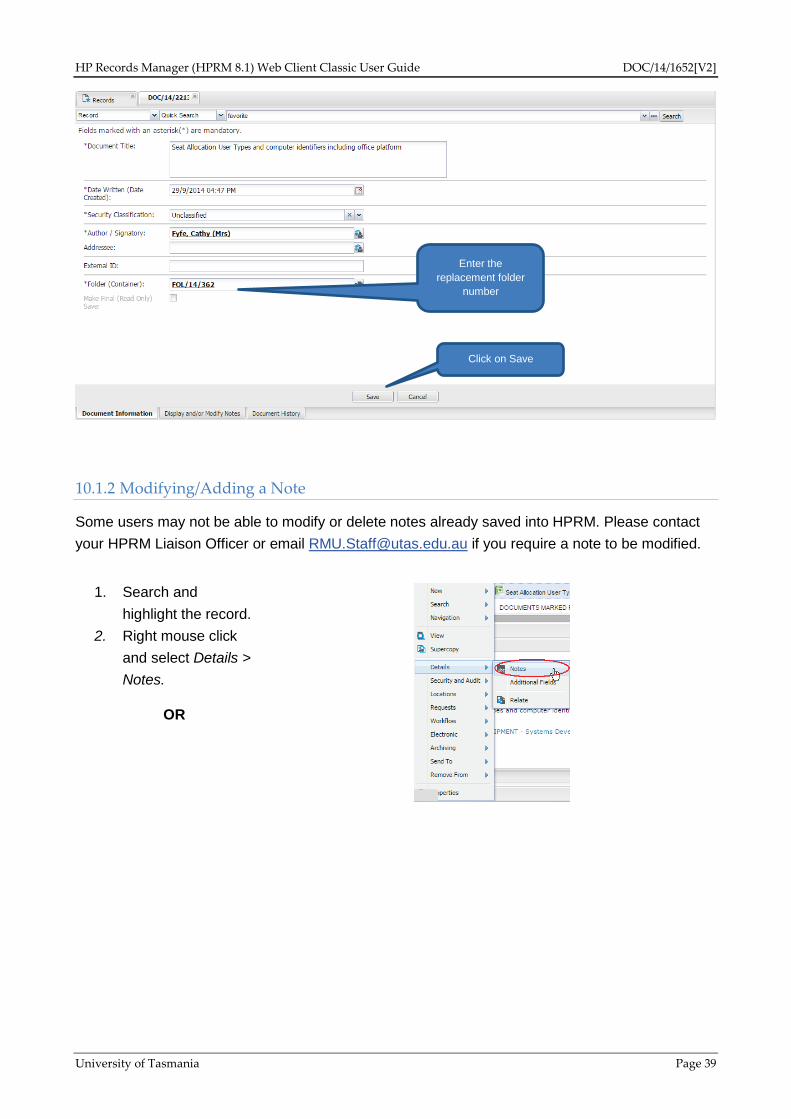
10.1.1 Changing the location of a Document to another Folder (Container)
Note: not all users may have this permission.
1. Search and highlight the records. 2. Right mouse click and select Locations >
Container. 3. Amend the Folder (Container) number. 4. Select OK.
OR
1. Search and highlight the record. 2. Right mouse click and select Properties. 3. Edit the *Folder (Container) as required. 4. Click on Save.
HP Records Manager (HPRM 8.1) Web Client Classic User Guide DOC/14/1652[V2]
University of Tasmania Page 39
10.1.2 Modifying/Adding a Note
Some users may not be able to modify or delete notes already saved into HPRM. Please contact your HPRM Liaison Officer or email [email protected] if you require a note to be modified.
HP Records Manager (HPRM 8.1) Web Client Classic User Guide DOC/14/1652[V2]
University of Tasmania Page 40
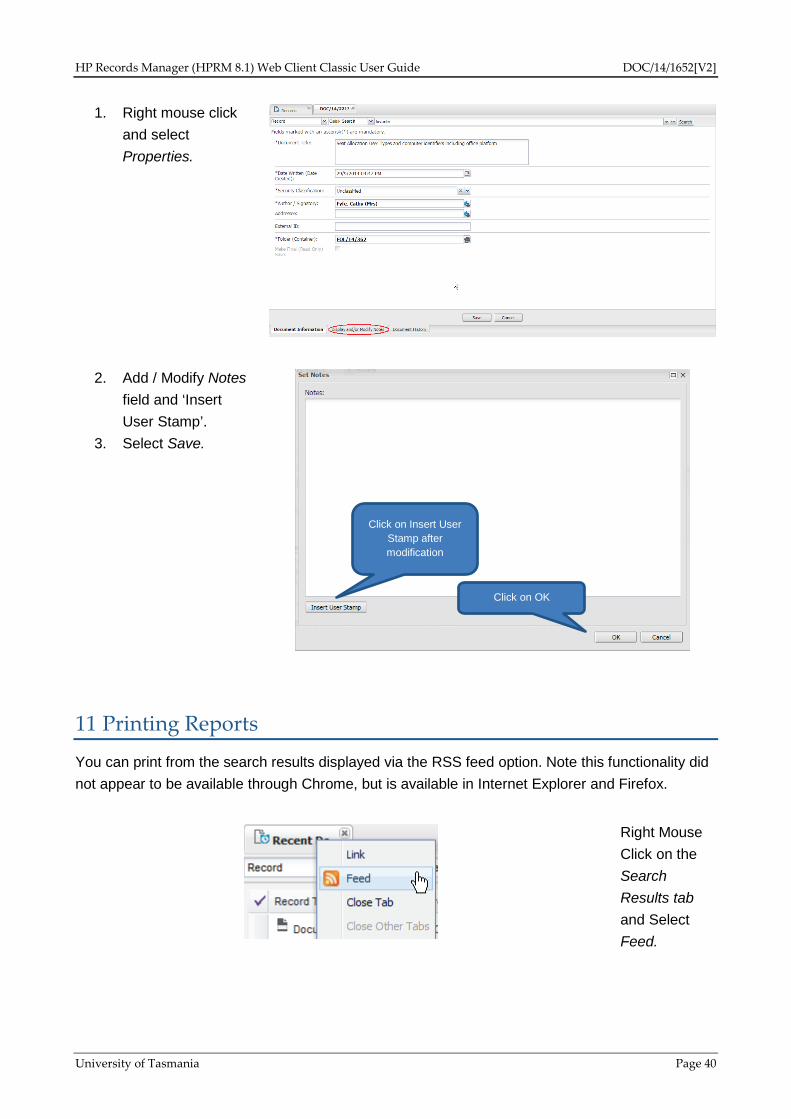
1. Right mouse click and select Properties.
2. Add / Modify Notes field and ‘Insert User Stamp’.
3. Select Save.
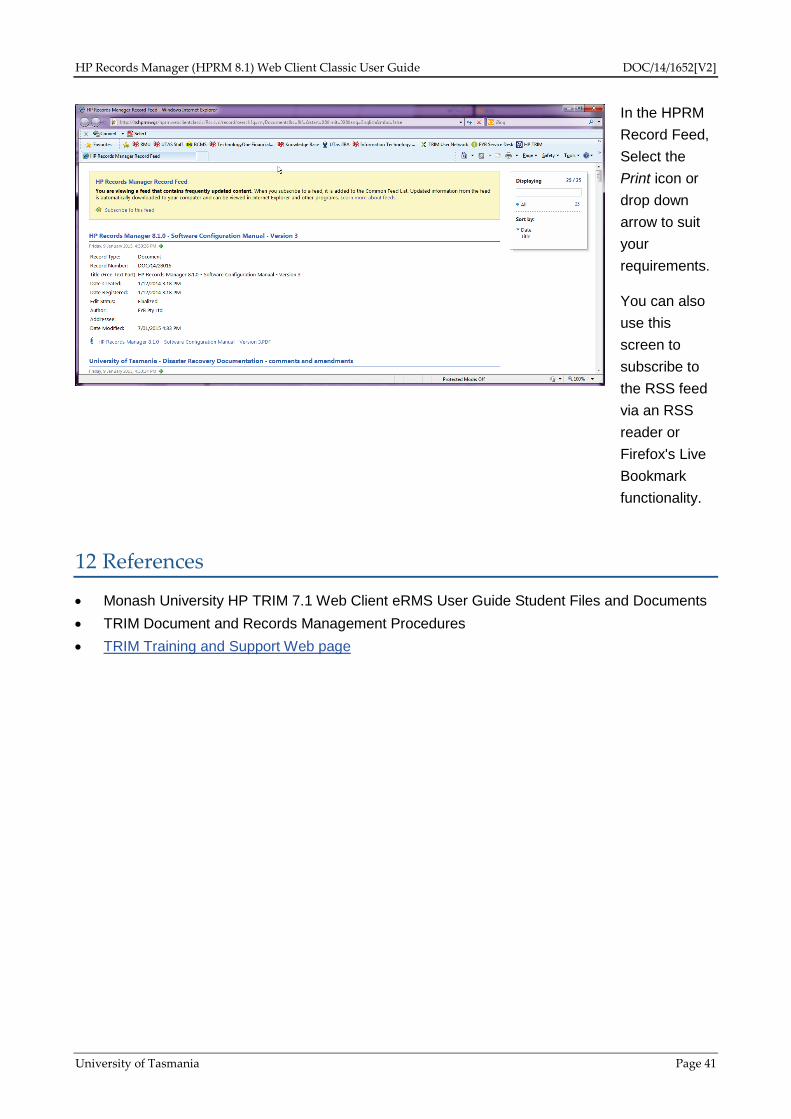
11 Printing Reports
You can print from the search results displayed via the RSS feed option. Note this functionality did not appear to be available through Chrome, but is available in Internet Explorer and Firefox.
Right Mouse Click on the Search Results tab and Select Feed.
Click on OK
Click on Insert User Stamp after modification
HP Records Manager (HPRM 8.1) Web Client Classic User Guide DOC/14/1652[V2]
University of Tasmania Page 41
In the HPRM Record Feed, Select the Print icon or drop down arrow to suit your requirements.
You can also use this screen to subscribe to the RSS feed via an RSS reader or Firefox's Live Bookmark functionality.
12 References
• Monash University HP TRIM 7.1 Web Client eRMS User Guide Student Files and Documents • TRIM Document and Records Management Procedures • TRIM Training and Support Web page
HP Records Manager (HPRM 8.1) Web Client Classic User Guide DOC/14/1652[V2]
University of Tasmania Page 42
13 Appendix 1 – Record Types
RECORD TYPE DESCRIPTION NUMBERING
Document Used to register documents, emails, images created and received by the University. Documents are to be placed into folders. Descriptions are to be in compliance with metadata standards. All HPRM users with the exception of ‘Inquiry User’ permissions can utilise this record type.
KKK/YYY/GGGGG For example: DOC/14/123 This number will be automatically generated by HPRM.
Contract Used to register fully executed contracts and agreements entered into by the University and third parties. Contracts are to be placed into folders. All HPRM Users with the exception of ‘Inquiry User’ can utilise this record type.
ZZZ/GGGGG For example: CON12354 This number will be automatically generated by HPRM.
Folder Used to create and manage folders related to the conduct of University business. May be alternatively contained in a Virtual Folder, Fleet Virtual Folder, Project Virtual Folder, or Student Virtual Folder to group similar or related folders together. Folders are titled using the Business Classification Scheme (BCS). They act as a container and can hold registered Documents. Only members of the ‘Group – Folder Creators’ can create Folders in HPRM.
KKK/YYYY/GGGG For example: FOL/13/1 This number will be automatically generated by HPRM.
Employee Sub Folder Used to create a pre-defined set of folders used to categorise the contents of the Employee Virtual Folder. Employee Sub Folders are linked to the Business Classification Scheme (BCS) and are titled using pre-defined titles.
KK/XXXXXX-01 For example EF/123456-01 Numbering based on ‘parent’ Employee Virtual Folder.
HP Records Manager (HPRM 8.1) Web Client Classic User Guide DOC/14/1652[V2]
University of Tasmania Page 43
RECORD TYPE DESCRIPTION NUMBERING
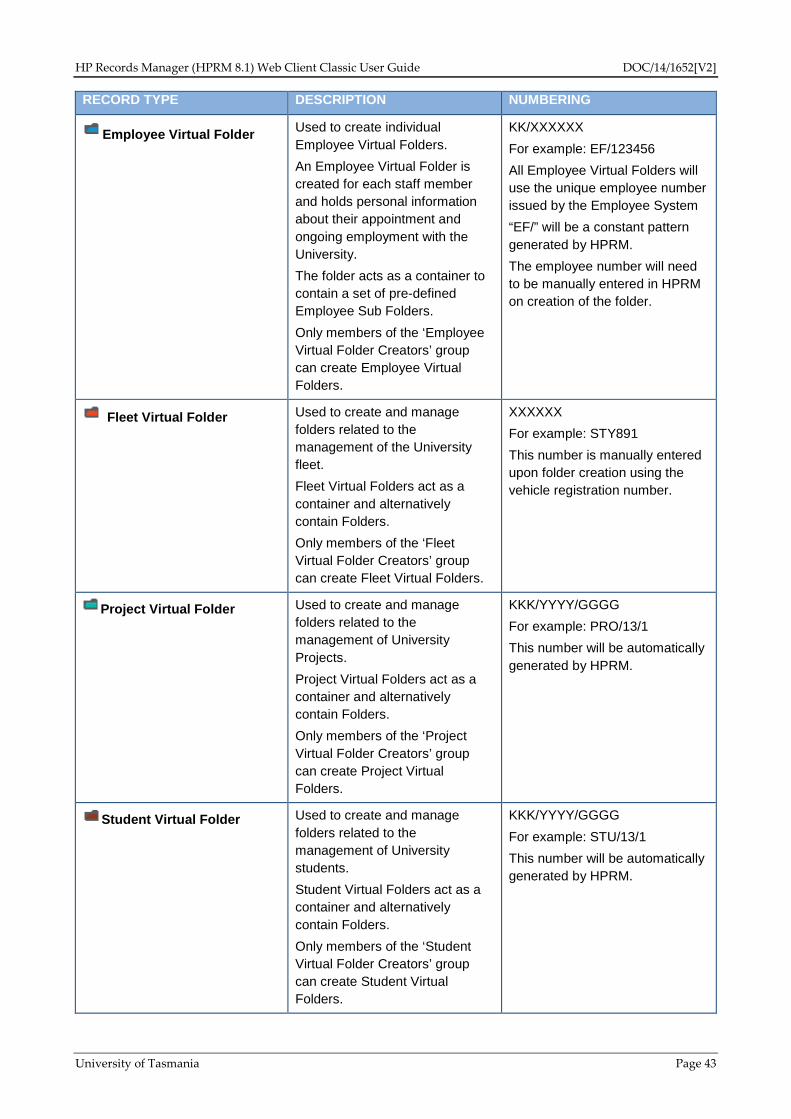
Employee Virtual Folder Used to create individual Employee Virtual Folders. An Employee Virtual Folder is created for each staff member and holds personal information about their appointment and ongoing employment with the University. The folder acts as a container to contain a set of pre-defined Employee Sub Folders. Only members of the ‘Employee Virtual Folder Creators’ group can create Employee Virtual Folders.
KK/XXXXXX For example: EF/123456 All Employee Virtual Folders will use the unique employee number issued by the Employee System “EF/” will be a constant pattern generated by HPRM. The employee number will need to be manually entered in HPRM on creation of the folder.
Fleet Virtual Folder Used to create and manage folders related to the management of the University fleet. Fleet Virtual Folders act as a container and alternatively contain Folders. Only members of the ‘Fleet Virtual Folder Creators’ group can create Fleet Virtual Folders.
XXXXXX For example: STY891 This number is manually entered upon folder creation using the vehicle registration number.
Project Virtual Folder Used to create and manage folders related to the management of University Projects. Project Virtual Folders act as a container and alternatively contain Folders. Only members of the ‘Project Virtual Folder Creators’ group can create Project Virtual Folders.
KKK/YYYY/GGGG For example: PRO/13/1 This number will be automatically generated by HPRM.
Student Virtual Folder Used to create and manage folders related to the management of University students. Student Virtual Folders act as a container and alternatively contain Folders. Only members of the ‘Student Virtual Folder Creators’ group can create Student Virtual Folders.
KKK/YYYY/GGGG For example: STU/13/1 This number will be automatically generated by HPRM.
HP Records Manager (HPRM 8.1) Web Client Classic User Guide DOC/14/1652[V2]
University of Tasmania Page 44
RECORD TYPE DESCRIPTION NUMBERING
Vacancy Sub Folder Used to create a pre-defined set of folders used to categorise the contents of the Vacancy Virtual Folder. Vacancy Sub Folders are linked to the Business Classification Scheme (BCS) and are titled using pre-defined titles.
LLLAAAXXXX-01 For example: FINPRO0142-01 Numbering based on ‘parent’ Vacancy Virtual Folder.
Vacancy Virtual Folder Used to create individual Vacancy Virtual Folders. A Vacancy Virtual Folder is created for each position in the University and holds information regarding the development of the position and the selection process to fill the position. The Folder acts as a container to contain a set of pre-defined Vacancy Sub Folders. Only members of the 'Vacancy Folder Creators’ group can create Vacancy Virtual Folders.
LLLAAAXXXX For example: FINPRO0142 The position number will need to be manually entered in HPRM on creation of the folder
Virtual Folder Used to group together records to provide a customised view of information stored in HPRM and as such can be used to group project related information or annual budgeting information etc. Virtual Folders act as a container and alternatively contain Folders. Only members of the ‘Virtual Folder Creators’ group can create Virtual Folders.
KK/YYYY/GGGGG For example: VF/13/1 This number will be automatically generated by HPRM.
Archive Box Used to contain inactive physical folders prior to destruction or transfer. Only members of the ‘Archive Box Creators’ group can create Archive Boxes.
KKK/YYYY/GGGGG For example: BOX/2013/123
Legacy Sub Folder Identifies record types utilised in previous system configuration that were sub folders. No longer utilised.
XXXXXXXX For example: 03/0127/01, AMS:09/1234/22-02
Legacy Folder Identifies record types utilised as Folders including ‘Parent’ folders in previous system configuration. No longer utilised.