HP D2D NAS Integration with Symantec™ Backup Exec™ 2010 Abstract This guide provides step by step instructions on how to configure and optimize Symantec Backup Exec 2010 in order to back up to HP D2D Backup Systems using a CIFS backup target. HP Part Number: EH985-90932 Published: February 2011 Edition: 1
Transcript
HP D2D NASIntegration with Symantec™ Backup Exec™2010
AbstractThis guide provides step by step instructions on how to configure and optimize Symantec Backup Exec 2010 in order to backup to HP D2D Backup Systems using a CIFS backup target.
HP Part Number: EH985-90932Published: February 2011Edition: 1
Confidential computer software. Valid license from HP required for possession, use or copying. Consistent with FAR 12.211 and 12.212, CommercialComputer Software, Computer Software Documentation, and Technical Data for Commercial Items are licensed to the U.S. Government undervendor's standard commercial license.
The information contained herein is subject to change without notice. The only warranties for HP products and services are set forth in the expresswarranty statements accompanying such products and services. Nothing herein should be construed as constituting an additional warranty. HP shallnot be liable for technical or editorial errors or omissions contained herein.
WARRANTY STATEMENT: To obtain a copy of the warranty for this product, see the warranty information website:
http://www.hp.com/go/storagewarranty
Linear Tape-Open, LTO, LTO Logo, Ultrium and Ultrium Logo are trademarks of Quantum Corp, HP and IBM in the US, other countries or both.
Microsoft, Windows, Windows NT, and Windows XP are U.S. registered trademarks of Microsoft Corporation.
Symantec and Backup Exec™ are trademarks or registered trademarks of Symantec Corporation or its affiliates in the U.S. and other countries.
1 Configure the D2D CIFS server.....................................................................4More about authentication modes...............................................................................................4Configuring User Authentication mode........................................................................................5Configuring AD Authentication Mode..........................................................................................6
To join a domain.................................................................................................................6To create shares and grant access permission..........................................................................8
2 Configure Backup Exec to use D2D CIFS Share............................................12Create a D2D CIFS target for backup........................................................................................12Create a Backup Exec Backup-to-disk folder...............................................................................13
3 Configure a backup rotation scheme...........................................................18To create a media set..............................................................................................................18To create backup policy...........................................................................................................20
About this guide..........................................................................................25Intended audience..................................................................................................................25Related documentation............................................................................................................25Document conventions and symbols..........................................................................................25HP technical support...............................................................................................................26HP websites...........................................................................................................................26Documentation feedback.........................................................................................................26
1 Configure the D2D CIFS serverThe first step in configuring the D2D device as a target for backups from Symantec Backup Execis to configure the CIFS server on the D2D Backup SystemOn the D2D Web Management Interface navigate to the NAS — CIFS Server page and select Edit.
The available Authentication options for the CIFS server are:• None – All shares created are accessible to any user from any client (this is the least secure
option)• User – Local (D2D) User account authentication
• AD – Active Directory User account authentication
More about authentication modesNone: This authentication mode requires no username or password authentication and is thesimplest configuration. Backup Exec will always be able to use shares configured in this mode withno changes to either server or Backup Exec configuration. However, this mode provides no datasecurity because anyone can access the shares and add or delete data.User: In this mode it is possible to create “local D2D users” from the D2D Web ManagementInterface. This mode requires the configuration of a respective local user on the Backup Exec mediaserver and configuration changes to the Backup Exec services. Individual users can then be assignedaccess to individual shares on the D2D Backup System. This authentication mode is ONLYrecommended when the Backup Exec media server is not a member of an AD Domain.AD: In this mode the D2D CIFS server becomes a member of an Active Directory Domain. In orderto join an AD domain the user needs to provide credentials of a user who has permission to addcomputers and users to the AD domain. After joining an AD Domain access to each share iscontrolled by Domain Management tools and domain users or groups can be given access toindividual shares on the D2D Backup System. This is the recommended authentication mode, if theBackup Exec Media server is a member of an AD domain.
4 Configure the D2D CIFS server
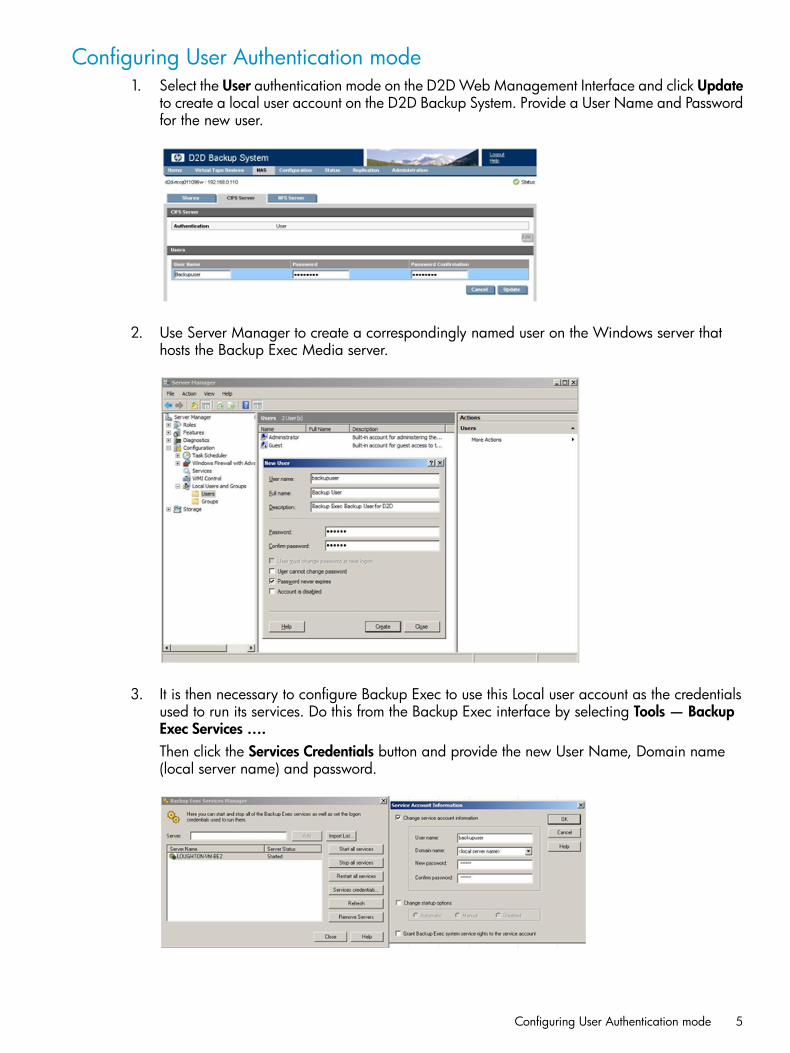
Configuring User Authentication mode1. Select the User authentication mode on the D2D Web Management Interface and click Update
to create a local user account on the D2D Backup System. Provide a User Name and Passwordfor the new user.
2. Use Server Manager to create a correspondingly named user on the Windows server thathosts the Backup Exec Media server.
3. It is then necessary to configure Backup Exec to use this Local user account as the credentialsused to run its services. Do this from the Backup Exec interface by selecting Tools — BackupExec Services ….Then click the Services Credentials button and provide the new User Name, Domain name(local server name) and password.
Configuring User Authentication mode 5
4. Restart the Backup Exec services before continuing with configuration. Note, however, thatthis is the ONLY user account that the Backup Exec Media server will be able to use to connectto remote storage that requires authentication, so this account must be the same for any otherdisk storage devices.
Configuring AD Authentication ModeThese are the steps required in order to configure backups in AD authentication mode:• Join the D2D CIFS server to the AD Domain and configure DNS.
• Create or specify a user to be used for backups.
• Apply user permissions to D2D shares.
• Configure Backup Exec services to use the correct Domain account.
To join a domain1. Connect to the D2D Web Management Interface, navigate to the NAS — CIFS Server page,
click Edit and choose AD from the drop-down menu. Provide the name of the domain that youwish to join, e.g “mydomain.local”
2. Click Update. If the domain controller is found, a pop-up box will request credentials of a userwith permission to join the domain. (Note that joining or leaving the domain will result infailure of any backup or restore operations that are currently running.) Provide credentials(username and password) of a domain user that has permission to add computers to thedomain and click Register.
6 Configure the D2D CIFS server
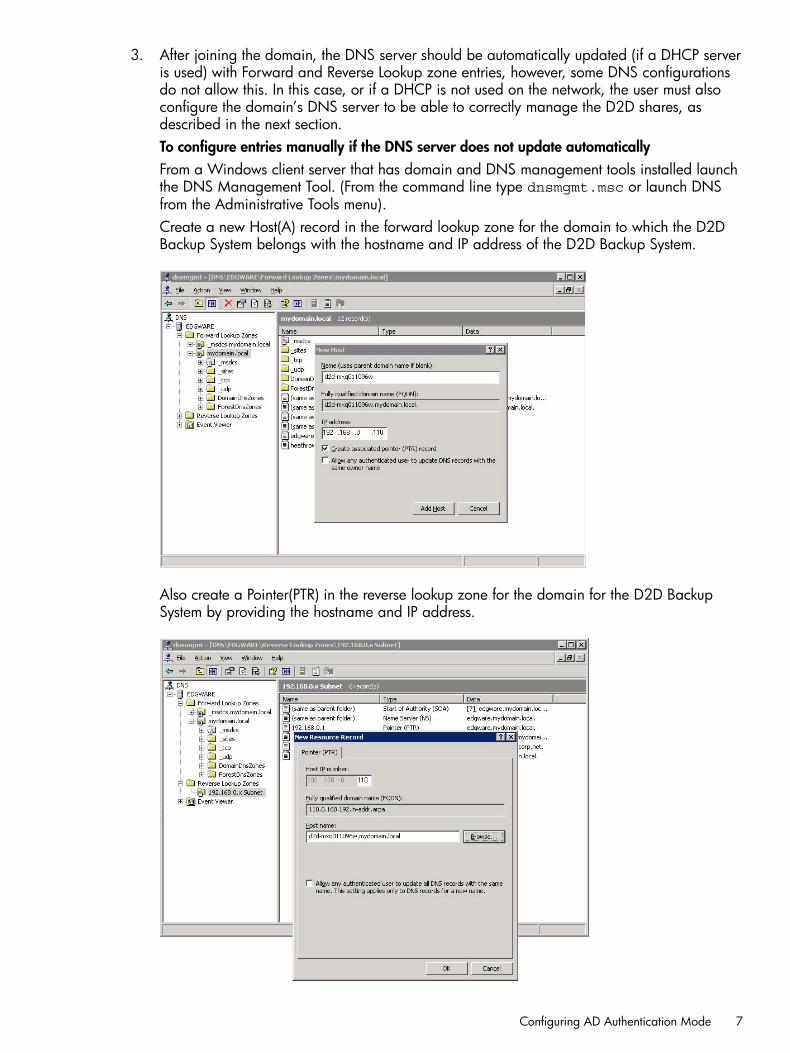
3. After joining the domain, the DNS server should be automatically updated (if a DHCP serveris used) with Forward and Reverse Lookup zone entries, however, some DNS configurationsdo not allow this. In this case, or if a DHCP is not used on the network, the user must alsoconfigure the domain’s DNS server to be able to correctly manage the D2D shares, asdescribed in the next section.To configure entries manually if the DNS server does not update automaticallyFrom a Windows client server that has domain and DNS management tools installed launchthe DNS Management Tool. (From the command line type dnsmgmt.msc or launch DNSfrom the Administrative Tools menu).Create a new Host(A) record in the forward lookup zone for the domain to which the D2DBackup System belongs with the hostname and IP address of the D2D Backup System.
Also create a Pointer(PTR) in the reverse lookup zone for the domain for the D2D BackupSystem by providing the hostname and IP address.
Configuring AD Authentication Mode 7
To create shares and grant access permissionNow that the D2D Backup System is part of a domain and can be managed, it is possible to createshares and grant access permission to them for domain account users or groups.1. Create a share on the D2D Backup System that is going to be used as a backup target, by
selecting NAS — Shares from the D2D Web Management Interface and clicking Create.Provide a share Name and Description, select the CIFS protocol and click Create.
2. Now that the D2D Backup System is a member of the domain its shares can be managedfrom any computer on the domain by configuring a customized Microsoft Management Console(MMC) with the Shared Folders snap-in. To do this first open a new MMC window by typingmmc at the command prompt or from the Start Search box. This will launch a new empty MMCwindow.
8 Configure the D2D CIFS server
3. To this empty MMC window add the Shared Folders snap-in. Select File — Add/RemoveSnap-in ..., then select Shared Folders from the left-hand pane.
4. Click Add > and in the dialog box choose the computer to be managed and select Sharesfrom the View options.
5. Click Finish and OK to complete the snap-in set up.
Configuring AD Authentication Mode 9
Note that the Folder Path field contains an internal path on the D2D Backup System.
6. Save this customized snap-in for future use.7. Select the Share Permissions tab and Add a user or group of users from the domain.
Specify the level of permission that the users will receive and click Apply.
8. Now, from any Windows server on the domain, it is possible to access the newly createdshare using the credentials of anyone who had been given permission to access the share. Ifa permitted user is logged into Windows, access to the share will be granted automaticallywith those permissions.
10 Configure the D2D CIFS server
NOTE: In some cases, when switching the D2D Backup System from No Authentication orUser Authentication mode to AD mode, it may be necessary to log out and back into aWindows client before it is possible to access the D2D shares.
9. It may also be necessary to configure Backup Exec to use this AD Domain user account as thecredentials used to run its services. Do this from the Backup Exec interface by selecting Tools— Backup Exec Services ….Select the Services Credentials button and provide the new User Name, Domain name andpassword.
10. Restart the Backup Exec services before continuing with configuration. Note, however, thatthis is the ONLY user account that the Backup Exec Media server will be able to use to connectto remote storage that requires authentication, so this account must be the same for any otherdisk storage devices.
Configuring AD Authentication Mode 11
2 Configure Backup Exec to use D2D CIFS ShareCreate a D2D CIFS target for backup
If a new D2D CIFS share has not already been created as part of the authentication configurationprocess in the previous section, it is now necessary to create a new CIFS NAS share.The available options for share creation are:• Name – This is the name of the CIFS share to be created
• Description – A “friendly” description of the share and its use, this will be presented to theWindows host for easy identification.
• Access Protocol – CIFS is the only option provided
• Network Path – This is a non-configurable field which shows the share name appended to theIP address upon creation of the share
• Write Protection – Global write protect for the share, to be used if no further writing is to bepermitted to the share.
1. Click Create, the share is configured and starts after a few seconds.
2. After the share has started it will report as “Online”. If required, configure User or ADauthentication mode, as already described, so that the share is accessible to the appropriateusers. After that it is possible to access the share from the Windows server, for example byclicking the Network Path link from the Shares page which will open a Windows Explorerwindow.
12 Configure Backup Exec to use D2D CIFS Share
Create a Backup Exec Backup-to-disk folderBackup Exec refers to NAS backup targets as “Backup-To-Disk” folders, which may be one of threetypes of folder:• Backup-To-Disk folder – This is used for CIFS shares or local disk devices
• Removable Backup-To-Disk folder – Used for removable media devices, such as HP RDX
• Shared Backup-To-Disk folder – Used with the CASO or SAN Shared Storage options to sharea NAS backup target across multiple Backup Exec Media servers.
When using an HP D2D CIFS share the “Backup-To-Disk” folder type should be used.1. From the Backup Exec, Devices page select the Media server and right click, then select New
Backup-To-Disk Folder…
2. This will launch a Backup-To-Disk Wizard to step through the creation and configuration of aBackup-To-Disk folder.Enter a name for this folder that Backup Exec will use to identify it. A best practice is to usethe name of the D2D Backup System and share name in order to easily identify where thisbackup-to-disk folder resides.
Create a Backup Exec Backup-to-disk folder 13
3. The next step is to provide the path to the backup-to-disk folder, this is the path to the CIFSshare on the D2D Backup System. There is no need to mount the D2D CIFS share as a Windowsdrive letter because the full path including domain extension or IP address with share namewill allow direct access to the D2D share.
4. If more than one Backup-To-Disk folder is required per D2D CIFS share, it is necessary tocreate multiple folders within the D2D NAS share because each Backup-to-disk folder mustbe in a different folder on disk.Use Windows Explorer to create a new folder on the D2D CIFS share.
5. The next step in the wizard provides the user with the option to pre-allocate the maximum sizeof each Backup-To-Disk file as it is created, this option MUST be set to “No”.Pre-allocating disk space for each backup to disk file will result in incorrectly reporteddeduplication ratio, and also poor performance or failures because the D2D Backup Systemwill need to “pad” the data file when created.
6. Configure the maximum size that each Backup-To-Disk file may reach before spanning to anew file.The default size is 4GB; however this should be set to a larger size in order to improveperformance. It is suggested that this maximum file size is set to at least the size of the fullbackup with enough headroom for future data growth. (If in doubt about the amount of growthexpected, setting this to the maximum value of 4TB (4096GB) will have no detrimental effect.)This means a single file can hold the entire backup and prevents the houskeeping process,which starts whenever a file is closed, from interfering with the remainder of the backup job.
14 Configure Backup Exec to use D2D CIFS Share
An exception to this rule is when D2D replication is being used when it may be beneficial touse a smaller file size in order to start replicating backup files before the whole backupcompletes. However this may reduce backup performance, if the D2D Backup System is heavilyloaded with other backups or housekeeping processes.
7. Configure the Maximum number of backup sets that can be held in each backup to disk file.This setting should be set to 1; this prevents backups from appending to backup-to-disk files.No space is lost in this configuration because no space is allocated per file. Appending ofbackups to Backup-to-disk files is undesirable because it prevents that file being overwrittenuntil all sets have expired. It also causes additional D2D replication overhead becausereplicating an appended file requires the replication target file to be “cloned” before newdata can be added to it, which reduces performance.
An exception is if a large Backup-to-disk file size is configured but backups are quite small.These backups could be appended to the Backup-to-disk file (if appending is enabled in thebackup job) and, in this case, the maximum number of backups per file can be configured
8. Configure the Maximum Number of Concurrent jobs.This is an important selection for D2D due to the limitation on the number of concurrently openfiles that are permitted. The default setting for this variable is 1, which means that only onebackup job is permitted to that Backup-To-Disk file at any one time.
Create a Backup Exec Backup-to-disk folder 15
When Backup Exec is backing up flat file data (rather than database or any other mediaagent) it will have four files open concurrently during the backup. One is the backup data file(B2DXXXXXX.bkf) which is deduplicated; the other three files are smaller than the 24KBpre-deduplication limit and consist of a file lock (B2DXXXXXX.lck), a changer configurationfile (Changer.cfg) and a Backup-To-Disk folder configuration file (Folder.cfg).However, it is possible that a second backup file may be temporarily open on the D2D BackupSystem during transitional periods when the backup spans to a new *.bkf file. This is becausethe Windows operating system will report that the previous file is closed before the D2DBackup System actually closes the file.It is recommended that no more than four backup jobs run concurrently to a D2D share - themaximum number of concurrent jobs setting is used to prevent more than four concurrentlyopen files. Depending on the number of Backup-To-Disk folders configured within a singleNAS share this value should be set in the range between 1 and 4.When Backup Exec is using media agents to back up other types of data, e.g. Exchange orOracle Database, it is possible that a much larger number of small (pre-deduplication) filesare held open concurrently. Thus it is recommended that only a single job runs to a D2D NASshare when backing up these data types.See the D2D Best Practices for VTL, NAS and Replication implementations for more informationon the maximum number of concurrently open deduplicated and pre-deduplicated files perD2D Share and per D2D Backup System appliance for different D2D Backup System models.
9. Configure the Low Disk Space Threshold setting.This is a number of GB of remaining disk space at which point backups to the Backup-To-Diskfolder are suspended. The default for this setting is 0GB, i.e. there is no low space thresholdset, and it is the recommended setting.With deduplication a physical disk space remaining figure is meaningless, because a backupmay use a fraction of the physical disk space compared to the amount of data backed up.
16 Configure Backup Exec to use D2D CIFS Share
10. Finally Backup Exec will present a summary of the Backup-To-Disk folder configuration beforecreating the folder.Once complete the Backup-To-Disk device will be created and presented on the Devices pagein Backup Exec. At creation time two small configuration files will be created on the D2D CIFSshare (Changer.cfg and Folder.cfg).
Create a Backup Exec Backup-to-disk folder 17
3 Configure a backup rotation schemeWhen backing up to CIFS shares on the D2D Backup System it is recommended that a similarretention and rotation scheme to that of virtual tape is used. There is some simplification over virtualtape in that no account needs to be taken of the number of cartridges within the virtual library,only the total number of files that can be supported on a D2D CIFS share (25000), which shouldbe more than adequate.It is, however, important to ensure that the amount of data in the share does not grow in anuncontrolled fashion due to keeping all backups forever. The default media set in Backup Exec isthe Keep Data Indefinitely set, this should not be used for CIFS backups.The following is an example of a “Best Practice” backup rotation and retention scheme configurationwith Backup Exec. This scheme observes the following best practices:• Backup-To-Disk files are never appended to; appended backups reduce replication performance,
prevent files from being overwritten until all sessions have expired and have no disk spacebenefit for NAS targets.
• Different media pools are used to set retention periods for different types of backup (Daily,Weekly, Monthly).
• Only one type of data is backed up in this Backup-To-Disk folder, in this case it is flat file data,other types would be Exchange, SQL, Oracle etc.
• This backup will create only one concurrent backup stream; up to three other flat file backups(of other client servers perhaps) could use the same Backup-To-Disk folder concurrently.
• Most backups will not include a Verify pass because this impacts overall performance.
• Software compression is disabled because this will slow the backup job and result in a worsededuplication ratio.
The rotation and retention scheme for this backup rotation scheme employs GFS as follows:1. Daily (Monday – Friday) Incremental backups, overwritten every week.2. Weekly (Saturday) Full backups, overwritten every 4 weeks.3. Monthly (1st Day Month) Full backups, overwritten every 12 months.4. Yearly (Jan 1st) Full backups, never overwritten.Monthly full backups will replace the last weekly full backup.
To create a media setThe first step in creating this scheme is to create new Backup Exec Media sets that employ thecorrect protection. Once this protection period expires media (in this case Backup-To-Disk Files)will be overwritten by the next backup job that uses the media set.In this example we need four new media sets as follows:
Append PeriodOverwrite Protection PeriodMedia Set Name
Infinite (though not used)5 DaysDaily Incremental Backup
Infinite (though not used)4 WeeksWeekly Full Backup
Infinite (though not used)1 YearMonthly Full Backup
Infinite (though not used)Infinite – Do not overwriteYearly Full Backup
18 Configure a backup rotation scheme
1. To create these media sets, go to the Media page of the Backup Exec interface and selectNew Media Set from the Tasks panel. An example of a media set configuration for the DailyIncremental Backup is shown.
2. It is also useful to change the Media overwrite options.From the Tools — Options menu select Media Management and change the Media overwriteoption to Overwrite recyclable media contained in the targeted media set before overwritingscratch media. This will ensure that the retention period of the media is not exceeded bycreating new Backup-To-Disk files rather than overwriting expired ones.
To create a media set 19
To create backup policy1. Once media sets have been created, a new backup policy can be created from the Job Setup
page on the Backup Exec User interface. There is a default backup policy that is similar to therequired scheme in this example, so copying this provides a start point for modification.
2. Once copied the new template can be renamed and edited to match the rotation scheme inthe example, the policy already consists of three individual job templates for Daily, Weeklyand Monthly backups.
Note that the individual Job templates for Daily, Weekly and Monthly backups need to bemodified.Device and MediaFirstly adjust the Device and Media options to:• Select the new Backup-To-Disk folder
• Change the media set to the newly created sets
• Set the job to always overwriteThe daily incremental backup template changes are shown here
20 Configure a backup rotation scheme
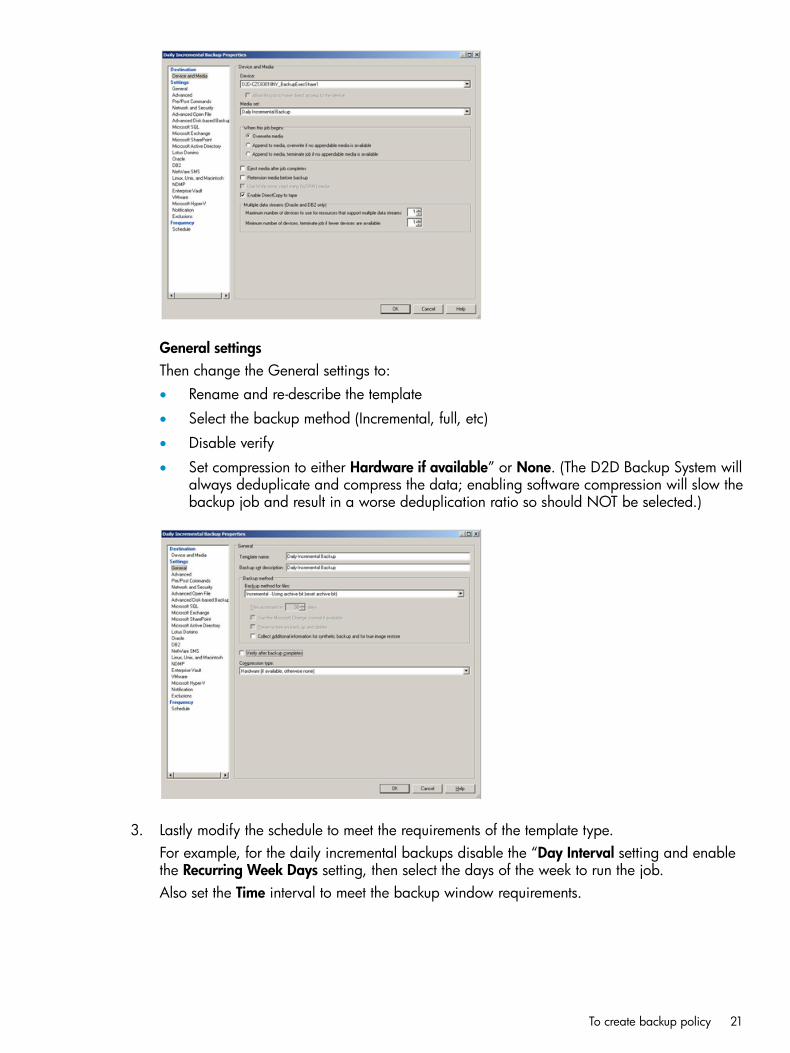
General settingsThen change the General settings to:• Rename and re-describe the template
• Select the backup method (Incremental, full, etc)
• Disable verify
• Set compression to either Hardware if available” or None. (The D2D Backup System willalways deduplicate and compress the data; enabling software compression will slow thebackup job and result in a worse deduplication ratio so should NOT be selected.)
3. Lastly modify the schedule to meet the requirements of the template type.For example, for the daily incremental backups disable the “Day Interval setting and enablethe Recurring Week Days setting, then select the days of the week to run the job.Also set the Time interval to meet the backup window requirements.
To create backup policy 21
4. Once the three existing templates have been modified, a new Yearly template needs to becreated using the same principles.The default template rules ensure that Weekly backups supersede Daily Backups and Monthlybackups supersede Weekly backups, if start times conflict, and can remain. Three further rulescan be created to ensure that Yearly backups supersede the other three backup types.
5. The last configuration step before actually creating the backup jobs is to create a BackupSelection list; this is the list of resources to be backed up.In this example the Selection list is just going to contain the local media server backup.If multiple servers are configured for backup, they will be queued to run sequentially in thebackup job. In order to ensure that multiple backup streams run concurrently to theBackup-To-Disk folder (assuming the concurrency value for the folder is greater than 1) morebackup selection lists can be created
22 Configure a backup rotation scheme
6. The last step in the process is to create backup jobs based on the Policy and Selection Lists.Select the New Jobs Using this policy option from the tasks panel, then select the Selectionlists for which jobs will be generated.
7. The jobs will be created and will run according to the schedule and rotation scheme defined.
To create backup policy 23
Housekeeping considerationsFor the initial backups new Backup-To-Disk files will be created for every new backup, however,as soon as sessions reach their protection expiration, Backup Exec will overwrite each file in turnas a new job starts.Because the backups are configured to use one Backup-To-Disk file per backup the housekeepingprocess will not start until the new backup has completed and thus will not interfere with the backup.However, if multiple jobs are running concurrently but do not finish at the same time there will besome housekeeping interaction with the other backups. In order to avoid this, some tuning of thebackup start times can be made in order to better align the backup finish times. This, however,means that a new policy with different templates is needed for each backup job.
The backups will now run according to the new schedule, for initial backups new backup files willbe created. When backup protection expires, e.g. after 1 week of incremental backups, the previousbackup files will be overwritten. Overwriting of the backup files will result in Housekeeping workbeing generated; this will run in parallel with the backup process and could cause a slight reductionin performance. During the backup, Backup Exec creates two files, one is the backup data filedepot which grows throughout the backup, the other is a temporary file of 15MB which is removedwhen the backup completes.
24 Configure a backup rotation scheme
About this guideThis guide provides information about:
• Provides step by step instructions on configuring a D2D NAS CIFS device on Symantec BackupExec 2010
• Describes the Symantec Backup Exec 2010 backup folder configuration options and identifieswhat settings to use with HP D2D NAS CIFS shares.
• Describes how to implement a full end–to–end recovery solution from a target D2D BackupSystem with D2D NAS CIFS shares using Symantec Backup Exec 2010
Intended audienceThis guide is intended for users who install, operate and maintain the HP StoreOnce D2D BackupSystem.This guide assumes a basic working knowledge of Symantec Backup Exec 2010 and that it hasbeen installed correctly by loading the appropriate Media Agents and licences.
Related documentationIn addition to this guide, the following document provides related information:
• HP StoreOnce Backup System Concepts Guide: If you are new to the HP StoreOnce BackupSystem, it is a good idea to read this guide before you configure your system. It describes theStoreOnce technology.
• HP StoreOnce Backup System User Guide: This guide contains detailed information on usingthe Web Management Interface. It also contains troubleshooting information, including detailson replacing failed or failing hard disks.
• D2D Best Practices for VTL, NAS and Replication implementations: This white paper adviseshow to plan the workload being placed on the HP StoreOnce Backup System in order tooptimize performance and minimize the impact of deduplication, replication and housekeepingoperations competing for resources. It is regularly updated.
You can find these documents from the Manuals page of the HP Business Support Center website:http://www.hp.com/support/manuals
In the Storage section, click Storage Solutions and then select your product.
Document conventions and symbolsTable 1 Document conventions
ElementConvention
Cross-reference links and e-mail addressesBlue text: Table 1 (page 25)