HTML <HTML> tag The first tag in a document should be HTML tag. These are the tags that’s tell a web browser where the HTML in your document begins and ends. Syntax -- --- <HTML>…………</HTML> <HEAD> tag The head tag has the general information also called meta-information. Metadata means data about data. Syntax------<HEAD>…………….</HEAD> THE HEAD ELEMENTS Only some tags are legal inside the head section. These are-- <base>,<link>,<meta>,<style>,<script>..etc. Table 1:Head Elements Tag Description <head> Defines information about the documents <title> Define the documents title <base> Defines the base URL for all the links on the page <link> Define the resourse reference <TITLE> tag Title is placed in head structure. Between the title tag type the title of the document. this will appear at the top of the browser’s site. Syntax---<TITLE>……..</TITLE <BODY> tag
Transcript
HTML<HTML> tag The first tag in a document should be HTML tag. These are the tags that’s tell a web browser where the HTML in your document begins and ends. Syntax -- --- <HTML>…………</HTML>
<HEAD> tag The head tag has the general information also called meta-information. Metadata means data about data. Syntax------<HEAD>…………….</HEAD>
THE HEAD ELEMENTS Only some tags are legal inside the head section. These are--<base>,<link>,<meta>,<style>,<script>..etc.
Table 1:Head Elements Tag Description
<head> Defines information about the documents
<title> Define the documents title
<base> Defines the base URL for all the links on the page
<link> Define the resourse reference
<TITLE> tag
Title is placed in head structure. Between the title tag type the title of the document. this will appear at the top of the browser’s site.
Syntax---<TITLE>……..</TITLE
<BODY> tagBody tag comes after head structure. In the body tag one can find all the stuff which should be displayed in Brower window.. ie. text, graphics, links, images..etc…. The most common attributes of body tag are BGCOLOR,BACKGROUND,TEXT AND LINK…
BGCOLOR Specifies the background color of the page. BACKGROUND sets background to a image. TEXT specifies the color of the text of the page. LINK specifies color of the hyperlink on the page.
Syntax----<BODY>……….</BODY>
EXAMPLE
Open a Notepad and type the following code.
<html>
<head><title>EXAMPLE</title></head>
<body bgcolor = ”green”>Welcome to HTML!</body>
</html>
Save as the “Mypage.html” in ‘C:’ drive
Start your internet browser. Select “Open” in the file menu Of your browser. A dialog box appears . Select “Browser” and locate your HTML file which you created-“Mypage.html” .Select it and “open”.
NOTE- when we save as HTML tag file ,you can use either .html extension or .htm extension. with newer software it will be perfectly safe to use .html
extension.Comments in HTML
Comment tag is used to insert comments in HTML source code. Comments will be ignored by browser . you can use comments to explain your code.
Syntax--- <!—This is comment-->
Note that you need an exclamation point after the opening bracket, but not before the closing bracket.
EXAMPLE –
<html>
<head><title>EXAMPLE</title></head>
<body ><!—This is body of the page-->
Welcome to HTML!</body>
</html>
WORKING WITH TEXTStandard HTML allows a fair amount of formatting to be applied to text, apart from size, color or font change. Bold and ITALIC texts are handled by the <B> and <I>.If you use both then get bold italic text. Here are some formatting are….
Simple Formatting-
The three most frequently used formatting tags are…
<B> hello </B> <I>Italic</I> <U>underline</U>
Example
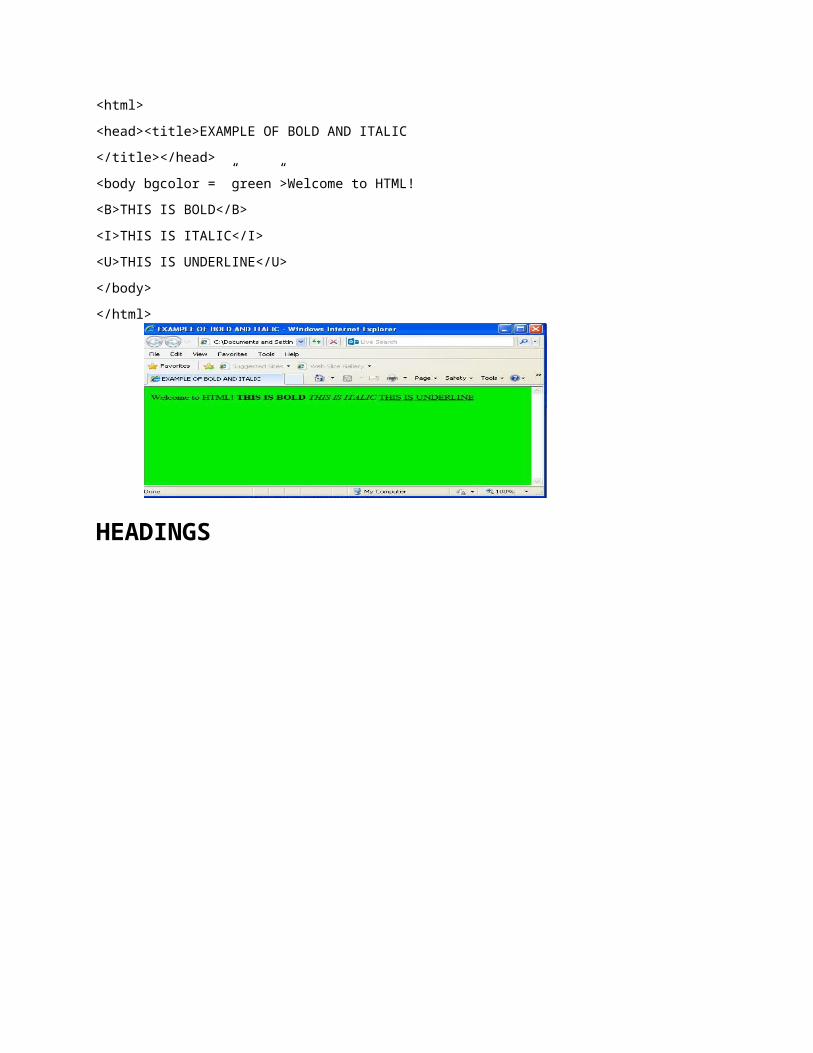
<html>
<head><title>EXAMPLE OF BOLD AND ITALIC
</title></head>
<body bgcolor = ”green”>Welcome to HTML!
<B>THIS IS BOLD</B>
<I>THIS IS ITALIC</I>
<U>THIS IS UNDERLINE</U>
</body>
</html>
HEADINGS
<html>
<head><title>EXAMPLE OF BOLD AND ITALIC
</title></head>
<body bgcolor = ”green”>Welcome to HTML!
<H1>THIS IS BOLD</H1>
<H2>THIS IS ITALIC</H2>
<H3>THIS IS UNDERLINE</H3>
</body>
</html>
NOTE-HTML automatically adds an extra blank line before and after a headings
EXAMPLE-
<html>
<head><title>EXAMPLE OF BOLD AND ITALIC
</title></head>
<body bgcolor = ”green”>Welcome to HTML!
<H1 ALIGN=”LEFT”>THIS IS BOLD</H1></BR>
<H2 ALIGN=”LEFT”>THIS IS NOT BOLD</H2></BR>
<H3 ALIGN=”LEFT”>THIS IS FUULL BOLD</H3></BR>
</body>
</html>
ADDRESSAddress specifies information such as authorship and contact details for the current documents. Browser render the content with paragraph-breaks before and after <ADDRESS> tag
Syntax------<ADDRESS>………………………..</ADDRESS>
Example
<html>
<head><title>EXAMPLE address
</title></head>
<body bgcolor = ”red”>Welcome to QPATH
<address>shahara state <br>
Lucknow </address>
<H1 ALIGN=”LEFT”>THIS IS BOLD</H1></BR>
<H2 ALIGN=”LEFT”>THIS IS NOT BOLD</H2></BR>
<H3 ALIGN=”LEFT”>THIS IS FUULL BOLD</H3></BR>
</body>
</html>
The following table list are available for text formatting in HTML
Table 2-Text Formatting tags
TAG DESCRIPTION<b> Define bold text<big> Define big text<i> Define italic text<small> Define small text<strong> Define strong text<sub> Define supscripted text<sup> Define superscript text<del> Define deleted text<u> Depricate.use style indeed
Texts are displayed with a standard font(sanserif, vardana, new roman)
The FONT tag allows you to change font and can take up to attributes-FACE,COLOR ,SIZE.
Size defines he text size. It can be value between 1 to 7
Color defines the color of the text enclosed between <FONT> tag. Face defines the name of the font to used
Following table shows the font attributes.
Font Example PurposeSize=”number” Size=”2” Defines the font sizeSize=”+number” Size=”+1” Increase the font sizeSize=”-number” Size=”-1” Decrease sizeFace=”face-name” Face=”Times” Defines face nameColor=”color-name” Color=”red” Defines the font color
<html>
<head><title>EXAMPLE address
</title></head>
<body>Example of font and size and color
<p style=”font-family: verdana”>THIS IS BOLD</p></BR>
<h1 style=”font-family: courier”>THIS IS NOT BOLD</h2></BR>
<h2 style=”font-size:80%”>THIS IS FULL BOLD</h3></BR>
<h3 style=”font-size:80%”>THIS IS FULL BOLD</h3></BR>
</body>
</html>
CHARACTER ENTITIES
Some characters have some special meaning in HTML, like the less than sign(<) that defines the start of HTML tag. If we want the browser to actually display these characters we insert character entities in the HTML source .
A character entity has three parts – an amparsands (&), an entity name or a # and an entity number, and finally a semicolon(;).To display a less than sign in HTML documents we must write – &1t; or <.
The advantage of using a name instead of a number is that a name is easier to learn.
The disadvantage is that not all browsers supports the newest entity names. The support for entity number is very good in almost all browsers. Entities are case sensitive.
NON-BREAKING SPACES
The most common character entity in HTML is the non-breaking spaces. Normally HTML will truncate space in the text. If you write 10 spaces in your text HTML will remove 9 of them. To add all spaces to your text , use the character entity.Result Description Entity name Entity number
Non-breaking space  < Less than < <
> Greater than > >& Ampersand & &“ Quotation mark " "‘ Apostrophe ' '
Example
<html>
<head><title>EXAMPLE address
</title></head>
<body>Example  <a href=”abc:person@IP.com”> of font and size and color
<h1 style=”font-family: verdana”>THIS IS BOLD</h1></BR>
<h2 style=”font-family: courier”>THIS IS NOT BOLD</h2></BR>
<h3 style=”font-size:80%”>THIS IS " FUULL BOLD</h3></BR>
</body>
</html>
PRESENTING AND ARRANGING TEXT
Line Break
<br> tag is used to end the line,but not to start the line.<br> tag breaks the line wherever you place it.<br> tag is empty tag. It has no closing tag.
Example
<html>
<head><title>EXAMPLE OF SMALL ,BIG , STRONG
</title></head>
<body>Welcome to QPATH
<p> QPATH<br> is located<br> in Shahara state</p>
</body>
</html>
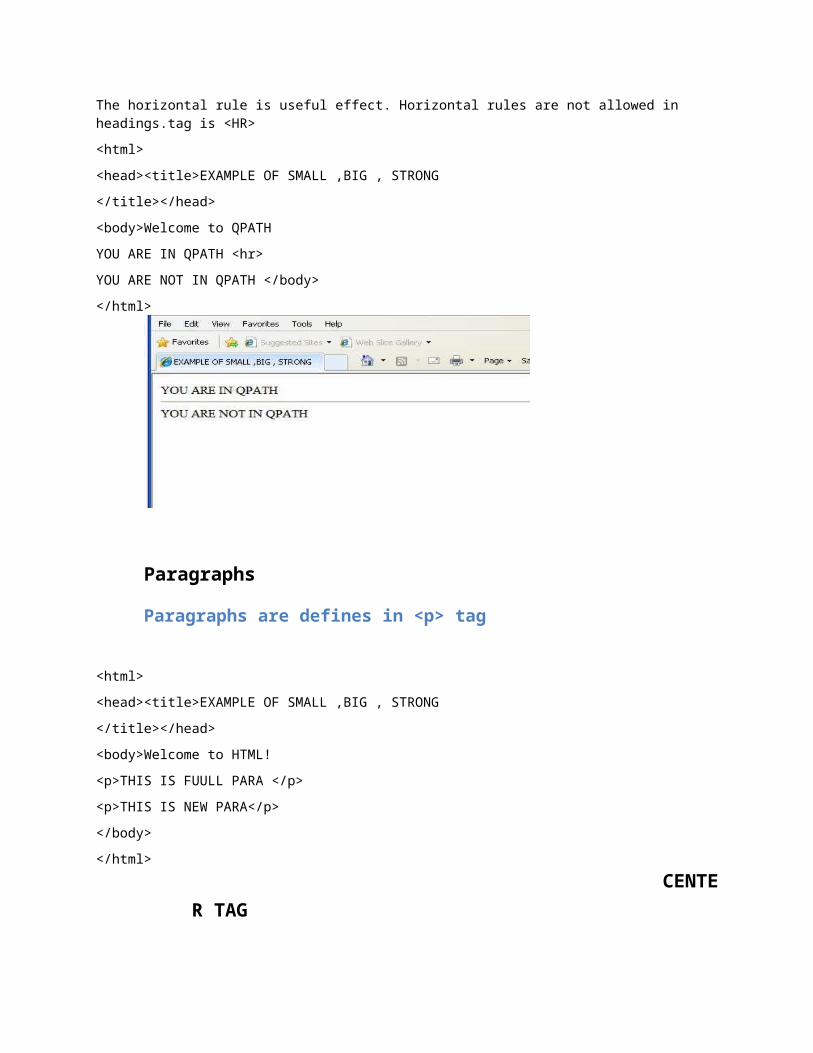
Horizontal Rules
The horizontal rule is useful effect. Horizontal rules are not allowed in headings.tag is <HR>
<html>
<head><title>EXAMPLE OF SMALL ,BIG , STRONG
</title></head>
<body>Welcome to QPATH
YOU ARE IN QPATH <hr>
YOU ARE NOT IN QPATH </body>
</html>
Paragraphs
Paragraphs are defines in <p> tag
<html>
<head><title>EXAMPLE OF SMALL ,BIG , STRONG
</title></head>
<body>Welcome to HTML!
<p>THIS IS FUULL PARA </p>
<p>THIS IS NEW PARA</p>
</body>
</html>
CENTER TAG
<html>
<head><title>Welcome To QPATH
</title></head>
<body>
<CENTER> YOU ARE IN QPATH </CENTER>
<LEFT> YOU ARE NOT IN QPATH
</LEFT>
</body>
</html>
DIV TAG
This tag is used to apply styles for a selected block of text.
Lists are used to display information in a compact, tight format and are a useful asset to know about
Ordered information Unordered information Definitions
ORDERED LISTS
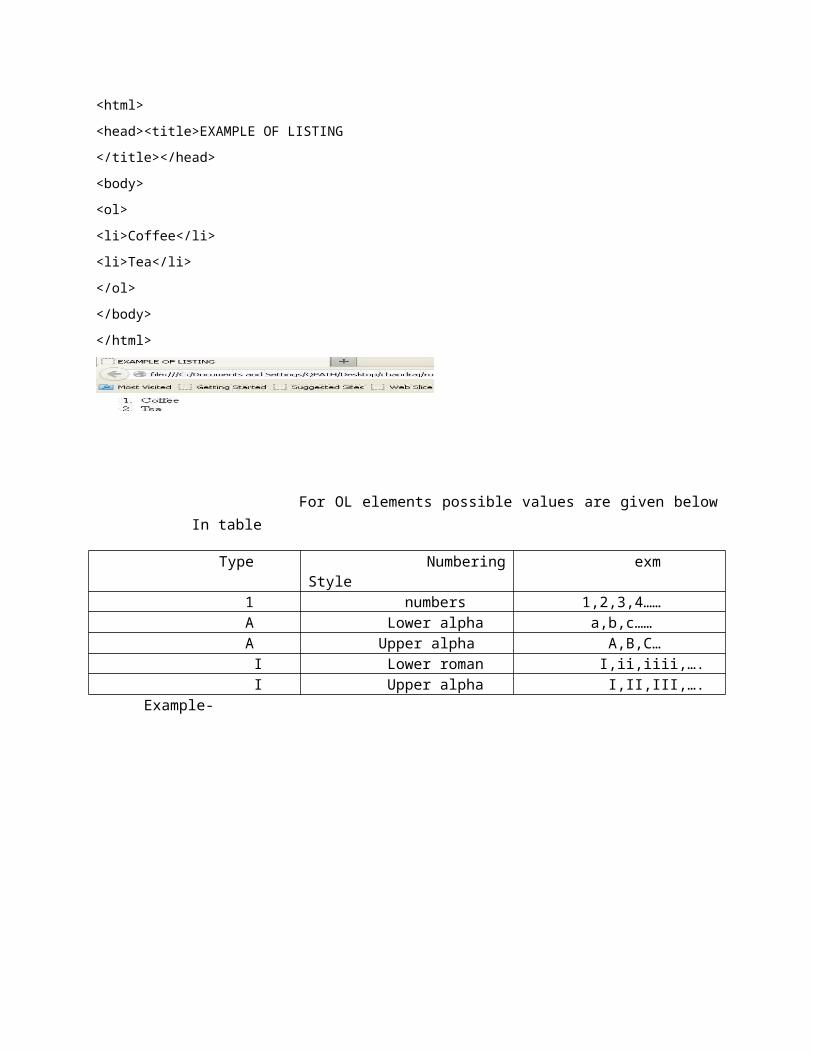
An ordered list is used to list items. An ordered list items with <OL> tag. Each list item starts with <LI> tag.Example.
<html>
<head><title>EXAMPLE OF LISTING
</title></head>
<body>
<ol>
<li>Coffee</li>
<li>Tea</li>
</ol>
</body>
</html>
For OL elements possible values are given below In table
Type Numbering Style exm 1 numbers 1,2,3,4…… A Lower alpha a,b,c…… A Upper alpha A,B,C… I Lower roman I,ii,iiii,…. I Upper alpha I,II,III,….
Example-
<html>
<head><title>EXAMPLE OF LISTING
</title></head>
<body>
<ol type=”A”>
<li>Coffee</li>
<li>Tea</li>
</ol>
<ol type=”a”>
<li>Coffee</li>
<li>Tea</li>
</ol>
<ol type=”i”>
<li>Coffee</li>
<li>Tea</li>
</ol>
<ol type=”I”>
<li>Coffee</li>
<li>Tea</li>
</ol>
<ol type=”1”>
<li>Coffee</li>
<li>Tea</li>
</ol>
</body>
</html>
UNORDERED LISTS
An unordered list is used to list items. An unordered list items with <UL> tag. Each list item starts with <LI> tag.Example.
<html>
<head><title>EXAMPLE OF LISTING
</title></head>
<body>
<ul>
<li>Coffee</li>
<li>Tea</li>
</ul>
</body>
</html>
The following example demonstrate different type of unordered list available in HTML
<html>
<head><title>EXAMPLE OF LISTING
</title></head>
<body>
<ul type=”disc”>
<li>Coffee</li>
<li>Tea</li>
</ul>
<ul type=”square”>
<li>Coffee</li>
<li>Tea</li>
</ul>
<ul type=”circle”>
<li>Coffee</li>
<li>Tea</li></ul></body>
</html>
DEFINITION LISTS
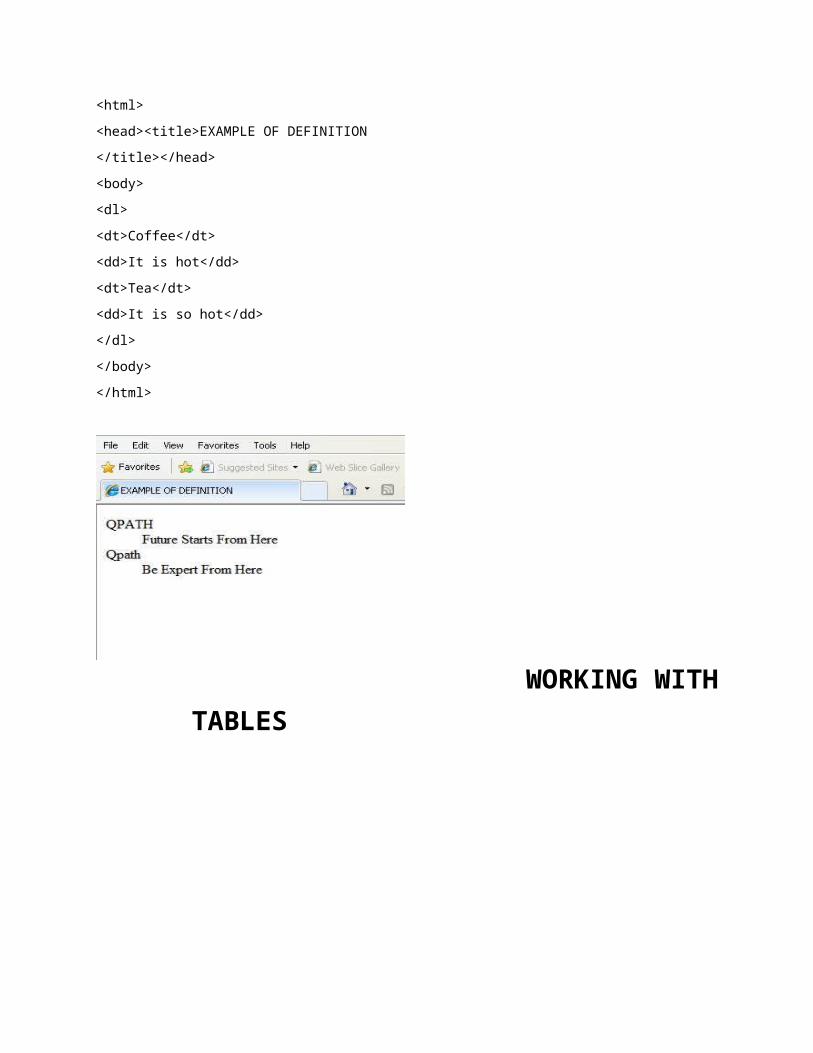
A definition list is not a list of items. This is a list of terms and explanations of the terms. A Definition list starts with <DL> tag. Each definition list start with <DT> tag and each definition list definition list start with <DD> tag.
Example-
<html>
<head><title>EXAMPLE OF DEFINITION
</title></head>
<body>
<dl>
<dt>Coffee</dt>
<dd>It is hot</dd>
<dt>Tea</dt>
<dd>It is so hot</dd>
</dl>
</body>
</html>
WORKING WITH TABLES
Tables are defined in <table> tag. A table is dived into rows and each row is divided in data cells(td tag). A data cell can contain text letters, images , links ,etc…
Tag Description
Table Defines a table
Th Defines a table head
Tr Defines a row
Td Defines a column
Caption Defines a table caption
cellpading Defines distance between the data in cell and the boundaries of the cell
cellspacing Defines distance between the data in cell and the boundaries of the cell
Colspan Define col spaning
rowspan Defines row spaning
Thead Define table headExample
<html>
<head>
<title>Example of Table</title></head>
<body><table border=”1”><tr>
<th>Name</th>
<th>class</th>
</tr><th>Rollo</th>
</tr>
<tr><td>Ram</td>
<td>MCA</td>
<td>16</td></tr>
<tr><td>Ramesh</td>
<td>MCA2</td>
<td>166</td></tr>
</table>
</body>
</html>
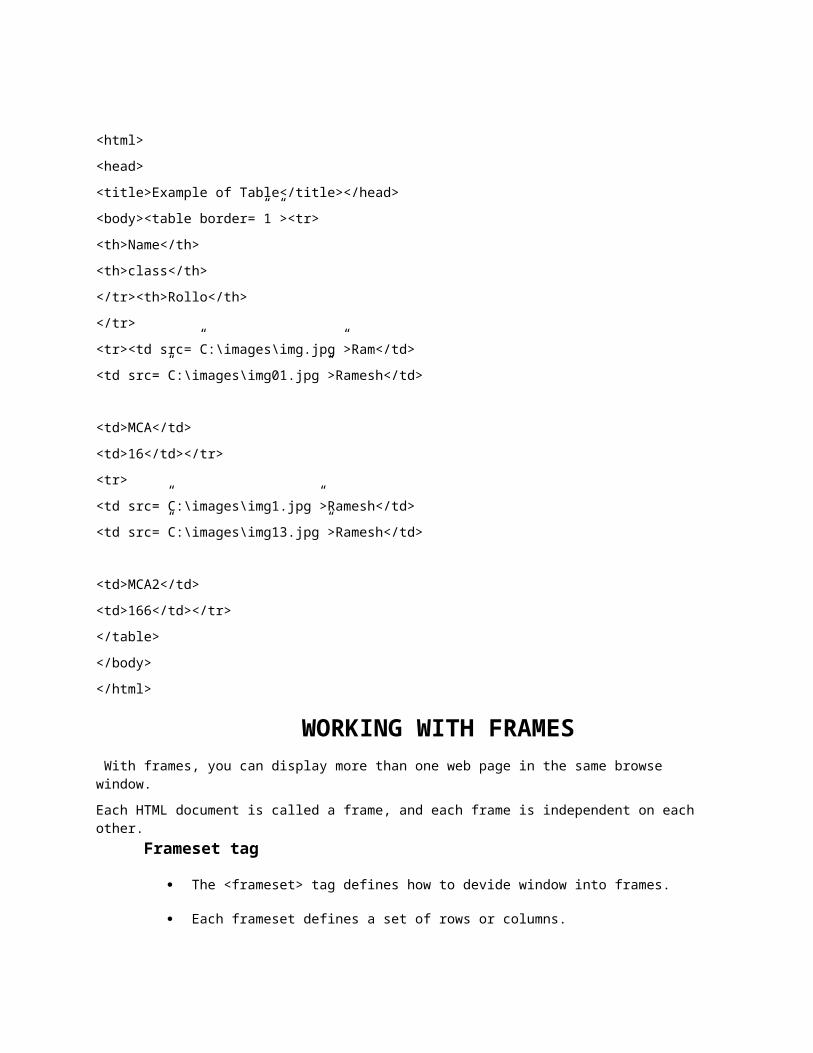
USING IMAGES IN TABLES
<html>
<head>
<title>Example of Table</title></head>
<body><table border=”1”><tr>
<th>Name</th>
<th>class</th>
</tr><th>Rollo</th>
</tr>
<tr><td src=”C:\images\img.jpg”>Ram</td>
<td src=”C:\images\img01.jpg”>Ramesh</td>
<td>MCA</td>
<td>16</td></tr>
<tr>
<td src=”C:\images\img1.jpg”>Ramesh</td>
<td src=”C:\images\img13.jpg”>Ramesh</td>
<td>MCA2</td>
<td>166</td></tr>
</table>
</body>
</html>
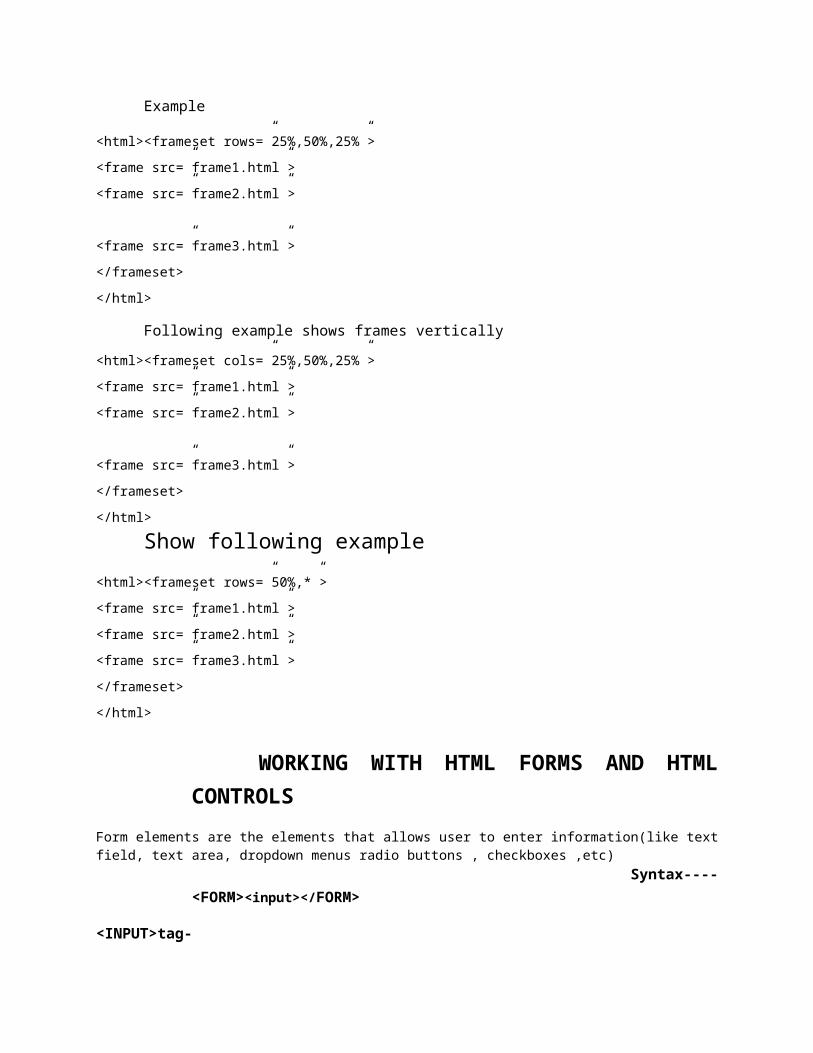
WORKING WITH FRAMES With frames, you can display more than one web page in the same browse window.
Each HTML document is called a frame, and each frame is independent on each other.Frameset tag
The <frameset> tag defines how to devide window into frames.
Each frameset defines a set of rows or columns.
Example
<html><frameset rows=”25%,50%,25%”>
<frame src=”frame1.html”>
<frame src=”frame2.html”>
<frame src=”frame3.html”>
</frameset>
</html>
Following example shows frames vertically
<html><frameset cols=”25%,50%,25%”>
<frame src=”frame1.html”>
<frame src=”frame2.html”>
<frame src=”frame3.html”>
</frameset>
</html>
Show following example
<html><frameset rows=”50%,*”>
<frame src=”frame1.html”>
<frame src=”frame2.html”>
<frame src=”frame3.html”>
</frameset>
</html>
WORKING WITH HTML FORMS AND HTML CONTROLS
Form elements are the elements that allows user to enter information(like text field, text area, dropdown menus radio buttons , checkboxes ,etc)
Syntax----<FORM><input></FORM>
<INPUT>tag-
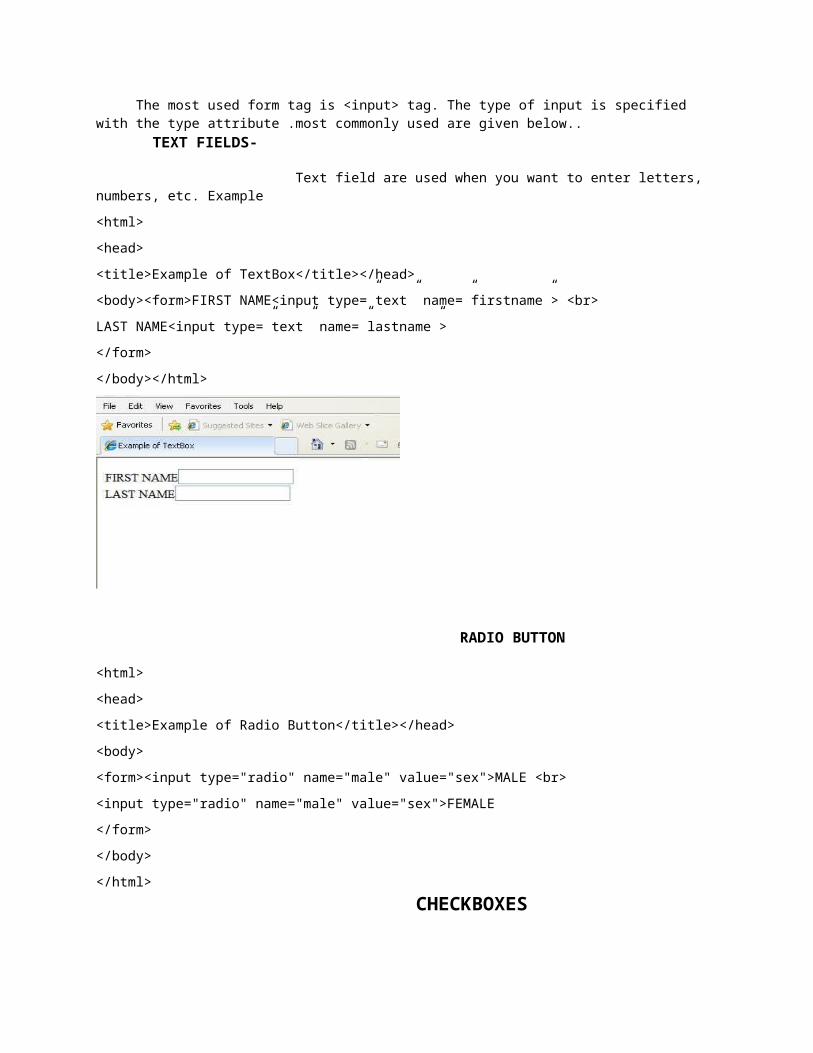
The most used form tag is <input> tag. The type of input is specified with the type attribute .most commonly used are given below..
TEXT FIELDS-
Text field are used when you want to enter letters, numbers, etc. Example
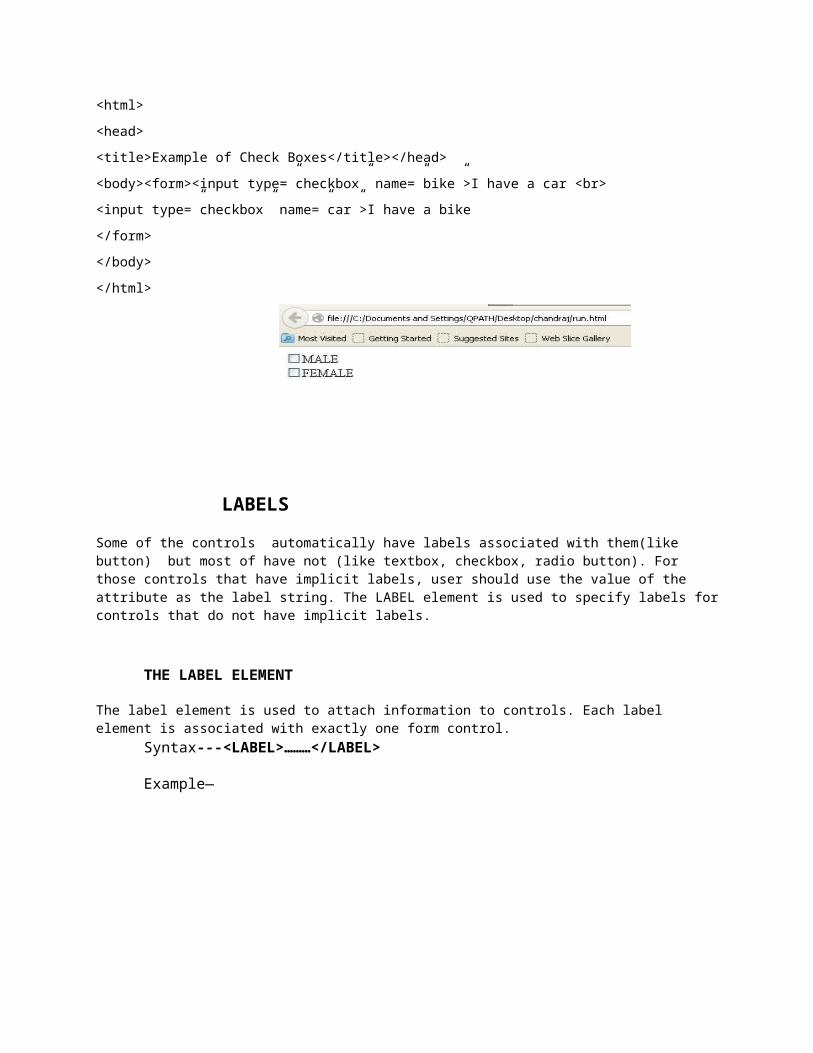
<body><form><input type=”checkbox” name=”bike”>I have a car <br>
<input type=”checkbox” name=”car”>I have a bike
</form>
</body>
</html>
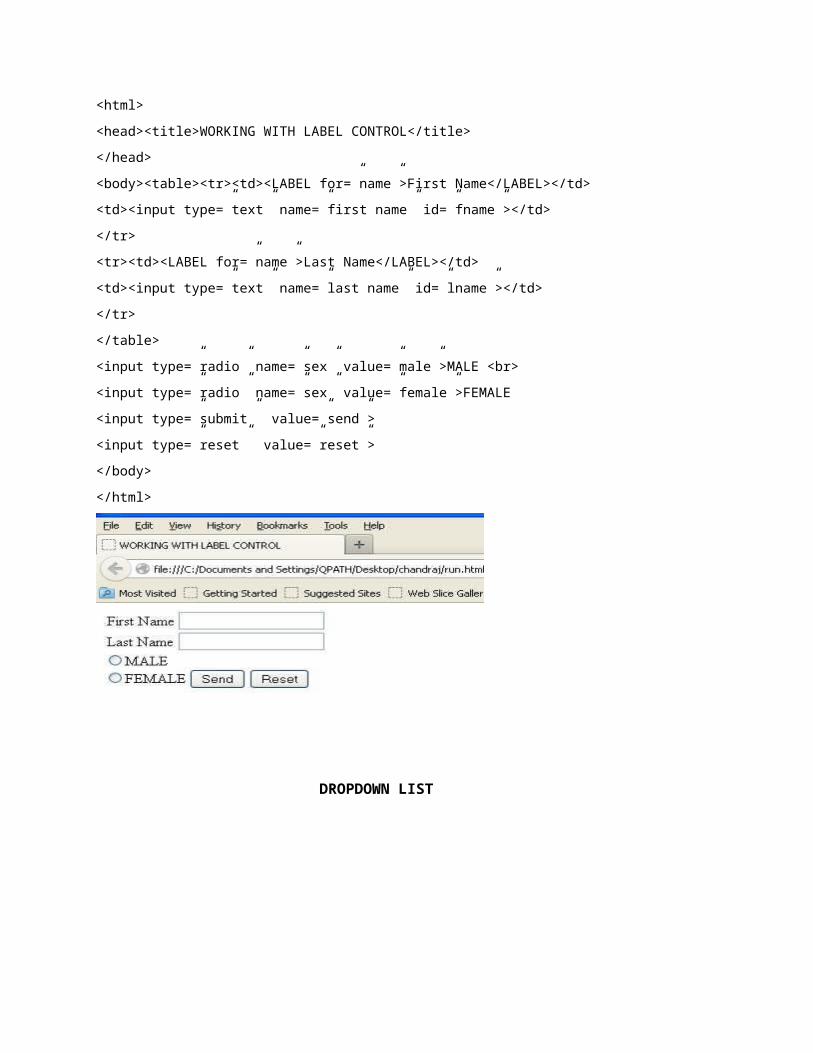
LABELS
Some of the controls automatically have labels associated with them(like button) but most of have not (like textbox, checkbox, radio button). For those controls that have implicit labels, user should use the value of the attribute as the label string. The LABEL element is used to specify labels for controls that do not have implicit labels.
THE LABEL ELEMENT
The label element is used to attach information to controls. Each label element is associated with exactly one form control.
<head><title>WORKING WITH DROPDOWN LIST CONTROL</title>
</head>
<body><form><select name=”car”>
<option value=”volvo”>Volvo
<option value=”safari”>Safari
<option value=” Toyota”>Toyota
<option value=”Boloro”>Boloro
</form>
</body>
</html>
What is CSS?Maybe you already heard about CSS without really knowing what it is. In this lesson you will learn more about what CSS is and what it can do for you.
CSS is an acronym for Cascading Style Sheets.
What can I do with CSS?
CSS is a style language that defines layout of HTML documents. For example, CSS covers fonts, colours, margins, lines, height, width, background images, advanced positions and many other things. Just wait and see!
HTML can be (mis-)used to add layout to websites. But CSS offers more options and is more accurate and sophisticated. CSS is supported by all browsers today.
After only a few lessons of this tutorial you will be able to make your own style sheets using CSS to give your website a new great look.
What is the difference between CSS and HTML?
HTML is used to structure content. CSS is used for formatting structured content.
Which benefits will CSS give me?
CSS was a revolution in the world of web design. The concrete benefits of CSS include:
control layout of many documents from one single style sheet; more precise control of layout; apply different layout to different media-types (screen, print, etc.); numerous advanced and sophisticated techniques.
The basic CSS syntax
Let's say we want a nice red color as the background of a webpage:
Using HTML we could have done it like this:
<body bgcolor="#FF0000"><body bgcolor=”red”>
With CSS the same result can be achieved like this:
body {background-color: #FF0000;}
As you will note, the codes are more or less identical for HTML and CSS. The above example also shows you the fundamental CSS model:
Applying CSS to an HTML document
There are three ways you can apply CSS to an HTML document. These methods are all outlined below. We recommend that you focus on the third method i.e. external.
Method 1: In-line (the attribute style)
One way to apply CSS to HTML is by using the HTML attribute style. Building on the above example with the red background color, it can be applied like this:
<html> <head> <title>Example</title> </head> <body style="background-color: #FF0000;"> <p>This is a red page</p> </body></html>
Method 2: Internal (the tag style)
Another way is to include the CSS codes using the HTML tag <style>. For example like this:
<html> <head> <title>Example</title> <style type="text/css"> body {background-color: #FF0000;}
h1{foreground-color:green;} </style> </head> <body> <h1>This is a red page</h1> </body></html>
Method 3: External (link to a style sheet)
The recommended method is to link to a so-called external style sheet. Throughout this tutorial we will use this method in all our examples.
An external style sheet is simply a text file with the extension .css. Like any other file, you can place the style sheet on your web server or hard disk.
For example, let's say that your style sheet is named style.css and is located in a folder named style. The situation can be illustrated like this:
The trick is to create a link from the HTML document (default.htm) to the style sheet (style.css). Such link can be created with one line of HTML code:
This link tells the browser that it should use the layout from the CSS file when displaying the HTML file. The really smart thing is that several HTML documents can be linked to the same style sheet. In other words, one CSS file can be used to control the layout of many HTML documents.
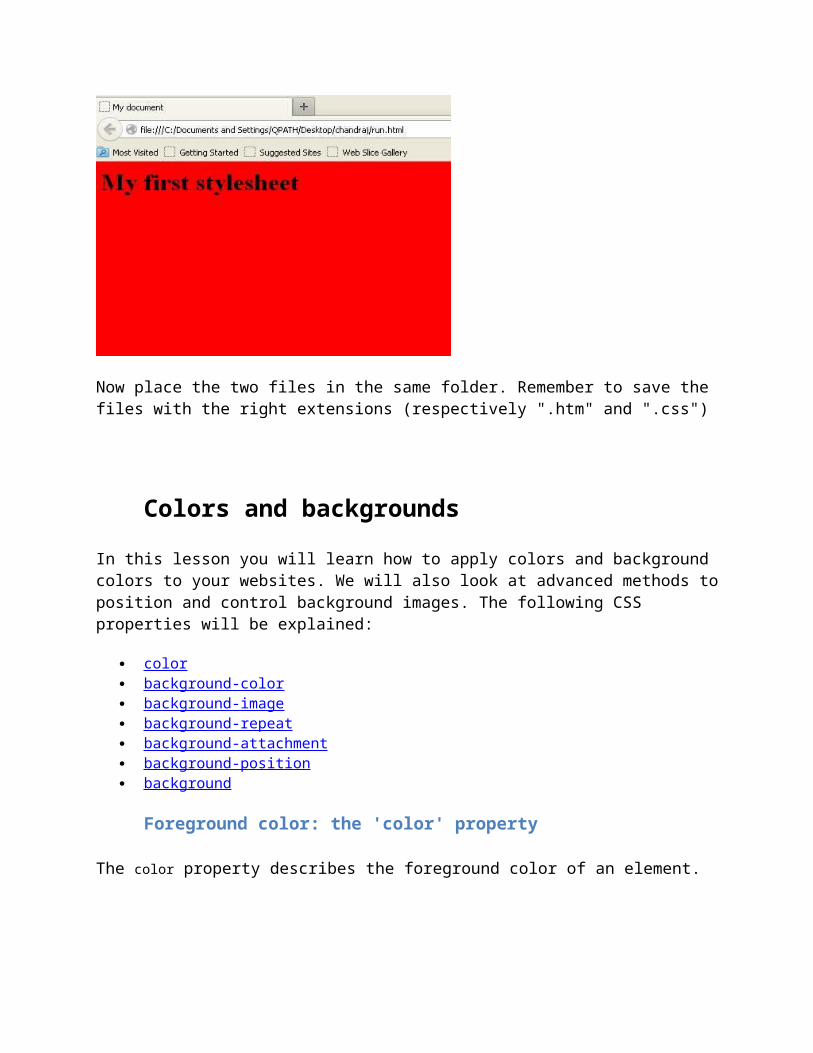
EXAMPLES
Open Notepad (or whatever text editor you use) and create two files - an HTML file and a CSS file - with the following contents:
Now place the two files in the same folder. Remember to save the files with the right extensions (respectively ".htm" and ".css")
Colors and backgrounds
In this lesson you will learn how to apply colors and background colors to your websites. We will also look at advanced methods to position and control background images. The following CSS properties will be explained:
color background-color background-image background-repeat background-attachment background-position background
Foreground color: the 'color' property
The color property describes the foreground color of an element.
For example, imagine that we want all headlines in a document to be dark red. The headlines are all marked with the HTML element <h1>. The code below sets the color of <h1> elements to red.
Colors can be entered as hexadecimal values as in the example above (#ff0000), or you can use the names of the colors ("red") or rgb-values (rgb(255,0,0)).
The 'background-color' property
The background-color property describes the background color of elements.
The element <body> contains all the content of an HTML document. Thus, to change the background color of an entire page, the background-color property should be applied to the <body> element.
You can also apply background colors to other elements including headlines and text. In the example below, different background colors are applied to <body> and <h1> elements.
body {background-color: #FFCC66;
}
h1 {color: #990000;background-color: #FC9804;
}
Notice that we applied two properties to <h1> by dividing them by a semicolon.
Background images [background-image]
The CSS property background-image is used to insert a background image.
As an example of a background image, we use the butterfly below. You can download the image so you can use it on your own computer (right click the image and choose "save image as"), or you can use another image as you see fit.
To insert the image of the butterfly as a background image for a web page, simply apply the background-image property to <body> and specify the location of the image.
body {background-color: #FFCC66;background-image: url("butterfly.gif");
}
h1 {color: #990000;background-color: #FC9804;
}
NB: Notice how we specified the location of the image as url("butterfly.gif"). This means that the image is located in the same folder as the style sheet. You can also refer to images in other folders using url("../images/butterfly.gif") or even on the Internet indicating the full address of the file: url("http://www.html.net/butterfly.gif").
Fonts
In this lesson you will learn about fonts and how they are applied using CSS. We will also look at how to work around the issue that specific fonts chosen for a website can only be seen if the font is installed on the PC used to access the website. The following CSS properties will be described:
The property font-family is used to set a prioritized list of fonts to be used to display a given element or web page. If the first font on the list is not installed on the computer used to access the site, the next font on the list will be tried until a suitable font is found.
There are two types of names used to categorize fonts: family-names and generic families. The two terms are explained below.
Family-name
Examples of a family-name (often known as "font") can e.g. be "Arial", "Times New Roman" or "Tahoma".
Generic family
Generic families can best be described as groups of family-names with uniformed appearances. An example is sans-serif, which is a collection of fonts without "feet".
Text
Formatting and adding style to text is a key issue for any web designer. In this lesson you will be introduced to the amazing opportunities CSS gives you to add layout to text. The following properties will be described:
The property text-indent allows you to add an elegant touch to text paragraphs by applying an indent to the first line of the paragraph. In the example below a 30px is applied to all text paragraphs marked with <p>:
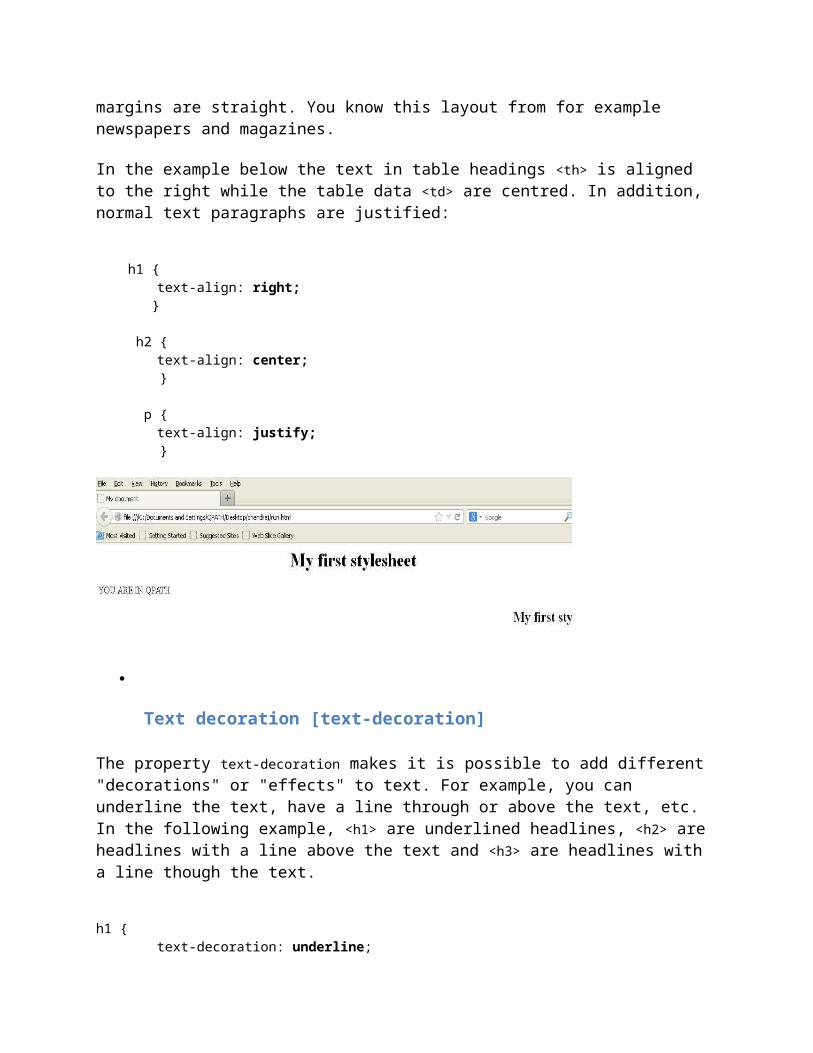
The CSS property text-align corresponds to the attribute align used in old versions of HTML. Text can either be aligned to the left, to the right or centred. In addition to this, the value justify will stretch each line so that both the right and left margins are straight. You know this layout from for example newspapers and magazines.
In the example below the text in table headings <th> is aligned to the right while the table data <td> are centred. In addition, normal text paragraphs are justified:
h1 {text-align: right;
}
h2 {text-align: center;
}
p {text-align: justify;
}
Text decoration [text-decoration]
The property text-decoration makes it is possible to add different "decorations" or "effects" to text. For example, you can underline the text, have a line through or above the text, etc. In the following example, <h1> are underlined headlines, <h2> are headlines with a line above the text and <h3> are headlines with a line though the text.
h1 {text-decoration: underline;
}
h2 {text-decoration: overline;
}
h3 {text-decoration: line-through;
}
Letter space [letter-spacing]
The spacing between text characters can be specified using the property letter-spacing. The value of the property is simply the desired width. For example, if you want a spacing of 3px between the letters in a text paragraph <p> and 6px between letters in headlines <h1> the code below could be used.
h1 {letter-spacing: 6px;
}
p {letter-spacing: 3px;
}
Text transformation [text-transform]
The text-transform property controls the capitalization of a text. You can choose to capitalize, use uppercase or lowercase regardless of how the original text is looks in the HTML code.
An example could be the word "headline" which can be presented to the user as "HEADLINE" or "Headline". There are four possible values for text-transform:
capitalize
Capitalizes the first letter of each word. For example: "john doe" will be "John Doe".
uppercase
Converts all letters to uppercase. For example: "john doe" will be "JOHN DOE".
lowercase
Converts all letters to lowercase. For example: "JOHN DOE" will be "john doe".
none
No transformations - the text is presented as it appears in the HTML code.
As an example, we will use a list of names. The names are all marked with <li> (list-item). Let's say that we want names to be capitalized and headlines to be presented in uppercase letters.
Try to take a look at the HTML code for this example and you will see that the text actually is in lowercase.
h1 {text-transform: uppercase;
}
li {text-transform: capitalize;
}
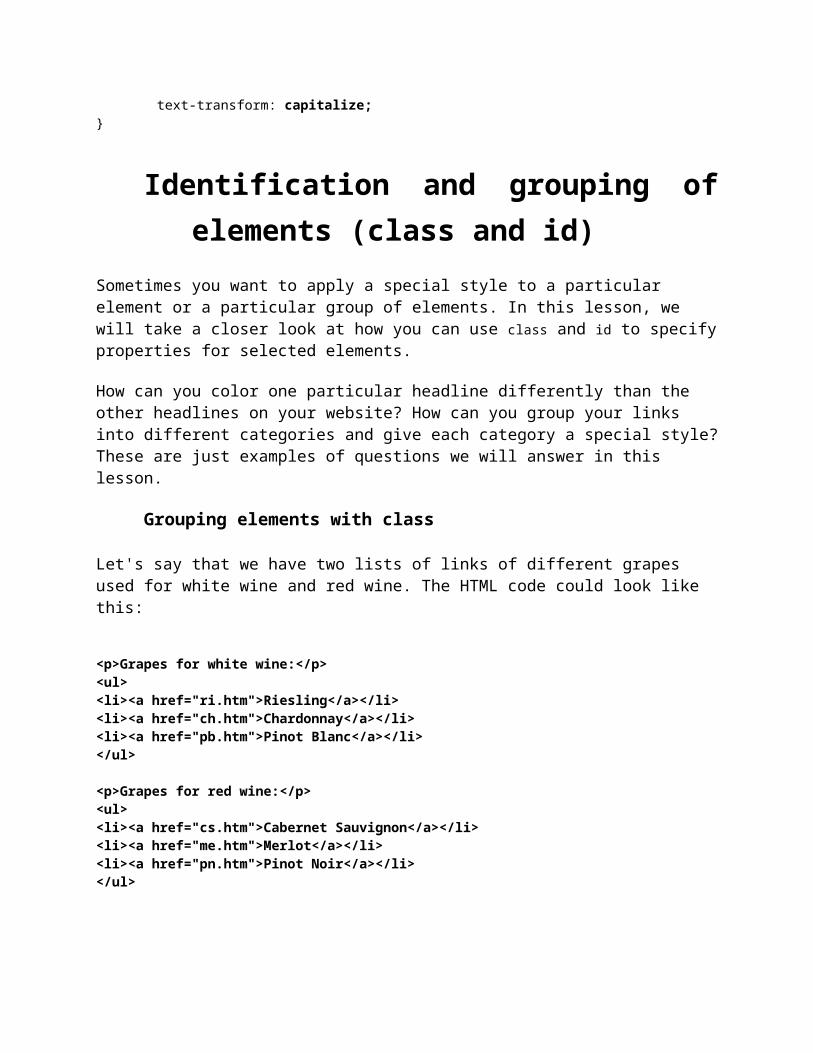
Identification and grouping of elements (class and id)
Sometimes you want to apply a special style to a particular element or a particular group of elements. In this lesson, we will take a closer look at how you can use class and id to specify properties for selected elements.
How can you color one particular headline differently than the other headlines on your website? How can you group your links into different categories and give each category a special style? These are just examples of questions we will answer in this lesson.
Grouping elements with class
Let's say that we have two lists of links of different grapes used for white wine and red wine. The HTML code could look like this:
<p>Grapes for white wine:</p><ul><li><a href="ri.htm">Riesling</a></li><li><a href="ch.htm">Chardonnay</a></li><li><a href="pb.htm">Pinot Blanc</a></li></ul>
<p>Grapes for red wine:</p><ul><li><a href="cs.htm">Cabernet Sauvignon</a></li><li><a href="me.htm">Merlot</a></li><li><a href="pn.htm">Pinot Noir</a></li></ul>
Then we want the white wine links to be yellow, the red wine links to be red and the rest of the existing links on the webpage to stay blue.
To achieve this, we divide the links into two categories. This is done by assigning a class to each link using the attribute class.
Let us try to specify some classes in the example above:
<p>Grapes for white wine:</p><ul><li><a href="ri.htm" class="whitewine">Riesling</a></li><li><a href="ch.htm" class="whitewine">Chardonnay</a></li><li><a href="pb.htm" class="whitewine">Pinot Blanc</a></li></ul>
<p>Grapes for red wine:</p><ul><li><a href="cs.htm" class="redwine">Cabernet Sauvignon</a></li><li><a href="me.htm" class="redwine">Merlot</a></li><li><a href="pn.htm" class="redwine">Pinot Noir</a></li></ul>
We can hereafter define special properties for links belonging to whitewine and redwine, respectively.
a {color: blue;
}
a.whitewine {color: #FFBB00;
}
a.redwine {color: #800000;
}
As shown in the example you can define the properties for elements which belong to a certain class by using .classname in the style sheet of the document.
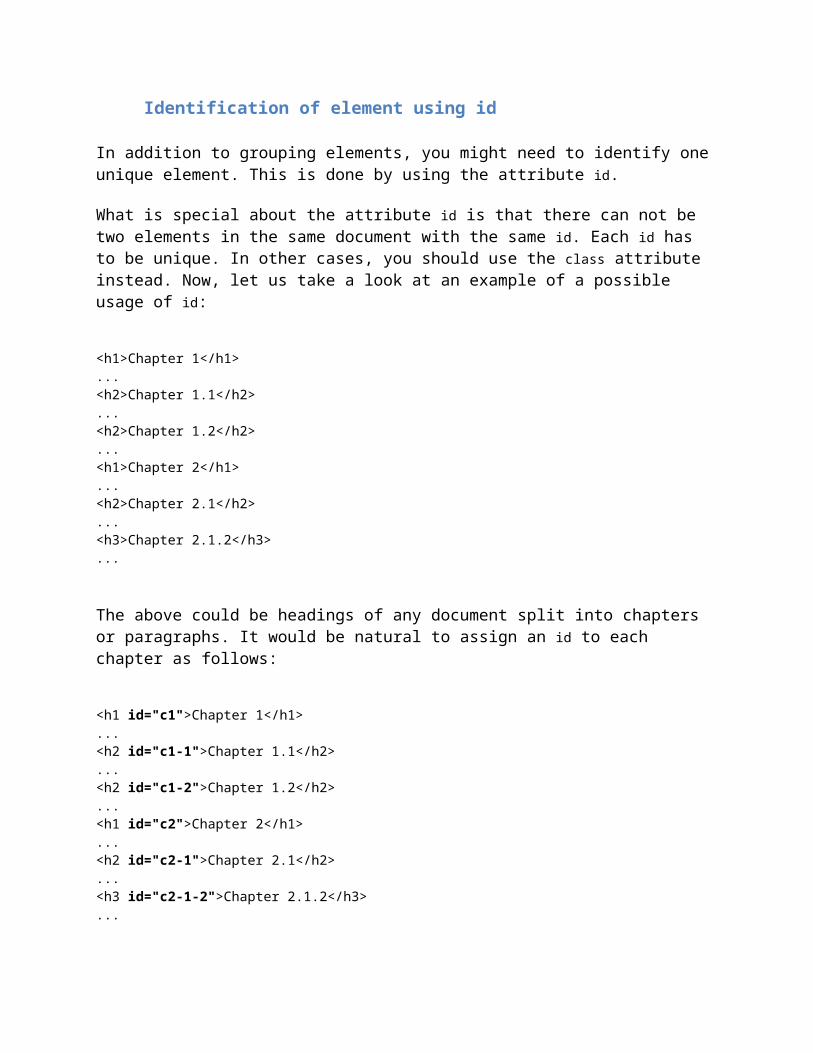
Identification of element using id
In addition to grouping elements, you might need to identify one unique element. This is done by using the attribute id.
What is special about the attribute id is that there can not be two elements in the same document with the same id. Each id has to be unique. In other cases, you should use the class attribute instead. Now, let us take a look at an example of a possible usage of id:
Let us say that the headline for chapter 1.2 must be in red. This can be done accordingly with CSS:
#c1-2 {color: red;
}
As shown in the example above you can define the properties in a specific element by using #id in the stylesheet of the document.
Borders
Borders can be used for many things, for example as a decorative element or to underline a separation of two things. CSS gives you endless options when using borders in your pages.
border-width border-color border-style border
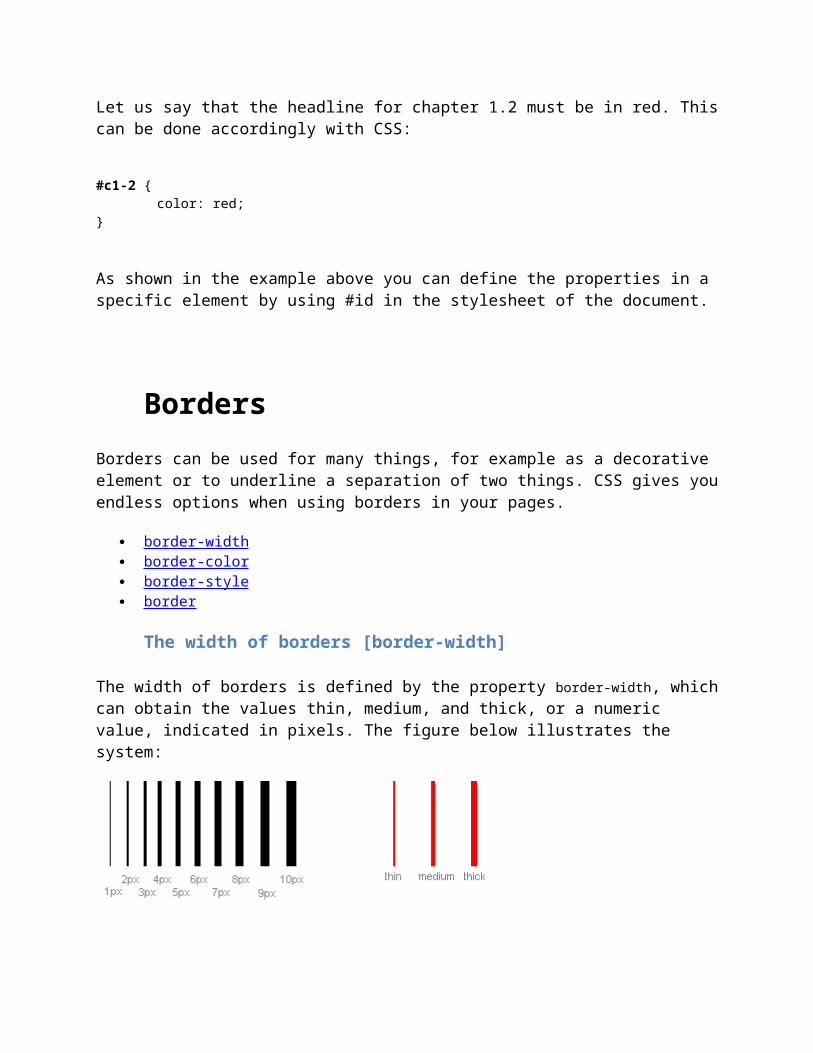
The width of borders [border-width]
The width of borders is defined by the property border-width, which can obtain the values thin, medium, and thick, or a numeric value, indicated in pixels. The figure below illustrates the system:
The property border-color defines which color the border has. The values are the normal color-values for example "#123456", "rgb(123,123,123)" or "yellow" .
Types of borders [border-style]
There are different types of borders to choose from. Below are shown 8 different types of borders as Internet Explorer 5.5 interprets them. All examples are shown with the color "gold" and the thickness "thick" but can naturally be shown in other colors and thicknesses.
The values none or hidden can be used if you do not want any border.
Examples of defining borders
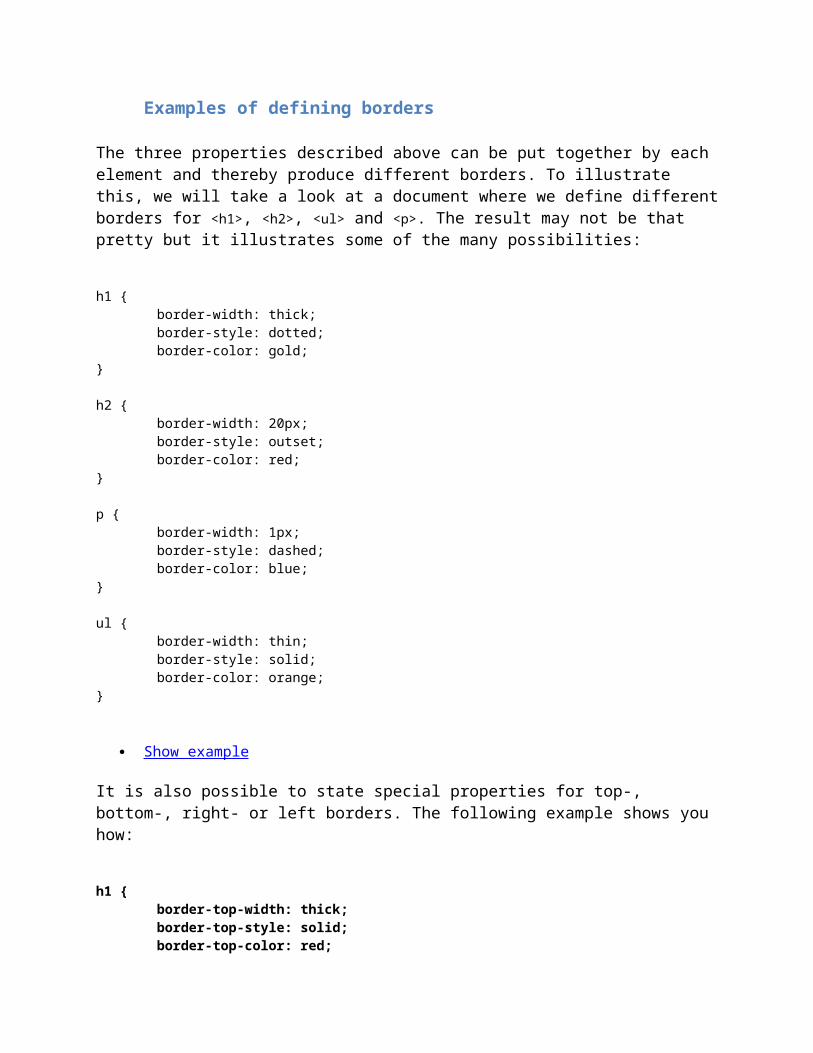
The three properties described above can be put together by each element and thereby produce different borders. To illustrate this, we will take a look at a document where we define different borders for <h1>, <h2>, <ul> and <p>. The result may not be that pretty but it illustrates some of the many possibilities:
Let's look at an example. As you know, links are specified in HTML with <a> tags. We can therefore use a as a selector in CSS:
a {color: blue;
}
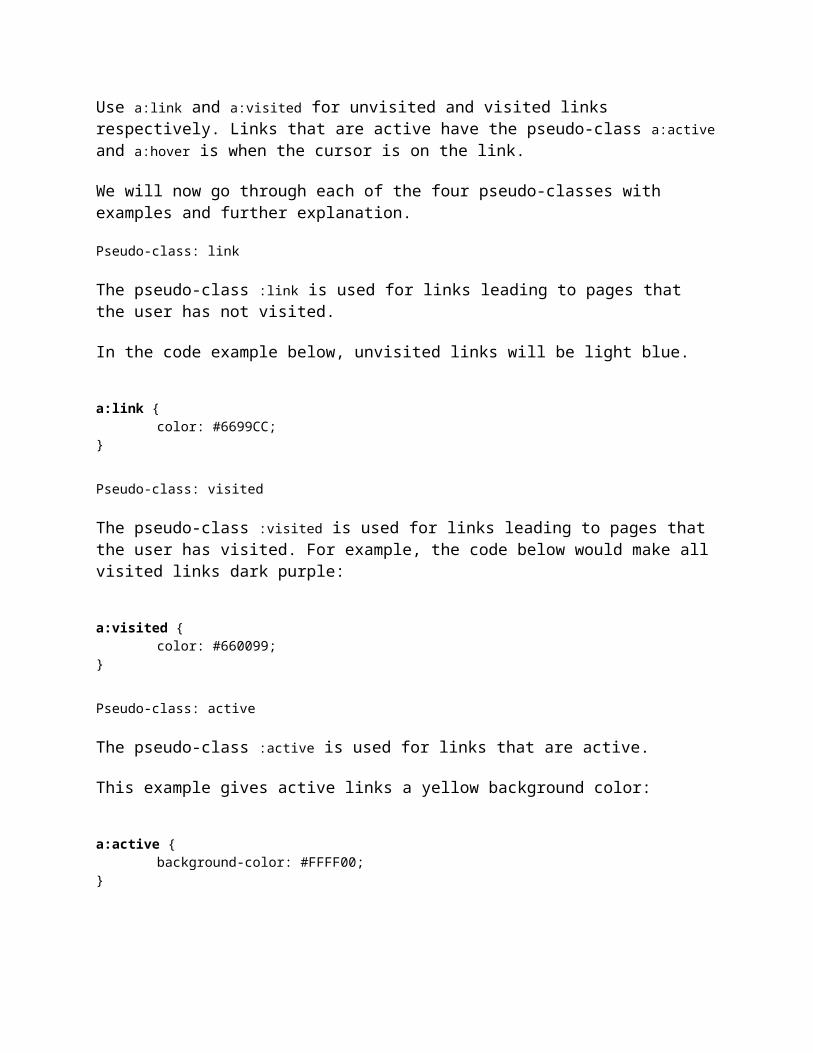
A link can have different states. For example, it can be visited or not visited. You can use pseudo-classes to assign different styles to visited and unvisited links.
a:link {color: blue;
}
a:visited {color: red;
}
Use a:link and a:visited for unvisited and visited links respectively. Links that are active have the pseudo-class a:active and a:hover is when the cursor is on the link.
We will now go through each of the four pseudo-classes with examples and further explanation.
Pseudo-class: link
The pseudo-class :link is used for links leading to pages that the user has not visited.
In the code example below, unvisited links will be light blue.
a:link {color: #6699CC;
}
Pseudo-class: visited
The pseudo-class :visited is used for links leading to pages that the user has visited. For example, the code below would make all visited links dark purple:
a:visited {color: #660099;
}
Pseudo-class: active
The pseudo-class :active is used for links that are active.
This example gives active links a yellow background color:
a:active {background-color: #FFFF00;
}
Pseudo-class: hover
The pseudo-class :hover is used when the mouse pointer hovers over a link.
This can be used to create interesting effects. For example, if we want our links to be orange and be italicized when the cursor is pointed at them, our CSS should look like this:
a:hover {color: orange;font-style: italic;
}
Example 1: Effect when the cursor is over a link
It is particular popular to create different effects when the cursor is over a link. We will therefore look at a few extra examples related to the pseudo-class :hover.
Example 1a: Spacing between letters
As you will remember from, the spacing between letters can be adjusted using the property letter-spacing. This can be applied to links for a special effect:
The two examples gives you an idea about the almost endless possibilities for combining different properties. You can create your own effects - give it a try!
Example 2: Remove underline of links
A frequently asked question is how to remove the underlining of links?
You should consider carefully whether it is necessary to remove the underlining as it might decrease usability of your website significantly. People are used to blue underlined links on web pages and know that they can click on them. Even my mum knows that! If you change the underlining and color of links there is a good chance that users will get confused and therefore not get the full benefit of the content on your website.
That said, it is very simple to remove the underlining of links. As you will recall from the property text-decoration can be used to determine whether text is underlined or not. To remove underlining, simply set the value of text-decoration to none.
a {text-decoration:none;
}
Alternatively, you can set text-decoration along with other properties for all four pseudo-classes.
JavaScript is a client side, object-oriented and high-level scripting language.
Client side: Programs are passed to the computer when browser is on, and then computer runs them.
JavaScript versus Java
. JavaScript and java are similar in some ways but fundamentally different different in many ways Difference between JavaScript and Java
JavaScript JavaInterpreted(not compiled) by client Compiled byte code downloaded from server,
executed on clientObject-based. Uses built-in, extensible object but no class and Inheritance
Object oriented. Applets consist of object classes with Inheritance
Code integrated with HTML and embedded in HTML.
Applets are dictnict from HTML
Variable data type not declared It is must in JAVADynamic binding . Object references checked at runtime.
Static binding. Object references must exist at compile time.
JAVA SCRIPT BASICS AND VARIABLES
Java script basics
How to JavaScript embedded in HTML ?
You can embedded JavaScript in a HTML document in the following way: Add statements and functions within a <SCRIPT> tag BY specifying a file as JavaScript source.
USING SCRIPT TAG
The <SCRIPT> tag is an extension of HTML.
Syntax--- <SCRIPT>JavaScript statement</SCRIPT>
A document can have multiple SCRIPT tags, and each can enclose any number of statements.
To insert a script in a HTML page, we use the <script> tag. Use the type attribute to define the scripting language.
<script type=”JavaScript”>. Then the JavaScript starts :The JavaScript command to write some output to a page is document.
Write. Then the script tag has to be close. Save the program as firstja.html in your drive. Then open the file in any browser.
Note: Head section : Script that contain functions go to the head section of the document. Then we can be sure that the script is loaded before the function is called.
Execute a section that is placed in the body section.EXAMPLE:
<html>
<head>
<script language="javascript">
function message()
{
document. write("hello");
}
</script>
</head>
<body onLoad="message();"
</body>
Body section: Executes a script that is placed in the body section.
Outputting on a page: The write method of document displays output in the Navigator.Syntax-- document. write(“message”)
VariablesA variable is a “container” for storing values. A variables value can change during the script’s execution.
CREATING A VARIABLE
To create a variable ,the var keyword is used with variable name ,a and is used once for declration. Variables can be assigned values latter on or immediately followed by the name with an equal sign and the value they represent.
By simple assigning a value For example-x=45With the keyword var it may e var x=43
RULES FOR VARIABLE NAME
A JavaScript variable name must be start from letter or _(underscore) Subsequent character can also be digits(0-9)
Because JavaScript is case sensitive ,so mind difference between A and a.
DATA TYPES IN JAVASCRIPT Following data types are used in JavaScript.
NUMBER
Integers can be positive ,0 ,or negative. Exa. 15,46,89.
STRING
Strings are closed within single or double quotation marks. Exa.”QPATH”.
BOOLEAN
NULL
UNDEFINED
A value which is undefined is a value held by a variable after it has been created, and before a value has been assigned to it.
JAVASCRIPT STATEMENTS What is statements?
All JavaScript scripts are essentially a series of commands that are passed to the interpreter to be carried out sequentially. JavaScript usually requires that each one be placed on a separate line. These lines of code are referred to Statements.
CONTROL STATEMENTS
Control statements are designed to allow you to create scripts that can decide which lines of code are evaluated , or how many times evaluated. Conditional statements are used to make decisions.
There are two types of control statements.
Conditional statements Loop statements
Conditional statements
There are five types of conditional statements
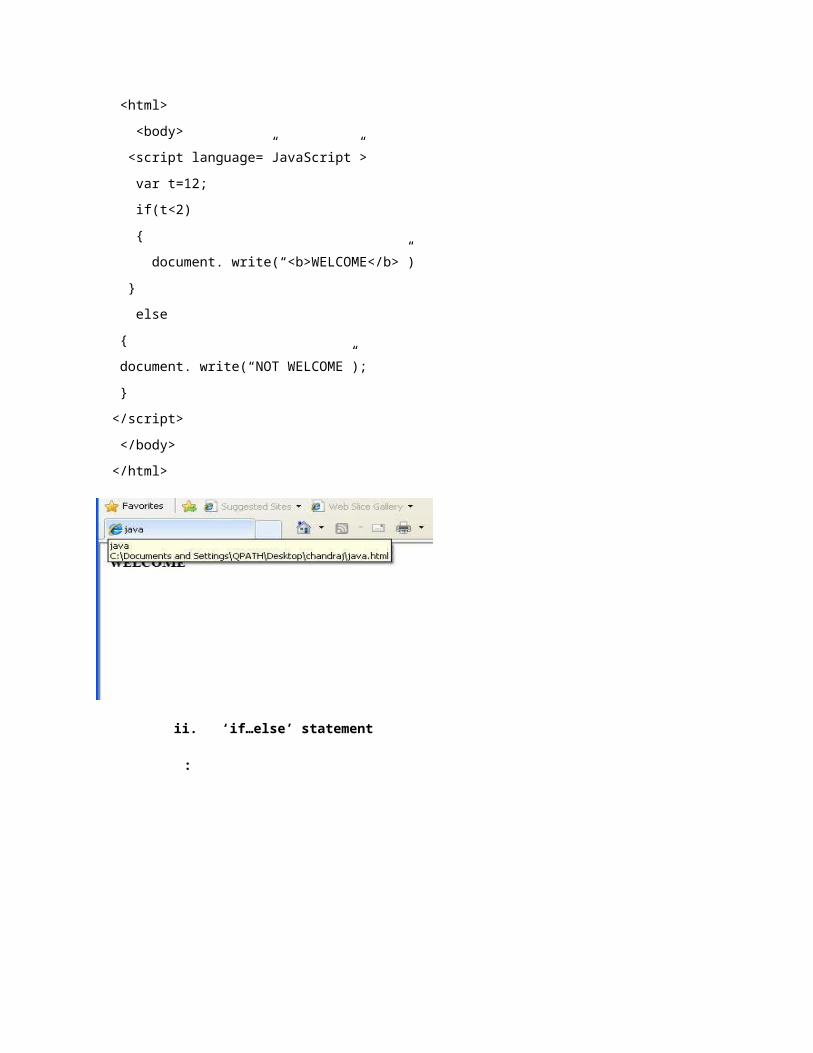
i. ‘if’ Statement: The ‘if’ statement is to performs certain statements if a logical condition is true.
Syntax- if(condition)
{ statement 1}
Example:
<html>
<body>
<script language=”JavaScript”>
var t=12;
if(t<2)
{
document. write(“<b>WELCOME</b>”)
}
else
{
document. write(“NOT WELCOME”);
}
</script>
</body>
</html>
ii. ‘if…else’ statement
:
<html>
<body>
<script language=”JavaScript”>
var b=12;
if(t<2)
{
document. write(“<b>Good Morning</b>”)
}
else
{
document. write(“<b>Good Evening</b>”);
}
</script>
</body>
</html>
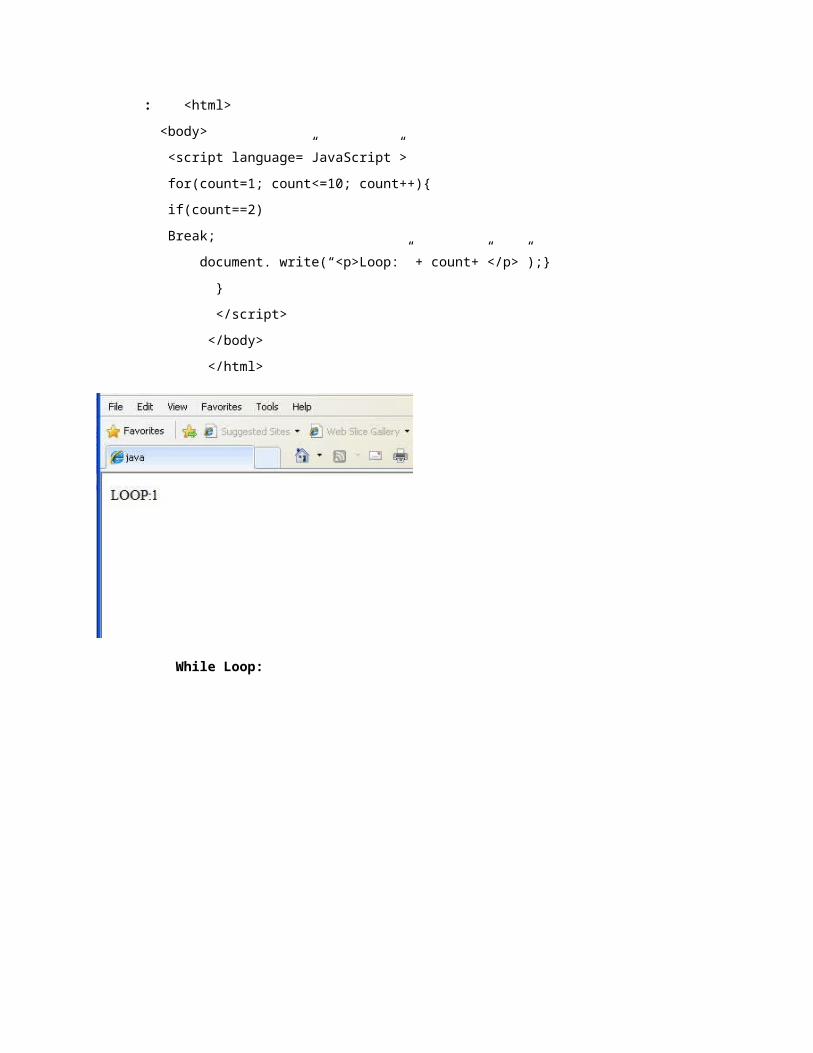
LOOP STATEMENTS
iii. For loop:
Syntax—for(initial value; condition; increment)
Example-
: <html>
<body>
<script language=”JavaScript”>
for(count=1; count<=10; count++){
if(count==2)
Break;
document. write(“<p>Loop:” + count+”</p>”);}
}
</script>
</body>
</html>
While Loop:
<html>
<body>
<script language=”JavaScript”>
i=0;
while(i<5)
{
document. write (“The value of i ”+i)
document. write(“<br>”);
i++;
}
</script>
</body>
</html>
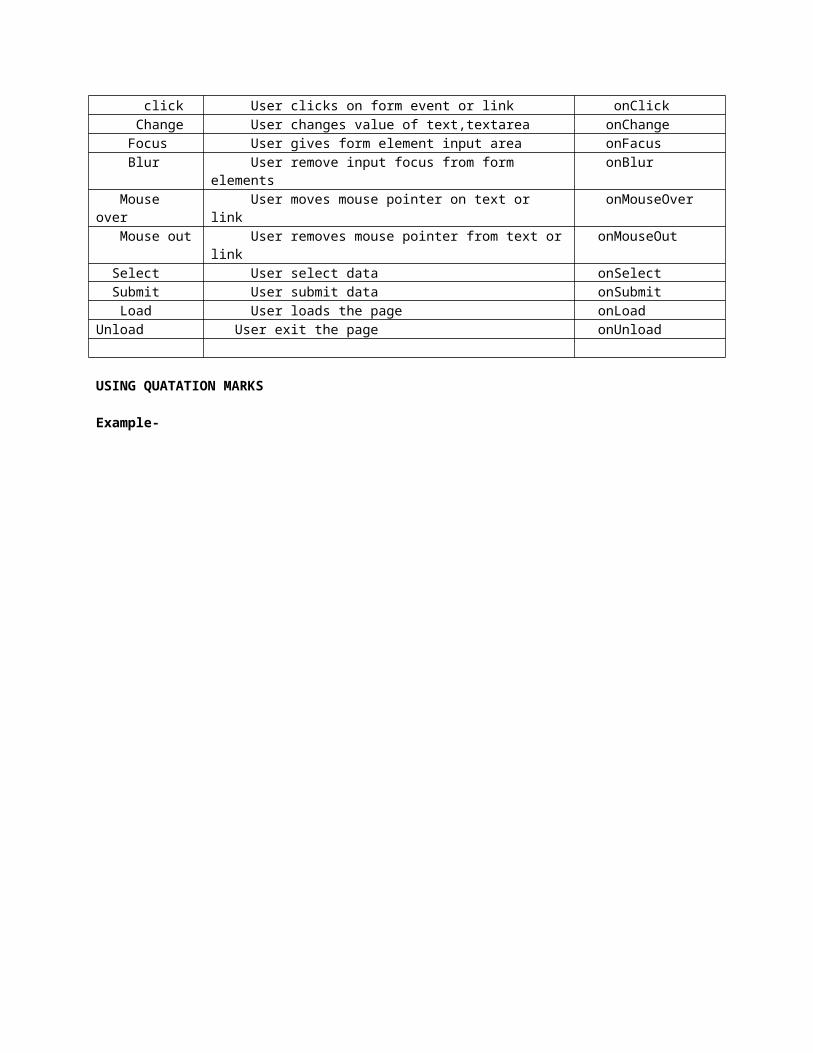
EVENT HANDLING AT A GLANCE Event handlers are small JavaScript code place inside an HTML tag. They help in handling events.
The following table lists events available in JavaScript
Events Occurs when Event handler click User clicks on form event or link onClick Change User changes value of text,textarea onChange Focus User gives form element input area onFacus Blur User remove input focus from form elements onBlur Mouse over User moves mouse pointer on text or link onMouseOver Mouse out User removes mouse pointer from text or link onMouseOut Select User select data onSelect
Submit User submit data onSubmit Load User loads the page onLoadUnload User exit the page onUnload
USING QUATATION MARKS
Example-
<html>
<head>
<script language=”JavaScript”>
function compute()
{
if(confirm(“Are you sure?”))
f. result. Value = eval(f.expr.value)
else
alert(“please come back again”)
}
</head>
<body>
<form>Enter the value:<input type=”text” name=”expr” size=15>
It displays a confirm box with a specified message and OK and Cancel buttons.
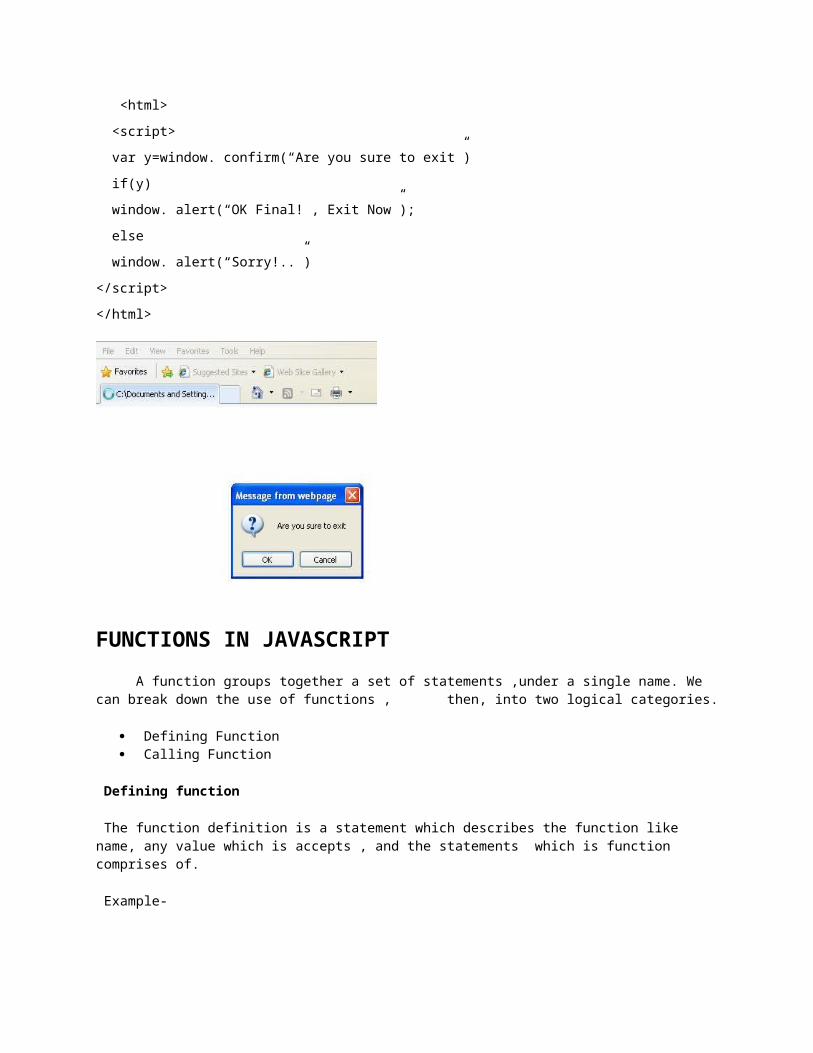
Example-
<html>
<script>
var y=window. confirm(“Are you sure to exit”)
if(y)
window. alert(“OK Final! , Exit Now”);
else
window. alert(“Sorry!..”)
</script>
</html>
FUNCTIONS IN JAVASCRIPT
A function groups together a set of statements ,under a single name. We can break down the use of functions , then, into two logical categories.
Defining Function Calling Function
Defining function
The function definition is a statement which describes the function like name, any value which is accepts , and the statements which is function comprises of.
Example-
<script language=”JavaScript”>
function sam_box()
{
alert(“I am called by a function”);
}
</script>
Given down example describes function declaration and function caling
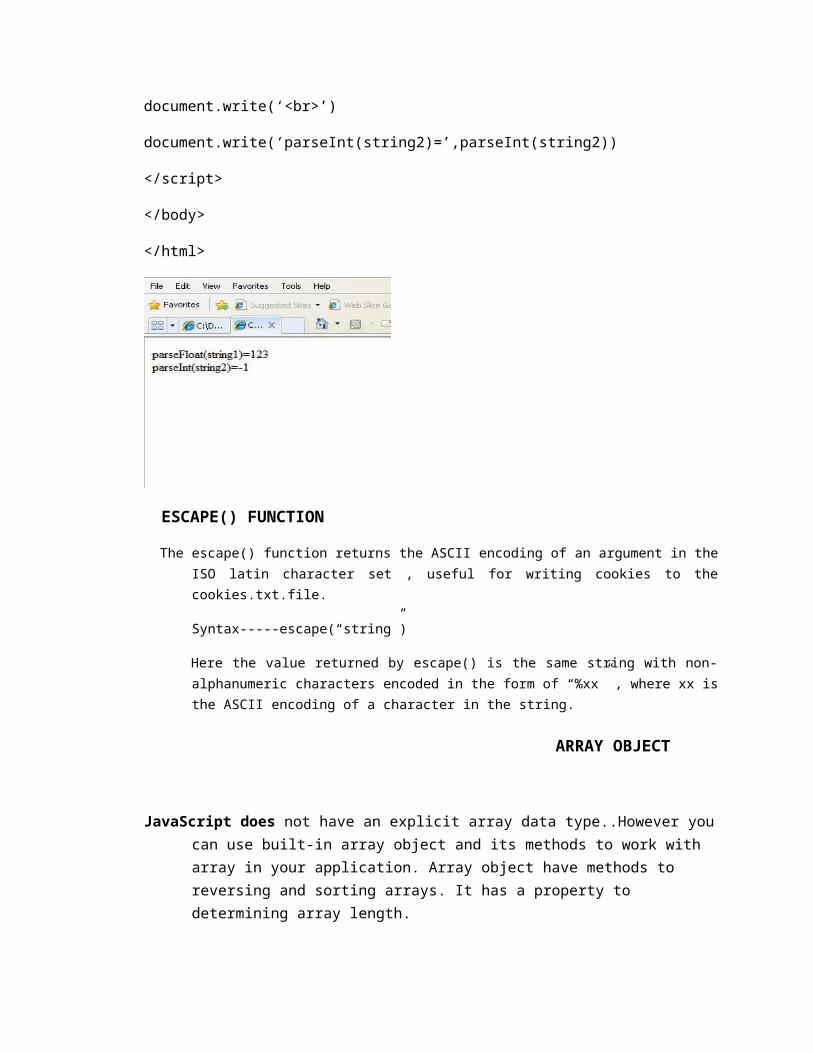
The two parse functions “parseInt” and “parseFloat” returns a numeric value a string is given as an argument.
Syntax----parseFloat(str)
Here “parseFloat” parse its arguments , the strin str and attempts to return a floating point number.
The Syntax of ParseInt
Syntax------parseInt(str[radix])
Here “parseInt” parses its first arguments, the string str , and attempts to return an integer of the specified radix(base),indicated by the second optional argument radix. For example , a radix of ten indicates to convert to a decimal number ,eight to octal, sixteen to hexadecimal,……For radixes above ten , the letters of the alphabets indicates numbers greater than nine. For example , for hexadecimal number , A through F are used.
The escape() function returns the ASCII encoding of an argument in the ISO latin character set , useful for writing cookies to the cookies.txt.file.
Syntax-----escape(“string”)
Here the value returned by escape() is the same string with non-alphanumeric characters encoded in the form of “%xx” , where xx is the ASCII encoding of a character in the string.
ARRAY OBJECT
JavaScript does not have an explicit array data type..However you can use built-in array object and its methods to work with array in your application. Array object have methods to reversing and sorting arrays. It has a property to determining array length.
COOKIES IN JAVASCRIPTCookies are small amount of data stored by web browser. They allow you to store particular information about a user and retrieve it every time they visit your page. Each user has their own set of cookies.
Cookies are typically used by web servers to perform functions such as tracking your visits to websites, enabling you to log in sites , and storing your shopping card.
Cookies has following characteristics:
They are to be used for relatively small amount of information. The number of cookies are very limited.
Setting a Cookie
The Document ,cookies property is used to set cookies in a JavaScript.Syntax---
document. cookie=”username=qpath; expire=32/05/2013 00:00:00”;Retrieving Cookies
To retrieving all properties set by cookies for the current document , the document. Cookie property is used .var x= document. cookies;
This returns a string comprising a list of name/value pairs , separated by semicolon, for all cookies that are valid for the current document.
Example
“username=qpath; password=abc23”Here two cookies are priviousaly set with username and second is with password..
EXAMPLE
The following program creates a webpage that prompts you for your name the first time you visit it , then store your name in cookie and display your name in the pages on subsequent visit.
The first time you visit the page , it should ask for your name and store it in a cookie. If you visit the page again at any point ,it will get your name from the cookie and display it within the page.
The cookie is given expiry date of 1 year from the current date, which means browser will remember your name even if you close it and reopen it.
You can clear the cookies by clicking on ”Clear me” link, which calls delete_cookie function and then refreshes the page and prompt for your name again.
EXAMPLE---
<html>
<head><script language=”JavaScript”>
function set_cookie(name,value,expire_year,expire_month,expire_day,path,domain,secure)
{
var cookie_string=name+”=”+escape(value);
if(expire_year)
{
var expire=new Date(expire_year,expire_month,expire_day);
document.location.reload();\”>forget about me</a>”);
</script>
</head>
</html>
CLIENT SIDE VALIDATION USING JAVASCRIPT
There are two good reasons to use client side validation. It’s a fast form validation: If something is wrong, the alarm is trigged upon submission of the
form. You can safely display only one error at a time and focus on the wrong field , to help ensure that
the user correctly fills in all the details you need.
The following sample validates a phone number form field which will accept only numbers and special characters namely ‘(‘,’)’,’+’, and ‘-’.All other special characters are ignored. Here the name and email are also verified for null values using JavaScript.