Electromechanical gearmotor for the automation of balanced rolling gates rondo istruzioni e avvertenze per l’installatore Instructions and warnings for the fitter Instructions et recommandations pour l’installation Anweisungen und hinweise für den installateur Instrucciones j advertencias para el instalador Instrukcja dla instalatora
Transcript
Electromechanical gearmotor for theautomation of balanced rolling gates
rondoistruzioni e avvertenze per l’installatore
Instructions and warnings for the fitter
Instructions et recommandations pour l’installation
This manual has been especially written for use by qualified installationtechnicians. No information given in this manual can be considered asbeing of interest to end users. Read these instructions carefully beforeproceeding with the installation, as they provide important informationregarding safety, installation, use and maintenance.
Any use or operation not explicitly provided for in these instructions is notpermitted. Improper use may cause damage and personal injury.RONDO is not suitable for use in potentially explosive atmospheres.
Instructions and Warnings for 5users of RONDO Gearmotor
GB
1
2
2.2) Typical system (Fig. 3)
1 RONDO gearmotor2 connector block3 release knob (only on versions with brake)
4 reverser switch or electronic control unit5 Power supply line6 Spring box
2.3) Mounting
1. Close the rolling gate all the way in order to make the springshaft accessible and drill an 11mm diameter horizontal hole90mm from the middle of the spring shaft; Fig. 4
2. Remove the two half ring nuts after loosening the two M8screws; Fig. 6
3. Remove the slide ring; Fig. 74. Slide out the plate in the direction indicated by the arrow; Fig. 85. Measure the diameter of the spring shaft. If the diameter of the lat-
ter is 60mm, proceed with the installation. If the shaft has a diam-eter of 48mm or 42mm, install the adapters provided; Fig. 9
6. Reinstall the plate removed at point 5, paying attention to thedirection of assembly, and screw on the four screws provided;Fig. 10
7. Mount the adapter ring removed at point 4 and grease its outersurface slightly; Fig. 11
8. Insert and tighten the M10 screw; make sure you thread itthrough the hole drilled in the spring shaft according to theinstructions under point 1; if necessary, use the adapter. Fig. 12
9. Tighten the two M10 screws so as to secure the gearmotor tothe spring shaft. Secure the two screws with lock nuts; Fig. 13
10. Drill a hole in the spring shaft for the power and release wire (onlyon versions with brake); Fig. 14
11. Assemble the release knob, with all the adjusters tightened (A),insert the wire and, holding it tight, secure it with the terminal (B).(only on versions with brake); Fig. 15
12. Execute the release manoeuvre by turning the bottom knobclockwise to loosen it. Check manually to make sure that thegearmotor is released. If necessary, operate the adjusters toeliminate any slack; Fig. 16
13. Slightly grease the teeth on the ring gears removed at point 3,then assemble them, tightening the two M8 screws well; Fig. 17
14. Measure the diameter of the spring boxes. If their diameter is200mm, proceed with the installation.
15. Otherwise, if the diameter is 220mm, use the appropriateadapter (B); Fig. 18
16. Remove the cover that protects the terminals. Loosen the cablegland. Make the connections Fig. 19. Tighten the cable glandscrews. Close the cover that protects the terminals.
17. Using a screwdriver, remove the glass for the adjustment of thelimit switches; Fig. 20
18. Position the last segment of the rolling gate on the half ring nutand drill an 11-mm diameter hole through it to match the hole inthe half ring nut;
19. Tightly fasten the rolling-shutter frame to the gearmotor usingscrew and washer M10. Fig. 21
20. Release the gearmotor (only on versions with brake) and openand close the rolling gate manually, making sure that it slidessmoothly. Lock the gearmotor again by tightening the releaseknob; Fig. 22
21. DOWN LIMIT SWITCH ADJUSTMENT (closing) Using the reverser switch, command the gearmotor to perform adown manoeuvre until the limit switch is triggered. In the instal-lation illustration, the closing manoeuvre limit switch is the oneshown in Fig. 23
22. ADJUSTING THE ASCENT LIMIT SWITCH (opening)Pull the clip outwards while rotating the wheel indicated by thearrow. Bear in mind the fact that approximately 1 cm of its trav-el corresponds to 1 m of upward movement. Release the clip.Power the gearmotor so it starts rising, and check that therolling-shutter stops in the position required. Fig. 24.Continue to make adjustments until you reach the positionrequired;
23. Reinsert the limit switch glass, paying attention to the mountingdirection; Fig. 25
24. In case the installation is contrary to the one described, proceedin the reverse order so that the second limit switch will regulatethe down movement, while the first one will regulate the upmovement.
1) Product description
RONDO is a gearmotor for spring-balanced rolling gates. It is suitablefor the automation of rolling gates having a maximum height of 6mand weighing up to 180kg. The gearmotor may be mounted on rollinggates with a spring shaft diameter of 42mm, 48mm and 60mm.
The spring boxes may have a diameter of 200mm / 220mm.The two ring nuts are made of die-cast aluminium. The gearmotor isequipped with a micrometric screw stop and mechanical positionmemory.
2.1) Preliminary checks
Please keep in mind that automatic rolling gate systems may only beinstalled by qualified personnel in compliance with the legislation inforce. Make sure that:• The packing is undamaged and contains all the parts shown in
Fig. 1.• The rolling gate opens and closes without presenting points of
greater friction.
• The rolling gate is well balanced, i.e., if it is stopped in any posi-tion it must not display a tendency to start moving again.
• The rolling gate moves silently and smoothly.• Refer to Fig. 2 to make sure that the mounting area is compati-
ble with the overall dimensions of the gearmotor.
2) Installation
GB
3
Release only when the rolling gate is stopped.
To release the gearmotor proceed as follows:1 Turn the bottom of the knob clockwise to loosen it until you feel
a certain resistance;
2 Open or close the rolling gate manually;3 Lock the gearmotor again by performing the contrary operation to
the one described at point 1.
!
3) Manual manoeuvre (only on versions with brake)
Testing is the most important aspect of the installation procedure.Each single component, such as the gearmotor, emergency stop,photocells, etc., may require a specific testing procedure.We recommend that you follow the directions provided in the relevantinstructions manuals.Testing of the entire automation system must be conducted by expe-rienced and qualified personnel, who must establish what tests arenecessary depending on the risks involved.To test RONDO proceed as follows:• Make sure that the fusible elements are in good condition, i.e. that
there are no breakages;
• Make sure that the gearmotor is securely fastened to the spring shaft;• Make sure that the screw connections have been well tightened;• Make sure that the electrical contacts are in good condition;• Make sure that the axial slack of the ring nut is not excessive;• Check the adjustment of the limit switches by carrying out a com-
plete manoeuvre (up-down);• Make sure that when the gearmotor is locked at any point, it dis-
plays no tendency to move;• Make sure that the release device easily disengages the rolling
gate’s gearmotor (only on versions with brake)
4) Testing
RONDO does not require any special maintenance. Scheduledchecks every six months will ensure the long life of the gearmotor andthe safe operation of the system.
Maintenance simply consists in repeating the testing pro-cedure.
5.1) Disposal
The automation system can be dismantled and scrapped withoutany risks, since there are no dangerous components. Perform theoperations described in the “Mounting” chapter in the reverse order
RONDO is made out of various types of materials which must be dis-posed of in compliance with the regulations in force.The materials must be separated according to their type (electrical,aluminium, plastic parts, etc.).
5) Maintenance
6) Technical characteristics
Power supply / frequency Vac/Hz 230/50 120/60
Absorbed current A 2 2.6 4.8
Absorbed power W 450 600 580
Max torque Nm 130 180
Max lifting force with 200mm diameter kg 130 180
Nominal speed Rpm 8.5 10
Nominal torque Nm 75 100
Rolling gate shaft standard diameter mm 60*
Roller shutter flanges diameter mm 200*
Crown rotation speed (loadless) Rpm 10 12
Operating ambient temperature °C -20 ÷ +50
Class protection IP 20
Thermal protection °C 140
Continuous operating time Minutes 4
Max work cycle sec 50% with 30s ON and 30s OFF
Weight kg 9.5 10
Insulation class F
* 48 and 42mm with supplied adapter
** 220mm with supplied adapter
RN2010RN2030
RN2020RN2040
RN2020/V1H6RN2040/V1H6
RN2010 - RN2020 - RN2020/V1H6
RN2030 - RN2040 - RN2040/V1H6
Reversible brakeless gearmotor
Non-reversible gearmotor with brake and release device
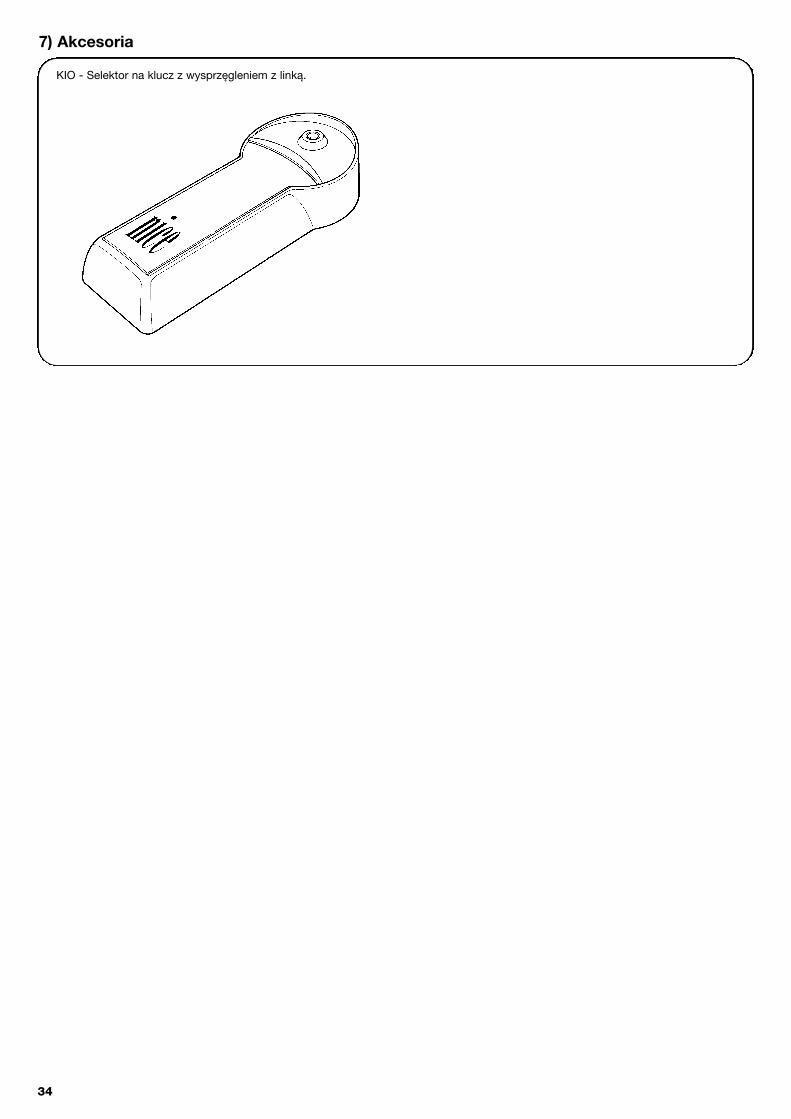
KIO - Key-operated selector switch with cord-type release
7) Accessories
4
Electromechanical gearmotor for theautomation of balanced rolling gates
rondoInstructions and warnings for users of theRONDO gearmotor
Congratulations for having chosen a Nice product for your automa-tion system!
Nice S.p.a. produces components for the automation of gates, doors,rolling gates, roller shutters and awnings: gearmotors, control units,radio controls, flashing lights, photocells and miscellaneous accessories.Nice uses only the finest materials and first-class workmanship. It focus-es on the development of innovative solutions designed to simplify theuse of its equipment, dedicating meticulous care to the study of its tech-nical, aesthetic and ergonomic characteristics. From the wide range ofNice products, your installation technician will certainly have selected theone best suited to your specific requirements.
However, Nice is not the producer of your automation system, which israther the result of a combination of operations carried out by your instal-lation technician, namely analysis, evaluation, selection of materials andsystem implementation. Each automation system is unique. Your instal-lation technician is the only person who possesses the experience andprofessionalism needed to set up a system capable of satisfying yourrequirements, a system that is safe, reliable, long lasting and built inaccordance with the regulations in force.
An automation system is not only very convenient; it also improves thelevel of security in your home. Moreover, it will last for years with very lit-tle maintenance. Even though the automation system you possessmeets the safety requirements of the legislation in force, this does notexclude the existence of a “residual risk”, i.e. the possibility that dangersmay arise, usually as a result of improper or unreasonable use. We haveprepared the following list of do’s and don’ts to help you avoid anymishaps:
• Before using your automation system for the first time, askthe installer to explain the origin of any residual risks; take a few min-utes and read the users instructions manual given you by theinstaller. Retain the manual for future use and deliver it to any subse-quent owner of the automation system.
• Your automation system is a machine that will faithfullyexecute your commands; unreasonable or improper use may gen-erate dangers: do not operate the system if there are people, animalsor objects within its range of operation.
• Children: automation systems are designed to guarantee high levelsof safety and security. They are equipped with detection devices thatprevent movement if people or objects are in the way, guaranteeing
✄
GB
6
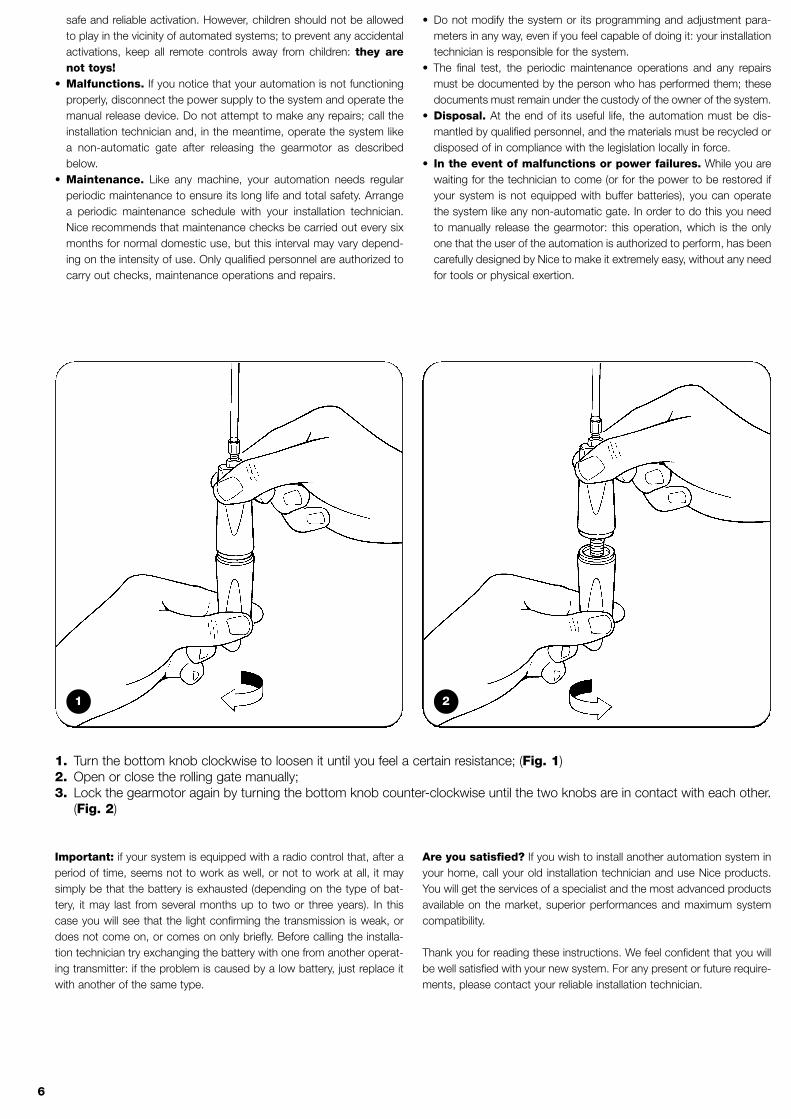
1. Turn the bottom knob clockwise to loosen it until you feel a certain resistance; (Fig. 1)2. Open or close the rolling gate manually;3. Lock the gearmotor again by turning the bottom knob counter-clockwise until the two knobs are in contact with each other.
(Fig. 2)
safe and reliable activation. However, children should not be allowedto play in the vicinity of automated systems; to prevent any accidentalactivations, keep all remote controls away from children: they arenot toys!
• Malfunctions. If you notice that your automation is not functioningproperly, disconnect the power supply to the system and operate themanual release device. Do not attempt to make any repairs; call theinstallation technician and, in the meantime, operate the system likea non-automatic gate after releasing the gearmotor as describedbelow.
• Maintenance. Like any machine, your automation needs regularperiodic maintenance to ensure its long life and total safety. Arrangea periodic maintenance schedule with your installation technician.Nice recommends that maintenance checks be carried out every sixmonths for normal domestic use, but this interval may vary depend-ing on the intensity of use. Only qualified personnel are authorized tocarry out checks, maintenance operations and repairs.
• Do not modify the system or its programming and adjustment para-meters in any way, even if you feel capable of doing it: your installationtechnician is responsible for the system.
• The final test, the periodic maintenance operations and any repairsmust be documented by the person who has performed them; thesedocuments must remain under the custody of the owner of the system.
• Disposal. At the end of its useful life, the automation must be dis-mantled by qualified personnel, and the materials must be recycled ordisposed of in compliance with the legislation locally in force.
• In the event of malfunctions or power failures. While you arewaiting for the technician to come (or for the power to be restored ifyour system is not equipped with buffer batteries), you can operatethe system like any non-automatic gate. In order to do this you needto manually release the gearmotor: this operation, which is the onlyone that the user of the automation is authorized to perform, has beencarefully designed by Nice to make it extremely easy, without any needfor tools or physical exertion.
1 2
Important: if your system is equipped with a radio control that, after aperiod of time, seems not to work as well, or not to work at all, it maysimply be that the battery is exhausted (depending on the type of bat-tery, it may last from several months up to two or three years). In thiscase you will see that the light confirming the transmission is weak, ordoes not come on, or comes on only briefly. Before calling the installa-tion technician try exchanging the battery with one from another operat-ing transmitter: if the problem is caused by a low battery, just replace itwith another of the same type.
Are you satisfied? If you wish to install another automation system inyour home, call your old installation technician and use Nice products.You will get the services of a specialist and the most advanced productsavailable on the market, superior performances and maximum systemcompatibility.
Thank you for reading these instructions. We feel confident that you willbe well satisfied with your new system. For any present or future require-ments, please contact your reliable installation technician.
rondo
Avvertenze
Il presente manuale è destinato solamente al personale tecnico qualifi-cato per l’installazione. Nessuna informazione contenuta nel presentefascicolo può essere considerata d’interesse per l’utilizzatore finale.E’ necessario leggere attentamente le istruzioni prima di procedere all’in-stallazione, in quanto forniscono importanti indicazioni riguardanti lasicurezza, l’installazione, l’uso e la manutenzione.
Tutto quello che non è espressamente previsto in queste istruzioni non èpermesso. L’uso improprio potrebbe essere fonte di danni e situazioni dipericolo.RONDO non è adatto all’uso in atmosfera potenzialmente esplosiva.
Istruzioni ed avvertenze destinate 11all’utilizzatore del motoriduttore RONDO
I
7
8
2.2) Impianto tipico (Fig. 3)
1 motoriduttore RONDO2 scatola di derivazione3 pomello di sblocco (solo su versioni con freno)4 invertitore di comando o centrale elettronica5 Linea elettrica di alimentazione6 Scatole portamolle
2.3) Fissaggio
1. Chiudere completamente la serranda in modo da rendere acces-sibile l’albero portamolle ed eseguire un foro orizzontale di diame-tro 11mm a 90mm dal centro dell’albero portamolle; Fig. 4
2. Togliere le due semighiere svitando le due viti M8; Fig. 63. Togliere l’anello di scorrimento; Fig. 74. Sfilare la piastra nel senso della freccia; Fig. 85. Misurare il diametro dell’albero portamolle. Se quest’ultimo ha un
diametro pari a 60mm, procedere con l’installazione. Se l’alberoha un diametro pari a 48mm o 42mm, applicare i relativi adattato-ri (in dotazione); Fig. 9
6. Reinserire la piastra tolta al punto 5, facendo attenzione al sensodi assemblaggio e avvitare le quattro viti in dotazione; Fig. 10
7. Inserire l’anello adattatore tolto al punto 4 ed ingrassarlo legger-mente all’esterno; Fig. 11
8. Avvitare la vite M10 facendo attenzione di farla passare attraversoil foro, eseguito al punto 1, nell’albero portamolle ed eventualmen-te l’adattatore. Fig. 12
9. Avvitare le due viti M10 in modo tale da fissare il motoriduttoreall’albero portamolle. Bloccare le due viti con controdado; Fig. 13
10. Eseguire un foro sull’albero portamolle in modo da far passare il cavodi alimentazione e di sblocco (solo su versioni con freno); Fig. 14
11. Assemblare il pomello di sblocco, con tutti i regolatori avvitati (A),infilare il cavo e tenendolo in tensione, bloccarlo con il morsetto(B). (solo su versioni con freno); Fig. 15
12. Eseguire la manovra di sblocco svitando in senso orario il pomelloinferiore. Verificare manualmente che il mototriduttore sia sbloccato.Eventualmente agire sui regolatori per eliminare i giochi; Fig. 16
13. Ingrassare leggermente la dentatura delle ghiere tolte al punto 3 eassemblarle serrando a fondo le due viti M8; Fig. 17
14. Misurare il diametro delle scatole portamolle. Se risultano avere undiametro pari a 200mm, proseguire con l’installazione.
15. Altrimenti, se pari a 220mm utilizzare l’apposito adattatore (B); Fig. 1816. Togliere il coperchietto proteggi morsetti. Svitare il pressacavo.
Effettuare i collegamenti Fig. 19. Avvitare le viti del pressacavo.Richiudere il coperchio proteggi morsetti.
17. Togliere con cacciavite il vetrino per regolazione dei finecorsa; Fig. 2018. Presentare l’ultimo telo della serranda sulla semighiera ed esegui-
re sullo stesso, un foro di diam.11 mm in corrispondenza del foropresente nella semighiera;
19. Bloccare a fondo il telo della serranda al motoriduttore medianterondella e vite M10. Fig. 21.
20. Sbloccare il motoriduttore (solo su versioni con freno), ed esegui-re la manovra manuale di apertura e chiusura della serranda veri-ficando il buon scorrimento. Ribloccare avvitando il pomello disblocco; Fig. 22
21. REGOLAZIONE FINECORSA DI DISCESA (chiusura) Con l’invertitore, comandare il motoriduttore in discesa fino all’in-tervento del finecorsa. Nell’installazione illustrata, il finecorsa di chiusura è quello indicatonella Fig. 23
22. REGOLAZIONE FINECORSA DI SALITA (apertura)Tirare la clip verso l'esterno e contemporaneamente ruotare larotella indicata dalla freccia tenendo conto che approssimativa-mente 1cm della sua corsa corrisponde ad 1m di salita. Rilascia-re la clip. Alimentare il motoriduttore in salita e verificare che la ser-randa salendo vada a fermarsi nel punto desiderato. Fig. 24.Proseguire per tentativi successivi fino a trovare la posizione desi-serata.
23. Reinserire il vetrino di finecorsa prestando attenzione al senso dimontaggio; Fig. 25
24. Nel caso in cui l’installazione sia contraria a quella illustrata, agirein modo inverso a quanto descritto poiché il secondo finecorsaregolerà la discesa, mentre il primo la salita.
1) Descrizione del prodotto
RONDO è un motoriduttore per serrande avvolgibili bilanciate a mol-le. Permette di automatizzare serrande con altezza max di 6m e pesofino a 180kg. Il motoriduttore può essere montato su serrande condiametro albero portamolle da Ø42mm, Ø48mm e Ø60mm.
Le scatole portamolle possono avere un diametro di 200mm /220mm. Le due ghiere sono in alluminio presso fuso. Dispone di fine-corsa a vite micrometrica e memoria meccanica di posizione.
2.1) Verifiche preliminari
Ricordiamo che gli impianti di serrande automatiche devono essereinstallati solo da personale qualificato e nel pieno rispetto delle normedi legge. In particolare verificare che:• La confezione sia integra e contenga tutte le parti presenti in Fig. 1.• La serranda non presenti punti di maggiore attrito sia nella corsa di
chiusura che di apertura.
• La serranda sia ben bilanciata, ossia, se fermata in qualsiasi posi-zione non accenni a riprendere il moto.
• La serranda, nella sua corsa, sia silenziosa e regolare.• Facendo riferimento alla Fig. 2 verificare che la zona di fissaggio
sia compatibile con l’ingombro del motoriduttore.
2) Installazione
I
9
Lo sblocco deve avvenire esclusivamente a serranda ferma.
Per sbloccare il motoriduttore occorre:1 Svitare in senso orario la parte inferiore del pomello fino a sentire
una certa resistenza;
2 Aprire o chiudere manualmente la serranda;3 Ribloccare il motoriduttore effettuando l’operazione contraria al
punto 1.
!
3) Manovra manuale (solo su versioni con freno)
Il collaudo è la parte più importante di tutta la realizzazione dell’auto-mazione. Ogni singolo componente, ad esempio motoriduttore, arre-sto di emergenza, fotocellule ecc. può richiedere una specifica fase dicollaudo e per questo si consiglia di seguire le procedure riportate neirispettivi manuali di istruzioni. Il collaudo dell’intera automazione deveessere eseguito da personale esperto e qualificato che deve farsi cari-co delle prove richieste in funzione del rischio presente.Per il collaudo de RONDO eseguire la seguente sequenza di opera-zioni:• Controllare che le fusioni siano in buono stato, cioè che non pre-
sentino delle rotture;
• Verificare che il motoriduttore sia ben fissato all’albero portamolle;• Controllare che i collegamenti a vite siano serrati a fondo;• Verificare che i contatti elettrici siano in buono stato;• Verificare che la ghiera non presenti eccessivi giochi assiali;• Verificare la regolazione dei finecorsa compiendo una manovra
completa (salita-discesa);• Verificare che il motoriduttore, bloccato in qualsiasi punto, non
accenni ad alcun movimento;• Verificare che lo sblocco disimpegni agevolmente il motoriduttore
dalla serranda (solo su versioni con freno)
4) Collaudo
La manutenzione di RONDO non necessita di accorgimenti particola-ri, ma un controllo programmato ogni sei mesi permette una maggio-re vita del motoriduttore ed un sicuro funzionamento del sistema.
La manutenzione consiste semplicemente nel ripetere laprocedura di collaudo.
5.1) Smaltimento
Nel caso di demolizione dell’automatismo non esistono particolaripericolosi o rischi derivanti dall’automazione stessa. Seguire in sensoinverso il capitolo “Fissaggio”.
RONDO è costituito da varie tipologie di materiali e l’eliminazione diquesti va effettuata rispettando le norme vigenti.E’ opportuno che i materiali vengano separati per tipologia (parti elet-triche, alluminio, plastica, ecc.).
5) Manutenzione
6) Caratteristiche tecniche
Alimentazione / frequenza Vac/Hz 230/50 120/60
Corrente assorbita A 2 2.6 4.8
Potenza assorbita W 450 600 580
Coppia max Nm 130 180
Forza maz di sollevamento con Ø 200mm kg 130 180
Velocità nominale Rpm 8.5 10
Coppia nominale Nm 75 100
Diametro standard albero serranda mm 60*
Diametro flangie avvolgibili mm 200*
Velocità rotazione corona (a vuoto) Rpm 10 12
Temperatura ambientale di funzionamento °C -20 ÷ +50
Grado di protezione IP 20
Termoprotezione °C 140
Tempo di funzionamento continuo minuti 4
Ciclo di lavoro max secondi 50% con 30s ON e 30s OFF
Peso kg 9.5 10
Classe di isolamento F
* 48 e 42mm con adattatore fornito
** 220mm con adattatore fornito
RN2010RN2030
RN2020RN2040
RN2020/V1H6RN2040/V1H6
RN2010 - RN2020 - RN2020/V1H6
RN2030 - RN2040 - RN2040/V1H6
Motoriduttore reversibile senza freno
Motoriduttore irreversibile con freno e dispositivo di sblocco
10
KIO - Selettore a chiave con sblocco a fune
7) Accessori
Motoriduttore elettromeccanico per l’automazione di serrande bilanciate
I
rondo
I
Istruzioni ed avvertenze destinateall’utilizzatore del motoriduttore RONDO
Complimenti per aver scelto per la vostra automazione un prodottoNice!
Nice S.p.a. produce componenti per l’automazione di cancelli, porte,serrande, tapparelle e tende da sole: motoriduttori, centrali di comando,radiocomandi, lampeggianti, fotocellule e accessori.Nice utilizza solo materiali e lavorazioni di qualità, e per vocazione ricer-ca soluzioni innovative che semplifichino al massimo l’utilizzo delle sueapparecchiature, curate nelle soluzioni tecniche, estetiche, ergonomi-che: nella grande gamma Nice il vostro installatore avrà senz’altro scel-to il prodotto più adatto alle vostre esigenze.
Nice non è però il produttore della vostra automazione, che è invece ilrisultato di un’opera di analisi, valutazione, scelta dei materiali, e realiz-zazione dell’impianto eseguita dal vostro installatore di fiducia.Ogni automazione è unica e solo il vostro installatore possiede l’espe-rienza e la professionalità necessarie ad eseguire un impianto secondole vostre esigenze, sicuro ed affidabile nel tempo, e soprattutto a regolad’arte, rispondente cioè alle normative in vigore.
Un impianto di automazione è una bella comodità, oltre che un validosistema di sicurezza e, con poche, semplici attenzioni, è destinato adurare negli anni.Anche se l’automazione in vostro possesso soddisfa il livello di sicurez-za richiesto dalle normative, questo non esclude l’esistenza di un “rischioresiduo”, cioè la possibilità che si possano generare situazioni di perico-lo, solitamente dovute ad un utilizzo incosciente o addirittura errato, perquesto motivo desideriamo darvi alcuni consigli sui comportamenti daseguire per evitare ogni inconveniente:
• Prima di usare per la prima volta l’automazione, fatevi spie-gare dall’installatore l’origine dei rischi residui, e dedicate qualcheminuto alla lettura del manuale di istruzioni ed avvertenze perl’utilizzatore consegnatovi dall’installatore. Conservate il manualeper ogni dubbio futuro e consegnatelo ad un eventuale nuovo pro-prietario dell’automazione.
• La vostra automazione è un macchinario che esegue fedel-mente i vostri comandi; un uso incosciente ed improprio può far-lo diventare pericoloso: non comandate il movimento dell’automazio-ne se nel suo raggio di azione si trovano persone, animali o cose.
✄
12
1. Svitare in senso orario il pomello inferiore fino a sentire una certa resistenza; (Fig. 1)2. Aprire o chiudere manualmente la serranda;3. Ribloccare il motoriduttore ruotando il pomello inferiore in senso antiorario fino a portare i due pomelli a contatto tra loro. (Fig. 2)
• Bambini: un impianto di automazione garantisce un alto grado disicurezza, impedendo con i suoi sistemi di rilevazione il movimento inpresenza di persone o cose, e garantendo un’attivazione sempre pre-vedibile e sicura. È comunque prudente vietare ai bambini di giocarein prossimità dell’automazione e per evitare attivazioni involontarie nonlasciare i telecomandi alla loro portata: non è un gioco!
• Anomalie: Non appena notate qualunque comportamento anomaloda parte dell’automazione, togliete alimentazione elettrica all’impiantoed eseguite lo sblocco manuale. Non tentate da soli alcuna riparazio-ne, ma richiedete l’intervento del vostro installatore di fiducia: nel frat-tempo l’impianto può funzionare come un’apertura non automatizza-ta, una volta sbloccato il motoriduttore come descritto più avanti.
• Manutenzione: Come ogni macchinario la vostra automazione habisogno di una manutenzione periodica affinché possa funzionare piùa lungo possibile ed in completa sicurezza. Concordate con il vostroinstallatore un piano di manutenzione con frequenza periodica; Niceconsiglia un intervento ogni 6 mesi per un normale utilizzo domestico,ma questo periodo può variare in funzione dell’intensità d’uso. Qua-lunque intervento di controllo, manutenzione o riparazione deve esse-re eseguito solo da personale qualificato.
• Anche se ritenete di saperlo fare, non modificate l’impianto ed i para-metri di programmazione e di regolazione dell’automazione: la respon-sabilità è del vostro installatore.
• Il collaudo finale, le manutenzioni periodiche e le eventuali riparazionidevono essere documentate da chi le esegue e i documenti conser-vati dal proprietario dell’impianto.
• Smaltimento: Al termine della vita dell’automazione, assicurateviche lo smantellamento sia eseguito da personale qualificato e che imateriali vengano riciclati o smaltiti secondo le norme valide a livellolocale.
• In caso di rotture o assenza di alimentazione: Attendendo l’in-tervento del vostro installatore, (o il ritorno dell’energia elettrica se l’im-pianto non è dotato di batterie tampone), l’impianto può essere azio-nato come una qualunque apertura non automatizzata. Per fare ciò ènecessario eseguire lo sblocco manuale: questa operazione, che è l’u-nica che può essere eseguita dall’utilizzatore dell’automazione, è par-ticolarmente curata da Nice per assicurarvi sempre la massima facili-tà di utilizzo, senza uso di attrezzi o necessità di sforzo fisico.2
1 2
Importante: se il vostro impianto è dotato di un radiocomando chedopo qualche tempo vi sembra funzionare peggio, oppure non funziona-re affatto, potrebbe semplicemente dipendere dall’esaurimento della pila(a seconda del tipo, possono trascorrere da diversi mesi fino a due/treanni). Ve ne potete accorgere dal fatto che la spia di conferma della tra-smissione è fioca, non si accende affatto, oppure si accende solo per unbreve istante. Prima di rivolgervi all’installatore provate a scambiare la pilacon quella di un altro trasmettitore eventualmente funzionante: se questafosse la causa dell’anomalia, sarà sufficiente sostituire la pila con altra del-lo stesso tipo.
Siete soddisfatti? Nel caso voleste aggiungere nella vostra casa unnuovo impianto di automazione, rivolgendovi allo stesso installatore e aNice vi garantirete, oltre che la consulenza di uno specialista e i prodottipiù evoluti del mercato, il migliore funzionamento e la massima compati-bilità delle automazioni.
Vi ringraziamo per aver letto queste raccomandazioni, e vi auguriamo lamassima soddisfazione dal vostro nuovo impianto: per ogni esigenza pre-sente o futura rivolgetevi con fiducia al vostro installatore.
13
rondo
Recommandations importantes
Ce manuel est destiné exclusivement au personnel technique qualifiépour l’installation. Aucune information contenue dans ce fascicule nepeut être considérée comme intéressante pour l’utilisateur final. Il estnécessaire de lire attentivement les instructions avant de procéder àl’installation, étant donné qu’elles fournissent d’importantes indicationsau sujet de la sécurité, de l’installation, de l’utilisation et de la mainte-nance.
Tout ce qui n’est pas expressément prévu dans ces instructions, estinterdit. L’utilisation impropre pourrait être la cause d’endommagementset de situations dangereuses. RONDO n’est pas approprié à l’utilisation en atmosphère potentielle-ment explosive
Instructions et avertissements pour 17l’utilisateur de l’opérateur RONDO
F
14
2.2) Installation typique (Fig. 3)
1 opérateur RONDO2 boîte de dérivation3 poignée de débrayage (seulement sur versions avec frein)
4 inverseur de commande ou logique de commande électronique5 Ligne électrique d’alimentation6 Boîtiers porte-ressorts
2.3) Fixation
1. Fermer complètement le rideau métallique pour que l'arbre porte-ressorts soit accessible et effectuer un trou horizontal de 11 mmde diamètre à 90mm du centre de l'arbre porte-ressorts; Fig. 4
2. Enlever les deux demi-bagues en dévissant les deux vis M8; Fig. 63. Enlever l’anneau de glissement; Fig. 74. Extraire la plaque dans le sens de la flèche; Fig. 85. Mesurer le diamètre de l’arbre porte-ressorts. Si celui-ci a un
diamètre de 60mm, procéder à l’installation. Si l’arbre a un dia-mètre de 48mm ou 42mm, appliquer les adaptateurs corres-pondants (fournis); Fig. 9
6. Réintroduire la plaque enlevée au point 5, en faisant attention ausens d’assemblage et visser les quatre vis fournies; Fig. 10
7. Introduire l’anneau adaptateur enlevé au point 4 et le graisserlégèrement à l’extérieur; Fig. 11
8. Visser la vis M10 en faisant attention à la faire passer à travers letrou, effectué au point 1, dans l’arbre porte-ressorts et éventuel-lement dans l’adaptateur. Fig. 12
9. Visser les deux vis M10 afin de fixer l’opérateur à l’arbre porte-ressorts. Bloquer les deux vis avec un contre-écrou; Fig. 13
10. Effectuer un trou sur l’arbre porte-ressorts afin de faire passer lecâble d’alimentation et de débrayage (seulement sur versionsavec frein); Fig. 14
11. Assembler la poignée de débrayage, avec tous les régulateurs vis-sés (A), enfiler le câble et en le gardant tendu, le bloquer à l’aide dela vis de blocage (B) (seulement sur versions avec frein); Fig. 15
12. Effectuer la manœuvre de débrayage en dévissant la poignéeinférieure dans le sens des aiguilles d’une montre. Vérifiermanuellement que l’opérateur est débrayé. Éventuellement éli-miner les jeux à l’aide des régulateurs; Fig. 16
13. Graisser légèrement les dents des bagues enlevées au point 3 etles assembler en serrant à fond les deux vis M8; Fig.17
14. Mesurer le diamètre des boîtiers porte-ressorts. Si leur diamètreest de 200mm, continuer l’installation.
15. Si leur diamètre est de 220mm, utiliser un adaptateur (B); Fig.18
16. Enlever le couvercle de protection des bornes. Dévisser le serre-câble. Effectuer les connexions Fig. 19. Visser les vis du serre-câble. Refermer le couvercle de protection des bornes.
17. Enlever avec un tournevis le verre, pour régler les fins de course;Fig. 20
18. Présenter la dernière section du rideau métallique sur la demi-bague et effectuer sur cette section un trou de 11 mm de dia-mètre au niveau du trou présent dans la demi-bague.
19. Bloquer à fond le tablier du rideau sur l'opérateur avec une ron-delle et une vis M10. Fig. 21
20. débrayér l’opérateur (seulement sur version avec frein), et effec-tuer la manœuvre manuelle d’ouverture et de fermeture durideau métallique en vérifiant son coulissement correct. Reblo-quer en vissant la poignée de débrayage; Fig. 22
21. RÉGLAGE FIN DE COURSE DE DESCENTE (fermeture)À l’aide de l’inverseur, commander l’opérateur en descente jus-qu’à l’intervention du fin de course.Dans l’installation illustrée, le fin de course de fermeture est celuiqui est indiqué dans la Fig. 23
22. RÉGLAGE FIN DE COURSE EN MONTÉE (ouverture)Tirer le clip vers l'extérieur et simultanément, tourner la moletteindiquée par la flèche en tenant compte qu'1 cm de course cor-respond approximativement à 1 m de montée. Relâcher le clip.Alimenter l'opérateur en montée et vérifier que le rideau en mon-tant s'arrête au point désiré. Fig. 24.Continuer en effectuant plusieurs tentatives de manière à trou-ver la position désirée.
23. Remettre en place le verre du fin de course en faisant attentionau sens de montage; Fig. 25
24. Si l’installation est contraire à celle illustrée, effectuer les opéra-tions de manière inverse à la description puisque le deuxième finde course règlera la descente et le premier la montée.
1) Description du produit
RONDO est un opérateur pour rideaux métalliques à enroulementavec compensation par ressorts. Il permet d’automatiser des rideauxmétalliques d’une hauteur max. de 6m et d’un poids max. de 180kg.L’opérateur peut être monté sur des rideaux métalliques ayant unarbre porte-ressorts d’un diamètre de Ø42mm, Ø48mm et Ø60mm.
Les boîtiers porte-ressorts peuvent avoir un diamètre de 200mm /220mm. Les deux bagues sont en aluminium moulé sous pression.Il dispose d’un fin de course à vis micrométrique et d’une mémoiremécanique de position.
2.1) Vérifications et opérations préliminaires
Nous rappelons que les automatismes pour rideaux métalliques doi-vent être installés exclusivement par du personnel technique qualifiéet dans le plein respect des normes légales. En particulier, vérifier que:• L’emballage est intact et contient toutes les pièces indiquées sur
la Fig. 1.• Le rideau métallique ne présente pas de points de frottement aus-
si bien dans la course de fermeture que d’ouverture.
• Le rideau métallique est bien équilibré, c’est à dire que, quelle quesoit la position dans laquelle il s’arrête, il n’a pas tendance à redé-marrer.
• Le rideau métallique, dans sa course, est silencieux et régulier.• En référence à la Fig. 2, vérifier que la zone de fixation est com-
patible avec l’encombrement de l’opérateur.
2) Installation
F
15
Le débrayage ne doit se faire que lorsque le rideaumétallique est arrêté.
Pour débrayér l’opérateur il faut:1 Dévisser dans le sens des aiguilles d’une montre la partie inférieu-
re de la poignée jusqu’à ce qu’on sente une certaine résistance;
2 Ouvrir ou fermer manuellement le rideau métallique;3 Rebloquer l’opérateur en effectuant l’opération inverse à celle du
point 1.
!
3) Manœuvre manuelle (seulement versions avec frein)
L’essai de fonctionnement est la partie la plus importante de toute la réa-lisation de l’installation. Chaque composant, comme par exemple lemoteur, l'arrêt d’urgence, les photocellules, etc., peut demander unephase d’essai spécifique et il est donc conseillé de suivre les procéduresdécrites dans les manuels d’instructions respectifs. L’essai de l’installa-tion doit être effectué par du personnel qualifié et expérimenté qui devrase charger d’établir les essais prévus en fonction du risque présent.Pour l’essai de RONDO, effectuer la séquence d’opérations suivante:• Contrôler que les pièces moulées sont en bon état, c’est à dire
qu’elles ne présentent pas de ruptures;
• Vérifier que l’opérateur est bien fixé à l’arbre porte-ressorts;• Contrôler que les raccords à vis sont serrés à fond;• Vérifier que les contacts électriques sont en bon état;• Vérifier que la bague ne présente pas de jeux axiaux excessifs;• Vérifier le réglage des fins de course en effectuant une manœuvre
complète (montée-descente);• Vérifier que l’opérateur, bloqué à un endroit quelconque, n’amor-
ce aucun mouvement;• Vérifier que le débrayage libère aisément l’opérateur du rideau
métallique (seulement sur versions avec frein).
4) Essai de fonctionnement
La maintenance de RONDO ne nécessite pas d’opérations particulièresmais un contrôle programmé tous les six mois permet de prolonger ladurée de l’opérateur et garantit la sécurité du fonctionnement du système.
La maintenance consiste simplement à répéter la procé-dure d’essai.
5.1) Mise au rebut
En cas de démolition de l’automatisme aucune des pièces n’estdangereuse et il n’y a pas de risque dérivant de l’automatismemême. Suivre en sens inverse le chapitre “Fixation”
RONDO est constitué de plusieurs types de matériaux et leur miseau rebut doit être effectuée en respectant les normes en vigueur. Il est conseillé de séparer les matériaux par type (parties électriques,aluminium, plastique, etc.).
5) Maintenance
6) Caractéristiques techniques
Alimentation / fréquence Vac/Hz 230/50 120/60
Courant absorbé A 2 2.6 4.8
Puissance absorbée W 450 600 580
Couple max. Nm 130 180
Force max. de soulèvement avec Ø 200 mm kg 130 180
Vitesse nominale Rpm 8.5 10
Couple nominal Nm 75 100
Diamètre standard abre rideau métallique mm 60*
Diamètre brides volets roulants mm 200*
Vitesse rotation couronne (à vide) Rpm 10 12
Température ambiante de fonctionnement °C -20 ÷ +50
Indice de protection IP 20
Protection thermique °C 140
Temps de fonctionnement continu Minutes 4
Cycle de travail max. Secondes50% avec 30s ON et 30s OFF
Poids kg 9.5 10
Classe d’isolation F
* 48 et 42mm avec adaptateur fourni
** 220mm avec adaptateur fourni
RN2010RN2030
RN2020RN2040
RN2020/V1H6RN2040/V1H6
RN2010 - RN2020 - RN2020/V1H6
RN2030 - RN2040 - RN2040/V1H6
Opérateur réversible sans frein
Opérateur réversible avec frein et dispositif de débrayage
16
KIO - Sélecteur à clé avec débrayage par câble
7) Accessoires
Opérateur électromécanique pour l’automatisationde rideaux métalliques équilibrés
rondoInstructions et avertissements pourl’utilisateur de l’opérateur RONDO
Félicitations pour avoir choisi un produit Nice pour votre automatisa-tion!
Nice S.p.a. produit des composants pour l’automatisme de portails,portes, rideaux métalliques, volets roulants et stores: opérateurs,armoires de commande, radiocommandes, clignotants, photocellules etaccessoires. Nice n’utilise que des matériaux et des usinages de qualitéet par vocation, elle recherche des solutions innovantes qui simplifient aumaximum l’utilisation de ses appareils, très soignés sur le plan de latechnique, de l’esthétique et de l’ergonomie: dans la vaste gamme Nice,votre installateur aura choisi sans aucun doute le produit le plus adaptéà vos exigences.
Nice n’est toutefois pas le producteur de votre automatisme qui est eneffet le résultat d’un travail d’analyse, évaluation, choix des matériaux etréalisation de l’installation, exécuté par votre installateur de confiance.Chaque automatisme est unique et seul votre installateur possède l’ex-périence et la compétence professionnelle nécessaires pour réaliser uneinstallation répondant à vos exigences, sûre et fiable dans le temps etsurtout, exécutée dans les règles de l’art et conforme par conséquentaux normes en vigueur.
Une installation d’automatisation est une belle commodité ainsi qu’unsystème de sécurité valable; avec quelques attentions très simples, elleest destinée à durer dans le temps. Même si l’automatisme en votre possession satisfait le niveau de sécu-rité requis par les normes, cela n’exclut pas la persistance d’un “risquerésiduel”, c’est-à-dire la possibilité de situations de danger dues géné-ralement à une utilisation inconsciente, voire erronée. C’est la raisonpour laquelle nous désirons vous donner quelques conseils sur les com-portements à adopter pour éviter tout inconvénient:
• Avant d’utiliser pour la première fois l’automatisme, faites-vousexpliquer par l’installateur l’origine des risques résiduels et consacrezquelques minutes à la lecture du manuel d’instructions et d’aver-tissements pour l’utilisateur qui vous est remis par l’installateur.Conservez le manuel pour pouvoir le consulter pour n’importe quel dou-te futur et remettez-le à tout nouveau propriétaire de l’automatisme.
• Votre automatisme est un équipement qui exécute fidèle-ment vos commandes; une utilisation inconsciente et incorrectepeut le rendre dangereux: ne commandez pas le mouvement de l’au-tomatisme si des personnes, des animaux ou des objets se trouventdans son rayon d’action.
✄
F
18
1. Dévisser dans le sens des aiguilles d’une montre, la poignée du bas, jusqu’à sentir une certaine résistance; (Fig. 1)2. Ouvrir ou fermer manuellement le rideau métallique;3. Rebloquer l’opérateur en tournant la poignée du bas dans le sens contraire aux aiguilles d’une montre jusqu’à ce que les
deux poignées soient en contact entre elles (Fig. 2)
• Enfants: une installation d’automatisation garantit un degré de sécu-rité élevé en empêchant avec ses systèmes de détection le mouve-ment en présence de personnes ou d’objets et en garantissant uneactivation toujours prévisible et sûre. Il est prudent toutefois d’éviter delaisser jouer les enfants à proximité de l’automatisme et pour éviter lesactivations involontaires, de ne pas laisser à leur portée les émetteursqui commandent la manœuvre: ce n’est pas un jeu!
• Anomalies: si vous notez une anomalie quelconque dans le fonc-tionnement de l’automatisme, coupez l’alimentation électrique del’installation et procédez au débrayage manuel. Ne tentez jamais de leréparer vous-même mais demandez l’intervention de votre installateurde confiance: dans l’intervalle, l’installation peut fonctionner commeun système non automatisé, après avoir débrayé l’opérateur suivantles indications données plus loin.
• Maintenance: comme toutes les machines, votre automatisme abesoin d’une maintenance périodique pour pouvoir fonctionner le pluslongtemps possible et en toute sécurité. Établissez avec votre instal-lateur un plan de maintenance périodique programmée; Nice conseilleune intervention tous les 6 mois pour une utilisation domestique nor-male mais celle période peut varier en fonction de l’intensité d’utilisa-tion. Toute intervention de contrôle, maintenance ou réparation doitêtre exécutée exclusivement par du personnel qualifié.
• Même si vous estimez en être capable, ne modifiez pas l’installation etles paramètres de programmation et de réglage de l’automatisme : laresponsabilité en incombe à votre installateur.
• L’essai de fonctionnement final, les maintenances périodiques et leséventuelles réparations doivent être documentés par la personne quis’en charge et les documents doivent être conservés par le proprié-taire de l’installation.
• Mise au rebut. À la fin de la vie de l’automatisme, assurez-vous quele démantèlement est effectué par du personnel qualifié et que lesmatériaux sont recyclés ou mis au rebut en respectant les normeslocales en vigueur.
• En cas de ruptures ou absence d’alimentation électrique. Enattendant l’intervention de votre installateur (ou le retour du courant sil’installation est dépourvue de batterie tampon), l’installation peut êtreactionnée comme n’importe quel autre système non automatisé. Pourcela, il faut effectuer le débrayage manuel : cette opération, qui est laseule pouvant être effectuée par l’utilisateur de l'automatisme, a faitl’objet d’une étude particulière de la part de Nice pour vous assurertoujours une utilisation extrêmement simple et aisée, sans aucun outilou effort physique.
1 2
Importante: si votre installation est munie d’une radiocommande quiau bout d’une certaine période présente des problèmes de fonctionne-ment ou ne fonctionne plus du tout, cela pourrait dépendre tout simple-ment du fait que la pile est usagée (suivant le type de pile, il peut s’écou-ler plusieurs mois jusqu’à deux ou trois ans). Vous pouvez vérifier cetétat de chose si le voyant de confirmation de la transmission est faible,s’il ne s’allume plus du tout ou s’il ne s’allume qu’un bref instant. Avantde vous adresser à l’installateur, essayez de remplacer la pile en utilisantcelle d’un autre émetteur qui fonctionne encore: si cette interventionremédie au problème, il vous suffit de remplacer la pile usagée par uneneuve du même type.
Êtes-vous satisfait? Si vous désirez équiper votre maison d’un nou-vel automatisme, adressez-vous au même installateur et à Nice. Vousserez sûr de bénéficier ainsi, en plus du conseil d’un spécialiste et desproduits les plus évolués du marché, également du meilleur fonctionne-ment et de la compatibilité parfaite des différents automatismes installés.
Nous vous remercions d’avoir lu ces recommandations et nous espé-rons que votre nouvelle installation vous donnera entière satisfaction:pour tout besoin présent ou futur, adressez-vous en toute confiance àvotre installateur.
Hinweise
Die vorliegende Anleitung ist nur für technisches Personal bestimmt, dasfür die Installation qualifiziert ist. Keine im vorliegenden Heft enthalteneInformation kann als interessant für den Endbenutzer betrachtet werden.Die Anweisungen vor der Installation genau lesen, da sie wichtige Hin-weise liefern, was Sicherheit, Installation, Bedienung und Wartungbetrifft.
Alles nicht ausdrücklich in diesen Anweisungen vorgesehene ist unzu-lässig. Ein unsachgemäßer Gebrauch könnte Schäden und Gefahrenverursachen. RONDO ist für den Gebrauch in potentieller EX-Atmosphäre ungeeignet.
Anweisungen und Hinweise für den 23Benutzer des Getriebemotors RONDO
D
2.2) Typische anlage (Abb. 3)
1 Getriebemotor RONDO2 Abzweigkasten3 Entriegelungsknauf (nur Modelle mit Bremse)
4 Umschalter oder elektronische Steuerung5 Elektrische Versorgungslinie6 Federträgergehäuse
2.3) Befestigung
1. Den Rollladen ganz schließen, so dass die Federträgerwelle zugäng-lich wird, dann 90mm von der Mitte der Federträgerwelle entfernteine horizontale 11mm große Bohrung durchführen; Abb. 4
2. Die beiden Halbnutmuttern entfernen, indem die beiden M8Schrauben abgeschraubt werden; Abb. 6
3. Den Gleitring entfernen - siehe Abb. 74. Die Platte in Pfeilrichtung herausziehen; Abb. 85. Den Durchmesser der Federträgerwelle messen. Mit der Installa-
tion weitermachen, falls ihr Durchmesser 60mm beträgt. Ist derDurchmesser dagegen 48 oder 42mm, müssen die jeweiligenAdapter (mitgeliefert) angebracht werden; Abb. 9
6. Die in Punkt 5 entfernte Platte wieder einbauen, dabei die Mon-tagerichtung beachten, dann die vier mitgelieferten Schraubenanschrauben; Abb. 10
7. Den in Punkt 4 entfernten Adapterring wieder einfügen und die-sen außen leicht einfetten; Abb. 11
8. Die M10 Schraube durch die in Punkt 1 ausgeführte Bohrung, dieFederträgerwelle und ggf. den Adapter führen und anschrauben;Abb. 12
9. Die beiden M10 Schrauben anschrauben, so dass der Getriebe-motor an der Federträgerwelle befestigt ist. Die beiden Schrau-ben mit einer Mutter blockieren; Abb. 13
10. Eine Bohrung an der Federträgerwelle für das Versorgungskabelund die Entriegelung ausführen (nur Modelle mit Bremse); Abb. 14
11. Den Entriegelungsknauf mit allen angeschraubten Reglern (A)montieren, das Kabel einführen und gespannt halten, dann mitder Klemme (B) blockieren (nur Modelle mit Bremse); Abb. 15
12. Eine Entriegelung ausführen und den unteren Knauf im Uhrzeigersinnlosschrauben. Von Hand prüfen, ob der Getriebemotor entriegelt ist.Ggf. die Regler zur Beseitigung der Spiele betätigen; Abb. 16
13. Die Zahnung der in Punkt 3 entfernten Nutmuttern leicht einfet-ten und diese zusammenbauen, dabei die beiden M8 Schraubenfest anziehen; Abb. 17
14. Den Durchmesser der Federträgergehäuse messen. Mit der Installa-tion weitermachen, falls sie einen Durchmesser von 200mm haben.
15. Sollte ihr Durchmesser dagegen 220mm sein, den dazu vorge-sehenen Adapter (B) anbringen; Abb. 18
16. Den Klemmenschutzdeckel entfernen. Den Kabelhalter abschrau-ben. Die Anschlüsse ausführen; Abb. 19. Die Kabelhalterschraubenwieder anschrauben. Den Klemmenschutzdeckel wieder anbringen.
17. Das Glas zur Einstellung der Endschalter mit einem Schrauben-zieher entfernen; Abb. 20
18. Die letzte Bahn des Rollladens zur Halbnutmutter bringen und andieser eine Bohrung mit 11mm Durchmesser ausführen, die mitder Bohrung an der Halbnutmutter zusammentreffen muss;
19. Die Bahn des Rollladens mit der Unterlegscheibe und derSchraube M10 gut am Getriebemotor blockieren. Abb. 21.
20. Den Getriebemotor entriegeln (nur Modelle mit Bremse) und denRollladen von Hand öffnen und schließen und prüfen, ob er ein-wandfrei gleitet. Den Entriegelungsknauf anschrauben und wie-der verriegeln; Abb. 22
21. EINSTELLUNG DES ENDSCHALTERS IN ABSTIEG (Schließung) Den Getriebemotor mit dem Umschalter in Abstieg steuern, bisder Endschalter ausgelöst wird. Für die geschilderte Installationist der Endschalter in Abstieg der auf Abb. 23 gezeigte.
22. EINSTELLUNG DES ENDSCHALTERS IN ANSTIEG (Öffnung)Die Klammer nach außen ziehen und das vom Pfeil angegebeneRad gleichzeitig drehen, dabei berücksichtigen, dass ca. 1 cm sei-nes Laufs 1 m Anstieg entspricht. Den Getriebemotor in Anstiegspeisen und prüfen, ob der Rollladen bei seinem Anstieg an dergewünschten Stelle anhält. Abb. 24. Mehrmals Versuche ausfüh-ren, bis die gewünschte Stellung festgelegt ist.
23. Das Endschalterglas in der korrekten Montagerichtung wiedereinfügen; Abb. 25
24. Falls die Installation umgekehrt zur geschilderten ist, auf umge-kehrte Weise vorgehen, da der zweite Endschalter für denAbstieg zuständig sein wird, und der erste für den Anstieg.
1) Beschreibung des produkts
RONDO ist ein Getriebemotor für Rollladen mit Ausgleich durchFedern. Mit RONDO können Rollladen mit einer Höhe von max. 6mund einem Gewicht bis zu 180 kg automatisiert werden. Der Getrie-bemotor kann an Rollladen mit einem Wellendurchmesser desFederträgers von Ø42mm, Ø48mm und Ø60mm montiert werden.
Das Federträgergehäuse kann einen Durchmesser von 200mm /220mm haben. Die beiden Nutmuttern sind aus Aludruckguss.Der Getriebemotor verfügt über einen Endschalter mit mikrometri-scher Schraube und mechanischem Stellungsgeber.
2.1) Vorprüfungen
Wir erinnern daran, dass Automatisierungsanlagen von Rollladen nur vonFachpersonal und unter genauester Einhaltung der Gesetzesverordnun-gen installiert werden dürfen. Insbesondere ist folgendes zu überprüfen: • Die Verpackung muss unbeschädigt sein und alle in Abb. 1
gezeigten Teile enthalten.• Der Rollladen darf in Öffnung sowie in Schließung keine Stellen mit
größerer Reibung aufweisen.
• Der Rollladen muss gut im Gleichgewicht sein, d.h. dass er sichnicht bewegen darf, wenn er in beliebiger Stellung angehalten wird.
• Der Rollladen muss sich leise und regelmäßig bewegen. • Unter Bezugnahme auf Abb. 2 ist zu prüfen, ob der Befestigungs-
bereich für den Platzbedarf des Getriebemotors geeignet ist.
2) Installation
20
Die Entriegelung darf ausschließlich bei stehendemRollladen ausgeführt werden.
Entriegelung des Getriebemotors:1 Den unteren Knaufteil im Uhrzeigersinn losschrauben, bis man
einen gewissen Widerstand spürt; 2 Den Rollladen von Hand öffnen oder schließen;3 Den Vorgang in Punkt 1 umgekehrt ausführen und den Getriebe-
motor dadurch verriegeln.
!
3) Handbedienung (nur Modelle mit Bremse)
Die Endprüfung ist das Wichtigste bei der Durchführung der Automa-tisierung. Für jedes einzelne Teil wie z.B. Getriebemotor, Notstopvor-richtung, Photozellen usw. kann eine spezielle Prüfung erforderlichsein. Daher wird empfohlen, nach den Verfahren in den jeweiligenAnleitungen vorzugehen. Die Endprüfung der gesamten Automatisie-rung muss von erfahrenem Fachpersonal mit Tests ausgeführt wer-den, die dem vorhandenen Risiko entsprechen müssen. Für die End-prüfung von RONDO, der Reihe nach folgende Vorgänge ausführen:• Prüfen, ob die Teile aus Aludruckguss in einwandfreiem Zustand
sind und keine Bruchstellen aufweisen;
• Prüfen, ob der Getriebemotor gut an der Federträgerwelle befestigt ist; • Prüfen, ob die Verschraubungen fest angezogen sind; • Prüfen, ob die elektrischen Kontakte in gutem Zustand sind;• Prüfen, ob die Nutmutter keine zu starken Längsspiele aufweist;• Die Endschaltereinstellung anhand einer vollständigen Bewegung
(An- und Abstieg) überprüfen;• Prüfen, ob der an beliebiger Stelle blockierte Getriebemotor keine
Bewegung verursacht;• Prüfen, ob der Getriebemotor durch die Entriegelung einwandfrei
vom Rollladen getrennt ist (nur Modelle mit Bremse)
4) Endprüfung
Für die Wartung von RONDO sind keine besonderen Maßnahmenerforderlich. Eine programmierte Wartung alle sechs Monate wirddem Getriebemotor eine längere Dauer und dem System dieBetriebssicherheit gewährleisten.
Die Wartung besteht einfach aus einer Wiederholung derEndprüfungen.
5.1) Entsorgung
Im Falle einer Verschrottung der Automatisierung gibt es keine gefähr-lichen Einzelteile oder Risiken aufgrund der Automatisierung selbst.Die Anweisungen in Kapitel “Befestigung” umgekehrt ausführen.
RONDO besteht aus verschiedenen Werkstoffen, die nach den gülti-gen Vorschriften zu entsorgen sind. Die Werkstoffe sollten nach ihrerArt getrennt werden (elektrische Teile, Aluminium, Kunststoff, usw.).
5) Wartung
D
21
6) Technische merkmale
Versorgung / Frequenz Vac/Hz 230/50 120/60
Stromaufnahme A 2 2.6 4.8
Leistungsaufnahme W 450 600 580
Max.Drehmoment Nm 130 180
Max. Hubkraft mit Ø 200mm kg 130 180
Nenndrehzahl Rpm 8.5 10
Nenndrehmoment Nm 75 100
Standarddurchmesser der Rollladenwelle mm 60*
Durchmesser der Aufrollflansche mm 200*
Kranzdrehzahl (ohne Last) Rpm 10 12
Umgebungs- und Betriebstemperatur °C -20 ÷ +50
Schutzart IP 20
Wärmeschutz °C 140
Dauerbetriebszeit Minuten 4
Max. Arbeitszyklus Sec 50% mit 30s ON und 30s OFF
Gewicht kg 9.5 10
Isolationsklasse F
* 48 und 42mm mit mitgeliefertem Adapter
** 220mm mit mitgeliefertem Adapter
RN2010RN2030
RN2020RN2040
RN2020/V1H6RN2040/V1H6
RN2010 - RN2020 - RN2020/V1H6
RN2030 - RN2040 - RN2040/V1H6
Selbsthemmender Getriebemotor ohne Bremse
Nicht selbsthemmender Getriebemotor mit Bremse und Entriegelung
KIO - Schlüsseltaster mit Schnurentriegelung
7) Zubehör
22
Elektromechanischer Getriebemotor für dieAutomatisierung ausgewuchteter Rollladen
rondoAnweisungen und hinweise für denbenutzer des Getriebemotors RONDO
Complimenti per aver scelto per la vostra automazione un prodottoNice!
Nice S.p.a. stellt Bestandteile für die Automatisierung von Türen undToren, Rollladen, Jalousien und Markisen her, wie Getriebemotoren,Steuerungen, Funksteuerungen, Blinkleuchten, Photozellen und Zube-hör. Nice verwendet ausschließlich Werkstoffe und Verarbeitungen hoch-stehender Qualität und ist aufgrund der Nice Betriebsphilosophie immerauf der Suche nach innovativen Lösungen, um die Verwendung der NiceApparaturen, vom technischen, ästhetischen und ergonomischenStandpunkt her besonders gepflegt, zu erleichtern: Ihr Installateur wirdbestimmt das richtige Produkt in der großen Nice Palette für Sie ausge-wählt haben.
Nice ist jedoch nicht der Hersteller Ihrer Automatisierung, die das Ergeb-nis von Analysen, Bewertungen, Auswahl der Materialien und der Durch-führung der Anlage durch Ihren Vertrauensinstallateur ist. Jede Automa-tisierung ist einzigartig, und nur Ihr Installateur besitzt die Erfahrung undProfessionalität, die notwendig sind, um eine Anlage nach Ihrem Bedarfauszuführen, die sicher und dauerhaft zuverlässig und vor allem fachge-recht ist bzw. den gültigen Vorschriften entspricht.
Eine Automatisierungsanlage ist etwas sehr bequemes, aber auch einwertvolles Sicherheitssystem und dauert mit nur wenigen Eingriffenbestimmt jahrelang. Auch wenn Ihre Automatisierung den von den Vor-schriften geforderten Sicherheitsniveaus entspricht, schließt dies dasVorhandensein von “Restrisiken” nicht aus, womit die Möglichkeitgemeint ist, dass gewöhnlich aufgrund eines verantwortungslosen oderfalschen Gebrauchs Gefahren erzeugt werden können; wir möchtenIhnen deshalb ein paar Ratschläge geben, wie Sie sich verhalten sollten,um allen Unannehmlichkeiten aus dem Weg zu gehen:
• Bevor Sie die Automatisierung zum ersten Mal verwenden,lassen Sie sich von Ihrem Installateur erklären, wie Restrisiken entstehenkönnen, und widmen Sie dem Lesen der Anweisungen und Hinweisefür den Benutzer, die Ihnen Ihr Installateur aushändigen wird, ein paarMinuten. Bewahren Sie die Anleitung für zukünftige Zweifelsfälle auf undübergeben Sie diese ggf. einem neuen Besitzer der Automatisierung.
• Ihre Automatisierung ist eine Maschine, die Ihre Befehlegetreu durchführt; ein verantwortungsloser und unsachgemäßerGebrauch kann gefährlich werden: verursachen Sie keine Bewegungder Automatisierung, wenn sich Personen, Tiere oder Gegenstände inihrem Aktionskreis befinden.
✄
D
24
1. Den unteren Knaufteil im Uhrzeigersinn losschrauben, bis man einen gewissen Widerstand spürt; (Abb. 1)2. Den Rollladen von Hand öffnen oder schließen;3. Den Getriebemotor wieder blockieren, indem der untere Knaufteil gegen den Uhrzeigersinn gedreht wird, bis sich die beiden
Knaufteile berühren; (Abb. 2)
• Kinder: eine Automatisierungsanlage gewährleistet einen hohen Sicher-heitsgrad und verhindert mit ihren Schutzsystemen, dass sie sich beiAnwesenheit von Personen und Gegenständen bewegt, und gewährlei-stet eine immer vorhersehbare und sichere Aktivierung. Als Vorsichts-maßnahme sollte man aber Kindern verbieten, in der Nähe der Automa-tisierung zu spielen, und man sollte die Fernbedienungen nicht in derReichweite von Kindern lassen: es handelt sich nicht um ein Spiel!
• Störungen. Schalten Sie die Stromversorgung zur Anlage ab, sobaldSie ein ungewöhnliches Verhalten der Automatisierung bemerken,und führen Sie die manuelle Entriegelung aus. Versuchen Sie nie,selbst Reparaturen auszuführen, sondern fordern Sie den Eingriff IhresVertrauensinstallateurs an: in der Zwischenzeit, nachdem Sie denGetriebemotor wie weiter vorne beschrieben entriegelt haben, kanndie Anlage wie eine nicht automatisierte Vorrichtung funktionieren.
• Wartung. Wie jede Maschine benötigt auch Ihre Automatisierungeine regelmäßige Wartung, damit sie so lange wie möglich und in vol-ler Sicherheit funktionieren kann. Vereinbaren Sie mit Ihrem Installateureinen programmierten Wartungsplan. Nice empfiehlt eine program-mierte Wartung alle sechs Monate bei Normalgebrauch für den Haus-halt, dieser Zeitraum kann aber je nachdem, wie häufig die Anlagebenutzt wird, unterschiedlich sein. Arbeiten wie Wartung, Kontrollenund Reparaturen dürfen nur von Fachpersonal ausgeführt werden.
• Auch wenn Sie meinen, dass Sie wissen, wie das gemacht wird,ändern Sie die Anlage und die programmierten Parameter sowie dieEinstellungen der Automatisierung nicht: diese Verantwortung stehtIhrem Installateur zu.
• Die Endprüfung, die periodischen Wartungen und eventuelle Repara-turen müssen von dem, der diese Arbeiten ausführt, belegt sein, unddiese Belege müssen vom Besitzer der Anlage aufbewahrt werden.
• Entsorgung. Versichern Sie sich, dass die Entsorgung am Ende derLebensdauer Ihrer Automatisierung von Fachpersonal gemacht wirdund dass die Materialien nach den örtlich gültigen Vorschriften recy-cled oder entsorgt werden.
• Im Falle von Defekten oder bei Stromausfall. Warten Sie aufIhren Installateur (oder bis der Strom wieder vorhanden ist, falls IhreAnlage keine Pufferbatterie hat); die Anlage kann wie eine beliebigenicht automatisierte Öffnungsvorrichtung betätigt werden. Dazu mussdie manuelle Entriegelung ausgeführt werden. Dieser Vorgang, dereinzige, den der Benutzer der Automatisierung ausführen kann, wur-de mit besonderer Aufmerksamkeit von Nice behandelt, damit Sie die-se Vorrichtung immer mit größter Einfachheit, ohne Werkzeug undohne körperliche Anstrengungen betätigen können.
1 2
Wichtig: falls Ihre Anlage mit Funksteuerung ausgestattet ist, die nacheiniger Zeit anscheinend schlechter oder gar nicht funktioniert, so könn-te das ganz einfach von der leeren Batterie abhängen (je nach Batteriekann das nach mehreren Monaten bis zu zwei-drei Jahre geschehen).Sie können das an dem Leuchtmelder bemerken, der die Sendungbestätigt, der nur schwach oder gar nicht oder nur ganz kurz leuchtet.Bevor Sie sich an den Installateur wechseln, versuchen Sie, die Batteriemit der eines anderen, funktionierenden Senders auszuwechseln: solltedas die Ursache sein, genügt es, die alte Batterie mit einer anderen glei-chen Typs auszuwechseln.
Sind Sie zufrieden? Wenn Sie eine neue Automatisierung für Ihr Hauswollen und sich an denselben Installateur und an Nice wenden, werdenSie sich die Beratung eines Fachmanns und die fortgeschrittensten Pro-dukte auf dem Markt, aber auch den besten Betrieb und die größte Ver-träglichkeit zwischen den Automatisierungen zusichern.
Wir danken Ihnen, dass Sie diese Ratschläge gelesen haben, und wün-schen Ihnen größte Zufriedenheit mit Ihrer neuen Anlage: wenden Siesich für gegenwärtige oder zukünftige Bedarfsfälle vertrauensvoll anIhren Installateur.
rondo
Advertencias
Este manual está destinado sólo al personal técnico cualificado para lainstalación. Ninguna información contenida en este manual puede serconsiderada de interés para el usuario final. Es necesario leer con aten-ción las instrucciones antes de comenzar con la instalación, porqueestas ofrecen indicaciones importantes acerca de la seguridad, instala-ción, uso y mantenimiento.
Está prohibido todo aquello que no esté expresamente previsto en estasinstrucciones. El empleo inadecuado puede ser causa de averías ysituaciones peligrosas.RONDO no es adecuado para su uso en atmósfera con riesgo de explo-sión.
Instrucciones y advertencias destinadas 29al usuario del motorreductor RONDO E
25
2.2) Instalación típica (Fig. 3)
1 motorreductor RONDO2 caja de derivación3 pomo de desbloqueo (sólo en las versiones con freno)
4 inversor de mando o central electrónica5 Línea eléctrica de alimentación6 Cajas portamuelles
2.3) Fijación
1. Cierre completamente el cierre enrollable para poder acceder aleje portamuelles y haga un taladro horizontal de 11 mm de diá-metro a 90mm del centro del eje portamuelles; Fig. 4
2. Quite las dos semipoleas desenroscando los dos tornillos M8; Fig. 63. Quite el anillo de deslizamiento; Fig. 74. Extraiga la placa en la dirección de la flecha; Fig. 85. Mida el diámetro del eje portamuelles. Si éste tiene un diámetro
igual a 60mm, proceda con la instalación. Si el eje tiene un diá-metro igual a 48mm o 42mm, aplique los adaptadores corres-pondientes (de serie); Fig. 9
6. Vuelva a instalar la placa que quitara en el punto 5, observandola dirección de ensamblaje y enrosque los cuatro tornillos entre-gados de serie; Fig. 10
7. Introduzca el anillo adaptador que desmontara en el punto 4 yengrase ligeramente su parte exterior; Fig. 11
8. Enrosque en el eje portamuelles y en el adaptador el tornillo M10,haciéndolo pasar por el taladro hecho en el punto 1; Fig. 12.
9. Enrosque los dos tornillos M10 fijando el motorreductor al eje por-tamuelles. Bloquee los dos tornillos con las contratuercas, Fig. 13.
10. Realice un taladro en el eje portamuelles para poder pasar elcable de alimentación y de desbloqueo (sólo en las versionescon freno); Fig. 14
11. Ensamble el pomo de desbloqueo con todos los reguladoresenroscados (A), pase el cable y manténgalo tenso, bloquéelocon la mordaza (B) (sólo en las versiones con freno); Fig. 15
12. Realice la maniobra de desbloqueo desenroscando hacia laderecha el pomo inferior. Controle manualmente que el motorre-ductor esté desbloqueado. De ser necesario, use los regulado-res para eliminar los juegos; Fig. 16
13. Engrase ligeramente los dientes de las poleas que se desmon-taran en el punto 3 y ensámblelas apretando hasta el fondo losdos tornillos M8; Fig. 17
14. Mida el diámetro de las cajas portamuelles. Si tuvieran un diá-metro de 200mm, siga con la instalación.
15. En caso contrario, si fuera de 220mm, utilice el adaptador espe-cífico (B); Fig. 18
16. Quite la tapa que protege los bornes. Desenrosque la mordazapara cable. Realice las conexiones; Fig. 19. Enrosque los torni-llos de la mordaza para cable. Cierre la tapa que protege losbornes.
17. Quite con un destornillador la tapa para la regulación de los finesde carrera; Fig. 20
18. Coloque el último perfil del cierre enrollable sobre la semipolea yrealice sobre el mismo un taladro de 11 mm de diámetro encorrespondencia del agujero roscado situado en la semipolea;
19. Bloquee el perfil del cierre enrollable al motorreductor hasta elfondo con la arandela y el tornillo M10; Fig. 21.
20. Desbloquee el motorreductor (sólo en las versiones con freno) yrealice la maniobra manual de apertura y cierre del cierre enro-llable, controlando que se deslice correctamente. Bloquee nue-vamente el pomo de desbloqueo; Fig. 22
21. REGULACIÓN DEL FIN DE CARRERA DE BAJADA (cierre)Con el inversor accione el motorreductor en bajada hasta que seaccione el fin de carrera. En la instalación ilustrada, el fin decarrera de cierre es aquel indicado en la Fig. 23
22. REGULACIÓN DEL FIN DE CARRERA DE SUBIDA (apertura)Tire del clip hacia afuera y contemporáneamente gire la ruedeci-lla indicada por la flecha teniendo en cuenta que 1 cm aproxi-madamente de su carrera corresponde a 1 m de subida. Accio-ne el motorreductor en subida y controle que al subir el cierreenrollable se detenga en el punto deseado. Fig. 24.Continúe con los intentos hasta encontrar la posición deseada;
23. Monte nuevamente la tapa del fin de carrera, colocándola en laposición justa; Fig. 25
24. Si la instalación fuera contraria a aquella ilustrada, siga los pasosde manera inversa a aquellos descritos, porque el segundo fin decarrera regulará la bajada, mientras que el primero regulará lasubida.
1) Descripción del producto
RONDO es un motorreductor para cierres enrollables compensadoscon muelles. Permite automatizar cierres con altura máx. de 6m y dehasta 180kg de peso. El motorreductor puede montarse en cierresenrollables con diámetro del eje portamuelles desde Ø42mm,
Ø48mm y Ø60mm. Las cajas portamuelles pueden tener un diáme-tro de 200mm / 220mm. Las dos poleas son de aluminio fundido apresión. Dispone de fin de carrera de tornillo micrométrico y memo-ria mecánica de posición.
2.1) Controles preliminares
Recordamos que los sistemas de cierres enrollables automáticosdeben ser instalados por personal experto respetando las normas devigentes. Controle que:• El embalaje esté íntegro y que contenga todos los componentes
indicados en la Fig. 1.• El cierre enrollable no presente puntos de mayor fricción, tanto
durante la carrera de cierre como en aquella de apertura.
• El cierre enrollable esté compensado correctamente, es decir que aldetenerlo en cualquier posición no tienda a moverse.
• La carrera del cierre sea silenciosa y regular.• Observando la Fig. 2 controle que la zona de fijación sea compati-
ble con el tamaño del motorreductor.
2) Instalación
26
E
27
El desbloqueo debe realizarse exclusivamente con elcierre enrollable detenido.
Para desbloquear el motorreductor, siga estos pasos:1 Desenrosque hacia la derecha la parte inferior del pomo hasta
sentir una cierta resistencia;2 Abra o cierre manualmente el cierre enrollable;3 Bloquee nuevamente el motorreductor, efectuando la operación
contraria al punto 1.
!
3) Maniobra manual (sólo en las versiones con freno)
El ensayo es la parte más importante de toda la instalación del auto-matismo. Cada componente, tal como motorreductor, parada deemergencia, fotocélulas, etc., puede requerir un ensayo específico;por lo tanto, se aconseja efectuar los procedimientos indicados en losmanuales de instrucciones respectivos. El ensayo de toda la automa-tización debe ser efectuado por personal experto y cualificado quedebe realizar los ensayos requeridos en función del riesgo presente.Para el ensayo de RONDO, siga esta secuencia de operaciones:• Controle que las fusiones estén en buenas condiciones, es decir
que no estén rotas;
• Controle que el motorreductor esté bien fijado al eje portamuelles;• Controle que las conexiones roscadas estén bien apretadas;• Controle que los contactos eléctricos estén en buenas condiciones;• Controle que la polea no tenga juegos axiales excesivos;• Controle la regulación de los fines de carrera realizando una manio-
bra completa (subida-bajada);• Controle que el motorreductor, bloqueado en cualquier punto, no
tienda a moverse;• Controle que el dispositivo de desbloqueo desenganche fácilmente
el motorreductor del cierre enrollable (solo en las versiones con freno)
4) Ensayo
El mantenimiento de RONDO no requiere grandes trabajos; un con-trol programado cada seis meses permitir una mayor duración delmotorreductor y un funcionamiento seguro del sistema.
El mantenimiento consiste simplemente en repetir el pro-cedimiento de ensayo.
5.1) Desguace
En el caso de desguace del automatismo, no existen peligros o ries-gos particulares causados por el mismo automatismo. Siga en elorden inverso los pasos del capítulo “Fijación”
RONDO está formado de varios tipos de materiales. El desguace dedichos materiales se debe efectuar respetando las normas localesvigentes. Es oportuno separar los materiales por tipo (piezas eléctri-cas, aluminio, plástico, etc.).
5) Mantenimiento
6) Características técnicas
Alimentación / frecuencia Vac/Hz 230/50 120/60
Corriente absorbida A 2 2.6 4.8
Potencia absorbida W 450 600 580
Par máx. Nm 130 180
Fuerza máx. de levantamiento con Ø 200mm kg 130 180
Velocidad nominal Rpm 8.5 10
Par nominal Nm 75 100
Diámetro estándar del eje del cierre enrollable mm 60*
Diámetro de las poleas del enrollador mm 200*
Velocidad de rotación de la corona (en vacío) Rpm 10 12
Temperatura ambiente de funcionamiento °C -20 ÷ +50
Grado de protección IP 20
Protección térmica °C 140
Tiempo de funcionamiento continuo Minutos 4
Ciclo de funcionamiento máx. Seg 50% con 30s ON y 30s OFF
Peso kg 9.5 10
Clase de aislamiento F
* 48 y 42mm con adaptador suministrado
** 220mm con adaptador suministrado
RN2010RN2030
RN2020RN2040
RN2020/V1H6RN2040/V1H6
RN2010 - RN2020 - RN2020/V1H6
RN2030 - RN2040 - RN2040/V1H6
Motorreductor reversible sin freno
Motorreductor irreversible con freno y dispositivo de desbloqueo
28
KIO - Selector de llave con desbloqueo por tirador
7) Accesorios
Motorreductor electromecánico para automatizarlos cierres enrollables compensados
rondoInstrucciones y advertencias destinadas alusuario del motorreductor RONDO
Felicitaciones por haber elegido un producto Nice para su automati-zación!
Nice S.p.a. produce componentes para la automatización de cancelas,puertas, cierres enrollables, persianas y toldos, tales como: motorre-ductores, centrales de mando, radiomandos, luces intermitentes, foto-células y accesorios. Los productos Nice son fabricados sólo con mate-riales de calidad y excelentes mecanizados. Nuestra empresa buscaconstantemente soluciones innovadoras que simplifiquen aún más eluso de nuestros aparatos, los que son cuidados bajo todo aspecto (téc-nico, estético y ergonómico): en la gran gama Nice, su instalador puedeescoger el producto que satisfaga de la mejor manera sus exigencias.
Nice no es quien escoge los componentes de su automatización, estees un trabajo de análisis, evaluación, elección de los materiales y reali-zación de la instalación efectuado por su instalador de confianza. Por lotanto, cada automatización es única y sólo su instalador puede ejecutaruna instalación a medida de sus exigencias (puesto que cuenta con laexperiencia y profesionalidad necesarias), segura y fiable en el tiempo y,sobre todo, que respete las normativas vigentes.
Una instalación de automatización es una gran comodidad, además deun sistema de seguridad válido y, con un mantenimiento reducido y sen-cillo, está destinada a durar por mucho tiempo. Aunque bien su auto-matización satisfaga el nivel de seguridad requerido por las normativas,esto no excluye la existencia de un “riesgo residual”, es decir, la posibi-lidad de que se puedan crear situaciones de peligro causadas por unuso inconsciente o incorrecto. Por dicho motivo, a continuación ledamos algunos consejos sobre cómo comportarse para evitar inconve-nientes:
• Antes de usar por primera vez el automatismo: pida a su ins-talador que le explique el origen de los riesgos residuales y lea estemanual de instrucciones y advertencias para el usuario entre-gado por el instalador. Conserve el manual por cualquier problemaque pueda surgir y recuerde entregarlo a un posible nuevo dueño delautomatismo.
• El automatismo ejecuta fielmente los mandos dados: un usoinconsciente o inadecuado puede ser peligroso. Por consiguiente, noaccione el automatismo cuando en su radio de acción haya personas,animales o cosas.
✄
E
30
1. Desenrosque hacia la derecha el pomo inferior hasta sentir una cierta resistencia (Fig. 1);2. Abra o cierre manualmente el cierre enrollable;3. Bloquee de nuevo el motorreductor girando el pomo inferior hacia la izquierda hasta que los dos pomos tengan contacto
entre sí (Fig. 2).
• Niños: una instalación de automatización garantiza un elevado gradode seguridad, impidiendo, gracias a sus sistemas de detección, quese mueva ante la presencia de personas o cosas y garantizando unaactivación previsible y segura. Procure que los niños no jueguen cer-ca del automatismo y mantenga los controles remotos lejos de sualcance: no son un juguete!
• Desperfectos: cada vez que el automatismo no funcione correcta-mente, corte la alimentación eléctrica de la instalación y realice el des-bloqueo manual. No realice ninguna reparación y llame a su instaladorde confianza: una vez desbloqueado el motorreductor, come descritoen seguida, la instalación podrá funcionar manualmente como uncerramiento no automatizado.
• Mantenimiento: para garantizar una larga vida útil y para un funcio-namiento seguro, la instalación, al igual que cualquier otra maquina-ria, requiere un mantenimiento periódico. Establezca con su instaladorun plan de mantenimiento con frecuencia periódica. Nice aconsejarealizar un mantenimiento cada 6 meses para un uso residencial nor-mal, que puede variar según la intensidad de uso. Cualquier tipo decontrol, mantenimiento o reparación debe ser realizado sólo por per-sonal cualificado.
• Aunque piense que lo sabe hacer, no modifique la instalación ni losparámetros de programación y regulación del automatismo: la res-ponsabilidad es de su instalador.
• El ensayo final, los trabajos de mantenimiento periódico y las posiblesreparaciones deben ser documentados por quien los efectúa y losdocumentos tienen que ser conservados por el dueño de la instala-ción.
• Desguace: al final de la vida útil del automatismo, el desguace debeser realizado por personal cualificado y los materiales deben ser reci-clados o eliminados según las normas locales vigentes.
• En el caso de roturas o falta de alimentación. Esperando laintervención de su instalador (o la llegada de la energía eléctrica si lainstalación no está dotada de baterías compensadoras), la instalaciónpuede accionarse igual que cualquier cerramiento no automatizado.A tal fin es necesario realizar el desbloqueo manual que es la únicaoperación que el usuario puede realizar y que Nice ha estudiado minu-ciosamente para facilitarle su empleo, sin necesidad de utilizar herra-mientas ni hacer esfuerzos físicos.2
1 2
Importante: si su instalación está dotada de un radiomando que,transcurrido un cierto período, no funciona correctamente o deja de fun-cionar, podría ser que la pila esté agotada (dura desde varios meses a2/3 años según el modelo). Ud. se podrá dar cuenta de este inconve-niente por el hecho de que la luz del indicador de confirmación de latransmisión es débil, no se enciende, o bien se enciende sólo duranteun breve instante. Antes de llamar al instalador, pruebe sustituir la pilacon una de otro transmisor que funcione correctamente: si el problemafuera este, sustituya la pila con otra del mismo tipo.
Está Ud. satisfecho? Si Ud. deseara montar en su casa un nuevoautomatismo, contacte al mismo instalador y a Nice, así podrá tener lagarantía de un asesoramiento de un experto y los productos másmodernos del mercado, el mejor funcionamiento y la máxima compati-bilidad de las automatizaciones.
Le agradecemos por haber leído estas recomendaciones y esperamosque esté satisfecho de su nueva instalación: ante cualquier exigencia,contacte con confianza a su instalador.
rondo
Ostrzeżenie
Niniejsza instrukcja przeznaczona jest wyłącznie dla technikainstalatora z odpowiednimi kwalifikacjami. Żadna z informacjizawartych w niniejszej instrukcji nie służy użytkownikowi. Przedprzystąpieniem do instalowania automatyki należy uważnieprzeczytać całą instrukcję, ponieważ dostarcza ona ważnychinformacji związanych z bezpieczeństwem, instalacją, użytkowaniemi czynnościami konserwacyjnymi.
Inne czynności poza tymi zawartymi w niniejszej instrukcji nie sądozwolone. Niewłaściwe użytkowanie może być źródłem uszkodzeń iniebezpiecznych sytuacji.Siłownik RONDO nie jest przeznaczony do użytku w środowiskuzagrożonym eksplozją.
Instrukcje i ostrzeżenia skierowane do 35użytkownika siłownika RONDO
PL
31
2.2) Instalacja Typowa (rys. 3)
1 siłownik RONDO2 puszka rozdzielcza3 pokrętło do wysprzęglania (w zestawie)
4 włącznik napędu lub centrala elektroniczna5 linia elektryczna zasilająca6 bębny nośne sprężyny
2.3) Mocowanie
1. Zamknąć dokładnie drzwi rolowane aby mieć dostęp do wałunośnego sprężyny. Wywiercić w wale nośnym poziomo otwór ośrednicy 11mm w odległości 90mm od jego środka; rys. 4
2. Po odkręceniu śrubek M8 ściągnąć obydwa półbębny; rys. 63. Ściągnąć tuleję slizgową; rys. 74. Ściągnąć uchwyt w kierunku strzałki; rys. 85. Zmierzyć średnicę wału nośnego sprężyny. Gdy średnica
wynosi 60 mm należy kontynuować instalowanie, gdybyśrednica wału wynosiła 48 mm lub 42 mm należy założyćodpowiednie adaptery (znajdujące się w zestawie); rys. 9
6. Ponownie założyć uchwyt ściągnięty w punkcie 5, zwracającuwagę na kierunek jego zakładania i przykręcić właściwymiśrubami; rys. 10
7. Założyć tuleję, która była ściągnięta w punkcie 4 i posmarowaćsmarem jej powierzchnię; rys. 11
8. Wkręcić śrubę M10 w wał nośny sprężyny uważając abyprzeszła przez otwór, wykonany zgodnie z punktem 1 iewentualnie przez adapter. rys. 12
9. Przykręcić siłownik do wału nośnego sprężyny dwoma śrubamiM10 i zablokować śruby przeciwnakrętkami; rys. 13
10. Wykonać otwór w wale nośnym sprężyny w celu przeciągnięciaprzez ten otwór przewodu zasilającego oraz linki dowysprzęglania (tylko dla wersji z hamulcem); rys. 14
11. Złożyć w całość pokrętło do wysprzęglenia ze wszystkimiczęściami do regulacji (A), wsunąć linkę wysprzęglania wpokrętło, przytrzymać i zablokować zaciskiem (B). (tylko dlawersji z hamulcem); rys. 15
12. Wykonać ruch wysprzęglenia wykręcając z uchwytu część dolnąpokrętła. Sprawdzić ręcznie czy siłownik jest wysprzęglony.Ewentualnie luzy wyregulować regulatorami; rys. 16
13. Lekko posmarować uzębienie odczepionych zgodnie zpunktem 3 półbębnów i przymocować je przykręcając śrubamiM8; rys. 17
14. Zmierzyć średnicę bębnów nośnych sprężyny i gdy ich średnicawynosi 200 mm przystąpić do instalowania.
15. Jeżeli średnica wynosi 220 mm należy założyć odpowiednieadaptery (B); rys. 18
16. Zdjąć osłonę zacisków elektrycznych. Poluzować zaciski iwykonać podłączenia zgodnie z rys. 19. Następnie dokręcićzaciski przewodów i założyć osłonę.
18. Ostatni pas rolety przyłożyć do bębna siłownika i wykonać w nimotwór średnicy 11mm odpowiednio do otworu gwintowanegoM10 znajdującego się w tym bębnie.
19. Po uprzednim założeniu podkładki przykręcić do oporu śrubąM10 płótno bramy rolowanej do siłownika. rys. 21
20. Wysprzęglić siłownik (tylko dla wersji z hamulcem) i wykonaćręcznie ruch obniżania i podnoszenia. Sprawdzić czy obniżanie ipodnoszenie bramy odbywa się prawidłowo. Następnie ponowniezablokować całość wkręcając dolną część pokrętła; rys. 22
21. REGULACJA WYŁĄCZNIKA GRANICZNEGO OBNIŻANIA (zamykania)Przełącznikiem włączyć siłownik i obniżyć bramę do momentu,w którym zainterweniuje wyłącznik graniczny. Pokręcającregulatorem, ustawić żądaną pozycję dolną bramy. Wyłącznik graniczny zamykania wskazany jest na rys. 23 (dlaprzedstawionej na rys. instalacji).
22. REGULACJA WYŁĄCZNIKÓW GRANICZNYCH NAWIJANIA(otwierania)Pociągnąć klips w kierunku na zewnątrz i jednocześnie obrócićkółkiem oznaczonym strzałką mając na uwadze to, że 1 cmjego obrotu odpowiada w przybliżeniu 1 metrowi wzniesienia.Zwolnić klips. Podłączyć zasilenie do siłownika nawijania isprawdzić czy faktycznie brama podniesie się i zatrzyma się nażądanej pozycji. rys. 24. Wykonać regulacje kilkakrotnie aż douzyskania żądanej pozycji.
23. Założyć z powrotem pokrywkę na regulatorze wyłącznikówkrańcowych zgodnie z jego położeniem wg rys. 25
24. W wypadku gdy instalowanie jest odwrotne niż przedstawionewyżej, wszystkie czynności należy wykonać w odwrotnejkolejności ponieważ drugi wyłącznik graniczny regulujeobniżanie, a pierwszy podwyższanie.
1) Opis produktu
RONDO jest siłownikiem do bram rolowanych, wyważonychsprężynami. Służy do automatyzacji bram rolowanych o maksymalnejwysokości 6m i o wadze do 180kg. Siłownik może być zamontowanyna bramach rolowanych, w których średnica wału nośnego sprężyny
wynosi Ø42mm, Ø48mm i Ø60mm. Bębny nośne sprężyn mogą miećśrednicę 200mm lub 220mm. Części siłownika wykonane są zaluminium metodą odlewu ciśnieniowego. Posiadają wyłącznikigraniczne ze śrubą drobnozwojną oraz mechaniczną pamięcią pozycji.
2.1) Kontrola Wstępna
Pamiętać należy, że instalacja do drzwi rolowanychautomatycznych musi być wykonywana wyłącznie przez personelwykwalifikowany zgodne z normami prawnymi W szczególności sprawdzić czy:• opakowanie nie jest uszkodzone i czy zawiera wszystkie części
przedstawione na rysunku rys. 1;
• brama rolowana przy podnoszeniu lub opuszczaniu nie zacina się;• brama rolowana jest dokładnie wyważona, tzn. gdy zatrzymana
jest na jakimkolwiek poziomie nie opuszcza się ani nie podnosi;• brama rolowana porusza się cicho i płynnie;• na podstawie rys. 2 sprawdzić, czy strefa zamocowania
odpowiada wymiarom siłownika.
2) Instalacja
32
Wysprzęglenie wykonywać wyłącznie przy bramienieruchomej.Aby wysprzęglić siłownik należy:1 Wykręcić z uchwytu część dolną pokrętła aż do odczucia
pewnego oporu;
2 Podnieść i opuścić ręcznie bramę;3 Ponownie zablokować siłownik wykonując czynności w
porządku przeciwnym niż w punkcie 1.
!
3) Ruch Ręczny (tylko w wersjach z hamulcem)
Próby ostateczne są najważniejszą fazą w instalowaniu automatyki.Każdy pojedynczy komponent, jak na przykład: siłownik,zatrzymanie awaryjne, fotokomórki, itp. mogą wymagaćspecyficznej fazy prób i dlatego też zaleca się wykonanie ichwedług właściwych instrukcji. Próby odbiorcze całej automatykimuszą być wykonane przez doświadczony i wykwalifikowanypersonel, który weźmie na siebie odpowiedzialność za wykonanieswojej pracy i świadomy jest ewentualnego niebezpieczeństwa.Próby siłownika RONDO polegają na poniższych czynnościach:• Sprawdzenie stanu odlewów, a więc czy nie mają pęknięć;• Sprawdzenie, czy siłownik jest odpowiednio przymocowany do
wału nośnego sprężyny;• Sprawdzenie, czy wszystkie śruby zakręcone są do oporu;• Sprawdzić, czy kontakty elektryczne są w dobrym stanie;• Sprawdzić, czy w bębnie napędowym nie ma zbyt dużego luzu
kompletny ruch (podniesienie, obniżenie);• Sprawdzić, czy siłownik zablokowany w jakiejkolwiek pozycji nie
porusza się;• Sprawdzić, czy wysprzęglenie prawidłowo odłącza siłownik od
rolety (tylko dla wersji z hamulcem)
4) Próby Odbiorcze
Siłownik RONDO nie wymaga specjalnych czynności konserwacyjnych, aprzewidziana kontrola co sześć miesięcy gwarantuje dłuższą żywotnośćsiłownika i bezpieczne funkcjonowanie systemu.
Czynności konserwacyjne polegają na powtórzeniuprocedury prób odbiorczych.
5.1) Utylizacja
Automatyka nie posiada części, które zagrożeniem dlaśrodowiska oraz nie istnieje żadne niebezpieczeństwo z niązwiązane. Przy jej demontażu należy wykonać procedurę“Mocowanie” ale w odwrotnej kolejności.
Siłownik RONDO wykonany jest z różnych surowców i utylizacjęposzczególnych elementów wykonać według aktualnie obowiązującychnorm prawnych. Należy pogrupować poszczególne elementy wedługsurowców (części elektryczne, aluminium, plastyk, itp.)
5) Czynności Konserwacyjne
6) Dane techniczne
Zasilanie / częstotliwość Vac/Hz 230/50 120/60Prąd pobierany A 2 2.6 4.8Moc absorbowana W 450 600 580Moment max. Nm 130 180Maks. siła podnoszenia przy Ø200mm kg 130 180Prędość nominalna Rpm 8.5 10Moment nominalny Nm 75 100średnica standard wała rolety mm 60*średnica standart tulei części nawiajnych mm 200*Prędkość bez obciążenia Rpm 10 12Temperatura środowiska pracy °C -20 ÷ +50Stopień zabezpieczenia IP 20Zabezpieczenie termiczne °C 140Czas pracy ciągłej Minuty 4Maksymalny czas pracy Sek 50% 30s ON z 30s OFFWaga kg 9.5 10Klasa izolacji F* 48 i 42mm z dostarczonym adapterem** 220 mm z dostarczonym adapterem
RN2010RN2030
RN2020RN2040
RN2020/V1H6RN2040/V1H6
RN2010 - RN2020 - RN2020/V1H6
RN2030 - RN2040 - RN2040/V1H6
Siłownik niesamohamowny bez hamulca
Siłownik niesamohamowny z hamulcem i wysprzęgleniem
PL
33
34
KIO - Selektor na klucz z wysprzęgleniem z linką.
7) Akcesoria
Siłownik elektromechaniczny do automatyzacjiwyrównoważonych drzwi rolowanych
rondoInstrukcje i ostrzeżenia dla użytkownikasiłownika Rondo
Gratulujemy wyboru automatyki firmy Nice!
Nice S.p.a. produkuje elementy do automatyzacji bram, drzwi, bramrolowanych, rolet i markiz: siłowniki, lampy sygnalizacyjne,fotokomórki i akcesoria. Firma Nice stosuje w swoich produktachwyłącznie surowce wysokiej jakości i, z powołania, poszukujenowych rozwiązań innowacyjnych maksymalnie ułatwiającychużytkowanie tych urządzeń. Elementy te są technicznie wysokiejjakości, estetyczne i z dokładnie opracowaną ergonomią. Z zestawuproduktów Nice wasz instalator z pewnością wybierze produkt, którynajbardziej odpowiada waszym wymaganiom.
Wasza automatyka nie jest produktem firmy Nice, ale jest dziełemsztuki zrealizowanym w wyniku wieloletnich analiz, obliczeń, wyborusurowców a realizacja tej instalacji powierzona jest waszemuinstalatorowi. Każda automatyka jest jedyna w swoim rodzaju. Gdywasz instalator posiada wystarczające doświadczenie i niezbędnąwiedzę do jej wykonania to automatyka na pewno będzieodpowiadała waszym wymaganiom, będzie trwała i niezawodna, aprzede wszystkim będzie wykonana zgodnie z aktualnieobowiązującymi normami prawnymi.
Automatyka jest wygodnym rozwiązaniem, posiada funkcjonalnysystem zabezpieczający i gdy jest zadbana będzie wam służy wiele lat.Gdy automatyka spełnia wasze wymagania w zakresie bezpieczeństwai zgodnie z normami prawnymi nie znaczy to, że nie istnieją inneniebezpieczeństwa. Mogą się bowiem utworzyć się sytuacjeniebezpieczne spowodowane nieodpowiedzialnym i błędnymużytkowaniem. Dlatego też chcemy przekazać wam użytecznewskazówki w celu uniknięcia takich niekorzystnych sytuacji:
• Przed pierwszym uruchomieniem automatyki należy poprosićinstalatora o dokładne przedstawienie ewentualnychniebezpieczeństw. Przeczytać instrukcję i ostrzeżenia dlainstalatora, którą wam przekazał. Przechowywać instrukcję w celuewentualnych przyszłych konsultacji, lub aby przekazać ją innemuużytkownikowi automatyki.
• Wasza automatyka jest systemem, który wykonuje sumienniewasze rozkazy; nierozumne użytkowanie może stać sięniebezpieczne. Nie włączać automatyki gdy w zasięgu jej działaniaznajdują się ludzie , zwierzęta lub rzeczy.
✄
PL
36
1. Odkręcić, wysuwając pokrętło dolne aż do odczucia pewnego oporu; (rys.1)2. Otworzyć i zamknąć ręcznie bramę rolowaną;3. Zasprzęglić siłownik poprzez przekręcenie pokrętłem w kierunku przeciwnym, wkręcając je do końca. (rys.2)
1 2
Ważne: gdy wasze urządzenie jest sterowane pilotem, któregodziałanie po pewnym czasie słabnie lub przestaje działać toprawdopodobnie baterie w nim znajdujące się wyczerpały się (wzależności od rodzaju baterii może stać się to po kilku miesiącach jaki po dwóch lub trzech latach). Światełko ostrzegawcze w pilocie jestwówczas słabe, w ogóle nie świeci się lub zaświeci się na krótki czas.Przed wezwaniem instalatora wymienić baterie, na takie same - zinnego funkcjonującego nadajnika. Jeżeli jest to jedyny powód niefunkcjonowania pilota to wystarczy wymienić baterie na nowe tegosamego rodzaju.
Jesteście zadowoleni z waszej automatyki? W wypadku zamiaruzainstalowania następnych urządzeń zaleca się wezwanie tegosamego instalatora, a firma Nice zagwarantuje wam opróczkonsultacji jednego ze specjalistów produkt najbardziej postępowyna rynku, idealne funkcjonujące urządzenie i maksymalnąkompatybilność systemu.
Dziękujemy za przeczytanie niniejszych wskazówek, życzymy dużejsatysfakcji z nowej automatyki. W celu ewentualnych wyjaśnień, czyporad prosimy zwrócić się do waszego instalatora.
• Dzieci: automatyka gwarantuje wysoki stopień bezpieczeństwa.Zatrzymuje ruch, gdy jej system zabezpieczający odczytaobecność osób lub rzeczy i gwarantuje uaktywnienie tego sytemuw sposób pewny i przewidziany. Bezpieczniej jednak zabronićdzieciom bawienia się w pobliżu automatyki oraz pozostawionymibez nadzoru pilotami, aby uniknąć nieumyślnego włączenia:nadajniki sterowania to nie zabawka!
• Anomalie. Gdy zauważy się jakiekolwiek niewłaściwe zachowanieautomatyki należy odłączyć od niej zasilanie elektryczne iwysprzęglić ręcznie według procedury niżej opisanej. Niewykonywać samodzielnie napraw, ale wezwać uprawnionegoinstalatora: brama może funkcjonować również bez automatyki.
• Czynności konserwacyjne. Automatyka, jak każda maszyna,wymaga okresowych czynności konserwacyjnych, co gwarantujejej bezpieczne i długoletnie funkcjonowanie. Uzgodnić z waszyminstalatorem program okresowych przeglądów konserwacyjnych.Firma Nice poleca, aby przeglądy wykonywać co sześć miesięcy,ale zależy to też od intensywności użytkowania. Jakikolwiek przegląd, związany z czynnościami konserwacyjnymiczy naprawą, ma być wykonany przez wykwalifikowany personel.
• Nawet wówczas, gdy jesteście pewni swojej wiedzy nie wolnowprowadzać żadnych zmian w instalacji, w parametrachprogramowania i w regulacji automatyki: czynności te sąobowiązkiem instalatora.
• Kontrola końcowa, okresowe przeglądy i ewentualne naprawy mająbyć udokumentowane przez osobę wykonującą te czynności:dokumenty te ma przechowywać właściciel instalacji.
• Złomowanie. Po zakończeniu eksploatowania instalacji demontażmusi być wykonany przez upoważnione osoby, materiały mają byćposegregowane według aktualnie obowiązujących miejscowychnorm prawnych.
• W wypadku uszkodzenia lub braku zasilania: Oczekując naprzybycie instalatora (lub na powrót energii elektrycznej oraz gdyinstalacja nie posiada akumulatorów awaryjnych) urządzenie możebyć uruchamiane ręcznie, czyli jak każde inne urządzenienieautomatyczne. Wysprzęglić urządzenie ręcznie: ta czynność jestjedyną czynnością, którą może wykonać użytkownik. Jest tofunkcja dokładnie opracowana przez firmę Nice w celu ułatwieniajej obsługi bez stosowania narzędzi i wysiłku fizycznego.2 3
Dichiarazione CE di conformità / EC declaration of conformity(secondo Direttiva 98/37/CE, Allegato II, parte B) (according to 98/37/EC Directive, Enclosure II, part B)
Amministratore delegato(General Manager)
Lauro Buoro
Numero / Number: 168/RN Data / Date: 02/2003 Revisione / Revision: 0
Il sottoscritto Lauro Buoro, Amministratore Delegato, dichiara che il prodottoThe undersigned Lauro Buoro, General Manager of the following producer, declares that the product
Nome produttore / Producer name: NICE S.p.a.Indirizzo / Address: Via Pezza Alta 13, 31046 Z.I. Rustignè - ODERZO - ITALYTipo / Type: Motoriduttore elettromeccanico “RONDO” per serrande bilanciate
Electromechanical gearmotor for balanced rolling shuttersModello / Model: RN2010, RN2020, RN2030, RN2040, RN2020/V1H6, RN2040/V1H6 Accessori / Accessories: Nessun accessorio / No accessory
Risulta conforme a quanto previsto dalle seguenti direttive comunitarie / Complies with the following community directivesRiferimento n° TitoloReference n° Title73/23/CEE DIRETTIVA BASSA TENSIONE / Low Voltage Directive89/336/CEE DIRETTIVA COMPATIBILITA’ ELETTROMAGNETICA (EMC) / EMC Electromagnetic Compatibility Directive98/37/CE (EX 89/392/CEE) DIRETTIVA MACCHINE / Machinery Directive
Risulta conforme a quanto previsto dalle seguenti Norme armonizzate / Complies with the following Harmonised standardsRiferimento n° Edizione Titolo Livello di valutazione ClasseReference n° Issue Title Estimate level ClassEN60335-1 04/1998 Sicurezza degli apparecchi elettrici d’uso domestico e similare – Norme generali.
Safety of household and electrical appliances – General requirementsEN60204-1 09/1993 Sicurezza del macchinario-Equipagg. elettrico delle macchine-Parte 1:Reg.generali
Safety of machinery-Electrical equipment of machines-Part 1:General requirementsEN55022 09/1998 Apparecchi per la tecnologia dell’informazione B
Caratteristiche di radiodisturbo. Limiti e metodi di misuraInformation technology equipment - Radio disturbance characteristics.Limits and methods of measurement
Risulta conforme a quanto previsto dalle altre norme e/o specifiche tecniche di prodotto / Complies with the other standards and/orproduct technical specificationsRiferimento n° Edizione Titolo Livello di valutazione ClasseReference n° Issue Title Estimate level ClassEN 12445 11/2000 Industrial, commercial and garage doors and gates
Safety in use of power operated doors - Test methodsEN 12453 11/2000 Industrial, commercial and garage doors and gates
Safety in use of power operated doors - Requirements
Inoltre dichiara che non è consentita la messa in servizio del prodotto suindicato finché la macchina, in cui il prodotto stesso èincorporato, non sia identificata e dichiarata conforme alla direttiva 98/37/CEE / He declares, moreover, that it is not allowed to use theabove mentioned product until the machine, in which this product is incorporated, has been identified and declared in conformity with the regulation98/37/CEE.
P.S.:Il prodotto suindicato si intende parte integrante di una delle configurazioni di installazione tipiche, come riportato nei nostricataloghi generali / The above mentioned product is meant integral part of the of one of the installation configuration as shown on our generalcatalogues.