65
G630-U10 Simplified Maintenance Manual Issue 01 Date HUAWEI TECHNOLOGIES CO., LTD.

G630-U10 Simplified Maintenance Manual
Issue 01
Date
HUAWEI TECHNOLOGIES CO., LTD.

Issue 01 (2014-04-01) Huawei Proprietary and Confidential
Copyright © Huawei Technologies Co., Ltd.
i
Copyright © Huawei Technologies Co., Ltd. 2014. All rights reserved.
No part of this document may be reproduced or transmitted in any form or by any means without prior
written consent of Huawei Technologies Co., Ltd.
Trademarks and Permissions
and other Huawei trademarks are trademarks of Huawei Technologies Co., Ltd.
All other trademarks and trade names mentioned in this document are the property of their respective
holders.
Notice
The purchased products, services and features are stipulated by the contract made between Huawei and
the customer. All or part of the products, services and features described in this document may not be
within the purchase scope or the usage scope. Unless otherwise specified in the contract, all statements,
information, and recommendations in this document are provided "AS IS" without warranties, guarantees or
representations of any kind, either express or implied.
The information in this document is subject to change without notice. Every effort has been made in the
preparation of this document to ensure accuracy of the contents, but all statements, information, and
recommendations in this document do not constitute a warranty of any kind, express or implied.
Huawei Technologies Co., Ltd.
Address: Huawei Industrial Base
Bantian, Longgang
Shenzhen 518129
People's Republic of China
Website: http://www.huawei.com
Email: [email protected]

G630-U20 Simplified Maintenance Manual About This Document
Issue 01 (2014-04-01) Huawei Proprietary and Confidential
Copyright © Huawei Technologies Co., Ltd..
ii
About This Document
Author
Prepared by Date 2014-02-28
Reviewed by Date 2014-02-28
Approved by Date 2014-02-28
Change History
Date Version Description Author
2014-02-28 V1.0 Released the first
issue.

G630-U20 Simplified Maintenance Manual Contents
Issue 01 (2014-04-01) Huawei Proprietary and Confidential
Copyright © Huawei Technologies Co., Ltd..
iii
Contents
About This Document .................................................................................................................... ii
1 Overview ......................................................................................................................................... 1
1.1 Applicable Scope .............................................................................................................................................. 1
1.2 Brief Introduction ............................................................................................................................................. 1
1.3 How to Obtain Product and Maintenance Information .................................................................................... 1
2 Product Overview ......................................................................................................................... 2
2.1 Appearance ....................................................................................................................................................... 2
2.2 Specifications ................................................................................................................................................... 2
3 Exploded View and Components on the PCBA ...................................................................... 4
3.1 Exploded View ................................................................................................................................................. 4
3.2 Components on the PCBA and BOM ............................................................................................................... 6
4 Software Upgrade ......................................................................................................................... 9
4.1 Selecting the Operation Type and the BIN File to Load................................................................................... 9
4.2 Home Screen .................................................................................................................................................. 11
4.3 Screen Element Description ........................................................................................................................... 11
4.3.1 Title Bar ................................................................................................................................................ 11
4.3.2 Scan && Download Button .................................................................................................................. 11
4.3.3 Remove Devices Button ........................................................................................................................ 13
4.4 Procedure ....................................................................................................................................................... 14
4.5 (Important) Be Cautious to Allow a Second-time Upgrade............................................................................ 14
4.6 Software Downloading Types ........................................................................................................................ 14
4.7 Using the microSD Card for an Upgrade ....................................................................................................... 15
4.8 Troubleshooting Upgrade Failures ................................................................................................................. 19
5 Maintenance Tools ...................................................................................................................... 20
6 Disassembly Procedure .............................................................................................................. 22
7 Assembly Procedure ................................................................................................................... 27
8 Troubleshooting Common Faults ............................................................................................ 31
8.1 Startup Failure ................................................................................................................................................ 31
8.2 Charging Failure ............................................................................................................................................. 36
8.3 Camera Failure ............................................................................................................................................... 37

G630-U20 Simplified Maintenance Manual Contents
Issue 01 (2014-04-01) Huawei Proprietary and Confidential
Copyright © Huawei Technologies Co., Ltd..
iv
8.4 Connection Failure Between the Phone and Computer .................................................................................. 38
8.5 Call Receiving Failure .................................................................................................................................... 39
8.6 Call Sending Failure ....................................................................................................................................... 40
8.7 Vibration Failure ............................................................................................................................................ 41
8.8 Ringtone Failure ............................................................................................................................................. 42
8.9 LCD Display Failure ...................................................................................................................................... 43
8.10 Key Failure ................................................................................................................................................... 44
8.11 No Sound Coming from the Headset During a Call ..................................................................................... 45
8.12 T-Flash Card Detection Failure .................................................................................................................... 46
8.13 GPS Signal Reception Failure ...................................................................................................................... 47
9 Functional Tests........................................................................................................................... 49
9.1 MMI Test ........................................................................................................................................................ 49
9.2 Wi-Fi Test ....................................................................................................................................................... 59
9.3 Voice Call Test ................................................................................................................................................ 60

G630-U20 Simplified Maintenance Manual 1 Overview
Issue 01 (2014-04-01) Huawei Proprietary and Confidential
Copyright © Huawei Technologies Co., Ltd..
1
1 Overview
1.1 Applicable Scope
The G630-U10 Maintenance Manual (Template) is available in the simplified and advanced
versions. The two versions are respectively applicable to common service centers and
advanced service centers authorized by Huawei. The simplified version (this document)
provides maintenance and repair instructions for technicians at common service centers to
conduct services of level 1 and level 2. Being Huawei proprietary, this document is accessible
only for authorized service centers. Although every effort was made to ensure the accuracy of
the document, errors may still exist. If you find any errors or have any suggestions, please
report them through Huawei service platform ComPartner.
1.2 Brief Introduction
This document introduces the product features, mechanical parts, assembly and disassembly
procedures, and common troubleshooting methods. You will be able to clear common faults of
the product with this document.
1.3 How to Obtain Product and Maintenance Information
To obtain product and maintenance information, visit Huawei service website. You are
recommended to install the ComPartner to download maintenance required software tools and
the phone version software.
To obtain the ComPartner installation package, log in to
http://support.huaweidevice.com/service/, search for ComPartner. You will find the
installation package.

G630-U20 Simplified Maintenance Manual 2 Product Overview
Issue 01 (2014-04-01) Huawei Proprietary and Confidential
Copyright © Huawei Technologies Co., Ltd..
2
2 Product Overview
2.1 Appearance
Error! Reference source not found. shows the appearance of the HUAWEI G630-U10 mobile
phone (G630-U10 for short).
Figure 2-1 G630-U10
2.2 Specifications Table 2-1 lists the G630-U10 specifications.

G630-U20 Simplified Maintenance Manual 2 Product Overview
Issue 01 (2014-04-01) Huawei Proprietary and Confidential
Copyright © Huawei Technologies Co., Ltd..
3
Table 2-1 G630-U10 specifications
No. Description
Mobile phone model Touchscreen smartphone
Dimensions (H x W x D) 143 mm x 71.8 mm x 8 mm
Weight About 155 g (including the battery)
Working band GSM: 850/900/1800/1900M
UMTS: 900/2100M
External ports Standard micro USB port, microSD card slot, 3.5 mm headset jack
UIM card interface Two standard 6-pin UIM card slots
microSD card 32 GB
USB interface USB 2.0, high speeds of up to 480 Mbit/s
Battery Capacity: 2000 mAh
Display 5-inch HD display, 720x1280 resolution
Antenna Built-in antenna
Camera Rear camera: 8 MP pixels; Front camera: 1 MP
Sensors Accelerator, proximity sensor, and ambient light sensor
Test the Bluetooth. Bluetooth v2.1 + EDR
Wi-Fi 802.11b/g/n, Wi-Fi routing
GPS GPSone
Power supply 100–240 V, 50/60 Hz, 1 A
Temperature Operating temperature: 0°C to +40°C
Storage temperature: –40°C to +70°C
Humidity Working humidity: 5% to 95% RH

G630-U20 Simplified Maintenance Manual 3 Exploded View and Components on the PCBA
Issue 01 (2014-04-01) Huawei Proprietary and Confidential
Copyright © Huawei Technologies Co., Ltd..
4
3 Exploded View and Components on the PCBA
3.1 Exploded View
Figure 3-1 shows the exploded view of the G630-U10.
Figure 3-1 Exploded view
Table 3-1 lists components in the exploded view.
Table 3-1 Components in the exploded view
No. Name
1 Receiver decoration
2 TP
3 LCD
4 Proximity sensor rubber
5 Front cover assembly

G630-U20 Simplified Maintenance Manual 3 Exploded View and Components on the PCBA
Issue 01 (2014-04-01) Huawei Proprietary and Confidential
Copyright © Huawei Technologies Co., Ltd..
5
No. Name
6 Proximity sensor FPC
7 Proximity sensor support
8 Speaker FPC
9 Receiver
10 Front camera
11 Rear camera
12 PCBA assembly
13 CPU shielding cover
14 RF shielding cover
15 Side key FPC
16 Motor
17 Battery
18 Speaker
19 Battery support assembly
20 Back cover assembly
21 Main antenna
22 GPS antenna
23 Wi-Fi antenna
24 Phone label
25 NFC antenna
26 Battery cover assembly
27 Two screws for fastening the battery steel plate
28 15 screws for fastening the phone

G630-U20 Simplified Maintenance Manual 3 Exploded View and Components on the PCBA
Issue 01 (2014-04-01) Huawei Proprietary and Confidential
Copyright © Huawei Technologies Co., Ltd..
6
3.2 Components on the PCBA and BOM
Figure 3-2 Layout of components and relevant failures (top)
J2101 rear camera slot
Fault symptom:Rear camera fault
J1701 speaker spring
Fault symptom:Speaker fault
U2002 backlight IC
Fault symptom:LCD fault
U2003 LCD positive/negative voltage IC
Fault symptom:LCD fault
U2202 gravity sensor
Fault symptom:Gravity sensor fault
U3201 RF IC
Fault symptom:RF fault
J1901 headset jack
Fault symptom:Headset fault
J2102 front camera slot
Fault symptom:Front camera fault
U201 power management chip
Fault symptom:Startup failure
U701 CPU chip
Fault symptom:Startup failure
X201 19.2M oscillator
Fault symptom:Startup failure
HD1G630P proximity sensor FPCFault symptom:Proximity/Ambient light sensor fault
J2404 6-pin connector
Fault symptom:Volume key fault, key startup failure, motor fault
U3801 WTR2605-RF chip
Fault symptom:RF fault
MIC1801 main microphone
Fault symptom:No voice transmitted or noice transmitted
U1500 EMM+DDR chip
Fault symptom:Startup failure
U3301 RF PA
Fault symptom:RF fault
LED2201 tri-color indicator
Fault symptom:Indicator fault

G630-U20 Simplified Maintenance Manual 3 Exploded View and Components on the PCBA
Issue 01 (2014-04-01) Huawei Proprietary and Confidential
Copyright © Huawei Technologies Co., Ltd..
7
Figure 3-3 Layout of components and relevant failures (bottom)
Table 3-2 is provided for your reference only. It is subject to changes without notice. Obtain
the latest BOM information from Huawei TCS system. For details about how to query a BOM
code, see the simplified version.
Table 3-2 lists the BOM information about key components on the PCBA.
Table 3-2 BOM code list
Position BOM Description
X201 1202021
5
Crystal Unit,19.2MHz,7pF,+/-10ppm,70ohm,2.5*2.0*0.9mm,NTC internal,Terminal
Dedicated
U201 3920057
2 Power Management IC(PM8110),3.0~4.4V,118WLNSP(pb-free),Terminal Dedicated
U701 3920057
4
Terminal Baseband process IC,WCDMA/GSM dualmode baseband
processor,1.2V/1.8V/2.85V,488NSP,Terminal Dedicated
U1500 4006054
3
MCP,4GB(x8) eMMC,52MHz,1024KB,3.3V/1.8V,FBGA162,8Gb(x32)
LPDDR2,Terminal Dedicated
J5003 5004WLAN/BT antenna springFault symptom:WLAN/BT fault
U4701WLAN/BT/FM IC
Fault symptom:WLAN/BT/FM fault
J1601 battery connector
Fault symptom:Startup failure
J2302 TF card slot
Fault symptom:TF card detection failure
J2303 SIM card slot
Fault symptom:SIM card detection failure
J2301 SIM card slot
Fault symptom:SIM card detection failure
J2001 LCD connector to the peer board
Fault symptom:LCD display fault
J3201 RF connector
Fault symptom:RF fault
J5001 J5002 GPSantenna spring
Fault symptom:GPS fault
J2501 TP connector
Fault symptom:TP failure
MIC1802 secondary microphone
Fault symptom:No voice transmitted, or noise transmitted
J2401 motor
Fault symptom:No or weak vibration
LED2101 flashlight
Fault symptom:Flashlight fault
U2801 NFCmodule
Fault symptom:NFC malfunctional
J5005 J5006 main antenna spring
Fault symptom:No or weak signal
J1602 USBconnector
Fault symptom:No charging or USB communication fault

G630-U20 Simplified Maintenance Manual 3 Exploded View and Components on the PCBA
Issue 01 (2014-04-01) Huawei Proprietary and Confidential
Copyright © Huawei Technologies Co., Ltd..
8
Position BOM Description
U3801 3920043
9
Terminal Baseband process IC,RF Transceiver
WTR2605 -2.2V/1.8V/1.3V-62-WLNSP-Terminal Dedicated
J1601 1424057
6 Card Block Connector,BTF Connector,3*2,Female,1.3mm,Terminal Dedicated
J1701 5162102
3 108-5785,Ground Spring,U1250
MIC1801 2205009
9 Microphone,-42dB.,3.76*2.95*1.1mm,silicon
J2102 1424049
6 BTB Connector,Female,24Pin,0.4mm,SMT,Mating Height 0.8mm,Terminal Dedicated
J2404 1424078
0
Card Socket,Spring Contact,6PIN,Horizontal,Center Line Spacing 1.6mm,Pin Tail
Length 0.4mm,SMT,Terminal Dedicated
U2101 3911080
0
Switching Regulators,1.5A LED Flash Driver
IC,2.5V~5.5V,1.5A,4MHz,CSP-9,Terminal Dedicated
U2201 3814009
8 Semiconductor Sensor,Accelerometer,LGA,3axis,Terminal Dedicated
J2101 1424057
9 BTB Connector,BTBconnector,34PIN,0.4mm,0.8mm,SMT,female,Terminal Dedicated
J2501 1424083
1
FPC Connector,8,0.5mm,0.5mm,Back Lock&Double Touch,0.8mm,Terminal
Dedicated
J1901 1424083
0
Earphone Connector,12.66*6.7*4.2,6Pin,Arc,SMT,Reverse plate (pin inside plate
distance to the flat top surface 1.65mm),Terminal Dedicated
J5004 5162498
9 Edge mini Groung Spring
U4701 3921016
0
Connectivity IC,Wireless Connectivity WCN3620,2.05V~2.17V,62-WLNSP,Terminal
Dedicated
J2302 1424070
8
Card Connector,MicroSD card Connector,8PIN,Horizon,1.1mm,hinge type,without
post,Terminal Dedicated
J2301 1424077
2
Card Socket,Micro SIM Socket,8Pin,Horizontal,2.54mm,Without Hold
Peg,PUSH-PULL,height 1.3mm,Terminal Dedicated
J2001 1424057
9 BTB Connector,BTBconnector,34PIN,0.4mm,0.8mm,SMT,female,Terminal Dedicated
J3201 1424000
4 Coaxial Connector,RF Switch,Straight,Female,SMT,Terminal Dedicated
J5001 5162498
9 Edge mini Groung Spring

G630-U20 Simplified Maintenance Manual 4 Software Upgrade
Issue 01 (2014-04-01) Huawei Proprietary and Confidential
Copyright © Huawei Technologies Co., Ltd..
9
4 Software Upgrade
4.1 Selecting the Operation Type and the BIN File to Load
After WH62406270ML01Ver1006 is run, the following dialog box is displayed.
Figure 4-1 Entering the login password
Enter the password (initial password: Huawei) and click OK.

G630-U20 Simplified Maintenance Manual 4 Software Upgrade
Issue 01 (2014-04-01) Huawei Proprietary and Confidential
Copyright © Huawei Technologies Co., Ltd..
10
Figure 4-2 Selecting the BIN file and configuration file
In this dialog box, you can select whether to allow a second-time upgrade and select the BIN
(Firmware) file and the configuration file to be loaded.
1. Select the operation type.
Under Be cautious to select, select or deselect Allow upgrade for the Second time to
allow or prohibit a second phone board upgrade.
If the board software is burned and then mounted, do not select this option, and ensure that the board has
just loaded with the BOOT file with the JTAG tool and does not have APP.
In a normal upgrade after printing rear labels, select this option; otherwise, file loading will fail.
Selection or deselection of this option may affect the NV data status of the phone. Be cautious to confirm
the operation in the displayed dialog box.
2. Select the file to load.
Under Please Select File, the browse button is unavailable and the file path is cleared if
the check boxes are deselected.
3. Once selecting a check box, an Open dialog box is displayed, asking you to select a BIN
file. After you select a file, its path information will be displayed in the text box and the
browse button will be available. When the check box is selected and the browse button is
available, you can click the button to change the file path.
4. The default configuration file PhoneMultiUpgradeDefaultCfg.xml (Windows phones
and some other products possibly cannot use the default configuration file, and therefore
a customized configuration file needs to be provided) and the software executable file
WH62406270ML01Ver1003(SmartPhone).xml are in the same directory level.
5. Select Next to navigate to the Home screen.
6. To cancel or exit the software, select Cancel.

G630-U20 Simplified Maintenance Manual 4 Software Upgrade
Issue 01 (2014-04-01) Huawei Proprietary and Confidential
Copyright © Huawei Technologies Co., Ltd..
11
4.2 Home Screen
After you click Next, the screen shown in Figure 4-3 is displayed.
Figure 4-3 Home screen
4.3 Screen Element Description
4.3.1 Title Bar
The title bar displays the software name, version, feature code, and compilation date from left
to right.
The feature code is automatically generated by the software based on the configuration file, and is
intended only for check by R&D personnel.
4.3.2 Scan && Download Button
After clicking the Scan && Download button (before loading a file, ensure that ports have
been correctly mapped; otherwise, loading will fail), the application scans for the mapped
ports (the names of ports to search for are specified in the configuration file) in Device
Manager and start loading software. The port numbers of the found ports are displayed on the
list. You can click Scan && Download several times until the ports of all the UEs are found.

G630-U20 Simplified Maintenance Manual 4 Software Upgrade
Issue 01 (2014-04-01) Huawei Proprietary and Confidential
Copyright © Huawei Technologies Co., Ltd..
12
Figure 4-4 During an upgrade process
During the software upgrade, do not close the application; otherwise the dialog box shown in
Figure 4-5 will be displayed.
Figure 4-5 Closing the application during an upgrade
Do not terminate the application forcibly during an upgrade through measures such as the
Windows Task Manager. Otherwise, the tested boards may get damaged.

G630-U20 Simplified Maintenance Manual 4 Software Upgrade
Issue 01 (2014-04-01) Huawei Proprietary and Confidential
Copyright © Huawei Technologies Co., Ltd..
13
Figure 4-6 Restoring NV after loading (not required for some products)
Figure 4-7 Successful downloading
4.3.3 Remove Devices Button
You can click Remove Devices to remove phones only after all phones are upgraded.
The Remove Devices button will clear all current screen display, preparing for the next
upgrade.

G630-U20 Simplified Maintenance Manual 4 Software Upgrade
Issue 01 (2014-04-01) Huawei Proprietary and Confidential
Copyright © Huawei Technologies Co., Ltd..
14
4.4 Procedure
Prepare the required environment and ensure that ports for all phones have been correctly
mapped in Device Manager. Then, click the Scan && Download button. If not all ports are
found after a click, perform several more clicks. During an upgrade, the upgrade progresses of
different phones may be different. When stable phone hot swapping is supported, especially if
several phones need to be hot swapped (unstable hot swapping may cause problems such as
computer down), first remove phones that have been upgraded successfully without affecting
phone being upgraded. This process releases ports for accessing new phones to be upgraded.
After the ports of the new phones are correctly mapped, click the Scan && Download button
again to upgrade the new phones, without affecting other phones being upgraded.
4.5 (Important) Be Cautious to Allow a Second-time Upgrade
Under Be cautious to select, select or deselect Allow upgrade for the Second time to allow
or prohibit a second phone board upgrade. That is, once is selected, a phone to which phone
software has been downloaded can be upgraded for a second time.
If this downloading tool needs to be used for software loading for a phone that is loaded with a BOOT file
with a JTAG tool and with applications with a USB flash driver, do not select the Allow upgrade for the
Second time option. In addition, before using this tool, ensure that the board has just loaded with the
BOOT file with the JTAG tool and does not have APP; otherwise, downloading will fail and a message
Refuse Download In AMSS Fail will be displayed. If this operation is incorrectly selected in this case, it
may result in faulty phones in subsequent work stations.
In a normal upgrade after printing rear labels, select this option; otherwise, the software upgrade will fail
and a message Refuse Download In AMSS Fail is displayed. Before a software upgrade, the phone
software automatically backs up the NV data in the current phone. After the software upgrade, the phone
software will automatically restore the NV data from the backup data. After a later USG upgrade or SD
upgrade, the NV data will also be restored from the backup. The backup data is restored in the NV backup
backup area of the phone. Pay attention to the message in the dialog box that is displayed after you
selecting or deselecting this option, and be cautious to confirm your operation.
4.6 Software Downloading Types
Two software upgrade types are available: software is burned (not supported for smart
phones), and software upgrade. The screens for the two types are similar except for the
messages displayed during interchanges with phones. Differentiate the phones for which
software needs to be burned and the phones for which software needs to be upgraded;
production line stoppage or even accidents may result if the phones are not correctly
differentiated. (The software should be initially started by a PE. Operators must not start it
without permission. If no exception occurs during software downloading, this software does
not need to be shut down.)

G630-U20 Simplified Maintenance Manual 4 Software Upgrade
Issue 01 (2014-04-01) Huawei Proprietary and Confidential
Copyright © Huawei Technologies Co., Ltd..
15
4.7 Using the microSD Card for an Upgrade
To upgrade the phone using a microSD card:
Step 1 Format the microSD card using FAT32.
Step 2 Create a dload folder in the microSD card's root directory.
Figure 4-8 shows the dload folder under the root directory.
Figure 4-8 dload folder under the microSD card's root directory
Step 3 Copy the upgrade file UPDATE.APP to the dload folder.
Step 4 Insert the microSD card into the phone, power on the phone, and enter *#*#2846579#*#* on
the dialing screen. Touch ProjectMenu > Upgrade > SD card upgrade > Confirm.

G630-U20 Simplified Maintenance Manual 4 Software Upgrade
Issue 01 (2014-04-01) Huawei Proprietary and Confidential
Copyright © Huawei Technologies Co., Ltd..
16
Figure 4-9 Operation procedure

G630-U20 Simplified Maintenance Manual 4 Software Upgrade
Issue 01 (2014-04-01) Huawei Proprietary and Confidential
Copyright © Huawei Technologies Co., Ltd..
17
The upgrade progress is displayed on the phone screen, as shown in Figure 4-10.

G630-U20 Simplified Maintenance Manual 4 Software Upgrade
Issue 01 (2014-04-01) Huawei Proprietary and Confidential
Copyright © Huawei Technologies Co., Ltd..
18
Figure 4-10 Upgrade process
After the upgrade is complete, restore the phone to its factory settings and check whether the
software version is correct.
If the phone cannot be powered on, use either of the following methods to perform a forcible
upgrade:
Install the battery to the phone (if the phone screen flashes, remove the battery from the phone
and install it again after 5 minutes). Press and hold the volume up and down keys, and then
press the power key. The phone automatically starts a forcible upgrade. The upgrade process
displayed on the phone screen is the same as that shown in Figure 4-9.
Remove the battery from the phone. Press and hold the volume up and down keys, and
connect the charger to the phone. The phone automatically starts a forcible upgrade. The
upgrade process displayed on the phone screen is the same as that shown in Figure 4-9.

G630-U20 Simplified Maintenance Manual 4 Software Upgrade
Issue 01 (2014-04-01) Huawei Proprietary and Confidential
Copyright © Huawei Technologies Co., Ltd..
19
4.8 Troubleshooting Upgrade Failures
Table 4-1 Upgrade failures and solutions
Failure Solution
(Computer) Failed to
detect the phone's
presence
Check whether there is any other driver conflicting with the USB
upgrade driver.
Check whether the USB upgrade driver has been installed
properly.
Check whether the USB cable has been properly connected.
Check whether the serial port settings are correct.
Failed to upgrade the
phone using the USB
cable.
Check whether the USB cable has been properly connected.
Check whether the target firmware version is higher than the
original one.
Perform the upgrade again.
Fail to upgrade the
phone using the
microSD card.
Check whether the upgrade file is correct.
Check whether the upgrade method is correct.
Check whether the microSD card functions properly.
Perform the upgrade again.
G630-U20 Simplified Maintenance Manual 5 Maintenance Tools
Issue 01 (2014-04-01) Huawei Proprietary and Confidential
Copyright © Huawei Technologies Co., Ltd..
20
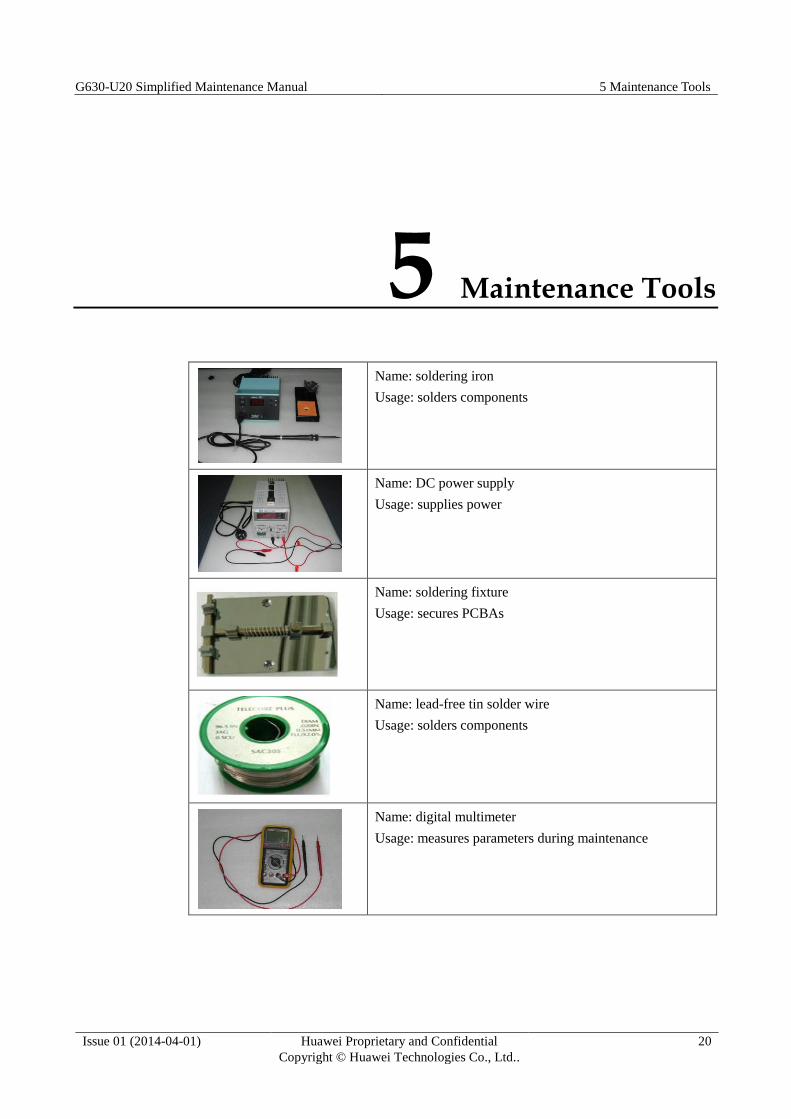
5 Maintenance Tools
Name: soldering iron
Usage: solders components
Name: DC power supply
Usage: supplies power
Name: soldering fixture
Usage: secures PCBAs
Name: lead-free tin solder wire
Usage: solders components
Name: digital multimeter
Usage: measures parameters during maintenance

G630-U20 Simplified Maintenance Manual 5 Maintenance Tools
Issue 01 (2014-04-01) Huawei Proprietary and Confidential
Copyright © Huawei Technologies Co., Ltd..
21
Name: toolkit
Usage: assembles and disassembles terminals
Name: electric screwdriver
Usage: fastens and removes screws

G630-U20 Simplified Maintenance Manual 6 Disassembly Procedure
Issue 01 (2014-04-01) Huawei Proprietary and Confidential
Copyright © Huawei Technologies Co., Ltd..
22
6 Disassembly Procedure
4. Place the mobile phone on a flat panel, press
the phone with your left hand, hold the electric
screwdriver with your right hand, and remove all
the 15 screws one after another.
3. Check the quantity and positions of screws on
the rear cover. There are 15 Phillips screws.
2. Hold the phone with your right hand, lever up the
hand hole on the battery cover with your left thumb to
open the battery cover.
1. Ensure that the ESD wrist strap is properly
grounded.

G630-U20 Simplified Maintenance Manual 6 Disassembly Procedure
Issue 01 (2014-04-01) Huawei Proprietary and Confidential
Copyright © Huawei Technologies Co., Ltd..
23
10. Lever up the battery steel plate with a crowbar
and remove the battery assembly.
9. Lever up the battery BTB connector with a
crowbar and remove the battery BTB connector.
8. Check the positions of the two screws that are
used to connect the battery and the front cover,
place the phone on a flat panel, press the phone with
your left hand, hold the electric screwdriver with
your right hand, and remove the two screws.
7. After the rear cover assembly is removed.
6. Use your hands to hold both sides of the rear
cover and remove the rear cover.
5. Check the position of the headset jack. Insert a
finger or a spudger from the upper right corner
into the headset jack, and slide your finger or the
spudger clockwise to release all clips from the
rear cover.

G630-U20 Simplified Maintenance Manual 6 Disassembly Procedure
Issue 01 (2014-04-01) Huawei Proprietary and Confidential
Copyright © Huawei Technologies Co., Ltd..
24
14. Hold the phone with your left hand, push
leftwards the PCBA with your right hand to release
clip 1 at the bottom.
13. Remove the rear camera. Use a finger or plastic
tweezers to lever up the rear camera and finally to
separate the camera from the front cover.
12. Remove the TP FPC ZIF. First, turn on the ZIF
connector switch, use a plastic tweezers to clasp the
FPC two ears, pull the FPC upwards, and remove
the FPC.
11. Lever up the LCD BTB connector with a
crowbar.

G630-U20 Simplified Maintenance Manual 6 Disassembly Procedure
Issue 01 (2014-04-01) Huawei Proprietary and Confidential
Copyright © Huawei Technologies Co., Ltd..
25
18. Use a finger or a crowbar to remove the front
camera. Firstly, unfasten the front camera BTB and
then remove the camera.
17. Use a finger or a crowbar to remove the rear
camera. Firstly, unfasten the rear camera BTB and
then remove the camera.
16. Shake the PCBA to release clip 3 on the right
side and finally to separate the PCBA and the front
cover.
15. Hold the phone with your left hand, push
rightwards the PCBA neck position with your right
hand to release clip 2 on the left side.

G630-U20 Simplified Maintenance Manual 6 Disassembly Procedure
Issue 01 (2014-04-01) Huawei Proprietary and Confidential
Copyright © Huawei Technologies Co., Ltd..
26
19. End.

G630-U20 Simplified Maintenance Manual 7 Assembly Procedure
Issue 01 (2014-04-01) Huawei Proprietary and Confidential
Copyright © Huawei Technologies Co., Ltd..
27
7 Assembly Procedure
2. Connect the rear camera BTB male and female. Make
sure the connectors are properly fastened and do not bump
the surrounding components.
1. Ensure that the ESD wrist strap is properly
grounded.

G630-U20 Simplified Maintenance Manual 7 Assembly Procedure
Issue 01 (2014-04-01) Huawei Proprietary and Confidential
Copyright © Huawei Technologies Co., Ltd..
28
4. Gently move the PCBA, aligning the positioning hole at
the PCBA bottom with the positioning rod in the lower left
corner of the front cover. Press the positioning hole area in
the lower left corner of the PCBA with your left thumb to
fit the positioning rod in the positioning hole. Press the
board at the clip position to fit the board into the clip with
your right thumb.
3. Connect the front camera BTB male and female.
Make sure the connectors are properly fastened and
do not bump the surrounding components.

G630-U20 Simplified Maintenance Manual 7 Assembly Procedure
Issue 01 (2014-04-01) Huawei Proprietary and Confidential
Copyright © Huawei Technologies Co., Ltd..
29
8. Use the tweezers to take the anti-dismantle label
and attach it to its specified position on the rear
cover. Use a cotton swab to gently press the
anti-dismantle label, ensuring that the label is
securely attached.
7. Install the15 screws clockwise, starting from the
headset jack.
6. Use an electric screwdriver to install screws for fastening
the front cover and the battery.
5. Fasten the LCD BTB and TP BTB to the PCBA,
without touching other components. Install the
battery and engage it into the BTB connector.

G630-U20 Simplified Maintenance Manual 7 Assembly Procedure
Issue 01 (2014-04-01) Huawei Proprietary and Confidential
Copyright © Huawei Technologies Co., Ltd..
30
9. Assemble the battery cover.

G630-U20 Simplified Maintenance Manual 8 Troubleshooting Common Faults
Issue 01 (2014-04-01) Huawei Proprietary and Confidential
Copyright © Huawei Technologies Co., Ltd..
31
8 Troubleshooting Common Faults
Before you repair a G630-U10, back up the user data and restore the phone to its factory settings.
8.1 Startup Failure
Most power-on failures are caused by power supply exceptions. Therefore, you can rectify
power-on failures by troubleshooting power supply circuit faults. Power-on failures are
divided into the following types:
No current: After you connect the phone to the DC power supply and power on the
phone, the reading on the power supply ranges from 0 mA to 5 mA.
Weak current: After you connect the phone to the DC power supply and power on the
phone, the reading on the power supply ranges from 5 mA to 100 mA.
Excessive current: After you connect the phone to the DC power supply and power on
the phone, the reading on the power supply exceeds 300 mA.
If the G630-U10 fails to be powered on, observe the power-on current reading on the DC
power supply to identify the fault.
No current

G630-U20 Simplified Maintenance Manual 8 Troubleshooting Common Faults
Issue 01 (2014-04-01) Huawei Proprietary and Confidential
Copyright © Huawei Technologies Co., Ltd..
32
Figure 8-1 Troubleshooting startup failures with no current
This situation occurs when the main power circuit is short-circuited. Check whether VBUS and
VPH_PWR circuits are short-circuited.
Weak current
Connect the phone to a
fake battery and
maintenance power supply,
press the power key, and
observe the current
Is the key copper foil
oxidized?
No current
Clean the key
Is the VPH_PWR voltage between
the range from 3.4 V to 4.2 V, and
equal to the maintenance power
voltage?
Check the clock
X201
Check the U201
N
Y
Y
N
Startup failure
G630-U20 Simplified Maintenance Manual 8 Troubleshooting Common Faults
Issue 01 (2014-04-01) Huawei Proprietary and Confidential
Copyright © Huawei Technologies Co., Ltd..
33
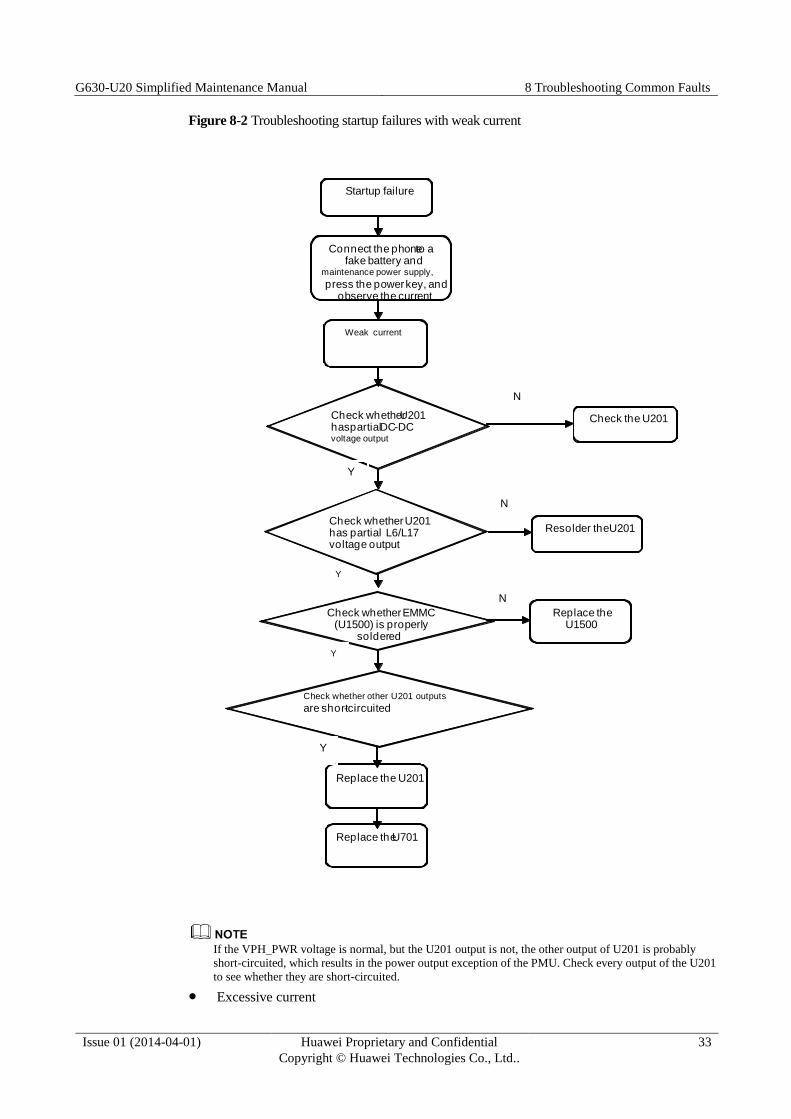
Figure 8-2 Troubleshooting startup failures with weak current
If the VPH_PWR voltage is normal, but the U201 output is not, the other output of U201 is probably
short-circuited, which results in the power output exception of the PMU. Check every output of the U201
to see whether they are short-circuited.
Excessive current
Connect the phoneto a fake battery and
maintenance power supply,
press the power key, and observe the current
Check whetherU201 haspartial DC-DC voltage output
Weak current
Check the U201
Check whether other U201 outputs
are short-circuited
Resolder theU201
Replace the U201
Y
N
N
Y
Startup failure
Check whether U201 has partial L6/L17voltage output
Check whether EMMC(U1500) is properly
soldered
Replace the U701
Y
Y
Replace the U1500
N

G630-U20 Simplified Maintenance Manual 8 Troubleshooting Common Faults
Issue 01 (2014-04-01) Huawei Proprietary and Confidential
Copyright © Huawei Technologies Co., Ltd..
34
Excessive current is usually caused by short-circuited power supply circuits (DC power
supply) which may result in 500 mA or greater current leakage. Mostly this fault occurs when
VBAT is short-circuited to ground.
Figure 8-3 Troubleshooting startup failures with excessive current
Startup failure summary:
1. Current leakage in case of excessive current:
When the phone is connected to a regulated power supply, excessive power such as hundreds
of mA current is generated upon a power-on. This problem usually occurs because the VBAT
is generally short-circuited to the ground. It also may be because the VPH_PWR is
short-circuited to the ground. It is earlier to troubleshoot VBAT short-circuit to the ground,
Connect the phone to a
fake battery and
maintenance power supply,
press the power key, and
observe the current
Check whether pin 1
of J1601 is short-
circuited to the
ground
Excessive current
(>500 mA)
Replace the J1601
Check whether the U201 voltage is
normal
Repair the capacitor
Resolder or replace
the U201
N
Y
N
Startup failure
Check whether the
capacitor connected
to the Vbat is short-
circuited
N
Y

G630-U20 Simplified Maintenance Manual 8 Troubleshooting Common Faults
Issue 01 (2014-04-01) Huawei Proprietary and Confidential
Copyright © Huawei Technologies Co., Ltd..
35
since fewer components (PA, antenna switch, and capacitor) are connected to the VBAT. You
can locate the fault by removing the components separately.
If the voltage on the VPH_PWR circuit is short-circuited, the component removal method is
not applicable. Instead, adjust the DC power output voltage to about 3 V, connect the negative
end of the power supply to the PCB negative end, connect the positive end of the power
supply to the detected short-circuit point, touch the PCB with your hand to locate the hot
position after about 20s, and then remove the hot component.
2. Current leakage in case of weak current:
If the power-on current is weak (generally less than 30 mA), usually the power management
chip, PA, or an ESD protection tube is damaged. It may also be because the EMMC fails to
start up and the program fails to run.
3. No or weak current when you press the power key:
If no current is generated, first check whether the power key fails to work. Then, check the
power supply line to the VBAT. If weak current is gated, measure each output voltage of the
power supply IC. If all IC output voltage is 0, this fault is most possibly related to the PM.
4. After you press the power key, the current sharply changes within a range or remains
unchanged at a fixed value:
This problem is usually due to a CPU or PM communication fault.

G630-U20 Simplified Maintenance Manual 8 Troubleshooting Common Faults
Issue 01 (2014-04-01) Huawei Proprietary and Confidential
Copyright © Huawei Technologies Co., Ltd..
36
8.2 Charging Failure
Figure 8-4 Troubleshooting charging failures
Y
Chargingfailure
Is J1602poorlysoldered?
Resolder the J1602
Check the U201
N
Y
Y
Is the battery damaged? Change the battery
N
Are the battery connector and the battery are in good
contact
Repair the J1601
N
Is the charger functional?
Replace the charger
N
Y

G630-U20 Simplified Maintenance Manual 8 Troubleshooting Common Faults
Issue 01 (2014-04-01) Huawei Proprietary and Confidential
Copyright © Huawei Technologies Co., Ltd..
37
8.3 Camera Failure
Figure 8-5 Troubleshooting camera failures
Y
Camera failure
Is the problem
solved af ter you
replace the
camera?
End
Is the J2101 poorly
soldered?Re-solder or
replace the J2101
Y
N
Y
Is the problem
solved af ter you re-
load the phone
sof tware?
End
Y
N
N
End
Replace the
U701
Replace the
U201
N

G630-U20 Simplified Maintenance Manual 8 Troubleshooting Common Faults
Issue 01 (2014-04-01) Huawei Proprietary and Confidential
Copyright © Huawei Technologies Co., Ltd..
38
8.4 Connection Failure Between the Phone and Computer
Figure 8-6 Troubleshooting connection failures between the phone and computer
Connection failure between
the phone and computer
Is the 5-pin mini USB connector poorly soldered?
Resolder the USB connector
Y
Is the problem solved after
you replace the USB cable?End
Y
N
N
Is there voltage at VCHG?
Replace the U201
Y
N
Is the problem solvedafter you reload the
phone software?
End
Y
N
Replace the USB

G630-U20 Simplified Maintenance Manual 8 Troubleshooting Common Faults
Issue 01 (2014-04-01) Huawei Proprietary and Confidential
Copyright © Huawei Technologies Co., Ltd..
39
8.5 Call Receiving Failure
Figure 8-7 Troubleshooting call receiving failures
No voice can be heard
af ter a call is set up
Is the problem
solved af ter you
replace the
receiver?
End
Is the insertion of the
headset misjudged?
Replace the
U701
Replace the
headset connector
Y
N
Y
Is the receiver
volume properly set?End
N
N
Y
G630-U20 Simplified Maintenance Manual 8 Troubleshooting Common Faults
Issue 01 (2014-04-01) Huawei Proprietary and Confidential
Copyright © Huawei Technologies Co., Ltd..
40
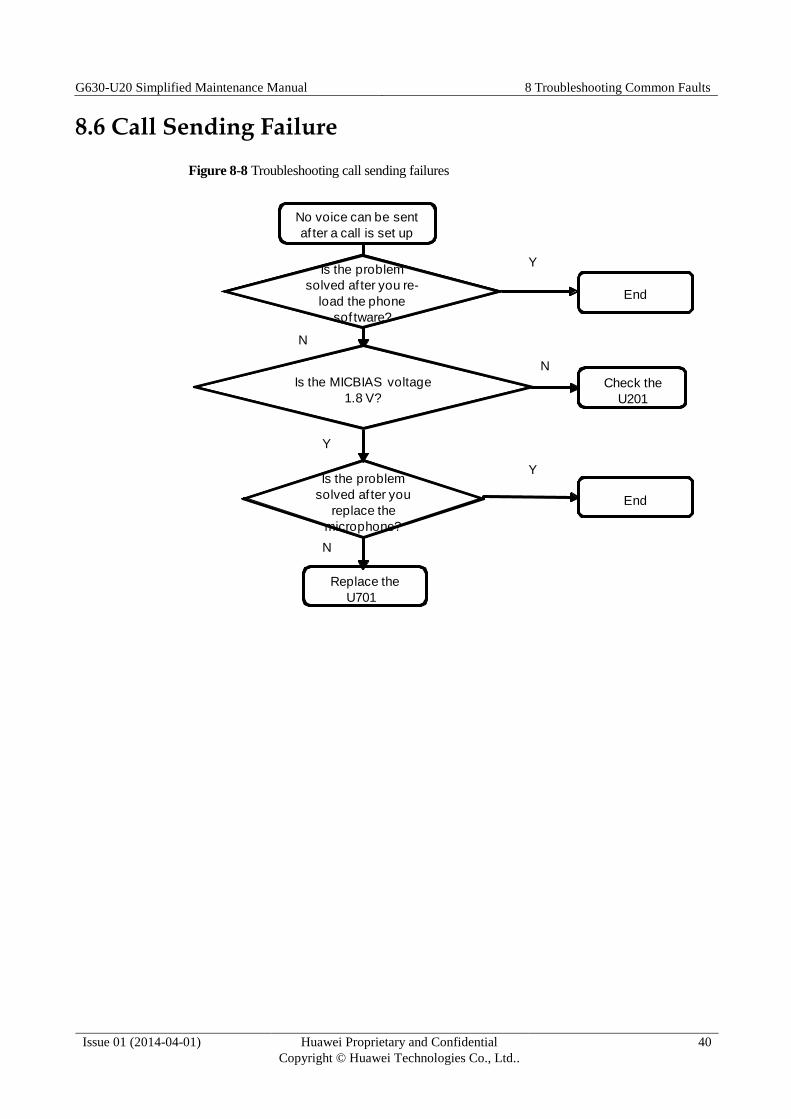
8.6 Call Sending Failure
Figure 8-8 Troubleshooting call sending failures
No voice can be sent
af ter a call is set up
Is the problem
solved af ter you
replace the
microphone?
End
Is the MICBIAS voltage
1.8 V?
Replace the
U701
Check the
U201
N
N
Y
Is the problem
solved af ter you re-
load the phone
sof tware?
End
Y
Y
N

G630-U20 Simplified Maintenance Manual 8 Troubleshooting Common Faults
Issue 01 (2014-04-01) Huawei Proprietary and Confidential
Copyright © Huawei Technologies Co., Ltd..
41
8.7 Vibration Failure
Figure 8-9 Troubleshooting vibration failures
No vibration
Is the VIB_DRV_N
voltage equal to
the battery voltage?
Check the U201
Is the problem solved
af ter you replace the
motor?
Check whether the voltage
dif ference meets the
requirement for the motor
operating voltage
End
Y
N
Y
Is the problem
solved af ter you re-
load the phone
sof tware?
End
Y
N
N

G630-U20 Simplified Maintenance Manual 8 Troubleshooting Common Faults
Issue 01 (2014-04-01) Huawei Proprietary and Confidential
Copyright © Huawei Technologies Co., Ltd..
42
8.8 Ringtone Failure
Figure 8-10 Troubleshooting ringtone failures
N
No ringtone for
incoming calls
Is the FPC in good contact?Re-crimp or
replace the
FPC
Is the problem solved
af ter you replace the
speaker?
Replace the
U701
End
Y
Y
N
Is the problem
solved af ter you re-
load the phone
sof tware?
End
Y
N
N
Is the ringtone
volume properly set? End
N
Y
Is the problem solved af ter
you replace the volume key
sub-board?
EndY

G630-U20 Simplified Maintenance Manual 8 Troubleshooting Common Faults
Issue 01 (2014-04-01) Huawei Proprietary and Confidential
Copyright © Huawei Technologies Co., Ltd..
43
8.9 LCD Display Failure
Figure 8-11 Troubleshooting LCD display failures
No display on the LCD
Is the problem solved
af ter you disassemble the
phone can re-fasten the
LCD BTB connector?
End
Y
N
Is the problem solved
af ter you re-load the
phone sof tware?
End
Y
N
Is the problem solved
af ter you replace the
LCD?
EndY
Replace the
U301
N
N
Is the to-ground-resistanceof T2001/T2002/T2003 is not 0 ohm?
Replace the
U201
Y

G630-U20 Simplified Maintenance Manual 8 Troubleshooting Common Faults
Issue 01 (2014-04-01) Huawei Proprietary and Confidential
Copyright © Huawei Technologies Co., Ltd..
44
8.10 Key Failure
Figure 8-12 Troubleshooting key failures
Key failure
Is the problem solved after you
replace the key
FPC?
End
N
Y
Are the key dome sheets in good
contact?
Clean or replace the
key dome
sheets
N
Y
Re-load the phone
software

G630-U20 Simplified Maintenance Manual 8 Troubleshooting Common Faults
Issue 01 (2014-04-01) Huawei Proprietary and Confidential
Copyright © Huawei Technologies Co., Ltd..
45
8.11 No Sound Coming from the Headset During a Call
Figure 8-13 Troubleshooting procedure for no sound coming from the headset during a call
No voice can be heard f rom the
headset af ter a call is set up
Is the headset
icon displayed
on the status bar?
Replace the
headset connector
Is the problem solved
af ter you replace the
headset?
Replace the
U701
End
Y
Y
N
Is the receiver
volume properly set?End
N
N
Y

G630-U20 Simplified Maintenance Manual 8 Troubleshooting Common Faults
Issue 01 (2014-04-01) Huawei Proprietary and Confidential
Copyright © Huawei Technologies Co., Ltd..
46
8.12 T-Flash Card Detection Failure
Figure 8-14 Troubleshooting T-Flash card detection failures
T-Flash card detection failure
Check whether any T-Flash card slot pins are tilted
Replace the slot
Y
Is the problem solved after you replace the
T-Flash card?
EndY
N
N
Replace the Z2302 End
Y
N
Replace the U701

G630-U20 Simplified Maintenance Manual 8 Troubleshooting Common Faults
Issue 01 (2014-04-01) Huawei Proprietary and Confidential
Copyright © Huawei Technologies Co., Ltd..
47
8.13 GPS Signal Reception Failure
Figure 8-15 Troubleshooting GPS signal reception failures
GPS signal reception failure
Is the GPS channel poorly soldered?
Re-solder or replace the faulty
component
Y
N
Y
Is the GPS antenna in good
contact with the
spring?
Replace the GPS antenna or spring
N
Re-load the phone software

G630-U20 Simplified Maintenance Manual 8 Troubleshooting Common Faults
Issue 01 (2014-04-01) Huawei Proprietary and Confidential
Copyright © Huawei Technologies Co., Ltd..
48
G630-U20 Simplified Maintenance Manual 9 Functional Tests
Issue 01 (2014-04-01) Huawei Proprietary and Confidential
Copyright © Huawei Technologies Co., Ltd..
49
9 Functional Tests
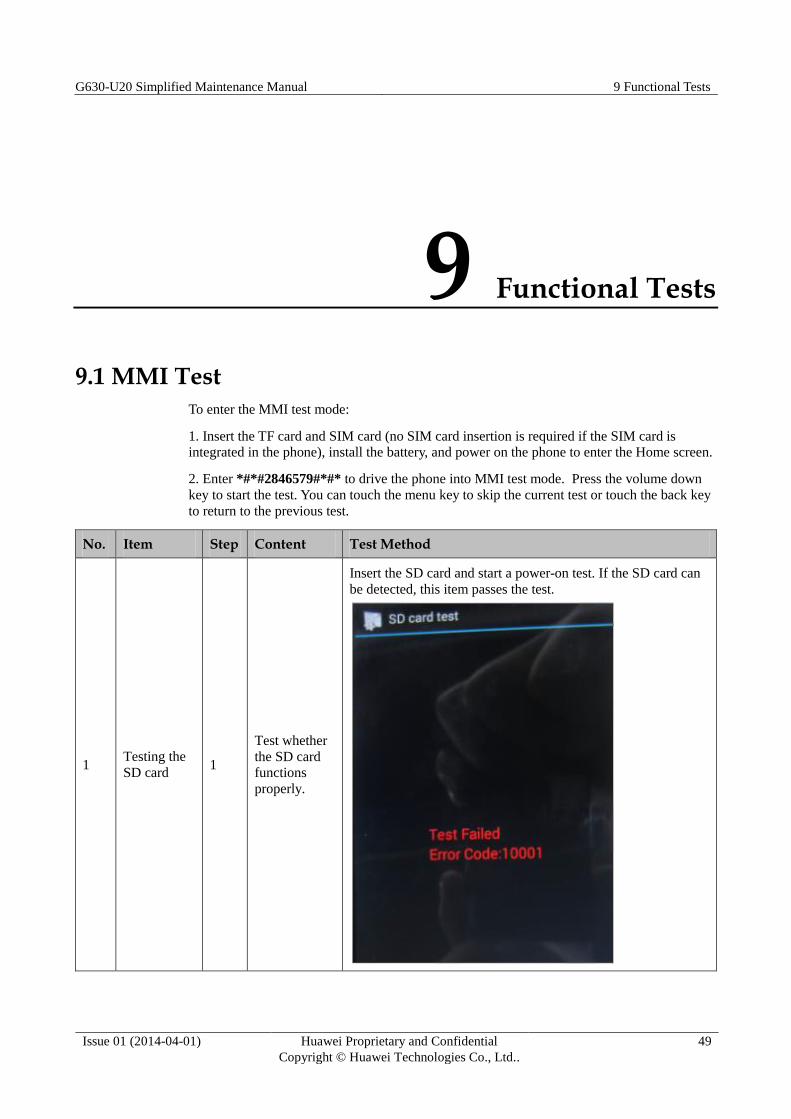
9.1 MMI Test To enter the MMI test mode:
1. Insert the TF card and SIM card (no SIM card insertion is required if the SIM card is
integrated in the phone), install the battery, and power on the phone to enter the Home screen.
2. Enter *#*#2846579#*#* to drive the phone into MMI test mode. Press the volume down
key to start the test. You can touch the menu key to skip the current test or touch the back key
to return to the previous test.
No. Item Step Content Test Method
1 Testing the
SD card 1
Test whether
the SD card
functions
properly.
Insert the SD card and start a power-on test. If the SD card can
be detected, this item passes the test.

G630-U20 Simplified Maintenance Manual 9 Functional Tests
Issue 01 (2014-04-01) Huawei Proprietary and Confidential
Copyright © Huawei Technologies Co., Ltd..
50
No. Item Step Content Test Method
2
Checking
for the
battery
2
Check
whether the
battery is
in-position.
If the battery is in-position, this item passes the test.
3 Key test 3 Test the keys.
Press or touch all the keys. When a key is pressed or touched,
the color of the corresponding key displayed on the screen will
change. After all keys are tested, press the Volume down key to
start the next test.

G630-U20 Simplified Maintenance Manual 9 Functional Tests
Issue 01 (2014-04-01) Huawei Proprietary and Confidential
Copyright © Huawei Technologies Co., Ltd..
51
No. Item Step Content Test Method
4 LCD test 4
White screen
Blank screen.
Color screen
Press the volume down key to display the white screen.
Press the volume down key to display the black screen.
Press the volume down key to display triple color bars (red,
green, and blue).
G630-U20 Simplified Maintenance Manual 9 Functional Tests
Issue 01 (2014-04-01) Huawei Proprietary and Confidential
Copyright © Huawei Technologies Co., Ltd..
52
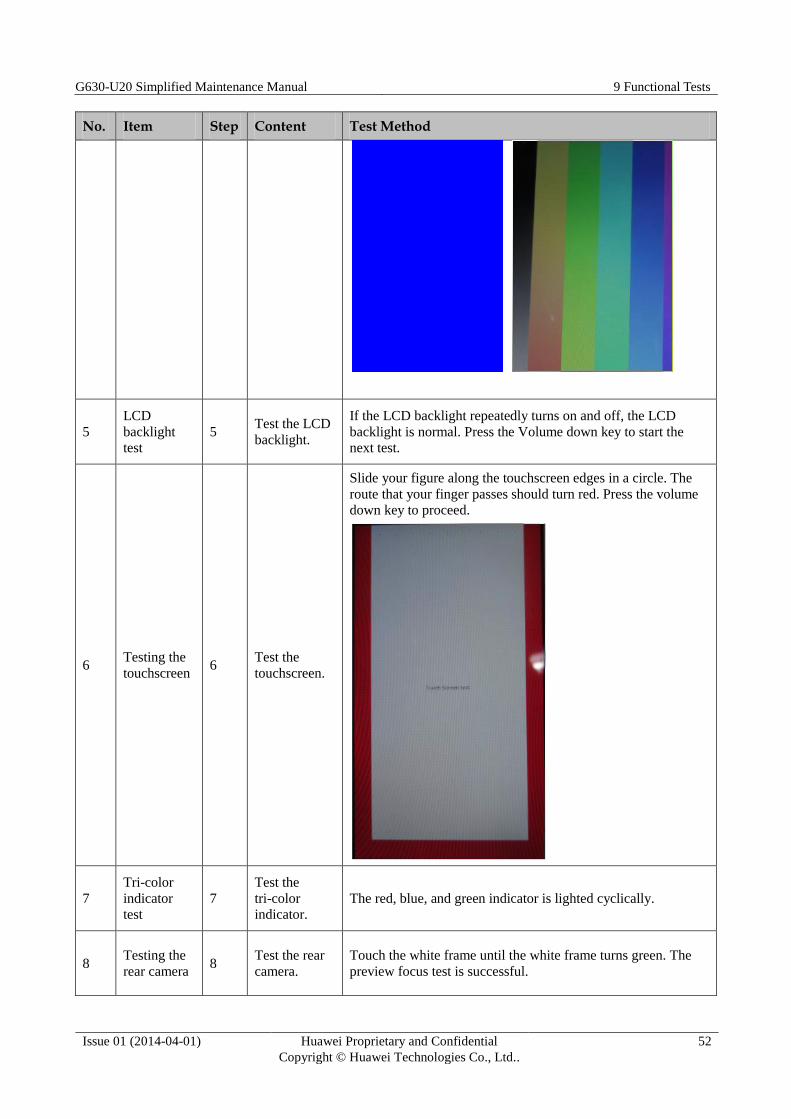
No. Item Step Content Test Method
5
LCD
backlight
test
5 Test the LCD
backlight.
If the LCD backlight repeatedly turns on and off, the LCD
backlight is normal. Press the Volume down key to start the
next test.
6 Testing the
touchscreen 6
Test the
touchscreen.
Slide your figure along the touchscreen edges in a circle. The
route that your finger passes should turn red. Press the volume
down key to proceed.
7
Tri-color
indicator
test
7
Test the
tri-color
indicator.
The red, blue, and green indicator is lighted cyclically.
8 Testing the
rear camera 8
Test the rear
camera.
Touch the white frame until the white frame turns green. The
preview focus test is successful.

G630-U20 Simplified Maintenance Manual 9 Functional Tests
Issue 01 (2014-04-01) Huawei Proprietary and Confidential
Copyright © Huawei Technologies Co., Ltd..
53
No. Item Step Content Test Method
9 Testing the
front camera 9
Test the front
camera.
10 Flashlight
test 10
Test the rear
camera
flashlight
function.
Touch the red text position. If the flashlight turns on, this item
passes the test.

G630-U20 Simplified Maintenance Manual 9 Functional Tests
Issue 01 (2014-04-01) Huawei Proprietary and Confidential
Copyright © Huawei Technologies Co., Ltd..
54
No. Item Step Content Test Method
11
Testing the
proximity
sensor
11
Test the
proximity and
light sensor's
proximity
detection
function.
Place the light shielding plate approximately 4 mm above the
light hole. If the portrait icon changes to an in-call icon, the
function is normal.

G630-U20 Simplified Maintenance Manual 9 Functional Tests
Issue 01 (2014-04-01) Huawei Proprietary and Confidential
Copyright © Huawei Technologies Co., Ltd..
55
No. Item Step Content Test Method
12 Ambient
light test 12
Test whether
the ambient
light sensor is
functional.
Check whether data of environmental light is detected. If yes,
the test is passed. When the test screen is displayed, orient the
phone front side to the light and block the light sensor using
your hand, the phone automatically detects the light changes
and determines whether the test item passes. If the test item
passes, the phone automatically proceeds to the next test item.
If the phone fails to detect the light changes after you tried
changing the light environment for the phone several times,
touch the menu key to confirm the light sensor failure.
13 Testing the
motor 13
Test the
vibration
motor.
The motor will vibrate intermittently. Press the Volume down
key to start the next test.
14 Testing the
speaker 14
Test the
speakers.
Automatically test the speaker. (Do not insert the headset.) If
the speaker emits pleasant sound during the test, the test passes.
Press the volume down key to start the next test.

G630-U20 Simplified Maintenance Manual 9 Functional Tests
Issue 01 (2014-04-01) Huawei Proprietary and Confidential
Copyright © Huawei Technologies Co., Ltd..
56
No. Item Step Content Test Method
15 Testing the
receiver 15
Test the
receiver.
If the receiver plays the pre-stored audio file repeatedly, the test
item passes. Press the volume down key to proceed.
16
Main
microphone
test
16 Test the main
microphone
Touch Record. Speak to the microphone, and then touch Play.
If the microphone functions properly, you can hear the voice
recording from the receiver.

G630-U20 Simplified Maintenance Manual 9 Functional Tests
Issue 01 (2014-04-01) Huawei Proprietary and Confidential
Copyright © Huawei Technologies Co., Ltd..
57
No. Item Step Content Test Method
17
Microphone
loopback
test
17 Test the
microphone.
Touch Record. Speak to the microphone, and then touch Play.
If the microphone functions properly, you can hear the voice
recording from the receiver. Test the secondary microphone and
headset in the same way. Press the Volume down key to start
the next test.
18 FM test 18 Test the FM
module
After a headset is inserted, the phone will search for and play an
FM channel. If you hear the program from the headset, the test
passes.
Press the Volume down key to start the next test.
19
Testing the
headset wire
control
function
19
Test the
control-by-wi
re function of
the headset.
When the headset is inserted into the phone, the in icon on the
test screen turns green; when the headset is removed, the out
icon turns green. In this case, the test item passes. Press the
Volume down key to start the next test.

G630-U20 Simplified Maintenance Manual 9 Functional Tests
Issue 01 (2014-04-01) Huawei Proprietary and Confidential
Copyright © Huawei Technologies Co., Ltd..
58
No. Item Step Content Test Method
20 Bluetooth
test 20
Test the
Bluetooth.
Automatically test the Bluetooth functions. During the test, the
phone will search for Bluetooth devices, and display the devices
that have been found. Press the Volume down key to start the
next test. (Note: This test requires another device with
Bluetooth enabled.)
21 Tilt sensor
test 21
Test the
gravity
sensing
function.
The LCD displays the current acceleration in the X, Y and Z
axes. If the phone can be placed in a position where the angles
between the phone and the X, Y and Z axes are 45 degrees, the
phone passes this test.
G630-U20 Simplified Maintenance Manual 9 Functional Tests
Issue 01 (2014-04-01) Huawei Proprietary and Confidential
Copyright © Huawei Technologies Co., Ltd..
59
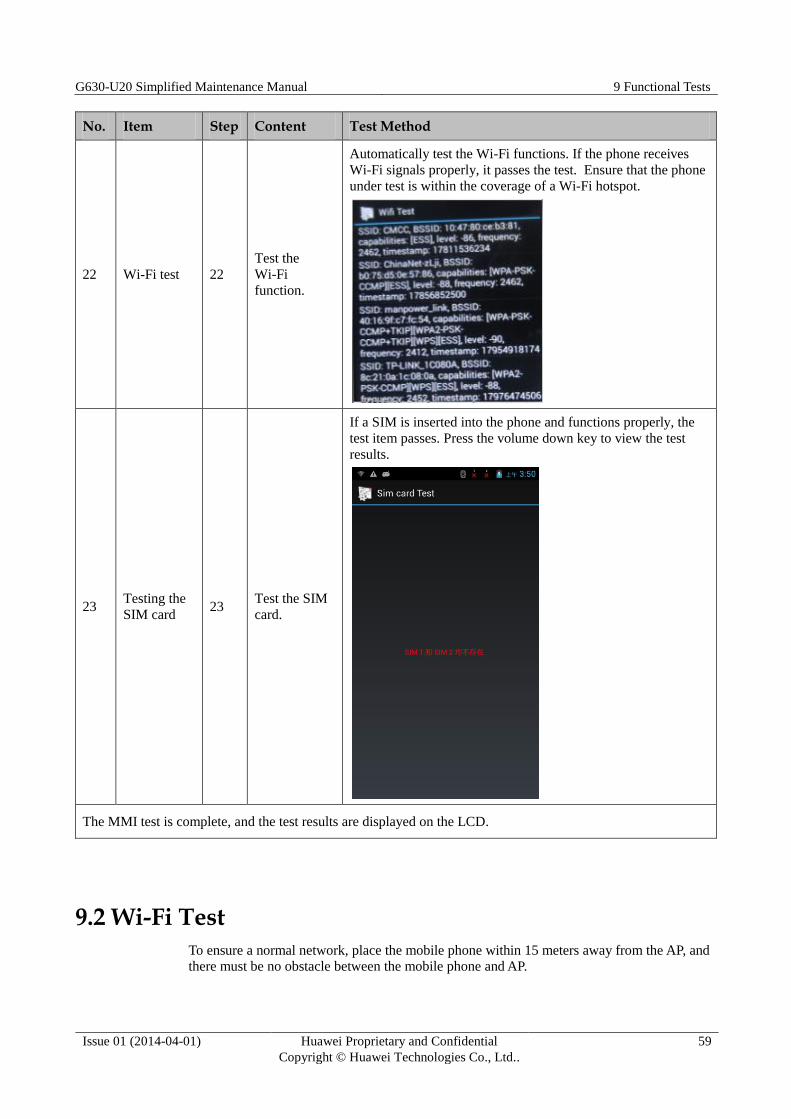
No. Item Step Content Test Method
22 Wi-Fi test 22
Test the
Wi-Fi
function.
Automatically test the Wi-Fi functions. If the phone receives
Wi-Fi signals properly, it passes the test. Ensure that the phone
under test is within the coverage of a Wi-Fi hotspot.
23 Testing the
SIM card 23
Test the SIM
card.
If a SIM is inserted into the phone and functions properly, the
test item passes. Press the volume down key to view the test
results.
The MMI test is complete, and the test results are displayed on the LCD.
9.2 Wi-Fi Test To ensure a normal network, place the mobile phone within 15 meters away from the AP, and
there must be no obstacle between the mobile phone and AP.

G630-U20 Simplified Maintenance Manual 9 Functional Tests
Issue 01 (2014-04-01) Huawei Proprietary and Confidential
Copyright © Huawei Technologies Co., Ltd..
60
Step 1 Configure the AP properly. Power on the phone and place it within the AP's transmission
range.
Step 2 Tap Settings > WIRELESS&SETTINGS > WLAN > turn WLAN on, and enable network
notifications.
Step 3 After the phone automatically finds the AP's SSID, touch the SSID and enter the password to
establish a connection.
Step 4 Change the distance between the phone and AP and check the change of the Wi-Fi signal
strength.
Step 5 In the normal network, launch a browser and access a website to test the network quality.
Step 6 If no problems are found, finish the Wi-Fi test. If any problems are found, troubleshoot the
phone or send it to an advanced service site for repair.
----End
9.3 Voice Call Test Step 1 Install a USIM card and battery on the mobile phone.
Step 2 Press the power key to power on the phone.
Step 3 Check whether the signal strength displayed on the LCD is normal.
Step 4 Make a call to a fixed-line phone, and check the voice quality during the call.
Step 5 If no problems are found during the test, finish the voice call test. If any problems are found,
troubleshoot the phone or send it to an advanced service site for repair.
----End


