20
Human Resources e-Recruitment User Guide Recruitment Request Approval Process Prepared by: Richelle Brehaut Human Resources Status: Version: 1 Date: 11/12/2013

Human Resources
e-Recruitment User Guide Recruitment Request Approval Process
Prepared by:
Richelle Brehaut Human Resources Status: Version: 1 Date: 11/12/2013

CRICOS Provider No. 00103D Insert file name here Page 2 of 20
Table of Contents 1
1. Purpose 4 2. Recruitment Roles and Responsibilities 4 3. Timeouts 4 4. Allow PageUp Pop-ups in Internet Explorer 4 5. Creating a position 4
5.1 Accessing PageUp ..................................................................................................................... 4
5.2 PageUp Logon Page ................................................................................................................... 4
5.3 Forgotten your password? ........................................................................................................ 5
Completing a Recruitment Request ...................................................................................................... 5
5.4 “Select a Job Template” ............................................................................................................ 5
5.5 “Position Info” Tab – “Job Role” Section ................................................................................ 6
5.6 “Headcount Management” Section .......................................................................................... 6
5.7 “Panel Details - To be completed if a position is to go through the recruitment process” Section ..................................................................................................................................................... 6
5.7.1 Chair of the Panel ................................................................................................................................... 6 5.7.2 ”Panel Members”..................................................................................................................................... 7 5.7.3 ”Position Info” Tab – “Add a New Panel Member” ................................................................................... 7
5.8 “Interview date” .......................................................................................................................... 7
5.9 “Position Details” Section ......................................................................................................... 8
5.10 “Reason for the fixed-term appointment” ................................................................................ 8
5.11 “Business Case” Section .......................................................................................................... 8
5.12 “Complete these questions for TAPS/Secondments only” Section ...................................... 8
5.13 “Advertising Details” Section ................................................................................................... 9
5.14 “Approval Process”.................................................................................................................... 9
5.15 Notes” Tab .................................................................................................................................11
5. “Sourcing” Tab ............................................................................................................................ 12
6. “Documents” Tab ........................................................................................................................ 13
7. Completing the Recruitment Request ....................................................................................... 13
8. Saving a Draft Recruitment Request ......................................................................................... 14
9. To Commence a Saved Recruitment Request .......................................................................... 15
10. What if a Recruitment Request is declined? ......................................................................... 15
6. Completing the Approval Process 15

CRICOS Provider No. 00103D Insert file name here Page 3 of 20
6.1 Position Info Tab/ Notes Section/Sourcing ........................................................................... 16
6.2 Document Tab .......................................................................................................................... 16
6.3 Adding Amending a document .............................................................................................. 16
6.4 Approving the Request ........................................................................................................... 16
6.5 Declining a Recruitment Request .......................................................................................... 17
7. Changing your Password 17 8. Restarting a Recruitment Request 18 9. Readvertising a position 18 10. What if someone is acting in a role? 18 11. How do I check the progress of my Recruitment Request? 19
Warning: uncontrolled when printed. Authorised by: Insert position of Dean or Director who authorised this report. Original Issue: 00/00/0000 Document owner: Insert staff position responsible for keeping this document/report current and compliant Current Version: 00/00/0000

CRICOS Provider No. 00103D Insert file name here Page 4 of 20
1. Purpose To provide a guide for PageUp users to use when creating and approving recruitment requests.
Please Note: If you have not been trained in PageUp and would like training please contact your Human Resources Officer or visit https://federation.edu.au/staff/working-at-feduni/human-resources/training.
2. Recruitment Roles and Responsibilities To understand the roles and responsibilities of the Human Resources and each School/Directorate/Centre/Institute please refer to the Recruitment and Merit Selection Overview.
3. Timeouts After a period of inactivity PageUp will timeout please be mindful of this, if it times out before you complete a Recruitment Request your work will be lost.
4. Allow PageUp Pop-ups in Internet Explorer Initially when you logon to PageUp you maybe prompted to “Allow pop-ups from this site” (PageUp). To do this click on the pop-up panel at the top of the page and select “Always Allow Pop-ups From This Site” or follow the steps below:
1. Open Internet Explorer. 2. Select “Tools”/”Pop-up Blocker”, and then click “Pop-up Blocker Settings”. 3. In the “Address of Website to allow” box, type the address:
https://admin.pageuppeople.com and then click Add.
5. Creating a position
5.1 Accessing PageUp To access Pageup please visit https://federation.edu.au/staff/staff-resources/pageup- people or follow the link on the Human Resources website.
5.2 PageUp Logon Page Logon using your Federation University login details.

CRICOS Provider No. 00103D Insert file name here Page 5 of 20
5.3 Forgotten your password? Visit https://admin.pageuppeople.com/p.aspx enter your email address and the security keyword which is always “federation”.
Completing a Recruitment Request Click on “New job” or click on “Manage jobs” to enable you to view the progress of your current jobs.
1. Select “New Job” from right hand panel
5.4 “Select a Job Template” Please select the relevant “Portfolio/Division” and the “School/Directorate/Centre/Institute” applicable to the position.

CRICOS Provider No. 00103D Insert file name here Page 6 of 20
5.5 “Position Info” Tab – “Job Role” Section The “Position Info” tab captures all the information specifically on the position.
1. Enter the “Job title” 2. “Recruitment Code”, this will automatically be created.
5.6 “Headcount Management” Section 1. Complete the “Number of new positions” / “Replacement” fields. Please Note: Both fields must be populated
2. If this position is a replacement position enter the name of the “Current/previous
incumbent” of this position (e.g. “Joe Bloggs) Please note: Position Descriptions need to be classified by Human Resources prior to the job being placed on Pageup.
5.7 “Panel Details - To be completed if a position is to go through the recruitment process” Section Please note: If this position is a TAP/Secondment you will not need to enter a panel.
5.7.1 Chair of the Panel Please enter the Names of the Selection Panel (starting with the Chair) by following the steps below:
1. Click the “binoculars” button 2. Enter the person’s “Last name” in the new window that will pop up 3. Click “Search”
CRICOS Provider No. 00103D Insert file name here Page 7 of 20
4. Highlight the relevant name 5. Click “OK”
If the chair of the panel is not listed click “Add New Panel Member” refer to ”Position Info” Tab – “Add a New Panel Member” below.
Please enter all panel members as they must be approved along with the Recruitment Request.
5.7.2 ”Panel Members” Enter other panel members here, through completing the following steps:
1. Click “Add Panel Member” 2. Enter the person’s “Last name” 3. Click “Search” 4. Highlight the relevant Panel Members name 5. Click “Add” (next to the name of the relevant panel member) 6. Repeat steps 1 to 5 for any additional panel members 7. Then click “Done”
Please Note: If a Panel Member is not listed please refer to “Position Info” Tab – “Add a New Panel Member” below.
5.7.3 ”Position Info” Tab – “Add a New Panel Member” Use the process below if a panel member is not yet listed in PageUp.
1. Click “Add new panel member” 2. Enter the New Panel Member’s details by completing all the fields listed: 3. Click “Save” 4. When you are returned to the Panel Members page enter the new Panel Member’s Last
name. 5. Now click “Search” 6. Highlight the relevant name and 7. Click on “Add” 8. Click “Done”
5.8 “Interview date” 1. Enter proposed “Interview date” here if you have it, this is not a mandatory field.

CRICOS Provider No. 00103D Insert file name here Page 8 of 20
5.9 “Position Details” Section This is the section where you enter the specific details of the position.
Please follow the steps below to complete this section:
1. Select the relevant “Department” from the drop down list 2. Select “Employment type” 3. Select the “Classification” 4. Select the “Campus” at which the position is primarily based 5. Enter dates for the “Employment period from – to” (if the position is fixed-term). 6. Enter “Time fraction” - if the appointment is part-time eg. 0.5 7. Enter the “Position Account Code”, This is free text, please add the percentage beside
the codes if you need to split the cost centres. 8. Select whether the appointment is a TAFE position or not.
5.10 “Reason for the fixed-term appointment” TAFE Teaching Staff
The Victorian TAFE Teaching Staff, Multi-Business Agreement 2009, requires a reason for a TAFE teaching position being fixed-term. You will need to select a reason why the appointment is fixed-term from the drop down list.
Academic and General Staff
The University of Ballarat, Union Collective Agreement, 2010-2012 (UCA), Academic and General Staff Employees clause 9 stipulates that employees may only be employed with the University on fixed-term employment contract under certain conditions. If the appointment that you are recruiting for is for a fixed term please select a reason from the drop down box provided (for further information on fixed term agreements please read clause 9 of the UCA).
5.11 “Business Case” Section This section asks a series of questions relating to the position and why it is relevant to the University, please take the time to add detail to this section as the Recruitment Committee will seriously consider this information when deciding to approve or decline a position.
5.12 “Complete these questions for TAPS/Secondments only” Section This section need only be completed if you are submitting a TAP or a Secondment. Please refer to the Online Temporary Appointments/Secondments Process Manual for information on this process.

CRICOS Provider No. 00103D Insert file name here Page 9 of 20
5.13 “Advertising Details” Section Please complete the two fields in this section:
1. Recruitment Account Code (the account code that recruitment costs will be paid from).
2. Select the Recruitment Process, this will always be “General” if the position is to be advertised.
5.14 “Approval Process” 1. You will notice here that your name will default as the “Requestor”
2. Select the relevant “Approval Process” based on the classification, and whether or not the appointment needs to go to Recruitment Committee.

CRICOS Provider No. 00103D Insert file name here Page 10 of 20
Appointments must be approved in line with the Delegations Policy. The approval list will then appear (in sequential order).
You will notice that some of these fields are pre-populated. If they are pre- populated and the person in the field is on leave please override with the name of the person acting in the role.
To complete the list,
1. Enter the relevant Approver’s name 2. Click the “binoculars”
If the name does not populate you will be directed to a search function. If the name does populate then move on to the next field and repeat the process.
If the Search window pops up:
1. Enter the persons “Last Name” 2. Click “Search” 3. Select the Approver 4. Click “OK”
Please note: Some fields including Recruitment Committee and Human Resources are prepopulated as are the bottom two approvers “Finance Recruitment Approvals” and “Financial Planning and Budget Approval” and “Financial Planning and Budget”. Please DO NOT overwrite these.

CRICOS Provider No. 00103D Insert file name here Page 11 of 20
5.15 Notes” Tab The “Notes” tab provides the opportunity to add any notes, and email notes or documents that may be relevant to the position.
To add a “Note” please follow the steps below:
1. Click the drop down box beside “Add” and then select “Note” 2. Enter your note. 3. To upload a file click “Browse”, select the file, then select “Open” 4. If you wish to email a note tick the box beside “E-mail this note to:” and then enter
the user name of the person you wish to email the note to in the box provided or click the binoculars to search for the person.
5. Enter “other email” as free text, if you wish to email someone not on the system 6. Click “Save”, the note will then be displayed. 7. Click “Next Page”

CRICOS Provider No. 00103D Insert file name here Page 12 of 20
5. “Sourcing” Tab Here you select where the position is to be advertised.
Then follow the steps below:
1. Click “Add Sourcing Channel” the below screen will then appear
2. Tick “Media” on the left hand side 3. Select the appropriate “Application form” from the drop down list 4. Scroll down the page to see Advertising options 5. Tick the relevant media options according to where you wish to advertise the
position If the Media option you require is not listed, enter the details in the “Other” text box provided.
6. Click “Save” (If when you return to the jobcard, a warning is displayed in red
you will need to check all fields have been completed.) 7. Click “Next Page” or click the “Documents Tab”
Please note: This screen will not appear properly in Firefox. Please change browser to Internet Explorer or Google Crome.

CRICOS Provider No. 00103D Insert file name here Page 13 of 20
6. “Documents” Tab At this stage you will attach the classified position description and draft advertisement to the recruitment request. Please follow the steps below:
1. Select “Document from a file” 2. Click “Browse” 3. Locate the classified position description in the relevant drive 4. Click “Open” 5. Click “Save” 6. Repeat the process again for the draft advertisement 7. All documents should now be displayed
7. Completing the Recruitment Request 1. Before saving the Recruitment Request (which initiates the approval
process), you may wish to review each Tab to check you have provided all the relevant information.
2. If you have completed the Recruitment Request click “Save” 3. If all mandatory fields are not completed when you press “Save” a message will
appear at the top of the screen saying “Please fill in all mandatory fields marked with an asterisk (*).” * will appear next to fields that you still need to complete.
4. Once you have populated all relevant fields click “Save”.
A message will then be displayed as shown below confirming that the position has been saved and containing a default “Job No#” (This number will later be changed to a sequential number for easier identification).
The Recruitment Request process is now complete and the approval process will begin.
Once the position has been approved by all approvers you will receive an email from the Director, Finance/Chief Financial Officer.

CRICOS Provider No. 00103D Insert file name here Page 14 of 20
8. Saving a Draft Recruitment Request PageUp does not have the ability to save a Recruitment Request so that you can return to it, if you press the “save button on the bottom of the page the approval process will commence. If for some reason you need to review a job and commence the approval process at a later date please use the below process.
Follow these steps if you need to save a draft recruitment request:
1. Return to the “Position Info” tab
2. Select the approval process “Save Draft – Please Use this Approval Process to Save Draft”
3. Click the Binoculars 4. Enter your last name in the space provided 5. Click “Search” 6. Highlight your name 7. Click “OK” 8. Click “Save and Exit”

CRICOS Provider No. 00103D Insert file name here Page 15 of 20
9. To Commence a Saved Recruitment Request 1. Go to “Manage Jobs” 2. Click “Edit” beside the relevant position 3. Make the relevant changes 4. Scroll down the “Position Info” screen to the “Approval
process” 5. Click “Cancel” 6. Enter “Ready to Initiate the Recruitment Process.” In the
pop up box. 7. Click “Ok” 8. Select the relevant “Approval Process” 9. Follow the steps shown in “Approval Process”.
10. What if a Recruitment Request is declined? If a Recruitment Request is declined the requestor will receive email notification.
To edit the declined Recruitment Request and recommence the “Approval Process”
1. Log into PageUp 2. Click “Manage Jobs” on right side of the screen 3. Click “Edit” on the “Declined” Recruitment Request 4. Make the relevant changes to the recruitment request. 5. Click “Restart” on the Approval Process 6. Select an “Approval process” and enter approvers again. 7. Once you have completed these steps click “Save”.
The Approval process will then be restarted.
6. Completing the Approval Process As an approver you will receive an email asking you to approve or decline recruitment requests. You must then
1. Logon to the external Internet 2. And click the link provided to view the request.
The job card will now be opened in PageUp. At this stage you can check and amend any elements of the role.
CRICOS Provider No. 00103D Insert file name here Page 16 of 20
6.1 Position Info Tab/ Notes Section/Sourcing Start at the “Position Info” tab and progress through each field ensuring that the information is correct and edit where appropriate. You may also add notes and add/delete media sources.
6.2 Document Tab On the document tab you can access the draft advertisement and the classified position description. To view the files:
3. Click on “View” beside the document that you wish to view 4. Now “Open”
6.3 Adding Amending a document If you wish to amend the documents attached open the document, make the changes and save the document on your computer. Then:
1. Delete the old document on the documents tab 2. Click “Select” then “Document from a file” 3. Click “Browse” 4. Click “Save”
Please Note: If you amend a classified PD you will need to refer the position description to Human Resources so that the amendments can be reviewed to ensure that the classification level remains the same.
6.4 Approving the Request Once you are satisfied that all information in the recruitment request is correct click the “Approve” option at the bottom of the page.
You may wish to choose to “Save a draft” and come back to the request later or click “Cancel” which will exit you from the Recruitment Request without saving.
If you approve the request it now be sent to the next approver on the list.

CRICOS Provider No. 00103D Insert file name here Page 17 of 20
6.5 Declining a Recruitment Request If you decline a recruitment request the whole approval process will be restarted. It is recommended that prior to declining the request you contact the Requester and attempt to resolve any issues. Please follow the steps below to decline a recruitment request:
1. Click “Decline” 2. Type in your reason for declining the request 3. Click “Save” 4. The Recruitment Request will be returned to the Requester who will make the
relevant changes and restart the “Approval Process”
7. Changing your Password 1. To change your password – log in to PageUp and click on
“Update Profile” on the right hand panel 2. Click “Change my password” in the pop up screen 3. Type your “Old password” 4. Type your “New password” and “Confirm password” 5. Click “Save”

CRICOS Provider No. 00103D Insert file name here Page 18 of 20
8. Restarting a Recruitment Request There are times when you need to restart the Recruitment Request process, because the wrong approval process was selected request has changed.
To restart the process please:
6. Log into PageUp 7. Click “Manage Jobs” on right side of the screen 8. Click “Edit” on the relevant Recruitment Request 9. Make the relevant changes to the Recruitment Request 10. Scroll down the “Position Info” page to the approval process and click “Cancel” 11. Type in the reason that you want to cancel the approval process, these reasons
will be sent to the requestor in an email. 12. Select an “Approval process” and enter approvers again (refer to “Approval
Process”). 13. Click “Save”.
The Approval process will then be restarted
9. Readvertising a position If you wish to readvertise a position because you have not received a suitable pool of applicants please follow the steps below.
1. Log into PageUp 2. Click “Manage Jobs” on right side of the screen 3. Click “Edit” on the relevant Recruitment Request 4. Click on the “Notes” tab 5. Click the drop down box beside “Add” and then select “Note” 6. Enter a note here saying that you wish to readvertise the position, where and
when you would like the position advertised. 7. Tick the box beside “Email this note to:” 8. Add the name of the relevant Human Resources Officer. 9. Click “Save”
10. What if someone is acting in a role? If someone is acting in a role for a period of time:
1. Type their name in the relevant box of the approval process 2. Add a note to the request to say who is acting, in what role, and for what period they
are acting in the role.
CRICOS Provider No. 00103D Insert file name here Page 19 of 20
This will ensure that there is a record of who approved a position and in what capacity.
11. How do I check the progress of my Recruitment Request?
If you wish to check the progress of your Recruitment Request please follow the steps below:
1. Click on “Manage Jobs” 2. Click “edit” beside the job that you wish to view 3. When you view the job you will be able to scroll down to the bottom of the
“Position Info” tab 4. Under approval process you can now see, where your request sitting. For
example, you can see the below request is approved by the Dean and is now sitting under Finance Recruitment Approvals.
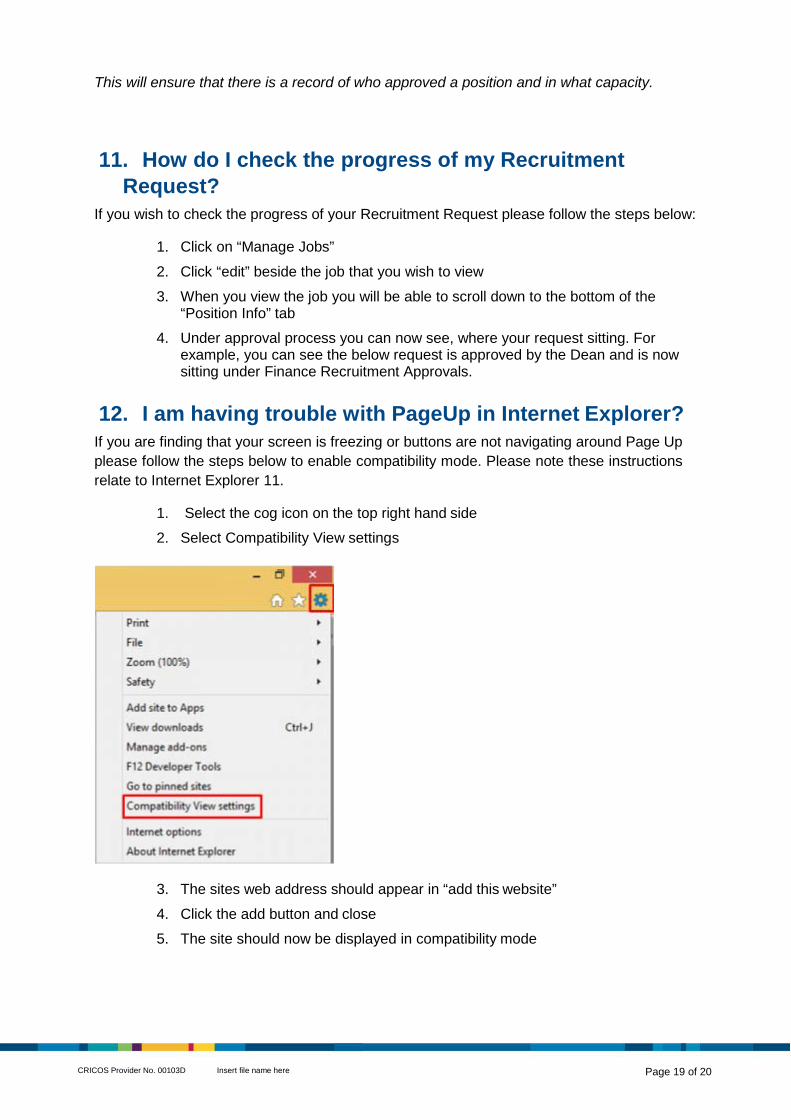
12. I am having trouble with PageUp in Internet Explorer?
If you are finding that your screen is freezing or buttons are not navigating around Page Up please follow the steps below to enable compatibility mode. Please note these instructions relate to Internet Explorer 11.
1. Select the cog icon on the top right hand side 2. Select Compatibility View settings
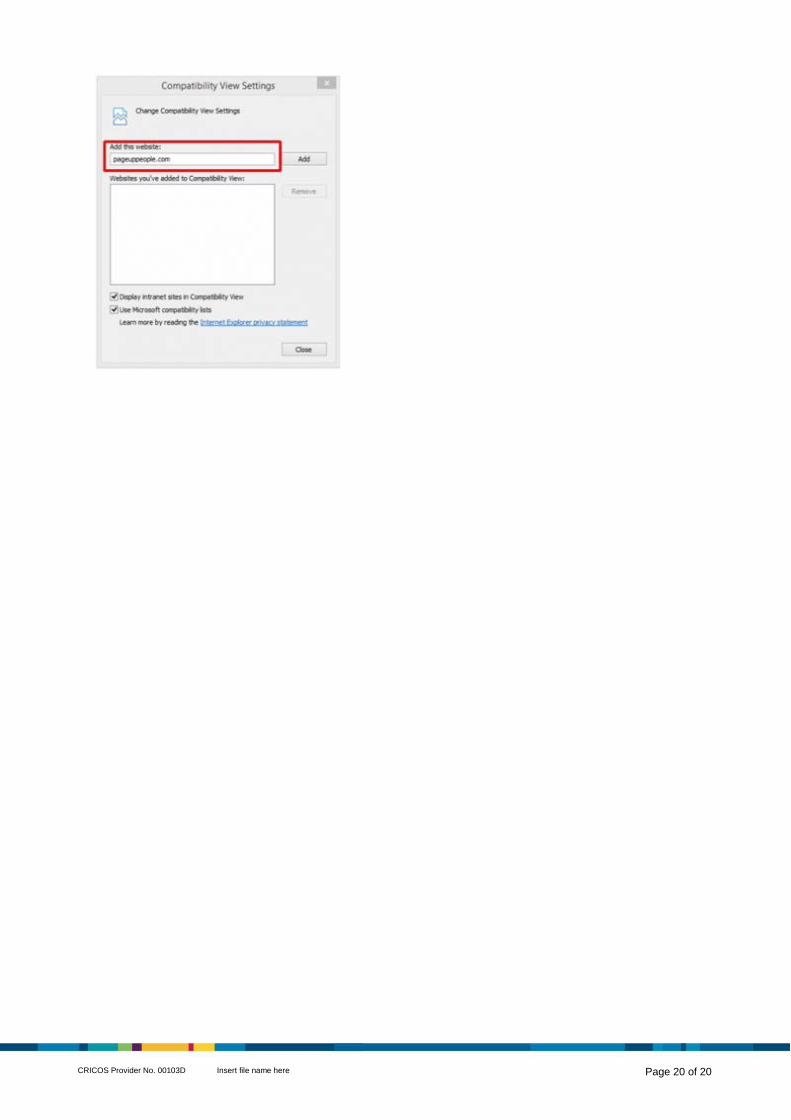
3. The sites web address should appear in “add this website” 4. Click the add button and close 5. The site should now be displayed in compatibility mode
CRICOS Provider No. 00103D Insert file name here Page 20 of 20


