111
Hyperion Process Guide Information Management Client Support Services | DCATS 210‐567‐7777 / Option 5 Hyperion Process Guide | Version 1 | Jan 2013

Hyperion Process Guide
Information Management Client Support Services | DCATS 210‐567‐7777 / Option 5
Hyperion Process Guide | Version 1 | Jan 2013
Hyperion Process Guide
2
Table of Contents
What is Hyperion? ......................................................................................................................................... 3
System Compatibility ................................................................................................................................ 3
Signing onto Hyperion................................................................................................................................... 4
HSC Portal Logon ...................................................................................................................................... 4
Set up User Preferences ......................................................................................................................... 10
Hyperion Task List – EC User ....................................................................................................................... 14
Assign Department Targets .................................................................................................................... 16
Review Budget Planning Report ............................................................................................................. 19
Run Consolidated Budget Recap ............................................................................................................. 20
Review Position Budgets ......................................................................................................................... 27
Review Current Year Projections ............................................................................................................ 28
Review State Appropriations for All State or for a Specific 14XXX Fund ................................................ 38
Run Consolidated Budget Recap after Funding Changes ....................................................................... 42
Promote/Reject Budget .......................................................................................................................... 50
Running Reports in Hyperion ...................................................................................................................... 54
Hyperion Task List – Department User ....................................................................................................... 57
Review Targets ........................................................................................................................................ 59
Review Budget Planning Report ............................................................................................................. 61
Review Current Year Projections ............................................................................................................ 62
Make Position Budget Changes in HCM ................................................................................................. 72
Review Days Available for Upcoming Budget Year ................................................................................. 72
Make Budget Changes in Hyperion......................................................................................................... 72
Review Expenses Funded with Expiring PIDs .......................................................................................... 82
Run Consolidated Budget Recap after Funding Changes ....................................................................... 87
Reconcile Expenses against State Appropriations .................................................................................. 95
Promote/Reject Budget .......................................................................................................................... 98
Entering data using Hyperion Forms ........................................................................................................ 102
Adding Comments in a web form ..................................................................................................... 105
Working with Supporting Detail ....................................................................................................... 109

Hyperion Process Guide
3
What is Hyperion?
Oracle Hyperion Planning is a Web‐based budgeting and planning solution, driving collaborative, event‐based operational planning processes throughout the organization for a wide range of financial and operational needs. It gives Web users the ability to enter, analyze, and report on data, manage the planning process, and personalize data entry forms. Planning is a comprehensive approach for the complete and closed‐loop planning process that drives continuous business improvement. With Planning, all decision makers and front‐line managers can communicate which course of action to take and get budget holders to collaborate so that the planning process is optimized and efficient. When a material event occurs that causes a change in direction, planners have the flexibility to adapt rapidly, ensuring that plans are relevant and useful. Planning benefits:
Facilitates collaboration, communication, and control across multi‐divisional organization
Provides a framework for perpetual planning, with attention to managing volatility and frequent planning cycles
Provides ease of use and deployment through the Web or Oracle Hyperion Smart View for Office, Fusion Edition
Lowers the total cost of ownership through a shorter roll out and implementation phase, and easier applications maintenance
Enhances decision‐making with reporting, analysis, and planning
Promotes modeling by including complex business rules and allocations
Integrates with Smart View so you can design worksheets in Microsoft Excel to enter, format, analyze, and report on data in a Planning application. Using ad hoc grids—focused data slices—in Smart View, you can also perform ad hoc analysis.
Integrates with other systems to load data
System Compatibility
Hyperion is compatible with the following browsers:
Internet Explorer: Versions 7, 8, 9
Firefox, will also work on Macs
Hyperion is NOT compatible with the following browsers:
Safari
Google Chrome
Hyperion Process Guide
4
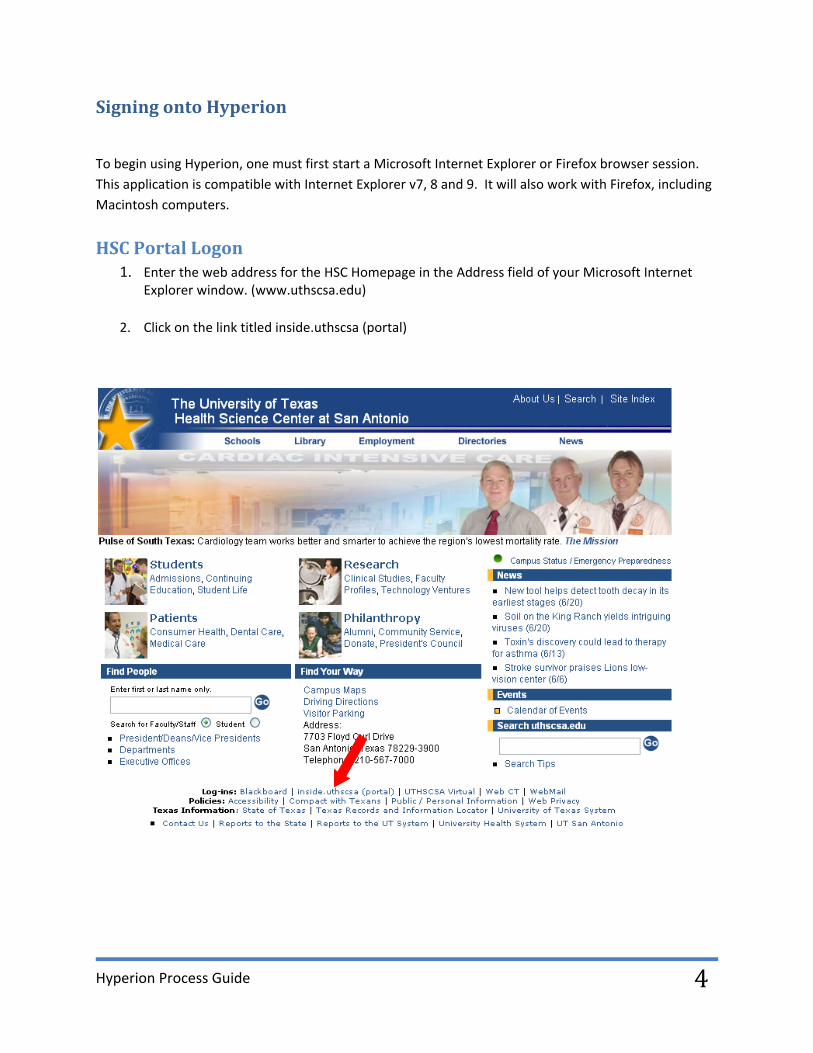
Signing onto Hyperion
To begin using Hyperion, one must first start a Microsoft Internet Explorer or Firefox browser session.
This application is compatible with Internet Explorer v7, 8 and 9. It will also work with Firefox, including
Macintosh computers.
HSC Portal Logon 1. Enter the web address for the HSC Homepage in the Address field of your Microsoft Internet
Explorer window. (www.uthscsa.edu)
2. Click on the link titled inside.uthscsa (portal)
Hyperion Process Guide
5
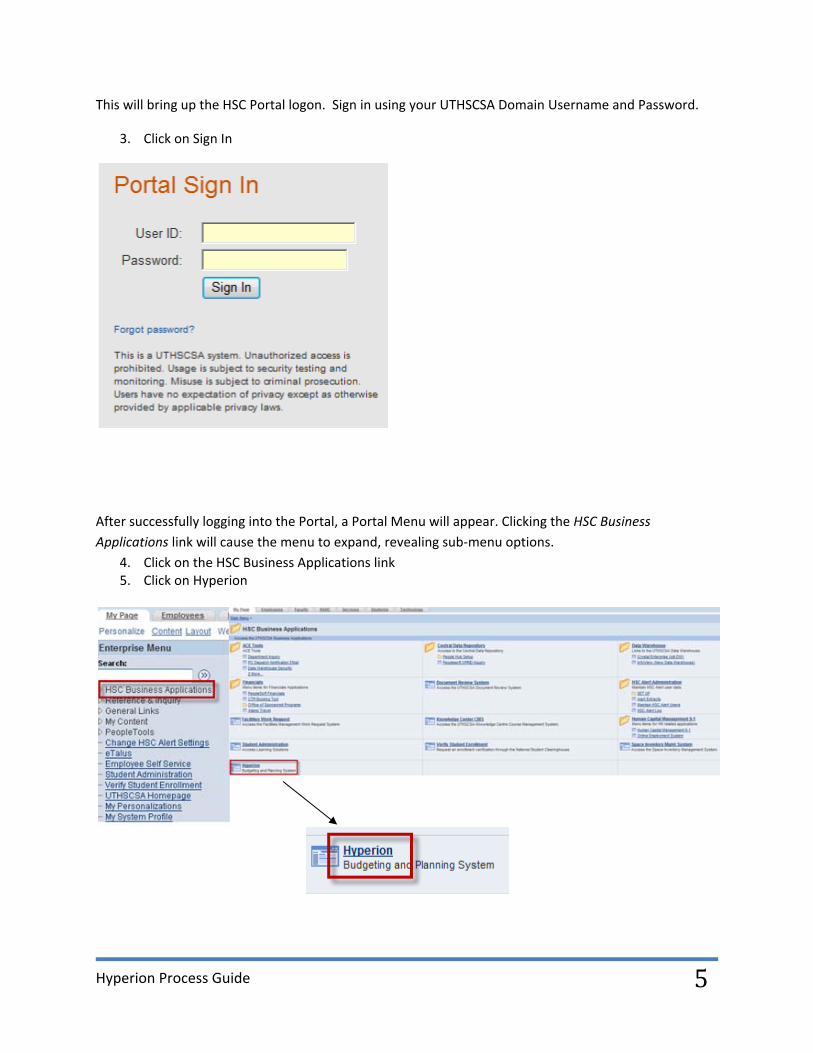
This will bring up the HSC Portal logon. Sign in using your UTHSCSA Domain Username and Password.
3. Click on Sign In
After successfully logging into the Portal, a Portal Menu will appear. Clicking the HSC Business
Applications link will cause the menu to expand, revealing sub‐menu options.
4. Click on the HSC Business Applications link 5. Click on Hyperion

Hyperion Process Guide
6
Log into the application using the steps below:
6. Log on using your UTHSCSA Domain username and password
7. Click on Log on

Hyperion Process Guide
7
A new window will open where you will begin accessing your menu pages.
1. Below the Planning Quick Links section, select HYPPBR

Hyperion Process Guide
8
2. Click on My Task List from the bottom left corner.
3. Select whether you are an EC Admin or Department Admin user

Hyperion Process Guide
9
This will expand your task list for you to begin completing.
Hyperion Process Guide
10
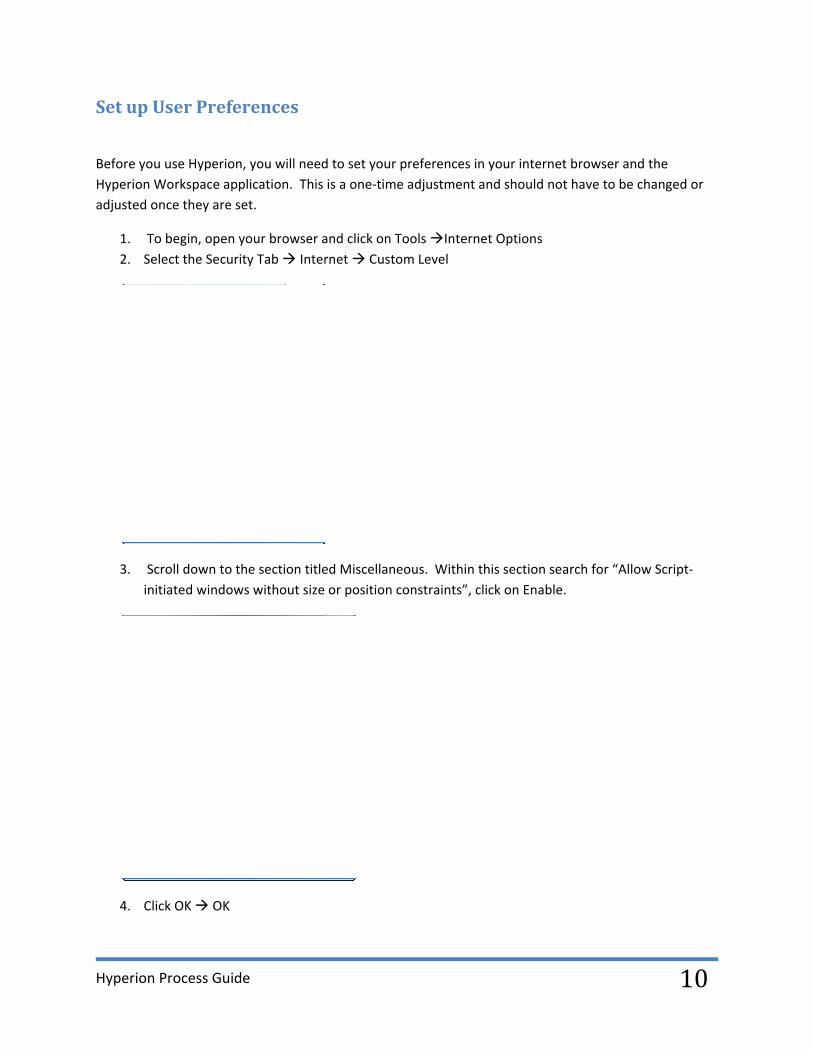
Set up User Preferences
Before you use Hyperion, you will need to set your preferences in your internet browser and the
Hyperion Workspace application. This is a one‐time adjustment and should not have to be changed or
adjusted once they are set.
1. To begin, open your browser and click on Tools Internet Options
2. Select the Security Tab Internet Custom Level
3. Scroll down to the section titled Miscellaneous. Within this section search for “Allow Script‐
initiated windows without size or position constraints”, click on Enable.
4. Click OK OK

Hyperion Process Guide
11
If your Pop‐Up Blockers are enabled, you will need to allow Pop‐ups for the Hyperion Planning URL.
In Internet Explorer, click on Tools, rest your cursor (but do not click) on Pop‐Up Blocker . When the
menu extends out, it should say “Turn ON Pop‐Up Blocker”. If it says, “Turn ON…”, cancel out of
Internet Options.
If your Pop‐Up Blocker says, “Turn OFF Pop‐Up Blocker, click on it to turn OFF the Pop‐Up Blocker. Close
your Internet Explorer session to refresh this change before logging into Hyperion Workspace.
To Set Preferences in the Hyperion Workspace application, follow the steps below:
1. To begin, log into Hyperion, click on HYPPBR to open the Hyperion Planning module. From the
Hyperion toolbar, click on File Preferences

Hyperion Process Guide
12
2. A window will open which will be defaulted to the General Tab, click on Financials Reporting
3. Set the Default Preview Mode to PDF Preview
4. Set the User Point of View to On
5. Thousands Separator to Comma
6. Decimal Separator to Period
7. Set the Query Ready Mode to Simple Excel
8. Click OK
The window will close and you will be viewing the Hyperion Workspace application. To change the
second set of preferences continue the following steps.
9. Verify you have opened HYPPBR, then click on FilePreferences

Hyperion Process Guide
13
10. A window will open which will be defaulted to the General Tab, click on Planning
11. Type in your UTHSCSA email address
12. Click on Save
13. Click OK to return to the Hyperion Workspace application

Hyperion Process Guide
14
Hyperion Task List – EC User
1. Set User Preferences in Hyperion 2. Assign Department Targets 3. Review Budget Planning Report in PeopleSoft HCM 4. Run Consolidated Budget Recap 5. Review Position Budgets in PeopleSoft HCM 6. Review Current year Projections 7. Review State Appropriations for All State funds 8. Review State Appropriations for specific 14xxx funds 9. Run Consolidated Budget Recap after Funding changes 10. Promote Budget

Hyperion Process Guide
15
1. To close a task after it has been completed, click on the Action Icon for each task
This will open the Task List Status window showing the current status of the task
2. To change the status to Complete, click on the checkbox on the bottom of the page. You can
continue to update the task status for additional tasks by clicking on Next Incomplete, or Next.
You also have the option to click on Task List Home to view the complete task listing.

Hyperion Process Guide
16
Assign Department Targets
1. Click HYPPBR
2. You will see a display to include a section Titled “Forms”, Click next to My Task List
Hyperion Process Guide
17
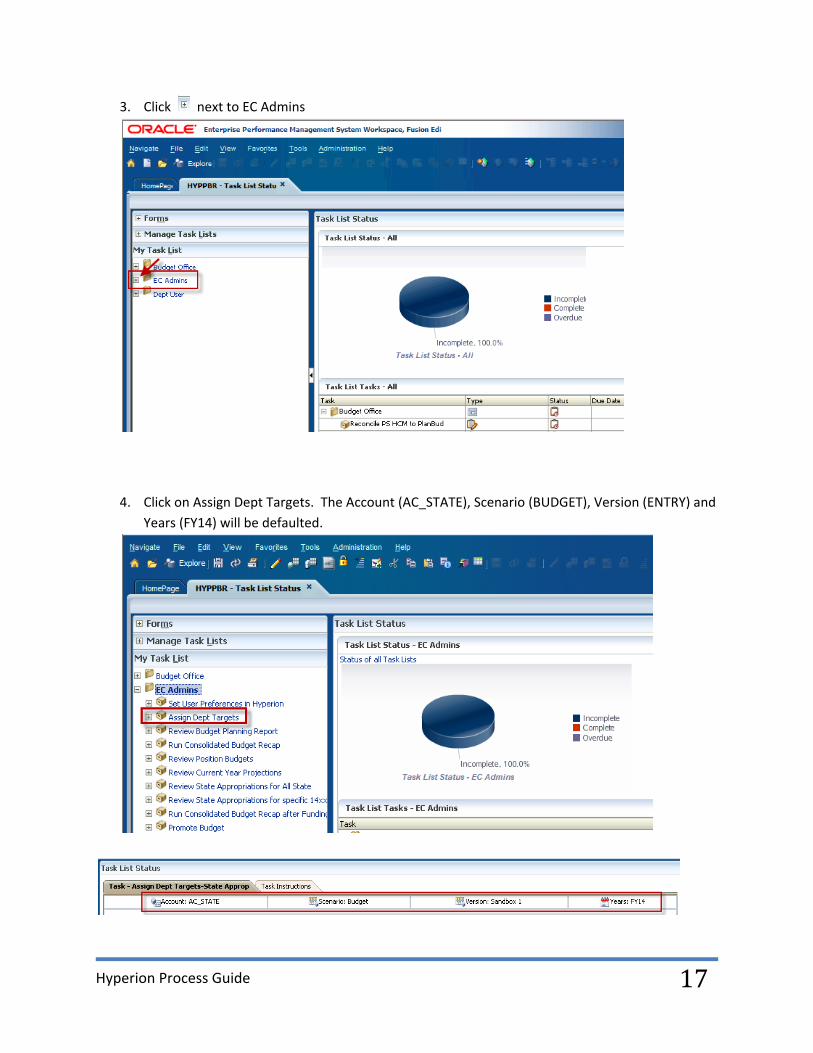
3. Click next to EC Admins
4. Click on Assign Dept Targets. The Account (AC_STATE), Scenario (BUDGET), Version (ENTRY) and
Years (FY14) will be defaulted.
Hyperion Process Guide
18
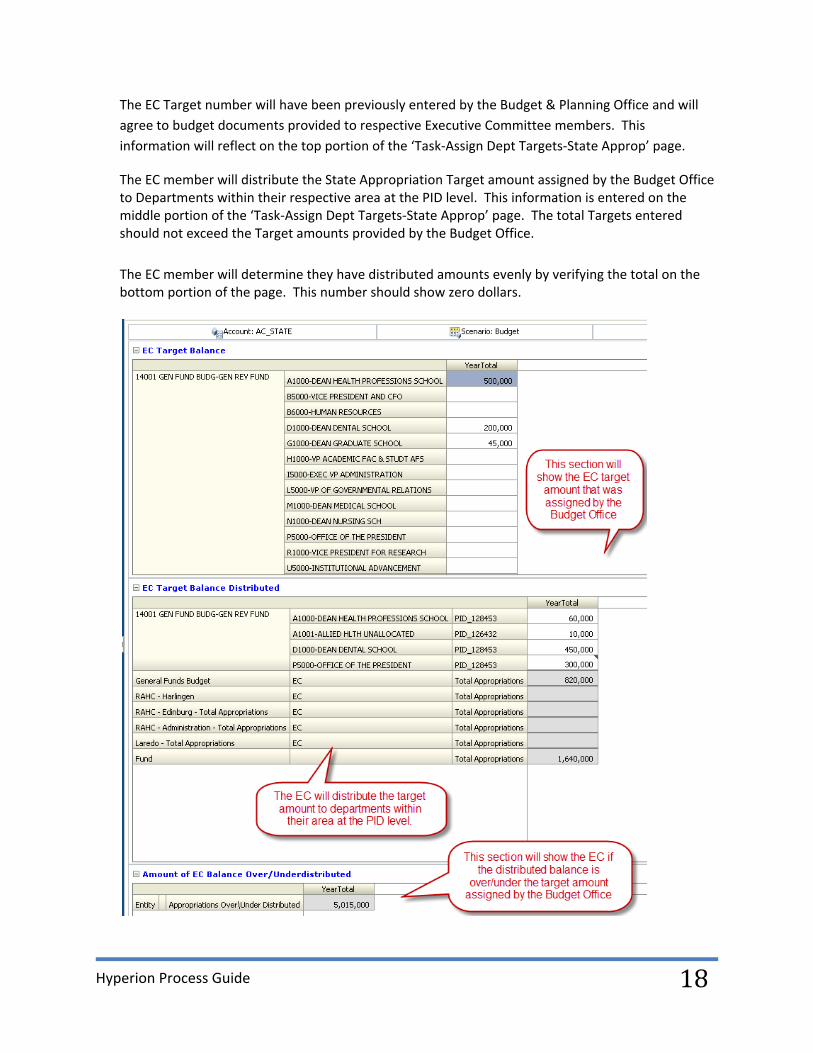
The EC Target number will have been previously entered by the Budget & Planning Office and will
agree to budget documents provided to respective Executive Committee members. This
information will reflect on the top portion of the ‘Task‐Assign Dept Targets‐State Approp’ page.
The EC member will distribute the State Appropriation Target amount assigned by the Budget Office to Departments within their respective area at the PID level. This information is entered on the middle portion of the ‘Task‐Assign Dept Targets‐State Approp’ page. The total Targets entered should not exceed the Target amounts provided by the Budget Office.
The EC member will determine they have distributed amounts evenly by verifying the total on the bottom portion of the page. This number should show zero dollars.
Hyperion Process Guide
19
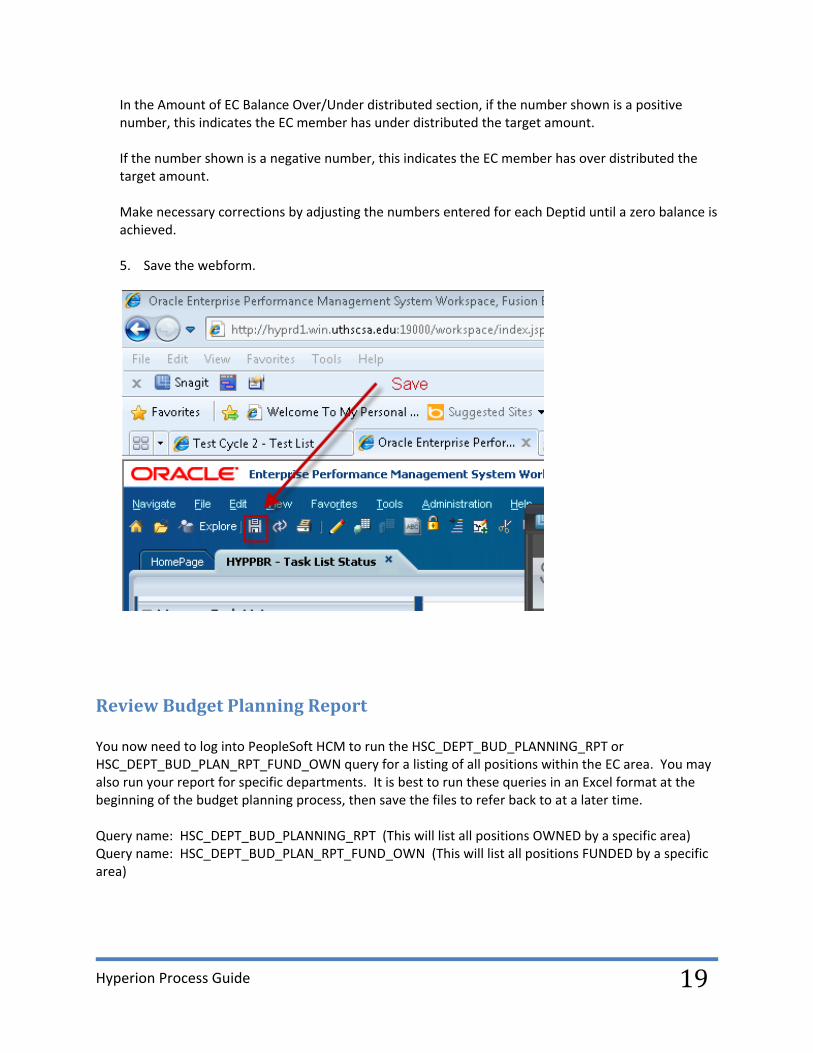
In the Amount of EC Balance Over/Under distributed section, if the number shown is a positive number, this indicates the EC member has under distributed the target amount. If the number shown is a negative number, this indicates the EC member has over distributed the target amount. Make necessary corrections by adjusting the numbers entered for each Deptid until a zero balance is achieved. 5. Save the webform.
Review Budget Planning Report You now need to log into PeopleSoft HCM to run the HSC_DEPT_BUD_PLANNING_RPT or HSC_DEPT_BUD_PLAN_RPT_FUND_OWN query for a listing of all positions within the EC area. You may also run your report for specific departments. It is best to run these queries in an Excel format at the beginning of the budget planning process, then save the files to refer back to at a later time. Query name: HSC_DEPT_BUD_PLANNING_RPT (This will list all positions OWNED by a specific area) Query name: HSC_DEPT_BUD_PLAN_RPT_FUND_OWN (This will list all positions FUNDED by a specific area)
Hyperion Process Guide
20
Run Consolidated Budget Recap
To review the Consolidated Budget, run the Budget Recap report. This report reflects a department’s
(or EC’s) budget in a Profit and Loss (P&L) format and replaces the HSC_DEPT_BUD_
CAT_SUMMARY query that users ran in PeopleSoft HCM. UT System looks at three ratios to determine
an institution’s financials health. These ratios are calculated based on 1) the Net Operating Margin,
2)the Change in Net Assets and 3)the Ending Net Assets. The report can be run for a specific PID or set
of PID’s, for a specific Fund Group or set of Funds, or all funds and/or all PID’s within a department. If
multiple Funds/PID’s are selected, the report will reflect each Fund/PID in a separate column.
If our overall (all funds) institutional ratios are unfavorable, the institution is required to explain the
reasons, which requires departments and/or EC Offices to be able to understand and explain the activity
that would put their area in an unfavorable financials condition.
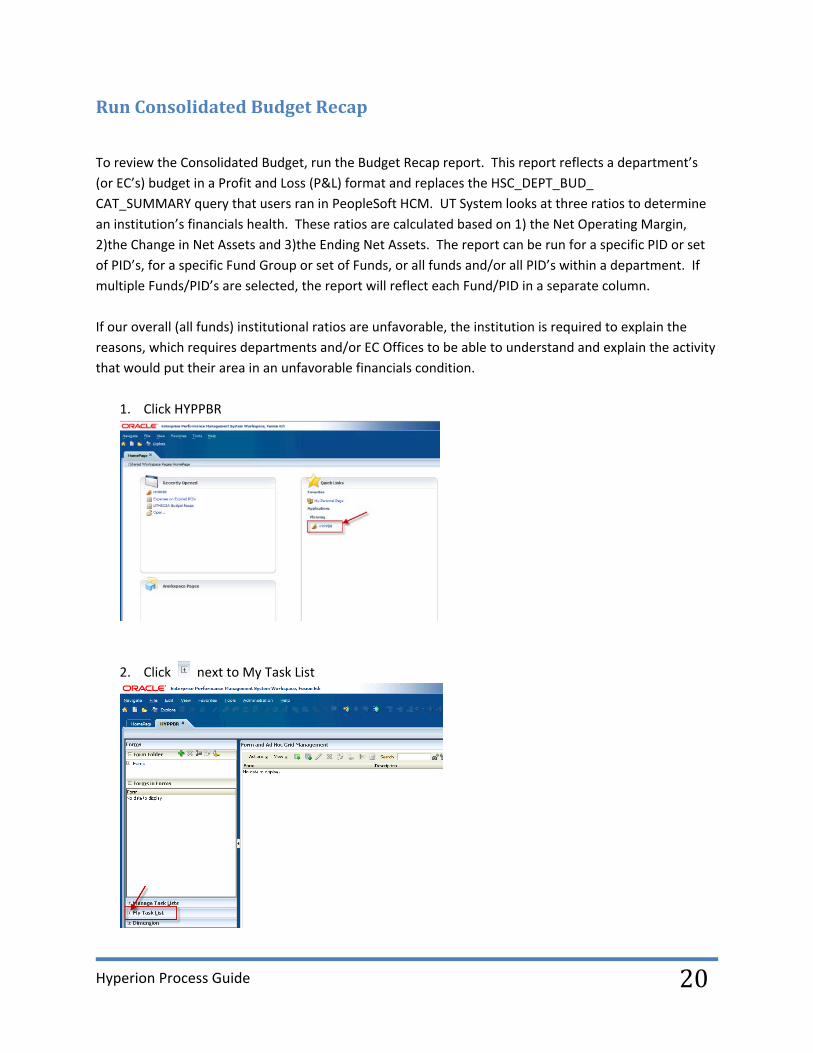
1. Click HYPPBR
2. Click next to My Task List

Hyperion Process Guide
21
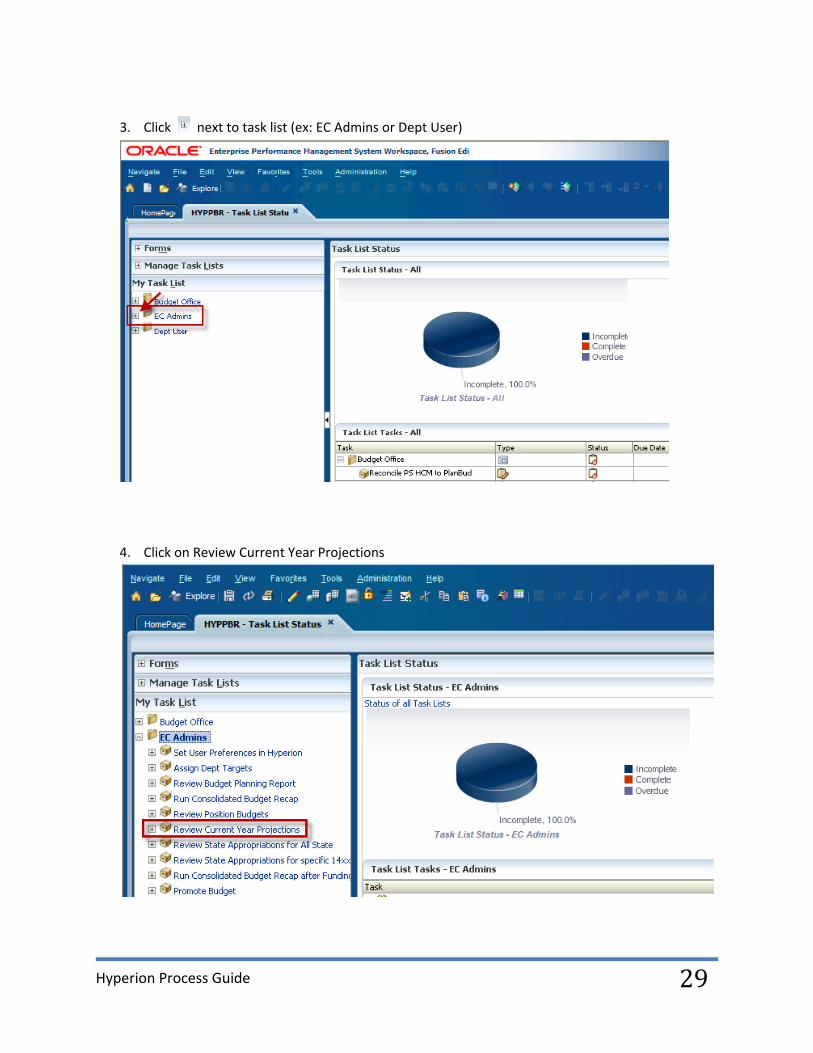
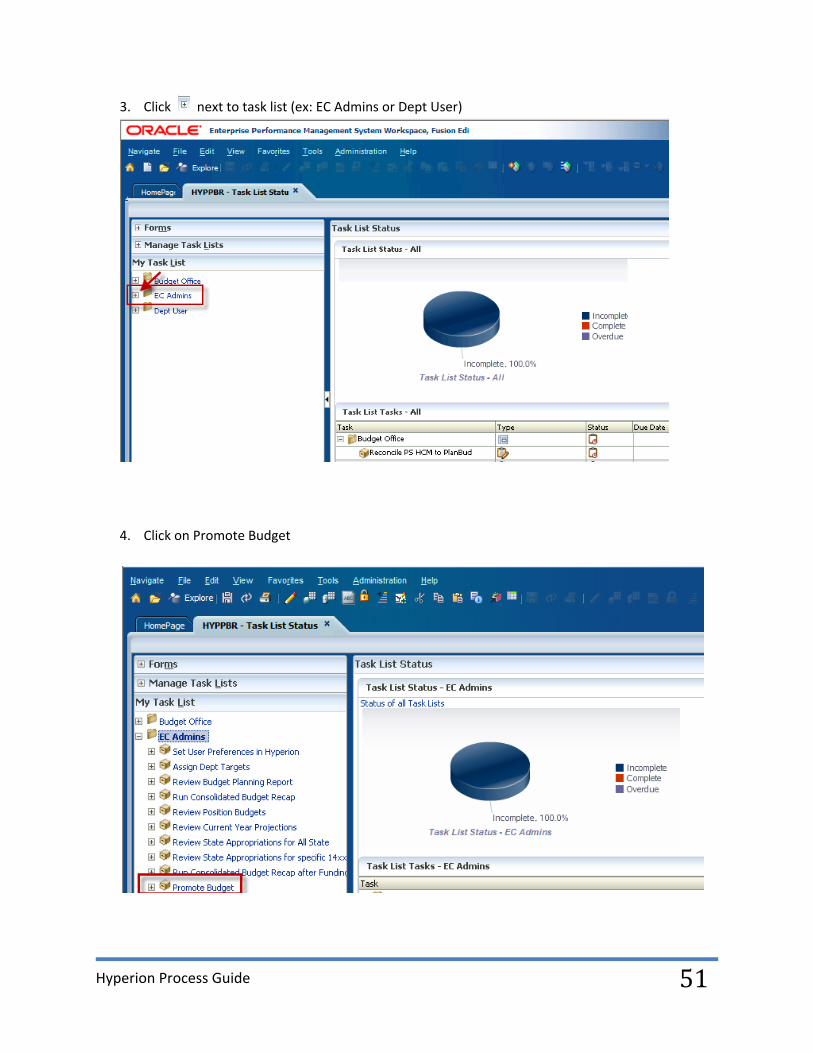
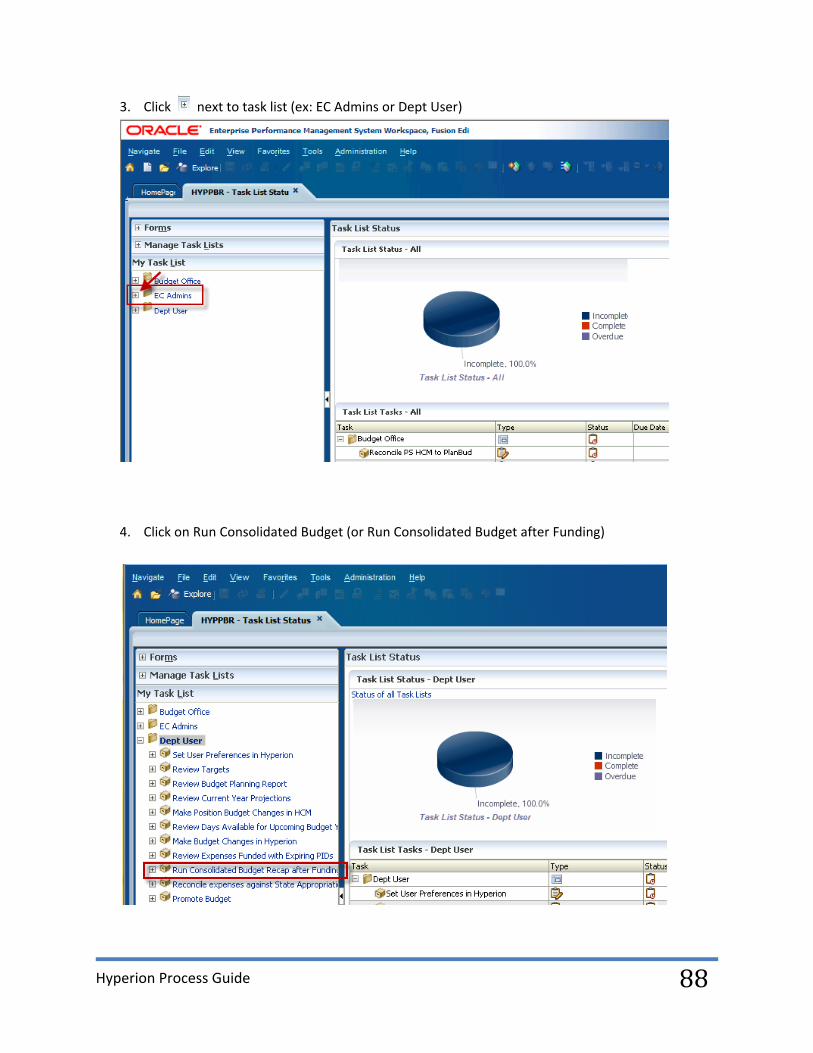
3. Click next to task list (ex: EC Admins or Dept User)
4. Click on Run Consolidated Budget Recap (or Run Consolidated Budget after Funding)

Hyperion Process Guide
22
5. The Preview User Point of View box will appear. Confirm or enter Entity (DEPTID) and click OK. If you need to change the entity, click Select…
6. To change the Entity, click the + sign next to Entity to expand as needed and select member, or
enter the entity in the Find box beginning with an asterisk (example: *T5700), click the search
(binoculars) icon.
Hyperion Process Guide
23
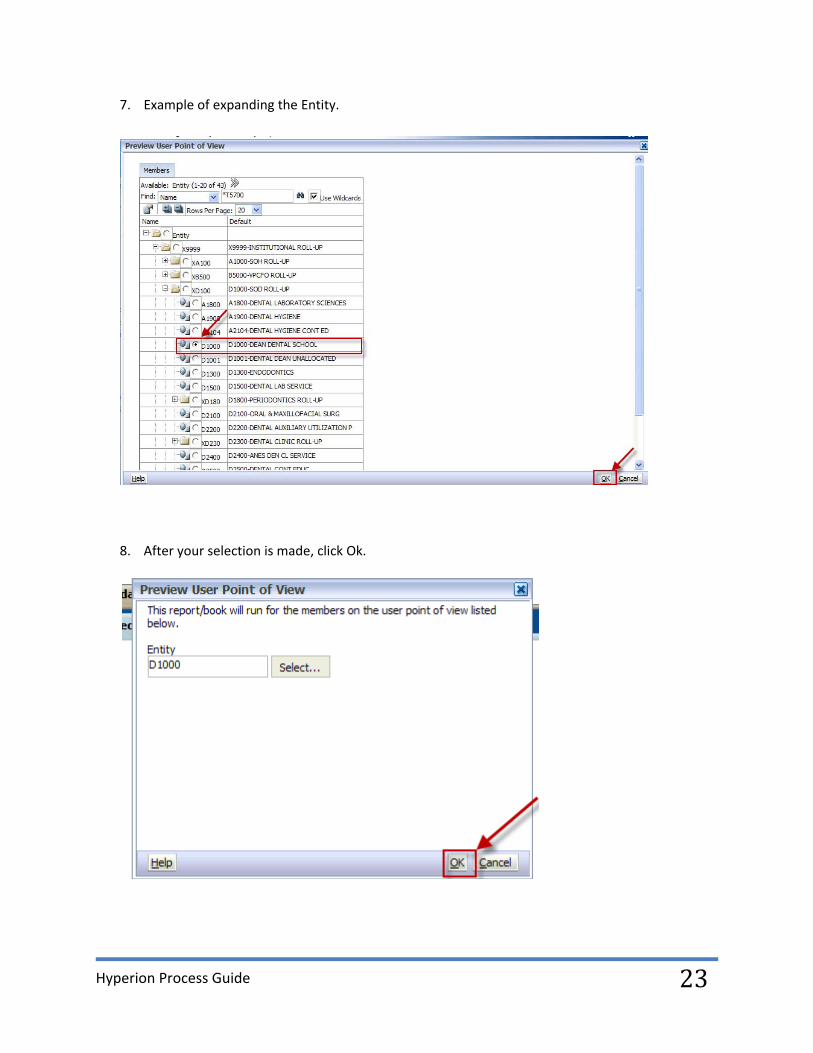
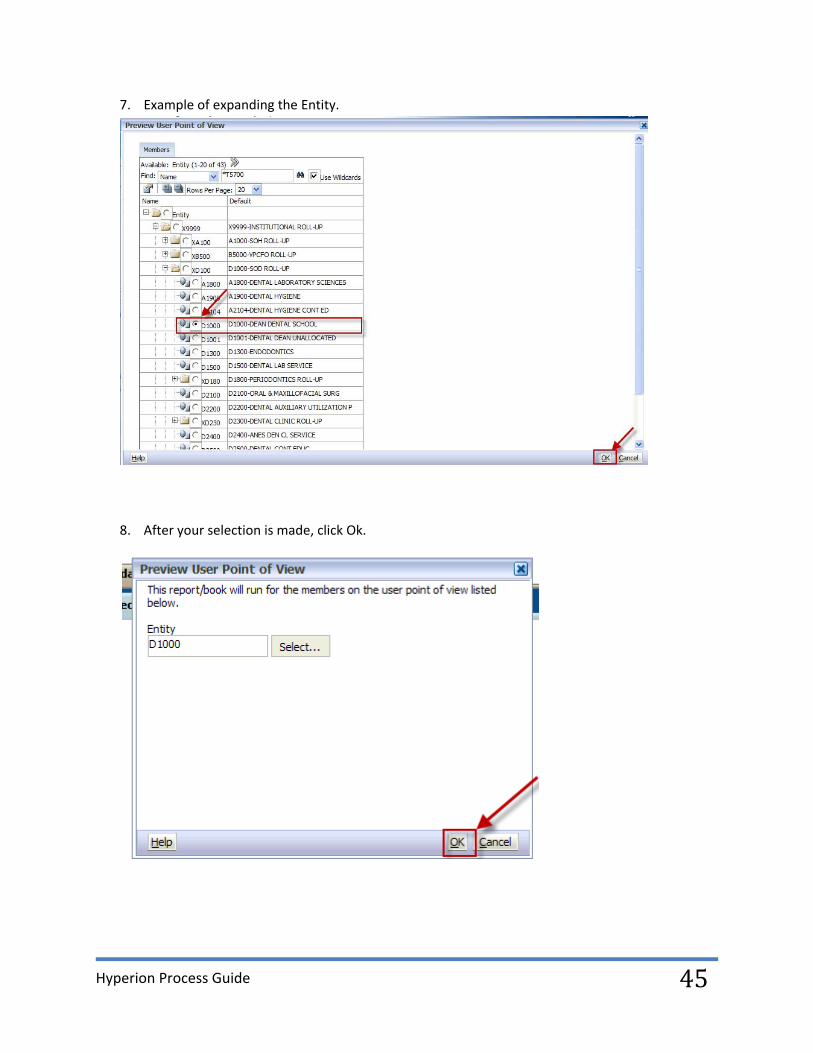
7. Example of expanding the Entity.
8. After your selection is made, click Ok.

Hyperion Process Guide
24
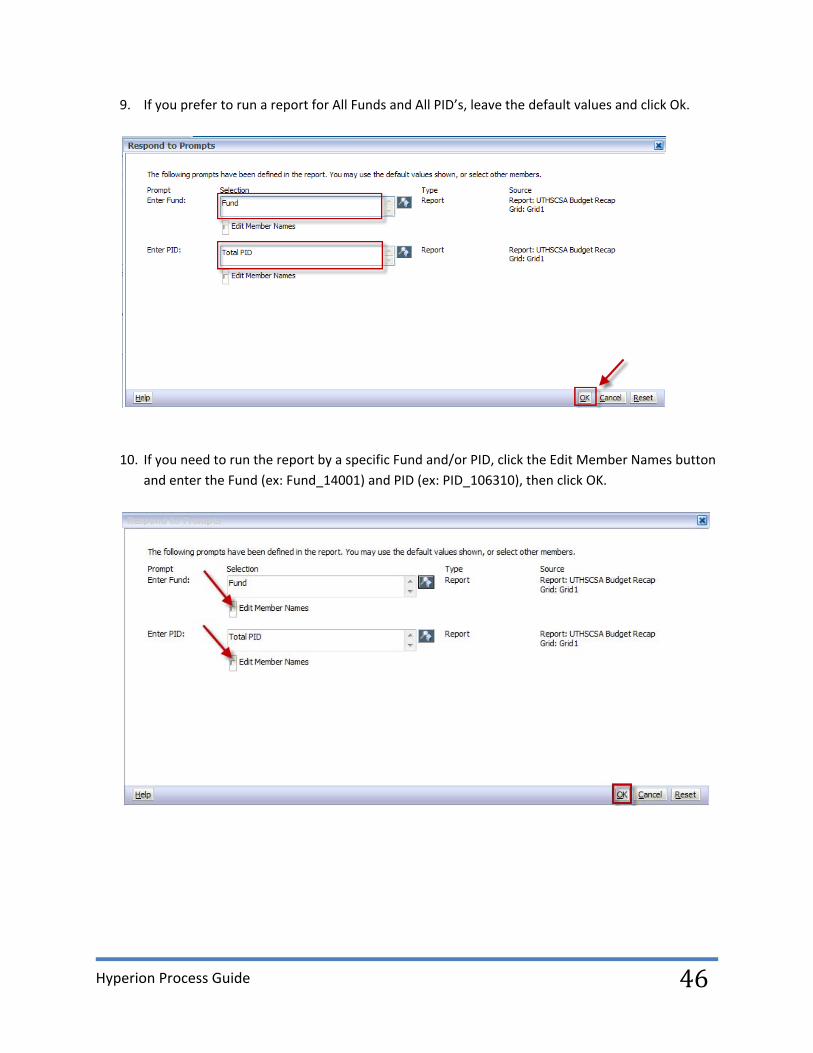
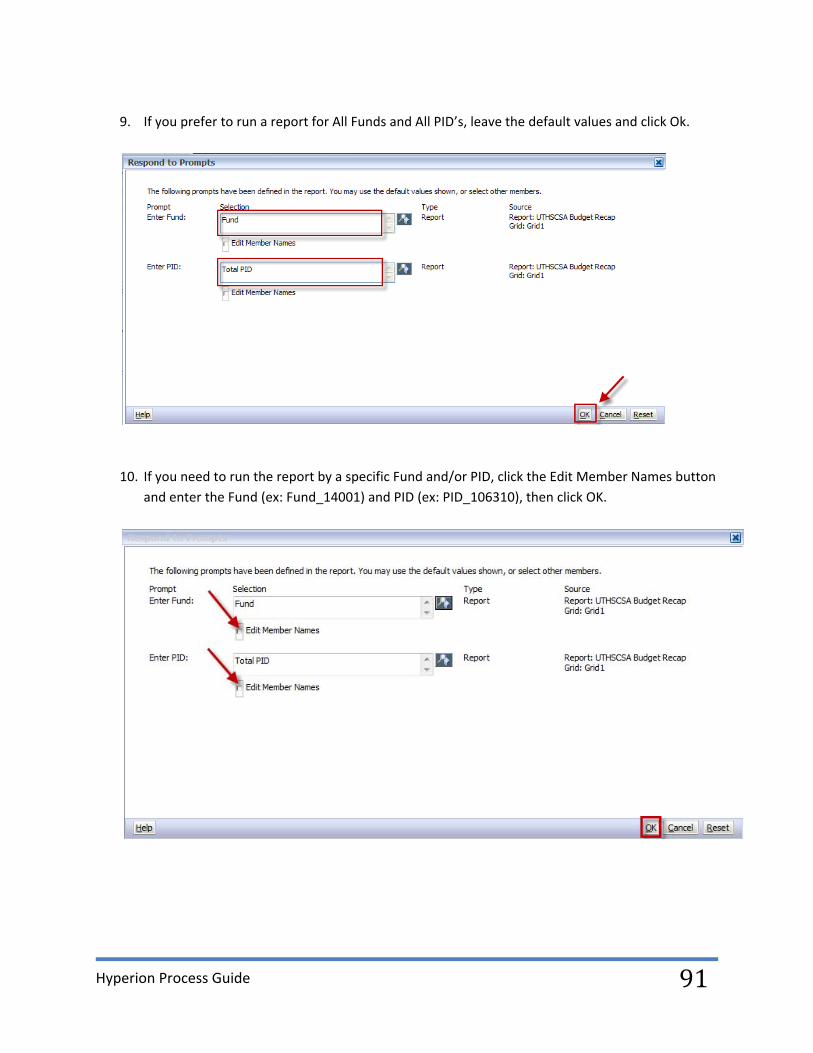
9. If you prefer to run a report for All Funds and All PIDs, leave the default values and click OK.
10. If you need to run the report by a specific Fund and/or PID, click the Edit Member Names button
and enter the Fund (ex: Fund_14001) and PID (ex: PID_106310), then click OK.

Hyperion Process Guide
25
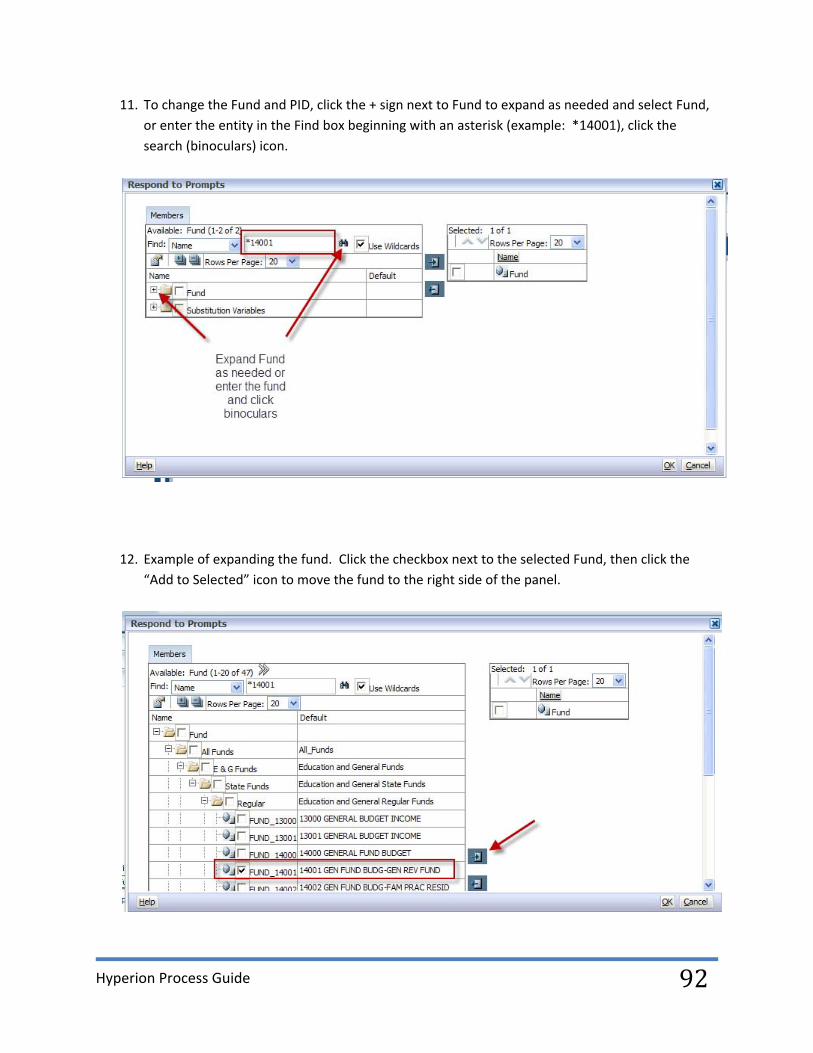
11. To change the Fund and PID, click the + sign next to Fund to expand as needed and select Fund,
or enter the entity in the Find box beginning with an asterisk (example: *14001), click the
search (binoculars) icon.
12. Example of expanding the fund. Click the checkbox next to the selected Fund, then click the
“Add to Selected” icon to move the fund to the right side of the panel.

Hyperion Process Guide
26
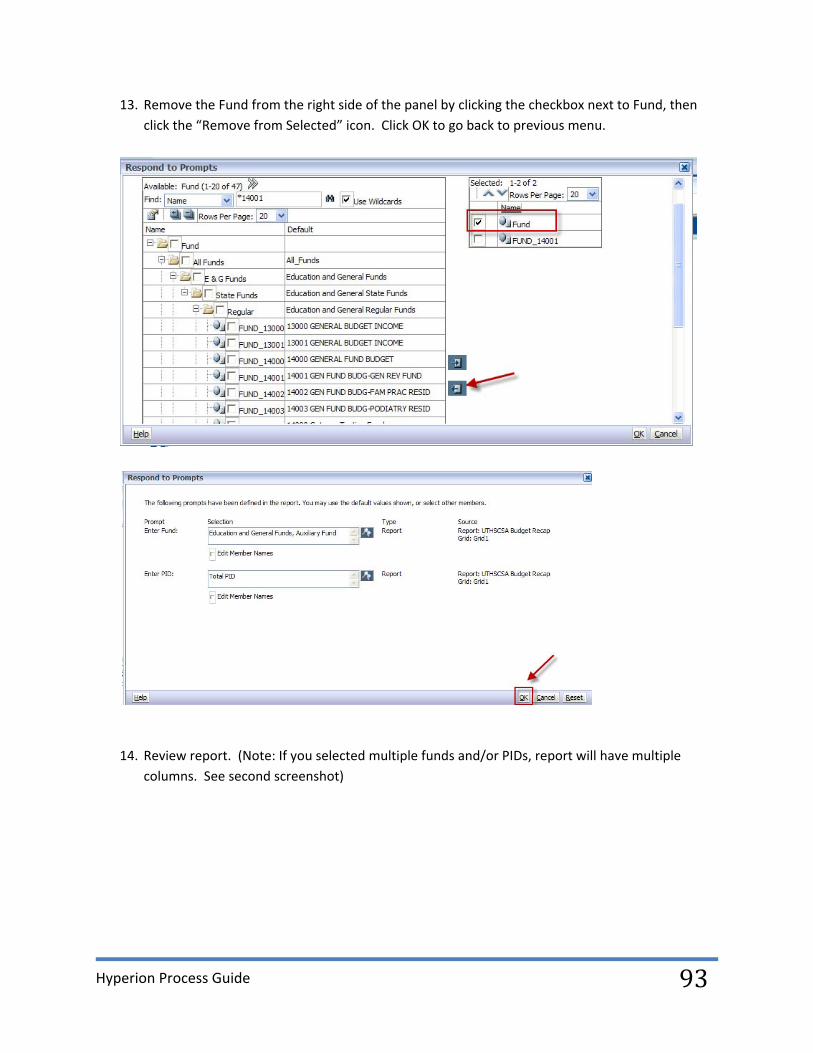
13. Remove the Fund from the right side of the panel by clicking the checkbox next to Fund, then
click the “Remove from Selected” icon. Click OK to go back to previous menu.
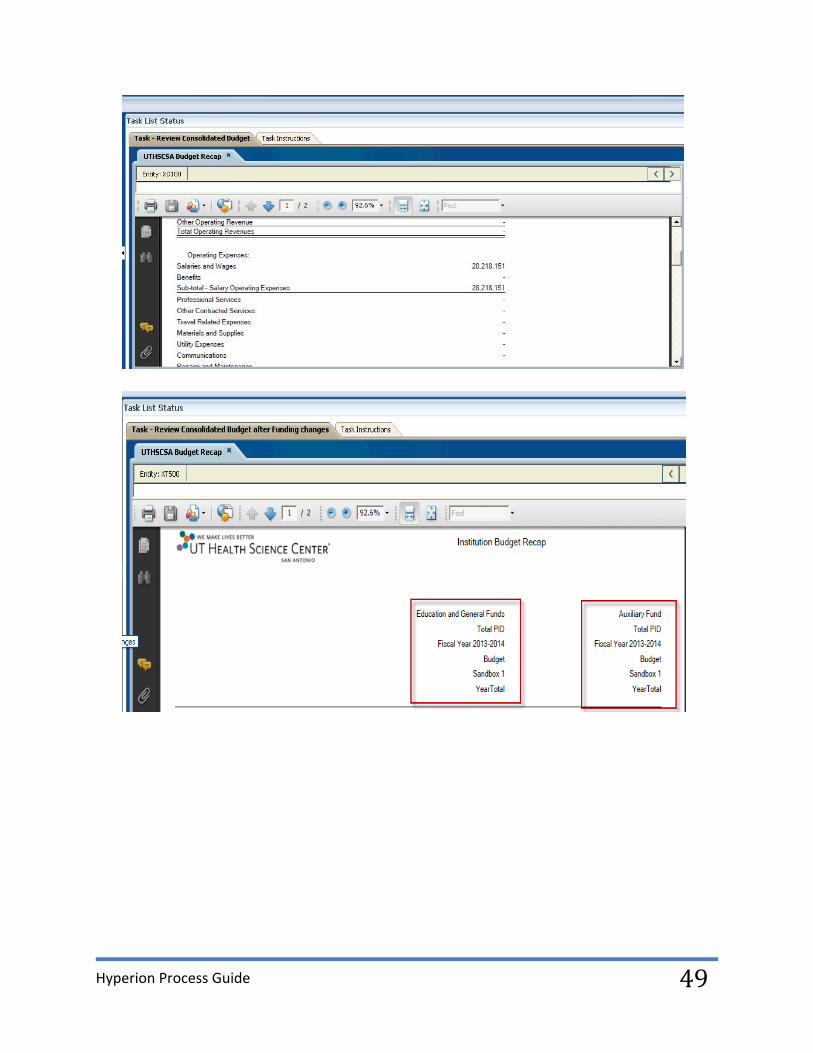
14. Review report. (Note: If you selected multiple funds and/or PIDs, report will have multiple
columns. See second screenshot)

Hyperion Process Guide
27
Review Position Budgets
You now need to log into PeopleSoft HCM to review specific position funding information entered by the
department. Coordinate with the department to make any necessary funding changes.

Hyperion Process Guide
28
Review Current Year Projections
Use the BegEndBal form to review or update departmental projections of the beginning balance for
next year's budget.
1. Click HYPPBR
2. Click next to My Task List
Hyperion Process Guide
29
3. Click next to task list (ex: EC Admins or Dept User)
4. Click on Review Current Year Projections

Hyperion Process Guide
30
5. Select Entity (ex: M1501), Fund (ex: 22100) and PID (ex: 126892). Click GO
6. The Actual View tab will pull in the actual current year activity from PeopleSoft Financials for September through December.
7. The Projection View tab will allow you to project out the current year ending balance which will
become the beginning balance for the next fiscal year.
Hyperion Process Guide
31
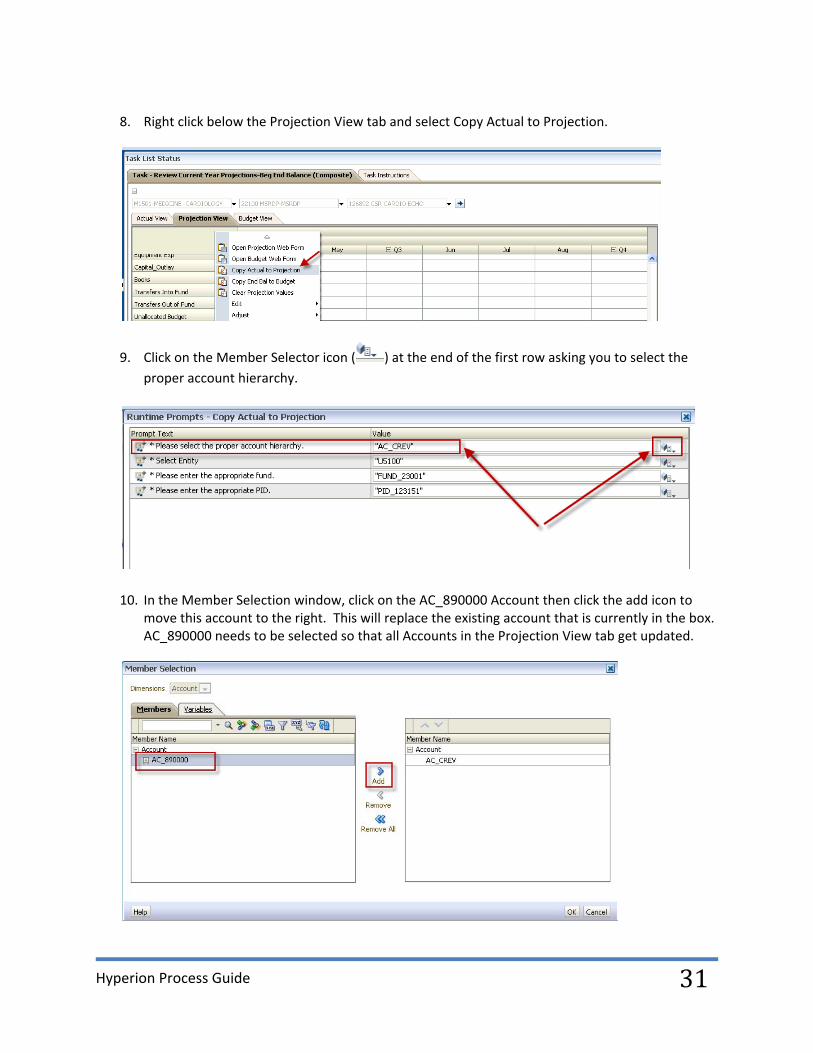
8. Right click below the Projection View tab and select Copy Actual to Projection.
9. Click on the Member Selector icon ( ) at the end of the first row asking you to select the
proper account hierarchy.
10. In the Member Selection window, click on the AC_890000 Account then click the add icon to move this account to the right. This will replace the existing account that is currently in the box. AC_890000 needs to be selected so that all Accounts in the Projection View tab get updated.

Hyperion Process Guide
32
11. Click OK
12. The Entity, Fund and PID dimensions will be defaulted to the previous selections. Click the
Launch button on the Runtime prompts to launch the business rule (process). This will pull the
Current Year Actuals amounts into the Current Year Projections.
You should receive a message stating the business rule (process) completed successfully. Click OK.
Hyperion Process Guide
33
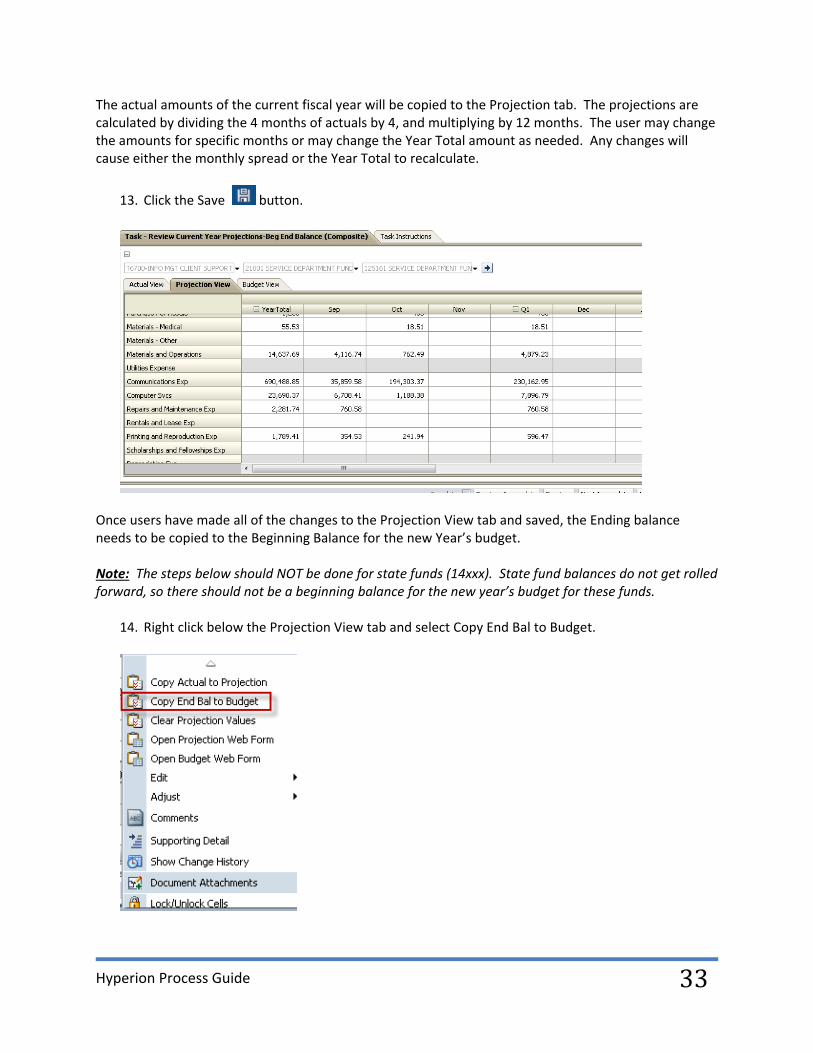
The actual amounts of the current fiscal year will be copied to the Projection tab. The projections are calculated by dividing the 4 months of actuals by 4, and multiplying by 12 months. The user may change the amounts for specific months or may change the Year Total amount as needed. Any changes will cause either the monthly spread or the Year Total to recalculate.
13. Click the Save button.
Once users have made all of the changes to the Projection View tab and saved, the Ending balance needs to be copied to the Beginning Balance for the new Year’s budget. Note: The steps below should NOT be done for state funds (14xxx). State fund balances do not get rolled forward, so there should not be a beginning balance for the new year’s budget for these funds.
14. Right click below the Projection View tab and select Copy End Bal to Budget.
Hyperion Process Guide
34
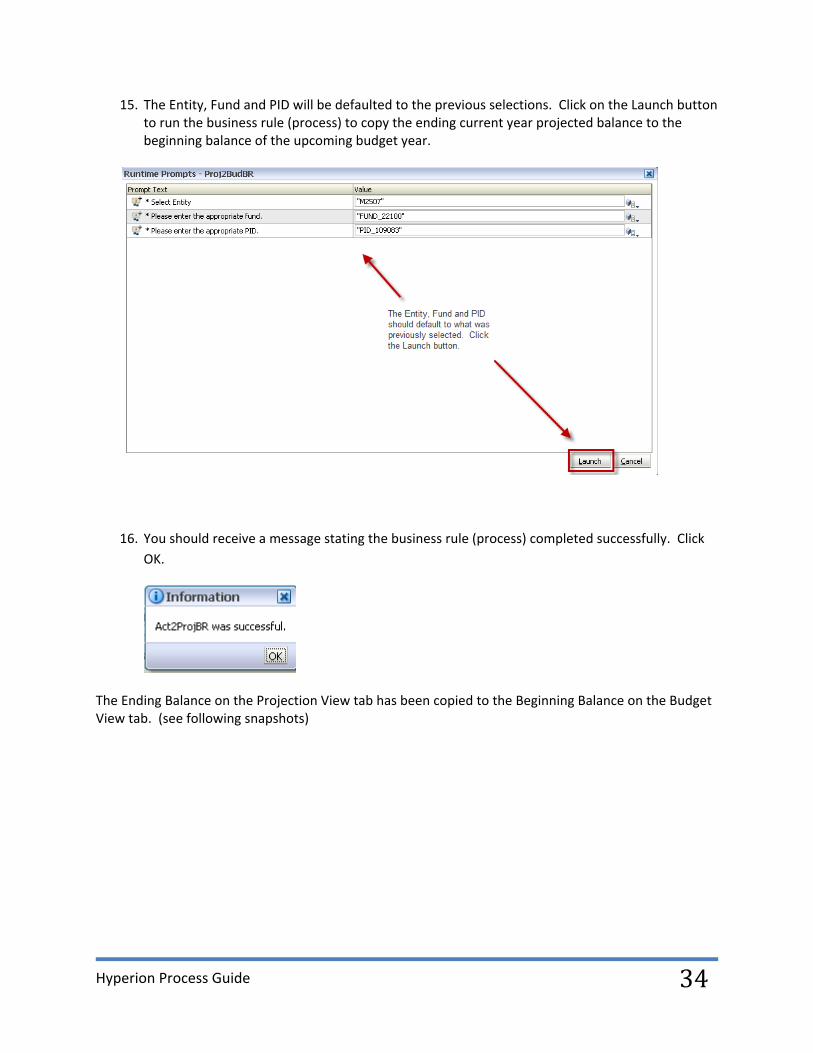
15. The Entity, Fund and PID will be defaulted to the previous selections. Click on the Launch button to run the business rule (process) to copy the ending current year projected balance to the beginning balance of the upcoming budget year.
16. You should receive a message stating the business rule (process) completed successfully. Click
OK.
The Ending Balance on the Projection View tab has been copied to the Beginning Balance on the Budget View tab. (see following snapshots)
Hyperion Process Guide
35
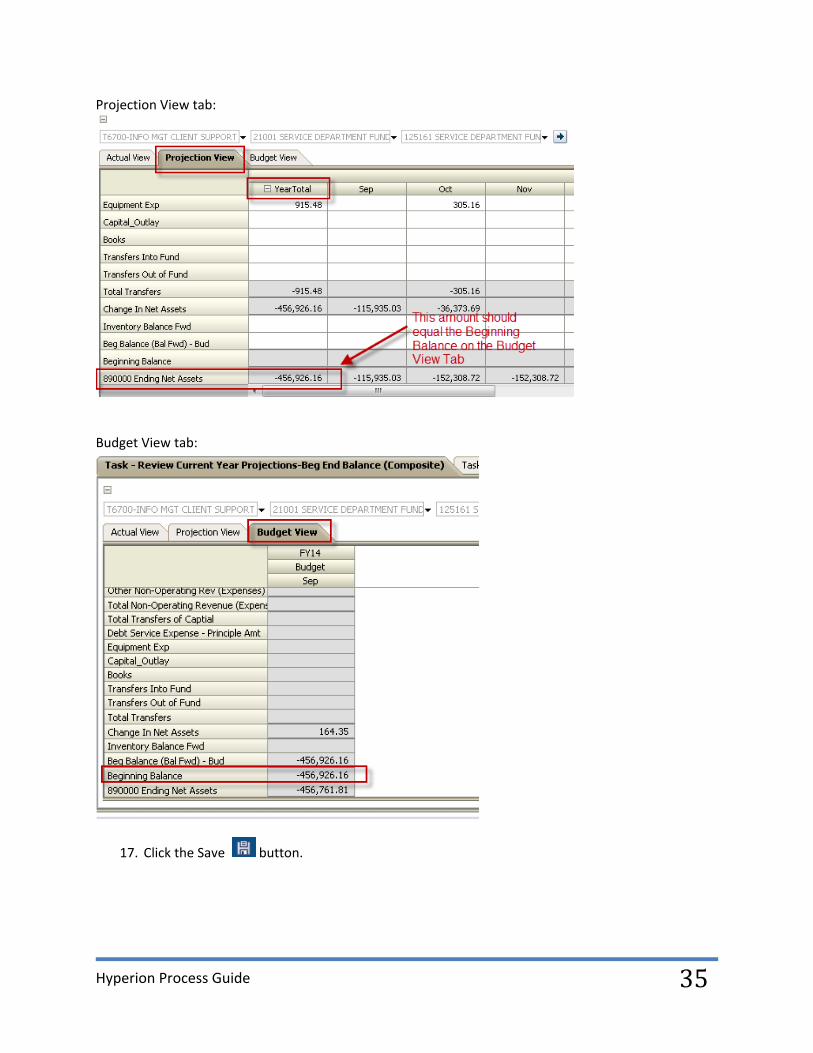
Projection View tab:
Budget View tab:
17. Click the Save button.

Hyperion Process Guide
36
18. Users also have the option of clearing the projection view if necessary. (For example: the user
needs to start over). Right‐click anywhere in the projection view tab and click on Clear
Projection Values.
19. The Entity, Fund and PID are defaulted to the previous selections. Click the Launch button to
run the business rule (process) to clear the projection values
20. You should receive a message stating the business rule (process) completed successfully. Click
OK.

Hyperion Process Guide
37
All values in the Projection tab will be cleared out.

Hyperion Process Guide
38
Review State Appropriations for All State or for a Specific 14XXX Fund
Use the State Appropriations Recon All State webform to ensure the overall state funds (14xxx) budget is within the EC Target. This webform includes RAHC, Laredo, SALSI, and Nursing Shortage Funds.
1. Click HYPPBR
2. Click next to My Task List
Hyperion Process Guide
39
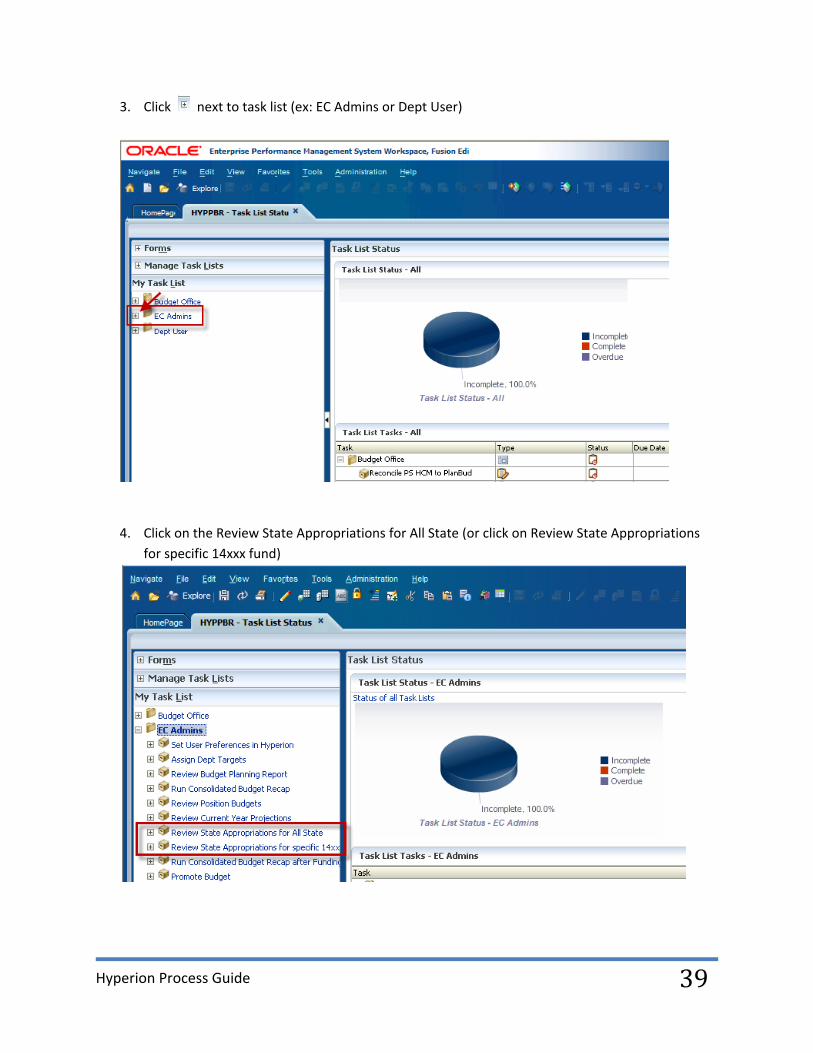
3. Click next to task list (ex: EC Admins or Dept User)
4. Click on the Review State Appropriations for All State (or click on Review State Appropriations
for specific 14xxx fund)
Hyperion Process Guide
40
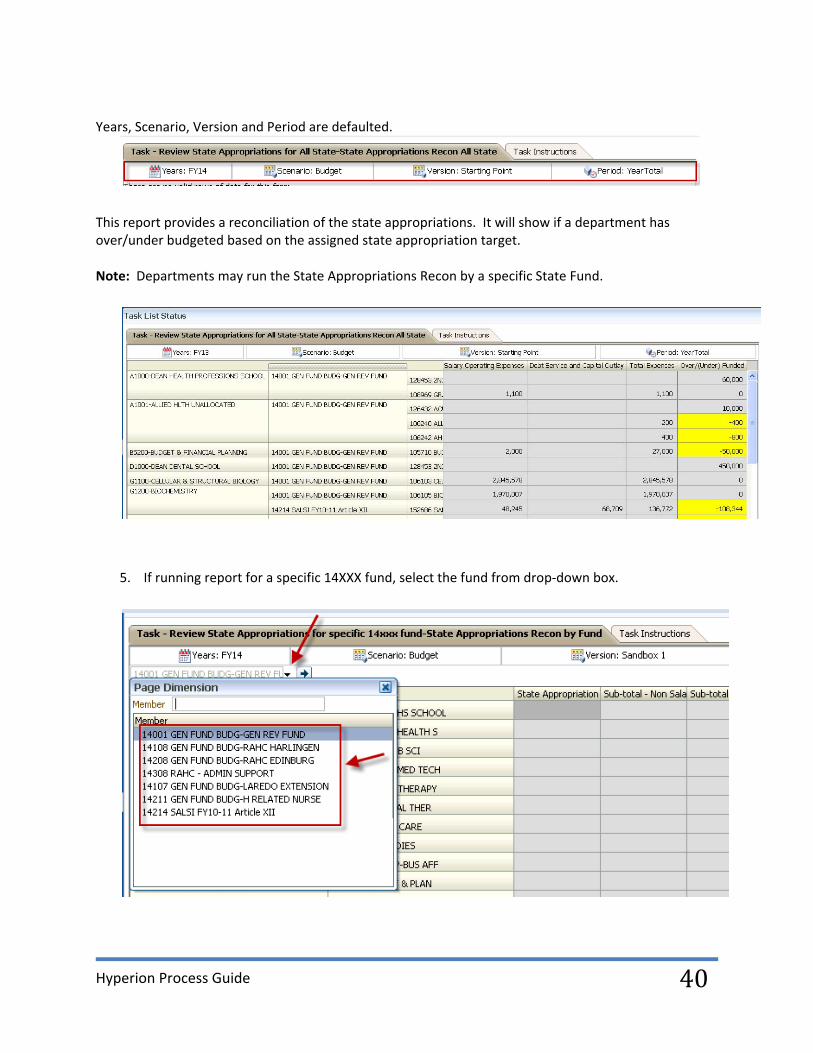
Years, Scenario, Version and Period are defaulted.
This report provides a reconciliation of the state appropriations. It will show if a department has over/under budgeted based on the assigned state appropriation target. Note: Departments may run the State Appropriations Recon by a specific State Fund.
5. If running report for a specific 14XXX fund, select the fund from drop‐down box.

Hyperion Process Guide
41
6. Click Go
7. Your report will be a result of the criteria you entered

Hyperion Process Guide
42
Run Consolidated Budget Recap after Funding Changes
To review the updated budgeted amounts, re‐run the Budget Recap report in HYPBBR as needed.
1. Click HYPPBR
2. Click next to My Task List

Hyperion Process Guide
43
3. Click next to task list (ex: EC Admins or Dept User)
4. Click on Run Consolidated Budget (or Run Consolidated Budget after Funding)

Hyperion Process Guide
44
5. The Preview User Point of View box will appear. Confirm or enter Entity (DEPTID) and click OK. If you need to change the entity, click Select….
6. To change the Entity, click the + sign next to Entity to expand as needed and select member, or
enter the entity in the Find box beginning with an asterisk (example: *T5700), click the search
(binoculars) icon.
Hyperion Process Guide
45
7. Example of expanding the Entity.
8. After your selection is made, click Ok.
Hyperion Process Guide
46
9. If you prefer to run a report for All Funds and All PID’s, leave the default values and click Ok.
10. If you need to run the report by a specific Fund and/or PID, click the Edit Member Names button
and enter the Fund (ex: Fund_14001) and PID (ex: PID_106310), then click OK.

Hyperion Process Guide
47
11. To change the Fund and PID, click the + sign next to Fund to expand as needed and select Fund,
or enter the entity in the Find box beginning with an asterisk (example: *14001), click the
search (binoculars) icon.
12. Example of expanding the fund. Click the checkbox next to the selected Fund, then click the
“Add to Selected” icon to move the fund to the right side of the panel.

Hyperion Process Guide
48
13. Remove the Fund from the right side of the panel by clicking the checkbox next to Fund, then
click the “Remove from Selected” icon. Click OK to go back to previous menu.
14. Review report. (Note: If you selected multiple funds and/or PIDs, report will have multiple
columns. See second screenshot)
Hyperion Process Guide
49
Hyperion Process Guide
50
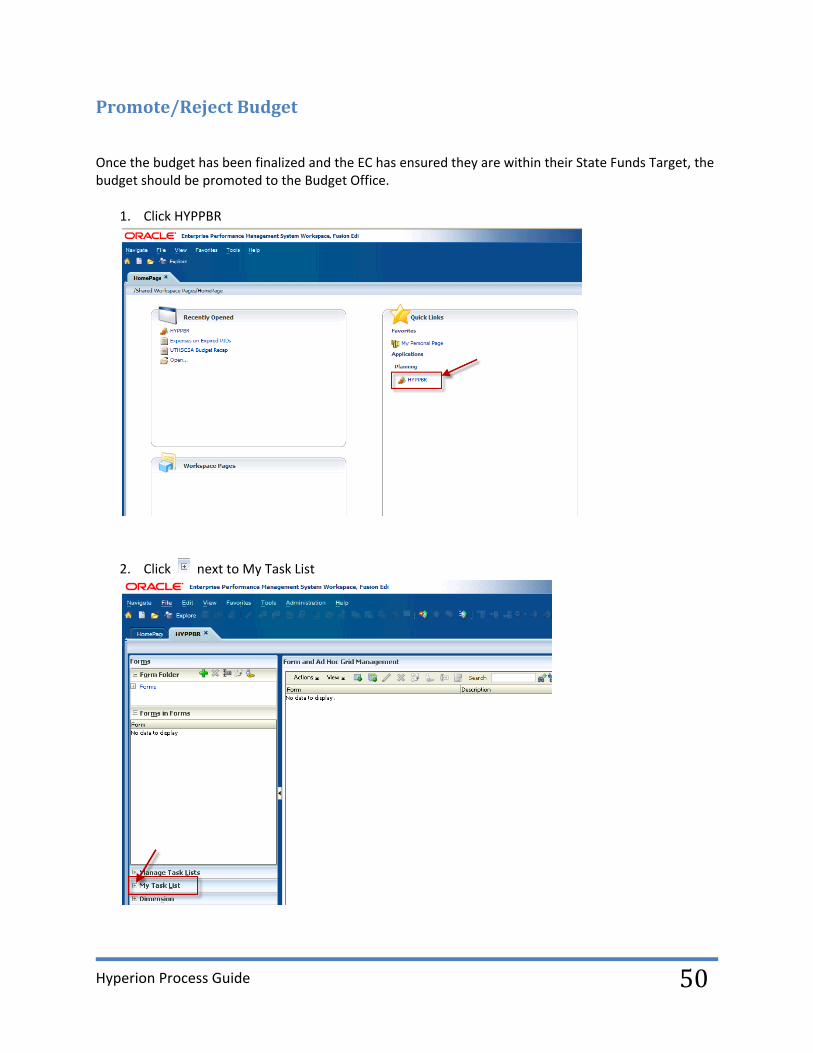
Promote/Reject Budget
Once the budget has been finalized and the EC has ensured they are within their State Funds Target, the budget should be promoted to the Budget Office.
1. Click HYPPBR
2. Click next to My Task List
Hyperion Process Guide
51
3. Click next to task list (ex: EC Admins or Dept User)
4. Click on Promote Budget

Hyperion Process Guide
52
5. Click on the Planning Unit (DEPTID)
6. Click on Actions and select Change Status
Hyperion Process Guide
53
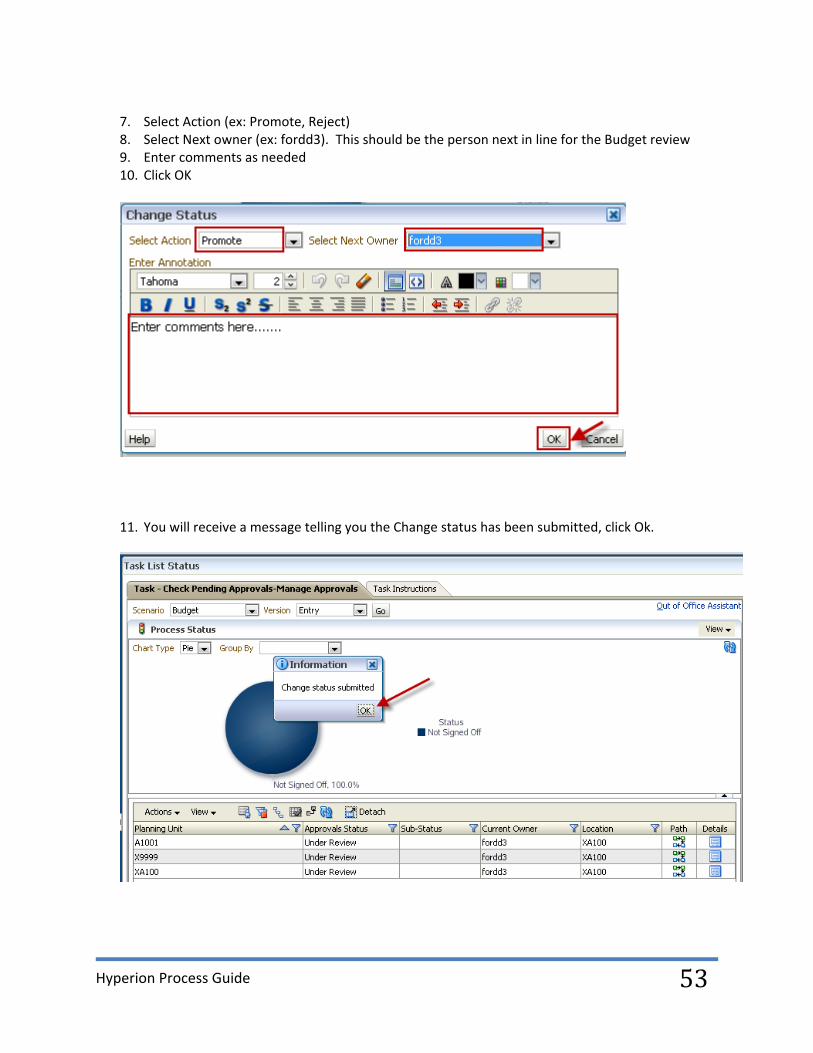
7. Select Action (ex: Promote, Reject) 8. Select Next owner (ex: fordd3). This should be the person next in line for the Budget review 9. Enter comments as needed 10. Click OK
11. You will receive a message telling you the Change status has been submitted, click Ok.
Hyperion Process Guide
54
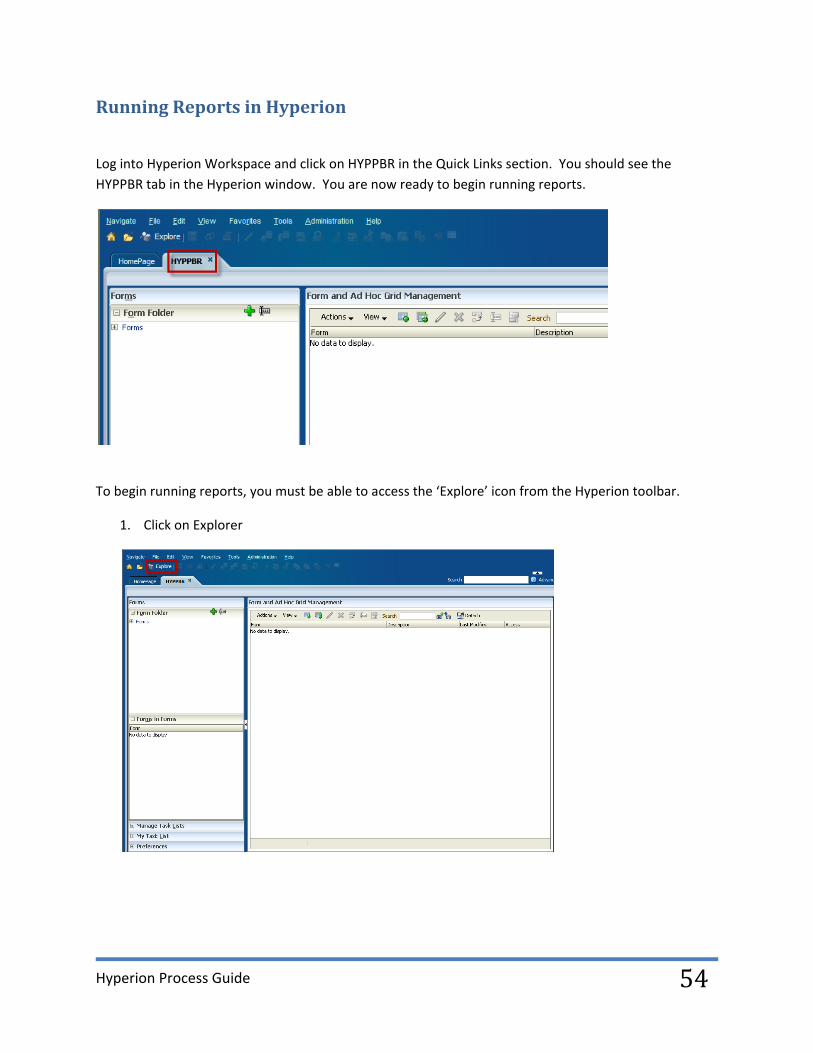
Running Reports in Hyperion
Log into Hyperion Workspace and click on HYPPBR in the Quick Links section. You should see the
HYPPBR tab in the Hyperion window. You are now ready to begin running reports.
To begin running reports, you must be able to access the ‘Explore’ icon from the Hyperion toolbar.
1. Click on Explorer

Hyperion Process Guide
55
Your screen will open a new tab and expand to the right, you will see folders.
2. Double click on the HYPPBR folder
3. Double click on the Financials Reports folder
4. Double click on the Institution folder
You will view several reports available for you.
5. Double click on the report you want to run
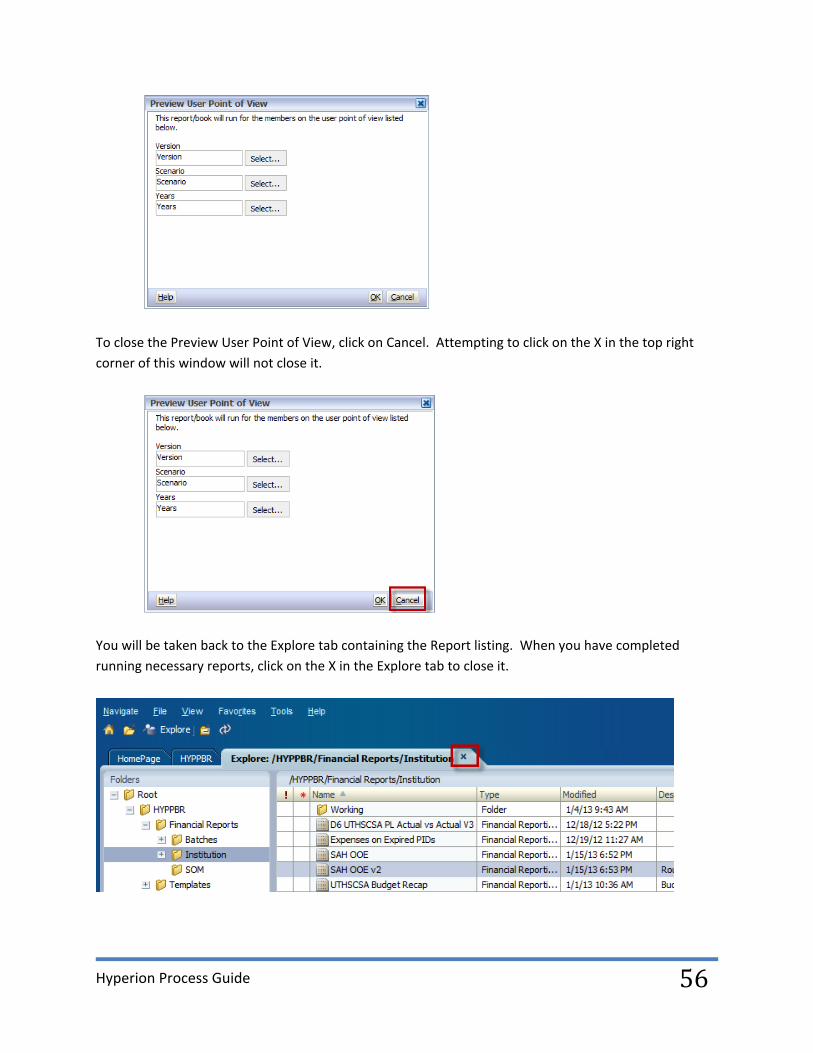
Depending on the report selected, your criteria options will vary. The Preview User Point of View will
open. The selections you make here will narrow your report results.
Hyperion Process Guide
56
To close the Preview User Point of View, click on Cancel. Attempting to click on the X in the top right
corner of this window will not close it.
You will be taken back to the Explore tab containing the Report listing. When you have completed
running necessary reports, click on the X in the Explore tab to close it.
Hyperion Process Guide
57
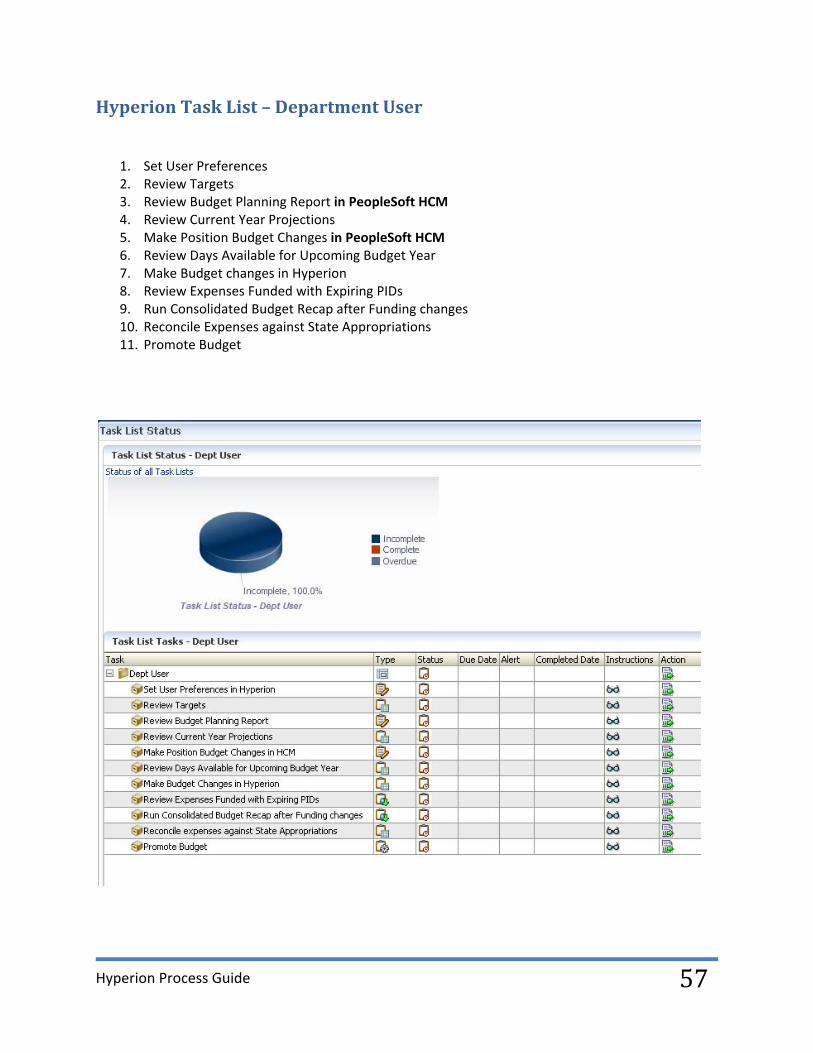
Hyperion Task List – Department User
1. Set User Preferences 2. Review Targets 3. Review Budget Planning Report in PeopleSoft HCM 4. Review Current Year Projections 5. Make Position Budget Changes in PeopleSoft HCM 6. Review Days Available for Upcoming Budget Year 7. Make Budget changes in Hyperion 8. Review Expenses Funded with Expiring PIDs 9. Run Consolidated Budget Recap after Funding changes 10. Reconcile Expenses against State Appropriations 11. Promote Budget

Hyperion Process Guide
58
1. To close a task after it has been completed, click on the Action Icon for each task
This will open the Task List Status window showing the current status of the task
2. To change the status to Complete, click on the checkbox on the bottom of the page. You can
continue to update the task status for additional tasks by clicking on Next Incomplete, or Next.
You also have the option to click on Task List Home to view the complete task listing.
Hyperion Process Guide
59
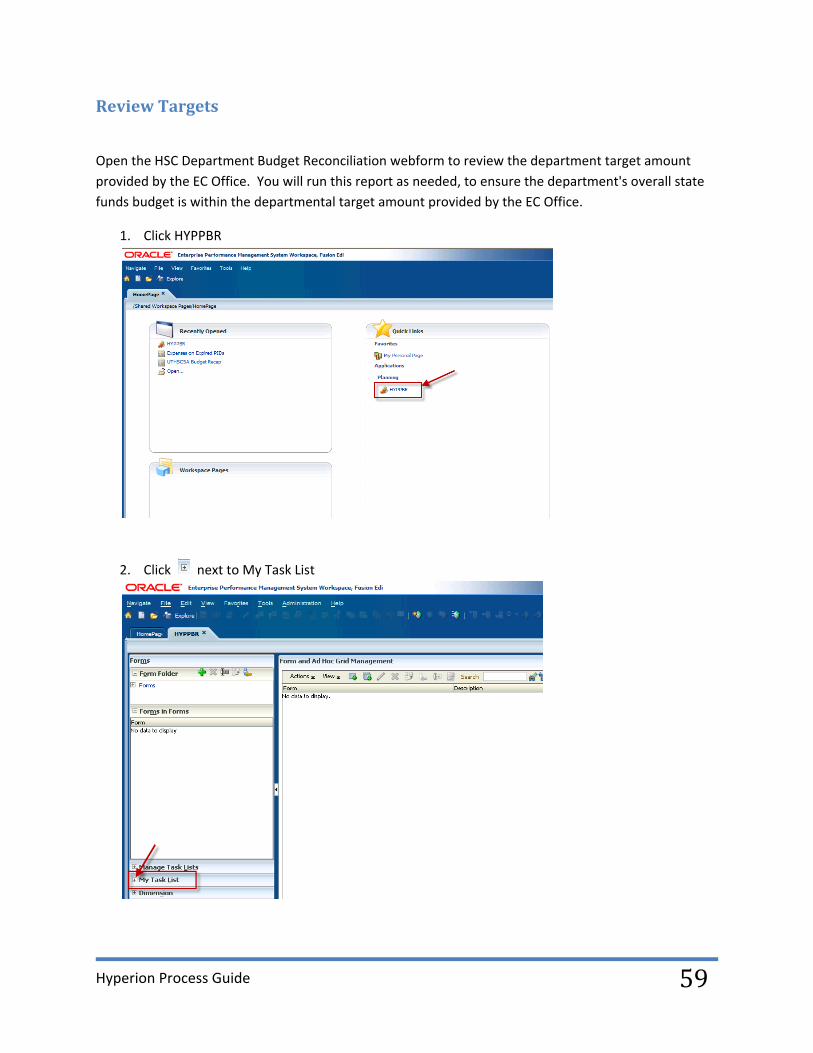
Review Targets
Open the HSC Department Budget Reconciliation webform to review the department target amount
provided by the EC Office. You will run this report as needed, to ensure the department's overall state
funds budget is within the departmental target amount provided by the EC Office.
1. Click HYPPBR
2. Click next to My Task List
Hyperion Process Guide
60
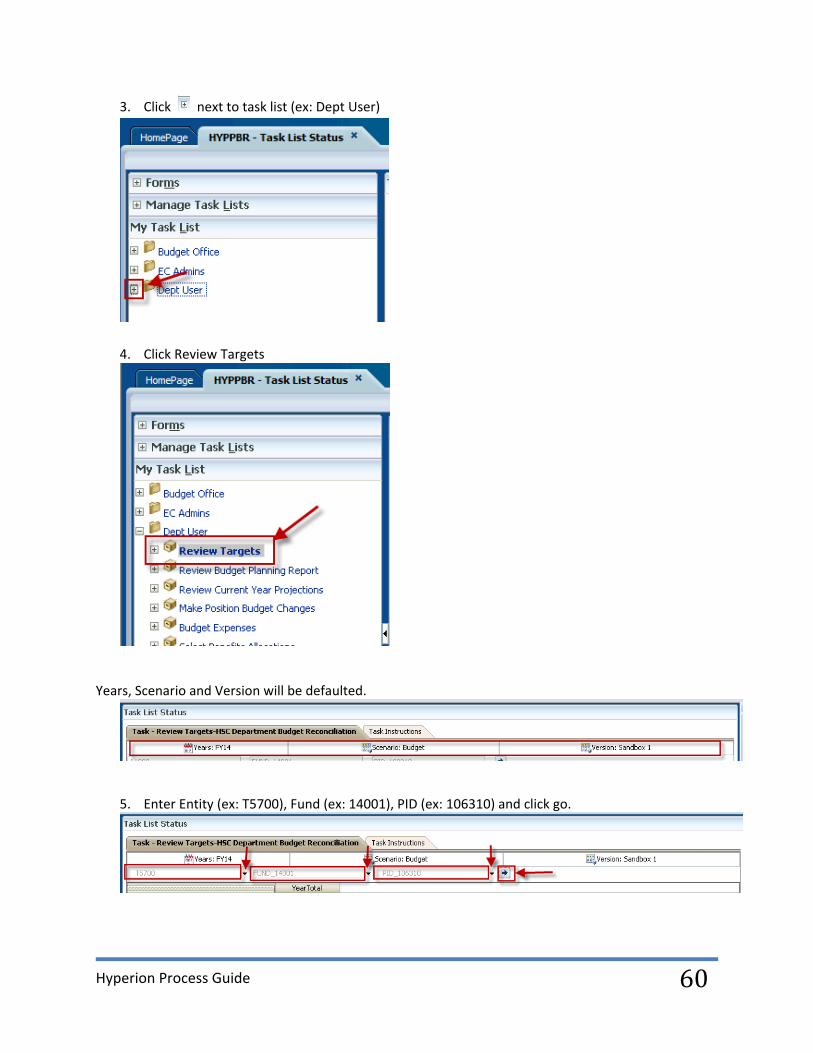
3. Click next to task list (ex: Dept User)
4. Click Review Targets
Years, Scenario and Version will be defaulted.
5. Enter Entity (ex: T5700), Fund (ex: 14001), PID (ex: 106310) and click go.

Hyperion Process Guide
61
The webform will help the department compare the State Appropriations against budgeted expenses.
Review Budget Planning Report
You now need to log into PeopleSoft HCM to run the HSC_DEPT_BUD_PLANNING_RPT or HSC_DEPT_BUD_PLAN_RPT_FUND_OWN query for a listing of all positions within your Deptid. It is best to run these queries in an Excel format at the beginning of the budget planning process, then save the files to refer back to at a later time.
Query name: HSC_DEPT_BUD_PLANNING_RPT (Will list all positions OWNED by a specific area).
Query name: HSC_DEPT_BUD_PLAN_RPT_FUND_OWN (Will list all positions FUNDED by a specific area).
Hyperion Process Guide
62
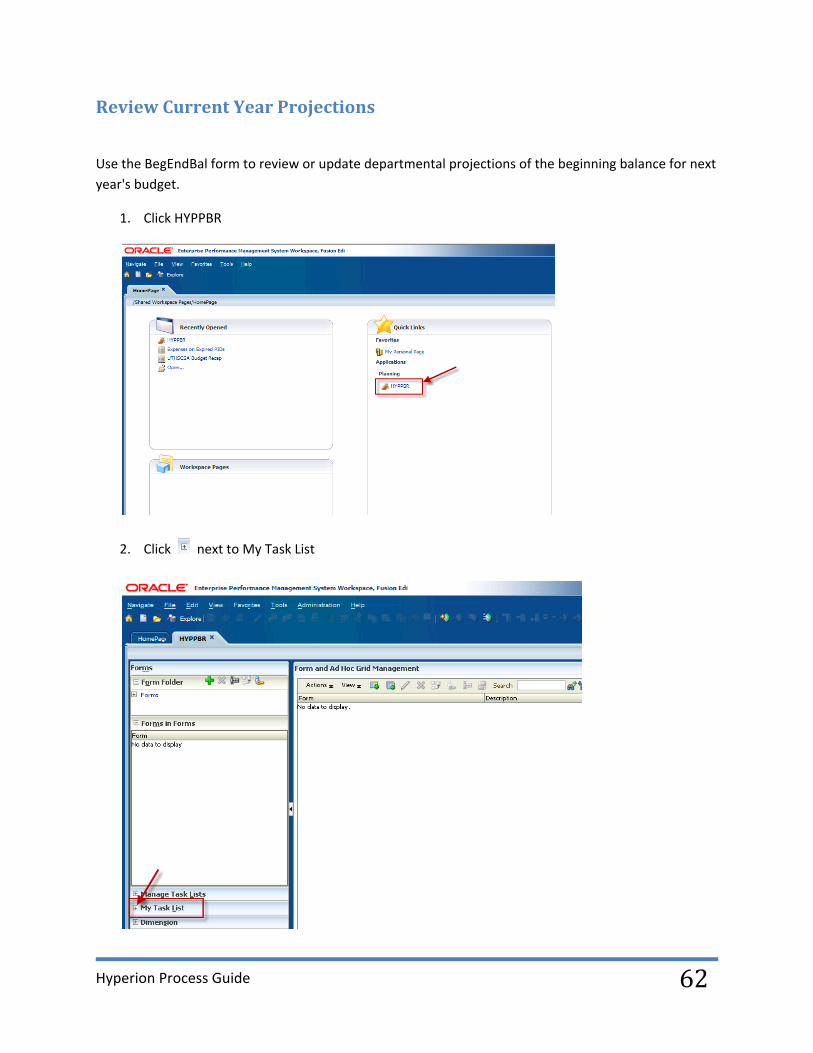
Review Current Year Projections
Use the BegEndBal form to review or update departmental projections of the beginning balance for next
year's budget.
1. Click HYPPBR
2. Click next to My Task List

Hyperion Process Guide
63
3. Click next to task list (ex: EC Admins or Dept User)
4. Click on Review Current Year Projections
Hyperion Process Guide
64
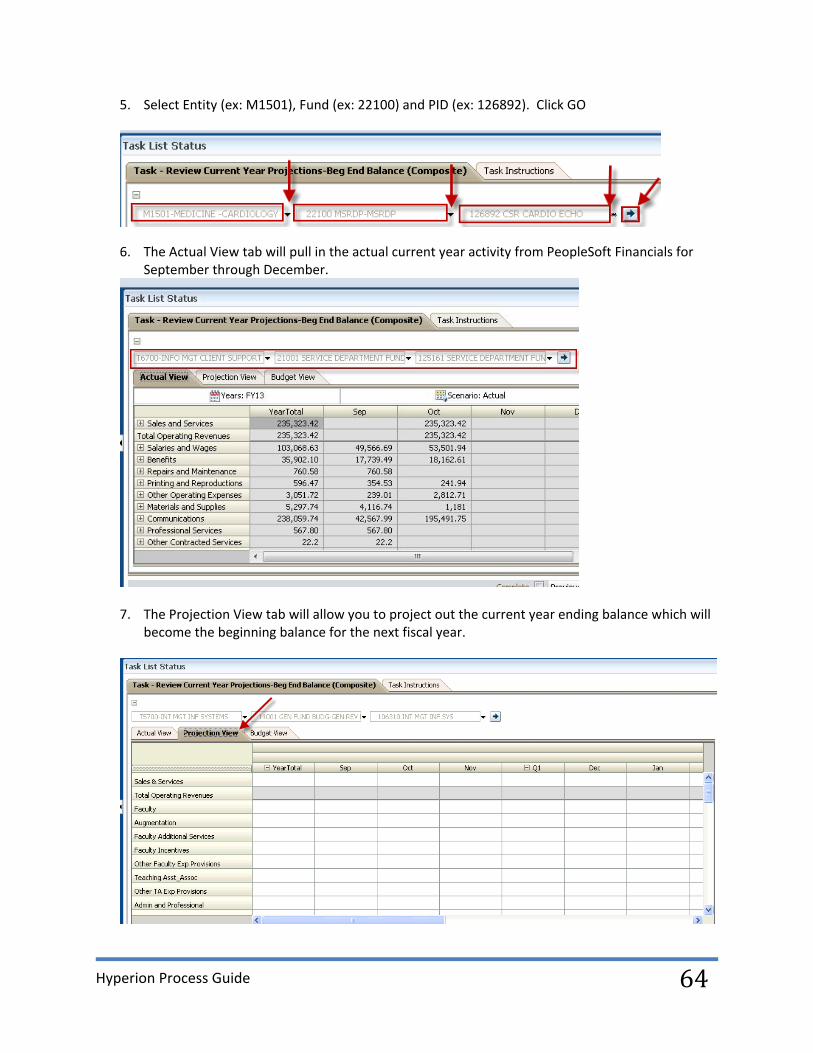
5. Select Entity (ex: M1501), Fund (ex: 22100) and PID (ex: 126892). Click GO
6. The Actual View tab will pull in the actual current year activity from PeopleSoft Financials for September through December.
7. The Projection View tab will allow you to project out the current year ending balance which will
become the beginning balance for the next fiscal year.

Hyperion Process Guide
65
8. Right click below the Projection View tab and select Copy Actual to Projection.
9. Click on the Member Selector icon ( ) at the end of the first row asking you to select the
proper account hierarchy.
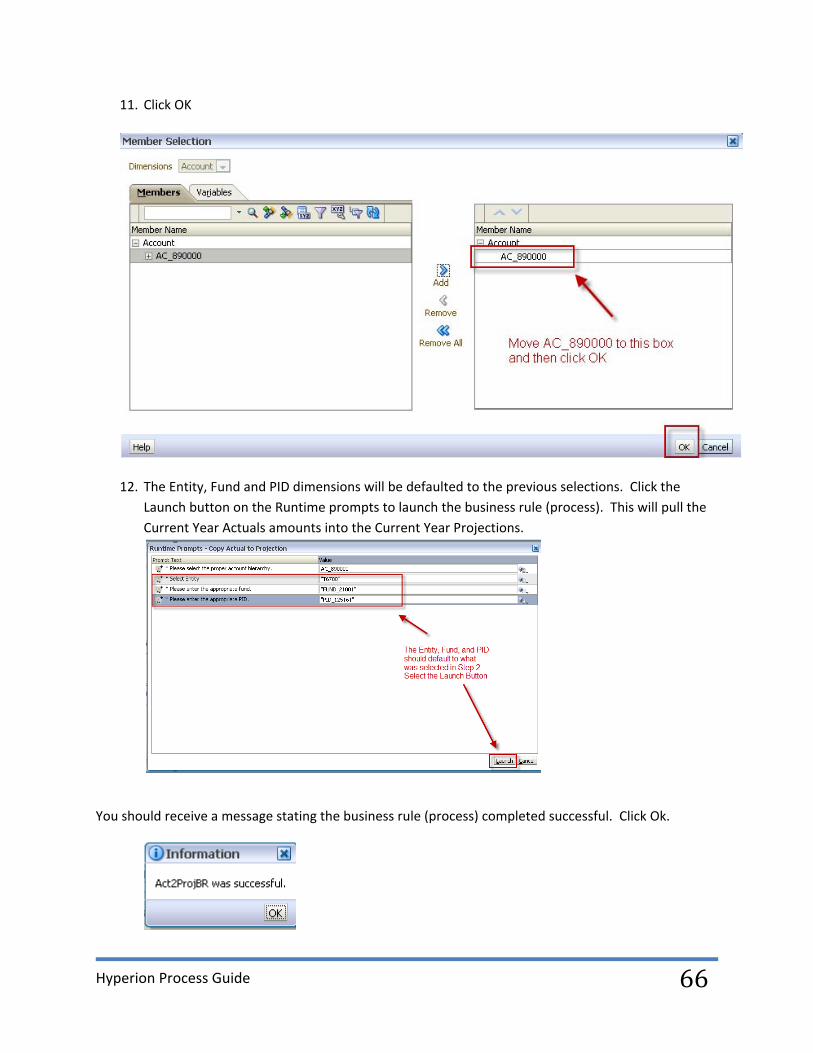
10. In the Member Selection window, click on the AC_890000 Account then click the add icon to
move this account to the right. This will replace the existing account that is currently in the box. AC_890000 needs to be selected so that all Accounts in the Projection View tab get updated.
Hyperion Process Guide
66
11. Click OK
12. The Entity, Fund and PID dimensions will be defaulted to the previous selections. Click the
Launch button on the Runtime prompts to launch the business rule (process). This will pull the
Current Year Actuals amounts into the Current Year Projections.
You should receive a message stating the business rule (process) completed successful. Click Ok.
Hyperion Process Guide
67
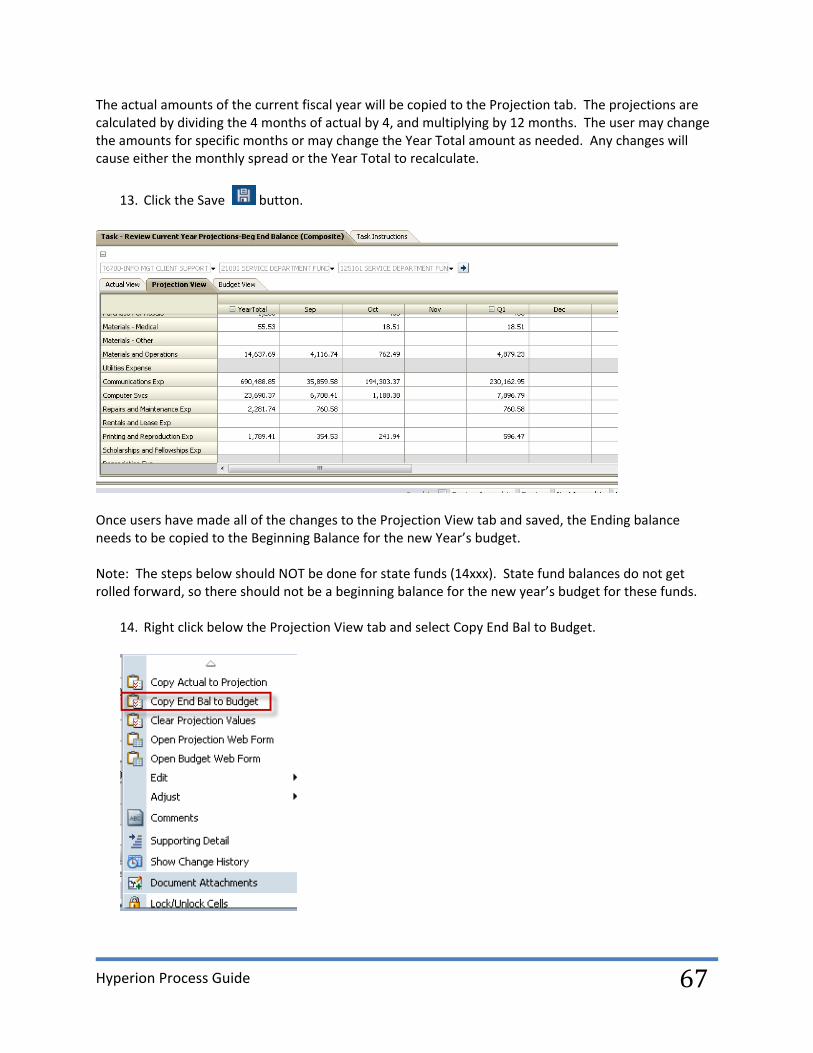
The actual amounts of the current fiscal year will be copied to the Projection tab. The projections are calculated by dividing the 4 months of actual by 4, and multiplying by 12 months. The user may change the amounts for specific months or may change the Year Total amount as needed. Any changes will cause either the monthly spread or the Year Total to recalculate.
13. Click the Save button.
Once users have made all of the changes to the Projection View tab and saved, the Ending balance needs to be copied to the Beginning Balance for the new Year’s budget. Note: The steps below should NOT be done for state funds (14xxx). State fund balances do not get rolled forward, so there should not be a beginning balance for the new year’s budget for these funds.
14. Right click below the Projection View tab and select Copy End Bal to Budget.

Hyperion Process Guide
68
15. The Entity, Fund and PID will be defaulted to the previous selections. Click on the Launch button to run the business rule (process) to copy the ending current year projected balance to the beginning balance of the upcoming budget year.
16. You should receive a message stating the business rule (process) completed successfully. Click
OK.
The Ending Balance on the Projection View tab has been copied to the Beginning Balance on the Budget
View Tab. (see following snapshots)

Hyperion Process Guide
69
Projection View tab:
Budget View tab:
17. Click the Save button.

Hyperion Process Guide
70
18. Users also have the option of clearing the projection view if necessary. (For example: the user
needs to start over). Right‐click anywhere in the projection view tab and click on Clear
Projection Values.
19. The Entity, Fund and PID will be defaulted to the previous selections. Click the Launch button to
run the business rule (process) to clear the projection values.
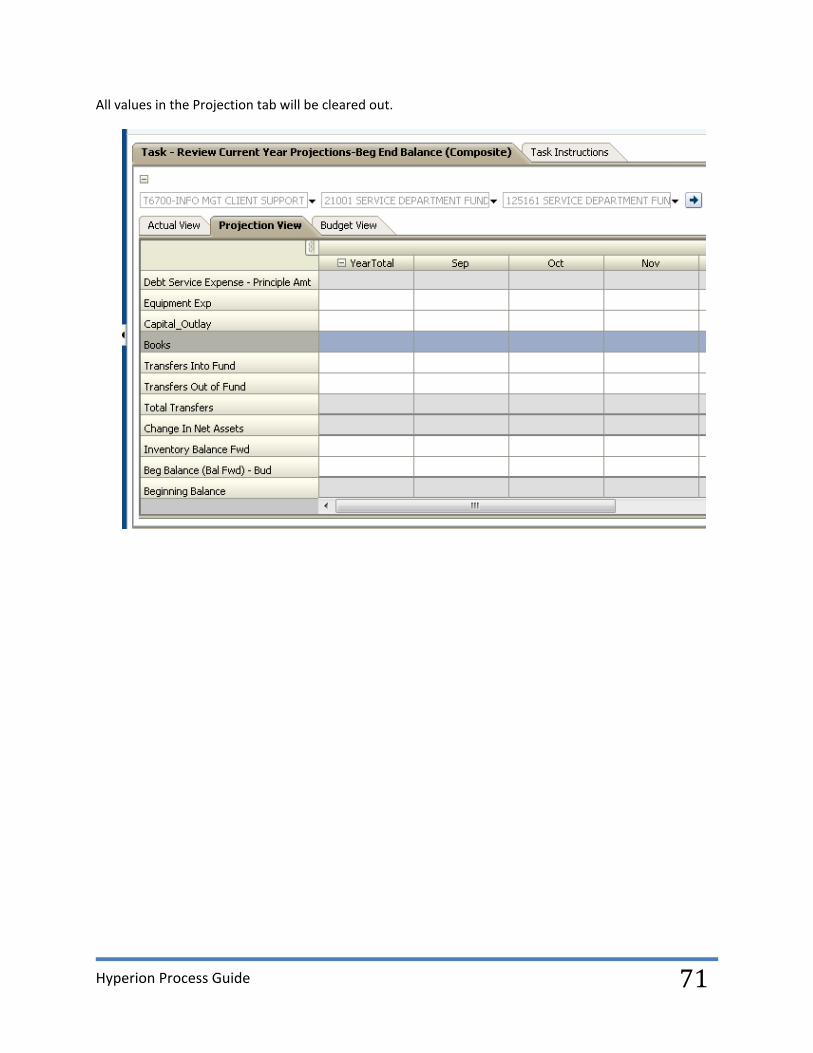
20. You should receive a message stating the business rule (process) completed successfully. Click OK.
Hyperion Process Guide
71
All values in the Projection tab will be cleared out.
Hyperion Process Guide
72
Make Position Budget Changes in HCM
You now need to long into PeopleSoft HCM to make position funding changes as needed.
Review Days Available for Upcoming Budget Year
This is a reference page that will primarily be used by clinical departments to help in the planning of
their clinical activities. When you are calculating to find the number of Days Available, this is the
number of working days in the year minus UTHSCSA holidays.
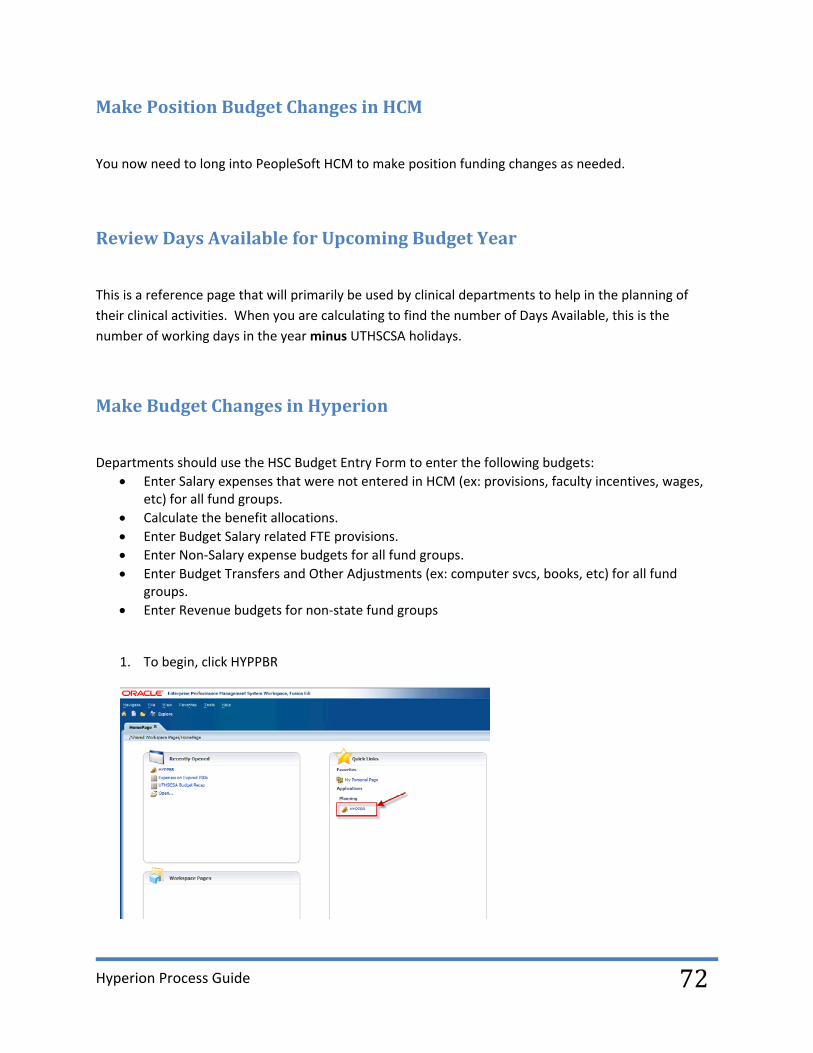
Make Budget Changes in Hyperion
Departments should use the HSC Budget Entry Form to enter the following budgets:
Enter Salary expenses that were not entered in HCM (ex: provisions, faculty incentives, wages, etc) for all fund groups.
Calculate the benefit allocations.
Enter Budget Salary related FTE provisions.
Enter Non‐Salary expense budgets for all fund groups.
Enter Budget Transfers and Other Adjustments (ex: computer svcs, books, etc) for all fund groups.
Enter Revenue budgets for non‐state fund groups
1. To begin, click HYPPBR
Hyperion Process Guide
73
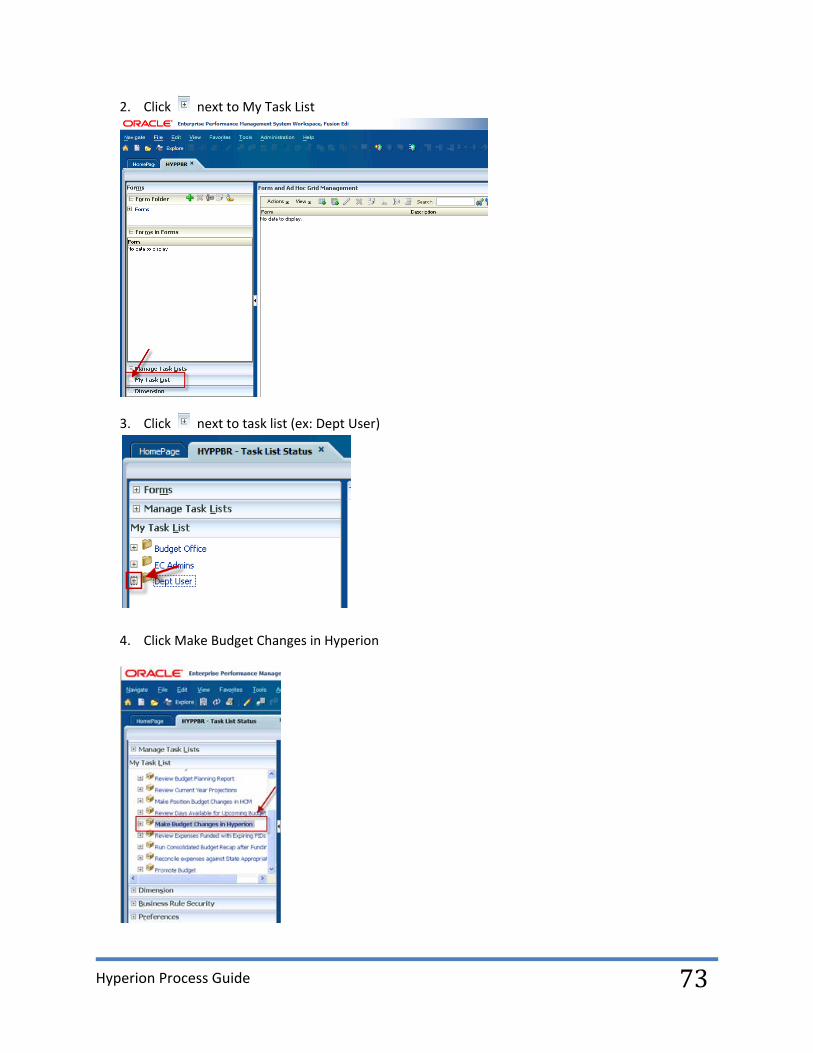
2. Click next to My Task List
3. Click next to task list (ex: Dept User)
4. Click Make Budget Changes in Hyperion

Hyperion Process Guide
74
The Budget Entry form is composed of different tabs which will allow users to enter budget amounts all
on one form. In addition, each tab will provide the user with Summary Totals from each tab.
a) Update Salary Expense Budgets
b) Calculate Benefits Expense Allocations
c) Enter Salary Related FTE Provisions
d) Enter Budgets for Non‐Salary Expenses
e) Enter Transfers & Other Adjustments/Expenses
f) Enter Revenue Budgets
Hyperion Process Guide
75
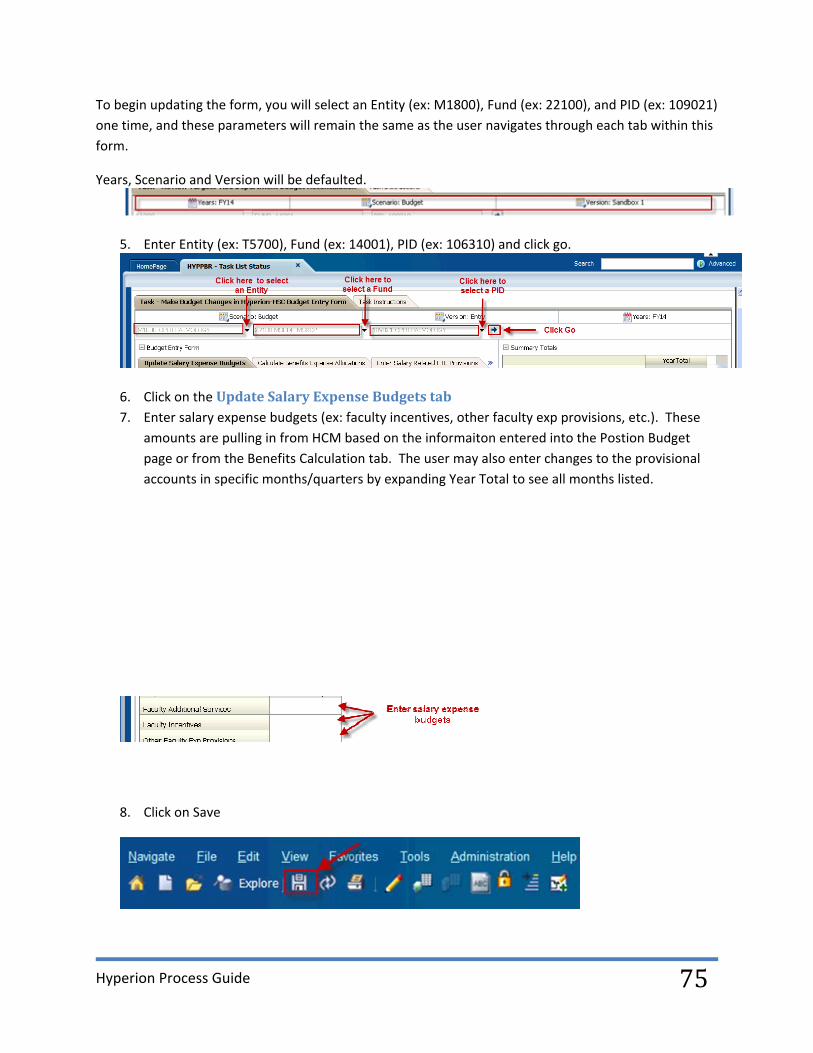
To begin updating the form, you will select an Entity (ex: M1800), Fund (ex: 22100), and PID (ex: 109021)
one time, and these parameters will remain the same as the user navigates through each tab within this
form.
Years, Scenario and Version will be defaulted.
5. Enter Entity (ex: T5700), Fund (ex: 14001), PID (ex: 106310) and click go.
6. Click on the Update Salary Expense Budgets tab 7. Enter salary expense budgets (ex: faculty incentives, other faculty exp provisions, etc.). These
amounts are pulling in from HCM based on the informaiton entered into the Postion Budget
page or from the Benefits Calculation tab. The user may also enter changes to the provisional
accounts in specific months/quarters by expanding Year Total to see all months listed.
8. Click on Save

Hyperion Process Guide
76
9. Click on the Calculate Benefits Expense Allocations tab
When Hyperion Planning first opens up to departments, the staff benefits amounts for all PIDs will be
pre‐populated based on the salary amounts that are feeding in from PeopleSoft HCM. The pre‐
populated benefits are based on the following rates:
21% for Faculty 29% for A&P and Classified Staff 10% for TAs.
If a department makes changes in HCM, to the provisional salaries or if they would like to select
different rates, they will need to re‐calculate the benefits.
NOTE: Staff Benefits will not calculate on state (14xxx) funds because these are budgeted at the
institutional level.
10. Right click anywhere on the form and select “Calculate Benefits” from the drop down menu.
11. Select the desired Staff Benefits rate using the drop down arrow for each of the salary
categories listed.
12. Click Launch

Hyperion Process Guide
77
The Staff Benefits budget amounts will now be populated based on the rates that were selected in the above process. If the user wants to adjust the benefits to something other than the selections in the drop‐down menu, they may do so by navigating back to the Update Salary Expense Budgets tab and adjusting the provisional benefits accounts. The Faculty Benefits Expense is based on the total of Faculty Salaries + Augmentation + Faculty Incentives + Additional Services. The Classified Benefits Expense is based on the total of Classified Salaries + Wages.
Hyperion Process Guide
78
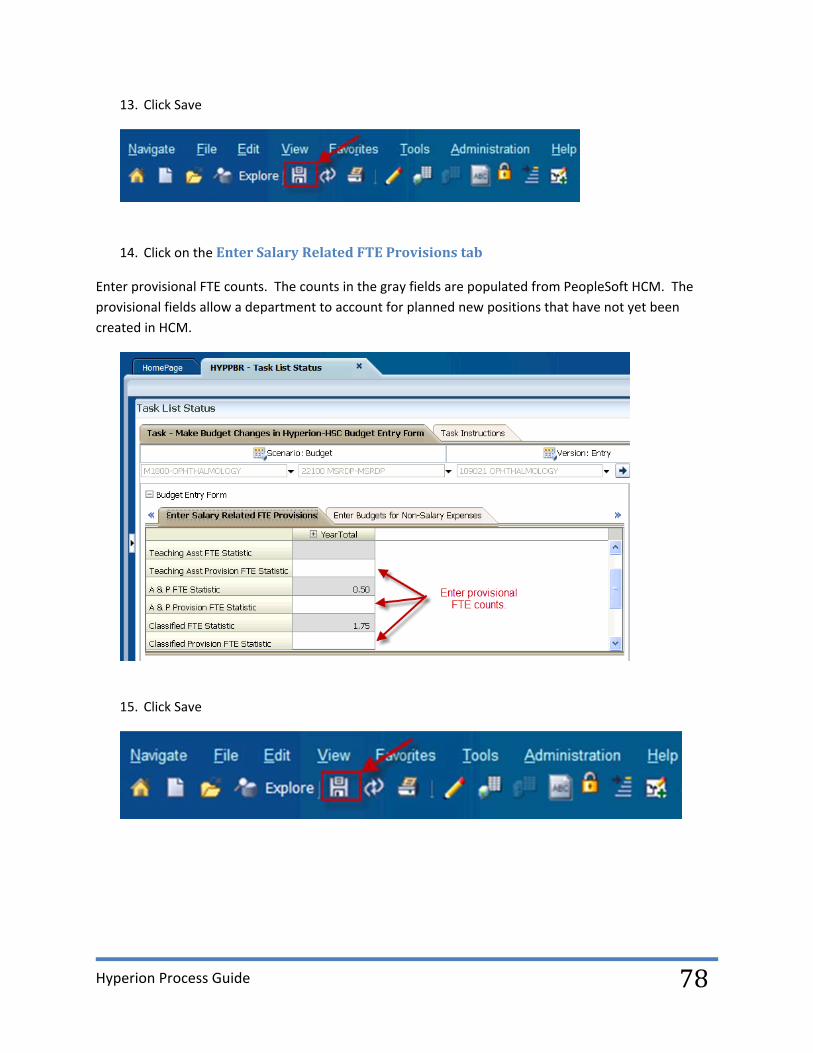
13. Click Save
14. Click on the Enter Salary Related FTE Provisions tab
Enter provisional FTE counts. The counts in the gray fields are populated from PeopleSoft HCM. The
provisional fields allow a department to account for planned new positions that have not yet been
created in HCM.
15. Click Save

Hyperion Process Guide
79
16. Click on the Non-Salary Expenses tab
17. Enter non‐salary expenses (ex: Travel Expenses, Materials and Operations, etc.) in the YearTotal
column. Departments may also enter changes in specific months/quarters by expanding
YearTotal to see all months listed. The amounts in the gray fields are pulling in from PeopleSoft
HCM or other web forms within Hyperion.
18. Click Save
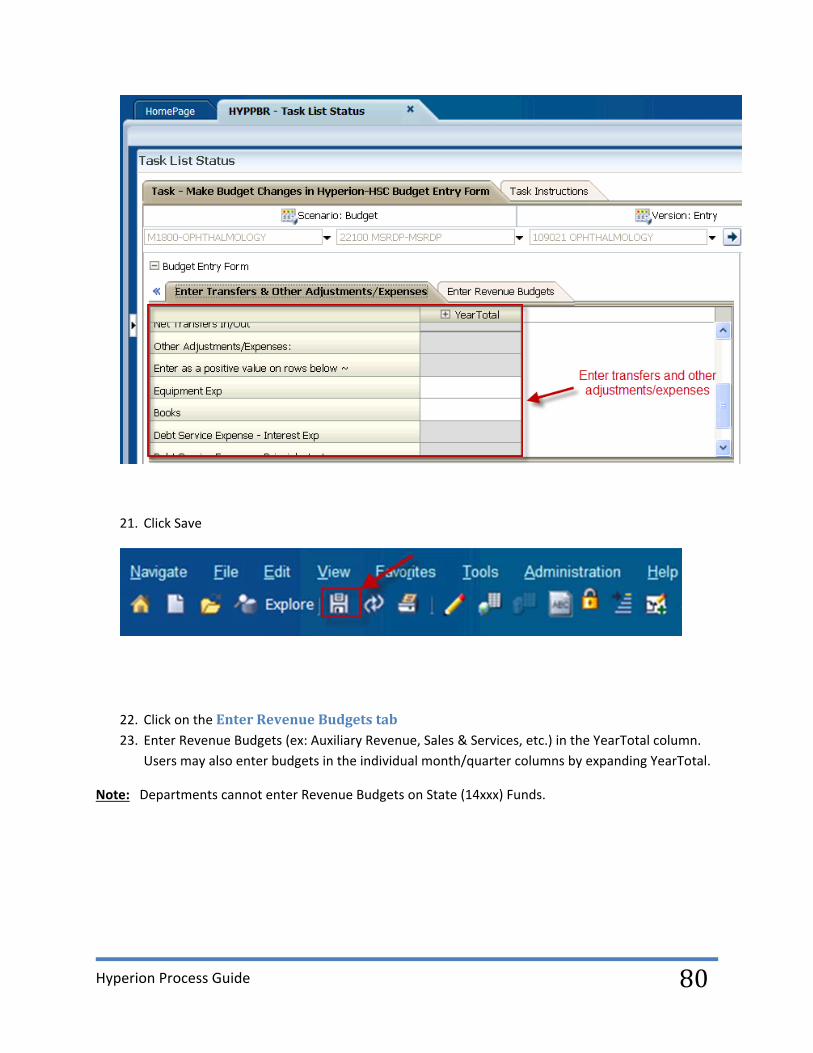
19. Click on the Enter Transfers & Other Adjustments/Expenses tab
20. Enter transfers and other adjustments/expenses. Departments may also enter changes in
specific months/quarters by expanding YearTotal to see all months listed. The amounts in the
gray fields are entered by the Budget Office.
Hyperion Process Guide
80
21. Click Save
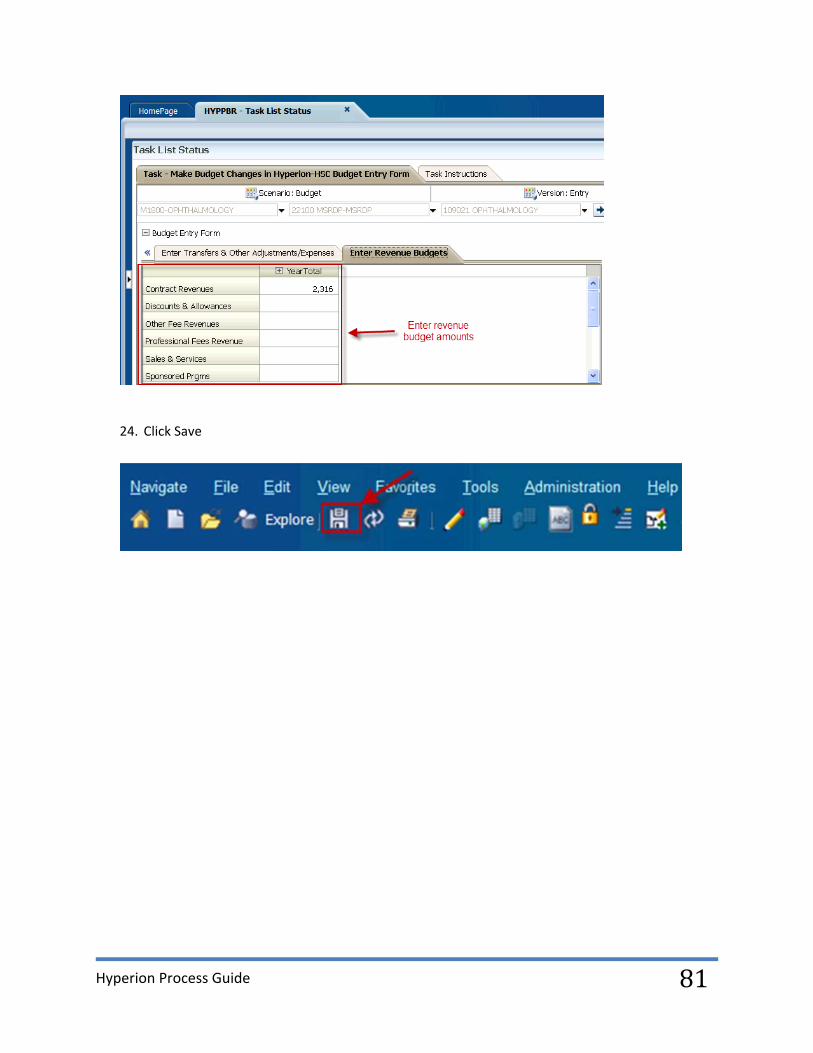
22. Click on the Enter Revenue Budgets tab 23. Enter Revenue Budgets (ex: Auxiliary Revenue, Sales & Services, etc.) in the YearTotal column.
Users may also enter budgets in the individual month/quarter columns by expanding YearTotal.
Note: Departments cannot enter Revenue Budgets on State (14xxx) Funds.
Hyperion Process Guide
81
24. Click Save

Hyperion Process Guide
82
Review Expenses Funded with Expiring PIDs
Run the Expenses funded on Expiring Projects report to review revenue and expense budgets that are associated with expiring Project IDs (PIDs). There should be no revenues/expenses assigned to PIDs that have already expired. Note: Users should run this report for ONLY one Entity at a time. Selecting multiple entities or the roll‐up entity can put constraints on the system and may slow down the application for all users.
1. Click HYPPBR
2. Click next to My Task List

Hyperion Process Guide
83
3. Click next to task list (ex: Dept User)
4. Click Review Expenses Funded with Expiring PIDs
5. Leave the defaulted values for Version, Scenario and Years.
Hyperion Process Guide
84
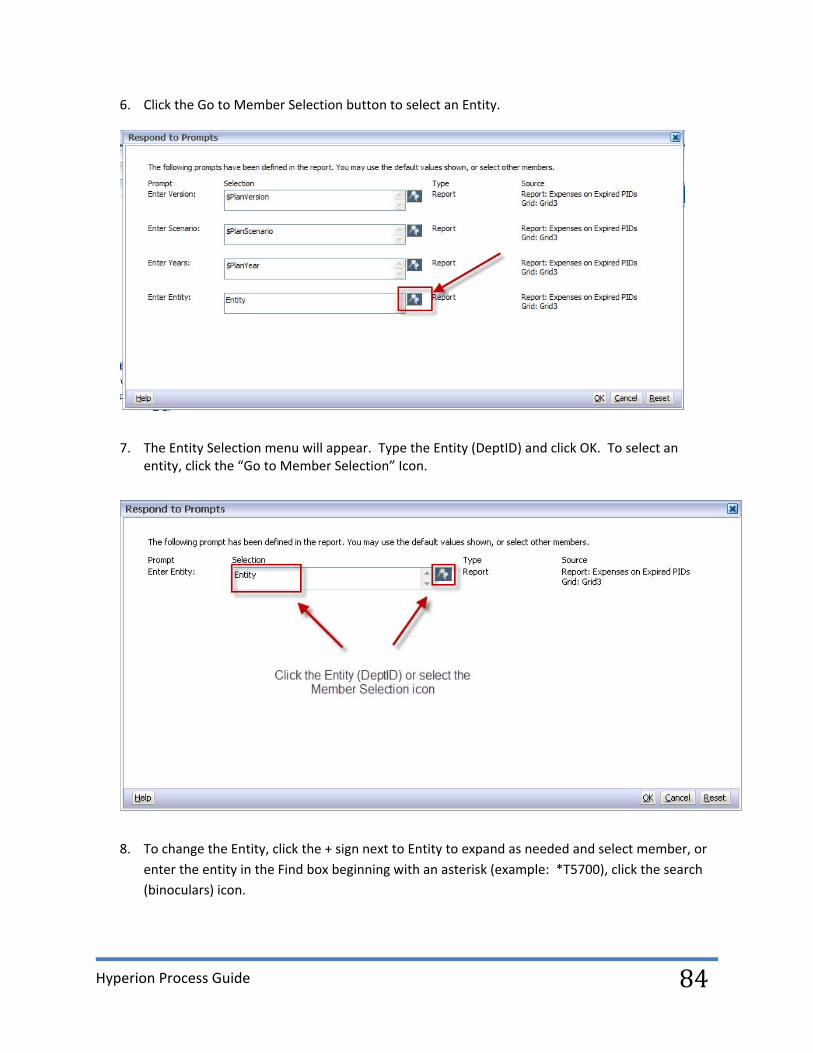
6. Click the Go to Member Selection button to select an Entity.
7. The Entity Selection menu will appear. Type the Entity (DeptID) and click OK. To select an entity, click the “Go to Member Selection” Icon.
8. To change the Entity, click the + sign next to Entity to expand as needed and select member, or
enter the entity in the Find box beginning with an asterisk (example: *T5700), click the search
(binoculars) icon.

Hyperion Process Guide
85
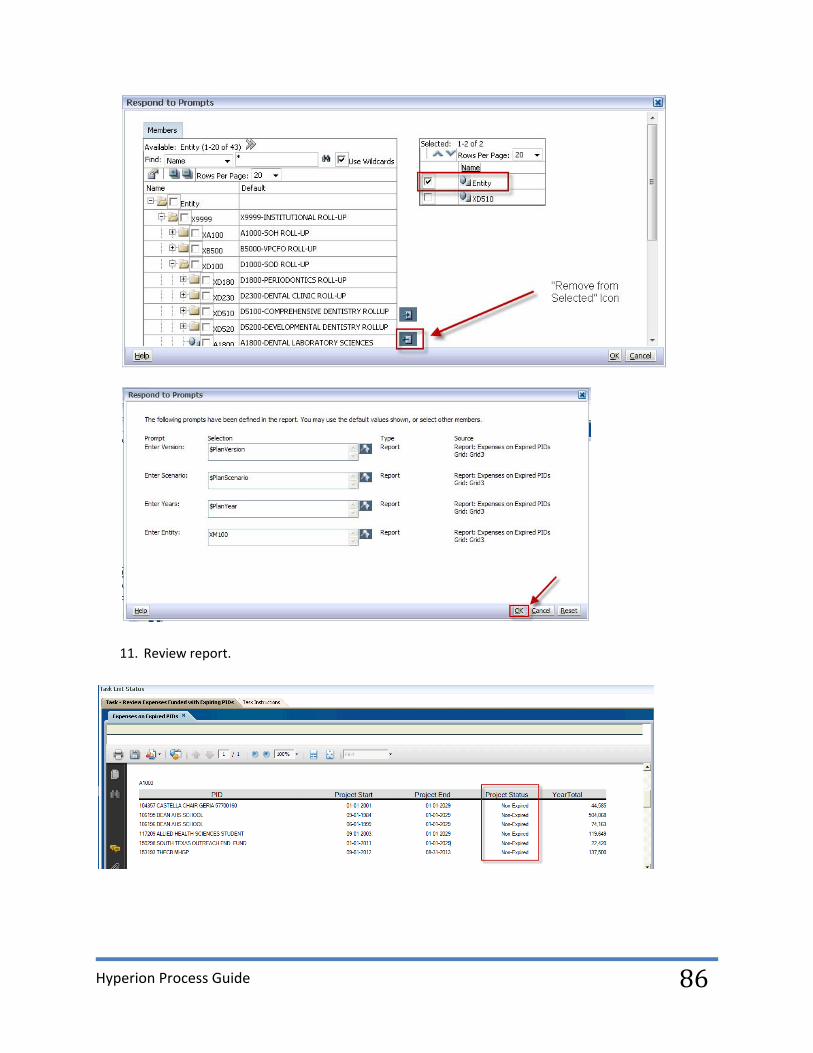
9. Example of expanding the Entity. Click the checkbox next to the selected Fund, then click the
“Add to Selected” icon to move the fund to the right side of the panel.
10. Remove the Fund from the right side of the panel by clicking the checkbox next to Fund, then
click the “Remove from Selected” icon. Click OK to go back to previous menu.
Hyperion Process Guide
86
11. Review report.

Hyperion Process Guide
87
Run Consolidated Budget Recap after Funding Changes
To review the Consolidated Budget, run the Budget Recap report. This report reflects a department’s
(or EC’s) budget in a Profit and Loss (P&L) format and replaces the HSC_DEPT_BUD_
CAT_SUMMARY query that users ran in PeopleSoft HCM. UT System looks at three ratios to determine
an institution’s financials health. These ratios are calculated based on 1) the Net Operating Margin,
2)the Change in Net Assets and 3)the Ending Net Assets. The report can be run for a specific PID or set
of PID’s, for a specific Fund Group or set of Funds, or all funds and/or all PID’s within a department. If
multiple Funds/PID’s are selected, the report will reflect each Fund/PID in a separate column.
If our overall (all funds) institutional ratios are unfavorable, the institution is required to explain the
reasons, which requires departments and/or EC Offices to be able to understand and explain the activity
that would put their area in an unfavorable financials condition.
1. Click HYPPBR
2. Click next to My Task List
Hyperion Process Guide
88
3. Click next to task list (ex: EC Admins or Dept User)
4. Click on Run Consolidated Budget (or Run Consolidated Budget after Funding)

Hyperion Process Guide
89
5. The Preview User Point of View box will appear. Confirm or enter Entity (DEPTID) and click OK. If you need to change the entity, click Select….
6. To change the Entity, click the + sign next to Entity to expand as needed and select member, or
enter the entity in the Find box beginning with an asterisk (example: *T5700), click the search
(binoculars) icon.

Hyperion Process Guide
90
7. Example of expanding the Entity.
8. After your selection is made, click Ok.
Hyperion Process Guide
91
9. If you prefer to run a report for All Funds and All PID’s, leave the default values and click Ok.
10. If you need to run the report by a specific Fund and/or PID, click the Edit Member Names button
and enter the Fund (ex: Fund_14001) and PID (ex: PID_106310), then click OK.
Hyperion Process Guide
92
11. To change the Fund and PID, click the + sign next to Fund to expand as needed and select Fund,
or enter the entity in the Find box beginning with an asterisk (example: *14001), click the
search (binoculars) icon.
12. Example of expanding the fund. Click the checkbox next to the selected Fund, then click the
“Add to Selected” icon to move the fund to the right side of the panel.
Hyperion Process Guide
93
13. Remove the Fund from the right side of the panel by clicking the checkbox next to Fund, then
click the “Remove from Selected” icon. Click OK to go back to previous menu.
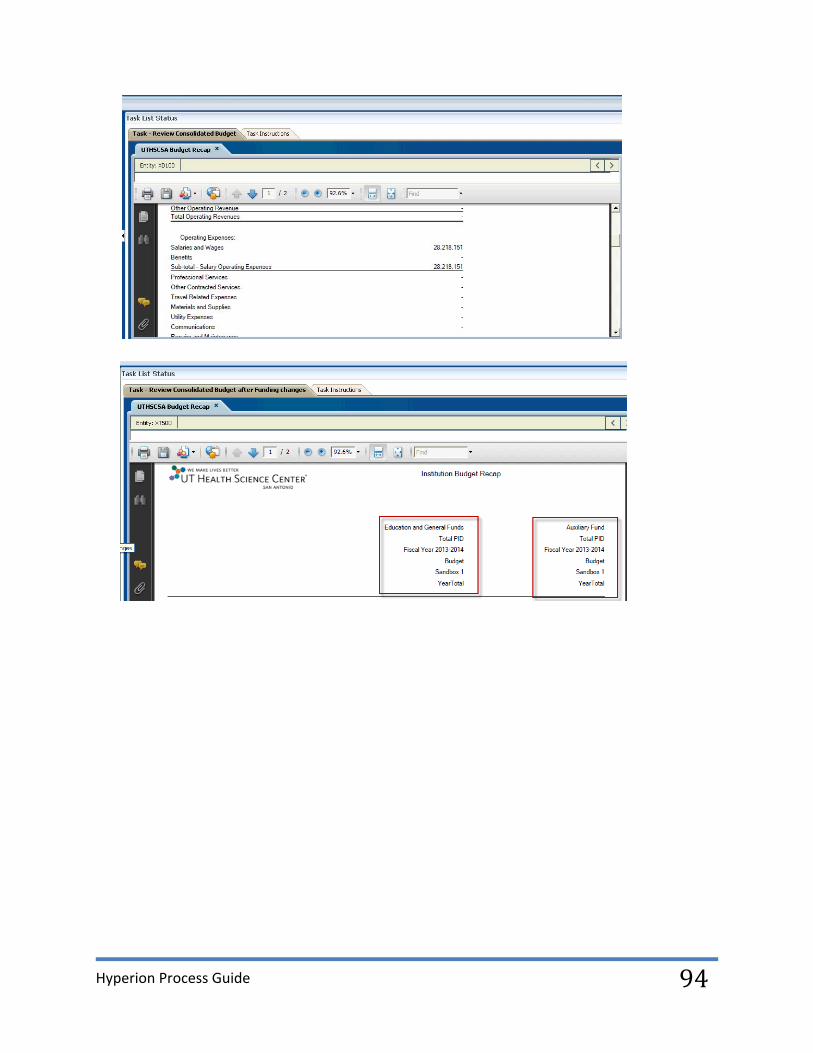
14. Review report. (Note: If you selected multiple funds and/or PIDs, report will have multiple
columns. See second screenshot)
Hyperion Process Guide
94

Hyperion Process Guide
95
Reconcile Expenses against State Appropriations
Use the State Appropriations Recon All State webform to ensure the overall state funds (14xxx) budget is within the EC Target. This webform includes RAHC, Laredo, SALSI, and Nursing Shortage Funds.
1. Click HYPPBR
2. Click next to My Task List
Hyperion Process Guide
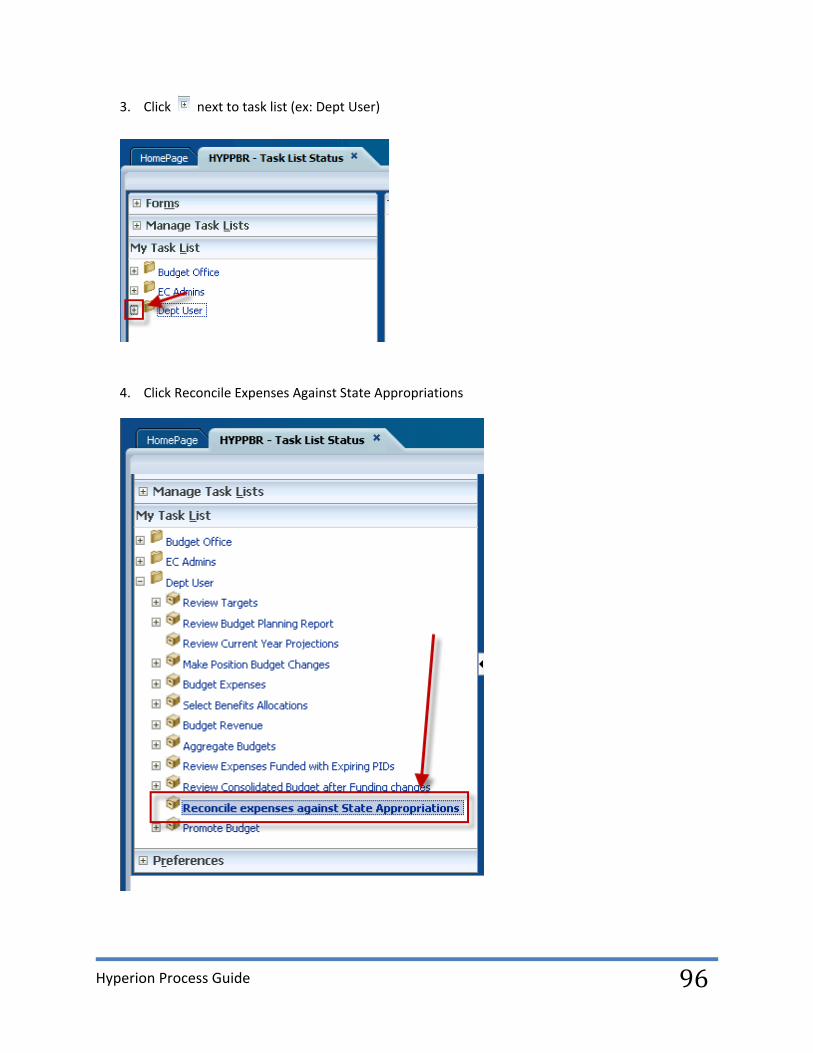
96
3. Click next to task list (ex: Dept User)
4. Click Reconcile Expenses Against State Appropriations
Hyperion Process Guide
97
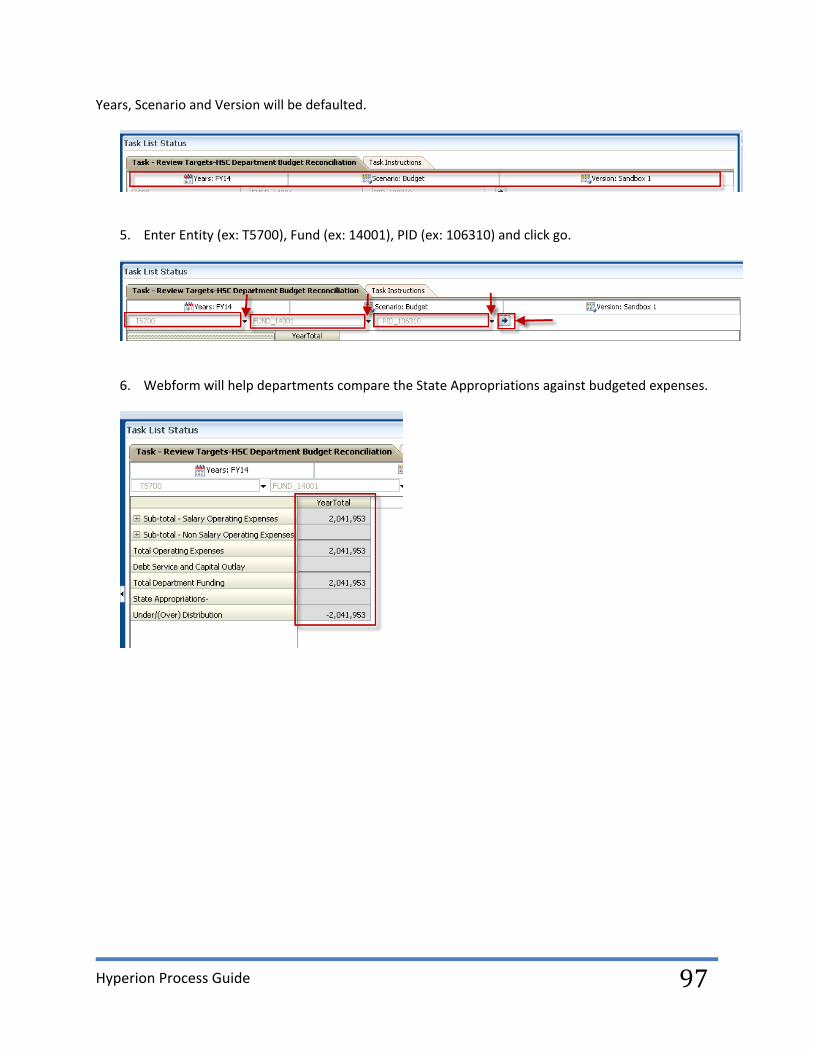
Years, Scenario and Version will be defaulted.
5. Enter Entity (ex: T5700), Fund (ex: 14001), PID (ex: 106310) and click go.
6. Webform will help departments compare the State Appropriations against budgeted expenses.
Hyperion Process Guide
98
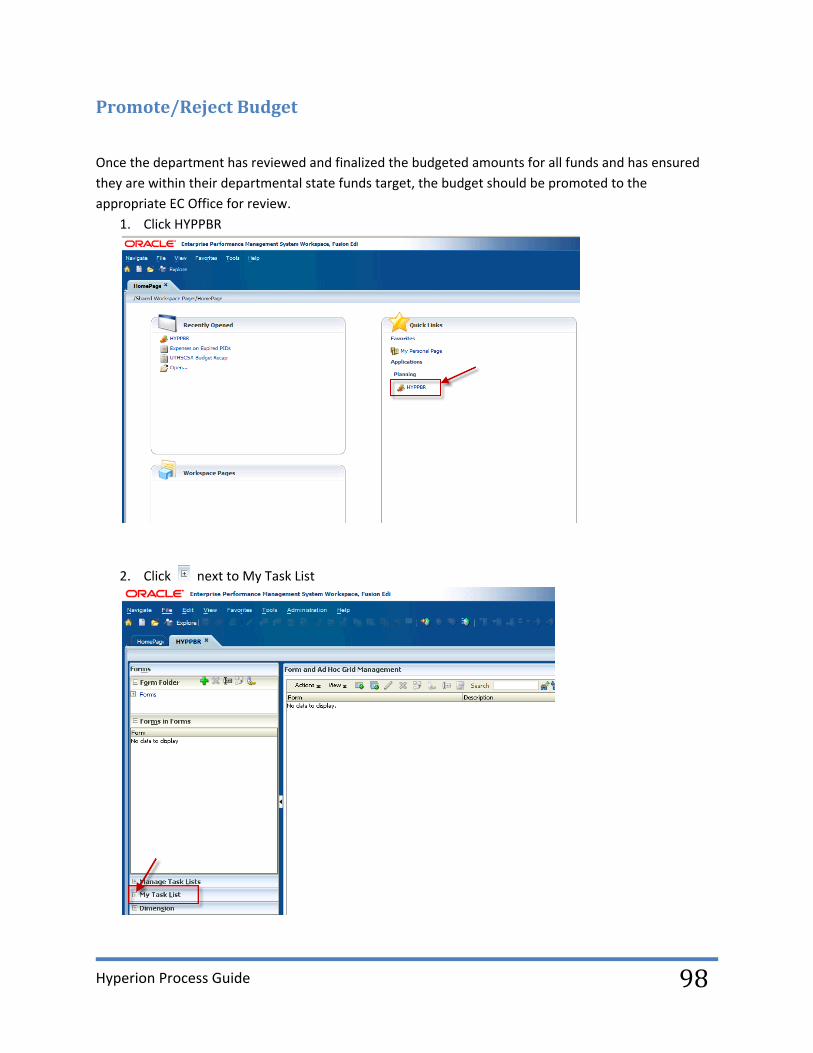
Promote/Reject Budget
Once the department has reviewed and finalized the budgeted amounts for all funds and has ensured
they are within their departmental state funds target, the budget should be promoted to the
appropriate EC Office for review.
1. Click HYPPBR
2. Click next to My Task List
Hyperion Process Guide
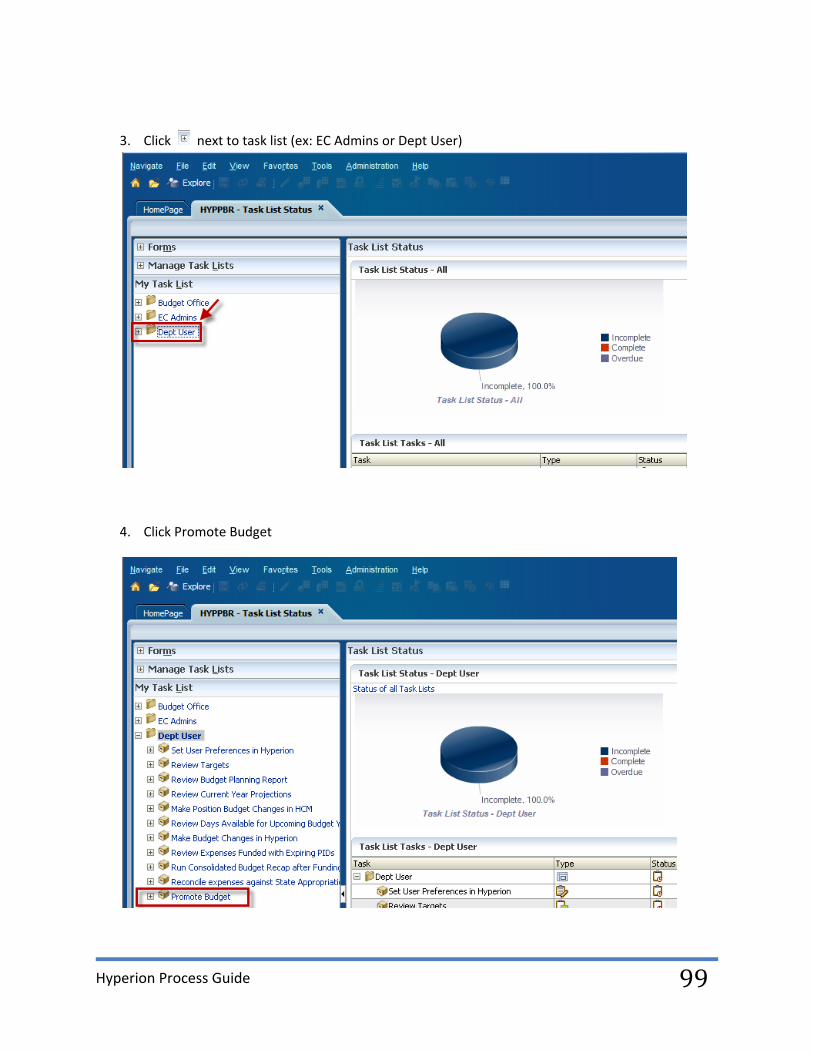
99
3. Click next to task list (ex: EC Admins or Dept User)
4. Click Promote Budget
Hyperion Process Guide
100
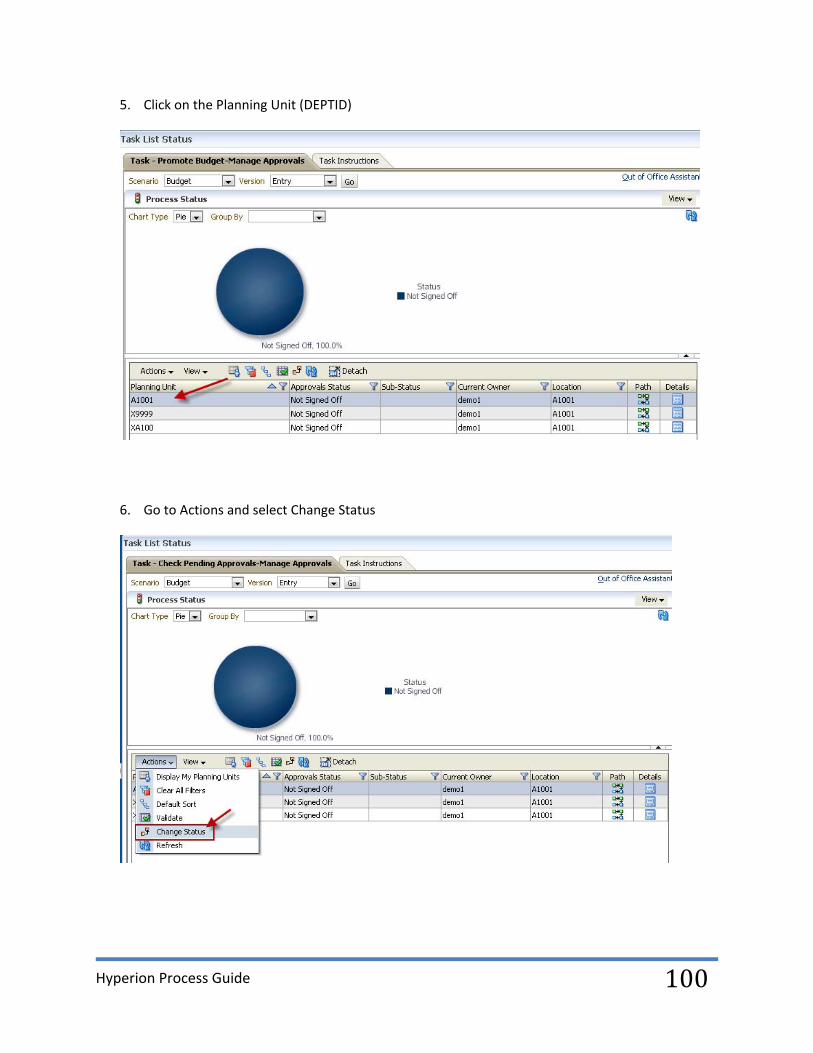
5. Click on the Planning Unit (DEPTID)
6. Go to Actions and select Change Status
Hyperion Process Guide
101
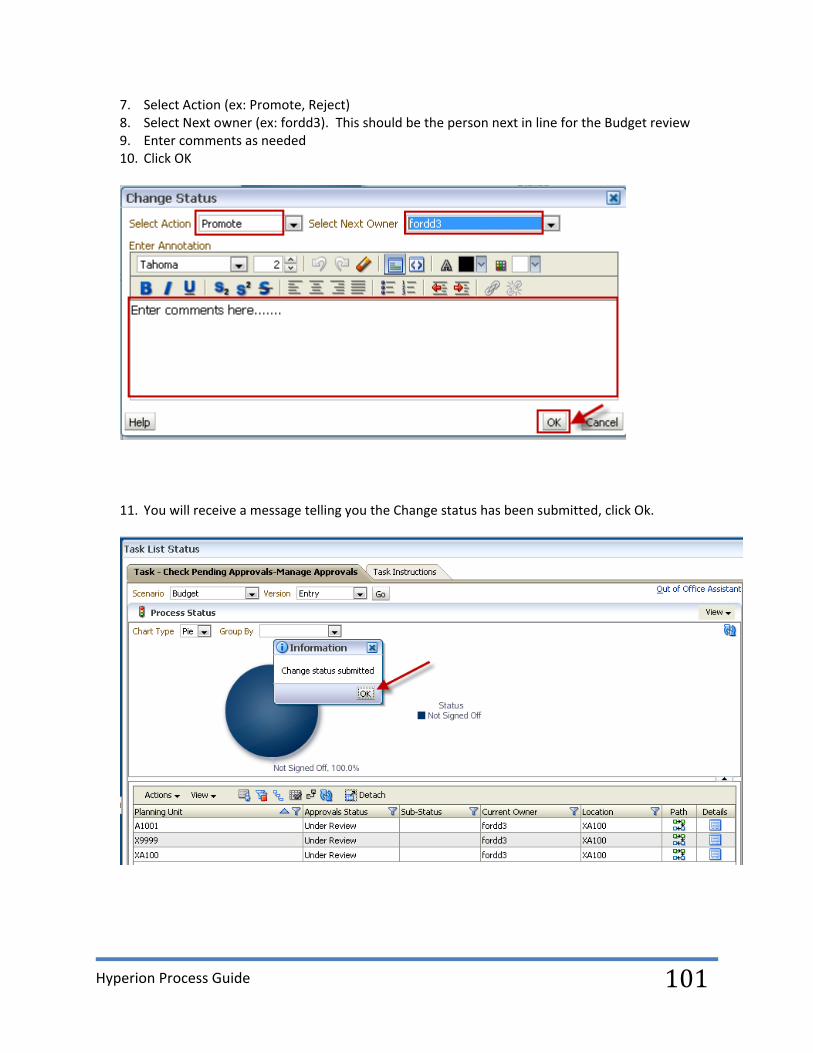
7. Select Action (ex: Promote, Reject) 8. Select Next owner (ex: fordd3). This should be the person next in line for the Budget review 9. Enter comments as needed 10. Click OK
11. You will receive a message telling you the Change status has been submitted, click Ok.

Hyperion Process Guide
102
Entering data using Hyperion Forms
There are two ways you can access the forms you will need for information reporting. You may go
directly to the Forms section using the following steps.
1. Click on the + sign to expand the menu items under Forms
If you are part of SOM (School of Medicine), you will select SOM
If you are not part of SOM, select Institution
2. Expand the Institution folder and you will see a listing to the right of the page of forms available
for your use.
To avoid any confusion on which reports you need to run, it is suggested you select the report name
from the Task List.
You will see the report view on the right side of the Task List Status page. Years, Scenario, Version and Period are defaulted
Hyperion Process Guide
103
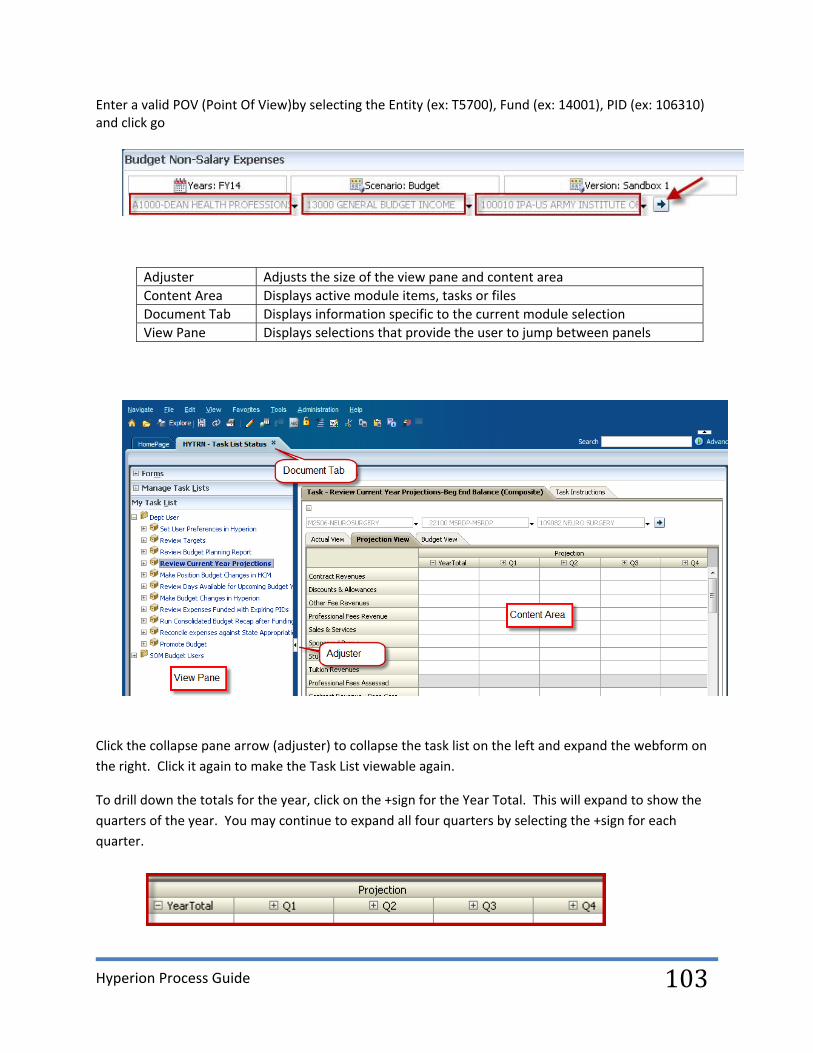
Enter a valid POV (Point Of View)by selecting the Entity (ex: T5700), Fund (ex: 14001), PID (ex: 106310) and click go
Adjuster Adjusts the size of the view pane and content area
Content Area Displays active module items, tasks or files
Document Tab Displays information specific to the current module selection
View Pane Displays selections that provide the user to jump between panels
Click the collapse pane arrow (adjuster) to collapse the task list on the left and expand the webform on
the right. Click it again to make the Task List viewable again.
To drill down the totals for the year, click on the +sign for the Year Total. This will expand to show the
quarters of the year. You may continue to expand all four quarters by selecting the +sign for each
quarter.

Hyperion Process Guide
104
Home
Open Document
Explore – Navigates to Explore where Financials reports (FR) are stored
Save – Save data input into web forms
Refresh – Refresh current view to reflect what is stored in the database
Print – Print the current screen
Adjust Data – Increase or decrease values by a percentage or value
Grid Spread – specify an amount or percentage by which Planning increases or decreases valus across mutiple dimensions on the form
Cell Text – Add commetns to a specific cell
Supporting detail – Add detail that will aggregate the cell value in a web form
Add/Edit Document – Add or edit documents to provide domentation for data in cells
Cut
Copy
Paste
Instructions – Display instructions for data forms
Open in Smart View
You may enter data in any of the white cells; the fields that are grayed out are read‐only.
Hyperion Process Guide
105
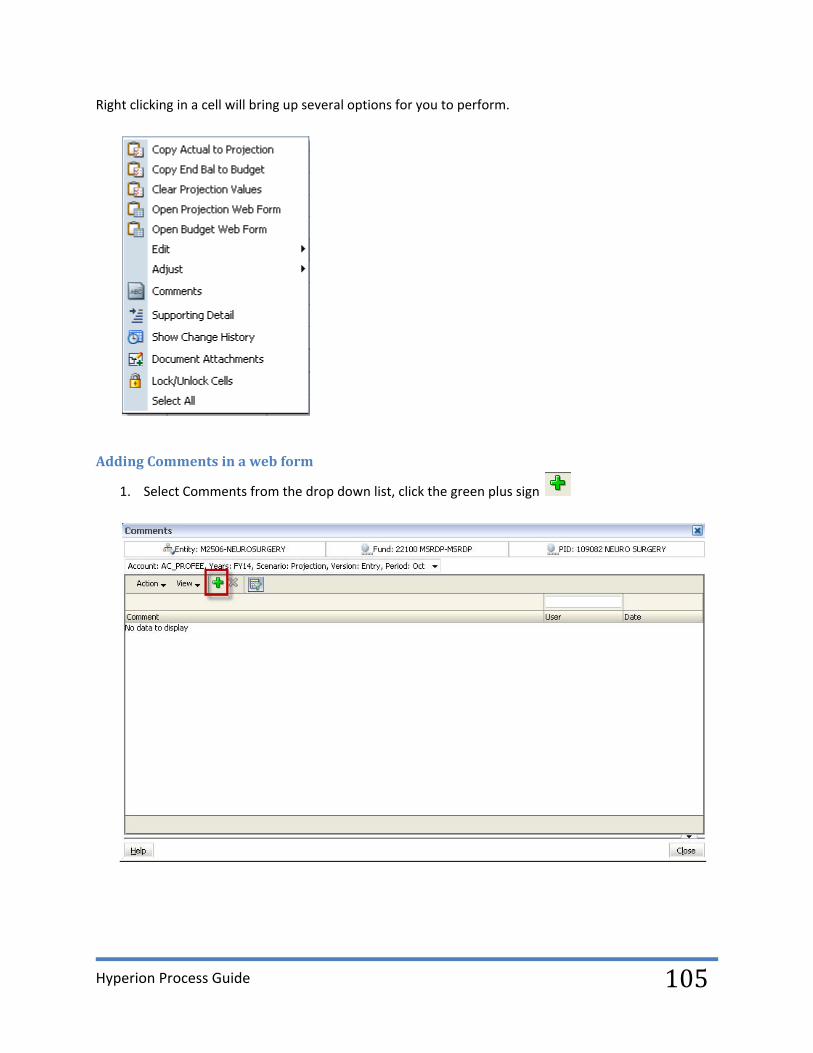
Right clicking in a cell will bring up several options for you to perform.
Adding Comments in a web form
1. Select Comments from the drop down list, click the green plus sign

Hyperion Process Guide
106
2. Enter your comments, then click Add
3. You can enter several rows of comments by selecting the green plus sign again
You are able to view all comments, however, you can only delete your own comments.
4. Click on Close when you have completed your Comment entries.

Hyperion Process Guide
107
The cell containing Comments will have a “dog ear” mark on the corner.
Form Colors:
When entering data into the web forms, you will notice different colors in the cells
White – default cell that allows data entry
Yellow – data entry has been entered, but has not been saved
Gray – Indentifies the cell as “Read Only”
Rose – Indentifies the cell requires supporting detail
Teal (light green) – Indentifies the cell having suporting detail
Navigating in the forms:
Depending on whether you are editing a cell, or if you just clicked in a cell, determines how you will
navigate in the web forms.
If you are not editing a cell, use the Left and Right; Up and Down arrow keys to move through
the web forms.
If you are editing a cell, use the Tab key to move throughout the web forms.

Hyperion Process Guide
108
To move to the next cell in the same row, click in the next cell, or press the Tab key
To move to the previous cell in the same row, click Shift + Tab keys
To move to the next cell in the same column, press the Enter key
To move to the previous cell in the same column, press Shift + Enter keys
Click on the Task Instructions tab to review specific Budget instructions for the listed task.
Hyperion Process Guide
109
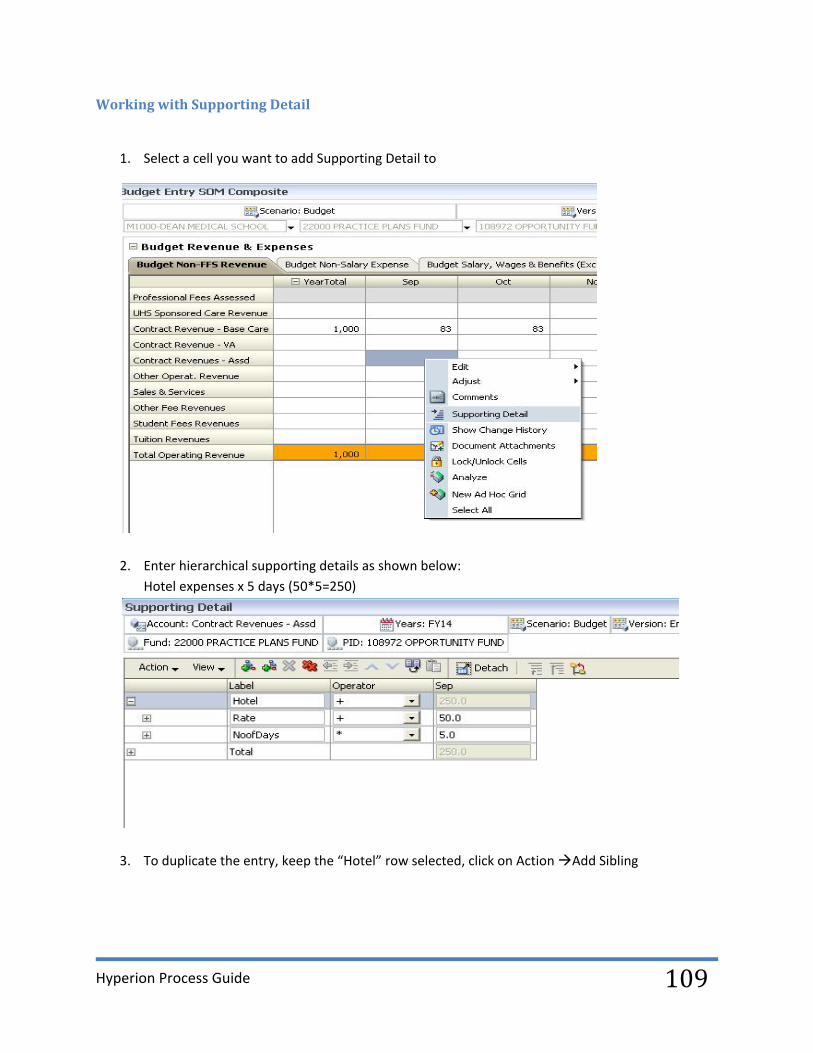
Working with Supporting Detail
1. Select a cell you want to add Supporting Detail to
2. Enter hierarchical supporting details as shown below:
Hotel expenses x 5 days (50*5=250)
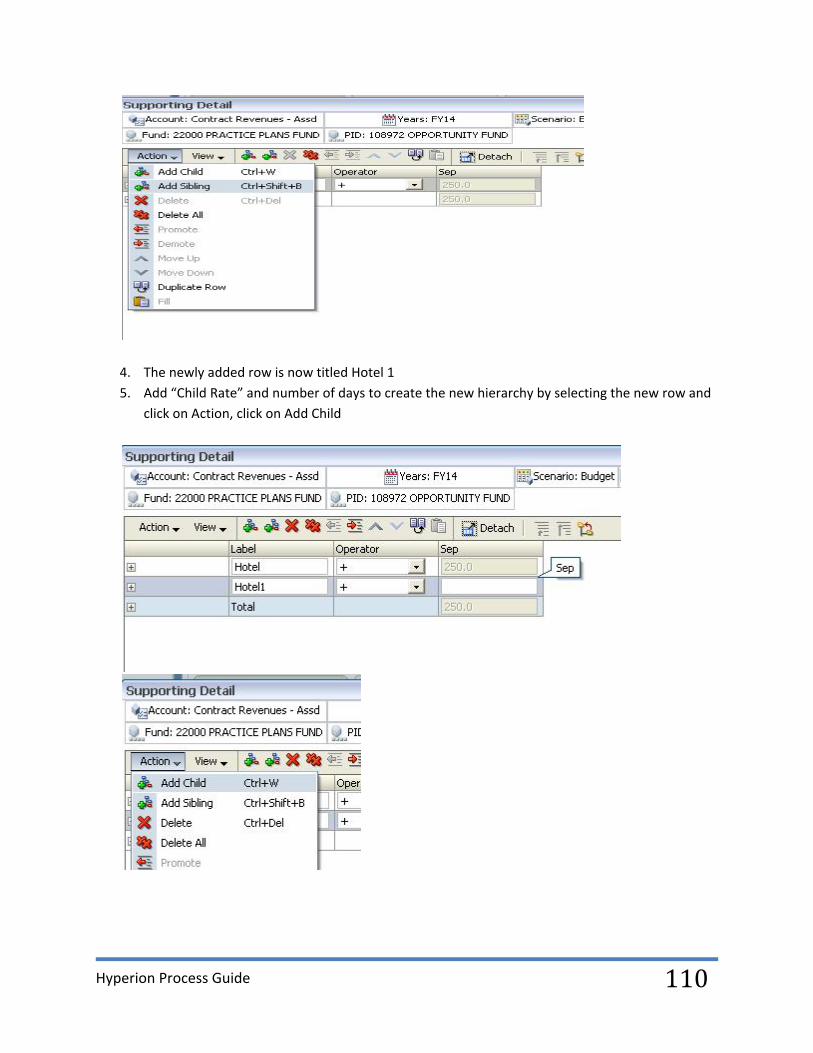
3. To duplicate the entry, keep the “Hotel” row selected, click on Action Add Sibling
Hyperion Process Guide
110
4. The newly added row is now titled Hotel 1
5. Add “Child Rate” and number of days to create the new hierarchy by selecting the new row and
click on Action, click on Add Child
Hyperion Process Guide
111
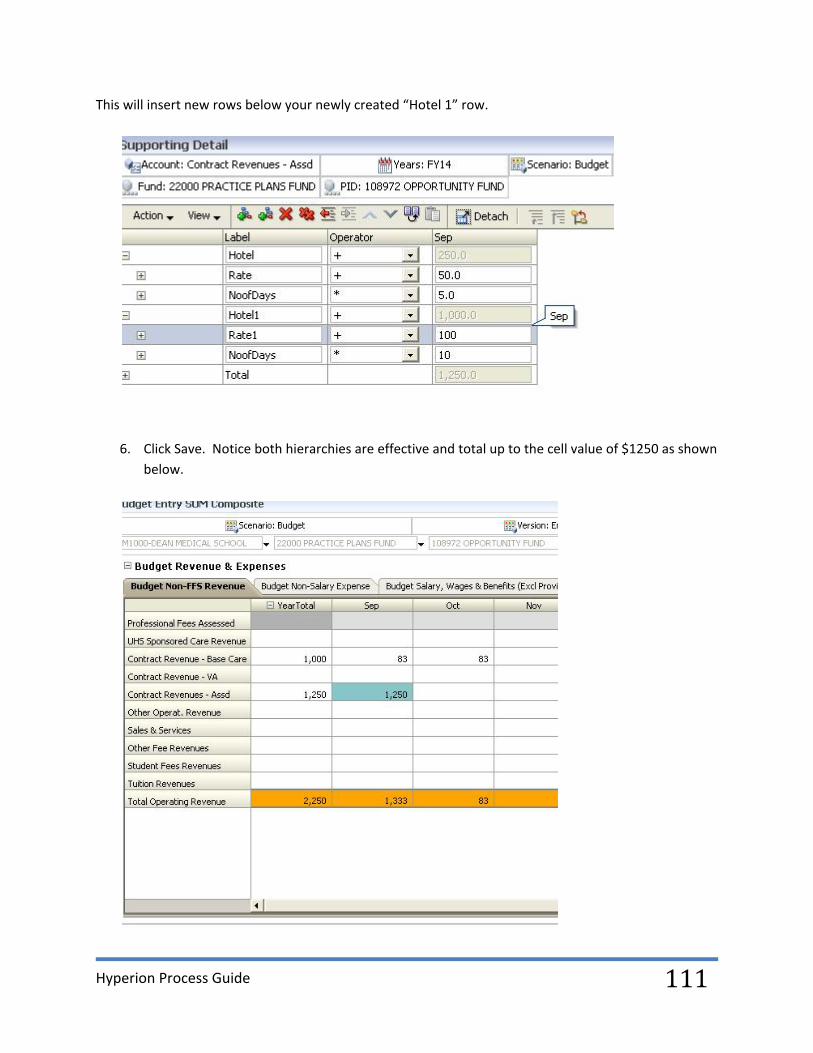
This will insert new rows below your newly created “Hotel 1” row.
6. Click Save. Notice both hierarchies are effective and total up to the cell value of $1250 as shown
below.


