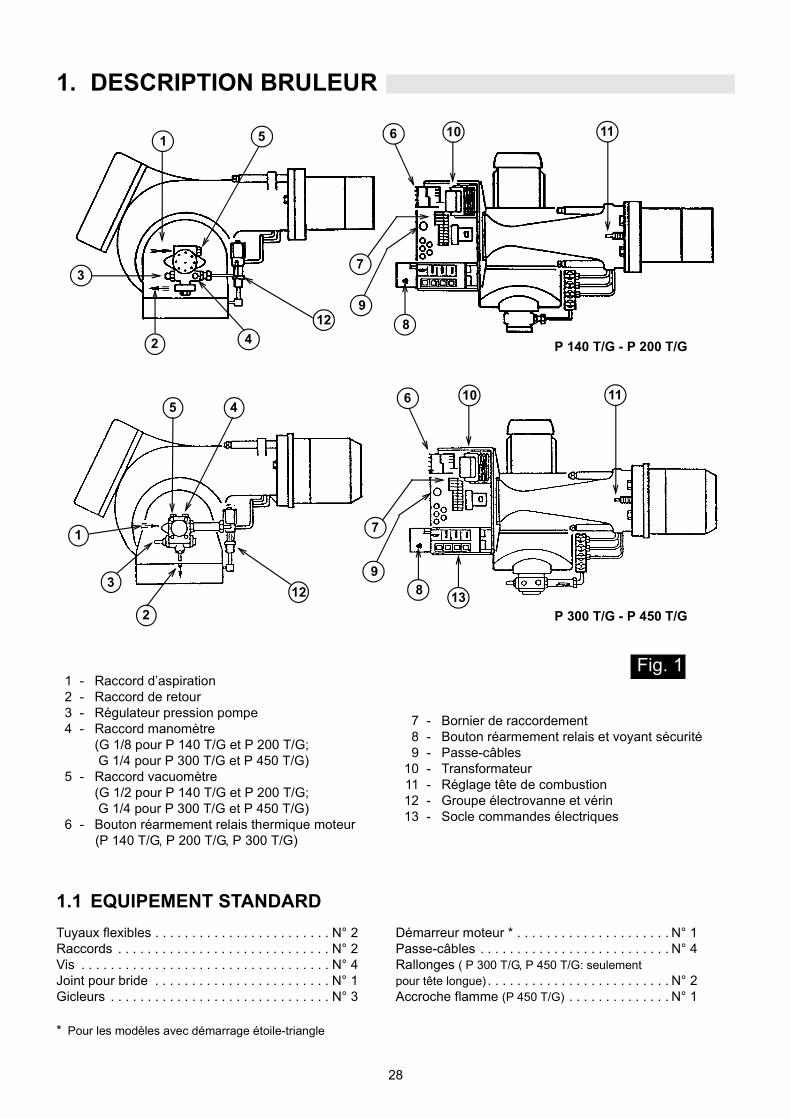
Istruzioni per installazione, uso e manutenzione Montage und Bedienungs Anleitung Manuel d’entretien Installation, use and maintenance instructions Bruciatori di gasolio Öl-Gebläsebrenner Brûleurs fioul Oil burners 2915890 (2) CODE MODELLO - MODELL MODELE - MODEL TIPO - TYP TYPE 3476823 P 140 T/G 476 M1 3476824 P 140 T/G 476 M1 3477723 P 200 T/G 477 M1 3477724 P 200 T/G 477 M1 3478837 P 300 T/G 478 M1 3478838 P 300 T/G 478 M1 3478839 P 300 T/G 478 M1 3478840 P 300 T/G 478 M1 3478841 P 300 T/G 478 M1 3478842 P 300 T/G 478 M1 3479336 P 450 T/G 479 M1 3479337 P 450 T/G 479 M1 3479338 P 450 T/G 479 M1 3479339 P 450 T/G 479 M1 I D F GB Dreistufig Three-stage operation Fonctionnement à 3 allures Funzionamento tristadio
Transcript
Istruzioni per installazione, uso e manutenzioneMontage und Bedienungs AnleitungManuel d’entretienInstallation, use and maintenance instructions
Bruciatori di gasolioÖl-GebläsebrennerBrûleurs fioulOil burners
2915890 (2)
CODE MODELLO - MODELLMODELE - MODEL
TIPO - TYPTYPE
3476823 P 140 T/G 476 M13476824 P 140 T/G 476 M13477723 P 200 T/G 477 M13477724 P 200 T/G 477 M13478837 P 300 T/G 478 M13478838 P 300 T/G 478 M13478839 P 300 T/G 478 M13478840 P 300 T/G 478 M13478841 P 300 T/G 478 M13478842 P 300 T/G 478 M13479336 P 450 T/G 479 M13479337 P 450 T/G 479 M13479338 P 450 T/G 479 M13479339 P 450 T/G 479 M1
I
D
F
GB
DreistufigThree-stage operationFonctionnement à 3 allures
Pressione in camera di combustione - Portata massima
(3 ugelli funzionanti)
Quando il bruciatore funziona con un solo ugello, oppure con due, le condizioni di pressurizzazione sono più
favorevoli e non pongono problemi.
DIMENSIONI DELLA CAMERA DI COMBUSTIONE DI PROVA (ISO 5063 - 1978)
D - Diametro caldaia in cm
P - Posizione fondo mobile in m
Per la sporgenza della testa di combustione
seguire le indicazioni fornite dal costruttore
della caldaia.
Per caldaie con cassa fumo anteriore
eseguire una opportuna protezione in mate-
riale refrattario sulla parte della testa
sporgente in camera di combustione.
mba
r
kg/h
kW
D
P
8
3. IMPIANTI IDRAU-LICI
Non si deve superare la depressione massima di 0,45 bar (35 cm Hg). Oltre tale valore si ha liberazione di gas dal
combustibile.
Si raccomanda che le tubazioni siano a perfetta tenuta.
Quando la cisterna è ad un livello inferiore del bruciatore, si
consiglia di far arrivare la tubazione di ritorno alla stessa
altezza della tubazione di aspirazione. In questo caso non è
necessaria la valvola di fondo.
Se la tubazione di ritorno arriva sopra il livello del com-
bustibile la valvola di fondo è indispensabile. Questa solu-
zione è meno sicura della precedente per la possibile man-
canza di tenuta della valvola.
H = Dislivello;L = Lunghezza totale del tubo di aspirazione;øi = Diametro interno del tubo. I tubi in rame con øi 14 mm
possono essere sostituiti con tubazioni in acciaio da G 1/2” ; i tubi in rame con øi 16 e 18 mm possono essere sostituiti con tubazioni in acciaio da G 3/4 ”.
Hmetri
P 140-200-300 T/G P 450 T/GL metri L metri
øi øi øi øi14 mm 16 mm 16 mm 18 mm
0 20 40 20 400,5 25 45 25 451 30 50 30 50
1,5 35 55 35 552 40 60 40 60
Hmetri
P 140-200-300 T/G P 450 T/GL metri L metri
øi14 mm
øi16 mm
øi16 mm
øi18 mm
0 50 60 20 400,5 40 50 18 351 30 40 15 30
1,5 20 30 13 252 10 20 10 203 5 10 5 10
INNESCO POMPA:Allentare il tappo dall’attacco vacuometro (5, fig.1) ed attendere la fuoriuscita del gasolio.
H max
. 10
m
Accertarsi, prima di mettere in funziona-mento il bruciatore, che il tubo di ritornonon abbia occlusioni. Un eventualeimpedimento provocherebbe la rotturadell’organo di tenuta della pompa.
ATTENZIONE:
H
max
10
m
H
INNESCO POMPA:Riempire la pompa dall’attaccovacuometro (5, fig.1), avviare ilbruciatore, sfiatare l’aria dall’at-tacco manometro (4, fig.1) edattendere l’innesco della pompa.Se avviene il blocco ripetere l’operazione.
9
4. IMPIANTO ELETTRICO
4.1 IMPIANTO ELETTRICO ESEGUITO IN FABBRICA
LEGENDA SCHEMI (A) - (B)CMV - Contattore motore
CO - Commutatore
FR - Fotoresistenza
h1,2,3 - Contaore di 1°, 2°, 3° stadio
L1,2,3 - Segnalazione di 1°, 2°, 3° sta-
dio
L4 - Segnalazione di blocco motore
MB - Morsettiera bruciatore
MV - Motore ventilatore
RT - Relè termico
TA - Trasformatore d’accensione
TB - Terra bruciatore
VS - Valvola di sicurezza
V1,2,3 - Valvola di 1°, 2°, 3° stadio
LEGENDA SCHEMA (C)F1 - Fusibili motore
F2 - Fusibile circuito ausiliario
F3 - Relè termico -
Tarato in fabbrica a:
P 300 T/G: 10,2 A per 400 V
17,6 A per 230 V
P 450 T/G: 16,7 A per 400 V
29 A per 230 V
KL1- Contattore di linea
KS1- Contattore di stella
KT - Relè temporizzatore per il passag-
gio da stella a triangolo (tarato in
fabbrica a 10 s.)
KT1- Contattore di triangolo
MA - Morsettiera avviatore
Q1 - Sezionatore con blocco porta
P 300 - 450 T/G AVVIAMENTO STELLA - TRIANGOLO
P 140 - 200 - 300 T/G AVVIAMENTO DIRETTO
AVVIATORE STELLA - TRIANGOLO
(A)
(B)
(C)
D2567
D2569
D2049
10
4.2 COLLEGAMENTI ELETTRICI ALLA MORSETTIERA( a cura dell’ installatore)
SCHEMA (A) - Allacciamento elettrico ai bruciatori P 140-200-300 T/G con avviamento motore diretto
Sezione cavi
SCHEMA (B) - Allacciamento elettrico ai bruciatori P 300-450 T/G con avviamento stella-triangolo
Sezione cavi
LEGENDA SCHEMI (A) - (B)I1 - Interruttore elettrico per arresto manuale
bruciatoreMA- Morsettiera avviatoreMB- Morsettiera bruciatorePS - Pulsante di sbloccoS - Segnalazione di blocco a distanzaTL - Telecomando di limite:
ferma il bruciatore quando la temperatura o la pressione in caldaia raggiunge il valore prestabilito
TS - Telecomando di sicurezza:interviene in caso di TL guasto
T2 - Telecomando di 2° stadioT3 - Telecomando di 3° stadio
SCHEMA (C) - Taratura relè termicoServe ad evitare la bruciatura del motore per un forte aumento dell’assorbimento dovuto alla mancanza di una fase.• Se il motore è alimentato a stella, 400 V, il cur-sore va posizionato su “MIN”.
• Se il motore è alimentato a triangolo, 230 V, il cursore va posizionato su “MAX”.
Se la scala del relè termico non comprende l’assorbimento di targa del motore a 400 V, la protezione è assicurata lo stesso.
NOTANegl’impianti in cui le lunghezze dei collega-menti dei termostati siano superiori a 20 metri, oppure l’ambiente in cui si trova il bruciatore sia particolarmente disturbato da interferenze elet-tromagnetiche (maggiore 10 v/m) è necessario inserire il kit interfaccia-relè codice 3010386.
P 140 T/G P 200 T/G P 300 T/G
230 V 400 V 230 V 400 V 230 V 400 V
F A gG/gL 25 25 40 25 63 50
L mm2 2,5 2,5 4 2,5 6 4
P 300 T/G P 450 T/G
230 V 400 V 230 V 400 V
F A gG/gL 50 40 63 50
L mm2 6 4 10 6
E mm2 4 2,5 6 4
P 140 - 200 - 300 T/G AVVIAMENTO MOTORE DIRETTO
D2568
P 300 - 450 T/G AVVIAMENTO STELLA - TRIANGOLO
(B)RELE’ TERMICO
(C)
Verificare il blocco oscurando la fotoresistenza,dopo aver tolto il coperchio della mensola.ATTENZIONE: ALTA TENSIONE
Importante:
(A)
D2570
11
5. SCELTA UGELLI, PRESSIONE POMPA, REGOLAZIONE TESTA DI COMBUSTIONE
• Stabilire per prima la massima portata desiderata con tutti e tre gli ugelli fun-
zionanti.
• Sulla base della portata massima scegliere, nella tabella A, la terna di ugelli
necessaria.
Utilizzare ugelli con angolo di polverizzazione 60° alla pressione di 12 bar.
Nel funzionamento tristadio, fino a:
- 116 kg/h (P 140 T/G)
- 170 kg/h (P 200 T/G)
- 193 kg/h (P 300 T/G)
il 1° e 2° ugello non sono uguali al 3°. Questo per ottenere nel 1° e 2° stadio di funzionamento valori di CO2 più
elevati, secondo norma DIN.
UGELLI CONSIGLIATI PER FUNZIONAMENTO TRISTADIO:
* La pressione della pompa è riferita a tre ugelli funzionanti.Quando funzionano due ugelli, e più ancora un ugello solo, la pressione sale automaticamente.
Le portate degli ugelli indicate in tabella sono nominali. La por-tata reale può essere diversa da quella nominale fino a ± 5%. La sua misura si effettua intubando gli ugelli e pesando il gaso-lio spruzzato. La pompalascia la fabbrica tarata a 12 bar. Si raccomanda di contenere eventuali variazioni alla pressione della pompa tra 10 e 14 bar.Infine, sulla base della portata massimaricavare, nel dia-gramma B, la regolazione della testa di combustione.La regolazione si effettua ruotando la vite A fino a che la tacca, rilevata dal diagramma, collima con il piano della bussola B (Fig. C).
Nota (solo per P 450 T/G)A seconda della portata desiderata è possibile utilizzare l’elicamontata di serie oppure l’elica fornita a corredo (vedere dia-gramma B).Per sostituire l’elica procedere come segue (Fig. D):-svitare le viti (1);-arretrare la parte ventilante facendola scorrere sui perni (2);-dopo aver svitato le viti (3), procedere con la sostituzionedell’elica;-rimontare il tutto con procedimento inverso.
UGELLI 60° PORTATA UGELLI 60° PORTATAPOMPA 12 BAR * TOTALE POMPA 12 BAR * TOTALE
* La pressione della pompa è riferita a tre ugelli funzionanti.Quando funzionano due ugelli, e più ancora un ugello solo, la pressione sale automaticamente.
P450: 1) con elica ø 192 (montata di serie)P450: 2) con elica ø 215 (a corredo)
Tacca 6
B
C
D3419
D
D3422
13
6. REGOLAZIONE SERRANDALa regolazione delle serrande va adattata di volta in volta alla portata degli ugelli e alla pressurizzazione della ca-mera di combustione.
La figura 2 mostra come sono disposte le serrande dell’aria; la figura 3 i corrispondenti martinetti di regolazione.Per aprire o chiudere le serrande agire nel modo seguente: allentare la ghiera 1), avvitare l’esagono 2) per diminuire la portata d’aria, svi-tarlo per aumentarla.
La corretta apertura delle serrande si determina mediante un controllo dellacombustione nei tre stadi di funzionamento del bruciatore.Il controllo della combustione dei vari stadi si effettua agendo sul commutatorefermando il bruciatore sullo stadio da controllare.
7. QUADRO ELETTRICO
CONTAOREPer sapere quante ore il bruciatore ha funzionato in 1° stadio (solo 1° ugello), togliere al contaore del 1° ugello le ore del 2° ugello.Per sapere quante ore il bruciatore ha funzionato in 2° stadio (1°+2° ugello), togliere al contaore del 2° ugello le ore del 3° ugello.Le ore di funzionamento in 3° stadio (1°+2°+3° ugello) si leggono direttamente sul contaore del 3° ugello.COMMUTATOREPosizione 0: bruciatore fermoPosizione 1: funzionamento solo in 1° stadioPosizione 2: funzionamento in 1° e 2° stadioPosizione 3: funzionamento in 1°, 2° e 3° stadioBLOCCO MOTOREE’ provocato dal relè termico salvamotore in caso di sovraccarico o mancanza di fase.Per sbloccare premere il pulsante del relè termico.
Contaore 2° ugello con segnalazione di funzio-namento
namento Contaore 1° ugello con segnalazione di funzio-
Contaore 3° ugello con segnalazione di funzio-namento
Segnalazione di blocco motore
Commutatore a quattro posizioniSegnalazione di blocco apparecchiatura conpulsante di sblocco
14
8. FUNZIONAMENTO BRUCIATORE
8.1 PROGRAMMA DI AVVIAMENTO DEL BRUCIATORE
PROGRAMMI DI AVVIAMENTO ALTERNATIVI
1) Se si desidera avere la preaccensione presente durante tutto il periodo di preventilazione (37 s): spostare il
ponte dai morsetti 11-3 ai morsetti 11-7 dell’ apparecchiatura.
2) Se si desidera accorciare il periodo di preventilazione da 37 a 20 s (con la contemporanea presenza della preac-
censione) spostare il filo dal morsetto 7 al morsetto 3 dell’ apparecchiatura (lasciando il ponte ai morsetti 11 - 3).
FUNZIONAMENTO TRISTADIO
Normale Con blocco per mancata accensioneTermostato
Motore
Trasf. d’accensione
Valvola di sicurezza
Valvola 1a fiamma
Valvola 2a fiamma
Valvola 3a fiamma
Spia di bloccoD2896
max
0
3° stadio
2° stadio
1° stadio
15
9. DIAGNOSTICA PROGRAMMA DI AVVIAMENTODurante il programma di avviamento, le indicazioni sono esplicate nella seguente tabella:
10.DIAGNOSTICA MAL FUNZIONAMENTOL’apparecchiatura in dotazione ha una sua funzione diagnostica attraverso la quale è possibile facilmente individuare lepossibili cause di mal funzionamento (segnalazione: LED ROSSO).Per utilizzare tale funzione, bisogna aspettare almeno dieci secondi dall’istante di messa in sicurezza dell’apparecchiatura epremere il pulsante di sblocco per un tempo minimo di tre secondi.Rilasciato il pulsante, il LED ROSSO comincerà a lampeggiare, come illustrato nella seguente figura.
Gli impulsi del LED costituiscono un segnale intervallato da 3 secondi circa.Il numero degli impulsi darà le informazioni sui possibili guasti, secondo la seguente tabella:
2 lampeggi Non viene rilevato un segnale stabile di fiamma nel tempo di sicurezza:– guasto alla fotoresistenza;– guasto alla valvola olio;– inversione fase/neutro;– guasto al trasformatore di accensione– bruciatore non regolato (gasolio insufficiente).
3 lampeggi – Non utilizzato.
4 lampeggi – Non utilizzato.
7 lampeggi Sparizione della fiamma durante il funzionamento:– bruciatore non regolato (gasolio insufficiente);– guasto alla valvola olio;– cortocircuito tra la fotoresistenza e la terra.
Wenn der Brenner mit einer oder mit zwei Düsen betrieben wird, sind die Feuerraumdruckbedingungen günstiger
und es gibt keine Probleme.
ABMESSUNGEN DES VERSUCHS - FEUERRAUMS (ISO 5063 - 1978)
D - Kesseldurchmesser in cm
P - Lage der verstellbaren Rückwand in m
Was den Brennerkopfüberstand anlangt
müssen die Vorschriften des
Kesselherstellers beachtet werden.
Bei Kesseln mit vorderer Rauchkammer
müss der Teil des Kopfes, welcher in den
Feuerraum hineinragt mit hitzebeständigem
Material geschützt werden.
mba
r
kg/h
kW
D
P
20
3. HYDRAULIKANSCHLÜSSE
Das max. Vakuum von 0,45 bar (35 cm Hg) darf nicht über-
schritten werden. Über diesem Wert bilden sich Brennstoffgase.
Sich vergewissern, dass die Leitungen absolut dicht sind.
Wenn der Tank tiefer als der Brenner angebracht ist,
empfehlen wir, die Rücklaufleitung in gleicher Höhe wie die
der Saugleitung enden zu lassen. In diesem Fall ist ein
Fussventil überflüssig.
Sollte die Rücklaufleitung über dem Niveau des
Brennstoffes enden, ist ein Fussventil unerlässlich
Diese Lösung ist aufgrund einer möglichen Undichtheit des
Ventiles nicht so sicher wie die vorher beschriebene.
H = Höhenunterschied;L = Gesamtlänge des Ausgangsschlauches;øi = Innerer Durchmesser des Schlauches. Kupferrohre mit
øi 14 mm können mit Stahlrohren G 1/2” ersetzt werden; Kupferrohre mit øi 16 und 18 mm können mit Stahlrohren G 3/4 ” ersetzt werden.
HMeter
P 140-200-300 T/G P 450 T/GL Meter L Meter
øi øi øi øi14 mm 16 mm 16 mm 18 mm
0 20 40 20 400,5 25 45 25 451 30 50 30 50
1,5 35 55 35 552 40 60 40 60
HMeter
P 140-200-300 T/G P 450 T/GL Meter L Meter
øi14 mm
øi16 mm
øi16 mm
øi18 mm
0 50 60 20 400,5 40 50 18 351 30 40 15 30
1,5 20 30 13 252 10 20 10 203 5 10 5 10
AUFFÜLLEN DER PUMPE:Den Verschluss des Vakuummeteranschlusses (5, Abb.1) lösen und das Austreten des Heizöls abwarten.
H max
. 10
m
Vor Inbetriebnahme des Brenners nach-prüfen, dass das Rückflussrohr nichtverstopft ist. Eventuelle Behinderungenwürden die Wellendichtung der Pumpebeschädigen.
ACHTUNG:
H
max
10
m
H AUFFÜLLEN DER PUMPE:Die Pumpe am Vakuummeteranschluss(5, Abb. 1) auffüllen. Den Brenner starten, die Luft am Manometer
ablassen (4, Abb. 1) und warten,
eine Störabschaltung erfolgen,muss der Vorgang wiederholt werden.
schaltet den Brenner aus, wenn die Tem-peratur oder der Kesseldruck den festge-legten Wert überschreiten
TS - Sicherheitsfernsteuerung:tritt bei Defekt an TL in Aktion
T2 - 2. Stufe Fernsteuerung T3 - 3. Stufe FernsteuerungSCHEMA (C) - Einstellung WärmerelaisDadurch wird ein Durchbrennen des Motors wegen starker Stromerhöhung infolge Ausfalls einer Phase vermieden.• Wenn der Motor über einen Sternschalter mit 400 V-Spannung verfügt, soll der Zeiger auf “MIN”-Stellung positioniert werden.
• Bei Dreieck-Schaltung mit 230 V-Spannung, muß der Zeiger auf Position “MAX” gestellt werden.
Auch wenn die Skala des Wärmerelais die Entnahmewerte des Motortypenschilds bei 400 V nicht vorsieht, wird der Schutz gewährleistet.NOTAIn Anlagen, in denen die Länge der Thermostat-verbindungen über 20 Meter beträgt, oder die sich in einer Umgebung befinden, in welcher der Brenner stark durch elektromagnetische Interferenzen gestört ist (über 10 v/m), muss der Kit Relais-Schnittstelle Code 3010386 ein-gebaut werden.
P 140 T/G P 200 T/G P 300 T/G
230 V 400 V 230 V 400 V 230 V 400 V
F A gG/gL 25 25 40 25 63 50
L mm2 2,5 2,5 4 2,5 6 4
P 300 T/G P 450 T/G
230 V 400 V 230 V 400 V
F A gG/gL 50 40 63 50
L mm2 6 4 10 6
E mm2 4 2,5 6 4
P 140 - 200 - 300 T/G DIREKTER MOTORSTART
D2568
P 300 - 450 T/G STERN - DREIECK MOTORSTART
(B)
WÄRMERELAIS
(C)
(A)
Zur Prüfung der Störabschaltung dieAbdeckung der Frontplatte entfernenund die Fotozelle abdunkeln.ACHTUNG: HOCHSPANNUNG
Wichting:
D2570
23
5. WAHL DER DÜSEN, DES PUMPENDRUCKES, DER BRENNERKOPFEINSTELLUNG
• Zuerst den gewünschten max. Durchsatz bei Betrieb aller drei Düsen
festlegen.
• Anhand des max. Durchsatzes und der Tabelle A oder B die angebrachten
Düsen wählen;
Düsen mit einem Zerstäubungswinkel von 60° beim empfohlenen Druck von
12 bar verwenden.
Bei dreistufigem Betrieb bis zu:
- 116 kg/h (P 140 T/G)
- 170 kg/h (P 200 T/G)
- 193 kg/h (P 300 T/G)
ist die 1. und die 2. Düse nicht mit der 3. Düse identisch, um in der 1. und 2. Betriebsstufe höhere, der DIN Norm
entsprechende CO2 Werte zu erhalten.
EMPFOHLENE DÜSEN BEI DREISTUFIGEM BETRIEB:
* Der Pumpendruck bezieht sich auf den Betrieb mit drei Düsen.Beim Betrieb von 2 Düsen, mehr noch beim Betrieb von nur 1 Düse, steigt der Druck automatisch an.
Die angegebenen Durchsatzwerte der Düsen sind nominal. Der tatsachliche Durchsatz kann vom Nominalwert bis zu ± 5% abweichen. Die Messung erfolgt indem die Düsen ver-rohrt werden und das gesprühte Oel gewogen wird. Die Pumpe wird in der Fabrik auf 12 bar eingestellt. Es wird empfohlen, eventuelle Abweichungen des Pumpendrukkes zwischen 10 und 14 bar zu halten.Schliesslich die Einstellung des Brennerkopfes aufgrund des max. Durchsatzes mit Hilfe des Diagrammes B feststel-len.Die Einstellung erfolgt, indem die Schraube A so weit gedrehtwird, bis die im Diagramm angegebene Einstellzahl mit der Ebene der Buchse B übereinstimmt (Abb. C).ANMERKUNG (nur für P 450 T/G) : je nach gewünschter Leistung kann die serienmäßigeingebaute Stauscheibe oder die mitgelieferte Stauscheibebenutzt werden (siehe Diagramm B). Für den Ersatz derStauscheibe wie folgt vorgehen (Abb. D):-die Schrauben 1) losschrauben;-den Belüftungsteil auf den Zapfen 2) zurückschieben;-die Schrauben 3) losschrauben und die Stauscheibeersetzen;-das Ganze umgekehrt wieder montieren.
DÜSEN 60° GESAMT- DÜSEN 60° GESAMT-PUMPE 12 BAR * DURCH-
* Der Pumpendruck bezieht sich auf den Betrieb mit drei Düsen.Beim Betrieb von 2 Düsen, mehr noch beim Betrieb von nur 1 Düse, steigt der Druck automa-tisch an.
P450: 1) Mit serienmäßig eingebauter Stauscheibe ø 192P450: 2) Mit mitgelieferter Stauscheibe ø 2155
Einstellzahl 6
C
BD3419
D3422
D
25
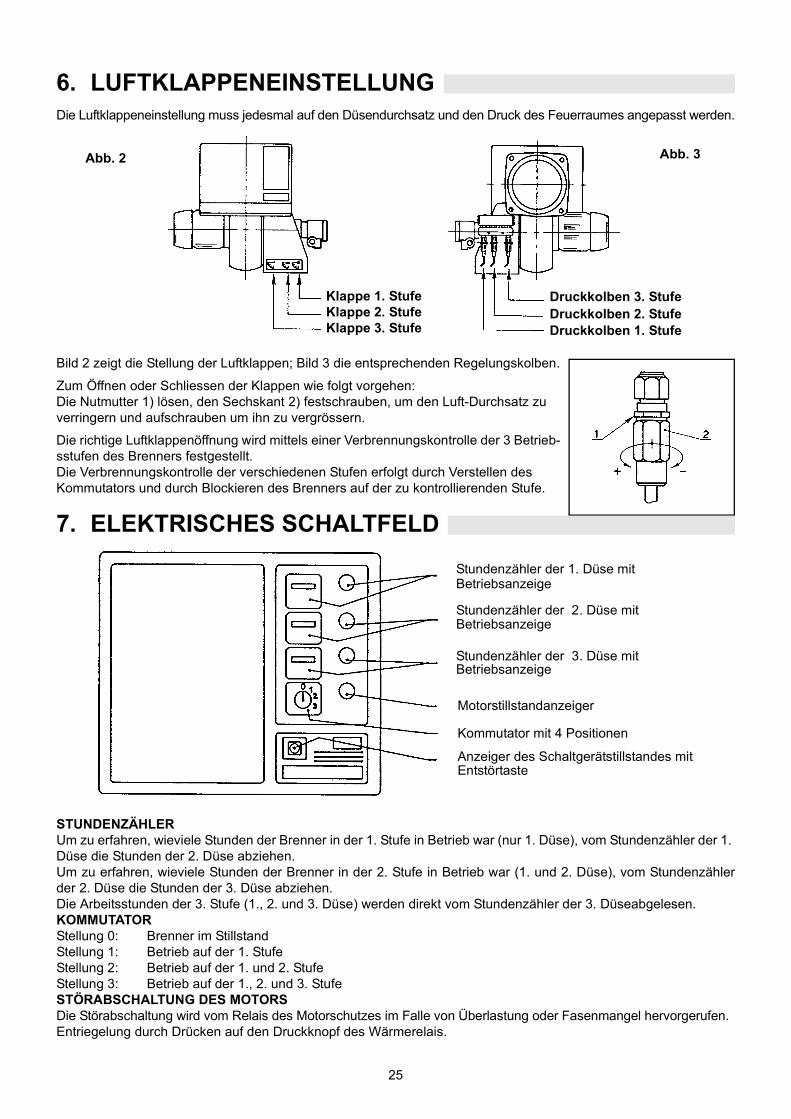
6. LUFTKLAPPENEINSTELLUNGDie Luftklappeneinstellung muss jedesmal auf den Düsendurchsatz und den Druck des Feuerraumes angepasst werden.
Bild 2 zeigt die Stellung der Luftklappen; Bild 3 die entsprechenden Regelungskolben.
Zum Öffnen oder Schliessen der Klappen wie folgt vorgehen: Die Nutmutter 1) lösen, den Sechskant 2) festschrauben, um den Luft-Durchsatz zu verringern und aufschrauben um ihn zu vergrössern.Die richtige Luftklappenöffnung wird mittels einer Verbrennungskontrolle der 3 Betrieb-sstufen des Brenners festgestellt.Die Verbrennungskontrolle der verschiedenen Stufen erfolgt durch Verstellen des Kommutators und durch Blockieren des Brenners auf der zu kontrollierenden Stufe.
7. ELEKTRISCHES SCHALTFELD
STUNDENZÄHLERUm zu erfahren, wieviele Stunden der Brenner in der 1. Stufe in Betrieb war (nur 1. Düse), vom Stundenzähler der 1. Düse die Stunden der 2. Düse abziehen.Um zu erfahren, wieviele Stunden der Brenner in der 2. Stufe in Betrieb war (1. und 2. Düse), vom Stundenzählerder 2. Düse die Stunden der 3. Düse abziehen.Die Arbeitsstunden der 3. Stufe (1., 2. und 3. Düse) werden direkt vom Stundenzähler der 3. Düseabgelesen.KOMMUTATORStellung 0: Brenner im StillstandStellung 1: Betrieb auf der 1. StufeStellung 2: Betrieb auf der 1. und 2. StufeStellung 3: Betrieb auf der 1., 2. und 3. StufeSTÖRABSCHALTUNG DES MOTORSDie Störabschaltung wird vom Relais des Motorschutzes im Falle von Überlastung oder Fasenmangel hervorgerufen.Entriegelung durch Drücken auf den Druckknopf des Wärmerelais.
Anzeiger des Schaltgerätstillstandes mitEntstörtaste
26
8. BRENNERBETRIEB
8.1 BRENNER - ANLAUFPROGRAMM
ALTERNATIVE ANLAUFPROGRAMME
1) Soll die Vorzündung während der ganzen Zeitspanne der Vorlüftung (37 s) vorhanden sein: die Brücke der
Klemmen von 11-3 auf die Klemmen 11-7 des Schaltgerätes verschieben.
2) Soll die Zeitspanne der Vorlüftung von 37 auf 20 s (bei andauernder Vorzündung) verkürzt werden, das Kabel
von der Klemme 7 auf die Klemme 3 des Schaltgerätes verschieben (die Brücke bleibt dabei auf den Klemmen
11 - 3) (Sonderfall ninsichtlich Vorbelüftung).
DREISTUFIGER BETRIEB
Normal Störung bei fehlender FlammeThermostat
Motor
Zündtransformator
Sicherheitsventil
Ventil 1. Flamme
Ventil 2. Flamme
Ventil 3. Flamme
StörungD2896
max
0
3. Stufe
2. Stufe
1. Stufe
27
9. BRENNERBETRIEBDie Bedeutung der verschiedenen Anzeigen wäh-rend des Anlaufprogramms ist in folgender Tabelle erklärt:
10.DIAGNOSTIK BETRIEBSSTÖRUNGENDas mitgelieferte Steuergerät hat eine Diagnosefunktion, mit der die möglichenUrsachen von Betriebsstörungen leicht auffindbar sind (Anzeige: ROTE LED).Um diese Funktion zu benützen, muss man mindestens zehn Sekunden ab dem Augenblick warten, ab dem das Gerät inSicherheitszustand ist, dann mindestens drei Sekunden lang auf den Entriegelungsschalter drücken.Nach dem Loslassen des Schalters beginnt die ROTE LED zu blinken, wie in der hier folgenden Abbildung gezeigt.
Die Impulse der LED verursachen ein Signal, das ca. alle 3 Sekunden gegeben wird.Die Anzahl der Impulse wird Informationen über die möglichen Defekte geben, nach der hier folgenden Tabelle:
2-maliges Blinken Innerhalb der Sicherheitszeit wird keine stabile Flamme festgestellt:– Defekt an der Photozelle;– Defekt an den Ölventilen;– Umkehrung von Phase/Nullleiter;– Defekt am Zündtransformator;– Brenner nicht eingestellt (Öl nicht ausreichend).
3-maliges Blinken – Nicht benutzt.
4-maliges Blinken – Nicht benutzt.
7-maliges Blinken Erlöschen der Flamme während des Betriebs:– Brenner nicht eingestellt (Öl nicht ausreichend);– Defekt an den Ölventilen;– Kurzschluss zwischen Photozelle und Erde.
8-maliges Blinken – Defekt des Ölfreigabethermostats;– Unterbrechung der Heizelementei.
10-maliges Blinken – Anschlussfehler oder interne Störung.
ROTE LED eingeschaltetMindestens 10 s Warten
Mindestens 3 sauf Entriegelungsschalter Signal Signal
Pression dans la chambre de combustion - Debit maximum
(3 gicleurs en fonctionnement)
Quand le brûleur fonctionne avec un seul gicleur, ou deux, les conditions de pressurisation sont plus
favorables et ne posent pas de problème.
DIMENSIONS DE LA CHAMBRE DE COMBUSTION D’EPREUVE (ISO 5063 - 1978)
D - Diamètre chaudière en cm
P - Position fond mobile en m
Pour la proéminence de la tête de
combustion, suivre les indications données
par le fabricant de la chaudière.
Pour les chaudières avec boîte à fumée
antériure, exécuter une protection
appropriée avec matériel refractaire sur la
partie de la tête proéminente en chambre de
combustion.
mba
r
kg/h
kW
D
P
32
3. TUYAUTERIES
Ne pas dépasser la depression max. de 0,45 bar (35 cm Hg).
Au-dessus de cette valeur se crée la séparation du gaz du combustible.Les tuyauteries doivent être parfaitement étanches.
Quand la cuve est à un nivaeu inférieur à celui du brûleur, il
est conseillé d’amener la tuyauterie de retour au même niveau que la tuyauterie d’aspiration. Dans ce cas, le clapet
crépine n’est pas une obligation.
Si la tuyauterie de retour arrive au-dessus du nivaeu du combustible, le clapet crépine est indispensable
Cette solution est moins sûre que la précédente à cause,
éventuellement, de la mauvaise étanchéité du clapet
crépine.
H = Dénivellation;L = Longueur totale du tube d’aspiration;øi = Diamètre interne de la tuyauterie. Les tuyauteries en
cuivre de øi 14 mm peuvent être remplacées par des tuyauteries en acier de G 1/2” ; les tuyauteries en cuivre de øi 16 et 18 mm peuvent être remplacées par des tuyauteries en acier de G 3/4 ”.
Hmètres
P 140-200-300 T/G P 450 T/GL mètres L mètres
øi øi øi øi14 mm 16 mm 16 mm 18 mm
0 20 40 20 400,5 25 45 25 451 30 50 30 50
1,5 35 55 35 552 40 60 40 60
Hmètres
P 140-200-300 T/G P 450 T/GL mètres L mètres
øi14 mm
øi16 mm
øi16 mm
øi18 mm
0 50 60 20 400,5 40 50 18 351 30 40 15 30
1,5 20 30 13 252 10 20 10 203 5 10 5 10
AMORÇAGE DE LA POMPE:Enlever le bouchon de raccordement du vacuomètre (5, fig.1) et attendre la sortie du fuel.
H max
. 10
m
S’assurer, avant de mettre en route lebrûleur, que le tube de retour ne sointpas obstrué. Une obturation éventuelleprovoquerait la rupture de l’organed’étanchéité de la pompe.
ATTENTION:
H
max
10
m
H
AMORÇAGE DE LA POMPE:Remplir de fuel la pompe par leraccord vacuomètre (5, fig.1), mettre en route le brûleur, purgerl’air par le raccord du manomètre(4, fig.1) et attendre la sortie dufuel. Si une mise en sécurité intervient, répéter l’opération.
33
4. INSTALLATION ELECTRIQUE
4.1 INSTALLATION ELECTRIQUE REALISEE EN USINE
LEGENDE SCHEMAS (A) - (B)CMV - Contacteur moteur
CO - Commutateur
FR - Photoresistance
h1,2,3 - Compteur d’heures 1°, 2°, 3°
allure
L1,2,3 - Lampe 1°, 2°, 3° allure
L4 - Lampe sécurité moteur
MB - Bornier brûleur
MV - Moteur ventilateur
RT - Relais thermique
TA - Transformateur d’allumage
TB - Terre brûleur
VS - Electrovanne de sécurité
V1,2,3 - Electrovanne 1°, 2°, 3° allure
LEGENDE SCHEMA (C)F1 - Fusées du circuit triphasé
F2 - Fusée du circuit de contrôle
F3 - Relais thermique -
Réglé en usine à:
P 300 T/G: 10,2 A pour 400 V
17,6 A pour 230 V
P 450 T/G: 16,7 A pour 400 V
29 A pour 230 V
KL1- Contacteur de ligne
KS1- Contacteur d’étoile
KT - Relais temporisateur pour le
passage étoile-triangle
(réglé en usine à 10 s.)
KT1- Contacteur de triangle
MA - Bornier démarreur
Q1 - Sectionneur avec bloc porte
P 300 - 450 T/G DEMARRAGE ETOILE - TRIANGLE
P 140 - 200 - 300 T/G DEMARRAGE DIRECT
DEMARREUR ETOILE - TRIANGLE
(A)
(B)
(C)
D2567
D2569
D2049
34
4.2 RACCORDEMENTS ELECTRIQUES AU BORNIER( effectué par l’installateur )
SCHEMA (A) - Raccordement electrique brûleurP 140-200-300 T/G avec démarrage moteur direct
Section câbles
SCHEMA (B) - Raccordement electrique brûleur P 300-450 T/G avec démarrage moteur étoile-trianle
Section câbles
LEGENDE SCHEMAS (A) - (B)I1 - Interrupteur électrique pour arrêt manuel
brûleurMA- Porte-bornes démarrage étoile-triangleMB- Porte-bornes brûleurPS - Bouton réarmementS - Signalisation de blocage à distanceTL - Télécommande de limite:
arrête le brûleur quand la température ou la pression dans la chaudière atteint la valeur maximum fixée
TS - Télécommande de sécurité:intervien quand le TL tombe en panne
SCHEMA (C) - Réglage relais thermiqueSert à éviter que le moteur ne grille à cause d’une forte absorption due à l’absence d’une phase.• Si le moteur est alimenté en étoile, 400 V, le curseur doit être positionné sur “MIN”.
• S’il est alimenté en triangle, 230 V, le curseur est positionné sur “MAX”.
La protection est également assurée si l’échelle du relais thermique ne comprend pas la valeur de l’intensité absorbée indiquée sur la plaque du moteur en 400 V.
REMARQUEIl est nécessaire dãutiliser le kit interface-relais code 3010386 dans les installations où la lon-gueur des fils des thermostats est supérieure à 20 mètres ou lorsque Le local où se trouve le brûleur est particulièrement sujet aux interféren-ces électromagnétiques (plus de 10 v/m).
P 140 T/G P 200 T/G P 300 T/G
230 V 400 V 230 V 400 V 230 V 400 V
F A gG/gL 25 25 40 25 63 50
L mm2 2,5 2,5 4 2,5 6 4
P 300 T/G P 450 T/G
230 V 400 V 230 V 400 V
F A gG/gL 50 40 63 50
L mm2 6 4 10 6
E mm2 4 2,5 6 4
(A)
P 140 - 200 - 300 T/G DEMARRAGE MOTEUR DIRECT
D2568
P 300 - 450 T/G DEMARRAGE ETOILE - TRIANGLE
(B)
RELAIS THERMIQUE
(C)
Verifier la mise en sécurité du brûleur enobacurcissant la cellule photoresistante,apres avoir enleve le couvercle de la console.ATTENTION: HAUTE TENSION
Important:
D2570
35
5. CHOIX DES GICLEURS, DE LA PRESSION DE LA POMPE, DE LA REGULATION DE LA TETE DE COMBUSTION
• Déterminer d’abort le débit maximum désideré, avec les 3 gicleurs en fonc-tionnement.
• Sur la base d débit maximum, choisir dans le tableau A, la liste des gicleurs nécessaires.Utiliser des gicleurs à angle de pulvérisation de 60° à la pression conseillée de 12 bar.Dans le fonctionnement à 3 allures, jusqu’à:- 116 kg/h (P 140 T/G) - 170 kg/h (P 200 T/G)- 193 kg/h (P 300 T/G) le 1er et 2ème gicleurs ne sont pas identiques au 3ème. Ceci afin d’obtenir, en 1ère et 2ème allure, des valeurs de CO2 plus élevées, suivant la norme DIN.
GICLEURS CONSEILLES POUR FONCTIONNEMENT À 3 ALLURE:
* La pression de la pompe s’entend avec les 3 gicleurs en fonctionnement.Lorsque l’on fonctionne avec deux gicleurs, et plus encore avec un seul gicleur, la pression monte automatiquement.
Les débits des gicleurs indiqués dans le tableau sont nomi-naux. Le débit réel peut être différent de celui nominal jusqu’à ± 5%. Sa mesure s’effectue en collectant an gicleur le fuel par une tuyauterie et en pesant le fuel ainsi éjecté. La pompe sort d’usine tarée à 12 bars. Il est recommandé de tenir compte d’éventuelles variations de pression de la pompe entre 10 et 14 bars.Sur la base du débit maximum, rechercher, dans le dia-gramme B, le réglage de la tête de combustion.Pour le réglage il faut tourner la vis A jusqu’à ce que l’enco-che indiquéé par le diagramme correspond au plan du four-reau B (Fig. C).REMARQUE (uniquement pour P 450 T/G) :selon la puissance désirée, il est possible d’utiliserl’accroche-flamme monté de série ou celui fourni à part(voir diagramme B). Procéder comme suit pour remplacerl’accroche-flamme (Fig. D) :-dévisser les vis 1);-reculer la partie ventilante en la faisant coulisser sur lesboulons creux 2);-remplacer l’accroche-flamme après avoir dévissé les vis 3);-remonter le tout mais en sens inverse.
GICLEURS 60° DEBIT GICLEURS 60° DEBITPOMPE 12 BAR * TOTAL POMPE 12 BAR * TOTAL
* La pression de la pompe s’entend avec les 3 gicleurs en fonctionnement.Lorsque l’on fonctionne avec deux gicleurs, et plus encore avec un seul gicleur, la pression monte automatiquement.
P 450: 1) Avec accroche-flamme ø 192 (monté de série) P 450: 2) Avec accroche-flamme ø 215 (fourni à part)
Encoche 6
B
C
D3419
D
D3422
37
6. REGLAGE VOLET D’AIRLe réglage du volet d’air doit être adapté respectivement aux débits des gicleurs et à la pressurisation de la chambre de combustion.
La figure 2 montre comment sont disposés les volets d’air; la figure 3 montre les vérins de réglage correspondants.
Pour ouvrir ou fermer le volet d’air, agir de la manière suivante: desserer l’écrou 1), vis-ser l’hexagone 2) pour diminuer le débit, le dévisser pour augmenter celui-ci.
L’ouverture correcte des volets d’air se détermine au moyen d’un contrôle de combus-tion pour les 3 allures de fonctionnement du brüleur.Le contrôle de la combustion des différentes allures s’effectue en agissant sur le com-mutateur arrêtant le brûleur sur l’allure à contrôler.
7. SOCLE COMMANDES ELECTRIQUES
COMPTEUR D’HEURESPour connaître le temps, en heures, durant lequel le brûleur a fonctionné en 1ère allure (1er gicleur seul), enlever du compteur d’heures du 1er gicleur les heures de fonctionnement du 2ème gicleur.Pour connaître le temps, en heures, durant lequel le brûleur a fonctionné en 2ème allure (1er + 2ème gicleur), enlever du compteur d’heures du 2ème gicleur les heures de fonctionnement du 3ème gicleur.Les heures de fonctionnement en 3ème allure (1er + 2ème + 3ème gicleur) se lisent directement sur le compteur du 3ème gicleur.COMMUTATEURPosition 0: brûleur arrêtéPosition 1: fonctionnement en 1ère allurePosition 2: fonctionnement en 2ème et 3ème allurePosition 3: fonctionnement en 1ère, 2ème et 3ème allureSECURITE MOTEURElle est provoquée par le relais thermique du moteur en cas de surcharge ou manque de phase.Pour le débloquer appuyer sur le bouton-poussoir du relais thermique.
Compteur d’heures 2ème gicleur et signalisationde fonctionnement
de fonctionnementCompteur d’heures 1er gicleur et signalisation
Compteur d’heures 3ème gicleur et signalisationde fonctionnement
Signalisation sécurité moteur
Commutateur à 4 positionSignalisation de sécurité du relais et bouton deréarmement
38
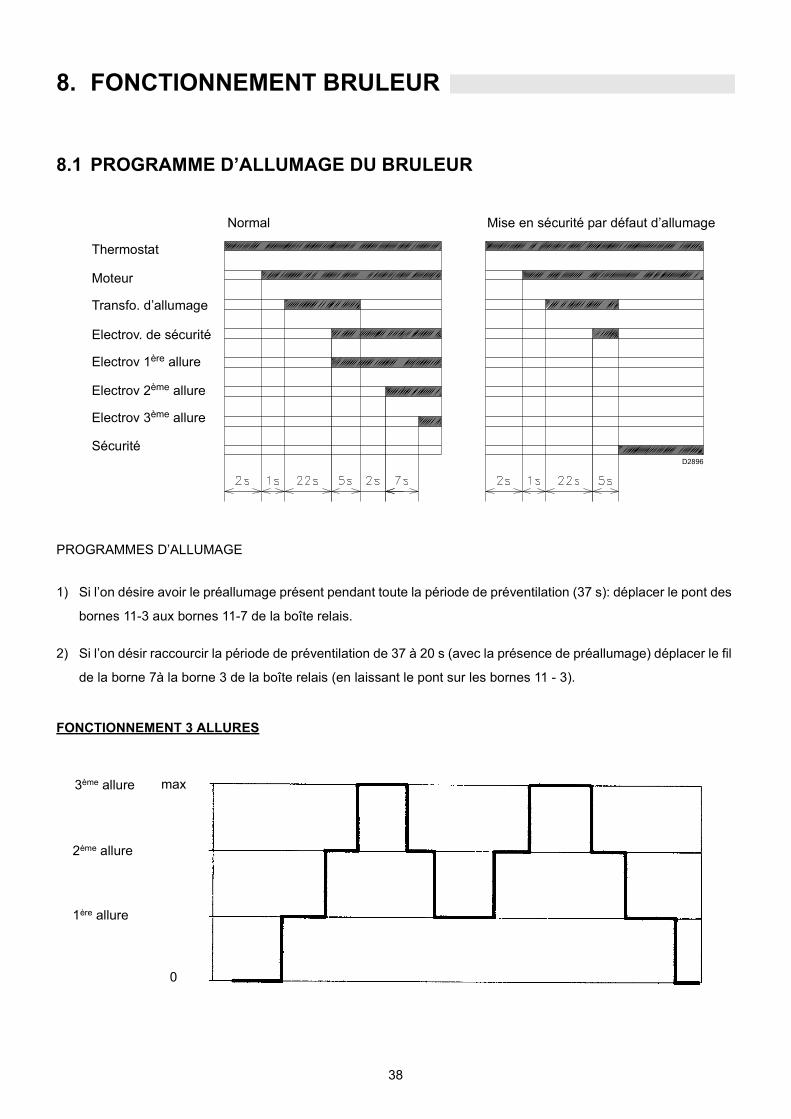
8. FONCTIONNEMENT BRULEUR
8.1 PROGRAMME D’ALLUMAGE DU BRULEUR
PROGRAMMES D’ALLUMAGE
1) Si l’on désire avoir le préallumage présent pendant toute la période de préventilation (37 s): déplacer le pont des
bornes 11-3 aux bornes 11-7 de la boîte relais.
2) Si l’on désir raccourcir la période de préventilation de 37 à 20 s (avec la présence de préallumage) déplacer le fil
de la borne 7à la borne 3 de la boîte relais (en laissant le pont sur les bornes 11 - 3).
FONCTIONNEMENT 3 ALLURES
Normal Mise en sécurité par défaut d’allumage
Thermostat
Moteur
Transfo. d’allumage
Electrov. de sécurité
Electrov 1ère allure
Electrov 2ème allure
Electrov 3ème allure
SécuritéD2896
max
0
3ème allure
2ème allure
1ère allure
39
9. DIAGNOSTIC CYCLE DE DÉMARRAGEPendant le programme de démarrage, les indications sont expliqées dans le tableau suivant:
10.DIAGNOSTIC MAUVAIS FONCTIONNEMENTLa boîte de contrôle fournie de série a une fonction diagnostic qui permet de localiser facilementles causes possibles de mauvais fonctionnement (signalisation: LED ROUGE).Pour utiliser cette fonction, il faut attendre au moins dix secondes après la mise en sécurité de la boîte de contrôle etappuyer sur le bouton de déblocage pendant au moins trois secondes.Le LED ROUGE se met à clignoter après avoir relâché le bouton, comme indiqué sur la figure suivante.
Les impulsions du led constituent un signal espacé d'environ 3 secondes.Le nombre d'impulsions donne des informations sur les pannes possibles, selon le tableau suivant:
2 clignotements Un signal stable de flamme n’est pas détecté durant le temps de sécurité:– anomalie de la photorésistance;– anomalie vannes fioul;– inversion phase/ neutre;– anomalie transformateur d'allumage– brûleur pas réglé (fioul insuffisant).
3 clignotements – Non utilisé.
4 clignotements – Non utilisé.
7 clignotements Disparition de la flamme durant le fonctionnement:– brûleur pas réglé (fioul insuffisant);– anomalie vannes fioul;– court-circuit entre la photorésistance et la terre.
When the burner operates with only one, or two nozzles, the pressurizzation conditions are improved and no
problems arise.
DIMENSIONS OF THE TESTING COMBUSTION CHAMBRE (ISO 5063 - 1978)
D - Boiler diameter (cm)
P - Position of the boiler movable wall (m)
For the combustion head projection carefully
follow the boiler manufacturer indications.
A proper protection with refractory material
on the combustion chamber shall be made,
when boilers with frontal smoke box are
used.
mba
r
kg/h
kW
D
P
44
3. HYDRAULIC SYSTEMS
Pay attention to do not overcome the max. depression of
0.45 bar (35 cm Hg), over this value the fuel may turn into gas.
Check the pipes are perfectly sealed.
When the fuel tank is under the burner level we suggest to
let the return line arrive where the suction line starts. In this
case the foot valve is not necessary.
Should the return line arrive over the fuel level, the foot
valve is indispensable. Notice that this solution is less safe
than the previous one, because it is possible the valve has
not a good sealing.
H = Difference in the pipes heights;L = Total lenght of the suction tube;øi = Internal diameter of the tube. Copper tubes øi 14 mm
could be replaced by steel tubes G 1/2” ; copper tubes øi 16 and 18 mm could be replaced by steel tubes G 3/4 ”.
Hmeters
P 140-200-300 T/G P 450 T/GL meters L meters
øi øi øi øi14 mm 16 mm 16 mm 18 mm
0 20 40 20 400,5 25 45 25 451 30 50 30 50
1,5 35 55 35 552 40 60 40 60
Hmeters
P 140-200-300 T/G P 450 T/GL meters L meters
øi14 mm
øi16 mm
øi16 mm
øi18 mm
0 50 60 20 400,5 40 50 18 351 30 40 15 30
1,5 20 30 13 252 10 20 10 203 5 10 5 10
PUMP PRIMING:Loose the tap from the vacuometer plug (5, fig.1) and wait for the flow of the fuel.
H max
. 10
m
Before placing the burner in operation,ensure that the return line is open. Anyobstruction may demage the pump seal.
ATTENTION:
H
max
10
m
H
PUMP PRIMING:Fill the pump with the light oil from the vacuometer plug (5, fig.1), put the burner in operation, purge the air from themanometer plug (4, fig.1) and.wait for the pump priming. If lock-out occurs repeat the procedure
45
4. ELECTRICAL SYSTEM
4.1 ELECTRICAL SYSTEM FACTORY-SET
KEY TO LAYOUTS (A) - (B)CMV - Motor contactor
CO - Commutator
FR - Photocell
h1,2,3 - 1., 2., 3. stage hourconters
L1,2,3 - 1., 2., 3. stage lamps
L4 - Lock-out motor lamp
MB - Burner terminal strip
MV - Fan motor
RT - Thermal relay
TA - Ignition transformer
TB - Burner ground (earth)
connection
VS - Safety solenoid valve
V1,2,3 - 1., 2., 3. stage solenoid valves
KEY TO LAYOUT (C)F1 - Power line fuses
F2 - Control devices fuse
F3 - Thermal relay - Factory calibration
at:
P 300 T/G: 10.2 A for 400 V
17.6 A for 230 V
P 450 T/G: 16.7 A for 400 V
29 A for 230 V
KL1- Line Contact-maker
KS1- Star Contact-maker
KT - Timer relay for switching from star
to delta (factory calibration at
10 s.)
KT1- Delta Contact-maker
MA - Starter terminal strip
Q1 - Disconnecting switch with
interlock
P 300 - 450 T/G STAR-DELTA MOTOR STARTING
P 140 - 200 - 300 T/G DIRECT MOTOR STARTING
STAR-DELTA STARTER
(A)
(B)
(C)
D2567
D2569
D2049
46
4.2 ELECTRICAL CONNECTION TO THE TERMINAL STRIP(installer-set)
LAYOUT (A) - Electrical connection P 140-200-300 T/G burners with direct motor starting
Cables cross-section
LAYOUT (B) - Electrical connection P 300-450 T/G burners with star-delta motor starting
shut down the burner when the boiler temperature or pressure reaches the maximum preset value
TS - Safety load control system:operateds when TL is faulty
T2 - 2nd stage load control systemT3 - 3rd stage load control system
SCHEMA (C) - Calibration of thermal relayThis is required to avoid motor burn-out in the event of a significant increase in power absorption caused by a missing phase.• If the motor is star-powered, 400 V, the cursor should be positioned to “MIN”.
• If it is delta-powered, 230 V, the cursor should be positioned to “MAX”.
If the scale of the thermal relay does not include rated motor absorption at 400 V, protection is still ensured.
NOTEIn systems where the run of wiring connecting the thermostat exceeds 20 metres in length, or in places where the burner is subject to particu-larly disturbing electromagnetic interference (over 10 v/m), you must insert the relay-inter-face kit item number 3010386.
P 140 T/G P 200 T/G P 300 T/G
230 V 400 V 230 V 400 V 230 V 400 V
F A gG/gL 25 25 40 25 63 50
L mm2 2,5 2,5 4 2,5 6 4
P 300 T/G P 450 T/G
230 V 400 V 230 V 400 V
F A gG/gL 50 40 63 50
L mm2 6 4 10 6
E mm2 4 2,5 6 4
P 140 - 200 - 300 T/G DIRECT MOTOR STARTING
D2568
(C)
THERMAL RELAY
(B)
P 300 - 450 T/G STAR-DELTA MOTOR STARTING
(A)
Check the lock-out by darkening thephoto-cell after removal of the cover.ATTENTION: HIGH VOLTAGE
Important:
D2570
47
5. CHOICE OF NOZZLES, PUMP PRESSURE, COMBUSTION HEAD ADJUSTMENT
• State, first of all, the maximum output required with all three nozzles in
operation.
• On the base of the maximum required output, choose, from table A, three
related nozzles.
Use nozzles with a 60° spray angle at the recommended pressure of 12 bar.
For three-stage operation, up to:
- 116 kg/h (P 140 T/G)
- 170 kg/h (P 200 T/G)
- 193 kg/h (P 300 T/G)
1st and 2nd nozzle are not equal to the 3rd one. Follow this procedure in order to obtain higher values of CO2
(during 1st and 2nd stage of operation), complying with German Standard DIN.
THREE-STAGE OPERATION SUGGESTED NOZZLES:
* The pump pressure is referred to all three nozzles operating, the pressure increases automatically with two nozzles in operation and more with only one.
Rated nozzles delivery are shown in the table. The real nozzle delivery may vary from the rated one up to ± 5%, its detection is made by weighing the oil sprayed out from the nozzle inserted in a tube. The pump leaves the factory rated at 12 bar. Pay attention to not overcome the pump pressure values of 10 and 14 bar.At the end, on the base of the maximum output, you obtain the combustion head adjustment from the dia-gramm D.The adjustment should be made by turning the screw A till the set-point (see diagram) is on the line with the washer B (Fig. C).
NOTE (for P 450 T/G only): depending on the desired output, you can use the ready-fitted standard-issue diffuser disc or the disc supplied (see diagram B). To replace the diffuser disc, proceed as follows (Fig. D):-unscrew screws 1);-slide the ventilating part back on pins 2);-first unscrew screws 3), then replace diffuser disc; -refit all parts following the above procedure in reverseorder.
NOZZLES 60° TOTAL NOZZLES 60° TOTALPUMP 12 BAR * DELIVERY PUMP 12 BAR * DELIVERY
* The pump pressure is referred to all three nozzles operating, the pressure increases auto-matically with two nozzles in operation and more with only one.
P 450: 1) With diffuser disc ø 192 (standard issue ready fitted)P 450: 2) With diffuser disc ø 215 (supplied)
Set-point 6
C
D3419
B
D3422
D
49
6. AIR DAMPER ADJUSTMENTThe air dampers adjustment shall be set each time in relation with the nozzles delivery and the combustion chamber pressurization.
Fig. 2 shows the placement of the air dampers as fig. 3 their correspondent hydraulic jacks.To open or close the air dampers proceed as follows: loose the ring nut 1), turn clockwise the exagonal body 2) in order to decrease the air flow, and counterclockwise to increase it.The right adjustment of the air dampers may be detect by checking the combustion results in the three stages of burner operation.To check the combustion during the different stages, the commutator should be set to the position corresponding to the burner stage to be controlled.
7. ELECTRIC PANEL
HOURCOUNTERDeducting the number of hours of 2nd nozzle hourcounter from those indicated in the 1st nozzle hourcounter you could know how many hours the burner has been performing only at 1st stage; the same procedure to detect the per-formance hours of the 2nd stage alone, deduct from the 2nd stage hourcounter the hours indicated in the 3rd nozzle hourcounter.The hours of 3rd stage operation are shown rightly on the 3rd nozzle hourcounter.COMMUTATORPos. 0: Burner stopPos. 1: Burner operation only at 1st stagePos. 2: Burner operation at 1st and 2nd stagePos. 3: Burner operation at 1st, 2nd, 3rd stageMOTOR LOCK-OUTIt is caused by the overload relay in case of overload or no electic supply.Release by pressing the pushbutton on thermal relay.
1st stage air damper2nd stage air damper3rd stage air damper
3rd stage hyd. jack2nd stage hyd. jack1st stage hyd. jack
Fig. 2 Fig. 3
2nd nozzle hourcounter with operation signal
1st nozzle hourcounter with operation signal
3rd nozzle hourcounter with operation signal
Motor lock-out signal
4 positions commutatorControl box lock-out signal with re-set push-button
50
8. BURNER OPERATION
8.1 BURNER START UP CYCLE
ALTERNATIVE START-UP CYCLES
1) If you desire the pre-ignition being present during the complete pre-purge phase (37 s): remove the bridge from
the terminals 11 - 3 and put it on the terminals 11 - 7 of the control box.
2) If you desire to reduce the pre-purge period from 37 to 20 s (with contemporaneus presence of the pre-ignition)
remove the wire from the terminal no. 7 to the no. 3 of the control box (maintaining the bridge to the terminals
11 - 3).
THREE STAGE OPERATION
Normal Lock-out because of no ignition
Thermostat
Motor
Ignition transformer
Safety valve
1st flame valve
2nd flame valve
3rd flame valve
Lock-out signalD2896
max
0
3rd stage
2nd stage
1st stage
51
9. BURNER START-UP CYCLE DIAGNOSTICSDuring start-up, indication is according to the followin table:
10.OPERATING FAULT DIAGNOSTICSThe control box has a self-diagnostic system, which easily allows identifyingthe operating faults (RED LED signal).ITo use this function, wait at least ten seconds from the safety lock out, and then press the reset button for a minimum of 3 sec-onds.After releasing the button, the RED LED starts flashing as shown in the diagram below.
The pulses of the LED constitute a signal spaced by approximately 3 seconds.The number of pulses will provide the information on the possible faults, according to the table below:
2 flashes The flame does not stabilise at the end of the safety time:– faulty photocell;– faulty or soiled light-oil valves;– neutral/phase exchange;– faulty ignition transformer– poor burner regulation (insufficient light oil).
3 flashes – Not used.
4 flashes – Not used.
7 flashes Loss of flame during operations:– poor burner regulation (insufficient light oil);– faulty or soiled light oil valves;– short circuit between photocell and earth.