27
1 I Digitalpiano UP-1 ArtNr 00038290, 00044926, 00044927, 00044348 Version 09/2019 User manual

1
I
Digitalpiano UP-1
ArtNr 00038290 00044926 00044927 00044348
Version 092019
User manual
2
THE FCC REGULATION WARNING (for USA)
This equipment has been tested and found to comply with the limits for a Class B digital device pursuant to Part 15 of the FCC Rules These limits are designed to provide reasonable protection against harmful interference in a residential installation This equipment generates uses and can radiate radio frequency energy and if not installed and used in accordance with the instructions may cause harmful interference to radio communications However there is no guarantee that interference will not occur in a particular installation If this equipment does cause harmful interference to radio or television reception which can be determined by turning the equipment off and on the user is encouraged to try to correct the interference by one or more of the following measures
Reorient or relocate the receiving antenna Increase the separation between the equipment and receiver Connect the equipment into an outlet on a circuit different from that to which the receiver is connected Consult the dealer or an experienced radioTV technician for help
Unauthorized changes or modification to this system can void the users authority to operate this equipment CAUTION
The normal function of the product may be disturbed by Strong Electro Magnetic Interference If so simply reset the product to resume normal operation by following the owners manual In case the function could not resume please use the product in other location PRECAUTIONS PLEASE READ CAREFULLY BEFORE PROCEEDING
Please keep this manual in a safe place for future reference Power Supply
Please connect the designated AC adaptor to an AC outlet of the correct voltage Do not connect it to an AC outlet of voltage other than that for which your instrument is intended Unplug the AC power adaptor when not using the instrument or during electrical storms Connections
Before connecting the instrument to other devices turn off the power to all units This will help prevent malfunction and or damage to other devices Location
Do not expose the instrument to the following conditions to avoid deformation discoloration or more serious damage Direct sunlight Extreme temperature or humidity Excessive dusty or dirty location Strong vibrations or shocks Close to magnetic fields Interference with other electrical devices
Radios and televisions placed nearby may experience reception interference Operate this unit at a suitable distance from radios and televisions Cleaning
Clean only with a soft dry cloth Do not use paint thinners solvents cleaning fluids or chemical-impregnated wiping cloths Handling
Do not apply excessive force to the switches or controls Do not let paper metallic or other objects into the instrument If this happens remove the electric plug from the outlet Then have the instrument inspected by qualified service personnel Disconnect all cables before moving the instrument
INFORMATION FOR YOUR SAFETY
3
Contents
4
Front Panel
1 POWER SWITCH Turn the power on or off Page 8 2 [MASTER VOLUME] knob Adjust the master volume Page 8 3 [MIC VOLUME] knob Adjust the microphone volume Page 9 4 [BRILLIANCE] knob
Adjust the brilliance of the piano Page 11 5 [TEMPO] knob
Spin to adjust the tempo press to reset the tempo Page 12 6 [METRO] button Turn the metronome onoff Page 12 7 [REC] button EnterExit record mode Page 14 8 [LEFT] button
Turn on or off the left-hand part when playing back a preset song Page 13 9 [RIGHT] button
Turn on or off the right-hand part when playingback a preset song Page 13
14 [VOICE] button
Enter the voice mode If the ldquoSPLITrdquo or ldquoDUALrdquo function is on press to switch between Voice L Voice R1 and Voice R2 Page 10 15 [VOICE DEMO] button
Play back the VOICE DEMO of the current selected Voice Page 10 16 [DUAL] button
Turn Voice R2 on Page 10 17 [SPLIT] button
Turn Voice L on and split the keyboard into left and right voice areas Page 11 18 [TWINOVA] button
Enter TWINOVA mode which will enable two players to play the piano Page 12 19 [FUNCTION] button
Press to open the Function menu Or press and hold to open the system setting menu Press repeatedly to select a menu item to edit Page 16 20 [PIANO] button Enter the PIANO mode Page
10 [SONG] button Enter song mode Page 13 11 [USB] button Open the inserted USB flash drive Page 13 12 [STARTSTOP] button
Startstop playing a song P13 Start recording a song P14 13 DATA DIAL
Change the selected parameter value Page 16 7 8 9 1
5
2IO Panel
21 [USB TO HOST] terminal Connect to a computer smart device or other USB host device Page 22 22 [USB TO DEVICE] port Insert a USB flash drive Page 13 23 [PHONE 1][PHONE 2] jacks
Connect to headphones Page 9 24 [MIC][AUX IN] switch MIC Connect a microphone to [AUX IN] [MIC] jack AUX IN Connect an external audio player output to [AUX IN] [MIC] jack Page 9
25 [AUX IN][MIC] jack Connect a microphone or the output of an audio device to this instrument Page 9
26 [AUX OUT] jacks Connect to the input of an external audio device like an external mixer Page 9
Pedal 27 Soft Pedal
Press this pedal to reduce the volume of the notes while you are playing 28 Sostenuto Pedal
If you play a note or chord on the keyboard and press the pedal while holding the note(s) the notes will sustain as long as the pedal is help However not all subsequent notes will sustain 29 Sustain Pedal
When you press and hold the pedal all notes played on the keyboard have a longer and natural sustain Display 1 Voice layer amp voice number 2 Octave value 3 Transpose value 4 Tempo value 5 Voice name 6 Measure and beat length 7 Represent recording standby mode 8 Time signature 21 22 23 24 25 26 27
6
Setup In this section we are going to introduce information about setting up your instrument and preparing to play Please go through this section carefully before turning the power on Component Guide Before proceeding to assemble the stand you may need to prepare a tool such as a Philips screwdriver (not supplied) Check carefully that all parts (have been indicated with numbers) are included before following the instructions below
7
Setup
Setup Guide
Step 1 Using 4 PCS Oslash6x40CM ldquo+rdquo Screw connect LeftRight stand board to Pedal box nally cover 4 PCS screw cap on the screw hole
Step 2 As shown below us e 10 pcs 4x15 screws to x big board with stand leftrigt board and pedal box
Step 3 Use 2 PCS Hand screw and 6 PCS Oslash6x18 BM ldquo+rdquoscrew to connect Piano body to Piano feet as shown
Now turn the plastic screw (A) under the Pedal unit out to the ground
A
8
Step 4 Using 2 PCS Oslash3x8 BM screw to connect earphone bracket to IO functionbox then insert the Pedal line into the Pedal line socket under the Piano bottom assembly completed
Step 51048863Connect the power cord to the DC IN jack at the rear of the pianoand then plug it to an AC outlet The installation is completed nowTurn on the power and enjoy the perfect performance
Power Supply and Power Switch Before power on make sure that the volumes of piano and all connected audio equipment are turned to the minimum value
1 Plug the ACDC adaptor into an AC outlet
2 Press the [POWER SWITCH] The LCD will display welcome interface which indicates the piano has powered on 3 If you want to turn off the piano press the [POWER SWITCH] again Note 1 In order to save energy we have designed the Auto Power Off function to this instrument With this function the instrument will be automatically powered off in 30 minutes if you do not take any operation on the instrument For more details please refer to Function chapter 2 When the keyboard is not in use or in the time of thunderstorm please disconnect the power for safety purpose Adjusting the Master Volume Turn the [MASTER VOLUME] knob in a clockwise direction to increase the volume and decrease it in an anti-clockwise direction
9
Connections
Connecting a pair of Headphones
We have designed two PHONES jacks for this instrument Two standard pairs of stereo headphones can be plugged in here for private practicemonitoring or late-night playing PHONES Jack when headphones are plugged into the jacks you can only hear the sound from the headphones as the internal stereo speaker system is automatically muted Note Do not listen with the headphones at high volume for long periods of time considering that it may cause hearing loss Connecting a Microphone You are the superstar With this microphone function enjoy singing with your keyboard performance Or create a magic voice show with the preprogrammed voice effects 1 To protect the speakers of the piano and your headphones please turn the [MIC VOLUME] knob to the minimum level 2 Set the [MICAUX IN] switch to ldquoMICrdquo position 3 Plug the microphone to [MICAUX IN] jack 4 Gradually tuning the [MIC VOLUME] knob while singing with microphone till an appropriate level You can also add voice effects to microphone For details please refer to Function chapter Connecting a Mixer or an Audio Equipment Through an audio cord connect your piano to a keyboard amplifier stereo sound system a mixer or recorder or other devices Plug audio cord into the [AUX OUT] jack located at the bottom-left of keyboard then plug the other end of the cord into AUX IN of the amplifier Note To avoid damaging the speakers please ensure that the volume has Been set to the minimum level before connecting the power and other devices Connecting an MP3CD Player Connect the audio output of an MP3CD player or other audio source to the stereo [MICAUX IN] jack located at the bottom-left of the keyboard The input signal is mixed with the audio from the piano which allows you to play along with the input music 1 Turn the [MICAUX IN] switch to ldquoAUX INrdquo position 2 Plug one side of audio cord into [MICAUX IN] jack and the other end to MP3CD player Using a USB Flash Drive A USB flash drive can be used to save the real-time recorded song (MP3) and play back songs from a USB flash drive The instrument is compatible with 2GB to 128GB FAT32 format USB flash drive but do not support USB flash drive partition The instrument can play back MP3 and SMF MIDI files under the root directory of USB flash drive Your recorded song will be saved under the root directory too
10
Playing Voices The piano features 40 realistic preset voices (Please refer to the Voice List) You may also try the voice related functions like Reverb Chorus in the Function menu to enrich your performance Playing Voices 1 Press the [VOICE] button The LCD displays currently selected voice name and number 2 Use the data dial to select a voice 3 Play the keyboard the selected voice will be used 4 You may use the [VOICE DEMO] button to hear the demo of the selected voice Note When DUAL or LOWER is turned on you can use the [VOICE] button to switch to Voice R2 or Voice L display to change the voice selections Playing Two Voices Simultaneously Dual function allows you to play two different voices simultaneously to create a new sound This will enrich your performance as two different instruments are playing at the same time 1 Press the [DUAL] button to turn Voice R2 on Play the keyboard you can hear two different voices being played at the same time 2 To change the voice combination you can repeatedly press the [VOICE] button to switch between Voice R1 and Voice R2 and then use data dial to select the voice you need 3 To turn Voice R2 off please press the [DUAL] button again
11
Playing Different Voices with Both Hands The lower function splits the keyboard into right and left areas to create two different voices The left area voice is lower voice and you can allocate an appropriate spilt point on the keyboard 1 Press [SPLIT] button to turn the lower function on Play the keyboard you will find the keyboard has been split into two areas at F3 each has its own voice selection 2 To change the voice combination you can press the [VOICE] button repeatedly to switch between Voice R1 and Voice L then use the data dial to choose a different voice 3 To turn the Voice L off please press the [SPLIT] button again Split Point
Split point is the key which splits the keyboard into left hand and right hand areas The default split point is F3 you can set it to any key you want To change the split point press and hold the [SPLIT] button then play a key The key you played will be used as the new split point
Adjusting the Brilliance of Voice If you need a brighter or warmer voice you can try to change the brilliance Slowly turn the panel [BRILLIANCE] knob to an appropriate level and play the keyboard to test the change Piano Mode Just a single press on the [PIANO] button the instrument will be turned into concert grand voice All parameters will be optimized for piano performance To exit piano mode you can press [VOICE] button to return to the voice display Note Dual Split and some other buttons will not be available in piano mode
12
Play the Piano with a Friend If you want to play a song together with a friend you can try the Twinova mode The Twinova mode can split the keyboard into two areas which have the same pitch and voice 1 Press [TWINOVA] button to enter Twinova mode The keyboard will be split into two areas the default split point is ldquoF4rdquo The pedal functions of Twinova Left Pedal Notes played on the left part have a longer sustain Middle Pedal Notes played on the left and right parts have a longer sustain Right pedal Notes played on the right part have a longer sustain 2 Besides the default split point F4 you can shift the split point to ldquoE3rdquo by pressing the [SPLIT] or [TWINOVA] button You can try them out and find the appropriate choice for your cooperation with your friend 3 If you are ready to exit the Twinova mode press the[VOICE] button to return to the voice mode Note Dual Split and some other buttons will not be available in Twinova mode Metronome The metronome can help you to keep an accurate tempo when practicing and playing How to use a metronome
1 Press the [METRO] button to turn the metronome on You will hear the ldquoDing Da Da Dahelliprdquo sound plays with current tempo and time signature 2 Press the [METRO] button again to stop the metronome To change the time signature of the metronome please refer to Function menu for metronome beat settings Note The metronome sound will not be recorded and it does not output from AUX OUT or USB AUDIO It can be heard from the internal speakers and the connected headphones Change or Reset the Tempo
1 Turn the panel [TEMPO] knob to change the tempo value range from 30 to 280 BPM 2 Press down the [TEMPO] knob to reset the default tempo of currently selected song Tempo Marking Press and hold the [TEMPO] knob for a while release when you see the display changes to Tempo Marking You can see the corresponding marking of current tempo setting in this mode so you can change the tempo to a certain marking defined in the sheet music
13
Play Back Songs
The piano has 90 preset classical songs of various genres You can record and save the user song inside the piano If a USB flash drive is connected the piano can play back the MP3 and MIDI files from it
Play Back Preset Songs 1 Press the [SONG] button the LCD displays the selected song 2 Use the data dial to select a song you want to play If a user song is recorded you will find it behind the preset songs 3 Press the [STARTSTOP] button to start the playback 4 Press the [LEFT] button to mute the left-hand track then you can listen to the right-hand track and try to play the left-hand notes Or you can press the [RIGHT] button to mute the right-hand track you may listen to the left-hand track and try to play the right-hand notes Pressing the muted part button again will cancel the mute
5 Press the [STARTSTOP] button to stop the playback
Play Back Songs from a USB Flash Drive This piano can support USB flash drives from 2G to 128GB of FAT32 format You can copy your favorite songs of MIDI or MP3 format to the root directory of the USB flash drive and play along with them 1 Insert the USB flash drive into the [USB TO DEVICE] port which located at the bottom-left of the keyboard 2 Press the [USB] button the LCD will display the MIDI and MP3 files in the root directory 3 Use the data dial to select a song you want to play 4 Press the [STARTSTOP] button to start playing the selected file 5 Pressing the [STARTSTOP] button again will stop the playback Note You can loop all files in the root directory or loop the single song for the playback Please refer to the Function menu select a ldquoSong Looprdquo mode as you want
14
Record Your Performance
All notes you played on this keyboard can be recorded you can play back the recorded user song anytime you need You can turn the metronome on while recording the metronome sound will not be recorded Record Your Performance with a USB Flash Drive You may connect a USB flash drive to the piano before recording Your performance will be recorded as a MP3 file and saved in the root directory of the USB flash drive The piano can support FAT32 USB flash drive If your drive is not you may receive a question from the display asking for your permission to format the drive to FAT32 Please note that all data saved in the drive will be erased if you choose to format it If you donrsquot use the USB flash drive for recording your performance will be recorded to the internal memory of the piano as the user song You will find it in the song display
Record Only the Keyboard Notes 1 Press the panel [REC] button enter the standby mode If you choose not to use the USB flash drive you may receive a question from the display asking if you want to overwrite the existing internal user song or not If you press [RIGHT] button as ldquoYESrdquo the existing user song will be replaced by your new record Press [LEFT] for ldquoNOrdquo this record operation will be canceled 2 The ldquoRECrdquo icon starts flashing in the LCD indicating that the piano is ready to record Press the [REC] button at this time will cancel recording 3 Press the panel [STARTSTOP] button or play any note on the keyboard to start recording 4 Press the panel [STARTSTOP] button or press the [REC] button again to stop recording The piano will automatically switch to the SONG or USB mode after your recorded performance is saved Press the [STARTSTOP] button to listen to it
15
Record with Accompaniment of a Preset Song If you want to record with accompaniment do as the following procedures 1 Press the panel [REC] and [METRO] buttons simultaneously enter the standby mode If you choose not to use the USB flash drive you may receive a question from the display asking you if you want to overwrite the existing internal user song or not If you press [RIGHT] button as ldquoYESrdquo the existing user song will be replaced by your new record] Press [LEFT] for ldquoNOrdquo this record operation will be canceled 2 Press the panel [STARTSTOP] button or play any note on thekeyboard to start recording While recording you can try to press the panel [LEFT] or [RIGHT] button to mute the corresponding part performance and then you can play the muted part 3 Press the panel [STARTSTOP] button or press the [REC] button again to stop recording The piano will automatically switch to SONG or USB mode after your recorded performance is saved Press the [STARTSTOP] button to listen to it Note The recording procedure will automatically stop when the storage Memory is full
16
Function Menu The function menu is a collection of the parameters of your piano You can easily customize your configuration here
Common Settings 1 Enter the common settings In the VOICE interface press the [FUNCTION] button 2 Select a parameter item Repeatedly press the [FUNCTION] button to select a parameter item Or you can use the data dial when keep holding the [FUNCTION] button pressed to quickly select a parameter item 3 Change parameter value Use the data dial to change the selected parameter value Detailed parameter items and their value range are shown below
17
Play Different Keys at the Same Position The transpose function allows the overall pitch of the piano to be shifted up or down by a maximum of one octave in semitone increments 1 Select the ldquoTransposerdquo item 2 Use the data dial to set transpose parameter value which changes in semitone For example set transpose parameter value as ldquo+1rdquo you will hear ldquoCrdquo pitch when playing the ldquoCrdquo key Shift the Pitch of Keyboard by Octave The Octave function can shift the pitch of a specified voice layer up or down by octave 1 Select the ldquoOctave R1rdquo ldquoOctave R2rdquo ldquoOctave Lrdquo item 2 Use the data dial to set octave parameter value which changes in octave For example set octave parameter value as ldquo+1rdquo you will hear ldquoC4rdquo pitch when play the original ldquoC3rdquo pitch Note To different preset voices they have its default octave settings Set the Touch Sensitivity of the Keyboard In order to simulate the acoustic piano touch sensitivity we have preprogrammed several touch response curves You can choose the most suitable one for your playing 1 Select the ldquoTouchrdquo item 2 Use the data dial to select ldquoTouch Responserdquo type You can play the keyboard and try which is the best for you Note The touch response setting will be automatically saved when you press the power button to power off the piano Set the Balance of Voice Layers and Music Volume You can individually set the volume of Voice R1 Voice R2 Voice R3 and the background music The background music includes the SONG MP3 and MIDI files from a USB flash drive and the USB audio input 1 Select the ldquoVolume R1rdquo ldquoVolume R2rdquo ldquoVolume Lrdquo or ldquoVolume Musicrdquo item 2 Use the data dial to adjust volume level ldquo0rdquo stands for mute ldquo32rdquo for the maximum level
18
Set the Time Signature for the Metronome 1 Select the ldquoMetronomerdquo item 2 Use the data dial to set the time signature type Note If the time signature of a preset song or a MIDI file is different from your setting the Metronome will work according to the selected or played song Select Different Speaker EQ According to your favor of the speaker effect you can select different speaker EQ settings The selected speaker EQ setting only takes effect on the speakers of the piano it will not affect the headphones AUX OUT USB Audio output or recording 1 Select the ldquoSpeaker EQrdquo item 2 Use the data dial to select different speaker EQ settings you can play back MP3 files at the same time and preview changes Note The Speaker EQ setting will be automatically saved when you press the power button to power off the piano String Resonance When a piano voice is selected pressing the sustain pedal will activate the String Resonance effect to the notes you played The String Resonance effect faithfully recreates the resonance from the strings and soundboard of an acoustic grand piano 1 Select the ldquoString Resonancerdquo item 2 Use the data dial to adjust the string resonance level Note The String Resonance setting will be automatically saved when you press the power button to power off the piano Add Reverb Effect to Your Performance The reverb effect creates a realistic environment for your performance like playing in a concert hall or live in a club 1 Select the ldquoReverb Typerdquo item 2 Use the data dial to select different reverb type you can play the keyboard at any time to preview changes You can also further adjust the reverb level 1Select the ldquoReverb Levelrdquo item 2Use the data dial to select a suitable reverb level Note The Reverb Type and Level settings will be automatically saved when you press the power button to power off the piano
19
Add Chorus Effect to Your Performance The chorus effect creates a rich ensemble sound as if one keyboard part was played by several instruments at the same time 1 Select the ldquoChorus Typerdquo item 2 Use the data dial to select different chorus type you can play the keyboard at any time to preview changes You can also further adjust the harmony level 1 Select the ldquoChorus Levelrdquo item 2 Use the data dial to select a suitable chorus level Note The Chorus Type and Level settings will be automatically saved when you press the power button to power off the piano Add Vocal Effect to Microphone Connect a microphone through MICAUX IN terminal switch the MICAUX IN to ldquoMICrdquo Now you can enjoy singing your favorite song If you want to add some rich and cool effects to your voice try the Mic FX settings 1 Select the ldquoMic FX Typerdquo item 2 Use the data dial to select different effect type You can also further adjust the microphone FX level 1 Select the ldquoMic FX Levelrdquo item 2 Use the data dial to select a suitable FX level Note The Microphone FX Type and Level settings will be automatically saved when you press the power button to power off the piano Select the Song Loop mode for Song Playback You can choose how to loop the songs when playing back internal songs or songs from a USB flash drive 1 Select the ldquoSong Looprdquo item 2 Use the data dial to switch between ldquoSinglerdquo-loop single selected song or ldquoAllrdquo-loop all internal songs or all songs in the root directory of the USB flash drive Note The Song Loop setting will be automatically saved when you press the power button to power off the piano
20
Other Settings Some global parameters can be found in the Other Settings menu You can configure these settings as below if necessary 1 Enter the ldquoOther Settingsrdquo menu In the VOICE interface press and hold the [FUNCTION] button about 2 seconds to open the ldquoOther Settingsrdquo menu 2 Select a parameter item Repeatedly press the [FUNCTION] button to select a desired parameter item Or you can use the data dial when keep holding the [FUNCTION] button pressed to quickly select a parameter item 3 Change parameter value Use the data dial to change the selected parameter value Detailed parameter items and their value range are shown below
Set MIDI OUT Channel You may need to change the MIDI OUT channel of VOICE R1 to match your application 1 Select the ldquoMIDI OUT CHrdquo item 2 Use the data dial to set the MIDI OUT channel of VOICE R1 Note The MIDI OUT channel setting will be automatically saved when you press the power button to power off the piano Set the Auto Power Off Time In order to save energy we have designed the Auto Power Off function in this piano When this function is enabled the piano will be automatically powered off in 30 minutes (default time) if you do not take any operation on the piano like playing the keyboard using the microphone or recording You can set the time period to decide the auto power off time 1 Select the ldquoPower OFFrdquo item 2 Use the data dial to set the Auto Power Off time When the Auto Power Off time is set to ldquoNeverrdquo the piano will not automatically power off Note The Auto Power Off setting will be automatically saved when you press the power button to power off the piano
21
Set the System Date and Time You may need to set the correct system date and time as it may be applied to the files saved to USB flash drive and some other functions 1 You can select the ldquoYearrdquo ldquoMonthrdquo ldquoDayrdquoldquoHourrdquo or ldquoMinuterdquo itemas necessary 2 Use the data dial to select the date and time parameters Note The System Data and Time settings will be automatically saved when you press the power button to power off the piano Reset to System Preset Refer to the following procedures to restore the factory settings 1 Select the ldquoSystem Resetrdquo item 2 Use the data dial to select ldquoExecuterdquo 3 The LCD displays ldquoReset all settingsrdquo for you to confirm Press the [RIGHT] button to confirm ldquoYESrdquo or press the [LEFT] button to select ldquoNOrdquo Caution If you select ldquoYESrdquo all personal settings will be erased and cannot be recovered 4 The LCD continually displays ldquoDelete User songrdquo for you to confirm Press the [RIGHT] button to confirm ldquoYESrdquo or press the [LEFT] button to select ldquoNOrdquo Caution If you select ldquoYESrdquo the user song will be deleted and cannot berecovered 5 If you choose to reset the settings or the user song it will take a period of time to reset the data Please wait with patience Caution DO NOT disconnect the power of the piano when the reset operation is in progress Or internal data could be damaged and your piano may not work 6 When above steps are finished the settings and user song of your piano is reset according to your selection
22
Work with Computer or Smart Device
Your piano is a powerful instrument with USB digital audio as well as USB MIDI INOUT With this exciting new feature now you can use the digital music coming from a computer or your smart phone as accompaniment or use your piano as an excellent USB speaker Whatrsquos more you can even use your smart device or laptop to record lossless digital audio of your performance and share with your friend Connect with a Computer 1 Use a USB type A to B cable connect your piano to a computer through the [USB TO HOST] terminal 2 The computer will automatically identify your piano and install driver automatically After the driver is successfully installed you may need to manually select your piano as the audio and MIDI INOUT devices of your computer 3 Try playing some music from your computer your piano is an excellent speaker system You can also record the sound from the piano to your computer with audio recorder softwareThe audio is transmitted in lossless digital signal 4 Working with MIDI sequencer software your piano works as a MIDI sound module or a MIDI keyboard for your creation Host Requirements
WINDOWS XP SP3 or later WINDOWS operating system OSX 108 or later OSX operating system
Connect with a Smart Device 1 Use an appropriate USB data cable to connect your pianorsquos [USB TO HOST] terminal to a smart device such as a smart phone or a tablet computer 2 Try playing back music on your smart device your piano has an excellent speaker system You can also record video as well as audio the sound track will be recorded directly from the the piano without any noise from the surroundings The audio is transmitted in lossless digital signal 3 Working with a MIDI sequencer APP your piano can be used as a MIDI sound module or a MIDI keyboard for your creation Host Requirements
Android 40 or later Some Android devices donrsquot have necessary driver they may not be able to work with your piano
iOS60 or later Connection with iOS device requires apple camera Connection kit
23
Troubleshooting
Specifications LCD Display
208rdquo Dot-matrix OLED Keys
88 Graded Hammer-Action Keys with triple sensors Polyphony
256 Preset Voices
40 panel voices 128GM voices 8 GM drum kits Preset Songs
90 classical songs Voice Demos
40 Effect
Reverb 10 types Chorus 12 types Microphone effect 9 types Control button
Power Switch Metronome Record Left Right Song USB StartStop Voice Voice Demo Dual Split Twinova Function Piano Other Controls
Master Volume Knob Mic Volume Knob Brilliance Knob Tempo Knob with button
Record
SMF 1 MIDI 441KHz 16bit Stereo 320Kbps CBR MPEG-1 layer 3 audio USB to Device
Mass Storage Class USB flash drive 2GB~128GB FAT 32 Support SMF 0 and 1 MIDI file MPEG-1 layer 3 audio file USB to Host
USB MIDI and USB Audio Connectors
USB to HOST USB to DEVICE 2 Headphones AUX IN MIC AUX OUT Pedals (Sustain Soft Sostenuto) Power Supply
DC 15V Speakers
Woofer 30W x 2 Tweeter 20W x 2 Dimensions
1407 x 505 x 1062mm Weight
52 kg All specifications and appearances are subject to change
24
Voice List
25
26
MIDI Implementation Chart
27
WEEE-Declaration Disposal
Your product is designed and manufactured with materials and components of high quality which are recyclable and can be reused The symbol means that your product should be disposed of separately from household waste when it reaches its end of life Please dispose of this equipment at your local collection point or recycling center Please help to protect the environment in which we all live
All specifications and appearances are subject to change without notice All information was correct at
time of printing Musikhaus Kirstein GmbH does not guarantee for the accuracy or completeness of any
description photograph or statement contained in this manual Printed colors and specifications may
vary slightly from product Products from Musikhaus Kirstein GmbH are only sold through authorized
dealer Distributors and dealers are not agents of Musikhaus Kirstein GmbH and have no authority to
bind Musikhaus Kirstein GmbH legally in any way This manual is protected by copyright Any copying or reprint even in excerpts is only allowed with written consent of Musikhaus Kirstein GmbH The same applies to reproduction or copying of images even in altered form
Supplier Information
Musikhaus Kirstein GmbH
Bernbeurener Str 11
86956 Schongau
Telefon 0049-909494-0
Telefax 0049-909494-19
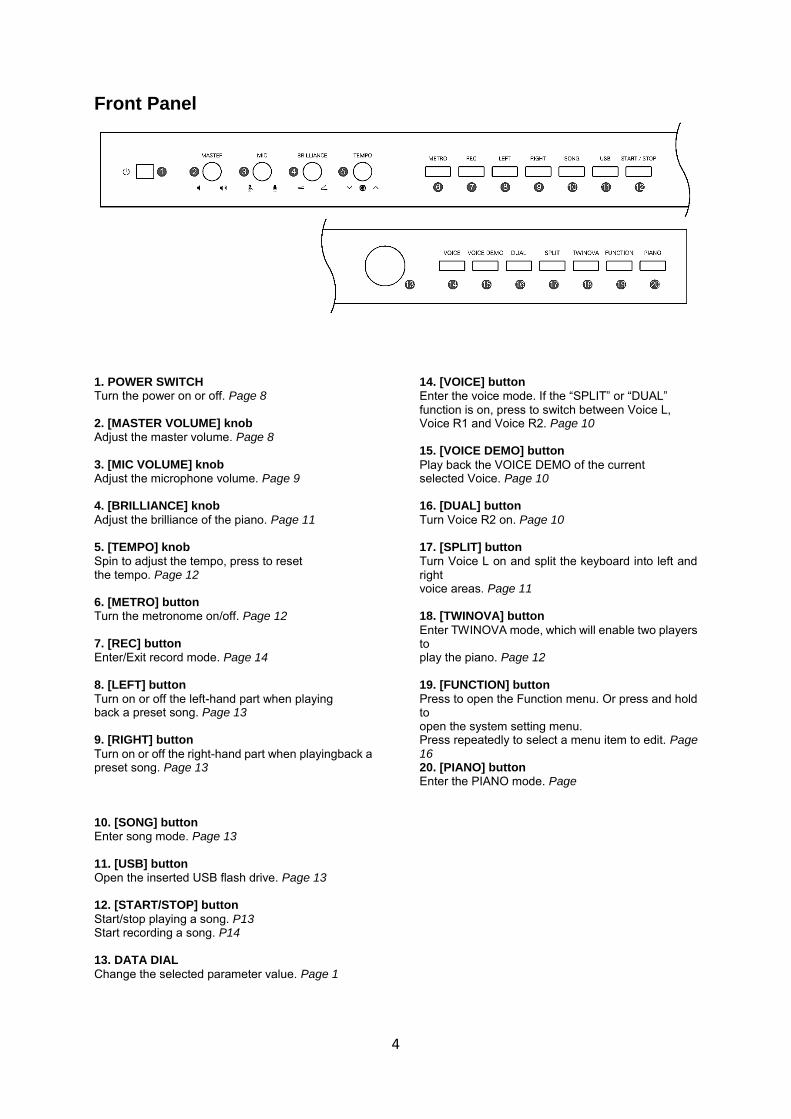


