215
IBM Cognos Express Xcelerator Version 10.1.0 Developer Guide

IBM Cognos Express XceleratorVersion 10.1.0
Developer Guide
���

NoteBefore using this information and the product it supports, read the information in “Notices” on page 195.
Product Information
This document applies to IBM Cognos Express Version 10.1.0 and may also apply to subsequent releases. To checkfor newer versions of this document, visit the IBM Cognos Information Centers (http://publib.boulder.ibm.com/infocenter/cogic/v1r0m0/index.jsp).
Microsoft product screen shot(s) used with permission from Microsoft.
Licensed Materials - Property of IBM
© Copyright IBM Corporation 2007, 2012.US Government Users Restricted Rights – Use, duplication or disclosure restricted by GSA ADP Schedule Contractwith IBM Corp.

Contents
Introduction . . . . . . . . . . . . . . . . . . . . . . . . . . . . . . . . . . ix
Chapter 1. Introduction to Xcelerator Development . . . . . . . . . . . . . . . . . 1Understanding Multidimensionality . . . . . . . . . . . . . . . . . . . . . . . . . . . 1
Durables Cube. . . . . . . . . . . . . . . . . . . . . . . . . . . . . . . . . . 1Your Role as Developer . . . . . . . . . . . . . . . . . . . . . . . . . . . . . . . . 3Understanding Xcelerator Object Naming Conventions . . . . . . . . . . . . . . . . . . . . . 3
Reserved Characters . . . . . . . . . . . . . . . . . . . . . . . . . . . . . . . . 3Rule Statements . . . . . . . . . . . . . . . . . . . . . . . . . . . . . . . . . 4Object Naming Exceptions . . . . . . . . . . . . . . . . . . . . . . . . . . . . . . 4
Chapter 2. Creating Cubes and Dimensions . . . . . . . . . . . . . . . . . . . . 7Designing Cubes . . . . . . . . . . . . . . . . . . . . . . . . . . . . . . . . . . 7
Selecting the Number of Dimensions . . . . . . . . . . . . . . . . . . . . . . . . . . 7Consolidating Detail Using Dimension Hierarchies . . . . . . . . . . . . . . . . . . . . . 9Types of Elements . . . . . . . . . . . . . . . . . . . . . . . . . . . . . . . . 12Element Attributes . . . . . . . . . . . . . . . . . . . . . . . . . . . . . . . . 12Designing Cubes - Summary . . . . . . . . . . . . . . . . . . . . . . . . . . . . 15
Creating Dimensions . . . . . . . . . . . . . . . . . . . . . . . . . . . . . . . . 16Creating Dimensions Using the Dimension Editor Window . . . . . . . . . . . . . . . . . . 16Modifying a Dimension . . . . . . . . . . . . . . . . . . . . . . . . . . . . . . 17Managing the Display of Elements in the Dimension Editor . . . . . . . . . . . . . . . . . . 22Creating Dimensions Using Dimension Worksheets . . . . . . . . . . . . . . . . . . . . . 24Using Named Hierarchy Levels with Xcelerator Dimensions . . . . . . . . . . . . . . . . . . 28
Creating Cubes . . . . . . . . . . . . . . . . . . . . . . . . . . . . . . . . . . 30Ordering Dimensions in a Cube . . . . . . . . . . . . . . . . . . . . . . . . . . . 30Creating a Cube . . . . . . . . . . . . . . . . . . . . . . . . . . . . . . . . . 31Optimizing the Order of Dimensions in a Cube . . . . . . . . . . . . . . . . . . . . . . 32Editing Cube Properties . . . . . . . . . . . . . . . . . . . . . . . . . . . . . . 33
Creating Pick Lists . . . . . . . . . . . . . . . . . . . . . . . . . . . . . . . . . 33Pick List Usage Notes . . . . . . . . . . . . . . . . . . . . . . . . . . . . . . . 34Pick List Types . . . . . . . . . . . . . . . . . . . . . . . . . . . . . . . . . 34Creating Pick Lists with Element Attributes . . . . . . . . . . . . . . . . . . . . . . . 35Creating Pick Lists with Control Cubes . . . . . . . . . . . . . . . . . . . . . . . . . 35Null Values in Pick Lists . . . . . . . . . . . . . . . . . . . . . . . . . . . . . . 37Pick List Order of Precedence . . . . . . . . . . . . . . . . . . . . . . . . . . . . 38
Replicating Cubes between Servers . . . . . . . . . . . . . . . . . . . . . . . . . . . 38Cube Relationships . . . . . . . . . . . . . . . . . . . . . . . . . . . . . . . . 38Server Relationships . . . . . . . . . . . . . . . . . . . . . . . . . . . . . . . 38
Chapter 3. Advanced Calculations for Business Data . . . . . . . . . . . . . . . . 41Overview of Cube Rules . . . . . . . . . . . . . . . . . . . . . . . . . . . . . . . 41Guidelines for Writing Xcelerator Rules Statements . . . . . . . . . . . . . . . . . . . . . . 42
General Considerations . . . . . . . . . . . . . . . . . . . . . . . . . . . . . . 42Syntax for Describing the Area . . . . . . . . . . . . . . . . . . . . . . . . . . . . 42Syntax for Formulas . . . . . . . . . . . . . . . . . . . . . . . . . . . . . . . 43Using Cube References . . . . . . . . . . . . . . . . . . . . . . . . . . . . . . 46Arranging Rules Statements . . . . . . . . . . . . . . . . . . . . . . . . . . . . . 47Specifying Different Rules at the N: and C: Levels . . . . . . . . . . . . . . . . . . . . . 47Bypassing Rules . . . . . . . . . . . . . . . . . . . . . . . . . . . . . . . . . 48Qualifying Element Names . . . . . . . . . . . . . . . . . . . . . . . . . . . . . 48
Rules Editor and Rules Worksheets . . . . . . . . . . . . . . . . . . . . . . . . . . . 48Creating Rules Worksheets . . . . . . . . . . . . . . . . . . . . . . . . . . . . . 49Saving Rules Worksheets . . . . . . . . . . . . . . . . . . . . . . . . . . . . . . 49
Rules and Dimension Consolidations . . . . . . . . . . . . . . . . . . . . . . . . . . . 50
© Copyright IBM Corp. 2007, 2012 iii
Order of Calculation . . . . . . . . . . . . . . . . . . . . . . . . . . . . . . . 50Overriding C: Level Elements with Rules . . . . . . . . . . . . . . . . . . . . . . . . 50Stacking Rules . . . . . . . . . . . . . . . . . . . . . . . . . . . . . . . . . 52
Sample Applications . . . . . . . . . . . . . . . . . . . . . . . . . . . . . . . . 52Calculating Ratios . . . . . . . . . . . . . . . . . . . . . . . . . . . . . . . . 52Sharing Data Between Cubes . . . . . . . . . . . . . . . . . . . . . . . . . . . . 54Restricting Rules to Simple Values . . . . . . . . . . . . . . . . . . . . . . . . . . . 56Calculating an Average Price . . . . . . . . . . . . . . . . . . . . . . . . . . . . 57Linking Two Asymmetrical Cubes . . . . . . . . . . . . . . . . . . . . . . . . . . . 58
Creating Drill-Through Processes and Rules . . . . . . . . . . . . . . . . . . . . . . . . 60Creating a Drill Process . . . . . . . . . . . . . . . . . . . . . . . . . . . . . . 60Editing Drill Processes. . . . . . . . . . . . . . . . . . . . . . . . . . . . . . . 62Deleting Drill Processes . . . . . . . . . . . . . . . . . . . . . . . . . . . . . . 62Creating a Drill Assignment Rule . . . . . . . . . . . . . . . . . . . . . . . . . . . 63Drill-Through Example . . . . . . . . . . . . . . . . . . . . . . . . . . . . . . 63
Debugging Rules . . . . . . . . . . . . . . . . . . . . . . . . . . . . . . . . . 66Tracing Calculations . . . . . . . . . . . . . . . . . . . . . . . . . . . . . . . 66Tracing Feeders . . . . . . . . . . . . . . . . . . . . . . . . . . . . . . . . . 68
Chapter 4. Organizing Objects in Xcelerator Applications . . . . . . . . . . . . . . 71Xcelerator Application Overview . . . . . . . . . . . . . . . . . . . . . . . . . . . . 71
Types of References. . . . . . . . . . . . . . . . . . . . . . . . . . . . . . . . 71Behavior of References . . . . . . . . . . . . . . . . . . . . . . . . . . . . . . 72Display Order for References in Applications . . . . . . . . . . . . . . . . . . . . . . . 72Using Applications and References in CXL Web . . . . . . . . . . . . . . . . . . . . . . 72Application Folders and Files on the ICAS . . . . . . . . . . . . . . . . . . . . . . . . 72
Security Considerations for Creating and Viewing Applications . . . . . . . . . . . . . . . . . . 73Creating and Managing Applications . . . . . . . . . . . . . . . . . . . . . . . . . . . 74
Creating a Top-Level Application . . . . . . . . . . . . . . . . . . . . . . . . . . . 74Renaming Applications . . . . . . . . . . . . . . . . . . . . . . . . . . . . . . 75Deleting Applications . . . . . . . . . . . . . . . . . . . . . . . . . . . . . . . 75Creating a Secondary-Level Application within an Existing Application . . . . . . . . . . . . . . 76
Adding Xcelerator Object References to an Application . . . . . . . . . . . . . . . . . . . . . 77Making a Reference Public . . . . . . . . . . . . . . . . . . . . . . . . . . . . . 77Adding References to Private Views and Subsets to an Application . . . . . . . . . . . . . . . . 78Simultaneously Creating a New Object and Adding a Reference to an Application. . . . . . . . . . . 79
Adding File References to an Application . . . . . . . . . . . . . . . . . . . . . . . . . 79Understanding Public and Private File References . . . . . . . . . . . . . . . . . . . . . 81Behavior of Files Uploaded to the ICAS . . . . . . . . . . . . . . . . . . . . . . . . . 81Updating Excel Files on the ICAS . . . . . . . . . . . . . . . . . . . . . . . . . . . 81Updating Non-Excel Files on the ICAS . . . . . . . . . . . . . . . . . . . . . . . . . 82
Adding URL References to an Application . . . . . . . . . . . . . . . . . . . . . . . . . 82Working with Object, File, and URL References in Xcelerator Applications . . . . . . . . . . . . . . 83
Viewing Xcelerator Application Properties . . . . . . . . . . . . . . . . . . . . . . . . 84Deleting Object, File, and URL References from Xcelerator Applications . . . . . . . . . . . . . . 85Renaming Object, File, and URL References in Xcelerator Applications . . . . . . . . . . . . . . 85Deleting Source Objects that are Referenced by Xcelerator Applications . . . . . . . . . . . . . . 86
Administering Security for Xcelerator Applications . . . . . . . . . . . . . . . . . . . . . . 86Assigning Security Privileges for Xcelerator Applications and References to User Groups . . . . . . . . 86Publishing Xcelerator Applications and References . . . . . . . . . . . . . . . . . . . . . 87Privatizing Xcelerator Applications and References . . . . . . . . . . . . . . . . . . . . . 88
Viewing Logical Groupings in Xcelerator Applications . . . . . . . . . . . . . . . . . . . . . 89Publishing Xcelerator Applications to CXL Web . . . . . . . . . . . . . . . . . . . . . . . 89
Setting Xcelerator Websheet Properties . . . . . . . . . . . . . . . . . . . . . . . . . 90Publishing Excel Files to CXL Web without Using Excel on the CXL Web Server . . . . . . . . . . . 90Creating Hyperlinks to Uploaded Files . . . . . . . . . . . . . . . . . . . . . . . . . 92Viewing Websheets that Contain the 0x1A Hexadecimal Character . . . . . . . . . . . . . . . . 92
Chapter 5. Importing Data with Processing Worksheets. . . . . . . . . . . . . . . 93Processing Worksheets Overview . . . . . . . . . . . . . . . . . . . . . . . . . . . . 93
iv IBM Cognos Express Xcelerator Version 10.1.0: Developer Guide

Importing Data Using Processing Worksheets . . . . . . . . . . . . . . . . . . . . . . . . 94Reading in the First Input Row . . . . . . . . . . . . . . . . . . . . . . . . . . . . 94Comparing Input Records with a Cube's Structures . . . . . . . . . . . . . . . . . . . . . 95Converting Using IF Formulas . . . . . . . . . . . . . . . . . . . . . . . . . . . . 96Converting Using a Lookup Cube . . . . . . . . . . . . . . . . . . . . . . . . . . . 97Creating Database Send (DBS) Formulas . . . . . . . . . . . . . . . . . . . . . . . . 100Processing a Data Source into a Cube . . . . . . . . . . . . . . . . . . . . . . . . . 101
Chapter 6. Controlling Access to Xcelerator Objects . . . . . . . . . . . . . . . 103Assigning Security Rights to Groups . . . . . . . . . . . . . . . . . . . . . . . . . . 103Interaction of Different Object Security Rights . . . . . . . . . . . . . . . . . . . . . . . 107Securing Cubes . . . . . . . . . . . . . . . . . . . . . . . . . . . . . . . . . . 108
Assigning Security Rights for Cubes. . . . . . . . . . . . . . . . . . . . . . . . . . 108Reserving and Releasing Cubes . . . . . . . . . . . . . . . . . . . . . . . . . . . 108Locking and Unlocking a Cube . . . . . . . . . . . . . . . . . . . . . . . . . . . 109
Securing Elements . . . . . . . . . . . . . . . . . . . . . . . . . . . . . . . . . 109Assigning Security Rights for Elements . . . . . . . . . . . . . . . . . . . . . . . . . 109Reserving and Releasing Elements . . . . . . . . . . . . . . . . . . . . . . . . . . 110Locking and Unlocking an Element . . . . . . . . . . . . . . . . . . . . . . . . . . 110
Securing Dimensions . . . . . . . . . . . . . . . . . . . . . . . . . . . . . . . . 111Assigning Security Rights for Dimensions . . . . . . . . . . . . . . . . . . . . . . . . 111Reserving and Releasing Dimensions . . . . . . . . . . . . . . . . . . . . . . . . . 112Locking and Unlocking a Dimension . . . . . . . . . . . . . . . . . . . . . . . . . 112
Securing Processes. . . . . . . . . . . . . . . . . . . . . . . . . . . . . . . . . 112Assigning Security Rights for Processes. . . . . . . . . . . . . . . . . . . . . . . . . 112Allowing Processes to Modify Security Data . . . . . . . . . . . . . . . . . . . . . . . 113
Securing Chores . . . . . . . . . . . . . . . . . . . . . . . . . . . . . . . . . 114Assigning Security Rights for Chores . . . . . . . . . . . . . . . . . . . . . . . . . 114
Securing Applications and References . . . . . . . . . . . . . . . . . . . . . . . . . . 114Securing Cells . . . . . . . . . . . . . . . . . . . . . . . . . . . . . . . . . . 115
Creating a Cell Security Control Cube . . . . . . . . . . . . . . . . . . . . . . . . . 115Using Rules to Define Cell-Level Security . . . . . . . . . . . . . . . . . . . . . . . . 116
Chapter 7. Using Xcelerator Action Buttons to Build Worksheet Applications . . . . . 119Overview. . . . . . . . . . . . . . . . . . . . . . . . . . . . . . . . . . . . 119Adding an Action Button to a Worksheet . . . . . . . . . . . . . . . . . . . . . . . . . 119Configuring an Action Button to Run a Process . . . . . . . . . . . . . . . . . . . . . . . 120
Selecting the Process to Run . . . . . . . . . . . . . . . . . . . . . . . . . . . . 121Setting Process Parameters . . . . . . . . . . . . . . . . . . . . . . . . . . . . . 122Setting Process Options for Calculation . . . . . . . . . . . . . . . . . . . . . . . . . 123Setting Process Options to Show Messages . . . . . . . . . . . . . . . . . . . . . . . 123Using the Action Button Server Name Property . . . . . . . . . . . . . . . . . . . . . . 124
Configuring an Action Button to Navigate to Another Worksheet . . . . . . . . . . . . . . . . . 124Select a Target Worksheet . . . . . . . . . . . . . . . . . . . . . . . . . . . . . 124Enable the Match Title Elements Option . . . . . . . . . . . . . . . . . . . . . . . . 125Setting the Replace Current Workbook Option . . . . . . . . . . . . . . . . . . . . . . 126Setting Calculation Options for after Navigating to a Worksheet . . . . . . . . . . . . . . . . 126
Configuring an Action Button to Run a Process and Navigate to a Worksheet . . . . . . . . . . . . . 126Configuring an Action Button to Recalculate or Rebuild a Worksheet . . . . . . . . . . . . . . . . 127Understanding Action Button Behavior with Xcelerator Active Forms . . . . . . . . . . . . . . . 127
Basic Action Button Behavior . . . . . . . . . . . . . . . . . . . . . . . . . . . . 127Additional Action Button Behavior . . . . . . . . . . . . . . . . . . . . . . . . . . 127
Setting the Appearance Properties of an Action Button . . . . . . . . . . . . . . . . . . . . 128Using Advanced Navigation and Mapping Options . . . . . . . . . . . . . . . . . . . . . 128
Configuring Source to Target Mapping . . . . . . . . . . . . . . . . . . . . . . . . . 129Example of Mapping a Source Value to a Target Cell . . . . . . . . . . . . . . . . . . . . 130Example of Mapping a Source SUBNM to a Target Cell . . . . . . . . . . . . . . . . . . . 131Example of Mapping the Selected DBRW to the Target Worksheet . . . . . . . . . . . . . . . . 131
Modifying an Existing Action Button . . . . . . . . . . . . . . . . . . . . . . . . . . 132Editing the Caption, Background Image, and Properties of an Existing Action Button . . . . . . . . . 132
Contents v

Moving and Resizing an Existing Action Button . . . . . . . . . . . . . . . . . . . . . . 132
Chapter 8. Developing Custom Web Applications with the URL API . . . . . . . . . 135URL API Overview . . . . . . . . . . . . . . . . . . . . . . . . . . . . . . . . 135Basic URL API Syntax . . . . . . . . . . . . . . . . . . . . . . . . . . . . . . . 135
Base URL. . . . . . . . . . . . . . . . . . . . . . . . . . . . . . . . . . . 135Parameters . . . . . . . . . . . . . . . . . . . . . . . . . . . . . . . . . . 135ObjectId Parameter . . . . . . . . . . . . . . . . . . . . . . . . . . . . . . . 136Using URL Escape Characters . . . . . . . . . . . . . . . . . . . . . . . . . . . . 136
Basic URL API Concepts. . . . . . . . . . . . . . . . . . . . . . . . . . . . . . . 136Setting Admin Host Name and CXL Web Server Name Parameters . . . . . . . . . . . . . . . 137Managing User Login and Logout . . . . . . . . . . . . . . . . . . . . . . . . . . 137Using the Action Parameter with CXL Web objects . . . . . . . . . . . . . . . . . . . . . 138Using the OpenObject Parameter to Open a CXL Web Object . . . . . . . . . . . . . . . . . 139Operating on an Existing CXL Web Object with the ObjectId Parameter . . . . . . . . . . . . . . 140
Accessing the Websheet Object . . . . . . . . . . . . . . . . . . . . . . . . . . . . 141Opening a Websheet Object . . . . . . . . . . . . . . . . . . . . . . . . . . . . 141Selecting Title Elements for a Websheet Object . . . . . . . . . . . . . . . . . . . . . . 142Applying Actions to a Websheet Object. . . . . . . . . . . . . . . . . . . . . . . . . 142Setting Display Properties for the Websheet Object . . . . . . . . . . . . . . . . . . . . . 142
Accessing the Cubeviewer Object. . . . . . . . . . . . . . . . . . . . . . . . . . . . 144Opening a Cubeviewer Object . . . . . . . . . . . . . . . . . . . . . . . . . . . . 144Setting Display Properties for the Cubeviewer Object . . . . . . . . . . . . . . . . . . . . 145Selecting Title Elements for the Cubeviewer Object . . . . . . . . . . . . . . . . . . . . . 146Applying Actions to a Cubeviewer Object . . . . . . . . . . . . . . . . . . . . . . . . 146Displaying Charts with the Cubeviewer Object . . . . . . . . . . . . . . . . . . . . . . 147
Setting Event Callback Functions for Cubeviewer and Websheet Objects. . . . . . . . . . . . . . . 149Enabling a Callback Function for Websheet and Cubeviewer Objects . . . . . . . . . . . . . . . 149Setting a Global Callback Function for All Title Dimensions . . . . . . . . . . . . . . . . . . 151
Accessing the Navigation Tree Object . . . . . . . . . . . . . . . . . . . . . . . . . . 152Opening the Navigation Tree Object . . . . . . . . . . . . . . . . . . . . . . . . . . 152Using the Navigation Tree Object in HTML Mode . . . . . . . . . . . . . . . . . . . . . 153Using the Navigation Tree Object in XML Mode. . . . . . . . . . . . . . . . . . . . . . 154
Chapter 9. Using Data Reservations. . . . . . . . . . . . . . . . . . . . . . . 159Data Reservation Overview. . . . . . . . . . . . . . . . . . . . . . . . . . . . . . 159Understanding Data Reservation behavior with other Xcelerator features . . . . . . . . . . . . . . 160
Data Reservations and Security . . . . . . . . . . . . . . . . . . . . . . . . . . . 160Data Reservations and the Xcelerator user interface . . . . . . . . . . . . . . . . . . . . 160Data Reservations and Data spreading . . . . . . . . . . . . . . . . . . . . . . . . . 161Data Reservations and TurboIntegrator processes and chores . . . . . . . . . . . . . . . . . 161Data Reservations and Sandboxes . . . . . . . . . . . . . . . . . . . . . . . . . . 162Data Reservations, Sandboxes, and Job Queue . . . . . . . . . . . . . . . . . . . . . . 163
Enabling Data Reservation . . . . . . . . . . . . . . . . . . . . . . . . . . . . . . 163Enabling Data Reservation for cubes . . . . . . . . . . . . . . . . . . . . . . . . . 163Enabling user groups to manage Data Reservations . . . . . . . . . . . . . . . . . . . . 164
Monitoring Data Reservations . . . . . . . . . . . . . . . . . . . . . . . . . . . . . 165Displaying Data Reservation cell status in Server Explorer . . . . . . . . . . . . . . . . . . 165Using TM1 Top to monitor threads waiting for Data Reservations . . . . . . . . . . . . . . . . 166Using the Audit Log to monitor Data Reservation events . . . . . . . . . . . . . . . . . . . 166Using TurboIntegrator and API functions to monitor Data Reservations . . . . . . . . . . . . . . 167
Managing Data Reservations with TurboIntegrator functions . . . . . . . . . . . . . . . . . . 167CubeDataReservationAcquire . . . . . . . . . . . . . . . . . . . . . . . . . . . . 167CubeDataReservationRelease . . . . . . . . . . . . . . . . . . . . . . . . . . . . 168CubeDataReservationReleaseAll . . . . . . . . . . . . . . . . . . . . . . . . . . . 169CubeDataReservationGet . . . . . . . . . . . . . . . . . . . . . . . . . . . . . 170CubeDataReservationGetConflicts . . . . . . . . . . . . . . . . . . . . . . . . . . 171
Managing Data Reservations with TM1 API functions . . . . . . . . . . . . . . . . . . . . . 172TM1DataReservationAcquire . . . . . . . . . . . . . . . . . . . . . . . . . . . . 173TM1DataReservationRelease . . . . . . . . . . . . . . . . . . . . . . . . . . . . 173
vi IBM Cognos Express Xcelerator Version 10.1.0: Developer Guide

TM1DataReservationReleaseAll . . . . . . . . . . . . . . . . . . . . . . . . . . . 174TM1DataReservationGetAll. . . . . . . . . . . . . . . . . . . . . . . . . . . . . 175TM1DataReservationGetConflicts . . . . . . . . . . . . . . . . . . . . . . . . . . . 176TM1DataReservationValidate . . . . . . . . . . . . . . . . . . . . . . . . . . . . 176API error codes for data reservations . . . . . . . . . . . . . . . . . . . . . . . . . 177
Appendix A. Supported Excel Functions - CXL Web . . . . . . . . . . . . . . . . 179Supported Functions . . . . . . . . . . . . . . . . . . . . . . . . . . . . . . . . 179
Date and Time Functions . . . . . . . . . . . . . . . . . . . . . . . . . . . . . 179Financial Functions . . . . . . . . . . . . . . . . . . . . . . . . . . . . . . . 180Information Functions . . . . . . . . . . . . . . . . . . . . . . . . . . . . . . 180Logical Functions . . . . . . . . . . . . . . . . . . . . . . . . . . . . . . . . 181Lookup and Reference Functions . . . . . . . . . . . . . . . . . . . . . . . . . . . 181Math and Trigonometric Functions . . . . . . . . . . . . . . . . . . . . . . . . . . 182Text and Data Functions. . . . . . . . . . . . . . . . . . . . . . . . . . . . . . 184Statistical Functions . . . . . . . . . . . . . . . . . . . . . . . . . . . . . . . 185
Appendix B. Unsupported Excel Functions - CXL Web. . . . . . . . . . . . . . . 189Database and List Management Functions . . . . . . . . . . . . . . . . . . . . . . . . . 189Date and Time Functions . . . . . . . . . . . . . . . . . . . . . . . . . . . . . . 189Financial Functions . . . . . . . . . . . . . . . . . . . . . . . . . . . . . . . . 190Information Functions . . . . . . . . . . . . . . . . . . . . . . . . . . . . . . . 191Lookup and Reference Functions . . . . . . . . . . . . . . . . . . . . . . . . . . . . 192Math and Trigonometric Functions . . . . . . . . . . . . . . . . . . . . . . . . . . . 192Statistical Functions . . . . . . . . . . . . . . . . . . . . . . . . . . . . . . . . 193Text and Data Functions. . . . . . . . . . . . . . . . . . . . . . . . . . . . . . . 194
Notices . . . . . . . . . . . . . . . . . . . . . . . . . . . . . . . . . . . 195
Index . . . . . . . . . . . . . . . . . . . . . . . . . . . . . . . . . . . . 199
Contents vii

viii IBM Cognos Express Xcelerator Version 10.1.0: Developer Guide

Introduction
This document is intended for use with IBM® Cognos® Express® Xcelerator.
This manual describes how to create and maintain objects on the IBM CognosAnalytic Server (ICAS), administer security, and develop Xcelerator applications.The guide also describes aspects of Xcelerator security.
Finding information
To find IBM Cognos product documentation on the web, including all translateddocumentation, access one of the IBM Cognos Information Centers(http://publib.boulder.ibm.com/infocenter/cogic/v1r0m0/index.jsp). ReleaseNotes are published directly to Information Centers, and include links to the latesttechnotes and APARs.
Samples disclaimer
The Great Outdoors Company, GO Sales, any variation of the Great Outdoorsname, and Planning Sample depict fictitious business operations with sample dataused to develop sample applications for IBM and IBM customers. These fictitiousrecords include sample data for sales transactions, product distribution, finance,and human resources. Any resemblance to actual names, addresses, contactnumbers, or transaction values is coincidental. Other sample files may containfictional data manually or machine generated, factual data compiled fromacademic or public sources, or data used with permission of the copyright holder,for use as sample data to develop sample applications. Product names referencedmay be the trademarks of their respective owners. Unauthorized duplication isprohibited.
Accessibility features
This product does not currently support accessibility features that help users witha physical disability, such as restricted mobility or limited vision, to use thisproduct.
Forward-looking statements
This documentation describes the current functionality of the product. Referencesto items that are not currently available may be included. No implication of anyfuture availability should be inferred. Any such references are not a commitment,promise, or legal obligation to deliver any material, code, or functionality. Thedevelopment, release, and timing of features or functionality remain at the solediscretion of IBM.
© Copyright IBM Corp. 2007, 2012 ix

x IBM Cognos Express Xcelerator Version 10.1.0: Developer Guide
Chapter 1. Introduction to Xcelerator Development
This section provides an introduction to the concept of multidimensionality anddescribes some common responsibilities of developers using IBM Cognos ExpressXcelerator.
Understanding MultidimensionalityWith IBM Cognos Xcelerator, you can create multidimensional databases thatprovide business and finance managers instant meaning from complex, dynamicbusiness models.
To understand multidimensionality, consider the example of the Vice President ofSales for a retail company who wants to analyze product sales across a retail chainthat operates in the United States and Canada. Each retail store records the unitsales, dollar sales, and discounts for the durable consumer products.
The sales are analyzed by product, scenario (actual versus budget), region,measures (units, dollar sales, and discounts), and week. What we have identified isa five-dimensional model. The dimensions identify how the data is organized orhow the types of data are tracked.
In Xcelerator, the sales analysis can reside in one or more multidimensionalstructures called cubes. A collection of cubes forms a database. Each data point in acube is identified by one element in each dimension of the cube; for example, actualdollar sales of dryers during the second week of January in the Boston store.Xcelerator cubes must contain no less than two and no more than 256 dimensions.
Durables CubeIn the following diagram, each dimension in the Durables cube is represented by avertical line segment. The elements within the dimension are represented by unitintervals.
© Copyright IBM Corp. 2007, 2012 1

Suppose you are the Vice President of Sales, and you need to quickly compare theperformance of products and stores to identify the winning strategies and troublespots. Using Xcelerator multidimensional views, you can create an unlimitednumber of ad hoc queries.
In the following example, you can quickly compare actual versus budgeted dollarsales across weeks. The region is Boston and the product is a dryer model.
By rearranging the view, you can compare dollar sales for the dryer model acrossall regions.
ScenarioProduct
Dryer ModelActual
Television Model
VCR Model
Washing Machine Model
Region Measures Time
Budget
Variance
Boston
Hartford
Nashua
New York
Montreal
Toronto
Units
DollarSales
Discounts
Week 1
Week 2
Week 3
Week 4
Week 5
Week 6
Week 7
Week 8
Week 9
Week 10
Week 11
Week 12
2 IBM Cognos Express Xcelerator Version 10.1.0: Developer Guide

Later sections of this book describe how you can use Xcelerator to reconfigureviews and drill down into your multi-dimensional data to satisfy your analysisrequirements.
Your Role as DeveloperAs an IBM Cognos Express Xcelerator developer, your responsibilities fall into fourmajor tasks:v Design and create the cubes that hold business analyses.v Decide where to store the cubes so they can be shared across the organization.v Import data into the cubes from transactional systems and other data sources.v Create formulas that perform calculations, such as average prices, currency
conversions, and price/earning ratios.
You must have access rights to the Xcelerator data in order to perform these tasks.Typically, your Xcelerator administrator is responsible for setting access rights. Thefollowing section describes the distinction between a local and a remote server, andlists the access rights you need to perform tasks on a remote server.
Understanding Xcelerator Object Naming ConventionsAs a developer, you are responsible for creating and naming many objects in theIBM Cognos Express Xcelerator system. You should observe the followingconventions when naming Xcelerator objects.
Reserved CharactersThe list of invalid characters is different for naming objects and when writing rulesor rule statements.
The following characters are reserved. You cannot use these reserved characterswhen you name Xcelerator applications, cubes, views, dimensions, subsets,processes, and chores:
Character Description
/ slash
Chapter 1. Introduction to Xcelerator Development 3

Character Description
\ back-slash
: colon
? question-mark
" double-quote
< less-than
> greater-than
| pipe
* asterisk
Note: The right curly brace (}) cannot be the first character in any Xcelerator objectname.
Rule StatementsThe following characters are reserved when writing rule statements. You cannotuse these reserved characters in Xcelerator rule statements:
Character Description
, comma
) Close parenthesis
| pipe
~ tilde
; semi-colon
@ at sign
When writing rules with "!dimension-name" constructs, do not use any of thereserved characters. Invalid dimension name characters for rule-writers are:, ) | ~; @ \ / : * ? " < >
See Object Naming Exceptions for more information.
Object Naming ExceptionsThere is no restriction on the characters that you can use in element, client, group,or alias names, with the following exceptions:
4 IBM Cognos Express Xcelerator Version 10.1.0: Developer Guide

MDX Expressions
An element name cannot contain a circumflex (^) because this character is used todenote relationships in MDX. IBM Cognos Express Xcelerator uses MDX to filterviews and generate dynamic subsets. Therefore, an element name that contains acircumflex causes errors when you apply filters or create dynamic subsets.
An element name can contain a right square bracket ( ] ) but when an elementname containing this character is referenced in an MDX expression, the characterneeds to be escaped by doubling it. For example, an element named Array[N]Elements, can be referred to in an MDX expression as [Array[N]] Elements].
Xcelerator Rules
You should be aware that some special characters in object names may conflictwhen used in a rules expression. For example, the @ character and exclamationpoint ! character are both valid characters for object names but are also used inrules expressions.
The @ character can be used in any Xcelerator object name. However, the @character is a string comparison operator in Xcelerator rules. If you reference anyobject containing the @ character in rules, the object name must be enclosed insingle quotation marks. For example, a dimension named products@location mustbe referenced as 'products@location' in rules.
The exclamation point ! character is also used in rules expressions and should notbe used in object names that will be used in rules. For example, the rules DBfunction uses the exclamation point as part of the !dimension argument.DB(’MarketExchange’,!market,!date)
Maximum String Length for Data Directory and Object Names
The entire string represented by the combination of the IBM Cognos AnalyticServer (ICAS) data directory name and the object name is limited to 256 bytes. Forexample, if your data directory is C:\Financial data\TM1\ (22 bytes), object namesare limited to 234 bytes, inclusive of a file extension such as.cub or .rux.
Some Xcelerator objects, such as views, subsets, and applications, are stored insub-directories of the ICAS data directory. In this case, the 256 byte limit is appliedto the combination of the ICAS data directory, the sub-directory, and the objectname.
Case Sensitivity
Object names are not case sensitive. For example, the dimension name actvsbud isequivalent to ActVsBud.
Spaces in Object Names
Spaces are allowed in all object names, but spaces are ignored by the IBM CognosAnalytic Server (ICAS). The ICAS considers the dimension name Act Vs Bud to beequivalent to ActVsBud (or actvsbud).
User Names
User names with reserved characters cannot save private objects.
Chapter 1. Introduction to Xcelerator Development 5

6 IBM Cognos Express Xcelerator Version 10.1.0: Developer Guide

Chapter 2. Creating Cubes and Dimensions
IBM Cognos Express Xcelerator stores business data in cubes. This sectiondescribes how to create cubes and their building blocks, dimensions.
Note: All tasks described in this section require Xcelerator or Architect. You cannotcreate cubes, create/edit dimensions, or establish replications with XceleratorClient.
Designing CubesXcelerator stores your business analyses in cubes. Each cell in a cube contains ameasure that you are tracking in an analysis. A cube can store data against one ormore measures.
You form a cube with dimensions, which identify how to organize the data or themeasures you want to track. One element in each dimension identifies the locationof a cell in a cube.
The following example cube contains three dimensions: Product, Measures, andMonth. Each measure, such as Sales, is organized or dimensioned by a productand a month. For example, the cell value 30000 represents the sales of Sedan-1 inthe month of January (Jan).
Xcelerator treats all dimensions the same way, whether they contain elements thatidentify measures or describe how you organize the measures.
Selecting the Number of DimensionsEvery cube has at least two dimensions and a maximum of 256 dimensions. Forexample, a two-dimensional cube is best suited as a lookup table when you wantto calculate values in other cubes that have more dimensions. For example, youcan convert the local currency amounts to a reporting currency by using atwo-dimensional cube that stores the exchange rates. You retrieve the rate usingthe Xcelerator rule.
300000
400510
280500
310500
420500
290500
400500
420500
300500
420500
422500
280500
Month
Sedan-3
Sedan-2
Sedan-1
Sales
Units
Variable CostsMeasures
Product
Jan Feb Mar Apr
© Copyright IBM Corp. 2007, 2012 7

The number of dimensions in a cube depends mostly on the dimensionality of yourdata. Consider the accounts in a Profit and Loss Statement.
Profit and Loss Statement (in thousands)
Year Ending 31 Dec, 2002
Net sales 200,000
Direct costs 35,000
Direct labor 50,000
Gross Profit 115,000
Salaries 30,000
Payroll 3,500
Electricity 5,000
Rent 10,000
Depreciation 6,000
If you want to examine how the revenue and expenses vary by their factors, youwould need to divide the accounts into two groups.v Accounts above the Gross Profit line, such as Net sales and Direct costs, which
you can dimension by product, region, scenario (Actual versus Budget), andmonths.
v Accounts below the Gross Profit line, such as Payroll, Electricity, and Rent,which you can dimension by region, scenario (Actual versus Budget), andmonths, but not product. You cannot directly attribute the overheads toproducts, so you cannot analyze them at the same level of detail.
This difference in dimensionality suggests two cubes:v Five-dimensional cube for the accounts above the Gross Profit linev Four-dimensional cube for the accounts below the Gross Profit line
Five-dimensional CubeThe following diagram represents the dimensions and elements in thefive-dimensional cube. Each dimension is represented by a vertical line segment.The elements within the dimension are represented by unit intervals.
8 IBM Cognos Express Xcelerator Version 10.1.0: Developer Guide

Four-dimensional CubeThe following diagram represents the dimensions and elements in thefour-dimensional cube. Each dimension is represented by a vertical line segment.The elements within the dimension are represented by unit intervals.
Consolidating Detail Using Dimension HierarchiesThe data you import into a cube provides a snapshot of your business at a specificlevel of detail. For example, you might import the weekly or monthly sales datafor products by city. The dimension elements that identify these data points aresimple or leaf-level elements in each dimension: sales for one week, one product,one city.
By using dimension hierarchies, you can easily aggregate numeric data intocategories that are meaningful in your analyses. Each category corresponds to an
Chapter 2. Creating Cubes and Dimensions 9

aggregation of detail for two or more elements in a dimension. For example, youcan create quarterly elements that sum monthly sales amounts. In Xcelerator,elements that represent aggregations are called consolidated elements orconsolidations.
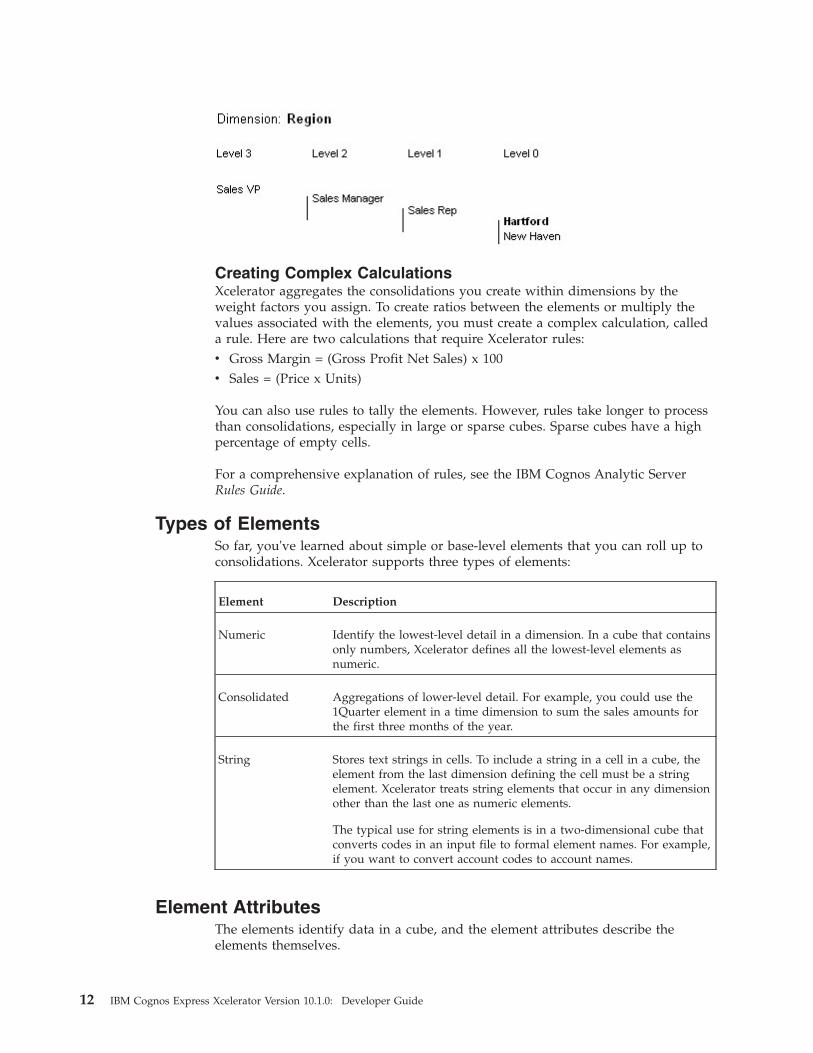
The following diagram shows three levels of consolidation for elements of aRegion dimension. The cities provide the lowest level of detail (Level 0). The citiesroll up into state consolidations (Level 1), which roll up into regionalconsolidations, which finally roll up into the Eastern USA consolidation (Level 3).
Navigating through a Dimension HierarchyA dimension hierarchy provides a navigation path for analyzing data at differentlevels of detail. Drilling down means navigating to greater levels of detail alongone dimension. For example, as you drill down from New England in the aboveRegion dimension, you access the underlying data for two states and then fourcities. Drilling up means navigating to summary levels in dimensions.
Using Weights to Express ConsolidationsWeight factors determine the contribution of an element to a consolidation. Toexpress that the Connecticut sales total is a sum of Hartford and New Haven, youassign a default weight factor of 1.0 to both Hartford and New Haven.
You can also consolidate elements by subtracting the values associated with theelements. For example, you can express Net Profit as Market Value - AcquisitionValue. You would assign a weight factor of 1.0 to Market Value and -1.0 toAcquisition Value. The following table presents four weighting examples ofconsolidation.
10 IBM Cognos Express Xcelerator Version 10.1.0: Developer Guide

DimensionConsolidatedElement
ConsolidationMethod
SubordinateElements Weight Factors
Account Net Profit Subtraction Market Value
AcquisitionValue
1.0
-1.0
Month 1Quarter Addition January
February
March
1.0
1.0
1.0
Period Yearly Budget 4-4-5Distribution
January
February
March
.07692
.07692
.09615
Region Connecticut Addition Hartford
New Haven
1.0
1.0
Creating Multiple Roll-ups in a DimensionYou can roll up low-level numeric data, such as sales and units, in several ways bycreating multiple hierarchies in a dimension. By creating multiple roll-ups in adimension, you can reduce the number of dimensions, and the number of emptycells in a cube.
In the following example, Hartford, a simple element in the Region dimension,rolls up along two paths: geographic and management.
Geographic Roll-up:
Management Roll-up:
Chapter 2. Creating Cubes and Dimensions 11
Creating Complex CalculationsXcelerator aggregates the consolidations you create within dimensions by theweight factors you assign. To create ratios between the elements or multiply thevalues associated with the elements, you must create a complex calculation, calleda rule. Here are two calculations that require Xcelerator rules:v Gross Margin = (Gross Profit Net Sales) x 100v Sales = (Price x Units)
You can also use rules to tally the elements. However, rules take longer to processthan consolidations, especially in large or sparse cubes. Sparse cubes have a highpercentage of empty cells.
For a comprehensive explanation of rules, see the IBM Cognos Analytic ServerRules Guide.
Types of ElementsSo far, you've learned about simple or base-level elements that you can roll up toconsolidations. Xcelerator supports three types of elements:
Element Description
Numeric Identify the lowest-level detail in a dimension. In a cube that containsonly numbers, Xcelerator defines all the lowest-level elements asnumeric.
Consolidated Aggregations of lower-level detail. For example, you could use the1Quarter element in a time dimension to sum the sales amounts forthe first three months of the year.
String Stores text strings in cells. To include a string in a cell in a cube, theelement from the last dimension defining the cell must be a stringelement. Xcelerator treats string elements that occur in any dimensionother than the last one as numeric elements.
The typical use for string elements is in a two-dimensional cube thatconverts codes in an input file to formal element names. For example,if you want to convert account codes to account names.
Element AttributesThe elements identify data in a cube, and the element attributes describe theelements themselves.
12 IBM Cognos Express Xcelerator Version 10.1.0: Developer Guide

You can use attributes to:v List features of elements. For example, the square footage of a store and the
engine size of a car model.v Provide alternative names, or aliases. For example, descriptive names of general
ledger accounts and the local language versions of product names.v Control the display format for the numeric data. Typically, you select a display
format for the measures you track in a cube.
You can select elements by attribute value in the Subset Editor. You can alsodisplay element names in Xcelerator dialog boxes using their aliases.
To create attributes and assign attribute values, use the Attributes Editor.
Descriptive AttributesThe following table shows sample attributes that describe car models.
Elements
Attributes
Horsepower(Numeric) Engine (Text) Audio (Text)
Sedan 1 190 V-8 Compact Disc
Sedan 2 140 Inline 4 Cassette / Radio
Sedan 3 120 Inline 4 Cassette / Radio
Sedan 4 180 V-8 Compact Disc
Sedan 5 140 Inline 4 Cassette / Radio
Alias AttributesThe following table shows German, Spanish, and French versions of Englishfurniture names.
Elements
Alias Attributes
Deutsche Español Français
Chair Stuhl Silla Chaise
Desk Schreibtisch Escritorio Bureau
Lamp Lampe Lámpara Lampe
Display Format AttributesThe Cube Viewer window displays numeric data in the formats shown in thefollowing table.
Format Name Description Example
Currency Numbers appear with a currency symbol andthe specified number of decimal places(Precision). Xcelerator uses the currency symboldefined in the Microsoft Windows RegionalSettings dialog box.
$90.00
General Numbers appear with a specified number ofdecimal places (Precision).
-90
Chapter 2. Creating Cubes and Dimensions 13

Format Name Description Example
Percentage Numbers appear as percentages, with a specifiednumber of decimal places (Precision).
90.00%
Scientific Numbers appear in exponential form, with aspecified number of decimal places (Precision).
9.0e+001
Date Numbers appear as a date string. 1=January 1,1900. There are a number of date formatsavailable.
March 31, 2002
Time Numbers appear as a time string. There are anumber of time formats available.
19:53:30 A
Comma Places commas in the appropriate places in largenumbers.
1,000,000
Custom A user-defined format. Custom
Using the Attributes Editor window, you can select a display format for everyelement in each dimension in a cube. However, it is recommended that you selectdisplay formats only for one dimension, the measures you track in a cube. You canalso select a format in the Cube Viewer window that applies to cells whoseelements do not have a display format defined.
Xcelerator determines which display format to use in the Cube Viewer window, asfollows:
Procedure1. Xcelerator first checks the elements in the column dimension for display
formats. If dimensions are stacked, Xcelerator checks from the bottom upward.2. If no format is found, Xcelerator checks the elements in the row dimension for
display formats. If dimensions are stacked, Xcelerator checks from right to left.3. If no format is found, Xcelerator checks the title elements for display formats.
The elements are inspected from right to left.4. If no format is found, Xcelerator applies the format for the current view.
To ensure that Xcelerator applies the format for the cube measures, position thedimension containing the measures as the bottommost column dimension.
Setting Display Formats for Rows or ColumnsYou might want to format the numbers in a single column or row. For example,numbers in a column or row that contain two decimal places might be betterrepresented as whole numbers with no decimal points. To format the numbers in asingle column or row, use the Attribute Editor.
The Month dimension displays in the column of the view. Any display format youassign to a column dimension overrides the display format you select for the rowdimension.
For the first task, let's make sure that no formatting is applied to the Year elementof the Month dimension. Follow these steps.
14 IBM Cognos Express Xcelerator Version 10.1.0: Developer Guide

Procedure1. Open the Format view of SalesPriorCube.2. In the Server Explorer, expand the SalesPriorCube cube so that you can see its
dimensions.3. Right-click the Month dimension, and select Edit Element Attributes.
The Attribute Editor opens.Note that there are no Format attribute values for the Month dimension. Youcan now be sure that any formats you set for the row dimension will takeprecedence in the Cube Viewer (or In-Spreadsheet Browser).
4. Click the Cancel to close the Attribute Editor.For this task, follow the steps to format the numbers in the Units row aswhole numbers with zero (0) decimal places.
5. In the Server Explorer, right-click the Account1 dimension, and select EditElement Attributes.The Attribute Editor opens.
6. Click the cell at the intersection of the Units element row and the Formatcolumn.
7. Click the Format button.The Number Format dialog box opens.
8. Select the Comma category, enter 0 in the Precision box, and click OK.9. Click OK in the Attributes Editor dialog box.
10. Click Recalculate to recalculate the Format view.The Units values now display as whole numbers without decimal points.
Attributes versus ElementsWhen you want to list multiple attributes values for a single element, considercreating additional elements or additional dimensions. For example, the exteriorcolor is an attribute of car models. The red models often outsell the other colormodels. If you create one element per car and another dimension with elements foreach color, you can use Xcelerator to track car sales by color. If you combine salesinto a single model, you might lose valuable detail.
Consider another example. In the car models table, there is an attribute categoryfor engine configuration. Each car has a single engine configuration, such as V-8. Ifany sedans are available in more than one engine configuration, consider creatingone element per engine configuration.
Designing Cubes - SummaryHere are guidelines to use when you design cubes:
Procedure1. List the measures you want to track in your business analysis. Examples of
measures include sales amounts, units sold, expenses, acquisition values, andcampaign costs.
2. Determine how you want to organize or dimension the measures. In mostanalyses, you track measures over time.v What is the base time interval: days, weeks, months?v Is there a geographic dimension?v Do the measures vary by customer and product?
Chapter 2. Creating Cubes and Dimensions 15

v Is there a scenario dimension (actual versus budget)?3. Determine how you want to consolidate the dimension elements.4. Create a list of attributes you want to associate with the elements of the cube.
Examples of attributes include store square footage, customer IDs, and locallanguage versions of element names.
5. Define the display formats for the measures in your cubes. For example, defineGross Margin as a percentage and Sales as a currency amount.
Creating DimensionsWhen you create a dimension, you identify the leaf-level elements that comprisethe dimension and, optionally, any hierarchies (consolidations) within thedimension.
There are four ways to create dimensions:v Dimension Editor - Add elements as well as create and rearrange
consolidations while you design dimensions. For more information, see“Creating Dimensions Using the Dimension Editor Window.”
v TurboIntegrator - Import element names from an ASCII, ODBC, cube view, ordimension subset source. Simultaneously create multiple dimensions andestablish consolidation within those dimensions. For more information, see theIBM Cognos Analytic Server TurboIntegrator Guide.
Note: Analytic Server requires DataDirect drivers to access an Oracle ODBCsource on Solaris or AIX®. These drivers are not supplied with Analytic Serverand must be acquired separately.
v Importing Data into a New Cube - Use TurboIntegrator to map input rowsfrom a data source to a cube. Then identify the input columns that supply thecell values and the elements that identify the cell location. For more informationabout this process, see the IBM Cognos Analytic Server TurboIntegrator Guide.
v Dimension Worksheets - Use these modified Microsoft Excel worksheets to listthe elements and hierarchical relationships for one dimension. For moreinformation, see “Creating Dimensions Using Dimension Worksheets” on page24.
Creating Dimensions Using the Dimension Editor WindowThis section walks you through the steps for creating a simple Area dimensionusing the Dimension Editor window. Assume that the hierarchy for the Areadimension includes the consolidated New England element and three simpleelements, Connecticut, Massachusetts and Vermont.
Procedure1. In the Tree pane of the Server Explorer, select Dimensions beneath the server
that you want to contain the dimension.2. Click Dimensions, Create New Dimension.
The Dimension Editor opens.You can now add elements to the dimension.
3. Click Edit, Insert Element or click Insert Sibling .The Dimension Element Insert dialog box opens.
4. To add a consolidated element, do the following:v Type New England in the Insert Element Name field.
16 IBM Cognos Express Xcelerator Version 10.1.0: Developer Guide
v Select Consolidated from the Element Type list.v Click Add.v Click OK.New England now appears as the first element of the dimension, which is aconsolidated element. Now let's add three child elements to the New Englandelement. As a result, New England becomes the parent element of the threechild elements.
5. Select the New England element.
6. Click Edit, Insert Child or click Insert Child .The Dimension Element Insert dialog box opens. Xcelerator displays a Parentname of New England, indicating that any elements you create will be thechildren of New England.
7. In the Insert Element Name field, type Connecticut and click Add.8. In the Insert Element Name field, type Massachusetts and click Add.9. In the Insert Element Name field, type Vermont and click Add.
The dialog box now contains three children of New England, each with adefault weight of 1.
10. Click OK.The Dimension Editor shows the new elements as children of New England.
11. Click Dimension, Save or click Save .The Dimension Save As dialog box opens.
12. Enter a dimension name and click Save.Dimension names can have a maximum of 256 characters. Always usedescriptive dimension names.The new dimension displays in the list of dimensions on the server.
Modifying a DimensionAfter creating a dimension, you can make the following modifications:v Add siblings to existing elements.v Add children to existing elements.v Rearrange the hierarchy structure, such as repositioning elements within
consolidations.v Delete elements from the dimension.v Delete elements from consolidations.v Edit element properties, such as changing the weight of an element within a
consolidation.v Rearrange the order of elements in the dimension.
Adding Siblings to Existing ElementsFollow these steps to add siblings to an existing element in the Dimension Editor.
Procedure1. Right-click the element to which you want to add siblings and select Edit
Dimension Structure.2. Click Edit, Insert Sibling.
The Dimension Element Insert dialog box opens.3. Enter the name of the first sibling in the Insert Element Name field.
Chapter 2. Creating Cubes and Dimensions 17

4. If applicable, enter an Element Weight.The default element weight is 1.
5. Click Add.6. Repeat steps 3 through 5 for each sibling you want to add.7. Click OK.
Xcelerator adds the new elements as siblings of the element you selected instep 1.
Adding Children to Existing ElementsFollow these steps to add children to existing elements in the Dimension Editor.
Procedure1. Right-click the element to which you want to add siblings and select Edit
Dimension Structure.If you add children to a simple (leaf-level) element, the element automaticallybecomes a consolidated element.
2. Click Edit, Insert Child.The Dimension Element Insert dialog box opens.
3. Enter the name of the first child in the Insert Element Name field.4. If applicable, enter an Element Weight.
The default element weight is 1.5. Click Add.6. Repeat steps 3 through 5 for each child you want to add.7. Click OK.
Xcelerator adds the new elements as children of the element you selected instep 1.
Rearranging the Dimension HierarchyFollow these steps to change the position of elements within the dimensionhierarchy.
Procedure1. In the Dimension Editor, select the elements you want to move.
v To select a single element, click the element.v To select multiple adjacent element, click the first element, hold down SHIFT,
and click the last element. You can also press CTRL-A to select all visibleelements.
v To select multiple non-adjacent elements, hold down CTRL, and click eachelement.
2. Drag and drop the elements to their new location in the dimension hierarchy.As you drag the elements, the cursor changes to indicate where Xcelerator willdrop the elements. Also, the status bar displays a message indicating whereXcelerator will drop the elements.You can also cut and paste elements to rearrange the dimension hierarchy.
Deleting Elements from a DimensionFollow these steps to delete elements from a dimension.
18 IBM Cognos Express Xcelerator Version 10.1.0: Developer Guide

Procedure1. Select the elements you want to delete.
v To select a single element, click the element.v To select multiple adjacent element, click the first element, hold down SHIFT,
and click the last element.v To select multiple non-adjacent elements, hold down CTRL, and click each
element.v To select elements by hierarchy level, attribute value, or spelling pattern, see
the IBM Cognos Express Xcelerator User Guide.2. Click Edit, Delete Element.
A confirmation dialog box displays that lists the dimension name and asks ifyou are sure you want to delete the object that you have selected. Click Yes toproceed with the deletion, click No or Cancel to cancel the deletion.
Deleting Elements from a ConsolidationFollow these steps to delete elements from a consolidation.
Procedure1. Select the elements you want to delete.
v To select a single element, click the element.v To select multiple adjacent element, click the first element, hold down SHIFT,
and click the last element.v To select multiple non-adjacent elements, hold down CTRL, and click each
element.
2. Click Edit, Delete Element from Consolidation or click Delete .A confirmation dialog box displays that lists the dimension name and asks ifyou are sure you want to delete the object that you have selected. Click Yes toproceed with the deletion, click No or Cancel to cancel the deletion.Xcelerator deletes the element from the consolidation, and keeps any otherinstances of the element in the dimension.
Note: If you define the element only within the consolidation, Xceleratordeletes the element from the dimension as well.
Editing Element PropertiesYou can edit the element properties to assign a new weight to an element of aconsolidation, or to change the element type of a leaf-level element.
Note: You cannot change the element type of consolidated elements, and youcannot assign an element weight to any instance of an element that is not amember of a consolidation.
Procedure1. Select the element.2. Click Edit, Element Properties.
The Dimension Element Properties dialog box opens.3. If necessary, select a new element type from the Element Type list.4. If necessary, enter a new Element Weight.5. Click OK.
Chapter 2. Creating Cubes and Dimensions 19
Setting the Order of Elements in a DimensionXcelerator lets you set the order of elements in a dimension to determine the indexvalue for each element in a dimension. The first element in a dimension has anindex value of 1, the second element has an index value of 2, and so on.
Set the order of elements in a dimension is an important feature because manyXcelerator functions (worksheet, rules, and TurboIntegrator) reference the elementindex values.
Note: If you change the order of elements in a dimension, any functions thatreference element index values return new and possibly unexpected values.
Procedure1. Order the elements as you want them to appear in the dimension.
You can use the sort options and drag-and-drop functionality of the DimensionEditor to alter the order of elements.
2. Click the Set Dimension Order button.3. Click Dimension, Save.
v When the sorting property of the dimension is set to Automatic, Xceleratorprompts you to change the sorting property to Manual.
v When the sorting property of the dimension is set to Manual, Xceleratorinserts any elements you added to the dimension wherever you manuallypositioned them in the Dimension Editor.
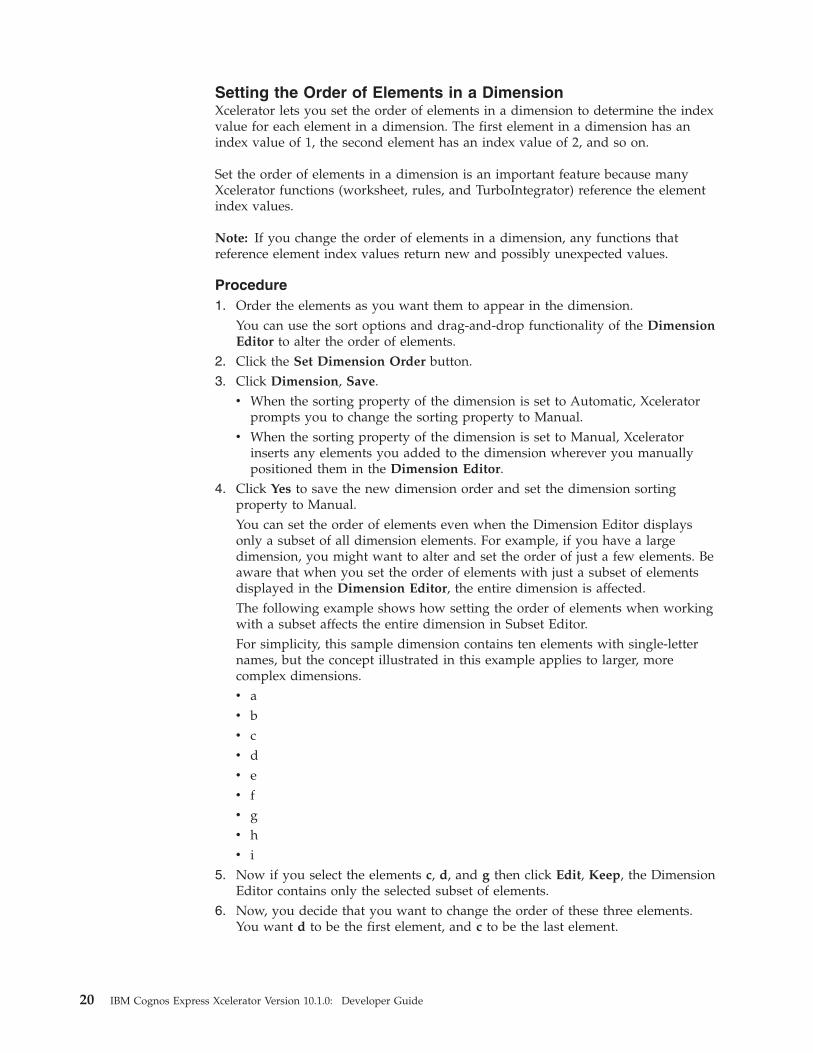
4. Click Yes to save the new dimension order and set the dimension sortingproperty to Manual.You can set the order of elements even when the Dimension Editor displaysonly a subset of all dimension elements. For example, if you have a largedimension, you might want to alter and set the order of just a few elements. Beaware that when you set the order of elements with just a subset of elementsdisplayed in the Dimension Editor, the entire dimension is affected.The following example shows how setting the order of elements when workingwith a subset affects the entire dimension in Subset Editor.For simplicity, this sample dimension contains ten elements with single-letternames, but the concept illustrated in this example applies to larger, morecomplex dimensions.v av bv cv dv ev fv gv hv i
5. Now if you select the elements c, d, and g then click Edit, Keep, the DimensionEditor contains only the selected subset of elements.
6. Now, you decide that you want to change the order of these three elements.You want d to be the first element, and c to be the last element.
20 IBM Cognos Express Xcelerator Version 10.1.0: Developer Guide
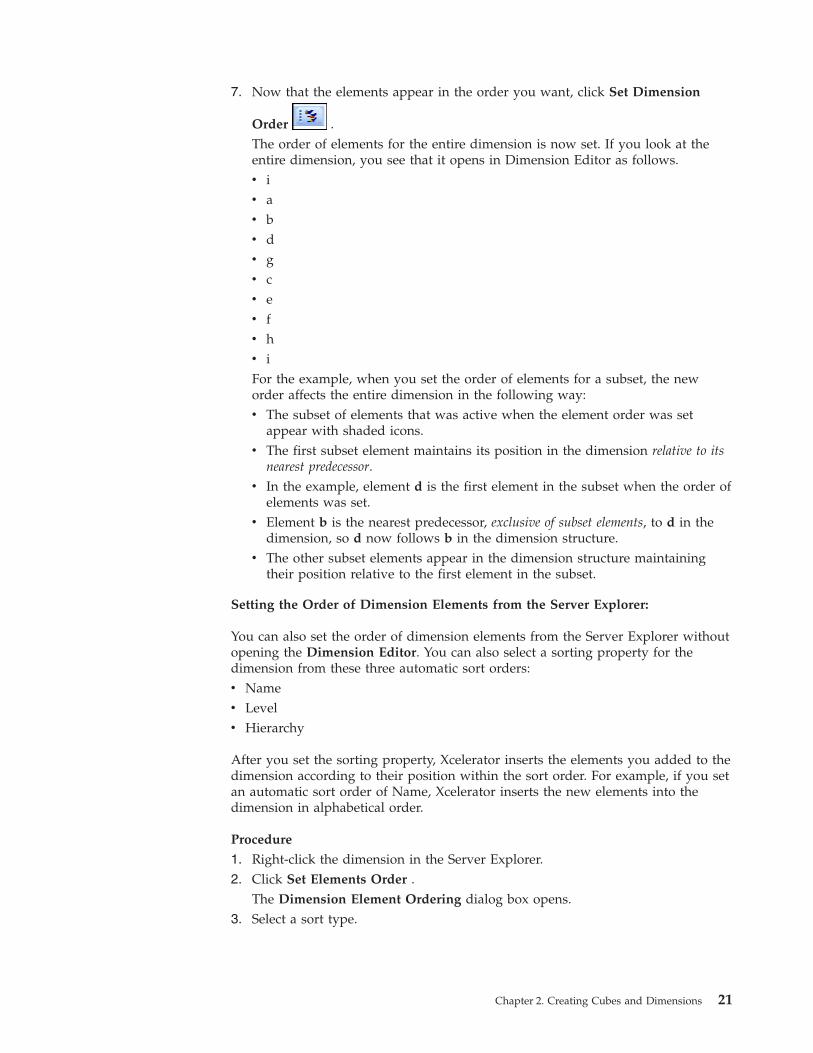
7. Now that the elements appear in the order you want, click Set Dimension
Order .The order of elements for the entire dimension is now set. If you look at theentire dimension, you see that it opens in Dimension Editor as follows.v iv av bv dv gv cv ev fv hv iFor the example, when you set the order of elements for a subset, the neworder affects the entire dimension in the following way:v The subset of elements that was active when the element order was set
appear with shaded icons.v The first subset element maintains its position in the dimension relative to its
nearest predecessor.v In the example, element d is the first element in the subset when the order of
elements was set.v Element b is the nearest predecessor, exclusive of subset elements, to d in the
dimension, so d now follows b in the dimension structure.v The other subset elements appear in the dimension structure maintaining
their position relative to the first element in the subset.
Setting the Order of Dimension Elements from the Server Explorer:
You can also set the order of dimension elements from the Server Explorer withoutopening the Dimension Editor. You can also select a sorting property for thedimension from these three automatic sort orders:v Namev Levelv Hierarchy
After you set the sorting property, Xcelerator inserts the elements you added to thedimension according to their position within the sort order. For example, if you setan automatic sort order of Name, Xcelerator inserts the new elements into thedimension in alphabetical order.
Procedure
1. Right-click the dimension in the Server Explorer.2. Click Set Elements Order .
The Dimension Element Ordering dialog box opens.3. Select a sort type.
Chapter 2. Creating Cubes and Dimensions 21

Sort Type Description
Automatic Enables the Automatic Sort By options: Name, Level, andHierarchy.
Manual Orders elements as they currently exist in the dimensionstructure and sets the dimension sorting property to Manual.
4. If you select the Manual sort type, skip to step 7.5. Select an Automatic Sort By option.
Sort By Description
Name Sorts elements alphabetically
Level Sorts elements by hierarchy level.
Hierarchy Sorts elements according to the dimension hierarchy.
6. If applicable, select a Sort Direction.7. Click OK.
Results
You have now set the order of the dimension elements. When you open thedimension, you will see the elements in order according to the Sort By option youspecified in step 5.
Managing the Display of Elements in the Dimension EditorThe Dimension Editor includes several features that let you manage the wayelements display. For example, when you work with large dimensions it might behelpful to display only the elements of a certain hierarchy level, or you might wantto view the elements in alphabetical order.
When you alter the display of elements in the Dimension Editor, you do notchange the dimension structure, you simply change the way Xcelerator presentsthe elements in the window.
The upcoming sections describe how to manage the display of elements in theDimension Editor.
Keeping ElementsFollow these steps to display only the selected elements in the Dimension Editor.
Procedure1. Select the elements you want to display.
v To select a single element, click the element.v To select multiple adjacent element, click the first element, hold down SHIFT,
and click the last element.v To select multiple non-adjacent elements, hold down CTRL, and click each
element.
2. Click Edit, Keep or click Keep .The Dimension Editor displays only the elements you selected.
22 IBM Cognos Express Xcelerator Version 10.1.0: Developer Guide
Hiding ElementsFollow these steps to hide selected elements in the Dimension Editor.
Procedure1. Select the elements you want to hide.
v To select a single element, click the element.v To select multiple adjacent element, click the first element, hold down SHIFT,
and click the last element.v To select multiple non-adjacent elements, hold down CTRL, and click each
element.
2. Click Edit, Hide or click Hide .The Dimension Editor hides the elements you selected. All other elementsremain visible.
Sorting Elements AlphabeticallyYou can sort the elements in the Dimension Editor in ascending or descendingalphabetical order.
Sort Order Description
Ascending AlphabeticalClick Edit, Sort By, Ascending or click Sort Ascending
Descending AlphabeticalClick Edit, Sort By, Descending or click Sort Descending
Sorting Elements by Index ValueYou can sort the elements in the Dimension Editor in ascending or descendingorder according to the index value.
Sort Order Description
Ascending Index Value Click Edit, Sort By, Index Ascending or click Sort By Index,
Ascending
Descending Index Value Click Edit, Sort By, Index Descending or click Sort By Index,
Descending
Sorting Elements by HierarchyYou can also sort elements as they appear in the dimension hierarchy.
Sort Type Description
As they appear in thedimension hierarchy Click Edit, Sort By, Hierarchy or click Hierarchy Sort
Viewing Elements by AliasIf you defined an alias attribute for a dimension, you can view the elements bytheir aliases in the Dimension Editor.
The dimensions in the Xcelerator Sample Data directory have aliases defined forFrench and German, so you can view all element names by their foreign languageequivalents.
Chapter 2. Creating Cubes and Dimensions 23

Procedure1. Open the Month dimension in the Dimension Editor.2. Click View, Toolbars, Alias to display the Alias toolbar.
The Alias toolbar contains two objects: a Use Aliases toggle button to turn thedisplay of aliases on or off, and a Select Alias list from which you can select analias.
3. Select Monat (German for 'Month') from the Select Alias list.4. Click the Use Aliases button.
Results
By default, Xcelerator does not display the aliases. The Dimension Editor nowdisplays all elements by their German aliases.
Creating Dimensions Using Dimension WorksheetsA dimension worksheet is a modified Microsoft Excel spreadsheet in which you listelements and hierarchical relationships for one dimension. Xcelerator saves theworksheet data in two files: dimension worksheet (dimname.xdi) and compiled file(dimname.dim).v When you create a dimension using the Dimension Editor window or
TurboIntegrator, Xcelerator writes only to the dimname.dim (compiled) file.v When you modify a dimension using the Dimension Editor, Xcelerator saves
your changes to the .dim file. If an .xdi file exists for the dimension, Xceleratorprompts you to save changes to the dimension worksheet. If you decline toupdate the dimension worksheet, the dimension structure in the .dim file willdiffer from that in the .xdi file.
v To ensure that Xcelerator has access to all of your dimension changes, create andmaintain dimensions with dimension worksheets or the Dimension Editor. Donot mix methods. This can lead to data loss.
Keeping Your Data SynchronizedXcelerator saves the dimension worksheet files to the first directory listed in theLocal Server Data Directory field in the Options dialog box. Therefore, Xceleratormight save your dimension worksheet (.xdi) to a different directory than yourdimension file (.dim).
Note: Be very careful when editing dimensions using worksheets. There areseveral ways in which data can be lost if you do not take proper precautions. Thefollowing examples show two ways you can lose dimension data.v On Monday, you edit a dimension worksheet for the Account1 dimension, and
save the dimension. On Tuesday, another administrator uses the DimensionEditor to make changes to the dimension. The changes she makes are notpropagated to the dimension worksheet file. On Wednesday, you make anotherchange to the dimension using the out-of-date dimension worksheet. Yourchanges overwrite the changes made by the other administrator.
v Two administrators decide to update a dimension on the same server using twodifferent dimension worksheets. This is very dangerous. Xcelerator can overwritethe changes very easily. Use one set of dimension worksheets. Try to avoid havingmore than one .xdi file for any dimension.
To avoid confusion and possible data loss, use precautions when editing dimensionworksheets. We recommend using one of the following procedures.v Use the remote server data directory to store the dimension worksheets.
24 IBM Cognos Express Xcelerator Version 10.1.0: Developer Guide

v Use a special directory to store your dimension worksheets.
Using the Remote Server Data Directory:
To edit the dimension worksheets in the server data directory on the remote server,follow these steps.
Procedure
1. Set the Local Server Data Directory in the Options dialog box to the datadirectory used by your remote IBM Cognos Analytic Server (ICAS).
2. Turn off the option Connect to Local Server on Startup.3. Verify that any local servers running on your computer are shut down.4. Log in to the remote ICAS.5. Make all of the modifications to your dimensions using the worksheet files in
the remote server data directory.6. Click ICAS , Dimension Worksheets, Save in Excel.
Xcelerator writes both the .dim file and the .xdi file to the remote server datadirectory.
Using a Worksheet Directory:
By using a special worksheet directory, you can sharply restrict access to yourdimension worksheets. This can be very useful in security-conscious installations.To set up a worksheet directory, follow these steps.
Procedure
1. Create a worksheet directory somewhere on your file system.2. Move all of your worksheet files (.xdi for dimensions, and .xru for rules) to the
worksheet directory.3. Set the Local Server Data Directory in the Options dialog box to the worksheet
directory.4. Connect to the remote server that contains the dimension you want to update,
and any other servers you want.5. Make all of the modifications to your dimensions using the worksheet files in
the worksheet directory.6. Click Xcelerator , Dimension Worksheets, Save in Excel.
The Select Server Name dialog box opens.7. Select the server on which you want to save the compiled dimension.8. Click OK.
Creating Dimension WorksheetsFollow these stesps to create a dimension using dimension worksheets.
Procedure1. Click Xcelerator , Dimension WorkSheets, New in Excel.
The Create a Dimension dialog box opens.2. In the top box, enter a name for the dimension as follows:
v To create a dimension on your local server, type the name of the dimension.For example: Product.
Chapter 2. Creating Cubes and Dimensions 25

v To create a dimension on a remote server, type the server name, a colon, andthen the dimension name. For example, sales:Product creates the Productdimension on the sales server.
Note: You must be the Xcelerator administrator to create a dimension on aremote server.
3. Click OK.A blank dimension worksheet opens in Excel.
Filling Out Dimension WorksheetsThe following worksheet defines the structure for a Month dimension.
The following sections describe how to define simple and consolidated elements ina dimension worksheet.
Defining Simple Elements:
26 IBM Cognos Express Xcelerator Version 10.1.0: Developer Guide

Begin filling out the dimension worksheet by defining the dimension's simple(leaf-level) elements, starting in row 1.
Procedure
1. In column A, specify the element type.v For numeric elements, type N.v For string elements, type S.In the example, all elements are numeric.
2. In column B, type the name of an element.
Defining Consolidated Elements:
After defining the simple elements in the dimension, you can define theconsolidated elements.
Procedure
1. In an empty row below the last simple element, type C in column A.2. Type the name of the consolidated element in column B.3. In subsequent rows, type the names of the consolidated element's children in
column B.For example, the following excerpt from a dimension worksheet shows theconsolidated element 1 Quarter defined as the consolidation of the children Jan,Feb, and Mar.
Weighting Elements in a Consolidation:
Use column C to weight the elements in a consolidation. To calculate the GrossMargin, for example, you subtract Variable Costs from Sales. To express thiscalculation, assign the weight -1 to the Variable Costs element in the consolidation.The following worksheet shows the weighting in the Account1 dimension.
Chapter 2. Creating Cubes and Dimensions 27

Saving Dimension WorksheetsTo save the dimension worksheet and compile the dimension, click Xcelerator ,Dimension Worksheets, Save in Excel. Xcelerator updates the dimensionworksheet file (dimname.xdi) and creates the compiled dimension file(dimname.dim).
Note: Be sure not to use File, Save in Excel.This action saves only the .xdi file;Xcelerator does not compile the dimension and save the .dim file.
Using Named Hierarchy Levels with Xcelerator DimensionsYou can assign your own custom names to the hierarchy levels of the Xceleratordimension by using the }HierarchyProperties control cube. The named levels youcreate can then be used when you externally access Xcelerator data with IBMCognos Report Studio, MDX statements or other MDX OLAP tools. You can alsoassign a default member for the dimension.
For example, instead of using the generic hierarchy level names of level000,level001, level002, you could assign names that describe the levels in a Customersdimension as shown in the following table.
Xcelerator Dimension Levels Example Named Dimension Levels
level000 All
level001 State
level002 City
level003 Individual
Configuring Named LevelsUse the }HierarchyProperties control cube to configure named levels.
28 IBM Cognos Express Xcelerator Version 10.1.0: Developer Guide

For more details about the }HierarchyProperties control cube, see the section aboutcontrol cubes in the IBM Cognos Express Xcelerator Operation Guide
Procedure1. In Xcelerator Architect, click theView menu and select Display Control
Objects.2. In the navigation pane, click to expand the Cubes node.3. Double-click the }HierarchyProperties control cube.
The }HierarchyProperties control cube opens.4. Click the title dimension list to select the dimension for which you want to
assign named levels.5. In the defaultMember cell, enter an existing element name to set as the default
member for this dimension.The element name you enter here may filter the dimension when Xceleratordata is retrieved from an external application like IBM Cognos Report Studio.Enter the name of the top element in the dimension hierarchy so all thedimension elements are retrieved by default.For example, set World as the default member for the Region dimension.
6. In the level000 to level020 cells, enter your own custom name for eachhierarchy level that exists in the dimension.
Note: Named levels are limited to a length of 255 single-byte characters. Fordetails, see “String Length Limit for Named Levels.”
7. After configuring named levels, you must do one of the following to apply thechanges:v Restart the IBM Cognos Analytic Server (ICAS), orv Run the RefreshMdxHierarchy function in a TurboIntegrator process. For
details, see “Using the RefreshMdxHierarchy TurboIntegrator Function withNamed Levels” on page 30.
Results
Note: Changes to element names or dimension structure are not automaticallydetected by the named levels feature. If your dimension changes, you must firstmanually update the named level assignments in the }HierarchyProperties controlcube and then either restart the ICAS or run theRefreshMdxHierarchyTurboIntegrator function to update the MDX hierarchies in theICAS.
String Length Limit for Named LevelsNamed levels are limited to a length of 255 single-byte characters. Even though the}HierarchyProperties control cube supports long strings, MDX statements canreturn an error with named levels longer than 255 characters.
If you enter a named level with a length greater than 255 single-byte characters,Xcelerator displays an error when the server starts up:
4648 ERROR 2008-06-27 13:50:04,532 TM1®.Hierarchy User-defined level namemodified from ...
Chapter 2. Creating Cubes and Dimensions 29

Using the RefreshMdxHierarchy TurboIntegrator Function withNamed LevelsAfter configuring or editing the named levels in the }HierarchyProperties controlcube, use the RefreshMdxHierarchy function to update the MDX hierarchies in theXcelerator server without requiring you to restart the server.
Procedure1. Create a new TI process.2. Enter the RefreshMdxHierarchy function on the ProLog tab using the following
format:RefreshMdxHierarchy(dimensionName)
where the optional parameter, dimensionName, can either specify a specificdimension to update or can be blank to update all dimensions.For example, to update all dimensions:RefreshMdxHierarchy(’’);
To update only the customers dimension:RefreshMdxHierarchy(’customers’);
3. Run the TI process.
Creating CubesYou can always create cubes on your local server. You must be the Xceleratoradministrator to create cubes on remote servers.
There are two ways to create cubes:v Empty Cube - Select from a list of existing dimensions in the Creating Cube
window to create a new cube with no data.v External Data Sources - Use TurboIntegrator to identify and map dimensions
and data from an external data sources to a new or existing cube.
This section documents creating cubes in the Creating Cube window. Forinformation about creating cubes in TurboIntegrator, see the IBM Cognos AnalyticServer TurboIntegrator Guide.
Ordering Dimensions in a CubeDimensions in a cube have an order that you select when you create a cube. Theorder you select can affect system performance, so you should give someconsideration to the order of dimensions before creating a cube.
As a first step toward ordering dimensions, divide the dimensions into twogroups: sparse and dense dimensions. A dense dimension has a high percentage ofvalues for its elements. You can estimate the density by answering this question: Ifone element in the dimension has a value, keeping the elements of the otherdimensions constant, what is the probability that the other elements in thedimension have values?
For example, if you have a budget in January for a given account and region, youprobably also have a value for the remaining months. Therefore, the Monthdimension is probably dense. Similarly, if you have a budget value for a givenmonth, account, and region, you probably also have an actual value, makingActVsBud a dense dimension.
30 IBM Cognos Express Xcelerator Version 10.1.0: Developer Guide

However, in a worldwide sales cube, you probably do not sell every product inevery region. Therefore, you would treat Product and Region as sparse dimensions.
We generally recommend that you order the dimensions as follows: smallest sparseto largest sparse, followed by smallest dense to largest dense. However, someflexibility is required. For example, it is probably better to put a very small, densedimension such as ActVsBud that has only two or three elements before a verylarge but sparse dimension, such as Product, which might have thousands ofelements.
Creating a CubeFollow these steps to create a cube.
Procedure1. Open the Server Explorer.2. In the Tree pane, select Cubes beneath the server on which you want to create
the cube.3. Click Cubes, Create New Cube.
The Creating Cube dialog box opens. The Available Dimensions box on theleft lists the dimensions stored on the server.
4. Type a cube name in the Cube Name field.
Note: If you do not type a name, Xcelerator names the new cube Unnamed.5. In the Available Dimensions box, double-click the name of the dimension
you want to use as the first dimension in the new cube.The dimension name moves to the Dimensions in new cube box.
You can also use the button to move selected names from the AvailableDimensions box to the Dimensions in new cube box. To select multipleadjacent names, click and drag across the names. To select multiplenon-adjacent names, hold down CRTL, and click each name.
6. Repeat the selection process for all the dimensions you want to include in thenew cube. You must select at least two dimensions. The maximum number ofdimensions is 256.
7. Using the up and down arrows, rearrange the dimensions if necessary.To remove a dimension from the list, double-click the dimension name.
8. If you want to specify the cube properties, click Properties. If you do notwant to assign cube properties, skip to step 13.The Cube Properties dialog box opens.From here, you can set a Measures and Time dimension for the cube, andspecify if the cube is loaded automatically or on demand.
Note: OLE DB for OLAP clients may include provisions for referencingMeasures and Time dimensions. Xcelerator does not reference Measures andTime dimensions, but does allow you to set these properties for other OLAPclients that may access the cube.
9. To set a Measures dimension, select a dimension from the MeasuresDimension list.
10. To set a Time dimension, select a dimension from the Time Dimension list.11. Specify how to load the cube:
v To load the cube into server memory only when a client requests cube data,select the Load On Demand box.
Chapter 2. Creating Cubes and Dimensions 31

v To automatically load the cube into memory when the server starts, clearthe Load On Demand box.
12. Click OK to save the properties and return to the Creating Cube dialog box.13. Click Create Cube to create the cube.
The Server Explorer window opens. The new cube displays in alphabeticalorder in the Cubes list in the Tree pane.
Optimizing the Order of Dimensions in a CubeIf you're not extremely familiar with your business data, it's possible to specify anorder of dimensions during cube creation that results in less than optimalperformance. Similarly, it's possible for the distribution of data in a cube to changeover time, making the order of dimensions specified during cube creation less thanideal. To address these issues, Xcelerator includes a feature that lets you optimizethe order of dimensions in a cube, thereby consuming less memory and improvingperformance.
When you optimize the order of dimensions in a cube, Xcelerator does not changethe actual order of dimensions in the cube structure. Xcelerator does change theway dimensions are ordered internally on the server, but because the cubestructure is not changed, any rules, functions, or applications referencing the cuberemain valid.
As you change the order of dimensions, you can instantly view a report detailingthe impact your changes have on cube memory consumption.
For the following reasons, you should optimize the order of dimensions in a cubeonly in a development environment while you are trying to determine optimalcube configuration:v Significant memory resources are required for the IBM Cognos Analytic Server
(ICAS) to reconfigure the order of dimensions in a cube. During the re-orderingprocess, the temporary RAM on the ICAS increases by a factor of two for thecube that you are re-ordering. For example, a 50 MB cube requires 100 MB ofRAM to reconfigure.
v Re-ordering puts a read lock on the server, locking all user requests while there-order is performed.
Note: You must be a member of the ADMIN group to optimize the order ofdimensions in cubes. The optimization option is only available for cubes on remoteservers; you cannot optimize the order of dimensions in cubes on a local server.Also, when you optimize the order of dimensions in a cube, you should not movethe string dimensions from the last position, nor move the string dimensions to thelast position.
Procedure1. In the Tree pane of the Server Explorer, select the cube you want to optimize.2. Click Cube, Re-order Dimensions.
The Cube Optimizer dialog box opens.3. Select a dimension in the New Order of Dimensions list box.
4. Click the up or down arrows to change the order of the dimension inthe cube.
5. Click Test.
32 IBM Cognos Express Xcelerator Version 10.1.0: Developer Guide
Note the value next to the Percent Change label. If this value is negative, thenew order of dimensions consumes less memory and is therefore more efficient.
6. Repeat steps 3 through 5 until you achieve the most efficient ordering ofdimensions.
7. Click OK.
Editing Cube PropertiesXcelerator allows you to set cube properties that specify measures and timedimensions used by OLE DB for OLAP applications, and that determine whether acube loads automatically or on demand. Usually, you set these cube propertieswhen you create a cube, but you can edit the properties any time.
Editing Measures and Time DimensionOLE DB for OLAP client applications include provisions for measures and timedimensions. Even though Xcelerator clients do not include such provisions, youcan use Xcelerator to set measures and time dimensions for cubes that you accessby OLE DB for OLAP clients.
Procedure1. Select the cube in the Tree pane of the Server Explorer.2. Click Cube, Properties.
The Cube Properties dialog box opens.3. Select a measures dimension in the Measures Dimension list.4. Select a time dimension in the Time Dimension list.5. Click OK.
Editing the Load on Demand PropertyBy default, IBM Cognos Analytic Server (ICAS) loads all cubes into memory whena server starts. While this allows fast access to ICAS data, it can consumesignificant server resources. If your server contains infrequently accessed cubes,you can conserve resources by setting those cubes to load only when a clientattempts to access the cube data.
Procedure1. Select the cube in the Tree pane of the Server Explorer.2. Click Cube, Properties.
The Cube Properties dialog box opens.3. Specify how to load the cube the cube:
v Select the Load On Demand box to load the cube on demand.v Clear the Load On Demand box to automatically load the cube when the
server starts.4. Click OK.
Creating Pick ListsA pick list is a list of valid values for a specific element or cube cell. When anadministrator defines a pick list for an element or a cell, a drop-down menucontaining the defined values is available in the specified cell when browsing acube in any of the Xcelerator clients.
Chapter 2. Creating Cubes and Dimensions 33

Values in cells containing a pick list are validated; a user must select one of thepredefined values for the cell. If a user attempts to enter a value that is not validfor the cell, an error appears indicating that only values from the pick list can beentered in the cell.
Pick List Usage NotesYou should be aware of the following requirements and behaviors when using picklists.v Cell edits applied through data spreading operations and TurboIntegrator
processes are not validated. Edits applied through either of these methods canresult in cell values that do not conform to valid pick list values. Data spreadingcan be applied to cells containing pick lists only through the data spreadingdialog boxes; data spreading shortcuts cannot be used in cells containing picklists.
v When defining a pick list that contains numeric values, you must use theCultural Invariant style, which uses a period (.) as a decimal separator. TheCultural Invariant style is equivalent to English style.
v When using pick lists with Excel 2007, you must have Excel 2007 Service Pack 2installed if you want to use pick lists in conjunction with automatic calculationmode. If you are running Excel 2007 without Service Pack 2, you should setExcel's calculation mode to manual. Using automatic calculation in the absenceof Service Pack 2 can result in access errors on cells containing pick lists.
v Do not use double quotation marks in a pick list value that may be viewed inthe CXL Web Cube Viewer. In CXL Web, pick list values that contain doublequotation marks prevent display of the contents of the pick list and may makethe view unusable. Double quotation marks in pick lists work correctly in CXLWebsheets.
v All pick lists in CXL Web automatically contain a selectable null value. To makenull values available in pick lists in Xcelerator Architect and Xcelerator, youmust explicitly define a null value in a static pick list. Null values cannot beused in dimension or subset pick lists in Xcelerator Architect and Xcelerator.
Pick List TypesYou can create three types of pick lists: static, subset, and dimension.
Static Pick ListsA static pick list is composed of a comma-delimited list of values using the syntaxstatic:value1:value2:value3:value4.
For example, static:red:orange:yellow:green results in a pick list containing thevalues red, orange, yellow, and green.
To include a null value in a static pick list, include two consecutive colons withoutintervening characters in the pick list definition. For example,static:value1:value2:value3:value4:: results in a pick list with a null value atthe end.
Subset Pick ListsA subset pick list contains values corresponding to all elements of a named subset.If the members of the subset change, the values available in the pick list changecorrespondingly.
A subset pick list is defined using the syntax subset:dimension_name:subset_name.
34 IBM Cognos Express Xcelerator Version 10.1.0: Developer Guide
For example, subset:Products:Winter results in a pick list containing all elementsfrom the Winter subset of the Products dimension.
Dimension Pick ListsA dimension pick list contains values corresponding to all elements of adimension. If the members of the dimension change, the values available in thepick list change correspondingly.
A dimension pick list is defined using the syntax dimension:dimension_name.
For example, dimension:Months results in a pick list containing all elements fromthe Months dimension.
Creating Pick Lists with Element AttributesThe easiest way to create a pick list is to define a text attribute named Picklist for adimension. You can then specify the members of a pick list for each element withinthe dimension, using any of the pick list types described above. When an elementhas a pick list defined, any cube cell identified by that element displays adrop-down list containing the pick list values.
Procedure1. In the Server Explorer, right-click the dimension for which you want to define
pick lists, then click Edit Element Attributes.2. In the Attributes Editor, click Edit, Add New Attribute.3. In the New Attribute dialog box, enter Picklist as the attribute name.4. Select Text as the attribute type.5. Click OK.
The Attributes Editor now contains a new column titled Picklist.6. For each element for which you want to create a pick list, enter a valid pick list
definition at the intersection of the element name and the Picklist column.a. To enter a static pick list, enter a comma-delimited list of values using the
syntax static:value1:value2:value3:value4.b. To enter a subset pick list, enter the pick list definition using the syntax
subset:dimension_name:subset_name.c. To enter a a dimension pick list, enter the pick list definition using the
syntax dimension:dimension_name.7. Click OK to close the Attributes Editor and save the pick list definitions.
Creating Pick Lists with Control CubesYou can also create pick lists with control cubes. This gives you greater controlover which cube cells should contain pick lists and allows greater flexibility indefining pick lists for individual cells. You can also create rules for the pick listcontrol cube, which allows you to define pick lists for any section of a cube, from asingle cell to the entire cube.
A pick list control cube is composed of the same dimensions as the regular cube itis associated with, along with an additional dimension named }Picklist. The}Picklist dimension contains a single string element, named Value.
Creating a Pick List Control CubeUse this procedure to create a pick list control cube.
Chapter 2. Creating Cubes and Dimensions 35
Procedure
In the Server Explorer, right-click the regular cube for which you want to create apick list control cube, then Create Pick List Cube.A new control cube is created, using the naming convention }Picklist_cubename. Forexample, when you create a pick list control cube for the Orders cube, the controlcube is named }Picklist_Orders.
Note: If you cannot view control cubes in the Server Explorer, click View, DisplayControl Objects to enable the display of control cubes and other control objects.
Defining Pick Lists for Individual Cells in a Control CubeFollow these steps to define pick lists for individual cells in a control cube. Thepick lists defined in the control cube are used to display pick list values in theassociated regular cube.
Procedure1. Double-click the control cube in the Server Explorer.
The control cube opens in the Cube Viewer.2. Configure the view of the control cube as necessary to view the cells for which
you want do define pick lists. For details on configuring cube views, see"Working with Cube Views" in the IBM Cognos Express Xcelerator User Guide.
3. In each cell for which you want to create a pick list, enter a pick list definition.You can enter any of the pick list types in the control cube: static, subset, ordimension.
4. Click File, Recalculate to recalculate the cube view.
Using Rules to Define Pick Lists In a Control CubeRules that define pick lists follow the same conventions as all other Xceleratorrules. As with other Xcelerator rules, a rule statement that defines a pick list mustinclude an area definition (the portion of the cube to which the rule applies), astring qualifier, and a formula. In the case of pick list rules, the formula is simplythe pick list definition that you want to apply.
Also as in all other Xcelerator rules, when multiple rule statements apply tooverlapping areas, the statements should be ordered from most restrictive area toleast restrictive area.
For more information on creating rules, including details on specifying an areadefinition, please see the IBM Cognos Analytic Server Rules Guide.
Procedure1. In the Server Explorer, right-click the }Picklist control cube for which you want
to create a rule, then click Create Rule.The Rules Editor opens.
2. Using a standard rules area definition, specify the cells you want the pick list toappear in.
3. Immediately after the area definition, type =S:. This is the string qualifier,indicating that the rule applies to string cells.
4. Immediately after the string qualifier, enter a pick list definition, enclosed insingle quotes, then enclosed in parentheses. For example,(’static:spring:summer:winter:fall’).
36 IBM Cognos Express Xcelerator Version 10.1.0: Developer Guide

5. Immediately after the pick list definition, type a semi-colon (;) to terminate therule statement.Using the procedure described in these steps should result in a rule statementsimilar to the following example, which indicates that an cell identified by thefabric element will display a static pick list containing the values wool, cotton,silk, and nylon.[’fabric’]=S:(’static:wool:cotton:silk:nylon’);
Other Pick List Rules Examples:
The following examples illustrate rules statements that define pick lists.
Rule statement Description
[’size’,’shirts’]=S:(’static:16:17:18’); This rule statement indicates that any cellidentified by the elements size and shirtswill display a static pick list composed ofthe values 16, 17, an 18.
[’size’,{’sweaters’,’vests’,’jackets’}]=S:(’static:XS:S:M:L:XL’);
This rule statement indicates that any cellidentified by the element size and any of theelements sweaters, vests, or jackets willdisplay a static pick list composed of thevalues XS, S, M, L, and XL.
[’fabric’]=S:(’dimension:materials’); This rule statement indicates that any cellidentified by the element fabric will displaya pick list composed of all elements in thematerials dimension.
Excluding Cells from Pick ListsThere may be some circumstances when you do not want an individual cell or aspecific area of a cube to use pick lists. To prevent a cell from displaying a picklist, enter none in the appropriate pick list control cube cell or use ('none') as theformula in a rules statement. For example, ['season']=S:('none');.
Null Values in Pick ListsAll pick lists in CXL Web (both Websheets and the Cube Viewer) always contain anull value that a user can select. The null value is automatically inserted into allpick lists in CXL Web; it does not have to be explicitly defined.
Pick lists in Xcelerator Architect and Xcelerator only contain a null value if the picklist is a static type and a null value has been explicitly defined for the pick list.Dimension pick lists and subset pick lists can never contain a null value whenused in Xcelerator Architect and Xcelerator.
Selecting Null Values in Pick ListsThere are two ways to select null values from pick lists.
Procedure1. In any of the Xcelerator clients, you can click the pick list and then click the
null value.
Important: In Xcelerator slices and Active Forms, do not click the null value ina string cell. This will delete the DBRW formula from the cell and you will nolonger be able to retrieve data for that cell from the IBM Cognos AnalyticServer (ICAS). You can safely click the null value in numeric cells.
Chapter 2. Creating Cubes and Dimensions 37

2. In CXL Web and Architect, you can press the Delete key in a cell containing apick list to select the null value.
Important: Do not press Delete to select a null value in Xcelerator slices orActive Forms. This will delete the DBRW formula from the cell and you will nolonger be able to retrieve data for that cell from the ICAS.
Pick List Order of PrecedenceWhen multiple pick lists apply to an individual cube cell, the following order ofprecedence is used to determine which pick list is used in the cell:v If a pick list control cube exists and contains a pick list definition for the current
cube cell, the definition in the pick list control cube is used.v If a pick list control cube does not exist, the elements that identify the current
cell are examined in reverse order in a search for Picklist element attributes. Thefirst Picklist element attribute that is encountered in this search is used in thecell.
Replicating Cubes between ServersUsing the Xcelerator Replication feature, you can copy cubes and other associatedobjects from a remote server to your local server, or between two remote servers.You can also synchronize the data updates among the copied cubes either atspecified time intervals or on demand.
Replication offers the following advantages:v Enhances response time because you can update a cube locally without
communicating across a network.v Lets you copy the latest shared data to a laptop for presentations outside of your
organization.
Xcelerator provides bi-directional synchronization for replicated data. During thesynchronization process, Xcelerator checks the servers involved in a replication forthe latest updates to the data, and then copies the latest updates to the otherservers.
Replication creates a relationship between two cubes and between two servers.These relationships are described in “Cube Relationships.”
Cube RelationshipsReplication creates a relationship between two cubes:v Source cube - The original cube in a replicationv Mirror cube - A copy of the source cube
Depending on your access privileges, you can replicate a single cube on manydifferent servers, and you can replicate a replicated cube.
Server RelationshipsBefore replicating a cube, you need to log on to a remote server and create areplication connection. Replication creates a relationship between two servers:v Source server - The remote server you log in to
v Target server - The server you logged in from
38 IBM Cognos Express Xcelerator Version 10.1.0: Developer Guide

The Server Explorer window lists the current replication connections beneath theReplications icon. In this example, regions 1 is the target server and sales is asource server.
Required Access PrivilegesThe following access privileges are required to replicate a cube:v Your security group must have Read access or higher to the cube you want to
replicate.v You must be the Xcelerator administrator on the target server. On your local
server, you are always the Xcelerator administrator.
Chapter 2. Creating Cubes and Dimensions 39

40 IBM Cognos Express Xcelerator Version 10.1.0: Developer Guide

Chapter 3. Advanced Calculations for Business Data
This section describes how to create "drill-through" processes and rules, whichenable you to link the cells with related data to provide the details or context forcube values.
For a thorough examination of rules in a business scenario, see the IBM CognosAnalytic Server Rules Guide. The guide contains a tutorial that steps you throughdeveloping rules in a business environment.
Note: The images of the Rules Editor in this section show the old Rules Editor. Tosee images of the new Rules Editor, see the IBM Cognos Analytic Server RulesGuide.
Depending on your platform, some of the supplied example data may not beavailable to all users.
Overview of Cube RulesThe most common calculations in OLAP applications involves aggregating dataalong a dimension. In Xcelerator, you create these calculations by usingconsolidation hierarchies. For example, in a Month dimension, you can define aquarterly total that sums the January, February and March values.
In many applications, you need to perform calculations that do not involveaggregating, such as cost allocations and exchange translations. With cube rules,you can create formulas to perform these calculations.
With cube rules, you can perform the following tasks:v Multiply prices by units to yield the sales amounts.v Override consolidations when necessary. For example, you can prevent a
quarterly price from displaying a tally of individual monthly prices.v Use data in one cube to perform calculations in another cube, or share data
between cubes. For example, you can pull sales data into a cube that containsProfit and Loss information.
v Assign the same values to multiple cells.
Note: You must be a member of the ADMIN group to create or edit Xceleratorrules.
You associate a cube rule with an individual cube. When you create a rule,Xcelerator stores the rule information in two files:
cube_name .rux - Stores the compiled rules. When you load a cube for which youhave defined rules into memory, Xcelerator searches for the cube's .rux file in thedata directory containing the cube.
cube_name .blb - Stores the format information for the Rules Editor.
Note: If you want to edit a .rux file in a text editor other than the Rules Editor, besure to delete the corresponding .blb file. If you do not delete the file, there will be
© Copyright IBM Corp. 2007, 2012 41

a discrepancy between the contents of the .rux file and the display in the RulesEditor, as the .blb file determines the display in the Rules Editor.
Guidelines for Writing Xcelerator Rules StatementsThe general format of a rules statement is:[Area]=Formula;
Variable Description
Area Specifies the portion of a cube affected by the rule.
Formula Describes how Xcelerator calculates the cells in the cube area.
To restrict a rule to simple values in the Area:[Area]=N:>Formula;
To restrict a rule to consolidated values in the Area:[Area]=C:>Formula;
General Considerationsv The syntax is not case-sensitive. You can use both uppercase and lowercase
letters.v You can use spaces within rules to improve clarity.v A rules statement can occupy one or more lines in the Rules Editor. A statement
can also contain one or more formulas.v You must end each statement with a semicolon (;).v To add comments and to exclude statements from processing, insert a number
sign (#) at the beginning of a line or statement. For example:#The following rule is not active
# [’Gross Margin’]=[’Sales’]*0.53;
Syntax for Describing the AreaThe Area identifies one or more cells in a cube.
Consider the following guidelines when you create an Area definition.v Specify no dimension elements, or one or more dimension elements.v Each element must be from a different dimension of the cube.v Enclose each element in single quotes.v Use commas to separate each element.v Enclose the entire Area definition in brackets.
The following table shows four Area examples. Each successive example narrowsthe scope.
Sample Area Scope
[ ] All cells in the cube.
['January'] All cells identified by a January element.
['Sales','January'] All cells identified by the Sales and January elements.
42 IBM Cognos Express Xcelerator Version 10.1.0: Developer Guide

Sample Area Scope
['Germany','Sales','January'] All cells identified by the Germany, Sales, and Januaryelements.
Using Subsets in an Area DefinitionYou can use a subset in place of a single element in an Area definition by enclosingall subset members in curly braces.
For example, the following Area definition applies a rule to all cube cells identifiedby the element Sales and the element January, February, or March:[’Sales’, {’January’, ’February’, ’March’}] =
Using Special Characters and Non-unique Element Names in anArea DefinitionYou can use the syntax 'dimensionname':'elementname' in a rules Area definition tospecify elements that are not unique to a single dimension, or for dimension namesthat contain special characters.
For example,[’Units’,’Mar’,’}Groups’:’ADMIN’]
allows you to write a rule for the }Groups dimension, which contains the curlybrace (}) special character.
Similarly,[’Units’,’Mar’, ’Region’:’North America’]
lets you write a rule when the element North America is not unique to the Regiondimension.
Syntax for FormulasA rules formula is an expression composed of:v Numeric constantsv Arithmetic operators and parenthesesv Numeric and string functions -- see the IBM Cognos Express Xcelerator Reference
Guide.v Conditional logicv Cube references
Numeric ConstantsThe simplest components of rules formulas are numeric constants.v Consists of numerals, an optional leading minus sign (-), and an optional
decimal point. For example, 5.0, 6, -5. Some examples of invalid numericconstants are: 1-, 1A, 3..4.
v Contains a maximum length of 20 characters.v You can use scientific notation to enter a numeric constant.
For example, the following rules statement assigns the value 200 to all cells in thecube.[ ] = 200;
Chapter 3. Advanced Calculations for Business Data 43

Arithmetic OperatorsYou can combine numeric constants with the following arithmetic operators.
Operator Meaning
+ (Plus sign) Addition
- (Minus sign) Subtraction
* (Asterisk) Multiplication
/ (Forward slash) Division - returns an undefined value anddisplays N/A in the view
\ (Backslash) Zero Display Division - same as Divisionoperator, but returns zero when you divide byzero.
^ (Caret) Exponentiation
Xcelerator evaluates arithmetic operators in the following order:v Exponentiationv Multiplicationv Divisionv Additionv Subtraction
Use parentheses to force a different order of evaluation. For example, theexpression 2*3+4 produces the same result as (2*3)+4 because multiplication takesprecedence over addition. The result is 10. However, if you want to perform theaddition first, rewrite the formula as 2*(3+4). The result changes from 10 to 14.
Using Conditional LogicUse the IF function to include conditional logic in rules. The general format is:IF(test, value1, value2)
v The IF function returns one of two values depending on the result of a logicaltest.
v When the expression Test is true, the IF function returns Value1.v When the expression Test is false, the IF function returns Value2.v The data type returned by an IF function is determined by the data types of
Value1 and Value2.v Value1 and Value2 must be the same data type, either string or numeric.v An IF function where Value1 is a string and Value2 is a number yields an error
statement.
You can also nest IF statements:IF(test1, value1, IF (test2, value2, value3))
The following table shows two IF examples.
44 IBM Cognos Express Xcelerator Version 10.1.0: Developer Guide
Expression Result
IF (7>6,1,0) yields 1
IF (7>6, 'True', 'False') yields 'True'
Using Comparison OperatorsYou can compare numbers with the following operators.
Operator Meaning
> Greater than
< Less than
>= Greater than or equal to
<= Less than or equal to
= Equal to
<> Not equal to
To compare two string values, insert the @ symbol before the comparison operator,as shown in the following example:IF (’A’@=’B’,0,1) yields the number 1.
You can combine logical expressions with logical operators.
Operator Meaning Example
& (Ampersand) AND (Value1 > 5) & (Value1 < 10)
Returns TRUE if the value is greater than 5 andless than 10.
% (Percent sign) OR (Value1 > 10) % (Value1 < 5)
Returns TRUE if the value is greater than 10 orless than 5.
~ (Tilde) NOT ~(Value1 > 5)
Equivalent to (Value1 <= 5)
You can concatenate strings using the pipe (|) character.
For example, the following expressions returns Rheingold.(Rhein | gold)
Chapter 3. Advanced Calculations for Business Data 45

If the string resulting from a concatenation is longer than 254 bytes, Xceleratorreturns an error.
Using Cube ReferencesAll rules formulas contain cube references, which point to areas within a cube fordata. The cube references can point to the cube for which you are writing a rule(internal cube references) or to areas within other cubes (external cube references).
Internal Cube ReferencesInternal cube references use the same syntax as the area for which you write therule. Examples include:[’January’]
[’Sales’,’January’]
[’Germany’,’Sales’,’January’]
In the following example, Xcelerator calculates the Gross Margin for Germany bymultiplying the Sales for Germany in the same cube by 0.53:[’Gross Margin’,’Germany’]=[’Sales’]*0.53;
External Cube ReferencesUse the DB function to point to external cubes.DB(’cube’, dimension1, dimension2,...dimensionn)
Argument Description
cube Name of the external cube.
dimension One of the following arguments:
v The name of an element in a dimension of the external cube,enclosed in single quotes.
v The name of a dimension preceded by an exclamation mark(!), which is called variable notation. An argument usingvariable notation returns the current dimension element in thecell to which a rule statement applies. For example, in arules-calculated cell that is identified by the Germany elementof the Region dimension, !Region returns Germany.
v An expression that resolves to an element name.
Specify a dimension argument for each dimension of the external cube. You mustorder the dimension arguments to correspond to the order of the dimensions in theexternal cube.
In the following rules statement, all Sales values in the internal cube are computedby multiplying Units in the internal cube by the values in the external PriceTabcube:[’Sales’]=[’Units’]*DB(’PriceTab’,!Region,!Product,!Month)
v The PriceTab cube contains only prices. Each of its cells is identified by anelement in three dimensions: Region, Product, Month. The internal cube containsthese dimensions and at least one other dimension that has both the Sales andUnits elements.
v Every Sales cell in the internal cube is identified by Sales and elements in thethree dimensions the internal cube shares with the PriceTab cube. To populate
46 IBM Cognos Express Xcelerator Version 10.1.0: Developer Guide

any Sales cell, Xcelerator pulls a PriceTab value located at the intersection of thecorresponding elements in the shared dimensions.
v The external cube can differ from the internal cube in terms of the number ofdimensions and the number of elements along each dimension. However, adimension you reference as a variable (as in !Region or !Product) must at leastcontain all the elements found in the internal cube's corresponding dimension.
Arranging Rules StatementsWhen more than one statement in a rule applies to the same Area, the firststatement takes precedence.
Consider this example. A cube named Priority has two dimensions, Region andYear. The rule has four statements:[’Germany’, ’Year1’] = 10;[’Year1’] = 5;[’United States’]= 6;[ ] = 2;
Here are sample values for the Priority cube, all of which are derived by thepreceding rule.
Region Year 1 Year 2 Year 3
France 5 2 2
Germany 10 2 2
United States 5 6 6
Xcelerator processes the rule statements as follows:v The first statement assigns the value 10 to the Germany, Year1 cell. The first
statement takes precedence over the second statement, which specifies that allYear1 cells contain 5.
v The second statement takes precedence over the third statement. Therefore, thecell for United States, Year 1 contains 5, even though the third statementspecifies that all values for United States should be 6.
v The last statement [ ] = 2 specifies that all values in the cube contain the value 2.This rule applies to all cells that are not affected by preceding statements, suchas the cell France, Year2.
Specifying Different Rules at the N: and C: LevelsIt is often necessary to differentiate the way C: level and N: level cells within anarea are treated.v N: Level Cells - Identified only by simple elements.v C: Level Cells - Identified by at least one consolidated element.
Use the following syntax to write a rules statement that applies only to N: levelcells in an area:[Area] = N:[Formula];
For example:[’Sales’] = N:[’Price’]*[’Units’]\1000;
Chapter 3. Advanced Calculations for Business Data 47
Use the following syntax to write a rules statement that applies only to C: levelcells in an area.[Area] = C:[Formula];
For example:[’Price’] = C:[’Sales’]\[’Units’]*1000;
When a specific area of a cube is calculated differently at the C: and N: levels, youcan use the following syntax:[Area] = N:[Formula A]; C:[Formula B];
For example:[’Price’] =
N:DB(’PriceCube’, !Actvsbud, !Region, !Model, !Month);
C:[’Sales’]\[’Units’]*1000;
Bypassing RulesBy using the STET function, you can bypass the effect of a rules statement forspecific areas of a cube.
For example, you might want to write a rules statement for Gross Margin thatapplies to all regions except France. You can write the general rule and theexception in two ways.v Write the STET statement first followed by the general statement:
[’GrossMargin’, ’France’] = STET;
[’Gross Margin’] = [’Sales’] * 0.53;
v Write one rules statement that includes an IF function:[’GrossMargin’] = IF(!Region @= ’France’, STET, [’Sales’]* 0.53);
Qualifying Element NamesWhen you want to limit a rules statement to values identified by an element thatappears in multiple dimensions, qualify the element name with its dimensionname using the following syntax:[’dimname’:’element’]
For example, if Total occurs in both the Region and Product dimensions and youwant the rule limited to cells identified by Total in the Region dimension, specify:[’Region’:’Total’]=
Rules Editor and Rules WorksheetsYou can create rules through two interfaces:v Rules Editor - All previous examples in this section use this interface.v Rules worksheet - A modified Excel worksheet in which you type rules
statements for one cube in column A.
Xcelerator saves the rules in two files:
cube .xru - Rules worksheet
48 IBM Cognos Express Xcelerator Version 10.1.0: Developer Guide

cube .rux - Compiled file
Note: You can modify the rules you create through the rules worksheets by usingthe Rules Editor. When you do so, Xcelerator prompts you to save the changes tothe worksheet. If you do not save the changes, the .xru and .rux files will be out ofsync. Therefore, you cannot subsequently modify the changes by editing the rulesworksheet. All rules described in that section apply to the rules worksheets as wellas the dimension worksheets.
To ensure that Xcelerator has access to all of your changes, use one of theinterfaces exclusively for creating and maintaining rules.
Creating Rules WorksheetsWhen you use a rules worksheet to create a rule on either a local or remote IBMCognos Analytic Server (ICAS), your Xcelerator client must have a valid directoryset in the Local Server Data Directory box in the Xcelerator Options dialog box.The directory is the location where your Xcelerator client saves the rulesworksheets (.xru files).
Note: If you do not set a directory, or if the directory is not valid, Xceleratorcannot save your rules worksheets.
Procedure1. Click ICAS , Rule Worksheets, New in Excel.
The Select Cube for Rules dialog box opens. The list contains the cubes on yourlocal server and any servers you have logged in to during the currentXcelerator session.
2. Select a cube and click OK.Xcelerator displays a blank rules worksheet that looks like other Excelworksheets, except the first column has a width of 100.
3. Place each rule statement on a separate line in column A, as in the followingexample.[’Gross Margin%’]=[’Gross Margin’]\[’Sales’]*100;
[’Price’]=N:DB(’PriceCube’,!actvsbud,!region,!model,!month);
C:[’Sales’]\[’Units’]*1000;
[’Sales’]=N:[’Price’]*[’Units’]\1000;
You can click ICAS , Edit Formula to access the ICAS Edit Formula dialogbox. This dialog box, which helps you construct accurate rules statements,provides all of the functionality found in the Rules Editor. The Rules Editor isdescribed later in this section.
Saving Rules WorksheetsTo save the rule in a format that Xcelerator can use, click ICAS , Rule WorkSheets,Save in Excel.
The Save option updates the rule worksheet file (cube.xru) and creates a compiledrules file (cube.rux). Xcelerator saves the .xru file in your local server datadirectory, and saves the .rux file in the data directory for the IBM Cognos AnalyticServer (ICAS). Xcelerator immediately applies the new rules to the cube.
Note: If you click File, Save in Excel, only the cube.xru file is updated. To use thenew rule in a cube, you must create the compiled rules file.
Chapter 3. Advanced Calculations for Business Data 49
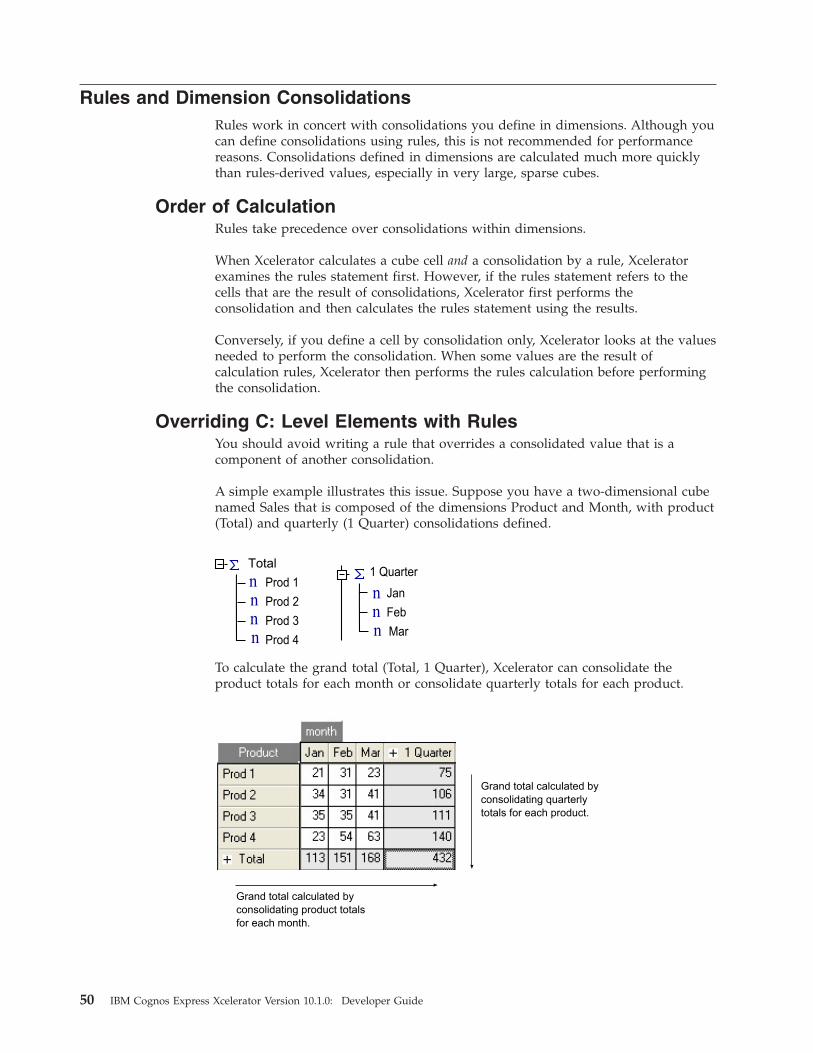
Rules and Dimension ConsolidationsRules work in concert with consolidations you define in dimensions. Although youcan define consolidations using rules, this is not recommended for performancereasons. Consolidations defined in dimensions are calculated much more quicklythan rules-derived values, especially in very large, sparse cubes.
Order of CalculationRules take precedence over consolidations within dimensions.
When Xcelerator calculates a cube cell and a consolidation by a rule, Xceleratorexamines the rules statement first. However, if the rules statement refers to thecells that are the result of consolidations, Xcelerator first performs theconsolidation and then calculates the rules statement using the results.
Conversely, if you define a cell by consolidation only, Xcelerator looks at the valuesneeded to perform the consolidation. When some values are the result ofcalculation rules, Xcelerator then performs the rules calculation before performingthe consolidation.
Overriding C: Level Elements with RulesYou should avoid writing a rule that overrides a consolidated value that is acomponent of another consolidation.
A simple example illustrates this issue. Suppose you have a two-dimensional cubenamed Sales that is composed of the dimensions Product and Month, with product(Total) and quarterly (1 Quarter) consolidations defined.
To calculate the grand total (Total, 1 Quarter), Xcelerator can consolidate theproduct totals for each month or consolidate quarterly totals for each product.
Total1 Quarter
JanFebMar
Prod 4Prod 3Prod 2Prod 1n
nnn
nnn
Grand total calculated byconsolidating product totalsfor each month.
Grand total calculated byconsolidating quarterly totals for each product.
50 IBM Cognos Express Xcelerator Version 10.1.0: Developer Guide

Suppose further that you write a rule that calculates a value for Total product salesin Jan, and that the rules-calculated value does not sum the individual productvalues for Jan. A rule that defines the value of Total products in Jan as 999 servesas an illustration.[’Jan’,’Total’]=999;
If the grand total is calculated by consolidating the product totals for each month,the value will differ from the consolidation of the quarterly totals for each product.This is because the rules-calculated value for total product sales in Jan overridesthe natural consolidation defined in the Product dimension.
You have no control over the order in which Xcelerator performs dimensionconsolidations. Furthermore, depending on which consolidation path is optimal atany given moment, Xcelerator may alternate between paths. Consequently, youmay request the Total, 1 Quarter value twice in the same session and get differentresults.
You can remedy this situation by writing a rules statement that calculates the valueof the Total, 1 Quarter consolidation as the sum of its immediate children along theMonth dimension, thereby overriding the Product dimension consolidation. Thestatement ['Total']=ConsolidateChildren('Month') performs this calculation.
However, there remains an implicit inconsistency when viewing the cube: the sumof the quarterly totals for each product is different from the sum of product totalfor each month. Thus, overriding C: level values that are components of otherconsolidations is not recommended.
Grand total calculated byconsolidating product totals foreach month appears incorrect. The actual grand total calculatedby consolidating product totalsfor each month is 1,318.
Grand total calculated byconsolidating product totalsfor each product is correct.
Value of Jan, Totalcalculated by the ['Jan','Total']=999rules statement
Chapter 3. Advanced Calculations for Business Data 51

Stacking RulesA rules statement can refer to a cell in a cube that is defined by other rulesstatements. Xcelerator stacks these rules statements until it can obtain a final value,and then works back to return a result. The number of levels of stacking thatXcelerator can accommodate is limited only by the available memory.
If a circular reference occurs within a rules stack, or the maximum level of stackingis exceeded, Xcelerator displays the error message:Error Evaluating Rule: Possible Circular Reference
Here is an example of a circular reference:[’Sales’] = [’Units’] * [’Price’] ;
[’Price’] = [’Sales’] / [’Units’] ;
Sample ApplicationsThis section contains examples of commonly used rules applications. Examinethese examples to develop an understanding of the syntax and scope of rules.
Calculating RatiosIn the following example, a rule calculates the Gross Margin as a percentage of theSales in the SalesCube cube. You associate this ratio with the Gross Margin%, anew numeric element in the Account1 dimension.
First, you need to create the Gross Margin% element.
Creating the Margin% ElementIf your SalesCube dimension already contains the GrossMargin element, skip to thenext section. Follow these steps if you need to add the element GrossMargin% tothe Account1 dimension.
Procedure1. Open the Server Explorer.2. Select the Account1 dimension.3. Click Dimension, Edit Dimension Structure.
The Dimension Editor opens.
Value of Jan, Totalcalculated by the['Jan','Total']=999rules statement
Grand total calculated byconsolidating quarterly totals for each productappears incorrect.
Grand total calculated byconsolidating product totals for each monthis correct.
Total, 1Quarter consolidationcalculated by rules statement['Total']=ConsolidateChildren('Month').
52 IBM Cognos Express Xcelerator Version 10.1.0: Developer Guide

4. Click Edit, Insert Element.The Dimension Element Insert dialog box opens.
5. Type Gross Margin% and click Add.6. Click OK.7. Save the dimension.
Creating the Margin% RuleFolllow these steps to create the Gross Margin% formula.
Procedure1. In the Server Explorer, right-click Sales Cube. If the rule already exists, click
Edit Rule. If you have not yet created the rule, click Create Rule.The Rules Editor opens.
2. Click Area .The Reference to Cube dialog box displays the dimensions of the SalesCubecube.
3. Click Account1.The Subset Editor window opens.
4. In the left pane, select Gross Margin% and click OK.The Reference to Cube dialog box reopens.
5. Click OK.The Rules Editor displays ['Gross Margin%'] in the entry field.
6. Click Equal .
7. Click Area again, and click Account1.8. In the Subset Editor window, select Gross Margin and click OK.9. Click OK in the Reference to Cube dialog box.
10. Click Zero Display Division .Xcelerator places a division sign after ['Gross Margin'].Note that there are two division buttons in the Rules Editor.
Division Operator - If you use this division operator in a rule that resultsin division by zero, Xcelerator returns an undefined value, and displays N/Ain the view.
Zero Display Division Operator - If you use this division operator in arule that results in division by zero, Xcelerator returns the value 0.
11. Click Area again, and click Account1
12. In the Subset Editor window, select Sales and click OK.13. Click OK in the Reference to Cube dialog box.14. Click Multiplication .15. Type 100 at the end of the formula.
16. Click Semicolon .
Note: You must end all rules statements with a semicolon.The complete rule should now appear as follows.[’Gross Margin%’]*[’Gross Margin’]\[’Sales’]*100;
17. Click Save.
Chapter 3. Advanced Calculations for Business Data 53

Results
Xcelerator saves the rule and applies it to the cube. A new Rule object opensbeneath the SalesCube cube. A rule always bears the same name as the cube withwhich it is associated.
Understanding the Generated RuleLet's examine the components of the new rules statement.v Area - Specifies the cube area that Xcelerator calculates. In this example, the
Gross Margin% element identifies all cell values derived through a rule.v Formula - Defines the calculation.v Terminator - Terminates all rules statements with a semicolon (;).
For more information about rules syntax, see the IBM Cognos Analytic Server RulesGuide.
Browsing the Gross Margin% ValuesThe sample view salesmargin% now displays the calculated values forGrossMargin%.
Procedure1. In the Server Explorer window, click the Views icon for the SalesCube cube.2. Double-click the view salesmargin%.
The view opens in the Cube Viewer.The values for Gross Margin%, which are derived through the rule you justcreated, appear in the view.
Sharing Data Between CubesThe SalesCube cube does not contain price data. The price information for thiscube is stored in a separate four-dimensional cube called PriceCube.
You can share values between cubes by using the DB rules function. Values arestored in one cube and referenced in other cubes. The following example showshow rules for one cube can reference values in a separate cube.
Procedure1. In the Server Explorer, double-click the SalesCube rule.
The Rules Editor opens.2. Position the cursor on the second entry line.
3. Click Area .The Reference to Cube dialog box displays the dimensions of the SalesCubecube.
4. Click Account1.The Subset Editor window opens.
5. In the left pane, select Price and click OK.The Reference to Cube dialog box reopens.
['Gross Margin%']=['Gross Margin']\['Sales']*100;
Area Formula Terminator
54 IBM Cognos Express Xcelerator Version 10.1.0: Developer Guide
6. Click OK.The Rules Editor displays ['Price'] in the entry field.
7. Click Equal .
8. Click Database Reference .The Select Cube dialog box opens.
9. Select PriceCube and click OK.The Reference to Cube dialog box displays the dimensions of the PriceCubecube.
10. Click OK.The following formula opens in the Rules Editor.[’Price’]=DB(’PriceCube’,!Actvsbud,!Region,!Model,!Month)
Read the formula as follows: Any cell in the SalesCube cube that is identifiedby the Price element takes its value from a cell in the PriceCube cube. Thelocation of the PriceCube cell is found at the intersection of correspondingelements in the four dimensions that PriceCube shares with SalesCube.For example, the SalesCube cell identified by the elements Actual, Germany, SSeries 1.8 L Sedan, Price, Jan takes its value from the PriceCube cell identifiedby the elements Actual, Germany, S Series 1.8 L Sedan, Jan.
11. Click Semicolon to place a semicolon at the end of the formula.12. Click Save to save the rule.
You can now change a price in the PriceCube cube and see the changereflected in the SalesCube cube. However, you cannot edit the prices inSalesCube because they are derived through the rule you just created.The sample view SalesPrice includes the price values.To open the sample view SalesPrice:
13. In the Server Explorer window, click the Views icon for the SalesCube cube.14. Double-click the view SalesMargin%.
The view opens in the Cube Viewer, complete with the Price values pulledfrom the PriceCube cube.
Calculating SalesIn the previous exercise, you brought prices into the SalesCube cube. If you changea price in PriceCube, Xcelerator does not change the corresponding sales value inSalesCube. This is because the sales values in SalesCube exist as data values in thecube. You need to create a rule to derive the sales values in SalesCube from theprices and units.
Procedure1. Reopen the Rules Editor for the SalesCube cube.2. Beneath the ['Price'] formula, enter the following rule:
['Sales']=['Price']*['Units']\1000;
Note: All values in the SalesCube cube are in thousands except the Pricevalues, which are actual numbers. Because Sales numbers should remain inthousands, you divide by 1000 in the rules statement.
3. Click Save to save the SalesCube rule.4. Reopen the sample SalesPrice view.
Xcelerator shades all cells identified by the Sales element, which indicates thatthe values in these cells are derived through rules.
Chapter 3. Advanced Calculations for Business Data 55

5. Change the January units value to 10,000 by typing 10000 in the cell at theintersection of Units and Jan.
6. Press F9 to recalculate the cell values.7. Observe the new sales value for January.
Note that the Gross Margin% value for January updates, as this value isderived through a rule, which references the Sales element.
8. Restore the value 313 to the cell at the intersection of Jan and Sales.
Restricting Rules to Simple ValuesIn the previous exercise, you created a rule that applies to all cells containing salesnumbers. This type of rule supersedes consolidations within dimensions,producing incorrect results. In the following exercise, you inspect a quarterly totalthrough a slice worksheet, and restrict the SalesCube rule to simple values, therebyallowing consolidations to function properly.
Procedure1. Open the sample view Sales1qtr of the SalesCube cube.
2. Click Slice to slice the view to an Excel worksheet.The slice should appear as follows.
56 IBM Cognos Express Xcelerator Version 10.1.0: Developer Guide

3. Save the slice worksheet with the name Test.4. Examine the Sales value for 1Quarter in cell B10.
According to the SalesCube rule, the value is the product of multiplying thefirst quarter price by a fraction (1/1000) of first quarter units. Instead, the valueshould be the consolidation of sales for the first three months. However, thevalues derived by the SalesCube rule (as it currently exists) take precedenceover the values derived through consolidation. To correct this, you need tomodify the rule so that it does not calculate the values for consolidatedelements.
5. Open the SalesCube rule in the Rules Editor.6. On the third line, insert N: in front of ['Price'] so that the formula reads:
[’Sales’]=N:>[’Price’]*[’Units’]\1000;
The restrictor N: limits the rule to the cells identified only by simple elements.The rule no longer applies to consolidated elements, leaving consolidations tofunction properly.
7. Click Save to save the edited rule.8. Press F9 to recalculate the test worksheet.
The correct value now opens at the intersection of Sales and 1Quarter.
Calculating an Average PriceExamine the Price, 1Quarter value in the Test worksheet. This number is the sumof the prices for January, February, and March. However, the number should reflectthe average price for the three months. The following rules statement yields thedesired value:[’Price’]=C:[’Sales’]\[’Units’]*1000;
Chapter 3. Advanced Calculations for Business Data 57

The restrictor C: limits this rules statement to consolidations; that is, only whenone or more of the elements that identify a Price cell are consolidated elements.
Procedure1. Reopen the Rules Editor for the SalesCube cube.2. Enter the following statement without the Area definition, as the third line in
the entry field.['Price']=DB('PriceCube',!actvsbud,!region,!model,!month);C:['Sales']\['Units']*1000;
You omit the Area definition because you already defined the Price area in thesecond line. When you want to apply different formulas to the same Area, youdefine the area and then specify the formulas sequentially.
3. Click Save to save the edited rule.4. In the test worksheet, press F9 to recalculate and update the values.
Observe the Price, 1Quarter value, which still displays the value 76,132.59. Thisis because Xcelerator uses the first rules formula it encounters that applies tothe Price, 1 Quarter cell:[’Price’]=DB(’PriceCube’,!actvsbud,!region,!model,!month);
This statement is appropriate only for N: level cells, such as Price, Jan.Consolidated Price values should be calculated through the second Pricestatement. By restricting the first Price formula to N: level cells only, you enableXcelerator to apply the second Price formula to consolidations.
Note: Xcelerator evaluates the rules statements in the order they appearwithin a rule, but the first formula for a given Area takes precedence over laterformulas for the same area. If you have multiple rules statements that addressthe same Area, you should order them least-restrictive to most-restrictive. Fordetails, see “Arranging Rules Statements” on page 47.
5. To restrict the first Price formula to N: level cells, open the SalesCube rule inthe Rules Editor.
6. Insert N: in front of the first formula portion of the first Price statement:[’Price’]=N:>DB(’PriceCube’,!actvsbud,!region,!model,!month);
The entire rule for the Price area should now appear as follows:[’Price’]=N:DB(’PriceCube’,!actvsbud,!region,!model,!month);C:[’Sales’]\[’Units’]*1000;
7. Click Save to save the rule.8. In the Test worksheet, press F9 to recalculate and display the updated values.
All Price values should now reflect the correct calculations, with the 1 Quarter,Price value as an average of the first three months of the year.
Linking Two Asymmetrical CubesMost companies do not break out overhead costs by product below the GrossMargin line. These numbers, such as rent and utilities, are available only on aregional or divisional basis. In other words, the structure of the cost numbers arenot symmetrical with the sales numbers. Therefore you would normally store thedata in separate cubes.
The cost data that corresponds to the sales data in the SalesCube cube is availablein the PnLCube cube. The two cubes compare, as follows:v PnLCube has four dimensions. The cost data is dimensioned by version (actual
versus budget), region, account, and month.
58 IBM Cognos Express Xcelerator Version 10.1.0: Developer Guide

v SalesCube has five dimensions. The sales data is dimensioned by version (actualversus budget), region, product (model), account, and month.
v The two cubes share three dimensions: Region, Actvsbud, and Month.v Measures tracked in these cubes are identified by elements in different
dimensions. SalesCube uses the Account1 dimension. PnLCube uses theAccount2 dimension.
v PnLCube has no data for Sales or Variable Costs. These values are alreadycalculated in detail in SalesCube.
In the following exercise, you write rules for the PnLCube that pulls the sales andvariable costs data from the SalesCube.
Procedure1. In the Server Explorer window, right-click the PnLCube, and click Create Rule.
The Rules Editor opens.2. Enter two statements to specify that the Sales and Variable Costs values in the
PnLCube pull the corresponding values from the SalesCube.v On the first line of the entry field, create this Sales formula:
[’Sales’]=DB(’SalesCube’, !Actvsbud,!Region, ’Total’,’Sales’, !Month);
v On the second line, create this Variable Costs formula:[’VariableCosts’]=DB(’SalesCube’, !Actvsbud, !Region,’Total’, ’Variable Costs’, !Month);
3. Click Save to save the rules.
Note: Note that the Sales and Variable Costs values now appear in the cube.The Gross Margin values are also available because you defined the GrossMargin in the account2 dimension as the difference between the Sales andVariableCosts.
4. In Microsoft Excel, open the sample worksheet TwoCubes.The TwoCubes worksheet is set up to simultaneously pull numbers fromSalesCube and PnLCube. This worksheet demonstrates how numbers can flowbetween the two cubes.Let's change the Units number in cell B6 to a very large number so that youcan see the effect of the change ripple through the worksheet.
5. Click cell B6 and type 100000.6. Press F9 to recalculate the worksheet.
Note that the Units value for the S Series 2.5 L Sedan changes the Sales valuefor that model and for the model total. These changes affect the Sales values ofthe PnLCube, which ripples all the way down to the Earnings Before Taxesvalue in the PnLCube.
Note: All the cell values in this worksheet are the result of references to twocubes, SalesCube or PnLCube. The worksheet does not calculate any of thevalues.
Chapter 3. Advanced Calculations for Business Data 59

Creating Drill-Through Processes and RulesYou can create a drill process and drill rules to associate a cell with more detaileddata. This data can provide underlying detail for the cell, or other informationrelevant to the cell.
Xcelerator drill- through consists of two components.v Drill Process - Defines the detailed data you want to associate with a cellv Drill Assignment Rule - Defines the relationship between the cell and the
detailed data
After you create a drill process and a drill assignment rule for a cube, you canexecute the process and open the detailed data in a new window, thereby "drillingthrough" to a new level of detail.
Creating a Drill ProcessA drill process is a TurboIntegrator process that defines the detailed data, whichopens in a new window. The cube from which a drill-through originates is calledthe origination cube.
Before you create a drill process, you should be familiar with the data you want toopen when drilling from the origination cube.
Procedure1. Right-click the origination cube in the Server Explorer.2. Click Drill, Create Drill Process.
The first window of the Drill Process Setup Wizard opens.The wizard displays a table with parameter values for the origination cube andall its dimensions. Xcelerator uses these parameter values to set up the drillprocess. When you execute the drill process to drill from an origination cube tothe detailed data, Xcelerator updates the parameter values to reflect the cubelocation from which the drill-through originates.
3. Click Next.The second window of the Drill Process Setup Wizard opens.
4. Select the Datasource Type for the detailed data you want to drill through tofrom the origination cube.There are three Datasource Type options.
Option Description
ODBC Drills from the origination cube to an ODBC source. The ODBC sourcemust be accessible from the computer on which the IBM CognosAnalytic Server (ICAS) is running.Note: NOTE: Xcelerator requires DataDirect drivers to access anOracle ODBC source on Solaris or AIX. These drivers are not suppliedwith Xcelerator and must be acquired separately.
60 IBM Cognos Express Xcelerator Version 10.1.0: Developer Guide
Option Description
Cube View Drills from the origination cube to a different cube view. You can drillto any cube that resides on the same server as the origination cube.
You can define a cube view data source that exceeds the maximumamount of memory that Xcelerator can allocate when you access aview. By default, the memory threshold for the MaximumViewSizeparameter in the Tm1s.cfg file is 100MB on a 32-bit system, and 500MB on a 64-bit system.
Important: If you do not specify the maximum view size in theconfiguration file, Xcelerator displays an error message when youattempt to drill to the cube view.
Other Drills from the origination cube to any data source TurboIntegratorsupports.
Xcelerator displays the data source options for the data source type youselected in the wizard.
5. Define the data source.v For an ODBC data source, you must supply the following information.
Option Description
Datasource Name Name of the ODBC data source (DSN) you want to access whendrilling from the origination cube.
User Name Valid user name to log on to the ODBC source.
Password Password for the user name.
Query Query that defines the data to return from the ODBC source.Query results data displays in a separate window when you drillfrom the origination cube.
v For a Cube View data source, you must supply the following information.
Element Description
Datasource Name Name of the view you want to open when drilling from theorigination cube. Click Browse to select a view name or create aview.
v For the Other data source, click Launch TurboIntegrator to define the datasource.
6. Click Finish.The Save Process As dialog box opens.
7. Enter a name for the drill process in the Name box.
Note: For best practice, we recommend that you use a drill process name thatidentifies the origination cube associated with the drill process. For instance, ifyou create a process to drill from a cube named PriceCube to an ODBC source,you would name the drill process PriceCubeToODBCSource. This type of
Chapter 3. Advanced Calculations for Business Data 61
naming convention makes it easier to identify a drill process name when youedit a drill process, or select from several drill processes associated with a cube.
8. Click Save.Xcelerator saves the drill process as a TurboIntegrator process, but prefixes thename you assigned in step 7 with the string }Drill_. For example, if you save adrill process with the name PriceCubeToODBCSource, Xcelerator saves theprocess as }Drill_PriceCubeToODBCSource.
Editing Drill ProcessesWhen you create a drill process with a Cube View data source, TurboIntegratorinserts the function ReturnViewHandle('Cube','View') above or below theGenerated Statements area, which is located on the Epilog subtab of theAdvanced tab in the TurboIntegrator window.
If you change the data source for a drill process, TurboIntegrator does not updatethe function with the new data source because the function is outside theGenerated Statements area. You must edit the Cube View data source in theReturnViewHandle function for the drill process.
Note: For a drill process with an ODBC data source, TurboIntegrator does notinsert the ReturnViewHandle function. Therefore, you do not need to edit thefunction when you change an ODBC data source for a drill process.
Procedure1. In the Server Explorer, right-click the origination cube with which the drill
process is associated.2. Click Drill, Edit Drill Process.
The Select dialog box opens.3. Select a drill process and click OK.
The TurboIntegrator window opens.4. Click the Advanced tab.5. Click the Epilog tab.6. Edit the ReturnViewHandle function to reflect the new view.
For example, to use the Europe_1Q view of the Sales cube as a data source, theReturnViewHandle function would look like this:ReturnViewHandle(’Sales’,’Europe_1Q’)
7. Click Save.8. Close the TurboIntegrator window.
Deleting Drill ProcessesFollow these steps to delete a drill process.
Procedure1. In the Server Explorer, right-click the origination cube with which the drill
process is associated.2. Click Drill, Delete Drill Processes.
The Delete Drill Processes dialog box opens.3. Select the process(es) you want to delete.
v To select multiple adjacent drill processes, click and drag across theprocesses.
62 IBM Cognos Express Xcelerator Version 10.1.0: Developer Guide

v To select multiple non-adjacent processes, hold down CTRL, and click eachdrill process.
4. Click OK.
Creating a Drill Assignment RuleA drill assignment rule is the Xcelerator rule that links cube cells with relateddetailed data. As indicated above, the related data can be a cube view, ODBCsource, or any other data source accessible through TurboIntegrator.
Procedure1. In the Server Explorer, select the origination cube for which you want to create
a drill assignment rule.2. Click Cube, Drill, Create Drill Assignment Rule.
The Rules Editor opens.For each cube area you want to associate with detailed data, continue withsteps 3 through 8.
3. Click Area to define the cube cells (area)you want to associate withdetailed data.When you click the Area button, the Reference to Cube dialog box opens.
4. To define the area, do one of the following:v To define the area as the entire cube, click OK.v To narrow the area definition, click the dimension buttons and select the
elements that define the cells you want to associate with the detailed data,and then click OK.
5. Click Equal .
6. Click String .7. Enter the name of the drill process enclosed in single quotation marks to define
the detailed data you want to associate with the area. For example, enter'PriceCubeToSource'.Caution: Do not include the }Drill_ prefix in a drill process name. For example,enter 'PriceCubeToSource' for a drill process named }Drill_PriceCubeToSource.You can associate more than one drill process with an area. Enclose all drillprocesses, separated by commas, within a set of single quotation marks.
Note: You can also use conditional logic or other functions to return the nameof a drill process.
8. Click Semicolon .The semi-colon indicates the end of a rules statement.
9. Click Save.
Results
You can now drill through to detailed data for which you have created a drillprocess and a drill assignment rule.
Drill-Through ExampleThis section guides you through the creation of a drill process and drill assignmentrule, which allows you to drill from the SalesByQuarter cube to a relational tablethat is the original source for the cube data. The table contains data at the monthly
Chapter 3. Advanced Calculations for Business Data 63

level, while the SalesByQuarter cube contains data at the quarterly level. Bydrilling through to the relational source, you can view the underlying detail for thecube data.
Setting Up the ODBC Data SourceThe example in this section drills through to an ODBC source (Access database).Before looking at the example, you must set up the ODBC data source.
Procedure1. Open the Microsoft Windows ODBC Data Source Administrator dialog box.
The procedure for opening this dialog box varies, depending on the version ofMicrosoft Windows you are running. For details, see the Microsoft WindowsHelp.
2. On the System DSN tab, click Add.The Create New Data Source dialog box opens.
3. Select Microsoft Access Driver and click Finish.The ODBC Access Setup dialog box opens.
4. Type CXL_sample_data in the Data Source Name box.5. Click Select.
The Select Database dialog box opens.6. Navigate to your \install_dir\Custom\TM1Data\PData\RelationalData
directory and select Sales.mdb.7. Click OK to exit the Select Database dialog box.8. Click OK to exit the ODBC Administrator dialog box.
The Access database named Sales is now available as an ODBC source. Theexample drill processes use this ODBC data source.
Creating a Drill ProcessYou can now create a drill process for the SalesByQuarterCube cube. The drillprocess defines an ODBC data source as the detailed data that you can view whenyou drill from the SalesByQuarterCube cube.
Procedure1. In the Server Explorer, right-click SalesByQuarterCube.2. Click Drill, Create Drill Process.
The Drill Process Setup Wizard opens. The table contains the defaultparameters for the drill process.
3. Select the Year parameter value.4. Click Select Element.
The Subset Editor opens.5. Select 1 Quarter and click OK.6. Repeat steps 3 through 5 to change the Gross Margin% parameter value to
Units.7. Click Next.
The second screen of the wizard opens.8. Select ODBC as the Datasource Type.9. Click Browse next to the Data Source Name box and select CXL_sample_data
.10. Enter admin as the User Name.
64 IBM Cognos Express Xcelerator Version 10.1.0: Developer Guide

11. Enter the following query in the Query box.This query is specific to the sample Access database. It uses IIF functions thatare unique to Access and cannot be used against any other database.SELECT ActvsBud, Region, Model, Account1, Month, DataFROM Sales WHERE ( ActvsBud = ’?actvsbud?’ AND Region = ’?region?’AND Model = ’?model?’ AND Account1 = ’?account1?’ AND
(
IIF( ’?quarter?’= ’1 Quarter’, Month = ’Jan’ OR Month= ’Feb’ OR Month = ’Mar’,
IIF( ’?quarter?’= ’2 Quarter’, Month = ’Apr’ OR Month= ’May’ OR Month = ’Jun’,
IIF( ’?quarter?’= ’3 Quarter’, Month = ’Jul’ OR Month= ’Aug’ OR Month = ’Sep’,
IIF( ’?quarter?’= ’4 Quarter’, Month = ’Oct’ OR Month= ’Nov’ OR Month = ’Dec’,
IIF( ’?quarter?’= ’Year’,TRUE,TRUE)))))
)
)
Note: Be sure to enclose the references to the Xcelerator parameter names inquestion marks (?).
12. Click Finish.The Save Process As dialog box opens.
13. Save the process as RELATIONALTABLE_SalesByMonth.
Results
The new drill process displays as an available process on the server. Note that theprocess name includes the }Drill_ prefix, indicating that it is a drill process.
You can now create a drill assignment rule to make the ODBC data sourceavailable from the SalesByQuarterCube cube.
Creating a Drill Assignment Rule for SalesByMonthFollow these steps to create a drill assignment rule that makes theRELATIONALTABLE_SalesByMonth process available from theSalesByQuarterCube cube.
Procedure1. In the Server Explorer, right-click SalesByQuarterCube.2. Click Drill, Create Drill Assignment Rule.
The Rules Editor opens.3. Enter the following rule in the large box.
[’Year’] = S:IF( ( ELLEV( ’actvsbud’, !actvsbud ) = 0) &( ELLEV( ’region’, !region)= 0 ) &( ELLEV( ’model’, !model)= 0 ) &( ELLEV( ’account1’, !account1) = 0),’RELATIONALTABLE_SalesByMonth’, ’’ );[] = S:IF( ISLEAF= 1, ’RELATIONALTABLE_SalesByMonth’,’’);
This rule indicates that the RELATIONALTABLE_SalesByMonth drill processwill be executed when you select the Drill option from a cell that is either:v Identified by the Year element and 0-level elements from all other
dimensionsv Identified by all 0-level elements
Chapter 3. Advanced Calculations for Business Data 65

4. Save the rule.You can now test the drill-through functionality for SalesByQuarterCube cube.
Viewing the Drill-Through ExampleFollow these steps to view the result of the drill process and drill assignment rule.
Procedure1. Open the Drill_relational view of the SalesByQuarterCube.2. Right-click the cell at the intersection of Units and Year.3. Click Drill.
An extract from the CXL_sample_data data source opens, displaying themonthly detail for the cell.
4. Click OK to close the window.5. Drill through other cells in the Drill_relational view to view the monthly detail.
You should be able to drill through any cell in the view.6. Change the Region title element from Germany to Europe.7. Right-click any cell in the view.
Results
Note that the Drill option is not available. This is because the drill assignment rulefor SalesByQuarterCube indicates that the Drill option is only available for cellsidentified by the 0-level elements or for the cells identified by the Year element and0-level elements. Europe is a consolidation, so the Drill option is not available.
Debugging RulesXcelerator provides a tool called the Rules Tracer to assist in the development anddebugging of rules. TheRules Tracer functionality is available only in theCubeViewer.
With the Rules Tracer, you can do the following:v Trace calculations - Ensure that rules are being assigned to selected cells and
calculated properly, or trace the path of consolidated elementsv Trace feeders - Ensure that selected leaf cells are feeding other cells properlyv Check feeders - Ensure that the children of a selected consolidated cell are fed
properly
Tracing CalculationsTo trace a calculation, whether a consolidation or a rules calculation, right-click thecell containing the calculation and click Trace Calculation.
The Rules Tracer window opens. From here, you can trace a calculation to its leaflevel components. The Rules Tracer window contains two panes.v Tracing Calculation (top pane) - Displays the definition of the current cell
location, with an icon indicating whether the value in the cell is derived by
Consolidation or by Rules . Also displays the current value of the cell. Ifthe value is derived by rules, the rule displays in the status bar of the TracingCalculation pane.
v Trace (bottom pane) - Displays the components of the first consolidatedelement or the first rule in the cell definition. You can double-click any item inthe bottom pane to trace a path to the leaf level elements that define the cell.
66 IBM Cognos Express Xcelerator Version 10.1.0: Developer Guide

Tracing a Rule Calculation Example (Simple)Follow these steps to view a simple example of tracing a rule calculation.
Procedure1. Open the Trace_simple view of the SalesCube cube.
This view contains the Price values that are derived through rules you createdearlier in this section.
2. Right-click the cell at the intersection of Price and Jan.3. Select Trace Calculation.
The Rules Tracer window opens.In the Tracing Calculation pane at the top, Xcelerator displays the current celldefinition, along with Rules icon indicating that the cell value is derivedthrough rules. The rule that applies to the cell is shaded, and the Calculatedvalue of the cell displays in the lower right corner of the pane.In the Trace pane at the bottom, Xcelerator shows the evaluation of the rulethat applies to the current cell. In this example, the rule[’Price’]=N:DB(’PriceCube’,!actvsbud,!region,!model,!month);C:[’Sales’]\[’Units’]*1000;
evaluates to[’Price’]=PriceCube(Actual, Germany, L Series 1.8L Sedan,Jan)
because the current cell is an N: location (not defined by any consolidations).You now know that the cell SalesCube(Actual, Germany, L Series 1.8L Sedan,Price, Jan) takes its value from PriceCube(Actual, Germany, L Series 1.8L Sedan,Jan).
Tracing a Consolidation Example (Complex)The previous simple example shows how the Rules Tracer works for cells at the N:level. The following example shows how you can use the Rules Tracer to tracevalues that include consolidations.
Procedure1. Open the Trace_complex view of the SalesCube cube.2. Right-click the cell at the intersection of Sales and 1 Quarter.3. Click Trace Calculation.
The Rules Tracer opens.In the Tracing Calculation pane at the top, Xcelerator displays the current cell
definition, along with the Consolidation icon indicating that the cell valueis derived through consolidation. The value of the Consolidated cell displays inthe lower right corner of the pane.In the Trace pane at the bottom, Xcelerator displays the components of the firstconsolidated element in the cell definition. In this example, T Series is the firstconsolidated element in SalesCube(Actual, Germany, T Series, Sales, 1Quarter).Xcelerator displays the T Series components with their values.
4. Double-click T Series 2.8L Coupe in the Trace pane.You are now tracing the value of SalesCube(Actual, Germany, T Series, Sales,1Quarter) through T Series 2.8L Coupe.The Tracing Calculation pane now displays the cell definition for the elementyou double-clicked.SalesCube(Actual, Germany, T Series 2.8L Coupe, Sales,1 Quarter)
Chapter 3. Advanced Calculations for Business Data 67
The Trace pane now displays the components of the first consolidated elementin this cell definition. The first consolidated element in SalesCube(Actual,Germany, T Series 2.8L Coupe, Sales, 1 Quarter) is 1 Quarter. Xcelerator showsthe three components Jan, Feb, and Mar, with their values.In the Trace pane, note that a Rules icon precedes each component name,indicating that the components derive their values through rules.
5. Double-click Jan in the Trace pane.You are now tracing the value of SalesCube(Actual, Germany, T Series, Sales,1Quarter) through the T Series 2.8L Coupe and Jan.The Tracing Calculation now displays the cell definition for the element youdouble-clicked. In this case, SalesCube(Actual, Germany, T Series 2.8L Coupe,Sales, Jan). This cell is calculated by a rule, ['Sales']=N:['Price']\['Units']*1000,which is shaded. The Consolidated value of the cell, 18730.0772, displays in thelower right corner of the pane.The Trace pane now displays the components of the rule formula and theirvalues. The component Price has a value of 43156.86, and is derived by anotherrule. The component Units has a value of 434, and is an Input Value, asdenoted by the gray bullet .By plugging these values into the rule formula, you can see that (43156.86 X434)\1000 = 18730.0772, confirming the value of SalesCube(Actual, Germany, TSeries 2.8L Coupe, Sales, Jan).
6. Double-click Price to view the rule that is used to derive the Price value.The following rule calculates the Price:[’Price’]=N:DB(’PriceCube’,!actvsbud,!region,!model,!month);C:[’Sales’]\[’Units’]*1000;
This rule evaluates to:PriceCube(Actual, Germany, T Series 2.8L Coupe, Jan)
which displays in the Trace pane as an Input Value, denoted by a gray bullet
, indicating that you cannot trace the calculation any further.
Tracing a New Calculation PathYou can click any cell definition in the Tracing Calculation pane of the Rules Tracerto begin tracing a new calculation path.
For instance, using the previous complex example, you could click the first celldefinition in the Tracing Calculation pane to begin tracing a new path through theT Series consolidation.
When you click a cell definition in the Tracing Calculation pane, the Trace panedisplays the components of the first consolidated element in the cell definition. Youcan then double-click any component to begin tracing a new calculation path.
Tracing FeedersThe Rules Tracer lets you trace the way a selected cell feeds other cells.
Because you can only feed other cells from a leaf element, the Trace Feederscommand is available for the leaf cells you define by rules, but is not available forconsolidated cells.
Procedure1. In the Cube Viewer, right-click the cell you want to trace.2. Click Trace Feeders.
68 IBM Cognos Express Xcelerator Version 10.1.0: Developer Guide

The Rules Tracer window opens. This window contains two panes.v Tracing Feeders (top pane) - Displays the definition of the current cell
location, and the feeder rules associated with the current cellv Trace (bottom pane) - Displays the locations fed by the current cell
3. Double-click a location in the Trace pane.This location becomes the current cell location in the Tracing Feeders pane, andthe Trace pane displays any locations fed by the current cell.
4. Continue double-clicking the locations in the Trace pane until you have tracedthe feeders to the level you require.
Checking FeedersIf a cube contains a rule with SKIPCHECK and FEEDERS statements, you can usethe Rules Tracer to check that Xcelerator properly feeds the components of theconsolidation.
Procedure1. In the Cube Viewer, right-click the consolidated cell you want to check.2. Click Check Feeders.
The Rules Tracer opens. This window contains two panes.v Checking Feeders (top pane) - Displays the definition of the current cell
(consolidation)v Trace (bottom pane) - Displays all components of the consolidation that are
not properly fedThe Trace pane is empty, which means the consolidation is fed properly andthe cubes values are accurate.If the Trace pane displays the components of the consolidation, you must editthe rule associated with the current cube to add the FEEDERS statements thatfeed all the listed components.
Note: You can only check the FEEDERS for a cell once per Xcelerator session.The action of checking the FEEDERS actually feeds the components of theconsolidation. Any subsequent checking of the FEEDERS does not yieldaccurate results. If you want to check the FEEDERS for a cell more than once,you must recycle the IBM Cognos Analytic Server (ICAS) before every check.
Chapter 3. Advanced Calculations for Business Data 69

70 IBM Cognos Express Xcelerator Version 10.1.0: Developer Guide

Chapter 4. Organizing Objects in Xcelerator Applications
IBM Cognos Express Xcelerator lets you organize objects logically by application,and by type. This section describes how to create Xcelerator applications.
Xcelerator Application OverviewXcelerator applications are objects that function as virtual folders to organizeshortcuts to other Xcelerator objects, files, and URLs in a logical, job-specificgrouping.
For example, you might create an application that organizes all Xcelerator objectsand related files for a North American sales organization.
You insert objects, files, and URLs into an application by creating a shortcut orreference. Applications and references provide a quick and organized way to openthe target objects to which the references point.
Types of ReferencesIBM Cognos Xcelerator applications can contain references to any of the followingitems:v Xcelerator objects - An application can contain references to any type of
Xcelerator object except for rules and replications.You can reference Xcelerator objects on the same IBM Cognos Analytic Server(ICAS) containing the application or any other ICAS to which you have access.
v Files - An application can reference any type of file, such as an Excelspreadsheet, a Word document, or any other file. Any Excel file can bereferenced, regardless of whether the file contains Xcelerator slices, functions, orother Xcelerator features.You can reference both external and uploaded files:A reference to an external file provides a shortcut to a file that can exist in anyshared directory on your network.A reference to an uploaded file saves a copy of the original file on the ICAS.However, changes to the original source file, outside of Xcelerator, are notautomatically reflected in the uploaded copy of the file on the ICAS. You mustupdate the file on the server to make the changes available.
Value of Jan, Totalcalculated by the['Jan','Total']=999rules statement
Grand total calculated byconsolidating quarterly totals for each productappears incorrect.
Grand total calculated byconsolidating product totals for each monthis correct.
Total, 1Quarter consolidationcalculated by rules statement['Total']=ConsolidateChildren('Month').
© Copyright IBM Corp. 2007, 2012 71

v URLs - An application can contain links to any web pages or resources that usethe http or https protocol.
Behavior of ReferencesIt is important to understand that when you add object and file references to anapplication, they exist by reference only - as a shortcut that opens the original IBMCognos Xcelerator object or file. Deleting a reference in an application is differentfrom deleting the source Xcelerator object or file:v Deleting a reference from an application has no impact on the corresponding
source Xcelerator object or file. Only the reference is deleted.v Deleting a source object in Xcelerator, or a file on disk, breaks any corresponding
reference in an application, but does not delete the reference. The referenceremains but is not functional if the source object or file is deleted.
One exception to the above is for uploaded file references. In this case, the file isactually copied to the IBM Cognos Analytic Server (ICAS). If you delete a referenceto an uploaded file, Xcelerator deletes the uploaded copy of the file from the ICAS.
For details on file references, see “Adding File References to an Application” onpage 79
Display Order for References in ApplicationsXcelerator displays references in applications in the following order. Within eachreference group, Xcelerator sorts the references alphabetically in descending order.v Cubesv Viewsv Dimensionsv Subsetsv Processesv Choresv Files and URLs
Note: You cannot set the order in which reference groups display, nor the sortorder within reference groups.
Using Applications and References in CXL WebWhen you create Xcelerator applications and references in the Server Explorer, theyare automatically available in CXL Web. This applies for references to cubes, views,files, and URLs.
For details, see “Publishing Xcelerator Applications to CXL Web” on page 89.
Application Folders and Files on the ICASThe folders and files that support Xcelerator applications are stored in the IBMCognos Analytic Server (ICAS) data directory.
Folders
The structure for Xcelerator application folders are organized in the followinglocation:TM1 Data Directory \ }applications
72 IBM Cognos Express Xcelerator Version 10.1.0: Developer Guide

Information about both referenced and uploaded files are stored in their relatedsub-folders here.
Referenced Files
Information about referenced files are stored in placeholder files named with the.extr extension.
For example, if you create an application reference to a file named sheet1.xls,Xcelerator creates a placeholder file named sheet1.xls.extr to keep track of thatentry.
Uploaded Files
Information about uploaded files are stored in placeholder files named with the.blob extension.
The actual files that are uploaded to the ICAS are stored in the following location:TM1 Data Directory \ }Externals
For example, if you upload a file to the Planning Sample database, it would besaved here:C:\Program Files\Cognos\TM1\Custom\TM1Data\PlanSamp\}Externals\
Xcelerator automatically appends a date and time suffix to the end of the file namefor any file you upload. The suffix uses the format year month day time.file extension.
For example, if you upload the file Sample_Budget.xls to the Planning Sampledatabase, Xcelerator renames it to Sample_Budget.xls_20090617155650.xls andstores the file in the following location:C:\Program Files\Cognos\TM1\Custom\TM1Data\PlanSamp\}Externals\Sample_Budget.xls_20090617155650.xls
Security Considerations for Creating and Viewing ApplicationsThe following table describes the security privileges required to perform actionsrelated to Xcelerator applications.
For details, see “Administering Security for Xcelerator Applications” on page 86.
Action Required security privilege
Create a top-level application Must be member of ADMIN or DataAdmingroup
Create a secondary-level application Admin access to parent application
View and use applications and references Read
Add a private reference to an application Read
Publish a private application Must be member of ADMIN or DataAdmingroup
Chapter 4. Organizing Objects in Xcelerator Applications 73

Action Required security privilege
Publish a private reference to a public object Admin
Publish a private reference to a privateobject
Cannot be done
Privatize a public application or reference Admin
Delete a public application or reference Admin
Delete a private application Admin
Delete a private reference Read
Creating and Managing ApplicationsTo begin adding applications to a IBM Cognos Analytic Server (ICAS), a memberof the ADMIN or DataAdmin group must first create one or more top-levelapplications. Top-level applications are applications that appear directly below theApplications group in the Server Explorer. Secondary-level applications appearwithin a parent application, as explained in "Creating a Secondary-LevelApplication within an Existing Application."
In the following example, you see an applications group (Applications), threetop-level applications (European Sales, North American Sales, and PacRim Sales),and two secondary-level applications (China and Indonesia) beneath the PacRimSales top-level application.
Creating a Top-Level ApplicationFollow these steps to create a top-level application.
Procedure1. Ensure that the Applications group is visible on your IBM Cognos Analytic
Server (ICAS). If the group is not visible, click View, Applications in the ServerExplorer.
2. In the Server Explorer, right-click the Applications group on the server whereyou want to create the application and click Create New Application.Xcelerator inserts a new top-level application temporarily named New Folderin the selected Applications group.
3. Assign a name to the new application.
74 IBM Cognos Express Xcelerator Version 10.1.0: Developer Guide
Note that Microsoft Windows has some reserved device names that cannot beused as folder or file names. See the MS Windows website for an updated listof reserved device names.All applications are private objects that only the user who creates theapplication can access. You must publish an application to make it available toother Xcelerator users. Only Architect and Xcelerator users can create publicapplications. Xcelerator Client users can create only private applications.
4. Right-click the application and click Security, Make Public to make theapplication available to other users.
Note: The type of icon that is used for an application depends on the privateor public status of the application.
v A private application displays with a Private Applications icon whichincludes a key in the upper right corner.
v A public application displays with a Public Applications icon .You can now begin adding references and/or secondary-level applications tothe application.
Renaming ApplicationsFollow these steps to rename an application.
Procedure1. Right-click the application in the Server Explorer.2. Click Rename.
The current application name is selected and ready to be edited.3. Type a new name for the application.4. Press ENTER.
Deleting ApplicationsYou can delete any application, public or private, to which you have ADMINprivilege.
Note: When you delete an application, IBM Cognos Xcelerator deletes allsub-applications and references contained in the application.
When you have ADMIN privilege to an application, you must also have ADMINprivilege to all references and sub-applications within the application, regardless ofthe security privileges that Xcelerator applies through the Xcelerator SecurityAssignments window. Therefore, when you have ADMIN access to an application,you can delete sub-applications and references to which you were assigned onlythe READ or NONE privilege.
To illustrate the ADMIN privilege for deleting an application, consider thefollowing example. There are three applications on a server (App1, App2, andApp3), all created by a member of the ADMIN group.
The administrator has defined the following security privileges to the applicationsfor the North America user group:
Chapter 4. Organizing Objects in Xcelerator Applications 75

Application NameSecurity Privilege for North America UserGroup
App1 Admin
App2 Read
App3 None
When a member of the North America user group logs on to the IBM CognosAnalytic Server (ICAS), he will see App1, to which he has ADMIN privilege, andApp2, to which he has READ privilege. He will not see App3, as he has NONEprivilege for that application.
Now, if a member of the North America user group attempts to delete App1, thedeletion will succeed. This is expected because the North America user group hasADMIN privilege to App1, which allows deletion of applications. However, bothApp2 and App3 (along with any references contained therein) will also be deletedwithout warning, despite the fact that the North America group has been assignedREAD and NONE privileges for the applications, respectively.
Procedure1. Right-click the application in the Server Explorer.2. Click Delete.3. Click Yes when prompted for confirmation.
Creating a Secondary-Level Application within an ExistingApplication
Any IBM Cognos Xcelerator user with Admin privilege to an existing applicationcan create secondary-level applications.
Procedure1. Right-click the existing application.2. Click New, Application.
Xcelerator inserts a new secondary-level application temporarily named NewFolder in the existing application.
3. Assign a name to the new application.Xcelerator creates the application as a private object which only you can access.
4. If you are a member of the ADMIN or DataAdmin group and you want topublish the application so that other Xcelerator users can access it, right-clickthe application and click Security, Make Public.When you publish a secondary-level application, security privileges for thesecondary-level application are inherited from the security privileges definedfor the parent application. You can change security privileges by following thesteps in “Assigning Security Privileges for Xcelerator Applications andReferences to User Groups” on page 86.
76 IBM Cognos Express Xcelerator Version 10.1.0: Developer Guide

Adding Xcelerator Object References to an ApplicationYou can add references to objects from the IBM Cognos Analytic Server (ICAS) onwhich the application resides as well as objects from other servers to which youare connected.
Procedure1. Select the object in the Server Explorer.2. Drag and drop the object onto the application.
A reference to the object displays in the application.By default, any reference you add to an application is a private reference, asindicated by a key superimposed over the object icon. Only you can access thereference.
Icon Description
A reference to the SalesCube cube that was added to theNorth American Sales application.
Xcelerator adds an image of a shortcut arrow to an object'sicon to represent a reference.
An image of a key is added to the lower corner of thereference icon to represent private references and to bothlower and upper right-hand corners to represent privateobjects.
Making a Reference PublicIf you want to make the reference available to other IBM Cognos Xcelerator users,you must publish the reference by right-clicking the reference and clickingApplication Item, Security, Make Public.
Xcelerator combines the object's icon with a shortcut arrow to identify a publicreference to a public object.
Icon Description
Public reference to a public subset.
Public reference to a public view.
To simplify the process of creating a public reference, you can right-click an objectin the Server Explorer, hold down the right mouse button, and then drag and dropthe object onto an application. When you drop the object, Xcelerator displays ashortcut menu. Click Create Public Reference.
You can publish references in public applications only. When you publish areference in an application, security privileges for the references are inherited fromthe security privileges defined for the parent application. You can change security
Chapter 4. Organizing Objects in Xcelerator Applications 77

privileges by following the steps outlined in “Assigning Security Privileges forXcelerator Applications and References to User Groups” on page 86.
Adding References to Private Views and Subsets to anApplication
When you add a reference to a private view or subset to an application, thereference is created as a private reference, which is the default behavior whencreating any reference in an application.
IBM Cognos Xcelerator adds an image of two keys to a reference icon to identify aprivate reference to a private object.
Icon Description
Private reference to a private subset.
Private reference to a private view.
These icons help you differentiate:v private references to private objects, fromv private references to public objects.
Xcelerator adds a single key to a reference icon to identify a private reference to apublic object.
Icon Description
Private reference to a public subset.
Private reference to a public view.
If you publish a private view or subset for which a reference exists, the reference isno longer valid, and displays an error message when accessed.
For example, if create a reference to a private view called View1, and then makeView1 public, the reference breaks and can not open the view. The following errormessage displays: Cannot find private view 'View1' of cube 'plan_BudgetPlan' onserver 'planning sample'.
In such a circumstance, you should delete the old reference and insert a newreference to the (now) public view or subset.
78 IBM Cognos Express Xcelerator Version 10.1.0: Developer Guide

Simultaneously Creating a New Object and Adding aReference to an Application
You can create a new IBM Cognos Xcelerator object from within an application.Xcelerator creates the new object on the server where the application resides, andinserts a private reference to the object in the application. You can createdimensions, cubes, processes, and chores from within an application.
Procedure1. In the Server Explorer, right-click the Application from which you want to
create the object, and click New <Object type>, on the shortcut menu. Forexample, to create a new cube, click New, Cube.When you select an object type, a dialog box or window opens. For example, ifyou click New, Cube, the Creating Cube dialog box opens.
2. Complete the procedure required to create the type of object you chose.When you are done, Xcelerator creates the object on the server and inserts aprivate reference to the object in the application.The example shows the result of creating the cube New Cube from within theNorth American Sales application.
Adding File References to an ApplicationYou can add file references to IBM Cognos Xcelerator applications for any type offile on your computer or network, such as Excel, Word, PowerPoint, PDF, or anyother file.
Notes:
v You can add a reference to any Excel file to an application. You are not restrictedto working only with Excel files containing Xcelerator slices or other Xceleratorfeatures.
v Files are opened with the program with which they are associated, as configuredin the Microsoft Windows file type settings. Xcelerator displays an icon for eachfile based on this association.
Procedure1. In the Server Explorer, right-click the Application to which you want to add the
file reference, and click Add File on the shortcut menu.The Add File dialog box opens.
2. Browse to the directory containing the file and select the file you want to addto the application.
3. Select an option that determines how Xcelerator will add the file to theapplication.Attach the file as a reference - Keeps the file in its current location and insertsa reference to the file in the Xcelerator application.
Chapter 4. Organizing Objects in Xcelerator Applications 79

When a file is added as a reference, it displays as icon with an arrow inXcelerator. For example, the icon for an Excel file that is added using the Attach
the file as a reference option looks like this in the Xcelerator applicationobject tree.The primary advantage of this option is that any edits or modifications to theExcel file are immediately available in the application. If you select this option,the Excel file should reside in a shared folder and you should navigate to thefile through your network to create a UNC path to the file.To maintain access to an attached Excel file whenever the IBM Cognos AnalyticServer (ICAS) is running, the computer where the file resides must be availableon the network.Copy the file to the ICAS - Copies the file to the ICAS on which theapplication resides.This type of reference displays as an icon without an arrow in Xcelerator. Forexample, an Excel file that is added using the Copy the file to the ICAS option
has the following icon in Xcelerator applications:Xcelerator copies the uploaded files to the }Externals subdirectory of the ICASdata directory. For example, if you add an Excel file to an application on thesdata server that is part of the sample Xcelerator database, Xcelerator saves thefile toC:\Program Files\Cognos\TM1\Custom\TM1Data\sdata\}Externals.The primary advantage to this option is that the file is available whenever theICAS is running. However, changes to the original source file are notautomatically reflected in the file on the ICAS. You must update the file on theserver to make the changes available.v For details on updating Excel files that have been copied to Xcelerator, see
“Updating Excel Files on the ICAS” on page 81.v For details on updating non-Excel files that have been copied to Xcelerator,
see “Updating Non-Excel Files on the ICAS” on page 82.
Note: If you select the Copy the file to the ICAS option, the file you want toupload cannot be currently in use by another program. If you attempt toupload an open file, Xcelerator displays an error message. Make sure the file isclosed before uploading it to Xcelerator.
4. Select either the Public or Private option.v Public - Makes the file reference available to other users who have access to
the Xcelerator application.v Private - Only you can access the reference to the file.
5. Depending on how Xcelerator is configured, the Publish to CXL Web checkbox may appear on the Add File dialog box.When this option is available, Xcelerator requires you to explicitly select it ifyou want to publish an Excel file from a Xcelerator application to CXL Web.For more details, see “Publishing Excel Files to CXL Web without Using Excelon the CXL Web Server” on page 90.If this option is available and you want to publish the selected Excel file toCXL Web, click the Publish to CXL Web check box.
Note: The Publish to CXL Web check box becomes enabled only after youclick on an Excel file.
6. Click Open.
80 IBM Cognos Express Xcelerator Version 10.1.0: Developer Guide
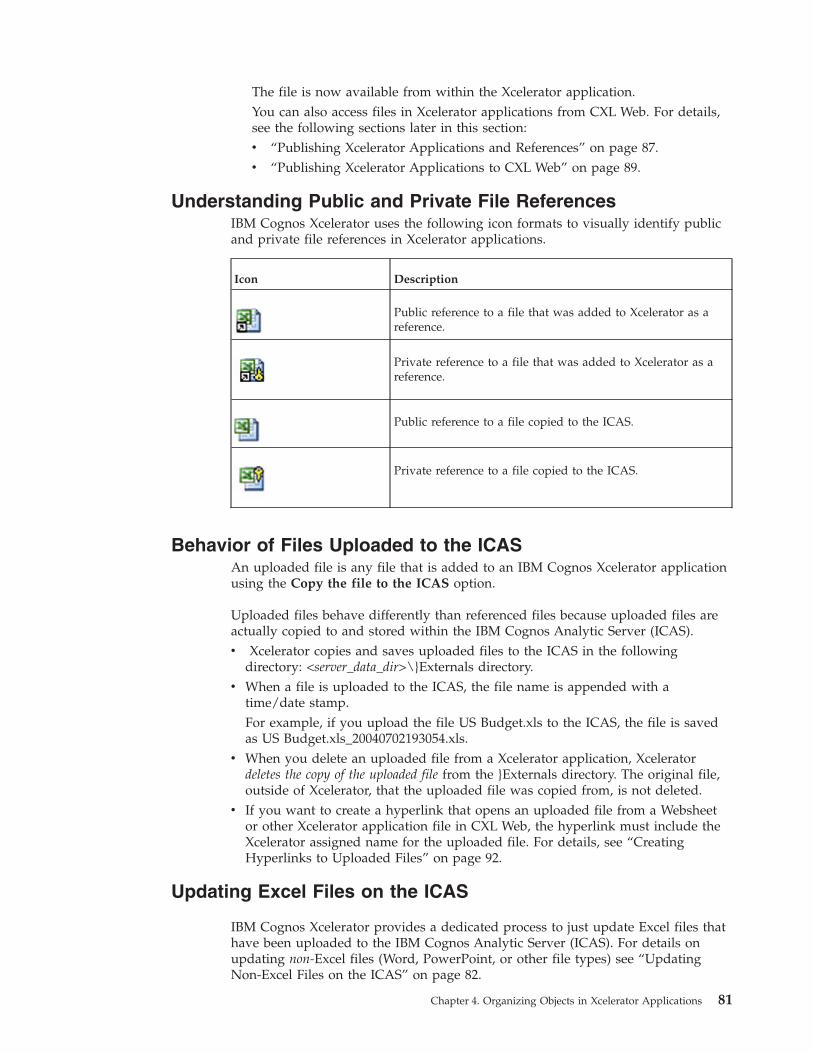
The file is now available from within the Xcelerator application.You can also access files in Xcelerator applications from CXL Web. For details,see the following sections later in this section:v “Publishing Xcelerator Applications and References” on page 87.v “Publishing Xcelerator Applications to CXL Web” on page 89.
Understanding Public and Private File ReferencesIBM Cognos Xcelerator uses the following icon formats to visually identify publicand private file references in Xcelerator applications.
Icon Description
Public reference to a file that was added to Xcelerator as areference.
Private reference to a file that was added to Xcelerator as areference.
Public reference to a file copied to the ICAS.
Private reference to a file copied to the ICAS.
Behavior of Files Uploaded to the ICASAn uploaded file is any file that is added to an IBM Cognos Xcelerator applicationusing the Copy the file to the ICAS option.
Uploaded files behave differently than referenced files because uploaded files areactually copied to and stored within the IBM Cognos Analytic Server (ICAS).v Xcelerator copies and saves uploaded files to the ICAS in the following
directory: <server_data_dir>\}Externals directory.v When a file is uploaded to the ICAS, the file name is appended with a
time/date stamp.For example, if you upload the file US Budget.xls to the ICAS, the file is savedas US Budget.xls_20040702193054.xls.
v When you delete an uploaded file from a Xcelerator application, Xceleratordeletes the copy of the uploaded file from the }Externals directory. The original file,outside of Xcelerator, that the uploaded file was copied from, is not deleted.
v If you want to create a hyperlink that opens an uploaded file from a Websheetor other Xcelerator application file in CXL Web, the hyperlink must include theXcelerator assigned name for the uploaded file. For details, see “CreatingHyperlinks to Uploaded Files” on page 92.
Updating Excel Files on the ICAS
IBM Cognos Xcelerator provides a dedicated process to just update Excel files thathave been uploaded to the IBM Cognos Analytic Server (ICAS). For details onupdating non-Excel files (Word, PowerPoint, or other file types) see “UpdatingNon-Excel Files on the ICAS” on page 82.
Chapter 4. Organizing Objects in Xcelerator Applications 81
Procedure1. Double-click the file in the Server Explorer.
The file opens in Excel with a temporary file name such as TM12C5D.xlsdisplayed in the title bar.
Note: It is important to remember the original name of the file you areupdating (as opposed to the temporary file name). You will need to select theoriginal file later in step 4.
2. Apply your edits to the Excel document.3. Click ICAS , Save Workbook on ICAS , Update Existing Application File on
ICAS .The Select Xcelerator External File to Update dialog box opens.
4. Select the original Excel file you want to update.Be sure to select the original Excel file you opened in Step 1. If you select anyother file, Xcelerator will overwrite that selected file without warning.
5. Click OK.Xcelerator updates the file on the ICAS. The Excel file is available from withinits parent application.
Updating Non-Excel Files on the ICASYou can update a non-Excel file that has been uploaded to the IBM CognosAnalytic Server (ICAS) by saving the file as an external file and then manuallyre-adding the file to the server.
Procedure1. Double-click the file in the Server Explorer.
The file opens in the associated program with a temporary file name such asTM163.doc displayed in the title bar.For example, an uploaded Word file opens in Microsoft Word.
2. Using the program associated with the file, make your changes to the file andthen use the program's Save As feature to save the file to a new location andfilename.
Note: Remember the name and location of the new updated file so you canadd it back into Xcelerator in the next step.
3. In Server Explorer, right-click on the old version of the file and click Delete.Xcelerator displays the Confirm Delete dialog so you can delete the old file.
4. Re-add the updated file using the steps described in “Adding File References toan Application” on page 79.
Adding URL References to an ApplicationYou can add a URL address to an application for any of the following URLprotocols:v http://v https://
When you open a URL reference in an IBM Cognos Xcelerator application fromwithin Xcelerator Server Explorer, or CXL Web, the target source of the URLdisplays in your system's default web browser.
82 IBM Cognos Express Xcelerator Version 10.1.0: Developer Guide

Procedure1. In the Server Explorer, right-click the Application to which you want to add the
URL reference, and click Add URL on the shortcut menu.The Add URL dialog opens.
2. Enter a complete URL, including the http:// or https:// protocol.For example: http://www.Company.com
3. Enter a descriptive name for the URL.For example: Company Web Site
4. Click OK to add the URL.The URL is added to the Xcelerator application, using your system's defaulticon for a URL link.
Working with Object, File, and URL References in XceleratorApplications
You can double-click a reference to an object, file, or URL in an IBM CognosXcelerator application to perform the default action on the object.
You can right-click an object reference, and select any supported action for theobject from the shortcut menu.
The following table describes the default action for all objects, files, and URLs thatyou can access from Xcelerator applications.
Reference Type Default Action
Cube Opens the default view of the cube in the Cube Viewer.
Cube view Opens the view in the Cube Viewer.
Dimension Opens the default subset of the dimension in the Subset Editor.If a default subset is not defined, the All subset is opened.
Subset Opens the subset in the Subset Editor.
Process Opens the process for editing in the TurboIntegrator window.
Chore If the chore is inactive, opens the chore in the Chore SetupWizard. (You cannot open an active chore.)
File Opens the file in the program with which it is associated, asconfigured in the Microsoft Windows file type settings. Forexample, an .xls file opens in Excel.
URL Opens the URL in your system's default web browser.
Note: When accessing Xcelerator objects that are located on another IBM CognosAnalytic Server (ICAS), the server must be running and you must be logged in toit.
Chapter 4. Organizing Objects in Xcelerator Applications 83

v If you try to access a reference to an object that resides on a server that isrunning, but to which you are not currently connected, Xcelerator prompts youto log in to the server.
v If you try to access a reference to an object that resides on a server that is notrunning, Xcelerator issues the following warning: The server on which thisobject resides is not responding. Refresh Server Explorer display?
To restore access to the reference, start the server on which the source objectresides.
Viewing Xcelerator Application PropertiesFollow these steps to view the properties of references and sub-applications in anIBM Cognos Xcelerator application.
Procedure1. Select the application in the Server Explorer.2. If the Properties pane is not visible in the Server Explorer, click Display,
Properties Window .The Properties pane displays information about all references andsub-applications to which you have at least Read access. References andsub-applications to which you have None access do not appear in the ServerExplorer, so you cannot view the properties of these items.Only immediate sub-applications of the selected Xcelerator application appearin the Properties pane.
3. To sort items in the Properties pane alphabetically by property value, click thecolumn label to which you want to apply the sort. For example, to sort itemsalphabetically by current status, click the Status column label.For each reference and sub-application, the following properties display.
Property Description
Name The name of the reference or sub-application as it appears in theselected application.
You can edit reference names, which do not have to directlycorrespond to source object names. For example, in the figure above,the Price reference refers to the source cube named PriceCube.
System Namev For most references, System Name is the actual name of the
source object to which a reference points.
v For files that have been uploaded to the IBM Cognos AnalyticServer (ICAS), System Name is the name assigned to the file onthe ICAS. Naming conventions for files uploaded to the ICAS aredescribed in “Behavior of Files Uploaded to the ICAS” on page81.
v For files that are attached as a reference, System Name is theUNC path to the file.
v The System Name property does not apply to sub-applications.
Server The ICAS on which the source object for a reference resides.
For example, in the above image the source cube for the Currencyreference resides on the inventory server.
84 IBM Cognos Express Xcelerator Version 10.1.0: Developer Guide
Property Description
Private This property applies only to subsets and views.
The Private property indicates whether the source for a subset orview reference is a private object. A property value of Yes indicatesthat the source is a private object. No indicates a public object.
For example, in the image above, the sources for the NorthAmerican Currencies subset reference, as well as the NorthAmerican Price Plan and North American Models views, are allprivate objects.
Status This property indicates the current availability of references andsub-applications. There are three possible Status values:
v Available - The reference or sub-application is available for use.
v Not Connected - You are not connected to the ICAS on whichthe source object for the reference resides. Log in to the server torestore your access to the reference.
v Not Available - The ICAS on which the source object for thereference resides is not running, and therefore you cannot accessthe reference.
Security This property indicates your security privilege for a reference orsub-application.
Deleting Object, File, and URL References from XceleratorApplications
Follow these steps to delete an object reference from an IBM Cognos Xceleratorapplication.
Procedure1. Right-click the object reference in the application.
Note: You must select the object reference in the application. If you select thesource object elsewhere in the server hierarchy, you cannot delete the objectfrom the application.
2. Click Application Item, Delete.To delete a file or URL reference from an application:v Right-click the file in the application.v Click Delete.
Renaming Object, File, and URL References in XceleratorApplications
A reference to an object or file in a IBM Cognos Xcelerator application does nothave to use the name of the source file with which it is associated. You can renamean object or file reference in an application and maintain the connection to thesource file.
Chapter 4. Organizing Objects in Xcelerator Applications 85

Procedure1. Right-click the reference in the application.2. Select the Rename option as follows:
v Click Application Item, Rename to rename an object reference.v Click Rename to rename a file or URL reference.The reference name is selected and ready to be edited.
3. Type a new name for the reference.4. Press Enter.
Deleting Source Objects that are Referenced by XceleratorApplications
When you delete a source object that is referenced by an IBM Cognos Xceleratorapplication, Xcelerator does not delete the corresponding object reference from theapplication.
For example, if you delete the Canada Sales view from the data server, thereference to the Canada Sales view remains in the North American Salesapplication.
If you attempt to open an object or file reference in an application, and the sourcefor the object or file has been deleted from the IBM Cognos Analytic Server (ICAS),Xcelerator displays an error message, stating that the object 'US Sales' on server'sdata' cannot be found and prompts you to delete the reference.
When the source for an object or file in an application has been deleted from theserver, you should delete the corresponding reference from the application. Fordetails, see “Deleting Object, File, and URL References from XceleratorApplications” on page 85.
Administering Security for Xcelerator ApplicationsThe following sections describe how to assign security privileges for IBM CognosXcelerator applications and references to user groups on the IBM Cognos AnalyticServer (ICAS), as well as how to publish and privatize Xcelerator applications andreferences.
Assigning Security Privileges for Xcelerator Applications andReferences to User Groups
You can assign security privileges for public items (either references orsub-applications) within public IBM Cognos Xcelerator applications to user groupson the IBM Cognos Analytic Server (ICAS). You must have Admin privilege to anapplication to assign security to items within the application.
You cannot assign security for private applications and references; only the userwho creates a private item can access the item.
Procedure1. In the Server Explorer, right-click the Xcelerator application that contains the
items to which you want to assign security.2. Click Security, Security Assignments.
86 IBM Cognos Express Xcelerator Version 10.1.0: Developer Guide

The Security Assignments window opens. The window lists all public items (Xcelerator objects, files, URLs, and sub-applications) that reside in the currentapplication.
3. Select the cell at the intersection of the item for which you want to definesecurity and the user group to which you want to assign security.
4. Click one of the available security privileges.
Security Privilege As applied to Xcelerator applications As applied to references
None Members of the user group cannot seethe application or its contents.
Members of the user groupcannot see the reference.
Read Members of the user group can see theapplication and use any referenceswithin the application to which thegroup has at least Read privilege.Members can also create privatereferences in the application.
Members of the user groupcan use the reference.
Admin Members of the user group can see theapplication, use references within theapplication, and create both public andprivate references in the application.They can also create privatesub-applications.
Members with Admin privilege to anapplication can set security privilegesfor all references and sub-applicationswithin the application.
Members of the user groupcan use the reference. Theycan also update or deletethe reference. They canpublish private references,and privatize publicreferences.
5. Repeat steps 3 and 4 for any other items for which you want to define security.6. Click OK.
Results
For any given user group, it is possible to assign the READ or ADMIN privilege toa reference when the privilege assigned to the object associated with the referenceis NONE. In this scenario, members of the user group will not be able to see thereference in an application.
For example, if a user group is assigned NONE privilege for a cube, but READprivilege for a reference to the same cube, members of the user group will not seethe reference to the cube in an application.
Publishing Xcelerator Applications and ReferencesThe following sections describe how to publish IBM Cognos Xceleratorapplications and references. To determine the security privileges required toperform these procedures, see "Security Considerations for Creating and ViewingApplications".
Publishing Private Xcelerator applicationsFollow these steps to publish a private application.
Chapter 4. Organizing Objects in Xcelerator Applications 87
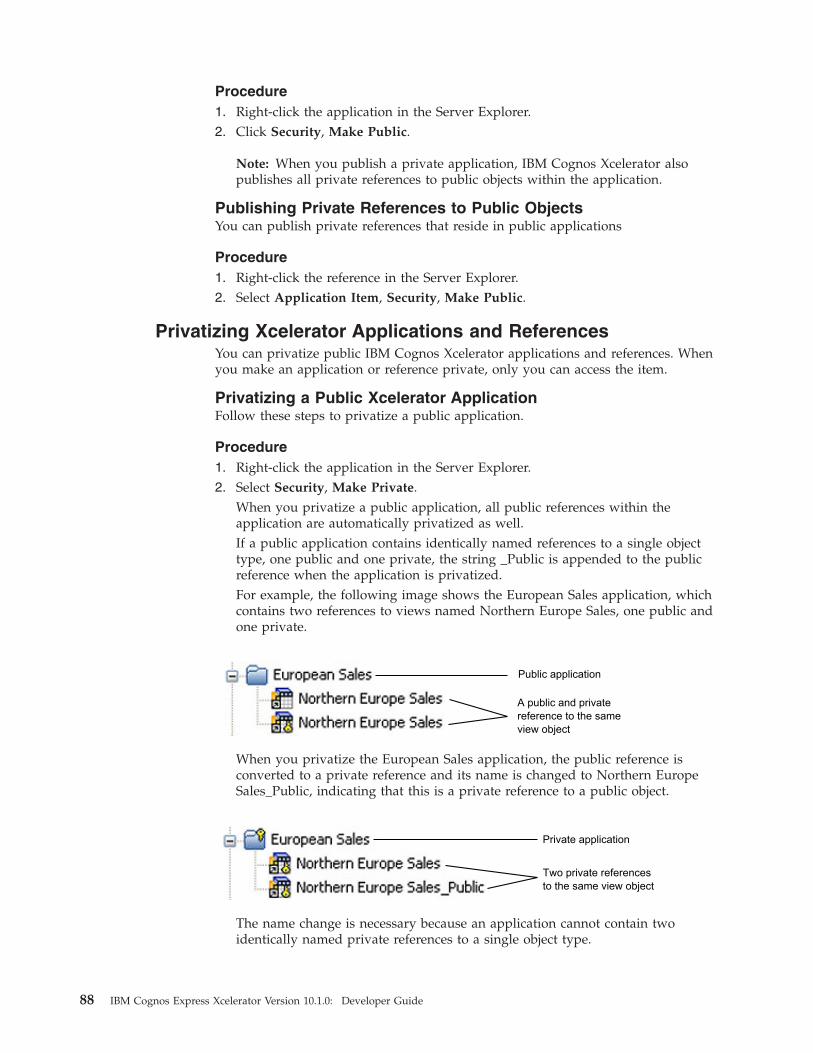
Procedure1. Right-click the application in the Server Explorer.2. Click Security, Make Public.
Note: When you publish a private application, IBM Cognos Xcelerator alsopublishes all private references to public objects within the application.
Publishing Private References to Public ObjectsYou can publish private references that reside in public applications
Procedure1. Right-click the reference in the Server Explorer.2. Select Application Item, Security, Make Public.
Privatizing Xcelerator Applications and ReferencesYou can privatize public IBM Cognos Xcelerator applications and references. Whenyou make an application or reference private, only you can access the item.
Privatizing a Public Xcelerator ApplicationFollow these steps to privatize a public application.
Procedure1. Right-click the application in the Server Explorer.2. Select Security, Make Private.
When you privatize a public application, all public references within theapplication are automatically privatized as well.If a public application contains identically named references to a single objecttype, one public and one private, the string _Public is appended to the publicreference when the application is privatized.For example, the following image shows the European Sales application, whichcontains two references to views named Northern Europe Sales, one public andone private.
When you privatize the European Sales application, the public reference isconverted to a private reference and its name is changed to Northern EuropeSales_Public, indicating that this is a private reference to a public object.
The name change is necessary because an application cannot contain twoidentically named private references to a single object type.
Public application
A public and privatereference to the sameview object
Private application
Two private referencesto the same view object
88 IBM Cognos Express Xcelerator Version 10.1.0: Developer Guide

Privatizing a Public ReferenceFollow these steps to privatize a public reference.
Procedure1. Right-click the reference in the Server Explorer.2. Select Application Item, Security, Make Private.
Viewing Logical Groupings in Xcelerator ApplicationsOne of the primary advantages of IBM Cognos Xcelerator applications is that theylet you view and manage objects and files in logical groupings. This simplifies thetask of using Xcelerator, because you can easily identify and locate files and objectsin job-specific applications without having to scan through large lists of objectsarranged by type.
To further simplify the use of Xcelerator, you can suppress the display of objects bytype. This yields a cleaner, more easily navigated display in the Server Explorer.(By default, all object types are displayed in the Server Explorer.)
To suppress the display of a particular type of object, click View, <Object type>from the Server Explorer. This clears the check mark next to the object type in theView menu and suppresses the display of the object type in the Server Explorer. Inthe following sample, all objects are suppressed except for Applications.
Note: When you suppress the display of a given object type in the Server Explorer,references to objects of that type still appear within Xcelerator applications.However, control objects are suppressed within applications when the display ofcontrol objects is suppressed in the Server Explorer.
Publishing Xcelerator Applications to CXL WebAll references to cubes, views, files, and URLs in IBM Cognos Xceleratorapplications are automatically available in CXL Web.
Note: If your installation of CXL Web is configured to run without Microsoft Excelon the Web server, you must explicitly publish all Excel files in Xceleratorapplications to CXL Web if you want the Excel files to be available as XceleratorWebsheets. For more details, “Publishing Excel Files to CXL Web without UsingExcel on the CXL Web Server” on page 90.
Assume North American Sales is a public application that contains references to acollection of Xcelerator objects and Excel files. When you access the sdata IBMCognos Analytic Server (ICAS) through CXL Web, these references are displayedunder Applications.
When working in CXL Web, you can click on a reference to open and display it asfollows:v Cubes and views display directly in CXL Web.v Excel files display as Xcelerator Websheets directly in CXL Web.
Note: Excel files that have been protected through the Excel command, Tools,Protection, cannot be accessed through CXL Web.
v Non-Excel files open and display in their associated program.
Chapter 4. Organizing Objects in Xcelerator Applications 89
Note: Some file types and programs may not be viewable from CXL Web.v URL references open and display in a separate web browser.
For example, click on an Excel file to open it in Xcelerator Websheet format.
Note: Xcelerator determines the column widths of the Websheet based on theExcel file from which the Websheet is generated. If the columns in the Excel file donot accommodate the full display of row and column labels, the correspondinglabels in the Websheet are truncated.
You can access both public and private applications and references through CXLWeb. Only the user who creates a private application or reference can access theitem through CXL Web. Access to public applications and references in CXL Web isdetermined by the security privileges defined for the source applications andreferences on the ICAS. For details on setting security privileges, see “AssigningSecurity Privileges for Xcelerator Applications and References to User Groups” onpage 86.
Setting Xcelerator Websheet PropertiesWebsheet properties are configured in Server Explorer to control how an Excel fileappears and behaves when viewed as a Websheet in IBM Cognos CXL Web.
Procedure1. In the Server Explorer, open the Xcelerator application containing the Excel file
from which the Xcelerator Websheet is generated.2. Right-click the Excel file.3. Click Properties.
The CXL Web Properties dialog box opens.4. Use the options on the General and Display Properties tabs to set properties
for the Xcelerator Websheet.For details on the CXL Web Properties options, see the IBM Cognos ExpressXcelerator User Guide.
5. Click OK.
Publishing Excel Files to CXL Web without Using Excel on theCXL Web Server
If your installation of IBM Cognos CXL Web is configured to run without MicrosoftExcel on the Web server, you must explicitly publish all Excel spreadsheet files inXcelerator applications to CXL Web if you want the Excel files to be available asXcelerator Websheets. Similarly, any time you change an Excel file that has beenpreviously published to CXL Web, you must republish the file to make the changesavailable in the Websheet.
For details about this configuration, see the ExcelWebPublishEnabled parameter inthe IBM Cognos Express Xcelerator Operations Guide.
Note: You cannot publish Excel 2007 .xlsx files to CXL Web when Excel is notavailable on the Web server. These files must be saved in Excel 2003 .xls format ifyou want to publish them to CXL Web.
There are several methods for publishing Excel files to CXL Web. You can:v Simultaneously add an Excel file to an application and publish to CXL Web
90 IBM Cognos Express Xcelerator Version 10.1.0: Developer Guide

v Publish individual Excel files that exist within an application to CXL Webv Publish all Excel files within an application to CXL Web
Simultaneously Adding an Excel File to an Application andPublishing to CXL WebWhen you initially add an Excel file to an application, you can choose tosimultaneously publish the file to IBM Cognos CXL Web. This option becomesavailable when the configuration parameter ExcelWebPublishEnabled is set to true.
There are two ways to add an Excel file to an application:v From Architect/Server Explorer - Right-click an application and choose Add
File.v From Xcelerator - Choose ICAS , Save Workbook on ICAS , Upload New
Application File to ICAS and then select an application folder.
Regardless of which method you use, Xcelerator displays a dialog box with anoption to publish the file to CXL Web while adding the file to an application.
Note: The Publish to CXL Web check box becomes enabled only after you click onan Excel .xls file.
You can choose to publish or not publish the Excel file to CXL Web as follows:v Select the Publish to CXL Web option to publish the Excel file to CXL Web.v Clear the Publish to CXL Web option to add the Excel file to the application but
not publish the file to CXL Web.
Deleting an Excel File from CXL WebYou can also delete an Excel file that has previously been published to IBM CognosCXL Web. When you delete an Excel file from CXL Web, the Websheet is no longeravailable in CXL Web but the source Excel file remains in the Xceleratorapplication.
Procedure1. Right-click the file.2. Select Remove from CXL Web.
Updating Excel Files in Xcelerator ApplicationsTo update a Microsoft Excel file that has been previously published, choose thefollowing option from the Excel toolbar: ICAS , Save Workbook on ICAS , UpdateExisting Application File on ICAS .
You can simultaneously republish the updated Excel file to CXL Web by selectingthe Publish File to CXL Web option.
For more details on updating Excel files, see “Updating Excel Files on the ICAS”on page 81.
Note: If you update an Excel file that has previously been published to IBMCognos CXL Web, but do not select the Publish File to CXL Web option, the file inthe application will differ from the file available in CXL Web. There is no visualindication in the Server Explorer to alert you that a file has been updated in anapplication but has not been republished to CXL Web.
Chapter 4. Organizing Objects in Xcelerator Applications 91

Creating Hyperlinks to Uploaded FilesIf you want a Websheet to contain a hyperlink to an uploaded file, the hyperlinkmust include the location and name that IBM Cognos Xcelerator assigns to theuploaded file.
When you add an uploaded file to a Xcelerator application, a copy of the file issaved on the IBM Cognos Analytic Server (ICAS) and the file name is appendedwith a data and time stamp. For example:Report_2006.xls_20070123212746.xls
If you do not include the Xcelerator assigned file name in the hyperlink, the linkdoes not work in CXL Web and an error displays, for example,
"File does not exist: TM1://planning sample/blob/PUBLIC/.\}Externals\upload_test_2.xls".
Procedure1. In Server Explorer, use the Properties pane to find the System Name, which is
Xcelerator assigned name for the uploaded Excel file that will be the target ofthe hyperlink.
2. Create the hyperlink to the uploaded Excel file using the following format:TM1://ServerName/blob/PUBLIC/.\}Externals\Filename
where:v ServerName is the ICAS sever name where the Excel file is located.v Filename is the name that Xcelerator assigned to the uploaded Excel file.For example:TM1://sdata/blob/PUBLIC/.\}Externals\Report_2006.xls_20070123212746.xls
3. In Excel, add the hyperlink to the worksheet where you want the link to exist.4. Add the worksheet to a Xcelerator application and then view the file as a
Websheet in CXL Web.
Viewing Websheets that Contain the 0x1A HexadecimalCharacter
IBM Cognos CXL Web cannot open a Websheet that contains the 0x1A hexadecimalcharacter. If you attempt to open a Websheet containing the 0x1A hexadecimalcharacter, CXL Web issues the following error:
Error occurred while converting the MS Excel workbook into XML format : '',hexadecimal value 0x1A, is an invalid character. Line 54, position 34.
If you remove the 0x1A hexadecimal character from the Websheet, the file willopen in CXL Web.
Note: The ASCIIOutput TurboIntegrator function places the 0x1A hexadecimalcharacter at the end of all generated files. If you use ASCIIOutput to exportXcelerator data to an ASCII file and then attempt to open the file in the XceleratorWebsheet, you will encounter this error.
92 IBM Cognos Express Xcelerator Version 10.1.0: Developer Guide

Chapter 5. Importing Data with Processing Worksheets
This section describes how to import data into an IBM Cognos Express Xceleratorcube using a processing worksheet. A processing worksheet is a modified Excelworksheet in which you use Xcelerator functions to send values to a location in anexisting cube.
Note: Processing worksheets, while a valid means of importing data, aredeprecated functionality in the current Xcelerator release. We strongly recommendusing TurboIntegrator to import data into Xcelerator cubes.
The following topics are described in this section.v Processing Worksheets Overviewv Importing Data Using Processing Worksheets
Processing Worksheets OverviewA processing worksheet is a modified Excel worksheet in which you use functionsto send input values to a location in an existing Xcelerator cube.
You can use processing worksheets to convert input values that do not mapdirectly to existing elements. For example, in the following table, the first twocolumns contain codes that do not directly correspond to elements in the cube towhich values are being sent.
Scenario Region Model Measure Jan Feb Mar
001 R54 S Series 1.8 L ... Price 25259.93 25830.76 25041.90
002 R54 S Series 1.8 L ... Price 25259.93 25830.76 25041.90
001 R32 S Series 1.8 L ... Price 25259.93 25830.76 25041.90
002 R32 S Series 1.8 L ... Price 25259.93 25830.76 25041.90
001 R1A S Series 1.8 L ... Price 25259.93 25830.76 25041.90
002 R1A S Series 1.8 L ... Price 25259.93 25830.76 25041.90
001 R30 S Series 1.8 L ... Price 25259.93 25830.76 25041.90
002 R30 S Series 1.8 L ... Price 25259.93 25830.76 25041.90
In this example, the codes in the first column represent elements in the Actvsbuddimension. By using a simple IF function, you can convert 001 to Actual and 002 toBudget.
The second column contains four region codes, which map to regions such asArgentina, United States, and Greece. If these were the only values, you couldwrite a nested IF formula to convert the values to elements. As the number of
© Copyright IBM Corp. 2007, 2012 93
possible values increases, writing a nested IF formula can be cumbersome anderror-prone. As an alternative, you can create a two-dimensional cube that servesas a lookup table for retrieving element names.
Importing Data Using Processing WorksheetsYou can create a processing worksheet to perform the following tasks:v Import data from input rows that require transformations.v Update cubes but not create cubes, nor create consolidations.v Use as a staging area for importing data.
Xcelerator reads the input records, one at a time, into the first row of theprocessing worksheet, and then sends the data values associated with the record toa Xcelerator cube.
Beneath the first worksheet row, a processing worksheet includes:v Conversion instructions for values that map to element names but do not match
element name spellings.v Any data transformation calculations that modify data values before importing.v Database Send (DBS) formulas that map the input data to cells in the cube. Each
formula sends a value from the first row to a location in the cube identified byone element in each dimension of the cube.
Note: You must use DBS formulas, not DBSW formulas, in processingworksheets. You must use DBR formulas rather than DBRW formulas inprocessing worksheets.
v Other values in each input row supply the element names directly or throughconversion instructions.
The following process summarizes the steps required to import data:v Read in the first input record into the processing worksheet as an example.v Compare the input with the cube structure.v Map the input values to element names, if necessary.v Build a DBS formula for each input value that populates a cube cell.v Process all input records.
Reading in the First Input RowYou can use processing worksheets to process data from the following datasources:v ASCII filesv ODBC data sourcesv Xcelerator cubes
The next three sections provide the steps for reading an initial record from eachdata source.
Procedure1. Create a new Excel worksheet, and close any other ones.2. Click ICAS , Process Data, Example.
The Select Cube, ODBC or Flat File dialog box opens.3. To choose a data source, click Cube, ODBC, or Flat File.
94 IBM Cognos Express Xcelerator Version 10.1.0: Developer Guide
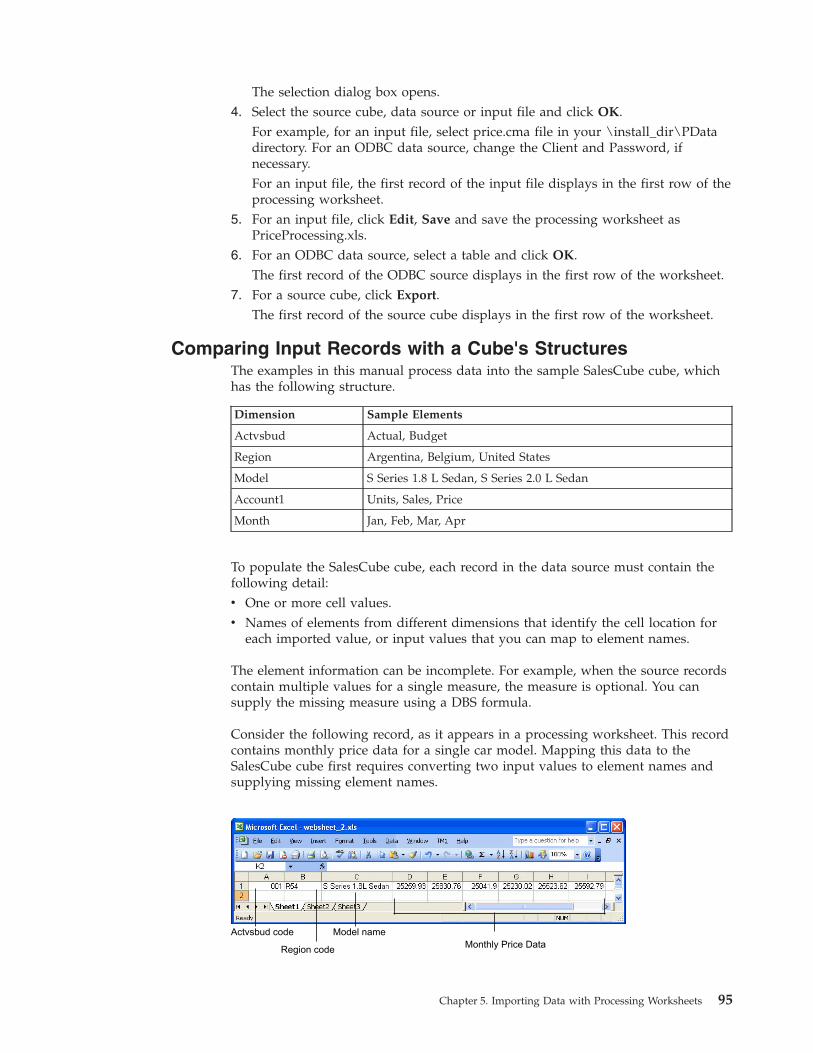
The selection dialog box opens.4. Select the source cube, data source or input file and click OK.
For example, for an input file, select price.cma file in your \install_dir\PDatadirectory. For an ODBC data source, change the Client and Password, ifnecessary.For an input file, the first record of the input file displays in the first row of theprocessing worksheet.
5. For an input file, click Edit, Save and save the processing worksheet asPriceProcessing.xls.
6. For an ODBC data source, select a table and click OK.The first record of the ODBC source displays in the first row of the worksheet.
7. For a source cube, click Export.The first record of the source cube displays in the first row of the worksheet.
Comparing Input Records with a Cube's StructuresThe examples in this manual process data into the sample SalesCube cube, whichhas the following structure.
Dimension Sample Elements
Actvsbud Actual, Budget
Region Argentina, Belgium, United States
Model S Series 1.8 L Sedan, S Series 2.0 L Sedan
Account1 Units, Sales, Price
Month Jan, Feb, Mar, Apr
To populate the SalesCube cube, each record in the data source must contain thefollowing detail:v One or more cell values.v Names of elements from different dimensions that identify the cell location for
each imported value, or input values that you can map to element names.
The element information can be incomplete. For example, when the source recordscontain multiple values for a single measure, the measure is optional. You cansupply the missing measure using a DBS formula.
Consider the following record, as it appears in a processing worksheet. This recordcontains monthly price data for a single car model. Mapping this data to theSalesCube cube first requires converting two input values to element names andsupplying missing element names.
Actvsbud code Model nameMonthly Price DataRegion code
Chapter 5. Importing Data with Processing Worksheets 95

Let's examine each input value:v Cell A1 contains a code that identifies the price data as actual or budget
amounts. Code 001 represents Actual, and Code 002 represents Budget, whichare two elements in the Actvsbud dimension. By using the Excel IF function, youcan convert these values to element names.
v Cell B1 supplies a region code that corresponds to an element name in theRegion dimension. Suppose that the input has 21 region codes that requireconversion. To convert these values, you can create a two-dimensional cube thatserves as a lookup table.
v Cell C1 supplies car model names, exactly as found in the Model dimension. Noconversion is required.
v Cells D1 through I1 supply the monthly data. You need to map this data toelements in the Month dimension.
Missing from each source record is a cell containing Price, which is an element inthe Account1 dimension. You specify this value directly in the DBS formulas thatsend the data values to the cube.
Converting Using IF FormulasThe first column in price.cma contains a scenario code, 001 for actual and 002 forbudget. You can use the Excel IF function to convert the code to the name of thecorresponding element from the Actvsbud dimension.
Procedure1. Click cell A3 of the processing worksheet.2. Enter the following formula:
=IF(A1="001","Actual","Budget")
Mapping Using Fixed LabelsCells D1 through O1 contain values that map to the 12 elements in the Monthdimension (Jan - Dec). Because these input columns always map to the samemonths, you can enter the element names directly in the processing worksheet.
Element names must exactly match the spellings in the dimension. You can avoidmisspelling names by copying them from the Subset Editor window.
The following steps illustrate how to copy element names from the Subset Editorwindow.
Procedure1. Open the Server Explorer.2. Double-click the Month dimension.
The Subset Editor window opens.3. Select the twelve months Jan - Dec in the Tree pane.4. Click Edit, Pick Elements, Horizontal.5. Return to the processing worksheet.6. Right-click cell D3 and click Paste.
Xcelerator pastes the element names horizontally starting in cell D3.
96 IBM Cognos Express Xcelerator Version 10.1.0: Developer Guide
Converting Using a Lookup CubeColumn B, the second input column, supplies the codes that identify the 21 regionsin which the car models are sold. For example, R54 represents Argentina. Toconvert these codes to element names, you have two choices:v Create a nested IF formula. As the list of codes increases, this becomes a
cumbersome choice.v Create a two-dimensional cube that serves as a lookup cube for the region
names, and then retrieve the names using a DBR formula.
We'll create a lookup cube called Translate that contains two dimensions, RegCodesand RegName.
Importing Unique NamesUsing TurboIntegrator, you can create a dimension whose elements are uniquevalues from an input column. In this example, the second column is price.cma.
Procedure1. Open the Server Explorer.2. In the Tree pane, right-click Processes and click Create New Process.
The TurboIntegrator dialog box opens.3. Specify an ASCII data source type.4. Click the Data Source Name Browse button and browse to the price.cma file
in your \install_dir\Pdata directory.5. Click the Variables tab.6. Specify a Content type of Ignore for all columns except the one that supplies
the codes you want to import. In this example, column 2 (identified by asample value of R54) supplies the codes you want to import.
7. Click the Maps tab.8. Specify No Action in both the Cube Action and Data Action sections of the
Cubes subtab.9. Click the Dimensions subtab, and do the following:
v Type Translate in the Dimension field.v Select Create from the Action list.v Select Numeric from the Element Type list.
10. Click File, Save and save the process as create_RegCodes_dimension.11. Click File, Execute to create the RegCodes dimension.
Results
RegCodes is now available as a dimension in the Server Explorer.
Creating a RegName DimensionFollow these steps to create the RegName dimension with a single string element.
Procedure1. Open the Server Explorer.2. In the Tree pane, right-click Dimensions and click Create New Dimension.
The Dimension Editor opens.3. Click Edit, Insert Element.
The Dimension Element Insert dialog box opens.
Chapter 5. Importing Data with Processing Worksheets 97

4. Type Name in the Element Name field.5. Select String from the Element Type list.6. Click Add.
The Name element now opens as a string element.7. Click OK.8. Click Edit, Save and save the dimension as RegName.
Creating the Translate CubeFollow these steps to create the Translate cube.
Procedure1. Right-click Cubes in the Server Explorer, and click Create new cube.
The Creating Cube window opens.2. Type Translate in the Cube Name field.3. In the Available Dimensions box, double-click RegCodes.
RegCodes moves to the Dimensions in new cube box.4. In the Available Dimensions box, double-click RegName.
RegName moves to the Dimensions in new cube box.5. Click OK to save the two-dimensional Translate cube.
Populating the Translate CubeUsing the Cube Viewer, you can now enter the corresponding region names for theregion codes.
The following steps illustrate how to populate the Translate cube with regionnames.
Procedure1. In the Tree pane of the Server Explorer window, double-click Translate.
The Cube Viewer opens.2. Press F9 to see the elements in each dimension of the Translate cube.3. Enter the region names that correspond to the region codes, using the table as
your guide.
RegCode Name
R54 Argentina
R32 Belgium
R55 Brazil
R1B Canada
R56 Chile
R45 Denmark
R33 France
R49 Germany
R44 Great Britain
R30 Greece
R353 Ireland
R39 Italy
98 IBM Cognos Express Xcelerator Version 10.1.0: Developer Guide

RegCode Name
R352 Luxemburg
R52 Mexico
R31 Netherlands
R47 Norway
R351 Portugal
R34 Spain
R46 Sweden
R1A United States
R598 Uruguay
4. Click File, Close to return to the Server Explorer.5. In the Server Explorer, click File, Save Data All to save the cell values.
Creating the DBR FormulaYou can now create a DBR formula that retrieves region names for each regioncode read into the processing worksheet.
Note: You must use DBR formulas, not DBRW formulas, in processing worksheets.
Procedure1. In the processing worksheet, click cell B3.2. Click ICAS, Edit Formula.
The Edit Formula bar opens.3. Click DB Ref.
The Select Cube dialog box opens.4. Click Pick.
A different Select Cube dialog box opens.5. Select local:Translate and click OK.
Xcelerator correctly assumes that the element from the RegCodes dimension isin cell B1, but cannot find an element for RegName and shows it as undefined.
6. Click RegName.The Subset Editor opens.
7. Select the element Name and click OK.The regname field now displays Picked.
8. Click OK in the Edit Reference to Translate dialog box.The Edit Formula bar now displays the complete formula:=DBR("local:Translate", $B$1, "Name")
This formula returns the value from the Translate cube found at the intersectionof the Regcodes element in cell B1 and the Regname element Name.
9. Click OK to insert the formula in cell B3.
Results
Cell B3 now displays Argentina, which is the correct region for the code R54.
Chapter 5. Importing Data with Processing Worksheets 99

Creating Database Send (DBS) FormulasYou can create DBS formulas that send numeric data values to the cube because:v You converted codes that map to elements in the Actvsbud dimension.v You converted codes that map to elements in the Region dimension.v You mapped multiple data values to their appropriate months.
Insert the DBS formulas in a row beneath the rows containing the data andmapping instructions. Do not insert them in the first row because they will beoverwritten as Xcelerator reads in records into the processing worksheet.
Procedure1. Click cell D4, an empty cell that will store the first DBS formula.2. Click ICAS, Edit Formula.
The Edit Formula bar opens.3. Click DB Send.
Xcelerator prompts you to select the value to be sent to the cube.4. Double-click cell D1, which contains the Jan cell value.
Xcelerator prompts you to select the type of cell reference.5. Click Column Rel.
The DBS formula always references row 1, but the column reference will berelative to the location of the formula.Xcelerator prompts you to indicate the type of data in the cell.
6. Click Numeric.The Select Cube dialog box prompts you to select the cube to be populated.
7. Click Pick.A different Select Cube dialog box opens.
8. Select the local:SalesCube cube and click OK.The Edit Reference to Cube dialog box displays with most of the mappinginstructions for the value (cell D1) to be sent to the cube.Cell A3 supplies an element in the Actvsbud dimension.v Cell B1 supplies an element in the Region dimension.v Cell C1 supplies an element in the Model dimension.v Cell D3 supplies an element in the Month dimension.To complete the mapping, you must identify an element for the Account1dimension. Price.cma contains price values, so all DBS formulas should mapto the price element.
9. Click account1.The Subset Editor opens.
10. Select Price and click OK.The account1 field of the Edit Reference to Cube dialog box now displaysPicked.
11. Click OK.The Edit Formula bar displays the generated DBS function:DBS(D$1,"local:SalesCube",$A$3,$B$3,$C$1,"Price",D$3)
For a full explanation of the formula, see “DBS Syntax” on page 101.12. Click OK to place this formula in the processing worksheet.13. Copy the formula in D3 to the range E3:O3.
100 IBM Cognos Express Xcelerator Version 10.1.0: Developer Guide
14. Save the PriceProcessing worksheet.
DBS SyntaxThe DBS function uses the following syntax:DBS (value, server:cube, e1, e2[,...en]):
Argument Description
value Numeric value that is sent to the cube.
server:cube The name of the cube that receives the sent value. The cube namemust be prefixed with the name of the server on which the cuberesides, for example sdata:SalesCube.
e1,...en Elements that identify the cell location in the cube that receives thevalue. Specify the element arguments in dimension order. Forexample, e1 must be an element from the first dimension of thecube, e2 must be an element from the second dimension of thecube.
Processing a Data Source into a CubeAfter you create a processing worksheet, you can process data into a cube.
If you have been completing the exercises in this section, you know that thePriceProcessing worksheet processes price values into the SalesCube cube.
You cannot use a processing worksheet to write values to cube cells that arecalculated by rules, as you cannot edit rules-derived cell values.v You must first verify that Price values in SalesCube are not derived by rules.v Then you can process a data source into a cube.
Procedure1. Open the Server Explorer.2. Double-click the SalesCube cube.3. Check if there is a rule attached to the cube. If not, skip to step 8.4. If a rule is attached, open the rule in the Rules Editor.5. Examine the rule to see if Price is calculated by rules.
Note: Note that the rule includes the following statement which calculates thevalue for Price at both the numeric and consolidated levels:[’Price’]=N:DB(’PriceCube’,!actvsbud,!region,!model,!month);C:[’Sales’]\[’Units’]*1000;
This statement calculates the value for Price at both the numeric andconsolidated levels.
6. Insert a pound sign (#) at the beginning of both statements to disable thecalculation of Price.#[’Price’]=N:DB(’PriceCube’,!actvsbud,!region,!model,!month);#C:[’Sales’]\[’Units’]*1000;
7. Save the rule.You can now use the processing worksheet to process the Price.cma source fileinto SalesCube.
8. If no rule is attached, open the processing worksheet that contains the DBSformulas and any mapping instructions.
Chapter 5. Importing Data with Processing Worksheets 101
If you followed the earlier examples in this section, open the PriceProcessingprocessing worksheet.
9. Close any other worksheets.10. Click ICAS , Process Data, Process.
The Select Cube, ODBC, or Flat File dialog box opens.11. Click Flat File.
The Select Input File dialog box opens.12. Select the Price.cma sourcefile and click OK.
Xcelerator processes the source file. During the process, a progress bardisplays.Xcelerator sequentially reads each record of the source file into the first row ofthe processing worksheet. The processing worksheet recalculates after eachrecord is read, and the DBS formulas send the values in the first row to theappropriate cell of the cube.
13. Browse SaleCube, and note that the Price values have been updated by thevalues in Price.cma.
102 IBM Cognos Express Xcelerator Version 10.1.0: Developer Guide

Chapter 6. Controlling Access to Xcelerator Objects
This section describes how you can limit access to objects on an IBM CognosAnalytic Server (ICAS) for all IBM Cognos Express Xcelerator installations,regardless of the authentication method.
Assigning Security Rights to GroupsYou can assign object-level security for any non-administrative user group inXcelerator. By assigning security rights to groups, you can control a user's access toXcelerator objects.
Note: You can not assign security rights for the ADMIN, DataAdmin orSecurityAdmin groups. The rights for these groups are predefined and appeardisabled in the ICAS Security Assignments dialog box.
Note also that only the English versions of the security-level entries are accepted.The following keywords must be used as listed here when manually enteringsecurity levels in the Xcelerator cell security control cube.
The object-level security rights for Xcelerator groups are:v Admin - Group has complete access to a cube, element, dimension, or other
object.v Lock - Group can view and edit a cube, element, dimension, or other object and
can permanently lock objects to prevent other users from updating them.v Read - Group can view a cube, element, dimension, process, or chore, but
cannot perform operations on the object.v Reserve - Group can view and edit a cube, element, dimension, or other object,
and can temporarily reserve objects to prevent other users from updating them.v Write - Group can view and update a cube, element, dimension, process, or
chore.v None - Group cannot see a cube, element, dimension, process, or chore, and
cannot perform operations on the object.
The following table describes the security rights that you can assign to groups.
© Copyright IBM Corp. 2007, 2012 103

Privilege Object Description
Admin Cube Members of the group can read, write, reserve, lock, anddelete the cube. They can save public cube views. They canalso grant security rights to other users for this object.
Element Members of the group can access, update, reserve, lock, anddelete the element. They can also grant security rights toother users for this object.
Dimension Members of the group can add, remove, and reorderelements in the dimension, and can reserve or lock thedimension. They can save public dimension subsets. Theycan also grant security rights to other users for this object.
Application Members of the group can see the application, use referenceswithin the application, and create both public and privatereferences in the application.
When a group has Admin privilege to an application,members of the group can set security privileges for allreferences and sub-applications within the application forother groups but not their own group.
Reference Members of the group can use the reference, as well asupdate or delete the reference. They can publish privatereferences, and privatize public references.
Lock Cube Members of the group have all privileges implied by Writepermission, and can also lock the cube. When a cube islocked, nobody can update its data.
The lock can be removed only by users who have Adminrights for the cube.
Locks stays in place after the remote server shuts down.
Element Members of the group have all privileges implied by Writepermission, and can also lock the element. When an elementis locked, nobody can update cube cells identified by theelement
The lock can be removed only by users who have Adminrights for the element.
Locks stays in place after the remote server shuts down.
Dimension Members of the group have all privileges implied by Writepermission, and can also lock the dimension. When adimension is locked, nobody can edit the dimensionstructure.
The lock can be removed only by users who have Adminrights for the dimension.
Locks stays in place after the remote server shuts down.
104 IBM Cognos Express Xcelerator Version 10.1.0: Developer Guide
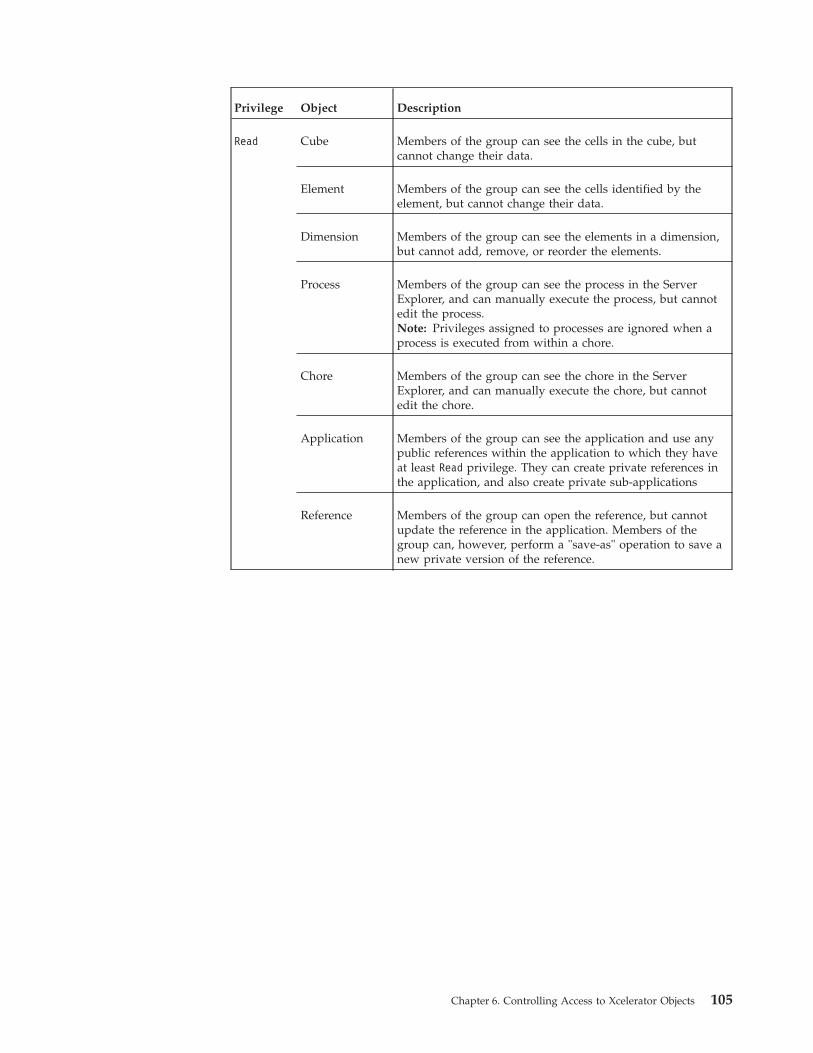
Privilege Object Description
Read Cube Members of the group can see the cells in the cube, butcannot change their data.
Element Members of the group can see the cells identified by theelement, but cannot change their data.
Dimension Members of the group can see the elements in a dimension,but cannot add, remove, or reorder the elements.
Process Members of the group can see the process in the ServerExplorer, and can manually execute the process, but cannotedit the process.Note: Privileges assigned to processes are ignored when aprocess is executed from within a chore.
Chore Members of the group can see the chore in the ServerExplorer, and can manually execute the chore, but cannotedit the chore.
Application Members of the group can see the application and use anypublic references within the application to which they haveat least Read privilege. They can create private references inthe application, and also create private sub-applications
Reference Members of the group can open the reference, but cannotupdate the reference in the application. Members of thegroup can, however, perform a "save-as" operation to save anew private version of the reference.
Chapter 6. Controlling Access to Xcelerator Objects 105

Privilege Object Description
Reserve Cube Members of the group have all privileges implied by Writepermission, and can also reserve the cube to prevent otherusers from applying edits. The reservation can be removedeither by the user who reserved the cube or by users whohave Admin rights for the cube.
A reservation expires automatically when the reserving userdisconnects from the remote server or when the server shutsdown.
Element Members of the group have all privileges implied by Writepermission, and can also reserve the element to preventother users from updating cube cells identified by theelement. The reservation can be removed either by the userwho reserved the element or by users who have Admin rightsfor the element.
A reservation expires automatically, when the reserving userdisconnects from the remote server or when the server shutsdown.
Dimension Members of the group have all privileges implied by Writepermission, and can also reserve the dimension to preventother users from redefining the dimension. The reservationcan be removed either by the user who reserved thedimension or by users who have Admin rights for thedimension.
A reservation expires automatically when the reserving userdisconnects from the remote server or when the server shutsdown.
Write Cube Members of the group can read and update cells. They cansave private cube views. The Write access privilege does notapply to cells identified by consolidated elements or to cellsderived from rules.
Element Members of the group can read and update the cellsidentified by the element and edit attributes of the element.
Dimension Members of the group can edit element attributes, editelement formats, and create private subsets for thedimension. Members can also edit attributes for thedimension itself.
106 IBM Cognos Express Xcelerator Version 10.1.0: Developer Guide

Privilege Object Description
None Cube Members of the group cannot see the cube in the ServerExplorer, and thus cannot browse the cube.
Element Members of the group cannot see the element in the SubsetEditor or Dimension Editor, and cannot see the cellsidentified by the element when browsing a cube.
Dimension Members of the group cannot see the dimension in theServer Explorer, and cannot browse a cube that contains thedimension.
Process Members of the group cannot see the process in the ServerExplorer, and thus cannot execute the process.Note: Privileges assigned to processes are ignored when aprocess is executed from within a chore.
Chore Members of the group cannot see the chore in the ServerExplorer, and thus cannot execute the chore.
Application Members of the group cannot see the application or itscontents in the Server Explorer.
Reference Members of the group cannot see the reference in the ServerExplorer.
Interaction of Different Object Security RightsIf you apply different security rights to the objects that identify a cell of data,Xcelerator applies the most restrictive security right to the cell.
Scenario 1
Suppose you assign a user Read access to the SalesCube cube, and Write access tothe elements in this cube. In this scenario, the Read access of the cube overrides theWrite access of the elements, and the user can view cube data but cannot updatethe cube data.
Scenario 2
The SalesPriorCube cube contains the following dimensions:v Actvsbudv Regionv Modelv Account1v Month
Suppose a user has Write access to the SalesPriorCube cube, Read access to all ofthe elements in the Actvsbud dimension, and Write access to all of the elements inthe other dimensions. The elements in the Actvsbud dimension identify every cellin the cube, and therefore the user cannot update any cube data.
Chapter 6. Controlling Access to Xcelerator Objects 107

Scenario 3
You can change the security rights for both cubes and dimensions. When groupshave security rights for a cube, those rights apply to all dimensions in the cube,unless you further restrict access for specific dimensions or elements.
Suppose you want several regional groups of users to read all data in theSalesPriorCube cube. You also want each group to update data in its own region.For example, you want salespeople in the North America group to update NorthAmerica data.
To implement this security scheme, you could:v Create groups that reflect sales regions.v Add users to the appropriate groups.v Grant each regional group Write access to the SalesPriorCube cube.v Grant the North America group Read access to those elements that do not reflect
data for the North America region.
The Xcelerator sample data reflects this security scheme. Usr1 is in the NorthAmerica group, which has Write access to the data associated with areas in theNorth America region, and Read access to the data associated with areas in otherregions.
Securing CubesYou can enhance or restrict a group's access to individual cubes. When you create anew cube, other groups initially have None access to the new cube. You must assignsecurity rights to the new cube for other groups.
Assigning Security Rights for CubesFollow these steps to assign security rights for a cube.
Procedure1. Open the Server Explorer.2. Select the Cubes icon for the server you are working with.3. Click Cubes, Security Assignments.
The Xcelerator Security Assignments dialog box opens.4. Click the cell at the intersection of the cube name and the group name for
which you want to assign rights.You can assign rights for multiple cubes or to multiple groups by selecting arange of cells. To select a range of cells, click a cell to establish the top of therange, hold down Shift, and click further down the column or row to establishthe bottom of the range.
5. Select the access level you want to assign.The name of the assigned access privilege displays in the cell.
6. Click OK.
Reserving and Releasing CubesWhen a user reserves a cube, that user gains exclusive rights to update the data inthe cube. Other users cannot update the cube data until the cube is released. Acube can be released by either the user who reserved it or by a user who has Adminrights for that cube.
108 IBM Cognos Express Xcelerator Version 10.1.0: Developer Guide

Consider reserving a cube as a way to temporarily freeze its data. A reservationexpires automatically when the reserving user disconnects from the remote serveror when the server shuts down.
Procedure1. Open the Server Explorer.2. Select the cube you want to reserve.3. Click Cube, Security, Reserve.
To release a cube:4. Follow Steps 1 and 2 for reserving a cube.5. Click Cube, Security, Release.
Locking and Unlocking a CubeWhen a user locks a cube, only those users who have Admin rights for that cubecan update its data or unlock the cube. Even the user who locks the cube cannotupdate the cube data or unlock the cube, unless he/she has Admin rights for thatcube.
Consider locking a cube as a way to permanently archive its data. Locks stays inplace after a server shuts down.
Procedure1. Open the Server Explorer.2. Select the cube you want to lock.3. Click Cube, Security, Lock.
To unlock a cube:4. Follow Steps 1 and 2 for locking a cube.5. Click Cube, Security, Unlock.
Securing ElementsYou can enhance or restrict a group's access to individual elements using theElement Security Assignments dialog box.
Assigning Security Rights for ElementsFollow these steps to assign security rights for elements.
Procedure1. Open the Server Explorer.2. Select the dimension you want to work with.3. Click Dimension, Security, Elements Security Assignments.
The Xcelerator Security Assignments dialog box displays.4. Click the cell at the intersection of the element name and the group name.
You can assign rights for multiple elements or to multiple groups by selecting arange of cells. To select a range of cells, click a cell to establish the top of therange, hold down Shift, and click further down the column or row to establishthe bottom of the range.
5. Select the access level you want to assign.The name of the assigned access privilege displays in the cell.
6. Click Save or OK.
Chapter 6. Controlling Access to Xcelerator Objects 109
Note: If you click Save, you can continue to assign security rights to differentelements. You can access elements in other dimensions by selecting adimension in the Select Dimension field.
Interaction of Security Rights for Leaf and ConsolidatedElementsYou can set different levels of security for a consolidated element and the leafelements that belong to the consolidation.
For example, the Region dimension in the sample data has the following elementhierarchy:
Suppose Usr4 has Read access to the Canada leaf element and None access to theNorth America consolidated element. Usr4 can see the data identified by theCanada element, but cannot see the consolidated data identified by the NorthAmerica element.
Reserving and Releasing ElementsWhen a user reserves an element, that user gains exclusive rights to update thedata identified by that element. Other users cannot update the element's data, untilthe element is released. An element can be released by either the user whoreserved it or by a user who has Admin rights for that element.
Consider reserving an element as a way to temporarily freeze the data that itidentifies. A reservation expires automatically when the reserving user disconnectsfrom the remote server or when the server shuts down.
Procedure1. Open the Server Explorer.2. Double-click the dimension you want to work with.
The Subset Editor displays.3. Select the element you want to reserve.4. Click Edit, Security, Reserve.
To release an element:5. Follow Steps 1 through 3 for reserving an element.6. Click Edit, Security, Release.
Locking and Unlocking an ElementWhen a user locks an element, only those users who have Admin rights for thatelement can update the data that it identifies. Even the user who locks the elementcannot update its data, unless they have Admin rights for that element.
Consider locking an element as a way to permanently archive the data that itidentifies. Locks stays in place after the remote server shuts down.
North America
Canada
Mexico
United States
nnn
110 IBM Cognos Express Xcelerator Version 10.1.0: Developer Guide
Procedure1. Open the Server Explorer.2. Double-click the dimension you want to work with.
The Subset Editor displays.3. Select the element you want to lock.4. Click Edit, Security, Lock.
To unlock an element:5. Follow Steps 1 through 3 for locking an element.6. Click Edit, Security, Unlock.
Securing DimensionsYou can enhance or restrict a group's access to individual dimensions.
By default, Xcelerator security controls dimensions on the IBM Cognos AnalyticServer (ICAS), as follows:v Only members of the ADMIN and DataAdmin groups can create and delete
dimensions on the ICAS server.v Groups with Read access to a dimension can view dimension and element
attributes through the Server Explorer, but cannot edit attribute values.v Other groups initially have None access to new dimensions.v When no security has been assigned to an element in a dimension, groups have
Write access to new elements in that dimension.v When you assign security rights to at least one element in a dimension, groups
have None access to new elements in that dimension. Existing elements keeptheir original access (Write), unless you change that access.
Note: If you change the security in a dimension, and you want to reset thatsecurity to the default setting (groups have Writeaccess to new elements added tothe dimension), shut down your ICAS server and manually delete the}ElementSecurity<dimname>.cub file.
Assigning Security Rights for DimensionsFollow these steps to assign security rights for a dimension.
Procedure1. Open the Server Explorer.2. Select the Dimensions icon for the server you are working with.3. Click Dimensions, Security Assignments.
The Xcelerator Security Assignments dialog box displays.4. Click the cell at the intersection of the dimension name and the group name.
You can assign rights for multiple dimensions or to multiple groups byselecting a range of cells. To select a range of cells, click a cell to establish thetop of the range, hold down Shift, and click further down the column or row toestablish the bottom of the range.
5. Select the access level you want to assign.The name of the assigned access privilege displays in the cell.
6. Click OK.
Chapter 6. Controlling Access to Xcelerator Objects 111
Reserving and Releasing DimensionsWhen a user reserves a dimension, that user gains exclusive rights to add, remove,and reorder elements in that dimension. Other users cannot modify the dimension,until it is released. A dimension can be released by either the user who reserved itor by a user who has Admin rights for that dimension.
Consider reserving a dimension before you re-define it. A reservation expiresautomatically when the reserving user disconnects from the remote server or whenthe server shuts down.
Procedure1. Open the Server Explorer.2. Select the dimension you want to work with.3. Click Dimension, Security, Reserve.
To release a dimension:4. Follow Steps 1 and 2 for reserving a dimension.5. Click Dimension, Security, Release.
Locking and Unlocking a DimensionWhen a user locks a dimension, only those users who have Admin rights for thatdimension can add, remove, or reorder elements in that dimension. Even the userwho locks the dimension cannot modify it, unless they have Admin rights for thatdimension.
Consider locking a dimension if you want exclusive control of its definition.
Procedure1. Open the Server Explorer.2. Select the dimension you want to work with.3. Click Dimension, Security, Lock from the pop-up menu.
To release a dimension:4. Follow Steps 1 and 2 for locking a dimension.5. Right-click the mouse, and click Dimension, Security, Unlock.
Securing ProcessesYou can enhance or restrict a group's access to individual TurboIntegratorprocesses.
Note: Xcelerator ignores security rights assigned to TurboIntegrator processeswhen you execute a process from a chore. The security rights you assign to thechore determine the ability of a group to execute a process from a chore. Forexample, if a group has Noneaccess to Process1, but Readaccess to a chore thatincludes Process1, the group can execute Process1 from the chore.
Assigning Security Rights for ProcessesFollow these steps to assign security rights for a process.
Procedure1. Open the Server Explorer.2. Select the Processes icon for the server you are working with.
112 IBM Cognos Express Xcelerator Version 10.1.0: Developer Guide
3. Click Processes, Security Assignments.The Xcelerator Security Assignments dialog box opens.
4. Click the cell at the intersection of the process name and the group name.You can assign rights for multiple processes or to multiple groups by selectingmultiple cells.To select a range of adjacent cells, click a cell to establish the top of the range,hold down Shift, and click further down the column or row to establish thebottom of the range.To select multiple non-adjacent cells, hold down CTRL, and click each cell.
5. Select the access level you want to assign.The name of the assigned access privilege displays in the cell(s).
6. Click OK.
Allowing Processes to Modify Security DataThe Xcelerator Security Access option controls whether a process is allowed tomodify security data in the script of the process. Only members of the ADMIN andSecurityAdmin groups are allowed to set this option. This option is set on aprocess-by-process basis from the Process menu in Server Explorer.
When the Security Access option is enabled for a process:v Members of the DataAdmin group are not allowed to edit the process since it
may contain scripts that could modify Xcelerator security.v Only members in the full ADMIN group can edit a process after the Security
Access option has been enabled.v Members of the SecurityAdmin group can view processes and turn this option
on and off, but are never allowed to edit the contents of a process.v The View option on the Process menu becomes available to allow users in the
DataAdmin and SecurityAdmin groups to view processes in read-only mode.
For more details about the ADMIN, SecurityAdmin and DataAdmin groups, seethe IBM Cognos Express Xcelerator Operation Guide.
Enabling the Security Access Option for a ProcessBy default, the Security Access option is disabled for any new process. If you wantto allow a new process to modify Xcelerator security, you need to manually enablethe Security Access option for that process.
Procedure1. In Server Explorer, select a process.2. Click Process, Security Access.
A check mark next to the Security Access option indicates that Xcelerator willallow the selected process to modify security data.
Note: If you upgraded to Xcelerator9.4 or later from an earlier Xceleratordatabase, the Security Access option is automatically enabled for all of yourexisting Xcelerator processes. This allows your existing processes to continuerunning without requiring you to individually set the Security Access optionfor each process.
Viewing a Process in Read-only ModeWhen the Security Access option is enabled for a process, users in the DataAdminand SecurityAdmin groups can only view the process in read-only mode.
Chapter 6. Controlling Access to Xcelerator Objects 113

Procedure1. In Server Explorer, select a process.2. Right-click the process and click View.
The process displays in read-only mode.
Securing ChoresYou can enhance or restrict a group's access to individual chores.
Assigning Security Rights for ChoresFollow these steps to assign security rights for a chore.
Procedure1. Open the Server Explorer.2. Select the Chores icon for the server you are working with.3. Click Chores, Security Assignments.
The Xcelerator Security Assignments dialog box opens.4. Click the cell at the intersection of the chore name and the group name.
You can assign rights for multiple chores or to multiple groups by selectingmultiple cells.To select a range of adjacent cells, click a cell to establish the top of the range,hold down Shift and click further down the column or row to establish thebottom of the range.To select multiple non-adjacent cells, hold down CTRL, and click each cell.
5. Select the access level you want to assign.The name of the assigned access privilege displays in the cell(s).
6. Click OK.
Securing Applications and ReferencesYou can assign security privileges for public items (references or sub-applications)within public Xcelerator applications to user groups on the IBM Cognos AnalyticServer (ICAS). You must have Admin privilege to an application to assign securityto items within the application.
You cannot assign security for private applications and references; only the userwho creates a private item can access the item.
Procedure1. In the Server Explorer, right-click the application that contains the items to
which you want to assign security.2. Click Security, Security Assignments.
The Xcelerator Security Assignments window opens. The Name list contains allpublic items ( Xcelerator objects, Excel files, and sub-applications) that reside inthe current application.
3. Select the cell at the intersection of the item for which you want to definesecurity and the user group to which you want to assign security.
4. Click one of the available security privileges.For details, see “Assigning Security Rights to Groups” on page 103.
5. Repeat steps 3 and 4 for any other items for which you want to define security.
114 IBM Cognos Express Xcelerator Version 10.1.0: Developer Guide

6. Click OK.For any given user group, you can assign the Read or Admin privilege to areference when you assign the None privilege to the source object associatedwith the reference. In this scenario, members of the user group cannot see thereference in an application.For example, if you assign the None privilege to a user group for a cube, butassign the Read privilege for a reference to the same cube, members of the usergroup cannot see the reference to the cube in an application.
Securing CellsCell-level security applies to a specified cell and overrides all other Xceleratorsecurity. Cell-level security requires:v Creating a cell security control cube that contains all of the dimensions of the
cube whose cell-level security you configure.v Setting security for the appropriate cells in the security control cube by assigning
security rights for Xcelerator security groups.
Note: For element-level security to apply to a cell, no security rights can beassigned to any Xcelerator security group for the cell. Cell-level security overrideselement-level security, so cell-level security for the cell must be undefined.
Cell-level security applies to leaf elements and generally does not apply toconsolidations, although you can use the None and Read security rights to controlthe display or editing of consolidations.
Creating a Cell Security Control CubeFollow these steps to create a cell security control cube.
Procedure1. In Xcelerator Architect or Xcelerator, right-click on the cube for which you want
to define cell-level security and then select Security, Create Cell Security Cube.
Xcelerator automatically creates a security control cube using the namingformat }CellSecurity_CubeName where CubeName is the name of the cube thatyou selected. For example, if you selected the cube SalesCube, then Xceleratorcreates the security control cube }CellSecurity_SalesCube.Xcelerator adds all the dimensions of the original cube to the newly createdsecurity control cube, plus the }Groups dimension is added as the lastdimension in the new cube.
2. Click View, Display Control Objects if the control cubes are not alreadyvisible.Xcelerator displays the new security control cube along with the original cube.
Chapter 6. Controlling Access to Xcelerator Objects 115

To apply security to cells in the security control cube, by Xcelerator securitygroup:
3. Open the security control cube you just created by double-clicking the securitycontrol cube, for example,
4. Click Recalculate to display the security control groups, or click Options,Automatic Recalculate.
5. Expand the rows to display the cells to which you want to assign securityrights.
Note: Remember, cell-level security applies to leaf elements.6. Enter the security level in the cube cells to assign security rights by user group.
For details, see “Assigning Security Rights to Groups” on page 103.For example, the months in the second quarter for the Inspectors group havesecurity assigned as None.
7. Close the security control cube.8. Save the view.9. Test the security levels by logging in as a user who is a member of the affected
security group and viewing the cube for which you have set security.
Using Rules to Define Cell-Level SecurityIn the security control cube, you can use Xcelerator rules to apply cell-levelsecurity instead of entering security rights into security control cube cells. Fordetails, see the IBM Cognos Express Xcelerator Operations Guide.
Cell securitycontrol cube
Original cube
116 IBM Cognos Express Xcelerator Version 10.1.0: Developer Guide

Suppose you want to create a rule to apply cell-level security for the}CellSecurity_SalesCube cube. The following rule prevents any users in theInspectors group from viewing any cells identified by the element Greece.[’Greece’,’Inspectors’] = S:’NONE’;
Note: Make sure that security group names are unique and other dimensions orelements do not use the same name.
The benefits of using rules to implement security are:v You do not enter security rights into cells in the security control cube, saving
data entry time.v Because Xcelerator does not store string rule values in memory nor saves them
to disk, you save on memory consumption and disk storage.
Chapter 6. Controlling Access to Xcelerator Objects 117

118 IBM Cognos Express Xcelerator Version 10.1.0: Developer Guide
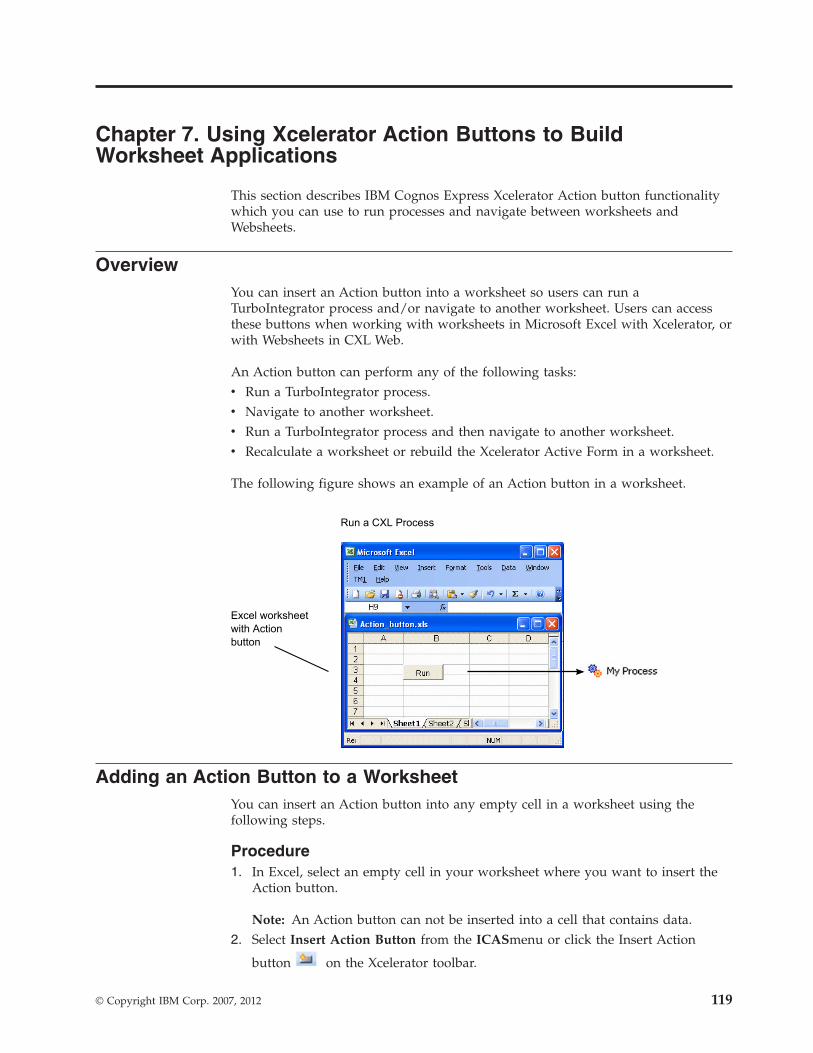
Chapter 7. Using Xcelerator Action Buttons to BuildWorksheet Applications
This section describes IBM Cognos Express Xcelerator Action button functionalitywhich you can use to run processes and navigate between worksheets andWebsheets.
OverviewYou can insert an Action button into a worksheet so users can run aTurboIntegrator process and/or navigate to another worksheet. Users can accessthese buttons when working with worksheets in Microsoft Excel with Xcelerator, orwith Websheets in CXL Web.
An Action button can perform any of the following tasks:v Run a TurboIntegrator process.v Navigate to another worksheet.v Run a TurboIntegrator process and then navigate to another worksheet.v Recalculate a worksheet or rebuild the Xcelerator Active Form in a worksheet.
The following figure shows an example of an Action button in a worksheet.
Adding an Action Button to a WorksheetYou can insert an Action button into any empty cell in a worksheet using thefollowing steps.
Procedure1. In Excel, select an empty cell in your worksheet where you want to insert the
Action button.
Note: An Action button can not be inserted into a cell that contains data.2. Select Insert Action Button from the ICASmenu or click the Insert Action
button on the Xcelerator toolbar.
Run a CXL Process
Excel worksheetwith Actionbutton
© Copyright IBM Corp. 2007, 2012 119

The Action button is inserted into the currently selected cell and the ActionButton Properties dialog box appears.
3. In the Action Button Properties dialog box, click the ICAS list to select theserver where your data is located.If you want to dynamically retrieve the IBM Cognos Analytic Server (ICAS)name from a cell or named-range whenever the Action button is run, click theUse Reference checkbox and then enter a cell or named-range reference.
v To select a cell reference, click the Excel Reference button and then clickthe cell in the current worksheet where the server name is located.
v To retrieve the process name by referencing a named range in Excel, use thefollowing format:=NameOfRange
The named range must point to only a single cell that contains text for theserver name.
If you are not currently connected to the server that you want to use, clickConnect to log in.
4. Click the Action option that you want the Action button to perform.You then need to configure the Action button depending on the type of actionthat you selected. For detailed steps, see the following sections:
Action See
Run a TurboIntegrator Process “Configuring an Action Button to Run aProcess”
Go to another Worksheet “Configuring an Action Button to Navigateto Another Worksheet” on page 124
Run a Process, then go to anotherWorksheet
“Configuring an Action Button to Run aProcess and Navigate to a Worksheet” onpage 126
Recalculate / Rebuild “Configuring an Action Button toRecalculate or Rebuild a Worksheet” onpage 127
5. Set the appearance properties of the Action button. See “Setting the AppearanceProperties of an Action Button” on page 128.
6. To finish the Action button and return to your worksheet, click OK in theAction Button Properties dialog box.
Results
The Action button is updated in your worksheet and can now be used.
Configuring an Action Button to Run a ProcessThe following steps summarize how to configure an Action button to run aTurboIntegrator process.
Procedure1. In the Action Button Properties dialog box, select the Run a TurboIntegrator
Process option.The Process tab displays.
120 IBM Cognos Express Xcelerator Version 10.1.0: Developer Guide
2. Select the process that you want to run. See “Selecting the Process to Run.”3. Set the Process parameters. See “Setting Process Parameters” on page 122.4. Select the calculation option that you want Xcelerator to apply before the
Action button runs the process. See “Configuring an Action Button toRecalculate or Rebuild a Worksheet” on page 127.
5. Select the calculation option that you want Xcelerator to apply after the processhas completed. See “Setting Process Options for Calculation” on page 123.
6. Configure the messages that you want Xcelerator to show before and after theprocess is run. See “Setting Process Options to Show Messages” on page 123.
Selecting the Process to RunYou can select the process you want to run in one of either two ways:v Select the process name from the Process list.v Dynamically retrieve the process name using an Excel reference.
Select the Process Name from the Process ListIf you want to select the process name from a list of available processes on thecurrent IBM Cognos Analytic Server (ICAS), perform the following steps.
Procedure
In the Process tab of the Action Button Properties dialog, click the Process list toselect an available process from the ICAS to which you are currently connected.The Parameters grid opens and displays the parameters for the selected process.
Results
You then need to enter the parameter values for the selected process in theParameter grid. See “Enter Parameter Values into the Parameter Grid” on page122.
Use an Excel Reference to Retrieve the Process NameIf you want to dynamically retrieve the process name by referencing a cell ornamed range in the current worksheet, perform the following steps. The processname will be retrieved when the Action button is run.
Procedure1. On the Action Button Properties dialog box, select Get Process info from
Worksheet in the Process list.
2. Click the Excel Reference button next to the Process Name box to select acell from the current worksheet.The Select a Cell dialog box opens.
3. Click the cell in the current worksheet where the process name is located.The location is automatically entered into the Select a Cell dialog box.
4. Click OK to close the Select a Cell dialog box.The cell reference appears in the Process Name box.
5. To retrieve the process name by referencing a named range in Excel, use thefollowing format:=NameOfRange
Chapter 7. Using Xcelerator Action Buttons to Build Worksheet Applications 121
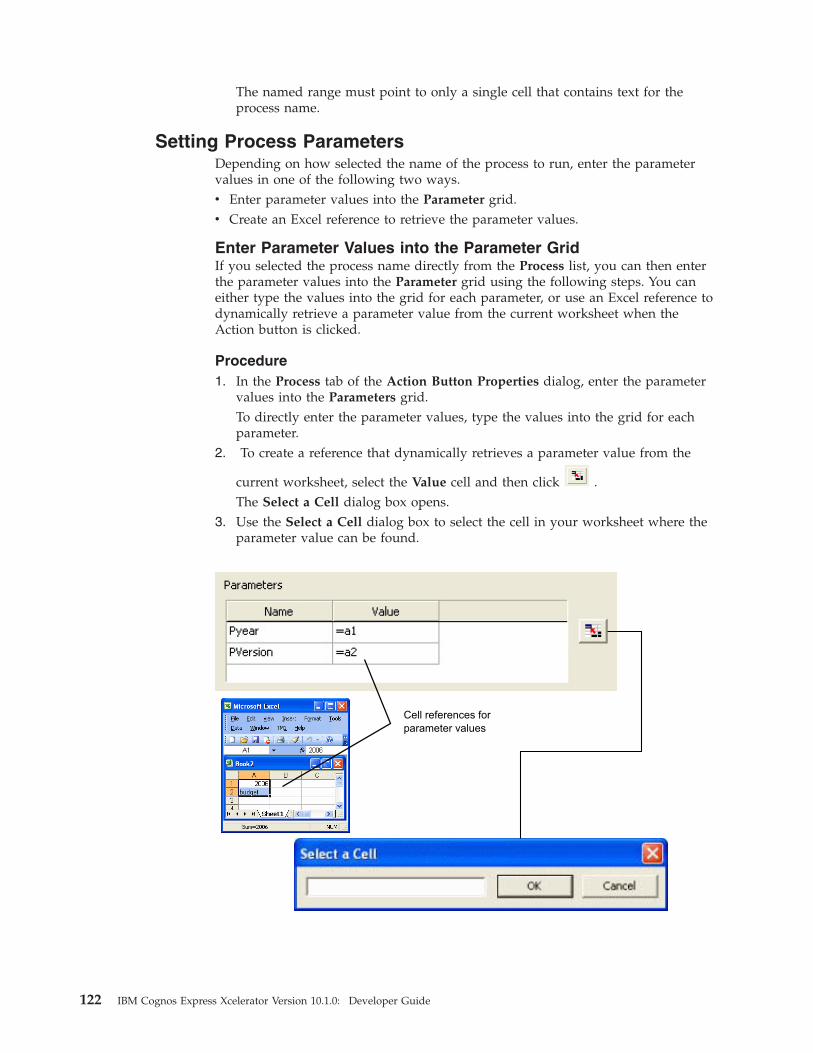
The named range must point to only a single cell that contains text for theprocess name.
Setting Process ParametersDepending on how selected the name of the process to run, enter the parametervalues in one of the following two ways.v Enter parameter values into the Parameter grid.v Create an Excel reference to retrieve the parameter values.
Enter Parameter Values into the Parameter GridIf you selected the process name directly from the Process list, you can then enterthe parameter values into the Parameter grid using the following steps. You caneither type the values into the grid for each parameter, or use an Excel reference todynamically retrieve a parameter value from the current worksheet when theAction button is clicked.
Procedure1. In the Process tab of the Action Button Properties dialog, enter the parameter
values into the Parameters grid.To directly enter the parameter values, type the values into the grid for eachparameter.
2. To create a reference that dynamically retrieves a parameter value from the
current worksheet, select the Value cell and then click .The Select a Cell dialog box opens.
3. Use the Select a Cell dialog box to select the cell in your worksheet where theparameter value can be found.
Cell references forparameter values
122 IBM Cognos Express Xcelerator Version 10.1.0: Developer Guide

Use an Excel Reference to Retrieve the Parameter ValuesIf you selected Get Process info from Worksheet in the Process list, you mustcreate an Excel reference that dynamically retrieves the process parameters from aworksheet.
Procedure
1. Click the Excel Reference button next to the Parameters box to select areference from the current worksheet.The Select a Range dialog box opens.
2. Select the range of cells in your worksheet where the parameter values arelocated. Each cell must contain the value for only one parameter.
Note: Parameters must be entered in the same order and type (string, numeric)as in the process.
3. Click OK to close the Select a Range dialog.The selected cell reference appears in the Parameters box.If you want to reference a named range in Excel, use the following format:=NameOfRange
The named range must point to a single cell or a range of cells, depending onthe parameters that the process is expecting.If the parameters for the process change, you must also update the processname and parameter settings for the Action button so the button can correctlyrun the process.
Note: Due to a problem in Microsoft Excel if an Action button that runs aTurboIntegrator process with parameter inputs is created and saved in an Excel2007 worksheet, the Action button stops working after the file is saved andthen re-opened. As a workaround, when using an Action button in Excel 2007to run a TI process that requires parameters, save the worksheet file in the .xlsformat.
Setting Process Options for CalculationUse the Process Options dialog box to select the calculation operation that will beperformed after the process is run.
Procedure1. Click Options to show the Process Options dialog box.2. Select the calculation operation that you want performed after the process has
run. The available calculation options include:v Automatically Recalculate Sheet - Recalculates the values in the current
worksheet.v Rebuild Sheet - Reloads the Xcelerator Active Form to its original report
definition configuration.v None - The Action button will not perform any calculation or rebuild
operation on the worksheet.
Setting Process Options to Show MessagesUse the Process Options dialog box to control the different message boxes thatXcelerator can show before and after the process is run.
Chapter 7. Using Xcelerator Action Buttons to Build Worksheet Applications 123
Procedure1. On the Process tab, click Options to open the Process Options dialog box.2. Select the confirmation and status messages that you want Xcelerator to show.
v Show Success Message - Displays a message after the process hassuccessfully run.
v Show Failure Message - Displays a message if the process does not runsuccessfully.
v Show Confirmation Dialog - Displays a confirmation message before theprocess is run. The user can click Yes or No.
3. Enter or edit the text for the messages you selected. You can also reference acell or a named range to dynamically retrieve the message text. For example:v To retrieve the message text from the contents of cell A1 in the current
worksheet, enter =A1 into the message text box.v To reference a named range in Excel, use the format =NameOfRange.
The named range must point to only a single cell that contains the text forthe message.
Using the Action Button Server Name PropertyThe Action button Properties dialog box includes a field where you can enter a cellor named-range reference to dynamically retrieve the IBM Cognos Analytic Server(ICAS) name for an Action button.To use this feature, click the Use Referencecheckbox in the ICASsection on the Action Button Properties dialog box and thenenter a cell or named-range reference.
Configuring an Action Button to Navigate to Another WorksheetYou can use an Action button to navigate to another worksheet in the sameworkbook, or to a worksheet in another workbook.
The following steps summarize how to configure an Action button to navigate toanother worksheet.
Procedure1. In the Action Button Properties dialog box, click the Go to another Worksheet
option.The Worksheet tab displays.
2. Select the target worksheet. See “Select a Target Worksheet.”3. Set the Match Title Elements option. See “Enable the Match Title Elements
Option” on page 125.4. Set the Replace Current Workbook option. See “Setting the Replace Current
Workbook Option” on page 126.5. Select the calculation option that you want Xcelerator to apply before the
Action button navigates to another worksheet. See “Configuring an ActionButton to Recalculate or Rebuild a Worksheet” on page 127.
6. Select the calculation option that you want Xcelerator to apply after thenavigation has completed. See “Setting Calculation Options for after Navigatingto a Worksheet” on page 126.
Select a Target WorksheetYou can select a worksheet by choosing it from a list or by directly typing itsname.
124 IBM Cognos Express Xcelerator Version 10.1.0: Developer Guide

Procedure1. Click the Xcelerator Applications option and then click Browse.
The Select a Worksheet dialog opens.
Note: To select a target workbook, you can also click the Files option and thenclick Browse. Then select a worksheet file from the Open dialog and then clickOpen. Another method to select a target workbook, is to click the Excel
Reference button.2. Select a worksheet and then click OK to return to the Action Button Properties
dialog.The Application folder path and name of the worksheet you selected displaysin the Workbook box.
3. To manually enter the Application folder path to the workbook, type the pathinto the Workbook box:v Start with the first folder name under Applications and use a back-slash \
character to separate folders. Do not include the Applications folder in thepath. For example:PlanningSample\Bottom Up Input\Budget Input
v To specify a worksheet and cell location to which you want to navigate, typethe worksheet name and location in the Sheet box using the followingformat:=SheetName!ColumnNameRowName
Note: If you enter a worksheet name that includes spaces, you must enclosethe name in single quotes as shown in the following example.='My First Sheet'!$A$2
Enable the Match Title Elements OptionThe Match Title Elements option automatically matches and sets the text of thetitle dimensions in the target worksheet when a user clicks the Action button tonavigate to the target worksheet.
When the Match Title Elements option is enabled, the dimensions in the sourceand target worksheets are automatically matched by the Xcelerator SUBNM andDBRW functions as follows:v Xcelerator automatically matches title dimensions in the source and target
worksheets based on the SUBNM formula in a cell.For example, when the same dimension exists in both the source and targetworksheets, the element selected in the source worksheet is set for the samedimension in the target worksheet. When a column is selected in the sourceworksheet, it matches to the column with the same title dimensions in the targetworksheet.
v Xcelerator automatically matches the row and column dimensions of thecurrently selected DBRW cell in the source worksheet to the matching titledimensions in the target worksheet, if they exist.For example, if Operating Expense and Feb-2004 are the row and columndimension elements for the currently selected element in the source worksheet,when navigating, these dimension elements are then matched to the titledimensions in the target worksheet. If the row Operating Expense and thecolumn Feb-2004 are both selected in the source worksheet, the DBRW cell is the
Chapter 7. Using Xcelerator Action Buttons to Build Worksheet Applications 125

cell that exists in both the Operating Expense row and the Feb-2004 column. Therow and column dimensions of the DBRW cell are then matched to titledimensions in the target worksheet.
Setting the Replace Current Workbook OptionThe Replace Current Workbook option determines if the target worksheet isopened in a new window or in the same window, replacing the source worksheet.
For example:v If Replace Current Workbook is not selected (default) and you are working in
CXL Web, then the source worksheet remains open and the target worksheetopens in a new tab.
v If Replace Current Workbook is selected and you are working in CXL Web, thenthe source worksheet will be replaced by the target worksheet on the same taband a new tab will not open.
Important: If you enable the Replace Current Workbook option, remember tosave your workbook before testing the new button. You could lose your changes ifyou click the button and cause the current workbook to close.
Setting Calculation Options for after Navigating to aWorksheet
Set the calculation options to be applied to the target worksheet after navigating.
Procedure
On the Worksheet tab, select the Calculation options that you want to use.v Automatically Recalculate Sheet - Recalculates the values in the current
worksheet.v Rebuild Sheet - Reloads the Xcelerator Active Form to its original report
definition configuration.v None - The Action button will not perform any calculation or rebuild operation
on the worksheet.
Configuring an Action Button to Run a Process and Navigate to aWorksheet
To configure an Action that runs a TurboIntegrator process and then navigates toanother worksheet, perform the following steps.
Procedure1. In the Action Button Properties dialog box, click the Run a Process, then go to
a Worksheet option.The Process tab displays.
2. Select the process that the Action Button will run. See “Configuring an ActionButton to Run a Process” on page 120.
3. Select the worksheet to which the Action button will navigate. See“Configuring an Action Button to Navigate to Another Worksheet” on page124.
126 IBM Cognos Express Xcelerator Version 10.1.0: Developer Guide

Configuring an Action Button to Recalculate or Rebuild a WorksheetYou can use an Action button to perform only a recalculation or rebuild operationwithout running a TI process or navigating to a new worksheet. This can be usefulif you only want to update the current sheet or reload the original version of anActive Form.
You can also use the Calculate tab to select the calculation operation that you wantXcelerator to perform before running a TI process or navigating to anotherworksheet.
Procedure1. Insert an Action button into your worksheet as described in “Adding an Action
Button to a Worksheet” on page 119.2. On the Action Button Properties dialog box, click the Calculate tab.3. In the Calculate tab, select the calculation option that you want to use.
v Automatically Recalculate Sheet - Recalculates the values in the currentworksheet.
v Rebuild Sheet - Reloads the Xcelerator Active Form to its original reportdefinition configuration.
v None - The Action button will not perform any calculation or rebuildoperation on the worksheet.
4. Set the appearance of the button as described in “Setting the AppearanceProperties of an Action Button” on page 128.
5. On the Action Button Properties dialog box, click OK to close the dialog andinsert the Action button into your worksheet.
Understanding Action Button Behavior with Xcelerator Active FormsThis section summarizes the behavior and order of operations when using anAction button with Active Forms.
Basic Action Button BehaviorEach time you click an Action button, the following steps are performed in thisorder:1. The DBRW formula is captured for the currently selected cell in the source
worksheet.The DBRW cell formula is captured before the following Recalc (F9) operationbecause the recalculation could change the number of active form rows due tozero suppression and/or MDX-based row subsets.
2. A Recalculation (F9) or rebuild operation is performed on the currentworksheet, depending on the calculation option that was selected on theCalculate tab of the Action Button Properties dialog box.
3. The updated values are captured for any other cells that are referenced byadvanced mapping options.
Additional Action Button BehaviorAfter the above basic steps have been completed, the following additional steps areperformed, depending on whether the Action button is running a TI process,navigating to another worksheet or both.
When using an Action button to run a TI process only:
Chapter 7. Using Xcelerator Action Buttons to Build Worksheet Applications 127
1. The TI process is run.2. The calculation operation that was selected on the Action button's Process
Options dialog box is performed.
When using an Action button to navigate only:1. The navigation action begins.2. Target values are set in the target worksheet.3. The calculation operation that was selected in the Worksheet tab of the Action
Button Properties dialog box is performed on the target worksheet.
When using an Action button to run a TI process and navigate to a worksheet:1. The TI process is run.2. The calculation operation that was selected on the Action button's Process
Options dialog box is performed.3. The navigation action begins.4. Target values are set in the target worksheet.5. The calculation operation that was selected in the Worksheet tab of the Action
Button Properties dialog box is performed on the target worksheet.
Setting the Appearance Properties of an Action ButtonUse the Appearance tab to set the caption, background picture, and other visualfeatures for the Action button.
Click the Appearance tab to adjust the appearance properties of the button.
The Appearance tab has the following options:v Caption - Sets the caption text that displays on the button.v Font - Displays a standard font dialog where you can change the font type and
size of the button text.v Show Background Image - Allows you to select an image file (bmp, gif, or jpg
format) that will be stretched to fit the button.v Display as Hyperlink - When enabled, this option displays the button as a
hyperlink with blue, underlined text instead of a standard button.v Preview - This area shows an example of the button.v Colors - Allows you to set text and background colors of the button. Click the
color sample to display a Color dialog where you can select a standard color ordefine a custom color.
Using Advanced Navigation and Mapping OptionsUse the Advanced Options dialog to manually map fields between the sourceworksheet and the target worksheet when inserting an Action button thatnavigates from one worksheet to another. This tool helps you map dimensions,cells, and values from the source worksheet to the target worksheet.
Note: Advanced mapping is applied after any automatic mapping has beenperformed by the Match Title Elements option.
To open the Advanced Options dialog, click Advanced Options on the Worksheettab.
128 IBM Cognos Express Xcelerator Version 10.1.0: Developer Guide
The Advanced Options dialog includes a grid where you define the mapping offields between the source and target worksheets. Use the Add and Delete buttonsto manage the rows in the grid.
Configuring Source to Target MappingYou map the source worksheet to the target worksheet by setting values for theSource Type, Source Object, Target Type, and Target Object fields in theAdvanced Mapping grid.
You can use the grid to specify how elements in the source and target worksheetsget matched up when the target sheet opens. Each row in the grid defines onemapping configuration.
Use the following steps to configure advanced mapping:
Step See
Indicate the type of object to map “Set the Source Type”
Determine the value for the type of objectyou are using
“Set the Source Object”
Indicate the type of cell to map “Set the Target Type” on page 130
Indicate where the value from the SourceObject will be inserted
“Set the Target Object” on page 130
Repeat these steps to create more mapping configurations.
Set the Source TypeThe Source Type field represents the type of object for the value you want to map.
Select the Source Type as follows:v SUBNM - Indicates that you are mapping from a cell that contains a title
dimension in the source worksheet.v Selected DBRW - Indicates that you are mapping from a cell that contains a
DBRW formula in the source worksheet.v Value - Indicates that you will enter a string or numeric value that will be sent
to the target.
Set the Source ObjectThe Source Object field takes a value, or Excel expression that evaluates to avalue, depending on what is selected in the Source Type field.
Enter the Source Object as follows:v If Source Type is set to SUBNM, then you need to specify the name of the title
dimension that exists in the source worksheet.v If Source Type is set to Selected DBRW, then you need to specify the name of a
row or column title dimension that exists in the source worksheet.v If Source Type is set to Value, then you need to enter a string or numeric value
that will be sent to the target worksheet.
Note: You can also retrieve these values from the source worksheet by using the =symbol to create an Excel reference.
Chapter 7. Using Xcelerator Action Buttons to Build Worksheet Applications 129

Set the Target TypeThe Target Type is the type of cell in the target worksheet where the value fromthe Source Object field will be inserted.
Select the Target Type as follows:v SUBNM - Indicates the target is a title dimension in the target worksheet.v Named Range - Indicates the target is a named range in the target worksheet.v Range - Indicates the target location is a cell in the target worksheet.
Note: If you set Target Type to either a Named Range or Range, any pre-existingdata or formula in the target cell will be overwritten when you use the Actionbutton to navigate. If the target cell contains a DBRW function, then the functionwill be lost and the cell will not be able to connect to, read from, or write to theIBM Cognos Analytic Server (ICAS).
Set the Target ObjectThe Target Object is the location in the target worksheet where the value from theSource Object will be inserted. This location can be either the name of a titledimension, a specific cell location, or a named range in the target worksheet,depending on what you selected for Target Type.
Enter the Target Object as follows:v If Target Type is set to SUBNM, specify the name of the title dimension in the
target worksheet. When Target Type is set to SUBNM, you must also enter avalue for the Subset and Alias fields.
v If Target Type is set to Named Range, specify the name of the range in thetarget worksheet.
v If Target Type is set to Range, specify the cell location in the target worksheet.
You can enter a value for the Target Object by directly entering the location valueor you can use an Excel reference to retrieve the location.v Directly enter value
To identify a location in the target worksheet, enter the value directly into theTarget Object field without the = symbol. For example, enter C3 to identify thelocation of the Target Object as the cell C3 of the target worksheet.
v Reference Excel cell
To reference a cell in the source worksheet that contains a location for the TargetObject, include the = symbol. For example, the cell A1 in the source worksheetmight contain the value C3 to represent the cell location for the Target Object inthe target worksheet.Repeat all of the above steps to create more mapping configurations.
Example of Mapping a Source Value to a Target CellThis example shows the mapping of a hard-coded value to one cell in the targetworksheet.
130 IBM Cognos Express Xcelerator Version 10.1.0: Developer Guide
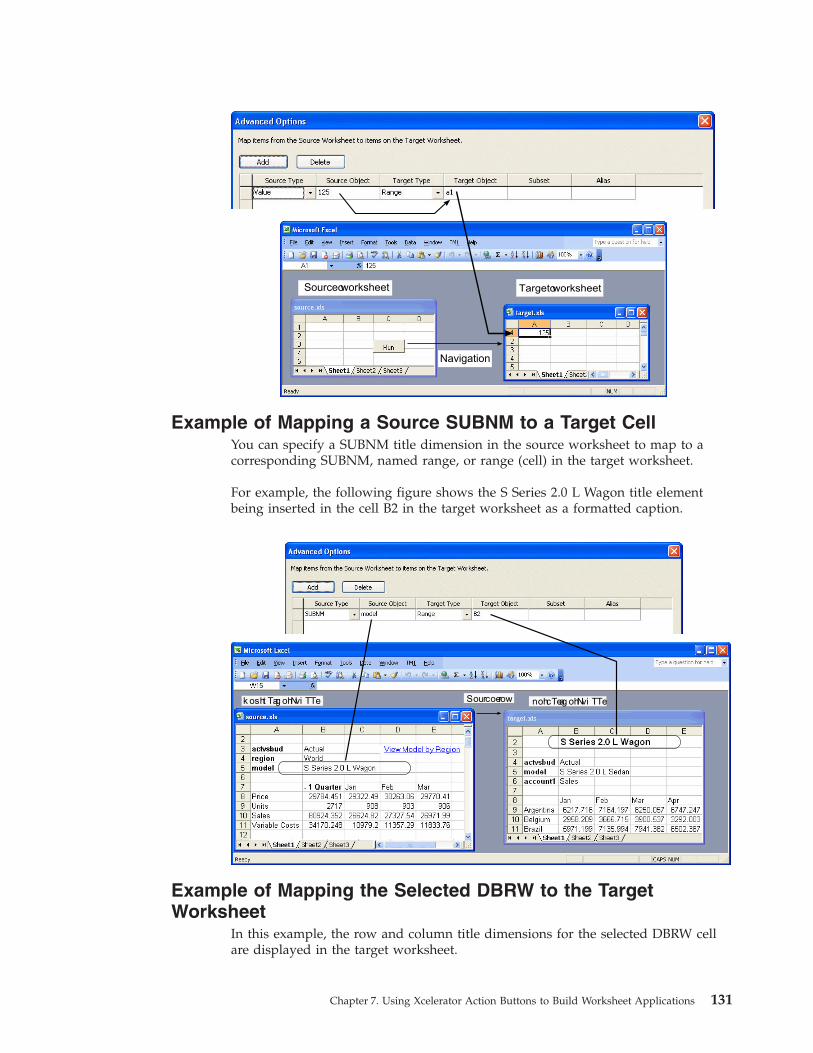
Example of Mapping a Source SUBNM to a Target CellYou can specify a SUBNM title dimension in the source worksheet to map to acorresponding SUBNM, named range, or range (cell) in the target worksheet.
For example, the following figure shows the S Series 2.0 L Wagon title elementbeing inserted in the cell B2 in the target worksheet as a formatted caption.
Example of Mapping the Selected DBRW to the TargetWorksheet
In this example, the row and column title dimensions for the selected DBRW cellare displayed in the target worksheet.
Source worksheet Target worksheet
Navigation
Sourcoer wk sht Tag hNvi TTe nohcTeag hNvi TTe
Chapter 7. Using Xcelerator Action Buttons to Build Worksheet Applications 131

Modifying an Existing Action ButtonAfter an Action button is inserted, you can edit its properties, size, and location asdescribed in the following sections.
Editing the Caption, Background Image, and Properties of anExisting Action Button
To edit the properties of an Action button, right-click on the button and select anoption from the menu.
The right-click menu provides the following main options:v Caption - Opens the Button Caption dialog to edit the button's caption.v Background Image - Opens a file selection dialog so you can browse and select
an image to use as the background of the button.v Properties - Opens the Action Button Properties dialog where you configure the
actions to take place when a user clicks the button.
Moving and Resizing an Existing Action ButtonAfter you click away from a new Action button, the button becomes enabled and isno longer in design mode. If you want to resize or move the button, you must turnon design mode in Excel as follows:
Procedure1. In Excel, click View, Toolbars, Control Toolbox.
The Excel Control Toolbox opens.
2. Click the Design Mode button.The text labels disappear on the Action buttons in the current worksheet.
3. Click on the Action button that you want to move or resize.
Sour ce wkusht cceTkaugc wkusht cce Novir oeikn
132 IBM Cognos Express Xcelerator Version 10.1.0: Developer Guide

Handles appear on the button indicating it can be resized and moved.v To resize the button, click and drag any of the handles.v To move the button, click and drag the button to a new location.
4. Exit design mode by clicking on the Design Mode button.The handles on the Action button disappear and the button returns to activemode.
Chapter 7. Using Xcelerator Action Buttons to Build Worksheet Applications 133

134 IBM Cognos Express Xcelerator Version 10.1.0: Developer Guide

Chapter 8. Developing Custom Web Applications with the URLAPI
In addition to using IBM Cognos CXL Web as a stand-alone application, webprogrammers and Xcelerator application developers can use the URL applicationprogramming interface (API) to incorporate CXL Web objects into custom webapplications, portals, and dashboards.
URL API OverviewThe URL API functionality is provided by creating URL query strings that displayand access the following CXL Web objects:v Websheetv Cubeviewerv Navigation Tree
Basic URL API SyntaxThe URL API is provided through the TM1WebMain.aspx handler file. You create aURL query string using Xcelerator specific parameters and then pass the completedURL to the CXL Web server. The URL API can open and display Websheet,Cubeviewer, and Navigation Tree objects. You can also use the URL API to applyvarious actions on these objects.
Base URLUse the following base URL to begin building a URL API call:http://<HostName>/TM1Web/TM1WebMain.aspx
where HostName can be the domain name or IP address of the web site orcomputer hosting the CXL Web server.
For example, if the CXL Web server is running on a remote computer calledmywebserver, use the name of that system for the HostName as follows:http://mywebserver/TM1Web/TM1WebMain.aspx
ParametersParameters define which object you want to access and what you want to do withthat object. You build a complete URL string by adding parameters to the baseURL as follows.
http://wbsvr/TM1Web/TM1WebMain.aspx?action=
Web page URL
Protocol
Domain name
Path to Web application
Query string
OpenObject&type=Cubeviewer&value=SalesCube$$Price
© Copyright IBM Corp. 2007, 2012 135
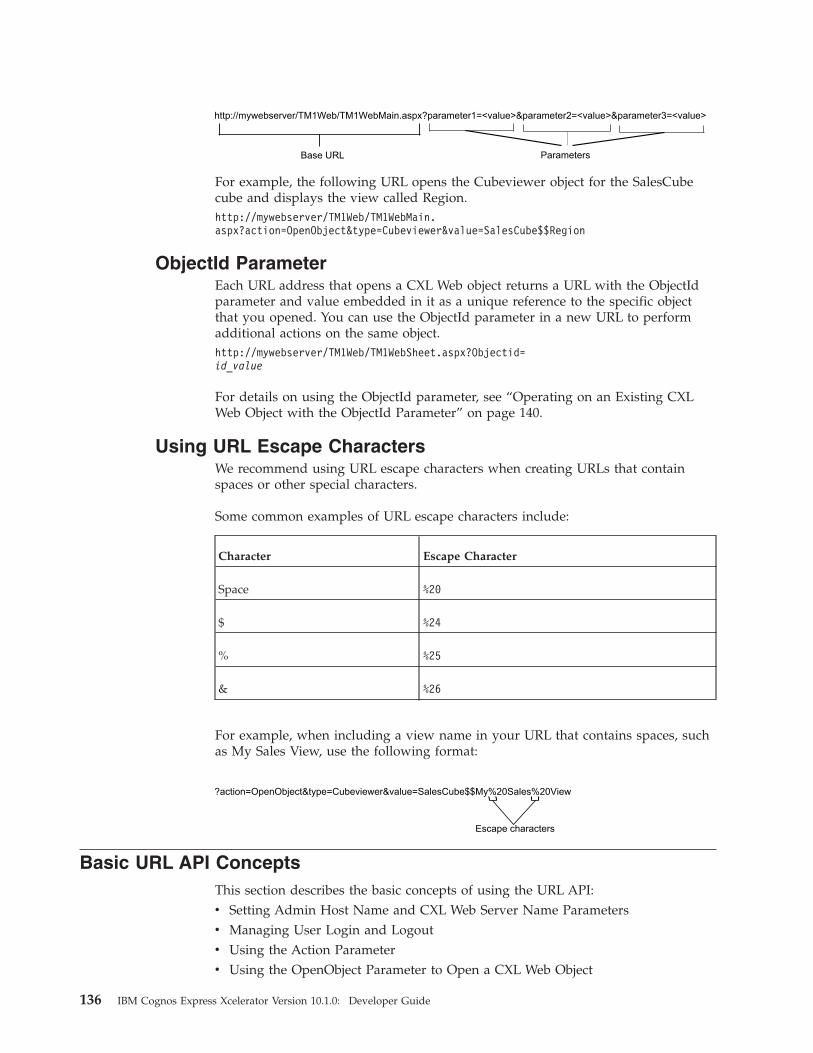
For example, the following URL opens the Cubeviewer object for the SalesCubecube and displays the view called Region.http://mywebserver/TM1Web/TM1WebMain.aspx?action=OpenObject&type=Cubeviewer&value=SalesCube$$Region
ObjectId ParameterEach URL address that opens a CXL Web object returns a URL with the ObjectIdparameter and value embedded in it as a unique reference to the specific objectthat you opened. You can use the ObjectId parameter in a new URL to performadditional actions on the same object.http://mywebserver/TM1Web/TM1WebSheet.aspx?Objectid=id_value
For details on using the ObjectId parameter, see “Operating on an Existing CXLWeb Object with the ObjectId Parameter” on page 140.
Using URL Escape CharactersWe recommend using URL escape characters when creating URLs that containspaces or other special characters.
Some common examples of URL escape characters include:
Character Escape Character
Space %20
$ %24
% %25
& %26
For example, when including a view name in your URL that contains spaces, suchas My Sales View, use the following format:
Basic URL API ConceptsThis section describes the basic concepts of using the URL API:v Setting Admin Host Name and CXL Web Server Name Parametersv Managing User Login and Logoutv Using the Action Parameterv Using the OpenObject Parameter to Open a CXL Web Object
http://mywebserver/TM1Web/TM1WebMain.aspx?parameter1=<value>¶meter2=<value>¶meter3=<value>
Base URL Parameters
?action=OpenObject&type=Cubeviewer&value=SalesCube$$My%20Sales%20View
Escape characters
136 IBM Cognos Express Xcelerator Version 10.1.0: Developer Guide

v Operating on an Existing CXL Web Object with the ObjectId Parameter
Setting Admin Host Name and CXL Web Server NameParameters
You can set the Admin Host and server name in the URL query string by using theAdminHost and TM1Server parameters as follows:&AdminHost=<value>&TM1Server=<value>
These values are optional in the URL, but must be provided to Xcelerator in eitherthe web.config file or the URL string. If these values are not found, then Xceleratorwill prompt the user for this information with a mini pop up window.
Xcelerator looks for Admin Host and server name in the following order:v If the AdminHost and TM1Server parameters are set in the URL, they will
override the values in the web.config file.v If these values are absent in the URL query string, CXL Web will try to
determine if they are set in the web.config file.v If the AdminHost and TM1Server parameters are absent from the URL string and
also not in the web.config file, then the entry fields for Admin Host and serverwill be displayed for the user in a mini-login form.
Managing User Login and LogoutUsers must log into the IBM Cognos Analytic Server (ICAS) when using the URLAPI to view CXL Web objects. You can manage the user login process in any of thefollowing ways:v Integrated Login - Use Microsoft Windows network authentication to control
access to Xcelerator data. For more details, see the IBM Cognos XceleratorOperations Guide.
v Include in URL - Specify login information in the URL when accessing CXLWeb objects. The URL must include values for AdminHost, TM1Server,UserName, and Password.Specifying a password within URL is not secure.
v Mini Login Popup - If all, or some, of the login information has not beenprovided in any other way, then a mini pop up window displays to prompt theuser to login before the CXL Web objects can be displayed.
v Custom Login Page - You can create your own custom login page by using theXcelerator login handler file, TM1WebLoginHandler.aspx, to process loginrequests through either a URL GET or a form POST method. For either method,you must provide values for AdminHost, TM1Server, UserName, and Passwordto the TM1WebLoginHandler.aspx file.
An example of a custom login using the TM1WebLoginHandler.aspx file and theform Post method follows:<form method="post" action="TM1WebLoginHandler.aspx?"><input name="AdminHost" id="AdminHost" type="text" value=""><br><input name="TM1Server" id="TM1Server" type="text" value="sdata"><br><input name="UserName" id="UserName" type="text" value="admin"><br><input name="Password" id="Password" type="password" value="">
Chapter 8. Developing Custom Web Applications with the URL API 137

<br><input name="SubmitBtn" id="SubmitBtn" type="submit" value="Login"/></form>
After logging in, you can redirect the user to a different URL by adding theredirect parameter to the login URL as follows:redirect=newUrl
where newURL can be any valid URL to navigate to after logging in. For example:redirect=myStartPage.html
If a login error occurs, Xcelerator inserts the error message into the returned URLin the following format:error=error_message
where error_message describes the error that occurred.
Logging OutTo logout, use the following URL component:action=Logout
If you include the redirect parameter, the user will be redirected to a specified URLafter logging out. Use the following format to specify a value for the redirectparameter:action=Logout&redirect=newURL
where newURL can be any valid URL for the user to be redirected to after loggingout.
Using the Action Parameter with CXL Web objectsThe action parameter specifies what type of action to run on a CXL Web object.Use the action parameter in the URL query string as follows:action=<TypeOfAction>
where TypeOfAction can be one of the following values:
Action Description
Close Closes an existing object.
Example:
action=Close
Logout Logs the user out from the current server session.
Example:
action=Logout
138 IBM Cognos Express Xcelerator Version 10.1.0: Developer Guide

Action Description
OpenObject Opens a CXL Web object.
Example:
action=OpenObject
For an overview of using the OpenObject action, see “Using theOpenObject Parameter to Open a CXL Web Object.”
Rebuild Recalculates all values and rebuilds all subsets for a XceleratorActive Form contained in a Websheet.
This action performs the same action as when you click the Rebuildbutton on the CXL Web toolbar.
Example:
action=Rebuild
Recalc Recalculates an existing Websheet or Cubeviewer object.
Example:
action=Recalc
Reload Reloads the Cubeviewer object only.
Example:
action=Reload
Save Saves changes made to the data values in a Websheet orCubeviewer object.
Example:
action=Save
Note: The Save command does not save the dimension layout ofthe view. Only the changed data values are saved to Xcelerator. Forexample, if you re-arrange the dimensions in the view and then usethe Save action, the new settings for the view layout are not saved.
Using the OpenObject Parameter to Open a CXL Web ObjectTo open and display a CXL Web object, use the action=OpenObject command andthe Type parameter in the following general format:action=OpenObject&type=object_type
where object_type can be Websheet, Cubeviewer, or NavigationTree.
Depending on the object type, additional options and parameters are required asdescribed in the next sections.
Opening Websheet and Cubeviewer objectsYou can use the OpenObject command to open Websheet and Cubeviewer objectsin any of the following ways:v Xcelerator Object Path - Opens an object using the name and location of the
object as used internally by Xcelerator.
Chapter 8. Developing Custom Web Applications with the URL API 139

For details, see “Using the Xcelerator Object Path to Open a Websheet Object”on page 141 and “Using the Xcelerator Object Path to Open a CubeviewerObject” on page 144.
v Application Organizer Path - Allows you to use the visual path in theXcelerator Navigation pane to specify the Websheet or cube view you want toopen.For details, see “Using the Application Organizer Path to Open a WebsheetObject” on page 141 and “Using the Application Organizer Path to Open aCubeviewer Object” on page 144.
v XML Tree Node ID - Opens an object using the unique ID of the object fromthe XML version of the Navigation Tree object.For details see “Using XML Tree Node IDs to Open Websheet and CubeviewerObjects” on page 156.You can also set the title selection and other display properties in the same URLwhen using the OpenObject command.
Opening the Navigation Tree objectTo open the Navigation Tree object, set the type parameter to NavigationTree.action=OpenObject&type=NavigationTree
For more details, see “Accessing the Navigation Tree Object” on page 152.
Operating on an Existing CXL Web Object with the ObjectIdParameter
Use the ObjectId parameter in a new URL when you want to perform actions on aCXL Web object that is already opened. The ObjectId=object_id parameter andvalue identify the object on which the operation needs to take place.
After a CXL Web object is opened using the action=OpenObject command, theObjectId is embedded into the returned URL in the following format:ObjectId=id_value
where id_value is a unique number that you can use to reference the specificXcelerator object.
For example, opening a Cubeviewer object returns the ObjectId in a URL similar tothis:http://mywebserver/TM1Web/TM1WebCubeviewer.aspx?ObjectId=83
After the object is initially opened in the web page document, you can obtain theObjectId value programmatically by parsing through the returned URL.
Add ObjectId=object_id to the new URL that you submit when performing anaction on a specific CXL Web object.
For example, to recalculate this same cube, create a URL that includes the ObjectIdfor the cube along with the recalc action as follows:http://mywebserver/TM1Web/TM1WebMain.aspx?ObjectId=83&action=recalc
Note: If the ObjectIdparameter is missing from the URL that you submit,Xcelerator performs the action on the currently active object.
140 IBM Cognos Express Xcelerator Version 10.1.0: Developer Guide

Accessing the Websheet ObjectA Websheet is a Microsoft Excel spreadsheet file with Xcelerator data that you canview in a Web browser. You can use the URL API to display a Websheet asdescribed in this section.
Opening a Websheet ObjectUse one of the following ways to identify the Websheet you want to open.v Xcelerator Object pathv Xcelerator Application Organizer pathv XML Tree Node ID
Using the Xcelerator Object Path to Open a Websheet ObjectTo open a Websheet object using the Xcelerator object path, use one of thefollowing formats, depending on whether the Websheet exists as a referenced Excelfile outside of Xcelerator, or as an internal Excel file that was uploaded to the IBMCognos Analytic Server (ICAS):
To open a Websheet that exists as a referenced Excel file, outside of Xcelerator:&action=OpenObject&type=Websheet&value=WebsheetPath
where WebsheetPath is the location and name of the external Excel file. This can beeither a path for a local file, or a UNC path for a file located on a network.
For example:&action=OpenObject&type=Websheet&value=C:\Samples\classic_slice.xls
or&action=OpenObject&type=Websheet&value=//MySystem/Samples/classic_slice.xls
Procedure1. In Server Explorer, use the Properties pane to find System Name, which is the
Xcelerator assigned name for the uploaded Excel file.2. Set the value parameter in the URL using the following format:
&action=OpenObject&type=Websheet&value=TM1://ServerName/blob/PUBLIC/.\}Externals\Filename
where:v ServerName is the name of the IBM Cognos Analytic Server (ICAS)where the
Excel file is located.v Filename is the name that Xcelerator assigned to the uploaded Excel file.For example:&action=OpenObject&type=Websheet&value=TM1://sdata/blob/PUBLIC/.\}Externals\Report_2006.xls_20070123212746.xls
Using the Application Organizer Path to Open a Websheet ObjectYou can use the location path to a Websheet object in the Xcelerator ApplicationOrganizer to open the object as follows.
Procedure1. In Server Explorer, expand the Application tree to locate the Websheet you
want to open.
Chapter 8. Developing Custom Web Applications with the URL API 141
2. Build a string that represents the path to the object. Start the path withApplications/ and separate any sub-folders with the slash / symbol.For example: Applications/My Reports/Report_2005.xls
3. Set the value parameter in your URL to the Application path you assembled.action=OpenObject&type=Websheet&value=Applications/My Reports/Report_2005.xls
Using an XML Tree Node ID to Open a Websheet ObjectUse the OpenObject command with the Tree Node ID value, obtained from theXML version of the Navigation Tree object, to open a Websheet object as follows:action=OpenObject&type=Websheet&value=TreeNodeID
For details, see “Using XML Tree Node IDs to Open Websheet and CubeviewerObjects” on page 156.
Selecting Title Elements for a Websheet ObjectYou can set the title elements for a Websheet object using the title_S#-R#-C#parameter for any cell that contains a SUBNM function.
Add the title_S#-R#-C# parameter to your URL using the following format:title_S#-R#-C#=element
where:v S#-R#-C# defines the sheet number, row number and column number for the
location of the SUBNM cell in the Websheet. Replace the # symbols with yourvalues for sheet, row, and column number.
v element is the string value for the name of the new title element you want toselect.
If you want to select the new title element by element index, instead of elementname, include the UseIndex parameter in the URL as follows:title_S#-R#-C#=element&UseIndex=yes
ortitle_S#-R#-C#=element&UseIndex=1
Applying Actions to a Websheet ObjectYou can use the Action Parameter with a Websheet Object.
See “Using the Action Parameter with CXL Web objects” on page 138.
Setting Display Properties for the Websheet ObjectYou can set the following display properties for the Websheet object by includingany of these properties in your URL using the format:&property=value
For example, add the following line to your URL to turn off the display of thetoolbar.&HideToolbar=yes
142 IBM Cognos Express Xcelerator Version 10.1.0: Developer Guide

Property Description
HideToolbar Turns the tool bar on or off. Default is on.
To turn off the tool bar:
v HideToolbar=yes
v HideToolbar=1
To turn on the tool bar:
v HideToolbar=no
v HideToolbar=0
AutoRecalc Turns automatic recalculation on or off. Default is off.
To turn off automatic recalculation, use one of the following:
v AutoRecalc=off
v AutoRecalc=no
v AutoRecalc=0
To turn on automatic recalculation, use one of the following:
v AutoRecalc=on
v AutoRecalc=yes
v AutoRecalc=1
HideTabs Turns the display of the tabs on or off. By default, Xceleratoruses the system property to determine if tabs are shown ornot.
To turn off tabs:
v HideTabs=yes
v HideTabs=1
To turn on tabs:
v HideTabs=no
v HideTabs=0
Chapter 8. Developing Custom Web Applications with the URL API 143

Accessing the Cubeviewer ObjectThe Cubeviewer object displays the Xcelerator cube view in a custom web page.
Opening a Cubeviewer ObjectUse one of the following ways to identify the cube view you want to open.v Xcelerator Object pathv Xcelerator Application Organizer pathv XML Tree Node ID
Using the Xcelerator Object Path to Open a Cubeviewer ObjectUse the following format to open a Cubeviewer object with the Xcelerator objectpath:
action=OpenObject&type=Cubeviewer&value= CubeName $$ ViewName $$ Status
where:v CubeName is the name of cube to which the view belongs.v ViewName is the name of cube view.v Status is the public or private status of the cube view.
Note: You must include a value of either PUBLICor PRIVATEin all uppercasecharacters to correctly identify the specific cube view that you want to open.
For example:
action=OpenObject&type=Cubeviewer&value=SalesCube$$Price$$PUBLIC
Using the Application Organizer Path to Open a CubeviewerObjectYou can use the location path to a cube view object in the Xcelerator ApplicationOrganizer to open the object as follows.
Cubeviewerobject
144 IBM Cognos Express Xcelerator Version 10.1.0: Developer Guide

Procedure1. In Server Explorer, expand the Application tree to locate the cube view you
want to open.2. Build a string that represents the path to the object. Start the path with
Applications/ and separate any sub-folders with the slash / symbol.For example: Applications/MyReports/Price
3. Set the value parameter in your URL to the Application path you assembled.action=OpenObject&type=Websheet&value=Applications/MyReports/Price
Using an XML Tree Node ID to Open a Cubeviewer ObjectUse the OpenObject command with the Tree Node ID value, obtained from theXML version of the Navigation Tree object, to open a Cubeviewer object as follows:action=OpenObject&type=Cubeviewer&value=TreeNodeID
For details, see “Using XML Tree Node IDs to Open Websheet and CubeviewerObjects” on page 156.
Setting Display Properties for the Cubeviewer ObjectYou can set the following display properties for the Cubeviewer object byincluding any of these properties in your URL using the format:&property=value
For example, add the following line to your URL to turn off the display of thetoolbar:&HideToolbar=yes
Action Description
HideToolbar Turns the tool bar on or off. Default is on.
To turn off the tool bar:
v HideToolbar=yes
v HideToolbar=1
To turn on the tool bar:
v HideToolbar=no
v HideToolbar=0
AutoRecalc Turns automatic recalculation on or off. Default is off.
To turn off automatic recalculation:
v AutoRecalc=off
v AutoRecalc=no
v AutoRecalc=0
To turn on automatic recalculation:
v AutoRecalc=on
v AutoRecalc=yes
v AutoRecalc=1
Chapter 8. Developing Custom Web Applications with the URL API 145

Action Description
HideTabs Turns the display of the tabs on or off. By default,Xcelerator uses the system property to determine if tabsare shown or not.
To turn off tabs:
v HideTabs=yes
v HideTabs=1
To turn on tabs:
v HideTabs=no
v HideTabs=0
HideTitlebar Turns the title bar on or off. Default setting is on.
To turn off the title bar:
v HideTitlebar=yes
v HideTitlebar=1
To turn on the title bar:
v HideTitlebar=no
v HideTitlebar=0
Note: This setting applies to the Cubeviewer object only.
Selecting Title Elements for the Cubeviewer ObjectYou can set the title elements in a Cubeviewer object by adding the title parameterto your URL using the following format:&title_DimensionName=element
where:v DimensionName is the name of the title dimension that you want to change.v element is the string value for the name of the new title element you want to
select.
If you want to select the new title element by element index, instead of elementname, include the UseIndex parameter in the URL as follows:&title_DimensionName=element&UseIndex=yes
Or
&title_DimensionName=element&UseIndex=1
Applying Actions to a Cubeviewer ObjectYou can apply the action parameter with the Cubeviewer object.
See “Using the Action Parameter with CXL Web objects” on page 138.
146 IBM Cognos Express Xcelerator Version 10.1.0: Developer Guide

Displaying Charts with the Cubeviewer ObjectSimilar to CXL Web, the Cubeviewer object can display Xcelerator data ingrid-only, chart-only, or combination grid and chart mode. Use the parametersdescribed in this section to control chart display options, such as chart type, colors,and size.
Setting Basic Chart OptionsThe Cubeviewer object has the following basic chart options:
Option Description
ChartOnly Displays the Cubeviewer object in chart-only mode.
Examples:
ChartOnly=yes
ChartOnly=1
GridOnly Displays the Cubeviewer object in grid-only mode.
Examples:
GridOnly=yes
GridOnly=1
GridAndChart Displays the Cubeviewer object with both a grid and chart.
Examples:
GridAndChart=yes
GridAndChart=1
ChartSize Use this parameter to set the display size of a chart.
Format: ChartSize= width,height
where the values for width and height are in pixels.
3DView Turn 3D view of the chart on and off.
To turn on 3D view:
v 3DView=yes
v 3DView=1
To turn off 3D view:
v 3DView=no
v 3DView=0
ShowLegend Displays a legend for a chart.
To turn on chart legend:
v ShowLegend=yes
v ShowLegend=1
To turn off chart legend:
v ShowLegend=no
v ShowLegend=0
Chapter 8. Developing Custom Web Applications with the URL API 147

Selecting Chart TypeSet the type of chart you want to display by using the ChartType parameter infollowing format:ChartType=x
where x can be the numeric value for one of the following defined chart types:
Value Chart Type
0 Point
1 Bubble
2 Line
3 Spline
4 Stepline
5 Fastline
6 Bar
7 Stackedbar
8 Stackedbar100
9 Column
10 Stackedcolumn
11 Stackedcolumn100
12 Area
13 Splinearea
14 Stackedarea
15 Stackedarea100
16 Pie
17 Doughnut
18 Stock
19 Candlestick
20 Range
21 Splinerange
148 IBM Cognos Express Xcelerator Version 10.1.0: Developer Guide

Value Chart Type
22 Gantt
23 Rangecolumn
24 Radar
25 Polor
26 Boxplot
27 Funnel
28 Pyramid
Setting Chart ColorSet the color palette for a chart by using the ColorPalette parameter as follows:ColorPalette=x
where x can be the numeric value for one of the following defined color palettes:
Number Color Palette
1 Default
2 Light Steel Blue
3 Earth Tones
4 Gray Scale
5 Semi Transparent
6 Excel Like
7 Light Beige
8 Berry
9 Chocolate
10 Fire
11 Greenblue
Setting Event Callback Functions for Cubeviewer and WebsheetObjects
You can capture a title element change event in a Websheet or Cubeviewer objectby using the TitleChangeCallback parameter in the initial URL and then creatingyour own JavaScript callback function to handle the callback event.v For a Websheet, you can capture the title change event on a SUBNM cell.v For a Cubeviewer, you can capture the change of a title dimension.
Enabling a Callback Function for Websheet and CubeviewerObjects
The overall steps for enabling a callback function are:
Chapter 8. Developing Custom Web Applications with the URL API 149

Procedure1. Add the TitleChangeCallback parameter to the initial URL that opens the
Websheet or Cubeviewer object. Use one of the following general formats:v For Websheet objects only, set callback for a specific title dimension by
SUBNM cell location.&TitleChangeCallback_Sheet-Row-Column=JSFunction(jsFunctionSignature)
v For Websheet and Cubeviewer objects, set callback for a specific titledimension by dimension name.&TitleChangeCallback_DimensionName=JSFunction(jsFunctionSignature)
v For Websheet and Cubeviewer objects, set a global callback function thatapplies to all title dimensions.&TitleChangeCallback=jsFunctionName(jsFunctionSignature)
2. Create your own JavaScript callback function to handle the callback event,using the same function signature that you provided in the URL. For example:function jsFunctionName(jsFunctionSignature)
{ // add code here to handle the callback event}
Setting a Callback Function for a Specific Title DimensionYou can set a callback function for a specific title dimension by specifying thedimension's SUBNM cell location or dimension name.
Setting a Callback Function for Websheet Objects OnlyYou can use the TitleChangeCallback_S#-R#-C# parameter in your URL to set acallback function for a specific dimension based on the SUBNM cell dimension'ssheet, row, column in the Websheet.
Use the following format to specify a title dimension by sheet, row, columnlocation in a Websheet:&TitleChangeCallback_S#-R#-C# =JSFunction(arg1,$dimName$, $subsetName$,$elemName$, arg2...)
where:v S#-R#-C# is the sheet, row, and column numbers of the cell in the Websheet that
contains the SUBNM function. Replace the # symbols with your values for sheet,row, and column number.
v jsFunction is the name of your own JavaScript function that will handle thecallback event. Add code for this function in your webpage, using the samefunction signature that you provide in the URL.
v arg1, arg2 ... represents other user-defined arguments in your callback function.
If you include $dimName$, $subsetName$, $elemName$, in the callback function,these arguments will dynamically be replaced with the string value of thedimension, subset, and element that the user selected.v $dimName$ is the name of the title dimension that the user selected.v $subsetName$ is the name of the subset for the title dimension.v $elemName$ is the element name that the user selected.
Setting a Callback Function for Websheet and CubeviewerObjectsUse the TitleChangeCallback_DimensionName parameter to specify a callbackfunction for a specific title dimension based on the name of the dimension.
150 IBM Cognos Express Xcelerator Version 10.1.0: Developer Guide

&TitleChangeCallback_DimensionName=JSFunction(arg1,$dimName$,$subsetName$, $elemName$,arg2 ...)
where:v DimensionName is the name of the title dimension in the Websheet or
Cubeviewer object that will trigger the callback event.v jsFunction is the name of your own JavaScript function that will handle the
callback event. Add code for this function in your webpage, using the samefunction signature that you provide in the URL.
v arg1, arg2 ... represents other user-defined arguments in your callback function.
If you include $dimName$, $subsetName$, $elemName$, in the callback function,these arguments will dynamically be replaced with the string value of thedimension, subset, and element that the user selected.v $dimName$ is the name of the title dimension that the user selected.v $subsetName$ is the name of the subset for the title dimension.v $elemName$ is the element name that the user selected.
Setting a Global Callback Function for All Title DimensionsTo capture change events for all title dimension in a Websheet or Cubeviewerobject, use the TitleChangeCallback parameter without specifying a specific titledimension. If a title dimension or SUBNM cell location is not specified in the URL,then the callback function will capture change events for all SUBNM cells in aWebsheet object, or all title dimensions in a Cubeviewer object.
Note: A callback function without a target title dimension can be superseded byusing a subsequent TitleChangeCallback command that does specify a titledimension. For example, TitleChangeCallback_DimensionName orTitleChangeCallback_Sheet-Row-Column.
Use the following URL format to set a callback function for all title dimensions:&TitleChangeCallback=JSFunction(arg1,$dimName$,$subsetName$, $elemName$, arg2...)
where:v jsFunction is the name of your own JavaScript function that will handle the
callback event.v arg1, arg2 ... represents other user-defined arguments in your callback function.
If you include $dimName$, $subsetName$, $elemName$, in the callback function,these arguments will dynamically be replaced with the string value of thedimension, subset, and element that the user selected.v $dimName$ is the name of the title dimension that the user selected.v $subsetName$ is the name of the subset for the title dimension.v $elemName$ is the element name that the user selected.
Add code for your callback function using the same function signature that youprovided in the URL.
Chapter 8. Developing Custom Web Applications with the URL API 151
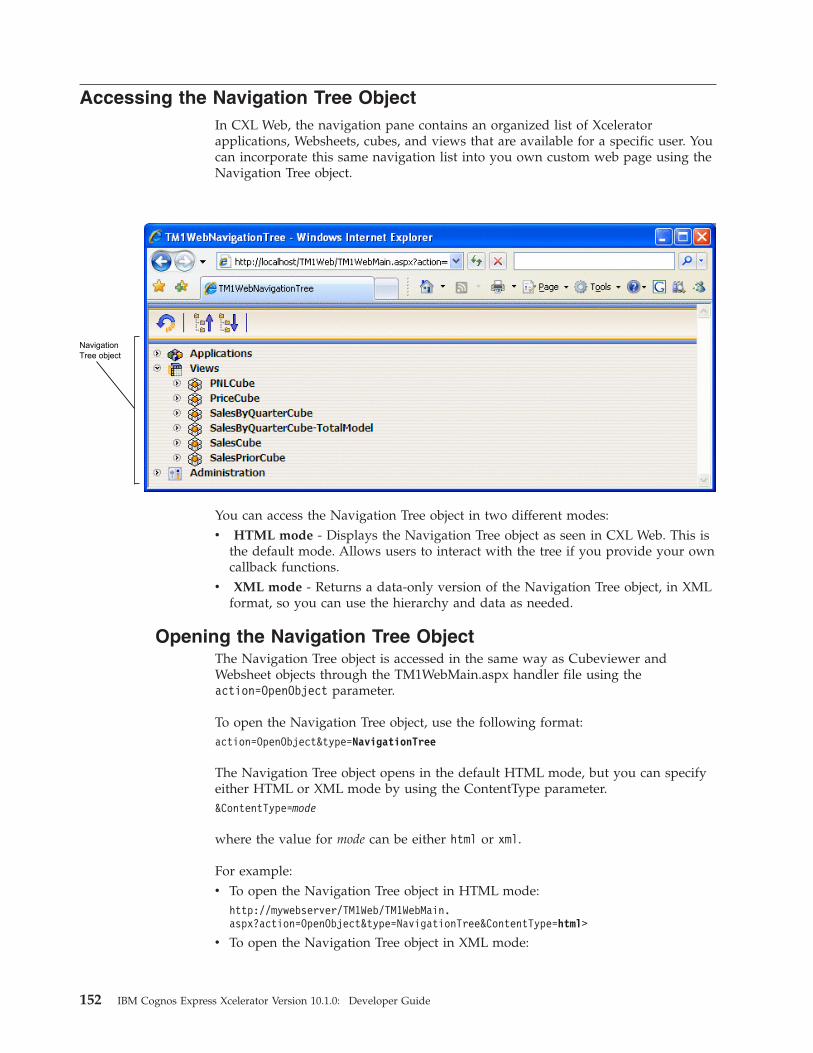
Accessing the Navigation Tree ObjectIn CXL Web, the navigation pane contains an organized list of Xceleratorapplications, Websheets, cubes, and views that are available for a specific user. Youcan incorporate this same navigation list into you own custom web page using theNavigation Tree object.
You can access the Navigation Tree object in two different modes:v HTML mode - Displays the Navigation Tree object as seen in CXL Web. This is
the default mode. Allows users to interact with the tree if you provide your owncallback functions.
v XML mode - Returns a data-only version of the Navigation Tree object, in XMLformat, so you can use the hierarchy and data as needed.
Opening the Navigation Tree ObjectThe Navigation Tree object is accessed in the same way as Cubeviewer andWebsheet objects through the TM1WebMain.aspx handler file using theaction=OpenObject parameter.
To open the Navigation Tree object, use the following format:action=OpenObject&type=NavigationTree
The Navigation Tree object opens in the default HTML mode, but you can specifyeither HTML or XML mode by using the ContentType parameter.&ContentType=mode
where the value for mode can be either html or xml.
For example:v To open the Navigation Tree object in HTML mode:
http://mywebserver/TM1Web/TM1WebMain.aspx?action=OpenObject&type=NavigationTree&ContentType=html>
v To open the Navigation Tree object in XML mode:
NavigationTree object
152 IBM Cognos Express Xcelerator Version 10.1.0: Developer Guide
http://mywebserver/TM1Web/TM1WebMain.aspx?action=OpenObject&type=NavigationTree&ContentType=xml>
After a user has logged in, the Navigation Tree can also be accessed directlythrough the following handlers:v TM1WebNavigationTree.aspx for HTML modev TM1WebNavigationTreeXml.aspx for XML mode
Using the Navigation Tree Object in HTML ModeWhen using the Navigation Tree object in HTML mode, you can control thedisplay of the toolbar and also provide your own callback functions to allow usersto interact with the Xcelerator objects displayed in the tree.
Displaying the Navigation Tree ToolbarWhen viewing the Navigation Tree object in HTML mode, you can display or hidethe object's toolbar by setting the HideToolbar parameter in the base URL using thefollowing format:&HideToolbar=x
To hide the Xcelerator titlebar:v &HideToolbar=yes
v &HideToolbar=1
To display the titlebar:v &HideToolbar=no
v &HideToolbar=0
Setting a Callback Function for the Navigation Tree ObjectIf you want information on individual object nodes to be exposed when a userclicks on them, you need to set a callback function for the Navigation Tree object.You can use the returned information that is sent to the callback function toperform additional actions on the selected object. For example, the returned XMLTree Node ID could be used to open the object.
You enable a callback by adding the Callback parameter to the base URL and thenwriting code for a callback function in your web page.
Procedure1. Use the following format to add the Callback parameter and the name of your
callback function to the base URL:&Callback=name_of_callback_function
For example:&Callback=MyCallBackFunction
2. Write your callback function in the web page to handle the following returnedvariables:MyCallBackFunction(id,type, isPrivate,name, description,source)
The returned variables provide the following information about the selectedobject node:v id - unique id of the selected nodev type - object type of the selected object (Websheet or Cubeviewer)
Chapter 8. Developing Custom Web Applications with the URL API 153

v isPrivate - whether the selected object is a private or public objectv name - name of the selected objectv description - description of the selected objectv source - source of the selected object, if anyFor example, the following URL and JavaScript function show a sample of howto capture user interaction with the Navigation Tree object.The following URL opens the Navigation Tree object and sets the callbackparameter to a function called handleNavTreeOpenObject:http://localhost/TM1Web/TM1WebMain.aspx?
action=OpenObject&AdminHost=&TM1Server=sdata&type=navigationtree&ContentType=html&Callback=handleNavTreeOpenObject>
The following JavaScript function would handle the callback event:function handleNavTreeOpenObject(id, type, isPrivate,name, description, source)
{
alert(’id=’ + id + ’;type=’ + type + ’;isPrivate=’ +isPrivate + ’;name=’ + name + ’;description=’ + description + ’;source=’+ source);
}
When the user clicks on an object in the Navigation Tree, the callback functiondisplays a message box showing the returned information about the selectedobject.
Using the Navigation Tree Object in XML ModeIn XML mode, the Navigation Tree object is sent back as a UTF-8 encoded XMLdocument. The returned XML document contains the hierarchy of the Applicationfolders, Websheets, cubes, and views stored in the IBM Cognos Analytic Server(ICAS) to which you are connected.
Use the following URL format to retrieve the Navigation Tree object as XML:http://<HostName>/TM1Web/TM1WebMain.aspx?action=OpenObject&type=NavigationTree&ContentType=xml
The returned XML data is structured in the following overall format:v The <NavigationTree> node is the top-level node returned.v The <Application> node contains application folders and references that can
display in CXL Web.v The <Server> node contains cubes and views that can display in CXL Web.
Note: The <Administration>node is not used with the URL API.
154 IBM Cognos Express Xcelerator Version 10.1.0: Developer Guide

XML Application NodeFor example, an expanded <Application> node looks like this:
Chapter 8. Developing Custom Web Applications with the URL API 155
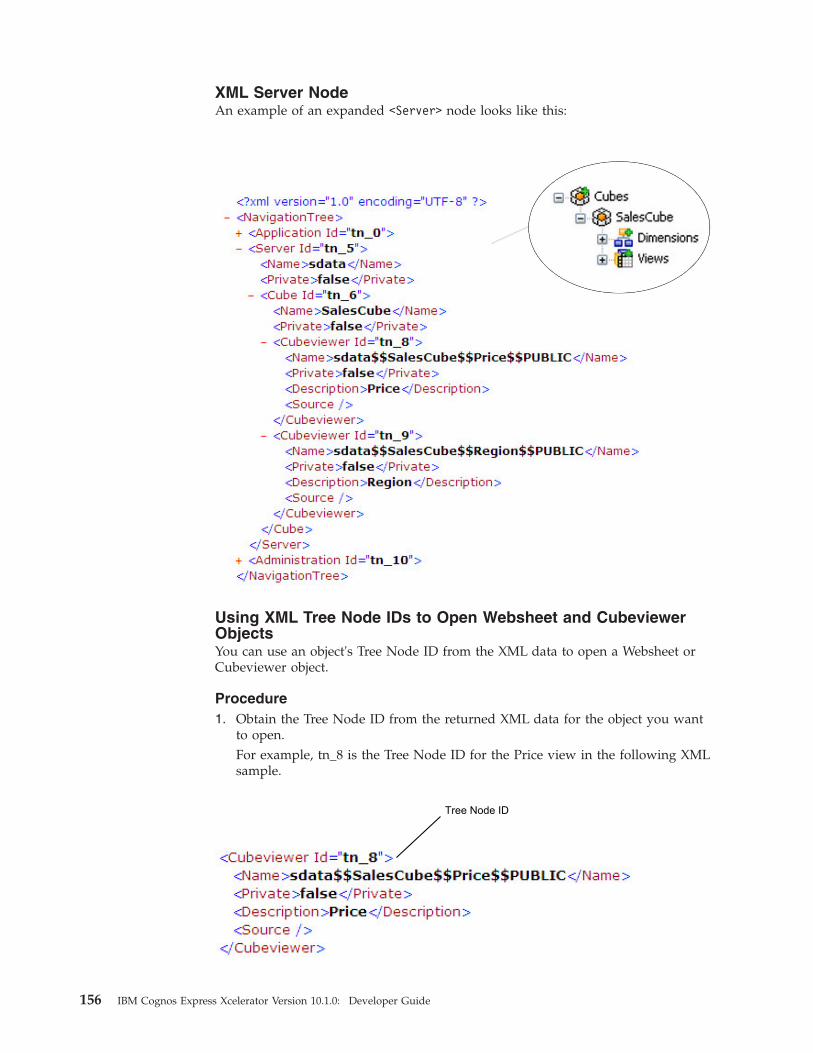
XML Server NodeAn example of an expanded <Server> node looks like this:
Using XML Tree Node IDs to Open Websheet and CubeviewerObjectsYou can use an object's Tree Node ID from the XML data to open a Websheet orCubeviewer object.
Procedure1. Obtain the Tree Node ID from the returned XML data for the object you want
to open.For example, tn_8 is the Tree Node ID for the Price view in the following XMLsample.
Tree Node ID
156 IBM Cognos Express Xcelerator Version 10.1.0: Developer Guide

2. Use the Tree Node ID string value with the OpenObject command in your URLas follows:action=OpenObject&type=Cubeviewer&value=TreeNodeID
For example, set value=tn_8 to display the Price view in a Cubeviewer object asfollows:action=OpenObject&type=Cubeviewer&value=tn_8
Chapter 8. Developing Custom Web Applications with the URL API 157

158 IBM Cognos Express Xcelerator Version 10.1.0: Developer Guide
Chapter 9. Using Data Reservations
This section describes all of the administrator, modeler, developer and programmertasks related to enabling and implementing the Data Reservation feature availablein IBM Cognos Xcelerator.
Note: By default, Data Reservation is not enabled. An administrator must enableand configure the feature before you can use the related TurboIntegrator (TI) andAPI functions to manage Data Reservations.
Data Reservation OverviewData Reservation (DR) is a server-related feature in Xcelerator that allows you toconfigure exclusive write-access to regions of a cube for individual users. Oncereserved, the data in that region can only be modified by that specific user untilthe reservation is released.
You can use DR to support your specific business processes or to control dataentry by acquiring and releasing Data Reservations on an as-needed or dynamicbasis. For example, DR provides an alternative way to dynamically controlwrite-access to cube data instead of trying to dynamically adjust Xceleratorsecurity to achieve similar write-access restrictions.
Note: All DRs must be managed via custom applications that you develop usingthe provided TurboIntegrator (TI) and API functions. You design the application toobtain, release and manage DRs based on the required business process.
When to use Data Reservations
You would use Data Reservations if you want to manually or dynamically manageuser write-access to Xcelerator data in a way that relates to your business process.Depending on your exact needs, you can apply the feature either as-needed ordynamically using TurboIntegrator and API functions.
For example, you might use DR to do the following:v Manually run a one-time TurboIntegrator process that uses Data Reservations to
lock out all users from making further edits to certain data after completing aspecific project or closing a recent budget.
v Apply Data Reservations using Xcelerator Action buttons and TurboIntegratorprocesses in a Microsoft Excel spreadsheet or Xcelerator Websheet todynamically control write-access to data as users interact with the data based ontheir roles and your company's business process.
v Use ICAS API functions within a custom external application to dynamicallyacquire and release Data Reservations.
How to use Data Reservations
To use Data Reservation, you must first enable and configure the feature forindividual cubes and user groups and then use TurboIntegrator or API functions toprogrammatically apply and manage DRs.
To enable DR, use the following Xcelerator tools:
© Copyright IBM Corp. 2007, 2012 159
v }CubeProperties control cube - Enables and configures Data Reservation forindividual cubes. For details, see “Enabling Data Reservation for cubes” on page163.
v Capabilities Assignments - Determines if the members of a user group canmanage (acquire and release) Data Reservations for themselves and other users.For details, see “Enabling user groups to manage Data Reservations” on page164.
To apply and manage Data Reservations, you must use TurboIntegrator and ICASAPI functions that allow you to programmatically obtain, release and managereservations. For details, see the following topics:v “Managing Data Reservations with TurboIntegrator functions” on page 167v “Managing Data Reservations with TM1 API functions” on page 172
How Data Reservations interacts with other Xcelerator features
For details on how Data Reservations interact with other Xcelerator features suchas data spreading, TurboIntegrator processes and security, see “UnderstandingData Reservation behavior with other Xcelerator features.”
Data Reservation monitoring tools
You can use Server Explorer, the TM1Top utility, the Xcelerator Audit log, andcertain TurboIntegrator and API functions to monitor Data Reservation activityand/or assignments. For details, see “Monitoring Data Reservations” on page 165.
Understanding Data Reservation behavior with other Xceleratorfeatures
This section describes how Data Reservations (DR) interact with other Xceleratorfeatures such as security, data spreading, TurboIntegrator (TI) processes andsandboxes.
Data Reservations and SecurityData Reservation is different from Xcelerator Security in the following waysv DR does not override Xcelerator security assignments, but only adds another
layer of write restriction on top of standard security for cube objects.v DR applies to individual users while Xcelerator security applies to groups of
users.v DR applies restrictions only to cube data and individual users. It does not
control any other Xcelerator objects.
This behavior is the same for both the REQUIRED and ALLOWED DataReservation modes.
Data Reservations and the Xcelerator user interfaceData Reservation affects the appearance of cells in a cube view in all of thedifferent Xcelerator user interfaces, such as Server Explorer, Xcelerator andXcelerator Web.
This behavior is different depending on the Data Reservation mode.
160 IBM Cognos Express Xcelerator Version 10.1.0: Developer Guide

REQUIRED mode
When a cube is configured to use Data Reservation in REQUIRED mode, all of thecells appear with a gray background and are not writable except for the cellscontained in your DR region. Only the cells in the DR for the current user will bewritable and appear with a white background.
ALLOWED mode
When a cube is configured to use Data Reservation in ALLOWED mode, all of thecells are writable, depending on security, and appear with a white backgroundexcept for the cells contained in the Data Reservations of other users. Cellsreserved by other users appear with a gray background and are not writable.
For details on checking whether a cell is part of a DR, see “Displaying DataReservation cell status in Server Explorer” on page 165.
Data Reservations and Data spreadingData spreading behaves the same as before - cells that are not writable, such ascalculated cells or cells with a hold, are skipped during a spread process. When auser has a Data Reservation and performs a data spreading operation, only thecells in that user's DR region will be considered writable and all other cells will beskipped.
This behavior is the same for both the REQUIRED and ALLOWED DataReservation modes.
Data Reservations and TurboIntegrator processes and choresYou should understand the following considerations when using Data Reservationand also running interactive (non-scheduled) and scheduled TurboIntegrator (TI)chores/processes:
Some of this behavior is different depending on which Data Reservation mode isbeing used and whether the chore is run interactively or scheduled.
Interactive Processes and Chores
When a user interactively runs a process or a chore, for example from theXcelerator user interface, then that process/chore runs as that user.v For REQUIRED mode, this means that the process/chore can write only to data
defined in the DRs held by that user.v For ALLOWED mode, the process/chore can write to any cell that is either
contained in a DR for that user or has the appropriate security rights for thatuser, but the process/chore cannot write to cells contained in another user's DR.
The following behavior is the same for both the REQUIRED and ALLOWED DataReservation modes.v If a write operation in the Interactive process/chore conflicts with the Data
Reservation of another user, then the process/chore fails and an error message isdisplayed to the user.
v To run a process that acquires and releases DRs, the user running the processmust belong to a user group that has the ManageDataReservation capability setto GRANT.
Chapter 9. Using Data Reservations 161

Scheduled Chores
When a scheduled chore automatically runs, it runs as the Admin user. Because ofthis, the chore may not be able to write to some cells if those cells are in the DataReservation of another user.
When a scheduled chore encounters a Data Reservation conflict, the behavior isdifferent depending on which Data Reservation mode is being used by the cube.v In REQUIRED mode, if a write operation in a scheduled chore conflicts with a
Data Reservation, the chore fails.To allow a scheduled chore to write to reserved cells when using DR inREQUIRED mode, you must handle this programmatically in yourTurboIntegrator process by allowing the Admin user to write to the reservedcells. You can modify the TurboIntegrator process to acquire and release thenecessary DRs for the Admin or possibly have the process temporarily turnoff/on the DR feature for the applicable cubes.
v In ALLOWED mode, if a write operation in a scheduled chore conflicts with aData Reservation, the chore will perform a data rollback and wait for thereservation to be released. When the reservation is released, the chore will retrythe operation.You cannot cancel a waiting chore by changing the Data Reservation mode toREQUIRED or OFF. The chore will continue to wait until one of the followingevents occurs.– Release the Data Reservation that is blocking the chore so the chore can
continue.– Use the TM1 Top utility to cancel the chore.– Shut down the server to cancel the chore.– Deactivate the scheduled chore.
Data Reservations and SandboxesYou should understand the following considerations about obtaining and releasingData Reservations on a specific cube while also entering data into sandboxes ofthat same cube.
DRs apply to the base version of a cube and any sandbox created from that cube.
The following sandbox behavior applies only to the REQUIRED Data Reservationmode.v If the DR feature is enabled for a cube, then you must have a DR on that cube to
write to the base data or any sandbox of that cube.For example, if a user has a DR to the Sales cube, then that user can only writeto that same set of cells in any sandbox created from the Sales cube.
v If your DR for a cube has been released, then you can no longer write to anysandbox of that cube.
v You can commit a sandbox to base data after a DR is released, however, theedited values for any cells that are no longer reserved for you will be droppedwith errors and your changes will be lost. To successfully commit the editedvalues to base data, you must first re-acquire the necessary DRs on that cubebefore attempting to commit the sandbox.
162 IBM Cognos Express Xcelerator Version 10.1.0: Developer Guide

Data Reservations, Sandboxes, and Job QueueIf you are using Data Reservations with sandboxes and the Job Queue feature, thefollowing behavior applies when committing sandbox data to base data, dependingon which Data Reservation mode is being used by the cube.v In REQUIRED mode, all necessary Data Reservations must be held until the
queued operation is complete for the sandbox data to be successfully saved tobase data. If the necessary Data Reservations are released before the Job Queuesaves the data or if a Data Reservation conflict is encountered, the values in theconflicting cells will not be saved.
v In ALLOWED mode, if a sandbox commit in the Job Queue conflicts with a DataReservation, the Job Queue will perform a data rollback for that operation andwait for the conflicting reservation to be released. All jobs in the Job Queue willbe blocked until the waiting job is allowed to continue. The only way to unblockthe Job Queue is to release the conflicting Data Reservations.
Enabling Data ReservationBy default, Data Reservation is not enabled. An administrator must enable andconfigure the feature before you can use the related TurboIntegrator (TI) and APIfunctions to manage Data Reservations.
Before using Data Reservations, you must:v Enable the feature for individual cubes (configured in the }CubeProperties
control cube).For details, see“Enabling Data Reservation for cubes”
v Allow user groups the ability to manage, acquire and release DRs for themselvesand other users (configured in the Capability Assignments window).For details, see “Enabling user groups to manage Data Reservations” on page164).
After DR has been enabled for a cube, the feature applies to all users of that cube,but can only be managed by members of the user groups granted permission inthe Capability Assignments window.
Enabling Data Reservation for cubesUse the DataReservationMode property in the }CubeProperties control cube toenable or disable Data Reservation for a specific cube.
For more details about the }CubeProperties control cube, see the "Control Cubes"section in the IBM Cognos Express Xcelerator Operation Guide.
Procedure1. In Server Explorer, click the View menu and then click to select Display
Control Objects.All of the IBM Cognos Analytic Server (ICAS) Control cubes appear in ServerExplorer with a prefix of a right curly brace }. For example, }CubeProperties.
2. In the Tree pane of Server Explorer, click to expand the Cubes node and thendouble-click the }CubeProperties control cube.
3. Enter a value for one of the available Data Reservation modes at theintersection of the DataReservationMode element (property) and the cube nameto enable the Data Reservation feature for that cube.
Chapter 9. Using Data Reservations 163
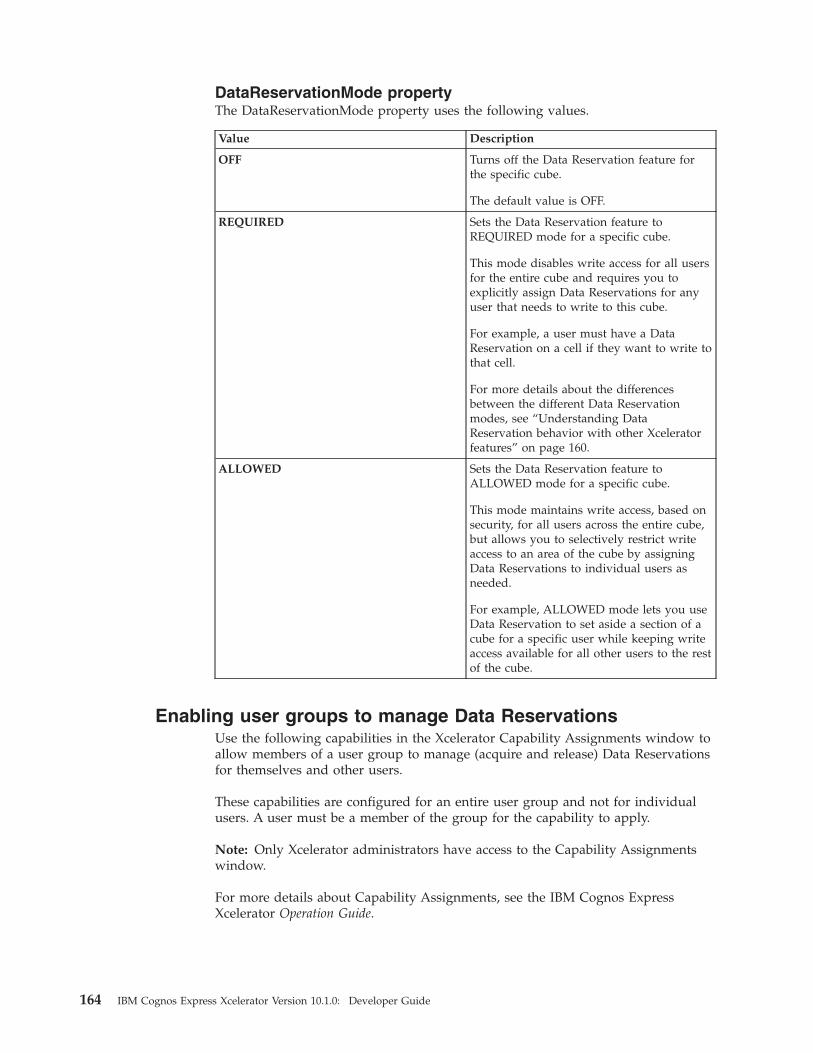
DataReservationMode propertyThe DataReservationMode property uses the following values.
Value Description
OFF Turns off the Data Reservation feature forthe specific cube.
The default value is OFF.
REQUIRED Sets the Data Reservation feature toREQUIRED mode for a specific cube.
This mode disables write access for all usersfor the entire cube and requires you toexplicitly assign Data Reservations for anyuser that needs to write to this cube.
For example, a user must have a DataReservation on a cell if they want to write tothat cell.
For more details about the differencesbetween the different Data Reservationmodes, see “Understanding DataReservation behavior with other Xceleratorfeatures” on page 160.
ALLOWED Sets the Data Reservation feature toALLOWED mode for a specific cube.
This mode maintains write access, based onsecurity, for all users across the entire cube,but allows you to selectively restrict writeaccess to an area of the cube by assigningData Reservations to individual users asneeded.
For example, ALLOWED mode lets you useData Reservation to set aside a section of acube for a specific user while keeping writeaccess available for all other users to the restof the cube.
Enabling user groups to manage Data ReservationsUse the following capabilities in the Xcelerator Capability Assignments window toallow members of a user group to manage (acquire and release) Data Reservationsfor themselves and other users.
These capabilities are configured for an entire user group and not for individualusers. A user must be a member of the group for the capability to apply.
Note: Only Xcelerator administrators have access to the Capability Assignmentswindow.
For more details about Capability Assignments, see the IBM Cognos ExpressXcelerator Operation Guide.
164 IBM Cognos Express Xcelerator Version 10.1.0: Developer Guide

Capability Description
ManageDataReservation Allows the members of the group to acquire and releaseData Reservations.
This capability is server-wide. Capabilities can not beapplied to specific cubes or users.
This capability is always set to GRANT for the standardADMIN, DataAdmin, and SecurityAdmin groups andcannot be modified.
Values for non-administrator groups:
DENY - Default value for all non-administrator groups.
GRANT- Enables this capability for a user group.
DataReservationOverride Allows the members of the group to release reservationsheld by other users.
This capability is always set to GRANT for the standardADMIN, DataAdmin, and SecurityAdmin groups andcannot be modified.
Values for non-administrator groups:
DENY - Default value for all non-administrator groups.
GRANT - Enables this capability for a user group.
Procedure1. In Server Explorer, right-click on a server and select Capability Assignments.2. In the Capability Assignments window, enter values for the
ManageDataReservation and DataReservationOverride capabilities at theintersection with the user group you want to configure.
Monitoring Data ReservationsYou can use the following tools to monitor Data Reservation activity and status.v Server Explorerv TM1 Top utilityv Xcelerator Audit Logv TurboIntegrator and API functions
Displaying Data Reservation cell status in Server ExplorerYou check the status of any cell in a cube view in Server Explorer as follows:
Procedure
In Server Explorer, open a cube view, right-click a cell and then click Edit Status.A message box appears indicating whether the cell’s value can be edited or thatthe cell is not editable because of a Data Reservation or other data accessrestriction.
Chapter 9. Using Data Reservations 165

Using TM1 Top to monitor threads waiting for DataReservations
You can use the TM1 Top utility to monitor threads that are waiting for a datareservation to be released. Any thread in this state is shown in TM1 Top with aData Reservation Release (DDR) value in the State field:
Wait:DRR
For more details about TM1 Top wait states, see the section "Understanding ThreadProcessing States" in the "System and Performance Monitoring" chapter in the IBMCognos Express Xcelerator Operation Guide.
Using the Audit Log to monitor Data Reservation eventsIf audit logging is enabled for the IBM Cognos Analytic Server (ICAS), server,ICAS will record Data Reservation events. You can then use the ICAS Audit log toquery and view the history of Data Reservation assignments.
For more details about using the ICAS Audit Log, see the "System andPerformance Monitoring" chapter in the IBM Cognos Express Xcelerator OperationGuide.
The following table lists the five Audit log events that are specific to DataReservations.
Audit Log Event Event Description
Property Set: CubeDataReservationEnable Recorded when the value of theCubeDataReservationEnable property for acube has changed.
Data Reservation: Acquired Recorded when acquiring a DataReservation.
Data Reservation: Released Recorded when releasing a DataReservation.
Data Reservation: Rollback Acquire Recorded when rollback of a reservationacquire occurs.
Data Reservation: Rollback Release Recorded when rollback of a reservationrelease occurs.
Notes about Rollback Eventsv The rollback of a Data Reservation acquire operation is to release the reservation.v The rollback of a Data Reservation release operation is to re-acquire the
reservation.
Querying for Data Reservation eventsAll Data Reservation events are associated with the IBM Cognos Analytic Server(ICAS) cube object and are therefore grouped as cube events in the Audit log. Youcan query for these events in the Audit Log window as follows.
166 IBM Cognos Express Xcelerator Version 10.1.0: Developer Guide

Procedure1. In Server Explorer, open the Audit Log window.2. In the Event Type section, select the Object option.3. Set the Object Type field to Cube.4. Set the Event drop-down list to one of the Data Reservation event types.5. Run the query.
Using TurboIntegrator and API functions to monitor DataReservations
As a custom solution, you could use the following IBM Cognos Analytic ServerTurboIntegrator and API functions to programmatically iterate cube objects andretrieve information about the related Data Reservations for each cube.v TurboIntegrator - “CubeDataReservationGet” on page 170.v TM1 API - “TM1DataReservationGetAll” on page 175.
Managing Data Reservations with TurboIntegrator functionsYou can use the following TurboIntegrator (TI) functions to programmaticallyobtain, release and manage Data Reservations.v CubeDataReservationAcquirev CubeDataReservationReleasev CubeDataReservationReleaseAllv CubeDataReservationGetv CubeDataReservationGetConflicts
Data Reservations are defined by a specific cube, user, and tuple (an ordered list ofelements).
CubeDataReservationAcquireThis is a TurboIntegrator function, valid only in TurboIntegrator processes.
Acquires a Data Reservation for the specified cube, user and tuple.
Syntax
CubeDataReservationAcquire(Cube, User, bForce, Address, [AddressDelimiter])
Argument Description
Cube Name of the cube.
User Name of the owner for the new reservation.
The user name supplied will be validated to make sure it is anexisting user.
Chapter 9. Using Data Reservations 167

Argument Description
bForce Boolean value that determines the behavior if the requestedreservation conflicts with an existing reservation.
If set to 0 (false), then the request is rejected if it conflicts with anexisting reservation.
If set to 1 (true) and the user running the TurboIntegrator processhas the DataReservationOverride capability, then the conflictingreservations are released, and the requested one is granted.
Address Tokenized string sequence of element names that define the tuple.The order must match the original dimension order of the cube.
All the cells in the cube contained by the tuple make up the regionbeing reserved. You can choose one element from each dimensionor use an empty string between the delimiters to select an entiredimension. Depending on where the element is located in thehierarchy, the request reserves a single cell, a slice, or the entirecube.
AddressDelimiter Optional character string that is used to separate element names inthe Address parameter.
Default value is '|'.
Return Value
Boolean - returns true if the acquisition succeeded.
ExampleCubeDataReservationAcquire(’DRTestCube’,’User1’,0,’ElemX|ElemY|ElemZ’);
The following example sets the bForce parameter to 1 to force the DR request if aconflict exists and uses a different delimiter character for the AddressDelimiterparameter.CubeDataReservationAcquire(’DRTestCube’,’User2’,1,’ElemX*ElemY*ElemZ’,’*’);
CubeDataReservationReleaseThis is a TurboIntegrator function, valid only in TurboIntegrator processes.
Releases the specified Data Reservation.
If the user specified is not the same as the owner of the reservation, then therelease will only succeed if the user specified has the DataReservationOverridecapability enabled.
SyntaxCubeDataReservationRelease(Cube, User, Address,[AddressDelimiter])
Argument Description
Cube Name of the cube.
168 IBM Cognos Express Xcelerator Version 10.1.0: Developer Guide

Argument Description
User Name of the owner of the reservation.
The user name supplied will be validated to make sure it is anexisting user.
Address Tokenized string sequence of element names that define thetuple. The order must match the original dimension order of thecube.
AddressDelimiter Optional character string that is used to separate element namesin the Address parameter.
Default value is '|'.
Return Value
Boolean - returns true if the release succeeded.
ExampleCubeDataReservationRelease(’DRTestCube’,’User1’,’ElemX|ElemY|ElemZ’);
The following example uses a different character for the AddressDelimiterparameter.CubeDataReservationRelease(’DRTestCube’,’User2’,’ElemX*ElemY*ElemZ’,’*’);
CubeDataReservationReleaseAllThis is a TurboIntegrator function, valid only in TurboIntegrator processes.
Releases multiple existing Data Reservations.
All reservations fully contained by the specified address that match the user filterwill be released. A blank user filter means all users.
If the user filter specified is not the same as the user running the TurboIntegratorproces, then the DataReservationOverride capability must be enabled.
Using a blank user filter and all wildcards in the address field releases allreservations.
SyntaxCubeDataReservationReleaseAll(Cube, UserFilter, Address, [AddressDelimiter])
Argument Description
Cube Name of the cube.
UserFilter User name filter to match against existing reservations.
Address Tokenized string sequence of element names that define the tuple.The order must match the original dimension order of the cube.
Chapter 9. Using Data Reservations 169

Argument Description
AddressDelimiter Optional character string that is used to separate element names inthe Address parameter.
Default value is '|'.
Return Value
Boolean - returns true if no errors.
ExampleCubeDataReservationReleaseAll(’DRTestCube’,’User1’,’ElemX|ElemY|ElemZ’);
The following example releases all reservations in the specified cube for all users.CubeDataReservationReleaseAll(’DRTestCube’,’’,’||’);
CubeDataReservationGetThis is a TurboIntegrator function, valid only in TurboIntegrator processes.
Finds existing reservations on a specific cube for all or one user.
Syntax
CubeDataReservationGet(Index, Cube, User, [AddressDelimiter]) returnsAddress;
Argument Description
Index A one-based loop index to use for iterating through reservations onthe specified cube.
Cube Name of the cube to search.
User Reservation owner name to use as a filter.
If left blank, the function returns reservations for any owner.
If a name is provided, the function filters the results for just thespecified owner.
AddressDelimiter Optional character string that is used to separate element names inthe returned Address parameter.
Default value is '|'.
Return Value
Address - Reservation creation time, name of the reservation owner and Elementaddress of the reservation. Creation time comes first, followed by delimiter,followed by UserID, followed by delimiter, followed by Elements IDs separated bythe delimiter in order of dimensions in the cube (original order).
170 IBM Cognos Express Xcelerator Version 10.1.0: Developer Guide
An empty string is returned if there is no entry for the specified index.
The format of the return value is:
[creation time][delimiter][ownername][delimiter][element1][delimiter][element2][delimiter]...[elementN]
For example:
"20100622211601|Fred Bloggs|Element1|Element2|Element3"
Note: The reservations can change while iterating the list of reservations so the useof index is not guaranteed to give a complete list of reservations. Reservations canbe added or removed at any position in the list, so reservations can be skipped orrepeated when looping through index values.
If the owner filter is specified, then the index applies only to the members of thefiltered list. If the list of reservations has owners as follows: User1, User1, User2and the request specifies an owner of User2 then an index of 1 will retrieve thethird member of the list.
ExampleCubeDataReservationGet(1,’DRTestCube’,’User1’,’*’);
CubeDataReservationGet(1,’DRTestCube’,’’);
The following sample would find all the reservations owned by user Fred Bloggsin the Expense Input cube and do "something useful" with them:vIndex = 1;vCube = ’Expense Input’;vUserFilter = ’Fred Bloggs’;vDelim = ’|’;vAddress = CubeDataReservationGet( vIndex, vCube, vUserFilter,vDelim);WHILE (vAddress @<> ’’);
vSep1 = SCAN( vDelim, vAddress);vDRUser = SUBST( vAddress, 1, vSep1 - 1);vDRAddress = SUBST( vAddress, vSep1 + 1, LONG(vDRAddress) - vSep1);
# do something meaningful with theuser and reservation address here
vIndex = vIndex + 1;vAddress = CubeDataReservationGet( vIndex, vCube, vUserFilter,vDelim);
END;
CubeDataReservationGetConflictsThis is a TurboIntegrator function, valid only in TurboIntegrator processes.
Finds existing reservations on a specific cube that would conflict with the specifieduser, address and tuple.
SyntaxCubeDataReservationGetConflicts(Index, Cube, User,Address, [AddressDelimiter])returns ConflictAddress;
Chapter 9. Using Data Reservations 171

Argument Description
Index A one-based loop index to use for iterating through conflicts thatsatisfy this query.
Cube Name of the cube to search
User The query will search for reservations that will conflict with thisuser.
Address Tokenized string sequence of element names that define thetuple. The order must match the original dimension order of thecube.
AddressDelimiter Optional character string that is used to separate element namesin the Address parameter.
Default value '|'.
Return Value
ConflictAddress - Reservation creation time, name of the reservation owner andElement address of the reservation. The creation time comes first, followed bydelimiter, followed by UserID, followed by delimiter, followed by Elements IDsseparated by the delimiter in order of dimensions in the cube (original order).
An empty string is returned if there is no entry for the specified index.
The format of the return value is:[creation time][delimiter][owner name][delimiter][element1][delimiter]
[element2][delimiter]...[elementN]
For example:
"20100622211601|Fred Bloggs|Element1|Element2|Element3"
Note: The reservations can change while iterating the list of conflict reservations sothe use of index is not guaranteed to give a complete list of reservations.Reservations can be added or removed at any position in the list, so reservationscan be skipped or repeated when looping through index values.
Managing Data Reservations with TM1 API functionsYou can use the following TM1 C API functions to programmatically obtain,release and manage Data Reservations.v TM1DataReservationAcquirev TM1DataReservationReleasev TM1DataReservationReleaseAllv TM1DataReservationGetAllv TM1DataReservationGetConflictsv TM1DataReservationValidate
172 IBM Cognos Express Xcelerator Version 10.1.0: Developer Guide
TM1DataReservationAcquireRequests a DR for a specific IBM Cognos Analytic Server (ICAS) cube, user andtuple.
If there is an existing reservation owned by a different user whose region overlapsthe requested reservation, then the reservation request will be rejected unless thebForce flag is used. If the bForce flag is true and the user running the API has theDataReservationOverride capability, then any conflicting reservations will bereleased and the new reservation will be granted.
Syntax
TM1DataReservationAcquire(TM1P hPool, TM1V hCube, TM1VhClient, TM1V bForce,TM1V elementArray);
Parameter Description
hPool Standard memory pool used by all API commands.
hCube Handle to the cube you want to access.
hClient The owner to use for the reservation
bForce Boolean value that determines the behavior if the requestedreservation conflicts with an existing reservation.
If set to 0 (false), then the request is rejected if it conflicts with anexisting reservation.
If set to 1 (true), then the function replaces any conflictingreservations.
elementArray Array of element handles that define the tuple, the order mustmatch the dimension order.
Return Value
Boolean value of true if the request was granted or false otherwise.
Possible Errorsv TM1ErrorCubeNumberOfKeysInvalidv TM1ErrorObjectHandleInvalidv TM1ErrorCubeKeyInvalidv TM1ErrorObjectSecurityNoReserveRights
TM1DataReservationReleaseReleases an existing DR for a specific IBM Cognos Analytic Server (ICAS) cube,user and tuple.
The owner used for hClient must match the holder of the DR for the command tosucceed unless the user invoking the API has the DataReservationOverridecapability enabled.
Chapter 9. Using Data Reservations 173
The addresses supplied must be an exact match.
Syntax
TM1DataReservationRelease(TM1P hPool, TM1V hCube, TM1V hClient,TM1VelementArray);
Parameter Description
hPool Standard memory pool used by all API commands.
hCube Handle to the cube you want to access.
hClient The owner of the reservation.
elementArray Array of element handles that define the tuple. The order must matchthe dimension order.
Return Value
Boolean value of true if the request succeeded or false otherwise. Not finding thereservation is a failure and returns false. Insufficient privilege is handled as anerror.
Possible Errorsv TM1ErrorCubeNumberOfKeysInvalidv TM1ErrorObjectHandleInvalidv TM1ErrorCubeKeyInvalidv TM1ErrorObjectSecurityNoAdminRightsv TM1ErrorObjectSecurityNoReserveRights
TM1DataReservationReleaseAllReleases multiple Data Reservations for the specified IBM Cognos Analytic Server(ICAS) user.
The specified address tuple specifies the starting point for the search. Allreservations owned by the specified user fully contained within the region definedby the address are released. Any reservation that overlaps the address but is notfully contained is not released.
Specifying a NULL client will remove reservations for all users. If the owner is notthe same as the user executing the command, then the user must have theDataReservationOverride capability. Attempts to execute this command for adifferent user or all users without the override capability will be rejected withoutsearching for existing reservations.
An administrator can release all reservations on a cube by specifying a NULLclient and wildcards for every element in the address.
Syntax
TM1DataReservationReleaseAll(TM1P hPool, TM1V hCube, TM1V hClient,TM1VelementArray);
174 IBM Cognos Express Xcelerator Version 10.1.0: Developer Guide

Parameter Description
hPool Standard memory pool used by all API commands.
hCube Handle to the cube you want to access.
hClient The owner of the reservation.
elementArray Array of element handles that define the starting point for the releaseoperation. The order must match the dimension order.
Return Value
Boolean value of true if there were no errors.
Possible Errorsv TM1ErrorCubeNumberOfKeysInvalidv TM1ErrorObjectHandleInvalidv TM1ErrorCubeKeyInvalidv TM1ErrorObjectSecurityNoReserveRightsv TM1ErrorObjectSecurityNoAdminRights
TM1DataReservationGetAllDetermines which Data Reservations are currently held on a IBM Cognos AnalyticServer (ICAS) cube.
The client parameter is optional. If it is not supplied (the parameter is set toTM1ObjectNull), then all the DRs on the cube are returned.
If the client parameter is supplied, then only the DRs held by that particular userare returned.
Syntax
TM1DataReservationGetAll(TM1P hPool, TM1V hCube, TM1VhClient);
Parameter Description
hPool Standard memory pool used by all API commands.
hCube Handle to the cube you want to access.
hClient Optional handle for the user you want to query for.
Return Value
Array of DR data with the following format:v [1] Cube name (TM1ValTypeString)v [2-n] Array of DR information (TM1ValTypeArray)
– [1] Creation Time
Chapter 9. Using Data Reservations 175
– [2] User name (TM1ValTypeString)– [3-n] Array of element names defining the tuple (TM1ValTypeArray)
- [1-n] Element name (TM1ValTypeString)
Possible Errors
TM1ErrorObjectHandleInvalid
TM1DataReservationGetConflictsDetermines which reservations currently held on a IBM Cognos Analytic Server(ICAS) cube will conflict with the specified client (user) and address.
This command can be used to gather the information needed to determine why anattempt to acquire a reservation failed, assuming the reservation that caused thedenial is still there.
Syntax
TM1DataReservationGetConflicts(TM1P hPool, TM1V hCube, TM1V hClient, TM1VelementArray)
Parameter Description
hPool Standard memory pool used by all API commands
hCube Handle to the cube you want to access
hClient The client (user) to compare against current reservation owners.
elementArray Array of element handles that define the tuple to compare against.The order must match the dimension order
Return Value
Returns an array of DR data with the following format:v [1] Cube name (TM1ValTypeString)v [2-n] Array of DR information (TM1ValTypeArray)
– [1] Creation Time– [2] User name (TM1ValTypeString)– [3-n] Array of element names defining the tuple (TM1ValTypeArray)
- [1-n] Element name (TM1ValTypeString)
TM1DataReservationValidateValidates all the Data Reservations on a IBM Cognos Analytic Server (ICAS) cube.
Any reservation owned by a client (user) that no longer exists will be removed.
176 IBM Cognos Express Xcelerator Version 10.1.0: Developer Guide

Syntax
TM1DataReservationValidate(TM1P hPool, TM1V hCube);
Parameter Description
hPool Standard memory pool used by all API commands
hCube Handle to the cube we want to access
Return Value
Boolean value of true.
Possible Errors
TM1ErrorObjectNotFound (invalid cube)
API error codes for data reservationsThe following table describes the possible error codes that can be returned by theIBM Cognos Analytic Server (ICAS) C API functions for data reservations.
Error Description
TM1ErrorCubeNumberOfKeysInvalid Number of elements doesn't match thenumber of cube dimensions.
TM1ErrorObjectHandleInvalid Cube, Client, or Element handle does notmap to an existing object.
TM1ErrorCubeKeyInvalid The element supplied doesn't match anelement in the dimension at that position.The element supplied is a UDC.
TM1ErrorObjectSecurityNoReserveRights Capability to use reservation is not granted.
TM1ErrorObjectSecurityNoAdminRights Attempt to release a reservation when notthe owner and without the overridecapability being granted.
Chapter 9. Using Data Reservations 177

178 IBM Cognos Express Xcelerator Version 10.1.0: Developer Guide

Appendix A. Supported Excel Functions - CXL Web
IBM Cognos CXL Web supports many Excel worksheet functions.
Supported FunctionsThis appendix lists the supported Excel functions by category and in alphabeticalorder, and describes any differences in performance between the Excel functionsand CXL Web functions.
Date and Time FunctionsThe following table lists date and time functions.
Function Description
DATE Returns the serial number of a particular date.
DATEVALUE Converts a date in the form of text to a serial number.
DAY Converts a serial number to a day of the month.
DAYS360 Calculates the number of days between two dates based on a360-day year.
HOUR Converts a serial number to an hour.
MINUTE Converts a serial number to a minute.
MONTH Converts a serial number to a month.
NOW Returns the serial number of the current date and time.
SECOND Converts a serial number to a second.
TIME Returns the serial number of a particular time.
TIMEVALUE Converts a time in the form of text to a serial number.
TODAY Returns the serial number of today's date.
WEEKDAY Converts a serial number to a day of the week.
YEAR Converts a serial number to a year.
© Copyright IBM Corp. 2007, 2012 179

Financial FunctionsThe following table lists financial functions.
Function Description
DB Returns the depreciation of an asset for a specified period using thefixed-declining balance method.
DDB Returns the depreciation of an asset for a specified period using thedouble-declining balance method or some other method you specify.
FV Returns the future value of an investment.
IPMT Returns the interest payment for an investment for a given period.
IRR Returns the internal rate of return for a series of cash flows.
ISPMT Calculates the interest paid during a specific period of aninvestment.
MIRR Returns the internal rate of return where positive and negative cashflows are financed at different rates.
NPER Returns the number of periods for an investment.
NPV Returns the net present value of an investment based on a series ofperiodic cash flows and a discount rate.
PMT Returns the periodic payment for an annuity.
PPMT Returns the payment on the principal for an investment for a givenperiod.
PV Returns the present value of an investment.
RATE Returns the interest rate per period of an annuity.
SLN Returns the straight-line depreciation of an asset for one period.
SYD Returns the sum-of-years' digits depreciation of an asset for aspecified period.
Information FunctionsThe following table lists information functions.
Function Description
ISERR Returns TRUE if the value is any error value except #N/A.
ISERROR Returns TRUE if the value is any error value.
ISNA Returns TRUE if the value is the #N/A error value.
NA Returns the error value #N/A.
180 IBM Cognos Express Xcelerator Version 10.1.0: Developer Guide

Logical FunctionsThe following table lists logical functions.
Function Description
AND Returns TRUE if all its arguments are TRUE.
FALSE Returns the logical value FALSE.
IF Specifies a logical test to perform.
NOT Reverses the logic of its argument.
OR Returns TRUE if any argument is TRUE.
TRUE Returns the logical value TRUE.
Lookup and Reference FunctionsThe following table lists lookup and reference functions.
Note: Certain functions, such as LOOKUP and ROWS, may accept twodimensional arrays as arguments. CXL Web does not support two dimensionalarrays. Depending on the data organization and requirements, these functions canstill obtain correct values, for example, when the data being retrieved falls in theinitial portions of the array. To ensure correct values when working with thesefunctions on CXL Web you may need to reorganize the input data into repeatedfunctions using one dimensional arrays or you may need to use direct cellreferences.
Function Description
ADDRESS Returns a reference as text to a single cell in a worksheet.
CHOOSE Chooses a value from a list of values.
COLUMN Returns the column number of a reference.
COLUMNS Returns the number of columns in a reference.
HLOOKUP Looks in the top row of an array and returns the value of theindicated cell.
HYPERLINK Creates a shortcut or jump that opens a document stored on anetwork server, an intranet, or the Internet.
INDEX Uses an index to choose a value from a reference or array.
LOOKUP Looks up values in a vector or array.
OFFSET Returns a reference offset from a given reference.
Appendix A. Supported Excel Functions - CXL Web 181

Function Description
ROW Returns the row number of a reference.
ROWS Returns the number of rows in a reference.
VLOOKUP Looks in the first column of an array and moves across the row toreturn the value of a cell.
Math and Trigonometric FunctionsThe following table lists math and trigonometric functions.
Function Description
ABS Returns the absolute value of a number.
ACOS Returns the arccosine of a number.
ACOSH Returns the inverse hyperbolic cosine of a number.
ASIN Returns the arcsine of a number.
ASINH Returns the inverse hyperbolic sine of a number.
ATAN Returns the arctangent of a number.
ATAN2 Returns the arctangent from x- and y-coordinates.
ATANH Returns the inverse hyperbolic tangent of a number.
CEILING Rounds a number to the nearest integer or to the nearest multipleof significance.
COMBIN Returns the number of combinations for a given number ofobjects.
COS Returns the cosine of a number.
COSH Returns the hyperbolic cosine of a number.
DEGREES Converts radians to degrees.
EVEN Rounds a number up to the nearest even integer.
EXP Returns e raised to the power of a given number.
FACT Returns the factorial of a number.
FLOOR Rounds a number down, toward zero.
INT Rounds a number down to the nearest integer.
182 IBM Cognos Express Xcelerator Version 10.1.0: Developer Guide

Function Description
LN Returns the natural logarithm of a number.
LOG Returns the logarithm of a number to a specified base.
LOG10 Returns the base-10 logarithm of a number.
MOD Returns the remainder from division.
ODD Rounds a number up to the nearest odd integer.
PI Returns the value of pi.
POWER Returns the result of a number raised to a power.
PRODUCT Multiplies its arguments.
RADIANS Converts degrees to radians.
RAND Returns a random number between 0 and 1.
ROMAN Converts an arabic numeral to roman, as text.
ROUND Rounds a number to a specified number of digits.
ROUNDDOWN Rounds a number down, toward zero.
ROUNDUP Rounds a number up, away from zero.
SIGN Returns the sign of a number.
SIN Returns the sine of the given angle.
SINH Returns the hyperbolic sine of a number.
SQRT Returns a positive square root.
SUM Adds its arguments.
SUMIF Adds the cells specified by a given criteria.
TAN Returns the tangent of a number.
TANH Returns the hyperbolic tangent of a number.
Appendix A. Supported Excel Functions - CXL Web 183

Text and Data FunctionsThe following table lists text and data functions.
Function Description
CHAR Returns the character specified by the code number.
CLEAN Removes all nonprintable characters from text.
CODE Returns a numeric code for the first character in a text string.
CONCATENATE Joins several text items into one text item.
DOLLAR Converts a number to text, using the $ (dollar) currency format.
EXACT Checks to see if two text values are identical.
FIND Finds one text value within another (case-sensitive).
FIXED Formats a number as text with a fixed number of decimals.
LEFT Returns the leftmost characters from a text value.
LEN Returns the number of characters in a text string.
LOWER Converts text to lowercase.
MID Returns a specific number of characters from a text string startingat the position you specify.
PROPER Capitalizes the first letter in each word of a text value.
REPLACE Replaces characters within text.
REPT Repeats text a given number of times.
RIGHT Returns the rightmost characters from a text value.
SEARCH Finds one text value within another (not case-sensitive).
SUBSTITUTE Substitutes new text for old text in a text string.
T Converts its arguments to text.
TEXT Formats a number and converts it to text.
TRIM Removes spaces from text.
UPPER Converts text to uppercase.
VALUE Converts a text argument to a number.
184 IBM Cognos Express Xcelerator Version 10.1.0: Developer Guide

Statistical FunctionsThe following table lists statistical functions.
Function Description
AVEDEV Returns the average of the absolute deviations of data pointsfrom their mean.
AVERAGE Returns the average of its arguments.
AVERAGEA Returns the average of its arguments, including numbers, text,and logical values.
BINOMDIST Returns the individual term binomial distribution probability.
CONFIDENCE Returns the confidence interval for a population mean.
CORREL Returns the correlation coefficient between two data sets.
COUNT Counts how many numbers are in the list of arguments.
COUNTA Counts how many values are in the list of arguments.
COUNTIF Counts the number of nonblank cells within a range that meetthe given criteria.
COVAR Returns covariance, the average of the products of paireddeviations.
DEVSQ Returns the sum of squares of deviations.
EXPONDIST Returns the exponential distribution.
FISHER Returns the Fisher transformation.
FISHERINV Returns the inverse of the Fisher transformation.
FORECAST Returns a value along a linear trend.
GEOMEAN Returns the geometric mean.
GROWTH Returns values along an exponential trend.
HARMEAN Returns the harmonic mean.
INTERCEPT Returns the intercept of the linear regression line.
KURT Returns the kurtosis of a data set.
LARGE Returns the k-th largest value in a data set.
LINEST Returns the parameters of a linear trend.
Appendix A. Supported Excel Functions - CXL Web 185

Function Description
LOGEST Returns the parameters of an exponential trend.
MAX Returns the maximum value in a list of arguments.
MAXA Returns the maximum value in a list of arguments, includingnumbers, text, and logical values.
MEDIAN Returns the median of the given numbers.
MIN Returns the minimum value in a list of arguments.
MINA Returns the smallest value in a list of arguments, includingnumbers, text, and logical values.
MODE Returns the most common value in a data set.
NORMDIST Returns the normal cumulative distribution.
NORMINV Returns the inverse of the normal cumulative distribution.
NORMSDIST Returns the standard normal cumulative distribution.
NORMSINV Returns the inverse of the standard normal cumulativedistribution.
PEARSON Returns the Pearson product moment correlation coefficient.
PERMUT Returns the number of permutations for a given number ofobjects.
RSQ Returns the square of the Pearson product moment correlationcoefficient.
SKEW Returns the skewness of a distribution.
SLOPE Returns the slope of the linear regression line.
SMALL Returns the k-th smallest value in a data set.
STANDARDIZE Returns a normalized value.
STDEV Estimates standard deviation based on a sample.
STDEVA Estimates standard deviation based on a sample, includingnumbers, text, and logical values.
STDEVP Calculates standard deviation based on the entire population.
STDEVPA Calculates standard deviation based on the entire population,including numbers, text, and logical values.
186 IBM Cognos Express Xcelerator Version 10.1.0: Developer Guide

Function Description
STEYX Returns the standard error of the predicted y-value for each x inthe regression.
TREND Returns values along a linear trend.
VAR Estimates variance based on a sample.
VARA Estimates variance based on a sample, including numbers, text,and logical values.
VARP Calculates variance based on the entire population.
VARPA Calculates variance based on the entire population, includingnumbers, text, and logical values.
WEIBULL Returns the Weibull distribution.
Appendix A. Supported Excel Functions - CXL Web 187

188 IBM Cognos Express Xcelerator Version 10.1.0: Developer Guide

Appendix B. Unsupported Excel Functions - CXL Web
IBM Cognos CXL Web supports many Excel worksheet functions. This appendixlists the Excel functions, by category and in alphabetical order, that are notsupported in CXL Web.
Database and List Management FunctionsThis table lists the management functions that are not supported in CXL Web.
Function Description
DAVERAGE Returns the average of selected database entries.
DCOUNT Counts the cells that contain numbers in a database.
DCOUNTA Counts nonblank cells in a database.
DGET Extracts from a database a single record that matches thespecified criteria.
DMAX Returns the maximum value from selected database entries.
DMIN Returns the minimum value from selected database entries.
DPRODUCT Multiplies the values in a particular field of records thatmatch the criteria in a database.
DSTDEV Estimates the standard deviation based on a sample ofselected database entries.
DSTDEVP Calculates the standard deviation based on the entirepopulation of selected database entries.
DSUM Adds the numbers in the field column of records in thedatabase that match the criteria.
DVAR Estimates variance based on a sample from selected databaseentries.
DVARP Calculates variance based on the entire population of selecteddatabase entries.
Date and Time FunctionsThis table lists the date and time functions that are not supported in CXL Web.
Function Description
EDATE Returns the serial number of the date that is the indicatednumber of months before or after the start date.
EOMONTH Returns the serial number of the last day of the month before orafter a specified number of months.
NETWORKDAYS Returns the number of whole workdays between two dates.
WEEKNUM Converts a serial number to a number representing where theweek falls numerically with a year.
WORKDAY Returns the serial number of the date before or after a specifiednumber of workdays.
YEARFRAC Returns the year fraction representing the number of wholedays between start_date and end_date.
© Copyright IBM Corp. 2007, 2012 189

Financial FunctionsThis table lists the financial functions that are not supported in CXL Web.
Functions Description
ACCRINT Returns the accrued interest for a security that pays periodicinterest.
ACCRINTM Returns the accrued interest for a security that pays interest atmaturity.
AMORDEGRC Returns the depreciation for each accounting period by using adepreciation coefficient.
AMORLINC Returns the depreciation for each accounting period.
COUPDAYBS Returns the number of days from the beginning of the couponperiod to the settlement date.
COUPDAYS Returns the number of days in the coupon period that containsthe settlement date.
COUPDAYSNC Returns the number of days from the settlement date to the nextcoupon date.
COUPNCD Returns the next coupon date after the settlement date.
COUPNUM Returns the number of coupons payable between the settlementdate and maturity date.
COUPPCD Returns the previous coupon date before the settlement date.
CUMIPMT Returns the cumulative interest paid between two periods.
CUMPRINC Returns the cumulative principal paid on a loan between twoperiods.
DISC Returns the discount rate for a security.
DOLLARDE Converts a dollar price, expressed as a fraction, into a dollar price,expressed as a decimal number.
DOLLARFR Converts a dollar price, expressed as a decimal number, into adollar price, expressed as a fraction.
DURATION Returns the annual duration of a security with periodic interestpayments.
EFFECT Returns the effective annual interest rate.
FVSCHEDULE Returns the future value of an initial principal after applying aseries of compound interest rates.
INTRATE Returns the interest rate for a fully invested security.
MDURATION Returns the Macauley modified duration for a security with anassumed par value of $100.
NOMINAL Returns the annual nominal interest rate.
ODDFPRICE Returns the price per $100 face value of a security with an oddfirst period.
ODDFYIELD Returns the yield of a security with an odd first period.
ODDLPRICE Returns the price per $100 face value of a security with an oddlast period.
ODDLYIELD Returns the yield of a security with an odd last period.
190 IBM Cognos Express Xcelerator Version 10.1.0: Developer Guide

Functions Description
PRICE Returns the price per $100 face value of a security that paysperiodic interest.
PRICEDISC Returns the price per $100 face value of a discounted security.
PRICEMAT Returns the price per $100 face value of a security that paysinterest at maturity.
RECEIVED Returns the amount received at maturity for a fully investedsecurity.
TBILLEQ Returns the bond-equivalent yield for a Treasury bill.
TBILLPRICE Returns the price per $100 face value for a Treasury bill.
TBILLYIELD Returns the yield for a Treasury bill.
VDB Returns the depreciation of an asset for a specified or partialperiod using a declining balance method.
XIRR Returns the internal rate of return for a schedule of cash flowsthat is not necessarily periodic.
XNPV Returns the net present value for a schedule of cash flows that isnot necessarily periodic.
YIELD Returns the yield on a security that pays periodic interest.
YIELDDISC Returns the annual yield for a discounted security; for example, aTreasury bill.
YIELDMAT Returns the annual yield of a security that pays interest atmaturity.
Information FunctionsThis table lists the information functions that are not supported in CXL Web.
Function Description
CELL Returns information about the formatting, location, or contents of acell.
ERROR.TYPE Returns a number corresponding to an error type.
INFO Returns information about the current operating environment.
ISBLANK Returns TRUE if the value is blank.
ISEVEN Returns TRUE if the number is even.
ISLOGICAL Returns TRUE if the value is a logical value.
ISNONTEXT Returns TRUE if the value is not text.
ISNUMBER Returns TRUE if the value is a number.
ISODD Returns TRUE if the number is odd.
ISREF Returns TRUE if the value is a reference.
ISTEXT Returns TRUE if the value is text.
N Returns a value converted to a number.
TYPE Returns a number indicating the data type of a value.
Appendix B. Unsupported Excel Functions - CXL Web 191

Lookup and Reference FunctionsThis table lists the lookup and reference functions that are not supported in CXLWeb.
Function Description
AREAS Returns the number of areas in a reference.
INDIRECT Returns a reference indicated by a text value.
MATCH Looks up values in a reference or array.
RTD Retrieves real-time data from a program that supports COMautomation.
TRANSPOSE Returns the transpose of an array.
Math and Trigonometric FunctionsThis table lists the math and trigonometric functions that are not supported in CXLWeb.
Function Description
FACTDOUBLE Returns the double factorial of a number.
GCD Returns the greatest common divisor.
LCM Returns the least common multiple.
MDETERM Returns the matrix determinant of an array.
MINVERSE Returns the matrix inverse of an array.
MMULT Returns the matrix product of two arrays.
MROUND Returns a number rounded to the desired multiple.
MULTINOMIAL Returns the multinomial of a set of numbers.
QUOTIENT Returns the integer portion of a division.
RANDBETWEEN Returns a random number between the numbers you specify.
SERIESSUM Returns the sum of a power series based on the formula.
SQRTPI Returns the square root of (number * pi).
SUBTOTAL Returns a subtotal in a list or database.
SUMPRODUCT Returns the sum of the products of corresponding arraycomponents.
SUMSQ Returns the sum of the squares of the arguments.
SUMX2MY2 Returns the sum of the difference of squares of correspondingvalues in two arrays.
SUMX2PY2 Returns the sum of the sum of squares of correspondingvalues in two arrays.
SUMXMY2 Returns the sum of squares of differences of correspondingvalues in two arrays.
TRUNC Truncates a number to an integer.
192 IBM Cognos Express Xcelerator Version 10.1.0: Developer Guide

Statistical FunctionsThis table lists the statistical functions that are not supported in CXL Web.
Function Description
BETADIST Returns the beta cumulative distribution function.
BETAINV Returns the inverse of the cumulative distribution function for aspecified beta distribution.
CHIDIST Returns the one-tailed probability of the chi-squared distribution.
CHIINV Returns the inverse of the one-tailed probability of thechi-squared distribution.
CHITEST Returns the test for independence.
COUNTBLANK Counts the number of blank cells within a range.
CRITBINOM Returns the smallest value for which the cumulative binomialdistribution is less than or equal to a criterion value.
FDIST Returns the F probability distribution.
FINV Returns the inverse of the F probability distribution.
FREQUENCY Returns a frequency distribution as a vertical array.
FTEST Returns the result of an F-test.
GAMMADIST Returns the gamma distribution.
GAMMAINV Returns the inverse of the gamma cumulative distribution.
GAMMALN Returns the natural logarithm of the gamma function, G(x).
HYPGEOMDIST Returns the hyper geometric distribution.
LOGINV Returns the inverse of the lognormal distribution.
LOGNORMDIST Returns the cumulative lognormal distribution.
NEGBINOMDIST Returns the negative binomial distribution.
PERCENTILE Returns the k-th percentile of values in a range.
PERCENTRANK Returns the percentage rank of a value in a data set.
POISSON Returns the Poisson distribution.
PROB Returns the probability that values in a range are between twolimits.
QUARTILE Returns the quartile of a data set.
RANK Returns the rank of a number in a list of numbers.
TDIST Returns the Student's t-distribution.
TINV Returns the inverse of the Student's t-distribution.
TRIMMEAN Returns the mean of the interior of a data set.
TTEST Returns the probability associated with a Student's t-test.
ZTEST Returns the one-tailed probability-value of a z-test.
Appendix B. Unsupported Excel Functions - CXL Web 193

Text and Data FunctionsThis table lists the text and data functions that are not supported in CXL Web.
Function Description
ASC Changes full-width (double-byte) English letters or katakanawithin a character string to half-width (single-byte) characters.
BAHTTEXT Converts a number to text, using the ß (baht) currency format.
JIS Changes half-width (single-byte) English letters or katakanawithin a character string to full-width (double-byte) characters.
PHONETIC Extracts the phonetic (furigana) characters from a text string.
AutoShapes CXL Web does not support Microsoft Office Autoshapes.
194 IBM Cognos Express Xcelerator Version 10.1.0: Developer Guide

Notices
This information was developed for products and services offered worldwide.
IBM may not offer the products, services, or features discussed in this document inother countries. Consult your local IBM representative for information on theproducts and services currently available in your area. Any reference to an IBMproduct, program, or service is not intended to state or imply that only that IBMproduct, program, or service may be used. Any functionally equivalent product,program, or service that does not infringe any IBM intellectual property right maybe used instead. However, it is the user's responsibility to evaluate and verify theoperation of any non-IBM product, program, or service. This document maydescribe products, services, or features that are not included in the Program orlicense entitlement that you have purchased.
IBM may have patents or pending patent applications covering subject matterdescribed in this document. The furnishing of this document does not grant youany license to these patents. You can send license inquiries, in writing, to:
IBM Director of LicensingIBM CorporationNorth Castle DriveArmonk, NY 10504-1785U.S.A.
For license inquiries regarding double-byte (DBCS) information, contact the IBMIntellectual Property Department in your country or send inquiries, in writing, to:
Intellectual Property LicensingLegal and Intellectual Property LawIBM Japan Ltd.1623-14, Shimotsuruma, Yamato-shiKanagawa 242-8502 Japan
The following paragraph does not apply to the United Kingdom or any othercountry where such provisions are inconsistent with local law: INTERNATIONALBUSINESS MACHINES CORPORATION PROVIDES THIS PUBLICATION "AS IS"WITHOUT WARRANTY OF ANY KIND, EITHER EXPRESS OR IMPLIED,INCLUDING, BUT NOT LIMITED TO, THE IMPLIED WARRANTIES OFNON-INFRINGEMENT, MERCHANTABILITY OR FITNESS FOR A PARTICULARPURPOSE. Some states do not allow disclaimer of express or implied warranties incertain transactions, therefore, this statement may not apply to you.
This information could include technical inaccuracies or typographical errors.Changes are periodically made to the information herein; these changes will beincorporated in new editions of the publication. IBM may make improvementsand/or changes in the product(s) and/or the program(s) described in thispublication at any time without notice.
Any references in this information to non-IBM Web sites are provided forconvenience only and do not in any manner serve as an endorsement of those Websites. The materials at those Web sites are not part of the materials for this IBMproduct and use of those Web sites is at your own risk.
© Copyright IBM Corp. 2007, 2012 195

IBM may use or distribute any of the information you supply in any way itbelieves appropriate without incurring any obligation to you.
Licensees of this program who wish to have information about it for the purposeof enabling: (i) the exchange of information between independently createdprograms and other programs (including this one) and (ii) the mutual use of theinformation which has been exchanged, should contact:
IBM Software GroupAttention: Licensing3755 Riverside DrOttawa, ON K1V 1B7Canada
Such information may be available, subject to appropriate terms and conditions,including in some cases, payment of a fee.
The licensed program described in this document and all licensed materialavailable for it are provided by IBM under terms of the IBM Customer Agreement,IBM International Program License Agreement or any equivalent agreementbetween us.
Any performance data contained herein was determined in a controlledenvironment. Therefore, the results obtained in other operating environments mayvary significantly. Some measurements may have been made on development-levelsystems and there is no guarantee that these measurements will be the same ongenerally available systems. Furthermore, some measurements may have beenestimated through extrapolation. Actual results may vary. Users of this documentshould verify the applicable data for their specific environment.
Information concerning non-IBM products was obtained from the suppliers ofthose products, their published announcements or other publicly available sources.IBM has not tested those products and cannot confirm the accuracy ofperformance, compatibility or any other claims related to non-IBM products.Questions on the capabilities of non-IBM products should be addressed to thesuppliers of those products.
All statements regarding IBM's future direction or intent are subject to change orwithdrawal without notice, and represent goals and objectives only.
This information contains examples of data and reports used in daily businessoperations. To illustrate them as completely as possible, the examples include thenames of individuals, companies, brands, and products. All of these names arefictitious and any similarity to the names and addresses used by an actual businessenterprise is entirely coincidental.
If you are viewing this information softcopy, the photographs and colorillustrations may not appear.
196 IBM Cognos Express Xcelerator Version 10.1.0: Developer Guide
Trademarks
IBM, the IBM logo, ibm.com, TM1, Express, and Cognos are trademarks orregistered trademarks of International Business Machines Corp., registered in manyjurisdictions worldwide. Other product and service names might be trademarks ofIBM or other companies. A current list of IBM trademarks is available on the Webat “ Copyright and trademark information ” at www.ibm.com/legal/copytrade.shtml.
The following terms are trademarks or registered trademarks of other companies:v Microsoft, Windows, Windows NT, and the Windows logo are trademarks of
Microsoft Corporation in the United States, other countries, or both.v Java and all Java-based trademarks and logos are trademarks or registered
trademarks of Oracle and/or its affiliates.
Notices 197

198 IBM Cognos Express Xcelerator Version 10.1.0: Developer Guide
Index
Special characters/ (forward slash) in rules 44\\ (backslash) in rules 44% (percent sign) in rules 45| (pipe) in rules 45& (ampersand) in rules 45}Externals subdirectory
Excel files 79~ (tilde) in rules 45
Aaccess privileges
admin 103assigning to chores 114assigning to cubes 108assigning to dimensions 111assigning to elements 109assigning to processes 112consolidated elements 110interactions 107lock 104, 106none 107read 105, 107replication rights 39reserve 106write 106
Action buttonadding to a worksheet 119advanced navigation and mapping options 128appearance properties 128modifying 132moving and resizing 132navigating to another worksheet 124overview 119running a process and navigating to a worksheet 126
aliasesDimension Editor 24element attributes 13samples 13
applicationadmin access privilege 104none access privilege 107read access privilege 105security privileges 114
applicationsadding file references 79adding object references 77converting from private to public 88converting from public to private 88creating and managing 74creating secondary-level 76deleting references 85location on server 72overview 71private 88privatizing public 89privatizing public applications 88public 88publishing 74, 88
applications (continued)publishing private references 88publishing to Web client 90references to private subsets 78references to private views 78renaming references 86security privileges 73, 86top-level 74viewing logical groupings 89working with references 84
Area (rule target) 42assigning security rights 103asymmetrical cubes
linking 59attributes
examples 13format 14overview 13versus elements 15
Bbypassing rules statements 48
Ccalculating averages
rules statements 58cell-level security
consolidations 115leaf elements 115security control cube 115
childadding to consolidated elements 18
chorenone access privilege 107read access privilege 105security 114
circular references (rules) 52comparison operators
rules formulas 45conditional logic
rules formulas 44consolidated elements 110
adding children 18defined 12defining with dimension worksheets 27deleting elements 19
consolidationscreating with weight factors 10multiple paths within a single dimension 11versus rules 12
constantsrules formulas 43
control cubes}PickList 35
cubeadmin access privilege 103as lookup tables 97assigning access privileges 108
© Copyright IBM Corp. 2007, 2012 199
cube (continued)creating 31creating cube dialog box 31creating with external data sources 30creating with no data 30DB rules function for sharing data 54DBS formula values 100display value formats 14examples 7, 9linking asymmetrical 59loading on demand 33lock access privilege 104locking 109mirror 38none access privilege 107optimizing 32ordering dimensions 30properties 31read access privilege 105releasing 109reserve access privilege 106reserving 109retrieving values using DBR formulas 99rules formulas references 46security 111selecting dimensions 8source 38unlocking 109write access privilege 106
CubeDataReservationAcquire 167CubeDataReservationGet 170CubeDataReservationGetConflicts 171CubeDataReservationRelease 168CubeDataReservationReleaseAll 169Cubeviewer objects
accessing with the URL API 144applying actions 146displaying charts 147opening 144selecting title elements 146setting a global callback function 151setting display properties 145setting event callback functions 149
Ddata
rolling up 9Data Reservation
behavior with other features 160displaying cell status 165enabling 163enabling for cubes 163enabling for user groups 165how to use 159monitoring 165monitoring with TM1 Top utility 166overview 159using functions to monitor 167using with API functions 172using with TurboIntegrator functions 167viewing Audit log events 166when to use 159
Data Reservation API functionserror codes 177TM1DataReservationAcquire 173TM1DataReservationGetAll 175
Data Reservation API functions (continued)TM1DataReservationGetConflicts 176TM1DataReservationRelease 173TM1DataReservationReleaseAll 174TM1DataReservationValidate 176
Data Reservation TurboIntegrator functionsCubeDataReservationAcquire 167CubeDataReservationGet 170CubeDataReservationGetConflicts 171CubeDataReservationRelease 168CubeDataReservationReleaseAll 169
DB rules function 46DBS formulas
creating 100overview 94
debugging ruleschecking FEEDERS 69overview 66tracing calculations 66tracing FEEDERS 68
deletingconsolidated elements 19elements from dimensions 19references from applications 85
dense dimensions 30dialog boxes
Creating Cube 31Dimension Editor
selecting elements 22sorting elements 23using aliases 24
dimensionsadding elements 18adding siblings 17admin access privilege 104admin group 111assigning access privileges 111, 112, 114consolidations 12, 50creating 16creating with Dimension Editor 16deleting elements 19dense 30editing 17hierarchies 9, 27lock access privilege 104locking 112methods for creating 16named levels 28none access privilege 107ordering in cubes 30read access privilege 105releasing 112reserve access privilege 106reserving 112selecting in a cube 8setting order of elements 20, 21sparse 30unlocking 112worksheets 25, 28write access privilege 106
display formatscube values 14setting 15
drill-through processes 60, 62, 63, 64down 10
200 IBM Cognos Express Xcelerator Version 10.1.0: Developer Guide

Eelement attributes
Picklist 35elements
adding siblings 17adding to dimension 16, 18admin access privilege 103assigning access privileges 109changing position within hierarchy 18consolidated 12, 110deleting consolidated 19deleting from dimension 19lock access privilege 104locking 111none access privilege 107numeric 12order in dimensions 20read access privilege 105releasing 110reserve access privilege 106reserving 110security 111select all visible elements 18selecting in Dimension Editor 22setting order from Server Explorer 21setting order in dimensions 20, 21sorting in Dimension Editor 22string 12types 12unlocking 111versus attributes 15weight factors 10write access privilege 106
Excel}Externals subdirectory 79file references 84, 85, 86worksheet functions 179worksheet functions unsupported 189
Ffunctions
date and time 179DB 46, 54financial 180IF 44information 180logical 181lookup and reference 181math and trignometric 182statistical 185STET 48supported Excel worksheet 179text and data 184unsupported 189, 190, 191, 192, 193, 194
Ggroups
assigning security rights 103dimension 115
Hhierarchy levels overview 9
hyperlinksopening uploaded application files 92
IIF function
rules formulas 44importing data
processing worksheets 94
Llevel 0 (dimension hierarchies) 9linking asymmetrical cubes 59loading cubes on demand 33lock access privilege 104, 106logical operators
rules formulas 45
Mmirror cubes 38multidimensionality
diagram 2example 1overview 1
multiple consolidation paths 11
Nnamed hierarchy levels 28naming conventions
Xcelerator objects 3navigation tree objects
accessing with the URL API 152opening 152setting a callback function 153using in HTML mode 153using in XML mode 154XML application node 155XML server node 156XML tree node IDs 156
none access privilege 107numeric
constant in rules formulas 43define elements 12
Oobject references
default actions 84deleting from applications 85renaming 86
objectsdisplay in Server Explorer 89
OLAP 33OLE DB 33operators (rules)
arithmetic 44comparison 45logical 45
optimizing cubes 32
Index 201
Ppick lists
creating 34creating with control cubes 35creating with element attributes 35defining with rules 36dimension 35order of precedence 38static 34subset 34types 34
populating cubesDBS formulas 100
privateapplications 88references in applications 88
processmodifying security data 113none access privilege 107read access privilege 105security 112
publicapplications 88references in applications 88
publishing applications to Web client 90
Rratios
calculating using rules 52read access privilege 105, 107references
admin access privilege 104converting from private to public 88converting from public to private 89none access privilege 107private 88, 89public 88, 89read access privilege 105
renaming application references 86replications
access rights required 39advantages 38cube relationships 38mirror cube 38server relationships 38source cube 38source server 38target server 38
reserve access privilege 106reserved characters
object names 3rolling up 10rules
debugging 66deriving values 41file names 41overview 41pick lists 36Rules Tracer 66versus consolidations 12
rules formulasarithmetic operators 44comparing expressions 45comparsion operators 45conditional logic 44
rules formulas (continued)cube references 46external cube references 46internal cube references 46logical operators 45numeric constants 43syntax 43
rules statementsArea 42arranging 47bypassing 48calculating averages 58calculating ratios 52circular references 52consolidated and numeric elements 47DB function 54DB rules function for sharing cube data 54Formula 42guidelines 42linking asymmetrical cubes 59order of calculation 50overriding dimension consolidations 50precedence over dimension consolidations 50restricting scope 48restricting to simple values 56sample 54sample applications 52specifying target 42STET function 48syntax 42, 54
Rules Tracerchecking FEEDERS 69complex example 67overview 66simple example 67tracing calculations 66tracing FEEDERS 68
rules worksheetscreating 49file names 48overview 48saving 49using 49
Ssecurity
access privileges 103applications 114applying privileges to applications 86, 114cell-level 115chores 114cube-level 108, 111dimension-level 111element-level 109, 111group 111group rights 103processes 112references 114rights interaction 107
Security Access option 113security control cube 115server
source 38target 38
Server Explorersetting element order 21
202 IBM Cognos Express Xcelerator Version 10.1.0: Developer Guide
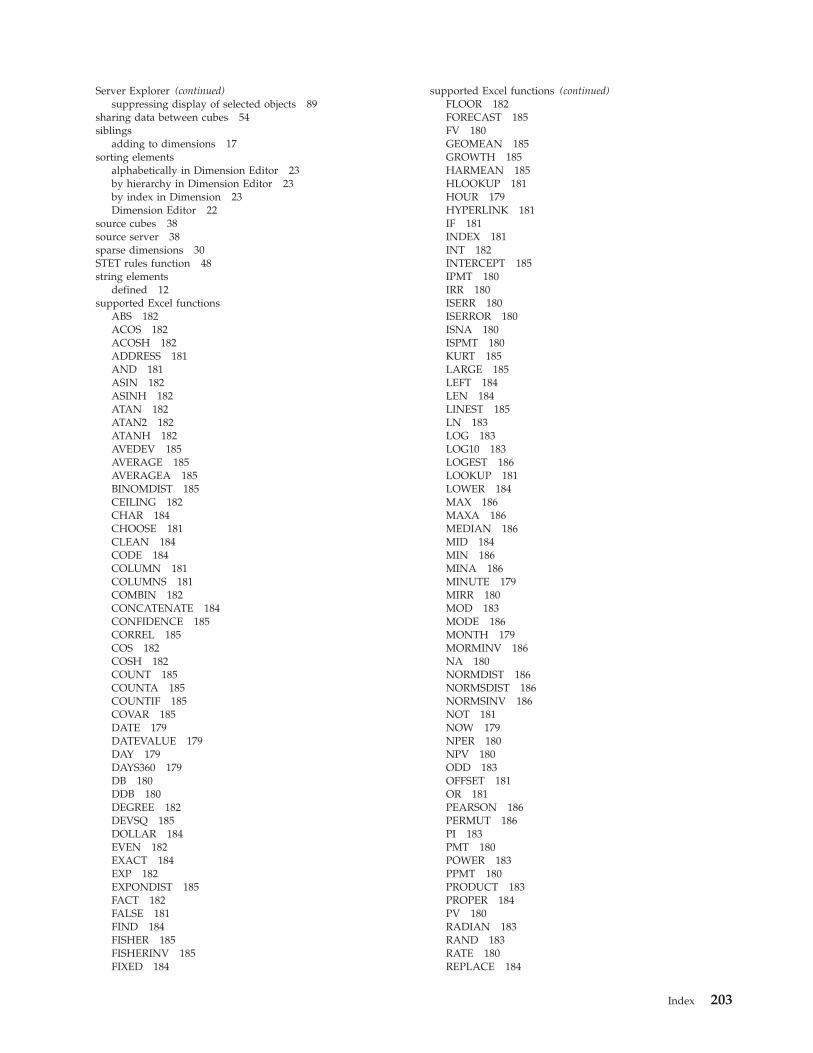
Server Explorer (continued)suppressing display of selected objects 89
sharing data between cubes 54siblings
adding to dimensions 17sorting elements
alphabetically in Dimension Editor 23by hierarchy in Dimension Editor 23by index in Dimension 23Dimension Editor 22
source cubes 38source server 38sparse dimensions 30STET rules function 48string elements
defined 12supported Excel functions
ABS 182ACOS 182ACOSH 182ADDRESS 181AND 181ASIN 182ASINH 182ATAN 182ATAN2 182ATANH 182AVEDEV 185AVERAGE 185AVERAGEA 185BINOMDIST 185CEILING 182CHAR 184CHOOSE 181CLEAN 184CODE 184COLUMN 181COLUMNS 181COMBIN 182CONCATENATE 184CONFIDENCE 185CORREL 185COS 182COSH 182COUNT 185COUNTA 185COUNTIF 185COVAR 185DATE 179DATEVALUE 179DAY 179DAYS360 179DB 180DDB 180DEGREE 182DEVSQ 185DOLLAR 184EVEN 182EXACT 184EXP 182EXPONDIST 185FACT 182FALSE 181FIND 184FISHER 185FISHERINV 185FIXED 184
supported Excel functions (continued)FLOOR 182FORECAST 185FV 180GEOMEAN 185GROWTH 185HARMEAN 185HLOOKUP 181HOUR 179HYPERLINK 181IF 181INDEX 181INT 182INTERCEPT 185IPMT 180IRR 180ISERR 180ISERROR 180ISNA 180ISPMT 180KURT 185LARGE 185LEFT 184LEN 184LINEST 185LN 183LOG 183LOG10 183LOGEST 186LOOKUP 181LOWER 184MAX 186MAXA 186MEDIAN 186MID 184MIN 186MINA 186MINUTE 179MIRR 180MOD 183MODE 186MONTH 179MORMINV 186NA 180NORMDIST 186NORMSDIST 186NORMSINV 186NOT 181NOW 179NPER 180NPV 180ODD 183OFFSET 181OR 181PEARSON 186PERMUT 186PI 183PMT 180POWER 183PPMT 180PRODUCT 183PROPER 184PV 180RADIAN 183RAND 183RATE 180REPLACE 184
Index 203

supported Excel functions (continued)REPT 184RIGHT 184ROMAN 183ROUND 183ROUNDDOWN 183ROUNDUP 183ROW 182ROWS 182RSQ 186SEARCH 184SECOND 179SIGN 183SIN 183SINH 183SKEW 186SLN 180SLOPE 186SMALL 186SQRT 183STANDARDIZE 186STDEV 186STDEVA 186STDEVP 186STDEVPA 186STEYX 187SUBSTITUTE 184SUM 183SUMIF 183SYD 180T 184TAN 183TANH 183TEXT 184TIME 179TIMEVALUE 179TODAY 179TREND 187TRIM 184TRUE 181UPPER 184VALUE 184VAR 187VARA 187VARP 187VARPA 187VLOOKUP 182WEEKDAY 179WEIBULL 187YEAR 179
syntaxrules formulas 43
Ttarget server 38TM1DataReservationAcquire 173TM1DataReservationGetAll 175TM1DataReservationGetConflicts 176TM1DataReservationRelease 173TM1DataReservationReleaseAll 174TM1DataReservationValidate 176
Uunsupported Excel functions
ACCRINT 190ACCRINTM 190AMORDEGRC 190AMORLINC 190AREAS 192ASC 194BAHTTEXT 194BETADIST 193BETAINV 193CELL 191CHIDIST 193CHIINV 193CHITEST 193COUNTBLANK 193COUPDAYBS 190COUPDAYS 190COUPDAYSNC 190COUPNCD 190COUPNUM 190COUPPCD 190CRITBINOM 193CUMIPMT 190CUMPRINC 190DAVERAGE 189DCOUNT 189DCOUNTA 189DGET 189DISC 190DMAX 189DMIN 189DOLLARDE 190DOLLARFR 190DPRODUCT 189DSTDEV 189DSTDEVP 189DSUM 189DURATION 190DVAR 189DVARP 189EDATE 189EFFECT 190EOMONTH 189ERROR.TYPE 191FACTDOUBLE 192FDIST 193FINV 193FRENQUENCY 193FTEST 193FVSCHEDULE 190GAMMADIST 193GAMMAINV 193GAMMALN 193GCD 192HYPGEOMDIST 193INDIRECT 192INFO 191INTRATE 190ISBLANK 191ISEVEN 191ISLOGICAL 191ISNONTEXT 191ISNUMBER 191ISODD 191ISREF 191ISTEXT 191
204 IBM Cognos Express Xcelerator Version 10.1.0: Developer Guide
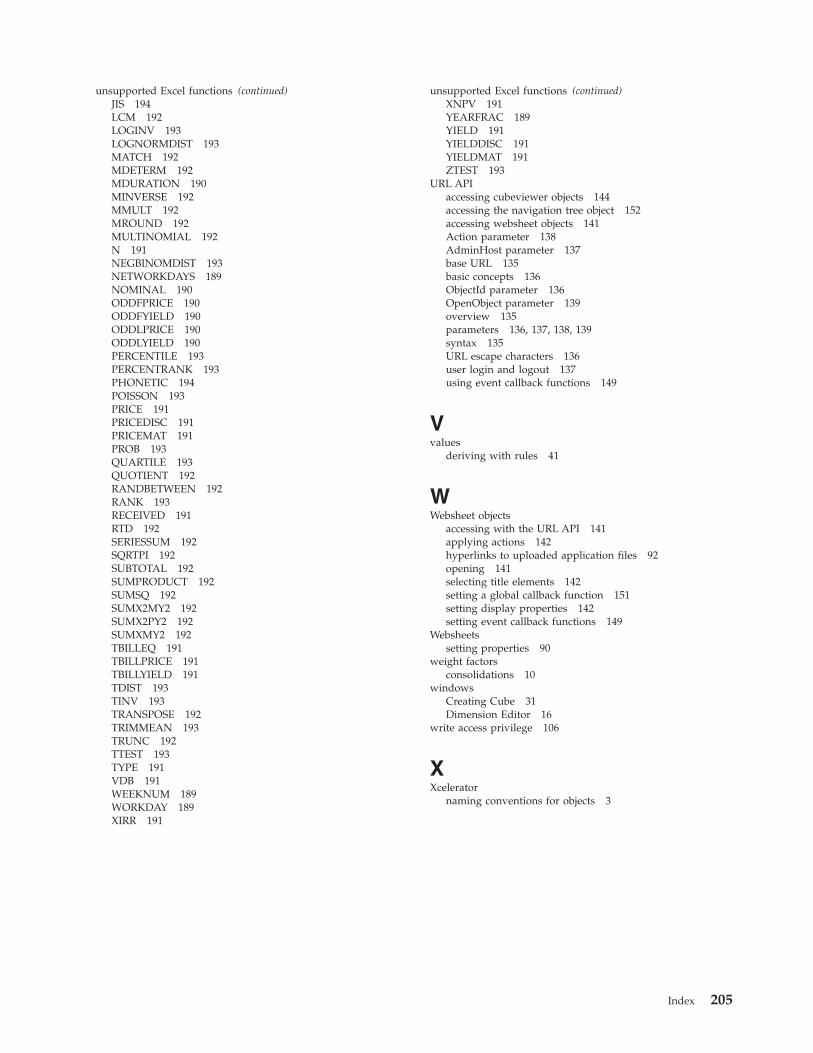
unsupported Excel functions (continued)JIS 194LCM 192LOGINV 193LOGNORMDIST 193MATCH 192MDETERM 192MDURATION 190MINVERSE 192MMULT 192MROUND 192MULTINOMIAL 192N 191NEGBINOMDIST 193NETWORKDAYS 189NOMINAL 190ODDFPRICE 190ODDFYIELD 190ODDLPRICE 190ODDLYIELD 190PERCENTILE 193PERCENTRANK 193PHONETIC 194POISSON 193PRICE 191PRICEDISC 191PRICEMAT 191PROB 193QUARTILE 193QUOTIENT 192RANDBETWEEN 192RANK 193RECEIVED 191RTD 192SERIESSUM 192SQRTPI 192SUBTOTAL 192SUMPRODUCT 192SUMSQ 192SUMX2MY2 192SUMX2PY2 192SUMXMY2 192TBILLEQ 191TBILLPRICE 191TBILLYIELD 191TDIST 193TINV 193TRANSPOSE 192TRIMMEAN 193TRUNC 192TTEST 193TYPE 191VDB 191WEEKNUM 189WORKDAY 189XIRR 191
unsupported Excel functions (continued)XNPV 191YEARFRAC 189YIELD 191YIELDDISC 191YIELDMAT 191ZTEST 193
URL APIaccessing cubeviewer objects 144accessing the navigation tree object 152accessing websheet objects 141Action parameter 138AdminHost parameter 137base URL 135basic concepts 136ObjectId parameter 136OpenObject parameter 139overview 135parameters 136, 137, 138, 139syntax 135URL escape characters 136user login and logout 137using event callback functions 149
Vvalues
deriving with rules 41
WWebsheet objects
accessing with the URL API 141applying actions 142hyperlinks to uploaded application files 92opening 141selecting title elements 142setting a global callback function 151setting display properties 142setting event callback functions 149
Websheetssetting properties 90
weight factorsconsolidations 10
windowsCreating Cube 31Dimension Editor 16
write access privilege 106
XXcelerator
naming conventions for objects 3
Index 205


