108
IBM Informix Version 2.20 IBM Informix Storage Manager Administrator’s Guide SC27-3550-00
IBM InformixVersion 2.20
IBM Informix Storage ManagerAdministrator’s Guide
SC27-3550-00
����

IBM InformixVersion 2.20
IBM Informix Storage ManagerAdministrator’s Guide
SC27-3550-00
����
Note:Before using this information and the product it supports, read the information in “Notices” on page C-1.
This publication includes information about new features and changes in existing functionality.
The following changes and enhancements are relevant to this publication. For a comprehensive list of all newfeatures for this release, see the IBM Informix Getting Started Guide.
This document contains proprietary information of IBM. It is provided under a license agreement and is protectedby copyright law. The information contained in this publication does not include any product warranties, and anystatements provided in this manual should not be interpreted as such.
When you send information to IBM, you grant IBM a nonexclusive right to use or distribute the information in anyway it believes appropriate without incurring any obligation to you.
© Copyright IBM Corporation 1996, 2010.US Government Users Restricted Rights – Use, duplication or disclosure restricted by GSA ADP Schedule Contractwith IBM Corp.
Contents
Introduction . . . . . . . . . . . . . . . . . . . . . . . . . . . . . . . . . viiIn This Introduction . . . . . . . . . . . . . . . . . . . . . . . . . . . . . . . . viiAbout This Publication . . . . . . . . . . . . . . . . . . . . . . . . . . . . . . . vii
Types of Users . . . . . . . . . . . . . . . . . . . . . . . . . . . . . . . . . viiSoftware Dependencies . . . . . . . . . . . . . . . . . . . . . . . . . . . . . . viiiAssumptions About Your Locale . . . . . . . . . . . . . . . . . . . . . . . . . . . viiiDemonstration Database. . . . . . . . . . . . . . . . . . . . . . . . . . . . . . viii
What's New in Storage Manager for IBM Informix, Version 11.70 . . . . . . . . . . . . . . . . . ixExample Code Conventions . . . . . . . . . . . . . . . . . . . . . . . . . . . . . . ixAdditional Documentation. . . . . . . . . . . . . . . . . . . . . . . . . . . . . . . xCompliance with Industry Standards . . . . . . . . . . . . . . . . . . . . . . . . . . . xSyntax Diagrams . . . . . . . . . . . . . . . . . . . . . . . . . . . . . . . . . . x
How to Read a Command-Line Syntax Diagram . . . . . . . . . . . . . . . . . . . . . . xiKeywords and Punctuation . . . . . . . . . . . . . . . . . . . . . . . . . . . . . xiiiIdentifiers and Names . . . . . . . . . . . . . . . . . . . . . . . . . . . . . . xiii
How to Provide Documentation Feedback . . . . . . . . . . . . . . . . . . . . . . . . . xiii
Chapter 1. Informix Storage Manager . . . . . . . . . . . . . . . . . . . . . . 1-1In This Chapter . . . . . . . . . . . . . . . . . . . . . . . . . . . . . . . . . . 1-1What Is ISM? . . . . . . . . . . . . . . . . . . . . . . . . . . . . . . . . . . 1-1
Networker . . . . . . . . . . . . . . . . . . . . . . . . . . . . . . . . . . 1-2ISM Server Tasks . . . . . . . . . . . . . . . . . . . . . . . . . . . . . . . . 1-2
Y2K Compliance . . . . . . . . . . . . . . . . . . . . . . . . . . . . . . . . . 1-3How Do ON-Bar and ISM Fit Together? . . . . . . . . . . . . . . . . . . . . . . . . . 1-3
What Happens During a Backup Operation? . . . . . . . . . . . . . . . . . . . . . . . 1-3What Happens During a Restore Operation? . . . . . . . . . . . . . . . . . . . . . . . 1-4
Configuring ISM . . . . . . . . . . . . . . . . . . . . . . . . . . . . . . . . . 1-5Setting Up ISM on UNIX . . . . . . . . . . . . . . . . . . . . . . . . . . . . . 1-6Setting Up ISM on Windows . . . . . . . . . . . . . . . . . . . . . . . . . . . . 1-7Setting Up ISM Volume Pool Names . . . . . . . . . . . . . . . . . . . . . . . . . . 1-8Setting Up ISM and ON-Bar on UNIX . . . . . . . . . . . . . . . . . . . . . . . . . 1-8Setting ISM Environment Variables and ONCONFIG Parameters . . . . . . . . . . . . . . . . 1-8Updating the onbar Script . . . . . . . . . . . . . . . . . . . . . . . . . . . . . 1-9
Uninstalling ISM . . . . . . . . . . . . . . . . . . . . . . . . . . . . . . . . . 1-9Using ISM with DNS Disabled . . . . . . . . . . . . . . . . . . . . . . . . . . . . 1-11Migrating ISM 1.0 to ISM 2.2 . . . . . . . . . . . . . . . . . . . . . . . . . . . . . 1-11Reverting from ISM 2.2 to ISM 1.0 . . . . . . . . . . . . . . . . . . . . . . . . . . . 1-14Using ISM . . . . . . . . . . . . . . . . . . . . . . . . . . . . . . . . . . . 1-14
Using ISM Administrative Privileges . . . . . . . . . . . . . . . . . . . . . . . . . 1-14Starting and Stopping ISM. . . . . . . . . . . . . . . . . . . . . . . . . . . . . 1-15Reviewing ISM Logs. . . . . . . . . . . . . . . . . . . . . . . . . . . . . . . 1-15
Chapter 2. Configuring ISM Server Properties. . . . . . . . . . . . . . . . . . . 2-1In This Chapter . . . . . . . . . . . . . . . . . . . . . . . . . . . . . . . . . . 2-1Setting the Number of Parallel Data Streams . . . . . . . . . . . . . . . . . . . . . . . . 2-1Setting Target Sessions for a New Device . . . . . . . . . . . . . . . . . . . . . . . . . 2-2Setting the Retention Period for All Data . . . . . . . . . . . . . . . . . . . . . . . . . 2-2Adding, Changing, or Deleting Administrative Users . . . . . . . . . . . . . . . . . . . . . 2-3
Adding the First Administrative User to the ISM Server . . . . . . . . . . . . . . . . . . . 2-3Choosing Acceptable ISM User and Group Names . . . . . . . . . . . . . . . . . . . . . 2-4Deleting an Administrative User . . . . . . . . . . . . . . . . . . . . . . . . . . . 2-5
Connecting to a Different ISM Server . . . . . . . . . . . . . . . . . . . . . . . . . . 2-5Using ISM Configuration Parameters to Change the Volume Pool Name . . . . . . . . . . . . . . . 2-6Using ISM Environment Variables . . . . . . . . . . . . . . . . . . . . . . . . . . . 2-7Using ON-Bar Environment Variables with ISM . . . . . . . . . . . . . . . . . . . . . . . 2-8
© Copyright IBM Corp. 1996, 2010 iii
Chapter 3. Managing Storage Devices . . . . . . . . . . . . . . . . . . . . . . 3-1In This Chapter . . . . . . . . . . . . . . . . . . . . . . . . . . . . . . . . . . 3-1Choosing and Configuring Storage Devices . . . . . . . . . . . . . . . . . . . . . . . . 3-1Adding and Deleting Storage Devices . . . . . . . . . . . . . . . . . . . . . . . . . . 3-2
Enabling and Disabling a Storage Device . . . . . . . . . . . . . . . . . . . . . . . . 3-4Changing Storage-Device Properties . . . . . . . . . . . . . . . . . . . . . . . . . . 3-4Designating a Storage Device as Read-only . . . . . . . . . . . . . . . . . . . . . . . 3-5
Using Tape Drives and Optical Disk Drives as Storage Devices . . . . . . . . . . . . . . . . . . 3-5Using File Systems as Storage Devices . . . . . . . . . . . . . . . . . . . . . . . . . . 3-5Using Storage Devices for Logical-Log Backups . . . . . . . . . . . . . . . . . . . . . . . 3-6Reserving a Storage Device for Cloning . . . . . . . . . . . . . . . . . . . . . . . . . . 3-6Automating Media Management for Tape and Optical Devices . . . . . . . . . . . . . . . . . . 3-8
Enabling Automatic Media Management . . . . . . . . . . . . . . . . . . . . . . . . 3-8Selecting a Storage Volume . . . . . . . . . . . . . . . . . . . . . . . . . . . . . 3-8Relabeling Volumes Automatically . . . . . . . . . . . . . . . . . . . . . . . . . . 3-8Using Unrecognizable Volumes . . . . . . . . . . . . . . . . . . . . . . . . . . . 3-9
Chapter 4. Managing Storage Volumes. . . . . . . . . . . . . . . . . . . . . . 4-1In This Chapter . . . . . . . . . . . . . . . . . . . . . . . . . . . . . . . . . . 4-1Managing the Data Life Cycle . . . . . . . . . . . . . . . . . . . . . . . . . . . . . 4-1
How ISM Uses the Retention Period . . . . . . . . . . . . . . . . . . . . . . . . . . 4-1How ISM Uses Volume Pools . . . . . . . . . . . . . . . . . . . . . . . . . . . . 4-4
Managing Storage Volumes . . . . . . . . . . . . . . . . . . . . . . . . . . . . . . 4-6Labeling a Volume . . . . . . . . . . . . . . . . . . . . . . . . . . . . . . . . 4-7Mounting a Volume . . . . . . . . . . . . . . . . . . . . . . . . . . . . . . . 4-8Choosing Volumes for Mounting . . . . . . . . . . . . . . . . . . . . . . . . . . . 4-8Unmounting Volumes. . . . . . . . . . . . . . . . . . . . . . . . . . . . . . . 4-9Finding a Volume Name . . . . . . . . . . . . . . . . . . . . . . . . . . . . . . 4-9Relabeling a Volume . . . . . . . . . . . . . . . . . . . . . . . . . . . . . . . 4-9
Overriding Automatic Media Management . . . . . . . . . . . . . . . . . . . . . . . . 4-11Disabling a Storage Volume . . . . . . . . . . . . . . . . . . . . . . . . . . . . 4-11Protecting a Storage Volume from Automatic Recycling . . . . . . . . . . . . . . . . . . . 4-11Deleting Volumes from the ISM Catalog . . . . . . . . . . . . . . . . . . . . . . . . 4-11
Cloning Storage Volumes and Save Sets . . . . . . . . . . . . . . . . . . . . . . . . . 4-12Tracking Cloned Data . . . . . . . . . . . . . . . . . . . . . . . . . . . . . . 4-13Cloning Storage Volumes . . . . . . . . . . . . . . . . . . . . . . . . . . . . . 4-13Cloning Save Sets. . . . . . . . . . . . . . . . . . . . . . . . . . . . . . . . 4-14
Chapter 5. Recovering Save Sets with ISM . . . . . . . . . . . . . . . . . . . . 5-1In This Chapter . . . . . . . . . . . . . . . . . . . . . . . . . . . . . . . . . . 5-1Restoring a Save Set with ON-Bar . . . . . . . . . . . . . . . . . . . . . . . . . . . 5-1Locating Volumes That Contain Partial Save Sets . . . . . . . . . . . . . . . . . . . . . . 5-1ReCreating the ISM Catalog Before You Use ON-Bar . . . . . . . . . . . . . . . . . . . . . 5-1Recovering Data from a Cloned Volume . . . . . . . . . . . . . . . . . . . . . . . . . 5-2Recovering Data After a Disaster . . . . . . . . . . . . . . . . . . . . . . . . . . . . 5-3
If You Have the ISM Server Bootstrap Printout . . . . . . . . . . . . . . . . . . . . . . 5-3If You Do Not Have the ISM Server Bootstrap Printout . . . . . . . . . . . . . . . . . . . 5-3Creating and Backing Up the ISM Bootstrap . . . . . . . . . . . . . . . . . . . . . . . 5-4
Transferring Data with the Imported Restore . . . . . . . . . . . . . . . . . . . . . . . . 5-5The ISM_CLIENT and ISM_SERVER Environment Variables . . . . . . . . . . . . . . . . . . 5-5Imported Restore Procedure with Files Larger than 2 GB . . . . . . . . . . . . . . . . . . . 5-5Step 1: Backing Up the Source Database Server to ISM. . . . . . . . . . . . . . . . . . . . 5-6Step 2: Porting ISM to Your Target Database Server . . . . . . . . . . . . . . . . . . . . . 5-8Step 3: Restoring Data from ISM to the Target Database . . . . . . . . . . . . . . . . . . . 5-13
Appendix A. ISM Command-Line Utilities . . . . . . . . . . . . . . . . . . . . A-1ism_add . . . . . . . . . . . . . . . . . . . . . . . . . . . . . . . . . . . . A-1ism_catalog . . . . . . . . . . . . . . . . . . . . . . . . . . . . . . . . . . . A-2ism_chk.pl . . . . . . . . . . . . . . . . . . . . . . . . . . . . . . . . . . . A-3
Specifying the Start and End Times for the Log Report . . . . . . . . . . . . . . . . . . . A-4
iv IBM Informix Storage Manager Administrator’s Guide
Contents of the ism_chk.pl Report . . . . . . . . . . . . . . . . . . . . . . . . . . A-4Sample ism_chk.pl Verbose Output . . . . . . . . . . . . . . . . . . . . . . . . . . A-5
ism_clone . . . . . . . . . . . . . . . . . . . . . . . . . . . . . . . . . . . A-6ism_config . . . . . . . . . . . . . . . . . . . . . . . . . . . . . . . . . . . A-6ism_op . . . . . . . . . . . . . . . . . . . . . . . . . . . . . . . . . . . . A-8ism_rm . . . . . . . . . . . . . . . . . . . . . . . . . . . . . . . . . . . . A-9ism_show . . . . . . . . . . . . . . . . . . . . . . . . . . . . . . . . . . . A-9ism_shutdown . . . . . . . . . . . . . . . . . . . . . . . . . . . . . . . . . A-10
Usage . . . . . . . . . . . . . . . . . . . . . . . . . . . . . . . . . . . A-10ism_startup . . . . . . . . . . . . . . . . . . . . . . . . . . . . . . . . . . A-11
Usage . . . . . . . . . . . . . . . . . . . . . . . . . . . . . . . . . . . A-11ism_watch . . . . . . . . . . . . . . . . . . . . . . . . . . . . . . . . . . . A-12NSR Commands . . . . . . . . . . . . . . . . . . . . . . . . . . . . . . . . . A-12
Appendix B. Accessibility . . . . . . . . . . . . . . . . . . . . . . . . . . . B-1Accessibility features for IBM Informix . . . . . . . . . . . . . . . . . . . . . . . . . . B-1
Accessibility Features . . . . . . . . . . . . . . . . . . . . . . . . . . . . . . . B-1Keyboard Navigation . . . . . . . . . . . . . . . . . . . . . . . . . . . . . . . B-1Related Accessibility Information . . . . . . . . . . . . . . . . . . . . . . . . . . . B-1IBM and Accessibility. . . . . . . . . . . . . . . . . . . . . . . . . . . . . . . B-1
Dotted Decimal Syntax Diagrams. . . . . . . . . . . . . . . . . . . . . . . . . . . . B-1
Notices . . . . . . . . . . . . . . . . . . . . . . . . . . . . . . . . . . . C-1Trademarks . . . . . . . . . . . . . . . . . . . . . . . . . . . . . . . . . . . C-3
Index . . . . . . . . . . . . . . . . . . . . . . . . . . . . . . . . . . . . X-1
Contents v

vi IBM Informix Storage Manager Administrator’s Guide
Introduction
In This Introduction . . . . . . . . . . . . . . . . . . . . . . . . . . . . . . . . viiAbout This Publication . . . . . . . . . . . . . . . . . . . . . . . . . . . . . . . vii
Types of Users . . . . . . . . . . . . . . . . . . . . . . . . . . . . . . . . . viiSoftware Dependencies . . . . . . . . . . . . . . . . . . . . . . . . . . . . . . viiiAssumptions About Your Locale . . . . . . . . . . . . . . . . . . . . . . . . . . . viiiDemonstration Database. . . . . . . . . . . . . . . . . . . . . . . . . . . . . . viii
What's New in Storage Manager for IBM Informix, Version 11.70 . . . . . . . . . . . . . . . . . ixExample Code Conventions . . . . . . . . . . . . . . . . . . . . . . . . . . . . . . ixAdditional Documentation. . . . . . . . . . . . . . . . . . . . . . . . . . . . . . . xCompliance with Industry Standards . . . . . . . . . . . . . . . . . . . . . . . . . . . xSyntax Diagrams . . . . . . . . . . . . . . . . . . . . . . . . . . . . . . . . . . x
How to Read a Command-Line Syntax Diagram . . . . . . . . . . . . . . . . . . . . . . xiKeywords and Punctuation . . . . . . . . . . . . . . . . . . . . . . . . . . . . . xiiiIdentifiers and Names . . . . . . . . . . . . . . . . . . . . . . . . . . . . . . xiii
How to Provide Documentation Feedback . . . . . . . . . . . . . . . . . . . . . . . . . xiii
In This IntroductionThis introduction provides an overview of the information in this manual anddescribes the conventions it uses.
About This PublicationThis publication describes IBM® Informix® Storage Manager Administrator’s Guide(ISM), which manages storage devices and media for your Informix databaseserver. Use ISM with ON-Bar to back up and restore database server data.
Types of UsersThis manual is written for the following users:v Database administratorsv Database server administratorsv Backup operators
This manual is written with the assumption that you have the followingbackground:v Familiarity with the ON-Bar backup and restore utility
For more information about ON-Bar, refer to the IBM Informix Backup and RestoreGuide
v A working knowledge of your computer, your operating system, and the utilitiesthat your operating system provides
v Some experience working with relational databases or exposure to databaseconcepts
If you have limited experience with relational databases, SQL, or your operatingsystem, refer to the IBM Informix Getting Started Guide for your database server fora list of supplementary titles.
© Copyright IBM Corp. 1996, 2010 vii

Software DependenciesISM supports the following database servers:v IBM Informix, Version 7.3xv IBM Informix Dynamic Server with Advanced Decision Support and Extended
Parallel Options, Version 8.2xv IBM Informix Extended Parallel Server, Version 8.3xv IBM Informix Extended Parallel Server, Version 8.4v IBM Informix Extended Parallel Server, Version 8.51v IBM Informix, Version 9.2xv IBM Informix, Version 9.3v IBM Informix Dynamic Server with J/Foundation, Version 9.3v IBM Informix, Version 9.40v IBM Informix, Version 10.0v IBM Informix, Version 11.10 and later
Assumptions About Your LocaleIBM Informix products can support many languages, cultures, and code sets. Allthe information related to character set, collation, and representation of numericdata, currency, date, and time is brought together in a single environment, called aGlobal Language Support (GLS) locale.
The examples in this manual are written with the assumption that you are usingthe default locale, en_us.8859-1. This locale supports U.S. English formatconventions for date, time, and currency. In addition, this locale supports the ISO8859-1 code set, which includes the ASCII code set plus many 8-bit characters suchas é, è, and ñ.
If you plan to use nondefault characters in your data or your SQL identifiers, or ifyou want to conform to the nondefault collation rules of character data, you needto specify the appropriate nondefault locale.
For instructions on how to specify a nondefault locale, additional syntax, and otherconsiderations related to GLS locales, see the IBM Informix GLS User's Guide.
Demonstration DatabaseThe DB-Access utility, provided with the database server products, includes one ormore of the following demonstration databases:v The stores_demo database illustrates a relational schema with information about
a fictitious wholesale sporting-goods distributor. Many examples in IBMInformix manuals are based on the stores_demo database.
Extended Parallel Server
v The sales_demo database illustrates a dimensional schema for data-warehousing applications. For conceptual information about dimensional datamodeling, see the IBM Informix Database Design and Implementation Guide.
End of Extended Parallel Server
Dynamic Server
viii IBM Informix Storage Manager Administrator’s Guide
v The superstores_demo database illustrates an object-relational schema. Thesuperstores_demo database contains examples of extended data types, type andtable inheritance, and user-defined routines.
End of Dynamic Server
For information about how to create and populate the demonstration databases,see the IBM Informix DB–Access User's Guide. For descriptions of the databases andtheir contents, see the IBM Informix Guide to SQL: Reference.
The scripts that you use to install the demonstration databases reside in the$INFORMIXDIR/bin directory on UNIX and in the %INFORMIXDIR%\bindirectory on Windows.
What's New in Storage Manager for IBM Informix, Version 11.70This publication includes information about new features and changes in existingfunctionality.
The following changes and enhancements are relevant to this publication. For acomprehensive list of new features for this release, see the IBM Informix GettingStarted Guide.
Table 1. What's New in IBM Informix Storage Manager Administrator's Guide for Version11.70
Overview Reference
New editions and product names:
Dynamic Server editions were withdrawnand new Informix editions are available.Some products were also renamed. Thepublications in the Informix library pertain tothe following products:
v IBM Informix database server, formerlyknown as IBM Informix Dynamic Server(IDS)
v IBM Informix OpenAdmin Tool forInformix, formerly known as OpenAdminTool for Informix Dynamic Server (IDS)
v IBM Informix SQL Warehousing Tool,formerly known as Informix WarehouseFeature
For more information about the Informixproduct family, go to http://www.ibm.com/software/data/informix/;.
Example Code ConventionsExamples of SQL code occur throughout this publication. Except as noted, the codeis not specific to any single IBM Informix application development tool.
If only SQL statements are listed in the example, they are not delimited bysemicolons. For instance, you might see the code in the following example:CONNECT TO stores_demo...
DELETE FROM customerWHERE customer_num = 121
Introduction ix
...
COMMIT WORKDISCONNECT CURRENT
To use this SQL code for a specific product, you must apply the syntax rules forthat product. For example, if you are using an SQL API, you must use EXEC SQLat the start of each statement and a semicolon (or other appropriate delimiter) atthe end of the statement. If you are using DB-Access, you must delimit multiplestatements with semicolons.
Tip: Ellipsis points in a code example indicate that more code would be added ina full application, but it is not necessary to show it to describe the conceptbeing discussed.
For detailed directions on using SQL statements for a particular applicationdevelopment tool or SQL API, see the documentation for your product.
Additional DocumentationDocumentation about this release of IBM Informix products is available in variousformats.
All of the product documentation (including release notes, machine notes, anddocumentation notes) is available from the information center on the Web athttp://publib.boulder.ibm.com/infocenter/idshelp/v117/index.jsp. Alternatively,you can access or install the product documentation from the Quick Start CD thatis shipped with the product.
Compliance with Industry StandardsIBM Informix products are compliant with various standards.
The American National Standards Institute (ANSI) and the InternationalOrganization of Standardization (ISO) have jointly established a set of industrystandards for the Structured Query Language (SQL). IBM Informix SQL-basedproducts are fully compliant with SQL-92 Entry Level (published as ANSIX3.135-1992), which is identical to ISO 9075:1992. In addition, many features ofIBM Informix database servers comply with the SQL-92 Intermediate and FullLevel and X/Open SQL Common Applications Environment (CAE) standards.
Syntax DiagramsSyntax diagrams use special components to describe the syntax for statements andcommands.
Table 2. Syntax Diagram Components
Component represented in PDF Component represented in HTML Meaning
>>---------------------- Statement begins.
-----------------------> Statement continues on nextline.
>----------------------- Statement continues fromprevious line.
x IBM Informix Storage Manager Administrator’s Guide
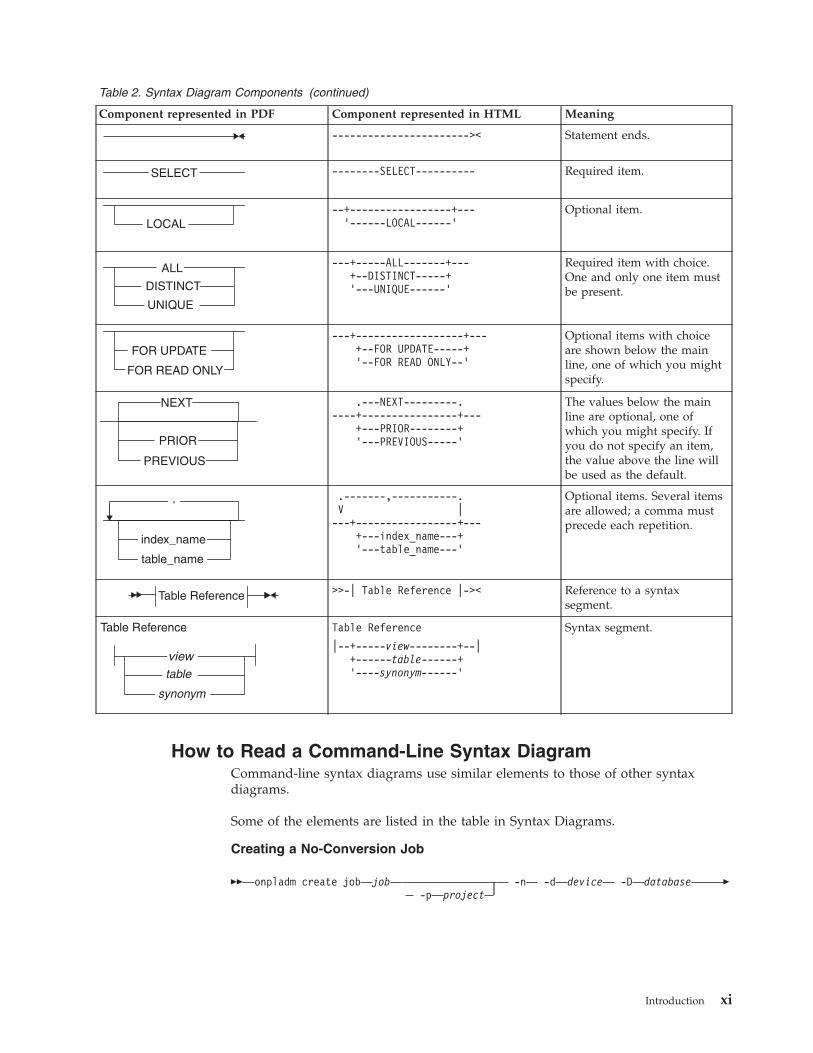
Table 2. Syntax Diagram Components (continued)
Component represented in PDF Component represented in HTML Meaning
----------------------->< Statement ends.
--------SELECT---------- Required item.
--+-----------------+---'------LOCAL------'
Optional item.
---+-----ALL-------+---+--DISTINCT-----+'---UNIQUE------'
Required item with choice.One and only one item mustbe present.
---+------------------+---+--FOR UPDATE-----+'--FOR READ ONLY--'
Optional items with choiceare shown below the mainline, one of which you mightspecify.
.---NEXT---------.----+----------------+---
+---PRIOR--------+'---PREVIOUS-----'
The values below the mainline are optional, one ofwhich you might specify. Ifyou do not specify an item,the value above the line willbe used as the default.
.-------,-----------.V |---+-----------------+---
+---index_name---+'---table_name---'
Optional items. Several itemsare allowed; a comma mustprecede each repetition.
>>-| Table Reference |->< Reference to a syntaxsegment.
Table Reference
|--+-----view--------+--|+------table------+'----synonym------'
Syntax segment.
How to Read a Command-Line Syntax DiagramCommand-line syntax diagrams use similar elements to those of other syntaxdiagrams.
Some of the elements are listed in the table in Syntax Diagrams.
Creating a No-Conversion Job
�� onpladm create job job-p project
-n -d device -D database �
Introduction xi
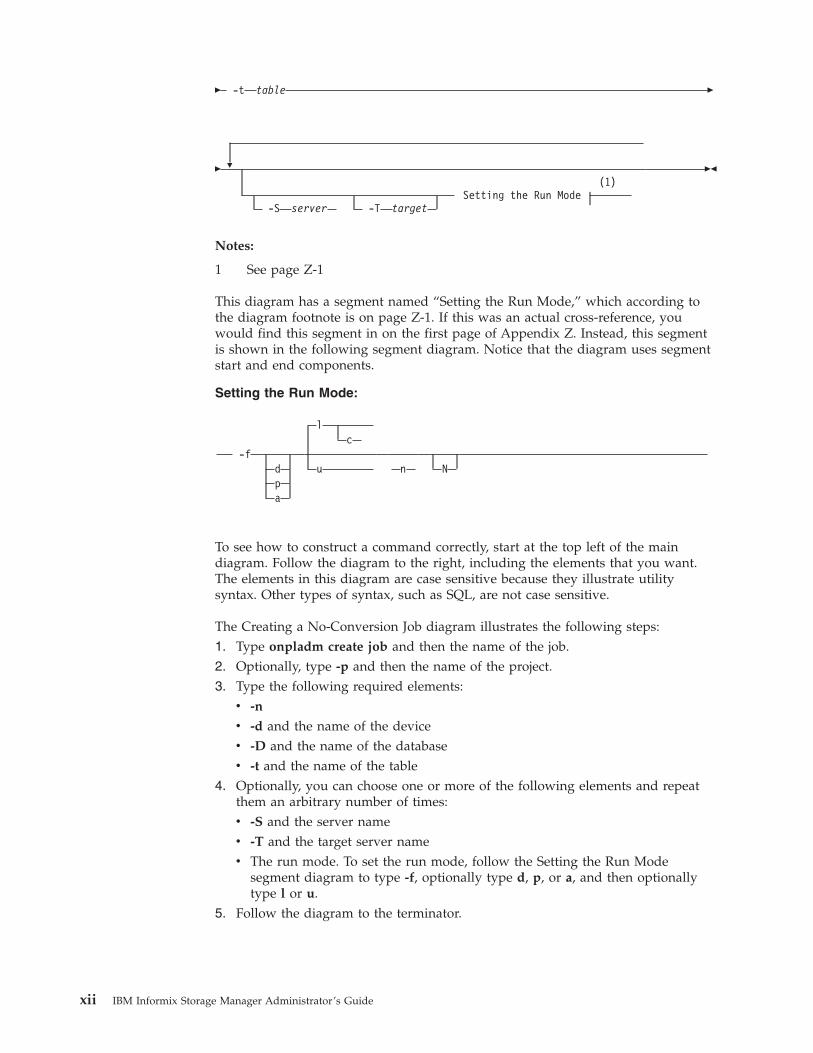
� -t table �
� �(1)
Setting the Run Mode-S server -T target
��
Notes:
1 See page Z-1
This diagram has a segment named “Setting the Run Mode,” which according tothe diagram footnote is on page Z-1. If this was an actual cross-reference, youwould find this segment in on the first page of Appendix Z. Instead, this segmentis shown in the following segment diagram. Notice that the diagram uses segmentstart and end components.
Setting the Run Mode:
-fdpa
lc
u n N
To see how to construct a command correctly, start at the top left of the maindiagram. Follow the diagram to the right, including the elements that you want.The elements in this diagram are case sensitive because they illustrate utilitysyntax. Other types of syntax, such as SQL, are not case sensitive.
The Creating a No-Conversion Job diagram illustrates the following steps:1. Type onpladm create job and then the name of the job.2. Optionally, type -p and then the name of the project.3. Type the following required elements:v -n
v -d and the name of the devicev -D and the name of the databasev -t and the name of the table
4. Optionally, you can choose one or more of the following elements and repeatthem an arbitrary number of times:v -S and the server namev -T and the target server namev The run mode. To set the run mode, follow the Setting the Run Mode
segment diagram to type -f, optionally type d, p, or a, and then optionallytype l or u.
5. Follow the diagram to the terminator.
xii IBM Informix Storage Manager Administrator’s Guide
Keywords and PunctuationKeywords are words reserved for statements and all commands exceptsystem-level commands.
When a keyword appears in a syntax diagram, it is shown in uppercase letters.When you use a keyword in a command, you can write it in uppercase orlowercase letters, but you must spell the keyword exactly as it appears in thesyntax diagram.
You must also use any punctuation in your statements and commands exactly asshown in the syntax diagrams.
Identifiers and NamesVariables serve as placeholders for identifiers and names in the syntax diagramsand examples.
You can replace a variable with an arbitrary name, identifier, or literal, dependingon the context. Variables are also used to represent complex syntax elements thatare expanded in additional syntax diagrams. When a variable appears in a syntaxdiagram, an example, or text, it is shown in lowercase italic.
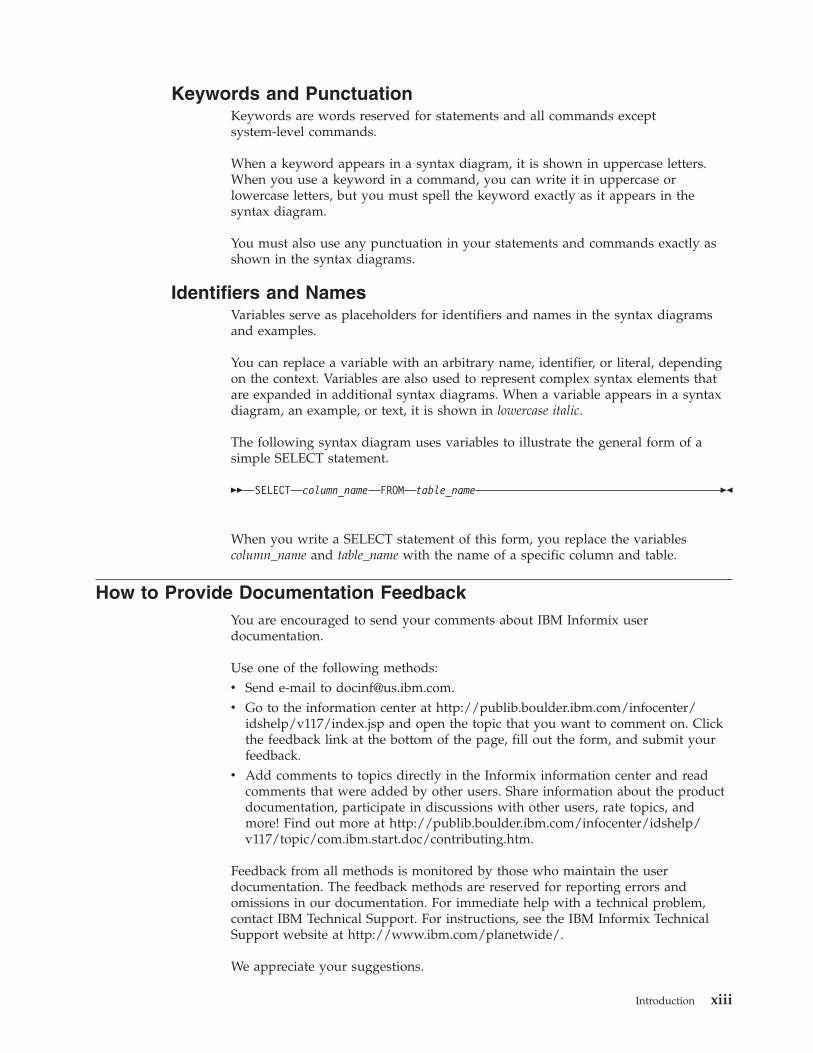
The following syntax diagram uses variables to illustrate the general form of asimple SELECT statement.
�� SELECT column_name FROM table_name ��
When you write a SELECT statement of this form, you replace the variablescolumn_name and table_name with the name of a specific column and table.
How to Provide Documentation FeedbackYou are encouraged to send your comments about IBM Informix userdocumentation.
Use one of the following methods:v Send e-mail to [email protected] Go to the information center at http://publib.boulder.ibm.com/infocenter/
idshelp/v117/index.jsp and open the topic that you want to comment on. Clickthe feedback link at the bottom of the page, fill out the form, and submit yourfeedback.
v Add comments to topics directly in the Informix information center and readcomments that were added by other users. Share information about the productdocumentation, participate in discussions with other users, rate topics, andmore! Find out more at http://publib.boulder.ibm.com/infocenter/idshelp/v117/topic/com.ibm.start.doc/contributing.htm.
Feedback from all methods is monitored by those who maintain the userdocumentation. The feedback methods are reserved for reporting errors andomissions in our documentation. For immediate help with a technical problem,contact IBM Technical Support. For instructions, see the IBM Informix TechnicalSupport website at http://www.ibm.com/planetwide/.
We appreciate your suggestions.
Introduction xiii

xiv IBM Informix Storage Manager Administrator’s Guide
Chapter 1. Informix Storage Manager
In This Chapter . . . . . . . . . . . . . . . . . . . . . . . . . . . . . . . . . . 1-1What Is ISM? . . . . . . . . . . . . . . . . . . . . . . . . . . . . . . . . . . 1-1
Networker . . . . . . . . . . . . . . . . . . . . . . . . . . . . . . . . . . 1-2ISM Server Tasks . . . . . . . . . . . . . . . . . . . . . . . . . . . . . . . . 1-2
Y2K Compliance . . . . . . . . . . . . . . . . . . . . . . . . . . . . . . . . . 1-3How Do ON-Bar and ISM Fit Together? . . . . . . . . . . . . . . . . . . . . . . . . . 1-3
What Happens During a Backup Operation? . . . . . . . . . . . . . . . . . . . . . . . 1-3What Happens During a Restore Operation? . . . . . . . . . . . . . . . . . . . . . . . 1-4
Configuring ISM . . . . . . . . . . . . . . . . . . . . . . . . . . . . . . . . . 1-5Setting Up ISM on UNIX . . . . . . . . . . . . . . . . . . . . . . . . . . . . . 1-6Setting Up ISM on Windows . . . . . . . . . . . . . . . . . . . . . . . . . . . . 1-7Setting Up ISM Volume Pool Names . . . . . . . . . . . . . . . . . . . . . . . . . . 1-8Setting Up ISM and ON-Bar on UNIX . . . . . . . . . . . . . . . . . . . . . . . . . 1-8Setting ISM Environment Variables and ONCONFIG Parameters . . . . . . . . . . . . . . . . 1-8Updating the onbar Script . . . . . . . . . . . . . . . . . . . . . . . . . . . . . 1-9
Uninstalling ISM . . . . . . . . . . . . . . . . . . . . . . . . . . . . . . . . . 1-9Using ISM with DNS Disabled . . . . . . . . . . . . . . . . . . . . . . . . . . . . 1-11Migrating ISM 1.0 to ISM 2.2 . . . . . . . . . . . . . . . . . . . . . . . . . . . . . 1-11Reverting from ISM 2.2 to ISM 1.0 . . . . . . . . . . . . . . . . . . . . . . . . . . . 1-14Using ISM . . . . . . . . . . . . . . . . . . . . . . . . . . . . . . . . . . . 1-14
Using ISM Administrative Privileges . . . . . . . . . . . . . . . . . . . . . . . . . 1-14Starting and Stopping ISM. . . . . . . . . . . . . . . . . . . . . . . . . . . . . 1-15
Preventing Corruption of ISM's Internal Database . . . . . . . . . . . . . . . . . . . . 1-15Reviewing ISM Logs. . . . . . . . . . . . . . . . . . . . . . . . . . . . . . . 1-15
In This ChapterThis chapter provides an overview of how IBM Informix Storage Manager (ISM)works with the ON-Bar utility, which you can use to perform backups andrestores. For more information, see the IBM Informix Backup and Restore Guide.
ISM provides data-storage management services for your Informix database server.ISM receives backup and restore requests from ON-Bar and directs your data toand from storage volumes that are mounted on storage devices. ISM tracksbacked-up data through a data life cycle that the database administrator or systemadministrator determines and can automatically manage your storage devices andstorage volumes.
What Is ISM?ISM includes the following components:v The ISM server for exchanging backup and recovery information between
storage devices and ON-Barv The ISM catalog, which maintains up-to-date records of the backup operations
that have been performed and the media on which the backed-up data is storedv The ISM Administrator program lets you to manage your ISM server and
storage devices from a graphical interface. You can use ISM Administrator tomonitor the progress of your backup and restore operations, manage backed-updata, and control your storage media and storage devices.
© Copyright IBM Corp. 1996, 2010 1-1
The ISM server resides on the same computer as ON-Bar and the Informixdatabase server; your storage devices must be attached to this computer as well.The ISM server runs on UNIX or Windows. ISM supports both 32-bit and 64-bitoperating systems.
NetworkerEMC NetWorker® (formerly Legato NetWorker) is a network storage managementsolution that protects and helps to manage data across an entire network ofcomputers. It manages your data and creates a database of saved data to make iteasy to locate data for recovery. EMC NetWorker is not an IBM Informix utility. Forinformation on using NetWorker nsr commands with ISM, see your EMCNetWorker documentation.
ISM Server TasksFigure 1-1 shows the interaction between ON-Bar, ISM server, and ISM commands.ISM must be running before you can use the ISM commands.
The ISM server performs the following tasks:v Receives backup and restore requests from ON-Barv Manages the data life cycle of your datav Maintains the ISM catalog
The ISM catalog allows you to store related save sets in volumes and to trackrelated volumes by means of volume pools. A volume is a specific backupmedium, such as a disk or reel of magnetic tape. A volume pool is a named setof volumes.
v Creates and saves information that is needed to restore the state of the ISMserver after a disk failure.
The ISM command-line utilities allow you to perform the following tasks:v Add, change, and delete administrative usersv Connect to and administer multiple ISM servers on your networkv Configure up to four storage devices for each ISM serverv Configure up to four active data streamsv Label and mount storage volumes on your storage devicesv Determine how long the ISM server must track backed-up data
Figure 1-1. ON-Bar and ISM Interaction
1-2 IBM Informix Storage Manager Administrator’s Guide
v Manage the storage volumesv Create exact copies of data
For a complete description, see Appendix A, “ISM Command-Line Utilities,” onpage A-1.
Y2K ComplianceISM is Y2K compliant. ISM supports dates in the year 2000 and beyond. Allinternal dates are stored in an internal format that allows representation of datesfrom January 1, 1970 through December 31, 2037. ISM correctly interprets the year2000 as a leap year. When a year is entered as a two-digit specification, ISMinterprets it as follows:v A year entered in the range of 70 - 99 is interpreted as 1970 - 1999v A year entered in the range of 00 - 37 is interpreted as 2000 - 2037v A year entered in the range of 38 - 69 is invalid
How Do ON-Bar and ISM Fit Together?ON-Bar and ISM communicate through an X/Open Backup Services Application(XBSA) Programming Interface, which enables ISM to provide media-managementservices for the database server. Figure 1-1 on page 1-2 illustrates how ON-Bar andISM interact on a network to back up the database server.
You can initiate ON-Bar backup and restore operations with the onbar commandline, the onbar script, or the ON-Bar option in IBM Informix Server Administrator(ISA). For information on how to run ON-Bar commands from ISA, see the ISAonline help.
What Happens During a Backup Operation?The database server administrator or operator uses ON-Bar to request a backupoperation. When the ISM server receives a backup request from ON-Bar, it createsone or more save sets on the storage media as the data is backed up. The ISMserver writes the backup data to storage volumes mounted on storage devices thatare attached to the ISM server. ISM uses volume pools to sort specific data ontopreselected storage volumes in order to help manage your data. For example, bydefault ISM writes data from dbspaces to a collection of volumes in the ISM Datavolume pool and the logical-log files to volumes in the ISM Logs volume pool.
During a backup or restore operation, ISM requests that you mount a labeledstorage volume from the appropriate volume pool on one of the storage devicesattached to the ISM server. You can label and mount a storage volume when youreceive the request from the ISM server, or you can prelabel several volumes andmount them as you need them.
To further automate the labeling and mounting process, you can designate that aspecific storage device must handle all storage media that is loaded in itexclusively as ISM media. This arrangement means that you can load a blank tapein a storage device, and the ISM server labels and mounts it when it needs a newstorage volume for an ON-Bar backup. For more information, see Chapter 4,“Managing Storage Volumes,” on page 4-1.
Chapter 1. Informix Storage Manager 1-3
Figure 1-2 on page 1-4 illustrates how data and requests move between ON-Bar,the ISM server, and the database server during a backup operation. Backuprequests are processed in the following sequence:1. The user uses ON-Bar to start a backup operation.2. ON-Bar determines what data needs to be backed up.3. ON-Bar connects to the ISM server.4. ON-Bar retrieves the data from the appropriate storage spaces or logical logs
on the Informix database server, builds a list of backup objects, and passes it tothe ISM server.
5. The ISM server creates a save set from the data and writes that save set to theproper storage volumes.
6. The ISM server enters a record of the save sets and the storage volumes in theISM catalog.The ISM server uses the ISM catalog to track the save sets and the volumes towhich they are backed up.
7. After the backup operation finishes, ON-Bar disconnects from ISM.8. ON-Bar creates a save set called the ISM server bootstrap, which contains
configuration information about the ISM server for disaster recovery purposes.The ISM server writes the ISM server bootstrap to a volume from the ISMDatavolume pool. You can send the ISM server bootstrap information to the printerthat you designated during installation.
9. ON-Bar writes information about the backup to the database server messagelog and ON-Bar activity log. ISM writes information about the backup to theISM\2.20\logs\messages log.
Use the ism_watch command to track ISM server activity.
Warning: Because ISM server bootstrap information is vital for disaster recovery,keep the most recent bootstrap printout in a safe place.
What Happens During a Restore Operation?The database server administrator or operator uses ON-Bar to request a restoreoperation. When the ISM server receives a restore request from ON-Bar, ISMsearches the ISM catalog to identify the required storage volumes. When ISMrecovers data, ISM requests a specific storage volume by name. To fulfill thisrequest, mount the appropriate storage volume on one of the storage devices thatis attached to the ISM server.
Figure 1-2. Data Movement During an ON-Bar Backup
1-4 IBM Informix Storage Manager Administrator’s Guide
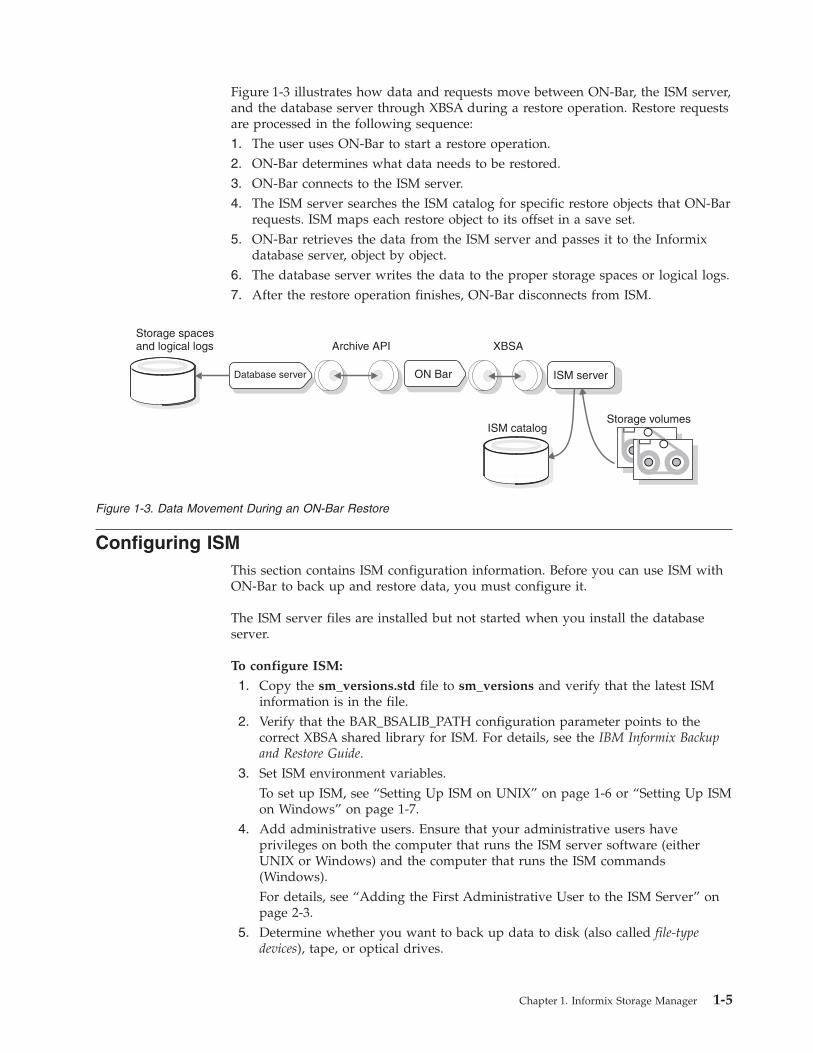
Figure 1-3 illustrates how data and requests move between ON-Bar, the ISM server,and the database server through XBSA during a restore operation. Restore requestsare processed in the following sequence:1. The user uses ON-Bar to start a restore operation.2. ON-Bar determines what data needs to be restored.3. ON-Bar connects to the ISM server.4. The ISM server searches the ISM catalog for specific restore objects that ON-Bar
requests. ISM maps each restore object to its offset in a save set.5. ON-Bar retrieves the data from the ISM server and passes it to the Informix
database server, object by object.6. The database server writes the data to the proper storage spaces or logical logs.7. After the restore operation finishes, ON-Bar disconnects from ISM.
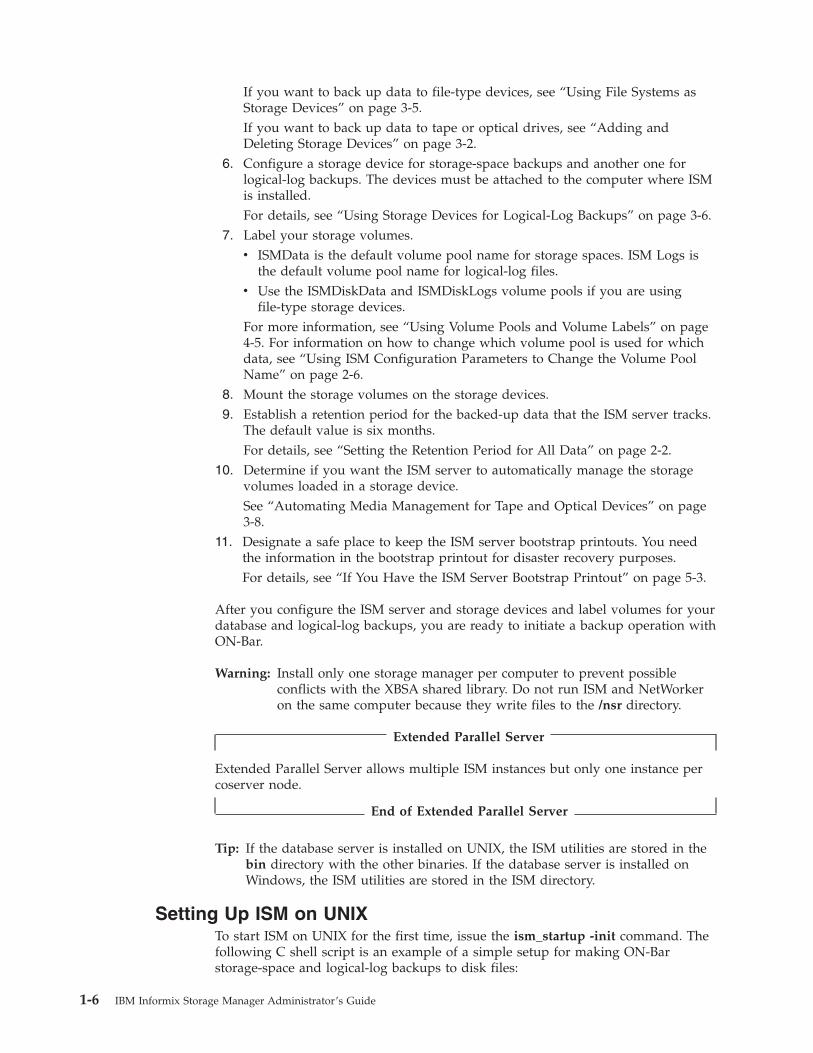
Configuring ISMThis section contains ISM configuration information. Before you can use ISM withON-Bar to back up and restore data, you must configure it.
The ISM server files are installed but not started when you install the databaseserver.
To configure ISM:
1. Copy the sm_versions.std file to sm_versions and verify that the latest ISMinformation is in the file.
2. Verify that the BAR_BSALIB_PATH configuration parameter points to thecorrect XBSA shared library for ISM. For details, see the IBM Informix Backupand Restore Guide.
3. Set ISM environment variables.To set up ISM, see “Setting Up ISM on UNIX” on page 1-6 or “Setting Up ISMon Windows” on page 1-7.
4. Add administrative users. Ensure that your administrative users haveprivileges on both the computer that runs the ISM server software (eitherUNIX or Windows) and the computer that runs the ISM commands(Windows).For details, see “Adding the First Administrative User to the ISM Server” onpage 2-3.
5. Determine whether you want to back up data to disk (also called file-typedevices), tape, or optical drives.
Figure 1-3. Data Movement During an ON-Bar Restore
Chapter 1. Informix Storage Manager 1-5
If you want to back up data to file-type devices, see “Using File Systems asStorage Devices” on page 3-5.If you want to back up data to tape or optical drives, see “Adding andDeleting Storage Devices” on page 3-2.
6. Configure a storage device for storage-space backups and another one forlogical-log backups. The devices must be attached to the computer where ISMis installed.For details, see “Using Storage Devices for Logical-Log Backups” on page 3-6.
7. Label your storage volumes.v ISMData is the default volume pool name for storage spaces. ISM Logs is
the default volume pool name for logical-log files.v Use the ISMDiskData and ISMDiskLogs volume pools if you are using
file-type storage devices.For more information, see “Using Volume Pools and Volume Labels” on page4-5. For information on how to change which volume pool is used for whichdata, see “Using ISM Configuration Parameters to Change the Volume PoolName” on page 2-6.
8. Mount the storage volumes on the storage devices.9. Establish a retention period for the backed-up data that the ISM server tracks.
The default value is six months.For details, see “Setting the Retention Period for All Data” on page 2-2.
10. Determine if you want the ISM server to automatically manage the storagevolumes loaded in a storage device.See “Automating Media Management for Tape and Optical Devices” on page3-8.
11. Designate a safe place to keep the ISM server bootstrap printouts. You needthe information in the bootstrap printout for disaster recovery purposes.For details, see “If You Have the ISM Server Bootstrap Printout” on page 5-3.
After you configure the ISM server and storage devices and label volumes for yourdatabase and logical-log backups, you are ready to initiate a backup operation withON-Bar.
Warning: Install only one storage manager per computer to prevent possibleconflicts with the XBSA shared library. Do not run ISM and NetWorkeron the same computer because they write files to the /nsr directory.
Extended Parallel Server
Extended Parallel Server allows multiple ISM instances but only one instance percoserver node.
End of Extended Parallel Server
Tip: If the database server is installed on UNIX, the ISM utilities are stored in thebin directory with the other binaries. If the database server is installed onWindows, the ISM utilities are stored in the ISM directory.
Setting Up ISM on UNIXTo start ISM on UNIX for the first time, issue the ism_startup -init command. Thefollowing C shell script is an example of a simple setup for making ON-Barstorage-space and logical-log backups to disk files:
1-6 IBM Informix Storage Manager Administrator’s Guide
#!/bin/csh# setup for ISM storage manager
echo “ISM setup begins”
# the user must edit these two lines to select# appropriate disk locations for storage manager use.setenv SM_DISKDEV1 /backups/dbspacessetenv SM_DISKDEV2 /backups/logfiles
# start ISM serverecho “initialize ISM server, must be done as root”ism_startup -init
Important: To make informix the ISM user and thereby ensure informix hasaccess to conduct ISM operations during daily routines, you must runthe following command after any ism_startup -init or ISM installation:ism_add -admin informix@server
# create some devices and media# the ISM user, defined in ism_add -admin, can do these tasksecho “create and mount ISM devices and pools”ism_add -device $SM_DISKDEV1 -type fileism_add -device $SM_DISKDEV2 -type fileism_op -label $SM_DISKDEV1 -pool ISMDiskData -volume ISMDataism_op -label $SM_DISKDEV2 -pool ISMDiskLogs -volume ISMLogsism_op -mount $SM_DISKDEV1ism_op -mount $SM_DISKDEV2echo “end of ISM setup”
To configure ISM to start up automatically:
1. Add $INFORMIXDIR/bin/ism_startup to one of the rc scripts in /etc/rc2.d (onSolaris) to start the ISM server when UNIX boots. Make sure the PRINTERenvironment variable is set correctly.
2. Add $INFORMIXDIR/bin/ism_shutdown -q to one of the rc scripts in/etc/rc0.d to shut down the ISM server when UNIX shuts down.
After you configure ISM, you can set the LOG_BACKUP_MODE configurationparameter to CONT or MANUAL to back up the logical logs. Until ISM isconfigured and available to back up the logical logs, LOG_BACKUP_MODE mustbe set to NONE.
To stop and start ISM manually:
v After you shut down the database server, to shut down ISM, use theism_shutdown command.
v Before you restart the database server, issue the ism_startup command to startISM.
Setting Up ISM on WindowsThe database server installation program creates the following ISM services:v ISM Local Executionv ISM Portmapperv ISM Server
You can use a batch file called ism_startup.bat to set up ISM operations withON-Bar on Windows and start the ISM services. This batch file configures twofile-type devices to back up logical logs and storage spaces. This configuration
Chapter 1. Informix Storage Manager 1-7
allows you to back up logical logs and storage spaces to disk. You must edit thelocations for the SM_DISKDEV1 and SM_DISKDEV2 environment variables asneeded.
You must be a member of the Informix-Admin group to perform these operations.To open a command window for running ISM commands, select Start > Programs> Informix > ol_servername.REM setup for IBM Informix Storage Managerecho “ISM setup begins”
REM this step should be done only onceism_startup -init
Important: To make informix the ISM user and thereby ensure informix hasaccess to conduct ISM operations during daily routines, you must runthe following command after any ism_startup -init or ISM installation:ism_add-admin informix@server
REM user must edit these two lines to select appropriate diskREM locations for storage manager use.set SM_DISKDEV1=\backups\dbspacesset SM_DISKDEV2=\backups\logfiles
REM we need to create some devices and mediaecho “create and mount ISM devices and pools”ism_add -device %SM_DISKDEV1% -type fileism_add -device %SM_DISKDEV2% -type fileism_op -label %SM_DISKDEV1% -pool ISMDiskData -volume ISMDataism_op -label %SM_DISKDEV2% -pool ISMDiskLogs -volume ISMLogsism_op -mount %SM_DISKDEV1%ism_op -mount %SM_DISKDEV2%echo “end of ISM setup”
Setting Up ISM Volume Pool NamesIf you use ISM, you can specify the volume pool names for storage spaces andlogical logs in the ISM_DATA_POOL and ISM_LOG_POOL configurationparameters in the ONCONFIG file. If you do not set these parameters, ISMData isthe default volume pool name for storage spaces and ISMLogs is the defaultvolume pool name for logical logs.
If you are using ISMDiskData and ISMDiskLogs for the volume pool names,update the ISM_DATA_POOL and ISM_LOG_POOL entries in the ONCONFIG filewith those names.
To back up storage spaces and logical logs to the same storage device, set theISM_DATA_POOL and ISM_LOG_POOL parameters in the ONCONFIG file to thesame volume pool name. However, for best restore performance, we recommendthat you back up storage spaces and logical logs to different volume pools ondifferent storage devices.
Setting Up ISM and ON-Bar on UNIX
Setting ISM Environment Variables and ONCONFIGParameters
When you use ISM, you must set certain environment variables that affect the wayin which the ISM server handles requests. For information, see “Using ON-Bar
1-8 IBM Informix Storage Manager Administrator’s Guide
Environment Variables with ISM” on page 2-8.
Dynamic Server
You set these environment variables in the onbar script or in your environment.
End of Dynamic Server
Extended Parallel Server
You can set these environment variables in your environment if you enter onbar-w at the command prompt, or before you start the database server set them instart_worker.sh or start_worker.bat.
End of Extended Parallel Server
Updating the onbar ScriptIf you configure ISM and ON-Bar to use a storage pool other than ISMData, youneed to edit the onbar or onbar.bat script to direct ism_catalog to the storage poolthat you are using. For example, if you use the ISMDiskData pool, make thefollowing changes in the ism_catalog line of the onbar script:
UNIX Only
On UNIX, the command in the onbar script is:\${INFORMIXDIR}/bin/ism_catalog -create_bootstrap -poolISMDiskData
End of UNIX Only
Windows Only
On Windows, the command in the onbar.bat script is:%ISMDIR%\bin\ism_catalog -create_bootstrap -pool ISMDiskData
End of Windows Only
Warning: If the onbar script selects a nonexistent storage pool, ON-Bar seems tohang and a message appears in the ISM log that an operation is waitingfor the ISMData pool to be mounted.
For more information on the onbar script, see the IBM Informix Backup and RestoreGuide.
Uninstalling ISMThe following two sections provide procedures for uninstalling ISM on UNIX andWindows. You must uninstall your currently running ISM in these situations:v Before you reinstall ISM on UNIX or on Windowsv Before you install NetWorker or another storage manager
Chapter 1. Informix Storage Manager 1-9
You must not install ISM on a computer in which a NetWorker server or aNetWorker client is already installed. If you attempt such an installation, it failswith the following message:The ISM setup script detected that another storage manager isinstalled in /nsr, which conflicts with ISM. If you want to setupISM, you need to de-install the other storage manager and thenrun $INFORMIXDIR/bin/ism_startup -init.
For ISM to be installed on a computer that has a NetWorker server or client on it,the NetWorker server or client has to be completely uninstalled first.
To uninstall your currently running ISM on UNIX:
1. Log in as user informix.2. Change to the ISM binaries directory:
cd $INFORMIXDIR/bin
3. Become user root.4. Shut down the ISM daemons:
./ism_shutdown -q
5. Verify that the daemons are shut down:ps -ef | grep nsr
6. Move the ISM executables to a temporary directory:mkdir ./ism.tmpmv ism* ism.tmpmv nsr* ism.tmpmv mm* ism.tmpmv save* ism.tmpmv scanner ism.tmpmv usam ism.tmpmv recover ism.tmp
7. Move the ISM catalogs to a temporary directory:cd $INFORMIXDIRmv ism ism.bak
8. Remove the symbolic link to the ISM catalogs:rm /nsr
9. Remove the call to ism_catalog from the $INFORMIXDIR/onbar script.
Now you are ready to install your new storage manager on UNIX.
Tip: The ism_shutdown command shuts down the ISM daemons nsrd, nsrexecd,nsrmmdbd, and nsrindexd. It does not uninstall ISM, that is, it does notremove the ISM executables in $INFORMIXDIR/bin, the symbolic link /nsr,or the various ISM files in $INFORMIXDIR/ism.
To uninstall your currently running ISM on Windows:
1. Shut down ISM. On a command line enter:ism_shutdown -deinstall
2. Shut down the Informix database server:onmode -yuk
3. Check Settings > Control Panel > Services to see if the database server isdown. If it is not down, wait until it is.
4. Change the user environment variable PATH so that %ISMDIR%\bin is nolonger in the environment variable PATH. You might find:PATH=c:\WINDOWS\system32;d:\ISM\1.00\bin;c:\msdev;
1-10 IBM Informix Storage Manager Administrator’s Guide
Change it to:PATH=c:\WINDOWS\system32;c:\msdev;
5. Rename the directory that contains the ISM executables:rename %ISMDIR% ism.bak
6. Delete the user environment variable ISM DIR.7. Start the Windows registry. On the command line enter:
regedt32
8. Go to HKEY_LOCAL_MACHINE > SOFTWARE > Informix > ISM.With the cursor on ISM, click to select and then choose Edit > Delete from theregistry menu.
Warning: Make sure that ISM is selected. You must have the correct entry. Becareful when you edit the registry because mistakes can corruptWindows.
9. Go to HKEY_LOCAL_MACHINE > SOFTWARE > XBSA.With the cursor on XBSA, click to select and then choose Edit > Delete fromthe registry menu.
Using ISM with DNS Disabled
Windows Only
The domain name service (DNS) translates the host names into internet protocol(IP) addresses. This means that when your computer is not on the network, DNS isdisabled and you need to provide the IP address and hostname in the hosts file.
End of Windows Only
Dynamic Server
For nonnetwork ISM installations with Informix, create a Windows hosts file withthe default local loopback entry as follows:127.0.0.1 localhost
The hosts file is located in C:\WINNT\system32\drivers\etc\hosts. If this entryis not present in the hosts file, you might get the following error when you useISM:nsrmmd #1: unauthorized READ_LABEL call to mmd 1: Access violation -[] unknown host: 127.0.0.1
End of Dynamic Server
Migrating ISM 1.0 to ISM 2.2You can either upgrade ISM 1.0 to ISM 2.2 alone or upgrade ISM with the databaseserver version.
Migration reinstalls the ISM binaries but maintains the ISM data (the catalogs andtape volumes that contain the save sets).
Chapter 1. Informix Storage Manager 1-11
The following section explains how to migrate ISM 1.0 to ISM 2.2. ISM 2.2 includeschanges to the format of data in the ISM catalogs and volumes. Begin thefollowing procedure with ISM 1.0 running on your old database server version.
Important: Do not use ISM 1.0 storage media for future backups after you migratefrom ISM 1.0 to ISM 2.2.
To migrate ISM:
1. Complete a full backup of your system with one of the following commands:onbar -b -wonbar -b -L 0
2. Create a bootstrap of your ISM 1.0 server with the following command:ism_catalog -create_bootstrap -pool ISMData
The bootstrap is a copy of the files and directories in $INFORMIXDIR/ism/mm, index, and res (UNIX) or %ISMDIR%\mm, index, and res (Windows).These directories are backed up into a single save set, called the bootstrap.
3. Shut down the ISM 1.0 server.
UNIX Only
On UNIX:ism_shutdown
End of UNIX Only
Windows Only
On Windows:ism_shutdown -deinstall
End of Windows Only
4. Remove the ISM 1.0 catalogs.
Warning: Do not remove the res directory.
UNIX Only
On UNIX:rm -rf $INFORMIXDIR/ism/indexrm -rf $INFORMIXDIR/ism/mm
End of UNIX Only
Windows Only
On Windows:del %ISMDIR%/indexdel %ISMDIR%/mm
End of Windows Only
1-12 IBM Informix Storage Manager Administrator’s Guide
If you have file-type devices configured in ISM, you cannot move, copy, orrename the directories that contain those devices.
5. Remove ISM 1.0. (This step is optional.)Follow the instructions on how to remove ISM 1.0 in “Uninstalling ISM” onpage 1-9. Use regedt32 to check the registry keys.
6. On Windows, you must rename or remove the ISM 1.0 bin directory becausethe ISM 2.2 installer installs the ISM files in a different directory. Then movethe ISM 2.2 bin directory to the ISM 1.0 bin directory location.
7. Install the new ISM 2.2 files, either separately or with the new database serverversion.
Warning: You must install the new ISM 2.2 files in the same directory as theISM 1.0 files.
8. If you are upgrading ISM on Windows, follow these steps to ensure that ISMis properly configured.a. The installer might have made a Windows command window script for
the Informix environment. The filename of this script is servername.CMD.b. Edit this file to be sure that ISMDIR and PATH are correct for the location
of the ISM 2.2 directory.c. Change the %INFORMIXDIR%\bin\onbar.bat file for any
user-customized references to the ISM directory.d. If necessary, edit the %INFORMIXDIR%\bin\SETISM.BAT file to ensure
that it refers to the ISM 2.2 directory.e. Check your database server configuration file (usually
%INFORMIXDIR%\etc\ONCONFIG.servername). Be sure that theBAR_BSALIB_PATH parameter points to the libbsa.dll in the binsubdirectory of the ISM 2.2 directory.
f. Check Windows system environment variable settings that affect the PATHenvironment variable or that set the ISMDIR environment variable.
g. Copy the sm_versions.std file to create a new sm_versions file.h. If you changed the configuration files, you might need to reboot Windows.
Warning: An error message that an entry point cannot be found in libnsr.dllmeans part of the Windows configuration still references the oldISM installation.
9. Start the ISM server with the following command. Do not initialize the server.ism_startup
10. Place the tape that contains the bootstrap in a device and mount it, if it is notalready mounted.
11. Create an index for your host with the following command:nsrck -c
12. Locate the bootstrap on the tape and note the save-set ID: ism_catalog-find_bootstrap device_name.
13. Recover your bootstrap with the following command:ism_catalog -recover
Important: Do not replace the res directory with the res.R directory. Wait forthe preceding command to issue a message that the index wasfully recovered.
14. Remove all the defined devices with the following command. You mustunmount each device individually.
Chapter 1. Informix Storage Manager 1-13
ism_op -unmount device_name
15. Segregate all ISM 1.0 volumes. Make backups of file-type devices.
Important: For future use, you must store the tape with the bootstrap thatyou created in step 2. Without the bootstrap, you cannot revert toISM 1.0 if you need to.
16. Label new volumes.ISM 2.2 must not write to any ISM 1.0 volumes because they would beunreadable by ISM 1.0 if you chose to revert.ism_op -label device_name -volume volume_name -poolISMData
17. Mount the new volumes with the following command for each device:ism_op -mount device_name
18. Create a new bootstrap to back up the converted indexes.ism_catalog -create_bootstrap -pool ISMData
19. Upgrade the database server to the new version if necessary, and then startthe database server.
20. Immediately perform a level-0 backup.onbar -b -L 0
Reverting from ISM 2.2 to ISM 1.0When you revert the database server to an earlier version, do not revert to ISM 1.0.All versions of the database server, up through Version 9.3, support ISM 2.2. Also,ISM 2.2 is year-2000 compliant, but ISM 1.0 is not. Versions of the database serverwithout ON-Bar are not compatible with ISM.v Because the database server installers install ISM, be sure to preserve the ISM 2.2
directory by renaming it.v To install the earlier database server version, follow the instructions in the IBM
Informix Installation Guide.v To revert to the earlier database server version, follow the instructions in the
IBM Informix Migration Guide.v To restore the ISM directory, copy the new ISM files to the directory that you
renamed earlier and rename the directory to its original name.
If you need to revert the database server and perform a point-in-time restore of theearlier database server version, ISM 2.2 might have the original backups in itscatalog (if you followed the procedure in this manual for upgrading ISM). If thebackups are no longer in the ISM catalog, recover the catalogs from the backupmedia after you revert the database server.
Using ISMTo have access to and be able to run ISM, you must correctly configure certainprivileges and system requirements.
Using ISM Administrative PrivilegesBy default, ISM grants administrative user privileges to root or informix for ISMservers on UNIX and to Administrator for ISM servers on Windows. Only usersincluded in the ISM server administrator list can make configuration changes tothe ISM server. For more details, see “Adding the First Administrative User to theISM Server” on page 2-3.
1-14 IBM Informix Storage Manager Administrator’s Guide

Important: If the ISM server software is running on UNIX, you must have root oruser informix privileges to recover data. For more information, seeChapter 5, “Recovering Save Sets with ISM,” on page 5-1.
Starting and Stopping ISMTo start ISM, issue the following command:ism_startup
To stop ISM, issue the following command:ism_shutdown
Preventing Corruption of ISM's Internal DatabaseAlways shut down the server properly with the ism_shutdown command toprevent corruption of the database accessed by the nsrmmdbd daemon. In theevent that the database becomes corrupted due to improper shutdown or becauseof hardware failure, follow these steps to recreate the client index and the/nsr/mm/mmvolume database:1. Shut down the ISM server with the ism_shutdown command.2. Rename the client index and the volume database using the following
commands:mv nsr_home_directory/index/server_name/db nsr_home_directory/index/server_name/db.old
mv nsr_home_directory/mm/mmvolume nsr_home_directory/mm/mmvolume.old
wherensr_home_directory is the directory where nsr is installed. In most cases it will bensr.server_name is the backup server.The following example uses /nsr as nsr_home_directory and client as server_name:mv /nsr/index/client/db /nsr/index/client/db.old
mv /nsr/mm/mmvolume /nsr/mm/mmvolume.old
3. Restart the ISM server using the ism_startup command.4. Check the consistency of the index files by running the command nsrck -F.5. If necessary, to create new indexes, run the command nsrck -c as user root.
This command will create new indexes in a newly created db subdirectory.
Reviewing ISM LogsThe ISM server maintains two log files in which it records its activities. The firstlog records the requests received and operations that the ISM server performs. Thesecond log records the XBSA messages that the ISM server sends or receives.
To review either of the log files directly, make a copy and open the copy with atext editor. The log files reside in the following locations:
UNIX Only
v On UNIX, the activity log is located in a file named $INFORMIXDIR/ism/logs/daemon.log. The XBSA messages log is located in $INFORMIXDIR/ism/applogs/xbsa.messages.If you have different Informix database servers installed in different directorieson the same computer, you can find the location of the activity log for the activeISM server with the following command:ls -ls /nsr
Chapter 1. Informix Storage Manager 1-15
End of UNIX Only
Windows Only
v On Windows, the activity log is located in a file named %ISMDIR%\logs\daemon.log. The XBSA messages log is located in c:\nsr\applogs\xbsa.messages.
End of Windows Only
For more information on the activity log and XBSA messages log, see “Using ISMEnvironment Variables” on page 2-7.
1-16 IBM Informix Storage Manager Administrator’s Guide
Chapter 2. Configuring ISM Server Properties
In This Chapter . . . . . . . . . . . . . . . . . . . . . . . . . . . . . . . . . . 2-1Setting the Number of Parallel Data Streams . . . . . . . . . . . . . . . . . . . . . . . . 2-1Setting Target Sessions for a New Device . . . . . . . . . . . . . . . . . . . . . . . . . 2-2Setting the Retention Period for All Data . . . . . . . . . . . . . . . . . . . . . . . . . 2-2Adding, Changing, or Deleting Administrative Users . . . . . . . . . . . . . . . . . . . . . 2-3
Adding the First Administrative User to the ISM Server . . . . . . . . . . . . . . . . . . . 2-3Choosing Acceptable ISM User and Group Names . . . . . . . . . . . . . . . . . . . . . 2-4Deleting an Administrative User . . . . . . . . . . . . . . . . . . . . . . . . . . . 2-5
Connecting to a Different ISM Server . . . . . . . . . . . . . . . . . . . . . . . . . . 2-5Using ISM Configuration Parameters to Change the Volume Pool Name . . . . . . . . . . . . . . . 2-6Using ISM Environment Variables . . . . . . . . . . . . . . . . . . . . . . . . . . . 2-7Using ON-Bar Environment Variables with ISM . . . . . . . . . . . . . . . . . . . . . . . 2-8
In This ChapterThis chapter describes how to customize the ISM server properties to suit yourenvironment.
The ISM server connects your Informix database server to your storage devicesand enables you to monitor the progress of your backup and restore operations,manage backed-up data, and control your storage media and storage devices.
Use the ism_config command to change the ISM server properties. For moreinformation, see “ism_config” on page A-6.
Setting the Number of Parallel Data StreamsISM supports up to four parallel data streams. You can adjust the number of datastreams that can be active at one time. When you set this value, it allows you tospecify the number of save sets that are backed up to the ISM serversimultaneously. Backing up save sets in parallel allows your storage devices tooperate at their most efficient levels because they receive a steady stream of data,which is written onto your storage volumes. For example, suppose that you havefour storage devices and set the number of parallel data streams to four. During abackup to all four devices, each device receives one data stream.
To set or adjust the number of data streams that can be backed up in parallel:
1. To display the ISM server properties, use the following command:ism_show -config
The parallelism field in the ism_show -config output indicates the number ofparallel data streams.
2. To change the number of parallel data streams, use the following command:ism_config -streams #datastreams
To back up only one data stream at a time, set the value to 1.ism_config -streams 1
Alternatively, you can perform the following steps in Windows using ISMAdministrator:1. Click Device –> Server Properties.2. Select the General tab.
© Copyright IBM Corp. 1996, 2010 2-1
3. Specify a number in the Maximum Number of Simultaneous Data Streamsfield. To back up only one data stream at a time, set the value to 1.
4. Click OK.
In the following situations, adjust the number of data streams that you back up inparallel:v The ISM server is taking too long to back up all the data streams.
Increase the number of data streams.v The ISM server is so busy backing up data streams that it is not available for
any other tasks.Decrease the number of data streams.
v The ISM server runs out of swap space or memory.Decrease the number of data streams.
Setting Target Sessions for a New DeviceWhen you define and mount multiple devices for the ISMData pool, allstorage-space backups still go to the first device. You can send storage-spacebackups or logical-log backups to multiple devices at the same time.
To use multiple devices:
1. Start ISM in the usual way (ism_startup).2. Define and label all devices (up to 4).3. Shut down ISM in the usual way (ism_shutdown).4. Enter the following command at the prompt:
nsradmin
5. At the nsradmin prompt, enter the following command:print NSR device
6. To update the target sessions variable for your configured devices, enter thefollowing command. You need to enter this command only once to apply it toall configured devices.update target sessions: 1
7. The following information is displayed for each device:update resource id: resource_idtarget sessions: 1;Update?
Enter y.8. Restart ISM in the usual way (ism_startup).
Setting the Retention Period for All DataYou can specify how long the ISM server tracks the data on your storage volumesbefore it designates that a volume is eligible for reuse.
The ISM server maintains an entry for each backed-up save set in the ISM catalogfor the length of time that you set as the retention period. You can use ON-Bar torecover a save set at any time during the retention period for a save set.
When the retention period for a save set expires, the ISM server no longermaintains the save-set entry in the ISM catalog.
2-2 IBM Informix Storage Manager Administrator’s Guide

To obtain information about the expiration date and retention period:
1. To display the expiration date for a save set, issue the ism_show -volumescommand (see the expires field).
2. To display the retention period for the ISM server, issue the ism_show -configcommand (see the retention policy field).
To recover an expired save set, use the ism_catalog -recreate_from command atany point until the storage volume that contains the save set is relabeled. Fordetails on how to recover expired save sets, see “ReCreating the ISM CatalogBefore You Use ON-Bar” on page 5-1.
To set the retention period for the ISM server:
1. To set the length of time before the data is marked Expired, issue the followingcommand:ism_config -retention #days
2. Specify the retention period in days. The default is six months.
Alternatively, you can perform the following steps in Windows using ISMAdministrator:1. Choose Device –> Server Properties to open the Server Properties window and
click the General tab.2. Specify a number and calendar unit in the Retention Period to set the length of
time before the data is marked expired. You can enter a value in days, weeks,months, or years. The default value is six months.
3. Click OK.
Important: Because changing the retention period for the ISM server applies thenew retention period to all the data that the ISM server tracks, somedata might become eligible for automatic recycling either sooner orlater than you expected. Be careful about changing the retention periodfor the ISM server because you can potentially overwrite recentbackups.
For more information on how ISM manages the life cycle of data, see “Managingthe Data Life Cycle” on page 4-1. For details on how to issue ISM commands atthe command line, see Appendix A.
Adding, Changing, or Deleting Administrative UsersTo make configuration changes to the ISM server, label and mount storagevolumes, and initiate cloning operations, you must have administrative userprivileges on the ISM server.
Adding the First Administrative User to the ISM ServerTo administer your ISM server, you need administrative user privileges for thatISM server based on the system on which you run your administrative programs.Administrative user privileges can be granted to individual user accounts, UNIXgroups, or Windows groups. They are typically restricted to an individual system.
When you installed ISM, the local root@server_name for UNIX ISM servers or thelocal Windows Administrators group, Administrators@server_name, for Windows,ISM servers was added as an administrative user by default. To add additional
Chapter 2. Configuring ISM Server Properties 2-3
administrative users, you must log in as either user root or informix on UNIX oras Administrators@server_name on Windows.
For each administrator entry in the list of administrators, the ISM server comparesthe hostname of the administrator with the hostname of the account. If the hostnames match, the ISM server compares the administrator name with both the userand group name of the account. If the administrator name and the user name orgroup name match, the ISM server grants administrative privileges to thatadministrator.
For example, if your ISM server is running on a computer called nova, but you useISM commands on a computer called jupiter, you must log on to nova and addthe user name or group name that you use on jupiter to the nova list of ISMadministrative users. The following numbered steps illustrate:v How to add a user or user group on jupiter as an administrative user to the
ISM server on nova
v How to add a user or user group on nova (other than root, informix, orAdministrator) as an administrative user to the ISM server on nova
To add a user or user group:
1. Log on to nova as user root, informix, or Administrator.2. To add a user or group on jupiter as an administrative user for the ISM server,
run one of the following commands at the command line:v To add a user named karen on jupiter, run the following command:
ism_add -admin karen@jupiter
You might need to qualify the hostname as follows:jupiter.informix.com
v To add a group on jupiter, run the following command:ism_add -admin group_name@jupiter
This user or group can now use any of the ISM command-line utilities on thecomputer jupiter to administer the ISM server on nova.
3. To add other users or groups on nova (the computer that is running the ISMserver) as administrative users for the ISM server, run one of the followingcommands at the command line:v To add a user on nova, run the following command:
ism_add -admin user_name@nova
v To add a group on nova, run the following command:ism_add -admin group_name@nova
This user or group can now use the ISM command-line utilities on nova toadminister the ISM server on nova.
If you are not on the administrative users list and try to make configurationchanges to the ISM server, you receive the following message:user user_name needs to be on administrator's list
Choosing Acceptable ISM User and Group NamesIf you need to restrict the administrative users list so that it does not include root,informix, or Administrators, make sure that the administrative users list includesaccess to the user who started the ISM server. Typically this user is the systemaccount.
2-4 IBM Informix Storage Manager Administrator’s Guide
The following list shows acceptable ISM user and group names.
Acceptable Usage Example
local_group@hostname root@jupiter; Administrators@jupiter
global_group@hostname Domain_Admins@jupiter
account_name@hostname jsmith@[email protected]
wildcard@hostname *@jupiter
account_name@wildcard jsmith@*
Important: Be careful about using wildcards to grant users or groupsadministrative user privileges. If you use a wildcard before the @ sign,you grant ISM administrative user privileges to any user logged ontothat system. If you use a wildcard after the @ sign, you grant ISMadministrative user privileges to any group or account that is namedbefore the @ sign, regardless of location. It is recommended that youavoid using wildcards when you grant administrative user privileges.
ISM does not recognize the following names:@Domain name@unresolved TCP/IP name
ISM displays the following error message:Cannot establish a connection with server 'hostname':Server hostname: Unknown host.
Deleting an Administrative UserEvery user or group in the Administrator list has permission to modify the ISMserver configuration.
To delete an administrative user from the ISM server:
1. Log on as user root, informix, or Administrator.2. Specify the user name or group and hostname in the following command:
ism_rm -admin name@hostname
If you remove yourself as an administrative user, you can no longer administerthe ISM server.
Connecting to a Different ISM ServerIf you have more than one ISM server on your network, you can open aconnection to a different ISM server from your current session. The followingcommands allow you to specify an ISM server on a different computer:v ism_add
v ism_catalog
v ism_clone
v ism_config
v ism_op
v ism_rm
v ism_show
v ism_watch
Chapter 2. Configuring ISM Server Properties 2-5
Alternatively, you can perform the following steps in Windows using ISMAdministrator:1. In the Devices window, click View –> New Window.2. Specify the name of the ISM server to which you want to connect. ISM lists the
last ten ISM servers to which you connected.3. Click OK.
Using ISM Configuration Parameters to Change the Volume Pool NameThe following parameters, when listed in the ONCONFIG configuration file for thedatabase server, affect how the ISM server handles backup and restore requests.
ONCONFIG Parameter Effect on ISM Server
ISM_DATA_POOL If present in the ONCONFIG file, this parameterspecifies the volume pool to be used for backingup dbspaces and other storage spaces. The valuefor this parameter can be any volume pool thatISM recognizes. If this parameter is not present,ISM uses the ISMData volume pool.
ISM_LOG_POOL If present in the ONCONFIG file, this parameterspecifies the volume pool to be used for backingup logical logs. The value for this parameter can beany volume pool that ISM recognizes. If thisparameter is not present, ISM uses the ISMLogsvolume pool.
The following volume pool names are recommended:v ISMData for storing storage spaces on nonfile-type devicesv ISMDiskData for storing storage spaces on file-type devicesv ISMLogs for storing logical logs on nonfile-type devicesv ISMDiskLogs for storing logical logs on file-type devices
You can direct storage-space and logical-log backups to the same device. In thefollowing example, ISMDiskData is the volume pool name for both storage-spaceand logical-log backups. However, you can specify any volume pool name in theONCONFIG file as follows:ISM_DATA_POOL ISMDiskDataISM_LOG_POOL ISMDiskData
If you change the name of either ISMData or ISMLogs, you must also complete thefollowing steps:v Update ISM_DATA_POOL and ISM_LOG_POOL in the ONCONFIG file with
the new names.v Change the create-bootstrap command in the onbar script ($INFORMIXDIR/
bin/onbar or onbar.bat).For example, change ism_catalog -create_bootstrap -pool ISMData toism_catalog -create_bootstrap -pool new_pool_name.
2-6 IBM Informix Storage Manager Administrator’s Guide
If you choose not to use ISM, remove the create_bootstrap command from theonbar script or onbar.bat script.
UNIX Only
On Solaris, if you are a member of the bargroup, it must be your primary group.
End of UNIX Only
For information on the onbar script, see the IBM Informix Backup and Restore Guide.
Using ISM Environment VariablesThe following environment variables control the size and number of log files thatISM maintains.
Environment Variable Description
ISM_MAXLOGSIZE If this variable is not set in the environment of theISM server, its value is 0, which is interpreted asno limit. That is, the system resource is the limit. Ifthis variable is set, the value set is the maximumlog size. When the size of the log reaches thisISM_MAXLOGSIZE value, the log is truncated andit starts over with the next log message.
ISM_MAXLOGVERS If this variable is set in the environment of the ISMserver, the variable specifies the maximum numberof activity-log files to be preserved by the ISMserver. If this environment variable is not set, thedefault number of files to be preserved is four. Ifthe variable is set to a null value, the ISM serverpreserves no activity log files.
ISM_DEBUG_FILE If this variable is set in the environment of the ISMserver, the variable specifies where the XBSAmessages must be written. If you do not set thisvariable, the XBSA messages log is in$INFORMIXDIR/ism/applogs/xbsa.messages onUNIX or c:\nsr\applogs\xbsa.messages onWindows.
When ISM starts up, it checks the length of the activity log. On UNIX, this logresides in the $INFORMIXDIR/ism/logs/daemon.log file. On Windows, the file is%ISMDIR%\logs\daemon.log. If the log file exceeds the threshold that theISM_MAXLOGSIZE environment variable specifies, the ISM server renames it todaemon.001. If a file named daemon.001 is already present, the ISM serverrenames that file to daemon.002, and so on, for all other existing log files up to themaximum number that ISM_MAXLOGVERS specifies.
The ISM server does not monitor the size of the XBSA messages log, which residesin a file named $INFORMIXDIR/ism/applogs/xbsa.messages on UNIX. This logresides in a file named c:\nsr\applogs\xbsa.messages on Windows. Use theISM_DEBUG_FILE environment variable to change the location of the XBSAmessages log.
To manage the growth of this file, set the ISM_DEBUG_LEVEL environmentvariable to 1 (the default) or 0, thereby minimizing or eliminating updates. If you
Chapter 2. Configuring ISM Server Properties 2-7

use a higher level of detail, or you want complete assurance that the XBSAmessages log can never fill up the disk, you can use the cron utility on UNIX orthe Winat facility on Windows to save a periodic snapshot of the file and thentruncate it.
For more information about ISM logs, refer to “Reviewing ISM Logs” on page 1-15.For information about ISM_DEBUG_LEVEL, see “Using ON-Bar EnvironmentVariables with ISM” below.
Using ON-Bar Environment Variables with ISMThe following environment variables, when set in the ON-Bar environment,determine whether ISM uses compression or encryption when backing up data.
Dynamic Server
You can set these environment variables in the onbar script file. For example:ISM_COMPRESSION=TRUE; export ISM_COMPRESSION
End of Dynamic Server
Extended Parallel Server
You can set these environment variables in the start_worker script file. Insert thelines that contain the environment variables before the line that starts the onbar_wutility.
End of Extended Parallel Server
Environment Variable in EffectWhen ON-Bar Issues a Request Effect on ISM Server Processing for That Request
ISM_COMPRESSION If this variable is set to TRUE in the environment of the onbar process making arequest, the ISM server uses a data-compression algorithm to store or retrievethe data specified in that request. If it is set to FALSE or is not present, the ISMserver does not use compression.
ISM_ENCRYPTION If this variable is set to TRUE or XOR in the environment of the onbar processmaking a request, the ISM server uses encryption to store or retrieve the dataspecified in that request. If it is set to NONE or is not present, the ISM serverdoes not use encryption.
ISM_DEBUG_LEVEL If this variable is set in the ON-Bar environment, it controls the level ofreporting detail recorded in the XBSA messages log. The XBSA shared librarywrites to this log. You can specify a value between 0 and 9. If this environmentvariable is not set, has a null value, or has a value outside of this range, thedetail level equals 1 by default. A detail level of 0 suppresses all XBSAdebugging records. A level of 1 reports only XBSA failures.
2-8 IBM Informix Storage Manager Administrator’s Guide
Chapter 3. Managing Storage Devices
In This Chapter . . . . . . . . . . . . . . . . . . . . . . . . . . . . . . . . . . 3-1Choosing and Configuring Storage Devices . . . . . . . . . . . . . . . . . . . . . . . . 3-1Adding and Deleting Storage Devices . . . . . . . . . . . . . . . . . . . . . . . . . . 3-2
Enabling and Disabling a Storage Device . . . . . . . . . . . . . . . . . . . . . . . . 3-4Changing Storage-Device Properties . . . . . . . . . . . . . . . . . . . . . . . . . . 3-4Designating a Storage Device as Read-only . . . . . . . . . . . . . . . . . . . . . . . 3-5
Using Tape Drives and Optical Disk Drives as Storage Devices . . . . . . . . . . . . . . . . . . 3-5Using File Systems as Storage Devices . . . . . . . . . . . . . . . . . . . . . . . . . . 3-5Using Storage Devices for Logical-Log Backups . . . . . . . . . . . . . . . . . . . . . . . 3-6Reserving a Storage Device for Cloning . . . . . . . . . . . . . . . . . . . . . . . . . . 3-6Automating Media Management for Tape and Optical Devices . . . . . . . . . . . . . . . . . . 3-8
Enabling Automatic Media Management . . . . . . . . . . . . . . . . . . . . . . . . 3-8Selecting a Storage Volume . . . . . . . . . . . . . . . . . . . . . . . . . . . . . 3-8Relabeling Volumes Automatically . . . . . . . . . . . . . . . . . . . . . . . . . . 3-8Using Unrecognizable Volumes . . . . . . . . . . . . . . . . . . . . . . . . . . . 3-9
In This ChapterThis chapter discusses the commands that you use to configure storage devices touse ISM.
Choosing and Configuring Storage DevicesTable 3-1 shows the types of storage devices that ISM supports.
Table 3-1. Types of Storage Devices
Device Type Media Type
Half-inch magnetic tape drives himt
Quarter-inch cartridge tape drives qic
Four-millimeter (DAT) tape drives 4mm
Eight-millimeter tape drives 8mm
Eight-millimeter five-gigabyte tape drives 8mm 5GB
3480 tape drives 3480
3570 tape drives 3570
4890 tape drives 4890
9490 Timberline tape drives 9490
Digital linear tape drives dlt
File system File
Optical disk drives Optical
VHS tape drives VHS
Important: ISM does not support autochangers or high-speed devices.Autochangers are storage devices such as jukeboxes, carousels,libraries, near-line storage, datawheels, silos, and autoloaders.
Keep the following issues in mind when you configure your storage devices:
© Copyright IBM Corp. 1996, 2010 3-1
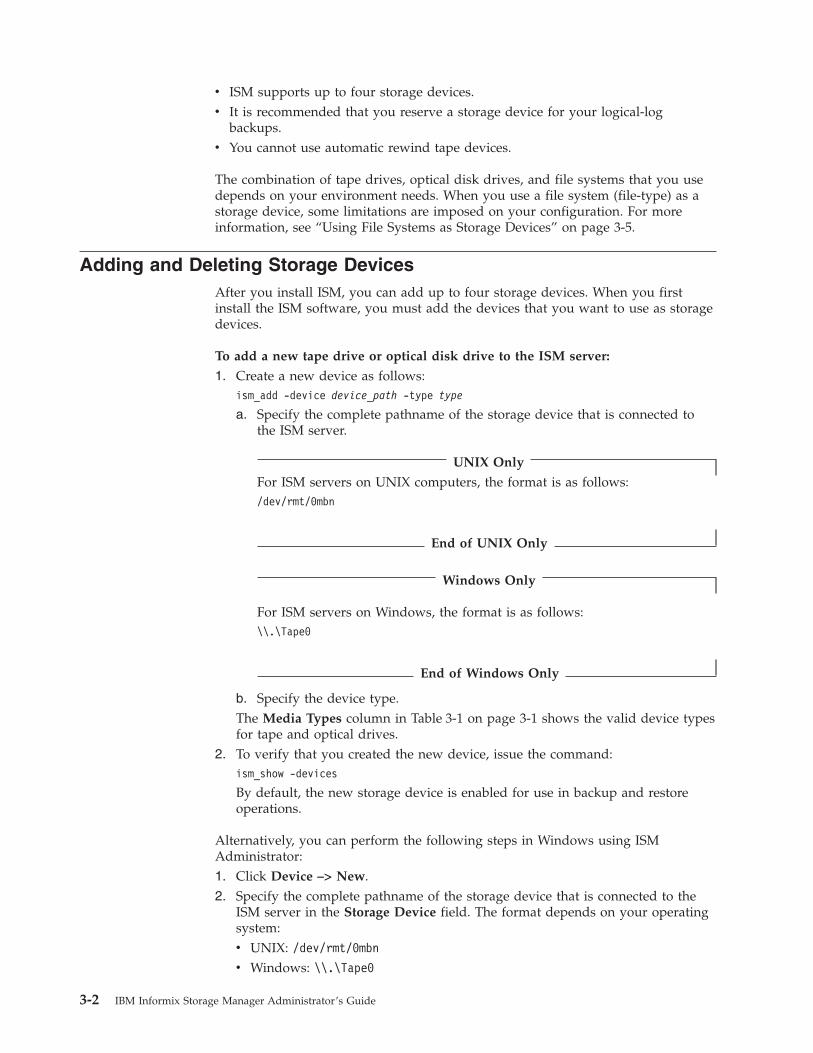
v ISM supports up to four storage devices.v It is recommended that you reserve a storage device for your logical-log
backups.v You cannot use automatic rewind tape devices.
The combination of tape drives, optical disk drives, and file systems that you usedepends on your environment needs. When you use a file system (file-type) as astorage device, some limitations are imposed on your configuration. For moreinformation, see “Using File Systems as Storage Devices” on page 3-5.
Adding and Deleting Storage DevicesAfter you install ISM, you can add up to four storage devices. When you firstinstall the ISM software, you must add the devices that you want to use as storagedevices.
To add a new tape drive or optical disk drive to the ISM server:
1. Create a new device as follows:ism_add -device device_path -type type
a. Specify the complete pathname of the storage device that is connected tothe ISM server.
UNIX Only
For ISM servers on UNIX computers, the format is as follows:/dev/rmt/0mbn
End of UNIX Only
Windows Only
For ISM servers on Windows, the format is as follows:\\.\Tape0
End of Windows Only
b. Specify the device type.The Media Types column in Table 3-1 on page 3-1 shows the valid device typesfor tape and optical drives.
2. To verify that you created the new device, issue the command:ism_show -devices
By default, the new storage device is enabled for use in backup and restoreoperations.
Alternatively, you can perform the following steps in Windows using ISMAdministrator:1. Click Device –> New.2. Specify the complete pathname of the storage device that is connected to the
ISM server in the Storage Device field. The format depends on your operatingsystem:v UNIX: /dev/rmt/0mbnv Windows: \\.\Tape0
3-2 IBM Informix Storage Manager Administrator’s Guide
3. Select the storage-device type from the Type field.4. Click OK.
For more information, see “Using Tape Drives and Optical Disk Drives as StorageDevices” on page 3-5.
Important: A no-rewind backup device is required when you use tape devices.
To add a file system as a storage device to the ISM server:
1. On the ISM server, create a new directory or folder where you want to store thedata.Be sure to create it on media with free space that is larger than the size of yourbackup. It is recommended that you create the file-type device on a differentdrive from the one that contains your operating system so that you do not runout of disk space.
2. Create a new device as follows:ism_add -device device_path -type file
a. Specify the pathname of the directory or folder that you just created.b. Specify a device type of file.
3. To verify that you created the new device, issue the command:ism_show -devices
By default, the new storage device is enabled for use in backup and restoreoperations.
Alternatively, you can perform the following steps in Windows using ISMAdministrator:1. On the ISM server, create a new directory or folder where you want to store the
data. Be sure to create it on media with free space that is larger than the size ofyour backup.
2. Return to the ISM Administrator program. Click Device –> New.3. In the Storage Device field, enter the complete path name of the directory or
folder that you created.4. Select File from the Type field.5. Click OK.
For more information, see “Using File Systems as Storage Devices” on page 3-5.
Important: You cannot include file-type volumes used with a file-type device in apool that includes other types of volumes. ISM does not allow volumesof other types to be recycled or added to a pool of file-type volumes.For details on how ISM uses volume pools, see “How ISM UsesVolume Pools” on page 4-4.
To delete a storage device:
1. Remove the storage device as follows:ism_rm -device device_path
2. To verify that the device was deleted, issue the command:ism_show -devices
Alternatively, you can perform the following steps in Windows using ISMAdministrator:
Chapter 3. Managing Storage Devices 3-3
1. Select the appropriate device in the Device window.2. Click Device –> Delete.
You cannot remove a storage device that has a storage volume mounted on it.
Enabling and Disabling a Storage DeviceBefore the ISM server can use a storage device for backup or restore operations,you must enable it. To determine if a storage device is enabled or disabled, use theism_show -devices command or the nsradmin -c command. You can use thensradmin -c command in full-screen mode to enable or disable a storage device asshown in the following steps.
Using the nsradmin command to enable or disable a storage device:
1. Log in as user root.2. Enter the following command:
nsradmin -c
3. Choose the command Select.4. Under type, choose NSR device.5. Choose the command Next until you locate the storage device you want to
modify.6. Choose the command Edit, and then press RETURN.7. Under enabled, select Yes or No.8. Press ESC to leave the menu.9. Press RETURN to save your changes.
Alternatively, you can perform the following steps in Windows using ISMAdministrator:1. Select the appropriate device in the Device window.2. Select or clear the Disable option in the Device menu. The Disable option is
available only when the selected device does not have a storage volumemounted on it.
You cannot enable or disable a storage device that has an ISM storage volumemounted on it.
Changing Storage-Device PropertiesIf a storage device already has a storage volume mounted on it, you cannot changeany of the device properties.
Use the ism_config command to change the storage device properties. For details,see “ism_config” on page A-6.
Alternatively, you can start Storage Manager Administrator and click Device –>Properties. You can change the pathname, the device type, or disable the device. Ifa storage device already has a storage volume mounted on it, you cannot changeany of the device properties. However, you can enable the Automatic MediaManagement option from the Device Properties window at any time. This featuredoes not apply to file-type storage devices.
3-4 IBM Informix Storage Manager Administrator’s Guide
Designating a Storage Device as Read-onlyIf you want to designate a storage device associated with a volume as read-only,follow these steps:
Designating a storage device as read-only:
1. Unmount the storage volume on the device that you want to designate asread-only:ism_op -unmount device_path
2. To designate the storage device as read-only, use the command:ism_config -volume name -only_restore yes
You can use this volume only for restores, not for backups.3. To redesignate the storage device as writable, use the command:
ism_config -volume name -only_restore no
4. Remount the storage volume on the device.You can now use this storage volume for backups.
Using Tape Drives and Optical Disk Drives as Storage DevicesUsing tape drives or optical disk drives as storage devices provides a long-term,inexpensive way to store your data. You can store tapes and optical disks offsite orin a protected vault. They provide virtually unlimited storage capacity because youcan always purchase new media. Tape and optical disk drives access datasequentially, which slows down backup and recovery.
If you are using tape drives or optical disk drives as storage devices for backups ofyour storage spaces, It is recommended that you reserve one device for yourcontinuous logical-log file storage volumes. The other devices are available toreceive data from storage-space backups.
Important: When the currently mounted tape becomes full, ISM requires operatorintervention to change tapes. The request to change tapes appears inthe ISM log. You use the ism_watch command to monitor ISM fortape-change requests. To automate tape changes during unattendedbackups, you can use NetWorker or other storage managers thatsupport advanced devices.
Warning: You must use no-rewind tape devices because ISM writes a file mark onthe storage volume at the end of each backup and then appends dataonto the storage volume based on the position of the file mark. (Abackup operation might contain several save sets.) If you use a rewindtape device, your backups will appear to have completed successfullybut your tapes will contain only the last save set. The current save setoverwrites the previous save set and data is lost.
Using File Systems as Storage DevicesBackup and restore speed are important considerations when you plan yourbackup strategy. File-type storage devices such as file systems or the hard driveback up data more quickly than some tape devices. This feature is especiallyimportant if you have a limited time for backup. You can also access your datamore quickly during restore operations because file systems allow random accessto your data.
Chapter 3. Managing Storage Devices 3-5
The maximum size of a file-type device on many systems is 2 gigabytes.
Disadvantages of file-type storage devices include expense (disk drives are moreexpensive than tapes) and the inability to store the data on the file-type storagedevice offsite.
You must mount and label storage volumes for file-type devices, even though thereis no physical volume to mount. When ISM writes data to this file-type volume,the volume is treated as one or more open files. If you enter a value for thefile-type volume, ISM writes data to the file-type volume until that value isreached. For specific instructions on how to label storage volumes, see “Labeling aVolume” on page 4-7.
Although you can specify up to four file-type devices, we recommend a maximumof two file-type devices so that you can reserve two tapes for copying the data.The copying process is called cloning. Once a file-type device is full, you mustclone the data to tape before you can overwrite the file-type device with new data.Alternately, you can clone your backups to tape after your backups complete. Youmust recover the data to the cloned copy on tape. For more information, see“Reserving a Storage Device for Cloning” on page 3-6 and “Cloning StorageVolumes” on page 4-13.
Important: You cannot include file-type devices in a volume pool that includesother types of storage volumes. ISM does not allow volumes of othertypes to be recycled or added to a pool of file-type volumes. Youcannot clone bootstrap records. Bootstrap records are always backed upto the ISMData volume pool, even when all other data is backed up toISMDiskData or ISMDiskLogs.
Using Storage Devices for Logical-Log BackupsDuring a backup, the ISM server automatically routes storage spaces to volumes inthe ISMData volume pool and logical-log files to volumes in the ISMLogs volumepool. (For more information, see “Using ISM Configuration Parameters to Changethe Volume Pool Name” on page 2-6.) You can configure ON-Bar to back up eachlogical-log file as soon as it becomes full. Thus the timing of logical-log filebackups is not always predictable.
When you keep a storage volume from the ISMLogs volume pool mounted on oneof the storage devices, you ensure that a storage device is always available toaccept logical-log data that the ISM server routes. It is recommended that you keepan ISMLogs labeled storage volume mounted on one of the storage devices at alltimes. For more information on volume pools, see “How ISM Uses Volume Pools”on page 4-4.
Reserving a Storage Device for CloningCloning data to tape ensures that you can successfully recover your data after thefile-type volumes are relabeled. This procedure requires a second tape device, inaddition to the one tape device used for logical-log file backups, as Figure 3-1shows. For more information, see “Using File Systems as Storage Devices” on page3-5.
3-6 IBM Informix Storage Manager Administrator’s Guide
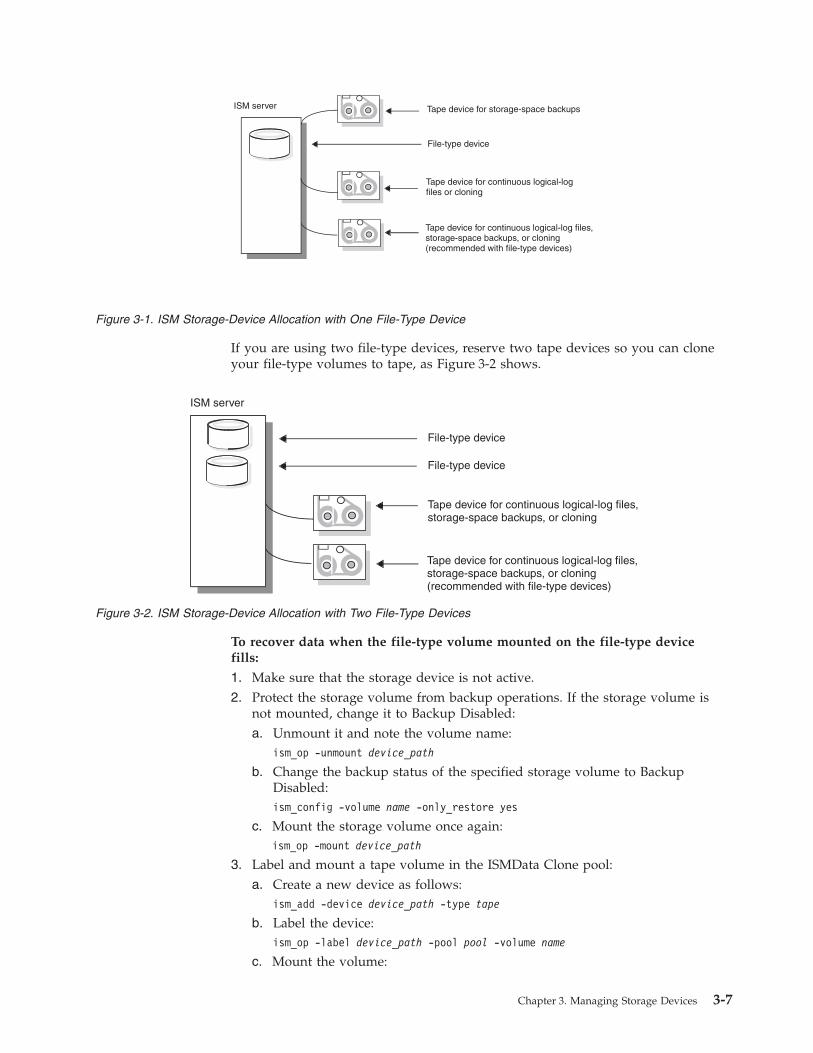
If you are using two file-type devices, reserve two tape devices so you can cloneyour file-type volumes to tape, as Figure 3-2 shows.
To recover data when the file-type volume mounted on the file-type devicefills:
1. Make sure that the storage device is not active.2. Protect the storage volume from backup operations. If the storage volume is
not mounted, change it to Backup Disabled:a. Unmount it and note the volume name:
ism_op -unmount device_path
b. Change the backup status of the specified storage volume to BackupDisabled:ism_config -volume name -only_restore yes
c. Mount the storage volume once again:ism_op -mount device_path
3. Label and mount a tape volume in the ISMData Clone pool:a. Create a new device as follows:
ism_add -device device_path -type tape
b. Label the device:ism_op -label device_path -pool pool -volume name
c. Mount the volume:
Figure 3-1. ISM Storage-Device Allocation with One File-Type Device
Figure 3-2. ISM Storage-Device Allocation with Two File-Type Devices
Chapter 3. Managing Storage Devices 3-7

ism_op -mount device_path
4. Clone the file-type volume (or save set) to tape:ism_clone -volume name -pool pool
Depending on the type of media that you use, you might need more than oneclone volume to hold all the data from the file-type device.
5. Relabel the file-type volume so that it can be used for new backups.When you relabel the file-type volume, you can no longer access the originaldata. If you need to recover data, ISM directs you to mount the cloned volume.
Automating Media Management for Tape and Optical DevicesTo simplify the backup procedure and avoid the task of prelabeling and mountinga storage volume before backup, use the Automatic Media Management option.
If the ISM server detects a writable storage volume from the appropriate volumepool loaded in a storage device, the ISM server automatically mounts the volumeand uses it for the backup operation. If the ISM server detects a volume withoutan ISM label, it considers the volume to be blank and automatically labels, mounts,and overwrites the volume with new data. ISM labels the storage volumes with thenext sequential label that is associated with the appropriate pool of volumes.
Enabling Automatic Media ManagementTo enable Automatic Media Management from the command line, issue theism_config -volume volume_name -recycle auto command. This feature does notapply to file-type storage devices.
Selecting a Storage VolumeWhen you enable the Automatic Media Management option, ISM uses thefollowing hierarchy to choose a storage volume to write data to:v A writable storage volume from the appropriate volume poolv A storage volume from the appropriate pool that is eligible for recyclingv An unlabeled storage volume
Relabeling Volumes AutomaticallyIf ISM detects a storage volume from the appropriate pool with the Recycle statusof Eligible, ISM mounts, relabels, and overwrites the storage volume with newdata. However, the new label uses the same name and sequence number as theoriginal label. Therefore, newer data might be on a storage volume with a lowerlabel number. ISM labels recycled storage volumes in this way to provide you withan easy way to determine the age of your storage volumes. Lower-numberedstorage volumes typically are older than higher-numbered storage volumes, eventhough the data on the older storage volume might be more recent.
For example, suppose that over time you add ten storage volumes, ISMData.0001through ISMData.0010, to the ISMData volume pool. When the retention periodsfor all the save sets on ISMData.0001 expire, ISMData.0001 becomes eligible forautomatic recycling. During a backup operation, the ISM server searches for awritable storage volume from the ISMData volume pool. If ISMData.0001 is theonly volume from the ISMData pool loaded in a storage device, or if the ISMserver needs more than one volume to complete the backup operation and noother writable volumes from the ISMData pool are detected, the ISM serverautomatically relabels and mounts ISMData.0001 and continues the backup
3-8 IBM Informix Storage Manager Administrator’s Guide
operation. ISM relabels ISMData.0001 with the same name and sequence number.However, the original data on ISMData.0001 can no longer be recovered.
Although the data on ISMData.0001 might be more recent than the data onISMData.0010, you can tell at a glance that the physical media on ISMData.0001 isolder than ISMData.0010. Because storage media can wear out over time, thislabeling scheme enables you to monitor the age of your media.
ISM gives each physical volume a default expiration date of two years after it islabeled. If you relabel a volume, it gets a new two-year expiration date. Theexpiration date of a storage volume refers to the physical media, not the data onthe volume. When a volume reaches its expiration date, ISM automatically changesthe Backup status of the volume to Disabled. This status means that no new datacan be written to the volume. However, the data on the volume can still berecovered until the volume is relabeled.
To determine the expiration date of your physical media, execute the ism_show-volumes command at the command line. If you relabel volumes within the samevolume pool, however, you can easily determine the relative age of a volume bythe volume sequence number.
Using Unrecognizable VolumesISM does not recognize storage volumes without a label.
ISM does not recognize the following volume labels and considers these storagevolumes as unlabeled:v Storage volumes that are labeled with something other than an ISM labelv Storage volumes with ISM labels that were written in a density different from
that of the device in which they are currently loadedFor example, if you performed ISM backups on a new 8-millimeter tape drive,an older 8-millimeter tape drive might not be able to read the volumes from thenewer device because the device uses a different density to write the data.
If ISM does not recognize a storage volume, relabel the storage volume. For details,see “Relabeling a Volume” on page 4-9.
Warning: Be careful about sharing non-ISM storage volumes or ISM volumeswritten in different densities among different backup devices if you usethe Automatic Media Management option. Otherwise, you mightpotentially relabel and overwrite valuable data.
Adjusting the number of active data streams on the ISM server can also affect howISM writes data to the storage volumes. For more information, see “Setting theNumber of Parallel Data Streams” on page 2-1.
Chapter 3. Managing Storage Devices 3-9

3-10 IBM Informix Storage Manager Administrator’s Guide

Chapter 4. Managing Storage Volumes
In This Chapter . . . . . . . . . . . . . . . . . . . . . . . . . . . . . . . . . . 4-1Managing the Data Life Cycle . . . . . . . . . . . . . . . . . . . . . . . . . . . . . 4-1
How ISM Uses the Retention Period . . . . . . . . . . . . . . . . . . . . . . . . . . 4-1What Is the Save-Set Retention Status? . . . . . . . . . . . . . . . . . . . . . . . . 4-2What Is a Recycling Status of Eligible? . . . . . . . . . . . . . . . . . . . . . . . . 4-3What Is a Recycling Status of Manual? . . . . . . . . . . . . . . . . . . . . . . . . 4-3
How ISM Uses Volume Pools . . . . . . . . . . . . . . . . . . . . . . . . . . . . 4-4Writing to Volumes of Different Media Types . . . . . . . . . . . . . . . . . . . . . . 4-5Using Volume Pools and Volume Labels . . . . . . . . . . . . . . . . . . . . . . . 4-5Using Expiration Dates for Volume Labels . . . . . . . . . . . . . . . . . . . . . . . 4-6
Managing Storage Volumes . . . . . . . . . . . . . . . . . . . . . . . . . . . . . . 4-6Labeling a Volume . . . . . . . . . . . . . . . . . . . . . . . . . . . . . . . . 4-7Mounting a Volume . . . . . . . . . . . . . . . . . . . . . . . . . . . . . . . 4-8Choosing Volumes for Mounting . . . . . . . . . . . . . . . . . . . . . . . . . . . 4-8Unmounting Volumes. . . . . . . . . . . . . . . . . . . . . . . . . . . . . . . 4-9Finding a Volume Name . . . . . . . . . . . . . . . . . . . . . . . . . . . . . . 4-9Relabeling a Volume . . . . . . . . . . . . . . . . . . . . . . . . . . . . . . . 4-9
Relabeling a Volume Eligible for Recycling . . . . . . . . . . . . . . . . . . . . . . 4-10Relabeling a Volume Before It Is Eligible for Recycling . . . . . . . . . . . . . . . . . . 4-10Relabeling a File-Type Volume . . . . . . . . . . . . . . . . . . . . . . . . . . 4-10Recycling a Volume or Adding More Volumes to a Pool . . . . . . . . . . . . . . . . . . 4-10
Overriding Automatic Media Management . . . . . . . . . . . . . . . . . . . . . . . . 4-11Disabling a Storage Volume . . . . . . . . . . . . . . . . . . . . . . . . . . . . 4-11Protecting a Storage Volume from Automatic Recycling . . . . . . . . . . . . . . . . . . . 4-11Deleting Volumes from the ISM Catalog . . . . . . . . . . . . . . . . . . . . . . . . 4-11
Cloning Storage Volumes and Save Sets . . . . . . . . . . . . . . . . . . . . . . . . . 4-12Tracking Cloned Data . . . . . . . . . . . . . . . . . . . . . . . . . . . . . . 4-13Cloning Storage Volumes . . . . . . . . . . . . . . . . . . . . . . . . . . . . . 4-13Cloning Save Sets. . . . . . . . . . . . . . . . . . . . . . . . . . . . . . . . 4-14
In This ChapterThis chapter discusses how ISM manages the life cycle of your data and describeshow to manage your storage volumes.
Managing the Data Life CycleISM manages your data in the following two ways:v Uses a data-management policy called a retention period to control the life cycle
of your data in the ISM catalogv Uses volume pools and volume labels to sort and track data in the ISM catalog
How ISM Uses the Retention PeriodThe retention status of a save set and the recycling status of a storage volumeindicate how ISM manages your data. A save set can consist of storage-spacebackups or logical-log backups. To see the status of a save set, use the ism_show-volume name command. For more information, see “ism_show” on page A-9.
The ISM server tracks your data based on the retention period that anadministrative user sets. For details, see “Setting the Retention Period for All Data”on page 2-2. Every time that a backup is completed, the ISM server creates entries
© Copyright IBM Corp. 1996, 2010 4-1
for each backed-up save set in the ISM catalog. The ISM catalog allows ON-Bar toreconstruct the data to look exactly as it did at a specific time.
What Is the Save-Set Retention Status?Retention, expiration, recycling, and labeling are volume-level operations.
The retention policy applies to both volumes and save sets. ISM retains the volumeuntil all the save sets on that volume expire. A volume expires when the newestsave set stored on the volume expires. If a volume is empty, it expires when itsexpiration date is reached.
For example, if you set the retention period to one month, an empty volumeexpires in one month. Suppose you save a save set to this volume each week untilit holds six save sets. This volume expires after 10 weeks, one month after the lastsave set is saved during the sixth week.
ON-Bar can restore a save set any time during the retention period. To determine ifON-Bar can restore a specific save set, use ism_show -volume name to check thesave-set status. If the retention status of the save set is blank, the retention periodfor the save set has not yet expired, and ON-Bar can restore it. For information onusing ON-Bar, refer to the IBM Informix Backup and Restore Guide.
If the retention status of a save set is marked Expired, ON-Bar can no longerrestore the save set. You need to recreate the save-set entry before you can restoreit with ON-Bar. To recreate the save-set entry in the ISM catalog, executeism_catalog -recreate_from from the command line. For details on how to recoverexpired save sets, see “ReCreating the ISM Catalog Before You Use ON-Bar” onpage 5-1 and “ism_catalog” on page A-2.
When a volume expires, ON-Bar can no longer restore any of the save sets. Torecover an expired volume, execute ism_catalog -recover_from the command line.After you recover the volume, you can restore the save sets on this volume withON-Bar.
The status of a save-set entry does not necessarily change to Expired on the sameday that its retention period is exceeded. ISM changes the retention status for asave set when all the save sets that are dependent on it also exceed their retentionperiods. Save sets that contain level-1 and level-2 backups are dependent on thesave set for the level-0 backup. This extra time ensures that an administrator canreconstruct a save set to a specific time in the retention period.
In Figure 4-1, the retention period is set for one week on the ISM server. Theretention period for the save set for the level-0 backup that was performed onSeptember 1 expires on September 8. The level-1 or level-2 backups that wereperformed during the rest of the week depend on this level-0 backup, so the entryfor the level-0 backup does not expire until the entries for the level-1 and level-2backups have also expired. During this time, you can use ON-Bar to restore thesave sets.
On September 15, all the save sets from the backup cycle for the first week changestatus to Expired.
4-2 IBM Informix Storage Manager Administrator’s Guide
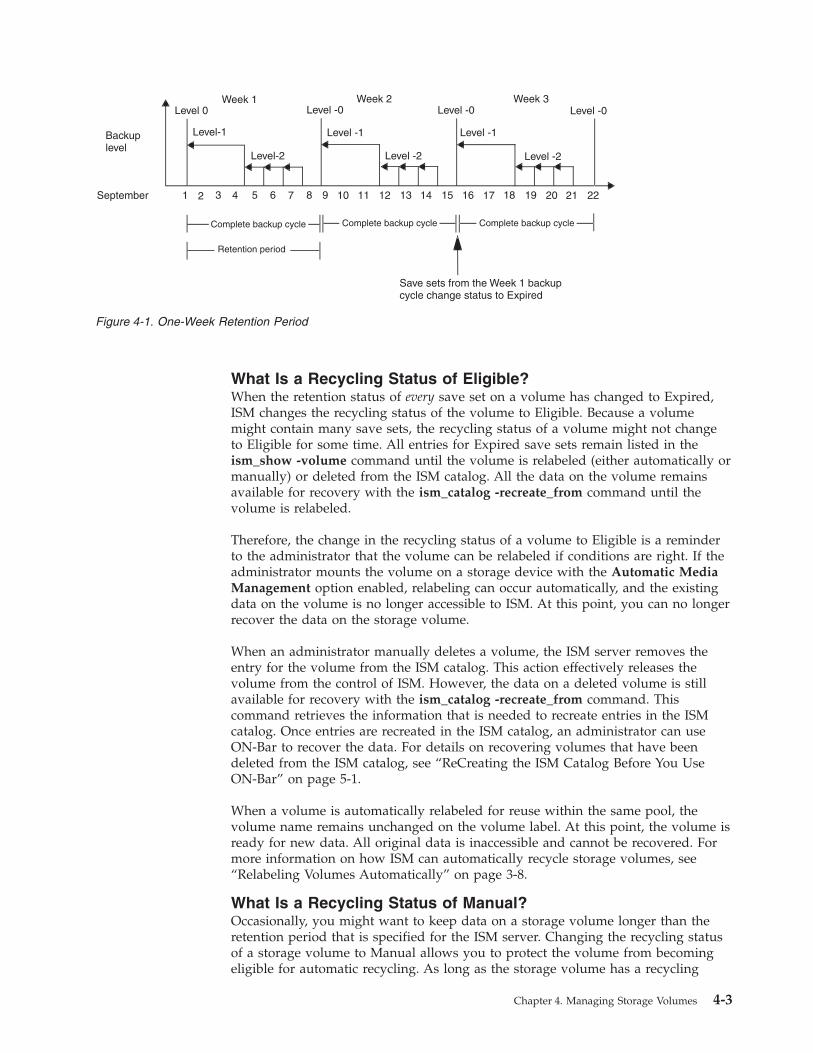
What Is a Recycling Status of Eligible?When the retention status of every save set on a volume has changed to Expired,ISM changes the recycling status of the volume to Eligible. Because a volumemight contain many save sets, the recycling status of a volume might not changeto Eligible for some time. All entries for Expired save sets remain listed in theism_show -volume command until the volume is relabeled (either automatically ormanually) or deleted from the ISM catalog. All the data on the volume remainsavailable for recovery with the ism_catalog -recreate_from command until thevolume is relabeled.
Therefore, the change in the recycling status of a volume to Eligible is a reminderto the administrator that the volume can be relabeled if conditions are right. If theadministrator mounts the volume on a storage device with the Automatic MediaManagement option enabled, relabeling can occur automatically, and the existingdata on the volume is no longer accessible to ISM. At this point, you can no longerrecover the data on the storage volume.
When an administrator manually deletes a volume, the ISM server removes theentry for the volume from the ISM catalog. This action effectively releases thevolume from the control of ISM. However, the data on a deleted volume is stillavailable for recovery with the ism_catalog -recreate_from command. Thiscommand retrieves the information that is needed to recreate entries in the ISMcatalog. Once entries are recreated in the ISM catalog, an administrator can useON-Bar to recover the data. For details on recovering volumes that have beendeleted from the ISM catalog, see “ReCreating the ISM Catalog Before You UseON-Bar” on page 5-1.
When a volume is automatically relabeled for reuse within the same pool, thevolume name remains unchanged on the volume label. At this point, the volume isready for new data. All original data is inaccessible and cannot be recovered. Formore information on how ISM can automatically recycle storage volumes, see“Relabeling Volumes Automatically” on page 3-8.
What Is a Recycling Status of Manual?Occasionally, you might want to keep data on a storage volume longer than theretention period that is specified for the ISM server. Changing the recycling statusof a storage volume to Manual allows you to protect the volume from becomingeligible for automatic recycling. As long as the storage volume has a recycling
Figure 4-1. One-Week Retention Period
Chapter 4. Managing Storage Volumes 4-3
status of Manual, ISM does not automatically recycle this volume, nor does it setthe recycling status to Eligible. ISM continues to track the volume in the ISMcatalog, and you can recover the data on the volume with the ism_catalog-recreate_from command. The storage volume is protected from automaticrecycling until you remove the Manual recycling status or relabel the volumemanually.
You can also use the Manual recycling status to create your own volume recyclingpolicy. For example, suppose that you have a limited number of storage volumesand want to reuse them in a specific order, regardless of the age of the data on thevolumes. You can apply the Manual recycling status to each volume and thenrelabel each volume as needed. The ISM server tracks these volumes in the ISMcatalog until you relabel or delete them from the ISM catalog. For storage devicesthat have the Automatic Media Management option enabled, the volumes areprotected from automatic recycling.
How ISM Uses Volume PoolsISM uses pools of volumes to sort and organize your storage space and logical-logbackups. A volume pool is a collection of storage volumes. Any tape and opticaldisk storage volume can belong to the same volume pool. When you initiate anON-Bar backup, ISM directs the data to a specific volume pool rather than to aspecific volume. If ISM detects that a volume from the correct pool is mounted ona storage device, ISM writes data to that volume, regardless of media type.
Every storage volume belongs to a specific pool of volumes. ISM uses two types ofvolume pools, Backup and Backup Clone. Data cannot be mixed between pools ofdiffering type. This situation enables ISM to keep original and cloned dataseparate. ISM ships with the following pools for use in backup and cloningoperations:v ISMData pool. Storage volumes in this pool accept backups of your storage
spaces.v ISMLogs pool. Storage volumes in this pool accept backups of your logical-log
files.v ISMDiskData pool. Storage volumes in this pool accept backups of your storage
spaces when you use a file-type storage device. Volumes in this pool are ofmedia type file and cannot be mixed with volumes of other media type.
v ISMDiskLogs pool. Storage volumes in this pool accept backups of yourlogical-log files when you use a file-type storage device. Volumes in this pool areof media type file and cannot be mixed with volumes of other media type.
v ISMData Clone pool. Storage volumes in this pool accept clones of yourstorage-space backups.
v ISMLogs Clone pool. Storage volumes in this pool accept clones of yourlogical-log backups.
We recommend that you use the ISMData and ISMData Clone pools for storagespaces and the ISMLogs and ISMLogs Clone pools for logical logs. If you usefile-type storage devices, use the ISMDiskData and ISMDiskLogs pools for thefile-type volumes.
ISM also ships with several other preconfigured pools that are included forforward compatibility, as follows:v Defaultv Default Clone
4-4 IBM Informix Storage Manager Administrator’s Guide
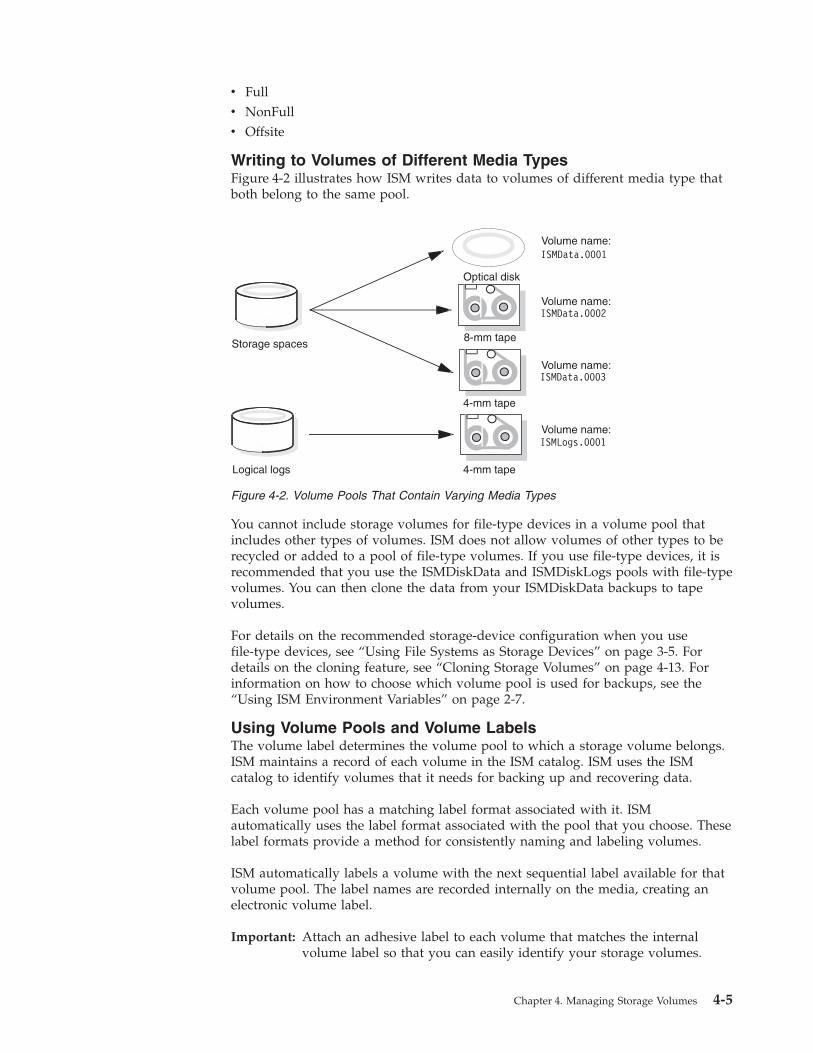
v Fullv NonFullv Offsite
Writing to Volumes of Different Media TypesFigure 4-2 illustrates how ISM writes data to volumes of different media type thatboth belong to the same pool.
You cannot include storage volumes for file-type devices in a volume pool thatincludes other types of volumes. ISM does not allow volumes of other types to berecycled or added to a pool of file-type volumes. If you use file-type devices, it isrecommended that you use the ISMDiskData and ISMDiskLogs pools with file-typevolumes. You can then clone the data from your ISMDiskData backups to tapevolumes.
For details on the recommended storage-device configuration when you usefile-type devices, see “Using File Systems as Storage Devices” on page 3-5. Fordetails on the cloning feature, see “Cloning Storage Volumes” on page 4-13. Forinformation on how to choose which volume pool is used for backups, see the“Using ISM Environment Variables” on page 2-7.
Using Volume Pools and Volume LabelsThe volume label determines the volume pool to which a storage volume belongs.ISM maintains a record of each volume in the ISM catalog. ISM uses the ISMcatalog to identify volumes that it needs for backing up and recovering data.
Each volume pool has a matching label format associated with it. ISMautomatically uses the label format associated with the pool that you choose. Theselabel formats provide a method for consistently naming and labeling volumes.
ISM automatically labels a volume with the next sequential label available for thatvolume pool. The label names are recorded internally on the media, creating anelectronic volume label.
Important: Attach an adhesive label to each volume that matches the internalvolume label so that you can easily identify your storage volumes.
Figure 4-2. Volume Pools That Contain Varying Media Types
Chapter 4. Managing Storage Volumes 4-5
The preconfigured ISMData and ISMLogs label formats automatically use the ISMserver hostname, the appropriate pool name, and a numbering scheme that labelsthe volumes from 0001 to 9999, as the following table shows.
Label Use
nova.ISMData.0024 This volume is from the ISMData pool andcontains storage spaces from a host named nova.
nova.ISMLogs.0012 This volume is from the ISMLogs pool andcontains logical logs from a host named nova.
The following table lists the pools that you must use for your storage spaces andlogical logs and the format of the resulting volume label.
Data for Backup Pool NameNumberingSequence Volume Label Format
Storage spaces ISMData
ISMDiskData
ISMData Clone
0001-9999
0001-9999
0001-9999
hostname.ISMData.0001
hostname.ISMDiskData.0001
hostname.ISMDataClone.0001
Logical logs ISMLogs
ISMDiskLogs
ISMLogs Clone
0001-9999
0001-9999
0001-9999
hostname.ISMLogs.0001
hostname.ISMDiskLogs.0001
hostname.ISMLogsClone.0001
Use the ism_op -label device command to label a volume. After a volume is labeledand mounted, it is available for backups. You can label several volumes at oncewithout dismissing the dialog box, if you prefer. For details, see “ism_op” on pageA-8.
Using Expiration Dates for Volume LabelsWhenever you label or relabel a storage volume, ISM automatically assigns atwo-year expiration date to the volume. This expiration date applies to the physicalmedia and is different from the retention period that you assign to your data.When a volume reaches its two-year expiration date, ISM marks the Backup statusfor the volume as Disabled. To minimize the failure rate of older media, ISMcannot write new data to the volume. The ISM server still tracks the data on thevolume and applies the retention period to the save sets on the volume. Until thevolume is relabeled, you can recover the data. When you relabel a storage volume,it receives a new two-year expiration date.
Managing Storage VolumesISM requires that you label and mount a volume before you can use it to back updata. Labeling a volume associates the volume with a specific volume pool andprovides ISM with a unique name for tracking and recognizing the media. ISMuses the volume labels to maintain a record of each volume in the ISM catalog.ISM uses the ISM catalog to identify volumes that it needs to back up and recoverdata.
If you have the Automatic Media Management option enabled for a storagedevice, you can have ISM automatically label and mount volumes on that storagedevice. For more information, see “Automating Media Management for Tape andOptical Devices” on page 3-8. You can also prelabel a volume without mounting it.
4-6 IBM Informix Storage Manager Administrator’s Guide
Tip: You can put several save sets on one volume if they are intended for the samepool and space exists on the volume.
Labeling a VolumeWhen you label a volume, you associate the volume with a specific volume pool,which means that the volume is eligible to receive data when ISM needs a volumefrom that pool.
To label a blank volume:
1. Load the volume in a storage device.2. To label a blank volume, use the following command:
ism_op -label device -pool pool -volume name
a. Specify the pathname of the device.b. Use the ISMData and ISMData Clone pools for storage spaces and the
ISMLogs and ISMLogs Clone pools for logical logs.If you use a file-type device, use the ISMDiskData and ISMDiskLogs poolsto create file-type storage volumes.
c. Specify the volume name.d. Optionally, use the -set_capacity option to set the estimated capacity for the
volume:For tape volumes, if you do not set the capacity explicitly, the ISM serveruses a default setting based on the media type. ISM writes data to the tapevolume, however, until the volume is full, regardless of the estimatedcapacity that is set.For file-type and optical disk volumes, if you do not set a value, ISM writesdata to the file-type device or optical device until the device is full. If youenter a value, however, ISM writes data to the file-type or optical diskdevice until that value is reached.
Alternatively, you can perform the following steps in Windows using ISMAdministrator:1. Load the volume in a storage device.2. Open the Devices window and select the storage device.3. Click Volume –> Label.4. Select a volume pool from the Pool field. Use the ISMData and ISMData Clone
pools for storage spaces and the ISMLogs and ISMLogs Clone pools for logicallogs. If you use a file-type device, use the ISMDiskData and ISMDiskLogs poolsto create file-type storage volumes.
5. Enter a volume label in the Volume Label field. If you do not enter a label,ISM uses the next sequential label according to the rules of the label formatthat is associated with the volume pool. The next sequential label appears inthe Volume Label field.
6. Optionally, set the estimated capacity for the volume:v For tape volumes, if you do not set the capacity explicitly, the ISM server
uses a default setting based on the media type. ISM writes data to the tapevolume until the volume is full, regardless of the estimated capacity that isset.
v For file-type and optical disk volumes, if you do not set a value, ISM writesdata to the file-type device or optical device until the device is full. If youenter a value ISM writes data to the file-type or optical disk device until thatvalue is reached.
Chapter 4. Managing Storage Volumes 4-7
7. Click OK.
Mounting a VolumeBefore you can back up or recover data from a volume, you must mount thevolume on a storage device that the ISM server recognizes.
If you use a file-type storage device, you must still mount a labeled volume on thefile-type device before ISM can write backups to the file-type device. The labelingand mounting processes work the same way for file-type volumes as for tapevolumes and optical disks.
To mount a volume in a specific device:
1. Load the storage volume in the device.2. Label the storage volume (see “Labeling a Volume” on page 4-7).3. To mount the storage volume, use the following command:
ism_op -mount device
Alternatively, you can perform the following steps in Windows using ISMAdministrator:1. Load the volume in the device.2. Open the Devices window and select the storage device.3. Click Volume –> Mount.
The Mount status of the storage volume changes to Mounted, and the volumename and pool name appear in their respective columns.
If you try to initiate an ON-Bar backup when a volume is not mounted, ISMrequests a writable volume with the following message:media waiting: backup to pool 'ISMData' waiting for 1 writablebackup tape or disk
You receive one of three messages to request that you mount a volume, relabel avolume, or label a new volume.
If you are recovering data, ISM requests the volume that you need to mount in thedevice by its volume name, as the following example shows:media waiting: recover waiting for 8mm 5GB ISMData.0034
Important: To perform an unattended backup with a stand-alone device, you mustpremount the volume if the storage device does not have theAutomatic Media Management option enabled. The storage devicemust also be enabled.
Choosing Volumes for MountingWhen ISM requires a volume for backup, it uses the following hierarchy to selectvolumes that are not currently in use from the appropriate volume pool:1. Already mounted storage volume available for backups2. Already mounted storage volume that is eligible for recycling on a device with
the Automatic Media Management option enabled3. Unmounted, unlabeled storage volume in a device with the Automatic Media
Management option enabled4. Unmounted storage volume that is available for backups
4-8 IBM Informix Storage Manager Administrator’s Guide
5. Unmounted storage volume that is eligible for recycling in a device with theAutomatic Media Management option enabled
Unmounting VolumesYou can only unmount a storage volume when the storage device is not active.
To unmount a volume from a specific storage device:
1. To unmount the storage volume, use the following command:ism_op -unmount device
The Mount status of the storage volume changes to Unmounted.2. Unload the volume from the backup device.
Alternatively, you can perform the following steps in Windows using ISMAdministrator:1. Select the storage device in Devices window.2. Click Volume –> Unmount. The mount status of the storage device changes to
Unmounted.3. Unload the volume from the backup device.
Finding a Volume NameISM can detect whether a selected storage device has a volume already loaded andwhether the volume already has an ISM label. If the physical label on the volumeis missing or illegible, perform the following steps to determine its name.
To detect a storage volume:
1. Load the volume in a storage device.2. To detect the storage volume, use the following command:
ism_op -detect device
ISM displays the volume name and pool name.
Alternatively, you can perform the following steps in Windows using ISMAdministrator:1. Load the volume in a storage device.2. Select the storage device in Storage Manager Administrator.3. Click Volume –> Detect. The volume name and pool name are shown.
Relabeling a VolumeISM uses volume labels to track your data. Relabeling a volume means that youcan no longer recover the original data on the volume. To relabel a volume, use theism_op -label command. You can relabel a volume only if it is unmounted. If youdelete a volume from the ISM catalog, It is recommended that you do not use thedeleted volume name for a new volume unless you are sure that you will neverneed to recover the data on the original volume.
You can relabel a volume whenever you want to. But to ensure that your data isprotected, we recommend that you relabel a volume only under the followingconditions:v When a volume is eligible for recyclingv Before a volume is eligible for recyclingv When the volume is a file-type volume
Chapter 4. Managing Storage Volumes 4-9

v When you add more volumes to a pool
Relabeling a Volume Eligible for RecyclingWhen the retention periods for all the save sets on a volume expire and theirretention status is marked Expired, the recycling status of the storage volumechanges to Eligible. At this point, you know that the retention period set for theISM server for all the data on the volume has expired. If you use the AutomaticMedia Management option, ISM automatically relabels the volume and overwritesit with new data. However, the new label uses the same name and sequencenumber as the original label. Therefore, newer data might be on a volume with alower label number. ISM labels recycled volumes in this way so that you can easilydetermine the age of your volumes. Each time that a volume is relabeled, itreceives a new two-year expiration date. Lower-numbered volumes typically areolder than higher-numbered volumes, even though the data on the older volumemight be more recent.
Eligible volumes are recycled within the same pool. For example, an eligiblevolume from the ISMData pool remains in the ISMData pool when it is relabeled.If you want to recycle a volume to a different pool, you must manually label thevolume and change the volume pool selection. For more information, see“Recycling a Volume or Adding More Volumes to a Pool” on page 4-10.
Relabeling a Volume Before It Is Eligible for RecyclingYou can manually relabel a storage volume at any time. If you relabel a storagevolume before it is eligible for recycling, the retention period for some of the savesets on the volume have not yet expired, and you risk losing valuable data. Once astorage volume is relabeled, you can no longer recover the original data.
Warning: If you want to relabel a storage volume before its recycling statuschanges to Eligible, be sure that you do not need any of the save sets onthe volume for a restore operation. Relabeling a storage volumeoverwrites the data on the volume, and you cannot recover the originaldata.
Relabeling a File-Type VolumeIf you use a file-type device, you need to relabel the file-type volume mounted onthe file-type device when the volume fills with data. ISM tracks file-type volumesin the same way that it tracks other volumes. If you relabel the file-type volume,you can no longer recover the original data. To ensure that the data is protected,we recommend that you clone the data on your file-type volume to tape before yourelabel the volume. ISM tracks cloned volumes in the same way that it trackssource volumes. When you clone your data to tape before you relabel a file-typevolume, you ensure that you can recover the data.
After the file-type volume is relabeled, it appears to the ISM server that a newfile-type volume is available to be mounted.
For more information on cloning volumes, see “Cloning Storage Volumes” on page4-13.
Recycling a Volume or Adding More Volumes to a PoolBoth recycling eligible volumes and adding more volumes to a pool haveadvantages. When you recycle, you reuse the same volumes and do not add newvolumes to the pool. However, the media might wear out over time and have ahigher failure rate. ISM uses the original volume sequence number to relabelvolumes within the same volume pool. This number enables you to easily track
4-10 IBM Informix Storage Manager Administrator’s Guide

which volumes are older. When you relabel a volume to a different volume pool,the volume receives the next available sequence number for the new pool. Becauseeach volume receives a new two-year expiration date when it is relabeled, youcannot determine how old a specific volume is when it is relabeled to a differentvolume pool.
On the other hand, if your site requires you to maintain the backups in storage fora certain period of time, you might have to add more media to the volume poolinstead of recycling it. For example, if your volumes fill up in 90 days but yourretention period is set for 180 days, you need to add new media to the pool untilyou can recycle the backup volumes that contain expired or old backups.
Overriding Automatic Media ManagementISM allows you the flexibility to change how ISM manages a storage volume, ifnecessary.
Disabling a Storage VolumeTypically, a storage volume can be used for both backup and restore operations.Occasionally, you might decide that a particular storage volume must not receiveany more new data. In this case, you can change the Backup status to Disabled,which prevents ISM from using the storage volume during a backup operation.ISM uses this storage volume only for restore operations until you change thevolume status.
If a storage volume fills with data during a backup operation, the ISM serverautomatically changes the Backup status to Disabled. This action ensures that theISM server does not try to use the volume for subsequent backup operations.Whenever a storage volume gets full, ISM sets the Backup status to Disabled untilthat volume is recycled. For the procedure, see “Enabling and Disabling a StorageDevice” on page 3-4.
Important: The data on the volume with a Backup status of Disabled is stillsubject to the retention period that is set for the ISM server. Therecycling status of the volume changes to Eligible after all the save setson the volume have expired, and the volume is then eligible forautomatic recycling.
Protecting a Storage Volume from Automatic RecyclingOccasionally, you might decide that you want to keep the data on a particularvolume longer than the retention period for the ISM server specifies or becauseyou created a different volume recycling plan. To override the retention period forthe data on a volume, change the recycling status of a volume to Manual. Thevolume is not a candidate for automatic recycling until you manually relabel thevolume or use the ism_config -recycle manual command. ISM continues to trackthe storage volume in its ISM catalog, and you can always recover the data on thevolume with the ism_catalog -recreate_from command.
Deleting Volumes from the ISM CatalogRemoving a volume means that ISM no longer tracks the volume in the ISMcatalog and effectively releases the volume from the control of ISM. Remove avolume from the ISM catalog only if you will never need the data on the volumeagain or if the volume has been physically damaged and is unusable.
Chapter 4. Managing Storage Volumes 4-11
You rarely need to remove a volume from the ISM catalog. ISM catalog entries takeup a small amount of disk space. Leave the volume in the ISM catalog so that youdo not accidentally label another volume with the same name.
If a volume is lost or destroyed, remove its entry from the ISM catalog. Otherwise,ISM might request the volume to recover data.
To delete a storage volume from the ISM catalog:
1. Remove the storage device as follows:ism_rm -volume name
2. To verify that the storage volume was deleted, issue the command:ism_show -volumes
The ISM server no longer tracks the storage volume and its associated savesets.
Alternatively, you can perform the following steps in Windows using ISMAdministrator:1. Open the Volume Inventory window and select the volume.2. Click Volume –> Delete.
Important: If you accidentally delete a volume from the ISM catalog, you can stillrecover the data with the ism_catalog -recreate_from command as longas you have not overwritten the volume with new data.
Cloning Storage Volumes and Save SetsCloning volumes or save sets is beneficial for the following purposes:v Sending data off-sitev Replacing old volumesv Testing the integrity of your data
If you use a file system as a storage device, clone your data to tape when thefile-type volume fills with data. This action ensures that your data is available forrecovery if your file-type volume fills quickly.
Create clones of your media to store identical copies of your data off site, or shareor transfer important data to other company facilities easily.
Most media has a limited life span. Consequently, routinely replace your volumes.The expiration date of a storage volume indicates how old the physical media is,not the data on the volume. A volume has a default expiration date of two yearsafter it is labeled. If you relabel a volume, it receives a new two-year expirationdate. When a volume reaches its expiration date, ISM automatically changes theBackup status of the volume to Disabled. This status means that no new data canbe written to the volume. However, the data on the volume can still be recovereduntil the volume is relabeled. If you have old volumes that contain important data,clone them before they expire to ensure the safety of the data. If you clone avolume to newer media, you can prevent media failures during recover operations.You can determine the expiration date of your physical media with the ism_show-volumes command at the command line.
When you clone a volume, you can determine the integrity of backed-up data. ISMdisplays an error message if it has difficulty reading the data from the originalvolume during the cloning process.
4-12 IBM Informix Storage Manager Administrator’s Guide
You can clone entire volumes from the command line. Because save sets can spanmultiple volumes, ISM might request more than one source volume to completethe cloning operation. Furthermore, because media varies in size and capacity, youmight need more destination volumes to hold the cloned data than the sourcevolumes require. Conversely, depending on the type of media that you use, youmight be able to fit multiple source volumes on one destination volume.
Important: You cannot perform disaster recovery operations from cloned volumes.For instructions on how to recover the ISM catalog after a disaster, see“Recovering Data After a Disaster” on page 5-3.
Tracking Cloned DataCloned data on a volume is indistinguishable from the original, although thedifferent capacities of storage media can mean that more or fewer volumes arerequired. Data-tracking information about each cloned save set is added to theexisting entries that describe the source save sets. If administrators go outside ofthe ISM application and duplicate their volumes with a copy utility that theoperating system or hardware provides, ISM has no knowledge of these volumesand cannot recover data stored on such volumes.
Both original and cloned volumes share the same ISM catalog entries, so thecloned data is subject to the same retention period as the original data. ISMautomatically manages both original and cloned data based on the retentionperiods for the volumes. If you clone data a week before the retention period forthe source data expires, the retention status for the cloned data changes to Expiredat the same time that the original data does. If you want to keep data on a clonedvolume beyond the retention period of the original data, you can change therecycling status of the cloned volume to Manual. ISM can keep and track the dataon the cloned volume indefinitely.
To distinguish between cloned and original volumes, you must assign the clonedvolume to a clone pool and include clone in the volume name. ISM providespreconfigured ISMData Clone and ISMLogs Clone pools for you to use when youclone your storage spaces and logical logs.
Cloning Storage VolumesCloning with ISM provides an additional layer of protection because it allows youto make identical copies of the data on your volumes as you need them.
The original volume is the source volume, and the volume that receives the cloneddata is the destination volume. The destination volume must be a different volumefrom the source volume. Cloned data belongs to a clone pool. Use the ISMDataClone pool and the ISMLogs Clone pool for your cloned volumes.
The requirements for cloning storage volumes with ISM follow:v Two backup devicesv Source and destination volumes
To clone a file-type storage volume before it is full:
1. If the volume is already mounted, you must unmount it to change the Backupstatus. This action ensures that no new data is written to the file-type volumeduring the cloning operation.If the volume is already unmounted, change the Backup status for the volumeto Disabled.
Chapter 4. Managing Storage Volumes 4-13
2. To clone a volume, use the following command:ism_clone -volume name
a. Specify the name of the volume to clone.b. Specify the name of the clone pool (Default Clone, ISM Data Clone, or ISM
Log Clone).3. Mount the selected storage volume and cloned volume.
Alternatively, you can perform the following steps in Windows using ISMAdministrator:1. In the Volume Inventory window, select the storage volume that you want to
clone. If you are cloning a file-type storage volume before the volume is full,change the Backup status for the volume to Disabled. If the volume is alreadymounted, you must unmount it in order to change the Backup status. Thisaction ensures that no new data is written to the file-type volume during thecloning operation.
2. Click Volume –> Clone.3. Select a clone pool from the Clone Pool field.4. Click OK.5. Mount the selected storage volume and cloned volume.
Cloning Save SetsIn addition to cloning all the save sets on a storage volume, you can cloneindividual save sets. ISM tracks these individual cloned save sets in the same waythat it tracks the originals. The cloned save sets are subject to the same retentionperiod as the original save sets and must be written to a volume that belongs to aclone pool. When the original save sets expire, so do the cloned save sets.
To clone a save set:
1. Mount a storage volume from the appropriate clone pool on a storage device.2. To display the save set IDs for a volume, use the following command:
ism_show -volume name
3. To clone a save set, use the following command:ism_clone -saveset ssid
a. Specify one or more save set IDs.b. Specify the name of the clone pool.
4. Click the Clone button in the toolbar or choose Save Set > Clone.5. Mount the selected storage volume and cloned volume.
Alternatively, you can perform the following steps in Windows using ISMAdministrator:1. Mount a storage volume from the appropriate clone pool on a storage device.2. Select the save set in the Volume Inventory window.3. Click Save Set –> Clone.4. Select the appropriate clone pool from the Clone Pool field.5. Click OK.6. Mount the selected storage volume and cloned volume.
4-14 IBM Informix Storage Manager Administrator’s Guide
Chapter 5. Recovering Save Sets with ISM
In This Chapter . . . . . . . . . . . . . . . . . . . . . . . . . . . . . . . . . . 5-1Restoring a Save Set with ON-Bar . . . . . . . . . . . . . . . . . . . . . . . . . . . 5-1Locating Volumes That Contain Partial Save Sets . . . . . . . . . . . . . . . . . . . . . . 5-1ReCreating the ISM Catalog Before You Use ON-Bar . . . . . . . . . . . . . . . . . . . . . 5-1Recovering Data from a Cloned Volume . . . . . . . . . . . . . . . . . . . . . . . . . 5-2Recovering Data After a Disaster . . . . . . . . . . . . . . . . . . . . . . . . . . . . 5-3
If You Have the ISM Server Bootstrap Printout . . . . . . . . . . . . . . . . . . . . . . 5-3If You Do Not Have the ISM Server Bootstrap Printout . . . . . . . . . . . . . . . . . . . 5-3Creating and Backing Up the ISM Bootstrap . . . . . . . . . . . . . . . . . . . . . . . 5-4
Transferring Data with the Imported Restore . . . . . . . . . . . . . . . . . . . . . . . . 5-5The ISM_CLIENT and ISM_SERVER Environment Variables . . . . . . . . . . . . . . . . . . 5-5Imported Restore Procedure with Files Larger than 2 GB . . . . . . . . . . . . . . . . . . . 5-5Step 1: Backing Up the Source Database Server to ISM. . . . . . . . . . . . . . . . . . . . 5-6Step 2: Porting ISM to Your Target Database Server . . . . . . . . . . . . . . . . . . . . . 5-8Step 3: Restoring Data from ISM to the Target Database . . . . . . . . . . . . . . . . . . . 5-13
In This ChapterThis chapter describes how to recover data at various points during the data lifecycle.
Restoring a Save Set with ON-BarAs long as the retention status for a save set has not changed to Expired toindicate that the retention period for the save set has passed, you can use ON-Barto initiate a restore operation for that save set. For instructions on how to initiate arestore operation with ON-Bar, refer to the IBM Informix Backup and Restore Guide.
Locating Volumes That Contain Partial Save SetsDepending on the size of your storage spaces, a save set might require more thanone storage volume during a backup. The Partial column in the ism_show-volume command indicates if a save set spans more than one storage volume.Typically, save sets do not span more than two volumes. If you need to recover asave set, you might want to preload all the volumes before you begin the restoreoperation.
ReCreating the ISM Catalog Before You Use ON-BarThe ISM server tracks the backed-up data in the ISM catalog. You can recreateentries in the ISM catalog for expired save sets and for volumes that have beendeleted from the ISM catalog from the command line.
After you recreate entries in the ISM catalog, you can use ON-Bar to recover thedata. For details on how to use the ISM command-line utilities, see Appendix A,“ISM Command-Line Utilities.”
Before you use ON-Bar to recover data, use the ism_catalog -recreate fromcommand to recreate the entries in the ISM catalog in the following situations:v Recovering expired save sets
© Copyright IBM Corp. 1996, 2010 5-1
After a save set has expired, you need to recreate its entry in the ISM catalogbefore you can restore the data with ON-Bar.
v Recovering volumes that are eligible for recyclingWhen the Recycling status for a storage volume has changed to Eligible, theretention periods for all the save sets on the storage volume have expired. Youneed to recreate the entries in the ISM catalog before you can restore the datawith ON-Bar.
v Recovering volumes that have been deleted from the ISM catalogIf you remove a storage volume from the ISM catalog, but the data on thevolume is still intact, you can recreate the entries in the ISM catalog and thenuse ON-Bar to recover the data on the volume.
If the ISM server is on UNIX, you must have root privileges to execute theism_catalog command. If the ISM server is on Windows, you must be a member ofthe Informix-Admin group.
To recover entries in the ISM catalog:
1. Load the volume in a storage device.2. At the command line, initiate the following command with the full pathname
of the storage device on which you loaded the storage volume:ism_catalog -recreate_from device
3. Use ON-Bar to restore the data.
When you recover a storage volume in this way, ISM automatically marks theBackup status for the volume as Disabled to ensure that no new data is written tothe storage volume. To protect the volume from automatic recycling, change therecycling status of the volume to Manual. ISM does not automatically recycle avolume marked Manual.
Recovering Data from a Cloned VolumeCloned volumes provide added security because they allow you to recover yourdata in case the original volumes become damaged or destroyed.
During a restore operation, ISM is configured to request the original sourcevolume. However, if you know that the original volume is unavailable (perhaps itis stored off site), you can force ISM to request a cloned volume.
To force ISM to request a cloned volume:
1. Use the ism_rm -volume command to delete the original storage volume.Alternatively, change the Restore status for each save set on the originalvolume to Disabled:ism_config -volume name -disable_restore ssid
To obtain a list of the ssid numbers, issue the ism_show -volume namecommand.
2. Use ism_catalog to recover unexpired save sets.If the save sets on the cloned volume have expired, follow the instructions in“ReCreating the ISM Catalog Before You Use ON-Bar” on page 5-1 to recreatethe ISM catalog.
3. Use ON-Bar to restore the data.
5-2 IBM Informix Storage Manager Administrator’s Guide

Alternatively, you can perform the following steps in Windows using ISMAdministrator:1. Delete the original volume in the Volume Inventory window. Alternatively, you
can change the Restore status for each save set on the original volume toDisabled.
2. Use ism_catalog to recover unexpired save sets. If the save sets on the clonedvolume have expired, follow the instructions in “ReCreating the ISM CatalogBefore You Use ON-Bar” on page 5-1 to recreate the ISM catalog.
3. Use ON-Bar to restore the data.
When you delete the original volume from the ISM catalog or change the Restorestatus for each save set on the original volume to Disabled, ISM knows that theoriginal volume is unavailable for the restore operation and requests the clonedvolume instead.
Recovering Data After a DisasterHardware malfunctions rarely occur at convenient times, but if you have a disasterrecovery plan in place and maintain regular backups of your database server, youare well prepared to recover critical data in a timely manner.
Before you can restore your data with ON-Bar, you must recreate the ISM catalogin the following situations:v The ISM catalog is corruptedv You reinstalled the operating system and the Informix database server software,
which includes the ISM software
If You Have the ISM Server Bootstrap PrintoutThe following steps overwrite all existing information for this ISM server andrecover the ISM catalog.
To recover the ISM catalog:
1. Locate the most recent bootstrap printout for the ISM server.The bootstrap printout lists which volume contains the ISM server bootstrapsave set.
2. Mount the volume that contains the most recent bootstrap save set on a storagedevice and issue the following command:ism_catalog -recover
ISM recreates the ISM catalog for this ISM server.3. After you recreate the ISM catalog, use ON-Bar to restore your data.
If You Do Not Have the ISM Server Bootstrap PrintoutIf you do not have the most recent ISM server bootstrap printout, you must locatethe storage volume that contains the most recent bootstrap save set before you canrecover the ISM catalog.
To recover the ISM catalog:
1. Mount the storage volume that contains the most recent backup from theISMData volume pool.This volume contains the most recent ISM server bootstrap save set.
Chapter 5. Recovering Save Sets with ISM 5-3
If you do not know which volume contains the most recent backup from theISMData volume pool, you must scan each volume for the most recentbootstrap save set. At the command line, enter the following command withthe full pathname of the storage device on which you loaded the storagevolume:ism_catalog -find_bootstrap device
ISM displays the ssid numbers for all bootstrap save sets on the volume. Youcan use bootstraps to restore the ISM catalog only from volumes of typeBackup. You cannot use bootstraps from volumes of type Backup Clone in therestore process.
2. After you locate the volume with the most recent bootstrap save set, issue thefollowing command:ism_catalog -recover
ISM recreates the ISM catalog for this ISM server.3. After you recreate the ISM catalog, use ON-Bar to restore your data.
Important: You cannot perform disaster recovery from a cloned bootstrap save set.
Creating and Backing Up the ISM BootstrapTo create the ISM bootstrap, use one of the following methods:v onbar script
If you use the onbar script to perform backups, it automatically calls theism_catalog -create_bootstrap command, which creates and backs up the ISMbootstrap. For more information, see “Updating the onbar Script” on page 1-9.
v ism_catalog -create_bootstrap commandThe ism_catalog -create_bootstrap command creates a full backup of the ISMcatalog when it is first used, but subsequently performs incremental backups.Therefore, the media or volume containing the first bootstrap creation is alwaysnecessary in order to restore the bootstrap successfully. To avoid the need for thefirst media or volume during bootstrap restore, a full bootstrap backup must beperformed every time. To accomplish this, the level must be specified explicitlyby using, the underlying savegrp command that ism_catalog -create_bootstrapcalls.To perform a full backup of the ISM catalog every time, run the followingcommand as the user root:$INFORMIXDIR/bin/savegrp -O -l full ISMData
In this command:– -O is a capital-o (not a zero).– ISMData is the pool name where the bootstrap data is saved.You can edit the $INFORMIXDIR/bin/onbar shell script to replace theism_catalog -create_bootstrap command with the savegrp command. Redirectthe output (both stdout and stderr) of the savegrp command to the ON-Baractivity log file (specified by the BAR_ACT_LOG configuration parameter inonconfig file).For more information, see “ism_catalog” on page A-2.
Important: We recommend that you back up the ISM bootstrap after each level-0backup.
5-4 IBM Informix Storage Manager Administrator’s Guide
Transferring Data with the Imported RestoreWith the imported restore feature, you can transfer all the data from one instanceof the database server to the same instance on a foreign host. For example, you canback up data to ISM on one computer and restore it to ISM on a differentcomputer. You can perform imported restores using either whole system (serial) orstorage-space (parallel) backups. The parallel backup must include all storagespaces and logical logs. You must also use compatible versions of XBSA librariesand ISM for both operations.
Important: You cannot use a backup from one database server version to restoreon a different version. You can, however, change the database servername in an imported restore.
The ISM_CLIENT and ISM_SERVER Environment VariablesThe ISM_CLIENT environment variable only needs to be set when you do animported restore. ISM_CLIENT is set on the target server as part of the restoreprocedure. ISM_CLIENT is the hostname of the source.
When you back up the source database server to ISM, set ISM_SERVER to thehostname of the source. For the restore procedure, set ISM_SERVER to thehostname of the target. In both the backup and the restore procedures,ISM_SERVER is the local machine. Remote connections are not supported withISM.
You obtain the values of these environment variables with the hostnamecommand.
Imported Restore Procedure with Files Larger than 2 GBIf ISM is configured to write storage objects to a device of type file, then it willsplit objects larger than 2 GB into several files each with a maximum size of 2 GB.These files (known as save sets) have unique names that reflect the order in whichthe files were created and written. This is also true for the multiple files thatcomprise a storage object larger than 2 GB. Therefore the order in which the filesof such a storage object are written can be determined by their unique file names.
If the ISM catalog needs to be recreated (because the catalog is lost or in animported restore situation), the command ism_catalog -recreate_from <device> isto be used. This command scans the files (save sets) on the device to rebuild thecatalog. However, internally it does not use the unique filename to scan the files inthe correct order. Instead it relies implicitly on the file creation time or inodenumber for the correct order. If the files have been copied in the wrong order, thenthese criteria will not establish the correct order and the command will fail tocorrectly rebuild the catalog entries for the storage objects. This is only the case forstorage objects larger than 2 GB that have been split into several files.
Always use a system utility such as tar or cpio to copy or archive all the save setson a device of type file. Do not copy single files. Even though the device is of typefile, it is to be treated as a tape device.
If the save sets have already been copied as single files, move the files of storageobjects larger than 2 GB to give them different names. The files can remain in thesame directory. You can use the command mv <original_name> <new_name>. Usingthe move command mv avoids actual move of large data and instead onlymanipulates the existing inode. For each file create a symbolic link using a
Chapter 5. Recovering Save Sets with ISM 5-5

command ln -s <original name> <new_name>. Be sure to create these symboliclinks in the correct order (as designated by the filenames). These symbolic linkswill then have new inodes and creation times in the correct order. After this runthe command ism_catalog -recreate_from <device>, which will correctly scan thedevice based on the symbolic link names.
The imported restore is a subset of the following three processes:v Disaster recoveryv Database server upgradev Initialization of High-Availability Data Replication (HDR)
As its name implies, you can also use the imported restore solely to complete animported restore.
An imported restore consists of these three steps:1. Backing up the source database server to ISM2. Porting ISM to a target computer that is a different physical host3. Restoring the data from ISM to the target database server with the same
instance on the target computer
These procedures are discussed in detail in the following sections.
Important: The imported restore procedure is the same for both UNIX andWindows. However, when you set the environment variables, youmust use the appropriate UNIX or Windows syntax.
Step 1: Backing Up the Source Database Server to ISM
Important: If the hostname command outputs a fully-qualified hostname, use fullyqualified hostnames in the imported restore procedure. An example ofa qualified hostname is [email protected]. If the commandoutputs the short hostname (mycomputer, for example), use the shortform.
To back up the source database server to ISM:
1. Execute the hostname command on your source and target computers.2. Bring the database server to quiescent mode with the following command:
onmode -s
3. Set the following ISM environment variables:
UNIX Only
On UNIX:ISM_SERVER = source_hostnameISM_DATA_VOLUME_POOL = ISMDataISM_LOG_VOLUME_POOL = ISMLogsexport ISM_SERVERexport ISM_DATA_VOLUME_POOLexport ISM_LOG_VOLUME_POOL
5-6 IBM Informix Storage Manager Administrator’s Guide
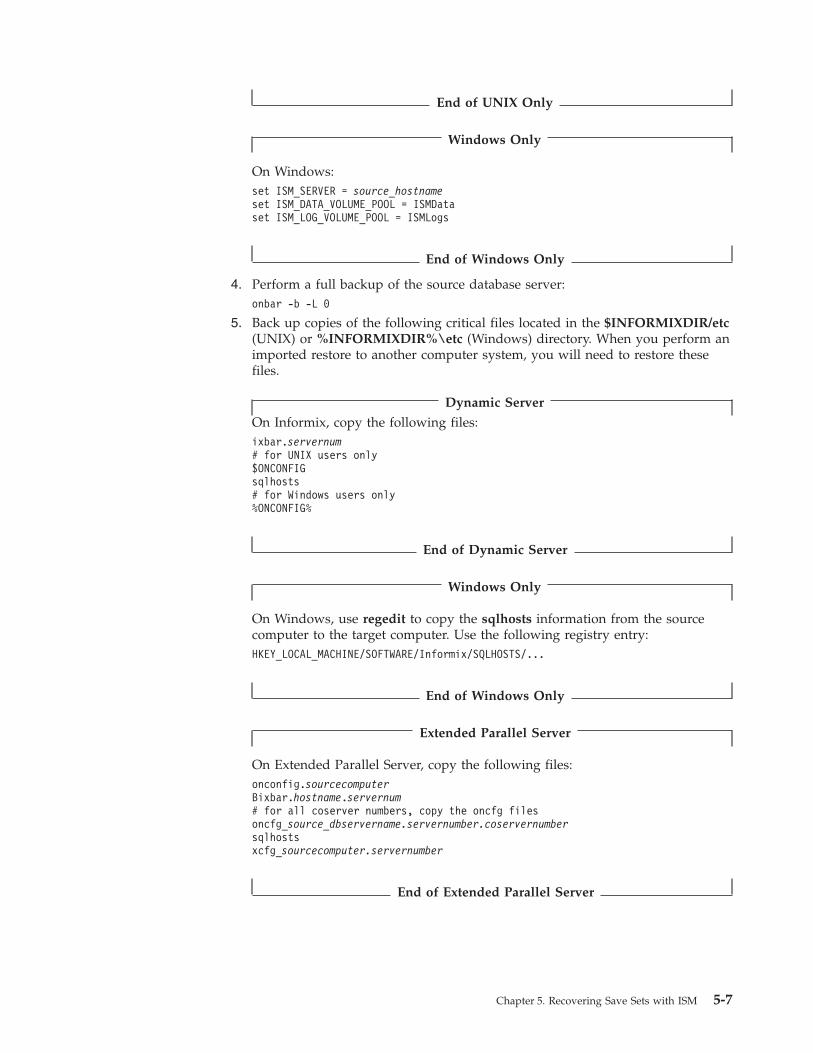
End of UNIX Only
Windows Only
On Windows:set ISM_SERVER = source_hostnameset ISM_DATA_VOLUME_POOL = ISMDataset ISM_LOG_VOLUME_POOL = ISMLogs
End of Windows Only
4. Perform a full backup of the source database server:onbar -b -L 0
5. Back up copies of the following critical files located in the $INFORMIXDIR/etc(UNIX) or %INFORMIXDIR%\etc (Windows) directory. When you perform animported restore to another computer system, you will need to restore thesefiles.
Dynamic Server
On Informix, copy the following files:ixbar.servernum# for UNIX users only$ONCONFIGsqlhosts# for Windows users only%ONCONFIG%
End of Dynamic Server
Windows Only
On Windows, use regedit to copy the sqlhosts information from the sourcecomputer to the target computer. Use the following registry entry:HKEY_LOCAL_MACHINE/SOFTWARE/Informix/SQLHOSTS/...
End of Windows Only
Extended Parallel Server
On Extended Parallel Server, copy the following files:onconfig.sourcecomputerBixbar.hostname.servernum# for all coserver numbers, copy the oncfg filesoncfg_source_dbservername.servernumber.coservernumbersqlhostsxcfg_sourcecomputer.servernumber
End of Extended Parallel Server
Chapter 5. Recovering Save Sets with ISM 5-7
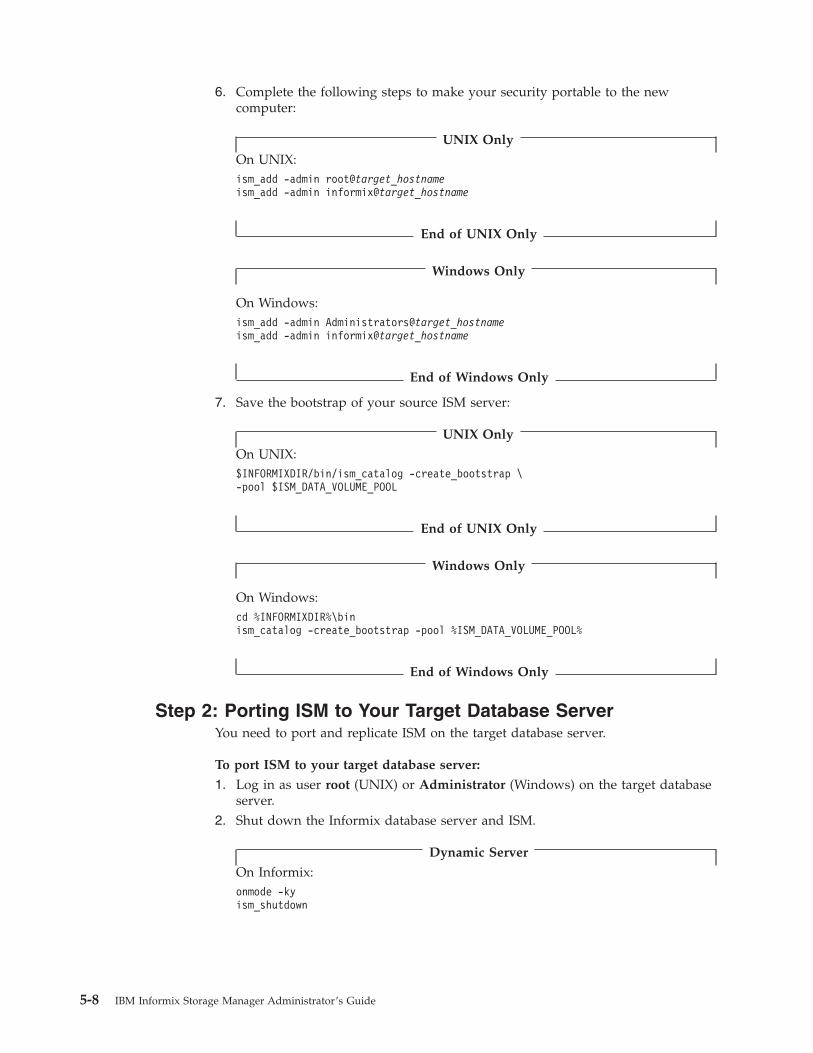
6. Complete the following steps to make your security portable to the newcomputer:
UNIX Only
On UNIX:ism_add -admin root@target_hostnameism_add -admin informix@target_hostname
End of UNIX Only
Windows Only
On Windows:ism_add -admin Administrators@target_hostnameism_add -admin informix@target_hostname
End of Windows Only
7. Save the bootstrap of your source ISM server:
UNIX Only
On UNIX:$INFORMIXDIR/bin/ism_catalog -create_bootstrap \-pool $ISM_DATA_VOLUME_POOL
End of UNIX Only
Windows Only
On Windows:cd %INFORMIXDIR%\binism_catalog -create_bootstrap -pool %ISM_DATA_VOLUME_POOL%
End of Windows Only
Step 2: Porting ISM to Your Target Database ServerYou need to port and replicate ISM on the target database server.
To port ISM to your target database server:
1. Log in as user root (UNIX) or Administrator (Windows) on the target databaseserver.
2. Shut down the Informix database server and ISM.
Dynamic Server
On Informix:onmode -kyism_shutdown
5-8 IBM Informix Storage Manager Administrator’s Guide
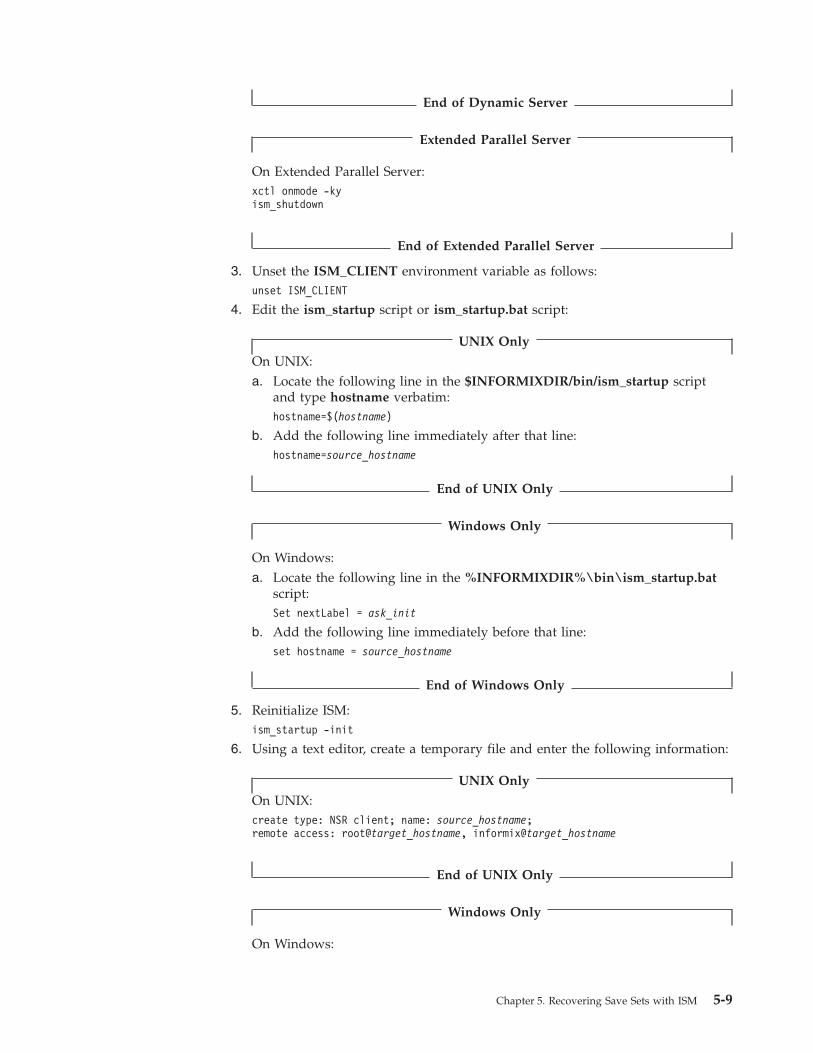
End of Dynamic Server
Extended Parallel Server
On Extended Parallel Server:xctl onmode -kyism_shutdown
End of Extended Parallel Server
3. Unset the ISM_CLIENT environment variable as follows:unset ISM_CLIENT
4. Edit the ism_startup script or ism_startup.bat script:
UNIX Only
On UNIX:a. Locate the following line in the $INFORMIXDIR/bin/ism_startup script
and type hostname verbatim:hostname=$(hostname)
b. Add the following line immediately after that line:hostname=source_hostname
End of UNIX Only
Windows Only
On Windows:a. Locate the following line in the %INFORMIXDIR%\bin\ism_startup.bat
script:Set nextLabel = ask_init
b. Add the following line immediately before that line:set hostname = source_hostname
End of Windows Only
5. Reinitialize ISM:ism_startup -init
6. Using a text editor, create a temporary file and enter the following information:
UNIX Only
On UNIX:create type: NSR client; name: source_hostname;remote access: root@target_hostname, informix@target_hostname
End of UNIX Only
Windows Only
On Windows:
Chapter 5. Recovering Save Sets with ISM 5-9
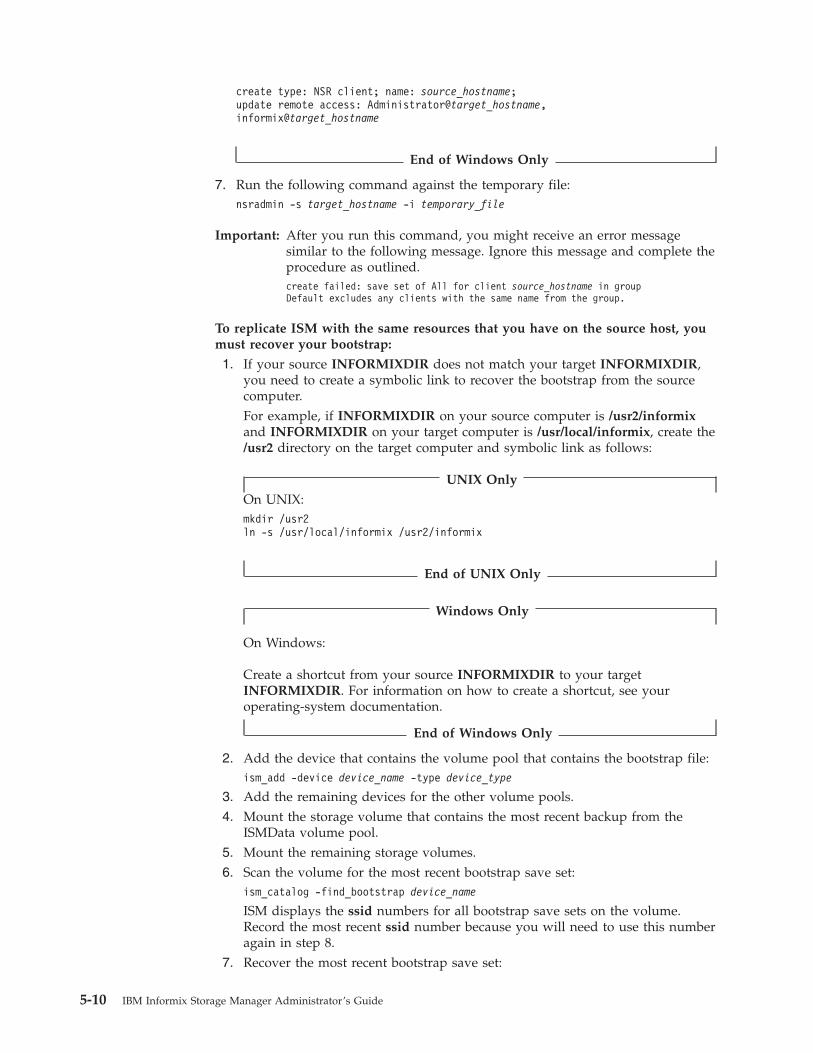
create type: NSR client; name: source_hostname;update remote access: Administrator@target_hostname,informix@target_hostname
End of Windows Only
7. Run the following command against the temporary file:nsradmin -s target_hostname -i temporary_file
Important: After you run this command, you might receive an error messagesimilar to the following message. Ignore this message and complete theprocedure as outlined.create failed: save set of All for client source_hostname in groupDefault excludes any clients with the same name from the group.
To replicate ISM with the same resources that you have on the source host, youmust recover your bootstrap:
1. If your source INFORMIXDIR does not match your target INFORMIXDIR,you need to create a symbolic link to recover the bootstrap from the sourcecomputer.For example, if INFORMIXDIR on your source computer is /usr2/informixand INFORMIXDIR on your target computer is /usr/local/informix, create the/usr2 directory on the target computer and symbolic link as follows:
UNIX Only
On UNIX:mkdir /usr2ln -s /usr/local/informix /usr2/informix
End of UNIX Only
Windows Only
On Windows:
Create a shortcut from your source INFORMIXDIR to your targetINFORMIXDIR. For information on how to create a shortcut, see youroperating-system documentation.
End of Windows Only
2. Add the device that contains the volume pool that contains the bootstrap file:ism_add -device device_name -type device_type
3. Add the remaining devices for the other volume pools.4. Mount the storage volume that contains the most recent backup from the
ISMData volume pool.5. Mount the remaining storage volumes.6. Scan the volume for the most recent bootstrap save set:
ism_catalog -find_bootstrap device_name
ISM displays the ssid numbers for all bootstrap save sets on the volume.Record the most recent ssid number because you will need to use this numberagain in step 8.
7. Recover the most recent bootstrap save set:
5-10 IBM Informix Storage Manager Administrator’s Guide
ism_catalog -recover
8. Enter the most recent bootstrap save set number you recorded earlier in step6.Wait until the following message appears. Ignore the warning and proceed tothe next step:nsrindexasm: Didn't find earlier versions to recover!WARNING: The online index for hostname was NOT fullyrecovered...
9. Shut down ISM:ism_shutdown
10. Recover the res.R file from the source database server.The res.R file contains the resource configuration information for the sourcedatabase server.
UNIX Only
On UNIX:cd $INFORMIXDIR/ismrm -rf resmv res.R res
End of UNIX Only
Windows Only
On Windows:cd %ISMDIR%del resrmdir resmove res.R res
End of Windows Only
Important: Perform step 11 for disaster recovery only if you did not issue theism_add -admin command on the source computer because it wasunavailable.
11. Create the following temporary file and then run the nsradmin commandagainst that file.
UNIX Only
On UNIX:print type:NSR;
update administrator:informix@source_host,root@source_host,informix@target_host,root@target_host
nsradmin -f $INFORMIXDIR/ism/res/nsr.res -i temporary_file
Chapter 5. Recovering Save Sets with ISM 5-11
End of UNIX Only
Windows Only
On Windows:print type:NSR;
update administrator:informix@source_host,Administrator@source_host,informix@target_host,Administrator@target_host
nsradmin -f %ISMDIR%\res\nsr.res -i temporary_file
End of Windows Only
12. Start ISM:ism_startup
13. Remove the device entries from the source computer that do not exist on thetarget computer:ism_show -devicesism_rm -device device_name
14. Create any additional media device entries that do not appear in ISM tomatch those that exist on your target host:ism_show -devicesism_add -device device_name -type device_type
15. Grant permission for local users to access the indexes for the source client.Using a text editor, create a temporary file and enter the followinginformation:
Important: You must enter the command exactly as it appears, including thespace between the two lines.
UNIX Only
On UNIX:print type: NSR client; name: source_hostname
update remote access: informix@target_hostname,root@target_hostname
End of UNIX Only
Windows Only
On Windows:print type: NSR client; name: source_hostname
update remote access: informix@target_hostname,Administrator@target_hostname
End of Windows Only
16. Run the following command against the temporary file:nsradmin -s target_hostname -i temporary_file
5-12 IBM Informix Storage Manager Administrator’s Guide

Step 3: Restoring Data from ISM to the Target Database
Important: Set up the target database server with exactly the same disk layout anddevice allocations as the source database from which you aretransferring the data. Make sure that you assign the same databaseserver number that was used on the source computer.
To restore the data from ISM to the target database server:
1. Log in as user informix.
2. If the Informix database server is online, shut it down.
Dynamic Server
On Informix:onmode -ky
End of Dynamic Server
Extended Parallel Server
On Extended Parallel Server:xctl onmode -ky
End of Extended Parallel Server
3. Configure the following ISM environment variables for this session. Forexample:
UNIX Only
On UNIX:ISM_CLIENT = source_hostnameISM_SERVER = target_hostnameISM_DATA_VOLUME_POOL = same_value_on_source_hostISM_LOG_VOLUME_POOL = same_value_on_source_hostexport ISM_CLIENT ISM_SERVERexport ISM_DATA_VOLUME_POOLexport ISM_LOG_VOLUME_POOL
End of UNIX Only
Windows Only
On Windows:set ISM_CLIENT = source_hostnameset ISM_SERVER = target_hostnameset ISM_DATA_VOLUME_POOL = same_value_on_source_hostset ISM_LOG_VOLUME_POOL = same_value_on_source_host
End of Windows Only
4. Recover your media database for each of your data volume pools (ISM Data,ISM Logs):ism_catalog -recreate_from device_name
5. Synchronize the media index database:
Chapter 5. Recovering Save Sets with ISM 5-13
nsrim -v
6. To mark your media as appendable for each of your volume pools (ISMData,ISMLogs), complete the following steps:ism_show -devicesism_op -unmount device_nameism_show -volumesism_config -volume volume_name -only_restore noism_op -mount device_name
Dynamic Server
7. On Informix, restore copies of the following critical files located in the$INFORMIXDIR/etc (UNIX) or %INFORMIXDIR%\etc (Windows) directory:ixbar.servernum# for UNIX users only$ONCONFIGsqlhosts# for Windows users only%ONCONFIG%
Windows Only
Use regedit to copy the sqlhosts information from the source computer to thetarget computer. Use the following registry entry:HKEY_LOCAL_MACHINE/SOFTWARE/Informix/SQLHOSTS/...
Rename the oncfg* file and replace the host database server name with thetarget database server name. For example:oncfg_target_dbservername.servernum
End of Windows Only
End of Dynamic Server
Extended Parallel Server
8. On Extended Parallel Server, restore copies of the following critical fileslocated in the $INFORMIXDIR/etc directory from each coserver on the targetcomputer:onconfig.sourcecomputerBixbar.hostname.servernumoncfg_source_dbservername.servernumber.coservernumbersqlhostsxcfg_sourcecomputer.servernumber
For the following files, replace the host database server name with the targetdatabase server name:oncfg_source_dbservername.servernumber.coservernumberxcfg_hostname.servernumberBixbar.hostname.servernum
Edit the xcfg_hostname.servernumber file to change the source database servername to the target database server name.
End of Extended Parallel Server
5-14 IBM Informix Storage Manager Administrator’s Guide
9. Update the sqlhosts file or registry entry and include the proper sharedmemory settings for the target database server.
UNIX Only
In the sqlhosts file, change the database server name in the first and fourthentries on each line, if necessary. Change the hostname in the third entry tothe target hostname.
End of UNIX Only
10. Update the ONCONFIG file and replace the source database server name withthe target database server name. For example:DBSERVERNAME target_dbservername
Extended Parallel Server
For Extended Parallel Server only, change the host names in the NODE lines.Delete the SADDR, LADDR, and HADDR lines that follow each NODE line inthe ONCONFIG file.
End of Extended Parallel Server
11. Create new dbspaces if you have not already done so.Make sure they reside at the same path locations as they do on the sourcedatabase server. User informix and group informix also must own thesedbspaces.
12. Perform the imported restore on the target database server:onbar -r
13. Reconfigure your ISM settings for daily backup and restore operations.Do not change the settings of the ISM_CLIENT and ISM_SERVERenvironment variables.
Important: If the imported restore fails with an error about the source hostnamenot having access, grant permission for local users to access theindexes for the source client. For details, see steps 15 and 16 on page5-12.
Chapter 5. Recovering Save Sets with ISM 5-15

5-16 IBM Informix Storage Manager Administrator’s Guide
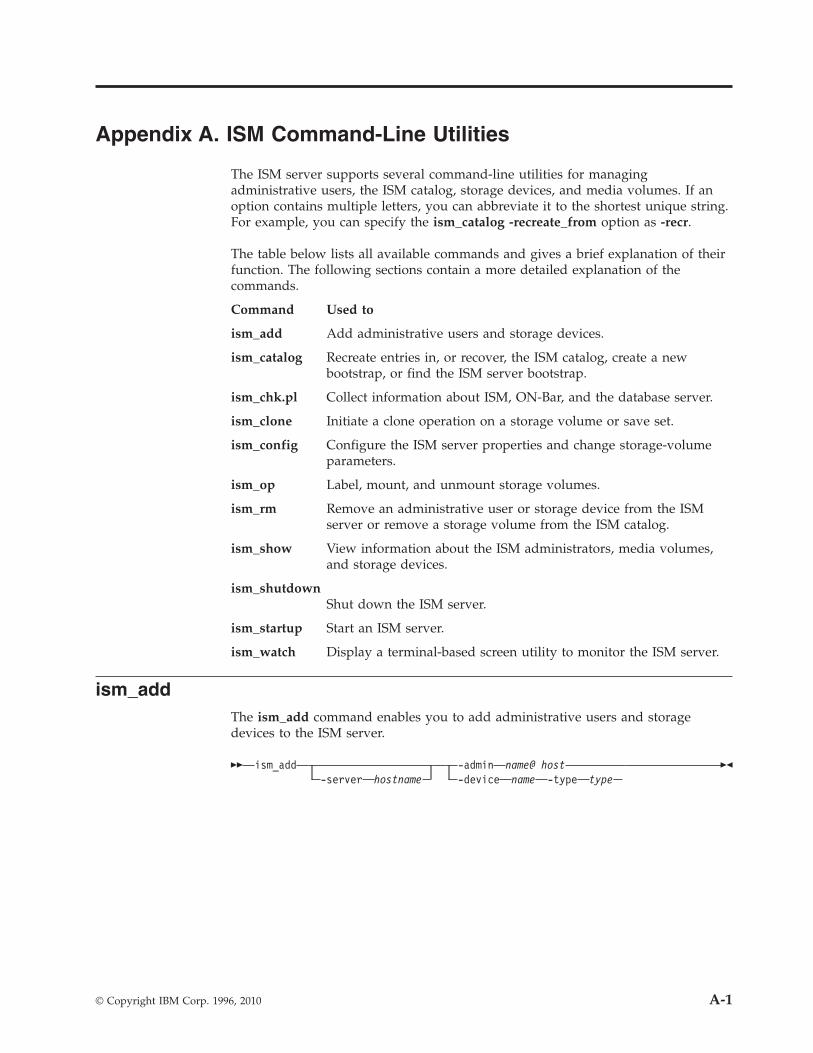
Appendix A. ISM Command-Line Utilities
The ISM server supports several command-line utilities for managingadministrative users, the ISM catalog, storage devices, and media volumes. If anoption contains multiple letters, you can abbreviate it to the shortest unique string.For example, you can specify the ism_catalog -recreate_from option as -recr.
The table below lists all available commands and gives a brief explanation of theirfunction. The following sections contain a more detailed explanation of thecommands.
Command Used to
ism_add Add administrative users and storage devices.
ism_catalog Recreate entries in, or recover, the ISM catalog, create a newbootstrap, or find the ISM server bootstrap.
ism_chk.pl Collect information about ISM, ON-Bar, and the database server.
ism_clone Initiate a clone operation on a storage volume or save set.
ism_config Configure the ISM server properties and change storage-volumeparameters.
ism_op Label, mount, and unmount storage volumes.
ism_rm Remove an administrative user or storage device from the ISMserver or remove a storage volume from the ISM catalog.
ism_show View information about the ISM administrators, media volumes,and storage devices.
ism_shutdownShut down the ISM server.
ism_startup Start an ISM server.
ism_watch Display a terminal-based screen utility to monitor the ISM server.
ism_addThe ism_add command enables you to add administrative users and storagedevices to the ISM server.
�� ism_add-server hostname
-admin name@ host-device name -type type
��
© Copyright IBM Corp. 1996, 2010 A-1
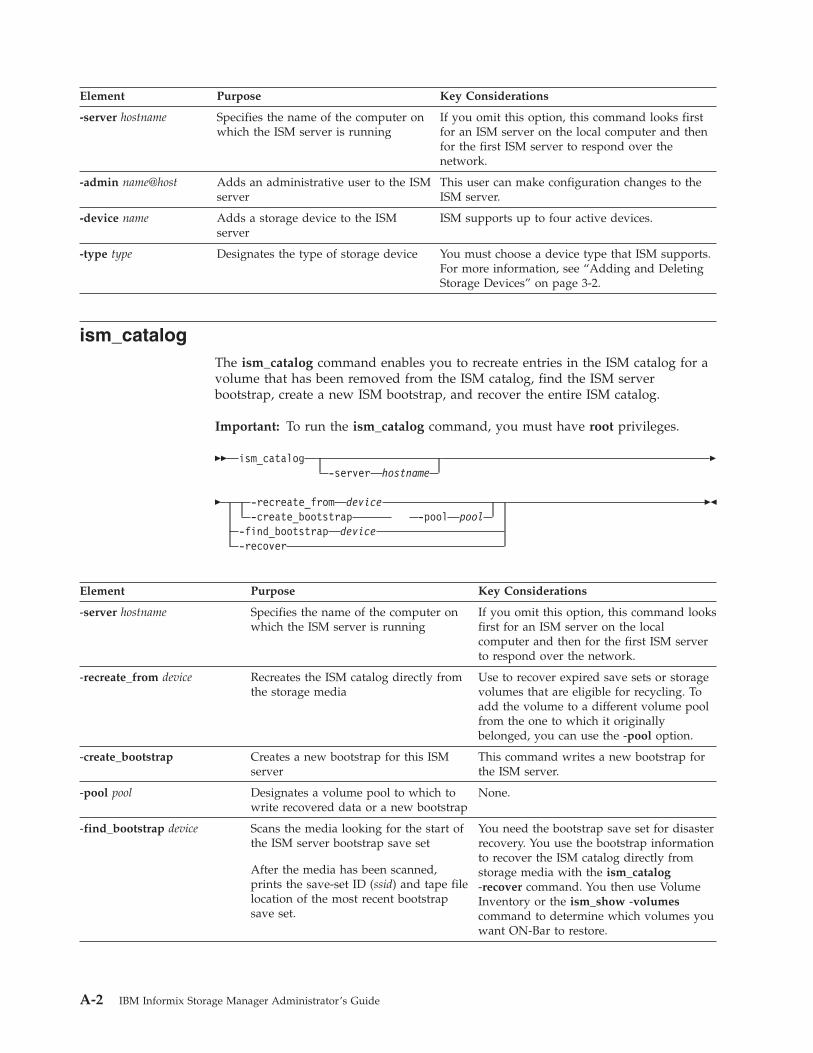
Element Purpose Key Considerations
-server hostname Specifies the name of the computer onwhich the ISM server is running
If you omit this option, this command looks firstfor an ISM server on the local computer and thenfor the first ISM server to respond over thenetwork.
-admin name@host Adds an administrative user to the ISMserver
This user can make configuration changes to theISM server.
-device name Adds a storage device to the ISMserver
ISM supports up to four active devices.
-type type Designates the type of storage device You must choose a device type that ISM supports.For more information, see “Adding and DeletingStorage Devices” on page 3-2.
ism_catalogThe ism_catalog command enables you to recreate entries in the ISM catalog for avolume that has been removed from the ISM catalog, find the ISM serverbootstrap, create a new ISM bootstrap, and recover the entire ISM catalog.
Important: To run the ism_catalog command, you must have root privileges.
�� ism_catalog-server hostname
�
� -recreate_from device-create_bootstrap -pool pool
-find_bootstrap device-recover
��
Element Purpose Key Considerations
-server hostname Specifies the name of the computer onwhich the ISM server is running
If you omit this option, this command looksfirst for an ISM server on the localcomputer and then for the first ISM serverto respond over the network.
-recreate_from device Recreates the ISM catalog directly fromthe storage media
Use to recover expired save sets or storagevolumes that are eligible for recycling. Toadd the volume to a different volume poolfrom the one to which it originallybelonged, you can use the -pool option.
-create_bootstrap Creates a new bootstrap for this ISMserver
This command writes a new bootstrap forthe ISM server.
-pool pool Designates a volume pool to which towrite recovered data or a new bootstrap
None.
-find_bootstrap device Scans the media looking for the start ofthe ISM server bootstrap save set
After the media has been scanned,prints the save-set ID (ssid) and tape filelocation of the most recent bootstrapsave set.
You need the bootstrap save set for disasterrecovery. You use the bootstrap informationto recover the ISM catalog directly fromstorage media with the ism_catalog-recover command. You then use VolumeInventory or the ism_show -volumescommand to determine which volumes youwant ON-Bar to restore.
A-2 IBM Informix Storage Manager Administrator’s Guide
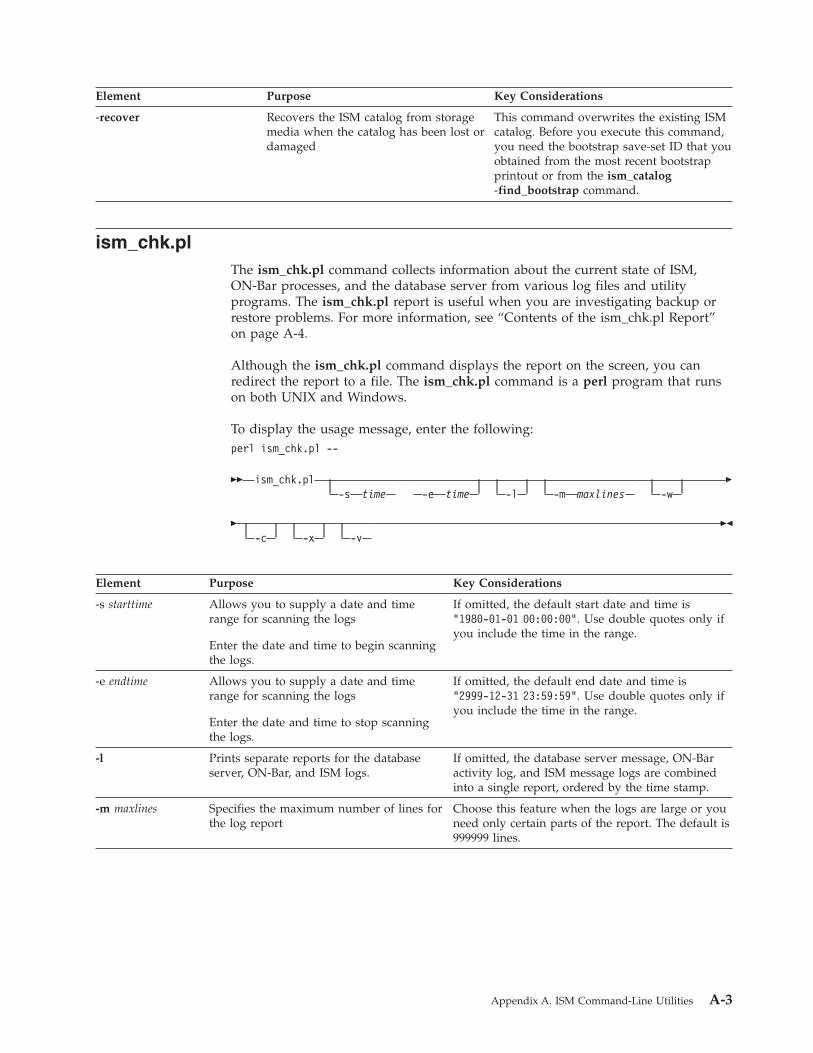
Element Purpose Key Considerations
-recover Recovers the ISM catalog from storagemedia when the catalog has been lost ordamaged
This command overwrites the existing ISMcatalog. Before you execute this command,you need the bootstrap save-set ID that youobtained from the most recent bootstrapprintout or from the ism_catalog-find_bootstrap command.
ism_chk.plThe ism_chk.pl command collects information about the current state of ISM,ON-Bar processes, and the database server from various log files and utilityprograms. The ism_chk.pl report is useful when you are investigating backup orrestore problems. For more information, see “Contents of the ism_chk.pl Report”on page A-4.
Although the ism_chk.pl command displays the report on the screen, you canredirect the report to a file. The ism_chk.pl command is a perl program that runson both UNIX and Windows.
To display the usage message, enter the following:perl ism_chk.pl --
�� ism_chk.pl-s time -e time -l -m maxlines -w
�
�-c -x -v
��
Element Purpose Key Considerations
-s starttime Allows you to supply a date and timerange for scanning the logs
Enter the date and time to begin scanningthe logs.
If omitted, the default start date and time is"1980-01-01 00:00:00". Use double quotes only ifyou include the time in the range.
-e endtime Allows you to supply a date and timerange for scanning the logs
Enter the date and time to stop scanningthe logs.
If omitted, the default end date and time is"2999-12-31 23:59:59". Use double quotes only ifyou include the time in the range.
-l Prints separate reports for the databaseserver, ON-Bar, and ISM logs.
If omitted, the database server message, ON-Baractivity log, and ISM message logs are combinedinto a single report, ordered by the time stamp.
-m maxlines Specifies the maximum number of lines forthe log report
Choose this feature when the logs are large or youneed only certain parts of the report. The default is999999 lines.
Appendix A. ISM Command-Line Utilities A-3
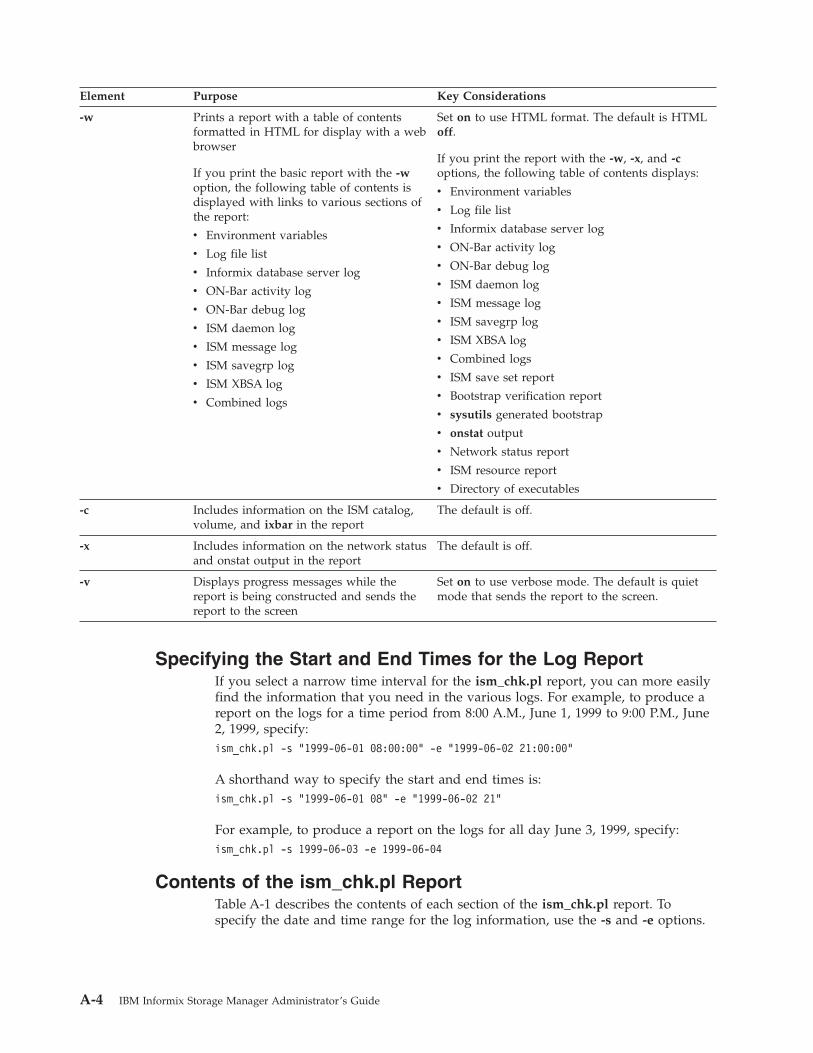
Element Purpose Key Considerations
-w Prints a report with a table of contentsformatted in HTML for display with a webbrowser
If you print the basic report with the -woption, the following table of contents isdisplayed with links to various sections ofthe report:
v Environment variables
v Log file list
v Informix database server log
v ON-Bar activity log
v ON-Bar debug log
v ISM daemon log
v ISM message log
v ISM savegrp log
v ISM XBSA log
v Combined logs
Set on to use HTML format. The default is HTMLoff.
If you print the report with the -w, -x, and -coptions, the following table of contents displays:
v Environment variables
v Log file list
v Informix database server log
v ON-Bar activity log
v ON-Bar debug log
v ISM daemon log
v ISM message log
v ISM savegrp log
v ISM XBSA log
v Combined logs
v ISM save set report
v Bootstrap verification report
v sysutils generated bootstrap
v onstat output
v Network status report
v ISM resource report
v Directory of executables
-c Includes information on the ISM catalog,volume, and ixbar in the report
The default is off.
-x Includes information on the network statusand onstat output in the report
The default is off.
-v Displays progress messages while thereport is being constructed and sends thereport to the screen
Set on to use verbose mode. The default is quietmode that sends the report to the screen.
Specifying the Start and End Times for the Log ReportIf you select a narrow time interval for the ism_chk.pl report, you can more easilyfind the information that you need in the various logs. For example, to produce areport on the logs for a time period from 8:00 A.M., June 1, 1999 to 9:00 P.M., June2, 1999, specify:ism_chk.pl -s "1999-06-01 08:00:00" -e "1999-06-02 21:00:00"
A shorthand way to specify the start and end times is:ism_chk.pl -s "1999-06-01 08" -e "1999-06-02 21"
For example, to produce a report on the logs for all day June 3, 1999, specify:ism_chk.pl -s 1999-06-03 -e 1999-06-04
Contents of the ism_chk.pl ReportTable A-1 describes the contents of each section of the ism_chk.pl report. Tospecify the date and time range for the log information, use the -s and -e options.
A-4 IBM Informix Storage Manager Administrator’s Guide
Table A-1. Contents of the ism_chk.pl Report
Report Section Description
Environment variables Lists the important environment variables that affect oninit, ISM, and ON-Bar.
Log file list Lists the full path names of the various logs that contain information about ISMand ON-Bar operations.
Database server logON-Bar activity logON-Bar debug logISM daemon logISM message logISM savegrp logISM XBSA log
Lists the text from these logs.
ISM save set report Lists all the save sets currently in the ISM catalogs. Use the -c option to print thisreport.
Bootstrap verification report Verifies that the dbspaces and logical logs that are in the ON-Bar bootstrap fileare also in the ISM catalog.
Use the -c option to print this report.
sysutils generated bootstrap Recreates the ON-Bar bootstrap file that is generated from the ON-Bar catalogs.
Use the -c option to print this report.
onstat -a output Displays the output of onstat -a that shows the state of the database server.
Use the -x option to print this report.
For more information, see the onstat section of the utilities chapter in the IBMInformix Administrator's Guide.
network status report Displays the output of the netstat utility that reports on network load andresources.
Use the -x option to print this report.
ISM resource report Lists the ISM resource file that contains definitions for storage devices andvolumes, and the retention policies for stored objects.
Use the -x option to print this report.
directory of executables Lists the contents of the Informix executables directory.
Use this output to verify the software version. Use the -x option to print thisreport.
Sample ism_chk.pl Verbose OutputThe following sample output is from the ism_chk.pl command with the -v verboseflag set. The -m option limits the report to the last 10 lines of the logs. The reportis written to an ASCII file, my_ism_report.$ perl ism_chk.pl -v -m 10 > my_ism_report
ism_chk: checking ISM/Onbar/Online logs-s 1980-01-01 00:00:00-e 2999-12-31 23:59:59-m 10 lines will be displayed-v report output selected
checking ISM resources...checking ONCONFIG ONCONFIG.ol_mazama28...checking Online log...
Appendix A. ISM Command-Line Utilities A-5
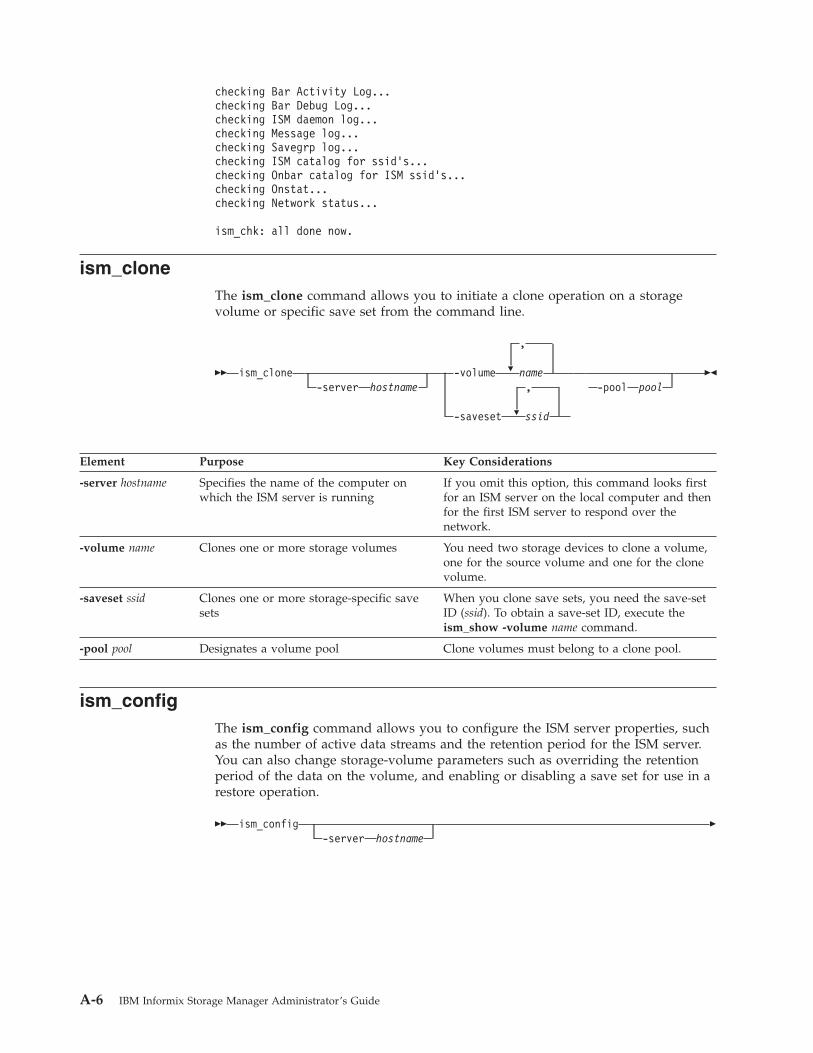
checking Bar Activity Log...checking Bar Debug Log...checking ISM daemon log...checking Message log...checking Savegrp log...checking ISM catalog for ssid's...checking Onbar catalog for ISM ssid's...checking Onstat...checking Network status...
ism_chk: all done now.
ism_cloneThe ism_clone command allows you to initiate a clone operation on a storagevolume or specific save set from the command line.
�� ism_clone-server hostname
�
�
,
-volume name,
-saveset ssid
-pool pool��
Element Purpose Key Considerations
-server hostname Specifies the name of the computer onwhich the ISM server is running
If you omit this option, this command looks firstfor an ISM server on the local computer and thenfor the first ISM server to respond over thenetwork.
-volume name Clones one or more storage volumes You need two storage devices to clone a volume,one for the source volume and one for the clonevolume.
-saveset ssid Clones one or more storage-specific savesets
When you clone save sets, you need the save-setID (ssid). To obtain a save-set ID, execute theism_show -volume name command.
-pool pool Designates a volume pool Clone volumes must belong to a clone pool.
ism_configThe ism_config command allows you to configure the ISM server properties, suchas the number of active data streams and the retention period for the ISM server.You can also change storage-volume parameters such as overriding the retentionperiod of the data on the volume, and enabling or disabling a save set for use in arestore operation.
�� ism_config-server hostname
�
A-6 IBM Informix Storage Manager Administrator’s Guide
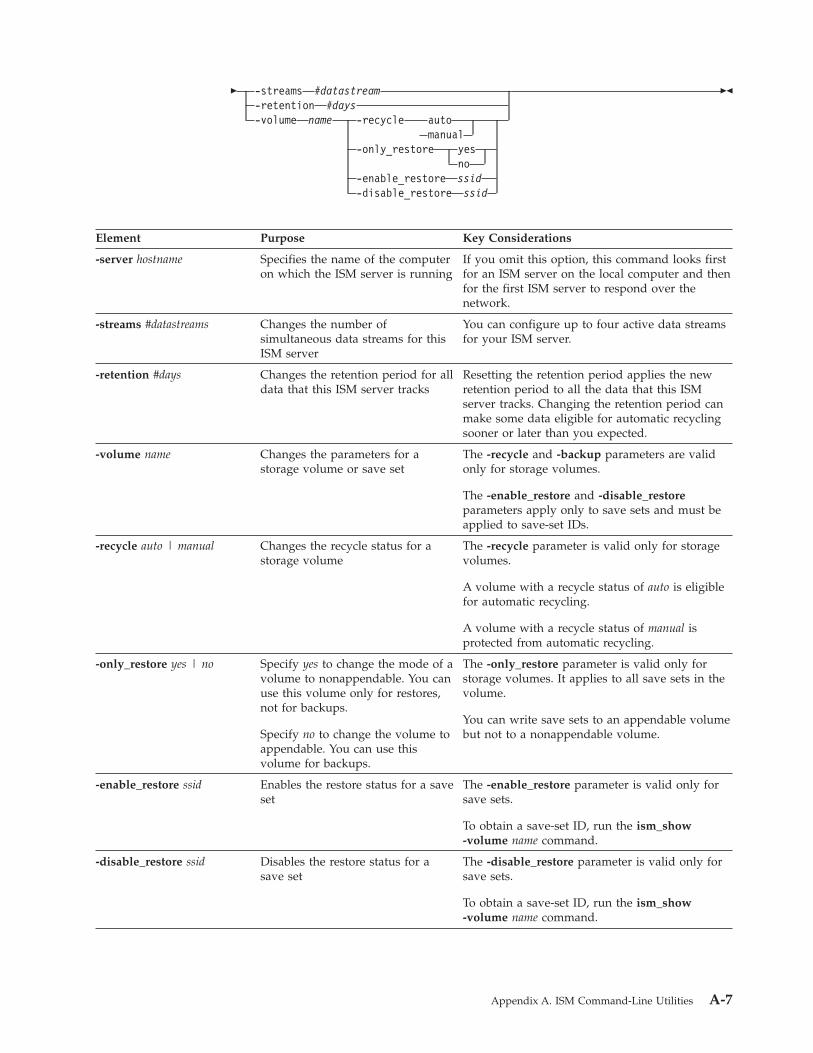
� -streams #datastream-retention #days-volume name -recycle auto
manual-only_restore yes
no-enable_restore ssid-disable_restore ssid
��
Element Purpose Key Considerations
-server hostname Specifies the name of the computeron which the ISM server is running
If you omit this option, this command looks firstfor an ISM server on the local computer and thenfor the first ISM server to respond over thenetwork.
-streams #datastreams Changes the number ofsimultaneous data streams for thisISM server
You can configure up to four active data streamsfor your ISM server.
-retention #days Changes the retention period for alldata that this ISM server tracks
Resetting the retention period applies the newretention period to all the data that this ISMserver tracks. Changing the retention period canmake some data eligible for automatic recyclingsooner or later than you expected.
-volume name Changes the parameters for astorage volume or save set
The -recycle and -backup parameters are validonly for storage volumes.
The -enable_restore and -disable_restoreparameters apply only to save sets and must beapplied to save-set IDs.
-recycle auto | manual Changes the recycle status for astorage volume
The -recycle parameter is valid only for storagevolumes.
A volume with a recycle status of auto is eligiblefor automatic recycling.
A volume with a recycle status of manual isprotected from automatic recycling.
-only_restore yes | no Specify yes to change the mode of avolume to nonappendable. You canuse this volume only for restores,not for backups.
Specify no to change the volume toappendable. You can use thisvolume for backups.
The -only_restore parameter is valid only forstorage volumes. It applies to all save sets in thevolume.
You can write save sets to an appendable volumebut not to a nonappendable volume.
-enable_restore ssid Enables the restore status for a saveset
The -enable_restore parameter is valid only forsave sets.
To obtain a save-set ID, run the ism_show-volume name command.
-disable_restore ssid Disables the restore status for asave set
The -disable_restore parameter is valid only forsave sets.
To obtain a save-set ID, run the ism_show-volume name command.
Appendix A. ISM Command-Line Utilities A-7
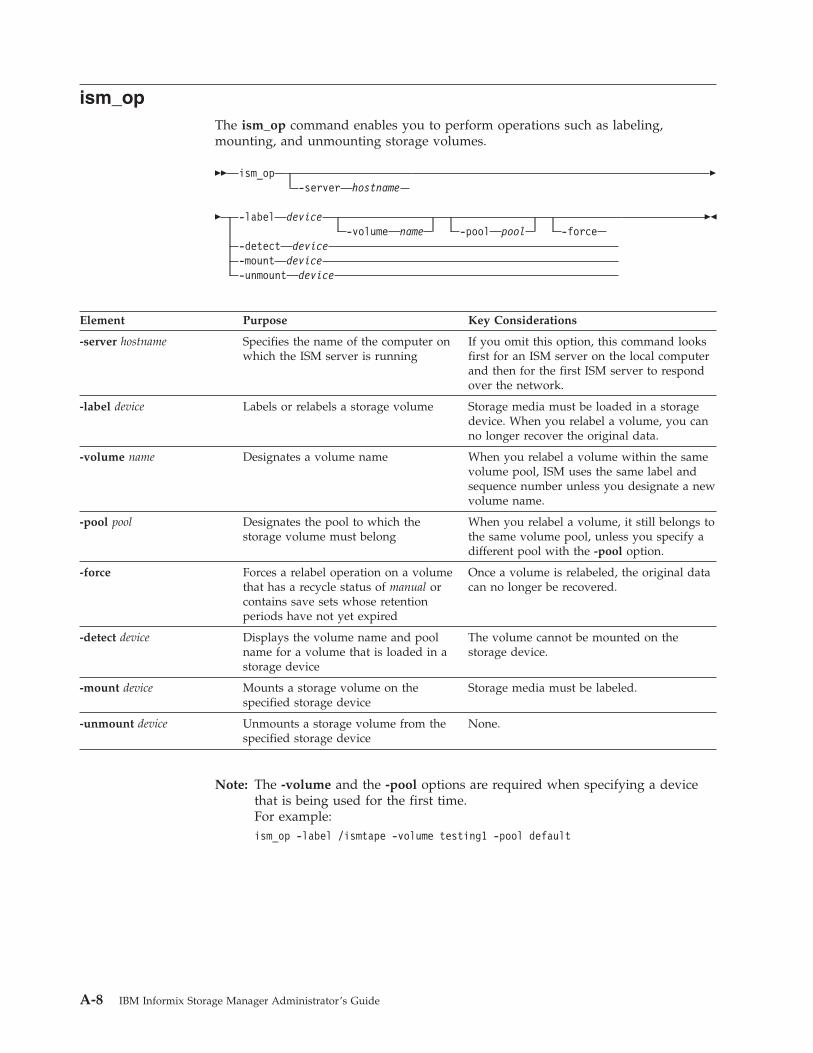
ism_opThe ism_op command enables you to perform operations such as labeling,mounting, and unmounting storage volumes.
�� ism_op-server hostname
�
� -label device-volume name -pool pool -force
-detect device-mount device-unmount device
��
Element Purpose Key Considerations
-server hostname Specifies the name of the computer onwhich the ISM server is running
If you omit this option, this command looksfirst for an ISM server on the local computerand then for the first ISM server to respondover the network.
-label device Labels or relabels a storage volume Storage media must be loaded in a storagedevice. When you relabel a volume, you canno longer recover the original data.
-volume name Designates a volume name When you relabel a volume within the samevolume pool, ISM uses the same label andsequence number unless you designate a newvolume name.
-pool pool Designates the pool to which thestorage volume must belong
When you relabel a volume, it still belongs tothe same volume pool, unless you specify adifferent pool with the -pool option.
-force Forces a relabel operation on a volumethat has a recycle status of manual orcontains save sets whose retentionperiods have not yet expired
Once a volume is relabeled, the original datacan no longer be recovered.
-detect device Displays the volume name and poolname for a volume that is loaded in astorage device
The volume cannot be mounted on thestorage device.
-mount device Mounts a storage volume on thespecified storage device
Storage media must be labeled.
-unmount device Unmounts a storage volume from thespecified storage device
None.
Note: The -volume and the -pool options are required when specifying a devicethat is being used for the first time.For example:ism_op -label /ismtape -volume testing1 -pool default
A-8 IBM Informix Storage Manager Administrator’s Guide
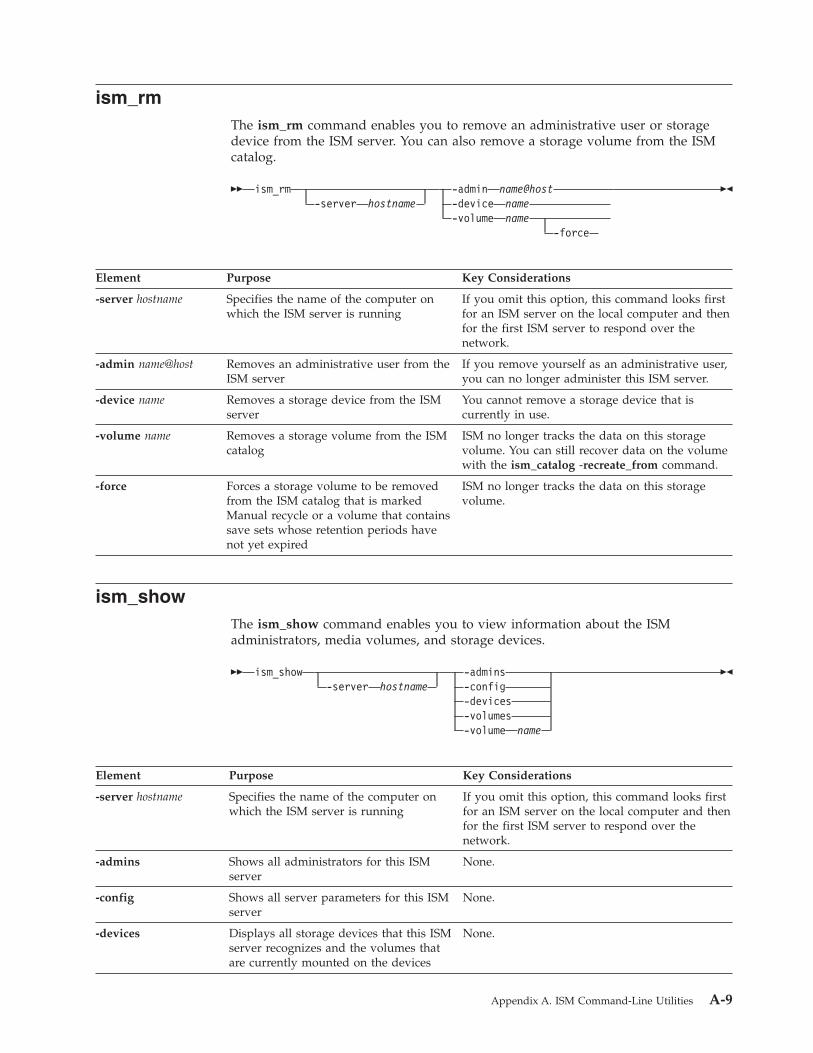
ism_rmThe ism_rm command enables you to remove an administrative user or storagedevice from the ISM server. You can also remove a storage volume from the ISMcatalog.
�� ism_rm-server hostname
-admin name@host-device name-volume name
-force
��
Element Purpose Key Considerations
-server hostname Specifies the name of the computer onwhich the ISM server is running
If you omit this option, this command looks firstfor an ISM server on the local computer and thenfor the first ISM server to respond over thenetwork.
-admin name@host Removes an administrative user from theISM server
If you remove yourself as an administrative user,you can no longer administer this ISM server.
-device name Removes a storage device from the ISMserver
You cannot remove a storage device that iscurrently in use.
-volume name Removes a storage volume from the ISMcatalog
ISM no longer tracks the data on this storagevolume. You can still recover data on the volumewith the ism_catalog -recreate_from command.
-force Forces a storage volume to be removedfrom the ISM catalog that is markedManual recycle or a volume that containssave sets whose retention periods havenot yet expired
ISM no longer tracks the data on this storagevolume.
ism_showThe ism_show command enables you to view information about the ISMadministrators, media volumes, and storage devices.
�� ism_show-server hostname
-admins-config-devices-volumes-volume name
��
Element Purpose Key Considerations
-server hostname Specifies the name of the computer onwhich the ISM server is running
If you omit this option, this command looks firstfor an ISM server on the local computer and thenfor the first ISM server to respond over thenetwork.
-admins Shows all administrators for this ISMserver
None.
-config Shows all server parameters for this ISMserver
None.
-devices Displays all storage devices that this ISMserver recognizes and the volumes thatare currently mounted on the devices
None.
Appendix A. ISM Command-Line Utilities A-9
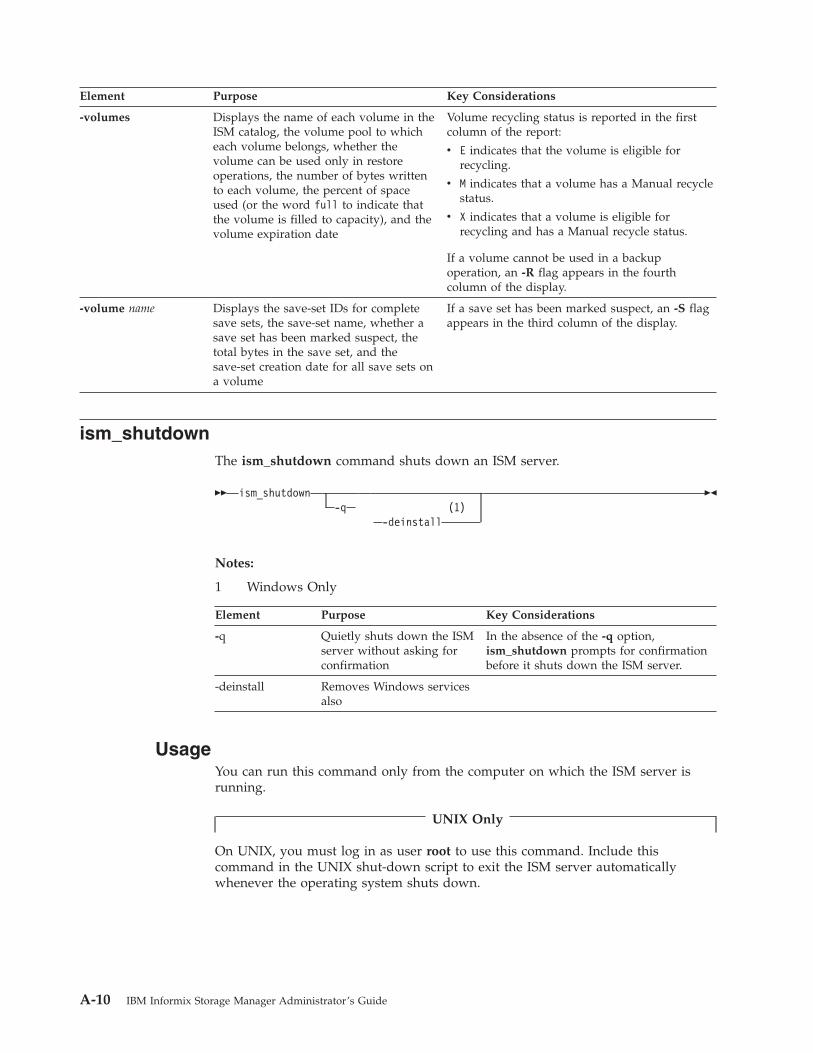
Element Purpose Key Considerations
-volumes Displays the name of each volume in theISM catalog, the volume pool to whicheach volume belongs, whether thevolume can be used only in restoreoperations, the number of bytes writtento each volume, the percent of spaceused (or the word full to indicate thatthe volume is filled to capacity), and thevolume expiration date
Volume recycling status is reported in the firstcolumn of the report:
v E indicates that the volume is eligible forrecycling.
v M indicates that a volume has a Manual recyclestatus.
v X indicates that a volume is eligible forrecycling and has a Manual recycle status.
If a volume cannot be used in a backupoperation, an -R flag appears in the fourthcolumn of the display.
-volume name Displays the save-set IDs for completesave sets, the save-set name, whether asave set has been marked suspect, thetotal bytes in the save set, and thesave-set creation date for all save sets ona volume
If a save set has been marked suspect, an -S flagappears in the third column of the display.
ism_shutdownThe ism_shutdown command shuts down an ISM server.
�� ism_shutdown-q (1)
-deinstall
��
Notes:
1 Windows Only
Element Purpose Key Considerations
-q Quietly shuts down the ISMserver without asking forconfirmation
In the absence of the -q option,ism_shutdown prompts for confirmationbefore it shuts down the ISM server.
-deinstall Removes Windows servicesalso
UsageYou can run this command only from the computer on which the ISM server isrunning.
UNIX Only
On UNIX, you must log in as user root to use this command. Include thiscommand in the UNIX shut-down script to exit the ISM server automaticallywhenever the operating system shuts down.
A-10 IBM Informix Storage Manager Administrator’s Guide
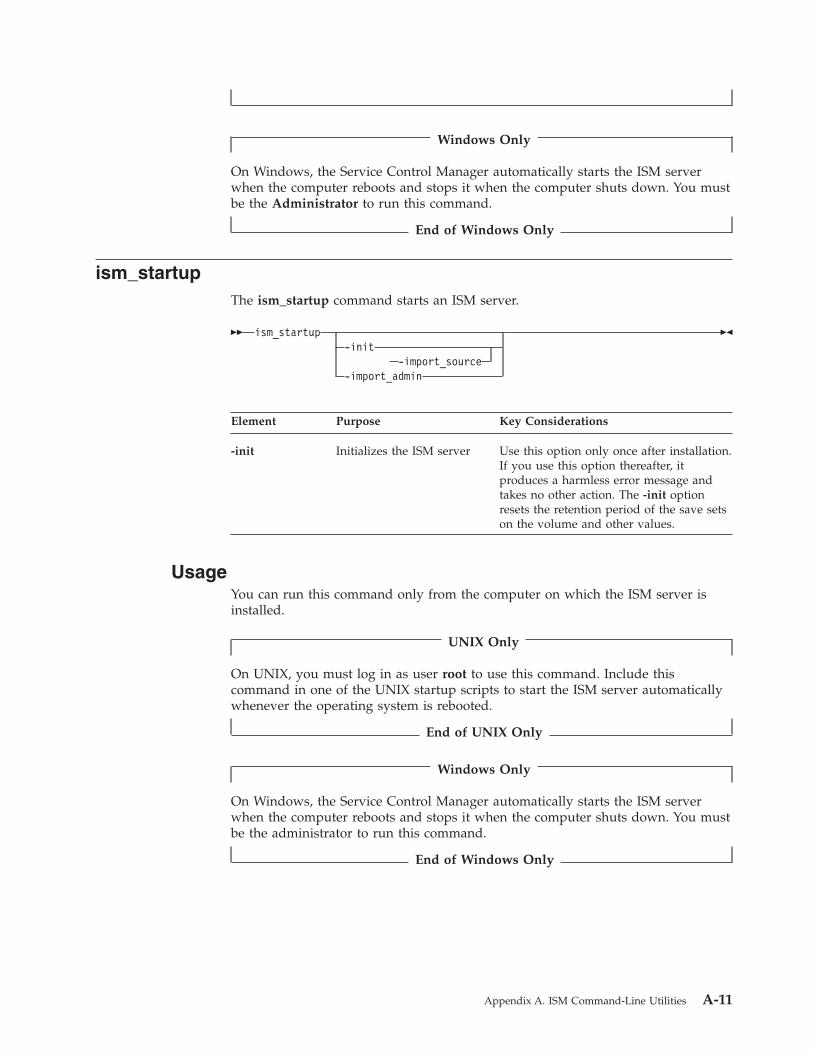
Windows Only
On Windows, the Service Control Manager automatically starts the ISM serverwhen the computer reboots and stops it when the computer shuts down. You mustbe the Administrator to run this command.
End of Windows Only
ism_startupThe ism_startup command starts an ISM server.
�� ism_startup-init
-import_source-import_admin
��
Element Purpose Key Considerations
-init Initializes the ISM server Use this option only once after installation.If you use this option thereafter, itproduces a harmless error message andtakes no other action. The -init optionresets the retention period of the save setson the volume and other values.
UsageYou can run this command only from the computer on which the ISM server isinstalled.
UNIX Only
On UNIX, you must log in as user root to use this command. Include thiscommand in one of the UNIX startup scripts to start the ISM server automaticallywhenever the operating system is rebooted.
End of UNIX Only
Windows Only
On Windows, the Service Control Manager automatically starts the ISM serverwhen the computer reboots and stops it when the computer shuts down. You mustbe the administrator to run this command.
End of Windows Only
Appendix A. ISM Command-Line Utilities A-11
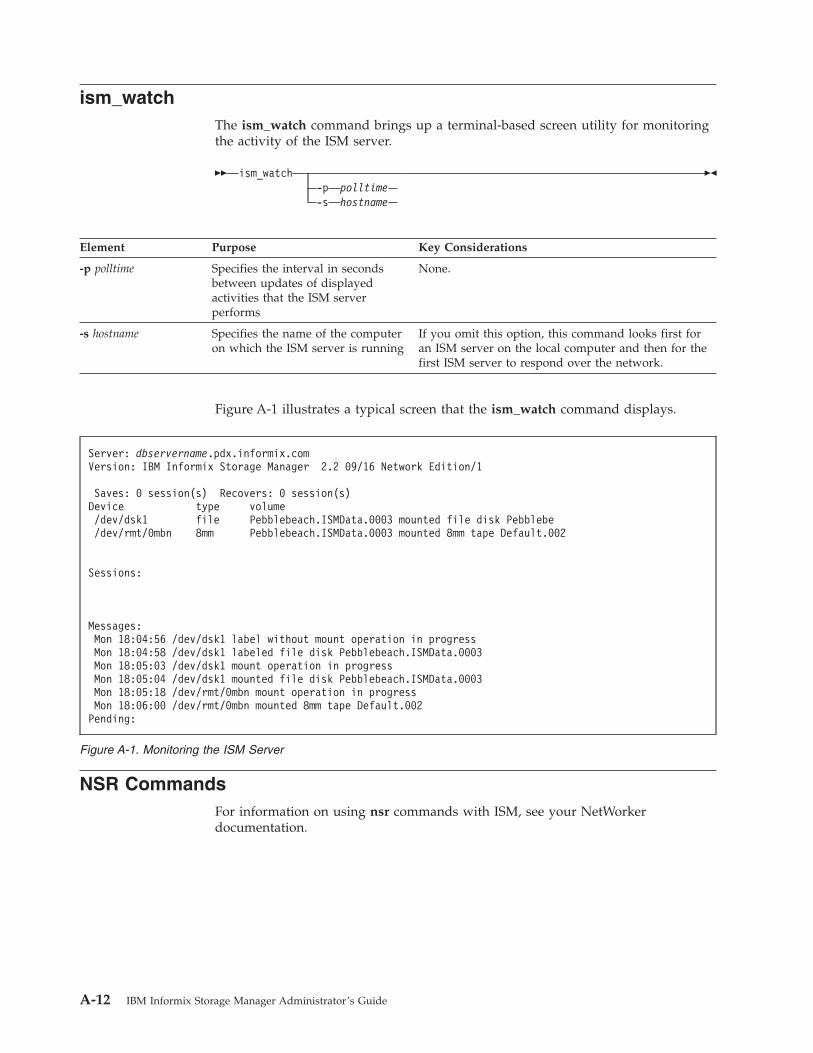
ism_watchThe ism_watch command brings up a terminal-based screen utility for monitoringthe activity of the ISM server.
�� ism_watch-p polltime-s hostname
��
Element Purpose Key Considerations
-p polltime Specifies the interval in secondsbetween updates of displayedactivities that the ISM serverperforms
None.
-s hostname Specifies the name of the computeron which the ISM server is running
If you omit this option, this command looks first foran ISM server on the local computer and then for thefirst ISM server to respond over the network.
Figure A-1 illustrates a typical screen that the ism_watch command displays.
NSR CommandsFor information on using nsr commands with ISM, see your NetWorkerdocumentation.
Server: dbservername.pdx.informix.comVersion: IBM Informix Storage Manager 2.2 09/16 Network Edition/1
Saves: 0 session(s) Recovers: 0 session(s)Device type volume/dev/dsk1 file Pebblebeach.ISMData.0003 mounted file disk Pebblebe/dev/rmt/0mbn 8mm Pebblebeach.ISMData.0003 mounted 8mm tape Default.002
Sessions:
Messages:Mon 18:04:56 /dev/dsk1 label without mount operation in progressMon 18:04:58 /dev/dsk1 labeled file disk Pebblebeach.ISMData.0003Mon 18:05:03 /dev/dsk1 mount operation in progressMon 18:05:04 /dev/dsk1 mounted file disk Pebblebeach.ISMData.0003Mon 18:05:18 /dev/rmt/0mbn mount operation in progressMon 18:06:00 /dev/rmt/0mbn mounted 8mm tape Default.002Pending:
Figure A-1. Monitoring the ISM Server
A-12 IBM Informix Storage Manager Administrator’s Guide
Appendix B. Accessibility
IBM strives to provide products with usable access for everyone, regardless of ageor ability.
Accessibility features for IBM InformixAccessibility features help a user who has a physical disability, such as restrictedmobility or limited vision, to use information technology products successfully.
Accessibility FeaturesThe following list includes the major accessibility features in IBM Informix. Thesefeatures support:v Keyboard-only operation.v Interfaces that are commonly used by screen readers.v The attachment of alternative input and output devices.
Tip: The IBM Informix Information Center and its related publications areaccessibility-enabled for the IBM Home Page Reader. You can operate allfeatures using the keyboard instead of the mouse.
Keyboard NavigationThis product uses standard Microsoft Windows navigation keys.
Related Accessibility InformationIBM is committed to making our documentation accessible to persons withdisabilities. Our publications are available in HTML format so that they can beaccessed with assistive technology such as screen reader software. The syntaxdiagrams in our publications are available in dotted decimal format. For moreinformation about the dotted decimal format, go to “Dotted Decimal SyntaxDiagrams.”
You can view the publications for IBM Informix in Adobe Portable DocumentFormat (PDF) using the Adobe Acrobat Reader.
IBM and AccessibilitySee the IBM Accessibility Center at http://www.ibm.com/able for more informationabout the commitment that IBM has to accessibility.
Dotted Decimal Syntax DiagramsThe syntax diagrams in our publications are available in dotted decimal format,which is an accessible format that is available only if you are using a screen reader.
In dotted decimal format, each syntax element is written on a separate line. If twoor more syntax elements are always present together (or always absent together),the elements can appear on the same line, because they can be considered as asingle compound syntax element.
© Copyright IBM Corp. 1996, 2010 B-1
Each line starts with a dotted decimal number; for example, 3 or 3.1 or 3.1.1. Tohear these numbers correctly, make sure that your screen reader is set to readpunctuation. All syntax elements that have the same dotted decimal number (forexample, all syntax elements that have the number 3.1) are mutually exclusivealternatives. If you hear the lines 3.1 USERID and 3.1 SYSTEMID, your syntax caninclude either USERID or SYSTEMID, but not both.
The dotted decimal numbering level denotes the level of nesting. For example, if asyntax element with dotted decimal number 3 is followed by a series of syntaxelements with dotted decimal number 3.1, all the syntax elements numbered 3.1are subordinate to the syntax element numbered 3.
Certain words and symbols are used next to the dotted decimal numbers to addinformation about the syntax elements. Occasionally, these words and symbolsmight occur at the beginning of the element itself. For ease of identification, if theword or symbol is a part of the syntax element, the word or symbol is preceded bythe backslash (\) character. The * symbol can be used next to a dotted decimalnumber to indicate that the syntax element repeats. For example, syntax element*FILE with dotted decimal number 3 is read as 3 \* FILE. Format 3* FILEindicates that syntax element FILE repeats. Format 3* \* FILE indicates thatsyntax element * FILE repeats.
Characters such as commas, which are used to separate a string of syntaxelements, are shown in the syntax just before the items they separate. Thesecharacters can appear on the same line as each item, or on a separate line with thesame dotted decimal number as the relevant items. The line can also show anothersymbol that provides information about the syntax elements. For example, the lines5.1*, 5.1 LASTRUN, and 5.1 DELETE mean that if you use more than one of theLASTRUN and DELETE syntax elements, the elements must be separated by a comma.If no separator is given, assume that you use a blank to separate each syntaxelement.
If a syntax element is preceded by the % symbol, that element is defined elsewhere.The string following the % symbol is the name of a syntax fragment rather than aliteral. For example, the line 2.1 %OP1 means that you should refer to a separatesyntax fragment OP1.
The following words and symbols are used next to the dotted decimal numbers:
? Specifies an optional syntax element. A dotted decimal number followedby the ? symbol indicates that all the syntax elements with acorresponding dotted decimal number, and any subordinate syntaxelements, are optional. If there is only one syntax element with a dotteddecimal number, the ? symbol is displayed on the same line as the syntaxelement (for example, 5? NOTIFY). If there is more than one syntax elementwith a dotted decimal number, the ? symbol is displayed on a line byitself, followed by the syntax elements that are optional. For example, ifyou hear the lines 5 ?, 5 NOTIFY, and 5 UPDATE, you know that syntaxelements NOTIFY and UPDATE are optional; that is, you can choose one ornone of them. The ? symbol is equivalent to a bypass line in a railroaddiagram.
! Specifies a default syntax element. A dotted decimal number followed bythe ! symbol and a syntax element indicates that the syntax element is thedefault option for all syntax elements that share the same dotted decimalnumber. Only one of the syntax elements that share the same dotteddecimal number can specify a ! symbol. For example, if you hear the lines
B-2 IBM Informix Storage Manager Administrator’s Guide
2? FILE, 2.1! (KEEP), and 2.1 (DELETE), you know that (KEEP) is thedefault option for the FILE keyword. In this example, if you include theFILE keyword but do not specify an option, default option KEEP is applied.A default option also applies to the next higher dotted decimal number. Inthis example, if the FILE keyword is omitted, default FILE(KEEP) is used.However, if you hear the lines 2? FILE, 2.1, 2.1.1! (KEEP), and 2.1.1(DELETE), the default option KEEP only applies to the next higher dotteddecimal number, 2.1 (which does not have an associated keyword), anddoes not apply to 2? FILE. Nothing is used if the keyword FILE is omitted.
* Specifies a syntax element that can be repeated zero or more times. Adotted decimal number followed by the * symbol indicates that this syntaxelement can be used zero or more times; that is, it is optional and can berepeated. For example, if you hear the line 5.1* data-area, you know thatyou can include more than one data area or you can include none. If youhear the lines 3*, 3 HOST, and 3 STATE, you know that you can includeHOST, STATE, both together, or nothing.
Notes:
1. If a dotted decimal number has an asterisk (*) next to it and there isonly one item with that dotted decimal number, you can repeat thatsame item more than once.
2. If a dotted decimal number has an asterisk next to it and several itemshave that dotted decimal number, you can use more than one itemfrom the list, but you cannot use the items more than once each. In theprevious example, you could write HOST STATE, but you could not writeHOST HOST.
3. The * symbol is equivalent to a loop-back line in a railroad syntaxdiagram.
+ Specifies a syntax element that must be included one or more times. Adotted decimal number followed by the + symbol indicates that this syntaxelement must be included one or more times. For example, if you hear theline 6.1+ data-area, you must include at least one data area. If you hearthe lines 2+, 2 HOST, and 2 STATE, you know that you must include HOST,STATE, or both. As for the * symbol, you can only repeat a particular item ifit is the only item with that dotted decimal number. The + symbol, like the* symbol, is equivalent to a loop-back line in a railroad syntax diagram.
Appendix B. Accessibility B-3

B-4 IBM Informix Storage Manager Administrator’s Guide
Notices
This information was developed for products and services offered in the U.S.A.
IBM may not offer the products, services, or features discussed in this document inall countries. Consult your local IBM representative for information on theproducts and services currently available in your area. Any reference to an IBMproduct, program, or service is not intended to state or imply that only that IBMproduct, program, or service may be used. Any functionally equivalent product,program, or service that does not infringe any IBM intellectual property right maybe used instead. However, it is the user’s responsibility to evaluate and verify theoperation of any non-IBM product, program, or service.
IBM may have patents or pending patent applications covering subject matterdescribed in this document. The furnishing of this document does not give youany license to these patents. You can send license inquiries, in writing, to:
IBM Director of LicensingIBM CorporationNorth Castle DriveArmonk, NY 10504-1785U.S.A.
For license inquiries regarding double-byte (DBCS) information, contact the IBMIntellectual Property Department in your country or send inquiries, in writing, to:
Intellectual Property LicensingLegal and Intellectual Property LawIBM Japan Ltd.1623-14, Shimotsuruma, Yamato-shiKanagawa 242-8502 Japan
The following paragraph does not apply to the United Kingdom or any othercountry where such provisions are inconsistent with local law:INTERNATIONAL BUSINESS MACHINES CORPORATION PROVIDES THISPUBLICATION “AS IS” WITHOUT WARRANTY OF ANY KIND, EITHEREXPRESS OR IMPLIED, INCLUDING, BUT NOT LIMITED TO, THE IMPLIEDWARRANTIES OF NON-INFRINGEMENT, MERCHANTABILITY OR FITNESSFOR A PARTICULAR PURPOSE. Some states do not allow disclaimer of express orimplied warranties in certain transactions, therefore, this statement may not applyto you.
This information could include technical inaccuracies or typographical errors.Changes are periodically made to the information herein; these changes will beincorporated in new editions of the publication. IBM may make improvementsand/or changes in the product(s) and/or the program(s) described in thispublication at any time without notice.
Any references in this information to non-IBM Web sites are provided forconvenience only and do not in any manner serve as an endorsement of those Websites. The materials at those Web sites are not part of the materials for this IBMproduct and use of those Web sites is at your own risk.
© Copyright IBM Corp. 1996, 2010 C-1
IBM may use or distribute any of the information you supply in any way itbelieves appropriate without incurring any obligation to you.
Licensees of this program who wish to have information about it for the purposeof enabling: (i) the exchange of information between independently createdprograms and other programs (including this one) and (ii) the mutual use of theinformation which has been exchanged, should contact:
IBM CorporationJ46A/G4555 Bailey AvenueSan Jose, CA 95141-1003U.S.A.
Such information may be available, subject to appropriate terms and conditions,including in some cases, payment of a fee.
The licensed program described in this information and all licensed materialavailable for it are provided by IBM under terms of the IBM Customer Agreement,IBM International Program License Agreement, or any equivalent agreementbetween us.
Any performance data contained herein was determined in a controlledenvironment. Therefore, the results obtained in other operating environments mayvary significantly. Some measurements may have been made on development-levelsystems and there is no guarantee that these measurements will be the same ongenerally available systems. Furthermore, some measurements may have beenestimated through extrapolation. Actual results may vary. Users of this documentshould verify the applicable data for their specific environment.
Information concerning non-IBM products was obtained from the suppliers ofthose products, their published announcements or other publicly available sources.IBM has not tested those products and cannot confirm the accuracy ofperformance, compatibility or any other claims related to non-IBM products.Questions on the capabilities of non-IBM products should be addressed to thesuppliers of those products.
All statements regarding IBM’s future direction or intent are subject to change orwithdrawal without notice, and represent goals and objectives only.
All IBM prices shown are IBM’s suggested retail prices, are current and are subjectto change without notice. Dealer prices may vary.
This information contains examples of data and reports used in daily businessoperations. To illustrate them as completely as possible, the examples include thenames of individuals, companies, brands, and products. All of these names arefictitious and any similarity to the names and addresses used by an actual businessenterprise is entirely coincidental.
COPYRIGHT LICENSE:
This information contains sample application programs in source language, whichillustrate programming techniques on various operating platforms. You may copy,modify, and distribute these sample programs in any form without payment toIBM, for the purposes of developing, using, marketing or distributing applicationprograms conforming to the application programming interface for the operatingplatform for which the sample programs are written. These examples have not
C-2 IBM Informix Storage Manager Administrator’s Guide
been thoroughly tested under all conditions. IBM, therefore, cannot guarantee orimply reliability, serviceability, or function of these programs. The sampleprograms are provided "AS IS", without warranty of any kind. IBM shall not beliable for any damages arising out of your use of the sample programs.
Each copy or any portion of these sample programs or any derivative work, mustinclude a copyright notice as follows:
© (your company name) (year). Portions of this code are derived from IBMCorp. Sample Programs. © Copyright IBM Corp. (enter the year or years). Allrights reserved.
If you are viewing this information softcopy, the photographs and colorillustrations may not appear.
TrademarksIBM, the IBM logo, and ibm.com® are trademarks or registered trademarks ofInternational Business Machines Corp., registered in many jurisdictions worldwide.Other product and service names might be trademarks of IBM or other companies.A current list of IBM trademarks is available on the Web at “Copyright andtrademark information” at http://www.ibm.com/legal/copytrade.shtml.
Adobe, the Adobe logo, and PostScript are either registered trademarks ortrademarks of Adobe Systems Incorporated in the United States, and/or othercountries.
Intel, Itanium, and Pentium are trademarks or registered trademarks of IntelCorporation or its subsidiaries in the United States and other countries.
Java and all Java-based trademarks are trademarks of Sun Microsystems, Inc. in theUnited States, other countries, or both.
Linux is a registered trademark of Linus Torvalds in the United States, othercountries, or both.
Microsoft, Windows, and Windows NT are trademarks of Microsoft Corporation inthe United States, other countries, or both.
UNIX is a registered trademark of The Open Group in the United States and othercountries.
Other company, product, or service names may be trademarks or service marks ofothers.
Notices C-3

C-4 IBM Informix Storage Manager Administrator’s Guide
Index
AAccessibility B-1
dotted decimal format of syntax diagrams B-1keyboard B-1shortcut keys B-1syntax diagrams, reading in a screen reader B-1
Activity log, ON-Bar 1-4, A-3, A-4Adding administrative users 2-3Adding storage devices
file-type 3-3tape or optical drives 3-2
Administrative useradding the first 2-3deleting 2-5ism_add 2-3, A-1ism_rm A-9privileges 1-14
Automatic Media Managementdescribed 3-8labeling volumes 4-8relabeling 3-8volume-selection criteria 3-8
BBackups
See also Logical-log backup.bootstrap 5-4imported restore 5-5ON-Bar and ISM interaction 1-2
Boot file.See Bootstrap.
Bootstrapbacking up 5-4defined 1-4finding save set 5-3ism_catalog A-2recovering A-2saving 1-6
CCatalog, ISM.
See ISM catalog.Changing
storage device properties 3-4volume pool name 2-6
Choosing user and group names 2-4Cloned data
recovering 5-2tracking 4-13
Cloningfile-type volumes to tape 3-7, 4-13how retention period applies 4-13ism_clone A-6pools 4-4reserving a device 3-6save sets 4-14storage volumes 4-13understanding feature 4-12
Cold restore.See Restoring.
Collecting ISM information A-3Command-line utilities
ism_add A-1ism_catalog A-2ism_chk.pl A-3ism_clone A-6ism_config A-6ism_op A-8ism_rm 5-2, A-9ism_show A-9ism_shutdown A-10ism_startup A-11ism_watch A-12using 1-2
Compressionin ON-Bar environment with ISM 2-8
Configuration parametersISM_DATA_POOL 1-8, 2-6ISM_LOG_POOL 1-8, 2-6
Configuringdevices 3-1ISM on UNIX 1-6ISM on Windows 1-7ISM server properties 2-1
Connecting to new ISM server 2-5Creating the bootstrap 5-4Criteria for labeling blank volumes 3-9
Ddaemon.log 2-7Data life cycle
Automatic Media Management 3-8manual status 4-3recycle status 4-3retention period 2-2, 4-1save-set retention status 4-2
Data recovery.See Restoring.
Data streams, setting 2-1Database server upgrade 1-11, 5-6Database server upgrade, imported restore 5-5Deleting
administrative users 2-5storage devices 3-3
Detecting volume name 4-9Devices
adding 3-2allocating 3-6Automatic Media Management 3-8changing properties 3-4cloning 3-6configuring 1-6, 3-1deleting 3-3designating as read-only 3-5enabling and disabling 3-4file-type, optical, tape
adding 3-3using 3-5
© Copyright IBM Corp. 1996, 2010 X-1
Devices (continued)reserving for
cloning 3-6logical logs 3-6
setting target sessions 2-2types supported 3-1
Disabilities, visualreading syntax diagrams B-1
Disability B-1Disabling storage devices 3-4Disaster recovery
bootstrap A-2imported restore 5-5recreating ISM catalog 5-3, A-2
Dotted decimal format of syntax diagrams B-1
EEligible recycling status 4-3Enabling storage devices 3-4Encryption
in ON-Bar environment with ISM 2-8Environment variables
ISM_CLIENT 5-5ISM_COMPRESSION 2-8ISM_DATA_POOL 1-8ISM_DEBUG_FILE 2-7ISM_DEBUG_LEVEL 2-8ISM_ENCRYPTION 2-8ISM_LOG_POOL 1-8ISM_MAXLOGSIZE 2-7ISM_MAXLOGVERS 2-7ISM_SERVER 5-5ON-Bar utility 2-8
Expiration of media 3-9, 4-10, 4-12Expired save sets
defined 4-2recovering 5-2
FFile system.
See File-type devices.File-type devices
adding 3-3cloning to tape 3-7configuring
UNIX 1-6Windows 1-7
pool restrictions 4-5using 3-5
File-type volumescloning to tape 3-7, 4-13labeling 4-7mounting 4-8pool restrictions 4-4, 4-5relabeling 4-10unmounting 4-9using 3-6
Finding a volume name 4-9
GGroup names, choosing 2-4
HHigh-Availability Data Replication (HDR), imported
restore 5-5Hosts file, Windows 1-11
IImported restore 5-5, 5-15Informix Storage Manager.
See ISM.Installation 1-5Internal volume label 4-5ISM
adding administrative users 2-3changing server properties 2-2command-line utilities A-1connecting to a different server 2-5deleting administrative users 2-5installation 1-5message logs 2-7, A-3, A-4nsr commands A-12overview 1-1reports A-3setup
UNIX 1-6Windows 1-7
uninstallation 1-9volume pool names 1-8
ISM catalogdeleting volume 4-11recreating entries 5-1restoring catalog 1-5
ISM Local Execution service 1-7ISM Portmapper service 1-7ISM server bootstrap.
See ISMData pool, bootstrap save set.ISM Server service 1-7ism_add
-admin 1-7, 2-4-device 1-7, 1-8syntax A-1
ism_catalog-create_bootstrap 2-7, 5-4-find_bootstrap 5-3-recover 4-2, 5-3-recreate_from 2-3, 4-2, 5-1syntax A-2
ism_chk.pl A-3ISM_CLIENT environment variable 5-5ism_clone A-6ISM_COMPRESSION environment variable 2-8ism_config
changing server properties 2-1syntax A-6
ISM_DATA_POOL configuration parameter 1-8, 2-6ISM_DEBUG_FILE environment variable 2-7ISM_DEBUG_LEVEL environment variable 2-8ISM_ENCRYPTION environment variable 2-8ISM_LOG_POOL configuration parameter 1-8, 2-6ISM_MAXLOGSIZE environment variable 2-7ISM_MAXLOGVERS environment variable 2-7ism_op A-8ism_rm 5-2, A-9ISM_SERVER environment variable 5-5ism_show
-volume 5-2
X-2 IBM Informix Storage Manager Administrator’s Guide
ism_show (continued)-volumes 3-9, 4-12syntax A-9
ism_shutdownsyntax A-10UNIX 1-10Windows 1-10
ism_startup 1-5, A-11ism_watch 1-4, A-12ISMData pool
bootstrap save set 1-4configuration parameter 2-6renaming 2-6setting environment variables 1-8setting up 1-8
ISMDiskData pool 1-6ISMDiskLogs pool 1-6ISMLogs pool
configuration parameter 2-6renaming 2-6setting environment variables 1-8setting up 1-8
LLabeling
Automatic Media Management 4-8automating 1-3criteria for blank 3-9formats 4-5from command line A-8recyclable volumes 4-10storage volumes 4-7unrecognized labels 3-9
libnsr.dll 1-13Life cycle of data 4-1Locales viiiLocating partial save sets 5-1Log files
daemon.log and environment variables 2-7reserving device 3-6viewing 1-15xbsa.messages, preventing disk overflow 2-7
Logical logs.See Log files.
Logical restore.See Restoring.
Logical-log backupallocating storage devices 1-6operation 1-4storage devices 3-6
MManaging media automatically 3-8Manual recycling status 4-3Media types, list of supported 3-1Message file
See also Activity log, ON-Bar.daemon.log 2-7, A-4xbsa.messages 2-7, A-4
Migrating to ISM 2.2 1-11Mounting volumes
from command line A-8from Devices window 4-8how ISM chooses 4-8
NNo-rewind tape devices 3-5nsr commands A-12nsr directory 1-10, 1-15nsradmin command 2-2, 3-4, 5-10, 5-11nsrck command 1-13nsrd daemon 1-10nsrexecd daemon 1-10nsrim command 5-13nsrindexasm 5-11nsrindexd daemon 1-10nsrmmd command 1-11nsrmmdbd daemon 1-10
OON-Bar environment with ISM
Compression 2-8Encryption 2-8
ON-Bar utilityactivity log 1-4, A-3, A-4backup operation 1-3connection to ISM 1-3environment variables 2-8recovering with 5-1recreating the ISM catalog 5-1restore operation 1-4setting up ISM 1-5
onbar scriptbackup and restore data 1-3recreating bootstrap 5-3
ONCONFIG file parameters.See Configuration parameters.
Optical disk drivesadding 3-2automating media management 3-8using 3-5
PPartial save sets 5-1Permissions, adding administrative users 1-14, 2-3Physical restore.
See Restoring.Pools
file-type devices, restrictions 4-5for cloning 4-4how ISM uses 4-4ISM volume name 1-8label format 4-5relabeling volumes 4-10
Premounting backup volumes 4-8Properties
device 3-4ISM server 2-1
RRead-only designating 3-5Recovering
bootstrap A-2cloned data 5-2expired save sets 5-2expired volumes 4-2from a disaster 5-3
Index X-3
Recovering (continued)locating partial save sets 5-1volumes
deleted from ISM catalog 5-2eligible for recycling 5-2
when to use ON-Bar 5-1recreating
save sets 4-2Recreating
ISM catalog 5-1Recycle status
eligible 4-3manual 4-3
Relabelingeligible volumes 4-9file-type volumes 4-10manually 4-10
Renaming ISMData or ISMLogs 2-6Restoring
imported 5-5, 5-15ON-Bar operation 1-4save sets 5-1
Retention periodclones 4-13save sets and volumes 4-2setting 2-2
Reverting from ISM 2.2 1-14
SSave sets
bootstrap 1-4, 5-3cloning 4-14locating partial 5-1recovering expired 5-2retention status 4-2
Screen readerreading syntax diagrams B-1
Server, ISMadministrative users 2-3, 2-5connecting to new 2-5data streams 2-1properties 2-1retention period 2-2
Services, ISM 1-7Setup procedures 1-6Sharing storage volumes 3-9Shortcut keys
keyboard B-1Simultaneous data streams, setting 2-1Starting ISM automatically
UNIX 1-7Windows 1-7
Storage devices.See Devices.
Storage volumesAutomatic Media Management 3-8cloning 4-13criteria for labeling blank 3-9defined 1-2deleting 4-11, A-9detecting name 4-9estimated capacity 4-7expiration 3-9, 4-10, 4-12file-type 3-6internal labels 4-5labeling 4-5, 4-7
Storage volumes (continued)labeling blank volumes 3-9locating partial save sets 5-1managing from command line A-8mounting 4-8premounting 4-8recovering deleted 5-2recovering recyclable 5-2recycle status 4-3relabeling
automatically 3-8file-type volumes 4-10when to do 4-9
sharing 3-9supported media types 3-1unlabeled 3-9unmounting 4-9
Syntax diagramsreading in a screen reader B-1
TTape drives
adding 3-2automating media management 3-8no-rewind 3-5using 3-5
Target sessions, multiple devices 2-2Tracking cloned data 4-13Types of supported devices 3-1
UUninstalling ISM 1-9UNIX operating system
configuring ISM 1-6Unlabeled volumes 3-9Unmounting volumes 4-9update target sessions 2-2Upgrading ISM 1-11Users, administrative
adding the first 2-3deleting 2-5ism_add 2-3, A-1ism_rm A-9
VVisual disabilities
reading syntax diagrams B-1Volume pools
default names 1-8defined 1-2
Volume.See Storage volume.
WWindows Administrator group, permissions 2-3Windows, configuring ISM 1-7WORM.
See Optical disk drives.
X-4 IBM Informix Storage Manager Administrator’s Guide

Xxbsa.messages log 2-7
Index X-5

X-6 IBM Informix Storage Manager Administrator’s Guide


����
Printed in USA
SC27-3550-00


