62
IBM Operational Decision Manager Version 8 Release 5 Configuring Operational Decision Manager on JBoss

IBM Operational Decision ManagerVersion 8 Release 5
Configuring Operational DecisionManager on JBoss
���

NoteBefore using this information and the product it supports, read the information in “Notices” on page 51.
This edition applies to version 8, release 5, modification 1 of Operational Decision Manager and to all subsequentreleases and modifications until otherwise indicated in new editions.
© Copyright IBM Corporation 2012, 2013.US Government Users Restricted Rights – Use, duplication or disclosure restricted by GSA ADP Schedule Contractwith IBM Corp.

Contents
Chapter 1. Configuring OperationalDecision Manager on JBoss . . . . . . 1Configuring Rule Execution Server on JBoss . . . . 1
Before you start . . . . . . . . . . . . 1Step 1: Selecting and applying the persistence type 2Step 2: Restricting database user permissions . . 3Step 3: Establishing the database credentials . . . 4Step 4: Creating a data source and connection pool 4Step 5: Configuring security . . . . . . . . 6Step 6: Deploying the execution unit (XU) RARfile. . . . . . . . . . . . . . . . . 6Step 7: Deploying the Rule Execution Servermanagement EAR . . . . . . . . . . . 8Step 8: Creating a schema for the Rule ExecutionServer database . . . . . . . . . . . . 8
Creating a database schema by using the RuleExecution Server console . . . . . . . . 8
Installation Settings wizard overview . . . 8Opening the Rule Execution Server console 9Step 1: Welcome to the Installation Settingswizard . . . . . . . . . . . . . 10Step 2: Choose the database schema . . . 10Step 3: Review the database schema . . . 11Step 4: The Installation Settings wizardreport . . . . . . . . . . . . . 11
Creating a database schema by running SQLscripts . . . . . . . . . . . . . . 12
Step 9: Deploying the hosted transparent decisionservice . . . . . . . . . . . . . . . 13Step 10: Verifying the configuration . . . . . 13Optional configuration steps. . . . . . . . 14
Repackaging the Rule Execution Serverarchive using Ant . . . . . . . . . . 14Configuring Rule Execution Server fordifferent environments. . . . . . . . . 15Rule Execution Server deployment for highavailability and scalability . . . . . . . 16
Cluster configuration and topology . . . 16JBoss clusters . . . . . . . . . . . 17
Configuring the Decision Center consoles on JBoss 18Before you start . . . . . . . . . . . . 18Step 1: Restricting database user permissions . . 19Step 2: Creating a data source and connectionpool . . . . . . . . . . . . . . . . 20Step 3: Configuring security on JBoss . . . . . 22
Defining groups and permissions . . . . . 22Declaring custom groups . . . . . . . . 23
Step 4: Deploying the Decision Center EAR onJBoss . . . . . . . . . . . . . . . 24
Step 5: Verifying the deployment of the DecisionCenter Enterprise console. . . . . . . . . 24Step 6: Completing your Decision Centerconfiguration . . . . . . . . . . . . . 25
Completing the configuration from theDecision Center Enterprise console . . . . 25
Installation Settings wizard overview . . . 25Step 1: Configure the database . . . . . 26Step 2: Set up message files . . . . . . 26Step 3: Set up groups . . . . . . . . 27Step 4: Set the persistence locale . . . . 28Step 5: Set configuration parameters . . . 28
Completing the configuration by using Anttasks. . . . . . . . . . . . . . . 30
Setting up the Ant tasks environment. . . 30Creating the database schema . . . . . 31Defining and uploading message files . . 35Setting the persistence locale . . . . . 36Adding or removing configurationparameters . . . . . . . . . . . 36Repackaging the Decision Center archive 38
Configuring the search function of the DecisionCenter Business console . . . . . . . . . 39
Using a remote Solr search engine . . . . . 39Setting parameters for the Solr search engine 39
Additional steps to configure Decision ValidationServices . . . . . . . . . . . . . . 40
Before you start . . . . . . . . . . . 40Step 1: Creating Decision Warehouse databaseresources . . . . . . . . . . . . . 41Step 2: Deploying the Decision ValidationServices archive for the first time . . . . . 43Step 3: Checking the availability of DecisionValidation Services . . . . . . . . . . 43Step 4: Packaging Decision Validation Servicesby using Ant . . . . . . . . . . . . 44
Chapter 2. Verifying your configurationof Decision Center. . . . . . . . . . 47Publishing a project to Decision Center . . . . . 47Opening the Decision Center consoles . . . . . 48
Notices . . . . . . . . . . . . . . 51Trademarks . . . . . . . . . . . . . . 53
Index . . . . . . . . . . . . . . . 55
© Copyright IBM Corp. 2012, 2013 iii

iv IBM Operational Decision Manager: Configuring Operational Decision Manager on JBoss

Chapter 1. Configuring Operational Decision Manager onJBoss
Configuring Rule Execution Server on JBossTo use Rule Execution Server on a new instance of JBoss, you must establish yourdatabase, deploy the provided archives for this server, and perform a number ofconfiguration tasks.
Operational Decision Manager 8.5.1 supports JBoss 5.1.2 EAP and 6.1.
Before you startTo configure Rule Execution Server on JBoss you must follow a series of steps
The first two steps concern your choice of persistence and permissions on thedatabase. These steps are meant for a database administrator. Then, steps 3 to 5depend on whether:v You want to create an empty database for Rule Execution Server before or
during the deployment of the WAR file.v You want to create or clear the database schema using the Installation Settings
wizard in the Rule Execution Server console, or using the SQL scripts directly.
There are also some “Optional configuration steps” on page 14.
This configuration guide presents generic instructions for all supported databases.To help beginner users, the examples are given for the embedded Derby database.
Note: Make sure to clean up prior installations. Delete the /work and /tmpdirectories from the folder in which you deploy Rule Execution Server:<JBOSS_HOME>/server/default. This ensures that JSP pages are recompiled duringthe installation.
What steps to follow
The following table summarizes the steps that you follow to configure RuleExecution Server on JBoss depending on the persistence type that you choose.
Installation stepsPersistence
File Data source JDBC
“Step 1: Selecting and applying thepersistence type” on page 2
Defaultpersistencemode
“Step 2: Restricting database userpermissions” on page 3
Not applicable
“Step 3: Establishing the databasecredentials” on page 4
Not applicable
“Step 4: Creating a data source andconnection pool” on page 4
Not applicable Not applicable
© Copyright IBM Corp. 2012, 2013 1

Installation stepsPersistence
File Data source JDBC
“Step 5: Configuring security” onpage 6
“Step 6: Deploying the executionunit (XU) RAR file” on page 6
“Step 7: Deploying the RuleExecution Server managementEAR” on page 8
“Step 8: Creatinga schema for theRule ExecutionServer database”on page 8
“Creating adatabase schemaby using theRule ExecutionServer console”on page 8
Not applicable
“Creating adatabase schemaby running SQLscripts” on page12
Not applicable
“Step 9: Deploying the hostedtransparent decision service” onpage 13
Optional Optional Optional
“Step 10: Verifying theconfiguration” on page 13
Recommended Recommended Recommended
Related concepts:Troubleshooting Rule Execution Server on JBoss
Step 1: Selecting and applying the persistence typeYou can change the default datasource RuleApp and Java™ XOM persistencesettings by running an Ant script that generates a new Rule Execution Servermanagement archive.
Typically, you do this if you are in development mode. This step does not apply tobeginners who work with the embedded Derby database.
For you to change the persistence settings, the distribution provides an Ant scriptin the <ODM_InstallDir>/executionserver/bin/ressetup.xml file. Use it to create anew instance of the Rule Execution Server management archive and, in the case ofa Java EE application server, the execution unit (XU).
Solaris users
If you use file-based persistence on Solaris, your file system must support allcharacters used in directory and file names that are present in the ruleset path(RuleApp name and ruleset name). Set the LANG system property with the encodingthat is compatible with your package and rule names, for example en_US.UTF-8.
2 IBM Operational Decision Manager: Configuring Operational Decision Manager on JBoss

Decision Warehouse
If you select the file persistence type for RuleApps, you cannot use DecisionWarehouse.
MySQL persistence
If you choose to use MySQL as a persistence back end, add or set the followingproperties in the MySQL configuration file: my.ini on Windowsor my.cnf on UNIXoperating systems:sql-mode=STRICT_ALL_TABLESmax_allowed_packet=1073741824
For more information about these settings, see the MySQL 5.0 reference manual:5.1.6. Server SQL Modes and 5.1.3 Server System Variables.
Step 2: Restricting database user permissionsIf Rule Execution Server data is stored in a database, the database administratormight require that you provide the specific permissions to access the database.
Note: This step applies when database access needs to be restricted. If you managethe database yourself (for example, you use an embedded database for testpurposes) or if you do not need further restrictions, skip this step and proceed tothe next configuration step.
Connection to the Rule Execution Server database, as established in the data sourcecredentials, and any subsequent requests to the database are handled through adatabase user. This database user (name and password), for example resdbUser, isdefined by the database administrator and has no relation to the standard RuleExecution Server groups.
The following table gives the typical list of permissions that the databaseadministrator must define on the Rule Execution Server database, with attentiongiven to the type of operations. Some supported databases do not require all thesepermissions.
Database permission
Operation
Browse and edit rulesetsand RuleApps
Create the Rule ExecutionServer schema
CREATE ANY INDEX Not required Required
DROP ANY INDEX Not required Required
CREATE ANY SEQUENCE Not required Required
DROP ANY SEQUENCE Not required Required
SELECT ANY SEQUENCE Required Not required
CREATE ANY TABLE Not required Required
DROP ANY TABLE Not required Required
INSERT ANY TABLE Required Not required
SELECT ANY TABLE Required Not required
UPDATE ANY TABLE Required Not required
DELETE ANY TABLE Required Not required
CREATE ANY TRIGGER Not required Required
Chapter 1. Configuring Operational Decision Manager on JBoss 3

Database permission
Operation
Browse and edit rulesetsand RuleApps
Create the Rule ExecutionServer schema
CREATE ANY VIEW Not required Required
DROP ANY VIEW Not required Required
Step 3: Establishing the database credentialsYou must establish the credentials of the database dedicated to Rule ExecutionServer if you are using database persistence.
These credentials are required to establish the datasource, which you will do in thenext step.
Note: Skip to the next step if you are a beginner using the embedded Derbydatabase.
If you set persistence to file, you can skip all the database-related tasks andproceed directly to “Step 7: Deploying the Rule Execution Server managementEAR” on page 8.
If a database does not already exist, create one now by following the instructionsfor that database type. You can also create the database in the deployment step.
For example, if you use an XA data source, you can create an empty database withan XA data source. Add the following property to your deployment descriptor file(*-ds.xml):
<xa-datasource-property name="CreateDatabase">create</xa-datasource-property>
After the database is created, you can use the Installation Settings wizard in theRule Execution Server console or you can run the provided SQL scripts to createthe database schema so that in includes the tables and views.
Step 4: Creating a data source and connection poolIf you use data source persistence, you must create a data source and a connectionpool.
Before you begin
Make sure that you have the matching JAR files in the <JBOSS_HOME>/server/default/lib directory. For example, the Derby embedded database drivers requirethe following JAR files:v The derby.jar file in <InstallDir>/studio/samples/shared/lib.v The derby-plugin.jar file in <JBOSS_HOME>/docs/examples/varia.v The org.jboss.jdbc.DerbyDatabase MBean in a plug-in package in the
derby-plugin.jar archive.
Procedure
To create a data source and a connection pool:
4 IBM Operational Decision Manager: Configuring Operational Decision Manager on JBoss

1. In the <JBOSS_HOME>/server/default/deploy directory, create a data sourcedescriptor file that ends with -ds.xml, for example res-derby-xa-ds.xml.Here is an example of an XA data source for use with the Derby database. Thisexample is based on the derby-xa-ds.xml file, which is provided in the<JBOSS_HOME>/docs/examples/jca directory.<?xml version="1.0" encoding="UTF-8"?><datasources>
<xa-datasource><jndi-name>jdbc/resdatasource</jndi-name><xa-datasource-class>
org.apache.derby.jdbc.EmbeddedXADataSource</xa-datasource-class><xa-datasource-property name="User">
resdbUser</xa-datasource-property><xa-datasource-property name="Password">
resdbUser</xa-datasource-property><xa-datasource-property name="DatabaseName">
c:/resdb</xa-datasource-property><xa-datasource-property name="CreateDatabase">
create</xa-datasource-property><min-pool-size>5</min-pool-size><max-pool-size>20</max-pool-size><idle-timeout-minutes>5</idle-timeout-minutes><check-valid-connection-sql>
select count(*) from RULEAPPS</check-valid-connection-sql><metadata>
<type-mapping>Derby</type-mapping></metadata>
</xa-datasource></datasources>
2. Set the values of the properties in this file.The properties to set depend on your database and data source type. In thisexample, these properties are enclosed between the tag pair <xa-datasource>... </xa-datasource>, which identify the XA data source. The following tabledescribes the properties.
Table 1.
Properties Description
Commonproperties
JNDI name This property is independent from the type of data source anddatabase and must be set to this value:
<jndi-name>jdbc/resdatasource</jndi-name>
Data sourceclass
This property is specific to XA data sources. It defines the classthat handles the connections to the database. For example:
<xa-datasource-class>org.apache.derby.jdbc.EmbeddedXADataSource</xa-datasource-class>
Connectionproperties
These properties are specific to XA data sources and arenecessary for the data source to get a connection to thedatabase. These properties depend on the database you want toconnect to. For example:
<xa-datasource-property name="DatabaseName">c:/resdb</xa-datasource-property>
<xa-datasource-property name="User">resdbUser</xa-datasource-property>
<xa-datasource-property name="Password">resdbUser</xa-datasource-property>
Customproperties
Data sources can require more properties or services. Forexample, in the case of embedded databases (such as Derby),you must start the database first. Databases are started from aservice. In the XML descriptor, this dependency is translated bythe tag pair <depends> ... </depends>.
Chapter 1. Configuring Operational Decision Manager on JBoss 5

Results
If your JBoss instance is running, it automatically detects and deploys the newdescriptor.
Step 5: Configuring securityYou control access to Rule Execution Server and enforce security by defining usergroups and associated roles.
The main groups and their associated default user and password are summarizedin the following table.
Group Use Default user/password
resAdministrators Gives a user fulladministrator rights to:
v Access and use the RuleExecution Server consoleto populate the databaseschema
v Deploy, browse, andmodify RuleApps
v Monitor the decisionhistory, purge and back upthe history
v Run diagnostics and viewserver information
resAdmin/resAdmin
resDeployers Gives a user the rights to:
v Deploy, browse, andmodify RuleApps
v Test rulesets
resDeployer/resDeployer
resMonitors Gives a user the rights to:
v View RuleApps
v Monitor decision historyand access Decision Centerreports
resMonitor/resMonitor
You declare groups and users in the files roles.properties and users.properties,which you create in the directory <JBOSS_HOME>/server/default/conf.
Below are examples of these property files:
roles.propertiesresAdmin=resAdministrators,resDeployers,resMonitorsresDeployer=resDeployers,resMonitorsresMonitor=resMonitors
users.propertiesresAdmin=resAdminresDeployer=resDeployerresMonitor=resMonitor
Step 6: Deploying the execution unit (XU) RAR fileNext, you deploy the resource adapter archive (RAR) for the execution unit (XU).
6 IBM Operational Decision Manager: Configuring Operational Decision Manager on JBoss

About this task
The execution unit (XU) is a resource adapter for Java EE application servers. It issupplied as a RAR archive that you must deploy on your application server.Deploy the XU by copying the XU RAR and XML files to the deployment directoryof your application server.
In addition to the procedure described here, you also have the option to deploy theXU inside the application (embed the XU into the EAR). There might be someinstances where, due to your application constraints, you have to deploy the XUinside the application. It is your decision to choose the appropriate deploymentmode of the XU (either embed into the EAR or deploy as a global connector). Referto the application server documentation for instructions on packaging a connectorinto an EAR.
Note:
v When the XU is deployed as a global connector, its third-party libraries (such asASM) might be used by the deployed J2EE applications instead of the librariesdeployed in the application server.
v When the XU is deployed as a global connector, use a parent last setting for itsJ2EE application if your J2EE application does not support the version of thelibraries from independent software vendors that are distributed with DecisionServer. If this is not possible, you might have to embed the XU into the EARthat is executing the rules.
v When using an embedded XU packaging, use a parent last setting for the codelibrary if the the version of the libraries from independent software vendors thatare deployed at the code library level of the application server is not compatiblewith the XU.
When deployed to JBoss 6.1, the XU uses the JDK logging API. The loggingconfiguration is handled by the JBoss configuration file jboss-logging.xml. Thisfile is located in your JBoss server deployment directory:<JBOSS_HOME>/server/default/deploy. For more information on this file, refer to the JBossdocumentation.
The XU uses the logger name com.ibm.rules.res.execution. To write onlywarnings and errors to the JBoss log, add the following line in thejboss-logging.xml file:<logger category="com.ibm.rules.res.execution">
<level name="WARNING"/></logger>
Procedure1. In your JBoss deployment directory, <JBOSS_HOME>/server/default/deploy,
locate the jca-jboss-beans.xml file.2. Open the file in an editor and search for the text Whether to track unclosed
connections and close them.3. Set the debug attribute.
<property name="debug">false</property>
4. Save the file.5. Depending on the version of JBoss that you are running, proceed as follows:
Chapter 1. Configuring Operational Decision Manager on JBoss 7

Option Description
In JBoss 5 Copy the jrules-res-xu-JBOSS5.rar andjrules-res-xu-JBOSS5-ds.xml files from<ODM_InstallDir>/executionserver/applicationservers/JBoss5 into the<JBOSS_HOME>/server/default/deploydirectory.
In JBoss 6.1 Copy the jrules-res-xu-JBOSS6.rar andjrules-res-xu-JBOSS6-ds.xml files from<ODM_InstallDir>/executionserver/applicationservers/JBoss6 into the<JBOSS_HOME>/server/default/deploydirectory.
Step 7: Deploying the Rule Execution Server managementEAR
To deploy the Rule Execution Server management EAR archive, you must copy itto the deployment directory of your application server.
Procedure1. Depending on the version of JBoss you are using (5 or 6.1), locate one of the
following EAR files:v <ODM_InstallDir>/executionserver/applicationservers/JBoss5/jrules-res-
management-JBOSS5.ear
v <ODM_InstallDir>/executionserver/applicationservers/JBoss6/jrules-res-management-JBOSS6.ear
2. Copy the file to the following directory:<JBOSS_HOME>/server/default/deploy
Step 8: Creating a schema for the Rule Execution Serverdatabase
After you have created a dedicated Rule Execution Server database, you can createthe schema for the database by running SQL scripts from either the Rule ExecutionServer console or the SQL tool of your database.
Creating a database schema by using the Rule Execution ServerconsoleTo create a schema for the Rule Execution Server database, you can use theInstallation Settings wizard if you work on Windows and other supporteddistributed platforms.
Installation Settings wizard overview:
On Windows and distributed platforms only, you can use the Installation Settingswizard of the Rule Execution Server console to choose a database type and create aschema that contains the necessary tables and views.
You can use the Installation Settings wizard to configure Rule Execution Serverwith database persistence.
Note: You must have created the data source connection before you use theInstallation Settings wizard.
8 IBM Operational Decision Manager: Configuring Operational Decision Manager on JBoss

The Installation Settings wizard creates all the required tables for Rule ExecutionServer and Decision Warehouse.
If you are using file persistence or have an existing database schema, theInstallation Settings wizard does not open when you sign in to the Rule ExecutionServer console. If you want to modify the database schema after having created thedatabase tables already, you must run the SQL scripts in the database client.
The combination of persistence settings for RuleApps and managed Java XOMsaffects the way in which you use the Installation Settings wizard.v If the RuleApp persistence and the Java XOM persistence are both set to file,
no wizard is presented.v If the RuleApp persistence and the Java XOM persistence are both set to
datasource or jdbc, the RuleApp persistence details part of the InstallationSettings wizard opens for you to create the schema for RuleApps and theDecision Warehouse trace when you sign in to the Rule Execution Serverconsole. After you have completed this step, the Java XOMs persistence detailspart of the wizard opens for you to configure the database for Java XOMpersistence.
v If the RuleApp persistence is set to file and the Java XOM is set to datasourceor jdbc, you see only Java XOMs persistence details, and you cannot use theDecision Warehouse.
v If the RuleApp persistence is set to datasource and the Java XOM is set to fileor is not defined, only RuleApp persistence details opens for you to create theschema for RuleApps when you sign in to the Rule Execution Server console.The wizard does not show Java XOMs persistence details.
The following table summarizes the cases.
Persistence
RuleApps
file datasource/JDBC
Java XOMs file No InstallationSettings wizard
RuleAppspersistence detailsonly
datasource Java XOMspersistence detailsonly
No DecisionWarehouse
Complete InstallationSettings wizard
Opening the Rule Execution Server console:
To open the Rule Execution Server console and the Installation Settings wizard,you must sign in with administrator rights.
Procedure
1. Start the application server by double-clicking run.bat in <JBOSS_HOME>/bin
2. Open the Rule Execution Server console in a web browser by typing res at theroot URL on the host machine:http://localhost:8080/res
v If your browser is not running on the same host as the application server,replace localhost with the address of the machine.
Chapter 1. Configuring Operational Decision Manager on JBoss 9
v If the web application is mapped to a host which is defined on a port that isdifferent from the default of the server, change the port number to the hostport number.
3. Sign in to the Rule Execution Server console as the administrator. For example:
User ID
resAdmin
Password
resAdmin
Results
If you use database persistence and the database schema is empty, the InstallationSettings wizard opens and you can use it to complete the installation.
Step 1: Welcome to the Installation Settings wizard:
If you open the Rule Execution Server console with datasource or jdbc as thepersistence setting and an empty database schema, the Installation Settings wizardopens.
The wizard can display the following parts:v RuleApp persistence details: This part opens if you set datasource persistence
for RuleApps, regardless of the persistence type for managed Java XOMs.v Java XOMs persistence details: This part opens after RuleApp persistence
details if you have set datasource or jdbc persistence for both RuleApps andJava XOMs. In this case, you go through the same steps twice.The wizard starts with Java XOMs persistence details if you have set thepersistence type to file for RuleApps, and to datasource or jdbc for managedJava XOMs.
Both parts of the wizard are similar, and you use them in the same way:1.
The Welcome page provides the following information:v Persistence details about the type of database used. This includes information
about the driver and JDBC URL.v A brief description of the purpose of the Installation Settings wizard.v A diagnostic report that provides information about why the persistence
check failed (because you have not created the database schema).2. Click Next to proceed.
Step 2: Choose the database schema:
Select a schema for your database. The wizard includes settings for differentdatabases, or you can select a customized SQL script.
About this task
You select an available Rule Execution Server database schema or you upload acustom schema.
10 IBM Operational Decision Manager: Configuring Operational Decision Manager on JBoss

Procedure
1. In the Database schema selected field, select an available type of databaseschema.If you select a db2 or db2_os390 schema, an extra field opens so that you canenter the name of the buffer pool, which is used to create the DecisionWarehouse tablespace. This buffer pool must have a page size of 32K. Checkthe DB2® documentation for information about how to create a 32K buffer pool.
Note:
The scripts for creating the Decision Warehouse database on DB2 are writtenfor databases that use automatic storage. When you use the Installation Settingswizard, you create both the Rule Execution Server and the Decision Warehousedatabase, so your database must use automatic storage.
If you have not configured your DB2 database to use automatic storage, youcannot use the Rule Execution Server console to create the Rule ExecutionServer tables. In this case see “Creating a database schema by running SQLscripts” on page 12.
2. Optional: Select custom if you want to use a customized SQL script, and thenclick Browse to select the location of the custom script.
3. Click Next to review the database schema.
Step 3: Review the database schema:
After you have selected a database schema, you confirm the creation of a schemafor Rule Execution Server.
About this task
You can also use SQL drop statements that flush data from an existing table, andview the SQL statements. Ensure that you have a backup of your databaseresources.
Procedure
1. Select from the following options:
Create SQL schema “resdbUser”
Select this option to run the SQL statement for the schema type selectedin the previous step.
Keep drop SQL statements
Select this option to flush data from an existing Rule Execution Serverdatabase.
Show SQL statements
Click this option to display the SQL statements.2. Click Execute to start the options that you have selected.
Step 4: The Installation Settings wizard report:
After you have selected and confirmed the schema, the Installation Settings wizardreports the status of the schema creation.
Chapter 1. Configuring Operational Decision Manager on JBoss 11

Procedure
1. Click Show execution details to view the list of executed SQL statements.2. Click Finish to open the Explorer tab in the Rule Execution Server console.
What to do next
If you have just worked in RuleApps persistence details and the persistencesetting for managed Java XOMs is datasource or jdbc, the Java XOMs persistencedetails part of the wizard opens for you to repeat this procedure.
Creating a database schema by running SQL scriptsAfter you have created an empty database, you can create the Rule ExecutionServer database schema by running SQL scripts if you do not want to use theInstallation Settings wizard.
The SQL scripts can be found in this directory: <ODM_InstallDir>/executionserver/databases. This directory also contains a readme file where youcan find additional information about the scripts.
The script that creates the database schema is namedrepository_<DatabaseName>.sql.
Note:
If you want to use Decision Warehouse, you can also create the required databasetable by running the script trace_<DatabaseName>.sql. If you are also persistingthe Java XOM in a database, you must create these tables by running thexomrepository_<DatabaseName>.sql script.
If you use Command Editor to run the scripts, you must log in with the credentialsyou use for the data source for Rule Execution Server.
Use any tool that can handle SQL to import and run the SQL scripts. The toolsprovided for each database include:
Database Database tool
IBM® DB2 DB2 command line processor
Derby ij command line processor
MySQL mysql command line processor
Oracle sqlplus command line processor
Postgre SQL Postgre SQL command line tool
SQL Server Query Tool
Sybase isql command line processor
To access the database, the database user must have a user ID and a password. Thedatabase user must also have:v complete privileges on the tables and view of the schema (create, insert, delete)v create index privileges
On Oracle, the database user must also have create trigger and create sequenceprivileges.
12 IBM Operational Decision Manager: Configuring Operational Decision Manager on JBoss

When using an Oracle database, run all the scripts in the SQL Plus client.
When using DB2, the scripts that create the Rule Execution Server database tablesare written for databases that use automatic storage. The following conditionsapply:v BP32K is the buffer pool that is expected in SYSCAT.BUFFERPOOLS. If BP32K is not
there, you can use the existing buffer pool or create a new buffer pool namedBP32K. Use the following command to query SYSCAT.BUFFERPOOLS for the existingbuffer pool:Select * from SYSCAT.BUFFERPOOLS
Otherwise, use the following command to create a buffer pool named BP32K:CREATE BUFFERPOOL BP32K SIZE 2000 PAGESIZE 32K
v You must update the trace_db2.sql script and select the custom option in theInstallation Settings wizard to run it. Modify the following line in the script tospecify storage for the tablespace:CREATE TABLESPACE RESDWTS PAGESIZE 32K BUFFERPOOL BP32K;
The following line gives an example of the tablespace specification in the script:CREATE TABLESPACE RESDWTS PAGESIZE 32K MANAGED BY DatabaseUSING [ FILE ’C:\DB2\Container.file’ 640 ] BUFFERPOOL BP32K;
v You might have to further modify the script based on your database settings.
Step 9: Deploying the hosted transparent decision serviceYou can deploy the hosted transparent decision service on your application server.
Procedure1. Depending on the version of JBoss that you are running, copy one of the
following files to the deploy directory of your JBoss server:
Option Description
In JBoss 5 <ODM_InstallDir>/executionserver/applicationservers/JBoss5/jrules-res-htds-JBOSS5.ear
In JBoss 6.1 <ODM_InstallDir>/executionserver/applicationservers/JBoss6/jrules-res-htds-JBOSS6.ear
2. Set the ruleset.xmlDocumentDriverPool.maxSize ruleset property to theappropriate value.See Setting the ruleset.xmlDocumentDriverPool.maxSize property.
What to do next
For more information about checking that the hosted transparent decision servicehas been deployed successfully, refer to the Rule Execution Server console onlinehelp.
Step 10: Verifying the configurationYou can verify that Rule Execution Server has been successfully configured byrunning Rule Execution Server diagnostics.
Chapter 1. Configuring Operational Decision Manager on JBoss 13

About this task
If the diagnostics are performed before any XUs have been started, the test ispassed and a message displays to verify that no XU(s) have been initialized.
Note: To let a scalable number of users access resources through the Javacomponents, JCA assigns the task of implementing connection pooling toapplication server vendors.
Procedure1. Open the Rule Execution Server console by typing res at the root URL on the
host machine:http://localhost:8080/res
If your browser is not running on the same host as the application server,replace localhost with the address of the machine. If the web application ismapped to a host that is defined on a different port to 8080, change the portnumber from 8080 to the host port number.
2. Sign in to the Rule Execution Server console.3. Click the Diagnostics tab.4. Click Run Diagnostics.
Optional configuration stepsYou can enhance your configuration with additional options, such as multiserverconfiguration, or deploying onto a server cluster.
Repackaging the Rule Execution Server archive using AntWhen you need to repackage a Rule Execution Server archive to configure the RuleExecution Server, you can use an Ant task, provided that you have set up the Anttask environment.
Before you begin
Before you run the res-setup Ant task, you must set up the Ant task environmentcorrectly. For more information, see Setting up your environment to use Ant.
About this task
By default, persistence is set to datasource. To change the persistence type, youcan use an Ant task. An Ant script is provided with the distribution for thispurpose. The script creates new archives that use a specific persistence mode.
The following procedure repackages the archives to change the persistence mode tofile.
Procedure
To repackage an archive file using Ant:
Write the code that creates a new XU (execution unit) RAR file and a newmanagement EAR file that set file persistence:In JBoss 5:
14 IBM Operational Decision Manager: Configuring Operational Decision Manager on JBoss

ant -Dxu.in=../applicationservers/JBoss5/jrules-res-xu-JBOSS5.rar-Dxu.out=myxu.rar-Dconsole.ear.in=../applicationservers/JBoss5/jrules-res-management-JBOSS5.ear-Dconsole.ear.out=mymanagement.ear-Dpersistence.type=file -f ressetup.xml setup
In JBoss 6.1:ant -Dxu.in=../applicationservers/JBoss6/jrules-res-xu-JBOSS6.rar-Dxu.out=myxu.rar-Dconsole.ear.in=../applicationservers/JBoss6/jrules-res-management-JBOSS6.ear-Dconsole.ear.out=mymanagement.ear-Dpersistence.type=file -f ressetup.xml setup
Configuring Rule Execution Server for different environmentsGeneral configuration guidelines apply if you want to enable Rule ExecutionServer on different environments in a single cell.
Before you begin
These instructions assume that you do not configure multiple instances of RuleExecution Server in a single cell.
About this task
Most likely, the development of your business rule management system (BRMS)requires more than a single deployment of Rule Execution Server. Thedevelopment lifecycle of a business rule application is similar to any other softwaredevelopment process: it includes stages for implementation, testing, deployment,and maintenance. At the very least, you are likely to need an environment for yourdevelopment team, one for your QA team, and another one for in-productionapplications. When you configure Rule Execution Server in a single cell, it is goodpractice to isolate the rulesets that you use on each server and ensure that theexecution units (XUs) do not interfere with each other.
Consider the following guidelines to set up your different environments in a singlecell.
Procedure1. Set up different data sources.2. Deploy and configure a XU for each environment.3. Deploy the Rule Execution Server console for each environment.4. To set up a data source for each environment, use unique JNDI names.
For example: jdbc/resdatasourceEnv1 and jdbc/resdatasourceEnv2
5. To deploy the Rule Execution Server console for each environment, proceed asfollows:a. Modify the deployment descriptor of the Rule Execution Server EAR or
WAR management archive: in the web.xmlfile, uncomment theJMX_XU_QUERY_PART parameter and specify xuName=xuEnv1.
b. Deploy the Rule Execution Server EAR or WAR file to the server.In the resource, reference settings in the application server:1) Set the JNDI for the data source as:jdbc/resdatasourceEnv1.2) Set the JNDI name for the XU a: eis/ConnectionFactoryEnv1.
c. Repeat a and b to deploy the Rule Execution Server console for the otherenvironments.
Chapter 1. Configuring Operational Decision Manager on JBoss 15
6. Restart the node agents after you complete the configuration.7. Call the XU instances to register the XU with the Rule Execution Server
console.
Rule Execution Server deployment for high availability andscalabilityUse Rule Execution Server in a cluster or other multi-server environments.
Cluster configuration and topology:
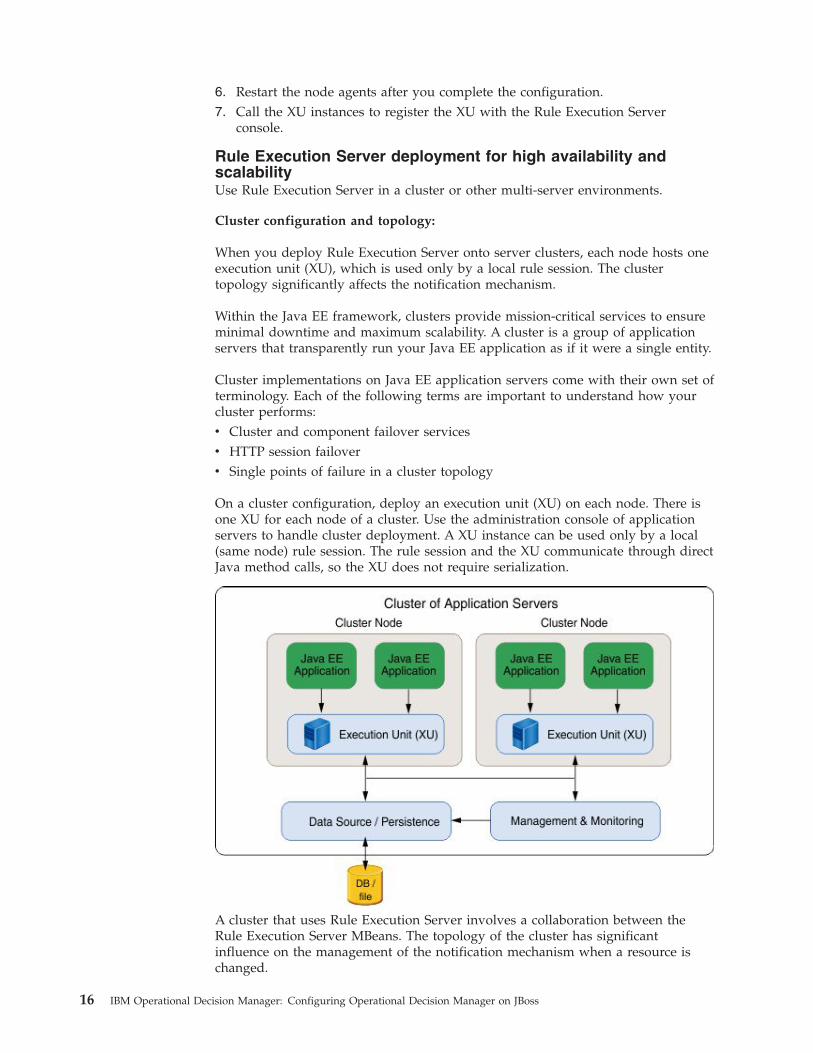
When you deploy Rule Execution Server onto server clusters, each node hosts oneexecution unit (XU), which is used only by a local rule session. The clustertopology significantly affects the notification mechanism.
Within the Java EE framework, clusters provide mission-critical services to ensureminimal downtime and maximum scalability. A cluster is a group of applicationservers that transparently run your Java EE application as if it were a single entity.
Cluster implementations on Java EE application servers come with their own set ofterminology. Each of the following terms are important to understand how yourcluster performs:v Cluster and component failover servicesv HTTP session failoverv Single points of failure in a cluster topology
On a cluster configuration, deploy an execution unit (XU) on each node. There isone XU for each node of a cluster. Use the administration console of applicationservers to handle cluster deployment. A XU instance can be used only by a local(same node) rule session. The rule session and the XU communicate through directJava method calls, so the XU does not require serialization.
A cluster that uses Rule Execution Server involves a collaboration between theRule Execution Server MBeans. The topology of the cluster has significantinfluence on the management of the notification mechanism when a resource ischanged.
16 IBM Operational Decision Manager: Configuring Operational Decision Manager on JBoss

The management model is likely to use several times a basic scenario of adistributed notification mechanism within a cluster to interact with the variousexecution unit (XU) instances. A XU message-driven rule bean (MBean) isdeployed with the XU to collaborate with the Rule Execution Server JMXinfrastructure.
The following sequence applies:1. A management client sets a resource on a ruleset MBean.2. The ruleset makes a query to the MBean server to retrieve all the XU instances
in the cluster. This operation requires a specific implementation for eachapplication server.
3. A notification is sent to each instance.
JBoss clusters:
When you deploy the different Rule Execution Server components on a JBossapplication server, it is important to activate a single instance of the managementconsole in a JBoss cluster.
There is no synchronization between deployed management consoles. Themanagement console must be in the cluster to find the Execution Unit (XU)MBeans of the cluster.
Contrary to WebSphere®, the XU MBean on JBoss is activated when the RAR isdeployed. Consequently, the management console automatically discovers all theXUs deployed in the cluster before any ruleset has been executed.
The notification mechanism works by transmitting messages to all the XUinstances on cluster members. The management model finds the list of members ina cluster with the local MBean server, then uses the JMX remote connection oneach cluster member to notify all XU instances.
To implement failover for the management console, deploy the EAR for JBoss ineach <JBOSS_HOME>/server/all/deploy-hasingleton in the cluster. This allows youto have the management console run on a single server in the cluster. You mustalso specify the dependency of the high-availability singleton on the RuleExecution Server data source, by editing the file <JBOSS_HOME>/server/all/deploy/deploy-hasingleton-service.xml, and adding the following line:<depends>jboss.jdbc:datasource=jdbc/resdatasource,service=metadata</depends>
to the HASingletonController mbean descriptor:<mbean code="org.jboss.ha.singleton.HASingletonController"name="jboss.ha:service=HASingletonDeployer">...</mbean>
In this case, the management console is accessible only on the master node serverin the cluster. If the master node fails, another server in the cluster is automaticallyselected as the master node, and the management console is activated on theserver.
Use the following command to launch a server instance in a cluster:
$JBOSS_HOME/bin/run.bat -c all -b <server_address>
Chapter 1. Configuring Operational Decision Manager on JBoss 17
Where <server_address> is an IP address that can be reached by the other serversin the cluster.
For more information, refer to http://www.onjava.com/pub/a/onjava/2003/08/20/jboss_clustering.html
Configuring the Decision Center consoles on JBossTo use the Decision Center Enterprise console on a new instance of the JBossapplication server, you must deploy the provided archive for this server andperform a number of configuration tasks.
Operational Decision Manager 8.5.1 supports JBoss 5.1.2 EAP and 6.1.
Before you startReview the steps that you must perform to complete the configuration.
These instructions are intended for users familiar with JBoss and the database theyare using. Examples using the Derby embedded database are included throughoutto help beginners.
Before you start, do the following:1. Delete the /work and /tmp directories from the folder in which you deploy
Decision Center.2. Set JBOSS_HOME as an environment variable.
When you have a clean environment, refer to “What steps to follow” tounderstand the steps that you must follow to configure Decision Center on yourapplication server.
You can complete the configuration of your application server with the InstallationSettings wizard in the Decision Center console or with Ant scripts.
If you need to configure Decision Validation Services, see “Additional steps toconfigure Decision Validation Services” on page 40.
After finishing the configuration, you can use Decision Center (see Opening theDecision Center Enterprise console). There is no rule project the first time you openthe console. You must publish a project from Rule Designer (see Publishing aproject).
Note: If you have rule projects created with a previous product version, refer tothe Migrating topics on how to upgrade the Decision Center database schema.
What steps to follow
The steps that you follow to configure Decision Center on JBoss 5 and 6.1 aresummarized in the following table:
Step Required
“Step 1: Restricting database user permissions” on page 19
18 IBM Operational Decision Manager: Configuring Operational Decision Manager on JBoss

Step Required
“Step 2: Creating a data source and connection pool” onpage 20
“Step 3: Configuring securityon JBoss” on page 22
“Defining groups andpermissions” on page 22
“Declaring custom groups”on page 23
Optional
“Step 4: Deploying the Decision Center EAR on JBoss” onpage 24
“Step 5: Verifying the deployment of the Decision CenterEnterprise console” on page 24
Recommended
“Step 6: Completing yourDecision Centerconfiguration” on page 25
“Completing theconfiguration from theDecision Center Enterpriseconsole” on page 25
Use one of the two methodsto complete the installation.Required for distributedplatforms only.
“Completing theconfiguration by using Anttasks” on page 30
Verifying your configuration of Decision Center
Step 1: Restricting database user permissionsDecision Center data is stored in a database. The database administrator mightrequire that you provide the specific permissions that you need when accessingthis database.
Note: This step applies when database access needs to be restricted. If you managethe database yourself (for example, you use an embedded database for testpurposes) or if you do not need further restrictions, skip this step and proceed tothe next configuration step.
Connection to the Decision Center database, established in the data sourcecredentials, and any subsequent requests to the database are handled through adatabase user. This database user (name and password), for example rtsdbUser, isdefined by the database administrator and has no relation to the standard DecisionCenter groups.
The following table gives the permissions that the database administrator mustdefine on the Decision Center database, with attention given to the type ofoperations that you want to perform. Some supported databases do not require allthe above permissions.
Chapter 1. Configuring Operational Decision Manager on JBoss 19

Databasepermission
Operation
Use DecisionCenter
Create thedatabase schemaby using theDecision Centerconsole or Anttasks
Modify thedatabase schemaby using theDecision Centerconsole or Anttasks
Migrate thedatabase schema
ALTER TABLE Not required Not required Required Required
CREATE INDEX Not required Required Required Required
CREATE ROLE Not required Not required Not required Required
CREATESEQUENCE
Not required Required Required Required
CREATE TABLE Not required Required Required Required
CREATE VIEW Not required Required Required Required
DROP INDEX Not required Not required Required Required
DROPSEQUENCE
Not required Not required Required Required
DROP TABLE Not required Not required Required Required
DROP VIEW Not required Not required Required Required
INSERT TABLE Required Required Required Required
SELECTSEQUENCE
Required Required Required Required
SELECT TABLE Required Required Required Required
UPDATE TABLE Required Required Required Required
Step 2: Creating a data source and connection poolYou declare a data source to store the data that is used by Decision Center.
Before you begin
You must have a database to create a data source.
Note: Beginners who use the Derby embedded database can create the database aspart of this procedure.
For a list of supported databases, see the IBM Support site.
Procedure1. In the <JBOSS_HOME>/server/default/deploy directory, create an XML descriptor
file that ends with -ds.xml, for example dc-derby-ds.xml.The following dc-derby-ds.xml example is based on the file derby-ds.xmlprovided in <JBOSS_HOME>/docs/examples/jca.<?xml version="1.0" encoding="UTF-8"?><datasources>
<local-tx-datasource><jndi-name>jdbc/ilogDataSource</jndi-name><connection-url>jdbc:derby:c:/rtsdb;create=true</connection-url><driver-class>org.apache.derby.jdbc.EmbeddedDriver</driver-class><user-name>rtsdbUser</user-name><password>rtsdbUser</password><min-pool-size>5</min-pool-size>
20 IBM Operational Decision Manager: Configuring Operational Decision Manager on JBoss
<max-pool-size>20</max-pool-size><idle-timeout-minutes>5</idle-timeout-minutes><track-statements/>
</local-tx-datasource></datasources>
2. Set the values of the properties in this file.By default, JBoss uses local transaction data sources that are identified by thetags: <local-tx-datasource> ... </local-tx-datasource>
The properties to set in the XML descriptor depend on the type of data sourceand on the database you want to connect to. You must set at least the followingproperties:
JNDI name
This property is independent from the type of data source and databaseand must be set to this value:<jndi-name>jdbc/ilogDataSource</jndi-name>
Connection URL
This property is for local transaction data sources. It defines the JDBCconnection URL. For example: <connection-url>jdbc:derby:c:/rtsdb;create=true</connection-url>
Driver class
This property is for local transaction data sources. It defines the classthat handles the connections to the database. For example:<driver-class>org.apache.derby.jdbc.EmbeddedDriver</driver-class>
Make sure that you have the equivalent .jar files in<JBOSS_HOME>/server/default/lib. For example, for the Derbyembedded database drivers:v derby.jar, provided in <InstallDir>/studio/samples/shared/lib.v derby-plugin.jar, provided in <JBOSS_HOME>/docs/examples/varia.
User name and Password
These properties are for local transaction data sources. The tagsusername="rtsdbUser" and password="rtsdbUser" are used to access thedatabase. These user name and password are used only to access thedatabase.
Note: If the transaction isolation level is not set to READ-COMMITTED, DecisionCenter might encounter various database deadlocks. Therefore, you might haveto configure data source isolation for better concurrency.
What to do nextv If you must be 100% compliant with Java EE specifications, you must disable
direct JNDI data source lookup. Instructions are provided in<ODM_InstallDir>/teamserver/lib/jrules-teamserver.jar, in the/ilog/rules/teamserver/preferences.properties file.
v For Derby:– The database name is the directory in which the database is created.– The org.jboss.jdbc.DerbyDatabase MBean is provided in a plug-in that is
packaged in the derby-plugin.jar archive.
Chapter 1. Configuring Operational Decision Manager on JBoss 21

Step 3: Configuring security on JBossYou control access to Decision Center and enforce security by defining user groupsand associated roles.
Defining groups and permissionsYou control access to Decision Center and enforce security by defining user groupsand associated roles.
About this task
Any user of Decision Center must belong to at least one of these mandatorygroups:v rtsAdministrator
v rtsConfigManager
v rtsInstaller
v rtsUser
Adherence to these groups determines what parts of Decision Center a user canaccess. You must create all these groups. For testing purposes, also create a defaultuser and password for each of these groups. In addition, if you want to follow theDecision Center permissions tutorial in your own installation, you must create thetwo Validator and Eligibility custom groups.
The following table summarizes the mandatory and custom groups and theirassociated role, default user, and password.
Group Use Default User - Password
rtsAdministrator Mandatory, gives the useradministrator access.
rtsAdmin - rtsAdmin
rtsConfigManager Mandatory, gives the userconfiguration manageraccess.
rtsConfig - rtsConfig
rtsUser Mandatory, gives a userstandard access.
rtsUser1 - rtsUser1
rtsInstaller Mandatory, gives the useraccess to the InstallationSettings wizard.
rtsAdmin - rtsAdmin
Validator Optional custom group, usedin the Decision Centerpermissions tutorial.
Val - Val
Eligibility Optional custom group, usedin the Decision Centerpermissions tutorial.
Eli - Eli
Note: For more information on the Decision Center groups, see Groups.
You declare groups and users in the files roles.properties and users.properties.
The following procedure is a suggested configuration with a default user for eachof the basic groups.
22 IBM Operational Decision Manager: Configuring Operational Decision Manager on JBoss

Procedure1. Create the files roles.properties and users.properties in the configuration
directory: <JBOSS_HOME>/server/default/conf.2. In roles.properties, map users to their groups.
For example:rtsUser1=rtsUserrtsConfig=rtsConfigManager, rtsUserrtsAdmin=rtsAdministrator,rtsInstaller,rtsUserEli=Eligibility,rtsUserVal=Validator,Eligibility,rtsUser
3. In users.properties, declare the user and password combinations.For example:rtsUser1=rtsUser1rtsConfig=rtsConfigrtsAdmin=rtsAdminEli=EliVal=Val
What to do next
After you deploy the archive in the next step, you must upload all groups to thedatabase from the Installation Settings wizard of the Decision Center console. Formore information, see Step 3: Set up groups.
Declaring custom groupsIf you create custom groups, you must declare them before you deploy the EARfile.
About this task
The Decision Center EAR file references the basic groups: rtsUser,rtsConfigManager, rtsAdministrator, and rtsInstaller.
You must add any custom groups that you declared in “Defining groups andpermissions” on page 22. Also, add the Validator and Eligibility groups thatyou created for the Decision Center tutorials.
Tip:
v The EAR file is compressed. You must open it to extract the files that must bechanged, and then replace the files in the EAR file. You can use Ant commandsto repackage the EAR file, as explained in Repackaging the Decision Centerarchive.
v Back up the EAR file before you modify it.v To use the Decision Center permissions mechanism, you must upload groups to
the database. For more information, see Completing the configuration from theDecision Center Enterprise console.
Procedure1. Add each custom group as a role in the appropriate application.xml file.
v JBoss 5: <ODM_InstallDir>/teamserver/applicationservers/JBoss5/jrules-teamserver-JBOSS5.ear/META-INF
v JBoss 6.1: <ODM_InstallDir>/teamserver/applicationservers/JBoss6/jrules-teamserver-JBOSS6.ear/META-INF/
For example:
Chapter 1. Configuring Operational Decision Manager on JBoss 23

...<security-role>
<role-name>my_custom_group</role-name></security-role>...
2. If you have already deployed the archive, upload the custom groups to thedatabase from the Installation Settings wizard of the Decision Center console.For more information, see Set up groups.
What to do next
Otherwise, proceed to “Step 4: Deploying the Decision Center EAR on JBoss” andupload the groups when you complete the configuration.
Step 4: Deploying the Decision Center EAR on JBossTo deploy the Decision Center EAR on JBoss, you must copy the EAR archive tothe deployment directory of your application server.
Procedure
Copy the file <ODM_InstallDir>/teamserver/applicationservers/JBoss5/jrules-teamserver-JBOSS5.ear (on JBoss 5) or the file <ODM_InstallDir>/teamserver/applicationservers/JBoss6/jrules-teamserver-JBOSS6.ear (on JBoss 6.1) to thedeploy folder:<JBOSS_HOME>/server/default/deploy
Important:
Deploying the Decision Center EAR sets the persistence locale. After you save arule to the database, you cannot change the persistence locale. If you want toinstall Decision Center in a language other than English, take note of theinstructions provided in “Step 6: Completing your Decision Center configuration”on page 25.
Step 5: Verifying the deployment of the Decision CenterEnterprise console
After you have finished configuring Decision Center for your application server,verify that you have deployed the archive successfully.
About this task
You start your application server and then use your web browser to open theDecision Center Enterprise console.
Procedure1. Make sure that your application server is running.2. Start a new browser instance and enter the default URL to access Decision
Center in a web browser: http://localhost:<PORT_NUMBER>/teamserverSet <PORT_NUMBER> to the port number of your web application. If yourbrowser is not running on the same host as the application server, replace thelocalhost with the address of the host.The Decision Center log in page opens in your browser.
3. Sign in with rtsAdministrator rights to start testing.For example rtsAdmin and rtsAdmin.
24 IBM Operational Decision Manager: Configuring Operational Decision Manager on JBoss

Step 6: Completing your Decision Center configurationAfter you have created a data source, defined security settings, and deployed theDecision Center EAR file, you complete the configuration either from the DecisionCenter console or by running Ant tasks. If your database is DB2 for z/OS, generatethe schema on z/OS for reasons of performance. You can, however, use the wizardto import extension files.
Completing the configuration from the Decision CenterEnterprise consoleAfter you have deployed the Decision Center archive to your application server,you can work from the Decision Center Enterprise console to complete or modifythe configuration.
Installation Settings wizard overview:
You use the Installation Settings wizard in the Decision Center console to create ormodify the database schema, set up message files or groups, or change thepersistence locale or configuration parameters.
The Installation Settings wizard opens automatically when you start the DecisionCenter console to complete an installation.
You can also open the Installation Settings wizard by clicking Configure >Installation Settings Wizard in the Decision Center console after you have
completed your initial installation. If you open Decision Center after you havefollowed the steps to install the module, only the Install tab is available. For moreinformation, see Opening the Decision Center Enterprise console.
Note: To access the Installation Settings wizard, you must have bothadministrator privileges and the rtsInstaller role when you sign in.
You use the Installation Settings wizard for the following actions.
Table 2. Actions in the Installation Settings wizard
Action Description
Configure thedatabase
Mandatory when you complete the configuration with a database on adistributed platform. For more information, see Step 1: Configure thedatabase.
Set up messagefiles
Mandatory during the installation only if you have some custom rulemodel extension files. For more information, see Step 2: Set upmessage files.
Set up groups You must set up the same groups that are declared in the applicationserver if you want to use the Decision Center security and permissionsmechanisms. For more information, see Step 3: Set up groups.
Change thepersistence locale
Mandatory if the persistence locale is different from the locale en_US.For more information, see Step 4: Set the persistence locale.
Changeconfigurationparameters
Optional. You change some configuration parameters when youcustomize Decision Center. For more information, see Step 5: Setconfiguration parameters.
After you have completed the installation, Decision Center is ready to use but doesnot contain rule projects. If you open Decision Center and no rule projects are
Chapter 1. Configuring Operational Decision Manager on JBoss 25

available, a message in the Configure tab informs you that no project has beenfound and that you should either publish a rule project by using Rule Designer orcontact the administrator.
If you see this message, you must publish a rule project from Rule Designer. Formore information, see Publishing a project.
More information about using the Installation Settings wizard is available from theDecision Center console online help. To access the online help, click Help in thetop banner after you have signed in to Decision Center.
Note: If you have rule projects that were created with a previous product version,refer to the Migrating topics on how to upgrade the Decision Center databaseschema.
Step 1: Configure the database:
You use the Installation Settings wizard to configure the database.
About this task
You store the extensions to the Decision Center rule model in two XML files:v Model description: This file usually has the file name extension .brmx.v Initialization of enumerations and hierarchies: This file usually has file name
extension .brdx.
For more information about defining common model extensions, see thecustomization topics.
Procedure
1. When the Installation Settings wizard opens in Decision Center, click Next.2. Select one of the extension files.
v Default extensions (already selected)v Custom extensions (brmx/brdx), orv Custom extensions (Zip)
3. Click Generate SQL to generate the script that creates the database tables,which are based on the contents of your rule model files.
4. After the script is generated, select the Execute the SQL script check box, andthen click Next.
Step 2: Set up message files:
Message files contain the display text that is associated with the extensions to therule model contained in the .brmx and .brdx files.
About this task
You can find the default message file in <ODM_InstallDir>/teamserver/bin/defaultextensionmessages_<LOCALE>.properties.
If you use the default rule model when you create your database, the defaultmessage file is automatically sent to the database. To upload your own messagefiles, use the Installation Settings wizard as explained below.
26 IBM Operational Decision Manager: Configuring Operational Decision Manager on JBoss
You must have a message file for each locale that you use. Message files areidentified by their locale. The contents of the message files must respect theISO-LATIN-1 standard.
Procedure
To declare a message file in the Installation Settings wizard:1. Click New.2. Enter a locale.3. Browse to the location of the message file for this locale.4. Click Apply.
Results
If Decision Center supports this locale, the Installation Settings wizard assigns alocale code so that you can identify it.
Example
For example:status=StatuseffectiveDate=Effective DateexpirationDate=Expiration Datenew=Newdefined=Defined
Step 3: Set up groups:
In addition to creating groups in your application server when you set up securityaccess, you must use the Setup Groups page in the Installation Settings wizard toupload groups to the database.
Before you begin
Before you set up groups in the Enterprise console, make sure to add all thegroups that you want to see in the available list when enforcing project security orsetting permissions in Decision Center. For more information, refer to the topics onGroups and Permissions in the Decision Center help.
About this task
You set up groups only if you want to use the Decision Center project access andpermission mechanisms.
Tip: In Decision Center, the groups are the roles in the application server, not thegroups defined in the user registry. Decision Center uses the group information toverify whether a user belongs to a role in the application server.
You do not have to upload the rtsAdministrator or rtsInstaller group. Theadministrator group has access to everything, and an installer user must belong toanother group.
You use the Setup Groups page in the Installation Settings wizard to upload thedefault groups for rtsUser and rtsConfigManager, and any custom groups, such asValidator and Eligibility if you want to follow the permissions tutorial.
Chapter 1. Configuring Operational Decision Manager on JBoss 27

Procedure
To set up groups:1. Click New.2. Type the group name.3. Click Apply.4. Repeat steps 1 to 3 for each group.5. When you have added all the groups, proceed in one of the following ways:
v Click Next if you want to set a different persistence locale, or configurationparameters.
v Click Finish if you do not want to change these settings.
Step 4: Set the persistence locale:
The persistence locale determines the language in which you store rules in theDecision Center database.
About this task
You set the locale when you deploy the Decision Center EAR file to yourapplication server. As a consequence, you store the rules in the database in thelocale of the Decision Center application.
Changing the persistence locale does not change the language in which DecisionCenter displays rules. Changing it in Decision Center is necessary only to matchthe locale of Rule Designer when you synchronize your rule projects, and to accessthe tutorials in your locale.
Important: You must not change the persistence locale after you have saved arule to the database.
Procedure
To set the persistence locale:1. Enter a locale in the Locale field.2. Click Apply.3. Proceed as follows:
v Click Next if you want to set the configuration parameters.v Click Finish if you do not want to change these settings.
Step 5: Set configuration parameters:
Many tasks that are related to customizing Decision Center require that you add orremove configuration parameters.
About this task
Decision Center uses the following configuration parameters to generate completeURLs in permalinks:v teamserver.server.port: the port numberv teamserver.server.isSecure: true if the connection is securev teamserver.server.hostname: the name of the host.
28 IBM Operational Decision Manager: Configuring Operational Decision Manager on JBoss

To create, modify, or delete configuration parameters, you use the Set configurationparameters page in the Installation Manager wizard. You generate these parameterswhen you sign in to the Decision Center console for the first time after you haveconfigured the database. You can use the Installation Settings wizard to changethese parameters at any time.
The following table gives a description of the main configuration parametersavailable in teamserver.war/WEB-INF/lib/teamserver-model-XXX.jar/ilog/rules/teamserver/preferences.properties.
Note:
The parameters in the table include the teamserver prefix, which is not in thepreferences.properties file. You must include the prefix when you setconfiguration parameters in the Installation Settings wizard.
Parameter Used to
teamserver.<extractorValidator>.classSpecify a class of ruleset extractor validators touse for the extractorValidator name. The classmust implement the IlrExtractorValidatorinterface. After you define this class, specify thisname as the extractor validator to use whendefining a ruleset extractor.
teamserver.build.path Define the location of the IRL cache in the filesystem. Compute the path as follows:
v Use this property with the name of the userwho started the server as the root for the cache(<build.path>_<username>).
v If this property is not defined, use the systemproperty java.io.tmpdir and add rtscache. Forexample, <temp dir>/rtscache_<username>).
v If the system property is not defined, use theserver directory and add rtscache. For example,<server dir>/rtscache_<username>).
teamserver.brl.verbalizers Specify the list of locales for which a BALverbalizer is defined.
teamserver.brl.verbalizer.<locale> Specify the verbalizer class for the locale. The classmust implement theilog.rules.vocabulary.verbalization.IlrVerbalizer interface.
Procedure
1. Create a parameter or change an existing one.v To create a parameter, click New.v To change a parameter, select the check box next to the parameter and then
click Modify to change the parameter or click Delete to remove it.2. Click Apply to implement your changes.3. Proceed as follows:
v Click Previous if you want to make changes to previous settings.v Click Finish. The Installation log opens with a summary of the operations
that you performed in the Installation Settings wizard.4. Click OK to finish.
Chapter 1. Configuring Operational Decision Manager on JBoss 29
What to do next
You now have to sign in to the Decision Center console. Continue with the sectionPublishing a project.
Completing the configuration by using Ant tasksAnt tasks provide an alternative method for completing or modifying theconfiguration. These tasks perform the same configuration steps as the InstallationSettings wizard in the Decision Center console.
Setting up the Ant tasks environment:
To run Decision Center Ant tasks, you must first set up the required environmentvariables.
To run Ant tasks, you must have version 1.7.1 (or later) of Ant set up on yoursystem. If Ant is not installed or your version is older than version 1.7.1, you mustset up your environment to use the correct version of Ant. You can download Antfrom the Apache web site, or you can use the Ant 1.7.1 distribution packaged at<ODM_InstallDir>/shared/tools/ant, where <ODM_InstallDir> is your OperationalDecision Manager installation directory.
To test your current version of Ant:
Type the following command in a Windows command prompt or UNIX shell: ant-version
To set up your environment to use Ant:
1. Set the ANT_HOME environment variable to <ODM_InstallDir>/shared/tools/ant.
2. Set the JAVA_HOME environment variable to the path to your JDK installation(1.6).
3. Add the directory <ODM_InstallDir>/shared/tools/ant/bin to your PATHenvironment variable.
The Decision Center Ant tasks are defined in <ODM_InstallDir>/teamserver/bin/build.xml and executed by commands of the form:ant <taskName> <parameters list>
Note: To execute these Ant tasks, you must use the same Java virtual machineversion and vendor as the one that is used by the application server.
Ant task parameters start with -D. Use them to set values such as the followingones:v -Dserver.url=<server url>: Specifies the URL of the target application server.v -DdatasourceName=<data source name>: Specifies the JNDI name of the data
source to use for the task. The default value is jdbc/ilogDataSource.ant execute-schema -Dserver.url=<protocol://host:port>/teamserver/-DdatasourceName=jdbc/ilogDataSource -Dfile=my_sql_file.sql
The <protocol://host:port> URL is defined in the file <ODM_InstallDir>/teamserver/bin/teamserver-anttasks.properties. If your browser is not running on the samehost as the application server, replace localhost with the address of the machine. Ifyour web application is mapped to a host on a port that is different from the portnumber shown, change the port number to your host port number.
30 IBM Operational Decision Manager: Configuring Operational Decision Manager on JBoss

The file <ODM_InstallDir>/teamserver/bin/teamserver-anttasks.propertiesdefines the value of some common parameters and others that depend on theapplication server used. You do not have to include these parameters in your Anttask command if they are properly defined in this file. The content of theteamserver-anttasks.properties file is as follows:# Default properties# ------------------------------------rtsAdmin.login=rtsAdminrtsAdmin.password=rtsAdmin
protocol=httpserver.host=localhostserver.port=8080server.url=${protocol}://${server.host}:${server.port}/teamserver
datasourceName=jdbc/ilogDataSource
outputFile=output.sql
languagePackPath = .languagePackOutputPath = ./generated
persistenceLocale =selector =branch =override = false
Also, take note of any special instructions in this file concerning your applicationserver.
The appserver.name property configures the class path for the Ant tasks. If youhave to add specific drivers to your class path, you can add them to<ODM_InstallDir>/teamserver/lib/classpath-teamserver.xml.
Communication between the Ant tasks and Decision Center supports the HTTP orHTTPS communication protocols. For more information, see Ant taskcommunication protocol.
Creating the database schema:
You can create the database schema in a single operation by using theset-extensions Ant task, or choose to create it step by step.
Creating schemas with the set-extensions Ant task:
For convenience, you can create the database schema by using the set-extensionsAnt task.
About this task
Extensions to the Decision Center rule model are stored in two XML files.v Model description: This file usually has the file name extension .brmx.v Initialization of enumerations and hierarchies: This file usually has file name
extension .brdx.
You can use Ant tasks to load the rule model from the two XML files and build theSQL script that is necessary to get the proper database schema.
Chapter 1. Configuring Operational Decision Manager on JBoss 31

Note: To run these Ant tasks, you must use the same Java virtual machine versionand vendor as the one used by the application server.
Alternatively, you can create the database schema step by step, which is useful ifyou want to look at the generated SQL schema. See “Creating the schema using astep-by-step sequence.”
Procedure
Run the set-extensions Ant task.This Ant target runs gen-create-schema + execute-schema + upload-extensions +upload-roles. Set the following parameters:
-Dserver.url=<server url>
-DdatasourceName=<data source name>
-DextensionModel=<model file>The model description file, with the .brmx extension
-DextensionData=<data file>The model data description, with .brdx extension
[-DdbSchemaName=<database schema name>]You can use this optional parameter to specify the database schema name.Otherwise, Decision Center uses the database user name as the schema name.However, some databases allow some users to access several schemas, and thedefault schema does not always reflect the user name.
[-Droles=<role list>]You can use this optional parameter to upload the list of roles to DecisionCenter. This list is specified as "role1 role2". For example:ant upload-roles -Droles="rtsUser rtsConfigManager Eligibility Validator"
Creating the schema using a step-by-step sequence:
If you want to look at the generated SQL schema, you can create it step-by-step.
Creating the database schema script:
You can create the database schema script by using the gen-create-schema Anttask.
Procedure
To create the SQL script that is necessary to create or update the database schema,run the gen-create-schema Ant task with these parameters:
-Dserver.url=<server url>
-DdatasourceName=<data source name>
-DextensionModel=<model file>The model description (.brmx extension).
-DextensionData=<data file>The model data description (.brdx extension).
[-DdbSchemaName=<database schema name>]You can use this optional parameter to specify the database schema name inwhich the Decision Center tables are stored. If you do not specify the
32 IBM Operational Decision Manager: Configuring Operational Decision Manager on JBoss

parameter, Decision Center uses the database user name as the schema name.However, some databases allow some users to access several schemas, and thedefault schema is not always named the same as the user.
[-DoutputFile=<SQL file>]The name of the file that stores the generated SQL script. If this parameter isnot specified, the task creates a file named output.sql in the directory that isdefined as basedir in the build.xml file.
ant gen-create-schema -DextensionModel=my_model_file.brmx -DextensionData=my_data_file.brdx -DoutputFile=my_sql_file.sql
Results
1. The task connects to the specified data source from the application server.2. The task checks whether this data source points to an existing Decision Center
database.v If a database does not exist, the task builds the SQL script to create a fresh
database schema to store the model.v If a database does exist, the task builds the SQL script that is necessary to
update the existing database schema.
Executing the database schema script:
You execute the database schema script.
Procedure
To execute the SQL script that you created, run the execute-schema Ant task withthese parameters:
-Dserver.url=<server url>
-DdatasourceName=<data source name>
[-Dfile=<SQL file>]The name of the file to execute, which corresponds to the script that youcreated. If you do not specify this parameter, the task attempts to execute a filenamed output.sql in the directory that is defined as basedir in the build.xmlfile.
ant execute-schema -Dfile=my_sql_file.sql
Uploading the database schema extension:
You upload the database schema extension.
Procedure
To store the rule model description in the database schema, run theupload-extensions Ant task with these parameters:
-Dserver.url=<server url>
-DdatasourceName=<data source name>
-DextensionModel=<model file>The model description (.brmx extension).
-DextensionData=<data file>The model data description (.brdx extension).
ant upload-extensions -DextensionModel=my_model_file.brmx -DextensionData=my_data_file.brdx
Chapter 1. Configuring Operational Decision Manager on JBoss 33
Results
The description is stored in the database so that Decision Center applications canload it when they start. It is also used by gen-create-schema to get the currentmodel description to run a diff with the new schema.
In a cluster, you must restart the servers and close all current sessions.
Uploading a list of roles or groups to the database:
In addition to creating groups in your application server when you set up securityaccess, you must upload groups to the database.
Before you begin
1. Add all the groups that you want to see in the available list when you enforceproject security or setting permissions in Decision Center.
2. Create the default groups for rtsUser and rtsConfigManager, and upload yourcustom groups.
About this task
You must upload roles or groups only if you want to use the Decision Centerproject access and permissions mechanisms. For more information, see the topicson Groups and Permissions in the Decision Center online help.
You do not have to upload the rtsAdministrator group or the rtsInstallergroup. The Administrator group has access to everything and an Installer usermust belong to another group.
Note: To run these Ant tasks, you must use the same Java virtual machine versionand vendor as the one used by the application server.
Procedure
To store in the database the list of roles or groups to be used by the application,run the upload-roles Ant task with the following parameters:
-Dserver.url=<server url>
-DdatasourceName=<data source name>
-Droles=<role list><role list> is the list of roles or groups to upload to Decision Center, specifiedas "group1 group2".
ant upload-roles -Droles="rtsUser rtsConfigManager Eligibility Validator"
Removing a database schema:
You can create an SQL script to remove (drop) a database schema by using thegen-drop-schema Ant task.
About this task
To remove a database schema, you proceed in two steps:1. Create the SQL script that is necessary to remove the database schema.2. Execute the SQL script that you created.
34 IBM Operational Decision Manager: Configuring Operational Decision Manager on JBoss

Procedure
1. To create the SQL script to delete a database schema, run the gen-drop-schemaAnt task with the following parameters:
-Dserver.url=<server url>
-DdatasourceName=<data source name>
-DextensionModel=<model file>The description of the database schema to remove.
[-DdbSchemaName=<database schema name>]You can use an optional parameter to specify the database schema name. Ifyou do not specify this parameter, Decision Center uses the database username as the schema name. However, in some databases, users can accessseveral schemas and the default schema is not always named as the user.
[-DoutputFile=<SQL file>]The name of the file that stores the generated SQL script. If you do notspecify this parameter, the task creates a file named output.sql in thedirectory that is defined as basedir in the build.xml file.
ant gen-drop-schema -DextensionModel=my_model_file.brmx -DoutputFile=my_sql_file.sql
2. To execute the SQL script that you created, run the execute-schema Ant taskwith these parameters:
-Dserver.url=<server url>
-DdatasourceName=<data source name>
[-Dfile=<SQL file>]The name of the file to execute, which corresponds to the script that youcreated. If you do not specify this parameter, the task attempts to execute afile named output.sql in the directory that is defined as basedir in thebuild.xml file.
ant execute-schema -Dfile=my_sql_file.sql
The task connects to the specified data source from the application server. Itreads the model description that is passed in the parameters, and generates theSQL script to remove the existing schema. Because many database tables arelinked through foreign keys, these tables must be removed in a specific orderand the script generation handles these constraints.
Example
Here is the complete code sample:ant gen-drop-schema -DextensionModel=my_model_file.brmx -DoutputFile=my_sql_file.sqlant execute-schema -Dfile=my_sql_file.sql
Defining and uploading message files:
You can define and upload message files to Decision Center by using theupload-messages Ant task.
Message files contain the display text that is associated with the extensions to therule model that is contained in the .brmx and .brdx files. For example:status=StatuseffectiveDate=Effective DateexpirationDate=Expiration Datenew=Newdefined=Defined
Chapter 1. Configuring Operational Decision Manager on JBoss 35

The default messages file is provided in: <ODM_InstallDir>/teamserver/bin/defaultextensionmessages_<LOCALE>.properties
Note: The contents of the messages files must conform to the ISO-LATIN-1standard.
You must have a messages file for each locale that you use. Upload the messagesfile to Decision Center by running the upload-messages Ant task with theseparameters:v -Dserver.url=<server url>
v -DdatasourceName=<data source name>
v -Dlocale=<locale>
v -DmessageFile=<message file>
ant upload-messages -Dlocale=en_US -DmessageFile=mymessages.properties
Setting the persistence locale:
The persistence locale is used to determine the language in which rules are storedin the Decision Center database.
About this task
The persistence locale is set when you deploy the Decision Center archive to yourapplication server, which means that the rules in the database are stored in thelocale of the Decision Center application.
Changing the persistence locale does not change the language in which rulesdisplay in Decision Center. Changing the persistence locale in Decision Center isnecessary only to match the locale of Rule Designer when you synchronize yourrule projects, and to access the tutorials in your locale.
Important: You must not change the persistence locale after you have saved arule to the database.
Procedure
To set the persistence locale by running an Ant task:1. Open the <ODM_InstallDir>/teamserver/bin/teamserver-anttasks.properties
file.This file defines the value of some common parameters.
2. Add your locale to the persistenceLocale property and save theteamserver-anttasks.properties file.For example: persistenceLocale = fr_FR
3. Run the Ant task in this form: ant taskName parameters_list
Alternatively, you can add the parameter to the command line. For example:ant taskName -DpersistenceLocale=fr_FR
Adding or removing configuration parameters:
For many tasks that are related to customizing Decision Center, you must add orremove configuration parameters.
36 IBM Operational Decision Manager: Configuring Operational Decision Manager on JBoss

The following configuration parameters, used to generate complete URLs inpermalinks, are generated the first time you sign in to Decision Center after thedatabase is configured. You can use the Installation Settings wizard to set theseparameters beforehand or change them afterward:v teamserver.server.port: The port numberv teamserver.server.isSecure: true if the connection is secure.v teamserver.server.hostname: The name of the host
The following table gives a description of the main configuration parametersavailable in teamserver.war/WEB-INF/lib/teamserver-model-XXX.jar/ilog/rules/teamserver/preferences.properties.
Parameter Use
teamserver.<extractorValidator>.class Specify a ruleset extractor validator class touse for the extractorValidator name. Theclass must implement theIlrExtractorValidator interface. After thisclass is defined, specify this name as theextractor validator to use when defining aruleset extractor.
teamserver.build.path Define where the cache of the IRL is locatedon the file system. The path is computed asfollows:
1. First, use this property with the name ofthe user who started the server as theroot for the cache:<build.path>_<username>.
2. If the path is not defined, use the systemproperty java.io.tmpdir and addrtscache. For example,<temp_dir>/rtscache_<username>.
3. If the system property is not defined, usethe server directory and add rtscache.For example, <server_dir>/rtscache_<username>.
teamserver.brl.verbalizers Specify the list of locales for which a BALverbalizer is defined.
teamserver.brl.verbalizer.<locale> Specify the verbalizer class for the specifiedlocale. The class must implement theIlrVerbalizer interface.
You can use the following Ant tasks to add or remove configuration parameters:
set-config-param
Sets a configuration parameter for a specified user. If the user is notspecified, it sets a global parameter.
Parameters:v -Dserver.url=<server url>
v -DdatasourceName=<data source name>
v [-Duser=<username>]
v -Dkey=<parameter key>
v -Dvalue=<parameter value>
Chapter 1. Configuring Operational Decision Manager on JBoss 37

For example:ant set-config-param -Dkey=locale -Dvalue=en_US
remove-config-param
Drops the configuration parameter for a specified user. If the user is notspecified, it drops the global configuration parameter.
Parameters:v -Dserver.url=<server url>
v -DdatasourceName=<data source name>
v [-Duser=<username>]
v -Dkey=<parameter key>
print-config-param
Prints the global parameters or specified user parameters if the usernamevalue is specified. If no key is specified, all keys are printed.
Parameters:v -Dserver.url=<server url>
v -DdatasourceName=<data source name>
v [-Duser=<username>]
v -Dkey=<parameter key>
Repackaging the Decision Center archive:
You can repackage the Decision Center archive by using an Ant task.
When you add new .jar files to the Decision Center archive, you must repackagethe archive by running the repackage-ear or repackage-war Ant task. This taskdoes not use the server.url and datasourceName parameters.
If you have customized Decision Center, you must package the custom .jar filesbefore you use the Ant task to repackage the Decision Center.
The repackage-ear or repackage-war Ant task takes the following parameters:
-DtargetEar=<target ear>-DtargetWar=<target war> for the Tomcat application server
-DsourceEar=<source ear>DsourceWar=<source war> for the Tomcat application server
-DdescriptorsDir=<descriptors directory>A directory that is copied into the META-INF directory of the target EAR (notmandatory).
-DadditionalJars=<"myjar1.jar,myjar2.jar, myjarn.jar">Additional .jar files to store in the lib directory of the target archive (notmandatory).
-DtmpDir=<directory>A directory that you can specify to store temporary files (not mandatory).
-DwebResourcesDir=<web resources directory>A directory that is copied into the WAR library (not mandatory).
38 IBM Operational Decision Manager: Configuring Operational Decision Manager on JBoss

-Dconsole=both|enterprise|businessSpecifies whether to repackage the Business or the Enterprise WAR files. Thedefault is both.
Configuring the search function of the Decision CenterBusiness console
The search function in the Decision Center Business console is based on the Solrsearch engine. You must configure the engine to provide this functionality.
Using a remote Solr search engineYou can set up the search function in Decision Center Business console to workwith a remote instance of the Apache Solr search engine.
About this task
The search function in Decision Center Business console uses an embeddedinstance of the Apache Solr search engine. Alternatively, you can have the searchfunction work with a remote instance of the search engine, which you can run onanother computer, or the same computer but in a dedicated web application.
Procedure
To configure the search function to run with a remote instance of the Solr searchengine:1. Install the Apache Solr search engine on another computer, or as part of a
dedicated web application on your computer.For information on installing the Solr server, visit the Apache Solr website.
2. Locate the decisioncenter-solr-home.zip file in the Decision Centerteamserver folder on your computer.The Decision Center installation program placed the folder on your computer.
3. Uncompress the file in a directory in the remote instance of the Solr server.4. Configure the home directory of the remote Solr server to use the location of
the uncompressed configuration files.For more information, see the documentation on the Apache Solr website.
5. Configure the Decision Center preferences.properties file to point to the URLof the Solr server.
Setting parameters for the Solr search engineYou can configure the search function in the Decision Center Business console torun with the Apache Solr search engine.
Decision Center Business console provides a function for searching rule projects.When you install this feature, it uses an embedded instance of the Apache Solrsearch engine. Alternatively, you can have the search function run with a remoteinstance of the search engine, which you can install on another computer, or on thesame computer but in a dedicated web application. For more information, see“Using a remote Solr search engine.”
You can set three parameters for the search engine:
Chapter 1. Configuring Operational Decision Manager on JBoss 39

Table 3. Search parameters
Parameter Description
search.SearchProvider This parameter takes one of the followingvalues:
v SolrEmbedded: Use this value to select theembedded Solr search engine.
v SolrRemote: Use this value to select aremote instance of the Solr search engine.
search.SolrEmbeddedDataDir Use this optional parameter to direct theindex of the embedded version(SolrEmbedded) to a specific directory on theDecision Center.
search.SolrRemoteUrl Use this parameter with SolrRemote toprovide the URL of the remote Solr searchengine.
You set the configuration parameters for the search engine within thepreferences.properties file for Decision Center. For more information on thepreferences.properties file, see Configuration parameter maintenance.
The following table provides examples for setting the parameters inpreferences.properties to work with the Solr search engine:
Table 4. Configuration table for search properties
Solr server Parameter settings
External server
The URL of the external server depends on theinstallation. For this example, the remote address of thesearch engine is http://mysearchserver:8983/solr.
Set the preferences.properties file as follows:
search.SearchProvider=SolrRemotesearch.SolrRemoteUrl=http://mysearchserver:8983/solr
Embedded serverIn this example, you store the index inthe c:/temp/DC-SearchIndex directory on your computer.
Set the preferences.properties file as follows:
search.SearchProvider=SolrEmbeddedsearch.SolrEmbeddedDataDir=c:/temp/DC-SearchIndex
If you do not specify a directory for search.SolrEmbeddedDataDir, Decision Centerstores the search index in a temporary directory. When the server stops running, italso stops using the temporary directory. When the server restarts, it creates a newtemporary directory, and completely re-indexes the repository.
If you specify a directory for search.SolrEmbeddedDataDir, the directory and itscontent persist across server restarts, and the server does not re-index therepository with each restart.
Additional steps to configure Decision Validation ServicesThere are additional steps that you must perform to configure Decision ValidationServices.
Before you startBefore deploying and configuring Decision Validation Services, you must completesome steps.1. Install Rule Execution Server.2. Install Decision Center.
40 IBM Operational Decision Manager: Configuring Operational Decision Manager on JBoss

3. Configure both of these applications on the same application server.
After these installations are complete, see “What steps to follow” to understand theadditional tasks that you might have to complete.
Note:
Only users belonging to the resAdministrators or resMonitors groups are able tosee the Decision Warehouse tab in the Rule Execution Server console after DecisionValidation Services is configured.
What steps to follow
The configuration steps you follow to configure Decision Validation Services aresummarized in the following table:
Step Required
“Step 1: Creating Decision Warehouse database resources” Optional. If you have usedthe Rule Execution Serverconsole to create databaseresources, you do not haveto perform this task. SeePopulating a database byusing the Rule ExecutionServer console for moreinformation.
“Step 2: Deploying the Decision Validation Services archivefor the first time” on page 43
This archive is the default SSP archive packaged with theDecision Validation Services installer.
Optional. This steps allowsyou to check the availabilityof the feature.Note:
You can also use the defaultSSP archive if you have anXML XOM. In this case, youdo not have to repackage thearchive to include the XMLXOM.
“Step 3: Checking the availability of Decision ValidationServices” on page 43
Optional.
“Step 4: Packaging Decision Validation Services by usingAnt” on page 44
Optional. You can use thistask as an alternative methodfor configuring or modifyingthe Decision ValidationServices installation.
Step 1: Creating Decision Warehouse database resourcesYou can use SQL scripts to create a dedicated schema in the database.
If you set the Rule Execution Server persistence to datasource or jdbc and youintend to use Decision Warehouse to store your test execution results, you mustcreate a dedicated schema in the database that contains these tables and views. Todo so, you can use the provided SQL scripts, located in <ODM_InstallDir>/executionserver/databases. A readme file in this directory provides additionalinformation about the scripts.
Chapter 1. Configuring Operational Decision Manager on JBoss 41

The script that creates the Decision Warehouse database schema is namedtrace_<database_name>.sql.
Note:
The Installation Settings wizard in the Rule Execution Server console creates all thenecessary tables for Rule Execution Server and for Decision Warehouse. If you areconfiguring Decision Validation Services and you have already run the InstallationSettings wizard to create the tables, you do not have to create database resourcesmanually. However, if you did not use the wizard to create database resources, youmust run the script to create the Decision Warehouse database schema.
When you use DB2 (except on z/OS), the scripts that create the Rule ExecutionServer database tables are written for databases that use automatic storage.v BP32K is the buffer pool that is expected in SYSCAT.BUFFERPOOLS. If BP32K is not
there, you can use the existing buffer pool or create a new buffer pool namedBP32K. Use the following command to query SYSCAT.BUFFERPOOLS for the existingbuffer pool:Select * from SYSCAT.BUFFERPOOLS
Otherwise, use the following command to create a buffer pool named BP32K:CREATE BUFFERPOOL BP32K SIZE 2000 PAGESIZE 32K
v You must update the trace_db2.sql script and select the custom option in theInstallation Settings wizard to run it. Modify the following line in the script tospecify storage for the table space:CREATE TABLESPACE RESDWTS PAGESIZE 32K BUFFERPOOL BP32K;
Here is an example of the table space specification in the script:CREATE TABLESPACE RESDWTS PAGESIZE 32K MANAGED BY DatabaseUSING [ FILE ’C:\DB2\Container.file’ 640 ] BUFFERPOOL BP32K;
v You might have to further modify the script based on your database settings.
Note:
If you completed this task as part of the Rule Execution Server configuration, youdo not have to do this a second time. It is included here solely for completeness.
If you use Command Editor to run the scripts, you must log in with the credentialsthat you use for the data source for Rule Execution Server.
Use any tool that can handle SQL to import and run the SQL scripts. The toolsprovided for each database include:
Database Database tool
IBM DB2 DB2 command line processor
Derby ij command line processor
MySQL mysql command line processor
Oracle sqlplus command line processor
Postgre SQL Postgre SQL command line tool
SQL Server Query Tool
Sybase isql command line processor
To access the database, the database user must have the following credentials:
42 IBM Operational Decision Manager: Configuring Operational Decision Manager on JBoss

v A user ID and a passwordv Complete privileges on the tables and view of the schema (create, insert,
delete)v create index privilegesv On Oracle, create trigger and create sequence privileges. If you use an Oracle
database, run all the scripts in the SQL Plus client.
Install a database client for the database that you use. Refer to the documentationof the database for more information.
The default CLOB size might not be sufficient for the FULL_EXECUTION_TRACE field inthe EXECUTION_TRACES table. You might need a size qualifier if SQL raisesexceptions with the <Lob-Value> reason code.
Step 2: Deploying the Decision Validation Services archive forthe first timeDeploy the Decision Validation Services archive for the first time.
About this task
If you want to check the availability of Decision Validation Services, you mustdeploy the default SSP (Scenario Service Provider) EAR as described below.
Note: You must deploy the archive on the same server as the execution unit (XU).
Procedure
Copy the JBoss file <ODM_InstallDir>/executionserver/applicationservers/JBoss5/jrules-ssp-JBOSS5.ear (on JBoss 5) or <ODM_InstallDir>/executionserver/applicationservers/JBoss6/jrules-ssp-JBOSS6.ear (on JBoss 6.1) to<JBOSS_HOME>/server/<server configuration>/deploy.You can use this procedure to deploy the default SSP archive packaged with theinstaller or any subsequent deployment of a repackaged archive.If you have an XML XOM, you can also use the SSP EAR to test your rules.
Note: Because the ruleset archive inside a RuleApp includes an XML XOM, youdo not have to repackage the SSP EAR to include the XOM.
Step 3: Checking the availability of Decision Validation ServicesA specific testing URL is designed for you to check the rule session type, the DAOfactory class for trace persistence, the class used to cache the Decision ValidationServices job, and the pool size for asynchronous execution.
To check the availability of Decision Validation Services:1. Enter the URL http://<host>:<port>/testing in a web browser.2. Log in to the (Scenario Service Provider) SSP application in one of the Rule
Execution Server roles.The application displays a home page, which contains information about theSSP server.
Version
The version of Decision Server used.
Patch level
The patch level of Decision Server used.
Chapter 1. Configuring Operational Decision Manager on JBoss 43
License information
The type of license of this version.
RuleSession
The rule session type (POJO or J2SE).
DAO Factory Class
The DAO (Data Access Object) factory class that is used to persist the traceinto the data warehouse.
Job store class
The name of the class that is used to persist the Decision ValidationServices job into a cache to free the memory during long computations.
Job pool size
The size of the pool for asynchronous execution.
Started since
The time and date when the SSP started.
Jobs currently running
The About screen provides information about the jobs that are currentlyrunning after you run Decision Validation Services in Decision Center:v A Job ID is listed in the table when a user clicks Run in Decision
Center.v The Created column records the date and time when each job is
initialized.v The Status column shows the number of scenarios that have already
been tested, compared to the total number of scenarios.v The Start time records the time when a resource is allocated for the job.v The Parts column records the number of parts in the job:
– A job that is not executed in parallel has one part.– A job that is executed in parallel has one or more parts.
v The End time records the time when the execution of the job iscomplete, that is, all of the scenarios in the job have been tested.
The report for the job is automatically downloaded by Decision Center atthe end of the execution. If the scenario suite is run in the background, theuser downloads the report by viewing the list of scenario suites, and thenclicking the report link when it becomes available. After the report isviewed, the job is removed from the table. The job remains in the tableuntil the report is downloaded.
Step 4: Packaging Decision Validation Services by using AntYou can configure Decision Validation Services archives by using an Ant task.
About this task
This section is for users who install the product on Windows and other supporteddistributed platforms only.
You can configure Decision Validation Services archives by running the ssp-setupAnt task.
44 IBM Operational Decision Manager: Configuring Operational Decision Manager on JBoss
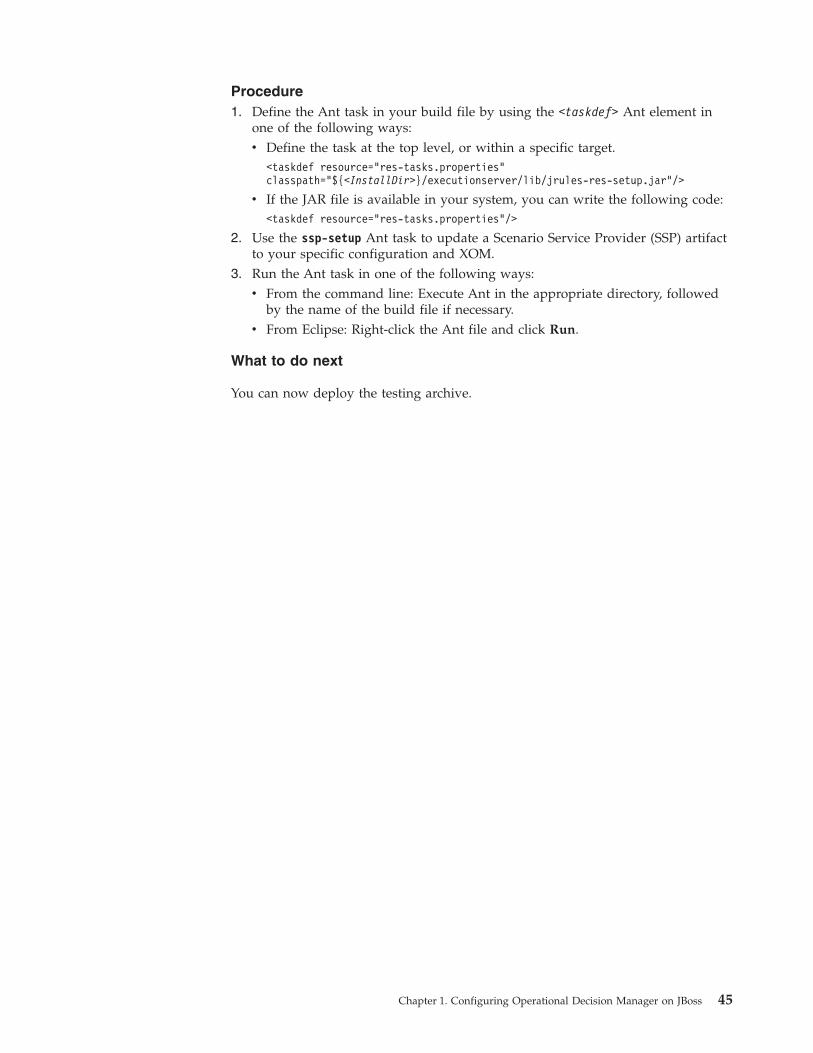
Procedure1. Define the Ant task in your build file by using the <taskdef> Ant element in
one of the following ways:v Define the task at the top level, or within a specific target.
<taskdef resource="res-tasks.properties"classpath="${<InstallDir>}/executionserver/lib/jrules-res-setup.jar"/>
v If the JAR file is available in your system, you can write the following code:<taskdef resource="res-tasks.properties"/>
2. Use the ssp-setup Ant task to update a Scenario Service Provider (SSP) artifactto your specific configuration and XOM.
3. Run the Ant task in one of the following ways:v From the command line: Execute Ant in the appropriate directory, followed
by the name of the build file if necessary.v From Eclipse: Right-click the Ant file and click Run.
What to do next
You can now deploy the testing archive.
Chapter 1. Configuring Operational Decision Manager on JBoss 45

46 IBM Operational Decision Manager: Configuring Operational Decision Manager on JBoss

Chapter 2. Verifying your configuration of Decision Center
You can verify that you have correctly configured Decision Center by publishingsome projects, opening the consoles, and running the diagnostics.
Publishing a project to Decision CenterAfter completing the configuration, Decision Center is ready to be used but doesnot contain any rule projects. You publish rule projects from Rule Designer.
About this task
To publish a rule project to Decision Center, the project must be imported intoyour workspace.
The procedure uses the Decision Center tutorial projects as an example of how toimport and publish a rule project. If you want to carry out the Decision Centertutorials, you have to publish the following projects:v loanvalidation-rules (with loanvalidation-xom)v loanvalidation-rules-dependent
v squery-loanvalidation-rules (with squery-loanvalidation-xom)
Procedure1. To open Rule Designer, click Start > All Programs > IBM > package_group >
Rule Designer.2. In Rule Designer click File > Import > General > Existing Projects into
Workspace, and click Next.3. Click Select root directory, browse to <InstallDir>/studio/tutorials/shared,
and click OK.4. Select the projects and click Finish.5. Right-click the loanvalidation-rules rule project, and click Decision Center >
Connect.6. Complete the Decision Center Configuration dialog as follows. The warning
message Connection not established displays until you establish theconnection.
User namertsAdmin
PasswordrtsAdmin
URL http://localhost:<port>/teamserver
Data sourceLeave this field empty.
Note: If security is enabled, use https://localhost:<PORT_NUMBER>/teamserver
7. Click Connect.The connection is established when the warning message closes and theProject configuration area becomes active.
© Copyright IBM Corp. 2012, 2013 47

8. In the Project configuration area, check that Create a new project onDecision Center is selected, and then click Finish.
9. The Synchronize Complete - Decision Center Participant dialog opens whenthe publishing process is complete. Click OK to close this dialog.
10. A dialog opens asking you if you want to change to Team Synchronizingperspective. Click Yes.An empty Synchronize view opens, indicating that the projects in RuleDesigner and Decision Center are the same. This means that your rules arenow published to Decision Center.
11. Repeat for the other rule projects.
What to do next
You can now open the Decision Center Enterprise console and perform diagnostics.
Opening the Decision Center consolesAfter you have deployed the Decision Center EAR or WAR to your applicationserver, you can open the Decision Center consoles.
You can open the consoles by using the following URLs in a web browser:v Enterprise console: http://localhost:<PORT_NUMBER>/teamserverv Business console: http://localhost:<PORT_NUMBER>/decisioncenter
Note: If your browser is not running on the same host as the application server,replace localhost with the address of the machine. If your web application ismapped to a host with a port that is different from the default port, use the portnumber of the host.
By default, the data source is jdbc/ilogDataSource. If you want to specify adifferent data source, you have to pass it as a request parameter in the URL. Forexample:
http://localhost:7001/teamserver?datasource=jdbc/serverextendedbrm.
The locale of the sign-in page is English by default. You can specify a localeparameter in the URL that switches the sign-in page to the required locale. Forexample:
http://localhost:<port>/teamserver?locale=es (assuming that your message filesare localized).
If you sign in with another locale in the URL and want to change the localeafterward, click Options in the top banner of the Enterprise console or Profile inthe Business console. This saves the locale and restores it the next time you sign in.
If you open Decision Center but no database exists, you automatically access theInstallation Settings wizard with only the Install tab available.
After completing the installation, Decision Center is ready to use but does notcontain a rule project. You have to publish a rule project from Rule Designer.
A diagnostics tool, available in the Configure tab of the Enterprise Console, showsa report on the status of your Decision Center configuration.
48 IBM Operational Decision Manager: Configuring Operational Decision Manager on JBoss

To learn more about Decision Center, see Decision Center.
Chapter 2. Verifying your configuration of Decision Center 49

50 IBM Operational Decision Manager: Configuring Operational Decision Manager on JBoss

Notices
This information was developed for products and services offered in the U.S.A.
IBM may not offer the products, services, or features discussed in this document inother countries. Consult your local IBM representative for information on theproducts and services currently available in your area. Any reference to an IBMproduct, program, or service is not intended to state or imply that only that IBMproduct, program, or service may be used. Any functionally equivalent product,program, or service that does not infringe any IBM intellectual property right maybe used instead. However, it is the user's responsibility to evaluate and verify theoperation of any non-IBM product, program, or service.
IBM may have patents or pending patent applications covering subject matterdescribed in this document. The furnishing of this document does not grant youany license to these patents. You can send license inquiries, in writing, to:
IBM United Kingdom Laboratories,Mail Point 151,Hursley Park,Winchester,Hampshire,England SO21 2JN
For license inquiries regarding double-byte character set (DBCS) information,contact the IBM Intellectual Property Department in your country or sendinquiries, in writing, to:
Intellectual Property LicensingLegal and Intellectual Property LawIBM Japan, Ltd.19-21, Nihonbashi-Hakozakicho, Chuo-kuTokyo 103-8510, Japan
The following paragraph does not apply to the United Kingdom or any othercountry where such provisions are inconsistent with local law:INTERNATIONAL BUSINESS MACHINES CORPORATION PROVIDES THISPUBLICATION "AS IS" WITHOUT WARRANTY OF ANY KIND, EITHEREXPRESS OR IMPLIED, INCLUDING, BUT NOT LIMITED TO, THE IMPLIEDWARRANTIES OF NON-INFRINGEMENT, MERCHANTABILITY OR FITNESSFOR A PARTICULAR PURPOSE. Some states do not allow disclaimer of express orimplied warranties in certain transactions, therefore, this statement may not applyto you.
This information could include technical inaccuracies or typographical errors.Changes are periodically made to the information herein; these changes will beincorporated in new editions of the publication. IBM may make improvementsand/or changes in the product(s) and/or the program(s) described in thispublication at any time without notice.
Any references in this information to non-IBM Web sites are provided forconvenience only and do not in any manner serve as an endorsement of those
© Copyright IBM Corp. 2012, 2013 51

websites. The materials at those websites are not part of the materials for this IBMproduct and use of those websites is at your own risk.
IBM may use or distribute any of the information you supply in any way itbelieves appropriate without incurring any obligation to you.
Licensees of this program who wish to have information about it for the purposeof enabling: (i) the exchange of information between independently createdprograms and other programs (including this one) and (ii) the mutual use of theinformation which has been exchanged, should contact:
IBM United Kingdom Laboratories,Mail Point 151,Hursley Park,Winchester,Hampshire,England SO21 2JN
Such information may be available, subject to appropriate terms and conditions,including in some cases, payment of a fee.
The licensed program described in this document and all licensed materialavailable for it are provided by IBM under terms of the IBM Customer Agreement,IBM International Program License Agreement or any equivalent agreementbetween us.
Any performance data contained herein was determined in a controlledenvironment. Therefore, the results obtained in other operating environments mayvary significantly. Some measurements may have been made on development-levelsystems and there is no guarantee that these measurements will be the same ongenerally available systems. Furthermore, some measurements may have beenestimated through extrapolation. Actual results may vary. Users of this documentshould verify the applicable data for their specific environment.
Information concerning non-IBM products was obtained from the suppliers ofthose products, their published announcements or other publicly available sources.IBM has not tested those products and cannot confirm the accuracy ofperformance, compatibility or any other claims related to non-IBM products.Questions on the capabilities of non-IBM products should be addressed to thesuppliers of those products.
This information contains examples of data and reports used in daily businessoperations. To illustrate them as completely as possible, the examples include thenames of individuals, companies, brands, and products. All of these names arefictitious and any similarity to the names and addresses used by an actual businessenterprise is entirely coincidental.
COPYRIGHT LICENSE:
This information contains sample application programs in source language, whichillustrate programming techniques on various operating platforms. You may copy,modify, and distribute these sample programs in any form without payment toIBM, for the purposes of developing, using, marketing or distributing applicationprograms conforming to the application programming interface for the operatingplatform for which the sample programs are written. These examples have notbeen thoroughly tested under all conditions. IBM, therefore, cannot guarantee or
52 IBM Operational Decision Manager: Configuring Operational Decision Manager on JBoss

imply reliability, serviceability, or function of these programs. The sampleprograms are provided "AS IS", without warranty of any kind. IBM shall not beliable for any damages arising out of your use of the sample programs.
Each copy or any portion of these sample programs or any derivative work, mustinclude a copyright notice as follows:
© (your company name) (year). Portions of this code are derived from IBM Corp.Sample Programs. © Copyright IBM Corp. _enter the year or years_.
TrademarksIBM, the IBM logo, and ibm.com are trademarks or registered trademarks ofInternational Business Machines Corp., registered in many jurisdictions worldwide.Other product and service names might be trademarks of IBM or other companies.A current list of IBM trademarks is available on the Web at “Copyright andtrademark information” at www.ibm.com/legal/copytrade.shtml.
Linux is a registered trademark of Linus Torvalds in the United States, othercountries, or both.
Microsoft, Windows, and the Windows logo are trademarks of MicrosoftCorporation in the United States, other countries, or both.
UNIX is a registered trademark of The Open Group in the United States and othercountries.
Java and all Java-based trademarks and logos are trademarks or registeredtrademarks of Oracle and/or its affiliates.
Notices 53

54 IBM Operational Decision Manager: Configuring Operational Decision Manager on JBoss

Index
AAnt tasks
configuring Decision Center 30creating the database schema 32defining and uploading message
files 35execute-schema 33executing the database schema 33gen-create-schema 32gen-drop-schema 34print-config-param 37remove-config-param 37removing a database schema 34repackage-war 38repackaging the Decision Center
archive 38set-config-param 37setting configuration parameters 37setting the persistence locale 36setting up the environment 30ssp-setup 44to repackage an EAR file 14upload-extensions 33upload-messages 35upload-roles 34uploading groups to the database 34uploading the database schema
extension 33asynchronous execution
pool size 43
Ccells 15clusters
JBoss 17configuration parameters
adding or removing 37setting up 28
configuring Decision Centerdeclaring custom groups 23deploying Decision Validation
Services 43configuring Decision Validation
Services 44checking availability of Decision
Validation Services 43creating database resources 41
configuring Decision Validation Serviceson JBoss 40
configuring Rule Execution Servervarious environments 15
connection poolcreating 20
connection poolscreating 4
custom groups, declaringDecision Center 23
Ddata source
creating 20data sources
creating 4database
establishing credentials 4database resources
for Decision Validation Services 41database schema
creating 32executing 33for Rule Execution Server
choosing, using InstallationSettings wizard 10
reviewing, using InstallationSettings wizard 11
removing 34uploading extension 33
databasescreating a schema from the console 8permissions
Decision Center 19populating with SQL scripts 12user permissions 3
Decision Centeradding groups 22adding users 22configuring for JBoss 18configuring security 22configuring the database 26configuring with Ant tasks 30deploying on JBoss 24Installation Settings wizard 25opening 48repackaging the archive 38setting up configuration
parameters 28setting up groups 27setting up message files 26setting up persistence locale 28verifying deployment 24
Decision Validation Serviceschecking availability 43configuring 40deploying 43packaging using Ant 44
Decision Warehousepersistence setting for execution
trace 2declaring
custom groups in Decision Center 23deploying
Decision Validation Services 43deployment descriptor 4diagnostics
running 14dropping a database schema
See removing
EEAR archives
repackaging using Ant 14environment variables
for Ant 30environments
Rule Execution Serverconfiguration 15
Ggroups
adding 22adding in JBoss 6setting up 27uploading to the database 34
Hhosted transparent decision service
deploying on JBoss 13
IInstallation Settings wizard 8, 25
choosing the database schema 10Configure Database 26report 12reviewing the database schema 11Set Configuration Parameters 28Set Persistence Locale 28Set up Groups 27Set up Message File 26
installing Decision Centerrestricting user permissions 19
JJBoss application server
adding groups 6adding users 6clusters 17configuring for Decision Center 18configuring for Rule Execution
Server 1configuring security 6, 22creating a connection pool 20creating a data source 4, 20creating a database schema 8deploying Rule Execution Server 8deploying the Decision Center
EAR 24deploying the XU RAR 7hosted transparent decision
service 13verifying deployment of Decision
Center 24
© Copyright IBM Corp. 2012, 2013 55

Mmessage files
defining and uploading 35setting up 26
Oopening
Decision Center 48Rule Execution Server console 9
Ppackaging
Decision Validation Services 44Rule Execution Server archives using
Ant 14permissions 22
database access 3Decision Center installation 19
persistenceconfiguring in Rule Execution
Server 2persistence locale
setting 36setting up 28
publishing rule projectsfrom Decision Center 47
Rremoving
database schema 34Rule Execution Server
configuringusing Ant tasks 14
configuring for JBoss 1configuring security 6creating a database schema 8deploying on cluster
environments 16deploying on JBoss 8deploying the hosted transparent
decision service 13deploying the XU RAR 7populating a database 12running diagnostics 14setting up the persistence mode 2
Rule Execution Server consoleopening 9
rule projectspublishing
from Decision Center 47
SScenario Service Provider (SSP)
ssp-setup Ant task 44security settings
configuring 6SQL scripts
to remove a database schema 34ssp-setup, Ant task 44
Uuser permissions 3users
adding 22adding in JBoss 6
WWebLogic Server application server
verifying deployment of DecisionCenter 24
XXU RAR
deploying on JBoss 7XUConnectionFactory
default JNDI name 15
56 IBM Operational Decision Manager: Configuring Operational Decision Manager on JBoss


����
Printed in USA


