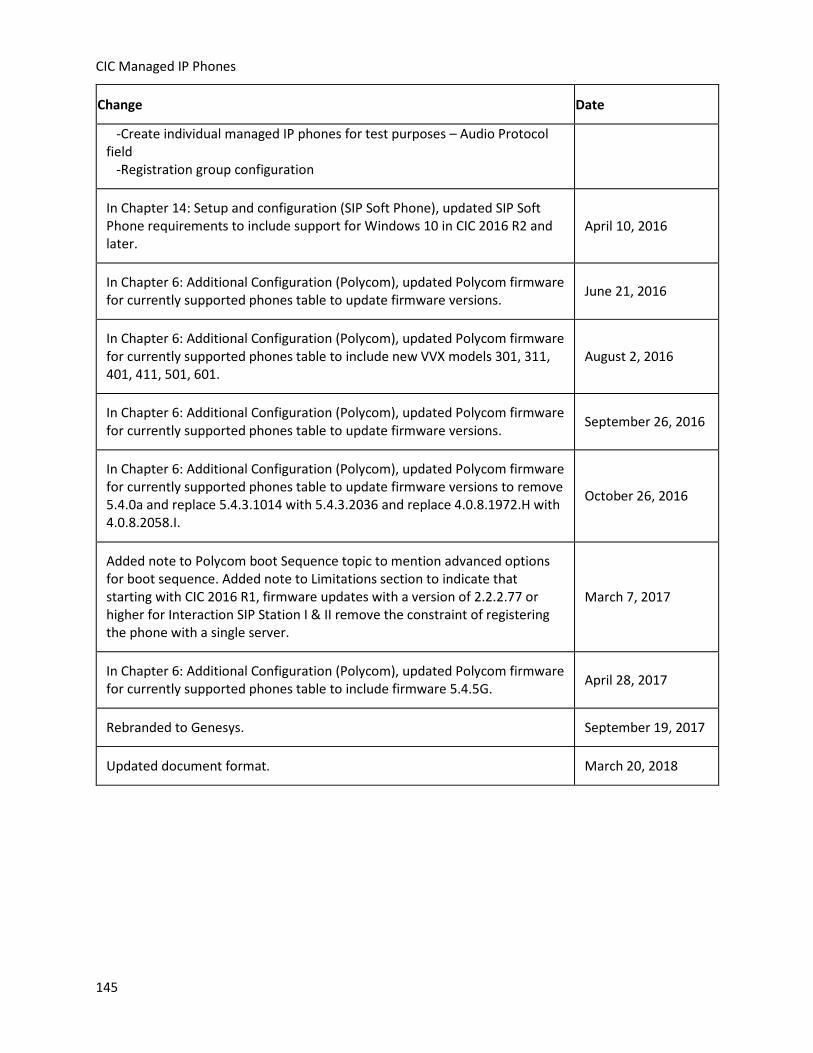
1 CIC Managed IP Phones Administrator’s Guide 2018 R3 Last updated March 20, 2018 (See Change Log for summary of changes.) Abstract CIC systems can reduce initial IP phone configuration time and ongoing maintenance with “managed IP phones”. A provisioning subsystem manages all IP phone configuration in Interaction Administrator, updates manufacturer-specific firmware, and manages resetting phones as needed. This document describes all aspects of Polycom phone, Interaction SIP Station I & II, SIP Soft Phone, and AudioCodes phone implementation including configuring the network for managed IP phones, creating multiple managed IP phones and associated SIP stations, advanced configuration, boot and provision sequences, and troubleshooting.
Transcript
1
CIC Managed IP Phones
Administrator’s Guide
2018 R3
Last updated March 20, 2018 (See Change Log for summary of changes.)
Abstract CIC systems can reduce initial IP phone configuration time and ongoing maintenance with “managed IP
phones”. A provisioning subsystem manages all IP phone configuration in Interaction Administrator, updates manufacturer-specific firmware, and manages resetting phones as needed. This document
describes all aspects of Polycom phone, Interaction SIP Station I & II, SIP Soft Phone, and AudioCodes phone implementation including configuring the network for managed IP phones, creating multiple
managed IP phones and associated SIP stations, advanced configuration, boot and provision sequences, and troubleshooting.
i
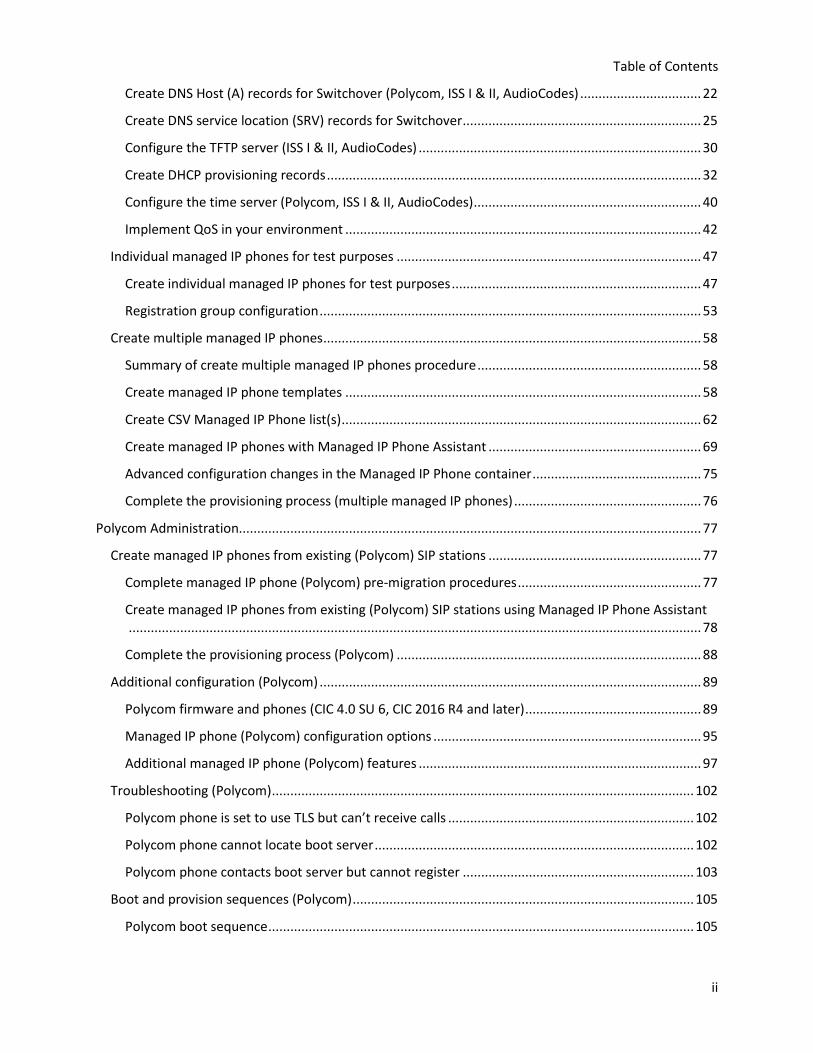
Table of Contents Introduction to CIC Managed IP Phones ....................................................................................................... 6
About this guide ............................................................................................................................................ 6
New CIC distribution model ...................................................................................................................... 6
New CIC installations ................................................................................................................................ 6
CIC 2.4/3.0 to 2015 R1 or later migrations ............................................................................................... 6
Create managed IP phones from existing (Polycom) SIP stations .......................................................... 77
Complete managed IP phone (Polycom) pre-migration procedures .................................................. 77
Create managed IP phones from existing (Polycom) SIP stations using Managed IP Phone Assistant ............................................................................................................................................................ 78
Complete the provisioning process (Polycom) ................................................................................... 88
Copyright and Trademark Information ..................................................................................................... 146
6
Introduction to CIC Managed IP Phones CIC systems can reduce initial IP phone configuration time and ongoing maintenance with "managed IP phones". The CIC provisioning subsystem manages configuration for supported IP phones in Interaction Administrator, updates manufacturer-specific firmware, and manages resetting phones as needed. This document describes all aspects of Polycom phone, Interaction SIP Station, SIP Soft Phone, and AudioCodes phone implementation including network configuration, creating managed IP phones and associated SIP stations for new and upgrade installations, manual provisioning, and troubleshooting.
About this guide This guide is intended for partners, planners, implementers, administrators, and others who plan to implement and maintain managed IP phones for a CIC system. The managed IP phones implementation is a post-installation procedure that follows the CIC server installation.
New CIC distribution model
The CIC product suite has a new distribution model with new naming, faster release cycles, and higher quality. The new distribution model is based on the mainline continuous development of CIC 4.0, expressed in the 20## R# Patch# format.
• CIC 4.0 SU 6 was the last release using the older model. CIC 2015 R1 is the first release of the new distribution model.
• Each CIC 2015 R1 or later release functions as a new CIC installation and as an update to existing CIC installations.
• CIC 2015 R1 or later can be applied any CIC 4.0 SU.
For more information, see the Product Information site at https://my.inin.com/products/cic/Pages/Releases-and-Patches.aspx.
Note: For the purposes of this guide, CIC generally refers to CIC 2015 R1 or later, acknowledging that it is based on the continuous development of CIC 4.0. Specific release/version numbers are provided as needed, for example when discussing migrations or when a feature was introduced.
New CIC installations
This guide covers creating managed IP phones as part of a new CIC installation.
CIC 2.4/3.0 to 2015 R1 or later migrations
The CIC 2.4/3.0 to CIC 2015 R1 or later migration package contains the tools and documentation to guide you through the process of migrating existing CIC 2.4/3.0 systems to CIC 2015 R1 or later. To download the latest versions of the migration tools and documentation, see the CIC 2.4/3.0 to CIC 2015 R1 and later migration package page on the Product Information site at https://my.inin.com/products/cic/Pages/Migrations.aspx.
CIC Migration Guide, included with the migration package, includes the procedures for migrating CIC 3.0 managed IP phones from a CIC 3.0 system to a CIC 2015 R1 or later system.
CIC provisioning subsystem The CIC provisioning subsystem on the CIC server manages the configuration of Polycom phones, Interaction SIP Station I & II phones, SIP Soft Phones, and AudioCodes phones for the purpose of reducing initial IP phone configuration time and ongoing maintenance. The CIC provisioning subsystem
manages the CIC features available on each phone, and also updates the firmware and manages resetting the phones as needed.
The Managed IP Phones container in Interaction Administrator contains all Polycom phones, Interaction SIP Station phones, SIP Soft Phones, and AudioCodes phones that the CIC provisioning subsystem manages. The Managed IP Phones container also contains templates to create managed IP phones and the SIP stations associated to each, as well as registration groups for organizing phones according to the sources of registration data.
The CIC provisioning subsystem allows administrators to complete the following tasks in Interaction Administrator:
• Set Polycom, Interaction SIP Station I & II, SIP Soft Phone, and AudioCodes model templates with feature sets.
• Create individual managed Polycom phones, Interaction SIP Station I & II phone, SIP Soft phones, and AudioCodes phones.
• Create multiple managed IP phones for Polycom phones, Interaction SIP Station I & II phones, SIP Soft Phones, and AudioCodes from CSV files, and migrate existing Polycom phones to managed IP phones.
• Alter feature sets on Polycom, Interaction SIP Station I & II, SIP Soft Phones, and AudioCodes phones. On the next reboot, the phones pull the updated configuration files automatically.
• Schedule an after hours reboot for one or multiple Polycom phones, Interaction SIP Station phones I & II, SIP Soft Phones, and AudioCodes phones.
• Manage and distribute appropriate firmware versions to Polycom phones, Interaction SIP Station I & II Phones, and AudioCodes phones.
For more information, see the Polycom Administration, Interaction SIP Station I & II Administration, SIP Soft Phone Administration, and AudioCodes Administration sections in this guide.
Supported managed IP phones CIC 2015 R1 and later supports Polycom phones, Interaction SIP Station I & II phones, PureConnect SIP Soft Phones, and AudioCodes phones as managed IP phones.
Supported managed IP phones
8
Polycom phones
This section summarizes managed IP phone support for Polycom phones in new installations and migrations and provides references for more detailed information.
Supported Polycom models and firmware
See Polycom firmware for supported and EOL phones or the TestLab site at http://testlab.inin.com/ for the latest supported Polycom phone models and firmware.
New Installations: Polycom phones
We recommend that you create managed IP phones for Polycom phones using a CSV list as part of your new CsIC installation to more easily and efficiently manage those phones. For more information, see Create multiple managed IP phones.
Please note that non-managed Polycom phones are also supported in CIC 2015 R1 or later. However, you will not gain any of the advantages that managed Polycom phones offer.
Interaction SIP Station I & II phones
The Interaction SIP Station I & II are SIP-based devices designed for the contact center and enterprise environment that use power over Ethernet with physical controls for volume, mute, on-hook/off-hook, and emergency/urgent speed autodial.
The Interaction SIP Station I & II offer a low-cost alternative to basic IP phones, soft phones with USB headsets, and high-priced high-end multimedia phone devices.
For contact center and enterprise users, Interaction SIP Station I & II with Interaction Desktop and other CIC clients offer full-featured call control.
The major differences between Interaction SIP Station I & II are:
• Interaction SIP Station I, formerly known as Interaction SIP Station, has Fast Ethernet ports, an emergency speed dial button, and requires Power over Ethernet.
• Interaction SIP Station II, available in CIC 2015 R2 or later, has Gigabit Ethernet ports, a full dialpad, and has the option of using a power adapter or Power over Ethernet.
Interaction SIP Station I & II work in conjunction with the CIC provisioning subsystem and are configured in Interaction Administrator in the same way as Polycom phones, SIP Soft Phones, and AudioCodes phones. Each Interaction SIP Station I & II phone must be implemented as a managed IP phone.
This section summarizes managed IP phone support for Interactive SIP Station I & II phones in new installations and provides references for more detailed information.
See Interaction SIP Station phone I & II specifications and description for details about Interaction SIP Station I & II phone hardware.
Interaction SIP Station firmware
See the TestLab site at http://testlab.inin.com/ for the latest supported Interaction SIP Station firmware.
New installations: Interaction SIP Station
We recommend that you create managed IP phones for Interaction SIP Station I & II phones using a CSV list as part of your new CIC installation to more easily and efficiently manage those phones. For more information, see Create multiple managed IP phones.
SIP Soft Phones
PureConnect's SIP Soft Phone is a standalone application that places and controls calls, providing SIP endpoint functionality. The SIP Soft Phone application requires a USB headset to deliver audio to the user. The SIP Soft Phone can be used with Interaction Desktop and other CIC clients.
The SIP Soft Phone application works in conjunction with the CIC provisioning subsystem and is configured in Interaction Administrator in the same way as Polycom phones, Interaction SIP Station phones, and AudioCodes phones. Each SIP Soft Phone must be implemented as a managed IP phone.
New installations: SIP Soft Phone
Create a managed IP phone for each SIP Soft Phone as part of your new CIC installation using a comma-separated values (CSV) list. For more information, see Create multiple managed IP phones.
AudioCodes phones
Starting in CIC 4.0 SU 5 and continuing with CIC 2015 R1 and later, Genesys supports the AudioCodes 420 HD SIP IP phone. For information about the 420HD and the 400HD SIP IP Phone Series, see the AudioCodes website at http://www.audiocodes.com/products/420hd.
AudioCodes phones work with the CIC provisioning subsystem and you configure them in Interaction Administrator in the same way as Polycom phones, Interaction SIP Station I & II phones, and SIP Soft Phones. You must implement each AudioCodes phone as a managed IP phone.
AudioCodes phones are similar to the Interaction SIP Station I & II phones in their network and Interaction Administrator configuration. However, they have a headset, LCD display, a dial pad, and
more function keys. Interaction SIP Station I has none of these features; Interaction SIP Station II has a dialpad and more function keys only.
AudioCodes firmware
See the TestLab site at http://testlab.inin.com/ for the latest supported AudioCodes firmware.
New installations: AudioCodes
We recommend that you create managed IP phones for AudioCodes phones using a comma-separated values (CSV) list as part of your new CIC installation to more easily and efficiently manage those phones. For more information, see Create multiple managed IP phones.
Managed IP phone network provisioning This section summarizes managed IP phone network provisioning and provides references for more detailed information.
Standard procedure: Automated provisioning
CIC provisioning of managed IP phones connects the managed IP phones and downloads their configurations from the CIC server. The goal for CIC Managed IP Phone provisioning is to automate it as much as possible so that no user participation is needed.
The two factors necessary to the success of automated provisioning are:
• Use a DHCP server (and DNS server for a Switchover pair).
The administrator sets the appropriate DHCP server records to configure the managed Polycom, Interaction SIP Station I & II, SIP Soft Phone, and AudioCodes network. If the CIC system uses a Switchover pair, the administrator must also set two types of DNS records so that the phones will automatically switch to the active CIC server when a Switchover event occurs. For more information, see Configure the network for managed IP phones.
• Provide the MAC Address (Polycom, Interaction SIP Station I & II, and AudioCodes) or the Full Computer Name (SIP Soft Phone) for each managed IP phone.
For an initial new managed IP phone deployment, the administrator provides the MAC Addresses for Polycom phones, Interaction SIP Station I & II phones, and AudioCodes phones, and the Full Computer Names for SIP Soft Phones in a CSV list that is imported to Interaction Administrator. (For more information, see Create multiple managed IP phones.) When a managed IP phone contacts the provisioning subsystem to request configuration, the provisioning subsystem will match the phone’s MAC address or computer name with an existing
managed IP phone configuration, and it will serve the configuration to the device without any additional steps.
Manual provisioning (managed IP phones)
Manual provisioning of some or all managed IP phones may be necessary in certain circumstances, for example:
• The MAC address or full computer name has not been specified in Interaction Administrator configuration for some or all Polycom, Interaction SIP Station I & II, and/or SIP Soft Phones, or AudioCodes phones.
Note: In an implementation of new Polycom, Interaction SIP Station I & II, SIP Soft Phones, and/or AudioCodes phones, the MAC address or full computer name may not be known at the same time the comma-separated values (CSV) list is created.
• The CIC system has no DHCP server or the DHCP server cannot be accessed.
• Some Polycom phones, Interaction SIP Station I & II phones, SIP Soft Phones, and/or AudioCodes phones are in remote locations.
Typically, an administrator with required privileges performs the manual provisioning through the phone’s local user interface. In some cases, for example, remote locations, users must perform the manual provisioning. Manual provisioning is performed on each managed phone’s configuration.
For more information, see Complete the provisioning process (multiple managed IP phones).
Managed IP phone creation methods This section summarizes managed IP phone creation methods and provides references for more detailed information.
Create individual managed IP phones
We recommend that you create one or more managed IP phones individually in the Interaction Administrator Managed IP Phones container only under the following circumstances:
• For test purposes.
See Create individual managed IP phones for test purposes. Walk through the creation of an individual managed IP phone so that you can explore the Managed IP Phone container and learn about managed IP phone configuration before deploying multiple managed IP phones in new or upgrade installations.
• Post-implementation.
Create managed IP phones individually after the initial managed IP phone implementation as additional managed IP phones are added to the network.
Use Managed IP Phone Assistant to create multiple managed IP phones
The standard procedure for the initial managed IP phone implementation for an CIC installation to create new managed IP phones (Polycom, Interaction SIP Station I & II, SIP Soft Phone, and AudioCodes)
Managed IP phones and SIP security
12
using Managed IP Phone Assistant in Interaction Administrator. Managed IP Phone Assistant is a wizard that simplifies the creation of multiple managed IP phones and associated SIP stations.
Use the Managed IP Phone Assistant Import option to create multiple managed IP phones and associated SIP stations. The procedure consists of the following steps:
1. Create one or more managed IP phone templates.
2. Create a CSV Managed IP Phone List based on 1) Template, or 2) Type, Manufacturer, and Model.
3. Run the Managed IP Phone Assistant, choosing the Import option to import the CSV Managed IP Phone List.
For more information, see Create multiple managed IP phones.
Managed IP phones and SIP security Polycom, SIP Soft Phone, Interaction SIP Station I & II, and AudioCodes support SIP line security (TLS/SRTP) for SIP station-to-station calls and managed IP phone registration groups. TLS/STRP support for Interaction SIP Station I & II and AudioCodes is available in CIC 2016 R4 and later.
Specific instructions for configuring managed IP phones and associated SIP stations for TLS/SRTP are provided in this document where appropriate.
For additional information on SIP security features and configuration, see PureConnect Security Features Technical Reference in the PureConnect Documentation Library, in addition to Interaction Administrator Help.
Basic Managed IP Phones Configuration
Configure the network for managed IP phones
This section describes how to configure the DNS and DHCP servers on the IP phone network for provisioning of each of the three managed IP phone types, and provides additional network configuration specific to each type.
IP phone network requirements
This section describes the supported network protocols for managed IP phones and requirements necessary for performing the procedures in this section.
Supported network protocols
CIC Managed IP Phones support the following network protocols:
• Domain Name System (DNS) protocol to specify a DNS domain for the voice VLAN, and for Switchover server pairs to resolve DNS names for the two servers so that phones will automatically switch to the active CIC server when a Switchover event occurs.
• Dynamic Host Configuration Protocol (DHCP) to reduce system administration workload, allowing voice VLAN devices to be added to the network with little or no manual configuration.
This guide assumes that you are familiar with DNS and DHCP server configuration and have required domain administrator privileges to perform the network configuration procedures in this section.
Before performing the procedures described in this section, make sure that you have:
• Set up and configured a VLAN for voice devices (configuration for managed IP phone procedures provided in this section).
• Installed and configured a DNS server (configuration for managed IP phone procedures provided in this section).
• Installed and configured a DHCP server for the VLAN for voice devices and set up a scope for your IP phone addresses (options for managed IP phones provided in this section).
IP phone network architecture
The CIC network architecture is built around the concept of VLANs. A VLAN (Virtual-LAN) is a network within a network which is accessed by tagging network traffic for that VLAN. Any given network may have many VLANs and may allow for routing traffic between the VLANs as needed. VLANs serve as a way to isolate certain devices from the general network (typically called the data VLAN). They also serve to isolate the traffic from those devices from general view, whether by devices not on that specific VLAN or by malicious parties attempting to penetrate the network.
It is important for all of the voice traffic in an CIC system to be isolated onto a separate VLAN, typically called the voice VLAN. This means that all devices which generate/pass on voice traffic need to be on the voice VLAN. This includes the CIC Servers, phones, Media Servers, Gateways, and Interaction SIP Proxies.
CIC Servers, Media Servers, and Proxies may also be accessible from the data VLAN to allow for easy remote access. Giving servers access to both VLANs complicates configuration, though, as they must have multiple NICs (Network Interface Controllers) and proper DNS/DHCP configuration on both VLANs. The configuration can become more complicated when remote sites are included.
The diagrams presented in this section show the ideal configuration for the network over multiple offices, but your actual configuration may be a bit different. For instance, although the Managed Proxy and Media Server for a remote office are shown as two distinct servers, in some cases it is appropriate to have them share the same physical device.
The following diagram shows a wide view of a typical network configuration for managed IP phones.
Basic Managed IP Phones Configuration
14
Each site, including the home office, needs access to the voice VLAN over the WAN, and each site needs its own DHCP and DNS servers. An exception to this is very small offices that can use the DNS and DHCP servers of the home office over the WAN. However, this increases WAN traffic, and should be avoided if possible. Additionally, any sites that have Interaction SIP Station I & II deployed must have a DHCP server on both the voice VLAN and the data VLAN.
The following diagrams show basic home office and remote office network architecture.
CIC Managed IP Phones
15
DNS and DHCP servers are separate, non-CIC Servers in the CIC system network. This allows for DHCP and DNS maintenance without putting the CIC server at risk. Each of the non-phone devices (CIC server, Media Server, Proxy, Gateway) should have a static IP address so that they can be contacted in the event of a reboot without the querying device needing to refresh its data.
Phones should generally have dynamic IP addresses assigned to them by the DHCP server. This makes the DHCP server much easier to maintain and configure.
IP phone network configuration task list
Take the time to determine the IP phone network settings you will need for your implementation ahead of time so that managed IP phone process can run as smoothly as possible.
This section lists the IP phone network configuration tasks required for each of the managed IP phone types.
Note: Interaction SIP Station is abbreviated as ISS.
Task Polycom ISS I & II, AudioCodes SIP Soft Phone
o Create a DNS domain for the voice VLAN x x
o Create DNS Host (A) records for Switchover x x x
Basic Managed IP Phones Configuration
16
Task Polycom ISS I & II, AudioCodes SIP Soft Phone
o Create DNS SRV records for Switchover x x x
o Configure the TFTP server x
o Create DHCP provisioning records x x x
o Configure time server x x x
o Implement QoS in your environment x x x
The rest of this section provides the considerations and recommended procedures for each task.
Using the SIP Soft Phone on the voice VLAN
It is possible to use the SIP Soft Phone on a different VLAN (your voice VLAN). The support for this method is not within the application layer, so the SIP Soft Phone itself cannot accomplish this without additional help at lower layers. Third party drivers for many Network Interface Cards (NICs) allow the support for multiple VLANs though a single NIC port by creating virtual adapters. When each VLAN is added to the configuration, a new virtual NIC is created, which looks like a second physical NIC to the Operating System. The SIP Soft Phone configuration allows you to select which NIC is used for SIP and RTP. Selecting the virtual NIC that communicates on the voice VLAN will bind that data to that NIC, which the NIC drivers will then assign to the voice VLAN. For more information about whether your workstation's NIC supports this feature, consult the manufacturer.
Create a DNS domain for the voice VLAN (Polycom, ISS I & II, AudioCodes)
For Polycom, Interaction SIP Station I & II, and AudioCodes phones, we recommend that you create a separate DNS domain for the voice VLAN (managed IP phones and SIP lines) by creating a voice DNS forward lookup zone.
For example, you might create a DNS domain for voice, yourvoicelan.voip, in addition to the existing DNS domain for data, yourdatalan.local or yourdatalan.com, and set each NIC to register with the appropriate DNS server. (This document uses lab.voip and lab.local as examples.) This will ensure that when the DHCP scope provides the managed IP phones with the primary DNS lookup zone, the phones will correctly register with the DNS voice domain.
Perform the following procedures to create a DNS domain for the voice VLAN:
• Create a voice DNS forward lookup zone
• Create DNS Host (A) records for servers in the DNS voice domain
Create a voice DNS forward lookup zone
1. On the machine that functions as the DNS server, select Start->Programs->Administrative Tools->DNS.
2. Right-click on Forward Lookup Zones and select New Zone…
CIC Managed IP Phones
17
The New Zone Wizard launches.
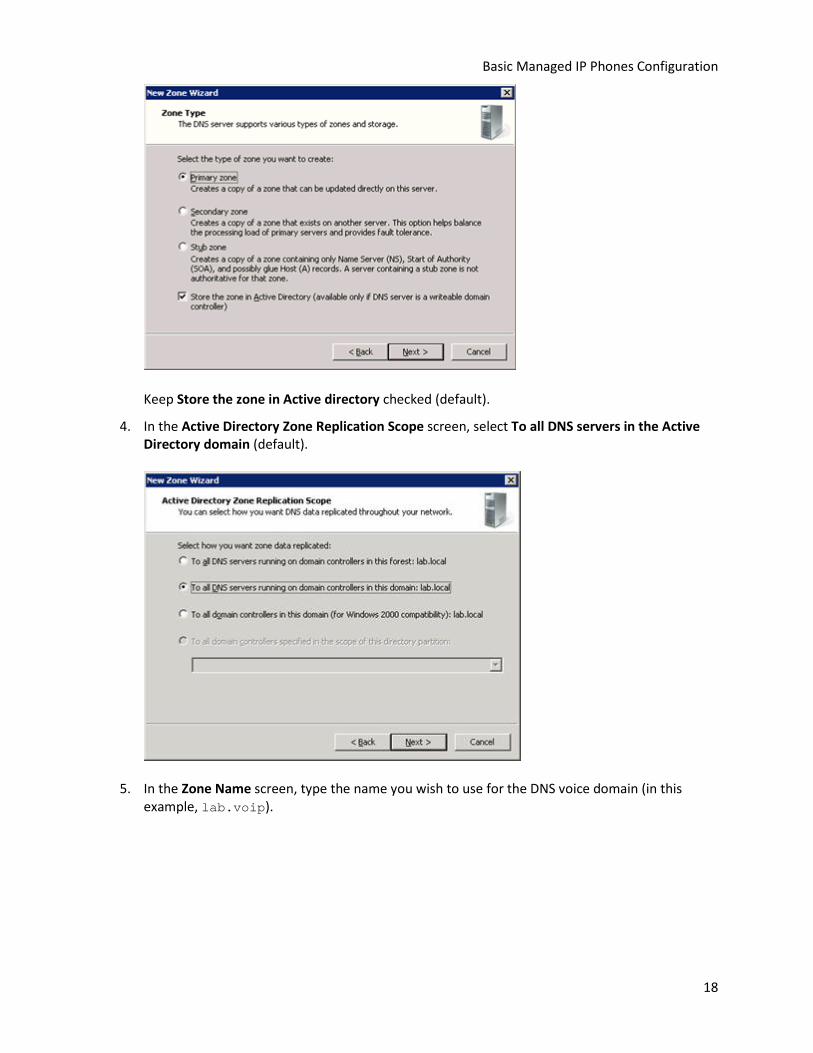
3. In the Zone Type screen, select Primary Zone (default).
Basic Managed IP Phones Configuration
18
Keep Store the zone in Active directory checked (default).
4. In the Active Directory Zone Replication Scope screen, select To all DNS servers in the Active Directory domain (default).
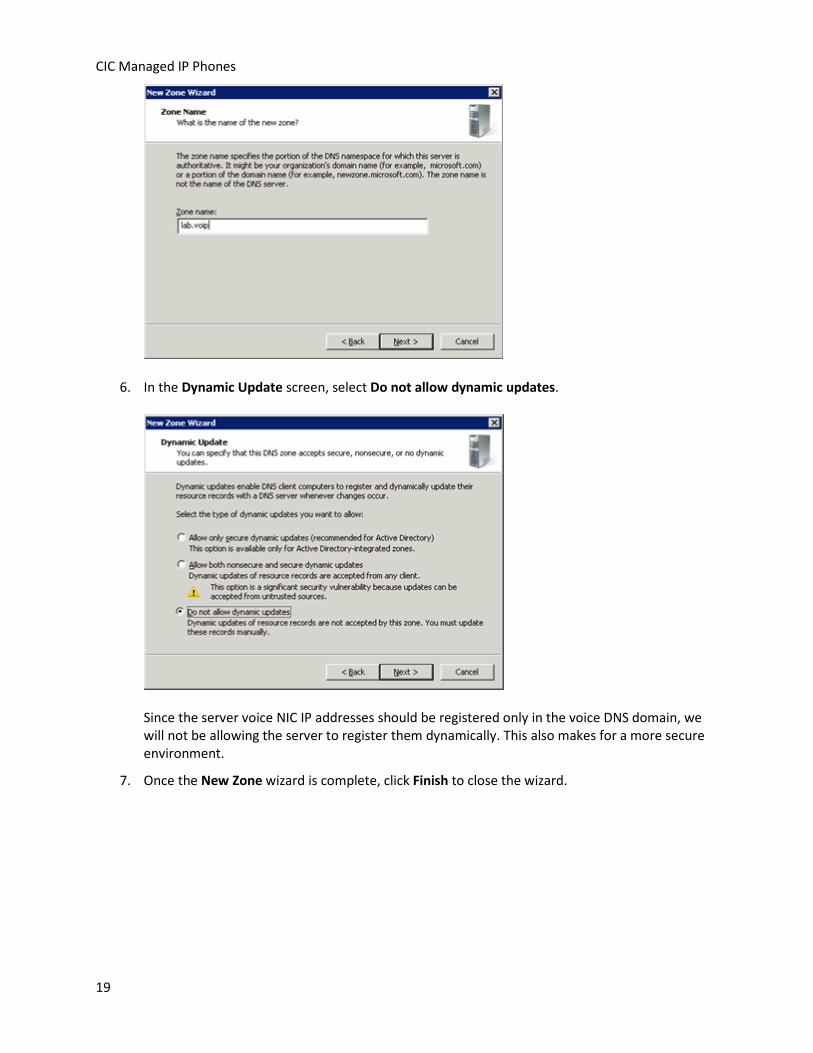
5. In the Zone Name screen, type the name you wish to use for the DNS voice domain (in this example, lab.voip).
CIC Managed IP Phones
19
6. In the Dynamic Update screen, select Do not allow dynamic updates.
Since the server voice NIC IP addresses should be registered only in the voice DNS domain, we will not be allowing the server to register them dynamically. This also makes for a more secure environment.
7. Once the New Zone wizard is complete, click Finish to close the wizard.
Basic Managed IP Phones Configuration
20
The new lab.voip forward lookup zone for the DNS voice domain is now available in the Forward Lookup Zones container.
Create DNS Host (A) records for servers in the DNS voice domain
Create a DNS Host (A) record for each server that will be in the DNS voice domain — CIC server(s), media server, proxy server, etc. The reason why this procedure is necessary is because we are manually administering the DNS records instead of allowing dynamic registrations.
To create a DNS Host (A) record
1. Right-click on the newly-created DNS Forward Lookup zone for voice (in this example, lab.voip) and select New Host (A or AAAA)…
CIC Managed IP Phones
21
2. In New Host screen, complete the entries as described below.
Name
Enter the name of a server that will be in the DNS voice domain (in this example, the CIC server vm40ic1).
IP address
Type the IP address of this server (in this example, 10.250.1.151). You can verify the IP address value for the selected server on the voice VLAN by typing ipconfig in command line on the server.
Basic Managed IP Phones Configuration
22
Create associated pointer (PTR) record check box
Ensure that this check box is enabled.
Add Host
Click this button to continue.
A message appears, stating the host record (in this example, vm40ic1.lab.voip) was successfully created. Click OK.
3. Repeat the previous steps to create records for the second CIC server, Proxy Server, Media Server and other servers you want to be in the DNS voice domain.
When you are finished, the records you created are available in the voice VLAN forward look up zone (in this example, lab.voip) container.
Create DNS Host (A) records for Switchover (Polycom, ISS I & II, AudioCodes)
For all three managed IP phone types, if your implementation includes a Switchover pair, perform the following procedures to create the DNS Host (A) records required for provisioning for the two CIC servers so that the phones can find the active server when booting up (provisioning) and performing SIP operations.
You will create two provisioning DNS Host (A) records for the Switchover pair with the same name, then use the different CIC server voice VLAN IP addresses, as shown in the following table containing sample entries.
Host (A) record name Type Address
provision.lab.voip A 10.250.1.151
CIC Managed IP Phones
23
provision.lab.voip A 10.250.1.152
Notes:
• We recommend that you use provision in the Host (A) record name to clearly identify the purpose of these records.
• The Host (A) record name must not match any existing record name.
• Do not use the name of either CIC server.
To create the DNS Host (A) records for the Switchover pair
1. Right-click on the newly-created DNS forward lookup zone for voice (in this example, lab.voip) and select New Host (A or AAA)…
2. In the New Host screen, complete the entries as described below.
Name
Type the name of the provisioning Host (A) record for the Switchover pair (in this example, provision).
IP address
Type the IP address of the active CIC server (in this example, 10.250.1.151)
Create associated pointer (PTR) record check box
Ensure that this check box is disabled.
Basic Managed IP Phones Configuration
24
Add Host
Click this button to continue.
A message appears, stating the host record (in this example, provision.lab.voip) was successfully created. Click OK.
3. Repeat the previous steps to create the second Host (A) record:
a. In the Name field, type the exact same name (in this example, provision).
b. In the IP address field, specify the IP address of the backup CIC server (in this example, 10.250.1.152).
c. All other fields should be identical to the first Host (A) record created.
4. When you are finished, the records you created in the voice VLAN forward look up zone (in this example, lab.voip) appear in the container.
To verify the records you just created, perform an nslookup on the command line for this record, for example, provision.lab.voip. The server will return the IP addresses in a random order.
CIC Managed IP Phones
25
Create DNS service location (SRV) records for Switchover
If your implementation includes a Switchover pair, perform the following procedures to create the DNS SRV records required for provisioning for the two CIC servers so that the phones can find the active server when booting up (provisioning) and performing SIP operations.
You will create a DNS SRV record for each of the supported SIP line transport protocols (UDP, TCP, and TLS over TCP (SIP Secure or _sips)) that you plan to use for the Switchover pair. For example, if you plan to use the TCP protocol, create two DNS SRV records for TCP, one for the active CIC server and one for the backup CIC server.
If you plan to use all three protocols, you will create six DNS SRV records, as shown in the following table containing sample entries:
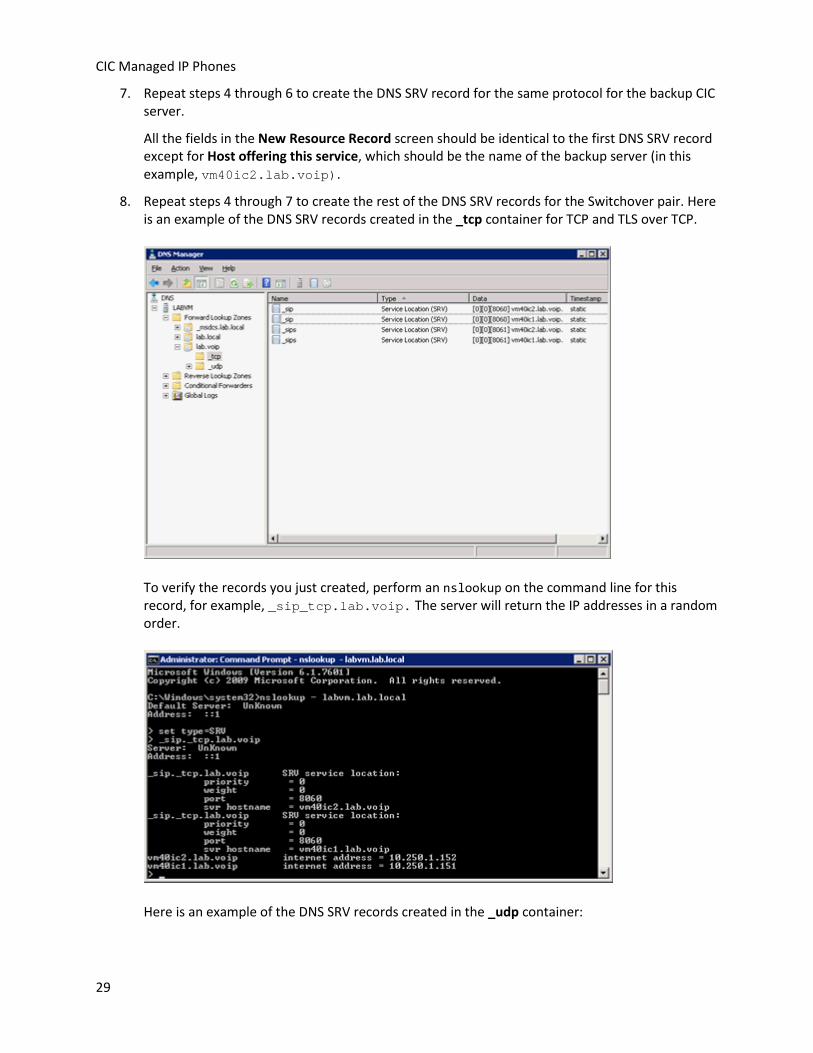
Service Priority Weight Port Hostname
_sip._tcp 0 0 8060 vm40ic1.lab.voip
_sip._tcp 0 0 8060 vm40ic2.lab.voip
_sips._tcp 0 0 8061 vm40ic1.lab.voip
_sips._tcp 0 0 8061 vm40ic2.lab.voip
_sip._udp 0 0 8060 vm40ic1.lab.voip
_sip._udp 0 0 8060 vm40ic2.lab.voip
Notes:
• Port configuration may vary. The ports specified in the table are the default port configurations in CIC that match the default registration group and SIP line configurations.
• Interaction SIP Station I supports DNS SRV in CIC 4.0 SU 4 to SU 6 and CIC 2015 R1 and later, which contains v.1.2.2._p10_build_17 or later firmware.
Basic Managed IP Phones Configuration
26
• Interaction SIP Station I & II support DNS SRV in CIC 2015 R2 and later which contains v.2.0.4.15.7 or later firmware.
• AudioCodes supports DNS SRV in CIC 4.0 SU 5 to SU 6 and CIC 2015 R1 and later, which contains v2.0.0.18 or later firmware.
To create the DNS SRV records
1. Right-click on lab.voip to create two new DNS domains for SRV (one for _tcp and one for _udp) and select New Domain….
2. In the New DNS Domain screen, type _tcp.
3. Repeat steps 1 and 2 to create the _udp domain.
4. Right-click on the newly-created DNS forward lookup zone for voice (in this example, lab.voip) and select Other New Records…
CIC Managed IP Phones
27
Select Other New Records… in the newly created DNS forward lookup zone for voice
5. In the Resource Record Type screen, Select Service Location (SRV) and click Create Record….
6. In the New Resource Record screen, complete the entries for the first DNS SRV record for the active CIC server, as described below.
Basic Managed IP Phones Configuration
28
Service
Enter the appropriate information for this DNS SRV record (for example, _sip).
Protocol
Enter the appropriate information for this DNS SRV record (for example, _tcp). The container for the protocol will be created if it does not already exist.
Port number
Enter the appropriate information for this DNS SRV record (for example, 8060).
Priority
Leave the default setting.
Weight
Leave the default setting.
Host offering this service
Enter the FQDN name of the active CIC server (for example, vm40ic1.lab.voip)
CIC Managed IP Phones
29
7. Repeat steps 4 through 6 to create the DNS SRV record for the same protocol for the backup CIC server.
All the fields in the New Resource Record screen should be identical to the first DNS SRV record except for Host offering this service, which should be the name of the backup server (in this example, vm40ic2.lab.voip).
8. Repeat steps 4 through 7 to create the rest of the DNS SRV records for the Switchover pair. Here is an example of the DNS SRV records created in the _tcp container for TCP and TLS over TCP.
To verify the records you just created, perform an nslookup on the command line for this record, for example, _sip_tcp.lab.voip. The server will return the IP addresses in a random order.
Here is an example of the DNS SRV records created in the _udp container:
Basic Managed IP Phones Configuration
30
To verify the records you just created, perform an nslookup on the command line for this record, for example, _sip_udp.lab.voip, the server will return the IP addresses in a random order.
In Create individual managed IP phones for test purposes, you will configure the default Registration group to obtain registration settings from the DNS SRV records you created.
Configure the TFTP server (ISS I & II, AudioCodes)
This section describes the role of the TFTP server with Interaction SIP Station I & II and AudioCodes, and provides the recommended procedures for configuring the TFTP server.
CIC Managed IP Phones
31
Role of the TFTP server with the Interaction SIP Station I & II
Interaction SIP Station I & II and AudioCodes obtain firmware and configuration via HTTP instead of TFTP, allowing for a much faster upgrade process. However, Interaction SIP Station I & II and AudioCodes still use the TFTP server when an error occurs during a firmware upgrade process (recovery mode).
Configure the TFTP server
All sites with Interaction SIP Station I & II and AudioCodes phones should perform the following procedures to configure the TFTP server:
• Enable the TFTP server on the CIC server
Enable the TFTP server on the CIC server
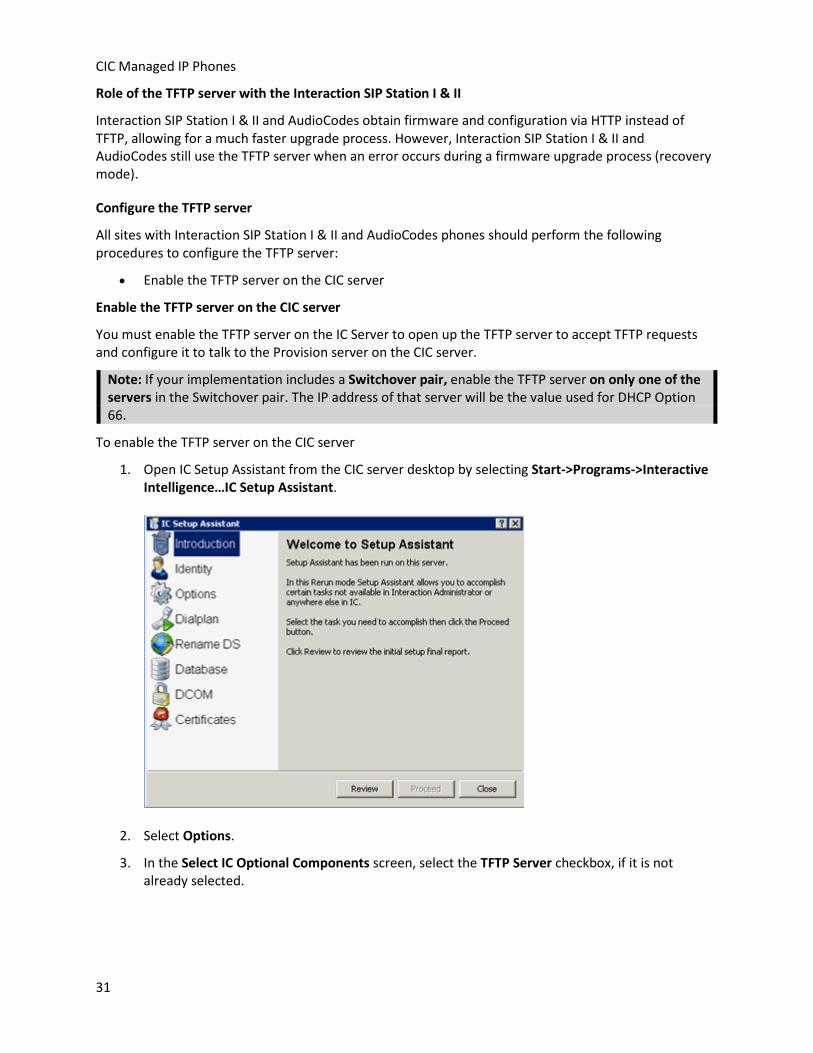
You must enable the TFTP server on the IC Server to open up the TFTP server to accept TFTP requests and configure it to talk to the Provision server on the CIC server.
Note: If your implementation includes a Switchover pair, enable the TFTP server on only one of the servers in the Switchover pair. The IP address of that server will be the value used for DHCP Option 66.
To enable the TFTP server on the CIC server
1. Open IC Setup Assistant from the CIC server desktop by selecting Start->Programs->Interactive Intelligence…IC Setup Assistant.
2. Select Options.
3. In the Select IC Optional Components screen, select the TFTP Server checkbox, if it is not already selected.
Basic Managed IP Phones Configuration
32
Note: If your implementation includes aSwitchover pair, the Switchover Service checkbox will also be selected.
Create DHCP provisioning records
As described in IP phone network requirements, you should have already installed and configured a DHCP server for the voice VLAN and set up a scope for your IP phone addresses.
This section explains how to create the DHCP provisioning records required for the DHCP scope for the voice VLAN for the three managed IP phone types:
• Required DHCP option provisioning records
• Configure DHCP option records
• Configure DHCP records for multiple phone model recovery
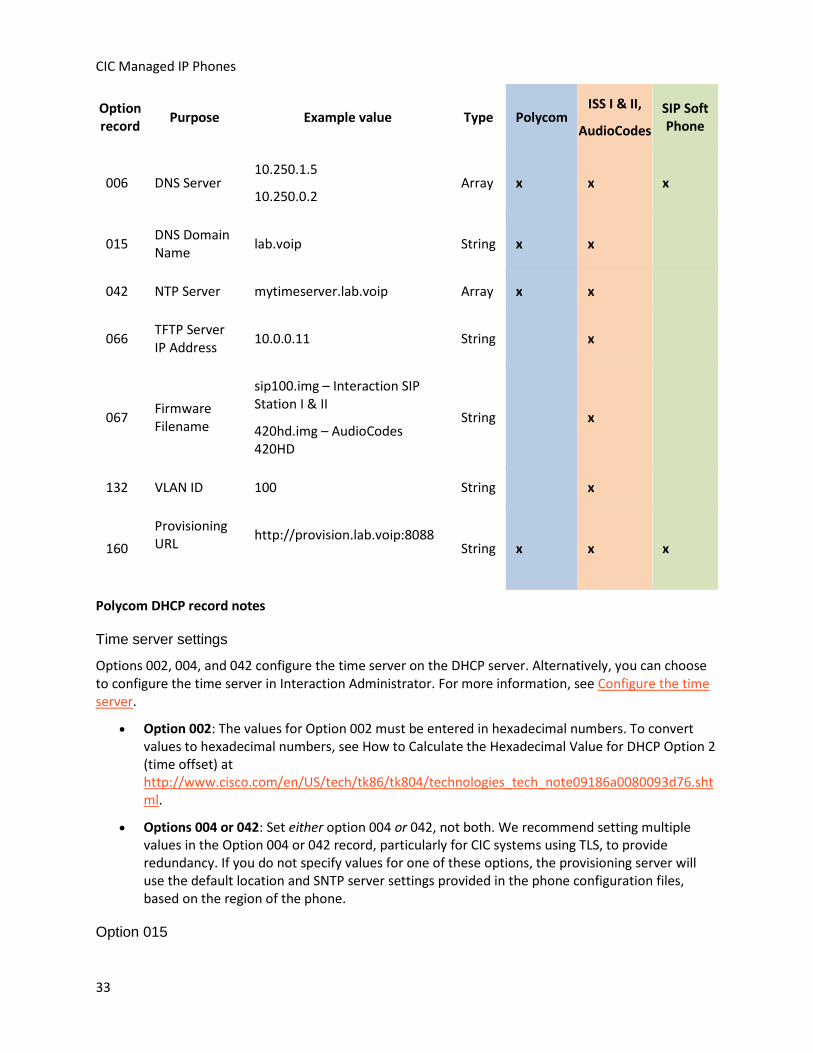
Required DHCP option provisioning records
The following table describes the required DHCP server provisioning records configuration for each of the three managed IP phone types. Specific notes for each managed IP phone type follow the table.
Note: Interaction SIP Station is abbreviated as ISS.
Option record Purpose Example value Type Polycom
ISS I & II,
AudioCodes SIP Soft Phone
002 Time Offset FFFF.B9B0 (hexadecimal input value) -18000 (converted value)
Long x x
004 Time Server mytimeserver.lab.voip Array x x
CIC Managed IP Phones
33
Option record Purpose Example value Type Polycom
ISS I & II,
AudioCodes SIP Soft Phone
006 DNS Server 10.250.1.5
10.250.0.2 Array x x x
015 DNS Domain Name lab.voip String x x
042 NTP Server mytimeserver.lab.voip Array x x
066 TFTP Server IP Address 10.0.0.11 String x
067 Firmware Filename
sip100.img – Interaction SIP Station I & II
420hd.img – AudioCodes 420HD
String x
132 VLAN ID 100 String x
160 Provisioning URL
http://provision.lab.voip:8088
String x x x
Polycom DHCP record notes
Time server settings
Options 002, 004, and 042 configure the time server on the DHCP server. Alternatively, you can choose to configure the time server in Interaction Administrator. For more information, see Configure the time server.
• Option 002: The values for Option 002 must be entered in hexadecimal numbers. To convert values to hexadecimal numbers, see How to Calculate the Hexadecimal Value for DHCP Option 2 (time offset) at http://www.cisco.com/en/US/tech/tk86/tk804/technologies_tech_note09186a0080093d76.shtml.
• Options 004 or 042: Set either option 004 or 042, not both. We recommend setting multiple values in the Option 004 or 042 record, particularly for CIC systems using TLS, to provide redundancy. If you do not specify values for one of these options, the provisioning server will use the default location and SNTP server settings provided in the phone configuration files, based on the region of the phone.
Use the DNS domain for the voice VLAN for the Option 015 record.
Option 160
• Option 160 is the primary default record used by Polycom phones to find the provisioning server.
• Option 160 takes precedence over Option 066 (the secondary default record used by Polycom phones to find the provisioning server). We recommend that you do not use Option 066 for Polycom phones.
• Switchover environments: Make sure that you have first created the DNS Host (A) records as described in Create DNS Host (A) records for Switchover and DNS Service Location (SRV) records as described in Create DNS service location (SRV) records for Switchover. For DHCP Option 160, use the DNS Host (A) provisioning record in the URL.
Interaction SIP Station I & II and AudioCodes DHCP record notes
Time server settings
Options 002, 004, and 042 configure the time server on the DHCP server.
• Option 002: The values for Option 002 must be entered in hexadecimal numbers. To convert values to hexadecimal numbers, see How to Calculate the Hexadecimal Value for DHCP Option 2s(time offset) at http://www.cisco.com/en/US/tech/tk86/tk804/technologies_tech_note09186a0080093d76.shtml.
• Options 004 or 042: Set either option 004 or 042, not both. If you do not specify values for one of these options, the provisioning server will use the default location and SNTP server settings provided in the phone configuration files, based on the region of the phone.
All DHCP Option records
• Set all DHCP Options on the DHCP server in both the data and voice VLANs.
Option 066
• Option 066 is the IP address of the TFTP server used in recovery mode.
• Make sure that you have first enabled and configured the TFTP server as described in Configure the TFTP server.
• Switchover environments: Make sure that you have enabled and configured the TFTP server on the initial active server only, as described in Configure the TFTP server. Set DHCP Option 066 on the initial active server only.
Option 067
• Option 067 is for implementations using different managed IP phone types and models, requiring recovery mode. To handle the conflict, set up Option 067 according to Vendor Class. The value for Option 067 is sip100.img (Interaction SIP Station I firmware filename), sip200.img (Interaction SIP Station II firmware filename), or 420hd.img (AudioCodes 420HD firmware filename). See Configure DHCP records for multiple phone recovery.
• Option 132 must be used if your Interaction SIP Station I, Interaction SIP Station II, or AudioCodes phones will communicate on any VLAN other than the native VLAN (use a voice VLAN). Interaction SIP Station I & II and AudioCodes have a special “recovery mode” that it falls back to under certain conditions, such as a firmware update failure. This fail-safe mode brings the device up in the native VLAN and ignores any CDP/LLDP VLAN assignment. Since CDP/LLDP will be ignored, the only way to push the device to the voice VLAN is to set option 132 in the native VLAN DHCP scope. You do not need to set this option in the voice VLAN DHCP scope. Failure to set this option will cause any device that goes into “recovery mode” for any reason to stay in that mode until it either finds provisioning information on native VLAN, or obtains an option 132 message in the native VLAN DHCP assignment. Option 132 has no effect in normal (non-recovery) mode.
Note: 2.0.4+ firmware caches the VLAN tag acquired from CDP/LLDP during normal operations. This negates the need for Option 132 unless the phone factory reset or otherwise loses the cache. For this reason, Option 132 should still be configured in the native VLAN.
Option 160
• Option 160 is the default record used by Interaction SIP Station I & II and AudioCodes phones to find the provisioning server.
• Switchover environments: Make sure that you have first created the DNS Host (A) records as described in “Create DNS Host (A) records for Switchover”. For DHCP Option 160, use the DNS Host (A) provisioning record in the URL.
SIP Soft Phone DHCP record notes
Option 006
Option 006 is the default DHCP record used for DNS server discovery. The SIP Soft Phone should be used in conjunction with DNS to allow for referencing the CIC server by name. DNS discovery can also be set up manually in the client workstation’s network configuration.
Option 160
Option 160 is the default record used by the SIP Soft Phone to find the provisioning server. It is the only DHCP record required for the SIP Soft Phone.
Configure DHCP option records
Follow this procedure to configure DHCP option records. In this example, DHCP Option 160 is created.
To configure DHCP option records
1. On the machine that functions as the DHCP server, select Start->Programs->Administrative Tools->DHCP. Or use Server Manager to open DHCP.
2. Right-click on the DHCP server (if using a Windows 2008 server, right-click on IPv4) and select Set Predefined Options….
Basic Managed IP Phones Configuration
36
3. In the Predefined Options and Values screen, click the Add button to add a new DHCP option record.
4. In the Option Type screen fill in the entries as described below.
Name
Enter a name for this record, related to IP phone provisioning.
CIC Managed IP Phones
37
Data type
Specify the data type (in this example, String).
Code
Specify the option record code (in this example, 160).
Description
Type a description for this record, related to IP phone provisioning.
5. Click OK.
6. In the Predefined Options and Values screen, type the URL that the IP phones will use to contact the provisioning server (for a Switchover pair, use the provisioning DNS Host (A) record) in the String Value field.
7. Click OK.
8. Right-click the Scope Options (or Server Options) container and select Configure Options….
Basic Managed IP Phones Configuration
38
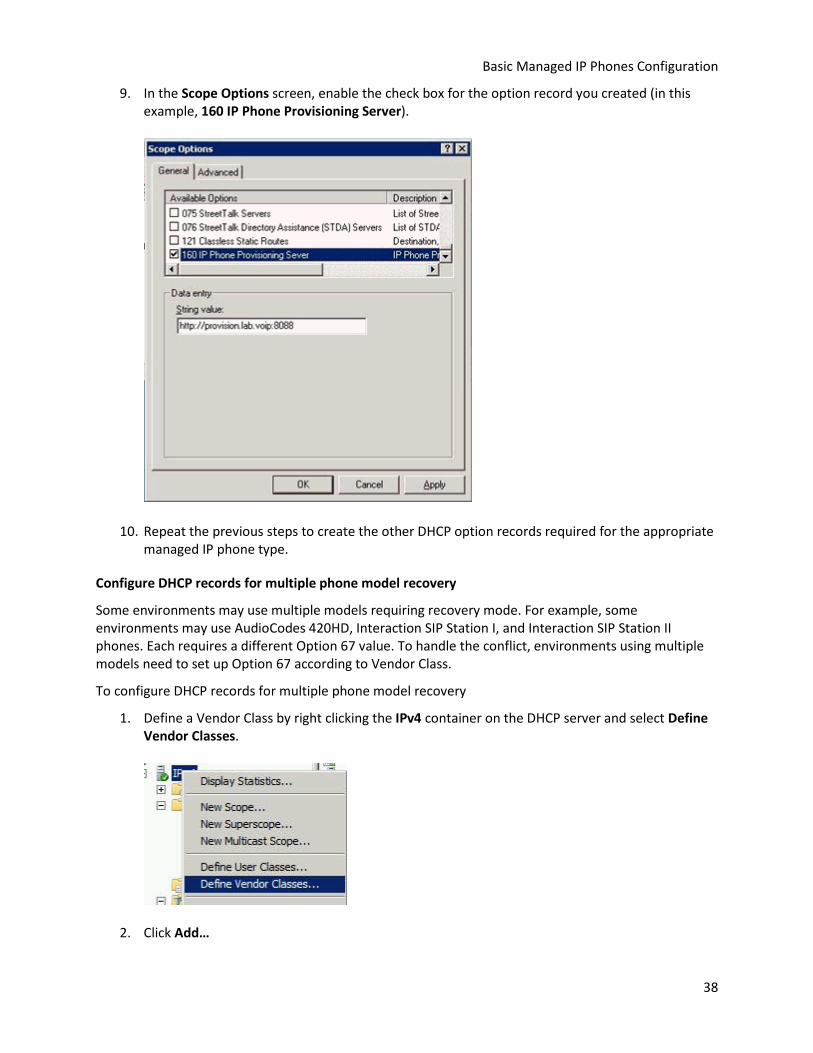
9. In the Scope Options screen, enable the check box for the option record you created (in this example, 160 IP Phone Provisioning Server).
10. Repeat the previous steps to create the other DHCP option records required for the appropriate managed IP phone type.
Configure DHCP records for multiple phone model recovery
Some environments may use multiple models requiring recovery mode. For example, some environments may use AudioCodes 420HD, Interaction SIP Station I, and Interaction SIP Station II phones. Each requires a different Option 67 value. To handle the conflict, environments using multiple models need to set up Option 67 according to Vendor Class.
To configure DHCP records for multiple phone model recovery
1. Define a Vendor Class by right clicking the IPv4 container on the DHCP server and select Define Vendor Classes.
2. Click Add…
CIC Managed IP Phones
39
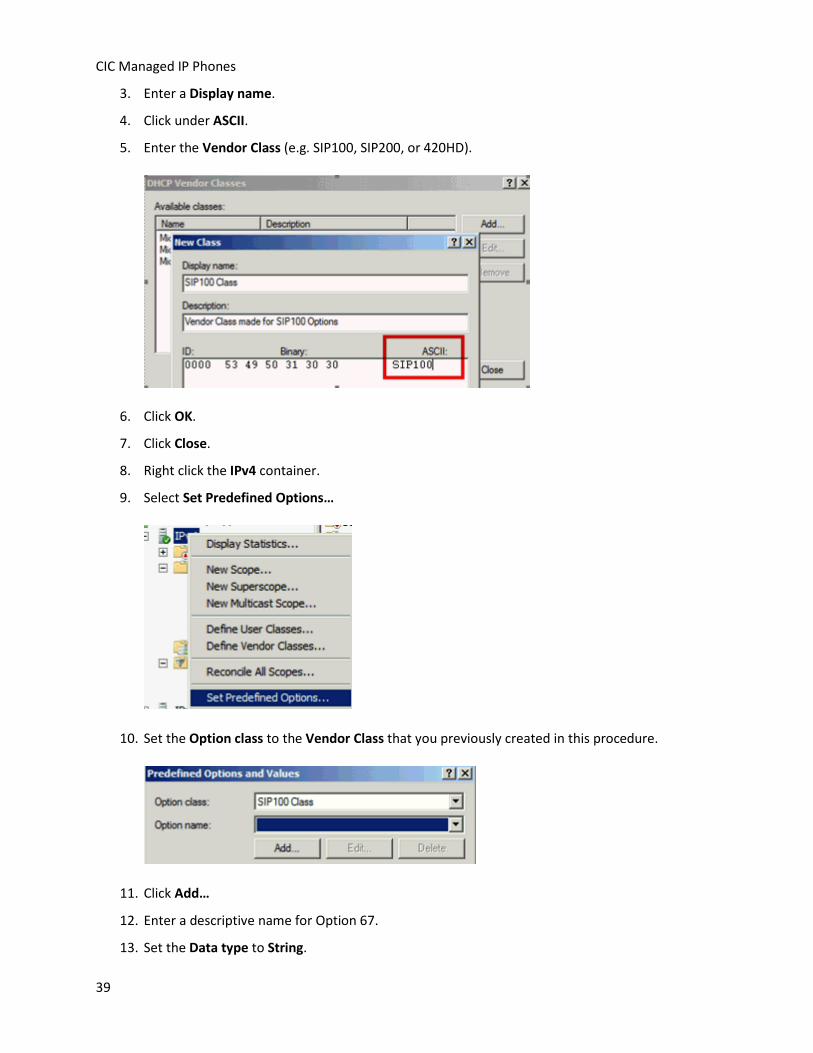
3. Enter a Display name.
4. Click under ASCII.
5. Enter the Vendor Class (e.g. SIP100, SIP200, or 420HD).
6. Click OK.
7. Click Close.
8. Right click the IPv4 container.
9. Select Set Predefined Options…
10. Set the Option class to the Vendor Class that you previously created in this procedure.
11. Click Add…
12. Enter a descriptive name for Option 67.
13. Set the Data type to String.
Basic Managed IP Phones Configuration
40
14. Enter Code 067.
15. Click OK.
16. Enter the firmware file name.
When the phone boots up, it will identify its Vendor Class in DHCP Option 60 of the Discover. The DHCP server will use this to match the appropriate Option 67.
Configure the time server (Polycom, ISS I & II, AudioCodes)
In Polycom, Interaction SIP Station I & II, and AudioCodes managed IP phone implementations, each managed IP phone requests the time from the time server (SNTP provider) in the region in which the phone is located. You can configure the time server for these three managed IP phone types either on the DHCP server or in Interaction Administrator.
CIC Managed IP Phones
41
Important!
Whether configured on the DHCP server or in Interaction Administrator, the time server configuration is crucial in CIC systems using TLS. If a managed IP phone cannot connect to a time server to determine the time, it will not be able to perform certificate expiration validation needed to authenticate a secure SIP connection. This means that the phone will not be able to register with the CIC system. Further, if the managed IP phone cannot connect to a time server when it boots up, the phone will fail. It is important that the specified time server be available when the phones boot up.
Configure the time server on the DHCP server
The DHCP Option records for the time server are Options 002, 004, and 042. See the Polycom DHCP record notes and Interaction SIP Station I & II and AudioCodes record notes in Create DHCP provisioning records.
Configure the time server in Interaction Administrator
You can configure a Simple Network Time Protocol (SNTP) server in Interaction Administrator. Please note:
• When you run IC Setup Assistant in a new or upgrade installation, Setup Assistant automatically enables the CIC server to be able to be used as the SNTP server.
• Post-installation, either before or after you have created managed IP phones in Interaction Administrator, you must configure the SNTP server in the Interaction Administrator Regionalization container so that it is available prior to rebooting the phones. The default is to use the CIC server as the SNTP server.
• If the time server settings are provided by the DHCP server, they will override the location and SNTP server settings by default. You can change it so that the location and SNTP server settings provided in the provisioning server’s phone configuration files override the DHCP server settings. To do so, make the following change for each managed IP phone in the Interaction Administrator Managed IP Phones container: Right-click on the phone, select Properties…Options…Advanced Options and change Configuration Time Zone Overrides DHCP and Configuration NTP Server Overrides DHCP to Yes.
To configure the time server in Interaction Administrator
Perform this procedure for the Default Location as well as all other locations configured in the Regionalization container.
1. In the Interaction Administrator Regionalization container, select Locations.
2. Right-click on <Default Location> and select Properties.
3. In the Configuration tab, in the SNTP Server field, either:
o Keep the default selection Use CIC server. Interaction Administrator will use the Windows Time service on the CIC server to synchronize the time on managed IP phones.
OR
o Enter the name or IP address of a valid time server in the other field, for example, 176.10.10.199. If you don’t know the time server’s IP address, check with IT. Please
Basic Managed IP Phones Configuration
42
note that Interaction Administrator does not validate the time server entered in this field.
4. Repeat steps 1 through 3 for the other locations configured in the Regionalization container.
Implement QoS in your environment
This section describes the PureConnect QoS driver, SIP Soft Phones and QoS considerations, and recommended QoS configuration settings for RTP and SIP for all managed IP phone types. For general information about implementing QoS on CIC systems, see pureConnect Quality of Service Technical Reference at https://help.genesys.com/cic/mergedProjects/wh_tr/desktop/quality_of_service_for_the_ic_platform.htm.
PureConnect QoS driver
In CIC, Genesys developed a new QoS driver to more closely integrate with Customer Interaction Center. It is the default QoS driver for CIC. It operates independently of the Windows QoS Packet Scheduler, which was the recommended QoS driver for CIC 3.0.
Installs that use the QoS feature include:
Application name Install name OS
CIC Server ICServer.msi 64-bit
IC User Applications 32-bit
ICUserApps_32bit.msi with one or both of these features selected:
For a complete list of installs that use the QoS feature, see the PureConnect KB article https://my.inin.com/Support/Pages/KB-Details.aspx?EntryID=Q131006915300479.
The default behavior for most of these installs is to silently install the PureConnect QoS driver and add the certificate to the Trusted Publishers list. The IC User Applications installs are the exception. See SIP Soft Phone and QoS considerations.
Some sites may prefer to modify this default behavior. For instructions, see the PureConnect KB article https://my.inin.com/Support/Pages/KB-Details.aspx?EntryID=Q131006915300479.
SIP Soft Phone and QoS considerations
Among managed IP phones, SIP Soft Phones have special considerations because audio originates on the computer instead of a Polycom phone or Interaction SIP Station I & II phones.
As discussed the PureConnect QoS driver section, the IC User Applications install (32-bit and 64-bit) with the SIP Soft Phone feature selected is one of the installs that installs the PureConnect QoS driver.
• If the IC User Applications install is run in Full UI mode (via Setup.exe or double-clicking the .msi), a QoS Requirement screen appears, prompting the user to choose the QoS driver installation and recommending that the PureConnect QoS driver be installed.
When this option is selected, the install will add the PureConnect certificate to the Trusted Publishers list, and then install the driver.
Other
When this option is selected, the PureConnect certificate is not added to the Trusted Publishers list and the driver is not installed. We recommend that users do not select this option unless specified by and administrator. Selecting this option implies that another form of QoS is used at this time.
For more information, see PureConnect KB article https://my.inin.com/products/pages/kb-details.aspx?entryid=q131006915300479.
• If the IC User Applications install is run using Group Policy, startup or logon script, or command line, the default is to silently install the PureConnect QoS driver and silently add the certificate to the Trusted Publishers list. If you want to modify the default PureConnect QoS driver installation, use one of these methods to modify the QoS feature properties and run the install, as described in PureConnect KB article https://my.inin.com/products/pages/kb-details.aspx?entryid=q131006915300479.
Configure QoS settings for RTP and SIP
The QoS value is passed to manage IP phones during provisioning via the phone configuration file. The value is stored as a Byte value in Interaction Administrator, and then converted to a DSCP decimal value. The value can range from 0 to 63 (decimal).
We recommend that you modify the following QoS values for all managed IP phone types to make client workstations compatible with other devices and systems on the network. In some cases, you must first create one or more managed IP phones as described in Create individual managed IP phones for test purposes.
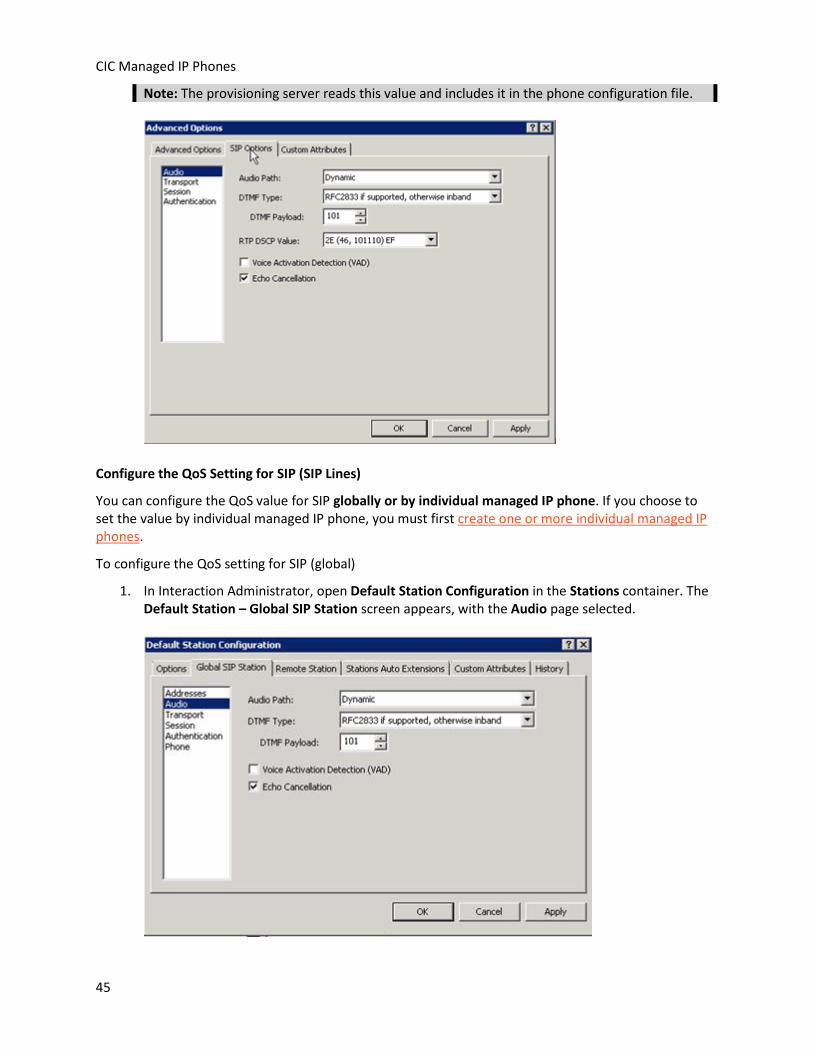
Configure the QoS setting for RTP (SIP Station)
In order to configure the QoS setting for RTP packets for managed IP phones and associated SIP station audio, you must first create one or more individual managed IP phones.
To configure the QoS setting for RTP
1. Create one or more individual managed IP phones for each managed IP phones type for test purposes.
2. In Interaction Administrator, open a managed IP phone in the IP Managed Phones container.
3. In the Managed IP Phone Configuration - Options tab, click the Advanced Options… button.
The Advanced Options – SIP Options screen appears, with the Audio page selected.
4. In the RTP DSCP Value field, specify the QoS setting and click OK.
The optimal setting for VoIP packets is B8 (hex), which is equivalent to a DSCP value of 46. To disable DSCP tagging, set the value to 0.
Note: The provisioning server reads this value and includes it in the phone configuration file.
Configure the QoS Setting for SIP (SIP Lines)
You can configure the QoS value for SIP globally or by individual managed IP phone. If you choose to set the value by individual managed IP phone, you must first create one or more individual managed IP phones.
To configure the QoS setting for SIP (global)
1. In Interaction Administrator, open Default Station Configuration in the Stations container. The Default Station – Global SIP Station screen appears, with the Audio page selected.
Basic Managed IP Phones Configuration
46
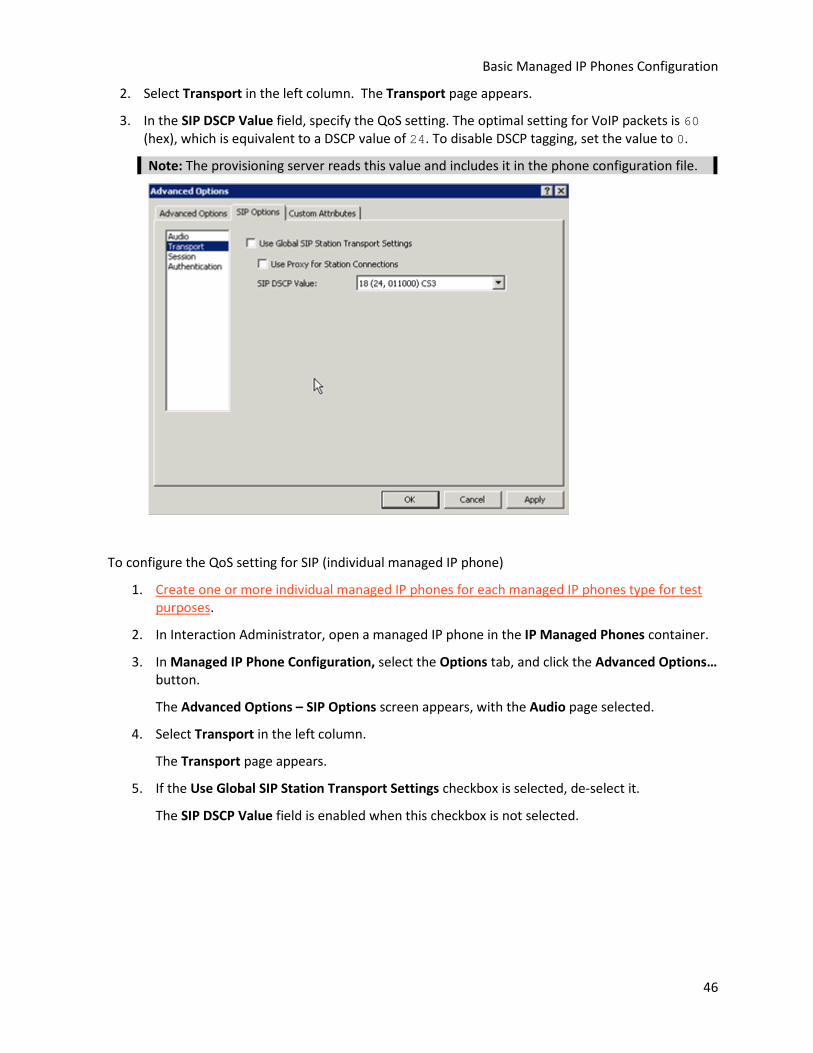
2. Select Transport in the left column. The Transport page appears.
3. In the SIP DSCP Value field, specify the QoS setting. The optimal setting for VoIP packets is 60 (hex), which is equivalent to a DSCP value of 24. To disable DSCP tagging, set the value to 0.
Note: The provisioning server reads this value and includes it in the phone configuration file.
To configure the QoS setting for SIP (individual managed IP phone)
1. Create one or more individual managed IP phones for each managed IP phones type for test purposes.
2. In Interaction Administrator, open a managed IP phone in the IP Managed Phones container.
3. In Managed IP Phone Configuration, select the Options tab, and click the Advanced Options… button.
The Advanced Options – SIP Options screen appears, with the Audio page selected.
4. Select Transport in the left column.
The Transport page appears.
5. If the Use Global SIP Station Transport Settings checkbox is selected, de-select it.
The SIP DSCP Value field is enabled when this checkbox is not selected.
CIC Managed IP Phones
47
6. In the SIP QOS Byte field, specify the QoS setting. The optimal setting for VoIP packets is 60 (hex), which is equivalent to a DSCP value of 24. To disable DSCP tagging, set the value to 0.
Note: The provisioning server reads this value and includes it in the phone configuration file.
Individual managed IP phones for test purposes
We recommend creating individual managed IP phones for the appropriate managed IP phone types in your CIC system for test purposes, before proceeding with a full managed IP phone implementation. This section describes the basic configuration needed for test purposes.
Create individual managed IP phones for test purposes
Create at least one individual managed IP phone for each of the managed IP phone types you plan to implement and configure as needed for your test purposes.
To create individual managed IP phones
1. Open Interaction Administrator and right-click in the Managed IP Phones container and select New…
Basic Managed IP Phones Configuration
48
2. In the New Managed IP Phone screen, enter the information for the first managed IP phone type you wish to create and click OK.
Name
Enter the name of the new managed IP phone.
Template
Keep the default setting of none. (It is not necessary to create a managed IP phone template until you create multiple managed IP phones.)
CIC Managed IP Phones
49
Type
Select the type of IP phone: Workstation or Stand-alone phone.
Note: If you are creating a managed IP phone for Interaction SIP Station, do not select Stand-alone phone. This configuration is not supported.
Manufacturer
Select the IP Phone manufacturer. Currently, the supported manufacturers are AudioCodes, ININ (Genesys), and Polycom. Select ININ for Interaction SIP Station I, Interaction SIP Station II, and SIP Soft Phone.
Model
Select the phone model based on the manufacturer. If the manufacturer is AudioCodes or Polycom, choose from a list of AudioCodes or Polycom phone models. If the manufacturer is ININ, choose Interaction SIP Station (for Interaction SIP Station I), Interaction SIP Station II or Soft Phone.
3. In the Managed IP Phone Configuration screen, enter the information in the General tab that you wish to define for this managed IP phone type for test purposes.
Basic Managed IP Phones Configuration
50
Name
Unique name of this IP phone.
Active
Keep the default setting of Active for this managed IP phone.
MAC Address
(Polycom, Interaction SIP Station I & II, AudioCodes): Enter the MAC Address in the format xx:xx:xx:xx:xx:xx. Polycom addresses start with 00:04:f2. Interaction SIP Station MAC addresses start with 00:26:fd. AudioCodes addresses start with 00:90:8f.
Full Computer Name
(SIP Soft Phone): Enter the full computer name of the managed IP phone. The correct full computer name is listed on the SIP Soft Phone user's computer. Navigate to My Computer -> Properties -> Computer Name and note the Full Computer Name. For example: PattyJ.acme.com or PattyJ.
Registration
Select Registration Group. Depending on your implementation and what you plan to test, it may be necessary to modify the default registration group. See Registration group configuration in this section.
Location
Keep the default location unless you plan to test multiple locations. In addition to reading SNTP settings from the phone, the CIC server uses the location settings to determine the codecs to be used for the phone’s audio during the call.
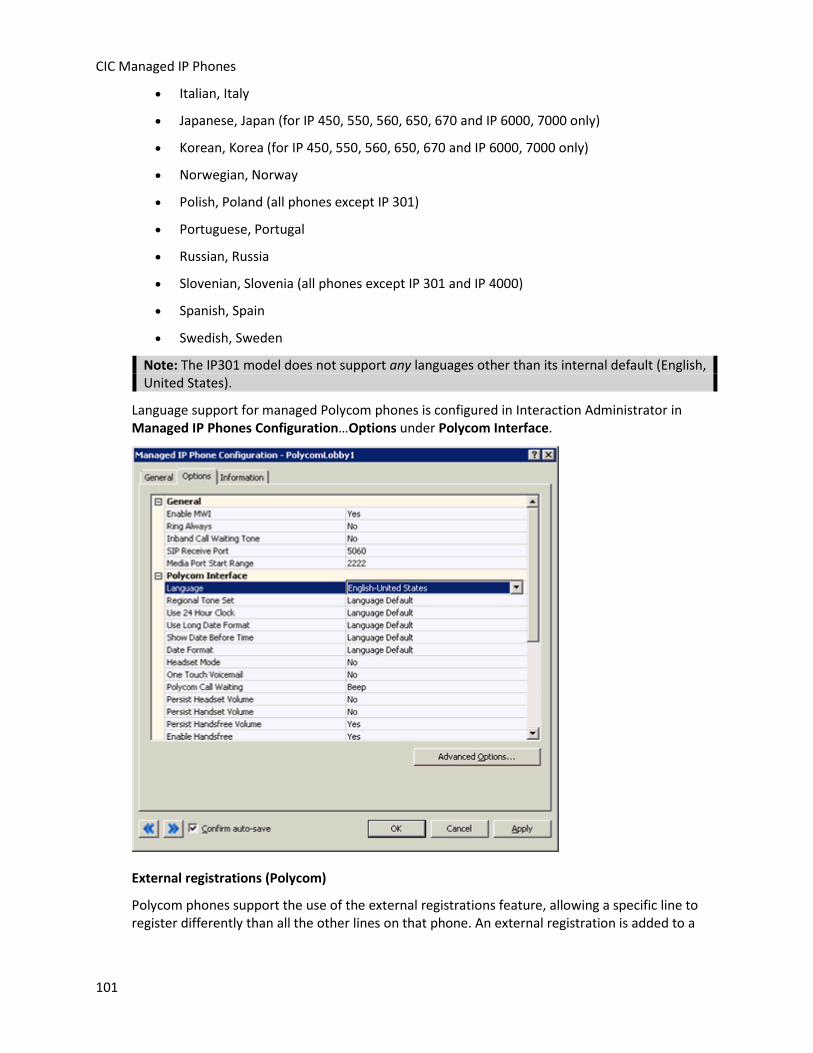
Firmware Version
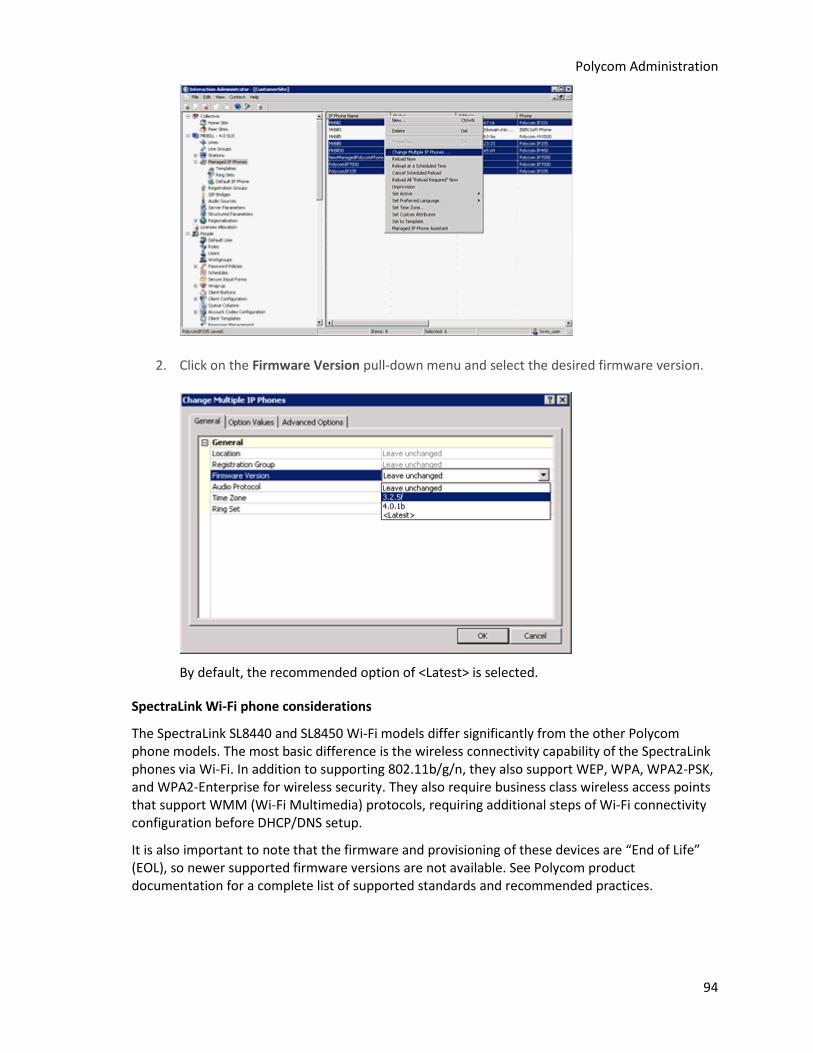
Select the firmware version for this managed IP phone. By default, the recommended option of <Latest> is selected. Older firmware versions previously installed on this system may also appear in the drop down list. In certain scenarios, you may wish to select older approved firmware for this phone model, for example, to control the rollout of new firmware to a managed IP phone or group of managed IP phones during a release update.
Note: This option will not appear if the selected managed IP phone model does not support the selectable firmware feature.
CIC Managed IP Phones
51
Audio Protocol
(Polycom, SIP Soft Phone, Interaction SIP Station I&II, and AudioCodes): The audio stream on this IP phone can be unencrypted using RTP (Real Time Protocol) or encrypted using Secure RTP (SRTP). If you plan to use TLS/STRP, select STRP. Otherwise, leave the default setting of RTP. (Certain Polycom IP phone models do not support this audio protocol option; therefore this field is not displayed.)
Time Zone
(Polycom, Interaction SIP Station I & II, AudioCodes): The time zone that is set here will be passed to the phone during configuration. This will override the setting that is in the phone’s configuration.
Note: Time zone can also be configured for these three managed IP phone types with Options 002, 004, and 042 on the DHCP server.
Station Appearances
As part of creating managed IP phones, associated SIP station appearances are created on those IP phones. Proceed to step 4 to configure the station appearance for this managed IP phone.
4. Under Station Appearances in the Managed IP Phones Configuration General tab, select Edit… to open the Station Configuration for the selected managed IP phone.
5. In the Station Configuration - Configuration tab, enter the information that you wish to define for the station appearance for test purposes.
Basic Managed IP Phones Configuration
52
Extension
Enter the extension number for this station appearance.
Changes to other Configuration tab settings are optional. For information, see Interaction Administrator help.
6. Select the Station Configuration - Licensing tab.
A Basic Station license was assigned by default to the SIP station appearance associated with the managed IP phone. Assign other licenses, such as Client Access and ACD Access, as needed for test purposes.
7. Click OK to return to the Managed IP Phone Configuration screen.
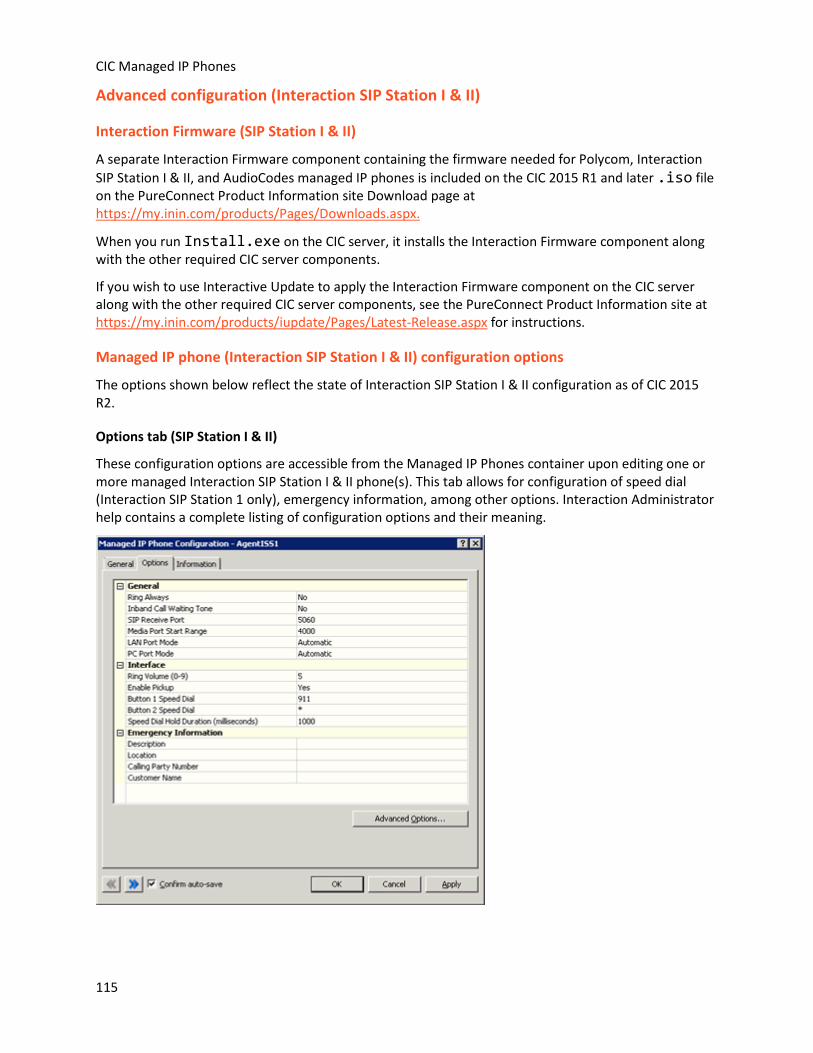
8. If you wish to configure additional options for the managed IP phone for test purposes, do so in the Managed IP Phone Configuration - Options tab. The available options will vary, depending on the managed IP phone type.
CIC Managed IP Phones
53
o For Polycom configuration options, see "Additional configuration (Polycom)" in this document and Interaction Administrator Help.
o For Interaction SIP Station I & II options, see "Additional configuration (Interaction SIP Station I & II)" in this document and Interaction Administrator Help.
o For SIP Soft Phone configuration options, see "Setup and configuration (SIP Soft Phone)" and Interaction Administrator Help.
o For AudioCodes configuration options, see "Additional configuration (AudioCodes)" and Interaction Administrator Help.
Note: If you have not yet configured QoS for RTP and SIP as described in “Implement QoS for your environment”, do so now.
9. Repeat the previous steps to create a managed IP phone for the other managed IP phone types you plan to implement.
Registration group configuration
Registration groups are a required attribute of every managed IP phone. The registration group controls who the phone registers and communicates with. Each registration group consists of an ordered list of registrations. Each registration either points to a line, is specified manually, or is obtained from a SIP proxy or DNS SRV. A managed IP phone will attempt to use the first registration, if it fails, then it uses the second one, etc.
Basic Managed IP Phones Configuration
54
Depending on your implementation and what you plan to test, it may be necessary to modify the registration group configuration for the individual managed IP phones that you create for test purposes.
Default registration group
As part of the CIC installation, IC Setup Assistant automatically created two permanent default registration groups:
• <Default Registration Group> for the default <Stations-UDP> line
• <Default Secure Registration Group> for the default <Stations-TLS> line
To view the <Default Registration Group> settings
1. In the Interaction Administrator Managed IP Phones container, click on Registration Groups.
2. Right-click on <Default Registration Group> and select Properties.
3. In the Registration Group Configuration screen, note that only one registration is listed under Registrations. Additional registrations can be added for redundancy.
Notes:
o A registration group cannot have more than one SIP Line registration. If a registration group does have a SIP Line registration, it must be the first entry in the list.
o A registration group cannot have more than one DNS SRV registration. If a registration group does have a DNS SRV registration, it must be the first entry in the list.
4. Click the listed registration and select Edit… to view the registration settings.
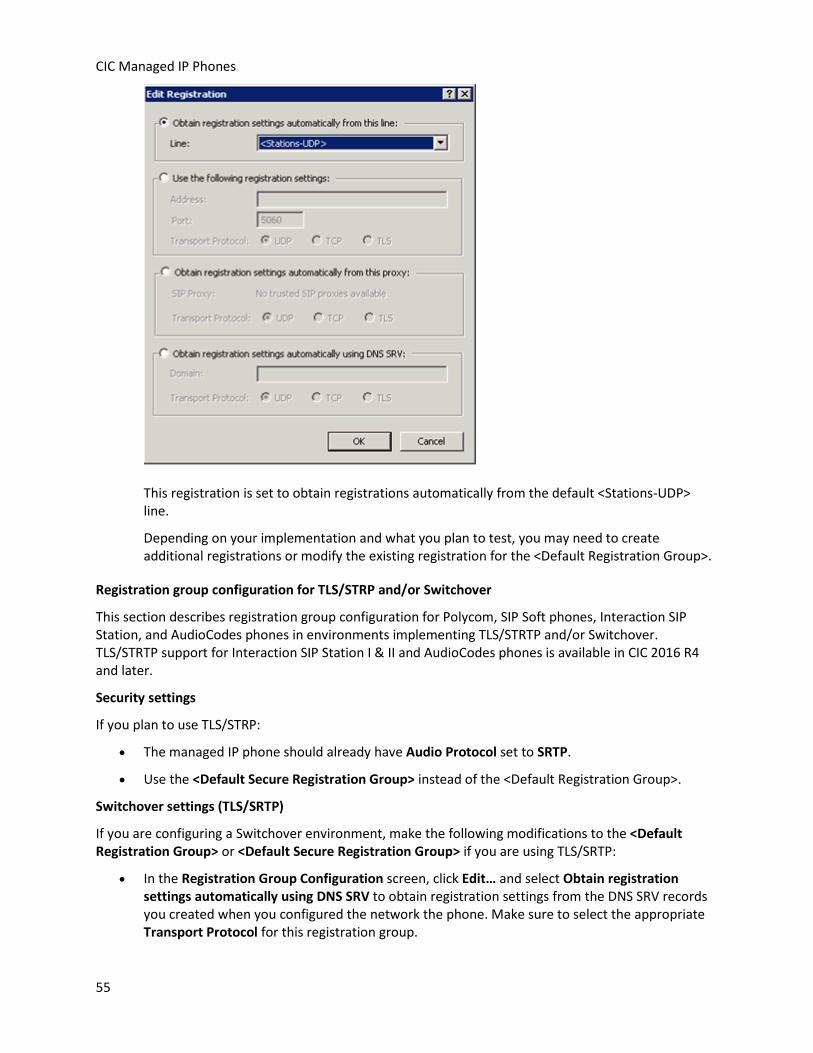
CIC Managed IP Phones
55
This registration is set to obtain registrations automatically from the default <Stations-UDP> line.
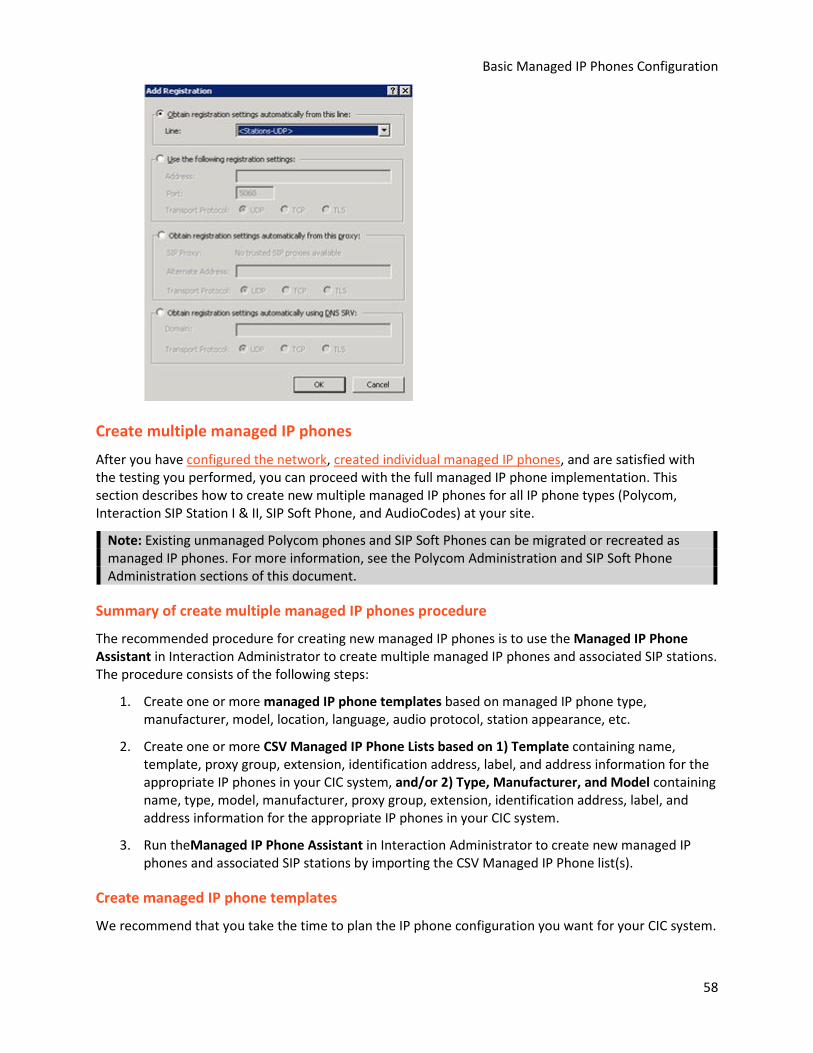
Depending on your implementation and what you plan to test, you may need to create additional registrations or modify the existing registration for the <Default Registration Group>.
Registration group configuration for TLS/STRP and/or Switchover
This section describes registration group configuration for Polycom, SIP Soft phones, Interaction SIP Station, and AudioCodes phones in environments implementing TLS/STRTP and/or Switchover. TLS/STRTP support for Interaction SIP Station I & II and AudioCodes phones is available in CIC 2016 R4 and later.
Security settings
If you plan to use TLS/STRP:
• The managed IP phone should already have Audio Protocol set to SRTP.
• Use the <Default Secure Registration Group> instead of the <Default Registration Group>.
Switchover settings (TLS/SRTP)
If you are configuring a Switchover environment, make the following modifications to the <Default Registration Group> or <Default Secure Registration Group> if you are using TLS/SRTP:
• In the Registration Group Configuration screen, click Edit… and select Obtain registration settings automatically using DNS SRV to obtain registration settings from the DNS SRV records you created when you configured the network the phone. Make sure to select the appropriate Transport Protocol for this registration group.
Basic Managed IP Phones Configuration
56
• If your Switchover environment requires remote survivability (for example, a remote office using a SIP Proxy), click Add… in Registration Group Configuration to add another registration to the <Default Registration Group> and select Obtain registrations settings automatically from this proxy. Make sure to select the appropriate Transport Protocol for this registration group.
Interaction SIP Station I & II and AudioCodes registration group configuration
This section describes Interaction SIP Station I & II and AudioCodes registration group configuration limitations and instructions for environments implementing Switchover.
Interaction SIP Station I & II and AudioCodes support for DNS SRV
• Interaction SIP Station I supports DNS SRV in CIC 4.0 SU 4 to SU 6 and CIC 2015 R1 and later, which contains v.1.2.2._p10_build_17 or later firmware.
• Interaction SIP Station I & II support DNS SRV in CIC 2015 R2 and later which contains v.2.0.4.15.7 or later firmware.
• AudioCodes supports DNS SRV in CIC 4.0 SU 6 and CIC 2015 R1 and later, which contains v2.2.277.2.3 or later firmware.
Note, however, that Interaction SIP Station I & II and AudioCodes support only a single registration entry: either DNS SRV or a stations line.
Limitations
Interaction SIP Station I & II and AudioCodes have the following registration group configuration limitations:
• Interaction SIP Station I & II and AudioCodes do not support multiple entries (registrations) in a registration group.
CIC Managed IP Phones
57
Note: Starting with CIC 2016 R1, firmware updates with a version of 2.2.2.77 or higher for Interaction SIP Station I & II remove the constraint of registering the phone with a single server.
Switchover settings (SIP Station I & II or AudioCodes)
Switchover environments that use only Interaction SIP Station I & II and AudioCodes do not need to modify the <Default Registration Group>.
However, if the Switchover environment includes Interaction SIP Station I & II, AudioCodes, Polycom, or SIP Soft phones, follow these steps to create separate registration groups specifically for the Interaction SIP Station I & II and/or AudioCodes phones. For example:
1. In Managed IP Phones…Registration Groups, create a new Regular registration group for the Interaction SIP Stations.
2. In the Registration Group Configuration screen, click Add…
3. In the Add Registration screen, select either obtain registration settings automatically from this line to obtain registration settings from the <Stations-UDP> line or obtain registration settings automatically using DNS SRV.
Basic Managed IP Phones Configuration
58
Create multiple managed IP phones
After you have configured the network, created individual managed IP phones, and are satisfied with the testing you performed, you can proceed with the full managed IP phone implementation. This section describes how to create new multiple managed IP phones for all IP phone types (Polycom, Interaction SIP Station I & II, SIP Soft Phone, and AudioCodes) at your site.
Note: Existing unmanaged Polycom phones and SIP Soft Phones can be migrated or recreated as managed IP phones. For more information, see the Polycom Administration and SIP Soft Phone Administration sections of this document.
Summary of create multiple managed IP phones procedure
The recommended procedure for creating new managed IP phones is to use the Managed IP Phone Assistant in Interaction Administrator to create multiple managed IP phones and associated SIP stations. The procedure consists of the following steps:
1. Create one or more managed IP phone templates based on managed IP phone type, manufacturer, model, location, language, audio protocol, station appearance, etc.
2. Create one or more CSV Managed IP Phone Lists based on 1) Template containing name, template, proxy group, extension, identification address, label, and address information for the appropriate IP phones in your CIC system, and/or 2) Type, Manufacturer, and Model containing name, type, model, manufacturer, proxy group, extension, identification address, label, and address information for the appropriate IP phones in your CIC system.
3. Run theManaged IP Phone Assistant in Interaction Administrator to create new managed IP phones and associated SIP stations by importing the CSV Managed IP Phone list(s).
Create managed IP phone templates
We recommend that you take the time to plan the IP phone configuration you want for your CIC system.
CIC Managed IP Phones
59
If it is appropriate for your site, create one or more managed IP phone templates based on your planning decisions. For example, you might want to create separate templates for the following situations:
• The CIC system has Polycom phones (perhaps a variety of Polycom models), SIP Soft Phones, Interaction SIP Station I & II phones, and AudioCodes phones.
• The CIC system has IP phones in a variety of locations.
• The audio stream on certain IP phones will be unencrypted using RTP, and others will be encrypted using SRTP.
• Certain IP phones will have regular station appearances, and others will have shared station appearances.
Note: Templates are most useful for significant quantities of the phones of the same type, manufacturer, model, etc. For example if your site has 30 Polycom IP335 phones, one IP7000 conference phone (for a conference room), one IP670 phone (for the CEO), one IP650 for the receptionist, a template is recommended for the IP335’s but is not needed for the other three phones.
To create managed IP phone templates
1. In the Interaction Administrator Managed IP Phones container, highlight Templates, right-click in the right pane and select New… from the Context menu.
The New Managed IP Phone Template screen appears.
Basic Managed IP Phones Configuration
60
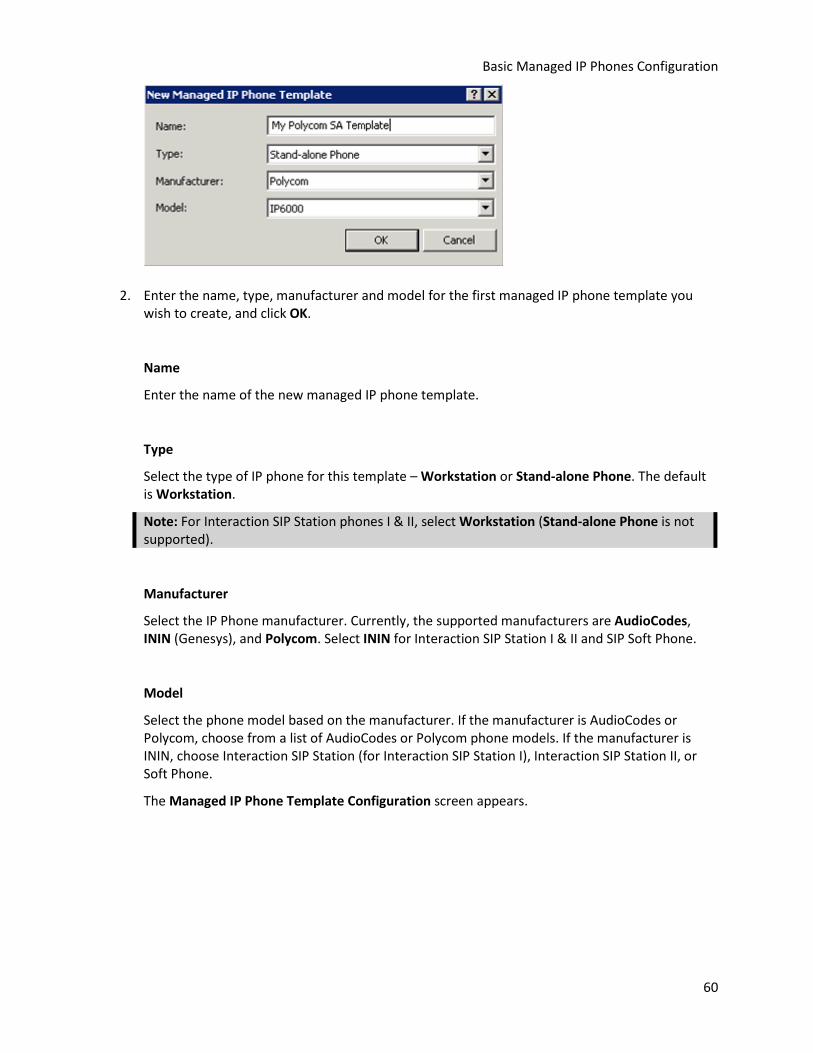
2. Enter the name, type, manufacturer and model for the first managed IP phone template you wish to create, and click OK.
Name
Enter the name of the new managed IP phone template.
Type
Select the type of IP phone for this template – Workstation or Stand-alone Phone. The default is Workstation.
Note: For Interaction SIP Station phones I & II, select Workstation (Stand-alone Phone is not supported).
Manufacturer
Select the IP Phone manufacturer. Currently, the supported manufacturers are AudioCodes, ININ (Genesys), and Polycom. Select ININ for Interaction SIP Station I & II and SIP Soft Phone.
Model
Select the phone model based on the manufacturer. If the manufacturer is AudioCodes or Polycom, choose from a list of AudioCodes or Polycom phone models. If the manufacturer is ININ, choose Interaction SIP Station (for Interaction SIP Station I), Interaction SIP Station II, or Soft Phone.
The Managed IP Phone Template Configuration screen appears.
CIC Managed IP Phones
61
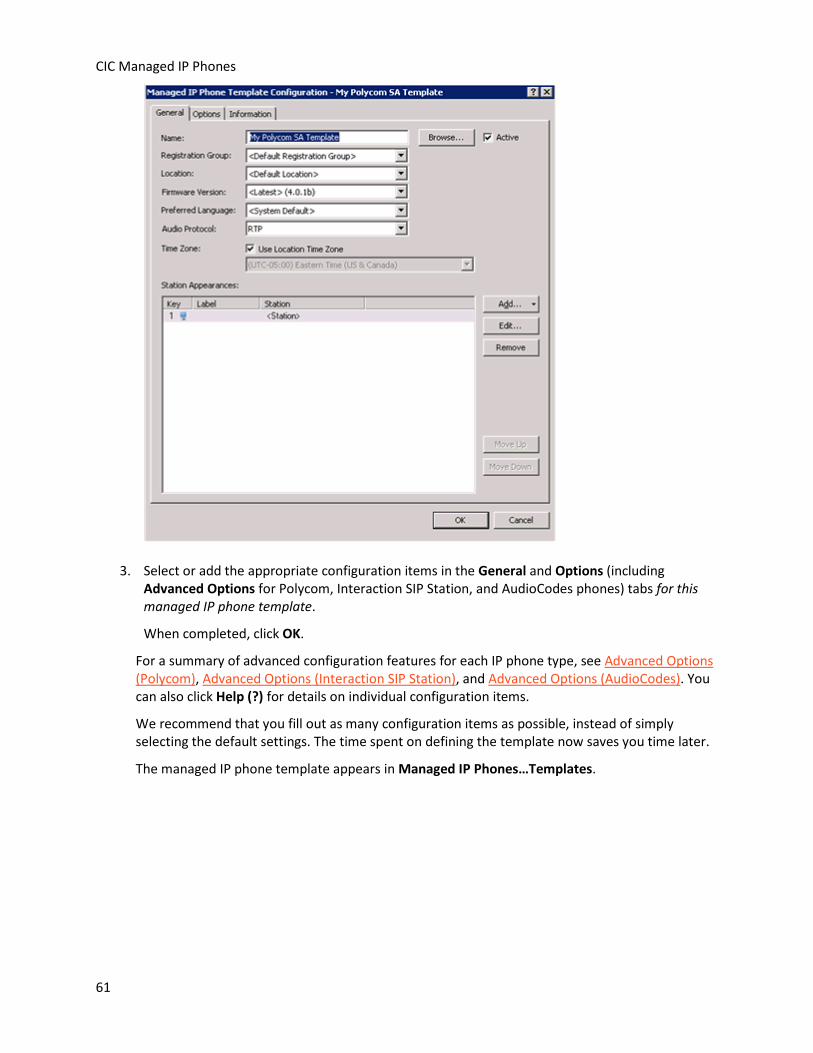
3. Select or add the appropriate configuration items in the General and Options (including Advanced Options for Polycom, Interaction SIP Station, and AudioCodes phones) tabs for this managed IP phone template.
When completed, click OK.
For a summary of advanced configuration features for each IP phone type, see Advanced Options (Polycom), Advanced Options (Interaction SIP Station), and Advanced Options (AudioCodes). You can also click Help (?) for details on individual configuration items.
We recommend that you fill out as many configuration items as possible, instead of simply selecting the default settings. The time spent on defining the template now saves you time later.
The managed IP phone template appears in Managed IP Phones…Templates.
Basic Managed IP Phones Configuration
62
4. Repeat the previous steps for the other managed IP phone templates you wish to create. For
example:
Create CSV Managed IP Phone list(s)
Once you have created the managed IP phone template(s), create one or more CSV Managed IP Phone lists based on:
• Template: Containing name, template, proxy group, extension, identification address, label, and address information for the appropriate IP phones in your CIC system. Each IP phone must reference one of the managed IP phone templates you have created by name.
-And/or-
• Type, Manufacturer, and Model containing name, type, manufacturer, model, proxy group, extension, identification address, label, and address information for the appropriate IP phones in your CIC system.
Two sample Managed IP Phones CSV lists corresponding to the two types of CSV lists are available to download from the Product Information site at https://my.inin.com/support/products/cic/Pages/Utilities-Downloads.aspx:
• CSV Managed IP Phone List-Template.csv and CSV Managed IP Phone List-Template.xlsx
• CSV Managed IP Phone List-TMM.csv and CSV Managed IP Phone List-TMM.xlsx
When you run Managed IP Phone Assistant, you will import a completed CSV Managed IP Phone list.
Follow this procedure to create a CSV managed IP phone list based on a template.
To create a CSV Managed IP Phone-Template list
1. Download the most recent sample Managed IP Phone CSV lists from the Product Information site at https://my.inin.com/products/cic/Pages/Utilities-Downloads.aspx to the CIC server or location accessible by the CIC server.
2. Open a copy of CSV Managed IP Phone List-Template.xlsx and enter the attributes in the appropriate columns for each managed IP phone and associated SIP station you wish to create.
The following table provides descriptions of each attribute.
Attribute Description
Name (Required) Type the name of the IP phone.
Template (Required) Type the managed IP phone template for this IP phone. The template name must be identical to one of the templates you have created.
Proxy Group
Type the Registration (Proxy) Group to be used with the managed IP phone template for this IP phone.
If this value is left blank, Managed IP Phone Assistant will fill in the Registration Group defined in the template.
Extension Type the primary appearance extension number for this IP phone.
When this value is left blank, it will remain blank in Managed IP Phone Assistant.
Identification Address
If you know the IP address for this IP phone ahead of time, type the SIP connection address in the form of sip:xxx@IPaddress:portnumber, e.g., sip:[email protected]:5060.
If you do not know the IP address, leave this value blank. It will be filled in when the phone registers with the CIC server following provisioning.
(Polycom only) Type the label that will be used for the primary appearance of this IP phone and the associated SIP station. Typical values for label are the station extension or the user's extension (in the case where one user will almost always be using the station).
When this value is left blank, Managed IP Phone Assistant will fill in the Name attribute (IP phone name).
Address
If you know the address for this IP phone ahead of time, type:
For Polycom phones
The MAC address of the IP phone. Polycom addresses start with 00:04:f2.
For SIP Soft Phones
The full computer name for the IP phone. To make sure you get the full computer name, navigate to My Computer>Properties>Computer Name and note the Full Computer Name. For example: PattyJ.acme.com.
For Interaction SIP Station I & II phones
The MAC address of the IP phone. Interaction SIP Station MAC addresses start with 00.26.fd.
For AudioCodes phones
The MAC address of the IP phone. AudioCodes addresses start with 00:90:8f.
If you do not know the address ahead of time:
For Polycom phones
You must manually provision using the provisioning IVR.
For SIP Soft Phones
You must manually provision using the SIP Soft Phone Provisioning wizard.
CIC Managed IP Phones
65
Attribute Description
For Interaction SIP Station I phones
The Interaction SIP Station I cannot be provisioned through the provisioning IVR. If the MAC address was not known at the time the CSV list is created, the MAC address must be manually entered for each Interaction SIP Station I in the Interaction Administrator Managed IP Phone container before the corresponding phone is set up and booted.
For Interaction SIP Station II phones
You must manually provision using the provisioning IVR.
For AudioCodes phones
You must manually provision using the provisioning IVR.
3. When you have completed entering the IP phone information, save the file, selecting .CSV as the file type. The following message may appear when saving the CSV Managed IP Phone list:
Ignore this message and click Yes.
The message explains that some of the macros in the Excel file cannot be preserved in the resulting CSV file. You will not need those macros when Managed IP Phone Assistant imports the file.
Here is an example of the resulting CSV Managed IP Phone List.csv file as it appears in Excel:
When the CSV file is opened in a text editor, the IP phone information is separated by commas, with one IP phone listed per line.
Basic Managed IP Phones Configuration
66
4. If you have not already done so, download your CSV Managed IP Phone list-Template.csv file to a secure location on the CIC server.
Create a CSV Managed IP phone-TMM list
Follow this procedure to create a CSV managed IP phone list based on type, manufacturer and model.
To create a CSV Managed IP Phone-TMM list
1. Download the most recent sample Managed IP Phone CSV lists from Product Information site at https://my.inin.com/support/products/cic/Pages/Utilities-Downloads.aspx to the CIC server or location accessible by the CIC server.
2. Open a copy of CSV Managed IP Phone List-TMM.xlsx and enter the attributes in the appropriate columns for each managed IP phone and associated SIP station you wish to create.
The following table provides descriptions of each attribute.
Attribute Description
Name (Required) Type the name of the IP phone.
Type (Required) Type the type of IP phone – Workstation or Stand-alone Phone.
For Interaction SIP Station I & II phones: Type Workstation. (Stand-alone Phone is not supported).
Manufacturer (Required) Type the IP phone manufacturer.
Currently, the supported manufacturers are AudioCodes, ININ (Genesys), and Polycom.
Model (Required) Type the phone model based on the manufacturer.
If the manufacturer is Polycom: Type the Polycom phone model.
If the manufacturer is ININ: If the manufacturer is ININ, type Soft Phone or Interaction SIP Station (for Interaction SIP Station 1), Interaction SIP Station II.
If the manufacturer is AudioCodes: Type the AudioCodes phone model.
Proxy Group
Type the Registration (Proxy) Group to be used with the managed IP phone template for this IP phone.
If this value is left blank, Managed IP Phone Assistant will fill in the default Registration Group.
Extension Type the primary appearance extension number for this IP phone.
When this value is left blank, it will remain blank in Managed IP Phone Assistant.
Identification Address
If you know the IP address for this IP phone ahead of time, type the SIP connection address in the form of sip:xxx@IPaddress:portnumber, e.g., sip:[email protected]:5060.
If you do not know the IP address, leave this value blank. It will be filled in when the phone registers with the CIC server following provisioning.
Label
(Polycom only) Type the label that will be used for the primary appearance of this IP phone and the associated SIP station. Typical values for Label are the station extension or the user's extension (in the case where one user will almost always be using the station).
When this value is left blank, Managed IP Phone Assistant will fill in the Name attribute (IP phone name).
Address
If you know the address for this IP phone ahead of time, type:
For Polycom phones
The MAC address of the IP phone. Polycom addresses start with 00:04:f2.
For SIP Soft Phones
The full computer name for the IP phone. To make sure you get the full computer name, navigate to My Computer>Properties>Computer Name and note the Full Computer Name. For example: PattyJ.acme.com.
Basic Managed IP Phones Configuration
68
Attribute Description
For Interaction SIP Station I & II
The MAC address of the IP phone. Interaction SIP Station MAC addresses start with 00.26.fd.
For AudioCodes phones
The MAC address of the IP phone. AudioCodes addresses start with 00:90:8f.
If you do not know the address ahead of time:
For Polycom phones
You must manually provision using the provisioning IVR.
For SIP Soft Phones
You must manually provision using the SIP Soft Phone Provisioning wizard.
For Interaction SIP Station I phones
The Interaction SIP Station I cannot be provisioned through the provisioning IVR. If the MAC address was not known at the time the CSV list is created, the MAC address must be manually entered for each Interaction SIP Station I in the Interaction Administrator Managed IP Phone container before the corresponding phone is set up and booted.
For Interaction SIP Station II phones
You must manually provision using the provisioning IVR.
For AudioCodes phones
You must manually provision using the provisioning IVR.
3. When you have completed entering the IP phone information, save the file, selecting .CSV as the file type. The following message may appear when saving the CSV Managed IP Phone list:
CIC Managed IP Phones
69
Ignore this message and click Yes. The message explains that some of the macros in the Excel file cannot be preserved in the resulting CSV file. You will not need those macros when Managed IP Phone Assistant imports the file.
Here is an example of the resulting CSV Managed IP Phone List.csv file as it appears in Excel:
When the CSV file is opened in a text editor, the IP phone information is separated by commas, with one IP phone listed per line.
4. If you have not already done so, download your CSV Managed IP Phone list-TMM.csv file to a secure location on the CIC server.
Create managed IP phones with Managed IP Phone Assistant
The Managed IP Phone Assistant guides you through the process of creating multiple managed IP phones and associated SIP stations from an imported CSV Managed IP Phone list.
Note: We recommend that you run the Managed IP Phone Assistant outside of your core business hours because the procedure requires significant server resources.
To create managed IP phones with Managed IP Phone Assistant
1. In the Managed IP Phones container, right-click in the right pane and select Managed IP Phone Assistant from the Context menu.
Basic Managed IP Phones Configuration
70
The Managed IP Phone Assistant Welcome screen appears.
2. If you are running Managed IP Phone Assistant after business hours, click Yes to proceed past the warning message.
CIC Managed IP Phones
71
The Add Managed IP Phones screen appears.
3. Select Create managed IP phones from a .CSV file.
The Create Managed IP Phones from a CSV file screen appears.
Basic Managed IP Phones Configuration
72
4. Browse to the location of your CSV Managed IP Phone List.csv file(s) on the CIC server. Select the .csv file you wish to import and click Next.
The assistant will warn you if it encounters errors while parsing the CSV file, providing an Errors button on the dialog. Click Errors to view the status of the errors and a description:
Warning error
Managed IP Phone Assistant cannot verify one or more values. You can continue with the import, but some of those values will not be imported.
Severe error
Managed IP Phone Assistant detects no columns or the file could not be opened. You cannot continue with the import.
5. If you imported a CSV list based on type, manufacturer, and model (CSV Managed IP Phone List-TMM.csv), the Access Control screen appears.
CIC Managed IP Phones
73
6. Select the dial plan classifications for the managed IP phones and station appearances in the CSV file.
For more information, click Help (?).
Note: This screen does not appear if you imported a CSV list based on template, because the dial plan classifications are already defined in the template.
The Saving Managed IP Phones screen appears.
7. Click Commit Changes to save the imported managed IP phones. Click Back to make changes.
If you imported a CSV list based on type, manufacturer, and model (CSV Managed IP Phone List-TMM.csv), the Station Appearances Licenses screen appears.
Basic Managed IP Phones Configuration
74
A Basic Station license is assigned by default to SIP stations associated with managed IP phones. If needed, assign Client Access licenses, ACD Access licenses, and/or add-on licenses. For more information, click Help (?).
Note: This screen does not appear if you imported a CSV list based on template, because the station appearance licensing is already defined in the template.
8. After you click Commit Changes, the assistant prepares the managed IP phones and applies licenses.
The following message may appear if total count of licenses is exceeded: Some or all licenses could not be allocated to each station appearance.
If this message appears, click Review to display the errors and make the necessary changes in the Interaction Administrator License Allocation container.
The Completed the Managed IP Phone Assistant screen appears.
9. Click Finish.
When the Managed IP Phone Assistant has completed, the new managed IP phones appear in the Managed IP Phones container.
CIC Managed IP Phones
75
o The new managed IP phones will have a Status of Not registered. Their status will become Up-to-date on the phones' next SIP registration.
o If you did not supply the Address attribute for one or more managed IP phones in your CSV Managed IP Phone list, they will have a status of Not provisioned. Their status will become Up-to-date once you provision them using the Polycom phone, SIP Soft Phone, Interaction SIP Station II, or AudioCodes provisioning IVR, or for Interaction SIP Station I by manually entering the MAC address for each Interaction SIP Station in Interaction Administrator before the corresponding phone is set up and booted.
10. As part of creating managed IP phones, the associated SIP station appearances created on those IP phones appear in the Stations container.
The SIP stations associated with managed IP phones are of the type Managed Workstation or Managed Stand-alone Phone.
If needed, you can assign Client Access licenses, ACD Access licenses, and add-on licenses to users in the Licensing tab now, or in the Licenses Allocation container.
Advanced configuration changes in the Managed IP Phone container
The following sections in this document provide a summary of advanced configuration features for each IP phone type and instructions for configuration entries or changes:
• Advanced configuration (Polycom)
• Advanced configuration (Interaction SIP Station I & II)
• Setup and configuration (SIP Soft Phone)
• Advanced configuration (AudioCodes)
Basic Managed IP Phones Configuration
76
Genesys recommends that you specify as many configuration items as possible, instead of using the default settings.
Complete the provisioning process (multiple managed IP phones)
CIC provisioning of managed IP phones connects the managed IP phones and downloads their configurations from the CIC server. The goal for CIC Managed IP Phone provisioning is to automate it as much as possible so that no user participation is needed.
If you followed the instructions to configure the network and to create multiple managed IP phones using Managed IP Phones Assistant, automated provisioning will occur once the phones are set up and booted (or re-booted).
When a managed IP phone contacts the provisioning subsystem, the provisioning system will match the phone's computer name or MAC address with an existing managed IP phone configuration, and it will serve the configuration to the device without any additional steps.
Manual provisioning (multiple managed IP phones)
Manual provisioning of some or all managed IP phones may be necessary if:
• The MAC Address (Polycom, Interaction SIP Station I & II, AudioCodes) or Full Computer Name (SIP Soft Phone) has not been specified in the CSV list for some or all Polycom, Interaction SIP Station I & II, SIP Soft Phones, and/or AudioCodes.
Note: In an implementation of new Polycom and/or SIP Soft Phones, the MAC Address or Full Computer Name may not be known at the time the CSV list is created.
• The CIC system has no DHCP server or the DHCP server cannot be accessed.
• Some Polycom phones, Interaction SIP Station phones I & II, SIP Soft Phones, and/or AudioCodes are in remote locations.
Typically, an administrator with required privileges performs the manual provisioning. In some cases, for example, remote locations, users must perform the manual provisioning.
Manual provisioning is performed on each managed phone’s configuration:
• For Polycom phones: Manually provision using the provisioning IVR.
• For SIP Soft Phones: Manually provision using the SIP Soft Phone Provisioning wizard.
• For Interaction SIP Station I phones: The Interaction SIP Station I cannot be provisioned through the provisioning IVR because they don’t have a dial pad. If the MAC address was not known at the time the CSV list is created, the MAC address must be manually entered for each Interaction SIP Station in the Interaction Administrator Managed IP Phone container before the corresponding phone is set up and booted.
• For Interaction SIP Station II phones: Interaction SIP Station II phones have a dial pad. Manually provision using the provisioning IVR.
• For AudioCodes phones: Manually provision using the provisioning IVR.
There may be circumstances when non-standard manual provisioning procedures may be needed. See Appendix A: Non-standard provisioning scenarios for details.
CIC Managed IP Phones
77
Polycom Administration
Create managed IP phones from existing (Polycom) SIP stations
Note: This section is for use with existing CIC systems with unmanaged Polycom phones migrating to CIC 2015 R1 or later.
If your CIC system has existing unmanaged Polycom phones (SIP stations), we recommend that you convert them to managed IP phones. Once you have done so, you no longer need to maintain Polycom phone configuration (.cfg) files.
Before beginning the procedures described in this section, you must first configure the network. We also recommend that you first create individual managed IP phones and are satisfied with the testing you performed.
Complete managed IP phone (Polycom) pre-migration procedures
We recommend that you complete the following pre-migration procedures for easier conversion to managed IP phones:
• Add the SIP Phone Information Update server parameter. When the phones reboot, the Manufacturer and Model fields for existing SIP stations populate automatically.
• Update a common .cfg file to include the sec.tagSerialNo=1 configuration parameter. When the phones reboot, the MAC Address field for existing SIP stations populates automatically.
All Polycom phones send this information each time they register, meaning that the data populates in Interaction Administrator as each phone re-registers with the CIC server. The system uses this data when you run Managed IP Phone Assistant to convert to managed IP phones and associated SIP stations.
Add the SIP Phone Information Update server parameter
The SIP Phone Information Update server parameter allows the CIC system to automatically populate the Manufacturer and Model fields for a Polycom phone (SIP station) in Interaction Administrator. Set the SIP Phone Information Update server parameter to a value of 1, yes, or true. When the phones are reloaded (rebooted), Telephony Services will derive the model and manufacturer information from the User-Agent strings in the registration message and dynamically update the DS attributes for the corresponding SIP Station.
Note: If you use the sample handlers called IP Phone Utilities from the SIP-Related Download Files page on the PureConnect Customer Care website (https://my.inin.com/products/sip-platforms/Pages/default.aspx ) for creating configuration files based on the information in Interaction Administrator, please note that adding the SIP Phone Information Update parameter is not compatible with these examples.
The phones must be rebooted for the SIP Phone Information Update server parameter to take effect. It will take some time for all of the phones to re-register with the server, so make sure you check to see that the values have populated before proceeding.
Update a common .cfg file to include sec.tagSerialNo=1 configuration parameter
Update the Polycom phone configuration files in the root directory of the TFTP or FTP server to include the sec.tagSerialNo=1 configuration parameter, if it is not already included. This allows the CIC system
to automatically populate the MAC Address field for a Polycom phone (SIP station) in Interaction Administrator. Choose a common file such as xic.cfg (if using files generated by the ININ IP Phone Configurator), or the sip.cfg file. When the .cfg file is updated and the phones are reloaded (rebooted), Telephony Services will derive the MAC address from the User-Agent strings in the registration message dynamically update the configuration for the corresponding SIP Station.
The phones must be rebooted for the .cfg file updates to take effect. It will take some time for all of the phones to re-register with the server, so make sure you check to see that the values have populated before proceeding.
Create managed IP phones from existing (Polycom) SIP stations using Managed IP Phone Assistant
This section describes how to use the Migrate option in the Managed IP Phone Assistant to create managed IP phones and associated SIP stations from existing (Polycom phone) SIP stations.
In this procedure, a sample SIP Workstation IP335 station will be migrated to a new managed IP phone and associated station.
Notes:
• We recommend that you run the Managed IP Phone Assistant outside of your core business hours because the procedure requires significant server resources.
• The complexity and variation of XML files can mean that your files may have problems being migrated. If this occurs, contact PureConnect Customer Care and open an incident. Be prepared with logs and copies of your XML files. You can continue after you have opened your ticket and simply use the phones in an unmanaged fashion until you are able to successfully complete the migration.
To create managed IP phones from existing (Polycom) SIP stations
1. Before you begin, make sure that you know the location of the Polycom phone/SIP station configuration files (.cfg), as the Managed IP Phone Assistant will ask for this information. The .cfg file location is typically the root directory of your TFTP server, either a local directory path or a network share. It must be accessible from the machine where the Managed IP Phone Assistant will be run.
2. Highlight the Managed IP Phones container and select Managed IP Phone Assistant from the Context menu.
Note: Run the Managed IP Phone Assistant after business hours
CIC Managed IP Phones
79
The Managed IP Phone Assistant Welcome screen appears.
3. If you are running Managed IP Phone Assistant after business hours, click Yes to proceed past the warning message.
The Add Managed IP Phones screen appears.
Polycom Administration
80
4. Select Create managed IP phones by migrating existing stations to phones on a per manufacturer basis.
The Select Manufacturer screen appears.
5. Choose the manufacturer of the stations you wish to migrate.
Currently Polycom is the only supported manufacturer.
If you selected Polycom in the previous screen, the Select Default Model screen appears.
CIC Managed IP Phones
81
6. From the drop-down list, select the default phone model that should be used if the model cannot be derived from the stations on the phones being migrated.
For example, SIP stations associated with a Polycom configuration file may not have a manufacturer or model set in Interaction Administrator. By selecting the default model, the Managed IP Phone Assistant knows what settings to use for the migration. In this example, the default model selected is an IP335.
Note: If you set the SIP Phone Information Update server parameter as described in an earlier section, selecting the default model in this is screen is unimportant, since the server parameter ensures that each phone will be populated appropriately for manufacturer and model in Interaction Administrator.
The New Phone Naming screen appears.
7. Use this page to specify a format string that specifies the name for the assistant to use for the migration item. The assistant also creates an associated SIP station with the same name. There are two different substitution strings that can also be used alone or with a format string to create phone names.
Polycom Administration
82
Phone name format This is the name of the first private station display name that is added to the migration item. Use a format string to define the phone's name when created. Use one or more substitution strings with a format string, so that every phone created will have meaningful and unique name. There are two different substitution strings:
$FirstPrivateStation$
This is the name of the first private station display name as defined in the reg.x.displayName attribute found in the SIP phone's .cfg file that is added to the migration item.
$MAC$
This is the MAC address of the phone being migrated.
By default, the assistant uses the $FirstPrivateStation$ substitution string. A substitution string can be used separately, in combination with the other substitution string, in combination with a format string, or a format string can be used alone. For example:
• $FirstPrivateStation$
• $MAC$
• $FirstPrivateStation$-$MAC$-SecondFloor
• SecondFloorPhone – Using just text, the assistant appends the text with _1, _2, and so on after naming the first IP phone and associated SIP station.
If a single format string of ManagedPhone is used without a substitution string, then all new phone names created would be named ManagedPhone_1, ManagedPhone_2, etc. If the substitution string $MAC$ is used together with the format string of ManagedPhone, such as ManagedPhone - $MAC$, then the MAC address for each phone would be substituted in the new name, i.e., ManagedPhone - 0004f2008100.
Note: The substitution strings are case-sensitive. For example, if Phone - $mac$ is specified, $mac$ will not resolve to the MAC address. The string must be entered as Phone - $MAC$ for proper MAC address resolution.
Sample phone name
The sample phone name field shows how the phone name format field will resolve.
8. Click Show Available Substitution Strings to view the substitution strings. The Phone Configuration File Directory screen appears.
CIC Managed IP Phones
83
Enter the directory or click Browse to select the directory where the existing IP phone configuration (.cfg) files are located. The .cfg file location is typically the root directory of your TFTP server, either a local directory path or a network share. It must be accessible from the machine where the Managed IP Phone Assistant will be run. In this example, the location is D:\I3\IC\TFTPRoot. The Managed IP Phone Assistant searches this directory for .cfg files and displays a list of files found in the next screen, Select the Items to Migrate. The assistant uses the settings in the selected .cfg files to create managed IP phone objects. For the assistant to recognize a phone configuration file, the file must:
• Be in the XXXXXXXXXXXX.cfg format, where XXXXXXXXXXXX is a 12 character alpha-numeric MAC address.
• Contain an APPLICATION XML element at the root that has a CONFIG_FILES XML attribute that specifies the other phone configuration files.
Each .cfg file that meets these criteria will be displayed as a selectable item to migrate. The assistant must have read access to the phone configuration directory specified. For more information, click Help (?).
9. Click Next. The Select the Items to Migrate screen appears.
Polycom Administration
84
Select the items to migrate by highlighting the items in the Available list and clicking Add to move them to the Selected list. The items displayed in the Available list are the Polycom configuration files that the assistant found in the directory specified in the Phone Configuration File Directory screen.
10. At least one item must be selected to continue. Click Next. The Build Migration Items screen appears.
This screen shows that the migration process is going to begin building migration items, and it lists the number of migration items that will be included in the process. In this example, there is just one migration item.
11. Click Next. After the migration items have been built, the Current State of Migration Items screen appears.
CIC Managed IP Phones
85
The number of items with errors, warnings, or no errors or warnings are listed.
• Items with errors
The assistant cannot create a managed IP phone from these items. Click the Show Item Details button and review the Build History tab to aid in resolving the error.
Items with warnings
These items are candidates for migration at the current state, and the assistant may be able to create a managed IP phone from these items.
Items with no errors or warnings
These items are good candidates for migration at the current state, and the assistant will most likely be able to create a managed IP phone from these items.
Note: We strongly recommend that you review the migration item details by clicking Show Item Details. Item details include information about the new managed phone that will be created for the selected migration item, and information about error and warnings listed for that migration item.
12. Click Next. The Backup Directory Services screen appears.
Polycom Administration
86
Note: We strongly recommended that you perform a Directory Services backup. This is the final step in the migration process before the Managed IP Phone Assistant begins creating the managed IP phones based on the migration items.
13. Click Backup Directory Services to perform the backup. The Directory Services backup may take several minutes. There is a timeout set at 40 minutes. If the timeout is reached, the assistant displays The CIC server was unable to perform a backup of Directory Services. Either click Try Again to attempt another backup, or click Continue without making a backup. When the backup is complete, the screen will show the location of the backup file, for example, D:\I3\IC\Backup\RegistryBackup_16-8-2011-458037. Please note this location. This is the last screen before the migration process begins. If you wish to learn more about what happens during the migration process, click Help (?). The Managed IP Phone Assistant prompts you to begin the migration process.
14. Click Yes to start the migration process.
When the migration process is completed, the Migration Results screen appears.
CIC Managed IP Phones
87
This screen shows the number of managed IP phones that were created in the migration process and indicates whether warning or errors occurred.
15. Click Show Detailed Migration Results to view each step that was taken during the migration for each migration item.
If errors and warnings occurred, you can see at what point they occurred and why. Depending on the migration results, you may be prompted to reload the phones or you can make changes to individual IP phones in the Managed IP Phone container after the assistant completes, and reload the phones at that time. For more information, click Help (?). The Managed IP Phone Assistant process is now complete.
Polycom Administration
88
16. Click Finish to exit the assistant. The new managed IP phones appear in the Managed IP Phones container.
Notice that the new managed IP phone in this example has a status of Not registered. On the phone's next SIP registration, this status will become Up-to-date. As part of creating managed IP phones, associated SIP station appearances are created on those IP phones, of the type Managed Workstation or Managed Stand-alone Phone. They can be viewed in the Stations container.
Complete the provisioning process (Polycom)
CIC provisioning of managed IP phones connects the managed IP phones and downloads their configurations from the CIC server. The goal for CIC managed IP phone provisioning is to automate it as much as possible so that no user participation is needed.
If you followed the instructions to configure the network and to create managed IP phones from existing (Polycom) SIP Stations using Managed IP Phones Assistant, automated provisioning will occur once the phones are set up and booted (or re-booted).
When a managed IP phone contacts the provisioning subsystem, the provisioning subsystem will match the phone’s computer name or MAC address with an existing managed IP phone configuration, and it will serve the configuration to the device without any additional steps.
Manual provisioning (Polycom)
Manual provisioning of some or all managed IP phones may be necessary if:
CIC Managed IP Phones
89
• The CIC system has no DHCP server or the DHCP server cannot be accessed.
• Some Polycom phones are in remote locations.
Typically, an administrator with required privileges performs the manual provisioning through the phone’s provisioning IVR. In some cases, for example, remote locations, users must perform the manual provisioning. Manual provisioning is performed on each managed phone’s configuration.
Additional configuration (Polycom)
Polycom firmware and phones (CIC 4.0 SU 6, CIC 2016 R4 and later)
Polycom firmware for supported and EOL phones
The following tables show the Polycom firmware versions for currently supported and End of Life (EOL) phones for CIC 4.0 SU 6 and CIC 2016 R4 and later.
Notes:
• CIC 2015 R1 and later supports all listed Polycom firmware versions.
• Starting with CIC 2016 R4 Patch2, CIC 2016 R3 Patch8, CIC 2016 R2 Patch14, CIC 2016 R1 Patch20, CIC 2015 R4 Patch20, CIC 2015 R3 Patch24, and CIC 2015 R2 Patch24+ support is provided for Polycom phone models VVX 301, 311, 401, 411, 501, and 601.
Firmware for currently supported phones (CIC 4.0 SU 6, CIC 2016 R4 and later)
Firmware Initially Made Available in… Phone Type Phone Model
5.4.5G
2017 R3 and later
2017 R2 Patch6
2017 R1 Patch12
2016 R4 Patch17
2016 R4 Patch15 + ES
2016 R3 Patch23
2016 R2 Patch23
2016 R1 Patch27
Desktop Phones
VVX 101, VVX 201
VVX300/301, VVX310/311
VVX400/401, VVX410/411
VVX500/501
VVX600/601
Polycom Administration
90
Firmware Initially Made Available in… Phone Type Phone Model
Firmware and provisioning no longer supported, although the phones are still available from the manufacturer.
3.2.7 Desktop phones
IP320, IP330, IP430 --
3.1.6
Desktop phones
Conference phones
IP301, IP501, IP600, IP601
IP4000 Except for the IP4000, does not support SRTP.
2.1.4 Desktop phones IP300, IP500 Does not support SRTP, DND syncing, idle screen
configuration, or voice-quality monitoring.
Interaction Firmware (Polycom)
A separate Interaction Firmware component containing the firmware needed for Polycom, Interaction SIP Station, and AudioCodes managed IP phones is included on the CIC 2015 R1 and later .iso file on the Product Information site Download page at https://my.inin.com/products/cic/Pages/default.aspx.
When you run Install.exe on the CIC server, it installs the Interaction Firmware component along with the other required CIC server components.
If you wish to use Interactive Update to apply the Interaction Firmware component on the CIC server along with the other required CIC server components, see the Product Information site at https://my.inin.com/products/iupdate/Pages/Latest-Release.aspx for instructions.
Polycom firmware update required
Starting in June 2016, Polycom introduced a new MAC address range for VVX, SoundPoint IP and SoundStation phones, as well as SoundStructure Installed Audio products, due to exhaustion of the current 00:04:xx:xx:xx:xx MAC address range. Phones with a MAC address in the range 64:16:7f:xx:xx:xx require a firmware update, which is included in currently supported CIC
patch releases, starting with CIC 2015 R2. See PureConnect KB article https://my.inin.com/products/pages/kb-details.aspx?entryid=q146602352400297 for details.
Selectable Polycom firmware
Starting with CIC 4.0 SU 3, administrators can select from a list of supported Polycom firmware versions for a specified model to apply to a managed IP phone or group of managed IP phones in Interaction Administrator.
The selectable firmware feature enables you to:
• More easily control CIC release deployment to managed IP (Polycom) phones. For example, you can leave the phones on an older firmware version when a release is first deployed, then set a few phones to the new firmware to test it, then push out all the phones when ready.
• Test for a regression by pushing a test phone back to an older firmware version for verification purposes.
Note: The selectable firmware feature option will not appear if the selected Polycom IP Phone model(s) do not support it.
To select a firmware version for a single managed IP phone:
1. Select a managed IP phone in the Managed IP Phones container and double-click to open the Managed IP Phone Configuration dialog.
2. In the Managed IP Phone Configuration dialog, select the firmware version from the Firmware Version drop down list.
By default, the recommended option of <Latest> is selected. Older firmware versions previously installed on this system may also appear in the drop down list. In certain scenarios, you may wish to select older approved firmware for this Polycom IP phone model, for example, to control the rollout of new firmware to a managed IP phone or group of managed IP phones during a release update. This option will not appear if the selected Polycom IP phone model does not support this feature.
To select a firmware version for multiple IP phones:
1. Select two or more managed IP phones in the Managed IP phones container, right-click and select Change Multiple IP Phonesfrom the Context menu.
Polycom Administration
94
2. Click on the Firmware Version pull-down menu and select the desired firmware version.
By default, the recommended option of <Latest> is selected.
SpectraLink Wi-Fi phone considerations
The SpectraLink SL8440 and SL8450 Wi-Fi models differ significantly from the other Polycom phone models. The most basic difference is the wireless connectivity capability of the SpectraLink phones via Wi-Fi. In addition to supporting 802.11b/g/n, they also support WEP, WPA, WPA2-PSK, and WPA2-Enterprise for wireless security. They also require business class wireless access points that support WMM (Wi-Fi Multimedia) protocols, requiring additional steps of Wi-Fi connectivity configuration before DHCP/DNS setup.
It is also important to note that the firmware and provisioning of these devices are “End of Life” (EOL), so newer supported firmware versions are not available. See Polycom product documentation for a complete list of supported standards and recommended practices.
CIC Managed IP Phones
95
Support for End of Life devices
SIP Handset manufacturers such as Polycom move their products to an End of Life (EOL) status sometime after they stop production of that particular product model. Once this happens, they typically also stop maintaining the firmware used with those models as well. Genesys has opted to attempt to support our customers who still operate on these EOL handsets by continuing to make them available as Managed IP Phones. This support however is limited.
To date, all EOL phones are still available when selecting the model of your Managed IP Phone, their configuration files are still generated, and the last supported firmware files are included with the CIC server. While we have opted to support the administration, configuration, and interoperability of these devices with CIC, we are unable to address any issues that are determined to exist at the device level. We do not have the ability to create new firmware, nor obtain newer firmware from the manufacturers for products they have listed as EOL. Additionally, Genesys may discontinue the support of any EOL device for any reason in the future.
To check the status of any particular phone model, consult the manufacturer or the Test Lab site (http://testlab.inin.com).
Provisioning FTP adapter
Polycom phones running 2.1.4 firmware (the IP300 and IP500) use the Provisioning FTP Adapter for their initial firmware requests. This adapter by default listens on Port 21, but it can be disabled by creating the server parameter Provision FTP Enabled and setting it to No.
Managed IP phone (Polycom) configuration options
Availability of configuration options for Polycom managed IP phones depends upon the model of the phone. Newer models tend to have more options.
Options tab (Polycom)
These configuration options are accessible from the Managed IP Phones container upon editing one or more managed Polycom phone(s). The Options tab contains such configuration as port settings, localization, volume persistence, and emergency information. Interaction Administrator help contains a complete listing of configuration options and their meaning.
The Advanced Options are accessible from the Advanced Options button in the Options tab, if configuring just one phone, or in the Advanced Options tab if configuring more than one phone. The Advanced Options tab contains configuration for timeout, Polycom features, echo/noise suppression, gain settings, auto-dial, local Polycom dial plan, Network Address Translation (NAT), flash parameters, syslog, voice quality monitoring, and phone-specific SIP security. Interaction Administrator help contains a complete listing of advanced configuration options and their meaning.
CIC Managed IP Phones
97
Additional managed IP phone (Polycom) features
This section describes some of the unique features that Polycom phones offer over other managed IP phones types:
• Call parking/Zone paging
• Shared line appearances
• Custom configuration files
• Supported languages for Polycom phones
• External registrations
Call parking / Zone paging
Call parking places a parked call (read held call) into a specific call queue, or orbit. Any other Polycom phone can pick up the parked call by specifying which orbit to pick up from.
Zone page allows one phone to page an entire dial group (via an extension). It passes one-way audio to all phones reachable at the specified extension.
Dial string Function
*901 <extension> Zone page
*902 <orbit#> Park call in orbit <orbit#>
*903 <orbit#> Pick up parked call from orbit <orbit#>
*904 (<orbit#>) List parked calls (in orbit <orbit#>)
Dial options for Call parking and Zone paging
Shared line appearances
Polycom phones support shared line appearances, allowing one line to be mirrored over multiple stations. An example of using this is an assistant having an appearance of the manager’s phone line on his or her phone so that assistant can see whether the manager is on the phone or not, and answer the manager’s calls.
The first step for setting up shared lines is to mark the desired stations as sharable. Only station on Polycom phones support this feature. This is done through Interaction Administrator by editing the station appearance on a managed Polycom IP phone.
Once the station has been marked as Sharable, it can be added to the desired Polycom managed IP phone as a shared station appearance. Select the desired station appearance and a screen will appear for the configuration of the shared appearance. Once the configuration is complete, simply reboot the phone with the shared appearance.
Polycom Administration
98
CIC Managed IP Phones
99
Custom configuration files (Polycom)
The provisioning server supports the ability to add a custom attribute to Polycom phones named config_files (case-insensitive), which must contain a comma-separated list of files. Provisioning includes the files in the config_files list for Polycom phones if the file exists in the \i3\ic\provision\polycom directory on the CIC server. These files are requested after the config files are generated by provisioning and allow administrators to set custom config file attributes that are not handled by provisioning (e.g. microbrowser settings). See Boot and provision sequences (Polycom) for more details on the file inheritance model used by Polycom phones in the provisioning sequence.
The config_files custom attribute supports [MACADDRESS] and [MODEL] placeholders, with the value being substituted automatically (e.g. [MACADDRESS]-config.cfg would become 0004f2000000-config.cfg and [MODEL]-config.cfg would become IP330-config.cfg). With this mechanism, custom configuration can be set on a per-phone and a per-model basis.
Polycom Administration
100
Supported languages for Polycom phones
• Language support for Polycom phone models is based on the version of your Polycom firmware. Please refer to Polycom’s VoIP SIP Software Release Matrix at http://downloads.polycom.com/voice/voip/sip_sw_releases_matrix.html for information on your firmware version.
• The following list shows all known languages supported as of Polycom 3.2.5c:
• Chinese, China (for IP 450, 550, 560, 650, 670 and IP 6000, 7000 only)
• Japanese, Japan (for IP 450, 550, 560, 650, 670 and IP 6000, 7000 only)
• Korean, Korea (for IP 450, 550, 560, 650, 670 and IP 6000, 7000 only)
• Norwegian, Norway
• Polish, Poland (all phones except IP 301)
• Portuguese, Portugal
• Russian, Russia
• Slovenian, Slovenia (all phones except IP 301 and IP 4000)
• Spanish, Spain
• Swedish, Sweden
Note: The IP301 model does not support any languages other than its internal default (English, United States).
Language support for managed Polycom phones is configured in Interaction Administrator in Managed IP Phones Configuration…Options under Polycom Interface.
External registrations (Polycom)
Polycom phones support the use of the external registrations feature, allowing a specific line to register differently than all the other lines on that phone. An external registration is added to a
Polycom Administration
102
phone via the Managed IP Phone configuration screen in Interaction Administrator. See Appendix B: How registrations work (proxy settings) for more detailed information.
Troubleshooting (Polycom)
This section outlines a few of the more common problem scenarios encountered with Polycom phones. In all of these scenarios, it is useful to obtain a packet capture to see exactly what traffic is passing to and from the phone, including DNS, HTTP, and SIP traffic.
Polycom phone is set to use TLS but can’t receive calls
If a Polycom phone cannot connect to a network time server (via SNTP) to determine the time, it will not be able to register or validate a certificate sent from the CIC Server to validate the call connection. That means all calls will fail silently. Further, if the Polycom phone cannot connect to a network time server when booting, the phone will fail.
To resolve this, ensure that each Polycom phone using TLS can connect to an NTP server. This can be configured in multiple ways.
• Set the NTP server on the DHCP server via either DHCP Option 004 or 042.
• If no domain controller is available, set the IC Server to be the SNTP server.
For more information, see Configure the network for managed IP phones.
Polycom phone cannot locate boot server
By default, the phone’s Boot Server setting is set to Custom + Option 66, with Custom’s default value set to 160. You can set both of these values on the phone. When the phone looks at options supplied by the DHCP server, it first looks for Option 160. If that option does not define a boot server, then the phone looks at Option 66. As described in Polycom DHCP record notes, you normally do not need to set Option 66 on a Polycom phone in order for the phone to locate the boot server.
Notes:
• Steps often differ depending on the phone model used and whether the phone is starting or is already running. If these steps don’t match your phone, see the Polycom documentation for configuration instructions.
• The SpectraLink phones do not have a menu key; rather, the main screen has an icon called Settings which gives access to the configuration menus. Beyond this, the menus are structured similarly to the configuration menus on other models. The Network Settings are set up a little differently, though this last difference is due to the SpectraLink phones running Polycom’s 4.x firmware rather than to the model itself.
To check that the phone has its Boot Server settings set correctly:
1. Navigate to the phone’s Network Configuration screen:
a. Press the Menu button. Press 3 for Settings. Press 2 for Advanced.
b. Key in the password (the default is 456) and then press the Enter button.
c. Press 1 for Admin Settings.
d. Press 1 for Network Configuration.
CIC Managed IP Phones
103
2. Navigate to the DHCP menu screen:
a. Choose DHCP Menu followed by Select.
b. Choose Boot Server and press Edit.
c. Use the arrow keys to select Custom + Opt 66.
d. Press OK.
e. Choose Boot Srv Opt and press Edit.
f. Enter 160 on the keypad.
g. Press OK and then press Exit twice.
3. Select Save Config.
The phone saves your configuration changes and reboots. If it still cannot locate the boot server, verify via DNS that the hostname configured in DHCP resolves to the IP address of the desired CIC server.
Polycom phone contacts boot server but cannot register
If the non-provisioned phone can contact the boot server, it displays a line labeled Setup. If the phone is provisioned, it displays the line label set in Interaction Administrator.
If the phone is not registered:
• When you go off-hook, the phone will display the message URL call is disabled.
• The phone icon next to the line label will appear hollow.
If you set up a Polycom phone using the Configure a Polycom phone’s boot server manually procedure but the phone fails to register:
1. Repeat Steps 1 and 2 of the procedure for manually configuring the phone.
The screen shows the boot server’s URL or IP address followed by the port number.
2. Check the boot server and port information to verify that it is correct.
A common cause of registration failure is that the phone cannot correctly resolve the short name of its server via DNS. To determine if this is the problem, open Windows Explorer on your CIC server. Then:
1. Locate the Polycom log under \I3\IC\Logs\<yyyy-mm-dd>\phones. The filename is the MAC address of the phone-boot_<log sequence number if any>.
2. Open the log in Windows Notepad or a text editor. 3. In the log, locate the section beginning with DHCP returned result.
The log should look like this:
Polycom Administration
104
0101000017|app1 |3|00|DHCP returned result 0x38F from server 10.250.0.2.
0101000017|app1 |3|00| Phone IP address is 10.250.0.92.
0101000017|app1 |3|00| Subnet mask is 255.255.255.0.
0101000017|app1 |3|00| Gateway address is 10.250.0.1.
0101000017|app1 |3|00| Boot server address is http://lab1ic.sbsdomain.local:8088.
0101000017|app1 |3|00| DNS server is 10.250.0.2.
0101000017|app1 |3|00| DNS alternate server is 10.250.0.1.
0101000017|app1 |3|00| DNS domain is sbsdomain.local.
4. In the DHCP returned result section:
In the line that begins DNS server is, note the URL of the DNS server.
If this value is not present, then DHCP Option 6 is not defined.
In the line that begins DNS domain is, note the name of the DNS domain.
This line is immediately below the DNS Server values. If this value is not present, then DHCP Option 15 is not defined.
5. Determine if the DNS server can resolve the DNS domain: a. Open a command prompt, type nslookup and then press Enter. The command window
will look like this:
C:\>nslookup
Default Server: nighthawk.example.com
Address: 172.16.1.2
b. If the default server address differs from the one in the Polycom phone’s log, then type server, the address from the Polycom phone’s boot log, and then press Enter. Windows will change the server address to the address you typed. The command window will look like this (your server address will be different):
> server 10.250.0.2
CIC Managed IP Phones
105
Default Server: [10.250.0.2]
Address: 10.250.0.2
c. Type the short name of your CIC server (such as lab1ic) and the domain name suffix in the Polycom phone’s boot log above (such as sbsdomain.local), then press Enter. If the DNS server can resolve the CIC server name, then the command window will look like this:
> lab1ic.sbsdomain.local
Server: [10.250.0.2]
Address: 10.250.0.2
Name: lab1ic.sbsdomain.local
Address: 10.250.0.51
Boot and provision sequences (Polycom)
This section explains the behavior of a Polycom phone upon powering on. It is helpful while troubleshooting a phone to understand what it is actually doing during startup. When the phone first powers up, it will run through the bootloader (boot sequence), checking its current firmware. It will then start the SIP application and get its configuration (provision sequence).
Polycom boot sequence
Note: Starting with CIC 2017 R3, Interaction Administrator includes the following advanced options for Polycom phones capable of 4.0 or newer firmware. • Boot Server Type • Boot Server Option • Boot Server Option Type • Provisioning URL If the Boot Server Type option is set to Static, the phone uses the value of the Provisioning URL option instead of the DHCP option during the Polycom boot sequence. For more information, refer to Advanced options: Polycom phones or templates in Interaction Administrator help.
• Phone powers up and does CDP/LLDP VLAN discovery o Troubleshoot via packet capture o If the switch returns a response, it will use that VLAN
• Runs through the DHCP discovery
Polycom Administration
106
o Troubleshoot via packet capture, syslog, or bootlog o DHCP must return
IP Address Option 1:Subnet Mask Option 6: DNS server(s) – These servers must be able to resolve the name of the
CIC server (short name + option 15). If using switchover, they must also be able to resolve SRV entries for the phone’s domain.
o DHCP should return Option 3: Router – used if the phone needs to contact any resources not within
its subnet. Option 15: Domain Name - used for DNS A Record lookup. Option 160: Custom Provisioning Server – The phone defaults to Custom +
Opt 66 with Custom defined as 160. It will check for a provisioning server in Option 160 of the DHCP response first, then fall back to Option 66.
If there is not 160 or 66 set: If a boot server value is stored in flash memory and the value is
not 0.0.0.0, then the value stored in flash is used. Otherwise the phone sends out a DHCP INFORM query. If it fails it will report on the screen that it Failed to
contact boot server. o DHCP may return
Option 4/42: Time Server(s) - defined so the phone can do SNTP queries to determine time. If you have this defined in the Configuration files generated from IA, these DHCP Options are optional.
Option 2: Time Server Offset – If you have your time server derived from the Option 4 or 42 values, you must also define the offset.
• Phone will ask for model-specific bootrom.ld (example /2345-12500-001.bootrom.ld)
If it has a different version, it will download and save the new version then reboot
• Phone will ask for <MAC>.cfg (example: /0004f218dece.cfg) o This file contains a list of files that the phone should request to obtain configuration o If there is no managed phone with this MAC address
Provision Server will create a provisional station <MAC>.cfg is populated with provisional configuration file names
• Phone will ask for model-specific sip.ld (example /2345-12500-001.sip.ld)
If it has a different version, it will download and save the new version then reboot
Polycom provision sequence
• Phone will start the SIP application and query DHCP again
• Phone will ask for model-specific bootrom.ld again
• Phone will ask for <MAC>.cfg again
• Phone will ask for model-specific sip.ld again
CIC Managed IP Phones
107
• Phone will ask for the files from <MAC>.cfg in order, generally:
o /server/cert/ca.cfg – CIC certificate authority for use with TLS connections
o /phone/<guid>.cfg – contains custom configuration for that managed phone
o /proxy/<registration_group>.cfg – contains registration information for the phone’s registration group
o /server/xic.cfg – contains dialplan and feature-specific configuration
o /phone1.cfg – contains Polycom-default configuration
o /sip.cfg – contains Polycom-default configuration
o /overrides/<MAC>-phone.cfg – contains phone-specific configuration that was changed from the phone’s user interface
• Phone will ask for default files; these files may not be available
o /<MAC>-license.cfg – phone-specific license
o /contacts/<MAC>-directory.xml – contacts directory
• Phone will REGISTER with the CIC server
Proper provisioning and registration can be verified by either a Wireshark capture, or by the combination of Provision Server and SIPEngine logs.
Precedence example
Polycom phones give precedence to whatever configuration file is acquired first; therefore, any configuration received in server/xic.cfg will override configuration received in sip.cfg.
As an example, say that a phone has the CUSTOM::config_files attribute set to config_me.cfg. Assuming that the file exists, the phone will request this config_me.cfg immediately before it requests phone1.cfg. The contents of config_me.cfg are:
<?xml version="1.0" standalone="yes"?>
<mb>
<idleDisplay>
<home mb.idleDisplay.home="http://www.inin.com"/>
<refresh mb.idleDisplay.refresh="4"/>
</idleDisplay>
reg.1.address="blahblahblah"
</mb>
The phone will ignore the reg.1.address attribute configuration, since that is received prior to this file in phone/<guid>.cfg. However, the other two attributes are not received until “sip.cfg”, so the phone will apply these two attributes accordingly.
Interaction SIP Station I & II Administration
108
Phone Simulator (Polycom)
A quick way to check what configuration will be passed to a phone is to use PhoneSim.exe, a PureConnect tool that simulates the provisioning requests for managed IP phones. All the configuration attributes are displayed and can be filtered by file, attribute name, or attribute value. The configuration files that are passed by the provisioning server are saved in the specified output directory.
This tool correctly applies configuration according to file precedence. To determine whether a specific attribute is being applied from the proper file, simply look at the filename associated with that file.
Interaction SIP Station I & II Administration
Interaction SIP Station I & II phone specifications and description
Interaction SIP Station I & II
The Interaction SIP Station I & II are SIP-based devices designed for the contact center and enterprise environment that use power over Ethernet with physical controls for volume, mute, on-hook/off-hook, and emergency/urgent speed autodial.
The Interaction SIP Station I & II offer a low-cost alternative to basic IP phones, soft phones with USB headsets, and high-priced high-end multimedia phone devices.
For contact center and enterprise users, Interaction SIP Station I & II with Interaction Desktop and other CIC clients offer full-featured call control.
The major differences between Interaction SIP Station I & II are:
• Interaction SIP Station I, formerly known as Interaction SIP Station, has Fast Ethernet ports, an emergency speed dial button, and requires Power over Ethernet.
CIC Managed IP Phones
109
• Interaction SIP Station II, available in CIC 2015 R2 or later, has Gigabit Ethernet ports, a full dialpad, and has the option of using a power adapter or Power over Ethernet.
Compliancy statements
The Interaction SIP Station I & II are fully compliant with the SIP communications standard and works in most global deployments including EU countries.
The use of this equipment may be subject to local rules and regulations. The following rules and regulations may be relevant in some or all areas:
• Federal Communications (FCC Statement)
• CE Notice (European Union)
• WEEE EU Directive
Federal Communications (FCC statement)
This device complies with FCC Rules Part 15. Operation is subject to the following two conditions: (1) this device may not cause harmful interference and (2) this device must accept any interference received including interference that may cause undesirable operation.
This equipment has been tested and found to comply within the limit of a Class A digital device, pursuant to Part 15 of the FCC Rules. These limits are designed to provide reasonable protection against harmful interference in a residential installation.
However, there is no guarantee that interference will not occur in a particular installation. If this equipment does cause harmful interference to radio or television reception, which can be determined by switching the equipment on and off, the user is encouraged to try to correct the interference by one or more of the following measures:
1. Reorient or relocate the interference receiving antenna.
2. Increase the distance of separation between the equipment and interference receiver.
3. Connect the equipment to a power outlet on a circuit different from that to which the interference receiver is connected.
4. Consult the dealer or an experienced radio/TV technician for help.
5. Changes or modifications not expressly approved by the party responsible for compliance could void the user’s authority to operate the equipment.
CE Notice (European Union)
The symbol indicates compliance of this equipment to the EMC Directive and the Low Voltage Directive of the European Union. These markings indicate that this system meets the following technical standards:
1. EN 55022 — Limits and Methods of Measurement of Radio Interference Characteristics of Information Technology Equipment
Note: EN 55022 emissions requirements provide for two classifications:
o Class A is for typical commercial areas.
Interaction SIP Station I & II Administration
110
o Class B is for typical domestic areas.
2. EN 55024 — Information technology equipment - Immunity characteristics - Limits and methods of measurement
3. EN 61000-3-2 — Electromagnetic compatibility (EMC) - Part 3: Limits - Section 2: Limits for harmonic current emissions (Equipment input current up to and including 16 A per phase)
4. EN 61000-3-3 — Electromagnetic compatibility (EMC) -Part 3: Limits - Section 3: Limitation of voltage fluctuations and flicker in low-voltage supply systems for equipment with rated current up to and including 16 A.
5. EN 60950 — Safety of Information Technology Equipment.
To determine which classification applies to your device, examine the FCC registration label located on the device. If the label indicates a Class A rating, the following warning applies to your computer:
This device is classified for use in a typical Class B domestic environment.
WEEE EU Directive
Pursuant to the WEEE EU Directive, electronic and electrical waste must not be disposed of with unsorted waste. Please contact your local recycling authority for disposal of this product.
Specifications
The following table summarizes Interaction SIP Station I & II phone specifications.
Feature Details
VoIP Signaling Protocols SIP: RFC 3261, RFC 2327 (SDP)
Data Protocols
IPv4, TCP, UDP, ICMP, ARP, DNS
802.1p/Q for Traffic Priority and QoS
ToS (Type of Service) field, indicating desired QoS
DHCP Client
NTP Client
Media Processing
Voice Coders: G.711, G.723.1, G.729A/B, G.722. Additionally, Interaction SIP Station II supports Opus.
Telephony Features Speed Dial (Interaction SIP Station I) Dialpad (Interaction SIP Station II), pickup, disconnect, switchover/failover support
Configuration/Management Automatic provisioning for firmware and configuration file upgrade
DHCP options for automatic provisioning
Port Usage Default port 4000 for RTP traffic, port 4001 for RTCP traffic. Depends on the value of Media Port Start Range in the Managed IP Phone Configuration Options in Interaction Administrator.
Power Class 1 PoE
Optional DC to USB power cord (Interaction SIP Station II only)
Hardware
Connectors interfaces:
2 x RJ-45 ports (10/100BaseT Ethernet) for WAN and LAN (Gigabit support on Interaction SIP Station II)
PoE: IEEE802.3af
RJ-9 port (jack) for Handset
Mounting:
Wall mounting
Power:
Class 1 PoE
Keys:
Emergency Speed Dial (Interaction SIP Station I)
Dialpad (Interaction SIP Station II)
Pickup Disconnect
Mute
Volume Up
Volume Down
Multi-function status LED
Idle
Call alerting
On mute
Interaction SIP Station I & II Administration
112
Feature Details Volume up/down
Physical description
To manage incoming and outgoing calls, the Interaction SIP Station includes call control buttons and an LED status indicator.
Interaction SIP Station I
4.5” (11.43 cm) x 4.5” (11.43cm) c 1.5” (3.81cm)
Interaction SIP Station II
4.5” (11.43 cm) x 4.7” (11.93cm) c 1.5” (3.81cm)
For more information, see:
• Interaction SIP Station and Interaction SIP Station II Product Information Sheet at http://www.inin.com/resources/ProductLiterature/Interaction-SIP-Station.pdf.
• Interaction SIP Station Quick Reference and Interaction SIP Station II Quick Reference in the Quick Reference Materials section in the PureConnect Documentation Library at https://my.inin.com/products/cic/Documentation/index.htm.
Set up Interaction SIP Station I & II phones
Before you set up Interaction SIP Station I & II Phones
Before setting up one or more Interaction SIP Station I & II phones, make sure that you have completed the network configuration needed for Interaction SIP Station I & II, as described in Configure the network for managed IP phones.
Your Interaction SIP Station I or II package includes the following items. Be sure all of these parts are available in the box before you proceed.
• One Interaction SIP Station I or II
• One Ethernet patch cable
• A desk-mounting plate with two desk-mounting screws (Interaction SIP Station I only)
• A headset hanger (Interaction SIP Station I only)
When unpacking, ensure that all the following items are present and undamaged. If anything appears to be missing or broken, contact the distributor from whom you purchased the phone for assistance.
Interaction SIP Station Phone I with hanger Two Desk-Mounting Screws
Ethernet Patch Cable Desk Mounting Base Plate
Fasten the phone to the desk (optional-Interaction SIP Station I only)
You can optionally secure the Interaction SIP Station I to a desk or other appropriate service using the included base plate that can be mounted to the bottom of the phone with the two screws provided.
To attach the base plate to the phone:
1. On the bottom of the phone, remove the two screws in the center.
2. If desired, insert the hanger before mounting the plate in step 3 (hanger not shown below).
3. Using the provided screws, attach the base plate to the bottom of the phone, as shown.
Interaction SIP Station I & II Administration
114
Note: The indented side of the holes faces out.
4. Place the phone on the desired surface and mark the surface through the holes on each end of the base plate.
5. Drill or punch a small hole on these marks to receive the screws.
6. Place the base plate over the holes and fasten it to the surface.
For instructions on using Interaction SIP Station, see the Interaction SIP Station Quick Reference card, available in the PureConnect Documentation Library.
Connect the network cable
The procedure below describes how to cable your phone. After you connect the network cable, the Status LED will flash orange as it cycles through the start-up process. Genesys recommends provisioning the phone through Interaction Administrator.
1. Connect a RJ-9 headset to the RJ-9 headset jack.
2. Connect the PoE LAN port on the Interaction SIP Station I or II to your available LAN jack using the provided Ethernet patch cord.
3. If you have only one LAN jack, you can use the included PC port on the Interaction SIP Station I or II to provide a LAN connection to your PC.
CIC Managed IP Phones
115
Advanced configuration (Interaction SIP Station I & II)
Interaction Firmware (SIP Station I & II)
A separate Interaction Firmware component containing the firmware needed for Polycom, Interaction SIP Station I & II, and AudioCodes managed IP phones is included on the CIC 2015 R1 and later .iso file on the PureConnect Product Information site Download page at https://my.inin.com/products/Pages/Downloads.aspx.
When you run Install.exe on the CIC server, it installs the Interaction Firmware component along with the other required CIC server components.
If you wish to use Interactive Update to apply the Interaction Firmware component on the CIC server along with the other required CIC server components, see the PureConnect Product Information site at https://my.inin.com/products/iupdate/Pages/Latest-Release.aspx for instructions.
Managed IP phone (Interaction SIP Station I & II) configuration options
The options shown below reflect the state of Interaction SIP Station I & II configuration as of CIC 2015 R2.
Options tab (SIP Station I & II)
These configuration options are accessible from the Managed IP Phones container upon editing one or more managed Interaction SIP Station I & II phone(s). This tab allows for configuration of speed dial (Interaction SIP Station 1 only), emergency information, among other options. Interaction Administrator help contains a complete listing of configuration options and their meaning.
The Advanced Options are accessible from the Advanced Options button in the Options tab, if configuring just one phone, or in the Advanced Options tab if configuring more than one phone. This tab allows configuration of provisioning, syslog, gains, LAN and VLAN, and audio quality diagnostics. Interaction Administrator help contains a complete listing of configuration options and their meaning.
Additional managed IP phone (Interaction SIP Station I & II) features
This section describes two unique features that Interaction SIP Station phones offer over other Managed IP Phones supported by CIC: Configurable speed dials and LED status light.
Configurable speed dials (Interaction Station 1 only)
Interaction SIP Station I phones can have two speed-dial numbers configured in the Options tab in Interaction Administrator. They can be mapped to any valid number or extension. Button 1 Speed Dial is mapped to the exclamation point (!) key on the Interaction SIP Station I and defaults to 911. Generally this key is left as defaulted for making emergency calls. Button 2 Speed Dial is mapped to the pickup key and defaults to *. To initiate a speed-dial call, simply press and hold the appropriate key until the call is made and connected.
LED status light
Interaction SIP Station phones I & II have a multicolor LED in the center of the phone. This light indicates various states for the phone by color and flashing.
In general, if the LED is solid blue, then the Interaction SIP Station can receive calls. If it is not solid blue, then it cannot receive calls. If the phone does not have an active call and the volume is adjusted, the LED will flash once for each button press: orange if adjusting the volume down, red if adjusting the volume up. When a reboot is signaled by the CIC server, the LED will rapidly flash orange before proceeding to the boot sequence.
Boot Sequence
CIC Managed IP Phones
117
When the phone first boots up, the light will be solid purple then solid orange while the phone powers on. When the phone starts querying DHCP and getting its configuration, the LED will flash orange quickly. If at this point the Interaction SIP Station obtains new firmware, it will download the firmware, then transition to solid orange as it saves the new firmware before rebooting. Once the phone has obtained configuration, the LED will transition to solid orange pending registration. If the registration fails, the LED will blink orange slowly. If the registration succeeds, the LED will be solid blue.
Call Sequence
When the phone receives a call, it will flash red to indicate that a call is waiting to be answered. Once the call is picked up, it will transition to blinking blue, indicating that a call is in progress. If the call is placed on hold, the LED will continue to flash blue. If the volume of a call is adjusted, the LED will flash orange once for each button press. If the phone’s microphone is muted, the LED will transition to solid red until either the call is disconnected or the microphone is unmated. Once the call is disconnected, the LED will return to solid blue.
Troubleshooting (Interaction SIP Station I & II)
This section covers a couple of the more common issues with the Interaction SIP Station I & II. Whenever troubleshooting a network issue with the Interaction SIP Station, packet captures are invaluable.
Cannot hear audio through headset
The Jabra GN 1200 headset supports a variety of telephones with different models requiring different switch settings. If you cannot hear audio through the headset (e.g., no ring tone when you press the volume up button), check the switch position on the inline switch on the headset. Interaction SIP Station I & II use switch position 1.
Interaction SIP Station cannot start or connect to the network
If you have entered incorrect network settings, such as an incorrect VLAN ID or static IP address settings, to a point to where the Interaction SIP Station unit can no longer start or connect to the network (as verified via packet captures), you can reset the unit to factory default network settings.
Interaction SIP Station I & II Administration
118
Warning!
This procedure should be performed by the network administrator only. It should not be performed by an agent.
To reset Interaction SIP Station to factory default network settings:
1. Disconnect the network connection from the unit, which, in turn, removes power from the unit.
2. Wait a few seconds.
3. Interaction SIP Station I: Press and hold both round buttons on the top of the unit.
Interaction SIP Station II: Press and hold the Mute and Volume down buttons.
4. Plug in the network connection into the unit.
The unit restarts.
5. Continue holding the two round buttons until the indicator light on the unit blinks three times with a purple color.
The unit has been reset to factory default network settings.
Boot and provision sequences (Interaction SIP Station I & II)
This section explains the behavior of the Interaction SIP Station I & II upon powering on. Unlike a Polycom phone, the Interaction SIP Station I & II do not have separated boot and provision sequences. The unit will power on then directly go into the provisioning sequence.
Firmware boot/provisioning sequence (SIP Station I & II)
• Phone powers on and performs CDP and/or LLDP discovery, depending upon configuration
o Gets port-mode configuration
o Gets VLAN information (if any)
• Phone will run through DHCP discovery:
o DHCP must return:
IP Address
Option 1 - Subnet Mask
Option 15 - DNS server
o DHCP should return:
Option 3 - Router to contact devices outside of subnet
Option 66 - TFTP Server Address
Option 67 - Bootfile Name (usually sip100.img)
Option 160 - Provision server address (usually the CIC server or a provisioning proxy)
o DHCP may return:
CIC Managed IP Phones
119
Option 4/42 - Network time servers
Option 2 - Time offset
• Phone will query DNS for the provision server found in Options 160
o If not found, the phone will boot up with its old configuration
• Phone will send HTTP GET request for the Bootfile to the Provision Server
o It will pull a portion of the file and check if it matches its current firmware
o If it doesn't, the phone will GET the complete file, flash the firmware to its memory and reboot
• Phone will send HTTP GET request for <MAC>.cfg to the Provision Server
• Phone will attempt to register with its configured SIP Proxy
• If the configuration file has changed, the phone will reboot
Phone Simulator (SIP Station I & II)
A quick way to check what configuration will be passed to a phone is to use PhoneSim.exe, a PureConnect tool that simulates the provisioning requests for managed IP phones. See Phone Simulator (Polycom).
SIP Soft Phone Administration
Setup and configuration (SIP Soft Phone)
SIP Soft Phone requirements
The SIP Soft Phone is supported on workstations running on Microsoft Windows 7 (32-bit and 64-bit), Microsoft Windows 8 (32-bit and 64-bit), and Microsoft Windows 8.1(32-bit and 64-bit), which support the PureConnect QoS driver.
Notes:
• The SIP Soft Phone is not supported on workstations running Microsoft Windows XP (32-bit and 64-bit), which does not support the PureConnect QoS driver.
• Starting with CIC 2016 R2, Microsoft Windows 10 is supported.
• Starting with CIC 2015 R1, Microsoft Windows 8.1 is supported.
• Starting with CIC 2015 R1, Microsoft Windows XP is no longer supported.
SIP Soft Phone installation
The SIP Soft Phone is a selectable feature in the Custom Setup screen of the IC User Applications install (32-bit and 64-bit).
SIP Soft Phone Administration
120
Make sure that this feature is selected when IC User Applications is installed on workstations that will use the SIP Soft Phone. If not installed during initial installation, select IC User Applications in the Control Panel -> Programs and Features, and select Change to open the Custom Setup screen and select the SIP Soft Phone feature.
In the QoS Requirement screen, select PureConnect QoS driver to add the PureConnect certificate to the Trusted Publishers list and install the PureConnect QoS driver.
For more information:
• For instructions on installing IC User Applications, see the PureConnect Installation and Configuration Guide in the PureConnect Documentation Library.
• For more information about the PureConnect QoS driver, see Implement QoS in your environment and PureConnect KB article https://my.inin.com/Support/Pages/KB-Details.aspx?EntryID=Q131006915300479.
When it comes to audio devices, audio quality and personal preference are subjective. When you select a USB headset, choose a quality headset with noise and echo cancellation. You can discuss personal experience with headsets and recommendations from other partners and customers on the PureConnect Community Forum at http://community.inin.com/.
SIP Soft Phone setup process
If you followed the instructions to configure the network for SIP Soft Phones and to create multiple Managed IP Phones using Managed IP Phones Assistant (with the full computer names filled in the CSV list), automated provisioning will occur when the SIP Soft Phone starts on a workstation.
Other setup procedures may be required or recommended, depending on the circumstances:
• If the workstation contains more than one NIC or if the NIC was altered following the SIP Soft Phone installation, specify the network adapter to use with the SIP Soft Phone. See Network adapter configuration for instructions.
• We highly recommend that SIP Soft Phone users configure their SIP Soft Phones to use the default devices configured in the Windows Multimedia Control Panel. See Audio configuration for instructions.
• If CIC Language Packs are installed on the CIC system, SIP Soft Phone users can display the user interface in an alternative language. See Set the user interface language for instructions.
• Manual provisioning using the SIP Soft Phone Provisioning wizard may be necessary if there is no DHCP server or the DHCP server cannot be accessed, or if the full computer name was not specified in the CSV list for some or all SIP Soft Phones. See SIP Soft Phone Provisioning wizard in this section for instructions.
Network adapter configuration
If the workstation contains more than one NIC or if the NIC was altered following the SIP Soft Phone installation, specify the network adapter to use with the SIP Soft Phone after the phone has been provisioned.
The SIP Soft Phone can be configured to use a specific network adapter for Real-time Transfer Protocol (RTP) and SIP communications.
To specify the network adapter:
1. Right-click the SIP Soft Phone icon in the system tray and click Options from the menu.
2. In the Options screen, select the adapter that best suits the RTP or SIP traffic.
Auto-Detection of changes to the network adapter
The SIP Soft Phone automatically detects when a selected network adapter for SIP and/or audio connections becomes unavailable or disconnected and then terminates the connections. When the selected adapters become available again, the SIP Soft Phone establishes the connections again.
Audio configuration
We highly recommend that SIP Soft Phone users configure their SIP Soft Phone to Use default communication devices which is the default configuration set in the Windows Multimedia Control Panel.
To configure the audio device:
1. Right-click the SIP Soft Phone icon in the system tray and click Options from the menu.
2. In the Options screen, select Audio Configuration.
CIC Managed IP Phones
123
Select Use default communication devices to use default configuration set in the Windows Multimedia Control Panel. The administrator should instruct users to configure the Windows Multimedia Control Panel to set the default speakers and microphone to a USB headset device:
a. Right-click the Speakers icon in the notifications area of the Windows taskbar and select Sounds.
b. Select and configure the headset's speaker on the Playback tab.
c. Select and configure the headset's microphone device on the Recording tab.
Alternatively, users can select Use custom settings in the Audio Configuration screen to specify the speakers and microphone they want to use.
Set the user interface language
If CIC Language Packs are installed on the CIC system, SIP Soft Phone users can display the user interface in an alternative language.
To configure the audio device:
1. Right-click the SIP Soft Phone icon in the system tray and click Options from the menu.
2. In the Options screen, select Language.
SIP Soft Phone Administration
124
3. From the Language list, select the appropriate language for the user interface.
4. Exit and restart the SIP Soft Phone.
SIP Soft Phone Provisioning wizard
Manual provisioning using the SIP Soft Phone Provisioning wizard may be necessary if there is no DHCP server or the DHCP server cannot be accessed, or if the full computer name was not specified in the CSV list for some or all SIP Soft Phones.
To run the SIP Soft Phone Provisioning wizard:
1. Right-click the SIP Soft Phone icon in the system tray and click Provision… from the menu.
The SIP Soft Phone Provisioning wizard Welcome screen appears.
CIC Managed IP Phones
125
2. Use the Get SIP Soft Phone Configuration screen to load the phone configuration file. The configuration file contains information to provision the SIP Soft Phone. There are two options for loading the configuration file:
Option Description
Automatic Discovery
If the network is configured for the SIP Soft Phone (DHCP Option 160), the Automatic Discovery option is selected by default.
An information icon appears next to the Automatic Discovery option. Move the pointer over the icon to display either the reason the option is not available or the location of the provisioning server given by the DHCP lookup.
For instructions, see "to automatically load the configuration file."
Configure Settings
If the configuration file is not available or an error occurs during Automatic Discovery, select the Configure Settings option to manually load configuration information.
A Phone Provisioning Server field appears below the Configure Settings option.
For instructions see "to manually load the configuration file."
3. To automatically load the configuration file (Automatic Discovery):
SIP Soft Phone Administration
126
a. Click Next to load the configuration.
b. If there are any errors when loading the configuration, an error message appears on the Get SIP Soft Phone Configuration screen.
Do one of the following actions:
If the configuration loads successfully and you have multiple network adapters, select the appropriate option on the Select Network Adapters screen.
If the configuration loads successfully and you do not have multiple network adapters, click Finish to exit the SIP Soft Phone Provisioning wizard.
To manually load the configuration file (Configure Settings option):
c. In the Phone Provisioning Server field, specify the name of the provisioning server (CIC server).
d. Click Next to load the specified configuration file.
Do one of the following:
If the configuration loads successfully and you have multiple network adapters, select the appropriate option on the Select Network Adapters screen.
If the configuration loads successfully and you do not have multiple network adapters, click Finish to exit the SIP Soft Phone Provisioning wizard.
If the configuration file is not available on the server, click Next to complete the auto provisioning portion of the SIP Soft Phone Provisioning wizard.
4. The Use Auto Provisioning screen will appear if the Full Computer Name of the computer running the SIP Soft Phone does not match the Full Computer Name for any of the Managed IP Phones configured in the Managed IP Phones container in Interaction Administrator.
If this screen appears, you must use the wizard to provision the SIP Soft Phone using the provisioning IVR. The wizard initiates a call to the CIC server to perform the provisioning. The
CIC Managed IP Phones
127
server then generates the appropriate configuration and triggers the SIP Soft Phone to retrieve its new configuration.
To provision the SIP Soft Phone usng the provisioning IVR:
a. Click the Provision button.
If the Provision button is disabled, see Troubleshooting (SIP Soft Phone).
b. Following the voice prompts, enter the requested information using the dial pad. You will be prompted for the type of provisioning (by administrator or user), the extension number for the phone, and the PIN number. Administrators are required to enter both administrator and station information.
The CIC server generates the appropriate configuration and triggers the SIP Soft Phone to retrieve its new configuration.
c. Once the SIP Soft Phone is provisioned, click Next.
The SIP Soft Phone Provision Complete screen appears whenever SIP Soft Phone provisioning is completed depending on the option used for loading the configuration file and whether provisioning was necessary.
5. Click Finish to exit the SIP Soft Phone Provisioning wizard.
SIP Soft Phone Help
See SIP Soft Phone Help for instructions on using the SIP Soft Phone.
Managed IP phone (SIP Soft Phone) configuration options
The options shown below reflect the state of SIP Soft Phone configuration as of CIC 4.0 GA.
Options tab
These configuration options are accessible from the Managed IP Phones container upon editing one or more managed SIP Soft Phones. This tab allows for configuration of diagnostic captures and emergency information, among other options. Interaction Administrator online help contains the complete listing of configuration options and their meaning.
SIP Soft Phone Administration
128
SIP Soft Phone and remote survivability
Remote survivability is the ability of a remote location to continue to operate in some (typically limited) capacity in the event that the connection to the main location is down. In this scenario, the CIC server is unreachable, meaning that the CIC client application will not function, even though the SIP Soft Phone is still running. The local SIP Proxy server and SIP gateways will be available as well.
See Appendix B: How registrations work (proxy settings) for more information about remote survivability.
In a remote survivability scenario:
1. SIP Soft phone users will be able to make outbound calls using the SIP Soft Phone dial pad. To access the dial pad:
a. Right-click the SIP Soft Phone icon in the system tray and click Dial Pad from the menu.
b. Using the dial pad, you can enter phone numbers to dial and have call control over those outbound calls.
CIC Managed IP Phones
129
The calls go directly from the SIP Soft Phone to the proxy server, which will route them out the local gateway.
2. SIP Soft Phone users will be able to receive inbound calls, but the SIP Soft Phone cannot alert users about the calls. The SIP Soft Phone relies on the CIC client for this functionality, and CIC client will not be available. Users will need to have the SIP Soft Phone Dial Pad open in order to check for calls.
Because the SIP Soft Phone does not alert or pop for inbound calls, the SIP Soft Phone is not practical, and therefore not supported, as a remote survivability solution. Physical devices such as Polycom phones and Interaction SIP Station phones are more practical in a remote survivability situation.
Troubleshooting (SIP Soft Phone)
This section outlines a few of the more common problem scenarios encountered with SIP Soft Phones. In all of these scenarios, it is useful to obtain a packet capture to see exactly what traffic is passing to and from the SIP Soft Phone, including DNS and SIP traffic.
SIP Soft Phone cannot obtain configuration from provisioning server
The SIP Soft Phone uses DHCP Option 160 which it queries from the DHCP server to obtain the name of the provisioning server. There are a few reasons why the SIP Soft Phone may not be able to obtain the configuration file from provisioning server.
Note: Obtaining a packet capture from both the client and server may be a necessary troubleshooting step.
To make sure that the SIP Soft Phone can obtain configuration from provisioning server:
1. Verify DHCP Option 160 configuration on the DHCP server. (See Configure the network for managed IP phones.)
2. Verify via DNS that the hostname configured in DHCP resolves to the IP address of the desired CIC server. (See Configure the network for managed IP phones.)
3. Verify that the Windows User account that is running the SIP Soft Phone has full access to the following registry keys:
SIP Soft Phone Administration
130
HKLMSoftwarePoliciesMicrosoftSystemCertificates
HKLMSoftwarePoliciesMicrosoftCryptography
4. Verify that the Windows User account that is running the SIP Soft Phone has full access to the following file path:
5. If there is a firewall between the client workstation running the SIP Soft Phone and the CIC servers, verify that the firewall rules allow communication to the CIC servers on ports 8088 (http) and 8089 (https).
SIP Soft Phone contacts provisioning server but cannot register
If the SIP Soft Phone is unable to make calls, it typically indicates that it is not registered and will result in the following behavior:
• Placing outbound calls via the CIC client will not complete.
• The CIC client will be unable to pick up incoming calls.
Note: Obtaining a packet capture from both the client and server may be a necessary troubleshooting step.
To make sure that the SIP Soft Phone can register:
1. Ensure that the appropriate network adapter/VPN is selected in the Options screen. See Setup and configuration (SIP Soft Phone.
2. Ensure that the audio device is working properly by running the Audio Tuning wizard. See Setup and configuration (SIP Soft Phone.
3. Ensure that the SIP Soft Phone can correctly resolve the name of its proxies (via DNS). (See Appendix B: How registrations work (proxy settings).
Verify that the SIP Soft Phone correctly resolves the applicable DNS record (DNS SRV, server hostname, SIP Proxy name, etc.)
Startup and provision sequences (SIP Soft Phone)
This section explains the behavior of a SIP Soft Phone upon powering on. It is helpful while troubleshooting a phone to understand what it is actually doing during startup.
CIC Managed IP Phones
131
SIP Soft Phone startup sequence
There are two ways to launch the SIP Soft Phone. The SIP Soft Phone can be launched by manually running it from the desktop shortcut or by attempting to log in to CIC client and selecting SIP Soft Phone as the station type. (Only a single instance of the SIP Soft Phone can be running at a time.) In either case, the startup sequence is the same.
In the startup sequence, the SIP Soft Phone attempts to:
• Initialize the audio input and output devices based on registry keys:
o HKEY_CURRENT_USER\Software\Interactive Intelligence\SIP Soft Phone\<fullcomputername>\4.0 Selected Audio Input Device
o HKEY_CURRENT_USER\Software\Interactive Intelligence\SIP Soft Phone\<fullcomputername>\4.0 Selected Audio Output Device
• Bind to the network adapter based on a registry key:
o HKEY_CURRENT_USER\Software\Interactive Intelligence\SIP Soft Phone\<fullcomputername>\4.0 Selected Network Adapters
• Download a configuration file based on a registry key:
o HKEY_CURRENT_USER\Software\Interactive Intelligence\SIP Soft Phone\<fullcomputername>\4.0 ConfigUrl
• If the previous step fails, the SIP Soft Phone attempts to download a configuration file based on a DHCP Option 160.
SIP Soft Phone provision sequence
• As previously mentioned, the SIP Soft Phone first looks in the registry for a key that specifies the configuration file if it has successfully provisioned during a previous startup.
o HKEY_CURRENT_USER\Software\Interactive Intelligence\SIP Soft Phone\<fullcomputername>\ConfigUrl (example: https://provision.lab.voip:8088/AgentPC1.lab.local.i3sipcfg)
• If the configuration file registry key does not exist, the SIP Soft Phone will automatically query the DHCP server for Option 160 to determine if a boot server is defined and then attempt to automatically download the configuration file.
• If that option does not define a boot server, then the SIP Soft Phone will need to be provisioned manually via the SIP Soft Phone Provisioning wizard.
Phone Simulator (SIP Soft Phone)
A quick way to check what configuration will be passed to a phone is to use PhoneSim.exe, a PureConnect tool that simulates the provisioning requests for managed IP phones. See Phone Simulator (Polycom).
AudioCodes Administration
132
AudioCodes Administration
Advanced configuration (AudioCodes)
Starting in CIC 4.0 SU 5 and continuing with CIC 2015 R1 and later, Genesys supports the AudioCodes 420 HD SIP IP phone. For information about the 420HD and the 400HD SIP IP Phone Series, see the AudioCodes website at http://www.audiocodes.com/products/420hd.
AudioCodes phones work with the CIC provisioning subsystem and you configure them in Interaction Administrator in the same way as Polycom phones, Interaction SIP Station I & II phones, and SIP Soft Phones. You must implement each AudioCodes phone as a managed IP phone.
AudioCodes phones are similar to the Interaction SIP Station I & II phones in their network and Interaction Administrator configuration. However, they have a headset, LCD display, a dial pad, and more function keys. Interaction SIP Station I has none of these features; Interaction SIP Station II has a dialpad and more function keys only.
Interaction Firmware (AudioCodes)
A separate Interaction Firmware component containing the firmware needed for Polycom, Interaction SIP Station, and AudioCodes managed IP phones is included on the CIC 2015 R1 and later .iso file on the PureConnect Product Information site Download page at https://my.inin.com/products/Pages/Downloads.aspx.
When you run Install.exe on the CIC server, it installs the Interaction Firmware component along with the other required CIC server components.
If you wish to use Interactive Update to apply the Interaction Firmware component on the CIC server along with the other required CIC server components, see the PureConnect Product Information site at https://my.inin.com/products/iupdate/Pages/Latest-Release.aspx for instructions.
Managed IP phone (AudioCodes) configuration options
The options shown below reflect the state of AudioCodes configuration as of CIC 4.0 SU 5.
Options tab (AudioCodes)
These configuration options are accessible from the Managed IP Phones container upon editing one or more managed AudioCodes phones. Interaction Administrator help contains a complete listing of configuration options and their meaning.
The Advanced Options are accessible from the Advanced Options button in the Options tab, if configuring just one phone, or in the Advanced Options tab if configuring more than one phone. This tab allows configuration of provisioning, syslog, gains, LAN and VLAN, and audio quality diagnostics. Interaction Administrator help contains a complete listing of configuration options and their meaning.
AudioCodes Administration
134
Additional managed IP phone (AudioCodes) features
For information about the 420HD and the 400HD SIP IP Phone Series, see the AudioCodes website at http://www.audiocodes.com/products/420hd.
Troubleshooting (AudioCodes)
This section currently is a placeholder for common issues with AudioCodes phones.
Boot and provision sequences (AudioCodes)
This section explains the behavior of the AudioCodes phone upon powering on. Unlike a Polycom phone, the AudioCodes phone does not have separated boot and provision sequences. The unit will power on then directly go into the provisioning sequence.
Firmware boot/provisioning sequence (AudioCodes)
• Phone powers on and performs CDP and/or LLDP discovery, depending upon configuration
o Gets port-mode configuration
o Gets VLAN information (if any)
• Phone will run through DHCP discovery:
o DHCP must return:
IP Address
Option 1 – Subnet Mask
Option 15 – DNS server
o DHCP should return:
Option 3 – Router to contact devices outside of subnet
Option 66 – TFTP Server Address
Option 67 – Bootfile Name (usually 420HD.img)
Option 160 – Provision server address (usually the CIC server or a provisioning proxy)
o DHCP may return:
Option 4/42 – Network time servers
Option 2 – Time offset
• Phone will query DNS for the provision server found in Option 160
o If not found, the phone will boot up with its old configuration
• Phone will send HTTP GET request for the Bootfile to the Provision Server
o It will pull a portion of the file and check if it matches its current firmware
o If it doesn’t, the phone will GET the complete file, flash the firmware to its memory and reboot
• Phone will send HTTP GET request for additional config files listed with the CUSTOM::config_files attribute specified.
• Phone will send HTTP GET request for <MAC>.cfg to the Provision Server
• Phone will attempt to register with its configured SIP proxy
• If the configuration file has changed, the phone will reboot
Custom configuration files (AudioCodes)
The provisioning server supports the ability to add a custom attribute to AudioCodes phones named config_files (case-insensitive), which must contain a comma-separated list of files. Provisioning includes the files in the config_files list for AudioCodes phones if the file exists in the \i3\ic\provision\AudioCodes directory on the CIC server. These files are requested after the config files are generated by provisioning and allow administrators to set custom config file attributes that are not handled by provisioning. The format of the custom configuration files is described below.
The Configuration file is a *.cfg file with the file name specified in the list under the config_files custom attribute.
Ensure that the configuration file adheres to the following guidelines:
• No spaces on either side of the equals (=) sign.
• Each parameter must be on a new line.
• Each parameter has the following syntax: <parameter name>=<value>
Below is an example of part of a configuration file:
voip/line/0/enabled=1
voip/line/0/id=1234
voip/line/0/description=310HD
voip/line/0/auth_name=1234
voip/line/0/auth_password=4321
Phone Simulator (AudioCodes)
A quick way to check what configuration will be passed to a phone is to use PhoneSim.exe, a PureConnect tool that simulates the provisioning requests for managed IP phones. See Phone Simulator (Polycom).
136
Appendixes
Appendix A: Non-standard provisioning scenarios
This appendix describes several non-standard provisioning scenarios when there is no DHCP server or the DHCP server cannot be accessed.
Remote phones
In the event that a managed IP phone needs to be deployed at a remote site, it is possible to avoid excess WAN traffic associated with provision phones. The Interaction SIP Proxy offers a Provision Proxy feature when managed by CIC. Phones are able to send their HTTP provisioning requests to the SIP Proxy, instead of over the WAN to the CIC server.
When an HTTP request comes in from a phone, the SIP Proxy will forward the HTTP requests to the CIC server then cache whatever is returned by the Provision Server. The next time a request comes in for the same file, the SIP Proxy will check with the Provision Server to see if the file has changed, then return the file to the phone.
The Provision Proxy feature is enabled from the System -> CIC Integration tab in the SIP Proxy web interface.
Configure a Polycom phone’s boot server manually
On a Polycom phone, follow these steps to point the phone to the CIC (boot) server. As needed, use the buttons and arrow keys next to the choices displayed on the phone’s LCD screen:
Note: Steps for some phones differ slightly from those described here, and steps often differ depending on whether a phone is just starting or already running. If these steps don’t match your phone, see the Polycom documentation for instructions about how to configure your phone.
1. Navigate to the phone’s Network Configuration screen:
a. Press the Menu button. Press 3 for Settings. Press 2 for Advanced.
b. Key in the password (the default is 456) and then press the Enter button.
c. Press 1 for Admin Settings. Press 1 for Network Configuration.
2. Navigate to the screen where you enter the CIC server’s address:
a. Choose DHCP Menu followed by Select.
b. Choose Boot Server and press Edit.
c. Use the arrow keys to select Static.
d. Press OK and then press Exit to go up a level.
e. Use the arrow keys to select ServerMenu and press Select.
f. Select ServerType: and use the arrow to select HTTP followed by OK.
g. Select ServerAddr: and press Edit.
CIC Managed IP Phones
137
3. Enter the CIC server’s URL and the provisioning port number:
a. If needed, press the phone’s Alphanumeric toggle button (see above figure) to toggle from entering letters to numbers. Some phones might differ slightly from the one shown here.
b. Key in the CIC server’s computer name or IP address, then a colon, then port number 8088.
An example is 10.20.0.157:8088. For IP300/IP500 models, you must enter the full URL.
Note: Enter letters by pressing the corresponding number key multiple times:
To enter . press the * key once.
To enter : press the # key twice.
To enter / press the # key three times.
If these instructions do not work on your phone, see the Polycom documentation for your phone.
4. Press OK, Exit, and then Save to reboot the phone and connect with the designated server.
Configure an Interaction SIP Station through the web interface
The Interaction SIP Station has a web interface to enable configuration in the instance of inability to connect to the DNS or a provisioning server. Do not use the web interface in conjunction with CIC Managed IP Phones.
Firmware Version Web Interface Address
1.2.2 http://<ISS_ip_addr>:80
The default username/password for the interface is admin/1234. The web interface allows for configuration of network parameters, speed dial, and diagnostic tools and allows for manual updating of the phone’s configuration.
Appendixes
138
Appendix B: How registrations work (proxy settings)
This appendix describes how registration groups function.
Registrations overview
When a phone is configured to use a particular registration group, it will be configured in such a way that all station appearances on that phone will use the same SIP registration settings, according to the contents and ordering of the registration group. Each registration essentially serves as a mapping to a hostname (or IP address), a port, and a protocol for use when the phone registers. Configuring more than one registration in a registration group serves to provide SIP redundancy according to two paradigms: failover and fallback.
Registration types
Each registration group consists of an ordered list of one or more registrations of the following types:
Line
The most basic registration type, the Line allows for selection of a line that has already been defined for the particular CIC server. All of the transport settings are derived from the configuration of the selected line. If there is a Line within the registration group, the Line must be the first entry. There may only be one Line per registration group.
Manual
Manual registrations allow for administrator-specified registrations. The address, port, and transport protocol must all be specified. The address may be a hostname, FQDN, or IP address. It can point to anything, but some caution is advised. Manual registrations have primarily been used for secondary SIP proxies, but with the ability to use a Managed Proxy, the use of manual registrations has declined.
Managed Proxy
The Managed Proxy feature of the Interaction SIP Proxy allows phones in a remote location to register with the SIP proxy while still maintaining some functionality of, and communication with, the CIC server. The transport protocol must be specified, but the contact address and port will be derived from the configuration of the associated Managed Proxy. In order to properly function, the managed phone and
CIC Managed IP Phones
139
its Managed Proxy must be in the same CIC location. Managed Proxies are commonly used for remote survivability situations (see below).
DNS SRV
DNS SRV records are a way for the phone to track multiple registration addresses without CIC needing to do so as well. This is most commonly used in Switchover settings (see below).
Switchover (failover)
Switchover operates according to the failover paradigm: the primary registration is actually a pair of CIC servers (a Switchover pair) in which both servers have the same capabilities. When a call is made, the last known functional server is attempted. In the event that the currently active server fails, the other server in the pair will come up. When another call is attempted, the phone will first try the now-down server, then contact the now-up server once the previous attempt fails. For each subsequent call, the phone will remember which was last functional and route its call attempts accordingly.
For Polycom phones and for SIP Soft Phones, this is configured via a DNS SRV registration in the registration group. Since the DNS SRV record can be used to point to more than one registration address, the phones will be able to track both members of the Switchover pair without CIC needing to notify them of a Switchover event.
Remote survivability (fallback)
Remote survivability is the ability of a phone to still maintain a SIP registration in the event that connection to the main CIC server is severed. This operates according to the fallback paradigm: there is a single main registration as well as one or more limited-functionality registrations. Any additional registration entries in a registration group will be treated as such and are assumed to have less than the full CIC functionality.
When connection to the main CIC server is severed, the phones will successively try each of the fallback registrations whenever an outbound call is made.
A common scenario for remote survivability is the following:
Your implementation has a distributed architecture where remote offices only have phones, proxy servers, and SIP gateways, and connect to the CIC servers at a central location via MPLS/WAN connections. In the event that the WAN fails, the phones will first attempt to contact the CIC server. When that fails, it makes the call through the Proxy which routes the call out the local SIP gateway.
External registrations (proxy settings)
For Polycom phones only, external registrations allow a specific line/station appearance on a phone to register differently than all the other lines on that phone. For example, external registrations would be useful in a large company where CIC is deployed for a certain sector like customer support, and some
Appendixes
140
other SIP call system is deployed elsewhere. If an employee needs to be able to directly call into the other SIP call system, an external registration can be added to that user’s phone.
There are two parts to setting up external registrations:
• Set up the external registration group
• Add the external registration to the phone
Set up the external registration group
To designate a registration group as external, simply select a type of External rather than Regular when creating the registration group. The registration group itself is then constructed much like a regular registration group, with the exception that only registration types allowed are Manual and DNS SRV. As before, there is no limit as to how many entries can be in the group, but more than three is generally impractical.
Once created, the external registration group can only be used for external registrations. It is not available for selection as the main Registration Group of a managed IP phone.
Add the external registration to the phone
Once an external registration group has been created, external registrations can be added to Polycom managed IP phones in a similar manner to adding a shared station appearance. The station should then be configured with whatever Identification Address and credentials that the SIP server in the corresponding external registration group will expect.
CIC Managed IP Phones
141
142
Change Log The following changes have been made since this document was last published.
Change Date
In Chapter 3: Create individual managed IP phones for test purposes:
- Updated Registration group configuration for default protocol changed from TCP to UDP in IC 4.0 SU1.
- Updated Polycom and SIP Soft Phone registration group configuration to add screenshot to Switchover settings.
June 1, 2012
Updated Chapter 6: Additional Configuration (Polycom) to add SpectraLink Wi-Fi phone considerations subsection to Polycom firmware and model limitations.
June 1, 2012
Updated Chapter 7: Troubleshooting (Polycom) under Polycom phone cannot locate boot server, added note about SpectraLink phones. June 1, 2012
In Chapter 14: Setup and Configuration (SIP Soft Phone), revised Audio device requirement statement. January 11, 2013
In Chapter 1: Introduction to IC Managed IP Phones, updated About this guide to refer to the IC Migration Guide for the procedures for migrating IC 3.0 managed IP phones to IC 4.0 managed IP phones.
January 24, 2013
In Chapter 3: Create individual managed IP phones for test purposes, updated the screenshots in Create individual managed IP phones for test purposes procedure to include the selectable firmware version option on the Managed IP Phone Configuration – General tab, added in IC 4.0 SU 3.
January 24, 2013
In Chapter 6: Additional Configuration (Polycom), renamed the subsection on Polycom firmware to Polycom firmware and phones (IC 4.0 SU 3 and later) and updated it for the selectable firmware version feature and other firmware changes in IC 4.0 SU 3.
January 24, 2013
In Chapter 3: Create individual managed IP phones for test purposes, added note in the Default registration group subsection that a registration group cannot have more than one SIP line or DNS SRV registration.
July 25, 2013
In Chapter 6: Additional Configuration (Polycom), updated the Polycom firmware for supported and EOL phones section for firmware supported in IC 4.0 SU 3 and later.
October 30, 2013
In Chapter 2: Configure the network for managed IP phones, in Required DHCP option provisioning records, updated Option 132 for Interaction SIP Station.
October 30, 2013
CIC Managed IP Phones
143
Change Date
Updated the following sections of this document for Interaction SIP Station support for DNS SRV in IC 4.0 SU 4 and later:
- Chapter 2: Configure the network for managed IP phones, sections IP phone network configuration task list and Create DNS service location (SRV) records for Switchover.
- Chapter 3: Create individual managed IP phones for test purposes, section Interaction SIP Station registration group configuration.
- Appendix B: How registrations work (proxy settings).
October 30, 2013
In Chapter 6: Additional Configuration (Polycom), added entry Polycom firmware for VVX600 phones in Polycom firmware and phones (IC 4.0 SU 3 and later), to be available in IC 4. SU 5 and pre-release support available in IC 4.0 SU 3 and IC 4.0 SU 4.
January 13, 2014
In Chapter 6: Additional Configuration (Polycom):
- Modified table in Polycom firmware and phones (IC 4.0 SU 3 and later) to show official support in IC 4.0 SU 5 for VVX300, 310, 400, 410, and 600 phones.
- Added new section Interaction Firmware for IC 4.0 SU 5 and later.
January 27, 2014
In Chapter 11: Additional Configuration (Interaction SIP Station), added new section Interaction Firmware for IC 4.0 SU 5 and later. January 27, 2014
Updated guide for support for AudioCodes 420HD IP phone in IC 4.0 SU 5 and later. Created new AudioCodes Administration section. January 27, 2014
In Chapter 6: Additional Configuration (Polycom), modified table in Polycom firmware and phones (IC 4.0 SU 6 and later):
- To show official support in IC 4.0 SU 6 for Polycom firmware 4.1.6h
- Add IC Release column showing what SU’s and ES’s a firmware version is supported in.
May 16, 2014
Updated documentation to reflect changes required in the transition from version 4.0 SU# to CIC 2015 R1, such as updates to product version numbers, system requirements, installation procedures, references to the Product Information site URLs, and copyright and trademark information.
September 15, 2014
Made updates throughout the entire document for Interaction SIP Station II and associated firmware, available in CIC 2015 R2 and later. December 5, 2014
Change Log
144
Change Date
In Chapter 2: Configure the network for managed IP phones, made the following updates: - Added new section Configure DHCP records for multiple phone models.
- In Configure the TFTP server, removed section on manually copying the firmware file to the TFTP server for a Switchover pair, as this has been fixed for CIC 2015 R2 and later.
December 5, 2014
In Chapter 6: Additional Configuration (Polycom), updated Polycom firmware and phones (CIC 4.0 SU 6, CIC 2015 R4 and later) for new Polycom SoundPoint IP and VVX firmware in CIC 2015 R4.
June 17, 2015
In Chapter 14: Setup and configuration (SIP Soft Phone), updated SIP Soft Phone requirements to include support for 32-bit as well as 64-bit for Windows 8 and Windows 8.1.
July 1, 2015
Updated document to reflect transition to Interaction Desktop in CIC 2015 R3 and removal of Interaction Client .NET Edition in CIC 2016 R1. September 15, 2015
Updated document for rebranding in CIC 2016 R1. September 15, 2015
In Chapter 2: Configure the network for managed IP phones, in the Required DHCP option provisioning records table, updated Option 067 to provide more information and refer to the Configure DHCP records for multiple phone recovery section.
October 15, 2015
In Chapter 6: Additional Configuration (Polycom), updated Polycom firmware for currently supported phones table to remove older, obsolete firmware versions.
Updated the copyright page.
February 15, 2016
In Chapter 6: Additional Configuration (Polycom), updated Polycom firmware for currently supported phones table for support for VVX 100 and 200 phones in CIC 2016 R4 and later.
April 10, 2016
Updated the following chapters for TLS/SRTP support for Interaction SIP Station and AudioCodes in CIC 2016 R4 and later:
-Chapter 1: Introduction to IC Managed IP Phones, updated Managed IP phones and SIP security.
-Chapter 3: Create individual managed IP phones for test purposes, updated the following sections:
April 10, 2016
CIC Managed IP Phones
145
Change Date
-Create individual managed IP phones for test purposes – Audio Protocol field -Registration group configuration
In Chapter 14: Setup and configuration (SIP Soft Phone), updated SIP Soft Phone requirements to include support for Windows 10 in CIC 2016 R2 and later.
April 10, 2016
In Chapter 6: Additional Configuration (Polycom), updated Polycom firmware for currently supported phones table to update firmware versions. June 21, 2016
In Chapter 6: Additional Configuration (Polycom), updated Polycom firmware for currently supported phones table to include new VVX models 301, 311, 401, 411, 501, 601.
August 2, 2016
In Chapter 6: Additional Configuration (Polycom), updated Polycom firmware for currently supported phones table to update firmware versions. September 26, 2016
In Chapter 6: Additional Configuration (Polycom), updated Polycom firmware for currently supported phones table to update firmware versions to remove 5.4.0a and replace 5.4.3.1014 with 5.4.3.2036 and replace 4.0.8.1972.H with 4.0.8.2058.I.
October 26, 2016
Added note to Polycom boot Sequence topic to mention advanced options for boot sequence. Added note to Limitations section to indicate that starting with CIC 2016 R1, firmware updates with a version of 2.2.2.77 or higher for Interaction SIP Station I & II remove the constraint of registering the phone with a single server.
March 7, 2017
In Chapter 6: Additional Configuration (Polycom), updated Polycom firmware for currently supported phones table to include firmware 5.4.5G. April 28, 2017
This product includes software licensed under the Common Development and Distribution License (6/24/2009). We hereby agree to indemnify the Initial Developer and every Contributor of the software licensed under the Common Development and Distribution License (6/24/2009) for any liability incurred by the Initial Developer or such Contributor as a result of any such terms we offer. The source code for the included software may be found at http://wpflocalization.codeplex.com.
A database is incorporated in this software which is derived from a database licensed from Hexasoft Development Sdn. Bhd. ("HDSB"). All software and technologies used by HDSB are the properties of HDSB or its software suppliers and are protected by Malaysian and international copyright laws. No warranty is provided that the Databases are free of defects, or fit for a particular purpose. HDSB shall not be liable for any damages suffered by the Licensee or any third party resulting from use of the Databases.
Other brand and/or product names referenced in this document are the trademarks or registered trademarks of their respective companies.
DISCLAIMER
GENESYS TELECOMMUNICATIONS LABORATORIES (GENESYS) HAS NO RESPONSIBILITY UNDER WARRANTY, INDEMNIFICATION OR OTHERWISE, FOR MODIFICATION OR CUSTOMIZATION OF ANY GENESYS SOFTWARE BY GENESYS, CUSTOMER OR ANY THIRD PARTY EVEN IF SUCH CUSTOMIZATION AND/OR MODIFICATION IS DONE USING GENESYS TOOLS, TRAINING OR METHODS DOCUMENTED BY GENESYS.
Genesys Telecommunications Laboratories, Inc. 2001 Junipero Serra Boulevard Daly City, CA 94014 Telephone/Fax (844) 274-5992 www.genesys.com