15
ICP-MS User’s Booklet 1) Stretch and hook the tubing onto the peristaltic pump, and click on the tubing clamp locks. Stretch tubing down and hook it on ↓ ↖ Click clamp locks on

ICP-MS User’s Booklet 1) Stretch and hook the tubing onto the peristaltic pump, and click on the tubing clamp
locks.
Stretch tubing down and hook it on
↓
↖ Click clamp locks on

2) Check the argon cylinder pressures to estimate how much argon is remaining. A full cylinder will have around 2200 psi. A full cylinder will last approximately 5 hours of use.
3) Double-click the “LSA Chemistry Recharge” icon :
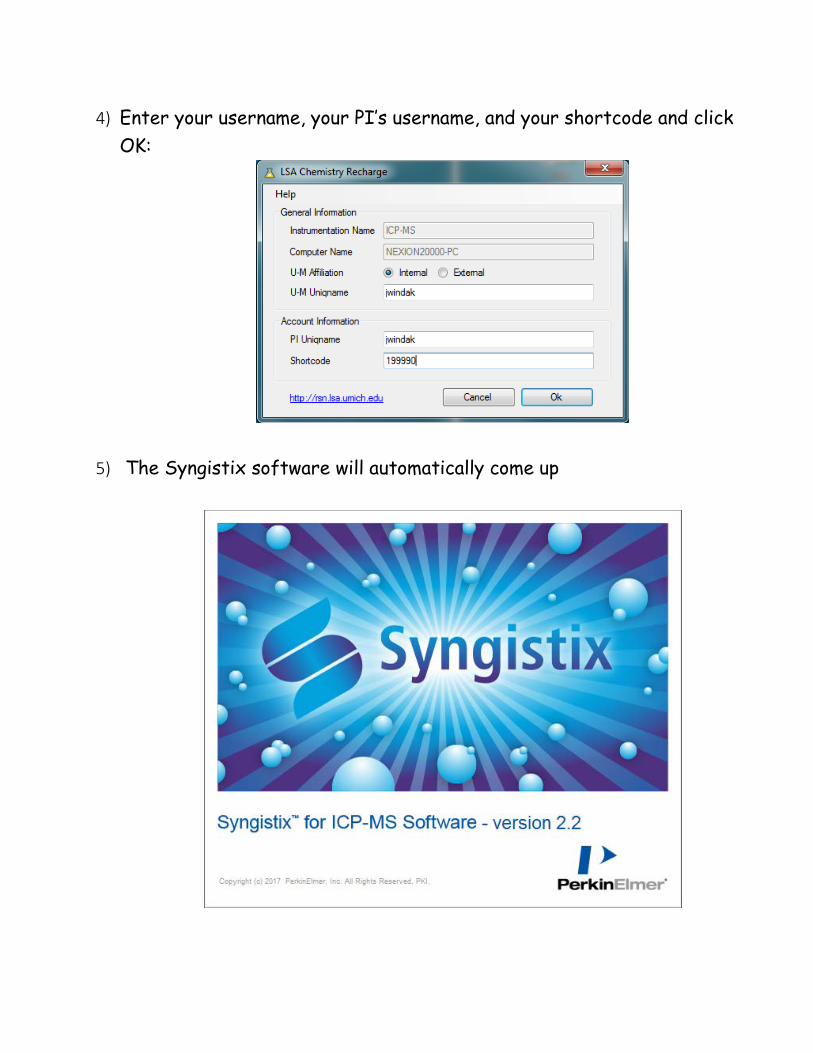
4) Enter your username, your PI’s username, and your shortcode and click OK:
5) The Syngistix software will automatically come up

6) After Syngistix loads, you can turn on the plasma:
If the plasma successfully ignites, the indicator will turn green:
↓ Click here to turn on the plasma.

Also, the plasma itself may be viewed at the front of the instrument:
7) If you have previously created a workspace, you can open this workspace by clicking on the main Syngistix icon:
Opening your workspace will give you easy access to all of your methods, sample lists, and data sets.
← First click on the Syngistix icon
← 2nd, click on Workspace
← 3rd, click on Open Workspace

8) If you need to create a method, or to edit an existing method, click on the “method” icon on the toolbar:
This will bring up the method screen. There are 9 sub-tabs in the method screen. The important ones are “Timing”, “Calibration”, and “Sampling”. First, click on the “Timing” tab, in order to enter the elements and internal standards you wish to use.
Please note: For internal standards, we have an internal standard mixture that is automatically teed into the sample solution flow. The internal standards which are present are Bismuth, Holmium, Indium, Li6, Scandium, Terbium, and Yttrium.
↓ Timing Tab
↑ Insert Elements Here

You can enter elements in the “Analyte” column by either tying in the symbol for the element, or by clicking on the element in the periodic table. To group elements together to use with an internal standard, first highlight the rows you wish to group:
Then click on the arrow below the Method icon, and click on “define group”
↓ Rows were highlighted by clicking and dragging down this column.

Next, highlight only the row for the internal standard row. Then click on the method icon arrow, and click on “Set Internal Std”
After this has been done, the elements should appear grouped together with an arrow pointing at the internal standard element
↑ Highlight only the internal standard row.
↑ Elements are grouped together with an arrow pointing at the internal standard.

Next, click on the “Calibration” tab. The important items to set are what type of curve to use (simple linear usually works best), what type of units (usually ug/L) and the concentrations of your calibration standards (I recommend 1, 5, & 10 ug/L)
Finally, click on the “Sampling” tab. In this tab you define where your blank and calibration standards will be located in the autosampler tray.
↓ Calibration tab
↓ Curve type
Set units ↑
↓ Set concentrations
↓ Sampling tab
↓ set Autosampler locations
Type in names describing each solution ↑

After you have finished creating a method, you should save it by clicking on the Syngistix icon and clicking on “Save As”. You will then have a method that can be used for analyzing those particular elements.
Here is a picture of the autosampler tray, showing how the locations are numbered:
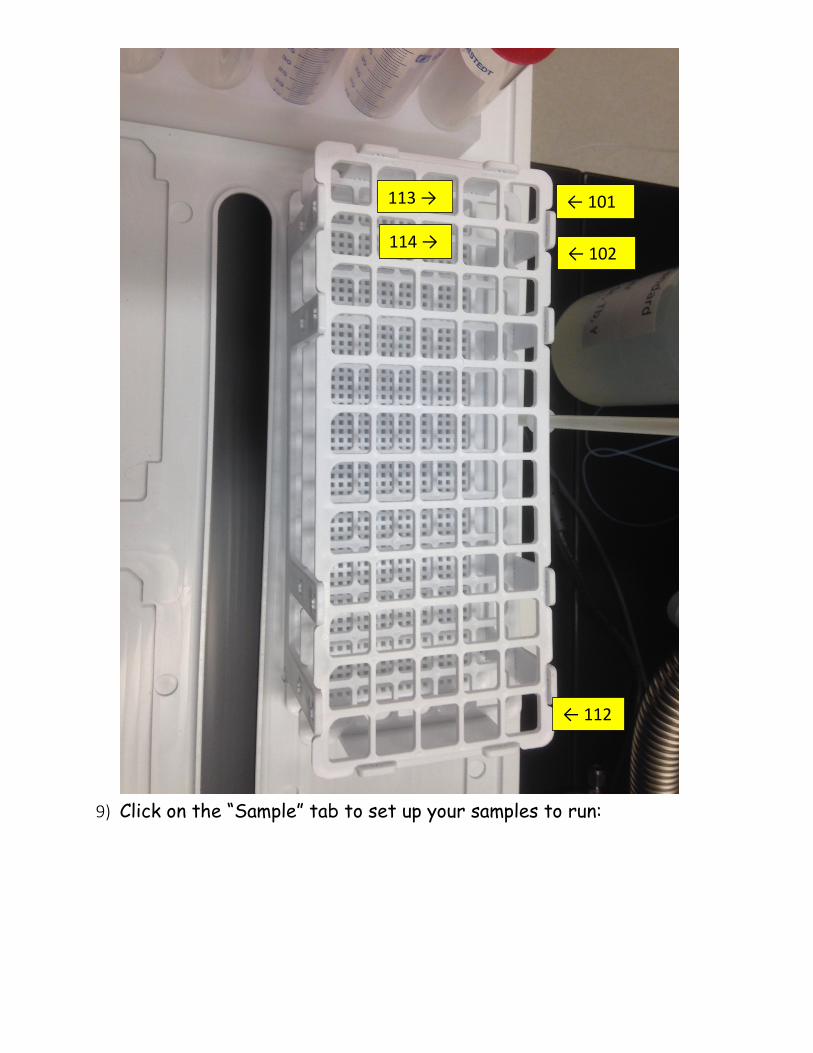
9) Click on the “Sample” tab to set up your samples to run:
← 101
← 102
← 112
113 →
114 →

To fill in the Batch table for your samples, first enter where the sample is located in the autosampler tray. Next, give an ID name for the Batch. Then give each sample a name under Sample ID. For the first sample in the list, the Measurement Action should be “Run Blank, Stds. And Sample”. For every sample after that, the Measurement Action should be only “Run Sample”. Finally, enter the method to use used to analyze the samples.
10) All of the sample rows you wish to run must be high-lighted.
← Click on the Sample icon
↓ Then click on the Batch tab
↑ All rows must be high-lighted.

11) Then click on “Analyze Batch” to run the samples.
12) When the samples are finished, click on the “Reporter” icon to display the report. Click on the Export All button to export the data.
After you click on Export All, it will ask you where you wish to save the report and to give it a file name. It exports all of the data into an Excel spreadsheet. The picture of the calibration curves, however, does not get exported. The only way to save a picture of the calibration curves is to click
← Click on Analyze Batch
↓ Click on the Reporter icon to display the report.
Click on Export All to export the data ↓
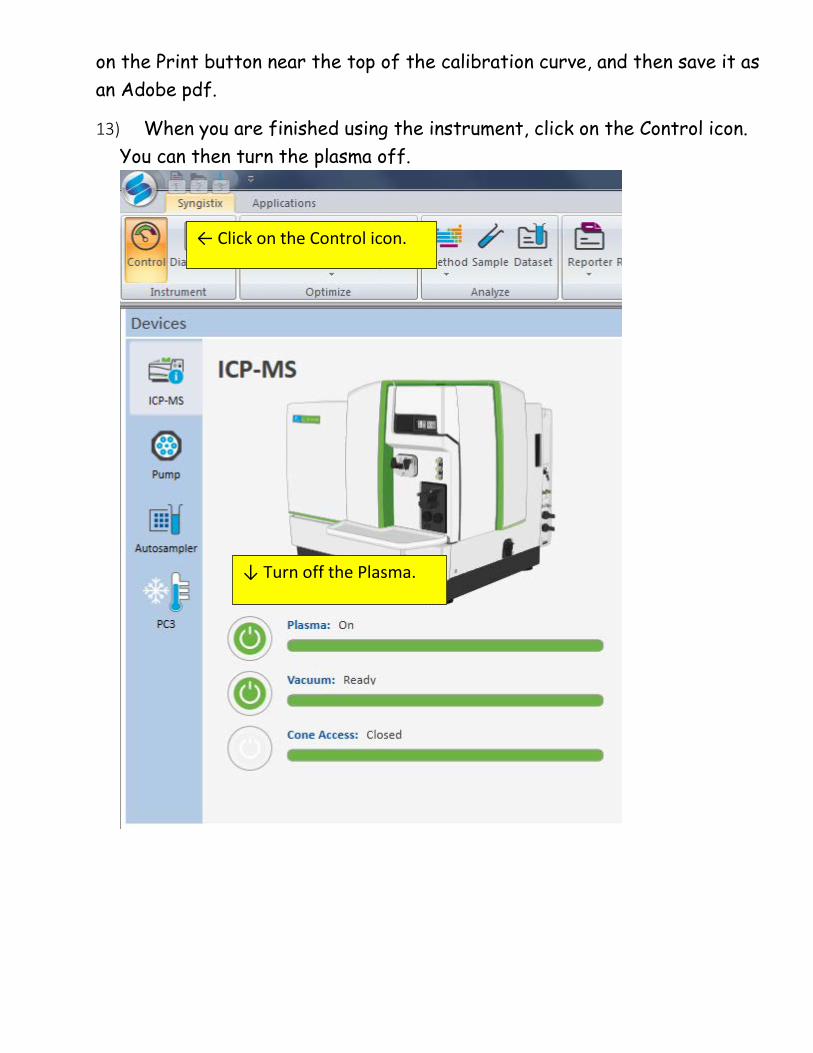
on the Print button near the top of the calibration curve, and then save it as an Adobe pdf.
13) When you are finished using the instrument, click on the Control icon. You can then turn the plasma off.
← Click on the Control icon.
↓ Turn off the Plasma.

14) Finally, close the Syngistix software. Please note, there is a bug in the software. When you try to close Syngistix, you will see an error message that Syngistix has encountered a problem. Click on “Close the Program”
15) Un-do the tubing clamps and un-hook the tubing from the peristaltic pump:
← Click on Close the Program.
← Un-do the clamps.
← Un-hook the tubing.


![a - nihs.go.jp€¦ · I-IP 4500 ICP-MS (Inductively coupled plasma mass spectrometer) b 70 Agilent 7500 ICP/MS ICP-MS & 0.7 ml]rnin Instrument conditions for ICP— Radio fre uenc](https://static.documents.pub/doc/80x56/5eaae50a41682f0a76693711/a-nihsgojp-i-ip-4500-icp-ms-inductively-coupled-plasma-mass-spectrometer-b.jpg)


