52
iDENprotect Server Administrator Guide iDENprotect Ltd. Version 2.0.0 draft, February 12th, 2018

iDENprotect Server AdministratorGuide
iDENprotect Ltd
Version 200 draft February 12th 2018
Table of Contents
Related Documents 1
1 iDENprotectserver Software Suite 2
2 Introduction to iDENprotectserver 3
21 iDENprotectserver Components 3
22 iDENprotect Enabled Devices and iDENprotectplus Tokens 4
23 Application Protection 5
3 Operating iDENprotectserver 7
31 iDENprotectserver Startup Workaround 7
32 iDENprotectserver Shutdown Workaround 7
33 Starting and Stopping other Services 8
34 Activating iDENprotectserver Licence 8
4 iDENprotectserver Admin Console 10
41 Management Console Views 11
411 Dashboard Tab 11
412 Devices Tab 11
413 Users Tab 12
414 Logs Tab 12
415 Reports Tab 13
416 Site Tab 13
417 Config Tab 14
5 iDENprotect Provisioning 15
51 Registering Devices 16
52 Assigning Devices 16
53 Enroling Devices 18
6 Configuring iDENprotectserver 19
61 Configuration Paramters 20
611 CA Parameters 20
612 Database Parameters 21
613 Email Parameters 21
614 LDAP Parameters 22
615 Logging Parameters 23
616 Web Server Parameters 24
617 User Enrolment Properties 25
62 Configuring Email Messages 26
7 Managing Network Ports on iDENprotectserver 27
71 Configuring Firewall 27
8 Managing Certificate Authorities (CAs) 28
9 Managing iDENprotect Users 29
91 Manual User Enrolment (with or without LDAP) 29
92 LDAP Auto-enrolment 29
10 Configuring LDAP 30
101 Connecting to LDAP server 30
102 Configuring LDAP Server 30
11 Configuring iDENprotectserver Database 33
111 Configuring MariaDB 33
112 Configuring Oracle Database 33
12 Logging 35
121 iDENprotectserver Log Events 35
122 Log Search Examples 36
13 Managing Web Server 38
131 Installing a Trusted SSL Certificate 38
1311 Generating Private Key and CSR 38
1312 Signing the CSR 38
1313 Installing the Certificates 39
1314 Testing the Certificate 39
132 Configuring nginx 40
Appendix A Using Built-in EJBCA Certificate Authority 41
A1 Installing EJBCA Administrator Certificate 41
A2 Using EJBCA Web Console 41
A21 Creating New iDENprotect Certificate Profile 42
A22 Creating End Entity Profile 43
A3 Configuring EJBCA Startup 45
Appendix B Cipher Suites in iDENprotectserver Admin Console 46
Appendix C iDENprotect Device Keystore 47
Appendix D Database Schema 47
This guide describes how to manage the iDENprotectserver including how to start and stop the server
how to change network ports configure logs and reports and how to troubleshoot iDENprotectserver
and Certificate Authorities
This guide is intended for iDENprotectserver administrators
Related DocumentsFor more information see the following documents in the documentation set
bull iDENprotectserver Installation Guide version 200
bull iDENprotect for iOS Developer Guide 10
bull iDENprotect Security Architecture
1
1 iDENprotectserver Software SuiteiDENprotect iprovides multi-factor authentication using PKI technology and standards based
authentication protocols iDENprotect consists of a number of feature rich components ranging from
application development tools integration solutions identity management mobile application user amp
device provisioning and user management console
iDENprotect is the name of iDENprotectrsquos multi-layered software-based identity management and
authentication security software scalable to any number of users It is used to manage and secure
digital identities of users
iDENprotect Enabled Device is a mobile device such as a mobile phone a tablet computer or laptop
that has been enabled to work as an or with an authentication device in the iDENprotect framework
using an iDENprotect App iDENprotect Apps are available for most device platforms
iDENprotectplus is an optional hardware authentication component of the iDENprotect solution It is a
physical credit card form factor device which allows easy multi-factor authentication
iDENprotectserver is the backend management server central to the iDENprotect solution The
iDENprotectserver is flexible due to its ability to connect to external components such as Databases
Certification Authorities and directory services as well as having the ability to create and use internal
components such as internal Databases internal Certificate Authorities iDENprotectserver manages the
full lifecycle of the user centrally
In this document both iDENprotect Enabled Devices and iDENprotectpluss are sometimes collectively
referred to as Devices
2
2 Introduction to iDENprotectserver
iDENprotectserver is the management server for any organisation that uses iDENprotect and
iDENprotectplus The main purpose of iDENprotectserver is to allow a safe and secure enrolment to the
service to maintain central records of authorised users with their authentication devices and to
revoke and remove access when necessary iDENprotect uses Public Key Infrastructure (PKI) the most
secure and trusted way to manage digital identities and to authenticate users onto a variety of
platforms natively iDENprotect removes the complexities associated with PKI deployments due to its
intelligent automation ensuring a simple user experience for the user but also the administrator who
maintains and supports the platform
iDENprotectserver is managed through a simple and clear web console that provides functions such as
user management device management reports logs and general configuration settings to ensure the
solution fits within your business and operational processes Depending on the deployment there are
other functions such as to view certificates within the internal CA component and also internal
database attributes
Figure 1 iDENprotectserver Typical Enterprise Deployment
Sensitive communications to and from the iDENprotectserver are secured to prevent eavesdropping
attacks iDENprotectserver listens to incoming authentication requests from enroled Devices in HTTPS
port 443 When requests arrive iDENprotectserver validates them based on the information contained
within pre-registered digital certificates and only processes authenticated requests All persistent data
in the iDENprotectserver is stored securely within databases
When an iDENprotect-secured transaction is started the iDENprotect App or iDENprotectplus forms a
connection to the iDENprotectserver to authenticate the user After successful authentication the user
can access the secured content
21 iDENprotectserver Components
iDENprotectserver is a modular system At the core of the system is always the iDENprotectserver
application which has the following subcomponents
3
Component Standalone Deployment(Internal)
Enterprise Deployment (External)
Database system MariaDB MySQL-compliant database systems such as OracleDatabase
Web server reverse proxy nginx Apache HTTP Server amp CA API Security Proxy
Certificate Authority iDENprotect InternalCertification Authority
Microsoft Certificate Services
Directory Services LDAP v3 Directory Service LDAP v3 Directory Service
The standalone iDENprotectserver installer package includes MariaDB nginx and the iDENprotect
internal CA component For organisations who are using BlackBerry software - in particular BlackBerry
Dynamics - iDENprotectserver contains a separate PKI connector application that relays authentication
information securely between iDENprotect and BlackBerry Dynamics runtime
iDENprotectserver is a Java application that has an embedded Tomcat application server The
iDENprotectserver is able to perform its purpose either as a single application server or operate behind
other application servers such as nginx or reverse proxy servers If the environment where
iDENprotectserver is deployed has multiple zones for security purposes its modular design allows for
other web facing components to be placed in front of the iDENprotectserver in order to inspect the
traffic or for other security needs
22 iDENprotect Enabled Devices and iDENprotectplus
Tokens
A mobile device secured with iDENprotect technology is called an iDENprotect Enabled Device In
iDENprotect Enabled Devices iDENprotect security operations are secured by a private key in the
Secure Enclave on an iOS device or an equivalent secure location on other platforms
iDENprotect architecture is used when a mobile device function or resource requires authentication
At that point the mobile device connects to iDENprotectserver over a TLS -encrypted Ethernet
connection (only TLS 12 supported by default) The user is prompted to open an iDENprotect App
(preinstalled on the mobile device) and to authenticate biometrically (with Touch ID for example) or
PIN code
An example of an iDENprotect App is iDENprotect for BlackBerry which integrates the BB Dynamics
Mobile Application Management (MAM) framework with iDENprotect authentication iDENprotect for
BlackBerry is available from App Store
An iDENprotectplus token offers another layer of security It is a separate hardware module thatrsquos used
to identify its owner when prompted by an iDENprotect App
The iDENprotectplus can only communicate over Bluetooth so it is unable to connect to
iDENprotectserver by itself Connection to iDENprotectserver is provided by the iDENprotect App The
iDENprotectplus forms a Bluetooth pairing with the iDENprotect App which connects to the
iDENprotectserver over a TLS-encrypted Ethernet connection
After forming the connection successfully the user is prompted for identification via Touch ID or PIN
code in the iDENprotect App
iDENprotectserver securely manages the whole user life cycle for all provisioned iDENprotect Devices A
4
Device is always assigned to a single user - either automatically via LDAP integration or manually in the
iDENprotectserver Admin Console - and only Devices that are registered in the iDENprotectserver
database can be assigned to users
Before the Device is ready for use the user must enrol the Device on an iDENprotect App that sends a
secure enrolment request to the iDENprotectserver Only a Device that has been enroled is able to
authenticate the user
23 Application Protection
iDENprotect can defend itself against application attacks and detect when an attack is being
attempted The mechanisms behind these controls are provided by Arxan a leader in application
protection
With the application controls enabled iDENprotect secures its integrity by being resistant to
application tampering malware insertion and other types of attacks iDENprotect applies Arxan
solutions by inserting tiny code guards into the application binary to lockdown the application against
attacks These guards employ with obfuscation encryption cryptographic key transformation and
other techniques
The iDENprotect application uses these Arxan Guards to secure the iDENprotect application
sourcecode and the iDENprotect engine framework using Arxan GuardSpec
The configuration of the application protection mechanisms cannot be configured amended or altered
by the administrator The purpose of this section is to highlight the protection in place and the defined
policies-
Table 1 Application Protection Controls Applied
Application Policy Enabled
Checksum (Code) Yes
Checksum (Data) Yes
Custom Yes
Damage (Code) Yes
Damage (Data) Yes
Debugger Detection Yes
External Symbol Renaming Yes
Hook Detection Yes
Jailbreak Detection Yes
Obfuscation Yes
Objective-C Renaming Yes
Repair (Code) Yes
Repair (Data) Yes
5
Application Policy Enabled
Resource Verification Yes
Root Detection Yes
String Encryption Yes
Swizzle Detection Yes
Application protection is always on
6
3 Operating iDENprotectserver
iDENprotectserver is a Java application that runs as a service named idenprotect Most of the
additional components - such as the nginx web server - are also run as services
The idenprotect is operated with the service manager using the following commands
bull on RHEL 6 service idenprotect start stop restart
bull on RHEL 7 servicectl start stop restart idenprotect
To check the state of the idenprotect service enter the following command
bull on RHEL 6 service idenprotect status
bull on RHEL 7 servicectl status idenprotect
When iDENprotectserver is running normally the status check returns Running (ltprocess IDgt)
31 iDENprotectserver Startup Workaround
If the service fails iDENprotectserver can be launched with the ispash startup script which is located
in the installation directory optidenprotect It is recommended to run the script using the
identear user account that was created during iDENprotectserver installation
1 Open a terminal window
2 If not already identear change user to identear account
su identear
3 Enter password for identear
4 Run the startup script
cd optidenprotectsh ispash
The startup script starts launching the iDENprotectserver as a background process All server startup
messages are logged in the main Logging Properties To check the server startup status read the last
lines of the file with tail varlogidenprotectlog command
When the server has started correctly there is a line StartupInfoLogger - Started WebLauncherin the log file
iDENprotectserver home directory optidenprotect contains a script file restartsh to quickly
restart the server Run it with the sh restartsh command using the identear user account
32 iDENprotectserver Shutdown Workaround
To stop iDENprotectserver after it has been started with ispash script identify which process ID it is
using and then kill the process
7
1 Find the iDENprotectserver process ID with ps and grep commands
ps -ef | grep idenprotect`
2 The output should contain a long Java command Identify the process ID number (bolded in the
following example)
identear 27575 27574 0 Aug24 002955 -Xms384m -Xmx512m-XXMaxPermSize=256m -jar idenprotect-server-130jar
3 Kill the process
kill -1 ltprocess_idgt
33 Starting and Stopping other Services
During iDENprotectserver installation the following services are also installed
bull nginx web server - service name nginx
bull internal mariaDB database - service name mariadb
bull (optional) EJBCA CA server - service name ejbca
These services are started and stopped with the service manager using the following commands
bull on RHEL 6 service ltservicenamegt start stop restart
bull on RHEL 7 servicectl start stop restart ltservicenamegt
For example to restart nginx on RHEL 7 type servicectl restart nginx
34 Activating iDENprotectserver Licence
iDENprotectserver licence determines the amount of concurrent iDENprotect devices that
iDENprotectserver supports Without a valid licence iDENprotectserver will not accept any iDENprotect
enrolments or authentication attempts
The licence file is supplied from your vendor or from iDENprotect The licence file is named
licencexml Contact us at support ltatgt idenprotectcom if you have issues with the licence file
8
Figure 2 iDENprotectserver Admin Console iDENprotectserver Licences View
The licence is activated with the following steps
1 Log in to iDENprotectserver Admin Console
2 In the Dashboard Tab click on the Licences text
3 Upload your licence file
The licence file is validated and you should immediately see the licenced device pool under Device
Licencing chart reflect the amount of available licences
9
4 iDENprotectserver Admin ConsoleiDENprotectserver Admin Console is the web interface for managing and allocating iDENprotect Enabled
Devices and iDENprotectpluss to users The Management Console runs on an embedded Tomcat
application server and it is started with the same optidentearispash startup script as the rest of
the iDENprotectserver components
The following web browsers are supported to connect to the management console
bull Internet Explorer 10 11
bull Google Chrome 61 62 63
bull Mozilla Firefox 55 56 57
bull Microsoft Edge 12 13 14
The Management Console only accepts HTTPS connections secured by protocols specified in the
Tomcat properties file Edit the configuration file to align with your organisationrsquos security policy We
recommend using TLS 12 for security reasons
In normal iDENprotectserver installation the Management Console URL is set as the domain name of the
iDENprotectserver which is usually in the format httpsidenltmydomaingtcom The default
administrator user account is
bull User name ADMIN
bull Password 1detearAdm1n
Figure 3 iDENprotectserver login screen
Change the administrator login credentials after the initial iDENprotectserver
installation
Using the Management Console it is possible to
bull Add new iDENprotectplus manually to the device pool
bull Assign iDENprotect Enabled Device and iDENprotectplus to users
bull Remove Devices from active use
bull Create and remove new Management Console user accounts
bull View iDENprotectserver logs
10
bull Run iDENprotectserver reports
iDENprotect Enabled Device and iDENprotectpluss are identified in the iDENprotectserver Admin Console
by their serial numbers
41 Management Console Views
The iDENprotectserver Admin Console interface has intuitive screens for most common usage scenarios
User and Device management is handled in quickly loaded indexed lists and editing users is simple
411 Dashboard Tab
Figure 4 Dashboard
The Dashboard provides an overview of the server status It lists currently allocated Devices and login
events in one view
412 Devices Tab
The Devices tab lists all iDENprotect Devices on the iDENprotectserver Each Device is an iDENprotect
authentication entity (mobile device with iDENprotect App or physical iDENprotectplus Token) that is
registered on the server
11
Figure 5 Device List
The Devices can be sorted and filtered based on their Users email addresses device states or other
attributes
Manage firmwares and Register device pages are for registering iDENprotectplus Tokens via a DRA
(Device Rights and Attributes) file upload and updating or synchronising their firmware images
413 Users Tab
The Users tab lists all users who assigned one or more iDENprotect Devices
If the iDENprotectserver has been Configuring LDAP you can map Users and their permissions with the
LDAP directory using the Sync button
As with Devices Users can also be sorted and filtered based on different attributes
Figure 6 Device List
414 Logs Tab
The Logs tab lists the most recent activity on the server read from the main iDENprotectserver log file
idenprotectlog The log file location and logging parameters are defined in [Logging Properties] By
12
default the file is located in varlogidenprotect
Figure 7 Logs Tab
415 Reports Tab
The Reports tab contains a list of common printable report types for iDENprotectserver By default
reports are printed from the last 30 days but start and end dates for the reports can be changed in the
From Date and To Date fields
The following reports are available
bull Certificate signings - All signed iDENprotect certificates Certificates are signed during enrolment
and during authentication
bull Web user management - All events (create edit delete password reset) performed for
416 Site Tab
The Site tab contains management tools for the Management Console itself
bull Manage users - Displays and edits existing Management Console users
bull Add users - Adds a new user
bull View certificate - Displays the nginx web server certificate
bull About - Displays information about iDENprotectserver installation
13
Managing Users
The following user roles are available
bull Administrator - access to all features
bull Helpdesk - same as Administrator but canrsquot create new Management Console users or add new
iDENprotectplus Tokens
bull Readonly - same as Helpdesk but canrsquot change anything
Depending on the LDAP configuration Management Console accounts might be only possible to
create for users found in the LDAP directory For more information see LDAP Admin Sync in LDAP
Parameters
417 Config Tab
The Config tab contains configurable iDENprotectserver parameters in the following categories
bull config - General configuration parameters
bull ca - Certificate Authority configuration
bull database - Database connection parameters
bull email - Email server configuration and automated message contents
bull ldap - LDAP settings (optional)
bull logging - Log file locations and logging intervals
bull userenrollment - Settings for enrolment activity
All listed parameters can be configured in the web browser The parameters map to equivalent
parameters in etcidenprotectproperties configuration files on the iDENprotectserver file
system For descriptions of the parameters see [Configuring Server Parameters]
Changing parameters requires restarting the iDENprotectserver For instructions see [Restarting
iDENprotectserver]
14
5 iDENprotect ProvisioningiDENprotect Devices (iDENprotect Enabled Devices or iDENprotectplus tokens) are taken into use in a
process called provisioning During provisioning the Devices are
1 Registered on an organisationrsquos iDENprotectserver
2 Assigned to a user on the iDENprotectserver
3 Enroled into active use by its user
Only Devices registered to an iDENprotectserver and enroled by their users can be used to authenticate
the user in applications that have been integrated with that iDENprotectserver
During an authentication request iDENprotectserver verifies that the enroled
iDENprotect Enabled Device or iDENprotectplus is in possession of its assigned user
This is enforced through a biometric scan or by entering the userrsquos PIN code
To get iDENprotect Enabled Devices and iDENprotectplus tokens enroled correctly set up
iDENprotectserver so that it accepts incoming connections to HTTPS port 443 In addition iDENprotect
users need an iDENprotect App such as iDENprotect for BlackBerry to enrol their Devices
The status of a Device can be tracked in the iDENprotectserver Admin Console
Itrsquos possible to integrate iDENprotect Device user mapping with LDAP directory With LDAP itrsquos
possible to restrict user registration to LDAP directory members and to automatically enrol Devices
with recognized owners Provisioning a new iDENprotect Device using LDAP auto-enrolment looks
like this
Figure 8 iDENprotect Provisioning Sequence
15
51 Registering Devices
iDENprotect Devices can be registered on the iDENprotectserver by using an iDENprotect App to start
the registration process In the registration process the iDENprotect App relays identification
information from a iDENprotect Enabled Device or iDENprotectplus token to the iDENprotectserver This
information is stored in a DRA (Digital Rights and Attributes) file The contents of the DRA file are
different for iDENprotect Enabled Devices and iDENprotectpluss
bull In iDENprotect Enabled Devices the DRA file for registering the iDENprotect Enabled Device is
derived from the mobile device UUID (Universally Unique IDentifier)
bull In iDENprotectpluss the DRA is derived from the serial number that is programmed into the Token
during manufacturing
Users can register both iDENprotectpluss and the iDENprotect Enabled Devices with the iDENprotect
App This kind of registration is initiated by the user When launching the iDENprotect App the user is
prompted for (the userrsquos own) email address and the iDENprotectserver URL to connect to
Figure 9 Starting Registration
The users must know the iDENprotectserver URL before launching the iDENprotect App It is the
iDENprotect administratorrsquos responsibility to provide it to them
After a successful registration the registered Device is available in the iDENprotectserver and its initial
status is REGISTERED Each Device has a unique identifier listed in the Serial Number column in
iDENprotectserver Admin Console
All Devices that are in REGISTERED state can be assigned to users
When using [LDAP auto-enrolment] Devices are automatically assigned to their
users and moved to ASSIGNED status Proceed directly to Enroling Devices after this
step
52 Assigning Devices
If LDAP auto-enrolment is used skip this step
iDENprotect Devices and iDENprotectpluss that have been registered in the iDENprotectserver database
can be assigned to users in the Users view in the iDENprotectserver Admin Console
The Users view lists all Devices and whether they have been assigned or enroled yet Any Devices that
16
have not been assigned yet to an user have an Assign button visible next to them
Figure 10 Listing Users
If iDENprotectserver has been integrated with Active Directory or other LDAP-based directory services
the user information can be mapped from the LDAP service If no LDAP integration is used the user
details for assigned Devices are stored as parameters of the Device in the iDENprotectserver database
Each Device can only be assigned to a single user The internal iDENprotectserver user table is not
indexed and does not keep track if the same user has multiple Device assigned to them
To assign an Device to a user
1 Open the Users view in iDENprotectserver Admin Console
2 Find the Device to assign
3 Click Enroll button on the same row as the Device
4 Fill in and verify the userrsquos details
17
Figure 11 Assigning a Device to a User
Whether using LDAP integration or an internal iDENprotectserver user table the user email field must
always be populated when assigning Devices This address is used to deliver the Activation Code or
QR Code required to complete the enrolment The Device entries are dynamically loaded and
autocompleted from the database
After finishing this step the Device is in ASSIGNED state and is ready to be delivered to the user
53 Enroling Devices
The same iDENprotect App used for registering is also used for finishing the provisioning process by
allowing the user to enrol the iDENprotect App or iDENprotectplus
Enrolment can only be done after the Device has been assigned to a user and only the user for whom
the Device has been assigned to can enrol the Device When the user runs the App the App requests
an ActivationQR Code that has been sent to the userrsquos email address when the Device was assigned
to the user When using LDAP auto-enrolment this step is done automatically
After successfully entering the Activation Code or scanning the QR Code and confirming the Device
serial number the iDENprotect App prompts the user to set a PIN code for the iDENprotect Enabled
Device or iDENprotectplus This PIN code is used during authentication requests if biometric
identification such as Touch ID is not available
After successful enrolment the Device is in ENROLLED state and ready to use for user authentication
18
6 Configuring iDENprotectserver
There are two ways to change iDENprotectserver configuration in iDENprotectserver Admin Console
Config Tab or on the server file system by editing properties files in etcidenprotect directory
The parameters in the iDENprotectserver Admin Console Config Tab map to parameters in the
properties files When editing a parameter in one place the changes are reflected in the other
Some changes require restarting iDENprotectserver which must be done in command
line Restart iDENprotectserver based on instructions in [Operating iDENprotectserver
Services]
To edit iDENprotectserver configuration parameters in iDENprotectserver Admin Console Config Tab open
a configuration section and press Edit on the parameter you want to change After entering a new
value for the parameter press Commit at the bottom of the configuration section
Figure 12 Editing Email Title
If the paramater change requires iDENprotectserver restart the text Restart required after change is
displayed in the Config tab
Figure 13 Restart Required After Change
Configuration Categories
iDENprotectserver AdminConsole configurationsection
File name Description
ca caproperties Certificate Authority (CA) configuration profiles andkeystores
19
iDENprotectserver AdminConsole configurationsection
File name Description
database databaseproperties Database connection configuration
email emailproperties SMTP server configuration and email templates
ldap ldapproperties LDAP directory connection and user lookup configuration
logging loggingproperties Logfile locations and log formatting settings
webserver webserverproperties
Spring framework and nginx web server configuration
userenrollment userenrollmentproperties
iDENprotect enrolment settings
61 Configuration Paramters
611 CA Parameters
CA configuration parameters are defined in ca configuration section in iDENprotectserver Admin
Console or in etcidenprotectcaproperties Some of the parameters refer to the optional
EJBCA Certificate Authority If EJBCA is not used those parameters are ignored
Table 2 caproperties
Parameter Default Value Description
caname iDENtear CA Name of the CA
cabackend ejbca CA provider type Supported types are internal and
ejbca
cabackendejbcatrustStore
optejbcap12truststorejks
Location of the EJBCA TrustStore which contains the CAroot certificates Password for this is originally set duringiDENprotectserver installation
cabackendejbcakeyStore
optejbcap12superadminp12
Location of the EJBCA KeyStore which contains theEJBCA private key amp certificate chain The
superadminp12 file is required to gain access toEJBCA Administration Console
cabackendejbcakeyStoreType
PKCS12 KeyStore type Supported types are JKS and PKCS12
cabackendejbcawsurl
httpsltserver-namegt8443ejbcaejbcawsejbcawswsdl
EJBCA web services connection URL The port number
has to match the value in EJBCA webproperties file
cabackendejbcapluginurl
httpsltserver-namegt8443ejbcaidentear
EJBCA network traffic URL The port number has to
match the value in EJBCA webproperties file
cabackendejbcaendentityprofile
iDENtear FOB End Entity Profile name in EJBCA This has to match thename set in EJBCA Administration Console
20
Parameter Default Value Description
cabackendejbcacertificateprofile
ENDUSER Certificate Profile name in EJBCA This has to match thename set in EJBCA Administration Console
cacertificateusernamefmt
iDENtear s CA Certificate user name format definition
cacertificatecnfmt
CN=iDENtearCertificate s s
CA Certificate Common Name format definition
612 Database Parameters
Database connection parameters are defined in database configuration section in iDENprotectserver
Admin Console or in etcidenprotectdatabaseproperties
Table 3 databaseproperties
Parameter Default Value Description
dbusername Database user name For the built-in MariaDB databasethe user name was defined during iDENprotectserver
installation
dbpassword Password for the database user For the built-in MariaDBdatabase the password was defined duringiDENprotectserver installation
dbjdbcdriver commysqljdbcDriver
JDBC connection driver type Available options are
commysqljdbcDriver for MariaDBMySQL and
oraclejdbcOracleDriver for Oracle database
dbjdbcurl jdbcmysqlltdb-hostgtltdb-portgtltdb-namegtautoReconnect=true
Database connection URL with listening port Available
options are jdbcmysqlltdb-hostgtltdb-portgtltdb-namegtautoReconnect=true for
MariaDBMySQL and jdbcltdatabaseSIDgtthinltdb-hostgtltdb-portgtltglobaldatabase namegt for Oracle database
dbchangelog classpathdb-changelogxml
Log file name and location
dbvendor MYSQL Database type Available options are MYSQL and
ORACLE
613 Email Parameters
Email configuration parameters are defined in email configuration section in iDENprotectserver Admin
Console or in in etcidenprotectemailproperties
Table 4 emailproperties
Parameter Default Value Description
emailgatewayusername
idenprotect-adminexamplecom
Email account for communicating with registered users ofthe iDENprotectserver
emailgatewaypassword
Password for the email account
21
Parameter Default Value Description
emailgatewayhost mailexamplecom URL of the email server
emailgatewayport 25 Outbound email port (25 = unsecured SMTP)
emailgatewayfrom idenprotect-adminexamplecom
From address for emails sent from the iDENprotectserver
account
emailgatewaydisplayname
idenprotect-adminexamplecom
Human-readable sender name for emails sent from theiDENprotectserver account
userenrollmentemailsubject
deviceenrollmentemailsubject
pinresetenrollmentemailsubject
activationcodeenrollmentemailsubject
iDENprotect Enrollment iDENprotect PIN reset
Email subject field See Configuring Email Messages
userenrollmenttemplate
deviceenrollmenttemplate
pinresetenrollmenttemplate
activationcodeenrollmenttemplate
userEnrollmentEmailvm
deviceEnrollmentEmailvm
pinResetEmailvm
activationEmailvm
Enrollment email template contents in plaintext
userenrollmenttemplatehtml
deviceenrollmenttemplatehtml
pinresetenrollmenttemplatehtml
activationcodeenrollmenttemplatehtml
userEnrollmentEmailHtmlvm
deviceEnrollmentEmailHtmlcm
pinResetEmailHtmlvm
activationEmailHtmlvm
Enrollment email template contents in HTML
614 LDAP Parameters
LDAP configuration parameters are defined in ldap configuration section in iDENprotectserver Admin
Console or in etcidenprotectldapproperties
Table 5 ldapproperties
Parameter Default Value Description
ldapenabled Enables LDAP integration for iDENprotect users Possible
values are true and false
ldaptype real Sets LDAP directory type for internal testing purposes
The only supported value is real
ldapserver ldapltserver-urlgtgtserver-portgt
URL and port of the LDAP server
ldapauthmethod simple LDAP authentication method Supported types are
simple sasl and anonymous
22
Parameter Default Value Description
ldapauthuser LDAP management account username
ldapauthpass LDAP management account password
ldapsearchbase Distinguished Name of the search base Object whichdefines the location in the LDAP directory where a searchbegins
ldapsearchobjectClass
person The objectClass attribute to search for Supported
values are person top use and
organizationalPerson
ldapfielduserfirstlastfullname
uid givenName sn
cnID first name last name full name fields for thereturned LDAP user
ldapfieldemail Email field for the returned LDAP user DuringiDENprotect device registration the entered email is usedto identify the user in the LDAP directory
ldapusersync false Automatically un-enrolls users and marks their accountsfor deletion from the iDENprotectserver if the user accounthas been disabled or is no longer found in the correct
LDAP group Possible values are true and false
ldapuserenforce true If set to true deletes user accounts flagged by
ldapusersync If set to false only logs the
accounts in varlogidentearidentearlog
ldapuserattributename
physicalDeliveryOfficeName
Additional parameter for storing a description or addressof the office where the user is located
ldapautoenrollenabled
false Enables automatic enrollment for newly registered userswho can be found in the LDAP directory Possible values
are true and false
ldapadminsync false If set to true automatically updates user accounts thathave been linked to one of the three access levels foriDENprotectserver Admin Console in the LDAP directory
Possible values are true and false
ldapautoenrolluserNotFoundforceCreate
false Attempts to create a user account in the LDAP directorywhen the user account (as identified by the email addressgiven by the user) has not been found during registration
Possible values are true and false
ldapautoenrollgroup
CN=ltGroupTitlegtOU=ltGroupsgtDC=ltorganisationgt
Automatic enrollment is enabled for all LDAP users in thisgroup
ldapusercron
ldapadmincronltcron sync timegt Sets up LDAP synchronisation jobs for user and admin
accounts using cron syntax For example 0 0 sets the synchronisation to run every hour
ldapadmingroup
ldaphelpdeskgroup
ldapreadonlygroup
CN=ltGroupTitlegtOU=ltGroupsgtDC=ltorganisationgt
Access level to iDENprotectserver Admin Console is grantedbased on LDAP userrsquos membership in these groups
615 Logging Parameters
Log file settings are defined in logging configuration section in iDENprotectserver Admin Console or in
23
etcidenprotectloggingproperties
Table 6 loggingproperties
Parameter Default Value Description
webapplog varlogidenprotect
Log file directory
webapploglayout orgapachelog4jEnhancedPatternLayout
Log layout pattern class
webapploglayoutConversionPattern
d p [t] C1 -m throwable2n
Logging pattern in the log file See log4j reference forpossible values
webapplogmaxLogSize
50mb Maximum log file size in MB
webapplogmaxBackupIndex
10 The number of backup log files that are stored The oldestone is overwritten when this number is exceeded
webapplogDatePattern
dd File suffix format for daily logs dd appends the dayof the month to the log file
webappRolling orgapachelog4jDailyRollingFileAppender
Log4j class for rolling files over
webappConsole orgapachelog4jConsoleAppender
log4jappenderstdout
Definitions for appending log events to Systemout
log4jappenderlogfile
Definitions for appending log events to the defined logfile
log4jappendersyslog
Definitions for appending log events to syslog utility
log4jloggercoukapplymobileidentear
DEBUG logfile Logging level for events stored in log file
log4jrootLogger INFO stdout Logging level for events printed in Systemout
616 Web Server Parameters
Web server configuration parameters are defined in webserver configuration section in
iDENprotectserver Admin Console or in etcidenprotectwebserverproperties
Table 7 webserverproperties
Parameter Default Value Description
serverport 8081 Port for internal web server after reverse proxy(iDENprotectserver external port is always 443)
errorwhitelabelenabled
false Enables Spring Boot whitelabel error page if set to
true nginx default error pages are used if set to false
24
Parameter Default Value Description
servertomcatbasedir
varoptidentear Tomcat server directory The default is the same asiDENprotectserver install directory
springresourcesaddMappings
false Enables Spring Boot default resource handling if set to
true
documentroot classpathstatic Tomcat document root
frontendbuild classpathbuild
encodingstrategy base64 Conversion method between strings and byte[]
Supported values are hex and base64
datetimesourcestrategy
dynamic Sets time handling for TOTP (Time-based One-Time
Password) generation Supported values are dynamicand fixed
securerandomgeneratorstrategy
random Sets random number generator to fixed or truly random
Supported values are fixed and random
identitygeneratorstrategy
random Sets if identifiers are fixed or truly random Supported
values are fixed and random
showapidocs false Displays REST API documentation in the web UI if set to
true
expirywarningdays 30 Device certificate expiration warning in days
multipartenabled true Enables multipart file transfer to solve file size restrictions
multipartlocation tmp Storage location for temporary files during multiparttransfers
multipartmax-file-size
2MB Maximum file size for individual multipart files
multipartmax-request-size
2MB Maximum request file size for multipartform-data
serverdateTimezoneid
Server time zone as Java TimeZone id
617 User Enrolment Properties
User enrolment parameters are defined in userenrollment configuration section in iDENprotectserver
Admin Console or in etcidenprotectuserenrollmentproperties
Table 8 userenrollmentproperties
Parameter Default Value Description
loginserver iDENprotectserver hostname Hostname or IP address for the server that handlesenrollment requests
qrcode-callbacklink
httpsltservergtuserapienrollmentsessionuuiduid=userid
URL for the generated QR code that is used duringenrolment This URL is included in all enrolment emailscontaining enrolment
25
Parameter Default Value Description
timetoliveminutes
30 Sets how long the QR code URL is active After the timeto live has passed the URL expires and is no longeraccessible
62 Configuring Email Messages
In iDENprotect use iDENprotectserver sends email messages to the user during the following events
Table 9 Email Messages
Event Template file Description
iDENprotect activation ActivationEmailvm Email containing Activation Code Automatically sent touser after successful enrollment
iDENprotect enrolment deviceEnrollmentEmailvm and
userEnrollmentEmailvm
Email containing instructions on acquiring iDENprotectApp and getting started with iDENprotect Used when aniDENprotect device is set up for a user without userrsquosinput
PIN reset pinResetEmailvm Email containing a PIN reset notification and a newActivation Code PIN reset is initiated by the user
By default message template files are located in etcidenprotectemail-templates While the
listed vm files are plaintext files the directory also contains HTML-formatted versions of the files
(such as ActivationEmailHtmlvm) If a HTML version of a message can be found iDENprotectserver
uses it as the email message template If HTML version is not found the plaintext file is used instead
Plaintext and HTML file names are configured in Email Parameters
The email subject fields are entered in ltparametergtemailsubject fields which are only available in
iDENprotectserver Admin Console Config tab
These emails can contain any text or HTML styling In addition the email templates use the following
variables
bull $userfirstName - First name of the email recipient
bull $userlastName - Last name of the email recipient
bull $activationCode - Generated one-time Activation Code used during enrolment
bull $qrUrl - Generated enrolment QR Code image embedded within the message Only works with
HTML messages
bull $portalQrUrl - URL link to the QR Code
26
7 Managing Network Ports on iDENprotectserver
The iDENprotectserver installation consists of many components that communicate via network ports
Some of these ports use default values and others are set during installation Generally all ports can
be changed
Generally iDENprotectserver uses well-established default ports for its network traffic such as 3306 for
MySQL database connections All ports are set during installation and all ports are configurable
afterwards
The following TCP ports must be open on the server for iDENprotectserver application to function
correctly
Inbound TCP Ports
bull 22 (SSH port for terminal connections)
bull 443 (HTTPS port for accessing iDENprotectserver Admin Console)
bull 8443 (For accessing EJBCA administration console)
Outbound TCP Ports
bull 25 (SMTP port for sending emails)
bull 53 (DNS service)
bull 389 (if using LDAP)
bull 1521 (if using external Oracle database server)
bull 3306 (if using external MySQL server)
71 Configuring Firewall
On RHEL firewall ports are configured with the iptables or firewalld tools Both can accept and
reject connections to any inbound and outbound ports For instructions on using iptables or
firewalld see Using the iptables service and Using firewalls respectively in RHEL 7 Linux Security
Guide
As an example to allow inbound TCP connections on the server to port 22 (SSH) enter the following
command (as root)
iptables -I INPUT 1 -p tcp --dport 22 -m state --state NEWESTABLISHED -j ACCEPT
27
8 Managing Certificate Authorities (CAs)The Certificate Authority (CA) used by the iDENprotectserver establishes trust within the whole
iDENprotect solution It is
bull The trust anchor of iDENprotect when the CA is run in standalone mode
bull Part of the trust chain in an environment where the iDENprotectserver CA is subordinated to an
existing PKI service
This iDENprotect CA is the central location where certificates from iDENprotect Apps and
iDENprotectpluss are validated and signed to establish trust The CA applies the certificate policy for the
certificates issued by iDENprotectserver to ensure compliance with the overall PKI architecture
iDENprotectserver can use most commonly available CA implementations such as Microsoft CA and
EJBCA The iDENprotectserver installation package includes an EJBCA (Enterprise JavaBeans Certificate
Authority) application If the EJBCA application was selected to be installed it is configured as the
default CA in iDENprotectserver When using another CA install iDENprotectserver without EJBCA and
configure the CA after installation
Changing CAs after iDENprotectserver is in active use is difficult We recommend to
set up the CA during initial installation without changing it afterwards
28
9 Managing iDENprotect UsersAn iDENprotect User is someone who has been Registered as the owner contact person of a specific
iDENprotect Device and who has successfully Enroled that Device on the iDENprotectserver by entering
an Activation Code or scanning a QR Code after the device registration has been accepted During
registration users are mapped to an LDAP directory such as Microsoft Active Directory or stored as
owners of specific Devices in the iDENprotectserver database if LDAP is not used
LDAP integration can be automated to accept all registration attempts from users within a defined
LDAP auto-enrolment group In those cases a user who has successfully registered a Device and who
can be found from the LDAP auto-enrolment group receives the ActivationQR Code immediately If
LDAP auto-enrolment is not used assigning Devices to Users requires manual intervention by the
iDENprotect administrator even when LDAP is otherwise used
A Device can belong only to a single user but a user can have multiple iDENprotect Devices assigned
and enrolled
91 Manual User Enrolment (with or without LDAP)
In manual enrolment users register their iDENprotect devices on the iDENprotectserver Each registered
Device is stored on the iDENprotectserver as a Device in REGISTERED state
At this point and iDENprotectserver administrator must assign the registered device to a user by filling in
the user details manually as described in Assigning Devices or by entering the userrsquos LDAP username
After this step the user is considered to be the owner of the Device and the Device state is changed
to ASSIGNED
The userrsquos email address is used as as their contact reference and it must be
correct in order for the user to be able to enrol the device
When the Device is assigned to the user the user receives an email containing the ActivationQR
Code to the defined email address By following the instructions in the email the user can enrol the
Device and finish the provisioning process
92 LDAP Auto-enrolment
LDAP auto-enrolment provides an efficient way to register new iDENprotect Devices into the
iDENprotectserver and automatically send ActivationQR Codes to the users so they can proceed with
enrolment
LDAP auto-enrolment works by connecting users who are registering Devices automatically to a LDAP
user group that has permissions to assign users on the iDENprotectserver The user has to provide an
email address during registration which is used to identify the user in the LDAP group If the email is
not found in the group the Device can be registered but will not be automatically assigned to the user
In this case a iDENprotectserver administrator must intervene to correctly assign the device
When the user submits the registration iDENprotectserver receives the userrsquos email address and the
DRA (Digital Registration Attributes) file of the iDENprotect Enabled Device or iDENprotectplus If the
email accoutn owned by the user exists in LDAP group iDENprotectserver completes the registration by
auto-populating the userrsquos personal details and assigns the Device to the user
29
10 Configuring LDAPLDAP directories store user information such as name and email address which are used to
authenticate the users of the LDAP system When LDAP is enabled in iDENprotectserver configuration
iDENprotectserver uses the configured LDAP directory to verify the user information submitted during
the Device registration process by mapping it with existing LDAP records in a LDAP directory
iDENprotectserver supports the following LDAP systems
bull Microsoft Active Directory 2008 R2
bull Microsoft Active Directory 2012
bull Microsoft Active Directory 2012 R2
bull Microsoft Active Directory 2016
The iDENprotectserver LDAP plugin only needs read access to the LDAP directory Configure the service
account allocated for iDENprotectserver as read-only This access allows the lookup of users and users
within a specific group that have been approved to be enroled by the iDENprotectserver
LDAP settings are defined during iDENprotectserver installation and stored in the LDAP configuration
file LDAP Parameters When the settings are configured properly iDENprotectserver can perform LDAP
tasks such as searching for user information based on first name or surname
ldapproperties is loaded again every time iDENprotectserver is restarted Therefore all changes to
LDAP configuration require a restart
101 Connecting to LDAP server
LDAP server connection is defined in the LDAP configuration file LDAP Parameters To set up the
connection edit the following values in the file or in the Config panel in iDENprotectserver Admin
Console
bull ldapenabled - Set to true to enable LDAP
bull ldaptype - Set to real Other values are only for internal testing purposes
bull ldapserver - Enter LDAP server IP and port to connect to in the format ldapltserver-ipgtltserver-portgt
bull ldapauthmethod - Enter authentication method Available options are simple sasl and
anonymous If unsure of the right option select simple
bull ldapauthuser - Enter the LDAP service account username (if using simple or SASL
authentication)
bull ldapauthpass - Enter the LDAP service account password (if using simple or SASL
authentication)
The connection parameters must match the LDAP serverrsquos settings
102 Configuring LDAP Server
Setting up Search Parameters
Once the connection is established set the user search parameters for the LDAP query in LDAP
Parameters or in the Config panel in iDENprotectserver Admin Console
30
bull ldapsearchbase - Set the Distinguished Name of the search base where the LDAP search
begins
bull ldapsearchobjectClass - Set the objectclass of the search base target
bull ldapfieldusername firstname lastname fullname email - Set the column
names for user information
bull ldapuserattributename - Additional user identification parameter such as
physicalDeliveryOfficeName
Setting up Service Account
iDENprotectserver needs to have read access to the LDAP server to be able to query the LDAP directory
We recommend creating a dedicated LDAP account for this purpose The account only requires
membership in the Domain Users group
For example to create the service account in Active Directory 2016
1 Open Active Directory Users and Groups
2 Navigate to the Users folder
3 Right-click on the window and select New -rarr User
4 Enter the user account details
Use the same username and password as in LDAP parameters ldapauthuser and ldapauthpass
Setting up LDAP Auto-enrolment
To streamline the iDENprotect enrollment process enable auto-enrolment for newly registered
Devices
bull ldapautoenrollenabled - Set to true to enable auto-enrolment
bull ldapautoenrolluserNotFoundforceCreate - Set to true to automatically create user
accounts in the LDAP directory if the email address given during registration is not found in the
LDAP directory For this purpose the service account must also be a member of Domain Admins
group
bull ldapautoenrollgroup - Enter the auto-enrolment Group name in the LDAP directory All
members in this group are automatically enrolled when they register a new Device The Group
syntax is CN=ltGroupNamegtOUltGroupFoldergtDC=ltLDAPDirectoryNamegt
Setting up LDAP Synchronisation
31
The system can be set to periodically synchronise the registered users in iDENprotectserver and the
users in the LDAP directory This synchronisation removes any user accounts from iDENprotectserver
that
bull Are removed from the LDAP directory
bull Are set to Disabled state in the LDAP directory
bull Are removed from the auto-enrolment Group (if auto-enrolment has been enabled)
Any account that matches one or more of these criteria is removed from iDENprotectserver The
synchronisation job can be set to run with desired intervals using a cron command The following
settings configure LDAP synchronisation
bull ldapusersync - Set to true to enable synchronisation
bull ldapuserenforce - Set to true to immediately delete the account from iDENprotectserver
Setting to false only flags the account in varlogidenprotectidentearlog When an
account is flagged the log contains a line DefaultUserService - ltusernamedomaincomgt Nota member of users group for that user
iDENprotectserver Admin Console can be synchronised with access with LDAP directory When this
option is enabled users can login to iDENprotectserver Admin Console with their LDAP account
bull ldapadminsync - Set to true to automatically update user accounts that have been linked to
one of the three access levels in Management Console
bull ldapadminhelpdeskreadonlygroup - Group name containing users with Administrator
Helpdesk Readonly privileges
Both user synchronisation and Management Console synchronisation are set to run on specified
intervals using the ldapusercron and ldapadmincron parameters Both parameters are entered
using standard cron syntax
32
11 Configuring iDENprotectserver Database
The default database system in iDENprotectserver is mariaDB a MySQL-compatible
relational database management system It is possible to use other database
systems such as Oracle Database with some additional post-install configuration
111 Configuring MariaDB
During iDENprotectserver installation the installer creates a MariaDB database which contains data for
iDENprotect internal use In addition it has empty tables for Devices Users and Certificates all of
which are required for proper iDENprotect authentication use All Device and certificate data
generated during iDENprotect use is stored in these tables
MariaDB database can be set up on the same server running iDENprotectserver application or on a
different server MariaDB uses very little system resoures so we recommend installing it on the same
server as iDENprotectserver
Using MariaDB database requires no further configuration after installation If a different database has
been configured up at some point change the database connection parameters in
etcidenprotectdatabaseproperties to start using MariaDB
1 Set parameter dbjdbcdriver to commysqljdbcDriver
2 Set parameter dbjdbcurl to jdbcmysqlltserver-ipgtltportgtltdatabase-namegtautoReconnect=true
3 Set parameter dbvendor to MYSQL
112 Configuring Oracle Database
iDENprotectserver supports Oracle Database version 11g Release 2 (1120x)
Enterprise and Express editions Due to the high system resource usage of Oracle
Database we donrsquot recommend running Oracle Database and iDENprotectserver on
the same server
Oracle Database is not automatically configured during iDENprotectserver installation To use Oracle
Database instead of MariaDB first change the database connection parameters in
etcidenprotectdatabaseproperties
1 Set parameter dbusername to the schema user name of the iDENprotect database
2 Set parameter dbpassword to the userrsquos password
3 Set parameter dbjdbcdriver to oraclejdbcOracleDriver
4 Set parameter dbjdbcurl to jdbcltdatabase-SIDgtthinltserver-ipgtltportgtltglobal-database-namegt
5 Set parameter dbvendor to ORACLE
iDENprotectserver Oracle Database connector requires that an empty schema for the data is created
before launching iDENprotectserver successfully During startup iDENprotectserver creates all tables and
required core data when it detects that the schema is empty
There are multiple ways to create a new user schema in Oracle Database For instructions see
33
CREATE USER in Oracle Database SQL Reference
34
12 LoggingiDENprotectserver logs activity in the following log files
Table 10 Diagnostic Troubleshooting Logs
Log File Location Description
iDENprotectser
ver logvarlogidenprotectlog (locationdefined in [Logging Properties])
Stores authentication request connectionsdevice enrolments and other connectionattempts from devices enroled on theiDENprotectserver Also contains
EJBCA logs (ifEJBCAcomponent isin use)
varlogejbcalog and
varlogejbcaerrStores all processed authentication requestshandled by EJBCA and whether they weresuccessful or not
Web serverlogs
varlognginxaccesslog and
varlognginx_errorlogStores information on web server activity mostlyrelating to the iDENprotectserver Admin Console
Install logs tmpispa_loglog Installation logs for iDENprotectserver components
idenprotectlog and all other log files are plaintext files accessible to all text reader programs To
read and process a file use Linux utilities such as cat tail and grep For example to see the
contents of the iDENprotectserver log file type cat varlogidenprotectlog
121 iDENprotectserver Log Events
Table 11 iDENprotect Log Events
Description Class Name Contents Examples
Authentication event DefaultCryptoService Hash data signature amp certificate
iDENprotect registration DevicesController Device registered ltserialgt
iDENprotect enrolment - phase1 (initiation)
DefaultEnrollmentService
Successful enrollmentidentification for deviceDeviceid serial stateisLocked hasUser
iDENprotect enrolment - phase2 (certificate signing)
InternalCA Signing CSR with profile ENDUSER
iDENprotect enrolment - phase3 (completion)
EnrollmentController Successful enrollment completion
iDENprotect signatureverification
DefaultSigningServiceamp
SignatureValidationController
Sucessfully verified signatureltserialgt
Registration email DefaultEmailGatewayService
Sending email sendMessage toltaddressgt subject ltsubjectgt
LDAP User synchronisation DefaultLdapService Sync Job Complete
iDENprotectserver Admin Consolelogin
CsrfAuthenticationSuccessHandler
ltusergt Successfully Authenticatedto Admin Console from ltIP addressgt
35
122 Log Search Examples
Finding Authentication Events
A typical authentication event is identified by DefaultDeviceService and DefaultCryptoServicetext strings and the serialNumber of the Device (AMP002-Dw0sOAiY-448495 in the following
example)
2017-11-01 155724174 DEBUG [http-nio-8081-exec-4] DefaultDeviceService -Found Deviceid=1701 serialNumber=AMP002-Dw0sOAiY-448495 state=ENROLLEDisLocked=false2017-11-01 155724176 DEBUG [http-nio-8081-exec-4] SigningHelper - Choosendevice primary cert2017-11-01 155724180 DEBUG [http-nio-8081-exec-4] SigningHelper - Constructedcertificate with type X5092017-11-01 155724183 DEBUG [http-nio-8081-exec-4] DefaultCryptoService -Verify signature using input data414d503030322d447730734f4169592d343438343935 signature3046022100c8a2252a1b2a7f6ccc0a22df891a383fe1ca2bfc8875949d6086ee8dd14b832e022100b2a7d347a658cc7516e18baf9a2fa364e11c5e1364d168d20a42ea7edafb0d87 certificate-----BEGIN CERTIFICATE-----
Finding Registration Events
Device registration and enrollment events are logged in varlogidentearidentearlog A typical
registration event is identified by DefaultRegistrationService text string and the serial number of
the Device (AMP002-J6diTlXe-420732 in the following examples)
2017-11-02 074913661 DEBUG [http-nio-8081-exec-10] DefaultRegistrationService- Found ProductLineid=3 deviceLine=AMP revision=002 isSoft=true2017-11-02 074913700 DEBUG [http-nio-8081-exec-10] DefaultRegistrationService- Saved Deviceid=179 serialNumber=AMP002-J6diTlXe-420732 state=REGISTEREDisLocked=false2017-11-02 074913721 DEBUG [http-nio-8081-exec-10] DefaultRegistrationService- Prepared data forcoukapplymobileidentearserveruserUser312bc6f[id=ltnullgtfirstName=lastName=middleName=ltnullgtemailAddress=(OMITTED)radiusUsername=ltnullgtadAttribute=ltnullgtactiveDirectoryUsername=ltnullgtdevice=Deviceid=179 serialNumber=AMP002-J6diTlXe-420732 state=REGISTERED isLocked=false]
Finding Assignment Events
A typical assignment event is identified by DefaultUserService text string and the serial number of
the Device
36
2017-11-02 074913808 DEBUG [http-nio-8081-exec-10] DefaultRegistrationService- Created and saved by LDAP coukapplymobileidentearserveruserUser312bc6f2017-11-02 074913810 DEBUG [http-nio-8081-exec-10] DefaultUserService - Setassign status to Deviceid=179 serialNumber=AMP002-J6diTlXe-420732state=ASSIGNED isLocked=false2017-11-02 074913812 DEBUG [http-nio-8081-exec-10] DefaultUserService - AutoassignedcoukapplymobileidentearserveruserUser312bc6f[id=180firstName=lastName=middleName=ltnullgtemailAddress=(OMITTED)radiusUsername=ltnullgtadAttribute=ltnullgtactiveDirectoryUsername=ltnullgtdevice=Deviceid=179 serialNumber=AMP002-J6diTlXe-420732 state=ASSIGNED isLocked=false]2017-11-02 074913823 DEBUG [http-nio-8081-exec-10] DefaultUserService - Sentactivation email to (OMITTED)
In the above example the user is automatically assigned with LDAP auto-enrollment
Finding Enrolment Events
A typical enrolment event is identified by DefaultEnrollmentService The enrolment process is
more complex and includes multiple steps involving TOTP (Time-based One-Time Password)
generation signature verification and CA interaction
2017-11-02 084215692 DEBUG [http-nio-8081-exec-7] DefaultEnrollmentService -Handling enrollment initialisation2017-11-02 084215693 DEBUG [http-nio-8081-exec-7] EnrollmentProcessHelper -New enrollment session createdcoukapplymobileidentearserverenrollmentdomainEnrollmentSession1653436c[id=9f0c534e-2a55-4852-906d-92701fedd1d8createdAt=2017-11-02T084215693ZexpiresAt=2017-11-02T091215693ZdeviceId=ltnullgtcertificateRequest=ltnullgt]2017-11-02 084215694 DEBUG [http-nio-8081-exec-7] InMemoryCachingRepository -Adding session with id 9f0c534e-2a55-4852-906d-92701fedd1d8 to cache2017-11-02 084215695 DEBUG [http-nio-8081-exec-7] DefaultEnrollmentService -Returning enrollment initialisation responsecoukapplymobileidentearserverenrollmentdtoEnrollmentInitiationResponse346f72e7[enrollmentId=9f0c534e-2a55-4852-906d-92701fedd1d8creationTime=2017-11-02T084215693ZexpiryTime=2017-11-02T091215693Zslot=8]2017-11-02 084215697 INFO [http-nio-8081-exec-7] EnrollmentController -Successfull enrollment initiation
2017-11-02 084217349 DEBUG [http-nio-8081-exec-5] DefaultEnrollmentService -Successfully added extra cert for device Deviceid=185 serialNumber=AMP002-J6diTlXe-420732 state=ENROLLED isLocked=false2017-11-02 084217356 INFO [http-nio-8081-exec-5] EnrollmentController -Successfully added extra cert2017-11-02 084227369 DEBUG [http-nio-8081-exec-1] DefaultDeviceService -Updated device statuscoukapplymobileidentearserverdevicedtoDeviceStatusUpdateRequest54858129[deviceSerialNumber=AMP002-J6diTlXe-420732battery=0expiry=ltnullgtisActivated=1isEnrolled=1sp=time=ltnullgtuptime=0version=debug=ltnullgt]
37
13 Managing Web ServeriDENprotectserver uses nginx as the web engine for running iDENprotectserver Admin Console and [EJBCA
Web Console (optional)] During installation nginx is set to only accept connections to ports 443 (for
iDENprotectserver Admin Console) and 8443 (for EJBCA Web Console) using TLS 12 or later protocol
Generally there is need to change the nginx configuration after it has set up However the nginx
installation does not include a signed SSL certificate This chapter contains instructions on creating and
signing a trusted SSL certificate but purchasing and maintaining the certificate is the responsibility of
the customer organisation
131 Installing a Trusted SSL Certificate
The terms SSL and TLS are sometimes used interchangeably in networking Even
though the iDENprotectserver is configured to only accept TLS connections the
certificates used to secure traffic are by convention referred to as SSL certificates
In order to handle web connections securely the iDENprotectserver must use a valid SSL certificate If no
valid certificate has been configured iDENprotectserver rejects all web connections
1311 Generating Private Key and CSR
1 In the iDENprotectserver terminal create a new 2048-bit RSA key using OpenSSL
openssl req -new -newkey rsa2048 -nodes -keyout serverkey -out servercsr
Change the name of serverkey and servercsr to the hostname of
iDENprotectserver
This starts the process of generating 2 files a private key file for decrypting SSLTLS traffic and a CSR
(Certificate Signing Request) file
1 Enter the organisational and geographic information for the certificate
2 When prompted for the Common Name enter the fully qualified domain name of the
iDENprotectserver For example idendomaincom
3 Enter an email address for contact information regarding the certificate
1312 Signing the CSR
Once the CSR file is created send it to the CA (Certificate Authority) provider such as VeriSign The
reply from the CA typically contains the signed certificate chain in a pem or crt file This file is the
public key of the iDENprotectserver Store it on the iDENprotectserver computer
When copy-pasting the CSR file contents make sure to include all of them Many
CSRs fail because the BEGIN and END lines were not included in the request
38
1313 Installing the Certificates
To have a functional SSL setup for iDENprotectserver both keys have to be stored on the server and
configured in nginx
1 Copy the key file and the CRT or PEM received from the CA in the varcerts directory
2 Edit etcnginxnginxconf and add the locations for the keys ssl_certificate and ssl_certificate_key
ssl_certificate varcertsmy_domain_namepem (or bundlecrt)ssl_certificate_key varcertsmy_domain_namekey
Adjust the file names to match the certificate files
3 Restart the nginx web server
systemctl restart nginx
1314 Testing the Certificate
Open a web browser and enter the iDENprotectserver URL The browser should not alert to any
certificate validation errors
Depending on the browser a valid SSL certificate is indicated by a padlock or similar icon in the
address bar which means that iDENprotectserver now has a trusted certificate for the web site
Figure 14 Certificate information
39
132 Configuring nginx
Configuration settings for nginx are stored in etcnginxnginxconf To change the settings open
nginxconf in a text editor
The following parameters are important for running iDENprotectserver
Table 12 nginx parameters
Parameter Default Value Description
server_name localhost Hostname of the server
listen 443 Ports that the server listens to
ssl_protocols TLSv1 TLSv11TLSv12
Allowed SSLTLS protocols
ssl_certificate Location of the web serverrsquos public key
ssl_certificate_key Location of the web serverrsquos private key
ssl_ciphers See Cipher Suites iniDENprotectserver AdminConsole
List of supported cipher suites
40
Appendix A Using Built-in EJBCA CertificateAuthority
EJBCA is a Public Key Infrastructure (PKI) Certificate Authority (CA) application developed by
PrimeKey Solutions AB
EJBCA is set as the iDENprotectserver Certificate Authority by default during installation The certificate
database and passwords are also set during installation
When using EJBCA with iDENprotectserver it is not mandatory to perform any additional configuration
on the EJBCA application The iDENprotect solution functions well using the default settings
EJBCA is managed using its own web console running in URL httpsltejbca-hostgtltejbca-portgtejbca for example httpsidendomaincom8443ejbca The web console contains
tools for creating and editing Certificate Authorities for authenticating Devices and manage
certificates used by iDENprotectserver for securing any iDENprotect communications
A1 Installing EJBCA Administrator Certificate
Access to the console is secured with the P12 certificate created during installation The certificate is
protected with a password that also was set during installation (parameter 17 administrator P12
keystore)
During iDENprotectserver installation the certificate is generated in the iDENprotectserver file system in
location optidentearejbcap12superadminp12 To access the EJBCA web console import the
certificate into the web browser (if using Firefox) or operating system (if using any other browser) See
the instructions for Firefox and for Chrome on Linux
A2 Using EJBCA Web Console
EJBCA web console main view shows the publicly available resources of EJBCA such as public CA
certificates and check the status of individual issued certificates
To access the administration console click Administration in the left-side menu panel The
administration console contains options to configure iDENprotectserver certificate handling on a low
level
The most important parts to configure in the EJBCA administration console are
bull Certificate Authorities which issue certificates used in iDENprotect
bull Certificate Profiles (especially the ENDUSER profile) which define how the iDENprotect Devices are
handled in iDENprotectserver
bull End Entity Profiles which define the CA and Certificate Profile to use when signing device-specific
certificates (called End Entities in EJBCA)
41
Figure 15 Editing End Entity Profile
The End Entities listed in EJBCA map to listed Devices in the iDENprotectserver Admin Console
Figure 16 Viewing End Entity
For full information on configuring EJBCA settings with the administration console see EJBCA
Administrator Guide
A21 Creating New iDENprotect Certificate Profile
1 Click Certificate Profiles
2 Enter a name for the new Certificate Profile in the empty row at the bottom of the list and click
Add
3 Click Edit on the new profile
4 Set the following parameters
a Type Sub CA
b Signature algorithm SHA256withECDSA
c Permissions Allow all EXCEPT Allow subject DN override by End Entity Information
d Extended Key Usage Use
e Subject Alternative Name Use
f Authority Information Access Use
g Available CAs Select only one
5 Click Save
42
Figure 17 Setting Certificate Profile
A22 Creating End Entity Profile
1 Click End Entity Profiles
2 Enter a name for the new End Entity Profile in the empty row at Add Profile section and click Add
3 Add Subject DN Attributes
a Required Common Name (CN)
43
b Optional Organisation (O) Organisational Unit (OU) Locality (L) State or Province (ST)
Country (C)
c Set all attributes as Modifiable
4 Set the previously created Certificate Profile as the Default Certificate Profile
5 Select required profiles as Available Certificate Profiles
6 Set iDENtear CA as the Default CA
Figure 18 Setting End Entity Profile
44
A3 Configuring EJBCA Startup
EJBCA (Enterprise JavaBeans Certificate Authority) is installed and configured during iDENprotectserver
installation Usually there is no need to change these settings after install but if the internal listening
ports in the iDENprotectserver application corresponding changes in EJBCA configuration must be made
as well
To change the configuration later edit the optejbcaconfwebproperties configuration file The
following parameters are important
Table 13 EJBCA Properties
Parameter Default Value Description
javatrustpassword Password for the Java trustStore
superadmintrustpassword
Password for the internal administrator PKCS12keystore
httpsservertrustpassword
Password for the SSL certificate used by theEJBCA administrator console
httpsserverhostname Full DNS hostname of the EJBCA server thatfunctions as the Certificate Authority for iSPA
httpsserverdn CN=$httpsserverhostnameO=EJBCASampleC=SE
Distinguished Name of the SSL certificate usedby the EJBCA administrator console
httpsserverprivhttps 8443 Port number for the EJBCA server This has to
match the cabackendejbcawsurlparameter value in [caproperties] CAconfiguration file
After changing EJBCA settings re-run the Apache Ant command as ejbca user The ejbca user
account and its password were created during iDENprotectserver installation
1 Change user to ejbca
su ejbca
2 Deploy new EJBCA application to the iDENprotectserver
ant clean deploy
3 Run the web configuration script
ant web-configure
4 Restart the EJBCA service
service ejbca restart
45
Appendix B Cipher Suites in iDENprotectserver
Admin ConsoleThese are the cipher suites supported in the nginx web server running iDENprotectserver Admin
Console The cipher suites can be changed in the etcnginxnginxconf configuration file by
editing the ssl_ciphers parameter
bull ECDHE-RSA-AES256-GCM-SHA384
bull ECDHE-RSA-AES128-GCM-SHA256
bull DHE-RSA-AES256-GCM-SHA384
bull DHE-RSA-AES128-GCM-SHA256
bull ECDHE-RSA-AES256-SHA384
bull ECDHE-RSA-AES128-SHA256
bull ECDHE-RSA-AES256-SHA
bull ECDHE-RSA-AES128-SHA
bull DHE-RSA-AES256-SHA256
bull DHE-RSA-AES128-SHA256
bull DHE-RSA-AES256-SHA
bull DHE-RSA-AES128-SHA
bull ECDHE-RSA-DES-CBC3-SHA
bull EDH-RSA-DES-CBC3-SHA
bull AES256-GCM-SHA384
bull AES128-GCM-SHA256
bull AES256-SHA256
bull AES128-SHA256
bull AES256-SHA
bull AES128-SHA
46
Appendix C iDENprotect Device KeystoreiDENprotect Enabled Devices and iDENprotectpluss have a secure keystore with many security
measures designed to protect keys and their usage and to ensure that keys cannot be tampered with
or removed from the device
iDENprotect Enabled Device have an unlimited amount of slots available for key storage
iDENprotectpluss are limited to 11 slots
Table 14 Keystore Slot Number Table
SlotNumber
Key Key Type Key Usage Key Generation
Slot 0 ltSystem reservedgt
Slot 1 Device Key ECDH ECDSA
Encrypting and decryptingBluetooth communications anddecrypting iDENprotectserver
asset transfers
Generated during initial startupby device RNG Signed duringenrolment by iDENprotectserver
Slot 2 iDENprotectserver
CertificateECDH ECDSA
Downloaded during enrolment
Slot 3 Signing Key ECDSA atdevicersquossecurehardware
Local signing key Created during enrolment
Slot 4 ltSparegt
Slot 5 TOTP (Time-basedOne-Time Password)Key
AES-256 Used in SSO applications Created during enrolment
Slot 6 ltSparegt
Slot 7 MDM (or MAM)Encryption Key fromMDM Provider (suchas Good Dynamics)
Depends onprovider
Management Containerencryption
Created at MDM initial setup
Appendix D Database SchemaTable 15 DEVICES Table
Description Field Type Null Key Default Extra
ID bigint(20) NO PRI NULL auto_increment
SERIAL_NUMBER varchar(64)
NO UNI NULL
ACTIVATION_CODE varchar(16)
NO NULL
CERTIFICATE varchar(4096)
YES NULL
47
Description Field Type Null Key Default Extra
DEVICE_STATE_ID
bigint(20) NO MUL NULL
LAST_SUCCESSFUL_OTP_VALUE
bigint(20) YES NULL
LAST_SUCCESSFUL_OTP_DATETIME
timestamp
YES NULL
IS_LOCKED
bit(1) NO b0
OTP_KEY
blob YES NULL
EXPIRY_DATE
timestamp
YES NULL
LOGIN_SUCCESS_COUNT
bigint(20) YES NULL
LOGIN_FAILURE_COUNT
bigint(20) YES NULL
BATTERY_CHARGE
int(11) YES NULL
USAGE_SECONDS
bigint(20) YES NULL
PIN_RESET_FLAG
bit(1) NO b0
PIN_CHANGE_FLAG
bit(1) NO b0
OTP_FAILURE_COUNT
bigint(20) YES NULL
SW_VERSION
varchar(32)
YES NULL
PRODUCT_LINE_ID
bigint(20) NO MUL 1
Table 16 DEVICES_EXTRA_CERTIFICATES Table
48
Description Field Type Null Key Default Extra
TAG varchar(32)
NO MUL NULL
CERTIFICATE varchar(4096)
NO NULL
DEVICE_ID bigint(20) NO MUL NULL
ID int(11) NO PRI NULL auto_increment
Table 17 SERVER_CREDENTIALS Table
Description Field Type Null Key Default Extra
ID bigint(20) NO PRI NULL auto_increment
CREDENTIALS_TYPE
int(11) NO UNI NULL
CERTIFICATE
blob NO NULL
PRIVATE_KEY
blob NO NULL
COMMON_NAME
varchar(255)
YES NULL
ORGANISATIONAL_UNIT
varchar(255)
YES NULL
ORGANISATION
varchar(255)
YES NULL
LOCALITY
varchar(255)
YES NULL
STATE varchar(255)
YES NULL
COUNTRY
varchar(255)
YES NULL
49
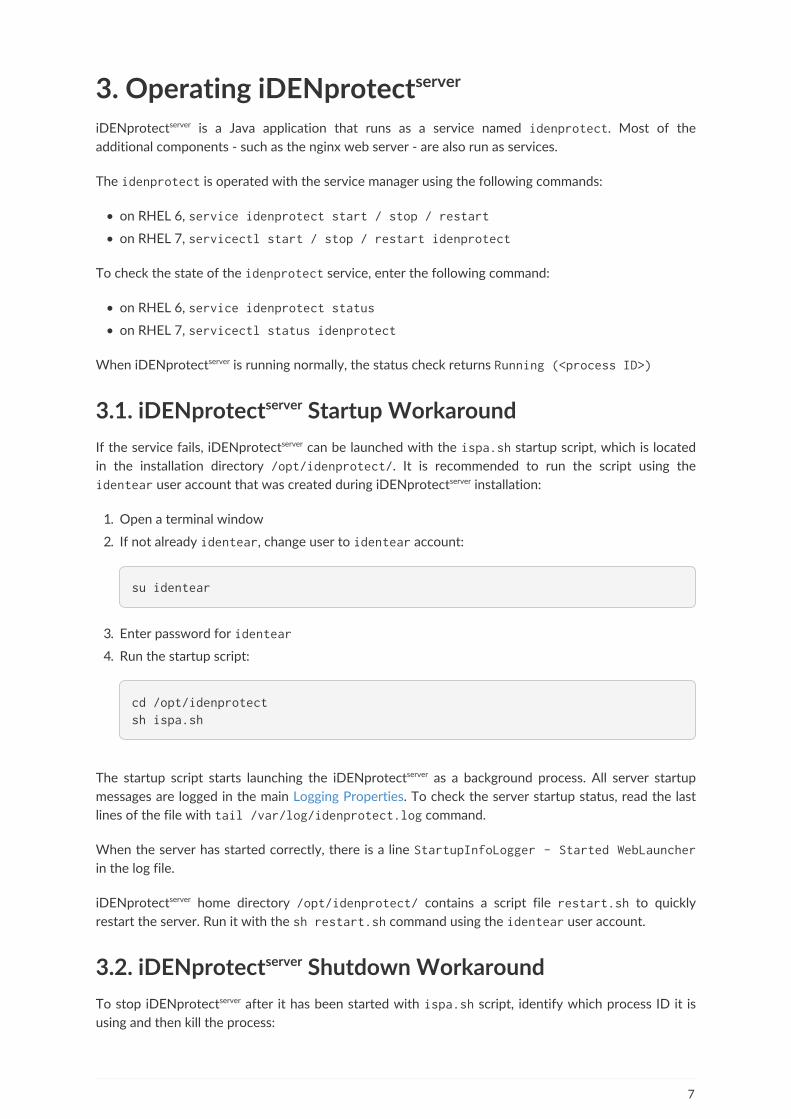
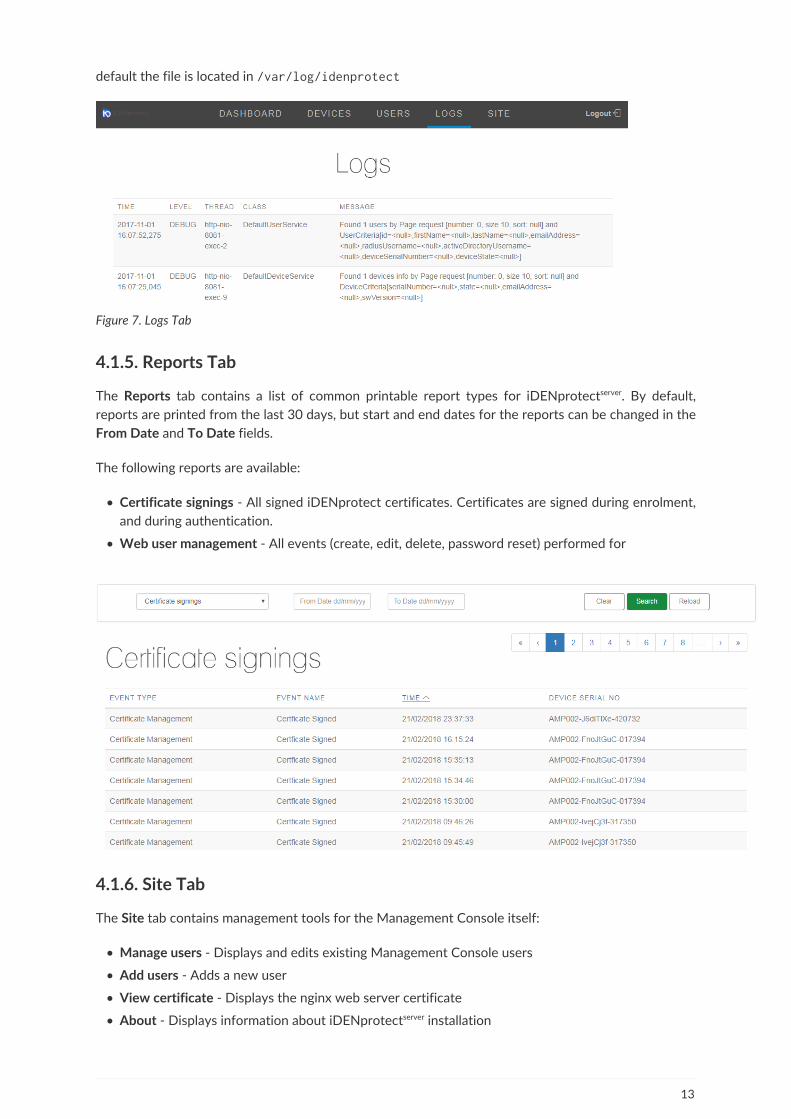
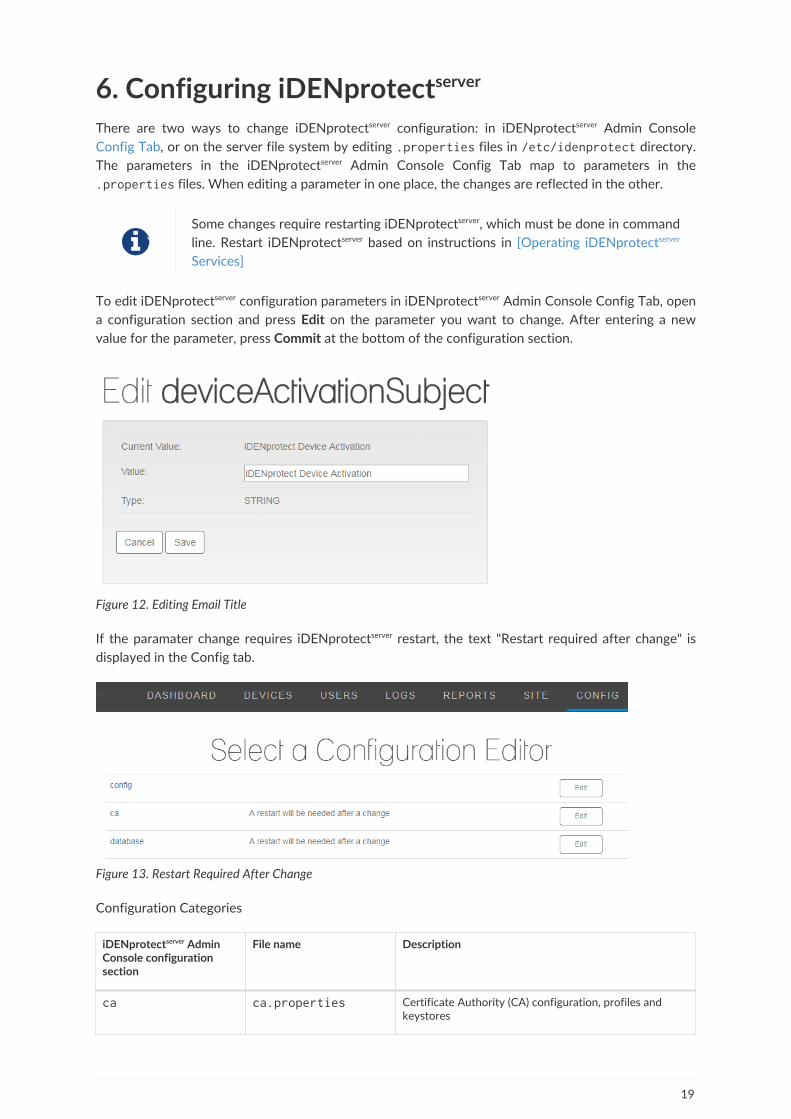
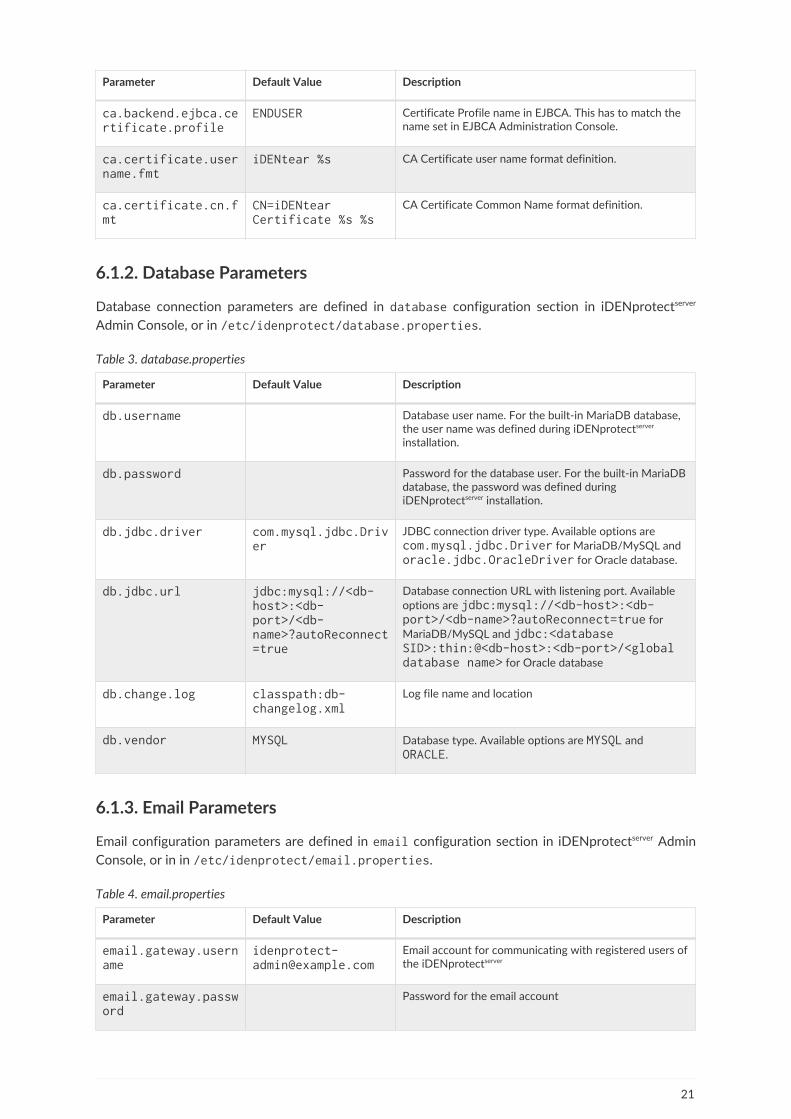
Parameter Default Value Description
ldapauthuser LDAP management account username
ldapauthpass LDAP management account password
ldapsearchbase Distinguished Name of the search base Object whichdefines the location in the LDAP directory where a searchbegins
ldapsearchobjectClass
person The objectClass attribute to search for Supported
values are person top use and
organizationalPerson
ldapfielduserfirstlastfullname
uid givenName sn
cnID first name last name full name fields for thereturned LDAP user
ldapfieldemail Email field for the returned LDAP user DuringiDENprotect device registration the entered email is usedto identify the user in the LDAP directory
ldapusersync false Automatically un-enrolls users and marks their accountsfor deletion from the iDENprotectserver if the user accounthas been disabled or is no longer found in the correct
LDAP group Possible values are true and false
ldapuserenforce true If set to true deletes user accounts flagged by
ldapusersync If set to false only logs the
accounts in varlogidentearidentearlog
ldapuserattributename
physicalDeliveryOfficeName
Additional parameter for storing a description or addressof the office where the user is located
ldapautoenrollenabled
false Enables automatic enrollment for newly registered userswho can be found in the LDAP directory Possible values
are true and false
ldapadminsync false If set to true automatically updates user accounts thathave been linked to one of the three access levels foriDENprotectserver Admin Console in the LDAP directory
Possible values are true and false
ldapautoenrolluserNotFoundforceCreate
false Attempts to create a user account in the LDAP directorywhen the user account (as identified by the email addressgiven by the user) has not been found during registration
Possible values are true and false
ldapautoenrollgroup
CN=ltGroupTitlegtOU=ltGroupsgtDC=ltorganisationgt
Automatic enrollment is enabled for all LDAP users in thisgroup
ldapusercron
ldapadmincronltcron sync timegt Sets up LDAP synchronisation jobs for user and admin
accounts using cron syntax For example 0 0 sets the synchronisation to run every hour
ldapadmingroup
ldaphelpdeskgroup
ldapreadonlygroup
CN=ltGroupTitlegtOU=ltGroupsgtDC=ltorganisationgt
Access level to iDENprotectserver Admin Console is grantedbased on LDAP userrsquos membership in these groups
615 Logging Parameters
Log file settings are defined in logging configuration section in iDENprotectserver Admin Console or in
23
etcidenprotectloggingproperties
Table 6 loggingproperties
Parameter Default Value Description
webapplog varlogidenprotect
Log file directory
webapploglayout orgapachelog4jEnhancedPatternLayout
Log layout pattern class
webapploglayoutConversionPattern
d p [t] C1 -m throwable2n
Logging pattern in the log file See log4j reference forpossible values
webapplogmaxLogSize
50mb Maximum log file size in MB
webapplogmaxBackupIndex
10 The number of backup log files that are stored The oldestone is overwritten when this number is exceeded
webapplogDatePattern
dd File suffix format for daily logs dd appends the dayof the month to the log file
webappRolling orgapachelog4jDailyRollingFileAppender
Log4j class for rolling files over
webappConsole orgapachelog4jConsoleAppender
log4jappenderstdout
Definitions for appending log events to Systemout
log4jappenderlogfile
Definitions for appending log events to the defined logfile
log4jappendersyslog
Definitions for appending log events to syslog utility
log4jloggercoukapplymobileidentear
DEBUG logfile Logging level for events stored in log file
log4jrootLogger INFO stdout Logging level for events printed in Systemout
616 Web Server Parameters
Web server configuration parameters are defined in webserver configuration section in
iDENprotectserver Admin Console or in etcidenprotectwebserverproperties
Table 7 webserverproperties
Parameter Default Value Description
serverport 8081 Port for internal web server after reverse proxy(iDENprotectserver external port is always 443)
errorwhitelabelenabled
false Enables Spring Boot whitelabel error page if set to
true nginx default error pages are used if set to false
24
Parameter Default Value Description
servertomcatbasedir
varoptidentear Tomcat server directory The default is the same asiDENprotectserver install directory
springresourcesaddMappings
false Enables Spring Boot default resource handling if set to
true
documentroot classpathstatic Tomcat document root
frontendbuild classpathbuild
encodingstrategy base64 Conversion method between strings and byte[]
Supported values are hex and base64
datetimesourcestrategy
dynamic Sets time handling for TOTP (Time-based One-Time
Password) generation Supported values are dynamicand fixed
securerandomgeneratorstrategy
random Sets random number generator to fixed or truly random
Supported values are fixed and random
identitygeneratorstrategy
random Sets if identifiers are fixed or truly random Supported
values are fixed and random
showapidocs false Displays REST API documentation in the web UI if set to
true
expirywarningdays 30 Device certificate expiration warning in days
multipartenabled true Enables multipart file transfer to solve file size restrictions
multipartlocation tmp Storage location for temporary files during multiparttransfers
multipartmax-file-size
2MB Maximum file size for individual multipart files
multipartmax-request-size
2MB Maximum request file size for multipartform-data
serverdateTimezoneid
Server time zone as Java TimeZone id
617 User Enrolment Properties
User enrolment parameters are defined in userenrollment configuration section in iDENprotectserver
Admin Console or in etcidenprotectuserenrollmentproperties
Table 8 userenrollmentproperties
Parameter Default Value Description
loginserver iDENprotectserver hostname Hostname or IP address for the server that handlesenrollment requests
qrcode-callbacklink
httpsltservergtuserapienrollmentsessionuuiduid=userid
URL for the generated QR code that is used duringenrolment This URL is included in all enrolment emailscontaining enrolment
25
Parameter Default Value Description
timetoliveminutes
30 Sets how long the QR code URL is active After the timeto live has passed the URL expires and is no longeraccessible
62 Configuring Email Messages
In iDENprotect use iDENprotectserver sends email messages to the user during the following events
Table 9 Email Messages
Event Template file Description
iDENprotect activation ActivationEmailvm Email containing Activation Code Automatically sent touser after successful enrollment
iDENprotect enrolment deviceEnrollmentEmailvm and
userEnrollmentEmailvm
Email containing instructions on acquiring iDENprotectApp and getting started with iDENprotect Used when aniDENprotect device is set up for a user without userrsquosinput
PIN reset pinResetEmailvm Email containing a PIN reset notification and a newActivation Code PIN reset is initiated by the user
By default message template files are located in etcidenprotectemail-templates While the
listed vm files are plaintext files the directory also contains HTML-formatted versions of the files
(such as ActivationEmailHtmlvm) If a HTML version of a message can be found iDENprotectserver
uses it as the email message template If HTML version is not found the plaintext file is used instead
Plaintext and HTML file names are configured in Email Parameters
The email subject fields are entered in ltparametergtemailsubject fields which are only available in
iDENprotectserver Admin Console Config tab
These emails can contain any text or HTML styling In addition the email templates use the following
variables
bull $userfirstName - First name of the email recipient
bull $userlastName - Last name of the email recipient
bull $activationCode - Generated one-time Activation Code used during enrolment
bull $qrUrl - Generated enrolment QR Code image embedded within the message Only works with
HTML messages
bull $portalQrUrl - URL link to the QR Code
26
7 Managing Network Ports on iDENprotectserver
The iDENprotectserver installation consists of many components that communicate via network ports
Some of these ports use default values and others are set during installation Generally all ports can
be changed
Generally iDENprotectserver uses well-established default ports for its network traffic such as 3306 for
MySQL database connections All ports are set during installation and all ports are configurable
afterwards
The following TCP ports must be open on the server for iDENprotectserver application to function
correctly
Inbound TCP Ports
bull 22 (SSH port for terminal connections)
bull 443 (HTTPS port for accessing iDENprotectserver Admin Console)
bull 8443 (For accessing EJBCA administration console)
Outbound TCP Ports
bull 25 (SMTP port for sending emails)
bull 53 (DNS service)
bull 389 (if using LDAP)
bull 1521 (if using external Oracle database server)
bull 3306 (if using external MySQL server)
71 Configuring Firewall
On RHEL firewall ports are configured with the iptables or firewalld tools Both can accept and
reject connections to any inbound and outbound ports For instructions on using iptables or
firewalld see Using the iptables service and Using firewalls respectively in RHEL 7 Linux Security
Guide
As an example to allow inbound TCP connections on the server to port 22 (SSH) enter the following
command (as root)
iptables -I INPUT 1 -p tcp --dport 22 -m state --state NEWESTABLISHED -j ACCEPT
27
8 Managing Certificate Authorities (CAs)The Certificate Authority (CA) used by the iDENprotectserver establishes trust within the whole
iDENprotect solution It is
bull The trust anchor of iDENprotect when the CA is run in standalone mode
bull Part of the trust chain in an environment where the iDENprotectserver CA is subordinated to an
existing PKI service
This iDENprotect CA is the central location where certificates from iDENprotect Apps and
iDENprotectpluss are validated and signed to establish trust The CA applies the certificate policy for the
certificates issued by iDENprotectserver to ensure compliance with the overall PKI architecture
iDENprotectserver can use most commonly available CA implementations such as Microsoft CA and
EJBCA The iDENprotectserver installation package includes an EJBCA (Enterprise JavaBeans Certificate
Authority) application If the EJBCA application was selected to be installed it is configured as the
default CA in iDENprotectserver When using another CA install iDENprotectserver without EJBCA and
configure the CA after installation
Changing CAs after iDENprotectserver is in active use is difficult We recommend to
set up the CA during initial installation without changing it afterwards
28
9 Managing iDENprotect UsersAn iDENprotect User is someone who has been Registered as the owner contact person of a specific
iDENprotect Device and who has successfully Enroled that Device on the iDENprotectserver by entering
an Activation Code or scanning a QR Code after the device registration has been accepted During
registration users are mapped to an LDAP directory such as Microsoft Active Directory or stored as
owners of specific Devices in the iDENprotectserver database if LDAP is not used
LDAP integration can be automated to accept all registration attempts from users within a defined
LDAP auto-enrolment group In those cases a user who has successfully registered a Device and who
can be found from the LDAP auto-enrolment group receives the ActivationQR Code immediately If
LDAP auto-enrolment is not used assigning Devices to Users requires manual intervention by the
iDENprotect administrator even when LDAP is otherwise used
A Device can belong only to a single user but a user can have multiple iDENprotect Devices assigned
and enrolled
91 Manual User Enrolment (with or without LDAP)
In manual enrolment users register their iDENprotect devices on the iDENprotectserver Each registered
Device is stored on the iDENprotectserver as a Device in REGISTERED state
At this point and iDENprotectserver administrator must assign the registered device to a user by filling in
the user details manually as described in Assigning Devices or by entering the userrsquos LDAP username
After this step the user is considered to be the owner of the Device and the Device state is changed
to ASSIGNED
The userrsquos email address is used as as their contact reference and it must be
correct in order for the user to be able to enrol the device
When the Device is assigned to the user the user receives an email containing the ActivationQR
Code to the defined email address By following the instructions in the email the user can enrol the
Device and finish the provisioning process
92 LDAP Auto-enrolment
LDAP auto-enrolment provides an efficient way to register new iDENprotect Devices into the
iDENprotectserver and automatically send ActivationQR Codes to the users so they can proceed with
enrolment
LDAP auto-enrolment works by connecting users who are registering Devices automatically to a LDAP
user group that has permissions to assign users on the iDENprotectserver The user has to provide an
email address during registration which is used to identify the user in the LDAP group If the email is
not found in the group the Device can be registered but will not be automatically assigned to the user
In this case a iDENprotectserver administrator must intervene to correctly assign the device
When the user submits the registration iDENprotectserver receives the userrsquos email address and the
DRA (Digital Registration Attributes) file of the iDENprotect Enabled Device or iDENprotectplus If the
email accoutn owned by the user exists in LDAP group iDENprotectserver completes the registration by
auto-populating the userrsquos personal details and assigns the Device to the user
29
10 Configuring LDAPLDAP directories store user information such as name and email address which are used to
authenticate the users of the LDAP system When LDAP is enabled in iDENprotectserver configuration
iDENprotectserver uses the configured LDAP directory to verify the user information submitted during
the Device registration process by mapping it with existing LDAP records in a LDAP directory
iDENprotectserver supports the following LDAP systems
bull Microsoft Active Directory 2008 R2
bull Microsoft Active Directory 2012
bull Microsoft Active Directory 2012 R2
bull Microsoft Active Directory 2016
The iDENprotectserver LDAP plugin only needs read access to the LDAP directory Configure the service
account allocated for iDENprotectserver as read-only This access allows the lookup of users and users
within a specific group that have been approved to be enroled by the iDENprotectserver
LDAP settings are defined during iDENprotectserver installation and stored in the LDAP configuration
file LDAP Parameters When the settings are configured properly iDENprotectserver can perform LDAP
tasks such as searching for user information based on first name or surname
ldapproperties is loaded again every time iDENprotectserver is restarted Therefore all changes to
LDAP configuration require a restart
101 Connecting to LDAP server
LDAP server connection is defined in the LDAP configuration file LDAP Parameters To set up the
connection edit the following values in the file or in the Config panel in iDENprotectserver Admin
Console
bull ldapenabled - Set to true to enable LDAP
bull ldaptype - Set to real Other values are only for internal testing purposes
bull ldapserver - Enter LDAP server IP and port to connect to in the format ldapltserver-ipgtltserver-portgt
bull ldapauthmethod - Enter authentication method Available options are simple sasl and
anonymous If unsure of the right option select simple
bull ldapauthuser - Enter the LDAP service account username (if using simple or SASL
authentication)
bull ldapauthpass - Enter the LDAP service account password (if using simple or SASL
authentication)
The connection parameters must match the LDAP serverrsquos settings
102 Configuring LDAP Server
Setting up Search Parameters
Once the connection is established set the user search parameters for the LDAP query in LDAP
Parameters or in the Config panel in iDENprotectserver Admin Console
30
bull ldapsearchbase - Set the Distinguished Name of the search base where the LDAP search
begins
bull ldapsearchobjectClass - Set the objectclass of the search base target
bull ldapfieldusername firstname lastname fullname email - Set the column
names for user information
bull ldapuserattributename - Additional user identification parameter such as
physicalDeliveryOfficeName
Setting up Service Account
iDENprotectserver needs to have read access to the LDAP server to be able to query the LDAP directory
We recommend creating a dedicated LDAP account for this purpose The account only requires
membership in the Domain Users group
For example to create the service account in Active Directory 2016
1 Open Active Directory Users and Groups
2 Navigate to the Users folder
3 Right-click on the window and select New -rarr User
4 Enter the user account details
Use the same username and password as in LDAP parameters ldapauthuser and ldapauthpass
Setting up LDAP Auto-enrolment
To streamline the iDENprotect enrollment process enable auto-enrolment for newly registered
Devices
bull ldapautoenrollenabled - Set to true to enable auto-enrolment
bull ldapautoenrolluserNotFoundforceCreate - Set to true to automatically create user
accounts in the LDAP directory if the email address given during registration is not found in the
LDAP directory For this purpose the service account must also be a member of Domain Admins
group
bull ldapautoenrollgroup - Enter the auto-enrolment Group name in the LDAP directory All
members in this group are automatically enrolled when they register a new Device The Group
syntax is CN=ltGroupNamegtOUltGroupFoldergtDC=ltLDAPDirectoryNamegt
Setting up LDAP Synchronisation
31
The system can be set to periodically synchronise the registered users in iDENprotectserver and the
users in the LDAP directory This synchronisation removes any user accounts from iDENprotectserver
that
bull Are removed from the LDAP directory
bull Are set to Disabled state in the LDAP directory
bull Are removed from the auto-enrolment Group (if auto-enrolment has been enabled)
Any account that matches one or more of these criteria is removed from iDENprotectserver The
synchronisation job can be set to run with desired intervals using a cron command The following
settings configure LDAP synchronisation
bull ldapusersync - Set to true to enable synchronisation
bull ldapuserenforce - Set to true to immediately delete the account from iDENprotectserver
Setting to false only flags the account in varlogidenprotectidentearlog When an
account is flagged the log contains a line DefaultUserService - ltusernamedomaincomgt Nota member of users group for that user
iDENprotectserver Admin Console can be synchronised with access with LDAP directory When this
option is enabled users can login to iDENprotectserver Admin Console with their LDAP account
bull ldapadminsync - Set to true to automatically update user accounts that have been linked to
one of the three access levels in Management Console
bull ldapadminhelpdeskreadonlygroup - Group name containing users with Administrator
Helpdesk Readonly privileges
Both user synchronisation and Management Console synchronisation are set to run on specified
intervals using the ldapusercron and ldapadmincron parameters Both parameters are entered
using standard cron syntax
32
11 Configuring iDENprotectserver Database
The default database system in iDENprotectserver is mariaDB a MySQL-compatible
relational database management system It is possible to use other database
systems such as Oracle Database with some additional post-install configuration
111 Configuring MariaDB
During iDENprotectserver installation the installer creates a MariaDB database which contains data for
iDENprotect internal use In addition it has empty tables for Devices Users and Certificates all of
which are required for proper iDENprotect authentication use All Device and certificate data
generated during iDENprotect use is stored in these tables
MariaDB database can be set up on the same server running iDENprotectserver application or on a
different server MariaDB uses very little system resoures so we recommend installing it on the same
server as iDENprotectserver
Using MariaDB database requires no further configuration after installation If a different database has
been configured up at some point change the database connection parameters in
etcidenprotectdatabaseproperties to start using MariaDB
1 Set parameter dbjdbcdriver to commysqljdbcDriver
2 Set parameter dbjdbcurl to jdbcmysqlltserver-ipgtltportgtltdatabase-namegtautoReconnect=true
3 Set parameter dbvendor to MYSQL
112 Configuring Oracle Database
iDENprotectserver supports Oracle Database version 11g Release 2 (1120x)
Enterprise and Express editions Due to the high system resource usage of Oracle
Database we donrsquot recommend running Oracle Database and iDENprotectserver on
the same server
Oracle Database is not automatically configured during iDENprotectserver installation To use Oracle
Database instead of MariaDB first change the database connection parameters in
etcidenprotectdatabaseproperties
1 Set parameter dbusername to the schema user name of the iDENprotect database
2 Set parameter dbpassword to the userrsquos password
3 Set parameter dbjdbcdriver to oraclejdbcOracleDriver
4 Set parameter dbjdbcurl to jdbcltdatabase-SIDgtthinltserver-ipgtltportgtltglobal-database-namegt
5 Set parameter dbvendor to ORACLE
iDENprotectserver Oracle Database connector requires that an empty schema for the data is created
before launching iDENprotectserver successfully During startup iDENprotectserver creates all tables and
required core data when it detects that the schema is empty
There are multiple ways to create a new user schema in Oracle Database For instructions see
33
CREATE USER in Oracle Database SQL Reference
34
12 LoggingiDENprotectserver logs activity in the following log files
Table 10 Diagnostic Troubleshooting Logs
Log File Location Description
iDENprotectser
ver logvarlogidenprotectlog (locationdefined in [Logging Properties])
Stores authentication request connectionsdevice enrolments and other connectionattempts from devices enroled on theiDENprotectserver Also contains
EJBCA logs (ifEJBCAcomponent isin use)
varlogejbcalog and
varlogejbcaerrStores all processed authentication requestshandled by EJBCA and whether they weresuccessful or not
Web serverlogs
varlognginxaccesslog and
varlognginx_errorlogStores information on web server activity mostlyrelating to the iDENprotectserver Admin Console
Install logs tmpispa_loglog Installation logs for iDENprotectserver components
idenprotectlog and all other log files are plaintext files accessible to all text reader programs To
read and process a file use Linux utilities such as cat tail and grep For example to see the
contents of the iDENprotectserver log file type cat varlogidenprotectlog
121 iDENprotectserver Log Events
Table 11 iDENprotect Log Events
Description Class Name Contents Examples
Authentication event DefaultCryptoService Hash data signature amp certificate
iDENprotect registration DevicesController Device registered ltserialgt
iDENprotect enrolment - phase1 (initiation)
DefaultEnrollmentService
Successful enrollmentidentification for deviceDeviceid serial stateisLocked hasUser
iDENprotect enrolment - phase2 (certificate signing)
InternalCA Signing CSR with profile ENDUSER
iDENprotect enrolment - phase3 (completion)
EnrollmentController Successful enrollment completion
iDENprotect signatureverification
DefaultSigningServiceamp
SignatureValidationController
Sucessfully verified signatureltserialgt
Registration email DefaultEmailGatewayService
Sending email sendMessage toltaddressgt subject ltsubjectgt
LDAP User synchronisation DefaultLdapService Sync Job Complete
iDENprotectserver Admin Consolelogin
CsrfAuthenticationSuccessHandler
ltusergt Successfully Authenticatedto Admin Console from ltIP addressgt
35
122 Log Search Examples
Finding Authentication Events
A typical authentication event is identified by DefaultDeviceService and DefaultCryptoServicetext strings and the serialNumber of the Device (AMP002-Dw0sOAiY-448495 in the following
example)
2017-11-01 155724174 DEBUG [http-nio-8081-exec-4] DefaultDeviceService -Found Deviceid=1701 serialNumber=AMP002-Dw0sOAiY-448495 state=ENROLLEDisLocked=false2017-11-01 155724176 DEBUG [http-nio-8081-exec-4] SigningHelper - Choosendevice primary cert2017-11-01 155724180 DEBUG [http-nio-8081-exec-4] SigningHelper - Constructedcertificate with type X5092017-11-01 155724183 DEBUG [http-nio-8081-exec-4] DefaultCryptoService -Verify signature using input data414d503030322d447730734f4169592d343438343935 signature3046022100c8a2252a1b2a7f6ccc0a22df891a383fe1ca2bfc8875949d6086ee8dd14b832e022100b2a7d347a658cc7516e18baf9a2fa364e11c5e1364d168d20a42ea7edafb0d87 certificate-----BEGIN CERTIFICATE-----
Finding Registration Events
Device registration and enrollment events are logged in varlogidentearidentearlog A typical
registration event is identified by DefaultRegistrationService text string and the serial number of
the Device (AMP002-J6diTlXe-420732 in the following examples)
2017-11-02 074913661 DEBUG [http-nio-8081-exec-10] DefaultRegistrationService- Found ProductLineid=3 deviceLine=AMP revision=002 isSoft=true2017-11-02 074913700 DEBUG [http-nio-8081-exec-10] DefaultRegistrationService- Saved Deviceid=179 serialNumber=AMP002-J6diTlXe-420732 state=REGISTEREDisLocked=false2017-11-02 074913721 DEBUG [http-nio-8081-exec-10] DefaultRegistrationService- Prepared data forcoukapplymobileidentearserveruserUser312bc6f[id=ltnullgtfirstName=lastName=middleName=ltnullgtemailAddress=(OMITTED)radiusUsername=ltnullgtadAttribute=ltnullgtactiveDirectoryUsername=ltnullgtdevice=Deviceid=179 serialNumber=AMP002-J6diTlXe-420732 state=REGISTERED isLocked=false]
Finding Assignment Events
A typical assignment event is identified by DefaultUserService text string and the serial number of
the Device
36
2017-11-02 074913808 DEBUG [http-nio-8081-exec-10] DefaultRegistrationService- Created and saved by LDAP coukapplymobileidentearserveruserUser312bc6f2017-11-02 074913810 DEBUG [http-nio-8081-exec-10] DefaultUserService - Setassign status to Deviceid=179 serialNumber=AMP002-J6diTlXe-420732state=ASSIGNED isLocked=false2017-11-02 074913812 DEBUG [http-nio-8081-exec-10] DefaultUserService - AutoassignedcoukapplymobileidentearserveruserUser312bc6f[id=180firstName=lastName=middleName=ltnullgtemailAddress=(OMITTED)radiusUsername=ltnullgtadAttribute=ltnullgtactiveDirectoryUsername=ltnullgtdevice=Deviceid=179 serialNumber=AMP002-J6diTlXe-420732 state=ASSIGNED isLocked=false]2017-11-02 074913823 DEBUG [http-nio-8081-exec-10] DefaultUserService - Sentactivation email to (OMITTED)
In the above example the user is automatically assigned with LDAP auto-enrollment
Finding Enrolment Events
A typical enrolment event is identified by DefaultEnrollmentService The enrolment process is
more complex and includes multiple steps involving TOTP (Time-based One-Time Password)
generation signature verification and CA interaction
2017-11-02 084215692 DEBUG [http-nio-8081-exec-7] DefaultEnrollmentService -Handling enrollment initialisation2017-11-02 084215693 DEBUG [http-nio-8081-exec-7] EnrollmentProcessHelper -New enrollment session createdcoukapplymobileidentearserverenrollmentdomainEnrollmentSession1653436c[id=9f0c534e-2a55-4852-906d-92701fedd1d8createdAt=2017-11-02T084215693ZexpiresAt=2017-11-02T091215693ZdeviceId=ltnullgtcertificateRequest=ltnullgt]2017-11-02 084215694 DEBUG [http-nio-8081-exec-7] InMemoryCachingRepository -Adding session with id 9f0c534e-2a55-4852-906d-92701fedd1d8 to cache2017-11-02 084215695 DEBUG [http-nio-8081-exec-7] DefaultEnrollmentService -Returning enrollment initialisation responsecoukapplymobileidentearserverenrollmentdtoEnrollmentInitiationResponse346f72e7[enrollmentId=9f0c534e-2a55-4852-906d-92701fedd1d8creationTime=2017-11-02T084215693ZexpiryTime=2017-11-02T091215693Zslot=8]2017-11-02 084215697 INFO [http-nio-8081-exec-7] EnrollmentController -Successfull enrollment initiation
2017-11-02 084217349 DEBUG [http-nio-8081-exec-5] DefaultEnrollmentService -Successfully added extra cert for device Deviceid=185 serialNumber=AMP002-J6diTlXe-420732 state=ENROLLED isLocked=false2017-11-02 084217356 INFO [http-nio-8081-exec-5] EnrollmentController -Successfully added extra cert2017-11-02 084227369 DEBUG [http-nio-8081-exec-1] DefaultDeviceService -Updated device statuscoukapplymobileidentearserverdevicedtoDeviceStatusUpdateRequest54858129[deviceSerialNumber=AMP002-J6diTlXe-420732battery=0expiry=ltnullgtisActivated=1isEnrolled=1sp=time=ltnullgtuptime=0version=debug=ltnullgt]
37
13 Managing Web ServeriDENprotectserver uses nginx as the web engine for running iDENprotectserver Admin Console and [EJBCA
Web Console (optional)] During installation nginx is set to only accept connections to ports 443 (for
iDENprotectserver Admin Console) and 8443 (for EJBCA Web Console) using TLS 12 or later protocol
Generally there is need to change the nginx configuration after it has set up However the nginx
installation does not include a signed SSL certificate This chapter contains instructions on creating and
signing a trusted SSL certificate but purchasing and maintaining the certificate is the responsibility of
the customer organisation
131 Installing a Trusted SSL Certificate
The terms SSL and TLS are sometimes used interchangeably in networking Even
though the iDENprotectserver is configured to only accept TLS connections the
certificates used to secure traffic are by convention referred to as SSL certificates
In order to handle web connections securely the iDENprotectserver must use a valid SSL certificate If no
valid certificate has been configured iDENprotectserver rejects all web connections
1311 Generating Private Key and CSR
1 In the iDENprotectserver terminal create a new 2048-bit RSA key using OpenSSL
openssl req -new -newkey rsa2048 -nodes -keyout serverkey -out servercsr
Change the name of serverkey and servercsr to the hostname of
iDENprotectserver
This starts the process of generating 2 files a private key file for decrypting SSLTLS traffic and a CSR
(Certificate Signing Request) file
1 Enter the organisational and geographic information for the certificate
2 When prompted for the Common Name enter the fully qualified domain name of the
iDENprotectserver For example idendomaincom
3 Enter an email address for contact information regarding the certificate
1312 Signing the CSR
Once the CSR file is created send it to the CA (Certificate Authority) provider such as VeriSign The
reply from the CA typically contains the signed certificate chain in a pem or crt file This file is the
public key of the iDENprotectserver Store it on the iDENprotectserver computer
When copy-pasting the CSR file contents make sure to include all of them Many
CSRs fail because the BEGIN and END lines were not included in the request
38
1313 Installing the Certificates
To have a functional SSL setup for iDENprotectserver both keys have to be stored on the server and
configured in nginx
1 Copy the key file and the CRT or PEM received from the CA in the varcerts directory
2 Edit etcnginxnginxconf and add the locations for the keys ssl_certificate and ssl_certificate_key
ssl_certificate varcertsmy_domain_namepem (or bundlecrt)ssl_certificate_key varcertsmy_domain_namekey
Adjust the file names to match the certificate files
3 Restart the nginx web server
systemctl restart nginx
1314 Testing the Certificate
Open a web browser and enter the iDENprotectserver URL The browser should not alert to any
certificate validation errors
Depending on the browser a valid SSL certificate is indicated by a padlock or similar icon in the
address bar which means that iDENprotectserver now has a trusted certificate for the web site
Figure 14 Certificate information
39
132 Configuring nginx
Configuration settings for nginx are stored in etcnginxnginxconf To change the settings open
nginxconf in a text editor
The following parameters are important for running iDENprotectserver
Table 12 nginx parameters
Parameter Default Value Description
server_name localhost Hostname of the server
listen 443 Ports that the server listens to
ssl_protocols TLSv1 TLSv11TLSv12
Allowed SSLTLS protocols
ssl_certificate Location of the web serverrsquos public key
ssl_certificate_key Location of the web serverrsquos private key
ssl_ciphers See Cipher Suites iniDENprotectserver AdminConsole
List of supported cipher suites
40
Appendix A Using Built-in EJBCA CertificateAuthority
EJBCA is a Public Key Infrastructure (PKI) Certificate Authority (CA) application developed by
PrimeKey Solutions AB
EJBCA is set as the iDENprotectserver Certificate Authority by default during installation The certificate
database and passwords are also set during installation
When using EJBCA with iDENprotectserver it is not mandatory to perform any additional configuration
on the EJBCA application The iDENprotect solution functions well using the default settings
EJBCA is managed using its own web console running in URL httpsltejbca-hostgtltejbca-portgtejbca for example httpsidendomaincom8443ejbca The web console contains
tools for creating and editing Certificate Authorities for authenticating Devices and manage
certificates used by iDENprotectserver for securing any iDENprotect communications
A1 Installing EJBCA Administrator Certificate
Access to the console is secured with the P12 certificate created during installation The certificate is
protected with a password that also was set during installation (parameter 17 administrator P12
keystore)
During iDENprotectserver installation the certificate is generated in the iDENprotectserver file system in
location optidentearejbcap12superadminp12 To access the EJBCA web console import the
certificate into the web browser (if using Firefox) or operating system (if using any other browser) See
the instructions for Firefox and for Chrome on Linux
A2 Using EJBCA Web Console
EJBCA web console main view shows the publicly available resources of EJBCA such as public CA
certificates and check the status of individual issued certificates
To access the administration console click Administration in the left-side menu panel The
administration console contains options to configure iDENprotectserver certificate handling on a low
level
The most important parts to configure in the EJBCA administration console are
bull Certificate Authorities which issue certificates used in iDENprotect
bull Certificate Profiles (especially the ENDUSER profile) which define how the iDENprotect Devices are
handled in iDENprotectserver
bull End Entity Profiles which define the CA and Certificate Profile to use when signing device-specific
certificates (called End Entities in EJBCA)
41
Figure 15 Editing End Entity Profile
The End Entities listed in EJBCA map to listed Devices in the iDENprotectserver Admin Console
Figure 16 Viewing End Entity
For full information on configuring EJBCA settings with the administration console see EJBCA
Administrator Guide
A21 Creating New iDENprotect Certificate Profile
1 Click Certificate Profiles
2 Enter a name for the new Certificate Profile in the empty row at the bottom of the list and click
Add
3 Click Edit on the new profile
4 Set the following parameters
a Type Sub CA
b Signature algorithm SHA256withECDSA
c Permissions Allow all EXCEPT Allow subject DN override by End Entity Information
d Extended Key Usage Use
e Subject Alternative Name Use
f Authority Information Access Use
g Available CAs Select only one
5 Click Save
42
Figure 17 Setting Certificate Profile
A22 Creating End Entity Profile
1 Click End Entity Profiles
2 Enter a name for the new End Entity Profile in the empty row at Add Profile section and click Add
3 Add Subject DN Attributes
a Required Common Name (CN)
43
b Optional Organisation (O) Organisational Unit (OU) Locality (L) State or Province (ST)
Country (C)
c Set all attributes as Modifiable
4 Set the previously created Certificate Profile as the Default Certificate Profile
5 Select required profiles as Available Certificate Profiles
6 Set iDENtear CA as the Default CA
Figure 18 Setting End Entity Profile
44
A3 Configuring EJBCA Startup
EJBCA (Enterprise JavaBeans Certificate Authority) is installed and configured during iDENprotectserver
installation Usually there is no need to change these settings after install but if the internal listening
ports in the iDENprotectserver application corresponding changes in EJBCA configuration must be made
as well
To change the configuration later edit the optejbcaconfwebproperties configuration file The
following parameters are important
Table 13 EJBCA Properties
Parameter Default Value Description
javatrustpassword Password for the Java trustStore
superadmintrustpassword
Password for the internal administrator PKCS12keystore
httpsservertrustpassword
Password for the SSL certificate used by theEJBCA administrator console
httpsserverhostname Full DNS hostname of the EJBCA server thatfunctions as the Certificate Authority for iSPA
httpsserverdn CN=$httpsserverhostnameO=EJBCASampleC=SE
Distinguished Name of the SSL certificate usedby the EJBCA administrator console
httpsserverprivhttps 8443 Port number for the EJBCA server This has to
match the cabackendejbcawsurlparameter value in [caproperties] CAconfiguration file
After changing EJBCA settings re-run the Apache Ant command as ejbca user The ejbca user
account and its password were created during iDENprotectserver installation
1 Change user to ejbca
su ejbca
2 Deploy new EJBCA application to the iDENprotectserver
ant clean deploy
3 Run the web configuration script
ant web-configure
4 Restart the EJBCA service
service ejbca restart
45
Appendix B Cipher Suites in iDENprotectserver
Admin ConsoleThese are the cipher suites supported in the nginx web server running iDENprotectserver Admin
Console The cipher suites can be changed in the etcnginxnginxconf configuration file by
editing the ssl_ciphers parameter
bull ECDHE-RSA-AES256-GCM-SHA384
bull ECDHE-RSA-AES128-GCM-SHA256
bull DHE-RSA-AES256-GCM-SHA384
bull DHE-RSA-AES128-GCM-SHA256
bull ECDHE-RSA-AES256-SHA384
bull ECDHE-RSA-AES128-SHA256
bull ECDHE-RSA-AES256-SHA
bull ECDHE-RSA-AES128-SHA
bull DHE-RSA-AES256-SHA256
bull DHE-RSA-AES128-SHA256
bull DHE-RSA-AES256-SHA
bull DHE-RSA-AES128-SHA
bull ECDHE-RSA-DES-CBC3-SHA
bull EDH-RSA-DES-CBC3-SHA
bull AES256-GCM-SHA384
bull AES128-GCM-SHA256
bull AES256-SHA256
bull AES128-SHA256
bull AES256-SHA
bull AES128-SHA
46
Appendix C iDENprotect Device KeystoreiDENprotect Enabled Devices and iDENprotectpluss have a secure keystore with many security
measures designed to protect keys and their usage and to ensure that keys cannot be tampered with
or removed from the device
iDENprotect Enabled Device have an unlimited amount of slots available for key storage
iDENprotectpluss are limited to 11 slots
Table 14 Keystore Slot Number Table
SlotNumber
Key Key Type Key Usage Key Generation
Slot 0 ltSystem reservedgt
Slot 1 Device Key ECDH ECDSA
Encrypting and decryptingBluetooth communications anddecrypting iDENprotectserver
asset transfers
Generated during initial startupby device RNG Signed duringenrolment by iDENprotectserver
Slot 2 iDENprotectserver
CertificateECDH ECDSA
Downloaded during enrolment
Slot 3 Signing Key ECDSA atdevicersquossecurehardware
Local signing key Created during enrolment
Slot 4 ltSparegt
Slot 5 TOTP (Time-basedOne-Time Password)Key
AES-256 Used in SSO applications Created during enrolment
Slot 6 ltSparegt
Slot 7 MDM (or MAM)Encryption Key fromMDM Provider (suchas Good Dynamics)
Depends onprovider
Management Containerencryption
Created at MDM initial setup
Appendix D Database SchemaTable 15 DEVICES Table
Description Field Type Null Key Default Extra
ID bigint(20) NO PRI NULL auto_increment
SERIAL_NUMBER varchar(64)
NO UNI NULL
ACTIVATION_CODE varchar(16)
NO NULL
CERTIFICATE varchar(4096)
YES NULL
47
Description Field Type Null Key Default Extra
DEVICE_STATE_ID
bigint(20) NO MUL NULL
LAST_SUCCESSFUL_OTP_VALUE
bigint(20) YES NULL
LAST_SUCCESSFUL_OTP_DATETIME
timestamp
YES NULL
IS_LOCKED
bit(1) NO b0
OTP_KEY
blob YES NULL
EXPIRY_DATE
timestamp
YES NULL
LOGIN_SUCCESS_COUNT
bigint(20) YES NULL
LOGIN_FAILURE_COUNT
bigint(20) YES NULL
BATTERY_CHARGE
int(11) YES NULL
USAGE_SECONDS
bigint(20) YES NULL
PIN_RESET_FLAG
bit(1) NO b0
PIN_CHANGE_FLAG
bit(1) NO b0
OTP_FAILURE_COUNT
bigint(20) YES NULL
SW_VERSION
varchar(32)
YES NULL
PRODUCT_LINE_ID
bigint(20) NO MUL 1
Table 16 DEVICES_EXTRA_CERTIFICATES Table
48
Description Field Type Null Key Default Extra
TAG varchar(32)
NO MUL NULL
CERTIFICATE varchar(4096)
NO NULL
DEVICE_ID bigint(20) NO MUL NULL
ID int(11) NO PRI NULL auto_increment
Table 17 SERVER_CREDENTIALS Table
Description Field Type Null Key Default Extra
ID bigint(20) NO PRI NULL auto_increment
CREDENTIALS_TYPE
int(11) NO UNI NULL
CERTIFICATE
blob NO NULL
PRIVATE_KEY
blob NO NULL
COMMON_NAME
varchar(255)
YES NULL
ORGANISATIONAL_UNIT
varchar(255)
YES NULL
ORGANISATION
varchar(255)
YES NULL
LOCALITY
varchar(255)
YES NULL
STATE varchar(255)
YES NULL
COUNTRY
varchar(255)
YES NULL
49
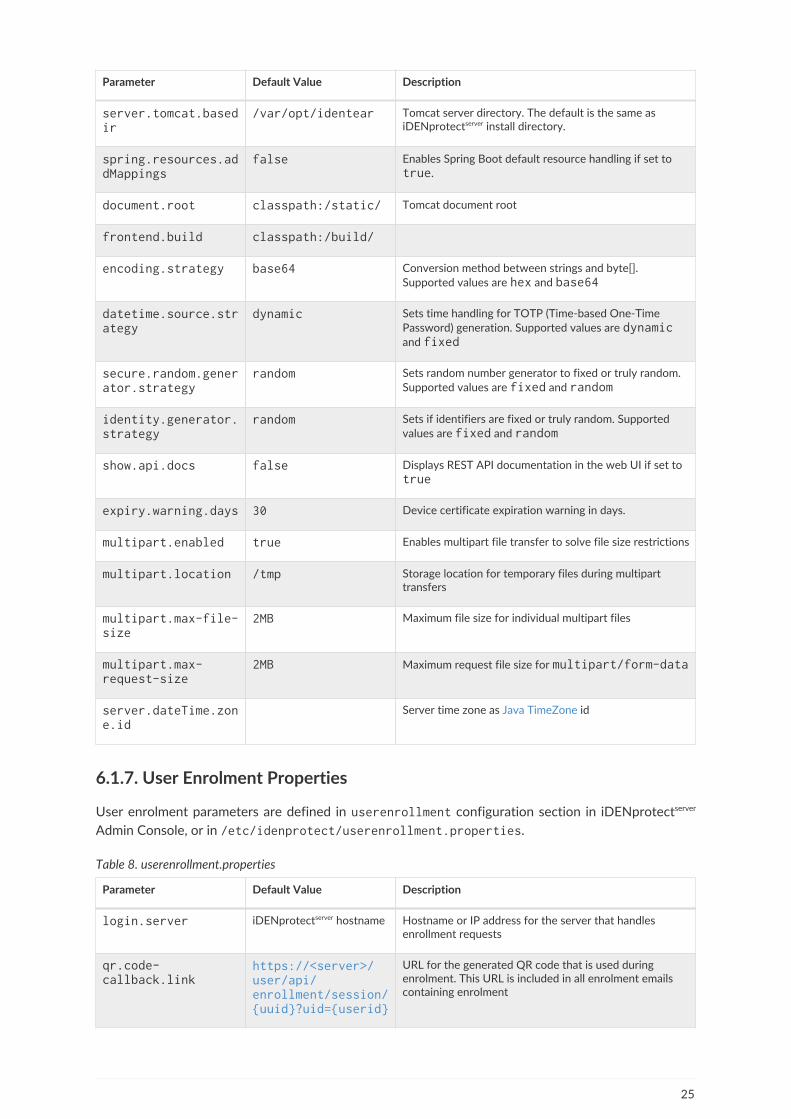
Parameter Default Value Description
timetoliveminutes
30 Sets how long the QR code URL is active After the timeto live has passed the URL expires and is no longeraccessible
62 Configuring Email Messages
In iDENprotect use iDENprotectserver sends email messages to the user during the following events
Table 9 Email Messages
Event Template file Description
iDENprotect activation ActivationEmailvm Email containing Activation Code Automatically sent touser after successful enrollment
iDENprotect enrolment deviceEnrollmentEmailvm and
userEnrollmentEmailvm
Email containing instructions on acquiring iDENprotectApp and getting started with iDENprotect Used when aniDENprotect device is set up for a user without userrsquosinput
PIN reset pinResetEmailvm Email containing a PIN reset notification and a newActivation Code PIN reset is initiated by the user
By default message template files are located in etcidenprotectemail-templates While the
listed vm files are plaintext files the directory also contains HTML-formatted versions of the files
(such as ActivationEmailHtmlvm) If a HTML version of a message can be found iDENprotectserver
uses it as the email message template If HTML version is not found the plaintext file is used instead
Plaintext and HTML file names are configured in Email Parameters
The email subject fields are entered in ltparametergtemailsubject fields which are only available in
iDENprotectserver Admin Console Config tab
These emails can contain any text or HTML styling In addition the email templates use the following
variables
bull $userfirstName - First name of the email recipient
bull $userlastName - Last name of the email recipient
bull $activationCode - Generated one-time Activation Code used during enrolment
bull $qrUrl - Generated enrolment QR Code image embedded within the message Only works with
HTML messages
bull $portalQrUrl - URL link to the QR Code
26
7 Managing Network Ports on iDENprotectserver
The iDENprotectserver installation consists of many components that communicate via network ports
Some of these ports use default values and others are set during installation Generally all ports can
be changed
Generally iDENprotectserver uses well-established default ports for its network traffic such as 3306 for
MySQL database connections All ports are set during installation and all ports are configurable
afterwards
The following TCP ports must be open on the server for iDENprotectserver application to function
correctly
Inbound TCP Ports
bull 22 (SSH port for terminal connections)
bull 443 (HTTPS port for accessing iDENprotectserver Admin Console)
bull 8443 (For accessing EJBCA administration console)
Outbound TCP Ports
bull 25 (SMTP port for sending emails)
bull 53 (DNS service)
bull 389 (if using LDAP)
bull 1521 (if using external Oracle database server)
bull 3306 (if using external MySQL server)
71 Configuring Firewall
On RHEL firewall ports are configured with the iptables or firewalld tools Both can accept and
reject connections to any inbound and outbound ports For instructions on using iptables or
firewalld see Using the iptables service and Using firewalls respectively in RHEL 7 Linux Security
Guide
As an example to allow inbound TCP connections on the server to port 22 (SSH) enter the following
command (as root)
iptables -I INPUT 1 -p tcp --dport 22 -m state --state NEWESTABLISHED -j ACCEPT
27
8 Managing Certificate Authorities (CAs)The Certificate Authority (CA) used by the iDENprotectserver establishes trust within the whole
iDENprotect solution It is
bull The trust anchor of iDENprotect when the CA is run in standalone mode
bull Part of the trust chain in an environment where the iDENprotectserver CA is subordinated to an
existing PKI service
This iDENprotect CA is the central location where certificates from iDENprotect Apps and
iDENprotectpluss are validated and signed to establish trust The CA applies the certificate policy for the
certificates issued by iDENprotectserver to ensure compliance with the overall PKI architecture
iDENprotectserver can use most commonly available CA implementations such as Microsoft CA and
EJBCA The iDENprotectserver installation package includes an EJBCA (Enterprise JavaBeans Certificate
Authority) application If the EJBCA application was selected to be installed it is configured as the
default CA in iDENprotectserver When using another CA install iDENprotectserver without EJBCA and
configure the CA after installation
Changing CAs after iDENprotectserver is in active use is difficult We recommend to
set up the CA during initial installation without changing it afterwards
28
9 Managing iDENprotect UsersAn iDENprotect User is someone who has been Registered as the owner contact person of a specific
iDENprotect Device and who has successfully Enroled that Device on the iDENprotectserver by entering
an Activation Code or scanning a QR Code after the device registration has been accepted During
registration users are mapped to an LDAP directory such as Microsoft Active Directory or stored as
owners of specific Devices in the iDENprotectserver database if LDAP is not used
LDAP integration can be automated to accept all registration attempts from users within a defined
LDAP auto-enrolment group In those cases a user who has successfully registered a Device and who
can be found from the LDAP auto-enrolment group receives the ActivationQR Code immediately If
LDAP auto-enrolment is not used assigning Devices to Users requires manual intervention by the
iDENprotect administrator even when LDAP is otherwise used
A Device can belong only to a single user but a user can have multiple iDENprotect Devices assigned
and enrolled
91 Manual User Enrolment (with or without LDAP)
In manual enrolment users register their iDENprotect devices on the iDENprotectserver Each registered
Device is stored on the iDENprotectserver as a Device in REGISTERED state
At this point and iDENprotectserver administrator must assign the registered device to a user by filling in
the user details manually as described in Assigning Devices or by entering the userrsquos LDAP username
After this step the user is considered to be the owner of the Device and the Device state is changed
to ASSIGNED
The userrsquos email address is used as as their contact reference and it must be
correct in order for the user to be able to enrol the device
When the Device is assigned to the user the user receives an email containing the ActivationQR
Code to the defined email address By following the instructions in the email the user can enrol the
Device and finish the provisioning process
92 LDAP Auto-enrolment
LDAP auto-enrolment provides an efficient way to register new iDENprotect Devices into the
iDENprotectserver and automatically send ActivationQR Codes to the users so they can proceed with
enrolment
LDAP auto-enrolment works by connecting users who are registering Devices automatically to a LDAP
user group that has permissions to assign users on the iDENprotectserver The user has to provide an
email address during registration which is used to identify the user in the LDAP group If the email is
not found in the group the Device can be registered but will not be automatically assigned to the user
In this case a iDENprotectserver administrator must intervene to correctly assign the device
When the user submits the registration iDENprotectserver receives the userrsquos email address and the
DRA (Digital Registration Attributes) file of the iDENprotect Enabled Device or iDENprotectplus If the
email accoutn owned by the user exists in LDAP group iDENprotectserver completes the registration by
auto-populating the userrsquos personal details and assigns the Device to the user
29
10 Configuring LDAPLDAP directories store user information such as name and email address which are used to
authenticate the users of the LDAP system When LDAP is enabled in iDENprotectserver configuration
iDENprotectserver uses the configured LDAP directory to verify the user information submitted during
the Device registration process by mapping it with existing LDAP records in a LDAP directory
iDENprotectserver supports the following LDAP systems
bull Microsoft Active Directory 2008 R2
bull Microsoft Active Directory 2012
bull Microsoft Active Directory 2012 R2
bull Microsoft Active Directory 2016
The iDENprotectserver LDAP plugin only needs read access to the LDAP directory Configure the service
account allocated for iDENprotectserver as read-only This access allows the lookup of users and users
within a specific group that have been approved to be enroled by the iDENprotectserver
LDAP settings are defined during iDENprotectserver installation and stored in the LDAP configuration
file LDAP Parameters When the settings are configured properly iDENprotectserver can perform LDAP
tasks such as searching for user information based on first name or surname
ldapproperties is loaded again every time iDENprotectserver is restarted Therefore all changes to
LDAP configuration require a restart
101 Connecting to LDAP server
LDAP server connection is defined in the LDAP configuration file LDAP Parameters To set up the
connection edit the following values in the file or in the Config panel in iDENprotectserver Admin
Console
bull ldapenabled - Set to true to enable LDAP
bull ldaptype - Set to real Other values are only for internal testing purposes
bull ldapserver - Enter LDAP server IP and port to connect to in the format ldapltserver-ipgtltserver-portgt
bull ldapauthmethod - Enter authentication method Available options are simple sasl and
anonymous If unsure of the right option select simple
bull ldapauthuser - Enter the LDAP service account username (if using simple or SASL
authentication)
bull ldapauthpass - Enter the LDAP service account password (if using simple or SASL
authentication)
The connection parameters must match the LDAP serverrsquos settings
102 Configuring LDAP Server
Setting up Search Parameters
Once the connection is established set the user search parameters for the LDAP query in LDAP
Parameters or in the Config panel in iDENprotectserver Admin Console
30
bull ldapsearchbase - Set the Distinguished Name of the search base where the LDAP search
begins
bull ldapsearchobjectClass - Set the objectclass of the search base target
bull ldapfieldusername firstname lastname fullname email - Set the column
names for user information
bull ldapuserattributename - Additional user identification parameter such as
physicalDeliveryOfficeName
Setting up Service Account
iDENprotectserver needs to have read access to the LDAP server to be able to query the LDAP directory
We recommend creating a dedicated LDAP account for this purpose The account only requires
membership in the Domain Users group
For example to create the service account in Active Directory 2016
1 Open Active Directory Users and Groups
2 Navigate to the Users folder
3 Right-click on the window and select New -rarr User
4 Enter the user account details
Use the same username and password as in LDAP parameters ldapauthuser and ldapauthpass
Setting up LDAP Auto-enrolment
To streamline the iDENprotect enrollment process enable auto-enrolment for newly registered
Devices
bull ldapautoenrollenabled - Set to true to enable auto-enrolment
bull ldapautoenrolluserNotFoundforceCreate - Set to true to automatically create user
accounts in the LDAP directory if the email address given during registration is not found in the
LDAP directory For this purpose the service account must also be a member of Domain Admins
group
bull ldapautoenrollgroup - Enter the auto-enrolment Group name in the LDAP directory All
members in this group are automatically enrolled when they register a new Device The Group
syntax is CN=ltGroupNamegtOUltGroupFoldergtDC=ltLDAPDirectoryNamegt
Setting up LDAP Synchronisation
31
The system can be set to periodically synchronise the registered users in iDENprotectserver and the
users in the LDAP directory This synchronisation removes any user accounts from iDENprotectserver
that
bull Are removed from the LDAP directory
bull Are set to Disabled state in the LDAP directory
bull Are removed from the auto-enrolment Group (if auto-enrolment has been enabled)
Any account that matches one or more of these criteria is removed from iDENprotectserver The
synchronisation job can be set to run with desired intervals using a cron command The following
settings configure LDAP synchronisation
bull ldapusersync - Set to true to enable synchronisation
bull ldapuserenforce - Set to true to immediately delete the account from iDENprotectserver
Setting to false only flags the account in varlogidenprotectidentearlog When an
account is flagged the log contains a line DefaultUserService - ltusernamedomaincomgt Nota member of users group for that user
iDENprotectserver Admin Console can be synchronised with access with LDAP directory When this
option is enabled users can login to iDENprotectserver Admin Console with their LDAP account
bull ldapadminsync - Set to true to automatically update user accounts that have been linked to
one of the three access levels in Management Console
bull ldapadminhelpdeskreadonlygroup - Group name containing users with Administrator
Helpdesk Readonly privileges
Both user synchronisation and Management Console synchronisation are set to run on specified
intervals using the ldapusercron and ldapadmincron parameters Both parameters are entered
using standard cron syntax
32
11 Configuring iDENprotectserver Database
The default database system in iDENprotectserver is mariaDB a MySQL-compatible
relational database management system It is possible to use other database
systems such as Oracle Database with some additional post-install configuration
111 Configuring MariaDB
During iDENprotectserver installation the installer creates a MariaDB database which contains data for
iDENprotect internal use In addition it has empty tables for Devices Users and Certificates all of
which are required for proper iDENprotect authentication use All Device and certificate data
generated during iDENprotect use is stored in these tables
MariaDB database can be set up on the same server running iDENprotectserver application or on a
different server MariaDB uses very little system resoures so we recommend installing it on the same
server as iDENprotectserver
Using MariaDB database requires no further configuration after installation If a different database has
been configured up at some point change the database connection parameters in
etcidenprotectdatabaseproperties to start using MariaDB
1 Set parameter dbjdbcdriver to commysqljdbcDriver
2 Set parameter dbjdbcurl to jdbcmysqlltserver-ipgtltportgtltdatabase-namegtautoReconnect=true
3 Set parameter dbvendor to MYSQL
112 Configuring Oracle Database
iDENprotectserver supports Oracle Database version 11g Release 2 (1120x)
Enterprise and Express editions Due to the high system resource usage of Oracle
Database we donrsquot recommend running Oracle Database and iDENprotectserver on
the same server
Oracle Database is not automatically configured during iDENprotectserver installation To use Oracle
Database instead of MariaDB first change the database connection parameters in
etcidenprotectdatabaseproperties
1 Set parameter dbusername to the schema user name of the iDENprotect database
2 Set parameter dbpassword to the userrsquos password
3 Set parameter dbjdbcdriver to oraclejdbcOracleDriver
4 Set parameter dbjdbcurl to jdbcltdatabase-SIDgtthinltserver-ipgtltportgtltglobal-database-namegt
5 Set parameter dbvendor to ORACLE
iDENprotectserver Oracle Database connector requires that an empty schema for the data is created
before launching iDENprotectserver successfully During startup iDENprotectserver creates all tables and
required core data when it detects that the schema is empty
There are multiple ways to create a new user schema in Oracle Database For instructions see
33
CREATE USER in Oracle Database SQL Reference
34
12 LoggingiDENprotectserver logs activity in the following log files
Table 10 Diagnostic Troubleshooting Logs
Log File Location Description
iDENprotectser
ver logvarlogidenprotectlog (locationdefined in [Logging Properties])
Stores authentication request connectionsdevice enrolments and other connectionattempts from devices enroled on theiDENprotectserver Also contains
EJBCA logs (ifEJBCAcomponent isin use)
varlogejbcalog and
varlogejbcaerrStores all processed authentication requestshandled by EJBCA and whether they weresuccessful or not
Web serverlogs
varlognginxaccesslog and
varlognginx_errorlogStores information on web server activity mostlyrelating to the iDENprotectserver Admin Console
Install logs tmpispa_loglog Installation logs for iDENprotectserver components
idenprotectlog and all other log files are plaintext files accessible to all text reader programs To
read and process a file use Linux utilities such as cat tail and grep For example to see the
contents of the iDENprotectserver log file type cat varlogidenprotectlog
121 iDENprotectserver Log Events
Table 11 iDENprotect Log Events
Description Class Name Contents Examples
Authentication event DefaultCryptoService Hash data signature amp certificate
iDENprotect registration DevicesController Device registered ltserialgt
iDENprotect enrolment - phase1 (initiation)
DefaultEnrollmentService
Successful enrollmentidentification for deviceDeviceid serial stateisLocked hasUser
iDENprotect enrolment - phase2 (certificate signing)
InternalCA Signing CSR with profile ENDUSER
iDENprotect enrolment - phase3 (completion)
EnrollmentController Successful enrollment completion
iDENprotect signatureverification
DefaultSigningServiceamp
SignatureValidationController
Sucessfully verified signatureltserialgt
Registration email DefaultEmailGatewayService
Sending email sendMessage toltaddressgt subject ltsubjectgt
LDAP User synchronisation DefaultLdapService Sync Job Complete
iDENprotectserver Admin Consolelogin
CsrfAuthenticationSuccessHandler
ltusergt Successfully Authenticatedto Admin Console from ltIP addressgt
35
122 Log Search Examples
Finding Authentication Events
A typical authentication event is identified by DefaultDeviceService and DefaultCryptoServicetext strings and the serialNumber of the Device (AMP002-Dw0sOAiY-448495 in the following
example)
2017-11-01 155724174 DEBUG [http-nio-8081-exec-4] DefaultDeviceService -Found Deviceid=1701 serialNumber=AMP002-Dw0sOAiY-448495 state=ENROLLEDisLocked=false2017-11-01 155724176 DEBUG [http-nio-8081-exec-4] SigningHelper - Choosendevice primary cert2017-11-01 155724180 DEBUG [http-nio-8081-exec-4] SigningHelper - Constructedcertificate with type X5092017-11-01 155724183 DEBUG [http-nio-8081-exec-4] DefaultCryptoService -Verify signature using input data414d503030322d447730734f4169592d343438343935 signature3046022100c8a2252a1b2a7f6ccc0a22df891a383fe1ca2bfc8875949d6086ee8dd14b832e022100b2a7d347a658cc7516e18baf9a2fa364e11c5e1364d168d20a42ea7edafb0d87 certificate-----BEGIN CERTIFICATE-----
Finding Registration Events
Device registration and enrollment events are logged in varlogidentearidentearlog A typical
registration event is identified by DefaultRegistrationService text string and the serial number of
the Device (AMP002-J6diTlXe-420732 in the following examples)
2017-11-02 074913661 DEBUG [http-nio-8081-exec-10] DefaultRegistrationService- Found ProductLineid=3 deviceLine=AMP revision=002 isSoft=true2017-11-02 074913700 DEBUG [http-nio-8081-exec-10] DefaultRegistrationService- Saved Deviceid=179 serialNumber=AMP002-J6diTlXe-420732 state=REGISTEREDisLocked=false2017-11-02 074913721 DEBUG [http-nio-8081-exec-10] DefaultRegistrationService- Prepared data forcoukapplymobileidentearserveruserUser312bc6f[id=ltnullgtfirstName=lastName=middleName=ltnullgtemailAddress=(OMITTED)radiusUsername=ltnullgtadAttribute=ltnullgtactiveDirectoryUsername=ltnullgtdevice=Deviceid=179 serialNumber=AMP002-J6diTlXe-420732 state=REGISTERED isLocked=false]
Finding Assignment Events
A typical assignment event is identified by DefaultUserService text string and the serial number of
the Device
36
2017-11-02 074913808 DEBUG [http-nio-8081-exec-10] DefaultRegistrationService- Created and saved by LDAP coukapplymobileidentearserveruserUser312bc6f2017-11-02 074913810 DEBUG [http-nio-8081-exec-10] DefaultUserService - Setassign status to Deviceid=179 serialNumber=AMP002-J6diTlXe-420732state=ASSIGNED isLocked=false2017-11-02 074913812 DEBUG [http-nio-8081-exec-10] DefaultUserService - AutoassignedcoukapplymobileidentearserveruserUser312bc6f[id=180firstName=lastName=middleName=ltnullgtemailAddress=(OMITTED)radiusUsername=ltnullgtadAttribute=ltnullgtactiveDirectoryUsername=ltnullgtdevice=Deviceid=179 serialNumber=AMP002-J6diTlXe-420732 state=ASSIGNED isLocked=false]2017-11-02 074913823 DEBUG [http-nio-8081-exec-10] DefaultUserService - Sentactivation email to (OMITTED)
In the above example the user is automatically assigned with LDAP auto-enrollment
Finding Enrolment Events
A typical enrolment event is identified by DefaultEnrollmentService The enrolment process is
more complex and includes multiple steps involving TOTP (Time-based One-Time Password)
generation signature verification and CA interaction
2017-11-02 084215692 DEBUG [http-nio-8081-exec-7] DefaultEnrollmentService -Handling enrollment initialisation2017-11-02 084215693 DEBUG [http-nio-8081-exec-7] EnrollmentProcessHelper -New enrollment session createdcoukapplymobileidentearserverenrollmentdomainEnrollmentSession1653436c[id=9f0c534e-2a55-4852-906d-92701fedd1d8createdAt=2017-11-02T084215693ZexpiresAt=2017-11-02T091215693ZdeviceId=ltnullgtcertificateRequest=ltnullgt]2017-11-02 084215694 DEBUG [http-nio-8081-exec-7] InMemoryCachingRepository -Adding session with id 9f0c534e-2a55-4852-906d-92701fedd1d8 to cache2017-11-02 084215695 DEBUG [http-nio-8081-exec-7] DefaultEnrollmentService -Returning enrollment initialisation responsecoukapplymobileidentearserverenrollmentdtoEnrollmentInitiationResponse346f72e7[enrollmentId=9f0c534e-2a55-4852-906d-92701fedd1d8creationTime=2017-11-02T084215693ZexpiryTime=2017-11-02T091215693Zslot=8]2017-11-02 084215697 INFO [http-nio-8081-exec-7] EnrollmentController -Successfull enrollment initiation
2017-11-02 084217349 DEBUG [http-nio-8081-exec-5] DefaultEnrollmentService -Successfully added extra cert for device Deviceid=185 serialNumber=AMP002-J6diTlXe-420732 state=ENROLLED isLocked=false2017-11-02 084217356 INFO [http-nio-8081-exec-5] EnrollmentController -Successfully added extra cert2017-11-02 084227369 DEBUG [http-nio-8081-exec-1] DefaultDeviceService -Updated device statuscoukapplymobileidentearserverdevicedtoDeviceStatusUpdateRequest54858129[deviceSerialNumber=AMP002-J6diTlXe-420732battery=0expiry=ltnullgtisActivated=1isEnrolled=1sp=time=ltnullgtuptime=0version=debug=ltnullgt]
37
13 Managing Web ServeriDENprotectserver uses nginx as the web engine for running iDENprotectserver Admin Console and [EJBCA
Web Console (optional)] During installation nginx is set to only accept connections to ports 443 (for
iDENprotectserver Admin Console) and 8443 (for EJBCA Web Console) using TLS 12 or later protocol
Generally there is need to change the nginx configuration after it has set up However the nginx
installation does not include a signed SSL certificate This chapter contains instructions on creating and
signing a trusted SSL certificate but purchasing and maintaining the certificate is the responsibility of
the customer organisation
131 Installing a Trusted SSL Certificate
The terms SSL and TLS are sometimes used interchangeably in networking Even
though the iDENprotectserver is configured to only accept TLS connections the
certificates used to secure traffic are by convention referred to as SSL certificates
In order to handle web connections securely the iDENprotectserver must use a valid SSL certificate If no
valid certificate has been configured iDENprotectserver rejects all web connections
1311 Generating Private Key and CSR
1 In the iDENprotectserver terminal create a new 2048-bit RSA key using OpenSSL
openssl req -new -newkey rsa2048 -nodes -keyout serverkey -out servercsr
Change the name of serverkey and servercsr to the hostname of
iDENprotectserver
This starts the process of generating 2 files a private key file for decrypting SSLTLS traffic and a CSR
(Certificate Signing Request) file
1 Enter the organisational and geographic information for the certificate
2 When prompted for the Common Name enter the fully qualified domain name of the
iDENprotectserver For example idendomaincom
3 Enter an email address for contact information regarding the certificate
1312 Signing the CSR
Once the CSR file is created send it to the CA (Certificate Authority) provider such as VeriSign The
reply from the CA typically contains the signed certificate chain in a pem or crt file This file is the
public key of the iDENprotectserver Store it on the iDENprotectserver computer
When copy-pasting the CSR file contents make sure to include all of them Many
CSRs fail because the BEGIN and END lines were not included in the request
38
1313 Installing the Certificates
To have a functional SSL setup for iDENprotectserver both keys have to be stored on the server and
configured in nginx
1 Copy the key file and the CRT or PEM received from the CA in the varcerts directory
2 Edit etcnginxnginxconf and add the locations for the keys ssl_certificate and ssl_certificate_key
ssl_certificate varcertsmy_domain_namepem (or bundlecrt)ssl_certificate_key varcertsmy_domain_namekey
Adjust the file names to match the certificate files
3 Restart the nginx web server
systemctl restart nginx
1314 Testing the Certificate
Open a web browser and enter the iDENprotectserver URL The browser should not alert to any
certificate validation errors
Depending on the browser a valid SSL certificate is indicated by a padlock or similar icon in the
address bar which means that iDENprotectserver now has a trusted certificate for the web site
Figure 14 Certificate information
39
132 Configuring nginx
Configuration settings for nginx are stored in etcnginxnginxconf To change the settings open
nginxconf in a text editor
The following parameters are important for running iDENprotectserver
Table 12 nginx parameters
Parameter Default Value Description
server_name localhost Hostname of the server
listen 443 Ports that the server listens to
ssl_protocols TLSv1 TLSv11TLSv12
Allowed SSLTLS protocols
ssl_certificate Location of the web serverrsquos public key
ssl_certificate_key Location of the web serverrsquos private key
ssl_ciphers See Cipher Suites iniDENprotectserver AdminConsole
List of supported cipher suites
40
Appendix A Using Built-in EJBCA CertificateAuthority
EJBCA is a Public Key Infrastructure (PKI) Certificate Authority (CA) application developed by
PrimeKey Solutions AB
EJBCA is set as the iDENprotectserver Certificate Authority by default during installation The certificate
database and passwords are also set during installation
When using EJBCA with iDENprotectserver it is not mandatory to perform any additional configuration
on the EJBCA application The iDENprotect solution functions well using the default settings
EJBCA is managed using its own web console running in URL httpsltejbca-hostgtltejbca-portgtejbca for example httpsidendomaincom8443ejbca The web console contains
tools for creating and editing Certificate Authorities for authenticating Devices and manage
certificates used by iDENprotectserver for securing any iDENprotect communications
A1 Installing EJBCA Administrator Certificate
Access to the console is secured with the P12 certificate created during installation The certificate is
protected with a password that also was set during installation (parameter 17 administrator P12
keystore)
During iDENprotectserver installation the certificate is generated in the iDENprotectserver file system in
location optidentearejbcap12superadminp12 To access the EJBCA web console import the
certificate into the web browser (if using Firefox) or operating system (if using any other browser) See
the instructions for Firefox and for Chrome on Linux
A2 Using EJBCA Web Console
EJBCA web console main view shows the publicly available resources of EJBCA such as public CA
certificates and check the status of individual issued certificates
To access the administration console click Administration in the left-side menu panel The
administration console contains options to configure iDENprotectserver certificate handling on a low
level
The most important parts to configure in the EJBCA administration console are
bull Certificate Authorities which issue certificates used in iDENprotect
bull Certificate Profiles (especially the ENDUSER profile) which define how the iDENprotect Devices are
handled in iDENprotectserver
bull End Entity Profiles which define the CA and Certificate Profile to use when signing device-specific
certificates (called End Entities in EJBCA)
41
Figure 15 Editing End Entity Profile
The End Entities listed in EJBCA map to listed Devices in the iDENprotectserver Admin Console
Figure 16 Viewing End Entity
For full information on configuring EJBCA settings with the administration console see EJBCA
Administrator Guide
A21 Creating New iDENprotect Certificate Profile
1 Click Certificate Profiles
2 Enter a name for the new Certificate Profile in the empty row at the bottom of the list and click
Add
3 Click Edit on the new profile
4 Set the following parameters
a Type Sub CA
b Signature algorithm SHA256withECDSA
c Permissions Allow all EXCEPT Allow subject DN override by End Entity Information
d Extended Key Usage Use
e Subject Alternative Name Use
f Authority Information Access Use
g Available CAs Select only one
5 Click Save
42
Figure 17 Setting Certificate Profile
A22 Creating End Entity Profile
1 Click End Entity Profiles
2 Enter a name for the new End Entity Profile in the empty row at Add Profile section and click Add
3 Add Subject DN Attributes
a Required Common Name (CN)
43
b Optional Organisation (O) Organisational Unit (OU) Locality (L) State or Province (ST)
Country (C)
c Set all attributes as Modifiable
4 Set the previously created Certificate Profile as the Default Certificate Profile
5 Select required profiles as Available Certificate Profiles
6 Set iDENtear CA as the Default CA
Figure 18 Setting End Entity Profile
44
A3 Configuring EJBCA Startup
EJBCA (Enterprise JavaBeans Certificate Authority) is installed and configured during iDENprotectserver
installation Usually there is no need to change these settings after install but if the internal listening
ports in the iDENprotectserver application corresponding changes in EJBCA configuration must be made
as well
To change the configuration later edit the optejbcaconfwebproperties configuration file The
following parameters are important
Table 13 EJBCA Properties
Parameter Default Value Description
javatrustpassword Password for the Java trustStore
superadmintrustpassword
Password for the internal administrator PKCS12keystore
httpsservertrustpassword
Password for the SSL certificate used by theEJBCA administrator console
httpsserverhostname Full DNS hostname of the EJBCA server thatfunctions as the Certificate Authority for iSPA
httpsserverdn CN=$httpsserverhostnameO=EJBCASampleC=SE
Distinguished Name of the SSL certificate usedby the EJBCA administrator console
httpsserverprivhttps 8443 Port number for the EJBCA server This has to
match the cabackendejbcawsurlparameter value in [caproperties] CAconfiguration file
After changing EJBCA settings re-run the Apache Ant command as ejbca user The ejbca user
account and its password were created during iDENprotectserver installation
1 Change user to ejbca
su ejbca
2 Deploy new EJBCA application to the iDENprotectserver
ant clean deploy
3 Run the web configuration script
ant web-configure
4 Restart the EJBCA service
service ejbca restart
45
Appendix B Cipher Suites in iDENprotectserver
Admin ConsoleThese are the cipher suites supported in the nginx web server running iDENprotectserver Admin
Console The cipher suites can be changed in the etcnginxnginxconf configuration file by
editing the ssl_ciphers parameter
bull ECDHE-RSA-AES256-GCM-SHA384
bull ECDHE-RSA-AES128-GCM-SHA256
bull DHE-RSA-AES256-GCM-SHA384
bull DHE-RSA-AES128-GCM-SHA256
bull ECDHE-RSA-AES256-SHA384
bull ECDHE-RSA-AES128-SHA256
bull ECDHE-RSA-AES256-SHA
bull ECDHE-RSA-AES128-SHA
bull DHE-RSA-AES256-SHA256
bull DHE-RSA-AES128-SHA256
bull DHE-RSA-AES256-SHA
bull DHE-RSA-AES128-SHA
bull ECDHE-RSA-DES-CBC3-SHA
bull EDH-RSA-DES-CBC3-SHA
bull AES256-GCM-SHA384
bull AES128-GCM-SHA256
bull AES256-SHA256
bull AES128-SHA256
bull AES256-SHA
bull AES128-SHA
46
Appendix C iDENprotect Device KeystoreiDENprotect Enabled Devices and iDENprotectpluss have a secure keystore with many security
measures designed to protect keys and their usage and to ensure that keys cannot be tampered with
or removed from the device
iDENprotect Enabled Device have an unlimited amount of slots available for key storage
iDENprotectpluss are limited to 11 slots
Table 14 Keystore Slot Number Table
SlotNumber
Key Key Type Key Usage Key Generation
Slot 0 ltSystem reservedgt
Slot 1 Device Key ECDH ECDSA
Encrypting and decryptingBluetooth communications anddecrypting iDENprotectserver
asset transfers
Generated during initial startupby device RNG Signed duringenrolment by iDENprotectserver
Slot 2 iDENprotectserver
CertificateECDH ECDSA
Downloaded during enrolment
Slot 3 Signing Key ECDSA atdevicersquossecurehardware
Local signing key Created during enrolment
Slot 4 ltSparegt
Slot 5 TOTP (Time-basedOne-Time Password)Key
AES-256 Used in SSO applications Created during enrolment
Slot 6 ltSparegt
Slot 7 MDM (or MAM)Encryption Key fromMDM Provider (suchas Good Dynamics)
Depends onprovider
Management Containerencryption
Created at MDM initial setup
Appendix D Database SchemaTable 15 DEVICES Table
Description Field Type Null Key Default Extra
ID bigint(20) NO PRI NULL auto_increment
SERIAL_NUMBER varchar(64)
NO UNI NULL
ACTIVATION_CODE varchar(16)
NO NULL
CERTIFICATE varchar(4096)
YES NULL
47
Description Field Type Null Key Default Extra
DEVICE_STATE_ID
bigint(20) NO MUL NULL
LAST_SUCCESSFUL_OTP_VALUE
bigint(20) YES NULL
LAST_SUCCESSFUL_OTP_DATETIME
timestamp
YES NULL
IS_LOCKED
bit(1) NO b0
OTP_KEY
blob YES NULL
EXPIRY_DATE
timestamp
YES NULL
LOGIN_SUCCESS_COUNT
bigint(20) YES NULL
LOGIN_FAILURE_COUNT
bigint(20) YES NULL
BATTERY_CHARGE
int(11) YES NULL
USAGE_SECONDS
bigint(20) YES NULL
PIN_RESET_FLAG
bit(1) NO b0
PIN_CHANGE_FLAG
bit(1) NO b0
OTP_FAILURE_COUNT
bigint(20) YES NULL
SW_VERSION
varchar(32)
YES NULL
PRODUCT_LINE_ID
bigint(20) NO MUL 1
Table 16 DEVICES_EXTRA_CERTIFICATES Table
48
Description Field Type Null Key Default Extra
TAG varchar(32)
NO MUL NULL
CERTIFICATE varchar(4096)
NO NULL
DEVICE_ID bigint(20) NO MUL NULL
ID int(11) NO PRI NULL auto_increment
Table 17 SERVER_CREDENTIALS Table
Description Field Type Null Key Default Extra
ID bigint(20) NO PRI NULL auto_increment
CREDENTIALS_TYPE
int(11) NO UNI NULL
CERTIFICATE
blob NO NULL
PRIVATE_KEY
blob NO NULL
COMMON_NAME
varchar(255)
YES NULL
ORGANISATIONAL_UNIT
varchar(255)
YES NULL
ORGANISATION
varchar(255)
YES NULL
LOCALITY
varchar(255)
YES NULL
STATE varchar(255)
YES NULL
COUNTRY
varchar(255)
YES NULL
49
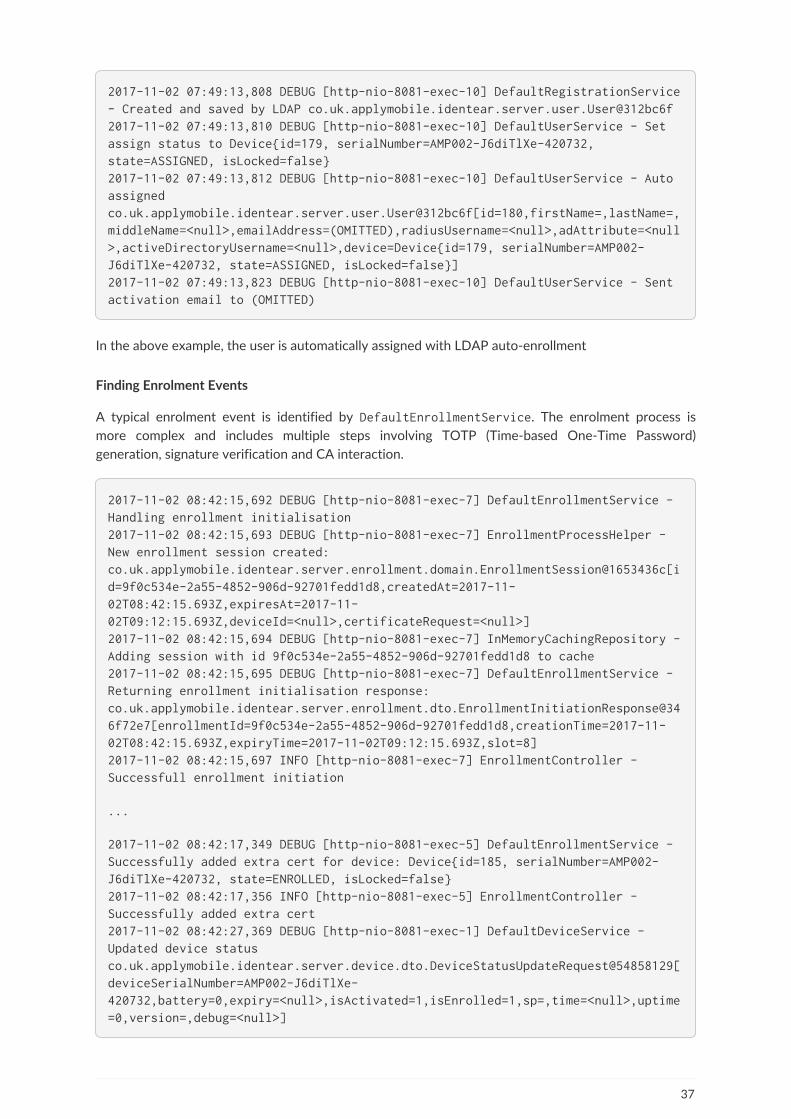
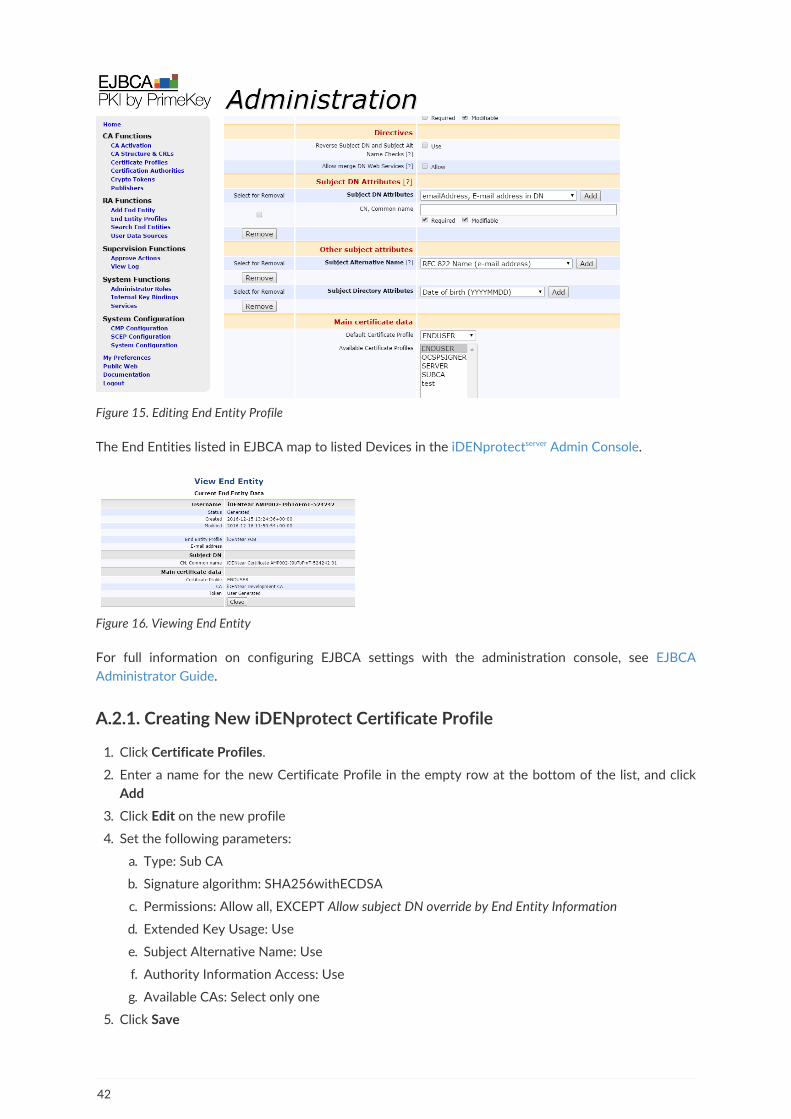

Description Field Type Null Key Default Extra
DEVICE_STATE_ID
bigint(20) NO MUL NULL
LAST_SUCCESSFUL_OTP_VALUE
bigint(20) YES NULL
LAST_SUCCESSFUL_OTP_DATETIME
timestamp
YES NULL
IS_LOCKED
bit(1) NO b0
OTP_KEY
blob YES NULL
EXPIRY_DATE
timestamp
YES NULL
LOGIN_SUCCESS_COUNT
bigint(20) YES NULL
LOGIN_FAILURE_COUNT
bigint(20) YES NULL
BATTERY_CHARGE
int(11) YES NULL
USAGE_SECONDS
bigint(20) YES NULL
PIN_RESET_FLAG
bit(1) NO b0
PIN_CHANGE_FLAG
bit(1) NO b0
OTP_FAILURE_COUNT
bigint(20) YES NULL
SW_VERSION
varchar(32)
YES NULL
PRODUCT_LINE_ID
bigint(20) NO MUL 1
Table 16 DEVICES_EXTRA_CERTIFICATES Table
48
Description Field Type Null Key Default Extra
TAG varchar(32)
NO MUL NULL
CERTIFICATE varchar(4096)
NO NULL
DEVICE_ID bigint(20) NO MUL NULL
ID int(11) NO PRI NULL auto_increment
Table 17 SERVER_CREDENTIALS Table
Description Field Type Null Key Default Extra
ID bigint(20) NO PRI NULL auto_increment
CREDENTIALS_TYPE
int(11) NO UNI NULL
CERTIFICATE
blob NO NULL
PRIVATE_KEY
blob NO NULL
COMMON_NAME
varchar(255)
YES NULL
ORGANISATIONAL_UNIT
varchar(255)
YES NULL
ORGANISATION
varchar(255)
YES NULL
LOCALITY
varchar(255)
YES NULL
STATE varchar(255)
YES NULL
COUNTRY
varchar(255)
YES NULL
49
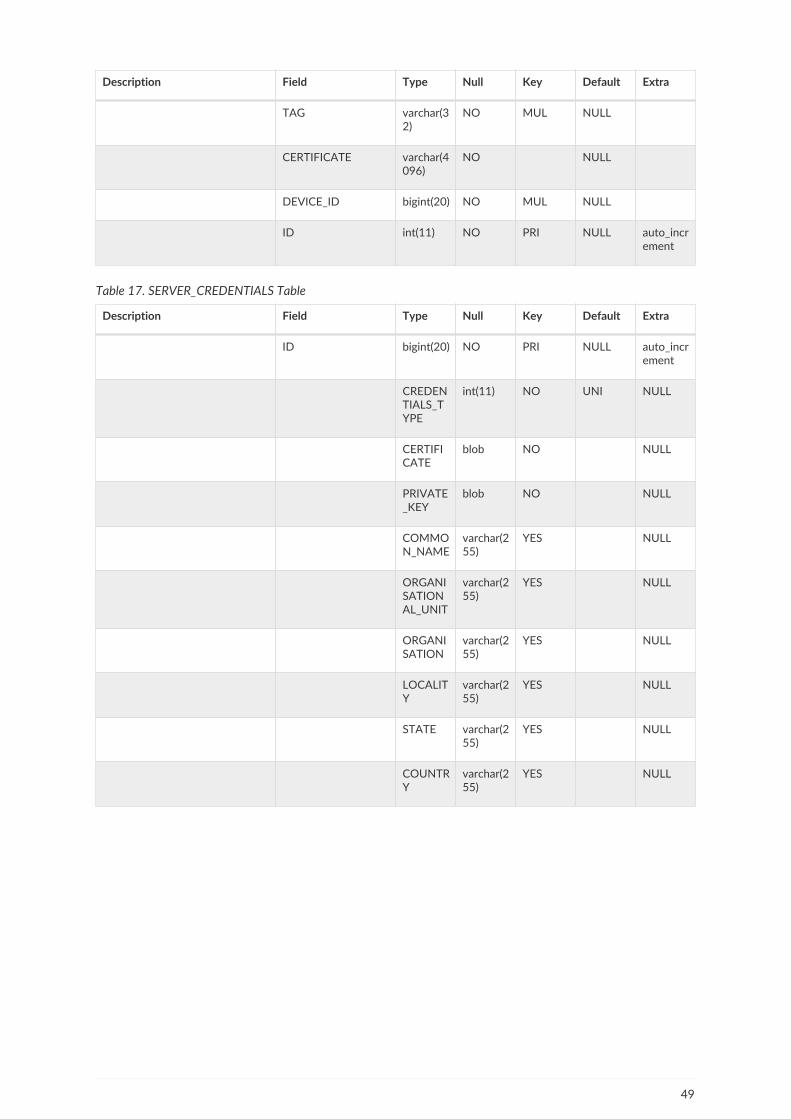
Description Field Type Null Key Default Extra
TAG varchar(32)
NO MUL NULL
CERTIFICATE varchar(4096)
NO NULL
DEVICE_ID bigint(20) NO MUL NULL
ID int(11) NO PRI NULL auto_increment
Table 17 SERVER_CREDENTIALS Table
Description Field Type Null Key Default Extra
ID bigint(20) NO PRI NULL auto_increment
CREDENTIALS_TYPE
int(11) NO UNI NULL
CERTIFICATE
blob NO NULL
PRIVATE_KEY
blob NO NULL
COMMON_NAME
varchar(255)
YES NULL
ORGANISATIONAL_UNIT
varchar(255)
YES NULL
ORGANISATION
varchar(255)
YES NULL
LOCALITY
varchar(255)
YES NULL
STATE varchar(255)
YES NULL
COUNTRY
varchar(255)
YES NULL
49


