90
IFRC shelter kit guidelines VKHOWHU FRYHULQGG $0

IFRC shelter kit guidelines

© International Federation of Red Cross and Red Crescent Societies
Any part of this handbook may be cited, copied, translated into other languages or adapted to meet local needs without prior permission from the In-ternational Federation of Red Cross and Red Cres-cent Societies, provided that the source is clearly stated.
The maps used do not imply the expression of any opinion on the part of the International Federation of Red Cross and Red Crescent Societies or Na-tional Societies concerning the legal status of a territory or of its authorities.
2010 International Federation of Red Cross and Red Crescent Societies
P.O. Box 372CH-1211 Geneva 19SwitzerlandTelephone: +41 22 730 4222Telefax: +41 22 733 0395E-mail: [email protected] site: www.ifrc.org
strategy2020Strategy 2020 voices the collective determination of International Federation of Red Cross and Red Crescent Societies (IFRC) in tackling
the major challenges that confront humanity in the next decade. Informed by the needs and vulnerabilities of
the diverse communities where we work, as well as the basic rights and freedoms to which all are entitled, this strategy seeks to benefit all who look to Red Cross Red Crescent to help
to build a more humane, dignified, and peaceful world.
Over the next ten years, the collective focus of the IFRC will be on achieving the following strategic aims:
1. Save lives, protect livelihoods, and strengthen recovery from disasters and crises
2. Enable healthy and safe living
3. Promote social inclusion and a culture of non-violence and peace

Introduction //
International Federation of Red Cross and Red Crescent Societies // The IFRC shelter kit / i
The IFRC shelter kit
Foreword
Natural disasters typically result in damage to or the destruction of housing leaving people homeless, temporarily displaced, or lacking adequate shelter. For example, in 2008, an estimated three and a quarter million people were left homeless by natural disasters. In the initial stages of a disaster, access to adequate shelter can be a critical determinant for survival. Beyond survival, shelter is essential to provide security and personal safety, protection from the climate and enhanced resistance to disease and ill health. It is also important for human dignity and to sustain family and community life as far as possible in difficult circumstances.
Rather than waiting for the provision of tents or other such temporary shelter solutions, many people whose homes are affected by natural disasters begin the sheltering process themselves, using materials they are able to salvage from their damaged homes or sourced from their surroundings and with whatever tools they are able to access. Relief items, such as plastic sheeting or tarpaulins, as well as basic tools, rope and fixings such as nails, valuably aid such households to rapidly provide their own shelter solutions or to make damaged houses habitable.
To support people helping themselves to provide appropriate shelter following a disaster, the International Federation of Red Cross and Red Crescent Societies (IFRC) shelter kit has been developed, containing essential tools and materials to contribute to the construction of a basic household shelter or to make rapid repairs to a damaged home. Although the distribution of construction materials and tools has been a component of shelter relief programmes in many emergencies, until recently such assistance packages have only been developed after the disasters, a process that takes time and leads to inconsistencies in specifications and quality. By creating a standardised shelter kit, pre-positioned regionally in significant quanities using defined and tested specifications, IFRC has significantly improved the speed of delivery and predictability at the start of shelter responses. In 2008, a total of 50,000 IFRC shelter kits were distributed in Myanmar, Haiti, Nepal and Cuba, to rapidly provide the preferred “non-tent” shelter relief.
IFRC shelter kits are to complement framing elements and other materials obtained by disaster-affected households, or existing structures, to provide the required safe and adequate enclosure. In addition, the use of IFRC shelter kits does require informed programme decision-making and some technical understanding of how to build, even if the structure is to be temporary, to ensure that disaster affected households are not made more vulnerable through poorly located or constructed shelters. As a result, information and guidance is required on how to use the items in IFRC shelter kit to produce safe, adequate shelter.

// Introduction
ii / The IFRC shelter kit // International Federation of Red Cross and Red Crescent Societies
This booklet has been developed as part of the IFRC Global Shelter Programme. This programme focuses on developing best practice and policy in sheltering, building the human resources capacity of National Societies and ensuring that there is operational and technical support for the International Federation and its membership. Additionally it provides coordination, support and networking to advance the shelter sector.
Given that the provision of shelter is far more than simple design and the building of a structure, this booklet is not intended to be a definitive how-to guide for shelter programming, nor a builder’s manual. Instead it aims to provide the reader with better insight into how best to support disaster affected people to meet their immediate shelter needs through dignified, appropriate and durable shelter solutions. It is hoped that this booklet will help those preparing for, planning, managing and implementing shelter relief operations to decide whether or how the IFRC shelter kit can assist in meeting post-disaster shelter needs.
Graham SaundersHead Shelter and Settlements DepartmentInternational Federation of Red Cross and Red Crescent Societies
December 2009

Introduction //
International Federation of Red Cross and Red Crescent Societies // The IFRC shelter kit / iii
Acknowledgment
Project coordinated by: Corinne Treherne
Edited by: Joseph Ashmore and Corinne Treherne
Lead authors: Carmen Ferrer and Irantzu Serra (Spanish Red Cross), Joseph Ashmore,
Illustrations: Mikel Larraza and Irantzu Serra (Spanish Red Cross), Joseph Ashmore
Special thanks to the shelter group of volunteers from the Spanish Red Cross:Gabriel Fernández del Pino, Gerard Suriol, Marta Peña, Miguel Ángel Gómez, Nuria Muñoz, Pablo Arias y Silvia Naveira
Additional thanks to the valuable contributions from the following individuals from the American, Australian, French, Netherlands and Spanish Red Cross Societies and the IFRC Secretariat:Alberto Monguzzi, Alka Kapoorsharma, Brigitte Gaillis, Emeline Decoray, Felix de Vries, Igor Dmitryuk, Irfan Hameed, Isabelle Sechaud, Jeremy Francis, John Manley, Patrick Oger, Steve Barton, Valle Galan

// Introduction
iv / The IFRC shelter kit // International Federation of Red Cross and Red Crescent Societies
Contents5
Foreword ...............................................................................................................i
Acknowledgments ............................................................................................... iii
1 Booklet overview ........................................................................................ iv
2 What is an IFRC shelter kit? .......................................................................viii
3 Why distribute IFRC shelter kits? ................................................................ ix
4 What is shelter? ...........................................................................................x
Section A - PlanningA.1 Planning ..................................................................................................... 2
A.1.1 Considering whether to distribute shelter kits .................................. 2A.1.2 Assessment - vulnerability and capacity .......................................... 3A.1.3 Coordination ................................................................................... 3A.1.4 Other shelter options ...................................................................... 4
A.2 Timing ........................................................................................................ 5
A.3 Climate and priorities .................................................................................. 7
A.4 Settlement .................................................................................................. 8
A.5 Skills and staffing ...................................................................................... 10A.5.1 Skills ............................................................................................. 10A.5.2 Capacity ....................................................................................... 11
A.6 Materials and alternatives ......................................................................... 12A.6.1 Access to materials ...................................................................... 12
A.7 Logistics ................................................................................................... 13
A.8 Distribution ............................................................................................... 16
A.9 Adaptation of shelter kits .......................................................................... 18
A.10 Checklist .................................................................................................. 20A.10.1 Assessment .................................................................................. 20A.10.2 Project planning and implementation ............................................ 21
Section B - Construction and repairB.1 Think before you build .............................................................................. 24
B.1.1 Repair of damaged structures....................................................... 24B.1.2 Designing a structure .................................................................... 24B.1.3 Comfort and habitability ................................................................ 25B.1.4 Shelter upgrading ......................................................................... 26

Introduction //
International Federation of Red Cross and Red Crescent Societies // The IFRC shelter kit / v
B.2 Site preparation, drainage and flooring ..................................................... 27B.2.1 Site preparation ............................................................................ 27B.2.2 Drainage ....................................................................................... 27B.2.3 Layout of the shelter ..................................................................... 28B.2.4 Flooring ........................................................................................ 29
B.3 Anchors and foundations .......................................................................... 30B.3.1 Anchors ........................................................................................ 30B.3.2 Foundations ................................................................................. 32
B.4 Frame and bracing ................................................................................... 33B.4.1 What is “frame and bracing”? ....................................................... 33B.4.2 Joints .......................................................................................... 35B.4.3 Joints using a rope ....................................................................... 36B.4.4 Joints using nails ......................................................................... 38
B.5 Coverings ................................................................................................ 39B.5.1 Coverings .................................................................................... 39B.5.2 Fixing plastic tarpaulin to the frame ............................................... 40B.5.3 Fixing plastic tarpaulin to rope ...................................................... 41B.5.4 Joining pieces of the plastic tarpaulin ............................................ 41B.5.5 Insulation ...................................................................................... 42
B.6 Construction checklist ............................................................................. 43
Section C - Shelter examplesC.1 Introduction .............................................................................................. 46
C.1.1 - C.1.10 Examples ......................................................................... 47
Section D - SpecificationD.1 IFRC Shelter kit Contents: Summary poster .............................................. 54
D.2 Tarpaulin - (HSHETARPW406) .................................................................. 56
D.3 Shelter Tool kit (KRELSHEK01) ................................................................. 58D.3.1 Rope, 30m ................................................................................... 58D.3.2 Handsaw ...................................................................................... 59D.3.3 Nail, for roof sheets ....................................................................... 60D.3.4 Shovel .......................................................................................... 60D.3.5 Hoe .............................................................................................. 62D.3.6 Machete ....................................................................................... 63D.3.7 Shears .......................................................................................... 64D.3.8 Nails ............................................................................................. 65D.3.9 Tie wire ......................................................................................... 66D.3.10 Claw hammer ............................................................................... 66D.3.11 Packaging .................................................................................... 67

// Introduction
vi / The IFRC shelter kit // International Federation of Red Cross and Red Crescent Societies
Annexii.1 Sphere, shelter and settlement standards ................................................ 72
ii.1.1 Sphere: common standards ......................................................... 73
ii.1.2 Sphere: shelter and settlement standards ................................................. 74ii.1.3 Sphere: non-food items standards ................................................ 75
ii.2 Further reading ......................................................................................... 76

Introduction //
International Federation of Red Cross and Red Crescent Societies // The IFRC shelter kit / vii
Booklet overview1
This booklet describes what an International Federation of Red Cross and Red Crescent Societies (IFRC) shelter kit is. It also explains when, if, and how to use it. A full specification of the IFRC shelter kit is included in Section C.
For IFRC shelter kits to be most effective, they should be distributed as soon as possible after a disaster. To help inform this decision, this booklet provides information on when to use IFRC shelter kits (Section A). This includes a diagram to inform decision making (A.1) and a checklist containing questions to ask when deciding whether or not to distribute them (A.10).
Section B contains construction detailing and guidance for the use of shelter kits with additional materials to form basic emergency shelters. It also includes Advice on the repair and upgrade of damaged or temporary structures.
Section C contains some examples of structures that people can build with shelter kits if they can find additional timber or bamboo.
Audience: This booklet is aimed at Red Cross and Red Crescent shelter delegates, Emergency Response Unit (ERU) and Field Assessment and Coordination Team (FACT) shelter specialists and shelter specialists in National Societies. It is also aimed at those planning, managing and implementing shelter relief operations.

// Introduction
viii / The IFRC shelter kit // International Federation of Red Cross and Red Crescent Societies
What is an IFRC shelter kit?2
Definition of the shelter kit: The IFRC shelter kit (catalogue number KRELSHEK02) is a clearly defined collection of tools and fixings (KRELSHEK01) combined with two plastic tarpaulins (HSHETARPW406). Full details on specification are included in Section D and in 5 IFRC / ICRC Emergency relief items catalogue.
The IFRC shelter kit is intended to support people affected by disaster or conflict. It can be used to help create temporary shelters, as well as having other uses.The IFRC shelter kit does not contain materials for the frame of a structure.
What can I do with an IFRC shelter kit?IFRC shelter kits, with the addition of suitable construction materials are primarily intended to help those affected by disasters to:
construct emergency shelters •repair damaged houses or upgrade existing shelters •
With additional materials, IFRC shelter kits may also be used to help build new structures such as:
latrines • ( 1 Excreta disposal in emergencies)fences • ( 12 Shade nets)water collection points •rainwater harvesting systems for shelters •
As IFRC shelter kits contain common tools, they may also be used for a variety of other uses including:
removing rubble •digging drainage ditches and preparing the •groundsupporting livelihood activities such as boat •building, furniture building, or gardening
We can also use shelter kits to help build
latrines, but remember that sanitation is more than a
latrine!
1 x IFRC Shelter KitKRELSHEK02
2 x TarpaulinHSHETARPW406
1 x IFRC Shelter Tool KitKRELSHEK01
={

Introduction //
International Federation of Red Cross and Red Crescent Societies // The IFRC shelter kit / ix
Why distribute IFRC shelter kits?3
Flexible solution The items provided in an IFRC shelter kit can be combined with existing materials such as timber, bamboo and metal roof sheets to construct temporary shelters, or they can be used to repair damaged houses. The tools can also be used to dig drainage ditches, to build latrines, to prepare the ground or to support livelihood activities.
Fast and simple to deployThe IFRC shelter kit consists of commonly available and clearly specified items (Section D). The packaged IFRC shelter kits can be pre-positioned in global, regional or national warehouses. In the field, individual IFRC shelter kits can be transported by hand if required.
Supports local shelter solutionsPeople affected by disaster can combine the kit with salvaged, locally harvested or purchased materials, and use local construction methods. The materials and tools in the kit can be reused if households need to relocate, construct more permanent homes, or maintain their homes at a later stage.
Shelter kits are cost effectiveAn IFRC shelter kit costs approximately one-quarter the price of a standard one-family tent. It is also substantially cheaper to transport. This can allow a large number of people to be targeted following a natural disaster.
The primary responders in a disaster are those affectedThe IFRC shelter kit is intended primarily for distribution to families to meet their shelter needs in emergency and recovery. However it may be used for other purposes in the field, such as building latrines, flooring or for livelihoods activities. Shelter Kits provide resources for families to effect their own recovery. For IFRC shelter kits to be put to their most effective use, the decision to distribute them should be made quickly after a disaster.
Assess needs, vulnerability and capacities before distributing IFRC shelter kits!IFRC shelter kits are versatile but should not be used automatically in all responses. Shelter responses should be based on the needs, vulnerabilities and capacities of the intended recipients. Shelter responses must also be based upon the capacity of organisations to support them in a timely manner. See Section A for further discussion of when to use IFRC shelter kits.

// Introduction
x / The IFRC shelter kit // International Federation of Red Cross and Red Crescent Societies
What is shelter?4
Definition of shelter. Shelter is more than a roof! A shelter is a secure habitable covered living space providing privacy and dignity for those within it.
Emergency shelter solutionsAppropriate emergency shelter solutions based on immediate needs should assure:
protection from climate ✔ security and personal safety ✔enhanced resistance to ill health and disease ✔ support for family and community life ✔ communal coping strategies ✔that self-sufficiency is encouraged and dependency is discouraged ✔that adverse impacts on local environment and economy are minimised ✔that household livelihood support and local economic activities are maximised ✔
Some of the functions of appropri- ate emergency shelter. Shelter programmes should support families to meet these needs.
Shelter provides...
protection from the weather
health: I am less likely to
get ill because I have a shelter.
security: I feel
safer because I have a door.
livelihoods: My shelter is near my
work...
dignity: I can change
clothes because I can close the door
support for family and
community life: We can live together as a
family.

A - Planning //
International Federation of Red Cross and Red Crescent Societies // The IFRC shelter kit / 1
Section A
Planning

// A - Planning
2 / The IFRC shelter kit // International Federation of Red Cross and Red Crescent Societies
Emergency shelter Repair/upgrade Return
Consider providing training and support
Consider distributing additional materials
Preparedness/contingency
Disaster
PlanningA.1
Considering whether to distribute shelter kitsA.1.1
no
yes
Prepare in advance of a disaster!
(Stockpiling/training)
no
Stop! develop a strategy and a coordinated
response.
no
yes
Materials assessment (A.5):Do people have access to materials to make a frame?• Are other materials required?• Are more than two tarpaulins needed?•
Vulnerability/skills assessment (A.4):Are all of the affected people able to use the tools?
Do you have a preparedness/contingency
plan? (A.2)
Do you have a sheltering strategythat is coordinated? (A.1.3)?
Capacity assessment (A.4.2, A.2):Do you have the capacity to deliver the shelter kits fairly? • Will shelter kits still meet the needs when they are received?•
yesPlan and implement the distribution plan
Mo
nito
ring
/eva
luat
ion:
rem
emb
er t
o
chec
k th
at t
he k
its s
till m
eet
the
need
s!
Needs assessment (A.1.2):Would shelter kits help to meet the shelter needs? (• A.1.2)Would shelter kits be more useful than other responses? (tents • cash/vouchers/transitional shelters etc.) (A.1.4)
What phase of response would the kits be
used for? (A.2)

A - Planning //
International Federation of Red Cross and Red Crescent Societies // The IFRC shelter kit / 3
Assessment – vulnerability and capacityA.1.2
Before deciding to distribute shelter kits, establish that there is a need for them by conducting a properly informed but rapid assessment.
6 IFRC, Guidelines for assessment in emergencies, 2008.
Consultation Wherever possible, include focus group discussions and interviews to establish the needs of affected population. All assessments should be based on an analysis of the problems and people’s capacity to address them. Ask: “will the distribution of shelter kits help to reduce the vulnerability of those affected by the disaster?“
CapacityEstablish the capacity of your organisation to deliver the shelter kits. Ask: “Will they be delivered soon enough that they will still make a positive impact?”Be aware that vulnerabilities and needs change with time following a disaster (A.2).
CoordinationA.1.3
Coordinate externallyCoordinate with other organisations to ensure that the level of support offered does not create imbalance with the projects of other organisations. In some countries the Emergency Shelter Cluster is established to support coordination - work with it!
Coordinate internallyCoordinate internally with other sectors in your own organisation: Sheltering is a process and may require intervention in sanitation, livelihoods, water, health and other sectors.
We shipped all these kits but they were not used- we should have conducted a better
assessment.
We did not have the capacity to deliver the
kits in time
What are other organisations doing in the same village?
The livelihoods team are distributing farming tools…

// A - Planning
4 / The IFRC shelter kit // International Federation of Red Cross and Red Crescent Societies
Other shelter optionsA.1.4
Before distributing shelter kits, consider whether training programmes, vouchers, cash, or loans, providing labour, or distribution of construction materials would be a more effective way of addressing needs and vulnerabilities following a disaster.
There are many ways of supporting people with shelter affected by disasters. For more on cash see 4 Guidelines for cash transfer programming Icon credits: 13Transitional settlement and reconstruction after natural disasters.
Vouchers that can be exchanged
for materialsWe could distribute
shelter kits
support markets
Labour – Provide carpenters to help
with building
Or a combination of several of these...
non-food items
cash to help people rent, buy materials or hire
builders
We could support people in
many ways: we could provide...
training in safe construction techniques

A - Planning //
International Federation of Red Cross and Red Crescent Societies // The IFRC shelter kit / 5
TimingA.2
Emergency shelter/ repair/upgrade
Disaster (or return)
From emergency to recovery
Activities:pre-positioning of shelter kits• training• local resources study•
Emergency response activities step 1:quick assessment• coordination• first sheltering strategy• selection of beneficiaries• trainings • distribution of shelter kits•
Shelter kit distribution is possible for reconstruction, BUT full assessments are required
Reconstruction/ maintenance
Emergency response activities step 2:assessment • coordination• refine shelter strategy with a view to recovery• add supports e.g. (cash, materials, non food • items, technical support)evaluation phase 1•
Preparedness (activities continue after the disaster!)

// A - Planning
6 / The IFRC shelter kit // International Federation of Red Cross and Red Crescent Societies
Needs change with timeNeeds change with time. A kit that may have been useful in the first weeks after a disaster may be less useful months later. Be aware that people affected by a disaster will move quickly to create their own shelter.
PreparednessContingency planning should be conducted in all at risk locations. Preparation may involve pre-positioning of kits (A.7), training, and analysis of markets.
When to use a kit: after a disasterWhen there is limited time for assessments and procurement, pre-stocked IFRC shelter kits can either be imported or used from local stockpiles. As time passes, more detailed assessments should be possible and projects should be adapted to better suit the local needs.
When to use a kit: following a displacementIFRC shelter kits can be used to support people to return and rebuild if they have been displaced from their homes.
Example – Pakistan 2005–2006: shelter kits and roof sheets were distributed in two phases. The first distribution was for those remaining on their land two months after the earthquake. The second distribution was for people returning to damaged houses six months after the earthquake.
Project cycleAny project, including one to distribute shelter kits, should go through a repeat process of assessment, planning, implementation, review and evaluation. As time passes, new information from assessments and continuous monitoring should be used to adapt the project.
The project cycle - (Adapted from - 6 Guidelines for Assessment in Emergencies)
We were too slow to decide to distribute the
kits…
Implementation
Continuous monitoring
Review /evaluation
Planning
Assessment

A - Planning //
International Federation of Red Cross and Red Crescent Societies // The IFRC shelter kit / 7
Climate and prioritiesA.3
Cold climatesIn cold climates, the priority is to ensure that people have sufficient clothing and bedding to keep the immediate space around them warm and dry.Simple shelters made using the IFRC shelter kit do not provide sufficient protection from the weather in cold climates, and alternative shelter solutions should be considered.
Cold climate shelter priorities for survival
Priority 1. • Clothing and beddingWarm clothes, hats and blankets can help to keep the immediate space around people warm.
Priority 2. • WaterproofingIFRC shelter kits used with building materials can create waterproof roofs, walls and floors.
Priority 3. • BeddingPlastic tarpaulin from the IFRC shelter kit under mattresses can help to prevent rising damp.
Priority 4. • Wind proofing / thermal bufferIFRC shelter kits can help to wind proof shelters or be used to create a thermal buffer zone.
Priority 5. • Heating and ventilationHeating of internal spaces must be conducted with care to prevent fire.
Priority 6. • Insulation of floorIFRC shelter kits can be used to fix gravel, straw or other insulators to trap air and reduce damp.
Priority 7. • Insulation of walls Plastic tarpaulin can be used to cover insulation.( 3 Selecting NFIs for shelter)
Hot climatesThe priorities in hot climates are to provide protection from sun, heat and rain. Be aware that covering a structure in plastic sheeting can make spaces very hot, making them behave like a green house. (See section B.1.3 - climate-related design issues)
Warm clothing and bed-ding are the top shelter priority in cold climates
Hig
her
pri
ori
ty
Clothes, blankets
Water-proofing
Bedding
Wind proofing
Stove and fuel
Insulated roof
Insulated floor

// A - Planning
8 / The IFRC shelter kit // International Federation of Red Cross and Red Crescent Societies
My house has been destroyed but I can...
SettlementA.4
Take special care in deciding to distribute IFRC shelter kits when:in • urban environmentsin • camps and newly built settlementsland is unsafe •people do not own their land or houses •
Urban contextsShelter kits are often less useful in urban settings because people without money may have less access to land or to construction materials than those in rural areas. Additionally people in rural areas may be more accustomed to building their own houses.
Example – Haiti 2008: IFRC shelter kits were distributed following floods. In rural environments toolkits were helpful. However in the town of Gonaives, many of the kits distributed to families sheltered in churches and schools were sold. For these families, alternative approaches, such as providing cash for landless families to help them rent houses, were used.
Camps and new settlementsShelter kits are generally not advisable for use in camps or new built settlements as they do not provide the frame for a shelter. More site specific shelter solutions may be required.
If new sites must be established, ensure that a skilled site planner is engaged, and ensure that people have access to water, drainage and other site services.
stay with myneighbours...
quickly repair my house...
live in a tent or a temporary
structure on my land...
I would prefer not to have tolive in a shared
building.
I would prefer not to have tolive in a camp.
Some of a non-displaced person's options

A - Planning //
International Federation of Red Cross and Red Crescent Societies // The IFRC shelter kit / 9
OwnershipPeople who have not been displaced often have better access to materials (that they can either harvest or reclaim). They are also more likely to have access to land on which they can re-build.
When people rent buildings, the buildings are not owned by the occupiers, there may be less incentive to repair them. IFRC shelter kits may be less appropriate in these circumstances.
Land is unsafe (See also section B.1, when the buildings themselves are unsafe)With all hazards (earthquake, winds floods etc.), the location of shelters is one of the greatest risks. Wherever possible try and support people to find the safest sites for construction.
Although it may not be possible to validate every plot of land immediately after a disaster, a rough assessment should be given of the hazards facing each community. The distribution of shelter kits should not increase the vulnerability of those they aim to help.
All shelter construction should have accompanying drainage. Shelter kits provide basic tools for digging drainage.
This building does not belong to me – why should I
repair it?
If in a zone where there is a risk of earthquakes, cyclones or other hazards, provide basic training in
safe construction.
This village is at risk of being destroyed by a landslide – it would
be irresponsible to encourage people to rebuild here.

// A - Planning
10 / The IFRC shelter kit // International Federation of Red Cross and Red Crescent Societies
Skills and staffingA.5
SkillsA.5.1
Who builds traditionally?It is not always the case that all people are able to build or repair their own houses. Ask who builds traditionally and think of ways of supporting others to build safely.
Support for vulnerable peopleIt is not always the case that the community will support vulnerable individuals. Ask: “how will vulnerable people construct shelters or repair their homes?”
Vulnerable people can be supported by:providing teams of trained carpenters and builders to help •with constructionproviding cash so that households can hire labour •working with partner organisations who will provide labour, cash or training •establishing reconstruction committees to mobilise community support for the •most vulnerable individuals
See A.1.4 for other shelter optionsExample – Cuba 2008: distribution teams consisted of one member of Red Cross, one member of the civil defence department, one representative of the Housing Ministry and one local official.
The government has a special brigade in charge for repairing houses and reconstruction, the members of which were masons or carpenters. This allowed consistency in quality as well as ensuring that those who where unable to build had a decent quality of support.
Example – Pakistan earthquake 2005: an international organisation distributed shelter kits. They were supported by a local NGO, who were mobilising the communities and training in safer construction.
I am a shop keeper – I am not a
builder.
If shelter kits might be useful – have teams
prepared to train people on their use.
The people in affected communities and supporting organisations are the most important resource following a disaster.
Be prepared for a disaster by working with people to build
safely.

A - Planning //
International Federation of Red Cross and Red Crescent Societies // The IFRC shelter kit / 11
CapacityA.5.2
Staff requirements for an IFRC shelter kits distribution programmeA shelter kit distribution should involve the following people:
volunteers, community committees and community leaders •a shelter delegate •a relief delegate •shelter specialists in the Emergency Response Unit (ERU) or the Field •Assessment and Coordination Team (FACT)logistic and procurement staff •volunteers to disseminate, monitor and evaluate the shelter response •delegates working in other sectors such as livelihoods, water and sanitation •
Training – when and how to use shelter kitsBasic trainings on when and how to use of IFRC shelter kits have been developed for the following target groups ( 10 IFRC Shelter kit training package): 1) Regional Disaster response teams 2) National Disaster response teams 3) Disaster-affected communities
Ideally training for regional and national disaster response teams should take place in advance of disasters, so that the team members are prepared. Training on shelter kits for disaster-affected communities would normally happen following disasters.
Example – Haiti 2008: following wide spread flooding, a training of trainers was conducted in the capital city. These trainers held 10 minute trainings at distribution sites for recipients of shelter kits. The learning answered these questions:
What is contained in a shelter kit?• What can you build with a shelter kit?• How can you securely fix plastic sheeting to timber?• How steep should the pitch of roofing sheets be? (It should be •
approximately 300 – steep enough so that rain runs off, but not so steep that there is too much wind lift.)
Training – safe constructionTraining of communities and local builders in disaster-resistant construction should ideally take place as part of disaster risk reduction activities. When shelter kits are distributed after a disaster there is commonly a surge in construction, and training programmes will help people to “build back safer”.

// A - Planning
12 / The IFRC shelter kit // International Federation of Red Cross and Red Crescent Societies
Materials and alternativesA.6
Access to materialsA.6.1
People’s ability to build or repair shelters is largely dependent upon their access to materials. When distributing tool kits, analyse and monitor people’s access to natural resources and ability to purchase materials.
When assessing materials availability, take into account the quantities and qualities of materials as well as the environmental impact of harvesting materials. Be aware that demand for materials and their availability changes seasonally, as well as with time, in the weeks and months following a disaster. Keep a close watch on markets.
Locally available materialsIFRC shelter kits are best suited to construction with timber. If there is no timber available to disaster affected people, then reconsider whether the IFRC shelter kit is the most appropriate response. It may be necessary to adapt the shelter kit. (A.9)
Reclaim of materialsWhen distributing shelter kits, consider whether to provide support for people to reclaim timber and other construction materials ( 16 Timber as a construction material in humanitarian operations). For example, one wheelbarrow and a crowbar could be distributed with every 5 or 10 shelter kits.
Quantity of materialBased on “acceptable” local standards (construction quality, covered area, materials), calculate what volumes of material is needed for a family shelter. Will a shelter kit be sufficient to support this need? (See A.9, Adaptation of shelter kits). Sphere standards and indicators (Annex 1) provide a useful background to assessing whether a shelter design is “acceptable” or not.
Quality of materialThe quality of construction materials following a disaster is often very variable. Poor quality materials will reduce the lifetime and affect the safety of shelters.
After we distributed shelter kits, everyone cut down the trees to make frames for
their shelters.
How do people build houses and shelters locally?
What materials do people use locally?
Do people use timber? Do they use bamboo, do they use earth or do they use bricks and concrete?

A - Planning //
International Federation of Red Cross and Red Crescent Societies // The IFRC shelter kit / 13
LogisticsA.7
All IFRC logistics procedures shall apply for IFRC shelter kits including procurement, storage and transport of material. IFRC logistics procedures, forms and manuals are available from 7 Logistics standards online.
The IFRC shelter kit’s specifications are clearly defined in the Red Cross Red Crescent Emergency Items Catalogue 2009 and specified in Section D. These specifications must be used when procuring.
7 Samples of logistics forms are available from Logistics standards online. 8 Samples of relief forms for distribution and local distribution of goods are
available on the “Mission assistance, 2008 CD Rom”
Lead timesFor rapid distributions in the aftermath of a disaster many options are available dependent on the selected sourcing strategy. These include, but are not limited to:
internationally pre-positioned kits that are •available so that delivery can begin immediatelyadditional procurement of shelter kits (whether •local/national or international) – which would be based upon the best sourcing options
Consult your in-country logistician or take support from the Regional Logistics Unit when desigining a programme plan of action. This will allow logistics to define the best sourcing options and reduce lead times.
Air freight/sea freight
Comparison of air and sea transport of pre-positioned shelter kits
Airfreight can be mobilised within 48 hours upon receipt of a properly completed logistics requisition
at least 10 times more expensive than sea freight
Sea freight can be mobilised within 10-21 days upon receipt of a properly completed requisition
substantially cheaper than air freight but transit time can be affected by vessel delays and weather conditions
In comparison to a family tent, the shelter kit is lighter and smaller, so substantially cheaper to transport by air freight. However the cost of air freight may be more than double the cost of the shelter kit itself.
Regional stocks exist so that shelter kits can be delivered as
quickly as possible.
Quicker butmore expensive
(air freight)
Slower but cheaper(air freight)

// A - Planning
14 / The IFRC shelter kit // International Federation of Red Cross and Red Crescent Societies
Example – Myanmar 2008: the first Federation charter flight was sent to Yangon, containing 300 shelter kits including tarpaulins. Transit time 4 hours. The cost of the charter was US$ 121 per kit. After the initial emergency phase, shelter kits were sent from China to Yangon port with an approximate transit time of 3 weeks. The sea freight cost per complete kit was US$ 2.25
Refer to relevant Regional Logistics Unit for an estimate of transport costs.
ProcurementProcurement must be conducted by trained logistics/procurement experts.A properly completed and authorised requisition for each purchase or mobilisation of kits is required before kits can be shipped or procured.
A logistics requisition is a pre-numbered document which defines the requirements for procurement. It also serves as the authorisation document for purchasing office.A logistics requisition must include:
quantity •expected delivery date •mode of delivery •consignee/Delivery address •special requirements: donor requirements •markings, documents •signed by authorised persons and approved by the Head of requesting •Delegation or budget holder, and validated by Finance. Check the AUTHORISATION level!properly coded: account, project, activity, donor. •specified with budgetary limit and currency. •clear description of goods: check specifications • ( 5 Emergency Relief Items Catalogue 2009)
StockpilingThe IFRC maintains the following stockpiles
regional stockpiles in Panama, Kuala Lumpur and Dubai •sub-stock: e.g. West Africa, East Africa •in some countries where there is a high risk of natural disaster a decision may •be made to hold national stockpiles
Refer to stock reports on Fednet or request updated information from the relevant Regional Logistics Unit. Each regional stockpile is a mix of Federation owned and National Society owned.
To mobilise kits from regional prepositioned stocks refer to relevant Regional Logistics Unit (Panama, Kuala Lumpur or Dubai). A properly completed and authorised requisition for each purchase or mobilisation of kits is required before kits can be shipped or procured by a Regional Logistics Unit.

A - Planning //
International Federation of Red Cross and Red Crescent Societies // The IFRC shelter kit / 15
Quality One of the advantages of using the standard IFRC shelter kit is of quality. The detailed specifications (Section C) both allow suppliers to know what is required, and allows IFRC to verify that materials delivered are of the required quality.
PackagingThe shelter tool kit is packaged in a polypropylene bag. Two shelter tool kits are placed in a double-walled corrugated cardboard box. The plastic tarpaulins are packaged separately in bales of five tarpaulins. Shelter tool kits and tarpaulins are commonly shipped in separate containers.
Shelter tool kit (x1)
KRELSHEK02
Shelter tool kit (x2) - per
carton
Tarpaulins (x 2)
HSHETARPW406
Tarpaulin (x5)
per bale
Shelter kit (x1)
KRELSHEK01
Weight 11kg 22kg 8.8kg 22kg 19.8kg
Volume 0.028m3 0.057m3 0.023m3 0.0576m3 0.051m3
Qty per 40 foot container
2,300 tool kits
1,150 cartons
6,000 pcs (3,000 kits)
1,200 bales
1,300 kits
Warehousing and Storage
11 Refer to IFRC Warehouse Manual 2008. ((https://fednet.ifrc.org/logisticsstandards/home.asp)
The cardboard boxes should be able to withstand stacking of up to 2m high with several handlings without any damage to the box or its contents.
Health and safetyStaff handling the kits should be offered gloves. The packaging of the shelter kit is designed so that sharp items (nails, saws machetes) should not puncture the
packaging. However ensure that staff handling the kits are aware of the risks.
Maxim
um 2m
Stacks of toolkits should be less than 2m tall
190mm1,150mm
260mmToolkit packed size

// A - Planning
16 / The IFRC shelter kit // International Federation of Red Cross and Red Crescent Societies
DistributionA.8
Consider how vulnerable individuals will carry the kits from the distribution site. For many individuals the kit on its own is too heavy to carry. This is a special concern when shelter kits are being distributed in combination with other materials.
Choosing a reasonable catchment area will help to reduce the need for those receiving kits from having to walk too far.
Examples – Pakistan 2005 and Haiti 2008: all damaged or destroyed houses were individually visited by distribution team members with the support of a representative of the affected community. Tokens were then given to the families who qualified for a shelter kit.
Security at distributionsSafety of volunteers and staff as well as beneficiaries is a primary concern. As with all distributions, IFRC shelter kit distributions require good planning as well as consultation with relevant people and communities. Information and expectations surrounding the distribution should be carefully managed.
8 General advice on security at distributions is given in the IFRC Mission assistance, 2008 CD, (“Security at distributions.pdf”).
Who to distribute to?Commonly, shelter kits are distributed to each disaster-affected family, irrespective of the number of people in each family. However in some circumstances this may not be the most appropriate response.
Be aware of the hazards from unsafe buildings or sites that face people. (A.4) Distribution of kits should not increase vulnerability to these hazards.
Plan distributions to keep them safe!
How will I carry this home?
I live on my own and I get one shelter kit.
I live with six children and my husband and an elderly relative and I get one shelter kit. Is that fair?
We need more materials! Extra plastic sheeting would help!

A - Planning //
International Federation of Red Cross and Red Crescent Societies // The IFRC shelter kit / 17
Example – Baluchistan, Pakistan 2008: each family lives in a compound often containing 50 individuals. Multiple kits were given to each family. The number of kits given to each family was found by dividing the number of people in each damaged compound by 8.
Distributions provide an opportunity to disseminate training materials, manuals, and train disaster affected people (A.5.2) on issues such as how to fix a tarpaulin to a frame.
Sharing shelter kits between familiesWhere there is a shortage of shelter kits, or where they are being used for communal facilities, shelter kits may be shared between groups of families. However sharing tools and shelter materials between families requires a strong social community organisation and is not a common practice.
Example – Cuba 2008: after their use on one shelter, the tools in the IFRC shelter kit were collected for re-use by community brigades.
Example – Myanmar 2008: IFRC shelter kits were distributed following the cyclone. As the tools and fixings were packaged separately from the plastic sheeting, it was possible to distribute one kit of tools per five families and two tarpaulins to every family. This allowed a much larger total population to be reached with finite resources.
Warning: splitting kits should be conducted only in exceptional contexts.
How much can we distribute?Be realistic about how quickly distribution teams can distribute shelter kits. If quicker distribution rates are required, then consider multiple distribution teams.
Example – Pakistan 2005: a distribution team of 6 people working in the mountains was able to distribute up to 200 shelter kits per day, where distribution sites were accessible by road. (Fewer could be distributed when access was by helicopter.) This team was backed up by an assessment team of 10 people split into five groups of two people.
Example – Haiti 2008: a distribution team of between 10 and 20 people were able to distribute an average of 150 shelter kits per day. They were supported by an assessment team of two people per village.

// A - Planning
18 / The IFRC shelter kit // International Federation of Red Cross and Red Crescent Societies
Adaptation of shelter kitsA.9
Any adaptation of shelter kit contents will take time. The delays caused may mean that they arrive too late.
Question Possible action (time permitting)
Traditional construction/available materials
Is bamboo the main construction material?
Increase binding wire, rope or rattan. Consider hand drills so that the bamboo can be pegged.
Materials/Environment
Can families access sufficient construction materials?
Add construction materials such as timber and corrugated iron.
Clean up
Are additional tools needed for clean-up? (such as for removing reinforced concrete)
Consider community clean-up kits These might include: crowbars, wheelbarrows, sledgehammers.
Skills
Are the tools used locally? Consider including locally appropriate tools.
Capacity/vulnerable groups
Do all families have the skills and the capacity to build?
Consider community shelter kits, distributing cash or providing labour.
Security
Is it safe or politically acceptable to distribute all of the items?
Re-consider the distribution of the machete in tense/conflict situation.
Logistics
Would the logistics challenges of distributing the kits lead to a reduced number of families being supported?
Consider adapting the contents of the kit locally.
Family size
Is one size of kit appropriate for all family sizes?
Consider different kits for different family sizes. This must be done in consultation with distribution teams.
Damage levels
Are all houses equally damaged? Consider vouchers or different kits for different levels of damage.

A - Planning //
International Federation of Red Cross and Red Crescent Societies // The IFRC shelter kit / 19
Adaptation of kit contentsIFRC shelter kits can often be delivered quicker than other combinations of shelter items, because the specification is clearly defined ( 5 Emergency Items Catalogue) and they can be pre-positioned. However, if time allows, it may be better to adapt the contents of the shelter kit, or add materials, or add other kits such as hygiene kits.
Example – Myanmar 2008: many organisations used adapted versions of the IFRC Shelter kit that were more suited to construction with bamboo.
Example – Cuba 2008: each shelter kit was distributed along with a kitchen set, a mosquito net and a jerry can.
When distributing or adapting kits, liase with your other team members working in relief, logistics, water, sanitation livelihoods and health. Also consult with other organisations. (A.1.3)
One size fits all?Although “one size of shelter kit fits all” may be the simplest and most reproducible program to implement, shelter solutions tailored to the individual needs may be more appropriate.
Alternative approaches include providing vouchers that can be redeemed at local suppliers for construction materials, or different packages for different family sizes or for different levels of damage.
Community tool kitsCommunity tool kits allow for resources to be shared and reduces unnecessary distribution. They also allow for larger tools such as sledgehammers to be distributed.
Example – Peru 2007: a shelter construction programme was implemented. A kit including items such as wheelbarrows and industrial staplers were given to each group of workers.
CommitteesIf kits are to be shared between families, “community tool” committees may need to be established to ensure that all affected people maintain access to the tools distributed. Be aware that these committees will take time to establish.
Example – Peru 2007: tool kits were given per team of builders. each team was responsible for its tool kits. In every village, teams asked communities or local authorities for a safe place to keep the tools for the duration of the construciton project at each location.
Are there existing community structures such as
religious groups or women’s groups that we can work with?

// A - Planning
20 / The IFRC shelter kit // International Federation of Red Cross and Red Crescent Societies
ChecklistA.10
Be aware that the situation will change quite rapidly after a disaster as people help themselves, markets and transport links re-open, and the context changes. The distribution of IFRC shelter kits must be accompanied by ongoing monitoring and evaluation, and adjusted accordingly.Remember that for shelter kits to be useful, an informed decision to distribute them must be taken as quickly as possible.
AssessmentA.10.1
NeedsDo the affected people need support with shelter? ✔Would other types of support such as tents, vouchers, cash distribution, or ✔supporting markets meet shelter needs more effectively?Have people been consulted as to what materials they most require? ✔Do IFRC shelter kits meet the needs of the most vulnerable members of ✔society?Should IFRC Shelter Kits be altered to meet the needs more effectively? ✔Are all of the tools, such as the hoes and the machetes appropriate to the ✔context?
Organisational capacityDoes your organisation have the capacity to properly identify the needs of the ✔most vulnerable affectees? Does your organisation have the capacity to properly, promptly and fairly ✔distribute the kits considering your limitations?Are materials of sufficent quantity and quality available? ✔
Community capacity Do all affected people have the skills to use the tools? ✔ What support will be available to those who are not able to build? ✔
Strategy and coordination: Do shelter kits fit in with the responses of other organisations? ✔ Do shelter kits fit in with other sectors of your organisation? ✔Do shelter kits fit in with other items being distributed, such as: clothes, ✔blankets, mattresses, kitchen sets, hygiene kits, cleaning kits (for individuals or communities), and mosquito nets?
Timing Will IFRC shelter kits be delivered in soon enough for them to be useful? ✔
Skills and staffingDo you have a team in place? ✔
Land and settlementDo the majority of the affected people have access to safe land on which to ✔build?Are basic services such as water available? ✔

A - Planning //
International Federation of Red Cross and Red Crescent Societies // The IFRC shelter kit / 21
Materials and alternatives Do affected people have sufficient materials to build a frame? ✔ Will distributing shelter kits encourage people to damage the environment? ✔ If people do not have materials, can they be distributed? ✔ Are the shelter kits just a component of the response? (Consider the ✔procurement of local materials rather than imported shelter kits.)Will the standard shelter kit be suitable to integrate with the existing ✔construction culture? (example tin snips are not useful for thatch/bamboo.)
Adaptation of shelter kits Would well-managed community tool kits be a more appropriate use of ✔resources? Do people commonly build from timber? Note that IFRC shelter kits are ✔designed for use with timber. They may need to be adapted for use with bamboo or other materials.Are there any specialist tools required such as wheelbarrows or crowbars? ✔
HazardsIs sufficient training and physical support offered to rebuild safely? ✔Are the kits appropriate for the climatic conditions? ✔Are proposed shelter locations safe? (Often the only available land is vacant ✔because it is hazardous.)
Logistics and distribution Is warehousing available both at point of arrival and at distribution points? ✔ Have your logistics team been consulted and are sourcing options ✔established?Is local transport available? ✔
Project planning and implementationA.10.2
Have you formed a project plan? ✔What training and technical support will you be offering to project staff and to ✔disaster-affected people?Have you budgeted for logistics and staffing costs? ✔
Monitoring and evaluationWho will be conducting ongoing monitoring of the distribution and ✔effectiveness of the kits? Who will evaluate and monitor the project? ✔How will you monitor and evaluate the project? ✔Will you be conducting a survey to monitor satisfaction among those who ✔receive the kits?Based on monitoring and ongoing assessments, are you prepared to adapt ✔your plan?

// A - Planning
22 / The IFRC shelter kit // International Federation of Red Cross and Red Crescent Societies

B - Construction and repair //
International Federation of Red Cross and Red Crescent Societies // The IFRC shelter kit / 23
Section BConstruction
and repair

// B - Construction and repair
24 / The IFRC shelter kit // International Federation of Red Cross and Red Crescent Societies
Think before you buildB.1
This section provides basic construction advice primarily for the construction of emergency, transitional and semi-permanent shelters. However, much of the guidance is also applicable to making repairs to existing structures and maintenance of emergency shelters.
Repair of damaged structuresB.1.1
Following a natural disaster many houses can be made habitable with relatively simple repairs. For example, plastic tarpaulin can be nailed or tied in place to:
make a damaged roof waterproof •temporarily cover windows and doors •
Other tools in the shelter kit can be used for cleaning up and creating drainage.
Do not build or repair unless you are sure the structure is safe.
If in doubt get expert technical advice.
Designing a structureB.1.2
Although most shelters are designed and built by the people affected by the disaster themselves, they may need some support with the design and construction of their shelters.
The design of any structure should be such that it is appropriate to needs and the context. 14 Sphere contains some standards for emergency contexts.
Even simple structures built with shelter kits must take into account:local advice, traditional construction and how people will rebuild •maintenance and upgrade at a later stage by the people who use it •drainage and access to sanitation and infrastructure •climate •what worked locally when the last disaster event struck •covered living space •hazards such as winds or earthquakes •
Communicating the designHowever simple a structure is, plans should be drawn before it is built. These plans should be understandable by those who will be using them. (For simple shelters, these may be as basic as a sketch drawn on the sand.)
Building a prototype is a good way to demonstrate to people what is possible or planned, to get feedback on designs and to develop a materials list.
We can make some quick and
easy repairs to this house!
B - Construction and repair //
International Federation of Red Cross and Red Crescent Societies // The IFRC shelter kit / 25
Comfort and habitabilityB.1.3
Covered living spaceThe size and shape of an emergency shelter depends on the materials that disaster affected people can access.
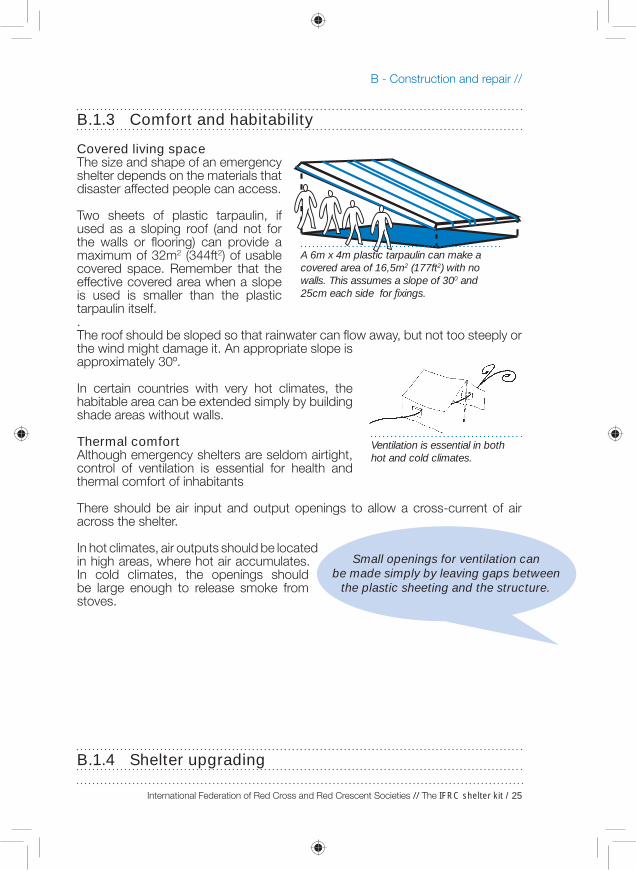
Two sheets of plastic tarpaulin, if used as a sloping roof (and not for the walls or flooring) can provide a maximum of 32m2 (344ft2) of usable covered space. Remember that the effective covered area when a slope is used is smaller than the plastic tarpaulin itself.. The roof should be sloped so that rainwater can flow away, but not too steeply or the wind might damage it. An appropriate slope is approximately 30º.
In certain countries with very hot climates, the habitable area can be extended simply by building shade areas without walls.
Thermal comfortAlthough emergency shelters are seldom airtight, control of ventilation is essential for health and thermal comfort of inhabitants There should be air input and output openings to allow a cross-current of air across the shelter.
In hot climates, air outputs should be located in high areas, where hot air accumulates. In cold climates, the openings should be large enough to release smoke from stoves.
Shelter upgradingB.1.4
Ventilation is essential in both hot and cold climates.
Small openings for ventilation can be made simply by leaving gaps between
the plastic sheeting and the structure.
A 6m x 4m plastic tarpaulin can make a covered area of 16,5m2 (177ft2) with no walls. This assumes a slope of 300 and 25cm each side for fixings.

// B - Construction and repair
26 / The IFRC shelter kit // International Federation of Red Cross and Red Crescent Societies
Larger pieces of plastic tarpaulin are easier to reuse, so think carefully before cutting plastic tarpaulins.
Plastic tarpaulin can be used as temporary roofing until permanent roofing can be obtained. However it has a limited life span and structures should be designed to allow for this later upgrade
1) Immediate emergency shelter, with plastic tarpaulin, poles and rope structure.
2) Elevation of covering.
3) Walls made from local materials and plastic tarpaulin for the roof.
4) Construction improved with walls and covering made with local materials.
Site preparation, drainage and flooringB.2

B - Construction and repair //
International Federation of Red Cross and Red Crescent Societies // The IFRC shelter kit / 27
Site preparationB.2.1
Once the shelter site has been chosen, it should be cleaned of stones, plants and obstacles. Try to avoid clearing trees and larger bushes as these will provide shade and help to stabilise the soil.
The objectives of site preparation are to:prepare a flat, dry and smooth site for the shelter • improve insulation from humidity and cold ground • make it easier to clean the floor for the shelter • improve the stability of the shelter •protect floor sheeting from damage •
For emergency shelters:tamp down, level and compact the shelter site, •
or make a platform (or plinth), to elevate the shelter •base. If available, place stones at the base of shelters to improve drainage. Cover the stones with a layer of earth. Compact this earth.
DrainageB.2.2
Drainage collects and removes rain water.
In humid and rainy climates, drainage ditches should be dug around shelters, and around infrastructure such as roads and water distribution points.
Drainage for emergency sheltersDig a ditch providing a visible slope for water to flow along. This may be upgraded by adding a bed of gravel or filtering material at the bottom (rocks, rubble, etc.)
Be aware that drainage should be at least 50cm away from the shelter pegs.
Drainage ditches should be deep and wide enough to cope with the maximum expected rainfall. Drainage ditches should connect to a site-wide drainage network so that run off from one shelter does not flood other shelters.
Layout of the shelterB.2.3
Dig drainage around shelters.
Drainage should be at least 50cm from pegs.
There should be a visible slope in drainage ditches.

// B - Construction and repair
28 / The IFRC shelter kit // International Federation of Red Cross and Red Crescent Societies
3-4-5 trianglesWhen marking shelters on the ground you may need a right angle. Any triangle with sides with lengths in the ratio 3:4:5, will have a right angle. (Example: a triangle with its three sides of length 3m, 4m, 5m will have one right angle between the sides of length 3m and 4m)
To make a 3:4:5 triangle without a measuring tape:
1) Cut a length of rope (it does not matter the length).
2) Divide the rope into 12 equal lengths. Mark each length with 11 equally spaced knots.
3) Join the ends with a knot.
4) Hammer a fixed stake into the ground and put the rope around it.
5) There should be 4 knots on one side of the stake and 3 on the other side.
6) Fix these new points to the floor area with another 2 stakes.
The rope to and from the first stake will make a right angle.
A 3-4-5 triangle made by a rope with 12 knots and three pegs.
Checking that the corners are square: l1
l1
l2l2
1) Measure all four sides. Check that opposite sides are the same length.
and
2) Measure the diagonals (black and white arrows) - these should be the same.
53
4

B - Construction and repair //
International Federation of Red Cross and Red Crescent Societies // The IFRC shelter kit / 29
FlooringB.2.4
In wet, or cold, climates, aim to isolate the living space from the ground. (See A.9 for distribution of non-food Items (NFIs) and other materials to complement the shelter kit)
A plastic tarpaulin floor. • Plastic tarpaulin can be used for the entire shelter or only the sleeping area. This will help to keep people dry. Use spare blankets for thermal insulation.A mattress with plastic tarpaulin. • Place dry vegetation between two layers of plastic tarpaulin. This will insulate from humidity and cold.Rammed earth. • Make a raised floor using mud and compress it to make an insulating rammed earth floor.Elevated floor. • Create supports using recovered materials, for example bricks, or concrete blocks. Make flooring over these supports (using wooden planks, plywood planks, etc.). The internal finishing can be improved by spreading some cement mortar to level it. Improved flooring or slab. • Where land owners allow, there are sufficient budgets, and it is locally appropriate, consider making a concrete slab to stabilise the floor and make it easier to clean. Alternatively use traditional methods such as cow dung or other local additives to create a solid floor.
Example – Peru Earthquake Operation, 2007: 2 sacks of cement, each weighing 42.5Kg, and 1m3 of sand were used for a 7m x 4m floor that was 10cm thick.

// B - Construction and repair
30 / The IFRC shelter kit // International Federation of Red Cross and Red Crescent Societies
Anchors and foundationsB.3
When building an emergency shelter, the structure should be securely fixed to the ground by using either anchors or foundations.
Anchors • : An anchor is a fixed point of support used to hold a structure in place. Example: a tent peg fixed into the ground is an anchor. It is connected to the tent pole via a rope (or brace).Foundations • : a foundation is the part of a structure that transfers the load of the building to the ground. Example: a pole embedded in the ground, or roots of a tree. If a tree did not have roots, the wind would easily blow it over.
For larger or more permanent structures, other types of foundations as well as soil tests may be required.
AnchorsB.3.1
Anchors work through traction (by pulling).
The softer the ground, the greater the contact area between the anchor and ground will be needed.
The stability of anchors is provided by:the strength and tension in the ropes or braces •the amount of earth over the anchor, and its surface area •the weight of the anchor •anchoring the shelter to a fixed element (stake, tree, post, etc.) •
Use knots or sliders to tighten ropes fixed to anchors. Sliders can be made from a piece of wood, or any other material in which two holes can be drilled.
Example of an anchor.
A slider made from a piece of wood can help to tighten a rope fixed to an anchor.
A double clove hitch can be used to tie a rope to an anchoring post.
The roots of a tree are an example of a solid foundation

B - Construction and repair //
International Federation of Red Cross and Red Crescent Societies // The IFRC shelter kit / 31
Some examples of different anchors in an emergency shelter:
A peg driven into the ground at an angle greater than 90º from the rope. Tension in the rope drives the peg further into the ground. Leave the peg completely buried, in order to avoid trips or injuries. This is not advisable for very sandy or soft ground.
Any buried object that offers resistance. Examples of suitable objects are wooden boards, logs, or rocks. The greater the resistance between the object and the ground the better.
Dig a ditch, insert the end of the tarpaulin and cover it up with earth. Tamp down the earth firmly.
Wrap stones in the plastic tarpaulin and bury them. Stones should be larger than a fist. This is not advisable for very sandy or soft ground.
Wrap a stick in the tarpaulin and bury it. The softer the ground, the longer the stick must be. This is most suitable for soft and/or sandy ground.
Wrap a piece of wood with the tarpaulin and securely nail the strip to stakes. Hammer the stakes into the ground.
If making a concrete slab floor, embed large and solid objects with wire strips sticking out of them. Tie the structure to the strips.

// B - Construction and repair
32 / The IFRC shelter kit // International Federation of Red Cross and Red Crescent Societies
FoundationsB.3.2
The purpose of foundations is to transmit the loads to the ground.
Possible post foundation solutions
Hammer poles at least 30cm (1ft.) into a new hole in the •ground.
Dig a hole at least 60cm (2ft.) deep. •Put a stone at the bottom to form a stable base for the post. •Insert the post into the hole. •Fill the hole in with earth, in layers 10cm (4 inches) thick •tamping down very firmly. Compact the earth around the post. •Wedges may be used to improve the strength of a •temporary foundation. Stronger, stabilised soil can be made by adding 10% of •cement to the soil that you are filling hole with.
Make a hole with vertical walls, at least 50 cm (approx. 2 ft.) •deep.Bury the vertical poles in the hole. •Use masonry or stones bound together with lime or cement •mortar to fill the hole.

B - Construction and repair //
International Federation of Red Cross and Red Crescent Societies // The IFRC shelter kit / 33
Frame and bracingB.4
What are frame and bracing?B.4.1
The frame is the rigid structure of the shelter.
The frame is made up of rigid elements, vertical pillars, horizontal beams, and diagonal bracing to stiffen the frame. A structure must bear the weight of the coverings and of other external actions such as the force of the wind, snow or earthquakes.
TriangulationWhen frames are built, the easiest way to improve the resistance of them is to use diagonal elements to make triangles.
Rectangular structures (such as the frame of a wall) can be deformed
without reinforcements
Triangular structures are more resistant than rectangular ones
Reinforcing the wall diagonally forms a triangle and provides greater
resistance. Boards, steel cables, ropes etc. may be used.
How to brace a structure:Structures can be braced by simply nailing or binding rigid materials such as pieces of timber or bamboo. Wire can also be used to make bracing that works solely in tension. When wire is used, it should be tensioned with the help of a piece of wood or with the 75mm (3 inch) nails included in the Shelter Kit.
When using a rope for bracing, you will still need
anchors for additional stability.
Left : a wall braced with tensioned wire, showing that bracing should be in both directions. Right – detailing: using a nail to tension the wire. Be careful – the nail could cause injury
√
√X

// B - Construction and repair
34 / The IFRC shelter kit // International Federation of Red Cross and Red Crescent Societies
Example: This structure for a latrine has a wooden frame with diagonal reinforcements. The structure is triangular and uses the plastic sheeting for closure.
WindIn places with strong winds:
Use a long thin shelter design, angled away •from the prevailing wind. Rectangular buildings have shorter roof spans and are stronger for their size.Ensure that the roof is well tied down: the •roofing materials should be securely fastened to the roofing battens The battens should be securely fastened to the roof structure. The roof structure should be securely fastened to the walls.When placing metal sheets on the roof, ensure •that the overlapping sides are away from the prevailing wind.
VerticalsTo check that poles in an emergency structure are vertical, you can either estimate by eye or use a “plumb line”.
Making a plumb line with a weight and a string:
Use one of the threads of the rope included in the IFRC Shelter kit and any weight (a stone for example).
Tie the weight to one of the ends of the string.1. Attach the free end of the string to the top part of the post, slightly 2. separated from it in such a way the stone does not touch the post.The string marks the vertical line when at rest (ensure that there is no 3. wind).Repeat this action on both sides of the post.4. Correct the inclination of the post where necessary.5.
Ensure that the roof is well tied down.

B - Construction and repair //
International Federation of Red Cross and Red Crescent Societies // The IFRC shelter kit / 35
Joints B.4.2
Check that timber joints are made so that the geometry of the joint holds it together. If using nails, they should just stop the timbers from slipping apart. Most joints should have some additional reinforcement.
TimberJoints in timber can be made with rope, nails or pegs. For more on jointing with timber see 15 Timber as a construction material in humanitarian operations.
BambooWhen using bamboo it is better to use rope or a drill with pegs, because nails can easily split the bamboo.
Bamboo has hollow segments joined by solid sections called nodes. When jointing bamboo, avoid crushing these hollow sections. This can be done by fixing it between nodes (rather than at an open-ended hollow section), or by reinforcing the bamboo with a cylindrical shaped piece of wood fitted inside the hollow section of the bamboo pole.
When using bamboo, always work with the skills and construction techniques of the affected community as the species of bamboo and local building skills and traditions vary between locations. For more see: 2 www.humanitarianbamboo.org
Maximising contact areaJoints can be strengthened by increasing the contact surface between pieces of wood. The jointing techniques used depend upon the skills of builders, the direction of the stresses and the fixings that will be used.
Reinforcing jointsJoints are usually the weakest part of the structure. Place reinforcements between the posts so that the reinforcements take the loads rather than the joints.
Joints should be designed so that gravity
will tighten them, and not loosen them over
time...
Avoid crushing hollow sections of bamboo.
In jointing these two pieces of bamboo, the joint is reinforced with a secondary short section of bamboo.
Example of a timber joint that maximises the contact area between the two pieces of timber.

// B - Construction and repair
36 / The IFRC shelter kit // International Federation of Red Cross and Red Crescent Societies
Fixing two poles together at a right angle
Timber:
The joint on the far right is stronger than the joint at the far left: stronger joints will have more reinforcement.
Bamboo:
Example of joints using pegs and wire.
Joints using a ropeB.4.3
To bind joints in emergency shelters, it is possible to untwist the rope from the IFRC shelter kit into three parts. Note however for larger structures, the complete rope (12mm diameter) should be used.
I can use the rope with timber and bamboo,
but they behave differently...

B - Construction and repair //
International Federation of Red Cross and Red Crescent Societies // The IFRC shelter kit / 37
Fixing two poles together in right angle
Timber
Bamboo
Tie a clove hitch (see point B.3.1) on one of the posts. Then turn the rope as shown in the figures. Tighten the binding and finish off with another clove hitch. Make each turn of the binding as tight as possible.
Fixing two poles together in diagonal angle
Timber
Bamboo
Start with a “stevedore’s knot” around both posts. Turn the rope as shown. Tighten the binding. Finish off either with a clove hitch or another stevedore’s knot.

// B - Construction and repair
38 / The IFRC shelter kit // International Federation of Red Cross and Red Crescent Societies
Extending a pole.Two poles may be joined in parallel to create one longer extended pole.
Timber
Bamboo
Start with a clove hitch, then wrap the rope around the two posts. “Choke” the tie and finish off with a clove hitch. Tighten each turn of the tie to provide greater firmness. If the overlap between the two poles is short, then make one long tie. If the overlap between the poles is long, then make two short ties near the ends of the poles.
Joints using nails B.4.4
How to nail a jointThree nails for a joint is preferred to make a strong joint, but if this will split the timber, two nails per joint is acceptable. The nails should be fixed in different directions to prevent the joint from falling apart. Nails should be far enough apart that they do not split the wood. Wood is more likely to split nearer its edges.
A single nail can twist or pull out.
Parallel nails can pull out.
Two or more angled (also called skewed or tosh) nails are strongest.

B - Construction and repair //
International Federation of Red Cross and Red Crescent Societies // The IFRC shelter kit / 39
Coverings B.5
Coverings B.5.1
Although plastic and iron sheeting are perhaps the most commonly used emergency roofing materials, many other roofing solutions such as grass, palm and tiles may also be used.
Plastic tarpaulinThe main principles to observe when fixing the plastic tarpaulins are to:
spread the load where it is fixed to other materials •prevent the tarpaulin from flapping •avoid contact with points of friction that will tear •the tarpaulin
The tarpaulin should be tightly fixed to the frame, or well anchored to the ground or to any other rigid element such as a tree or a wall.
The tarpaulin must be tightened to avoid flapping in the wind and also to prevent puddles from forming.
9 Plastic sheeting
Corrugated galvanised Iron (CGI/iron sheet/zinc sheet)When using roofing plates:
Check that each nail has a rubber washer. This will prevent leaks at the •attachment point.Always hammer in the nails at the highest part of •the corrugated sheet in order to avoid leaks.Ensure that each sheet is strongly anchored to •the structure. Iron sheet can be dangerous with strong winds. (Flying razor blades)For large roofs, always start on the lower side of •the roofing and work upwards towards the ridge. Higher sheets should overlap lower sheets.Reinforce the perimeter of the roofing and the •four corners of each roofing sheet. These are the weakest points of the roof.
( 3 Selecting NFIs for shelter)
Always nail up from the lower side of roofing.
Nails should pass through the ridges of corrugated sheet. If they are nailed through the valleys, the roof will leak.
Leave enough width around each piece to fix the canvas to the structure or to another piece of canvas.

// B - Construction and repair
40 / The IFRC shelter kit // International Federation of Red Cross and Red Crescent Societies
Fixing plastic tarpaulin to the frameB.5.2
Spread the loadFixings on the plastic tarpaulin must be spread over a large area to prevent them from pulling through. To spread the load, use wide head nails to fix it. If no wide head nails are available, use other materials that can be been found locally for washers:
bottle tops •washers •pieces of rope •pieces of plastic tarpaulin folded several •timeswooden battening •
Reinforcement bands in the plastic tarpaulin in the IFRC shelter kit are grey in colour. Wherever possible, nail through the reinforcing band as this is the strongest part of the tarpaulin. If this is not possible, make a fold at the end of the tarpaulin before nailing it down.
The tarpaulin can be fixed to the timber structure with industrial staplers. This is fast and cheap, but the staple gun will need to be looked after carefully so that it does not get lost. Staples should be close together, as they can easily rip the plastic sheeting. Be aware that there are different sizes of staples and that they will rust if exposed to water, so cannot be used as a long-term solution.
Fixing plastic sheeting to the frame
Fixing to timber
There should be less than 30cm between nails. The best option is to nail through reinforcement bands.
Fixing to bamboo
Best option: perform a double fold over the reinforcing strip, also using pieces of bamboo or wood cut to act as washers to protect the sheeting. It is much better to drill or tie to bamboo as nails will often split it.
Common nails with washers, bottle tops or other materials may be used to share out the load.

B - Construction and repair //
International Federation of Red Cross and Red Crescent Societies // The IFRC shelter kit / 41
Fixing plastic tarpaulin to ropeB.5.3
Fixing plastic tarpaulin to rope
If tying the rope through plastic tarpaulin without eyelets, either fold the sheet first, or make a hole in the reinforcement band.
Left: the rope is tied to a knot, right: a small stone is folded up in the tarpaulin and the rope tied behind it.
Once the tarpaulin has been tied firmly, its tension can be maintained by anchoring it to the ground (see B.3.1).
Joining pieces of the plastic tarpaulinB.5.4
Sewn with threadThreads taken from rope included in the IFRC shelter kit can be used to sew plastic tarpaulin together.
When sewing plastic sheet, fold the seam before sewing, so that the thread passes through two layers of plastic sheet. Small items available locally such as lengths of wire or splinters of hardwood can be used as a needle. When sewing, use the needle and thread to make the holes. Making holes with nails or larger items will weaken the sewing and may cause the stitching to leak.
A thread is used to sew the tarpaulin.A needle can be fabricated locally, Threads can be untwisted from the rope in the shelter kit.

// B - Construction and repair
42 / The IFRC shelter kit // International Federation of Red Cross and Red Crescent Societies
InsulationB.5.5
Shelters with plastic tarpaulin can get very hot. Plastic tarpaulin also has a reduced lifetime in locations with strong sun. To help cool shelters with plastic tarpaulin or sheet metal roofs:
cover them with vegetation (if the structure can •withstand the added weight)add an additional covering •create a shade area over the entire shelter •create a suspended ceiling •
(For more on creating shade: 12 Shade Nets).
Ventilated air gapShading structures can also be built over roofs. For a shade structure to be effective over a shelter there should be a well ventilated gap between the roof and the structure. Typicaly this gap should be around 50cm (approx. 2ft.) wide.
Shade structures may be required in hot climates.

B - Construction and repair //
International Federation of Red Cross and Red Crescent Societies // The IFRC shelter kit / 43
Construction checklist B.6
Think before starting to build ( 14 Sphere, shelter and settlement standard 4 design)
Are you building on and incorporating local skills and methods? ✔Have you looked at repairing existing shelters before building new ones? ✔Have you consulted with the people who will be living in the shelters? ✔Do you have a design brief? Does it include space, thermal isolation, and ✔shade?Do you have enough material to build a safe shelter? ✔Have you taken into account hazards such as unstable ground, floodwater, ✔and earthquake risk?Have you checked the space that your shelter will require? ✔Have you planned to upgrade you shelter at a later date? ✔Does the shelter have appropriate ventilation? ✔
Site preparation, drainage and ground improvementsDo you already have a safe, flat, smooth and dry site to build on it? ✔Have flooding, damp or cold floor conditions been considered? ✔Have you dug drainage around the shelter, and connected the drainage to a ✔site drainage system?
Anchors and foundationsHave you checked the soil type and stability? ✔Are anchors well fixed and tightened? ✔Are foundations sufficiently deep? ✔
Frame and bracingStructural pieces must work as just one element so:
Are walls securely connected to the foundations/anchors? ✔Are walls braced diagonally? ✔Is the roof frame securely connected to the walls? ✔Are roofing battens securely connected to the roof frame? ✔
CoveringsIs the roofing material securely fixed to the roofing battens and the frame? ✔Have you minimised the cutting of the plastic tarpaulin so that it can be re- ✔used later?Is plastic tarpaulin tight enough to evacuate rainwater from the roof and ✔prevent the tarpaulin from flapping in the wind?Have you spread the load at fixing points and used the reinforcement bands? ✔Is the plastic tarpaulin in contact with anything sharp that can puncture it? ✔Will the covering allow rainwater to be harvested? ✔

// B - Construction and repair
44 / The IFRC shelter kit // International Federation of Red Cross and Red Crescent Societies

C - Shelter examples //
International Federation of Red Cross and Red Crescent Societies // The IFRC shelter kit / 45
Section C
Shelter examples

// C - Shelter examples
46 / The IFRC shelter kit // International Federation of Red Cross and Red Crescent Societies
IntroductionC.1
This section contains examples of shelters that can be built with the IFRC shelter kit, with the addition of some wood or bamboo to make the structure.
These examples are intended to show what kinds of emergency structure can be built using a shelter. They are not intended to be used as construction drawings. In all cases consult and observe what people are accustomed to building locally.
If we simply want shade from the sun and rain or we can build low walls from other materials; we could make a larger covered area
If we had extra tarpaulins, we could build larger covered areas or add walls...
If we cannot find any timber poles, we could temporarily use a
tree...
There are many designs of simple shelters that we can build with the IFRC shelter kit that was given to us.
With only a few poles we could build simple and very
temporary structures...
With more timber poles, and other construction materials we could build
stronger structures...

C - Shelter examples //
International Federation of Red Cross and Red Crescent Societies // The IFRC shelter kit / 47
Example C.1.1
Description: an emergency shelter built using an existing tree or a vertical pole as the main structural element. One of the tarpaulins is used for the main covering, and held in place with rope and smaller sticks if they are available. The other tarpaulin can be cut into parts to make doors and flooring. Alternatively it could be used to extend the shelter.
Comments: such a basic structure is only for use when there are no other options. Where people are forced to build such basic structures to live in, consider poles and other structural materials, as the habitable living space will be small. The internal space will further be reduced as the plastic sags.
In the illustrations to the right, the tarpaulin is buried into the ground at the edges.
ExampleC.1.2
Description: an emergency shelter, made with two or more vertical wooden poles and rope or a wooden pole for the ridge. One plastic sheet is used to cover the roof; the other can be used to form the end walls and partly cover the floor.
Comments: This is a very basic shelter that is similar in shape to a ridge tent. Where people are forced to build such basic structures to live in, consider additional poles and other structural materials, as the habitable living space will be small. The internal space will further be reduced as the plastic sags.
In the illustrations to the right, the tarpaulin is buried into the ground at the edges.
Exploded diagram showing separate covering, frame and floor. The doors have been cut from the same sheet as the floor.
Exploded diagram showing separate covering frame and floor. The doors have been cut from thesame sheet as the floor.
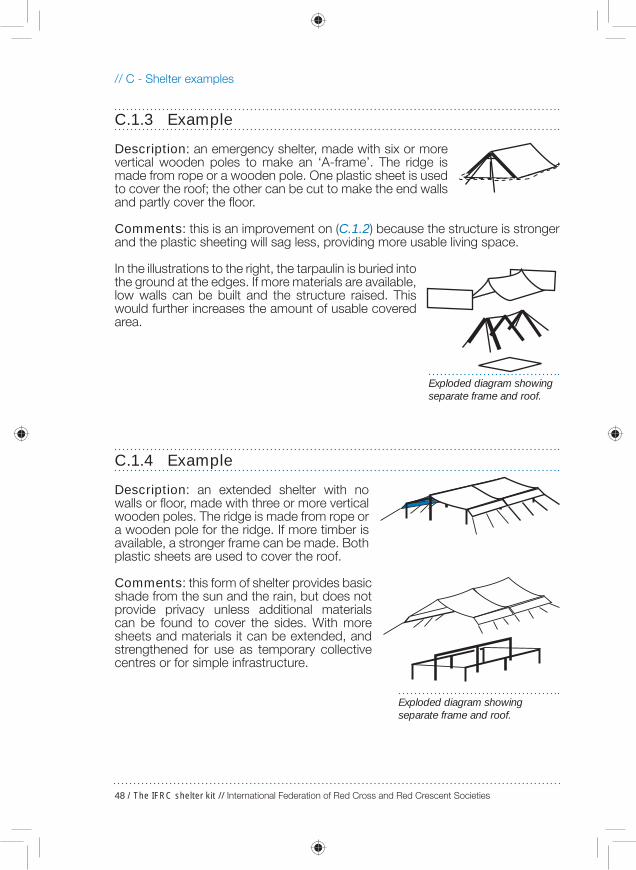
// C - Shelter examples
48 / The IFRC shelter kit // International Federation of Red Cross and Red Crescent Societies
ExampleC.1.3
Description: an emergency shelter, made with six or more vertical wooden poles to make an ‘A-frame’. The ridge is made from rope or a wooden pole. One plastic sheet is used to cover the roof; the other can be cut to make the end walls and partly cover the floor.
Comments: this is an improvement on (C.1.2) because the structure is stronger and the plastic sheeting will sag less, providing more usable living space.
In the illustrations to the right, the tarpaulin is buried into the ground at the edges. If more materials are available, low walls can be built and the structure raised. This would further increases the amount of usable covered area.
ExampleC.1.4
Description: an extended shelter with no walls or floor, made with three or more vertical wooden poles. The ridge is made from rope or a wooden pole for the ridge. If more timber is available, a stronger frame can be made. Both plastic sheets are used to cover the roof.
Comments: this form of shelter provides basic shade from the sun and the rain, but does not provide privacy unless additional materials can be found to cover the sides. With more sheets and materials it can be extended, and strengthened for use as temporary collective centres or for simple infrastructure.
Exploded diagram showing separate frame and roof.
Exploded diagram showing separate frame and roof.

C - Shelter examples //
International Federation of Red Cross and Red Crescent Societies // The IFRC shelter kit / 49
ExampleC.1.5
Description: this shelter is based on a minimum of four upright poles with rope bracing. It has a sloping roof, and can be built with all walls and the floor made of plastic. One sheet would make the roof and two walls, the second sheet would make the floor and other walls.
Comments: as drawn this shelter is small, but has reasonable head height. If more materials are available the frame should be strengthened. It is most appropriate as a shelter if a safe wall or terracing exists, so that the structure can be built off it.
ExampleC.1.6
Description: this emergency shelter is based around one central vertical pole. The walls are raised by the poles that are dug into the ground in each corner. Ropes should be used to prevent the roof from sagging and to brace the structure.
Comments: as drawn, with plastic sheeting walls and floor, this shelter is small, but has reasonable head height. This type of design can be a little difficult to construct as it fits a flat plastic sheet over the roof, which is not flat.
Exploded diagram showing the separate frame and covering.
Exploded diagram showing the separate frame and covering.

// C - Shelter examples
50 / The IFRC shelter kit // International Federation of Red Cross and Red Crescent Societies
ExampleC.1.7
Description: as with (C.1.6), this shelter is based on one central pole that supports thee roof. The walls are raised by the poles the corners, and the frame is strongly braced so that it is stable even without the plastic sheeting.
Comments: as drawn, and using plastic sheeting walls and floor, this shelter is small, but has reasonable head height. This type of design can be a little difficult to construct as it fits a flat plastic sheet over the roof, which is not flat. However in some locations it may be closer to traditional design of huts.
ExampleC.1.8
Description: this is a shelter with a gabled roof. It is based on a solid and braced timber frame. There is not sufficient plastic in the shelter kit to cover all of the walls, so additional covering materials will be required.
Comments: this is a fairly basic shed type shelter. If it is to last is should be built safely, and additional timber as well as technical support may be required by the more vulnerable for the affected families.
Exploded diagram showing separate frame and covering.
Exploded diagram showing separate frame and covering.

C - Shelter examples //
International Federation of Red Cross and Red Crescent Societies // The IFRC shelter kit / 51
ExampleC.1.9
Description: this emergency shelter uses a tunnel shaped design. The roof is supported by flexible poles such as bamboo or flexible timber poles. There may or may not be additional vertical supports depending upon the materials used.
Comments: this shape of shelter is fairly common around the world, but the exact design detailing depends upon local building practices. Given the shape of roof the plastic sheet does not need to be folded or cut to cover the roof.
ExampleC.1.10
Description: this is an extended version of (C.1.9) the roof for this shelter is supported by flexible poles such as bamboo or bush poles. Depending upon the quality and quantity of the poles, additional vertical support may be required
Comments: this shape of shelter is fairly common around the world, but the exact design depends upon local building practices. The plastic sheet does not need to be folded or cut to cover the roof.
Exploded diagram showing separate frame and covering.
Exploded diagram showing separate frame and covering.

// C - Shelter examples
52 / The IFRC shelter kit // International Federation of Red Cross and Red Crescent Societies

D - Specification //
International Federation of Red Cross and Red Crescent Societies // The IFRC shelter kit / 53
Section D
Specification

// D - Specification
54 / The IFRC shelter kit // International Federation of Red Cross and Red Crescent Societies
IFRC shelter kit contents: summary posterD.1
TARPAULIN – Quantity per kit: 2 (SHETARPW406)
TARPAULIN – 4m x 6mTarpaulins are made of woven plastic. They are the key component of the shelter kit. They can be used for roofing, walls and floor covering.
SHELTER TOOL KIT – Quantity per kit: 1 (KRELSHEK01) Contains:
ROPE – Quantity per kit: 1A universal fixing with many uses, such as binding timbers together, stabilising structures or fixing tarpaulin in place.
HANDSAW – Quantity per kit: 1The handsaw is for cutting timber to required size. Do not use on metal or other hard materials.
NAIL for roof sheets – Quantity per kit: ½Kg (approximately 1lb.)Nails for roofing sheets are have a domed head and a washer. They are used for fixing tarpaulins to timber, and for fixing corrugated iron sheet. When used properly the nails will not let rain seep through their own holes.
SHOVEL – Quantity per kit: 1 The shovel is useful when preparing the foundation of a shelter. It can also be used for digging trenches around the shelter if is raining. It can be used as an everyday tool when disaster affected people re-establish their livelihoods.
HOE – Quantity per kit: 1The hoe can be used to prepare the ground for a shelter. It can be used as an everyday tool when disaster affected people re-establish their livelihoods.

D - Specification //
International Federation of Red Cross and Red Crescent Societies // The IFRC shelter kit / 55
MACHETE – Quantity per kit: 1The machete is shaped like a very big knife. It is also useful for clearing sites, shaping timber or, bamboo, and cutting extra materials.
SHEARS – Quantity per kit: 1The shears are for cutting metal roofing sheets, and wire. Cutting wire or nails with the shears will damage them.
NAILS, LARGE – Quantity per kit: ½kg (approximately 1lb.)These are 75mm long, simple nails for building with timber.
NAILS, SMALL – Quantity per kit: ½kg (approximately 1lb.)These are 40mm long, simple nails for building with timber.
TIE WIRE – Quantity per kit: 25m (approximately 82ft.)1.5mm diameter tie wire can be used for binding timber or bamboo, or for fixing tarpaulins. It can also be used for reinforcing structures and for diagonal bracing.
CLAW HAMMER – Quantity 1For driving and removing nails, and for working with other tools to make joints.
WOVEN SACK – Quantity 1Woven sack is for easy packaging and transportation of the shelter kit.

// D - Specification
56 / The IFRC shelter kit // International Federation of Red Cross and Red Crescent Societies
Tarpaulin - (HSHETARPW406)D.2
Quantity per kit 2
Standard plastic sheeting was developed in an inter-organisation research project. It is recommended not to use other types of plastic sheets found on local markets. Material Woven high-density polyethylene (HDPE) black fibres fabric
laminated on both sides with low density polyethylene (LDPE)coating.
Reinforcement Reinforced with 6 bands of 7.5cm width made of woven black HDPE fibres fabric and coated outside. Positioned as in the drawing above.
Tensile strength Minimum 50DaN and 15% to 25% elongation in warp and weft outside of the reinforcement bands under ISO 1421.
Tensile strength of the reinforcement bands
Minimum 70DaN inside the reinforcement bands as per ISO 1421 plus the additional procedure.
Tear strength Minimum 10DaN under ISO 4674 (A2) outside of the reinforcement bands.
Welding Only one welding allowed, in the middle of the sheet, lengthwise. Minimum resistance is 80% of the original tarpaulin tensile strength in weft under ISO 1421 plus additional procedure
7.5cm
7.5cm
7.5cm
7.5cm
87.5cm
87.5cm
5cm
87.5cm
87.5cm
6m
4m
1m
7.5cm7.5cm

D - Specification //
International Federation of Red Cross and Red Crescent Societies // The IFRC shelter kit / 57
Ultra violet (UV) resistance
Maximum 5% loss on original tarpaulin tensile strength under ISO 1421 after 1500 hours UV under ASTM G53/94 (UVB 313 nm peak), to be tested outside and inside the reinforcement bands.
Width 4m standard size ±1% net width
Length 6m
Weight ISO 3801 200g/m² ±5%, plus 10% for the reinforcement bands under ISO 3801.
Temperature resistance
Temperature resistant from -200C to 800C.
Features Water, rot, soil and fauna resistant. Long outdoor use life in all climates.
Flammability Flash point above 2000C.
Colour White sun reflective on both sides, grey bands. Inner black fibres must ensure good opacity.
Printing On each piece, manufacturer name, month and year of production (letters of 2.5cm [1 inch] high maximum). One length indicator mark every metre/customer logo on request.
Further information:The expected life span of 2 years in severe tropical conditions. •Irregular or pointed surfaces can puncture or wear through the plastic sheet. •Be careful of sharp sticks or edges where the plastic sheet comes into contact with the frame of the shelter.Ensure that plastic sheeting is securely tied down to avoid it from flapping or •and getting damaged in the wind.To improve re-useability of plastic sheeting, avoid cutting plastic sheeting •unless necessary.
Safety:Plastic sheet is flammable above 200ºC. As a result, it must be kept away •from heat sources, such as fires, cookers or stoves.Plastic sheeting does not protect against dangers such as falling •rocks or trees. Ensure that buildings are on a safe site.
For further information on the use and specification of plastic sheeting, see
9 Plastic Sheeting, IFRC and Oxfam.

// D - Specification
58 / The IFRC shelter kit // International Federation of Red Cross and Red Crescent Societies
Shelter Tool kit (KRELSHEK01)D.3
Rope, 30mD.3.1
Black polypropylene rope, 12mm diameter, twisted.
Diameter 12mm ±0.5mm
Length 30m
Weight 1.9kg
Number of strands 3 minimum
Type Twisted
Material Polypropylene, no recycled fibres, UV stabilized
Colour Black
Tensile strength 300kg
MaintenanceAfter cutting the rope it will become frayed. To avoid this:
Burn the ends immediately after cutting the rope, in such a way that all the •threads of the rope melt and fuse together.Tie a simple knot at the end of the rope. •Tie the ends with adhesive tape or a wire. •
Finishing a cut rope to prevent it from fraying. Left to right: burning the ends, tying a knot, binding the end with tape or wire.

D - Specification //
International Federation of Red Cross and Red Crescent Societies // The IFRC shelter kit / 59
HandsawD.3.2
Saw for timber, 400mm blade.
Type and dimensions
Carpenter handsaw, 400-450mm blade, lacquered, overall length 550mm ±50mm
Blade thickness 1mm ± 0.05mm, protected against oxidation
Blade protection Protective cardboard, teeth protection with hard, plastic cover.
Seal type Laminated carbon steel, hardened and tempered
Number of teeth 7-teeth per inch
Quality of make Soft edges but no dents, cracks or broken teeth
Hardness Rockwell C*
45 to 50 HRC for the whole blade, 48 to 52 HRC at teeth level
Carbon content 0.47% to 0.55%
Manganese content 0.5% to 0.8%
Handle Wooden dismountable handle, minimum 3 fixations, polished varnish hardwood, large 85x35mm opening for hand comfort when wearing gloves. Optional 45/90° square.
Strength testing With the blade inserted into a 10mm wide slot to a depth equal to 1/3 the blade's length, but not exceeding 150mm, a deflection of 90° is applied 25 times in each direction without breakage or permanent set to the blade.
MaintenanceSaw blades should be kept covered, clean dry •and sharpened.
SafetyHold the piece to be cut firmly on a solid and flat •surface before starting to cut. Do not saw with too much pressure on the saw; •the blade can bend or break. Saw blades should be covered with a cardboard •or a plastic sheath when transporting them.KEEP OUT OF REACH OF CHILDREN. •
* “Rockwell Hardness C“ is a hardness measurement that can be found in laboratories. It is based on the net increase in depth of impression as a load is applied
Hold the timber firmly on a flat surface before starting to cut. Cut beside your body

// D - Specification
60 / The IFRC shelter kit // International Federation of Red Cross and Red Crescent Societies
Nail, for roof sheetsD.3.3
Galvanized with watertight rubber washer, 75mm long (3.5”), umbrella type
Type Iron nails, made of polished low-carbon steel, cold processed, not heat treated except for galvanization.
Shape Spiral rolled or twisted shank, sealed umbrella-type spring-head.
Corrosion treatment
Hot-dip galvanized at 300g/m2 ±10%
Tensile strength Minimum 650N/mm2
Accessories Attached rubber washer to each nail
Dimensions (+/-5%)
Shank: 75x3.6mm; head diameter: 22mm
Rubber washer Diameter 26mm x thickness 2mm
Packing Packed in a strong, thick plastic bag
Quantity Net weight: 0.5kg
Using nailsNails being used for roofing should always have a rubber washer. If not, the •roof will leak.Nails can often be re-used several times if they are straightened carefully. •
Safety Old or broken nails should not be left on the ground as they could •cause injury or puncture wheels.Pieces of timber should not be left on the ground with nails •sticking out. Nails should be removed or hammered flat.
ShovelD.3.4
Round point with Y handle
Material Pressed carbon-steel, hardened and tempered
Corrosion protection Black paint
Quality of make No excess metal in the eye, no dents, no cracks, soft edges

D - Specification //
International Federation of Red Cross and Red Crescent Societies // The IFRC shelter kit / 61
Hardness Rockwell C 35 minimum to 48 maximum HRC
Carbon content 0.4% to 0.5%
Manganese content 0.5% to 0.8%
Silicone content 0.25% maximum
Phosphorus and Sulphur content
0.06% maximum
Dimensions 295x225mm
Hole diameter Front side 36mm, back side 40mm
Weight 1kg ±50g, without handle
Strength testing Using a fitted, standard hardwood handle, clamp the • blade of the shovel near the handle in a horizontal position. Gradually apply a load of 45kg and maintain it for 2 minutes. This should not result in any damage to the blade or a loosening of the handle, and no permanent set in excess of 25mm.With one centimetre of the end of the blade secured in • a clamp, move the handle back and forth 30 degrees. There should be no permanent set greater than 25mm.With the shovel held in a digging position, a piece of • wood, 37mm in diameter, is hit hard against it. The blade should not buckle or break.
Handle No chips, rough surfaces, holes or knots. Smooth, • polished, varnished, surface. Dry, strong and flexible wood. Handle adapted to head so that it protrudes and can be blocked with a nail from the other side of the hammer-head eye. Total length 1,070mm ±50mm.The other end of the handle is made in a Y-shape with • same quality of wood. The branches of the Y handle must be made in one piece only, of good-quality iron, securely fitted to the handle.
SafetyDo not leave the shovel on the ground, as a trip hazard. •When using the shovel, lift carefully so as not to hurt your back. •Stand with your feet approximately hip width apart for balance, and keep the shovel close to your body. Bend from the knees (not the back) and tighten your stomach muscles as you lift the shovel. Avoid twisting movements.
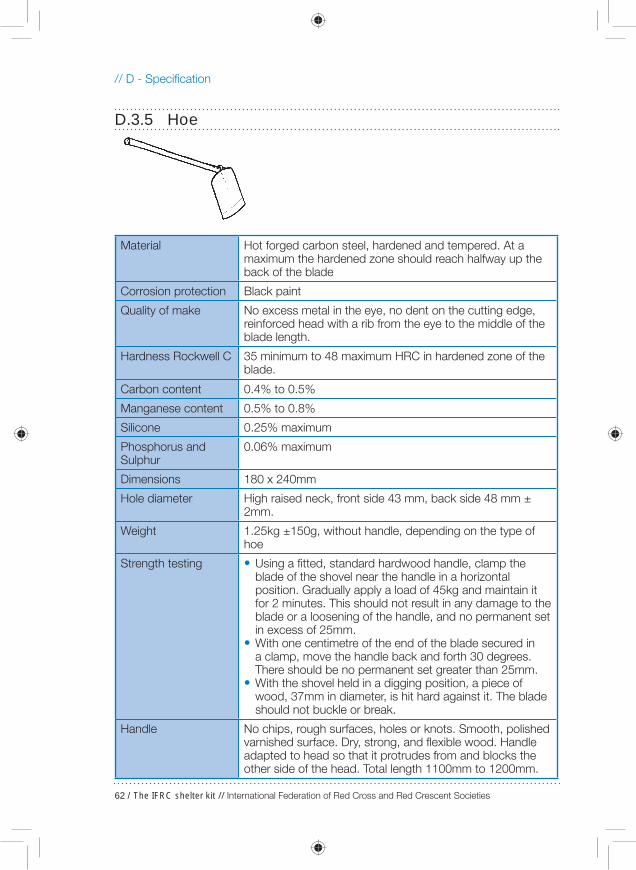
// D - Specification
62 / The IFRC shelter kit // International Federation of Red Cross and Red Crescent Societies
HoeD.3.5
Material Hot forged carbon steel, hardened and tempered. At a maximum the hardened zone should reach halfway up the back of the blade
Corrosion protection Black paint
Quality of make No excess metal in the eye, no dent on the cutting edge, reinforced head with a rib from the eye to the middle of the blade length.
Hardness Rockwell C 35 minimum to 48 maximum HRC in hardened zone of the blade.
Carbon content 0.4% to 0.5%
Manganese content 0.5% to 0.8%
Silicone 0.25% maximum
Phosphorus and Sulphur
0.06% maximum
Dimensions 180 x 240mm
Hole diameter High raised neck, front side 43 mm, back side 48 mm ± 2mm.
Weight 1.25kg ±150g, without handle, depending on the type of hoe
Strength testing Using a fitted, standard hardwood handle, clamp the • blade of the shovel near the handle in a horizontal position. Gradually apply a load of 45kg and maintain it for 2 minutes. This should not result in any damage to the blade or a loosening of the handle, and no permanent set in excess of 25mm.With one centimetre of the end of the blade secured in • a clamp, move the handle back and forth 30 degrees. There should be no permanent set greater than 25mm.With the shovel held in a digging position, a piece of • wood, 37mm in diameter, is hit hard against it. The blade should not buckle or break.
Handle No chips, rough surfaces, holes or knots. Smooth, polished varnished surface. Dry, strong, and flexible wood. Handle adapted to head so that it protrudes from and blocks the other side of the head. Total length 1100mm to 1200mm.

D - Specification //
International Federation of Red Cross and Red Crescent Societies // The IFRC shelter kit / 63
AssemblyInsert the wooden handle into the blade. •Hit the handle on the end that the steel blade fits in. •If necessary, use wedges (as with the hammer) to hold the blade in. •Submerge the head in water for 20 minutes so that the wood can swell and •the handle fit the steel blade more securely.
SafetyRegularly check that the blade is soundly attached to the handle. •With a straight back, hoe towards yourself with open legs, so that •there is no risk of the blade hitting your legs.
MacheteD.3.6
Type Curved blade, 405mm/16”, lacquered against oxidation, overall length 55cm.
Blade thickness 2.5mm thick with 3 grooves that runs the full length of the blade to key in the handle.
Handle Wooden handle with 3 steel rivets plus washers.
Material Hot forged carbon steel, hardened and tempered, hardened throughout the entire blade, but remains normal past the first rivet hole.
Protection Blade packed in carton pocket for protection.
Quality of make No dent on the cutting edge.
Hardness Rockwell C 45 minimum to 50 maximum HRC near cutting edge, test 3 positions along the cutting edge.
Carbon content 0.6% to 0.65%
Manganese content 0.6% to 0.8%
Silicone 0.30% maximum
Phosphorus and Sulphur
0.03% maximum
Handle No chips, rough surfaces, holes or knots. Smooth, polished and varnished surface. Dry, strong, hardwood.
Strength testing Insert the blade in a 10mm wide slot up to a depth equal to 1/3 its blade length, but not exceeding 150mm; apply a deflection of 45° in each direction without breakage or permanent set to the blade.
MaintenanceThese machetes need to be sharpened before use. •

// D - Specification
64 / The IFRC shelter kit // International Federation of Red Cross and Red Crescent Societies
To sharpen the machete, a rounded stone can •be used. Keep the stone wet and hold the blade at a slight angle to the stone. Rub the stone against the surface of the blade with circular movements.Ideally the edge of the blade should be •sharpened daily.Do not stick the machete into the ground as this •will damage the edge of the blade.
SafetyWear strong shoes. •Ensure that feet, hands, and the rest of the body are away from the •materials to be cut. Check that there is no-one near, particularly behind you when using the •machete.Keep machetes in a protective sheath when not in use. •Take care when jumping or climbing over obstacles when carrying the •machete. The safest way to pass obstacles is to throw the machete far ahead you before jumping.KEEP AWAY FROM CHILDREN! •
ShearsD.3.7
Straight, for metal sheet, semi-hard 0.8mm maximum, 260mm long
Type Tin snips for intensive use and easy maintenance
Make Each blade and handle forged as one piece, symmetrical blades
Capacity Up to 0.8mm semi-hard iron sheet
Material Hot-forged carbon steel, hardened and tempered; special treatment applied to the blade edge
Rustproof Protected against corrosion with special paint
Dimensions Total length: 260mm ±2mm
Maintenance Dismountable in two parts only, with bolt and self-locking nut
MaintenanceThese shears only cut thin metal plate. Wires, rods and steel nails may •seriously damage the shears.Grease and tighten the turning screw periodically. •
Safety Cut with shears away from the body. •
Sharpen the blade using a small stone and circular movements

D - Specification //
International Federation of Red Cross and Red Crescent Societies // The IFRC shelter kit / 65
Hold down the metal plate well before the last cut to avoid being hurt by •sharp edges.If right-handed, cut in such a way that the part to be discarded is on the right- •hand side of the shears. Cut the other way round if left-handed.Only use your own manual strength to cut with the shears. Do not use other •means to increase the force.
Use gloves when cutting sheet metal. •Use strong sheaths to transport the shears provided. •
NailsD.3.8
Iron nails, for wood, two sizes, 75mm long (3”) and 40mm (1½”)
Type Iron nails, made of polished low-carbon steel; cold processed, not heat treated except for galvanization
Rustproof Hot dip galvanized at 300g/m2 ± 10%
Tensile strength Minimum 650N/mm2
Shape Flat, smooth, circular head; plain, round shank and diamond point
Dimensions (+/-5%) Large type – length x diameter: 75 x 3.6mm, head diameter: 7.7mm, and Small type – length x diameter: 40 x 2.2mm, head diameter: 5.5mm
The edges that have just been cut can cause injuries to the hand holding the shears. Be careful.
These shears are designed for cutting soft metal plate. Cutting rods, wires or nails may damage the blade of the shears.

// D - Specification
66 / The IFRC shelter kit // International Federation of Red Cross and Red Crescent Societies
Packing Packed in strong, thick plastic bag
Quantity Net weight: 0.5kg per type
Use There are two sizes of nail. Do not use the 75mm nails on •bamboo. Check 40mm nails do not break the bamboo before starting to build.
SafetyOld or broken nails should not be left on the ground as they can cause injury •or puncture wheels.
Tie wireD.3.9
Galvanised wire, 1.5 mm diameter, 25m length, roll
Material Low carbon steel, galvanised binding / tie wire.
Quantity Roll of 25m
Dimension Diameter 1.5mm ±5%
Tensile strength Minimum 500 N/mm² to Maximum 700N/mm²
SafetyWear gloves when using tie wire whenever possible. •Fold the ends of the wire back to reduce the risk of injury. •
Claw hammerD.3.10
A 0.75Kg carpenters hammer with head and handle. The hammer head has one flat side and one claw side
Material High-carbon steel head, treated to achieve a martensitic structure, with dressed striking faces
Quality of make Smooth surface and edges with no dents or cracks; no excess metal in the eye

D - Specification //
International Federation of Red Cross and Red Crescent Societies // The IFRC shelter kit / 67
Weight of the head 750g ±1%
Hardness Rockwell C 50 minimum to 58 maximum HRC on striking faces
Hardness Rockwell C 35 maximum HRC closed to the eye
Handle No chips, rough surfaces, holes or knots. Smooth, polished or varnished surface. Dry, strong, and flexible wood. Handle adapted to head so that it protrudes and can be blocked on other side with a metal wedge on the other side of the head. Moisture minimum 10%, maximum 15%, under ISO 3130.
Pull-apart test After two series of 25 vigorous blows with varying delivery angle, secure head in a clamp, apply a minimum traction of 50kg trying to pull the handle out. This should not damage the hammer head or the handle, and the handle should remain firmly attached to the head.
Bending test For the claw hammer only, apply a load perpendicularly to the axis of the handle and close to the end, so as to obtain a 125Nm torque, irrespective of the size of the hammer. Start the load at zero and increase gradually, without jerking. Hold the test load for at least 10s. This should not create any damage to the hammer head or handle.
MaintenanceTo fix the hammerhead to the handle, insert wedges at an oblique angle to •the axis of the hammerhead. To ensure that the hammerhead fits the handle tightly, you can •submerge the hammer in water for approximately 20 minutes.With use, the hammerhead may deteriorate creating sharp edges. •Where this happens, the hammerhead should be smoothed.
SafetyKeep hands away from bangs by the hammer, where possible. •Reduce the risk of injury by holding a nail near its head rather than near the •surface of the timber.Regularly check that the hammerhead is fixed to the handle. •Keep your eyes away from nails that are being hammered. •

// D - Specification
68 / The IFRC shelter kit // International Federation of Red Cross and Red Crescent Societies
PackagingD.3.11
Polypropylene bagTarpaulins are not packed in this bag.
Material New, woven polypropylene (PP), 80g/m² minimum, both sides coated with PE or PP
Dimensions 1300 x 400mm ±10mm
Colour White
This bag includes a copy of the content list for the shelter kit.
Carton
Each cardboard box includes two kits. Tarpaulins are packed separately.
Type Double-walled corrugated cardboard.
Reinforcement Corners reinforced with 4 double-walled, corrugated cardboard. Folded corners equal to the total height of the carton.
Dimensions 1.2 x 0.3 x 0.2m
Sealing Sealed with adhesive tape plus four heat-sealed 10mm plastic straps.
Quality Loaded cartons should withstand 2m-high stacking on pallets, and several handlings (both hand and forklift) without damage

Annexes //
International Federation of Red Cross and Red Crescent Societies // The IFRC shelter kit / 71
The IFRC shelter kithow to use
t Annex

// Annexes
72 / The IFRC shelter kit // International Federation of Red Cross and Red Crescent Societies
Sphere, shelter, settlement standards Annex 1
The Sphere initiative has developed the Humanitarian Charter and identified minimum standards to be attained in disaster assistance through a process based on consensus. The standards have been developed in each of five key sectors (water supply and sanitation, nutrition, food aid, shelter and health services). 13 The humanitarian charter and standards can be found in the sphere handbook 2004 edition. Future editions will be posted at www.sphereproject.org
Each chapter of the Sphere handbook contains several standards. Each standard is accompanied by indicators to help identify whether those standards have been met. Each standard is also accompanied by guidance notes to provide clarity.
We reproduce below the standards form the chapters which are the most relevant to the use of shelter kits.
common standards (ii.1.1) • shelter and settlement (ii.1.2) • non food items (ii.1.3) •
The Sphere handbook contains:
Standards to be attained in disaster response• Indicators that these standards have been met• Guidance notes on these standards and indicators•

Annexes //
International Federation of Red Cross and Red Crescent Societies // The IFRC shelter kit / 73
Sphere: common standardsAnnex 1.1
Common standard 1: participationThe disaster-affected population actively participates in the assessment, design, implementation, monitoring and evaluation of the assistance programme.
Common standard 2: initial assessmentAssessments provide an understanding of the disaster situation and a clear analysis of threats to life, dignity, health and livelihoods to determine, in consultation with the relevant authorities, whether an external response is required and, if so, the nature of the response.
Common standard 3: responseA humanitarian response is required in situations where the relevant authorities are unable and/or unwilling to respond to the protection and assistance needs of the population on the territory over which they have control, and when assessment and analysis indicate that these needs are unmet.
Common standard 4: targetingHumanitarian assistance or services are provided equitably and impartially, based on the vulnerability and needs of individuals or groups affected by disaster.
Common standard 5: monitoringThe effectiveness of the programme in responding to problems is identified and changes in the broader context are continually monitored, with a view to improving the programme, or to phasing it out as required.
Common standard 6: evaluationThere is a systematic and impartial examination of humanitarian action, intended to draw lessons to improve practice and policy and to enhance accountability.
Common standard 7: aid worker competencies and responsibilitiesAid workers possess appropriate qualifications, attitudes and experience to plan and effectively implement appropriate programmes.
Common standard 8: supervision, management and support of personnelAid workers receive supervision and support to ensure effective implementation of the humanitarian assistance programme.

// Annexes
74 / The IFRC shelter kit // International Federation of Red Cross and Red Crescent Societies
Sphere: shelter and settlement standardsAnnex 1.2
Shelter and settlement standard 1: strategic planningExisting shelter and settlement solutions are prioritised through the return or hosting of disaster-affected households, and the security, health, safety and well-being of the affected population are ensured.
Shelter and settlement standard 2: physical planningLocal physical planning practices are used where possible, enabling safe and secure access to and use of shelters and essential services and facilities, as well as ensuring appropriate privacy and separation between individual household shelters.
Shelter and settlement standard 3: covered living spacePeople have sufficient covered space to provide dignified accommodation. Essential household activities can be satisfactorily undertaken, and livelihood support activities can be pursued as required.
Shelter and settlement standard 4: designThe design of the shelter is acceptable to the affected population and provides sufficient thermal comfort, fresh air and protection from the climate to ensure their dignity, health, safety and well-being.
Shelter and settlement standard 5: constructionThe construction approach is in accordance with safe local building practices and maximises local livelihood opportunities.
Shelter and settlement standard 6: environmental impactThe adverse impact on the environment is minimised by the settling of the disaster-affected households, the material sourcing and construction techniques used.

Annexes //
International Federation of Red Cross and Red Crescent Societies // The IFRC shelter kit / 75
Sphere: non food items standardsAnnex 1.3
Non-food items standard 1: clothing and beddingThe people affected by the disaster have sufficient clothing, blankets and bedding to ensure their dignity, safety and well-being.
Non-food items standard 2: personal hygieneEach disaster-affected household has access to sufficient soap and other items to ensure personal hygiene, health, dignity and well-being.
Non-food items standard 3: cooking and eating utensilsEach disaster-affected household has access to cooking and eating utensils.
Non-food items standard 4: stoves, fuel and lightingEach disaster-affected household has access to communal cooking facilities or a stove and an accessible supply of fuel for cooking needs and to provide thermal comfort. Each household also has access to appropriate means of providing sustainable artificial lighting to ensure personal security.
Non-food items standard 5: tools and equipmentEach disaster-affected household responsible for the construction or maintenance and safe use of their shelter has access to the necessary tools and equipment.

// Annexes
76 / The IFRC shelter kit // International Federation of Red Cross and Red Crescent Societies
Further readingAnnex 2
1 Harvey, P. Excreta disposal in emergencies: A field manual, WEDC, Loughborough University, UK, 2007.Practical manual on the disposal of excreta, including the building of latrines.
2 http://www.humanitarianbamboo.org Website containing guidance (under development) and information on the sourcing and use of bamboo for use in humanitarian respons-es.
3 IASC Emergency shelter cluster, Shelter Centre, Selecting NFIs for shelter, 2008. Provides information, case studies and guidance on how to choose the best items to distribute to those affected by natural disaster or conflict www.shelterlibrary.org
4 ICRC/IFRC Guidelines for cash transfer programming, 2007 Provides information on when and how to distribute cash in disaster response From http://www.ifrc.org
5 IFRC/ICRC Emergency relief items catalogue Detailed specifications of all items commonly used by IFRC and ICRC http://procurement.ifrc.org/catalogue/
6 IFRC, Guidelines for assessment in emergencies, 2008. Practical information and guidance on how to conduct assessments in emergencies From: http://www.ifrc.org
7 IFRC Logistics standards onlineIFRC logistics procedures, forms and manualshttps://fednet.ifrc.org/logisticsstandards/home.asp
8 IFRC Mission assistance, 2008, CD-ROMIFRC procedures, forms and manuals
9 IFRC, Oxfam GB, Plastic sheeting, A guide to the use and specification of plastic sheeting in humanitar-ian relief, 2007 An illustrated booklet on when and how to use plastic sheeting most effectively in emergencies www.plastic-sheeting.org

Annexes //
International Federation of Red Cross and Red Crescent Societies // The IFRC shelter kit / 77
10 IFRC, IFRC shelter kit training package, 2009
The Shelter Department of IFRC has finalised a training package. (available in English, French or Spanish) Contact country, regional or zonal offices.
11 IFRC, IFRC warehouse manual 2008Practical information and guidance on how to manage a warehouse and properly stock relief itemshttps://fednet.ifrc.org/logisticsstandards/home.asp
12 Sheltercentre, Médecins Sans Frontières Belgium, Shade nets: use, deployment and procurement of shade netting in humanitarian relief environments, 2006 An illustrated booklet on when to use, how to specify and how to use shade net www.shelterlibrary.org
13 Sheltercentre, UN/OCHA, Transitional settlement and reconstruction after natural disasters, 2009 A book containing information and guidance on how to agree strate-gies for reconstruction after natural disasters. Contains description of the types of shelter programmes that organisations can implement. www.shelterlibrary.org
14 Sphere Project, Humanitarian charter and minimum standards in humanitarian response, 2004 Contains standards, guidance and indicators as to whether stand-ards have been achieved for all humanitarian responses.www.sphereproject.org
15 UN/OCHA, Tents, A guide to the use and logistics of tents in humanitarian relief, 2004 A booklet describing when and how to use tents as well how to sup-port those living in them to best adapt them to meet their needs www.shelterlibrary.org
16 UN/OCHA / IFRC / CARE International, Timber as a construction material in humanitarian operations, 2009, An illustrated booklet on how to source and use timber for the con-struction of basic structures. www.humanitariantimber.org

// Annexes
78 / The IFRC shelter kit // International Federation of Red Cross and Red Crescent Societies

The Fundamental Principles of the International Red Cross and Red Crescent Movement
HumanityThe International Red Cross and Red Crescent Movement, born of a desire to bring assistance without discrimination to the wounded on the battlefield, endeavours, in its international and national capacity, to prevent and alleviate human suffering wherever it may be found. Its purpose is to protect life and health and to ensure respect for the human being. It promotes mutual understanding, friendship, cooperation and lasting peace amongst all peoples.
ImpartialityIt makes no discrimination as to nationality, race, religious beliefs, class or political opinions. It endeavours to relieve the suffering of individuals, being guided solely by their needs, and to give priority to the most urgent cases of distress.
NeutralityIn order to enjoy the confidence of all, the Movement may not take sides in hostilities or engage at any time in controversies of a political, racial, religious or ideological nature.
IndependenceThe Movement is independent. The National Societies, while auxiliaries in the humanitarian services of their governments and subject to the laws of their respective countries, must always maintain their autonomy so that they may be able at all times to act in accordance with the principles of the Movement.
Voluntary serviceIt is a voluntary relief movement not prompted in any manner by desire for gain.
UnityThere can be only one Red Cross or Red Crescent Society in any one country. It must be open to all. It must carry on its humanitarian work throughout its territory.
UniversalityThe International Red Cross and Red Crescent Movement, in which all societies have equal status and share equal responsibilities and duties in helping each other, is worldwide.

1718
00
01/
2010
E 2
,00
0
The International Federation of Red Cross and Red Crescent Societies promotes the humanitarian activities of National Societies among vulnerable people.
By coordinating international disaster relief and encouraging development support it seeks to prevent and alleviate human suffering.
The International Federation, the National Societies and the International Committee of the Red Cross together constitute the International Red Cross and Red Crescent Movement.
Our world is in a mess. It’s time to make your move. ourworld-yourmove.org


