28
www.whirlpool.com JT469

1GB
www.whirlpool.com
JT469
2 GB
INDEXINSTALLATION 3 Installation
SAFETY 4 Important safety instructions 5 Trouble shooting guide 6 Precautions
ACCESSORIES AND MAINTENANCE 7 Accessories 8 Maintenance & Cleaning
CONTROL PANEL 9 Control Panel
GENERAL USE 10 Stand-by Mode 10 Start Protection / Child Lock 10 Pause or Stop cooking 11 Add/stir/turn food 11 Set Clock 12 Stop Turntable 12 Timer
COOKING FUNCTION 13 Microwave 14 Jet Start 14 Grill 15 Crisp 16 Forced Air 17 6th Sense Reheat 18 6th Sense Defrost 19 6th Sense Steam 20 Combi Grill + Microwave 21 Combi Forced Air + Microwave 22 6th Sense Bread Defrost 23 6th Sense Menu (Automatic recipes) ENVIRONMENTAL HINTS 28 Environmental Hints 28 Technical Specifications
3GB
Position the oven at a distance from other heating sources. For sufficient venti-lation there must be a space of at least 30 cm above the oven.
INSTALLATIONPRIOR TO CONNECTING
The microwave oven shall not be placed in a cabinet. This oven is not intended to be placed or used on a working surface lower than 850 mm above the floor.
Check that the voltage on the rating plate corresponds to the voltage in your home.
Do not remove the microwave inlet protection plates located on the side of the oven cavity wall. They prevent grease & food particles from entering the microwave inlet channels.Place the oven on a stable, even surface that is strong enough to hold the oven and the food utensils you put in it. Use care when handling.
Ensure that the space underneath, above and around the oven is empty to allow for proper airflow.
Ensure that the appliance is not damaged. Check that the oven door closes firmly against the door support and that the internal door seal is not damaged. Empty the oven and clean the interior with a soft, damp cloth.
Do not operate this appliance if it has a damaged mains cord or plug, if it is not working properly, or if it has been damaged or dropped. Do not immerse the mains cord or plug in water. Keep the cord away from hot sur-faces. Electrical shock, fire or other hazards may result.
Do not use extension cord: If the power supply cord is too short, have a qualified electrician or serviceman install an outlet near the appli-ance.
WARNING: Improper use of the grounding plug can result in a risk of electric shock. Consult a qualified electri-cian or serviceman if the grounding instructions are not completely understood, or if doubt exists as to whether the microwave oven is properly grounded.
AFTER CONNECTING
The oven can be operated only if the oven door is firmly closed.Poor television reception and radio interference may result if the oven is located close to a TV, radio or aerial.
The earthing of this appliance is compulsory. The manufacturer will accept no responsibility for injury to per-sons, animals or damage to objects arising from the non-observance of this requirement.
The manufacturers are not liable for any problems caused by the user’s failure to observe these instructions.

4 GB
IMPORTANT SAFETY INSTRUCTIONS
READ CAREFULLY AND KEEP FOR FUTURE REFERENCE
If material inside / outside the oven should ignite or smoke is emitted, keep oven door closed and turn the oven off. Disconnect the power cord or shut off power at the fuse or circuit breaker panel.
Do not leave the oven unattended, especially when using paper, plastic or oth-er combustible materials in the cooking process. Paper can char or burn and some plastics can melt if used when heating foods.
WARNING: The appliance and its accessible parts become hot during use.Care should be taken to avoid touching heating elments inside the oven.Children less then 8 years of age shall be kept away unless continuously su-pervised.The Microwave oven is intended for heating food and beverages. Drying of food or clothing and heating of warming pads, slippers, sponges, damp cloth and similar may lead to risk of injury, ignition or fire.
This appliance can be used by children aged from 8 years and above and persons with reduced physical, sensory or mental capabilities or lack of ex-perience and knowledge if they have been given supervision or instruction concerning use of the appliance in a safe way and understand the hazards in-volved. Cleanning and user maintenance shall not be made by children unless they are aged from 8 years and above and supervised. Children should be supervised to ensure that they do not play with the ap-pliance. Keep the appliance and its cord out of reach of children less than 8 years.
WARNING: Do not use your microwave oven for heating anything in airtight sealed containers. The pressure increases and may cause damage when opening or may explode.
WARNING: The door seals and the door seal areas must be regularly inspect-ed for damage. If these areas are damaged the appliance should not be oper-ated until it has been repaired by a trained service technician.
Do not use your microwave oven for cooking or reheating whole eggs with or without shell since they may explode even after microwave heating has ended.

5GB
IMPORTANT SAFETY INSTRUCTIONS
The appliances are not intended to be operated by means of an external timer or separate remote-control system.
Do not leave the oven unattended if you are using a lot of fat or oil since they can overheat and cause a fire!
Do not heat, or use flammable materials in or near the oven. Fumes can create a fire hazard or explosion.
Do not use your microwave oven for drying textiles, paper, spices, herbs, wood, flowers or other combustible materials. Fire could result.
Do not use corrosive chemicals or vapors in this appliance. This type of oven is specifically designed to heat or cook food. It is not designed for industrial or laboratory use.
Do not hang or place heavy items on the door as this can damage the oven opening and hinges. The door han-dle should not be used for hanging things on.
TROUBLE SHOOTING GUIDE
If the mains cord needs replacing it should be replaced by the original mains cord, which is available via our service organization. The mains cord must only be replaced by a trained service technician.
WARNING: Service only to be carried out by a trained service technician. It is hazardous for anyone other than a trained person to carry out any service or repair operation, Which involves the removal of any cover, which gives protec-tion against exposure to microwave energy.Do not remove any cover.
If the oven does not work, do not make a service call until you have made the following checks:• The Glass turntable and turntable support is in place. • The Plug is properly inserted in the wall socket.• The Door is properly closed.• Check your Fuses and ensure that there is power available.• Check that the oven has ample ventilation.• Wait for 10 minutes, then try to operate the oven once more.• Open and then close the door before you try again.This is to avoid unnecessary calls for which you will be charged. When calling for Service, please give the serial number and type number of the oven (see Service label). Con-sult your warranty booklet for further advice.
6 GB
PRECAUTIONSGENERAL
This appliance is designed for domestic use only! The appliance should not be operated without food in the oven when using microwaves. Operation in this man-ner is likely to damage the appliance.
The ventilation openings on the oven must not be covered. Blocking the air intake or exhaust vents may cause damage to the oven and poor cooking results.
If you practice operating the oven, put a glass of water inside. The water will absorb the microwave energy and the oven will not be damaged.
Do not store or use this appliance outdoors.
Do not use this product near a kitchen sink, in a wet basement, or near a swimming pool, or similar.
Do not use the cavity for any storage purposes.
Remove wire twist-ties from paper or plastic bags before placing bag in the oven.
Do not use your microwave oven for deep-frying, because the oil temperature cannot be controlled.
Use hot pads or oven mitts to prevent burns, when touching containers, oven parts, and pan after cooking.
LIQUIDS
e.g. beverages or water. Overheating the liquid beyond boiling point can oc-cur without evidence of bubbling. This could result in a sudden boil over of the hot iquid.To prevent this possibility the following steps should be taken:
1. Avoid using straight-sided containers with narrow necks.2. Stir the liquid before placing the container in the oven and let the teaspoon remain in the container.3. After heating, allow standing for a short time, stirring again before carefully removing the container from
the oven.
CAREFUL
After heating baby food or liquids in a baby bottle or in a baby food jar, always stir and check the temperature before serving. This will ensure that the heat is evenly distributed and the risk of scalding or burns can be avoided.Always refer to a microwave cookbook for details. Especially, if cooking or reheating food that contains alcohol.Ensure the Lid and the Teat is removed before heating!

7GB
ACCESSORIESGENERAL
There are a number of accessories available on the market. Before you buy, ensure they are suitable for microwave use.Ensure that the utensils you use are oven proof and allow microwaves to pass through them before cooking.
When you put food and accessories in the microwave oven, ensure that they do not come in contact with the in-terior of the oven. This is especially important with accessories made of metal or metal parts.
If accessories containing metal comes in contact with the oven interior, while the oven is in operation, sparking can occur and the oven could be damaged.
Always ensure that the turntable is able to turn freely before starting the oven. If the turntable isn’t able to turn freely you should use a smaller vessel or the Stop turntable function (see Large vessels).
Turntable SupportUse the Turntable Support under the Glass Turntable. Never put any other utensils on the Turnta-ble Support.• Fit the Turntable Support in the oven.Glass TurntableUse the Glass Turntable with all cooking methods. It collects the dripping juices and food particles that other-wise would stain and soil the interior of the oven.• Place the Glass Turntable on the Turntable Support.
Lid
Middle Grid
Bottom
STEAMERTo steam cook food using the dedicated function (STEAM). Place the food on the middle grid when cooking food as fish and vegetables. Do not use the middle grid when cooking food as pasta, rice or beans. Always place the Steamer on the Glass Turntable.
WIRE RACKUse the high Wire Rack when cooking with Grill or Combi grill+Microwaves.Use the low Wire Rack when cooking with Forced Air or Combi Forced Air+Microwaves.
CRISP PLATEPlace the food directly on the Crisp Plate. The Crisp Plate may be preheated before use (max. 3 min.). Always use the Glass Turntable as support when using the Crisp Plate.Do not place any utensils on the Crisp Plate since it will quickly become very hot and is likely to cause damage to the utensil.
CRISP HANDLEUse the Crisp Handle to remove the hot Crisp Plate from the oven.
BAKING PLATE (accessory sold separately)Use the Baking Plate when cooking in Forced Air only. Never use it in combination with microwaves.• Place the Baking Plate on the Baking Plate runner in the cavity.
PLATE COVER (accessory sold separately)The Cover is used to cover food during cooking and reheating with microwaves only and helps to reduce spattering, retain food moisture as well as reducing the time needed. USE the cover for two level reheating.

8 GB
MAINTENANCE & CLEANING
Cleaning is the only maintenance normally required. It must be carried out with the microwave oven discon-nected.
Failure to maintain the oven in a clean condition could lead to deterioration of the surface that could adversely affect the life of the appliance and possibly result in a hazardous situation.Do not use metal scouring pads, abrasive cleansers, steel-wool pads, gritty washcloths, etc. which can damage the control panel, and the interior and ex-terior oven surfaces. Use a cloth with a mild detergent or a paper towel with spray glass cleaner. Apply spray glass cleaner to a paper towel.
Do not spray directly on the oven.
At regular intervals, especially if spill overs have occurred, remove the turnta-ble, the turntable support and wipe the base of the oven clean.
This oven is designed to operate with the glass turntable in place.
Do not allow grease or food particles to build up around the door.For stubborn stains, boil a cup of water in the oven for 2 or 3 minutes. Steam will soften the marks.
Adding some lemon juice to a cup of water, placing this on the glass turntable and boiling for a few minutes can eliminate odors inside the oven.
Do not use steam cleaning appliances when cleaning your microwave oven.
The oven should be cleaned regularly and any food deposits removed.
The Grill element does not need cleaning since the intense heat will burn off any splashes, but the ceiling be-neath it may need regular cleaning. This should be done with a soft and damp cloth with mild detergent.
If the Grill is not used regularly, it should be run for 10 minutes a month to burn off any splashes, in order to re-duce the risk of fire.
CAREFUL CLEANING:
The Crisp Plate should be cleaned in mild, detergent water. Heavily soiled areas can be cleaned with a scour-ing cloth and a mild cleanser.Always let the Crisp Plate cool off before cleaning.
Do not immerse or rinse with water while the crisp-plate is hot. Quick cooling may damage it.
Do not use steel-wool pads. This will scratch the surface.
DISHWASHER SAFE: • Turntable support • Wire rack • Crisp handle • Glass turntable • Steamer • Baking plate (accessory sold separately)
Use a soft and damp cloth with mild detergent to clean the interior surfaces, front and rear of the door and the door opening.
Do not operate the microwave oven when the glass turntable has been removed for cleaning.

9GB
CONT
ROL
PANE
L
STO
P BU
TTO
N
Pres
s to
sto
p or
rese
t any
of t
he o
ven
func
tions
.
MIC
RO
WAV
E BU
TTO
N
Use
to s
elec
t Mic
row
ave
func
tion.
GR
ILL
BUTT
ON
Use
to s
elec
t Gril
l fun
ctio
n.
CR
ISP
BUTT
ON
Use
to s
elec
t 6th s
ense
Cris
p fu
nctio
n.
FOR
CED
AIR
BU
TTO
N
Use
to s
elec
t For
ced
Air
func
tion.
REH
EAT
BU
TTO
N
Use
to s
elec
t 6th S
ense
Reh
eat f
unct
ion.
DEF
RO
ST B
UTT
ON
Use
to s
elec
t 6th S
ense
Def
rost
func
tion.
STE
AM
BU
TTO
N
Use
to s
elec
t 6th S
ense
Ste
am fu
nctio
n.
STO
P TU
RN
TABL
E BU
TTO
N
Use
this
func
tion
whe
n yo
u ne
eded
to u
se
V ery
larg
e ve
ssel
s th
at c
ould
not
turn
free
ly in
th
e ov
en. I
t wor
ks o
nly
with
the
follo
win
g co
okin
g fu
nctio
ns:
• F
orce
d A
ir
• Com
bi G
rill +
Mic
row
ave
• C
ombi
For
ced
Air
+ M
icro
wav
e.
BRE
AD
DEF
RO
ST B
UTT
ON
U
se to
sel
ect 6
th S
ense
Bre
ad D
efro
st fu
nctio
n.
TIM
ER B
UTT
ON
U
se to
set
the
kitc
hen
timer
.
DIG
ITA
L D
ISPL
AY
The
disp
lay
incl
udes
a 2
4-ho
ur c
lock
and
in
dica
tor s
ymbo
ls.
JET
STA
RT
BUTT
ON
Pr
oduc
t ON
: con
firm
the
cook
ing
para
met
er
and
then
sta
rt th
e co
okin
g pr
oces
s.Pr
oduc
t OFF
: act
ivat
e th
e Je
t Sta
rt fu
nctio
n.
CO
MBI
BU
TTO
N
Use
to s
elec
t Com
bi G
rill +
Mic
row
ave
/ Com
bi
Fan
+ M
icro
wav
e fu
nctio
ns.
CO
NFI
RM
ATIO
N B
UTT
ON
Prod
uct O
N: c
onfir
m th
e co
okin
g pa
ram
eter
an
d th
en s
tart
the
cook
ing
proc
ess.
Prod
uct O
FF: a
ctiv
ate
the
Jet S
tart
func
tion.
RO
TATI
NG
KN
OB
Acco
rdin
g to
the
diffe
rent
func
tions
, tu
rn to
sel
ect:
•M
icro
wav
e po
wer
leve
l
•Coo
king
tim
e
•Wei
ght
•T
empe
ratu
re
•Foo
d ty
pe/c
ateg
ory
6TH S
ENSE
MEN
U B
UTT
ON
Use
to a
cces
s th
e au
tom
atic
reci
pes.

10 GB
START PROTECTION / CHILD LOCK
This automatic safety function is activated one min-ute after the oven has returned to “stand by mode“. (see Stand-By Mode chapter for more details).
When the safety function is active the door must be opened and closed in order to start the cooking, oth-erwise the display will show “door”.
Door
PAUSE OR STOP COOKING
To pause cooking:The cooking can be paused to check, turn or stir the food by opening the door. The setting will be main-tained for 10 minutes.
To continue cooking:Close the door and press the Jet Start or Confirma-tion Button ONCE. The cooking is resumed from where it was paused.
If you don’t want to continue cooking you can:Remove the food, close the door and press the STOP Button.When the cooking is finished:A beep will signal once a minute for 10 minutes when the cooking is finished. Press the STOP Button or open the door to cancel the signal.
Note: The oven will only hold the settings for 60 sec onds if the door is opened and then closed after the cooking is finished.
STAND-BY MODE
After the pressure of the Stop Button, or if the user does not interact with the product for a certain time, the oven enters Stand-By mode.When the product is in Stand-By, the display shows the clock time (or it shows blank if the clock has not been set. See the Clock chapter to discover how to set the clock). Turn the Rotating Knob or press any button to exit Stand-By mode.

11GB
Depending on the selected function, it could be needed to add / stir / turn food during cooking. In these cases the oven will pause cooking and it will ask you to perform the needed action.When required, you should: Open the door.
Add, Stir or Turn the food (depending on the required action).
Close the door and restart by pressing the Confirmation Button / Jet Start button.
Notes: - If the door is not opened within 2 minutes since the request to Add some food, the oven will go in Stand-by mode. - If the door is not opened within 2 minutes since the request to Stir ot Turn the food, the oven will continue the cooking process (in this case the final results may not be the optimal ones).
ADD/ STIR/ TURN FOODi
CLOCK
The first time the oven is plugged in, or after a power failure, the product will enter clock setting. If the clock is not set, the display will shows blank instead of the clock.You can also set the clock at any time: just keep pressed for a few seconds the Timer Button when the product is in Stand-By mode (see Stand-By Mode chapter).
The hours digits blink. Turn the Rotating Knob to set the hours.
Press Confirmation Button: the minutes digite start blinking.
Turn the Rotating Knob to set the minutes.
Press the Confirmation Button again.
The clock is set and in operation.
If STOP is pressed in clock setting mode, the clock will be disabled the display shows blank.

12 GB
TIMER
Use this function when you need a kitchen timer to measure exact time for various purposes such as letting the dough rise before baking etc.Note that the Kitchen Timer does NOT activate any cooking cycle.
With the product is in Stand-By Mode (see Stand-By Mode chapter), press the Timer Button.
Turn the Rotating Knob to set the minutes to measure.
Press the Confirmation Button / Timer Button. The function will start.
An acoustic signal will be heard when the timer has finished to count down.
Note: after the timer has been started, it is possible to start a cooking function. In this case, pressing the Timer Button the display will show for a few seconds the remaining time of the Timer function.
STOP TURNTABLE
To get the best possible results, the Glass Turntable has to rotate while cooking.Anyhow, in case you need to use very large vessels that could not turn freely in the oven, it is possible to stop the rotation of the Glass Turntable using the Stop Turntable function. This function works only with the following cooking functions:- Forced Air- Combi Grill + Microwave- Combi Forced Air + Microwave

13GB
MICROWAVE
Microwave function allows to quickly cook or reheat food and beverages.
ONCE THE COOKING PROCESS HAS BEEN STARTED :To adjust the power: press the Microwave Button and rotate the Rotating Knob to adjust value.To increase time/decrease time: turn the Rotating Knob, or press Jet Start Button /Confirmation Button to in-crease the cooking time of 30 seconds.
Press the Microwave Button .
Turn the Rotating Knob to set the power (see the table below).
Press the Confirmation Button.
Turn the Rotating Knob to set the time.
Press the Confirmation Button/Jet Start Button. The function will start.
Suggested accessory:
Plate Cover (sold separately)
POWER SUGGESTED USE:
950 W Reheating of beverages, water, clear soups, coffee, tea or other food with a high water content. If the food contains egg or cream choose a lower power.
750 W Cooking of fish, meat, vegetables etc.
650 W Cooking dishes, not possible to stir.
500 WMore careful cooking e.g. high protein sauces, cheese and egg dishes and to finish cooking casse-roles.
350 W Simmering stews, melting butter.
160 W Defrosting.
90 W Softening butter, cheeses, ice cream and chocolate.

14 GB
This function is used for quick reheating of food with a high water content such as clear soups, coffee or tea.
JET START
Press the Jet Start Button.
Press the Grill Button .
Turn the Rotating Knob to set the time.
Press the Confirmation Button/Jet Start Button. The function will start.
• For food like cheese, toast, steaks and sausages, place food on the high Wire Rack.• Ensure that the utensils used are heat resistant when you use this function.• Do not use plastic utensils when grilling. They will melt. Items of wood or paper are not suitable either.• Be careful, not to touch the ceiling beneath the grill element.
Tips and suggestions:
Pressing the Jet Start Button the Microwave function will start at maximum power for 30 seconds, and each additional pressure of the Jet Start Button will increase the cooking time of 30 seconds.After the function has started, you can also use the Rotating Knob to increase or decrease the cooking time.
This function uses a powerful quartz grill to brown foods, creating a grill or a gratin effect.Grill function allows to brown foods like cheese toast, hot sandwiches, potato croquettes, sausages, vegetables.
GRILL
Dedicated accessory: High Rack
15GB
CRISP
Dedicated accessories:
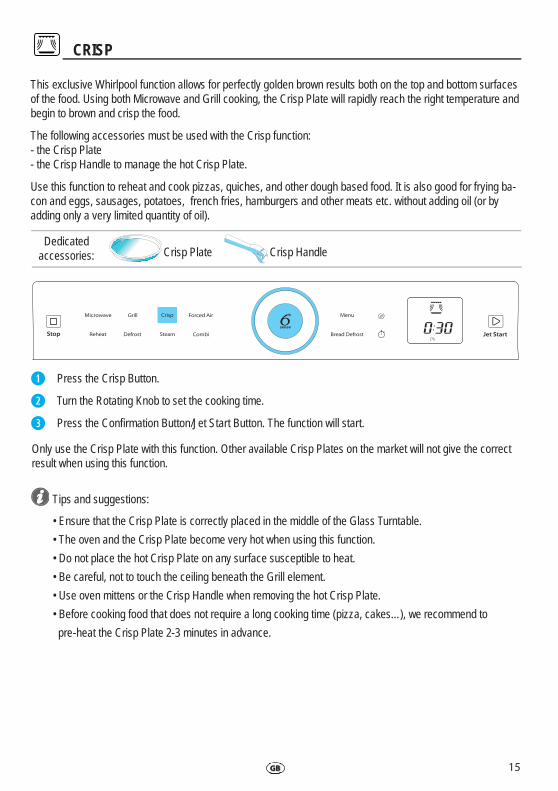
This exclusive Whirlpool function allows for perfectly golden brown results both on the top and bottom surfaces of the food. Using both Microwave and Grill cooking, the Crisp Plate will rapidly reach the right temperature and begin to brown and crisp the food.
The following accessories must be used with the Crisp function:- the Crisp Plate- the Crisp Handle to manage the hot Crisp Plate.
Use this function to reheat and cook pizzas, quiches, and other dough based food. It is also good for frying ba-con and eggs, sausages, potatoes, french fries, hamburgers and other meats etc. without adding oil (or by adding only a very limited quantity of oil).
Crisp Plate Crisp Handle
Press the Crisp Button .
Turn the Rotating Knob to set the cooking time.
Press the Confirmation Button/Jet Start Button. The function will start.
Only use the Crisp Plate with this function. Other available Crisp Plates on the market will not give the correct result when using this function.
• Ensure that the Crisp Plate is correctly placed in the middle of the Glass Turntable.
• The oven and the Crisp Plate become very hot when using this function.
• Do not place the hot Crisp Plate on any surface susceptible to heat.
• Be careful, not to touch the ceiling beneath the Grill element.
• Use oven mittens or the Crisp Handle when removing the hot Crisp Plate.
• Before cooking food that does not require a long cooking time (pizza, cakes…), we recommend to
pre-heat the Crisp Plate 2-3 minutes in advance.
Tips and suggestions:

16 GB
1: WHIT PREHEAT:
Press the Forced Air Button .
Turn the Rotating Knob to set the temperature and press the Confirmation Button to confirm.
The display will show the text “Pre” (Preheat): pressing the Confirmation Button you will start the Pre-heat cycle (the display will show the text “Pre-Heat). When the temperature has been reached, a mes-sage informs you to add the food.
Insert the food, then turn the Rotating Knob to set the time.
Press the Confirmation Button/Jet Start Button. The function will start.
2: WITHOUT PREHEAT:
Press the Forced Air Button .
Turn the Rotating Knob to set the temperature and press the Confirmation Button to confirm.
The display will show the text “Pre” (Preheat): to skip the Preheat cycle do NOT press the Confirma-tion Button, and just turn the Rotating Knob to set the cooking time.
Press the Confirmation Button/Jet Start Button. The function will start..
ONCE THE COOKING PROCESS HAS BEEN STARTED: To adjust the temperature: press the Forced air Button and rotate the Rotating Knob to adjust value.To increase time/decrease time: rotate the Rotating Knob, or press Jet Start /Confirmation Button to increase the cooking time of 30 seconds.
• Use the low Wire rack to put food on to allow the air to circulate properly around the food.
• Ensure that the utensils used are ovenproof when you use this function.
• Use the Crisp Plate as a baking plate when you bake small items like cookies and muffins. Place the plate on the low wire rack.
Tips and suggestions:
Dedicated accessory:
This function allows you to obtain oven-baked dishes. Using a powerful heat element and fan, the cooking cy-cle is just like that of a traditional oven. Use this function to cook meringues, pastry, cakes, soufflés, poultry and roast meats.It is possible to use the Forced Air function with or without a Preheat phase. The Preheat phase use both the fan and the Grill to quickly preheat the oven before you start cooking, to achieve the best possible cooking re-sults.
Low Rack
FORCED AIR

17GB
Press the 6th Sense Reheat Button. The text “Heat” will appear on the display.
Press the Confirmation Button/Jet Start Button. The function will start.
This function allows you to automatically reheat your dishes. The microwave will automatically calculate the needed microwave power level and time to get the best possible result in the shortest timeUse this function to reheat ready-made food either frozen, chilled or at room temperature..Place food onto a microwave safe and heatproof dinner plate or dish.
6TH SENSE REHEAT
Suggested accessory:
• The net weight shall be kept within 250g - 600g when using this function.
• Ensure the oven is at room temperature before using this function in order to obtain the best result.
• Arrange the thicker, denser food to the outside of the plate and the thinner or less dense food in the middle.
• Place thin slices of meat on top of each other or interlace them.
• Thicker slices such as meat loaf and sausages have to be placed close to each other.
• Waiting 1-2 minutes before serving the reheated food will improves the results, especially for frozen food.
• Plastic foil should be scored or pricked with a fork, to relieve the pressure and to prevent bursting, as steam builds-up during cooking.
Tips and suggestions:
Plate Cover (sold separately)
18 GB
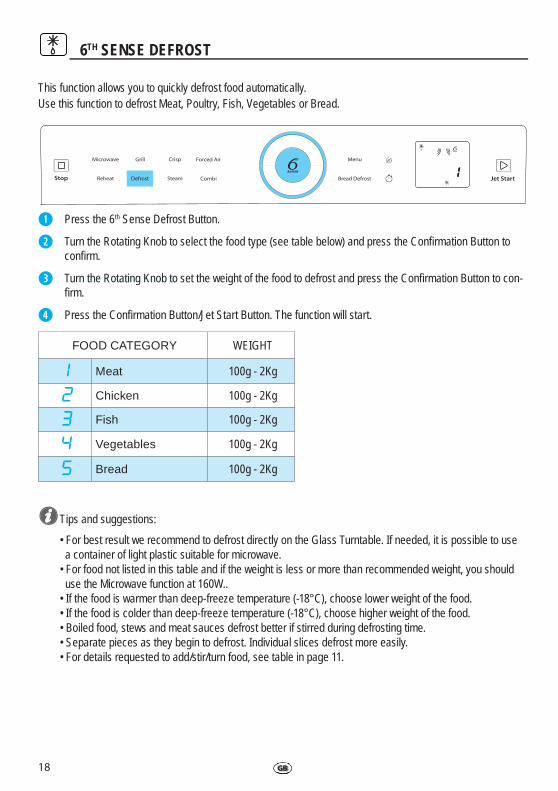
This function allows you to quickly defrost food automatically. Use this function to defrost Meat, Poultry, Fish, Vegetables or Bread.
Press the 6th Sense Defrost Button .
Turn the Rotating Knob to select the food type (see table below) and press the Confirmation Button to confirm.
Turn the Rotating Knob to set the weight of the food to defrost and press the Confirmation Button to con-firm.
Press the Confirmation Button/Jet Start Button. The function will start.
6TH SENSE DEFROST
FOOD CATEGORY WEIGHT
1 Meat 100g - 2Kg
2 Chicken 100g - 2Kg
3 Fish 100g - 2Kg
4 Vegetables 100g - 2Kg
5 Bread 100g - 2Kg
• For best result we recommend to defrost directly on the Glass Turntable. If needed, it is possible to use a container of light plastic suitable for microwave.• For food not listed in this table and if the weight is less or more than recommended weight, you should use the Microwave function at 160W..• If the food is warmer than deep-freeze temperature (-18°C), choose lower weight of the food.• If the food is colder than deep-freeze temperature (-18°C), choose higher weight of the food.• Boiled food, stews and meat sauces defrost better if stirred during defrosting time.• Separate pieces as they begin to defrost. Individual slices defrost more easily.• For details requested to add/stir/turn food, see table in page 11.
Tips and suggestions:

19GB
Press the 6th Sense Steam Button.
Turn the Rotating Knob to set the cooking time.(If time is not set, the program will only run to boiling point before switching off).
Press the Confirmation Button/Jet Start Button. The function will start.
Lid
Middle Grid
Bottom
Dedicated accessory:
This function allows you to obtain healthy and natural tasting dishes by cooking with steam. Use this function to steam cook foods such as vegetables and fish. The provided steamer accessory must always be used with this function. This function works in 2 phase. • The first phase quickly brings the water to boiling temperature. • The second phase automatically adjusts to simmering temperature in order to avoid over boiling. The display will show the steam time and count down at this step.
6TH SENSE STEAM
Steamer
Cooking vegetables:Place the vegetables on the middle grid. Pour 50-100 ml water into the bottom part. Cover with the lid and set the time. Soft vegetables such as broccoli and leek require 2-3 minutes cooking time. Harder vegetables such as carrots and potatoes require 4-5 minutes cooking time.
Cooking fish:Pour water up to the “Steam” level inside the bottom (base) of the steamer (about 100ml). Put the fish on the middle grid, cover with the lid and set the cooking time..
• The steamer is designed to be used with microwaves only!
• Never use the steamer with any other function at all. Using the steamer in any other function may cause
damage.
• Always place the steamer on the Glass Turntable.
Tips and suggestions:

20 GB
Press the Combi Button .
The display will show the number “1”, corresponding to the Combi Grill + Microwave function. Press the
Confirmation Button.
Turn the Rotating Knob to set the power (see the table below) and press the Confirmation Button.
Turn the Rotating Knob to set the time.
Press the Confirmation Button/Jet Start Button. The function will start.
High Rack
This function combines Microwave and Grill heating, allowing you to cook au gratin in less time.
COMBI GRILL + MICROWAVE
Dedicated accessory:
ONCE THE COOKING PROCESS HAS BEEN STARTED :To adjust the Microwave power: press the Microwave Button and turn the Rotating Knob to adjust value.To increase time/decrease time: turn the Rotating Knob, or press Jet Start Button /Confirmation Button to in-crease the cooking time of 30 seconds.
POWER LEVEL
SUGGESTED USE:
650 W Vegetables
500 W Poultry & Lasagne
350 W Fish
160 W Meat
90 W Gratined fruit
• Do not leave the oven door open for long periods when the Grill is in operation, as this will cause a drop in temperature.• If you cook large gratins which require stopped turntable rotation, then turn the dish after approximately half the cooking time. This is necessary for getting colour on the whole top surface. • Ensure that the utensils used are microwave safe and heat resistant when you use this function.• Do not use plastic utensils when grilling. They will melt. Items of wood or paper are not suitable either.• Be careful, not to touch the ceiling beneath the grill element.
Tips and suggestions:

21GB
Power Suggested use:
350 WCooking Poultry, Jacket potatoes, La-sagne & Fish
160 W Cooking Roast meat & Fruit cakes
90 W Cooking Cakes & Pastry
Press the Combi Button .
The display will show the number “1”, corresponding to the Combi Grill + Microwave function. Turn the Rotating Knob to select the number “2”, corresponding to the Combi Forced Air + Microwave function, then press the Confirmation Button.
Turn the Rotating Knob to set the temperature and press the Confirmation Button.
Turn the Rotating Knob to set the power (see the table below) and press the Confirmation Button.
Turn the Rotating Knob to set the time.
Press the Confirmation Button/Jet Start Button. The function will start.
ONCE THE COOKING PROCESS HAS BEEN STARTED :To adjust the temperature/power: press the Forced Air Button and turn the Rotating Knob to adjust value.To increase time/decrease time: turn the Rotating Knob, or press Jet Start /Confirmation Button to increase the
cooking time of 30 seconds.
• Use the low Wire rack to put food on to allow the air to circulate properly around the food.• Ensure that the utensils used are microwave safe and ovenproof when you use this function.
Tips and suggestions:
This function combines Microwave and Forced Air cooking, allowing you to prepare oven-baked dishes in less time. Combi Forced Air + Microwave allows you to cook dishes like roast meat, poultry, jacket potatoes, precooked frozen foods, fish, cakes and pastry.
Low Rack
COMBI FORCED AIR + MICROWAVE
Dedicated accessory:

22 GB
Insert the empty Crisp Plate and press the Bread Defrost button.
Turn the Rotating Knob to select the weight of the bread to defrost.
Press Confirmation Button. Press the Confirmation Button. The Preheat cycle will start, and the display will show the text “Pre-Heat”. When the temperature has been reached, the display will show the text “Add Food” to inform you that you have to insert the bread to defrost. Place the bread on the preheated
Crisp Plate.
Press the Confirmation Button/Jet Start Button. The function will start.
Tips and suggestions:
• Ensure that the Crisp Plate is correctly placed in the middle of the Glass turntable.
• The oven and the Crisp Plate become very hot when using this function.
• Do not place the hot Crisp Plate on any surface susceptible to heat.
• Use oven mittens or the Crisp handle when removing the hot Crisp Plate.
• Only use the supplied Crisp Plate with this function. Other available Crisp Plates on the market will not give the correct result when using this function.
• For details requested to add/stir/turn food, see table in page 11.
Dedicated accessories:
This exclusive Whirlpool function allows you to defrost frozen bread. Combining both Defrost and Crisp technol-ogies, your bread will taste and feel as if it were freshly baked.Use this function to quickly defrost and heat frozen rolls, baguettes & croissants. 6th Sense Bread Defrost can be used if the net weight is between 50g- 400g.
The following accessories must be used with this function:- the Crisp Plate- the Crisp Handle to manage the hot Crisp Plate.
6TH SENSE BREAD DEFROST
Crisp Plate Crisp Handle

23GB
6th Sense Menu is a simple and intuitive guide, offering automatic recipes that guarantee perfect results every time.Use this menu to prepare the dishes listed in the following tables. Simply select a recipe and follow the instruc-tions on the display: 6th Sense Menu will automatically adjust the cooking parameters to get the best results.
Press the Menu button.
Turn the Rotating Knob to select the Recipe number (see the table below).
Press the Confirmation Button to confirm.
Depending on the selected recipe, the display could ask you to set the Time / Amount / Weight. Use the Rotating Knob and the Confirmation Button to set the asked values.
Press the Confirmation Button/Jet Start Button. The function will start.
• For large amounts/pieces of food like roasts and oven baked fish a standing time of 8 - 10 minutes is rec
ommended.
• For food like vegetables, hot dogs and steamed fish recommended standing time is 2 - 3 minutes.
• For details requested to add/stir/turn food, see table in page 11.
Tips and suggestions:
6TH SENSE MENU
ACCESSORIES
Microwave and Oven Proof Dish Crisp Plate Steamer
Steamer(bottom and lid) Low Rack High Rack

24 GB
FOOD CATEGORY ACCESSORIES FOOD TYPE AMOUNT PREPARATION
MEAT
1. Beef [Roasted]
800g- 1500g Season the roast and place in oven when preheated. Turn the roast when oven prompts.
2. Lamb [Roasted]
1000g- 1500g
Season the roast and place in cold oven. Turn the roast when oven prompts.
3. Entrecote [Grilled]
2pcs-4pcs Brush with oil and place in cold oven. Turn when oven prompts. Season.
CHICKEN
4. Wings [Crisp]
400g- 1000g Season the chicken wings. Grease the Crisp Plate. Add wings when Crisp Plate is preheated,turn when oven prompts.
5. Fillets [Crisp]
300g- 1000g Lightly grease the Crisp Plate. Season and add fillets when Crisp Plate is pre-heated. Turn food when oven prompts.
FISH & SEAFOOD
6. Fish fillets [Steam]
300g-800g Season and place at steam grid. Add 100ml water in bottom and cover with lid.
7. Frozen gratin [Baked]
600g-1200g Remove any aluminium foil.
8. Frozen coated fillets [Crisp]
200g-600g Lightly grease the Crisp Plate. Add food when Crisp Plate is preheated. Turn food when oven prompts.
9. Shrimps [Steam]
100g- 400g Put the 100-400g food in the bottom, add 400-700ml water into the bottom, cover with the lid.
VEGETA-BLES
10. Potatoes [Baked]
200g-1000g Suitable for potatoes:200-300g each. Wash and pierce. Turn when oven prompts.
11. Tomatoes [Baked]
300g-800g Cut in halves, season and sprinkle cheese on top.
12. Carrots [Steam]
200g-500g Place in steam grid. Add 100ml water in bottom and cover with lid.
13. Broccoli [Steam]
200g-500g Place in steam grid. Add 100ml water in bottom and cover with lid.
14. Potato Wedges [Crisp]
300g-800g Peel and cut potatoes. Season and lightly oil the crispplate + drizzle oil on top. Stir-when oven prompts.
6TH SENSE MENU
Microwave and Oven Proof Dish Crisp Plate Steamer
Steamer(bottom and lid) Low Rack High Rack

25GB
6TH SENSE MENU
FOOD CATEGORY
ACCESSORIES FOOD TYPE AMOUNT PREPARATION
PIZZA & QUICHE
15. Home made pizza [Crisp]
1 batch Prepare a dough based on 150ml water, 15g fresh yeast, 200-225g flour and salt + oil. Let rise. Roll it out on greased crisp-plate and prick it. Add topping like toma-toes, mozzarella cheese and ham.
16. Quiche Lorraine [Crisp]
1 batch Prepare the pastry (250g flour, 150 g but-ter + 2½ tblsp water) or use ready made pastry.(400-450g) Line the Crisp Plate with the pastry. Prick it. Prebake the pas-try. When oven prompts to add the stuff-ing, add 200g of ham and 175g cheese and pour over a mix of 3 eggs and 300 ml cream. Place back into the oven and con-tinue the cooking.
17. Frozen pan pizza [Crisp]
300g-800g
Remove package.
18. Frozen thin pizza [Crisp]
250g-500g
Remove package.
19. Prebaked Frozen Quiche [Crisp]
200g-800g
Remove package.
RICE
20. Rice [Steam]
1 - 4 servings
Place from 1 to 4 servings of rice on the bottom (base) of the steamer, considering that each serving corresponds to 100g. Add salted water up to the appropriate level shown inside the steamer, below the text “Rice + Water” (1 = 1 serving, 2 = 2 servings, etc.). Cover with the steamer lid. Do not use the middle grid of the steamer. As prompted by the display, select the number of servings to be cooked (L1 = 1 serving, L2 = 2 servings, etc.).
Microwave and Oven Proof Dish Crisp Plate Steamer
Steamer(bottom and lid) Low Rack High Rack

26 GB
FOOD CATEGORY
ACCESSORIES FOOD TYPE AMOUNT PREPARATION
PASTA & LASAGNA
MEAT
21. Pasta [Steam]
1 - 3 servings
Place from 1 to 3 servings of pasta on the bottom (base) of the steamer, consider-ing that each serving corresponds to 70g. Add salted water up to the appropriate lev-el shown inside the steamer, below the text “Pasta + Water” (1 = 1 serving, 2 = 2 serv-ings, etc.). Cover with the steamer lid. Do not use the middle grid of the steamer. As prompted by the display, select the num-ber of servings to be cooked (L1 = 1 serving, L2 = 2 servings, etc.).
22. Meat lasagna
4 - 8 servings
Prepare your favorite recipe or follow the rec-ipe on the lasagne package.
23. Frozen lasagna
500g- 1200g
Remove any aluminium foil.
DESSERT 24. Crème brûlée
2 - 6 servings
For 4 portions, heat up 100ml cream + 200ml milk. Whisk 2 eggs + 2 eggyolks with 3 table-spoons sugar and 1 teaspoon vanilla. Whisk the hot liquid into the eggs. Fill the mixture into 4 portion dishes (microwave- and oven proof) and place them into the crispplate. Boil up ½liter water and pour besides the dishes in the Crisp Plate. Cook and let cool down. Sprinkle brown sugar on top or use white sugar + burner to brown the sugar.
CAKES & PASTRIES
25. Home made fruit pie
1 batch Make a pastry of 180g flour, 125g butter and 1 egg. (or use ready made pastry) Line the crisp-plate with the pastry, prick it and fill with 700g-800g sliced apples mixed with sugar and cin-namon.
26. Scones [Crisp]
1 batch Shape into one large piece or in smaller pieces on greased Crisp Plate.
27. Sponge cake
1 batch Mix a recipe with the total weight of 700g - 800g. Add the cake when oven is pre heated.
6TH SENSE MENU
Microwave and Oven Proof Dish Crisp Plate Steamer
Steamer(bottom and lid) Low Rack High Rack
27GB
FOOD CATEGORY
ACCESSORIES FOOD TYPE AMOUNT PREPARATION
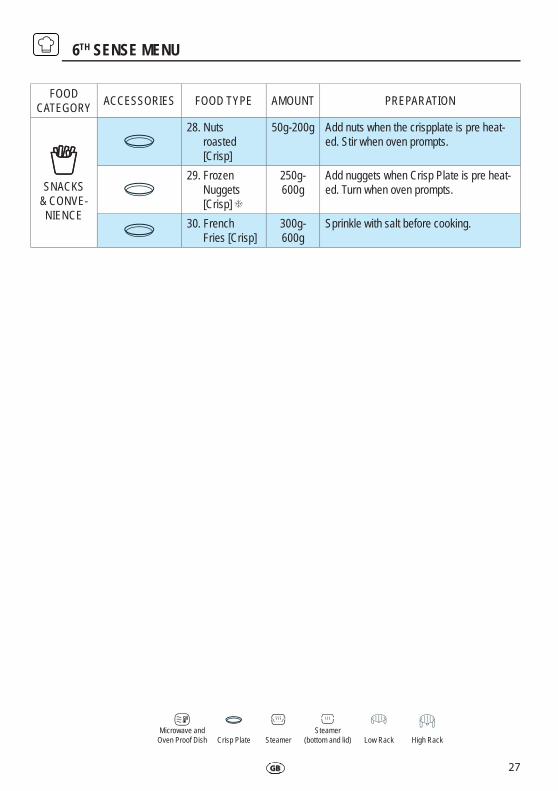
SNACKS & CONVE-NIENCE
28. Nuts roasted [Crisp]
50g-200g Add nuts when the crispplate is pre heat-ed. Stir when oven prompts.
29. Frozen Nuggets [Crisp]
250g-600g
Add nuggets when Crisp Plate is pre heat-ed. Turn when oven prompts.
30. French Fries [Crisp]
300g-600g
Sprinkle with salt before cooking.
6TH SENSE MENU
Microwave and Oven Proof Dish Crisp Plate Steamer
Steamer(bottom and lid) Low Rack High Rack

28 GB
GB
In accordance with IEC 60705, Edition 4, 2010-04.The International Electrotechnical Commission has developed a standard for comparative testing of heating performance of different microwave ovens. We recommend the following for this oven:
TECHNICAL SPECIFICATION
Supply Voltage 230 V/50 HZ
Rated Power Input 2200 W
MW output power 1000 W
Grill 1200 W
Forced air 1500 W
Standby power <2.0W
Off-mode power <0.5W
Outer dimensions (HxWxD) 379 X 491 X 540
Inner dimensions (HxWxD) 210 X 395 X 370
ENVIRONMENTAL HINTSThe packing box may be fully recycled as confirmed by the recycling symbol. Follow local disposal regulations. Keep potentially hazardous packaging (plastic bags, polystyrene etc.) out of the reach of children.This appliance is marked according to the European directive 2002/96/EC on Waste Electrical and Electron-ic Equipment (WEEE). By ensuring this product is disposed of correctly, you will help prevent potential nega-tive consequences for the environment and human health, which could otherwise be caused by inappropriate waste handling of this product.The symbol on the product, or on the documents accompanying the product, indicates that this appliance may not be treated as household waste. Instead it shall be handed over to the applica-ble collection point for the recycling of electrical and electronic equipment. Disposal must be carried out in accordance with local environmental regulations for waste disposal.For more detailed information about treatment, recovery and recycling of this product, please contact your local city office, your household waste disposal service or the shop where you pur-chased the product.Before scrapping, cut off the mains cord so that the appliance cannot be connected to the mains.
W 1 0 6 9 9 0 2 6 Whi
rlpoo
l is
a re
gist
ered
trad
emar
k of
Whi
rlpoo
l, U
SA
TEST AMOUNT APPROX. TIME POWER LEVEL CONTAINER
12.3.1 1000 g 14 min 750 W Pyrex 3.227
12.3.2 475 g 6.5 min 750 W Pyrex 3.827
12.3.3 900 g 13 min 750 W Pyrex 3.838
12.3.4 1100 g 28 - 30 min Forced Air 200°C + 350 W Pyrex 3.827
12.3.5 700 g 25 min Forced Air 200°C + 90 W Pyrex 3.827
12.3.6 1000 g 30 - 35 min Forced Air 200°C + 350 W Pyrex 3.827
13.3 500 g 2 min 12 sec JET DEFROST


