13
iLink User Guide Version 3.2 1 Sep 2015
| Date post: | 25-Apr-2018 |
| Category: |
Documents |
| Upload: | duongduong |
| View: | 220 times |
| Download: | 4 times |
iLink
User Guide
Version 3.2 1 Sep 2015

Page 2
Copyright © 2007-2015, Westpac Banking Corporation, ABN 33 007 457 141. All rights reserved.
Date Version Description
June 2007 1.0 Initial Version
April 2009 2.0 Updated for 2009 release
April 2009 2.1 Minor text changes for readability
June 2010 3.0 Updated for 2010 release
November 2010 3.1 Updated for 2011 release
September 2015 3.2 Updated for new layout
Document History

- 3 -
Page 3
Copyright © 2007-2015, Westpac Banking Corporation, ABN 33 007 457 141. All rights reserved.
iLink
Table of Contents
1 Introduction .......................................................................................................................................... 5
2 Signing In .............................................................................................................................................. 5
2.1 Sign In Page ....................................................................................................................................... 6
2.2 Forgotten Password ........................................................................................................................... 6
2.3 Getting Started ................................................................................... Error! Bookmark not defined.
2.4 Dashboard .......................................................................................................................................... 6
3 Receiving Files ..................................................................................................................................... 7
3.1 Folder View ........................................................................................................................................ 7
3.2 File Details .......................................................................................................................................... 8
3.2.1 File History .................................................................................. Error! Bookmark not defined.
3.2.2 Downloading Files ....................................................................................................................... 8
4 Sending Files ........................................................................................................................................ 8
4.1 Duplicates ........................................................................................................................................... 9
4.2 Authorisation ...................................................................................................................................... 9
4.2.1 Uploading a File for Authorisation ............................................................................................... 9
4.2.2 Authorising a File ........................................................................................................................ 9
4.2.3 Authoriser Roles........................................................................................................................ 10
4.2.4 Authorisation Options ................................................................................................................ 10
5 Managing Files ................................................................................................................................... 10
5.1 Deleting Files .................................................................................................................................... 10
5.2 Moving Files ..................................................................................................................................... 11
5.3 Searching for Files ........................................................................................................................... 11

- 4 -
Page 4
Copyright © 2007-2015, Westpac Banking Corporation, ABN 33 007 457 141. All rights reserved.
iLink
5.4 My Folders ........................................................................................................................................ 11
6 Administration .................................................................................................................................... 12
6.1 User Tasks ....................................................................................................................................... 12
6.2 Update Your Details ......................................................................................................................... 12
6.3 User Administration .......................................................................................................................... 12
6.4 Search Event History........................................................................................................................ 13
7 Support ............................................................................................................................................... 13

- 5 -
Page 5
Copyright © 2007-2015, Westpac Banking Corporation, ABN 33 007 457 141. All rights reserved.
iLink
1 Introduction
iLink is a web based interface which is used to securely send or receive files to and from Qvalent
systems. iLink provides a simple user interface which is similar to web based mail systems.
The URL for iLink is https://ilink.westpac.com.au/
2 Site Navigation
2.1 Top Menu
iLink displays the available menu options at the top of the page. The available menus are listed
below. Note that your user may not have access to all these menu options.
Dashboard – Shows a summary of recently sent or received files.
Files – Upload and authorise files to Westpac or download files received from Westpac.
Administration – Administer user accounts and view company audit history.
User Guides (question mark symbol on the right) – Download iLink user guides.
User Profile (person symbol on the right) – Change your password or other user settings.
2.2 Files Sidebar
iLink displays the files sidebar on all file processing pages. The same options are also present under
the Files menu at the top of the page. The sidebar provides easy access to frequently performed
tasks, such as uploading and downloading files.
- 6 -
Page 6
Copyright © 2007-2015, Westpac Banking Corporation, ABN 33 007 457 141. All rights reserved.
iLink
3 Signing In
3.1 Sign In Page
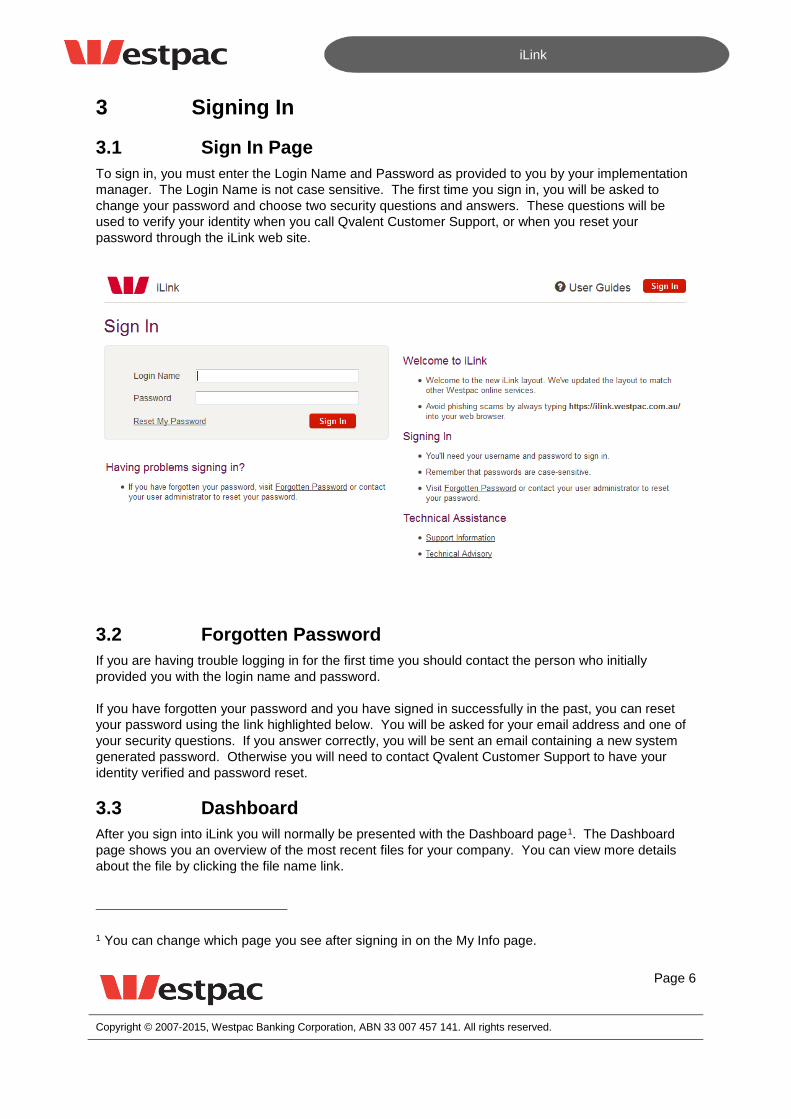
To sign in, you must enter the Login Name and Password as provided to you by your implementation
manager. The Login Name is not case sensitive. The first time you sign in, you will be asked to
change your password and choose two security questions and answers. These questions will be
used to verify your identity when you call Qvalent Customer Support, or when you reset your
password through the iLink web site.
3.2 Forgotten Password
If you are having trouble logging in for the first time you should contact the person who initially
provided you with the login name and password.
If you have forgotten your password and you have signed in successfully in the past, you can reset
your password using the link highlighted below. You will be asked for your email address and one of
your security questions. If you answer correctly, you will be sent an email containing a new system
generated password. Otherwise you will need to contact Qvalent Customer Support to have your
identity verified and password reset.
3.3 Dashboard
After you sign into iLink you will normally be presented with the Dashboard page1. The Dashboard
page shows you an overview of the most recent files for your company. You can view more details
about the file by clicking the file name link.
1 You can change which page you see after signing in on the My Info page.

- 7 -
Page 7
Copyright © 2007-2015, Westpac Banking Corporation, ABN 33 007 457 141. All rights reserved.
iLink
4 Receiving Files
iLink provides a familiar email based interface for managing your received files from Qvalent.
Received files are displayed in your Inbox folder, which is located under the Files menu.
The Deleted Items folder contains files that you have chosen to delete from your other folders.
4.1 Folder View
Below is the folder view, showing files in the selected folder. Files are listed in order of date received,
i.e. the newest files are at the top. You can view a different folder by selecting it in the left menu (e.g.
Sent or Deleted Items in this example).
Unread files appear bold in the list. Files that have already been viewed appear in normal text. For
example, the first file is read and the others are unread. Please note that files can be viewed and
downloaded as many times as needed.
Files will automatically be deleted when they are 90 days old.
You can select one or more files by clicking the check box next to the file. From there you can:
Delete the selected files by clicking on the Delete button (moving them to the Deleted Items
folder)
Download the selected files by clicking on the Download button
Mark all selected files as unread by click the Mark as Unread button
Move all selected files to another folder by selecting the folder from the Move to Folder drop
down box and clicking Move
You can select all files in the folder by clicking the checkbox at the top of the list.
- 8 -
Page 8
Copyright © 2007-2015, Westpac Banking Corporation, ABN 33 007 457 141. All rights reserved.
iLink
To view more detail about a particular file, click on the Name of the file.
4.2 File Details and Download
The File Details page shows you the details of the selected file. The information provided is
summarised as follows:
File Name – This is the default filename that the file will have once it has been downloaded
on to your computer.
Folder – Advises you which folder the file currently resides in.
Created Date – Date and time the file was created.
File Type – This will be different for each type of file that you send and receive (e.g.
CreditCardBatch, CashAppliedFile).
Created By – The full name of the file creator. This will be ‘Qvalent’ for received files.
Status – The current status of the file.
File Id – This is a unique identifier generated by Qvalent for every file in the iLink system.
This number should be quoted in all correspondence regarding this file.
Size – The size of the file.
History – The history of this file, showing the events that have occurred to this file, such as
which users have downloaded the file.
4.2.1 Downloading Files
You can download the file you are viewing either as plain text or in a zip file.
To download the file as plain text, click the file name link with the text file icon next to it.
To download the file in a zip file, click the file name link with the zip file icon next to it.
Your web browser may prompt you to choose a location to save the file. The downloaded file will still
be in the iLink folder you downloaded it from, and can still be downloaded by other users.
5 Sending Files
iLink allows you to upload files to Qvalent in any format that has previously been agreed upon with
Qvalent. To upload files to Qvalent for processing, click the Files menu then click the Upload File
option.
To upload a file:
Select the file type for the file that is being sent (e.g. Credit Card Batch)
Click on Browse to locate the file on your computer to upload.

- 9 -
Page 9
Copyright © 2007-2015, Westpac Banking Corporation, ABN 33 007 457 141. All rights reserved.
iLink
If you are uploading a ZIP file and would like your file to be automatically unzipped when it is
sent then you should tick the Automatically unzip… check box. This option has no effect on
files that do not end with .zip.
Once you have selected your file, press on the Upload File button. This will transmit your file
to Qvalent for processing.
Files sent to Qvalent will be stored in the Sent folder.
Once the file has been successfully uploaded, you will see a summary screen with the file id that was
generated. If your company has been set up for upload authorisation, you will be notified that an
authoriser must approve your file before it can be delivered. See section 5.2 for more details.
5.1 Duplicates
If you upload a file with the same content as a previously uploaded file, iLink will alert you that the file
has been marked as a possible duplicate.
The file will remain in the sent or held folder with status Duplicate. You should check this file carefully
against the listed possible duplicates. If you wish to send this file anyway you must tick the checkbox
confirming that you wish to process the file and press Submit.
If the file is an accidental duplicate, you should delete it.
5.2 Authorisation
When your implementation manager is setting up your iLink account you may be asked if you would
like to enable Upload Authorisation. When this option is enabled, all uploaded files must be
authorised by an appropriate user before they can be sent to Qvalent for processing.
Files awaiting authorisation are stored in the Held folder with their status set to Authorisation
Required. Files in this state cannot be moved or deleted and remain this way until they are either
authorised or declined by an approved authoriser.
5.2.1 Uploading a File for Authorisation
If authorisation is required, you will be notified of this after uploading the file. You will be provided
with a list of approved authorisers for this file. You have the option to send an automated email
notification to inform them that a file is awaiting authorisation.
You are not required to send any notification emails if you would prefer to notify them personally, or if
they are already expecting the file.
5.2.2 Authorising a File
To authorise a file:
Click on the Held folder under the Files menu. A list of files requiring authorisation is shown.
Click on the name of the file you wish to review.
Download the file and review its contents (if required).
If you approve this file for submission, press the Authorise button. Otherwise, press the
Decline button.

- 10 -
Page 10
Copyright © 2007-2015, Westpac Banking Corporation, ABN 33 007 457 141. All rights reserved.
iLink
When a file is authorised, it is sent to Qvalent for processing and is moved to the Sent folder. The file
history will show which user authorised the file.
When a file is declined, the status is set to Declined and the file is moved to the Deleted Items folder.
The file history will show which user declined the file. The original file uploader receives an email
indicating that the file has been declined and will not be processed. The uploader and the authoriser
can then resolve the issue outside of iLink.
5.2.3 Authoriser Roles
A file can be authorised by any user in your company with the role of Authoriser. File uploaders
cannot authorise their own files. See the Administration section below for more details on user roles
and how to assign roles to users.
5.2.4 Authorisation Options
There are three different authorisation options you can request when your iLink account is created:
No Authorisation – Files are uploaded and sent straight through to Qvalent. No authorisation
is required.
Single Authorisation – After a file is uploaded, it must be authorised by a second user before it
is processed
Dual Authorisation – After a file is uploaded, it must be authorised by two unique authorisers
before it is processed. In this case the file remains in the Held folder after it has been
authorised the first time. Only after it is authorised a second time by another authoriser will it
be sent for processing.
You can change your authorisation option by contacting your Qvalent Implementation Manager or the
Qvalent Customer Support team. Contact details can be found at the bottom of this document.
6 Managing Files
6.1 Deleting Files
Before deleting a file you may wish to check that the file has already been downloaded. You can do
this by either checking that the file status is Downloaded or by clicking on the file name to open the
File Details screen and then view the History. The History will show if file has been downloaded
previously, as depicted below.
Once you have confirmed you wish to delete the file, press the Delete button on the File Details
screen. This will move the file from the Inbox to Deleted Items folder.
Alternatively, you can delete multiple files at once by clicking the check boxes on the folder view
screen then pressing Delete (see section 4.1).
You can recover an accidently deleted file by moving it from the Deleted Items folder into another
folder. See the next section for more information about moving files between folders.
- 11 -
Page 11
Copyright © 2007-2015, Westpac Banking Corporation, ABN 33 007 457 141. All rights reserved.
iLink
All files are permanently deleted after they are 90 days old.
6.2 Moving Files
To move a file from one folder to another you must firstly select the file by clicking the check box next
to the file(s) you wish to move. Next select the desired folder from the Move to Folder… drop down
then press Move.
6.3 Searching for Files
The search facility allows you to search for files that match various search criteria, such as filename,
date, status and file type. Select Search Files under the Files menu.
To search for files:
Enter a File Name, or part of a filename (optional).
Enter a Date range by selecting from the pop up calendars.
Select a File Type from the drop down box or select Any File Type.
Select the Status of files to search for or select Any Status.
Select a Direction option to restrict the search to either received or sent files.
Click Search
The results of your search will then be displayed. The search results page looks very similar to the
standard folder view.
6.4 My Folders
iLink allows you to create personal folders to manage your files. All folders are created at a company
level, so if one user creates a folder, it is visible to all users in your company. The Manage My
Folders option in Files menu allows you to create, edit and delete your folders. System folders such
as Inbox, Sent and Deleted Items cannot be modified.
Once in the Manage My Folders screen you can:
View the contents of the folder by clicking the folder name.
Edit the folder name by clicking the Edit Details link for a folder
Delete the folder by clicking the Delete Folder link for a folder. Note that a folder must be
empty before you can delete it.
Create a new folder by pressing the Add New Folder button. Enter a unique name for the folder then press Save.
See section 6.2 for details on how to move files into your new folder.
- 12 -
Page 12
Copyright © 2007-2015, Westpac Banking Corporation, ABN 33 007 457 141. All rights reserved.
iLink
7 Administration
7.1 User Tasks
Users in iLink can be assigned any combination of the following tasks:
Upload Files – Upload files for processing and view their own previously uploaded files.
Search and Download – Download sent and received files, browse any folder, manage
custom folders and search for files.
Authoriser – Authorise files when Single or Dual Authorisation is in place.
Company Administrator – Manage user accounts and view event history for their company.
7.2 Update Your Details
Any user can edit their own details by clicking on the Update My Details option in the left menu under
the User Profile menu.
Users can change their name, phone numbers, email address, password and security questions. A
user can view their own tasks but cannot change them. If a user’s tasks need to be changed, the
Company Administrator must make these changes through the Administration screens (see below).
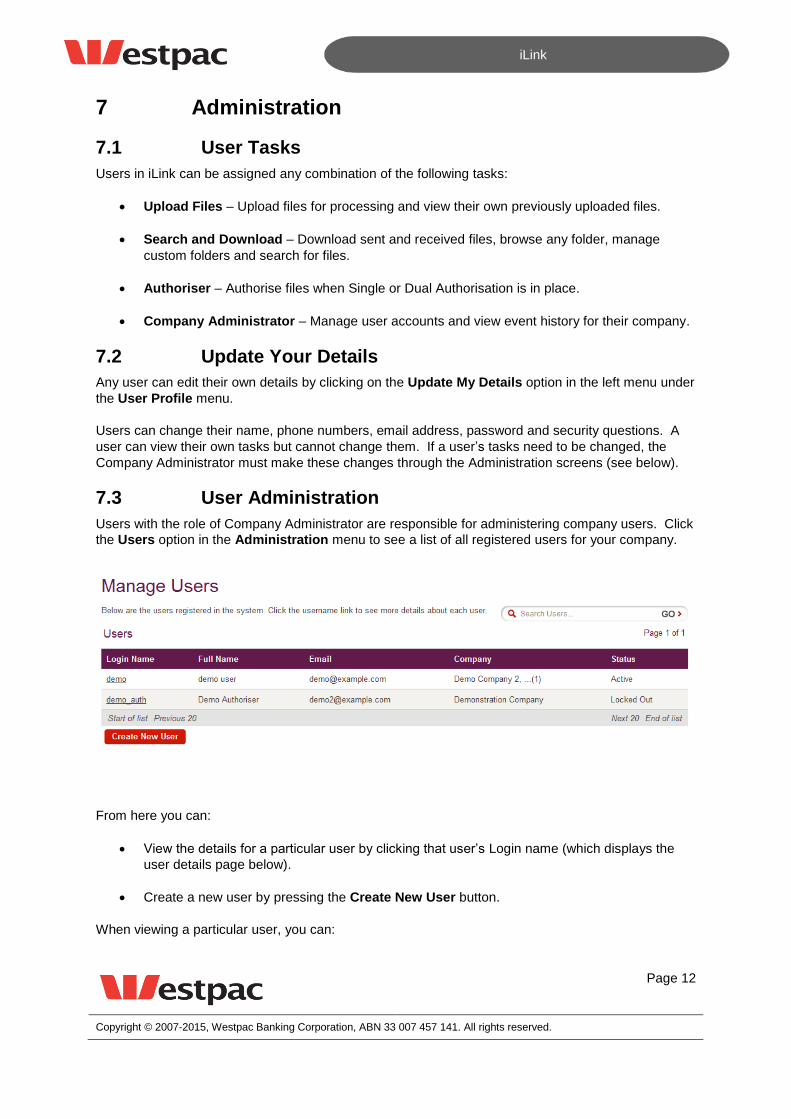
7.3 User Administration
Users with the role of Company Administrator are responsible for administering company users. Click
the Users option in the Administration menu to see a list of all registered users for your company.
From here you can:
View the details for a particular user by clicking that user’s Login name (which displays the
user details page below).
Create a new user by pressing the Create New User button.
When viewing a particular user, you can:

- 13 -
Page 13
Copyright © 2007-2015, Westpac Banking Corporation, ABN 33 007 457 141. All rights reserved.
iLink
Edit the user details including: login name, tasks, name, phone numbers, email address. To
save any modifications, you must confirm your identity by entering your own password, then
press Save.
Disable the user, preventing them from signing in
Reset the user’s password to a system generated password. The user will then be forced to
enter a new password the next time they log in.
View actions performed by this user (by pressing the Event History button).
7.4 Search Event History
The Search Event History screen allows company administrators to view the audit trail for their
company. Events include users signing in, files being sent and received etc. Goto the Event History
option in the Administration menu.
To search the event history,
Enter a Start date or select from the pop up calendar.
Enter an End date or select from the pop up calendar.
Select a Current Status from the drop down box or select Any Status.
Enter in a text Description to search for (optional).
Press Search
The results of your search will then be displayed on the screen.
8 Support
Should you have any queries regarding the use of iLink, please contact Qvalent Customer Support via
email at [email protected] or by phone on 1300 726 370 (available Monday to Friday, 7
a.m. to 6 p.m. AEST) and one of our representatives will be happy to assist you.
Alternatively, please contact your Westpac representative.


