ILLUSTRATED GUIDE R22+ Effective Walls in Residential Construction in British Columbia This guide was developed to assist builders and designers to construct walls that achieve R22 or higher thermal performance. The information included in this guide is relevant for low- and mid-rise residential buildings across British Columbia. NOVEMBER 2017
Transcript
ILLUSTRATED GUIDE
R22+ Effective Walls in Residential Construction in British Columbia
This guide was developed to assist builders and designers to construct walls that achieve R22 or higher thermal performance. The information included in this guide is relevant for low- and mid-rise residential buildings across British Columbia.
N OV E M B E R 2 0 1 7
2 | Illustrated Guide – R22+ Effective Walls in Residential Construction in British Columbia
PrefaceAbout this GuideThe Illustrated Guide to R22+ Effective Walls in Residential Construction in British Columbia is published by BC Housing. This guide consolidates information on above and below grade wall assemblies for low- and mid-rise buildings that are capable of achieving R-22 or greater effective thermal performance. The guide is intended to be an industry, utility, and government resource with respect to meeting this thermal performance level, while not compromising other aspects of building enclosure performance, including moisture management, air leakage, and durability.
This edition of the guide has a shift in focus from the original guide, and now includes information that applies to low-rise detached and semi-detached homes, row-houses/townhomes, and multi-unit residential buildings up to six storeys within British Columbia. While this guide provides general guidance on assembly selection and key considerations, it does not provide extensive information on detailing of the assemblies at transitions and penetrations. The Additional Resources section on page 53 contains a list of various other guides that provide extensive information on the design and construction of high-performance building enclosure assemblies. Although the guide generally focuses on wood-frame, concrete, and steel-frame walls that use traditional construction methods, some guidance is included for other less common wall types.
It is important to note that each building and construction project is different and each present unique challenges. This guide provides an overview of assemblies that can meet higher thermal performance targets, but it is likely that the various methods shown will need to be modified to accommodate variations in each project. Additionally, alternative wall assemblies exist that are beyond the scope of this guide.
DisclaimerThis guide is provided for general information, except where noted. The greatest care has been taken to confirm the accuracy of the information contained herein. However, the authors, funders, publisher, and other contributors assume no liability for any damage, injury, loss, or expense that may be incurred or suffered as a result of the use of this publication, including products, building techniques, or practices. The views expressed herein do not necessarily represent those of any individual contributor, BC Housing, the City of Vancouver, or the City of New Westminster.
Building science, products, and construction practices change and improve over time, and it is advisable to regularly consult up-to-date technical publications on building envelope science, products, and practices rather than relying solely on this publication. Seek specific information on the use of products, the requirements of good design and construction practices and requirements of the applicable building codes before undertaking a construction project. Consult the manufacturer’s instructions for construction products, and also speak with and retain consultants with appropriate engineering or architectural qualifications, and appropriate municipal and other authorities, regarding issues of design and construction practices, including fire protection. Most provisions of the building codes (British Columbia Building Code and the Vancouver Building By-law) have not been specifically referenced, and use of the guide does not guarantee compliance with code requirements, nor does the use of systems not covered by this guide preclude compliance. Always review and comply with the specific requirements of the applicable building codes for each construction project. The materials and colours shown as examples in the guide are not intended to represent any specific brands or products, and it is acknowledged that many product options exist.
Illustrated Guide – R22+ Effective Walls in Residential Construction in British Columbia | 3
AcknowledgementsThis guide was funded and commissioned by BC Housing, the City of Vancouver, and the City of New Westminster, and was prepared by RDH Building Science Inc. Acknowledgement is extended to all those who participated in this project as part of the project team or as external reviewers.
AuthorsLorne Ricketts | James Higgins | Graham Finch - RDH Building Science Inc.
External Reviewers & ContributorsBob Deeks - RDC Fine Homes
Chris Higgins & Sailen Black- City of Vancouver
Deborah van der Horst - H&H Small Space Solutions Inc.
Douglas Bennion - Quad-Lock Building Systems
Hamid Heidarali - HDB
Ineke Van Zeeland & Robert Jonkman - Canadian Wood Council
Jason Jung - ASTTBC
Jieying Wang - FPInnovations
Jim Baker & Zachary May - Building and Safety Standards Branch
John Riley - InterCoast Building Solutions Inc.
Keith Calder - Jensen Hughes Consulting Canada Inc.
Mark Lawton - Morrison Hershfield Limited
Maura Gatensby - Architectural Institute of British Columbia
Murray Frank - Constructive Home Solutions Inc.
Norm Connolly - City of New Westminster
Pierre Busque - Busque Engineering Ltd.
Richard Kadulski - Richard Kadulski Architect
Stan Jang - Building Balance Consulting Inc.
Wei Chen - Exp Global Inc.
4 | Illustrated Guide – R22+ Effective Walls in Residential Construction in British Columbia
Illustrated Guide – R22+ Effective Walls in Residential Construction in British Columbia | 5
Building Enclosures OverviewThe building enclosure is a system of materials, components, and assemblies that physically separate the exterior and interior environments. It comprises various elements including roofs, above grade walls, windows, doors, skylights, below grade walls, and floors, which in combination must control water, air, heat, water vapour, fire, smoke, and sound. Additionally, the enclosure is an aesthetic element of the building.
To perform these functions, building assemblies may use a series of layers, each intended to serve one or multiple functions within the building enclosure. As an example, for an above grade wood-frame wall, cladding is typically installed to provide the aesthetic exterior finish as well as the primary water shedding surface. A water resistive barrier (WRB) is installed inboard of the cladding as a secondary barrier to moisture to prevent water ingress, and a drainage gap is installed between the cladding and WRB to allow drainage of water which penetrates past the cladding. This approach is commonly referred to as a rainscreen wall assembly. Insulation is installed to control the flow of heat (i.e. energy transfer) through the enclosure, and an air barrier is installed to control bulk air movement through the wall. A vapour barrier is also installed to control diffusion of water vapour through the wall assembly, and while typically a very impermeable material is used for this function (i.e. Type 1 vapour barriers less than ≈6 ng/(s·m²·Pa)), more permeable materials can also fulfill this function (i.e. Type 2 vapour barriers less than 60 ng/(s·m²·Pa) and smart vapour retarders). In many cases these functions can be provided in combination by a single layer within the assembly; for example, the WRB and air barrier may both be provided by the sheathing membrane. In concrete wall assemblies, any number of these barriers may be provided by the concrete itself. The position of these different elements of the enclosure assembly and appropriate detailing of the building enclosure systems at transitions and penetrations is fundamental to their performance.
This guide focuses on wall assemblies that can achieve an effective thermal performance of approximately R-22 (R-21.86, RSI-3.85) while still meeting the other performance requirements for enclosure assemblies. These wall assemblies help to reduce the transmission of heat energy through the building enclosure and consequently reduce the heating and cooling loads of the building, and the overall building energy consumption.
1 | Introduction
BC Building Code (BCBC) and Vancouver Building By-law (VBBL) Compliance | In many cases this guide indicates best practices with respect to air, vapour, and moisture management, rather than minimum requirements as specified by relevant building regulations. This approach is intended to promote the construction of effective and durable assemblies. Furthermore, in some cases the guide identifies materials, assemblies, or practices for which a registered professional (B.C. architect or engineer) may be required by the Code and/or the authority having jurisdiction to indicate compliance with relevant building regulations . Relevant building regulations should be reviewed and complied with for each project .
Thermal Insulation
Water Shedding SurfaceWater Resistive BarrierAir BarrierVapour Retarder
Plan View
6 | Illustrated Guide – R22+ Effective Walls in Residential Construction in British Columbia
1 | Introduction
3/4”
Ven
tilat
ed A
ir Sp
ace
(neg
lect
s fur
ring)
R-value CalculationsThe thermal resistance of building assemblies is commonly indicated using R-value, provided in imperial units of [ft²·°F·hr/Btu], and can also be provided as RSI-value, in metric units of [m²·K/W]. All R-values in this guide are provided in imperial units. The higher the R-value, the better the thermal performance. U-values are another way of describing heat flow through a wall, and are the inverse of R-values. The lower the U-value, the better the thermal performance.
For low-rise residential construction, R-values can be calculated according to Section 9.36 of the British Columbia Building Code (BCBC). This section specifies that R-values are to be calculated using the Isothermal Planes method. The R-value of layers of the wall assemblies which include multiple components, such as insulated stud walls, should be calculated using the Parallel Paths method (i.e. area weighted U-value calculation). An example R-value calculation for a split insulation wood-frame wall assembly is shown below.
Material properties, air film properties, framing factors (% of the wall area that is framing), and the treatment of thermal bridges for calculating R-values (RSI-values) are provided in the appendix Section A9.36.2.4 of the BCBC. For all calculations in this guide, a 23% framing factor was used corresponding with standard framing practices for 16” spaced studs. Part 9 of the BCBC does not require accounting of thermal bridging through fasteners or brick ties, or other penetrating elements such as pipes, ducts, shelf angles, anchors and ties, and minor structural members that must partially or completely penetrate the building enclosure to perform their intended function. Major penetrations such as balconies, beams, and columns do not need to be included as long as they form less than 2% of the gross wall area, and the surrounding insulation is installed tight against the penetrating element. Continuous cladding supports such as strapping which penetrates the insulation should be accounted for.
RSI 1.0 [m²·K/W] = R-5.678 [ft²·°F·hr/Btu] R = 1/U
R-22.4 (RSI 3.95)
+ ++++ +++ ==
Split Insulated Wall R-0.10 (RSI 0.02)
R-1.02 (RSI 0.18)
R-6.0 (RSI 1.06)
R-0.61 (RSI 0.11)
R-13.4 (RSI 2.36)
Inte
rior A
ir Fi
lm
Exte
rior A
ir Fi
lm
1.5”
Ext
erio
r Ins
ulat
ion
(R-4
/inch
)
7/16
” O
SB S
heat
hing
2x6
Stud
Wal
l w/ R
-19
Fibr
egla
ss B
atts
1/2”
Dry
wal
l
Clad
ding
(7/8
” Stu
cco
on B
acke
rboa
rd)
R-0.68 (RSI 0.12)
R-0.17 (RSI 0.03)
R-0.45 (RSI 0.08)
R-13.4
AF= 23% Framing RF= R-6.8
2x6
Woo
d Fr
amin
g
Fibr
egla
ss B
att I
nsul
atio
n (R
-19)
100 100AF RF
+ = =+AI RI
23 6.8
77 19
AI= 77% Insulation RI= R-19
1 | Introduction
Illustrated Guide – R22+ Effective Walls in Residential Construction in British Columbia | 7
Wall Assemblies in Non-Part 9 Residential Buildings
Requirements for CalculationsFor non-Part 9 residential buildings, calculation of the thermal performance of the wall assembly may require more effort beyond the minimum code requirements of Part 9.36 of the BCBC. The heat loss of potentially significant thermal bridges like concrete floor slabs, mechanical service penetrations, and large built-up structural wood elements should be accounted for in the thermal calculations. Regular penetrations like clips or fasteners through exterior insulation should also be accounted for. Both the American Society of Heating, Refrigerating and Air-Conditioning Engineers (ASHRAE) standard 90.1 and the National Energy Code of Canada for Buildings (NECB) provide guidance on accounting for thermal bridging in effective R-value calculations, and the ASHRAE Handbook – Fundamentals provides specific guidance for various calculation methods. Appropriate methods include hand calculations, thermal modelling, and even laboratory testing. See also the Building Envelope Thermal Bridging Guide (see Additional Resources on page 53). A registered professional should be consulted with, and may be required by the authority having jurisdiction, for the design and calculation of the effective R-value of the wall assemblies in a non-Part 9 multi-unit residential building.
Wood Multi-Unit Residential Buildings up to Six StoreysThe increased height of these buildings creates a need for more structural framing, particularly at the lower floor levels. Stud packs of built-up 2x6 or larger 4x6 studs/columns may be utilized to meet seismic and load-bearing requirements. In these larger buildings, framing factors can be 30% or higher in some areas. The BCBC and VBBL do not give specific guidance on appropriate framing factors that should be assumed for wood-frame wall assemblies in taller multi-unit residential buildings. More accurate framing factors can potentially be determined based on the minimum structural requirements for each specific building, and should include stud packs, built-up beams, and framing for seismic components. Assemblies with exterior insulation will reduce the thermal bridging associated with these members.
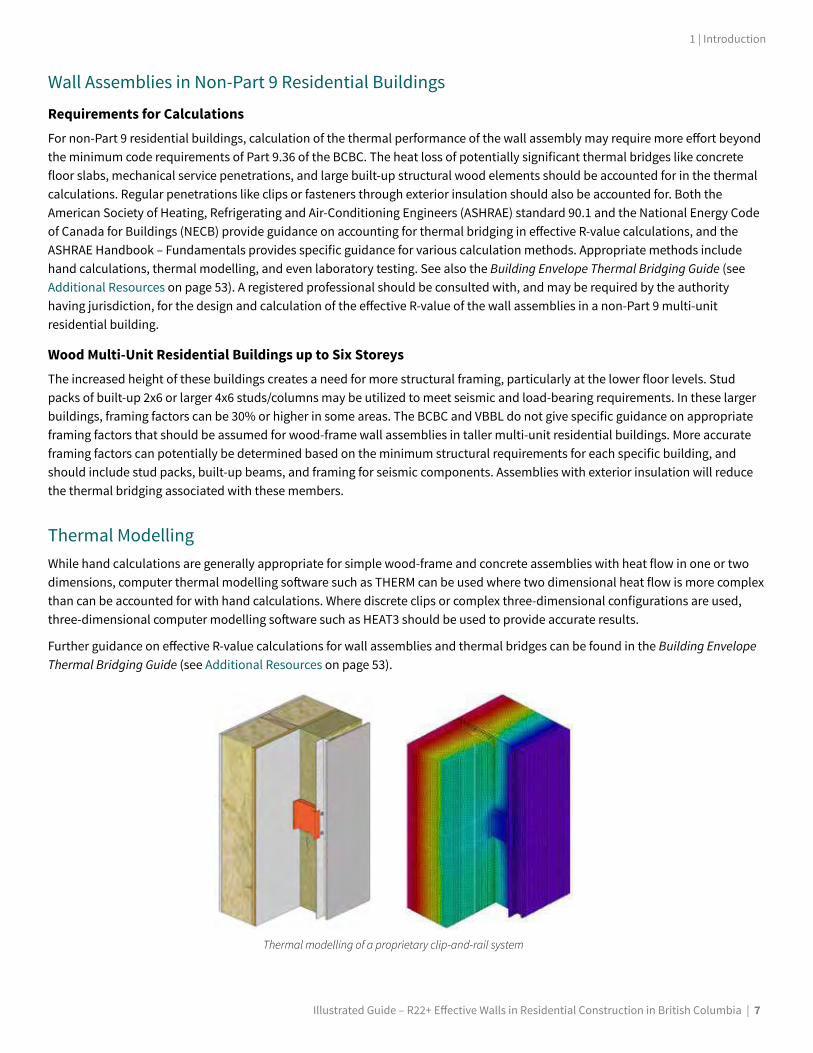
Thermal ModellingWhile hand calculations are generally appropriate for simple wood-frame and concrete assemblies with heat flow in one or two dimensions, computer thermal modelling software such as THERM can be used where two dimensional heat flow is more complex than can be accounted for with hand calculations. Where discrete clips or complex three-dimensional configurations are used, three-dimensional computer modelling software such as HEAT3 should be used to provide accurate results.
Further guidance on effective R-value calculations for wall assemblies and thermal bridges can be found in the Building Envelope Thermal Bridging Guide (see Additional Resources on page 53).
Thermal modelling of a proprietary clip-and-rail system
8 | Illustrated Guide – R22+ Effective Walls in Residential Construction in British Columbia
1 | Introduction
Material Thermal PropertiesMaterial thermal performance properties are commonly denoted as R-value/inch or RSI/mm, or provided in the material conductivity (Btu·in/hr·ft²·°F or W/m·K). While the material thermal properties can be found for various common building and insulation materials in the appendix Section A9.36.2.4 of the BCBC and various tables in ASHRAE 90.1, the NECB, and ASHRAE Handbook – Fundamentals, newer materials or proprietary systems may use other sources. In general, the material manufacturer should provide the specific thermal performance values for the product, as determined by standardized material properties testing. The original source for the material thermal properties, whether from a code or from proprietary sources, should be recorded and cited for all thermal calculations and thermal modelling.
Air Barrier SystemsAn air barrier system is used to control the flow of air into and out of a building. Control of these airflows is important to limit energy loss due to exfiltration, to reduce the potential for air leakage and associated condensation, for occupant comfort, and for indoor air quality. Refer to the Illustrated Guide – Achieving Airtight Buildings (see Additional Resources on page 53) for more guidance on designing, building, and testing airtight buildings.
For an air barrier to be effective, it must meet five design requirements:
• All the elements (materials) of the air barrier system must be adequately air-impermeable.
• The air barrier system must be continuous throughout the building enclosure including at transition and penetration details.
• The air barrier system must be structurally adequate or be supported to resist air pressure forces due to peak wind loads, sustained stack effect, and mechanical equipment such as fans.
• The air barrier system must be sufficiently rigid or be supported so that displacement under pressure does not compromise its performance or that of other elements of the assembly.
• The air barrier system should have a service life as long as that of the assembly component covering it, or alternately be easily accessible for repair or replacement.
A number of different systems exist which can fulfill these requirements, and each has potentially positive and negative attributes. More guidance and details on all air barrier types can be found in the various resources listed in Additional Resources on page 53.
Interior Air Barrier SystemsSealed Polyethylene (or Other Membranes): In the sealed polyethylene sheet air barrier system approach, the polyethylene sheet installed to the interior of the stud cavity is sealed at all transitions and penetrations with tapes and sealants to provide a continuous air barrier system. The polyethylene sheet is clamped between the framing and the gypsum wall board which provide the necessary structural support. A similar approach can also be used with alternative sheet products such as smart vapour retarders or other appropriate plastic membranes.
Airtight Drywall Approach (ADA): In the ADA, the interior gypsum wall board (i.e. drywall) provides the air barrier system, and continuity is maintained using sealants and gaskets. Special attention must be paid to ensure continuity at intersections of the exterior walls with partition walls, ceilings, and floors.
1 | Introduction
Illustrated Guide – R22+ Effective Walls in Residential Construction in British Columbia | 9
Sealed Sheathing (with Service Cavity): Sheathing placed at the interior side of the wall can be detailed as airtight by sealing the joints between sheathing boards using membrane, tape, or sealant. The air barrier transition at the floor line requires careful attention to achieve continuity of the interior air barrier. The service wall provides a space for interior services like electrical and plumbing to be installed without having to penetrate through the interior air barrier.
Spray Foam: Both open cell and closed cell spray polyurethane foams can be used as an air barrier, and are often used at penetrations and transitions to accommodate complex geometries. However, these products can also be used within the stud cavities (or in some cases at the exterior) to provide the main component of the air barrier system. Joints, cracks, and gaps that are too small to be effectively sealed with spray foam (such as between bottom plate and floor, or between double top plates) should be sealed with other sealants or adhesives.
Exterior Air Barrier SystemsSealed Sheathing: The sealed sheathing air barrier approach consists of sealing the joints between sheathing boards using membrane, tape, or sealant so that the sheathing itself provides the air barrier. As the sheathing itself is rigid and fastened to the studs, no additional support is typically required for this system.
Sheathing Membrane: The sheathing membrane, which is usually installed as a water resistive barrier (WRB), can also function as the air barrier. Both mechanically fastened and self-adhered sheet membranes can potentially be used. The laps between sheets are sealed, and all penetrations and transitions should be sealed. While adhesion and fastening of these systems provides some support, often the wood strapping or exterior insulation provides improved support for these systems.
Liquid-Applied Membrane: The exterior liquid-applied membrane system relies upon the exterior sheathing as the support and continuous backing in order to achieve an airtight barrier at the air-tight liquid membrane once cured. The same principles for continuity and adhesion of sheathing membrane approaches also apply to this system.
Note that for wall assemblies with an exterior air barrier, the relative physical continuity of the interior plane of the wall should still be considered. Interior layers like polyethylene sheet or gypsum wall board should be installed without gaps or large voids, in order to limit the potential for air flow from the interior into the wall assembly, which can lead to durability issues. This is especially important for deeper wall assemblies with interior insulation.
Mass WallsProperly designed and installed concrete or masonry walls may be considered airtight at clear wall areas. However care must be taken to insure the continuity of the air barrier at all interfaces with windows, doors, and all other penetrations. Information on maintaining the continuity of the air barrier in mass walls is available in the Building Envelope Guide for Houses – Part 9 Residential Construction (see Additional Resources on page 53).
10 | Illustrated Guide – R22+ Effective Walls in Residential Construction in British Columbia
1 | Introduction
Interior Air Barrier SystemsTypically the most important consideration in designing an air barrier system is maintaining continuity at transition and penetration details. A selection of these key details are provided below, which graphically indicate potential methods for maintaining air barrier continuity. Note that various other important details exist, and alternate methods for ensuring continuity are possible. These details are for a polyethylene sheet air barrier, but other interior air barrier systems such as airtight drywall should also address continuity at these key locations. In general, interior air barrier systems are considered a less airtight approach compared to exterior air barrier systems (see next page). Refer to the guides listed in Additional Resources on page 53 for further guidance on air barrier detailing.
Roof to Wall TransitionsCompared with exterior air barrier systems, one advantage of interior air barriers is that typically the roof to wall transition is more straightforward. In the above detail, continuity at the transition is provided simply by taping the polyethylene sheet in the ceiling to the sheet in the wall.
Electrical Receptacles PenetrationsPenetrations through the air barrier should be sealed to ensure continuity. In the above detail, an electrical receptacle is sealed using a pre-made polyethylene boot, which is then sealed at the wire penetration and to the polyethylene sheet air barrier. When using interior air barrier systems, penetrations that require sealing are often numerous. They may include pipes, light fixtures, and structural members, and all joints and interfaces must be structurally supported.
Above Grade to Below Grade Wall TransitionsWhere the above grade walls meet the below grade walls it is important to ensure that the air barrier system maintains continuity. In the above detail, blocks of air-impermeable insulation are cut and installed between the joists, and spray foam is used to seal around their perimeter. Spray foam alone could also be used in this application.
Rim Joist TransitionsWhen using an interior air barrier system, floors interrupt the air barrier and transition detailing is required. In the above detail, blocks of air-impermeable insulation are cut and installed between the joists, and spray foam is used to seal around their perimeter. These locations should be insulated to the same level as the adjacent wall. The wall polyethylene is sealed to the floor above and the wall top plate below.
1 | Introduction
Illustrated Guide – R22+ Effective Walls in Residential Construction in British Columbia | 11
Exterior Air Barrier SystemsWhile placing the air barrier on the exterior will typically simplify and reduce the number of air barrier transitions and penetrations that must be dealt with, resulting in a generally more airtight system compared with an interior air barrier approach, a variety of key details still exist which should be carefully considered. A selection of these key details are provided below which graphically indicate potential methods for maintaining air barrier continuity at these locations. Various other important details exist, and alternate methods for ensuring continuity are possible. These details are for a mechanically fastened sheet sheathing membrane, but can be adapted for other systems such as adhered sheathing membranes.
Roof-to-Wall TransitionsWhen an exterior air barrier system is used, often one of the most challenging transition details is at the roof-to-wall interface. The adjacent detail indicates transition of the air barrier via tape over the top plate before installation of the roof framing, and tape from the interior ceiling polyethylene and exterior barrier to the top plate. An alternative method could be pre-stripping a sheet air barrier material over or between the top plates.
Mechanical Ducts or Other PenetrationsPenetrations through the air barrier should be sealed to ensure continuity. In the adjacent detail, a duct penetration is sealed using a foil-faced transition membrane and sealant. The hood is also sealed to the duct to prevent the exhausting of humid air into the wall cavity. Other penetrations which should be sealed include pipes, wires, conduits, structural members, and decorative accessories.
Above Grade to Below Grade Wall TransitionsWhere the above grade walls meet the below grade walls it is important to ensure that the air barrier system maintains continuity. In the adjacent detail a combination of sheathing tape and an adhered membrane are used to transition from the sheathing membrane to the below grade waterproofing membrane. Note it is important to consider the material compatibility of the various components used in multi-step air barrier transitions.
12 | Illustrated Guide – R22+ Effective Walls in Residential Construction in British Columbia
1 | Introduction
Mid-Rise Design ConsiderationsSince multi-unit residential buildings are generally taller (up to six storeys), the height difference between low-rise and mid-rise buildings exposes the walls and other above grade elements to more wind and rain. For wood-frame walls, it also means the walls will contain more wood to accommodate the structural requirements, especially for five-storey buildings and higher. Additionally, the increased height means that frame shrinkage will be greater and that access for maintenance and renewals will be more difficult. As a result, design and construction of the building enclosure for multi-unit residential wood-frame buildings should be more durable than low-rise and single-family buildings. In some cases mass-walls like concrete or masonry may be more appropriate for mid-rise construction. The higher wind and rain loads and cumulative rain runoff need to be assessed for the impact on the structure, attachment of cladding elements, and the water shedding characteristics of the cladding.
Building Shape and InterfacesWhile climate and local topography impact exposure conditions, the designer has limited control over these factors. Therefore, the most direct way to control exposure to wetting, especially on taller buildings, is through building features. Overhang protection utilizing projecting elements such as roofs, canopies and drip edges to limit runoff on the wall assemblies should be used wherever possible. In addition, drainage should be provided to allow water that reaches walls at upper floors to drain out from the wall assembly. Refer to the guides listed in the Additional Resources section on page 53 for further guidance on designing wall assemblies for taller buildings.
Air Barrier Material and InstallationWhile single-family and smaller Part-9 buildings can use loose-layed and stapled air barrier membranes at the interior or exterior, and mass walls may be considered the airtight element, more robust air barrier product and installation method are more appropriate on taller buildings, because the higher wind loads and pressures may exert higher forces on the air barrier in these assemblies.
The main concern with installing a sheet-applied exterior sheathing membranes on larger buildings is the potential for damage during construction before the cladding is installed, especially during windy weather. Care must be taken to keep the air barrier system intact or to correctly repair damaged areas as the cladding system is installed. In most cases, the sheathing membrane should be installed in conjunction with the strapping or other cladding support system that can secure the membrane tightly in place. However, small clip systems like brick-ties may not be adequate and could lead to tearing of the membrane. Therefore, a robust air barrier membrane should always be used, for example a thicker commercial-grade sheet-applied membrane. Where higher exposure is expected or where strapping will not be in place to secure the membrane, a self-adhered membrane or a liquid-applied membrane should be used.
Multi-unit residential buildings up to six storeys are exposed to higher wind and rain loads compared to low-rise buildings
1 | Introduction
Illustrated Guide – R22+ Effective Walls in Residential Construction in British Columbia | 13
Cladding Attachment Through Exterior InsulationChapter 2 of this guide outlines the various options for attaching cladding to the wall when exterior insulation is used. The specific guidance provided in the Fastener Tables on page 25 pertains only to wall assemblies on low-rise buildings less than 3 storeys. The higher wind-loads expected on larger buildings requires specific structural analysis for each individual building. See Additional Resources on page 53 for further guidance on structural calculations for screws through rigid exterior insulation.
Many proprietary clip and girt systems are available on the market for attaching cladding to the sheathing through exterior insulation, without necessarily relying on the rigid exterior insulation for support. This approach may be more appropriate for mid-rise buildings. Each manufacturer will have different structural requirements and attachment guidelines, depending on cladding type, exterior insulation thickness, lateral loads expected, and various other factors. Systems often include a steel, aluminium, or fibreglass clip with an integrated girt or rail system on the exterior face of the exterior insulation. Brick ties can also be considered a discrete cladding attachment, though these are used to secure the masonry cladding laterally, and do not generally transfer the vertical load to the primary structure (see Chapter 2 on page 19).
Each proprietary system will have different thermal performance characteristics and may require thermal modelling to determine the overall thermal performance of the wall assembly. Most high-performance clip systems will result in less than 30% thermal degradation of the exterior insulation (i.e. 70% effectiveness of the exterior insulation). See the manufacturer’s literature for each clip system to find more information on the structural uses and limitations as well as the thermal performance.
The thermal performance tables presented in the sections on steel-stud wall assemblies (page 36 and page 38) show effective R-values for walls with 70% to 100% effective exterior insulation, accounting for thermal degradation due to a range of cladding systems. This value is then combined with the effective R-value of the overall backup wall assembly, as determined by thermal modelling using Heat3 (www.buildingphysics.com). This modelling includes the effect of a concrete floor slab (see page 40) to determine the effective R-value of the full-height wall assembly.
Screws through rigid exterior insulation
Generic intermittent z-girt clip
Proprietary fibreglass clip
Brick tiesProprietary aluminium clipProprietary metal clip
14 | Illustrated Guide – R22+ Effective Walls in Residential Construction in British Columbia
1 | Introduction
Fire Risk ConsiderationsFire risk is managed by identifying and addressing hazards and implementing controls and mitigating measures through design, construction and operations. The foundation for these is contained within the local building and fire codes. The Building Code generally applies to the design and construction of buildings, and the Fire Code generally applies to operation and maintenance of buildings, including construction operations, although there is overlap between the two Codes in some instances. The specific Code applicable should be reviewed
The Building and Fire Codes currently applicable in the Province of British Columbia are the 2012 British Columbia Building Code (BCBC), and the 2012 British Columbia Fire Code (BCFC). The exceptions to this are on federal lands and in the City of Vancouver, which are regulated by the National Codes and the Vancouver Building and Fire By-laws (VBBL, Fire Bylaws 11312).
This section summarizes the fire risks associated with building construction in general as well as specific recommendations for the design and construction of R-22+ walls for low- and mid-rise buildings .
Fire Risk During ConstructionConstruction of low- and mid-rise buildings with wall assemblies that achieve R-22+ thermal performance can involve activities and materials that increase the risk of fire. For example, construction activities that involve heat sources or hot work increase the probability of fire occurring, which, combined with increasing quantities of combustible materials like foam insualtion on site can lead to severe consequences to life safety and property. These risks are not specific to the design and construction of walls alone, but are addressed through the application of provisions that apply generally to the whole structure, including:
• Control of sources of ignition including smoking, electrical components, heating equipment, combustion engines, hot surface applications, etc.
• Protection of combustible materials from hot work through requirements for separation or noncombustible barriers
• Active monitoring and follow-up inspections of potential ignition activities
• Limits on combustible waste and protection of combustible and flammable liquids
In addition to limiting activities and materials that may increase fire risk, Section 5.6 of the BCFC also requires planning, equipment and facilities to support firefighting and life safety including fire safety planning, firefighting access, fire extinguishers, standpipes, exiting and fire warning systems.
These provisions are intended to provide a minimum level of safety for all construction sites. However, this does not preclude the application of additional safety measures to construction activities. The following additional measures can assist in further limiting the potential for fire initiation, growth and spread.
Fire Initiation
Protection from fire initiation often includes enhanced security to limit site access and the potential for intentional fire initiation. A site-specific enhanced hot work permitting program should also be used to facilitate detailed planning and provide direct control over work that inherently has an increased hazard. This program may also include monitoring, auditing and specific consequences for non-compliance with the site-specific permit process. For example, a practical approach to reducing this risk is to use a weather barrier that does not require the direct application of heat or flame for installation.
Fire GrowthLimiting the risk of fire growth can include limits on combustible content on site, through either temporary storage strategies that provide adequate spatial separation of combustible materials, or an on-demand delivery strategy to limit duration of on-site storage. Daily housekeeping to limit the accumulation of combustible waste is also an important aspect of this approach. Furthermore, where the building is intended to have an automatic sprinkler system, it is advisable to stage installation and operation of the system in-step with building construction.
1 | Introduction
Illustrated Guide – R22+ Effective Walls in Residential Construction in British Columbia | 15
Fire SpreadReducing the risk of fire spread to other areas means limiting the exposed potentially flammable construction materials through provision of protective barriers as soon as reasonably practicable, including those barriers required by the BCBC (e.g. exterior cladding and interior finish materials). This could be achieved on a storey-by-storey basis. Accelerated completion of fire compartmentalization to limit fire from involving the entire structure is also important. This can be achieved by provision of fire doors and completion of fire separations as early as possible.
These recommendations are particularly applicable to the construction of walls that may contain combustible insulation or may require weather barriers applied through the application of flame or heat.
Fire Risk of Completed Assemblies
Combustible Construction and Material LimitsThe BCBC limits the type of construction primarily as a function of the building size and the ability of a responding fire service to control a fire. The larger and taller a building, the greater the hazard of a fire to be beyond the ability of the responding fire service to control. The Code addresses this hazard through the limitation of the use combustible components. In this respect, there are two types of materials relative to construction types: noncombustible and combustible. Sprinklers are also an important consideration in limiting the potential growth and spread of fire, and their use can permit several relaxations related to building construction in general.
Buildings that are required to be constructed of noncombustible construction are limited in the type, configuration and quantity of combustible material that can be used. With respect to exterior walls in buildings required to be of noncombustible construction, the BCBC permits the following significant combustible exceptions:
• Minor Combustible Components (Article 3.1.5.2.)
• Combustible Cladding Systems for Exterior Walls (Article 3.1.5.5.)
• Gypsum Board (Article 3.1.5.11.)
• Combustible Insulation (Article 3.1.5.12.)
• Decorative Wood Cladding (Article 3.1.5.21.)
One of the most significant of the exceptions is for cladding of exterior walls, which are permitted to be of combustible cladding systems in non-load-bearing wall assemblies where a building is not more than three storeys in building height or is sprinklered throughout, the interior surfaces of the wall assembly are protected by a thermal barrier conforming to Sentence 3.1.5.12.(3), and the wall assembly satisfies certain performance criteria when subjected to testing in conformance with CAN/ULC-S134, “Fire Test of Exterior Wall Assemblies.”
Another significant exception is the use of foamed plastic insulation in exterior wall assemblies based on flame spread rating of the insulation, certain building characteristics, and provision of protective barriers. These are covered in more detail in Article 3.1.5.12.
Buildings that are permitted to be constructed of combustible construction have few limits on the type of combustible material used in their design and construction. Article 3.1.4.2. of the BCBC requires the protection of foamed plastic insulation from adjacent spaces within the building through provision of a protective barrier. The protective barrier is intended to delay the burning of the foamed plastic insulation when exposed to fire from the interior of the building, and can include (depending upon occupancy) masonry, concrete, plaster, gypsum board, plywood, hardboard, fibreboard, OSB, waferboard or sheet metal. In addition, the cladding for mid-rise buildings five and six storeys in building height is limited to noncombustible material, fire-retardant-treated wood, or an exterior wall assembly that meets certain performance conditions when tested in conformance with CAN/ULC-S134, and has a thermal barrier. These requirements do not apply where the exterior cladding is required to be of noncombustible material, as outlined on the following page.
16 | Illustrated Guide – R22+ Effective Walls in Residential Construction in British Columbia
1 | Introduction
Spatial SeparationSpatial separation requirements (Subsection 3.2.3. of the BCBC and the VBBL) are intended to limit the probability that fire will spread from a building to spatially separated neighbouring buildings, and is governed by occupancy, sprinklering, the area and configuration (ratio) of exposing building face of fire compartments, and distance to boundaries between buildings. These factors are used to establish a permitted “percentage of unprotected openings” (e.g. windows and doors), which in turn impacts the construction of the exterior wall. The spatial separation requirements apply to all buildings regardless of the type of construction of the building.
Table 3.2.3.7. “Minimum Construction Requirements for Exposing Building Faces,” addresses the type of construction of exterior walls and cladding based on proximity of the building to lot boundaries. If a building is required by Subsection 3.2.2. (i.e. based on occupancy) to be of noncombustible construction, the exterior walls and cladding are required to be noncombustible, and are not exempted by this table. If a building is permitted to be of combustible construction, then the construction of the exterior wall and cladding is permitted to be of combustible material unless the exterior wall (exposed building face) is within the bounds for permitted percentage of unprotected openings in Table 3.2.3.7. that would require noncombustible construction and cladding. However, where the exterior wall is required to be of noncombustible construction, it may still contain combustible components in accordance with the exemptions outlined in Subsection 3.1.5., except for the use of foamed plastic insulation where the permitted percentage of unprotected openings is 10% or less. Note that foamed plastic insulation may also require additional exterior protection in accordance with Articles 3.2.3.8.
Where the cladding is required to be of noncombustible construction, it may be permitted to be of combustible material where the exposing building face has a maximum permitted area of unprotected openings of more than 25% but not more than 50%, has limiting distance greater than 5 m, sprinklered throughout (including attic and roof spaces) and meets certain cladding specifications, or the entire wall assembly meets certain performance criteria when tested in conformance with CAN/ULC-S134.
Continuity of Fire SeparationsContinuity of fire separations is important to limiting fire spread, especially where they abut other fire separations, floors, ceilings or exterior walls. Subsections 3.1.9. and 3.1.11. of the BCBC require the provision of fire stopping and blocking to maintain the continuity of fire separations and limit the spread of smoke and fire.
Fire Stopping and Fire BlockingFire stopping is intended to limit the spread of fire or smoke where a fire separation is penetrated by a service or other item. This is usually achieved with listed fire stop assemblies or with assemblies that are cast in place or tightly fitted. Fire Blocking is intended to limit the potential for growth and spread of fire in concealed spaces through barriers or limitations on concealed space size. Fire blocks are required to be provided at every floor level, the ceiling level where the ceiling forms part of an assembly required to have a fire-resistance rating, and locations necessary to limit the maximum dimension of a concealed wall space to 20 m horizontally and 3 m vertically. Fire blocks are not required where any of the following conditions can be achieved :
• The wall space is filled with insulation
• The wall uses noncombustible construction materials and insulation within the wall space
• The exposed materials within the space including insulation have a flame-spread rating of not more than 25 (on any exposed surface, or on any surface that would be exposed by cutting through the material in any direction) and fire blocks are installed so that the vertical distance between them is not more than 10 m
• The horizontal dimension of any insulated and concealed air space within the wall is not more than 25 mm
The Building Codes and Fire Codes regulate the design and construction of building assemblies to limit the fire risk to life and property. The provisions of these Codes have been outlined to help identify high-risk considerations. However, it is recommended that those involved in the design and construction of low- and mid-rise buildings reference the requirements in the locally applicable Building and Fire Codes and work with the local authority having jurisdiction or code consultant to establish the appropriate design, construction practices, and operational considerations appropriate for the specific project of interest.
1 | Introduction
Illustrated Guide – R22+ Effective Walls in Residential Construction in British Columbia | 17
Exterior Insulation Below Grade
Interior Insulation Below Grade
Exterior Insulation Steel Stud
Split Insulation Steel Stud
Exterior Insulation Below Grade
Interior Insulation Below Grade
Exterior Insulation Steel Stud
Split Insulation Steel Stud
Exterior Insulation Below Grade
Interior Insulation Below Grade
Exterior Insulation Steel Stud
Split Insulation Steel Stud
Exterior Insulation Below Grade
Interior Insulation Below Grade
Exterior Insulation Steel Stud
Split Insulation Steel Stud
Exterior Insulation Below Grade
Interior Insulation Below Grade
Exterior Insulation Steel Stud
Split Insulation Steel Stud
Assembly Performance Attributes
Performance RatingEach assembly type presented in this guide includes an indicator of the relative performance for five different categories. The star rating out of five can be used to compare different assemblies for relative cost efficiency, constructability, airtightness, moisture durability, and sustainability. This allows for comparison beyond just the potential thermal performance and insulation needed to reach the R-22 effective requirements.
Each category is rated out of five stars with a lower star rating indicating lower performance and a higher star rating indicating higher performance. For example, a wall assembly that is highly airtight and moisture durable could be rated at five stars for these categories. However if it is also relatively expensive, difficult to construct and has a high environmental impact, it could be marked at one or two stars in each of these categories. Note that the wood-frame, concrete, and steel stud wall assemblies presented in this guide are each rated on individual scales associated with their construction type.
Cost EfficiencyThe rating for this category indicates the relative cost efficiecy of the assembly in achieving effective R-22 thermal performance, compared with other assemblies. This rating accounts for cost of construction materials, labour to install them, and potential maintenance costs associated with the assembly type. In general, assemblies with simpler framing and insulation methods are less expensive than those with complex framing or proprietary insulation methods.
ConstructabilityConstructability accounts for the relative ease of installation of the various components, potential sequencing challenges, and whether the base construction uses standard materials. Wall assemblies that require specialized framing or insulation are considered less constructible than those with standard framing and insulation. Walls that allow for insulation to be installed without posing potential sequencing issues are also considered constructible.
AirtightnessThis category rates the relative airtightness that can be provided by the assembly when using an exterior air barrier approach (via sheathing membrane) or interior sealed sheathing (when a service wall is provided). It accounts for the potential benefit of exterior insulation in supporting the air barrier, and how easily continuity can be maintained across various interfaces and details.
Traditional interior air barrier approaches are considered the least airtight, and are not included as a standard approach in each of the assemblies presented.
Exterior Insulation Below Grade
Interior Insulation Below Grade
Exterior Insulation Steel Stud
Split Insulation Steel Stud
Exterior Insulation Below Grade
Interior Insulation Below Grade
Exterior Insulation Steel Stud
Split Insulation Steel Stud
Exterior Insulation Below Grade
Interior Insulation Below Grade
Exterior Insulation Steel Stud
Split Insulation Steel Stud
Exterior Insulation Below Grade
Interior Insulation Below Grade
Exterior Insulation Steel Stud
Split Insulation Steel Stud
Exterior Insulation Below Grade
Interior Insulation Below Grade
Exterior Insulation Steel Stud
Split Insulation Steel Stud
Exterior Insulation Below Grade
Interior Insulation Below Grade
Exterior Insulation Steel Stud
Split Insulation Steel Stud
Exterior Insulation Below Grade
Interior Insulation Below Grade
Exterior Insulation Steel Stud
Split Insulation Steel Stud
$
$
18 | Illustrated Guide – R22+ Effective Walls in Residential Construction in British Columbia
1 | Introduction
Moisture DurabilityThis category measures relative moisture durability from exterior sources like rain, and from interior condensation sources such as interior vapour drive or air leakage. The rating accounts for both the moisture exposure the assembly might be subject to due to these sources, and its susceptibility to damage if wetting from these sources does occur. In general, wall assemblies with exterior insulation provide more moisture durability than walls with interior insulation, especially for walls with deep stud cavities.
SustainabilityThis indicates the relative complete life-cycle environmental impact of each of the wall assemblies. The rating accounts for different parts of the life-cycle of the wall assemblies: materials and construction, ease of modification, and end of service life. In general, wall assemblies are considered to be more sustainable if they use more naturally occurring and low-energy materials, require less material overall, can potentially provide a longer service life, and use materials and components that can be easily recycled at the end of the service life. The Athena Impact Estimator for Buildings (Athena IE4B v.5.0.0105) life-cycle assessment software was used to determine ratings for each assembly.
It should be noted that the evaluation provided by these metrics is for general guidance purposes based on broad assumptions and that a number of design changes may improve or worsen the performance of any particular assembly in any of the categories identified. The rating for each category is highly dependent on the specific components and materials used for each specific wall assembly of each wall type. It is not intended as an absolute rating for all assemblies for each wall type. It is also recognized that various other factors may impact wall assembly performance attributes like constructability or cost, including builder familiarity and market forces.
Assembly Suitability IconsEach assembly type includes icons indicating the most appropriate uses with respect to building type. The walls are categorized based on durability and constructibility of each assembly. The categories are as follows:
• Single-family and duplex homes
• Townhomes and small buildings three storeys or less
• Multi-unit residential buildings up to six storeys
Various walls will be suited to all building types due to their rated durability and ease of construction. Certain wall types are better suited just to single-family and duplex homes which are considered to present lower risk conditions and are generally simpler to construct.
Exterior Insulation Below Grade
Interior Insulation Below Grade
Exterior Insulation Steel Stud
Split Insulation Steel Stud
Exterior Insulation Below Grade
Interior Insulation Below Grade
Exterior Insulation Steel Stud
Split Insulation Steel Stud
Exterior Insulation Below Grade
Interior Insulation Below Grade
Exterior Insulation Steel Stud
Split Insulation Steel Stud
Exterior Insulation Below Grade
Interior Insulation Below Grade
Exterior Insulation Steel Stud
Split Insulation Steel Stud
Exterior Insulation Below Grade
Interior Insulation Below Grade
Exterior Insulation Steel Stud
Split Insulation Steel Stud
Exterior Insulation Below Grade
Interior Insulation Below Grade
Exterior Insulation Steel Stud
Split Insulation Steel Stud
Single-family/duplex Three storeys or less Multi-unit up to six storeys
Illustrated Guide – R22+ Effective Walls in Residential Construction in British Columbia | 19
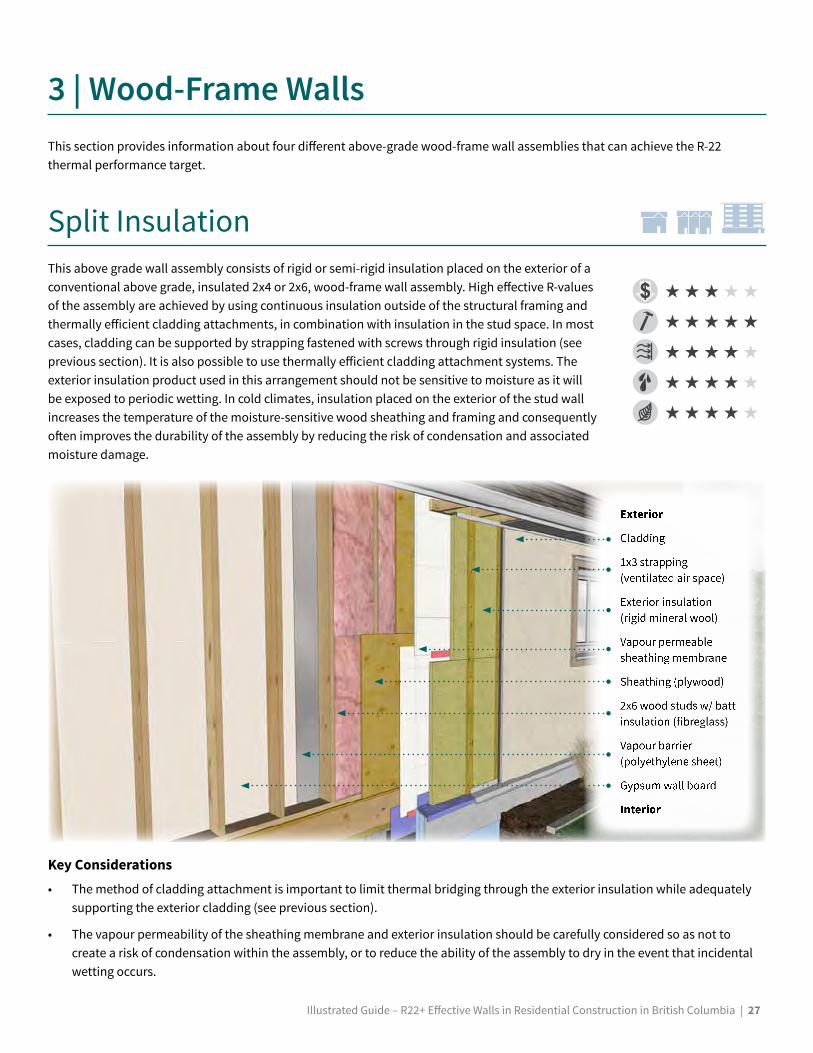
This section provides an overview of the various cladding support systems commonly used with exterior insulation. Specific guidance is provided for the design and construction of cladding attachment systems that incorporate screws through strapping and exterior insulation, including fastener tables for low-rise above-grade wood-frame wall assemblies.
Cladding Support OptionsOften exterior insulation is required to achieve R-22 thermal performance, and the associated cladding attachment and detailing may be new for some builders. In a conventional wood-framed wall assembly, cladding is attached either directly to the sheathing or over vertical strapping1 fastened directly to the stud wall and wood sheathing. The addition of exterior insulation increases the distance between the sheathing and the cladding, thus changing the loading that must be supported. There are various approaches which can be used to support the cladding, and the selection of a method often depends on the structural loads which must be accommodated. The amount of thermal bridging (i.e. reduction in effectiveness of the exterior insulation) associated with each of these methods varies, and is also an important consideration. In all cases, it is important that other aspects of assembly design including the provision of drainage be considered.
Fasteners Through Insulation: Cladding can be attached and supported by vertical strapping that is fastened with long screws through the exterior insulation and into the framed wall. This is in most cases the most thermally efficient mechanically fastened cladding support option, as thermal bridging of the exterior insulation is limited to the fasteners through the insulation. The strapping also creates a drainage space, capillary break, and ventilation cavity (i.e. rainscreen cavity) which is consistent with effective moisture-management techniques. In this arrangement, the rigid exterior insulation and fasteners will act in tandem to carry the cladding load. Extruded polystyrene (XPS), expanded polystyrene (EPS), polyisocyanurate (polyiso), and rigid mineral fibre insulations are suitable for this attachment method. Given the prevalence of this system in low-rise residential construction, further guidance on structural cladding support using screws through insulation is provided in the following pages of this section.
Proprietary Thermally Efficient Spacers and Clips: Proprietary thermally efficient spacer and clip systems can be used to facilitate installation and/or to support heavier claddings or resist larger wind loads. A number of systems exist, and selection should be made based on the thermal efficiency of the spacers in combination with the ability to support the required loads and accommodate the specified insulation thickness. Low conductivity materials such as fibreglass and stainless steel can provide excellent thermal efficiency.1For the purposes of this guide, the term “strapping” will be used to describe vertical wood furring used to create a capillary break and ventilation space .
2 | Cladding Support & Fasteners Through Exterior Insulation
Disclaimer & Note on BC Building Code (BCBC) and Vancouver Building By-law (VBBL) Compliance | The structural design guidance and the specific structural requirements given are completed for wood-frame wall assembly types and cladding types (i.e. weights) as described in this section . Structural calculations and design was completed using standard engineering analysis and supporting testing information available in existing literature . The fastener and strapping requirements tables provided in this section can be referenced for the design and construction of wood-frame wall assemblies where the cladding is supported on strapping fastened through exterior insulation . For wall assemblies that do not match the types and configurations described in this section, additional resources and project specific structural design of the cladding attachment would likely be required. The manufacturers of the cladding, insulation, and fastener products used for a specific project should be consulted to confirm the suitability of the product for wood-frame wall assemblies where the cladding is supported on strapping fastened through exterior insulation . See Additional Resources on page 53 for further structural design information .
20 | Illustrated Guide – R22+ Effective Walls in Residential Construction in British Columbia
2 | Cladding Support & Fasteners Through Exterior Insulation
Continuous Framing or Wood Spacers: Cladding can also be supported using continuous wood framing which penetrates the exterior insulation, or alternatively by standard strapping installed over wood spacers. When continuous wood framing is used, the reduction of the thermal efficiency of the exterior insulation should be accounted for using a parallel paths approach, consistent with the approach for wood stud walls. Continuous framing and wood spacers can also provide the additional benefit of facilitating the use of semi-rigid insulation, rather than rigid.
Masonry Ties: In cases where masonry cladding is used, masonry ties are used to support the cladding in conjunction with bearing of the masonry on lintels or a shelf angle, consistent with standard practice for this cladding type. These ties can either be installed such that they penetrate the exterior insulation, or can be installed on the exterior face of thermally efficient spacer systems to reduce the thermal impact of the ties.
Structural Adhesive: In some systems, such as Exterior Insulated Finish Systems (EIFS), structural adhesives can be used to attach the exterior insulation and integrated cladding. An advantage of this system is that no structural elements must penetrate the insulation, so consequently there is essentially no reduction in the insulation effectiveness. Historically, moisture-related issues have been experienced with face-sealed EIFS. However, adequate performance is achievable when installed using rainscreen principles including drainage behind the insulation and good detailing over a robust water resistive barrier.
Structural ConsiderationsFor systems using fasteners through exterior insulation, vertical strapping on the front face of the exterior insulation is fastened with long screws through the insulation and into the framed wall. The cladding is then attached and supported with separate fasteners through the strapping. The bending resistance from the screw (when installed into the sheathing and studs), coupled with a truss system, where the fasteners take tension loads, and the compression loads are resisted by the bearing of the strapping on the insulation layer, provides the primary support for the cladding in the service load state. Additionally, the friction between the insulation and the strapping and sheathed wall (created by the force applied by the fasteners) provides some resistance to the vertical load, though it is generally not accounted for in the structural design. Insulation that is rigid enough to be used in this manner includes XPS, EPS, polyisocyanurate, and rigid mineral fibre products.
Service load state (section view)
Tension
Bending
Gravity
Friction
Compression (Insulation)
Wind/ Seismic
2 | Cladding Support & Fasteners Through Exterior Insulation
Illustrated Guide – R22+ Effective Walls in Residential Construction in British Columbia | 21
This cladding attachment system can be used effectively for claddings with weights up to 15 lbs/ft² (73 kg/m²), excluding the weight of the insulation. Within this limit, the screw size and installation will vary depending on the cladding weight. Based on research and current industry practice it is recommended that claddings that weigh over 15 lbs/ft² (73 kg/m²) be attached using an engineered approach specific to the cladding type and weight. Though cladding weight will generally govern the structural support requirements on low-rise wood-frame buildings, the potential forces generated by wind as well as seismic activity is also considered in the structural design to confirm these loads can be accommodated.
In addition to cladding weight, the stud spacing of the backup wall, the sheathing type and thickness and the exterior insulation thickness and type will affect the required fastener spacing, size, minimum embedment into the backup wall, and the strapping thickness and width. Each factor must be considered in the design for the cladding attachment on strapping with fasteners through exterior insulation.
Lower density rigid and semi-rigid mineral fibre insulation (less than 8 lbs/ft³, 126 kg/m³) is not considered rigid enough for this application and would likely compress excessively under the vertical strapping during installation. Therefore, these products are not included in subsequent guidance on cladding attachment with fasteners through exterior insulation. Additionally, this structural system relies on the increased pullout strength of large screws as compared to nails. Nails are not recommended for use in this application.
Cladding WeightCladding weight for the purpose of the structural calculations included in this guide are categorized as Light (less than 5 lbs/ft², 24kg/m²), Medium (5 to less than 10 lbs/ft², 24–49 kg/m²), Heavy (10–15 lbs/ft², 49–73 kg/m²), and Very Heavy (over 15 lbs/ft², 73 kg/m²) weight cladding. The approximate weight and category for various common cladding types is shown below. Each cladding type will have different weights for different brands and cladding arrangements, so the specific cladding weight should be determined from product technical data to confirm which category it is in.
StrappingIn general, the most appropriate strapping for this application will be plywood strapping1 ripped to width, since the requirements for large screws at close spacing risk splitting strapping made from dimension lumber. Additionally, after the strapping is installed, more fasteners are installed through the strapping to secure the cladding. Larger dimension lumber strapping such as nominal 1x3 or nominal 1x4 may also be adequate in this application. The required strapping thickness and width for structural purposes is a function of the cladding weight and insulation density. Thicker and wider strapping may be necessary when used with rigid mineral wool products (compared to rigid foam) in order to reduce potential bowing or twisting of the strapping between fasteners as it is installed and as cladding is attached.
Strapping thickness and width should meet the minimum requirements given in the tables at the end of this section, though they are not constrained to the sizes given and can be wider and thicker where appropriate. For example, some cladding products may require a minimum fastener embedment that is thicker than the minimum strapping thickness given in the tables, as specified by the cladding manufacturers. Additionally, refer to the code requirements for minimum strapping dimensions and spacing in Part 9 construction (BCBC and VBBL 9.27.5).1Borate treatments are often suitable for wood strapping, and are recommended for most applications. Alkaline copper quat (ACQ) and chromated copper arsenate (CCA) may also be suitable wood treatments, though compatibility with fasteners and adjacent metals should be considered.
Wood Siding
Fibre Cement Siding Thin Concrete Panel Stucco Thin Stone Veneer
0 lbs/�² Light Weight Medium Weight Heavy Weight Very HeavyWeight
5 lbs/�²(24 kg/m²)
10 lbs/�²(49 kg/m²)
15 lbs/�²(73 kg/m²)
Thick Stone, Masonry, etc.Metal Panel
Vinyl Siding
22 | Illustrated Guide – R22+ Effective Walls in Residential Construction in British Columbia
2 | Cladding Support & Fasteners Through Exterior Insulation
Drain MatFor wall assemblies with light weight cladding and up to a maximum of 2” of exterior insulation, strapping may be replaced with an appropriate drain mat product on the front face of the exterior insulation. The drain mat is used to create the drained and vented cavity behind the cladding, and support the cladding attachment. The cladding should be attached with screw fasteners installed through the drain mat and insulation directly into the backup wall, with at least the same fastener spacing, size and embedment requirements as given for equivalent strapping applications (see tables), or as required by the cladding manufacturer. Note that the cladding type used must be compatible with the larger screw fasteners used to attach it through the exterior insulation. The drain mat product should have a minimum compression and stiffness strength to meet the forces expected from cladding attachment and as required by the cladding manufacturer for an acceptable attachment substrate. Refer to the specific product literature and manufacturer guidance for determining the suitability of the drain mat product for installation in a rainscreen or vertical drainage application. Note that this wall assembly may still require the use of wood strapping in order to support cladding and trim around windows or other penetrations through the exterior insulation.
Some assemblies in other parts of this guide are shown with a thin drainage layer at the exterior of the sheathing membrane, such as would be provided by a grooved sheathing membrane product or grooved insulation. In most cases this layer is expected to have minimal thickness and is not considered to affect the structural requirements of the assembly. The requirements of the fastener tables can be applied to assemblies with these components. For assemblies that include an actual drain mat in this configuration, the same structural requirements would apply as for drain mat used at the front face of the exterior insulation, as described above.
ScrewsScrews used to attach the strapping over the insulation should be either stainless steel or galvanized steel with a coating rated to 2000 hour salt spray per ASTM B117, as they will be exposed to the exterior environment and should be protected from corrosion to ensure long term durability. Additional resistance may be required in highly corrosive environments. Always ensure the screw type is compatible with both the strapping material (i.e. wood pressure treatment) and the cladding material1. This application may require specialty screws designed to accommodate the potentially large torque expected as they are installed through thick layers of insulation and into the backup wall. One important construction consideration is the use of screws with a countersunk head so that the screw head can be embedded into the front face of the strapping and out of the way of cladding materials and attachment accessories.
1Stainless steel fasteners should be used when using ACQ treated wood, and either stainless steel or galvanized steel fasteners can be used when using Borate or CCA treated wood . Caution should be exercised when using aluminum based materials in conjunction with copper based wood treatments such as ACQ and CCA. For further information refer to the Builder Insight #8 - Compatibility of Fasteners and Connectors with Residential Pressure Treated Wood (see Additional Resources on page 53).
Long screws used for fastening strapping over exterior insulation
2 | Cladding Support & Fasteners Through Exterior Insulation
Illustrated Guide – R22+ Effective Walls in Residential Construction in British Columbia | 23
Backup Wall and Minimum Fastener EmbedmentThe stud spacing of the exterior framed wall will govern the horizontal spacing of the strapping and fasteners, as all fasteners through exterior insulation must be installed through the exterior sheathing into studs. Closer stud and strapping horizontal spacing (i.e. maximum 16” o.c.) provides additional support of the cladding, and therefore may allow less frequent vertical screw placement. For wider spaced framing (i.e. 24” o.c. horizontal spacing) closer vertical spacing of screws may be required (see tables).
The structural design included in this section assumes all of the screws used to fasten the strapping in place are installed through wood sheathing and into the wood framing in the backup wall1, and standard plywood or oriented strand board sheathing is used as the sheathing material. For ease of construction, consider using markers or snap lines on the outside face of the wall sheathing membrane in line with the stud framing in order to clearly indicate the correct location of screws into the backup wall. Note that screws that unintentionally miss the framing should not be removed for repositioning, as the hole created in the sheathing membrane by the screw may introduce a risk or water ingress and air leakage in the wall assembly. Screws should be left in place, with a secondary screw installed as close as possible into the stud.
The minimum embedment length as given in the tables is measured from the outside face of the wood sheathing. BCBC and VBBL requirements for the minimum embedment of cladding attachment fasteners (9.27.5.7) dictate that the fasteners must at least fully penetrate through the exterior sheathing, and therefore the tables include a minimum fastener embedment of 1-1/2”, to account for up to 3/4” exterior sheathing. Additionally, minimum embedment length only accounts for the non-tapered portion of the screw where the screws threads are at the full diameter, and does not include the tip of the screw. As a rule of thumb, approximately the front 1/4” of the screw should be ignored in determining the appropriate screw length. Contact the screw manufacturer for further information.
DeflectionTesting has shown that some minor deflection of the strapping and cladding may be experienced for wall assemblies with heavy weight claddings. In most cases, the deflection is constrained to less than 1/32” for typical heavy weight cladding loads. Claddings that may be prone to cracking such as stucco or adhered stone should be installed so as to reduce continuous inside corners and irregular shapes, and wherever possible should be segmented into smaller areas across the face of the wall assembly using crack control joints. Refer to Additional Resources on page 53 for further structural design and testing information.
Potential deflection for heavy weight cladding may be reduced by using deflection blocks at the top of the strapping pieces, or by installing screws at an upwards angle into the backup wall. The approach with deflection blocks uses pressure treated dimension lumber blocking, installed at the top of the strapping either at the rim joist or at the top of the wall, in order to “hang” the strapping (see illustration on next page). This provides a solid wood support mechanism and minimizes the deflection movement of the cladding. Note that the blocking attachment should be designed to provide 100% of the vertical support for the cladding in order to prevent vertical loading on the screws at portions of the strapping without deflection blocks. In addition to vertical deflection, this approach can also serve to minimize over-tightening of the screws laterally through exterior insulation. The structural design in this section does not account for installation of deflection blocks at the top of the strapping, and therefore specific structural design should be completed for wall assemblies where this configuration is desired.
2Note that specific structural design can be completed for an assembly where fasteners are supported only by the sheathing, though this design approach is not included in this guide .
24 | Illustrated Guide – R22+ Effective Walls in Residential Construction in British Columbia
2 | Cladding Support & Fasteners Through Exterior Insulation
Installation Methods
Insulation BoardsInstallation of one or multiple layers of exterior insulation requires a stepped approach, as each insulation board should be attached using only the strapping as much as possible, so as to reduce the number of fastener penetrations through the insulation and sheathing membrane. This approach is most easily completed using the following installation procedure (see illustration):
1. Install the starter course of insulation using the strapping fastened at the bottom edge and held upright in place as needed. Insulation boards should be installed with the vertical edges offset 8” from the strapping so that each board (usually 48” wide) will be secured behind 3 separate straps.
2. Place the insulation behind the strapping and “stack” it on the starter course, with screws installed along the strapping through the insulation boards as they are installed up to the top edge.
3. Insulation boards in a single layer can be stacked directly above the course below or offset horizontally, and should be offset 16” horizontally between layers if multiple insulation layers are used.
An alternative installation approach is to use one or two fasteners to temporarily pin the insulation boards in place before the strapping is installed. This approach may require screws with large washers to adequately secure heavier insulation. Refer to the insulation manufacturer product data for further guidance on fastener layout and installation requirements.
Where screws are installed at an upward angle, the support system will rely more readily on the truss action of the screw tension and insulation compression, rather than screw bending resistance. Therefore, the potential for deflection that may occur from supporting heavy weight cladding on the strapping is reduced. Note that screws installed at an upwards angle may need to be longer than those used horizontally as they must achieve the same embedment in the backup wall. The structural design in this section does not account for screws being installed at an upwards angle and therefore specific structural design should be completed for wall assemblies where this configuration is to be used.
Section View
Deflection block Screw at upward angle
1
2
3
16" 8"
2 | Cladding Support & Fasteners Through Exterior Insulation
Illustrated Guide – R22+ Effective Walls in Residential Construction in British Columbia | 25
Continuity of InsulationBoards should be installed in as large as possible pieces over the wall area. Pieces can be cut after installation to ensure all wall surfaces, including around openings and penetrations, are covered while minimizing gaps and insulation board joints. Multiple layers of insulation should be used when possible, with joints staggered to reduce thermal bypass at the insulation. Exterior insulation should only be interrupted by necessary service penetrations and structural elements. Cladding accessories such as trim and flashings should be installed in front of the insulation where possible. For example, the back face of through-wall flashings can be installed onto intermittent pieces of pressure treated lumber in the plane of the insulation (see illustration) instead of installing the flashing at the face of the sheathing. Self-adhered membrane can be used instead of the metal flashing material to divert water out from the sheathing membrane as required.
Rainscreen Free AreaThe BCBC and VBBL require that rainscreen cavities have a minimum free area of 80% (9.27.2), meaning that material used to create the space must not exceed 20% of the cross-sectional area of the drained and vented cavity. This requirement can generally be met with most strapping arrangements, including the strapping widths given in the tables at the end of this section. However, at details or terminations wherever additional insulation or cladding support is necessary, narrower strapping or intermittent pieces should be used as infill for wall assemblies where 3-1/2” wide strapping is used, in order to maintain the 80% free area. Drain mat products used to create the rainscreen cavity must also provide a minimum 80% open cavity area. The authority having jurisdiction should be notified to confirm that the arrangement of the drained and vented cavity is acceptable. Note that mass walls are exempted by the BCBC from rainscreen requirements.
Fastener TablesThe following information provides the structural requirements for attaching strapping over exterior insulation using screws. The tables are organized by cladding weight, with fastener requirements shown for insulation thicknesses up to 8”. Illustrations of each aspect of the fastener and strapping installation requirements are shown below. See Additional Resources on page 53 for more guidance on the structural design of cladding support using fasteners through exterior insulation, and for guidance on systems that use more than 8” of exterior insulation.
Section View Plan View
Stud
fram
ing
(16"
-24"
o.c
.)
Max
imum
ver
tical
sc
rew
spac
ing
Minimum strapping size (thickness x width)
Minimum screw size number
Minimum screw embedment (through wood sheathing and into wood studs,
discounting screw tip)
Insulation thickness (rigid foam/rigid mineral wool)
Flashing set out from the face of the sheathing
26 | Illustrated Guide – R22+ Effective Walls in Residential Construction in British Columbia
2 | Cladding Support & Fasteners Through Exterior Insulation
*Wall assemblies with light weight cladding and up to 2” of exterior insulation may use a drain mat rainscreen product in lieu of strapping where appropriate, with fasteners attached directly to the wall framing . Appropriateness of products and fastening configurations in this application to be confirmed with drain mat manufacturer and cladding manufacturer. This approach is unlikely to be suitable for insulation thickness greater than 2”, or for heavier claddings .
Light Weight Cladding
Medium Weight Cladding
Heavy Weight Cladding
Fastener Tables*
*The values provided in the above tables pertain only to wood-frame wall assemblies on low-rise buildings less than three storeys . The higher wind-
loads expected on larger buildings requires specific structural design. See Additional Resources on page 53 for further guidance .
Illustrated Guide – R22+ Effective Walls in Residential Construction in British Columbia | 27
Exterior
Cladding
1x3 strapping (ventilated air space)
Exterior insulation (rigid mineral wool)
Vapour permeable sheathing membrane
Sheathing (plywood)
2x6 wood studs w/ batt insulation (fibreglass)
Vapour barrier (polyethylene sheet)
Gypsum wall board
Interior
This section provides information about four different above-grade wood-frame wall assemblies that can achieve the R-22 thermal performance target.
Split InsulationThis above grade wall assembly consists of rigid or semi-rigid insulation placed on the exterior of a conventional above grade, insulated 2x4 or 2x6, wood-frame wall assembly. High effective R-values of the assembly are achieved by using continuous insulation outside of the structural framing and thermally efficient cladding attachments, in combination with insulation in the stud space. In most cases, cladding can be supported by strapping fastened with screws through rigid insulation (see previous section). It is also possible to use thermally efficient cladding attachment systems. The exterior insulation product used in this arrangement should not be sensitive to moisture as it will be exposed to periodic wetting. In cold climates, insulation placed on the exterior of the stud wall increases the temperature of the moisture-sensitive wood sheathing and framing and consequently often improves the durability of the assembly by reducing the risk of condensation and associated moisture damage.
Key Considerations• The method of cladding attachment is important to limit thermal bridging through the exterior insulation while adequately
supporting the exterior cladding (see previous section).
• The vapour permeability of the sheathing membrane and exterior insulation should be carefully considered so as not to create a risk of condensation within the assembly, or to reduce the ability of the assembly to dry in the event that incidental wetting occurs.
3 | Wood-Frame Walls
$
28 | Illustrated Guide – R22+ Effective Walls in Residential Construction in British Columbia
3 | Wood-Frame Walls
CladdingAny type of cladding can be used with this wall assembly. The selection of the cladding attachment strategy will depend on the weight and support requirements of the cladding. In many cases, the cladding can simply be attached to vertical 1x3 strapping (or similar) fastened through the exterior insulation and into the backup wall. In this arrangement, the rigid exterior insulation and fasteners will act in tandem to carry the cladding load (see previous section). Thermally efficient cladding supports and brick ties can also be used with this assembly and would permit the use of semi-rigid exterior insulation products.
Water Resistive BarrierA vapour-permeable sheathing membrane should be installed on the exterior of the wall sheathing, behind the exterior insulation. There are a variety of both loose (i.e. mechanically fastened) and self-adhered sheet products, as well as some liquid applied products that can be used in this application. The sheathing membrane should be vapour-permeable so as to facilitate some outward drying of the assembly. Where relatively impermeable foam insulation is used on the exterior, joints should be taped and sealed so that water does not penetrate through the insulation and potentially become trapped in the wall assembly. (Further discussion on next page.)
Air BarrierThis assembly can accommodate several air-barrier strategies. However, often the most straightforward one to use is the exterior sheathing membrane. If the sheathing membrane is to form the air barrier, it must be taped and sealed to ensure continuity. Structural support of the sheathing membrane is provided by the sandwiching of the insulation and sheathing on either side. Alternatively, a sealed sheathing approach can be used, or potentially airtight polyethylene on the interior of the stud wall or airtight drywall, though ensuring continuity of the latter approaches can be arduous. Continuity of the air barrier at transitions and penetrations is critical to its performance.
Interior Insulation TypesThe stud space can be insulated using a variety of different insulation types, including batts (i.e. mineral wool or fibreglass), blown-in fibrous insulation (i.e. cellulose or fibreglass), or spray foam.
Exterior Insulation TypesVarious types of exterior insulation can potentially be used in split insulation wall assemblies, including permeable insulations such as semi-rigid or rigid mineral wool, or semi-rigid fibreglass, and relatively impermeable insulations such as extruded polystyrene (XPS), expanded polystyrene (EPS), polyisocyanurate (polyiso), and closed-cell spray polyurethane foam.
While each of these insulation materials can provide adequate thermal resistance, the permeability of the materials is of particular importance with respect to the drying capacity of the wall assembly. (Further guidance on the following page).
Effective Assembly R-value of Split Insulation Wall Assembly
[ft²·°F·hr/Btu]2x4 Stud Wall (R-12 Batts)
2x6 Stud Wall (R-19 Batts)
Thickness of Exterior
Insulation
R-value/inch of Exterior Insulation
R-4.0 R-5.0 R-4.0 R-5.0
0” 11.3 11.3 16.2 16.2
1/2” 13.3 13.8 18.2 18.7
1” 15.3 16.3 20.2 21.2
1 1/2” 17.3 18.8 22 2 23 72” 19.3 21.3 24 2 26 2
2 1/2” 21.3 23 8 26 2 28 73” 23 3 26 3 28 2 31 2
3 1/2” 25 3 28 8 30 2 33 74” 27 3 31 3 32 2 36 2
4 1/2” 29 3 33 8 34 2 38 75” 31 3 36 3 36 2 41 2
5 1/2” 33 3 38 8 38 2 43 76” 35 3 41 3 40 2 46 2
A 23% framing factor is assumed which is consistent with standard 16” o .c . stud framing practices .R-values below the R-22 requirement
3 | Wood-Frame Walls
Illustrated Guide – R22+ Effective Walls in Residential Construction in British Columbia | 29
Vapour Barrier and Exterior Insulation ConsiderationsThe exterior insulation in this assembly increases the temperature of the sheathing and reduces the potential for condensation. However, a vapour barrier should still be installed on the interior of the stud wall unless the majority of insulation R-value is placed on the exterior of the sheathing. Typically, a polyethylene sheet is used as the interior vapour barrier in these types of assemblies.
A relatively impermeable foam plastic insulation will not readily allow for moisture in the wall to dry outwards. If this insulation is installed in conjunction with an interior vapour barrier, the two vapour barriers can trap moisture that inadvertently gets into the assembly and can potentially lead to fungal growth and decay.
To avoid this situation, when impermeable insulation is used, the ratio of insulation outboard of the sheathing to insulation in the stud cavity should be carefully considered so as to maintain the temperature of the sheathing at relatively safe levels and avoid condensation. Additionally, while not explicitly required by the codes, a relatively more permeable interior vapour barrier such as a smart vapour retarder or vapour retarder paint could be used to permit some amount of inward drying. A thin drainage layer could also be included at the exterior of the sheathing membrane to facilitate drainage of any water which may penetrate behind the insulation. In general, a vapour permeable exterior insulation in combination with an interior vapour barrier typically provides a lower risk wall assembly than does an assembly using impermeable exterior insulation
Code Compliance Paths for Split Insulation Wall Assemblies
Using permeable exterior insulation (defined by the Code as > 60 ng/(s·m²·Pa)) does not trigger the requirements regarding placement of impermeable insulation products and consequently can comply with the Code. When using this approach it is important to consider the thickness of the insulation in determining its permeance. When exterior insulation with permeance relatively close to the code limit is used, it may be prudent to use a relatively permeable interior vapour barrier such as a smart vapour retarder or vapour retarder paint, as well as a drainage layer behind the insulation such as grooved sheathing membrane.
When impermeable exterior insulation is used, the wall can comply by meeting the insulation ratio requirements of Table 9.25.5.2 which are intended to limit the potential for condensation within the wall assembly. Since outward drying in these assemblies is limited by the impermeable insulation, it may be prudent to use a relatively permeable interior vapour barrier such as a smart vapour retarder or vapour retarder paint, as well as a drainage layer behind the insulation such as grooved sheathing membrane. The exterior-to-interior insulation ratio can also be taken to an extreme such that only exterior insulation is used.
Exterior-to-Interior Insulation Ratio (Table 9 25 5 2)
30 | Illustrated Guide – R22+ Effective Walls in Residential Construction in British Columbia
3 | Wood-Frame Walls
Exterior InsulationThis above grade wall assembly consists of rigid or semi-rigid insulation placed on the exterior of a conventional above grade, uninsulated 2x4 or 2x6, wood-frame wall assembly. High effective R-values of the assembly are achieved by using continuous insulation outside of the structural framing in combination with thermally efficient cladding attachments. In most cases cladding can be supported by strapping fastened with screws through rigid insulation (see previous section). It also possible to use thermally efficient cladding attachment systems. The exterior insulation product used in this arrangement should not be sensitive to moisture as it will be exposed some periodic wetting. In cold climates, insulation placed on the exterior of the stud wall increases the temperature of the moisture-sensitive wood sheathing and framing and consequently often improves the durability of the assembly by reducing the risk of condensation and associated moisture damage.
Exterior
Cladding
1x3 strapping (ventilated air space)
Exterior insulation (extruded polystyrene)
Sheathing membrane
Sheathing (plywood)
2x4 wood studs (empty cavity)
Gypsum wall board
Interior
Key Considerations• The method of cladding attachment is important to limit thermal bridging through the exterior insulation while adequately
supporting the exterior cladding (see previous section).
• Since in this assembly the insulation is located entirely outside the framed wall, the typically used interior vapour barrier (i.e. polyethylene sheet, vapour barrier paint, etc.) should be removed.
• Vapour impermeable sheathing membrane can be used to provide both liquid water and vapour control (i.e. water resistive barrier and vapour barrier).
$
3 | Wood-Frame Walls
Illustrated Guide – R22+ Effective Walls in Residential Construction in British Columbia | 31
CladdingAny type of cladding can be used with this wall assembly. The selection of the cladding attachment strategy will depend on the weight and support requirements of the cladding. In many cases the cladding can simply be attached to vertical strapping fastened with screws through the exterior insulation and into the backup wall. In this arrangement, the rigid exterior insulation and fasteners will act in tandem to carry the cladding load (see previous section). Thermally efficient cladding supports and brick ties can also be used with this assembly and would permit the use of semi-rigid exterior insulation products.
Water Resistive BarrierA vapour-impermeable sheathing membrane should be installed on the exterior of the wall sheathing, behind the exterior insulation, to provide the water resistive barrier for this assembly. Typically a self-adhered sheet product is appropriate for this application, and some liquid applied products can also be used. Where relatively impermeable foam insulation is used on the exterior, joints should be taped and sealed so that water does not penetrate through the insulation and potentially become trapped in the wall assembly.
Air BarrierThe most straightforward air barrier approach for this assembly is to use the self-adhered sheathing membrane. If a mechanically fastened sheathing membrane is used, it must be taped and sealed to ensure continuity. Structural support of a mechanically fastened sheathing membrane is provided by the sandwiching of the insulation and sheathing on either side. Alternatively, a sealed sheathing approach can be used. Continuity of the air-barrier at transitions and penetrations is critical to its performance.
Exterior Insulation TypesVarious types of exterior insulation can potentially be used in this assembly including permeable insulations such as semi-rigid or rigid mineral wool, or semi-rigid fibreglass, and relatively impermeable insulations such as extruded polystyrene (XPS), expanded polystyrene (EPS), polyisocyanurate (polyiso), and closed-cell spray polyurethane foam.
Vapour BarrierThe exterior insulation in this assembly increases the temperature of the sheathing and nearly eliminates the potential for damage associated with condensation on the framing. Relatively impermeable sheathing membranes can be used as the vapour barrier in this assembly, and help limit the potential for inward vapour drive from incidental water trapped between the insulation and the sheathing membrane. A vapour barrier should not be installed at the interior.
Effective Assembly R-value for 2x4 or 2x6 Exterior Insulation
Stud Wall (No Batts) [ft²·°F·hr/Btu]
Thickness of Exterior
Insulation
R-value/inch of Exterior Insulation
R-4.0 R-5.0
3 1/2” 17.8 21.3
4” 19.8 23 84 1/2” 21.8 26 3
5” 23 8 28 85 1/2” 25 8 31 3
6” 27 8 33 86 1/2” 29 8 36 3
7” 31 8 38 8R-values below the R-22 requirement
Using Impermeable Materials Outside Wood-frame Walls | There may be a risk of trapping existing construction moisture in the wall assembly if vapour-impermeable materials are used at the exterior face of the wall at wood stud packs and window headers, since moisture will not easily dry inwards due to the wood thickness . Always check that the wood is dry prior to installing impermeable membranes or insulation products, or consider using permeable exterior materials .
32 | Illustrated Guide – R22+ Effective Walls in Residential Construction in British Columbia
3 | Wood-Frame Walls
Exterior
Cladding
Strapping (ventilated air space)
Sheathing membrane
Sheathing (plywood)
Double stud wall with insulation (cellulose with supporting netting)
Vapour barrier (polyethylene sheet)
Gypsum wall board
Interior
Double StudThis above grade wall assembly consists of a deeper stud cavity created by an additional framed wall installed to the interior of a conventional wood-frame wall. High effective R-values of the assembly are achieved by filling the increased cavity depth with either batt insulation, blown-in fibrous insulation, or spray foam insulation. There is no exterior insulation installed in this assembly, so cladding can be attached directly to the wall through vertical strapping (i.e. furring) using standard rainscreen detailing. In cold climates, the additional depth of insulation installed on the interior side of the exterior sheathing can slightly decrease the sheathing temperature and consequently increase the risk of condensation on the moisture-sensitive wood sheathing and framing. As a result, continuity of the air barrier and installation of an interior vapour barrier are critical to the performance of this assembly, as is the quality of the insulation installation to reduce airflow within the assembly (i.e. convective looping).
Key Considerations• The quality of the insulation installation is critical to limiting convective looping within the increased wall assembly depth,
which can reduce the effectiveness of the insulation and also contribute to moisture accumulation within the assembly.
• Continuity of the air barrier and installation of an interior vapour barrier are fundamental to the performance of this assembly as the slightly decreased exterior sheathing temperature (as compared to standard construction) increases the risk of condensation and related damage.
$
3 | Wood-Frame Walls
Illustrated Guide – R22+ Effective Walls in Residential Construction in British Columbia | 33
CladdingAny type of cladding can be used with this wall assembly and can be fastened directly to the wall using vertical strapping (i.e. furring) and standard rainscreen details. The cladding is intended to control the majority of bulk water, and any water that does penetrate past the cladding must be able to drain out via the cavity created by the vertical strapping.
Water Resistive BarrierA vapour-permeable sheathing membrane should be installed on the exterior of the wall sheathing, behind the vertical strapping. There are a variety of both loose (i.e. mechanically fastened) and self-adhered sheet products, as well as some liquid applied products which can be used in this application. The sheathing membrane should be vapour-permeable to facilitate some outward drying of the assembly.
Air BarrierThis assembly can accommodate several air-barrier strategies. However, often the most straightforward one to use is the exterior sheathing membrane. If the sheathing membrane is to form the air barrier, it must be taped and sealed to ensure continuity. Structural support of the sheathing membrane is provided by sandwiching between the vertical strapping and sheathing on either side, or else through adhesion to the sheathing. Alternatively, a sealed sheathing approach can be used for the air barrier. In this approach, joints in the sheathing must be taped and sealed.
Due to the significant depth of the insulated space, an interior layer (i.e. polyethylene sheet or drywall) should also be detailed as airtight to provide a secondary air barrier to prevent flow of air into the insulated cavity from the interior and reduce the potential for convective looping.
Insulation TypesThe stud space can be insulated using a variety of different insulation types including batt (i.e. mineral wool or fibreglass), blown-in fibrous insulation (i.e. cellulose or fibreglass), or open-cell spray foam. With fibrous fill insulations, higher density blown products with integral binders can be used to prevent settlement within the deep wall cavity. A combination of closed-cell spray foam and fibrous fill in a flash-and-fill application could also be considered to improve airtightness of the assembly and also reduce convective looping within the insulation between the studs.
Vapour BarrierThe relatively large amount of insulation installed to the interior of moisture-sensitive wood framing and sheathing increases the risk of moisture accumulation within this assembly. To control the outward flow of water vapour through this assembly an interior vapour barrier should be installed on the interior of innermost stud wall. Typically, a polyethylene sheet is used as the interior vapour barrier in these types of assemblies.
Effective Assembly R-value for Double 2x4 Stud Wall* [ft²·°F·hr/Btu]Thickness of
5” 36 7 41 2 48 3Assumes interior stud wall has the same 23% framing factor as the exterior stud wall, though it may require less framingR-values below the R-22 requirement
34 | Illustrated Guide – R22+ Effective Walls in Residential Construction in British Columbia
3 | Wood-Frame Walls
Exterior
Cladding
Strapping (ventilated air space)
Sheathing membrane
Sheathing (plywood)
Deep stud wall (engineered wood I-joist) with insulation (fibreglass batts)
Taped and sealed interior plywood sheathing
2x4 framed wall
Gypsum wall board
Interior
Deep Stud With Service WallThis above grade wall assembly consists of a deeper stud cavity created using either deep studs (2x10, 2x12) or engineered wood I-joists and an additional 2x4 service wall constructed on the interior to allow for running of electrical, plumbing, and HVAC services without penetrating the interior air barrier. These wall types will typically need to be engineered. High effective R-values of the assembly are achieved by filling the increased cavity depth with either batt insulation, blown-in fibrous insulation, or spray foam insulation. There is often no exterior insulation installed in this assembly, so cladding can be attached directly to the wall through vertical strapping (i.e. furring) using standard rainscreen detailing. In cold climates, the additional depth of insulation installed on the interior side of the exterior sheathing can slightly decrease the sheathing temperature and consequently increase the risk of condensation. As a result, continuity of the air barrier and installation of an interior vapour barrier are critical to the performance of this assembly, as is the quality of the insulation installation to reduce airflow within the assembly (i.e. convective looping).
Key Considerations• The quality of the insulation installation is critical to limiting convective looping within the increased wall assembly depth,
which can reduce the effectiveness of the insulation and also contribute to moisture accumulation within the assembly.
• Continuity of the air barrier and installation of an interior vapour barrier are fundamental to the performance of this assembly, as the slightly decreased exterior sheathing temperature (as compared to standard construction) increases the risk of condensation and related damage.
$
3 | Wood-Frame Walls
Illustrated Guide – R22+ Effective Walls in Residential Construction in British Columbia | 35
CladdingAny type of cladding can be used with this wall assembly and can be fastened directly to the wall using vertical strapping (i.e. furring) and standard rainscreen details. The cladding is intended to control the majority of bulk water, and any water that does penetrate past the cladding must be able to drain out via the cavity created by the vertical strapping.
Water Resistive BarrierA vapour-permeable sheathing membrane should be installed on the exterior of the wall sheathing, behind the vertical strapping. There are a variety of both loose (i.e. mechanically fastened) and self-adhered sheet products, as well as some liquid applied products that can be used in this application. The sheathing membrane should be vapour-permeable to facilitate some outward drying of the assembly.
Air BarrierThe interior sheathing between the service wall and deep stud (or engineered wood I-joist) wall should be detailed as airtight to provide the air barrier for this assembly. This interior air barrier will prevent the flow of air into the insulated cavity from the interior as well as reduce the potential for convective looping. In addition to the interior air barrier, a secondary exterior air barrier such as a vapour permeable self-adhered sheathing membrane or sealed sheathing can also be used to reduce wind penetration and improve the overall assembly airtightness. Note that the air barrier transition at the floor line requires careful attention to achieve continuity of the interior air barrier.
Insulation TypesThe stud space can be insulated using a variety of different insulation types including batt (i.e. mineral wool or fibreglass), blown-in fibrous insulation (i.e. cellulose), or open-cell spray foam. With fibrous fill insulations, higher density blown products with integral binders can be used to prevent settlement within the deep wall cavity. A cost effective combination of open-cell spray foam and fibrous fill in a flash and fill application could also be considered to improve airtightness of the assembly and also reduce convective looping within the insulation between the studs. The service wall stud space can either be left empty, or it can be insulated to increase the assembly R-value.
Note specifically that some 2x8 framed wall assemblies will achieve R-22 thermal performance, while others will not. Achieving R-22 with this type of framing will depend primarily on the R-value per inch of the insulation, the framing factor, the presence of a service wall, and the cladding type.
Vapour BarrierThe relatively large amount of insulation installed to the interior of the sheathing increases the risk of moisture accumulation within this assembly. An interior vapour barrier should be installed on the interior of deep stud or engineered wood I-joist walls to control the outward flow of water vapour through this assembly. Plywood or OSB can be used as the interior vapour barrier in these types of assemblies.
Effective Assembly R-value for Deep Stud Walls [ft²·°F·hr/Btu]
A 23% framing factor is assumed which is consistent with standard 16” o .c . stud framing practices . Reduced framing factors may be possible .R-values below the R-22 requirement
1Plywood and OSB have a dry cup vapour permeance of less than 60 ng/(s•m²•Pa), but are exempted from the requirements for placement of impermeable materials due to having significantly higher wet cup vapour permeance.
36 | Illustrated Guide – R22+ Effective Walls in Residential Construction in British Columbia
5 | Steel Stud WallsSteel stud framing is significantly less thermally efficient than wood framing. The metal studs conduct heat and can lead to significant thermal bridging through insulation placed inside the framing. Other materials such as concrete that may penetrate through insulation elements will also cause significant thermal bridging, and should be avoided wherever possible (see following section). It is not appropriate to determine the effective R-value for steel stud assemblies using the parallel paths method due to the complex heat flow pathways. The effective R-values provided for the following two assembly types are based on three-dimensional thermal modelling that accounts for the effect of various cladding attachment clip systems.
Exterior InsulationThis above grade wall assembly consists of rigid or semi-rigid insulation placed on the exterior of a conventional above grade, uninsulated steel stud wall assembly. High effective R-values of the assembly are achieved by using continuous insulation outside of the structural framing and concrete, in combination with thermally efficient cladding attachment systems. The exterior insulation product used in this arrangement should not be sensitive to moisture because it will be exposed to some periodic wetting. In cold climates, insulation placed on the exterior of the stud wall increases the temperature of the sheathing and framing and consequently often improves the durability of the assembly by reducing the risk of condensation and associated moisture damage.
Exterior
Cladding
Metal z-girts on clips (ventilated air space)
Exterior insulation (semi-rigid mineral wool)
Sheathing membrane
Sheathing (gypsum wall board)
6" steel studs (empty cavity)
Gypsum wall board
Interior
$
5 | Steel Stud Walls
Illustrated Guide – R22+ Effective Walls in Residential Construction in British Columbia | 37
Key Considerations• The method of cladding attachment is important to limit thermal bridging through the
exterior insulation while adequately supporting the exterior cladding. Thermally efficient clips like fibreglass or stainless steel clip systems provide the least thermal bridging through the exterior insulation.
• Concrete elements that extend beyond the exterior face of the wall sheathing will impact the thermal performance of the wall assembly. Using continuous exterior insulation over all structural elements will reduce or eliminate this thermal bridging. If needed, use structural thermal breaks for components that must protrude through the insulation.
• A vapour impermeable sheathing membrane can be used to provide both liquid water and vapour control (i.e. water resistive barrier and vapour barrier).
CladdingAny type of cladding can be used with this wall assembly, though fire protection requirements may restrict this. The selection of the cladding attachment strategy will depend on the weight and support requirements of the cladding. Thermally efficient cladding supports and brick ties can be used with this assembly and permit the use of semi-rigid exterior insulation products.
Water Resistive BarrierA vapour-impermeable sheathing membrane should be installed on the exterior of the wall sheathing, behind the exterior insulation, to provide the water resistive barrier for this assembly. Typically, a self-adhered sheet product is appropriate for this application, and some liquid applied products can also be used.
Air BarrierThe most straightforward air barrier approach for this assembly is the self-adhered sheathing membrane. If a mechanically fastened sheathing membrane is used, it must be taped and sealed to ensure continuity. Structural support of a mechanically fastened sheathing membrane is provided by the sandwiching of the insulation and sheathing on either side. Alternatively, a sealed sheathing approach can be used. Continuity of the air-barrier at transitions and penetrations is critical to its performance.
Exterior Insulation TypesVarious types of exterior insulation can potentially be used in this assembly including permeable insulations such as semi-rigid or rigid mineral wool. See Fire Risk Considerations on page 14 for guidance on the use of combustible insulation types in above grade wall assemblies.
Vapour BarrierThe exterior insulation in this assembly increases the temperature of the sheathing and nearly eliminates the potential for damage associated with condensation in the wall. Relatively impermeable sheathing membranes can be used as the vapour barrier in this assembly, and help limit the potential for inward vapour drive from incidental water trapped between the insulation and the sheathing membrane. A vapour barrier should not be installed at the interior.
Effective Assembly R-value for 6" Exterior Insulated Steel Stud Wall (No Batts) [ft²·°F·hr/Btu]
38 | Illustrated Guide – R22+ Effective Walls in Residential Construction in British Columbia
5 | Steel Stud Walls
Split Insulation This above grade wall assembly consists of rigid or semi-rigid insulation placed on the exterior of an insulated steel stud wall assembly. High effective R-values of the assembly are achieved by using continuous insulation outside of the structural framing and thermally efficient cladding attachments, in combination with insulation in the stud space. The thermal bridging due to the steel stud framing and the concrete slab edges will significantly impact the overall thermal performance of the wall assembly; the majority of the insulation should be concentrated at the exterior. Steel stud split insulation wall assemblies with less than 4" of exterior insulation will likely not meet the minimum R-22 effective requirements.
Cladding should be supported by thermally efficient cladding attachment systems. The exterior insulation product used in this arrangement should not be sensitive to moisture as it will be exposed to periodic wetting. In cold climates, insulation placed on the exterior of the stud wall increases the temperature of the sheathing and framing and consequently often improves the durability of the assembly by reducing the risk of condensation and associated moisture damage.
Key Considerations• The method of cladding attachment is important to limit thermal bridging through the exterior insulation while adequately
supporting the exterior cladding (see previous section).
• The vapour permeability of the sheathing membrane and exterior insulation should be carefully considered so as not to create a risk of condensation within the assembly, or to reduce the ability of the assembly to dry in the event that incidental wetting occurs.
• The thermal performance of the insulated steel stud wall assembly will be significantly reduced due to thermal bridging both through the steel stud framing and any concrete elements in line with or beyond the exterior face of the sheathing.
Exterior
Cladding
Metal z-girts on clips (ventilated air space)
Exterior insulation (semi-rigid mineral wool)
Sheathing membrane
Sheathing (gypsum wall board)
6" steel studs with batt insulation (mineral wool)
Vapour barrier (polyethylene sheet)
Gypsum wall board
Interior
$
5 | Steel Stud Walls
Illustrated Guide – R22+ Effective Walls in Residential Construction in British Columbia | 39
CladdingAny type of cladding can be used with this wall assembly, though fire protection requirements may restrict this. The selection of the cladding attachment strategy will depend on the weight and support requirements of the cladding. Thermally efficient cladding supports and brick ties can be used with this assembly and permit the use of semi-rigid exterior insulation products. Cladding attachment with screws through rigid insulation is generally not suitable for steel stud walls due to constructability issues.
Water Resistive BarrierA vapour-permeable sheathing membrane should be installed on the exterior of the wall sheathing, behind the exterior insulation. There are a variety of both loose (i.e. mechanically fastened) and self-adhered sheet products, as well as some liquid applied products that can be used in this application. The sheathing membrane should be vapour-permeable so as to facilitate outward drying of the assembly. Where relatively impermeable foam insulation is used on the exterior, joints should be taped and sealed so that water does not penetrate through the insulation and potentially become trapped in the wall assembly.
Air BarrierThis assembly can accommodate several air-barrier strategies. However, often the most straightforward one to use is the sheathing membrane. If the sheathing membrane is to form the air barrier, it must be taped and sealed to ensure continuity. Structural support of the sheathing membrane is provided by the sandwiching of the insulation and sheathing on either side. Alternatively, a sealed sheathing approach can be used. Continuity of the air barrier at transitions and penetrations is critical to its performance.
Exterior Insulation TypesVarious types of exterior insulation can potentially be used in this assembly including permeable insulations such as semi-rigid or rigid mineral wool. See Fire Risk Considerations on page 14 for guidance on the use of combustible insulation types in above grade wall assemblies.
Vapour BarrierThe exterior insulation in this assembly increases the temperature of the sheathing and reduces the potential for condensation. However, a vapour barrier should still be installed on the interior of the stud wall unless the vast majority of insulation R-value is placed on the exterior of the sheathing. Typically, a polyethylene sheet is used as the interior vapour barrier in these types of assemblies, though other options including vapour barrier paint or smart vapour retarder sheet products may be appropriate in some areas. If sufficient exterior insulation is installed a more permeable option such as latex paint may be adequate.
40 | Illustrated Guide – R22+ Effective Walls in Residential Construction in British Columbia
6 | Mid-Rise Concrete ConstructionThis section provides guidance on concrete assemblies in buildings when used as the overall structure, including enclosure elements, and assemblies that interface with other wall assemblies above grade.
Above Grade Concrete Wall AssembliesMass walls can be insulated on the exterior, interior, or on both sides (in the case of Insulating Concrete Forms [ICFs]). Exterior insulation concrete walls are more appropriate for above grade assemblies both in terms of moisture durability and thermal continuity. The method of cladding attachment through exterior insulation is important to limit thermal bridging through the exterior insulation. Thermally efficient cladding supports and brick ties can be used with this assembly. If interior insulation is used, continuous insulation like rigid foam board and/or spray foam should be used inboard of the interior framing and finishes, in order to limit thermal bridging.
ICF above grade concrete wall assemblies are another approach that can be used to meet R-22+ insulation levels. See Other R-22+ Walls on page 50.
Exposed Slab EdgesFor buildings with a concrete floor structure, the concrete slab edge must be adequately insulated at the exterior face to limit thermal bridging past the wall assembly. Exterior insulation on the wall should extend beyond the wall framing to completely cover the exterior face of the concrete slab edge. For walls with split insulation where the majority of the insulation is in the wall stud cavity, consider installing the wall framing set out from the slab edge to allow for more exterior insulation without changing the plane of the cladding. Walls with no exterior insulation and no ability to cover the concrete slab edge with insulation should employ a concrete thermal break product, because uncontrolled slab edge thermal bridging will dramatically impact the overall thermal performance of the wall (see next page).
Exposed slab edges can result in significantly more thermal bridging compared to slab edges covered with insulation
Exterior insulation above grade concrete wall
Interior insulation above grade concrete wall
6 | Mid-Rise Concrete Construction
Illustrated Guide – R22+ Effective Walls in Residential Construction in British Columbia | 41
BalconiesConcrete elements that extend beyond the exterior face of the wall sheathing, both for steel stud and wood-frame wall assemblies, can lead to significant thermal bridging and overall reduction in the effective R-value, even where exterior insulation is used. If the insulation does not fully cover the exposed concrete elements, or no thermal break is used, then heat loss can occur through the concrete floor slab and balcony to the outside. This thermal bridging can account for 50% or more of the overall heat loss through the assembly.
Podium SlabWood-frame town-homes and multi-unit residential buildings are often constructed over a concrete podium or parking garage. The interface between these two assemblies can lead to significant thermal bridging if correct insulation measures are not used, since concrete is far more thermally conductive than wood. Exposed concrete elements should be covered with insulation material or be thermally broken.
Thermal Break ProductsConcrete thermal break products can be used to inhibit heat loss through exposed concrete elements while still providing the structural support needed. These products are most commonly used at slab edges and balconies to create a separation between interior and exterior concrete elements. They use lower conductivity materials such as high-strength foam and stainless steel reinforcing that interlock with adjacent concrete and reinforcing, to provide insulation for the concrete without significantly effecting the shape or performance of the concrete elements. Alternatively, manufactured balcony products that use thermally efficient materials attached at the outside face of the enclosure can also be used to limit thermal bridging through the concrete. Concrete thermal breaks and manufactured balcony products are an effective way of reducing concrete thermal bridging in locations where standard insulation cannot be used to cover exposed concrete or where balconies extend through wall insulation.
Note that thermal break products for structural steel penetrations are also available and provide similar benefits as concrete thermal breaks.
v
Balconies that penetrate the insulation can cause significant thermal bridging
Concrete slab thermal breaks allow for continuous concrete elements without significant
thermal bridging
42 | Illustrated Guide – R22+ Effective Walls in Residential Construction in British Columbia
Exterior
Gravel fill
Exterior insulation (extruded polystyrene)
Dampproofing/waterproofing
Concrete foundation
Wood studs
Gypsum wall board
Interior
Protective layer over above-grade portions of foundation insulation (cement board)
Below grade walls also form an important part of the thermal enclosure of buildings. This section provides information about two different methods for insulating these walls.
Exterior InsulationThis below grade wall assembly consists of rigid insulation placed on the exterior of the concrete foundation wall. A wood stud wall is often constructed on the interior of the concrete wall to provide room for electrical and plumbing services. High effective R-values of the assembly are achieved by using continuous insulation outside of the concrete structure. The insulation product used in this arrangement should be highly moisture tolerant and suitable for below grade applications. In cold climates, insulation placed on the exterior of the wall increases the temperature of the concrete and consequently often reduces the risk of condensation and associated damage to moisture sensitive interior wall components and finishes. Drainage is provided at the exterior of the insulation to eliminate hydrostatic pressure on the wall assembly and reduce the risk of water ingress.
Key Considerations• Drainage to deflect water away from the foundation wall and to prevent hydrostatic pressures is important to the
long-term performance of this wall assembly with respect to water penetration.
• Detailing of the wall to ensure continuity of the water resistive barrier, air barrier, vapour barrier, and insulation at the below grade to above-above grade wall transition is important to the overall performance.
• The exterior of foundation walls can be difficult and expensive to access post-construction. Therefore, it is prudent to design these assemblies conservatively with respect to water penetration and to use durable materials.
7 | Below Grade Walls
$
7 | Below Grade Walls
Illustrated Guide – R22+ Effective Walls in Residential Construction in British Columbia | 43
DrainageAdequate control of surface and ground-water is fundamental to the long-term water penetration resistance of this assembly. An impermeable surface at grade (i.e. clay cap) sloped away from the building in conjunction with porous media (i.e. gravel fill) and perimeter drainage at the base of the foundation wall (i.e. weeping tile) will direct water away from the wall assembly. In situations where there is potential for hydrostatic pressure to be experienced by the assembly, additional precautions must be taken including the use of a fully bonded waterproof membrane instead of a dampproofing membrane.
Water Resistive Barrier (Waterproofing/Dampproofing)Where the wall assembly does not experience hydrostatic pressure, only relatively minor amounts of water will penetrate past the insulation. In these cases, a dampproofing membrane is sufficient to resist water ingress when used in conjunction with appropriate joint and crack control details for the concrete wall. However, if hydrostatic pressure is present, a more robust waterproofing membrane should be used as it will be relied upon to prevent water ingress.
Air BarrierThe concrete wall is the most airtight element in this assembly and is usually the most straightforward to make continuous with adjacent building enclosure assemblies such as the concrete floor slab (or air barrier below the slab) and above grade walls.
InsulationVarious types of insulation can be used including extruded polystyrene, high density expanded polystyrene and rigid mineral wool. It is important that the selected insulation product is extremely moisture tolerant as it can potentially be exposed to significant wetting in this below grade application. The exterior insulation in this assembly will maintain the concrete structure at closer to indoor temperatures, consequently typically reducing the risk of condensation and associated damage.
Vapour BarrierThe concrete foundation wall and dampproofing membrane provide the vapour control in this assembly. Given the below grade nature of this assembly and the generally wet nature of soil, negligible drying of this assembly to the exterior will occur. Consequently, no additional vapour barrier should be installed on the interior to facilitate drying of any minor incidental wetting.
Other ConsiderationsA gap or other capillary break should be provided between interior wood framing and the concrete foundation wall. Alternatively, preservative-treated wood can framing can be used. Direct contact between concrete and untreated wood framing members can lead to moisture related damage.
This assembly could potentially also be a split insulated assembly with insulation installed in the stud cavity as well as on the exterior of the concrete. In this arrangement the ratio of interior to exterior insulation should be considered so as to maintain the temperature of the interior concrete surface at relatively safe levels and avoid condensation. For this alternative, the Code requires that an interior vapour barrier be installed.
Effective Assembly R-value of Exterior Insulated Below-Grade
Wall [ft²·°F·hr/Btu]
Thickness of Exterior
Insulation
R-value/inch of Exterior Insulation
R-4.0 R-5.0
3 1/2” 16.6 20.1
4” 18.6 22 64 1/2” 20.6 25 1
5” 22 6 27 65 1/2” 24 6 30 1
6” 26 6 32 66 1/2” 28 6 35 1
7” 30 6 37 67 1/2” 32 6 40 1
8” 34 6 42 6R-values below the R-22 requirement
44 | Illustrated Guide – R22+ Effective Walls in Residential Construction in British Columbia
7 | Below Grade Walls
Interior InsulationThis below grade wall assembly consists of rigid or spray-in-place air-impermeable moisture tolerant insulation placed on the interior of the concrete foundation wall. Traditionally, many below grade interior insulated walls have been insulated with batt insulation between wood-framing and a polyethylene sheet was used to provide air and vapour control. However, these wall assemblies pose an unacceptable risk, especially for high R-value walls (i.e. R-22 walls). High effective R-values of the assembly are instead achieved by using continuous insulation placed between the concrete foundation wall and an interior stud framed service wall. Placement of insulation on the interior of the concrete foundation wall results in cooler concrete interior surface temperatures and consequently an increased risk of condensation and associated damaged. A robust interior air barrier should be installed to limit this risk.
Key Considerations• Drainage to deflect water away from the foundation wall and to prevent hydrostatic pressures is important to the
long-term performance of this wall assembly with respect to water penetration.
• Detailing of the wall to ensure continuity of the water resistive barrier, air barrier, vapour barrier, and insulation at the below grade to above-above grade wall transition is important to the overall performance.
• The exterior of foundation walls can be difficult and expensive to access post-construction. Therefore, it is prudent to design these assemblies conservatively with respect to water penetration and to use durable materials.
Exterior
Gravel fill
Dampproofing/waterproofing
Concrete foundation
Taped and sealed interior insulation (extruded polystyrene)
Wood studs
Gypsum wall board
Interior
$
7 | Below Grade Walls
Illustrated Guide – R22+ Effective Walls in Residential Construction in British Columbia | 45
DrainageAdequate control of surface and ground-water is fundamental to the long-term water penetration resistance of this assembly. An impermeable surface at grade (i.e. clay cap) sloped away from the building in conjunction with porous media (i.e. gravel fill) and perimeter drainage at the base of the foundation wall (i.e. weeping tile) will direct water away from the wall assembly. In situations where there is potential for hydrostatic pressure to be experienced by the assembly, additional precautions must be taken including the use of a fully bonded waterproof membrane instead of a dampproofing membrane.
Water Resistive Barrier (Waterproofing/Dampproofing)Where the wall assembly does not experience hydrostatic pressure, a dampproofing membrane is sufficient to resist water ingress when used in conjunction with appropriate joint and crack control details for the concrete wall. However, if hydrostatic pressure is present, then a more robust waterproofing membrane should be used as it will be relied upon to prevent water ingress.
Air BarrierThe concrete wall is the most airtight element in this assembly and is usually the most straightforward element to make continuous with adjacent assemblies such as the concrete floor slab (or air barrier below the slab) and above grade walls. However, with interior insulation approaches it is also important that an interior air barrier be maintained to limit the potential for relatively warm and moist interior air to flow past the insulation and come in contact with the interior surface of the colder concrete foundation wall. This is often achieved through sealing of joints between insulation boards or by using spray foam products.
InsulationExtruded polystyrene (XPS) and closed-cell spray polyurethane foam insulation are typically most appropriate for this application because they are both insensitive to potential moisture within the concrete and are relatively air and vapour impermeable. Air permeable insulation products are not generally recommended unless other measures are considered.
Vapour BarrierThe relatively vapour-impermeable foam insulation (i.e. XPS or closed-cell spray foam) provide the vapour barrier in this assembly. No additional vapour barrier should be installed on the interior of the wood stud wall to facilitate drying of any minor incidental wetting.
Other ConsiderationsInstead of a wood stud wall it is also possible to use only strapping fastened through the insulation if a significant gap is not needed for services. An interior finish is required to provide fire protection for the foam plastic insulation, or alternatively an intumescent coating can be used in some jurisdictions for an unfinished basement.
Effective Assembly R-value of Exterior Insulated Below-Grade
Wall [ft²·°F·hr/Btu]
Thickness of Interior
Insulation
R-value/inch of Exterior Insulation
R-5.0 R-6.0
3 1/2” 20.1 23 64” 22 6 26 6
4 1/2” 25 1 29 65” 27 6 32 6
5 1/2” 30 1 35 66” 32 6 38 6
6 1/2” 35 1 41 67” 37 6 44 6
7 1/2” 40 1 47 68” 42 6 50 6
R-values below the R-22 requirement
46 | Illustrated Guide – R22+ Effective Walls in Residential Construction in British Columbia
Various wood-frame wall assemblies that will not meet the R-22 effective requirements when constructed using standard framing practices (i.e. 23% framing factor for 16” o.c. studs) and standard insulation types are outlined below.
2x6 stud walls with insulation only in the stud cavity (regardless of the insulation type)
Exterior insulation stud wall with 3” or less of Insulation (regardless of the insulation type)
2x4 double stud wall on 2x6 plates with staggered overlapping studs
(It is also nearly impossible to reach R-22 without a gap between the two stud walls)
Exterior insulation wall with continuous framing and 4” or less of insulation
(regardless of the insulation type)
Walls Less Than R-22
Walls Less Than R-22
Illustrated Guide – R22+ Effective Walls in Residential Construction in British Columbia | 47
Various steel stud and concrete wall assemblies that will not meet the R-22 effective requirement using standard construction methods and standard insulation types are outlined below.
Concrete wall with 3" or less of insulation (regardless of the insulation type or placement)
6" steel stud walls with insulation only in the stud cavity
(regardless of the insulation type)
Exterior insulation steel stud wall with 3" or less of insulation (regardless of insulation type)
Exterior insulation steel stud wall with continuous metal Z-girts and 6" or less of exterior insulation
(regardless of the insulation type)
48 | Illustrated Guide – R22+ Effective Walls in Residential Construction in British Columbia
Detailed discussions of each assembly including thermal performance values have been provided throughout the guide. This section provides a summary of the minimum insulation levels required for each assembly to achieve R-22 effective as well as key considerations for ease of reference. It should be noted that the R-values of these assemblies will vary slightly depending on specific assembly layer selections (i.e. cladding), but the values provided are intended to be conservative.
Minimum Insulation Levels to Achieve R-22 Effective
2x6 Studs (R-19 Batts) + 1 1/2” of R-4/inch or R-5/inch Ext. Ins.
2x6 Studs (R-22 Batts) + 1” of R-5/inch Ext. Ins.
2x6 Studs (R-24 Batts) + 1” of R-4/inch Ext. Ins.
The vapour permeability of the sheathing membrane and the exterior insulation should be carefully considered so as not to create a risk of condensation within the assembly, or to reduce the ability of the assembly to dry.
The method of cladding attachment is important to limit thermal bridging through the exterior insulation while adequately supporting the exterior cladding.
Continuity of the air barrier and installation of a vapour barrier are fundamental to the performance of this assembly as the slightly decreased exterior sheathing temperature increases the risk of condensation and related damage.
Continuity of the air barrier and installation of a vapour barrier are fundamental to the performance of this assembly as the slightly decreased exterior sheathing temperature increases the risk of condensation and related damage.
2x4 or 2x6 Studs (No Batts) + 5” R-4/inch or 4” R-5/inch
2x4 Double Stud Wall with No Gap and R-5/inch Insulation
2x4 Double Stud Wall with 1/2” Gap and R-4/inch Insulation
2x4 Double Stud Wall with 1” Gap and R-3.4/inch Insulation
2x8 Stud Wall with R-4 or R-5/inch Insulation
2x10 Stud Wall with R-3.4/inch Insulation
9.5” Engineered Wood I-Joist with R-3.4/inch or
R-4/inch or R-5/inch insulation
Wood Frame Key Considerations
Summary of WallsSp
lit In
sula
tion
Exte
rior
Insu
latio
nDo
uble
Stu
dDe
ep S
tud
Summary of Walls
Illustrated Guide – R22+ Effective Walls in Residential Construction in British Columbia | 49
4” R-5/inch Insulation or 3 1/2” R-6/inch Interior Insulation
Minimum Insulation Levels to Achieve R-22 Effective
Minimum Insulation Levels to Achieve R-22 Effective
6" Studs (R-20 Batts) + 4” of R-4/inch or R-5/inch Ext. Ins.
The vapour permeability of the sheathing membrane and the exterior insulation should be carefully considered so as not to create a risk of condensation within the assembly, or to reduce the ability of the assembly to dry. Continuity of insulation at concrete floor slabs must be carefully considered.
The method of cladding attachment is important to limit thermal bridging through the exterior insulation while adequately supporting the exterior cladding.
Empty Studs + 6” of R-4/inch or 5" R-5/inch Ext. Ins.
Split
Insu
latio
n
Steel Stud
Concrete
Above Grade
Exte
rior
Insu
latio
n
Key Considerations
Key Considerations
The exterior of foundation walls can be difficult and expensive to access post-construction. Therefore, it is prudent to design these assemblies conservatively with respect to water penetration and to use durable materials.
The method of cladding attachment is important to limit thermal bridging through the exterior insulation while adequately supporting the exterior cladding.
Continuity of insulation is difficult to maintain at concrete floor slabs. Thermal break products should be used at the floor slab to avoid thermal bridging.
Detailing of the wall to ensure continuity of the water resistive barrier, air barrier, vapour barrier, and insulation at below grade to above grade wall transitions is important to the overall performance.
5” R-4/inch Insulation or 4” R-5/inch Exterior Insulation
6” R-4/inch Insulation or 5” R-5/inch Exterior Insulation
4” R-5/inch Insulation or 3 1/2” R-6/inch Interior Insulation
2 1/2” R-5/inch + 2x4 Studs (R-12 Batts)
Exte
rior
Insu
latio
nEx
teri
or In
sula
tion
Inte
rior
Insu
latio
nIn
teri
or In
sula
tion
50 | Illustrated Guide – R22+ Effective Walls in Residential Construction in British Columbia
This section provides a brief overview of alternative wall assemblies that could potentially be used to achieve the R-22 thermal performance target, but are not covered in detail within this guide.
Structurally Insulated PanelsThis above grade wall assembly consists of manufactured structurally insulated panels (SIPs) consisting of continuous rigid insulation (typically EPS) sandwiched between two layers of OSB sheathing. These panels are then assembled to form the exterior enclosure of the building. Typically 5 1/2” of insulation would be required in this assembly to achieve R-22 or greater.
Addressing the joints between panels with respect to construction tolerances and air barrier continuity is an important consideration when using this system and manufacturers will typically provided the relevant details. Joints should be sealed on both the interior and exterior and the gap filled to prevent convective looping between panels. A sheathing membrane is typically installed on the exterior of this assembly to provide the water resistive barrier and the air barrier, or else the SIPs panels can be sealed to provide the air barrier. A stud wall can be constructed on the interior of the SIPs for services.
Interior Insulation Above Grade WallThis above grade wall assembly consists of rigid insulation boards (typically extruded polystyrene) installed on the interior of the batt insulated stud wall. This assembly is similar in principle to the exterior insulation strategy for increasing the wall R-value, though successful application is often more difficult. In cold climates, the additional depth of insulation installed on the interior side of the exterior sheathing can slightly decrease the sheathing temperature and consequently increase the risk of condensation on the moisture-sensitive wood sheathing and framing. The rigid insulation should be sealed to provide the air barrier, and the low permeance of the insulation boards is also adequate to provide the vapour barrier. Installation and sealing of electrical outlets and other service penetration can be difficult when using this wall assembly. Interior gypsum wall board can be installed on vertical strapping or an interior service wall to provide an interior finish as well as fire protection.
Other R-22+ Walls
Other R-22+ Walls
Illustrated Guide – R22+ Effective Walls in Residential Construction in British Columbia | 51
Continuous Exterior FramingThis above grade wall assembly consists of rigid or semi-rigid insulation placed on the exterior of a conventional above grade, insulated 2x4 or 2x6, wood-frame wall assembly. However, in this case the cladding support is provided using vertical framing which continuously penetrates through the exterior insulation. While relatively uncommon, this method can provide additional cladding support as compared to only fasteners through the insulation. The continuous wood members that penetrate the exterior insulation must be considered in the calculation of the wall effective R-value in a manner similar to that used for stud walls (i.e. parallel paths). Due to the reduction of the insulation performance by the continuous framing, additional insulation thickness is required for this assembly to achieve the same thermal performance as an exterior insulated assembly with only fasteners or thermally efficient clips through the insulation. Other considerations for this assembly are similar to those for the split insulation or exterior insulation above grade assemblies.
Insulating Concrete Forms (Above Grade)This wall assembly consists of Insulating Concrete Forms (ICFs) which are manufactured interlocking modular concrete formwork made of rigid expanded polystyrene (EPS) insulation. Once assembled, these forms are filled with concrete and remain in place to provide insulation. High effective R-values of the assembly are achieved by the combination of the interior and exterior form layers, and to meet R-22 typically at least 5” of total insulation thickness will be required. Interior finishes can be installed either directly onto the foam using built-in flanges in the ICF (channels in the ICF foam can be used to provide a space for services), or with an interior stud wall.
52 | Illustrated Guide – R22+ Effective Walls in Residential Construction in British Columbia
Other R-22+ Walls
Insulating Concrete Forms (Below Grade)This wall assembly consists of Insulating Concrete Forms (ICFs), which are manufactured interlocking modular concrete forms made of rigid expanded polystyrene (EPS) insulation. Once assembled, these forms are filled with concrete and remain in place to provide insulation. High effective R-values of the assembly are achieved by the combination of the interior and exterior form layers, and a typical ICF will meet R-22 with a total insulation thickness of approximately 5”. In below grade applications, a damp-proofing or waterproofing material should be applied to the exterior insulation. Interior finishes can be installed either directly onto the foam using built-in flanges in the ICF (channels in the ICF foam can be used to provide a space for services), or with an interior stud wall.
Interior Rigid Insulation and BattsThis below grade wall is similar to the interior insulated below grade wall assembly that is insulated with rigid or spray-in-place, air-impermeable, moisture tolerant, insulation placed on the interior of the concrete foundation wall. The primary difference is that this wall also includes batt insulation in the stud cavity. Using batt insulation in the stud cavity can provide the required R-value while allowing for a reduction in the amount of rigid insulation which is required. The rigid insulation is used as the air barrier in this assembly, and an interior vapour barrier (interior of the batt insulation) is still required to meet code requirements. Given the limited outward drying capacity of this assembly, it may be prudent to use a relatively permeable interior vapour barrier such as a smart vapour retarder or vapour barrier paint. A minimum of 2” of rigid foam or spray foam insulation is required between the stud and concrete walls to achieve R-22 and limit the potential for condensation within the wall assembly.
Illustrated Guide – R22+ Effective Walls in Residential Construction in British Columbia | 53
This guide provides an overview of different assemblies which can potentially be used to meet an R-22 performance requirement. Other resources are also available which provide more detailed information regarding building enclosure systems and design.
Design Guides• Illustrated Guide—Energy Efficiency Requirements for Houses in British Columbia | BC Housing
(Available at www.bchousing.org)
• Illustrated Guide—Achieving Airtight Buildings | BC Housing (Available at www.bchousing.org)
• Guide for Designing Energy-Efficient Building Enclosures for Wood-Frame Multi-Unit Residential Buildings | FPInnovations, BC Housing, and the Canadian Wood Council. (Available at www.fpinnovations.ca)
• Building Envelope Guide for Houses - Part 9 Residential Construction | BC Housing (Available at www.bchousing.org)
• Building Enclosure Design Guide - Wood-Frame Multi-Unit Residential Buildings | BC Housing (Available at www.bchousing.org)
• Canadian Home Builder’s Association Builders’ Manual | Canadian Home Builders’ Association (Available at www.chba.ca/buildermanual.aspx)
• Canadian Wood-Frame House Construction | Canada Mortgage and Housing Corporation (CMHC) (Available at www.cmhc-schl.gc.ca)
• Residential Construction Performance Guide | BC Housing (Available at www.bchousing.org)
• Builder’s Guide to Cold Climates | Building Science Corporation (Available at www.buildingsciencepress.com)
• Pathways to High-Performance Housing in British Columbia | FPInnovations (Available at www.fpinnovations.ca)
Structural Design Guides and References• Guide to Attaching Sheathing, Furring and/or Cladding through Continuous Foam Insulation to Wood Framing, Steel Framing,
Concrete and CMU Substrates with TRUFAST SIP TP, SIP LD and Tru-Grip Fasteners | NTA Inc. (Available at www.trufast.com)
• External Insulation of Masonry Walls and Wood Framed Walls | The National Renewable Energy Laboratory (U.S. Department of Energy) (Available at www.ntis.gov)
• Roxul - ComfortBoard (IS) Deflection Testing | Building Science Corporation (Available at www.roxul.com)
• Guide to Attaching Exterior Wall Coverings through Foam Sheathing to Wood or Steel Wall Framing | Foam Sheathing Coalition (Available at www.hunterpanels.com)