150
15-601064 Issue 8b - (Tuesday, December 11, 2012) Implementing Voicemail Pro IP Office 8.1

15-601064 Issue 8b - (Tuesday, December 11, 2012)
Implementing Voicemail Pro
IP Office 8.1

Implementing Voicemail Pro Page 215-601064 Issue 8b (Tuesday, December 11, 2012)IP Office 8.1
© 2012 AVAYA All Rights Reserved.
NoticesWhile reasonable efforts have been made to ensure that the information inthis document is complete and accurate at the time of printing, Avaya assumesno liability for any errors. Avaya reserves the right to make changes andcorrections to the information in this document without the obligation to notifyany person or organization of such changes.
Documentation disclaimerAvaya shall not be responsible for any modifications, additions, or deletions tothe original published version of this documentation unless such modifications,additions, or deletions were performed by Avaya.
End User agree to indemnify and hold harmless Avaya, Avaya's agents,servants and employees against all claims, lawsuits, demands and judgmentsarising out of, or in connection with, subsequent modifications, additions ordeletions to this documentation, to the extent made by End User.
Link disclaimerAvaya is not responsible for the contents or reliability of any linked Web sitesreferenced within this site or documentation(s) provided by Avaya. Avaya isnot responsible for the accuracy of any information, statement or contentprovided on these sites and does not necessarily endorse the products,services, or information described or offered within them. Avaya does notguarantee that these links will work all the time and has no control over theavailability of the linked pages.
WarrantyAvaya provides a limited warranty on this product. Refer to your salesagreement to establish the terms of the limited warranty. In addition, Avaya’sstandard warranty language, as well as information regarding support for thisproduct, while under warranty, is available to Avaya customers and otherparties through the Avaya Support Web site: http://www.avaya.com/support.Please note that if you acquired the product from an authorized Avaya reselleroutside of the United States and Canada, the warranty is provided to you bysaid Avaya reseller and not by Avaya.
LicensesTHE SOFTWARE LICENSE TERMS AVAILABLE ON THE AVAYA WEBSITE,HTTP://SUPPORT.AVAYA.COM/LICENSEINFO/ ARE APPLICABLE TO ANYONEWHO DOWNLOADS, USES AND/OR INSTALLS AVAYA SOFTWARE, PURCHASEDFROM AVAYA INC., ANY AVAYA AFFILIATE, OR AN AUTHORIZED AVAYARESELLER (AS APPLICABLE) UNDER A COMMERCIAL AGREEMENT WITHAVAYA OR AN AUTHORIZED AVAYA RESELLER. UNLESS OTHERWISE AGREEDTO BY AVAYA IN WRITING, AVAYA DOES NOT EXTEND THIS LICENSE IF THESOFTWARE WAS OBTAINED FROM ANYONE OTHER THAN AVAYA, AN AVAYAAFFILIATE OR AN AVAYA AUTHORIZED RESELLER, AND AVAYA RESERVESTHE RIGHT TO TAKE LEGAL ACTION AGAINST YOU AND ANYONE ELSE USINGOR SELLING THE SOFTWARE WITHOUT A LICENSE. BY INSTALLING,DOWNLOADING OR USING THE SOFTWARE, OR AUTHORIZING OTHERS TODO SO, YOU, ON BEHALF OF YOURSELF AND THE ENTITY FOR WHOM YOUARE INSTALLING, DOWNLOADING OR USING THE SOFTWARE (HEREINAFTERREFERRED TO INTERCHANGEABLY AS “YOU” AND “END USER”), AGREE TOTHESE TERMS AND CONDITIONS AND CREATE A BINDING CONTRACTBETWEEN YOU AND AVAYA INC. OR THE APPLICABLE AVAYA AFFILIATE(“AVAYA”).
Avaya grants End User a license within the scope of the license types describedbelow. The applicable number of licenses and units of capacity for which thelicense is granted will be one (1), unless a different number of licenses or unitsof capacity is specified in the Documentation or other materials available toEnd User. "Designated Processor" means a single stand-alone computingdevice. "Server" means a Designated Processor that hosts a softwareapplication to be accessed by multiple users. "Software" means the computerprograms in object code, originally licensed by Avaya and ultimately utilized byEnd User, whether as stand-alone products or pre-installed on Hardware."Hardware" means the standard hardware originally sold by Avaya andultimately utilized by End User.
License typesDesignated System(s) License (DS). End User may install and use each copy ofthe Software on only one Designated Processor, unless a different number ofDesignated Processors is indicated in the Documentation or other materialsavailable to End User. Avaya may require the Designated Processor(s) to beidentified by type, serial number, feature key, location or other specificdesignation, or to be provided by End User to Avaya through electronic meansestablished by Avaya specifically for this purpose.
CopyrightExcept where expressly stated otherwise, no use should be made of materialson this site, the Documentation(s) and Product(s) provided by Avaya. Allcontent on this site, the documentation(s) and the product(s) provided byAvaya including the selection, arrangement and design of the content is ownedeither by Avaya or its licensors and is protected by copyright and otherintellectual property laws including the sui generis rights relating to theprotection of databases. You may not modify, copy, reproduce, republish,upload, post, transmit or distribute in any way any content, in whole or in part,including any code and software. Unauthorized reproduction, transmission,dissemination, storage, and or use without the express written consent ofAvaya can be a criminal, as well as a civil, offense under the applicable law.
Third Party Components Certain software programs or portions thereof included in the Product maycontain software distributed under third party agreements ("Third PartyComponents"), which may contain terms that expand or limit rights to usecertain portions of the Product ("Third Party Terms"). Information regardingdistributed Linux OS source code (for those Products that have distributed theLinux OS source code), and identifying the copyright holders of the Third PartyComponents and the Third Party Terms that apply to them is available on theAvaya Support Web site: http://support.avaya.com/Copyright.
Preventing toll fraud"Toll fraud" is the unauthorized use of your telecommunications system by anunauthorized party (for example, a person who is not a corporate employee,agent, subcontractor, or is not working on your company's behalf). Be awarethat there can be a risk of toll fraud associated with your system and that, iftoll fraud occurs, it can result in substantial additional charges for yourtelecommunications services.
Avaya fraud interventionIf you suspect that you are being victimized by toll fraud and you needtechnical assistance or support, call Technical Service Center Toll FraudIntervention Hotline at +1-800-643-2353 for the United States and Canada.For additional support telephone numbers, see the Avaya Support Web site:http://support.avaya.comSuspected security vulnerabilities with Avaya products should be reported toAvaya by sending mail to: [email protected].
TrademarksAvaya and Aura are trademarks of Avaya, Inc.The trademarks, logos and service marks (“Marks”) displayed in this site, thedocumentation(s) and product(s) provided by Avaya are the registered orunregistered Marks of Avaya, its affiliates, or other third parties. Users are notpermitted to use such Marks without prior written consent from Avaya or suchthird party which may own the Mark. Nothing contained in this site, thedocumentation(s) and product(s) should be construed as granting, byimplication, estoppel, or otherwise, any license or right in and to the Markswithout the express written permission of Avaya or the applicable third party.Avaya is a registered trademark of Avaya Inc. All non-Avaya trademarks arethe property of their respective owners.
Downloading documentsFor the most current versions of documentation, see the Avaya Support Website: http://www.avaya.com/support
Contact Avaya SupportAvaya provides a telephone number for you to use to report problems or toask questions about your product. The support telephone number is1-800-242-2121 in the United States. For additional support telephonenumbers, see the Avaya Web site: http://www.avaya.com/support
Implementing Voicemail Pro Page 315-601064 Issue 8b (Tuesday, December 11, 2012)IP Office 8.1
Contents
ContentsWhat is new in 8.11.
Voicemail Pro2...................................................................... 112.1 Supported Languages
..................................................................... 122.2 Voicemail Pro Licenses
..................................................................... 132.3 Number of Simultaneous Users
Installation3...................................................................... 163.1 General Installation Requirements
............................................................................ 173.1.1 Computer Specifications
............................................................................ 203.1.2 Single Server Support
............................................................................ 213.1.3 Virtual Server Support
............................................................................ 213.1.4 Network Requirements
............................................................................ 213.1.5 Disk Space Requirements
............................................................................ 213.1.6 Web Server Operation
............................................................................ 213.1.7 ContactStore Operation
............................................................................ 223.1.8 SFTP Server Requirements
..................................................................... 223.2 Server/Client Installation
............................................................................ 263.2.1 Modifying the Installed Components
............................................................................ 273.2.2 Web Campaigns Installation
............................................................................ 283.2.3 The Voicemail Pro Services
..................................................................... 293.3 Upgrading Voicemail Pro
............................................................................ 293.3.1 Upgrade from below version 3.2
............................................................................ 303.3.2 Upgrade from Version 3.2+
............................................................................ 313.3.3 Upgrade to Voicemail Pro
..................................................................... 323.4 UMS Web Services
............................................................................ 333.4.1 IMAP Installation
............................................................................ 363.4.2 Web Voicemail Installation
............................................................................ 423.4.3 UMS Exchange Configuration
..................................................................... 543.5 Voicemail Email
............................................................................ 563.5.1 SMTP Setup
............................................................................ 583.5.2 MAPI Setup
............................................................................ 683.5.3 Voicemail Email Operation
..................................................................... 713.6 Text To Speech (TTS) Installation
............................................................................ 713.6.1 Installing Generic Text to Speech
............................................................................ 723.6.2 Installing Avaya Text to Speech
............................................................................ 723.6.3 Setting Up Text To Speech to Read Email
..................................................................... 733.7 Troubleshooting
............................................................................ 733.7.1 Checking the Voicemail Pro Service
............................................................................ 743.7.2 Voicemail Pro User Log
............................................................................ 753.7.3 Tracing in Debug
............................................................................ 763.7.4 The Voicemail Console
Using the Voicemail Pro Client4...................................................................... 784.1 Logging in to the Voicemail Pro Server
..................................................................... 804.2 Confirm Call Flow Download Window
..................................................................... 804.3 Continue Offline Message Window
..................................................................... 814.4 Saving Changes
..................................................................... 814.5 Logging Out
..................................................................... 814.6 Closing Down
IP Office Configuration5...................................................................... 855.1 User and Group Mailboxes
..................................................................... 865.2 System Settings
..................................................................... 885.3 User Voicemail Settings
..................................................................... 905.4 User Source Numbers
..................................................................... 915.5 Hunt Group Settings
..................................................................... 935.6 Voicemail Channel Reservations
System Preferences6...................................................................... 976.1 General
..................................................................... 996.2 Directories
..................................................................... 1006.3 Email
............................................................................ 1006.3.1 MAPI
............................................................................ 1016.3.2 SMTP Sender
............................................................................ 1046.3.3 SMTP Receiver
..................................................................... 1056.4 Housekeeping
..................................................................... 1066.5 SNMP Alarm
..................................................................... 1076.6 Outcalling
..................................................................... 1076.7 Voicemail Recording
..................................................................... 1096.8 Backup & Restore
..................................................................... 1106.9 VPNM
Centralized Voicemail Pro7...................................................................... 1177.1 Centralized Voicemail
..................................................................... 1187.2 Fallback IP Office Control
..................................................................... 1197.3 Backup Voicemail Server Operation
............................................................................ 1217.3.1 Manual Failback
............................................................................ 1217.3.2 Graceful Failback
............................................................................ 1217.3.3 Automatic Failback
..................................................................... 1217.4 Distributed Voicemail Servers
..................................................................... 1247.5 Combined Options
..................................................................... 1267.6 Installation Notes
Appendix8...................................................................... 1328.1 SMTP Logging
..................................................................... 1328.2 SFTP Host Key Verification
..................................................................... 1328.3 Installing VoiceMail Pro as an ACM Gateway
..................................................................... 1348.4 Installing Networked Messaging (VPNM)
............................................................................ 1358.4.1 Requirements for VPNM
............................................................................ 1368.4.2 Installing VoiceMail Pro with VPNM Support
............................................................................ 1378.4.3 Configuring VPNM Preferences
............................................................................ 1408.4.4 Testing a VPNM Setup
..................................................................... 1418.5 Glossary
............................................................................ 1418.5.1 Centralized Voicemail Pro Server
............................................................................ 1418.5.2 Distributed Voicemail Pro Server
............................................................................ 1418.5.3 MAPI
............................................................................ 1418.5.4 SNTP
............................................................................ 1418.5.5 VPNM
............................................................................ 1418.5.6 VRL
...............................................................................143Index


Implementing Voicemail Pro Page 515-601064 Issue 8b (Tuesday, December 11, 2012)IP Office 8.1
What is new in 8.1
Chapter 1.

Implementing Voicemail Pro Page 715-601064 Issue 8b (Tuesday, December 11, 2012)IP Office 8.1
What is new in 8.1:
1. What is new in 8.1The following is a summary of the new features in Voicemail Pro 8.1.
· Support for IP Office Server EditionOn IP Office Server Edition, a Server Edition license provides all the Voicemail Pro features that are provided by thePreferred Edition license on IP500 and IP500 V2. The maximum number of ports that you can simultaneously use forvoicemail operation on IP Office Server Edition with a Server Edition license is 100.
· Synchronization of primary and backup voicemail serversApart from call flows, voicemail messages, greetings, and recorded names, the synchronization between the primaryand the backup voicemail servers now also includes the registry settings, user variables, SMTP mappings, and alarms.However, the synchronization excludes the directory locations, settings specific to Voicemail Pro client, Voicemail ProIIS port settings, Campaign settings, Service SID of the Voicemail Pro service, and backup configuration settings.
· Failback operation on backup voicemail serverIn the previous releases, if central server failed and backup server took over the control as the active voicemail server,the system administrator needed to shutdown the backup server for the control to be passed back to the centralserver. In 8.1, the system administrator can configure backup server to initiate an automatic failback operation to passthe control back to central server. The system administrator can choose from three different modes of failback operation to configure on backup server -manual, graceful, and automatic. In manual mode, the system administrator needs to shutdown backup server. Ingraceful mode, backup server hands over the control to central server immediately after all the active voicemail callson the backup server come to an end. In automatic mode, backup server waits for the failback operation timeoutbefore handing over the control to central server, and if all the active voicemail calls on the backup server come to anend before the timeout, the handover of the control is immediate.
· Restriction on minimum length of mailbox password You can now set a restriction on the minimum length of a mailbox password. Use the general system preference Min.Password Length for the purpose. The minimum value that you can set is 0 in IP Office mailbox mode and 2 inIntuity emulation mode. The maximum value is 15.
· Using a remote FTP server for backup and restore operations You can now save the backup files generated by either a scheduled backup or an immediate backup to a remote FTPserver. Similarly, you can now restore a backup saved on a remote FTP server.
· VRLA feature support on Linux-based voicemail serverYou can now configure a Linux-based voicemail server to transfer the saved voice recordings to the Windows-basedVoice Recording Library (VRL) application IP Office ContactStore using Secure File Transfer Protocol (SFTP). Thereby,you can use the Voice Recording Library Authentication (VRLA) feature on a Linux-based voicemail server.
97


Implementing Voicemail Pro Page 915-601064 Issue 8b (Tuesday, December 11, 2012)IP Office 8.1
Voicemail Pro
Chapter 2.
Implementing Voicemail Pro Page 1015-601064 Issue 8b (Tuesday, December 11, 2012)IP Office 8.1
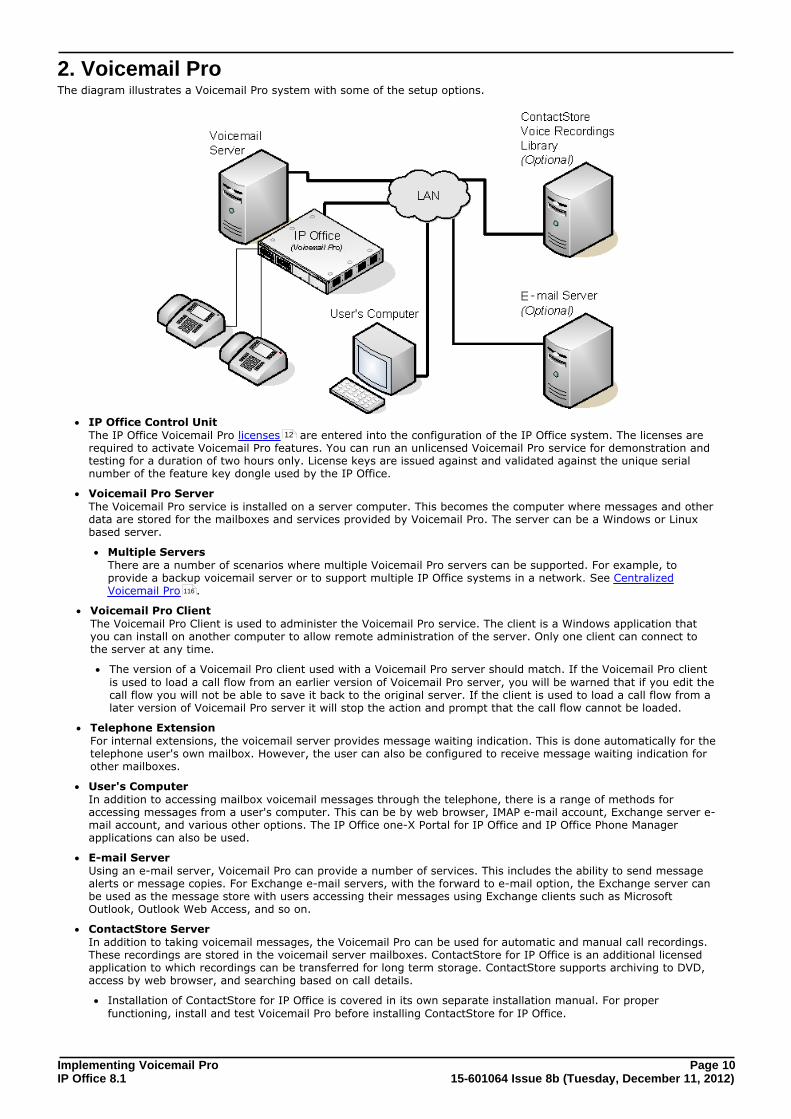
2. Voicemail ProThe diagram illustrates a Voicemail Pro system with some of the setup options.
· IP Office Control Unit The IP Office Voicemail Pro licenses are entered into the configuration of the IP Office system. The licenses arerequired to activate Voicemail Pro features. You can run an unlicensed Voicemail Pro service for demonstration andtesting for a duration of two hours only. License keys are issued against and validated against the unique serialnumber of the feature key dongle used by the IP Office.
· Voicemail Pro Server The Voicemail Pro service is installed on a server computer. This becomes the computer where messages and otherdata are stored for the mailboxes and services provided by Voicemail Pro. The server can be a Windows or Linuxbased server.
· Multiple Servers There are a number of scenarios where multiple Voicemail Pro servers can be supported. For example, toprovide a backup voicemail server or to support multiple IP Office systems in a network. See CentralizedVoicemail Pro .
· Voicemail Pro ClientThe Voicemail Pro Client is used to administer the Voicemail Pro service. The client is a Windows application thatyou can install on another computer to allow remote administration of the server. Only one client can connect tothe server at any time.
· The version of a Voicemail Pro client used with a Voicemail Pro server should match. If the Voicemail Pro clientis used to load a call flow from an earlier version of Voicemail Pro server, you will be warned that if you edit thecall flow you will not be able to save it back to the original server. If the client is used to load a call flow from alater version of Voicemail Pro server it will stop the action and prompt that the call flow cannot be loaded.
· Telephone Extension For internal extensions, the voicemail server provides message waiting indication. This is done automatically for thetelephone user's own mailbox. However, the user can also be configured to receive message waiting indication forother mailboxes.
· User's Computer In addition to accessing mailbox voicemail messages through the telephone, there is a range of methods foraccessing messages from a user's computer. This can be by web browser, IMAP e-mail account, Exchange server e-mail account, and various other options. The IP Office one-X Portal for IP Office and IP Office Phone Managerapplications can also be used.
· E-mail Server Using an e-mail server, Voicemail Pro can provide a number of services. This includes the ability to send messagealerts or message copies. For Exchange e-mail servers, with the forward to e-mail option, the Exchange server canbe used as the message store with users accessing their messages using Exchange clients such as MicrosoftOutlook, Outlook Web Access, and so on.
· ContactStore Server In addition to taking voicemail messages, the Voicemail Pro can be used for automatic and manual call recordings.These recordings are stored in the voicemail server mailboxes. ContactStore for IP Office is an additional licensedapplication to which recordings can be transferred for long term storage. ContactStore supports archiving to DVD,access by web browser, and searching based on call details.
· Installation of ContactStore for IP Office is covered in its own separate installation manual. For properfunctioning, install and test Voicemail Pro before installing ContactStore for IP Office.
12
116
Implementing Voicemail Pro Page 1115-601064 Issue 8b (Tuesday, December 11, 2012)IP Office 8.1
Voicemail Pro:
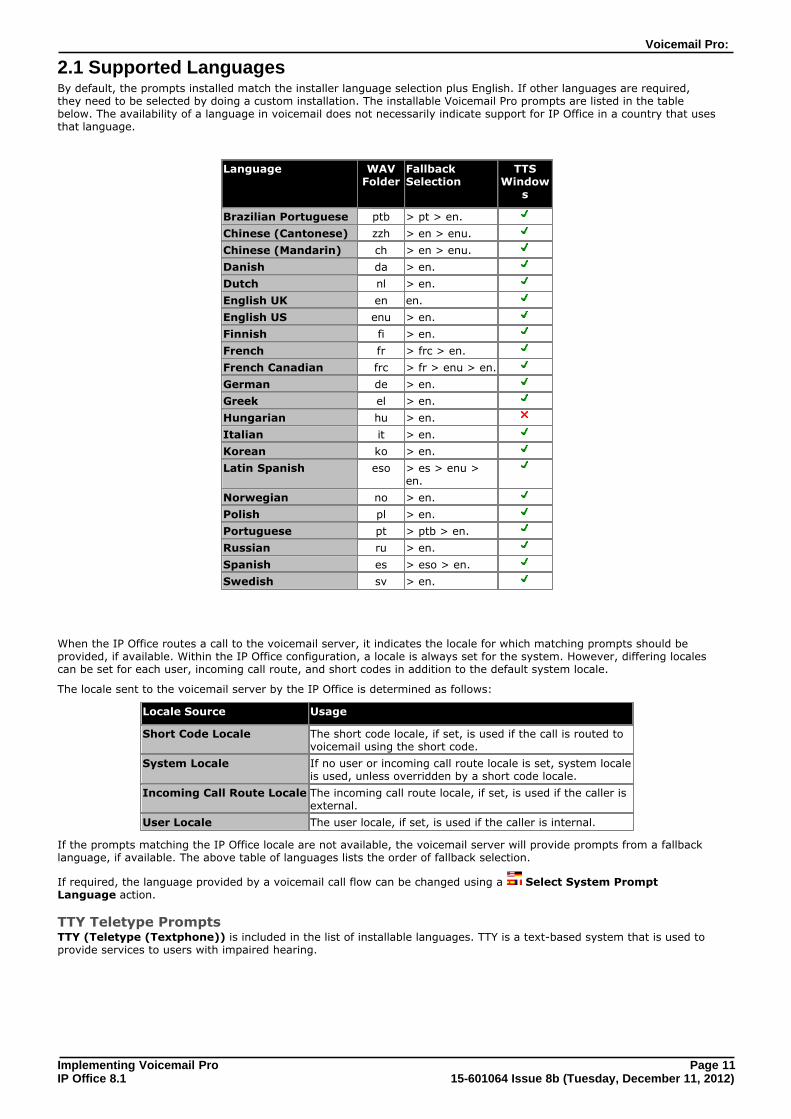
2.1 Supported LanguagesBy default, the prompts installed match the installer language selection plus English. If other languages are required,they need to be selected by doing a custom installation. The installable Voicemail Pro prompts are listed in the tablebelow. The availability of a language in voicemail does not necessarily indicate support for IP Office in a country that usesthat language.
Language WAVFolder
FallbackSelection
TTSWindow
s
Brazilian Portuguese ptb > pt > en.
Chinese (Cantonese) zzh > en > enu.
Chinese (Mandarin) ch > en > enu.
Danish da > en.
Dutch nl > en.
English UK en en.
English US enu > en.
Finnish fi > en.
French fr > frc > en.
French Canadian frc > fr > enu > en.
German de > en.
Greek el > en.
Hungarian hu > en.
Italian it > en.
Korean ko > en.
Latin Spanish eso > es > enu >en.
Norwegian no > en.
Polish pl > en.
Portuguese pt > ptb > en.
Russian ru > en.
Spanish es > eso > en.
Swedish sv > en.
When the IP Office routes a call to the voicemail server, it indicates the locale for which matching prompts should beprovided, if available. Within the IP Office configuration, a locale is always set for the system. However, differing localescan be set for each user, incoming call route, and short codes in addition to the default system locale.
The locale sent to the voicemail server by the IP Office is determined as follows:
Locale Source Usage
Short Code Locale The short code locale, if set, is used if the call is routed tovoicemail using the short code.
System Locale If no user or incoming call route locale is set, system localeis used, unless overridden by a short code locale.
Incoming Call Route Locale The incoming call route locale, if set, is used if the caller isexternal.
User Locale The user locale, if set, is used if the caller is internal.
If the prompts matching the IP Office locale are not available, the voicemail server will provide prompts from a fallbacklanguage, if available. The above table of languages lists the order of fallback selection.
If required, the language provided by a voicemail call flow can be changed using a Select System PromptLanguage action.
TTY Teletype PromptsTTY (Teletype (Textphone)) is included in the list of installable languages. TTY is a text-based system that is used toprovide services to users with impaired hearing.

Implementing Voicemail Pro Page 1215-601064 Issue 8b (Tuesday, December 11, 2012)IP Office 8.1
2.2 Voicemail Pro LicensesThe Help | About screen in the voicemail client can be used to check which IP Office the voicemail server is working andthe licenses it has received from that IP Office.
The license keys are entered into the IP Office configuration using the IP Office Manager. If the Voicemail Pro server isinstalled without licenses, it will run for 2 hours and then shut down.
For IP Office Release 6 and higher, support for Voicemail Pro is enabled by the addition of a Preferred Edition license.
· Preferred Edition (Voicemail Pro) : This license enables support for Voicemail Pro as the IP Office's voicemail server with four voicemail ports. Avoicemail server with the Preferred Edition license provides the services listed below. Additional licenses can beadded for additional voicemail features, these are detailed separately. The Preferred Edition license waspreviously called Voicemail Pro (4 ports).
· Mailboxes for all users and hunt groups.
· Announcements for users and hunt groups.
· Customizable call flows.
· Call recording to mailboxes.
· Campaigns.
· TTS e-mail reading for userslicensed for Mobile User or PowerUser profiles.
· Use of Conference Meet Mefunctions on IP500, IP500 V2, andServer Edition systems.
· Advanced Edition :The Advanced Edition license enables the additional features listed below. A Preferred Edition license is a pre-requisite for the Advanced Edition license.
· Support for Customer Call Reporter.
· Voicemail Pro database interaction (IVR).
· Voicemail Pro call flow generic TTS (8 ports).[1]
· Voicemail Pro Visual Basic Scripting.
· Voicemail Pro call recording toContactStore.[2]
1.Provides up to 8 ports of TTS for use with Speak Text actions within call flows.
2.In a Small Community Network using centralized voicemail, this license only enables ContactStore support forthe central IP Office. Remote IP Offices in the network require their own Advanced Edition license or a VMProRecordings Administrator license.
· Server Edition : On IP Office Server Edition, the Server Edition license provides all the Voicemail Pro features that are provided bythe Preferred Edition license on IP500 and IP500 V2.
· Additional Voicemail Pro Messaging Ports The required license for Voicemail Pro server support (Preferred Edition (Voicemail Pro)) also enables fourvoicemail ports. This license can be used to add additional voicemail ports up to the maximum capacity of the IPOffice system (IP406 V2 = 20, IP412 = 30, IP500 = 40, IP500 V2 = 40, IP Office Server Edition = 100). Thislicense was previously called Additional Voicemail Pro (ports).
VMPro Recordings Administrators : To support ContactStore in a Small Community Network, IP Offices other than the central IP Office require eithertheir own Advanced Edition license or this license.
· VMPro Networked Messaging : Enables the VPNM (Voicemail Pro Networked Messaging) functionality within Voicemail Pro. Enabling VPNM isrequired for message exchange with remote Voicemail Pro systems and Avaya Interchange systems.
· VMPro TTS (Generic) : This legacy license enables use of text-to-speech facilities using third-party TTS software with Voicemail Pro. Onelicense per simultaneous instance of TTS usage. The IP Office Advanced Edition license also enables eight ports ofgeneric TTS.
· VMPro TTS (ScanSoft) : This legacy license enables use of text-to-speech facilities using Avaya-supplied TTS software with Voicemail Prorunning on a Windows server. One license per simultaneous instance of TTS usage.
Implementing Voicemail Pro Page 1315-601064 Issue 8b (Tuesday, December 11, 2012)IP Office 8.1
Voicemail Pro: Voicemail Pro Licenses
Legacy LicensesThe following legacy licenses are still supported by IP Office Release 6 and higher.
· UMS Web Services This legacy license is used to enable UMS voicemail services support for users set to the Basic User profile.Other users are enabled for UMS through their licensed user profile.
· VMPro Database Interface : This legacy license enables third-party database support within Voicemail Pro call flows. For IP Office Release 6and higher, this is also enabled by the Advanced Edition license.
· VMPro VB Script : This legacy license enables Visual Basic Script support with Voicemail Pro. For IP Office Release 6 and higher,this is also enabled by the Advanced Edition license.
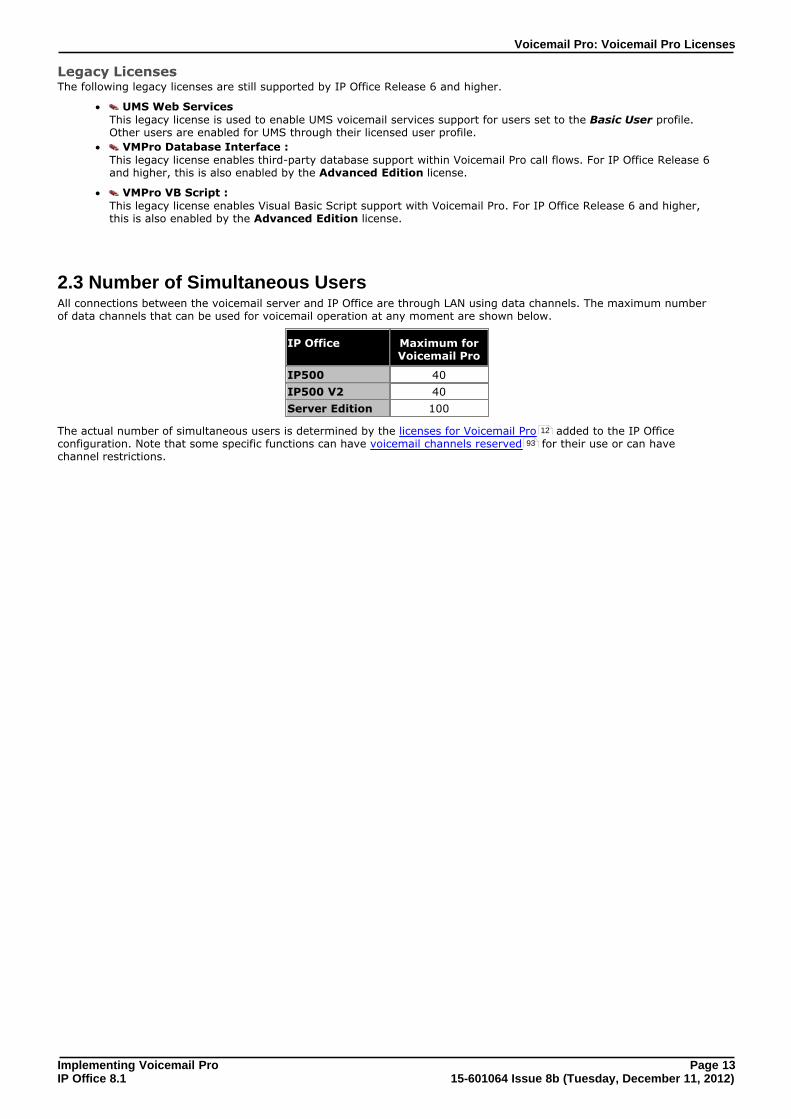
2.3 Number of Simultaneous UsersAll connections between the voicemail server and IP Office are through LAN using data channels. The maximum numberof data channels that can be used for voicemail operation at any moment are shown below.
IP Office Maximum forVoicemail Pro
IP500 40
IP500 V2 40
Server Edition 100
The actual number of simultaneous users is determined by the licenses for Voicemail Pro added to the IP Officeconfiguration. Note that some specific functions can have voicemail channels reserved for their use or can havechannel restrictions.
12
93


Implementing Voicemail Pro Page 1515-601064 Issue 8b (Tuesday, December 11, 2012)IP Office 8.1
Installation
Chapter 3.
Implementing Voicemail Pro Page 1615-601064 Issue 8b (Tuesday, December 11, 2012)IP Office 8.1
3. InstallationWindows Server InstallationThis section covers the installation of the Voicemail Pro server on a Windows server computer. Voicemail Pro 8.1 can beinstalled with the following IP Office systems running IP Office Release 8.1 software:
· IP Office 500
· IP Office 500v2
· IP Office Server Edition
Mixing Linux and Windows ServersIn scenarios where multiple Voicemail Pro servers are used, a mix of Linux-based and Windows-based servers can beused. For details on scenarios where multiple Voicemail Pro servers are used, see Centralized Voicemail Pro .
3.1 General Installation RequirementsHere is a list of general requirements for all types of voicemail installation.
· A client computer with IP Office Manager and Microsoft .NET Framework versions 2.0 installed on it. If .NET 2.0 isnot detected, you will be prompted to install it before the Voicemail Pro installation proceeds.
· An IP Office Feature Key. For details, see Avaya IP Office Standard Version Installation (15-601042).
· Licenses based on the serial number of the IP Office Feature Key. These should include:
· A license for Voicemail Pro and any additional voicemail ports is required. If Voicemail Pro Server is installedwithout a license it will run for two hours and then shut down.
· Licenses for any other Voicemail Pro components being installed, see Voicemail Pro Licenses .
· Latest version of the IP Office Applications DVD or the IP Office Unified Communications Module Software alongwith the latest fixes and patches. To get the latest version of a required software, visit http://support.avaya.com.
Tips
· Before you begin to install Voicemail Pro, check that the computer that you are using can connect to the IP Officeunit and that you can load and save a configuration file using IP Office Manager.
· Switch off any computer and hard disk sleep, power down, suspend, hibernation modes.
· Install the Voicemail Pro software using an account with full administrator rights on the computer. The servicesubsequently runs under that account. If you prefer, create a separate account for this purpose and configure itsuch that the account password does not expire.
116
12
Implementing Voicemail Pro Page 1715-601064 Issue 8b (Tuesday, December 11, 2012)IP Office 8.1
Installation: General Installation Requirements
3.1.1 Computer SpecificationsThe Voicemail Pro application requires various licenses entered into the IP Office configuration to control the features itoffers and the number of simultaneous connections . The number of simultaneous connections can be up to 40 on IPOffice 5.0+ IP500 control units and up to 100 on IP Office 8.1+ IP Office Server Edition control units. The operation ofVoicemail Pro can be customized to provide special services.
The Voicemail Pro software can be installed as separate Voicemail Pro client and server parts. You can perform remoteadministration of the Voicemail Pro server from a computer with just the Voicemail Pro client installed. A copy of theclient is automatically installed locally with the Voicemail Pro server.
Source
DVD IP Office 8.0 Application DVD (Disk 1).
Languages See Supported Languages .
IP500 IP Office Preferred Edition.
IP Office ServerEdition
Server Edition.
License See below.
The Voicemail Pro server part of the software consists of several components in addition to the core server software,these are:
· Campaigns The Voicemail Pro can be configured to run a campaign. This consists of a series of questions for which theVoicemail Pro records the callers answer or key presses. With International Time Zone (ITZ) support, the VoicemailPro records the IP Office time and not the Voicemail Pro local time. The resulting recordings can then be playedback by users. Users can use the web aspect of campaigns to perform this playback and processing of campaignrecordings via their web browser. This requires an IIS web server to be run on the same computer as the VoicemailPro software.
· UMS Web VoicemailUsers can use UMS to access their voicemail mailbox using either an IMAP compatible e-mail program or throughtheir web browser. UMS Web Voicemail requires the Voicemail Pro service to be installed on a server computer thathas IIS already present. It also installs PHP if not detected as already present.
· Text to Speech (TTS) Through adding additional licenses, the Voicemail Pro is able to use the TTS functions of Windows to speak text andnumbers to callers in addition to recording prompts. This is intended mainly for scenarios where the Voicemail Prois obtaining text and number values from a customer database.
· Installation on Windows Server Operating SystemsOn many Windows server computers, while the Windows Audio components are present by default they are not alwaysenabled. If this is the case the playback of voice prompts may be 'choppy' and the TTS (if installed) will not work.However, enabling Windows Audio does not require the server computer to have a sound card installed.
1.Verify that you have full administrator rights for the computer.
2.Click Start | Administrative Tools | Services.
3.If the status of the Windows Audio service is not Started, start the service and set the Startup Type toAutomatic.
Notes:
1. Do not use the Large Fonts setting, as it may cause options on some screens to become inaccessible.
2. For a good connection speed, use a 100 Mbps network card.
3. Free disk space requirements are also subject to the message storage required.
Basic Voicemail Pro
Minimum Hardware Requirements
RAM 256MB
Hard Disk FreeSpace
2GB*
Processor:
- Pentium P4 1.4GHz
- Celeron Any 1.7GHz
- AMD Any 1.4GHz.
*Add 1MB per minute of message and prompt storagespace as per your requirements.
Operating System Support
Server OS: Service Client
2003 Server
2008 Server
Client OS:
XP Professional
Vista
Windows 7
13
11
21
Implementing Voicemail Pro Page 1815-601064 Issue 8b (Tuesday, December 11, 2012)IP Office 8.1
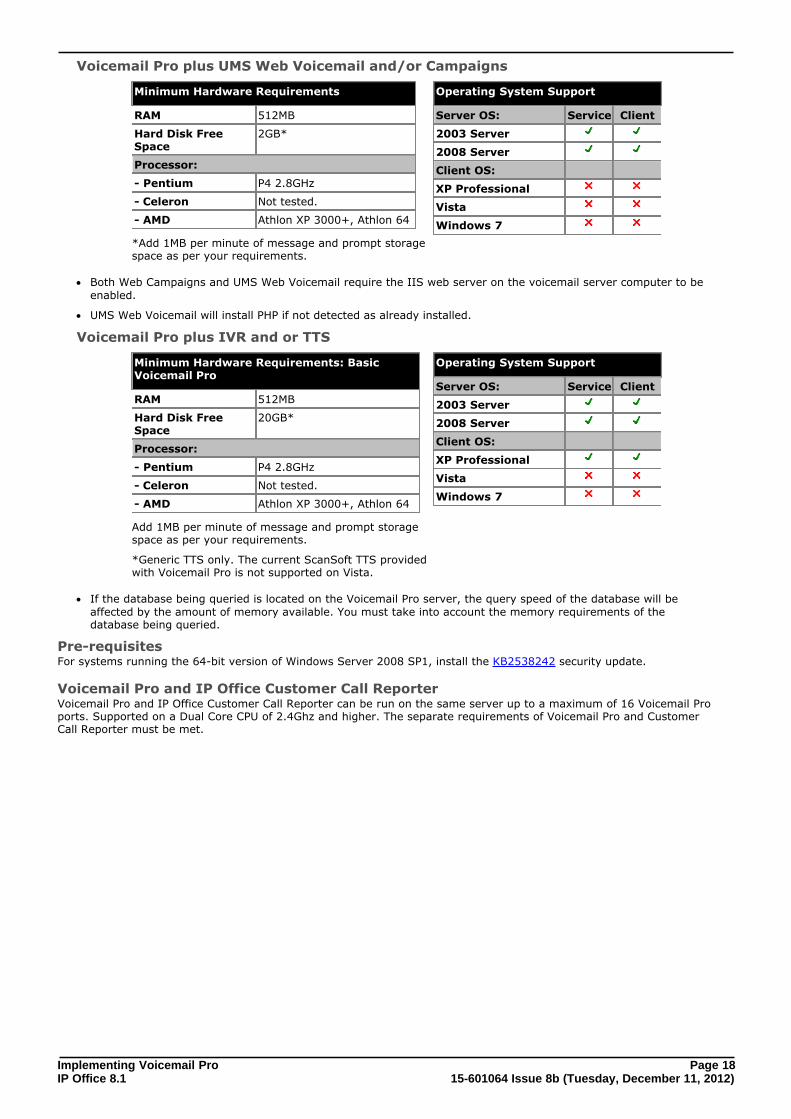
Voicemail Pro plus UMS Web Voicemail and/or Campaigns
Minimum Hardware Requirements
RAM 512MB
Hard Disk FreeSpace
2GB*
Processor:
- Pentium P4 2.8GHz
- Celeron Not tested.
- AMD Athlon XP 3000+, Athlon 64
*Add 1MB per minute of message and prompt storagespace as per your requirements.
Operating System Support
Server OS: Service Client
2003 Server
2008 Server
Client OS:
XP Professional
Vista
Windows 7
· Both Web Campaigns and UMS Web Voicemail require the IIS web server on the voicemail server computer to beenabled.
· UMS Web Voicemail will install PHP if not detected as already installed.
Voicemail Pro plus IVR and or TTS
Minimum Hardware Requirements: BasicVoicemail Pro
RAM 512MB
Hard Disk FreeSpace
20GB*
Processor:
- Pentium P4 2.8GHz
- Celeron Not tested.
- AMD Athlon XP 3000+, Athlon 64
Add 1MB per minute of message and prompt storagespace as per your requirements.
*Generic TTS only. The current ScanSoft TTS providedwith Voicemail Pro is not supported on Vista.
Operating System Support
Server OS: Service Client
2003 Server
2008 Server
Client OS:
XP Professional
Vista
Windows 7
· If the database being queried is located on the Voicemail Pro server, the query speed of the database will beaffected by the amount of memory available. You must take into account the memory requirements of thedatabase being queried.
Pre-requisitesFor systems running the 64-bit version of Windows Server 2008 SP1, install the KB2538242 security update.
Voicemail Pro and IP Office Customer Call ReporterVoicemail Pro and IP Office Customer Call Reporter can be run on the same server up to a maximum of 16 Voicemail Proports. Supported on a Dual Core CPU of 2.4Ghz and higher. The separate requirements of Voicemail Pro and CustomerCall Reporter must be met.
Implementing Voicemail Pro Page 1915-601064 Issue 8b (Tuesday, December 11, 2012)IP Office 8.1
Installation: General Installation Requirements
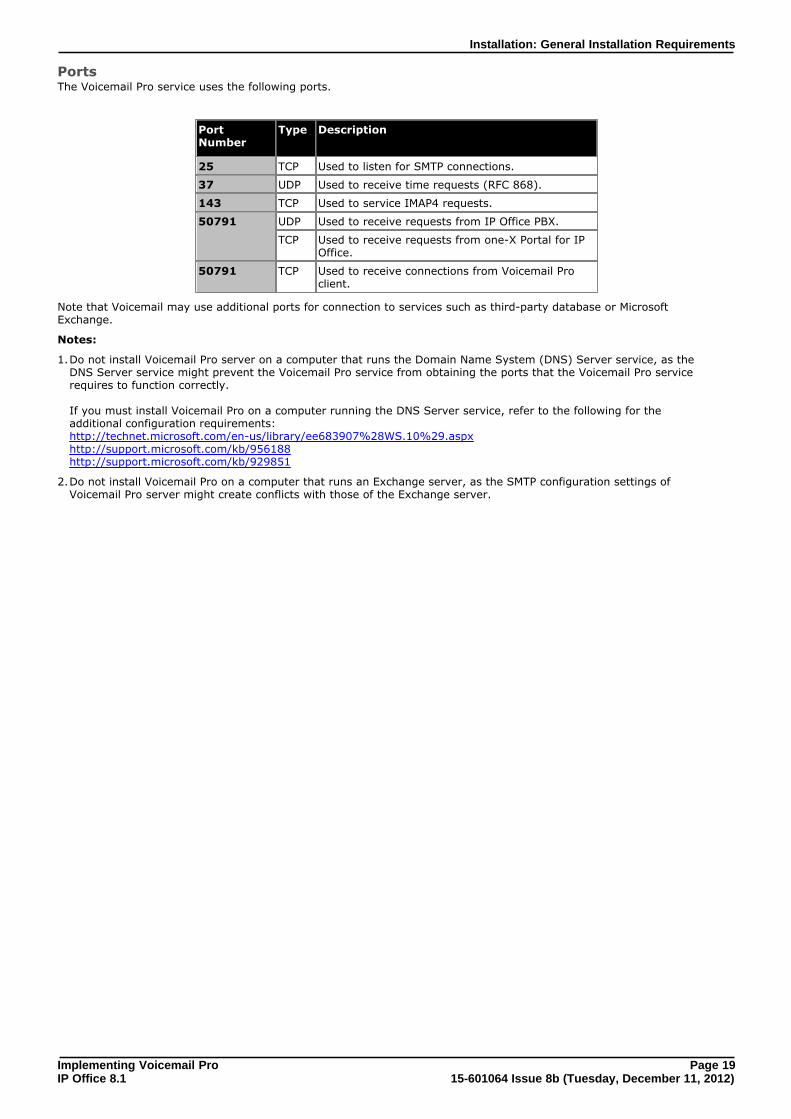
PortsThe Voicemail Pro service uses the following ports.
PortNumber
Type Description
25 TCP Used to listen for SMTP connections.
37 UDP Used to receive time requests (RFC 868).
143 TCP Used to service IMAP4 requests.
50791 UDP Used to receive requests from IP Office PBX.
TCP Used to receive requests from one-X Portal for IPOffice.
50791 TCP Used to receive connections from Voicemail Proclient.
Note that Voicemail may use additional ports for connection to services such as third-party database or MicrosoftExchange.
Notes:
1.Do not install Voicemail Pro server on a computer that runs the Domain Name System (DNS) Server service, as theDNS Server service might prevent the Voicemail Pro service from obtaining the ports that the Voicemail Pro servicerequires to function correctly.
If you must install Voicemail Pro on a computer running the DNS Server service, refer to the following for theadditional configuration requirements:http://technet.microsoft.com/en-us/library/ee683907%28WS.10%29.aspxhttp://support.microsoft.com/kb/956188http://support.microsoft.com/kb/929851
2.Do not install Voicemail Pro on a computer that runs an Exchange server, as the SMTP configuration settings ofVoicemail Pro server might create conflicts with those of the Exchange server.
Implementing Voicemail Pro Page 2015-601064 Issue 8b (Tuesday, December 11, 2012)IP Office 8.1
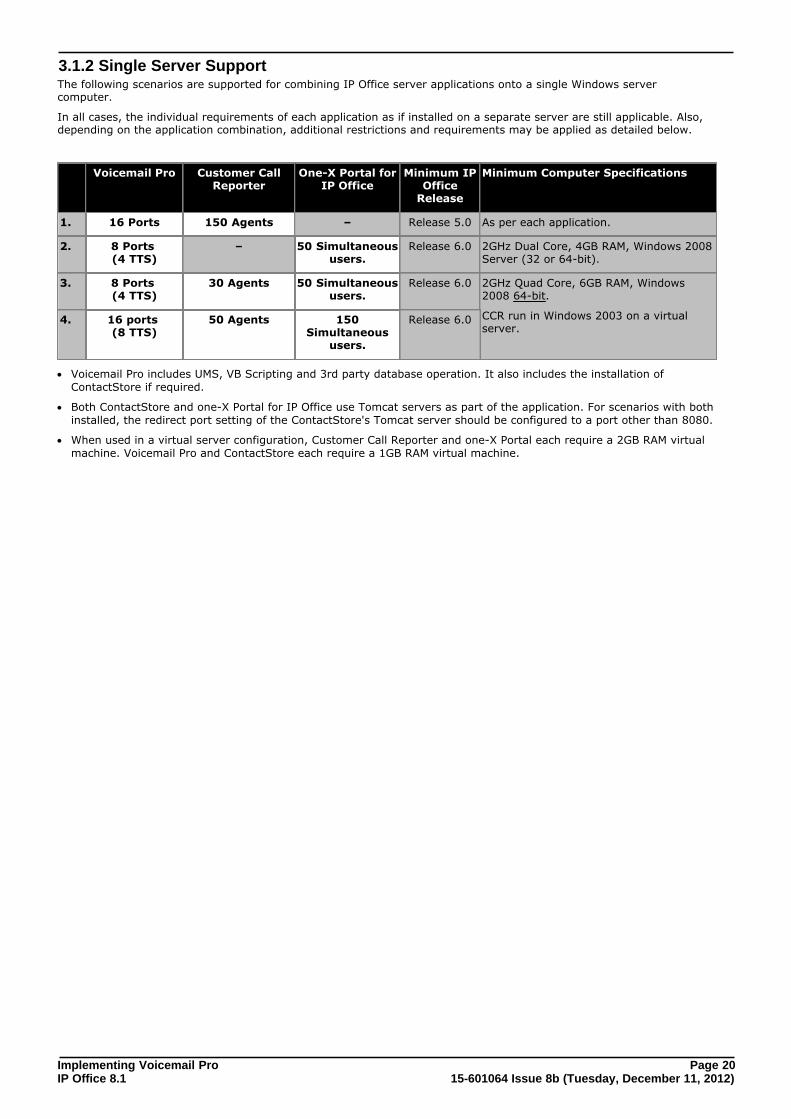
3.1.2 Single Server SupportThe following scenarios are supported for combining IP Office server applications onto a single Windows servercomputer.
In all cases, the individual requirements of each application as if installed on a separate server are still applicable. Also,depending on the application combination, additional restrictions and requirements may be applied as detailed below.
Voicemail Pro Customer CallReporter
One-X Portal forIP Office
Minimum IPOffice
Release
Minimum Computer Specifications
1. 16 Ports 150 Agents – Release 5.0 As per each application.
2. 8 Ports (4 TTS)
– 50 Simultaneoususers.
Release 6.0 2GHz Dual Core, 4GB RAM, Windows 2008Server (32 or 64-bit).
3. 8 Ports (4 TTS)
30 Agents 50 Simultaneoususers.
Release 6.0 2GHz Quad Core, 6GB RAM, Windows2008 64-bit.
CCR run in Windows 2003 on a virtualserver.
4. 16 ports (8 TTS)
50 Agents 150Simultaneous
users.
Release 6.0
· Voicemail Pro includes UMS, VB Scripting and 3rd party database operation. It also includes the installation ofContactStore if required.
· Both ContactStore and one-X Portal for IP Office use Tomcat servers as part of the application. For scenarios with bothinstalled, the redirect port setting of the ContactStore's Tomcat server should be configured to a port other than 8080.
· When used in a virtual server configuration, Customer Call Reporter and one-X Portal each require a 2GB RAM virtualmachine. Voicemail Pro and ContactStore each require a 1GB RAM virtual machine.

Implementing Voicemail Pro Page 2115-601064 Issue 8b (Tuesday, December 11, 2012)IP Office 8.1
Installation: General Installation Requirements
3.1.3 Virtual Server SupportOperation of IP Office server applications, including Voicemail Pro, is supported using the following virtual servers.
· VMWare Server.
· Microsoft Virtual Server 2005 R2.
· Microsoft Server Hyper-V.
3.1.4 Network RequirementsThe computer should be configured and tested for TCP/IP networking.
The voicemail server computer must be connected to the IP Office Control Unit directly or through a LAN switch.
If directly connected, changing the settings of the computer network card to match the IP Office control unit can resolvesome issues. This should be done according to the computer or network card manufacturer's instructions. The options forIP Office LAN ports are:
· All IP Office LAN ports are 10Mbps/100Mbps auto sensing.
If not directly connected, using any of the above settings must be supported and matched by the intervening networkequipment.
· The computer must have a static IP address.
· If the IP Office is acting as a DHCP server, it defaults to using 192.168.42.2 to 192.168.42.201 for DHCP clients.This leaves 192.168.42.202 to 192.168.42.254 for devices that require fixed IP addresses.
3.1.5 Disk Space RequirementsThe following are only approximations:
· At least 2GB of free disk space is required on the operating system drive (by default c:), regardless of to whichdrive Voicemail Pro is actually installed.
· A compact Voicemail Pro installation requires 130MB.
· A typical installation requires approximately 255MB.
· A custom installation requires up to 2GB of disk space. However, prompts and recorded messages consume anadditional 1MB of disk space per minute.
· For a busy environment you can expect to require at least 1000 minutes of message recording space, that is 1GB.
· If you are installing the Client only, you can expect to require at least 170MB.
3.1.6 Web Server OperationIf a Web browser access is required, the Microsoft IIS Web Server must be installed on the server computer beforeVoicemail Pro is installed:
· Microsoft web server products run as services and require Voicemail Pro to also run as a service.
· Internet Information Server 5.0 or higher is required.
3.1.7 ContactStore OperationContactStore is the current IP Office Voice Recording Library (VRL) application. For details on ContactStore, see Avaya IPOffice ContactStore (15-601037).
You must do the following to use ContactStore with Voicemail Pro:
· Install the latest version of IP Office ContactStore along with the available patches and verify its operation beforeyou install Voicemail Pro.
· Use different hard disk partitions to store the archived IP Office ContactStore messages and the Voicemail Promessages. Alternatively, you may use a different hard disk to store the archived IP Office ContactStore messages,or install IP Office ContactStore on a different computer.
· As you require additional Voicemail Pro licenses to use ContactStore to store recordings, enter an AdvancedEdition license key on IP Office hosting the Voicemail Pro server. If you are using a Small Community Network,enter either Advanced Edition license keys or VMPro Recordings Administrators license keys on other IPOffices in the network that you want to use with ContactStore.
· Use RAID 1 or RAID 5.
· Use a DVD recorder for long-term archiving.
· Use a hard drive that has enough space to store the archived recordings. You need approximately 7.2MB of harddisk space to store an archived recording of one hour duration.
· Verify that no other web service running on the host computer is using the port address 8888, as the system usesthe non-configurable port address 8888 to access the archived messages stored in IP Office ContactStore through aweb interface.
12
Implementing Voicemail Pro Page 2215-601064 Issue 8b (Tuesday, December 11, 2012)IP Office 8.1
3.1.8 SFTP Server RequirementsTo be able to use some of the features of voicemail server (for example, the remote backup operation, VRLA, and so on),you must install and configure an SFTP server. You can choose to install any of the commercial or free SFTP serverapplications, for example the freeFTPd application. However, ensure the following for the SFTP server to work with thevoicemail server:
· Configure port 22 to accept incoming connections to the SFTP server.
· Create a separate user account on the SFTP server for use with the voicemail server.
· If the SFTP server application requires you to set permissions for the user account, set the Read, Write, and Deletefile permissions and the List, Create, and Delete folder permissions for the user account.
SFTP configuration requirements for VRLA feature on Linux-based server
For the VRLA feature to work on a Linux-based voicemail server, you must:
· Install the SFTP server on the computer that runs the ContactStore application.
· Set the Home directory of the user account such that the VRL directory (specified by the value of the registry entryHKEY_LOCAL_MACHINE->SOFTWARE->Network Alchemy->Voicemail->Directories->VRLDir on a 32-bitsystem and HKEY_LOCAL_MACHINE->SOFTWARE->Wow6432Node->NetworkAlchemy->Voicemail->Directories->VRLDir on a 64-bit system) lies inside the SFTP directory structure. For example, if you set C:\asdf\xyz as the VRL directory, then set either C:\asdf\xyz or C:\asdf as the Home directoryof the SFTP user account.
Testing and troubleshooting the SFTP connection1.Log in to the command line interface as the root user on the voicemail server.
2.Enter Sftp <username>@sftpIP, where <username> is the username of the SFTP user account.
3.Enter the password of the SFTP user account.The SFTP connection should get established.
4.If the SFTP connection is not established, then:
a.On the computer that runs the SFTP server, check if any other application is using port 22 for an SFTP connection.If yes, stop the application.
b.Clear all the entries in /root/.ssh/known_hosts that are associated with the IP address of the SFTP server.
3.2 Server/Client InstallationThe Voicemail Pro installation software for Windows offers a number of different types of installation. The key types areclient only, compact, typical and custom. These differ in the components installed as detailed in the table below.
Component Sub Component Installation Type Notes
Client Compact
Typical
Custom
VoicemailPro
Voicemail ProClient
Voicemail ProService
Languages Installs the prompts that best match the servercomputer locale plus English prompts. For aninstallation with additional languages use theCustom installation option.
Voicemail Pro Campaign WebComponent
Not available for installation on an XP Pro server.
Web Voicemail (UMS) Only available for installation on server operatingsystems.
Before you begin:
1.Log on to the server computer using the user account under which you intend the Voicemail Pro server or service torun. This user account must have full administrator rights to the server computer. You must update the VoicemailPro service password if the user account password is changed. To ensure that the voicemail service does not get interrupted, create a new user account called Voicemail andconfigure it such that it has full administrator rights on the computer and the account password does not expire.
2.In IP Office Manager, check that the correct licenses for Voicemail Pro have been installed and show a status ofValid.
3.For installations other than client-only and compact, check that the required pre-installation processes have beencompleted.
· Web Campaigns Installation
12
27
Implementing Voicemail Pro Page 2315-601064 Issue 8b (Tuesday, December 11, 2012)IP Office 8.1
Installation: Server/Client Installation
· Voicemail E-mail Installation
· UMS Web Voicemail
· IMAP Installation
· Web Voicemail Installation
· UMS Exchange Configuration
· Centralized Voicemail Pro
· Installing Text to Speech Features
· Voicemail Private Networked Messaging (VPNM) Installation
· Installation on Windows Server Operating SystemsOn many Windows server computers, while the Windows Audio components are present by default they are not alwaysenabled. If this is the case the playback of voice prompts may be 'choppy' and the TTS (if installed) will not work.However, enabling Windows Audio does not require the server computer to have a sound card installed.
1.Verify that you have full administrator rights for the computer.
2.Click Start | Administrative Tools | Services.
3.If the status of the Windows Audio service is not Started, start the service and set the Startup Type toAutomatic.
54
32
33
36
42
116
71
134

Implementing Voicemail Pro Page 2415-601064 Issue 8b (Tuesday, December 11, 2012)IP Office 8.1
To install the Voicemail Pro software components:
1.Insert the IP Office Applications DVD. Click on the link for Voicemail Pro and then double-click on setup.exe.
2.The Choose Setup Language menu is displayed. This language is used for the installation process and does notaffect the language prompts that are installed.
3.Select the language for the installation process. Click OK.
4.The Preparing Installation menu is displayed.
· Voicemail Pro requires Microsoft .NET 2.0 Framework. If this is not detected, you will be prompted to install it.Click Yes to install Microsoft .NET 2.0 Framework.
· If the Modify, repair or remove the program window is displayed, follow the upgrade process .
5.The Welcome window is displayed. Click Next.
6.The Customer Information menu is displayed.
· Use the default names or enter a user and company name. These settings do not affect the Voicemail Proinstallation.
· Select the option Anyone who uses this computer (all users).
· Click Next.
7.The Choose Destination Location menu is displayed. Unless specifically required, for ease of maintenance, usethe proposed folder location. Click Next.
8.The Messaging Components menu is displayed.
9.Select Voicemail Pro (Full) or Voicemail Pro Client - Only. Click Next. If Voicemail Pro Client - Only wasselected, go to step 14 .
10.The Setup Type menu is displayed. Select Compact, Typical or Custom and click Next.
· If the option selected was Custom, the Select Features menu is displayed. Select the components requiredfor the installation and click Next.
11.The Service Account Name window is displayed. This window is used to select the account under which theVoicemail Pro services will be run following installation.
· Enter the user name and password of the account to use. Alternatively, click Browse and select a name fromthe list of available computer or network accounts.
· Click Next. The account name and password are validated. If the validation fails, the system prompts youwhether to create a new account that matches the details entered.
12.The Select Program Folder menu is displayed. By default, the program folder for the Voicemail Pro client is setto IP Office. For ease of maintenance use this option unless there is a specific reason to use a different folder. ClickNext.
13.The Start Copying Files menu is displayed. It shows a summary of the components that are about to beinstalled. Check that this list is as expected. If for any reason the details are not what you expect, click Back andmake the required changes. When you are satisfied that the details are correct, click Next to start copying the files.
14.The Setup Status menu is displayed. This shows you the progress of the file installation. For a client onlyinstallation, the software installation process is now completed. Note: You may get the prompt to reset IIS. If so, click Yes to reset IIS. If you click No, some of the functionalitiesmay not be available until you restart IIS.
15.The InstallShield Wizard Complete menu is displayed.
16.Depending on the operating system and the components installed you may be prompted to restart the computer.If so select Yes, I want to restart my computer now.
17.Click Finish.
18.If the computer restarts, you will need to log in to continue the installation process.
19.The installation process continues by requesting a number of configuration settings used by the voicemail serverservices,
1.The IP Office Voicemail Pro E-mail Settings window is displayed. This is used to enter the account that thevoicemail pro server should use for e-mail functions. Enter the name of the e-mail account to use or click Browse and select an account to use. Click Next.
2.The IP Office Voicemail Pro SMTP E-mail Settings window opens.
3.In the Mail Server box, type the name of the SMTP mail server or use the name that is proposed. This shouldbe the fully qualified domain name.
4.In the Port Number box, type the number of the receiving port on the SMTP mail server. The default is 25.
5.To enforce server authentication, check the Server Requires Authentication box. This is optional. If youcheck it you also need to provide the Account Name and Password that need to be entered. You can also choosewhether or not to set the Use Challenge Response Authentication option.
29
24
Implementing Voicemail Pro Page 2515-601064 Issue 8b (Tuesday, December 11, 2012)IP Office 8.1
Installation: Server/Client Installation
6.Click Finish. The e-mail settings are validated. An error message is displayed if the system fails to connect toan SMTP server. Click OK to acknowledge the message.
20.You have now finished installing the Voicemail Pro server and client software.
21.If you use custom installation to install a specific Voicemail Pro feature, refer to the appropriate section for detailsof actions that need to be performed after the installation of the Voicemail Pro server software.
· Web Campaigns Installation
· Voicemail E-mail Installation
· UMS Web Voicemail
· IMAP Installation
· Web Voicemail Installation
· UMS Exchange Configuration
· Centralized Voicemail Pro
· Installing Text to Speech Features
· Voicemail Private Networked Messaging (VPNM) Installation
Initial ConfigurationFollowing installation of the server and client, you should check operation by using the client to connect to the server.
1.Click Start | Programs | IP Office | Voicemail Pro. The Voicemail Pro Client starts and the main window opens.
2.Change the default remote administrator account details:
a. In the navigation panel, click on Voicemail Pro Administrators. There should be one account calledAdministrator.
b.Double-click on the account (or right click and select Modify).
c. Change the Password and Confirm Password to a new value than the default (Administrator).
3.Initialize the server call flow:
a.Click the Save and Make Live icon.
b.Select Yes. The file root.vmp is created on the server. This is the compiled non-editable version of the call flowthat is used by the server.
c. Voicemail operation can now be tested from an extension by dialing *17.
4.You can now start configuring the operation of the voicemail server, for example changing the system preferences.
27
54
32
33
36
42
116
71
134
96
Implementing Voicemail Pro Page 2615-601064 Issue 8b (Tuesday, December 11, 2012)IP Office 8.1
3.2.1 Modifying the Installed Components
1.Open the Windows Control Panel.
2.Click Programs | Programs and Features.
3.In the list of installed programs, select IP Office Voicemail Pro and click Change. The installation wizard for IP Office Voicemail Pro opens up.
4.Select Modify and click Next. The Select Features menu is displayed.
5.Select the check boxes for all the features in the list that you want to install.Note: If you clear the check box for a feature that is already installed, the installation wizard will uninstall thefeature.
6.Click Next. The Service Account Name window is displayed.
7.Continue with the installation wizard following the steps from the To install the Voicemail Pro software componentssection of Server/Client Installation .22
Implementing Voicemail Pro Page 2715-601064 Issue 8b (Tuesday, December 11, 2012)IP Office 8.1
Installation: Server/Client Installation
3.2.2 Web Campaigns InstallationThe web campaigns component of Voicemail Pro requires IIS to be installed and running on the server computer.
1.Check that IIS is installed and running on the server computer.
· Windows 2008 Server IIS does not support legacy IIS applications such as Campaigns by default. This isrectified by reinstalling IIS from the Windows installation disk and selecting Legacy IIS support during theinstallation.
2.Check that the server computer can be browsed from the other computers on the customer network.
3.If the Voicemail Pro server software has not yet been installed:
· Run the Voicemail Pro software installation and select Voicemail Pro (Full).
· Select either Typical or Custom. If Custom is selected, select Voicemail Pro Campaign Web Component inthe list of components.
4.If the Voicemail Pro server software is already installed:
· Modify the installed components and select Voicemail Pro Campaign Web Component in the list ofcomponents.
Windows 2008 ServerThe following configuration changes are required for IIS version 7 after installation of the Voicemail Pro web campaignscomponent.
1.Click Start | Administrative Tools | Internet Information Services (IIS) Manager.
2.In the Connections pane, click the server node in the tree.The server Home page is displayed.
3.In Features View, double-click Handler Mappings.
4.Click Edit Feature Permissions.
5.Check the Scripts and Execute check boxes.
6.Click OK.
7.In the Connections pane, expand the server node in the tree.
8.Expand the Sites node, then expand the Default Web Site node, and select Campaign.The Campaign Home page is displayed.
9.In Features View, double-click Authentication.
10.Click ASP .NET Impersonation.
11.In the Actions pane, click Disable.
22
Implementing Voicemail Pro Page 2815-601064 Issue 8b (Tuesday, December 11, 2012)IP Office 8.1
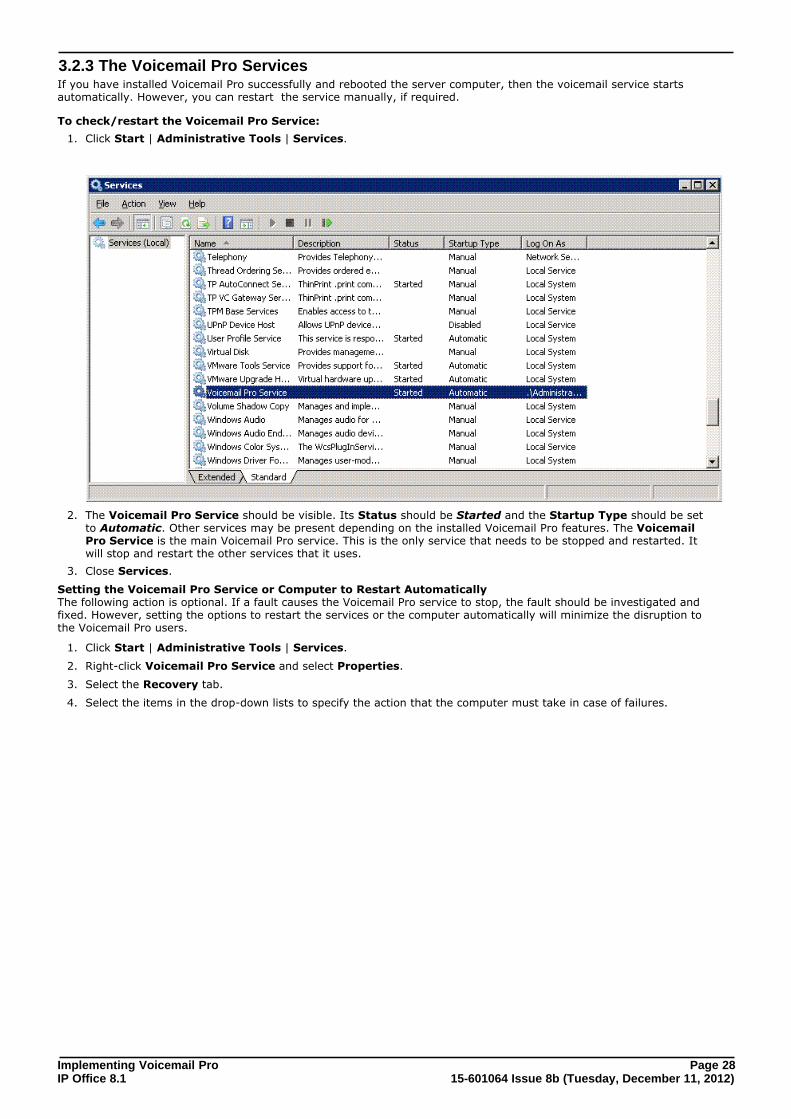
3.2.3 The Voicemail Pro ServicesIf you have installed Voicemail Pro successfully and rebooted the server computer, then the voicemail service startsautomatically. However, you can restart the service manually, if required.
To check/restart the Voicemail Pro Service:
1. Click Start | Administrative Tools | Services.
2. The Voicemail Pro Service should be visible. Its Status should be Started and the Startup Type should be setto Automatic. Other services may be present depending on the installed Voicemail Pro features. The VoicemailPro Service is the main Voicemail Pro service. This is the only service that needs to be stopped and restarted. Itwill stop and restart the other services that it uses.
3. Close Services.
Setting the Voicemail Pro Service or Computer to Restart AutomaticallyThe following action is optional. If a fault causes the Voicemail Pro service to stop, the fault should be investigated andfixed. However, setting the options to restart the services or the computer automatically will minimize the disruption tothe Voicemail Pro users.
1. Click Start | Administrative Tools | Services.
2. Right-click Voicemail Pro Service and select Properties.
3. Select the Recovery tab.
4. Select the items in the drop-down lists to specify the action that the computer must take in case of failures.
Implementing Voicemail Pro Page 2915-601064 Issue 8b (Tuesday, December 11, 2012)IP Office 8.1
Installation: Server/Client Installation
Using a Batch File to Start Services In some instances, certain computers might not respond quickly enough to start all of the Avaya services in the correctorder. In this circumstance, it is advisable to create a batch file which delays the start of these services until thecomputer is fully running.
Avaya IP Office Services can be started successfully at system start-up using a scheduled task that initiates the batch filebelow. This batch file ensures that the services will start successfully and in the correct order.
1. Set all Avaya services listed below to Manual start. Do not include Key Server.
2.Create the batch file below and save it to %SYSTEMROOT%. Only include lines for the services which are installed.
@echo offrem Wait 60 seconds before execute.timeout /t 60net start Voicemail Pro Service
3.Create a scheduled task to start the batch file at system start-up.
3.3 Upgrading Voicemail ProThis section describes how to upgrade Voicemail Pro.
Note: After you upgrade, the system updates the timestamp associated with the recordings to reflect the time of theassociated IP Office instead of the time of the Central Voicemail Pro server. The system does not automatically updatethe time stamp of Campaign recordings.
The options available are:
· Upgrading from below Voicemail Pro 3.2
· Upgrade from 3.2 or higher
· Upgrading from Voicemail Lite
3.3.1 Upgrade from below version 3.2It is important that the settings of an existing Voicemail Pro are exported before any upgrade. Although folders thatcontain prompts and messages are not affected by the upgrade process, the editable version of a customer call flow islost.
Note: When you upgrade Voicemail Pro to a newer version, the Voicemail Pro server updates the current time zoneoffset of the user. However, it will not update the campaign information.
To upgrade from below version 3.2 to version 4.x+:
1.Export the Database Before removing Voicemail Pro as part of an upgrade, you must create a backup copy of the call flow database. Thiswill contain any customizations made to the default call flow.
1.Start the Voicemail Pro Client.
2.From the File menu, select the option Import or Export.
3.Select the option Export call flows and click Next.
4.Enter a file path and file name ending in .mdb, for example C:\temp\backup.mdb. Click Next.
5.Click Finish to start the export then click Close to complete the export procedure.
6.Close the Voicemail Pro Client.
2.Back up the Registry Any registry settings that are associated with Voicemail Pro need to be backed up.
1.Insert the IP Office Applications DVD. Click on the link for Voicemail Pro and then double-click on setup.exe.The Choose Setup Language window opens.
2.Right-click the DVD drive and select Open.
3.Locate the file backupreg.bat and double-click it to run the application.
4.Check that the registry settings have been backed up. The batch file should have created 3 backup files in theWindows Temp directory. Make sure that the following 3 files exist in that location:
· VMPro.arf
· NetAly.arf
· IMSGateway.arf
3.Remove Voicemail Pro Any previous versions of Voicemail Pro must be removed before you start to install the new version.
1.Open the Windows Control Panel.
2.Click Programs | Programs and Features.
3.In the list of installed programs, select IP Office Voicemail Pro and click Uninstall.
29
30
31
Implementing Voicemail Pro Page 3015-601064 Issue 8b (Tuesday, December 11, 2012)IP Office 8.1
4.Follow the prompts that you see on the screen during the removal process.
5.When the process has been completed, click Finish.
4.Restore the Registry The Voicemail Pro registry settings that were backed up in step 2 need to be restored.
1.Insert the IP Office Applications DVD. Click on the link for Voicemail Pro and then double-click on setup.exe.The Choose Setup Language window opens.
2.Locate the file restorereg.bat and double-click it to run the application. This restores the registry settings previouslyassociated with Voicemail Pro.
5.Install the New Software See Installing Voicemail Pro and then refer to the sections that relate to the type of Voicemail Pro that you intend toinstall.
6.Restore the Database The copy of the call flow database that contained any customizations made to the default call flow needs to berestored.
1.Start Voicemail Pro.
2.From the File menu, select Import or Export. The Import or Export Call Flows window opens.
3.Select Import Call Flows.
4.Click Next.
5.Click the Browse button and locate the file that contains the backed up call flows.
6.Select the file and click Open.
7.In the Import or Export Call Flows window, click Next.
8.Click Finish to start importing the database.
9.Click Close to complete the import process.
10.Click on Save and Make Live to save the Call flows.
The new version of Voicemail Pro has been installed. Test that the system is running by dialing *17 from any extension.You should hear the mailbox announcement.
3.3.2 Upgrade from Version 3.2+Backup the database before you upgrade.
Note: When you upgrade Voicemail Pro to a newer version, the Voicemail Pro server updates the current time zoneoffset of the user. However, it does not update the campaign information.
To upgrade from version 3.2 or higher:
1.Insert the IP Office Applications DVD. Click on the link for Voicemail Pro and then double-click on setup.exe.The Choose Setup Language window opens.
2.Select the installation language. The language selected is used for the installation.
3.Click OK. You are asked 'This setup will perform an upgrade of IP Office Voicemail Pro. Do you want to continue?'
4.Click Yes. The Upgrading the IP Office Voicemail Pro window opens.
5.Click Next to start the upgrade. The setup status window opens. The progress of the upgrade is indicated by a timebar.
6.Click Finish. The E-mail settings window opens.
7.Enter your e-mail account details and click Next. The SMTP E-mail settings window opens.
8.Enter your SMTP E-mail details and click Finish. The SMTP settings entered will be validated. If an error occurs, thevalidating configuration window opens containing the SMTP Error .
9.Click Yes when prompted whether to start the Voicemail Pro service.
10.The new version of Voicemail Pro has been installed. Test that the system is running by dialing *17 from anyextension. You should hear the mailbox announcement.
29
16
132
Implementing Voicemail Pro Page 3115-601064 Issue 8b (Tuesday, December 11, 2012)IP Office 8.1
Installation: Upgrading Voicemail Pro
3.3.3 Upgrade to Voicemail ProYou can upgrade from Voicemail Lite to Voicemail Pro. The steps described here will remove Voicemail Lite but will notremove the existing mailbox messages and greetings.
Note: When you upgrade Voicemail Pro to a newer version, the Voicemail Pro server will update the current timezone offset of the user; however, it will not update the campaign information. Similar is the case with restoringregistry settings.
To upgrade from Voicemail Lite to Voicemail Pro:
1.Remove Voicemail Lite
1.Make sure that Voicemail Lite is not running.
2.Open the Windows Control Panel.
3.Click Programs | Programs and Features.
4.In the list of installed programs, select IP Office Admin Suite and click Change. The Installshield Wizard for IPOffice Admin Suite opens up.
5.Click Next. The Program Maintenance window is displayed.
6.Select Modify and click Next.
7.In the list of selected Features, click the option Voicemail Lite and select This feature will not be available. The
feature Voicemail Lite will have a red cross by the name. .
· Important - Do not uncheck any other boxes as this will also remove those features.
8.Click Next. The Ready to Modify the Program window opens.
9.Click Install. The Voicemail Lite program will be removed, which may take several minutes.
10.Click Finish to exit the InstallShield Wizard.
11.Click Close to close the Add/Remove Programs window.
12.Remove any shortcuts to VMLite.exe from Start | Programs | Startup.
2.Install the New Software The next step is to install the Voicemail Pro software. See Installing Voicemail Pro and then refer to the sections thatrelate to the type of Voicemail Pro that you intend to install.
3.Move the Voicemail Lite Folders Before users begin to use Voicemail Pro, copy the Voicemail Lite folders that contain voicemail messages and mailboxgreetings to Voicemail Pro.
4.Using Windows Explorer or My Computer, locate the folder C:\Program Files\Avaya\IP Office\Voicemail Server.
5.Copy all sub-folders and files in that folder.
6.Paste the sub-folders and files in the folder C:\Program Files\Avaya\IP Office\Voicemail Pro\VM. Replace anyexisting folders.
7.Select the Mailbox Mode. Voicemail Lite runs in IP Office mailbox mode. By default Voicemail Pro installs in Intuity mailbox mode. If required byyour users, you can set Voicemail Pro back to IP Office mailbox mode.
1.Start the Voicemail Pro Client.
2.Click the Preferences icon and select General.
3.On the General tab, change the Default Telephony Interface from Intuity to IP Office.
4.Click OK.
5.Click Save & Make Live.
The new version of Voicemail Pro has been installed. Test that the system is running by dialing *17 from any extension.You should hear the mailbox announcement.
16
Implementing Voicemail Pro Page 3215-601064 Issue 8b (Tuesday, December 11, 2012)IP Office 8.1
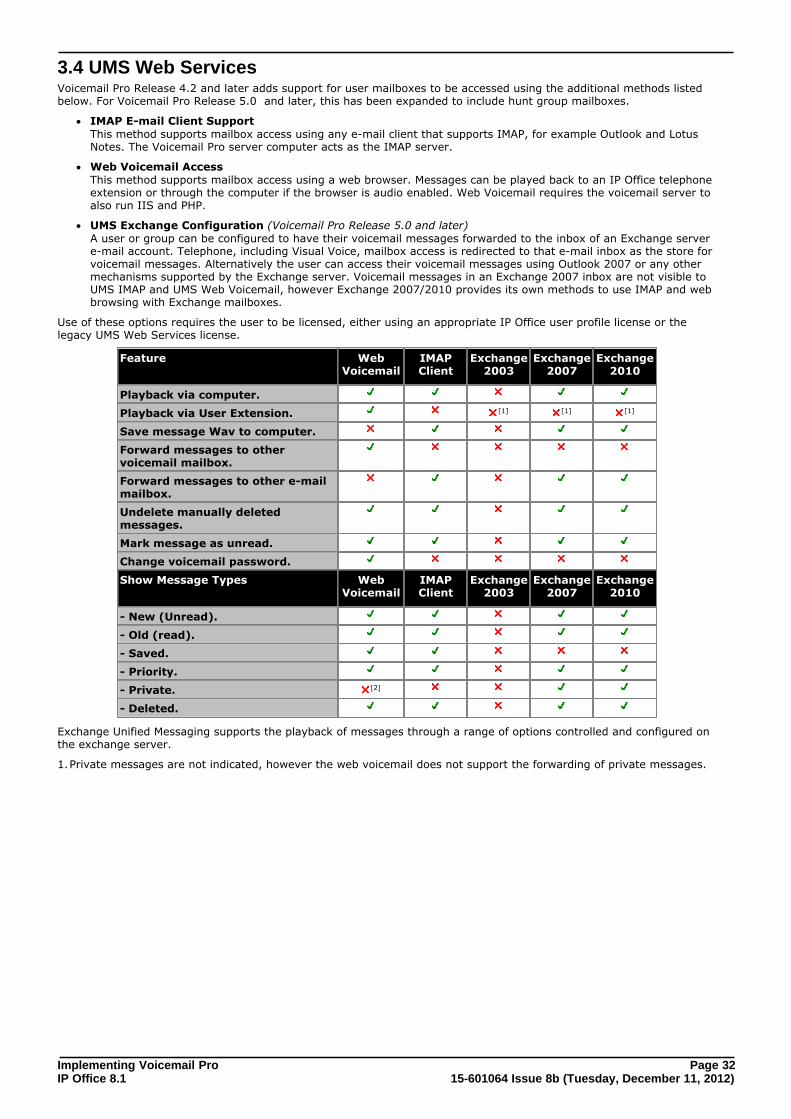
3.4 UMS Web ServicesVoicemail Pro Release 4.2 and later adds support for user mailboxes to be accessed using the additional methods listedbelow. For Voicemail Pro Release 5.0 and later, this has been expanded to include hunt group mailboxes.
· IMAP E-mail Client SupportThis method supports mailbox access using any e-mail client that supports IMAP, for example Outlook and LotusNotes. The Voicemail Pro server computer acts as the IMAP server.
· Web Voicemail AccessThis method supports mailbox access using a web browser. Messages can be played back to an IP Office telephoneextension or through the computer if the browser is audio enabled. Web Voicemail requires the voicemail server toalso run IIS and PHP.
· UMS Exchange Configuration (Voicemail Pro Release 5.0 and later)A user or group can be configured to have their voicemail messages forwarded to the inbox of an Exchange servere-mail account. Telephone, including Visual Voice, mailbox access is redirected to that e-mail inbox as the store forvoicemail messages. Alternatively the user can access their voicemail messages using Outlook 2007 or any othermechanisms supported by the Exchange server. Voicemail messages in an Exchange 2007 inbox are not visible toUMS IMAP and UMS Web Voicemail, however Exchange 2007/2010 provides its own methods to use IMAP and webbrowsing with Exchange mailboxes.
Use of these options requires the user to be licensed, either using an appropriate IP Office user profile license or thelegacy UMS Web Services license.
Feature WebVoicemail
IMAPClient
Exchange2003
Exchange2007
Exchange2010
Playback via computer.
Playback via User Extension. [1] [1] [1]
Save message Wav to computer.
Forward messages to othervoicemail mailbox.
Forward messages to other e-mailmailbox.
Undelete manually deletedmessages.
Mark message as unread.
Change voicemail password.
Show Message Types WebVoicemail
IMAPClient
Exchange2003
Exchange2007
Exchange2010
- New (Unread).
- Old (read).
- Saved.
- Priority.
- Private. [2]
- Deleted.
Exchange Unified Messaging supports the playback of messages through a range of options controlled and configured onthe exchange server.
1.Private messages are not indicated, however the web voicemail does not support the forwarding of private messages.
Implementing Voicemail Pro Page 3315-601064 Issue 8b (Tuesday, December 11, 2012)IP Office 8.1
Installation: UMS Web Services
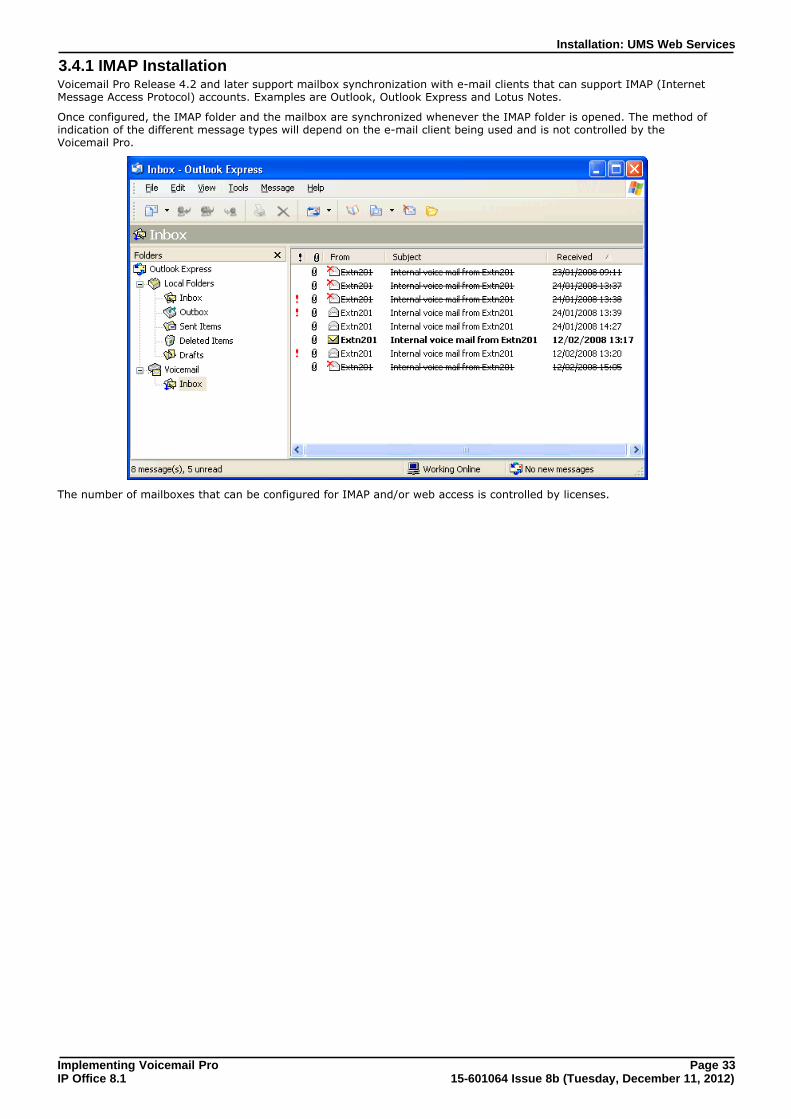
3.4.1 IMAP InstallationVoicemail Pro Release 4.2 and later support mailbox synchronization with e-mail clients that can support IMAP (InternetMessage Access Protocol) accounts. Examples are Outlook, Outlook Express and Lotus Notes.
Once configured, the IMAP folder and the mailbox are synchronized whenever the IMAP folder is opened. The method ofindication of the different message types will depend on the e-mail client being used and is not controlled by theVoicemail Pro.
The number of mailboxes that can be configured for IMAP and/or web access is controlled by licenses.
Implementing Voicemail Pro Page 3415-601064 Issue 8b (Tuesday, December 11, 2012)IP Office 8.1
Installing the Voicemail Pro IMAP ServerThe IMAP server is installed as a part of the Voicemail Pro service installation. It uses the IP address of the Voicemail Proserver computer and runs on the standard IMAP port 143. To prevent any conflicts with the Voicemail Pro IMAP server,do not run any other IMAP server on the same computer.
Licensing IP Office for Web ServicesUMS web services can be licensed in a number of ways by licenses added to the IP Office configuration:
· User Licensing User licensing is done as follows.
· Users whose Profile is set to Teleworker User or Power User can be licensed using the Teleworker Profileor Power User Profile licenses.
· User's whose Profile is set to Basic User can be licensed using the legacy UMS Web Services licenses.
· Hunt Group Licensing Hunt groups are licensed by UMS Web Services licenses.
1.Start IP Office Manager.
2.Receive the configuration from the IP Office associated with the Voicemail Pro server.
3.In the Licenses section, add the required licenses.
4.Merge the configuration back to the IP Office and then receive the configuration again.
5.In the Licenses section check that the License Status of the licenses is now shown as Valid.
6.Start the Voicemail Pro client
7.Select Help | About.
8.The screen should list the Web Services as Started and should show the number of UMS licenses.
Configure Users for UMS1.Start IP Office Manager.
2.Receive the configuration from the IP Office system hosting the user.
3.Select User and then select the required user.
4.Set their Profile to either Teleworker or Power User.
5.Select the Voicemail tab. Enable UMS Web Services. Click OK.
6.Merge the configuration back to the IP Office.
Configuring Hunt Groups for UMSAccess to hunt group mailboxes using UMS is supported for Voicemail Pro 5.0+.
1.Start IP Office Manager.
2.Receive the configuration from the IP Office system hosting the hunt group.
3.Select the hunt group.
4.Click on the Voicemail tab.
5.Enable UMS Web Services. Click OK.
6.Merge the configuration back to the IP Office.
Implementing Voicemail Pro Page 3515-601064 Issue 8b (Tuesday, December 11, 2012)IP Office 8.1
Installation: UMS Web Services
Configuring a User E-mail accountThe exact method of configuration of an IMAP account depends on the IMAP client being used by the user. For example itmay be required to enable some field with dummy data in order for the e-mail client to accept the account even thoughthose settings are not used by the Voicemail Pro IMAP server.
The general details that are required are:
IMAP Account Setting IP Office Value
Incoming Server Voicemail Pro server IP address or domain nameaddress.
Account Name User name or extension number.
Password User voicemail code.
Example: Outlook
1.Select Tools and then Options.
2.Select Mail Setup and then click E-mail Accounts.
3.Select Add a new e-mail account.
4.Select IMAP as the server type.
5.In Server Information for Incoming mail server and Outgoing mail server enter the IP address or domainname address of the Voicemail Pro server computer.
6.In Logon Information enter the user's extension number and voicemail code as the User Name and Password.
7.Click Next.
Example: Outlook Express
1.Select Tools and then Accounts.
2.Select Add and then Mail.
3.Enter a descriptive name such as Voicemail and click Next.
4.Enter an e-mail address. This is not used but a value must be entered to move to the next screen. Click Next.
5.Set My incoming mail server is a to IMAP.
6.In the Incoming server field enter the IP address or domain name address of the Voicemail Pro server computer.
7.Enter a value in the Outgoing mail server field. This is not used but a value must be entered to move to the nextscreen. Click Next.
8.For Account Name enter the user's extension number or name in the IP Office configuration.
9.For Password enter the user's Voicemail Code.
10.Click Next and then Finish.
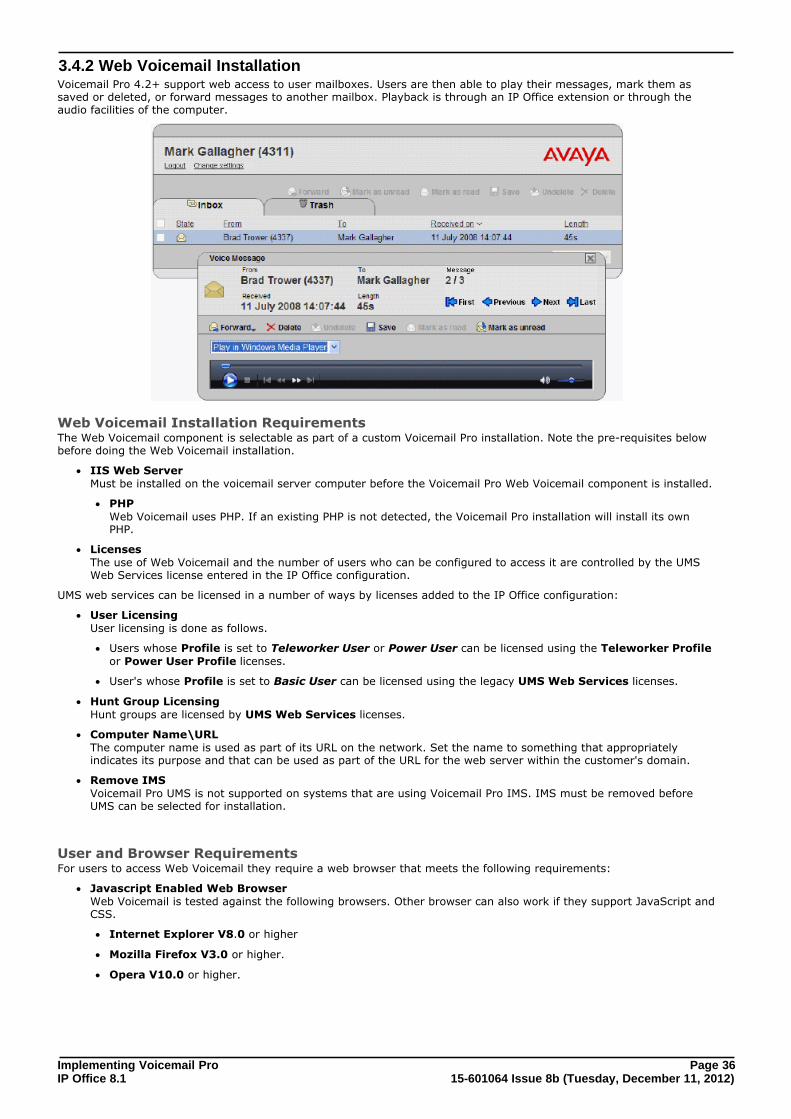
Implementing Voicemail Pro Page 3615-601064 Issue 8b (Tuesday, December 11, 2012)IP Office 8.1
3.4.2 Web Voicemail InstallationVoicemail Pro 4.2+ support web access to user mailboxes. Users are then able to play their messages, mark them assaved or deleted, or forward messages to another mailbox. Playback is through an IP Office extension or through theaudio facilities of the computer.
Web Voicemail Installation RequirementsThe Web Voicemail component is selectable as part of a custom Voicemail Pro installation. Note the pre-requisites belowbefore doing the Web Voicemail installation.
· IIS Web ServerMust be installed on the voicemail server computer before the Voicemail Pro Web Voicemail component is installed.
· PHPWeb Voicemail uses PHP. If an existing PHP is not detected, the Voicemail Pro installation will install its ownPHP.
· Licenses The use of Web Voicemail and the number of users who can be configured to access it are controlled by the UMSWeb Services license entered in the IP Office configuration.
UMS web services can be licensed in a number of ways by licenses added to the IP Office configuration:
· User Licensing User licensing is done as follows.
· Users whose Profile is set to Teleworker User or Power User can be licensed using the Teleworker Profileor Power User Profile licenses.
· User's whose Profile is set to Basic User can be licensed using the legacy UMS Web Services licenses.
· Hunt Group Licensing Hunt groups are licensed by UMS Web Services licenses.
· Computer Name\URLThe computer name is used as part of its URL on the network. Set the name to something that appropriatelyindicates its purpose and that can be used as part of the URL for the web server within the customer's domain.
· Remove IMSVoicemail Pro UMS is not supported on systems that are using Voicemail Pro IMS. IMS must be removed beforeUMS can be selected for installation.
User and Browser RequirementsFor users to access Web Voicemail they require a web browser that meets the following requirements:
· Javascript Enabled Web BrowserWeb Voicemail is tested against the following browsers. Other browser can also work if they support JavaScript andCSS.
· Internet Explorer V8.0 or higher
· Mozilla Firefox V3.0 or higher.
· Opera V10.0 or higher.
Implementing Voicemail Pro Page 3715-601064 Issue 8b (Tuesday, December 11, 2012)IP Office 8.1
Installation: UMS Web Services
· Computer Playback Using browser access, you can playback messages either via an IP Office extension or through the web browser.Avaya test browser playback using the following Windows media players:
· Windows Media Player 10.
· Windows Media Player 11.
· Quick Time 7.4.
· VLC 0.8.
· User Name and PasswordOnce enabled for UMS Web Services in the IP Office configuration, to log on using Web Voicemail, the user willneed to know their Name and Voicemail Code as set in the IP Office configuration. Note that this is the Nameand not the Full Name.
IIS Configuration Requirements for Windows Server 2003If you are using the Windows 2003 Server operating system, Web Voicemail does not work if you do not enable the CGIWeb service extension in IIS Manager before the installation of Web Voicemail. If you install ASP.NET from a Webdownload or as part of an application such as Visual Studio .NET, you also need to enable the ASP.NET Web serviceextension in IIS Manager.
Proceed as follows to enable the Web service extensions:
1.Click Start | Administrative Tools | Internet Information Services (IIS) Manager.
2.In the left pane, expand the server node and click Web Service Extensions in the tree.
3.In the right pane, select the Web service extension that you want to enable, and then click Allow.
Note: If you use the Configure Your Server wizard or the Add or Remove Programs dialog box to install ASP.NET,ASP.NET Web service extension is automatically enabled in IIS Manager.
Voicemail Pro Software Installation with Web Voicemail ComponentThe Web Voicemail component is installed as part of a Custom Voicemail Pro installation.
1.Verify that IIS is installed and running on the voicemail server computer. Check that it can be browsed from usercomputers.
· While the server can be browsed by IP address, the URL used by users will be based on the server's computername within the customer domain. Check that web server can be browsed from user computers using theserver's computer name as part of the URL.
2.Insert the IP Office Applications DVD. Click on the link for Voicemail Pro and then double-click on setup.exe.The Choose Setup Language window opens.
3.When asked for the type of Voicemail Pro install to perform, select Voicemail Pro (Full).
4.On the next screen select Custom.
5.In the list of components scroll down and select Web Voicemail. Do not change any of the other selections unlessyou understand the requirements for those components.
6.Follow the remainder of the installation process and reboot the voicemail server when required.
Licensing IP Office for Web ServicesUMS web services can be licensed in a number of ways by licenses added to the IP Office configuration:
· User Licensing User licensing is done as follows.
· Users whose Profile is set to Teleworker User or Power User can be licensed using the Teleworker Profileor Power User Profile licenses.
· User's whose Profile is set to Basic User can be licensed using the legacy UMS Web Services licenses.
· Hunt Group Licensing Hunt groups are licensed by UMS Web Services licenses.
1.Start IP Office Manager.
2.Receive the configuration from the IP Office associated with the Voicemail Pro server.
3.In the Licenses section, add the required licenses.
4.Merge the configuration back to the IP Office and then receive the configuration again.
5.In the Licenses section check that the License Status of the licenses is now shown as Valid.
Implementing Voicemail Pro Page 3815-601064 Issue 8b (Tuesday, December 11, 2012)IP Office 8.1
6.Start the Voicemail Pro client
7.Select Help | About.
8.The screen should list the Web Services as Started and should show the number of UMS licenses.
Configure Users for UMS1.Start IP Office Manager.
2.Receive the configuration from the IP Office system hosting the user.
3.Select User and then select the required user.
4.Set their Profile to either Teleworker or Power User.
5.Select the Voicemail tab. Enable UMS Web Services. Click OK.
6.Merge the configuration back to the IP Office.
Configuring Hunt Groups for UMSAccess to hunt group mailboxes using UMS is supported for Voicemail Pro 5.0+.
1.Start IP Office Manager.
2.Receive the configuration from the IP Office system hosting the hunt group.
3.Select the hunt group.
4.Click on the Voicemail tab.
5.Enable UMS Web Services. Click OK.
6.Merge the configuration back to the IP Office.
Enabling Web VoicemailIf the Exchange server and Voicemail Pro are installed on the same computer, the security settings of the Exchangeserver override the Voicemail Pro settings. So, if you access Web Voicemail with default settings, you may receive anerror message "HTTP Error 403.4 - Forbidden".
Follow the below procedure to enable Web Voicemail:
1.Click Start | Administrative Tools | Internet Information Services (IIS) Manager.
2.In the Connections pane, expand the Sites node and click Default Web Site in the tree.
3.In Features View, double-click SSL Settings.
4.Clear the Require SSL check box.
5.Restart the IIS service.
Note: If the Exchange server and Voicemail Pro are not installed on the same computer, you do not need to enable WebVoicemail explicitly.
UMS Web Voicemail and ContactStoreIt is possible to run ContactStore and UMS Web Voicemail on the same server computer. However some additional stepsare required after the installation to enable browser access to both applications.
1.Install UMS Web Voicemail.
2.Install ContactStore.
3.Reboot the server.
4.Within services, stop the ContactStore service.
5.Using a web browser access a voicemail mailbox using UMS Web Voicemail.
6.Restart the ContactStore service.
7.Both application should now be accessible via web browser.
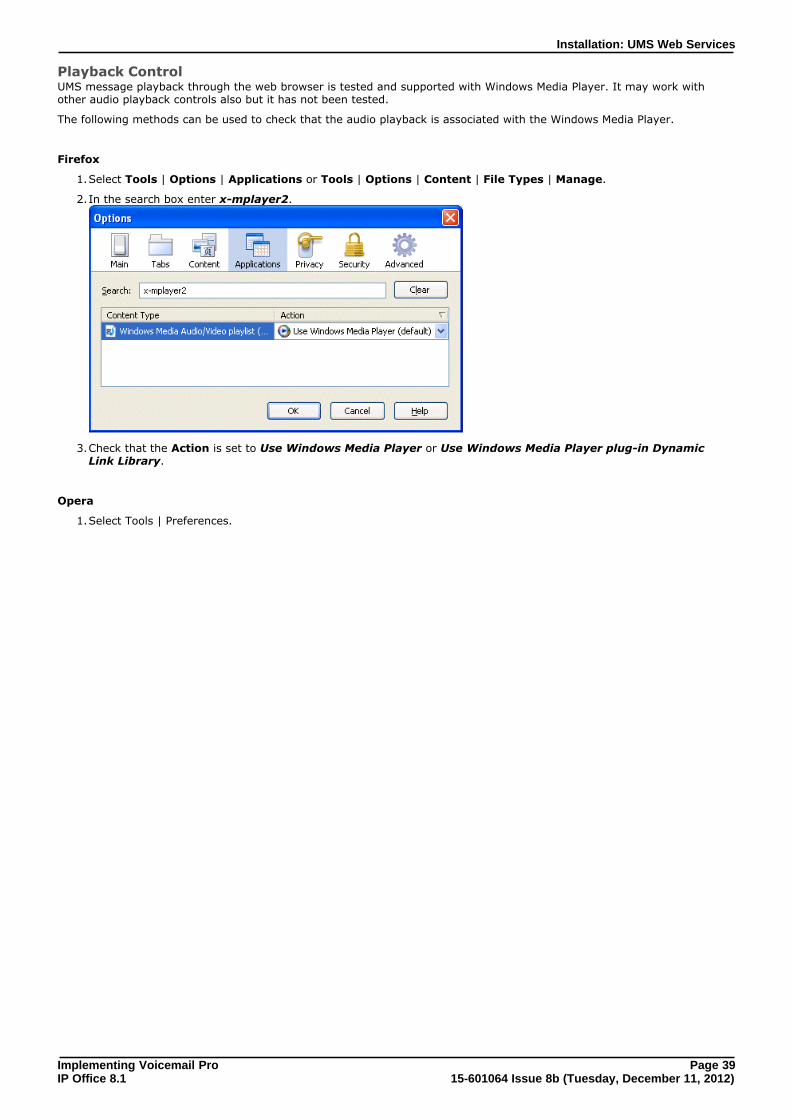
Implementing Voicemail Pro Page 3915-601064 Issue 8b (Tuesday, December 11, 2012)IP Office 8.1
Installation: UMS Web Services
Playback ControlUMS message playback through the web browser is tested and supported with Windows Media Player. It may work withother audio playback controls also but it has not been tested.
The following methods can be used to check that the audio playback is associated with the Windows Media Player.
Firefox
1.Select Tools | Options | Applications or Tools | Options | Content | File Types | Manage.
2.In the search box enter x-mplayer2.
3.Check that the Action is set to Use Windows Media Player or Use Windows Media Player plug-in DynamicLink Library.
Opera
1.Select Tools | Preferences.
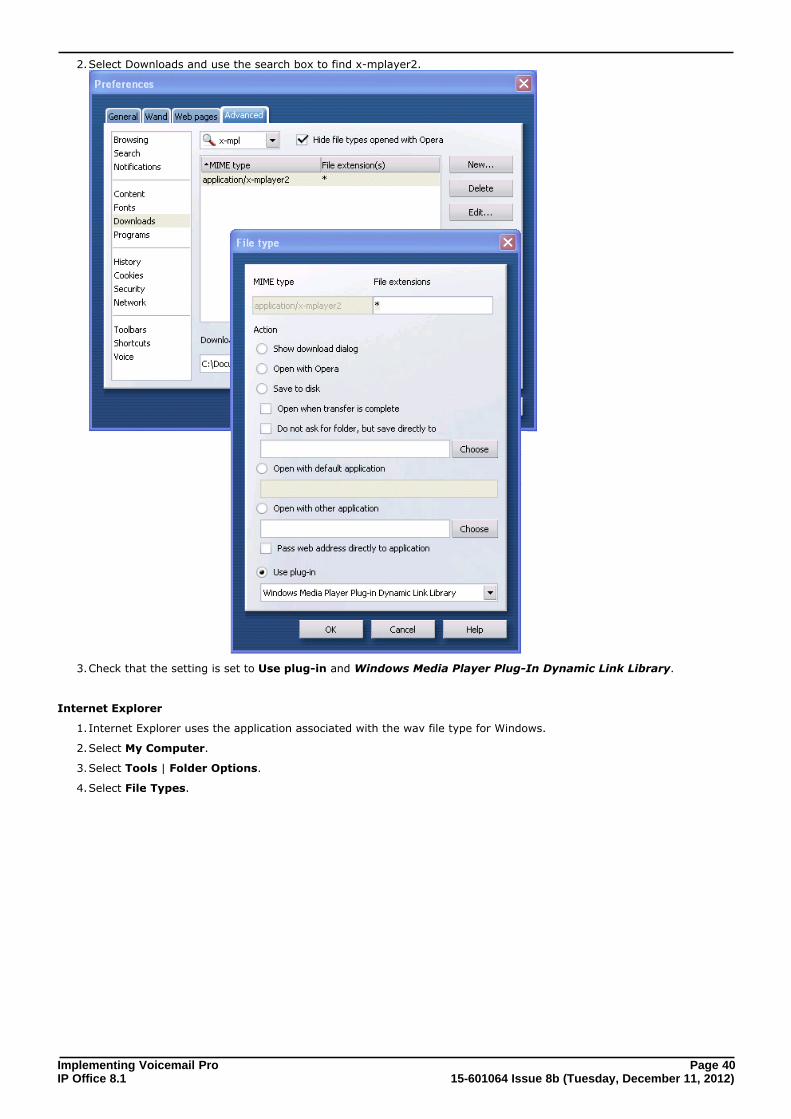
Implementing Voicemail Pro Page 4015-601064 Issue 8b (Tuesday, December 11, 2012)IP Office 8.1
2.Select Downloads and use the search box to find x-mplayer2.
3.Check that the setting is set to Use plug-in and Windows Media Player Plug-In Dynamic Link Library.
Internet Explorer
1.Internet Explorer uses the application associated with the wav file type for Windows.
2.Select My Computer.
3.Select Tools | Folder Options.
4.Select File Types.
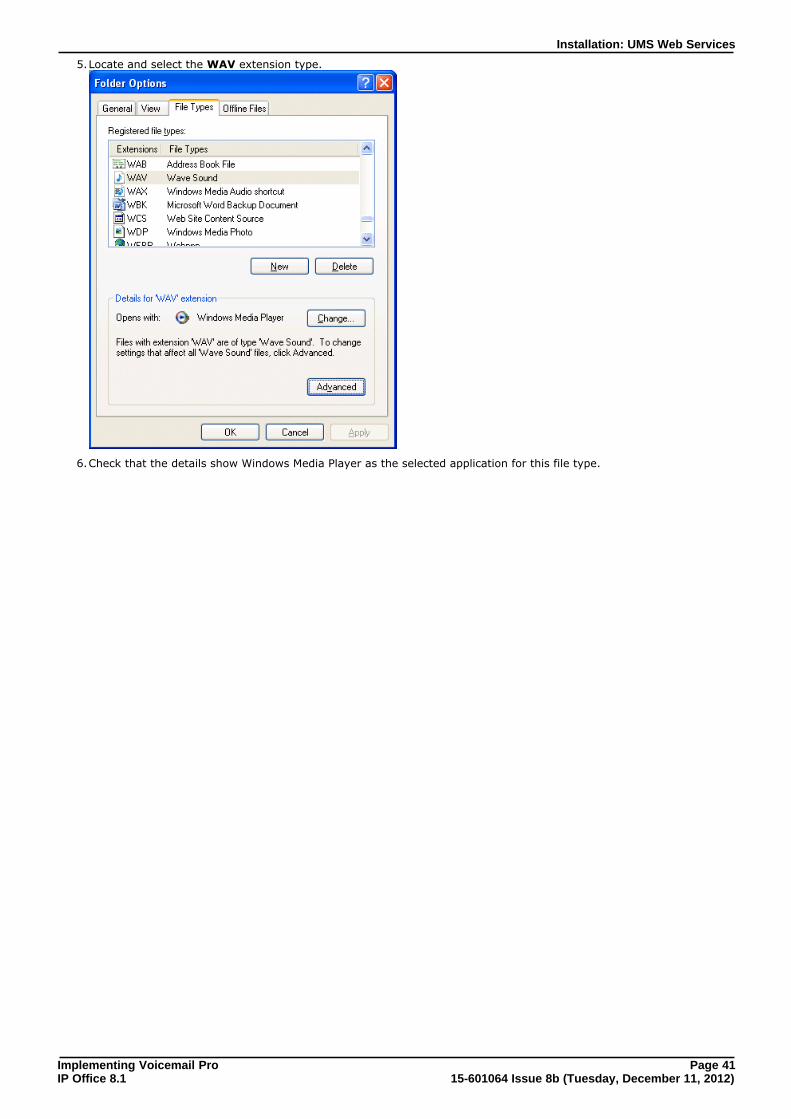
Implementing Voicemail Pro Page 4115-601064 Issue 8b (Tuesday, December 11, 2012)IP Office 8.1
Installation: UMS Web Services
5.Locate and select the WAV extension type.
6.Check that the details show Windows Media Player as the selected application for this file type.
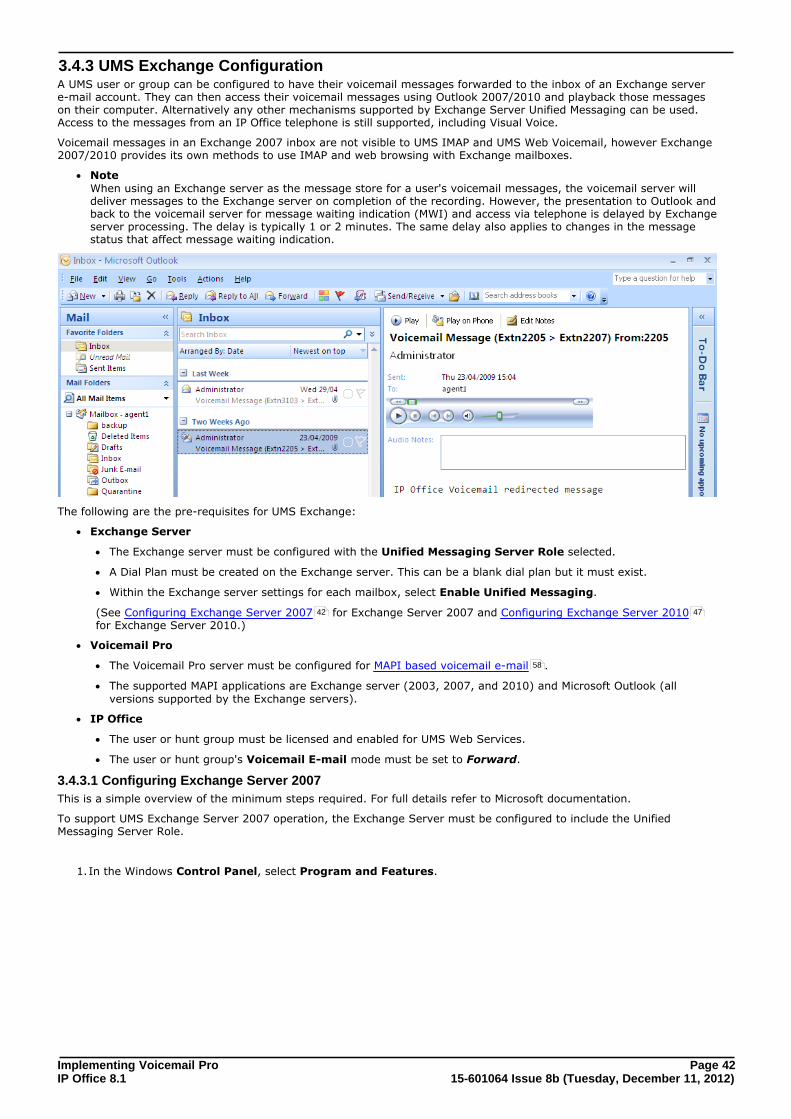
Implementing Voicemail Pro Page 4215-601064 Issue 8b (Tuesday, December 11, 2012)IP Office 8.1
3.4.3 UMS Exchange ConfigurationA UMS user or group can be configured to have their voicemail messages forwarded to the inbox of an Exchange servere-mail account. They can then access their voicemail messages using Outlook 2007/2010 and playback those messageson their computer. Alternatively any other mechanisms supported by Exchange Server Unified Messaging can be used.Access to the messages from an IP Office telephone is still supported, including Visual Voice.
Voicemail messages in an Exchange 2007 inbox are not visible to UMS IMAP and UMS Web Voicemail, however Exchange2007/2010 provides its own methods to use IMAP and web browsing with Exchange mailboxes.
· Note When using an Exchange server as the message store for a user's voicemail messages, the voicemail server willdeliver messages to the Exchange server on completion of the recording. However, the presentation to Outlook andback to the voicemail server for message waiting indication (MWI) and access via telephone is delayed by Exchangeserver processing. The delay is typically 1 or 2 minutes. The same delay also applies to changes in the messagestatus that affect message waiting indication.
The following are the pre-requisites for UMS Exchange:
· Exchange Server
· The Exchange server must be configured with the Unified Messaging Server Role selected.
· A Dial Plan must be created on the Exchange server. This can be a blank dial plan but it must exist.
· Within the Exchange server settings for each mailbox, select Enable Unified Messaging.
(See Configuring Exchange Server 2007 for Exchange Server 2007 and Configuring Exchange Server 2010for Exchange Server 2010.)
· Voicemail Pro
· The Voicemail Pro server must be configured for MAPI based voicemail e-mail .
· The supported MAPI applications are Exchange server (2003, 2007, and 2010) and Microsoft Outlook (allversions supported by the Exchange servers).
· IP Office
· The user or hunt group must be licensed and enabled for UMS Web Services.
· The user or hunt group's Voicemail E-mail mode must be set to Forward.
3.4.3.1 Configuring Exchange Server 2007
This is a simple overview of the minimum steps required. For full details refer to Microsoft documentation.
To support UMS Exchange Server 2007 operation, the Exchange Server must be configured to include the UnifiedMessaging Server Role.
1.In the Windows Control Panel, select Program and Features.
42 47
58
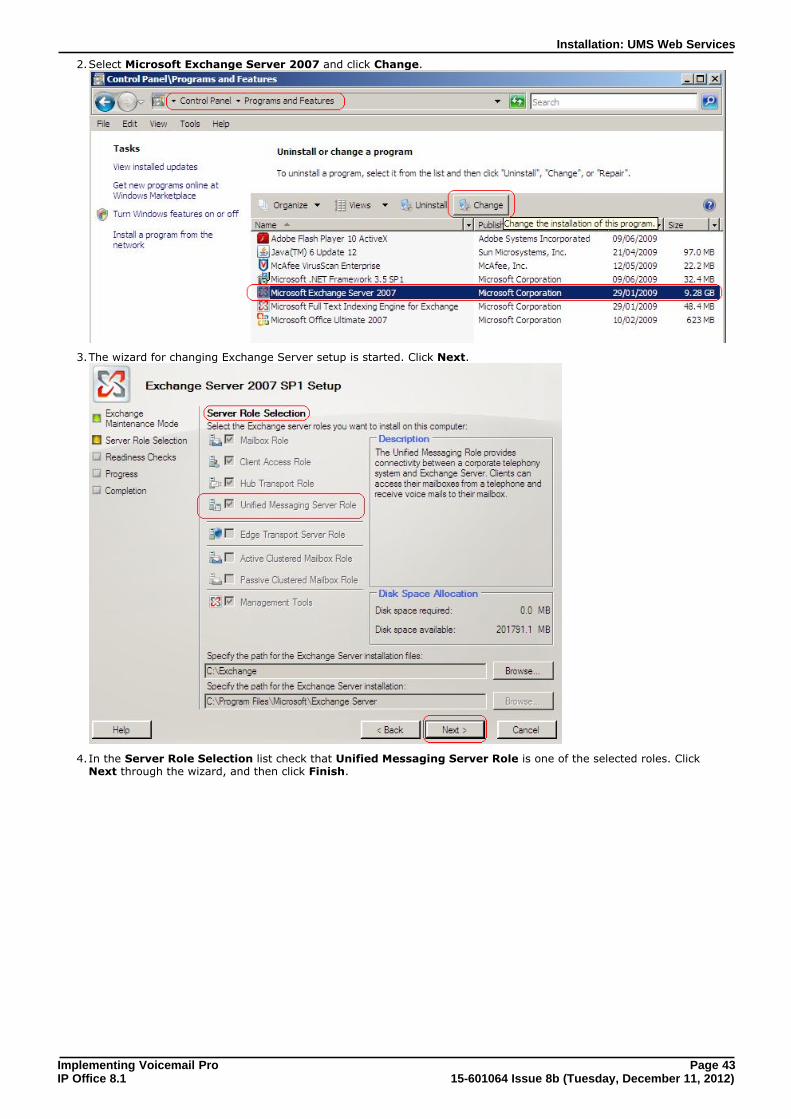
Implementing Voicemail Pro Page 4315-601064 Issue 8b (Tuesday, December 11, 2012)IP Office 8.1
Installation: UMS Web Services
2.Select Microsoft Exchange Server 2007 and click Change.
3.The wizard for changing Exchange Server setup is started. Click Next.
4.In the Server Role Selection list check that Unified Messaging Server Role is one of the selected roles. ClickNext through the wizard, and then click Finish.
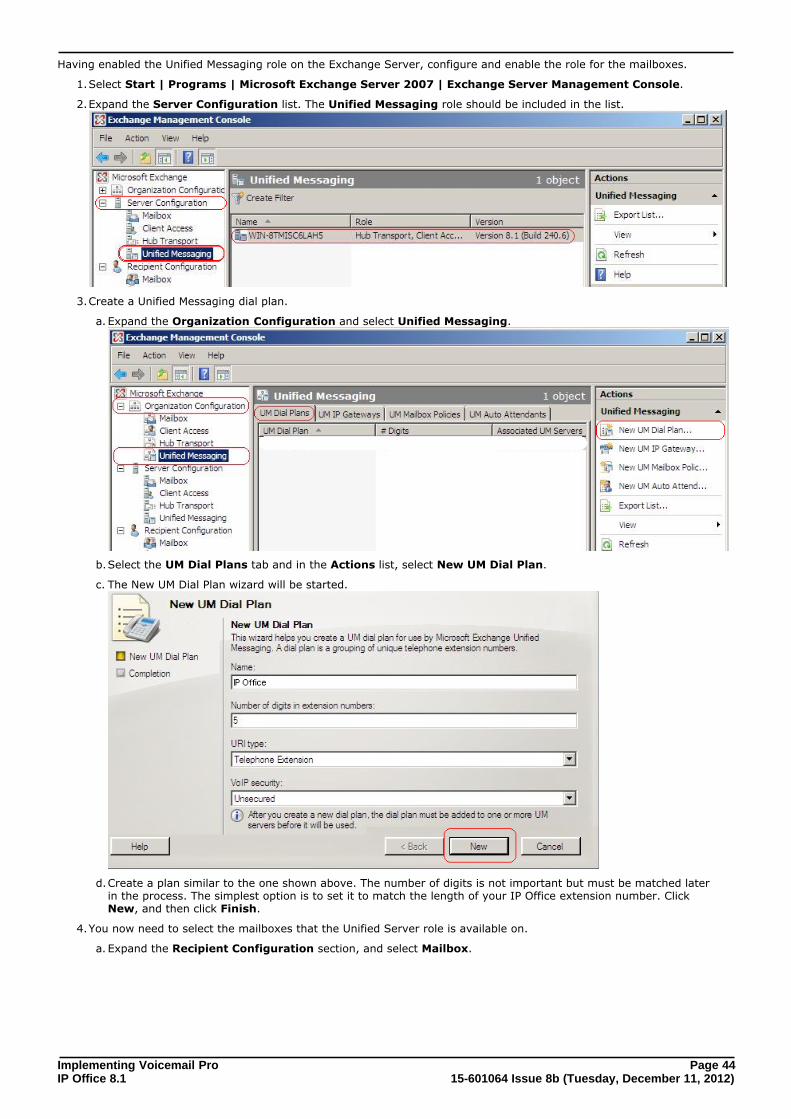
Implementing Voicemail Pro Page 4415-601064 Issue 8b (Tuesday, December 11, 2012)IP Office 8.1
Having enabled the Unified Messaging role on the Exchange Server, configure and enable the role for the mailboxes.
1.Select Start | Programs | Microsoft Exchange Server 2007 | Exchange Server Management Console.
2.Expand the Server Configuration list. The Unified Messaging role should be included in the list.
3.Create a Unified Messaging dial plan.
a. Expand the Organization Configuration and select Unified Messaging.
b.Select the UM Dial Plans tab and in the Actions list, select New UM Dial Plan.
c. The New UM Dial Plan wizard will be started.
d.Create a plan similar to the one shown above. The number of digits is not important but must be matched laterin the process. The simplest option is to set it to match the length of your IP Office extension number. Click New, and then click Finish.
4.You now need to select the mailboxes that the Unified Server role is available on.
a. Expand the Recipient Configuration section, and select Mailbox.
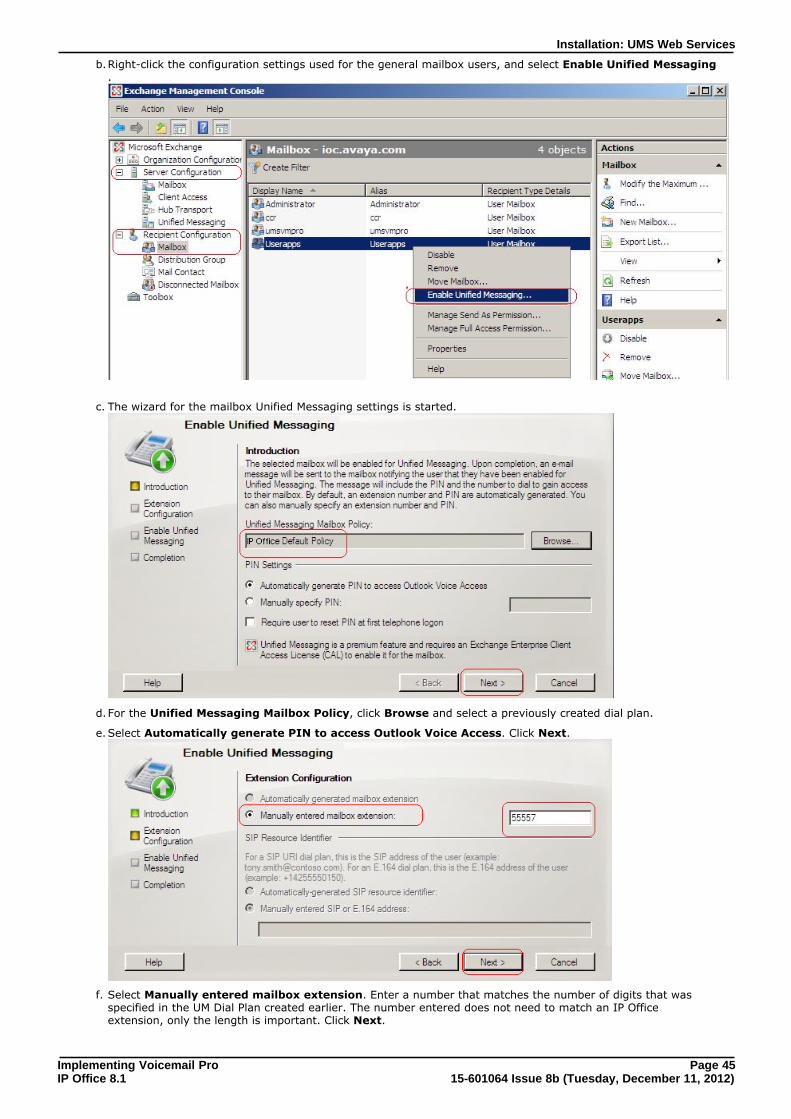
Implementing Voicemail Pro Page 4515-601064 Issue 8b (Tuesday, December 11, 2012)IP Office 8.1
Installation: UMS Web Services
b.Right-click the configuration settings used for the general mailbox users, and select Enable Unified Messaging.
c. The wizard for the mailbox Unified Messaging settings is started.
d.For the Unified Messaging Mailbox Policy, click Browse and select a previously created dial plan.
e.Select Automatically generate PIN to access Outlook Voice Access. Click Next.
f. Select Manually entered mailbox extension. Enter a number that matches the number of digits that wasspecified in the UM Dial Plan created earlier. The number entered does not need to match an IP Officeextension, only the length is important. Click Next.

Implementing Voicemail Pro Page 4615-601064 Issue 8b (Tuesday, December 11, 2012)IP Office 8.1
g.Select Enable, and then click Finish.
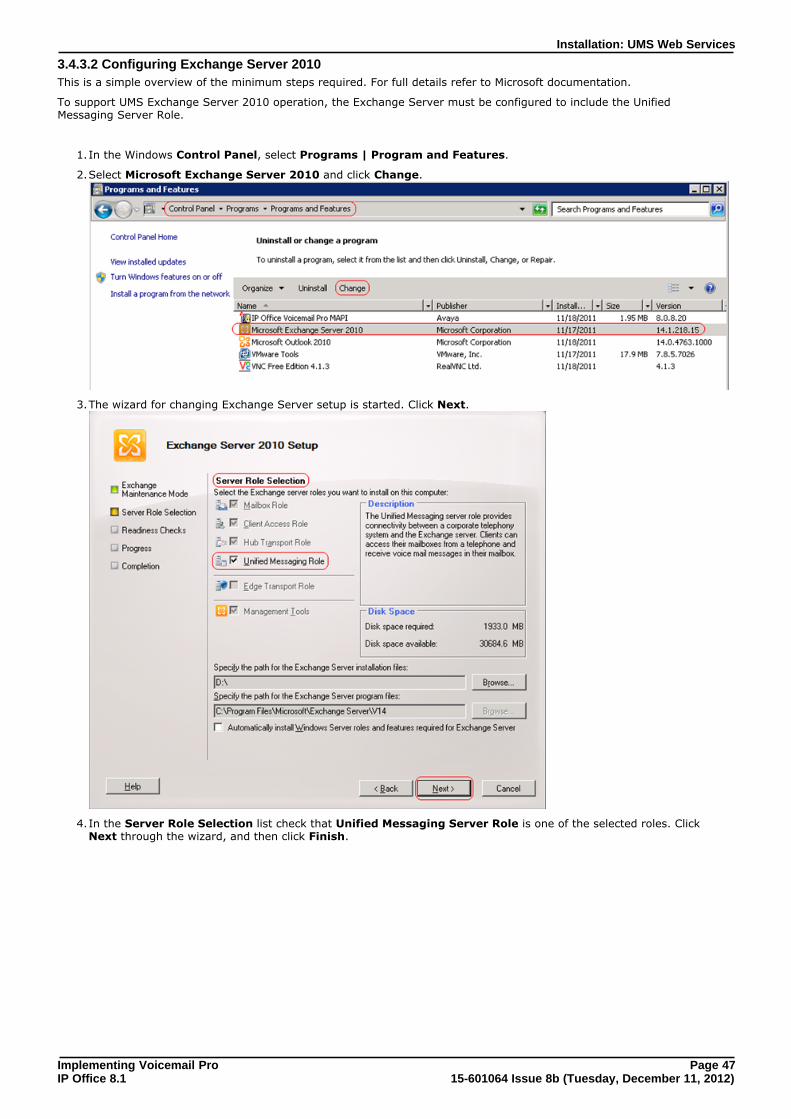
Implementing Voicemail Pro Page 4715-601064 Issue 8b (Tuesday, December 11, 2012)IP Office 8.1
Installation: UMS Web Services
3.4.3.2 Configuring Exchange Server 2010
This is a simple overview of the minimum steps required. For full details refer to Microsoft documentation.
To support UMS Exchange Server 2010 operation, the Exchange Server must be configured to include the UnifiedMessaging Server Role.
1.In the Windows Control Panel, select Programs | Program and Features.
2.Select Microsoft Exchange Server 2010 and click Change.
3.The wizard for changing Exchange Server setup is started. Click Next.
4.In the Server Role Selection list check that Unified Messaging Server Role is one of the selected roles. ClickNext through the wizard, and then click Finish.
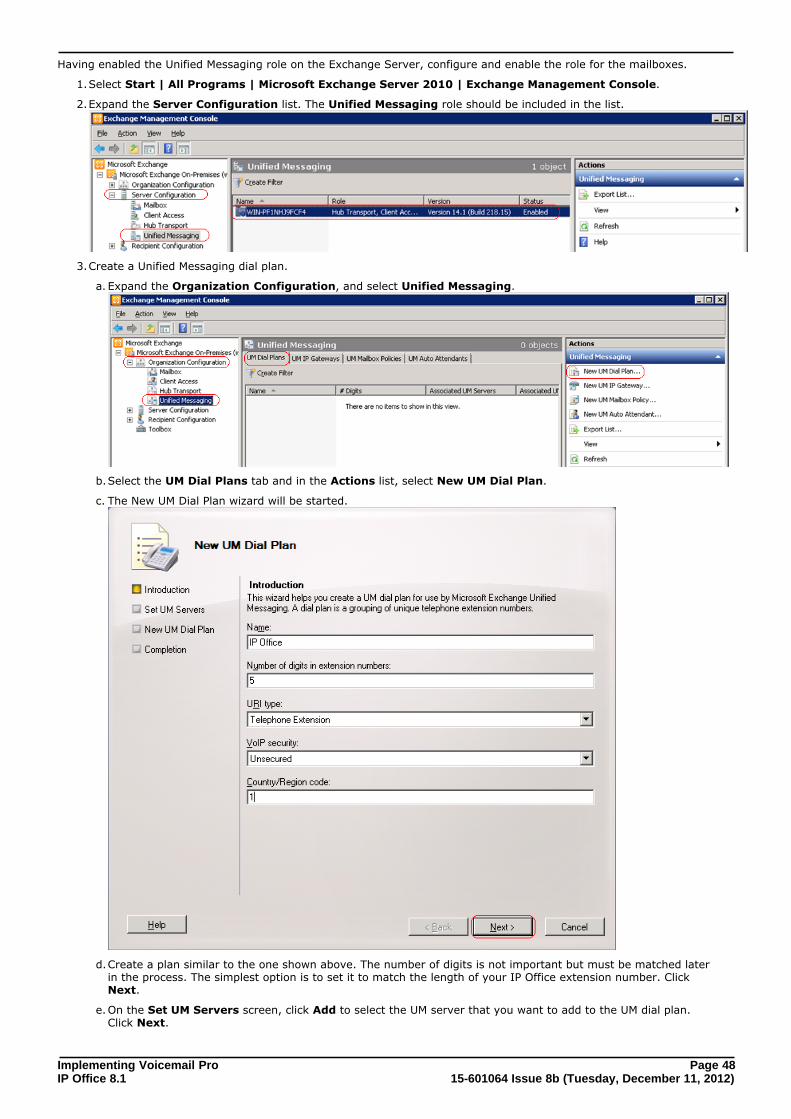
Implementing Voicemail Pro Page 4815-601064 Issue 8b (Tuesday, December 11, 2012)IP Office 8.1
Having enabled the Unified Messaging role on the Exchange Server, configure and enable the role for the mailboxes.
1.Select Start | All Programs | Microsoft Exchange Server 2010 | Exchange Management Console.
2.Expand the Server Configuration list. The Unified Messaging role should be included in the list.
3.Create a Unified Messaging dial plan.
a. Expand the Organization Configuration, and select Unified Messaging.
b.Select the UM Dial Plans tab and in the Actions list, select New UM Dial Plan.
c. The New UM Dial Plan wizard will be started.
d.Create a plan similar to the one shown above. The number of digits is not important but must be matched laterin the process. The simplest option is to set it to match the length of your IP Office extension number. Click Next.
e.On the Set UM Servers screen, click Add to select the UM server that you want to add to the UM dial plan.Click Next.
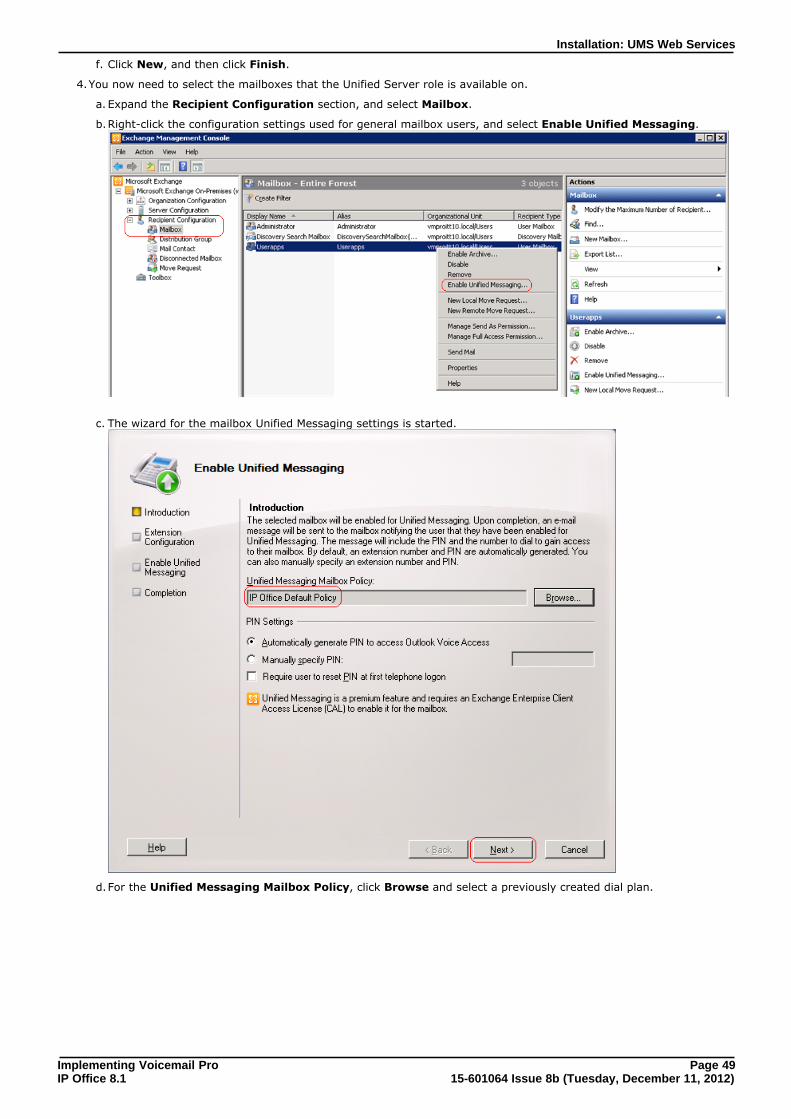
Implementing Voicemail Pro Page 4915-601064 Issue 8b (Tuesday, December 11, 2012)IP Office 8.1
Installation: UMS Web Services
f. Click New, and then click Finish.
4.You now need to select the mailboxes that the Unified Server role is available on.
a. Expand the Recipient Configuration section, and select Mailbox.
b.Right-click the configuration settings used for general mailbox users, and select Enable Unified Messaging.
c. The wizard for the mailbox Unified Messaging settings is started.
d.For the Unified Messaging Mailbox Policy, click Browse and select a previously created dial plan.
Implementing Voicemail Pro Page 5015-601064 Issue 8b (Tuesday, December 11, 2012)IP Office 8.1
e.Select Automatically generate PIN to access Outlook Voice Access. Click Next.
f. Select Manually entered mailbox extension. Enter a number that matches the number of digits that wasspecified in the UM Dial Plan created earlier. The actual number entered does not need to match an IP Officeextension, only the length is important. Click Next.
g.Select Enable, and then click Finish.
Implementing Voicemail Pro Page 5115-601064 Issue 8b (Tuesday, December 11, 2012)IP Office 8.1
Installation: UMS Web Services
3.4.3.3 Configuring Registry Settings
By default, UMS Exchange supports only up to 166 users. In order to support more number of users, proceed as follows:
1.On the computer hosting the Exchange server, open Registry Editor.
2.Under HKEY_LOCAL_MACHINE/SYSTEM/CurrentControlSet/Services/MSExchangeIS/ParametersSystem, add a new keyMaxObjsPerMapiSession.
3.Under the new key, create a new DWORD Value objtMessageView, and set the value to thrice the number of requiredusers. For example, to support 500 users, set the value to 1500.
4.Restart the Microsoft Exchange Information Store service.
3.4.3.4 Assigning Permission to Users for MAPI
Use the steps in this section to assign permissions to user accounts to run the MAPI service. To assign permissions,complete the following procedures:
1.Assign Send As permissions .
2.Assign additional permissions .
Assigning additional permissionsProcedures for assigning permissions are different for the different versions of Exchange Server. Select the procedurethat applies to your environment.
· Assigning permissions on Exchange 2003
· Assigning permissions on Exchange 2007
· Assigning permissions on Exchange 2010
3.4.3.4.1 Assigning Send As Permissions
To assign security permissions to the user under whose account MAPI service is to be executed:
1. Log on to the Active Directory server using an account that has Domain Administrator privileges.
2. Click Start | Administrative Tools | Active Directory Users and Computers.
3. From the View drop-down menu, select Advanced Features.
4. In the left pane of the Active Directory Users and Computers dialog box, right-click the domain and selectProperties.
5. In the Properties dialog box, select the Security tab.
6. Click Advanced.
7. In the Advanced Security Settings dialog box, click Add.
8. In the Select Users, Computers, Service Account, or Group dialog box, add the user’s account.
9. Click OK.
10. In the Apply to field, select Descendant User objects.
11. In the Permissions box, select Send As permissions.
12. Click OK to close the Permission Entry dialog box.
13. Click OK to close the Advanced Security Settings dialog box.
14. Click OK to close the Properties dialog box.
The system periodically applies a security descriptor to the following groups, which results in the Send As permissionsbeing removed from these groups.
· Administrators
· Domain Administrators
To prevent the Send As permissions from being removed:
1. Click Start > Run, type cmd, and click OK.Note: You must be a member of the domain administrator group.
2. In the command window, enter the following:
dsacls "cn=adminsdholder,cn=system,dc=<xxx>,dc=<yyy>" /G "\<MM Security Group>:CA;Send As"
where,
· dc=<xxx>,dc=<yyy> is the customer’s fully qualified domain name (for example, dc=Avaya,dc=com).
· <MAPI> is the name of the service permissions group.
It will take at least an hour for the security permissions to replicate to the user’s account.
51
51
52
53
54
Implementing Voicemail Pro Page 5215-601064 Issue 8b (Tuesday, December 11, 2012)IP Office 8.1
3.4.3.4.2 Assigning Permissions on Exchange 2003
If the user is on Exchange 2003 server, proceed as follows:
1.Modify the advanced security settings for Mailbox Store.
2.Edit the registry to display the Security tab. Note: To edit the registry, you must be a member of the domain administrator group.
3.Add the additional permissions to the user account.
Modifying Advanced Security Settings for Mailbox Store
1.Log on to the Active Directory server using an account that has privileges to edit permissions (such as administrator).
2.Click Start | All Programs | Microsoft Exchange | System Manager.
3.In the left pane of the Exchange System Manager window, expand the Servers node in the tree.
4.Expand the server node in the list, and then expand the First Storage Group node.
5.Right-click Mailbox Store and select Properties.
6.In the Security tab of the Properties dialog box, click Advanced.
7.Under the Permissions tab of the Advanced Security Settings window, change all the Permission Entries toAllow.
8.Restart the computer.
Editing the registry
If you are using Exchange System Manager or Active Directory Sites and Services, the Security tab for the Exchangeorganization container and a few sub-containers are not visible. To enable the Security tab at all levels within theMicrosoft Exchange container, you can update the registry.
1. Log on as the Microsoft Exchange administrator.
2. Click Start > Run.
3. In the Run dialog box, in the Open field, type regedit.
4. Press Enter.
5. In the Registry Editor dialog box, locate the following key:“HKEY_CURRENT_USER\Software\Microsoft\Exchange\ExAdmin”
6. Right-click ExAdmin and select New > DWORD Value.
7. Enter the following value name: ShowSecurityPage.
8. Double-click the ShowSecurityPage value.
9. In the Edit DWORD Value dialog box, set the Value data to 1.
10. Click OK.
Adding permissions on Exchange 2003
Proceed as follows to add the additional permissions to the user’s account:
1.Log on to the Active Directory server using an account that has privileges to assign permissions to accounts (such asadministrator).
2.Click Start | Administrative Tools | Active Directory Sites and Services.
3.In the left pane, select Active Directory Sites and Services.
4.From the View drop-down menu, select Show Services Node.
5.In the left pane, expand Services, expand Microsoft Exchange, and then locate the appropriate ExchangeOrganization object that MAPI will connect to.
6.Right-click and select Properties.
7.In the Properties dialog box, click the Security tab. Note: This tab is visible only if you have edited the registry (see Editing the registry ).
8.Click Add.
9.In the Select Users, Computers, Service Accounts, or Groups dialog box, add the user’s account.
10.Click OK.
11.Under Permissions, select the permissions that you want to assign to the user's account.
52
Implementing Voicemail Pro Page 5315-601064 Issue 8b (Tuesday, December 11, 2012)IP Office 8.1
Installation: UMS Web Services
· Read
· Execute
· Read permissions
· Create children
· List contents
· Read properties
· Write properties
· Administer information store
· Create named properties in the information store
· View information store status
· Receive As
· Send As
12.Click Apply.
13.Click OK.
14.Close the Active Directory Sites and Services dialog box.
15.Wait for the directory cache to expire.
3.4.3.4.3 Assigning Permissions on Exchange 2007
If user account is on Exchange 2007 server, proceed as follows to assign additional permissions to the user account:
1. Verify that the user to be added is a member of the Exchange recipient Administrator group.
2. Log on to the Active Directory server using an account that has privileges to assign permissions to accounts (such asadministrator).
3. Click Start | Administrative Tools | Active Directory Sites and Services.
4. In the left pane, select Active Directory Sites and Services.
5. From the View pull-down menu, select Show Services Node.
6. In the left pane, expand Services, expand Microsoft Exchange, and then locate the appropriate ExchangeOrganization.
7. Right-click it and select Properties.
8. In the Properties window, click the Security tab.The Security tab may not be visible in an environment with both Exchange 2003 and Exchange 2007 mail servers. Toenable the Security tab, see Editing the registry .
9. Click Add.
10. In the Select Users, Computers, Service Accounts, or Groups window, add the user’s account.
11. Click OK.
12. Under Permissions for the group, select Read and click Apply.
13. Click Advanced.
14. In the Advanced Security Settings window, on the Permissions tab, select the check box at the bottom of thewindow. This will apply the permissions inherited from the parent to this object and its child objects.
15. Click Add and add the user’s account.
16. Click OK.
17. In the Apply to field, select This object and all descendant objects.
18. Verify that the following box is not selected: Apply these permissions to objects and/or containers withinthis container only.
19. In the Permissions field, select the required permissions.
· List contents
· Read all properties
· Write all properties
· Read permissions
· Create all child objects
· Administer information store
· Create named properties in the information store
· Receive As
52
Implementing Voicemail Pro Page 5415-601064 Issue 8b (Tuesday, December 11, 2012)IP Office 8.1
· Send As
· View information store status
For a mixed environment of Exchange 2003 and Exchange 2007 mail servers, also select the following permissions, whichare only displayed for Exchange 2007 in the mixed environment:
· Read
· Execute
20. Click OK.
3.4.3.4.4 Assigning Permissions on Exchange 2010
If user account is on Exchange 2010 server, proceed as follows to assign additional permissions to the user account:
1. Verify that the user to be added is a member of the Exchange recipient Administrator group.
2. Log on to the Active Directory server using an account that has privileges to assign permissions to accounts (such asadministrator).
3. Click Start | Administrative Tools | Active Directory Sites and Services.
4. In the left pane, select Active Directory Sites and Services.
5. From the View pull-down menu, select Show Services Node.
6. In the left pane, expand Services, expand Microsoft Exchange, right-click the appropriate Exchange Organization,and select Properties.
7. In the Properties window, click the Security tab.The Security tab may not be visible in an environment with both Exchange 2003 and Exchange 2010 mail servers. Toenable the Security tab, see Editing the registry .
8. Click Add.
9. In the Select Users, Computers, Service Accounts, or Groups window, add the user’s account.
10. Click OK.
11. Under Permissions for the group, select Read and click Apply.
12. Click Advanced.
13. In the Advanced Security Settings window, on the Permissions tab, select the check box at the bottom of thewindow. This will apply the permissions inherited from the parent to this object and its child objects.
14. Click Add and add the user’s account.
15. Click OK.
16. In the Apply to field, select This object and all descendant objects.
17. Verify that the following box is not selected: Apply these permissions to objects and/or containers within thiscontainer only.
18. In the Permissions field, select the required permissions.
· List contents
· Read all properties
· Write all properties
· Read permissions
· Create all child objects
· Administer information store
· Create named properties in the information store
· Receive As
· Send As
· View information store status
For a mixed environment of Exchange 2003 and Exchange 2010 mail servers, also select the following permissions, whichare only displayed for Exchange 2010 in the mixed environment:
· Read
· Execute
19. Click OK.
3.5 Voicemail EmailVoicemail E-mail features of the voicemail server provide a number of e-mail functions:
52
Implementing Voicemail Pro Page 5515-601064 Issue 8b (Tuesday, December 11, 2012)IP Office 8.1
Installation: Voicemail Email
· Forward a Message to E-mail If the voicemail server is set to IP Office mailbox mode, mailbox users are able to manually forward an voicemailmessage to their e-mail.
· Automatic New Voicemail Messages For all mailbox modes, users can use voicemail e-mail to automatically have a message sent to their e-mailwhenever they receive a new voicemail message. The e-mail can be a simple alert or it can include a copy of thevoicemail as an attachment.
· eMail Action With customized call flows, an eMail action can be used to send a caller's recorded voicemail message to aspecified e-mail address.
· UMS ExchangeIn conjunction with Exchange server and Microsoft Outlook, users are able to use their Outlook inbox as theirmailbox for voicemail messages. If the Exchange server is 2007/2010 and the mailbox is configured for UnifiedMessaging, the users will also have the ability to play the message within Outlook, if using Microsoft Outlook2007/2010.
Voicemail E-mail features require the voicemail server to be configured for access to either an SMTP e-mail server or to aMAPI e-mail server via a MAPI enabled e-mail client program on the voicemail server computer.
· SMTP Installation This is an e-mail standard supported by most e-mail servers. It is the default e-mail mode for the voicemailserver.
· MAPI Installation MAPI requires a MAPI compliant e-mail client program to be installed on the Voicemail Pro server. Supported MAPIclients are Outlook 2000, 2002, 2003, 2007. It also requires the Voicemail Pro service to be run using a useraccount that is able to send e-mails via that MAPI client.
· The exact method of integration between the voicemail server and the MAPI e-mail client depends on whetherthe voicemail server is part of a work group or a domain. This guide contains examples for both approaches.
· The MAPI process described in this guide is based on Microsoft Windows 2000 Professional with MicrosoftOutlook 2000 and Microsoft Outlook Express 5.5. Steps may differ depending on the version of Windows and e-mail client used. Note:1. Starting with Exchange Server 2007, the MAPI is not shipped with the Exchange server but can be installedseparately. For details, see http://support.microsoft.com/kb/945835.2. Microsoft does not support installing Exchange Server components and Microsoft Outlook on the samecomputer. For details, see http://support.microsoft.com/kb/266418.
56
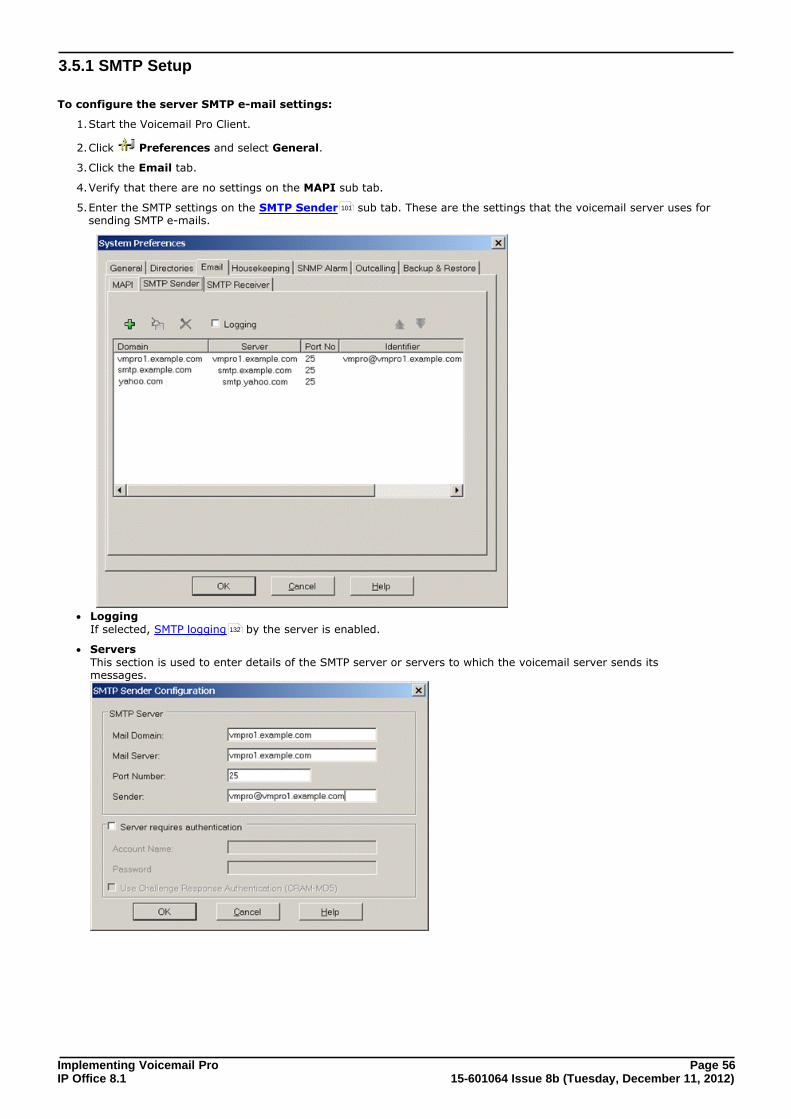
Implementing Voicemail Pro Page 5615-601064 Issue 8b (Tuesday, December 11, 2012)IP Office 8.1
3.5.1 SMTP Setup
To configure the server SMTP e-mail settings:
1.Start the Voicemail Pro Client.
2.Click Preferences and select General.
3.Click the Email tab.
4.Verify that there are no settings on the MAPI sub tab.
5.Enter the SMTP settings on the SMTP Sender sub tab. These are the settings that the voicemail server uses forsending SMTP e-mails.
· Logging If selected, SMTP logging by the server is enabled.
· Servers This section is used to enter details of the SMTP server or servers to which the voicemail server sends itsmessages.
101
132
Implementing Voicemail Pro Page 5715-601064 Issue 8b (Tuesday, December 11, 2012)IP Office 8.1
Installation: Voicemail Email
To add a server, click on the . icon. To edit the server, click on the icon. To delete a server entry, click on .
· Mail Domain This field is used differently depending on whether it is the first entry in the list or not:
· For the first server entry in the list: This is the default outgoing e-mail settings. It also sets the mail destination domain on which the voicemailserver filters incoming messages (see below) and so is repeated on the SMTP Receiver tab.
· Messaging Between Voicemail Servers For messaging between voicemail servers, the first entry in the SMTP Sender list must be the oneconfigured and used. Each server uses the SMTP server service on the same server computer as thevoicemail service. For example a Windows based servers uses the SMTP e-mail provided by the IIS on thesame server. The voicemail service also uses the domain set to filter incoming SMTP mails received by theSMTP server. For this to work, the domain entered should be the fully qualified name of the server on whichthe voicemail server is running, for example vmpro1.example.com. Any incoming messages where therecipient mail domain is not exactly the same as the specified domain are ignored. The recipient can eitherby vmsyncmaster, vmsyncslave or the name or extension of a mailbox on the Voicemail Pro server, forexample [email protected] or [email protected].
· For subsequent entries: The domain specifies that these settings should be used for e-mails sent to the matching domain. The entrymust be a fully qualified name resolvable by DNS or an IP address.
· Server This specifies the IP address or fully qualified domain name of the SMTP server to which messages are sent.
· For the first server entry in the list: Where messaging between voicemail servers is being used (central, backup and or distributed servers), the firstentry is used and will match the domain set above.
· For subsequent entries: It will be the address of the e-mail server that will handle e-mails for recipients other than another voicemailserver on the network.
· Port Number This is port to which messages are sent, usually 25.
· Sender (Identifier)Note that some servers will only accept e-mails from a specific sender or sender domain. If left blank, the voicemailserver will insert a sender using either the e-mail address set for the voicemail mailbox user if set or otherwiseusing the best matching name it can resolve from the IP Office.
· Server Requires Authentication This check box indicates whether the connection to send SMTP messages to the mail server requires authenticationwith that server. The authentication will typically be to the name and password of a mailbox account configured onthat server.
· Account Name Sets the name to use for authentication.
· Password Set the password to use for authentication.
· User Challenge Response Authentication (Cram MD5) If this check box is selected, the name and password are sent using Cram MD5.
6.Click OK.
7.Click Save and Make Live.
104
Implementing Voicemail Pro Page 5815-601064 Issue 8b (Tuesday, December 11, 2012)IP Office 8.1
3.5.2 MAPI Setup3.5.2.1 Domain Member
Before you start to install the Voicemail Pro software, you must:
1. Create a Voicemail Domain Account .
2. Configure Outlook for Internet Mail .
You are then ready to install Voicemail Pro for MAPI Voicemail E-mail as a Domain Member. This involves the followingkey stages:
1. Install the Voicemail Pro Software .
2. Switch Voicemail Pro to MAPI .
3.5.2.1.1 Creating a Voicemail Domain Account
1. Make sure that the computer that is running the Voicemail server is a member of the domain. To join the domainyou will need access to a log account with administrative permissions on the domain as well as the server computer,consult the domain administrator.
2. On the Exchange server:
· Create an account called Voicemail on the domain and an associated mailbox.
· Provide a secure password.
· Check the User Cannot Change Password and Password Never Expires boxes.
3. Log on to the voicemail server computer using a domain administrator account.
4. Click Start | Administrative Tools | Computer Management.
5. In the left pane, expand Local Users and Groups, and click Groups.
6. Double-click Administrators, and click Add.
7. Click Locations and select the domain name in the list.
8. In the Enter the object names to select field, type Voicemail and click Check Names.
9. Select Voicemail in the list and click OK followed by OK.
58
64
65
60
Implementing Voicemail Pro Page 5915-601064 Issue 8b (Tuesday, December 11, 2012)IP Office 8.1
Installation: Voicemail Email
3.5.2.1.2 Configuring Outlook for VoiceMail Email
To configure Outlook on your system, perform the following steps:
1. On the desktop, right-click the Outlook icon and select Properties.
2. On the General tab, select Add.
a. Select Microsoft Exchange Server.
b. Click Next.
c. In the Server field, enter the name of the Exchange server.
d. In the Mailbox field, enter Voicemail.
e. Click Next.
f. When you are asked if you travel with this computer, select No.
g. Click Next.
h. Click Finish.
3. Highlight the MS Exchange Settings and click Properties.
a. Highlight Microsoft Exchange Server and click Properties.
b. Click Check name.
c. If the name is resolved, select Apply.
d. Click OK, OK, and Close to shut the mail settings.
4. Do not continue until the name has been resolved correctly with the Exchange server. If the name is not resolved,check the account details with the Exchange Administrator.
5. Open Outlook and select Yes to register Outlook as the default e-mail application.
a. Select Tools > Options.
b. Click the Preferences tab.
c. Click E-mail Options.
d. Uncheck Save copies of messages in Sent Items folder.
· You might want this option selected during initial setup to aid troubleshooting. However due to the size of wavfile message attachments you should uncheck it after installation testing is completed.
6. Log on to the computer running the Voicemail Pro Server using the voicemail account.
7. From Outlook, send a message direct to an extension user.
8. If this message is received correctly, you can continue installing the Voicemail Pro software. See Installing theVoicemail Pro Software .
65

Implementing Voicemail Pro Page 6015-601064 Issue 8b (Tuesday, December 11, 2012)IP Office 8.1
3.5.2.1.3 Installing the VoiceMail Pro Software
To install Voicemail Pro software, perform the following steps:
1. Log off and log on using the Voicemail account and password.
2. Install the required Voicemail Pro software.
3. When the system prompts for a User Name and Password for the Voicemail Pro service, enter the Voicemail accountdetails.
4. Restart the server and log on using the Voicemail account.
5. When SMTP e-mail details are requested, enter no values and ignore the error message following the SMTP check.
6. Start the Voicemail Pro Service .
7. Check that the basic voicemail services start and operate correctly.
3.5.2.1.4 Adding Port to Windows Firewall
Voicemail Pro installed on Linux uses MAPI service as a proxy to the Microsoft Exchange server. Voicemail Pro will sendcommands to the MAPI service, which in turn will send the corresponding MAPI commands to the Exchange server. Theresponses from the Exchange server will be relayed back to the Voicemail Pro server via the MAPI service.
For the client servers to communicate with the Voicemail Pro server, add the port that the MAPI service uses to theWindows Firewall.
1.Open the Windows Control Panel.
2.Open System and Security | Windows Firewall.
3.Click Advanced settings.
4.Click Inbound Rules in the left pane.
5.Click New Rule in the right pane.The New Inbound Rule Wizard opens up.
6.Select Port and click Next.
7.Select TCP and enter the port number that the MAPI service uses in the Specific local ports field.
8.Click Next.
9.Select Allow the connection and click Next.
10.Check the Domain, Private, and Public check boxes.
11.Click Next.
12.Enter a name for the rule and click Finish.
13.Click Outbound Rules in the left pane and repeat step 5 to step 12 .
3.5.2.1.5 Switching VoiceMail Pro to MAPI
By default, the Voicemail Pro server is configured for SMTP e-mail mode. However, if MAPI settings are entered it willswitch to MAPI mode. Some options are not available if you are working offline. You must be working online to use thisfeature.
To select the server e-mail mode
1.Start the Voicemail Pro client.
2.Click Preferences and select General.
3.Click the Email tab.
4.Select the MAPI sub tab. Set the settings to match a MAPI account already configured and able to send e-mails fromthe MAPI client on the voicemail server.
a. Select the Enable MAPI check box to switch the voicemail server to use MAPI for its e-mail options rather thanSMTP.
28
60 60
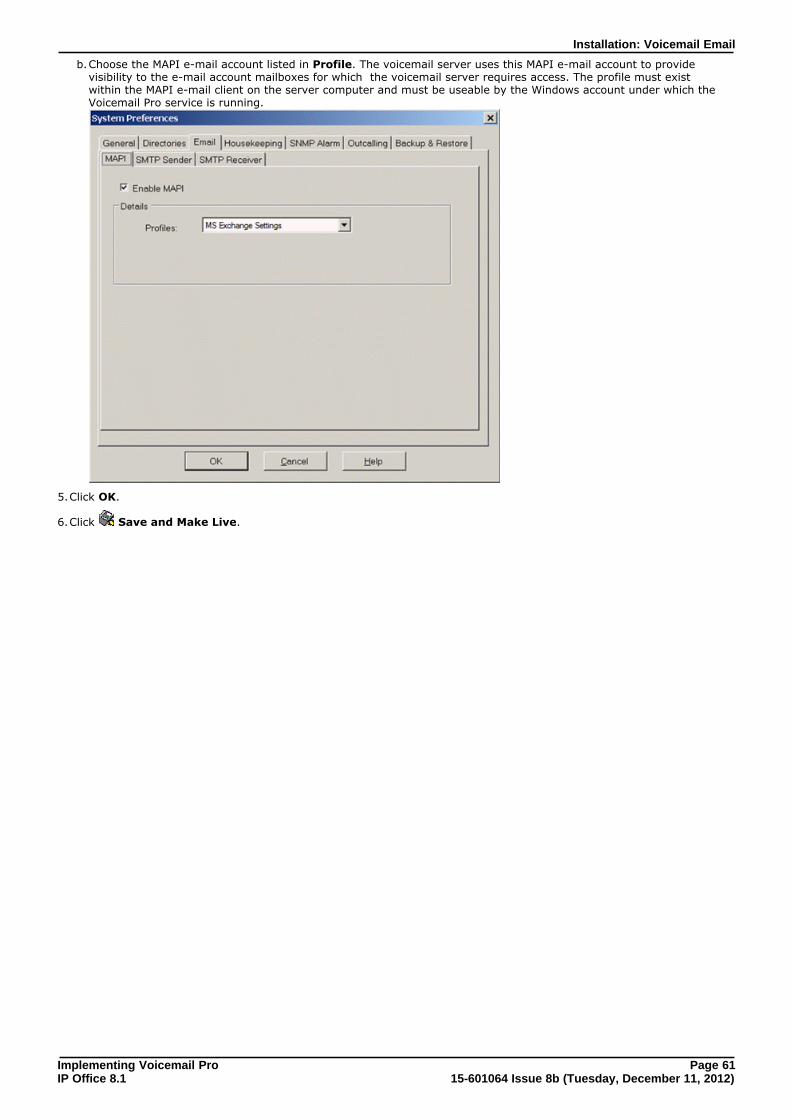
Implementing Voicemail Pro Page 6115-601064 Issue 8b (Tuesday, December 11, 2012)IP Office 8.1
Installation: Voicemail Email
b.Choose the MAPI e-mail account listed in Profile. The voicemail server uses this MAPI e-mail account to providevisibility to the e-mail account mailboxes for which the voicemail server requires access. The profile must existwithin the MAPI e-mail client on the server computer and must be useable by the Windows account under which theVoicemail Pro service is running.
5.Click OK.
6.Click Save and Make Live.

Implementing Voicemail Pro Page 6215-601064 Issue 8b (Tuesday, December 11, 2012)IP Office 8.1
3.5.2.2 Work Group Member
Before you start to install the Voicemail Pro software, you must:
1. Create a Voicemail User Account .
2. Configure Outlook Express for Internet Mail .
3. Configure Outlook for Voicemail E-mail .
4. Configure Outlook for Exchange Server .
The user name and password created are requested as part of the installation of the Voicemail Pro service. The MicrosoftOutlook software must be installed on your computer before you can configure it.
You are then ready to install the Voicemail Pro software. See Installing the Voicemail Pro Software .
By default, Voicemail Pro is set to use SMTP for e-mails. Set Voicemail Pro to use MAPI. See Switching Voicemail Pro toMAPI .
You also need to set the SMTP E-mail Account settings on the Voicemail Pro so that they match those of the customer'se-mail server. See Changing SMTP E-mail Account Settings .
3.5.2.2.1 Installing VoiceMail Pro for MAPI VoiceMail Email as a Work Group Member
Before you start to install the Voicemail Pro software, you must:
1. Create a voicemail user account. See Creating a Voicemail User Account .
2. Configure Outlook Express for Internet Mail. See Configuring Outlook Express for Internet Mail .
3. Configure Outlook for Internet mail. See Configuring Outlook for Voicemail E-mail .
4. Configure Outlook for Exchange server. See Configuring Outlook for Exchange Server .
The user name and password created are requested as part of the installation of the Voicemail Pro service. The MicrosoftOutlook software must be installed on your computer before you can configure it.
You are then ready to install the Voicemail Pro software. See Installing the Voicemail Pro Software .
By default, Voicemail Pro is set to use SMTP for e-mails. Set Voicemail Pro to use MAPI. See , Switching Voicemail Pro toMAPI .
You also need to set the SMTP E-mail Account settings on the Voicemail Pro so that they match those of the customer'se-mail server. See Changing SMTP E-mail Account Settings .
3.5.2.2.2 Creating a Voicemail User Account
To create a Voicemail User Account
For this example the name of the created user account is Voicemail.
1. Log on to the server computer using an administrator account.
2. Open the Windows Control Panel.
3. Click User Accounts | Add or remove user accounts.
4. Click Create a new account.
5. Enter Voicemail as the new account name and select Administrator as the account type.
6. Click Create Account.The new account Voicemail is created and added to the list of user accounts.
7. Click Voicemail and create a secure password for the account.
8. Continue with one of the following as appropriate to the installed MAPI client and method for sending e-mail.
62
63
59
65
65
60
67
62
63
59
65
65
60
67
Implementing Voicemail Pro Page 6315-601064 Issue 8b (Tuesday, December 11, 2012)IP Office 8.1
Installation: Voicemail Email
3.5.2.2.3 Configuring Outlook Express for Internet Mail
To configure Outlook Express for Internet Mail
1. Click the Outlook Express icon to start the Configuration wizard.
2. In the Display name box enter Voicemail.
3. Click Next.
4. Select I already have an e-mail address that I'd like to use and enter the address in E-mail address, [email protected]. Click Next.
5. Enter the name or address of the Incoming mail server and the Outgoing mail server. Note: If you enter the name, configure the IP address of the DNS Server in the voicemail computer.
6. Click Next.
7. Enter the e-mail account name and password, for example Voicemail. Select Remember password.
8. Click Next.
9. Click Finish to complete the wizard.
10.Open Outlook Express and select Tools > Options.
11.Click the General tab.
· Uncheck Send and Receive messages at Start up.
· Uncheck Check for new messages every.
12.Select the Send tab.
· Uncheck Save copy of sent messages in the 'Sent Items' folder.
· Check Send messages immediately.
· Under Mail Sending Format select Plain Text.
13.Click OK.
14.Log on to the server computer using the account that will be used for the Voicemail Pro server.
15.From Outlook or Outlook Express, send a message direct to an extension user.
16.If this message is received correctly, continue with installing the Voicemail Pro software.
Implementing Voicemail Pro Page 6415-601064 Issue 8b (Tuesday, December 11, 2012)IP Office 8.1
3.5.2.2.4 Configuring Outlook for Internet Mail
For the installation of Outlook to work correctly, the following setup process must be followed. Outlook can be configuredin two ways. Using the Wizard, prior to completing the steps below will cause Outlook not to send the messagescorrectly.
To configure Outlook for Internet Mail:
1. Right-click the Outlook icon on the desktop and select Properties.
2. Select Add.
3. Select Internet E-mail and click OK.
4. For the Mail Account, enter Voicemail.
5. For User Information enter Voicemail as the Name and for the E-mail address enter your address, for [email protected].
6. Select the Servers tab. Enter the name or IP address of the Outgoing mail server and Incoming mail server.
7. The Incoming Mail Server details can be left blank as Outlook does not need to check for mail. Otherwise, enterthe account name and password for example, Voicemail. Select Remember password.
8. Select the Connection tab. Select Connect using my local area network (LAN). Click Next.
9. Click OK.
10.Click Next.
11.Accept the default path for file creation.
12.Select Next, then Finish and then Close.
13.Open Outlook.
14.On the E-mail Service Option Screen, select Internet Only.
15.Click Next.
16.Select Yes to register Outlook as the default e-mail application.
17.Select Tools > Options.
18.Click the Preferences tab.
19.Click E-mail Options.
20.Uncheck Save copies of messages in Sent Items folder.
· You might want this option selected during initial setup and troubleshooting. Due to the size of wav filemessage attachments it is advisable to uncheck it after installation is complete.
21.Log on to the server computer using the account that will be used for the Voicemail Pro server.
22.From Outlook or Outlook Express, send a message direct to an extension user.
23.If this message is received correctly, continue with installing the Voicemail Pro software.
Implementing Voicemail Pro Page 6515-601064 Issue 8b (Tuesday, December 11, 2012)IP Office 8.1
Installation: Voicemail Email
3.5.2.2.5 Configuring Outlook for Exchange Server
This option can be selected if Outlook is to be configured to connect to the Exchange server, using a valid user name andpassword, while the Voicemail computer remains a member of a work group.
To configure Outlook for Exchange Server:
1. Create a new mailbox on the Exchange server, for example Voicemail, and assign it the same password as hasbeen configured on the voicemail computer.
2. Clear User must Change password at Next Logon and select Password Never Expires.
3. On the voicemail computer, logon with the Voicemail account.
4. Right-click the Outlook icon on the desktop and select Properties.
5. Select Add.
6. Highlight Microsoft Exchange Server and click OK.
7. Type in the Exchange server name and enter Voicemail in the Mailbox field.
8. Highlight the MS Exchange Settings, Click Properties.
9. Highlight Microsoft Exchange Server. Click Properties.
10.Click Check name.
11.If the name is resolved, select Apply. Click OK, OK and Close to shut the Mail settings.
12.Do not continue until the name has been resolved correctly with the Exchange server. If the name is not resolved,check the account details with the Exchange administrator.
13.Open Outlook and select Yes to register Outlook as the default e-mail application.
14.Select Tools > Options.
15.Choose the Preferences tab. Click E-mail Options.
16.Uncheck Save copies of messages in Sent Items folder.
· You can keep this option selected during initial setup and troubleshooting. Due to the size of the wav filemessage attachments, deselect it once the installation is complete.
17.Log on to the server computer using the account that will be used for the Voicemail Pro server.
18.From Outlook or Outlook Express, send a message direct to an extension user.
19.If this message is received correctly, continue with installing the Voicemail Pro software.
3.5.2.2.6 Installing the VoiceMail Pro Software
To install Voicemail Pro software, perform the following steps:
1. Log off and log on using the Voicemail account and password.
2. Install the required Voicemail Pro software.
3. When the system prompts for a User Name and Password for the Voicemail Pro service, enter the Voicemail accountdetails.
4. Restart the server and log on using the Voicemail account.
5. When SMTP e-mail details are requested, enter no values and ignore the error message following the SMTP check.
6. Start the Voicemail Pro Service .
7. Check that the basic voicemail services start and operate correctly.
3.5.2.2.7 Switching VoiceMail Pro to MAPI
By default, the Voicemail Pro server is configured for SMTP e-mail mode. However, if MAPI settings are entered it willswitch to MAPI mode. Some options are not available if you are working offline. You must be working online to use thisfeature.
To select the server e-mail mode
1.Start the Voicemail Pro client.
2.Click Preferences and select General.
3.Click the Email tab.
4.Select the MAPI sub tab. Set the settings to match a MAPI account already configured and able to send e-mails fromthe MAPI client on the voicemail server.
a. Select the Enable MAPI check box to switch the voicemail server to use MAPI for its e-mail options rather thanSMTP.
28
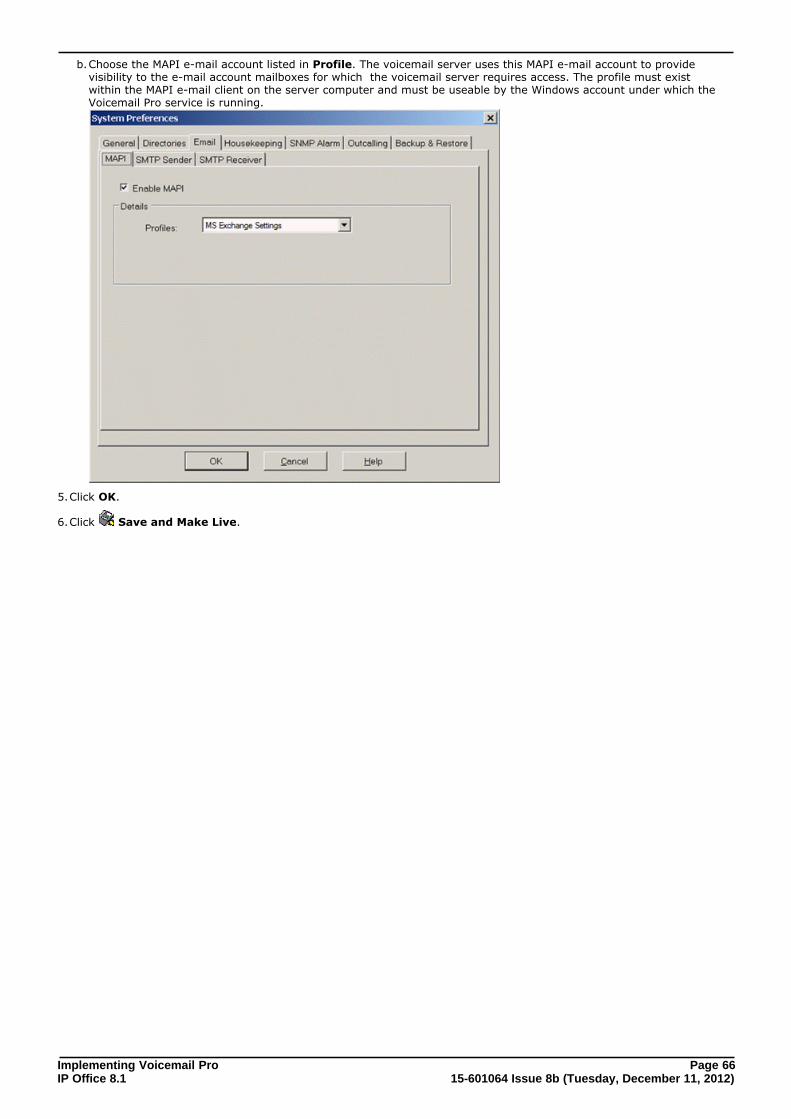
Implementing Voicemail Pro Page 6615-601064 Issue 8b (Tuesday, December 11, 2012)IP Office 8.1
b.Choose the MAPI e-mail account listed in Profile. The voicemail server uses this MAPI e-mail account to providevisibility to the e-mail account mailboxes for which the voicemail server requires access. The profile must existwithin the MAPI e-mail client on the server computer and must be useable by the Windows account under which theVoicemail Pro service is running.
5.Click OK.
6.Click Save and Make Live.
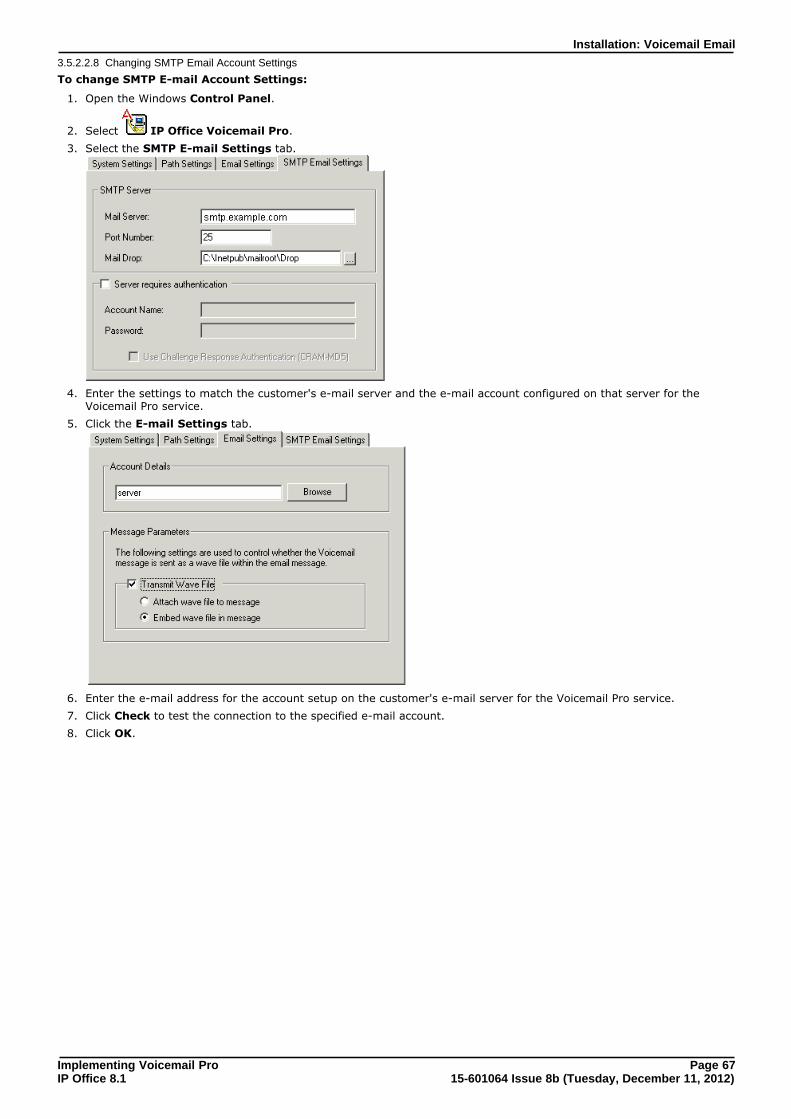
Implementing Voicemail Pro Page 6715-601064 Issue 8b (Tuesday, December 11, 2012)IP Office 8.1
Installation: Voicemail Email
3.5.2.2.8 Changing SMTP Email Account Settings
To change SMTP E-mail Account Settings:
1. Open the Windows Control Panel.
2. Select IP Office Voicemail Pro.
3. Select the SMTP E-mail Settings tab.
4. Enter the settings to match the customer's e-mail server and the e-mail account configured on that server for theVoicemail Pro service.
5. Click the E-mail Settings tab.
6. Enter the e-mail address for the account setup on the customer's e-mail server for the Voicemail Pro service.
7. Click Check to test the connection to the specified e-mail account.
8. Click OK.
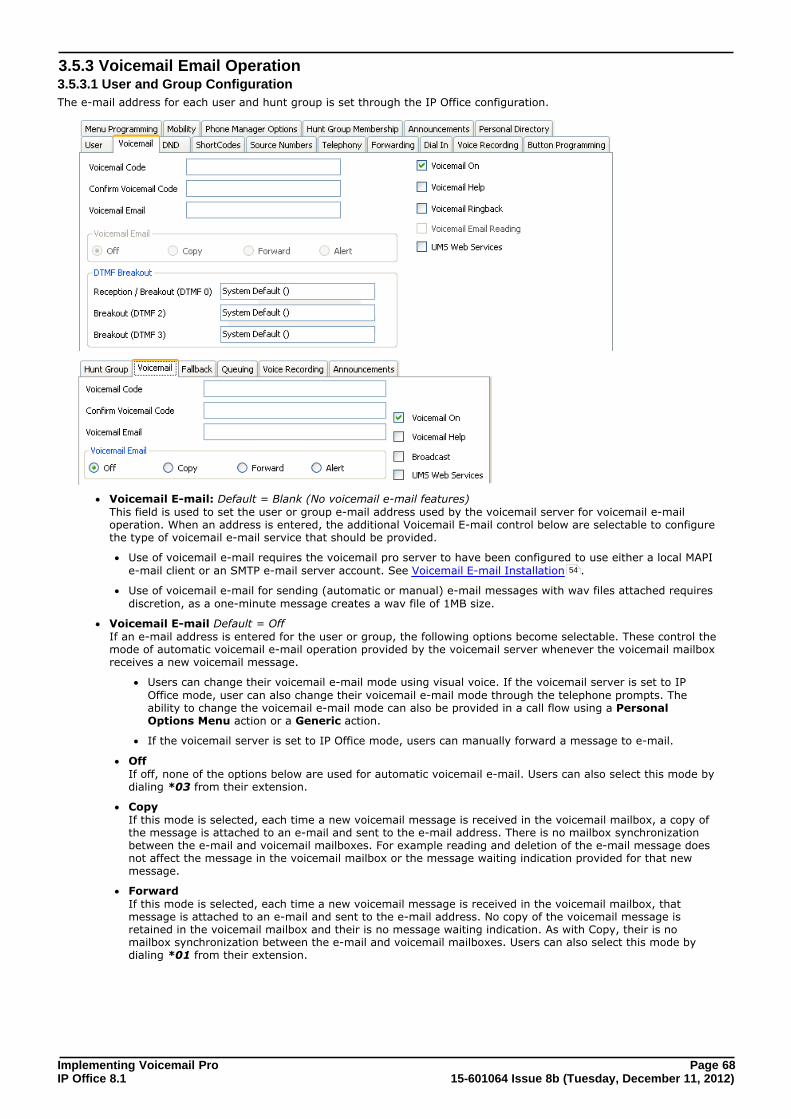
Implementing Voicemail Pro Page 6815-601064 Issue 8b (Tuesday, December 11, 2012)IP Office 8.1
3.5.3 Voicemail Email Operation3.5.3.1 User and Group Configuration
The e-mail address for each user and hunt group is set through the IP Office configuration.
· Voicemail E-mail: Default = Blank (No voicemail e-mail features) This field is used to set the user or group e-mail address used by the voicemail server for voicemail e-mailoperation. When an address is entered, the additional Voicemail E-mail control below are selectable to configurethe type of voicemail e-mail service that should be provided.
· Use of voicemail e-mail requires the voicemail pro server to have been configured to use either a local MAPIe-mail client or an SMTP e-mail server account. See Voicemail E-mail Installation .
· Use of voicemail e-mail for sending (automatic or manual) e-mail messages with wav files attached requiresdiscretion, as a one-minute message creates a wav file of 1MB size.
· Voicemail E-mail Default = OffIf an e-mail address is entered for the user or group, the following options become selectable. These control themode of automatic voicemail e-mail operation provided by the voicemail server whenever the voicemail mailboxreceives a new voicemail message.
· Users can change their voicemail e-mail mode using visual voice. If the voicemail server is set to IPOffice mode, user can also change their voicemail e-mail mode through the telephone prompts. Theability to change the voicemail e-mail mode can also be provided in a call flow using a PersonalOptions Menu action or a Generic action.
· If the voicemail server is set to IP Office mode, users can manually forward a message to e-mail.
· OffIf off, none of the options below are used for automatic voicemail e-mail. Users can also select this mode bydialing *03 from their extension.
· CopyIf this mode is selected, each time a new voicemail message is received in the voicemail mailbox, a copy ofthe message is attached to an e-mail and sent to the e-mail address. There is no mailbox synchronizationbetween the e-mail and voicemail mailboxes. For example reading and deletion of the e-mail message doesnot affect the message in the voicemail mailbox or the message waiting indication provided for that newmessage.
· ForwardIf this mode is selected, each time a new voicemail message is received in the voicemail mailbox, thatmessage is attached to an e-mail and sent to the e-mail address. No copy of the voicemail message isretained in the voicemail mailbox and their is no message waiting indication. As with Copy, their is nomailbox synchronization between the e-mail and voicemail mailboxes. Users can also select this mode bydialing *01 from their extension.
54

Implementing Voicemail Pro Page 6915-601064 Issue 8b (Tuesday, December 11, 2012)IP Office 8.1
Installation: Voicemail Email
· UMS ExchangeVoicemail Pro 5.0+ supports voicemail e-mail to an Exchange server e-mail account. For users andgroups also enabled for UMS Web Services this significantly changes their mailbox operation. TheExchange server inbox is used as their voicemail message store and features such as message waitingindication are set by new messages in that location rather than the voicemail mailbox on the voicemailserver. Telephone access to voicemail messages, including Visual Voice access, is redirected to theExchange server mailbox. See UMS Exchange Server Installation and UMS Exchange.
· AlertIf this mode is selected, each time a new voicemail message is received in the voicemail mailbox, a simplee-mail message is sent to the e-mail address. This is an e-mail message announcing details of the voicemailmessage but with no copy of the voicemail message attached. Users can also select this mode by dialing *02 from their extension.
3.5.3.2 How Voicemail Email Messages Look
Messages sent by a user or group's voicemail e-mail settings contain the following:
· To The user/group e-mail address.
· From The name and address setting of the e-mail client account.
· Subject Voicemail Message ('calling number' > 'user name') From:'calling number'.
· Body If the user or group's Voicemail E-mail mode is set to Copy or Forward, the message body will contain "IP Office
Voicemail redirected message".
· Attachment When using Copy or Forward mode, the message is attached as a wav file.
Messages sent through a Voicemail Pro eMail action are configurable, see The Voicemail Pro eMail Action .
42
70
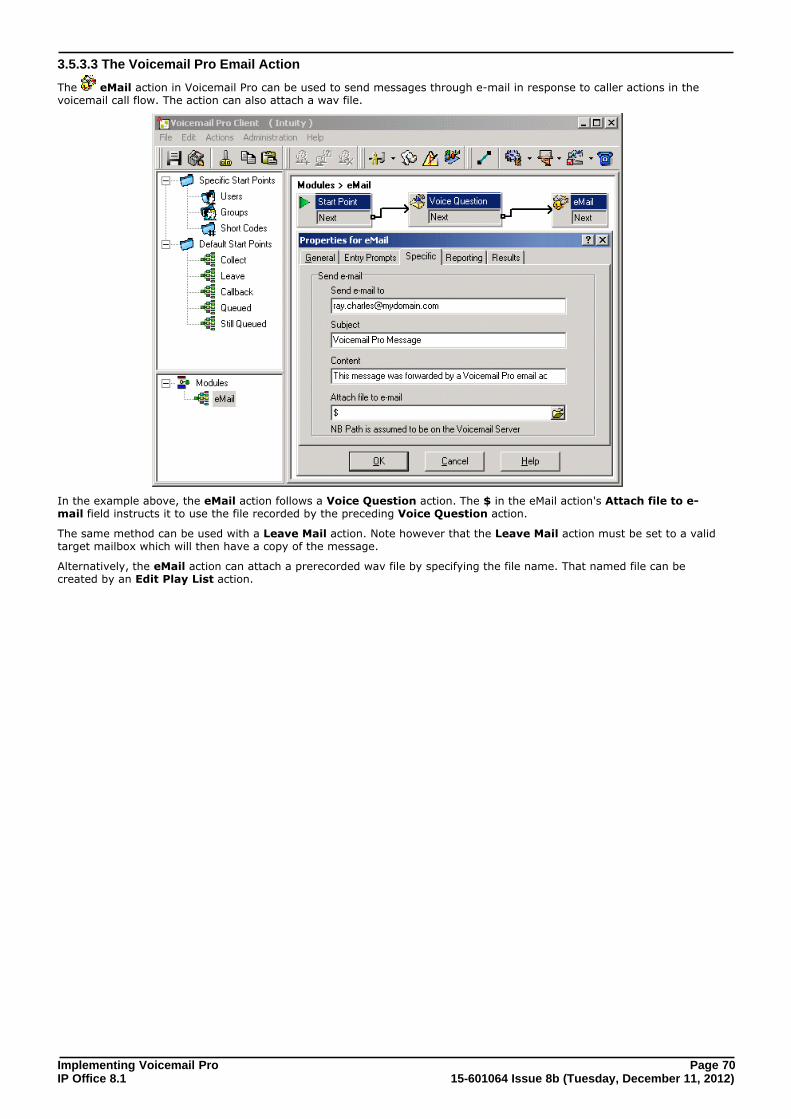
Implementing Voicemail Pro Page 7015-601064 Issue 8b (Tuesday, December 11, 2012)IP Office 8.1
3.5.3.3 The Voicemail Pro Email Action
The eMail action in Voicemail Pro can be used to send messages through e-mail in response to caller actions in thevoicemail call flow. The action can also attach a wav file.
In the example above, the eMail action follows a Voice Question action. The $ in the eMail action's Attach file to e-mail field instructs it to use the file recorded by the preceding Voice Question action.
The same method can be used with a Leave Mail action. Note however that the Leave Mail action must be set to a validtarget mailbox which will then have a copy of the message.
Alternatively, the eMail action can attach a prerecorded wav file by specifying the file name. That named file can becreated by an Edit Play List action.

Implementing Voicemail Pro Page 7115-601064 Issue 8b (Tuesday, December 11, 2012)IP Office 8.1
Installation: Voicemail Email
3.6 Text To Speech (TTS) InstallationThe Voicemail Pro server uses Text To Speech (TTS) in the following ways:
· Speak text in call flows using the Speak Text action. The text can include variables passed from other actionsincluding database actions.
· When installed in parallel with Voicemail E-mail , TTS can be used to provide e-mail reading to selectedmailbox users.
· TTS can be used by the Voicemail Pro client user to record prompts used by call flow actions.
Windows TTS LicensingVoicemail Pro TTS requires the server computer to have a Microsoft SAPI 5 compatible TTS engine installed and a validlicense entry.
· E-mail Reading Users who want to use this feature must have their user profile configured as either Mobile User or Power Userusing Mobile User Profile or Power User Profile licenses. In addition, IP Office with a Windows-based voicemailserver must have a VMPro TTS (Generic) or a VMPro TTS (ScanSoft) license and IP Office with a Windows-based voicemail server must have a VMPro TTS Professional license for e-mail reading to work.
· Speak Text Actions / Prompt Recording The license for this operation depend on whether you will be using the Avaya-supplied ScanSoft TTS speechengines or a 3rd party generic TTS speech engines (including the TTS speech engines included in Microsoftoperating systems).
· Generic TTS The use of up to 8 simultaneous generic TTS ports is enabled by the Advanced Edition license. Alternativelyseparate VMPro TTS (Generic) licenses can be added.
· Avaya ScanSoft TTS The use of the Avaya supplied ScanSoft TTS engines is licensed by the addition of VMPro TTS (ScanSoft)licenses to the IP Office configuration.
Generic TTS LicensingIf you add both VMPro TTS (Generic) and VMPro TTS (ScanSoft) licenses, the system will use both of the TTSengines for calls on a first-come-first-serve basis. You will not be able to control the use of TTS engine for particular calls.Therefore, license only one type of TTS engine within a system.
LanguagesFor Voicemail Pro 5.0 or higher on Windows, the TTS engine supports the same set of languages as Voicemail Pro speechprompts except for Hungarian.
If more than one TTS language is installed, use Select System Prompt Language action to switch TTS to a differentlanguage from the selected default.
· Installation on Windows Server Operating SystemsOn many Windows server computers, while the Windows Audio components are present by default they are not alwaysenabled. If this is the case the playback of voice prompts may be 'choppy' and the TTS (if installed) will not work.However, enabling Windows Audio does not require the server computer to have a sound card installed.
1.Verify that you have full administrator rights for the computer.
2.Click Start | Administrative Tools | Services.
3.If the status of the Windows Audio service is not Started, start the service and set the Startup Type toAutomatic.
3.6.1 Installing Generic Text to SpeechTo install Text To Speech:
1.Install and test Voicemail Pro as normal.
2.Using IP Office Manager, add the Advanced Edition or VMPro TTS (Generic) license into the IP Officeconfiguration. Send the new configuration to the IP Office system.
3.Reload the IP Office configuration into IP Office Manager and check that the status of the license has changed to Valid.
4.The Voicemail Pro installation includes the default Microsoft TTS engines (Microsoft Sam, Mike, Mary, and SimplifiedChinese) as standard. If another third-party SAPI 5 compatible TTS engine is going to be used, install that software.
5.If the system is licensed for generic TTS, Voicemail Pro will automatically discover any SAPI 5 installed engine. Ifthere is no third-party engine installed then the Microsoft third-party engine is used.
54 72

Implementing Voicemail Pro Page 7215-601064 Issue 8b (Tuesday, December 11, 2012)IP Office 8.1
3.6.2 Installing Avaya Text to SpeechThe Avaya TTS engine for Voicemail Pro is supplied on media disks (x2) separate from the Voicemail Pro softwareinstallation media. By default, TTS engine installation also includes installation of the English US and English UK languagepacks.
To install Avaya Text To Speech on Microsoft Windows:
1.Install and test Voicemail Pro as normal.
2.Using IP Office Manager, add the VMPro TTS (ScanSoft) license into the IP Office configuration. Send the newconfiguration to the IP Office system.
3.Reload the IP Office configuration into IP Office Manager and check that the status of the license has changed to Valid.
4.Insert the first Avaya TTS DVD. The installation should auto-start.
5.Follow the prompts and install the required languages.
6.If the system is licensed for Avaya TTS, the ScanSoft engine is automatically used.
3.6.3 Setting Up Text To Speech to Read Email
In conjunction with MAPI e-mail clients and Exchange server, TTS can be used to read new e-mails in a user's e-mailinbox when they access their voicemail mailbox.
· The Voicemail Pro server must have been installed and configure to support voicemail e-mail using a MAPI client.
· E-mail reading can only be enabled for IP Office users whose Profile setting is set to Mobile User or Power User. IPOffice must have a VMPro TTS (Generic) or a VMPro TTS (ScanSoft) license for e-mail reading to work with aWindows-based voicemail server and a VMPro TTS Professional license for e-mail reading to work with a Linux-based voicemail server.
· This feature is supported only for Intuity mode. Users hear their new voicemail messages and then the number of"Messages with text". Before each e-mail is spoken, details of who it is from, when the message was sent and thesize are given. These details assist you in deciding to skip large or non-urgent e-mails.
· E-mail reading cannot be used for e-mails in HTML format. If HTML messages are received, all of the code will beread out as a message.
1.Within the IP Office configuration, display the settings for the user.
2.On the User tab, set the user's Profile to either Mobile User or Power User.
3.On the Voicemail tab:
· Voicemail E-mail Enter the user's e-mail address.
54
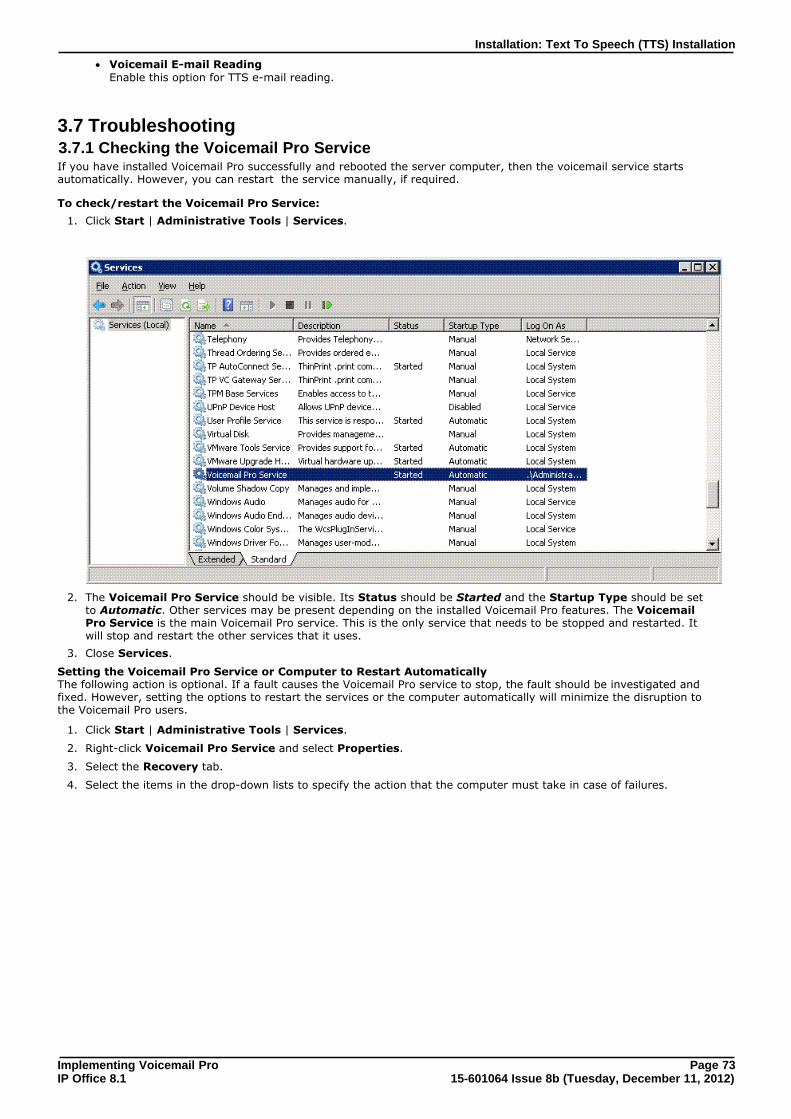
Implementing Voicemail Pro Page 7315-601064 Issue 8b (Tuesday, December 11, 2012)IP Office 8.1
Installation: Text To Speech (TTS) Installation
· Voicemail E-mail Reading Enable this option for TTS e-mail reading.
3.7 Troubleshooting3.7.1 Checking the Voicemail Pro ServiceIf you have installed Voicemail Pro successfully and rebooted the server computer, then the voicemail service startsautomatically. However, you can restart the service manually, if required.
To check/restart the Voicemail Pro Service:
1. Click Start | Administrative Tools | Services.
2. The Voicemail Pro Service should be visible. Its Status should be Started and the Startup Type should be setto Automatic. Other services may be present depending on the installed Voicemail Pro features. The VoicemailPro Service is the main Voicemail Pro service. This is the only service that needs to be stopped and restarted. Itwill stop and restart the other services that it uses.
3. Close Services.
Setting the Voicemail Pro Service or Computer to Restart AutomaticallyThe following action is optional. If a fault causes the Voicemail Pro service to stop, the fault should be investigated andfixed. However, setting the options to restart the services or the computer automatically will minimize the disruption tothe Voicemail Pro users.
1. Click Start | Administrative Tools | Services.
2. Right-click Voicemail Pro Service and select Properties.
3. Select the Recovery tab.
4. Select the items in the drop-down lists to specify the action that the computer must take in case of failures.
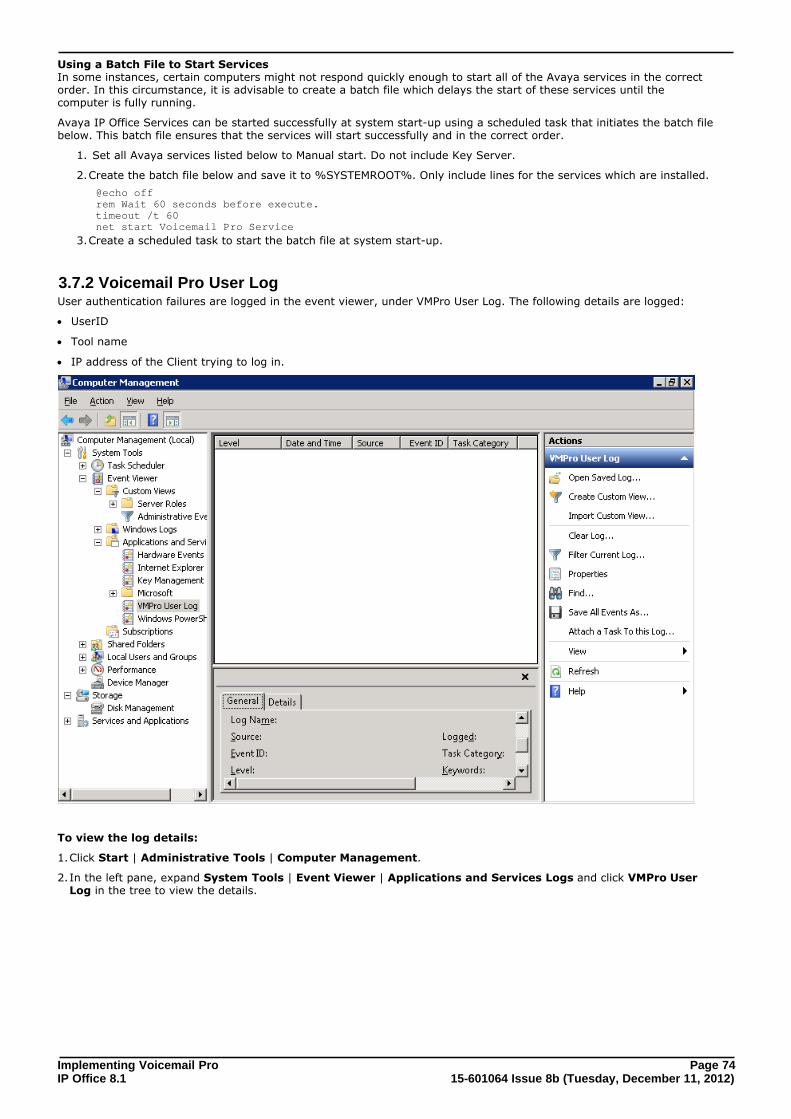
Implementing Voicemail Pro Page 7415-601064 Issue 8b (Tuesday, December 11, 2012)IP Office 8.1
Using a Batch File to Start Services In some instances, certain computers might not respond quickly enough to start all of the Avaya services in the correctorder. In this circumstance, it is advisable to create a batch file which delays the start of these services until thecomputer is fully running.
Avaya IP Office Services can be started successfully at system start-up using a scheduled task that initiates the batch filebelow. This batch file ensures that the services will start successfully and in the correct order.
1. Set all Avaya services listed below to Manual start. Do not include Key Server.
2.Create the batch file below and save it to %SYSTEMROOT%. Only include lines for the services which are installed.
@echo offrem Wait 60 seconds before execute.timeout /t 60net start Voicemail Pro Service
3.Create a scheduled task to start the batch file at system start-up.
3.7.2 Voicemail Pro User LogUser authentication failures are logged in the event viewer, under VMPro User Log. The following details are logged:
· UserID
· Tool name
· IP address of the Client trying to log in.
To view the log details:
1.Click Start | Administrative Tools | Computer Management.
2.In the left pane, expand System Tools | Event Viewer | Applications and Services Logs and click VMPro UserLog in the tree to view the details.
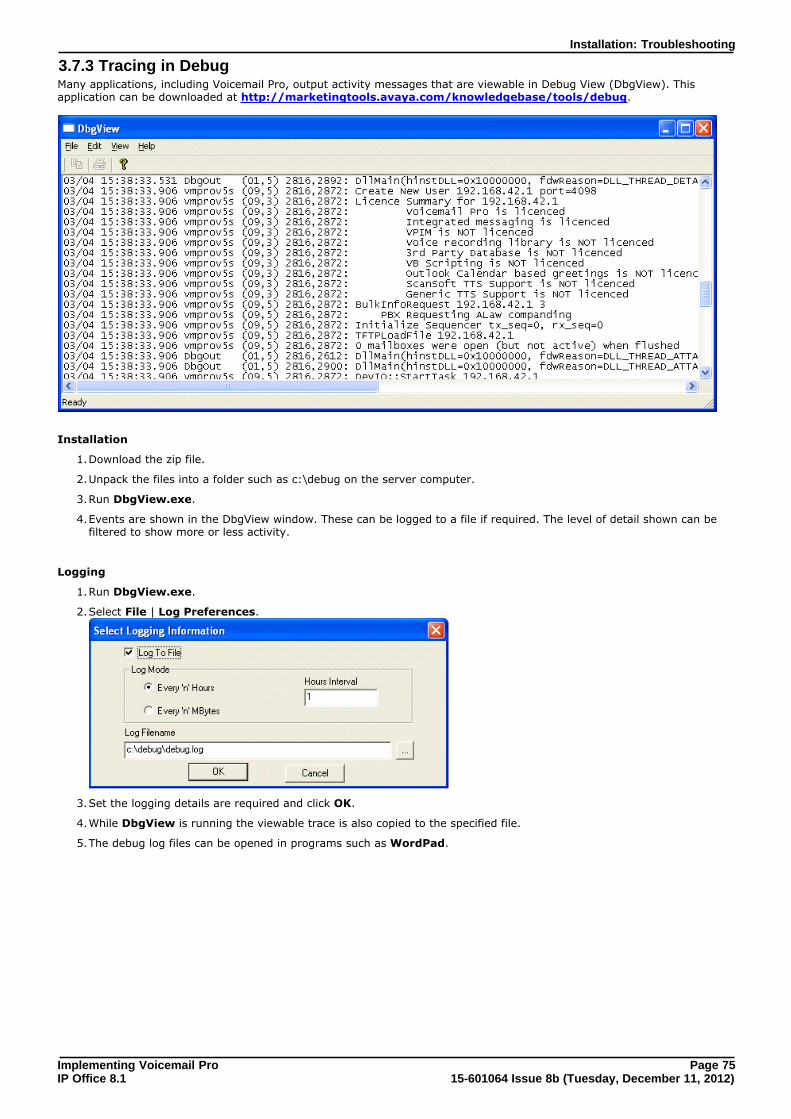
Implementing Voicemail Pro Page 7515-601064 Issue 8b (Tuesday, December 11, 2012)IP Office 8.1
Installation: Troubleshooting
3.7.3 Tracing in DebugMany applications, including Voicemail Pro, output activity messages that are viewable in Debug View (DbgView). Thisapplication can be downloaded at http://marketingtools.avaya.com/knowledgebase/tools/debug.
Installation
1.Download the zip file.
2.Unpack the files into a folder such as c:\debug on the server computer.
3.Run DbgView.exe.
4.Events are shown in the DbgView window. These can be logged to a file if required. The level of detail shown can befiltered to show more or less activity.
Logging
1.Run DbgView.exe.
2.Select File | Log Preferences.
3.Set the logging details are required and click OK.
4.While DbgView is running the viewable trace is also copied to the specified file.
5.The debug log files can be opened in programs such as WordPad.
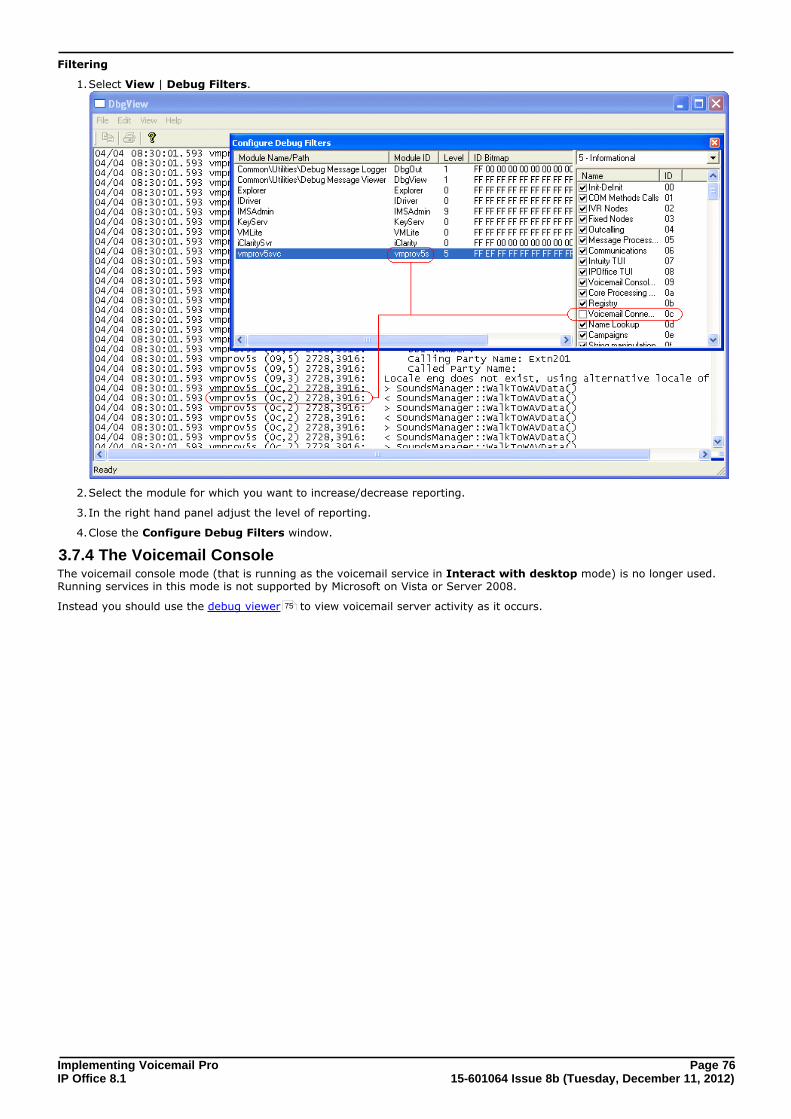
Implementing Voicemail Pro Page 7615-601064 Issue 8b (Tuesday, December 11, 2012)IP Office 8.1
Filtering
1.Select View | Debug Filters.
2.Select the module for which you want to increase/decrease reporting.
3.In the right hand panel adjust the level of reporting.
4.Close the Configure Debug Filters window.
3.7.4 The Voicemail ConsoleThe voicemail console mode (that is running as the voicemail service in Interact with desktop mode) is no longer used.Running services in this mode is not supported by Microsoft on Vista or Server 2008.
Instead you should use the debug viewer to view voicemail server activity as it occurs.75

Implementing Voicemail Pro Page 7715-601064 Issue 8b (Tuesday, December 11, 2012)IP Office 8.1
Using the Voicemail ProClient
Chapter 4.
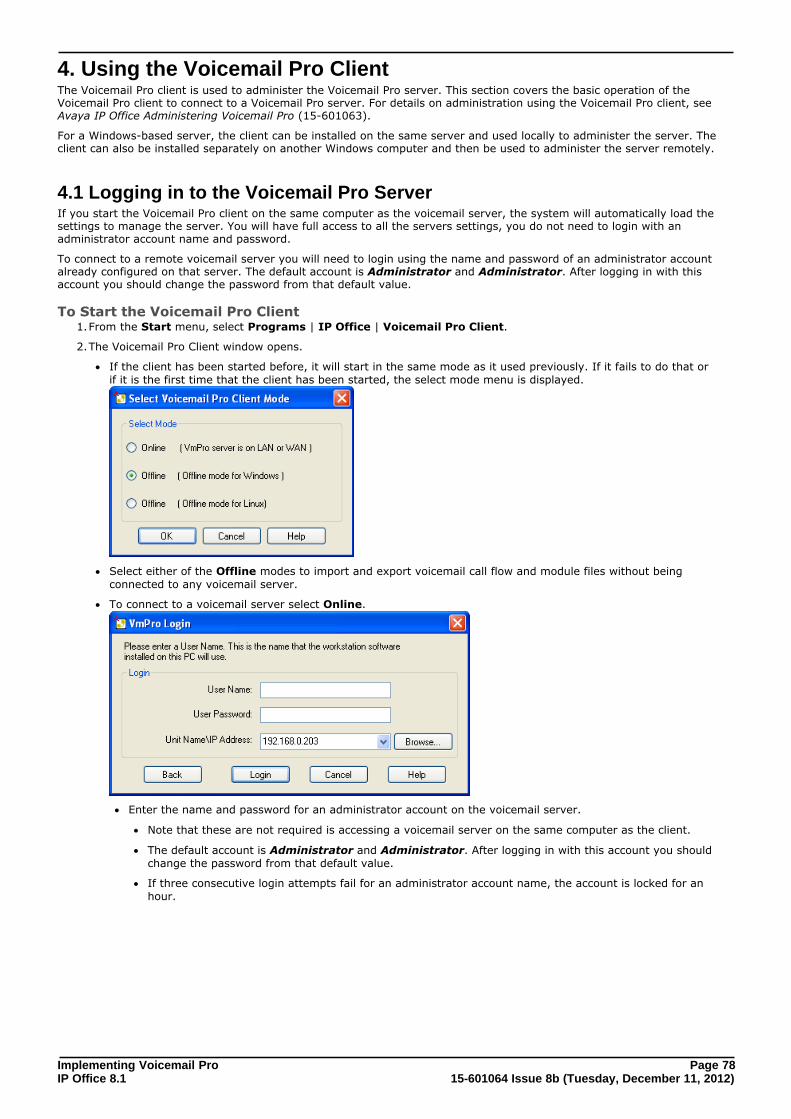
Implementing Voicemail Pro Page 7815-601064 Issue 8b (Tuesday, December 11, 2012)IP Office 8.1
4. Using the Voicemail Pro ClientThe Voicemail Pro client is used to administer the Voicemail Pro server. This section covers the basic operation of theVoicemail Pro client to connect to a Voicemail Pro server. For details on administration using the Voicemail Pro client, see Avaya IP Office Administering Voicemail Pro (15-601063).
For a Windows-based server, the client can be installed on the same server and used locally to administer the server. Theclient can also be installed separately on another Windows computer and then be used to administer the server remotely.
4.1 Logging in to the Voicemail Pro ServerIf you start the Voicemail Pro client on the same computer as the voicemail server, the system will automatically load thesettings to manage the server. You will have full access to all the servers settings, you do not need to login with anadministrator account name and password.
To connect to a remote voicemail server you will need to login using the name and password of an administrator accountalready configured on that server. The default account is Administrator and Administrator. After logging in with thisaccount you should change the password from that default value.
To Start the Voicemail Pro Client1.From the Start menu, select Programs | IP Office | Voicemail Pro Client.
2.The Voicemail Pro Client window opens.
· If the client has been started before, it will start in the same mode as it used previously. If it fails to do that orif it is the first time that the client has been started, the select mode menu is displayed.
· Select either of the Offline modes to import and export voicemail call flow and module files without beingconnected to any voicemail server.
· To connect to a voicemail server select Online.
· Enter the name and password for an administrator account on the voicemail server.
· Note that these are not required is accessing a voicemail server on the same computer as the client.
· The default account is Administrator and Administrator. After logging in with this account you shouldchange the password from that default value.
· If three consecutive login attempts fail for an administrator account name, the account is locked for anhour.
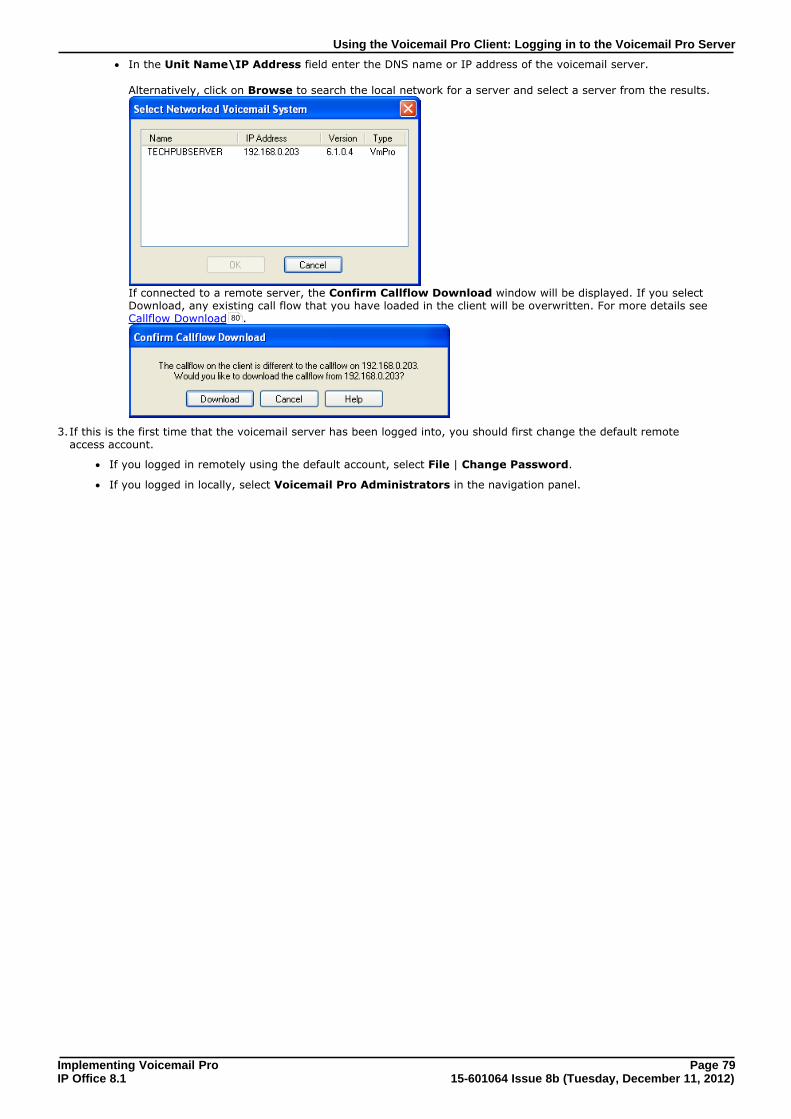
Implementing Voicemail Pro Page 7915-601064 Issue 8b (Tuesday, December 11, 2012)IP Office 8.1
Using the Voicemail Pro Client: Logging in to the Voicemail Pro Server
· In the Unit Name\IP Address field enter the DNS name or IP address of the voicemail server.
Alternatively, click on Browse to search the local network for a server and select a server from the results.
If connected to a remote server, the Confirm Callflow Download window will be displayed. If you selectDownload, any existing call flow that you have loaded in the client will be overwritten. For more details see Callflow Download .
3.If this is the first time that the voicemail server has been logged into, you should first change the default remoteaccess account.
· If you logged in remotely using the default account, select File | Change Password.
· If you logged in locally, select Voicemail Pro Administrators in the navigation panel.
80
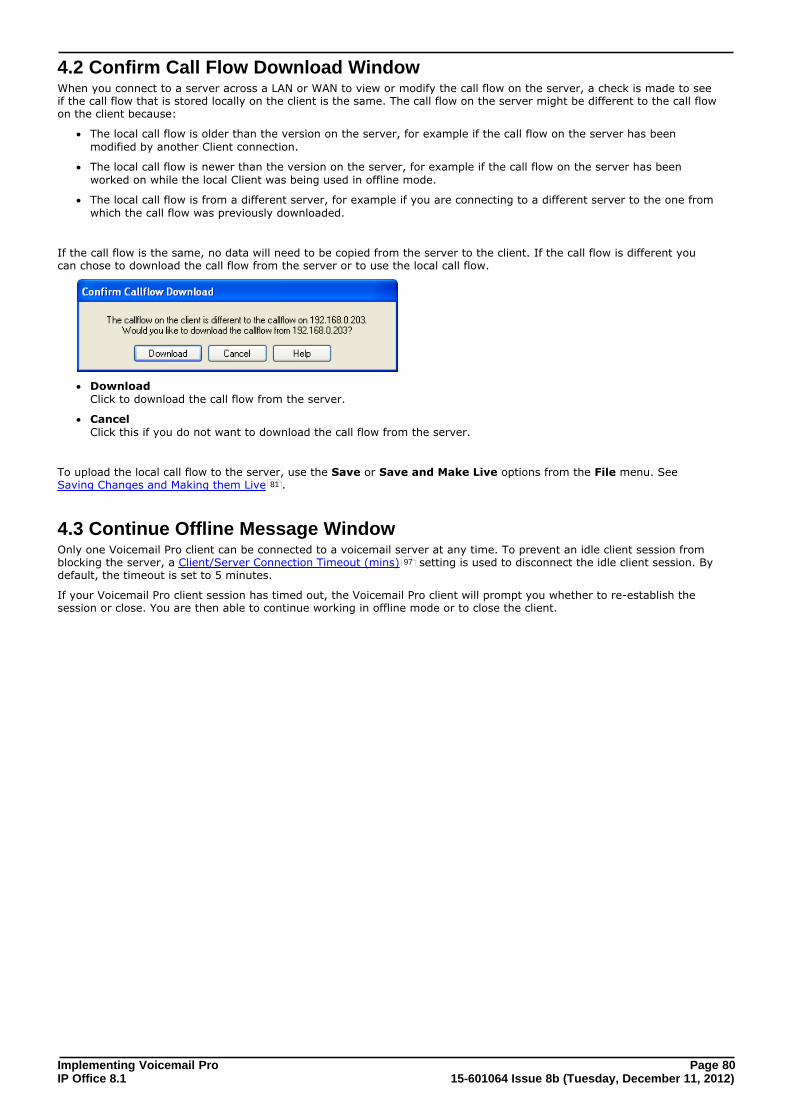
Implementing Voicemail Pro Page 8015-601064 Issue 8b (Tuesday, December 11, 2012)IP Office 8.1
4.2 Confirm Call Flow Download WindowWhen you connect to a server across a LAN or WAN to view or modify the call flow on the server, a check is made to seeif the call flow that is stored locally on the client is the same. The call flow on the server might be different to the call flowon the client because:
· The local call flow is older than the version on the server, for example if the call flow on the server has beenmodified by another Client connection.
· The local call flow is newer than the version on the server, for example if the call flow on the server has beenworked on while the local Client was being used in offline mode.
· The local call flow is from a different server, for example if you are connecting to a different server to the one fromwhich the call flow was previously downloaded.
If the call flow is the same, no data will need to be copied from the server to the client. If the call flow is different youcan chose to download the call flow from the server or to use the local call flow.
· Download Click to download the call flow from the server.
· Cancel Click this if you do not want to download the call flow from the server.
To upload the local call flow to the server, use the Save or Save and Make Live options from the File menu. SeeSaving Changes and Making them Live .
4.3 Continue Offline Message WindowOnly one Voicemail Pro client can be connected to a voicemail server at any time. To prevent an idle client session fromblocking the server, a Client/Server Connection Timeout (mins) setting is used to disconnect the idle client session. Bydefault, the timeout is set to 5 minutes.
If your Voicemail Pro client session has timed out, the Voicemail Pro client will prompt you whether to re-establish thesession or close. You are then able to continue working in offline mode or to close the client.
81
97
Implementing Voicemail Pro Page 8115-601064 Issue 8b (Tuesday, December 11, 2012)IP Office 8.1
Using the Voicemail Pro Client: Continue Offline Message Window
4.4 Saving ChangesUsing Voicemail Pro Client, you can make changes to call flow settings and can save the changes. To apply the changesto the voicemail server operation, you must also make the changes live.
To save the changes in offline mode
1.Click Save to save the changes to the local database.
2.After you log in, click Save & Make Live to make the changes live.
To save the changes in online mode
Click Save & Make Live to save the changes and make the changes live.
To save the changes to a file
Click Save as to save the call flow database as a .vmp file.
You can include a .vmp file in the operation of any voicemail system.
4.5 Logging OutIt can be useful to connect to a system to download the current system configuration and then disconnect and makechanges offline. You can then test configuration changes offline before applying them to a live system.
· Logging out is not the same as closing down with the Exit option. See Closing Down .
To Log Out1.From the File menu, select Log Out.
2.You are logged out of the Voicemail Pro server and placed in offline mode. You can either make configurationchanges offline and then log back in when you are ready or log on to a different server to work. See Logging in tothe Voicemail Pro Server .
4.6 Closing DownWhen you have finished working, you can close down the Voicemail Pro Client.
To Close the Voicemail Pro Client1.From the File menu, select Exit.
2.If you have not made any changes, the Voicemail Pro Client closes and you are returned to the desktop. If youhave made any changes, you are prompted whether to save the changes.
3.If you do not want to save the changes, click No. No changes are saved. If you want to save the changes, click Yes. The changes are saved but not made live.
4.If you want to make the changes live, click Save & make Live.
81
78

Implementing Voicemail Pro Page 8315-601064 Issue 8b (Tuesday, December 11, 2012)IP Office 8.1
IP Office Configuration
Chapter 5.
Implementing Voicemail Pro Page 8415-601064 Issue 8b (Tuesday, December 11, 2012)IP Office 8.1
5. IP Office ConfigurationThe default IP Office configuration settings support almost immediate voicemail operation as soon as a voicemail server isrunning on the LAN. Those default settings are:
· Voicemail running on a computer accessible by the IP Office using a broadcast address of 255.255.255.255.
· Voicemail on for each user and hunt group on.
· No Voicemail Code set for any mailboxes. Until a code is entered for a mailbox, it can only be accessed from theuser's own extension.
· No Voicemail E-mail or Voicemail Help operation.
· No Voicemail Reception numbers set for user mailboxes.
· Hunt group mailboxes are created and used by default but there is no default message waiting indication or methodfor collecting messages. A method for accessing each hunt group mailbox should be programmed.
Implementing Voicemail Pro Page 8515-601064 Issue 8b (Tuesday, December 11, 2012)IP Office 8.1
IP Office Configuration:
5.1 User and Group MailboxesThe voicemail server creates mailboxes based on the user and hunt group names that are entered in the IP OfficeManager application. Whenever the Voicemail Pro is restarted or the IP Office configuration is changed, new mailboxesare created for any new names that are found.
This method of operation has the following consequences:
· Mailboxes are based on names For all users and groups, if their name is changed or deleted, they are no longer associated with their formermailbox and any associated Voicemail Pro start points.
· Voicemail is case sensitive If a mailbox or start point name is entered incorrectly in IP Office Manager or Voicemail Pro, the intended operationwill not occur and the call may be disconnected.
· Voicemail removes spaces at the end of mailbox names If spaces are left at the end of a mailbox user's name in IP Office Manager, when the mailboxes are created, thespace at the end of the name is dropped. When this occurs the mailbox cannot be found as there is a mismatchbetween the user name and directory.
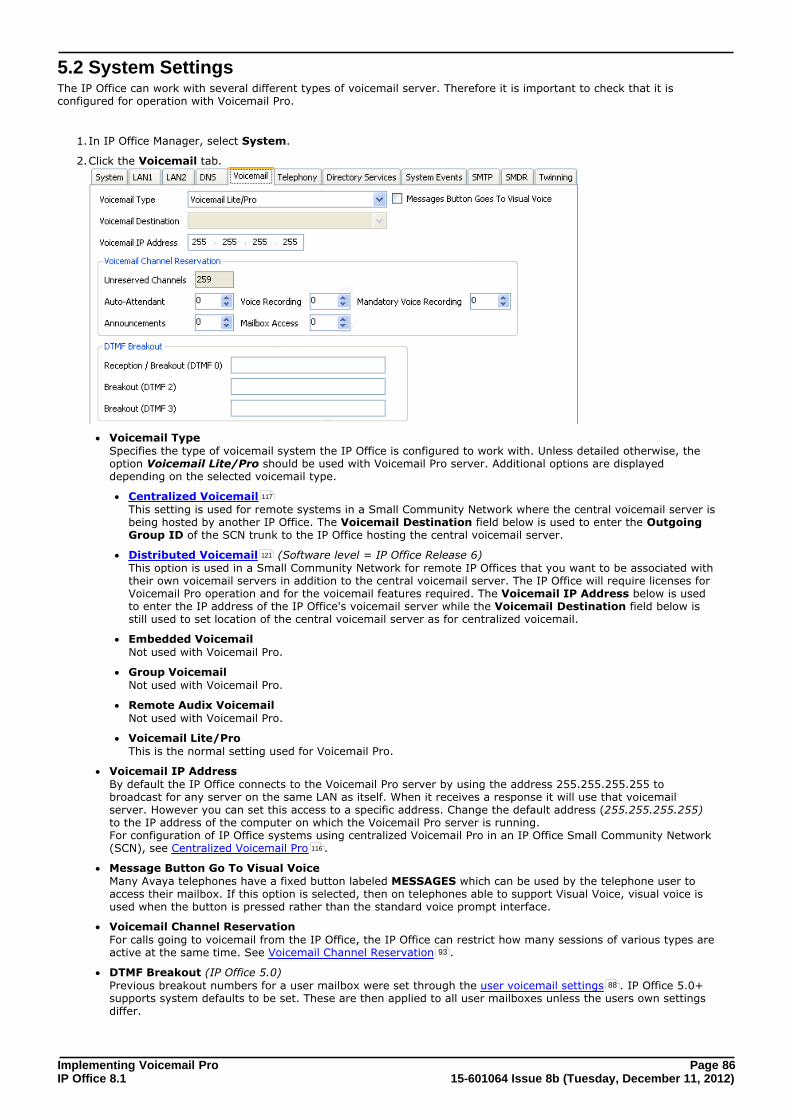
Implementing Voicemail Pro Page 8615-601064 Issue 8b (Tuesday, December 11, 2012)IP Office 8.1
5.2 System SettingsThe IP Office can work with several different types of voicemail server. Therefore it is important to check that it isconfigured for operation with Voicemail Pro.
1.In IP Office Manager, select System.
2.Click the Voicemail tab.
· Voicemail Type Specifies the type of voicemail system the IP Office is configured to work with. Unless detailed otherwise, theoption Voicemail Lite/Pro should be used with Voicemail Pro server. Additional options are displayeddepending on the selected voicemail type.
· Centralized Voicemail This setting is used for remote systems in a Small Community Network where the central voicemail server isbeing hosted by another IP Office. The Voicemail Destination field below is used to enter the OutgoingGroup ID of the SCN trunk to the IP Office hosting the central voicemail server.
· Distributed Voicemail (Software level = IP Office Release 6)This option is used in a Small Community Network for remote IP Offices that you want to be associated withtheir own voicemail servers in addition to the central voicemail server. The IP Office will require licenses forVoicemail Pro operation and for the voicemail features required. The Voicemail IP Address below is usedto enter the IP address of the IP Office's voicemail server while the Voicemail Destination field below isstill used to set location of the central voicemail server as for centralized voicemail.
· Embedded Voicemail Not used with Voicemail Pro.
· Group Voicemail Not used with Voicemail Pro.
· Remote Audix Voicemail Not used with Voicemail Pro.
· Voicemail Lite/Pro This is the normal setting used for Voicemail Pro.
· Voicemail IP Address By default the IP Office connects to the Voicemail Pro server by using the address 255.255.255.255 tobroadcast for any server on the same LAN as itself. When it receives a response it will use that voicemailserver. However you can set this access to a specific address. Change the default address (255.255.255.255)to the IP address of the computer on which the Voicemail Pro server is running. For configuration of IP Office systems using centralized Voicemail Pro in an IP Office Small Community Network(SCN), see Centralized Voicemail Pro .
· Message Button Go To Visual Voice Many Avaya telephones have a fixed button labeled MESSAGES which can be used by the telephone user toaccess their mailbox. If this option is selected, then on telephones able to support Visual Voice, visual voice isused when the button is pressed rather than the standard voice prompt interface.
· Voicemail Channel Reservation For calls going to voicemail from the IP Office, the IP Office can restrict how many sessions of various types areactive at the same time. See Voicemail Channel Reservation .
· DTMF Breakout (IP Office 5.0)Previous breakout numbers for a user mailbox were set through the user voicemail settings . IP Office 5.0+supports system defaults to be set. These are then applied to all user mailboxes unless the users own settingsdiffer.
117
121
116
93
88
Implementing Voicemail Pro Page 8715-601064 Issue 8b (Tuesday, December 11, 2012)IP Office 8.1
IP Office Configuration: System Settings
· Reception / Breakout (DTMF 0) The number to which a caller is transferred if they press 0 while listening to the mailbox greeting ratherthan leaving a message (*0 on embedded voicemail).
· For systems set to Intuity emulation mode, the mailbox user can also access this option when collectingtheir messages by dialing *0.
· If the mailbox has been reached through a call flow containing a Leave Mail action, the option providedwhen 0 is pressed are:
· For IP Office mode, the call follows the Leave Mail action's Failure or Success results connectionsdepending on whether the caller pressed 0 before or after the record tone.
· For Intuity mode, pressing 0 always follows the Reception / Breakout (DTMF 0) setting.
· Breakout (DTMF 2) The number to which a caller is transferred if they press 2 while listening to the mailbox greeting ratherthan leaving a message (*2 on embedded voicemail). For pre-5.0 systems this option is not support forVoicemail Pro running in IP Office mailbox mode.
· Breakout (DTMF 3) The number to which a caller is transferred if they press 3 while listening to the mailbox greeting ratherthan leaving a message (*3 on embedded voicemail). For pre-5.0 systems this option is not support forVoicemail Pro running in IP Office mailbox mode.
· SIP Settings These options are available when the IP Office configuration contains a SIP line or an H323 SCN line. The valuesare used when the voicemail server makes calls using a SIP trunk or to a SIP device.
· SIP Name: Default = User name. The value from this field is used when the From field of the SIP URI being used for a SIP call is set to UseInternal Data.
· SIP Display Name (Alias): Default = User name. The value from this field is used when the Display Name field of the SIP URI being used for a SIP call is setto Use Internal Data.
· Contact: Default = User name. The value from this field is used when the Contact field of the SIP URI being used for a SIP call is set toUse Internal Data.
· Anonymous: Default = Off. If the From field in the SIP URI is set to Use Internal Data, selecting this option inserts Anonymous intothat field rather than the SIP Name set above.
3.Click OK to save any changes.
4.Send the configuration back to the IP Office.
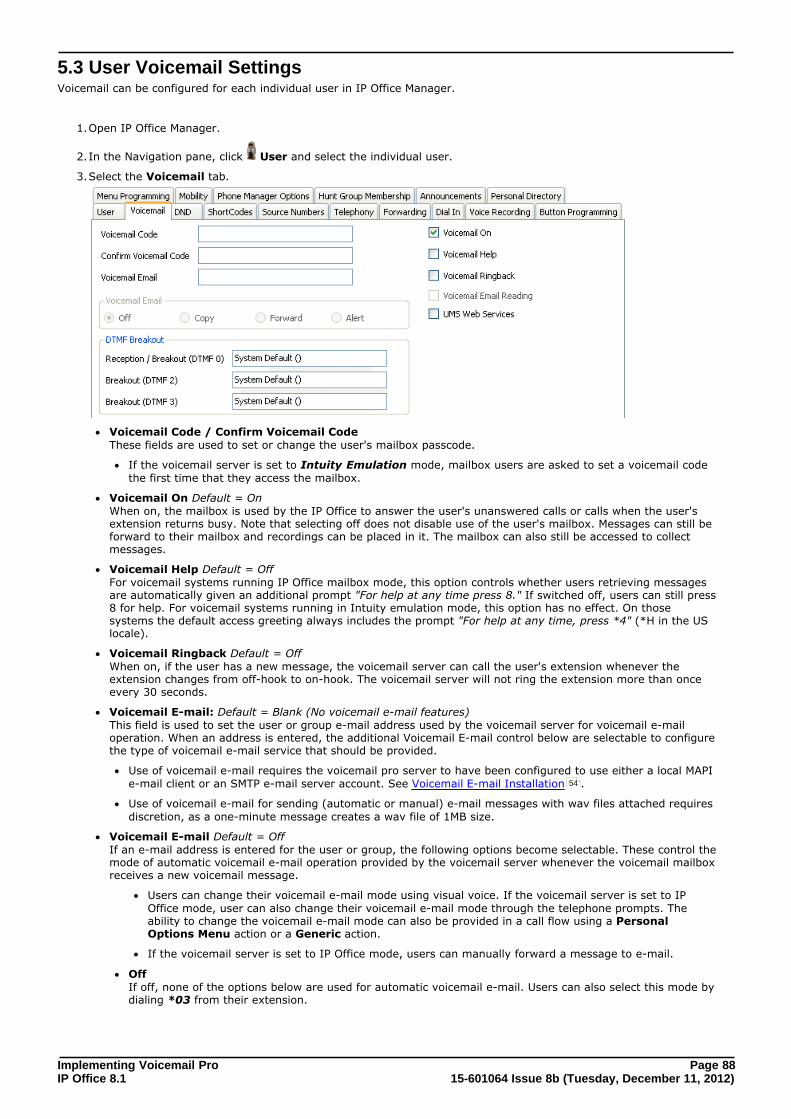
Implementing Voicemail Pro Page 8815-601064 Issue 8b (Tuesday, December 11, 2012)IP Office 8.1
5.3 User Voicemail SettingsVoicemail can be configured for each individual user in IP Office Manager.
1.Open IP Office Manager.
2.In the Navigation pane, click User and select the individual user.
3.Select the Voicemail tab.
· Voicemail Code / Confirm Voicemail Code These fields are used to set or change the user's mailbox passcode.
· If the voicemail server is set to Intuity Emulation mode, mailbox users are asked to set a voicemail codethe first time that they access the mailbox.
· Voicemail On Default = OnWhen on, the mailbox is used by the IP Office to answer the user's unanswered calls or calls when the user'sextension returns busy. Note that selecting off does not disable use of the user's mailbox. Messages can still beforward to their mailbox and recordings can be placed in it. The mailbox can also still be accessed to collectmessages.
· Voicemail Help Default = OffFor voicemail systems running IP Office mailbox mode, this option controls whether users retrieving messagesare automatically given an additional prompt "For help at any time press 8." If switched off, users can still press8 for help. For voicemail systems running in Intuity emulation mode, this option has no effect. On thosesystems the default access greeting always includes the prompt "For help at any time, press *4" (*H in the USlocale).
· Voicemail Ringback Default = OffWhen on, if the user has a new message, the voicemail server can call the user's extension whenever theextension changes from off-hook to on-hook. The voicemail server will not ring the extension more than onceevery 30 seconds.
· Voicemail E-mail: Default = Blank (No voicemail e-mail features) This field is used to set the user or group e-mail address used by the voicemail server for voicemail e-mailoperation. When an address is entered, the additional Voicemail E-mail control below are selectable to configurethe type of voicemail e-mail service that should be provided.
· Use of voicemail e-mail requires the voicemail pro server to have been configured to use either a local MAPIe-mail client or an SMTP e-mail server account. See Voicemail E-mail Installation .
· Use of voicemail e-mail for sending (automatic or manual) e-mail messages with wav files attached requiresdiscretion, as a one-minute message creates a wav file of 1MB size.
· Voicemail E-mail Default = OffIf an e-mail address is entered for the user or group, the following options become selectable. These control themode of automatic voicemail e-mail operation provided by the voicemail server whenever the voicemail mailboxreceives a new voicemail message.
· Users can change their voicemail e-mail mode using visual voice. If the voicemail server is set to IPOffice mode, user can also change their voicemail e-mail mode through the telephone prompts. Theability to change the voicemail e-mail mode can also be provided in a call flow using a PersonalOptions Menu action or a Generic action.
· If the voicemail server is set to IP Office mode, users can manually forward a message to e-mail.
· OffIf off, none of the options below are used for automatic voicemail e-mail. Users can also select this mode bydialing *03 from their extension.
54
Implementing Voicemail Pro Page 8915-601064 Issue 8b (Tuesday, December 11, 2012)IP Office 8.1
IP Office Configuration: User Voicemail Settings
· CopyIf this mode is selected, each time a new voicemail message is received in the voicemail mailbox, a copy ofthe message is attached to an e-mail and sent to the e-mail address. There is no mailbox synchronizationbetween the e-mail and voicemail mailboxes. For example reading and deletion of the e-mail message doesnot affect the message in the voicemail mailbox or the message waiting indication provided for that newmessage.
· ForwardIf this mode is selected, each time a new voicemail message is received in the voicemail mailbox, thatmessage is attached to an e-mail and sent to the e-mail address. No copy of the voicemail message isretained in the voicemail mailbox and their is no message waiting indication. As with Copy, their is nomailbox synchronization between the e-mail and voicemail mailboxes. Users can also select this mode bydialing *01 from their extension.
· UMS ExchangeVoicemail Pro 5.0+ supports voicemail e-mail to an Exchange server e-mail account. For users andgroups also enabled for UMS Web Services this significantly changes their mailbox operation. TheExchange server inbox is used as their voicemail message store and features such as message waitingindication are set by new messages in that location rather than the voicemail mailbox on the voicemailserver. Telephone access to voicemail messages, including Visual Voice access, is redirected to theExchange server mailbox. See UMS Exchange Server Installation and UMS Exchange.
· AlertIf this mode is selected, each time a new voicemail message is received in the voicemail mailbox, a simplee-mail message is sent to the e-mail address. This is an e-mail message announcing details of the voicemailmessage but with no copy of the voicemail message attached. Users can also select this mode by dialing *02 from their extension.
· UMS Web Services If selected, the user is able to use UMS to access their mailbox. Using the UMS options, messages can beaccessed via a web browser, an IMAP compatible e-mail application, or an Exchange server e-mail account. Theuse this function is subject to licenses.
· DTMF BreakoutWhen a caller is directed to voicemail to leave a message, they can be given the option to be transferred to adifferent extension. The greeting message needs to be recorded telling the caller the options available. Theextension numbers that they can be transferred to are entered in the fields below. For IP Office 5.0+, thesesystem default values can be set for these numbers and are used unless a different number is set within theseuser settings.
· Reception / Breakout (DTMF 0) The number to which a caller is transferred if they press 0 while listening to the mailbox greeting ratherthan leaving a message (*0 on embedded voicemail).
· For systems set to Intuity emulation mode, the mailbox user can also access this option when collectingtheir messages by dialing *0.
· If the mailbox has been reached through a call flow containing a Leave Mail action, the option providedwhen 0 is pressed are:
· For IP Office mode, the call follows the Leave Mail action's Failure or Success results connectionsdepending on whether the caller pressed 0 before or after the record tone.
· For Intuity mode, pressing 0 always follows the Reception / Breakout (DTMF 0) setting.
· Breakout (DTMF 2) The number to which a caller is transferred if they press 2 while listening to the mailbox greeting ratherthan leaving a message (*2 on embedded voicemail). For pre-5.0 systems this option is not support forVoicemail Pro running in IP Office mailbox mode.
· Breakout (DTMF 3) The number to which a caller is transferred if they press 3 while listening to the mailbox greeting ratherthan leaving a message (*3 on embedded voicemail). For pre-5.0 systems this option is not support forVoicemail Pro running in IP Office mailbox mode.
4.Click OK to save the voicemail changes for the user.
5.Amend any other user details, then save and merge the configuration changes.
42
32
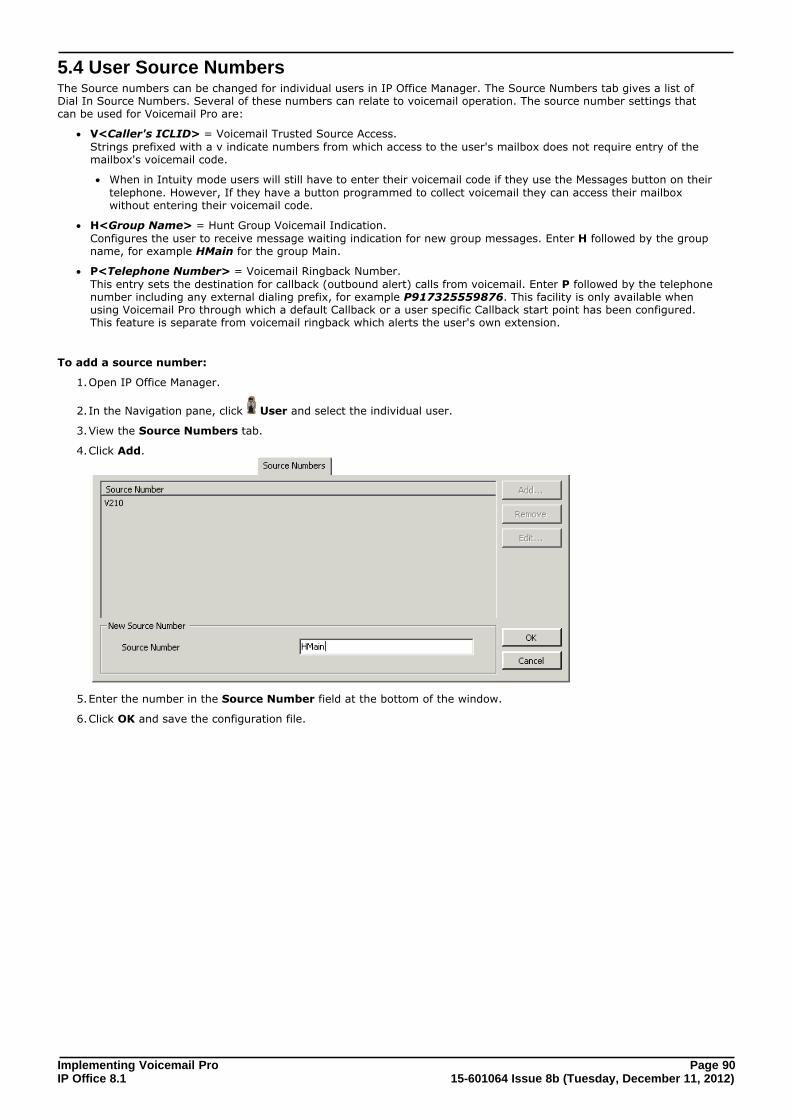
Implementing Voicemail Pro Page 9015-601064 Issue 8b (Tuesday, December 11, 2012)IP Office 8.1
5.4 User Source NumbersThe Source numbers can be changed for individual users in IP Office Manager. The Source Numbers tab gives a list ofDial In Source Numbers. Several of these numbers can relate to voicemail operation. The source number settings thatcan be used for Voicemail Pro are:
· V<Caller's ICLID> = Voicemail Trusted Source Access. Strings prefixed with a v indicate numbers from which access to the user's mailbox does not require entry of themailbox's voicemail code.
· When in Intuity mode users will still have to enter their voicemail code if they use the Messages button on theirtelephone. However, If they have a button programmed to collect voicemail they can access their mailboxwithout entering their voicemail code.
· H<Group Name> = Hunt Group Voicemail Indication. Configures the user to receive message waiting indication for new group messages. Enter H followed by the groupname, for example HMain for the group Main.
· P<Telephone Number> = Voicemail Ringback Number. This entry sets the destination for callback (outbound alert) calls from voicemail. Enter P followed by the telephonenumber including any external dialing prefix, for example P917325559876. This facility is only available whenusing Voicemail Pro through which a default Callback or a user specific Callback start point has been configured.This feature is separate from voicemail ringback which alerts the user's own extension.
To add a source number:
1.Open IP Office Manager.
2.In the Navigation pane, click User and select the individual user.
3.View the Source Numbers tab.
4.Click Add.
5.Enter the number in the Source Number field at the bottom of the window.
6.Click OK and save the configuration file.
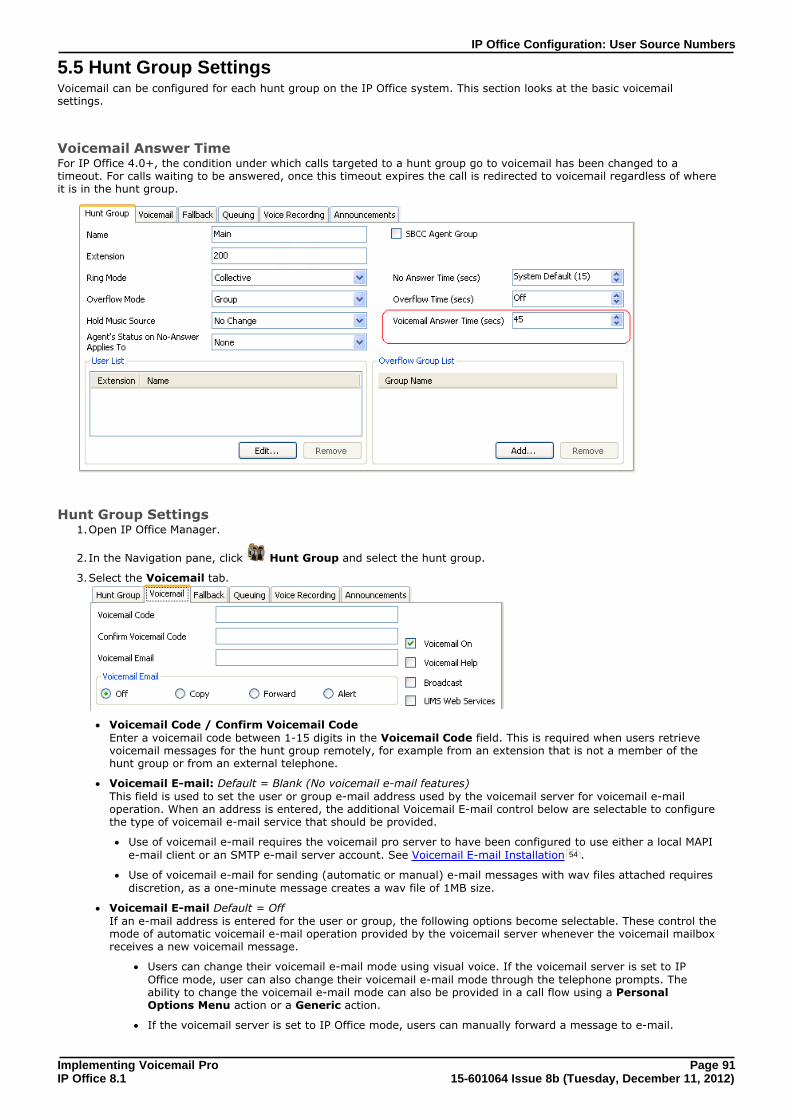
Implementing Voicemail Pro Page 9115-601064 Issue 8b (Tuesday, December 11, 2012)IP Office 8.1
IP Office Configuration: User Source Numbers
5.5 Hunt Group SettingsVoicemail can be configured for each hunt group on the IP Office system. This section looks at the basic voicemailsettings.
Voicemail Answer TimeFor IP Office 4.0+, the condition under which calls targeted to a hunt group go to voicemail has been changed to atimeout. For calls waiting to be answered, once this timeout expires the call is redirected to voicemail regardless of whereit is in the hunt group.
Hunt Group Settings1.Open IP Office Manager.
2.In the Navigation pane, click Hunt Group and select the hunt group.
3.Select the Voicemail tab.
· Voicemail Code / Confirm Voicemail Code Enter a voicemail code between 1-15 digits in the Voicemail Code field. This is required when users retrievevoicemail messages for the hunt group remotely, for example from an extension that is not a member of thehunt group or from an external telephone.
· Voicemail E-mail: Default = Blank (No voicemail e-mail features) This field is used to set the user or group e-mail address used by the voicemail server for voicemail e-mailoperation. When an address is entered, the additional Voicemail E-mail control below are selectable to configurethe type of voicemail e-mail service that should be provided.
· Use of voicemail e-mail requires the voicemail pro server to have been configured to use either a local MAPIe-mail client or an SMTP e-mail server account. See Voicemail E-mail Installation .
· Use of voicemail e-mail for sending (automatic or manual) e-mail messages with wav files attached requiresdiscretion, as a one-minute message creates a wav file of 1MB size.
· Voicemail E-mail Default = OffIf an e-mail address is entered for the user or group, the following options become selectable. These control themode of automatic voicemail e-mail operation provided by the voicemail server whenever the voicemail mailboxreceives a new voicemail message.
· Users can change their voicemail e-mail mode using visual voice. If the voicemail server is set to IPOffice mode, user can also change their voicemail e-mail mode through the telephone prompts. Theability to change the voicemail e-mail mode can also be provided in a call flow using a PersonalOptions Menu action or a Generic action.
· If the voicemail server is set to IP Office mode, users can manually forward a message to e-mail.
54
Implementing Voicemail Pro Page 9215-601064 Issue 8b (Tuesday, December 11, 2012)IP Office 8.1
· OffIf off, none of the options below are used for automatic voicemail e-mail. Users can also select this mode bydialing *03 from their extension.
· CopyIf this mode is selected, each time a new voicemail message is received in the voicemail mailbox, a copy ofthe message is attached to an e-mail and sent to the e-mail address. There is no mailbox synchronizationbetween the e-mail and voicemail mailboxes. For example reading and deletion of the e-mail message doesnot affect the message in the voicemail mailbox or the message waiting indication provided for that newmessage.
· ForwardIf this mode is selected, each time a new voicemail message is received in the voicemail mailbox, thatmessage is attached to an e-mail and sent to the e-mail address. No copy of the voicemail message isretained in the voicemail mailbox and their is no message waiting indication. As with Copy, their is nomailbox synchronization between the e-mail and voicemail mailboxes. Users can also select this mode bydialing *01 from their extension.
· UMS ExchangeVoicemail Pro 5.0+ supports voicemail e-mail to an Exchange server e-mail account. For users andgroups also enabled for UMS Web Services this significantly changes their mailbox operation. TheExchange server inbox is used as their voicemail message store and features such as message waitingindication are set by new messages in that location rather than the voicemail mailbox on the voicemailserver. Telephone access to voicemail messages, including Visual Voice access, is redirected to theExchange server mailbox. See UMS Exchange Server Installation and UMS Exchange.
· AlertIf this mode is selected, each time a new voicemail message is received in the voicemail mailbox, a simplee-mail message is sent to the e-mail address. This is an e-mail message announcing details of the voicemailmessage but with no copy of the voicemail message attached. Users can also select this mode by dialing *02 from their extension.
· Voicemail On Default = OnWhen on, the mailbox is used by the IP Office to answer the user's unanswered calls or calls when the user'sextension returns busy. Note that selecting off does not disable use of the user's mailbox. Messages can still beforward to their mailbox and recordings can be placed in it. The mailbox can also still be accessed to collectmessages.
· Voicemail Help Default = OffFor voicemail systems running IP Office mailbox mode, this option controls whether users retrieving messagesare automatically given an additional prompt "For help at any time press 8." If switched off, users can still press8 for help. For voicemail systems running in Intuity emulation mode, this option has no effect. On thosesystems the default access greeting always includes the prompt "For help at any time, press *4" (*H in the USlocale).
· Broadcast Select the option Broadcast if you want any voicemail messages left for the hunt group to be forwarded to themailboxes of the individual group members. The original message in the hunt group mailbox is deleted afterbeing broadcast.
· UMS Web Service (IP Office 5.0+)If selected, the hunt group mailbox can be accessing using UMS via a web browser or an IMAP compatible e-mail application.
4.Click OK and save the configuration.
42
32
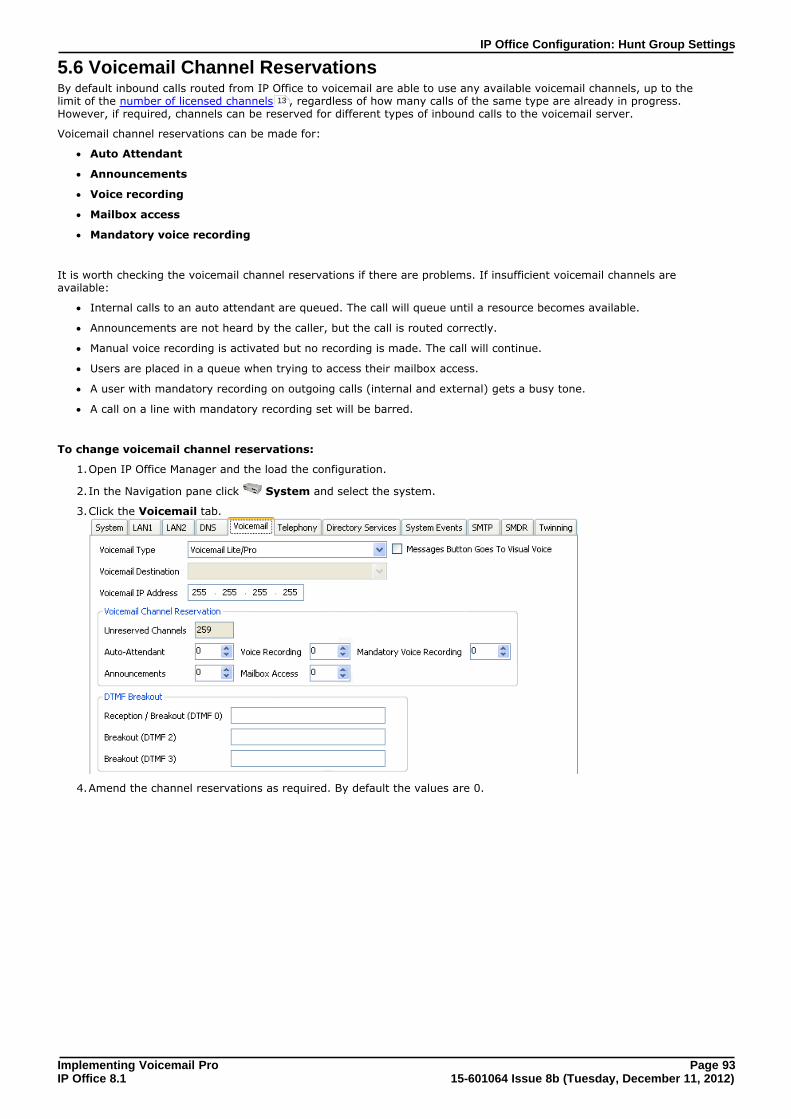
Implementing Voicemail Pro Page 9315-601064 Issue 8b (Tuesday, December 11, 2012)IP Office 8.1
IP Office Configuration: Hunt Group Settings
5.6 Voicemail Channel ReservationsBy default inbound calls routed from IP Office to voicemail are able to use any available voicemail channels, up to thelimit of the number of licensed channels , regardless of how many calls of the same type are already in progress.However, if required, channels can be reserved for different types of inbound calls to the voicemail server.
Voicemail channel reservations can be made for:
· Auto Attendant
· Announcements
· Voice recording
· Mailbox access
· Mandatory voice recording
It is worth checking the voicemail channel reservations if there are problems. If insufficient voicemail channels areavailable:
· Internal calls to an auto attendant are queued. The call will queue until a resource becomes available.
· Announcements are not heard by the caller, but the call is routed correctly.
· Manual voice recording is activated but no recording is made. The call will continue.
· Users are placed in a queue when trying to access their mailbox access.
· A user with mandatory recording on outgoing calls (internal and external) gets a busy tone.
· A call on a line with mandatory recording set will be barred.
To change voicemail channel reservations:
1.Open IP Office Manager and the load the configuration.
2.In the Navigation pane click System and select the system.
3.Click the Voicemail tab.
4.Amend the channel reservations as required. By default the values are 0.
13
Implementing Voicemail Pro Page 9415-601064 Issue 8b (Tuesday, December 11, 2012)IP Office 8.1
To view the utilization of voicemail channels:
1.Open the System Status Application.
2.Click Resources. The System Resources summary is displayed. The following details are displayed:
· The number of voicemail channels available.
· The number of channels in use.
· Congestion information
Channel Restrictions
· The Voicemail Pro server has restrictions on the number of channels it can use for different types of outgoing callsthat it can make. These limits are separate for each of the call types. When a limit is reached, further calls of thattype are delayed until one of the existing calls is completed. These limitations are not controlled by VoicemailChannel Reservation settings.
· Outcalling can use up to 5 channels at any time.
· Conference center invitation calls can use up to 5 channels at any time.
· Callback calls can use up to 2 channels at any time.
· Alarm calls can use up to 2 channels at any time.
93
Implementing Voicemail Pro Page 9515-601064 Issue 8b (Tuesday, December 11, 2012)IP Office 8.1
System Preferences
Chapter 6.
Implementing Voicemail Pro Page 9615-601064 Issue 8b (Tuesday, December 11, 2012)IP Office 8.1
6. System PreferencesA range of voicemail server settings can be set through the Voicemail Pro client.
To change the Voicemail Pro Preferences
1.Click the Preferences icon and then choose General or VPNM. Alternatively, from the Administration menu,select Preferences and then choose General or VPNM.
2.Select the System Preferences tab required.
· General General voicemail server settings.
· Directories Set the folder paths for different file locations.
· Email Select the e-mail mode (MAPI or SMTP) used by the voicemail server for its e-mail functions and configurevarious settings for the selected mode.
· Housekeeping Set the times for automatic deletion of different types of messages. Also, set the default playback order.
· SNMP Alarm Set the criteria which will cause the voicemail server to send alarms via the IP Office.
· Outcalling Set the default times for outcalling operation and the frequency of outcalling retires.
· Voicemail RecordingSet the configurations for the SFTP connection to the VRL directory.
· Backup & RestoreSet the configurations for an immediate backup or the configurations and schedules for the daily, weekly,and monthly backups.
· VPNM If VPNM is installed and licensed, this tab is available to set the locations of the remote VPNM servers andthe mailbox users on those servers.
97
99
100
105
106
107
107
109
110
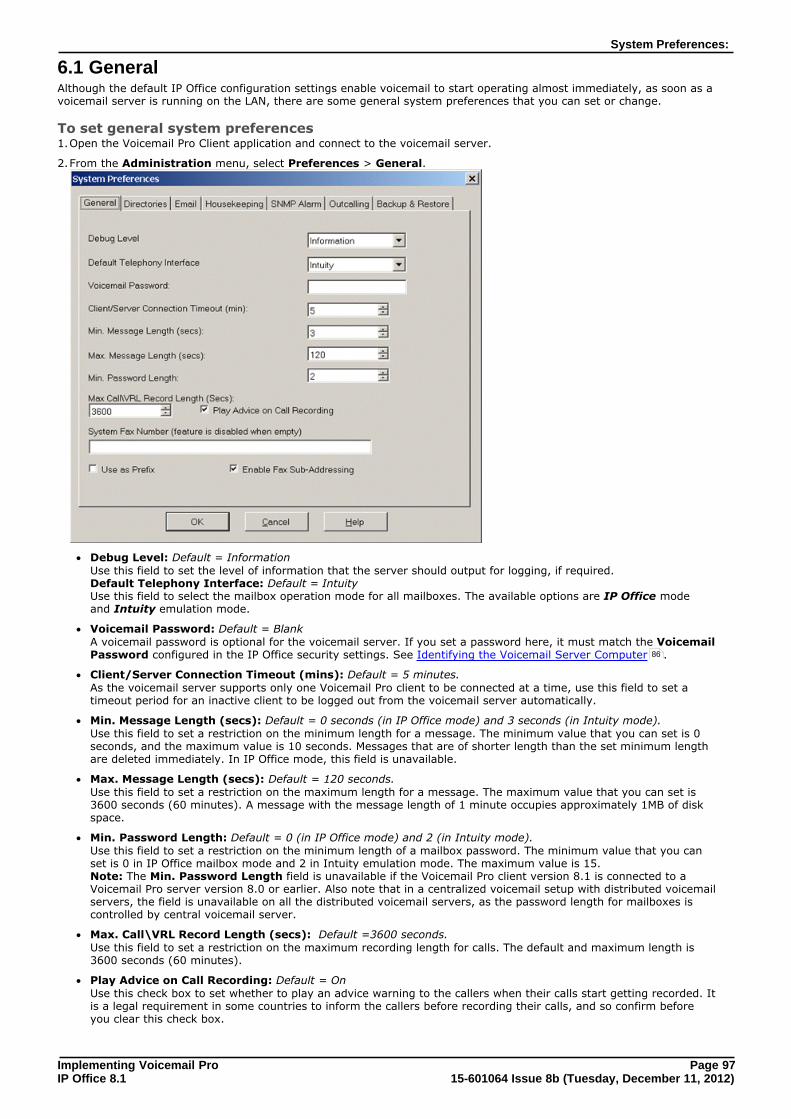
Implementing Voicemail Pro Page 9715-601064 Issue 8b (Tuesday, December 11, 2012)IP Office 8.1
System Preferences:
6.1 GeneralAlthough the default IP Office configuration settings enable voicemail to start operating almost immediately, as soon as avoicemail server is running on the LAN, there are some general system preferences that you can set or change.
To set general system preferences1.Open the Voicemail Pro Client application and connect to the voicemail server.
2.From the Administration menu, select Preferences > General.
· Debug Level: Default = InformationUse this field to set the level of information that the server should output for logging, if required. Default Telephony Interface: Default = Intuity Use this field to select the mailbox operation mode for all mailboxes. The available options are IP Office modeand Intuity emulation mode.
· Voicemail Password: Default = Blank A voicemail password is optional for the voicemail server. If you set a password here, it must match the VoicemailPassword configured in the IP Office security settings. See Identifying the Voicemail Server Computer .
· Client/Server Connection Timeout (mins): Default = 5 minutes.As the voicemail server supports only one Voicemail Pro client to be connected at a time, use this field to set atimeout period for an inactive client to be logged out from the voicemail server automatically.
· Min. Message Length (secs): Default = 0 seconds (in IP Office mode) and 3 seconds (in Intuity mode). Use this field to set a restriction on the minimum length for a message. The minimum value that you can set is 0seconds, and the maximum value is 10 seconds. Messages that are of shorter length than the set minimum lengthare deleted immediately. In IP Office mode, this field is unavailable.
· Max. Message Length (secs): Default = 120 seconds. Use this field to set a restriction on the maximum length for a message. The maximum value that you can set is3600 seconds (60 minutes). A message with the message length of 1 minute occupies approximately 1MB of diskspace.
· Min. Password Length: Default = 0 (in IP Office mode) and 2 (in Intuity mode).Use this field to set a restriction on the minimum length of a mailbox password. The minimum value that you canset is 0 in IP Office mailbox mode and 2 in Intuity emulation mode. The maximum value is 15.Note: The Min. Password Length field is unavailable if the Voicemail Pro client version 8.1 is connected to aVoicemail Pro server version 8.0 or earlier. Also note that in a centralized voicemail setup with distributed voicemailservers, the field is unavailable on all the distributed voicemail servers, as the password length for mailboxes iscontrolled by central voicemail server.
· Max. Call\VRL Record Length (secs): Default =3600 seconds. Use this field to set a restriction on the maximum recording length for calls. The default and maximum length is3600 seconds (60 minutes).
· Play Advice on Call Recording: Default = On Use this check box to set whether to play an advice warning to the callers when their calls start getting recorded. Itis a legal requirement in some countries to inform the callers before recording their calls, and so confirm beforeyou clear this check box.
86

Implementing Voicemail Pro Page 9815-601064 Issue 8b (Tuesday, December 11, 2012)IP Office 8.1
· System Fax Number: Default = Blank Use this field to set the number of the fax machine to which all incoming faxes are to be directed. If you are usinga fax board, the number that you enter must match the extension number that is connected to the fax board of thefax server computer.
· Intuity mailbox owners have the additional option to define their own personal fax number instead of thesystem fax number. As the system administrator, you still need to set a system fax number to enable mailboxowners to override it with their preferred personal fax number. Incoming calls are directed to Voicemail Pro andthen Voicemail Pro redirects fax calls to the mailbox owner's personal fax number, if one has been set. Fordetails, mailbox owners can refer Avaya IP Office Using Voicemail Pro in Intuity Mode (15-601130).
· If your fax system requires prefix addressing, for example the C3000 fax server, do not type a fax number inthe System Fax Number box. Instead, type the number to use as a prefix so that a fax message can beidentified and forwarded to the extension number of the intended recipient. For example, if the prefix is 55, afax message for extension 201 would have the prefix of 55 automatically added so that the complete numberbecomes 55201.
· System Fax Number By default, fax detection is not enabled when Voicemail Pro is first installed. When fax detection is enabled, any faxcalls that are left in a voicemail mailbox, are redirected to this system fax number.
· Use as a Prefix If your fax system does not use prefix addressing, leave this box unchecked. For this feature to work, you alsoneed to set up a short code.
· Enable Fax Sub-Addressing Most fax servers perform fax forwarding based on DTMF signaling received with the fax call. Check the EnableFax Sub-Addressing box so that the DTMF signal is passed to the fax server after the call has been answeredso that the fax can be forwarded to the e-mail address of the intended recipient.
3.Click OK.
4.Click Save and Make Live and select Yes.
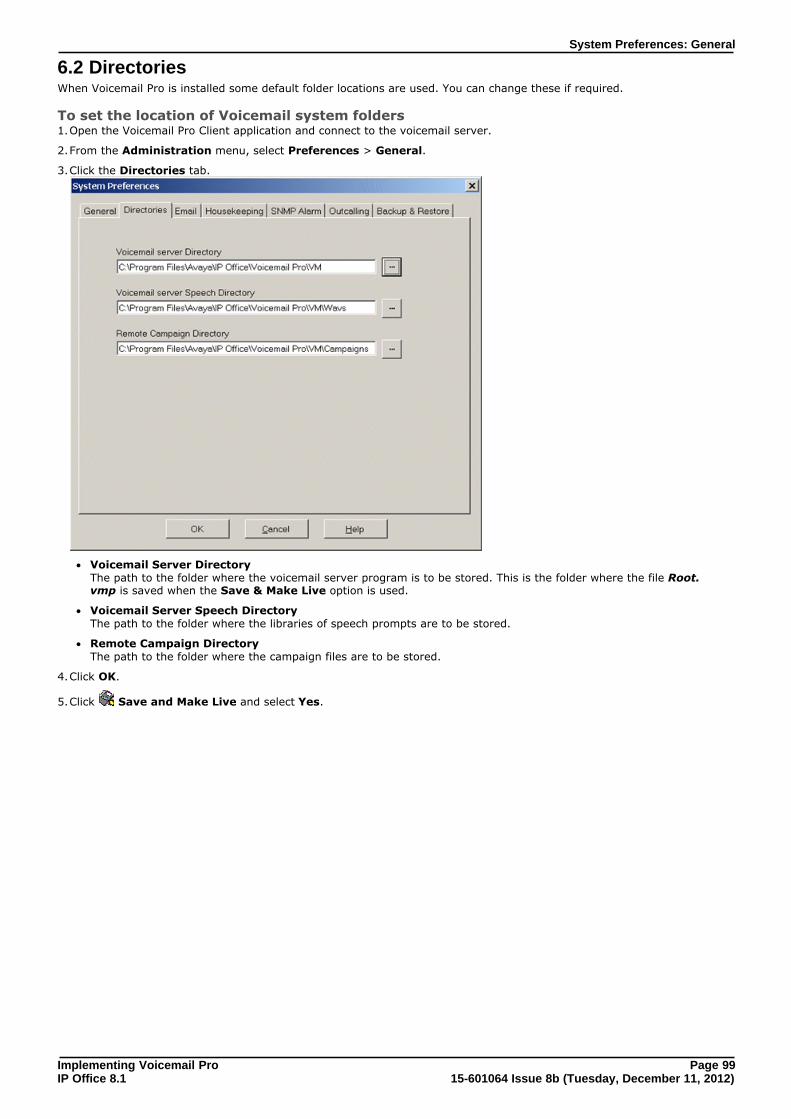
Implementing Voicemail Pro Page 9915-601064 Issue 8b (Tuesday, December 11, 2012)IP Office 8.1
System Preferences: General
6.2 DirectoriesWhen Voicemail Pro is installed some default folder locations are used. You can change these if required.
To set the location of Voicemail system folders1.Open the Voicemail Pro Client application and connect to the voicemail server.
2.From the Administration menu, select Preferences > General.
3.Click the Directories tab.
· Voicemail Server Directory The path to the folder where the voicemail server program is to be stored. This is the folder where the file Root.vmp is saved when the Save & Make Live option is used.
· Voicemail Server Speech Directory The path to the folder where the libraries of speech prompts are to be stored.
· Remote Campaign Directory The path to the folder where the campaign files are to be stored.
4.Click OK.
5.Click Save and Make Live and select Yes.
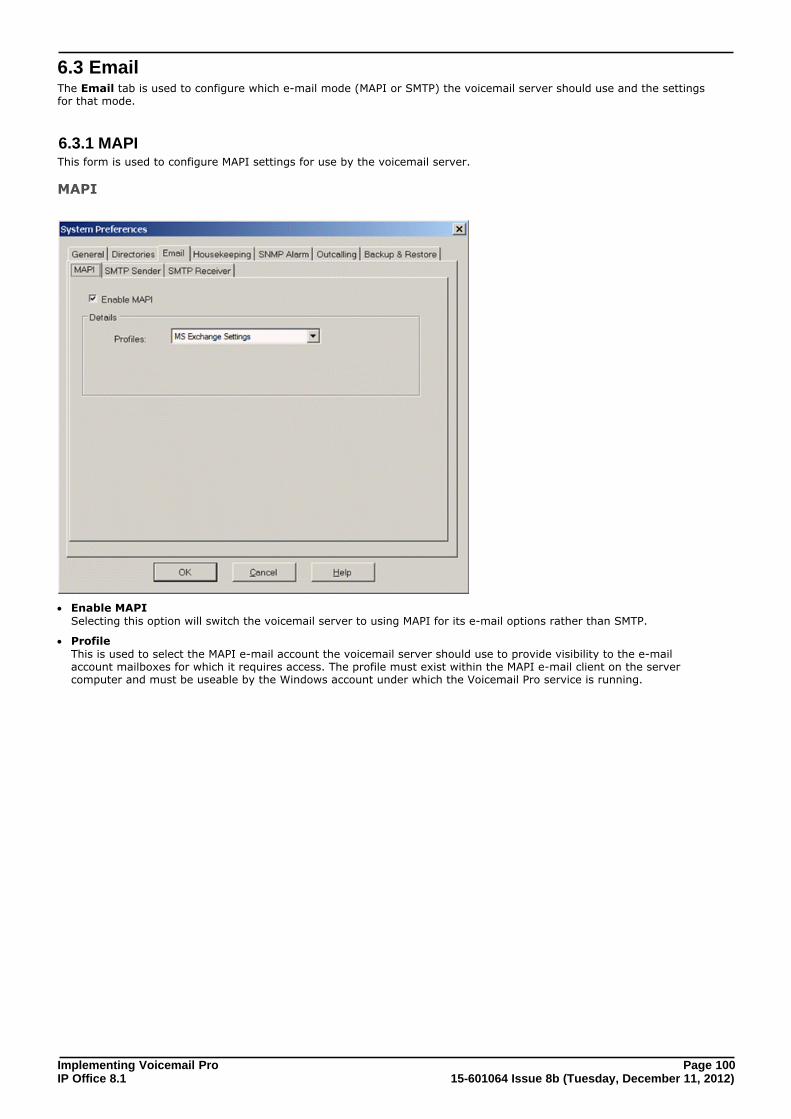
Implementing Voicemail Pro Page 10015-601064 Issue 8b (Tuesday, December 11, 2012)IP Office 8.1
6.3 EmailThe Email tab is used to configure which e-mail mode (MAPI or SMTP) the voicemail server should use and the settingsfor that mode.
6.3.1 MAPIThis form is used to configure MAPI settings for use by the voicemail server.
MAPI
· Enable MAPI Selecting this option will switch the voicemail server to using MAPI for its e-mail options rather than SMTP.
· Profile This is used to select the MAPI e-mail account the voicemail server should use to provide visibility to the e-mailaccount mailboxes for which it requires access. The profile must exist within the MAPI e-mail client on the servercomputer and must be useable by the Windows account under which the Voicemail Pro service is running.
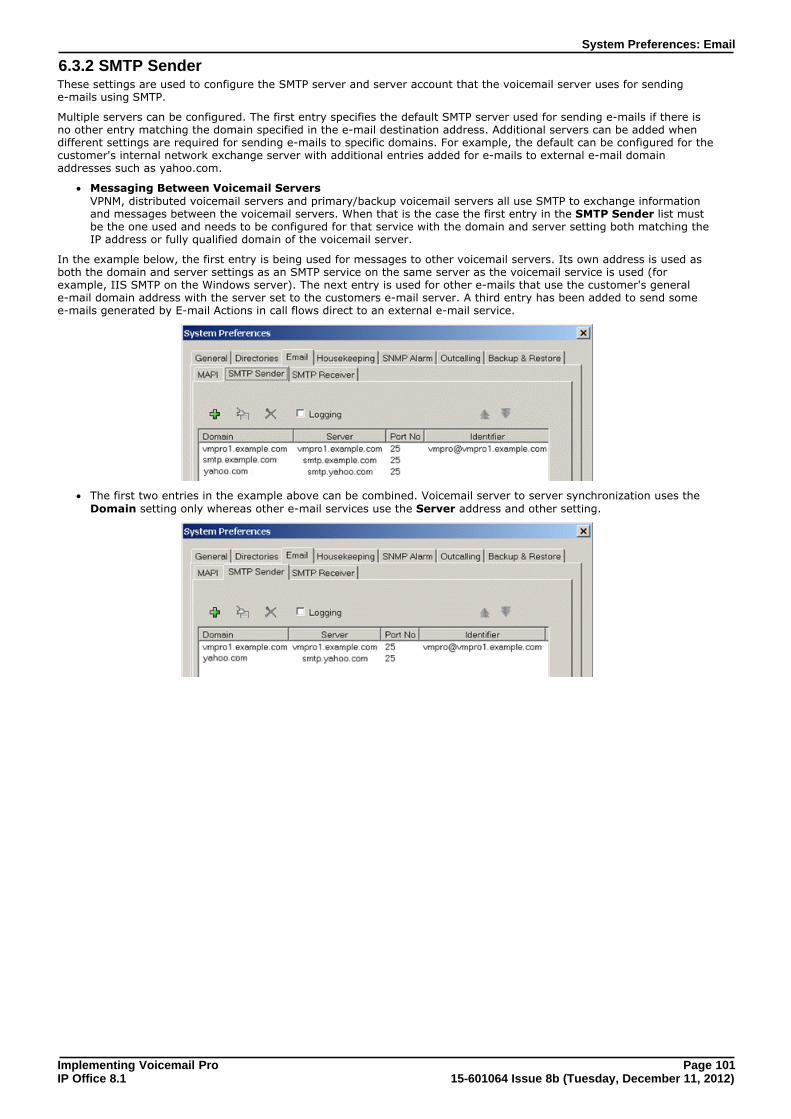
Implementing Voicemail Pro Page 10115-601064 Issue 8b (Tuesday, December 11, 2012)IP Office 8.1
System Preferences: Email
6.3.2 SMTP SenderThese settings are used to configure the SMTP server and server account that the voicemail server uses for sendinge-mails using SMTP.
Multiple servers can be configured. The first entry specifies the default SMTP server used for sending e-mails if there isno other entry matching the domain specified in the e-mail destination address. Additional servers can be added whendifferent settings are required for sending e-mails to specific domains. For example, the default can be configured for thecustomer's internal network exchange server with additional entries added for e-mails to external e-mail domainaddresses such as yahoo.com.
· Messaging Between Voicemail Servers VPNM, distributed voicemail servers and primary/backup voicemail servers all use SMTP to exchange informationand messages between the voicemail servers. When that is the case the first entry in the SMTP Sender list mustbe the one used and needs to be configured for that service with the domain and server setting both matching theIP address or fully qualified domain of the voicemail server.
In the example below, the first entry is being used for messages to other voicemail servers. Its own address is used asboth the domain and server settings as an SMTP service on the same server as the voicemail service is used (forexample, IIS SMTP on the Windows server). The next entry is used for other e-mails that use the customer's generale-mail domain address with the server set to the customers e-mail server. A third entry has been added to send somee-mails generated by E-mail Actions in call flows direct to an external e-mail service.
· The first two entries in the example above can be combined. Voicemail server to server synchronization uses the Domain setting only whereas other e-mail services use the Server address and other setting.
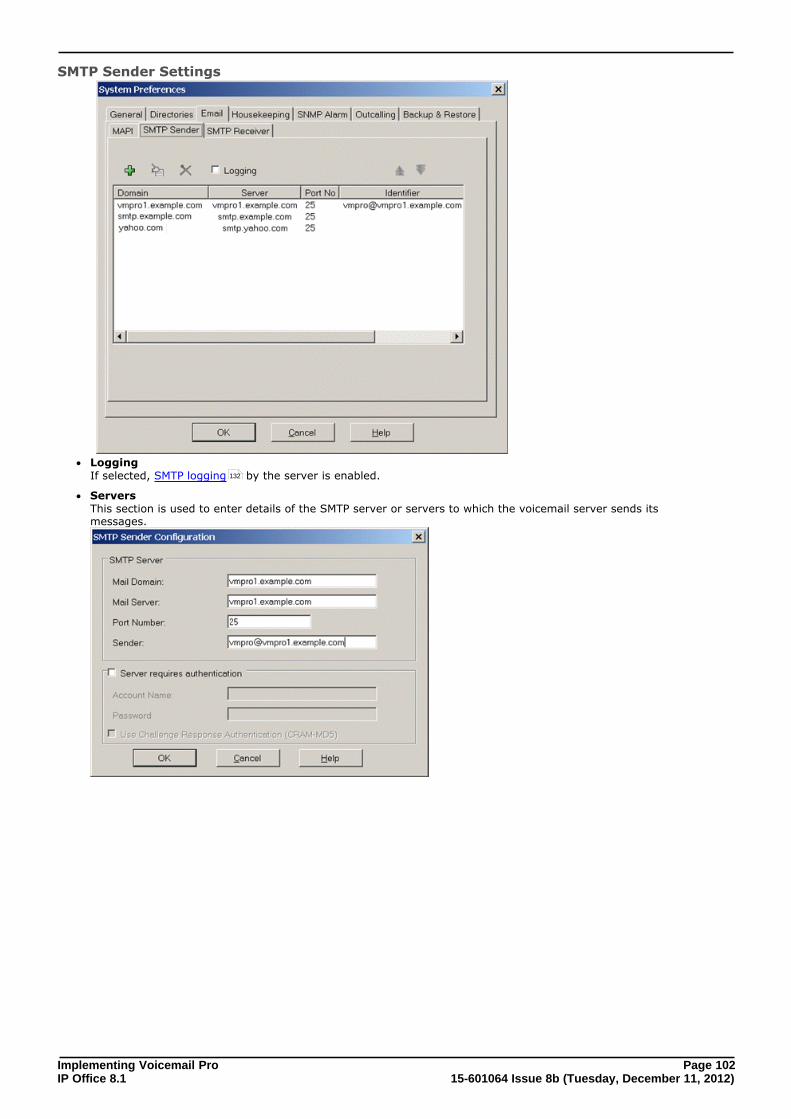
Implementing Voicemail Pro Page 10215-601064 Issue 8b (Tuesday, December 11, 2012)IP Office 8.1
SMTP Sender Settings
· Logging If selected, SMTP logging by the server is enabled.
· Servers This section is used to enter details of the SMTP server or servers to which the voicemail server sends itsmessages.
132
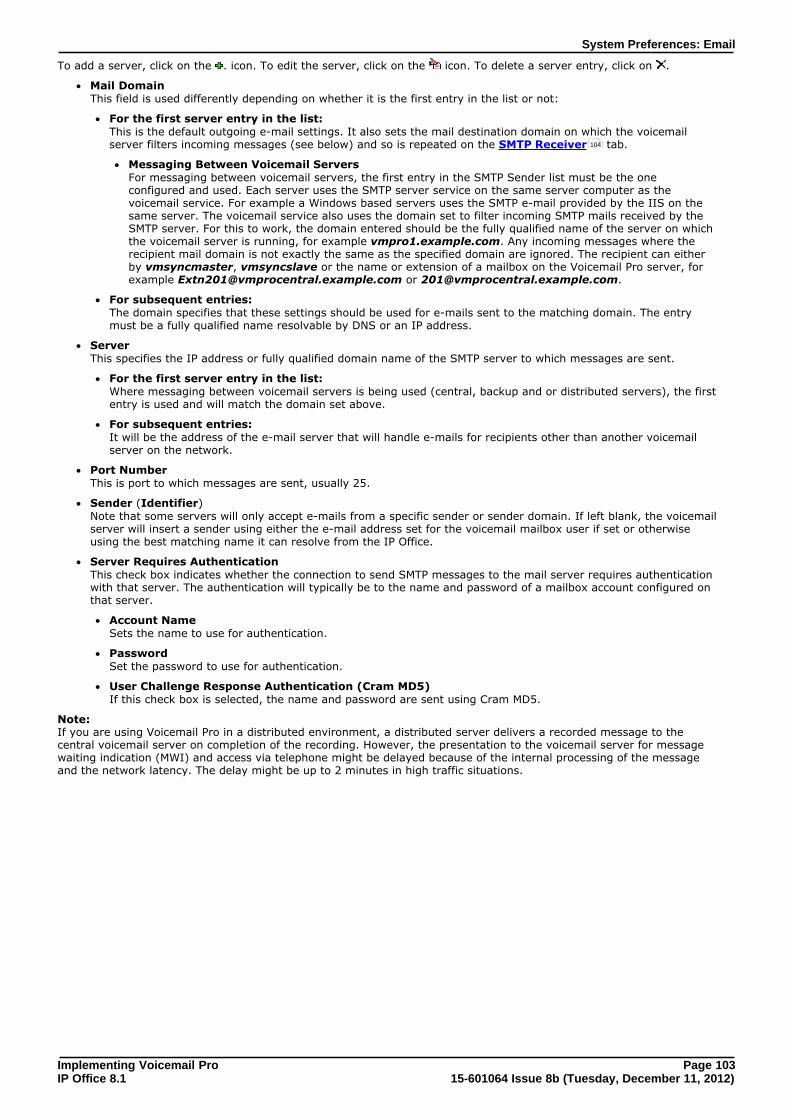
Implementing Voicemail Pro Page 10315-601064 Issue 8b (Tuesday, December 11, 2012)IP Office 8.1
System Preferences: Email
To add a server, click on the . icon. To edit the server, click on the icon. To delete a server entry, click on .
· Mail Domain This field is used differently depending on whether it is the first entry in the list or not:
· For the first server entry in the list: This is the default outgoing e-mail settings. It also sets the mail destination domain on which the voicemailserver filters incoming messages (see below) and so is repeated on the SMTP Receiver tab.
· Messaging Between Voicemail Servers For messaging between voicemail servers, the first entry in the SMTP Sender list must be the oneconfigured and used. Each server uses the SMTP server service on the same server computer as thevoicemail service. For example a Windows based servers uses the SMTP e-mail provided by the IIS on thesame server. The voicemail service also uses the domain set to filter incoming SMTP mails received by theSMTP server. For this to work, the domain entered should be the fully qualified name of the server on whichthe voicemail server is running, for example vmpro1.example.com. Any incoming messages where therecipient mail domain is not exactly the same as the specified domain are ignored. The recipient can eitherby vmsyncmaster, vmsyncslave or the name or extension of a mailbox on the Voicemail Pro server, forexample [email protected] or [email protected].
· For subsequent entries: The domain specifies that these settings should be used for e-mails sent to the matching domain. The entrymust be a fully qualified name resolvable by DNS or an IP address.
· Server This specifies the IP address or fully qualified domain name of the SMTP server to which messages are sent.
· For the first server entry in the list: Where messaging between voicemail servers is being used (central, backup and or distributed servers), the firstentry is used and will match the domain set above.
· For subsequent entries: It will be the address of the e-mail server that will handle e-mails for recipients other than another voicemailserver on the network.
· Port Number This is port to which messages are sent, usually 25.
· Sender (Identifier)Note that some servers will only accept e-mails from a specific sender or sender domain. If left blank, the voicemailserver will insert a sender using either the e-mail address set for the voicemail mailbox user if set or otherwiseusing the best matching name it can resolve from the IP Office.
· Server Requires Authentication This check box indicates whether the connection to send SMTP messages to the mail server requires authenticationwith that server. The authentication will typically be to the name and password of a mailbox account configured onthat server.
· Account Name Sets the name to use for authentication.
· Password Set the password to use for authentication.
· User Challenge Response Authentication (Cram MD5) If this check box is selected, the name and password are sent using Cram MD5.
Note:If you are using Voicemail Pro in a distributed environment, a distributed server delivers a recorded message to thecentral voicemail server on completion of the recording. However, the presentation to the voicemail server for messagewaiting indication (MWI) and access via telephone might be delayed because of the internal processing of the messageand the network latency. The delay might be up to 2 minutes in high traffic situations.
104
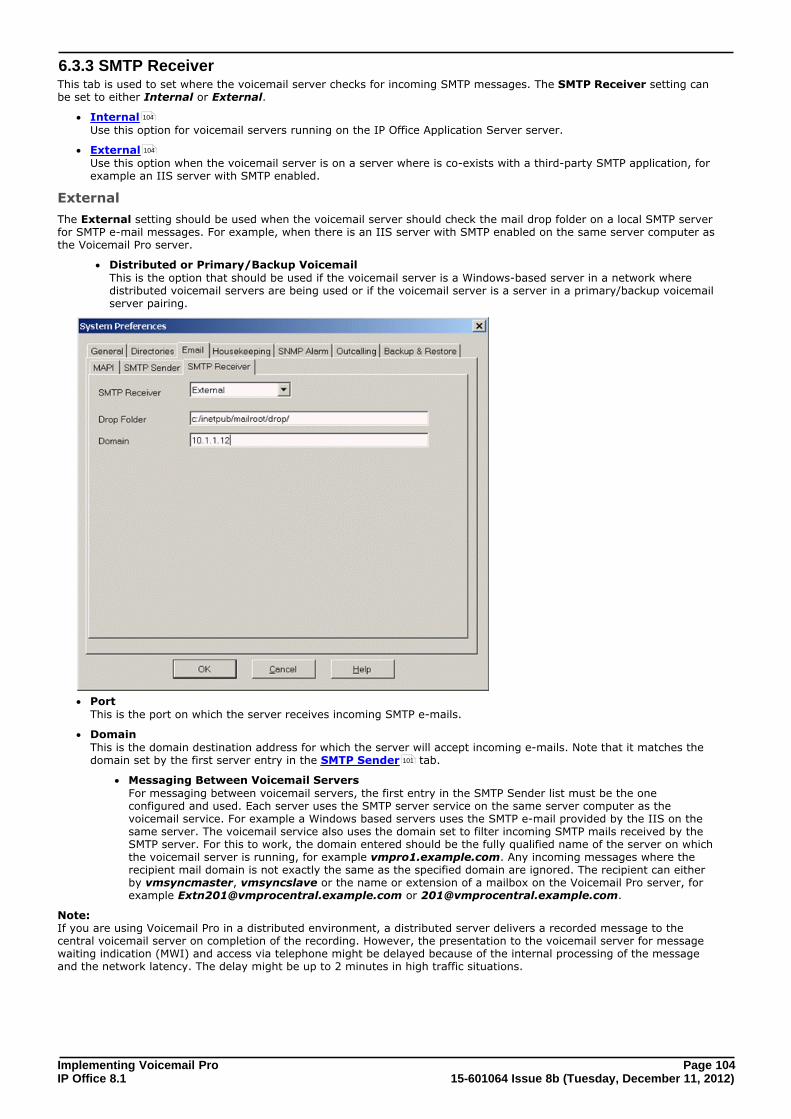
Implementing Voicemail Pro Page 10415-601064 Issue 8b (Tuesday, December 11, 2012)IP Office 8.1
6.3.3 SMTP ReceiverThis tab is used to set where the voicemail server checks for incoming SMTP messages. The SMTP Receiver setting canbe set to either Internal or External.
· Internal Use this option for voicemail servers running on the IP Office Application Server server.
· External Use this option when the voicemail server is on a server where is co-exists with a third-party SMTP application, forexample an IIS server with SMTP enabled.
External
The External setting should be used when the voicemail server should check the mail drop folder on a local SMTP serverfor SMTP e-mail messages. For example, when there is an IIS server with SMTP enabled on the same server computer asthe Voicemail Pro server.
· Distributed or Primary/Backup VoicemailThis is the option that should be used if the voicemail server is a Windows-based server in a network wheredistributed voicemail servers are being used or if the voicemail server is a server in a primary/backup voicemailserver pairing.
· Port This is the port on which the server receives incoming SMTP e-mails.
· Domain This is the domain destination address for which the server will accept incoming e-mails. Note that it matches thedomain set by the first server entry in the SMTP Sender tab.
· Messaging Between Voicemail Servers For messaging between voicemail servers, the first entry in the SMTP Sender list must be the oneconfigured and used. Each server uses the SMTP server service on the same server computer as thevoicemail service. For example a Windows based servers uses the SMTP e-mail provided by the IIS on thesame server. The voicemail service also uses the domain set to filter incoming SMTP mails received by theSMTP server. For this to work, the domain entered should be the fully qualified name of the server on whichthe voicemail server is running, for example vmpro1.example.com. Any incoming messages where therecipient mail domain is not exactly the same as the specified domain are ignored. The recipient can eitherby vmsyncmaster, vmsyncslave or the name or extension of a mailbox on the Voicemail Pro server, forexample [email protected] or [email protected].
Note:If you are using Voicemail Pro in a distributed environment, a distributed server delivers a recorded message to thecentral voicemail server on completion of the recording. However, the presentation to the voicemail server for messagewaiting indication (MWI) and access via telephone might be delayed because of the internal processing of the messageand the network latency. The delay might be up to 2 minutes in high traffic situations.
104
104
101
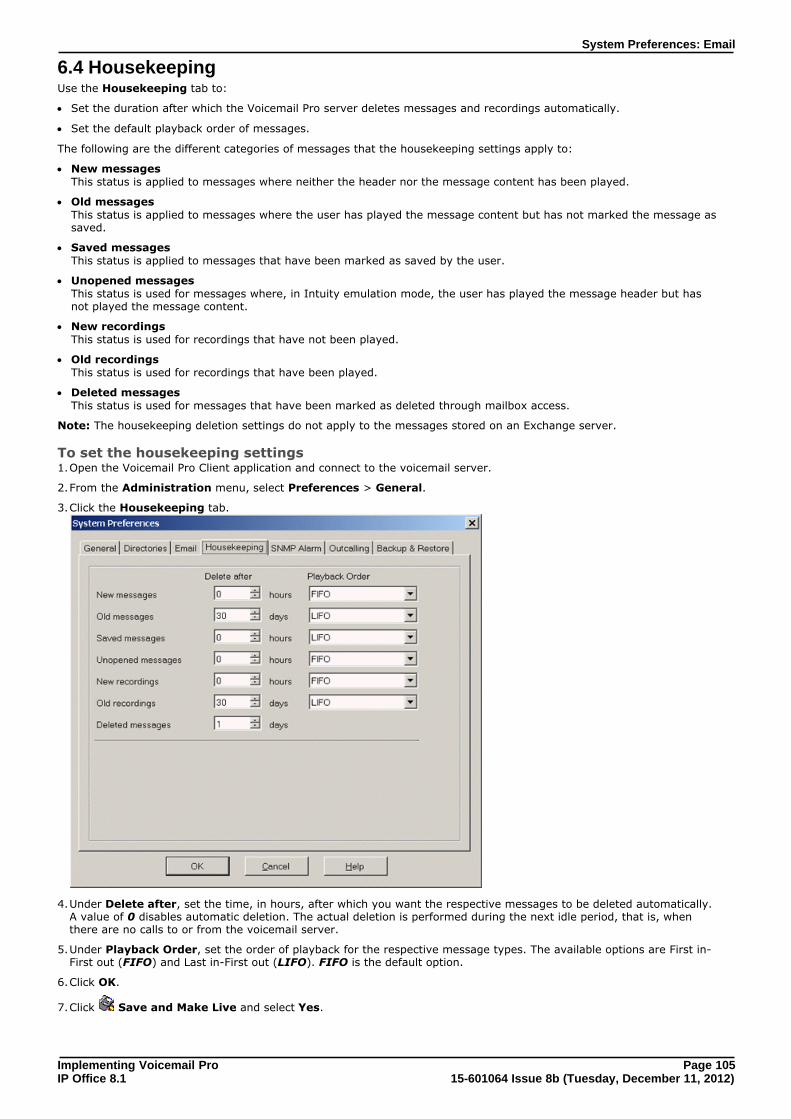
Implementing Voicemail Pro Page 10515-601064 Issue 8b (Tuesday, December 11, 2012)IP Office 8.1
System Preferences: Email
6.4 HousekeepingUse the Housekeeping tab to:
· Set the duration after which the Voicemail Pro server deletes messages and recordings automatically.
· Set the default playback order of messages.
The following are the different categories of messages that the housekeeping settings apply to:
· New messagesThis status is applied to messages where neither the header nor the message content has been played.
· Old messagesThis status is applied to messages where the user has played the message content but has not marked the message assaved.
· Saved messagesThis status is applied to messages that have been marked as saved by the user.
· Unopened messagesThis status is used for messages where, in Intuity emulation mode, the user has played the message header but hasnot played the message content.
· New recordingsThis status is used for recordings that have not been played.
· Old recordingsThis status is used for recordings that have been played.
· Deleted messagesThis status is used for messages that have been marked as deleted through mailbox access.
Note: The housekeeping deletion settings do not apply to the messages stored on an Exchange server.
To set the housekeeping settings1.Open the Voicemail Pro Client application and connect to the voicemail server.
2.From the Administration menu, select Preferences > General.
3.Click the Housekeeping tab.
4.Under Delete after, set the time, in hours, after which you want the respective messages to be deleted automatically.A value of 0 disables automatic deletion. The actual deletion is performed during the next idle period, that is, whenthere are no calls to or from the voicemail server.
5.Under Playback Order, set the order of playback for the respective message types. The available options are First in-First out (FIFO) and Last in-First out (LIFO). FIFO is the default option.
6.Click OK.
7.Click Save and Make Live and select Yes.

Implementing Voicemail Pro Page 10615-601064 Issue 8b (Tuesday, December 11, 2012)IP Office 8.1
6.5 SNMP AlarmThe IP Office system can be configured to generate alarms. These alarms can be sent from the IP Office using SNMP,SMTP e-mail, or Syslog alarm formats. This tab is used to set the levels at which the voicemail server will indicate to theIP Office to send an alarm.
To set SNMP alarms1.Open the Voicemail Pro Client application and connect to the voicemail server.
2.From the Administration menu, select Preferences > General.
3.Click the SNMP Alarm tab.
4.Under Alarm Threshold Unit, select either Disk Space Left (MB) or Recording Time left (minutes).
5.In the Alarm Threshold Level field, enter the number of units (minutes or MB) at which SNMP alarms are to betriggered. The minimum value that you can enter is 11. In addition to the alarm that triggers at the threshold value, the following SNMP alarms are set automatically:
· Space OK Alarm This alarm is triggered when the amount of available space returns to above a level set at Alarm Threshold Levelplus 30.
· Critical Alarm This alarm is set at 30. If the Alarm Threshold Level is set at less than 40, the critical alarm is set at AlarmThreshold Level minus 10. Note that the critical alarm value decreases if you decrease the Alarm Threshold value,but the critical alarm value does not increase if you increase the Alarm Threshold value. So, the critical alarm valuekeeps on decreasing and remains set at the least value that it takes. To reset the critical alarm back to 30, click Default Settings.
6.To return to the default alarm settings, click Default Settings. The Alarm Threshold Level is reset to 60. The SpaceOK level is reset to 90. The Critical Alarm level is reset to 30.
7.Click OK.
8.Click Save and Make Live and select Yes.
Implementing Voicemail Pro Page 10715-601064 Issue 8b (Tuesday, December 11, 2012)IP Office 8.1
System Preferences: SNMP Alarm
6.6 OutcallingThe outcalling preferences in Voicemail Pro are defaults for global operation. Mailbox owners can configure their ownoutcalling options from their telephone, for example, create their own time profile.
For details on configuring outcalling, see Avaya IP Office Using Voicemail Pro in Intuity Mode (15-601130) and Avaya IPOffice Phone Manager User Guide (15-600988).
A timeout value can also be set by a user. This is the duration for which outcalling will attempt to connect to a numberbefore giving up.
To set the global outcalling preferences1.Open the Voicemail Pro Client application and connect to the voicemail server.
2.From the Administration menu, select Preferences > General.
3.Click the Outcalling tab.
4.Select the times that outcalling is active in the System Times section.
· Prime Times The time period that outcalling is to be active as default for the system.
· Peak Times The busiest working hours.
5.Set the retry settings in the System Retry Settings section.
· The Number of Retries can be between 0 and 10. If the message is not collected after the last retry, nonotification is sent until another new message is delivered in the user's mailbox.
· The Retry Interval for each successive retry. The interval is the length of time between each attempt to connectto the target number again. The 6th to 10th retries use the default retry interval.
· Double-click a selected retry time to edit the interval between retries. The New interval number window openswhere the length of time between each attempt to ring the target number can be changed. Click OK to save thechange and return to the System Preferences window.
6.Click OK.
7.Click Save and Make Live and select Yes.
6.7 Voicemail RecordingThe Voicemail Recording tab is displayed only if you connect to a Linux-based voicemail server.
On a Linux-based voicemail server, use the Voicemail Recording tab to configure SFTP connection on voicemail serverto transfer recordings to the Voice Recording Library (VRL) application IP Office ContactStore.
To configure SFTP connection to the VRL directory1.Open the Voicemail Pro Client application and connect to the voicemail server.
2.On the Administration menu, click Preferences > General.
Implementing Voicemail Pro Page 10815-601064 Issue 8b (Tuesday, December 11, 2012)IP Office 8.1
3.Click the Voicemail Recording tab.
4.Enter the required details in the respective fields.Note: Enter the absolute FTP path of the VRL directory in Remote FTP Location.
5.Click Test Connection to verify the connectivity of the voicemail server to the remote SFTP server. If the connectionfails, see SFTP Host Key Verification .
6.Click OK.
7.Click Save and Make Live and select Yes.
132

Implementing Voicemail Pro Page 10915-601064 Issue 8b (Tuesday, December 11, 2012)IP Office 8.1
System Preferences: Backup & Restore
6.8 Backup & RestoreUsing the Backup & Restore tab, you can:
1.View the details of previous backups.
1.Take an immediate backup of the voicemail data and settings.
2.Schedule backups for the voicemail data and settings.
3.Restore the voicemail data and settings from a backup, on a Windows-based voicemail server.
To view, restore, or schedule backups1.Open the Voicemail Pro Client application and connect to the voicemail server.
2.On the Administration menu, click Preferences > General.
3.Click the Backup & Restore tab.
· The Data Backup section displays the following details of the previous backups:
· Type: Immediate, Daily, Weekly, or Monthly.
· Date & Time
· Backup Path
· Size
Note: The list includes only those backups that are saved on the local computer. To refresh the list, close theSystem Preferences dialog box and open the dialog box again.
· Last Run & TypeThe time and type of the previous backup.
· Next Run & TypeThe time and type of the backup that is scheduled to run next.
Note: If a backup is already in progress, the Next Run field displays Active.
· RestoreClick Restore to restore the voicemail data and settings from a backup. For details, see Avaya IP OfficeAdministering Voicemail Pro (15-601063).
· Backup NowClick Backup Now to take an immediate backup of the voicemail data and settings. For details, see Avaya IPOffice Administering Voicemail Pro (15-601063).
Note: If a backup is already in progress, the Backup & Restore dialog box displays Abort instead of Backup Now.Click Abort to abandon the backup in progress.
· ConfigureClick Configure to schedule backups for the voicemail data and settings. For details, see Avaya IP OfficeAdministering Voicemail Pro (15-601063).
Implementing Voicemail Pro Page 11015-601064 Issue 8b (Tuesday, December 11, 2012)IP Office 8.1
4.Click OK to close the System Preferences dialog box.
5.To save any changes, click Save and Make Live and select Yes.
Note: If you connect to a Linux-based voicemail server or to a Windows-based voicemail server that is not running onthe same computer as the Voicemail Pro Client, the Restore button is not available.
6.9 VPNM
This set of preferences is used to add a list of the remote VPNM servers and mailbox users on those servers.
· ! These features are not supported on a Linux-based Voicemail Pro server.
To open the VPNM window:
1. Start the Voicemail Pro Client.
2. From the Administration menu, select Preferences > VPNM. The VPNM window opens.
To add a VPNM server:
1. In the VPNM Server(s) section, click Add.
2. Enter the fully qualified domain name of the remote VPNM destination (the remote Voicemail Pro server computer orAvaya Interchange).

Implementing Voicemail Pro Page 11115-601064 Issue 8b (Tuesday, December 11, 2012)IP Office 8.1
System Preferences: VPNM
3. Enter the two digit access prefix, if these are being used.
4. Click OK.
To delete a VPNM server:
1. In the VPNM Server(s) section, select the server that is to be deleted.
2. Click Delete. When a server is deleted, all of the users associated with that server are also deleted.

Implementing Voicemail Pro Page 11215-601064 Issue 8b (Tuesday, December 11, 2012)IP Office 8.1
To add a user to VPNM server:
1. In the Users for VPNM Server(s) section, click Add. The Adding a new user window opens.
2. Enter details for the user. All of these details MUST be completed before the user can be added.
· Select the VPNM server from the listing.
· Enter the user's full name. The user's full name is used by the local Voicemail Pro's dial by name feature.
· Enter the user's extension. The local extension number is used as the local mailbox number and so should notconflict with any existing local number.
· Enter the user's remote extension. The remote extension number should be the user's real extension number.Typically this and the 'local extension number' are kept the same using a unique extension number dial plan forthe linked systems.
· Enter the user's full telephone number. The full telephone number should be a dialable number that is routed tothe user's extension or mailbox.
3. Click OK to save the details and return to the VPNM configuration window.
Implementing Voicemail Pro Page 11315-601064 Issue 8b (Tuesday, December 11, 2012)IP Office 8.1
System Preferences: VPNM
To add a group of users:
1. (Optional) Check the option Enable WildCard. When this option is selected you can use the question mark symbol(?) to represent any number.
2. In the Users for VPNM Server(s) section, click Add Range. The Adding a range of users window opens.
3. Enter details for the users. All of these details MUST be completed before the users can be added.
· Select the VPNM server for which you want to add the users.
· Enter the start number of the extension range.
· Enter the local prefix.
· Enter remote prefix.
4. Click OK to save the details and return to the VPNM configuration window.
To change details of a VPNM user:
1. In the Users for VPNM Server(s) section, select the name of the user whose details need to be changed.
2. Click Modify. You can change the user's full name, the local extension number and the full telephone number.

Implementing Voicemail Pro Page 11415-601064 Issue 8b (Tuesday, December 11, 2012)IP Office 8.1

Implementing Voicemail Pro Page 11515-601064 Issue 8b (Tuesday, December 11, 2012)IP Office 8.1
Centralized Voicemail Pro
Chapter 7.
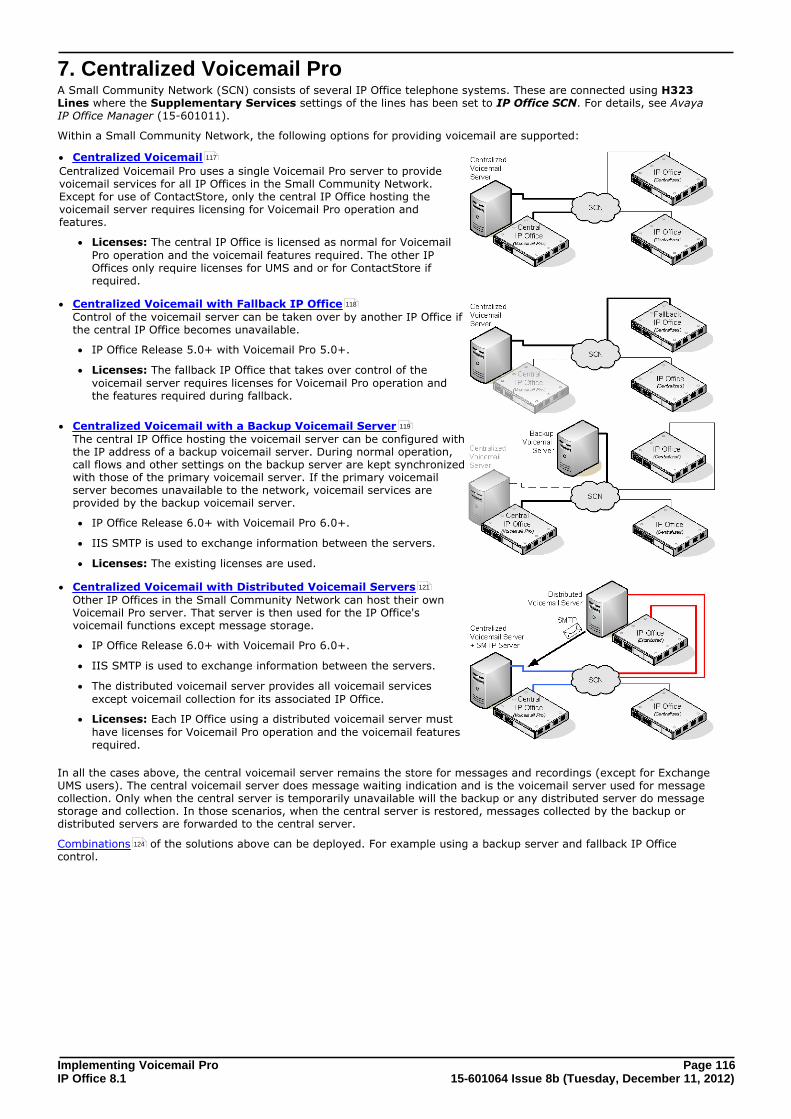
Implementing Voicemail Pro Page 11615-601064 Issue 8b (Tuesday, December 11, 2012)IP Office 8.1
7. Centralized Voicemail ProA Small Community Network (SCN) consists of several IP Office telephone systems. These are connected using H323Lines where the Supplementary Services settings of the lines has been set to IP Office SCN. For details, see AvayaIP Office Manager (15-601011).
Within a Small Community Network, the following options for providing voicemail are supported:
· Centralized Voicemail
Centralized Voicemail Pro uses a single Voicemail Pro server to providevoicemail services for all IP Offices in the Small Community Network.Except for use of ContactStore, only the central IP Office hosting thevoicemail server requires licensing for Voicemail Pro operation andfeatures.
· Licenses: The central IP Office is licensed as normal for VoicemailPro operation and the voicemail features required. The other IPOffices only require licenses for UMS and or for ContactStore ifrequired.
· Centralized Voicemail with Fallback IP Office Control of the voicemail server can be taken over by another IP Office ifthe central IP Office becomes unavailable.
· IP Office Release 5.0+ with Voicemail Pro 5.0+.
· Licenses: The fallback IP Office that takes over control of thevoicemail server requires licenses for Voicemail Pro operation andthe features required during fallback.
· Centralized Voicemail with a Backup Voicemail Server The central IP Office hosting the voicemail server can be configured withthe IP address of a backup voicemail server. During normal operation,call flows and other settings on the backup server are kept synchronizedwith those of the primary voicemail server. If the primary voicemailserver becomes unavailable to the network, voicemail services areprovided by the backup voicemail server.
· IP Office Release 6.0+ with Voicemail Pro 6.0+.
· IIS SMTP is used to exchange information between the servers.
· Licenses: The existing licenses are used.
· Centralized Voicemail with Distributed Voicemail Servers Other IP Offices in the Small Community Network can host their ownVoicemail Pro server. That server is then used for the IP Office'svoicemail functions except message storage.
· IP Office Release 6.0+ with Voicemail Pro 6.0+.
· IIS SMTP is used to exchange information between the servers.
· The distributed voicemail server provides all voicemail servicesexcept voicemail collection for its associated IP Office.
· Licenses: Each IP Office using a distributed voicemail server musthave licenses for Voicemail Pro operation and the voicemail featuresrequired.
In all the cases above, the central voicemail server remains the store for messages and recordings (except for ExchangeUMS users). The central voicemail server does message waiting indication and is the voicemail server used for messagecollection. Only when the central server is temporarily unavailable will the backup or any distributed server do messagestorage and collection. In those scenarios, when the central server is restored, messages collected by the backup ordistributed servers are forwarded to the central server.
Combinations of the solutions above can be deployed. For example using a backup server and fallback IP Officecontrol.
117
118
119
121
124
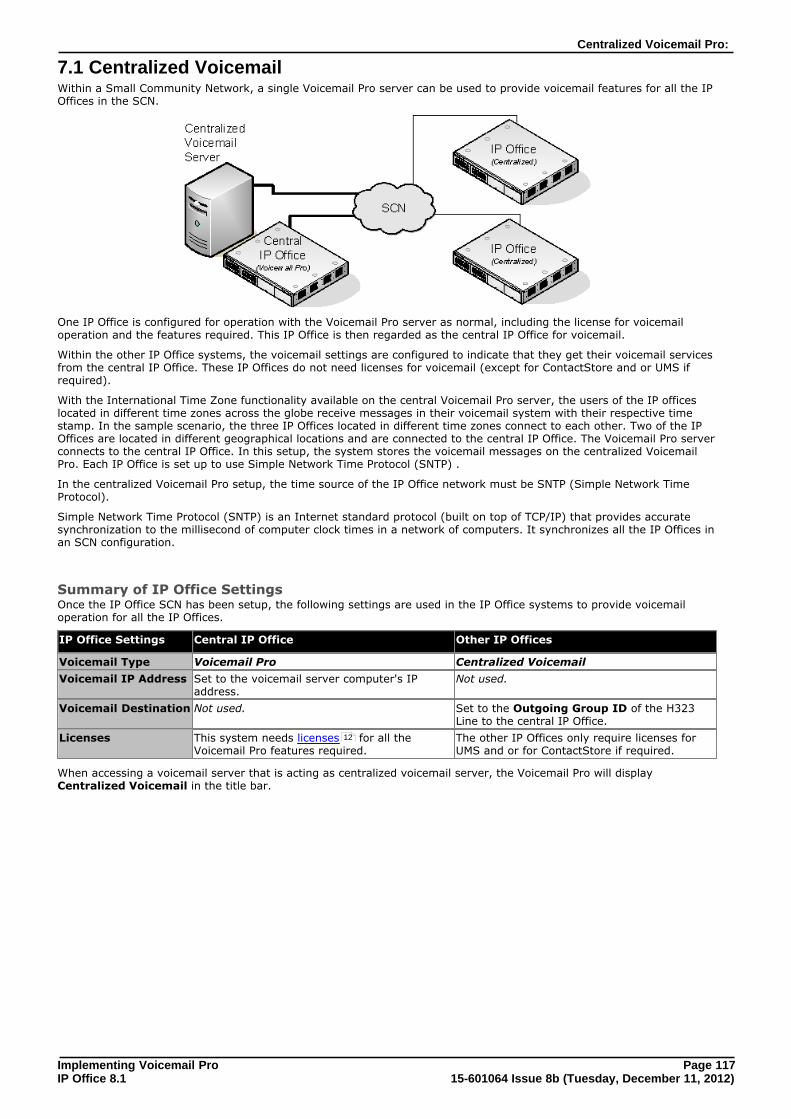
Implementing Voicemail Pro Page 11715-601064 Issue 8b (Tuesday, December 11, 2012)IP Office 8.1
Centralized Voicemail Pro:
7.1 Centralized VoicemailWithin a Small Community Network, a single Voicemail Pro server can be used to provide voicemail features for all the IPOffices in the SCN.
One IP Office is configured for operation with the Voicemail Pro server as normal, including the license for voicemailoperation and the features required. This IP Office is then regarded as the central IP Office for voicemail.
Within the other IP Office systems, the voicemail settings are configured to indicate that they get their voicemail servicesfrom the central IP Office. These IP Offices do not need licenses for voicemail (except for ContactStore and or UMS ifrequired).
With the International Time Zone functionality available on the central Voicemail Pro server, the users of the IP officeslocated in different time zones across the globe receive messages in their voicemail system with their respective timestamp. In the sample scenario, the three IP Offices located in different time zones connect to each other. Two of the IPOffices are located in different geographical locations and are connected to the central IP Office. The Voicemail Pro serverconnects to the central IP Office. In this setup, the system stores the voicemail messages on the centralized VoicemailPro. Each IP Office is set up to use Simple Network Time Protocol (SNTP) .
In the centralized Voicemail Pro setup, the time source of the IP Office network must be SNTP (Simple Network TimeProtocol).
Simple Network Time Protocol (SNTP) is an Internet standard protocol (built on top of TCP/IP) that provides accuratesynchronization to the millisecond of computer clock times in a network of computers. It synchronizes all the IP Offices inan SCN configuration.
Summary of IP Office SettingsOnce the IP Office SCN has been setup, the following settings are used in the IP Office systems to provide voicemailoperation for all the IP Offices.
IP Office Settings Central IP Office Other IP Offices
Voicemail Type Voicemail Pro Centralized Voicemail
Voicemail IP Address Set to the voicemail server computer's IPaddress.
Not used.
Voicemail Destination Not used. Set to the Outgoing Group ID of the H323Line to the central IP Office.
Licenses This system needs licenses for all theVoicemail Pro features required.
The other IP Offices only require licenses forUMS and or for ContactStore if required.
When accessing a voicemail server that is acting as centralized voicemail server, the Voicemail Pro will display Centralized Voicemail in the title bar.
12
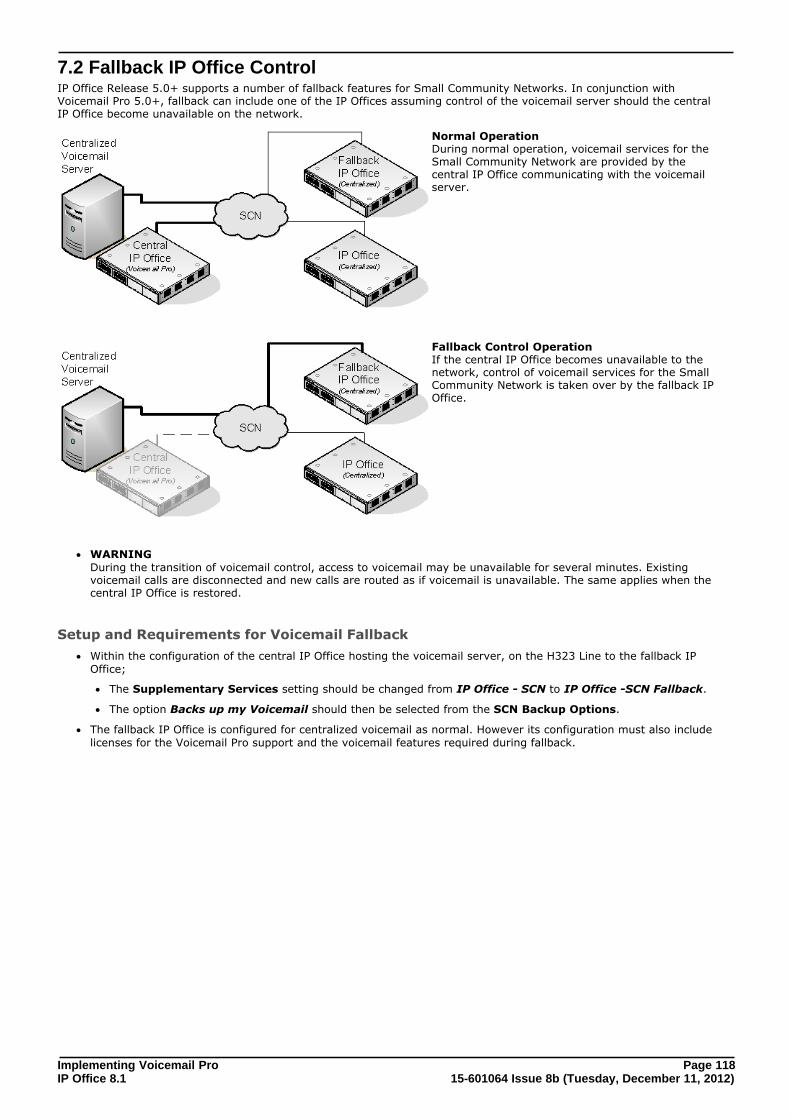
Implementing Voicemail Pro Page 11815-601064 Issue 8b (Tuesday, December 11, 2012)IP Office 8.1
7.2 Fallback IP Office ControlIP Office Release 5.0+ supports a number of fallback features for Small Community Networks. In conjunction withVoicemail Pro 5.0+, fallback can include one of the IP Offices assuming control of the voicemail server should the centralIP Office become unavailable on the network.
Normal Operation During normal operation, voicemail services for theSmall Community Network are provided by thecentral IP Office communicating with the voicemailserver.
Fallback Control Operation If the central IP Office becomes unavailable to thenetwork, control of voicemail services for the SmallCommunity Network is taken over by the fallback IPOffice.
· WARNING During the transition of voicemail control, access to voicemail may be unavailable for several minutes. Existingvoicemail calls are disconnected and new calls are routed as if voicemail is unavailable. The same applies when thecentral IP Office is restored.
Setup and Requirements for Voicemail Fallback
· Within the configuration of the central IP Office hosting the voicemail server, on the H323 Line to the fallback IPOffice;
· The Supplementary Services setting should be changed from IP Office - SCN to IP Office -SCN Fallback.
· The option Backs up my Voicemail should then be selected from the SCN Backup Options.
· The fallback IP Office is configured for centralized voicemail as normal. However its configuration must also includelicenses for the Voicemail Pro support and the voicemail features required during fallback.
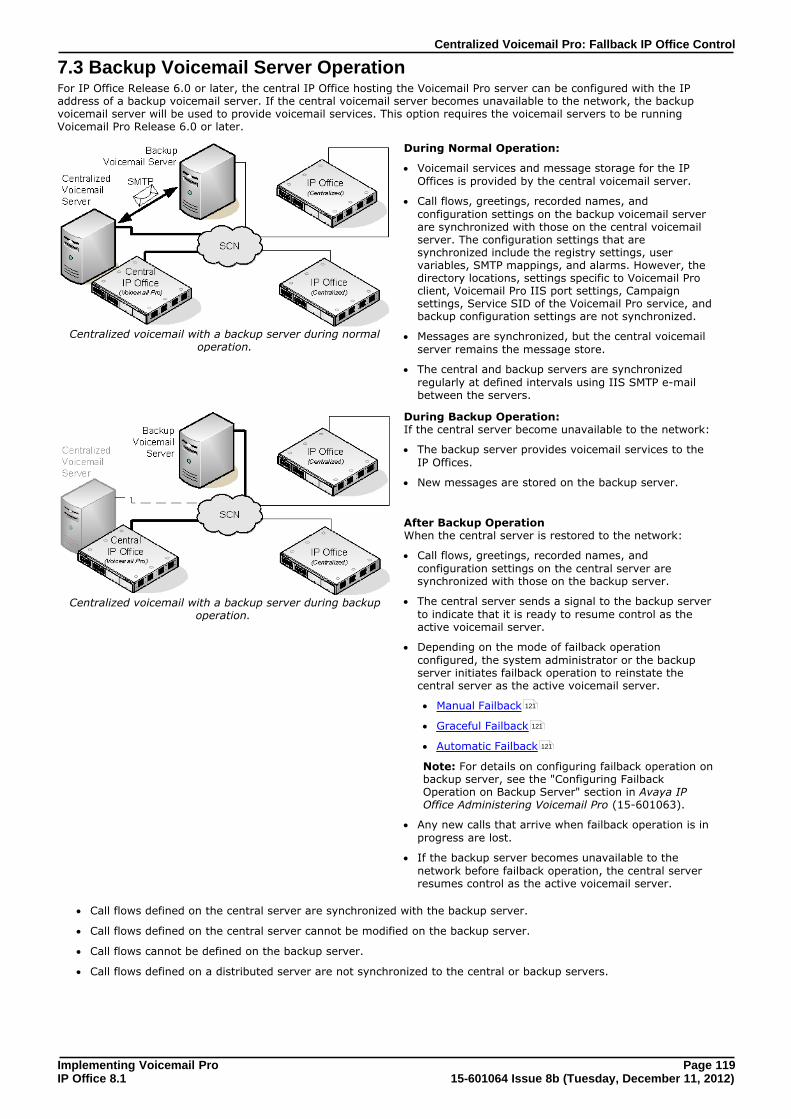
Implementing Voicemail Pro Page 11915-601064 Issue 8b (Tuesday, December 11, 2012)IP Office 8.1
Centralized Voicemail Pro: Fallback IP Office Control
7.3 Backup Voicemail Server OperationFor IP Office Release 6.0 or later, the central IP Office hosting the Voicemail Pro server can be configured with the IPaddress of a backup voicemail server. If the central voicemail server becomes unavailable to the network, the backupvoicemail server will be used to provide voicemail services. This option requires the voicemail servers to be runningVoicemail Pro Release 6.0 or later.
Centralized voicemail with a backup server during normaloperation.
During Normal Operation:
· Voicemail services and message storage for the IPOffices is provided by the central voicemail server.
· Call flows, greetings, recorded names, andconfiguration settings on the backup voicemail serverare synchronized with those on the central voicemailserver. The configuration settings that aresynchronized include the registry settings, uservariables, SMTP mappings, and alarms. However, thedirectory locations, settings specific to Voicemail Proclient, Voicemail Pro IIS port settings, Campaignsettings, Service SID of the Voicemail Pro service, andbackup configuration settings are not synchronized.
· Messages are synchronized, but the central voicemailserver remains the message store.
· The central and backup servers are synchronizedregularly at defined intervals using IIS SMTP e-mailbetween the servers.
Centralized voicemail with a backup server during backupoperation.
During Backup Operation: If the central server become unavailable to the network:
· The backup server provides voicemail services to theIP Offices.
· New messages are stored on the backup server.
After Backup Operation When the central server is restored to the network:
· Call flows, greetings, recorded names, andconfiguration settings on the central server aresynchronized with those on the backup server.
· The central server sends a signal to the backup serverto indicate that it is ready to resume control as theactive voicemail server.
· Depending on the mode of failback operationconfigured, the system administrator or the backupserver initiates failback operation to reinstate thecentral server as the active voicemail server.
· Manual Failback
· Graceful Failback
· Automatic Failback
Note: For details on configuring failback operation onbackup server, see the "Configuring FailbackOperation on Backup Server" section in Avaya IPOffice Administering Voicemail Pro (15-601063).
· Any new calls that arrive when failback operation is inprogress are lost.
· If the backup server becomes unavailable to thenetwork before failback operation, the central serverresumes control as the active voicemail server.
· Call flows defined on the central server are synchronized with the backup server.
· Call flows defined on the central server cannot be modified on the backup server.
· Call flows cannot be defined on the backup server.
· Call flows defined on a distributed server are not synchronized to the central or backup servers.
121
121
121
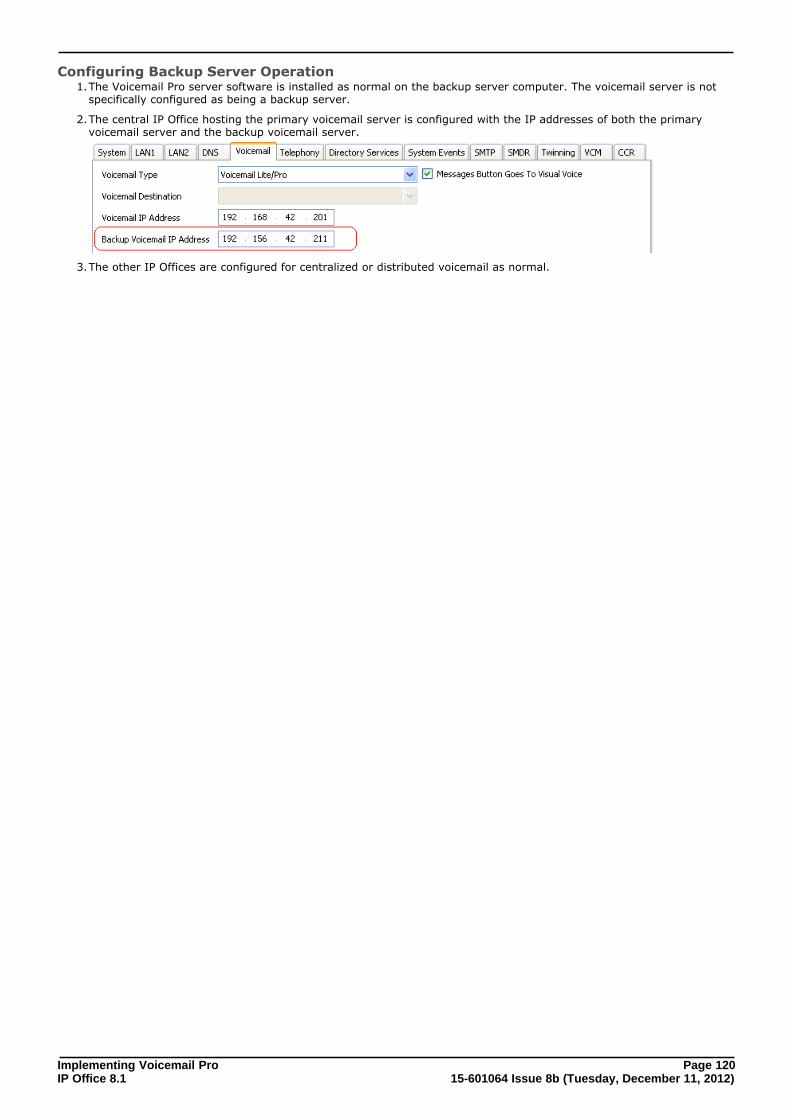
Implementing Voicemail Pro Page 12015-601064 Issue 8b (Tuesday, December 11, 2012)IP Office 8.1
Configuring Backup Server Operation1.The Voicemail Pro server software is installed as normal on the backup server computer. The voicemail server is not
specifically configured as being a backup server.
2.The central IP Office hosting the primary voicemail server is configured with the IP addresses of both the primaryvoicemail server and the backup voicemail server.
3.The other IP Offices are configured for centralized or distributed voicemail as normal.
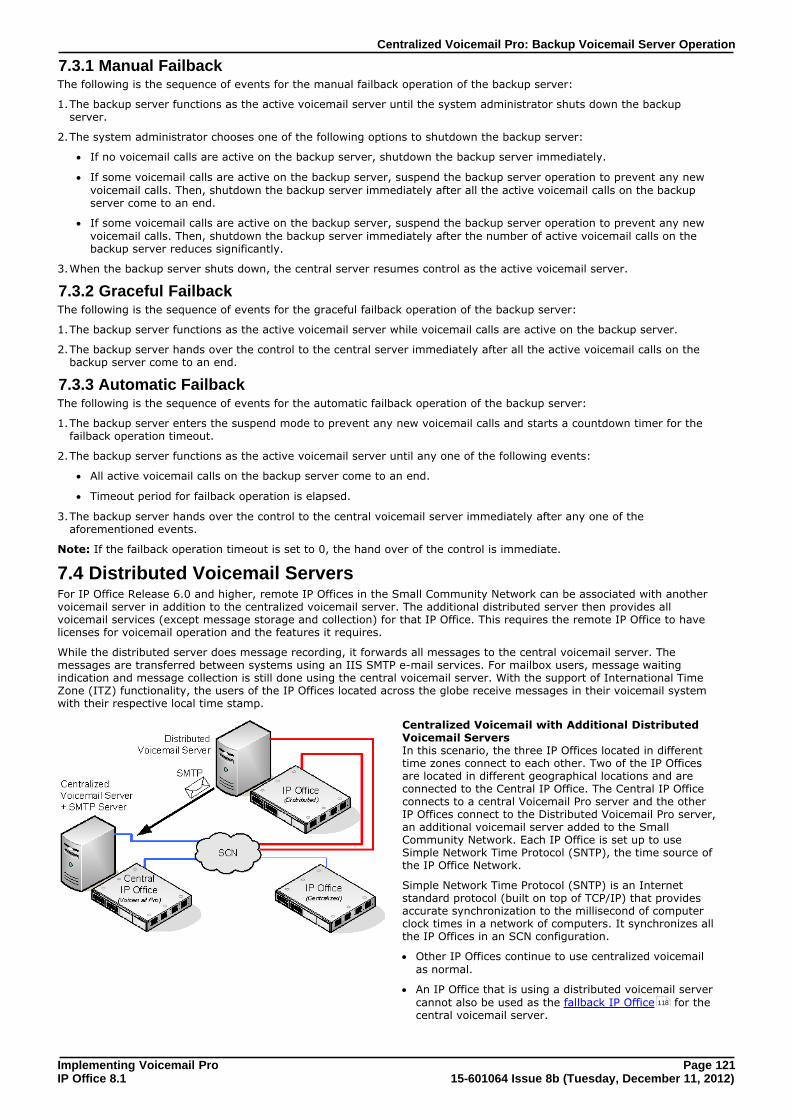
Implementing Voicemail Pro Page 12115-601064 Issue 8b (Tuesday, December 11, 2012)IP Office 8.1
Centralized Voicemail Pro: Backup Voicemail Server Operation
7.3.1 Manual FailbackThe following is the sequence of events for the manual failback operation of the backup server:
1.The backup server functions as the active voicemail server until the system administrator shuts down the backupserver.
2.The system administrator chooses one of the following options to shutdown the backup server:
· If no voicemail calls are active on the backup server, shutdown the backup server immediately.
· If some voicemail calls are active on the backup server, suspend the backup server operation to prevent any newvoicemail calls. Then, shutdown the backup server immediately after all the active voicemail calls on the backupserver come to an end.
· If some voicemail calls are active on the backup server, suspend the backup server operation to prevent any newvoicemail calls. Then, shutdown the backup server immediately after the number of active voicemail calls on thebackup server reduces significantly.
3.When the backup server shuts down, the central server resumes control as the active voicemail server.
7.3.2 Graceful FailbackThe following is the sequence of events for the graceful failback operation of the backup server:
1.The backup server functions as the active voicemail server while voicemail calls are active on the backup server.
2.The backup server hands over the control to the central server immediately after all the active voicemail calls on thebackup server come to an end.
7.3.3 Automatic FailbackThe following is the sequence of events for the automatic failback operation of the backup server:
1.The backup server enters the suspend mode to prevent any new voicemail calls and starts a countdown timer for thefailback operation timeout.
2.The backup server functions as the active voicemail server until any one of the following events:
· All active voicemail calls on the backup server come to an end.
· Timeout period for failback operation is elapsed.
3.The backup server hands over the control to the central voicemail server immediately after any one of theaforementioned events.
Note: If the failback operation timeout is set to 0, the hand over of the control is immediate.
7.4 Distributed Voicemail ServersFor IP Office Release 6.0 and higher, remote IP Offices in the Small Community Network can be associated with anothervoicemail server in addition to the centralized voicemail server. The additional distributed server then provides allvoicemail services (except message storage and collection) for that IP Office. This requires the remote IP Office to havelicenses for voicemail operation and the features it requires.
While the distributed server does message recording, it forwards all messages to the central voicemail server. Themessages are transferred between systems using an IIS SMTP e-mail services. For mailbox users, message waitingindication and message collection is still done using the central voicemail server. With the support of International TimeZone (ITZ) functionality, the users of the IP Offices located across the globe receive messages in their voicemail systemwith their respective local time stamp.
Centralized Voicemail with Additional DistributedVoicemail Servers In this scenario, the three IP Offices located in differenttime zones connect to each other. Two of the IP Officesare located in different geographical locations and areconnected to the Central IP Office. The Central IP Officeconnects to a central Voicemail Pro server and the otherIP Offices connect to the Distributed Voicemail Pro server,an additional voicemail server added to the SmallCommunity Network. Each IP Office is set up to useSimple Network Time Protocol (SNTP), the time source ofthe IP Office Network.
Simple Network Time Protocol (SNTP) is an Internetstandard protocol (built on top of TCP/IP) that providesaccurate synchronization to the millisecond of computerclock times in a network of computers. It synchronizes allthe IP Offices in an SCN configuration.
· Other IP Offices continue to use centralized voicemailas normal.
· An IP Office that is using a distributed voicemail servercannot also be used as the fallback IP Office for thecentral voicemail server.
118
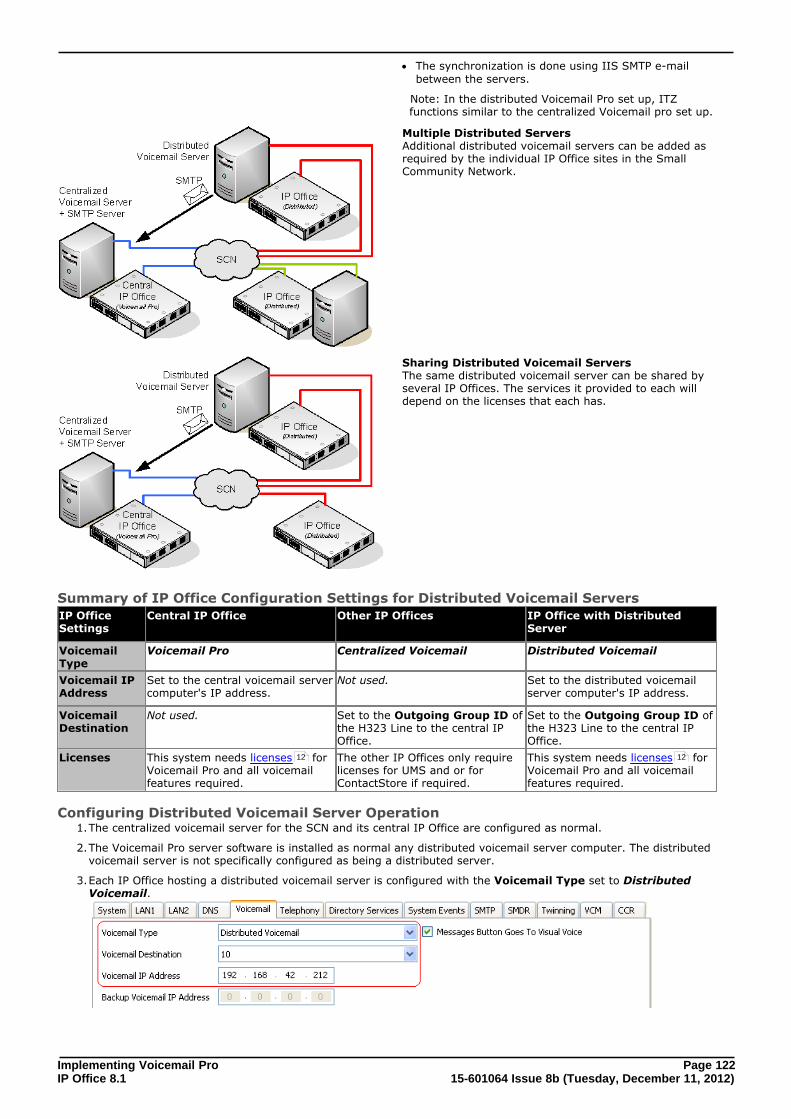
Implementing Voicemail Pro Page 12215-601064 Issue 8b (Tuesday, December 11, 2012)IP Office 8.1
· The synchronization is done using IIS SMTP e-mailbetween the servers.
Note: In the distributed Voicemail Pro set up, ITZfunctions similar to the centralized Voicemail pro set up.
Multiple Distributed Servers Additional distributed voicemail servers can be added asrequired by the individual IP Office sites in the SmallCommunity Network.
Sharing Distributed Voicemail ServersThe same distributed voicemail server can be shared byseveral IP Offices. The services it provided to each willdepend on the licenses that each has.
Summary of IP Office Configuration Settings for Distributed Voicemail Servers
IP OfficeSettings
Central IP Office Other IP Offices IP Office with DistributedServer
VoicemailType
Voicemail Pro Centralized Voicemail Distributed Voicemail
Voicemail IPAddress
Set to the central voicemail servercomputer's IP address.
Not used. Set to the distributed voicemailserver computer's IP address.
VoicemailDestination
Not used. Set to the Outgoing Group ID ofthe H323 Line to the central IPOffice.
Set to the Outgoing Group ID ofthe H323 Line to the central IPOffice.
Licenses This system needs licenses forVoicemail Pro and all voicemailfeatures required.
The other IP Offices only requirelicenses for UMS and or forContactStore if required.
This system needs licenses forVoicemail Pro and all voicemailfeatures required.
Configuring Distributed Voicemail Server Operation1.The centralized voicemail server for the SCN and its central IP Office are configured as normal.
2.The Voicemail Pro server software is installed as normal any distributed voicemail server computer. The distributedvoicemail server is not specifically configured as being a distributed server.
3.Each IP Office hosting a distributed voicemail server is configured with the Voicemail Type set to DistributedVoicemail.
12 12

Implementing Voicemail Pro Page 12315-601064 Issue 8b (Tuesday, December 11, 2012)IP Office 8.1
Centralized Voicemail Pro: Distributed Voicemail Servers
· The Voicemail Destination is set to the Outgoing Group ID of the H323 trunk to the central IP Officehosting the centralized voicemail server.
· The Voicemail IP Address is set to the IP address of the computer running the distributed voicemail serverfor the IP Office.
Note:If you are using Voicemail Pro in a distributed environment, a distributed server delivers a recorded message to thecentral voicemail server on completion of the recording. However, the presentation to the voicemail server for messagewaiting indication (MWI) and access via telephone might be delayed because of the internal processing of the messageand the network latency. The delay might be up to 2 minutes in high traffic situations.
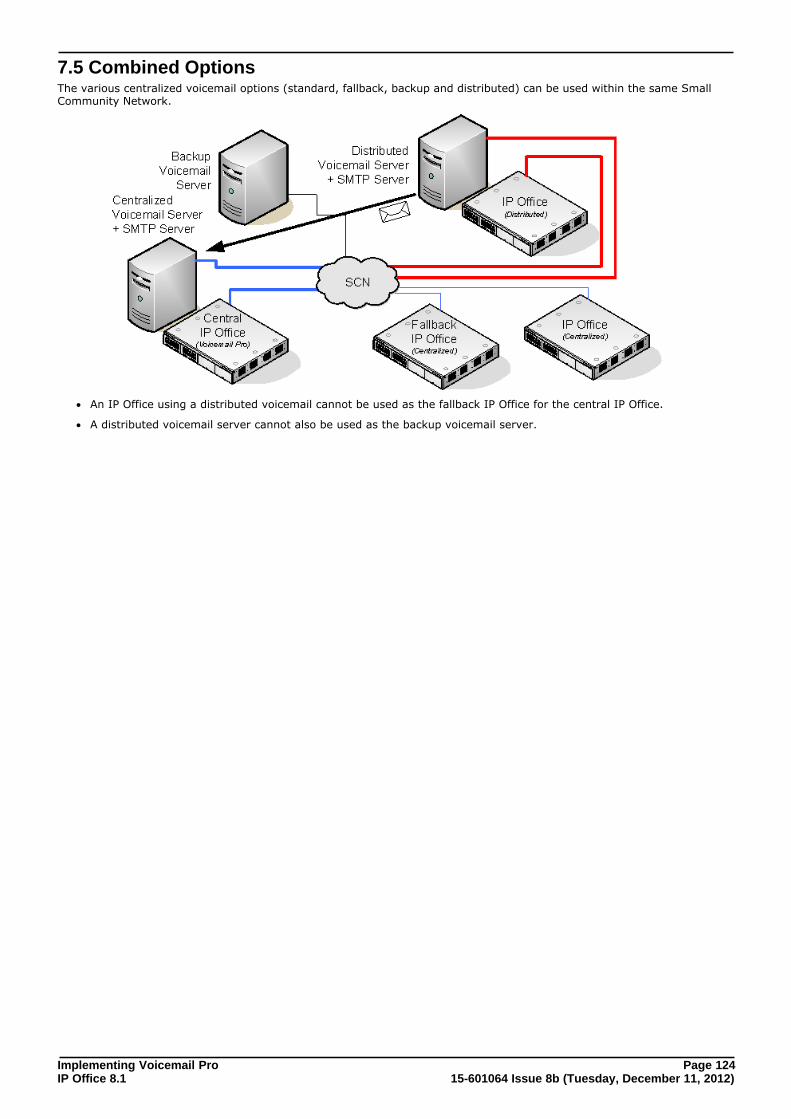
Implementing Voicemail Pro Page 12415-601064 Issue 8b (Tuesday, December 11, 2012)IP Office 8.1
7.5 Combined OptionsThe various centralized voicemail options (standard, fallback, backup and distributed) can be used within the same SmallCommunity Network.
· An IP Office using a distributed voicemail cannot be used as the fallback IP Office for the central IP Office.
· A distributed voicemail server cannot also be used as the backup voicemail server.
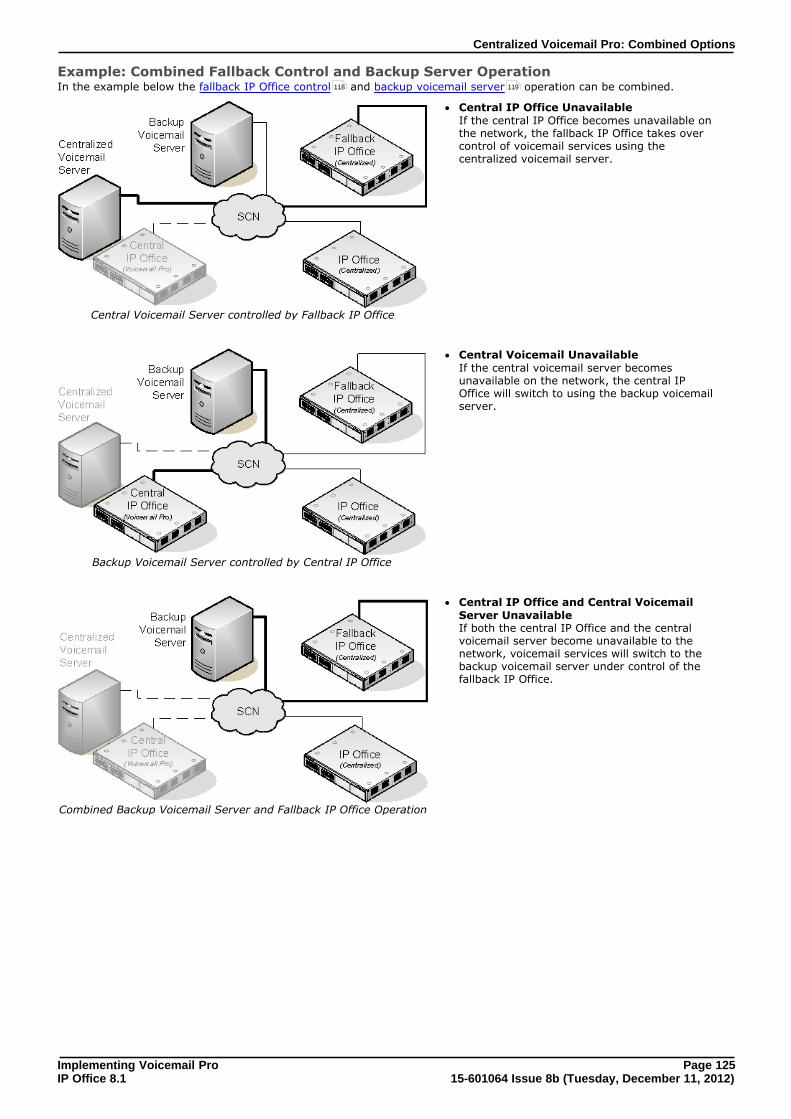
Implementing Voicemail Pro Page 12515-601064 Issue 8b (Tuesday, December 11, 2012)IP Office 8.1
Centralized Voicemail Pro: Combined Options
Example: Combined Fallback Control and Backup Server OperationIn the example below the fallback IP Office control and backup voicemail server operation can be combined.
Central Voicemail Server controlled by Fallback IP Office
· Central IP Office Unavailable If the central IP Office becomes unavailable onthe network, the fallback IP Office takes overcontrol of voicemail services using thecentralized voicemail server.
Backup Voicemail Server controlled by Central IP Office
· Central Voicemail Unavailable If the central voicemail server becomesunavailable on the network, the central IPOffice will switch to using the backup voicemailserver.
Combined Backup Voicemail Server and Fallback IP Office Operation
· Central IP Office and Central VoicemailServer Unavailable If both the central IP Office and the centralvoicemail server become unavailable to thenetwork, voicemail services will switch to thebackup voicemail server under control of thefallback IP Office.
118 119
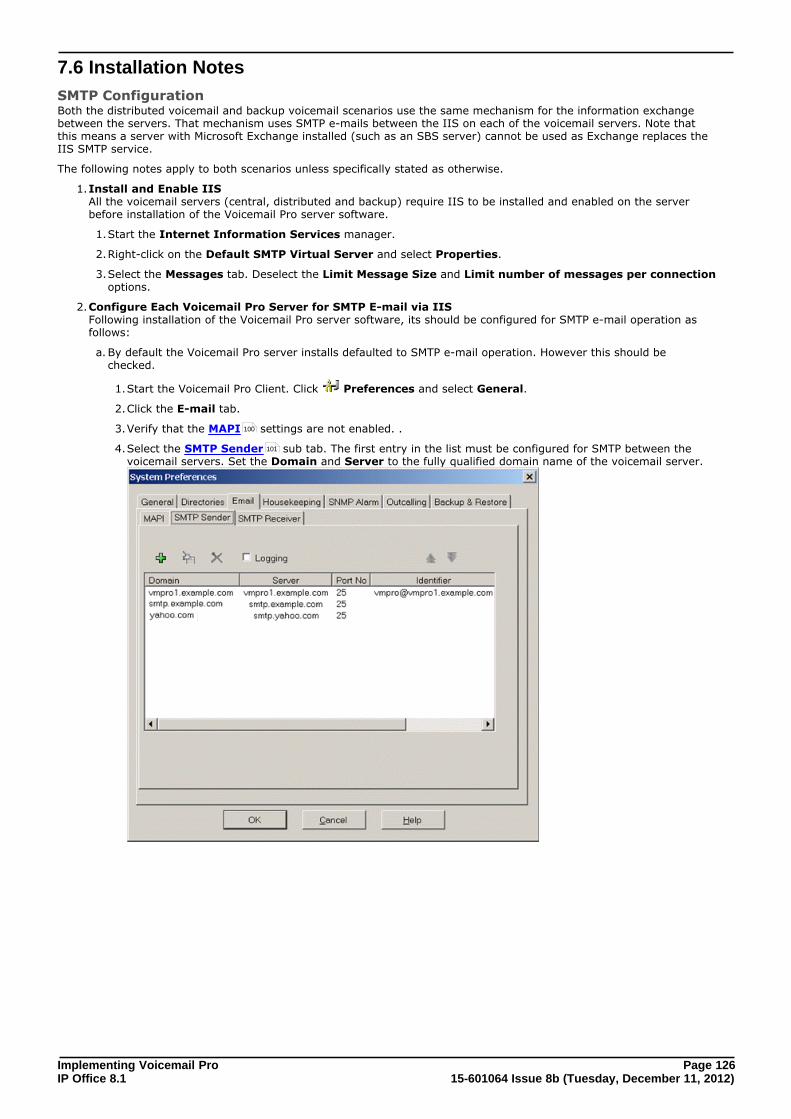
Implementing Voicemail Pro Page 12615-601064 Issue 8b (Tuesday, December 11, 2012)IP Office 8.1
7.6 Installation Notes
SMTP ConfigurationBoth the distributed voicemail and backup voicemail scenarios use the same mechanism for the information exchangebetween the servers. That mechanism uses SMTP e-mails between the IIS on each of the voicemail servers. Note thatthis means a server with Microsoft Exchange installed (such as an SBS server) cannot be used as Exchange replaces theIIS SMTP service.
The following notes apply to both scenarios unless specifically stated as otherwise.
1.Install and Enable IIS All the voicemail servers (central, distributed and backup) require IIS to be installed and enabled on the serverbefore installation of the Voicemail Pro server software.
1.Start the Internet Information Services manager.
2.Right-click on the Default SMTP Virtual Server and select Properties.
3.Select the Messages tab. Deselect the Limit Message Size and Limit number of messages per connectionoptions.
2.Configure Each Voicemail Pro Server for SMTP E-mail via IIS Following installation of the Voicemail Pro server software, its should be configured for SMTP e-mail operation asfollows:
a.By default the Voicemail Pro server installs defaulted to SMTP e-mail operation. However this should bechecked.
1.Start the Voicemail Pro Client. Click Preferences and select General.
2.Click the E-mail tab.
3.Verify that the MAPI settings are not enabled. .
4.Select the SMTP Sender sub tab. The first entry in the list must be configured for SMTP between thevoicemail servers. Set the Domain and Server to the fully qualified domain name of the voicemail server.
100
101
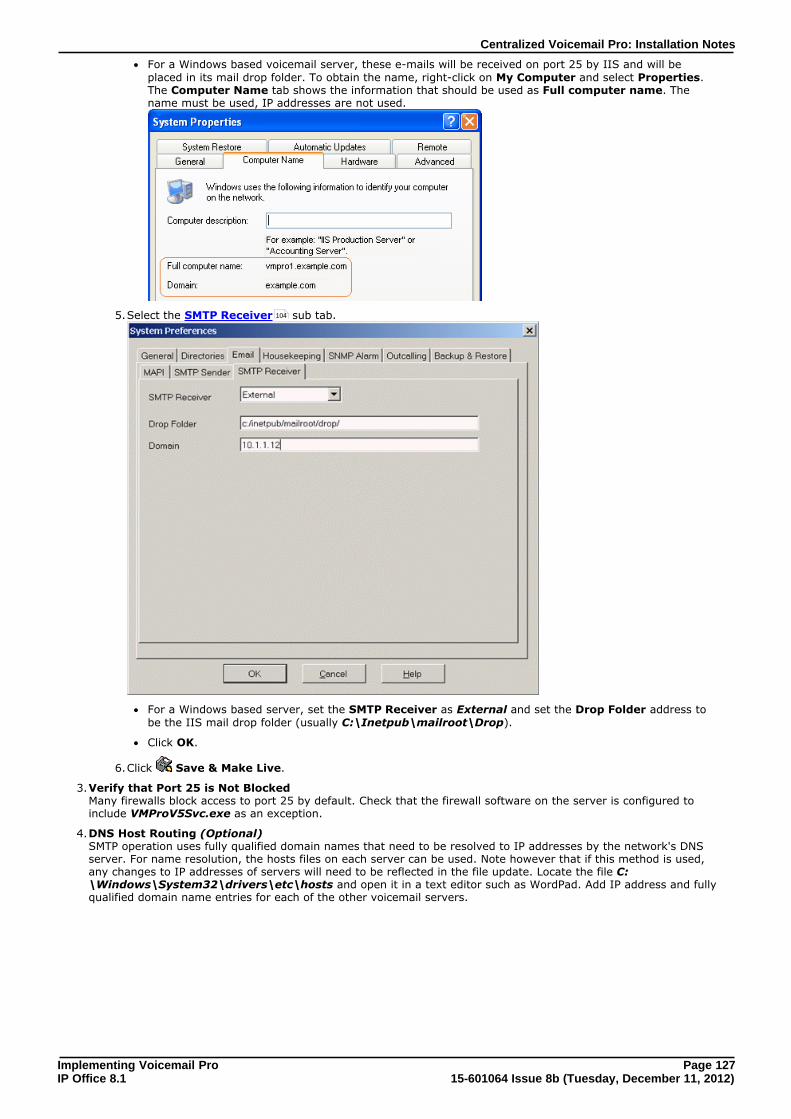
Implementing Voicemail Pro Page 12715-601064 Issue 8b (Tuesday, December 11, 2012)IP Office 8.1
Centralized Voicemail Pro: Installation Notes
· For a Windows based voicemail server, these e-mails will be received on port 25 by IIS and will beplaced in its mail drop folder. To obtain the name, right-click on My Computer and select Properties.The Computer Name tab shows the information that should be used as Full computer name. Thename must be used, IP addresses are not used.
5.Select the SMTP Receiver sub tab.
· For a Windows based server, set the SMTP Receiver as External and set the Drop Folder address tobe the IIS mail drop folder (usually C:\Inetpub\mailroot\Drop).
· Click OK.
6.Click Save & Make Live.
3.Verify that Port 25 is Not Blocked Many firewalls block access to port 25 by default. Check that the firewall software on the server is configured toinclude VMProV5Svc.exe as an exception.
4.DNS Host Routing (Optional) SMTP operation uses fully qualified domain names that need to be resolved to IP addresses by the network's DNSserver. For name resolution, the hosts files on each server can be used. Note however that if this method is used,any changes to IP addresses of servers will need to be reflected in the file update. Locate the file C:\Windows\System32\drivers\etc\hosts and open it in a text editor such as WordPad. Add IP address and fullyqualified domain name entries for each of the other voicemail servers.
104
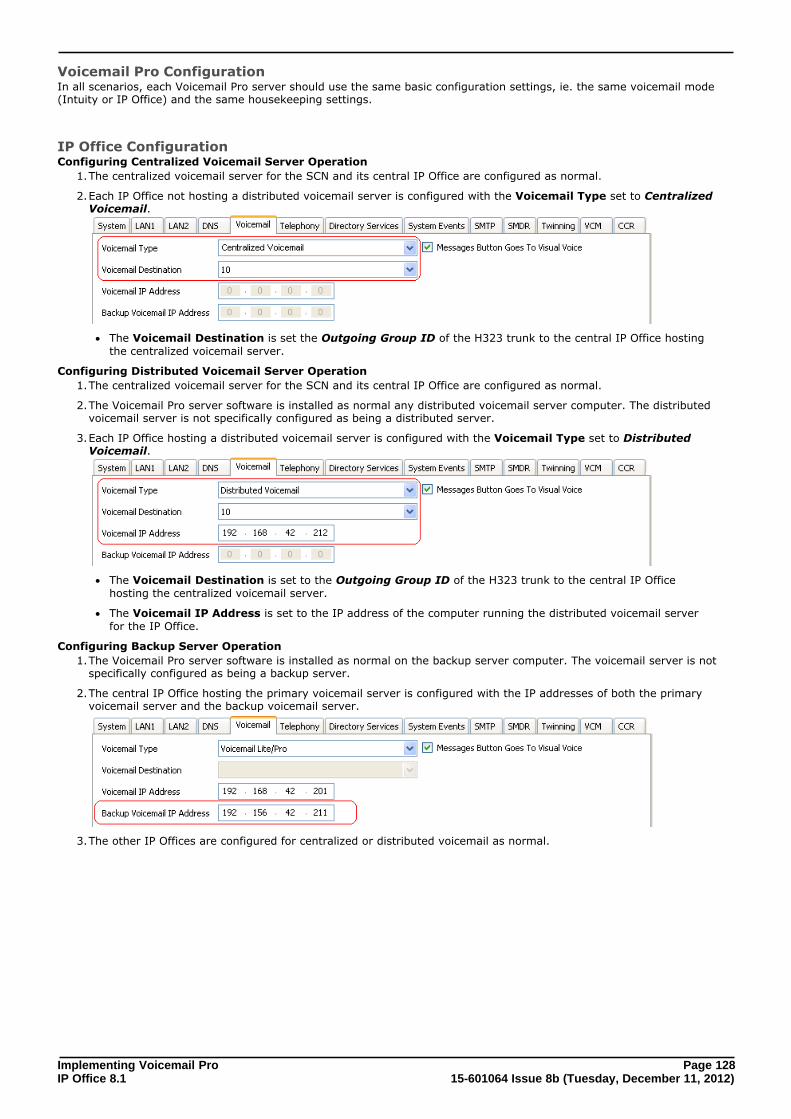
Implementing Voicemail Pro Page 12815-601064 Issue 8b (Tuesday, December 11, 2012)IP Office 8.1
Voicemail Pro ConfigurationIn all scenarios, each Voicemail Pro server should use the same basic configuration settings, ie. the same voicemail mode(Intuity or IP Office) and the same housekeeping settings.
IP Office ConfigurationConfiguring Centralized Voicemail Server Operation
1.The centralized voicemail server for the SCN and its central IP Office are configured as normal.
2.Each IP Office not hosting a distributed voicemail server is configured with the Voicemail Type set to CentralizedVoicemail.
· The Voicemail Destination is set the Outgoing Group ID of the H323 trunk to the central IP Office hostingthe centralized voicemail server.
Configuring Distributed Voicemail Server Operation
1.The centralized voicemail server for the SCN and its central IP Office are configured as normal.
2.The Voicemail Pro server software is installed as normal any distributed voicemail server computer. The distributedvoicemail server is not specifically configured as being a distributed server.
3.Each IP Office hosting a distributed voicemail server is configured with the Voicemail Type set to DistributedVoicemail.
· The Voicemail Destination is set to the Outgoing Group ID of the H323 trunk to the central IP Officehosting the centralized voicemail server.
· The Voicemail IP Address is set to the IP address of the computer running the distributed voicemail serverfor the IP Office.
Configuring Backup Server Operation
1.The Voicemail Pro server software is installed as normal on the backup server computer. The voicemail server is notspecifically configured as being a backup server.
2.The central IP Office hosting the primary voicemail server is configured with the IP addresses of both the primaryvoicemail server and the backup voicemail server.
3.The other IP Offices are configured for centralized or distributed voicemail as normal.
Implementing Voicemail Pro Page 12915-601064 Issue 8b (Tuesday, December 11, 2012)IP Office 8.1
Centralized Voicemail Pro: Installation Notes
Check the Server Connections1.Check Connection to the Central Server
In the following tests, remember to use the fully qualified domain name of each server.
a.Ping Test Make a ping from the server to the central server, for example ping vmpro1.example.com. You should see aseries of 4 successful replies from the server.
b.Telnet Test Make a telnet test from the server to the central server, for example telnet vmpro1.example.com 25. Youshould receive a response from the e-mail server within IIS. Enter quit to close the telnet connection.
2.Check Connection from the Central Server Repeat the ping and telnet tests, this time from the central server to the backup or distributed server.
Checking Status with the Voicemail Pro ClientWhen connected to a Voicemail Pro server using the Voicemail Pro client, the client title bar will display the role of thatvoicemail server; Centralized Voicemail, Backup Voicemail or Distributed Voicemail.
When connected to the backup voicemail server, if it is the active server, the title will have changed from BackupVoicemail to Backup Voicemail (Live).
When connected to the centralized voicemail server, the Distributed Voicemails folder can be selected to displaydetails of the distributed servers and the state of the connection with each. The Result will be either:
· In Progress The servers are synchronizing information via SMTP.
· Up-To-Date The servers are synchronized.

Implementing Voicemail Pro Page 13015-601064 Issue 8b (Tuesday, December 11, 2012)IP Office 8.1

Implementing Voicemail Pro Page 13115-601064 Issue 8b (Tuesday, December 11, 2012)IP Office 8.1
Appendix
Chapter 8.
Implementing Voicemail Pro Page 13215-601064 Issue 8b (Tuesday, December 11, 2012)IP Office 8.1
8. Appendix8.1 SMTP LoggingSMTP error logging is enabled to generate a log of SMTP activity.
For a Windows-based Voicemail Pro installation, the activity is logged in a file in C:\Program Files\Avaya\IPOffice\Voicemail Pro\VM\logs. The file name includes a date stamp for the day on which it is generated.
8.2 SFTP Host Key VerificationIf you are trying to connect to a SFTP server for the first time, the connection may fail with an error message about theauthenticity of the host. The behavior is a feature of the SSH protocol and is designed to protect you from a spoofingattack. To proceed, verify the host key of the SFTP server.
To verify the host key of the SFTP server1.Log in to the computer that runs the Voicemail Pro service using the same Windows account that is used to start the
service.
2.Open the WinSCP application.
3.Click New.
4.Enter the required details in the Host name and User name fields.
5.Click Login.A message is displayed that includes the host key of the SFTP server.
6.If you trust the displayed host key, click Yes to save the host key in the cache. Otherwise, get the host key from yoursystem administrator, and match it with the displayed host key before you click Yes.
7.Enter the password to verify the connectivity to the remote SFTP server.
8.3 Installing VoiceMail Pro as an ACM GatewayComplete the steps in this section to install Voicemail Pro as an ACM Gateway. There is only one type of installation forthe Voicemail Pro ACM Gateway. Therefore you are not offered the choice of custom, compact or typical during theinstallation process.
To install the ACM Gateway:
1. Insert the IP Office Applications DVD. Click Voicemail Pro, and then double-click setup.exe. The ChooseSetup Language window opens.
2. Select the installation language. This language is used for the installation and for the default language prompts.
3. Click OK. Installation preparation begins.
4. Voicemail Pro requires Microsoft .NET 2.0 Framework. If this version is not detected, you are prompted to install it.Click Yes to install Microsoft .NET 2.0 Framework and follow the instructions on the screen.
5. If the Modify, repair or remove the program window is displayed, follow the upgrade process .
6. In the Welcome window, click Next. The Customer Information window opens.
7. In the Customer Information window, type a user name and the company name or use the default names thatare proposed. These settings do not affect Voicemail Pro when it is installed.
8. In the same window choose the option that determines who should be able to use Voicemail Pro when it has beeninstalled. If you prefer, choose the Anyone who uses this computer (all users) option.
9. In the Customer Information window, click Next. The Choose Destination Location window opens.
10.In the Choose Destination Location window, click Browse and locate the folder where the Voicemail Pro files areto be installed. Otherwise, click Next to use the proposed folder. The Messaging Components window opens.
11.In the Messaging Components window, select ACM Gateway.
12.Click Next. The Service Account Name window opens. Details of the default administrator account may alreadybe filled in.
13.In the Service Account Name window, type the User Name and Password for the user account under which theVoicemail Pro service should run. This should be the Voicemail account created previously on the domain andExchange server. Alternatively, click Browse and select from the list of available computer or network accounts orclick Next to use the proposed account details. The Select Program Folder window opens.
14.By default, the program folders are created in a folder called IP Office. You can specify a different folder or selectone from the list of existing folders. To specify a different folder, type the folder name in the Program Folders box.Alternatively, to use an existing folder, highlight a name in the list of existing folders.
15.Click Next. The account details that you entered are verified. If you entered a user name that does not exist, thesystem prompts you whether to create a new computer user account with the specified name and password. Click Yes. The Select Program Folder window opens.
16.Select the program folder where you would like the icons for the Voicemail Pro components to be added. By default,the program icons are added to IP Office.
17.Click Next. The Start Copying Files window opens. Before any copying starts, you are presented with a summaryof the settings that you have chosen so far.
29
Implementing Voicemail Pro Page 13315-601064 Issue 8b (Tuesday, December 11, 2012)IP Office 8.1
Appendix: Installing VoiceMail Pro as an ACM Gateway
18.Review the settings to make sure that they are what you expect.
19.If for any reason the details are not what you expect, click Back and make the required changes. When you aresatisfied that the details are correct, click Next to start copying the files. The Setup Status window opens to keepyou informed while the installation takes place.
20.When the installation is complete, you are prompted to restart the computer. Choose Yes I want to restart mycomputer now.
21.Click Finish to restart the computer.
22.When the computer restarts, log back in. The IP Office Voicemail Pro - ACM Gateway Settings window opens.
23.In the Mail Server box, type the name of the mail server to use.
24.Choose Message Networking/Interchange to use Interchange or Modular Messaging to use ModularMessaging.1.
25.Click Next. The IP Office Voicemail Pro SMTP E-mail Settings window opens.
· In the Mail Server box, type the name of the SMTP mail server. This should be the fully qualified domain name.
· In the Port Number box, type the number of the receiving port on the SMTP mail server. The default is 25.
· In the Mail Drop box, type the name of the destination folder for outgoing e-mails on the SMTP Server.Alternatively, click the Browse button and select the folder to use.
· To enforce server authentication, check the Server Requires Authentication box. This is optional. If youcheck this option you also need to enter the account name and password. You can also choose whether or notto set the Use Challenge Response Authentication option.
26.Click Finish. The e-mail settings are validated. If everything has been installed correctly and the licenserequirements are met, you are prompted to start the Voicemail service. If the system fails to connect to the SMTPserver, an error message is displayed. You might need to start the Voicemail service manually. See Starting theVoicemail Pro Service .
27.Click OK to acknowledge the message. You have now finished installing the Voicemail Pro ACM Gateway software.
28
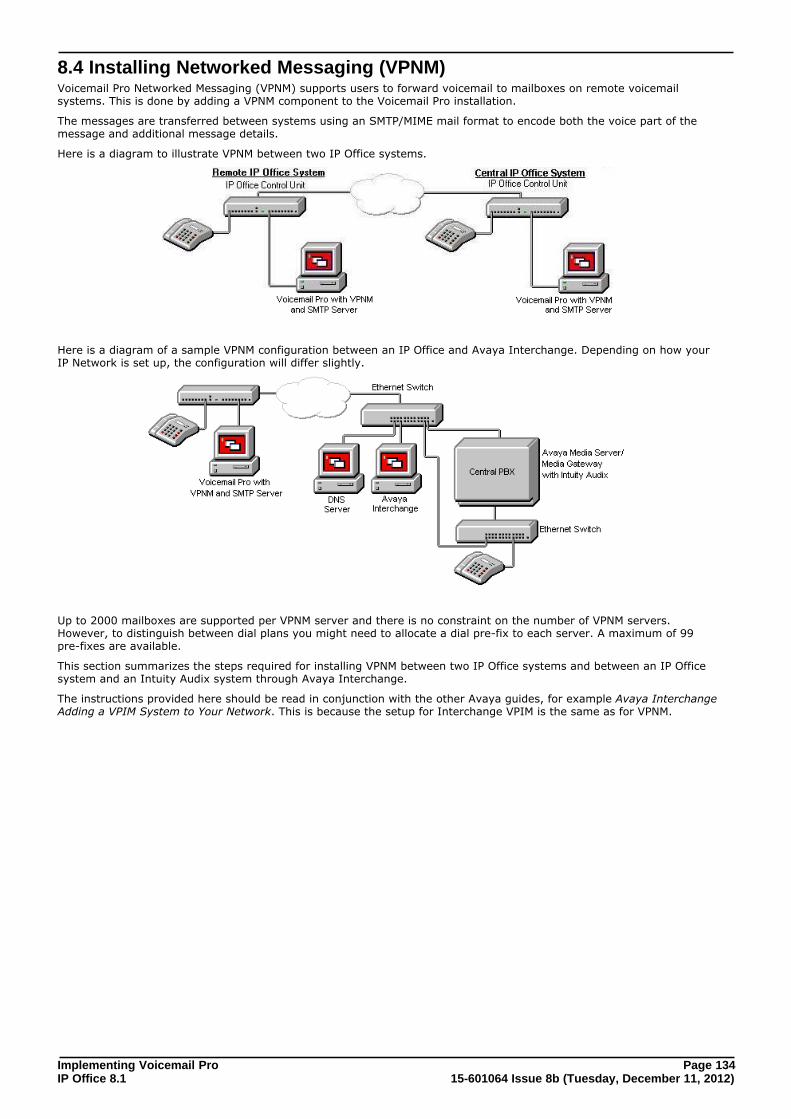
Implementing Voicemail Pro Page 13415-601064 Issue 8b (Tuesday, December 11, 2012)IP Office 8.1
8.4 Installing Networked Messaging (VPNM)Voicemail Pro Networked Messaging (VPNM) supports users to forward voicemail to mailboxes on remote voicemailsystems. This is done by adding a VPNM component to the Voicemail Pro installation.
The messages are transferred between systems using an SMTP/MIME mail format to encode both the voice part of themessage and additional message details.
Here is a diagram to illustrate VPNM between two IP Office systems.
Here is a diagram of a sample VPNM configuration between an IP Office and Avaya Interchange. Depending on how yourIP Network is set up, the configuration will differ slightly.
Up to 2000 mailboxes are supported per VPNM server and there is no constraint on the number of VPNM servers.However, to distinguish between dial plans you might need to allocate a dial pre-fix to each server. A maximum of 99pre-fixes are available.
This section summarizes the steps required for installing VPNM between two IP Office systems and between an IP Officesystem and an Intuity Audix system through Avaya Interchange.
The instructions provided here should be read in conjunction with the other Avaya guides, for example Avaya InterchangeAdding a VPIM System to Your Network. This is because the setup for Interchange VPIM is the same as for VPNM.
Implementing Voicemail Pro Page 13515-601064 Issue 8b (Tuesday, December 11, 2012)IP Office 8.1
Appendix: Installing Networked Messaging (VPNM)
8.4.1 Requirements for VPNM
Check for the following before installing VPNM:
· A Voicemail Pro server with VPNM installed connected to each IP Office system. Each system will need a license forboth Voicemail Pro and VPNM.
· All systems in the VPNM network need to be tested for their connectivity to the IP network. It is suggested that youtest the following:
· Ping the IP Addresses.
· Ping the computer names. If in a domain, ping the fully qualified domain name.
· The Voicemail Pro Servers must have an SMTP server installed. This can be done using the SMTP component ofInternet Information Service (IIS).
· To test type "Telnet <the name of the SMTP server> 25".
· Server names, where entered, must be fully qualified domain names.
· Voicemail Pro should not be installed on the same server as Exchange and/or the domain controller.

Implementing Voicemail Pro Page 13615-601064 Issue 8b (Tuesday, December 11, 2012)IP Office 8.1
8.4.2 Installing VoiceMail Pro with VPNM SupportFor Voicemail Pro 6.1, the VPNM components are embedded parts of the Voicemail Pro service and so automaticallyinstalled.
Implementing Voicemail Pro Page 13715-601064 Issue 8b (Tuesday, December 11, 2012)IP Office 8.1
Appendix: Installing Networked Messaging (VPNM)
8.4.3 Configuring VPNM Preferences
This set of preferences is used to add a list of the remote VPNM servers and mailbox users on those servers.
· ! These features are not supported on a Linux-based Voicemail Pro server.
To open the VPNM window:
1. Start the Voicemail Pro Client.
2. From the Administration menu, select Preferences > VPNM. The VPNM window opens.
To add a VPNM server:
1. In the VPNM Server(s) section, click Add.
2. Enter the fully qualified domain name of the remote VPNM destination (the remote Voicemail Pro server computer orAvaya Interchange).
3. Enter the two digit access prefix, if these are being used.
4. Click OK.
To delete a VPNM server:
1. In the VPNM Server(s) section, select the server that is to be deleted.
2. Click Delete. When a server is deleted, all of the users associated with that server are also deleted.
Implementing Voicemail Pro Page 13815-601064 Issue 8b (Tuesday, December 11, 2012)IP Office 8.1
To add a user to VPNM server:
1. In the Users for VPNM Server(s) section, click Add. The Adding a new user window opens.
2. Enter details for the user. All of these details MUST be completed before the user can be added.
· Select the VPNM server from the listing.
· Enter the user's full name. The user's full name is used by the local Voicemail Pro's dial by name feature.
· Enter the user's extension. The local extension number is used as the local mailbox number and so should notconflict with any existing local number.
· Enter the user's remote extension. The remote extension number should be the user's real extension number.Typically this and the 'local extension number' are kept the same using a unique extension number dial plan forthe linked systems.
· Enter the user's full telephone number. The full telephone number should be a dialable number that is routed tothe user's extension or mailbox.
3. Click OK to save the details and return to the VPNM configuration window.
Implementing Voicemail Pro Page 13915-601064 Issue 8b (Tuesday, December 11, 2012)IP Office 8.1
Appendix: Installing Networked Messaging (VPNM)
To add a group of users:
1. (Optional) Check the option Enable WildCard. When this option is selected you can use the question mark symbol(?) to represent any number.
2. In the Users for VPNM Server(s) section, click Add Range. The Adding a range of users window opens.
3. Enter details for the users. All of these details MUST be completed before the users can be added.
· Select the VPNM server for which you want to add the users.
· Enter the start number of the extension range.
· Enter the local prefix.
· Enter remote prefix.
4. Click OK to save the details and return to the VPNM configuration window.
To change details of a VPNM user:
1. In the Users for VPNM Server(s) section, select the name of the user whose details need to be changed.
2. Click Modify. You can change the user's full name, the local extension number and the full telephone number.
Implementing Voicemail Pro Page 14015-601064 Issue 8b (Tuesday, December 11, 2012)IP Office 8.1
8.4.4 Testing a VPNM SetupIt is advisable to test the VPNM setup.
To test the VPNM setup:
1. Dial into voicemail from one of the systems and record a message.
2. When selecting the target extension, enter an extension from the other system as specified in the VPNM Preferencesscreen.
3. The message should be delivered to the other systems Voicemail Pro server into C:\\Inetpub\mailroot\Drop.
4. The VPNMreceiver Service checks the Drop directory approximately every 30 seconds. When it finds a message inthe Drop directory, it will send the message to the relevant extension's voicemail box on the remote system.
Implementing Voicemail Pro Page 14115-601064 Issue 8b (Tuesday, December 11, 2012)IP Office 8.1
Appendix: Installing Networked Messaging (VPNM)
8.5 Glossary
8.5.1 Centralized Voicemail Pro ServerCentralized Voicemail Pro uses a single Voicemail Pro server to provide voicemail services for all IP Offices in the SmallCommunity Network. Except for use of ContactStore, only the central IP Office hosting the voicemail server requireslicensing for Voicemail Pro operation and features.
8.5.2 Distributed Voicemail Pro ServerFor IP Office Release 6.0 and higher, remote IP Offices in the Small Community Network can be associated with anothervoicemail server in addition to the centralized voicemail server. The additional distributed server then provides allvoicemail services (except message storage and collection) for that IP Office. This requires the remote IP Office to havelicenses for voicemail operation and the features it requires.
8.5.3 MAPIMessage Application Programming Interface (MAPI) is a Microsoft Windows system architecture that supports addingmessaging functionality into applications. MAPI-enabled e-mail applications can share e-mails and also work together todistribute the mail.
8.5.4 SNTPSimple Network Time Protocol (SNTP) is an Internet standard protocol (built on top of TCP/IP) that provides accuratesynchronization to the millisecond of computer clock times in a network of computers. It synchronizes all the IP Offices inan SCN configuration.
8.5.5 VPNMVoicemail Private Networked Messaging (VPNM) is a set of preferences available only if you have selected VPNM duringinstallation and is licensed within the IP Office configuration. It is used to add a list of the remote VPNM servers andmailbox users on those servers.
8.5.6 VRLUsing the Voice Recording Library (VRL) operation, Voicemail Pro can transfer specific users' automatic and/or manuallyrecorded calls to a third-party application. Users can select VRL as the destination for calls recorded via a Leave Mailaction in a call flow.
Currently, this mode of operation is only supported with the Contact Store for IP Office application from WitnessSystems. This application provides tools to sort, search and playback recordings. It also supports the archiving ofrecordings to DVD.

Implementing Voicemail Pro Page 14315-601064 Issue 8b (Tuesday, December 11, 2012)IP Office 8.1
Index
IndexAaccess works
mailbox 97
actions including 71
Add/Remove 29, 31
Add/Remove Programs 31
Add/Remove Programs window 31AddRef 75
Administrative Tools 74
Alarm Threshold 106Alarm Threshold Level 106
Alarm Threshold Unit
Choose 106
allow tracing
MAPI 75Auth 56, 101
Auto Attendant 93
Automatic 105Automatic Message Deletion 105
Avaya Text
Installing 72
Speech 72
Avaya TTS 71, 72Avaya TTS CD 72
Avaya-Scansoft TTS
compare 71
Bbackupreg.bat 29Barred 93
Breakout 88
Broadcast 91, 116
Ccall 29, 71, 80, 81, 85, 88, 90, 91, 93, 97, 105, 107, 116call archiving system 97
Call Recording 97
Call/VRL 97Callback 90
Centralized Voicemail Pro 116
channel object
speech 75
Channel Reservations 86, 93ChannelEvtSinkTracing 75
channels 75, 86, 93
client connects server 75
Client trying 74
Client/Server Connection Timeout 97
Collect Voicemail 90
COM 75COM objects 75
compare
Avaya-Scansoft TTS 71Computer Management 74
Computer Management window 74
Configure connection to VRL directory 107
Configure Debug Filters window
Close 75configure outcalling 107
Confirm Call Flow Download Window 80
Confirm Voicemail Code 88, 91construct 75
ConstructorTracing 75
ContactStore 21
Continue Offline Message Window 80
continue working 80
Create Voicemail User Account 62
Critical Alarm 106
Cti 75CtiNotifyTracing 75
DDbgView 75
DbgView window 75
Debug 75Debug Filters 75
Debug Filters window 75
Debug View 75
Default Callback 90
Default Settings 106Default Telephony Interface 97
change 31
destructed 75DestructorTracing 75
Diagnostics 75, 76
Dial In Source Numbers 90
Directory View 74
Disk Space 21Disk Space Left 106
Domain 104
SMTP 56, 101drop folder 104
DTMF signalling received 97
Eemail Accounts 30, 88, 91
eMail action 70email inbox 72
Email Messages
Content 69
Email Protocol 60, 65
Select 100Email Reading 71, 72
Email Settings 67
Email TTS 72, 100e-mails 72
Enable Fax Sub-Addressing
Check 97
EnableConnectionTracing 75
EnableFunctionTracing 75EnableObjectTracing 75
EnableProxyTracing 75
EnableRefTracing 75EnableTagTracing 75
EnableTracing 75
Error Logging 132
Export 29
Export Call Flows window 29
Ffax board 97
Fax Calls 97
Fax Sub-Addressing 97
finished working 81FireEventTracing 75
First In-First 105
GGeneral Configuration/system 107
General Configuration/System Preferences 107General System Preferences
Implementing Voicemail Pro Page 14415-601064 Issue 8b (Tuesday, December 11, 2012)IP Office 8.1
General System Preferences
Changing 97
Generic Text Installing 71
Speech 71
generic Text To Speech 71Generic TTS 71
Group Mailbox Names 85
HH<Group Name 90
HMain 90Housekeeping 105
Housekeeping tab 105
HTML 72
Hunt Group Configuration 91
Hunt Group Voicemail Indication 90HuntGroup 91
huntgroupconfiguration.htm 91
IIdentifier 56, 101, 104
Identifying Voicemail Server PC 86
Idle 105
IIS 126Import 29
Import Call Flows 29
IMS Administration 75
IMS Client Keys 75
IMS email 105IMS Server 75
IMS Tracing 75
Inactive 97Inactivity Timeout 97
increase/decrease
want 75
increase/decrease reporting 75
Inetpub/mailroot/Drop 140Install Voicemail Pro 31
Installatio
ACM Gateway 132Installation
Compact 22
Installation Process 72
Installshield 31
InstallShield Wizard 30Welcome 31
Interact 76
Intuity Mailbox Mode 31Intuity Mailbox User Guide
read 97
IP Office 4.0.
IP Office VoiceMail Pro 3.2 30
IP Office Admin Suite window 31IP Office feature key server 16
IP Office Mailbox Mode 31
IP Office Manager application 85IP Office Manager User 86, 116
IP Office Manager User Guide 86
see 116
IP Office Mode 91
IP Office Settings 68IP Office Small Community Network 116
IP Office VoiceMail Pro 3.2
IP Office 4.0. 30IP Office Voicemail Pro CD 30
IP Office Voicemail Pro window
Upgrading 30
LLanguages
Prompts 11
Supported 11
Last In-First Out 105
Licenses Feature Specific 12
Port 12
Required 12licenses exist 71
LIFO 105
Live 81
Local System Account 76
Log Preferences 75Logg
Errors 132
Logging 56, 101Out 81
login 78
long outcalling 107
Mmail drop folder 104Mailbox Mode 91
Select 31
MailboxEvtSinkTracing 75
Main Voicemail Pro Window 97, 99, 100, 105, 106, 107
Making them Live 81MAPI
Password 100
Profile 100MAPI - Email Protocol 60, 65
MAPI email 72, 76, 100
MAPI Email Preferences
Setting 100
MAPI Password leave 100
MAPI Profile 100
MAPI-based Voicemail Email Voicemail Pro 72
MAPIEventTracing 75
Max 97
mdb 29
Member Of 91Message Deletion Times
Setting 105
message housekeeping 105Message Housekeeping Preferences 105
Message Length 97
MessageEvtSinkTracing 75
MessageProcessingTracing 75
Messages button use 90
messages/recordings 97
Microsoft .NET Framework 16Microsoft 3rd 71
Microsoft IIS Web Server 21
Microsoft Sam 71
Microsoft SAPI 71
Microsoft Speech SDK 71Microsoft Speech SDK 5.1
use 71
Microsoft TTS 71Microsoft Windows
Implementing Voicemail Pro Page 14515-601064 Issue 8b (Tuesday, December 11, 2012)IP Office 8.1
Index
Microsoft Windows
part 71
Mike 71mins 97
Mobile 88
Multiple Language TTS Support 71
NNames 81New Software
Install 29, 31
no Remote 78Notify 80
Oon outgoing calls 93
on/off 88, 91
outcalling options 107Outcalling Preferences 30
Setting 107
Outcalling tab 107
Outcalling window
return 107Outlook Express 63
PPassword
MAPI 100
SMTP 56, 101Peak Times 107
Personal Announcements
points 30Ping 126
Play Advice
check 97
Port
SMTP 56, 101Preferences icon 31
Prefix 90, 97
Prime Times 107Problems 76, 93, 97, 116
produce
WAV file 71
Profile 100
Program Maintenance window 31program provides 76
Program window 31
Prompts 11Provide 75
Provide tracing
indicate 75
Provide tracing about 75
Provides voicemail 116
RRead Email 72
Reception 88
Reception/Breakout 88
recognize PC 86
Recording Time 97, 106
REG_DWORD 75Registry 75
Restore 29
Release 75
Remote Campaign Directory 99
Remove 29, 72Remove Voicemail Lite 31
Remove Voicemail Pro 29
Resources 93
restore Database 29
Registry 29
restorereg.bat 29Restrictions 116
Retries
Number 107
Retry Interval 107
Root.vmp 81, 99Run DbgView.exe 75
Russian 71
SSAPI 71
SAPI5 TTS 71ScanSoft 71, 72
ScanSoft TTS 71
SCN 116Selecting Mailboxes 71
Send messages via email 70
Sender 100
Server
SMTP 56, 101Server Name 78
Server PC 71, 75, 97
Set voicemail email 88set Voicemail Email Mode 88
Setup.exe
CD 30
Simple Mail Transfer Protocol 106
Simple Network Management Protocol 106Simplified Chinese 71
Simultaneous 71
Small Community Network 116SMTP 56, 101
SMTP - Email Protocol 60, 65
SMTP email 30
SMTP Receiver 104
SMTP Server Settings 67
SNMP 106
SNMP Alarms Setting 106
Software 29, 71, 75, 78
SOFTWARE/Avaya/Integrated Messaging/Admin” 75
SOFTWARE/Avaya/Integrated Messaging/Client” 75
Source 90Source Numbers
View 90
Speak Text Action 71, 72Specification
PC 17
Specifying
MAPI 100
start operating 97Start Voicemail Pro 29
Startup 31
steps appropriate 100Support Email Text
Speech 71
System Fax Number 97
System Preferences window 97
System Resources 93System Retry Settings 107
Implementing Voicemail Pro Page 14615-601064 Issue 8b (Tuesday, December 11, 2012)IP Office 8.1
System Settings 105
System Status Application
Open 93see 93
System Times 107
System Tool 74systems running 91
Ttab gives
list 90
TCP/IP networking 21telephone number including 90
Telnet 126
temp/backup.mdb 29
Testing
VPNM 140VPNM Setup 140
Text To Speech 71, 72, 100
TimeAndTrace 75TOC 107
tracing
MAPI 75
Trusted Source 90
TTS 71choose 71
includes 71
license 72start 72
TTS Usages 71
TTY 11
UUMSEventTracing 75unchecking
Voicemail On 88
un-checking
Voicemail On 91
Under Log 76Unit Name/IP Address 78
Up Text To Speech
Setting 72Updates In 91
Upgrade 29, 72
IP Office VoiceMail Pro window 30
Voicemail Pro 29, 31
US 71User
SMTP 56, 101
User Source Numbers Configuring 90
userconfiguration.htm 88
UserID 74
Using IP Office Manager 71, 72
Using Voicemail 90Using Windows Explorer 31
utilisation
view 93
VVersion 3.2 29, 30VM Pro 71, 72
VM Pro Generic TTS 71
VM Pro ScanSoft TTS 71VM Pro TTS 72
VM Server Specific 75
Vmdata.mdb 81
VMLite.exe 31
vmp file 81
VMPro TTS 71VMPro User Log 74
VMS API 75
VmsNotifyTracing 75Voice Recording Library 21
Voicemail
Email settings 68
Voicemail Channel Reservations 86, 93
Voicemail Code 88, 90, 91Voicemail Console 76
Voicemail Destination
Leave 86Voicemail Domain Account
Creating 58
Voicemail Email 71, 72, 88, 91
MAPI 100
Voicemail Email Mode Select 88, 91
Voicemail Email Reading 72, 88
Voicemail Help 88, 91Voicemail IP Address 86
Voicemail Lite 88, 90, 91
close 31
Voicemail 31
Voicemail Pro 29, 31Voicemail Lite Folders
Move 31
Voicemail Lite Installation Manual 91Voicemail Lite Manual 88
Voicemail Lite/Pro 86
Voicemail Mailbox 72, 97
Voicemail Message 88, 91
Voicemail On unchecking 88
un-checking 91
Voicemail Password match 97
VoiceMail Pro
System Overview 10
VoiceMail Pro 4.0. 30
Voicemail Pro below version 3.2 29VoiceMail Pro Call Flow
Start 28, 73
Voicemail Pro CD contains 29
Insert 29
Voicemail Pro Client
Close 29, 81
run 78Start 29, 31
use 97
Voicemail Pro Client window 78Voicemail Pro GUI
Start 29
Voicemail Pro housekeeping 105
Voicemail Pro Installation 71
Voicemail Pro installation includes 71Voicemail Pro Login window 78
Voicemail Pro Server 71, 81, 106, 116, 140
connect 78Voicemail Pro Service 30, 100
Locate 76
set 76
Implementing Voicemail Pro Page 14715-601064 Issue 8b (Tuesday, December 11, 2012)IP Office 8.1
Index
Voicemail Pro Software 31, 71
Voicemail Pro TTS 71
Voicemail Pro User Log 74Voicemail Pro window 97, 99, 100, 105, 106, 107
Voicemail Professional Server 76
voicemail ringback 90Check 88
Voicemail Ringback Number 90
Voicemail Server Directory 99
Voicemail Server PC
Identifying 86Voicemail Server Speech Directory 99
voicemail service 28, 73
Voicemail System 99Voicemail System Files 99
Voicemail Trusted Source Access 90
Voicemail Type 86
Line 116
Set 116Voicemail User Account 72
Create 62
VoIP 116VPNM 134
add 110, 137
delete 110, 137
Select 110, 137
test 140VPNM Preferences 140
VPNM Requirements 135
VPNM Setup Testing 140
VPNM Support 136
VPNMreceiver Service 140
VRL 97
VRL Record Length 97
WWaiting Indication 90
WAN 78, 80
Windows 2000 76
Windows Explorer 31Wizard 29, 31
Wordpad 75
Work 81, 107Work Group Member
Email 62
Workstation 78
www.microsoft.com/speech/download/sdk51 71
XXP 76
YYes - Select 80


Implementing Voicemail Pro Page 14915-601064 Issue 8b (Tuesday, December 11, 2012)IP Office 8.1

Implementing Voicemail Pro Page 15015-601064 Issue 8b (Tuesday, December 11, 2012)IP Office 8.1
Performance figures and data quoted in this document are typical, and must bespecifically confirmed in writing by Avaya before they become applicable to anyparticular order or contract. The company reserves the right to make alterationsor amendments to the detailed specifications at its discretion. The publication of
information in this document does not imply freedom from patent or otherprotective rights of Avaya or others.
All trademarks identified by the ® or ™ are registered trademarks or trademarks,respectively, of Avaya Inc. All other trademarks are the property of their
respective owners.
This document contains proprietary information of Avaya and is not to bedisclosed or used except in accordance with applicable agreements.
© 2012 Avaya Inc. All rights reserved.


