Page 1
1
Import Data Connection to a SQL Database
You can create a connection in SAP Analytics Cloud that allows you to import data from
Microsoft SQL Server.
For information on supported database versions, see System Requirements and Technical
Prerequisites.
NOTE: It is recommended that the SAP Cloud Platform Cloud Connector (SAP CP CC)
and SAP Analytics Cloud agent are installed together on a dedicated server, and not a
personal computer. This helps to ensure that multiple users can use an import data
connection without experiencing slowness or downtime.
1. Install Java Standard Edition Runtime Environment (JRE)
Java Standard Edition Runtime Environment (JRE) version 7 or higher must be installed.
To download the latest JRE, please visit Oracle.com.
Page 2
2
It is also recommended to set JRE_HOME environment variable to point to your JRE
installation folder.
Page 3
3
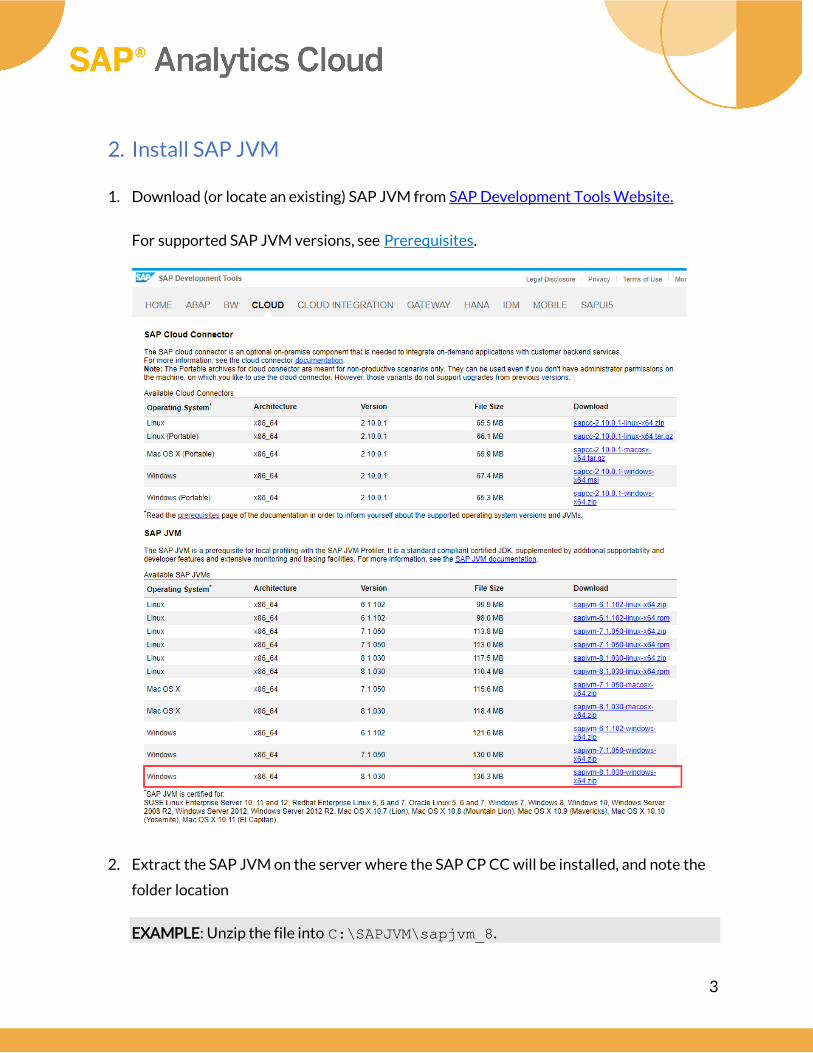
2. Install SAP JVM
1. Download (or locate an existing) SAP JVM from SAP Development Tools Website.
For supported SAP JVM versions, see Prerequisites.
2. Extract the SAP JVM on the server where the SAP CP CC will be installed, and note the
folder location
EXAMPLE: Unzip the file into C:\SAPJVM\sapjvm_8.
Page 4
4
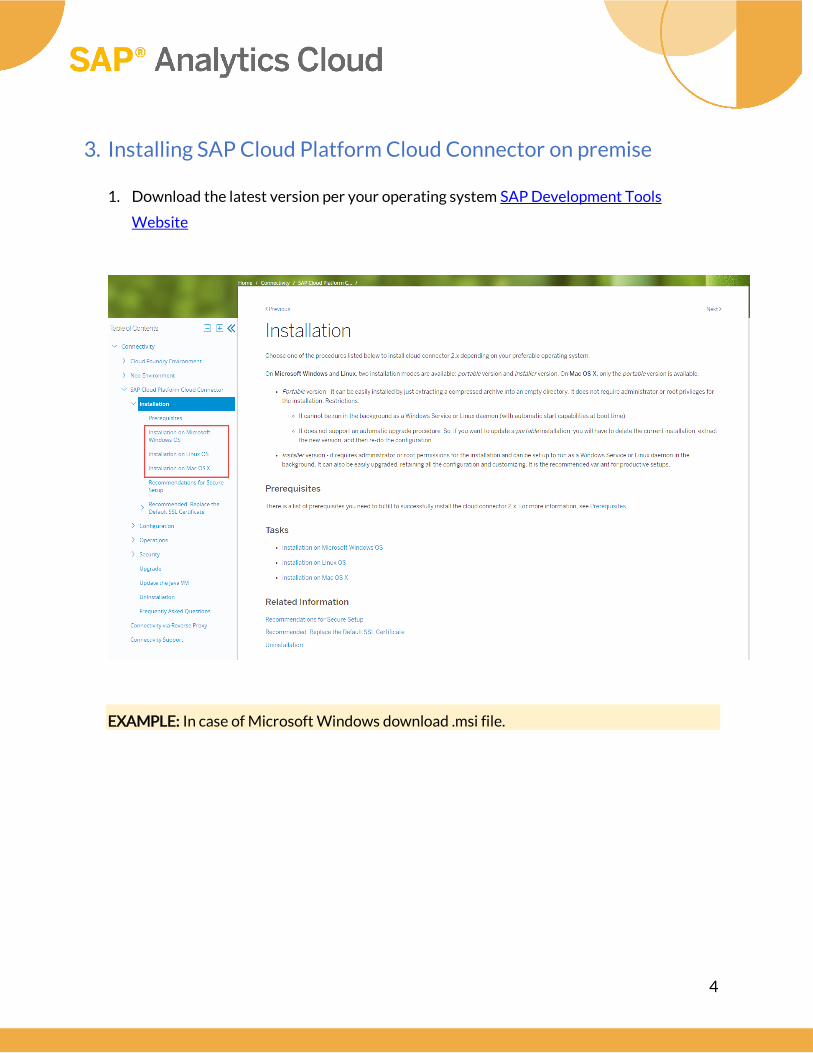
3. Installing SAP Cloud Platform Cloud Connector on premise
1. Download the latest version per your operating system SAP Development Tools
Website
EXAMPLE: In case of Microsoft Windows download .msi file.
Page 5
5
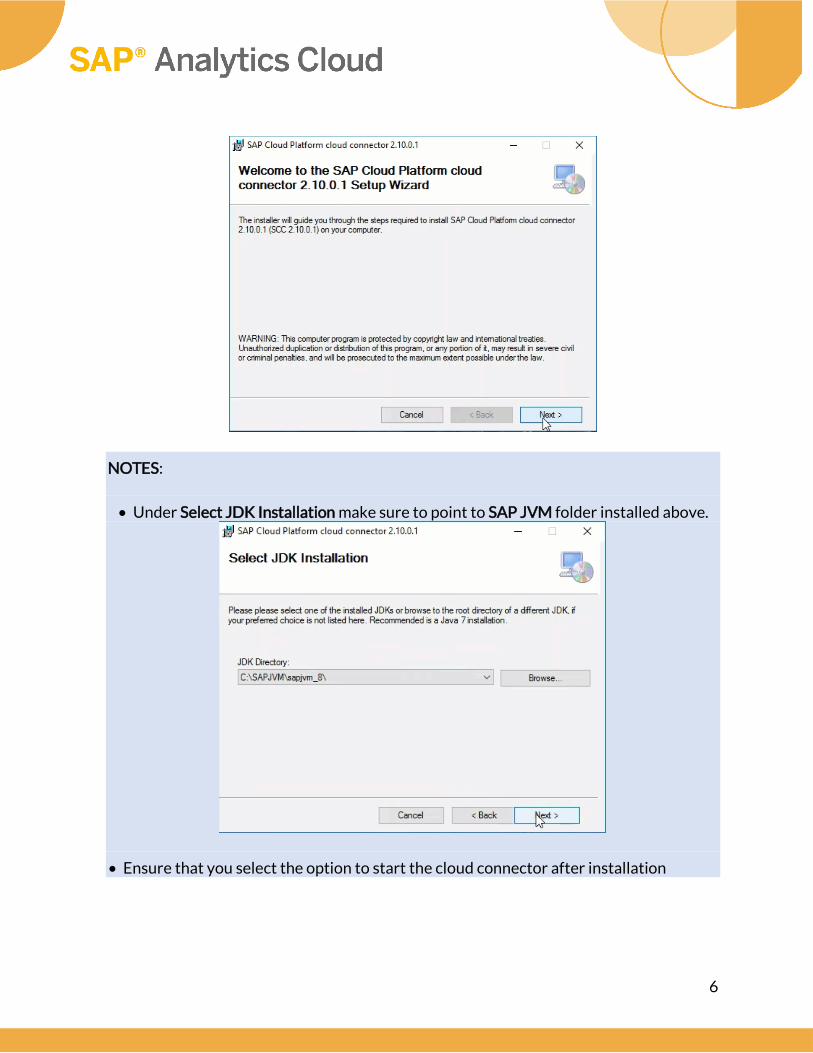
2. Start the installation of the SAP Cloud Platform Cloud Connector
Page 6
6
NOTES:
• Under Select JDK Installation make sure to point to SAP JVM folder installed above.
• Ensure that you select the option to start the cloud connector after installation
Page 7
7
4. Set Up Data Acquisition with SAP CP Cloud Connector
Before the initial configuration of the SAP CP CC you, or the owner of your
organization’s S-User account, must open an SAP Product Support Incident at the
following link:
https://launchpad.support.sap.com/#incident/solution using the component LOD-ANA-BI.
Your support ticket should include:
• A statement about wanting to set up data acquisition with the SAP CP CC
• Your SAP Analytics Cloud tenant URL
• Your S-User account ID
EXAMPLE:
Dear SAP Support,
I would like to set up data acquisition with the SAP Cloud Platform Cloud Connector in
SAP Analytics Cloud.
• My tenant URL is: <your Tenant URL>
• My S-User ID is: <your S-User>
Page 8
8
NOTE: Once our Operations team has configured a subaccount for data acquisition on
your SAP Analytics Cloud system, you will be able to complete the following steps
successfully. Depending on the day and our workload, typically we will get back to you
within an hour or the next business day.
If you do not know your S-User account ID, contact the person within your company who is
handling your SAP account or SAP Support.
Page 9
9
5. Install SAP Analytics Cloud Agent
The SAP Analytics Cloud Agent (SAC Agent) is a WAR file that can be deployed on Tomcat application server. There are two ways this can be done:
1. Installing a separate Tomcat application server to deploy SAC Agent WAR file as described in the Install Apache Tomcat section below
2. Using an existing Tomcat Java application server running in your environment
NOTE: It is recommended that you install a separate Tomcat server since the SAC Agent may require updates. This way you can take advantage of the new connectivity types being offered in SAP Analytics Cloud. For more information, see Updating SAP Analytics Cloud Agent.
1. Install Apache Tomcat
1. To install Apache Tomcat, please visit Apache Tomcat Website and
download the 32/64-bit Windows Server Installer.
NOTE: Apache Tomcat 7 or higher, as well as 64-bit Apache Tomcat must be installed.
Page 10
10
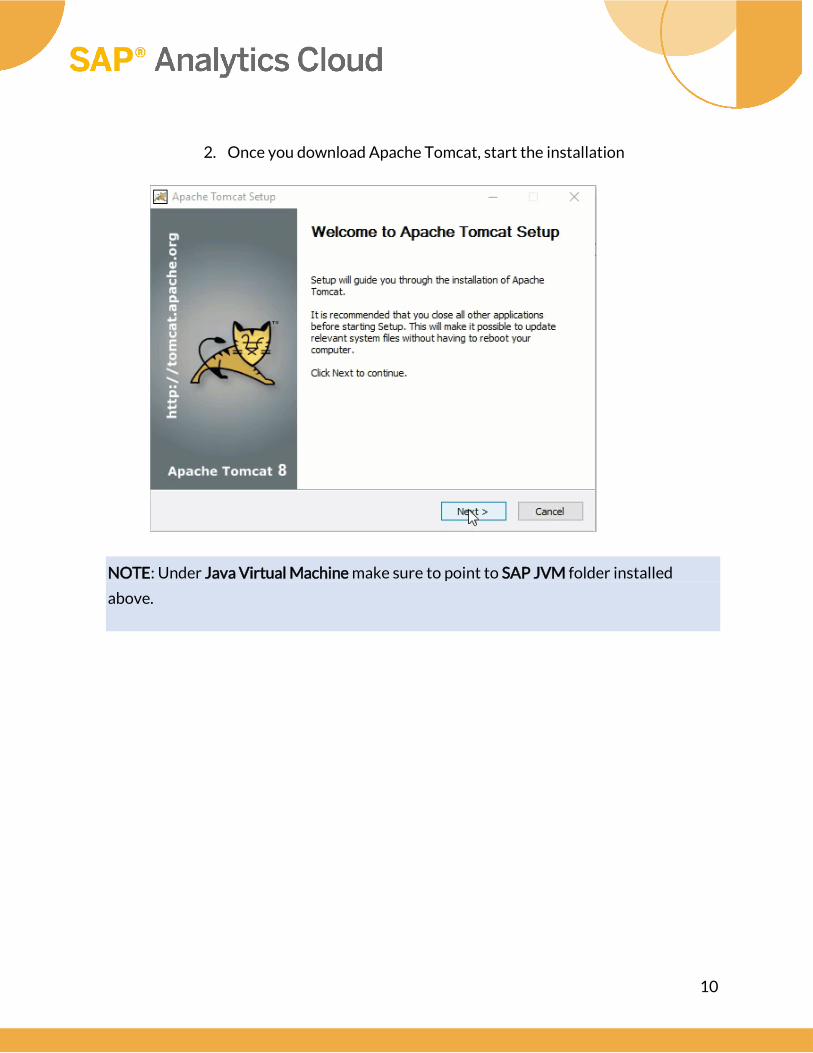
2. Once you download Apache Tomcat, start the installation
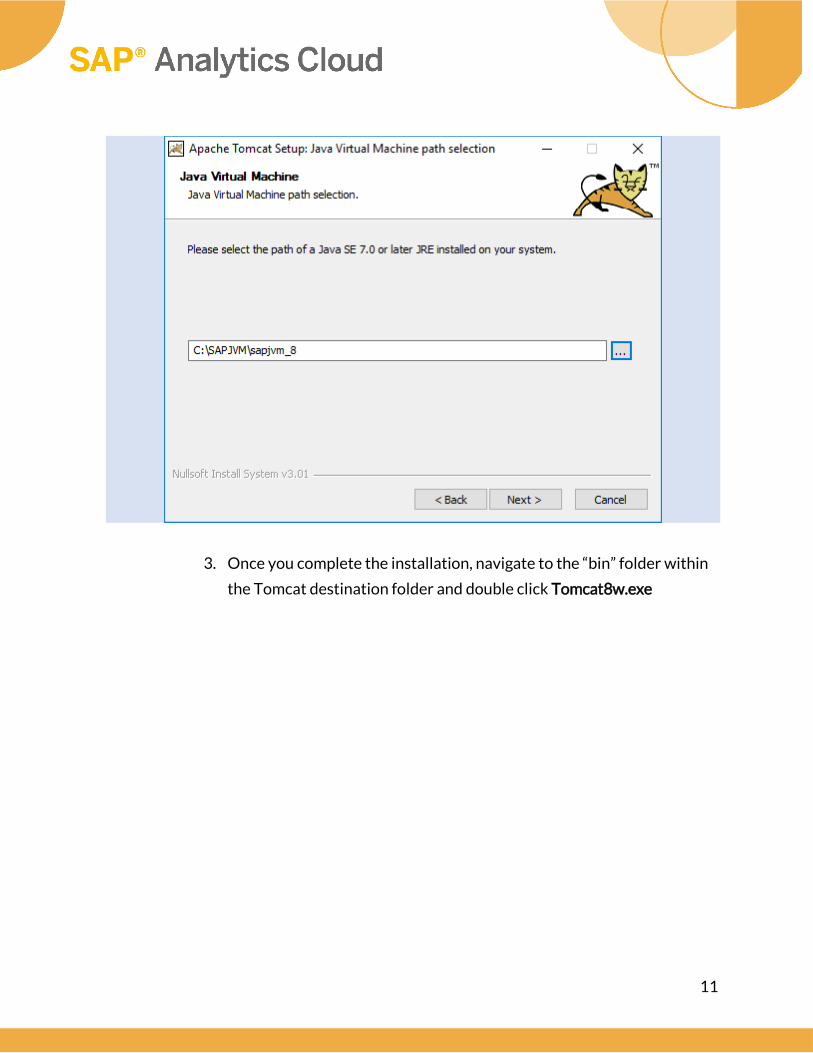
NOTE: Under Java Virtual Machine make sure to point to SAP JVM folder installed
above.
Page 11
11
3. Once you complete the installation, navigate to the “bin” folder within
the Tomcat destination folder and double click Tomcat8w.exe
Page 12
12
4. In the Tomcat properties directory, navigate to the Java tab and
increase the Initial Memory Pool and Maximum Memory Pool values to
1024MB and 2048MB respectively. This will ensure you avoid any
timeout errors when acquiring larger data sets in SAC.
Page 13
13
5. Start Tomcat if it’s not running.
NOTE: If Tomcat cannot be started after these changes, make sure that there is
sufficient memory.
NOTE: Under the General tab you can choose the Startup type as Automatic. This will
enable Tomcat to run automatically after startup. You can also start/stop the Tomcat
application by clicking on the ‘Start’ or ‘Stop’ buttons.
Page 14
14
2. Deploy SAP Analytics Cloud Agent
1. Go to SAP Software Downloads page and enter ‘SAP Analytics Cloud Agent’ into the
search bar at the top
2. Click the SAP Analytics Cloud Agent and download the zip file of the latest version
Page 15
15
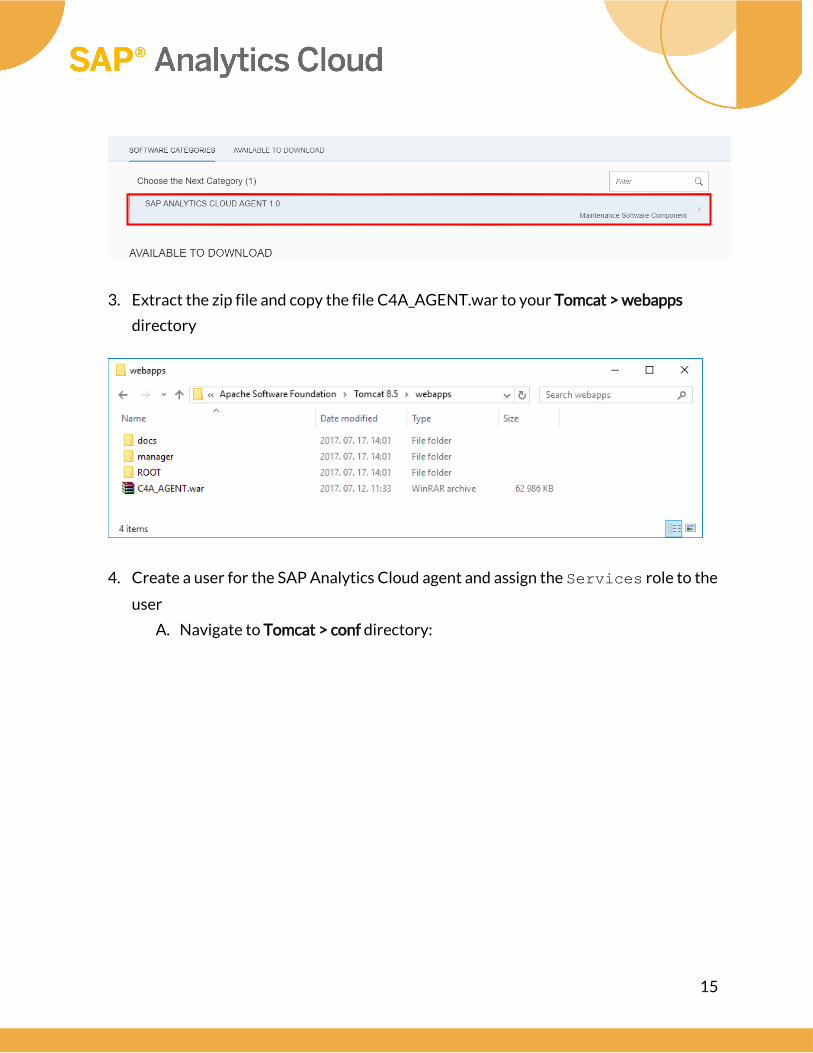
3. Extract the zip file and copy the file C4A_AGENT.war to your Tomcat > webapps
directory
4. Create a user for the SAP Analytics Cloud agent and assign the Services role to the
user
A. Navigate to Tomcat > conf directory:
Page 16
16
B. To create a user, open the tomcat-users.xml file in Notepad and add the
following lines:
<role rolename="Services"/>
<user username="CloudAgent" password="Welcome1" roles="Services"/>
Page 17
17
NOTE: Replace CloudAgent with a user name for the SAP Analytics Cloud agent, and replace Welcome1 with a password for the user.
Page 18
18
The user credentials will be needed later for setting up the connection to SAP Analytics Cloud Agent. For more information about how to create the user and assign the role, see Configuring Manager Application Access.
5. Save the tomcat-users.xml file
6. Start Tomcat by double clicking the Tomcat8.exe file located in the Tomcat
installation folder
EXAMPLE: C:\Program Files\Apache Software Foundation\Tomcat 8.5\bin
7. To ensure that Tomcat is up and running, enter your Tomcat server hostname along
with default Tomcat port 8080 in your browser
NOTE: To find your Tomcat server hostname on Microsoft Windows, navigate to: Control Panel > System and Security > System.
Your Tomcat server hostname is the same as your Full computer name as shown below.
If your Tomcat is connected, the following screen should appear.
Page 19
19
8. Test if the SAP Analytics Cloud Agent installation was successful by opening the
following URL in your browser: http://<Host>:<Port>/C4A_AGENT/deploymentInfo
EXAMPLE: http://Full_Computer_Name:8080/C4A_AGENT/deploymentInfo
A. If prompted in the browser, provide the necessary information:
• User Name: Agent user name specified in tomcat-users.xml file
• Password: Agent password specified in tomcat-users.xml file
B. The version of the deployed SAP Analytics Cloud Agent should be displayed
like below:
6. Configure the SAP CP Cloud Connector
1. Launch the SAPCP Cloud Connector administration page and login
using: https://<SAPCPCC_HOST>:<SAPCPCC_PORT>
A. Replace <SAPCPCC_HOST> with the host name of the system where the
cloud connector is installed.
Page 20
20
B. https://localhost:8443 can be used if accessing from the same machine where
SAP CP CC is installed with 8443 as the default port.
NOTE: Depending on your browser, you may encounter an error message such as the
ones below. To proceed, click on the Advanced button for Chrome or click on Continue
to this Website for Internet Explorer.
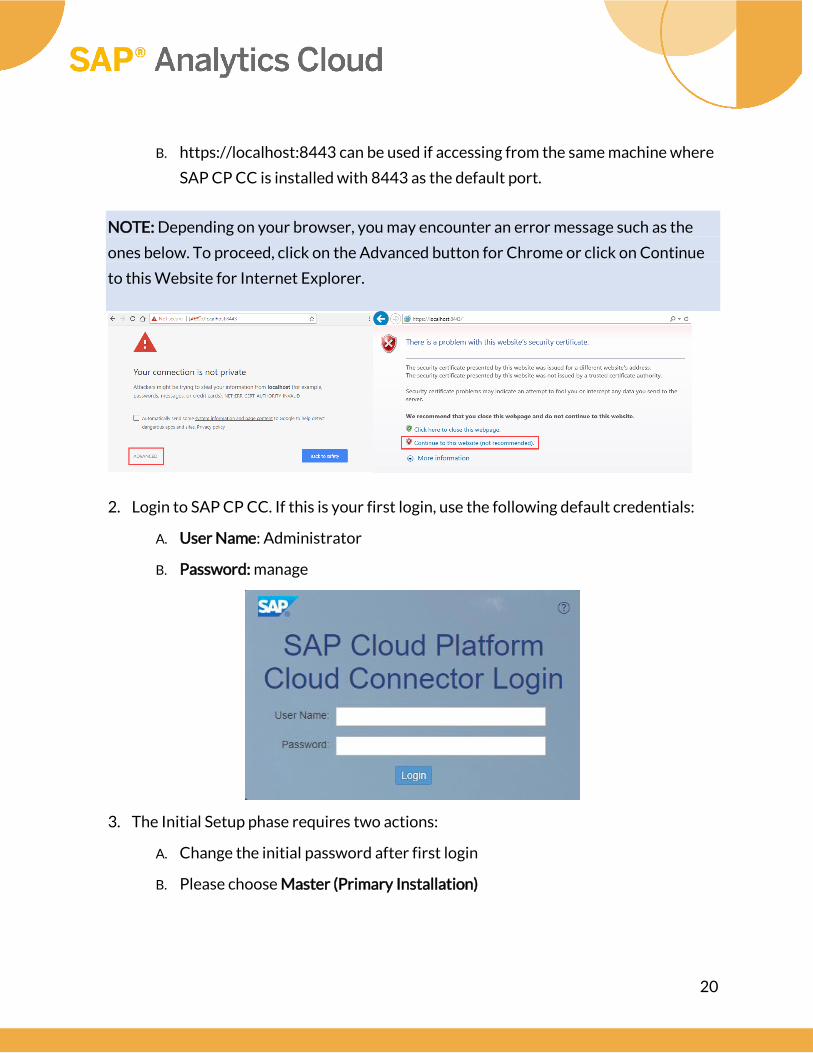
2. Login to SAP CP CC. If this is your first login, use the following default credentials:
A. User Name: Administrator
B. Password: manage
3. The Initial Setup phase requires two actions:
A. Change the initial password after first login
B. Please choose Master (Primary Installation)
Page 21
21
4. Click on Save button
5. The information obtained from SAP Support Incident should be used in the Define
Subaccount dialog to define your subaccount:
NOTE: If you access the internet through a proxy, specify your proxy host and port number
otherwise you can leave those blank.
6. Confirm that you are connected in the Connection Information area. You may need to
select the Connect button to start the connection
Page 22
22
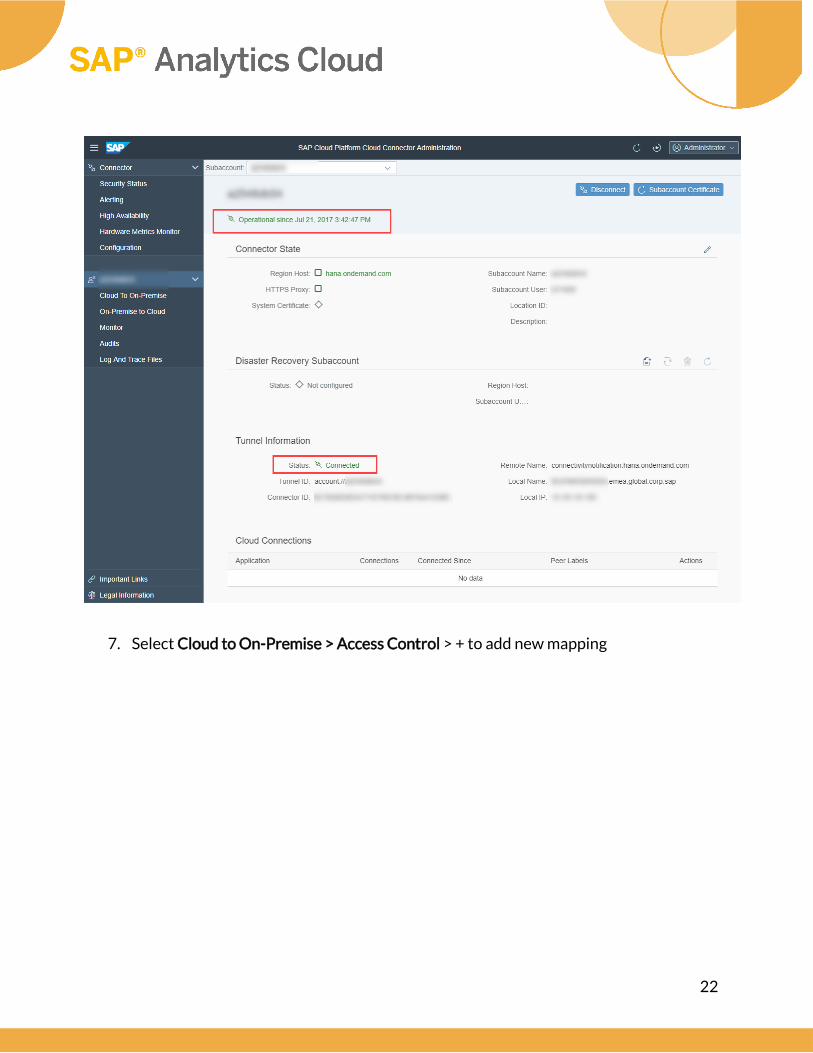
7. Select Cloud to On-Premise > Access Control > + to add new mapping
Page 23
23
8. In the Backend Type list, select Other SAP System and click on Next
9. In the Protocol list, select HTTP and click on Next
NOTE: You can choose HTTPS if SSL is configured on the Apache Tomcat instance
where SAP Analytics Cloud is deployed.
Page 24
24
10. Enter the internal host name and internal port number of the Tomcat server where
the SAP Analytics Cloud Agent is running
11. Enter a Virtual Host name and Virtual Port
The default Virtual Host and Virtual Port are the internal host and port specified
previously. You can keep the default values or you can rename them so that the internal
host name and port are not exposed. The virtual host name and port will be used when
configuring the SAP Analytics Cloud Agent.
Page 25
25
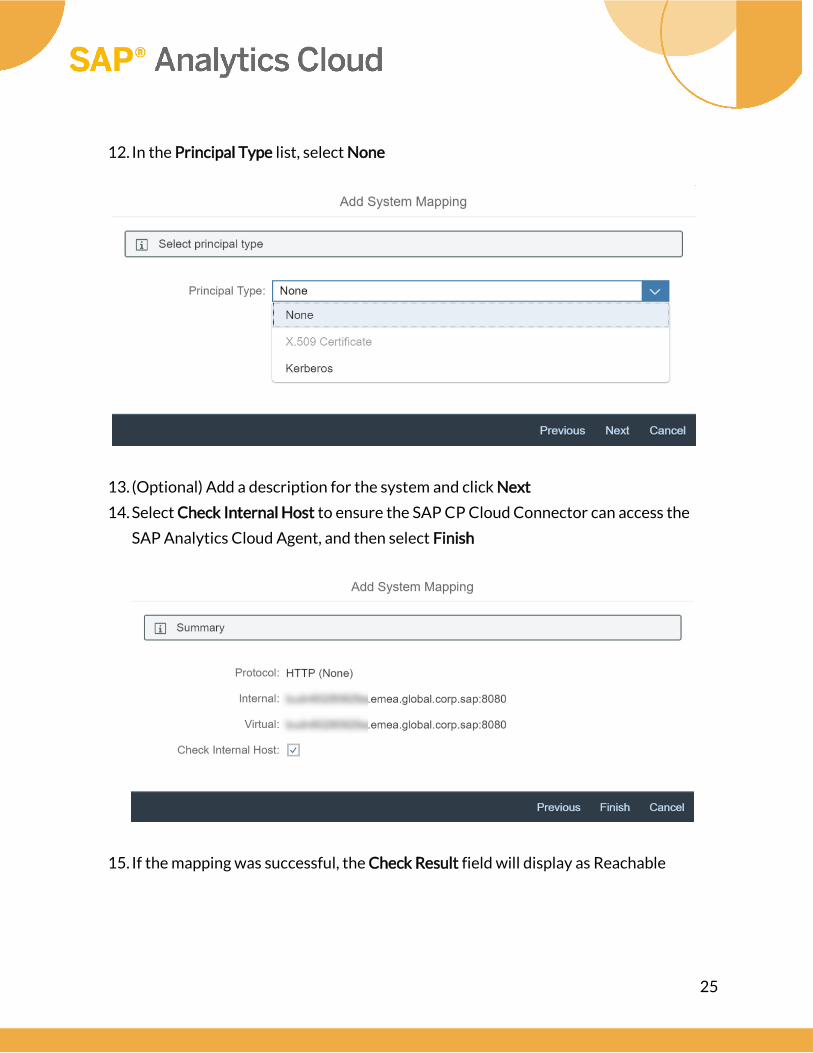
12. In the Principal Type list, select None
13. (Optional) Add a description for the system and click Next
14. Select Check Internal Host to ensure the SAP CP Cloud Connector can access the
SAP Analytics Cloud Agent, and then select Finish
15. If the mapping was successful, the Check Result field will display as Reachable
Page 26
26
16. Select the newly added system
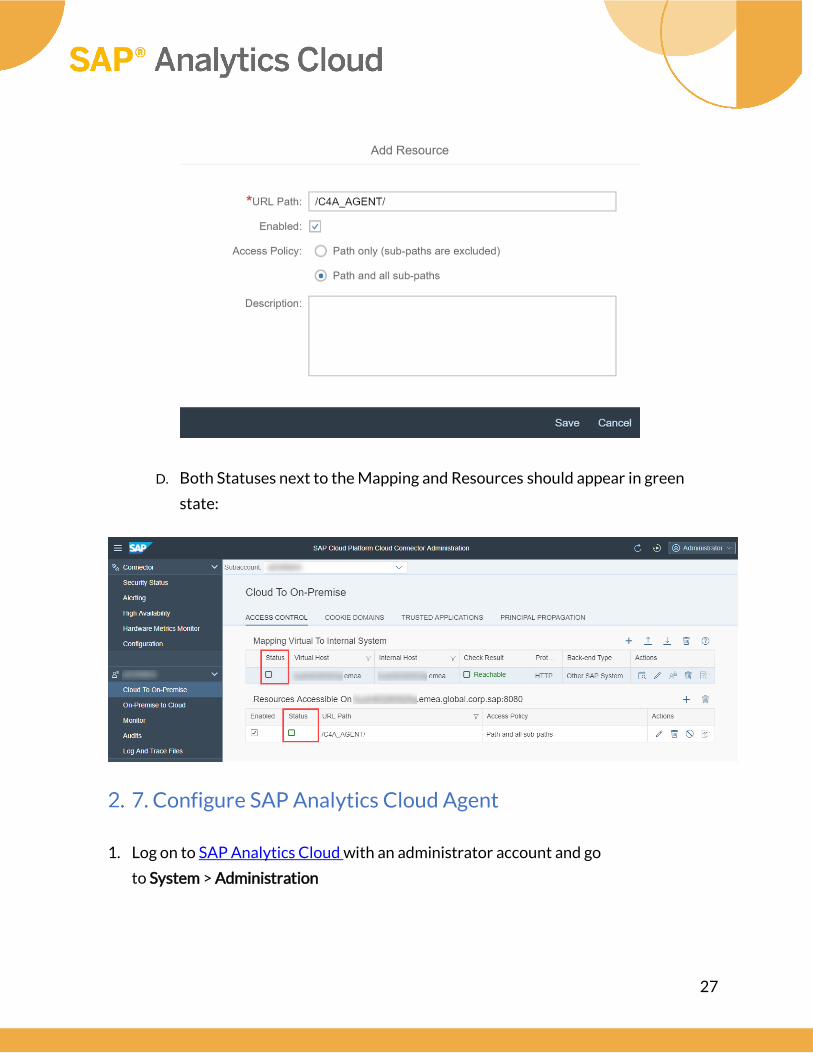
17. Add Resource
A. In the Resources Accessible area, select + to add new resource
B. Set the URL Path to /C4A_AGENT/
C. Choose Path and all sub-paths, and then select Save
Page 27
27
D. Both Statuses next to the Mapping and Resources should appear in green
state:
7. Configure SAP Analytics Cloud Agent
1. Log on to SAP Analytics Cloud with an administrator account and go
to System > Administration
Page 28
28
2. Navigate to the Datasource Configuration tab and select pencil icon in right upper
corner to edit.
3. In the SAP Analytics Cloud agent section, enter the following information:
• Host: Virtual host specified during the system mapping in SAP CP Cloud
Connector
• Port: Virtual port specified during the system mapping in SAP CP Cloud
Connector
• Username: Agent user name specified in tomcat-users.xml file
• Password: Agent password specified in tomcat-users.xml file
Page 29
29
4. Click on Save icon in the right upper corner
5. Click on Check configuration button. The following green popup states that you’ve
configured everything properly:
8. Install JDBC driver for SQL connectivity
If you haven't already installed a JDBC driver, follow these steps:
1. Download JDBC drivers for the databases that you want to connect to, and then place
the downloaded .jar file(s) in an appropriate folder. The .jar files can be in any location on
your machine as long as the .properties file includes the correct file locations (see the
next step). For information about supported databases locate JDBC + Freehand SQL
under the Data Connectivity — Import section.
2. Open a new Notepad file and paste the following:
Page 30
30
#MS SQL Server 2008=
#MS SQL Server 2012=
#MS SQL Server 2014=
#MySQL 5=
#IBM Puredata (Netezza) Server 7=
#Oracle 11=
CAUTION: The names of databases in your properties file must EXACTLY match the
names shown in this example. If you change the names, the SQL connections will fail.
3. Save the file as ‘driverconfig.properties’ and place it in the same machine where
the SAP Analytics Cloud agent is installed. This file specifies the paths to JDBC drivers
you want to use.
4. Specify the path for the JDBC driver located on your computer. In the example
below we modified the file by removing the hashtag before the line of the database
we want to connect to.
Page 31
31
NOTE: If the driver requires more than one .jar file, the paths can be separated by a
semicolon.
5. Define an environment variable pointing to the ‘driverconfig.properties’ file:
How to define an environment variable on Microsoft Windows system
1. To define an environment variable on Microsoft Windows, you’ll need to press
the Start button on and type in ‘environment’, then click on ‘Edit the system
environment variables’ from the result list.
Page 32
32
2. Click on ‘Environment Variables…’
Page 33
33
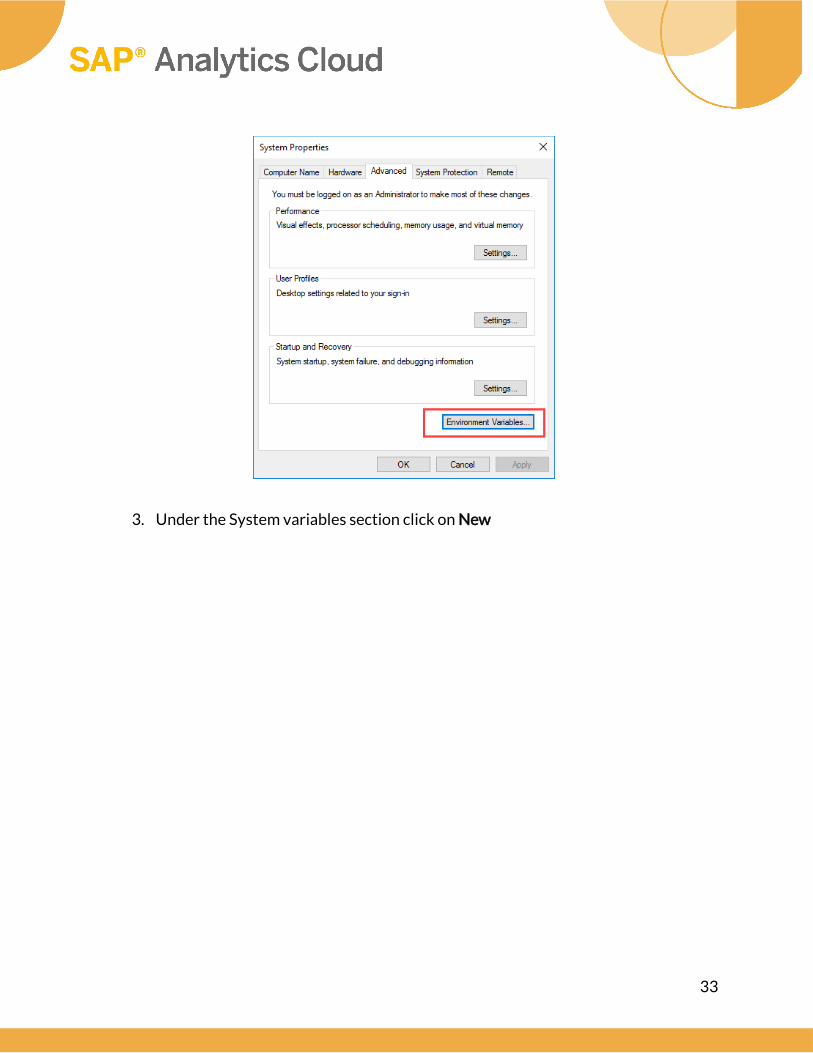
3. Under the System variables section click on New
Page 34
34
4. Specify a system variable pointing to the .properties file as explained above and
Press OK, OK and OK
• Variable name: SAP_CLOUD_AGENT_PROPERTIES_PATH
• Variable value: C:\DriverConfig\driverconfig.properties
Page 35
35
Example: How to download and install the Microsoft JDBC driver for MS SQL
Server.
A. Go to Microsoft website: Microsoft JDBC driver for MS SQL Server
B. Download: enu\sqljdbc_<version>_enu.exe
C. Unzip the file into a folder on your machine
D. Locate sqljdbc42.jar and copy to the DriverConfig folder
NOTE: If using JRE7 copy the sqljdbc41.jar file.
Page 36
36
E. Open the driverconfig.properties file in Notepad
F. Paste the path: C:\DriverConfig\sqljdbc42.jar after MS SQL Server 2014
G. Remove the hashtag before the line to allow SAP Analytics Cloud Agent to
locate the correct JDBC driver(s)
H. Save file
I. Restart Tomcat as mentioned in Install Apache Tomcat section
9. Create a new SQL Database connection
1. From the main menu, click Connection
Page 37
37
2. Click Add Connection > Import Data Connection > SQL Databases
Page 38
38
3. Enter the connection details and your login credentials:
• Connection name
• Description
• Server
• Database
• User Name
• Password
Page 39
39
4. Click OK
The new connection is added to the list of connections on the Connections screen.
5. You can use the recently created SQL Connection to create a model in Menu >
Modeler


![[Yii Framework] Import Excel Data Into Database SQL _ Sabitlabscode](https://static.documents.pub/doc/80x56/55cf863f550346484b95b41d/yii-framework-import-excel-data-into-database-sql-sabitlabscode.jpg)


