The Escape model #LTOWJ5030/ Escape Plus model #XTOWJ5030 Walk-In Tub Installation and Operating Instructions Page 1 of 13 Escape/Escape Plus Walk-In Tub 2006 IMPORTANT INSTALLATION and OPERATING INSTRUCTIONS To be provided to the Best Bath Systems Walk-In Tub owner/user.
Transcript
The Escape model #LTOWJ5030/ Escape Plus model #XTOWJ5030 Walk-In Tub Installation and Operating Instructions
Page 1 of 13 Escape/Escape Plus Walk-In Tub 2006
IMPORTANT INSTALLATION and OPERATING
INSTRUCTIONS
To be provided to the Best Bath Systems Walk-In Tub owner/user.
The Escape model #LTOWJ5030/ Escape Plus model #XTOWJ5030 Walk-In Tub Installation and Operating Instructions
Page 2 of 13 Escape/Escape Plus Walk-In Tub 2006
INSTRUCTIONS PERTAINING TO A RISK OF FIRE, ELECTRIC SHOCK OR INJURY TO PERSONS
IMPORTANT SAFETY INSTRUCTIONS
WARNING: When using this unit, basic precautions should be followed, including the following:
READ, FOLLOW AND SAVE ALL INSTRUCTIONS:
DANGER: To reduce the risk of injury, do not permit children or physically limited persons to use this unit unless they are closely supervised at all times. CAUTION: Prolonged submergence in water (especially hot water) may be harmful. Consult your physician if you want to use a hydro massage system for more than 20 minutes at a time Risk of hyperthermia and possible drowning, water with temperature in excess of 104º F (40º C) may be injurious to your health. Check and adjust water temperature before use. If you are under medical care, consult your physician for guidelines as to water temperature and duration of the hydro massage sessions. Individuals using medication and/or having an adverse medical history should consult a physician before use.
This hydro massage bathtub may be equipped with a water mixing valve on which THE DESIRED SETTINGS ARE TO BE COMPLETED BY THE INSTALLER.
Resetting or tampering with the valve mechanism may lead to serious injury. See Temperature Setting Instructions supplied with the valves.
INSTALLATION INSTRUCTIONS
Please refer to pages 13 – 14 of this manual for installation schematics.
WARNING: When using electrical products, basic precautions should always be followed, including the following:
1. DANGER: RISK OF ELECTRIC SHOCK. The unit MUST be installed and grounded by a qualified service representative using a grounded receptacle and GFCI (Ground-Fault Circuit Interrupter).
2. Grounding is required. The unit should be installed by a qualified service representative and grounded.
3. (For built-in and custom units) Install to permit access for servicing. 4. You must have at least one 15 amp, 120 volt circuit available. If you have the optional secondary air- or water jet system, you must have two 15 amp 120 volt
circuits. 5. The power cord MUST be plugged into the appropriate receptacle behind the unit skirting/access
panels. 6. A qualified service technician must perform all electrical wiring, service and repair in accordance
with all applicable local and national codes. Failure to do so may pose an electrical hazard. 7. Before making any electrical connections, make certain that the electrical power is turned OFF at
the breaker, and take measures to ensure that it CANNOT accidentally be turned on again. 8. Building materials and wiring should be routed away from the blower or heat producing components
of the system to prevent the risk of heat damage or fire. 9. For rough dimensions, see Installation Diagrams. 10. Make certain you have a flat surface that can support the combined weight of the tub, the water and
the user on the levelers.
The Escape model #LTOWJ5030/ Escape Plus model #XTOWJ5030 Walk-In Tub Installation and Operating Instructions
Page 3 of 13 Escape/Escape Plus Walk-In Tub 2006
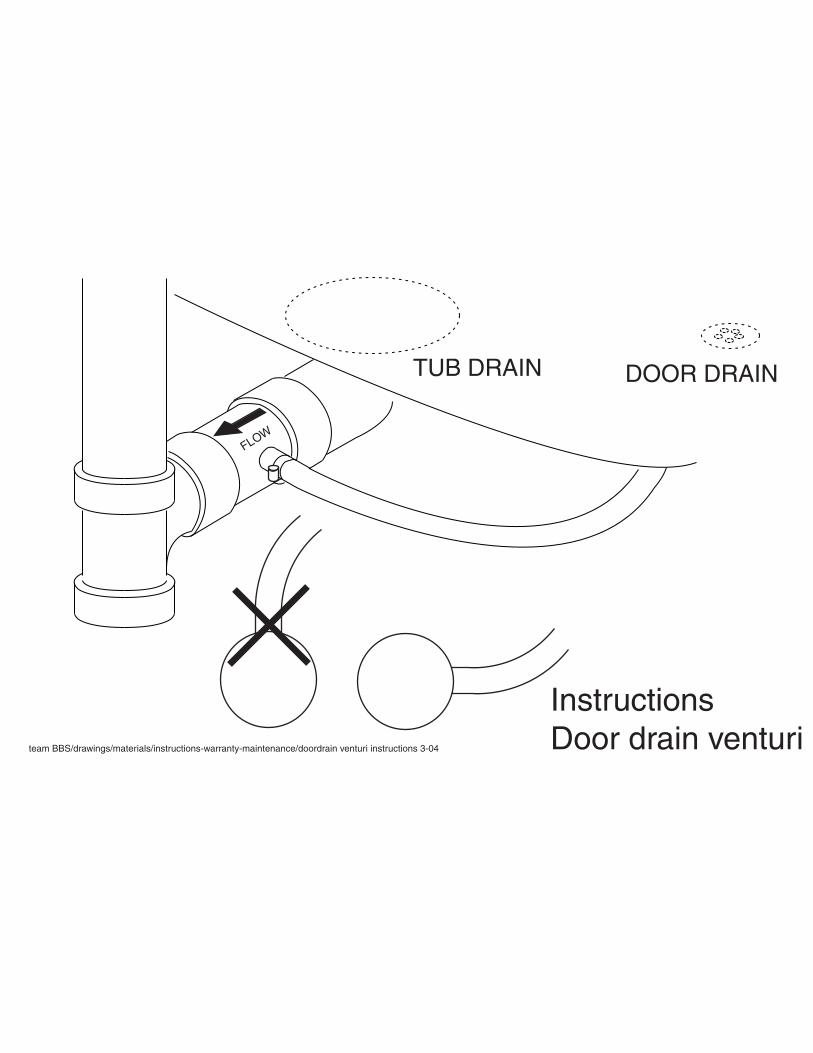
11. The plumbing connections, hot, cold and the drain should be installed to local codes. NOTE: The door drain assembly is attached at one end at the factory. Depending on the type of waste/overflow the tub came with: either a brass saddle Tee at the other end of the tubing or a piece of PVC pipe. The saddle Tee is to be installed between the drain shoe and the Tee so that the hole in the short brass tubing and the saddle Tee are aligned. Do not over tighten the screws.
See illustration sheet on page 11 for a schematic of these instructions.
SAVE THESE INSTRUCTIONS.
RECEIVING AND UNCRATING
1. Inspect the packaging for damage that looks like it may affect the contents before accepting it from the carrier and note the damage on the freight bill.
2. Uncrate the tub, inspect it for damage. If damage is found, file a claim with the carrier immediately. 3. Remove the screws in the boards that hold the tub to the pallet. 4. Lay the tub on its back and remove the boards and knock the two wood blocks off that are attached
to the bottom. 5. The access panels are held on by magnets. Remove these by pulling at the finger cut-out at the
bottom of the panel and put them in a safe place until the installation is complete.
PREPARING THE AREA
1. Remove the existing tub and the wall and floor materials as required. 2. Have a licensed electrician install the power supply per the requirements of the National Electrical
Code and the local authority having jurisdiction. a. The power supply (receptacle) for the pump and/or blower is to be located under the tub skirt
and must be connected to either: If the unit is equipped with only one pump or blower, then it requires one circuit rated
15Amp/120Volt which is properly grounded and protected by a suitable “Ground-Fault Circuit-Interrupter” (GFCI) and a circuit breaker.
If the unit is equipped with both a pump and a blower, then each of these requires a circuit rated 15Amp/120Volt which is properly grounded and protected by a suitable “Ground-Fault Circuit-Interrupter” (GFCI).
b. Follow all safety requirements as referenced under IMPORTANT SAFETY INSTRUCTIONS
on Page 2. 3. After the area is prepared and the floor is clean and level, the tub can be moved there. 4. Have a licensed plumber do the following:
a. Install the waste/overflow assembly and connect the door drain fitting to the drain. b. Install the plumbing fittings on the deck. c. Prepare the hot and cold water supply and the connection to the drain plumbing so that the
final connections can be made through the front access opening with the tub in its final location.
5. For “reverse” plumbing, where the tub is flipped to the opposite hand to enable use where a toilet will be in the way of the tub door, the drain plumbing may be run under the tub if necessary.
The Escape model #LTOWJ5030/ Escape Plus model #XTOWJ5030 Walk-In Tub Installation and Operating Instructions
Page 4 of 13 Escape/Escape Plus Walk-In Tub 2006
FINAL INSTALLATION
1. With all plumbing and electrical preparations complete and the floor clean, check that none of the tubing or wires has come loose and then move the tub into position.
2. Put a level on the flat part of the deck in both directions and see if it is level. 3. If this option was supplied, attach the extension to the tub and caulk the joints. 5. Screw the nailing flange to the studs after pre-drilling the screw holes. 6. Make the final drain connection and hook up the hot and cold lines.
7. Before filling the tub with water, be sure to wipe down the door seal using a damp soft cloth, as well as the surface in the door jamb that will come in contact with the seal. NOTE: For the initial startup make sure that the seal, the door jamb and the door are dry. Each tub is water tested at the factory, but to make sure nothing happened during shipping, handling and installation, it is very important and the installer’s responsibility to water test at this time.
8. Fill the tub and after 5 minutes, check for leaks at all fittings, connections, door hinge and door seal. 9. Turn the pump and/or blower on and let it run for at least 5 minutes. Check for leaks while the
pump/blower is running and again after it has been turned off. Check by hand where a visual check is not possible.
10. Adjust the temperature of the fill water to a level safe for any physical limitations of the end user. 11. Install the access panels by guiding the black plastic boss on the panel to the center of the magnet.
CARE OF YOUR WALK-IN TUB
Regular care of the tub will keep it clean and working at its best. This care should include the tub, the trim and fittings. No maintenance is required for the optional air blower and/or water pump.
POST-INSTALLATION CLEANING WARNING:
1. Do not, under any circumstances use wire brushes, metal sponges, knives, steel wool or scouring pads on any part of the tub.
2. Do not, under any circumstances use powerful solvent such as acetone, lacquer, paint thinner, benzene or abrasive cleanser on any part of the tub.
3. Do not use ammonia or chlorine-based agents on any plated surface as they will deplate the surface and void the warranty on the plated finish.
For a one time cleaning of the tub after installation, proceed as follows:
1. Remove any plaster and/or dabs of paint that have adhered to the surface by gently scraping them off with the sharpened edge of a makeshift spatula fashioned out of wood.
2. Oil or grease spots can be lifted with denatured alcohol. 3. Use liquid, non-bleach dishwashing detergent to remove any construction residue. 4. Lightly rubbing with a liquid cleaning compound (such as polishing compound used for cars),
followed by a light application of liquid or paste wax, will restore luster to any dulled surface. 5. Clean plated surfaces with warm water only.
The Escape model #LTOWJ5030/ Escape Plus model #XTOWJ5030 Walk-In Tub Installation and Operating Instructions
Page 5 of 13 Escape/Escape Plus Walk-In Tub 2006
REGULAR CLEANING Because of the detrimental effects that mineral deposits, soap scum and bacteria have on finished surfaces, it is important to keep your bathtub and the fixtures clean on a regular basis. The best way to counteract the soiling and often time corrosive action of these residues is to prevent water from remaining on any finished surface. For regular maintenance-type cleaning, proceed as follows once a week:
1. Check for stubborn spots. Oily or greasy spots can be lifted with denatured alcohol. 2. In order to keep the seal and the door jamb clean and free of dirt or debris of any kind, it is very
important that the door jamb and the seal to be cleaned with a mild dishwashing detergent and warm water using a soft cloth.
3. Wash all exposed surfaces of the bathtub. 4. Rinse and wipe dry.
If your tub is equipped with the water jet system, then:
1. Once a month, clean the entire system using liquid automatic dishwashing detergent, which will remove body and bath oils, soap residue and other sources that can contribute to bacterial growth in the hydro massage system.
2. Fill the tub to one inch above the highest jet and add one spoonful of liquid automatic dishwashing detergent, turn on the water jet system for 15 minutes, and then drain the tub.
3. Now refill the tub with just fresh water and run the system for another 15 minutes to rinse out the system, again drain the tub and wipe dry.
USER MAINTENANCE INSTRUCTIONS There are serviceable parts in this system. All service, repairs and electrical wiring must be performed by a qualified service technician in accordance with all applicable local and national codes.
OPERATING INSTRUCTIONS FOR YOUR WALK-IN TUB Your Walk-In Tub was specifically designed to deliver dependable operation. All Walk-In Tub hydro massage system fittings are manufactured of strong, highly inert brass and PVC materials to prevent water discoloration and ensure long life. The electrical components also conform to all of the applicable safety standards. Each Walk-In Tub system is thoroughly tested and inspected before leaving the factory to ensure your continued enjoyment and peace of mind. An automatic drying cycle that lasts one minute will start 20 minutes after the blower is turned off. There is a spring check valve at each air jet, but should water somehow still get in the lines, particularly when showering in the tub, this drying cycle will blow it out. Do not add any liquids or powders to the water, especially foamy, bubbly or oily types. Do not use the tub with the hydro massage system activated if you have taken alcohol, drugs or medication, which can greatly increase the risk of fatal hyperthermia. Limit your first session to no more than 10 minutes. Use of the tub too long at an excessively warm temperature for your body may induce hyperthermia.
The Escape model #LTOWJ5030/ Escape Plus model #XTOWJ5030 Walk-In Tub Installation and Operating Instructions
Page 6 of 13 Escape/Escape Plus Walk-In Tub 2006
Hyperthermia occurs when the internal temperature of the body reaches a level above the normal body temperature of 98.6º F (37º C). This level may vary by individuals and conditions. Consult your doctor regarding a safe temperature for your use of the tub. The symptoms of hyperthermia include in the internal temperature of the body, dizziness, lethargy, drowsiness and fainting. The effects of hyperthermia are as follows:
1. Failure to perceive heat 2. Failure to recognize the need to exit the hydro massage 3. Unawareness of impending hazard 4. Fetal damage in pregnant women 5. Physical inability to exit the Walk-In tub 6. Unconsciousness resulting in the danger of drowning
If you are pregnant, or you think you may be pregnant, or if you are under a doctor’s care, consult your physician for guidelines as to the appropriate water temperature and the duration of each use.
IMPORTANT INSTRUCTIONS
CAUTION: DO NOT OPERATE THE HYDRO MASSAGE SYSTEM WITH ANY PARTS OR FITTINGS REMOVED. 1. Use this unit only for its intended use as described in the manual. Do not use attachments not
recommended by the manufacturer. Any improper installation or misuse of the equipment may result in injury to user and will void the warranty.
2. To avoid injury, exercise care when entering or exiting the hydro massage bathtub as the floor may be slippery.
3. Do not use the door as support while entering or exiting the hydro massage bathtub, as the door may swing suddenly with applied weight.
4. Because of the risk of hyperthermia and drowning, do not use the hydro massage bathtub after strenuous exercise.
5. Because of the risk of electric shock, no appliances should be within five (5) feet (1.5 meters) of the bathtub, i.e., hair dryer, lamp, TV, radio, etc.
6. Do not open door until all water has been drained from the tub.
OPERATING YOUR WALK-IN BATH TUB 1. Folding seat model only: If the seat is not already out of the way, fold it in the up position
before you enter the tub. 2. Enter the tub, turn around and latch the door securely. The downward motion of the door lever
locks and seals the door. 3. Fold down the seat and sit down. 4. Turn the drain valve handle (the cover of the overflow) all the way to the left (counter clock wise)
to close the drain. 5. Fill to the water level that is comfortable for you, but at least one inch above the highest water jet. 6. Read and follow the information regarding hyperthermia. However, under no circumstances use a
bathtub with water above 104ºF (40ºC). 7. To operate the water jets, press the on buttons on the key pad on the side of the tub with the on
and off buttons. 8. To increase or decrease the pressure from all the jets, turn the air volume control knob to the
open or closed position to allow more or less air to be drawn in to the jets.
The Escape model #LTOWJ5030/ Escape Plus model #XTOWJ5030 Walk-In Tub Installation and Operating Instructions
Page 7 of 13 Escape/Escape Plus Walk-In Tub 2006
9. To increase the pressure from an individual jet, turn the face of the jet counter-clock wise to allow more water to the jet.
10. To operate the (optional) air jets, press the buttons on the three button key pad on the side of the tub in the following ways: on/off Button: The blower turns on and off. +/- Up/down Button: The speed of the blower increases/decreases until the button is released. +- Pulsation button:
a. The speed of the blower varies gradually from low to high and back to low. b. The blower turns off and on, then off again. 11. The blower returns to maximum speed. 12. After exiting the tub, always leave the door open unless the tub is in use to maintain the integrity
of the door seal.
DOOR SEAL AND DOOR LEAKS If a small leak has been detected around the Walk-In Tub door, check closely for any accumulation of dirt or debris. Any small collection of either on the door seal or where the seal comes in contact with the door jamb could result in a minor leak through the door seal:
1. Before filling the tub with water, be sure to wipe down the door seal using a damp soft cloth, as well as the surface on the door jamb that will come in contact with the seal.
2. Once the above surfaces have been wiped clean, be sure that when closing the door, the latch is completely locked down. NOTE: When draining the water from the tub, be sure that the door latch is in the locked position (forward). If the latch is not secure when draining the tub, as the water level lowers, the pressure on the door will be reduced, thus increasing the possibility of a leak around the door.
3. It is especially IMPORTANT to wipe down the door seal and door jamb after each use in order to maintain the integrity of the seal. NOTE: If there are any contaminates, i.e. dirt, dust, sand, etc. or the buildup of soap scum, calcium, etc. on the seal and/or the door jamb it will have an effect on the integrity of the water seal.
4. If the above steps fail to stop any minor leaks, you may adjust the door latch by using the supplied 1/8” hex key. Please refer to page 11 of this manual for a schematic of the door latch adjustment procedure.
The Escape model #LTOWJ5030/ Escape Plus model #XTOWJ5030 Walk-In Tub Installation and Operating Instructions
Page 8 of 13 Escape/Escape Plus Walk-In Tub 2006
WALK-IN BATH TUB LIMITED WARRANTY
Section I Best Bath Systems warrants the tub and certain components that comprise the Walk-In Tubs Hydro Massage System(s), but no other products, to be free from defects in workmanship and material under normal use and conditions for a period of five (5) year for parts, including the unit hardware, i.e. hinge, door latch mechanism, five (5) years for the finish of the unit, including all gel coat surfaces, i.e. door, access panels, molded wall system and deck extension and life time for the door seal from the date of original purchase by the owner/end-user. Best Bath Systems warrants the water jet pump to be free of defects in the manufacturing, material and workmanship for a period of ten (10) years, the electronic controls and the plating of apparent components for a period of 1 (one) year from the date of original purchase by the owner/end-user. See Section II for DOOR SEAL warranty details. Best Bath Systems warrants the air blower to be free of defects in the manufacturing, material and workmanship for a period of two (2) years, the electronic controls and the plating of apparent components for a period of 1 (one) year from the date of original purchase by the owner/end-user. See Section II for DOOR SEAL warranty details. Should service be required by reason of any defect or malfunction of the product during the warranty period, Best Bath Systems will replace or repair the part or product without charge subject to verification of the defect or malfunction. Best Bath Systems will not be responsible for any water damage to structures or property or damage to the Walk-In Tub’s Hydro Massage Systems. Best Bath Systems will assume no responsibility for the loss of the system, inconvenience due to loss, damage to real or personal property or any other consequential damage. Best Bath Systems will not be liable for any incidental expenses or material charges in connection with removal or replacement of the purchased part or any part or parts of the System. This warranty shall not apply to any type of failure resulting from negligence, abuse, misuse, misapplication, improper installation, alteration or modification, chemical corrosion or improper maintenance. There will be a charge for replacement parts or replacement of the component if the defective item is returned for any of the reasons listed above. Best Bath Systems reserves the sole authority to make any type of warranties or representations concerning Best Bath Systems or its products and will not be responsible for any warranties or representations made by any outside source, including dealers, retailers, distributors or contractors.
The Escape model #LTOWJ5030/ Escape Plus model #XTOWJ5030 Walk-In Tub Installation and Operating Instructions
Page 9 of 13 Escape/Escape Plus Walk-In Tub 2006
Best Bath Systems does not warrant the installation of their Walk-In Tub including the plumbing or electrical connection installation. Improper or negligent installation of the product or other components, alteration made of the Walk-In Tub, or alterations or modifications to the system, may cause the product or the system to malfunction. Such problems are not covered by the warranty, expressed or implied, given by or otherwise imposed by law on Best Bath Systems. This is the only warranty expressed or implied by Best Bath Systems. Warranties implied under State Law, including any implied warranty of merchantability or fitness for a particular purpose shall be limited to: five (5) year for parts, including the unit hardware, i.e. hinge, handle mechanism, five (5) years for the finish of the unit, including all gel coat surfaces, i.e. door, access panels, deck extension, flange trim and wall surround system and life time for the door seal from the date of original purchase by the owner/end-user. The air blower to be free of defects in the manufacturing, material and workmanship for a period of two (2) years, the electronic controls and the plating of apparent components for a period of 1 (one) year from the date of original purchase by the owner/end-user. This warranty is non-transferable. Section II. DOOR SEAL Best Bath Systems warrants the door seal for the life of the unit under normal use and conditions. This warranty shall not apply to any failure resulting from negligence, abuse, misuse, misapplication, alteration or modification or improper maintenance. The replacement door seal will be issued to the end user and it will be the responsibility of the end user to determine the means of installation. Best Bath Systems will not be liable for any incidental expenses or material charges in connection with removal or replacement of the door seal.
CUSTOMER SERVICE
Best Bath Systems 1-800-727-9907 ext. 229 Monday – Friday 8:00 – 5:00 Mountain Time.
Brigette Weis
TextBox
Accessible Environments, Inc. - Authorized Dealer for Best Bath Systems 800-643-5906 www.acessinc.com ......................................................................................................................................
FLOW
TUB DRAIN DOOR DRAIN
team BBS/drawings/materials/instructions-warranty-maintenance/doordrain venturi instructions 3-04
InstructionsDoor drain venturi
FLOW
TUB DRAIN DOOR DRAIN
team BBS/drawings/materials/instructions-warranty-maintenance/doordrain venturi instructions 3-04
InstructionsDoor drain venturi
DIV
. OF
FIB
ER
GLA
SS
SY
ST
EM
S IN
C.
MO
DE
L: A
ll w
alk-
in tu
bs
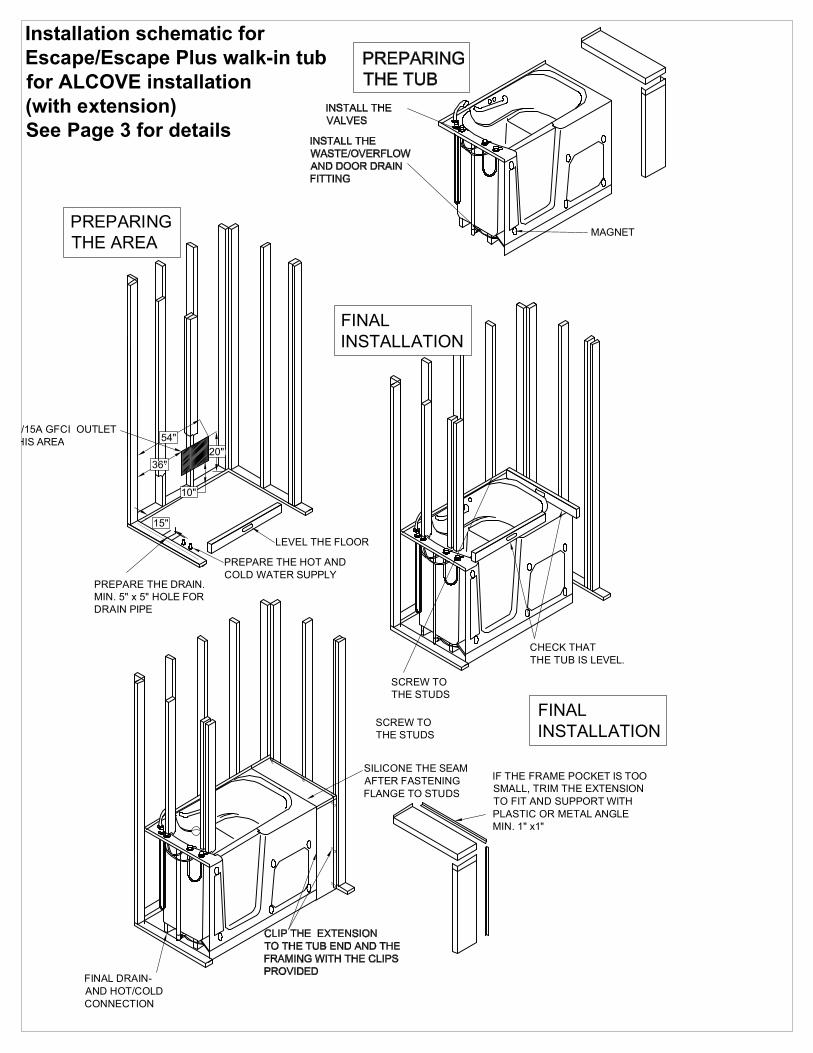
SILICONE THE SEAMAFTER FASTENINGFLANGE TO STUDS
PREPARINGTHE AREA
15"
PREPARE THE DRAIN.MIN. 5" x 5" HOLE FORDRAIN PIPE
36"
V/15A GFCI OUTLETHIS AREA
PREPARE THE HOT ANDCOLD WATER SUPPLY
54"
10"
20"
IF THE FRAME POCKET IS TOOSMALL, TRIM THE EXTENSIONTO FIT AND SUPPORT WITHPLASTIC OR METAL ANGLEMIN. 1" x1"
SCREW TOTHE STUDS
FINALINSTALLATION
FINAL DRAIN-AND HOT/COLDCONNECTION
MAGNET
CHECK THATTHE TUB IS LEVEL.
SCREW TOTHE STUDS
FINALINSTALLATION
LEVEL THE FLOOR
Installation schematic forEscape/Escape Plus walk-in tubfor ALCOVE installation(with extension)See Page 3 for details
PREPARINGTHE AREA
CHECK THATTHE TUB IS LEVEL.
15"
PREPARE THE DRAIN.MIN. 5" x 5" HOLE FORDRAIN PIPE
36"
INSTALL THEWASTE/OVERFLOWAND DOOR DRAINFITTING
INSTALL THE VALVESALLOWING SPACE FOR(OPTIONAL) WALL PANELS
PREPARINGTHE TUB
PREPARE THE HOT ANDCOLD WATER SUPPLY
SCREW TOTHE STUDS
FINALINSTALLATION
FINAL DRAIN-AND HOT/COLDCONNECTION
46"
10"
20"
1 ea 110V/15A GFCI OUTLET FOR THE JET PUMP AND1 ea 110V/15A GFCI OUTLET FOR THE BLOWER IN THIS AREA.
LEVEL THE FLOOR
Installation schematic forEscape/Escape Plus walk-in tubfor CORNER installationSee Page 3 for details
teamBBS/drawings/materials/instructions-warranty-maintenance/installation instructions 4-p tub/showers and 3-p wall surrounds SnapJoint 1 of 3 .pdf doc#IBB 082005-008a
division of Fiberglass Systems, Inc. 4545 Enterprise Street Boise, ID 83705 ph.: 800-727-9907 fax: 800-627-0929 www.best-bath.com
Page 1 of 3INSTALLATION INSTRUCTIONS FOR MODEL# LTOW5030XTOW5030
General information The unit consists of:1 ea Tub (unless it is a wall surround)1 ea or 2 ea Side wall panels1 ea Back wall panel1 ea Tube of mould resistant silicone caulk1 ea Rubber suction cup
This multi-piece tub/shower (wall surround) was designed for remodeling. This unit is installed from the front without the need for access from behind.A system of springs clips in the corners ensure alignment of the wall sections. INSTALLATION (see drawing on page 3)
Prepare any plumbing that will not be accessible later and drill any holes needed for plumbing.Always drill from the finished side. Standard hole saws and jigsaw blades will cut fiberglass.After installation: Install the optional flange trim kit.Caulk all panel joints with a small nozzle tip on the silicone caulking tube.Remove the protective duct tape from the springs on the side walls just prior to installation.
Scratches caused during installation may be wet-sanded out with 400, then 600 grit wet/dry sandpaper and then buffed to gloss with any automotive or marine buffing compound.
4T/S 3WS SJ
Brigette Weis
TextBox
Accessible Environments, Inc. - 800-643-5906 www.acessinc.com - authorized dealer for Best Bath Systems . ...............................................................................................................................
teamBBS/drawings/materials/instructions-warranty-maintenance/installation instructions 4-p tub/showers and 3-p wall surrounds SnapJoint 2 of 3 .pdf doc#IBB 072003-008a
PREPARATIONCheck that all the parts are there and if there is minor damage, it can be touched up later.Damage claims should be made immediately with the carrier.1 ea or 2 ea Side Wall panels1 ea Back Wall panel1 ea tube of silicone caulk1 ea Black rubber suction cupRemodel Flange Trim Kit ( optional ) Other Options
TOOLS GeneralTape measurePencilUtility knife Drill/screw gun #2 Phillips head bitPry barPlumb bobLevel (2 ft.)Caulk gunLeather gloves (to protect from fibers and metal springs)
TOOLS for Mixing Valve PlumbingHole saw, 4" for mixing valve holeHole saw, 1-1/4" for supply elbow- or fixed head holePipe wrenchPropane torchWire brush for copper fittingsPipe cutter for copper pipe Hack saw
SUPPLIES General30 ea 1-1/2" drywall screws5 ea Shim wedges
SUPPLIES for Mixing Valve PlumbingFlux SolderPipe dope/Teflon tapeEmery cloth
Page 2 of 3
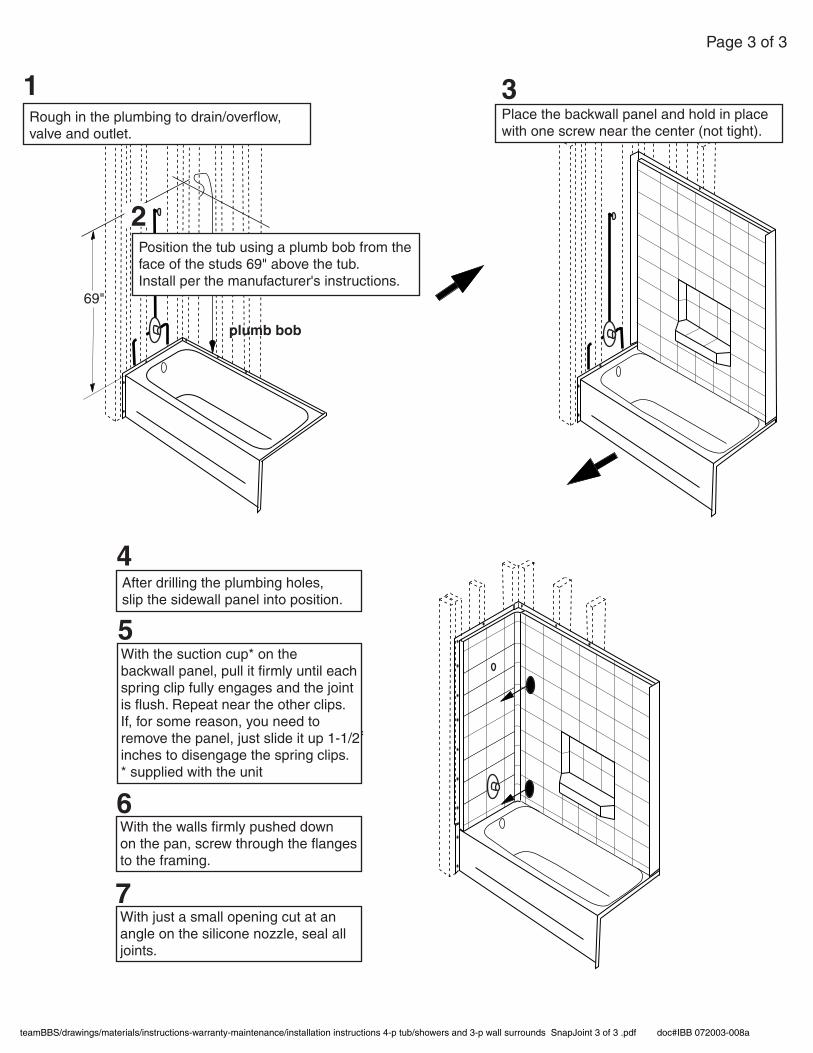
69"
Position the tub using a plumb bob from the face of the studs 69" above the tub.Install per the manufacturer's instructions.
Rough in the plumbing to drain/overflow, valve and outlet.
plumb bob
Page 3 of 3
1
6
4
5
Place the backwall panel and hold in place with one screw near the center (not tight).
3
With the suction cup* on the backwall panel, pull it firmly until each spring clip fully engages and the jointis flush. Repeat near the other clips. If, for some reason, you need to remove the panel, just slide it up 1-1/2 inches to disengage the spring clips.* supplied with the unit
With the walls firmly pushed down on the pan, screw through the flanges to the framing.
7With just a small opening cut at an angle on the silicone nozzle, seal all joints.
After drilling the plumbing holes, slip the sidewall panel into position.
2
teamBBS/drawings/materials/instructions-warranty-maintenance/installation instructions 4-p tub/showers and 3-p wall surrounds SnapJoint 3 of 3 .pdf doc#IBB 072003-008a