Important Instructions of Electric Heavy Duty 2-Hole Drill machine 1. Please do not put on the place of insecurity inclined to avoid fall injuries. 2. Please do not put your hands or objects near the punch pins once machine connected to the power supply. 3. Do not touch hollow pin(s) immediately after finish drilling within 15 minutes as the pin will be very hot. 4. Do not put your hands closed to paper guard while operate the machine. 5. Do not re-punch or partially punch holes. 6. When use this machine for long time without taking a break, it will power off automatically to protect machine, or engine will overheat. Please stop use it more than 15 minutes before turn on again. 7. Design for use on Standard Paper Only. Do not use for punching special papers such as board, vinyl covered or cloth covered paper, nor materials other than paper. Misuse will result in damage to your DRILL MACHINE. 8. Please always keep machine on turn off while you leave work. 9. Please use a separate socket with standard voltages. Do not use an extension cord and multi-joint socket to avoid risk of fire or electrical conductivity. 10. Shut off the power before starting the normal maintenance, service, adjustment, or repairing. And, please enquire/contact your dealer for any problem of this machine. 11. The machine is available for adult use only. Please be sure to put machine at the place where the child is not easy to obtain. 1
Transcript
Important Instructions of Electric Heavy Duty 2-Hole Drill machine
1. Please do not put on the place of insecurity inclined to avoid fall injuries.
2. Please do not put your hands or objects near the punch pins once machine connected to the
power supply.
3. Do not touch hollow pin(s) immediately after finish drilling within 15 minutes as the pin will be
very hot.
4. Do not put your hands closed to paper guard while operate the machine.
5. Do not re-punch or partially punch holes.
6. When use this machine for long time without taking a break, it will power off automatically to
protect machine, or engine will overheat. Please stop use it more than 15 minutes before
turn on again.
7. Design for use on Standard Paper Only. Do not use for punching special papers such as board,
vinyl covered or cloth covered paper, nor materials other than paper. Misuse will result in damage
to your DRILL MACHINE.
8. Please always keep machine on turn off while you leave work.
9. Please use a separate socket with standard voltages. Do not use an extension cord and multi-joint
socket to avoid risk of fire or electrical conductivity.
10. Shut off the power before starting the normal maintenance, service, adjustment, or repairing.
And, please enquire/contact your dealer for any problem of this machine.
11. The machine is available for adult use only. Please be sure to put machine at the place where the
child is not easy to obtain.
1
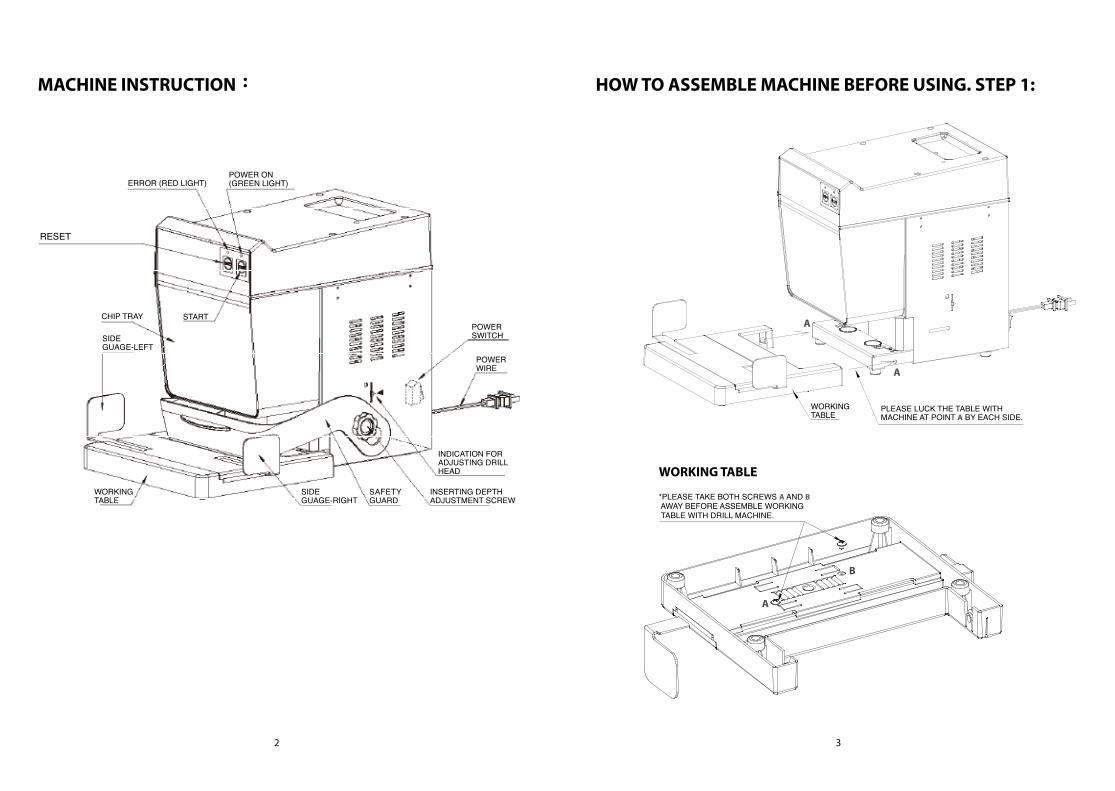
MACHINE INSTRUCTION: HOW TO ASSEMBLE MACHINE BEFORE USING. STEP 1:
ERROR (RED LIGHT)
RESET
PLEASE LUCK THE TABLE WITH MACHINE AT POINT A BY EACH SIDE.
*PLEASE TAKE BOTH SCREWS A AND B AWAY BEFORE ASSEMBLE WORKING TABLE WITH DRILL MACHINE.
POWER ON(GREEN LIGHT)
STARTCHIP TRAY
SIDEGUAGE-LEFT
SIDEGUAGE-RIGHT
SAFETY GUARD
INSERTING DEPTHADJUSTMENT SCREW
INDICATION FORADJUSTING DRILLHEAD
WORKINGTABLE
WORKINGTABLE
POWERSWITCH
POWERWIRE
A
A
B
A
WORKING TABLE
2 3
29
80
7
30
20
10
0
30
20
10
0
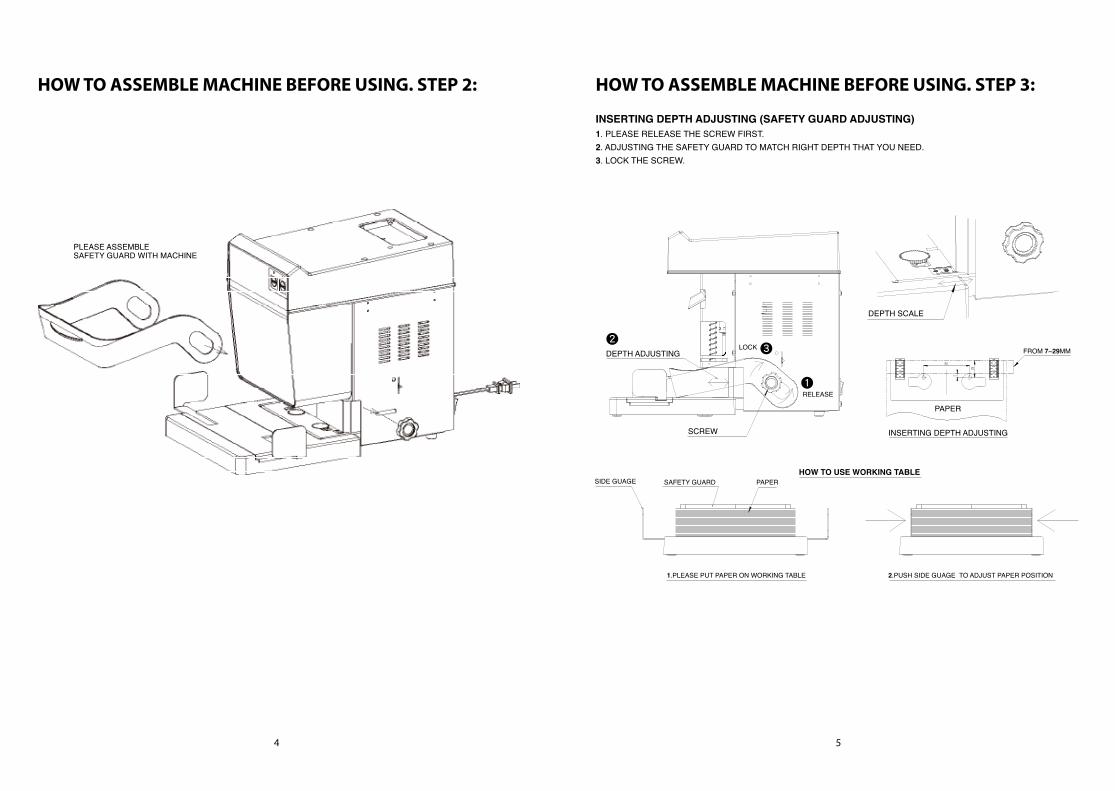
HOW TO ASSEMBLE MACHINE BEFORE USING. STEP 3:HOW TO ASSEMBLE MACHINE BEFORE USING. STEP 2:
PLEASE ASSEMBLESAFETY GUARD WITH MACHINE
DEPTH ADJUSTING
DEPTH SCALE
INSERTING DEPTH ADJUSTING
HOW TO USE WORKING TABLE
1.PLEASE PUT PAPER ON WORKING TABLE 2.PUSH SIDE GUAGE TO ADJUST PAPER POSITION
FROM 7~29MM
SIDE GUAGE SAFETY GUARD PAPER
SCREW
RELEASE
PAPER
1
32
INSERTING DEPTH ADJUSTING (SAFETY GUARD ADJUSTING)1. PLEASE RELEASE THE SCREW FIRST.2. ADJUSTING THE SAFETY GUARD TO MATCH RIGHT DEPTH THAT YOU NEED.3. LOCK THE SCREW.
LOCK
4 5
RESET START
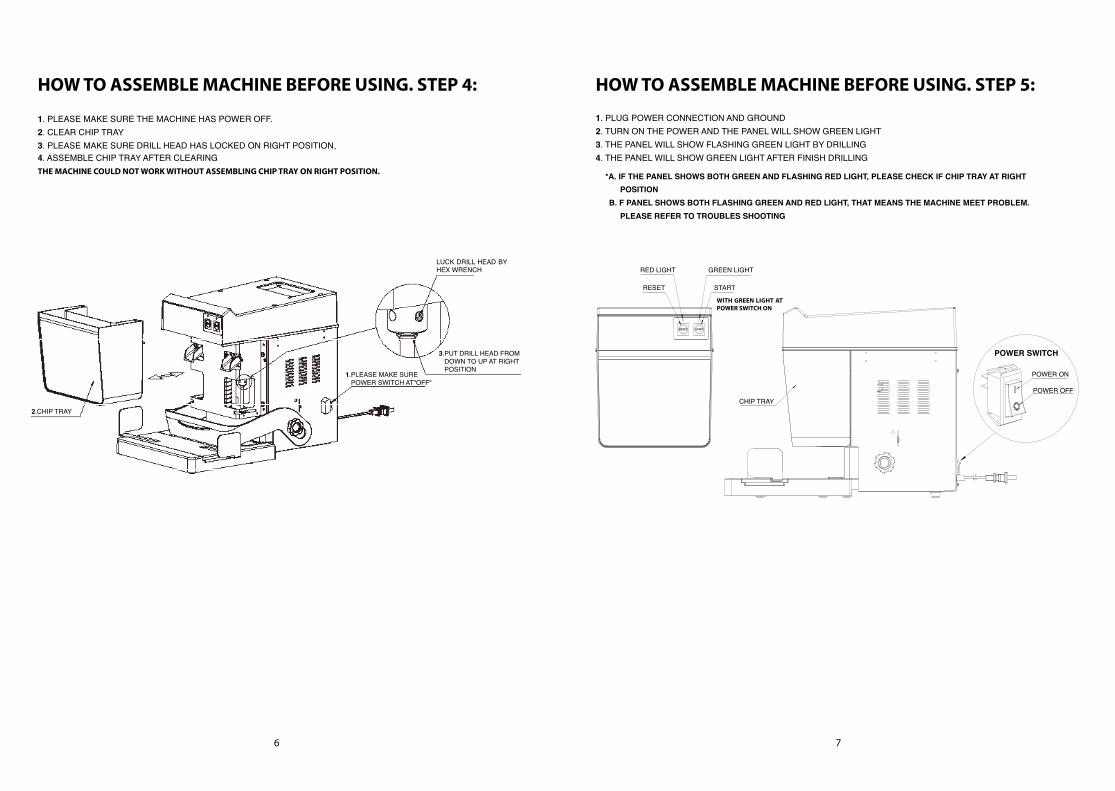
HOW TO ASSEMBLE MACHINE BEFORE USING. STEP 5:HOW TO ASSEMBLE MACHINE BEFORE USING. STEP 4:
1. PLEASE MAKE SURE THE MACHINE HAS POWER OFF.2. CLEAR CHIP TRAY3. PLEASE MAKE SURE DRILL HEAD HAS LOCKED ON RIGHT POSITION.4. ASSEMBLE CHIP TRAY AFTER CLEARINGTHE MACHINE COULD NOT WORK WITHOUT ASSEMBLING CHIP TRAY ON RIGHT POSITION.
1. PLUG POWER CONNECTION AND GROUND2. TURN ON THE POWER AND THE PANEL WILL SHOW GREEN LIGHT3. THE PANEL WILL SHOW FLASHING GREEN LIGHT BY DRILLING4. THE PANEL WILL SHOW GREEN LIGHT AFTER FINISH DRILLING
*A. IF THE PANEL SHOWS BOTH GREEN AND FLASHING RED LIGHT, PLEASE CHECK IF CHIP TRAY AT RIGHT POSITION B. F PANEL SHOWS BOTH FLASHING GREEN AND RED LIGHT, THAT MEANS THE MACHINE MEET PROBLEM. PLEASE REFER TO TROUBLES SHOOTING
2.CHIP TRAY
1.PLEASE MAKE SURE POWER SWITCH AT"OFF"
3.PUT DRILL HEAD FROM DOWN TO UP AT RIGHT POSITION
LUCK DRILL HEAD BY HEX WRENCH
RESET
RED LIGHT GREEN LIGHT
START
CHIP TRAY
POWER SWITCH
POWER ON
POWER OFF
WITH GREEN LIGHT AT POWER SWITCH ON
6 7
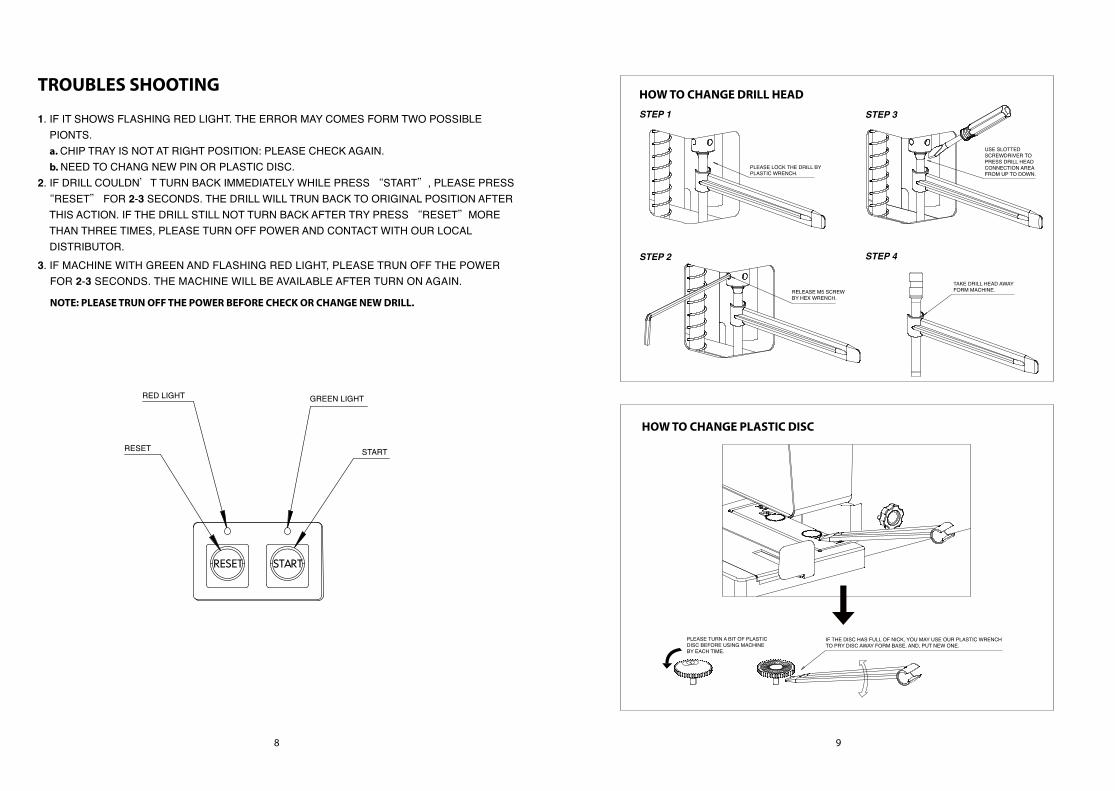
TROUBLES SHOOTING
1. IF IT SHOWS FLASHING RED LIGHT. THE ERROR MAY COMES FORM TWO POSSIBLE PIONTS. a. CHIP TRAY IS NOT AT RIGHT POSITION: PLEASE CHECK AGAIN. b. NEED TO CHANG NEW PIN OR PLASTIC DISC.2. IF DRILL COULDN’T TURN BACK IMMEDIATELY WHILE PRESS “START”, PLEASE PRESS “RESET” FOR 2-3 SECONDS. THE DRILL WILL TRUN BACK TO ORIGINAL POSITION AFTER THIS ACTION. IF THE DRILL STILL NOT TURN BACK AFTER TRY PRESS “RESET”MORE THAN THREE TIMES, PLEASE TURN OFF POWER AND CONTACT WITH OUR LOCAL DISTRIBUTOR.3. IF MACHINE WITH GREEN AND FLASHING RED LIGHT, PLEASE TRUN OFF THE POWER FOR 2-3 SECONDS. THE MACHINE WILL BE AVAILABLE AFTER TURN ON AGAIN.
NOTE: PLEASE TRUN OFF THE POWER BEFORE CHECK OR CHANGE NEW DRILL.
RESET START
RESET
RED LIGHT GREEN LIGHT
START
STEP 1
STEP 2
USE SLOTTED SCREWDRIVER TO PRESS DRILL HEAD CONNECTION AREA FROM UP TO DOWN.
STEP 3
STEP 4
TAKE DRILL HEAD AWAY FORM MACHINE. RELEASE M5 SCREW
BY HEX WRENCH.
PLEASE LOCK THE DRILL BY PLASTIC WRENCH.
HOW TO CHANGE DRILL HEAD
PLEASE TURN A BIT OF PLASTIC DISC BEFORE USING MACHINE BY EACH TIME.
HOW TO CHANGE PLASTIC DISC
IF THE DISC HAS FULL OF NICK, YOU MAY USE OUR PLASTIC WRENCH TO PRY DISC AWAY FORM BASE. AND, PUT NEW ONE.
8 9
PRESS START
STEP 1PLEASE TAKE PLASTIC DISC AWAY FORM BASE FIRST.
HOW TO CLEAN PAPER CHIP OF HOLLOW DRILL HEAD
STEP 2
STEP 3
STEP 4
PUT OUR CHIP CLEAR DISC ON THE ORIGINAL POSITION.
*BE CAREFUL, DO NOT PUT YOUR HAND CLOSE TO DRILL WHIL PRESS START.
CHIP WILL BE PUSHED OUT OF PIN BY CHIP CLEAR DISC.
PLEASE PUT HOLLOW PIN INTO GRINDER TOOL,AND GRIND THE PIN BY TURNING THE TOOL.
HOLLOW PIN
GRINDER TOOL
HOW TO GRIND YOUR HOLLOW PIN
STEP 1
STEP 2
STEP 3
STEP 4
STEP 5
PLEASE PUT AROUND 50 SHEETS PAPER ON WORKING TABLE.
HOW TO ADJUST DRILL PIN
PRESS START
IF PAPER COULDN’T PIERCE BY HOLLOW PIN, PLEASE USE SCREWDRIVER TO ADJUST SIDE-SCREW BY TURNING LEFT.
CHECK BY STEP 2 TO MAKE SURE THE DRILL IS AVAILABLE. IF NOT, PLEASE CHECK FROM STEP 3 TO STEP 5 AGAIN TILL SETTLE DOWN THIS ISSUE.
AND, USE LONG (AT LEAST 10 CM)SCREWDRIVER STRETCHING FROM POINT A TILLTOUCH ADJUSTED SCREW. THAN, PLEASE TURN SCREW LEFT FOR 180.
ELECTRICAL POWER SUPPLY
110V 60Hz220V 60Hz
DRILL HEAD DIAMETER
Ø 6.0mm
POWER CONSUMPTION 200W TABLE SIZE 250*221*82(m/m)
DISTANCE BETWEEN TWO HOLE
70m/m 80m/m
MAX OF PAPER GUIDE
322(m/m)
CYCLE TIME FOR DRILLING WITHIN 6 SECONDS
MACHINE DIMENSION
251(L)×402(W)×324(H) m/m
CUTTING CAPACITY 50mm (800 SHEETS 70 gsm PAPER)
MACHINE WEIGHT 13.5kgs
INSERTING DEPTH 7-29mm SAFETY GUARD YES
*The machine will shut down immediately once over heat using to protect operator.