35
Importing a COBOL or PL/I Copybook into a PowerExchange Data Map © 2010 Informatica
Importing a COBOL or PL/I Copybook into aPowerExchange Data Map
© 2010 Informatica
AbstractIn the PowerExchange Navigator, the term copybook refers generically to data definitions for records, segments, fields,keys, and other items from a data source that you import into a data map, or into records or segments in a data map, todefine the layout of the data. This article shows how to import a COBOL or PL/I copybook into a data map or into records orsegments in a data map.
Supported Versions¨ PowerExchange 9.0.1
Table of ContentsCopybooks Overview. . . . . . . . . . . . . . . . . . . . . . . . . . . . . . . . . . . . . . . . . . . . . . . . . . . . . . . . . . . . . 2
Importing a COBOL or PL/I Copybook. . . . . . . . . . . . . . . . . . . . . . . . . . . . . . . . . . . . . . . . . . . . . . . . . . 3
Importing a Copybook into a Data Map. . . . . . . . . . . . . . . . . . . . . . . . . . . . . . . . . . . . . . . . . . . . . . . . 3
Importing a Copybook into a Record or a Segment. . . . . . . . . . . . . . . . . . . . . . . . . . . . . . . . . . . . . . . . 8
Viewing or Editing Properties for a Data Map Table. . . . . . . . . . . . . . . . . . . . . . . . . . . . . . . . . . . . . . . 10
Importing a COBOL Copybook into a Data Map - Example. . . . . . . . . . . . . . . . . . . . . . . . . . . . . . . . . . . . 10
Step 1. Add a Data Map and Import a COBOL Copybook into the Data Map. . . . . . . . . . . . . . . . . . . . . . . 10
Step 2. Apply a Date Mask to a Field in the Data Map Record. . . . . . . . . . . . . . . . . . . . . . . . . . . . . . . . 16
Step 3. Use a WHERE Clause to Filter an Empty Record from the Output. . . . . . . . . . . . . . . . . . . . . . . . . 17
Step 4. Display Multiple Output Rows for Items in an OCCURS DEPENDING ON Clause. . . . . . . . . . . . . . . 18
Importing a COBOL Copybook with REDEFINES Statements - Example. . . . . . . . . . . . . . . . . . . . . . . . . . . . 18
Step 1. Add a Data Map and Import a COBOL Copybook with REDEFINES Statements into the Data Map. . . . 18
Step 2. Apply a Date Mask to a GROUP Field in the Data Map. . . . . . . . . . . . . . . . . . . . . . . . . . . . . . . . 21
Importing a PL/I Copybook - Example. . . . . . . . . . . . . . . . . . . . . . . . . . . . . . . . . . . . . . . . . . . . . . . . . . 23
Step 1. Add a Data Map and Import a PL/I Copybook into the Data Map. . . . . . . . . . . . . . . . . . . . . . . . . . 23
Step 2. Test the Data Map. . . . . . . . . . . . . . . . . . . . . . . . . . . . . . . . . . . . . . . . . . . . . . . . . . . . . . . 26
Reference Information for Copybook Imports. . . . . . . . . . . . . . . . . . . . . . . . . . . . . . . . . . . . . . . . . . . . . 26
Import Copybook - Source Details Dialog Box. . . . . . . . . . . . . . . . . . . . . . . . . . . . . . . . . . . . . . . . . . . 26
Import Copybook - Local Details Dialog Box. . . . . . . . . . . . . . . . . . . . . . . . . . . . . . . . . . . . . . . . . . . . 30
Import Copybook - Remote Details Dialog Box. . . . . . . . . . . . . . . . . . . . . . . . . . . . . . . . . . . . . . . . . . 31
Import Copybook - Configuration Details Dialog Box. . . . . . . . . . . . . . . . . . . . . . . . . . . . . . . . . . . . . . . 33
Record Definition and Duplicate Record Definition Dialog Boxes. . . . . . . . . . . . . . . . . . . . . . . . . . . . . . . 34
Copybooks OverviewIn the PowerExchange Navigator, the term copybook refers generically to data definitions for records, segments, fields,keys, and other items from a data source that you import into a data map, or into records or segments in a data map, todefine the layout of the data.
Import a copybook to eliminate the need to manually define the layout of these items in a data map.
You can import a copybook when you add a data map or after you add it. You can also import one or more copybooks into arecord or segment in a data map to add data definitions to the record or segment.
2
If a copybook contains a record or field that duplicates a record or field in a data map, you can select options to indicate howto handle the duplicate item. For example, you can choose to import, overwrite, or skip the item, or stop the import.
After you import a copybook, it is stored on the local system. You can then re-import that copybook from the local system.
The type of copybook that you can import depends on the data source type of the data map into which you are importing thecopybook. You can import a COBOL or PL/I copybook into data maps for all data source types except DB2.
Use the following guidelines when you import a COBOL or PL/I copybook into the following types of data maps:
Data Map Type Guidelines
Adabas data maps You must edit table properties in the data map to associate the imported field definitions withAdabas field definitions.For information, see “Viewing or Editing Properties for a Data Map Table” on page 10.
IMS DL/1 batch and ODBAdata maps
You must first import a database description block (DBD) copybook to add segment, key field,search field, and CCK field definitions from the IMS database, and to add tables to the data map.The DBD also defines the hierarchical sequence of segments.After you import a DBD, import a COBOL or PL/I copybook into each segment in the data map tooverlay the segment with its COPYLIB. This action redefines the data map while maintaining thehierarchical metadata for the database.
This article shows how to import a COBOL or PL/I copybook into a data map or into a record or segment in a data map.Additionally, this article shows how to use sample data maps and copybooks in the examples folder in the PowerExchangeinstallation directory to learn how to import COBOL copybooks, COBOL copybooks with REDEFINES statements, or PL/Icopybooks into data maps.
For information about importing other types of copybooks into data maps, see the PowerExchange Navigator User Guide.
Importing a COBOL or PL/I CopybookYou can import a copybook when you add a data map or after you add it. You can also import one or more copybooks into arecord or segment in a data map to add data definitions to the record or segment.
If a copybook contains a record or field that duplicates a record or field that is already in a data map, you can select optionsto indicate how to handle the duplicate item. For example, you can choose to import, overwrite, or skip the item, or stop theimport.
Importing a Copybook into a Data MapImport a copybook when you add a data map or after you add it.
1. Complete one of the following steps depending on whether you are importing a copybook into an existing datamap or adding a data map:
¨ For an existing data map, open the data map and click File > Import Copybook.
3
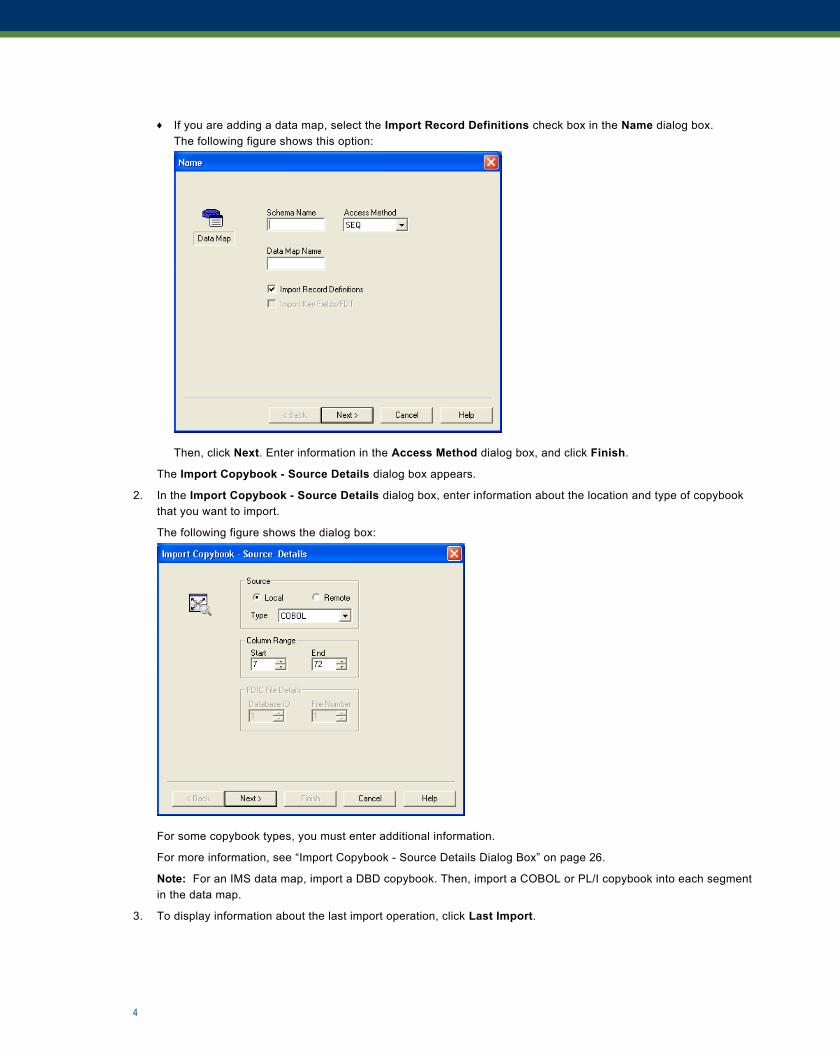
¨ If you are adding a data map, select the Import Record Definitions check box in the Name dialog box.The following figure shows this option:
Then, click Next. Enter information in the Access Method dialog box, and click Finish.
The Import Copybook - Source Details dialog box appears.
2. In the Import Copybook - Source Details dialog box, enter information about the location and type of copybookthat you want to import.
The following figure shows the dialog box:
For some copybook types, you must enter additional information.
For more information, see “Import Copybook - Source Details Dialog Box” on page 26.
Note: For an IMS data map, import a DBD copybook. Then, import a COBOL or PL/I copybook into each segmentin the data map.
3. To display information about the last import operation, click Last Import.
4
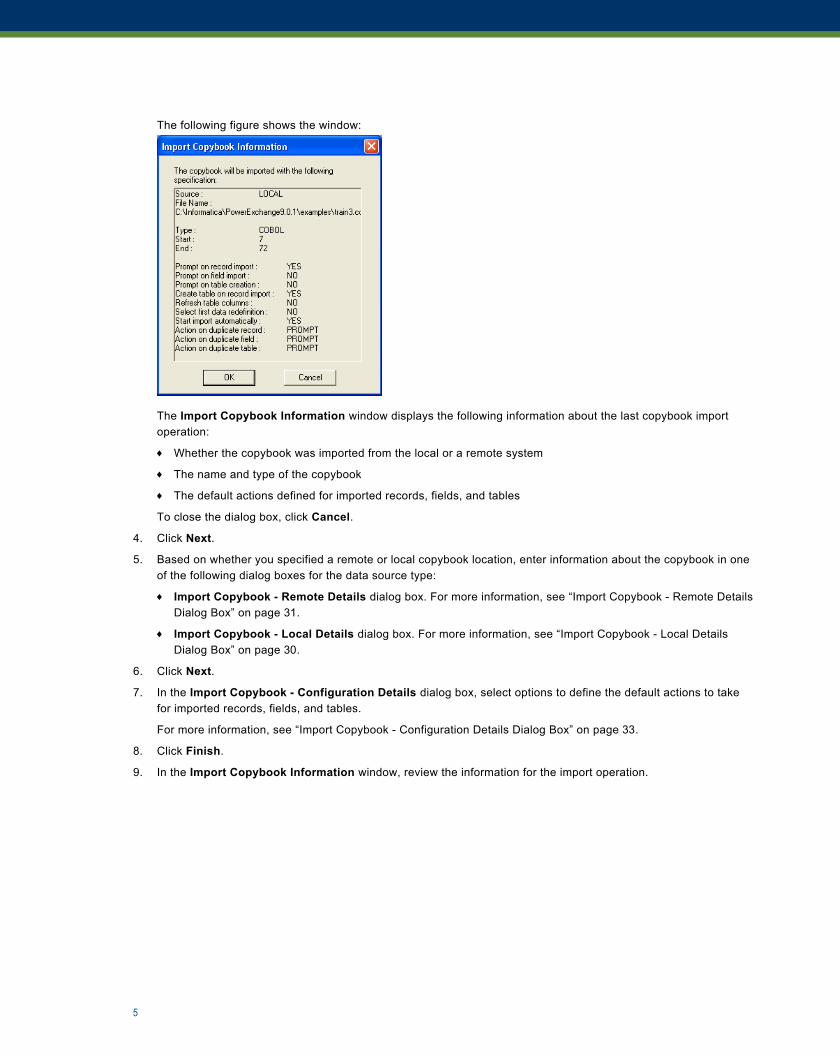
The following figure shows the window:
The Import Copybook Information window displays the following information about the last copybook importoperation:
¨ Whether the copybook was imported from the local or a remote system
¨ The name and type of the copybook
¨ The default actions defined for imported records, fields, and tables
To close the dialog box, click Cancel.
4. Click Next.
5. Based on whether you specified a remote or local copybook location, enter information about the copybook in oneof the following dialog boxes for the data source type:
¨ Import Copybook - Remote Details dialog box. For more information, see “Import Copybook - Remote DetailsDialog Box” on page 31.
¨ Import Copybook - Local Details dialog box. For more information, see “Import Copybook - Local DetailsDialog Box” on page 30.
6. Click Next.
7. In the Import Copybook - Configuration Details dialog box, select options to define the default actions to takefor imported records, fields, and tables.
For more information, see “Import Copybook - Configuration Details Dialog Box” on page 33.
8. Click Finish.
9. In the Import Copybook Information window, review the information for the import operation.
5

The following figure shows the window:
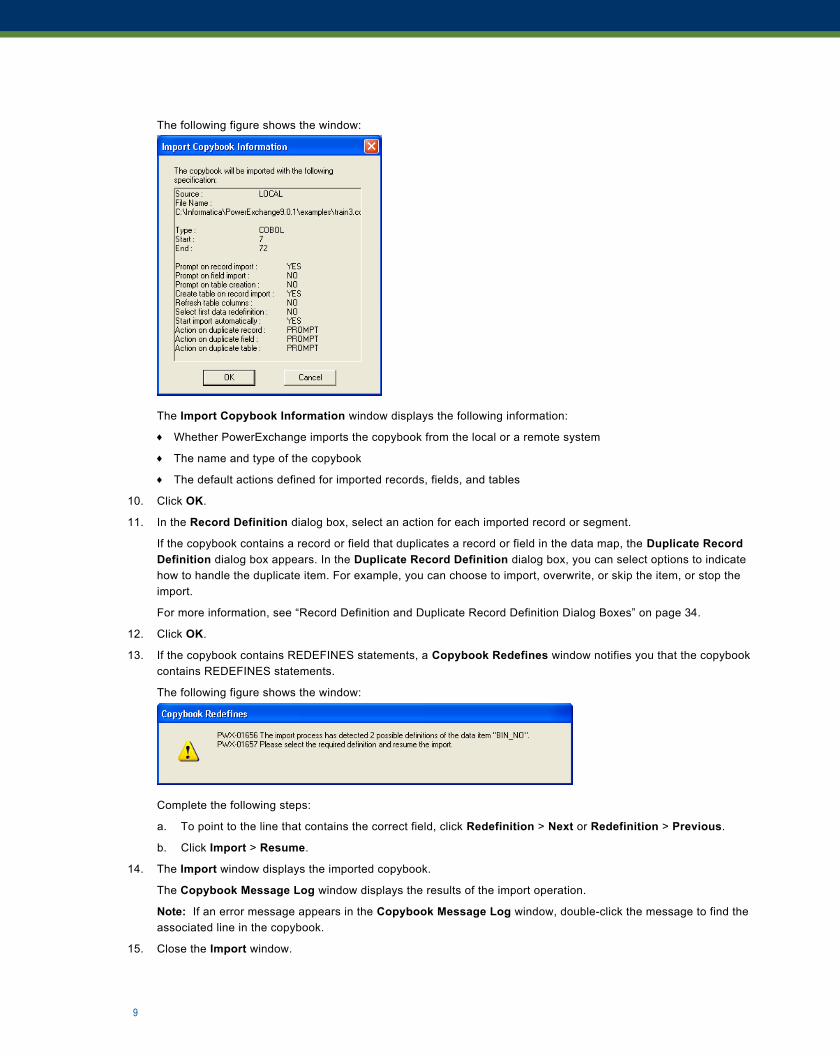
The Import Copybook Information window displays the following information:
¨ Whether PowerExchange imports the copybook from the local or a remote system
¨ The name and type of the copybook
¨ The default actions defined for imported records, fields, and tables
10. Click OK.
11. In the Record Definition dialog box, select an action for each imported record or segment.
If the copybook contains a record or field that duplicates a record or field in the data map, the Duplicate RecordDefinition dialog box appears. In the Duplicate Record Definition dialog box, you can select options to indicatehow to handle the duplicate item. For example, you can choose to import, overwrite, or skip the item, or stop theimport.
For more information, see “Record Definition and Duplicate Record Definition Dialog Boxes” on page 34.
12. Click OK.
13. If the copybook contains REDEFINES statements, a Copybook Redefines window notifies you that the copybookcontains REDEFINES statements.
The following figure shows the window:
Complete the following steps:
a. To point to the line that contains the correct field, click Redefinition > Next or Redefinition > Previous.
b. Click Import > Resume.
14. The Import window displays the imported copybook.
6
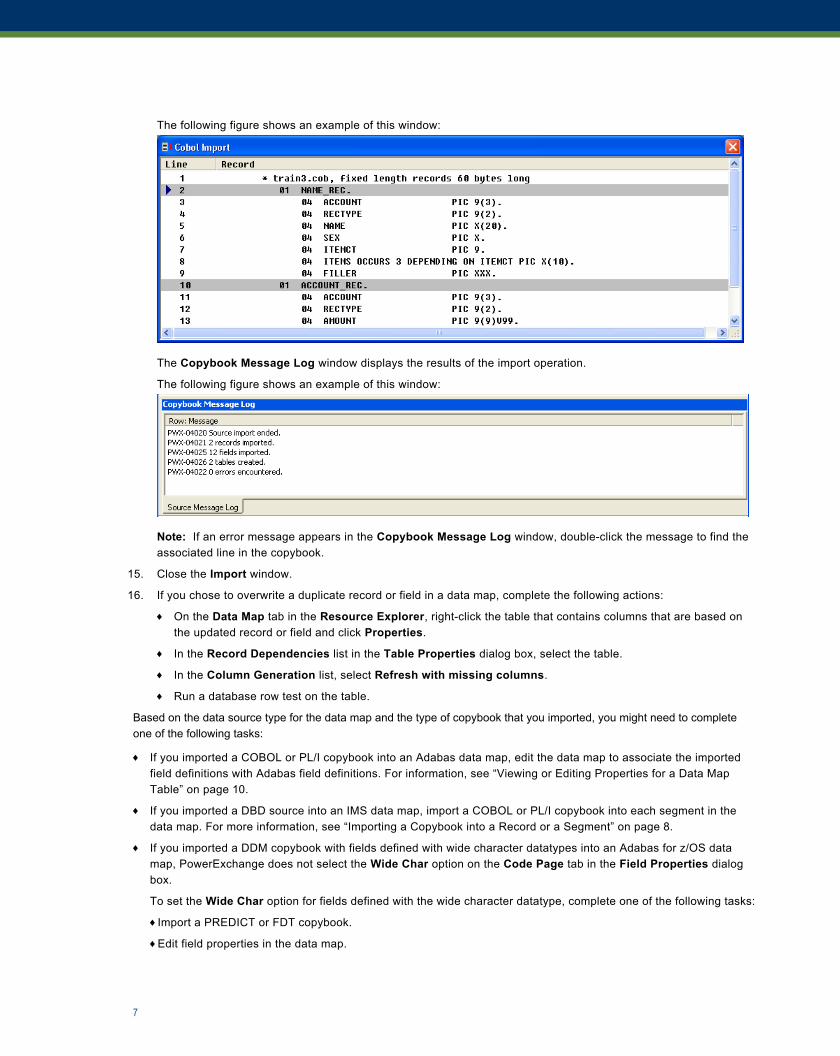
The following figure shows an example of this window:
The Copybook Message Log window displays the results of the import operation.
The following figure shows an example of this window:
Note: If an error message appears in the Copybook Message Log window, double-click the message to find theassociated line in the copybook.
15. Close the Import window.
16. If you chose to overwrite a duplicate record or field in a data map, complete the following actions:
¨ On the Data Map tab in the Resource Explorer, right-click the table that contains columns that are based onthe updated record or field and click Properties.
¨ In the Record Dependencies list in the Table Properties dialog box, select the table.
¨ In the Column Generation list, select Refresh with missing columns.
¨ Run a database row test on the table.
Based on the data source type for the data map and the type of copybook that you imported, you might need to completeone of the following tasks:
¨ If you imported a COBOL or PL/I copybook into an Adabas data map, edit the data map to associate the importedfield definitions with Adabas field definitions. For information, see “Viewing or Editing Properties for a Data MapTable” on page 10.
¨ If you imported a DBD source into an IMS data map, import a COBOL or PL/I copybook into each segment in thedata map. For more information, see “Importing a Copybook into a Record or a Segment” on page 8.
¨ If you imported a DDM copybook with fields defined with wide character datatypes into an Adabas for z/OS datamap, PowerExchange does not select the Wide Char option on the Code Page tab in the Field Properties dialogbox.
To set the Wide Char option for fields defined with the wide character datatype, complete one of the following tasks:
¨Import a PREDICT or FDT copybook.
¨Edit field properties in the data map.
7
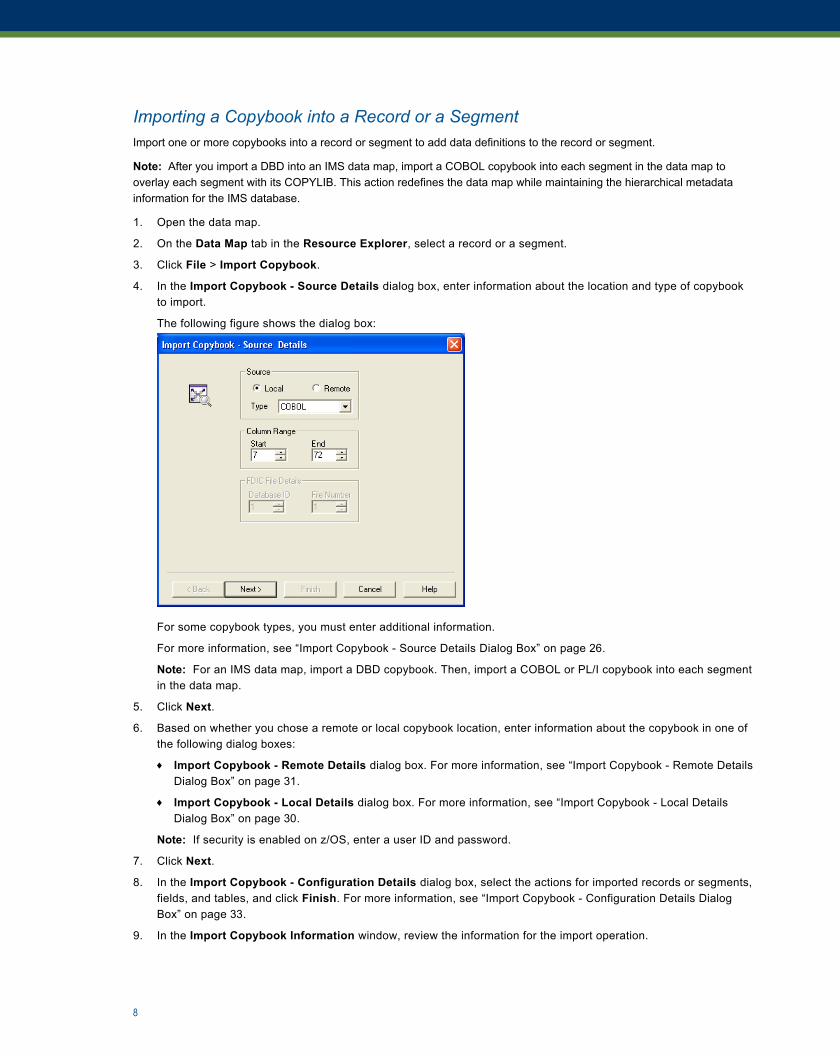
Importing a Copybook into a Record or a SegmentImport one or more copybooks into a record or segment to add data definitions to the record or segment.
Note: After you import a DBD into an IMS data map, import a COBOL copybook into each segment in the data map tooverlay each segment with its COPYLIB. This action redefines the data map while maintaining the hierarchical metadatainformation for the IMS database.
1. Open the data map.
2. On the Data Map tab in the Resource Explorer, select a record or a segment.
3. Click File > Import Copybook.
4. In the Import Copybook - Source Details dialog box, enter information about the location and type of copybookto import.
The following figure shows the dialog box:
For some copybook types, you must enter additional information.
For more information, see “Import Copybook - Source Details Dialog Box” on page 26.
Note: For an IMS data map, import a DBD copybook. Then, import a COBOL or PL/I copybook into each segmentin the data map.
5. Click Next.
6. Based on whether you chose a remote or local copybook location, enter information about the copybook in one ofthe following dialog boxes:
¨ Import Copybook - Remote Details dialog box. For more information, see “Import Copybook - Remote DetailsDialog Box” on page 31.
¨ Import Copybook - Local Details dialog box. For more information, see “Import Copybook - Local DetailsDialog Box” on page 30.
Note: If security is enabled on z/OS, enter a user ID and password.
7. Click Next.
8. In the Import Copybook - Configuration Details dialog box, select the actions for imported records or segments,fields, and tables, and click Finish. For more information, see “Import Copybook - Configuration Details DialogBox” on page 33.
9. In the Import Copybook Information window, review the information for the import operation.
8
The following figure shows the window:
The Import Copybook Information window displays the following information:
¨ Whether PowerExchange imports the copybook from the local or a remote system
¨ The name and type of the copybook
¨ The default actions defined for imported records, fields, and tables
10. Click OK.
11. In the Record Definition dialog box, select an action for each imported record or segment.
If the copybook contains a record or field that duplicates a record or field in the data map, the Duplicate RecordDefinition dialog box appears. In the Duplicate Record Definition dialog box, you can select options to indicatehow to handle the duplicate item. For example, you can choose to import, overwrite, or skip the item, or stop theimport.
For more information, see “Record Definition and Duplicate Record Definition Dialog Boxes” on page 34.
12. Click OK.
13. If the copybook contains REDEFINES statements, a Copybook Redefines window notifies you that the copybookcontains REDEFINES statements.
The following figure shows the window:
Complete the following steps:
a. To point to the line that contains the correct field, click Redefinition > Next or Redefinition > Previous.
b. Click Import > Resume.
14. The Import window displays the imported copybook.
The Copybook Message Log window displays the results of the import operation.
Note: If an error message appears in the Copybook Message Log window, double-click the message to find theassociated line in the copybook.
15. Close the Import window.
9
16. If you chose to overwrite a duplicate record or field in a data map, complete the following actions:
¨ On the Data Map tab in the Resource Explorer, right-click the table that contains columns that are based onthe updated record or field and click Properties.
¨ In the Record Dependencies list in the Table Properties dialog box, select the table.
¨ In the Column Generation list, select Refresh with missing columns.
¨ Run a database row test on the table.
Viewing or Editing Properties for a Data Map TableYou can view or edit properties for a table in a data map.
You might change a table name or define a hierarchy in a complex table. Also, you can define how records in a complextable appear in a database row test or are mapped in a target table.
To view or edit properties for a data map table:
1. Open the data map.
2. On the Data Map tab in the Resource Explorer, right-click a table and click Properties.
The Table Properties dialog box appears.
3. Depending on the data source for the data map, view or edit table properties on some or all tabs:
¨ Definition. Properties for a complex table, including settings for how records in a complex table appear in adatabase row test or are mapped in a target table, and how changes in records on which the table is based arereflected in the corresponding columns in the table.
¨ Keys. For Adabas, the primary key for the table.
¨ IMS Options. For IMS DL/1 batch and IMS ODBA, properties for segments in a complex table.
Importing a COBOL Copybook into a Data Map - ExampleIn this example, you add a multiple-record data map and import a COBOL copybook into it.
This example shows how to complete the following tasks:
1. Add a data map and import a COBOL copybook that contains an OCCURS DEPENDING ON clause into the datamap.When you add the data map, you use a fixed-length data file. After you add the data map, you create ahierarchical view of the flat file.
2. Apply a date mask to a field in a data map record.
3. Use a WHERE clause to filter an empty record from the output.
4. Display multiple output rows for items in an OCCURS DEPENDING ON clause.
This example uses the train3.dat and train3.cob files.
Step 1. Add a Data Map and Import a COBOL Copybook into the Data MapAdd a data map for a sequential flat file and import a COBOL copybook into the data map.
1. On the Resources tab in the Resource Explorer, click Add > Data Map.
10

2. In the Name dialog box, enter the following information:
Option Description
Schema Name Enter COBOL.
Data Map Name Enter map2.
Access Method Select SEQ.
Import Record Definitions Select this option.
The following figure shows the dialog box:
3. Click Next.
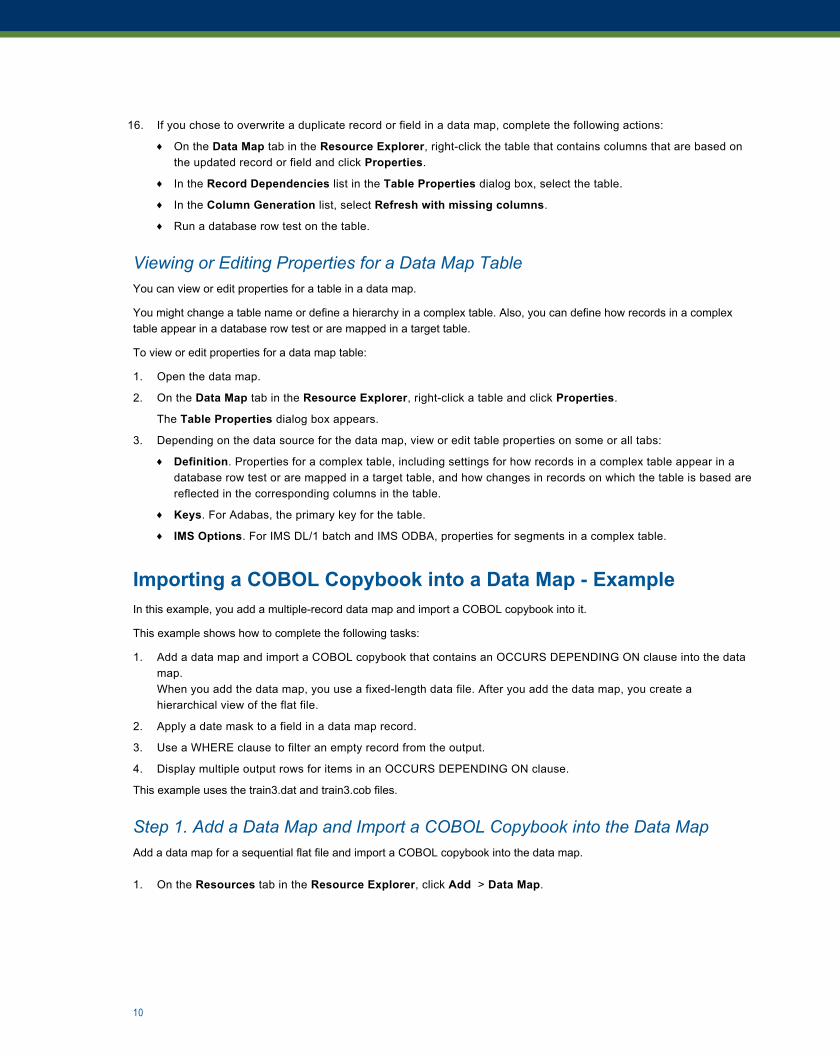
4. In the SEQ Access Method dialog box, enter the following information:
Option Description
File Name Click the Browse button to browse to the train3.dat file in the examples directory.
Fixed Select this option.
Size Enter 60.
11
The following figure shows the dialog box:
5. Click Finish.
6. In the Import Copybook - Source Details dialog box, enter the following information:
Option Description
Source Select Local.
Type Select COBOL.
Start Enter 7.
End Enter 72.
The following figure shows the dialog box:
7. Click Next.
12
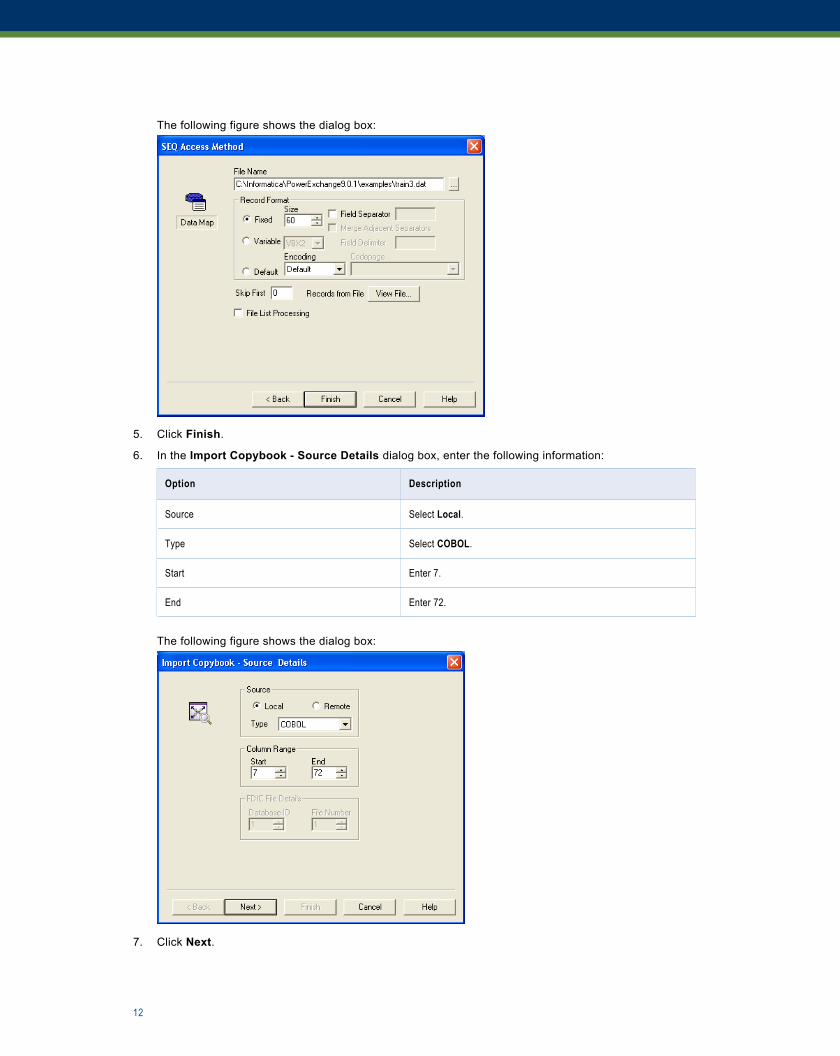
8. In the Import Copybook - Local Cobol Details dialog box, click the Browse button to browse to the train3.cob filein the examples directory.
The following figure shows the dialog box:
Note: To view the copybook, click Preview.
9. Click Next.
10. In the Import Copybook - Configuration Details dialog box, select the actions for imported records, fields, andtables and click Finish. For more information, see “Import Copybook - Configuration Details Dialog Box” on page33.
11. In the Import Copybook Information window, review the information for the import and click OK.
12. In the Record Definition dialog box for the NAME_REC record and the ACCOUNT_REC record, click OK.
The following figure shows the dialog box:
For more information, see “Record Definition and Duplicate Record Definition Dialog Boxes” on page 34.
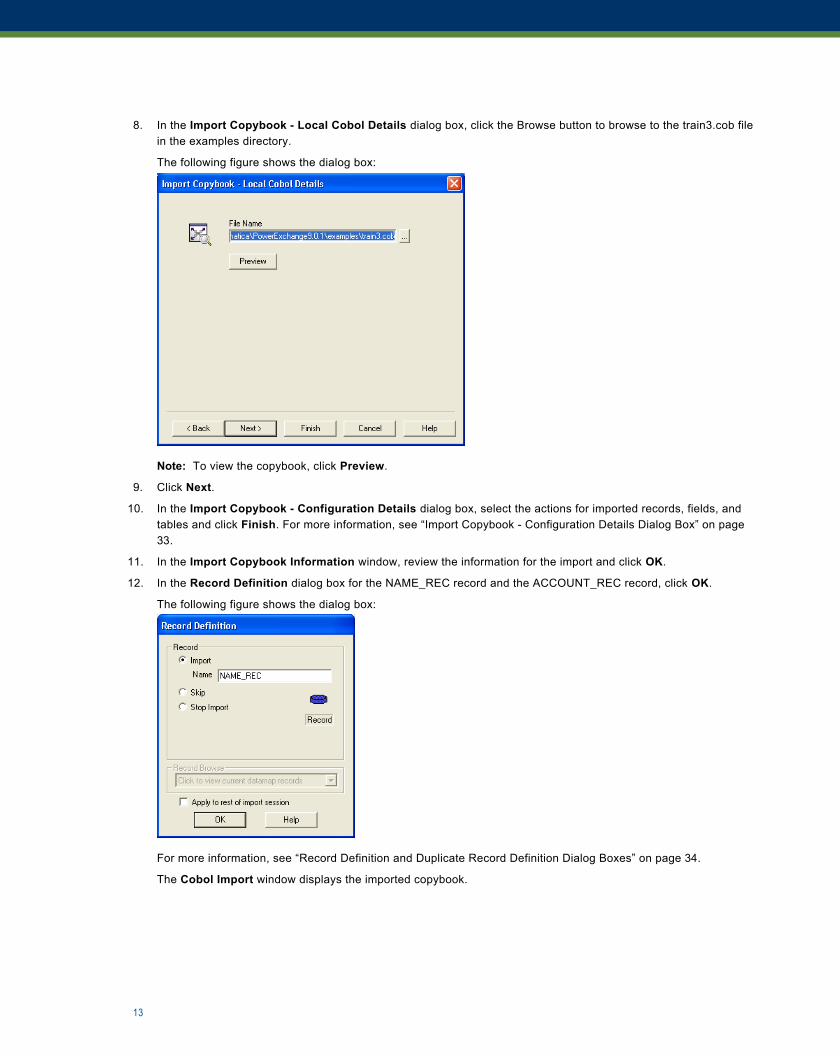
The Cobol Import window displays the imported copybook.
13
The following figure shows the window:
The Copybook Message Log window displays the results of the import operation.
The following figure shows the window:
Note: To find the associated line in the copybook for an error that appears in the Copybook Message Logwindow, double-click the message.
13. Close the Cobol Import window.
14. On the Data Map tab in the Resource Explorer, click the NAME_REC record.
15. In the Record window, right-click the RECTYPE field and click Properties.
The Name tab in the Field Properties dialog box appears.
16. In the Record ID Values box, enter 01.
14
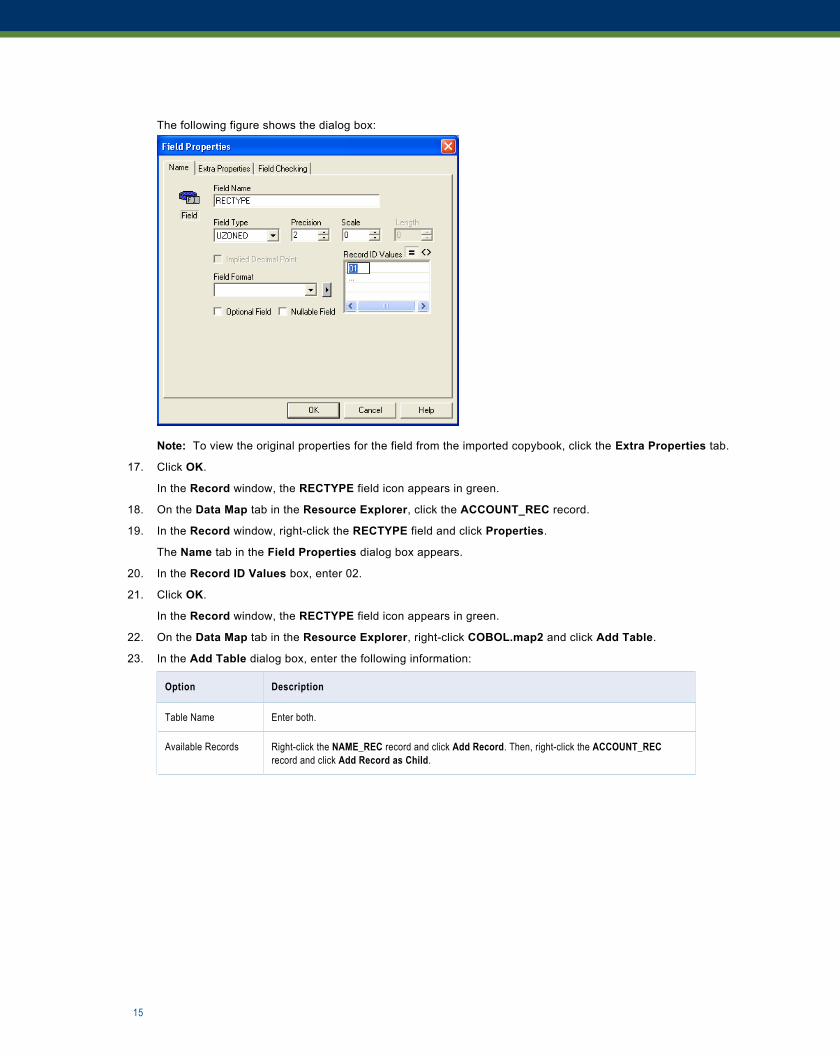
The following figure shows the dialog box:
Note: To view the original properties for the field from the imported copybook, click the Extra Properties tab.
17. Click OK.
In the Record window, the RECTYPE field icon appears in green.
18. On the Data Map tab in the Resource Explorer, click the ACCOUNT_REC record.
19. In the Record window, right-click the RECTYPE field and click Properties.
The Name tab in the Field Properties dialog box appears.
20. In the Record ID Values box, enter 02.
21. Click OK.
In the Record window, the RECTYPE field icon appears in green.
22. On the Data Map tab in the Resource Explorer, right-click COBOL.map2 and click Add Table.
23. In the Add Table dialog box, enter the following information:
Option Description
Table Name Enter both.
Available Records Right-click the NAME_REC record and click Add Record. Then, right-click the ACCOUNT_RECrecord and click Add Record as Child.
15
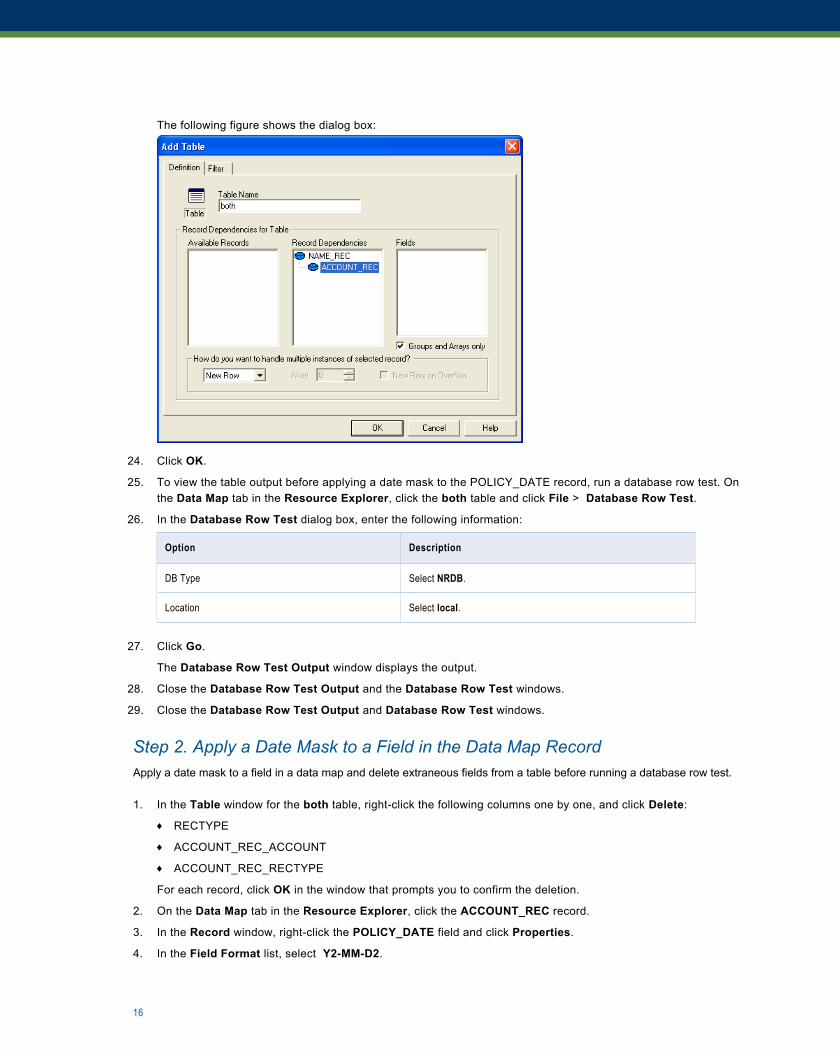
The following figure shows the dialog box:
24. Click OK.
25. To view the table output before applying a date mask to the POLICY_DATE record, run a database row test. Onthe Data Map tab in the Resource Explorer, click the both table and click File > Database Row Test.
26. In the Database Row Test dialog box, enter the following information:
Option Description
DB Type Select NRDB.
Location Select local.
27. Click Go.
The Database Row Test Output window displays the output.
28. Close the Database Row Test Output and the Database Row Test windows.
29. Close the Database Row Test Output and Database Row Test windows.
Step 2. Apply a Date Mask to a Field in the Data Map RecordApply a date mask to a field in a data map and delete extraneous fields from a table before running a database row test.
1. In the Table window for the both table, right-click the following columns one by one, and click Delete:
¨ RECTYPE
¨ ACCOUNT_REC_ACCOUNT
¨ ACCOUNT_REC_RECTYPE
For each record, click OK in the window that prompts you to confirm the deletion.
2. On the Data Map tab in the Resource Explorer, click the ACCOUNT_REC record.
3. In the Record window, right-click the POLICY_DATE field and click Properties.
4. In the Field Format list, select Y2-MM-D2.
16

The following figure shows the dialog box:
5. Click OK.
6. On the Data Map tab in the Resource Explorer, click the both table.
7. Click File > Database Row Test.
8. On the Database Row Test dialog box, enter the following information:
Option Description
DB Type Select NRDB.
Location Select local.
9. Click Go.
In the Database Row Test Output window, the POLICY_DATE column includes the century in the date format.
The following figure shows the output:
Step 3. Use a WHERE Clause to Filter an Empty Record from the OutputUse a WHERE clause to filter an empty record from the output in the Database Row Test Output window.
1. In the Database Row Test dialog box, enter the following statement in the SQL Statement box:select * from COBOL.map2.both where itemct > 0
2. In the Database Row Test dialog box, click Go.
In the Database Row Test Output window, the fourth record, which contains no items, disappears from the output.
3. Close the Database Row Test Output and Database Row Test windows.
17

Step 4. Display Multiple Output Rows for Items in an OCCURS DEPENDING ONClauseDisplay multiple output rows in the Database Row Test Output window for items in an OCCURS DEPENDING ON clause.
1. On the Data Map tab in the Resource Explorer, right-click the both table and click Properties.
2. In the Table Properties dialog box, select the ITEMS check box in the Fields list.
3. Click OK.
In the Table window, the icon for the ITEMS_L column appears in turquoise.
4. On the Data Map tab in the Resource Explorer, click the both table.
5. Click File > Database Row Test.
6. In the Database Row Test dialog box, click Go.
In the Database Row Test Output window, one row appears for each item in the record.
Importing a COBOL Copybook with REDEFINES Statements -ExampleYou can add a multiple-record data map and import a complex COBOL copybook with REDEFINES statements into it.
This example shows how to complete the following tasks:
1. Add a data map and import a COBOL copybook into it.When you add the data map, you use a fixed-length binary data file of EBCDIC data with 58320 records. Eachrecord is 57 bytes long. This EBCDIC data file simulates reading data from an IBM mainframe system.
In the Add Data Map dialog box, you set the skip records option to skip a header record in the data file.
You import a COBOL copybook with line numbers in columns 1 through 6 and comments in columns 73 through80. The COBOL copybook also contains REDEFINES statements.
Note: PowerExchange ignores the comment lines in the copybook.
2. Apply a date mask to a GROUP field in the data map.
This example uses the train5.dat and train5.cob files.
Step 1. Add a Data Map and Import a COBOL Copybook with REDEFINESStatements into the Data MapAdd a multiple-record data map and import a COBOL copybook with REDEFINES statements into the data map.
1. On the Resources tab in the Resource Explorer, click Add > Data Map.
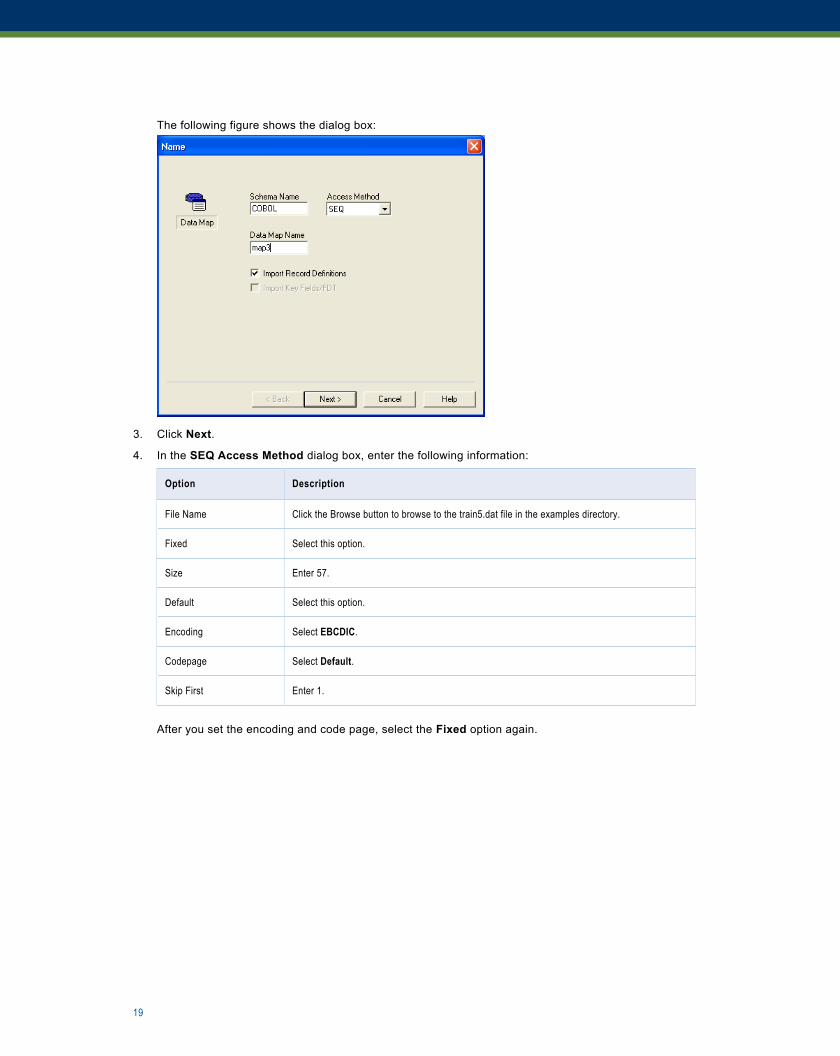
2. In the Name dialog box, enter the following information:
Option Description
Schema Name Enter COBOL.
Data Map Name Enter map3.
Access Method Select SEQ.
Import Record Definitions Select this option.
18
The following figure shows the dialog box:
3. Click Next.
4. In the SEQ Access Method dialog box, enter the following information:
Option Description
File Name Click the Browse button to browse to the train5.dat file in the examples directory.
Fixed Select this option.
Size Enter 57.
Default Select this option.
Encoding Select EBCDIC.
Codepage Select Default.
Skip First Enter 1.
After you set the encoding and code page, select the Fixed option again.
19

The following figure shows the dialog box:
5. Click Finish.
6. In the Import Copybook - Source Details dialog box, enter the following information:
Option Description
Source Select Local.
Type Select COBOL.
Start Enter 7.
End Enter 72.
The following figure shows the dialog box:
7. Click Next.
20
8. In the Import Copybook - Local Cobol Details dialog box, click the Browse button to browse to the train5.cob filein the examples directory.
Note: To view the copybook, click Preview.
9. Click Next.
10. In the Import Copybook - Configuration Details dialog box, select the actions for imported records, fields, andtables and click Finish. For more information, see “Import Copybook - Configuration Details Dialog Box” on page33.
11. In the Import Copybook Information window, review the information for the import and click OK.
12. In the Record Definition dialog box for the MASTER_REC record, click OK.
For more information, see “Record Definition and Duplicate Record Definition Dialog Boxes” on page 34.
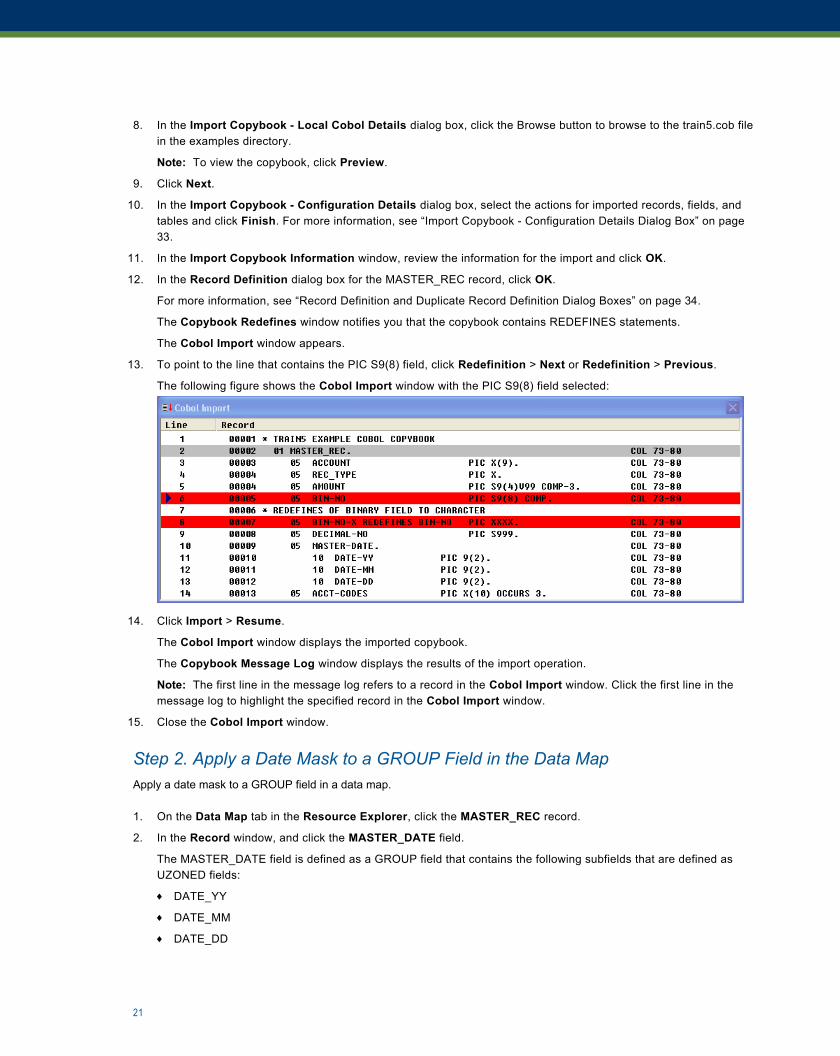
The Copybook Redefines window notifies you that the copybook contains REDEFINES statements.
The Cobol Import window appears.
13. To point to the line that contains the PIC S9(8) field, click Redefinition > Next or Redefinition > Previous.
The following figure shows the Cobol Import window with the PIC S9(8) field selected:
14. Click Import > Resume.
The Cobol Import window displays the imported copybook.
The Copybook Message Log window displays the results of the import operation.
Note: The first line in the message log refers to a record in the Cobol Import window. Click the first line in themessage log to highlight the specified record in the Cobol Import window.
15. Close the Cobol Import window.
Step 2. Apply a Date Mask to a GROUP Field in the Data MapApply a date mask to a GROUP field in a data map.
1. On the Data Map tab in the Resource Explorer, click the MASTER_REC record.
2. In the Record window, and click the MASTER_DATE field.
The MASTER_DATE field is defined as a GROUP field that contains the following subfields that are defined asUZONED fields:
¨ DATE_YY
¨ DATE_MM
¨ DATE_DD
21

In the next step, delete these subfields and set properties for the MASTER_DATE field to create a single datecolumn in the database row test output from the MASTER_DATE GROUP field.
3. In the Record window, select the DATE_YY field. Press SHIFT and click DATE_DD. Click the Delete button on thetoolbar.
4. On the confirmation dialog box, to view details about which cross-references will be deleted with the fields, clickMore Details.
5. Click Yes.
6. In the Record window, right-click the MASTER_DATE field and click Properties.
7. In the Field Properties dialog box, enter the following information:
Option Description
Field Type Select CHAR.
Length Enter 6.
Field Format Select Y2-MM-D2. Delete the hyphens.
The following figure shows the dialog box:
8. Click OK.
9. On the Data Map tab in the Resource Explorer, click the MASTER_REC table.
10. Click Add > Column.
11. In the Add Column dialog box, enter the following information:
Option Description
Name Enter new_date.
Base Field Select MASTER_REC:MASTER_DATE.
12. Click OK.
22
13. On the Data Map tab in the Resource Explorer, click the MASTER_REC table.
14. Click File > Database Row Test.
15. In the Database Row Test dialog box, click Go.
In the Database Row Test Output window, the new_date column displays the date.
Importing a PL/I Copybook - ExampleYou can substitute a PL/I copybook for a COBOL copybook. This example shows how to add a multiple-record data mapand import a PL/I copybook into it.
This example shows how to complete the following tasks:
1. Add a data map and import a PL/I copybook with multiple definitions of a field into it.When you add the data map, you use a fixed-length binary data file of 58320 EBCDIC data records, which follow asingle ASCII header record. Each record is 57 bytes long. This EBCDIC data file simulates reading data from anIBM mainframe system.
2. Test the data map.
This example uses the train5.dat and train5.pl1 files.
Step 1. Add a Data Map and Import a PL/I Copybook into the Data MapAdd a data map and import a PL/I copybook into the data map.
1. On the Resources tab in the Resource Explorer, click Add > Data Map.
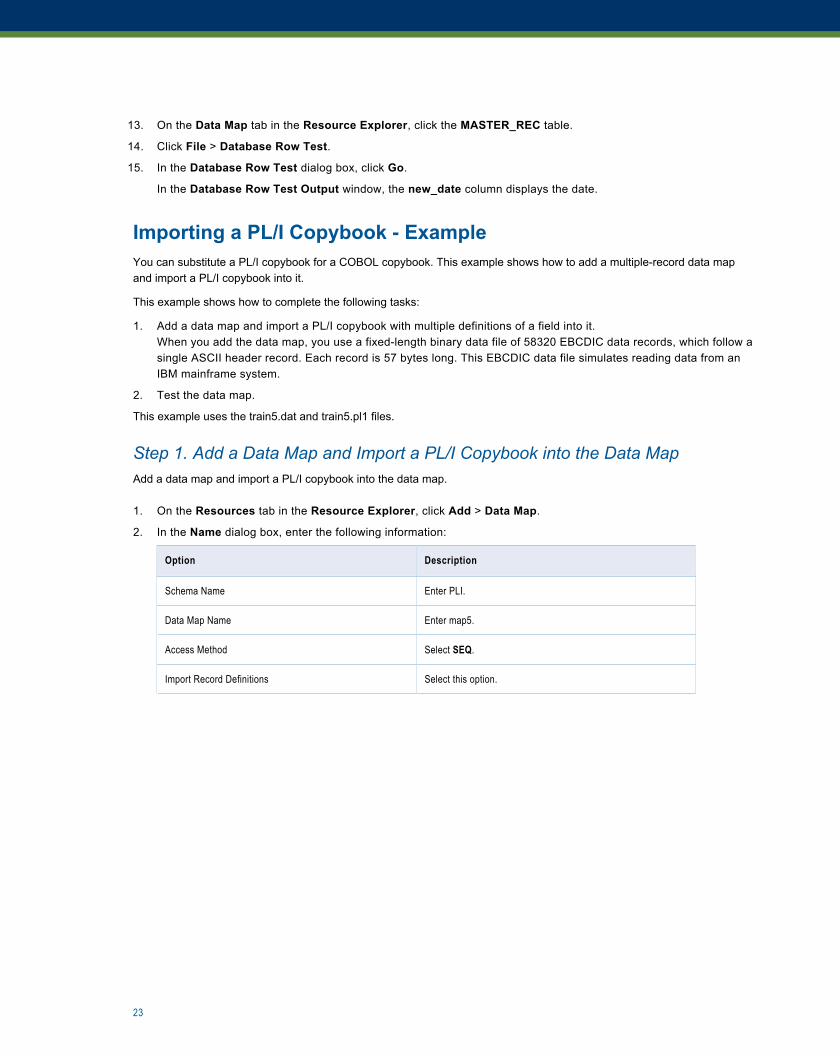
2. In the Name dialog box, enter the following information:
Option Description
Schema Name Enter PLI.
Data Map Name Enter map5.
Access Method Select SEQ.
Import Record Definitions Select this option.
23
The following figure shows the dialog box:
3. Click Next.
4. In the SEQ Access Method dialog box, enter the following information:
Option Description
File Name Click the Browse button to browse to the train5.dat file in the examples directory.
Fixed Select this option.
Size Enter 57.
Default Select this option.
Encoding Select EBCDIC.
Skip First Enter 1.
After you set the encoding, select the Fixed option again.
24
The following figure shows the dialog box:
5. Click Finish.
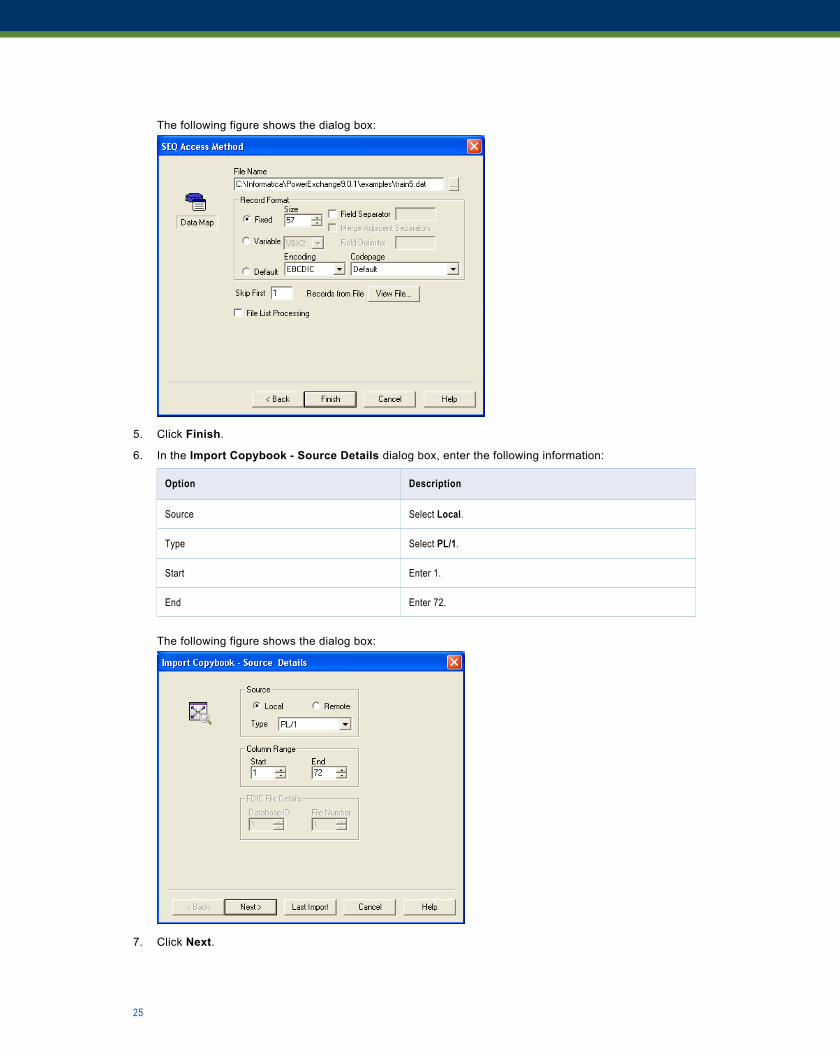
6. In the Import Copybook - Source Details dialog box, enter the following information:
Option Description
Source Select Local.
Type Select PL/1.
Start Enter 1.
End Enter 72.
The following figure shows the dialog box:
7. Click Next.
25
8. In the Import Copybook - Local PL/1 Details dialog box, click the Browse button to browse to the train5.pl1 file inthe examples directory.
Note: To view the copybook, click Preview.
9. Click Next.
10. In the Import Copybook - Configuration Details dialog box, select the actions for imported records, fields, andtables and click Finish. For more information, see “Import Copybook - Configuration Details Dialog Box” on page33.
11. In the Import Copybook Information window, review the information for the import and click OK.
12. In the Record Definition dialog box for the MASTER_REC record, click OK.
For more information, see “Record Definition and Duplicate Record Definition Dialog Boxes” on page 34.
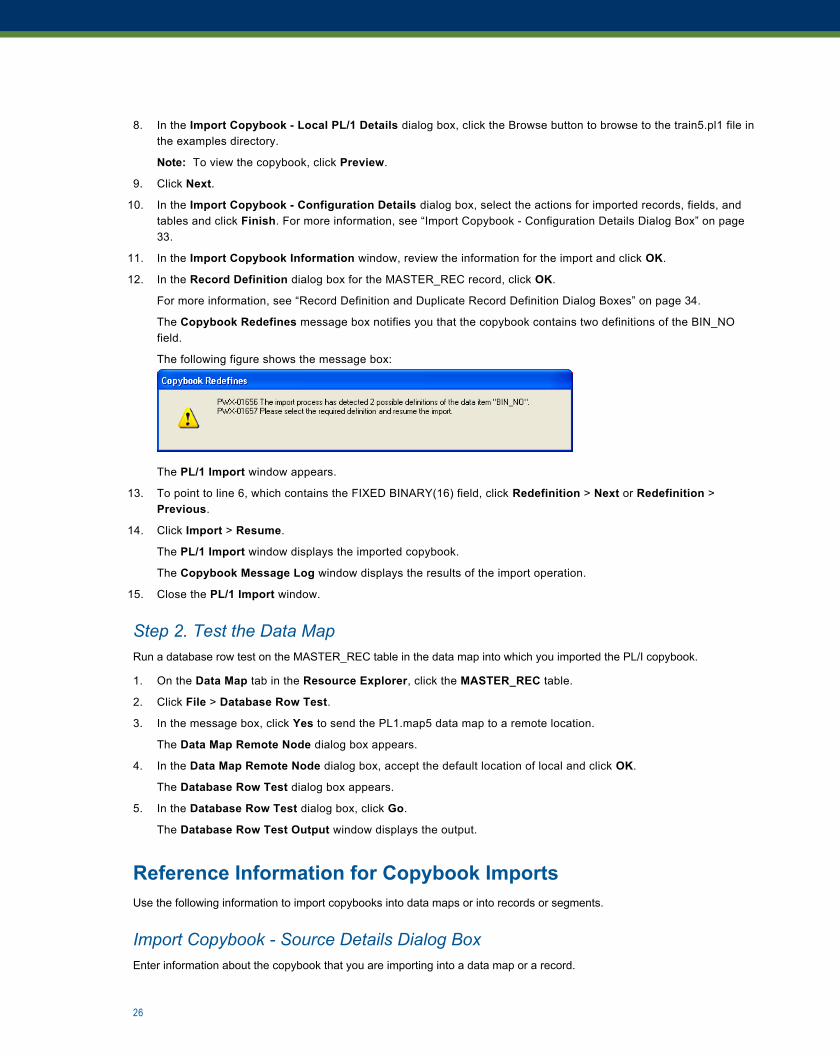
The Copybook Redefines message box notifies you that the copybook contains two definitions of the BIN_NOfield.
The following figure shows the message box:
The PL/1 Import window appears.
13. To point to line 6, which contains the FIXED BINARY(16) field, click Redefinition > Next or Redefinition >Previous.
14. Click Import > Resume.
The PL/1 Import window displays the imported copybook.
The Copybook Message Log window displays the results of the import operation.
15. Close the PL/1 Import window.
Step 2. Test the Data MapRun a database row test on the MASTER_REC table in the data map into which you imported the PL/I copybook.
1. On the Data Map tab in the Resource Explorer, click the MASTER_REC table.
2. Click File > Database Row Test.
3. In the message box, click Yes to send the PL1.map5 data map to a remote location.
The Data Map Remote Node dialog box appears.
4. In the Data Map Remote Node dialog box, accept the default location of local and click OK.
The Database Row Test dialog box appears.
5. In the Database Row Test dialog box, click Go.
The Database Row Test Output window displays the output.
Reference Information for Copybook ImportsUse the following information to import copybooks into data maps or into records or segments.
Import Copybook - Source Details Dialog BoxEnter information about the copybook that you are importing into a data map or a record.
26
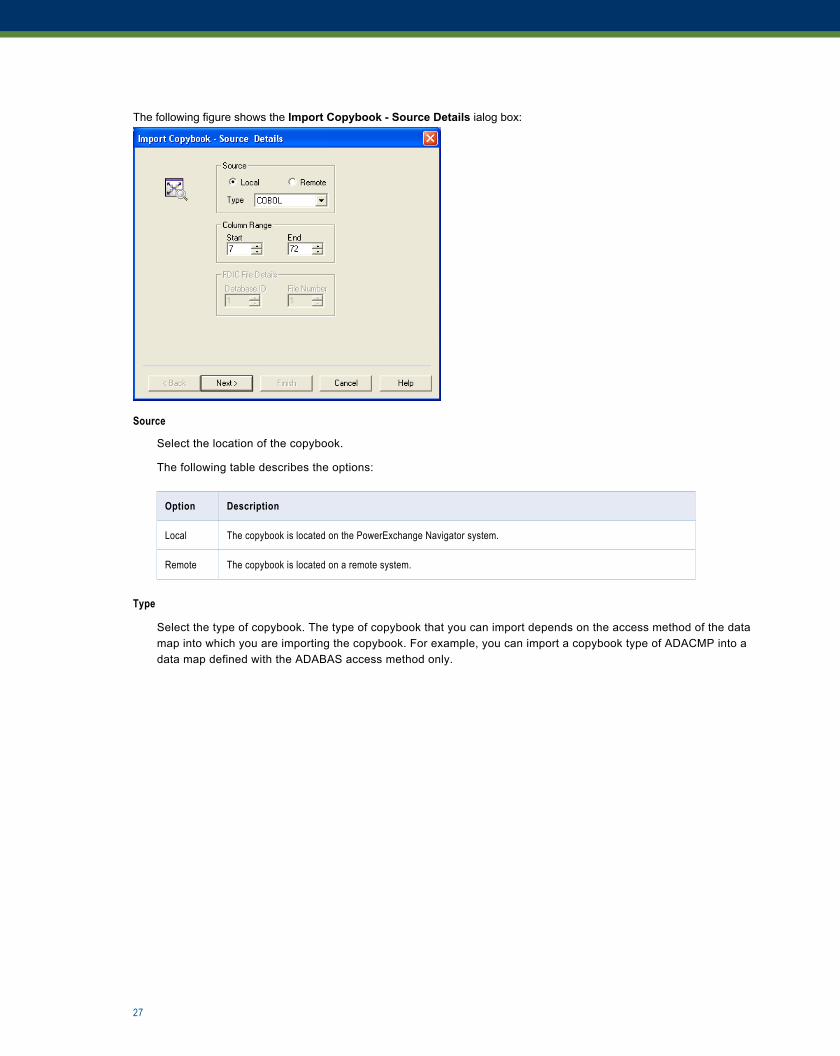
The following figure shows the Import Copybook - Source Details ialog box:
Source
Select the location of the copybook.
The following table describes the options:
Option Description
Local The copybook is located on the PowerExchange Navigator system.
Remote The copybook is located on a remote system.
Type
Select the type of copybook. The type of copybook that you can import depends on the access method of the datamap into which you are importing the copybook. For example, you can import a copybook type of ADACMP into adata map defined with the ADABAS access method only.
27
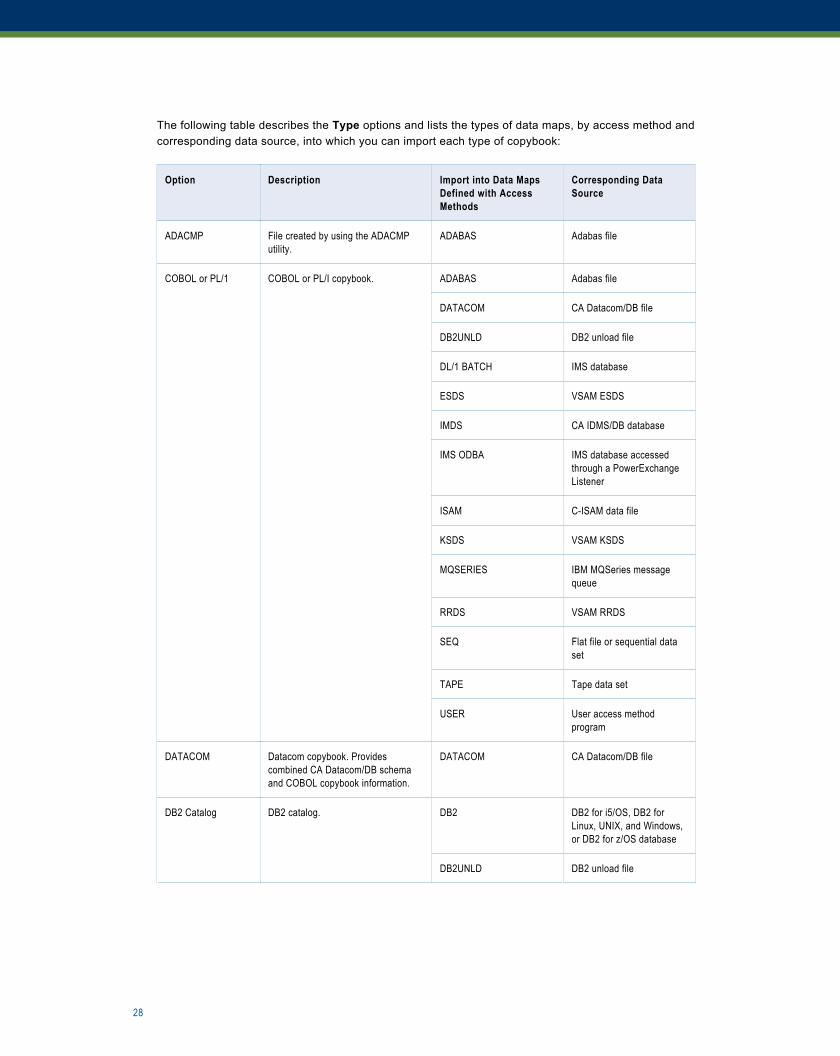
The following table describes the Type options and lists the types of data maps, by access method andcorresponding data source, into which you can import each type of copybook:
Option Description Import into Data MapsDefined with AccessMethods
Corresponding DataSource
ADACMP File created by using the ADACMPutility.
ADABAS Adabas file
COBOL or PL/1 COBOL or PL/I copybook. ADABAS Adabas file
DATACOM CA Datacom/DB file
DB2UNLD DB2 unload file
DL/1 BATCH IMS database
ESDS VSAM ESDS
IMDS CA IDMS/DB database
IMS ODBA IMS database accessedthrough a PowerExchangeListener
ISAM C-ISAM data file
KSDS VSAM KSDS
MQSERIES IBM MQSeries messagequeue
RRDS VSAM RRDS
SEQ Flat file or sequential dataset
TAPE Tape data set
USER User access methodprogram
DATACOM Datacom copybook. Providescombined CA Datacom/DB schemaand COBOL copybook information.
DATACOM CA Datacom/DB file
DB2 Catalog DB2 catalog. DB2 DB2 for i5/OS, DB2 forLinux, UNIX, and Windows,or DB2 for z/OS database
DB2UNLD DB2 unload file
28
Option Description Import into Data MapsDefined with AccessMethods
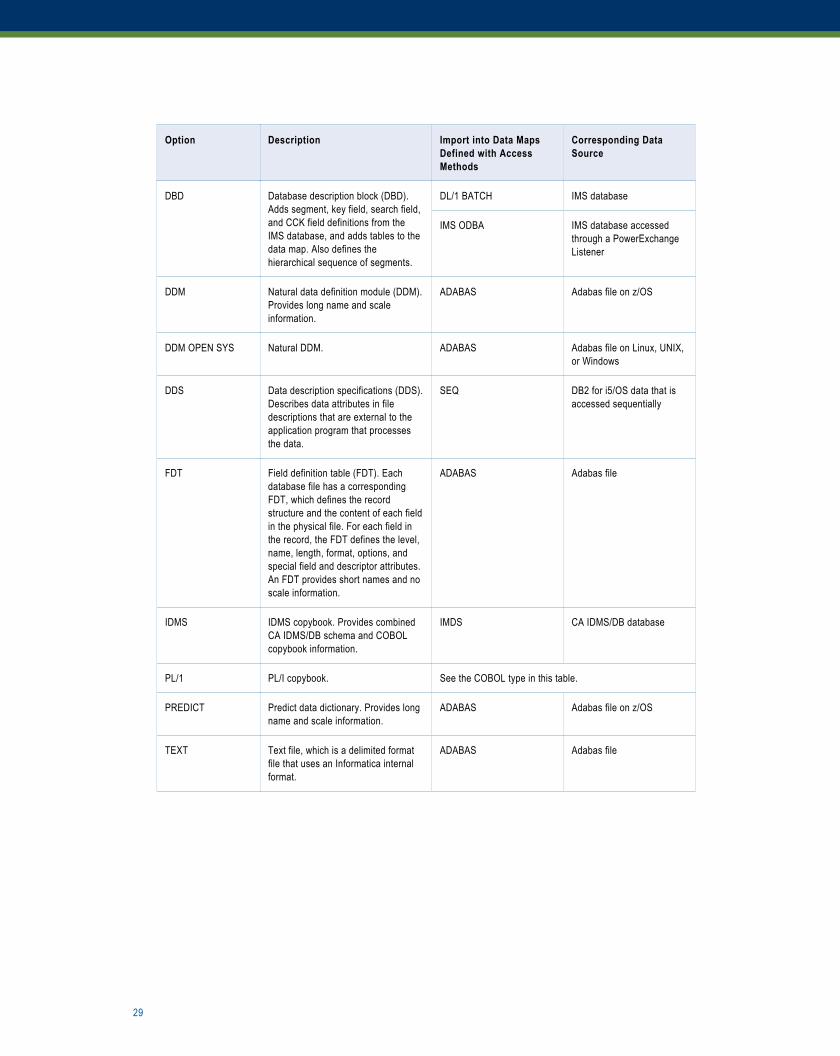
Corresponding DataSource
DBD Database description block (DBD).Adds segment, key field, search field,and CCK field definitions from theIMS database, and adds tables to thedata map. Also defines thehierarchical sequence of segments.
DL/1 BATCH IMS database
IMS ODBA IMS database accessedthrough a PowerExchangeListener
DDM Natural data definition module (DDM).Provides long name and scaleinformation.
ADABAS Adabas file on z/OS
DDM OPEN SYS Natural DDM. ADABAS Adabas file on Linux, UNIX,or Windows
DDS Data description specifications (DDS).Describes data attributes in filedescriptions that are external to theapplication program that processesthe data.
SEQ DB2 for i5/OS data that isaccessed sequentially
FDT Field definition table (FDT). Eachdatabase file has a correspondingFDT, which defines the recordstructure and the content of each fieldin the physical file. For each field inthe record, the FDT defines the level,name, length, format, options, andspecial field and descriptor attributes.An FDT provides short names and noscale information.
ADABAS Adabas file
IDMS IDMS copybook. Provides combinedCA IDMS/DB schema and COBOLcopybook information.
IMDS CA IDMS/DB database
PL/1 PL/I copybook. See the COBOL type in this table.
PREDICT Predict data dictionary. Provides longname and scale information.
ADABAS Adabas file on z/OS
TEXT Text file, which is a delimited formatfile that uses an Informatica internalformat.
ADABAS Adabas file
29

Column Range
Enter the start and end column range for the copybook:
Option Description
Start The start column number.Valid values are from 1 through 999.For the COBOL copybook type, default is 7.For all other copybook types, default is 1.
End The end column number.Valid values are from 1 through 999.For the COBOL and PL/I copybook types, default is 72.For all other copybook types, default is 80.
Note: You cannot set a column range for DBDs imported into IMS DL/1 batch data maps.
FDIC File Details
For DDM or PREDICT copybook types, enter both of the following values:
Option Description
Database ID The FDIC database ID.Valid values are from 1 through 99999.
File Number The FDIC file number.Valid values are from 1 through 9999.Default is 1.
Natural User Library Path
For the DDM OPEN SYS copybook type, enter the natural user library path.
Click the Browse button to browse to the path.
Import Copybook - Local Details Dialog BoxEnter information for the local copybook.
30

The following figure shows the Import Copybook - Local Cobol Details dialog box:
File Name
Enter the path and file name for the copybook, or click the Browse button to browse to the file.
Default is the last copybook imported into the data map from the local system.
Preview
Click Preview to view the copybook.
Concatenate Field Name and Description
For a DDS, select this option to concatenate the DDS field name and description.
Default is cleared.
Import Copybook - Remote Details Dialog BoxEnter information for the remote copybook.
The following figure shows the Import Copybook - Remote Cobol Details dialog box:
31
File Name
Enter the fully qualified file name of the copybook on the remote system.
For a DBD, enter the partitioned data set (PDS) file name and member in the following format:
HLQ.DTLDEMO(dbdname)
Location
Location from which to import the copybook. The options are:
Option Description
Local The copybook is located on the PowerExchange Navigator system.
Remote The copybook is located on a remote system.
The locations displayed in the Location list are defined by NODE statements in the dbmover.cfg configuration fileon the PowerExchange Navigator system.
UserID
For z/OS, enter an operating system user ID, which is required if security is enabled.
Password
For z/OS, enter a password for the user ID.
Save File Locally As
Enter the path and file name on the local system where a copy of the copybook is saved, or click the Browsebutton to browse to a file.
Name
For a DDM, enter the DDM name.
Name Browse
For a DDM, click Name Browse to browse to the DDM.
Preview
Displays the copybook.
Not available for an IDMS copybook.
DBName
For an IDMS copybook, enter the IDMS database name.
Advanced
For an IDMS copybook, click Advanced to enter information in the IDMS Advanced Properties dialog box.
32

Import Copybook - Configuration Details Dialog BoxSelect options to define the default actions to take for imported records, fields, and tables.
The following figure shows the Import Copybook - Configuration Details dialog box:
Option Description
Prompt on record import Select this option to prompt for a record name when you import a record. Default isselected.
Prompt on field import Select this option to prompt for a field name when you import a field. Default is cleared.
Prompt on table creation Select this option to prompt for a table name when you create a table. Default is cleared.
Create table on each record imported Select this option to create a table based on the record for each imported record. Default isselected.
Create tables for DL1 hierarchicalpaths
For a DBD, select this option to create all tables for all DL/1 hierarchical paths. Default iscleared.
Refresh table columns for importedrecords
For COBOL or PL/I copybooks imported into an IDMS, IMS DL/1 batch, or IMS ODBA datamap, select this option to update columns in tables that are based on records that areoverwritten during the copybook import operation. Default is cleared.
Select first data redefinition Select this option to use the first data definition if PowerExchange finds a REDEFINESclause. Default is cleared.
Start import automatically Select this option to start the import automatically. Default is selected.
Action on duplicate record Specifies the action to take if PowerExchange finds a duplicate record, field, or table duringthe import operation.The options are:- PROMPT. Prompts for the action to take.- UNIQUE NAME. Imports the record or segment using a unique name.- OVERWRITE. Overwrites the record or segment.- SKIP. Skips the record or segment.- APPEND. Appends the record or segment from the copybook to the record or segment in
the data map.Default is PROMPT.
Action on duplicate field
Action on duplicate table
33
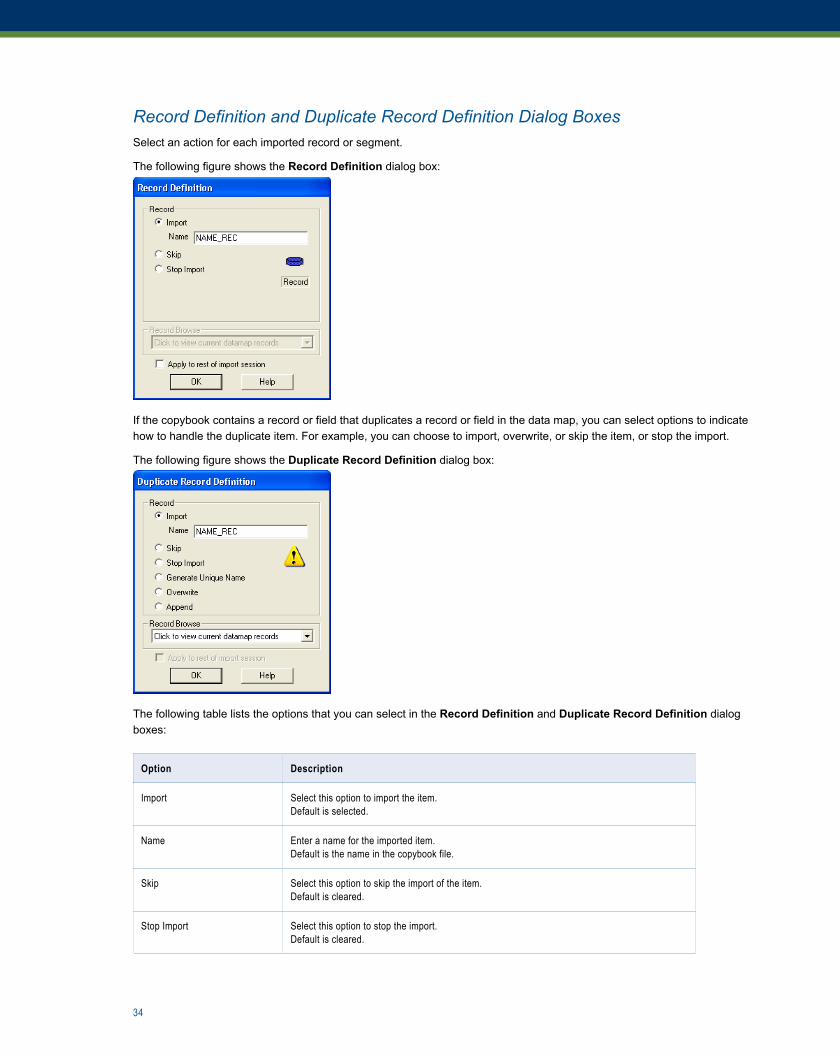
Record Definition and Duplicate Record Definition Dialog BoxesSelect an action for each imported record or segment.
The following figure shows the Record Definition dialog box:
If the copybook contains a record or field that duplicates a record or field in the data map, you can select options to indicatehow to handle the duplicate item. For example, you can choose to import, overwrite, or skip the item, or stop the import.
The following figure shows the Duplicate Record Definition dialog box:
The following table lists the options that you can select in the Record Definition and Duplicate Record Definition dialogboxes:
Option Description
Import Select this option to import the item.Default is selected.
Name Enter a name for the imported item.Default is the name in the copybook file.
Skip Select this option to skip the import of the item.Default is cleared.
Stop Import Select this option to stop the import.Default is cleared.
34

Option Description
Generate Unique Name Select this option to generate a unique name for a duplicate item.Default is cleared.
Overwrite Select this option to overwrite the item for which PowerExchange found a duplicate item.If you select this option, select the type of item to overwrite, which is one of the following:- Fields Only- RecordsDefault is cleared.
Append Select this option to append the duplicate item from the copybook to the item in the data map.Default is cleared.
Record Browse Select a record in the data map to browse.
Apply to rest of import session Select this option to apply the selected options to the rest of the import session.Default is cleared.
AuthorDiane FlemingPrincipal Technical Writer
35


