9.1 IntroductionIf you’ve ever tried burning a few tracks onto a CD, you’ll be well aware of the challenges of producing a CD that sounds comparable to a commercial release. Even with a complete mastery of the production process, and some great-sounding final mixes, your CD could still sound weak and comparatively amateurish. Although OSX and iTunes offer integral CD creation and burn-ing, the fact is that professional musicians and bands will invest a significant amount of money and experience in turning their finished mixes into a final product. So does this mean that users of Logic can’t enjoy the same degree of finesse and polish? Well, with a little know-how, and the audio tools of Logic, you too can produce a commercial-quality CD master.
The term Mastering describes the process of compiling and editing several (possibly contrasting) recordings, applying some form of audio “sweetening,” and assembling these to produce a final Red Book “production master” CD. Traditionally, mastering has necessitated the use of a separate facility (other than the music studio), specially equipped with mastering equipment includ-ing multiband compressors and high-end mastering EQ, as well as dedicated workstations like Sonic Solutions. Nowadays, however, the world of media is a lot more demanding, so it’s not uncommon for musicians, bands, and com-posers to master themselves. The bar, it appears, has been raised – but Logic is certainly up for the challenge!
9.2 Different approaches to masteringMastering itself can be divided into several objectives. First, of course, is the sweetening we most commonly associate with a commercial CD – in other words, the use of Compression, EQ, and a host of other processes across the finished two-track master. Secondly, tracks might as well need to be edited – setting correct start and end points, for example, or placing any fade-ins or fade-outs as required. Finally, the finished files or regions need to be ordered
for the CD, with appropriate markers to define the tracks and index points that appear on the CD. With these three objectives, you can master in the Logic universe.
Technique 1: iTunesThe first technique, and the one most Logic users are used to, is the idea of applying mix sweetening, edits, and fade-outs and dithering all options inside the main Logic application. The finished files are then rendered (using Bounce to Disk) or exported as 16-bit 44.1-kHz files ready for compilation. The compila-tion process, however, requires the use of other software – either iTunes (Apple’s integral audio CD burning tool) or dedicated Red Book software like Jam.
Audio masters, exported from Logic, can be assembled into a finished CD using iTunes or other suitable Red Book standard software.
Technique 2: burn from LogicFor the quickest and the most integral solution to the mastering problem, you can now burn CDs directly from Logic. Again, sweetening and edits can be applied directly to the main application. The burning of CDs, however, is car-ried out from the Bounce menu – rather than rendering an audio file, you’ll burn the finished mix onto a CD. This method is arguably the quickest way of creating a CD, especially with just one or two tracks needed to be burnt, but it doesn’t offer the most flexible solution in the long run.
Technique 3: WaveBurnerThe best technique – although only available to users of Logic Studio – is to use Apple’s dedicated Red Book application called WaveBurner. Originally developed by Emagic, WaveBurner has previously been sold as an indi-vidual programme, but is now included as a standard in Logic Studio. In essence, WaveBurner shares many features with Logic (including plug-ins like Multipressor or De-noiser) alongside tools specifically dedicated to the process of assembling a Red Book standard CD. The real advantage, however, is the way in which you can experiment with the order and sound of your CD – with automatic track crossfades, individual plug-ins for each region (or track), and the important Red Book options like ISRC codes and CD-Text.
9.3 Bounce to DiskWhether you are mastering in Logic itself, or using another application (like WaveBurner), the first step will be to render your Logic mix as an audio file. The temptation to apply audio sweetening or fades in the main Logic session can be there, but this should be avoided at all costs. Ideally, if you have at least one copy of your song un-mastered at 24 bits, then it would be more suitable to take to a professional mastering engineer (when the lucrative record deal arrives!) than a home-mastered 16-bit file. Separate high-resolution files also afford you the opportunity to approach mastering your work away from the
For a quick CD, use Logic’s integral CD Burn feature, as part of the Bounce to Disk option. Although this method is an easy way of burning single tracks (a rough mix, for example), it can be too restrictive for professional mastering.
“headspace” of a mix, so that tracks sound correct in terms of the whole CD rather than on an individual basis.
The Bounce dialogue window can be accessed via the Bounce button, on the main output channel strip. Before clicking on this, you’ll need to define the length of the bounce, designated by the current cycle length – without this, Logic will simply default to bouncing from the beginning of the first region to the end of the last. By defining the length manually, you can keep the best account of a few crucial factors – namely, the “hangover” at the end of the track generated by reverb tails and the allowance of a small amount of silence at the start of the audio file. At this stage it’s probably best to get a file slightly bigger, rather than too small, as trying to add information later (say, for example, when a reverb tail gets cut off) can be tricky, if not impossible.
In the Bounce window you’ll need to specify the file type, resolution, and dithering options. Ideally, a PCM, AIFF, 24 bit, 44.1 kHz, interleaved file is con-sidered the best “raw data” for mastering. More important, you should check that the dithering has been set to none, as dithering is best applied at the very last stage of mastering when the word length is reduced to a 16-bit mas-ter. The Bounce itself can be carried out in Realtime (maybe you’ve got some live synths or effects coming into the audio mixer) or Offline – a quicker way of rendering to file by temporarily devoting all your computer’s resources to the bounce process.
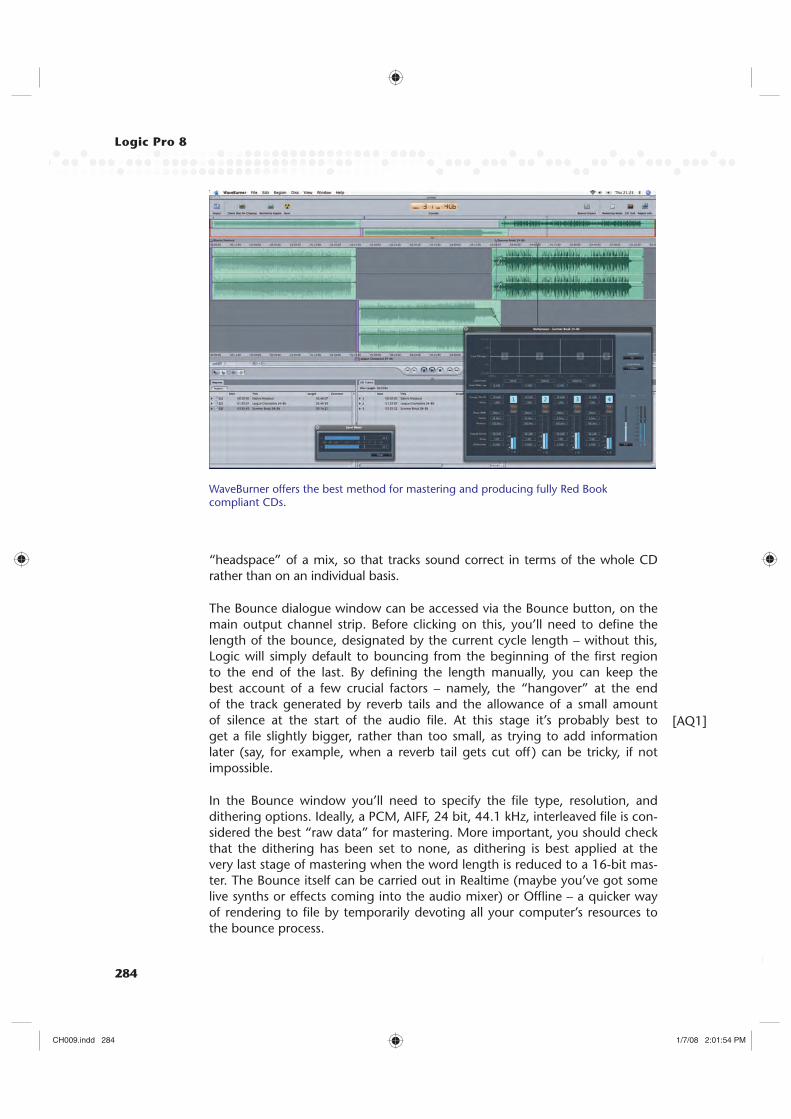
WaveBurner offers the best method for mastering and producing fully Red Book compliant CDs.
9.4 Audio mastering in LogicWith the raw data of your tracks assembled, you can begin to look at mix sweetening. Whether you’re using WaveBurner or Logic, the principal plug-ins and objectives will be the same, although the exact details of their application will vary. With the various songs pulled into a master Logic session, you could place each region on a different track and experiment with various plug-ins to reach the desired sound. Ideally, the CD should present a rounded and uni-form tone throughout, with a consistent “loudness” across the tracks – you could even try importing some commercial tracks as a reference to see just how far you can take things. Exactly how you achieve this will vary from track to track.
The principal tools used in mastering are well represented in Logic including phase-linear EQ, multiband compression, and limiting. Obviously, you can use any plug-in where appropriate, but these particular tools will be the most use-ful in achieving a professional sound. Plug-ins can be inserted either on the individual track’s insert points (for song-specific processing) or across the main master channel strip for general application (maybe when the album needs to be limited as a whole, for example). As with any audio processing, the order of the plug-ins is vitalfor the end result, although the widely accepted order for mastering is EQ, followed by compression, and finally limiting. Metering (applied across the main output using the Channel EQ’s Spectrum analyser or the Multimeter plug-in) will help keep an overview of things – note, in par-ticular, how the commercial tracks might metre differently to your own mixes.
Performing a bounce of your Logic arrangement – check that the duration of the bounce is slightly longer than your track and the resolution is 24 bit.
9.5 Editing fadesAs well as preparing the sound of the tracks, it’s also important to look at some other important mastering details, like the exact start and end points, and any desired fade-ins or fade-outs. Having already mastered audio edit-ing in Chapter 5, you should have no problems switching over to working on whole songs rather than individual regions. When you’re editing the start point, however, make sure you leave a small amount of silence and don’t cut right to the beat – this allows for older CD players to de-mute, and stops the track from “jumping-out” at the start of playback. Also pay close attention to unwanted noise at either end of the track – the easiest way to address this is to use the Sample Editor’s Functions menu to “Silence” unwanted noise, or use a quick Fade In and Fade Out as appropriate.
Creating proper track fade-outs (i.e., fading out over the last chorus) is a lit-tle more taxing. The problem lies in the fact that adding a fade using Logic’s conventional method – arrangement window’s fade tool – doesn’t account for the use of mastering processors. As the fade effects are preset, any correspond-ing change in the track’s level will result in a change in compression – so as the track fades out, for example, it slowly loses its compression. To counteract this, try performing another bounce, this time with the processing in place. The new “compressed” region can then be re-inserted into Logic (the old effect being disabled) and then the fade can be applied.
Mastering in Logic using a combination of channel inserts and the main stereo output object.
9.6 Exporting and burningOnce the tracks have been processed and edited correctly, you can begin to create the final exported 16-bit masters ready to be burnt, or indeed, you could burn the files directly from Logic. The Bounce dialogue window again comes into action – either to create the final rendered files or access to the
Use Logic’s Sample Editor to perform basic “top and tailing” tasks, like silencing unwanted noise or creating small fades (as illustrated).
For longer fade-outs you need to render the file with effects, then create the fade using either Logic’s region fade tool (as illustrated) or the Sample Editor’s fade.
Burn feature. Given the regions of the exact finished song length, you can use the Region menu to “Set Locators by Regions,” in this way the cycle length (and therefore the Bounce) will be exactly the same length as the region. The bounce dialogue window should specify the creation of 16-bit files, which will necessitate the (final) application of Dither to smooth out any quantizing noise brought about by moving away from 24 bits. Once exported, these files can be dragged straight into iTunes (or other suitable software) ready to be burnt.
Using the “Set Locators by Regions” feature you can create a new bounce with exactly the same length as that of your edited regions.
The last bounce will need to be dithered down to 16-bit resolution, ready to be burnt in another application.
With Burning now supported directly from the Bounce dialogue window, you can burn a CD directly from Logic itself. Again, where the session contains audio files greater than 16-bit resolution, the addition of dithering is essential, which can be selected from the appropriate pop-down menu in the Bounce window. Other pertinent options include setting the write speed (keep this
low to avoid any write errors that degrade the audio quality on playback) and writing the disc to a multisession CD. When the “write as multisession” option is selected, you’ll be able to add further mixes to the CD at a later point, other-wise Logic will simply burn a single onto the CD. Although adding sessions at a later point will save the use of CD-Rs, you might experience problems with CD players recognizing extra songs.
Quick and easy CD creation: Logic’s Bounce and Burn feature.
In many ways, the “Bounce and Burn” feature is best viewed as a quick fix for creating audio CDs – especially if you intend to write more than one track to the CD at any given time. In this scenario, it might be perfectly legitimate to attempt some rough mastering in the actual song’s file, rather than a separate session – simply insert a Multipressor and some EQ across the main stereo outs and away you go!
9.7 Mastering in WaveBurnerFor a fully professional result that meets the requirements of Red Book stand-ards, you’ll need to use WaveBurner. Preparing this will simply involve render-ing the files (ideally at 24 bits, without dither) ready to be imported into a WaveBurner session – after this, the rest of the mastering process (compres-sion, editing, and so on) can be carried out in WaveBurner’s domain. The advantages offered by WaveBurner stem from the fact that it is designed, from ground-up, as a tool for mastering – Logic, on the other hand, is a dedicated production tool. Track crossfades, for example, can be difficult to create in Logic – this is not the case in WaveBurner. Additionally, with support for CD-Text, UPC/EAN codes, and index marks, WaveBurner is one of the most com-plete Red Book compliant applications available for the Mac.
After creating a New session (File � New), raw master files can be inserted in WaveBurner via the Region � Add Audio File menu, or by dragging the audio file from Finder. WaveBurner’s screen is divided into four main areas, the most important being the Wave View and Overview areas (towards the top of the screen) that provide a graphic representation of the CD and the various regions that comprise it. The Region list, towards the bottom right-hand corner of the screen, lists the series of regions (or audio files) used in your session – a song, for example, could be constructed from several regions stuck together. The Track list, adjacent to the Region list, lists the Song marker used to break up the CD – more important, these can be completely arbitrar-ily placed, and aren’t necessarily tied to the regions.
The WaveBurner interface:
1. Overview – presents a complete overview of all the regions currently used in your WaveBurner session.
2. Wave View area – gives a more detailed presentation of the regions, also where you can perform the various editing tasks (fades, trimming, and so on) in WaveBurner.
3. Region list – a list of audio files used in your session.4. Track list – relates to the order and spacing of regions in the playlist and forms the
structure of your CD.5. Region list/Plug-in lists – displays the currently configured plug-ins used for the
selected region, or the “global” plug-in inserted across the mix outputs.
9.8 Processing and editingAudio processing is carried out in the Region and Mix plug-ins list. These work in much the same way as the channel and the master inserts did in the explanation of mastering in Logic. So, for example, the Region plug-ins can be
used to process audio files imported into WaveBurner on a song-by-song basis, while the Mix plug-ins are applied to the entire programme output – in other words, all the tracks. Although the Mix plug-ins can be useful for processing en masse, they are best used in metering and audio analysis plug-ins. WaveBurner’s available plug-ins aren’t as well stocked as Logic’s – for the sake of simplicity, only the mastering plug-ins are included – but support is provided for third-party audio units.
With WaveBurner’s specific focus on mastering, the editing tools work more quickly and more effectively than Logic’s Sample Editor. Changing start and end points, for example, results in WaveBurner intelligently shuffling the other tracks in line with your edits. Fades can be quickly addressed by adjust-ing the nodes at either end of the region, with options to change the fade curve. More important, unlike trying to master in Logic Pro, these fades are carried out after the Region plug-ins, ensuring a consistent tone irrespective of the fades. Dragging regions over one another creates a crossfade – either to iron out edit points in the two track masters or to create smooth transitions between different tracks.
9.9 Dithering, bouncing, and burningBy keeping your session masters in a high resolution, you will ensure the best possible signal integrity throughout the entire mastering process. Even so,
Importing new audio files that are ready for mastering.
the reduction to 16-bit resolution and the application of dither are always inevitable. For such a vital process, however, it is easy to miss when and how WaveBurner applies dither. Technically, the controls for dither are actually part of the Bounce preferences (WaveBurner � Preferences � Bounce) – an option whereby WaveBurner creates finished files for the songs you’ve created ( just like Logic’s bounce). Bounces can be performed region by region (Region � Bounce Mix), or you can create a bounce of the entire CD as one contiguous “image” file (File � Bounce Project). Rendering the files isn’t essential unless your computer’s under too much strain with its DSP to perform a Burn, or because you want to move the files (with effects printed into the mix) onto another application.
The bounce preferences contain WaveBurner’s dithering options – applied either to a bounce or to the final burn.
What isn’t immediately obvious is that the Bounce preferences also dictate how WaveBurner burns audio to a CD – particularly with respect to the appli-cation of Dither. Therefore, as long as the Bounce preference is set to dither, WaveBurner will automatically dither your files as part of the burn – with-out specifying the need to burn. In the rare case that you are importing files already processed and dithered, you’ll need to remember to return to the preferences and turn the dithering off.
By pressing the “create disc icon” you can initiate the burn – although this is only the beginning of the process of learning mastering. For something so apparently simple (how difficult can two tracks and a multiband compressor be?), the real art of mastering professional CDs will take a lifetime to master.
Ultimately, the art of mastering is a surprising blend of a gut instinct for what sounds right (in other words, the mastering engineers “ears”), alongside a complete understanding of the technical criteria of manufacturing an audio product. At least with Logic and WaveBurner you have some powerful tools in hand, and the opportunity to present your music in the best possible way.
Use the bounce feature to render WaveBurner’s output as an audio file, or to create a contiguous image file of the final CD.
�
Walkthrough 1
Editing and assembling a CD in WaveBurner
Step 1:
Start a new project in WaveBurner (File � New) and import your required 24-bit session masters (File � Import Audio File). Try resizing the three areas of WaveBurner’s interface (Overview, Wave area, and Regions lists) to best suit your needs – here we’ve selected a small overview and Regions list, alongside a large, clear wave area for editing. With the songs imported, you’ll probably need to perform some basic edits before going any further. To do this, click on the region you want to edit (from the overview) and click and drag either the start or the end point to resize the region. Leave some duration of silence at the start to allow for CD de-muting.
fade using the other two nodes that appear – sometimes the linear fade can be a little too obvious to the ears, whereas curves can be more gen-tle or extreme depending on the material you’re playing with. Another important thing to look at are the gaps and pacing between the tracks, as illustrated by the purple-shaded “pause time” area. Try slipping the next region backwards or forwards to match the required pace of transition – this is an important way of setting the feel of the album.
Step 3:
Where a region is dragged back beyond the shaded pause area, a cross-fade can be created between the two tracks. As with the fade-in and fade-out, the curve of this can be adjusted to get the smoothest, most musical transition between the two tracks. WaveBurner will automatically place the Song marker halfway between this transition – if you want it placed elsewhere, drag the small purple marker on the top of the wave area back to the appropriate point. In addition to song markers, you can place index points – simply change the marker tool (bottom right) from purple to orange.
With the structure of the CD defined, you can turn your attention to the sound, in an attempt to get a “loud” consistent tone throughout. To per-form this, some informative metering is essential so that you can hear and see detailed qualities of the track you’re working with. In the Mix plug-ins list, insert an instance of WaveBurner’s Multimeter and the Level Meter – this should give you a good overview of the timbre and the overall level of your CD. Try importing a commercially mastered track (similar to the CD you are working with) to get some reference to how things should look and sound.
Step 2:
Now turn your attention to the sound of the individual regions. Select a region from the Region list, click on the Region plug-ins tab, and insert the appropriate processing to achieve the desired sound. In most cases, a combination of the Linear-Phase EQ, Multipressor, and Limiter (in that order) should pull the mix up to the point where it sounds “loud and proud.” Check the results against the other tracks so that you achieve a consistent tone. Most importantly, avoid excessive clipping or distortion, which you can identify through careful listening, or (from a technical per-spective) using the Disc � Check Disc For Clipping menu option.
If everything’s sounding sweet, you’re ready to do the final preparation for the burn. If your source files are 24-bit you’ll need to check the dithering status of WaveBurner. To check this, go to WaveBurner’s preferences and select the Bounce tab. Now pick a dithering option from the pull-down menu – POW-r # 1, 2, or 3. Dithering is applied either when you Bounce files in WaveBurner, or as it creates the final burn. To set the burn in action, click on the Create Disc icon and insert a blank CD-R into your CD writer. To ensure a minimal error rate, use the lower burning speeds.
Dithering is an essential part of the analogue-to-digital conversion process. However, the process of dithering a signal also refers to the process of alter-ing the wordlength to suit your specification. For example, if you bounce your Logic song as a 24-bit file but wish to place this on a Red Book CD, you will need to dither this down to 16 bits. The 24-bit recording will allow for a much more accurate 16-bit file due to the increased resolution, unlike the “dither” noise added in 16-bit A/D conversion. Logic employ-ees a licenced algorithm called POW-r (Psychoacoustically Optimized Wordlength Reduction) from the POW-r Consortium LLC. (http://www.mil-media.com/docs/articles/powr.shtml). The POW-r algorithm is considered one of the best dithering algorithms and is widely supported by mastering engineers around the world.
Knowledgebase 3
�
POW-r
POW-r comes with three options within Logic. One is labelled “Dithering” which employs a noise-shaping curve to reduce noise. The remaining settings offer two types of noise shaping. The Logic Manual describes the first noise-shaping algorithm which can “extend the dynamic range by 5 to 10 dB.” The second noise-shaping algorithm is intended for work with speech as it can “extend the dynamic range by 20 dB within the 2–4 kHz range – the range the human ear is most sensitive to” (Apple Logic Manual). These noise-shaping curves have been developed to be sympathetic to the human ear and draw upon considerable research beginning with Fletcher and Munson’s Equal Loudness Contours (More information on Equal Loudness Contours can be found in Rumsey, F. & McCormick, T. (2002) Sound and Recording, An Introduction. Focal Press).
Knowledgebase 1
�
Pre-Mastering
Officially the term “Mastering” refers to the process of cutting a master disc from which the records would be pressed in duplication. Pre-Mastering origin-ally describes the process that engineers used to prepare the audio signal for the vinyl medium. Nowadays, the term Mastering tends to be used in place of Pre-Mastering and describes the process of preparing the audio for the intended medium, ordering the music and also signal processing.
Having looked at Logic’s standard channel EQ in the mixing chapter, let’s take a look at the mastering-orientated Linear-Phase EQ. Being much more CPU intensive than the Channel EQ, the Linear-Phase EQ produces a tech-nically superior sound by removing the phase shifts (caused as frequencies are cut and boosted) that occur in a conventional EQ. Even with its CPU drain, the Linear-Phase EQ is a welcome and sonically accurate tool for enhancing and shaping the timbre of a track in mastering. Operationally speaking, the Linear-Phase EQ includes the same controls as found on the Channel EQ, and the same phenomenally useful FFT analyser.
Applying EQ in Mastering requires an approach different to that of mixing. On the whole, your approach needs to be a subtle as possible – remember everything you do will be much more noticeable as you’re only working with two stereo tracks! Try to keep boosts, or preferably cuts, to a maximum of �3 dB with a wide bandwidth (low Q parameter) – if you’re going beyond this, you may well have a problem with the original mix. Overall, your track should exhibit a smooth response, with a gentle roll-off of high frequency energy. Remember though that there are other tools that can also have a timbral effect on the mix – sometimes more successful than EQ – like mul-tiband compression (especially on bass) or harmonic excitement (for some top-end sparkle).
�
Plug-in focus 2
�
Multipressor and multiband compression
Originally developed as part of WaveBurner, Multipressor is Logic’s answer to the big multiband compressors (like the TC M6000 or TC Finalizer, for example) so frequently used in mastering. Unlike conventional single-band compression, a multiband compressor splits an incoming audio signal into separate frequency bands before applying compression. Separated in this way, a complete mix is far easier to control and gel to form a finished mas-ter. In most cases the greatest amount of compression will be applied to the bottom-end of the mix – keeping the bass solid and tight – with the high-end requiring a light and minimal touch.
Multipressor features up to four bands of compression and downward expansion, although to make things easier you might just want to use three bands (low, mid, and high). One of the most important things is to set the right crossover frequencies for the different bands, as this can have a big effect on the finished compression achieved. To set the cross-over point, try moving the vertical borders in the left-hand corner of the
window – you could also use the Spectrum analyser (part of the Multimeter plug-in) to visually analyse the track’s constituent components. With one of the bands selected, you can adjust the compression ratio (start with about 2:1) and compression threshold to start squashing a particular frequency band.
With the right threshold and ratio set you should see the gain reduc-tion meters start to pump (try yielding about 3–6 dB depending on how squashed you want your mix to sound). You can also use the expander, like a gentle form of noise gate, to attenuate unwanted noise – this might only need to be applied to the high band where noise is most prominent. Attack and Release times change the responsiveness of the compressor; avoid setting the release too fast (the compressor might start to pump) or squashing the transients too much with a fast attack. Finally, as the Multipressor uses a form of auto Gain Makeup, you might want to adjust the relative output levels of the bands – do this by clicking on the top line of the respective band in the left-hand display.
Plug-in focus 3
�
Limiting
Although Multipressor does a good job of bringing the overall dynamic range of your track more in-line with a commercial CD, it’s still possible that your tracks will sound at least 4–6 dB quieter than a professional release. This is because fast transients (often from slightly louder drum hits) have slipped through the Multipressor’s “net” and are still dictating the overall peak level of the track – even though the average level is some-what below this. Professional mastering engineers will therefore make use of a fast-acting digital limiter (sometimes known as a Brickwall Limiter) to catch these peaks and reduce them. With the peaks reduced, the overall track level can be lifted to match the loud output currently favoured in mastering.
Logic and WaveBurner’s Limiter both present a basic set of controls that should allow you to squash transients in no time. The main parameter, Gain, pushes the overall mix harder towards 0 dB – where loud signals would then conventionally distort logic outputs, the Limiter kicks-in and applies gain reduction (indicated in the top meter) to stop this from happening. In most cases, especially those that have already been through the Multipressor, you’ll only need to apply about 3–4 dB of Gain, although you will need to listen carefully for any unwanted audio anomalies, especially distortion.
As well as the three big mastering tools (EQ, multiband compression, and limiting), both WaveBurner and Logic also feature other plug-ins suit-able for track sweetening. Stereo Spread, an effect often found on hard-ware mastering processors like TC electronics Finaliser, offers the ability to extend the width of a stereo signal – say, for example, the mix had been made slightly too mono. Unlike certain other Stereo Spreaders, Logic’s mix widener avoids the use of phase in achieving extra width – instead it uses a frequency distribution system to pan alternating frequencies to the left and right-hand speaker, respectively. By using this frequency distribution method, Stereo Spread avoids the phase problems often associated when a width enhancer is put back into mono. In truth, its effectiveness is some-what limited and it only works best with material possessing little or no stereo information.
Although they have little everyday use, Logic and WaveBurner’s other mastering plug-ins can be useful solutions to a range of mastering problems.
[AQ1] The sentence “At this stage it’s probably best to get…” has been rephrased, please check whether the intended meaning is retained.
[AQ2] The sentence “As the fade effects are preset, any corresponding…” has been rephrased, please check whether the intended meaning is retained.
Denoiser uses some clever trickery with FFT filtering to produce a cleaner audio signal in situations where the master possesses a large amount of unwanted noise. Like a conventional noise gate, Denoiser needs its Threshold set careful to make best use of the effect – try locating a quiet section of the master, with the noise present, and set the Threshold just above this. Reduction defines the amount of Denoising taking place, although if pushed too hard the Denoising can sound almost as distracting as the noise itself! The Noise Type fader seems a little strange at first, but it does make sense – in the centre position, the fader is sensitive to noise across the entire audio spectrum, towards the top its bias is towards darker noise, and to the bot-tom it is more sensitive to high-frequency noise.