43
Industrial RS-232 to RS-485/422 Converter KSC-240 Installation Guide DOC.070412-KSC-240
-1-
IndustrialRS-232 to RS-485/422 Converter
KSC-240
Installation Guide
DOC.070412-KSC-240

-2-
(C) 2006 KTI Networks Inc. All rights reserved. No part of this documen-tation may be reproduced in any form or by any means or used to makeany directive work (such as translation or transformation) without per-mission from KTI Networks Inc.
KTI Networks Inc. reserves the right to revise this documentation and tomake changes in content from time to time without obligation on the partof KTI Networks Inc. to provide notification of such revision or change.
For more information, contact:
United States KTI Networks Inc.P.O. BOX 631008Houston, Texas 77263-1008
Phone: 713-2663891Fax: 713-2663893E-mail: [email protected]: http://www.ktinet.com/
International Fax: 886-2-26983873E-mail: [email protected]: http://www.ktinet.com.tw/
-3-
The information contained in this document is subject to change withoutprior notice. Copyright (C) All Rights Reserved.TRADEMARKSEthernet is a registered trademark of Xerox Corp.
FCC NOTICEThis device complies with Class B Part 15 the FCC Rules. Operation issubject to the following two conditions: (1) This device may not causeharmful interference, and (2) this device must accept any interferencereceived including the interference that may cause.
CE NOTICEMarking by the symbol indicates compliance of this equipment tothe EMC directive of the European Community. Such marking is indica-tive that this equipment meets or exceeds the following technical stan-dards:EMC Class BEN 50081-1/1992 : EN55022:1994/A1:1995/A2:1997 Class B
EN61000-3-2:2000EN61000-3-3:1995/A1:2001
EN 55024:1998/A1:2001IEC 61000-4-2:1995IEC 61000-4-3:1995IEC 61000-4-4:1995IEC 61000-4-5:1995IEC 61000-4-6:1996IEC 61000-4-8:1993IEC 61000-4-11:1994

-4-
Table of Contents1. Introduction......................................................... 51.1 Features ........................................................................................ 61.2 Specifications ................................................................................ 7
2. Installation ......................................................... 122.1 Unpacking .................................................................................... 122.2 Safety Cautions .......................................................................... 132.3 DIN-Rail Mounting ....................................................................... 142.4 Panel Mounting ............................................................................ 162.5 Applying Power ........................................................................... 182.6 Power Failure Relay Output ........................................................ 212.7 DIP SW Configuration .................................................................. 222.7.1 RS-485/422 Driver and Receiver Control ................................. 282.8 Making Serial RS-232 Connection .............................................. 292.8.1 Cable for Connection to PC COM Port ..................................... 31
3 Making RS-485/422 Connection ....................... 323.1 RS-422 Point-to-Point Circuit ...................................................... 333.2 RS-422 Multi-drop Network ......................................................... 343.3 RS-485 Multi-drop Network ......................................................... 363.4 RS-485 Half-duplex 2-wire Network ............................................ 383.5 RS-485 Full-duplex 4-wire Network ............................................ 393.6 Summary of the Converter Applications ...................................... 41
4 LED Indicators ................................................... 424.1 LED Indicators ............................................................................. 42
5 Factory Default Configuration .......................... 43
-5-
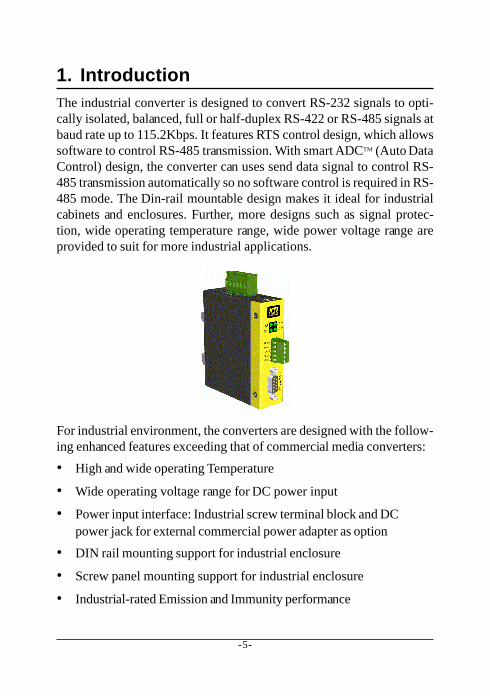
1. IntroductionThe industrial converter is designed to convert RS-232 signals to opti-cally isolated, balanced, full or half-duplex RS-422 or RS-485 signals atbaud rate up to 115.2Kbps. It features RTS control design, which allowssoftware to control RS-485 transmission. With smart ADCTM (Auto DataControl) design, the converter can uses send data signal to control RS-485 transmission automatically so no software control is required in RS-485 mode. The Din-rail mountable design makes it ideal for industrialcabinets and enclosures. Further, more designs such as signal protec-tion, wide operating temperature range, wide power voltage range areprovided to suit for more industrial applications.
For industrial environment, the converters are designed with the follow-ing enhanced features exceeding that of commercial media converters:
• High and wide operating Temperature
• Wide operating voltage range for DC power input
• Power input interface: Industrial screw terminal block and DCpower jack for external commercial power adapter as option
• DIN rail mounting support for industrial enclosure
• Screw panel mounting support for industrial enclosure
• Industrial-rated Emission and Immunity performance
-6-
1.1 Features� Supports RS-232 baud rate up to 115.2Kbps
� Operation with no required configuration
� Provides surge protection (transient voltage) on all interface lines
� Provides high ESD protection on all line signals
� Optical isolated between RS-232 and RS-485/422 interfaces
� Supports RS-422, 2-wire RS-485, and 4-wire RS-485 network
� Supports full-duplex or half-duplex for RS-485/422 interface
� Provides remote RTS control for RS-485 transmission
� Provides ADC TM (Auto Data Control) for RS-485 transmission
� Designed for industrial environments with:
- Surge, ESD, and isolation protection
- DIN-rail and panel mounting support
- Wide power voltage range support
- Terminal block and Jack-type power connectors
- Wide operating temperature range support
- Alarm relay output for device power failure
- Industrial-rated emission and immunity performance
-7-
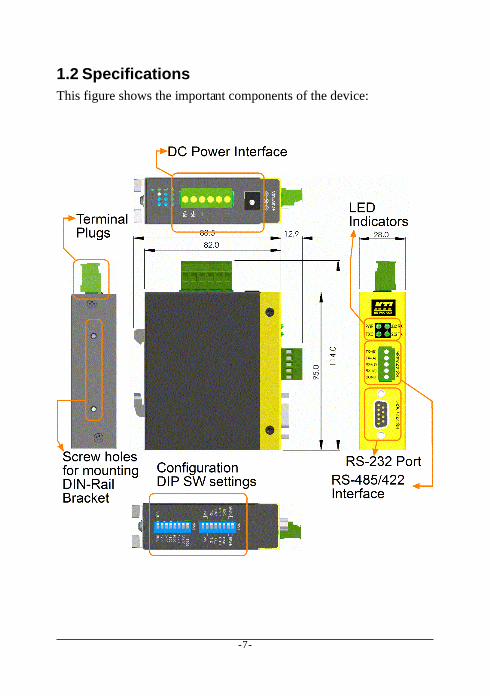
1.2 SpecificationsThis figure shows the important components of the device:
-8-
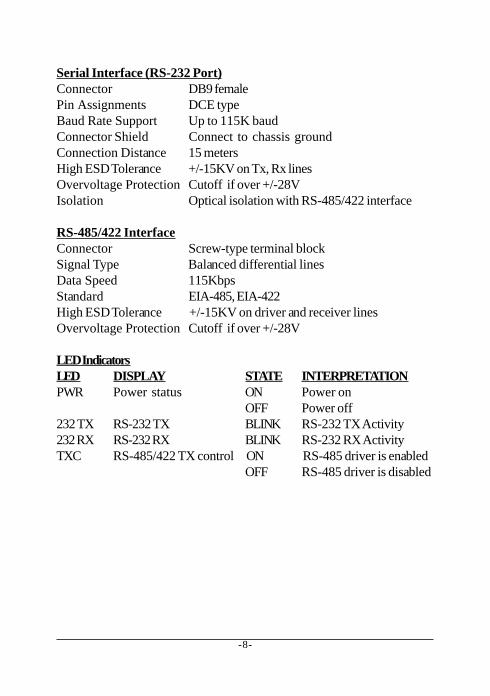
Serial Interface (RS-232 Port)Connector DB9 femalePin Assignments DCE typeBaud Rate Support Up to 115K baudConnector Shield Connect to chassis groundConnection Distance 15 metersHigh ESD Tolerance +/-15KV on Tx, Rx linesOvervoltage Protection Cutoff if over +/-28VIsolation Optical isolation with RS-485/422 interface
RS-485/422 InterfaceConnector Screw-type terminal blockSignal Type Balanced differential linesData Speed 115KbpsStandard EIA-485, EIA-422High ESD Tolerance +/-15KV on driver and receiver linesOvervoltage Protection Cutoff if over +/-28V
LED IndicatorsLED DISPLAY STATE INTERPRETATIONPWR Power status ON Power on
OFF Power off232 TX RS-232 TX BLINK RS-232 TX Activity232 RX RS-232 RX BLINK RS-232 RX ActivityTXC RS-485/422 TX control ON RS-485 driver is enabled
OFF RS-485 driver is disabled
-9-
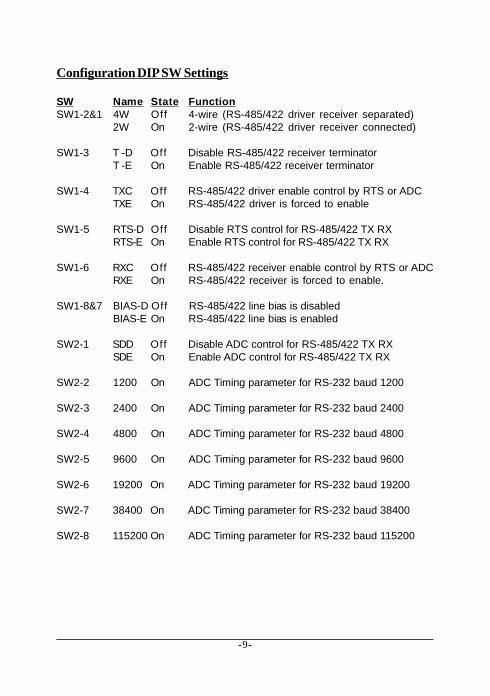
Configuration DIP SW Settings
SW Name State FunctionSW1-2&1 4W Off 4-wire (RS-485/422 driver receiver separated)
2W On 2-wire (RS-485/422 driver receiver connected)
SW1-3 T -D Off Disable RS-485/422 receiver terminatorT -E On Enable RS-485/422 receiver terminator
SW1-4 TXC Off RS-485/422 driver enable control by RTS or ADCTXE On RS-485/422 driver is forced to enable
SW1-5 RTS-D Off Disable RTS control for RS-485/422 TX RXRTS-E On Enable RTS control for RS-485/422 TX RX
SW1-6 RXC Off RS-485/422 receiver enable control by RTS or ADCRXE On RS-485/422 receiver is forced to enable.
SW1-8&7 BIAS-D Off RS-485/422 line bias is disabledBIAS-E On RS-485/422 line bias is enabled
SW2-1 SDD Off Disable ADC control for RS-485/422 TX RXSDE On Enable ADC control for RS-485/422 TX RX
SW2-2 1200 On ADC Timing parameter for RS-232 baud 1200
SW2-3 2400 On ADC Timing parameter for RS-232 baud 2400
SW2-4 4800 On ADC Timing parameter for RS-232 baud 4800
SW2-5 9600 On ADC Timing parameter for RS-232 baud 9600
SW2-6 19200 On ADC Timing parameter for RS-232 baud 19200
SW2-7 38400 On ADC Timing parameter for RS-232 baud 38400
SW2-8 115200 On ADC Timing parameter for RS-232 baud 115200
-10-
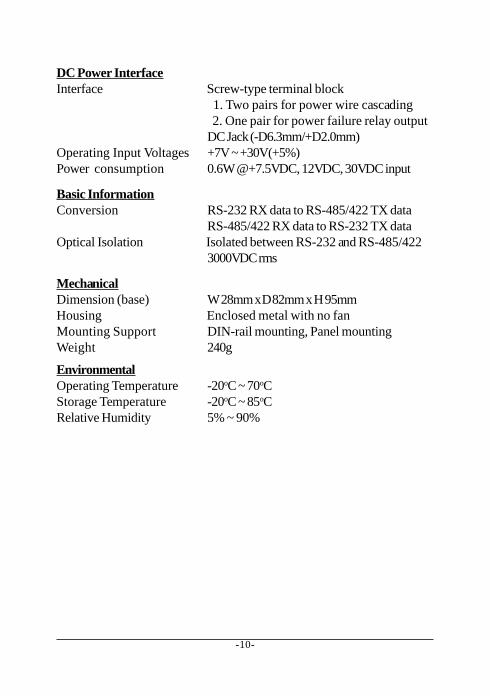
DC Power InterfaceInterface Screw-type terminal block
1. Two pairs for power wire cascading 2. One pair for power failure relay outputDC Jack (-D6.3mm/+D2.0mm)
Operating Input Voltages +7V ~ +30V(+5%)Power consumption 0.6W @+7.5VDC, 12VDC, 30VDC input
Basic InformationConversion RS-232 RX data to RS-485/422 TX data
RS-485/422 RX data to RS-232 TX dataOptical Isolation Isolated between RS-232 and RS-485/422
3000VDC rms
MechanicalDimension (base) W 28mm x D 82mm x H 95mmHousing Enclosed metal with no fanMounting Support DIN-rail mounting, Panel mountingWeight 240g
EnvironmentalOperating Temperature -20oC ~ 70oCStorage Temperature -20oC ~ 85oCRelative Humidity 5% ~ 90%
-11-
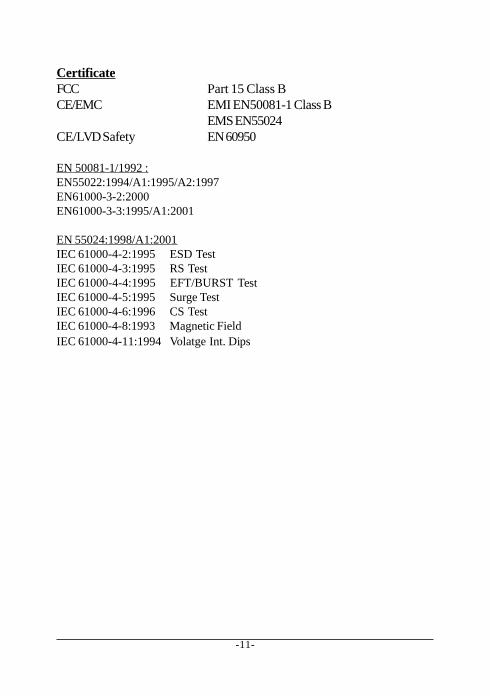
CertificateFCC Part 15 Class BCE/EMC EMI EN50081-1 Class B
EMS EN55024CE/LVD Safety EN 60950
EN 50081-1/1992 :EN55022:1994/A1:1995/A2:1997EN61000-3-2:2000EN61000-3-3:1995/A1:2001
EN 55024:1998/A1:2001IEC 61000-4-2:1995 ESD TestIEC 61000-4-3:1995 RS TestIEC 61000-4-4:1995 EFT/BURST TestIEC 61000-4-5:1995 Surge TestIEC 61000-4-6:1996 CS TestIEC 61000-4-8:1993 Magnetic FieldIEC 61000-4-11:1994 Volatge Int. Dips

-12-
2. Installation2.1 UnpackingCheck that the following components have been included:
• Information CD• The device unit• DIN-rail mounting bracket
If any item is found missing or damaged, please contact your local resellerfor replacement.
The following are available optional accessories:
• Panel Mounting BracketThe bracket is used for mounting the device on a panel surface.
• Commercial-rated AC power adapters:- Rated AC120V/60Hz DC7.5V 1A- Rated AC230V/50Hz DC7.5V 1A- Rated AC100V/50-60Hz DC7.5V 1A- Rated AC240V/50Hz DC7.5V 1A
The adapters are used for supplying DC power to the convertervia DC power jack interface.
-13-
2.2 Safety CautionsTo reduce the risk of bodily injury, electrical shock, fire, and damage tothe equipment, observe the following precautions.
• Do not service any product except as explained in your systemdocumentation.
• Opening or removing covers may expose you to electrical shock.Only a trained service technician should service components insidethese compartments.
• If any of the following conditions occur, unplug the product from theelectrical outlet and replace the part or contact your trained serviceprovider:- The power cable, extension cable, or plug is damaged.- An object has fallen into the product.- The product has been exposed to water.- The product has been dropped or damaged.- The product does not operate correctly when you follow theoperating instructions.
• Do not push any objects into the openings of your system. Doingso can cause fire or electric shock by shorting out interior compo-nents.
• Operate the product only from the type of external power sourceindicated on the electrical ratings label. If you are not sure of thetype of power source required, consult your service provider or localpower company.

-14-
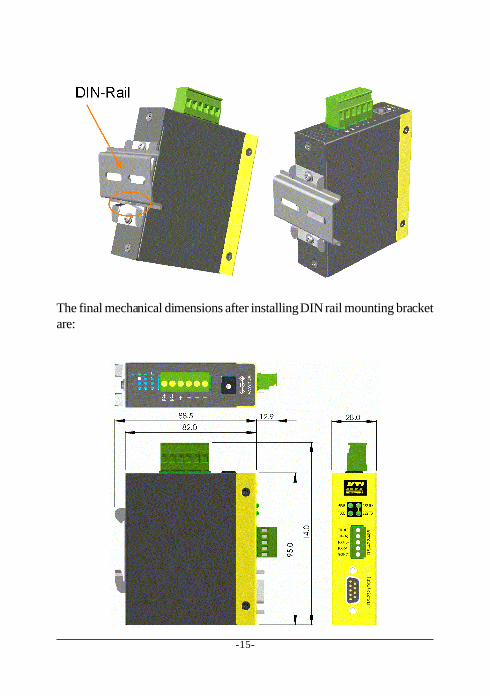
2.3 DIN-Rail MountingIn the product package, a DIN-rail bracket is installed on the device formounting the converter in a industrial DIN-rail enclosure.
The steps to mount the device onto a DIN rail are:1. Install the mounting bracket onto the device unit as shown below:
2. Attach bracket to the lower edge of the DIN rail and push the unitupward a little bit until the bracket can clamp on the upper edge ofthe DIN rail.
3. Clamp the unit to the DIN rail and make sure it is mounted securely.4. Make sure that there are proper heat dissipation from and adequate
ventilation around the device.
-15-
The final mechanical dimensions after installing DIN rail mounting bracketare:
-16-
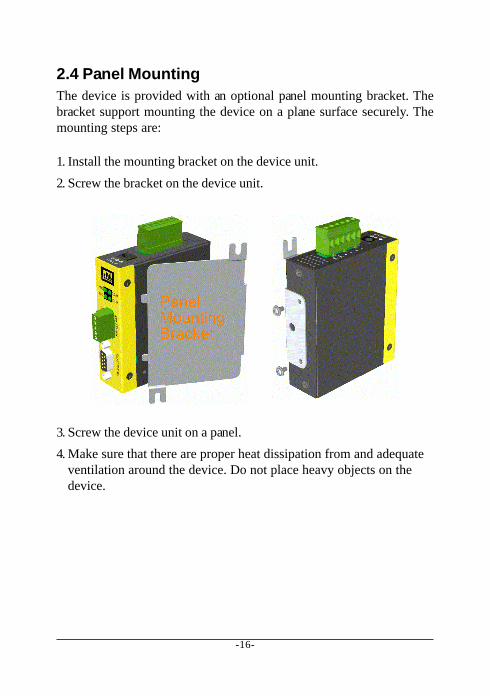
2.4 Panel MountingThe device is provided with an optional panel mounting bracket. Thebracket support mounting the device on a plane surface securely. Themounting steps are:
1. Install the mounting bracket on the device unit.2. Screw the bracket on the device unit.
3. Screw the device unit on a panel.4. Make sure that there are proper heat dissipation from and adequate
ventilation around the device. Do not place heavy objects on thedevice.
-17-
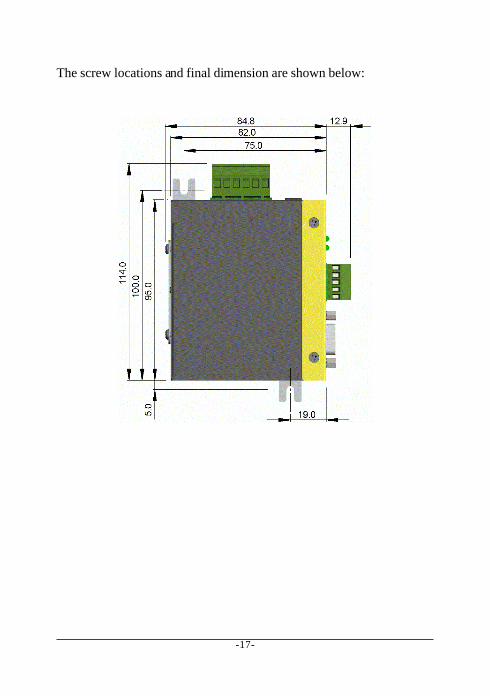
The screw locations and final dimension are shown below:

-18-
2.5 Applying PowerThe power specifications of the device are:
Operating Voltage +7 ~ +30VDCPower Consumption Max. 0.6W @+30VDC, +12VDC, +7.5VDC
The device provides two types of power interfaces, terminal block and DCpower jack for receiving DC power input from external power supply.
Using Terminal BlocksEither DC1 interface or DC2 interface can be used to receive DC powerfrom an external power system. Or, DC2 also can be used to deliver thepower received on DC1 to next device in cascading way.
DC1 + Vdc Positive (+) terminal
DC1 - Vdc Negative (-) terminal
DC2 + Vdc Positive (+) terminal
DC2 - Vdc Negative (-) terminal
Three 2P terminal plugs are provided together with the device. Two of thethree plugs are used for DC1 and DC2 interfaces respectively. The plug isshown below:
-19-
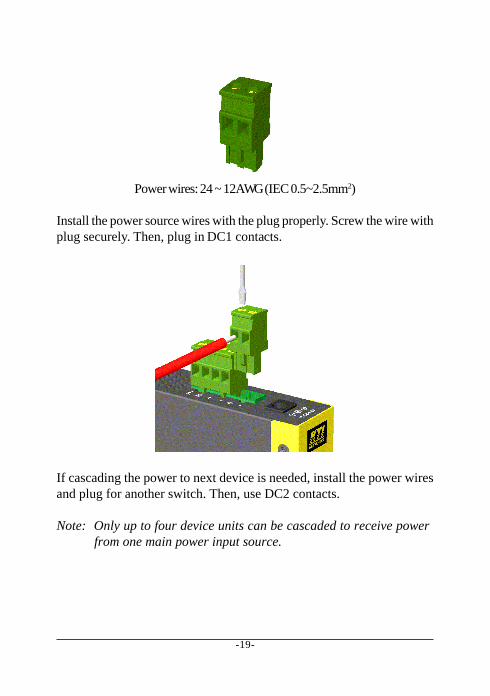
Power wires: 24 ~ 12AWG (IEC 0.5~2.5mm2)
Install the power source wires with the plug properly. Screw the wire withplug securely. Then, plug in DC1 contacts.
If cascading the power to next device is needed, install the power wiresand plug for another switch. Then, use DC2 contacts.
Note: Only up to four device units can be cascaded to receive powerfrom one main power input source.
-20-
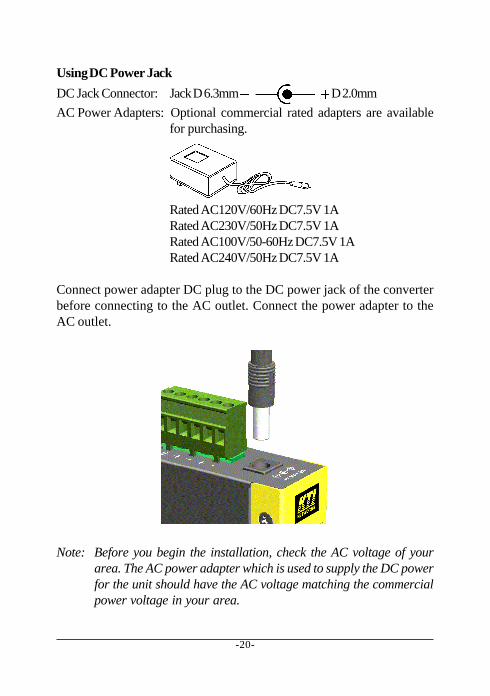
Using DC Power JackDC Jack Connector: Jack D 6.3mm D 2.0mmAC Power Adapters: Optional commercial rated adapters are available
for purchasing.
Rated AC120V/60Hz DC7.5V 1ARated AC230V/50Hz DC7.5V 1ARated AC100V/50-60Hz DC7.5V 1ARated AC240V/50Hz DC7.5V 1A
Connect power adapter DC plug to the DC power jack of the converterbefore connecting to the AC outlet. Connect the power adapter to theAC outlet.
Note: Before you begin the installation, check the AC voltage of yourarea. The AC power adapter which is used to supply the DC powerfor the unit should have the AC voltage matching the commercialpower voltage in your area.

-21-
2.6 Power Failure Relay OutputThe device provides a relay output to report power failure event to aremote alarm monitoring system. The replay output is provided with twocontacts labeled PF+ and PF- in the terminal block interface.
Use the provided 2P terminal plug for signal wiring and plug into the PF+/- contacts. The function is designed as :
Power is normal PF+ contact is shorted with PF- contact.Power failure PF+ contact is disconnected with PF- contact.
Note: Be sure the voltage applied on PF+/- contacts is within thespecification of 30VDC/1A max. or 120VAC/0.5A max.

-22-
2.7 DIP SW ConfigurationSW1-2 & 14W 4-wire (RS-485/422 driver receiver separated)2W 2-wire (RS-485/422 driver receiver connected)
[2W] setting activates the internal connection between driver and re-ceiver in RS-485/422 interface. It simplifies the installation of the con-verter in a 2-wire bus. RS-422 usually uses 2-wire topology only. RS-485supports both 2-wire and 4-wire topology.

-23-
SW1-3T-D Disable RS-485/422 receiver terminatorT-E Enable RS-485/422 receiver terminator
[T-E] setting enables the internal 120 ohms terminator on the receiverinterface. A proper termination is important in a bus topology or multi-drop network. The terminator is a resistor added in parallel with thereceiver's "A" and "B" lines in order to match the data line characteristicimpedance and reduce signal reflection. This setting is useful when theconverter is installed at the end of a RS-485 or RS-422 bus.
If the internal 120 Ohm terminator is not appropriate for your application,use [T-D] to disable it and use external one.
-24-
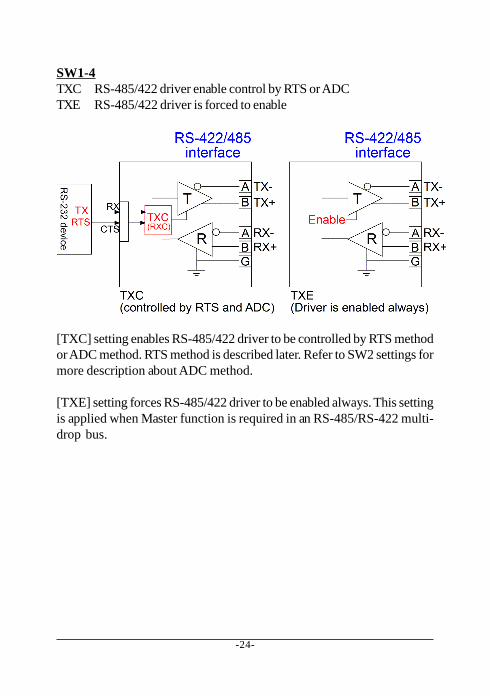
SW1-4TXC RS-485/422 driver enable control by RTS or ADCTXE RS-485/422 driver is forced to enable
[TXC] setting enables RS-485/422 driver to be controlled by RTS methodor ADC method. RTS method is described later. Refer to SW2 settings formore description about ADC method.
[TXE] setting forces RS-485/422 driver to be enabled always. This settingis applied when Master function is required in an RS-485/RS-422 multi-drop bus.

-25-
SW1-5RTS-D Disable RTS control for RS-485/422 driverRTS-E Enable RTS control for RS-485/422 driver
RTS control method allows the connected RS-232 device (such as a PC)to control RTS signal (CTS input at the converter end) by software toenable or disable RS-485/422 driver. [RTS-D] setting is used to disableRTS control method.
SW1-6RXC RS-485/422 receiver enable control by RTS or ADCRXE RS-485/422 receiver is forced to enable.
[RXC] setting enable to use the same [TXC] logic but reverse it as RXCfor the RS-485/422 receiver control. It means when the driver is enabledthe receiver is disabled. The receiver is enabled when the driver is dis-abled. This setting is applied when a half-duplex communication isadopted.
-26-
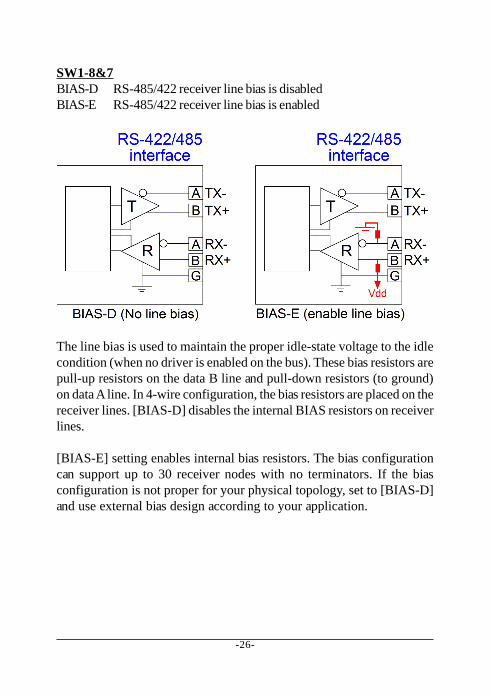
SW1-8&7BIAS-D RS-485/422 receiver line bias is disabledBIAS-E RS-485/422 receiver line bias is enabled
The line bias is used to maintain the proper idle-state voltage to the idlecondition (when no driver is enabled on the bus). These bias resistors arepull-up resistors on the data B line and pull-down resistors (to ground)on data A line. In 4-wire configuration, the bias resistors are placed on thereceiver lines. [BIAS-D] disables the internal BIAS resistors on receiverlines.
[BIAS-E] setting enables internal bias resistors. The bias configurationcan support up to 30 receiver nodes with no terminators. If the biasconfiguration is not proper for your physical topology, set to [BIAS-D]and use external bias design according to your application.
-27-
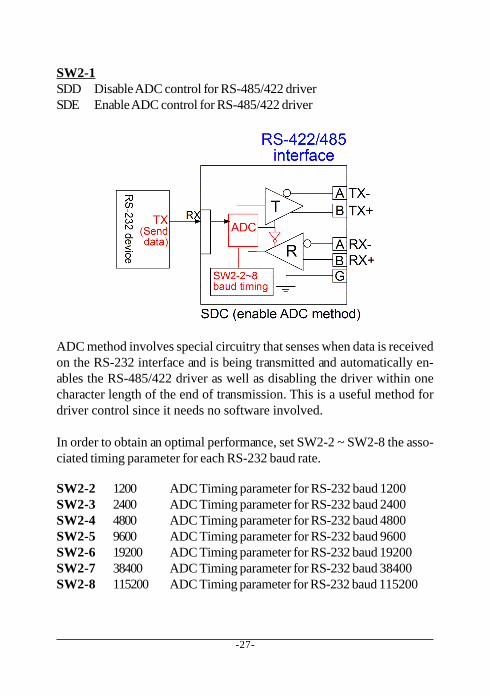
SW2-1SDD Disable ADC control for RS-485/422 driverSDE Enable ADC control for RS-485/422 driver
ADC method involves special circuitry that senses when data is receivedon the RS-232 interface and is being transmitted and automatically en-ables the RS-485/422 driver as well as disabling the driver within onecharacter length of the end of transmission. This is a useful method fordriver control since it needs no software involved.
In order to obtain an optimal performance, set SW2-2 ~ SW2-8 the asso-ciated timing parameter for each RS-232 baud rate.
SW2-2 1200 ADC Timing parameter for RS-232 baud 1200SW2-3 2400 ADC Timing parameter for RS-232 baud 2400SW2-4 4800 ADC Timing parameter for RS-232 baud 4800SW2-5 9600 ADC Timing parameter for RS-232 baud 9600SW2-6 19200 ADC Timing parameter for RS-232 baud 19200SW2-7 38400 ADC Timing parameter for RS-232 baud 38400SW2-8 115200 ADC Timing parameter for RS-232 baud 115200
-28-
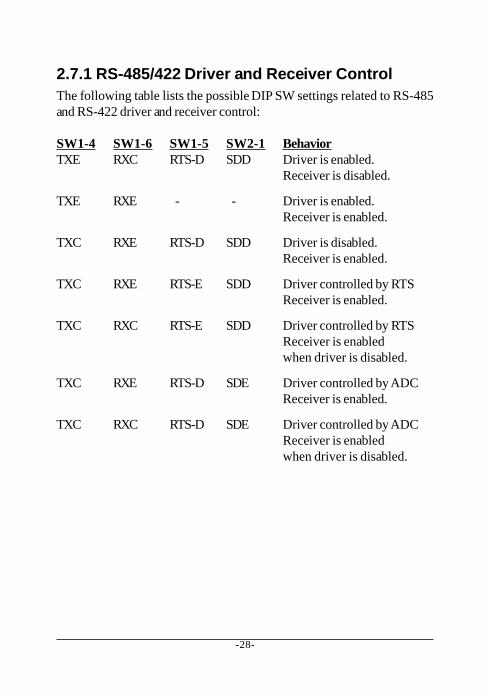
2.7.1 RS-485/422 Driver and Receiver ControlThe following table lists the possible DIP SW settings related to RS-485and RS-422 driver and receiver control:
SW1-4 SW1-6 SW1-5 SW2-1 BehaviorTXE RXC RTS-D SDD Driver is enabled.
Receiver is disabled.
TXE RXE - - Driver is enabled.Receiver is enabled.
TXC RXE RTS-D SDD Driver is disabled.Receiver is enabled.
TXC RXE RTS-E SDD Driver controlled by RTSReceiver is enabled.
TXC RXC RTS-E SDD Driver controlled by RTSReceiver is enabledwhen driver is disabled.
TXC RXE RTS-D SDE Driver controlled by ADCReceiver is enabled.
TXC RXC RTS-D SDE Driver controlled by ADCReceiver is enabledwhen driver is disabled.
-29-
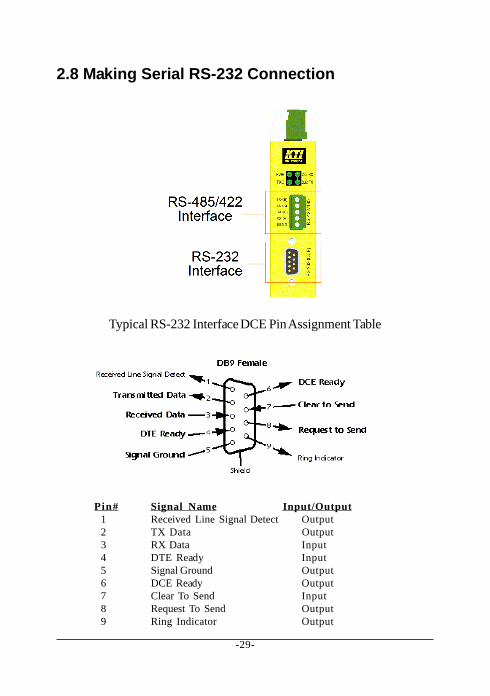
2.8 Making Serial RS-232 Connection
Typical RS-232 Interface DCE Pin Assignment Table
Pin# Signal Name Input/Output 1 Received Line Signal Detect Output 2 TX Data Output 3 RX Data Input 4 DTE Ready Input 5 Signal Ground Output 6 DCE Ready Output 7 Clear To Send Input 8 Request To Send Output 9 Ring Indicator Output

-30-
The RS-232 to RS-485/422 converter as an interface between an RS-232device and RS-485 or RS-422 bus. The connection is illustrated as fol-lows:
The following signals received on the RS-232 interface are converted toRS-485 bus signals:
Pin# Signal Name Input/Output 2 TX Data Output 3 RX Data Input 7 Clear To Send Input
-31-
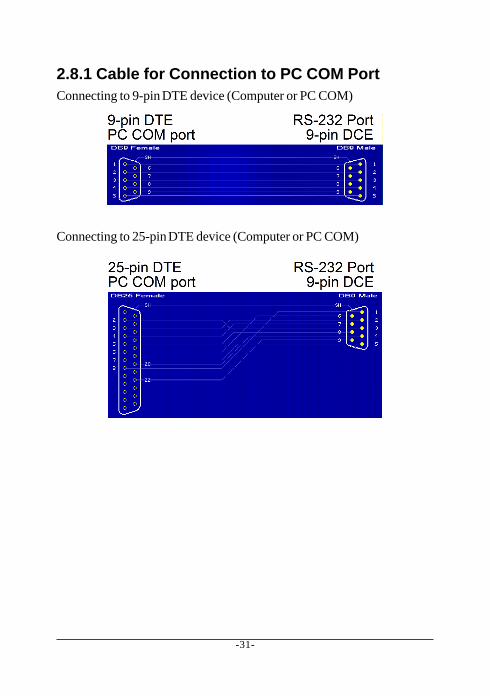
2.8.1 Cable for Connection to PC COM PortConnecting to 9-pin DTE device (Computer or PC COM)
Connecting to 25-pin DTE device (Computer or PC COM)
-32-
3 Making RS-485/422 ConnectionEIA-485 [TIA-485] Balanced (differential) interface; defines the Physicallayer, signaling protocol is not defined. EIA-485 specifies bidirectional,half-duplex data transmission. Up to 32 transmitters and 32 receivers maybe interconnected in any combination, including one driver and multiplereceivers (multi-drop), or one receiver and multiple drivers.
EIA/TIA-422 define a Balanced (differential) interface; specifying a single,unidirectional driver with multiple receivers (up to 32). RS-422 will sup-port Point-to-Point, Multi-Drop topology, but not Multi-Point [EIA485].EIA-485 devices may be used in 422 circuits, but EIA-422 may not beused in 485 circuits (because of the lack of an Enable line).
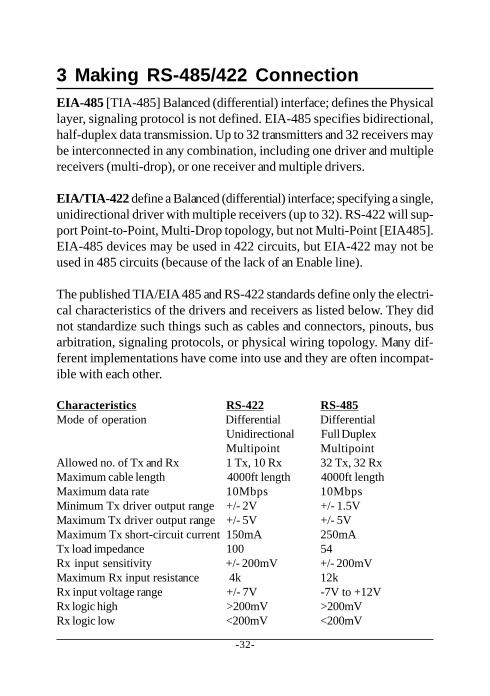
The published TIA/EIA 485 and RS-422 standards define only the electri-cal characteristics of the drivers and receivers as listed below. They didnot standardize such things such as cables and connectors, pinouts, busarbitration, signaling protocols, or physical wiring topology. Many dif-ferent implementations have come into use and they are often incompat-ible with each other.
Characteristics RS-422 RS-485Mode of operation Differential Differential
Unidirectional Full DuplexMultipoint Multipoint
Allowed no. of Tx and Rx 1 Tx, 10 Rx 32 Tx, 32 RxMaximum cable length 4000ft length 4000ft lengthMaximum data rate 10Mbps 10MbpsMinimum Tx driver output range +/- 2V +/- 1.5VMaximum Tx driver output range +/- 5V +/- 5VMaximum Tx short-circuit current 150mA 250mATx load impedance 100 54Rx input sensitivity +/- 200mV +/- 200mVMaximum Rx input resistance 4k 12kRx input voltage range +/- 7V -7V to +12VRx logic high >200mV >200mVRx logic low <200mV <200mV
-33-
RS-485 and RS-422 are in wide use as an interface for telecommunica-tions, industrial, medical, security and networking applications. The fol-lowing sections describe examples of some of popular physicaltopologies.
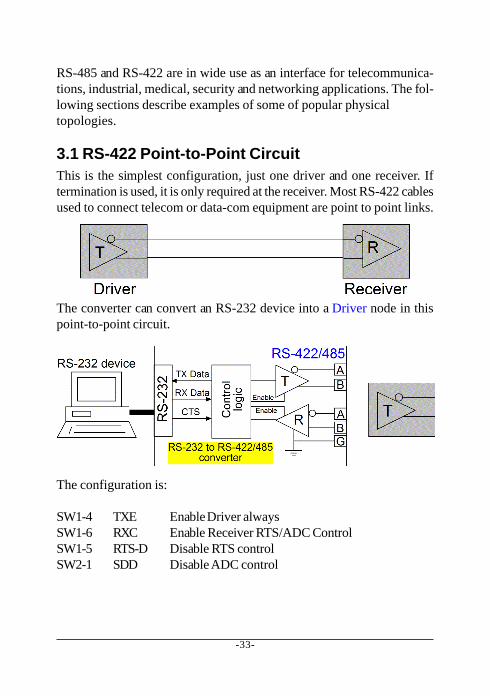
3.1 RS-422 Point-to-Point CircuitThis is the simplest configuration, just one driver and one receiver. Iftermination is used, it is only required at the receiver. Most RS-422 cablesused to connect telecom or data-com equipment are point to point links.
The converter can convert an RS-232 device into a Driver node in thispoint-to-point circuit.
The configuration is:
SW1-4 TXE Enable Driver alwaysSW1-6 RXC Enable Receiver RTS/ADC ControlSW1-5 RTS-D Disable RTS controlSW2-1 SDD Disable ADC control
-34-
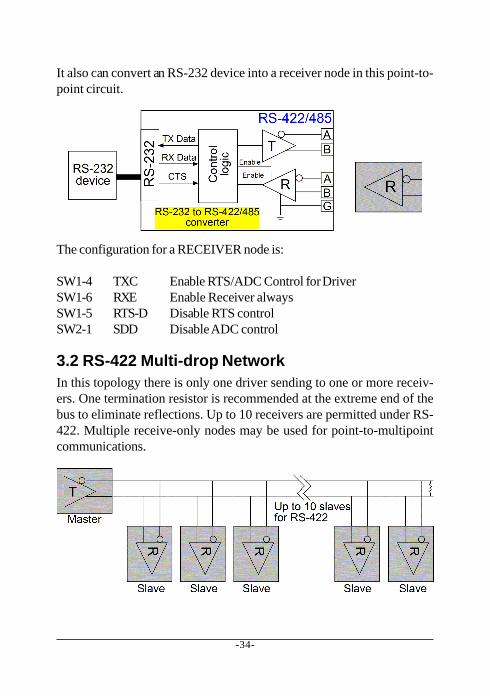
It also can convert an RS-232 device into a receiver node in this point-to-point circuit.
The configuration for a RECEIVER node is:
SW1-4 TXC Enable RTS/ADC Control for DriverSW1-6 RXE Enable Receiver alwaysSW1-5 RTS-D Disable RTS controlSW2-1 SDD Disable ADC control
3.2 RS-422 Multi-drop NetworkIn this topology there is only one driver sending to one or more receiv-ers. One termination resistor is recommended at the extreme end of thebus to eliminate reflections. Up to 10 receivers are permitted under RS-422. Multiple receive-only nodes may be used for point-to-multipointcommunications.
-35-
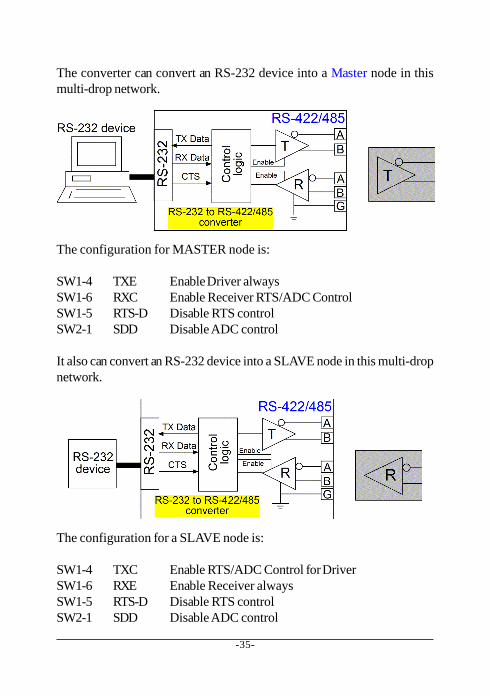
The converter can convert an RS-232 device into a Master node in thismulti-drop network.
The configuration for MASTER node is:
SW1-4 TXE Enable Driver alwaysSW1-6 RXC Enable Receiver RTS/ADC ControlSW1-5 RTS-D Disable RTS controlSW2-1 SDD Disable ADC control
It also can convert an RS-232 device into a SLAVE node in this multi-dropnetwork.
The configuration for a SLAVE node is:
SW1-4 TXC Enable RTS/ADC Control for DriverSW1-6 RXE Enable Receiver alwaysSW1-5 RTS-D Disable RTS controlSW2-1 SDD Disable ADC control
-36-
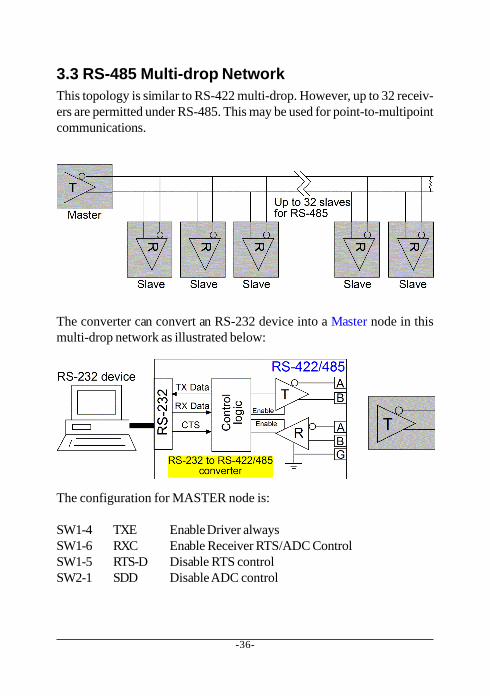
3.3 RS-485 Multi-drop NetworkThis topology is similar to RS-422 multi-drop. However, up to 32 receiv-ers are permitted under RS-485. This may be used for point-to-multipointcommunications.
The converter can convert an RS-232 device into a Master node in thismulti-drop network as illustrated below:
The configuration for MASTER node is:
SW1-4 TXE Enable Driver alwaysSW1-6 RXC Enable Receiver RTS/ADC ControlSW1-5 RTS-D Disable RTS controlSW2-1 SDD Disable ADC control
-37-
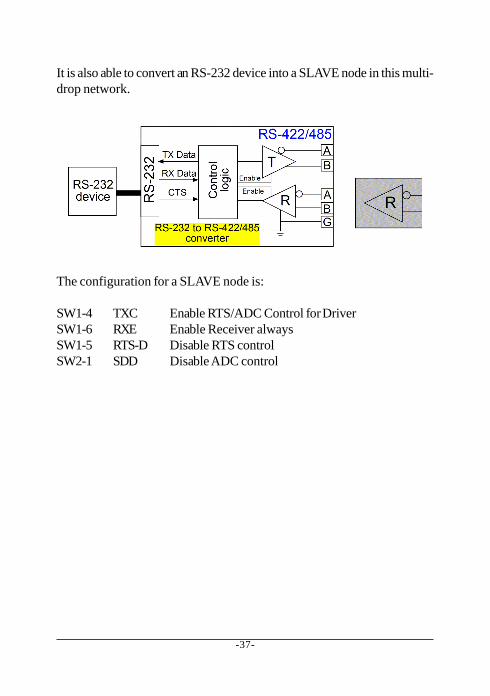
It is also able to convert an RS-232 device into a SLAVE node in this multi-drop network.
The configuration for a SLAVE node is:
SW1-4 TXC Enable RTS/ADC Control for DriverSW1-6 RXE Enable Receiver alwaysSW1-5 RTS-D Disable RTS controlSW2-1 SDD Disable ADC control
-38-
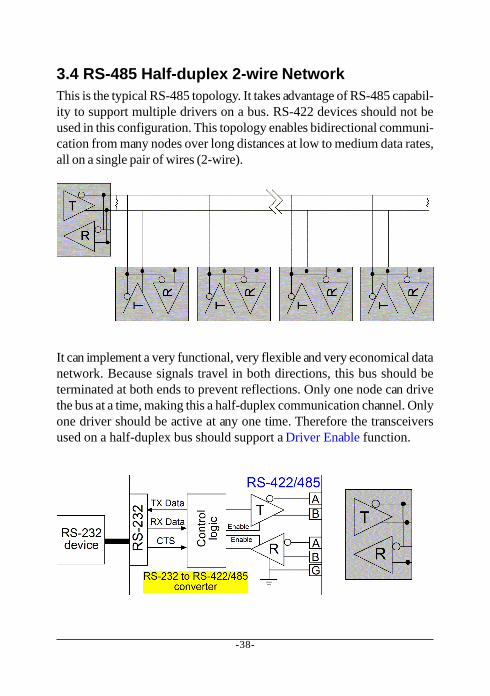
3.4 RS-485 Half-duplex 2-wire NetworkThis is the typical RS-485 topology. It takes advantage of RS-485 capabil-ity to support multiple drivers on a bus. RS-422 devices should not beused in this configuration. This topology enables bidirectional communi-cation from many nodes over long distances at low to medium data rates,all on a single pair of wires (2-wire).
It can implement a very functional, very flexible and very economical datanetwork. Because signals travel in both directions, this bus should beterminated at both ends to prevent reflections. Only one node can drivethe bus at a time, making this a half-duplex communication channel. Onlyone driver should be active at any one time. Therefore the transceiversused on a half-duplex bus should support a Driver Enable function.

-39-
The converter features RS-485 driver and receiver in one device. It alsoprovides very flexible configuration settings for Driver Enable controland Receiver Enable control. The configuration for the node in RS-485 2-wire network is:
SW1-2&1 2W Select 2-wire topologySW1-4 TXC Enable RTS/ADC Control for DriverSW1-6 RXC Enable RTS/ADC Control for ReceiverSW1-5 RTS-E Use RTS control (optional)SW2-1 SDE Use ADC control (optional)SW2-2-8 Baud Baud when ADC control is enabled (optional)SW1-3 T-D Disable internal terminator (optional)
3.5 RS-485 Full-duplex 4-wire NetworkThe 4-wire network simplifies bus arbitration in multi-node RS-485. Asingle Master node is the only driver allowed on the top most wire pair.All other nodes listen to all data traffic that passes on the party-line typemulti-drop bus. Nodes may transmit on the lower pair of wires whenaddressed by the master node or by using a software token-passing busarbitration scheme.

-40-
The master node may drive its bus while any of the slave nodes aredriving the lower pair, making this 4-wire network a full-duplex communi-cation channel. All communication occurs from master to slave or slaveto master, so any peer to peer communications must be routed throughthe master node.
To convert an RS-232 device into a Master node in RS-485 4-wire net-work, the configuration is:
SW1-2&1 4W Select 4-wire topologySW1-4 TXE Enable Driver alwaysSW1-6 RXC Enable RTS/ADC Control for ReceiverSW1-5 RTS-E Use RTS control (optional)SW2-1 SDE Or use ADC control (optional)SW2-2-8 Baud Baud when ADC control is enabled (optional)SW1-3 T-D Disable internal terminator (optional)
To convert an RS-232 device into a Slave node in RS-485 4-wire network,the configuration is:
SW1-2&1 4W Select 4-wire topologySW1-4 TXC Enable RTS/ADC Control for DriverSW1-6 RXE Enable Receiver alwaysSW1-5 RTS-E Use RTS control (optional)SW2-1 SDE Or use ADC control (optional)SW2-2-8 Baud Baud when ADC control is enabled (optional)SW1-3 T-D Disable internal terminator (optional)
-41-
3.6 Summary of the Converter ApplicationsThe common topologies implemented with RS-485 and RS-422 are:
1. RS-422 point to point in 2 -wire circuit2. RS-422 2-wire multi-drop network3. RS-485 2-wire multi-drop network4. RS-485 half-duplex bidirectional network in 2-wire topology5. RS-485 full-duplex bidirectional network in 4-wire topology
The converter is equipped with functionality and flexibility to convert anRS-232 device to a node in any one of the above topologies.

-42-
4 LED IndicatorsThe following figure shows the locations of the LED indicators:
4.1 LED Indicators
LED DISPLAY STATE INTERPRETATIONPWR Power status ON The device is powered on.
OFF The device is powered off.
232 TX RS-232 TX ON RS-232 TX data is presentOFF No RS-232 TX data
232 RX RS-232 RX ON RS-232 RX data is presentOFF No RS-232 RX data
TXC RS-485 ON The driver is enabled.Driver Enable OFF The driver is disabled and
is in tri-state (high-impedance).

-43-
5 Factory Default ConfigurationThe following table lists the factory default settings for configurationDIP SW:
SW Name Default SettingSW1-2&1 4W 4-wire (RS-485/422 driver receiver separated)
SW1-3 T-D (Off) Disable RS-485/422 receiver terminator
SW1-4 TXC (Off) RS-485/422 driver enable control by RTS or ADC
SW1-5 RTS-D (Off) Disable RTS control for RS-485/422 driver
SW1-6 RXC (Off) RS-485/422 receiver enable control by RTS or ADC
SW1-8&7 BIAS-D (Off) Disable RS-485/422 line bias
SW2-1 SDE (On) Enable ADC control for RS-485/422 driver
SW2-2 Off Disable ADC Timing for RS-232 baud 1200
SW2-3 Off Disable ADC Timing for RS-232 baud 2400
SW2-4 Off Disable ADC Timing for RS-232 baud 4800
SW2-5 9600 (On) Select ADC Timing for RS-232 baud 9600
SW2-6 Off Disable ADC Timing for RS-232 baud 19200
SW2-7 Off Disable ADC Timing for RS-232 baud 38400
SW2-8 Off Disable ADC Timing for RS-232 baud 115200


