Infant-to-Toddler Soothing Rocker Instructions Model Numbers: 79414, 79614 Please save these instructions for future reference. Adult assembly is required. No tools necessary. Requires one “D” (LR20) alkaline battery (not included). Use the upright position only when your child has developed enough upper body control to sit without leaning forward. Always use the restraint until your child is able to climb in and out of the chair unassisted. Designed for use with children from birth to 40 lbs.
Transcript
Infant-to-ToddlerSoothing Rocker
Instructions
Model Numbers: 79414, 79614
Please save these instructions for future reference.Adult assembly is required. No tools necessary.
Requires one “D” (LR20) alkaline battery (not included).Use the upright position only when your child has developed enough
upper body control to sit without leaning forward.Always use the restraint until your child is able to climb
in and out of the chair unassisted.Designed for use with children from birth to 40 lbs.
1
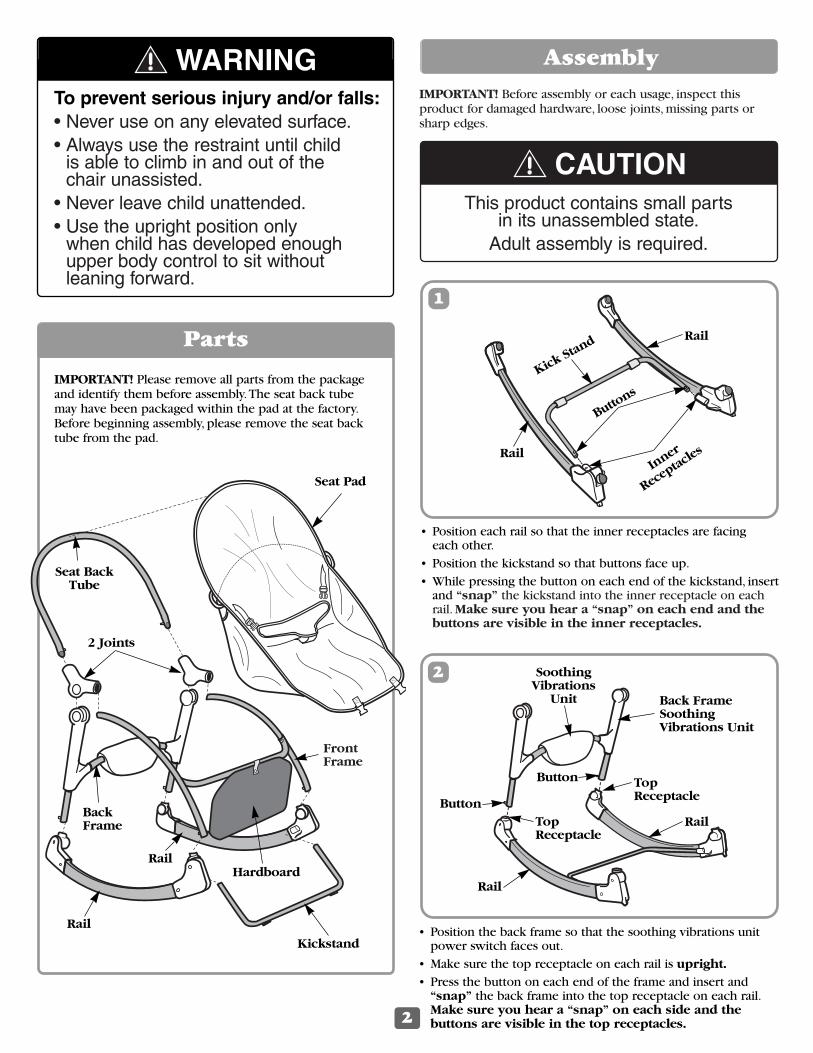
• Position each rail so that the inner receptacles are facing each other.
• Position the kickstand so that buttons face up.
• While pressing the button on each end of the kickstand, insertand “snap” the kickstand into the inner receptacle on eachrail. Make sure you hear a “snap” on each end and thebuttons are visible in the inner receptacles.
2
• Position the back frame so that the soothing vibrations unitpower switch faces out.
• Make sure the top receptacle on each rail is upright.• Press the button on each end of the frame and insert and
“snap” the back frame into the top receptacle on each rail.Make sure you hear a “snap” on each side and the buttons are visible in the top receptacles.
Kick Stand
Assembly
IMPORTANT! Please remove all parts from the packageand identify them before assembly.The seat back tubemay have been packaged within the pad at the factory.Before beginning assembly, please remove the seat backtube from the pad.
2
WARNING
Parts
BackFrame
Seat BackTube
Seat Pad
2 Joints
Hardboard
Kickstand
Rail
Rail
Rail
Rail
To prevent serious injury and/or falls:• Never use on any elevated surface.• Always use the restraint until child
is able to climb in and out of the chair unassisted.
• Never leave child unattended.• Use the upright position only
when child has developed enoughupper body control to sit without leaning forward.
FrontFrame
IMPORTANT! Before assembly or each usage, inspect this product for damaged hardware, loose joints, missing parts orsharp edges.
This product contains small parts in its unassembled state.
Adult assembly is required.
CAUTION
Buttons
Inner
Receptacles
Back FrameSoothingVibrations Unit
SoothingVibrations
Unit
Button
Button
Rail
Rail
TopReceptacle
TopReceptacle
3
• Position the front frame so that it bends back towards theback frame and the notched end is down.
• Make sure the top receptacle on each rail is upright.• While pressing the button on each end of the front frame,
insert and “snap” the front frame into the top receptacleon each rail. Make sure you hear a “snap” on each sideand the buttons are visible in the top receptacles.
Assembly
4
• Lift the front frame up slightly.
• Position one of the joints so the push button is outward andthe ribbed opening is upright. Fit the joint onto one of theends of the front frame.
• Press the button on the inside of the front frame. Slide thejoint down until the button “snaps” into place. Make sureyou hear a “snap”.
• Repeat this procedure to attach the other joint to the otherend of the front frame.
Front F
rame
Button
Joint
PushButton
RibbedOpening
RibbedOpening
3
5
• Position the seat back tube so that the open ends are forward.• Press the button on each end of the seat back tube and insert
the ends of the seat back tube into the joints on the frame.
• Push the seat back tube into the joints until the buttons “snap”into place. Make sure you hear a “snap” on each side.
• Pull up on the seat back tube to be sure it is secure.
Seat Back Tube
Buttons
Joints
TaperedEnds
Backward
OpenEnds
Forward
6
• Slide the pad over the seat back tube.
• Pull the pad down over the frame.
Pad
Rail
Button
Button
TopReceptacle
Notched End
TopReceptacle
Front FrameBack Frame
Assembly
4
8
• Turn the hardboard over and insert it into the pocket in thebottom of the pad.
• Push the front frame and rear frame toward each other.
• Press the push button on each joint and fit each joint intothe groove in each end of the rear frame. Make sure bothpush buttons “snap” into the hole in each end of therear frame.
• Check to be sure the front and rear frames are assembledcorrectly, by pulling them away from each other.The framesshould remain attached to each other.
Pocket
Hardboard
• Turn the seat face down.
• Fasten both buckles together. Make sure you hear a “snap”on both sides
Buckles
Push Button
Rear FrameGroove
Hole
Front Leg (Underneath Pad)
7 9
Set-Up and Use
• Pull both rear legs up until the small buttons “snap” intoplace. Make sure you hear a “snap” on both sides.
Buttons
Rear Legs
Upright Position
• Press the small button on each rear leg and push the rearframe down completely.
Semi-Recline Position
Rear Legs
Buttons
1
2
To prevent serious injury and/or falls:• Never use on any elevated surface.• Use the upright position only when child
has developed enough upper body control to sit without leaning forward.
WARNING
Battery Installation
• Insert a coin into the slot in the battery compartment door.Pry the battery compartment door open.
• Insert one “D”alkaline battery as shown inside the battery compartment.
Hint: Use only an alkaline battery for longest battery life.
• Replace the battery compartment door and be sure it snapssecurely closed.
Battery Tips• Remove the battery during long periods of non-use.Always
remove an exhausted battery from the product. Battery leakage and corrosion can damage this product. Dispose of the battery safely.
• Never short circuit the battery terminals.
• A non-rechargeable battery is not to be recharged.
• Only a battery of the same or equivalent type as recommendedin the Battery Installation instructions is to be used.
• If a removable rechargeable battery is used, it is only to becharged under adult supervision.
• A rechargeable battery is to be removed from the productbefore it is charged.
• If you use a battery charger, it should be examined regularly fordamage to the cord, plug, enclosure and other parts. Do not usea damaged battery charger until it has been properly repaired.
1.5V“D” (LR20)
SHOWN ACTUAL SIZE
5
BatteryCompartment
IMPORTANT! Before each usage or assembly, inspect this prod-uct for damaged hardware, loose joints, missing parts or sharpedges. Do not use if any parts are missing or broken. ContactFisher-Price® for replacement parts and instructions if needed.Never substitute parts.
• Place your child in the seat. Position the restraint padbetween your child’s legs.
• Fasten the restraint straps to the restraint pad. Make sure youhear a “click” on both sides.
• Make sure the restraint is securely attached by pulling it awayfrom your child.The restraint should remain buckled.
Securing Your Infant
Set-Up and Use
RestraintStrap
RestraintStrap
Restraint Pad
6
3
• Fit the ends of the toybar through the loopsin each side of the pad.
• From the back of theseat, insert the toy barlong straps through theslots on each rear leg.
• Fasten the strapstogether.
• Fasten the toys to thestraps on the toy bar.
5
To prevent serious injury and/or falls:• Never use on any elevated surface.• Always use the restraint until child is
able to climb in and out of the chairunassisted.
• Never leave child unattended.
WARNING
To tighten the restraint straps:• Feed the anchored end of the restraint strap up through the
buckle to form a loop .
• Pull the free end of the restraint strap .
• Repeat this procedure to tighten the other restraint strap B.
To loosen the restraint straps:• Feed the free end of the restraint strap up through the buckle
to form a loop .
B
B
AnchoredEnd
Free End
Tighten Restraint Loosen Restraint
Back View
B
AnchoredEnd
BuckleFree EndBuckle
B
4
• Enlarge the loop by pulling on the end of the loop toward the buckle.
• Pull the anchored end of the restraint strap to shorten the free end of the restraint strap .
• Repeat this procedure to loosen the other restraint strap .
Note: After adjusting the restraint straps to fit your child, makesure you pull on them to be sure they are securely fastened.
Toy Bar
Toys
Loop
Loop
StrapsToy Bar
SlotSlot
Strap
Strap
Set-Up and Use
7
Stationary Feeding Seat
Kickstand
• Position the seat in the upright or semi-recline position.
• Rotate the kickstand out.
• Make sure your child is properly secured in the seat.
• Slide the ON/OFF switch on the soothing unit to the ONposition.The seat will vibrate.
• Slide the ON/OFF switch on the soothing unit to the OFFposition.The seat will not vibrate.
ONOFF
Soothing Unit
6
6
To prevent serious injury and/or falls:• Never use on any elevated surface.• Always use the restraint until child is
able to climb in and out of the chairunassisted.
• Never leave child unattended.
WARNING
Soothing VibrationsIMPORTANT! When soothing vibrations become slow orvibrations stop, it’s time to replace the battery. Please refer tothe “Battery Installation” section on page 5.
Storing the Toy Bar
Storing Restraint System for Toddler Use
• Insert the restraint straps through the small slots in the pad.
• Insert the restraint pad down through the large slot in the pad.
• Turn the seat so that the back is facing you.
• Fasten the straps around the ends of the toybar.
RestraintStrap Restraint
Strap
RestraintPad
Back View
Toy Bar
Straps
Straps
CareThe pad is machine washable.Wash the pad separately in coldwater on the gentle cycle. Do not use bleach.Tumble dry sepa-rately on low heat and remove promptly. Surface wash theframe, with mild detergent and water. Do not use bleach. Do notuse harsh or abrasive cleaners. Rinse clean with water toremove residue.
To remove the pad:• Unfasten the buckles on the bottom of the pad.
• Remove the hardboard from the pocket in the pad.
• Press the push buttons on each joint to disassemble the frontand rear frames.
• Remove the pad.
• After washing, re-assemble the pad to the frame with hard-board (see Assembly steps 6-9).
If you have any questions about this product:In Canada, call 1-800-567-7724, or write to: Mattel Canada Inc., 6155 Freemont Blvd., Mississauga, Ontario L5R 3W2.In Great Britain, telephone 01628 500303.In Australia, call the Fisher-Price Australian Consumer Advisory Service toll-free at 1-800-800-812, or write to: Fisher-Price, Mattel Pty. Limited, 461 Plummer Street, Port Melbourne, Victoria 3207.
Fisher-Price, Inc., 636 Girard Avenue, East Aurora, New York14052 warrants that the Infant-to-Toddler Soothing Rocker isfree from all defects in material and workmanship when usedunder normal conditions for a period of one (1) year from thedate of purchase.
Should the product fail to perform properly, we will repair orreplace it at our option, free of charge. Purchaser is responsiblefor shipping the product to Consumer Relations at the addressindicated above and for all associated freight and insurance cost.Fisher-Price, Inc. will bear the cost of shipping the repaired orreplaced item to you.This warranty is void if the owner repairsor modifies the product.This warranty excludes any liabilityother than that expressly stated above including but not limitedto any incidental or consequential damages.
SOME STATES DO NOT ALLOW THE EXCLUSION OR LIMI-TATION OF INCIDENTAL OR CONSEQUENTIAL DAMAGES,SO THE ABOVE LIMITATION OR EXCLUSION MAY NOTAPPLY TO YOU.
THIS WARRANTY GIVES YOU SPECIFIC LEGAL RIGHTS,AND YOU MAY ALSO HAVE OTHER RIGHTS WHICH MAYVARY FROM STATE TO STATE.
Consumer InformationOccasionally a consumer may experience a problem with oneof our products. If this should happen, please call us, toll-free,rather than return this product to the store. Usually we cansolve the problem on the telephone or by sending you replace-ment parts. Please call Fisher-Price® Consumer Relations,toll-free at 1-800-432-KIDS, 8 AM - 6 PM EST Monday throughFriday. Hearing-impaired consumers using TTY/TDD equipment,please call 1-800-382-7470. Or, write to:
Fisher-Price® Consumer Relations636 Girard AvenueEast Aurora, New York 14052