54
Informatica ® PowerCenter Data Validation Option 10.2 Installation and Configuration Guide
Informatica® PowerCenter Data Validation Option10.2
Installation and Configuration Guide
Informatica PowerCenter Data Validation Option Installation and Configuration Guide10.2December 2017
© Copyright Informatica LLC 1998, 2017
This software and documentation contain proprietary information of Informatica LLC and are provided under a license agreement containing restrictions on use and disclosure and are also protected by copyright law. Reverse engineering of the software is prohibited. No part of this document may be reproduced or transmitted in any form, by any means (electronic, photocopying, recording or otherwise) without prior consent of Informatica LLC. This Software may be protected by U.S. and/or international Patents and other Patents Pending.
Use, duplication, or disclosure of the Software by the U.S. Government is subject to the restrictions set forth in the applicable software license agreement and as provided in DFARS 227.7202-1(a) and 227.7702-3(a) (1995), DFARS 252.227-7013©(1)(ii) (OCT 1988), FAR 12.212(a) (1995), FAR 52.227-19, or FAR 52.227-14 (ALT III), as applicable.
The information in this product or documentation is subject to change without notice. If you find any problems in this product or documentation, please report them to us in writing.
Informatica, Informatica Platform, Informatica Data Services, PowerCenter, PowerCenterRT, PowerCenter Connect, PowerCenter Data Analyzer, PowerExchange, PowerMart, Metadata Manager, Informatica Data Quality, Informatica Data Explorer, Informatica B2B Data Transformation, Informatica B2B Data Exchange Informatica On Demand, Informatica Identity Resolution, Informatica Application Information Lifecycle Management, Informatica Complex Event Processing, Ultra Messaging, Informatica Master Data Management, and Live Data Map are trademarks or registered trademarks of Informatica LLC in the United States and in jurisdictions throughout the world. All other company and product names may be trade names or trademarks of their respective owners.
Portions of this software and/or documentation are subject to copyright held by third parties, including without limitation: Copyright DataDirect Technologies. All rights reserved. Copyright © Sun Microsystems. All rights reserved. Copyright © RSA Security Inc. All Rights Reserved. Copyright © Ordinal Technology Corp. All rights reserved. Copyright © Aandacht c.v. All rights reserved. Copyright Genivia, Inc. All rights reserved. Copyright Isomorphic Software. All rights reserved. Copyright © Meta Integration Technology, Inc. All rights reserved. Copyright © Intalio. All rights reserved. Copyright © Oracle. All rights reserved. Copyright © Adobe Systems Incorporated. All rights reserved. Copyright © DataArt, Inc. All rights reserved. Copyright © ComponentSource. All rights reserved. Copyright © Microsoft Corporation. All rights reserved. Copyright © Rogue Wave Software, Inc. All rights reserved. Copyright © Teradata Corporation. All rights reserved. Copyright © Yahoo! Inc. All rights reserved. Copyright © Glyph & Cog, LLC. All rights reserved. Copyright © Thinkmap, Inc. All rights reserved. Copyright © Clearpace Software Limited. All rights reserved. Copyright © Information Builders, Inc. All rights reserved. Copyright © OSS Nokalva, Inc. All rights reserved. Copyright Edifecs, Inc. All rights reserved. Copyright Cleo Communications, Inc. All rights reserved. Copyright © International Organization for Standardization 1986. All rights reserved. Copyright © ej-technologies GmbH. All rights reserved. Copyright © Jaspersoft Corporation. All rights reserved. Copyright © International Business Machines Corporation. All rights reserved. Copyright © yWorks GmbH. All rights reserved. Copyright © Lucent Technologies. All rights reserved. Copyright © University of Toronto. All rights reserved. Copyright © Daniel Veillard. All rights reserved. Copyright © Unicode, Inc. Copyright IBM Corp. All rights reserved. Copyright © MicroQuill Software Publishing, Inc. All rights reserved. Copyright © PassMark Software Pty Ltd. All rights reserved. Copyright © LogiXML, Inc. All rights reserved. Copyright © 2003-2010 Lorenzi Davide, All rights reserved. Copyright © Red Hat, Inc. All rights reserved. Copyright © The Board of Trustees of the Leland Stanford Junior University. All rights reserved. Copyright © EMC Corporation. All rights reserved. Copyright © Flexera Software. All rights reserved. Copyright © Jinfonet Software. All rights reserved. Copyright © Apple Inc. All rights reserved. Copyright © Telerik Inc. All rights reserved. Copyright © BEA Systems. All rights reserved. Copyright © PDFlib GmbH. All rights reserved. Copyright © Orientation in Objects GmbH. All rights reserved. Copyright © Tanuki Software, Ltd. All rights reserved. Copyright © Ricebridge. All rights reserved. Copyright © Sencha, Inc. All rights reserved. Copyright © Scalable Systems, Inc. All rights reserved. Copyright © jQWidgets. All rights reserved. Copyright © Tableau Software, Inc. All rights reserved. Copyright© MaxMind, Inc. All Rights Reserved. Copyright © TMate Software s.r.o. All rights reserved. Copyright © MapR Technologies Inc. All rights reserved. Copyright © Amazon Corporate LLC. All rights reserved. Copyright © Highsoft. All rights reserved. Copyright © Python Software Foundation. All rights reserved. Copyright © BeOpen.com. All rights reserved. Copyright © CNRI. All rights reserved.
This product includes software developed by the Apache Software Foundation (http://www.apache.org/), and/or other software which is licensed under various versions of the Apache License (the "License"). You may obtain a copy of these Licenses at http://www.apache.org/licenses/. Unless required by applicable law or agreed to in writing, software distributed under these Licenses is distributed on an "AS IS" BASIS, WITHOUT WARRANTIES OR CONDITIONS OF ANY KIND, either express or implied. See the Licenses for the specific language governing permissions and limitations under the Licenses.
This product includes software which was developed by Mozilla (http://www.mozilla.org/), software copyright The JBoss Group, LLC, all rights reserved; software copyright © 1999-2006 by Bruno Lowagie and Paulo Soares and other software which is licensed under various versions of the GNU Lesser General Public License Agreement, which may be found at http:// www.gnu.org/licenses/lgpl.html. The materials are provided free of charge by Informatica, "as-is", without warranty of any kind, either express or implied, including but not limited to the implied warranties of merchantability and fitness for a particular purpose.
The product includes ACE(TM) and TAO(TM) software copyrighted by Douglas C. Schmidt and his research group at Washington University, University of California, Irvine, and Vanderbilt University, Copyright (©) 1993-2006, all rights reserved.
This product includes software developed by the OpenSSL Project for use in the OpenSSL Toolkit (copyright The OpenSSL Project. All Rights Reserved) and redistribution of this software is subject to terms available at http://www.openssl.org and http://www.openssl.org/source/license.html.
This product includes Curl software which is Copyright 1996-2013, Daniel Stenberg, <[email protected]>. All Rights Reserved. Permissions and limitations regarding this software are subject to terms available at http://curl.haxx.se/docs/copyright.html. Permission to use, copy, modify, and distribute this software for any purpose with or without fee is hereby granted, provided that the above copyright notice and this permission notice appear in all copies.
The product includes software copyright 2001-2005 (©) MetaStuff, Ltd. All Rights Reserved. Permissions and limitations regarding this software are subject to terms available at http://www.dom4j.org/ license.html.
The product includes software copyright © 2004-2007, The Dojo Foundation. All Rights Reserved. Permissions and limitations regarding this software are subject to terms available at http://dojotoolkit.org/license.
This product includes ICU software which is copyright International Business Machines Corporation and others. All rights reserved. Permissions and limitations regarding this software are subject to terms available at http://source.icu-project.org/repos/icu/icu/trunk/license.html.
This product includes software copyright © 1996-2006 Per Bothner. All rights reserved. Your right to use such materials is set forth in the license which may be found at http:// www.gnu.org/software/ kawa/Software-License.html.
This product includes OSSP UUID software which is Copyright © 2002 Ralf S. Engelschall, Copyright © 2002 The OSSP Project Copyright © 2002 Cable & Wireless Deutschland. Permissions and limitations regarding this software are subject to terms available at http://www.opensource.org/licenses/mit-license.php.
This product includes software developed by Boost (http://www.boost.org/) or under the Boost software license. Permissions and limitations regarding this software are subject to terms available at http:/ /www.boost.org/LICENSE_1_0.txt.
This product includes software copyright © 1997-2007 University of Cambridge. Permissions and limitations regarding this software are subject to terms available at http:// www.pcre.org/license.txt.
This product includes software copyright © 2007 The Eclipse Foundation. All Rights Reserved. Permissions and limitations regarding this software are subject to terms available at http:// www.eclipse.org/org/documents/epl-v10.php and at http://www.eclipse.org/org/documents/edl-v10.php.

This product includes software licensed under the terms at http://www.tcl.tk/software/tcltk/license.html, http://www.bosrup.com/web/overlib/?License, http://www.stlport.org/doc/ license.html, http://asm.ow2.org/license.html, http://www.cryptix.org/LICENSE.TXT, http://hsqldb.org/web/hsqlLicense.html, http://httpunit.sourceforge.net/doc/ license.html, http://jung.sourceforge.net/license.txt , http://www.gzip.org/zlib/zlib_license.html, http://www.openldap.org/software/release/license.html, http://www.libssh2.org, http://slf4j.org/license.html, http://www.sente.ch/software/OpenSourceLicense.html, http://fusesource.com/downloads/license-agreements/fuse-message-broker-v-5-3- license-agreement; http://antlr.org/license.html; http://aopalliance.sourceforge.net/; http://www.bouncycastle.org/licence.html; http://www.jgraph.com/jgraphdownload.html; http://www.jcraft.com/jsch/LICENSE.txt; http://jotm.objectweb.org/bsd_license.html; . http://www.w3.org/Consortium/Legal/2002/copyright-software-20021231; http://www.slf4j.org/license.html; http://nanoxml.sourceforge.net/orig/copyright.html; http://www.json.org/license.html; http://forge.ow2.org/projects/javaservice/, http://www.postgresql.org/about/licence.html, http://www.sqlite.org/copyright.html, http://www.tcl.tk/software/tcltk/license.html, http://www.jaxen.org/faq.html, http://www.jdom.org/docs/faq.html, http://www.slf4j.org/license.html; http://www.iodbc.org/dataspace/iodbc/wiki/iODBC/License; http://www.keplerproject.org/md5/license.html; http://www.toedter.com/en/jcalendar/license.html; http://www.edankert.com/bounce/index.html; http://www.net-snmp.org/about/license.html; http://www.openmdx.org/#FAQ; http://www.php.net/license/3_01.txt; http://srp.stanford.edu/license.txt; http://www.schneier.com/blowfish.html; http://www.jmock.org/license.html; http://xsom.java.net; http://benalman.com/about/license/; https://github.com/CreateJS/EaselJS/blob/master/src/easeljs/display/Bitmap.js; http://www.h2database.com/html/license.html#summary; http://jsoncpp.sourceforge.net/LICENSE; http://jdbc.postgresql.org/license.html; http://protobuf.googlecode.com/svn/trunk/src/google/protobuf/descriptor.proto; https://github.com/rantav/hector/blob/master/LICENSE; http://web.mit.edu/Kerberos/krb5-current/doc/mitK5license.html; http://jibx.sourceforge.net/jibx-license.html; https://github.com/lyokato/libgeohash/blob/master/LICENSE; https://github.com/hjiang/jsonxx/blob/master/LICENSE; https://code.google.com/p/lz4/; https://github.com/jedisct1/libsodium/blob/master/LICENSE; http://one-jar.sourceforge.net/index.php?page=documents&file=license; https://github.com/EsotericSoftware/kryo/blob/master/license.txt; http://www.scala-lang.org/license.html; https://github.com/tinkerpop/blueprints/blob/master/LICENSE.txt; http://gee.cs.oswego.edu/dl/classes/EDU/oswego/cs/dl/util/concurrent/intro.html; https://aws.amazon.com/asl/; https://github.com/twbs/bootstrap/blob/master/LICENSE; https://sourceforge.net/p/xmlunit/code/HEAD/tree/trunk/LICENSE.txt; https://github.com/documentcloud/underscore-contrib/blob/master/LICENSE, and https://github.com/apache/hbase/blob/master/LICENSE.txt.
This product includes software licensed under the Academic Free License (http://www.opensource.org/licenses/afl-3.0.php), the Common Development and Distribution License (http://www.opensource.org/licenses/cddl1.php) the Common Public License (http://www.opensource.org/licenses/cpl1.0.php), the Sun Binary Code License Agreement Supplemental License Terms, the BSD License (http:// www.opensource.org/licenses/bsd-license.php), the new BSD License (http://opensource.org/licenses/BSD-3-Clause), the MIT License (http://www.opensource.org/licenses/mit-license.php), the Artistic License (http://www.opensource.org/licenses/artistic-license-1.0) and the Initial Developer’s Public License Version 1.0 (http://www.firebirdsql.org/en/initial-developer-s-public-license-version-1-0/).
This product includes software copyright © 2003-2006 Joe WaInes, 2006-2007 XStream Committers. All rights reserved. Permissions and limitations regarding this software are subject to terms available at http://xstream.codehaus.org/license.html. This product includes software developed by the Indiana University Extreme! Lab. For further information please visit http://www.extreme.indiana.edu/.
This product includes software Copyright (c) 2013 Frank Balluffi and Markus Moeller. All rights reserved. Permissions and limitations regarding this software are subject to terms of the MIT license.
See patents at https://www.informatica.com/legal/patents.html.
DISCLAIMER: Informatica LLC provides this documentation "as is" without warranty of any kind, either express or implied, including, but not limited to, the implied warranties of noninfringement, merchantability, or use for a particular purpose. Informatica LLC does not warrant that this software or documentation is error free. The information provided in this software or documentation may include technical inaccuracies or typographical errors. The information in this software and documentation is subject to change at any time without notice.
NOTICES
This Informatica product (the "Software") includes certain drivers (the "DataDirect Drivers") from DataDirect Technologies, an operating company of Progress Software Corporation ("DataDirect") which are subject to the following terms and conditions:
1. THE DATADIRECT DRIVERS ARE PROVIDED "AS IS" WITHOUT WARRANTY OF ANY KIND, EITHER EXPRESSED OR IMPLIED, INCLUDING BUT NOT LIMITED TO, THE IMPLIED WARRANTIES OF MERCHANTABILITY, FITNESS FOR A PARTICULAR PURPOSE AND NON-INFRINGEMENT.
2. IN NO EVENT WILL DATADIRECT OR ITS THIRD PARTY SUPPLIERS BE LIABLE TO THE END-USER CUSTOMER FOR ANY DIRECT, INDIRECT, INCIDENTAL, SPECIAL, CONSEQUENTIAL OR OTHER DAMAGES ARISING OUT OF THE USE OF THE ODBC DRIVERS, WHETHER OR NOT INFORMED OF THE POSSIBILITIES OF DAMAGES IN ADVANCE. THESE LIMITATIONS APPLY TO ALL CAUSES OF ACTION, INCLUDING, WITHOUT LIMITATION, BREACH OF CONTRACT, BREACH OF WARRANTY, NEGLIGENCE, STRICT LIABILITY, MISREPRESENTATION AND OTHER TORTS.
Publication Date: 2017-12-19
Table of Contents
Preface . . . . . . . . . . . . . . . . . . . . . . . . . . . . . . . . . . . . . . . . . . . . . . . . . . . . . . . . . . . . . . . . . . . . . . 6Informatica Resources. . . . . . . . . . . . . . . . . . . . . . . . . . . . . . . . . . . . . . . . . . . . . . . . . . . 6
Informatica Network. . . . . . . . . . . . . . . . . . . . . . . . . . . . . . . . . . . . . . . . . . . . . . . . . 6
Informatica Knowledge Base. . . . . . . . . . . . . . . . . . . . . . . . . . . . . . . . . . . . . . . . . . . . 6
Informatica Documentation. . . . . . . . . . . . . . . . . . . . . . . . . . . . . . . . . . . . . . . . . . . . . 6
Informatica Product Availability Matrixes. . . . . . . . . . . . . . . . . . . . . . . . . . . . . . . . . . . . 7
Informatica Velocity. . . . . . . . . . . . . . . . . . . . . . . . . . . . . . . . . . . . . . . . . . . . . . . . . . 7
Informatica Marketplace. . . . . . . . . . . . . . . . . . . . . . . . . . . . . . . . . . . . . . . . . . . . . . . 7
Informatica Global Customer Support. . . . . . . . . . . . . . . . . . . . . . . . . . . . . . . . . . . . . . 7
Chapter 1: Prepare to Install Data Validation Option. . . . . . . . . . . . . . . . . . . . . . . . . . . 8Verify Informatica Services Requirements. . . . . . . . . . . . . . . . . . . . . . . . . . . . . . . . . . . . . . . 8
Verify the System Requirements. . . . . . . . . . . . . . . . . . . . . . . . . . . . . . . . . . . . . . . . . . . . . 9
Prepare the Data Validation Option Repository Database. . . . . . . . . . . . . . . . . . . . . . . . . . . . . 9
IBM DB2 Database Requirements. . . . . . . . . . . . . . . . . . . . . . . . . . . . . . . . . . . . . . . . 10
Microsoft SQL Server Database Requirements. . . . . . . . . . . . . . . . . . . . . . . . . . . . . . . . 10
Oracle Database Requirements. . . . . . . . . . . . . . . . . . . . . . . . . . . . . . . . . . . . . . . . . . 10
Configure Associated PowerCenter Users. . . . . . . . . . . . . . . . . . . . . . . . . . . . . . . . . . . . . . 11
Record the Configuration Information. . . . . . . . . . . . . . . . . . . . . . . . . . . . . . . . . . . . . . . . . 12
Chapter 2: Install Data Validation Option. . . . . . . . . . . . . . . . . . . . . . . . . . . . . . . . . . . . 15Before You Install . . . . . . . . . . . . . . . . . . . . . . . . . . . . . . . . . . . . . . . . . . . . . . . . . . . . . 15
Read the Release Notes. . . . . . . . . . . . . . . . . . . . . . . . . . . . . . . . . . . . . . . . . . . . . . 15
Verify the License Key. . . . . . . . . . . . . . . . . . . . . . . . . . . . . . . . . . . . . . . . . . . . . . . . 15
Extract the Installer Files. . . . . . . . . . . . . . . . . . . . . . . . . . . . . . . . . . . . . . . . . . . . . . 15
Install Data Validation Option in Graphical Mode. . . . . . . . . . . . . . . . . . . . . . . . . . . . . . . . . . 16
Install Data Validation Option in Silent Mode. . . . . . . . . . . . . . . . . . . . . . . . . . . . . . . . . . . . 17
Chapter 3: Configure Data Validation Option. . . . . . . . . . . . . . . . . . . . . . . . . . . . . . . . . 18Configure the PowerCenter Integration Service. . . . . . . . . . . . . . . . . . . . . . . . . . . . . . . . . . . 18
Configure PowerCenter Client Properties. . . . . . . . . . . . . . . . . . . . . . . . . . . . . . . . . . . . . . 18
Create the Target Folder in the PowerCenter Repository. . . . . . . . . . . . . . . . . . . . . . . . . . 19
Create a Connection to the Data Validation Option Repository. . . . . . . . . . . . . . . . . . . . . . 20
Configure Data Validation Client Preferences. . . . . . . . . . . . . . . . . . . . . . . . . . . . . . . . . . . . 21
Create the Data Validation Option Repository. . . . . . . . . . . . . . . . . . . . . . . . . . . . . . . . . 21
Configure Mapping Properties. . . . . . . . . . . . . . . . . . . . . . . . . . . . . . . . . . . . . . . . . . 25
Enable Informatica User Authentication. . . . . . . . . . . . . . . . . . . . . . . . . . . . . . . . . . . . 27
Configure JasperReports Properties. . . . . . . . . . . . . . . . . . . . . . . . . . . . . . . . . . . . . . . 29
Add the PowerCenter Repository. . . . . . . . . . . . . . . . . . . . . . . . . . . . . . . . . . . . . . . . . . . . 31
Configure Environment Variables. . . . . . . . . . . . . . . . . . . . . . . . . . . . . . . . . . . . . . . . . . . . 33
4 Table of Contents
Test the Data Validation Option Installation and Configuration. . . . . . . . . . . . . . . . . . . . . . . . . 35
JasperReports Server Setup. . . . . . . . . . . . . . . . . . . . . . . . . . . . . . . . . . . . . . . . . . . . . . . 35
Chapter 4: Configuring Multiple Environments . . . . . . . . . . . . . . . . . . . . . . . . . . . . . . 37Configuring Multiple Environments Overview. . . . . . . . . . . . . . . . . . . . . . . . . . . . . . . . . . . . 37
Configuration Process. . . . . . . . . . . . . . . . . . . . . . . . . . . . . . . . . . . . . . . . . . . . . . . . . . 38
Environment Configuration Files . . . . . . . . . . . . . . . . . . . . . . . . . . . . . . . . . . . . . . . . . . . . 38
preferences.xml. . . . . . . . . . . . . . . . . . . . . . . . . . . . . . . . . . . . . . . . . . . . . . . . . . . 39
DVConfig.properties. . . . . . . . . . . . . . . . . . . . . . . . . . . . . . . . . . . . . . . . . . . . . . . . . 40
Batch Files. . . . . . . . . . . . . . . . . . . . . . . . . . . . . . . . . . . . . . . . . . . . . . . . . . . . . . . . . . 40
Multiple Data Validation Option Users. . . . . . . . . . . . . . . . . . . . . . . . . . . . . . . . . . . . . . . . . 41
Sample Batch Files for Multiple Users. . . . . . . . . . . . . . . . . . . . . . . . . . . . . . . . . . . . . 41
Multiple Data Validation Option Repositories. . . . . . . . . . . . . . . . . . . . . . . . . . . . . . . . . . . . 42
Sample Batch Files for Multiple Data Validation Option Repositories. . . . . . . . . . . . . . . . . . 42
Multiple PowerCenter Versions. . . . . . . . . . . . . . . . . . . . . . . . . . . . . . . . . . . . . . . . . . . . . 42
Adding Repositories of Multiple PowerCenter Versions. . . . . . . . . . . . . . . . . . . . . . . . . . 43
Sample Batch Files for Multiple PowerCenter Versions. . . . . . . . . . . . . . . . . . . . . . . . . . . 43
Chapter 5: Upgrade Data Validation Option. . . . . . . . . . . . . . . . . . . . . . . . . . . . . . . . . . 44Upgrade Data Validation Option Overview. . . . . . . . . . . . . . . . . . . . . . . . . . . . . . . . . . . . . . 44
Upgrade Data Validation Option. . . . . . . . . . . . . . . . . . . . . . . . . . . . . . . . . . . . . . . . . . . . 45
Update Informatica Authentication Configuration . . . . . . . . . . . . . . . . . . . . . . . . . . . . . . . . . 45
UpdateInformaticaAuthenticationConfiguration. . . . . . . . . . . . . . . . . . . . . . . . . . . . . . . 46
Chapter 6: Install DVOcmd on UNIX. . . . . . . . . . . . . . . . . . . . . . . . . . . . . . . . . . . . . . . . . . 47Install DVOCmd on UNIX Overview. . . . . . . . . . . . . . . . . . . . . . . . . . . . . . . . . . . . . . . . . . . 47
Prepare to Install DVOCmd on UNIX. . . . . . . . . . . . . . . . . . . . . . . . . . . . . . . . . . . . . . . . . . 48
Step 1. Extract the DVOCmd Files. . . . . . . . . . . . . . . . . . . . . . . . . . . . . . . . . . . . . . . . . . . 48
Step 2. Prepare Other DVOCmd Files. . . . . . . . . . . . . . . . . . . . . . . . . . . . . . . . . . . . . . . . . 48
Step 3. Configure Environment Variables. . . . . . . . . . . . . . . . . . . . . . . . . . . . . . . . . . . . . . . 49
Step 4. Configure DVOCmd for Kerberos. . . . . . . . . . . . . . . . . . . . . . . . . . . . . . . . . . . . . . . 50
Appendix A: Installation and Configuration Checklist. . . . . . . . . . . . . . . . . . . . . . . . 51Installation and Configuration Checklist Overview. . . . . . . . . . . . . . . . . . . . . . . . . . . . . . . . . 51
Prepare to Install Data Validation Option. . . . . . . . . . . . . . . . . . . . . . . . . . . . . . . . . . . . . . . 51
Install Data Validation Option. . . . . . . . . . . . . . . . . . . . . . . . . . . . . . . . . . . . . . . . . . . . . . 52
Configure Data Validation Option. . . . . . . . . . . . . . . . . . . . . . . . . . . . . . . . . . . . . . . . . . . . 52
Install DVOCmd on UNIX. . . . . . . . . . . . . . . . . . . . . . . . . . . . . . . . . . . . . . . . . . . . . . . . . 52
Index. . . . . . . . . . . . . . . . . . . . . . . . . . . . . . . . . . . . . . . . . . . . . . . . . . . . . . . . . . . . 54
Table of Contents 5
PrefaceThe Informatica Data Validation Option Installation and Configuration Guide contains information about installing, configuring, and upgrading Data Validation Option. It also includes installation information for DVOCmd and the commands in DVOCmd. This guide assumes that you are familiar with the databases and operating systems in your environment.
Informatica Resources
Informatica NetworkInformatica Network hosts Informatica Global Customer Support, the Informatica Knowledge Base, and other product resources. To access Informatica Network, visit https://network.informatica.com.
As a member, you can:
• Access all of your Informatica resources in one place.
• Search the Knowledge Base for product resources, including documentation, FAQs, and best practices.
• View product availability information.
• Review your support cases.
• Find your local Informatica User Group Network and collaborate with your peers.
Informatica Knowledge BaseUse the Informatica Knowledge Base to search Informatica Network for product resources such as documentation, how-to articles, best practices, and PAMs.
To access the Knowledge Base, visit https://kb.informatica.com. If you have questions, comments, or ideas about the Knowledge Base, contact the Informatica Knowledge Base team at [email protected].
Informatica DocumentationTo get the latest documentation for your product, browse the Informatica Knowledge Base at https://kb.informatica.com/_layouts/ProductDocumentation/Page/ProductDocumentSearch.aspx.
If you have questions, comments, or ideas about this documentation, contact the Informatica Documentation team through email at [email protected].
6
Informatica Product Availability MatrixesProduct Availability Matrixes (PAMs) indicate the versions of operating systems, databases, and other types of data sources and targets that a product release supports. If you are an Informatica Network member, you can access PAMs at https://network.informatica.com/community/informatica-network/product-availability-matrices.
Informatica VelocityInformatica Velocity is a collection of tips and best practices developed by Informatica Professional Services. Developed from the real-world experience of hundreds of data management projects, Informatica Velocity represents the collective knowledge of our consultants who have worked with organizations from around the world to plan, develop, deploy, and maintain successful data management solutions.
If you are an Informatica Network member, you can access Informatica Velocity resources at http://velocity.informatica.com.
If you have questions, comments, or ideas about Informatica Velocity, contact Informatica Professional Services at [email protected].
Informatica MarketplaceThe Informatica Marketplace is a forum where you can find solutions that augment, extend, or enhance your Informatica implementations. By leveraging any of the hundreds of solutions from Informatica developers and partners, you can improve your productivity and speed up time to implementation on your projects. You can access Informatica Marketplace at https://marketplace.informatica.com.
Informatica Global Customer SupportYou can contact a Global Support Center by telephone or through Online Support on Informatica Network.
To find your local Informatica Global Customer Support telephone number, visit the Informatica website at the following link: http://www.informatica.com/us/services-and-training/support-services/global-support-centers.
If you are an Informatica Network member, you can use Online Support at http://network.informatica.com.
Preface 7
C h a p t e r 1
Prepare to Install Data Validation Option
This chapter includes the following topics:
• Verify Informatica Services Requirements, 8
• Verify the System Requirements, 9
• Prepare the Data Validation Option Repository Database, 9
• Configure Associated PowerCenter Users, 11
• Record the Configuration Information, 12
Verify Informatica Services RequirementsYou must install and configure Informatica services before you can install Data Validation Option.
Complete the following tasks before you install and configure Data Validation Option:
• Install and configure Informatica services.
• Configure at least one PowerCenter Integration Service.
• Configure at least one PowerCenter Repository Service.
• To integrate Data Validation Option with Metadata Manager, configure a Metadata Manager Service.
• To run Data Validation reports and dashboards, configure a Reporting and Dashboards Service or JasperReports Server.
Note: Effective in PowerCenter version 9.6.1 HotFix 4, Informatica deprecated the Reporting and Dashboards Service. You can download and install your own version of the recommended JasperReports Server to run Data Validation Option reports. If you are using PowerCenter 10.1.1 or later, you can no longer use the Reporting and Dashboards Service as Informatica dropped support for the same.
• Install and configure the PowerCenter Client on the same machine where you plan to install Data Validation Option.
8
Verify the System RequirementsYou must install Data Validation Option on a PowerCenter Client machine. Verify that the machine where you plan to install Data Validation Option meets the minimum system requirements.
Verify that the PowerCenter Client machine meets the following requirements:
Minimum system requirements
The PowerCenter Client machine where you install Data Validation Option must have at least 1 GB of RAM and 256 MB of disk space.
Download and install Microsoft Visual C++ 2008 SP1 Redistributable Package (x86) from the following link:
https://www.microsoft.com/en-us/download/details.aspx?id=5582
The software available for download at the referenced links belongs to a third party or third parties, not Informatica LLC. The download links are subject to the possibility of errors, omissions or change. Informatica assumes no responsibility for such links and/or such software, disclaims all warranties, either express or implied, including but not limited to, implied warranties of merchantability, fitness for a particular purpose, title and non-infringement, and disclaims all liability relating thereto.
PowerCenter version requirements
The PowerCenter version must be at least 9.0.1 HotFix 2. Install a later version of PowerCenter if you implement the following Data Validation Option features:
• Informatica authentication requires version 9.1.0 HotFix 3 or later.
• SAP R/3 data sources require version 9.1.0 or later.
• SAS data sources require version 9.1.0 or later.
Permission requirements
Verify that you have permissions on the PowerCenter Client machine to complete the following tasks:
• Create and modify environment variables.
• Read from and write to the Data Validation Option installation directory and subdirectories.
For more information about product requirements and supported platforms, see the Product Availability Matrix on Informatica Network: https://network.informatica.com/community/informatica-network/product-availability-matrices
Prepare the Data Validation Option Repository Database
Set up the database for the Data Validation Option repository. After you install Data Validation Option, you can create the Data Validation Option repository in this database.
The Data Validation Option repository database must meet the following requirements:
• The database type must be IBM DB2, Microsoft SQL Server, or Oracle.
• The database server must have at least 100 MB of disk space to create the Data Validation Option repository.
Verify the System Requirements 9
• The database user account must have permissions to create and drop tables, indexes, sequences and views, and to select, insert, update, and delete data from tables.
• Use 7-bit ASCII to create the password for the account.
IBM DB2 Database RequirementsUse the following guidelines when you set up the repository on IBM DB2:
• Ensure that the page size is at least 16 KB and use the default schema.
• Set the tablespace pageSize parameter to 32768 bytes.
• Ensure that the user name and schema name are the same.
• Do not set up the database on an IBM DB2 database cluster.
• Verify that table aliases have not been created for any tables in the database. Informatica does not support IBM DB2 table aliases for repository tables.
Microsoft SQL Server Database RequirementsUse the following guidelines when you set up the repository on Microsoft SQL Server:
• Verify that the database user account has the CONNECT, CREATE TABLE, and CREATE VIEW privileges.
Oracle Database RequirementsUse the following guidelines when you set up the repository on Oracle:
• Verify that the database user has the ALTER TABLE, CREATE INDEX, CREATE SEQUENCE, CREATE SESSION, CREATE SYNONYM, CREATE TABLE, CREATE VIEW, and INSERT INTO TABLE privileges.
• Verify that HIBERNATE_SEQUENCE has SELECT and ALTER privileges.
• Verify that public synonyms have not been created for any tables in the database. Informatica does not support Oracle public synonyms for repository tables.
• Verify that the NLS setting is compatible with the code page of the PowerCenter Integration Service process. If the PowerCenter Integration Service runs on a grid, verify the compatibility for every PowerCenter Integration Service process in the grid.
Oracle Advanced Security (ASO) RequirementsTo use an Oracle database as the Data Validation Option repository with Oracle Advanced Security (ASO) enabled, download and install the Java Cryptography Extension (JCE) unlimited strength jurisdiction policy files.
If you use IBM AIX, download the unrestricted JCE policy files for older releases. The policy files are available in a file named unrestricted.zip. If you use platforms other than IBM AIX, download JCE Unlimited Strength Jurisdiction Policy Files 7. The policy files are available in a file named jce_policy-7.zip.
1. Download the .zip file that contains the JCE policy files.
• On AIX, download the unrestricted.zip file from the following location: https://www14.software.ibm.com/webapp/iwm/web/reg/download.do?source=jcesdk&lang=en_US&S_PKG=13_01&cp=UTF-8
• On other platforms, download the jce_policy-7.zip file from the following location: http://www.oracle.com/technetwork/java/javase/downloads/jce-7-download-432124.html
10 Chapter 1: Prepare to Install Data Validation Option
2. Extract local_policy.jar and US_export_policy.jar from the .zip file to the following directory: <Informatica installation directory>\java\jre\lib\security
3. If you use a JasperReports Server for reports and dashboards, copy the jar files to the following directory: <Jasperserver home>\java\jre\lib\securityNote: Effective in PowerCenter version 9.6.1 HotFix 4, Informatica deprecated the Reporting and Dashboards Service. You can download and install your own version of the recommended JasperReports Server to run Data Validation Option reports. If you are using PowerCenter 10.1.1 or later, you can no longer use the Reporting and Dashboards Service as Informatica dropped support for the same.
Configure Associated PowerCenter UsersEach Data Validation Option user is associated with a PowerCenter user. When you run a data validation test, the PowerCenter Integration Service runs the underlying workflow based on the credentials of the associated PowerCenter user. You must configure the user permissions and user privileges on the corresponding PowerCenter Repository Service.
Create a user account for each Data Validation Option user.
1. Log in to the Administrator tool.
2. Click the Security tab.
3. In the Users area, click the Actions button, and then select Create User.
4. Enter the user information and then click OK.
If the domain uses Kerberos authentication, enter a user name that matches the Windows login name.
You specify this PowerCenter user when you add the PowerCenter repository for Data Validation Option.
5. Select the user in the Users area.
6. Click the Privileges tab.
7. Select the PowerCenter Repository Service.
The Edit Roles and Privileges dialog box appears.
8. On the Roles tab, expand the folder for the PowerCenter Repository Service.
9. Enable the PowerCenter Connection Administrator custom role.
10. Click OK.
11. Click the Permissions tab.
The Permissions tab shows that no permissions are assigned to the user.
12. Select the PowerCenter Repository Service.
13. Click the Edit Direct Permissions button.
The Edit Direct Permissions dialog box appears.
14. In the Access column, select Allow.
15. Click OK.
The Permissions tab shows that the user has permission on the PowerCenter Repository Service.
Configure Associated PowerCenter Users 11
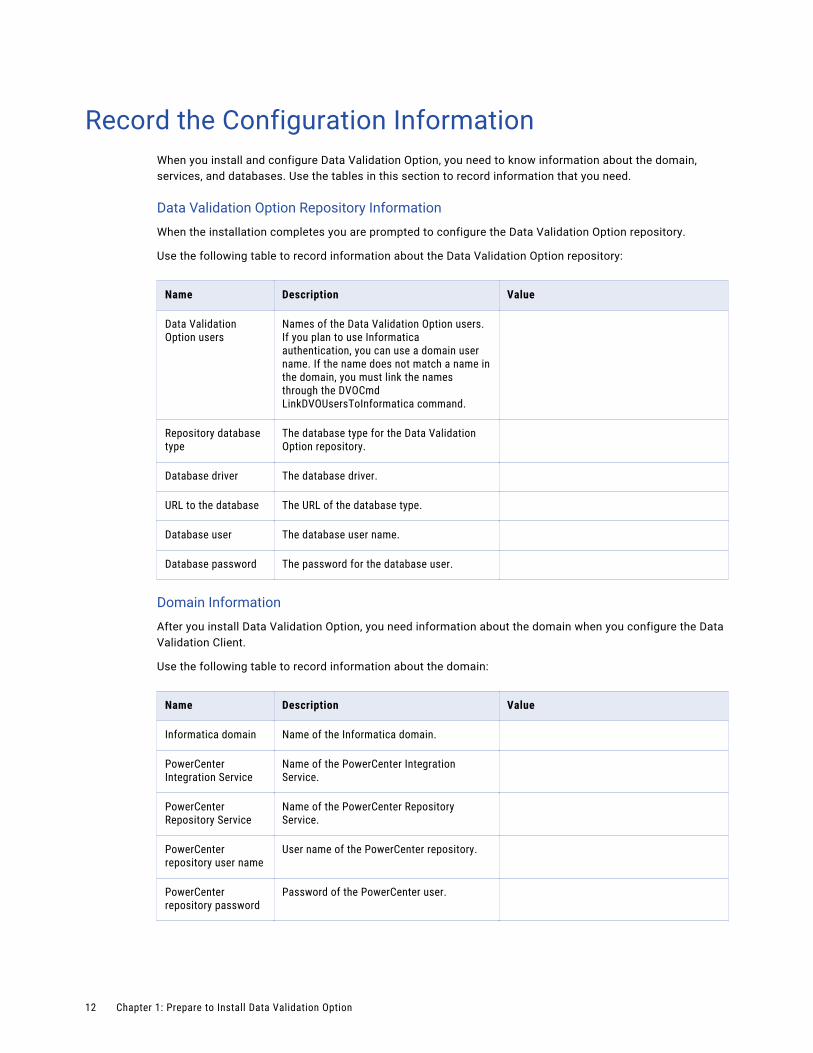
Record the Configuration InformationWhen you install and configure Data Validation Option, you need to know information about the domain, services, and databases. Use the tables in this section to record information that you need.
Data Validation Option Repository Information
When the installation completes you are prompted to configure the Data Validation Option repository.
Use the following table to record information about the Data Validation Option repository:
Name Description Value
Data Validation Option users
Names of the Data Validation Option users. If you plan to use Informatica authentication, you can use a domain user name. If the name does not match a name in the domain, you must link the names through the DVOCmd LinkDVOUsersToInformatica command.
Repository database type
The database type for the Data Validation Option repository.
Database driver The database driver.
URL to the database The URL of the database type.
Database user The database user name.
Database password The password for the database user.
Domain Information
After you install Data Validation Option, you need information about the domain when you configure the Data Validation Client.
Use the following table to record information about the domain:
Name Description Value
Informatica domain Name of the Informatica domain.
PowerCenter Integration Service
Name of the PowerCenter Integration Service.
PowerCenter Repository Service
Name of the PowerCenter Repository Service.
PowerCenter repository user name
User name of the PowerCenter repository.
PowerCenter repository password
Password of the PowerCenter user.
12 Chapter 1: Prepare to Install Data Validation Option
Name Description Value
Location of the domains.infa file
Location of the domains.infa file on a machine that hosts Informatica services.
Metadata Manager Service host
Optional. Host name of the machine that hosts the Metadata Manager Service.
Metadata Manager Service port
Optional. Port on which the Metadata Manager Service runs. Default is 10250.
Resource name Optional. Name of the Metadata Manager resource for the PowerCenter repository for Data Validation Option.
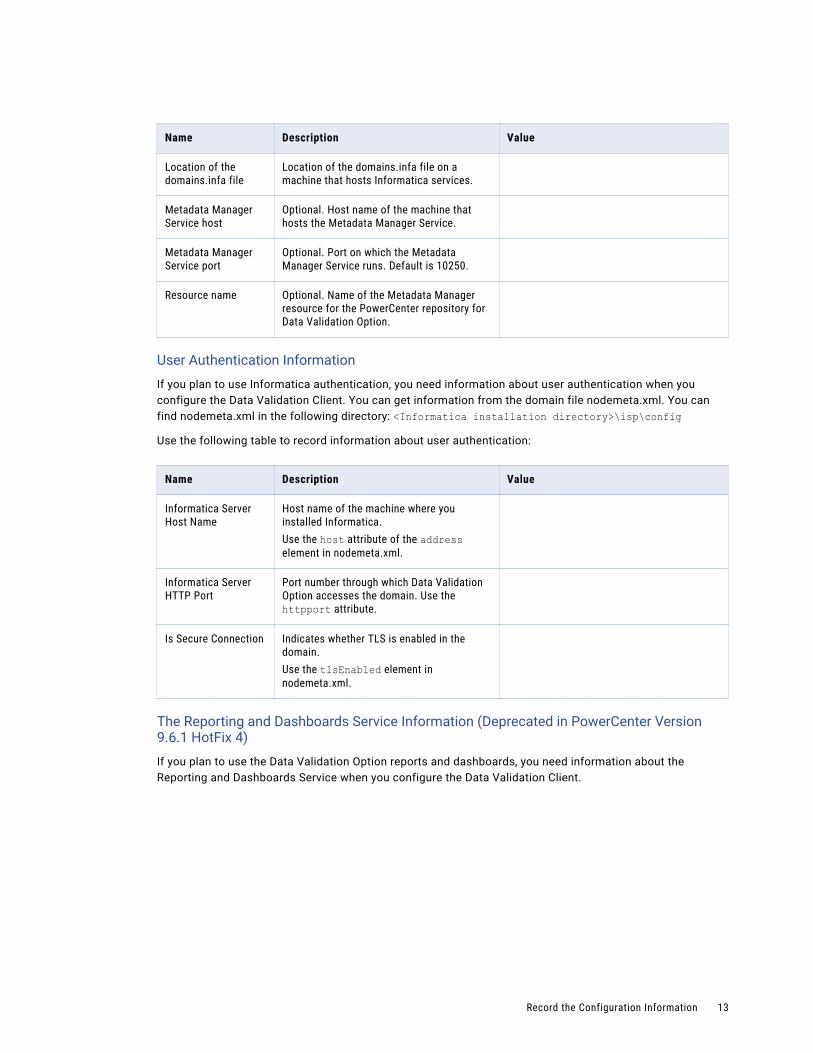
User Authentication Information
If you plan to use Informatica authentication, you need information about user authentication when you configure the Data Validation Client. You can get information from the domain file nodemeta.xml. You can find nodemeta.xml in the following directory: <Informatica installation directory>\isp\config
Use the following table to record information about user authentication:
Name Description Value
Informatica Server Host Name
Host name of the machine where you installed Informatica.Use the host attribute of the address element in nodemeta.xml.
Informatica Server HTTP Port
Port number through which Data Validation Option accesses the domain. Use the httpport attribute.
Is Secure Connection Indicates whether TLS is enabled in the domain.Use the tlsEnabled element in nodemeta.xml.
The Reporting and Dashboards Service Information (Deprecated in PowerCenter Version 9.6.1 HotFix 4)
If you plan to use the Data Validation Option reports and dashboards, you need information about the Reporting and Dashboards Service when you configure the Data Validation Client.
Record the Configuration Information 13
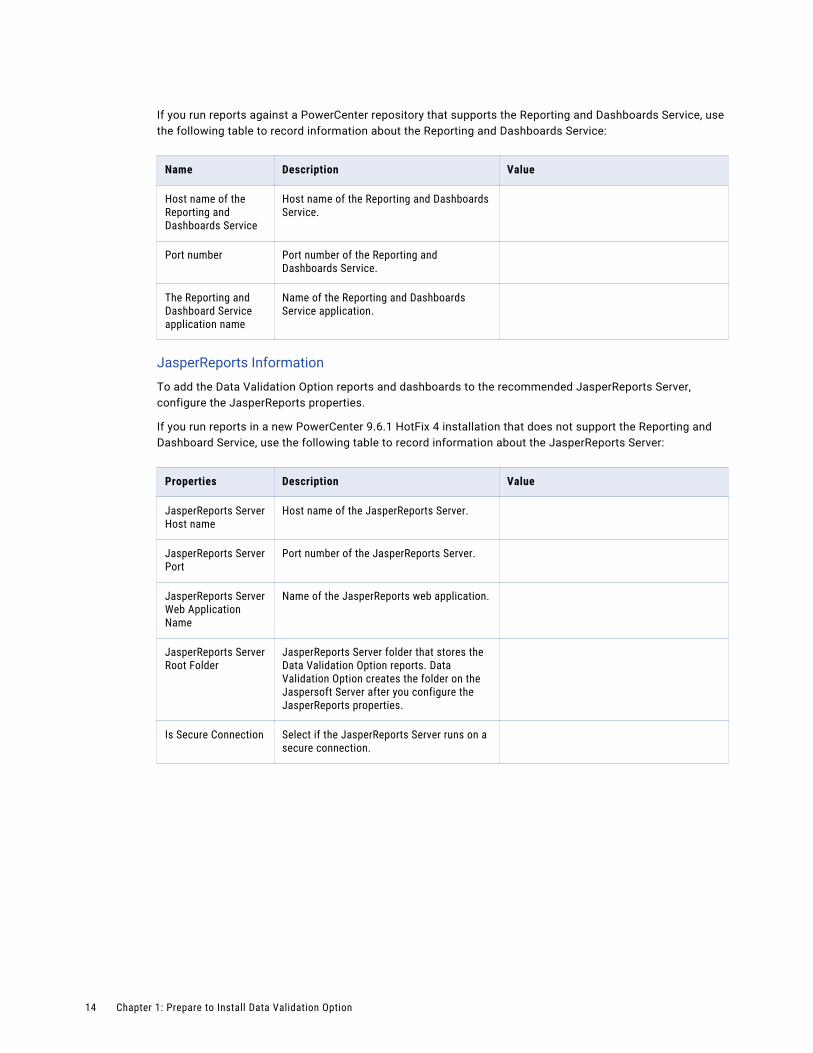
If you run reports against a PowerCenter repository that supports the Reporting and Dashboards Service, use the following table to record information about the Reporting and Dashboards Service:
Name Description Value
Host name of the Reporting and Dashboards Service
Host name of the Reporting and Dashboards Service.
Port number Port number of the Reporting and Dashboards Service.
The Reporting and Dashboard Service application name
Name of the Reporting and Dashboards Service application.
JasperReports Information
To add the Data Validation Option reports and dashboards to the recommended JasperReports Server, configure the JasperReports properties.
If you run reports in a new PowerCenter 9.6.1 HotFix 4 installation that does not support the Reporting and Dashboard Service, use the following table to record information about the JasperReports Server:
Properties Description Value
JasperReports Server Host name
Host name of the JasperReports Server.
JasperReports Server Port
Port number of the JasperReports Server.
JasperReports Server Web Application Name
Name of the JasperReports web application.
JasperReports Server Root Folder
JasperReports Server folder that stores the Data Validation Option reports. Data Validation Option creates the folder on the Jaspersoft Server after you configure the JasperReports properties.
Is Secure Connection Select if the JasperReports Server runs on a secure connection.
14 Chapter 1: Prepare to Install Data Validation Option

C h a p t e r 2
Install Data Validation OptionThis chapter includes the following topics:
• Before You Install , 15
• Install Data Validation Option in Graphical Mode, 16
• Install Data Validation Option in Silent Mode, 17
Before You InstallBefore you install Data Validation Option, complete tasks such as extracting the installer files and verifying the license key.
Read the Release NotesRead the Release Notes for updates to the installation and upgrade process. You can also find information about known and fixed limitations for the release.
Verify the License KeyVerify that you have a license key to install Data Validation Option.
Before you install the software, verify that you have the license key. You can get the license key in the following ways:
• Installation DVD. If you receive the Informatica installation files in a DVD, the license key file is included in the Informatica License Key CD.
• FTP download. If you download the Informatica installation files from the Informatica Electronic Software Download (ESD) site, the license key is in an email message from Informatica. Copy the license key file to a directory accessible to the user account that installs the product.
Contact Informatica Global Customer Support if you do not have a license key.
Extract the Installer FilesThe installer files are compressed and distributed as a zip file.
Use a zip utility to extract the installer files to a directory on your machine. Verify the zip utility version is compatible with the Windows operating system version. When you unzip the file, verify that the zip utility also extracts empty folders.
15
You can extract the installer files in the following ways:
• Installation DVD. Download the Informatica zip file from the installation DVD to a directory on your machine and then extract the installer files, or extract the installer files directly from the DVD to a directory on your machine. If you download the zip file to a directory on your machine, verify the length of the entire installation directory path, including the zip file name, is 60 characters or less.
• FTP download. Download the Informatica installation zip file from the Informatica Electronic Software Download site to a directory on your machine and then extract the installer files.
Note: Make sure that you download the file to a local directory or a shared network drive that is mapped on your machine. You can then extract the installer files. However, you cannot run the installer from a mapped file. Copy the extracted files to a local drive and then run the installer.
Install Data Validation Option in Graphical ModeYou can install Data Validation Option in graphical mode.
1. Close all other applications.
2. Run Install_DataValidator_<version>_ReleaseBuild.exe on the machine where you want to install Data Validation Option.
3. Click Next.
4. Enter the absolute path for the installation directory.
The installation directory must be on the current machine. The path must not contain spaces or the dollar sign ($). The maximum length of the path must be less than 260 characters.
5. Click Next.
6. Optionally, select the Start Menu folder or enter the folder name.
If you do not want to create a Start Menu folder, select Don't Create a Start Menu Folder.
7. To create a shortcut for all users, select Create Shortcuts for All Users.
8. Click Next.
The installer copies the Data Validation Client files to the installation directory.
9. After the installer copies the files, click Finish.
A message appears indicating that the Data Validation Option needs to be configured.
10. Complete the installation without performing configuration. You will configure Data Validation Option in a later task.
You can view the installation log file to get more information about the tasks performed by the installer. You can find the installation.log file in the following directory: <Data Validation Option installation directory>\.install4j
16 Chapter 2: Install Data Validation Option
Install Data Validation Option in Silent ModeYou can install Data Validation Option in silent mode. Use silent mode to install Data Validation Option on multiple machines. You can create a batch file to run the installation on each machine.
1. Copy the Data Validation Option installer to the client machine.
You can use software, such as Tivoli, to copy the installer.
2. Run the following command on the client machine:
Install_DataValidator_<version>_Release_Build.exe -q-dir <Data Validation Option installation directory>
Enclose the directory path with double quotes if the directory path has spaces. For example, you can use the following syntax:
Install_DataValidator_10.0_Release_Build.exe -q-dir "C:\Program Files (x86)\Informatica<version>\DVO"
After you complete the silent installation, you must configure Data Validation Option on each machine.
Install Data Validation Option in Silent Mode 17
C h a p t e r 3
Configure Data Validation OptionThis chapter includes the following topics:
• Configure the PowerCenter Integration Service, 18
• Configure PowerCenter Client Properties, 18
• Configure Data Validation Client Preferences, 21
• Add the PowerCenter Repository, 31
• Configure Environment Variables, 33
• Test the Data Validation Option Installation and Configuration, 35
• JasperReports Server Setup, 35
Configure the PowerCenter Integration ServiceThe PowerCenter Integration Services uses Java to run data validation tests. The dvoct.jar file contains the libraries that the PowerCenter Integration Service uses to run Data Validation Option tests.
You must copy the dvoct.jar file to the PowerCenter Integration Service machine and then configure the location of the file in the Administrator tool. If the PowerCenter Integration Service runs on a grid, copy the file to all machines that run the service process and configure the location for each service process.
1. Copy the dvoct.jar file from the Data Validation Client machine to any location on the PowerCenter Integration Service machine.
You can find the dvoct.jar file in the following directory on the Data Validation Client machine:
<Data Validation Option installation directory>\DVO\powercenterlibs2. In the Administrator tool, edit the PowerCenter Integration Service process properties.
3. Specify the full path and file name of dvoct.jar in the Java SDK Classpath property.
For example, specify the following value for Windows: C:\Program Files (x86)\Informatica<version>\DVO\powercenterlibs\dvoct.jar. To add multiple values in Java SDK Classpath property, separate the values with a semicolon for Windows or a colon for UNIX or Linux.
Configure PowerCenter Client PropertiesBefore you can use Data Validation Option, you need to configure the PowerCenter repository to connect to the Data Validation Option repository and to store data validation objects.
18
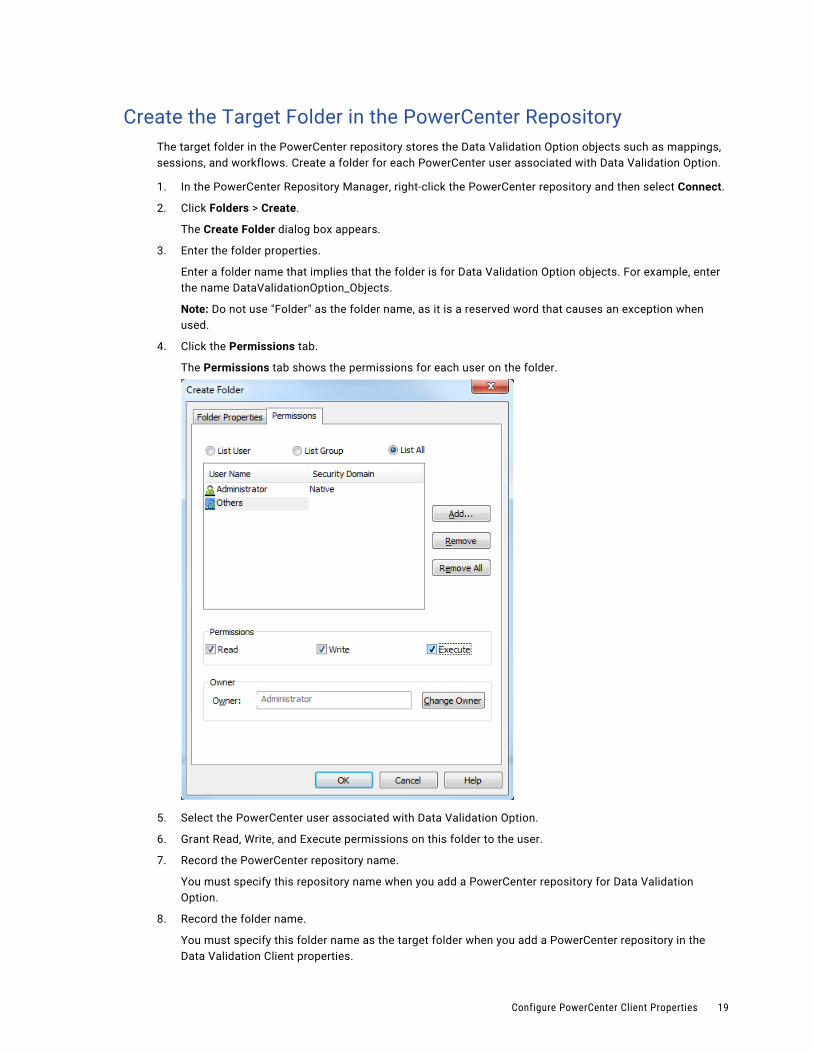
Create the Target Folder in the PowerCenter RepositoryThe target folder in the PowerCenter repository stores the Data Validation Option objects such as mappings, sessions, and workflows. Create a folder for each PowerCenter user associated with Data Validation Option.
1. In the PowerCenter Repository Manager, right-click the PowerCenter repository and then select Connect.
2. Click Folders > Create.
The Create Folder dialog box appears.
3. Enter the folder properties.
Enter a folder name that implies that the folder is for Data Validation Option objects. For example, enter the name DataValidationOption_Objects.
Note: Do not use "Folder" as the folder name, as it is a reserved word that causes an exception when used.
4. Click the Permissions tab.
The Permissions tab shows the permissions for each user on the folder.
5. Select the PowerCenter user associated with Data Validation Option.
6. Grant Read, Write, and Execute permissions on this folder to the user.
7. Record the PowerCenter repository name.
You must specify this repository name when you add a PowerCenter repository for Data Validation Option.
8. Record the folder name.
You must specify this folder name as the target folder when you add a PowerCenter repository in the Data Validation Client properties.
Configure PowerCenter Client Properties 19

Create a Connection to the Data Validation Option RepositoryCreate a connection to the Data Validation Option repository to enable the PowerCenter Integration Service to write test results to the repository.
1. In the PowerCenter Workflow Manager, click Connections > Relational.
2. Click New.
3. In the Select Subtype dialog box, select the database type of the Data Validation Option repository.
4. Click OK.
5. Enter the connection name and database properties.
Enter a meaningful connection name that implies that the connection is for Data Validation Option repository. For example, enter the name DataValidationOption_Repository.
6. Click OK.
7. Click Permissions.
The Permissions dialog box appears.
8. Select the PowerCenter user associated with Data Validation Option.
9. Grant Read, Write, and Execute permissions on this folder to the user.
10. Record the connection name.
You must specify this connection name when you add a PowerCenter repository for Data Validation Option.
11. Click OK.
Note: If the Data Validation Option repository is in a secure domain, ensure that you perform SSL configurations for the required databases and the Data Validation Client machine can access the databases through SSL mode.
20 Chapter 3: Configure Data Validation Option
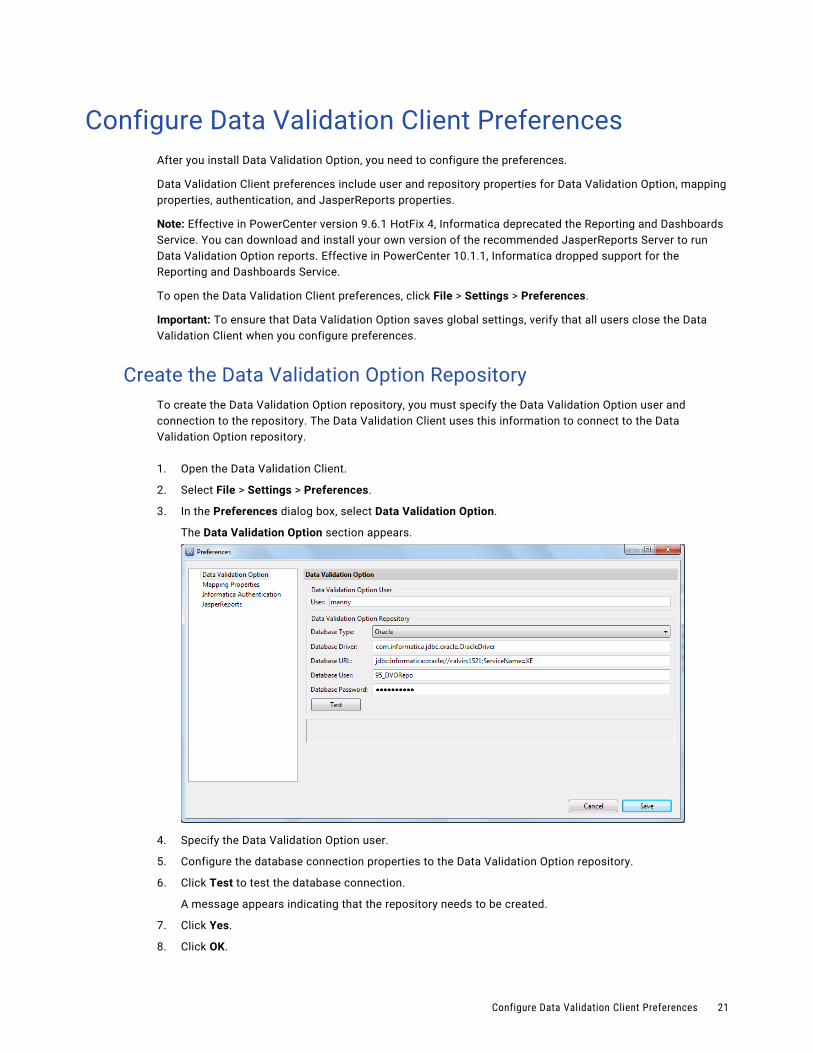
Configure Data Validation Client PreferencesAfter you install Data Validation Option, you need to configure the preferences.
Data Validation Client preferences include user and repository properties for Data Validation Option, mapping properties, authentication, and JasperReports properties.
Note: Effective in PowerCenter version 9.6.1 HotFix 4, Informatica deprecated the Reporting and Dashboards Service. You can download and install your own version of the recommended JasperReports Server to run Data Validation Option reports. Effective in PowerCenter 10.1.1, Informatica dropped support for the Reporting and Dashboards Service.
To open the Data Validation Client preferences, click File > Settings > Preferences.
Important: To ensure that Data Validation Option saves global settings, verify that all users close the Data Validation Client when you configure preferences.
Create the Data Validation Option RepositoryTo create the Data Validation Option repository, you must specify the Data Validation Option user and connection to the repository. The Data Validation Client uses this information to connect to the Data Validation Option repository.
1. Open the Data Validation Client.
2. Select File > Settings > Preferences.
3. In the Preferences dialog box, select Data Validation Option.
The Data Validation Option section appears.
4. Specify the Data Validation Option user.
5. Configure the database connection properties to the Data Validation Option repository.
6. Click Test to test the database connection.
A message appears indicating that the repository needs to be created.
7. Click Yes.
8. Click OK.
Configure Data Validation Client Preferences 21
9. Click Save.
A message appears indicating that you need to shut down the application.
10. Click OK.
Data Validation Option shuts down.
11. Open the Data Validation Client.
The Informatica Data Validation dialog box prompts you to enter the license key.
12. Browse for the license key file, select the file, and then click OK.
The Data Validation Client opens.
Data Validation Option Users and Informatica UsersData Validation Option users and users with Informatica credentials can launch the Data Validation Client. When users launch the Data Validation Client, they connect to a Data Validation Option schema. Enable Informatica authentication so that valid Informatica domain users can log in to Data Validation Option.
To enable authentication, map each Data Validation Option user to an Informatica user. If you want Data Validation Option to map the name of a Data Validation Option user to an Informatica user automatically, use the same name for both users. If the two users have different names, then you can use the DVOCmd LinkDVOUsersToInformatica command to map the Data Validation Option user to the Informatica user.
The permissions of an Informatica user determine whether the associated Data Validation Option user can access PowerCenter metadata. After you enable Informatica authentication, verify that the permissions and privileges are set correctly for each Informatica user.
Data Validation Option Repository PropertiesThe Data Validation Option repository properties determine how the Data Validation Client connects to the Data Validation Option repository.
Configure the following repository properties:User
Unique name for the Data Validation Option user. Use alphanumeric characters only. If you enabled Informatica authentication and the Data Validation Option user name does not match the associated PowerCenter user name, run the DVOCmd LinkDVOUsersToInformatica command to link the Data Validation Option user to the associated PowerCenter user.
Database Type
Type of database for the Data Validation Option repository.
Database Driver
The driver of the database type that you selected.
Database URL
The URL of the database type that you selected. Specify the values for the URL parameters, such as database host name, database name, and port number. The following examples show the URL formats for different databases:IBM DB2
Use the following URL format:
jdbc:informatica:db2://<hostname>:<port>;DatabaseName=<database_name>
For example, use the following URL:
22 Chapter 3: Configure Data Validation Option
jdbc:informatica:db2://127.0.0.1:50000;DatabaseName=sampleDatabase
Use the following URL format if you have enabled SSL on the DB2 database server:
jdbc:informatica:db2:// <hostname>:<port>;databaseName=<database_name>;EncryptionMethod=SSL;HostNameInCertificate= <hostname_in_certificate>;ValidateServerCertificate=true;TrustStore=<full_path_to_truststore_file>;TrustStorePassword=<truststorepassword>
For example, use the following URL:
jdbc:informatica:db2:// myhost.myorg.com:60012;databaseName=mydb;EncryptionMethod=SSL;HostNameInCertificate= myhost.myorg.com;ValidateServerCertificate=true;TrustStore=\\myhost\db2\certs_cacerts;TrustStorePassword=mypwd
Oracle
The URL format depends on whether or not Oracle Advanced Security (ASO) is enabled on the Oracle server.
ASO is not enabled
Use the following URL format:
jdbc:informatica:oracle://<hostname>:<port>;ServiceName=<service_name>
For example, use the following URL:
jdbc:informatica:oracle://127.0.0.1:1521;ServiceName=sampleServiceUse the following URL format if you enabled SSL on the Oracle database server:
jdbc:informatica:oracle://<hostname>:<port>;ServiceName=<service_name>;EncryptionMethod=SSL;HostNameInCertificate= <hostname_in_certificate>;ValidateServerCertificate=true;TrustStore=<full_path_to_truststore_file>;TrustStorePassword=<truststorepassword>
For example, use the following URL:
jdbc:informatica:oracle://myhost.myorg.com:60012;ServiceName=<service_name>;EncryptionMethod=SSL;HostNameInCertificate= myhost.myorg.com;ValidateServerCertificate=true;TrustStore=\\myhost\db2\certs_cacerts;TrustStorePassword=mypwd
ASO is enabled
jdbc:informatica:db2:// <hostname>:<port>;databaseName=<database_name>;EncryptionMethod=SSL;HostNameInCertificate= <hostname_in_certificate>;ValidateServerCertificate=true;TrustStore=<full_path_to_truststore_file>;TrustStorePassword=<truststorepassword>
For example, use the following URL:
jdbc:informatica:db2:// myhost.myorg.com:60012;databaseName=mydb;EncryptionMethod=SSL;HostNameInCertificate= myhost.myorg.com;ValidateServerCertificate=true;TrustStore=\\myhost\db2\certs_cacerts;TrustStorePassword=mypwd
Configure Data Validation Client Preferences 23
Use the following URL format:
jdbc:informatica:oracle://<hostname>:<port>;ServiceName=<service_name>;EncryptionLevel=required;EncryptionTypes=<encryption_types>;DataIntegrityLevel=required;DataIntegrityTypes=<data_integrity_types>
For example, use the following URL:
jdbc:informatica:oracle://127.0.0.1:1521;ServiceName=sampleService;EncryptionLevel=required;EncryptionTypes=AES256;DataIntegrityLevel=required;DataIntegrityTypes=MD5
In this example, AES256 is one of the encryption types and MD5 is one of the data integrity types that DataDirect JDBC Driver for Oracle supports. Consult the Oracle administrator to verify the data encryption and data integrity settings of your Oracle server. To specify multiple encryption types and data integrity types, enter a comma-separated list of values.
Microsoft SQL Server
Use the following URL format:
jdbc:informatica:sqlserver://<hostname>:<port>;DatabaseName=<database_name>
For example, use the following URL:
jdbc:informatica:sqlserver://127.0.0.1:1433;DatabaseName=sampleDatabase
Use the following URL format if you have enabled SSL on the SQL server:
jdbc:informatica:db2:// <hostname>:<port>;databaseName=<database_name>;EncryptionMethod=SSL;HostNameInCertificate= <hostname_in_certificate>;ValidateServerCertificate=true;TrustStore=<full_path_to_truststore_file>;TrustStorePassword=<truststorepassword>
For example, use the following URL
jdbc:informatica:sqlserver:// myhost.myorg.com:1433;DatabaseName=AUTODB;EncryptionMethod=SSL;HostNameInCertificate=myhost.myorg.com;ValidateServerCertificate=true;TrustStore=\\myhost\SSL\SQL\mycert_truststore.jks;TrustStorePassword=mypwd
Database User
The database user name.
Database Password
The password of the database user.
LinkDVOUsersToInformaticaLinks the existing Data Validation Option users with Informatica domain users. You can run this command on Windows.
Create a text file that contains a list of the Data Validation Option users and Informatica domain users in the following format:
<dvo_user_name1>,<Informatica_user_name1><dvo_user_name2>,<Informatica_user_name2>..<dvo_user_nameN>,<Informatica_user_nameN>
24 Chapter 3: Configure Data Validation Option
The LinkDVOUsersToInformatica command uses the following syntax:
DVOCmd LinkDVOUsersToInformatica [file_name] [--confdir conf_dir] [--username User name] [--password Password] [--ePassword Password Environment Variable] [--namespace Namespace]
The following table describes LinkDVOUsersToInformatica argument:
Option Argument Description
- file_name Name of the file that contains the mapping between Data Validation Option users and Informatica users.Enclose the file path in quotes.
--confdir conf_dir The user configuration directory. Specify the configuration directory if you have multiple Data Validation Option repositories on a client machine. If you have one Data Validation Option repository on a client machine and have not changed the configuration directory, you do not need to specify this option. Because Windows directories often contain spaces, you must enclose the file path in quotes.
--username User name Informatica domain administrator user name for the domain to which you configured Informatica authentication.Required if you configure Informatica authentication.
--password Password Password for the Informatica user name.Required if you configure Informatica authentication.If you set the password option, then do not set the ePassword option.
--ePassword Password Environment Variable
Encrypted form of the password of the Informatica user name.Use the DVOCmd EncryptPassword command to encrypt the password. Set an environment variable to the encrypted password and use the variable in the ePassword option. The command replaces the environment variable with the encrypted password and then decrypts the password.If you set the ePassword option, then do not set the password option. If the command contains both the password and ePassword options, then the Data Validation Option uses the ePassword and ignores the password.
--namespace Namespace Namespace of the LDAP domain.Required if you configure Informatica Authentication with LDAP domain.
Configure Mapping PropertiesWhen you run a data validation test, Data Validation Option creates and runs a PowerCenter mapping with the logic required to complete the test. You can configure the mapping properties to determine how the PowerCenter Integration Service processes the test data.
Important: To ensure that Data Validation Option saves global settings, verify that all users close the Data Validation Client when you configure preferences.
1. In the Data Validation Client, click File > Settings > Preferences.
2. In the Preferences dialog box, select Mapping Properties.
The Mapping Properties section appears.
Configure Data Validation Client Preferences 25
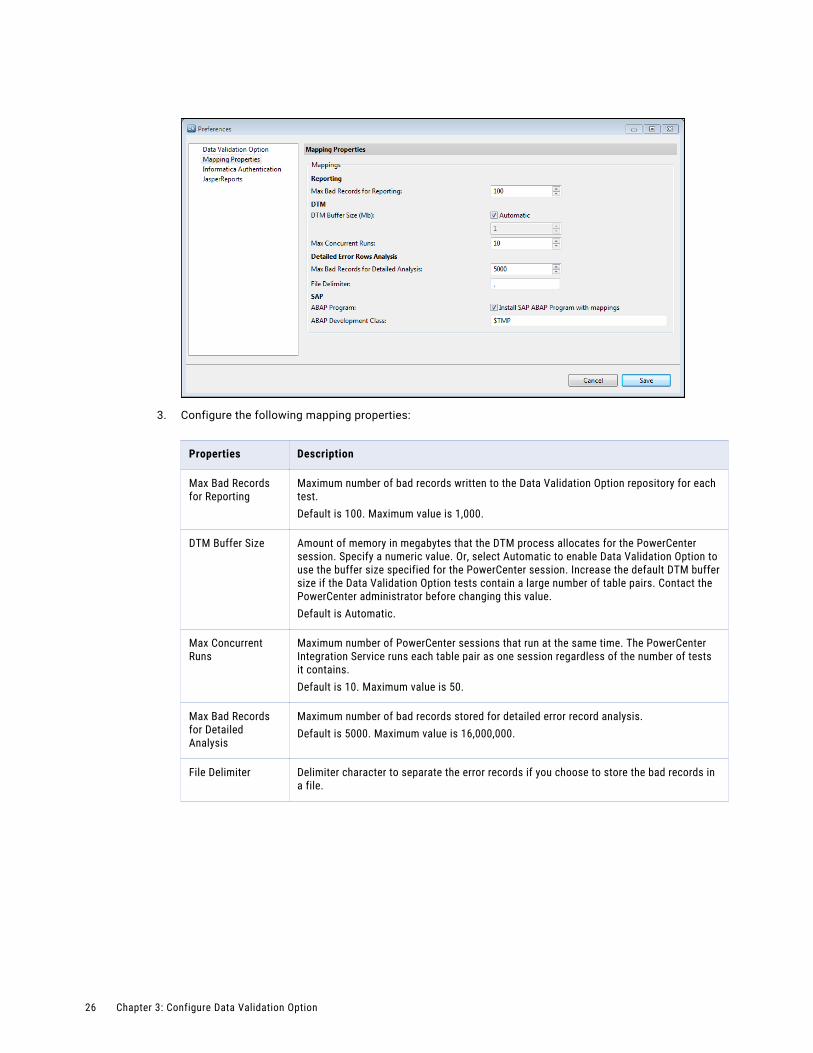
3. Configure the following mapping properties:
Properties Description
Max Bad Records for Reporting
Maximum number of bad records written to the Data Validation Option repository for each test.Default is 100. Maximum value is 1,000.
DTM Buffer Size Amount of memory in megabytes that the DTM process allocates for the PowerCenter session. Specify a numeric value. Or, select Automatic to enable Data Validation Option to use the buffer size specified for the PowerCenter session. Increase the default DTM buffer size if the Data Validation Option tests contain a large number of table pairs. Contact the PowerCenter administrator before changing this value.Default is Automatic.
Max Concurrent Runs
Maximum number of PowerCenter sessions that run at the same time. The PowerCenter Integration Service runs each table pair as one session regardless of the number of tests it contains.Default is 10. Maximum value is 50.
Max Bad Records for Detailed Analysis
Maximum number of bad records stored for detailed error record analysis.Default is 5000. Maximum value is 16,000,000.
File Delimiter Delimiter character to separate the error records if you choose to store the bad records in a file.
26 Chapter 3: Configure Data Validation Option

Properties Description
ABAP Program Indicator that determines whether you install the ABAP program. Select Install SAP ABAP Program with mappings to install the ABAP program in the development environment.Data Validation Option creates an ABAP program for each SAP source mapping. In the development environment, the ABAP program name is associated with the table object that you create in the Data Validation Client. When you import or copy a table object, Data Validation Option maintains the ABAP reference. Data Validation Option verifies that the ABAP program exists in the SAP system when it runs a test.Note: Do not select this option in a production or test environment if the programs are migrated from the development environment.
ABAP Development Class
Required if you access SAP. Enter the name of the development class where you want to install the program in the development environment.Default is $TMP.
4. Click Save.
Enable Informatica User AuthenticationBy default, Data Validation Option does not authenticate users. If the Informatica domain has TLS enabled and you access a PowerCenter repository version 9.1.0 HotFix 3 or later, you can enable Informatica Authentication to validate users based on Informatica domain credentials.
You must have the Administrator role in the Informatica domain to enable Informatica authentication. The Data Validation Client determines roles based on the PowerCenter user associated with the Data Validation Option user. Also, the Informatica services must be running to test the domain settings.Use the nodemeta.xml file to determine the values for these properties. You can find the nodemeta.xml file in the following directory on the machine where you installed Informatica services: <Informatica installation directory>\isp\config
You can also use the DVOCmd UpdateInformaticaAuthenticationConfiguration command to enable Informatica user authentication.
Important: To ensure that Data Validation Option saves global settings, verify that all users close the Data Validation Client when you configure preferences.
1. In the Data Validation Client, click File > Settings > Preferences.
The Preferences dialog box appears.
2. Select Informatica Authentication.
Configure Data Validation Client Preferences 27
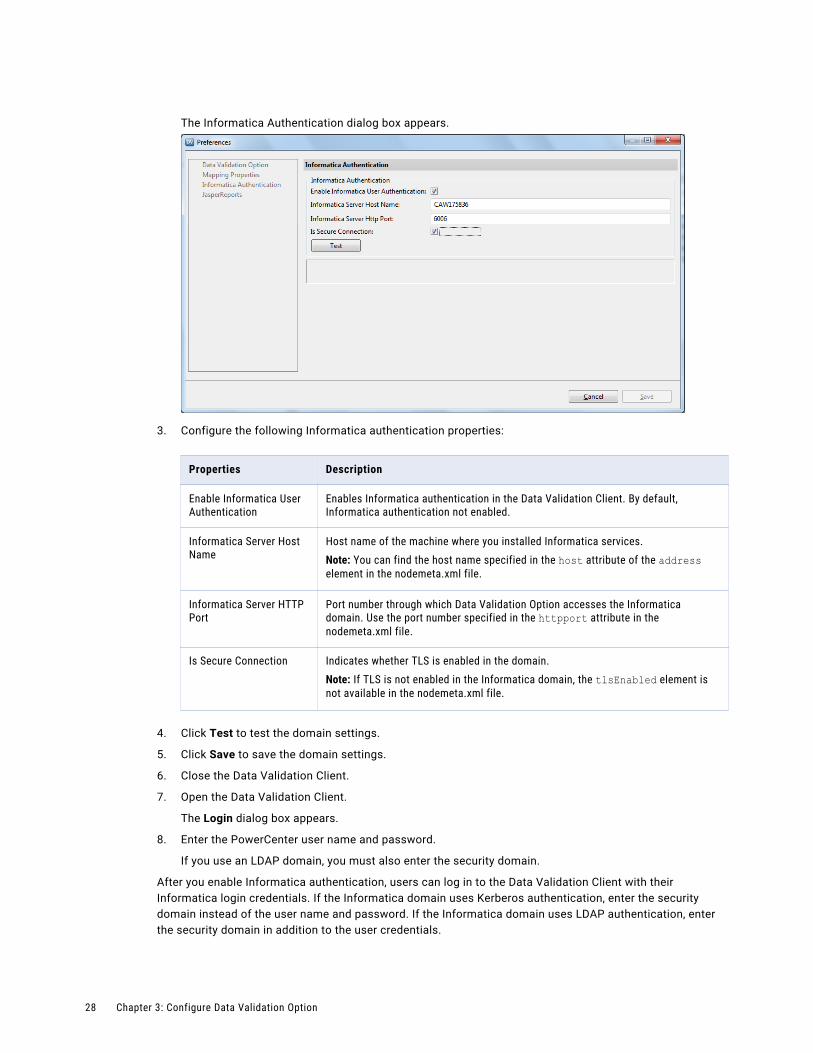
The Informatica Authentication dialog box appears.
3. Configure the following Informatica authentication properties:
Properties Description
Enable Informatica User Authentication
Enables Informatica authentication in the Data Validation Client. By default, Informatica authentication not enabled.
Informatica Server Host Name
Host name of the machine where you installed Informatica services.Note: You can find the host name specified in the host attribute of the address element in the nodemeta.xml file.
Informatica Server HTTP Port
Port number through which Data Validation Option accesses the Informatica domain. Use the port number specified in the httpport attribute in the nodemeta.xml file.
Is Secure Connection Indicates whether TLS is enabled in the domain.Note: If TLS is not enabled in the Informatica domain, the tlsEnabled element is not available in the nodemeta.xml file.
4. Click Test to test the domain settings.
5. Click Save to save the domain settings.
6. Close the Data Validation Client.
7. Open the Data Validation Client.
The Login dialog box appears.
8. Enter the PowerCenter user name and password.
If you use an LDAP domain, you must also enter the security domain.
After you enable Informatica authentication, users can log in to the Data Validation Client with their Informatica login credentials. If the Informatica domain uses Kerberos authentication, enter the security domain instead of the user name and password. If the Informatica domain uses LDAP authentication, enter the security domain in addition to the user credentials.
28 Chapter 3: Configure Data Validation Option
Troubleshooting Informatica AuthenticationInformatica authentication can fail for different reasons.
Review the following troubleshooting tip for Informatica authentication:
Why does a secure connection error appear when I try to log in to the Data Validation Client?
If the Informatica domain is changed to use the Transport Layer Security (TLS) protocol while Data Validation Option uses Informatica authentication to authenticate users, the following error might appear when you log in to the Data Validation Client:
Com.informatica.pcsf.servicesframework.ServicesFramework.Exception: [DTF_0001] An error occurred in the underlying transport layer: [Secure connection is required.]
Because you cannot log in to the Data Validation Client, run the DVOCmd UpdateInformaticaAuthenticationConfiguration command to enable TLS in Data Validation Option.
For example, run the following command:
DVOCmd UpdateInformaticaAuthenticationConfiguration --confdir c:\DVO_User --infaHostName MachineName --infaHttpPort 6005 --isSecureConnection true --username AdminUser --password AdminPassword
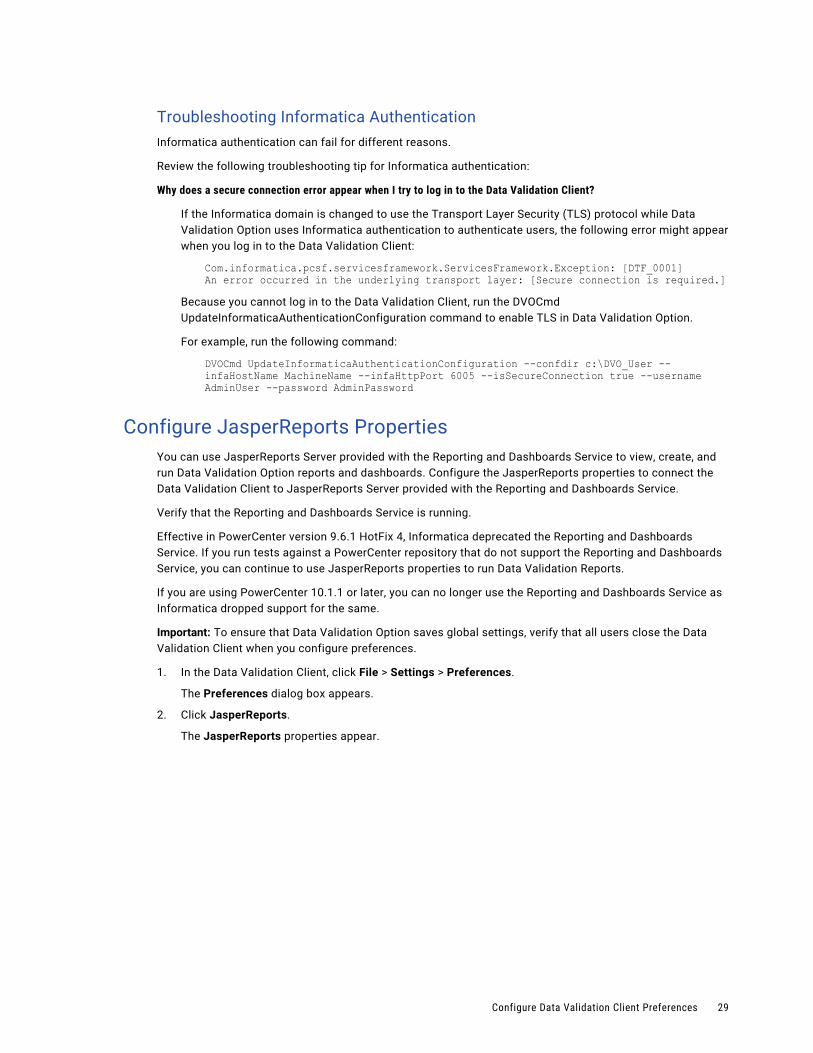
Configure JasperReports PropertiesYou can use JasperReports Server provided with the Reporting and Dashboards Service to view, create, and run Data Validation Option reports and dashboards. Configure the JasperReports properties to connect the Data Validation Client to JasperReports Server provided with the Reporting and Dashboards Service.
Verify that the Reporting and Dashboards Service is running.
Effective in PowerCenter version 9.6.1 HotFix 4, Informatica deprecated the Reporting and Dashboards Service. If you run tests against a PowerCenter repository that do not support the Reporting and Dashboards Service, you can continue to use JasperReports properties to run Data Validation Reports.
If you are using PowerCenter 10.1.1 or later, you can no longer use the Reporting and Dashboards Service as Informatica dropped support for the same.
Important: To ensure that Data Validation Option saves global settings, verify that all users close the Data Validation Client when you configure preferences.
1. In the Data Validation Client, click File > Settings > Preferences.
The Preferences dialog box appears.
2. Click JasperReports.
The JasperReports properties appear.
Configure Data Validation Client Preferences 29
3. Click Enable JasperReports.
4. Enter the following JasperReports properties:
Properties Description
JasperReports Server Host Name Host name of the Reporting and Dashboards Service.
JasperReports Server Port Port number of the Reporting and Dashboards Service.
JasperReports Server Web Application Name
Name of the JasperReports web application.
JasperReports Server Root Folder JasperReports Server directory that stores the Data Validation Option reports.If the directory does not exist, Data Validation Option creates it on the Jaspersoft Server after you configure the JasperReports properties.Warning: If the directory exists, Data Validation Option removes all contents before installing the reports.The directory name can include only alphanumeric and underscore characters, and must begin with a letter.
Is Secure Connection Select if the JasperReports Server runs on a secure connection.
5. Click Test to validate the connection to JasperReports Server.
6. Click Install Reports.
7. When prompted, enter the user name and password of a JasperReports Server user with administrator privileges.
8. Click OK.
If necessary, Data Validation Option creates the root directory on the Jaspersoft Server and imports the Data Validation Option reports and dashboards into JasperReports Server.
9. Click Save to save the properties.
30 Chapter 3: Configure Data Validation Option
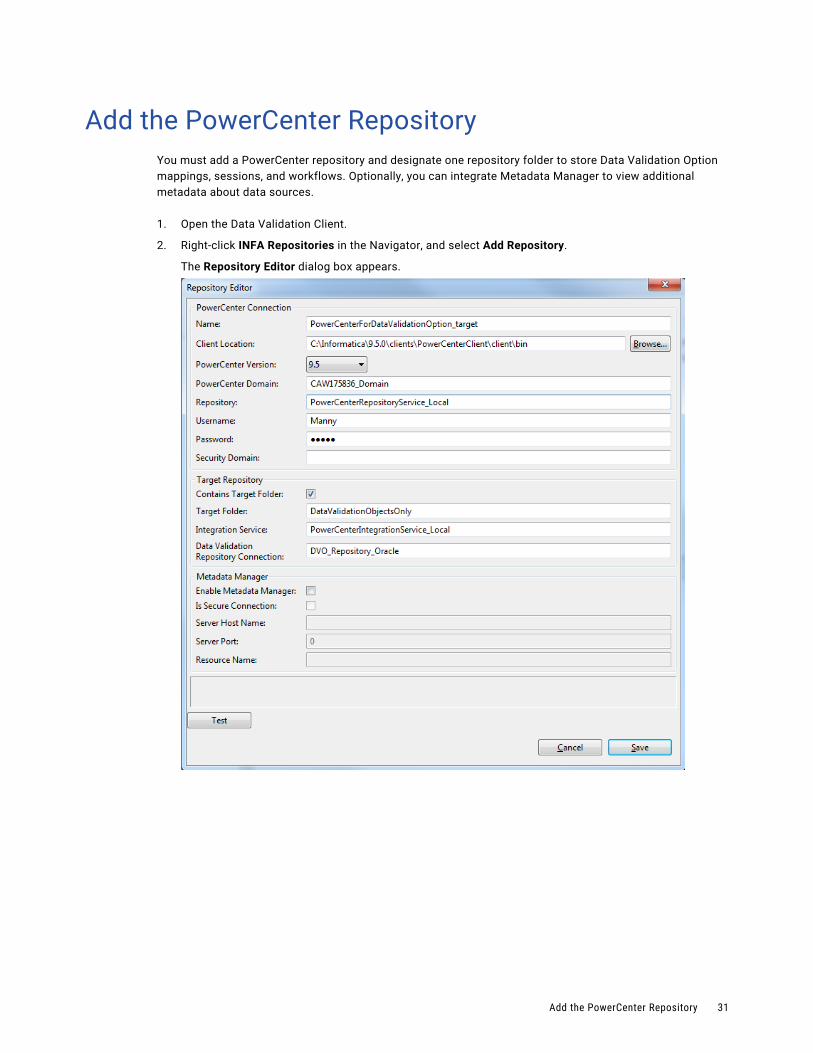
Add the PowerCenter RepositoryYou must add a PowerCenter repository and designate one repository folder to store Data Validation Option mappings, sessions, and workflows. Optionally, you can integrate Metadata Manager to view additional metadata about data sources.
1. Open the Data Validation Client.
2. Right-click INFA Repositories in the Navigator, and select Add Repository.
The Repository Editor dialog box appears.
Add the PowerCenter Repository 31
3. Enter the following PowerCenter connection properties:
Property Description
Name Logical name of the PowerCenter repository for Data Validation Option. This name appears in the Navigator pane of the Data Validation Client.Tip: If this is the repository that contains the target folder, append “target” to the name.
Client Location Location of the pmrep.exe file on the PowerCenter Client machine. For example: C:\Informatica\<version>\clients\PowerCenterClient\client\bin.
PowerCenter Version
The PowerCenter version that runs Data Validation Option.
PowerCenter Domain
Name of the Informatica domain.Note: If PowerCenter uses Kerberos authentication, the user name and password text boxes become unavailable when you enter the name of the domain.
Repository Name of the PowerCenter repository for Data Validation Option that is defined in the Informatica domain.
User name User name for the PowerCenter repository. The text box is unavailable if PowerCenter uses Kerberos authentication.
Password User password for the PowerCenter repository. The text box is unavailable if PowerCenter uses Kerberos authentication.
Security Domain Security domain for the PowerCenter user. Specify the name of the LDAP security domain. Leave this property blank if you use native authentication.
4. If the PowerCenter repository that you entered contains the target folder for the data validation metadata, enter the following target repository properties:
Property Description
Contains Target Folder
Indicator that determines whether this repository contains the target folder to store Data Validation Option mappings, sessions, and workflows. If you add multiple PowerCenter repositories, select this option for one PowerCenter repository. The Data Validation Option can read from multiple PowerCenter repositories, but it can create objects in only one PowerCenter repository.
Target Folder Name of the target folder that stores Data Validation Option mappings, sessions, and workflows.
Integration Service Name of the PowerCenter Integration Service that runs the Data Validation Option workflows.
Data Validation Repository Connection
Name of the repository connection that you created in the PowerCenter Workflow Manager.
32 Chapter 3: Configure Data Validation Option
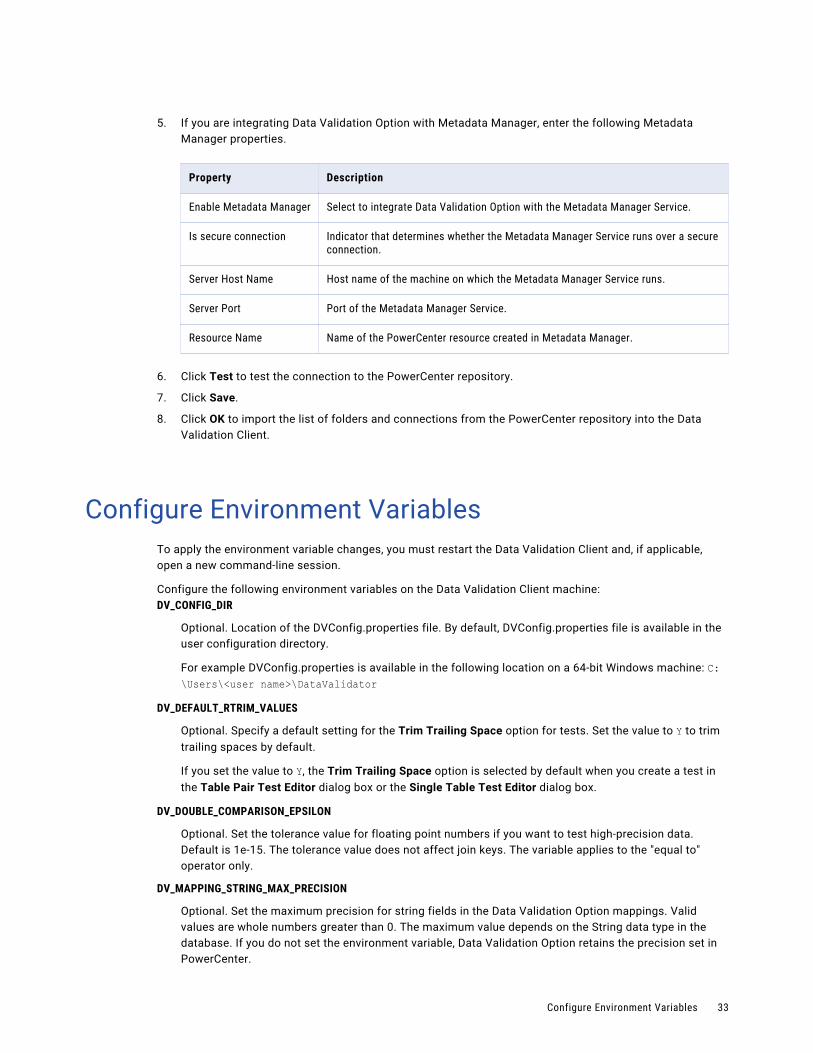
5. If you are integrating Data Validation Option with Metadata Manager, enter the following Metadata Manager properties.
Property Description
Enable Metadata Manager Select to integrate Data Validation Option with the Metadata Manager Service.
Is secure connection Indicator that determines whether the Metadata Manager Service runs over a secure connection.
Server Host Name Host name of the machine on which the Metadata Manager Service runs.
Server Port Port of the Metadata Manager Service.
Resource Name Name of the PowerCenter resource created in Metadata Manager.
6. Click Test to test the connection to the PowerCenter repository.
7. Click Save.
8. Click OK to import the list of folders and connections from the PowerCenter repository into the Data Validation Client.
Configure Environment VariablesTo apply the environment variable changes, you must restart the Data Validation Client and, if applicable, open a new command-line session.
Configure the following environment variables on the Data Validation Client machine:DV_CONFIG_DIR
Optional. Location of the DVConfig.properties file. By default, DVConfig.properties file is available in the user configuration directory.
For example DVConfig.properties is available in the following location on a 64-bit Windows machine: C:\Users\<user name>\DataValidator
DV_DEFAULT_RTRIM_VALUES
Optional. Specify a default setting for the Trim Trailing Space option for tests. Set the value to Y to trim trailing spaces by default.
If you set the value to Y, the Trim Trailing Space option is selected by default when you create a test in the Table Pair Test Editor dialog box or the Single Table Test Editor dialog box.
DV_DOUBLE_COMPARISON_EPSILON
Optional. Set the tolerance value for floating point numbers if you want to test high-precision data. Default is 1e-15. The tolerance value does not affect join keys. The variable applies to the "equal to" operator only.
DV_MAPPING_STRING_MAX_PRECISION
Optional. Set the maximum precision for string fields in the Data Validation Option mappings. Valid values are whole numbers greater than 0. The maximum value depends on the String data type in the database. If you do not set the environment variable, Data Validation Option retains the precision set in PowerCenter.
Configure Environment Variables 33
DV_RTRIM_JOIN_KEYS
Optional. Set the trailing space setting for join keys. Set the value to "Y" to remove the trailing spaces from join keys. Set the value to "N" to retain the trailing spaces. If you do not set the environment variable, Data Validation Option retains the trailing spaces.
DV_TREAT_EMPTY_STRING_AS_NULL
Optional. Set to indicate that a null value and an empty string are equal when Data Validation Option compares the values of fields in an Oracle database. If you do not set this environment variable and Data Validation Option compares two fields where one is null and the other has an empty value, Data Validation Option considers the values as not equal.
DVO_PC_960_MODE
Required if the target repository for Data Validation Option is in a PowerCenter repository version 9.6.0 to 9.6.x. Set the DVO_PC960_MODE environment variable to true.
DVO_PC_VERSION
If you use Informatica authentication with version 10.0, set 10.0.0 as the value for the environment variable. If you use Informatica authentication from version 10.1 through 10.1.1 HotFix 2, set 10.1.0 as the value for the environment variable. If you use Informatica authentication with version 10.2, set 10.2.0 as the value for the environment variable.
INFA_DOMAINS_FILE
Set to the following location of the domains.infa file on the Data Validation Client machine:
$INFA_HOME/domains.infa
INFA_HOME
Required. Set the INFA_HOME environment variable to the PowerCenter Client installation directory.
INFA_TRUSTSTORE
Required if you access a PowerCenter Client version earlier than 9.6.0. If you access version 9.6.0 or later, the installer sets this environment variable. The variable points to the directory that contains the trust store files for the SSL certificates. The directory must contain trust store files named infa_truststore.jks and infa_truststore.pem.
INFA_TRUSTSTORE_PASSWORD
Required if you access a domain version 9.6.0 or that has custom SSL certificate.
KRB5_CONFIG
Required. Use the KRB5_CONFIG environment variable to store the path and file name of the Kerberos configuration file. The name of the Kerberos configuration file is krb5.conf. You must set the KRB5_CONFIG environment variable on each machine that hosts an Informatica client.
Set the variable to the following value:
$INFA_HOME/services/shared/security/krb5.conf
34 Chapter 3: Configure Data Validation Option
Test the Data Validation Option Installation and Configuration
To verify that you properly installed and configured Data Validation Option, run a sample test. Create and run a COUNT_ROWS test on a single table that has a small amount of data.
1. Open the Data Validation Client.
2. Right-click the folder where you want to store the single table, and then select Add Single Table.
The Single Table Editor appears.
3. Enter the description of the single table.
4. Click Browse to select a table.
The Select Data Source dialog box appears.
5. Select a table with the least amount of data, and then click Select.
The Single Table Editor appears again.
6. Click Edit to select a connection.
The Select Connection for Table A dialog box appears.
7. Select the appropriate connection, and then click OK.
The Single Table Editor appears again.
8. Select the primary key for the table.
9. Save the single table.
10. Right-click the table in the navigator, and then select Add Constraint Test.
The Single Table Test Editor dialog box appears.
11. In the Function field, select COUNT_ROWS to add a COUNT_ROWS test.
12. In the Constraint Value field, enter a constraint value.
13. Click Save.
14. Right-click the test in the details area, and then select Run Test.
15. Verify that the test runs successfully.
JasperReports Server SetupYou must set up a JasperReports Server before you can generate Jasper reports.
You can use the JasperReports Server available with Informatica Services or use a standalone JasperReports Server. JasperReports Server available with Informatica Services is called the Reporting and Dashboards Service.
Informatica 9.1.0 HotFix 1 and HotFix 2 includes JasperReports Server 4.0.1. Informatica 9.1.0 HotFix 3 and later includes JasperReports Server 4.2.0. If you use Informatica 9.1.0 HotFix 1 or HotFix 2, contact Informatica Global Customer Support to obtain the required patch files that you must install to generate Jasper reports.
You can update the heap size of the JasperReports Server available with Informatica from the Administrator tool to improve the performance. Default heap size is 512MB. Update the heap size based on the
Test the Data Validation Option Installation and Configuration 35
requirement. In the Administrator tool, select the required Reporting and Dashboards Service and update Maximum Heap Size in the Advanced Properties tab.
If you want to use a standalone JasperReports Server, download and install JasperReports Server 4.2.1 for the Windows 32-bit platform, Windows 64-bit platform, or Linux 64-bit platform.
You can download the JasperReports Server installer from the following location: http://community.jaspersoft.com/project/jasperreports-server/releases
You must update the standalone JasperReports Server with the Datadirect drivers available with Data Validation Option. Copy dwdb2.jar, dwsqlserver.jar, and dworacle.jar from the following location: <Data Validation Option installation directory>\lib. Paste the files in the following directory: <JasperReports Server installation directory>\tomcat\lib.
You must install the SSL certificate if you use a JasperReports Server that runs over an HTTPS connection.
From the command line, browse to the following location: <Data Validation Option Installation Directory>\DVO\jre\bin
Run the following command: keytool -importcert -alias <certificate alias name> -file " <certificate path>\<certificate filename>" -keystore ..\lib\security\cacerts
36 Chapter 3: Configure Data Validation Option
C h a p t e r 4
Configuring Multiple Environments
This chapter includes the following topics:
• Configuring Multiple Environments Overview, 37
• Configuration Process, 38
• Environment Configuration Files , 38
• Batch Files, 40
• Multiple Data Validation Option Users, 41
• Multiple Data Validation Option Repositories, 42
• Multiple PowerCenter Versions, 42
Configuring Multiple Environments OverviewBy default, an installation of the Data Validation Client supports one user, one Data Validation Option repository, and one Informatica domain. When you launch the Data Validation Client, the client accesses the Data Validation Option repository associated with the user. You can access multiple environments from one instance of the Data Validation Client through configuration files.
If you configure multiple users and repositories, you must specify which user and repository to use when you launch the Data Validation Client. When you configure the Data Validation Client, you specify the user and database connection for the Data Validation Option repository. Data Validation Option stores this information in configuration files in the user configuration directory.
You can also switch PowerCenter installations. For example, you might run tests in a development environment on one PowerCenter installation, but you run tests in a production environment on a different PowerCenter installation. You specify the PowerCenter installation directory in the INFA_HOME environment variable.
Create a batch file to launch Data Validation Client for each specific environment.
37
Configuration ProcessTo configure multiple environments for a single installation of the Data Validation Client, you need to create configuration files and configure the Data Validation Client preferences.
1. Identify a user configuration directory for each user. Each environment that you configure requires a separate configuration directory.
2. Create the preferences.xml file. Use DVOCmd to create a preferences file that stores all the preferences that you configure in Data Validation Client. Move the file to the user configuration directory.
3. Create a .bat file. The batch file contains information about the domain and the user configuration directory. Each environment associated with a Data Validation Client requires a separate .bat file.
4. Launch Data Validation Client from the batch file.
5. Configure preferences and create a repository. When you configure the preferences and create a repository within the Data Validation Client, it updates the preferences.xml file and creates the DVConfig.properties file.
Environment Configuration FilesData Validation Option uses configuration files to access multiple environments through one Data Validation Client for multiple users, repositories, or PowerCenter installations.
Each user has a separate set of configuration files. When you launch the Data Validation Client, Data Validation Option uses the information from preferences.xml and DVconfig.properties to launch the client application with the proper environment configuration. You launch Data Validation Client from a .bat file.
Store the configuration files in the user configuration directory. The user configuration directory contains environment configuration files, log files, reports, and temporary files. Data Validation option creates a user configuration directory for each user. By default, you can find the user configuration directory in one of the following locations:
• Windows 32-bit: C:\Documents and Settings\<user name>\DataValidator\• Windows 64-bit: C:\Users\<user name>\DataValidator\
Data Validation Option uses following environment configuration files:preferences.xml
Contains configuration properties that you configure in the Data Validation Client preferences that you configure in the Preferences dialog box. Each user that shares access to one Data Validation Client requires a preferences file. Store the preferences file in the user configuration directory.
DVConfig.properties
Contains database and user information that the Data Validation Client uses when you launch the tool. Store the properties file in the user configuration directory.
38 Chapter 4: Configuring Multiple Environments
preferences.xmlThe preferences.xml file stores user preferences and the database connection for the Data Validation Option repository. Each user has a separate preferences file.
When you configure the user preferences and the connection to the Data Validation Option repository, Data Validation Option stores this information in the preference files.
If you need to configure multiple users, each user requires a separate preferences.xml file. Run the DVOCmd CreateUserConfig command to create a preferences.xml file for each user. When you launch the Data Validation Client, it retrieves the user preferences and database connection from the preference files.
Before you run DVOCmd CreateUserConfig command, identify the directories where you want to store the preferences.xml file for each user.
To view the directory that contains the preference file, click File > Settings > Open Settings Folder.
Creating the preferences.xml FileCreate a preferences.xml file for each unique environment that you want to access or for each user that accesses the Data Validation Client on the same machine.
1. From the command line, run the DVOCmd CreateUserConfig command.
The command generates the preference file and stores it in the specified output directory. The name of the preference file is <user name>-preferences.xml.
2. Rename the preferences file to preferences.xml, and move it to the user configuration directory for the user.
3. If you create preference files for multiple users in the same output directory, move the renamed preference file to a unique location for each user.
CreateUserConfigCreates a preferences file with the specified user names and user configuration directory. You can run this command on Windows.
The CreateUserConfig command uses the following syntax:
DVOCmd CreateUserConfig user_name [user_name2 …] [--confdir conf_dir] --outputdir output_dir [--overwrite]
Creates a preferences file called <username>-preferences.xml for each user in the output directory. The preferences file contains connection information for the Data Validation Option repository. Copy each preferences file from the output directory to the user configuration directory and rename it to preferences.xml. This allows each user to access the Data Validation Option repository.
The following table describes CreateUserConfig options and arguments:
Option Argument Description
- user_name The name of the Data Validation Option user. To create multiple users, enter multiple user names separated with spaces.
--confdir conf_dir The user configuration directory. Specify the configuration directory if you have multiple Data Validation Option repositories. If you have one Data Validation Option repository on a client machine and have not changed the configuration directory, you do not need to specify this option. Enclose the file path in quotes.
Environment Configuration Files 39
Option Argument Description
--outputdir output_dir Directory in which to store user preferences files.Enclose the file path in quotes. Use double-quotes if the path has space or special characters.
--overwrite - Overwrites the configuration files.
DVConfig.propertiesThe DVConfig.properties file contains database and user information that the Data Validation Client uses when you launch the tool.
The first time that you configure the Data Validation Client preferences, it creates the properties file in the user configuration directory. When you update the preferences that are contained in the properties file, the Data Validation Client updates the file.
Batch FilesCreate batch files to switch between multiple Data Validation Clients, users, repositories, or PowerCenter instances. The batch file specifies the user configuration directory and the path to the Data Validation Client executable.
A batch file can contain the following parameters:DVO_PC960_MODE
Set the DVO_PC960_MODE environment variable to "true" if the target PowerCenter repository is version 9.6.0 to 9.6.x.
DVO_PC_VERSION
If you use Informatica authentication with version 10.0, set 10.0.0 as the value for the environment variable. If you use Informatica authentication from version 10.1 through 10.1.1 HotFix 2, set 10.1.0 as the value for the environment variable. If you use Informatica authentication with version 10.2, set 10.2.0 as the value for the environment variable.
INFA_HOME environment variable
Set the INFA_HOME environment variable to the PowerCenter Client installation directory to run the Data Validation Client with a specific PowerCenter instance.
Directory and name of the Data Validation Client executable file
Specify the directory and name of the Data Validation Client executable file to run a specific Data Validation Client.
Directory and name of the DVOCmd executable file
Specify the directory and name of the DVOCmd executable file to run a specific instance of DVOCmd.
DV_CONFIG_DIR environment variable
Set the DV_CONFIG_DIR environment variable to the Data Validation Option user configuration directory to launch the Data Validation Client under a different Data Validation Option user account.
40 Chapter 4: Configuring Multiple Environments
Use the following syntax when you create a batch file for PowerCenter 9.6:
@echo offSET DVO_PC960_MODE=trueSET INFA_HOME=<Informatica installation directory>SET DV_CONFIG_DIR=<User configuration directory>cd\cd <directory and name of executable file>
Use the following syntax when you create a batch file for PowerCenter 10.0.0, 10.1.0, or 10.2.0:
@echo offSET DVO_PC_VERSION=<10.0.0_10.1.0_or_10.2.0>SET INFA_HOME=<Informatica installation directory>SET DV_CONFIG_DIR=<User configuration directory>cd\cd <directory and name of executable file>
Note: If you use a shortcut to launch the Data Validation Client, edit the shortcut to call the batch file instead of DVOClient.exe.
Multiple Data Validation Option UsersEach Data Validation Option user needs to have a separate Data Validation account. If multiple users need access to one Data Validation Client, you can set up the environment through the configuration files.
To set up multiple users to access one instance of the Data Validation Client, complete the following tasks:
• Verify that each user has a separate user configuration directory.
• Create a batch file for each user.
• Run the DVOCmd CreateUserConfig command to create the preferences.xml file.
Sample Batch Files for Multiple UsersYou can create batch files to run one instance of the Data Validation Client under different user accounts.
For example, you install Data Validation Option in the default directory. You create a separate batch file for each user and store the configuration files in the user configuration directory for each user.
You create the following batch file for the user named Mohan:
@echo offSET INFA_HOME=C:\Informatica\<version>\clients\PowerCenterClientset DV_CONFIG_DIR=C:\users\mohan\DataValidatorcd\c:\Program Files(x86)\Informatica<version>\DVO\DVOClient.exe
You create the following batch file for the user named Susan:
@echo offSET INFA_HOME=C:\Informatica\<version>\clients\PowerCenterClientset DV_CONFIG_DIR=C:\users\susan\DataValidatorcd\c:\Program Files(x86)\Informatica<version>\DVO\DVOClient.exe
Multiple Data Validation Option Users 41
Multiple Data Validation Option RepositoriesYou can configure the Data Validation Client machine to access multiple Data Validation Option repositories. You might create multiple Data Validation Option repositories if you run multiple versions of Data Validation Option simultaneously or if you have development and production environments.
Data Validation Option creates a separate user configuration directory for each user and repository. If you create multiple repositories, you must specify a unique user configuration directory for each repository.
To create an additional Data Validation Option repository, complete the following steps:
1. Create a database for the Data Validation Option repository.
2. Run the DVOCmd CreateUserConfig command to create the preferences file.
3. Create a batch file that specifies the user configuration directory.
4. Run the batch file to access the Data Validation Client.
5. Configure preferences and create a Data Validation Option repository.
Sample Batch Files for Multiple Data Validation Option Repositories
You can create batch files for one user to access multiple Data Validation Option repositories.
For example, you install Data Validation Option in the default directory. You need separate Data Validation Option repositories to store development and testing objects. You create separate user configuration directories to store the configuration files.
You create the following batch file for the development environment:
@echo offSET INFA_HOME=C:\Informatica\<version>\clients\PowerCenterClientset DV_CONFIG_DIR=C:\users\hakumar\DataValidator\DVO_DEVcd\c:\Program Files\Informatica<version>\DVO\DVOClient.exe
You create the following batch file for the production environment:
@echo offSET INFA_HOME=C:\Informatica\<version>\clients\PowerCenterClientset DV_CONFIG_DIR=C:\users\hakumar\DataValidator\DVO_PRDcd\c:\Program Files\Informatica<version>\DVO\DVOClient.exe
Multiple PowerCenter VersionsYou can configure multiple PowerCenter versions with Data Validation Option. You might need to use different PowerCenter versions based on different project requirements. For example, you might have two business units that use different versions of PowerCenter.
To change the PowerCenter instance associated with Data Validation Option, create a batch file. In each batch file, specify the corresponding PowerCenter Client installation directory in the INFA_HOME environment variable.
42 Chapter 4: Configuring Multiple Environments
Adding Repositories of Multiple PowerCenter VersionsIf the target repository is in a previous PowerCenter version, you need to modify the domains.infa file.
1. Copy the domains.infa file from the <PowerCenter Client installation directory>\clients\PowerCenterClient\ to the location you want, for example C:\DVO\domains.infa.
2. Use a text editor to modify the copied domains.infa file.
3. Copy the following lines of code from the domains.infa file of an earlier PowerCenter version:.
<vector xsi:type="domainservice:Portals" objVersion="1.0.0"><domainName>$DomainName</domainName><address xsi:type="metadata:NodeRef" objVersion="1.0.0"><host>$HostName</host><port>6005</port></address></vector>
Note: Place the lines before the <portals> tag.
4. Save the domains.infa file. Ensure that you do not change the name of the file.
5. Update either the INFA_HOME or INFA_DOMAINS_FILE environment variable with the location of the modified domains.infa file, that is C:\DVO\domains.infa, and launch the Data Validation Client.
6. Test the connection with target repository as the current version and the secondary repository as an earlier version.
Sample Batch Files for Multiple PowerCenter VersionsYou can create batch files to associate different versions of PowerCenter with the Data Validation Client.
For example, you install Data Validation Option in the default directory. You create a separate batch file for each PowerCenter version and store the configuration files in the separate user configuration directories.
For PowerCenter 9.5.1, you create the following batch file and name it DVO_PC951_<username>:
@echo offSET INFA_HOME=C:\Informatica\9.5.1\clients\PowerCenterClientset DV_CONFIG_DIR=C:\users\<username>\DataValidatorcd\c:\Program Files(x86)\Informatica10.0\DVO\DVOClient.exe
For PowerCenter 9.6.1, you create the following batch file and name it DVO_PC961_<username>
@echo offSET DVO_PC960_MODE=trueSET INFA_HOME=C:\Informatica\9.6.1\clients\PowerCenterClientset DV_CONFIG_DIR=C:\users\<username>\DataValidatorcd\c:\Program Files(x86)\Informatica10.0\DVO\DVOClient.exe
For PowerCenter 10.0.0, 10.1.0, or 10.2.0, you create the following batch file and name it DVO_PC<version>_<username>:
@echo offSET DVO_PC_VERSION=<10.0.0_10.1.0_or_10.2.0>SET INFA_HOME=C:\Informatica\9.6.1\clients\PowerCenterClientset DV_CONFIG_DIR=C:\users\<username>\DataValidatorcd\c:\Program Files(x86)\Informatica10.0\DVO\DVOClient.exe
Multiple PowerCenter Versions 43
C h a p t e r 5
Upgrade Data Validation OptionThis chapter includes the following topics:
• Upgrade Data Validation Option Overview, 44
• Upgrade Data Validation Option, 45
• Update Informatica Authentication Configuration , 45
Upgrade Data Validation Option OverviewYou can upgrade Data Validation Option from multiple prior versions. If the product version that is currently installed cannot be upgraded to the current version of Data Validation Option, you must first upgrade to a supported version, and then upgrade to the current version.
To determine the product version that is currently installed, click Help > About in the Data Validation Client.
You can upgrade directly from Data Validation Option versions 9.6.0 and 10.0 to Data Validation Option 10.2. If you are on a previous version, you must first upgrade to 9.6.0 before you can upgrade to version 10.2.
After you upgrade Data Validation Option, if you use Informatica authentication, you can run the UpdateInformaticaAuthenticationConfiguration Data Validation command to connect to the domain.
After you upgrade, you can install the latest Data Validation Option reports in the standalone JasperReports Server. If you install the latest reports, you must install them in a different folder in the standalone JasperReports Server. Do not overwrite the existing reports.
Jasper Reports
Effective in PowerCenter version 9.6.1 HotFix 4, Informatica deprecated the Reporting and Dashboards Service. Informatica will drop support for the Reporting and Dashboards Service in a future release.
If the Reporting and Dashboards Service was available before you upgraded to PowerCenter version 9.6.1 HotFix 4 or later, you can continue to use the Reporting and Dashboards Service. Informatica recommends that you begin using a third-party reporting tool before they drop support. If you used JasperReports to create reports, you can purchase a license from JasperSoft to continue running the reports when Informatica drops support.
If you install PowerCenter version 9.6.1 HotFix 4, you cannot create a Reporting and Dashboards Service or JasperReports Server. You must use a third-party reporting tool to run PowerCenter reports. You can download and install your own version of the recommended JasperReports Server to run Data Validation reports.
For information about the PowerCenter Reports, see the Informatica PowerCenter Using PowerCenter Reports Guide. For information about the PowerCenter repository views, see the Informatica PowerCenter Repository Guide.
44
Upgrade Data Validation OptionYou can upgrade from Data Validation Option version 9.6.0 or 10.0. If you are on a previous version, you must first upgrade to Data Validation Option 9.6.0 before you can upgrade to version 10.2.
1. Back up the database of the Data Validation Option repository.
2. Uninstall Data Validation Option.
3. Install Data Validation Option.
4. Run the following DVOCmd command to upgrade the Data Validation Option repository:
DVOCmd UpgradeRepository [--confdir CONFDIR] Specify the configuration directory if you have multiple Data Validation Option repositories on a client machine. If you have one Data Validation Option repository on a client machine and have not changed the configuration directory, you do not need to specify this option.
If you upgrade multiple Data Validation Clients that connect to the same Data Validation Option repository, upgrade the Data Validation Option repository one time.
5. If authentication was enabled in Data Validation Option version 9.6.0, and you access a domain version 9.5.1 or earlier, you must run the DVOCmd UpdateInformaticaAuthenticationConfiguration command to change the port to HttpPort.
6. Configure the following environment variables:
• DV_CONFIG_DIR. Set to the full path of the new user configuration directory.
• INFA_HOME. To change the PowerCenter installation associated with Data Validation Option, reset the INFA_HOME environment variable on the Data Validation Client to the location of the domains.infa file. The domains.infa file is available in the following location: <Informatica Client installation directory>\clients\PowerCenterClient\.
• DVO_PC960_MODE. If you use Informatica authentication with version 9.6.0 to 9.6.x or if the target repository for Data Validation Option is in an Informatica domain of version 9.6.0 to 9.6.x, set the DVO_PC960_MODE environment variable to true.
• DVO_PC_VERSION. If you use Informatica authentication with version 10.0, set 10.0.0 as the value for the environment variable. If you use Informatica authentication from version 10.1 through 10.1.1 HotFix 2, set 10.1.0 as the value for the environment variable. If you use Informatica authentication with version 10.2, set 10.2.0 as the value for the environment variable.
7. Start the Data Validation Client.
Update Informatica Authentication ConfigurationAfter you upgrade, if you use Informatica authentication, you can run the UpdateInformaticaAuthenticationConfiguration Data Validation command to connect to the domain.
Upgrade Data Validation Option 45
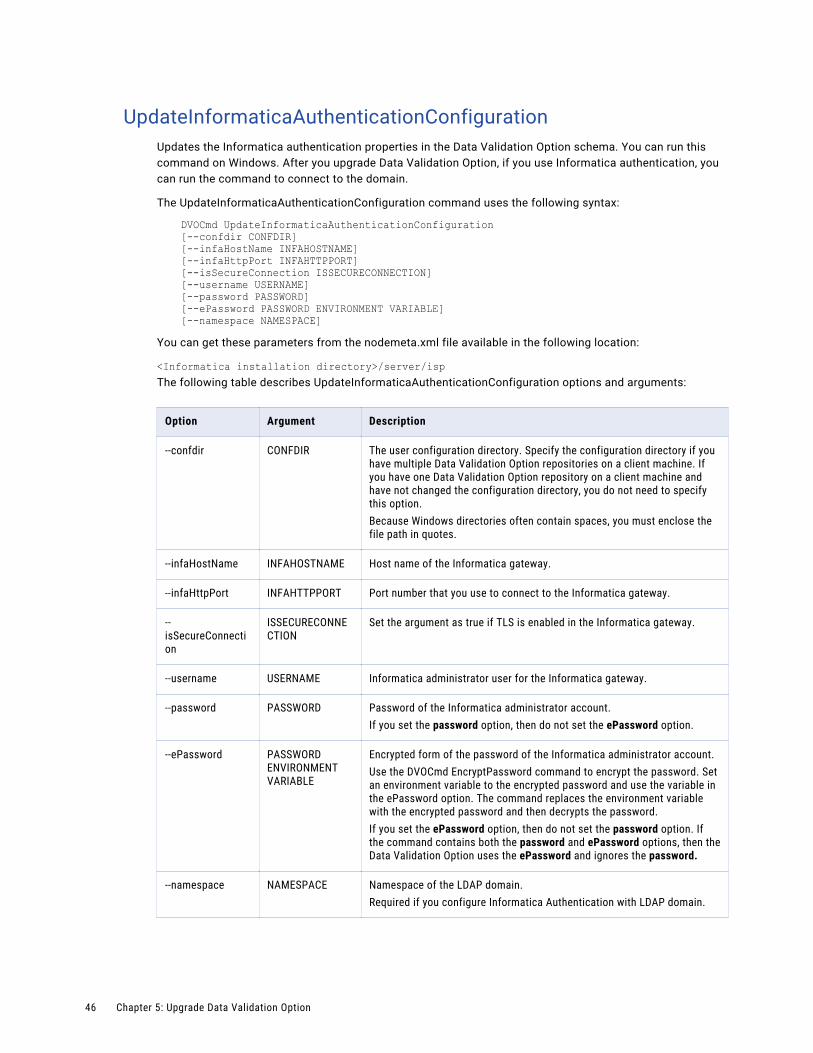
UpdateInformaticaAuthenticationConfigurationUpdates the Informatica authentication properties in the Data Validation Option schema. You can run this command on Windows. After you upgrade Data Validation Option, if you use Informatica authentication, you can run the command to connect to the domain.
The UpdateInformaticaAuthenticationConfiguration command uses the following syntax:
DVOCmd UpdateInformaticaAuthenticationConfiguration [--confdir CONFDIR] [--infaHostName INFAHOSTNAME] [--infaHttpPort INFAHTTPPORT] [--isSecureConnection ISSECURECONNECTION] [--username USERNAME] [--password PASSWORD][--ePassword PASSWORD ENVIRONMENT VARIABLE][--namespace NAMESPACE]
You can get these parameters from the nodemeta.xml file available in the following location:
<Informatica installation directory>/server/ispThe following table describes UpdateInformaticaAuthenticationConfiguration options and arguments:
Option Argument Description
--confdir CONFDIR The user configuration directory. Specify the configuration directory if you have multiple Data Validation Option repositories on a client machine. If you have one Data Validation Option repository on a client machine and have not changed the configuration directory, you do not need to specify this option.Because Windows directories often contain spaces, you must enclose the file path in quotes.
--infaHostName INFAHOSTNAME Host name of the Informatica gateway.
--infaHttpPort INFAHTTPPORT Port number that you use to connect to the Informatica gateway.
--isSecureConnection
ISSECURECONNECTION
Set the argument as true if TLS is enabled in the Informatica gateway.
--username USERNAME Informatica administrator user for the Informatica gateway.
--password PASSWORD Password of the Informatica administrator account.If you set the password option, then do not set the ePassword option.
--ePassword PASSWORD ENVIRONMENT VARIABLE
Encrypted form of the password of the Informatica administrator account.Use the DVOCmd EncryptPassword command to encrypt the password. Set an environment variable to the encrypted password and use the variable in the ePassword option. The command replaces the environment variable with the encrypted password and then decrypts the password.If you set the ePassword option, then do not set the password option. If the command contains both the password and ePassword options, then the Data Validation Option uses the ePassword and ignores the password.
--namespace NAMESPACE Namespace of the LDAP domain.Required if you configure Informatica Authentication with LDAP domain.
46 Chapter 5: Upgrade Data Validation Option
C h a p t e r 6
Install DVOcmd on UNIXThis chapter includes the following topics:
• Install DVOCmd on UNIX Overview, 47
• Prepare to Install DVOCmd on UNIX, 48
• Step 1. Extract the DVOCmd Files, 48
• Step 2. Prepare Other DVOCmd Files, 48
• Step 3. Configure Environment Variables, 49
• Step 4. Configure DVOCmd for Kerberos, 50
Install DVOCmd on UNIX OverviewDVOCmd installs with Data Validation Option. You can also install DVOCmd separately on a UNIX or Linux machine. You must install DVOCmd on a node within the Informatica domain.
Perform the following tasks to install DVOCmd on UNIX:
1. Extract the DVOCmd files and create the directory structure.
2. Copy files from the Data Validation Client and the Informatica installation directory to the DVOCmd directory structure.
3. Configure environment variables.
4. If you run DVOCmd in a Kerberos environment, cache a ticket-granting ticket.
Effective in version 10.1.1, PowerCenter dropped support for HP-UX. If use Data Validation Option with PowerCenter 10.1.1, you cannot configure DVOCmd on HP-UX. For more information about the UNIX versions that your version of PowerCenter supports, see the Product Availability Matrix on the Informatica Customer Portal: https://communities.informatica.com/community/my-support/tools/product-availability-matrices .
47
Prepare to Install DVOCmd on UNIXBefore you install DVOCmd on UNIX, you must perform prerequisite tasks on the UNIX machine, such as configuring PowerCenter for Data Validation Option.
Before you install DVOCmd on UNIX, perform the following tasks:
• If you installed a previous version of DVOCmd, delete the DVOCmd installation folder before you install DVOCmd.
• If you connect to more than one domain from the PowerCenter Client copy the domains.infa file from the PowerCenter Client installation directory to the following directory on the UNIX machine: /home/<user>/Informatica/<version>.
Step 1. Extract the DVOCmd FilesThe installer files are compressed and distributed as a .tar file.
You must install DVOCmd on a machine that hosts a node in the Informatica domain.
To unzip the .tar file on Solaris, use GNU Tar. You can download GNU Tar from the following website: http://www.gnu.org/software/tar/
1. Log in as a user with permission to untar the DVOCmd files.
2. Use binary mode to transfer the tar file to a machine that hosts an Informatic domain node through FTP.
3. From the command line, unzip or untar the DVOCmd package to a directory, such as the home directory.
For example, you might run the following command: cd $HOME tar -xvf install-dvocmd-<version>.tarThis command creates the installation directory structure and extracts files to the directory.
4. To convert the text files to a UNIX format, run the following command from the DVOCmd installation directory: $HOME/DVO/DVOCmd dos2unix DVOCmd
Step 2. Prepare Other DVOCmd FilesAfter you extract the installer files, you need to copy files from the Informatica installation directory to the DVOCmd installation directory. You also need to create a directory for the Data Validation properties file and copy DVOConfig.properties from the client machine.
1. Copy the jlmapi.jar file from the following directory: $INFA_HOME/server/bin/javalib/jlmapi.jar to the following directory: <DVOCmd installation directory>/lib
2. Copy the locale files from the following directory: $INFA_HOME/server/bin
pm_KAMMSG_PC_EN.respm_KAMMSG_PC_JA.respm_S_EN.res
48 Chapter 6: Install DVOcmd on UNIX
pm_S_JA.respmlocale.bin
to the following directory: <DVOCmd installation directory>/lib/pclib_<version>3. Create the following directory: $HOME/.config/DataValidator 4. Copy the DVOConfig.properties file from the Data Validation Client machine to the following directory:
$HOME/ .config/DataValidator.
Step 3. Configure Environment VariablesInformatica uses environment variables to store configuration information when it runs the application services and connects to the clients. Configure the environment variables to meet the Data Validation Option requirements.
Log in with the system user account you used to install Informatica.
Set the following environment variables on the UNIX or Linux machine:JRE
Set to the directory where JRE is installed with Informatica Services. For example, specify $INFA_HOME/server/java/jre/bin.
INFA_DOMAINS_FILE
Set to the path and file name of the domains.infa file. For example, specify /home/<user>/Informatica/<version>/domains.infa.
PC_CLIENT_INSTALL_PATH
Set to the installation path. For example, specify $INFA_HOME/server/bin.
PATH
Add the following directories to the PATH environment variable: $INFA_HOME/server/bin and $JRE/bin. If you are using a version of PowerCenter earlier than 9.6.0, add the JAVA_HOME/bin directory.
LD_LIBRARY_PATH
If you run DVOCmd on Linux or Solaris, verify that LD_LIBRARY_PATH includes the following path: $INFA_HOME/server/bin.
LIBPATH
If you run DVOCmd on AIX, verify that LIBPATH includes the following path: $INFA_HOME/server/bin.
SHLIB_PATH
If you run DVOCmd on HP-UX, verify that SHLIB_PATH includes the following path: $INFA_HOME/server/bin.
Note: Effective in version 10.1.1, PowerCenter dropped support for HP-UX. If use Data Validation Option with PowerCenter 10.1.1, you cannot configure DVOCmd on HP-UX.
DVO_PC960_MODE
If you are using Informatica authentication with version 9.6.0 or later, or if the target repository for Data Validation Option is in an Informatica domain of version 9.6.0 or later, set the DVO_PC960_MODE environment variable to true.
Step 3. Configure Environment Variables 49

DVO_PC_VERSION
If you use Informatica authentication with version 10.0, set 10.0.0 as the value for the environment variable. If you use Informatica authentication from version 10.1 through 10.1.1 HotFix 2, set 10.1.0 as the value for the environment variable. If you use Informatica authentication with version 10.2, set 10.2.0 as the value for the environment variable.
DV_CONFIG_DIR
Set to the directory where you copied the DVConfig.properties file. Specify the full path of the file, such as $HOME/ .config/DataValidator/DVConfig.properties.
If the domain uses Kerberos authentication in a version 9.6.0 or later domain, configure the following environment variables:INFA_TRUSTSTORE
If you enable secure communication, set the INFA_TRUSTSTORE variable with the directory that contains the truststore files for the SSL certificates. The directory must contain truststore files named infa_truststore.jks and infa_truststore.pem.
You must set the INFA_TRUSTSTORE variable if you use the default SSL certificate provided by Informatica or a certificate that you provide.
INFA_TRUSTSTORE_PASSWORD
If you enable secure communication for the domain and you specify the SSL certificate to use, set the INFA_TRUSTSTORE_PASSWORD variable with the password for the infa_truststore.jks that contains the SSL certificate. The password must be encrypted. Use the command line program pmpasswd to encrypt the password.
KRB5_CONFIG
Use the KRB5_CONFIG environment variable to store the path and file name of the Kerberos configuration file. The name of the Kerberos configuration file is krb5.conf. You must set the KRB5_CONFIG environment variable on each machine that hosts an Informatica client.
Set the variable to the following value: $INFA_HOME\services\shared\security\krb5.conf
Step 4. Configure DVOCmd for KerberosIf you are running Data Validation Option in a Kerberos environment, cache a ticket-granting ticket for the user on the Data Validation Option host.
1. Run the following command: kinit –f <username> where username is the Active Directory user name of the user.
The kinit command prompts you for the Active Directory password of the user.
2. To verify that the kinit command has cached the ticket, run the following command: klist.
For example, to run the RunTests command from UNIX in a Kerberos domain, enter the following commands in sequence:
kinit -f <username>./DVOCmd RunTests <External ID> --namespace <security domain name>
50 Chapter 6: Install DVOcmd on UNIX

A p p e n d i x A
Installation and Configuration Checklist
This appendix includes the following topics:
• Installation and Configuration Checklist Overview, 51
• Prepare to Install Data Validation Option, 51
• Install Data Validation Option, 52
• Configure Data Validation Option, 52
• Install DVOCmd on UNIX, 52
Installation and Configuration Checklist OverviewThe installation and configuration checklist summarizes the tasks that you must perform to complete an installation.
Prepare to Install Data Validation OptionTo prepare for an installation, perform the following tasks:
Verify Informatica services requirements. Verify that application services are running in the domain.
Verify the system requirements. Verify that the PowerCenter Client machine meets the following requirements:
•Minimum system requirements
•PowerCenter version requirements
•Permission requirements
Prepare the Data Validation Option repository database. Perform the following tasks to set up the repository database:
•Set up a database user account for the repository database.
•Verify the database requirements for the database that you use.
51
Configure associated PowerCenter users. Each Data Validation Option user is associated with a PowerCenter user.
Record information that you will need when you configure Data Validation Option. Record information about the repository, the domain, user authentication, and JasperReports.
Install Data Validation OptionPerform the following tasks associated with the installation:
Read the Release Notes.
Verify the license key.
Extract the installer files.
Perform the installation in graphical mode or in silent mode.
Configure Data Validation OptionTo complete the configuration of Data Validation Option, perform the following tasks:
Configure the PowerCenter Integration Service. Copy the dvoct.jar file to the PowerCenter Integration Service machine and configure the location of the file in the Administrator tool.
Configure PowerCenter Client properties. Perform the following tasks in the PowerCenter Client:
•Create a target folder in the Repository Manager to store data validation metadata.
•Create a connection in the Workflow Manager to the Data Validation Option repository.
Configure Data Validation Client preferences. Configure the following global settings in the Data Validation Client:
•Create the Data Validation repository.
•Configure mapping properties.
•Enable authentication.
•Configure JasperReports properties.
Add the PowerCenter repository to the Data Validation Client.
Configure environment variables.
Install DVOCmd on UNIXYou can also DVOCmd separately on a UNIX or Linux machine. You must install DVOCmd on a node within the Informatica domain.
52 Appendix A: Installation and Configuration Checklist
Perform the following tasks to install DVOCmd on a UNIX or Linux machine:
Complete pre-installation tasks. Perform the following pre-installation tasks:
•Uninstall any previous version of DVOCmd.
• If you connect to more than one domain from the PowerCenter Client, copy the domains.infa file to the UNIX machine.
Extract the DVOCmd files and convert the files to a UNIX format.
Prepare other DVOCmd file:
•Copy other files to the DVOCmd installation directory.
•Create a directory for the configuration file, and copy DVOConfig.properties to that directory.
Configure environment variables.
If you are running Data Validation Option in a Kerberos environment, configure Kerberos.
Install DVOCmd on UNIX 53

I n d e x
AAuthentication
update configuration at command line 46
Bbatch file
multiple PowerCenter instances 43multiple users 41
batch files configuring for multiple environments 40
CCreateUserConfig
command 39
DData Validation Option repository
creating 21database connection 22mapping properties, configuring 25multiple instances 42
database connection Data Validation Option repository 22
DVO repository requirements Microsoft SQL Server 10
DVOCmd CreateUserConfig command 39LinkDVOUsersToInformatica command 24UpdateInformaticaAuthenticationConfiguration command 46
Iinstallation
PowerCenter version requirements 9in graphical mode 16in silent mode 17minimum system requirements 9permission requirements 9upgrading from version 9.6.0 45
Llicense
specifying 21LinkDVOUsersToInformatica
command 24
Mmapping properties
configuring 25Metadata Manager
configuring 21Microsoft SQL Server
DVO repository requirements 10minimum system requirements
installation 9multiple users
configuring 41
OOracle Advance Security (ASO)
requirements 10
PPowerCenter repository
adding 31PowerCenter users
creating 11pre-install
record information 12
Rrepositories
PowerCenter, adding 31repository database
Oracle ASO 10
Ttable-pair tests
troubleshooting 29
UUpdateInformaticaAuthenticationConfiguration
command 46user configuration directory
creating at the command line 39users
creating 11linking 24
54


