+ All Categories
Home > Documents > Injecting Blockchain Calls with the Soot Framework and ...

Injecting Blockchain Calls with the Soot Framework and ...

Date post: 22-Jan-2022
Category:
Upload: others
View: 1 times
Download: 0 times
Share this document with a friend
55
Injecting Blockchain Calls with the Soot Framework and APKTool Documentation Contents 1 Terminology 3 2 Purpose of the documentation 3 3 Environment Used 4 4 Setting up Ganache 4 4.1 Installation ............................. 5 4.2 Running Ganache .......................... 5 4.3 Setting up the private Ethereum blockchain environment with Ganache ............................... 6 5 Remix 8 5.1 Setting up the Ethereum Remix Integrated Development Environ- ment (IDE) ............................. 8 5.2 Creating our Smart Contract using Remix ............. 10 5.3 Connecting Remix to the Ethereum Blockchain Environment . . . 11 5.4 Deploying the smart contract using Remix ............. 12 6 Android Application Setup 14 6.1 Installing Android Studio ...................... 14 6.2 Setting up the Android Studio Environment for using the Soot framework .............................. 15 6.2.1 Android AVD Manager Setup ............................... 15 1
Transcript

Injecting Blockchain Calls with the SootFramework and APKTool Documentation

Contents1 Terminology 3

2 Purpose of the documentation 3

3 Environment Used 4

4 Setting up Ganache 44.1 Installation . . . . . . . . . . . . . . . . . . . . . . . . . . . . . 54.2 Running Ganache . . . . . . . . . . . . . . . . . . . . . . . . . . 54.3 Setting up the private Ethereum blockchain environment with

Ganache . . . . . . . . . . . . . . . . . . . . . . . . . . . . . . . 6

5 Remix 85.1 Setting up the Ethereum Remix Integrated Development Environ-

ment (IDE) . . . . . . . . . . . . . . . . . . . . . . . . . . . . . 85.2 Creating our Smart Contract using Remix . . . . . . . . . . . . . 105.3 Connecting Remix to the Ethereum Blockchain Environment . . . 115.4 Deploying the smart contract using Remix . . . . . . . . . . . . . 12

6 Android Application Setup 146.1 Installing Android Studio . . . . . . . . . . . . . . . . . . . . . . 146.2 Setting up the Android Studio Environment for using the Soot

framework . . . . . . . . . . . . . . . . . . . . . . . . . . . . . . 156.2.1 Android AVD Manager Setup

. . . . . . . . . . . . . . . . . . . . . . . . . . . . . . . 15

1

6.3 Android Project Setup . . . . . . . . . . . . . . . . . . . . . . . . 176.3.1 Gradle Setup

. . . . . . . . . . . . . . . . . . . . . . . . . . . . . . . 186.3.2 Android Manifest File Setup

. . . . . . . . . . . . . . . . . . . . . . . . . . . . . . . 216.3.3 MainActivity File Setup

. . . . . . . . . . . . . . . . . . . . . . . . . . . . . . . 226.3.4 Generating and including the Java wrapper class in the

Android Studio project. . . . . . . . . . . . . . . . . . . . . . . . . . . . . . . 24

7 Blockchain Injection Using Compilers 257.1 Soot Compiler Framework . . . . . . . . . . . . . . . . . . . . . 257.2 Jimple Code . . . . . . . . . . . . . . . . . . . . . . . . . . . . . 267.3 Injecting Blockchain Calls into Android Applications . . . . . . . 32

7.3.1 Setting up the Eclipse Workspace and including Soot . . . 337.4 Including Soot in the Eclipse Project . . . . . . . . . . . . . . . . 36

7.4.1 Injecting our Blockchain Call using Eclipse. . . . . . . . . . . . . . . . . . . . . . . . . . . . . . . 37

7.4.2 Running Eclipse Example . . . . . . . . . . . . . . . . . 457.5 Signing our generated APK . . . . . . . . . . . . . . . . . . . . . 457.6 Installing the APK on the phone emulator . . . . . . . . . . . . . 457.7 Running the Private Blockchian and getting everything working . 467.8 Injecting blockchain code into Android applications using APKTool 47

7.8.1 Smali Code . . . . . . . . . . . . . . . . . . . . . . . . . 477.8.2 Injecting Blockchain Calls into Android Applications us-

ing APKTool . . . . . . . . . . . . . . . . . . . . . . . . 487.8.3 Installing the Generated APK file . . . . . . . . . . . . . 54

2

1 Terminology

Term Definitioncompiler A program that translates statements written in a source programming language and into machine language, object code or assembly.decompiler A program that translates machine language, object code or assembly into a high level language such Java.bytecode A low-level representation of program code that has been compiled. It can closely resemble assembly language.APK The Android Package Kit is used to distribute and for the subsequent execution of an Android application. It is similar to the exe format in Microsoft Windows.code injection The process of injecting statements into an application at a specific location without disturbing the flow of the application code.soot A compiler framework that is able to decompile and compile Java code with the capability of analysing and instrumenting Java code.instrumentation Refers to the modification and analysis of a programming language through the use of compiler technology.jimple An intermediate representation of Java code that Soot generates as output.APKTool A compiler framework that is able to simply decompile and compile Java code.smali An intermediate representation of Java code that APKTool generates as output.blockchain A peer-to-peer network that allows for the sharing of data among a vast number of peers [1]. All data stored on the blockchain is immutable.Ethereumblockchain

A blockchain environment that allows the use of smart contracts.

smart contract A contract with written rules and terms allowing for controlling the storage, sharing, and modification of data.Ganache A tool used for creating an Ethereum blockchain environment.solidity A smart contract object-oriented programming language that was developed by Ethereum.Remix Ethereum’s tool that helps developers program smart contracts. It enables smart contract developers to connect and push smart contracts to the Ethereum blockchain.DApps This refers to the decentralized, resilient, transparent, and incentivised applications that reside on blockchain infrastructures. These applications are supposedly less prone to errors.

2 Purpose of the documentationThis documentation is about how to set up the APKTool and Soot frameworkcompiler environment. Also, it is about how to inject blockchain calls into anAndroid application using APKTool and the Soot framework. We discuss how toset up the Ethereum private blockchain environment.

Figure 1 illustrates the process of injecting a blockchain call into an Androidapplication. Remix was used to connect to Ganache. Ganache is the privateblockchain environment that contains our smart contract. Remix was used to con-nect to Ganache and send the smart contract to Ganache. Then Soot/APKToolwas utilized to inject the blockchain call into the test application. The Androidtest application already had the API installed to eliminate some complexity. TheAndroid application when installed and run on the Android phone emulator sendsthe data to Ganache through the Web3j API. This might appear to be simple, butin reality it is not and becomes very time consuming.

3

Create Test App Soot/APKTool DecompileAndroid App Soot/APKTool Injects

Blockchain Call

Decompiled App

App Executes with

Blockchain call

Recom

piledA

pp

Remix/Ganache

Blockchain updated

Blockchain Done

GanacheBlockchain Updated

Figure 1: Overview of code injection

3 Environment UsedThis documentation is intended to be followed using Linux operating systems.We used Ubuntu 20.0.4 LTS because of the ease of use and reliability that thedistribution provides. Also, we have installed openjdk version 11.0.7. This is theversion of Java that is compatible with the Soot framework.

4 Setting up GanacheGanache is a tool that allows the generation of the private blockchain environment.Ganache allows an effortless way of specifying the blockchain accounts and othersettings for the private blockchain environment. Without Ganache, it would benearly impossible to set up a private Ethereum blockchain environment because acommand-line tool called geth would be required to set up a private blockchain.The geth command-line tool is very tricky to set up and to set the correct inputparameters.

4

4.1 InstallationGanache can be downloaded from https://www.trufflesuite.com/ganache.

4.2 Running GanacheTo run Ganache, navigate to the folder where the AppImage file is at. AnAppImage file is a compressed image with all the dependencies and librariesneeded to run the desired software.

The first step is to make the AppImage an executable. This can be accomplishedin Linux by making sure to make the file an executable.

To make a file executable in Linux:

1. right click the file

2. select properties

3. Navigate to the permissions and then select the check-box that says Allowexecuting file as program

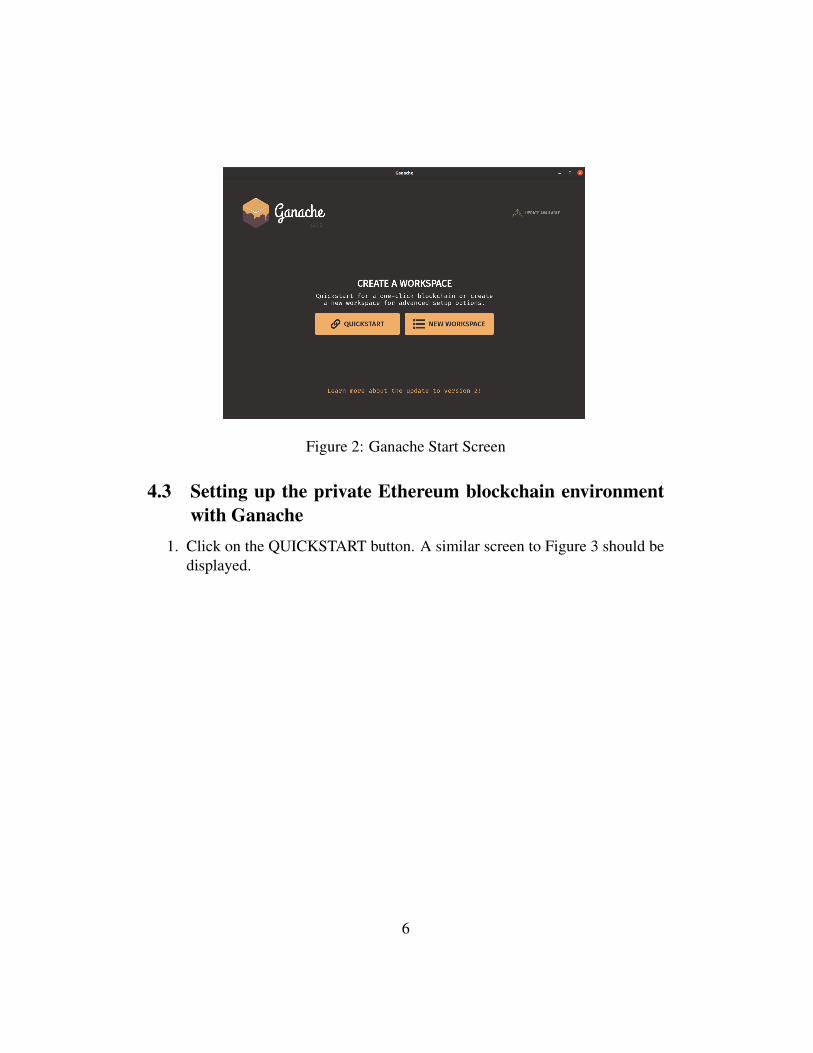
Now you should be able to click on the file to run Ganache. A similar screen,as shown in Figure 2 will be presented.

5

Figure 2: Ganache Start Screen

4.3 Setting up the private Ethereum blockchain environmentwith Ganache

1. Click on the QUICKSTART button. A similar screen to Figure 3 should bedisplayed.

6

Figure 3: Ganache Quickstart Screen

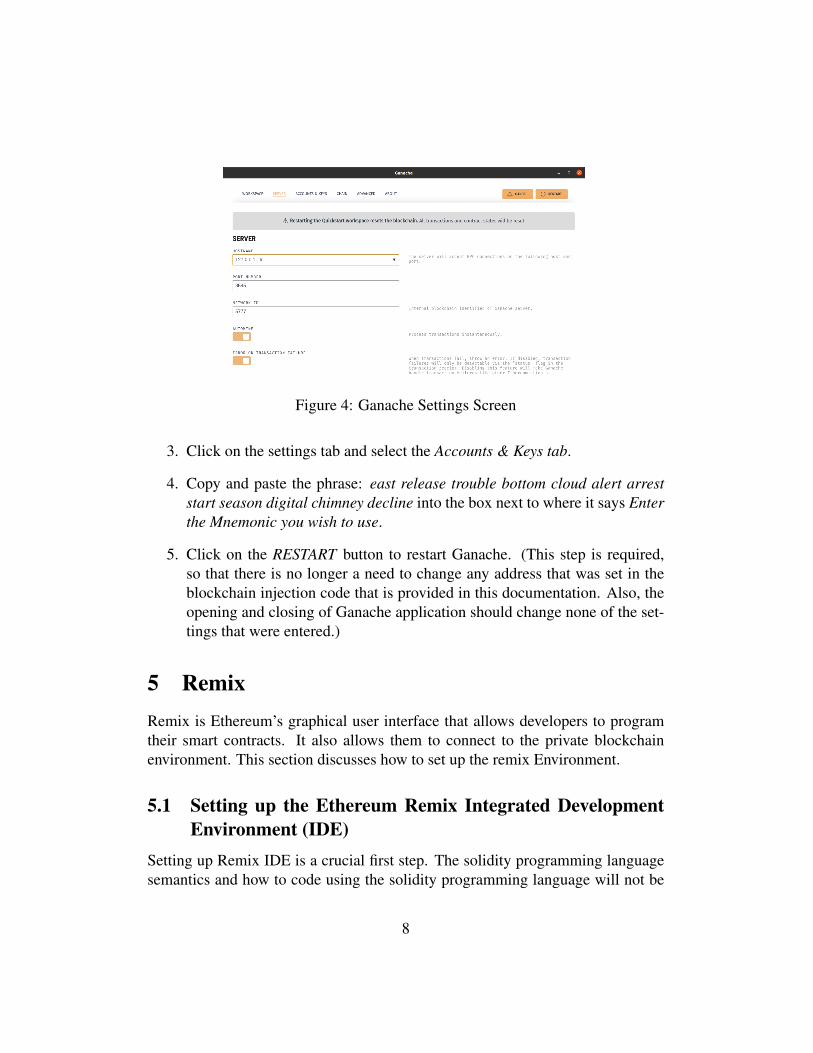
2. Next, click on the button, then click on the Server tab. Be sure toduplicate the settings as displayed in Figure 4.

7

Figure 4: Ganache Settings Screen

3. Click on the settings tab and select the Accounts & Keys tab.

4. Copy and paste the phrase: east release trouble bottom cloud alert arreststart season digital chimney decline into the box next to where it says Enterthe Mnemonic you wish to use.

5. Click on the RESTART button to restart Ganache. (This step is required,so that there is no longer a need to change any address that was set in theblockchain injection code that is provided in this documentation. Also, theopening and closing of Ganache application should change none of the set-tings that were entered.)

5 RemixRemix is Ethereum’s graphical user interface that allows developers to programtheir smart contracts. It also allows them to connect to the private blockchainenvironment. This section discusses how to set up the remix Environment.

5.1 Setting up the Ethereum Remix Integrated DevelopmentEnvironment (IDE)

Setting up Remix IDE is a crucial first step. The solidity programming languagesemantics and how to code using the solidity programming language will not be

8

discussed in this documentation. There are plenty of useful resources that explainthe programming aspect. The main focus is on how to set up and get started withthe Remix IDE.

Here are the steps:

1. Open either your Chrome or Firefox web browser and navigating to http://remix.ethereum.org/. The image shown in Figure 5 will then bedisplayed.

2. Click on the button Solidity located under Environments.

Notice on the left-hand side that the ribbon has included more click-ableoptions.

3. Set the compiler version to 0.5.15+commit.6a57276f .

The compiler is set to 0.5.15 version because it is specific to the syntax thatthe solidity code is referencing.

Figure 5: Main Screen

4. Click on the icon located on the left side ribbon. Then the screen, asshown in Figure 6, will be presented. Also, the same example files shouldbe present, but do not worry if you don’t have these files. We will not beusing them.

9

Figure 6: File Explorer Screen

5.2 Creating our Smart Contract using RemixIt is now time to create our smart contract. Here are the steps:

1. create a new file by clicking on the button located above the file namedStorage.sol.

2. name your file "Hello.sol" and click OK.

3. Copy and paste the code from Listing 1 into the empty file that was created.

4. Hit the buttons ctrl + s simultaneously to save the file.

This should trigger the compiler to compile automatically.If not just be sure to compile the file manually. If compiled correctly, you

would see on the left side ribbon.

1 pragma solidity >=0.5.15;2

3 contract ApplicationContract{4

5 string Name ="";6

7 function SetName(string memory statedata) public{8 Name = statedata;9 }

10

11 function Hello()public view returns(string memory){

10

12 return Name;13 }14 }

Listing 1: Hello World Solidity Code

5.3 Connecting Remix to the Ethereum Blockchain Environ-ment

Now it is time to connect Remix to our private Ethereum blockchain environment.This is accomplished by:

1. Click on the button which should provide a screen similar to Figure 7.

Figure 7: Remix Deploy Screen

2. Select Web3 Provider from the Environment drop-down menu.

3. Then a screen as displayed in Figure 8 will appear. Click the OK button.

11

Remix should now be connected.If you get the error, Cannot get account list: Error: Invalid JSON RPC response:".The error is saying it can not connect to the private blockchain.The solution to this problem is to make sure Ganache is running and thatGnache is set to your local-host IP.

Figure 8: Remix Deploy Options

5.4 Deploying the smart contract using RemixNow lets deploy our smart contract to the Ethereum Private blockchain.

Deploy the smart contract by clicking on the button.Once completed, a screen similar to Figure 9 will be displayed.

12

Figure 9: Remix Deployed Smart Contract

13

If the button is pressed, a screen similar to Figure 10 will be displayed. Itis possible to directly interact with the smart contract from Remix, but it is notencouraged to do this. Make sure not to enter in any data because we want to testthat the code injection works via Ganache and not via the Remix interface. If anydata was entered prematurely, there would be data present on the private Ethereumblockchain.

Figure 10: Deployed Hello Smart Contract

6 Android Application SetupHere, we will begin by discussing where you can find the information on how

to install Android Studio on your operating system. This is not a definitive guide,and the process might vary depending on if you are using Linux, Mac, or Win-dows.Since we are using Ubuntu, a Linux distro, we will be focusing mainly on instruc-tions related to the Ubuntu setup. Next, we will discuss setting up Android Studioto match our environment setup. Then we will conclude the section by discussingthe project setup.

6.1 Installing Android StudioTo install Android Studio:

1. Open your web browser and navigate tohttps://developer.android.com/studio.

2. Click on the download button and accept the agreement.

Wait for the download to complete.

3. Now open up the terminal by pressing ctrl+alt+t at the same time.

14

4. Next, issue a ls command to ensure that the .tar.gz file exists.

5. Type in tar xzf [filename].tar.gz. The command should be similar to Listing2. Note, filename is the name of the downloaded file.tar xzf android-studio-ide-193.6514223-linux.tar.gz

Listing 2: Extracting .tar.gz file

6. Next, change directories by issuing the command shown in Listing 3.cd android-studio/bin

Listing 3: Change directory to Android Folder

7. From here you can run android studio by issuing the command shown inListing 4../studio.sh

Listing 4: Running Android Studio

6.2 Setting up the Android Studio Environment for using theSoot framework

Now lets begin setting up the Android Studio environment. First we will discusshow to setup the Android AVD Manager. Then we will discuss how to setup theAndroid SDK manager.

6.2.1 Android AVD Manager Setup

1. Start up Android studio and navigate to the start screen, as shown in Figure11.

2. Click on Configure → AVDManager.

15

Figure 11: Welcome Screen

3. Click on Create Virtual Device....

4. Select Pixel 2 as shown in Figure 12, click Next, click next again, and thenclick the Finish button.

Be sure to click on the red x to close the window.

Figure 12: Phone Device

Android SDK Manager Setup

1. Click on Configure → SDKManager.

2. Select Android Pie 9.0 API level 28.

3. Click on the button to download the SDK.

4. Select Apply and then the OK button.

16

6.3 Android Project SetupNot it is time to create a new Android Studio project. This is accomplished by:

1. going to the welcome screen, as displayed in Figure 13.

Figure 13: Welcome Screen

2. Click on the Start a new Android Studio Project button.

3. Click on EmptyActivity, as displayed in Figure 14.

Figure 14: Empty Activity

4. Click the Next button and have the same configurations, as shown in Figure15.

Note, you will not have the same save location, which is OK. Just make sureyou save it to a location that you will remember for future use.

17

Figure 15: Final Configuration Settings

6.3.1 Gradle Setup

Now lets setup the Gradle Scripts for the Android Studio project. The script isused to help integrate the required libraries into our Android application withouthaving to worry about downloading the wrong library.Setup the gradle scripts by:

1. Navigate to Gradle Scripts → build.gradle(Module : app) which is in yourProject File explorer window (Figure 16).

Figure 16: Project Explorer Window

18

2. Copy the contents from Listing 5 and paste it into your ownbuild.gradle(Module:app) file.

1 apply plugin: ’com.android.application’2

3 android {4 compileSdkVersion 285 buildToolsVersion "28.0.3"6

7 defaultConfig {8 applicationId "com.example.simpleapplication"9 minSdkVersion 28

10 targetSdkVersion 2811 versionCode 112 versionName "1.0"13

14 testInstrumentationRunner "androidx.test.runner.AndroidJUnitRunner"

15 }16

17 buildTypes {18 release {19 minifyEnabled false20 proguardFiles getDefaultProguardFile(’proguard-

android-optimize.txt’), ’proguard-rules.pro’21 }22 }23 compileOptions {24 sourceCompatibility = 1.825 targetCompatibility = 1.826 }27

28 }29

30 dependencies {31 implementation fileTree(dir: ’libs’, include: [’*.jar’])32

33 implementation ’androidx.appcompat:appcompat:1.1.0’34 implementation ’androidx.constraintlayout:

constraintlayout:1.1.3’35 testImplementation ’junit:junit:4.12’36 androidTestImplementation ’androidx.test.ext:junit

:1.1.1’37 androidTestImplementation ’androidx.test.espresso:

espresso-core:3.2.0’38 // implementation fileTree(dir: ’libs’, include: [’*.aar

19

’, ’*.jar’], exclude: [])39 implementation(’org.web3j:core:4.5.6’)40 implementation(’org.slf4j:slf4j-simple:1.7.29’)41 }

Listing 5: build.gradle(Module:app)

3. Navigate to your build.gradle(Project:SimpleApplication) file and paste thecontents from Listing 6 into your build.gradle(Project:SimpleApplication) file.

1 // Top-level build file where you can add configurationoptions common to all sub-projects/modules.

2

3 buildscript {4

5 repositories {6 google()7 jcenter()8

9 }10 dependencies {11 classpath ’com.android.tools.build:gradle:3.6.2’12

13

14 // NOTE: Do not place your application dependencieshere; they belong

15 // in the individual module build.gradle files16 }17 }18

19 allprojects {20 repositories {21 google()22 jcenter()23

24 }25 }26

27 task clean(type: Delete) {28 delete rootProject.buildDir29 }

Listing 6: build.gradle(Project:SimpleApplication)

4. Re-sync your Gradle files by clicking on the Sync Now button that appearson the top of your file, as shown in Figure 17.

20

Figure 17: Gradle Sync Now

6.3.2 Android Manifest File Setup

The manifest file describes essential information about your app to the An-droid build tools, the Android operating system, and Google Play. The AndroidManifest file includes the activities, services, broadcast receivers, and contentproviders. Also, it includes the permissions that the Android application has. Itis required to set some permissions to allow our private blockchain to communi-cate with our Android application and allows for the sending of data to the privateblockchain.To set up our Manifest file we will need to:

1. Navigate to the file explorer window and go to App → Manifest →AndroidManifest.xml.

2. Open the file and copy the contents from Listing 7 and paste it into yourAndroidManifest.xml file.

1 <?xml version="1.0" encoding="utf-8"?>2 <manifest xmlns:android="http://schemas.android.com/apk/res/

android"3 package="com.example.simpleapplication">4 <uses-permission android:name="android.permission.

INTERNET" />5 <uses-permission android:name="android.permission.

ACCESS_COARSE_LOCATION" />6 <uses-permission android:name="android.permission.

ACCESS_FINE_LOCATION" />7 <uses-permission android:name="android.permission.

ACCESS_NETWORK_STATE" />8 <uses-permission android:name="android.permission.

ACCESS_WIFI_STATE" />9 <application

10 android:usesCleartextTraffic="true"11 android:allowBackup="true"12 android:icon="@mipmap/ic_launcher"13 android:label="@string/app_name"14 android:roundIcon="@mipmap/ic_launcher_round"15 android:supportsRtl="true"

21

16 android:theme="@style/AppTheme">17 <activity android:name=".MainActivity">18 <intent-filter>19 <action android:name="android.intent.action.

MAIN" />20

21 <category android:name="android.intent.category.LAUNCHER" />

22 </intent-filter>23 </activity>24 </application>25

26 </manifest>

Listing 7: Android Manifest)

6.3.3 MainActivity File Setup

To alleviate some of the complexity of the code injection we are providing youwith the MainActivity code. This will ensure that you can successfully inject thecode using APKTool and the Soot framework.To set up the MainActivity.java file, follow the next steps:

1. Navigate and open our java file by going toApp → Java → com.exmaple.simpleapplication → MainActivity.java.

2. Copy and paste the contents you see in Listing 8 into your MainActivity.javafile.Then click on the Save button, located under the File tab.

1 package com.example.simpleapplication;2

3 import android.os.Bundle;4 import android.util.Log;5

6 import androidx.appcompat.app.AppCompatActivity;7

8 import org.web3j.crypto.Credentials;9 import org.web3j.protocol.Web3j;

10 import org.web3j.protocol.http.HttpService;11 import org.web3j.tx.gas.ContractGasProvider;12

13 import java.math.BigInteger;

22

14

15 public class MainActivity extends AppCompatActivity {16 private Web3j web3j;17 Hello contract = ContractInit();18

19 @Override20 protected void onCreate(Bundle savedInstanceState) {21 super.onCreate(savedInstanceState);22 setContentView(R.layout.activity_main);23 }24 public Hello ContractInit(){25 web3j = Web3j.build(new HttpService("http

://10.0.2.2:8545"));26

27 ContractGasProvider contractGasProvider = newContractGasProvider() {

28 @Override29 public BigInteger getGasPrice(String

contractFunc) {30 return BigInteger.valueOf(3000000);31 }32 @Override33 public BigInteger getGasPrice() {34 return BigInteger.valueOf(3000000);35 }36 @Override37 public BigInteger getGasLimit(String

contractFunc) {38 return BigInteger.valueOf(3000000);39 }40 @Override41 public BigInteger getGasLimit() {42 return BigInteger.valueOf(3000000);43 }44 };45

46

47 Credentials credentials = Credentials.create("0x2d2c66151300672e8ec9b8c7315ef744115ff7b82f1e0b9a8bbf39452a3add28");

48 Log.d("Address",credentials.getAddress());49 Hello contract = Hello.load("0

x6B0c9E90a645e037949876dCf23523f7185A12bd",web3j,credentials, contractGasProvider);

50

23

51 return contract;52 }53 }

Listing 8: MainActivity.java file

6.3.4 Generating and including the Java wrapper class in the AndroidStudio project

Now lets setup the wrapper Java class that will allow the Android application toconnect to interact with the smart contract on the private blockchain.To setup the Java file be sure to:

1. Go to Remix and click on the .

2. Click on the button .

3. Then go into the terminal window, type in sudo apt-get install mousepad, andthen hit enter.

4. Type in sudo mousepad Hello.abi, hit enter, and do a ctrl + v to paste whatyou copied from Remix and save the file.

5. Copy the bytecode by going to Remix and click on .

6. Go back to your terminal window and type in sudo mousepad Hello.bin.

7. Hit ctrl + v to paste what you copied from Remix and save the file.

8. Type in web3j solidity generate –javaTypes -b Hello.bin -a Hello.abi -o . -p Ex-ample into our terminal window at the same location, we have our abi andbin file.

The files can be seen by typing in the ls command. This command willcreate an Example folder with our Hello.java file inside.

9. In the terminal window type in pwd to see what current working directorywe are in.

24

10. Navigate to our file explorer and go to the location where the current work-ing directory was set to.

Be sure to go into the folder and select the Hello.java file and hit ctrl + c tocopy the file.

11. Go back to Android Studio and go to app → Java →com.exmaple.simpleapplication.

12. Hit ctrl + v to paste the Hello.java file into the com.exmaple.simpleapplicationdirectory.

13. Accept all the pop-up messages.

Now the MainActivity and Hello Java file should be nested under thecom.exmaple.simpleapplication directory.

7 Blockchain Injection Using CompilersHow to inject blockchain calls using the APKTool and Soot framework will bediscussed in this section. First, we will discuss some background informationabout the Soot compiler, then we will discuss how to perform the blockchain codeinjection using the Soot compiler. Then we will go over how to install and signthe APK. Finally, we will discuss APKTool.

7.1 Soot Compiler FrameworkThe Soot framework is a Java optimization tool. But the Soot tool is now usedto analyse Android applications and instrument class files. The soot frameworkreads in Java files, Android APK files, jimple files, and jasmin files. For thisarticle, we will focus on the use of Soot to read in Android APK files (Figure18). Output from Soot consists of output Java/Android byte-code, jimple files,and jasmin files. Our focus is on APK file outputs.

25

Soot Framework

Java (bytecode and source

code up to Java 7) including

other languages that compile

to Java bytecode, e.g. Scala

Android Bytecode

Jimple intermediate representation

Jasmin, a low-level

intermediate representation

Input

Identify appropriate

Soot arguments

Start

Call-graph construction

Points-to analysis

Template-driven Intra-

procedural data-flow analysis

Template-driven Inter-procedural data-flow

analysis, in combination with heros (uses

IFDS/IDE) or Weighted Pushdown Systems

Aliasing can be resolved using

the flow-, field-, context-sensitive

demand-driven pointer analysis Boomerang

Soot Processes

Java bytecode

Android bytecode

Jimple

Jasmin

OutputTransformed Code

Figure 18: Soot features

7.2 Jimple CodeJimple is the simplified java code format that the Soot framework uses for theconstructing and deconstruction of Android applications.Now, let us discuss the structure of what the code will look like once we injectall of our blockchain calls into our Android Application. Below in Listing 9 is anexample we will be discussing. We will not be able to discuss everything exceptfor the fundamentals.

1 public class com.example.simpleapplication.MainActivity extendsandroidx.appcompat.app.AppCompatActivity

2 {3 com.example.simpleapplication.Hello contract;

26

4 private org.web3j.protocol.Web3j web3j;5

6 public void <init>()7 {8 com.example.simpleapplication.MainActivity $r0;9 com.example.simpleapplication.Hello $r1;

10

11 $r0 := @this: com.example.simpleapplication.MainActivity;12

13 specialinvoke $r0.<androidx.appcompat.app.AppCompatActivity: void <init>()>();

14

15 $r1 = virtualinvoke $r0.<com.example.simpleapplication.MainActivity: com.example.simpleapplication.HelloContractInit()>();

16

17 $r0.<com.example.simpleapplication.MainActivity: com.example.simpleapplication.Hello contract> = $r1;

18

19 return;20 }21

22 public com.example.simpleapplication.Hello ContractInit()23 {24 com.example.simpleapplication.MainActivity $r0;25 org.web3j.protocol.http.HttpService $r1;26 org.web3j.protocol.Web3j $r2;27 com.example.simpleapplication.MainActivity$1 $r3;28 org.web3j.crypto.Credentials $r4;29 java.lang.String $r5;30 com.example.simpleapplication.Hello $r6;31

32 $r0 := @this: com.example.simpleapplication.MainActivity;33

34 $r1 = new org.web3j.protocol.http.HttpService;35

36 specialinvoke $r1.<org.web3j.protocol.http.HttpService:void <init>(java.lang.String)>("http://10.0.2.2:8545");

37

38 $r2 = staticinvoke <org.web3j.protocol.Web3j: org.web3j.protocol.Web3j build(org.web3j.protocol.Web3jService)>($r1);

39

40 $r0.<com.example.simpleapplication.MainActivity: org.web3j.protocol.Web3j web3j> = $r2;

41

27

42 $r3 = new com.example.simpleapplication.MainActivity$1;43

44 specialinvoke $r3.<com.example.simpleapplication.MainActivity$1: void <init>(com.example.simpleapplication.MainActivity)>($r0);

45

46 $r4 = staticinvoke <org.web3j.crypto.Credentials: org.web3j.crypto.Credentials create(java.lang.String)>("0x2d2c66151300672e8ec9b8c7315ef744115ff7b82f1e0b9a8bbf39452a3add28");

47

48 $r5 = virtualinvoke $r4.<org.web3j.crypto.Credentials:java.lang.String getAddress()>();

49

50 staticinvoke <android.util.Log: int d(java.lang.String,java.lang.String)>("Address", $r5);

51

52 $r2 = $r0.<com.example.simpleapplication.MainActivity:org.web3j.protocol.Web3j web3j>;

53

54 $r6 = staticinvoke <com.example.simpleapplication.Hello:com.example.simpleapplication.Hello load(java.lang.String,org.web3j.protocol.Web3j,org.web3j.crypto.Credentials,org.web3j.tx.gas.ContractGasProvider)>("0x6B0c9E90a645e037949876dCf23523f7185A12bd", $r2, $r4, $r3);

55

56 return $r6;57 }58

59 protected void onCreate(android.os.Bundle)60 {61 com.example.simpleapplication.MainActivity $r0;62 android.os.Bundle $r1;63 org.web3j.protocol.core.RemoteFunctionCall $r2;64 com.example.simpleapplication.Hello $r3;65

66 $r0 := @this: com.example.simpleapplication.MainActivity;67

68 $r1 := @parameter0: android.os.Bundle;69

70 specialinvoke $r0.<androidx.appcompat.app.AppCompatActivity: void onCreate(android.os.Bundle)>($r1);

71

72 virtualinvoke $r0.<com.example.simpleapplication.MainActivity: void setContentView(int)>(2131361820);

28

73

74 $r3 = $r0.<com.example.simpleapplication.MainActivity:com.example.simpleapplication.Hello contract>;

75

76 $r2 = virtualinvoke $r3.<com.example.simpleapplication.Hello: org.web3j.protocol.core.RemoteFunctionCall SetName(java.lang.String)>("John");

77

78 virtualinvoke $r2.<org.web3j.protocol.core.RemoteFunctionCall: java.util.concurrent.CompletableFuturesendAsync()>();

79

80 return;81 }82 }

Listing 9: Jimple Code Example

Listing 9 is an example that we will recreate using the soot Framework. Whatthis code is representing is that we have our Hello smart contract where we arecalling the function SetName. The goal is to re-create what will appear in Listing10.

1 package com.example.simpleapplication;2

3 import android.os.Bundle;4 import android.util.Log;5

6 import androidx.appcompat.app.AppCompatActivity;7

8 import org.web3j.crypto.Credentials;9 import org.web3j.protocol.Web3j;

10 import org.web3j.protocol.http.HttpService;11 import org.web3j.tx.gas.ContractGasProvider;12

13 import java.math.BigInteger;14

15 public class MainActivity extends AppCompatActivity {16 private Web3j web3j;17 Hello contract = ContractInit();18

19 @Override20 protected void onCreate(Bundle savedInstanceState) {21 super.onCreate(savedInstanceState);22 setContentView(R.layout.activity_main);23 contract.SetName("John").sendAsync();

29

24 }25 public Hello ContractInit(){26 web3j = Web3j.build(new HttpService("http

://10.0.2.2:8545"));27

28 ContractGasProvider contractGasProvider = newContractGasProvider() {

29 @Override30 public BigInteger getGasPrice(String contractFunc) {31 return BigInteger.valueOf(3000000);32 }33 @Override34 public BigInteger getGasPrice() {35 return BigInteger.valueOf(3000000);36 }37 @Override38 public BigInteger getGasLimit(String contractFunc) {39 return BigInteger.valueOf(3000000);40 }41 @Override42 public BigInteger getGasLimit() {43 return BigInteger.valueOf(3000000);44 }45 };46

47

48 Credentials credentials = Credentials.create("0x2d2c66151300672e8ec9b8c7315ef744115ff7b82f1e0b9a8bbf39452a3add28");

49 Log.d("Address",credentials.getAddress());50 Hello contract = Hello.load("0

x6B0c9E90a645e037949876dCf23523f7185A12bd",web3j, credentials, contractGasProvider);

51 return contract;52 }53 }

Listing 10: Android Studio Java Code

What we are trying to do is inject contract.SetName("John").sendAsync(); atline 23 of our MainActivity.java file located in our Android Application code.Before doing so, we must understand the structure of Android Applications andhow they are represented in jimple form.

All the methods presented in the jimple code in Listing 9 are onCreate andContractInit. The units are a little bit trickier to understand. So let us look at the

30

method OnCreate represented below in Listing 11. What we should realize is thatlines 22 to 54 are the units.

1 protected void onCreate(android.os.Bundle)2 {3 com.example.simpleapplication.MainActivity $r0;4 android.os.Bundle $r1;5 org.web3j.protocol.core.RemoteFunctionCall $r2;6 com.example.simpleapplication.Hello $r3;7

8 $r0 := @this: com.example.simpleapplication.MainActivity;9

10 $r1 := @parameter0: android.os.Bundle;11

12 specialinvoke $r0.<androidx.appcompat.app.AppCompatActivity: void onCreate(android.os.Bundle)>($r1);

13

14 virtualinvoke $r0.<com.example.simpleapplication.MainActivity: void setContentView(int)>(2131361820);

15

16 $r3 = $r0.<com.example.simpleapplication.MainActivity:com.example.simpleapplication.Hello contract>;

17

18 $r2 = virtualinvoke $r3.<com.example.simpleapplication.Hello: org.web3j.protocol.core.RemoteFunctionCall SetName(java.lang.String)>("John");

19

20 virtualinvoke $r2.<org.web3j.protocol.core.RemoteFunctionCall: java.util.concurrent.CompletableFuturesendAsync()>();

21

22 return;23 }

Listing 11: Jimple Code Example Method onCreate

Every unit will contain a statement. For example the statement $r3 =$r0.<com.example.simpleapplication.MainActivity:com.example.simpleapplication.Hellocontract> consists of a assign statement. There is also a virtualinvoke statement.This means that we are attempting to assign to $r3 the assignment statement forinitializing our smart contract call.

We also have references. The references purpose is to tellthe compiler where to look for the code that the statements ref-erence. For example if we refer back to our previous statement$r3=$r0.<com.example.simpleapplication.MainActivity:com.example.simpleapplication.Hello

31

contract> the $r0 references com.exmaple.simpleapplication.MainActivity online 8 in Listing 9. An intersting thing about jimple code is that whenyou are referencing another Java file the statement will include $r[x] =$r[x]<MainFile:SomeOtherJavaFile methodname>. Where $r[x] is a reference tothe other file location, MainFile is a reference to the current Java file, SomeOther-JavaFile is a reference to the other Java file containing the method you are tryingto inject, and methodname is the method you want to call.

Based on the previous details, notice that in jimple code, all references areinside each method and are represented by some text followed with a $r[x] where[x] represents some integer value followed by a semicolon. This is important tounderstand, especially a vital detail to keep in mind for the next section, "InjectingBlockchain Calls into Android Applications."

7.3 Injecting Blockchain Calls into Android ApplicationsIn this section we want to introduce how to inject blockchain calls using the Sootframework. The blockchain call we will be injecting is utilizing the AndroidStudio project we set-up earlier.

Generating the APK to analyze

We want to create a APK file to analyse.This is accomplished by:

1. opening up our Android Studio project and clicking on build →BuildBundle(s)/APK(s) → BuildAPK(s).

2. Once you see the message shown in Figure 19 Click on the locate button.

Figure 19: Build APK Message

3. Rename the file to SimpleApplication.apk and paste it into a new directory onyour file system.

Be sure to remember where this file was saved to and write it down. Thisfile location will be used later on by the Soot Framework.

32

7.3.1 Setting up the Eclipse Workspace and including Soot

Eclipse is a popular integrated development environment that easily enables de-velopers to generate and work with Java code. You will want to install Eclipse bygoing to https://www.eclipse.org/downloads/ or installing directly fromthe Ubuntu software store.

Now we need to set-up our new project. This is accomplished by:

1. Start Eclipse

2. Next, create a new Java project by clicking on File → New Java Project.

Then you will see a blank Java Project with an empty class Java File.

3. When the set up wizard appears, click on Java → JavaProject and thenclick Next.

4. Fill in the information as displayed in Figure 20. Note, even though I havean error message, I have presented you with a project with the same namealready existing in the current path of my Linux file system. You should beable to click next without any errors.

Figure 20: Eclipse Java Project Set-up

5. For the next screen, be sure to accept the defaults, and you should now havean empty project created.

33

6. Create a new class file by clicking on the drop-down menu for Soot → src

and then right-clicking on src and selecting new → class.

7. When the menu appears, type in the Name field HicssSootAnalysis.

This will create for you an empty Java class file.

8. Next, we will want to copy and paste the contents from Listing 12 into theJava class file we just created.

Do not worry about what the code means yet. We will explain it in detaillater.

1 import soot.Body;2 import soot.BodyTransformer;3 import soot.Local;4 import soot.PackManager;5 import soot.PatchingChain;6 import soot.RefType;7 import soot.Scene;8 import soot.SootClass;9 import soot.SootMethodRef;

10 import soot.SootResolver;11 import soot.Transform;12 import soot.Type;13 import soot.Unit;14 import soot.Value;15 import soot.VoidType;16

17

18 import java.util.*;19

20 public class HicssSootAnalysis21 {22

23 static String EntryPointApp = "com.example.simpleapplication.MainActivity";

24 static String EntryPointBlockchain = "com.example.simpleapplication.Hello";

25 static String RemoteFunctionCallWeb3J = "org.web3j.protocol.core.RemoteFunctionCall";

26 static String SendAsync = "org.web3j.protocol.core.RemoteFunctionCall: java.util.concurrent.CompletableFuture sendAsync()";

27 static Local ContractReference = null;28 static Value BlockchainContractStmt = null;

34

29

30 public static void main(String[] args)31 {32

33 PackManager.v().getPack("jtp").add(new Transform("jtp.myInstrumenter", new BodyTransformer() {

34 @Override35 protected void internalTransform(final Body body

, String phaseName, @SuppressWarnings("rawtypes") Mapoptions) {

36 final PatchingChain<Unit> units = body.getUnits();

37 IterateOverAllUnits(units, body);38 }39 }));40 soot.Main.main(args);41 }42

43 private static void IterateOverAllUnits(PatchingChain<Unit> units, Body body) {

44 String StringLastKnownUnit = "";45 int counter = 0;46 for(Iterator<Unit> UnitIterator = units.

snapshotIterator(); UnitIterator.hasNext();) {47 final Unit LastKnownUnit = UnitIterator.next();48 StringLastKnownUnit = LastKnownUnit.toString();49 }50

51 }52 public static SootMethodRef makeMethodRef(String cName,

String mName, String rType, List<String> pTypes,53 boolean isStatic) {54 SootClass sc = SootResolver.v().makeClassRef(

cName);55 Type returnType = null;56 if (rType == "") {57 returnType = VoidType.v();58 } else {59 returnType = RefType.v(rType);60 }61 List<Type> parameterTypes = new ArrayList<Type>()

;62 for (String p : pTypes) {63 parameterTypes.add(RefType.v(p));64 }

35

65 return Scene.v().makeMethodRef(sc, mName,parameterTypes, returnType, isStatic);

66 }67

68 private static Local Return_Local(Body b, String name) {69 for (Local local : b.getLocals()) {70 if (local.getType().toString().contains(name)) {71 return local;72 }73 }74 return null;75 }76

77

78 private static boolean Check_If_SetContentView_Exists(String StringLastKnownUnit) {

79 if(Contains_Match_Case(StringLastKnownUnit,EntryPointApp) && Contains_Match_Case(StringLastKnownUnit, "SetContentView")) {

80 return true;81 }else {82 return false;83 }84 }85

86

87 public static boolean Contains_Match_Case(String str,String subString) {

88 return str.toLowerCase().contains(subString.toLowerCase());

89 }90 }

Listing 12: Eclipse Java Code

7.4 Including Soot in the Eclipse ProjectNow we need to include the Soot Framework in our eclipse project. Begin by:

1. create a Maven project by following the instructions athttps://crunchify.com/how-to-convert-existing-java-project-to-maven-in-eclipse/.

2. Navigate to our pom.xml file and copy the code from listing 13 to our file.Then save the file.

36

1 <project xmlns="http://maven.apache.org/POM/4.0.0" xmlns:xsi="http://www.w3.org/2001/XMLSchema-instance"xsi:schemaLocation="http://maven.apache.org/POM/4.0.0https://maven.apache.org/xsd/maven-4.0.0.xsd">

2 <modelVersion>4.0.0</modelVersion>3 <groupId>Soot</groupId>4 <artifactId>Soot</artifactId>5 <version>0.0.1-SNAPSHOT</version>6 <build>7 <sourceDirectory>src</sourceDirectory>8 <plugins>9 <plugin>

10 <artifactId>maven-compiler-plugin</artifactId>11 <version>3.8.0</version>12 <configuration>13 <source>1.8</source>14 <target>1.8</target>15 </configuration>16 </plugin>17 </plugins>18 </build>19 <dependencies>20 <dependency>21 <groupId>ca.mcgill.sable</groupId>22 <artifactId>soot</artifactId>23 <version>4.0.0</version>24 </dependency>25 </dependencies>26 </project>

Listing 13: XML file

3.

7.4.1 Injecting our Blockchain Call using Eclipse

This section will explain how to inject the blockchain call into the Android Ap-plication.For injecting the blockchain call we will want to add the following lines as shownin Listing 14 to our HicssSootAnalysis.java file in Eclipse at line 49.

1 if(Check_If_SetContentView_Exists(StringLastKnownUnit)) {2 //ADD LOCALS

37

3 LocalGenerator l = new LocalGenerator(body);4 Local lgContractReference = l.generateLocal(

RefType.v("com.example.simpleapplication.Hello"));5 Local lgRemoteFunctionCallReference = l.

generateLocal(RefType.v("org.web3j.protocol.core.RemoteFunctionCall"));

6

7 // Create $r3 = $r0.<com.example.simpleapplication.MainActivity: com.example.simpleapplication.Hello contract>;

8 LinkedList<Value> ContractInitArgs = newLinkedList<>();

9 AssignStmt AssignStmtContract = Jimple.v().newAssignStmt(Return_Local(body, "Hello"),Jimple.v().newVirtualInvokeExpr(Return_Local(body,"MainActivity"), Scene.v().getMethod("<"+ EntryPointApp +": "+ EntryPointBlockchain+" ContractInit()>").makeRef(), ContractInitArgs));

10 units.insertAfter(AssignStmtContract,LastKnownUnit);

11 // Create $r2 = virtualinvoke $r3.<com.example.simpleapplication.Hello: org.web3j.protocol.core.RemoteFunctionCall SetName(java.lang.String)>("John");

12 LinkedList<Value> ContractPersonName = newLinkedList<>();

13 ContractPersonName.add(StringConstant.v("John"));14 AssignStmt AssignStmtContractFunc = Jimple.v().

newAssignStmt(Return_Local(body, "RemoteFunctionCall"),Jimple.v().newVirtualInvokeExpr(Return_Local(body,"Hello"), Scene.v().getMethod("<"+ EntryPointBlockchain +": "+RemoteFunctionCallWeb3J +" SetName(java.lang.String)>").makeRef(), ContractPersonName));

15 units.insertAfter(AssignStmtContractFunc,AssignStmtContract);

16 // Create virtualinvoke $r2.<org.web3j.protocol.core.RemoteFunctionCall: java.util.concurrent.CompletableFuture sendAsync()>();

17 List<String> BlockchainArgumentsForSendAsync =new LinkedList<>();

18 SootMethodRef SendAsyncMethodRef = makeMethodRef("org.web3j.protocol.core.RemoteCall","sendAsync", "java.util.concurrent.CompletableFuture",BlockchainArgumentsForSendAsync, false);

19 VirtualInvokeExpr InvokeExprSendAsync = Jimple.v().newVirtualInvokeExpr(Return_Local(body,"RemoteFunctionCall"), SendAsyncMethodRef, Collections.<Value>emptyList());

38

20 InvokeStmt InvokeStatementSendAsync = Jimple.v().newInvokeStmt(InvokeExprSendAsync);

21 units.insertAfter(InvokeStatementSendAsync, (Unit) AssignStmtContractFunc);

22 }

Listing 14: Code to Inject

After the code will look similar to Listing 15.1 import soot.Body;2 import soot.BodyTransformer;3 import soot.Local;4 import soot.PackManager;5 import soot.PatchingChain;6 import soot.RefType;7 import soot.Scene;8 import soot.SootClass;9 import soot.SootMethodRef;

10 import soot.SootResolver;11 import soot.Transform;12 import soot.Type;13 import soot.Unit;14 import soot.Value;15 import soot.VoidType;16 import soot.javaToJimple.LocalGenerator;17 import soot.jimple.AssignStmt;18 import soot.jimple.InvokeStmt;19 import soot.jimple.Jimple;20 import soot.jimple.StringConstant;21 import soot.jimple.VirtualInvokeExpr;22

23 import java.util.*;24

25 public class HicssSootAnalysis26 {27

28 static String EntryPointApp = "com.example.simpleapplication.MainActivity";

29 static String EntryPointBlockchain = "com.example.simpleapplication.Hello";

30 static String RemoteFunctionCallWeb3J = "org.web3j.protocol.core.RemoteFunctionCall";

31 static String SendAsync = "org.web3j.protocol.core.RemoteFunctionCall: java.util.concurrent.CompletableFuturesendAsync()";

32 static Local ContractReference = null;

39

33 static Value BlockchainContractStmt = null;34

35 public static void main(String[] args)36 {37

38 PackManager.v().getPack("jtp").add(new Transform("jtp.myInstrumenter", new BodyTransformer() {

39 @Override40 protected void internalTransform(final Body body,

String phaseName, @SuppressWarnings("rawtypes") Map options){

41 final PatchingChain<Unit> units = body.getUnits();

42 IterateOverAllUnits(units, body);43 }44 }));45 soot.Main.main(args);46 }47

48 private static void IterateOverAllUnits(PatchingChain<Unit>units, Body body) {

49 String StringLastKnownUnit = "";50 int counter = 0;51 for(Iterator<Unit> UnitIterator = units.snapshotIterator

(); UnitIterator.hasNext();) {52 final Unit LastKnownUnit = UnitIterator.next();53 StringLastKnownUnit = LastKnownUnit.toString();54 if(Check_If_SetContentView_Exists(StringLastKnownUnit

)) {55 //ADD LOCALS56 LocalGenerator l = new LocalGenerator(body);57 Local lgContractReference = l.generateLocal(

RefType.v("com.example.simpleapplication.Hello"));58 Local lgRemoteFunctionCallReference = l.

generateLocal(RefType.v("org.web3j.protocol.core.RemoteFunctionCall"));

59

60 // Create $r3 = $r0.<com.example.simpleapplication.MainActivity: com.example.simpleapplication.Hello contract>;

61 LinkedList<Value> ContractInitArgs = newLinkedList<>();

62 AssignStmt AssignStmtContract = Jimple.v().newAssignStmt(Return_Local(body, "Hello"),Jimple.v().newVirtualInvokeExpr(Return_Local(body,"MainActivity"), Scene

40

.v().getMethod("<"+ EntryPointApp +": "+ EntryPointBlockchain+" ContractInit()>").makeRef(), ContractInitArgs));

63 units.insertAfter(AssignStmtContract,LastKnownUnit);

64 // Create $r2 = virtualinvoke $r3.<com.example.simpleapplication.Hello: org.web3j.protocol.core.RemoteFunctionCall SetName(java.lang.String)>("John");

65 LinkedList<Value> ContractPersonName = newLinkedList<>();

66 ContractPersonName.add(StringConstant.v("John"));67 AssignStmt AssignStmtContractFunc = Jimple.v().

newAssignStmt(Return_Local(body, "RemoteFunctionCall"),Jimple.v().newVirtualInvokeExpr(Return_Local(body,"Hello"), Scene.v().getMethod("<"+ EntryPointBlockchain +": "+RemoteFunctionCallWeb3J +" SetName(java.lang.String)>").makeRef(), ContractPersonName));

68 units.insertAfter(AssignStmtContractFunc,AssignStmtContract);

69 // Create virtualinvoke $r2.<org.web3j.protocol.core.RemoteFunctionCall: java.util.concurrent.CompletableFuture sendAsync()>();

70 List<String> BlockchainArgumentsForSendAsync =new LinkedList<>();

71 SootMethodRef SendAsyncMethodRef = makeMethodRef("org.web3j.protocol.core.RemoteCall","sendAsync", "java.util.concurrent.CompletableFuture",BlockchainArgumentsForSendAsync, false);

72 VirtualInvokeExpr InvokeExprSendAsync = Jimple.v().newVirtualInvokeExpr(Return_Local(body,"RemoteFunctionCall"), SendAsyncMethodRef, Collections.<Value>emptyList());

73 InvokeStmt InvokeStatementSendAsync = Jimple.v().newInvokeStmt(InvokeExprSendAsync);

74 units.insertAfter(InvokeStatementSendAsync, (Unit) AssignStmtContractFunc);

75 }76 }77

78 }79 public static SootMethodRef makeMethodRef(String cName,

String mName, String rType, List<String> pTypes,80 boolean isStatic) {81 SootClass sc = SootResolver.v().makeClassRef(cName);82 Type returnType = null;83 if (rType == "") {84 returnType = VoidType.v();

41

85 } else {86 returnType = RefType.v(rType);87 }88 List<Type> parameterTypes = new ArrayList<Type>();89 for (String p : pTypes) {90 parameterTypes.add(RefType.v(p));91 }92 return Scene.v().makeMethodRef(sc, mName,

parameterTypes, returnType, isStatic);93 }94

95 private static Local Return_Local(Body b, String name) {96 for (Local local : b.getLocals()) {97 if (local.getType().toString().contains(name)) {98 return local;99 }

100 }101 return null;102 }103

104

105 private static boolean Check_If_SetContentView_Exists(StringStringLastKnownUnit) {

106 if(Contains_Match_Case(StringLastKnownUnit, EntryPointApp) && Contains_Match_Case(StringLastKnownUnit, "SetContentView")) {

107 return true;108 }else {109 return false;110 }111 }112

113

114 public static boolean Contains_Match_Case(String str, StringsubString) {

115 return str.toLowerCase().contains(subString.toLowerCase());

116 }117 }

Listing 15: Soot Analysis Code With Blockchain Injection Code

Now lets look at the following:1 if(Check_If_SetContentView_Exists(StringLastKnownUnit

42

)) {

Listing 16: HicssSootAnalysis Code Snippet

What is represented here is a simple function in a if condition that will look andcheck if the SetContentView has been found. We know that based off of our pre-vious Android Code that SetContentView is in our MainActivity. This eliminatesSoot ;having to know where the entry point is at.

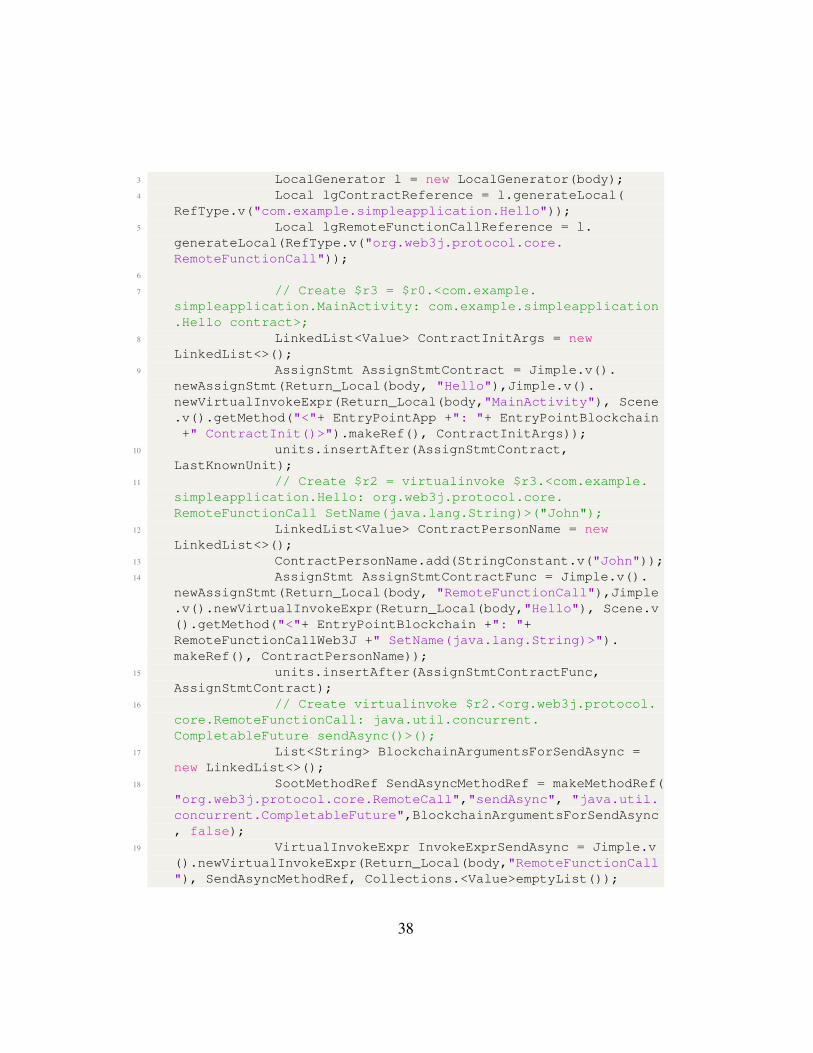
1 LocalGenerator l = new LocalGenerator(body);2 Local lgContractReference = l.generateLocal(

RefType.v("com.example.simpleapplication.Hello"));3 Local lgRemoteFunctionCallReference = l.

generateLocal(RefType.v("org.web3j.protocol.core.RemoteFunctionCall"));

Listing 17: HicssSootAnalysis Code Snippet

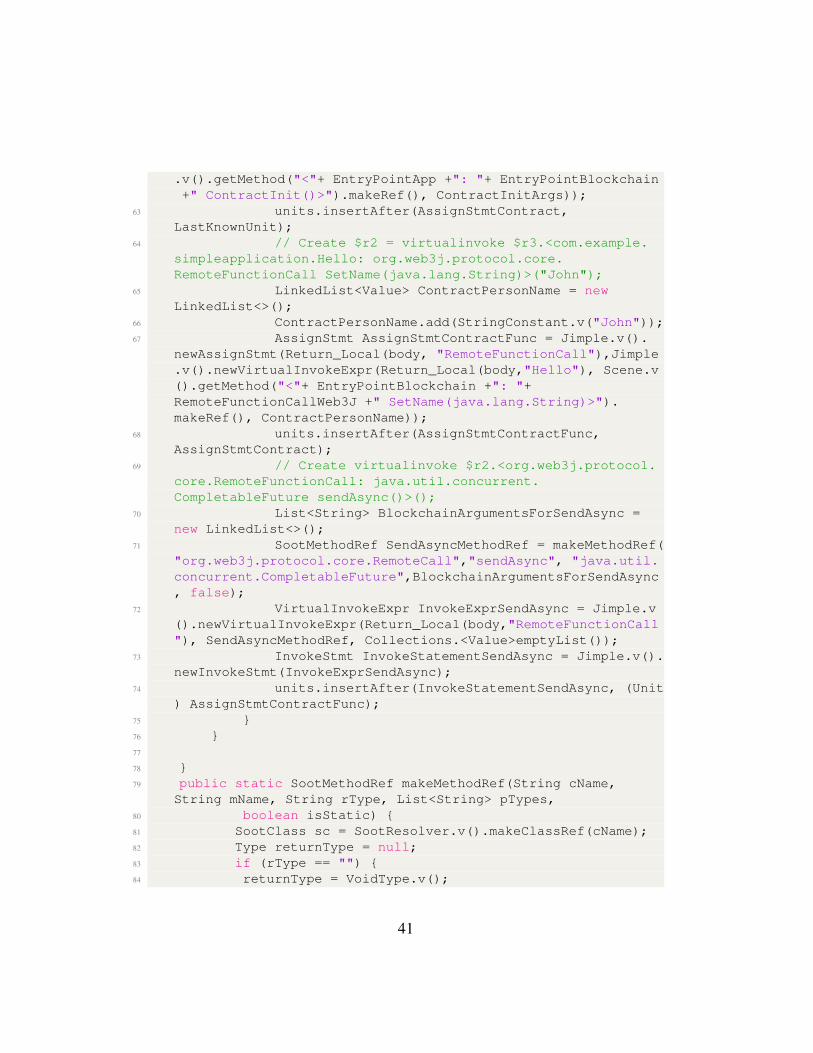
The code above is generating our locals. This is referencing our remote functioncall and the Hello smart contract Java code. The following lines are required andwithout them the injection would not work.

1 LinkedList<Value> ContractInitArgs = newLinkedList<>();

2 AssignStmt AssignStmtContract = Jimple.v().newAssignStmt(Return_Local(body, "Hello"),Jimple.v().newVirtualInvokeExpr(Return_Local(body,"MainActivity"), Scene.v().getMethod("<"+ EntryPointApp +": "+ EntryPointBlockchain+" ContractInit()>").makeRef(), ContractInitArgs));

3 units.insertAfter(AssignStmtContract,LastKnownUnit);

Listing 18: HicssSootAnalysis Code Snippet

The code above is used to generate the code$r3 = $r0.<com.example.simpleapplication.MainActivity:com.example.simpleapplication.Hello contract>. On line 2 we have to generate alinked list that will take in no parameters. Then on Line 3 we create a new as-sign statement with a virtualinvoke expression inside. Then we insert after the lastunit that was discovered by Soot.

1 LinkedList<Value> ContractPersonName = newLinkedList<>();

2 ContractPersonName.add(StringConstant.v("John"));3 AssignStmt AssignStmtContractFunc = Jimple.v().

newAssignStmt(Return_Local(body, "RemoteFunctionCall"),Jimple.v().newVirtualInvokeExpr(Return_Local(body,"Hello"), Scene.v

43

().getMethod("<"+ EntryPointBlockchain +": "+RemoteFunctionCallWeb3J +" SetName(java.lang.String)>").makeRef(), ContractPersonName));

4 units.insertAfter(AssignStmtContractFunc,AssignStmtContract);

Listing 19: Code Snippet

What we wanted to do is pass the persons name to our smart contract. We accom-plished this by passing in John into another linked list as displayed in the codeabove. Also we wanted to create another assignment statement with another vir-tualinvoke expression inside. This resulted in the following jimple code:$r2 = virtualinvoke $r3.<com.example.simpleapplication.Hello:org.web3j.protocol.core.RemoteFunctionCall SetName(java.lang.String)>("John").

1 List<String> BlockchainArgumentsForSendAsync =new LinkedList<>();

2 SootMethodRef SendAsyncMethodRef = makeMethodRef("org.web3j.protocol.core.RemoteCall","sendAsync", "java.util.concurrent.CompletableFuture",BlockchainArgumentsForSendAsync, false);

3 VirtualInvokeExpr InvokeExprSendAsync = Jimple.v().newVirtualInvokeExpr(Return_Local(body,"RemoteFunctionCall"), SendAsyncMethodRef, Collections.<Value>emptyList());

4 InvokeStmt InvokeStatementSendAsync = Jimple.v().newInvokeStmt(InvokeExprSendAsync);

5 units.insertAfter(InvokeStatementSendAsync, (Unit) AssignStmtContractFunc);

Listing 20: Code Snippet

We now needed to create the following jimple code:virtualinvoke $r2.<org.web3j.protocol.core.RemoteFunctionCall:java.util.concurrent.CompletableFuture sendAsync()>(). This was accomplished viacreating a empty linked list as displayed on line 1 and then creatinging anotherSoot method reference as displayed on line 2. Then we had to create a virtualin-voke expression as displayed on line 3. Finally we had to create a invoke statementand insert it after the last known unit that Soot found. Note, that the last unit youinsert for SendAsync is much different that the first 2 code snippets we discussedhere.

44

7.4.2 Running Eclipse Example

To generate the APK with the code that was just created we need to set-up theEclipse arguments to be able to generate the APK. To set the arguments:

1. Click on the drop-down menu button , select Run Configurations..., andthen click on the Arguments tab.

2. Copy and paste the arguments displayed in Listing 21.

Note, Android Jar Location is the location where your Android Jar is lo-cated in your filesystem it is usually /home/username/Android/Sdk/plat-forms where username is replaced with your username. Also, APK to Anal-yse is the location where you stored the APK that you want to inject theblockchain calls into.

1 -allow-phantom-refs -android-jars [Android Jar Location] -android-api-version 28 -src-prec apk -output-format dex-force-overwrite -output-dir OutputAPK -process-dir [APKto Analyse Location] --process-multiple-dex -p db.transformations enabled:true

Listing 21: Arguments

7.5 Signing our generated APKNow we need to sign our Android APK file so that our phone emulatorwill be able to run our Android APK file. Without signing it the emula-tor would reject the APK from ever running. In order to sign the APK filewe will need to refer to https://stackoverflow.com/questions/50705658/how-to-sign-an-apk-through-command-line.

7.6 Installing the APK on the phone emulatorNow we have signed our APK and we want to install it on our phone emulator.To install the APK on our phone emulator:

1. Open up our command prompt window and type in emulator -list-avds.

This command will allow you to see what phone emulators you have in-stalled. You will want to copy the text of the first phone emulator you see.If you do not see anything you will need to go and install a phone emulatoras previously mentioned in our Android Set-up section.

45

2. Type in emulator -avd and paste in the previous text we copied.

This will start the emulator for you.

3. Change directories to the location of where our generated APK is at. Youcan find this location by going to your Eclipse window and right clickingon Properties and selecting the Location path.

4. Paste the path when issuing the cd command.

5. Type in adb install SimpleApplication.apk.

Once the success message appears, you have now properly installed theAPK on your phone emulator.

7.7 Running the Private Blockchian and getting everythingworking

The steps for getting everything to communicate are:

1. Make sure Ganache is running by clicking on the AppImage file.

2. Click on Quickstart button.

3. Start the phone emulator.

4. Pass our smart contract to the private blockchain by going to http://remix.ethereum.org/ and making sure we follow the steps providedin the Back to Remix section.

It is now time to check to see if some data was passed to Ganache. This isaccomplished via going to the TRANSACTIONS tab and making sure thatwe see that there is a contract call. It will be a light blue message that saysCONTRACT CALL next to the transaction.

46

7.8 Injecting blockchain code into Android applications usingAPKTool

7.8.1 Smali Code

The APKtool is one of the most exciting and useful reverse engineering toolsbecause it can easily decompile an Android APK into smali code. The smali codecan then be modified or altered. This modified code can then be converted intoan APK. Smali code is essentially the assembly language that runs on Android’sJava virtual machine. The modification of smali code takes significant technicalexpertise. It requires a considerable amount of time to understand the registerstructure and the fine details of smali code modification.

For example, let us take a look at listing 22.1 .class public Lcom/example/simpleapplication/MainActivity;2 .super Landroidx/appcompat/app/AppCompatActivity;3 .source "MainActivity.java"4

5

6 # instance fields7 .field contract:Lcom/example/simpleapplication/Hello;8

9 .field private web3j:Lorg/web3j/protocol/Web3j;10

11

12 # direct methods13 .method public constructor <init>()V14 .locals 115

16 .line 1517 invoke-direct {p0}, Landroidx/appcompat/app/AppCompatActivity

;-><init>()V18

19 .line 1720 invoke-virtual {p0}, Lcom/example/simpleapplication/

MainActivity;->ContractInit()Lcom/example/simpleapplication/Hello;

21

22 move-result-object v023

24 iput-object v0, p0, Lcom/example/simpleapplication/MainActivity;->contract:Lcom/example/simpleapplication/Hello;

25

47

26 return-void27 .end method

Listing 22: Smali File Example

APKTool generates comments for the instance fields, direct methods, and virtualmethods. This makes it quicker to analyse see what is going on. The .methodkeyword is used to identify a method. The .class keyword is used to tell what classthe specific smali code file belongs to.The .locals keywork is used to define how many registers were used in the specificmethod. The registers will always begin the v[x] where [x] represents an integervalue. The .line indicates what line in the file the smali code refers to. Notethat .line could contain multiple lines of smali code. So every new line that isreferenced is incremented by some integer value. For example, in the example fileline 16 references the .line 15 and line 19 references .line 17 and spans multiplelines.For more information visit https://github.com/JesusFreke/smali/wiki/Registers

7.8.2 Injecting Blockchain Calls into Android Applications using APKTool

Let us now discuss how to inject blockchain calls using APKTool.The instructions are as follows:

1. Decompile our example Android APK file using the following command:apktool -r d SimpleApplication.apk.

This command will decompile our APK and all contents into a folder namedSimpleApplication. The folder will contain the following folder structure,as displayed in Figure 21.

48

Figure 21: APKTool SimpleApplication Folder Structure

49

We only need to be concerned with the folderSimpleApplication/smaliclasses2/com/example/simpleapplication.Also, we will only be manipulating the MainActivity.smali file.

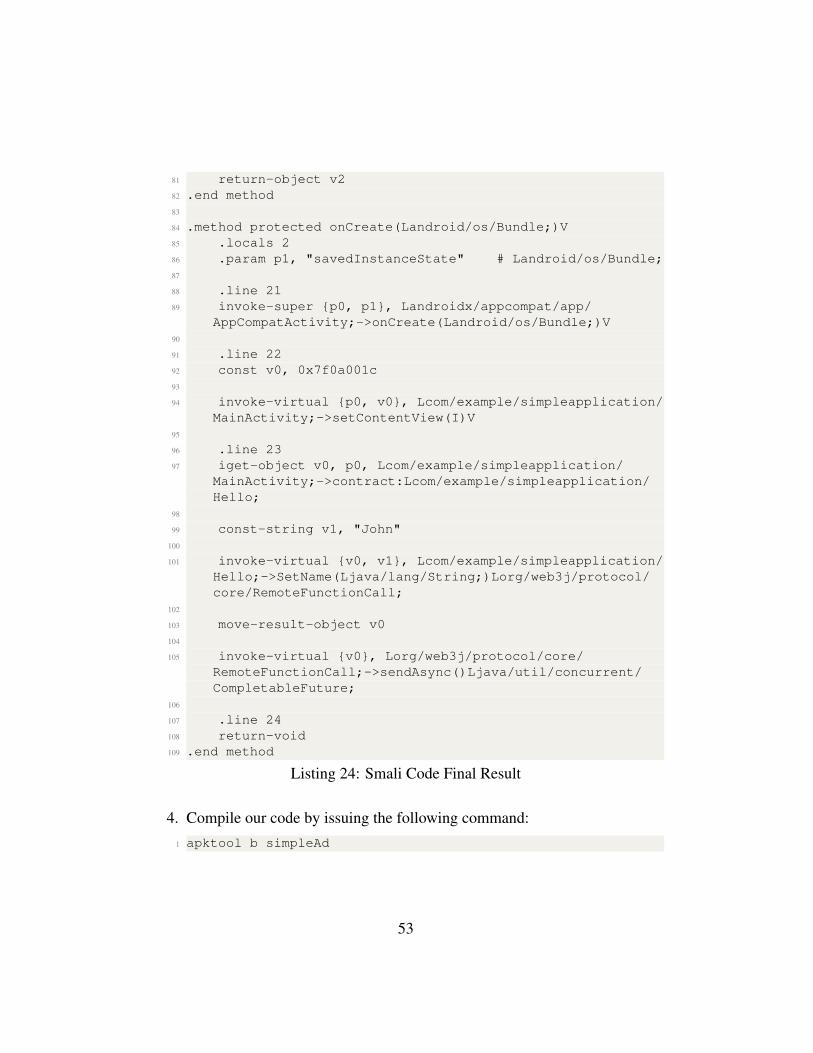
2. What we want to inject into our MainActivity.smali file at line 95 is thefollowing lines that appear in listing 23.

1 .line 232 iget-object v0, p0, Lcom/example/simpleapplication/

MainActivity;->contract:Lcom/example/simpleapplication/Hello;

3

4 const-string v1, "John"5

6 invoke-virtual {v0, v1}, Lcom/example/simpleapplication/Hello;->SetName(Ljava/lang/String;)Lorg/web3j/protocol/core/RemoteFunctionCall;

7

8 move-result-object v09

10 invoke-virtual {v0}, Lorg/web3j/protocol/core/RemoteFunctionCall;->sendAsync()Ljava/util/concurrent/CompletableFuture;

Listing 23: Smali Code to Inject

3. Increment the integer value by one for line 85. The final output should looklike listing 24.

1 .class public Lcom/example/simpleapplication/MainActivity;2 .super Landroidx/appcompat/app/AppCompatActivity;3 .source "MainActivity.java"4

5

6 # instance fields7 .field contract:Lcom/example/simpleapplication/Hello;8

9 .field private web3j:Lorg/web3j/protocol/Web3j;10

11

12 # direct methods13 .method public constructor <init>()V14 .locals 115

16 .line 15

50

17 invoke-direct {p0}, Landroidx/appcompat/app/AppCompatActivity;-><init>()V

18

19 .line 1720 invoke-virtual {p0}, Lcom/example/simpleapplication/

MainActivity;->ContractInit()Lcom/example/simpleapplication/Hello;

21

22 move-result-object v023

24 iput-object v0, p0, Lcom/example/simpleapplication/MainActivity;->contract:Lcom/example/simpleapplication/Hello;

25

26 return-void27 .end method28

29

30 # virtual methods31 .method public ContractInit()Lcom/example/simpleapplication/

Hello;32 .locals 433

34 .line 2635 new-instance v0, Lorg/web3j/protocol/http/HttpService;36

37 const-string v1, "http://10.0.2.2:8545"38

39 invoke-direct {v0, v1}, Lorg/web3j/protocol/http/HttpService;-><init>(Ljava/lang/String;)V

40

41 invoke-static {v0}, Lorg/web3j/protocol/Web3j;->build(Lorg/web3j/protocol/Web3jService;)Lorg/web3j/protocol/Web3j;

42

43 move-result-object v044

45 iput-object v0, p0, Lcom/example/simpleapplication/MainActivity;->web3j:Lorg/web3j/protocol/Web3j;

46

47 .line 2848 new-instance v0, Lcom/example/simpleapplication/

MainActivity$1;49

50 invoke-direct {v0, p0}, Lcom/example/simpleapplication/

51

MainActivity$1;-><init>(Lcom/example/simpleapplication/MainActivity;)V

51

52 .line 4853 .local v0, "contractGasProvider":Lorg/web3j/tx/gas/

ContractGasProvider;54 const-string v1, "0

x2d2c66151300672e8ec9b8c7315ef744115ff7b82f1e0b9a8bbf39452a3add28"

55

56 invoke-static {v1}, Lorg/web3j/crypto/Credentials;->create(Ljava/lang/String;)Lorg/web3j/crypto/Credentials;

57

58 move-result-object v159

60 .line 4961 .local v1, "credentials":Lorg/web3j/crypto/Credentials;62 invoke-virtual {v1}, Lorg/web3j/crypto/Credentials;->

getAddress()Ljava/lang/String;63

64 move-result-object v265

66 const-string v3, "Address"67

68 invoke-static {v3, v2}, Landroid/util/Log;->d(Ljava/lang/String;Ljava/lang/String;)I

69

70 .line 5071 iget-object v2, p0, Lcom/example/simpleapplication/

MainActivity;->web3j:Lorg/web3j/protocol/Web3j;72

73 const-string v3, "0x6B0c9E90a645e037949876dCf23523f7185A12bd"

74

75 invoke-static {v3, v2, v1, v0}, Lcom/example/simpleapplication/Hello;->load(Ljava/lang/String;Lorg/web3j/protocol/Web3j;Lorg/web3j/crypto/Credentials;Lorg/web3j/tx/gas/ContractGasProvider;)Lcom/example/simpleapplication/Hello;

76

77 move-result-object v278

79 .line 5180 .local v2, "contract":Lcom/example/simpleapplication/

Hello;

52

81 return-object v282 .end method83

84 .method protected onCreate(Landroid/os/Bundle;)V85 .locals 286 .param p1, "savedInstanceState" # Landroid/os/Bundle;87

88 .line 2189 invoke-super {p0, p1}, Landroidx/appcompat/app/

AppCompatActivity;->onCreate(Landroid/os/Bundle;)V90

91 .line 2292 const v0, 0x7f0a001c93

94 invoke-virtual {p0, v0}, Lcom/example/simpleapplication/MainActivity;->setContentView(I)V

95

96 .line 2397 iget-object v0, p0, Lcom/example/simpleapplication/

MainActivity;->contract:Lcom/example/simpleapplication/Hello;

98

99 const-string v1, "John"100

101 invoke-virtual {v0, v1}, Lcom/example/simpleapplication/Hello;->SetName(Ljava/lang/String;)Lorg/web3j/protocol/core/RemoteFunctionCall;

102

103 move-result-object v0104

105 invoke-virtual {v0}, Lorg/web3j/protocol/core/RemoteFunctionCall;->sendAsync()Ljava/util/concurrent/CompletableFuture;

106

107 .line 24108 return-void109 .end method

Listing 24: Smali Code Final Result

4. Compile our code by issuing the following command:1 apktool b simpleAd

53

7.8.3 Installing the Generated APK file

It is now time to install the generated APK file.

Do so by:

1. Navigating to the folder SimpleApplication/dist/.

2. Sign the APK as described in the section Signing our generated APK.

3. Install the APK using the command: adb install SimpleApplication.apk.

Note, it is a requirement to uninstall the previous application with the sameapplication name. If not, you will be unable to install the correct APK onyour phone emulator.

54

References[1] L. Mearian, “What is blockchain? The complete

guide,” Jan. 2019, library Catalog: www.computerworld.com.[Online]. Available: https://www.computerworld.com/article/3191077/what-is-blockchain-the-complete-guide.html

[2] “Ganache | Ganache Quickstart | Documentation,” library Catalog:www.trufflesuite.com. [Online]. Available: https://trufflesuite.com/docs/ganache/quickstart

[3] “soot-oss/soot,” library Catalog: github.com. [Online]. Available: https://github.com/soot-oss/soot

[4] “Apktool - Documentation.” [Online]. Available: https://ibotpeaches.github.io/Apktool/documentation/

55


Recommended