241
Inspection Management © 2020 General Electric Company

Inspection Management
© 2020 General Electric Company
Contents
Chapter 1: Overview 1Overview of the Inspection Management Module 2
Access the Inspection Management Overview Page for a Functional Location 2
Access the Inspection Management Overview Page for an Asset 4
Inspection Management Workflow 6
Chapter 2: Workflows 7Inspection Planning Workflow 8
Inspection Assessment Workflow 12
Chapter 3: Inspections 17About Inspections 18
About Types of Inspections 18
About Inspection Reports 19
About Inspection Checklists 33
About Active and Archived Inspections 34
About Inspection Intervals 34
Access the Inspection Data Section 35
Access Inspection Checklist 35
Create an Inspection 36
Assign Inspections to a User 38
Delete an Inspection 38
Approve Bulk Review Inspections 39
Lock an Inspection 40
Add a Related Record 41
Link a Related Record to an Inspection 42
Link Reference Document to an Inspection 42
Unlink a Related Record from an Inspection 45
Delete a Related Record 46
Access Inspection Reports 46
ii Inspection Management

Access Reference Documents 47
Add Inspection Confidence Evaluations 47
Review Inspection Confidence Evaluation 48
Delete Inspection Confidence Evaluations 49
Chapter 4: Inspection Profiles 51About Inspection Profile 52
About Inspection Scope 52
About Creating and Modifying Inspection Scope 53
Access the Inspection Profile Details Section 54
Create an Inspection Profile 54
Add an Existing Inspection Profile 55
Manage Sequence Definitions for an Inspection Profile 56
Delete an Inspection Profile 57
Access the Inspection Methods Section 58
Add an Inspection Method 59
Delete Inspection Methods 60
Access an Inspection Scope 60
Define the Inspection Scope 61
Chapter 5: Team Members 63About Team Members 64
About Roles 64
About Certifications 65
Add Team Members to an Inspection 66
Remove Team Members from an Inspection 66
Chapter 6: Inspection Tasks and Recommendations 68About Inspection Tasks and Recommendations 69
About Generating Inspections for Related Inspection Tasks 69
Bulk Printing of Inspection Reports 69
Access Inspection Recommendations 70
Create Inspection Recommendations 71
Modify the Date Filter for Inspection Recommendations 72
iii
Access the Underlying Inspection Tasks Section 73
Create an Inspection Task 73
Delete an Inspection Task 74
Modify the Date Filter for Inspection Tasks 75
Create an Inspection Report from an Inspection Task 75
Print Bulk Inspection Reports 77
View Bulk Printing Status 79
Download Bulk Inspection Reports 80
Chapter 7: Work Packs 81About Work Packs 82
About the Work Pack Hierarchy 82
Access the Work Packs Section 84
Create a Work Pack 85
Link a Work Pack 86
Unlink a Work Pack 87
Delete a Work Pack 88
Create Single and Bulk Inspections 88
Link an Inspection to a Work Pack 92
Unlink an Inspection from a Work Pack 93
Link an Inspection Task to a Work Pack 94
Unlink an Inspection Task from a Work Pack 96
Create a Sub Work Pack 97
Delete a Sub Work Pack 99
Chapter 8: Admin 100Inspection Configuration 101
Taxonomy Configuration 129
Overview Configuration 130
Compliance Configuration 132
Human Resources 132
Chapter 9: Deployment 142Deploy Inspection Management 143
iv Inspection Management

Deploy Inspection Management for the First Time 143
Upgrade Inspection Management 144
Inspection Datasheets - Revert to Baseline 145
Inspection Management Security Groups and Roles 148
Chapter 10: Data Loaders 151About the Inspection Management (IM) Data Loaders 152
About the Inspection Management (IM) Data Loaders Requirements 152
About the Inspection Management (IM) Data Loaders Inspection Types 153
About the Inspection Management (IM) Data Loaders Data Model 154
About the Inspection Management (IM) Data Loaders General Loading Strategy 154
About the Inspection Management (IM) Data Loaders Workbook Layout and Use 157
About the Inspection Management (IM) Data Loaders Load Verification 183
Chapter 11: Reference 184Family Field Descriptions 185
Catalog Items 205
General Reference 213
Chapter 12: Release Notes 225Second Quarter of 2020 226
Fourth Quarter of 2019 227
Third Quarter of 2019 228
Second Quarter of 2019 231
First Quarter of 2019 232
Third Quarter of 2018 234
v

Copyright GE Digital© 2020 General Electric Company.
GE, the GE Monogram, and Predix are either registered trademarks or trademarks of All other trademarksare the property of their respective owners.
This document may contain Confidential/Proprietary information of and/or its suppliers or vendors.Distribution or reproduction is prohibited without permission.
THIS DOCUMENT AND ITS CONTENTS ARE PROVIDED "AS IS," WITH NO REPRESENTATION ORWARRANTIES OF ANY KIND, WHETHER EXPRESS OR IMPLIED, INCLUDING BUT NOT LIMITED TOWARRANTIES OF DESIGN, MERCHANTABILITY, OR FITNESS FOR A PARTICULAR PURPOSE. ALL OTHERLIABILITY ARISING FROM RELIANCE UPON ANY INFORMATION CONTAINED HEREIN IS EXPRESSLYDISCLAIMED.
Access to and use of the software described in this document is conditioned on acceptance of the EndUser License Agreement and compliance with its terms.
vi © 2020 General Electric Company

Chapter
1OverviewTopics:
• Overview of the InspectionManagement Module
• Access the InspectionManagement Overview Pagefor a Functional Location
• Access the InspectionManagement Overview Pagefor an Asset
• Inspection ManagementWorkflow
© 2020 General Electric Company 1

Overview of the Inspection Management ModuleAn accurate understanding of the current conditions of equipment and location conditions is critical toanalyzing their reliability. The Inspection Management module allows you to document, manage, andanalyze data associated with the inspections of equipment and locations in your facilities.
More Details
Inspection Management functionality is fully integrated with other GE Digital APM features to give youaccess to other analytical tools, such as Thickness Monitoring and Risk Based Inspection.
Access the Inspection Management Overview Page for aFunctional Location
Procedure
In the module navigation menu, select Integrity > Inspection Management.
Note: You can also access the Inspection Management Overview page for a hierarchy level. To do so:
a. In the upper-left corner of the top navigation bar, select .The Asset Hierarchy page appears.
b. In the left pane, navigate to the functional location for which you want to access the InspectionManagement Overview page, and then select Integrity in the workspace.The Integrity section appears.
2 © 2020 General Electric Company
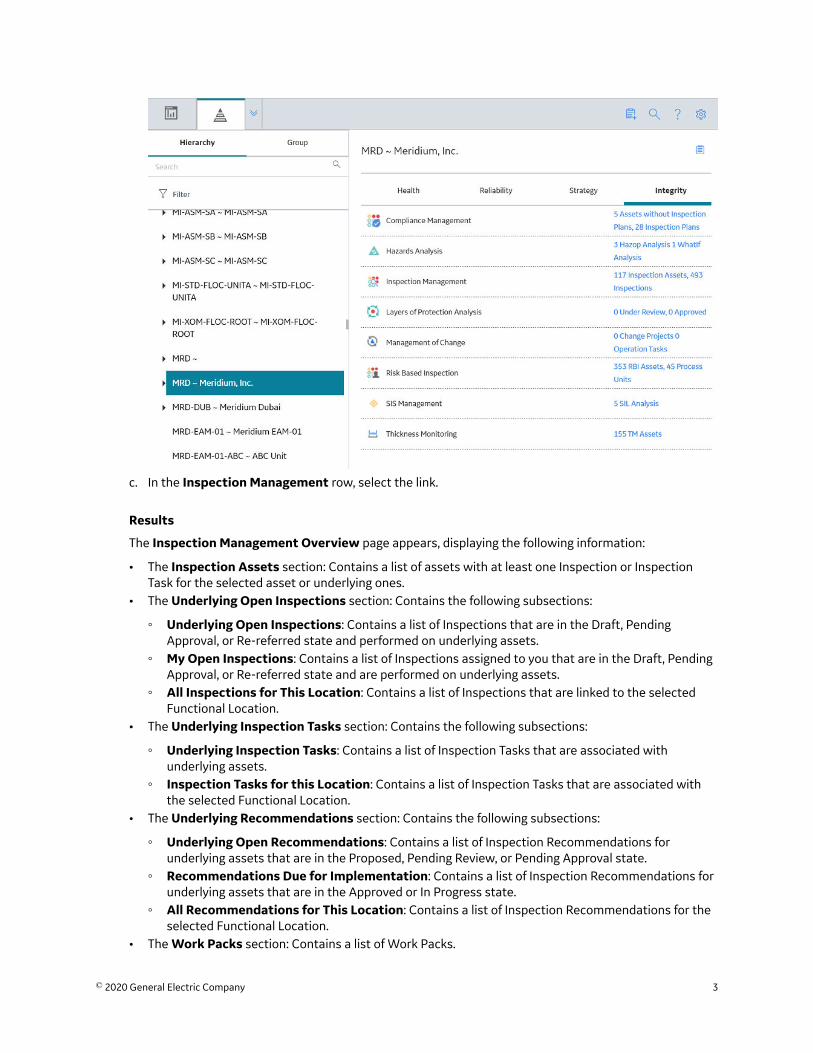
c. In the Inspection Management row, select the link.
Results
The Inspection Management Overview page appears, displaying the following information:
• The Inspection Assets section: Contains a list of assets with at least one Inspection or InspectionTask for the selected asset or underlying ones.
• The Underlying Open Inspections section: Contains the following subsections:
◦ Underlying Open Inspections: Contains a list of Inspections that are in the Draft, PendingApproval, or Re-referred state and performed on underlying assets.
◦ My Open Inspections: Contains a list of Inspections assigned to you that are in the Draft, PendingApproval, or Re-referred state and are performed on underlying assets.
◦ All Inspections for This Location: Contains a list of Inspections that are linked to the selectedFunctional Location.
• The Underlying Inspection Tasks section: Contains the following subsections:
◦ Underlying Inspection Tasks: Contains a list of Inspection Tasks that are associated withunderlying assets.
◦ Inspection Tasks for this Location: Contains a list of Inspection Tasks that are associated withthe selected Functional Location.
• The Underlying Recommendations section: Contains the following subsections:
◦ Underlying Open Recommendations: Contains a list of Inspection Recommendations forunderlying assets that are in the Proposed, Pending Review, or Pending Approval state.
◦ Recommendations Due for Implementation: Contains a list of Inspection Recommendations forunderlying assets that are in the Approved or In Progress state.
◦ All Recommendations for This Location: Contains a list of Inspection Recommendations for theselected Functional Location.
• The Work Packs section: Contains a list of Work Packs.
© 2020 General Electric Company 3

• The Task Types Coming Due Within the Year graph: Contains a graph that shows the total numberof Inspection Tasks of each type that are due in the current year.
• The All Inspections Pending Approval for Reviewers section: Contains a list of Inspections that arepending your approval.
• The Open Inspection Recommendations by Asset graph: Contains a graph that shows the numberof open Inspection Recommendations for each asset in the selected Functional Location.
Tip: To return to the Inspection Management Overview page after selecting a tab, select the tabagain.
Access the Inspection Management Overview Page for an Asset
About This Task
This topic describes how to access the Inspection Management Overview page for an asset that doesnot contain underlying assets in the asset hierarchy.
4 © 2020 General Electric Company

Procedure
1. Access the Inspection Management Overview page for the Functional Location that contains theasset.
2. Select Inspection Assets.The Inspection Assets section appears, displaying a list of assets (associated with the selectedFunctional Location or underlying assets) that are linked to an Inspection or an Inspection Task.
3. In the row containing the Equipment for which you want to access the Inspection ManagementOverview page, select the link.The Inspection Management Overview page for the selected asset appears, displaying the followinginformation:
• The Inspections section: Contains a list of Inspections linked to the asset.• The Inspection Tasks section: Contains a list of Inspection Tasks linked to the asset.• The Recommendations section: Contains a list of Inspection Recommendations that are linked to
the asset.• The Work Packs section: Contains a list of Work Packs.
© 2020 General Electric Company 5

Inspection Management WorkflowThis workflow provides the basic, high-level steps for using this module. The steps and links in thisworkflow do not necessarily reference every possible procedure.
1. Access the Equipment or Functional Location to be inspected from the Asset Hierarchy.2. Create an Inspection.3. Create an Inspection Profile.4. Add an Inspection Method.5. Define the Inspection Scope.6. Create Inspection Tasks.7. Create Work Packs.
6 © 2020 General Electric Company
Chapter
2WorkflowsTopics:
• Inspection Planning Workflow• Inspection Assessment
Workflow
© 2020 General Electric Company 7

Inspection Planning Workflow
Inspection Management: Inspection Planning WorkflowThis workflow details the process for managing Inspection Profile Items, Inspection Methods, InspectionTasks, and Work Packs for Execution.
In the following workflow diagram, the blue text in a shape indicates that a corresponding description hasbeen provided in the sections that follow the diagram.
1. Identify Asset for Inspection on page 92. Define Inspection Profile for Asset on page 93. Define Inspection Profile Items on page 94. Create Inspection Tasks for Asset on page 105. Inspection Tasks Exist? on page 106. Define Inspection Methods on page 97. Define Inspection Methods? on page 98. View Inspection Tasks for Asset on page 109. Set Up Scope for Inspection Task? on page 1010. About Checklist Configuration Templates on page 10111. Manage Inspection Tasks by Work Pack? on page 1012. Deploy Inspection Management on page 14313. Add Inspection Tasks to Work Pack on page 1114. Review Inspection Work Pack on page 1115. Inspection Assessment on page 11
8 © 2020 General Electric Company
16. Work Pack Ready? on page 1117. EAM - Work Order Generation on page 918. Asset Strategy Management on page 919. Inspection Assessment on page 11
Identify Asset for InspectionPersona: Technician
Depending on the inspection activities to be managed, select the appropriate assets for further definition.
Define Inspection Profile for AssetPersona: Technician
Define an Inspection Profile to identify what can be inspected and documented during the inspection.
Define Inspection Profile ItemsPersona: Technician
Define Inspection Profile Items to identify which individual parts or subcomponents of the asset may beinspected. The Inspection Profile represents the asset inspection configuration, not necessarily what isplanned to be inspected for any given task.
Define Inspection Methods?Persona: Technician
Determine if specific Inspection Methods must be defined to increase the confidence of detection ofdamage mechanisms.
Define Inspection MethodsPersona: Technician
For each Inspection Profile Item, define specific Inspection Methods (e.g., CUI Inspection, PenetrantFluorescent Test, Wet Magnesium Particle, and Radiographic X-ray).
Asset Strategy ManagementPersona: Analyst
Develop Asset Strategies from various strategy development methods, such as Risk Based Inspection. Theactions defined in the strategy are implemented as Inspection Tasks for execution in InspectionManagement.
Go to the Asset Strategy Management workflow.
EAM - Work Order GenerationPersona: Analyst
If the overall schedule is being managed by Enterprise Asset Management (EAM), Inspection Tasks mayalso be created from an EAM work management system.
Go to the EAM - Work Order Generation workflow.
© 2020 General Electric Company 9
Inspection Tasks Exist?Persona: Technician
If Inspection Tasks were created from the EAM - Work Management: Work Order Generation workflow, orbased on actions from the Asset Strategy Management workflow, then proceed directly to the ViewInspection Tasks for Asset step.
Otherwise, proceed to the Create Inspection Task for Asset step.
Create Inspection Tasks for AssetPersona: Technician
Create Inspection Tasks manually outside of an Asset Strategy for inspection activities that are notmanaged as part of an overall strategy.
View Inspection Tasks for AssetPersona: Technician
Irrespective of the initiating means, manage Inspection Tasks to track compliance and inspection activityexecution.
Set Up Scope for Inspection Task?Persona: Technician
Determine if Inspection Tasks should be further defined with specific scope requirements.
Define Inspection Scope for Each Inspection TaskPersona: Technician
Determine and select which of the possible Inspection Methods defined for the Inspection Profile Items ofthe asset will be carried out for the identified task.
Manage Inspection Tasks by Work Pack?Persona: Technician
Determine if a group of Tasks will be managed by a Work Pack for work distribution.
If not, then the Inspection Tasks can be performed directly in Inspection Management.
Custom Checklist Template Required?Persona: Analyst
Determine if the Inspection Tasks require a custom Checklist Template with custom or baseline checklistcategories and items.
If not, then the Inspection Tasks can be created using an existing Checklist Template or baselineInspection families.
Configure Custom Checklist TemplatePersona: Analyst
10 © 2020 General Electric Company
Create a Checklist Configuration Template that includes a custom or baseline assortment of categoriesand items.
Taxonomy Configuration Required?Persona: Analyst
Determine if the Checklist Template and/or Baseline Inspection families should be associated only withassets with a specific equipment taxonomy.
If not, the Checklist Template and/or Baseline Inspection families can be used to create Inspection Eventsfor all assets.
Configure Taxonomy ConfigurationPersona: Analyst
Create a Taxonomy Configuration that corresponds to equipment taxonomy for the selected assettaxonomy. Link Inspection Families or Checklist Templates to associate them with the assets with thatTaxonomy Configuration.
Create an Inspection Work PackPersona: Technician
If you will manage Inspection Tasks by a Work Pack, then create an Inspection Work Pack.
Add Inspection Tasks to Work PackPersona: Technician
Assign the Inspection Tasks to the Work Pack for work distribution.
Review Inspection Work PackPersona: Technician
Review the Work Pack for completeness and accuracy to verify that it is ready to be performed.
Work Pack Ready?Persona: Technician
Determine if the Work Pack is ready to be performed.
Inspection AssessmentPersona: Technician
If the individual Inspection Task or Work Pack is ready to be performed, then proceed to the InspectionManagement: Inspection Assessment workflow.
Go to the Inspection Management: Inspection Assessment workflow.
© 2020 General Electric Company 11
Inspection Assessment Workflow
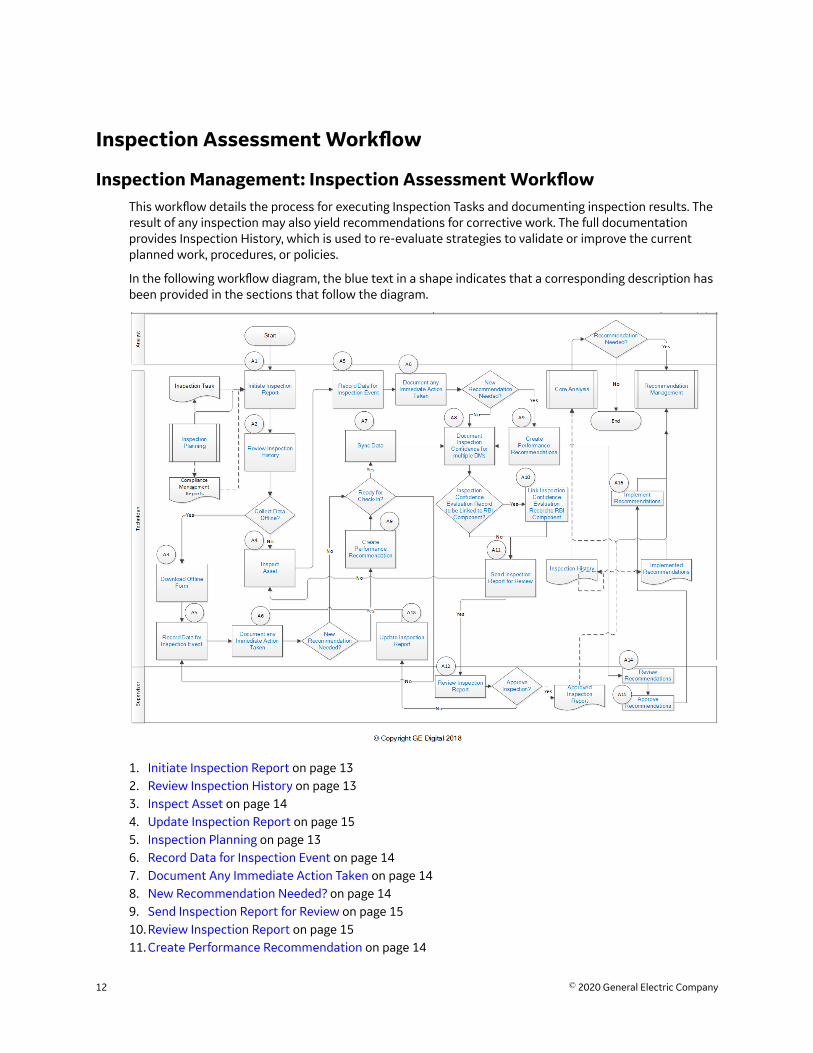
Inspection Management: Inspection Assessment WorkflowThis workflow details the process for executing Inspection Tasks and documenting inspection results. Theresult of any inspection may also yield recommendations for corrective work. The full documentationprovides Inspection History, which is used to re-evaluate strategies to validate or improve the currentplanned work, procedures, or policies.
In the following workflow diagram, the blue text in a shape indicates that a corresponding description hasbeen provided in the sections that follow the diagram.
1. Initiate Inspection Report on page 132. Review Inspection History on page 133. Inspect Asset on page 144. Update Inspection Report on page 155. Inspection Planning on page 136. Record Data for Inspection Event on page 147. Document Any Immediate Action Taken on page 148. New Recommendation Needed? on page 149. Send Inspection Report for Review on page 1510. Review Inspection Report on page 1511. Create Performance Recommendation on page 14
12 © 2020 General Electric Company
12. Approve Inspection? on page 1513. Recommendation Needed? on page 1614. Core Analysis on page 1615. Recommendation Management on page 1616. Inspection History on page 1517. Review Recommendations on page 1618. Approved Inspection Report on page 1519. Overview of the Inspection Management Module on page 220. Overview of the Inspection Management Module on page 221. Document Inspection Confidence for Multiple DMs on page 1422. Sync Data on page 1423. Download Offline Form on page 1324. Ready for Check-In? on page 1425. Create Performance Recommendation on page 1426. New Recommendation Needed? on page 14
Inspection PlanningPersona: Technician
This workflow details procedures related to the management of inspection profile items, inspectionmethods, inspection tasks, and work packs for execution.
Go to the Inspection Planning workflow.
Initiate Inspection ReportPersona: Technician
Based on Inspection Tasks or Work Pack definition, initiate Inspection Reports to document upcoming orcompleted inspection activities. You can also initiate an inspection report based on a one-time InspectionTask created as a result of a performance recommendation.
Review Inspection HistoryPersona: Technician
Prior to performing the inspection activities, review previous inspections based on past InspectionReports.
Collect Data Offline?Persona: Technician
Determine whether you want to collect data online (by entering data directly in GE Digital APM) or offline(by entering data in the offline form).
Download Offline FormPersona: Technician
Download the Offline Form of the Inspection record. This is used to record the findings when you inspectthe asset.
© 2020 General Electric Company 13

Record Data for Inspection EventPersona: Technician
Inspect each Inspection Profile Item based on the scope of the Inspection Task, and record the detailseither in the offline form or on the datasheet. If you have performed a Full Inspection Event, then recordthe General Findings. If you are performing a Checklist Event, then record the Checklist Findings. Thisinformation may help identify a degradation or a potential failure mechanism.
Document Any Immediate Action TakenPersona: Technician
Based on the findings, if an immediate action has been taken to mitigate a potential risk, document theaction in the Inspection Report.
New Recommendation Needed?Persona: Technician
Based on the findings of the inspection, determine whether a new recommendation is needed.
Inspect AssetPersona: Technician
Inspect the asset based on Task scope and, with consideration of the previous inspection history,implement recommendations and operational history.
This step is performed outside of GE Digital APM, in the field.
Ready for Check-In?Persona: Analyst
Determine whether the data that you have entered in the offline form is complete or additionalinformation is needed.
Sync DataPersona: Technician
After the information is ready to be checked-in, and the device is connected to the network, sync the datato GE Digital APM.
Document Inspection Confidence for Multiple DMsPersona: Technician
Create an Inspection Confidence Evaluation record to evaluate the Inspection Confidence or InspectionEffectiveness for multiple Damage Mechanisms (DMs) for this Inspection Event. This data will be used inRisk Based Inspection to evaluate the DMs.
Create Performance RecommendationPersona: Technician
If follow-up action is necessary, then create one or more Recommendations and manage them forward.
14 © 2020 General Electric Company
Inspection Confidence Evaluation Record to be Linked to RBI Component?Persona: Technician
Determine whether you want to link the Inspection Confidence Evaluation records to RBI Components.
Link Inspection Confidence Evaluation Record to RBI ComponentPersona: Technician
Link the Inspection Confidence Evaluation records to RBI Components.
Send Inspection Report for ReviewPersona: Technician
Based on the scope of the Inspection Task, and the information entered in the Inspection Report(including findings, recommendations, and any reference documents), determine if the Inspection Reportis ready for review. If yes, send it to a supervisor for review.
Review Inspection ReportPersona: Supervisor
Review the information in the report, including the findings and recommendations.
Approve Inspection?Persona: Supervisor
Determine if the Inspection Report is complete based on the scope defined in the Inspection Task. If theInspection Report is incomplete, you can assign the Inspection Task again to the Technician to update theInspection Report.
Update Inspection ReportPersona: Technician
Inspect the asset again, and update the Inspection Report based on the review comments.
Approved Inspection ReportPersona: Supervisor
After you approve the Inspection Report, the associated Inspection Tasks are updated with the newinspection dates based on the desired interval defined in the Asset Strategy.
Inspection HistoryPersona: Technician
The Inspection Report is included in the overall Inspection History for the asset. Inspection History is usedto re-evaluate asset strategies to validate or improve the planned work, procedures and policies. TheInspection History is also available for follow-up analysis, using the Core Analysis Workflow.
© 2020 General Electric Company 15
Recommendation Needed?Persona: Analyst
Determine if a follow-up action is necessary as a result of the overall inspection of the asset. This processis followed in the Recommendation Management work process.
Review RecommendationsPersona: Supervisor
Recommendations created from inspection activities are reviewed while reviewing the Inspection Report.These recommendations, are, however, reviewed again by the asset owner before they are implemented.This process is followed in the Recommendation Management work process.
Approve RecommendationsPersona: Approver
The reviewed recommendations are approved for impementation.
Implement Recommendations
Persona: Technician
The approved recommendations are implemented.
Core AnalysisPersona: Technician
For follow-up analysis, use Core Analysis.
Go to the Core Analysis: Asset Event Analysis workflow.
Go to the Core Analysis: Graph Analysis workflow.
Go to the Core Analysis: Query Analysis workflow.
Go to the Core Analysis: Report Analysis workflow.
Recommendation ManagementPersona: Technician
The new recommendation is managed for approval and implementation through the ManagePerformance Recommendations workflow.
Go to the Performance Recommendation Workflow.
16 © 2020 General Electric Company
Chapter
3InspectionsTopics:
• About Inspections• About Types of Inspections• About Inspection Reports• About Inspection Checklists• About Active and Archived
Inspections• About Inspection Intervals• Access the Inspection Data
Section• Access Inspection Checklist• Create an Inspection• Assign Inspections to a User• Delete an Inspection• Approve Bulk Review
Inspections• Lock an Inspection• Add a Related Record• Link a Related Record to an
Inspection• Link Reference Document to an
Inspection• Unlink a Related Record from
an Inspection• Delete a Related Record• Access Inspection Reports• Access Reference Documents• Add Inspection Confidence
Evaluations• Review Inspection Confidence
Evaluation• Delete Inspection Confidence
Evaluations
© 2020 General Electric Company 17
About InspectionsInspections are a way to document, manage, and analyze data associated with the inspections ofequipment and locations in your facility.
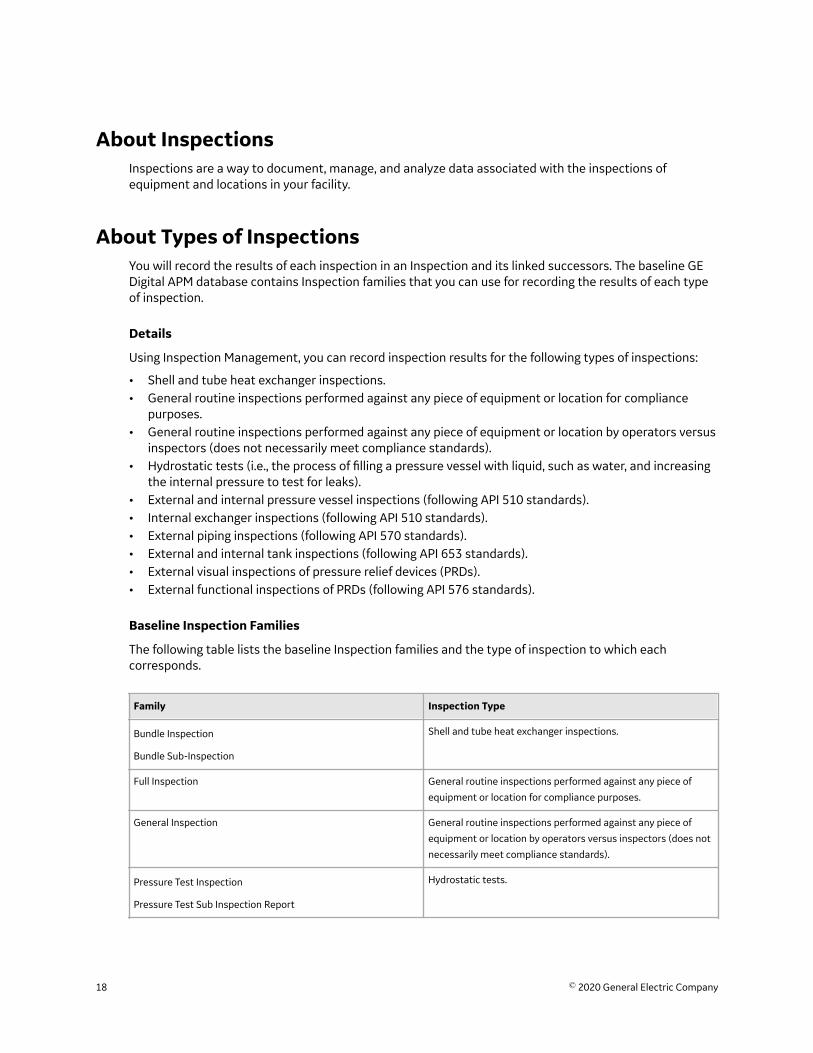
About Types of InspectionsYou will record the results of each inspection in an Inspection and its linked successors. The baseline GEDigital APM database contains Inspection families that you can use for recording the results of each typeof inspection.
Details
Using Inspection Management, you can record inspection results for the following types of inspections:
• Shell and tube heat exchanger inspections.• General routine inspections performed against any piece of equipment or location for compliance
purposes.• General routine inspections performed against any piece of equipment or location by operators versus
inspectors (does not necessarily meet compliance standards).• Hydrostatic tests (i.e., the process of filling a pressure vessel with liquid, such as water, and increasing
the internal pressure to test for leaks).• External and internal pressure vessel inspections (following API 510 standards).• Internal exchanger inspections (following API 510 standards).• External piping inspections (following API 570 standards).• External and internal tank inspections (following API 653 standards).• External visual inspections of pressure relief devices (PRDs).• External functional inspections of PRDs (following API 576 standards).
Baseline Inspection Families
The following table lists the baseline Inspection families and the type of inspection to which eachcorresponds.
Family Inspection Type
Bundle Inspection
Bundle Sub-Inspection
Shell and tube heat exchanger inspections.
Full Inspection General routine inspections performed against any piece of
equipment or location for compliance purposes.
General Inspection General routine inspections performed against any piece of
equipment or location by operators versus inspectors (does not
necessarily meet compliance standards).
Pressure Test Inspection
Pressure Test Sub Inspection Report
Hydrostatic tests.
18 © 2020 General Electric Company
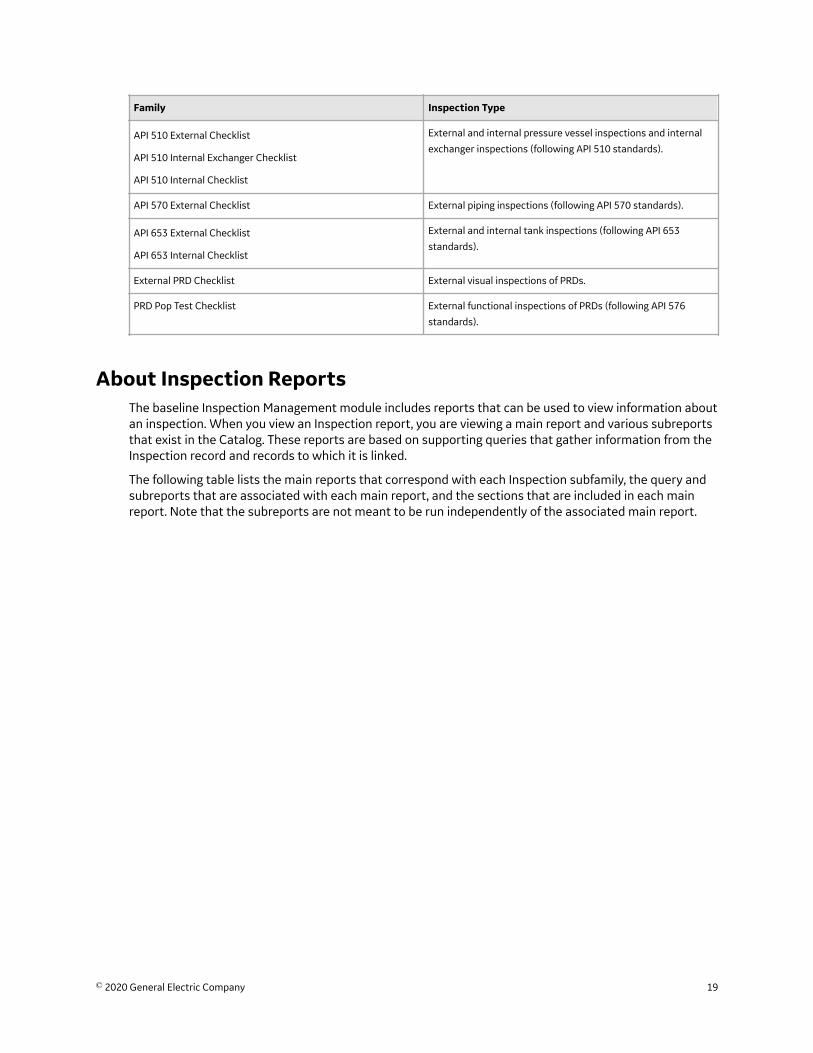
Family Inspection Type
API 510 External Checklist
API 510 Internal Exchanger Checklist
API 510 Internal Checklist
External and internal pressure vessel inspections and internal
exchanger inspections (following API 510 standards).
API 570 External Checklist External piping inspections (following API 570 standards).
API 653 External Checklist
API 653 Internal Checklist
External and internal tank inspections (following API 653
standards).
External PRD Checklist External visual inspections of PRDs.
PRD Pop Test Checklist External functional inspections of PRDs (following API 576
standards).
About Inspection ReportsThe baseline Inspection Management module includes reports that can be used to view information aboutan inspection. When you view an Inspection report, you are viewing a main report and various subreportsthat exist in the Catalog. These reports are based on supporting queries that gather information from theInspection record and records to which it is linked.
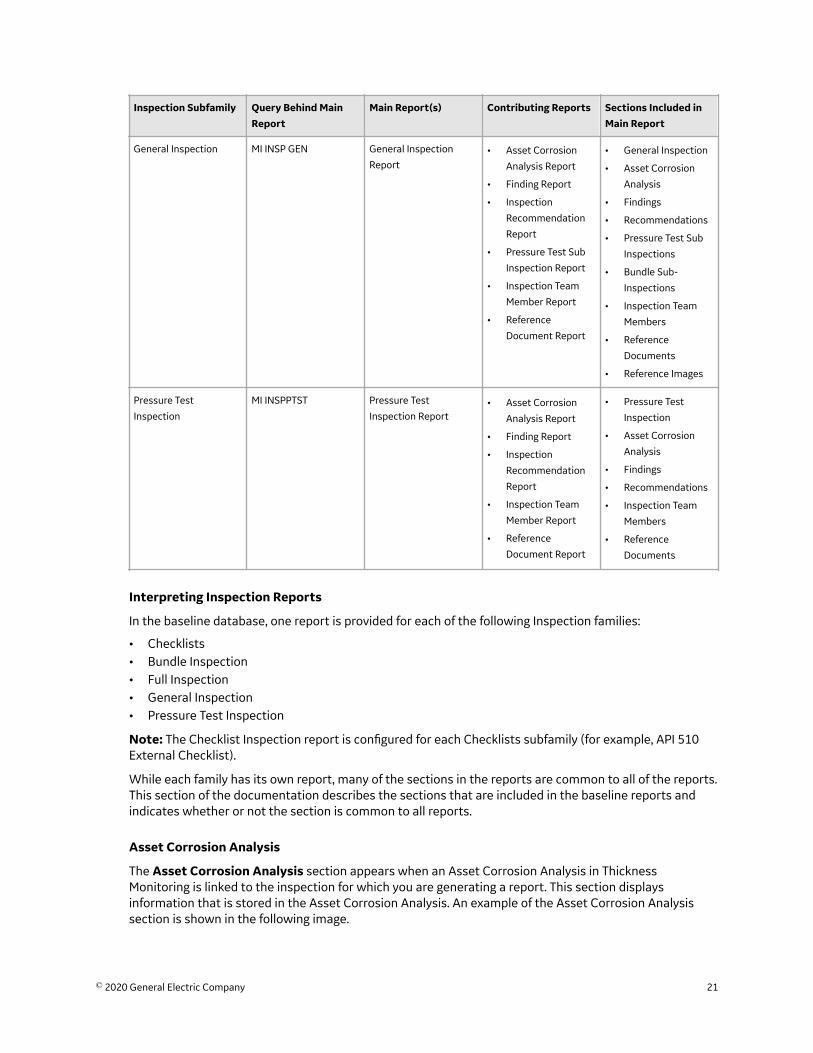
The following table lists the main reports that correspond with each Inspection subfamily, the query andsubreports that are associated with each main report, and the sections that are included in each mainreport. Note that the subreports are not meant to be run independently of the associated main report.
© 2020 General Electric Company 19

Inspection Subfamily Query Behind MainReport
Main Report(s) Contributing Reports Sections Included inMain Report
Bundle Inspection MI INSPBUND Bundle Inspection
Report• Asset Corrosion
Analysis Report
• Finding Report
• Inspection
Recommendation
Report
• Inspection Team
Member Report
• Reference
Document Report
• Bundle Inspection
• Asset Corrosion
Analysis
• Findings
• Pressure Test Sub
Inspections
• Recommendations
• Inspection Team
Members
• Reference
Documents
Checklists Checklist Report Query Checklist Inspection
Report• Asset Corrosion
Analysis Report
• Bundle Sub
Inspection Report
• Checklist Finding
Report
• Finding Report
• Inspection
Recommendation
Report
• Inspection Team
Member Report
• Pressure Test Sub
Inspection Report
• Reference
Document Report
• Asset Corrosion
Analysis
• Bundle Sub-
Inspection
• Checklist Findings
• Findings
• Recommendations
• Inspection Team
Members
• Pressure Test Sub
Inspections
• Reference
Documents
Checklists Checklist Report Query Blank Checklist
Inspection Report
Checklist Finding Report Checklist Findings
Full Inspection MI INSPFULL Full Inspection Report • Asset Corrosion
Analysis Report
• Bundle Sub
Inspection Report
• Finding Report
• Inspection
Recommendation
Report
• Inspection Team
Member Report
• Pressure Test Sub
Inspection Report
• Reference
Document Report
• Full Inspection
• Asset Corrosion
Analysis
• Findings
• Recommendations
• Pressure Test Sub
Inspections
• Bundle Sub-
Inspections
• Inspection Team
Members
• Reference
Documents
• Reference Images
20 © 2020 General Electric Company
Inspection Subfamily Query Behind MainReport
Main Report(s) Contributing Reports Sections Included inMain Report
General Inspection MI INSP GEN General Inspection
Report• Asset Corrosion
Analysis Report
• Finding Report
• Inspection
Recommendation
Report
• Pressure Test Sub
Inspection Report
• Inspection Team
Member Report
• Reference
Document Report
• General Inspection
• Asset Corrosion
Analysis
• Findings
• Recommendations
• Pressure Test Sub
Inspections
• Bundle Sub-
Inspections
• Inspection Team
Members
• Reference
Documents
• Reference Images
Pressure Test
Inspection
MI INSPPTST Pressure Test
Inspection Report• Asset Corrosion
Analysis Report
• Finding Report
• Inspection
Recommendation
Report
• Inspection Team
Member Report
• Reference
Document Report
• Pressure Test
Inspection
• Asset Corrosion
Analysis
• Findings
• Recommendations
• Inspection Team
Members
• Reference
Documents
Interpreting Inspection Reports
In the baseline database, one report is provided for each of the following Inspection families:
• Checklists• Bundle Inspection• Full Inspection• General Inspection• Pressure Test Inspection
Note: The Checklist Inspection report is configured for each Checklists subfamily (for example, API 510External Checklist).
While each family has its own report, many of the sections in the reports are common to all of the reports.This section of the documentation describes the sections that are included in the baseline reports andindicates whether or not the section is common to all reports.
Asset Corrosion Analysis
The Asset Corrosion Analysis section appears when an Asset Corrosion Analysis in ThicknessMonitoring is linked to the inspection for which you are generating a report. This section displaysinformation that is stored in the Asset Corrosion Analysis. An example of the Asset Corrosion Analysissection is shown in the following image.
© 2020 General Electric Company 21
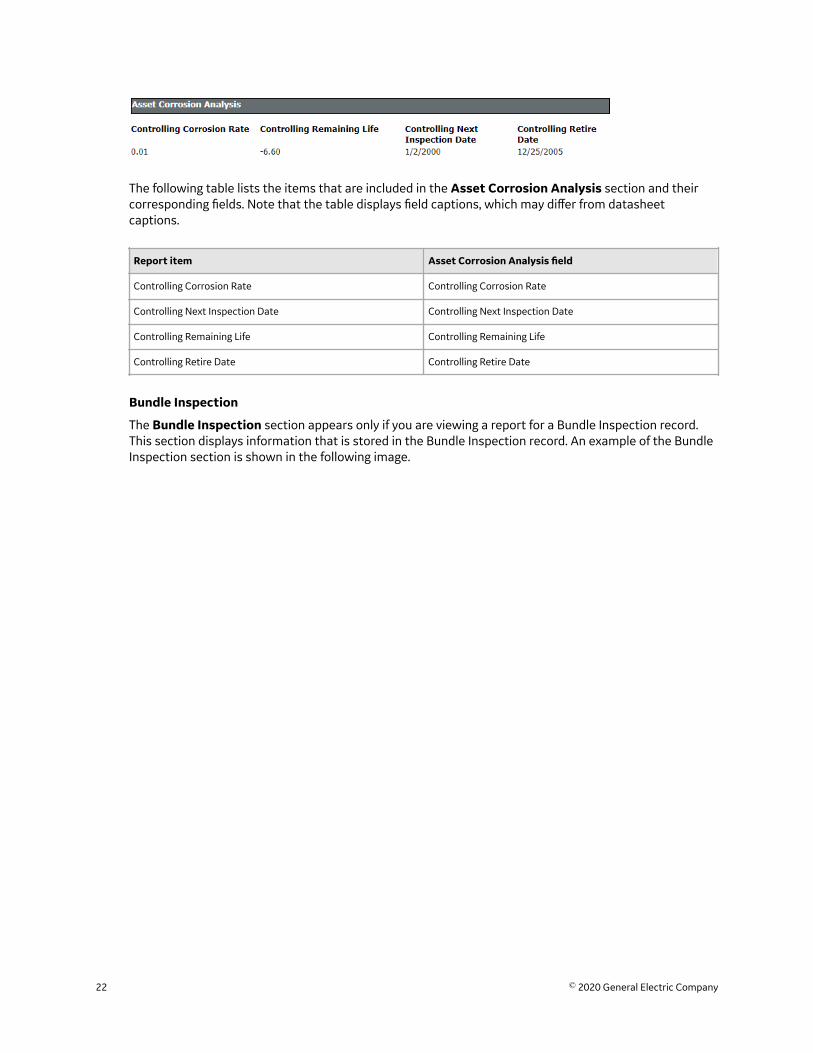
The following table lists the items that are included in the Asset Corrosion Analysis section and theircorresponding fields. Note that the table displays field captions, which may differ from datasheetcaptions.
Report item Asset Corrosion Analysis field
Controlling Corrosion Rate Controlling Corrosion Rate
Controlling Next Inspection Date Controlling Next Inspection Date
Controlling Remaining Life Controlling Remaining Life
Controlling Retire Date Controlling Retire Date
Bundle Inspection
The Bundle Inspection section appears only if you are viewing a report for a Bundle Inspection record.This section displays information that is stored in the Bundle Inspection record. An example of the BundleInspection section is shown in the following image.
22 © 2020 General Electric Company
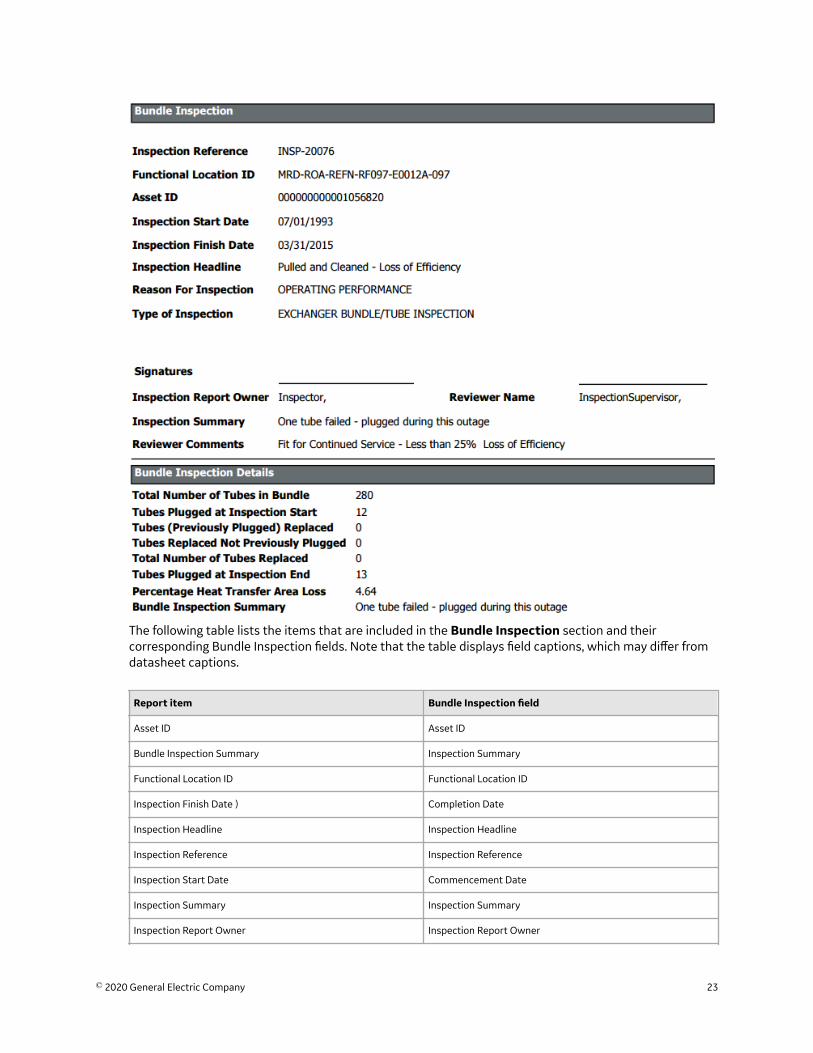
The following table lists the items that are included in the Bundle Inspection section and theircorresponding Bundle Inspection fields. Note that the table displays field captions, which may differ fromdatasheet captions.
Report item Bundle Inspection field
Asset ID Asset ID
Bundle Inspection Summary Inspection Summary
Functional Location ID Functional Location ID
Inspection Finish Date ) Completion Date
Inspection Headline Inspection Headline
Inspection Reference Inspection Reference
Inspection Start Date Commencement Date
Inspection Summary Inspection Summary
Inspection Report Owner Inspection Report Owner
© 2020 General Electric Company 23

Report item Bundle Inspection field
Percentage Heat Transfer Area Loss Percentage Heat Transfer Area Loss
Reason for Inspection Reason for Inspection
Reviewer Comments Reviewers Comments
Reviewer Name Reviewers Name
Total Number of Tubes in Bundle Total Number of Tubes in Bundle
Total Number of Tubes Replaced Total Number of Tubes Replaced at Inspection End
Tubes (Previously Plugged) Replaced Tubes (Plugged At Start) Replaced
Tubes Plugged at Inspection End Total Number of Tubes Plugged at Inspection End
Tubes Plugged at Inspection Start Tubes Plugged at Inspection Start
Tubes Replaced Not Previously Plugged Tubes (Not Previously Plugged) Replaced
Type of Inspection Type of Inspection
Bundle Sub Inspection
The Bundle Sub Inspections section appears if you are viewing a report for one of the following records:
• Checklists (unless you are viewing a blank Checklist Inspection report)• Full Inspection
This section displays information that is stored in the Bundle Sub-Inspection records that are linked to theFull Inspection or Checklists record. An example of the Bundle Sub-Inspections section is shown in thefollowing image.
Report item Bundle Sub-inspection field
Bundle Inspection Summary Inspection Summary
Bundle Tag Asset ID
Percentage Heat Transfer Area Loss Percentage Heat Transfer Area Loss
Total Number of Tubes in Bundle Total Number of Tubes in Bundle
Total Number of Tubes Replaced Total Number of Tubes Plugged at Inspection End
Tubes (Previously Plugged) Replaced Tubes (Plugged At Start) Replaced
Tubes Plugged at Inspection End Total Number of Tubes Plugged at Inspection End
24 © 2020 General Electric Company
Report item Bundle Sub-inspection field
Tubes Plugged at Inspection Start Tubes Plugged at Inspection Start
Tubes Replaced Not Previously Plugged Tubes (Not Previously Plugged) Replaced
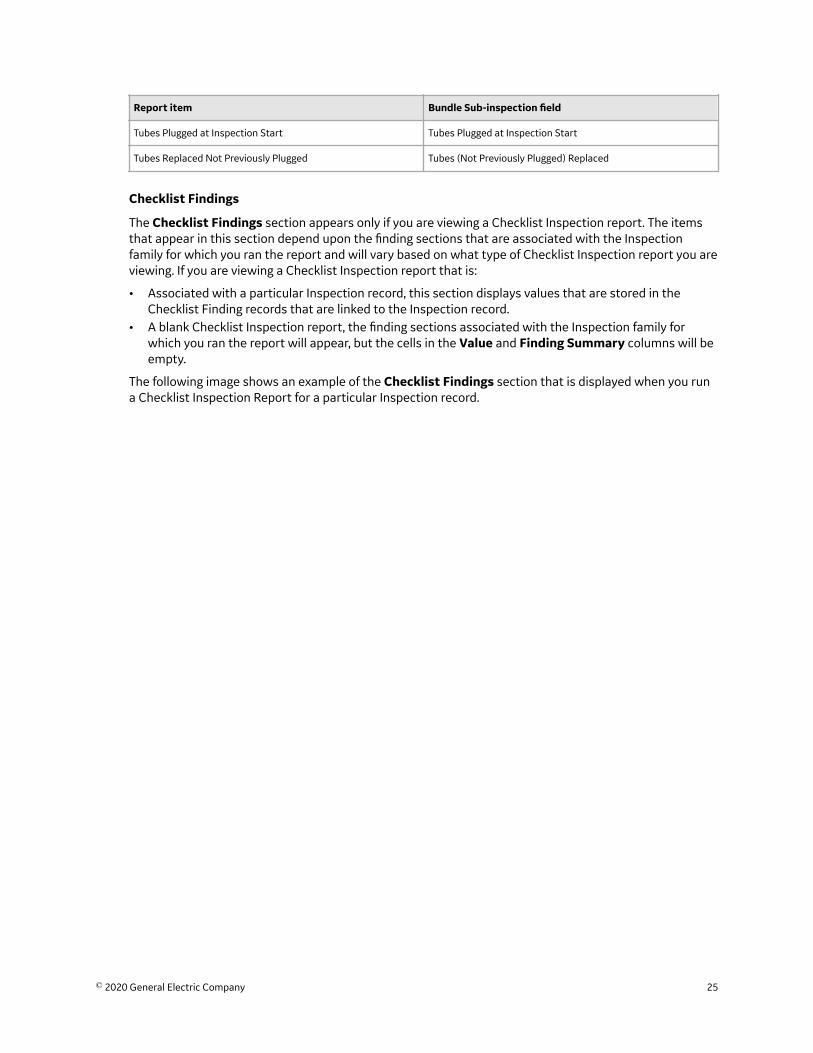
Checklist Findings
The Checklist Findings section appears only if you are viewing a Checklist Inspection report. The itemsthat appear in this section depend upon the finding sections that are associated with the Inspectionfamily for which you ran the report and will vary based on what type of Checklist Inspection report you areviewing. If you are viewing a Checklist Inspection report that is:
• Associated with a particular Inspection record, this section displays values that are stored in theChecklist Finding records that are linked to the Inspection record.
• A blank Checklist Inspection report, the finding sections associated with the Inspection family forwhich you ran the report will appear, but the cells in the Value and Finding Summary columns will beempty.
The following image shows an example of the Checklist Findings section that is displayed when you runa Checklist Inspection Report for a particular Inspection record.
© 2020 General Electric Company 25
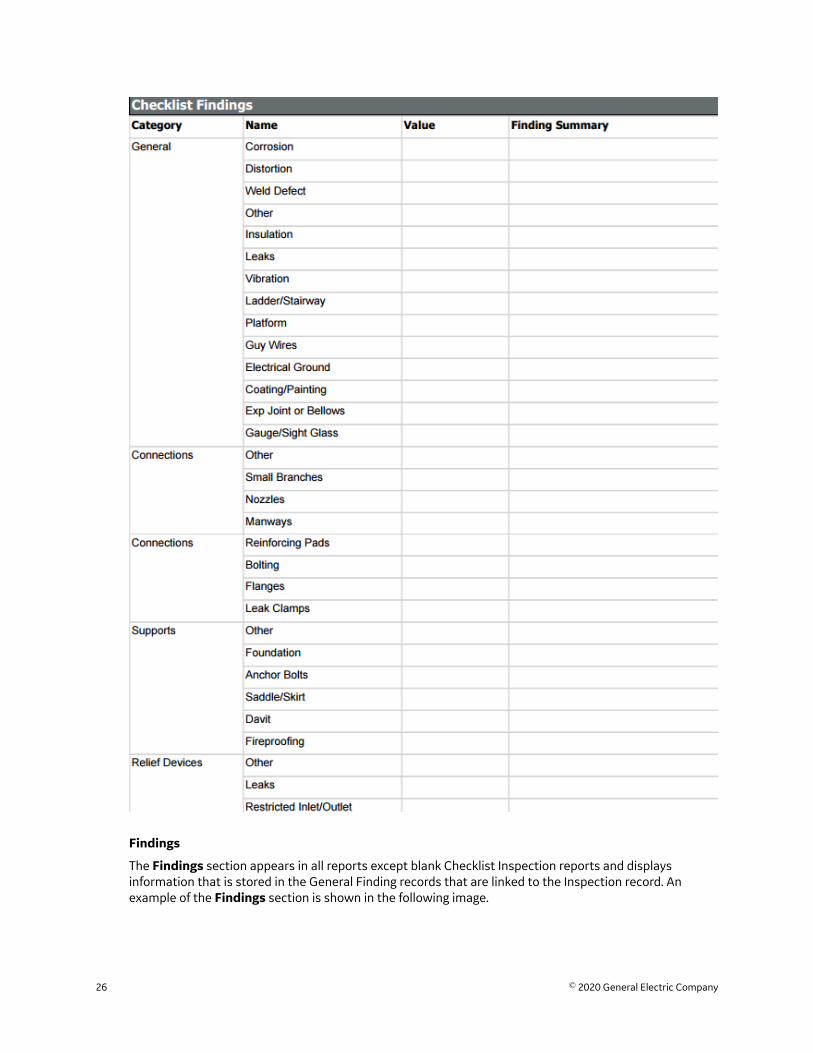
Findings
The Findings section appears in all reports except blank Checklist Inspection reports and displaysinformation that is stored in the General Finding records that are linked to the Inspection record. Anexample of the Findings section is shown in the following image.
26 © 2020 General Electric Company
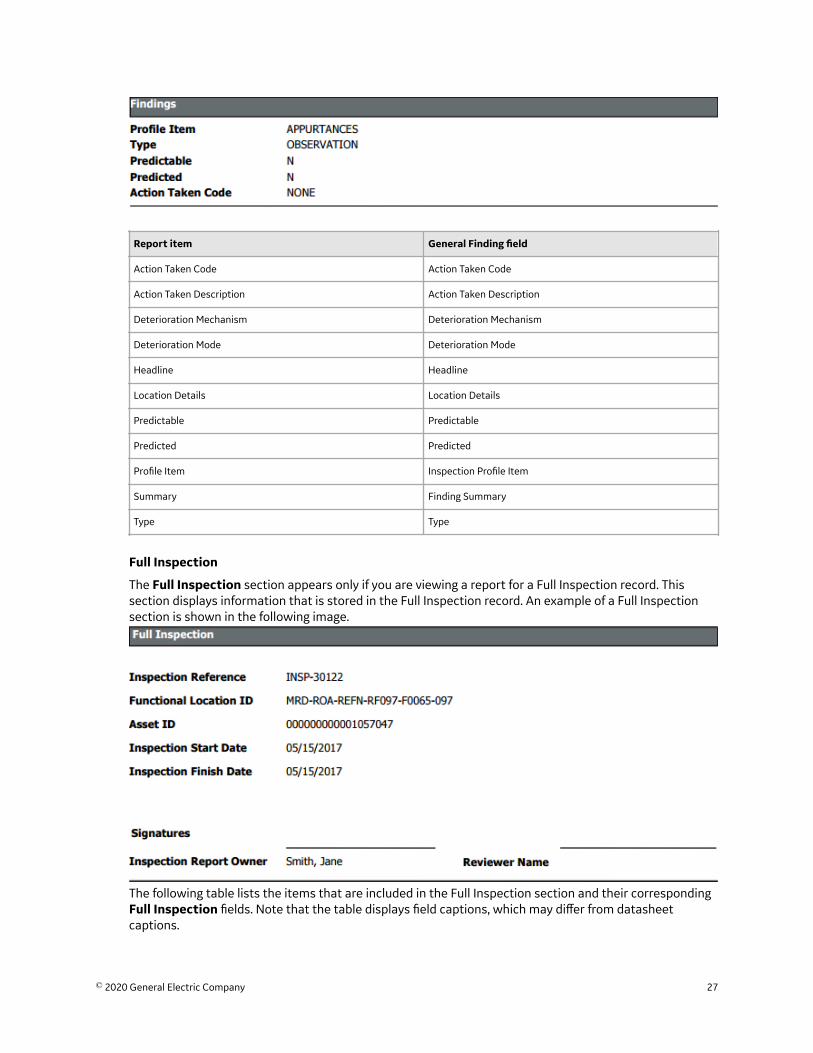
Report item General Finding field
Action Taken Code Action Taken Code
Action Taken Description Action Taken Description
Deterioration Mechanism Deterioration Mechanism
Deterioration Mode Deterioration Mode
Headline Headline
Location Details Location Details
Predictable Predictable
Predicted Predicted
Profile Item Inspection Profile Item
Summary Finding Summary
Type Type
Full Inspection
The Full Inspection section appears only if you are viewing a report for a Full Inspection record. Thissection displays information that is stored in the Full Inspection record. An example of a Full Inspectionsection is shown in the following image.
The following table lists the items that are included in the Full Inspection section and their correspondingFull Inspection fields. Note that the table displays field captions, which may differ from datasheetcaptions.
© 2020 General Electric Company 27

Report item Full Inspection field
Asset ID Asset ID
Functional Location ID Functional Location ID
Inspection Finish Date Completion Date
Inspection Headline Inspection Headline
Inspection Reference Inspection Reference
Inspection Start Date Commencement Date
Inspection Summary Inspection Summary
Inspection Report Owner Inspection Report Owner
Reason for Inspection Reason of Inspection
Reviewer Comments Reviewers Comments
Reviewer Name Reviewers Name
Type of Inspection Type of Inspection
Report item Reference Document Field
ID ID
Description Description
General Inspection
The General Inspection section appears only if you are viewing a report for a General Inspection record.This section displays information that is stored in the General Inspection record. An example of a GeneralInspection section is shown in the following image.
28 © 2020 General Electric Company

The following table lists the items that are included in the General Inspection section and theircorresponding General Inspection fields. Note that the table displays field captions, which may differ fromdatasheet captions.
Report item General Inspection field
Asset ID Asset ID
Functional Location ID Functional Location ID
Inspection Finish Date Completion Date
Inspection Headline Inspection Headline
Inspection Reference Inspection Reference
Inspection Start Date Commencement Date
Inspection Summary Inspection Summary
Inspection Report Owner Inspection Report Owner
Reason for Inspection Reason of Inspection
Reviewer Comments Reviewers Comments
Reviewer Name Reviewers Name
Type of Inspection Type of Inspection
Report item Reference Document Field
ID ID
Description Description
Inspection Team Members
The Inspection Team Members section appears in all reports except blank Checklist Inspection reportsand displays information that is stored in the Inspection Team Member records that are linked to theInspection record. An example of the Inspection Team Members section is shown in the following image.
Pressure Test Inspection
The Pressure Test Inspection section appears only if you are viewing a report for a Pressure TestInspection record. This section displays information that is stored in the Pressure Test Inspection record.An example of the Pressure Test Inspection section is shown in the following image.
© 2020 General Electric Company 29
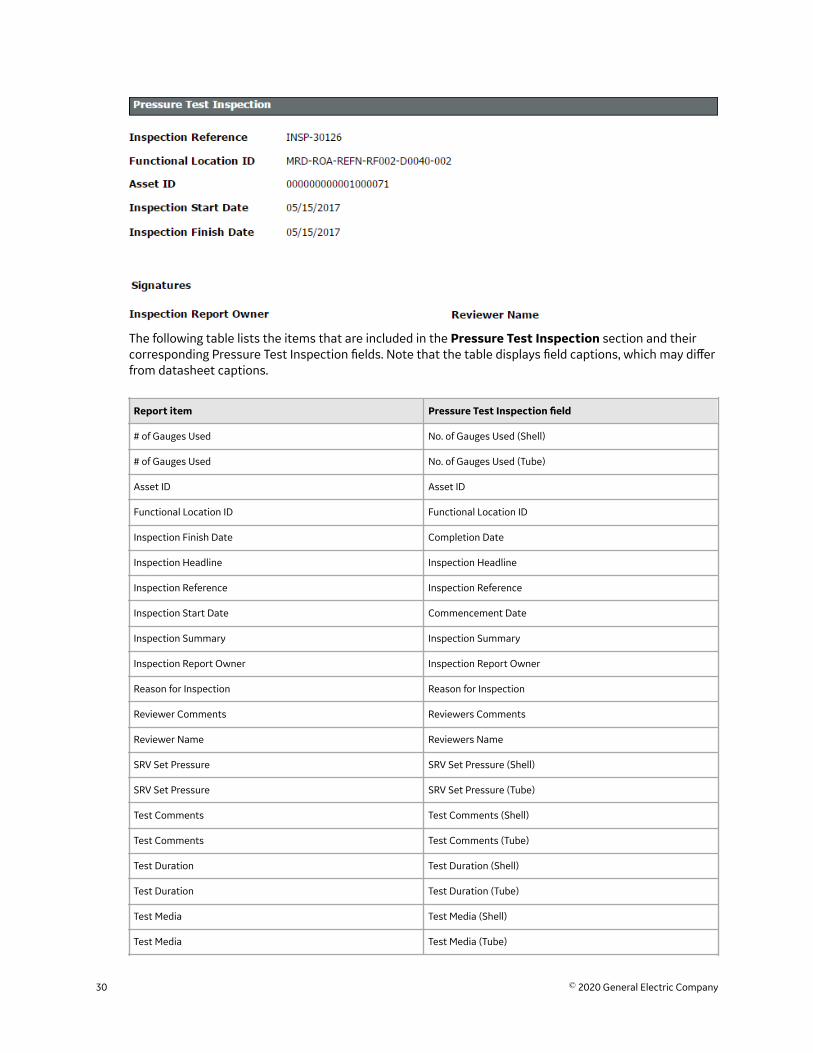
The following table lists the items that are included in the Pressure Test Inspection section and theircorresponding Pressure Test Inspection fields. Note that the table displays field captions, which may differfrom datasheet captions.
Report item Pressure Test Inspection field
# of Gauges Used No. of Gauges Used (Shell)
# of Gauges Used No. of Gauges Used (Tube)
Asset ID Asset ID
Functional Location ID Functional Location ID
Inspection Finish Date Completion Date
Inspection Headline Inspection Headline
Inspection Reference Inspection Reference
Inspection Start Date Commencement Date
Inspection Summary Inspection Summary
Inspection Report Owner Inspection Report Owner
Reason for Inspection Reason for Inspection
Reviewer Comments Reviewers Comments
Reviewer Name Reviewers Name
SRV Set Pressure SRV Set Pressure (Shell)
SRV Set Pressure SRV Set Pressure (Tube)
Test Comments Test Comments (Shell)
Test Comments Test Comments (Tube)
Test Duration Test Duration (Shell)
Test Duration Test Duration (Tube)
Test Media Test Media (Shell)
Test Media Test Media (Tube)
30 © 2020 General Electric Company

Report item Pressure Test Inspection field
Test Media Temp. Test Media Temperature (Shell)
Test Media Temp. Test Media Temperature (Tube)
Test Pressure Test Pressure (Shell)
Test Pressure Test Pressure (Tube)
Type of Inspection Type of Inspection
Witnessed By Witnessed By (Shell)
Witnessed By Witnessed By (Tube)
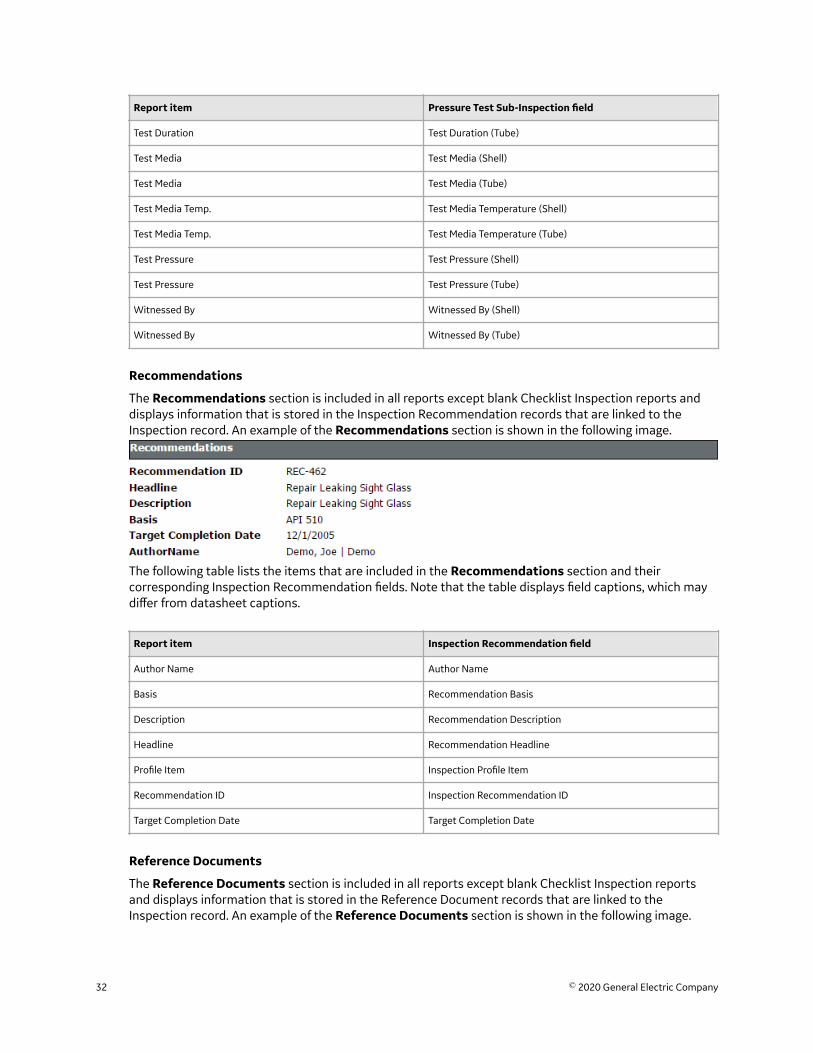
Pressure Test Sub Inspections Section
The Pressure Test Sub Inspections section appears if you are viewing a report for one of the followingrecords:
• Bundle Inspection• Checklists (except blank Checklist Inspection reports)• Full Inspection• General Inspection
This section displays information that is stored in the Pressure Test Sub-Inspection records that are linkedto the Inspection record. An example of the Pressure Test Sub Inspections section is shown in thefollowing image.
The following table lists the items that are included in the Pressure Test Sub Inspections section andtheir corresponding Pressure Test Sub-Inspection fields. Note that the table displays field captions, whichmay differ from datasheet captions.
Report item Pressure Test Sub-Inspection field
# of Gauges Used No. of Gauges Used (Shell)
# of Gauges Used No. of Gauges Used (Tube)
SRV Set Pressure SRV Set Pressure (Shell)
SRV Set Pressure SRV Set Pressure (Tube)
Test Comments Test Comments (Shell)
Test Comments Test Comments (Tube)
Test Duration Test Duration (Shell)
© 2020 General Electric Company 31
Report item Pressure Test Sub-Inspection field
Test Duration Test Duration (Tube)
Test Media Test Media (Shell)
Test Media Test Media (Tube)
Test Media Temp. Test Media Temperature (Shell)
Test Media Temp. Test Media Temperature (Tube)
Test Pressure Test Pressure (Shell)
Test Pressure Test Pressure (Tube)
Witnessed By Witnessed By (Shell)
Witnessed By Witnessed By (Tube)
Recommendations
The Recommendations section is included in all reports except blank Checklist Inspection reports anddisplays information that is stored in the Inspection Recommendation records that are linked to theInspection record. An example of the Recommendations section is shown in the following image.
The following table lists the items that are included in the Recommendations section and theircorresponding Inspection Recommendation fields. Note that the table displays field captions, which maydiffer from datasheet captions.
Report item Inspection Recommendation field
Author Name Author Name
Basis Recommendation Basis
Description Recommendation Description
Headline Recommendation Headline
Profile Item Inspection Profile Item
Recommendation ID Inspection Recommendation ID
Target Completion Date Target Completion Date
Reference Documents
The Reference Documents section is included in all reports except blank Checklist Inspection reportsand displays information that is stored in the Reference Document records that are linked to theInspection record. An example of the Reference Documents section is shown in the following image.
32 © 2020 General Electric Company

The following table lists the items that are included in the Reference Documents section and theircorresponding Reference Document fields. Note that the table displays field captions, which may differfrom datasheet captions.
Report item Reference Document field
Description Description
Document Path Document Path
Reference Document ID ID
About Inspection ChecklistsThe Inspection Finding Checklist represents subcomponents belonging to the item that you areinspecting. Since the subcomponents that you will need to inspect will differ based upon the type ofinspection that you are performing, the items that appear in the Inspection Finding Checklist will differbased upon the Inspection subfamily.
Checklist Details
The baseline Inspection families are:
• Checklist Inspection Template• External Checklist• Internal Checklist• Internal Exchanger Checklist• PRD Pop Test Checklist
Each of these families is hard-coded to use a particular System Code Table to create the finding sectionsand rows that appear in the grid on the Inspection Findings Checklist page. The sections and rows onthe Inspection Findings Checklist page are built from System Code Tables and referenced SystemCodes.
Note: The Checklist Inspection Template family is not hard-coded to include specific Checklist Findings.The Checklist Findings are defined by the checklist categories and items for the Checklist ConfigurationTemplate.
Tip: If you create custom Checklists subfamilies, you must add the Checklist System Code Table ID field(i.e., a field in the Checklists family) to the custom family.
Example: API 653 External Checklist Findings
The baseline GE Digital APM database contains the following System Code Table:
• ID: MI API 653 EXTERNAL CHECKLIST FINDING SECTIONS• Description: API 653 External Checklist Finding Section
This System Code Table contains the following System Codes:
• General• Connections
© 2020 General Electric Company 33
• Supports
Each of the System Codes that belong to this System Code Table contain referenced System Codes. Forexample, the System Code Supports contains the following referenced System Codes:
• Anchor Bolts• Dike/Retaining Wall• Foundation• Other
Together, the System Code Tables, System Codes, and referenced System Codes determine whichsections and rows you will see on the Inspection Finding Checklist page. Using this example:
• Each System Code belonging to the System Code Table MI API 653 EXTERNAL CHECKLIST FINDINGSECTIONS becomes a finding section.
• In each finding section, each referenced System Code becomes a separate row.
Each field within the checklist can be modified by the user to best fit the work process.
About Active and Archived InspectionsInspections that are still in the process of being completed or reviewed are referred to as ActiveInspections.
Archived Inspections are Inspections that have been reviewed, locked, and archived.
Locking the Inspection record ensures that the information that you supplied will not be deleted ormodified. After you lock an Inspection record, you cannot unlock it. You can lock Inspection recordsdefined for any of the following families by accessing Record Manager.
• Bundle Inspection• Full Inspection• General Inspection• Pressure Test Sub-Inspection
About Inspection IntervalsAn inspection interval identifies the length of time between Equipment inspections. Various factors willimpact the inspection intervals that you will define at various levels in your location hierarchy.
About Inspection Intervals
When populating the value in the Desired Interval field in Inspection Tasks, the GE Digital APM Systemuses the value stored in the Time-Based Inspection Interval Settings that you defined.
Example: Inspection Intervals
For example, jurisdictional regulations might dictate that a particular inspection must be conducted everytwo months. However, your organizational policy might dictate that this particular inspection beconducted every 30 days. In this case, you would define an inspection interval of 30 days.
34 © 2020 General Electric Company

Access the Inspection Data Section
Procedure
1. Access the Inspection Management Overview page for the equipment whose inspection data youwant to access.
2. Select the Inspections tab, and then, in the row containing the Inspection whose data you want toaccess, select the link.The Inspection Overview workspace for the selected Inspection appears, displaying the InspectionData section.
Note: The Inspection record and all related Inspection Confidence Evaluations, Team Members, sub-inspection records, and recommendations are read-only when an inspection is downloaded forInspection Field Data Collection.
Access Inspection Checklist
Procedure
1. Access the Inspection Data section.2. In the left pane, select the inspection type containing the checklist Inspection that you want to view.
One or more checklist inspections appear under the selected inspection type.
3. Next to the checklist title, select to view the checklist.The selected checklist appears in the workspace.
© 2020 General Electric Company 35
Tip: As needed, you can modify the fields in the datasheet, and then select to save your changes.
Results
• You can now make adjustments to the Inspection Data section by accessing the Record Manager.
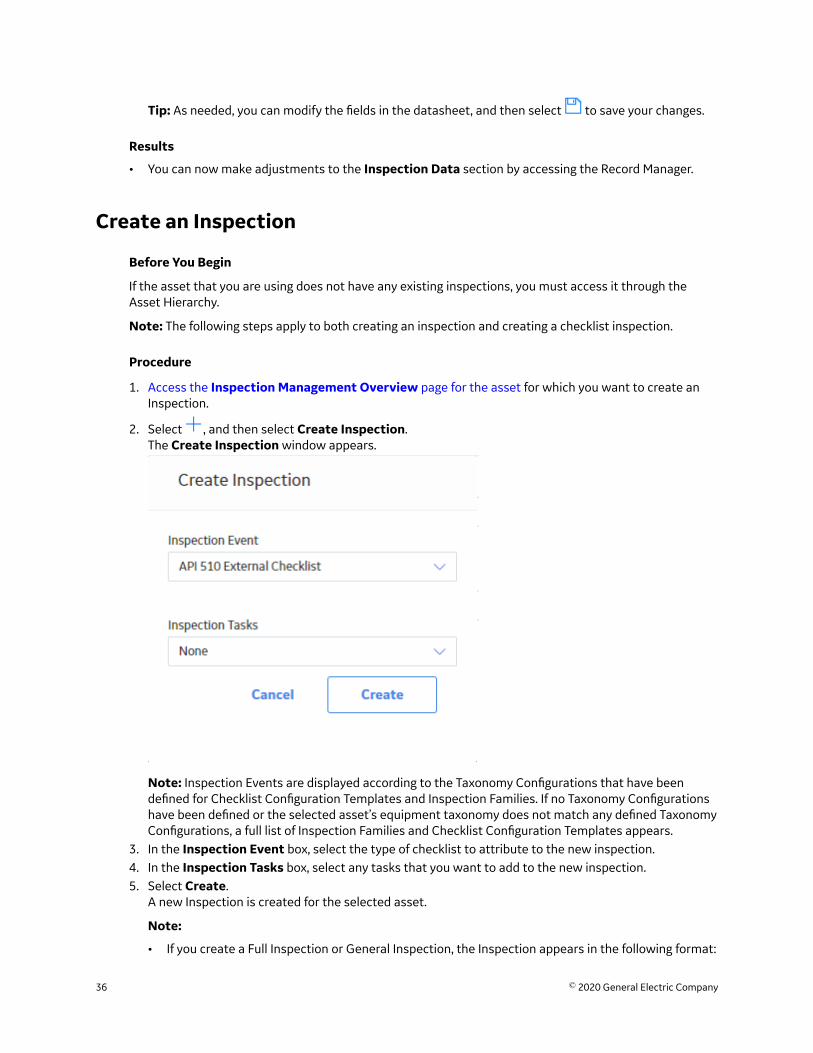
Create an Inspection
Before You Begin
If the asset that you are using does not have any existing inspections, you must access it through theAsset Hierarchy.
Note: The following steps apply to both creating an inspection and creating a checklist inspection.
Procedure
1. Access the Inspection Management Overview page for the asset for which you want to create anInspection.
2. Select , and then select Create Inspection.The Create Inspection window appears.
Note: Inspection Events are displayed according to the Taxonomy Configurations that have beendefined for Checklist Configuration Templates and Inspection Families. If no Taxonomy Configurationshave been defined or the selected asset’s equipment taxonomy does not match any defined TaxonomyConfigurations, a full list of Inspection Families and Checklist Configuration Templates appears.
3. In the Inspection Event box, select the type of checklist to attribute to the new inspection.4. In the Inspection Tasks box, select any tasks that you want to add to the new inspection.5. Select Create.
A new Inspection is created for the selected asset.
Note:
• If you create a Full Inspection or General Inspection, the Inspection appears in the following format:
36 © 2020 General Electric Company
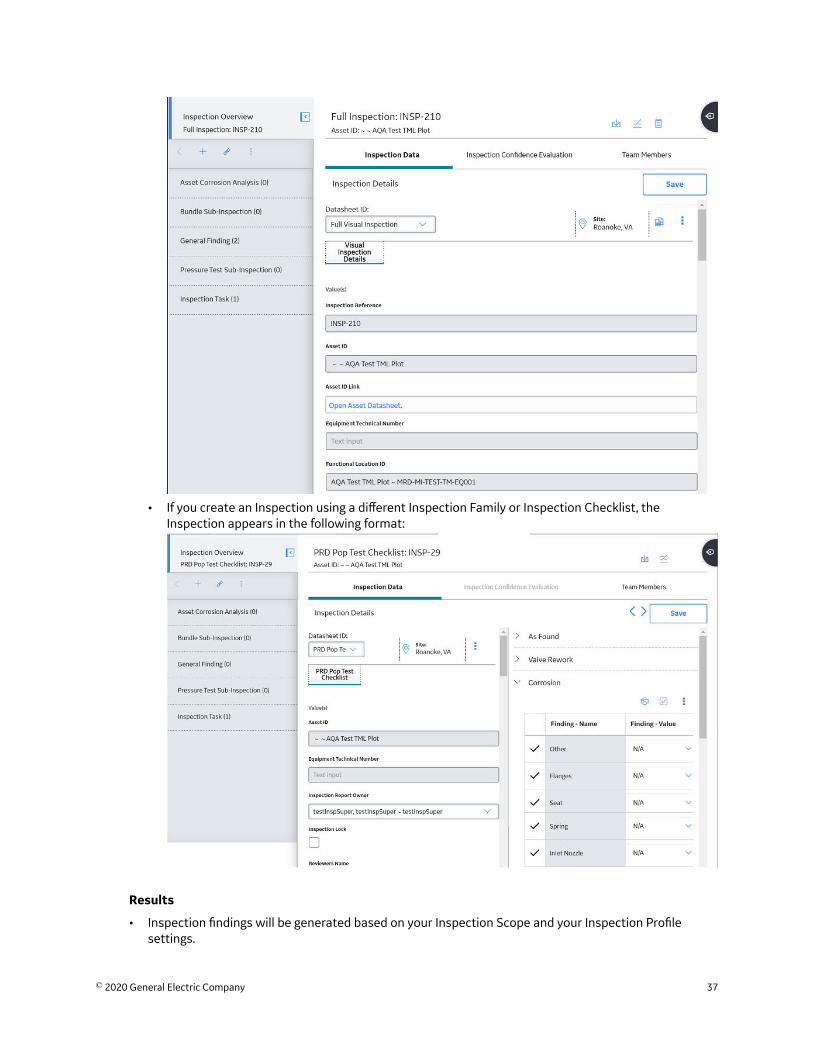
• If you create an Inspection using a different Inspection Family or Inspection Checklist, theInspection appears in the following format:
Results
• Inspection findings will be generated based on your Inspection Scope and your Inspection Profilesettings.
© 2020 General Electric Company 37
• The new inspection is saved. You can modify the inspection by accessing the datasheet, and then
selecting to save your changes.• Full Inspection Event Family findings will be generated automatically.• Checklist Inspections will never be generated automatically.• Other Event Families will require event configurations.• If you selected an Inspection Event that represents a Checklist Configuration Template, the Inspection
Event from the family defined for the Checklist Configuration Template is generated, and all ChecklistFindings defined by the Checklist Configuration Template are created.
Next Steps
• Add an inspection profile
Assign Inspections to a User
Procedure
1. Access the Inspection Data section for the Inspection record that you want to assign to a user.2. In the Inspection Report Owner box, select the name of the user to whom you want to assign the
selected inspection.
3. Select .
The Inspection is assigned to the selected user.
Delete an Inspection
About This Task
Note: You cannot delete locked Inspections.
Procedure
1. Access the Inspection Management Overview page for the equipment that is linked to theInspection you want to delete.
2. Select the Inspections tab.
The Inspections section appears.
38 © 2020 General Electric Company
3. Select the row containing the Inspection that you want to delete.4. In the upper-right corner of the section, select .
A message appears, asking you to confirm that you want to delete the Inspection.5. Select Yes.
The Inspection is deleted.
Approve Bulk Review Inspections
Before You Begin
• You must be set as the reviewer in the Reviewer's Name field of the Inspection Data record.• You must also have a Human Resource record and a Resource Role of Inspection Supervisor .
Procedure
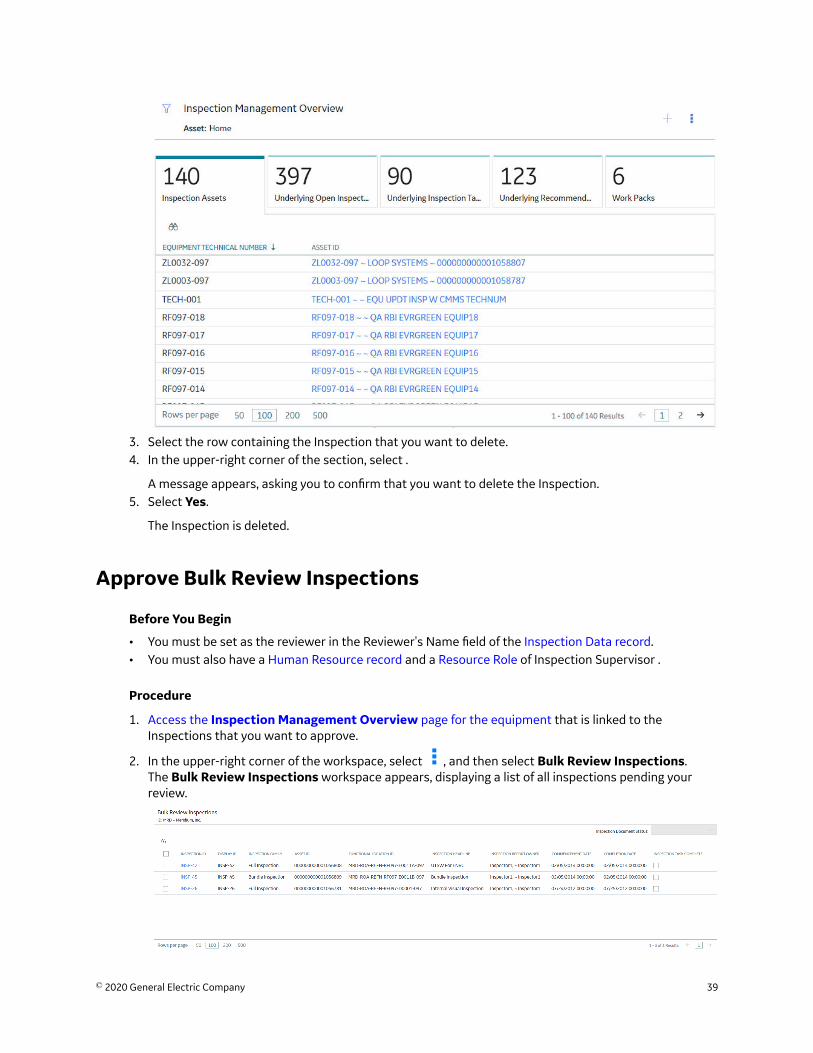
1. Access the Inspection Management Overview page for the equipment that is linked to theInspections that you want to approve.
2. In the upper-right corner of the workspace, select , and then select Bulk Review Inspections.The Bulk Review Inspections workspace appears, displaying a list of all inspections pending yourreview.
© 2020 General Electric Company 39

3. Next to the Inspection IDs of one or more inspections that you want to approve, select the checkboxes.
4. In the upper-right corner of the workspace, in the Inspection Document Status box, select , andthen select Approved (APPROVED).
Note: You can choose any available state in the Inspection Document Status box.
The Bulk Review Inspections window appears, asking you to confirm that you want to change thedocument status.
Tip: In the Reviewer's Comments box associated with each inspection, you can enter commentsabout the inspections.
5. Select Save.The document status for the selected inspections is approved and the inspections are removed fromthe list of available inspections.
Lock an Inspection
About This Task
After you create an Inspection record, you can lock it so that others cannot modify it. Locking theInspection record ensures that the information that you provided is not deleted or modified.
Important: After an Inspection is locked, only an Inspection Report Owner of that Inspection can unlockit.
Procedure
1. Access the Inspection Data section for the Inspection record that you want to lock.2. Select the Inspection Lock check box, and then select Save.
The Inspection is now locked and cannot be deleted or modified.
40 © 2020 General Electric Company
Note: You can select the Inspection Lock check box only if your name is selected in the InspectionReport Owner field.
3. Optional: Select the Final Inspection Lock check box, and then select Save.This indicates that the inspection has been properly reviewed.
Results
All fields except for the following become disabled:
• Inspection Document Status• Inspection Lock• Reviewers Name• Reviewers Comments• Final Inspection Lock• Published
Add a Related Record
Procedure
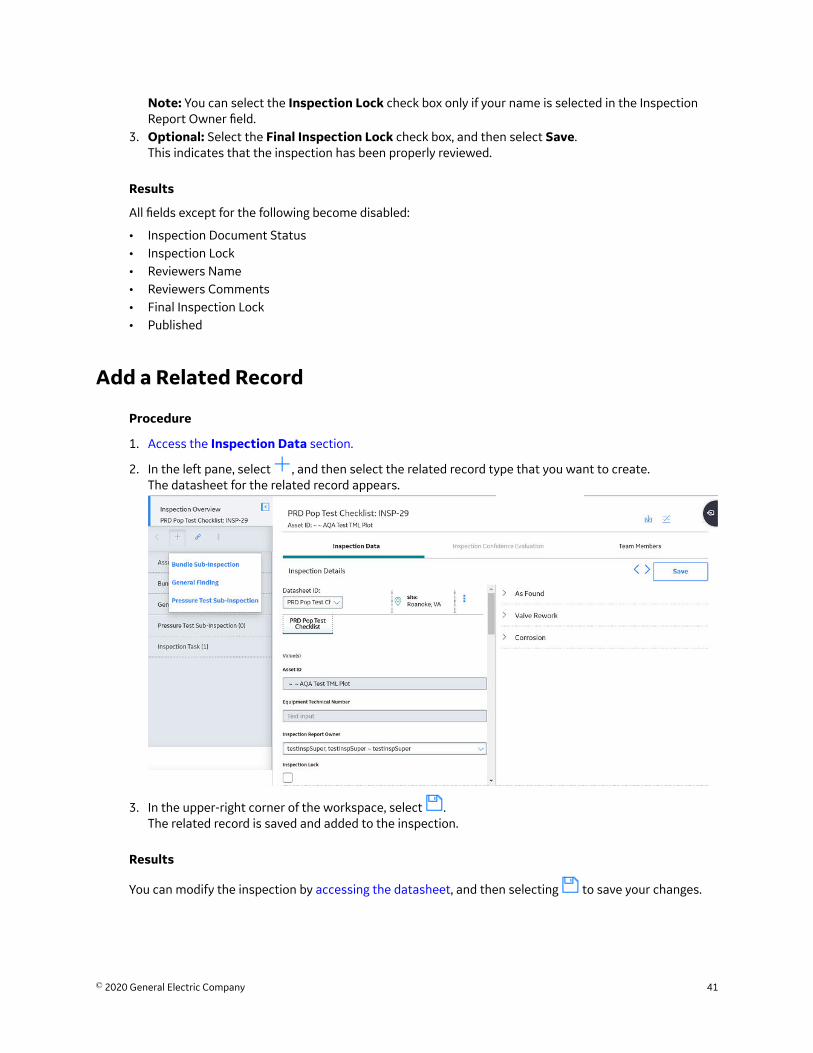
1. Access the Inspection Data section.
2. In the left pane, select , and then select the related record type that you want to create.The datasheet for the related record appears.
3. In the upper-right corner of the workspace, select .The related record is saved and added to the inspection.
Results
You can modify the inspection by accessing the datasheet, and then selecting to save your changes.
© 2020 General Electric Company 41

Link a Related Record to an Inspection
Procedure
1. Access the Inspection Data section.
2. In the left pane, select , and then select the related record type that you want to link to theInspection.The Link <Type of Related Inspection> to <Asset> window appears.
3. Search for the related record that you want to link, and then, next to that record, select the radiobutton.
Note: Only related families that can be linked to the selected Inspection will appear in the list.4. Select OK.
The related record is linked to the selected Inspection.
Link Reference Document to an Inspection
Procedure
1. Access the Inspection Data section.
2. Select , and then select Reference Documents.
42 © 2020 General Electric Company
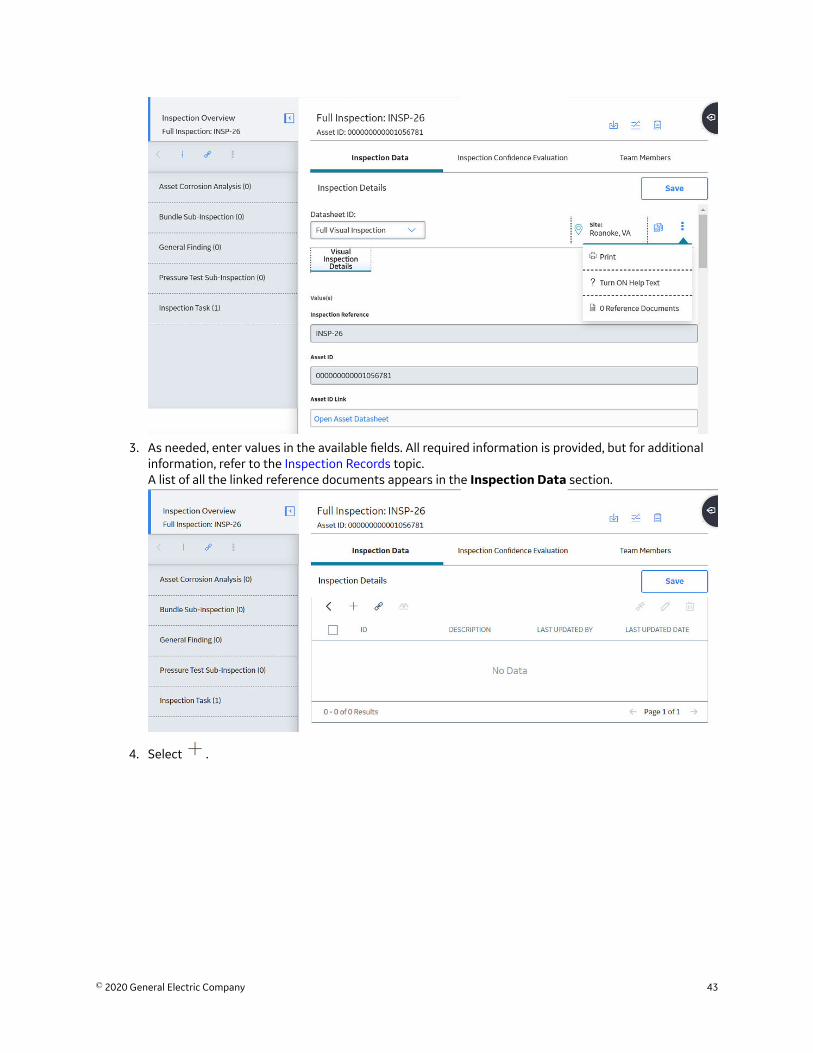
3. As needed, enter values in the available fields. All required information is provided, but for additionalinformation, refer to the Inspection Records topic.A list of all the linked reference documents appears in the Inspection Data section.
4. Select .
© 2020 General Electric Company 43
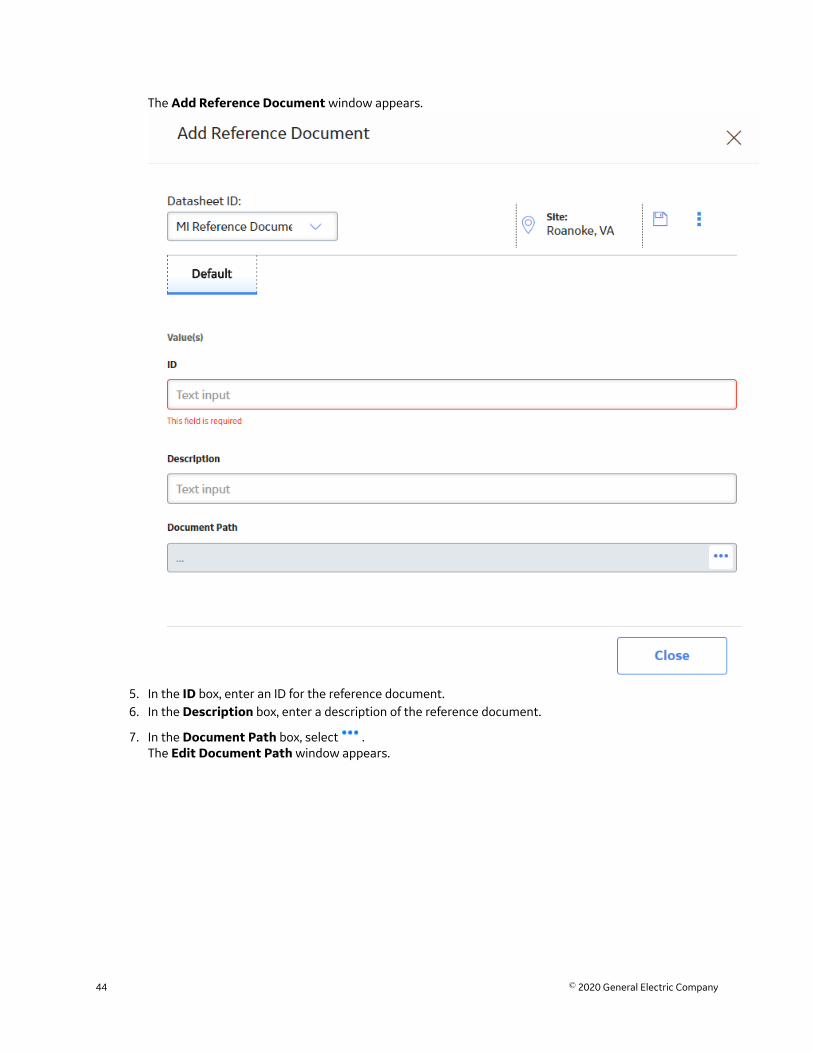
The Add Reference Document window appears.
5. In the ID box, enter an ID for the reference document.6. In the Description box, enter a description of the reference document.
7. In the Document Path box, select .The Edit Document Path window appears.
44 © 2020 General Electric Company
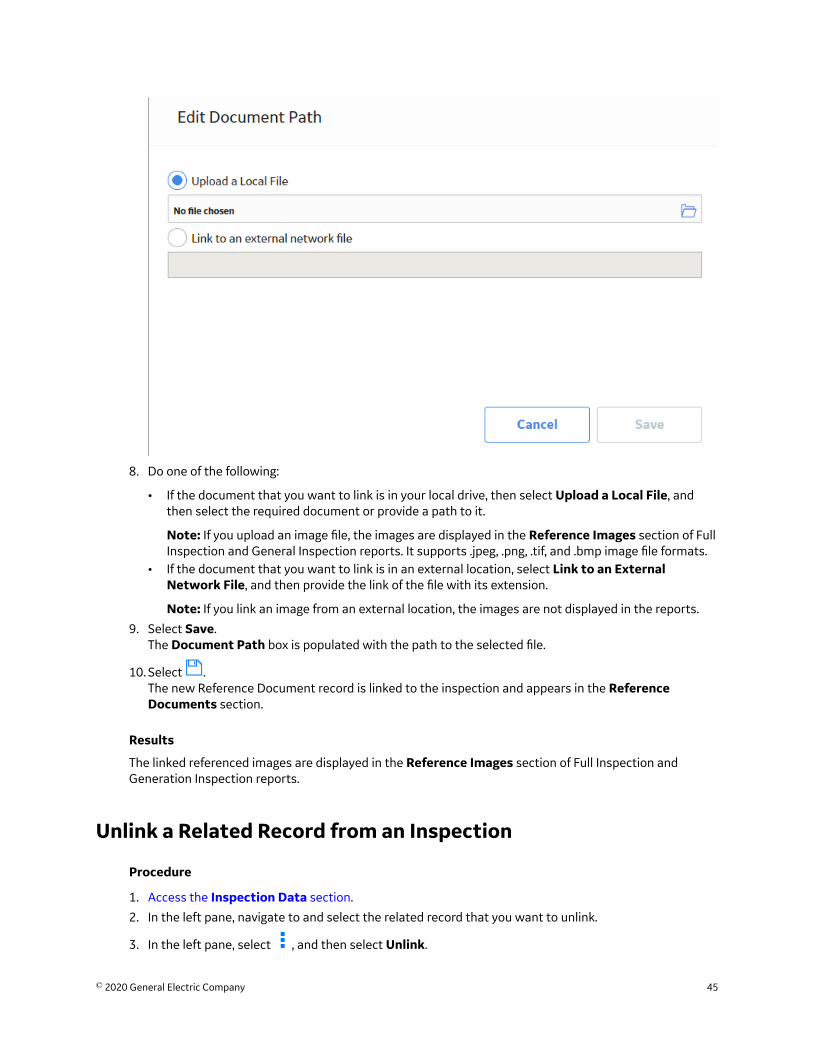
8. Do one of the following:
• If the document that you want to link is in your local drive, then select Upload a Local File, andthen select the required document or provide a path to it.
Note: If you upload an image file, the images are displayed in the Reference Images section of FullInspection and General Inspection reports. It supports .jpeg, .png, .tif, and .bmp image file formats.
• If the document that you want to link is in an external location, select Link to an ExternalNetwork File, and then provide the link of the file with its extension.
Note: If you link an image from an external location, the images are not displayed in the reports.
9. Select Save.The Document Path box is populated with the path to the selected file.
10. Select .The new Reference Document record is linked to the inspection and appears in the ReferenceDocuments section.
Results
The linked referenced images are displayed in the Reference Images section of Full Inspection andGeneration Inspection reports.
Unlink a Related Record from an Inspection
Procedure
1. Access the Inspection Data section.
2. In the left pane, navigate to and select the related record that you want to unlink.
3. In the left pane, select , and then select Unlink.
© 2020 General Electric Company 45

A message appears, asking you to confirm that you want to unlink the related record.4. Select Yes.
The related record is unlinked from the selected Inspection.
Delete a Related Record
Procedure
1. Access the Inspection Data section.2. In the left pane, navigate to and select the related record that you want to delete.
3. In the heading of the left pane, select , and then select Delete.
A message appears, asking you to confirm that you want to delete the related record and all of its linksto other records.
4. Select Yes.
The related record has been deleted from the selected Inspection.5. Select Yes.
Access Inspection Reports
Procedure
1. Access the Inspection Data section.
2. In the upper-right corner of the section, select , and then select Print.The Select a Report to Print window appears.
3. Select the Print a report check box, and then select the type of inspection report that you want toaccess.
4. Select OK.The selected Inspection Report appears on a new page.
46 © 2020 General Electric Company

Access Reference Documents
Procedure
1. Access the Inspection Data section for the Inspection containing the Reference Documents that youwant to view.
2. In the upper-right corner of the section, select , and then select Reference Documents.
The Reference Documents for the selected Inspection appear.
Tip: For Checklist Inspections, you must access Reference Documents through the Bulk Data Form.
Tip: For more information, refer to the Reference Documents section of the documentation.
Add Inspection Confidence Evaluations
Procedure
1. Access the Inspection Data section.2. Select the Inspection Confidence Evaluation tab.
The Inspection Confidence Evaluation section appears.
3. As needed, enter values in the available fields. All required information is provided, but for additionalinformation, refer to the Inspection Records topic.
a. In the RBI Component field, select the RBI Component that you want to add to the InspectionConfidence Evaluation.
Note: Only the RBI Components that are linked to the related Asset are displayed in this field. If theAsset does not have RBI Components, then this list is empty.
The Filter check-box is selected and the degradation mechanisms are filtered based on theselected RBI component.
b. Optionally, clear the Filter check box to display all the degradation mechanisms.
Note: Note: This field is disabled if there is no value in RBI Component field.
© 2020 General Electric Company 47
c. In the Degradation Mechanism field, select the degradations mechanism that you want to add tothe Inspection Confidence Evaluation.
d. In the Type of Inspection field, select the inspection type that you want to add to the InspectionConfidence Evaluation.
e. In the Extent field, select the extent that you want to add to the Inspection Confidence Evaluation.
4. Select .A new Inspection Confidence Evaluation is added to the selected inspection, and a new row appears.
Tip: As needed, you can repeat steps 3 and 4 to add additional records to Inspection ConfidenceEvaluation.
Results
You can now link an Inspection Confidence Evaluation to an RBI Degradation Mechanism Evaluation.
Review Inspection Confidence Evaluation
Before You Begin
• Make sure that the Risk Analyst resource role is assigned to you.• Make sure that the Allow Risk Analyst to Review Inspection Confidence Evaluation Records
check box is selected in Application Configurations section of the Inspection Configurationworkspace.
Procedure
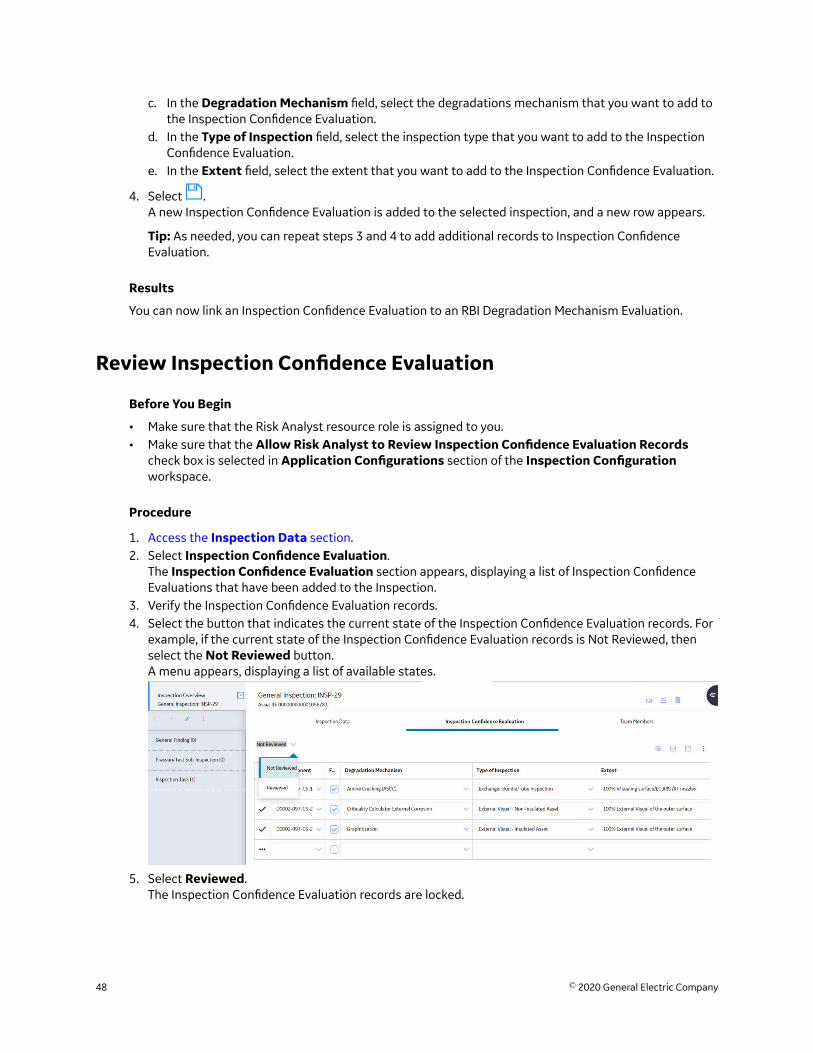
1. Access the Inspection Data section.2. Select Inspection Confidence Evaluation.
The Inspection Confidence Evaluation section appears, displaying a list of Inspection ConfidenceEvaluations that have been added to the Inspection.
3. Verify the Inspection Confidence Evaluation records.4. Select the button that indicates the current state of the Inspection Confidence Evaluation records. For
example, if the current state of the Inspection Confidence Evaluation records is Not Reviewed, thenselect the Not Reviewed button.A menu appears, displaying a list of available states.
5. Select Reviewed.The Inspection Confidence Evaluation records are locked.
48 © 2020 General Electric Company
Results
• Any user who does not have the Risk Analyst resource role cannot add, update, or modify theInspection Confidence Evaluation records.
• Your user name appears above the section to indicate other users about who locked the InspectionConfidence Evaluation records.
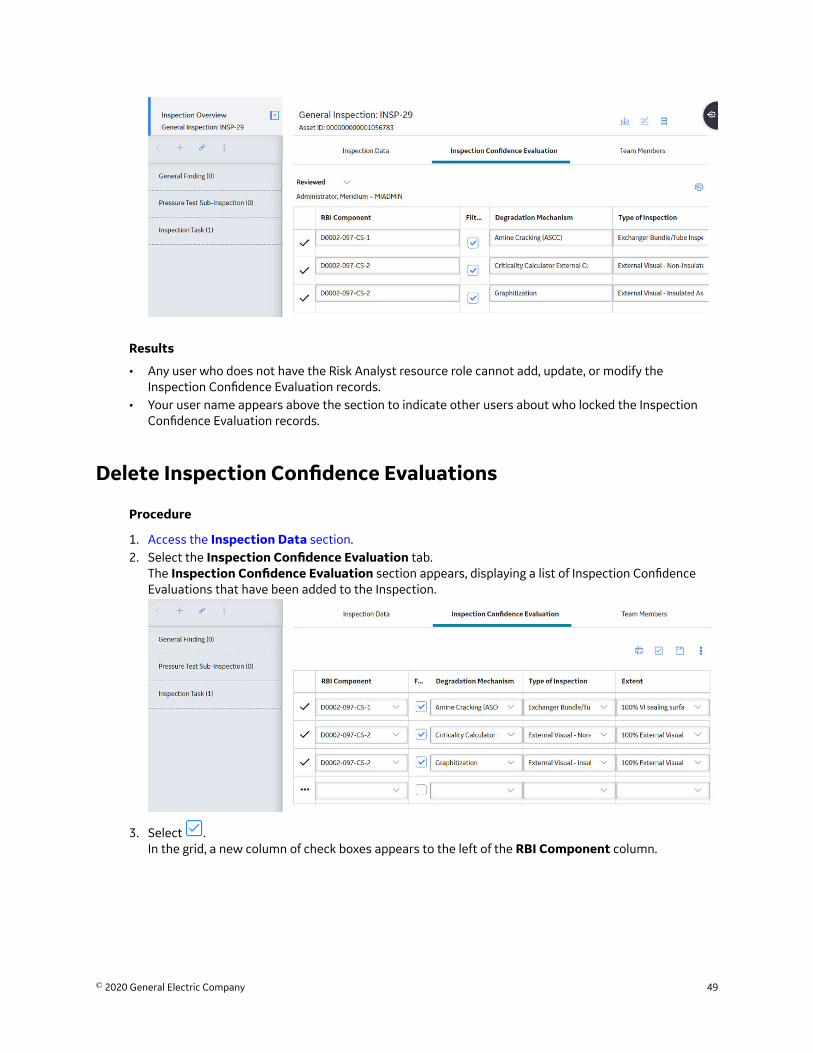
Delete Inspection Confidence Evaluations
Procedure
1. Access the Inspection Data section.2. Select the Inspection Confidence Evaluation tab.
The Inspection Confidence Evaluation section appears, displaying a list of Inspection ConfidenceEvaluations that have been added to the Inspection.
3. Select .In the grid, a new column of check boxes appears to the left of the RBI Component column.
© 2020 General Electric Company 49
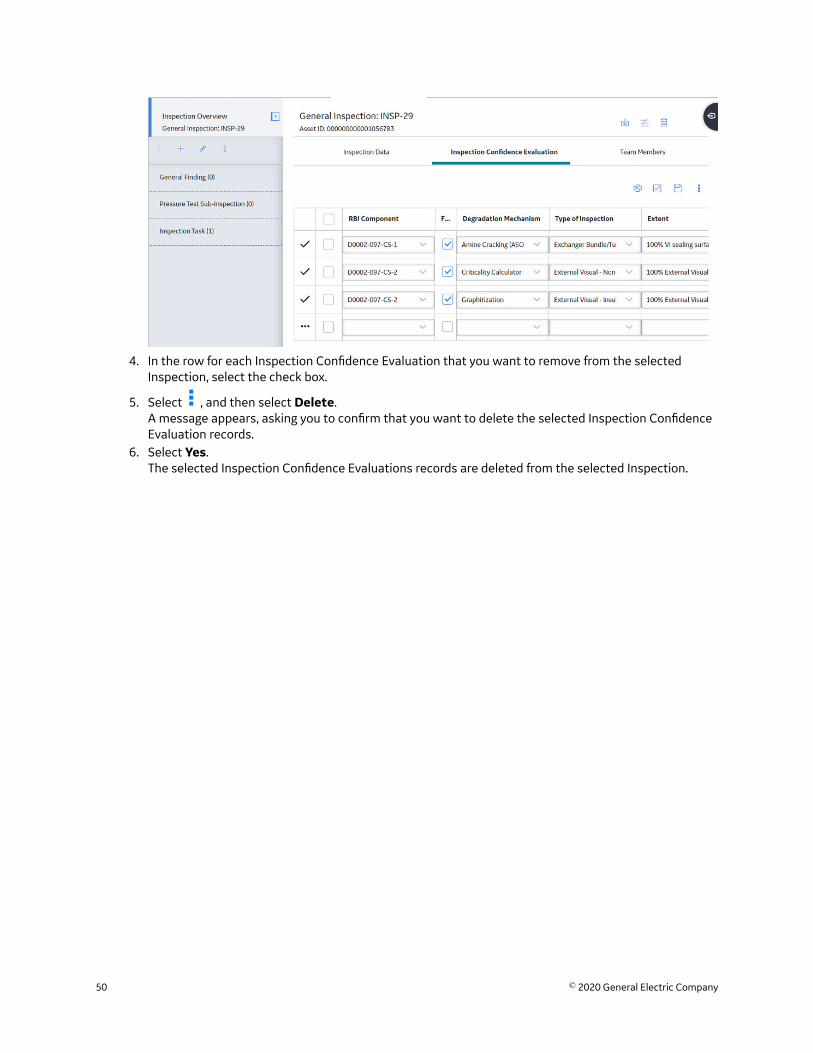
4. In the row for each Inspection Confidence Evaluation that you want to remove from the selectedInspection, select the check box.
5. Select , and then select Delete.A message appears, asking you to confirm that you want to delete the selected Inspection ConfidenceEvaluation records.
6. Select Yes.The selected Inspection Confidence Evaluations records are deleted from the selected Inspection.
50 © 2020 General Electric Company
Chapter
4Inspection ProfilesTopics:
• About Inspection Profile• About Inspection Scope• About Creating and Modifying
Inspection Scope• Access the Inspection Profile
Details Section• Create an Inspection Profile• Add an Existing Inspection
Profile• Manage Sequence Definitions
for an Inspection Profile• Delete an Inspection Profile• Access the Inspection Methods
Section• Add an Inspection Method• Delete Inspection Methods• Access an Inspection Scope• Define the Inspection Scope
© 2020 General Electric Company 51
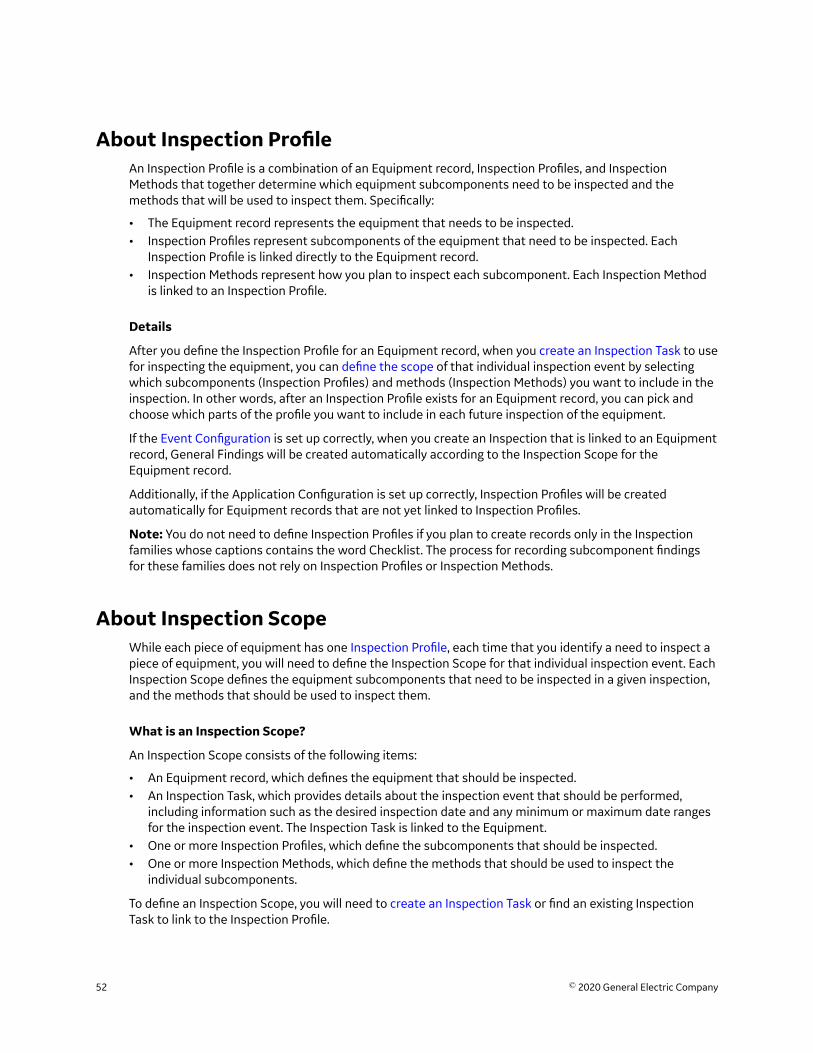
About Inspection ProfileAn Inspection Profile is a combination of an Equipment record, Inspection Profiles, and InspectionMethods that together determine which equipment subcomponents need to be inspected and themethods that will be used to inspect them. Specifically:
• The Equipment record represents the equipment that needs to be inspected.• Inspection Profiles represent subcomponents of the equipment that need to be inspected. Each
Inspection Profile is linked directly to the Equipment record.• Inspection Methods represent how you plan to inspect each subcomponent. Each Inspection Method
is linked to an Inspection Profile.
Details
After you define the Inspection Profile for an Equipment record, when you create an Inspection Task to usefor inspecting the equipment, you can define the scope of that individual inspection event by selectingwhich subcomponents (Inspection Profiles) and methods (Inspection Methods) you want to include in theinspection. In other words, after an Inspection Profile exists for an Equipment record, you can pick andchoose which parts of the profile you want to include in each future inspection of the equipment.
If the Event Configuration is set up correctly, when you create an Inspection that is linked to an Equipmentrecord, General Findings will be created automatically according to the Inspection Scope for theEquipment record.
Additionally, if the Application Configuration is set up correctly, Inspection Profiles will be createdautomatically for Equipment records that are not yet linked to Inspection Profiles.
Note: You do not need to define Inspection Profiles if you plan to create records only in the Inspectionfamilies whose captions contains the word Checklist. The process for recording subcomponent findingsfor these families does not rely on Inspection Profiles or Inspection Methods.
About Inspection ScopeWhile each piece of equipment has one Inspection Profile, each time that you identify a need to inspect apiece of equipment, you will need to define the Inspection Scope for that individual inspection event. EachInspection Scope defines the equipment subcomponents that need to be inspected in a given inspection,and the methods that should be used to inspect them.
What is an Inspection Scope?
An Inspection Scope consists of the following items:
• An Equipment record, which defines the equipment that should be inspected.• An Inspection Task, which provides details about the inspection event that should be performed,
including information such as the desired inspection date and any minimum or maximum date rangesfor the inspection event. The Inspection Task is linked to the Equipment.
• One or more Inspection Profiles, which define the subcomponents that should be inspected.• One or more Inspection Methods, which define the methods that should be used to inspect the
individual subcomponents.
To define an Inspection Scope, you will need to create an Inspection Task or find an existing InspectionTask to link to the Inspection Profile.
52 © 2020 General Electric Company
Note: You do not need to define an Inspection Scope if you plan to create records only in the Inspectionfamilies whose captions contain the word Checklist. The process for recording subcomponent findings forthese families does not rely on Inspection Profiles or Inspection Methods.
How is an Inspection Scope Used?
Each Inspection Scope consists of an Equipment record, an Inspection Task, one or more InspectionProfiles, and one or more Inspection Methods.
When you create an Inspection that is linked to an Equipment Record, the GE Digital APM systemgenerates General Findings automatically. The number of findings that are created automatically is basedon the Inspection Profiles and Inspection Methods included in the Inspection Scope.
Note: If you plan to only create records in the Inspection families whose captions contain the wordChecklist, you do not need to define an Inspection Scope. The process for recording subcomponentfindings for these families does not rely on Inspection Profiles or Inspection Methods.
About Creating and Modifying Inspection ScopeWhen you create a new Inspection Scope, you will need to:
• Select the equipment for which you want to create a new Inspection Scope.• Select the subcomponents (i.e., Inspection Profiles that you want to inspect).• Select the Inspection Methods that you want to use for the selected subcomponents.• Create a new Inspection Task that you want to include in the new Inspection Scope.
Details
If more than one inspection interval is defined for a particular task type, the Desired Interval field will bepopulated with the most conservative (i.e., lowest), non-zero inspection interval.
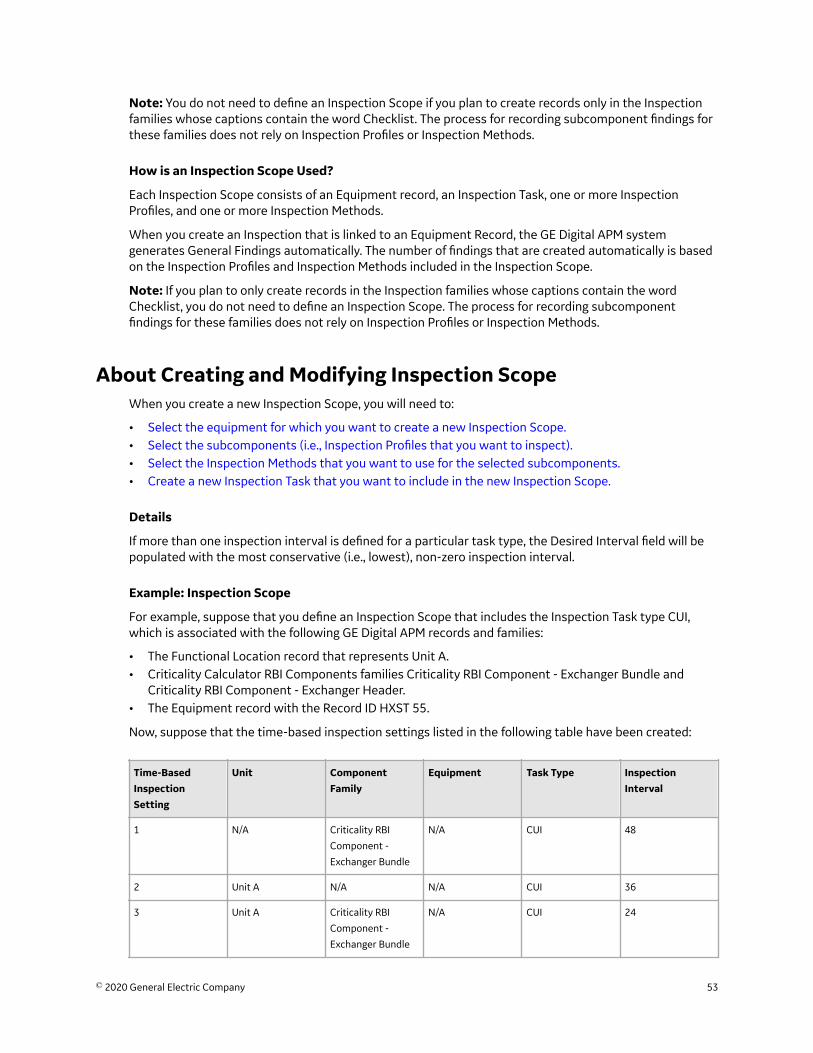
Example: Inspection Scope
For example, suppose that you define an Inspection Scope that includes the Inspection Task type CUI,which is associated with the following GE Digital APM records and families:
• The Functional Location record that represents Unit A.• Criticality Calculator RBI Components families Criticality RBI Component - Exchanger Bundle and
Criticality RBI Component - Exchanger Header.• The Equipment record with the Record ID HXST 55.
Now, suppose that the time-based inspection settings listed in the following table have been created:
Time-BasedInspectionSetting
Unit ComponentFamily
Equipment Task Type InspectionInterval
1 N/A Criticality RBI
Component -
Exchanger Bundle
N/A CUI 48
2 Unit A N/A N/A CUI 36
3 Unit A Criticality RBI
Component -
Exchanger Bundle
N/A CUI 24
© 2020 General Electric Company 53
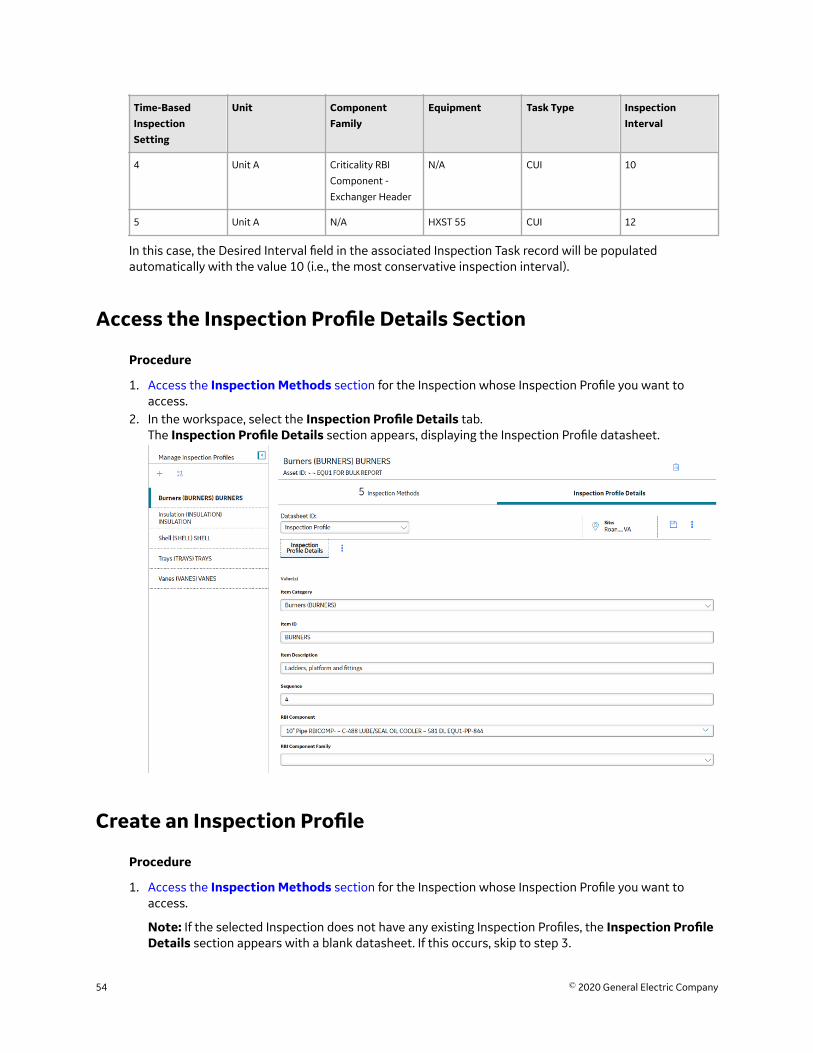
Time-BasedInspectionSetting
Unit ComponentFamily
Equipment Task Type InspectionInterval
4 Unit A Criticality RBI
Component -
Exchanger Header
N/A CUI 10
5 Unit A N/A HXST 55 CUI 12
In this case, the Desired Interval field in the associated Inspection Task record will be populatedautomatically with the value 10 (i.e., the most conservative inspection interval).
Access the Inspection Profile Details Section
Procedure
1. Access the Inspection Methods section for the Inspection whose Inspection Profile you want toaccess.
2. In the workspace, select the Inspection Profile Details tab.The Inspection Profile Details section appears, displaying the Inspection Profile datasheet.
Create an Inspection Profile
Procedure
1. Access the Inspection Methods section for the Inspection whose Inspection Profile you want toaccess.
Note: If the selected Inspection does not have any existing Inspection Profiles, the Inspection ProfileDetails section appears with a blank datasheet. If this occurs, skip to step 3.
54 © 2020 General Electric Company

2. In the left pane, select , and then select Create New Profile.A new Inspection Profile datasheet appears.
3. In the Item Category box, select the type of the profile.4. In the Item ID box, enter a unique name for the profile.5. As needed, enter values in the remaining available fields.
6. Select .The Inspection Profile is saved.
Next Steps
Add an Inspection Method
Add an Existing Inspection Profile
Procedure
1. Access the Inspection Profile Details section for the Inspection to which you want to add an existingInspection Profile.
Note: If the selected Inspection does not have any existing Inspection Profiles, the Inspection ProfileDetails section appears with a blank datasheet. If this occurs, skip to step 3.
2. In the left pane, select , and then select Add Existing Profile.The Add Existing Profile window appears.
© 2020 General Electric Company 55
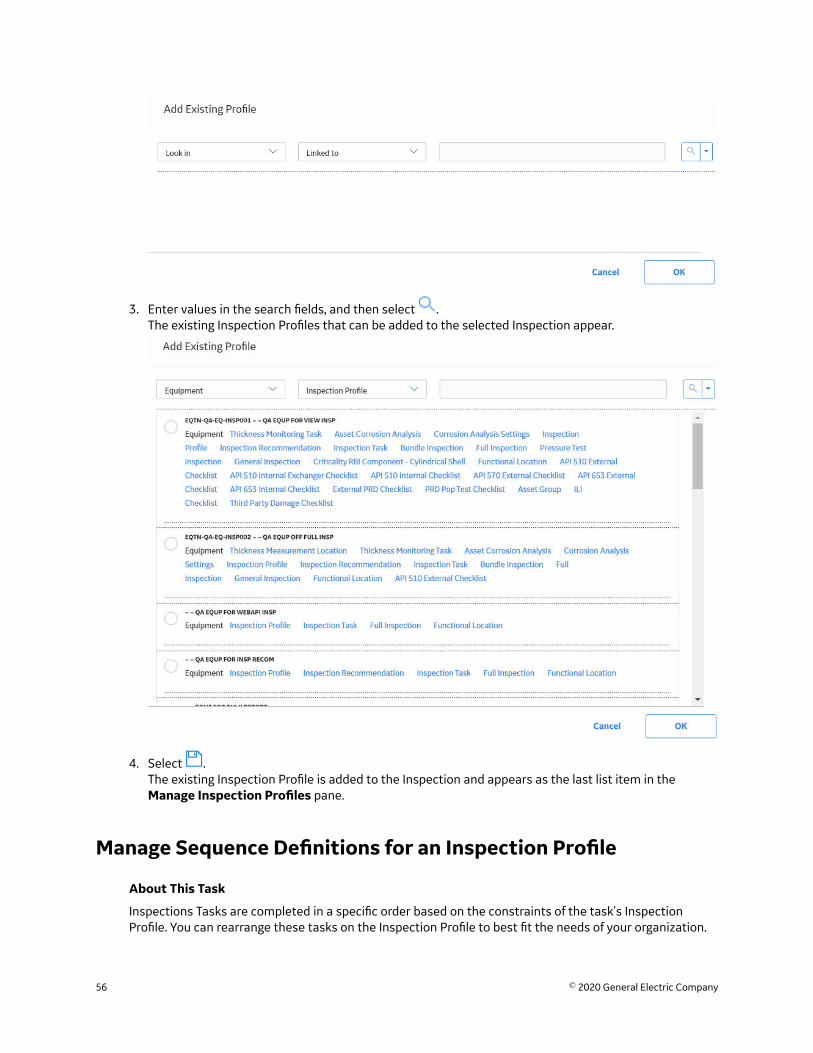
3. Enter values in the search fields, and then select .The existing Inspection Profiles that can be added to the selected Inspection appear.
4. Select .The existing Inspection Profile is added to the Inspection and appears as the last list item in theManage Inspection Profiles pane.
Manage Sequence Definitions for an Inspection Profile
About This Task
Inspections Tasks are completed in a specific order based on the constraints of the task's InspectionProfile. You can rearrange these tasks on the Inspection Profile to best fit the needs of your organization.
56 © 2020 General Electric Company
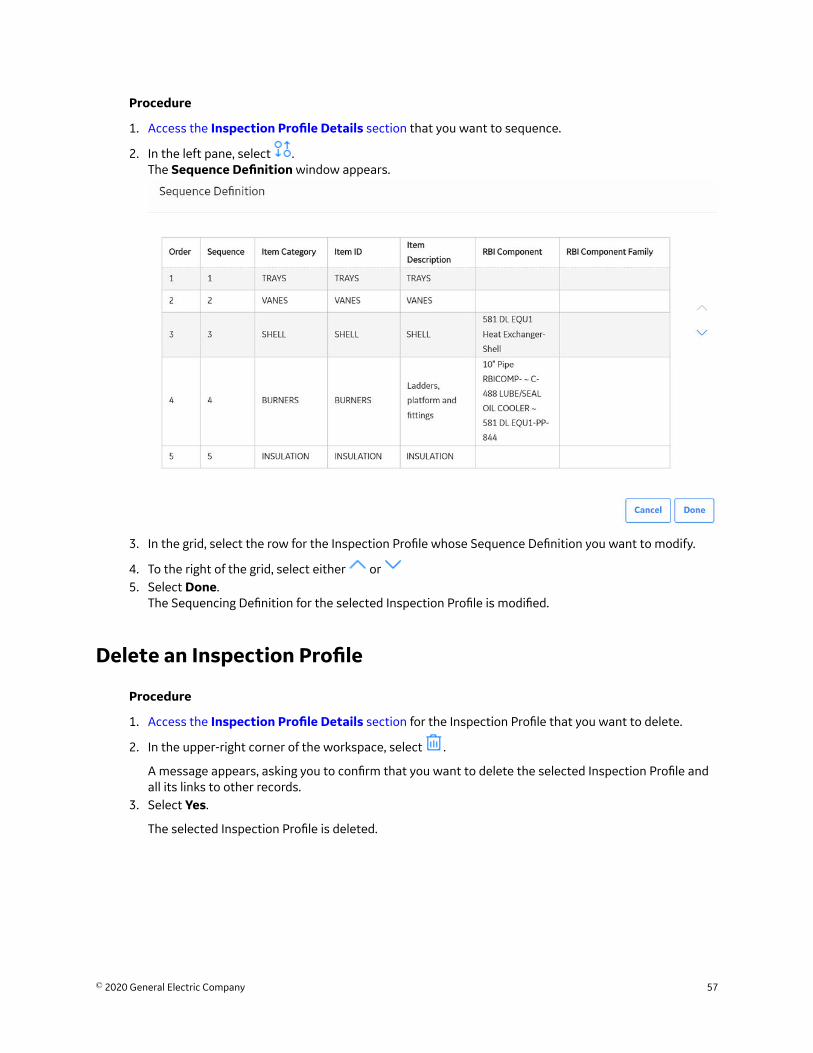
Procedure
1. Access the Inspection Profile Details section that you want to sequence.
2. In the left pane, select .The Sequence Definition window appears.
3. In the grid, select the row for the Inspection Profile whose Sequence Definition you want to modify.
4. To the right of the grid, select either or 5. Select Done.
The Sequencing Definition for the selected Inspection Profile is modified.
Delete an Inspection Profile
Procedure
1. Access the Inspection Profile Details section for the Inspection Profile that you want to delete.
2. In the upper-right corner of the workspace, select .
A message appears, asking you to confirm that you want to delete the selected Inspection Profile andall its links to other records.
3. Select Yes.
The selected Inspection Profile is deleted.
© 2020 General Electric Company 57
Access the Inspection Methods Section
Procedure
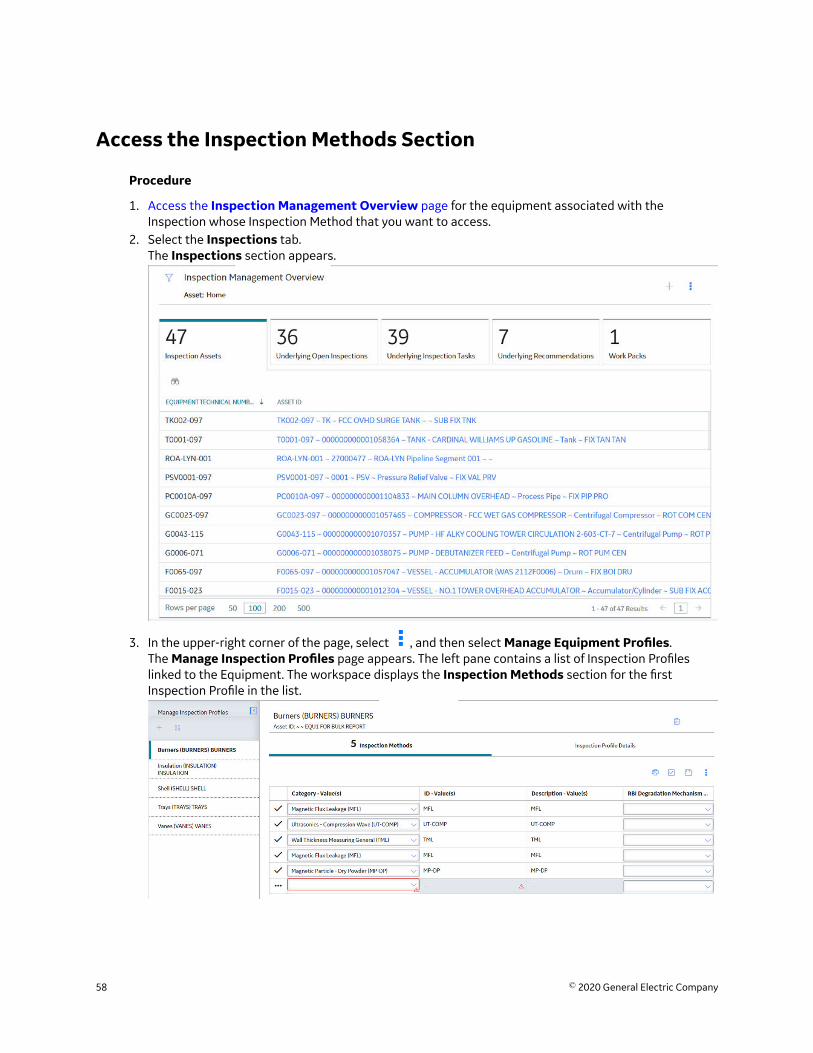
1. Access the Inspection Management Overview page for the equipment associated with theInspection whose Inspection Method that you want to access.
2. Select the Inspections tab.The Inspections section appears.
3. In the upper-right corner of the page, select , and then select Manage Equipment Profiles.The Manage Inspection Profiles page appears. The left pane contains a list of Inspection Profileslinked to the Equipment. The workspace displays the Inspection Methods section for the firstInspection Profile in the list.
58 © 2020 General Electric Company
Add an Inspection Method
Before You Begin
• Create an Inspection Profile.
Procedure
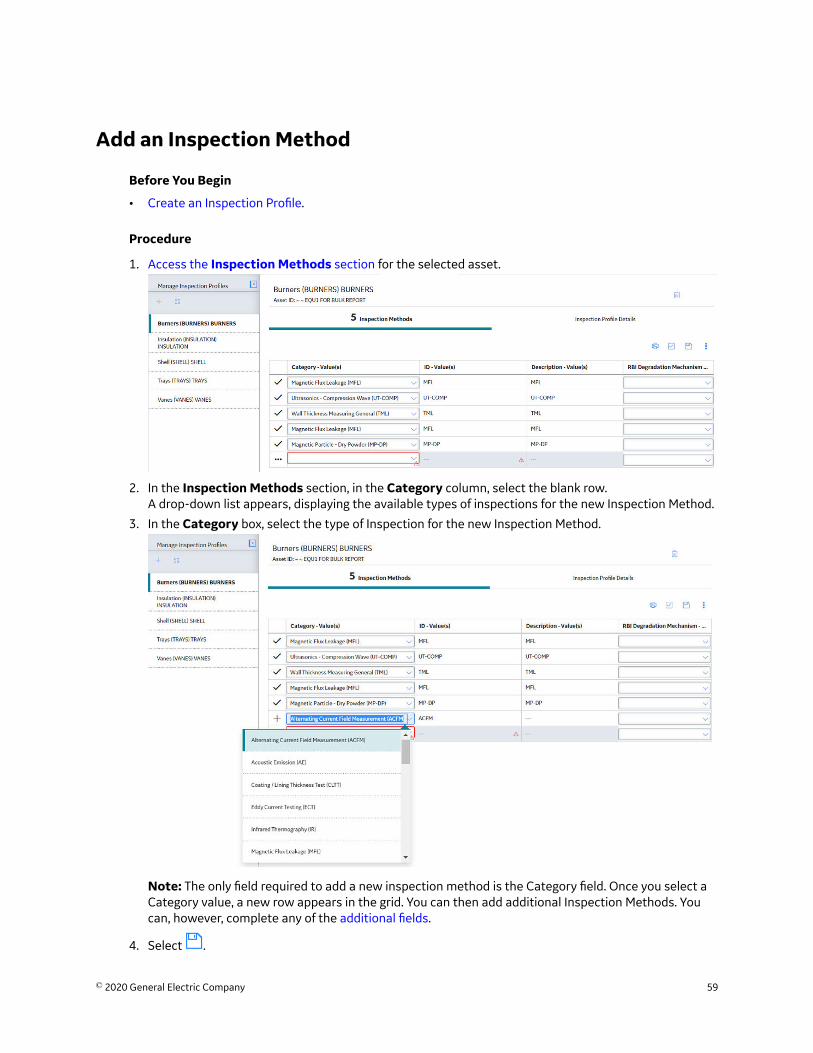
1. Access the Inspection Methods section for the selected asset.
2. In the Inspection Methods section, in the Category column, select the blank row.A drop-down list appears, displaying the available types of inspections for the new Inspection Method.
3. In the Category box, select the type of Inspection for the new Inspection Method.
Note: The only field required to add a new inspection method is the Category field. Once you select aCategory value, a new row appears in the grid. You can then add additional Inspection Methods. Youcan, however, complete any of the additional fields.
4. Select .
© 2020 General Electric Company 59
The Inspection Methods are saved.
Next Steps
Define Inspection Scope
Delete Inspection Methods
Procedure
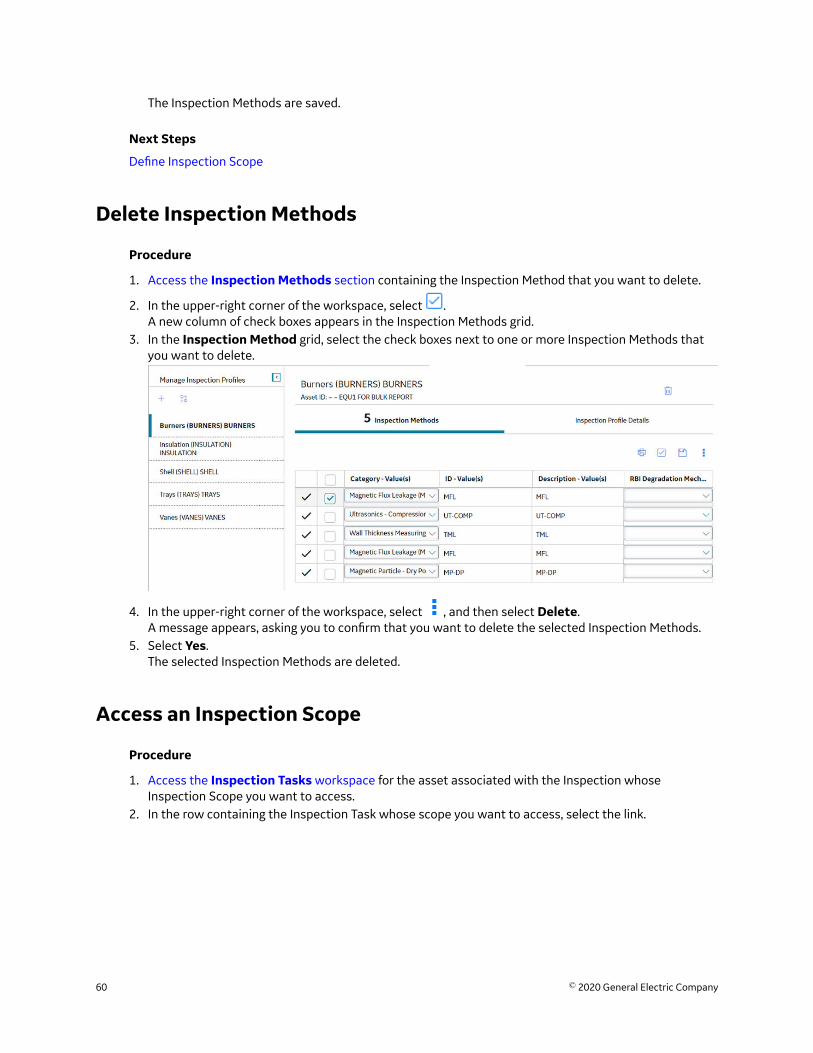
1. Access the Inspection Methods section containing the Inspection Method that you want to delete.
2. In the upper-right corner of the workspace, select .A new column of check boxes appears in the Inspection Methods grid.
3. In the Inspection Method grid, select the check boxes next to one or more Inspection Methods thatyou want to delete.
4. In the upper-right corner of the workspace, select , and then select Delete.A message appears, asking you to confirm that you want to delete the selected Inspection Methods.
5. Select Yes.The selected Inspection Methods are deleted.
Access an Inspection Scope
Procedure
1. Access the Inspection Tasks workspace for the asset associated with the Inspection whoseInspection Scope you want to access.
2. In the row containing the Inspection Task whose scope you want to access, select the link.
60 © 2020 General Electric Company
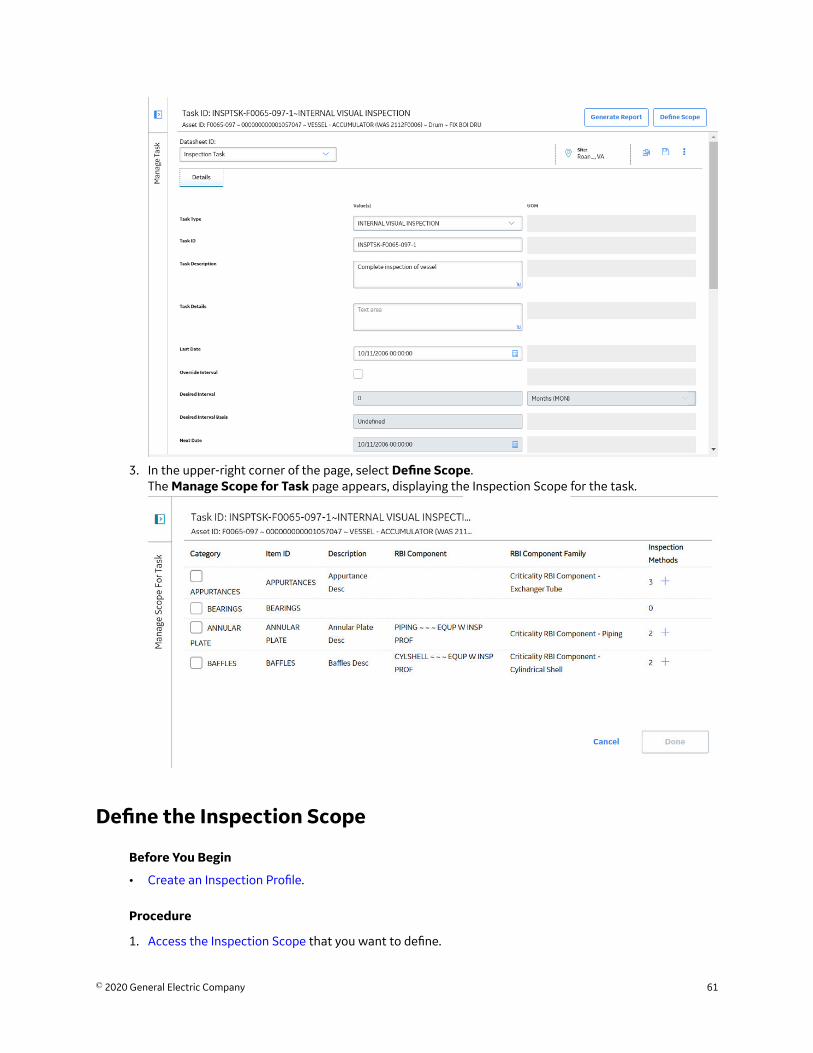
3. In the upper-right corner of the page, select Define Scope.The Manage Scope for Task page appears, displaying the Inspection Scope for the task.
Define the Inspection Scope
Before You Begin
• Create an Inspection Profile.
Procedure
1. Access the Inspection Scope that you want to define.
© 2020 General Electric Company 61
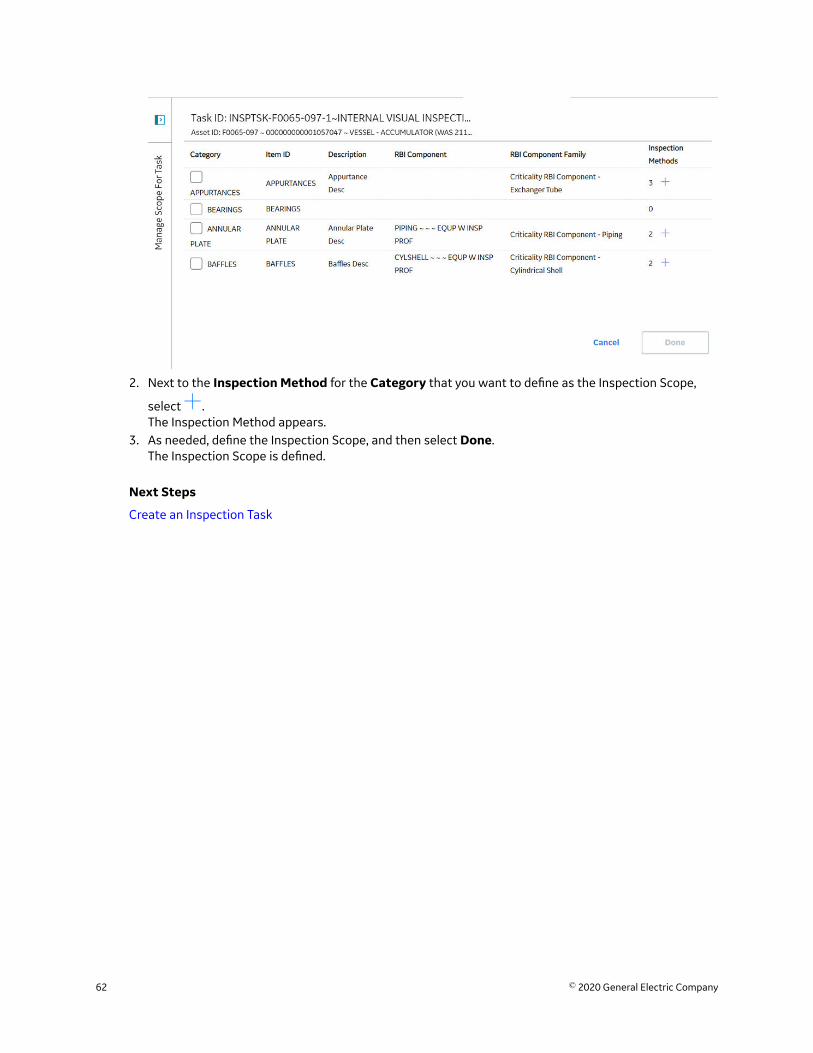
2. Next to the Inspection Method for the Category that you want to define as the Inspection Scope,
select .The Inspection Method appears.
3. As needed, define the Inspection Scope, and then select Done.The Inspection Scope is defined.
Next Steps
Create an Inspection Task
62 © 2020 General Electric Company

Chapter
5Team MembersTopics:
• About Team Members• About Roles• About Certifications• Add Team Members to an
Inspection• Remove Team Members from
an Inspection
© 2020 General Electric Company 63

About Team MembersAn inspection team member is any person that participates in an inspection. When you view aninspection report, you will see a section that lists all team members associated with that inspection.
Details
When you view an Inspection, you can create a new Inspection Team Member to link to the Inspection.Any user that has been assigned the Inspector role can be selected in the Inspection Team Member field.After the Inspection Team Member has been linked to the Inspection, the name in the Team Member fieldwill be displayed in the inspection report.
About Roles
Inspection Roles
Each Human Resource can be linked to one or more Resource Roles. The Role box indicates the position ofa user within the organization. You can modify Roles in Security Manager.
After a Human Resource is linked to a Resource Role, the value in the Role box:
• Determines certain administrative tasks that a user can perform.• Filters certain lists in Inspections.• Controls the workflow of Inspection Management users.
The following roles are used with Human Resource records. Each role should be used as described in thefollowing list.
Resource Role Description
Contract Inspector Gathers data to enter into a new or existing Inspection. This role
is typically assigned to an Inspector who is also a contractor for
your organization. The Contract Inspector must be assigned as a
Team Member to request approval on the Inspection Report by
updating the Status field.
Inspector Gathers data to enter into a new or existing Inspection.
Inspection Supervisor Reviews Inspections that have been created by a user with an
Inspector Resource Role.
Inspection Administrator Performs administrative tasks such as updating Security User
roles and certifications, managing and creating Inspection
Conditional Alerts, and defining default inspection intervals. A
user who is assigned an Inspection Administrator role can
complete the following tasks:
• Inspection Configuration
• Manage Inspection Resources, Roles, and Certifications
• Manage Inspection Alerts
• Manage Strategies
• Manage Time-Based Settings
64 © 2020 General Electric Company
Resource Role Description
Inspection Specialist Performs functions determined by your unique implementation
of this Resource Role.
Inspection Role Assignments
To assign a role to a Security User, you will need to link a Resource Role record to the Human Resourcerecord for that Security User. The Resource Role record contains the Role field, which should contain avalue that indicates the role assigned to that user.
For example, if John Smith is responsible for reviewing Inspection records, you would create a HumanResource record for John Smith and link it to a Resource Role record. That Resource Role record wouldcontain the value Inspection Supervisor in the Role field.
Security Roles
The following security roles are used when you assign secured users to roles in the Security Manager.These security roles are assigned to specific states in State Configuration for InspectionRecommendation, and these roles are checked when users try to transition states.
Security Role Description
MI Inspector Transitions Inspection Recommendations from the Proposed
state to the Pending Review or Superseded state.
MI Inspection Supervisor Transitions Inspection Recommendations from the Pending
Review state to the Proposed, Pending Approval, Cancelled, or
Rejected state.
SC Recommendation Reviewer Transitions Inspection Recommendations from the Pending
Approval state to the Pending Review, Approved, Cancelled, or
Rejected state.
SC Recommendation Implementer Transitions Inspection Recommendations from the Approved or
In Progress state to the Completed state.
Note: Super users can transition Inspection Recommendations between states without assigned securityroles.
About CertificationsYou can indicate a user's certification level by creating a Personnel Certification to link to that user'sHuman Resource information.
Details
When that user creates or approves an Inspection, the Certification will serve as documentation that theuser is qualified to perform that task. Because Inspections are often used as legal documentation to provethat an inspection took place, recording the responsible party's qualifications is an important step.
© 2020 General Electric Company 65
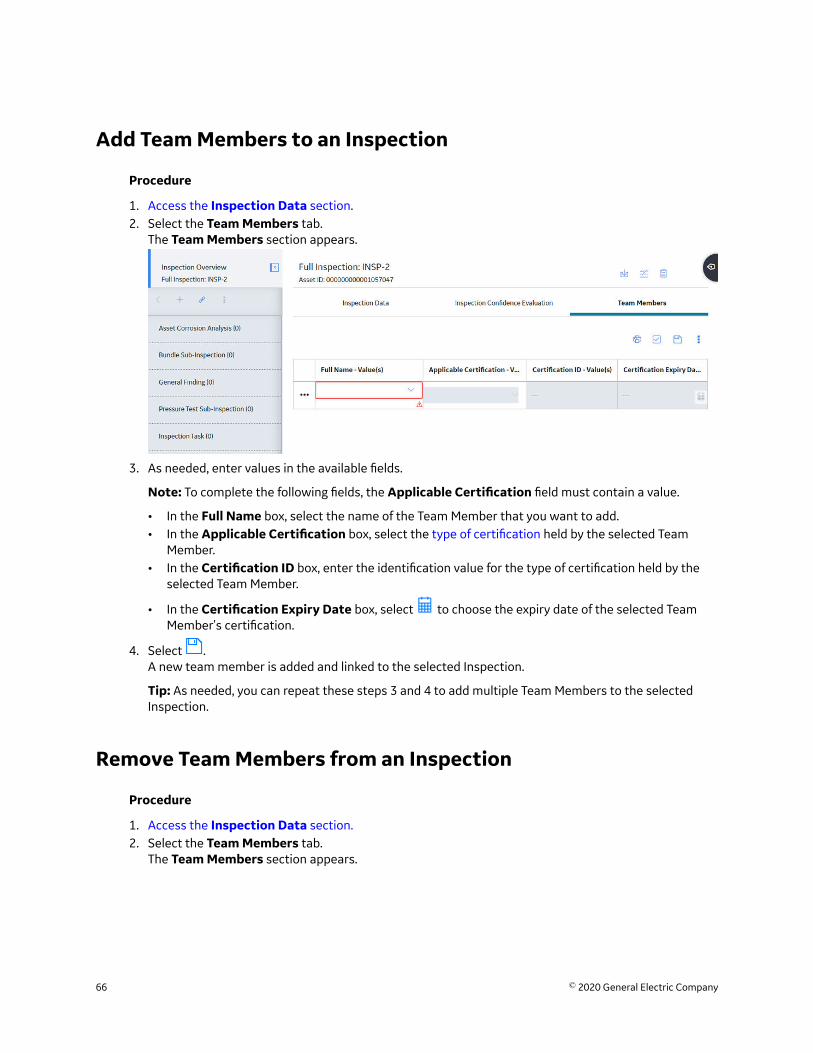
Add Team Members to an Inspection
Procedure
1. Access the Inspection Data section.2. Select the Team Members tab.
The Team Members section appears.
3. As needed, enter values in the available fields.
Note: To complete the following fields, the Applicable Certification field must contain a value.
• In the Full Name box, select the name of the Team Member that you want to add.• In the Applicable Certification box, select the type of certification held by the selected Team
Member.• In the Certification ID box, enter the identification value for the type of certification held by the
selected Team Member.
• In the Certification Expiry Date box, select to choose the expiry date of the selected TeamMember's certification.
4. Select .A new team member is added and linked to the selected Inspection.
Tip: As needed, you can repeat these steps 3 and 4 to add multiple Team Members to the selectedInspection.
Remove Team Members from an Inspection
Procedure
1. Access the Inspection Data section.2. Select the Team Members tab.
The Team Members section appears.
66 © 2020 General Electric Company
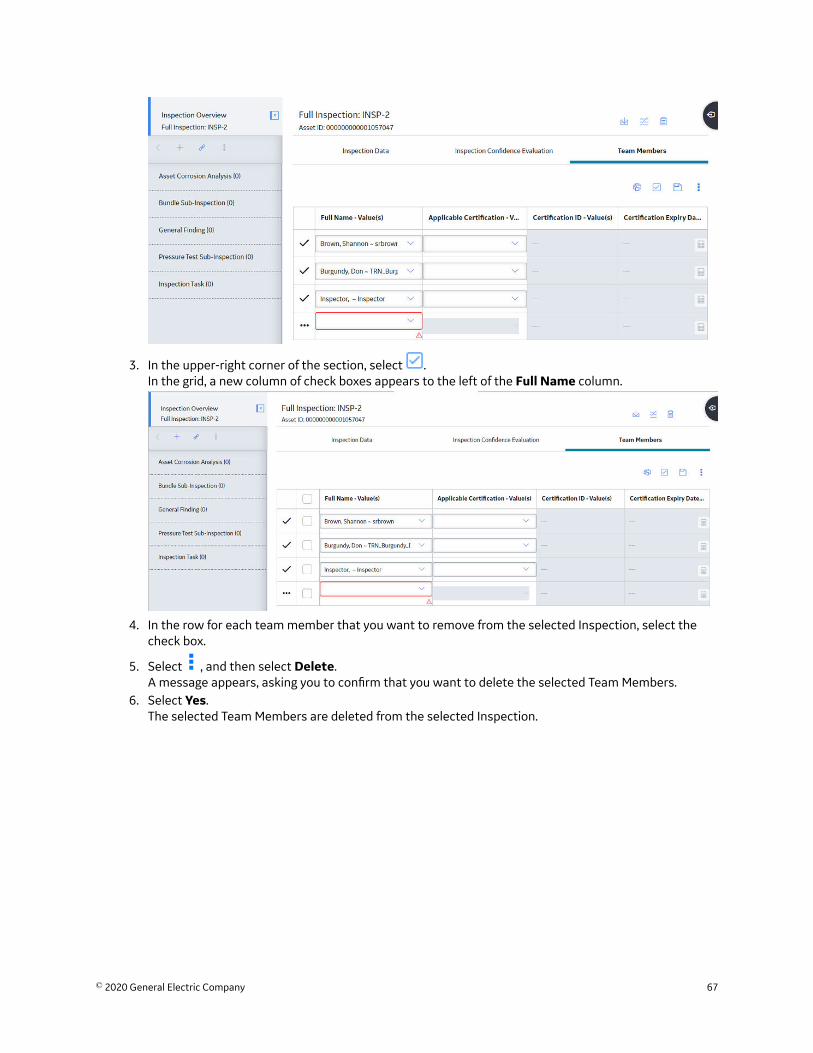
3. In the upper-right corner of the section, select .In the grid, a new column of check boxes appears to the left of the Full Name column.
4. In the row for each team member that you want to remove from the selected Inspection, select thecheck box.
5. Select , and then select Delete.A message appears, asking you to confirm that you want to delete the selected Team Members.
6. Select Yes.The selected Team Members are deleted from the selected Inspection.
© 2020 General Electric Company 67
Chapter
6Inspection Tasks and RecommendationsTopics:
• About Inspection Tasks andRecommendations
• About Generating Inspectionsfor Related Inspection Tasks
• Bulk Printing of InspectionReports
• Access InspectionRecommendations
• Create InspectionRecommendations
• Modify the Date Filter forInspection Recommendations
• Access the UnderlyingInspection Tasks Section
• Create an Inspection Task• Delete an Inspection Task• Modify the Date Filter for
Inspection Tasks• Create an Inspection Report
from an Inspection Task• Print Bulk Inspection Reports• View Bulk Printing Status• Download Bulk Inspection
Reports
68 © 2020 General Electric Company
About Inspection Tasks and RecommendationsBased on the results of an inspection, you might need to suggest that further action be taken. Forexample, if you inspect an area of a warehouse and notice that the roof is leaking, you may want tosuggest that the ceiling tiles be replaced.
You can create a new Inspection Task record that indicates that the ceiling tiles need to be replaced, oryou could create an Inspection Recommendation record to record the recommendation to replace theceiling tiles. Your business processes will dictate whether you should create an Inspection Task record or aRecommendation record. For example, inspectors may need to report all recommendations to asupervisor for approval. The supervisor might then be responsible for approving the recommendation,creating an associated Inspection Task record, and assigning that Inspection Task record to theappropriate inspector.
Additionally, if the Thickness Monitoring license is active and TM Analyses exist for the Equipment recordsthat you analyze in Inspection Management, you can specify that Inspection Task records be updatedbased upon Thickness Measurement records that you create in Thickness Monitoring. Specifically, thevalue in the Last Date field in the Inspection Task record will be populated with the value in theMeasurement Taken Date field in the Thickness Measurement records that you create via the TMMeasurement Data Entry page.
About Generating Inspections for Related Inspection TasksAfter the cost has been estimated for the work associated with all Inspection Tasks for a given Work Pack,you can determine which inspections you will perform and which you will not. You can then createInspections to represent the approved work that you will perform.
Example: Generating Inspections
For example, suppose a Work Pack includes tasks to inspect all pieces of equipment in a particularsystem. If you receive an estimate from an inspector that exceeds your budget, you might need to trim theinspection work and inspect only the pieces of equipment whose previous inspections revealed defects.
You can generate Inspections for the Inspection Tasks by:
• Generating an Inspection from a single Inspection Task.• Generating Inspections from all Inspection Tasks that are linked to the Work Pack.
Bulk Printing of Inspection ReportsUsing the bulk print functionality, you can generate multiple Inspection Reports at a time. The generatedreports are stored in a location configured in SQL Server Reporting Services (SSRS). After you successfullygenerate the reports, you can download the reports as a .zip file.
The bulk printing process consists of the following steps:
© 2020 General Electric Company 69
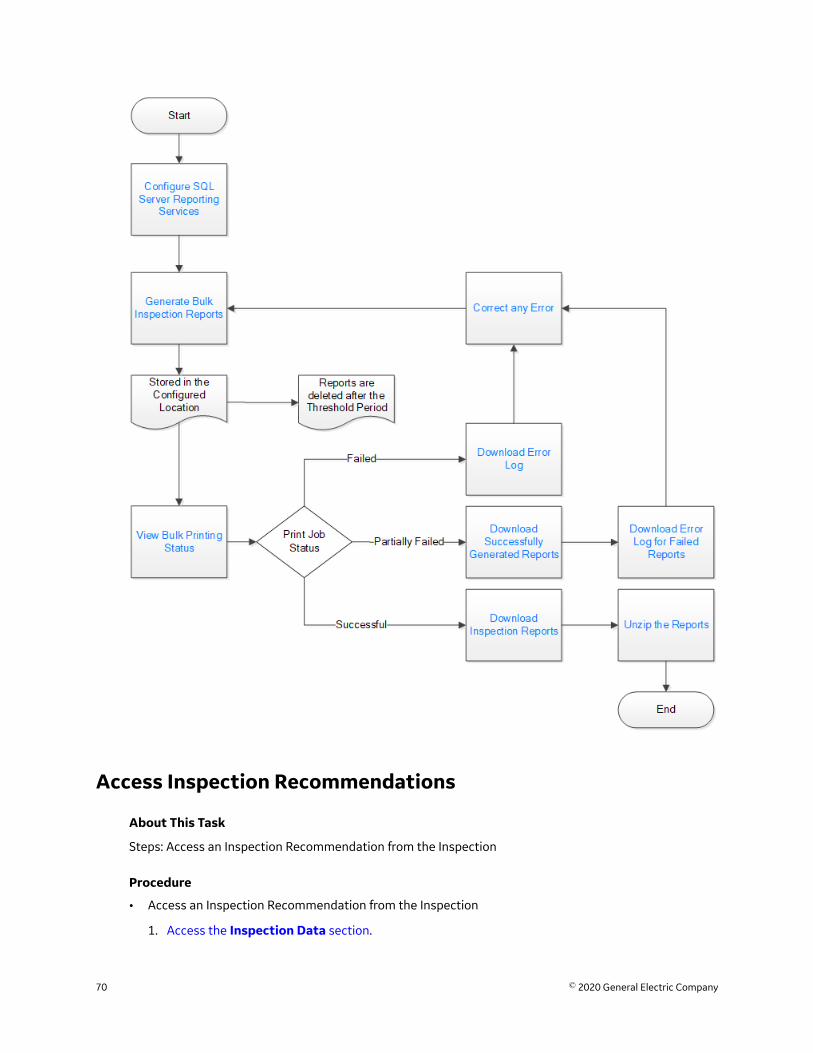
Access Inspection Recommendations
About This Task
Steps: Access an Inspection Recommendation from the Inspection
Procedure
• Access an Inspection Recommendation from the Inspection
1. Access the Inspection Data section.
70 © 2020 General Electric Company

2. In the upper-right corner of the page, select .The Recommended Actions pane appears, displaying a list of Inspection Recommendations forthe selected asset. You can now use the Recommended Actions functionality.
• Access an Inspection Recommendation from the Asset
1. Access the Inspection Management Overview page for the equipment containing theInspection Recommendation that you want to access.
2. Select the Underlying Recommendations tab.The Underlying Recommendations section appears, displaying a list of open recommendationsfor the selected asset. You can now use the Recommended Actions functionality.
Create Inspection Recommendations
Procedure
1. Access the Inspection Data section.
© 2020 General Electric Company 71

2. In the upper-right corner of the page, select .
A new Inspection Recommendation datasheet appears.3. As needed, enter values in the available fields, and then, in the upper-right corner of the workspace,
select .
A message appears, confirming that you have created an Inspection Recommendation. You can nowuse Recommended Actions functionality.
Modify the Date Filter for Inspection Recommendations
About This Task
In the Underlying Recommendations tab, the Underlying Open Recommendations andRecommendations Due for Implementation sections can be filtered using the Target Completion DateFilter, which is based on the value in the Target Completion Date field. If you do not modify these filterswhen accessing tasks or recommendations, the sections may appear to be empty. You can modify thedate filters to display the tasks and recommendations that you want to access. By default, the selecteddate filter is defined by the administrator.
Procedure
1. Access the Underlying Recommendations section.2. In the Underlying Open Recommendations or Recommendations Due for Implementation
section, select .
The Target Completion Date Filter box appears, displaying a list of date filters.
Note: The date filters that appear in the Target Completion Date Filter box are defined by theadministrator. If some date filters do not appear, an administrator can modify the filters in the DateFilters section of the Overview Configuration page in Application Settings.
3. Select the date filter that you want to use.4. Select Apply.
Inspection recommendations with a Target Completion Date that matches the selected date filterparameters appear.
72 © 2020 General Electric Company
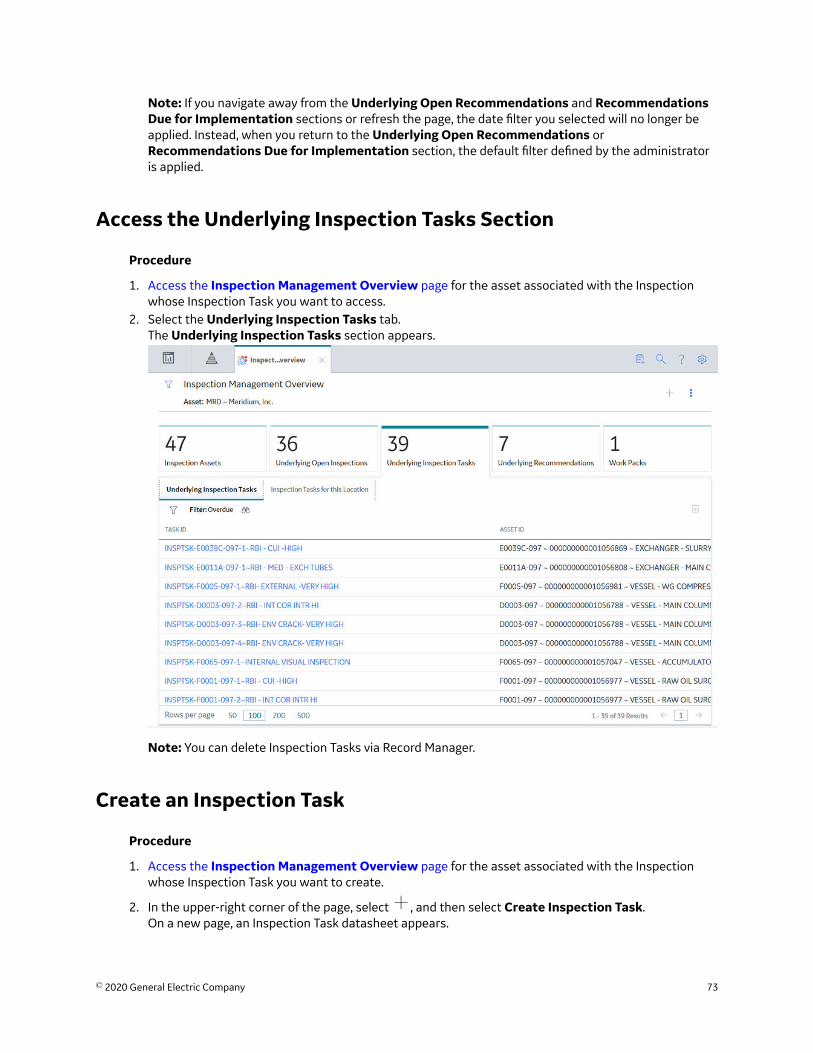
Note: If you navigate away from the Underlying Open Recommendations and RecommendationsDue for Implementation sections or refresh the page, the date filter you selected will no longer beapplied. Instead, when you return to the Underlying Open Recommendations orRecommendations Due for Implementation section, the default filter defined by the administratoris applied.
Access the Underlying Inspection Tasks Section
Procedure
1. Access the Inspection Management Overview page for the asset associated with the Inspectionwhose Inspection Task you want to access.
2. Select the Underlying Inspection Tasks tab.The Underlying Inspection Tasks section appears.
Note: You can delete Inspection Tasks via Record Manager.
Create an Inspection Task
Procedure
1. Access the Inspection Management Overview page for the asset associated with the Inspectionwhose Inspection Task you want to create.
2. In the upper-right corner of the page, select , and then select Create Inspection Task.On a new page, an Inspection Task datasheet appears.
© 2020 General Electric Company 73
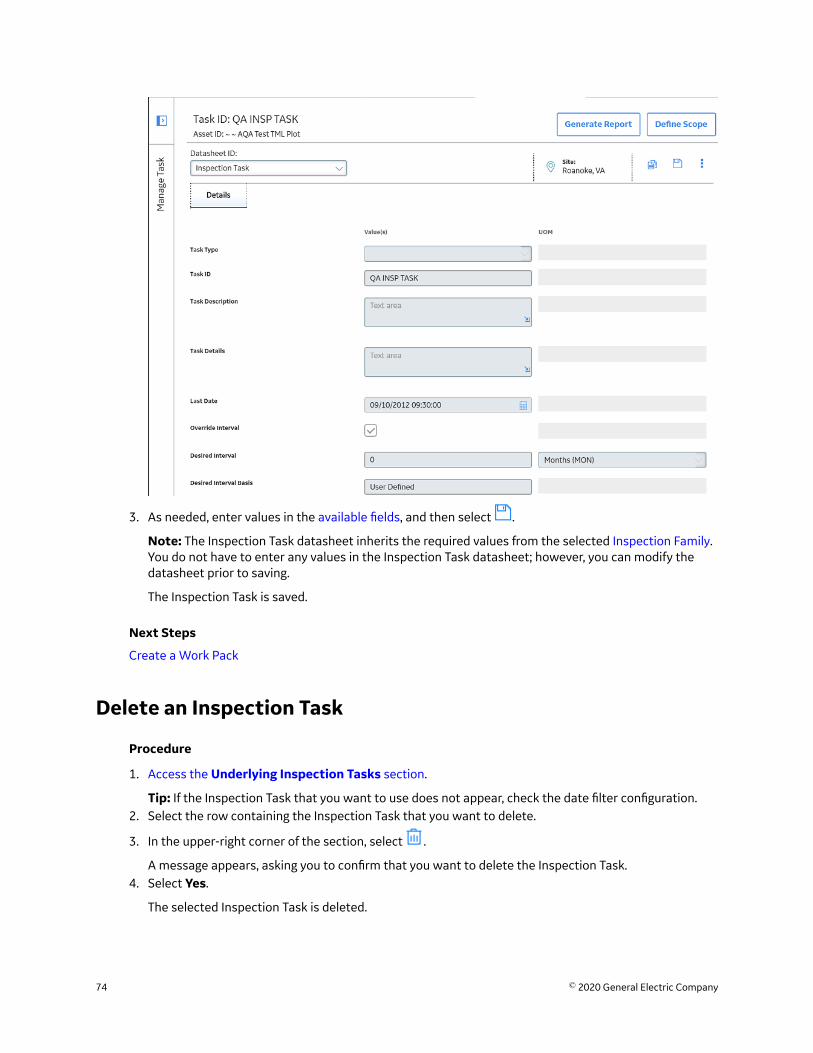
3. As needed, enter values in the available fields, and then select .
Note: The Inspection Task datasheet inherits the required values from the selected Inspection Family.You do not have to enter any values in the Inspection Task datasheet; however, you can modify thedatasheet prior to saving.
The Inspection Task is saved.
Next Steps
Create a Work Pack
Delete an Inspection Task
Procedure
1. Access the Underlying Inspection Tasks section.
Tip: If the Inspection Task that you want to use does not appear, check the date filter configuration.2. Select the row containing the Inspection Task that you want to delete.
3. In the upper-right corner of the section, select .
A message appears, asking you to confirm that you want to delete the Inspection Task.4. Select Yes.
The selected Inspection Task is deleted.
74 © 2020 General Electric Company
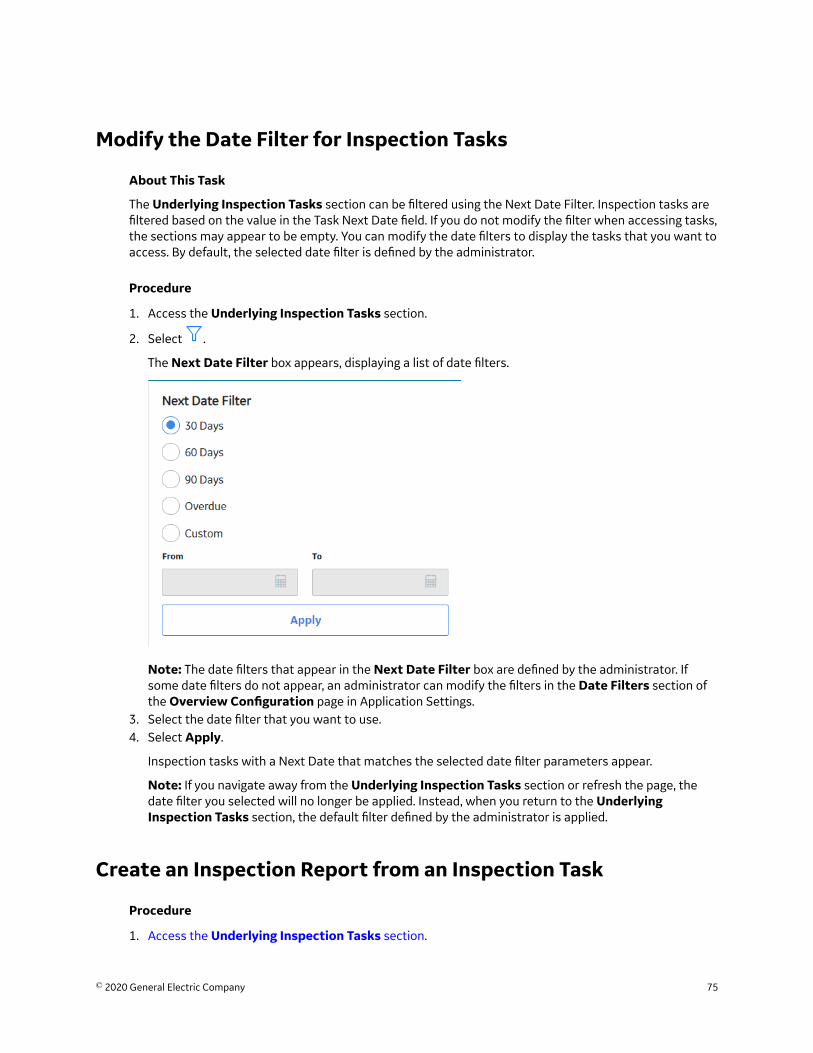
Modify the Date Filter for Inspection Tasks
About This Task
The Underlying Inspection Tasks section can be filtered using the Next Date Filter. Inspection tasks arefiltered based on the value in the Task Next Date field. If you do not modify the filter when accessing tasks,the sections may appear to be empty. You can modify the date filters to display the tasks that you want toaccess. By default, the selected date filter is defined by the administrator.
Procedure
1. Access the Underlying Inspection Tasks section.
2. Select .
The Next Date Filter box appears, displaying a list of date filters.
Note: The date filters that appear in the Next Date Filter box are defined by the administrator. Ifsome date filters do not appear, an administrator can modify the filters in the Date Filters section ofthe Overview Configuration page in Application Settings.
3. Select the date filter that you want to use.4. Select Apply.
Inspection tasks with a Next Date that matches the selected date filter parameters appear.
Note: If you navigate away from the Underlying Inspection Tasks section or refresh the page, thedate filter you selected will no longer be applied. Instead, when you return to the UnderlyingInspection Tasks section, the default filter defined by the administrator is applied.
Create an Inspection Report from an Inspection Task
Procedure
1. Access the Underlying Inspection Tasks section.
© 2020 General Electric Company 75
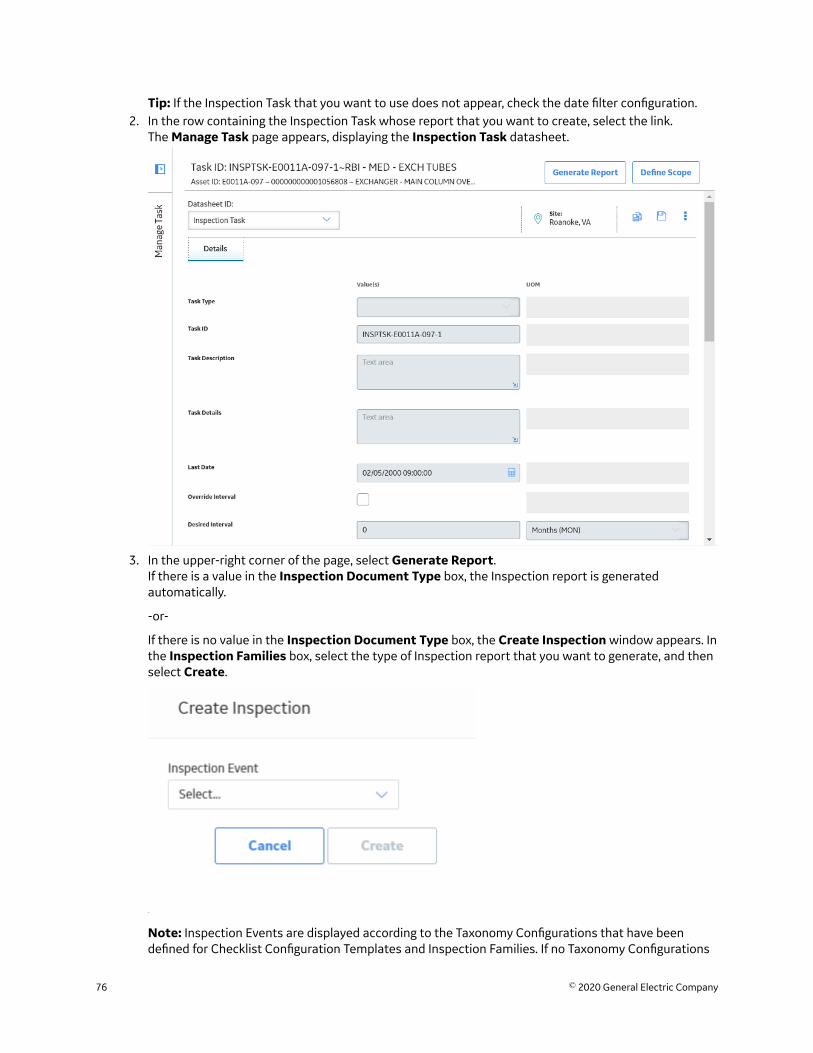
Tip: If the Inspection Task that you want to use does not appear, check the date filter configuration.2. In the row containing the Inspection Task whose report that you want to create, select the link.
The Manage Task page appears, displaying the Inspection Task datasheet.
3. In the upper-right corner of the page, select Generate Report.If there is a value in the Inspection Document Type box, the Inspection report is generatedautomatically.
-or-
If there is no value in the Inspection Document Type box, the Create Inspection window appears. Inthe Inspection Families box, select the type of Inspection report that you want to generate, and thenselect Create.
Note: Inspection Events are displayed according to the Taxonomy Configurations that have beendefined for Checklist Configuration Templates and Inspection Families. If no Taxonomy Configurations
76 © 2020 General Electric Company
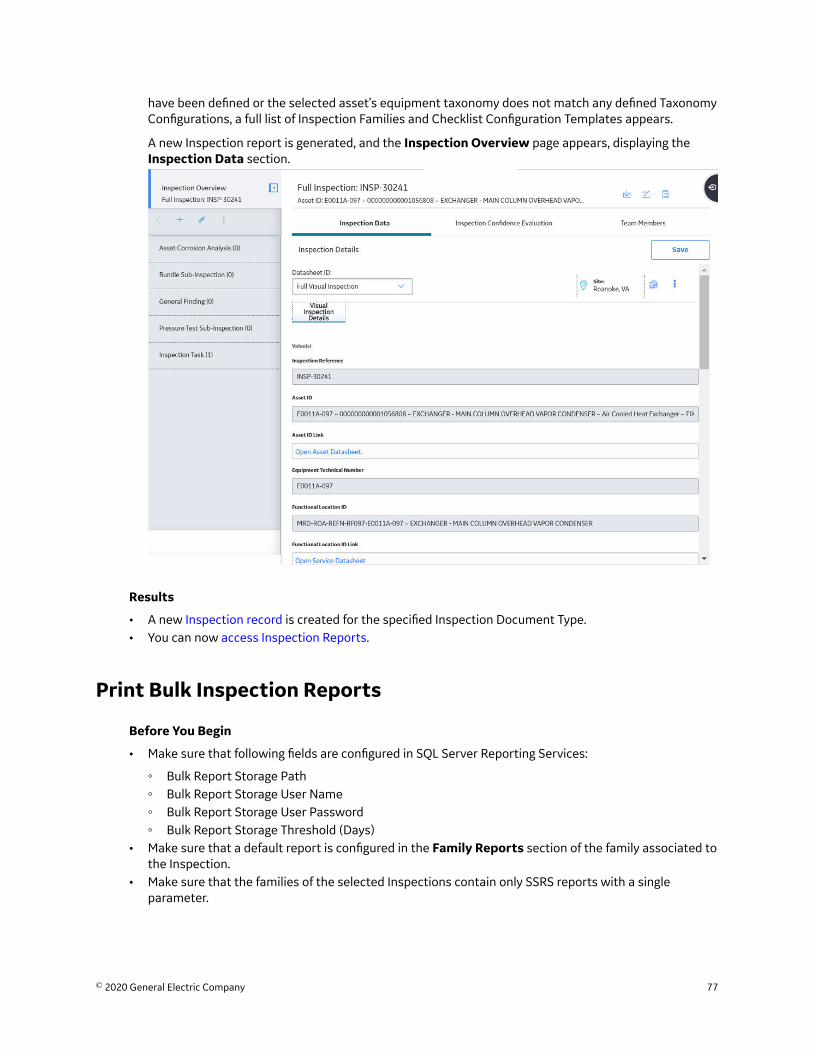
have been defined or the selected asset’s equipment taxonomy does not match any defined TaxonomyConfigurations, a full list of Inspection Families and Checklist Configuration Templates appears.
A new Inspection report is generated, and the Inspection Overview page appears, displaying theInspection Data section.
Results
• A new Inspection record is created for the specified Inspection Document Type.• You can now access Inspection Reports.
Print Bulk Inspection Reports
Before You Begin
• Make sure that following fields are configured in SQL Server Reporting Services:
◦ Bulk Report Storage Path◦ Bulk Report Storage User Name◦ Bulk Report Storage User Password◦ Bulk Report Storage Threshold (Days)
• Make sure that a default report is configured in the Family Reports section of the family associated tothe Inspection.
• Make sure that the families of the selected Inspections contain only SSRS reports with a singleparameter.
© 2020 General Electric Company 77
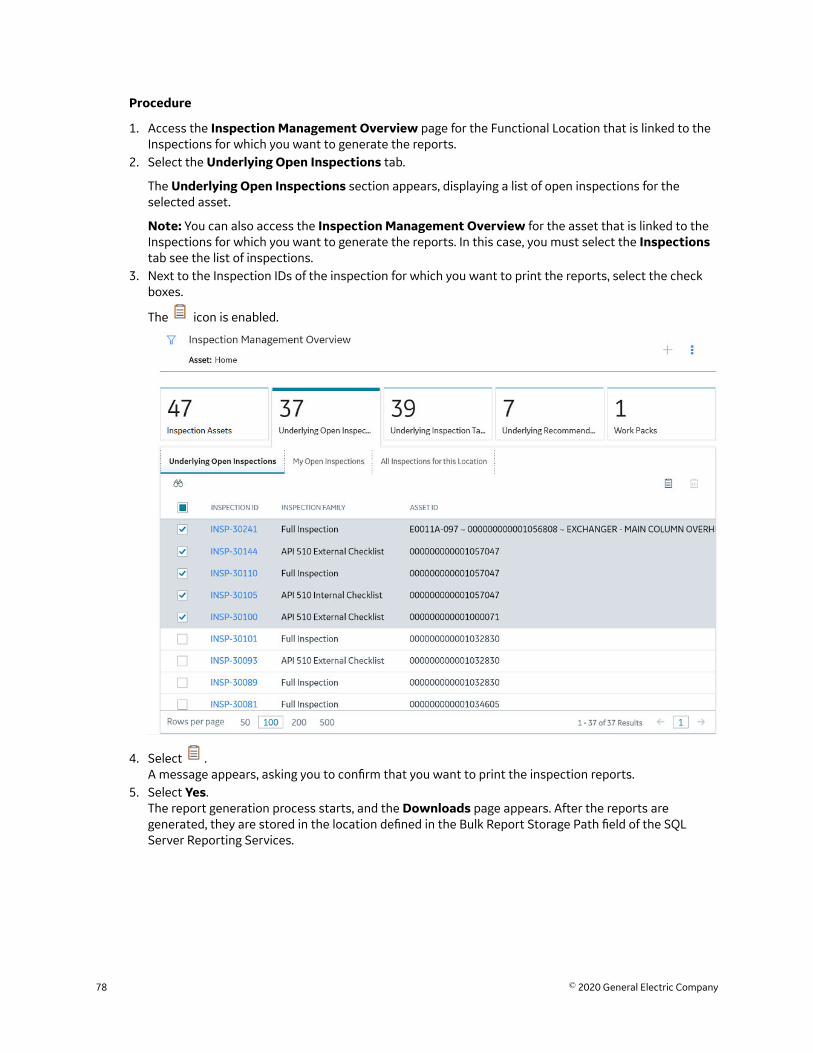
Procedure
1. Access the Inspection Management Overview page for the Functional Location that is linked to theInspections for which you want to generate the reports.
2. Select the Underlying Open Inspections tab.
The Underlying Open Inspections section appears, displaying a list of open inspections for theselected asset.
Note: You can also access the Inspection Management Overview for the asset that is linked to theInspections for which you want to generate the reports. In this case, you must select the Inspectionstab see the list of inspections.
3. Next to the Inspection IDs of the inspection for which you want to print the reports, select the checkboxes.
The icon is enabled.
4. Select .A message appears, asking you to confirm that you want to print the inspection reports.
5. Select Yes.The report generation process starts, and the Downloads page appears. After the reports aregenerated, they are stored in the location defined in the Bulk Report Storage Path field of the SQLServer Reporting Services.
78 © 2020 General Electric Company
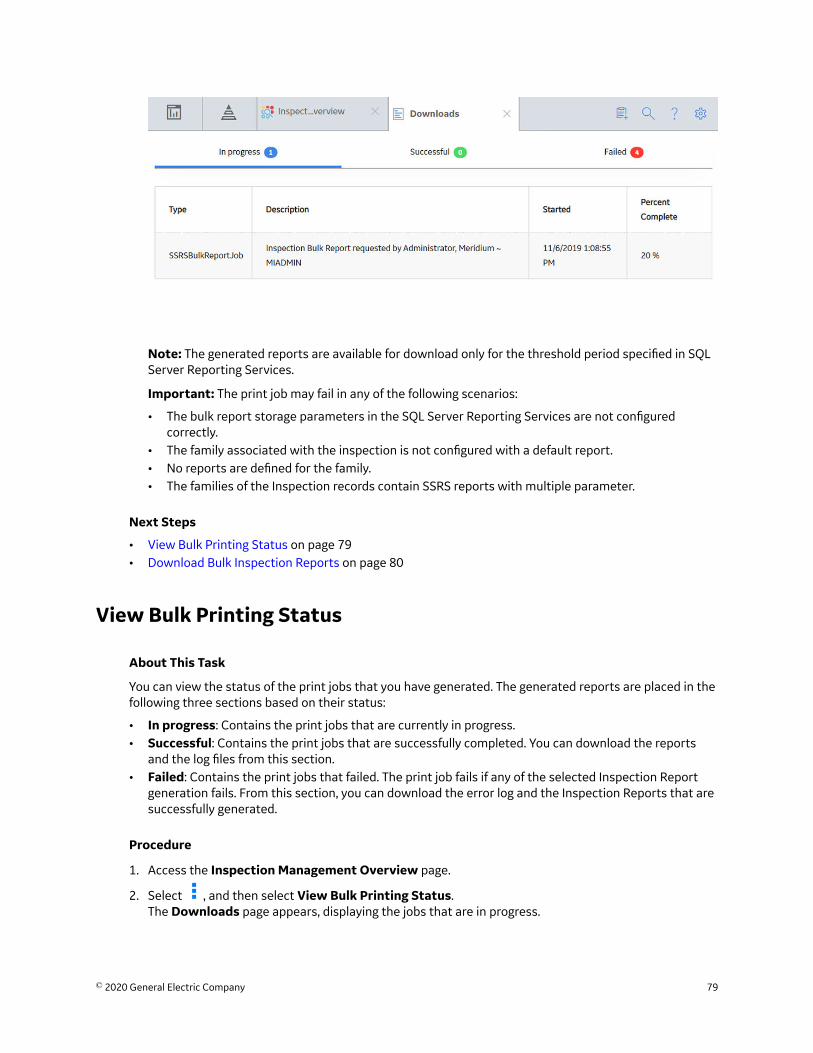
Note: The generated reports are available for download only for the threshold period specified in SQLServer Reporting Services.
Important: The print job may fail in any of the following scenarios:
• The bulk report storage parameters in the SQL Server Reporting Services are not configuredcorrectly.
• The family associated with the inspection is not configured with a default report.• No reports are defined for the family.• The families of the Inspection records contain SSRS reports with multiple parameter.
Next Steps
• View Bulk Printing Status on page 79• Download Bulk Inspection Reports on page 80
View Bulk Printing Status
About This Task
You can view the status of the print jobs that you have generated. The generated reports are placed in thefollowing three sections based on their status:
• In progress: Contains the print jobs that are currently in progress.• Successful: Contains the print jobs that are successfully completed. You can download the reports
and the log files from this section.• Failed: Contains the print jobs that failed. The print job fails if any of the selected Inspection Report
generation fails. From this section, you can download the error log and the Inspection Reports that aresuccessfully generated.
Procedure
1. Access the Inspection Management Overview page.
2. Select , and then select View Bulk Printing Status.The Downloads page appears, displaying the jobs that are in progress.
© 2020 General Electric Company 79
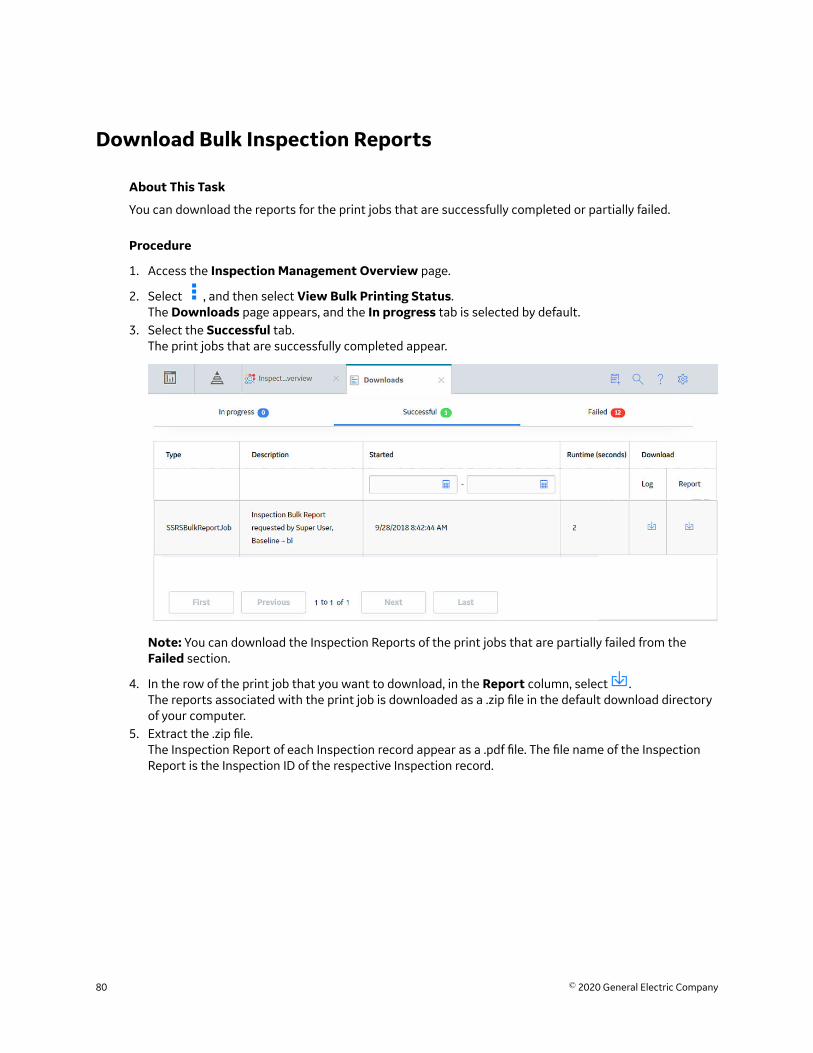
Download Bulk Inspection Reports
About This Task
You can download the reports for the print jobs that are successfully completed or partially failed.
Procedure
1. Access the Inspection Management Overview page.
2. Select , and then select View Bulk Printing Status.The Downloads page appears, and the In progress tab is selected by default.
3. Select the Successful tab.The print jobs that are successfully completed appear.
Note: You can download the Inspection Reports of the print jobs that are partially failed from theFailed section.
4. In the row of the print job that you want to download, in the Report column, select .The reports associated with the print job is downloaded as a .zip file in the default download directoryof your computer.
5. Extract the .zip file.The Inspection Report of each Inspection record appear as a .pdf file. The file name of the InspectionReport is the Inspection ID of the respective Inspection record.
80 © 2020 General Electric Company
Chapter
7Work PacksTopics:
• About Work Packs• About the Work Pack Hierarchy• Access the Work Packs Section• Create a Work Pack• Link a Work Pack• Unlink a Work Pack• Delete a Work Pack• Create Single and Bulk
Inspections• Link an Inspection to a Work
Pack• Unlink an Inspection from a
Work Pack• Link an Inspection Task to a
Work Pack• Unlink an Inspection Task from
a Work Pack• Create a Sub Work Pack• Delete a Sub Work Pack
© 2020 General Electric Company 81

About Work PacksA Work Pack is a collection of records that define inspection work that needs to be performed for a pieceof equipment or functional location. Work Packs store preparatory information about necessaryinspections. Work Packs, in combination with Inspections and Inspection Tasks that can be linked to WorkPacks, are intended to define planned inspection work that can be estimated by the outside resourceswho perform the work.
About the Work Pack HierarchyYou can create a Work Pack Hierarchy to organize the work that you will perform during inspections,where:
• The lowest level of the hierarchy contains a Work Pack for the actual item that will be inspected (i.e., apiece of equipment or location).
• The levels above the lowest level contain Work Pack for the locations containing the item that will beinspected.
Each Work Pack hierarchy can include up to three levels.
To fully understand this concept, you must understand the concept of a location hierarchy, where eachlocation at a lower level belongs to a location at a higher level.
Work Pack Hierarchy
You might have a location hierarchy that looks like the following diagram, where process locations belongto systems, systems belong to units, and so on.
82 © 2020 General Electric Company
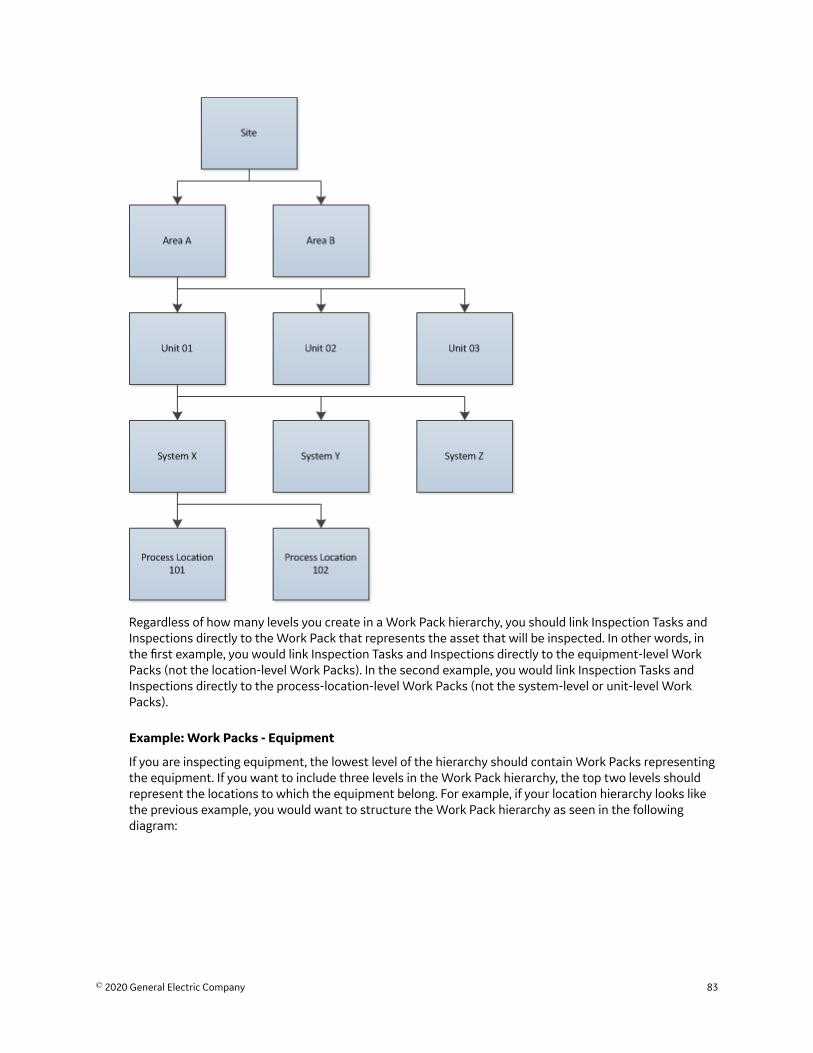
Regardless of how many levels you create in a Work Pack hierarchy, you should link Inspection Tasks andInspections directly to the Work Pack that represents the asset that will be inspected. In other words, inthe first example, you would link Inspection Tasks and Inspections directly to the equipment-level WorkPacks (not the location-level Work Packs). In the second example, you would link Inspection Tasks andInspections directly to the process-location-level Work Packs (not the system-level or unit-level WorkPacks).
Example: Work Packs - Equipment
If you are inspecting equipment, the lowest level of the hierarchy should contain Work Packs representingthe equipment. If you want to include three levels in the Work Pack hierarchy, the top two levels shouldrepresent the locations to which the equipment belong. For example, if your location hierarchy looks likethe previous example, you would want to structure the Work Pack hierarchy as seen in the followingdiagram:
© 2020 General Electric Company 83
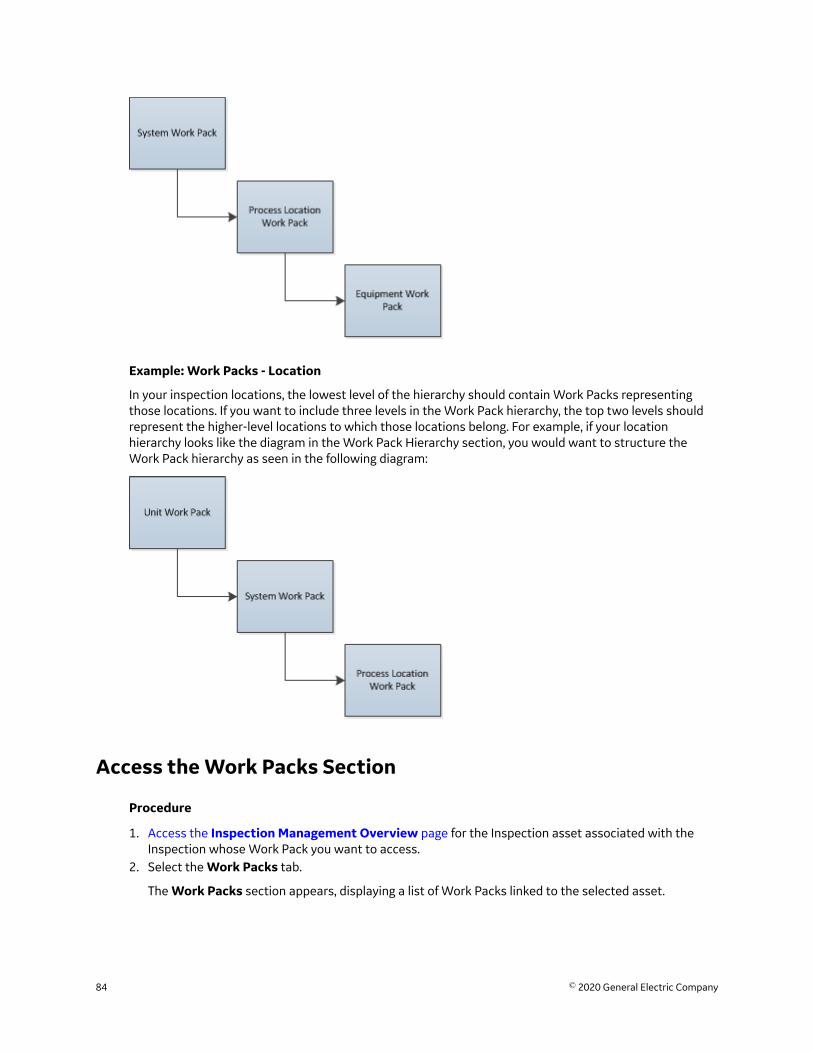
Example: Work Packs - Location
In your inspection locations, the lowest level of the hierarchy should contain Work Packs representingthose locations. If you want to include three levels in the Work Pack hierarchy, the top two levels shouldrepresent the higher-level locations to which those locations belong. For example, if your locationhierarchy looks like the diagram in the Work Pack Hierarchy section, you would want to structure theWork Pack hierarchy as seen in the following diagram:
Access the Work Packs Section
Procedure
1. Access the Inspection Management Overview page for the Inspection asset associated with theInspection whose Work Pack you want to access.
2. Select the Work Packs tab.
The Work Packs section appears, displaying a list of Work Packs linked to the selected asset.
84 © 2020 General Electric Company

Results
• You can now select a Work Pack ID or a Sub Work Pack ID, and then edit the selection.
Create a Work Pack
Procedure
1. Access the Inspection Management Overview page for the Inspection asset for which you want tocreate a Work Pack.
2. In the upper-right corner of the page, select , and then select Create Work Pack.On a new page, a Work Pack datasheet appears.
© 2020 General Electric Company 85

3. As needed, enter values in the available fields.
4. Select .The Work Pack is created.
Link a Work Pack
About This Task
Note: This procedure applies to linking existing Work Packs to other Work Packs and Sub Work Packs. GEDigital APM recommends that you have no more than three levels of Work Packs (i.e., a Parent Work Pack,a Child Work Pack, and a subsequent (or grandchild) Child Work Pack).
Procedure
1. Access the Work Packs section.2. In the row containing the Work Pack that you want to access, select the link.
The Work Pack Overview workspace for the selected Work Pack appears, displaying the Definitionssection.
86 © 2020 General Electric Company

3. In the left pane, select .The Link Existing Work Pack Records to <Work Pack Name> window appears.
4. As needed, enter values in the available search fields, and then select .The Work Packs that can be linked to the selected Work Pack appear.
5. Next to each Work Pack that you want to link to the Work Pack, select the check box, and then selectOK.The selected Work Packs are linked.
Unlink a Work Pack
Procedure
1. Access the Work Packs section.2. In the row containing the Work Pack that you want to unlink, select the link.
The Work Pack Overview workspace for the selected Work Pack appears, displaying the Definitionssection.
© 2020 General Electric Company 87
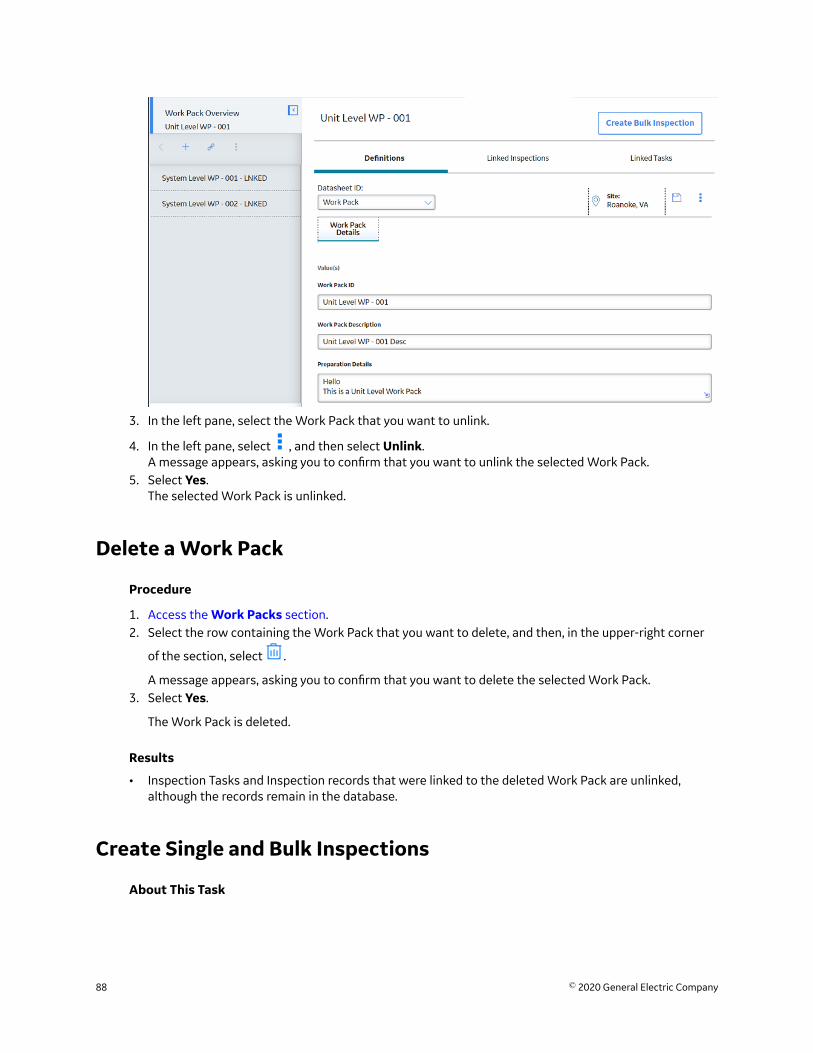
3. In the left pane, select the Work Pack that you want to unlink.
4. In the left pane, select , and then select Unlink.A message appears, asking you to confirm that you want to unlink the selected Work Pack.
5. Select Yes.The selected Work Pack is unlinked.
Delete a Work Pack
Procedure
1. Access the Work Packs section.2. Select the row containing the Work Pack that you want to delete, and then, in the upper-right corner
of the section, select .
A message appears, asking you to confirm that you want to delete the selected Work Pack.3. Select Yes.
The Work Pack is deleted.
Results
• Inspection Tasks and Inspection records that were linked to the deleted Work Pack are unlinked,although the records remain in the database.
Create Single and Bulk Inspections
About This Task
88 © 2020 General Electric Company
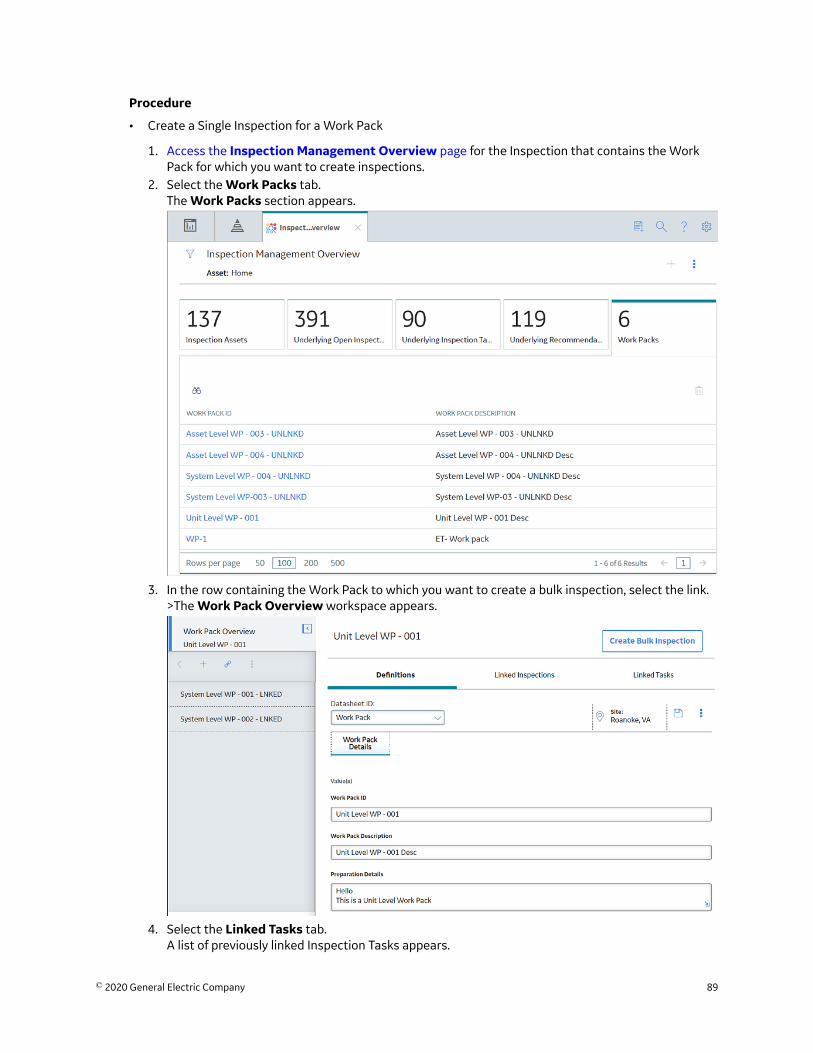
Procedure
• Create a Single Inspection for a Work Pack
1. Access the Inspection Management Overview page for the Inspection that contains the WorkPack for which you want to create inspections.
2. Select the Work Packs tab.The Work Packs section appears.
3. In the row containing the Work Pack to which you want to create a bulk inspection, select the link.>The Work Pack Overview workspace appears.
4. Select the Linked Tasks tab.A list of previously linked Inspection Tasks appears.
© 2020 General Electric Company 89
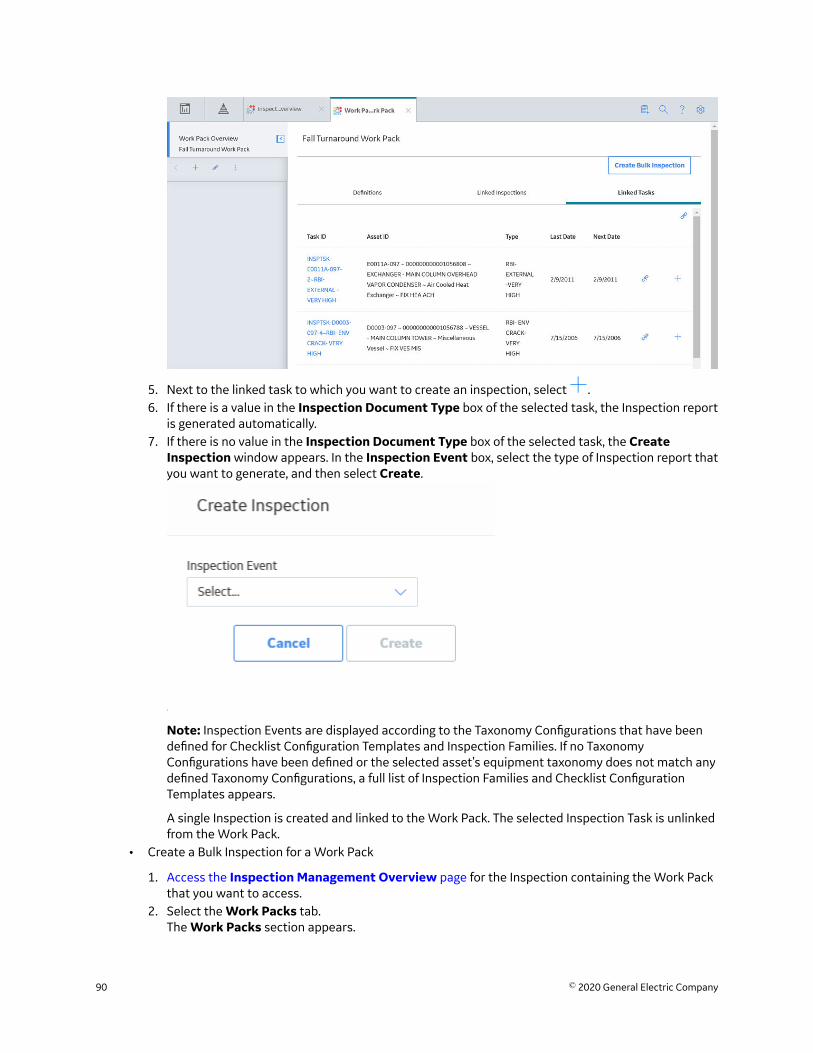
5. Next to the linked task to which you want to create an inspection, select .6. If there is a value in the Inspection Document Type box of the selected task, the Inspection report
is generated automatically.7. If there is no value in the Inspection Document Type box of the selected task, the Create
Inspection window appears. In the Inspection Event box, select the type of Inspection report thatyou want to generate, and then select Create.
Note: Inspection Events are displayed according to the Taxonomy Configurations that have beendefined for Checklist Configuration Templates and Inspection Families. If no TaxonomyConfigurations have been defined or the selected asset’s equipment taxonomy does not match anydefined Taxonomy Configurations, a full list of Inspection Families and Checklist ConfigurationTemplates appears.
A single Inspection is created and linked to the Work Pack. The selected Inspection Task is unlinkedfrom the Work Pack.
• Create a Bulk Inspection for a Work Pack
1. Access the Inspection Management Overview page for the Inspection containing the Work Packthat you want to access.
2. Select the Work Packs tab.The Work Packs section appears.
90 © 2020 General Electric Company
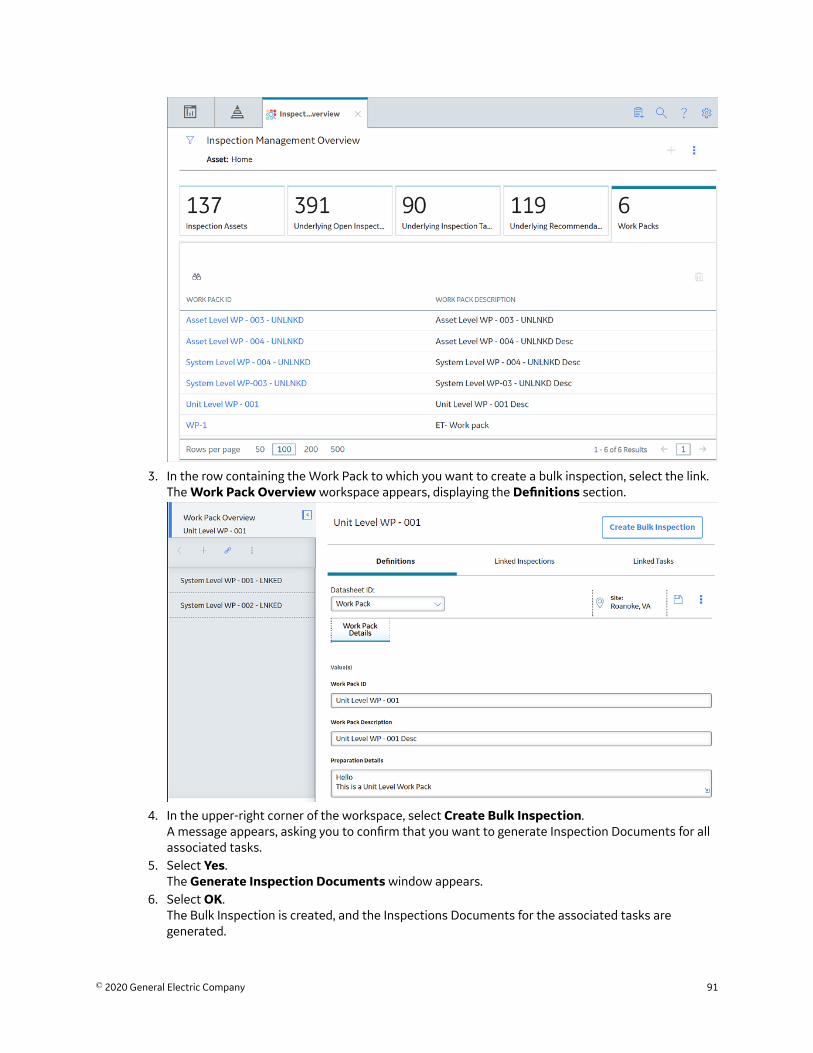
3. In the row containing the Work Pack to which you want to create a bulk inspection, select the link.The Work Pack Overview workspace appears, displaying the Definitions section.
4. In the upper-right corner of the workspace, select Create Bulk Inspection.A message appears, asking you to confirm that you want to generate Inspection Documents for allassociated tasks.
5. Select Yes.The Generate Inspection Documents window appears.
6. Select OK.The Bulk Inspection is created, and the Inspections Documents for the associated tasks aregenerated.
© 2020 General Electric Company 91

Note: If an inspection cannot be generated for an Inspection Task linked to the Work Pack, an errormessage for the task appears in the Generate Inspection Documents window. Those tasks willnot be unlinked from the Work Pack.
Link an Inspection to a Work Pack
Procedure
1. Access the Work Packs section.2. In the row containing the Work Pack that you want to link to an Inspection, select the link.
The Work Pack Overview workspace for the selected Work Pack appears, displaying the Definitionssection.
3. In the workspace, select the Linked Inspections tab.The Linked Inspections section appears, displaying the Inspections currently linked to the selectedWork Pack.
4. In the left pane, select .The Link Existing Work Pack Records to <Work Pack ID> window appears.
92 © 2020 General Electric Company

5. As needed, enter values in the available search fields, and then select .The Inspections that can be linked to the selected Work Pack appear.
6. Next to each Inspection that you want to link to the Work Pack, select the check box, and then selectOK.The Inspections are linked to the selected Work Pack.
Unlink an Inspection from a Work Pack
Procedure
1. Access the Work Packs section.2. In the row containing the Work Pack that you want to unlink, select the link.
The Work Pack Overview workspace for the selected Work Pack appears, displaying the Definitionssection.
© 2020 General Electric Company 93
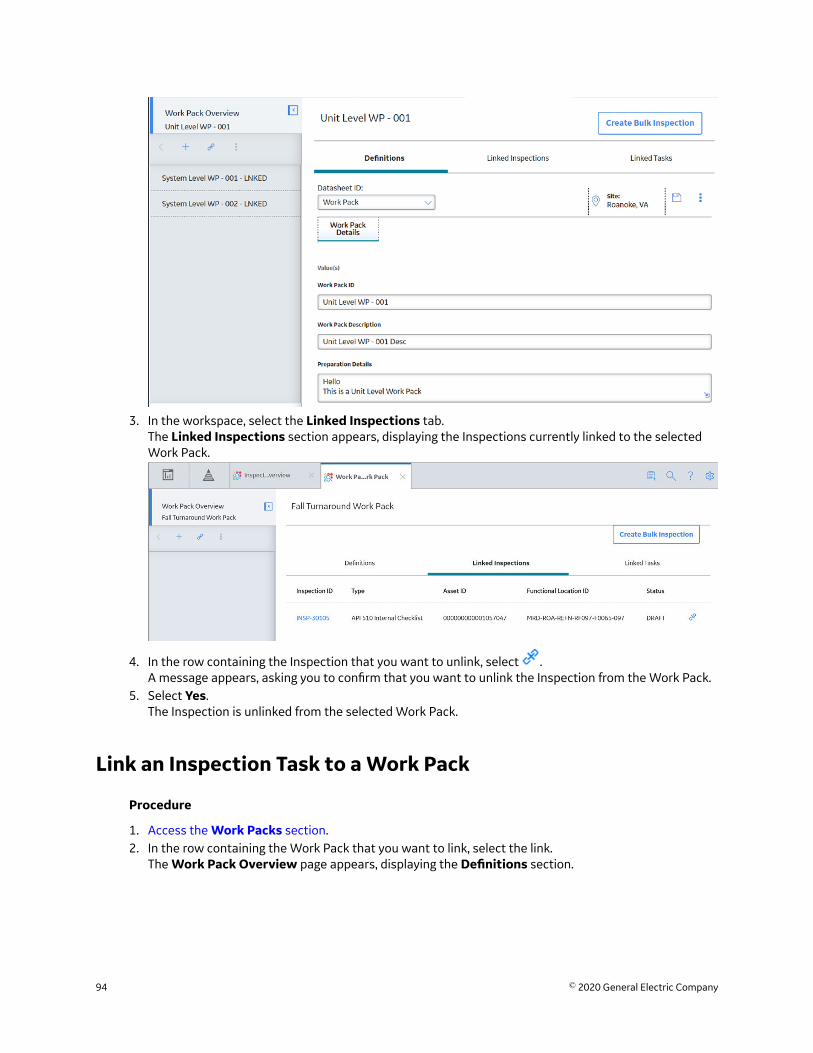
3. In the workspace, select the Linked Inspections tab.The Linked Inspections section appears, displaying the Inspections currently linked to the selectedWork Pack.
4. In the row containing the Inspection that you want to unlink, select .A message appears, asking you to confirm that you want to unlink the Inspection from the Work Pack.
5. Select Yes.The Inspection is unlinked from the selected Work Pack.
Link an Inspection Task to a Work Pack
Procedure
1. Access the Work Packs section.2. In the row containing the Work Pack that you want to link, select the link.
The Work Pack Overview page appears, displaying the Definitions section.
94 © 2020 General Electric Company

3. In the workspace, select the Linked Tasks tab.The Linked Tasks section appears, displaying tasks currently linked to the selected Work Pack.
4. On the right side of the workspace heading, select , and then select Search.The Link Existing Task Records to <Work Pack ID> window appears.
5. As needed, enter values in the available search fields, and then select .The Inspection Tasks that can be linked to the selected Work Pack appear.
6. In the search results, next to each Inspection Task that you want to link to the Work Pack, select thecheck box, and then select OK.The selected Inspection Tasks are linked to the selected Work Pack.
© 2020 General Electric Company 95

Unlink an Inspection Task from a Work Pack
Procedure
1. Access the Work Packs section.
2. In the Work Packs section, select the Work Pack ID from which you want to unlink an Inspection Task.The Work Pack Overview page appears, displaying the Definitions section.
96 © 2020 General Electric Company
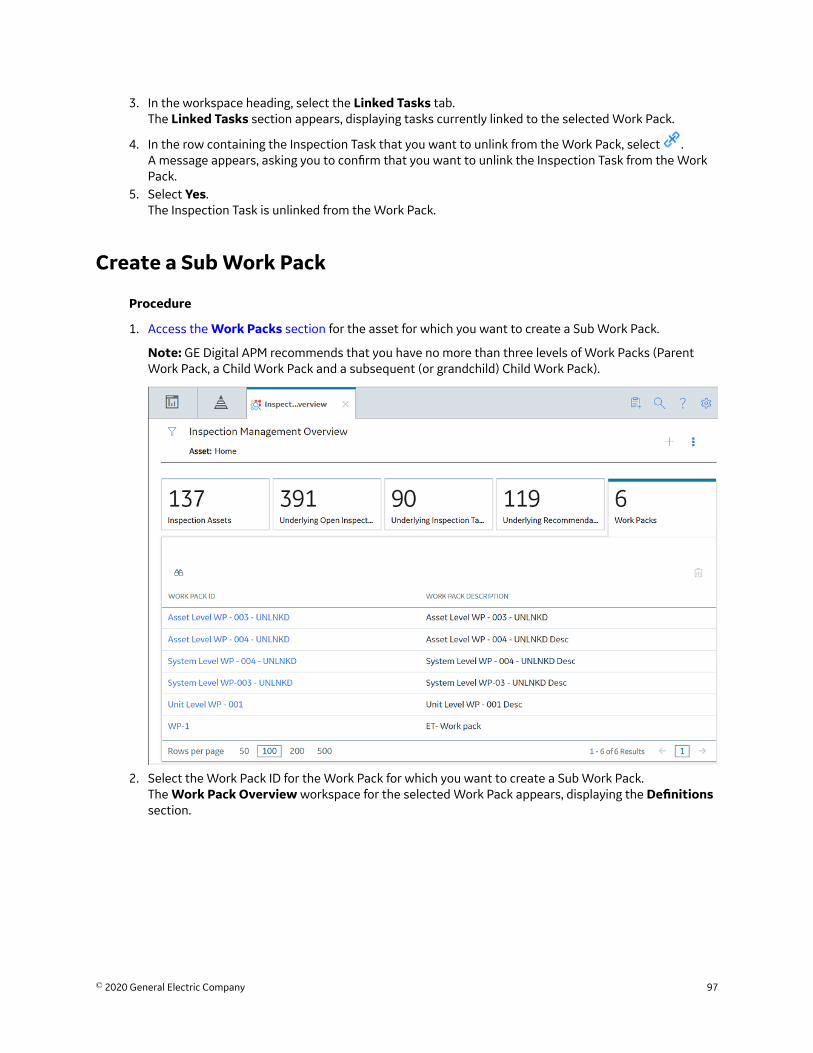
3. In the workspace heading, select the Linked Tasks tab.The Linked Tasks section appears, displaying tasks currently linked to the selected Work Pack.
4. In the row containing the Inspection Task that you want to unlink from the Work Pack, select .A message appears, asking you to confirm that you want to unlink the Inspection Task from the WorkPack.
5. Select Yes.The Inspection Task is unlinked from the Work Pack.
Create a Sub Work Pack
Procedure
1. Access the Work Packs section for the asset for which you want to create a Sub Work Pack.
Note: GE Digital APM recommends that you have no more than three levels of Work Packs (ParentWork Pack, a Child Work Pack and a subsequent (or grandchild) Child Work Pack).
2. Select the Work Pack ID for the Work Pack for which you want to create a Sub Work Pack.The Work Pack Overview workspace for the selected Work Pack appears, displaying the Definitionssection.
© 2020 General Electric Company 97
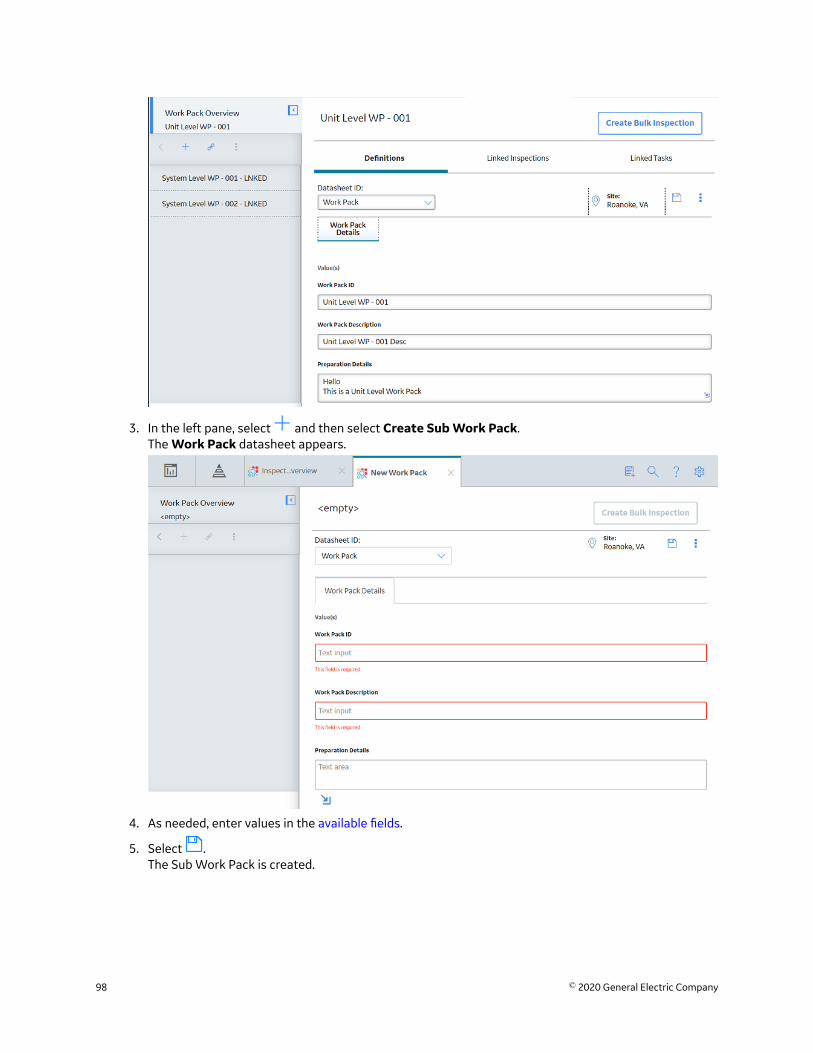
3. In the left pane, select and then select Create Sub Work Pack.The Work Pack datasheet appears.
4. As needed, enter values in the available fields.
5. Select .The Sub Work Pack is created.
98 © 2020 General Electric Company
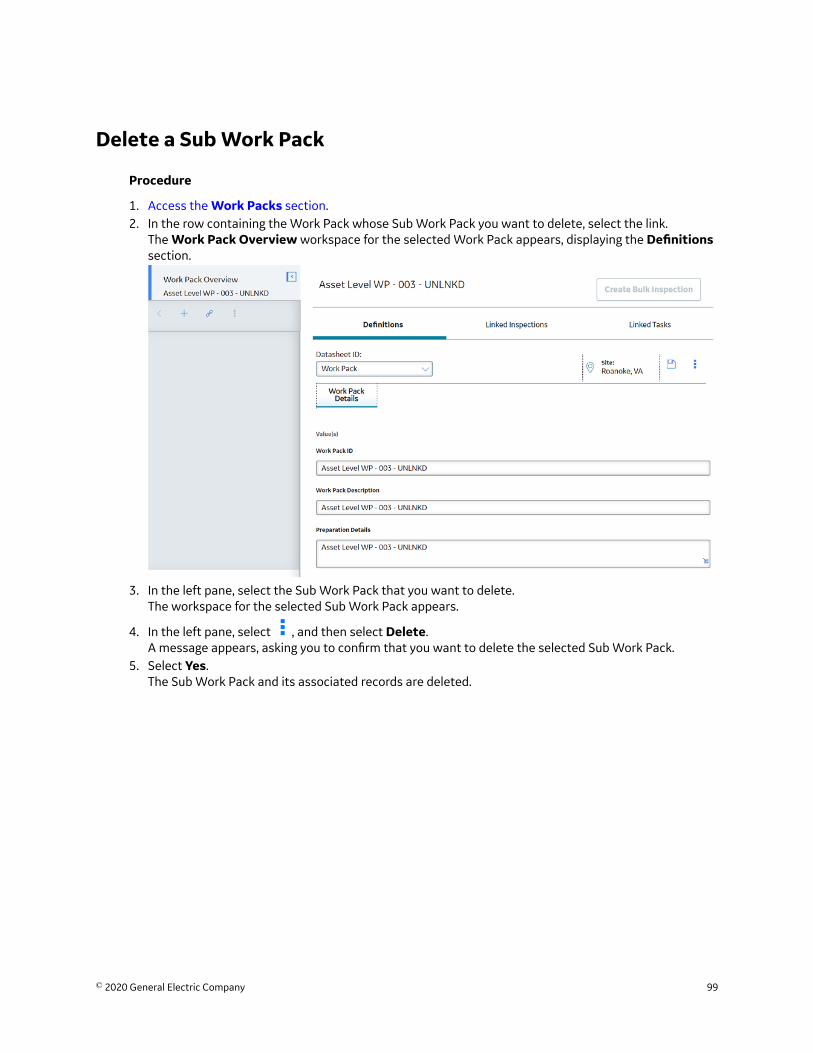
Delete a Sub Work Pack
Procedure
1. Access the Work Packs section.2. In the row containing the Work Pack whose Sub Work Pack you want to delete, select the link.
The Work Pack Overview workspace for the selected Work Pack appears, displaying the Definitionssection.
3. In the left pane, select the Sub Work Pack that you want to delete.The workspace for the selected Sub Work Pack appears.
4. In the left pane, select , and then select Delete.A message appears, asking you to confirm that you want to delete the selected Sub Work Pack.
5. Select Yes.The Sub Work Pack and its associated records are deleted.
© 2020 General Electric Company 99

Chapter
8AdminTopics:
• Inspection Configuration• Taxonomy Configuration• Overview Configuration• Compliance Configuration• Human Resources
100 © 2020 General Electric Company
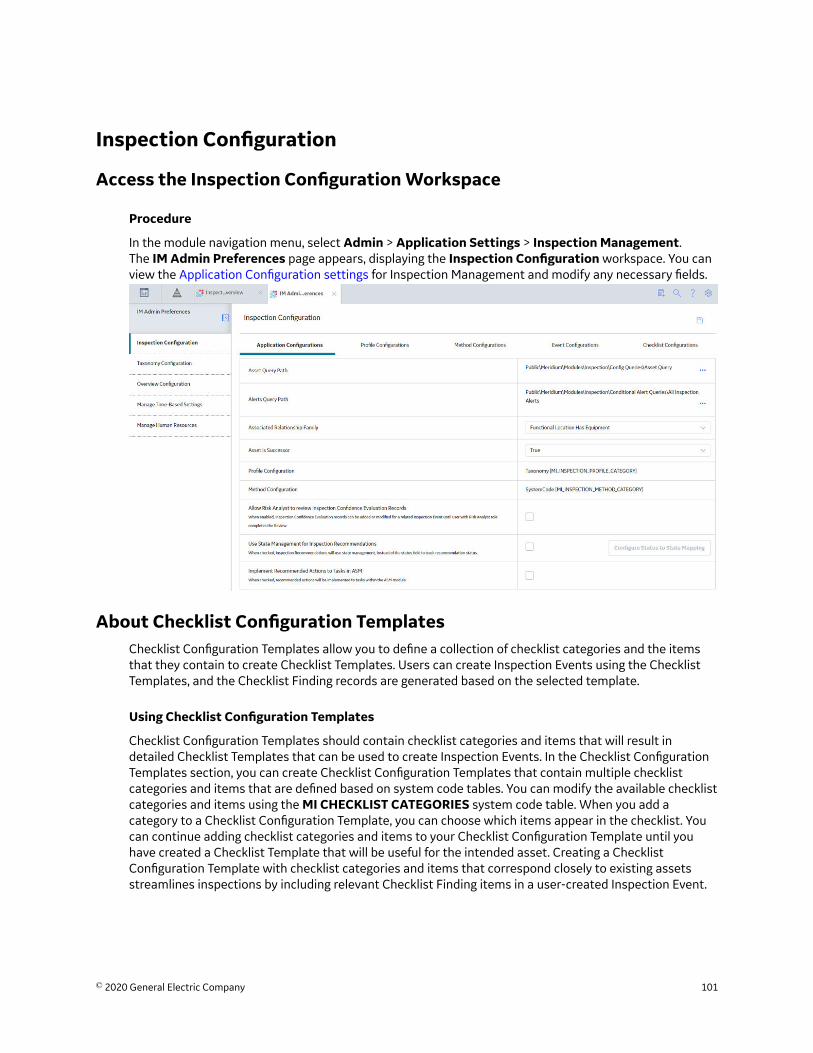
Inspection Configuration
Access the Inspection Configuration Workspace
Procedure
In the module navigation menu, select Admin > Application Settings > Inspection Management.The IM Admin Preferences page appears, displaying the Inspection Configuration workspace. You canview the Application Configuration settings for Inspection Management and modify any necessary fields.
About Checklist Configuration TemplatesChecklist Configuration Templates allow you to define a collection of checklist categories and the itemsthat they contain to create Checklist Templates. Users can create Inspection Events using the ChecklistTemplates, and the Checklist Finding records are generated based on the selected template.
Using Checklist Configuration Templates
Checklist Configuration Templates should contain checklist categories and items that will result indetailed Checklist Templates that can be used to create Inspection Events. In the Checklist ConfigurationTemplates section, you can create Checklist Configuration Templates that contain multiple checklistcategories and items that are defined based on system code tables. You can modify the available checklistcategories and items using the MI CHECKLIST CATEGORIES system code table. When you add acategory to a Checklist Configuration Template, you can choose which items appear in the checklist. Youcan continue adding checklist categories and items to your Checklist Configuration Template until youhave created a Checklist Template that will be useful for the intended asset. Creating a ChecklistConfiguration Template with checklist categories and items that correspond closely to existing assetsstreamlines inspections by including relevant Checklist Finding items in a user-created Inspection Event.
© 2020 General Electric Company 101

Checklist Configuration Templates and Taxonomy Configuration
The Checklist Configuration Templates that you create can be linked to a Taxonomy Configuration. When aChecklist Configuration Template has been linked to a Taxonomy Configuration, the Checklist Templateappears as an option when users create Inspection Events for an asset whose equipment taxonomymatches the Taxonomy Configuration. The Checklist Configuration Template will also appear by default ifthe equipment taxonomy of the asset does not match an existing Taxonomy Configuration.
Example: Fire Tube Boiler
A Checklist Configuration Template named Fire Tube Boilers Inspection Checklist contains the TubesWaterside checklist category. The Tubes Waterside checklist category contains two items: BorescopeInspection and Corrosion.
When a user creates an Inspection Event, a Checklist Template named Fire Tube Boilers InspectionChecklist appears in the Inspection Event list. If the user creates an Inspection Event using the Fire TubeBoilers Inspection Checklist Checklist Template, the Checklist Finding record displays the Tubes Watersidechecklist category with Borescope Inspection and Corrosion listed as Checklist Finding items.
Example: Fire Tube Boiler linked to a Taxonomy Configuration
The Fire Tube Boilers Inspection Checklist is linked to the following Taxonomy Configuration:
• Taxonomy Category: Fixed• Taxonomy Class: Boiler• Taxonomy Type: Misc Boiler
When a user creates an Inspection Event for an asset that shares that Taxonomy Configuration, Fire TubeBoilers Inspection Checklist appears in the list of available Checklist Templates for that asset.
About Application ConfigurationThis topic has been intentionally excluded from the GE Digital APM product documentation website. Thistopic is available to you via the product documentation that is provided within the GE Digital APM system.
Configure Status to State Mapping
About This Task
GE Digital APM supports uses of both Status and State Management for the approval work process ofInspection Recommendation. If you are currently using the Status field in Inspection Recommendation forthe approval work process and want to use the State Management for Inspection Recommendation, youmust map each Status value in the Inspection Recommendation Status field to a corresponding State inInspection Recommendation State Configuration. After you configure and save the mapping, you mustupgrade the existing Inspection Recommendation records using the Upgrade Records button so that allthe Status values are updated to the mapped States. This ensures that current approval work process forInspection Recommendation now uses states.
For example, the following Inspection Recommendation records are using the Status field.
102 © 2020 General Electric Company
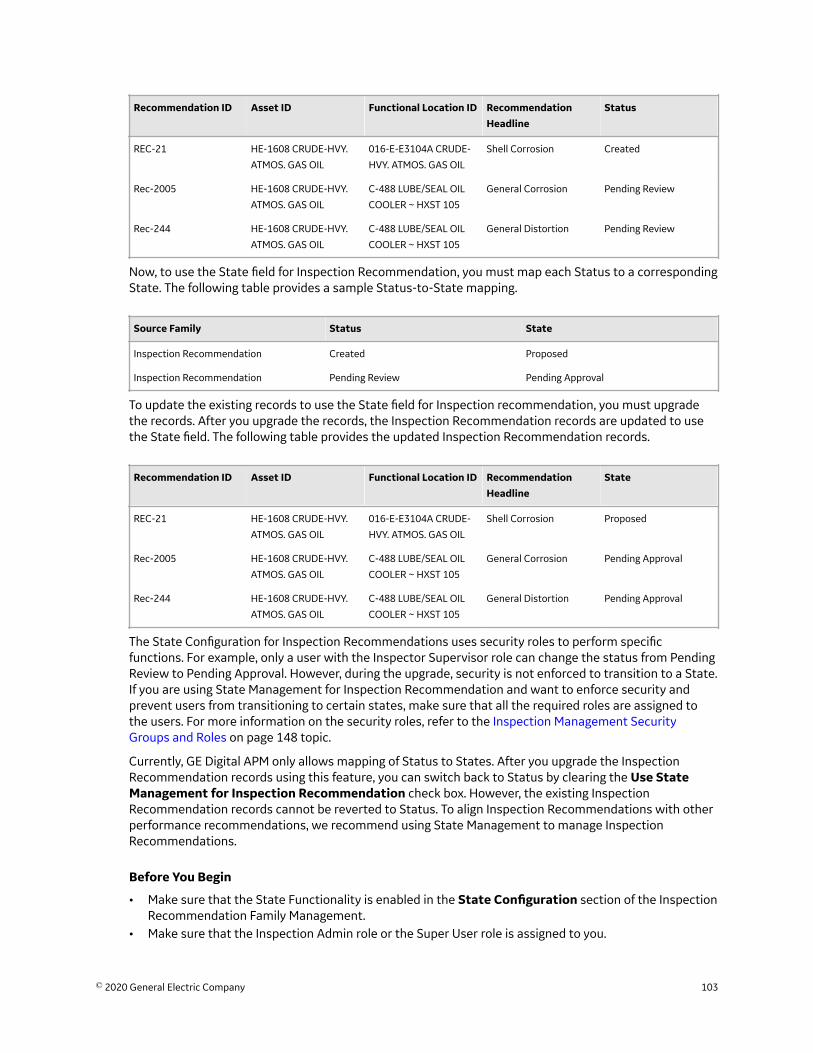
Recommendation ID Asset ID Functional Location ID RecommendationHeadline
Status
REC-21 HE-1608 CRUDE-HVY.
ATMOS. GAS OIL
016-E-E3104A CRUDE-
HVY. ATMOS. GAS OIL
Shell Corrosion Created
Rec-2005 HE-1608 CRUDE-HVY.
ATMOS. GAS OIL
C-488 LUBE/SEAL OIL
COOLER ~ HXST 105
General Corrosion Pending Review
Rec-244 HE-1608 CRUDE-HVY.
ATMOS. GAS OIL
C-488 LUBE/SEAL OIL
COOLER ~ HXST 105
General Distortion Pending Review
Now, to use the State field for Inspection Recommendation, you must map each Status to a correspondingState. The following table provides a sample Status-to-State mapping.
Source Family Status State
Inspection Recommendation Created Proposed
Inspection Recommendation Pending Review Pending Approval
To update the existing records to use the State field for Inspection recommendation, you must upgradethe records. After you upgrade the records, the Inspection Recommendation records are updated to usethe State field. The following table provides the updated Inspection Recommendation records.
Recommendation ID Asset ID Functional Location ID RecommendationHeadline
State
REC-21 HE-1608 CRUDE-HVY.
ATMOS. GAS OIL
016-E-E3104A CRUDE-
HVY. ATMOS. GAS OIL
Shell Corrosion Proposed
Rec-2005 HE-1608 CRUDE-HVY.
ATMOS. GAS OIL
C-488 LUBE/SEAL OIL
COOLER ~ HXST 105
General Corrosion Pending Approval
Rec-244 HE-1608 CRUDE-HVY.
ATMOS. GAS OIL
C-488 LUBE/SEAL OIL
COOLER ~ HXST 105
General Distortion Pending Approval
The State Configuration for Inspection Recommendations uses security roles to perform specificfunctions. For example, only a user with the Inspector Supervisor role can change the status from PendingReview to Pending Approval. However, during the upgrade, security is not enforced to transition to a State.If you are using State Management for Inspection Recommendation and want to enforce security andprevent users from transitioning to certain states, make sure that all the required roles are assigned tothe users. For more information on the security roles, refer to the Inspection Management SecurityGroups and Roles on page 148 topic.
Currently, GE Digital APM only allows mapping of Status to States. After you upgrade the InspectionRecommendation records using this feature, you can switch back to Status by clearing the Use StateManagement for Inspection Recommendation check box. However, the existing InspectionRecommendation records cannot be reverted to Status. To align Inspection Recommendations with otherperformance recommendations, we recommend using State Management to manage InspectionRecommendations.
Before You Begin
• Make sure that the State Functionality is enabled in the State Configuration section of the InspectionRecommendation Family Management.
• Make sure that the Inspection Admin role or the Super User role is assigned to you.
© 2020 General Electric Company 103
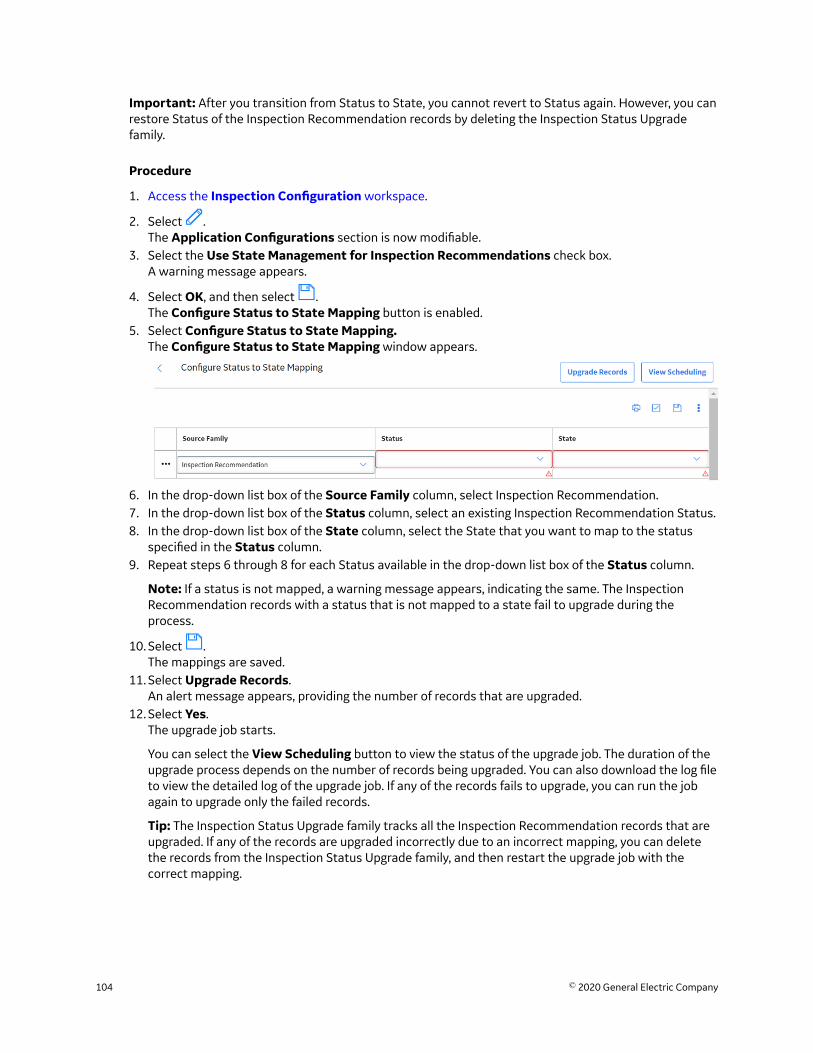
Important: After you transition from Status to State, you cannot revert to Status again. However, you canrestore Status of the Inspection Recommendation records by deleting the Inspection Status Upgradefamily.
Procedure
1. Access the Inspection Configuration workspace.
2. Select .The Application Configurations section is now modifiable.
3. Select the Use State Management for Inspection Recommendations check box.A warning message appears.
4. Select OK, and then select .The Configure Status to State Mapping button is enabled.
5. Select Configure Status to State Mapping.The Configure Status to State Mapping window appears.
6. In the drop-down list box of the Source Family column, select Inspection Recommendation.7. In the drop-down list box of the Status column, select an existing Inspection Recommendation Status.8. In the drop-down list box of the State column, select the State that you want to map to the status
specified in the Status column.9. Repeat steps 6 through 8 for each Status available in the drop-down list box of the Status column.
Note: If a status is not mapped, a warning message appears, indicating the same. The InspectionRecommendation records with a status that is not mapped to a state fail to upgrade during theprocess.
10. Select .The mappings are saved.
11. Select Upgrade Records.An alert message appears, providing the number of records that are upgraded.
12. Select Yes.The upgrade job starts.
You can select the View Scheduling button to view the status of the upgrade job. The duration of theupgrade process depends on the number of records being upgraded. You can also download the log fileto view the detailed log of the upgrade job. If any of the records fails to upgrade, you can run the jobagain to upgrade only the failed records.
Tip: The Inspection Status Upgrade family tracks all the Inspection Recommendation records that areupgraded. If any of the records are upgraded incorrectly due to an incorrect mapping, you can deletethe records from the Inspection Status Upgrade family, and then restart the upgrade job with thecorrect mapping.
104 © 2020 General Electric Company
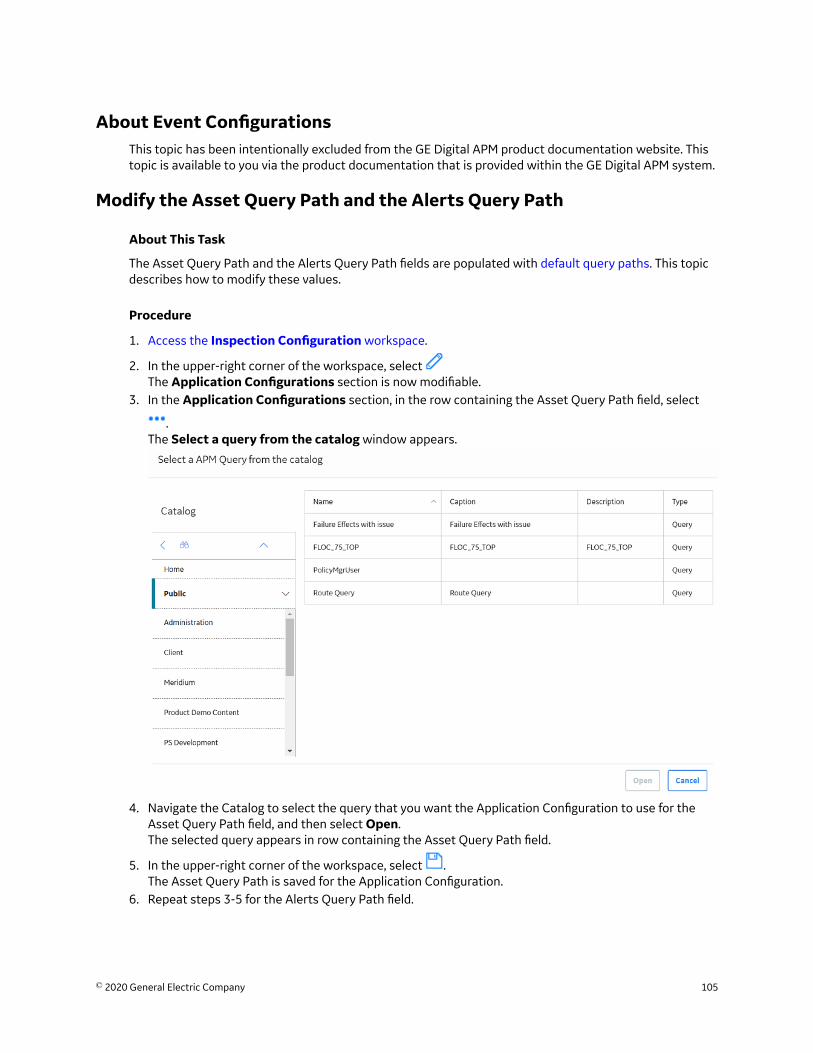
About Event ConfigurationsThis topic has been intentionally excluded from the GE Digital APM product documentation website. Thistopic is available to you via the product documentation that is provided within the GE Digital APM system.
Modify the Asset Query Path and the Alerts Query Path
About This Task
The Asset Query Path and the Alerts Query Path fields are populated with default query paths. This topicdescribes how to modify these values.
Procedure
1. Access the Inspection Configuration workspace.
2. In the upper-right corner of the workspace, select The Application Configurations section is now modifiable.
3. In the Application Configurations section, in the row containing the Asset Query Path field, select
.The Select a query from the catalog window appears.
4. Navigate the Catalog to select the query that you want the Application Configuration to use for theAsset Query Path field, and then select Open.The selected query appears in row containing the Asset Query Path field.
5. In the upper-right corner of the workspace, select .The Asset Query Path is saved for the Application Configuration.
6. Repeat steps 3-5 for the Alerts Query Path field.
© 2020 General Electric Company 105
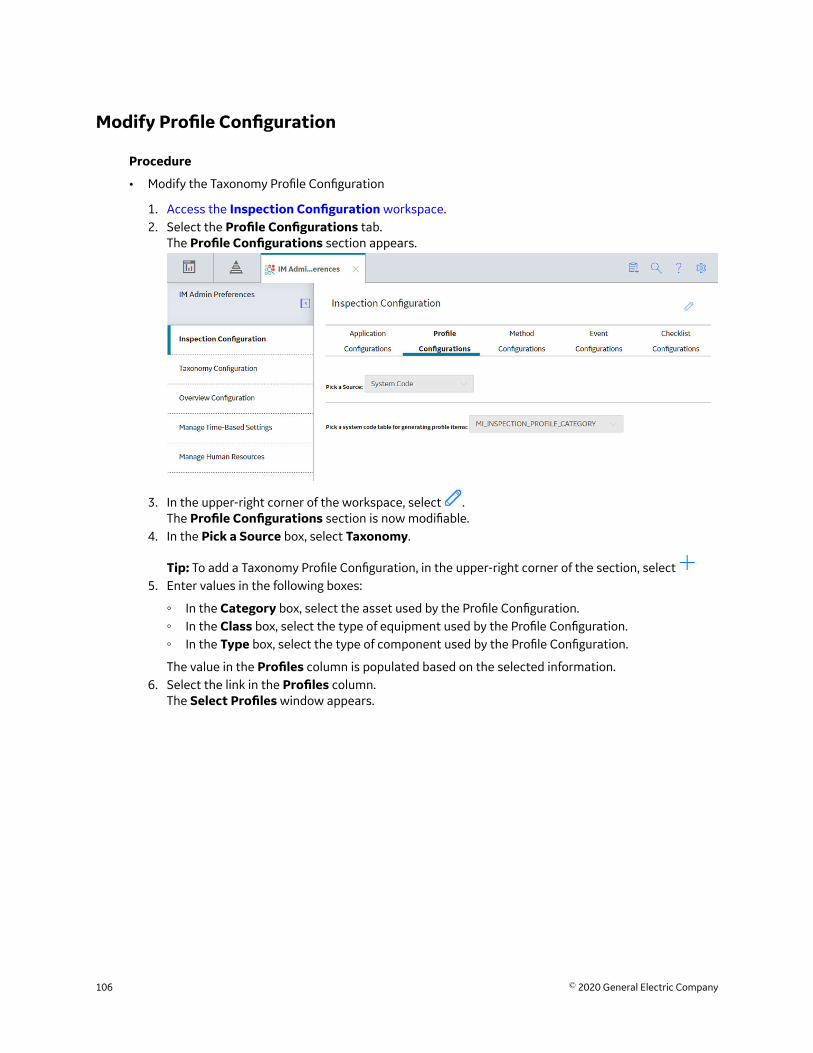
Modify Profile Configuration
Procedure
• Modify the Taxonomy Profile Configuration
1. Access the Inspection Configuration workspace.2. Select the Profile Configurations tab.
The Profile Configurations section appears.
3. In the upper-right corner of the workspace, select .The Profile Configurations section is now modifiable.
4. In the Pick a Source box, select Taxonomy.
Tip: To add a Taxonomy Profile Configuration, in the upper-right corner of the section, select 5. Enter values in the following boxes:
◦ In the Category box, select the asset used by the Profile Configuration.◦ In the Class box, select the type of equipment used by the Profile Configuration.◦ In the Type box, select the type of component used by the Profile Configuration.
The value in the Profiles column is populated based on the selected information.6. Select the link in the Profiles column.
The Select Profiles window appears.
106 © 2020 General Electric Company

7. Select the check box for each profile that you want to add.8. Select Done.
The selected profiles are added to the Profile Configuration.
9. In the workspace heading, select .The new Taxonomy Profile Configuration is modified.
• Modify the Profile System Code Configuration
1. Access the Inspection Configuration workspace.2. Select the Profile Configurations tab.
The Profile Configurations section appears.
© 2020 General Electric Company 107

3. In the upper-right corner of the workspace, select .
The Profile Configuration section is now modifiable.4. In the Pick a Source box, select System Code.5. In the Pick a system code table for generating profile items box, select the System Code table
that you want the Profile Configuration to use.
6. In the upper-right corner of the workspace, select .
The System Code Profile Configuration is modified.• Modify the Profile Query Configuration
1. Access the Inspection Configuration workspace.2. Select the Profile Configurations tab.
The Profile Configurations section appears.
3. In the upper-right corner of the workspace, select .
The Profile Configuration section is now modifiable.4. In the Pick a Source box, select Query.5. Next to the Path to profile query box, select Browse.
The Select a query from the catalog window appears.
108 © 2020 General Electric Company
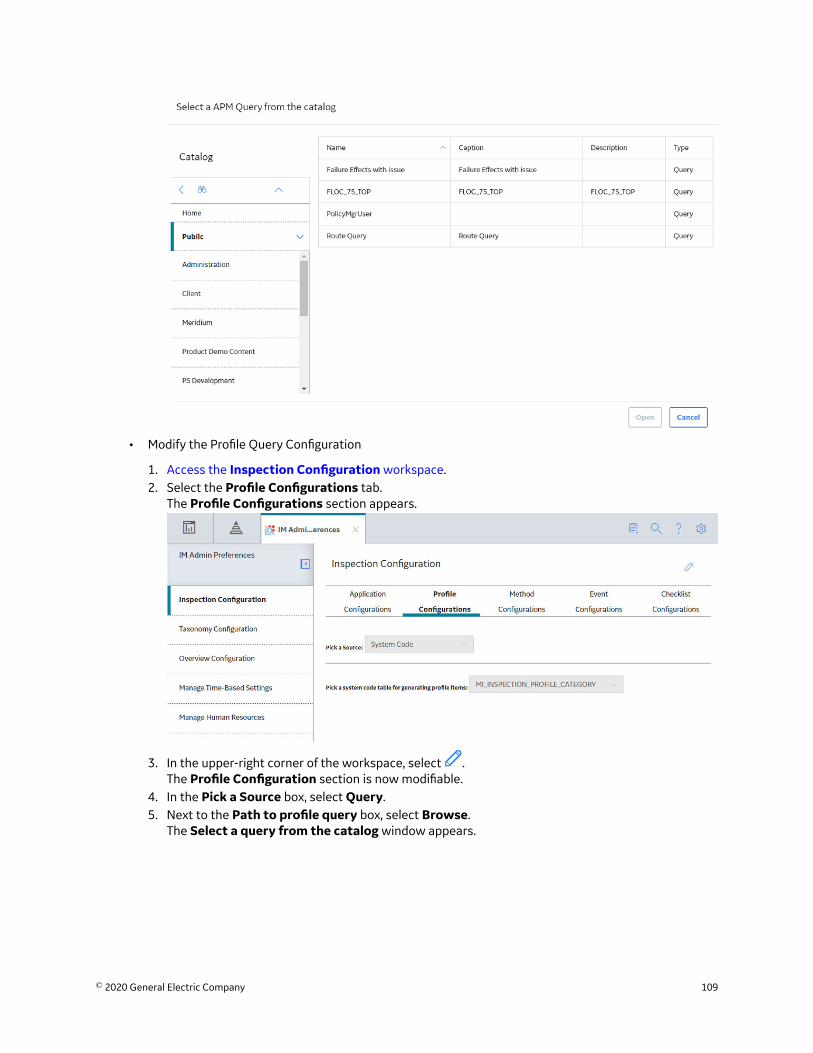
• Modify the Profile Query Configuration
1. Access the Inspection Configuration workspace.2. Select the Profile Configurations tab.
The Profile Configurations section appears.
3. In the upper-right corner of the workspace, select .The Profile Configuration section is now modifiable.
4. In the Pick a Source box, select Query.5. Next to the Path to profile query box, select Browse.
The Select a query from the catalog window appears.
© 2020 General Electric Company 109
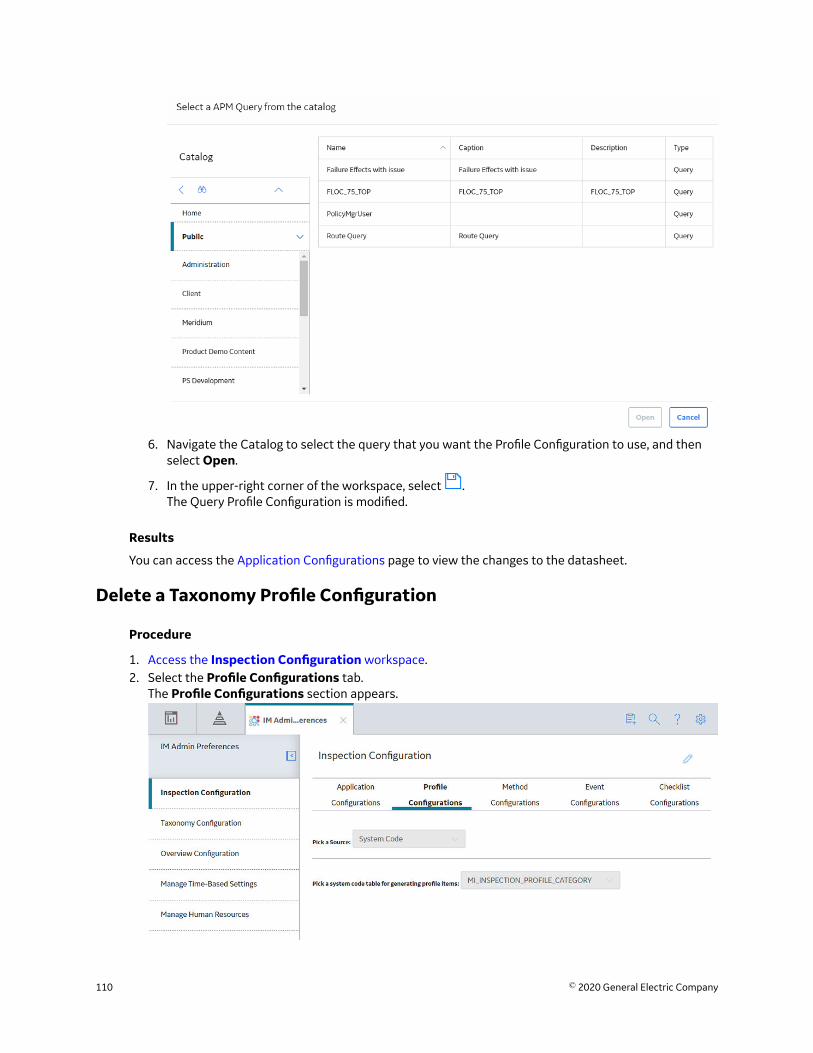
6. Navigate the Catalog to select the query that you want the Profile Configuration to use, and thenselect Open.
7. In the upper-right corner of the workspace, select .The Query Profile Configuration is modified.
Results
You can access the Application Configurations page to view the changes to the datasheet.
Delete a Taxonomy Profile Configuration
Procedure
1. Access the Inspection Configuration workspace.2. Select the Profile Configurations tab.
The Profile Configurations section appears.
110 © 2020 General Electric Company
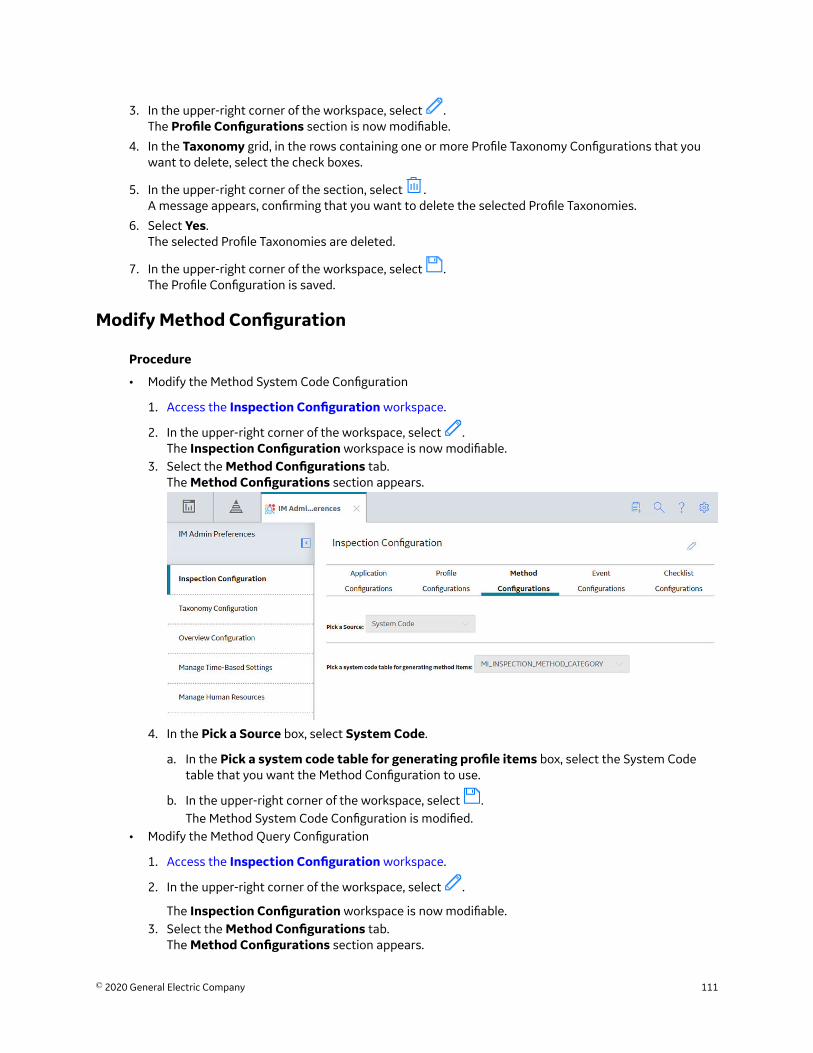
3. In the upper-right corner of the workspace, select .The Profile Configurations section is now modifiable.
4. In the Taxonomy grid, in the rows containing one or more Profile Taxonomy Configurations that youwant to delete, select the check boxes.
5. In the upper-right corner of the section, select .A message appears, confirming that you want to delete the selected Profile Taxonomies.
6. Select Yes.The selected Profile Taxonomies are deleted.
7. In the upper-right corner of the workspace, select .The Profile Configuration is saved.
Modify Method Configuration
Procedure
• Modify the Method System Code Configuration
1. Access the Inspection Configuration workspace.
2. In the upper-right corner of the workspace, select .The Inspection Configuration workspace is now modifiable.
3. Select the Method Configurations tab.The Method Configurations section appears.
4. In the Pick a Source box, select System Code.
a. In the Pick a system code table for generating profile items box, select the System Codetable that you want the Method Configuration to use.
b. In the upper-right corner of the workspace, select .The Method System Code Configuration is modified.
• Modify the Method Query Configuration
1. Access the Inspection Configuration workspace.
2. In the upper-right corner of the workspace, select .
The Inspection Configuration workspace is now modifiable.3. Select the Method Configurations tab.
The Method Configurations section appears.
© 2020 General Electric Company 111

4. In the Pick a Source box, select Query.
a. Next to the Path to method query box, select Browse.The Select a query from the catalog window appears.
b. Navigate the Catalog to select the query that you want the Method Configuration to use.
c. In the upper-right corner of the workspace, select The Method Query Configuration is modified.
Add or Modify Event Configuration
Procedure
• Add an Event Configuration
1. Access the Inspection Configuration workspace.2. In the Inspection Configuration workspace, select the Event Configurations tab.
The Event Configurations section appears, displaying a list of the Event Configurations currentlyapplied to the Inspection Configuration.
112 © 2020 General Electric Company
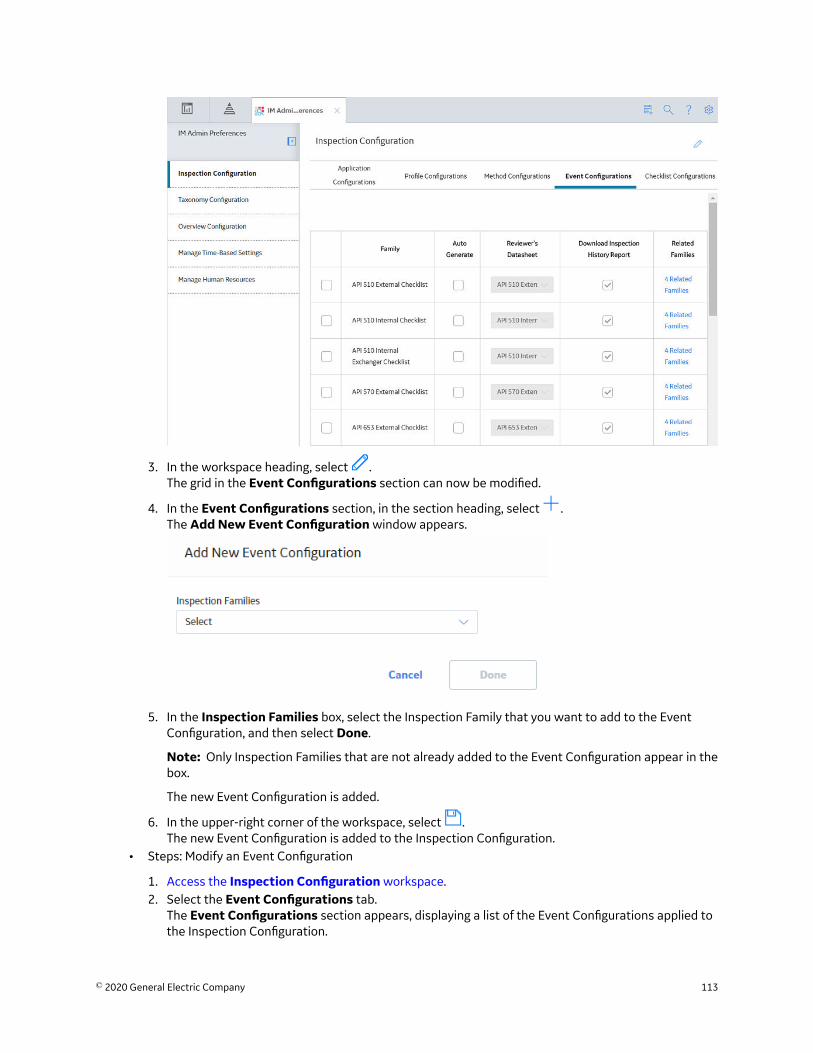
3. In the workspace heading, select .The grid in the Event Configurations section can now be modified.
4. In the Event Configurations section, in the section heading, select .The Add New Event Configuration window appears.
5. In the Inspection Families box, select the Inspection Family that you want to add to the EventConfiguration, and then select Done.
Note: Only Inspection Families that are not already added to the Event Configuration appear in thebox.
The new Event Configuration is added.
6. In the upper-right corner of the workspace, select .The new Event Configuration is added to the Inspection Configuration.
• Steps: Modify an Event Configuration
1. Access the Inspection Configuration workspace.2. Select the Event Configurations tab.
The Event Configurations section appears, displaying a list of the Event Configurations applied tothe Inspection Configuration.
© 2020 General Electric Company 113
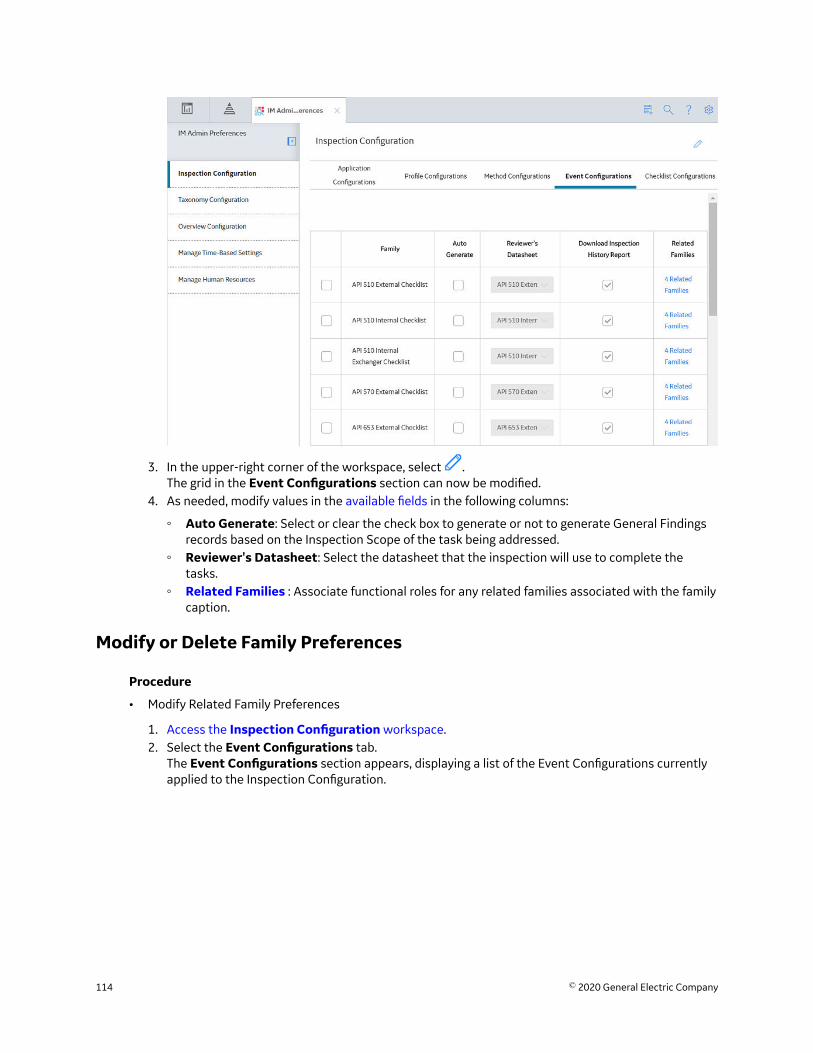
3. In the upper-right corner of the workspace, select .The grid in the Event Configurations section can now be modified.
4. As needed, modify values in the available fields in the following columns:
◦ Auto Generate: Select or clear the check box to generate or not to generate General Findingsrecords based on the Inspection Scope of the task being addressed.
◦ Reviewer's Datasheet: Select the datasheet that the inspection will use to complete thetasks.
◦ Related Families : Associate functional roles for any related families associated with the familycaption.
Modify or Delete Family Preferences
Procedure
• Modify Related Family Preferences
1. Access the Inspection Configuration workspace.2. Select the Event Configurations tab.
The Event Configurations section appears, displaying a list of the Event Configurations currentlyapplied to the Inspection Configuration.
114 © 2020 General Electric Company

3. In the upper-right corner of the workspace, select .The grid in the Event Configurations section can now be modified.
4. Select the Related Families link that you want to modify.The Related Families window appears.
Tip: To add a Related Family, in the upper-right corner of the Related Families box, select .5. As needed, modify the following values:
◦ In the Relationship column, select the relationship family for new related family.
© 2020 General Electric Company 115

◦ In the Family column, select the inspection family for the new related family.◦ In the Create column, select or clear the check box to allow users to create new related family
records.◦ In the Delete column, select or clear the check box to allow users to delete related family
records.◦ In the Link column, select or clear the check box to allow users to link related family records.◦ In the Unlink column, select or clear the check box to allow users to unlink related family
records.6. Select Done.
One or more related families are modified.
7. In the upper-right corner of the workspace, select .Related Family preferences are modified.
• Delete a Related Family
1. Access the Inspection Configuration workspace.2. Select the Event Configurations tab.
The Event Configurations section appears, displaying a list of the Event Configurations currentlyapplied to the Inspection Configuration.
• Steps: Delete a Related Family
1. Access the Inspection Configuration workspace.2. Select the Event Configurations tab.
The Event Configurations section appears, displaying a list of the Event Configurations currentlyapplied to the Inspection Configuration.
116 © 2020 General Electric Company
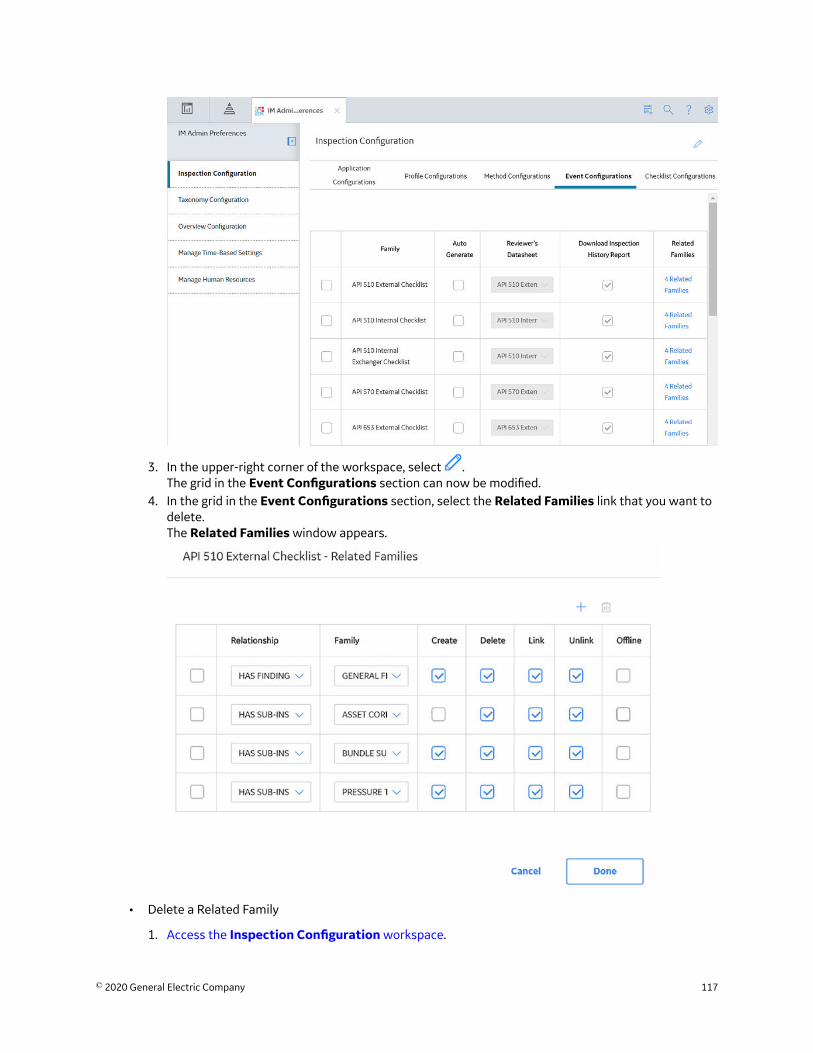
3. In the upper-right corner of the workspace, select .The grid in the Event Configurations section can now be modified.
4. In the grid in the Event Configurations section, select the Related Families link that you want todelete.The Related Families window appears.
• Delete a Related Family
1. Access the Inspection Configuration workspace.
© 2020 General Electric Company 117
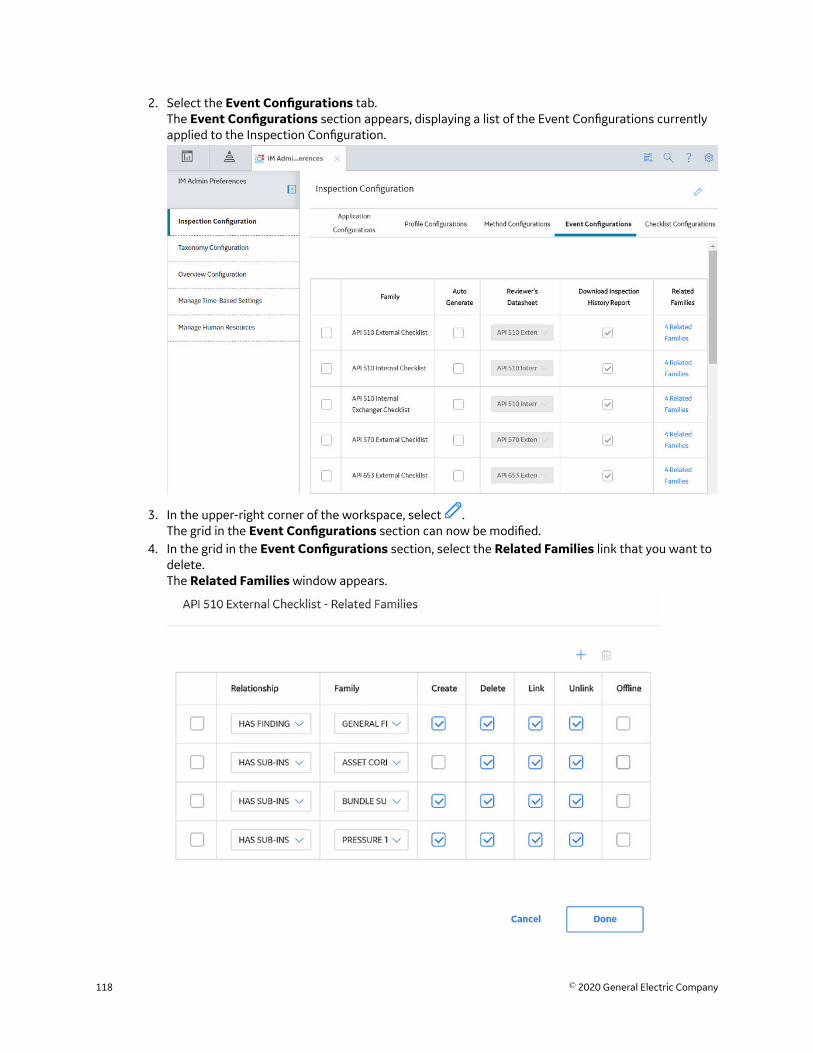
2. Select the Event Configurations tab.The Event Configurations section appears, displaying a list of the Event Configurations currentlyapplied to the Inspection Configuration.
3. In the upper-right corner of the workspace, select .The grid in the Event Configurations section can now be modified.
4. In the grid in the Event Configurations section, select the Related Families link that you want todelete.The Related Families window appears.
118 © 2020 General Electric Company
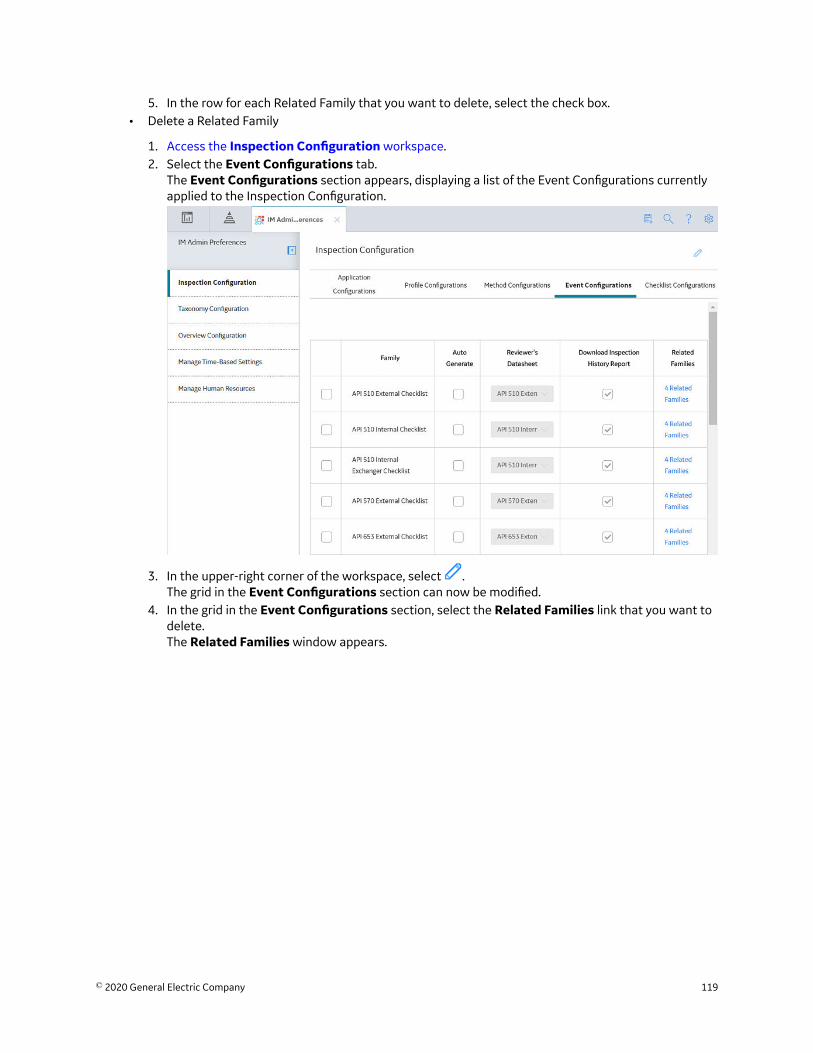
5. In the row for each Related Family that you want to delete, select the check box.• Delete a Related Family
1. Access the Inspection Configuration workspace.2. Select the Event Configurations tab.
The Event Configurations section appears, displaying a list of the Event Configurations currentlyapplied to the Inspection Configuration.
3. In the upper-right corner of the workspace, select .The grid in the Event Configurations section can now be modified.
4. In the grid in the Event Configurations section, select the Related Families link that you want todelete.The Related Families window appears.
© 2020 General Electric Company 119

5. In the row for each Related Family that you want to delete, select the check box.
6. In the upper-right corner of the window, select .A message appears, confirming that you want to delete the selected Related Families.
7. Select Yes.The selected Related Families are deleted.
8. In the upper-right corner of the window, select .The Related Family preferences are saved.
Delete an Event Configuration
Procedure
1. Access the Inspection Configuration workspace.2. Select the Event Configurations tab.
The Event Configurations section appears, displaying a list of the Event Configurations applied to theInspection Configuration.
120 © 2020 General Electric Company
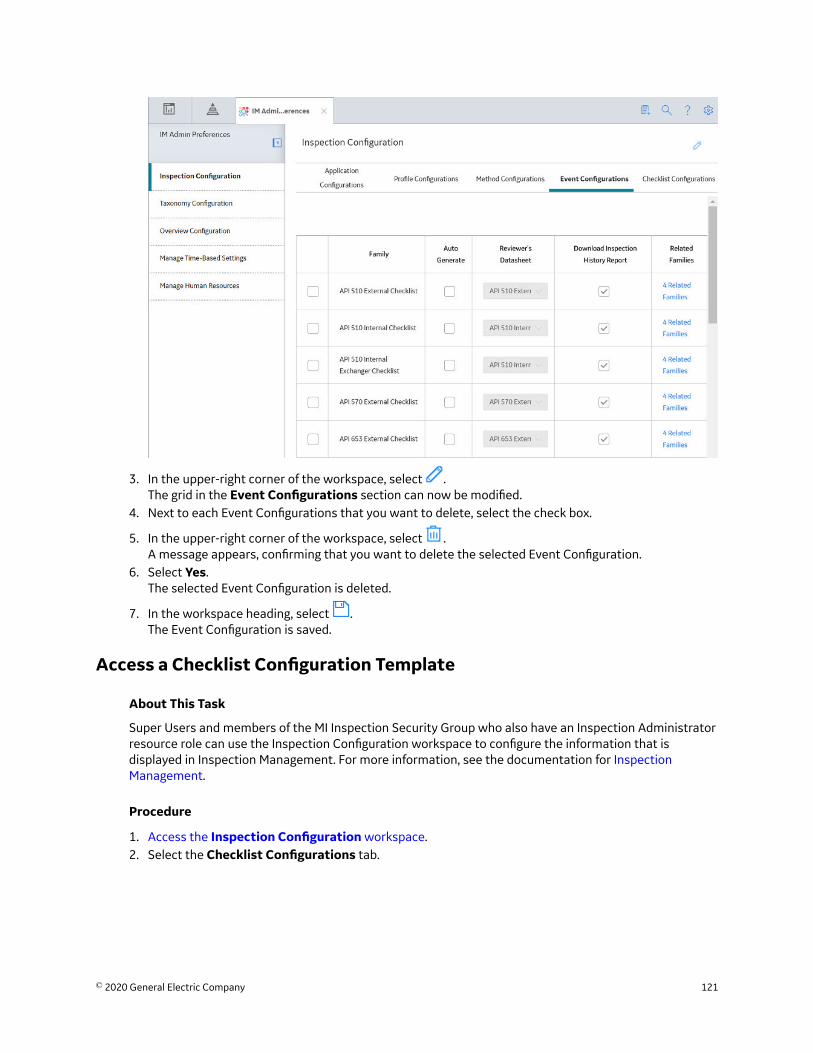
3. In the upper-right corner of the workspace, select .The grid in the Event Configurations section can now be modified.
4. Next to each Event Configurations that you want to delete, select the check box.
5. In the upper-right corner of the workspace, select .A message appears, confirming that you want to delete the selected Event Configuration.
6. Select Yes.The selected Event Configuration is deleted.
7. In the workspace heading, select .The Event Configuration is saved.
Access a Checklist Configuration Template
About This Task
Super Users and members of the MI Inspection Security Group who also have an Inspection Administratorresource role can use the Inspection Configuration workspace to configure the information that isdisplayed in Inspection Management. For more information, see the documentation for InspectionManagement.
Procedure
1. Access the Inspection Configuration workspace.2. Select the Checklist Configurations tab.
© 2020 General Electric Company 121
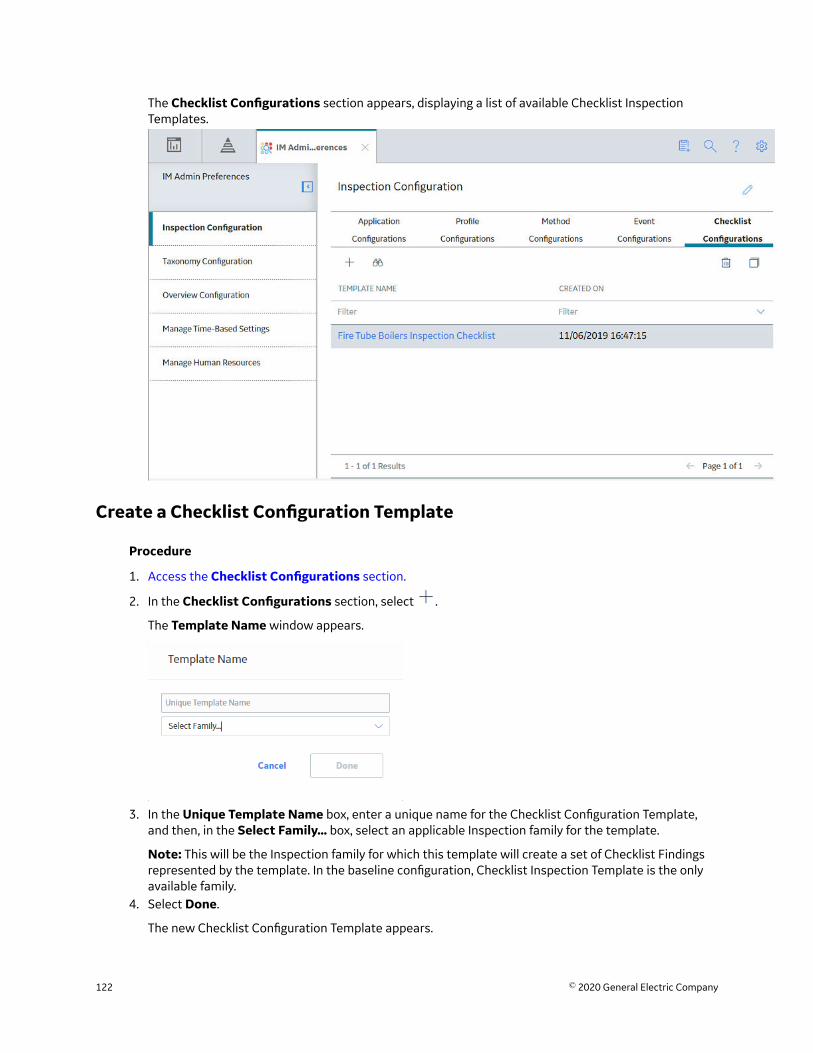
The Checklist Configurations section appears, displaying a list of available Checklist InspectionTemplates.
Create a Checklist Configuration Template
Procedure
1. Access the Checklist Configurations section.
2. In the Checklist Configurations section, select .
The Template Name window appears.
3. In the Unique Template Name box, enter a unique name for the Checklist Configuration Template,and then, in the Select Family... box, select an applicable Inspection family for the template.
Note: This will be the Inspection family for which this template will create a set of Checklist Findingsrepresented by the template. In the baseline configuration, Checklist Inspection Template is the onlyavailable family.
4. Select Done.
The new Checklist Configuration Template appears.
122 © 2020 General Electric Company
Delete a Checklist Configuration Template
Procedure
1. Access the Checklist Configurations section.2. In the Checklist Configurations section, select the Checklist Configuration Template you want to
delete.
3. Select 4. Select Yes.
The selected Checklist Configuration Template is deleted.
Add Categories and Items to a Checklist Configuration Template
About This Task
After creating a Checklist Configuration Template, you can select a checklist category from which youwant to add items to the template. The selected checklist category is used to sort your selected items inthe template. You can add multiple checklist categories that each contain one or more items to yourChecklist Configuration Template.
Procedure
1. Access the Checklist Configurations section.2. In the Checklist Configurations section, select the Checklist Configuration Template to which you
want to add items.
3. In the Checklist Configuration Template section, select .
© 2020 General Electric Company 123
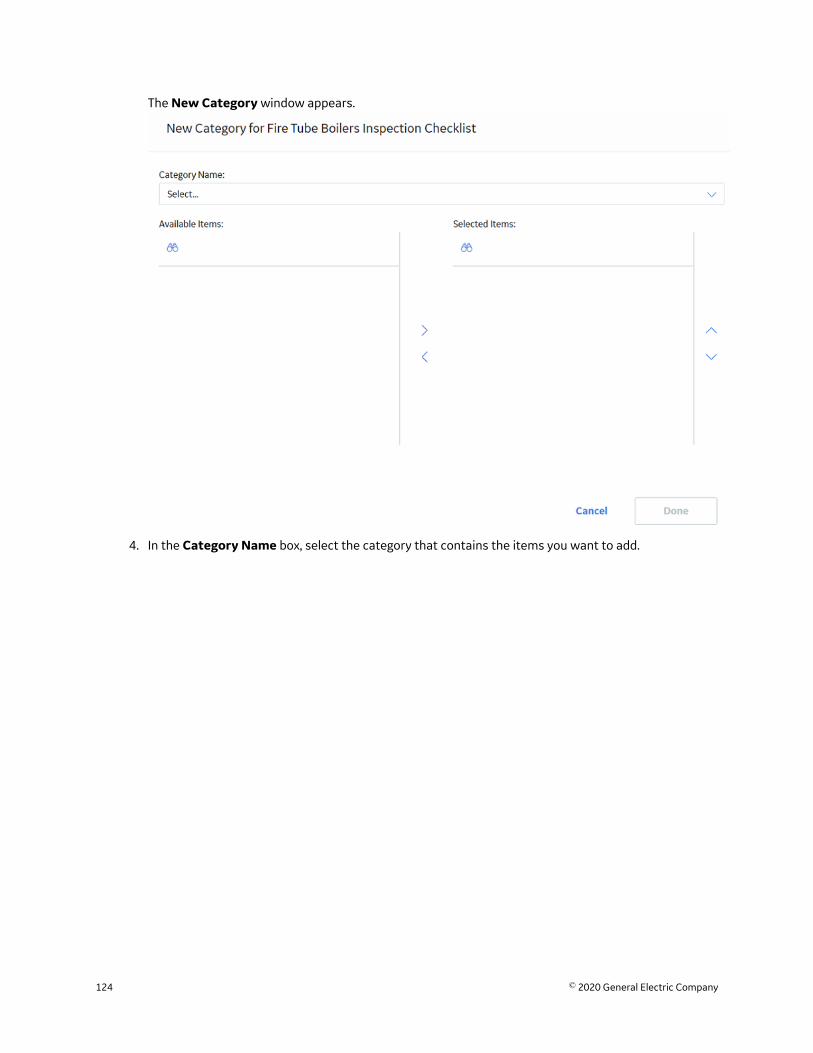
The New Category window appears.
4. In the Category Name box, select the category that contains the items you want to add.
124 © 2020 General Electric Company

The category items appear.
5. In the Available Items list, select one or more items that you want to include in the ChecklistConfiguration Template.
6. To add the items to the Selected Items list, select .
Tip: To remove an item from the Selected Items list, select the item you want to remove, and then
select . To reorder items, select and .7. Select Done.
© 2020 General Electric Company 125
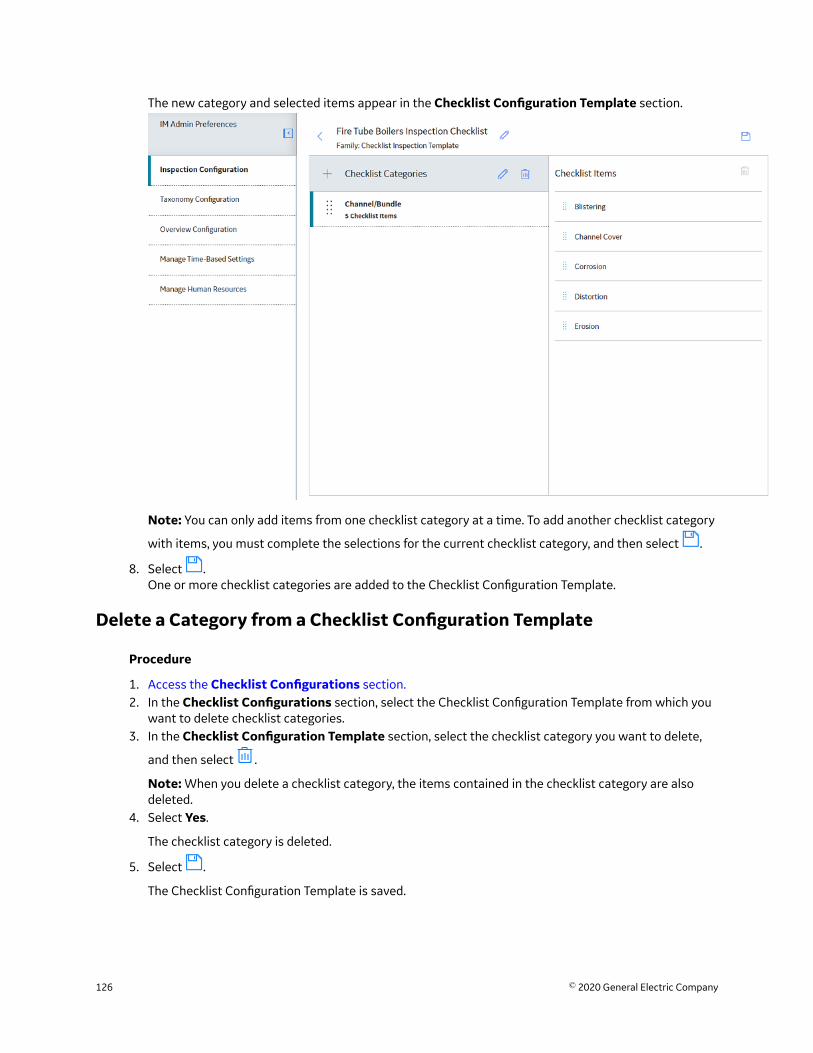
The new category and selected items appear in the Checklist Configuration Template section.
Note: You can only add items from one checklist category at a time. To add another checklist category
with items, you must complete the selections for the current checklist category, and then select .
8. Select .One or more checklist categories are added to the Checklist Configuration Template.
Delete a Category from a Checklist Configuration Template
Procedure
1. Access the Checklist Configurations section.2. In the Checklist Configurations section, select the Checklist Configuration Template from which you
want to delete checklist categories.3. In the Checklist Configuration Template section, select the checklist category you want to delete,
and then select .
Note: When you delete a checklist category, the items contained in the checklist category are alsodeleted.
4. Select Yes.
The checklist category is deleted.
5. Select .
The Checklist Configuration Template is saved.
126 © 2020 General Electric Company
Delete an Item from a Checklist Configuration Template
Procedure
1. Access the Checklist Configurations section.2. In the Checklist Configurations section, select the Checklist Inspection Template from which you
want to delete an item.3. In the Checklist Configuration Template section, select the checklist category that contains the
item you want to delete.
4. Select the item you want to delete, and then select .5. Select Yes.
The item is deleted.
6. Select .
The Checklist Configuration Template is saved.
Modify Categories and Items in a Checklist Configuration Template
Procedure
1. Access the Checklist Configurations section.2. In the Checklist Configurations section, select the Checklist Configuration Template that you want to
modify.3. In the Checklist Configuration Template section, select the checklist category that you want to
modify.
4. Select .
© 2020 General Electric Company 127
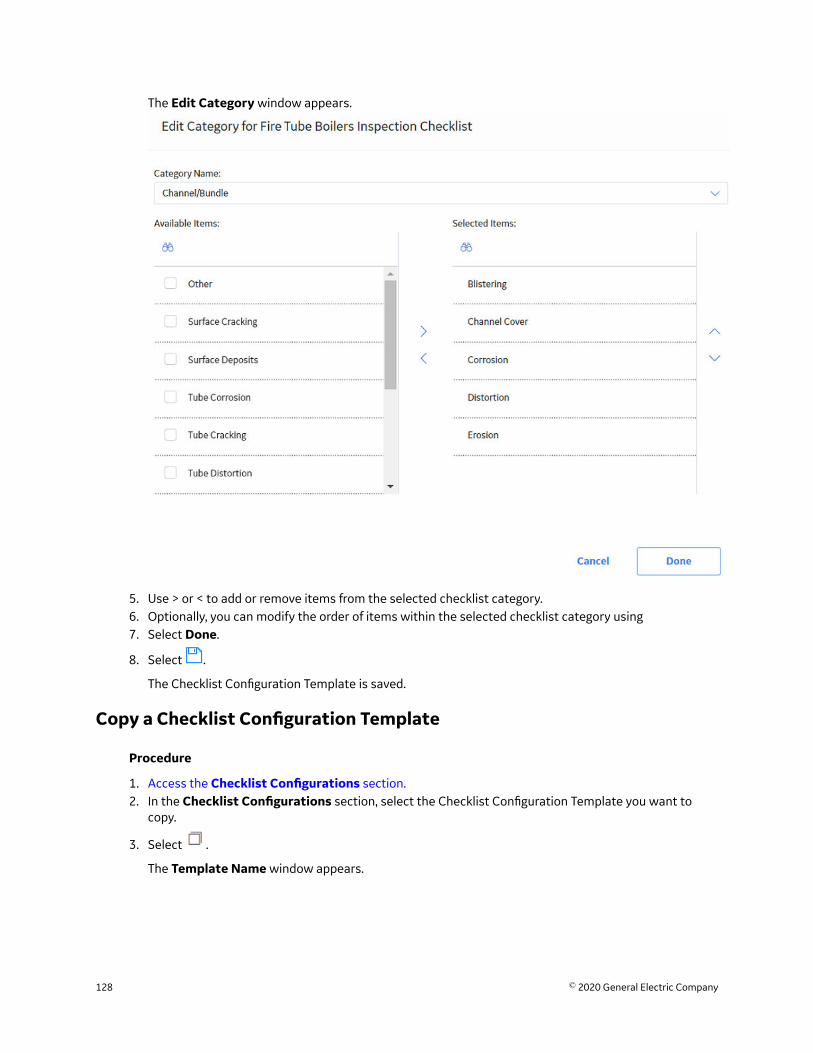
The Edit Category window appears.
5. Use > or < to add or remove items from the selected checklist category.6. Optionally, you can modify the order of items within the selected checklist category using7. Select Done.
8. Select .
The Checklist Configuration Template is saved.
Copy a Checklist Configuration Template
Procedure
1. Access the Checklist Configurations section.2. In the Checklist Configurations section, select the Checklist Configuration Template you want to
copy.
3. Select .
The Template Name window appears.
128 © 2020 General Electric Company
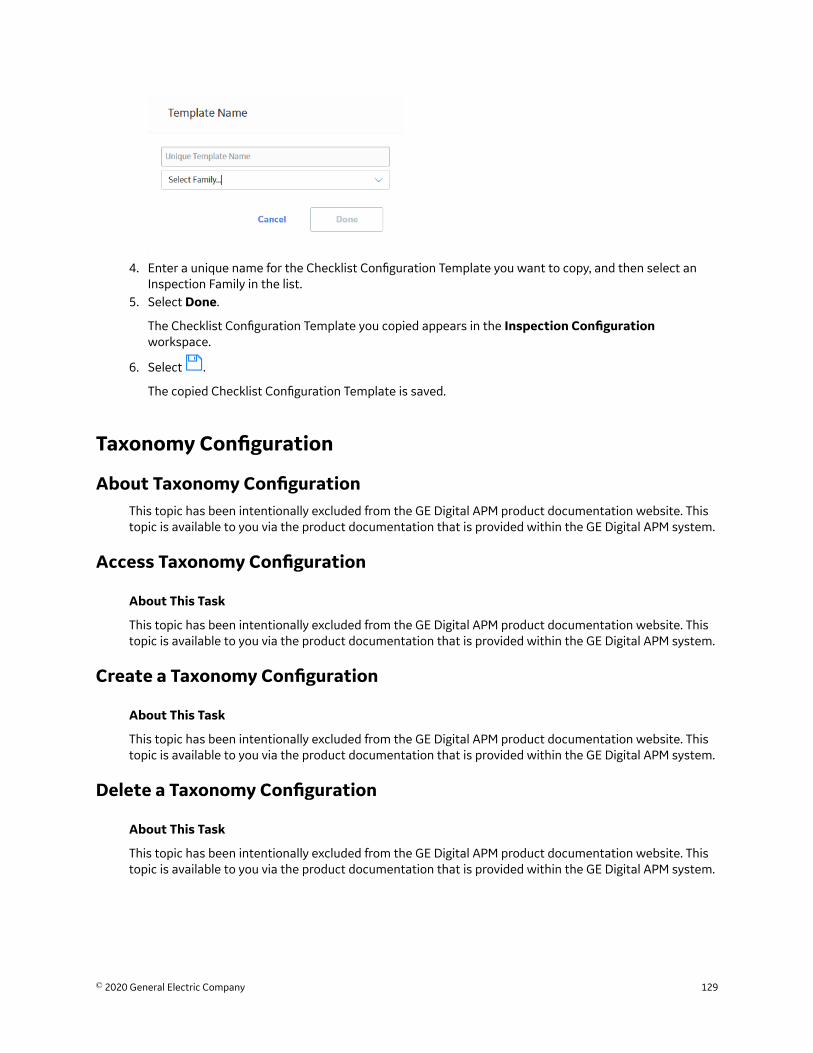
4. Enter a unique name for the Checklist Configuration Template you want to copy, and then select anInspection Family in the list.
5. Select Done.
The Checklist Configuration Template you copied appears in the Inspection Configurationworkspace.
6. Select .
The copied Checklist Configuration Template is saved.
Taxonomy Configuration
About Taxonomy ConfigurationThis topic has been intentionally excluded from the GE Digital APM product documentation website. Thistopic is available to you via the product documentation that is provided within the GE Digital APM system.
Access Taxonomy Configuration
About This Task
This topic has been intentionally excluded from the GE Digital APM product documentation website. Thistopic is available to you via the product documentation that is provided within the GE Digital APM system.
Create a Taxonomy Configuration
About This Task
This topic has been intentionally excluded from the GE Digital APM product documentation website. Thistopic is available to you via the product documentation that is provided within the GE Digital APM system.
Delete a Taxonomy Configuration
About This Task
This topic has been intentionally excluded from the GE Digital APM product documentation website. Thistopic is available to you via the product documentation that is provided within the GE Digital APM system.
© 2020 General Electric Company 129
Link a Checklist Configuration Template to a Taxonomy Configuration
About This Task
This topic has been intentionally excluded from the GE Digital APM product documentation website. Thistopic is available to you via the product documentation that is provided within the GE Digital APM system.
Link an Inspection Family to a Taxonomy Configuration
About This Task
This topic has been intentionally excluded from the GE Digital APM product documentation website. Thistopic is available to you via the product documentation that is provided within the GE Digital APM system.
Unlink a Checklist Configuration Template from a TaxonomyConfiguration
About This Task
This topic has been intentionally excluded from the GE Digital APM product documentation website. Thistopic is available to you via the product documentation that is provided within the GE Digital APM system.
Unlink an Inspection Family from a Taxonomy Configuration
About This Task
This topic has been intentionally excluded from the GE Digital APM product documentation website. Thistopic is available to you via the product documentation that is provided within the GE Digital APM system.
Overview Configuration
Modify Date Filters
About This Task
In the Date Filters section, you can modify the date filters that appear in the Underlying InspectionTasks, Underlying Open Recommendations, and Recommendations Due for Implementationsections. When you select a Default filter, the selected filter will show only the corresponding tasks andrecommendations when a user navigates to the page. When you select the Display check box beside afilter, the selected filter will appear as an option in the list of filters in the respective page.
Note: By default, the 30 Days filter is selected for the Underlying Inspection Tasks, and UnderlyingOpen Recommendations, and Recommendations Due for Implementation sections.
Tip: If the user selects an available filter in the page other than the Default filter defined by theadministrator, refreshing the page or navigating to a different page will reset the filter to the Default filterinstead of the filter that the user selected.
Procedure
1. In the module navigation menu, select Admin > Application Settings > Inspection Management.
130 © 2020 General Electric Company

2. Select Overview Configuration.The Overview Configuration workspace appears, displaying the Date Filters section.
3. In the Date Filters section, select .The Date Filters section can now be modified.
4. In the Task Next Date Filter Options list:
• In the Default column, select the filter that you want to use as the default.• In the Display column, select the filters that you want to use in the Underlying Inspection Tasks
page.• Optionally, if you selected the Custom filter as the default filter, enter values in the Months Prior
to Current Date and Months After Current Date boxes.5. In the Recommendation Target Completion Date Filter Options list:
• In the Default column, select the filter that you want to use as the default.• In the Display column, select the filters that you want to use in the Underlying
Recommendations page.• Optionally, if you selected the Custom filter as the default filter, enter values in the Months Prior
to Current Date and Months After Current Date boxes.6. In the Recommendations Due for Implementation Date Filter Options list:
• In the Default column, select the filter that you want to use as the default.• In the Display column, select the filters that you want to use in the Underlying
Recommendations page.• Optionally, if you selected the Custom filter as the default filter, enter values in the Months Prior
to Current Date and Months After Current Date boxes.
© 2020 General Electric Company 131
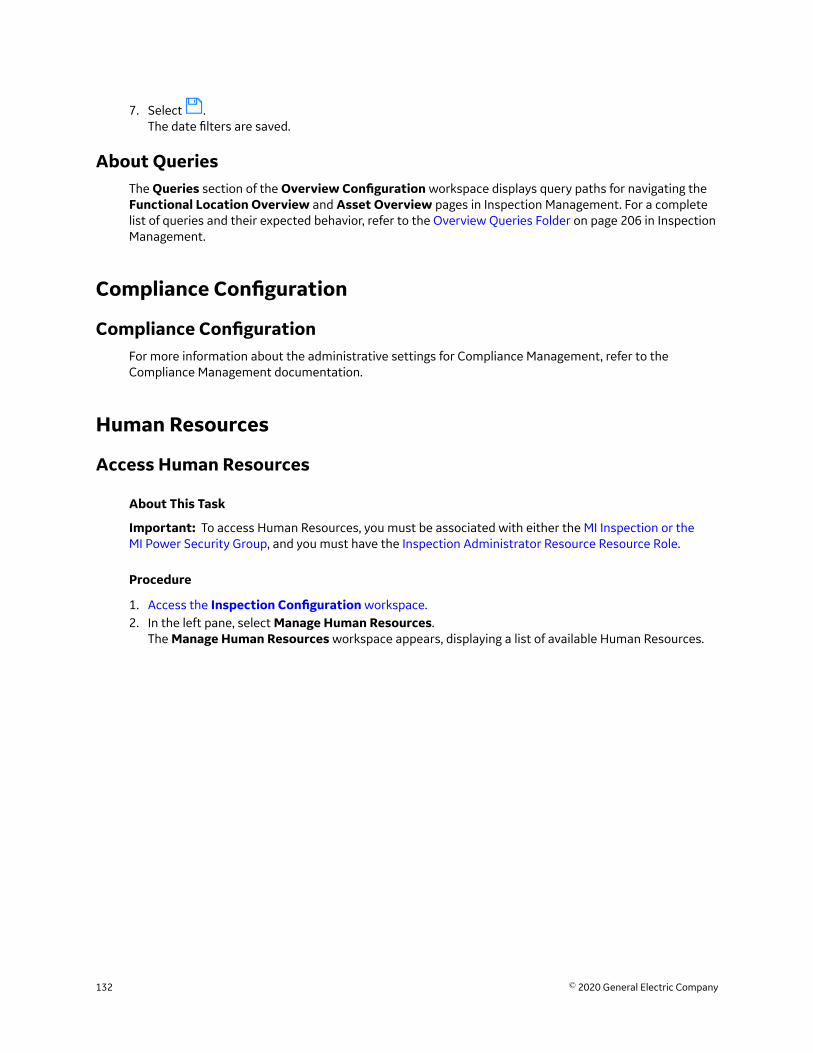
7. Select .The date filters are saved.
About QueriesThe Queries section of the Overview Configuration workspace displays query paths for navigating theFunctional Location Overview and Asset Overview pages in Inspection Management. For a completelist of queries and their expected behavior, refer to the Overview Queries Folder on page 206 in InspectionManagement.
Compliance Configuration
Compliance ConfigurationFor more information about the administrative settings for Compliance Management, refer to theCompliance Management documentation.
Human Resources
Access Human Resources
About This Task
Important: To access Human Resources, you must be associated with either the MI Inspection or theMI Power Security Group, and you must have the Inspection Administrator Resource Resource Role.
Procedure
1. Access the Inspection Configuration workspace.2. In the left pane, select Manage Human Resources.
The Manage Human Resources workspace appears, displaying a list of available Human Resources.
132 © 2020 General Electric Company
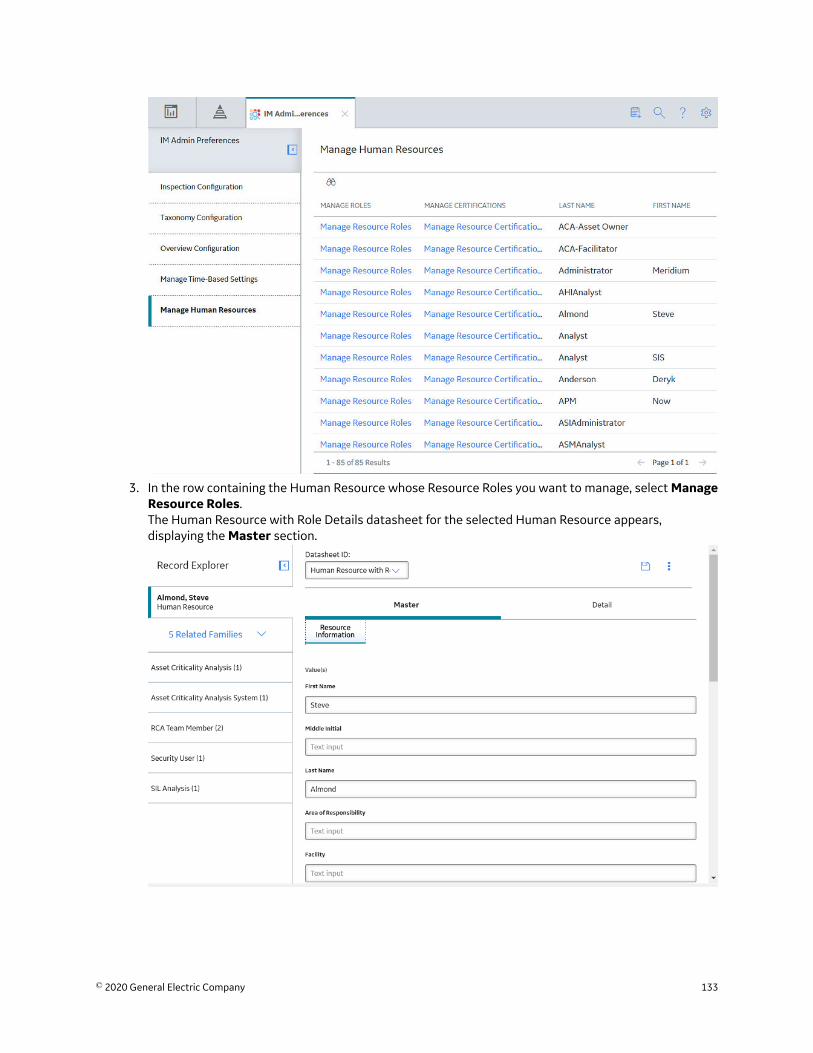
3. In the row containing the Human Resource whose Resource Roles you want to manage, select ManageResource Roles.The Human Resource with Role Details datasheet for the selected Human Resource appears,displaying the Master section.
© 2020 General Electric Company 133
Add a New Human Resource
Procedure
1. Access Human Resources.
2. In the upper-right corner of the workspace, select , and then select Add.
The Resource Information datasheet appears.
3. As needed, enter values in the available fields, and then select .
The new Human Resource record is saved.
Note: Although you accessed an existing Human Resource to create a new Human Resource, the newrecord is not linked to the old record.
Copy a Human Resource
Procedure
1. Access the Human Resource that you want to copy.
2. In the upper-right corner of the workspace, select , and then select Copy.
3. In the upper-right corner of the workspace, select , and then select Add.
The Resource Information datasheet appears.
4. In the upper-right corner of the workspace, select , and then select Paste.
The fields from the source record are copied to the new Human Resource record.5. As needed, modify values in the available fields.
6. Select .
The copied Human Resource record is saved.
Delete a Human Resource
Procedure
1. Access the Human Resource that you want to delete.
2. In the upper-right corner of the workspace, select , and then select Delete.
A message appears, asking you to confirm that you want to delete the Human Resource.3. Select Yes.
The Human Resource record is deleted.
Add a Resource Role to an Existing Human Resource
Procedure
1. Access the Human Resource to which you want to add a Resource Role.2. Select the Detail tab.
The Detail section appears.
134 © 2020 General Electric Company
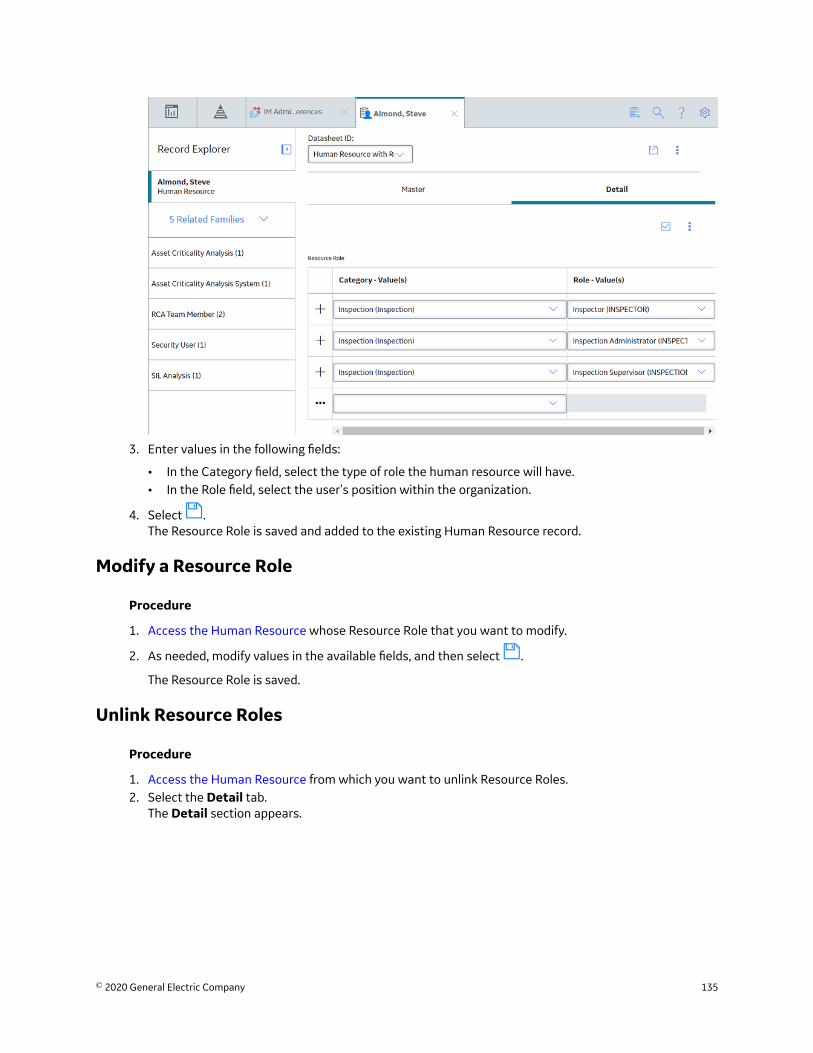
3. Enter values in the following fields:
• In the Category field, select the type of role the human resource will have.• In the Role field, select the user's position within the organization.
4. Select .The Resource Role is saved and added to the existing Human Resource record.
Modify a Resource Role
Procedure
1. Access the Human Resource whose Resource Role that you want to modify.
2. As needed, modify values in the available fields, and then select .
The Resource Role is saved.
Unlink Resource Roles
Procedure
1. Access the Human Resource from which you want to unlink Resource Roles.2. Select the Detail tab.
The Detail section appears.
© 2020 General Electric Company 135
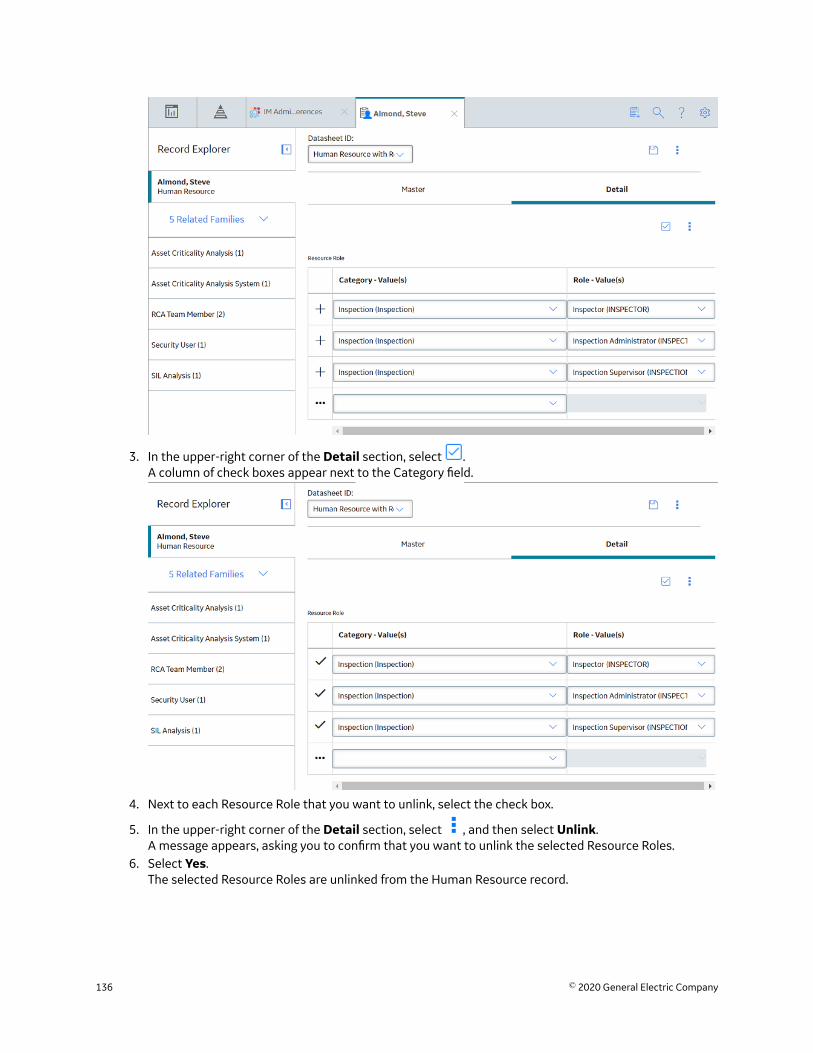
3. In the upper-right corner of the Detail section, select .A column of check boxes appear next to the Category field.
4. Next to each Resource Role that you want to unlink, select the check box.
5. In the upper-right corner of the Detail section, select , and then select Unlink.A message appears, asking you to confirm that you want to unlink the selected Resource Roles.
6. Select Yes.The selected Resource Roles are unlinked from the Human Resource record.
136 © 2020 General Electric Company
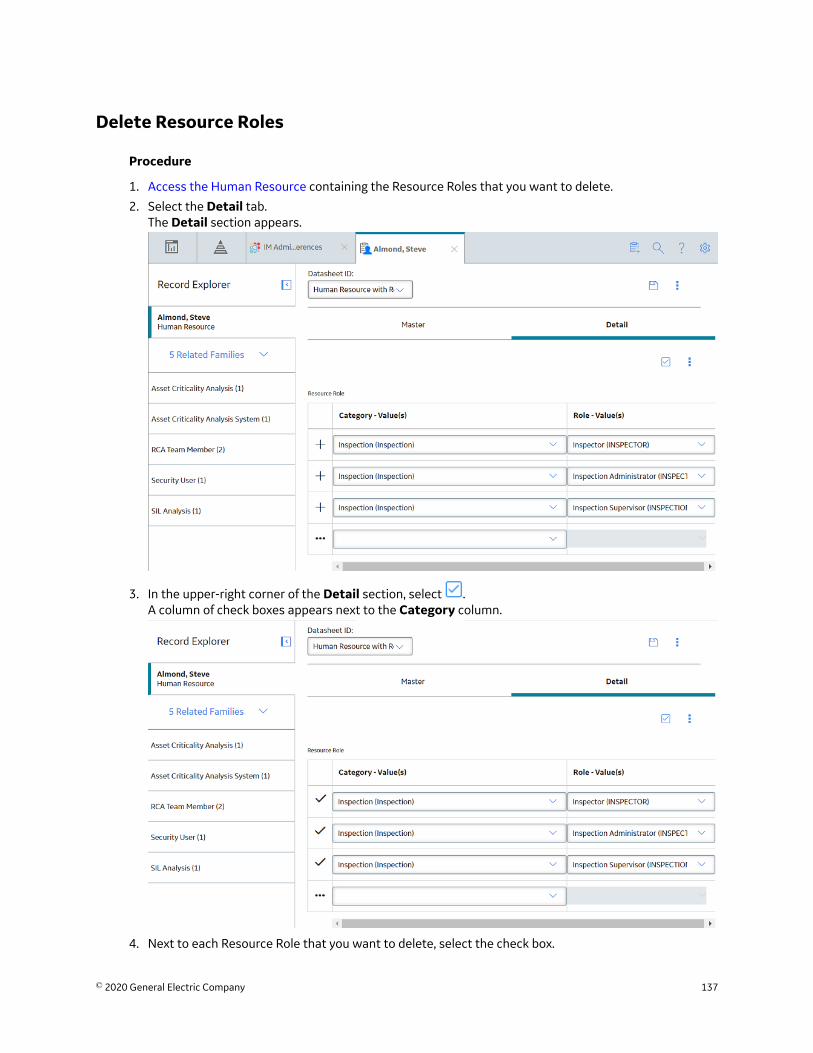
Delete Resource Roles
Procedure
1. Access the Human Resource containing the Resource Roles that you want to delete.
2. Select the Detail tab.The Detail section appears.
3. In the upper-right corner of the Detail section, select .A column of check boxes appears next to the Category column.
4. Next to each Resource Role that you want to delete, select the check box.
© 2020 General Electric Company 137
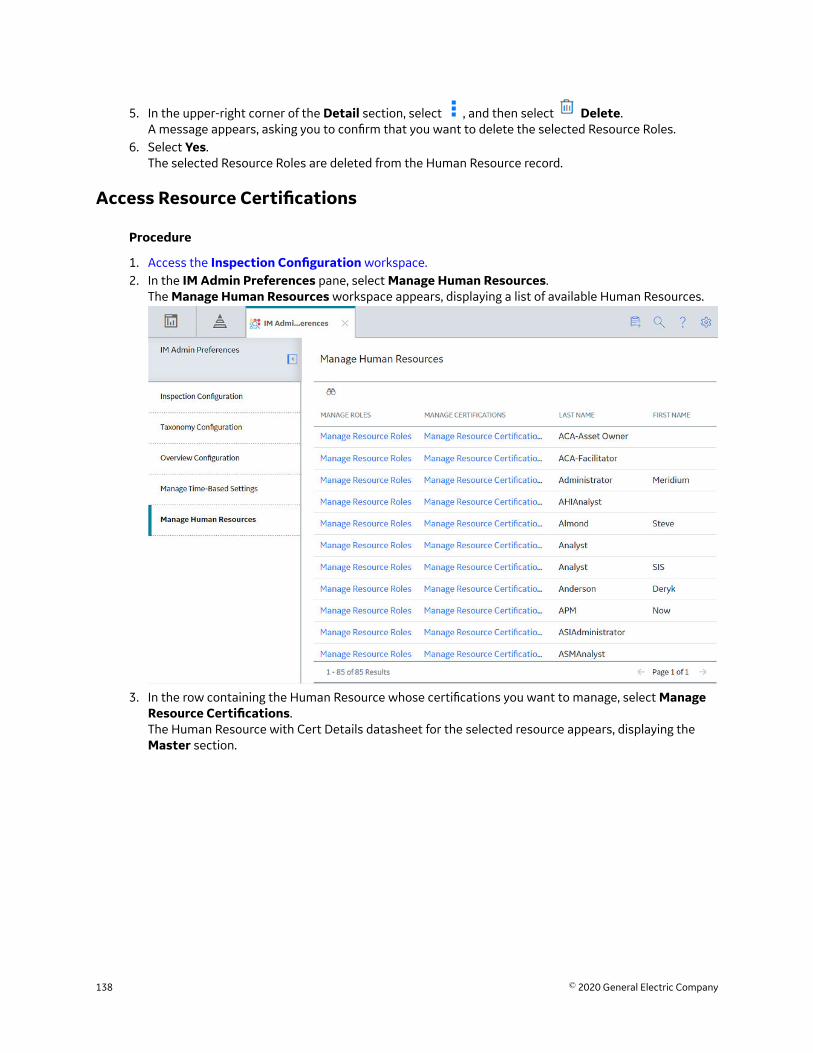
5. In the upper-right corner of the Detail section, select , and then select Delete.A message appears, asking you to confirm that you want to delete the selected Resource Roles.
6. Select Yes.The selected Resource Roles are deleted from the Human Resource record.
Access Resource Certifications
Procedure
1. Access the Inspection Configuration workspace.2. In the IM Admin Preferences pane, select Manage Human Resources.
The Manage Human Resources workspace appears, displaying a list of available Human Resources.
3. In the row containing the Human Resource whose certifications you want to manage, select ManageResource Certifications.The Human Resource with Cert Details datasheet for the selected resource appears, displaying theMaster section.
138 © 2020 General Electric Company

Add Resource Certifications to an Existing Human Resource
Procedure
1. Access the Resource Certifications of the Human Resource to which you want to add a ResourceCertification.
2. Select the Detail tab.The Detail section appears.
3. In the Certification Type box, select the type of Resource Certification that you want to add to theHuman Resource, and:
• In the Cert ID box, enter an ID number associated with the certification type.
© 2020 General Electric Company 139
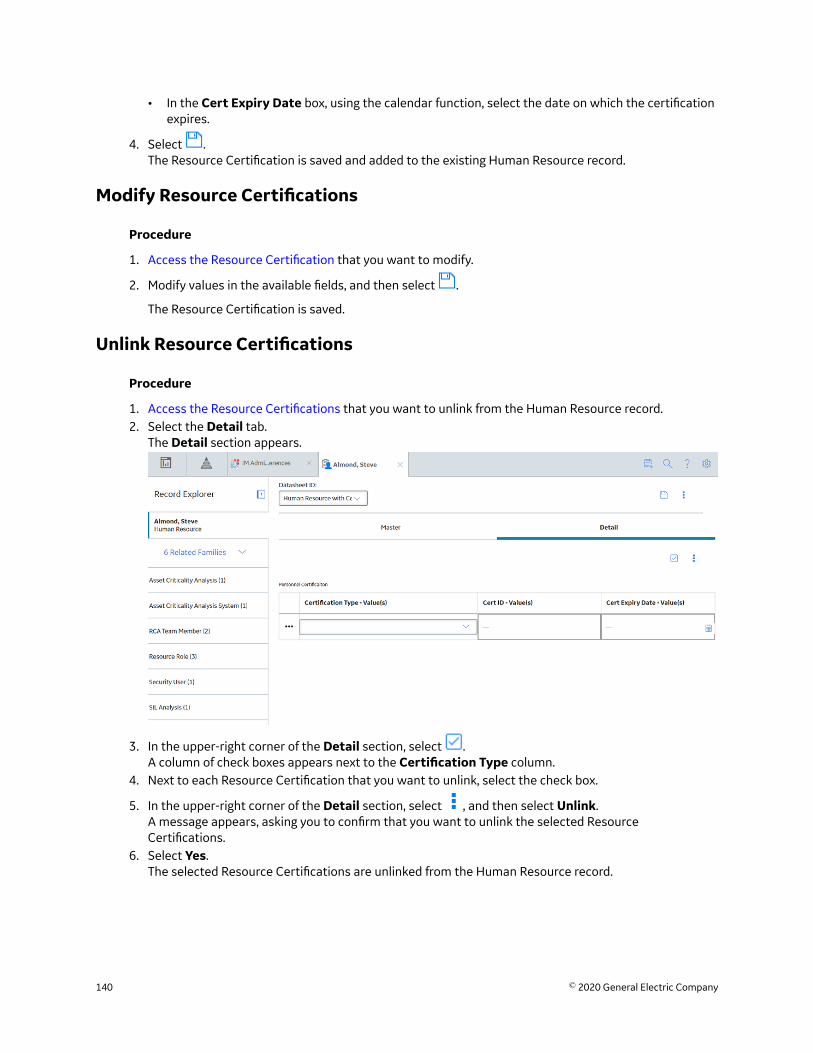
• In the Cert Expiry Date box, using the calendar function, select the date on which the certificationexpires.
4. Select .The Resource Certification is saved and added to the existing Human Resource record.
Modify Resource Certifications
Procedure
1. Access the Resource Certification that you want to modify.
2. Modify values in the available fields, and then select .
The Resource Certification is saved.
Unlink Resource Certifications
Procedure
1. Access the Resource Certifications that you want to unlink from the Human Resource record.2. Select the Detail tab.
The Detail section appears.
3. In the upper-right corner of the Detail section, select .A column of check boxes appears next to the Certification Type column.
4. Next to each Resource Certification that you want to unlink, select the check box.
5. In the upper-right corner of the Detail section, select , and then select Unlink.A message appears, asking you to confirm that you want to unlink the selected ResourceCertifications.
6. Select Yes.The selected Resource Certifications are unlinked from the Human Resource record.
140 © 2020 General Electric Company
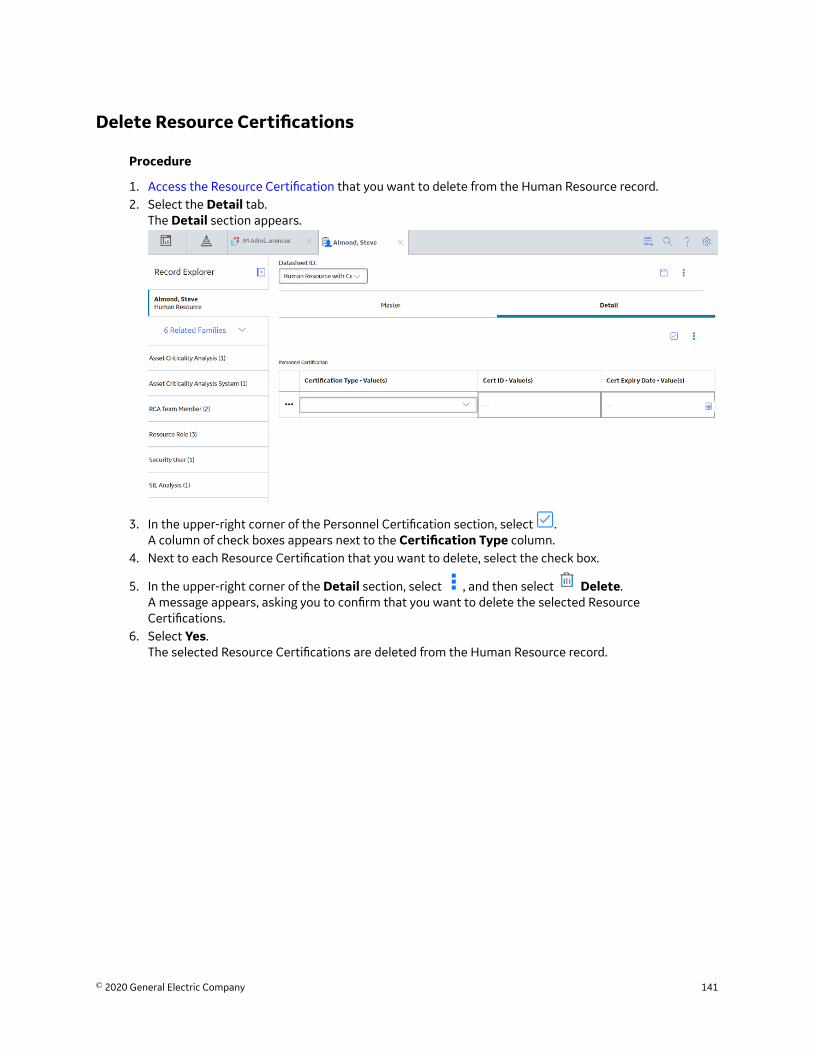
Delete Resource Certifications
Procedure
1. Access the Resource Certification that you want to delete from the Human Resource record.2. Select the Detail tab.
The Detail section appears.
3. In the upper-right corner of the Personnel Certification section, select .A column of check boxes appears next to the Certification Type column.
4. Next to each Resource Certification that you want to delete, select the check box.
5. In the upper-right corner of the Detail section, select , and then select Delete.A message appears, asking you to confirm that you want to delete the selected ResourceCertifications.
6. Select Yes.The selected Resource Certifications are deleted from the Human Resource record.
© 2020 General Electric Company 141
Chapter
9DeploymentTopics:
• Deploy Inspection Management• Deploy Inspection Management
for the First Time• Upgrade Inspection
Management• Inspection Datasheets - Revert
to Baseline• Inspection Management
Security Groups and Roles
142 © 2020 General Electric Company
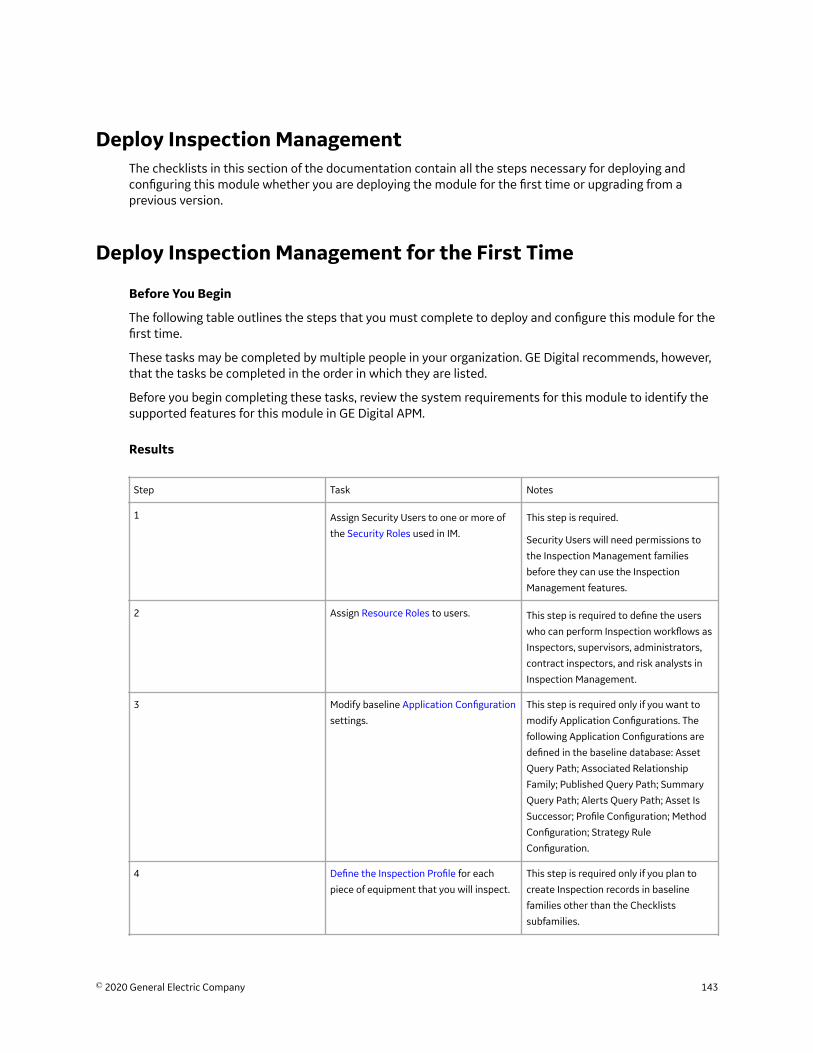
Deploy Inspection ManagementThe checklists in this section of the documentation contain all the steps necessary for deploying andconfiguring this module whether you are deploying the module for the first time or upgrading from aprevious version.
Deploy Inspection Management for the First Time
Before You Begin
The following table outlines the steps that you must complete to deploy and configure this module for thefirst time.
These tasks may be completed by multiple people in your organization. GE Digital recommends, however,that the tasks be completed in the order in which they are listed.
Before you begin completing these tasks, review the system requirements for this module to identify thesupported features for this module in GE Digital APM.
Results
Step Task Notes
1 Assign Security Users to one or more of
the Security Roles used in IM.
This step is required.
Security Users will need permissions to
the Inspection Management families
before they can use the Inspection
Management features.
2 Assign Resource Roles to users. This step is required to define the users
who can perform Inspection workflows as
Inspectors, supervisors, administrators,
contract inspectors, and risk analysts in
Inspection Management.
3 Modify baseline Application Configuration
settings.
This step is required only if you want to
modify Application Configurations. The
following Application Configurations are
defined in the baseline database: Asset
Query Path; Associated Relationship
Family; Published Query Path; Summary
Query Path; Alerts Query Path; Asset Is
Successor; Profile Configuration; Method
Configuration; Strategy Rule
Configuration.
4 Define the Inspection Profile for each
piece of equipment that you will inspect.
This step is required only if you plan to
create Inspection records in baseline
families other than the Checklists
subfamilies.
© 2020 General Electric Company 143

5 Modify the baseline Asset query. This step is required only if you want
Inspection records to be linked to records
in a family other than the Equipment
family.
6 Define Event Configurations for any new
Inspection families that you have created.
This step is required only if you have
created custom Inspection families that
you want to use within Inspection
Management.
7 Create a Checklist Configuration
Template on page 122 for custom
inspections.
This step is optional.
8 Define Taxonomy Configurations for
Inspection Families and Checklist
Configurations.
This step is required only if you want to
link Inspection Families and Checklist
Configurations to assets using equipment
taxonomy.
9 Assign certifications to users. This step is optional.
10 Group inspection work into Work Packs. This step is optional.
Upgrade Inspection Management
Before You Begin
The following tables outline the steps that you must complete to upgrade this module to the latestversion of GE Digital APM .
These tasks may be completed by multiple people in your organization. We recommend, however, that thetasks be completed in the order in which they are listed.
Note: If you are using Inspection Field Data Collection for Offline Inspections, please follow the upgradesteps to install the latest app on mobile devices used for Inspection Field Data Collection.
After you upgrade:
A new Human Resource role, Contract Inspector (ID: CONTRACT INSPECTOR) is now available inMI_RESOURCE_ROLE system code table. This is to facilitate the enhancement where a Contract Inspectorcan now update the Status field in Inspection records to Pending Approval without being the user definedin the Inspection Report Owner field if they are also a Team Member in the associated Inspection record.
Procedure
• Upgrade to the latest version of GE Digital APM.
144 © 2020 General Electric Company
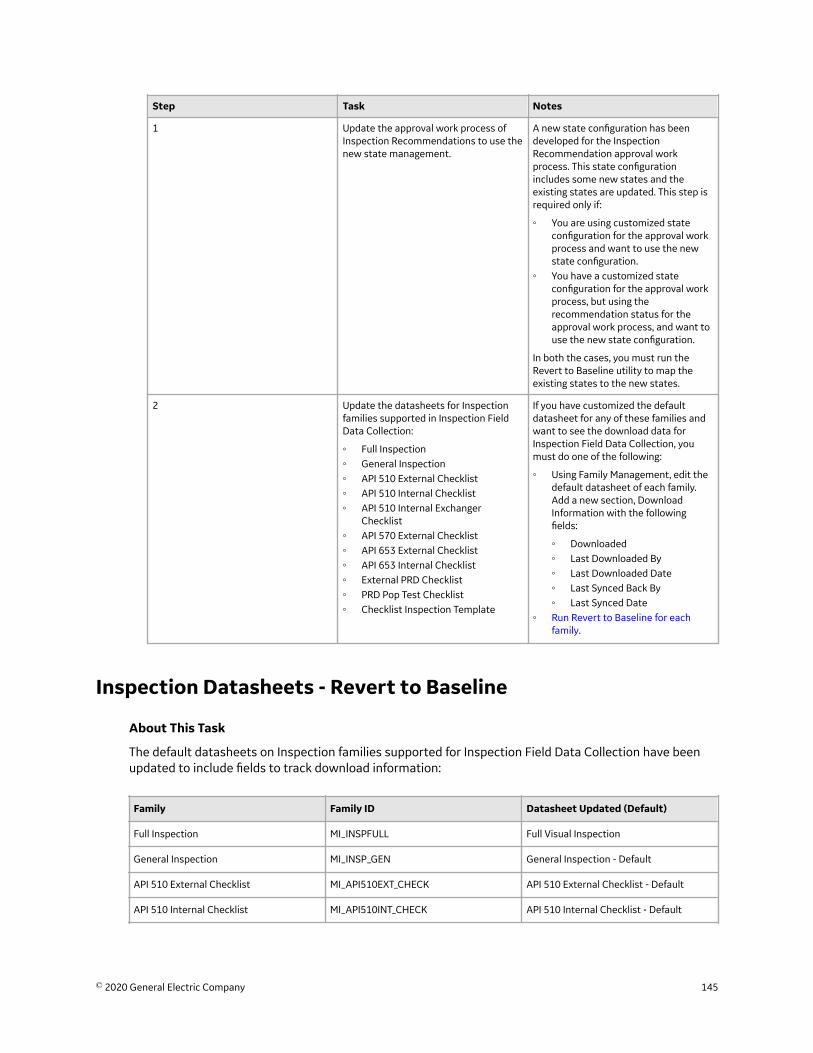
Step Task Notes
1 Update the approval work process ofInspection Recommendations to use thenew state management.
A new state configuration has beendeveloped for the InspectionRecommendation approval workprocess. This state configurationincludes some new states and theexisting states are updated. This step isrequired only if:
◦ You are using customized stateconfiguration for the approval workprocess and want to use the newstate configuration.
◦ You have a customized stateconfiguration for the approval workprocess, but using therecommendation status for theapproval work process, and want touse the new state configuration.
In both the cases, you must run theRevert to Baseline utility to map theexisting states to the new states.
2 Update the datasheets for Inspectionfamilies supported in Inspection FieldData Collection:
◦ Full Inspection◦ General Inspection◦ API 510 External Checklist◦ API 510 Internal Checklist◦ API 510 Internal Exchanger
Checklist◦ API 570 External Checklist◦ API 653 External Checklist◦ API 653 Internal Checklist◦ External PRD Checklist◦ PRD Pop Test Checklist◦ Checklist Inspection Template
If you have customized the defaultdatasheet for any of these families andwant to see the download data forInspection Field Data Collection, youmust do one of the following:
◦ Using Family Management, edit thedefault datasheet of each family.Add a new section, DownloadInformation with the followingfields:
◦ Downloaded◦ Last Downloaded By◦ Last Downloaded Date◦ Last Synced Back By◦ Last Synced Date
◦ Run Revert to Baseline for eachfamily.
Inspection Datasheets - Revert to Baseline
About This Task
The default datasheets on Inspection families supported for Inspection Field Data Collection have beenupdated to include fields to track download information:
Family Family ID Datasheet Updated (Default)
Full Inspection MI_INSPFULL Full Visual Inspection
General Inspection MI_INSP_GEN General Inspection - Default
API 510 External Checklist MI_API510EXT_CHECK API 510 External Checklist - Default
API 510 Internal Checklist MI_API510INT_CHECK API 510 Internal Checklist - Default
© 2020 General Electric Company 145
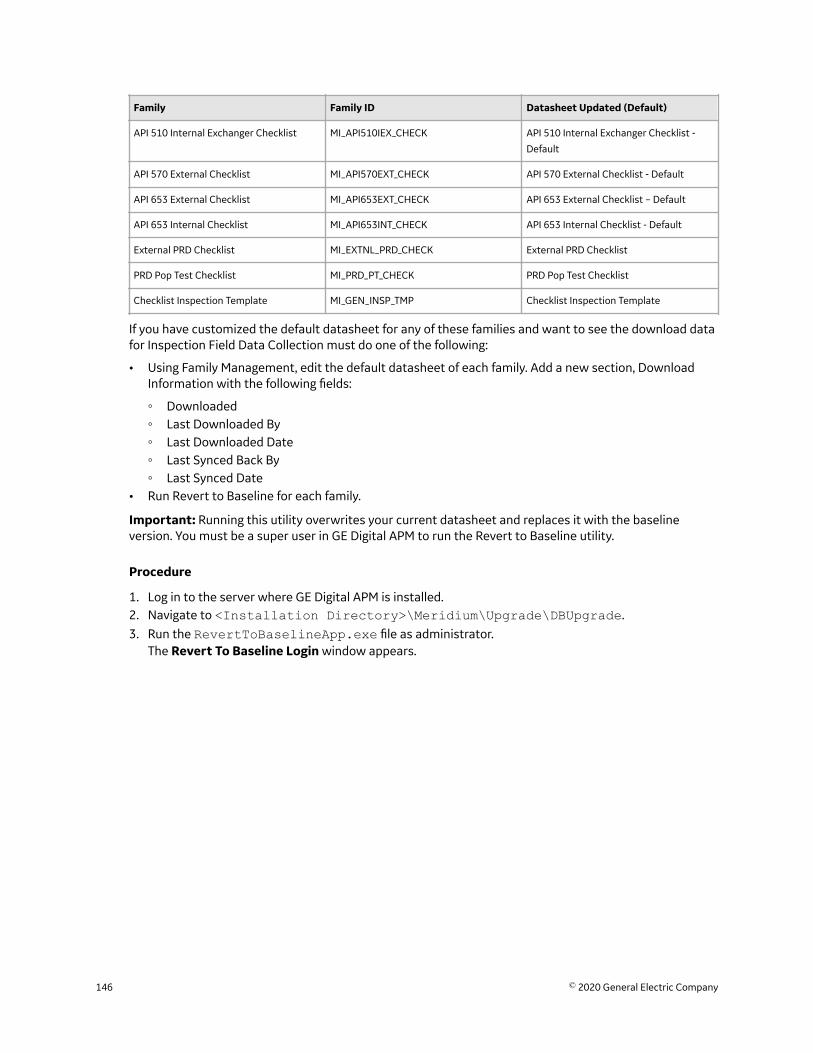
Family Family ID Datasheet Updated (Default)
API 510 Internal Exchanger Checklist MI_API510IEX_CHECK API 510 Internal Exchanger Checklist -
Default
API 570 External Checklist MI_API570EXT_CHECK API 570 External Checklist - Default
API 653 External Checklist MI_API653EXT_CHECK API 653 External Checklist – Default
API 653 Internal Checklist MI_API653INT_CHECK API 653 Internal Checklist - Default
External PRD Checklist MI_EXTNL_PRD_CHECK External PRD Checklist
PRD Pop Test Checklist MI_PRD_PT_CHECK PRD Pop Test Checklist
Checklist Inspection Template MI_GEN_INSP_TMP Checklist Inspection Template
If you have customized the default datasheet for any of these families and want to see the download datafor Inspection Field Data Collection must do one of the following:
• Using Family Management, edit the default datasheet of each family. Add a new section, DownloadInformation with the following fields:
◦ Downloaded◦ Last Downloaded By◦ Last Downloaded Date◦ Last Synced Back By◦ Last Synced Date
• Run Revert to Baseline for each family.
Important: Running this utility overwrites your current datasheet and replaces it with the baselineversion. You must be a super user in GE Digital APM to run the Revert to Baseline utility.
Procedure
1. Log in to the server where GE Digital APM is installed.2. Navigate to <Installation Directory>\Meridium\Upgrade\DBUpgrade.3. Run the RevertToBaselineApp.exe file as administrator.
The Revert To Baseline Login window appears.
146 © 2020 General Electric Company

4. In the Meridium Data Source box, enter the data source name that you want to access.5. Enter your login credentials, and then select Next.
The available families that can be reverted to baseline appear.6. Select the Inspection family that you want to update, and then select Revert to Baseline.
The Various Options For Revert window appears.
© 2020 General Electric Company 147

7. Select Datasheets.Select the Default Datasheet from the drop-down, and then select Ok.
8. Repeat steps 6-7 for each Inspection Family.
Inspection Management Security Groups and RolesThe following table lists the baseline Security Groups available for users within this module, as well as thebaseline Roles to which those Security Groups are assigned. In Predix APM, Roles are assigned to SecurityUsers through permission sets.
Important: Assigning a Security User to a Role grants that user the privileges associated with all of theSecurity Groups that are assigned to that Role. To avoid granting a Security User unintended privileges,before assigning a Security User to a Role, be sure to review all of the privileges associated with theSecurity Groups assigned to that Role.
Security Group Roles
MI Inspection MI Mechanical Integrity Administrator
MI Mechanical Integrity Power
MI Mechanical Integrity User
MI Inspection Viewer MI APM Viewer
MI Mechanical Integrity Viewer
The following roles can be assigned to a group or user:
• Inspector• Inspection Supervisor• SC Recommendations Implementer• SC Recommendations Reviewer
These roles are used in State Management.
Family MI Inspection MI Inspection Viewer
Entity Families
Alert View, Insert, Update, Delete View
Certification View, Insert, Update, Delete View
Checklist Finding View, Insert, Update, Delete View
Conditional Alerts View, Insert, Update, Delete View
Corrosion View, Insert, Update, Delete View
Equipment View, Insert, Update, Delete View
Event View, Insert, Update, Delete View
Finding View, Insert, Update, Delete View
Human Resource View View
Inspection Method View, Insert, Update, Delete View
Inspection Profile View, Insert, Update, Delete View
Inspection Team Member View, Insert, Update, Delete View
Inventory Group Configuration View View
148 © 2020 General Electric Company
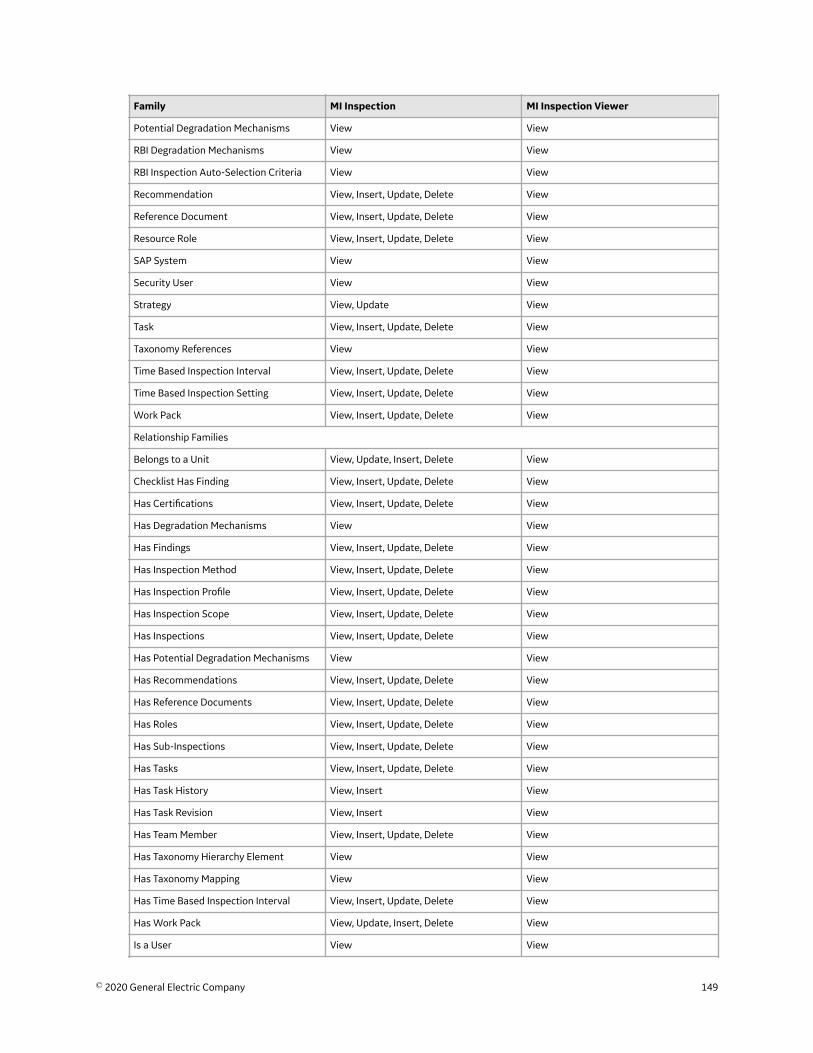
Family MI Inspection MI Inspection Viewer
Potential Degradation Mechanisms View View
RBI Degradation Mechanisms View View
RBI Inspection Auto-Selection Criteria View View
Recommendation View, Insert, Update, Delete View
Reference Document View, Insert, Update, Delete View
Resource Role View, Insert, Update, Delete View
SAP System View View
Security User View View
Strategy View, Update View
Task View, Insert, Update, Delete View
Taxonomy References View View
Time Based Inspection Interval View, Insert, Update, Delete View
Time Based Inspection Setting View, Insert, Update, Delete View
Work Pack View, Insert, Update, Delete View
Relationship Families
Belongs to a Unit View, Update, Insert, Delete View
Checklist Has Finding View, Insert, Update, Delete View
Has Certifications View, Insert, Update, Delete View
Has Degradation Mechanisms View View
Has Findings View, Insert, Update, Delete View
Has Inspection Method View, Insert, Update, Delete View
Has Inspection Profile View, Insert, Update, Delete View
Has Inspection Scope View, Insert, Update, Delete View
Has Inspections View, Insert, Update, Delete View
Has Potential Degradation Mechanisms View View
Has Recommendations View, Insert, Update, Delete View
Has Reference Documents View, Insert, Update, Delete View
Has Roles View, Insert, Update, Delete View
Has Sub-Inspections View, Insert, Update, Delete View
Has Tasks View, Insert, Update, Delete View
Has Task History View, Insert View
Has Task Revision View, Insert View
Has Team Member View, Insert, Update, Delete View
Has Taxonomy Hierarchy Element View View
Has Taxonomy Mapping View View
Has Time Based Inspection Interval View, Insert, Update, Delete View
Has Work Pack View, Update, Insert, Delete View
Is a User View View
© 2020 General Electric Company 149
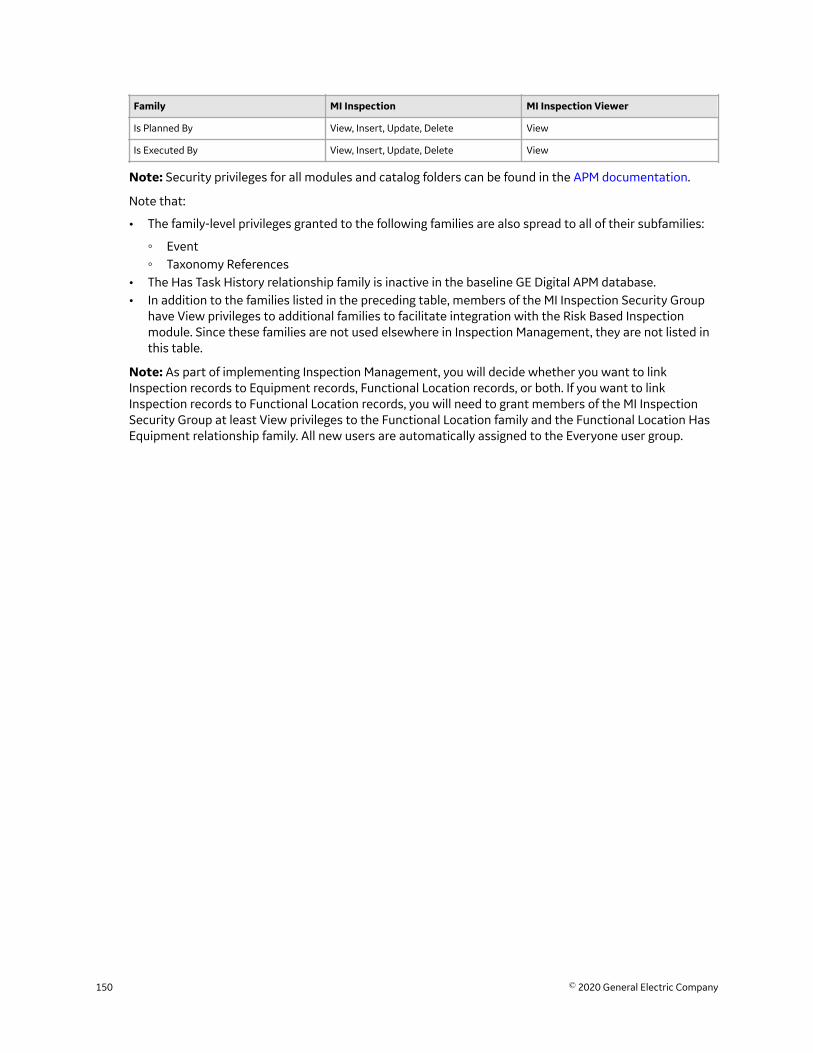
Family MI Inspection MI Inspection Viewer
Is Planned By View, Insert, Update, Delete View
Is Executed By View, Insert, Update, Delete View
Note: Security privileges for all modules and catalog folders can be found in the APM documentation.
Note that:
• The family-level privileges granted to the following families are also spread to all of their subfamilies:
◦ Event◦ Taxonomy References
• The Has Task History relationship family is inactive in the baseline GE Digital APM database.• In addition to the families listed in the preceding table, members of the MI Inspection Security Group
have View privileges to additional families to facilitate integration with the Risk Based Inspectionmodule. Since these families are not used elsewhere in Inspection Management, they are not listed inthis table.
Note: As part of implementing Inspection Management, you will decide whether you want to linkInspection records to Equipment records, Functional Location records, or both. If you want to linkInspection records to Functional Location records, you will need to grant members of the MI InspectionSecurity Group at least View privileges to the Functional Location family and the Functional Location HasEquipment relationship family. All new users are automatically assigned to the Everyone user group.
150 © 2020 General Electric Company
Chapter
10Data LoadersTopics:
• About the InspectionManagement (IM) Data Loaders
• About the InspectionManagement (IM) Data LoadersRequirements
• About the InspectionManagement (IM) Data LoadersInspection Types
• About the InspectionManagement (IM) Data LoadersData Model
• About the InspectionManagement (IM) Data LoadersGeneral Loading Strategy
• About the InspectionManagement (IM) Data LoadersWorkbook Layout and Use
• About the InspectionManagement (IM) Data LoadersLoad Verification
© 2020 General Electric Company 151
About the Inspection Management (IM) Data LoadersThe following Data Loaders are available in Inspection Management:
• Inspection Management (IM) Assets Data Loader• Inspection Management (IM) Functional Location Data Loader
Throughout the documentation, these Data Loaders are collectively called the Inspection Management(IM) Data Loaders. You can use them to implement Inspection Management when you have inspectiondata in a legacy system. To import data using these Data Loaders, GE Digital APM provides the followingExcel templates:
• Inspection Management (IM) Assets.xlsx: Using this Data Loader, you can create or updateInspections and related records that are linked to Equipment records.
• Inspection Management (IM) Functional Location.xlsx: Using this Data Loader, you can create orupdate Inspections and related records that are linked to Functional Location records.
The data from the templates will be imported into GE Digital APM using the corresponding Data Loaders.
Note: The Excel templates are referred to throughout this documentation as the data loader workbooks.
You can use the data loader workbooks to create or update records in the following Inspection families:
• Inspection Confidence Evaluation• Inspection Profile• Inspection Method• Inspection Task• Inspection (i.e., Bundle Inspection, Full Inspection, General Inspection, Pressure Test Inspection, and all
types of Checklists)• General Finding• Bundle Sub-Inspection• Pressure Test Sub-Inspection• Inspection Recommendation• Reference Document
Using the data loader workbooks, you can also create:
• Records that represent archived Inspections (i.e., inspections that have been completed and approvedin the past). Since archived Inspections will be locked after creation, they cannot be updated using thedata loader workbooks.
• Records of a custom sub inspection family that you may have created.
The data on the (Picklist) worksheet is not loaded when you load data.
Note: A data load for Inspection Management is intended to be completed by an individual in yourorganization who has been designated as being responsible for importing and maintaining Inspections inGE Digital APM, usually an Inspector.
About the Inspection Management (IM) Data LoadersRequirements
This documentation assumes that your organization has fully completed the deployment of the InspectionManagement module. The Inspection Management (IM) Data Loaders should only be used after the
152 © 2020 General Electric Company
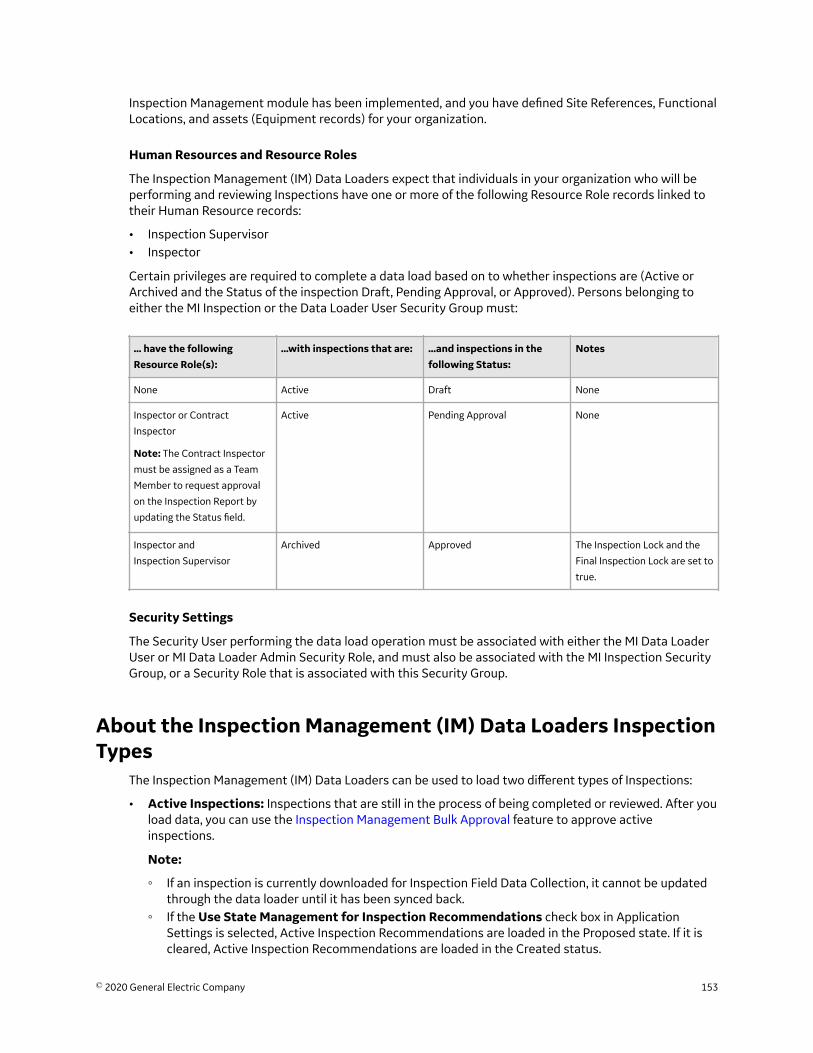
Inspection Management module has been implemented, and you have defined Site References, FunctionalLocations, and assets (Equipment records) for your organization.
Human Resources and Resource Roles
The Inspection Management (IM) Data Loaders expect that individuals in your organization who will beperforming and reviewing Inspections have one or more of the following Resource Role records linked totheir Human Resource records:
• Inspection Supervisor• Inspector
Certain privileges are required to complete a data load based on to whether inspections are (Active orArchived and the Status of the inspection Draft, Pending Approval, or Approved). Persons belonging toeither the MI Inspection or the Data Loader User Security Group must:
... have the followingResource Role(s):
...with inspections that are: ...and inspections in thefollowing Status:
Notes
None Active Draft None
Inspector or Contract
Inspector
Note: The Contract Inspector
must be assigned as a Team
Member to request approval
on the Inspection Report by
updating the Status field.
Active Pending Approval None
Inspector and
Inspection Supervisor
Archived Approved The Inspection Lock and the
Final Inspection Lock are set to
true.
Security Settings
The Security User performing the data load operation must be associated with either the MI Data LoaderUser or MI Data Loader Admin Security Role, and must also be associated with the MI Inspection SecurityGroup, or a Security Role that is associated with this Security Group.
About the Inspection Management (IM) Data Loaders InspectionTypes
The Inspection Management (IM) Data Loaders can be used to load two different types of Inspections:
• Active Inspections: Inspections that are still in the process of being completed or reviewed. After youload data, you can use the Inspection Management Bulk Approval feature to approve activeinspections.
Note:
◦ If an inspection is currently downloaded for Inspection Field Data Collection, it cannot be updatedthrough the data loader until it has been synced back.
◦ If the Use State Management for Inspection Recommendations check box in ApplicationSettings is selected, Active Inspection Recommendations are loaded in the Proposed state. If it iscleared, Active Inspection Recommendations are loaded in the Created status.
© 2020 General Electric Company 153
• Archived Inspections: Inspections that have been reviewed, locked, and archived. Because of thenature of approving archived inspections, it is best for one person to perform this function. In the dataloader workbooks, archived Inspections are those that have both the Inspection Lock and FinalInspection Lock fields set to True, and the Inspection Document Status field set to Approved. When anarchived Inspection is loaded, the Inspection Report Owner and Reviewer’s Name fields will be set tothe name of the user performing the data load.
Note: If the Use State Management for Inspection Recommendations check box in ApplicationSettings is selected, Archived Inspection Recommendations are loaded in the Completed state. If it iscleared, Archived Inspection Recommendations are loaded in the Implemented status.
Important: When you transition the state of a loaded recommendation to the Completed state, if thestate is unavailable, an error appears in the data loader log, stating an error occurred while attempting toset the state for the archived recommendation to MI_COMPLETED. Also, the recommendation will remainin the Proposed state.
About the Inspection Management (IM) Data Loaders DataModel
This topic has been intentionally excluded from the GE Digital APM product documentation website. Thistopic is available to you via the product documentation that is provided within the GE Digital APM system.
About the Inspection Management (IM) Data Loaders GeneralLoading Strategy
Prerequisites
• For Oracle databases, valid cell values are case-sensitive.• The data loader workbook contains sample data in each column. It is only for your reference. You must
remove this data before using the data loader workbook.
Best Practices
When importing data using the Inspection Management (IM) Data Loaders, you must use the followingbest practices:
• ID fields (the second row on each worksheet) must not include special characters or spaces.• Columns (including columns representing custom fields) on the worksheets should be formatted as
Text.• When loading archived Inspections, you do not need to set values for the Inspection Report Owner and
Reviewer’s Name cells. These fields will be set automatically to the name of the user who loads thedata.
• The supported date formats, time zone, and units of measure will be based on the user's settings.• When creating ID numbers for loading inspection data, choose unique values.• The value in the Inspection Reference field must be unique.
Load Sequence
The Inspection Management data load is performed in a specific sequence in order to create all necessaryrelationships between records:
154 © 2020 General Electric Company
1. The first step of the load sequence differs based on whether you are using the Inspection Management(IM) Assets Data Loader or the Inspection Management (IM) Functional Location Data Loader.If using the Inspection Management (IM) Assets Data Loader, the Assets worksheet is processed. Anexisting asset will be looked up based on values in the Equipment ID (MI_EQUIP000_EQUIP_ID_C),CMMS System (MI_EQUIP000_SAP_SYSTEM_C), and, if provided, Equipment Technical Number(MI_EQUIP000_EQUIP_TECH_NBR_C) cells.
If using the Inspection Management (IM) Functional Location Data Loader, the Functional_Locationworksheet is processed. An existing Functional Location will be looked up based on values in theFunctional Location ID (MI_FNCLOC00_FNC_LOC_C) and CMMS System(MI_FNCLOC00_SAP_SYSTEM_C) cells.
If an Asset or Functional Location specified on the respective worksheets does not exist, it will beskipped, along with all entries in the subsequent worksheets corresponding to that Asset or FunctionalLocation.
2. The Inspection_Profile worksheet is processed. For each row based on the cells specified in step 1, anInspection Profile is looked up. If the Asset or Functional Location does not have a correspondingInspection Profile, a new record will be created and linked.
3. The Inspection_Method worksheet is processed. The assets or Functional Locations from step 1 andthe Inspection Profiles from step 2 are considered, in addition to the following columns on theworksheet: Item Category (MI_PROFINSP_ITEM_CAT_C), Item ID (MI_PROFINSP_ITEM_ID_C), MethodCategory (MI_INSPMETH_ITEM_CAT_C), Method ID (MI_INSPMETH_ITEM_ID_C), and (only for assets) RBIDegradation Mechanism (MI_INSPMETH_DAMAGE_MECH_C).
4. If a corresponding Inspection Method is not found, a new Inspection Method record will be created.Otherwise, the record will be updated The Inspection_Task worksheet is processed. The assets orFunctional Locations from step 1 are considered as well as the following columns on the worksheet:Task ID (MI_TASK_ID), Reoccurring (MI_TASK_REOCC_FLG), and Override Interval(MI_TASK_OVERRIDE_INTER_F).If the Reoccurring cell is set to True, the Next Date cell cannot be specified because the task isreoccurring. As a result, the Next Date value will be automatically calculated.
If the Override Interval cell is set to False, the setting of the Desired Interval cell by the data loader willnot occur and the Desired Interval will be set to 0. Therefore, the Override Interval cell cannot be set toFalse.
If the Override Interval cell is set to False, but the value in the Desired Interval cell is less than thevalue in the Minimum Interval cell, the Desired Interval will be set to the value of Minimum Interval.
If the Reoccurring cell of the task is set to False, the Last Date and the Desired Interval cells cannot bespecified. For tasks that are not set to reoccur, the following cells will not be copied from the dataloader spreadsheet and they will have the following default settings:
• The Last Date cell will be empty.• The Desired Interval cell will be set to 0.
If logical cells (i.e. Override Interval, Reoccurring) do not have values, they will be set to True by default.5. The Inspections worksheet is processed. For each row based on the cells specified in step 1, as well as
the Inspection Reference (MI_EVENT_ID) column, an Inspection. If no corresponding Inspection recordis found, then a new record is created. Otherwise, the record will be updated.If the Inspection Document Status (MI_INSP_001_STATUS_INSP_C) cell is set to Approved and the FinalInspection Lock (MI_INSP_001_LOCK_FINAL_L) cell is set to True, the record will be considered anArchived Inspection. The Reviewer and Inspection Owner fields are automatically set to the userperforming the data load.
If the Inspection Task Complete field has been added as a column to the worksheet, and if values havebeen provided, an error message will be added to the log, and data in the columns will be skipped.
If an existing Inspection is being updated via the data load, but the Inspection Lock field for the recordis set to True, and:
© 2020 General Electric Company 155
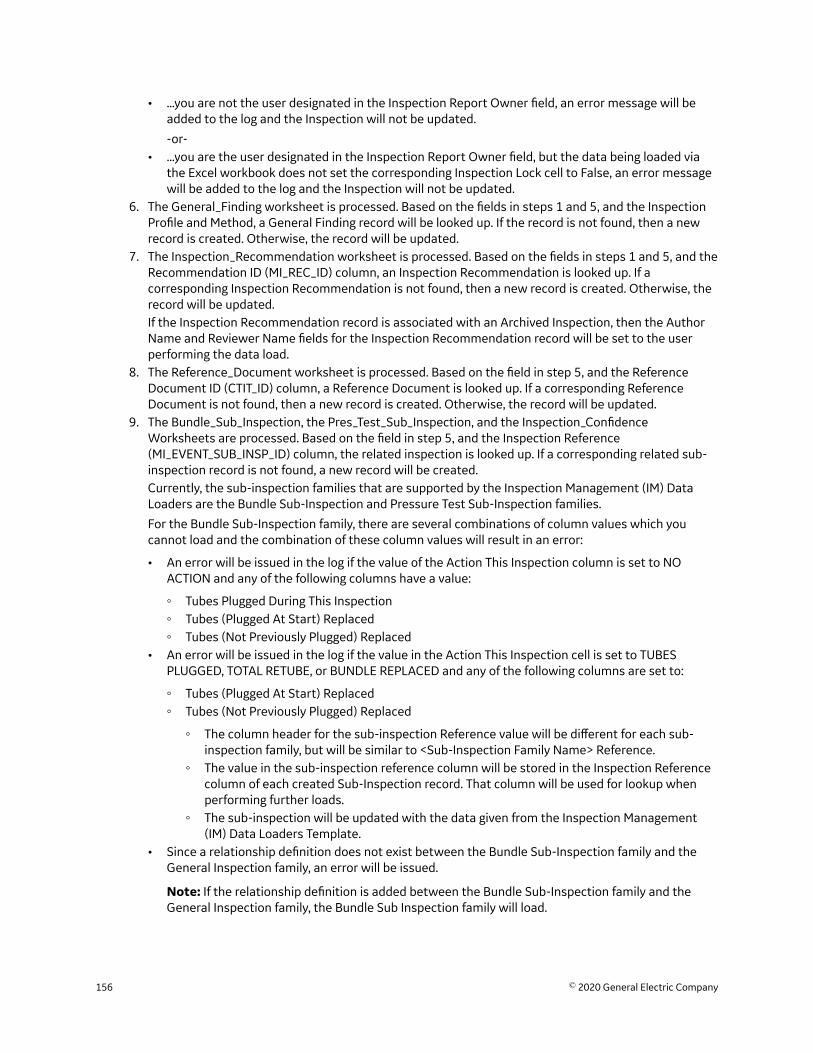
• ...you are not the user designated in the Inspection Report Owner field, an error message will beadded to the log and the Inspection will not be updated.
-or-• ...you are the user designated in the Inspection Report Owner field, but the data being loaded via
the Excel workbook does not set the corresponding Inspection Lock cell to False, an error messagewill be added to the log and the Inspection will not be updated.
6. The General_Finding worksheet is processed. Based on the fields in steps 1 and 5, and the InspectionProfile and Method, a General Finding record will be looked up. If the record is not found, then a newrecord is created. Otherwise, the record will be updated.
7. The Inspection_Recommendation worksheet is processed. Based on the fields in steps 1 and 5, and theRecommendation ID (MI_REC_ID) column, an Inspection Recommendation is looked up. If acorresponding Inspection Recommendation is not found, then a new record is created. Otherwise, therecord will be updated.If the Inspection Recommendation record is associated with an Archived Inspection, then the AuthorName and Reviewer Name fields for the Inspection Recommendation record will be set to the userperforming the data load.
8. The Reference_Document worksheet is processed. Based on the field in step 5, and the ReferenceDocument ID (CTIT_ID) column, a Reference Document is looked up. If a corresponding ReferenceDocument is not found, then a new record is created. Otherwise, the record will be updated.
9. The Bundle_Sub_Inspection, the Pres_Test_Sub_Inspection, and the Inspection_ConfidenceWorksheets are processed. Based on the field in step 5, and the Inspection Reference(MI_EVENT_SUB_INSP_ID) column, the related inspection is looked up. If a corresponding related sub-inspection record is not found, a new record will be created.Currently, the sub-inspection families that are supported by the Inspection Management (IM) DataLoaders are the Bundle Sub-Inspection and Pressure Test Sub-Inspection families.
For the Bundle Sub-Inspection family, there are several combinations of column values which youcannot load and the combination of these column values will result in an error:
• An error will be issued in the log if the value of the Action This Inspection column is set to NOACTION and any of the following columns have a value:
◦ Tubes Plugged During This Inspection◦ Tubes (Plugged At Start) Replaced◦ Tubes (Not Previously Plugged) Replaced
• An error will be issued in the log if the value in the Action This Inspection cell is set to TUBESPLUGGED, TOTAL RETUBE, or BUNDLE REPLACED and any of the following columns are set to:
◦ Tubes (Plugged At Start) Replaced◦ Tubes (Not Previously Plugged) Replaced
◦ The column header for the sub-inspection Reference value will be different for each sub-inspection family, but will be similar to <Sub-Inspection Family Name> Reference.
◦ The value in the sub-inspection reference column will be stored in the Inspection Referencecolumn of each created Sub-Inspection record. That column will be used for lookup whenperforming further loads.
◦ The sub-inspection will be updated with the data given from the Inspection Management(IM) Data Loaders Template.
• Since a relationship definition does not exist between the Bundle Sub-Inspection family and theGeneral Inspection family, an error will be issued.
Note: If the relationship definition is added between the Bundle Sub-Inspection family and theGeneral Inspection family, the Bundle Sub Inspection family will load.
156 © 2020 General Electric Company

About the Inspection Management (IM) Data Loaders WorkbookLayout and Use
To import data using the Inspection Management (IM) Data Loaders, GE Digital APM provides thefollowing Excel workbooks:
• Inspection Management (IM) Assets.xlsx (for Inspections related to Equipment records)• Inspection Management (IM) Functional Location.xlsx (for Inspections related to Functional Location
records)
You must use these workbooks to load the data. You can modify the Excel workbooks to include customfields used by your organization. Generally, your organization will use one of the two workbooks, but notboth.
Note: The Excel workbooks are referred to throughout this documentation as the data loader workbooks.
The following table provides a list of worksheets that are included in the data loader workbooks. Unlessotherwise specified, the worksheets appear in both the workbooks.
Worksheet Description
Assets This worksheet is used to specify existing Equipment records to
which Inspections and related records will be linked. This
worksheet appears only in the Inspection Management (IM)
Assets Data Loader workbook.
Functional_Location This worksheet is used to specify existing Functional Location
records to which Inspections and related records will be linked.
This worksheet appears only in the Inspection Management (IM)
Functional Location Data Loader workbook.
Inspection_Profile This worksheet is used to specify Inspection Profile records that
you want to create or update.
Inspection_Method This worksheet is used to specify Inspection Method records
that you want to create or update.
Inspection_Task This worksheet is used to specify Inspection Task records that
you want to create or update.
Inspections This worksheet is used to specify the following records:
• Bundle Inspection
• Full Inspection
• General Inspection
• Pressure Test Inspection
• All types of Checklists
Inspection_Confidence_Eval This worksheet is used to specify Inspection Confidence
Evaluation records that you want to create or update.
Bundle_Sub_Inspection This worksheet is used to specify Bundle Sub-Inspection
records that you want to create or update.
Press_Test_Sub_Inspection This worksheet is used to specify Pressure Test Sub-Inspection
records that you want to create or update.
© 2020 General Electric Company 157

Worksheet Description
General_Finding This worksheet is used to specify General Finding records that
you want to create or update.
Custom_Sub_Inspection If you have created a custom sub inspection family, this
worksheet is used to specify the custom sub inspection records
that you want to create or update.
Inspection_Recommendation This worksheet is used to specify Inspection Recommendation
records that you want to create or update.
Reference_Document This worksheet is used to specify Reference Document records
that you want to create or update.
(Picklist) This worksheet contains a list of valid values that you can enter
in each column (as applicable) in the aforementioned
worksheets. When you load data using the data loader, the data
on this worksheet is not loaded.
Color Coding
Certain columns on the worksheets have different functions and requirements. To illustrate this, certaincolumns are color-coded. The following table lists the colors and what they represent.
Color Description Comments
Grey Lookup Fields Indicates columns that contain values
that are used by the Inspection
Management (IM) Data Loaders to look up
and create records. If these columns are
removed from the worksheets, the data
load will fail. While the worksheets
require that these columns be present,
values are not necessarily required in
these columns.
Red Fields Required for Saving Records Indicates columns that contain values
that are required to save the record.
Blue Recommended Fields Indicates columns that, according to GE
Digital APM Best Practice for Inspection
Management, should contain values.
Green Custom Fields Indicates columns in which you can
specify custom fields.
Limitations
The Inspection Management (IM) Data Loaders have the following limitations:
• The values that you enter in the data loader workbooks are case-sensitive.• When you use the data loader to update Inspection Management families:
◦ If a cell contains data, the value in the corresponding field will be updated in the database.◦ If a cell is blank, the value in the corresponding field will not be updated with a blank value in the
database. The value that previously existed in the field is retained.
158 © 2020 General Electric Company
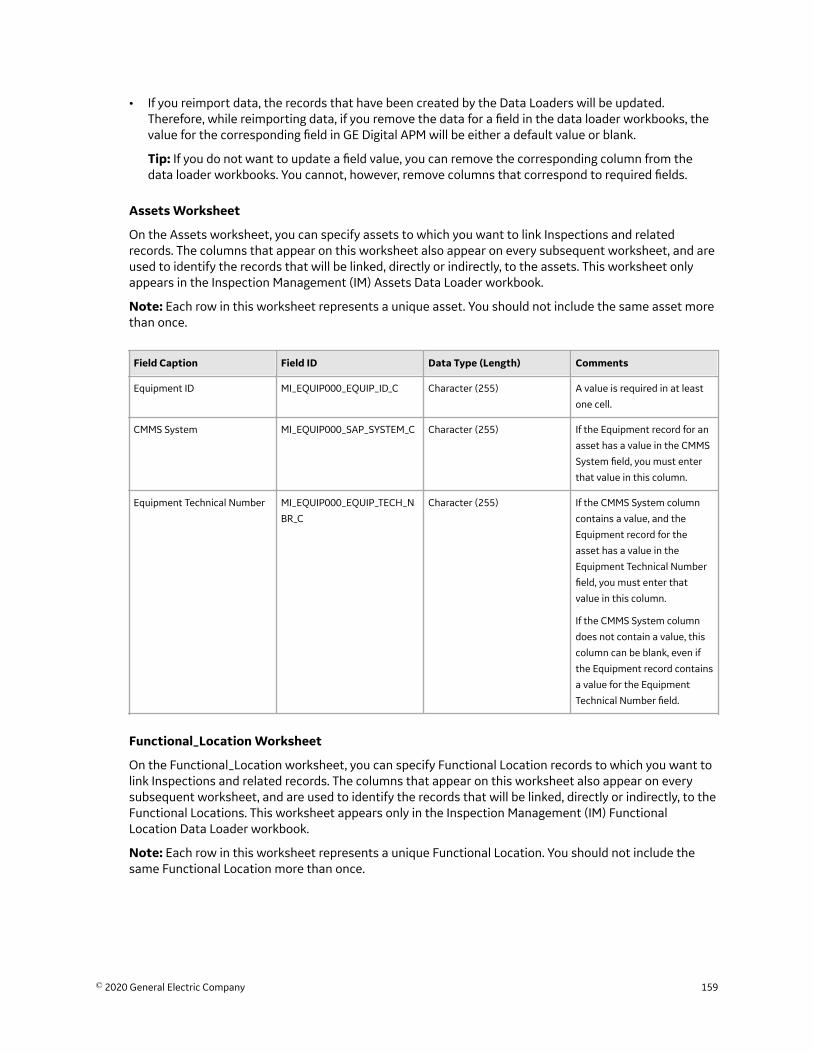
• If you reimport data, the records that have been created by the Data Loaders will be updated.Therefore, while reimporting data, if you remove the data for a field in the data loader workbooks, thevalue for the corresponding field in GE Digital APM will be either a default value or blank.
Tip: If you do not want to update a field value, you can remove the corresponding column from thedata loader workbooks. You cannot, however, remove columns that correspond to required fields.
Assets Worksheet
On the Assets worksheet, you can specify assets to which you want to link Inspections and relatedrecords. The columns that appear on this worksheet also appear on every subsequent worksheet, and areused to identify the records that will be linked, directly or indirectly, to the assets. This worksheet onlyappears in the Inspection Management (IM) Assets Data Loader workbook.
Note: Each row in this worksheet represents a unique asset. You should not include the same asset morethan once.
Field Caption Field ID Data Type (Length) Comments
Equipment ID MI_EQUIP000_EQUIP_ID_C Character (255) A value is required in at least
one cell.
CMMS System MI_EQUIP000_SAP_SYSTEM_C Character (255) If the Equipment record for an
asset has a value in the CMMS
System field, you must enter
that value in this column.
Equipment Technical Number MI_EQUIP000_EQUIP_TECH_N
BR_C
Character (255) If the CMMS System column
contains a value, and the
Equipment record for the
asset has a value in the
Equipment Technical Number
field, you must enter that
value in this column.
If the CMMS System column
does not contain a value, this
column can be blank, even if
the Equipment record contains
a value for the Equipment
Technical Number field.
Functional_Location Worksheet
On the Functional_Location worksheet, you can specify Functional Location records to which you want tolink Inspections and related records. The columns that appear on this worksheet also appear on everysubsequent worksheet, and are used to identify the records that will be linked, directly or indirectly, to theFunctional Locations. This worksheet appears only in the Inspection Management (IM) FunctionalLocation Data Loader workbook.
Note: Each row in this worksheet represents a unique Functional Location. You should not include thesame Functional Location more than once.
© 2020 General Electric Company 159

Field Caption Field ID Data Type (Length) Comments
Functional Location ID MI_FNCLOC00_FNC_LOC_C Character (255) A value is required in at least
one cell.
CMMS System MI_FNCLOC00_SAP_SYSTEM_C Character (255) If the CMMS System field in
the Functional Location record
contains a value, you must
enter that value in this
column.
Inspection_Profile Worksheet
On the Inspection_Profile worksheet, you can specify Inspection Profile records that you want to create orupdate.
Note: Each row represents a unique record, though multiple records may be related to the same asset.
Field Caption Field ID Data Type (Length) Comments
Equipment ID MI_EQUIP000_EQUIP_ID_C Character (255) Values in this column must
match the values entered on
the Assets worksheet. You can
link multiple records to the
same asset.
Functional Location ID MI_FNCLOC00_FNC_LOC_C Character (255) Values in this column must
match the values entered on
the Functional_Location
worksheet. You can link
multiple records to the same
Functional Location.
CMMS System MI_EQUIP000_SAP_SYSTEM_C
MI_FNCLOC00_SAP_SYSTEM_C
Character (255) Values in this column must
match the values entered on
the Assets or
Functional_Location
worksheet, if they exist. You
can link multiple records to the
same asset or Functional
Location.
Equipment Technical Number MI_EQUIP000_EQUIP_TECH_N
BR_C
Character (255) Values in this column must
match the values entered on
the Assets worksheet, if they
exist. You can link multiple
records to the same asset.
160 © 2020 General Electric Company

Field Caption Field ID Data Type (Length) Comments
Item Category MI_PROFINSP_ITEM_CAT_C Character (50) A value is required. The
combination of values in the
Item Category and Item
ID columns must be unique
per asset.
This column must only contain
System Code IDs from the
MI_INSPECTION_PROFILE_CAT
EGORY System Code Table.
Refer to the (Picklist)
worksheet for a list of values
that you can enter in this
column.
Item ID MI_PROFINSP_ITEM_ID_C Character (255) A value is required.
The combination of values in
the Item Category and Item
ID columns must be unique
per asset.
Item Description MI_PROFINSP_ITEM_DESC_C Text None
RBI Component MI_PROFINSP_COMPONENT_C Character (250) This column must only contain
the Entity ID of an existing
Criticality RBI Component
record that is linked to the
same asset or Functional
Location as the Inspection
Profile.
RBI Component Family MI_PROFINSP_COMP_FAM_C Character (100) This column must only contain
the Family name of the
Criticality RBI Component
specified in the RBI
Component column (e.g.,
Criticality RBI Component -
Piping).
This column appears only in
the Inspection Management
(IM) Assets Data Loader
workbook.
Sequence MI_PROFINSP_SEQUENCE_N Numeric None
Inspection_Method Worksheet
On the Inspection_Method worksheet, you can specify Inspection Method records that you want to createor update.
Note: Each row represents a unique record, though multiple records may be related to the sameInspection Profile.
© 2020 General Electric Company 161
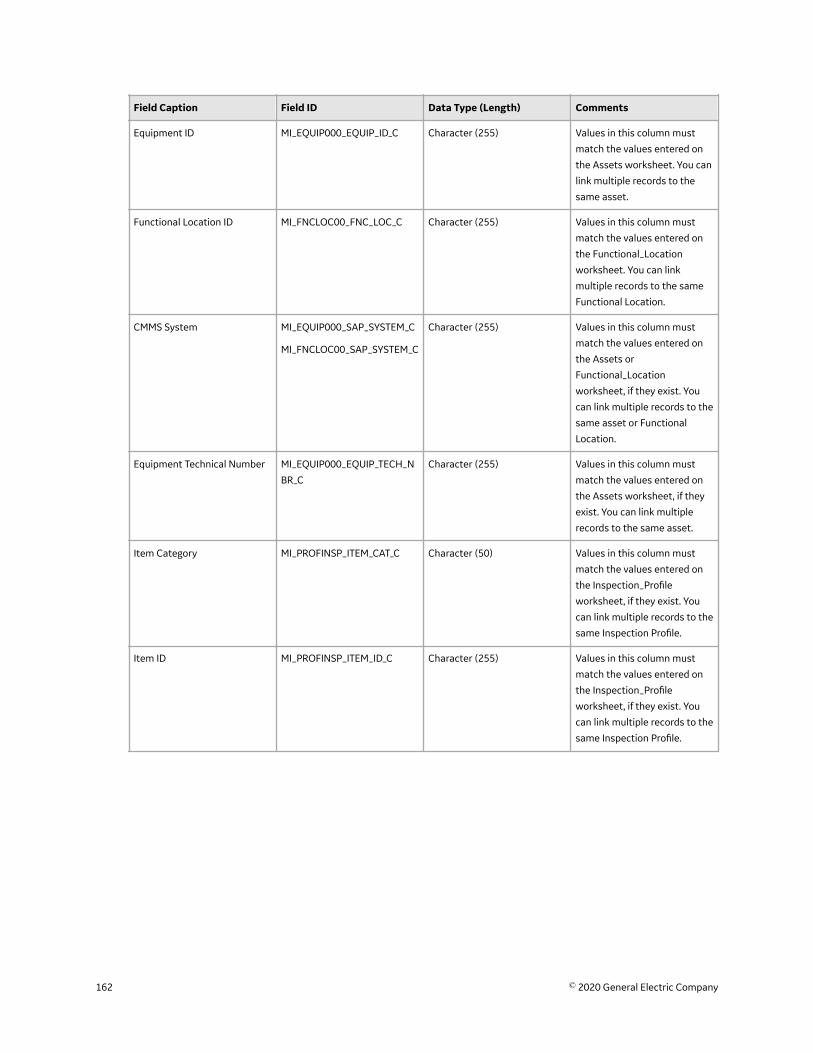
Field Caption Field ID Data Type (Length) Comments
Equipment ID MI_EQUIP000_EQUIP_ID_C Character (255) Values in this column must
match the values entered on
the Assets worksheet. You can
link multiple records to the
same asset.
Functional Location ID MI_FNCLOC00_FNC_LOC_C Character (255) Values in this column must
match the values entered on
the Functional_Location
worksheet. You can link
multiple records to the same
Functional Location.
CMMS System MI_EQUIP000_SAP_SYSTEM_C
MI_FNCLOC00_SAP_SYSTEM_C
Character (255) Values in this column must
match the values entered on
the Assets or
Functional_Location
worksheet, if they exist. You
can link multiple records to the
same asset or Functional
Location.
Equipment Technical Number MI_EQUIP000_EQUIP_TECH_N
BR_C
Character (255) Values in this column must
match the values entered on
the Assets worksheet, if they
exist. You can link multiple
records to the same asset.
Item Category MI_PROFINSP_ITEM_CAT_C Character (50) Values in this column must
match the values entered on
the Inspection_Profile
worksheet, if they exist. You
can link multiple records to the
same Inspection Profile.
Item ID MI_PROFINSP_ITEM_ID_C Character (255) Values in this column must
match the values entered on
the Inspection_Profile
worksheet, if they exist. You
can link multiple records to the
same Inspection Profile.
162 © 2020 General Electric Company
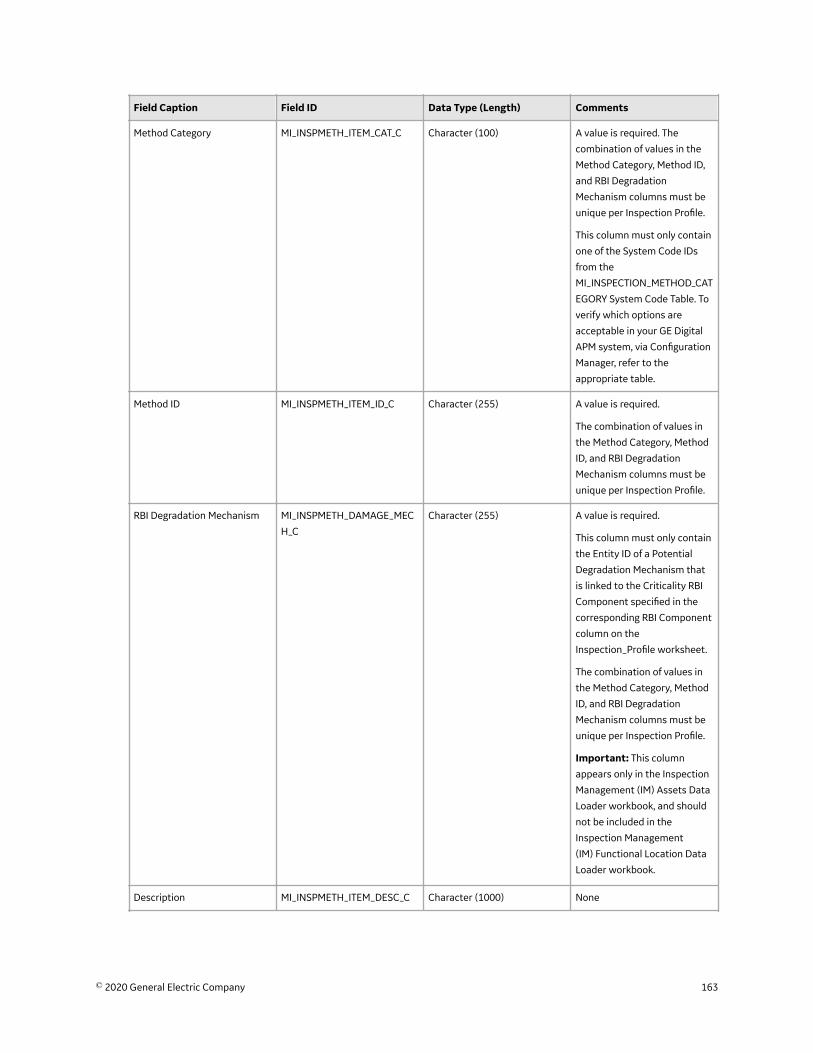
Field Caption Field ID Data Type (Length) Comments
Method Category MI_INSPMETH_ITEM_CAT_C Character (100) A value is required. The
combination of values in the
Method Category, Method ID,
and RBI Degradation
Mechanism columns must be
unique per Inspection Profile.
This column must only contain
one of the System Code IDs
from the
MI_INSPECTION_METHOD_CAT
EGORY System Code Table. To
verify which options are
acceptable in your GE Digital
APM system, via Configuration
Manager, refer to the
appropriate table.
Method ID MI_INSPMETH_ITEM_ID_C Character (255) A value is required.
The combination of values in
the Method Category, Method
ID, and RBI Degradation
Mechanism columns must be
unique per Inspection Profile.
RBI Degradation Mechanism MI_INSPMETH_DAMAGE_MEC
H_C
Character (255) A value is required.
This column must only contain
the Entity ID of a Potential
Degradation Mechanism that
is linked to the Criticality RBI
Component specified in the
corresponding RBI Component
column on the
Inspection_Profile worksheet.
The combination of values in
the Method Category, Method
ID, and RBI Degradation
Mechanism columns must be
unique per Inspection Profile.
Important: This column
appears only in the Inspection
Management (IM) Assets Data
Loader workbook, and should
not be included in the
Inspection Management
(IM) Functional Location Data
Loader workbook.
Description MI_INSPMETH_ITEM_DESC_C Character (1000) None
© 2020 General Electric Company 163
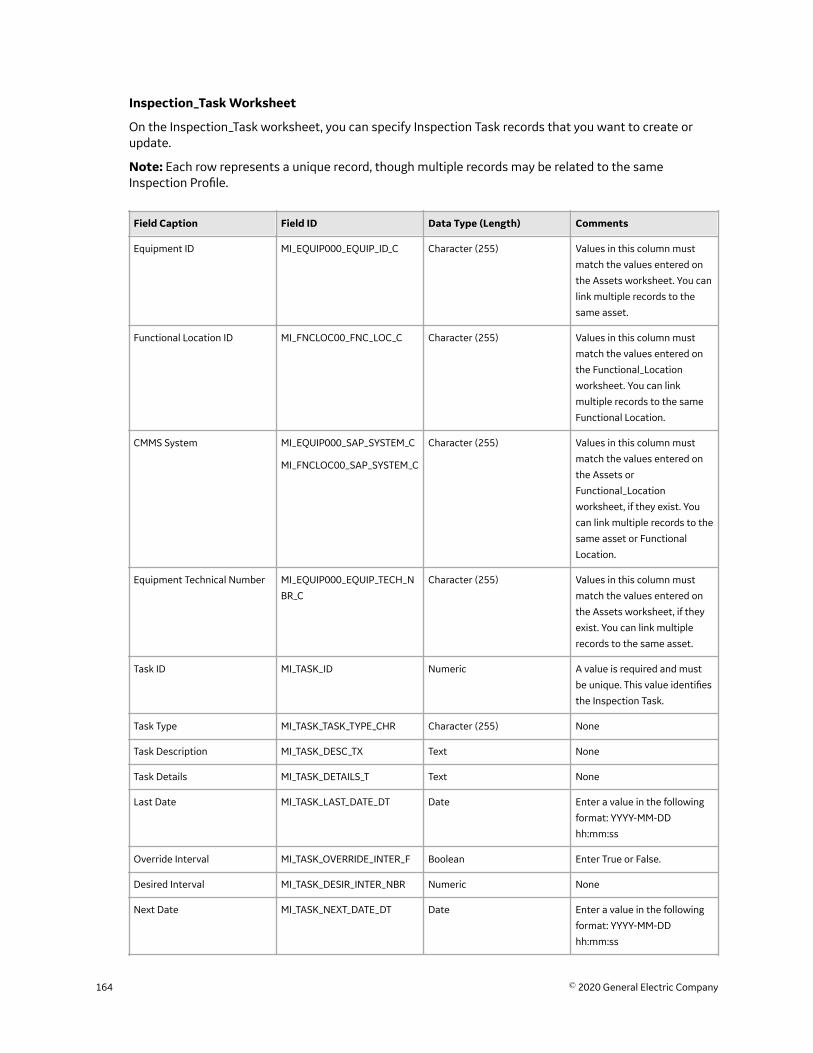
Inspection_Task Worksheet
On the Inspection_Task worksheet, you can specify Inspection Task records that you want to create orupdate.
Note: Each row represents a unique record, though multiple records may be related to the sameInspection Profile.
Field Caption Field ID Data Type (Length) Comments
Equipment ID MI_EQUIP000_EQUIP_ID_C Character (255) Values in this column must
match the values entered on
the Assets worksheet. You can
link multiple records to the
same asset.
Functional Location ID MI_FNCLOC00_FNC_LOC_C Character (255) Values in this column must
match the values entered on
the Functional_Location
worksheet. You can link
multiple records to the same
Functional Location.
CMMS System MI_EQUIP000_SAP_SYSTEM_C
MI_FNCLOC00_SAP_SYSTEM_C
Character (255) Values in this column must
match the values entered on
the Assets or
Functional_Location
worksheet, if they exist. You
can link multiple records to the
same asset or Functional
Location.
Equipment Technical Number MI_EQUIP000_EQUIP_TECH_N
BR_C
Character (255) Values in this column must
match the values entered on
the Assets worksheet, if they
exist. You can link multiple
records to the same asset.
Task ID MI_TASK_ID Numeric A value is required and must
be unique. This value identifies
the Inspection Task.
Task Type MI_TASK_TASK_TYPE_CHR Character (255) None
Task Description MI_TASK_DESC_TX Text None
Task Details MI_TASK_DETAILS_T Text None
Last Date MI_TASK_LAST_DATE_DT Date Enter a value in the following
format: YYYY-MM-DD
hh:mm:ss
Override Interval MI_TASK_OVERRIDE_INTER_F Boolean Enter True or False.
Desired Interval MI_TASK_DESIR_INTER_NBR Numeric None
Next Date MI_TASK_NEXT_DATE_DT Date Enter a value in the following
format: YYYY-MM-DD
hh:mm:ss
164 © 2020 General Electric Company
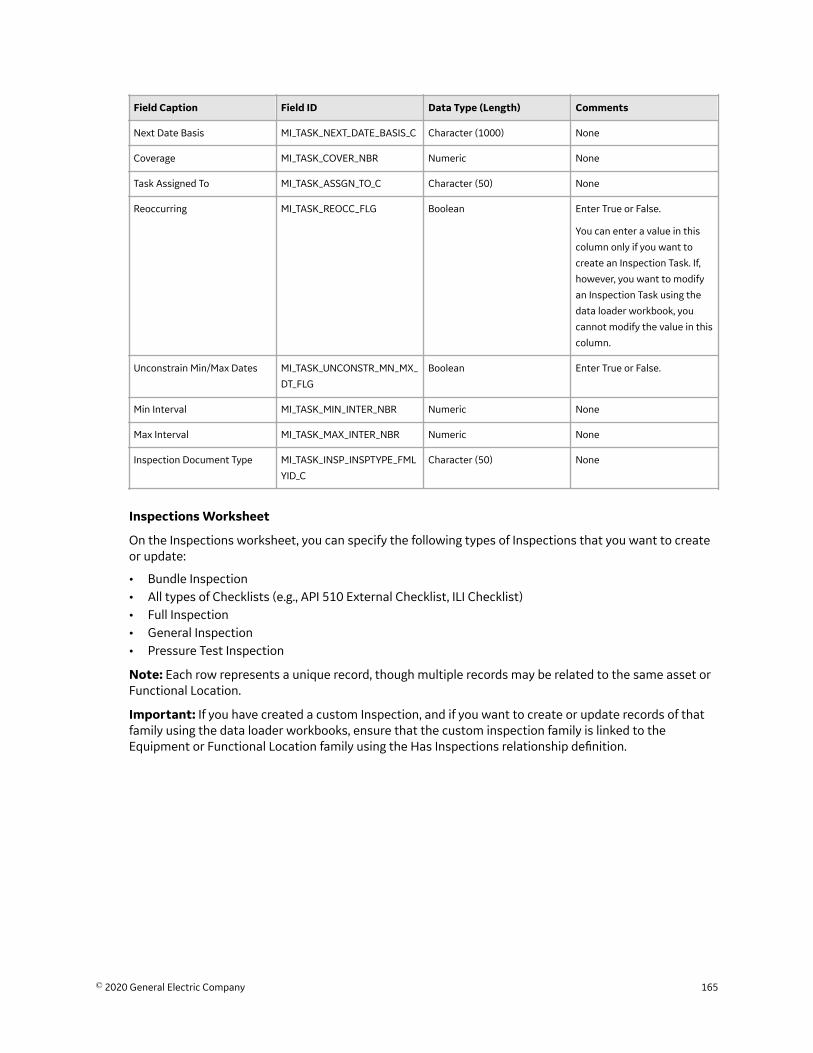
Field Caption Field ID Data Type (Length) Comments
Next Date Basis MI_TASK_NEXT_DATE_BASIS_C Character (1000) None
Coverage MI_TASK_COVER_NBR Numeric None
Task Assigned To MI_TASK_ASSGN_TO_C Character (50) None
Reoccurring MI_TASK_REOCC_FLG Boolean Enter True or False.
You can enter a value in this
column only if you want to
create an Inspection Task. If,
however, you want to modify
an Inspection Task using the
data loader workbook, you
cannot modify the value in this
column.
Unconstrain Min/Max Dates MI_TASK_UNCONSTR_MN_MX_
DT_FLG
Boolean Enter True or False.
Min Interval MI_TASK_MIN_INTER_NBR Numeric None
Max Interval MI_TASK_MAX_INTER_NBR Numeric None
Inspection Document Type MI_TASK_INSP_INSPTYPE_FML
YID_C
Character (50) None
Inspections Worksheet
On the Inspections worksheet, you can specify the following types of Inspections that you want to createor update:
• Bundle Inspection• All types of Checklists (e.g., API 510 External Checklist, ILI Checklist)• Full Inspection• General Inspection• Pressure Test Inspection
Note: Each row represents a unique record, though multiple records may be related to the same asset orFunctional Location.
Important: If you have created a custom Inspection, and if you want to create or update records of thatfamily using the data loader workbooks, ensure that the custom inspection family is linked to theEquipment or Functional Location family using the Has Inspections relationship definition.
© 2020 General Electric Company 165
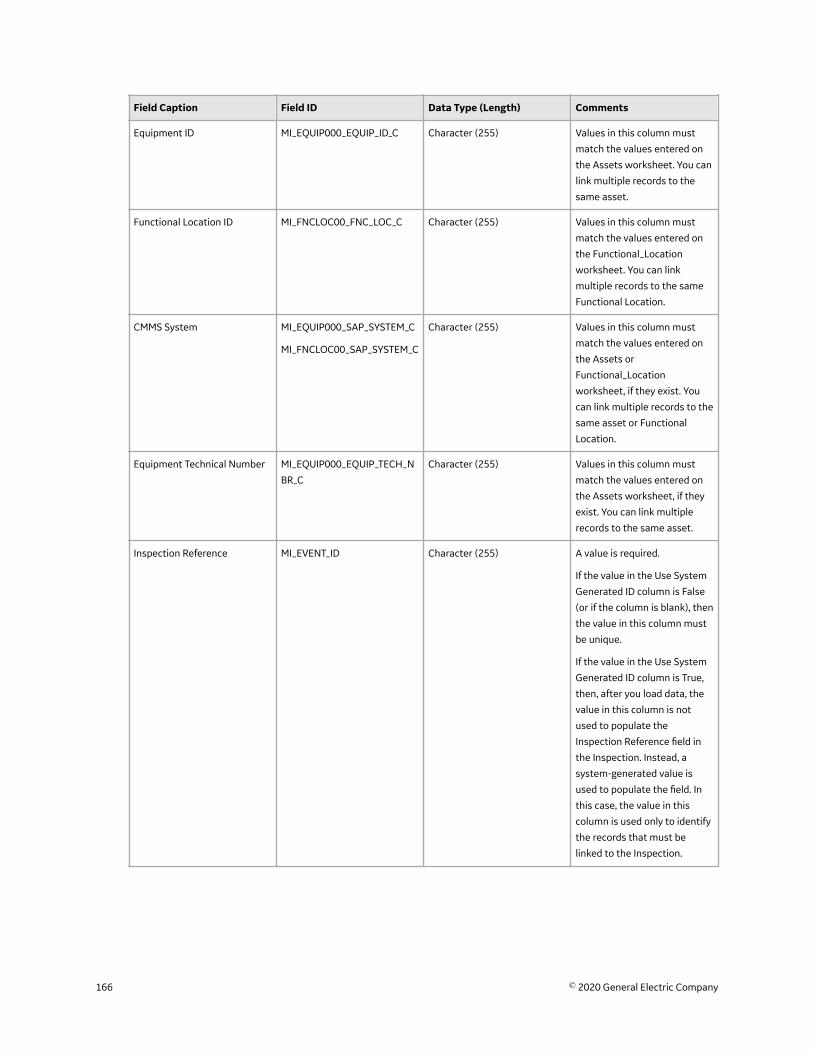
Field Caption Field ID Data Type (Length) Comments
Equipment ID MI_EQUIP000_EQUIP_ID_C Character (255) Values in this column must
match the values entered on
the Assets worksheet. You can
link multiple records to the
same asset.
Functional Location ID MI_FNCLOC00_FNC_LOC_C Character (255) Values in this column must
match the values entered on
the Functional_Location
worksheet. You can link
multiple records to the same
Functional Location.
CMMS System MI_EQUIP000_SAP_SYSTEM_C
MI_FNCLOC00_SAP_SYSTEM_C
Character (255) Values in this column must
match the values entered on
the Assets or
Functional_Location
worksheet, if they exist. You
can link multiple records to the
same asset or Functional
Location.
Equipment Technical Number MI_EQUIP000_EQUIP_TECH_N
BR_C
Character (255) Values in this column must
match the values entered on
the Assets worksheet, if they
exist. You can link multiple
records to the same asset.
Inspection Reference MI_EVENT_ID Character (255) A value is required.
If the value in the Use System
Generated ID column is False
(or if the column is blank), then
the value in this column must
be unique.
If the value in the Use System
Generated ID column is True,
then, after you load data, the
value in this column is not
used to populate the
Inspection Reference field in
the Inspection. Instead, a
system-generated value is
used to populate the field. In
this case, the value in this
column is used only to identify
the records that must be
linked to the Inspection.
166 © 2020 General Electric Company

Field Caption Field ID Data Type (Length) Comments
Use System Generated ID MI_SYS_GEN_ID Logical Enter True or False.
If you enter False (or leave this
column blank), after you load
data, the value in the
Inspection Reference column
is used to populate the
Inspection Reference field in
the Inspection. The default
value is False.
If you enter True, after you
load data, the value in the
Inspection Reference field in
the Inspection is populated
with a system-generated
value. In this case, even if you
enter a value in the Inspection
Reference column, it is not
used to populate the field.
If you want to use the data
loader workbooks to modify
an Inspection, the value in this
column must be False (or you
can leave this column blank).
If, however, the value in this
column is True, then, after you
load data, the Inspection is not
modified. Instead, a new
Inspection is created.
Family ID FMLY_ID Character (255) Values in this column are used
to identify the type of the
Inspection record that you
want to create or update.
In addition to the values
specified on the (Picklist)
worksheet, if you want to
enter the family ID of a custom
inspection family that you
created, ensure that the family
is linked to the Equipment or
Functional Location family
using the Has Inspections
relationship family.
Inspection Headline MI_EVENT_SHRT_DSC_CHR Character (255) None
Commencement Date MI_EVENT_STRT_DT Date Enter a value in the following
format: YYYY-MM-DD
hh:mm:ss
© 2020 General Electric Company 167
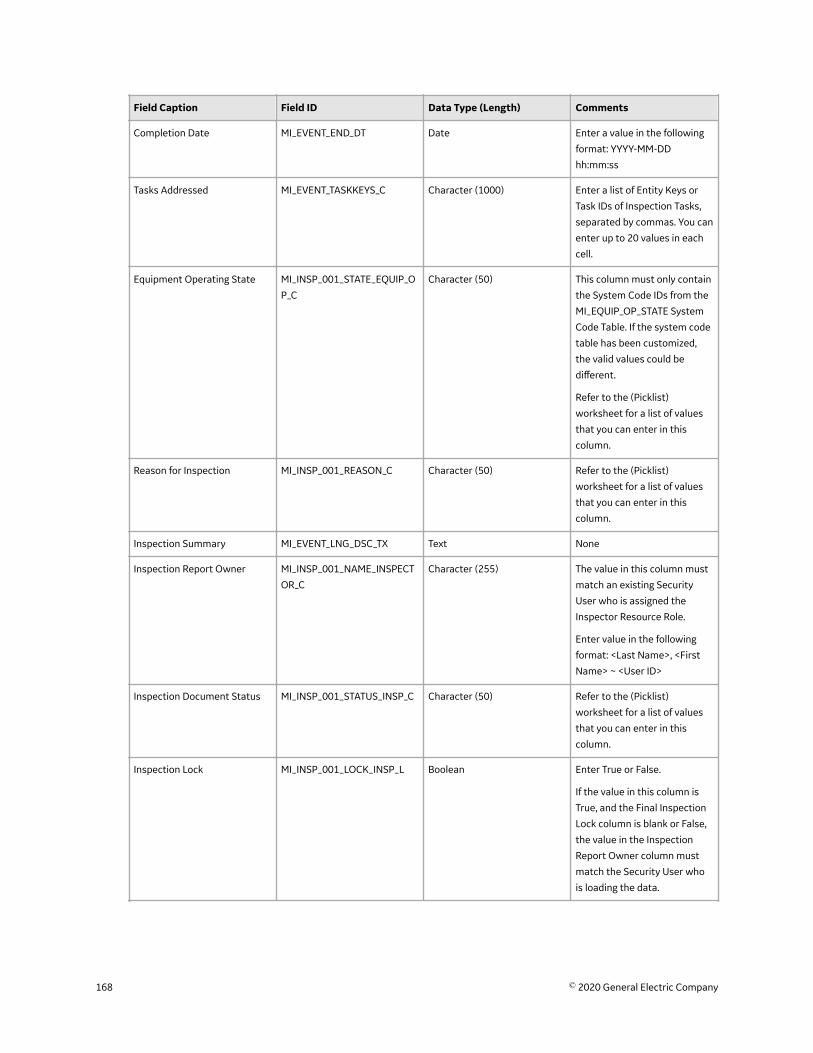
Field Caption Field ID Data Type (Length) Comments
Completion Date MI_EVENT_END_DT Date Enter a value in the following
format: YYYY-MM-DD
hh:mm:ss
Tasks Addressed MI_EVENT_TASKKEYS_C Character (1000) Enter a list of Entity Keys or
Task IDs of Inspection Tasks,
separated by commas. You can
enter up to 20 values in each
cell.
Equipment Operating State MI_INSP_001_STATE_EQUIP_O
P_C
Character (50) This column must only contain
the System Code IDs from the
MI_EQUIP_OP_STATE System
Code Table. If the system code
table has been customized,
the valid values could be
different.
Refer to the (Picklist)
worksheet for a list of values
that you can enter in this
column.
Reason for Inspection MI_INSP_001_REASON_C Character (50) Refer to the (Picklist)
worksheet for a list of values
that you can enter in this
column.
Inspection Summary MI_EVENT_LNG_DSC_TX Text None
Inspection Report Owner MI_INSP_001_NAME_INSPECT
OR_C
Character (255) The value in this column must
match an existing Security
User who is assigned the
Inspector Resource Role.
Enter value in the following
format: <Last Name>, <First
Name> ~ <User ID>
Inspection Document Status MI_INSP_001_STATUS_INSP_C Character (50) Refer to the (Picklist)
worksheet for a list of values
that you can enter in this
column.
Inspection Lock MI_INSP_001_LOCK_INSP_L Boolean Enter True or False.
If the value in this column is
True, and the Final Inspection
Lock column is blank or False,
the value in the Inspection
Report Owner column must
match the Security User who
is loading the data.
168 © 2020 General Electric Company

Field Caption Field ID Data Type (Length) Comments
Reviewers Name MI_INSP_001_NAME_REVIEWE
R_C
Character (255) The value in this column must
match an existing Security
User who is assigned the
Inspection Supervisor
Resource Role.
Enter value in the following
format: <Last Name>, <First
Name> ~ <User ID>
Reviewers Comments MI_INSP_001_COMMENTS_RE
VIEW_T
Text None
Final Inspection Lock MI_INSP_001_LOCK_FINAL_L Boolean Enter True or False.
If the value in this column and
the Inspection Lock column is
True, the Inspection Report
Owner and Reviewer's Name
fields for the record will be
populated with the name of
the user who is loading the
data.
Published MI_INSP_001_PUBLISHED_L Boolean Enter True or False.
Inspection Confidence
Evaluation Reviewed
MI_INSP_001_ICE_COMP_F Boolean Enter True of False.
If the value in this column is
True, the Inspection
Confidence Evaluation records
are locked.
You can update this field only
if:
• You have the Risk Analyst
resource role assigned to
you.
• The Allow Risk Analystto Lock InspectionConfidence EvaluationRecords check box is
selected in the
ApplicationConfigurations section of
the InspectionConfigurationworkspace.
Note: This column is not a
part of the baseline data
loader template. If required,
you can add this column to the
Inspections worksheet.
© 2020 General Electric Company 169
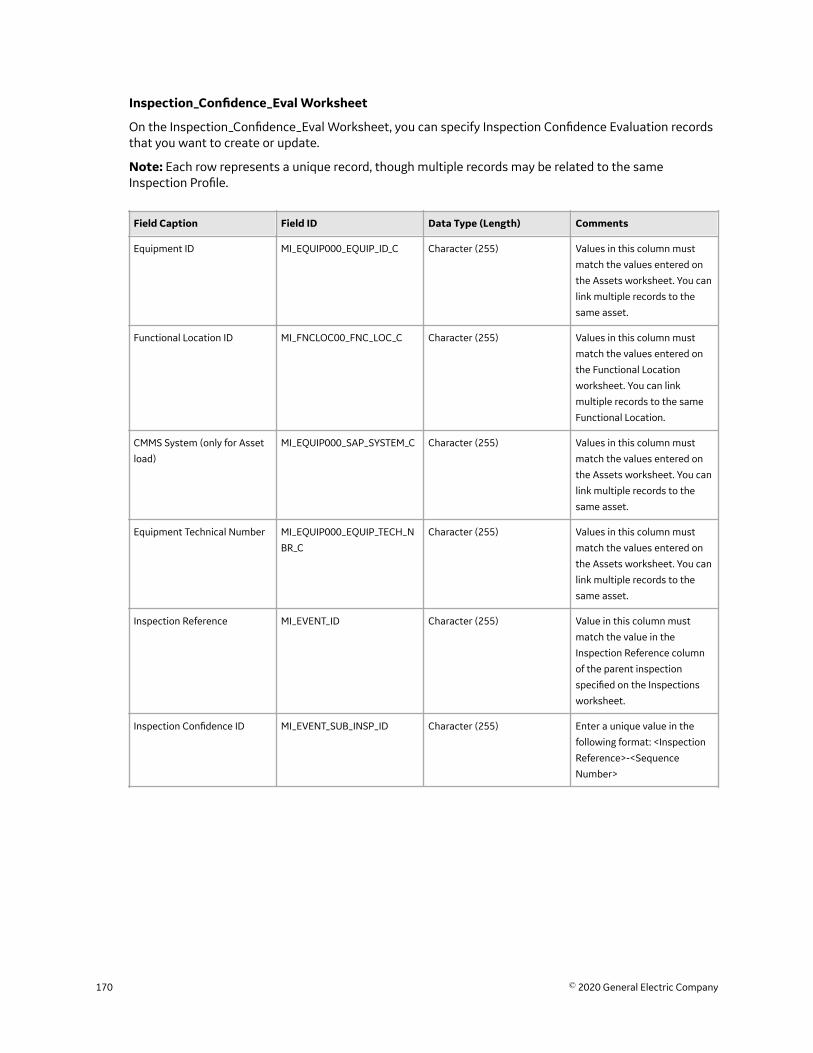
Inspection_Confidence_Eval Worksheet
On the Inspection_Confidence_Eval Worksheet, you can specify Inspection Confidence Evaluation recordsthat you want to create or update.
Note: Each row represents a unique record, though multiple records may be related to the sameInspection Profile.
Field Caption Field ID Data Type (Length) Comments
Equipment ID MI_EQUIP000_EQUIP_ID_C Character (255) Values in this column must
match the values entered on
the Assets worksheet. You can
link multiple records to the
same asset.
Functional Location ID MI_FNCLOC00_FNC_LOC_C Character (255) Values in this column must
match the values entered on
the Functional Location
worksheet. You can link
multiple records to the same
Functional Location.
CMMS System (only for Asset
load)
MI_EQUIP000_SAP_SYSTEM_C Character (255) Values in this column must
match the values entered on
the Assets worksheet. You can
link multiple records to the
same asset.
Equipment Technical Number MI_EQUIP000_EQUIP_TECH_N
BR_C
Character (255) Values in this column must
match the values entered on
the Assets worksheet. You can
link multiple records to the
same asset.
Inspection Reference MI_EVENT_ID Character (255) Value in this column must
match the value in the
Inspection Reference column
of the parent inspection
specified on the Inspections
worksheet.
Inspection Confidence ID MI_EVENT_SUB_INSP_ID Character (255) Enter a unique value in the
following format: <Inspection
Reference>-<Sequence
Number>
170 © 2020 General Electric Company

Field Caption Field ID Data Type (Length) Comments
RBI Component MI_INSCONFEV_RBI_COMP_N Numeric Enter the Component field
value of an existing RBI
Component.
The value in this field should
be a valid RBI Component for
the Asset that the Inspection
is related to.
Note: This column is not a
part of the baseline data
loader template. If required,
you can add this column to the
Inspection_Confidence_Eval
worksheet.
Filter DM MI_INSCONFEV_FILT_DM_F Boolean Enter True or False.
This field is required if the RBI
Component field has a value. If
the RBI Component field is
blank, this field is ignored
during loading.
If the value in this column is
True, and an RBI Component is
specified, the degradation
mechanism must belong to
the specified RBI Component.
Note: This column is not a
part of the baseline data
loader template. If required,
you can add this column to the
Inspection_Confidence_Eval
worksheet.
Degradation Mechanism MI_INSP_001_DEG_MECH_C Character (100) This column must only contain
the System Code IDs from the
DEGRADATION_MECHANISM_
TYPES System Code Table.
Refer to the (Picklist)
worksheet for a list of values
that you can enter in this
column.
© 2020 General Electric Company 171
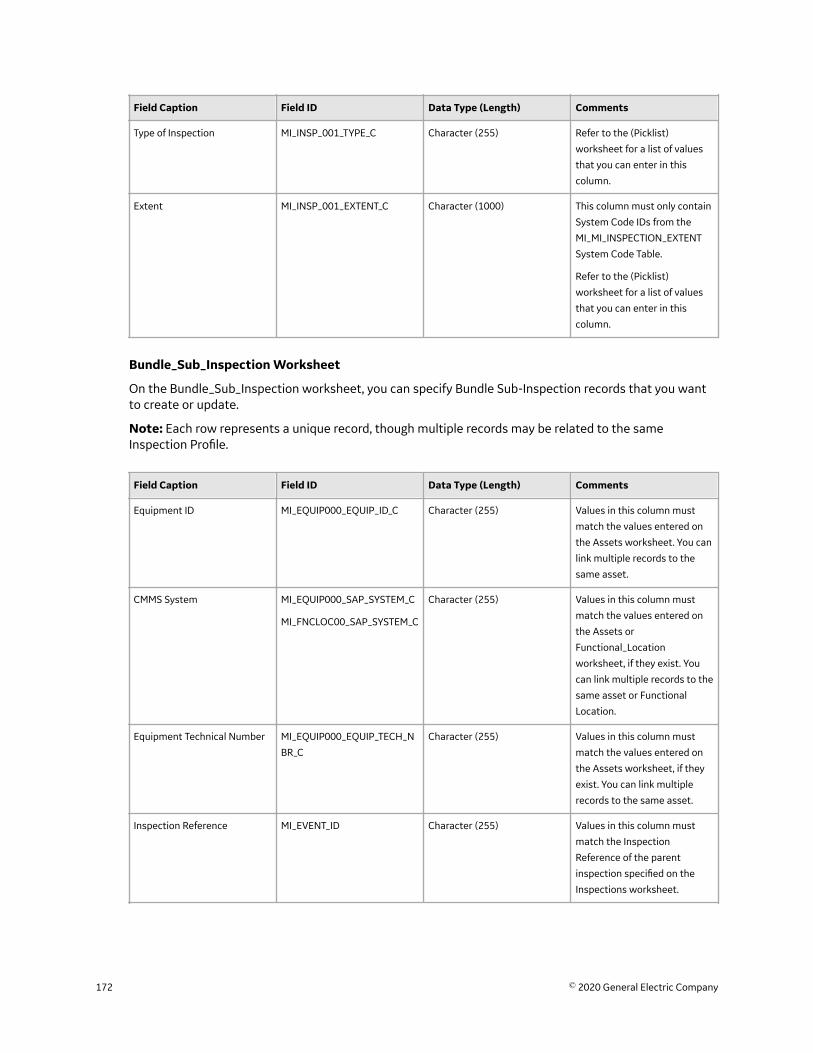
Field Caption Field ID Data Type (Length) Comments
Type of Inspection MI_INSP_001_TYPE_C Character (255) Refer to the (Picklist)
worksheet for a list of values
that you can enter in this
column.
Extent MI_INSP_001_EXTENT_C Character (1000) This column must only contain
System Code IDs from the
MI_MI_INSPECTION_EXTENT
System Code Table.
Refer to the (Picklist)
worksheet for a list of values
that you can enter in this
column.
Bundle_Sub_Inspection Worksheet
On the Bundle_Sub_Inspection worksheet, you can specify Bundle Sub-Inspection records that you wantto create or update.
Note: Each row represents a unique record, though multiple records may be related to the sameInspection Profile.
Field Caption Field ID Data Type (Length) Comments
Equipment ID MI_EQUIP000_EQUIP_ID_C Character (255) Values in this column must
match the values entered on
the Assets worksheet. You can
link multiple records to the
same asset.
CMMS System MI_EQUIP000_SAP_SYSTEM_C
MI_FNCLOC00_SAP_SYSTEM_C
Character (255) Values in this column must
match the values entered on
the Assets or
Functional_Location
worksheet, if they exist. You
can link multiple records to the
same asset or Functional
Location.
Equipment Technical Number MI_EQUIP000_EQUIP_TECH_N
BR_C
Character (255) Values in this column must
match the values entered on
the Assets worksheet, if they
exist. You can link multiple
records to the same asset.
Inspection Reference MI_EVENT_ID Character (255) Values in this column must
match the Inspection
Reference of the parent
inspection specified on the
Inspections worksheet.
172 © 2020 General Electric Company
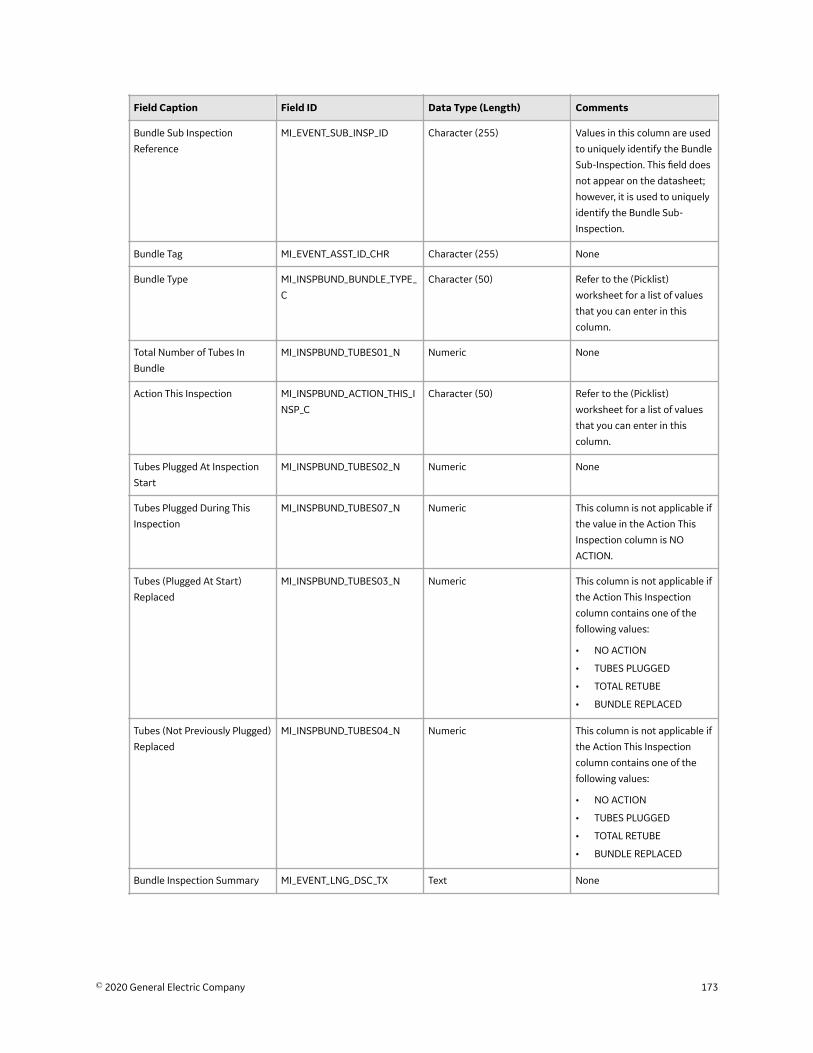
Field Caption Field ID Data Type (Length) Comments
Bundle Sub Inspection
Reference
MI_EVENT_SUB_INSP_ID Character (255) Values in this column are used
to uniquely identify the Bundle
Sub-Inspection. This field does
not appear on the datasheet;
however, it is used to uniquely
identify the Bundle Sub-
Inspection.
Bundle Tag MI_EVENT_ASST_ID_CHR Character (255) None
Bundle Type MI_INSPBUND_BUNDLE_TYPE_
C
Character (50) Refer to the (Picklist)
worksheet for a list of values
that you can enter in this
column.
Total Number of Tubes In
Bundle
MI_INSPBUND_TUBES01_N Numeric None
Action This Inspection MI_INSPBUND_ACTION_THIS_I
NSP_C
Character (50) Refer to the (Picklist)
worksheet for a list of values
that you can enter in this
column.
Tubes Plugged At Inspection
Start
MI_INSPBUND_TUBES02_N Numeric None
Tubes Plugged During This
Inspection
MI_INSPBUND_TUBES07_N Numeric This column is not applicable if
the value in the Action This
Inspection column is NO
ACTION.
Tubes (Plugged At Start)
Replaced
MI_INSPBUND_TUBES03_N Numeric This column is not applicable if
the Action This Inspection
column contains one of the
following values:
• NO ACTION
• TUBES PLUGGED
• TOTAL RETUBE
• BUNDLE REPLACED
Tubes (Not Previously Plugged)
Replaced
MI_INSPBUND_TUBES04_N Numeric This column is not applicable if
the Action This Inspection
column contains one of the
following values:
• NO ACTION
• TUBES PLUGGED
• TOTAL RETUBE
• BUNDLE REPLACED
Bundle Inspection Summary MI_EVENT_LNG_DSC_TX Text None
© 2020 General Electric Company 173
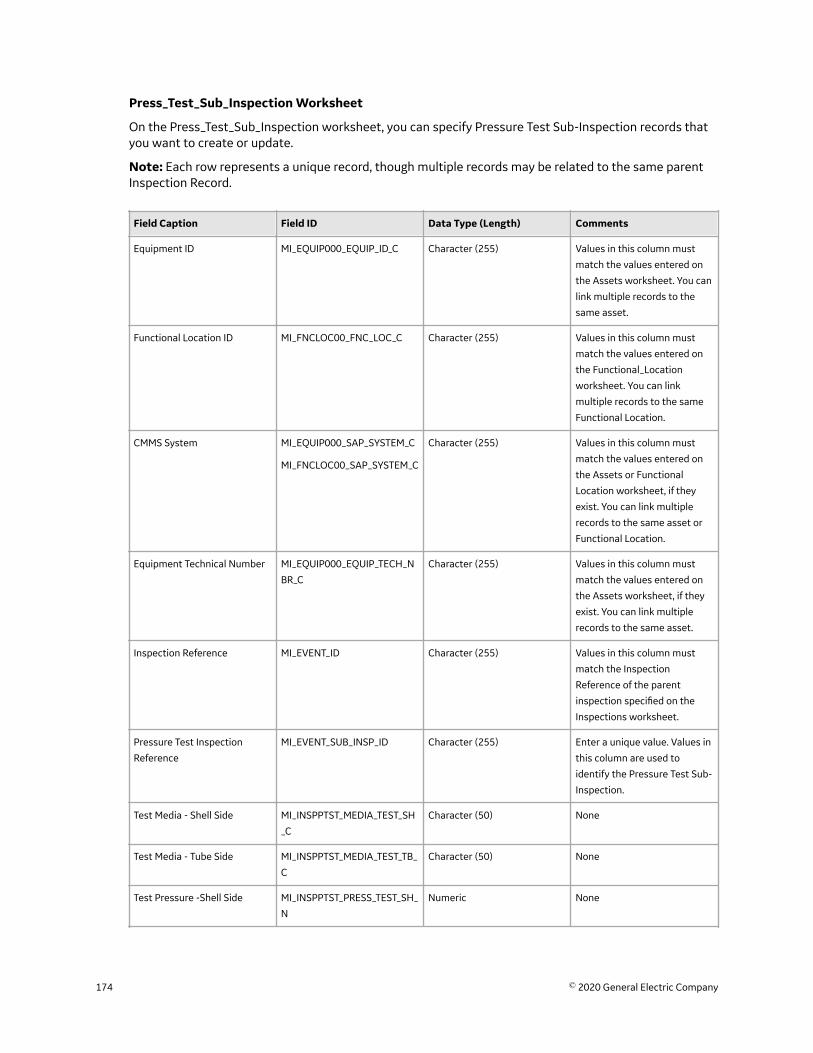
Press_Test_Sub_Inspection Worksheet
On the Press_Test_Sub_Inspection worksheet, you can specify Pressure Test Sub-Inspection records thatyou want to create or update.
Note: Each row represents a unique record, though multiple records may be related to the same parentInspection Record.
Field Caption Field ID Data Type (Length) Comments
Equipment ID MI_EQUIP000_EQUIP_ID_C Character (255) Values in this column must
match the values entered on
the Assets worksheet. You can
link multiple records to the
same asset.
Functional Location ID MI_FNCLOC00_FNC_LOC_C Character (255) Values in this column must
match the values entered on
the Functional_Location
worksheet. You can link
multiple records to the same
Functional Location.
CMMS System MI_EQUIP000_SAP_SYSTEM_C
MI_FNCLOC00_SAP_SYSTEM_C
Character (255) Values in this column must
match the values entered on
the Assets or Functional
Location worksheet, if they
exist. You can link multiple
records to the same asset or
Functional Location.
Equipment Technical Number MI_EQUIP000_EQUIP_TECH_N
BR_C
Character (255) Values in this column must
match the values entered on
the Assets worksheet, if they
exist. You can link multiple
records to the same asset.
Inspection Reference MI_EVENT_ID Character (255) Values in this column must
match the Inspection
Reference of the parent
inspection specified on the
Inspections worksheet.
Pressure Test Inspection
Reference
MI_EVENT_SUB_INSP_ID Character (255) Enter a unique value. Values in
this column are used to
identify the Pressure Test Sub-
Inspection.
Test Media - Shell Side MI_INSPPTST_MEDIA_TEST_SH
_C
Character (50) None
Test Media - Tube Side MI_INSPPTST_MEDIA_TEST_TB_
C
Character (50) None
Test Pressure -Shell Side MI_INSPPTST_PRESS_TEST_SH_
N
Numeric None
174 © 2020 General Electric Company

Field Caption Field ID Data Type (Length) Comments
Test Pressure - Tube Side MI_INSPPTST_PRESS_TEST_TB_
N
Numeric None
Test Duration - Shell Side MI_INSPPTST_DURATION_TEST
_SH_N
Numeric None
Test Duration - Tube Side MI_INSPPTST_DURATION_TEST
_TB_N
Numeric None
Test Media Temperature - Shell
Side
MI_INSPPTST_MEDIA_TEMP_S
H_N
Numeric None
Test Media Temperature -
Tube Side
MI_INSPPTST_MEDIA_TEMP_TB
_N
Numeric None
No. of Gauges Used - Shell Side MI_INSPPTST_NO_GAUGE_USE
D_SH_N
Numeric None
No. of Gauges Used - Tube Side MI_INSPPTST_NO_GAUGE_USE
D_TB_N
Numeric None
Witnessed By - Shell Side MI_INSPPTST_WITNESS_BY_SH
_C
Character (255) Enter a value in the following
format: <Last Name>, <First
Name> ~ <User ID>
Witnessed By - Tube Side MI_INSPPTST_WITNESS_BY_TB
_C
Character (255) Enter a value in the following
format: <Last Name>, <First
Name> ~ <User ID>
SRV Set Pressure - Shell Side MI_INSPPTST_SRV_SET_PRESS_
SH_N
Numeric None
SRV Set Pressure - Tube Side MI_INSPPTST_SRV_SET_PRESS_
TB_N
Numeric None
Test Comments - Shell Side MI_INSPPTST_COMMENTS_TES
T_SH_T
Text None
Test Comments - Tube Side MI_INSPPTST_COMMENTS_TES
T_TB_T
Text None
General_Finding Worksheet
On the General_Finding worksheet, you can specify General Finding records that you want to create orupdate.
Note: Each row represents a unique record, though multiple records may be related to the same FullInspection.
© 2020 General Electric Company 175
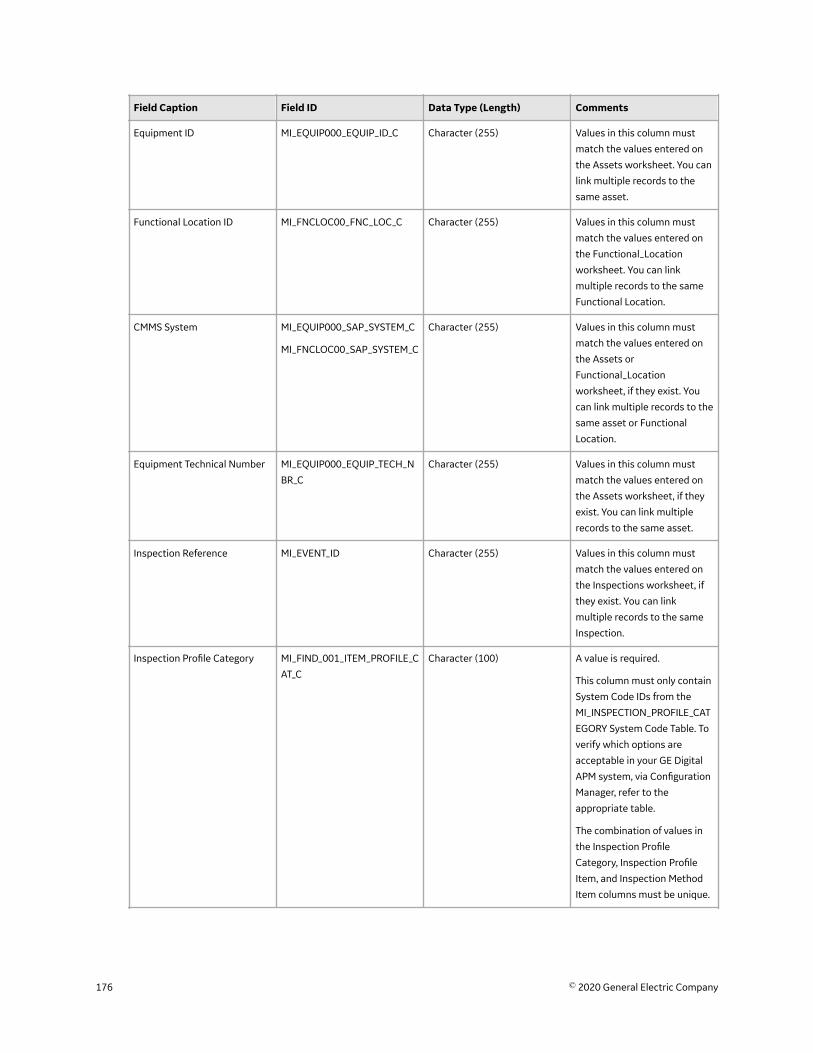
Field Caption Field ID Data Type (Length) Comments
Equipment ID MI_EQUIP000_EQUIP_ID_C Character (255) Values in this column must
match the values entered on
the Assets worksheet. You can
link multiple records to the
same asset.
Functional Location ID MI_FNCLOC00_FNC_LOC_C Character (255) Values in this column must
match the values entered on
the Functional_Location
worksheet. You can link
multiple records to the same
Functional Location.
CMMS System MI_EQUIP000_SAP_SYSTEM_C
MI_FNCLOC00_SAP_SYSTEM_C
Character (255) Values in this column must
match the values entered on
the Assets or
Functional_Location
worksheet, if they exist. You
can link multiple records to the
same asset or Functional
Location.
Equipment Technical Number MI_EQUIP000_EQUIP_TECH_N
BR_C
Character (255) Values in this column must
match the values entered on
the Assets worksheet, if they
exist. You can link multiple
records to the same asset.
Inspection Reference MI_EVENT_ID Character (255) Values in this column must
match the values entered on
the Inspections worksheet, if
they exist. You can link
multiple records to the same
Inspection.
Inspection Profile Category MI_FIND_001_ITEM_PROFILE_C
AT_C
Character (100) A value is required.
This column must only contain
System Code IDs from the
MI_INSPECTION_PROFILE_CAT
EGORY System Code Table. To
verify which options are
acceptable in your GE Digital
APM system, via Configuration
Manager, refer to the
appropriate table.
The combination of values in
the Inspection Profile
Category, Inspection Profile
Item, and Inspection Method
Item columns must be unique.
176 © 2020 General Electric Company
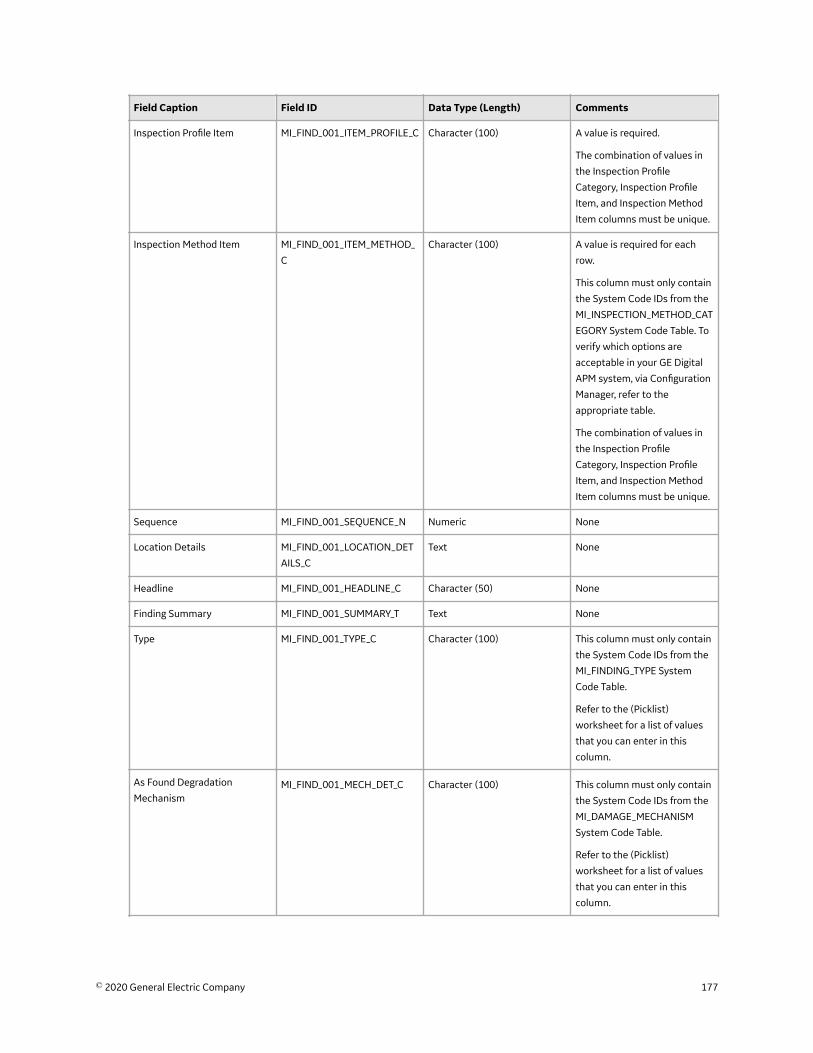
Field Caption Field ID Data Type (Length) Comments
Inspection Profile Item MI_FIND_001_ITEM_PROFILE_C Character (100) A value is required.
The combination of values in
the Inspection Profile
Category, Inspection Profile
Item, and Inspection Method
Item columns must be unique.
Inspection Method Item MI_FIND_001_ITEM_METHOD_
C
Character (100) A value is required for each
row.
This column must only contain
the System Code IDs from the
MI_INSPECTION_METHOD_CAT
EGORY System Code Table. To
verify which options are
acceptable in your GE Digital
APM system, via Configuration
Manager, refer to the
appropriate table.
The combination of values in
the Inspection Profile
Category, Inspection Profile
Item, and Inspection Method
Item columns must be unique.
Sequence MI_FIND_001_SEQUENCE_N Numeric None
Location Details MI_FIND_001_LOCATION_DET
AILS_C
Text None
Headline MI_FIND_001_HEADLINE_C Character (50) None
Finding Summary MI_FIND_001_SUMMARY_T Text None
Type MI_FIND_001_TYPE_C Character (100) This column must only contain
the System Code IDs from the
MI_FINDING_TYPE System
Code Table.
Refer to the (Picklist)
worksheet for a list of values
that you can enter in this
column.
As Found Degradation
MechanismMI_FIND_001_MECH_DET_C Character (100) This column must only contain
the System Code IDs from the
MI_DAMAGE_MECHANISM
System Code Table.
Refer to the (Picklist)
worksheet for a list of values
that you can enter in this
column.
© 2020 General Electric Company 177

Field Caption Field ID Data Type (Length) Comments
Damage Mode MI_FIND_001_MODE_DET_C Character (100) This column must only contain
the System Code IDs from the
MI_DAMAGE_MODE System
Code Table.
Refer to the (Picklist)
worksheet for a list of values
that you can enter in this
column.
Action Taken Code MI_FIND_001_ACT_TAKEN_CO
DE_C
Character (100) Refer to the (Picklist)
worksheet for a list of values
that you can enter in this
column.
Action Taken Description MI_FIND_001_ACT_TAKEN_DES
C_T
Text None
Predictable MI_FIND_001_PREDICTABLE_C Character (3) In the baseline GE Digital APM
system, This column must only
contain the following System
Code IDs:
• Y
• N
The list in this field is
populated by the MI_YES_NO
System Code Table. If the
system code table has been
customized, the valid values
could be different. To verify
which options are acceptable
in your GE Digital APM system,
via Configuration Manager,
refer to the appropriate table.
Custom_Sub_Inspection Worksheet
If you have created a custom sub inspection family, on the Custom_Sub_Inspection worksheet, you canspecify the custom sub inspection records that you want to create or update.
Important: Ensure that the custom sub inspection family that you have created is linked to theInspections family using the Has Sub Inspections relationship definition.
178 © 2020 General Electric Company
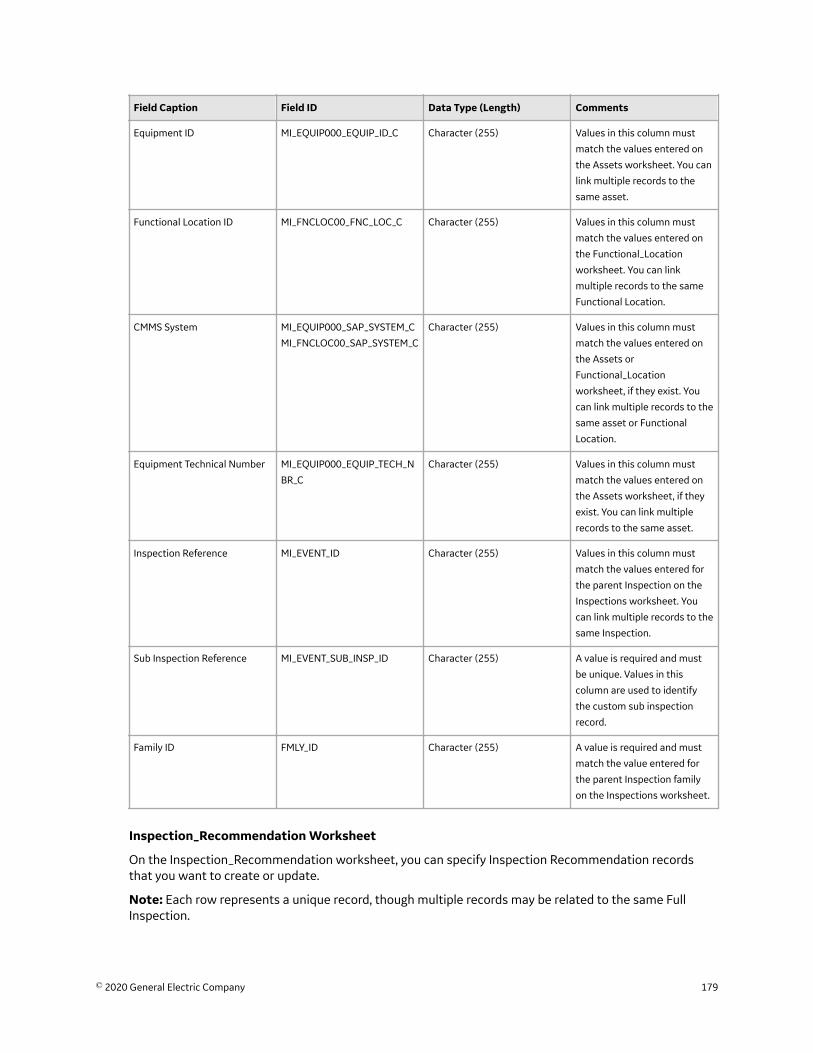
Field Caption Field ID Data Type (Length) Comments
Equipment ID MI_EQUIP000_EQUIP_ID_C Character (255) Values in this column must
match the values entered on
the Assets worksheet. You can
link multiple records to the
same asset.
Functional Location ID MI_FNCLOC00_FNC_LOC_C Character (255) Values in this column must
match the values entered on
the Functional_Location
worksheet. You can link
multiple records to the same
Functional Location.
CMMS System MI_EQUIP000_SAP_SYSTEM_C
MI_FNCLOC00_SAP_SYSTEM_C
Character (255) Values in this column must
match the values entered on
the Assets or
Functional_Location
worksheet, if they exist. You
can link multiple records to the
same asset or Functional
Location.
Equipment Technical Number MI_EQUIP000_EQUIP_TECH_N
BR_C
Character (255) Values in this column must
match the values entered on
the Assets worksheet, if they
exist. You can link multiple
records to the same asset.
Inspection Reference MI_EVENT_ID Character (255) Values in this column must
match the values entered for
the parent Inspection on the
Inspections worksheet. You
can link multiple records to the
same Inspection.
Sub Inspection Reference MI_EVENT_SUB_INSP_ID Character (255) A value is required and must
be unique. Values in this
column are used to identify
the custom sub inspection
record.
Family ID FMLY_ID Character (255) A value is required and must
match the value entered for
the parent Inspection family
on the Inspections worksheet.
Inspection_Recommendation Worksheet
On the Inspection_Recommendation worksheet, you can specify Inspection Recommendation recordsthat you want to create or update.
Note: Each row represents a unique record, though multiple records may be related to the same FullInspection.
© 2020 General Electric Company 179
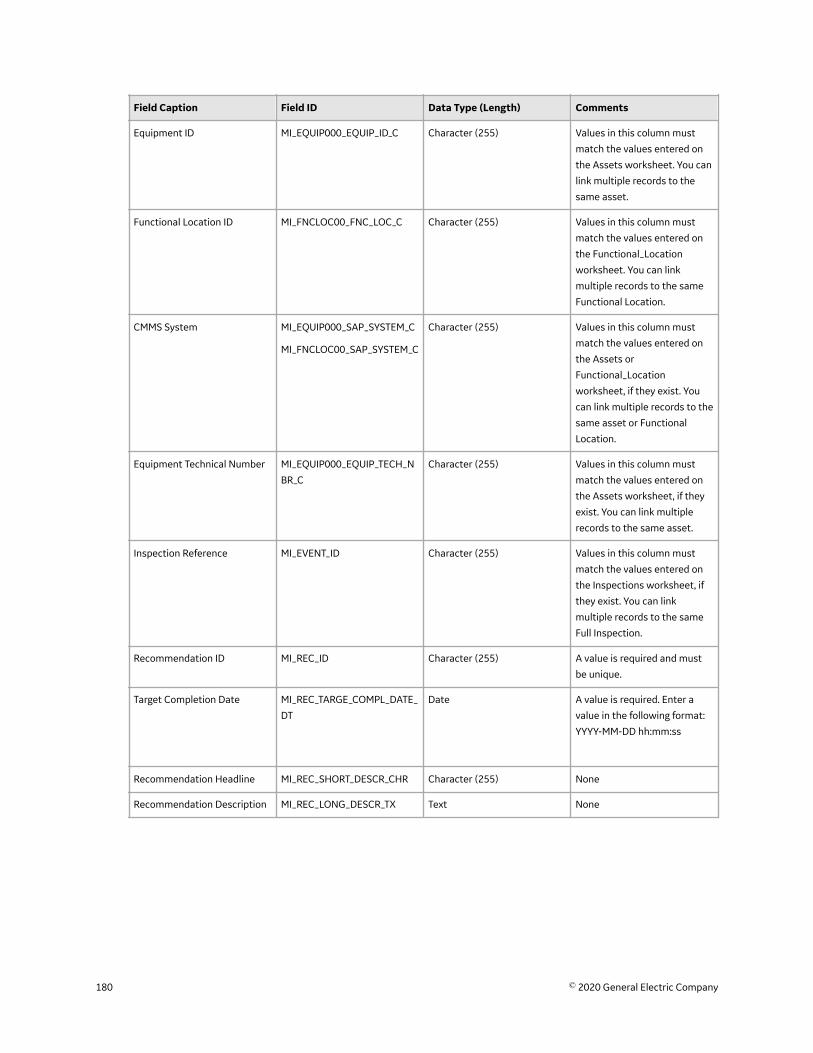
Field Caption Field ID Data Type (Length) Comments
Equipment ID MI_EQUIP000_EQUIP_ID_C Character (255) Values in this column must
match the values entered on
the Assets worksheet. You can
link multiple records to the
same asset.
Functional Location ID MI_FNCLOC00_FNC_LOC_C Character (255) Values in this column must
match the values entered on
the Functional_Location
worksheet. You can link
multiple records to the same
Functional Location.
CMMS System MI_EQUIP000_SAP_SYSTEM_C
MI_FNCLOC00_SAP_SYSTEM_C
Character (255) Values in this column must
match the values entered on
the Assets or
Functional_Location
worksheet, if they exist. You
can link multiple records to the
same asset or Functional
Location.
Equipment Technical Number MI_EQUIP000_EQUIP_TECH_N
BR_C
Character (255) Values in this column must
match the values entered on
the Assets worksheet, if they
exist. You can link multiple
records to the same asset.
Inspection Reference MI_EVENT_ID Character (255) Values in this column must
match the values entered on
the Inspections worksheet, if
they exist. You can link
multiple records to the same
Full Inspection.
Recommendation ID MI_REC_ID Character (255) A value is required and must
be unique.
Target Completion Date MI_REC_TARGE_COMPL_DATE_
DT
Date A value is required. Enter a
value in the following format:
YYYY-MM-DD hh:mm:ss
Recommendation Headline MI_REC_SHORT_DESCR_CHR Character (255) None
Recommendation Description MI_REC_LONG_DESCR_TX Text None
180 © 2020 General Electric Company
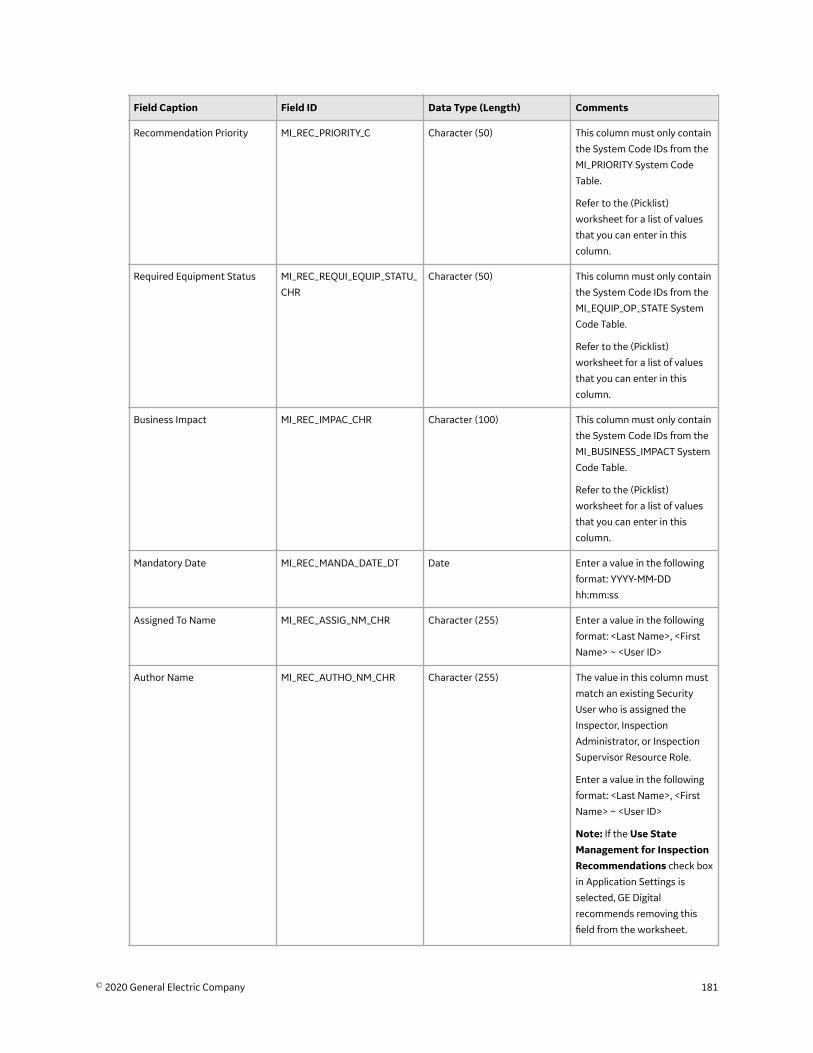
Field Caption Field ID Data Type (Length) Comments
Recommendation Priority MI_REC_PRIORITY_C Character (50) This column must only contain
the System Code IDs from the
MI_PRIORITY System Code
Table.
Refer to the (Picklist)
worksheet for a list of values
that you can enter in this
column.
Required Equipment Status MI_REC_REQUI_EQUIP_STATU_
CHR
Character (50) This column must only contain
the System Code IDs from the
MI_EQUIP_OP_STATE System
Code Table.
Refer to the (Picklist)
worksheet for a list of values
that you can enter in this
column.
Business Impact MI_REC_IMPAC_CHR Character (100) This column must only contain
the System Code IDs from the
MI_BUSINESS_IMPACT System
Code Table.
Refer to the (Picklist)
worksheet for a list of values
that you can enter in this
column.
Mandatory Date MI_REC_MANDA_DATE_DT Date Enter a value in the following
format: YYYY-MM-DD
hh:mm:ss
Assigned To Name MI_REC_ASSIG_NM_CHR Character (255) Enter a value in the following
format: <Last Name>, <First
Name> ~ <User ID>
Author Name MI_REC_AUTHO_NM_CHR Character (255) The value in this column must
match an existing Security
User who is assigned the
Inspector, Inspection
Administrator, or Inspection
Supervisor Resource Role.
Enter a value in the following
format: <Last Name>, <First
Name> ~ <User ID>
Note: If the Use StateManagement for InspectionRecommendations check box
in Application Settings is
selected, GE Digital
recommends removing this
field from the worksheet.
© 2020 General Electric Company 181
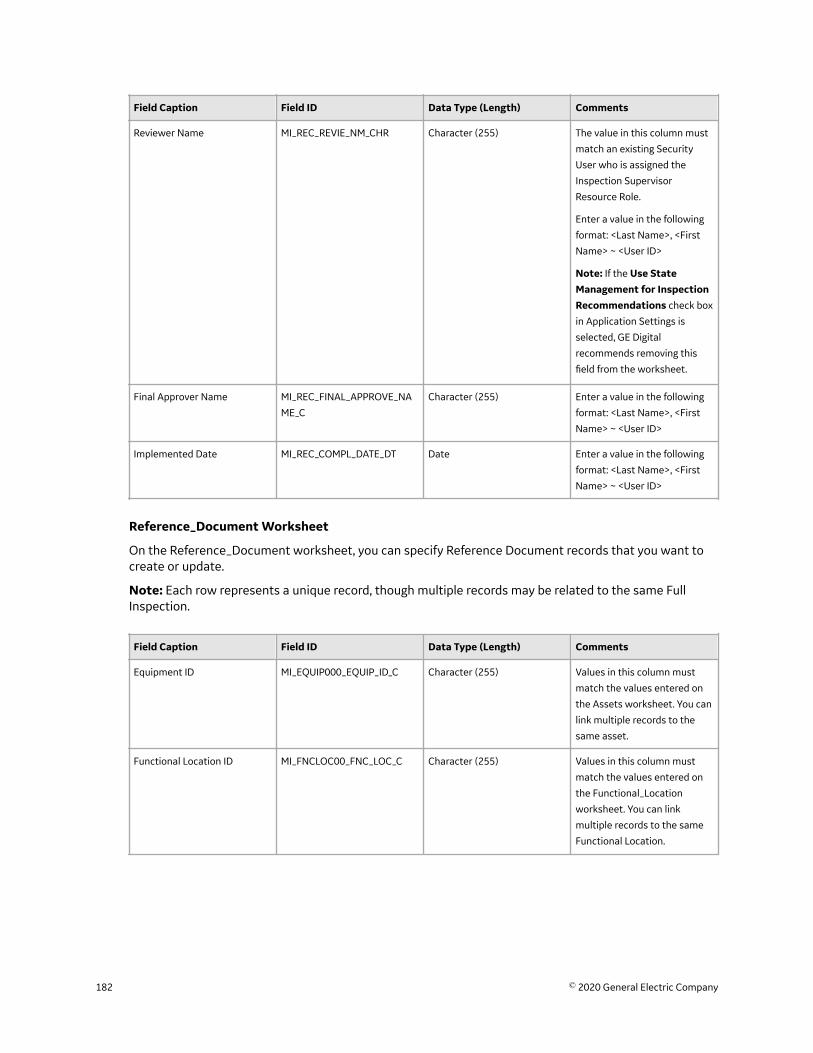
Field Caption Field ID Data Type (Length) Comments
Reviewer Name MI_REC_REVIE_NM_CHR Character (255) The value in this column must
match an existing Security
User who is assigned the
Inspection Supervisor
Resource Role.
Enter a value in the following
format: <Last Name>, <First
Name> ~ <User ID>
Note: If the Use StateManagement for InspectionRecommendations check box
in Application Settings is
selected, GE Digital
recommends removing this
field from the worksheet.
Final Approver Name MI_REC_FINAL_APPROVE_NA
ME_C
Character (255) Enter a value in the following
format: <Last Name>, <First
Name> ~ <User ID>
Implemented Date MI_REC_COMPL_DATE_DT Date Enter a value in the following
format: <Last Name>, <First
Name> ~ <User ID>
Reference_Document Worksheet
On the Reference_Document worksheet, you can specify Reference Document records that you want tocreate or update.
Note: Each row represents a unique record, though multiple records may be related to the same FullInspection.
Field Caption Field ID Data Type (Length) Comments
Equipment ID MI_EQUIP000_EQUIP_ID_C Character (255) Values in this column must
match the values entered on
the Assets worksheet. You can
link multiple records to the
same asset.
Functional Location ID MI_FNCLOC00_FNC_LOC_C Character (255) Values in this column must
match the values entered on
the Functional_Location
worksheet. You can link
multiple records to the same
Functional Location.
182 © 2020 General Electric Company

Field Caption Field ID Data Type (Length) Comments
CMMS System MI_EQUIP000_SAP_SYSTEM_C
MI_FNCLOC00_SAP_SYSTEM_C
Character (255) Values in this column must
match the values entered on
the Assets or
Functional_Location
worksheet, if they exist. You
can link multiple records to the
same asset or Functional
Location.
Equipment Technical Number MI_EQUIP000_EQUIP_TECH_N
BR_C
Character (255) Values in this column must
match the values entered on
the Assets worksheet, if they
exist. You can link multiple
records to the same asset.
Inspection Reference MI_EVENT_ID Character (255) Values in this column must
match the values entered on
the Inspections worksheet, if
they exist. You can link
multiple records to the same
Full Inspection.
Reference Document ID CTIT_ID Character (255) A value is required and must
be unique.
Description CTIT_DESC_TX Character (255) None
Document Path MIRD_DOC_PATH_CHR Character (1023) None
About the Inspection Management (IM) Data Loaders LoadVerification
Following a data load, you should perform the following steps in GE Digital APM to confirm the integrityand accuracy of the data imported from the data loader workbooks:
• Access the details of the import job. These details will indicate if any errors, minor or otherwise, wereencountered during the import job. The log may help account for any records that are unexpectedlyabsent after the data load.
• In Inspection Management or Record Manager, access the assets or Functional Locations specified inthe data loader workbooks, and then verify that the expected Inspection Profiles, Inspection Methods,and Inspections are present or updated, and that any associated records that you expected to becreated are also present in the database.
© 2020 General Electric Company 183
Chapter
11ReferenceTopics:
• Family Field Descriptions• Catalog Items• General Reference
184 © 2020 General Electric Company
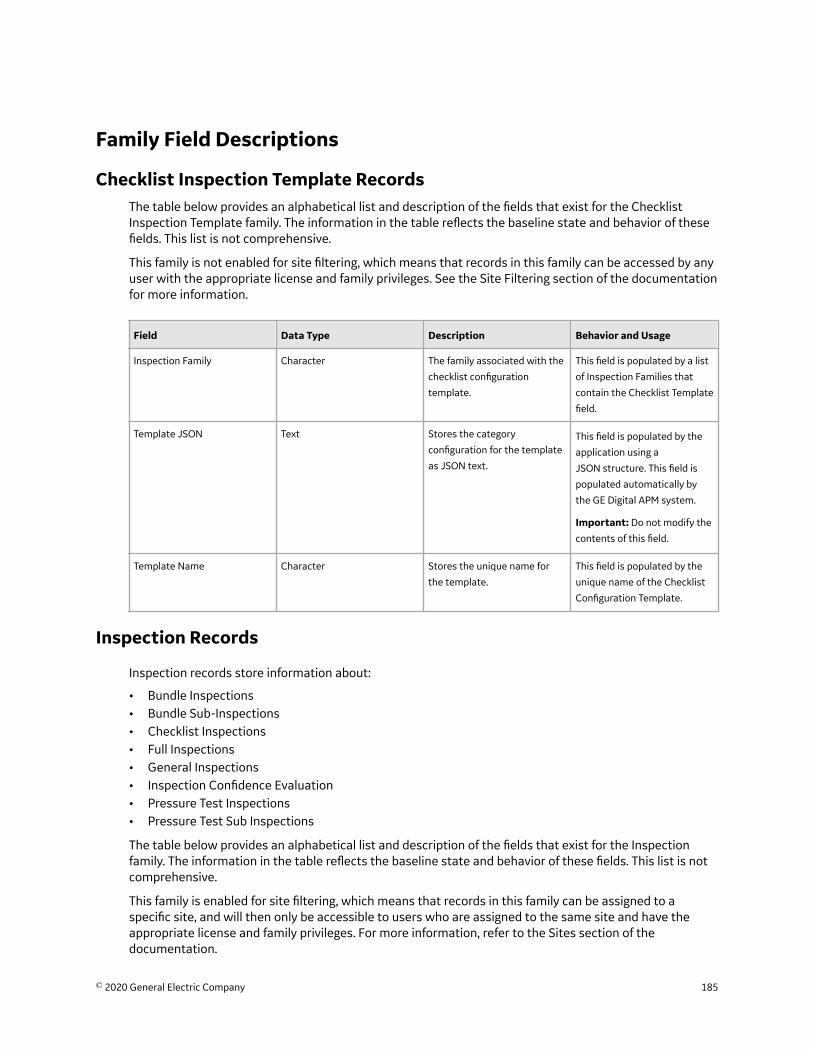
Family Field Descriptions
Checklist Inspection Template RecordsThe table below provides an alphabetical list and description of the fields that exist for the ChecklistInspection Template family. The information in the table reflects the baseline state and behavior of thesefields. This list is not comprehensive.
This family is not enabled for site filtering, which means that records in this family can be accessed by anyuser with the appropriate license and family privileges. See the Site Filtering section of the documentationfor more information.
Field Data Type Description Behavior and Usage
Inspection Family Character The family associated with the
checklist configuration
template.
This field is populated by a list
of Inspection Families that
contain the Checklist Template
field.
Template JSON Text Stores the category
configuration for the template
as JSON text.
This field is populated by the
application using a
JSON structure. This field is
populated automatically by
the GE Digital APM system.
Important: Do not modify the
contents of this field.
Template Name Character Stores the unique name for
the template.
This field is populated by the
unique name of the Checklist
Configuration Template.
Inspection Records
Inspection records store information about:
• Bundle Inspections• Bundle Sub-Inspections• Checklist Inspections• Full Inspections• General Inspections• Inspection Confidence Evaluation• Pressure Test Inspections• Pressure Test Sub Inspections
The table below provides an alphabetical list and description of the fields that exist for the Inspectionfamily. The information in the table reflects the baseline state and behavior of these fields. This list is notcomprehensive.
This family is enabled for site filtering, which means that records in this family can be assigned to aspecific site, and will then only be accessible to users who are assigned to the same site and have theappropriate license and family privileges. For more information, refer to the Sites section of thedocumentation.
© 2020 General Electric Company 185
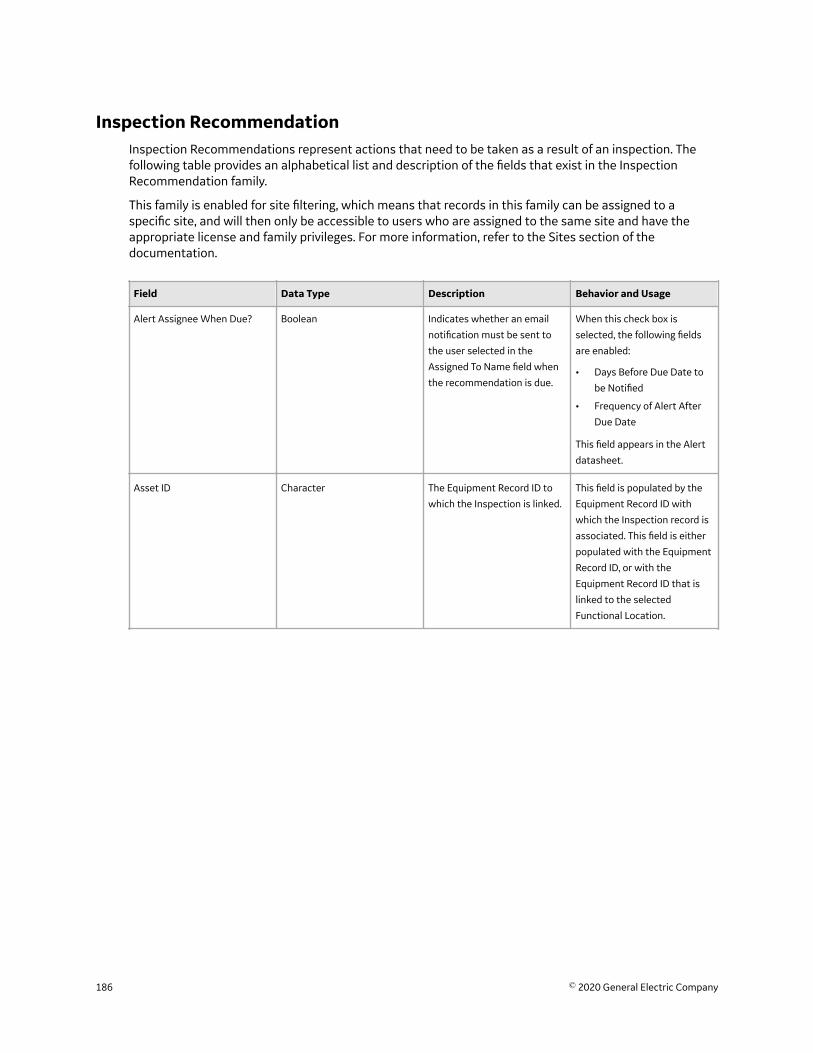
Inspection RecommendationInspection Recommendations represent actions that need to be taken as a result of an inspection. Thefollowing table provides an alphabetical list and description of the fields that exist in the InspectionRecommendation family.
This family is enabled for site filtering, which means that records in this family can be assigned to aspecific site, and will then only be accessible to users who are assigned to the same site and have theappropriate license and family privileges. For more information, refer to the Sites section of thedocumentation.
Field Data Type Description Behavior and Usage
Alert Assignee When Due? Boolean Indicates whether an email
notification must be sent to
the user selected in the
Assigned To Name field when
the recommendation is due.
When this check box is
selected, the following fields
are enabled:
• Days Before Due Date to
be Notified
• Frequency of Alert After
Due Date
This field appears in the Alert
datasheet.
Asset ID Character The Equipment Record ID to
which the Inspection is linked.
This field is populated by the
Equipment Record ID with
which the Inspection record is
associated. This field is either
populated with the Equipment
Record ID, or with the
Equipment Record ID that is
linked to the selected
Functional Location.
186 © 2020 General Electric Company

Field Data Type Description Behavior and Usage
Assigned to Name Character The first and last name of the
person to whom the
recommendation is assigned.
The value in this field is
populated by the First Name
and Last Name fields in the
corresponding Human
Resource records. If the
Human Resource record also
has an associated Security
User, the value from the User
ID field also appears.
In the database, values in this
field are stored in the following
formats:
<Last Name>, <First Name> ~
<User Name>
-or-
<Last Name>, <First Name> ~
For example, a name stored in
the database would be Smith,
Jane ~ jsmith.
The Human Resource records
that populate the drop-down
list box in this field are filtered
based on the site that is
applied to the Inspection
Recommendation.
© 2020 General Electric Company 187

Field Data Type Description Behavior and Usage
Author Name Character The first and last name of the
person who is proposing the
recommendation.
The value in this field is
populated by the First Name
and Last Name fields in
corresponding Human
Resource records that have
one of the following roles:
• Inspection Supervisor
• Inspection Administrator
• Inspector
If the Human Resource record
also has an associated
Security User, the value from
the User ID field also appears.
In the database, values in this
field are stored in the following
formats:
<Last Name>, <First Name> ~
<User Name>
-or-
<Last Name>, <First Name> ~
For example, a name stored in
the database would be Smith,
Jane ~ jsmith.
The Human Resource records
that populate the drop-down
list box in this field are filtered
based on the site that is
applied to the Inspection
Recommendation.
188 © 2020 General Electric Company
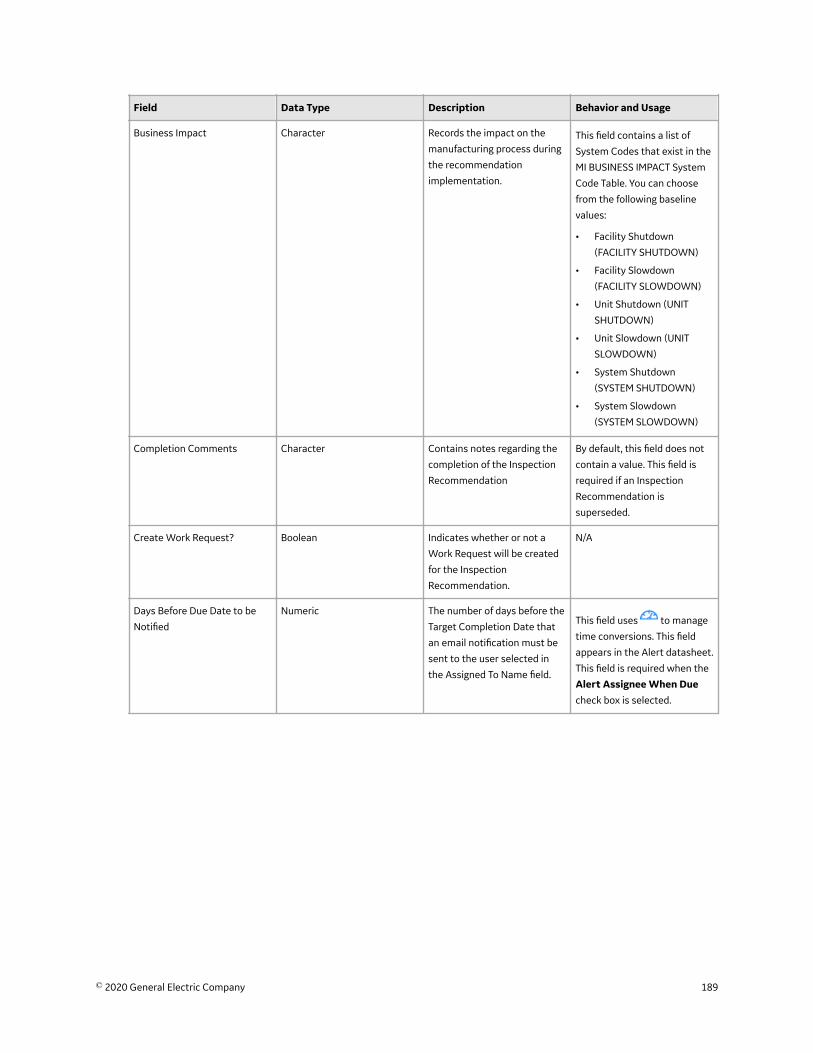
Field Data Type Description Behavior and Usage
Business Impact Character Records the impact on the
manufacturing process during
the recommendation
implementation.
This field contains a list of
System Codes that exist in the
MI BUSINESS IMPACT System
Code Table. You can choose
from the following baseline
values:
• Facility Shutdown
(FACILITY SHUTDOWN)
• Facility Slowdown
(FACILITY SLOWDOWN)
• Unit Shutdown (UNIT
SHUTDOWN)
• Unit Slowdown (UNIT
SLOWDOWN)
• System Shutdown
(SYSTEM SHUTDOWN)
• System Slowdown
(SYSTEM SLOWDOWN)
Completion Comments Character Contains notes regarding the
completion of the Inspection
Recommendation
By default, this field does not
contain a value. This field is
required if an Inspection
Recommendation is
superseded.
Create Work Request? Boolean Indicates whether or not a
Work Request will be created
for the Inspection
Recommendation.
N/A
Days Before Due Date to be
Notified
Numeric The number of days before the
Target Completion Date that
an email notification must be
sent to the user selected in
the Assigned To Name field.
This field uses to manage
time conversions. This field
appears in the Alert datasheet.
This field is required when the
Alert Assignee When Duecheck box is selected.
© 2020 General Electric Company 189
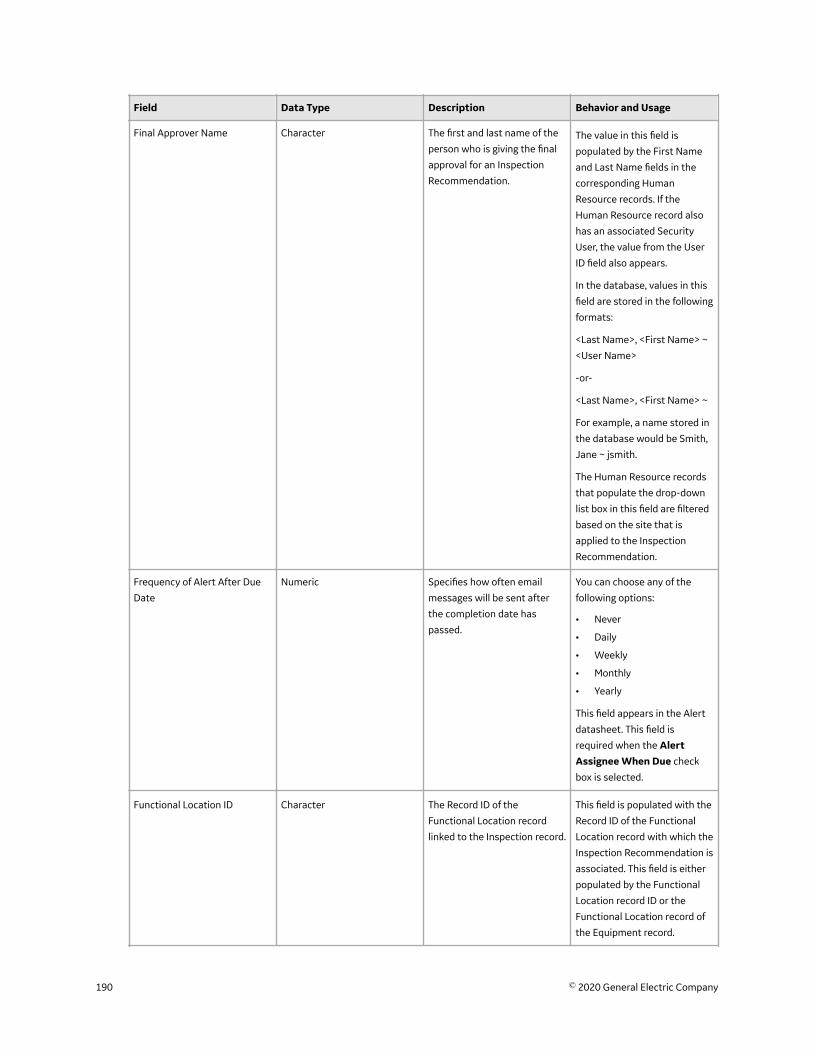
Field Data Type Description Behavior and Usage
Final Approver Name Character The first and last name of the
person who is giving the final
approval for an Inspection
Recommendation.
The value in this field is
populated by the First Name
and Last Name fields in the
corresponding Human
Resource records. If the
Human Resource record also
has an associated Security
User, the value from the User
ID field also appears.
In the database, values in this
field are stored in the following
formats:
<Last Name>, <First Name> ~
<User Name>
-or-
<Last Name>, <First Name> ~
For example, a name stored in
the database would be Smith,
Jane ~ jsmith.
The Human Resource records
that populate the drop-down
list box in this field are filtered
based on the site that is
applied to the Inspection
Recommendation.
Frequency of Alert After Due
Date
Numeric Specifies how often email
messages will be sent after
the completion date has
passed.
You can choose any of the
following options:
• Never
• Daily
• Weekly
• Monthly
• Yearly
This field appears in the Alert
datasheet. This field is
required when the AlertAssignee When Due check
box is selected.
Functional Location ID Character The Record ID of the
Functional Location record
linked to the Inspection record.
This field is populated with the
Record ID of the Functional
Location record with which the
Inspection Recommendation is
associated. This field is either
populated by the Functional
Location record ID or the
Functional Location record of
the Equipment record.
190 © 2020 General Electric Company

Field Data Type Description Behavior and Usage
Implementation Alert Text Character The text that will be included
in the email notification sent
to the approver.
This field appears in the Alert
datasheet. By default, this field
does not contain a value.
Optionally, you can type a
value in this field.
Implemented Date Date The date on which the
Inspection Recommendation
was implemented.
N/A
Inspection Profile Item Character The Inspection Profile that
represents the subcomponent
for which findings are being
recorded.
This field is populated with a
list of the Inspection Profiles
that you have defined for the
particular Inspection Scope.
Mandatory Date Character The date on which the
Inspection Recommendation
must be completed.
N/A
This field contains a
button, which you can select
to access the Calendar
feature.
Recommendation Basis Text Allows the user to explain the
reasoning for why an
Inspection Recommendation
was proposed.
By default, this field does not
contain a value. Optionally, you
can enter a value in this field.
Recommendation Description Character A description of the Inspection
Recommendation.
By default, this field does not
contain a value. Optionally, you
can enter a value in this field.
Recommendation Headline Character A short description of the
Inspection Recommendation
In the Alert datasheet, if you
select the Alert AssigneeWhen Due check box, the
value that you provide in the
Recommendation Headline
field becomes the subject of
the alert email.
Recommendation ID Character Unique ID assigned to the
Inspection Recommendation.
This field is generated by the
GE Digital APM system
through business rules.
Recommendation Priority Numeric The priority value used to rank
the importance of the
Inspection Recommendation.
N/A
This field contains a list of
System Codes that exist in the
MI_PRIORITY System Code
Table. You can choose from
the following baseline values:
• High (HIGH)
• Medium (MEDIUM)
• Low (LOW)
© 2020 General Electric Company 191
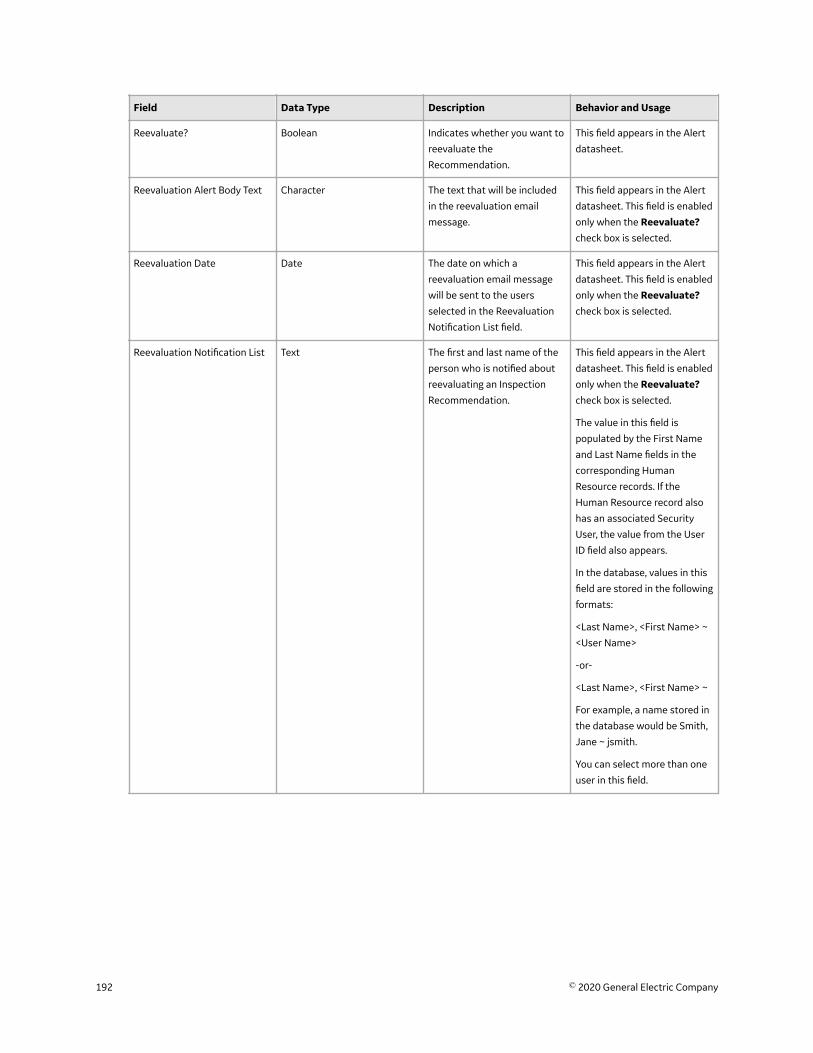
Field Data Type Description Behavior and Usage
Reevaluate? Boolean Indicates whether you want to
reevaluate the
Recommendation.
This field appears in the Alert
datasheet.
Reevaluation Alert Body Text Character The text that will be included
in the reevaluation email
message.
This field appears in the Alert
datasheet. This field is enabled
only when the Reevaluate?check box is selected.
Reevaluation Date Date The date on which a
reevaluation email message
will be sent to the users
selected in the Reevaluation
Notification List field.
This field appears in the Alert
datasheet. This field is enabled
only when the Reevaluate?check box is selected.
Reevaluation Notification List Text The first and last name of the
person who is notified about
reevaluating an Inspection
Recommendation.
This field appears in the Alert
datasheet. This field is enabled
only when the Reevaluate?check box is selected.
The value in this field is
populated by the First Name
and Last Name fields in the
corresponding Human
Resource records. If the
Human Resource record also
has an associated Security
User, the value from the User
ID field also appears.
In the database, values in this
field are stored in the following
formats:
<Last Name>, <First Name> ~
<User Name>
-or-
<Last Name>, <First Name> ~
For example, a name stored in
the database would be Smith,
Jane ~ jsmith.
You can select more than one
user in this field.
192 © 2020 General Electric Company
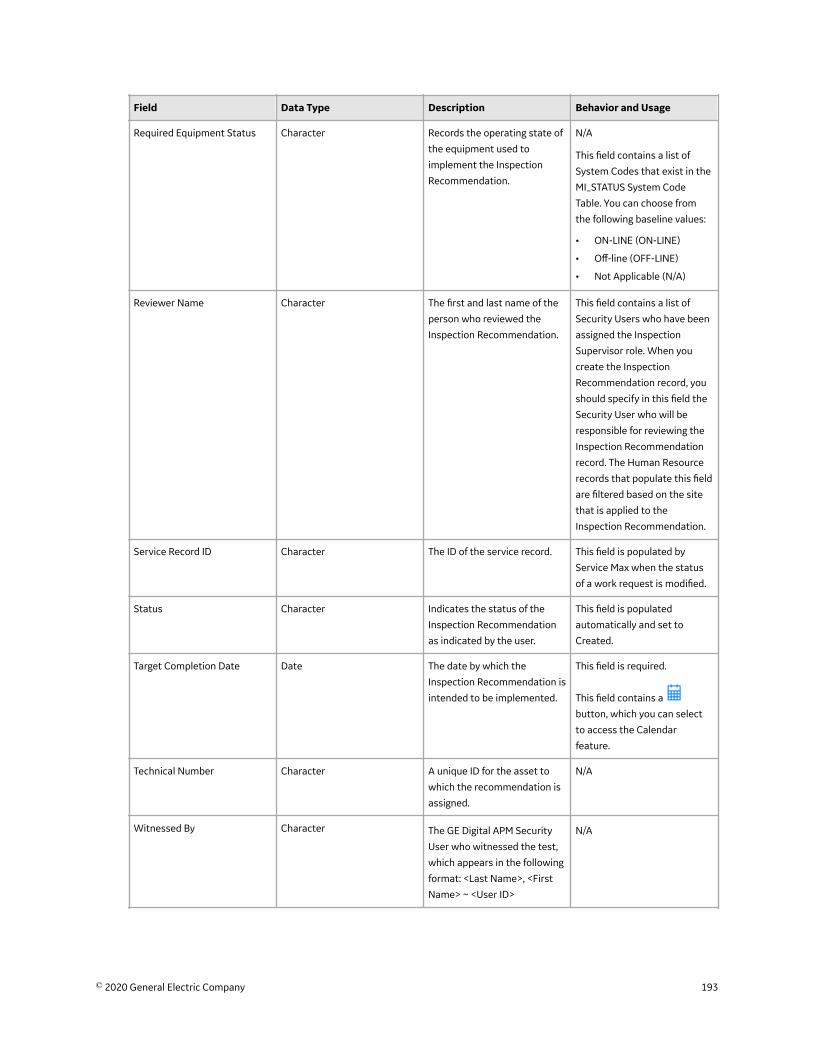
Field Data Type Description Behavior and Usage
Required Equipment Status Character Records the operating state of
the equipment used to
implement the Inspection
Recommendation.
N/A
This field contains a list of
System Codes that exist in the
MI_STATUS System Code
Table. You can choose from
the following baseline values:
• ON-LINE (ON-LINE)
• Off-line (OFF-LINE)
• Not Applicable (N/A)
Reviewer Name Character The first and last name of the
person who reviewed the
Inspection Recommendation.
This field contains a list of
Security Users who have been
assigned the Inspection
Supervisor role. When you
create the Inspection
Recommendation record, you
should specify in this field the
Security User who will be
responsible for reviewing the
Inspection Recommendation
record. The Human Resource
records that populate this field
are filtered based on the site
that is applied to the
Inspection Recommendation.
Service Record ID Character The ID of the service record. This field is populated by
Service Max when the status
of a work request is modified.
Status Character Indicates the status of the
Inspection Recommendation
as indicated by the user.
This field is populated
automatically and set to
Created.
Target Completion Date Date The date by which the
Inspection Recommendation is
intended to be implemented.
This field is required.
This field contains a
button, which you can select
to access the Calendar
feature.
Technical Number Character A unique ID for the asset to
which the recommendation is
assigned.
N/A
Witnessed By Character The GE Digital APM Security
User who witnessed the test,
which appears in the following
format: <Last Name>, <First
Name> ~ <User ID>
N/A
© 2020 General Electric Company 193

Field Data Type Description Behavior and Usage
Work Request Equipment Character The equipment against which
the work request will be
generated.
N/A
This field is disabled and
populated after the external
work request is created.
Work Request Functional
Location
Character The Functional Location
against which the work
request will be generated.
N/A
This field is disabled and
populated after the external
work request is created.
Work Request Reference Character The ID of the work request. N/A
Inspection ProfileInspection Profiles represent subcomponents of a piece of equipment on which inspections areperformed. The following table provides an alphabetical list and description of the fields that exist in theInspection Profile family. By default, all fields in the Inspection Profile family appear on the InspectionProfile datasheet.
This family is enabled for site filtering, which means that records in this family can be assigned to aspecific site, and will then only be accessible to users who are assigned to the same site and have theappropriate license and family privileges. For more information, refer to the Sites section of thedocumentation.
Field Data Type Description Behavior and Usage
Item Category Character The type of subcomponent
(e.g., pipes) that exists on the
piece of equipment needing
inspection.
This field appears as a list that
contains the System Code IDs
and Descriptions in the MI
INSPECTION PROFILE
CATEGORY (Inspection, Profile
Category) System Code Table.
The Profile Configuration
setting determines how this
field will be populated. You can
modify the value in this field
using the datasheet.
Item Description Character A description of the
subcomponent.
You can specify a value for this
field using the datasheet.
Item ID Character The ID of the subcomponent. This field is populated
automatically based on the
value in the Item Category
field. You can modify the value
in the Item ID field using the
datasheet.
194 © 2020 General Electric Company
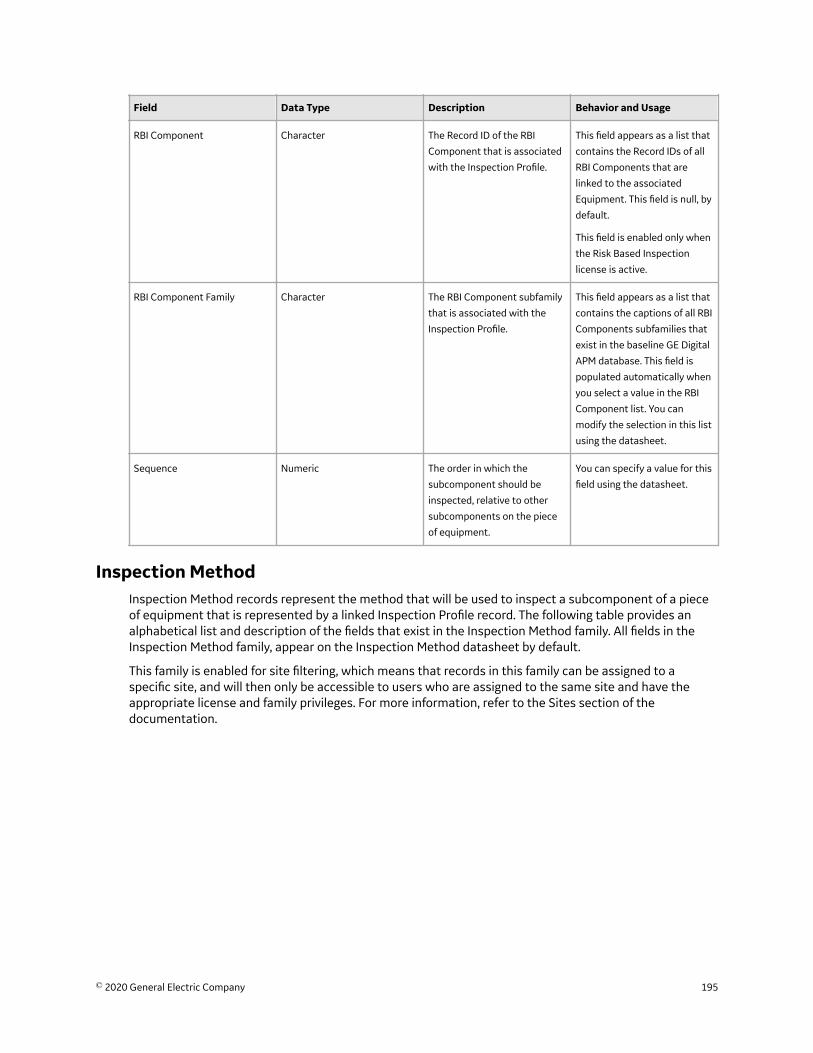
Field Data Type Description Behavior and Usage
RBI Component Character The Record ID of the RBI
Component that is associated
with the Inspection Profile.
This field appears as a list that
contains the Record IDs of all
RBI Components that are
linked to the associated
Equipment. This field is null, by
default.
This field is enabled only when
the Risk Based Inspection
license is active.
RBI Component Family Character The RBI Component subfamily
that is associated with the
Inspection Profile.
This field appears as a list that
contains the captions of all RBI
Components subfamilies that
exist in the baseline GE Digital
APM database. This field is
populated automatically when
you select a value in the RBI
Component list. You can
modify the selection in this list
using the datasheet.
Sequence Numeric The order in which the
subcomponent should be
inspected, relative to other
subcomponents on the piece
of equipment.
You can specify a value for this
field using the datasheet.
Inspection MethodInspection Method records represent the method that will be used to inspect a subcomponent of a pieceof equipment that is represented by a linked Inspection Profile record. The following table provides analphabetical list and description of the fields that exist in the Inspection Method family. All fields in theInspection Method family, appear on the Inspection Method datasheet by default.
This family is enabled for site filtering, which means that records in this family can be assigned to aspecific site, and will then only be accessible to users who are assigned to the same site and have theappropriate license and family privileges. For more information, refer to the Sites section of thedocumentation.
© 2020 General Electric Company 195

Field Data Type Description Behavior and Usage
Category Character The method that should be
used to inspect the
subcomponent that is
represented by an Inspection
Profile record to which the
Inspection Method record is
linked.
This field appears as a list that
contains the System Code IDs
and Descriptions in the MI
INSPECTION METHOD
CATEGORY (Inspection
Method Category) System
Code Table. The Method
Configuration setting
determines how this field will
be populated. You can modify
the value in this field using the
datasheet.
Description Character A description of the Inspection
Method.
You can specify a value for this
field using the datasheet.
ID Character The ID of the Inspection
Method.
This field is populated
automatically based on the
value in the Category field. You
can modify the value in the ID
field using the datasheet.
RBI Degradation Mechanism Character The Potential Degradation
Mechanisms record that is
associated with the Inspection
Method record.
This field appears as a list that
contains the Record IDs of all
Potential Degradation
Mechanisms records that are
linked to the Criticality
Calculator RBI Components
record that is associated with
the Inspection Profile record to
which the Inspection Method
record is linked. You can
specify a value for this field
using the datasheet.
Inspection State Mapping RecordsInspection State Mapping records are used when an administrator uses the Configure Status to StateMapping utility in Application Settings. This topic provides an alphabetical list and description of the fieldsthat exist for the Inspection State Mapping family. The information in the table reflects the baseline stateand behavior of these fields.
This family is not enabled for site filtering, which means that records in this family can be accessed by anyuser with the appropriate license and family privileges. For more information, refer to the Sites section ofthe documentation.
196 © 2020 General Electric Company

Field Data Type Description Behavior and Usage
Source Family Character Stores the ID of the family that
is being mapped.
The default value for this field
is the ID for the Inspection
Recommendation family.
Status Character Stores the system code value
of the status that is being
mapped. The value in this field
will be converted to a
corresponding state in
Inspection Recommendation
records.
The values available in this
field appear based on the
system code table that is
associated with the value that
populates in the Source Family
Status field.
State Character Stores the state ID of the state
that is being mapped. The
value in this field will be used
to replace an existing status in
Inspection Recommendation
records.
The values available in this
field appear based on the
available states configured for
the source family.
Inspection StrategyInspection Strategies represent methods by which inspections are performed. The following tableprovides an alphabetical list and description of the fields that exist in the Inspection Strategy family. Bydefault, all fields in the Inspection Strategy family appear on the Inspection Strategy datasheet.
This family is not enabled for site filtering, which means that records in this family can be accessed by anyuser with the appropriate license and family privileges. For more information, refer to the Sites section ofthe documentation.
© 2020 General Electric Company 197
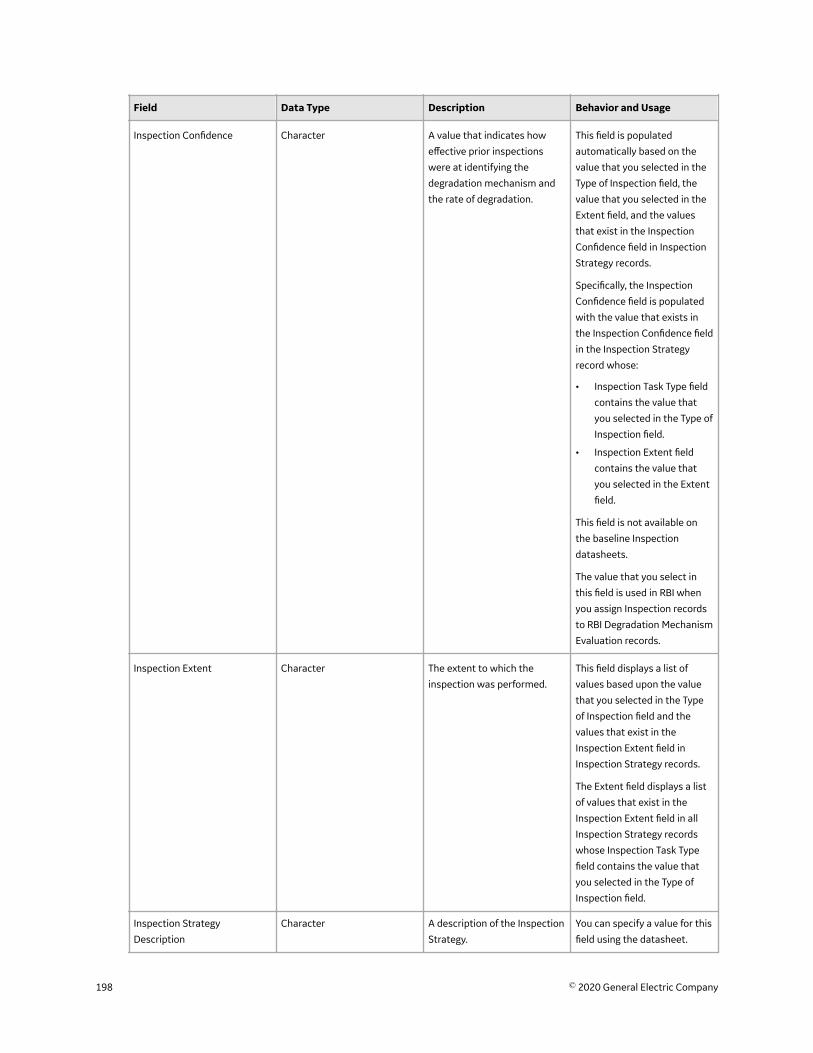
Field Data Type Description Behavior and Usage
Inspection Confidence Character A value that indicates how
effective prior inspections
were at identifying the
degradation mechanism and
the rate of degradation.
This field is populated
automatically based on the
value that you selected in the
Type of Inspection field, the
value that you selected in the
Extent field, and the values
that exist in the Inspection
Confidence field in Inspection
Strategy records.
Specifically, the Inspection
Confidence field is populated
with the value that exists in
the Inspection Confidence field
in the Inspection Strategy
record whose:
• Inspection Task Type field
contains the value that
you selected in the Type of
Inspection field.
• Inspection Extent field
contains the value that
you selected in the Extent
field.
This field is not available on
the baseline Inspection
datasheets.
The value that you select in
this field is used in RBI when
you assign Inspection records
to RBI Degradation Mechanism
Evaluation records.
Inspection Extent Character The extent to which the
inspection was performed.
This field displays a list of
values based upon the value
that you selected in the Type
of Inspection field and the
values that exist in the
Inspection Extent field in
Inspection Strategy records.
The Extent field displays a list
of values that exist in the
Inspection Extent field in all
Inspection Strategy records
whose Inspection Task Type
field contains the value that
you selected in the Type of
Inspection field.
Inspection Strategy
Description
Character A description of the Inspection
Strategy.
You can specify a value for this
field using the datasheet.
198 © 2020 General Electric Company

Field Data Type Description Behavior and Usage
Inspection Strategy ID Character The unique ID of the
Inspection Strategy.
This field is required.
Inspection Task Type Character The Inspection Method used
during the inspection event.
You can specify a value for this
field using the datasheet.
Recommended Inspection
Interval
Numeric The recommended time
between inspection events.
You can specify a value for this
field using the datasheet.
Recommended Inspection
Scope
Character An explanation of the tasks
that should be performed
during an inspection event.
You can specify a value for this
field using the datasheet.
Use Calculated Data Boolean Indicates whether or not to
use calculated data over data
that has been recommended
by the GE Digital APM system.
N/A
Inspection TaskInspection Tasks represent methods by which inspection tasks are performed from InspectionRecommendations. The following table provides an alphabetical list and description of the fields that existin the Inspection Task family. By default, all fields in the Inspection Task family appear in the InspectionStrategy datasheet.
This family is enabled for site filtering, which means that records in this family can be assigned to aspecific site, and will then only be accessible to users who are assigned to the same site and have theappropriate license and family privileges. For more information, refer to the Sites section of thedocumentation.
Field Data Type Description Behavior and Usage
Coverage Text A definition of the percentage
of the asset to be inspected.
You can specify a value for this
field using the datasheet.
Desired Interval Numeric The number of months
between inspection events.
N/A
Desired Interval Basis Text The comments from the
inspector that explain the
reasoning for the selected
Desired Interval.
If the value in the Override
Interval field is set to True, the
value in Desired Interval Basis
field will be User-Defined.
If the value in the Override
Interval field is set to False, the
system populates the Desired
Interval Basis field with one of
the following values:
• Compliance
Recommendation
• RBI Recommendation
• Undefined
© 2020 General Electric Company 199
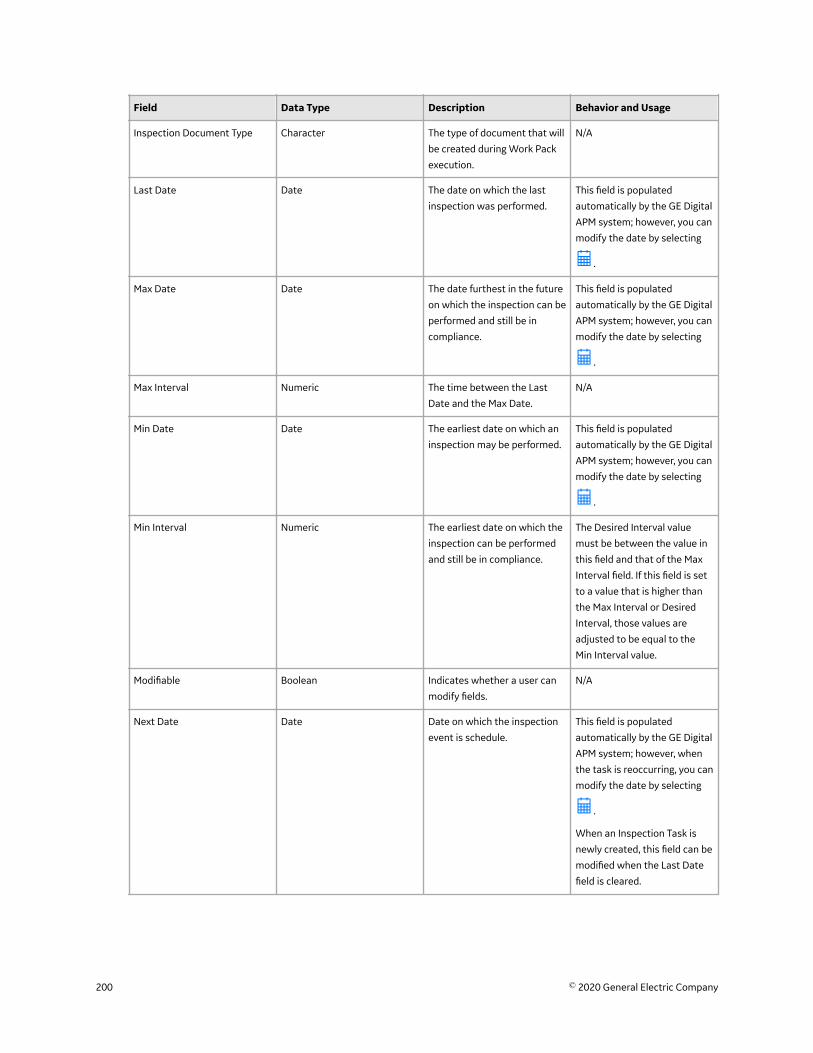
Field Data Type Description Behavior and Usage
Inspection Document Type Character The type of document that will
be created during Work Pack
execution.
N/A
Last Date Date The date on which the last
inspection was performed.
This field is populated
automatically by the GE Digital
APM system; however, you can
modify the date by selecting
.
Max Date Date The date furthest in the future
on which the inspection can be
performed and still be in
compliance.
This field is populated
automatically by the GE Digital
APM system; however, you can
modify the date by selecting
.
Max Interval Numeric The time between the Last
Date and the Max Date.
N/A
Min Date Date The earliest date on which an
inspection may be performed.
This field is populated
automatically by the GE Digital
APM system; however, you can
modify the date by selecting
.
Min Interval Numeric The earliest date on which the
inspection can be performed
and still be in compliance.
The Desired Interval value
must be between the value in
this field and that of the Max
Interval field. If this field is set
to a value that is higher than
the Max Interval or Desired
Interval, those values are
adjusted to be equal to the
Min Interval value.
Modifiable Boolean Indicates whether a user can
modify fields.
N/A
Next Date Date Date on which the inspection
event is schedule.
This field is populated
automatically by the GE Digital
APM system; however, when
the task is reoccurring, you can
modify the date by selecting
.
When an Inspection Task is
newly created, this field can be
modified when the Last Date
field is cleared.
200 © 2020 General Electric Company
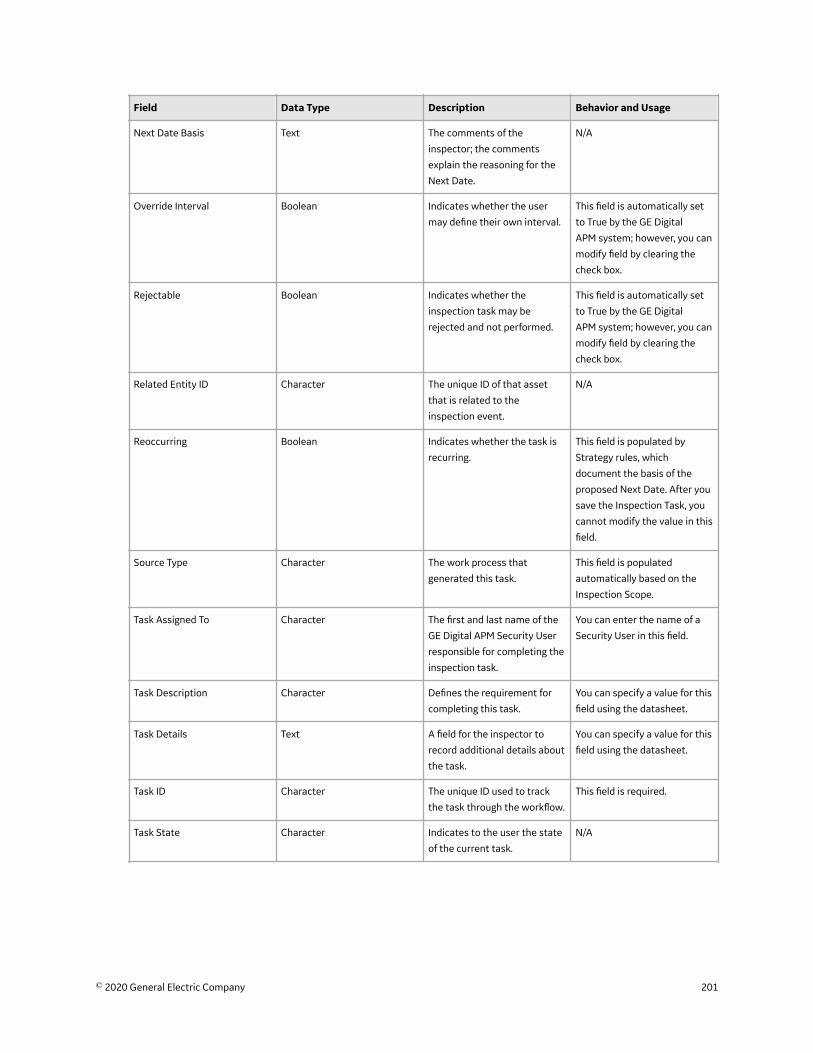
Field Data Type Description Behavior and Usage
Next Date Basis Text The comments of the
inspector; the comments
explain the reasoning for the
Next Date.
N/A
Override Interval Boolean Indicates whether the user
may define their own interval.
This field is automatically set
to True by the GE Digital
APM system; however, you can
modify field by clearing the
check box.
Rejectable Boolean Indicates whether the
inspection task may be
rejected and not performed.
This field is automatically set
to True by the GE Digital
APM system; however, you can
modify field by clearing the
check box.
Related Entity ID Character The unique ID of that asset
that is related to the
inspection event.
N/A
Reoccurring Boolean Indicates whether the task is
recurring.
This field is populated by
Strategy rules, which
document the basis of the
proposed Next Date. After you
save the Inspection Task, you
cannot modify the value in this
field.
Source Type Character The work process that
generated this task.
This field is populated
automatically based on the
Inspection Scope.
Task Assigned To Character The first and last name of the
GE Digital APM Security User
responsible for completing the
inspection task.
You can enter the name of a
Security User in this field.
Task Description Character Defines the requirement for
completing this task.
You can specify a value for this
field using the datasheet.
Task Details Text A field for the inspector to
record additional details about
the task.
You can specify a value for this
field using the datasheet.
Task ID Character The unique ID used to track
the task through the workflow.
This field is required.
Task State Character Indicates to the user the state
of the current task.
N/A
© 2020 General Electric Company 201
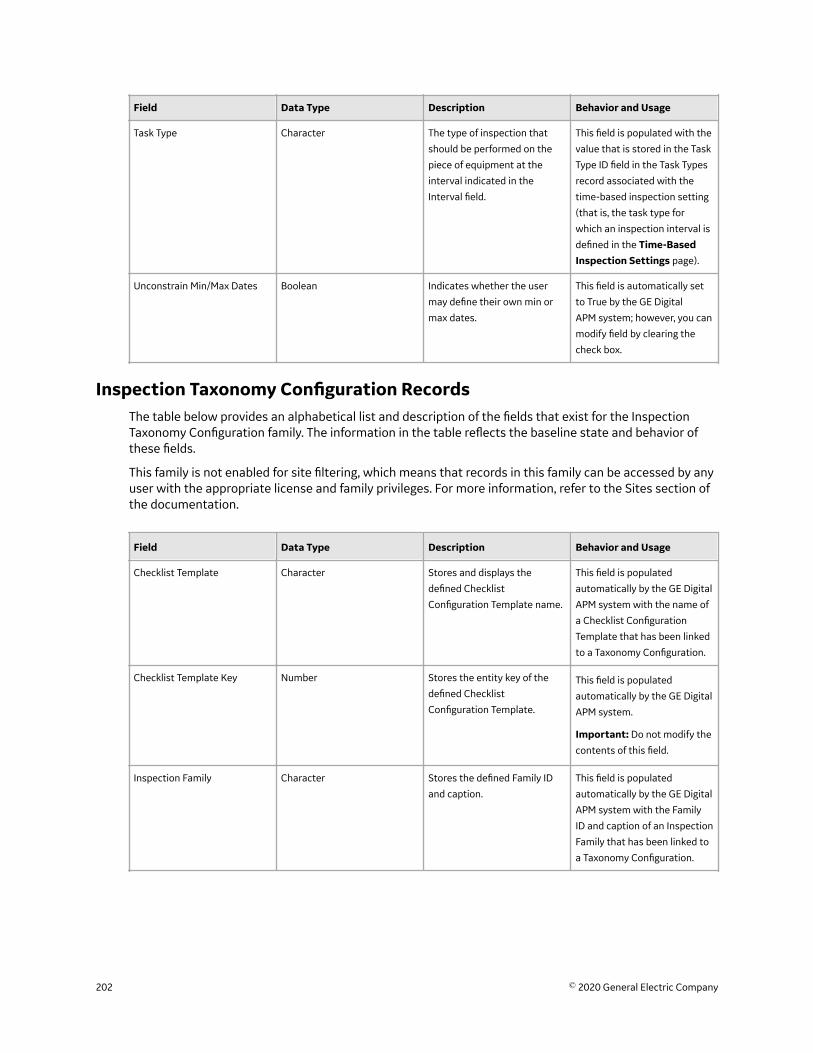
Field Data Type Description Behavior and Usage
Task Type Character The type of inspection that
should be performed on the
piece of equipment at the
interval indicated in the
Interval field.
This field is populated with the
value that is stored in the Task
Type ID field in the Task Types
record associated with the
time-based inspection setting
(that is, the task type for
which an inspection interval is
defined in the Time-BasedInspection Settings page).
Unconstrain Min/Max Dates Boolean Indicates whether the user
may define their own min or
max dates.
This field is automatically set
to True by the GE Digital
APM system; however, you can
modify field by clearing the
check box.
Inspection Taxonomy Configuration RecordsThe table below provides an alphabetical list and description of the fields that exist for the InspectionTaxonomy Configuration family. The information in the table reflects the baseline state and behavior ofthese fields.
This family is not enabled for site filtering, which means that records in this family can be accessed by anyuser with the appropriate license and family privileges. For more information, refer to the Sites section ofthe documentation.
Field Data Type Description Behavior and Usage
Checklist Template Character Stores and displays the
defined Checklist
Configuration Template name.
This field is populated
automatically by the GE Digital
APM system with the name of
a Checklist Configuration
Template that has been linked
to a Taxonomy Configuration.
Checklist Template Key Number Stores the entity key of the
defined Checklist
Configuration Template.
This field is populated
automatically by the GE Digital
APM system.
Important: Do not modify the
contents of this field.
Inspection Family Character Stores the defined Family ID
and caption.
This field is populated
automatically by the GE Digital
APM system with the Family
ID and caption of an Inspection
Family that has been linked to
a Taxonomy Configuration.
202 © 2020 General Electric Company
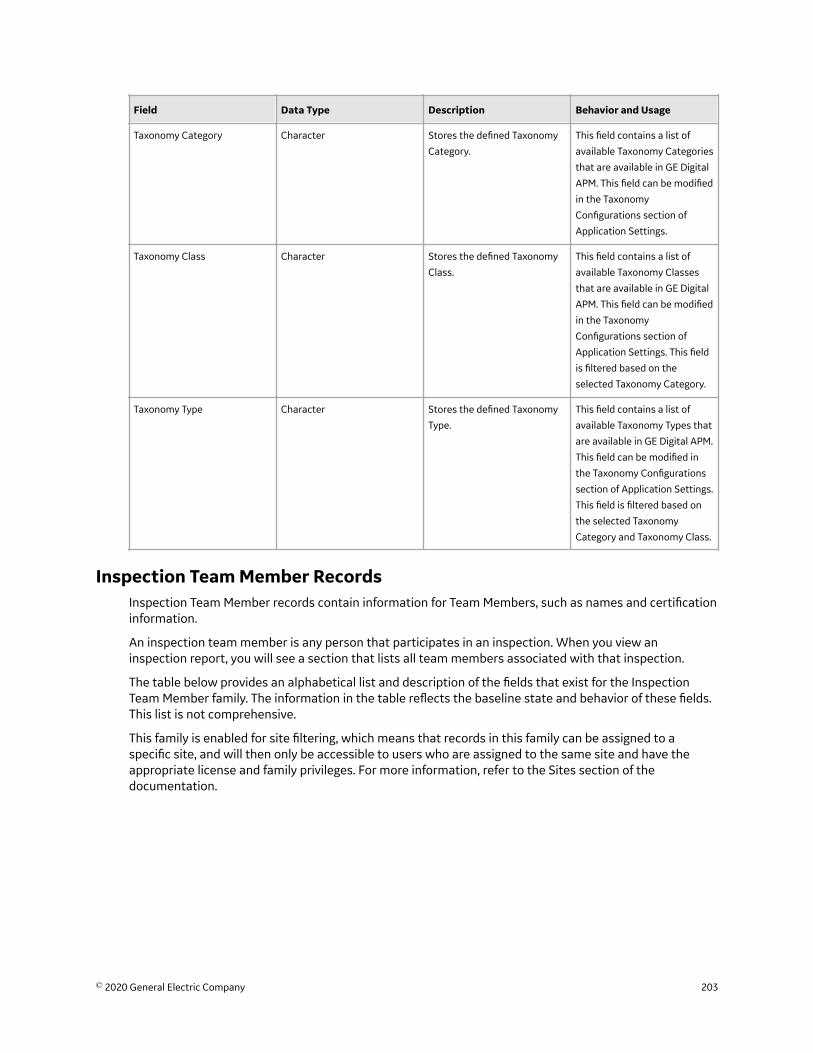
Field Data Type Description Behavior and Usage
Taxonomy Category Character Stores the defined Taxonomy
Category.
This field contains a list of
available Taxonomy Categories
that are available in GE Digital
APM. This field can be modified
in the Taxonomy
Configurations section of
Application Settings.
Taxonomy Class Character Stores the defined Taxonomy
Class.
This field contains a list of
available Taxonomy Classes
that are available in GE Digital
APM. This field can be modified
in the Taxonomy
Configurations section of
Application Settings. This field
is filtered based on the
selected Taxonomy Category.
Taxonomy Type Character Stores the defined Taxonomy
Type.
This field contains a list of
available Taxonomy Types that
are available in GE Digital APM.
This field can be modified in
the Taxonomy Configurations
section of Application Settings.
This field is filtered based on
the selected Taxonomy
Category and Taxonomy Class.
Inspection Team Member RecordsInspection Team Member records contain information for Team Members, such as names and certificationinformation.
An inspection team member is any person that participates in an inspection. When you view aninspection report, you will see a section that lists all team members associated with that inspection.
The table below provides an alphabetical list and description of the fields that exist for the InspectionTeam Member family. The information in the table reflects the baseline state and behavior of these fields.This list is not comprehensive.
This family is enabled for site filtering, which means that records in this family can be assigned to aspecific site, and will then only be accessible to users who are assigned to the same site and have theappropriate license and family privileges. For more information, refer to the Sites section of thedocumentation.
© 2020 General Electric Company 203
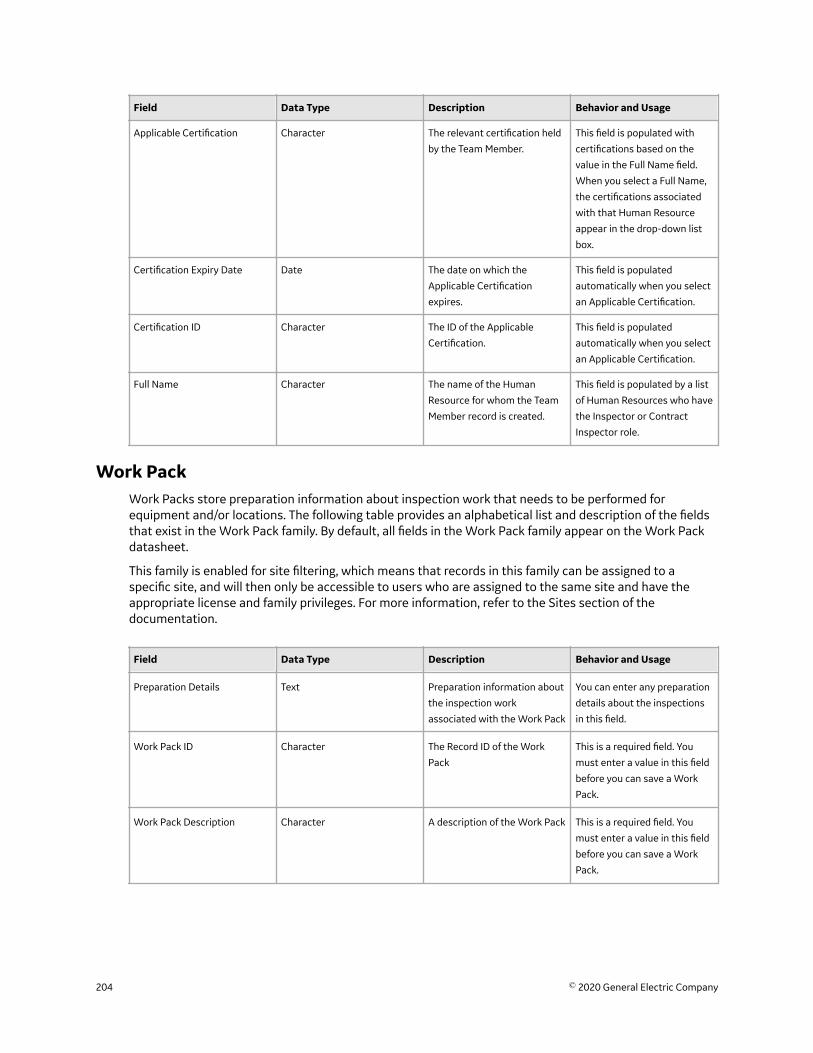
Field Data Type Description Behavior and Usage
Applicable Certification Character The relevant certification held
by the Team Member.
This field is populated with
certifications based on the
value in the Full Name field.
When you select a Full Name,
the certifications associated
with that Human Resource
appear in the drop-down list
box.
Certification Expiry Date Date The date on which the
Applicable Certification
expires.
This field is populated
automatically when you select
an Applicable Certification.
Certification ID Character The ID of the Applicable
Certification.
This field is populated
automatically when you select
an Applicable Certification.
Full Name Character The name of the Human
Resource for whom the Team
Member record is created.
This field is populated by a list
of Human Resources who have
the Inspector or Contract
Inspector role.
Work PackWork Packs store preparation information about inspection work that needs to be performed forequipment and/or locations. The following table provides an alphabetical list and description of the fieldsthat exist in the Work Pack family. By default, all fields in the Work Pack family appear on the Work Packdatasheet.
This family is enabled for site filtering, which means that records in this family can be assigned to aspecific site, and will then only be accessible to users who are assigned to the same site and have theappropriate license and family privileges. For more information, refer to the Sites section of thedocumentation.
Field Data Type Description Behavior and Usage
Preparation Details Text Preparation information about
the inspection work
associated with the Work Pack
You can enter any preparation
details about the inspections
in this field.
Work Pack ID Character The Record ID of the Work
Pack
This is a required field. You
must enter a value in this field
before you can save a Work
Pack.
Work Pack Description Character A description of the Work Pack This is a required field. You
must enter a value in this field
before you can save a Work
Pack.
204 © 2020 General Electric Company

Catalog Items
Config Queries FolderThe Catalog folder \\Public\Meridium\Modules\Inspection\Config Queries contains the followingitems.
Query Behavior and Usage
Asset Query This query is used to identify the records that store information
about pieces of equipment for which you perform inspections.
In the baseline database, this query returns a count of all
Equipment records with the Entity Key specified in the query
prompt (i.e., one or zero).
Base Summary Query Used by the Inspection History Summary Query.
Inspection History Summary Query Returns a list of all Inspection records that are linked to a
certain Equipment or Functional Location record. This query
uses the Base Summary Query to determine the Entity Key of
the Equipment or Functional Location record.
Published Documents Returns a list of all Inspection records whose Published fields
are set to true. This query contains a Load Inspection hyperlink
that lets you open Inspection records in the Record Manager.
Published Documents by Asset This query returns the same results as the Published
Documents query; however, this query contains a prompt on
the Asset Key field in the Inspection record.
User Key for HR Key Returns the Entity Key of each Security User record and the
Entity Key of each Human Resource record to which that
Security User record is linked. This query exists simply to
support the workflow facilitated by the following queries, which
exist in the Review Queries folder:
• Bundle Inspections for Review for Current User - Choose
State
• Bundle Inspections Pending Approval for Current User
• Full Inspections for Review for Current User - Choose State
• Full Inspections Pending Approval for Current User
• General Inspections for Review for Current User - Choose
State
• General Inspections Pending Approval for Current User
• Pressure Inspections Pending Approval for Current User
• Pressure Test Inspections for Review for Current User -
Choose State
Overview Charts FolderThe Catalog folder \\Public\Meridium\Modules\Inspection\Overview Charts contains the followingitems.
© 2020 General Electric Company 205

Graph Name Behavior and Usage
Open Recommendations by Asset This graph shows the number of open Recommendations for
the selected Asset. It appears in the OPEN INSPECTIONRECOMMENDATIONS BY ASSET section on the InspectionManagement Overview page.
Task Types Coming Due Within the Year This graph shows the number of Inspection Tasks of each type
that must be completed in the current year. It appears in the
TASK TYPES COMING DUE WITHIN THE YEAR section on the
Inspection Management Overview page.
Overview Queries FolderThe Catalog folder \\Public\Meridium\Modules\Inspection\Overview Queries containsqueries that are used on the following pages:
• The Inspection Management Overview page for the selected hierarchy level.• The Inspection Management Overview page for the selected asset.
The following table provides a list of queries that are used in the Inspection Management Overviewpage for the selected hierarchy level, along with a list of required fields and their alias names for eachquery.
Important: The queries in the table below may have one or more required fields or parameters. Whenusing the queries:
• Do not remove the required fields from a query.• Do not change the alias of the required fields.• Do not modify the order of required fields.• Do not modify the IDs of the query parameters.
If you do so, you cannot perform certain operations in the Inspection Management Overview page.
Query Name Behavior and Usage Required Fields
All Inspection Assets for Unit Returns a list of assets with at least one
Inspection or Inspection Task in the
selected unit or underlying assets. This
query is used to display results in the grid
in the Inspection Assets section.
None
All Inspections for Unit Returns a list of Inspections performed on
the selected Functional Location. This
query is used to display results in the AllInspections for This Locationsubsection in the UnderlyingInspections section.
• ENTY_KEY (Alias Name: Inspection
Entity Key)
• ENTY_ID (Alias Name: Inspection ID)
All Inspections for Unit and Below Returns the count of Inspections
performed on the selected Functional
Location or underlying assets.
None
206 © 2020 General Electric Company

Query Name Behavior and Usage Required Fields
All Inspection Assets with Inspection Or
Task for Unit
Returns a list of assets with at least one
Inspection or Inspection Task. This query
is used by the All Inspection Assets for
Unit query.
None
All Tasks for Unit Returns all Inspection Tasks performed
on the assets in the unit.ENTY_KEY (Alias Name: ENTY_KEY0)
Count of Task Types due Within the Year Returns the number of Task Types that
are due within the calendar year. This
query is used in the graph in the TASKTYPES COMING DUE WITHIN THEYEAR section.
None
Inspection Overview Parameters Returns the parameters used to navigate
through the Asset Hierarchy.
All fields in the query
My Open Inspections Returns a list of open Inspections
assigned to you. This query is used to
display results in the My OpenInspections subsection in the
Underlying Inspections section.
• ENTY_KEY (Alias Name: Inspection
Entity Key)
• ENTY_ID (Alias Name: Inspection ID)
Open Inspection Recommendations by
Asset
Returns the number of open Inspection
Recommendations for each asset
contained within the unit. This query is
used in the graph in the OPENINSPECTION RECOMMENDATIONS BYASSET section.
None
Open Inspections for Unit Returns a list of open Inspections for
Equipment or Functional Locations
contained within the unit based on their
current assigned status. This query is
used to display results in the UnderlyingOpen Inspections subsection in the
Underlying Inspections section.
• ENTY_KEY (Alias Name: Inspection
Entity Key)
• ENTY_ID (Alias Name: Inspection ID)
Open Recommendations for Asset Returns a list of Inspection
Recommendations for the given asset
based on their current assigned status.
This query is used to display results in the
following sections:
• All Recommendations for thisLocation subsection in the OverdueRecommendations section
• Recommendation section in the
Inspection Management AssetOverview page
This query is used when the Use StateManagement for InspectionRecommendations check box in
Application Settings is cleared.
• ENTY_KEY (Alias Name: Inspection
Entity Key)
• startDate
• endDate
© 2020 General Electric Company 207

Query Name Behavior and Usage Required Fields
Open Recommendations for Asset (State
Management)
Returns a list of open Inspection
Recommendations for the given asset
based on their current assigned state.
This query is used to display results in the
following sections:
• All Recommendations for thisLocation subsection in the OverdueRecommendations section
• Recommendation section in the
Inspection Management AssetOverview page
This query is used when the Use StateManagement for InspectionRecommendations check box in
Application Settings is selected.
• ENTY_KEY (Alias Name: Inspection
Entity Key)
• startDate
• endDate
Open Inspection Recommendations for
Unit
Returns a list of open Inspection
Recommendations for assets within the
unit based on their current assigned
status and filtered by date. This query is
used to display results in the UnderlyingOpen Recommendations subsection in
the Underlying Recommendationssection. This query is used when the UseState Management for InspectionRecommendations check box in
Application Settings is cleared.
• ENTY_KEY (Alias Name: Inspection
Entity Key)
• startDate
• endDate
Open Inspection Recommendations for
Unit (State Management)
Returns a list of open Inspection
Recommendations that are associated
with the asset and Functional Locations
in the unit based on their current
assigned state and filtered by date. This
query is used to display results in the
Underlying Open Recommendationssubsection in the UnderlyingRecommendations section. This query is
used when the Use State Managementfor Inspection Recommendationscheck box in Application Settings is
selected.
• ENTY_KEY (Alias Name: Inspection
Entity Key)
• startDate
• endDate
208 © 2020 General Electric Company
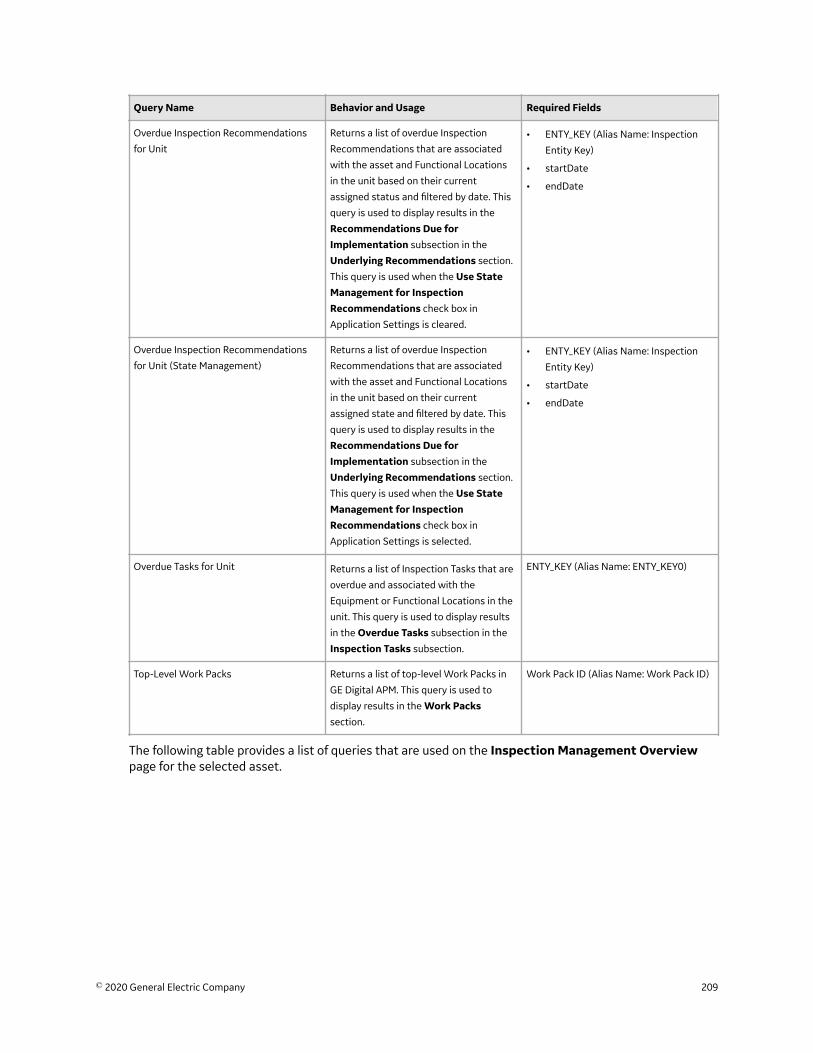
Query Name Behavior and Usage Required Fields
Overdue Inspection Recommendations
for Unit
Returns a list of overdue Inspection
Recommendations that are associated
with the asset and Functional Locations
in the unit based on their current
assigned status and filtered by date. This
query is used to display results in the
Recommendations Due forImplementation subsection in the
Underlying Recommendations section.
This query is used when the Use StateManagement for InspectionRecommendations check box in
Application Settings is cleared.
• ENTY_KEY (Alias Name: Inspection
Entity Key)
• startDate
• endDate
Overdue Inspection Recommendations
for Unit (State Management)
Returns a list of overdue Inspection
Recommendations that are associated
with the asset and Functional Locations
in the unit based on their current
assigned state and filtered by date. This
query is used to display results in the
Recommendations Due forImplementation subsection in the
Underlying Recommendations section.
This query is used when the Use StateManagement for InspectionRecommendations check box in
Application Settings is selected.
• ENTY_KEY (Alias Name: Inspection
Entity Key)
• startDate
• endDate
Overdue Tasks for Unit Returns a list of Inspection Tasks that are
overdue and associated with the
Equipment or Functional Locations in the
unit. This query is used to display results
in the Overdue Tasks subsection in the
Inspection Tasks subsection.
ENTY_KEY (Alias Name: ENTY_KEY0)
Top-Level Work Packs Returns a list of top-level Work Packs in
GE Digital APM. This query is used to
display results in the Work Packssection.
Work Pack ID (Alias Name: Work Pack ID)
The following table provides a list of queries that are used on the Inspection Management Overviewpage for the selected asset.
© 2020 General Electric Company 209
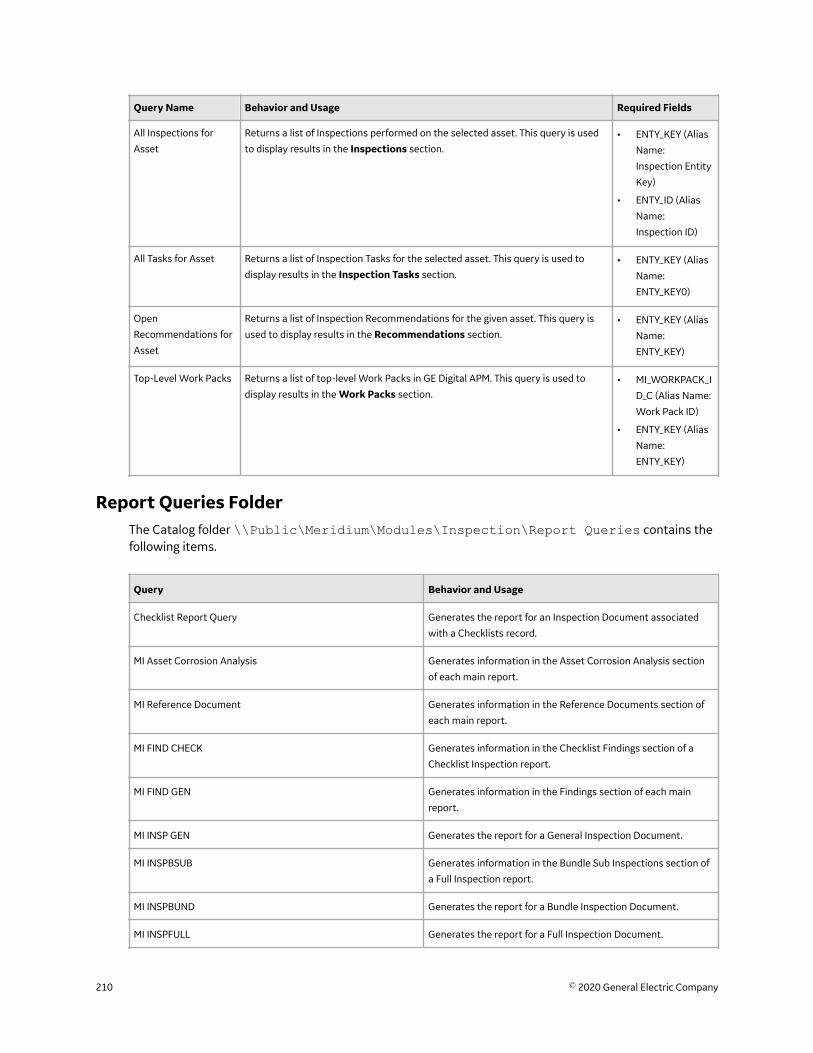
Query Name Behavior and Usage Required Fields
All Inspections for
Asset
Returns a list of Inspections performed on the selected asset. This query is used
to display results in the Inspections section.• ENTY_KEY (Alias
Name:
Inspection Entity
Key)
• ENTY_ID (Alias
Name:
Inspection ID)
All Tasks for Asset Returns a list of Inspection Tasks for the selected asset. This query is used to
display results in the Inspection Tasks section.• ENTY_KEY (Alias
Name:
ENTY_KEY0)
Open
Recommendations for
Asset
Returns a list of Inspection Recommendations for the given asset. This query is
used to display results in the Recommendations section.• ENTY_KEY (Alias
Name:
ENTY_KEY)
Top-Level Work Packs Returns a list of top-level Work Packs in GE Digital APM. This query is used to
display results in the Work Packs section.• MI_WORKPACK_I
D_C (Alias Name:
Work Pack ID)
• ENTY_KEY (Alias
Name:
ENTY_KEY)
Report Queries FolderThe Catalog folder \\Public\Meridium\Modules\Inspection\Report Queries contains thefollowing items.
Query Behavior and Usage
Checklist Report Query Generates the report for an Inspection Document associated
with a Checklists record.
MI Asset Corrosion Analysis Generates information in the Asset Corrosion Analysis section
of each main report.
MI Reference Document Generates information in the Reference Documents section of
each main report.
MI FIND CHECK Generates information in the Checklist Findings section of a
Checklist Inspection report.
MI FIND GEN Generates information in the Findings section of each main
report.
MI INSP GEN Generates the report for a General Inspection Document.
MI INSPBSUB Generates information in the Bundle Sub Inspections section of
a Full Inspection report.
MI INSPBUND Generates the report for a Bundle Inspection Document.
MI INSPFULL Generates the report for a Full Inspection Document.
210 © 2020 General Electric Company
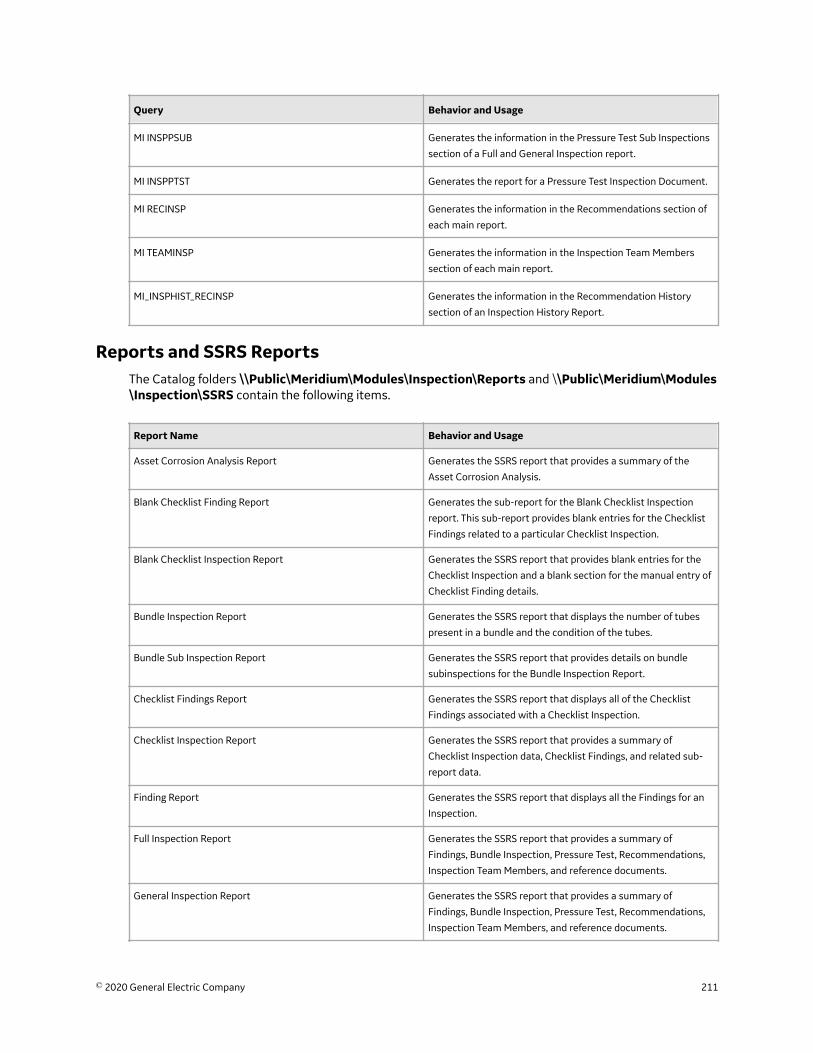
Query Behavior and Usage
MI INSPPSUB Generates the information in the Pressure Test Sub Inspections
section of a Full and General Inspection report.
MI INSPPTST Generates the report for a Pressure Test Inspection Document.
MI RECINSP Generates the information in the Recommendations section of
each main report.
MI TEAMINSP Generates the information in the Inspection Team Members
section of each main report.
MI_INSPHIST_RECINSP Generates the information in the Recommendation History
section of an Inspection History Report.
Reports and SSRS ReportsThe Catalog folders \\Public\Meridium\Modules\Inspection\Reports and \\Public\Meridium\Modules\Inspection\SSRS contain the following items.
Report Name Behavior and Usage
Asset Corrosion Analysis Report Generates the SSRS report that provides a summary of the
Asset Corrosion Analysis.
Blank Checklist Finding Report Generates the sub-report for the Blank Checklist Inspection
report. This sub-report provides blank entries for the Checklist
Findings related to a particular Checklist Inspection.
Blank Checklist Inspection Report Generates the SSRS report that provides blank entries for the
Checklist Inspection and a blank section for the manual entry of
Checklist Finding details.
Bundle Inspection Report Generates the SSRS report that displays the number of tubes
present in a bundle and the condition of the tubes.
Bundle Sub Inspection Report Generates the SSRS report that provides details on bundle
subinspections for the Bundle Inspection Report.
Checklist Findings Report Generates the SSRS report that displays all of the Checklist
Findings associated with a Checklist Inspection.
Checklist Inspection Report Generates the SSRS report that provides a summary of
Checklist Inspection data, Checklist Findings, and related sub-
report data.
Finding Report Generates the SSRS report that displays all the Findings for an
Inspection.
Full Inspection Report Generates the SSRS report that provides a summary of
Findings, Bundle Inspection, Pressure Test, Recommendations,
Inspection Team Members, and reference documents.
General Inspection Report Generates the SSRS report that provides a summary of
Findings, Bundle Inspection, Pressure Test, Recommendations,
Inspection Team Members, and reference documents.
© 2020 General Electric Company 211

Report Name Behavior and Usage
Inspection Recommendation Report Generates the SSRS report that displays all recommendations
that are associated with a given Inspection.
Inspection Team Member Report Generates the SSRS report that displays all team members
associated with an Inspection.
NR13 Full Inspection Generates the SSRS report (NR13 Version) that provides a
summary of Findings, Bundle Inspection, Pressure Test,
Recommendations, Inspection Team Members, and reference
documents.
NR13 General Inspection Report Generates the SSRS report (NR13 Verison) that provides a
summary of Findings, Bundle Inspection, Pressure Test,
Recommendations, Inspection Team Members, and reference
documents.
Pressure Test Inspection Report Generates the SSRS report that displays results of a Pressure
Test for Corrosion Analysis, Findings, and Recommendations,
using subreports.
Pressure Test Sub Inspection Report Generates the SSRS report that provides details on Pressure
Test subinspections for the Pressure Test Inspection report.
Reference Document Report Generates the SSRS report that displays a summary of all the
reference documents that are associated with an Inspection.
Work Pack Inspection Findings Summary Report Generates the Work Pack Inspection Findings Summary Report.
Work Pack Inspection Scope Summary Report Generates the Work Pack Inspection Scope Summary Report.
Resource Queries FolderThe Catalog folder \\Public\Meridium\Modules\Inspection\Resource Queries contains the followingitems.
212 © 2020 General Electric Company
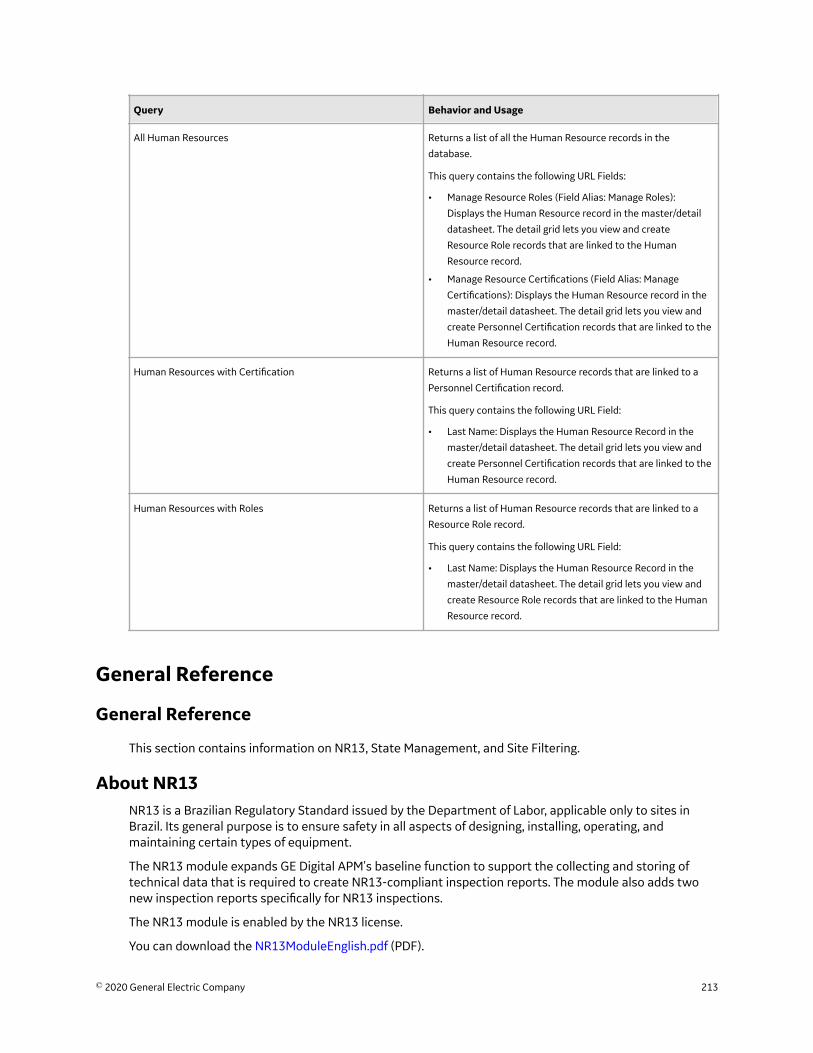
Query Behavior and Usage
All Human Resources Returns a list of all the Human Resource records in the
database.
This query contains the following URL Fields:
• Manage Resource Roles (Field Alias: Manage Roles):
Displays the Human Resource record in the master/detail
datasheet. The detail grid lets you view and create
Resource Role records that are linked to the Human
Resource record.
• Manage Resource Certifications (Field Alias: Manage
Certifications): Displays the Human Resource record in the
master/detail datasheet. The detail grid lets you view and
create Personnel Certification records that are linked to the
Human Resource record.
Human Resources with Certification Returns a list of Human Resource records that are linked to a
Personnel Certification record.
This query contains the following URL Field:
• Last Name: Displays the Human Resource Record in the
master/detail datasheet. The detail grid lets you view and
create Personnel Certification records that are linked to the
Human Resource record.
Human Resources with Roles Returns a list of Human Resource records that are linked to a
Resource Role record.
This query contains the following URL Field:
• Last Name: Displays the Human Resource Record in the
master/detail datasheet. The detail grid lets you view and
create Resource Role records that are linked to the Human
Resource record.
General Reference
General Reference
This section contains information on NR13, State Management, and Site Filtering.
About NR13NR13 is a Brazilian Regulatory Standard issued by the Department of Labor, applicable only to sites inBrazil. Its general purpose is to ensure safety in all aspects of designing, installing, operating, andmaintaining certain types of equipment.
The NR13 module expands GE Digital APM's baseline function to support the collecting and storing oftechnical data that is required to create NR13-compliant inspection reports. The module also adds twonew inspection reports specifically for NR13 inspections.
The NR13 module is enabled by the NR13 license.
You can download the NR13ModuleEnglish.pdf (PDF).
© 2020 General Electric Company 213
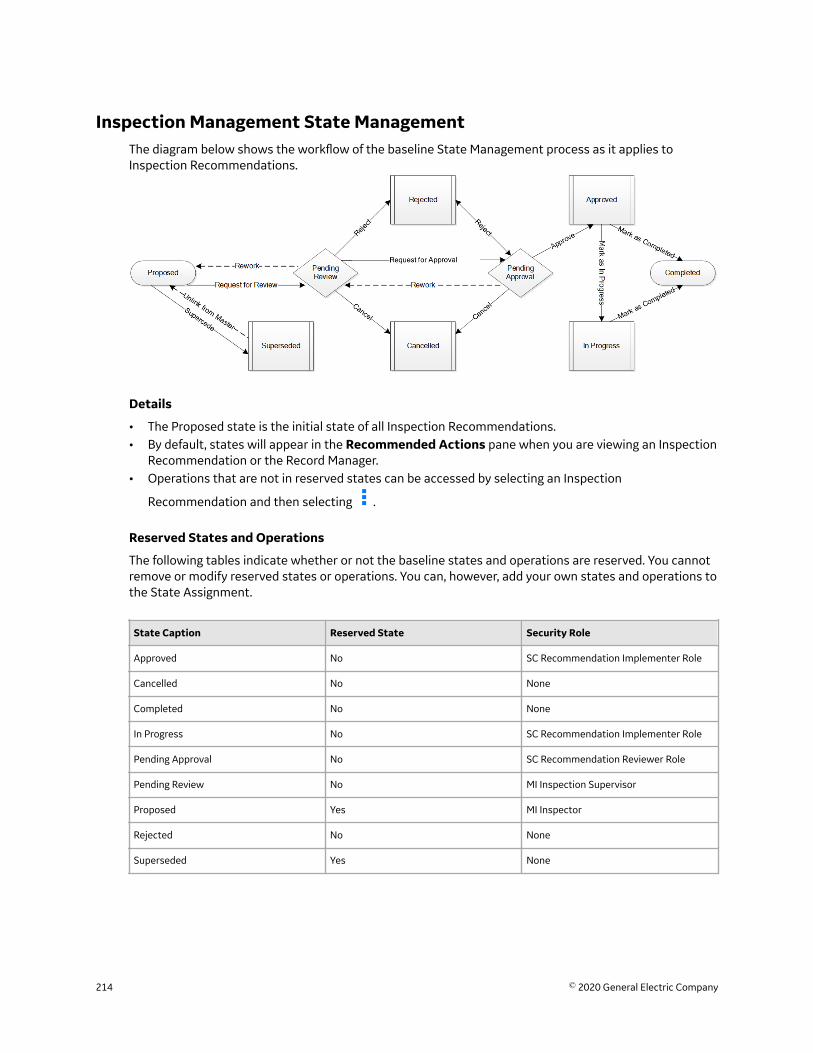
Inspection Management State ManagementThe diagram below shows the workflow of the baseline State Management process as it applies toInspection Recommendations.
Details
• The Proposed state is the initial state of all Inspection Recommendations.• By default, states will appear in the Recommended Actions pane when you are viewing an Inspection
Recommendation or the Record Manager.• Operations that are not in reserved states can be accessed by selecting an Inspection
Recommendation and then selecting .
Reserved States and Operations
The following tables indicate whether or not the baseline states and operations are reserved. You cannotremove or modify reserved states or operations. You can, however, add your own states and operations tothe State Assignment.
State Caption Reserved State Security Role
Approved No SC Recommendation Implementer Role
Cancelled No None
Completed No None
In Progress No SC Recommendation Implementer Role
Pending Approval No SC Recommendation Reviewer Role
Pending Review No MI Inspection Supervisor
Proposed Yes MI Inspector
Rejected No None
Superseded Yes None
214 © 2020 General Electric Company
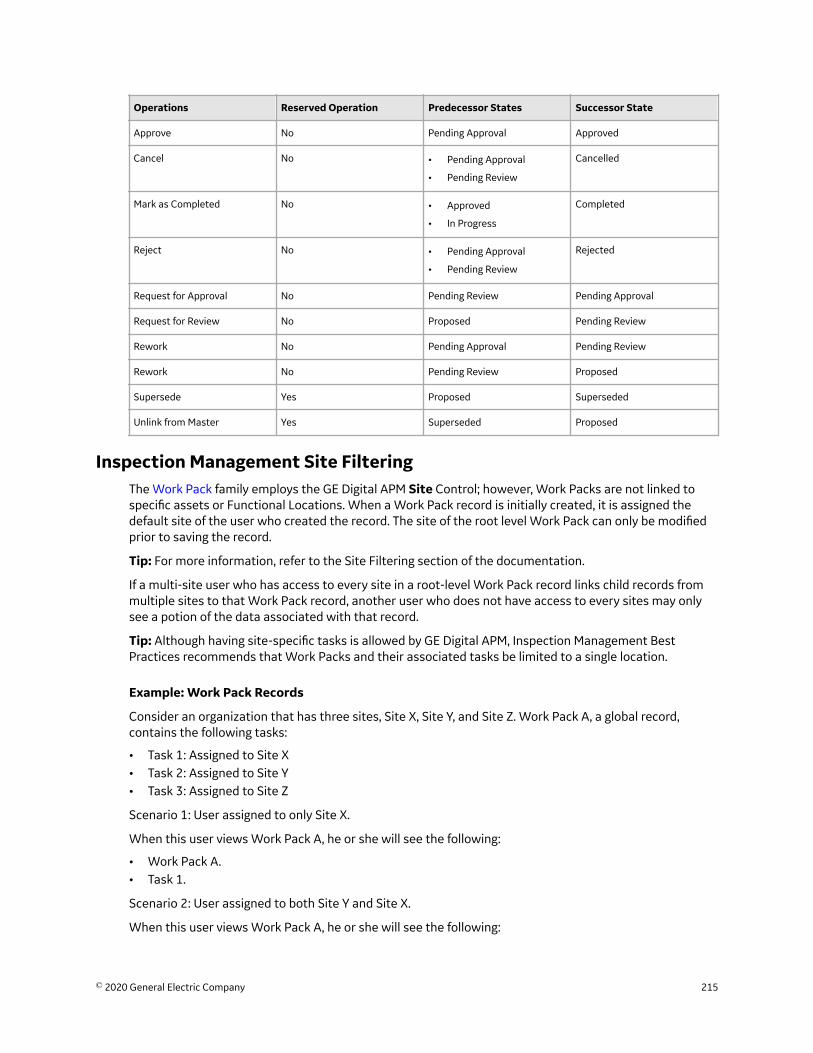
Operations Reserved Operation Predecessor States Successor State
Approve No Pending Approval Approved
Cancel No • Pending Approval
• Pending Review
Cancelled
Mark as Completed No • Approved
• In Progress
Completed
Reject No • Pending Approval
• Pending Review
Rejected
Request for Approval No Pending Review Pending Approval
Request for Review No Proposed Pending Review
Rework No Pending Approval Pending Review
Rework No Pending Review Proposed
Supersede Yes Proposed Superseded
Unlink from Master Yes Superseded Proposed
Inspection Management Site FilteringThe Work Pack family employs the GE Digital APM Site Control; however, Work Packs are not linked tospecific assets or Functional Locations. When a Work Pack record is initially created, it is assigned thedefault site of the user who created the record. The site of the root level Work Pack can only be modifiedprior to saving the record.
Tip: For more information, refer to the Site Filtering section of the documentation.
If a multi-site user who has access to every site in a root-level Work Pack record links child records frommultiple sites to that Work Pack record, another user who does not have access to every sites may onlysee a potion of the data associated with that record.
Tip: Although having site-specific tasks is allowed by GE Digital APM, Inspection Management BestPractices recommends that Work Packs and their associated tasks be limited to a single location.
Example: Work Pack Records
Consider an organization that has three sites, Site X, Site Y, and Site Z. Work Pack A, a global record,contains the following tasks:
• Task 1: Assigned to Site X• Task 2: Assigned to Site Y• Task 3: Assigned to Site Z
Scenario 1: User assigned to only Site X.
When this user views Work Pack A, he or she will see the following:
• Work Pack A.• Task 1.
Scenario 2: User assigned to both Site Y and Site X.
When this user views Work Pack A, he or she will see the following:
© 2020 General Electric Company 215

• Work Pack A.• Task 1.• Task 2.
Scenario 3: Super User
When this user views Work Pack A, he or she will see the following:
• Work Pack A.• Task 1.• Task 2.• Task 3.
Important: Although all tasks are contained within the global record Work Pack A, the user will only seethe tasks associated with the current site to which they are assigned.
Inspection Management URLsThere is one URL route associated with Inspection Management: im. The following table describes thevarious paths that build on the route, and the elements that you can specify for each.
Element Description Accepted Value(s) Notes
im/asset/<AssetEntityKey>/<WorkspaceName>: Accesses the Inspection Management page.
im/asset/<AssetEntityKey>/inspection/<InspectionEntityKey>: Accesses the
Inspection Data section of the Inspection Overview page.
im/asset/<AssetEntityKey>/task/<InspectionTaskEntityKey>: Accesses the Manage Task
page.
<AssetEntityKey> Specifies the level of the Asset
Hierarchy for which you want
to view Inspection
information.
Any Asset Entity Key that is
associated with an asset in the
Asset Hierarchy.
N/A
<WorkspaceName> Specifies the
Inspection Management page
that you want to view.
Overview Accesses the InspectionManagement Overviewworkspace.
Profile Accesses the InspectionProfile Details section.
<InspectionEntityKey> Specifies the level of the Asset
Hierarchy for which you want
to view Inspection
information.
Any Inspection Entity Key that
is associated with an asset in
the Asset Hierarchy.
Accesses the Inspection Datasection.
-1 The Inspection Data section.
If the <InspectionEntityKey>is a valid Inspection record,
you can bypass the
<AssetEntityKey> by
entering -1.
216 © 2020 General Electric Company

Element Description Accepted Value(s) Notes
<InspectionTaskEntityKey> Specifies the level of the Asset
Hierarchy for which you want
to view Inspection Task
information.
Any Inspection Task Entity Key
that is associated with an
asset in the Asset Hierarchy.
Accesses the Manage Taskpage.
im/functionallocation/<FunctionalLocationEntityKey>/<WorkspaceName>: Accesses the Inspection Management page.
im/functionallocation/<FunctionalLocationEntityKey>/inspection/<InspectionEntityKey>: Accesses the Inspection Data section of the Inspection Overview page.
im/functionallocation/<FunctionalLocationEntityKey>/task/<InspectionTaskEntityKey>: Accesses the Manage Task page.
<FunctionalLocationEntityKey
>
Specifies the functional
location level of the Asset
Hierarchy for which you want
to view Inspection
information.
Any Functional Location Entity
Key that is associated with an
asset in the Asset Hierarchy.
N/A
<WorkspaceName> Specifies the
Inspection Management page
that you want to view.
Overview Accesses the InspectionManagement Overviewpage.
Profile Accesses the InspectionProfile Details section.
<InspectionEntityKey> Specifies the functional
location level of the Asset
Hierarchy for which you want
to view Inspection
information.
Any Inspection Entity Key that
is associated with an asset in
the Asset Hierarchy.
Accesses the Inspection Datasection.
<InspectionTaskEntityKey> Specifies the functional
location level of the Asset
Hierarchy for which you want
to view Inspection Task
information.
Any Inspection Task Entity Key
that is associated with an
asset in the Asset Hierarchy.
Accesses the Manage Taskpage.
im/workpack/<WorkPackEntityKey>: Accesses the Work Pack Overview page.
im/workpack/<WorkPackEntityKey>/subworkpack/<SubWorkPackEntityKey>: Accesses
the Work Pack Overview page for the selected Sub Work pack.
<WorkPackEntityKey> Specifies the Work Pack that
you want to view.
Any related Work Pack Entity
Key.
Accesses the Definitionssection.
<SubWorkPackEntityKey> Specifies the Sub Work Pack
that you want to view.
Any related Sub Work Pack
Entity Key.Accesses the Definitionssection.
Note: You may have two Sub
Work Pack strings in a single
URL.
© 2020 General Electric Company 217

Element Description Accepted Value(s) Notes
im/task/<InspectionTaskEntityKey>/inspection/0/inspectionfamkey/<InspectionDocumentTypeFamilyKey>: Creates an inspection that is linked to an inspection task.
<InspectionTaskEntityKey> Specifies the Inspection Task
key for which you are creating
an inspection.
Any Inspection Task Entity Key
that is associated with an
asset in the Asset Hierarchy.
The inspection that you create
using the URL will be
associated with this task.
<InspectionDocumentTypeFa
milyKey>
Specifies the inspection
document type family key that
is associated with the
document type of the
inspection.
Any Inspection Document
Type Family Key that is
associated with the selected
asset.
If you do not have a document
type defined, a dialog appears,
asking you to select an
inspection family or checklist
template.
im/asset/<AssetEntityKey>/inspection/0: Creates an inspection that is associated with an asset.
<AssetEntityKey> Specifies the level of the Asset
Hierarchy for which you want
to create an inspection.
Any Asset Entity Key that is
associated with an asset in the
Asset Hierarchy.
The inspection that you create
using the URL will be
associated with this asset.
im/asset/<AssetEntityKey>/inspectionfamkey/<InspectionFamilyKey>: Creates an
inspection that is associated with an asset and an inspection family.
<AssetEntityKey> Specifies the level of the Asset
Hierarchy for which you want
to create an inspection.
Any Asset Entity Key that is
associated with an asset in the
Asset Hierarchy.
The inspection that you create
using the URL will be
associated with this asset.
<InspectionFamilyKey> Specifies the family key that is
associated with the inspection
family for which you want to
create an inspection.
Any Inspection Family Key that
is associated with the selected
asset.
The inspection that you create
using the query will be
associated with this inspection
family. You cannot associate
this inspection with a checklist
template.
Example URLs
Example URL Destination
im/asset/64251821851/overview The Inspection Management Overview page.
im/asset/64251821851/inspection/64251866183 The Inspection Data section of the Inspection Overviewpage.
im/asset/-1/inspection/64251866183 The Inspection Data section of the Inspection Overviewpage.
im/asset/64251821851/task/64252712345 The Manage Task page.
im/functionallocation/64253088766/Overview The Inspection Management Overview page.
im/functionallocation/64253088766/inspection/64251866183 The Inspection Data section of the Inspection Overviewpage.
im/functionallocation/64253088766/task/64252712345 The Manage Task page.
218 © 2020 General Electric Company
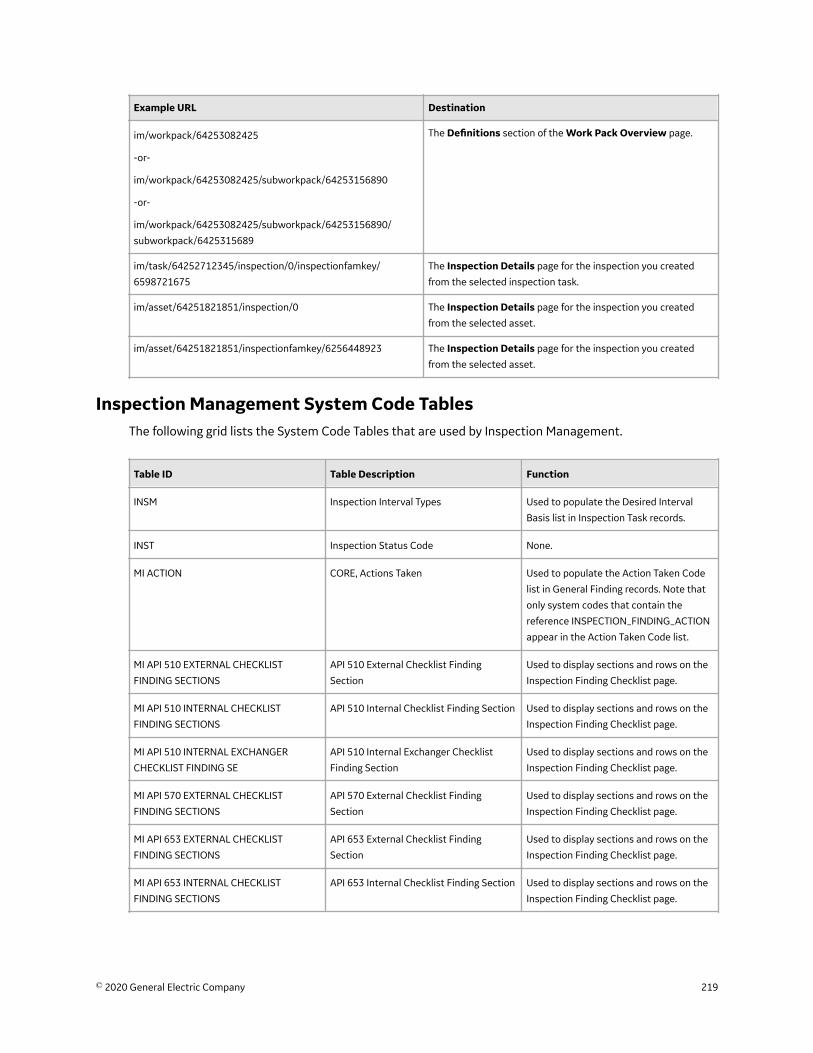
Example URL Destination
im/workpack/64253082425
-or-
im/workpack/64253082425/subworkpack/64253156890
-or-
im/workpack/64253082425/subworkpack/64253156890/
subworkpack/6425315689
The Definitions section of the Work Pack Overview page.
im/task/64252712345/inspection/0/inspectionfamkey/
6598721675
The Inspection Details page for the inspection you created
from the selected inspection task.
im/asset/64251821851/inspection/0 The Inspection Details page for the inspection you created
from the selected asset.
im/asset/64251821851/inspectionfamkey/6256448923 The Inspection Details page for the inspection you created
from the selected asset.
Inspection Management System Code TablesThe following grid lists the System Code Tables that are used by Inspection Management.
Table ID Table Description Function
INSM Inspection Interval Types Used to populate the Desired Interval
Basis list in Inspection Task records.
INST Inspection Status Code None.
MI ACTION CORE, Actions Taken Used to populate the Action Taken Code
list in General Finding records. Note that
only system codes that contain the
reference INSPECTION_FINDING_ACTION
appear in the Action Taken Code list.
MI API 510 EXTERNAL CHECKLIST
FINDING SECTIONS
API 510 External Checklist Finding
Section
Used to display sections and rows on the
Inspection Finding Checklist page.
MI API 510 INTERNAL CHECKLIST
FINDING SECTIONS
API 510 Internal Checklist Finding Section Used to display sections and rows on the
Inspection Finding Checklist page.
MI API 510 INTERNAL EXCHANGER
CHECKLIST FINDING SE
API 510 Internal Exchanger Checklist
Finding Section
Used to display sections and rows on the
Inspection Finding Checklist page.
MI API 570 EXTERNAL CHECKLIST
FINDING SECTIONS
API 570 External Checklist Finding
Section
Used to display sections and rows on the
Inspection Finding Checklist page.
MI API 653 EXTERNAL CHECKLIST
FINDING SECTIONS
API 653 External Checklist Finding
Section
Used to display sections and rows on the
Inspection Finding Checklist page.
MI API 653 INTERNAL CHECKLIST
FINDING SECTIONS
API 653 Internal Checklist Finding Section Used to display sections and rows on the
Inspection Finding Checklist page.
© 2020 General Electric Company 219
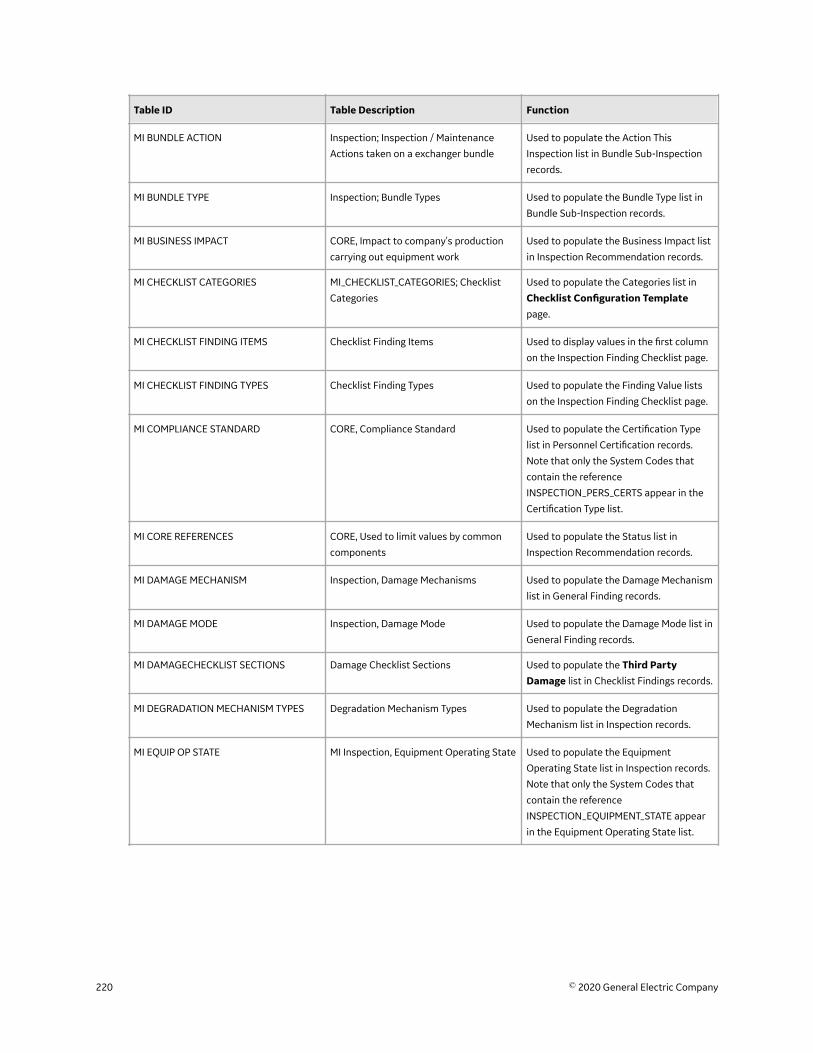
Table ID Table Description Function
MI BUNDLE ACTION Inspection; Inspection / Maintenance
Actions taken on a exchanger bundle
Used to populate the Action This
Inspection list in Bundle Sub-Inspection
records.
MI BUNDLE TYPE Inspection; Bundle Types Used to populate the Bundle Type list in
Bundle Sub-Inspection records.
MI BUSINESS IMPACT CORE, Impact to company's production
carrying out equipment work
Used to populate the Business Impact list
in Inspection Recommendation records.
MI CHECKLIST CATEGORIES MI_CHECKLIST_CATEGORIES; Checklist
Categories
Used to populate the Categories list in
Checklist Configuration Templatepage.
MI CHECKLIST FINDING ITEMS Checklist Finding Items Used to display values in the first column
on the Inspection Finding Checklist page.
MI CHECKLIST FINDING TYPES Checklist Finding Types Used to populate the Finding Value lists
on the Inspection Finding Checklist page.
MI COMPLIANCE STANDARD CORE, Compliance Standard Used to populate the Certification Type
list in Personnel Certification records.
Note that only the System Codes that
contain the reference
INSPECTION_PERS_CERTS appear in the
Certification Type list.
MI CORE REFERENCES CORE, Used to limit values by common
components
Used to populate the Status list in
Inspection Recommendation records.
MI DAMAGE MECHANISM Inspection, Damage Mechanisms Used to populate the Damage Mechanism
list in General Finding records.
MI DAMAGE MODE Inspection, Damage Mode Used to populate the Damage Mode list in
General Finding records.
MI DAMAGECHECKLIST SECTIONS Damage Checklist Sections Used to populate the Third PartyDamage list in Checklist Findings records.
MI DEGRADATION MECHANISM TYPES Degradation Mechanism Types Used to populate the Degradation
Mechanism list in Inspection records.
MI EQUIP OP STATE MI Inspection, Equipment Operating State Used to populate the Equipment
Operating State list in Inspection records.
Note that only the System Codes that
contain the reference
INSPECTION_EQUIPMENT_STATE appear
in the Equipment Operating State list.
220 © 2020 General Electric Company
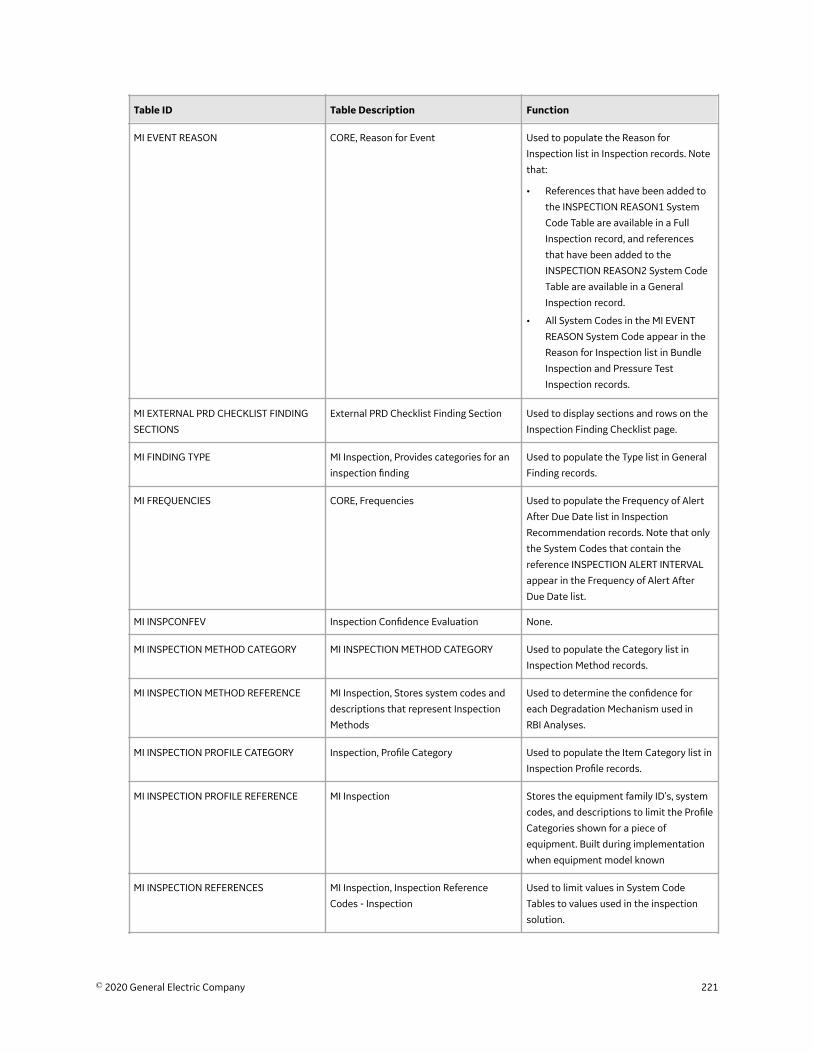
Table ID Table Description Function
MI EVENT REASON CORE, Reason for Event Used to populate the Reason for
Inspection list in Inspection records. Note
that:
• References that have been added to
the INSPECTION REASON1 System
Code Table are available in a Full
Inspection record, and references
that have been added to the
INSPECTION REASON2 System Code
Table are available in a General
Inspection record.
• All System Codes in the MI EVENT
REASON System Code appear in the
Reason for Inspection list in Bundle
Inspection and Pressure Test
Inspection records.
MI EXTERNAL PRD CHECKLIST FINDING
SECTIONS
External PRD Checklist Finding Section Used to display sections and rows on the
Inspection Finding Checklist page.
MI FINDING TYPE MI Inspection, Provides categories for an
inspection finding
Used to populate the Type list in General
Finding records.
MI FREQUENCIES CORE, Frequencies Used to populate the Frequency of Alert
After Due Date list in Inspection
Recommendation records. Note that only
the System Codes that contain the
reference INSPECTION ALERT INTERVAL
appear in the Frequency of Alert After
Due Date list.
MI INSPCONFEV Inspection Confidence Evaluation None.
MI INSPECTION METHOD CATEGORY MI INSPECTION METHOD CATEGORY Used to populate the Category list in
Inspection Method records.
MI INSPECTION METHOD REFERENCE MI Inspection, Stores system codes and
descriptions that represent Inspection
Methods
Used to determine the confidence for
each Degradation Mechanism used in
RBI Analyses.
MI INSPECTION PROFILE CATEGORY Inspection, Profile Category Used to populate the Item Category list in
Inspection Profile records.
MI INSPECTION PROFILE REFERENCE MI Inspection Stores the equipment family ID's, system
codes, and descriptions to limit the Profile
Categories shown for a piece of
equipment. Built during implementation
when equipment model known
MI INSPECTION REFERENCES MI Inspection, Inspection Reference
Codes - Inspection
Used to limit values in System Code
Tables to values used in the inspection
solution.
© 2020 General Electric Company 221

Table ID Table Description Function
MI INSPECTION STRATEGY MI Inspection Strategy None.
MI PDM FILTER MI RBI, Potential Degradation Filter Used to populate the Degradation
Mechanism list in Inspection records
belonging to the PRD Pop Test Checklist
subfamily.
MI PRD INSPECTION TYPE FILTER PRD Inspection Type Filter Used to populate the Type of Inspection
list in PRD Pop Test Checklist records.
MI PRD PT CHECKLIST FINDING SECTIONS PRD Pop Test Checklist Finding Sections Used to display sections and rows on the
Inspection Finding Checklist page.
MI PRIORITY CORE, baseline priority types Used to populate the Recommendation
Priority list in Inspection
Recommendation records.
MI RECOMMENDATION TYPE CORE, Recommendation Type Used to populate the Recommendation
Type list in Inspection Recommendation
records.
Note that the Recommendation Typefield is not included on the baseline
Inspection Recommendation datasheet.
MI RESOURCE ROLE List of user roles Used to populate the Role list in Resource
Role records.
MI STATUS Status Codes - CORE Used to populate the Inspection
Document Status list in Inspection
records. Note that only the System Codes
that contain the reference
INSPECTION_DOCUMENT_STATUS appear
in the Inspection Document Status list.
MI TASK TYPE REFERENCE CORE, Reference values to limit task type
lists when creating tasks
Used to populate the list in the Reference
list in Task Types records.
MI TEST MEDIA Fluids used for testing Used to populate the Test Media list in
Pressure Test Sub-Inspection records.
MI YES NO MI Core, Yes-No Used to populate the Predictable list in
General Finding records.
Inspection Management Data ModelInspection Management simply offers a customized view of individual records that belong to families inthe data model. In addition, each step in the Inspection Management workflow allows you to create, view,or manage those records.
The following diagram illustrates how records are linked to one another within Inspection Management.The shaded boxes represent entity families, and the arrows represent relationship families. You candetermine the direction of each relationship from the direction of the arrowhead: the box to the left ofeach arrow head is the predecessor in that relationship, and the box to the right of each arrowhead is thesuccessor in that relationship. For example, you can see that Inspection records are linked to Inspection
222 © 2020 General Electric Company
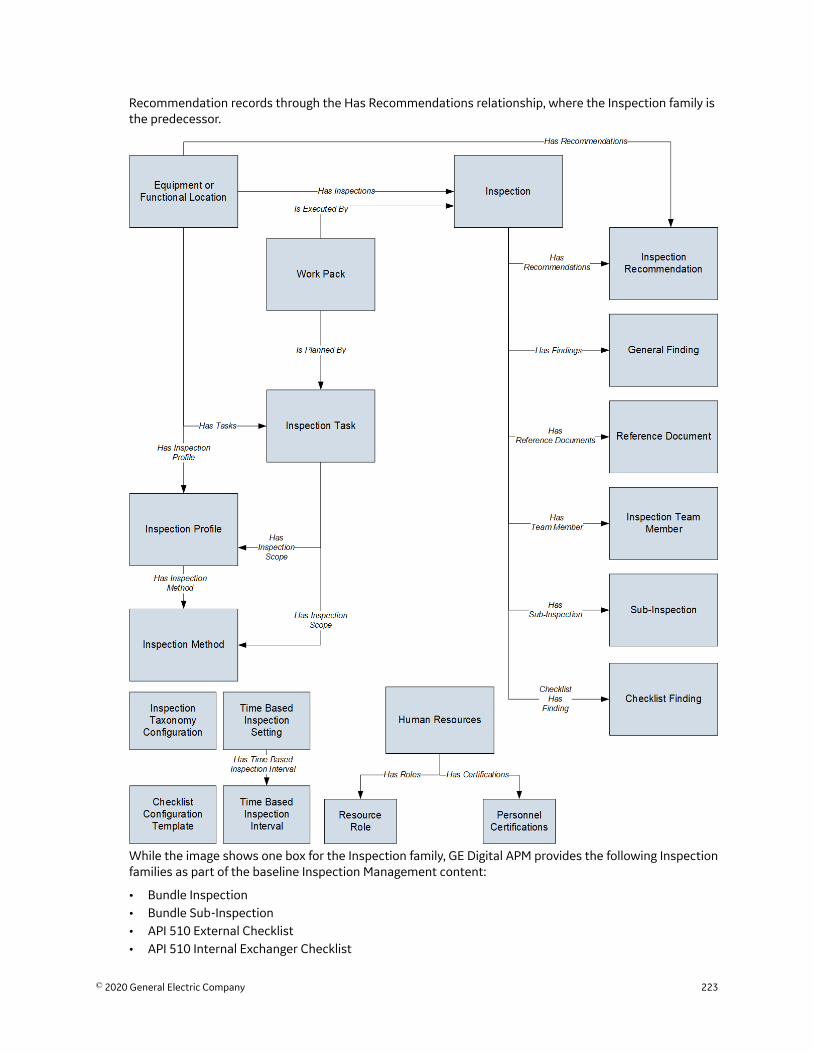
Recommendation records through the Has Recommendations relationship, where the Inspection family isthe predecessor.
While the image shows one box for the Inspection family, GE Digital APM provides the following Inspectionfamilies as part of the baseline Inspection Management content:
• Bundle Inspection• Bundle Sub-Inspection• API 510 External Checklist• API 510 Internal Exchanger Checklist
© 2020 General Electric Company 223

• API 510 Internal Checklist• API 570 External Checklist• API 653 External Checklist• API 653 Internal Checklist• External PRD Checklist• Full Inspection• General Inspection• PRD Pop Test Checklist• Pressure Test Inspection• Pressure Test Sub Inspection
In the image above, the Inspection box is the predecessor to the Checklist Finding box. In the baselinedatabase, however, only the following Inspection families are related to the Checklist Finding family:
• API 510 External Checklist• API 510 Internal Exchanger Checklist• API 510 Internal Checklist• API 570 External Checklist• API 653 External Checklist• API 653 Internal Checklist• External PRD Checklist• PRD Pop Test Checklist
Note that although both the Equipment and Functional Location families are related to the InspectionProfile family, this documentation assumes that you will create Inspection Profiles only for equipment. Youwill typically not create Inspection Profiles for locations.
224 © 2020 General Electric Company

Chapter
12Release NotesTopics:
• Second Quarter of 2020• Fourth Quarter of 2019• Third Quarter of 2019• Second Quarter of 2019• First Quarter of 2019• Third Quarter of 2018
© 2020 General Electric Company 225
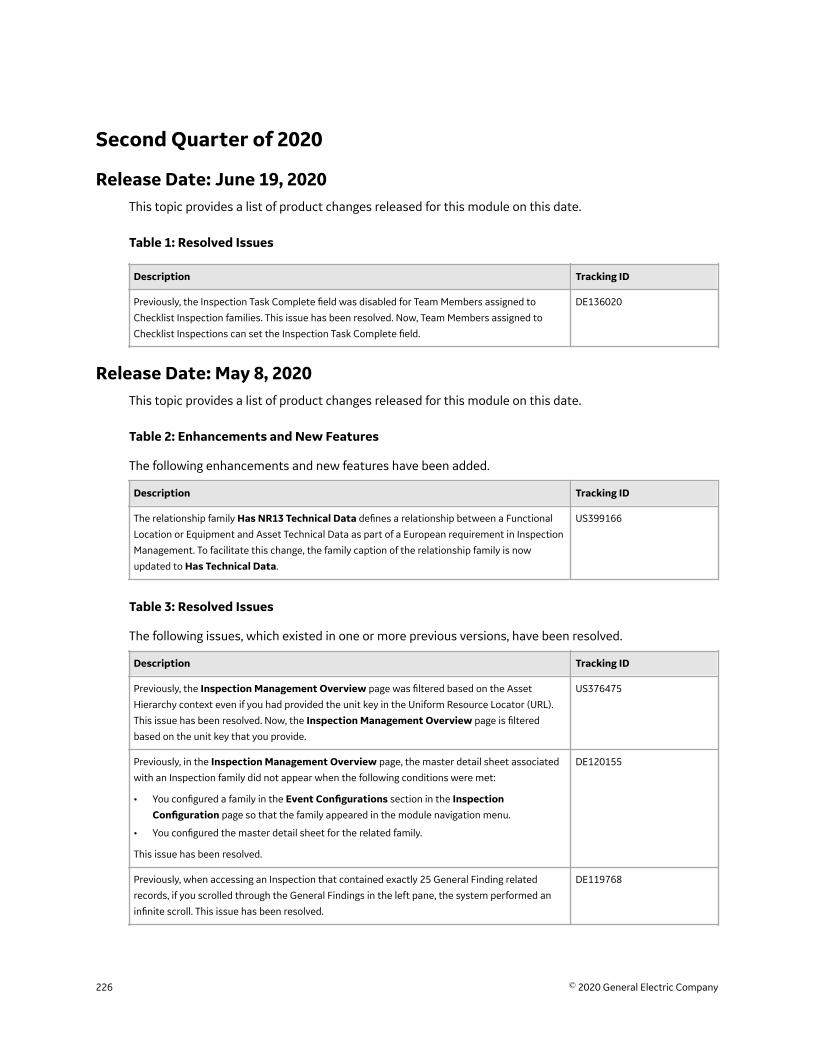
Second Quarter of 2020
Release Date: June 19, 2020This topic provides a list of product changes released for this module on this date.
Table 1: Resolved Issues
Description Tracking ID
Previously, the Inspection Task Complete field was disabled for Team Members assigned to
Checklist Inspection families. This issue has been resolved. Now, Team Members assigned to
Checklist Inspections can set the Inspection Task Complete field.
DE136020
Release Date: May 8, 2020This topic provides a list of product changes released for this module on this date.
Table 2: Enhancements and New Features
The following enhancements and new features have been added.
Description Tracking ID
The relationship family Has NR13 Technical Data defines a relationship between a Functional
Location or Equipment and Asset Technical Data as part of a European requirement in Inspection
Management. To facilitate this change, the family caption of the relationship family is now
updated to Has Technical Data.
US399166
Table 3: Resolved Issues
The following issues, which existed in one or more previous versions, have been resolved.
Description Tracking ID
Previously, the Inspection Management Overview page was filtered based on the Asset
Hierarchy context even if you had provided the unit key in the Uniform Resource Locator (URL).
This issue has been resolved. Now, the Inspection Management Overview page is filtered
based on the unit key that you provide.
US376475
Previously, in the Inspection Management Overview page, the master detail sheet associated
with an Inspection family did not appear when the following conditions were met:
• You configured a family in the Event Configurations section in the InspectionConfiguration page so that the family appeared in the module navigation menu.
• You configured the master detail sheet for the related family.
This issue has been resolved.
DE120155
Previously, when accessing an Inspection that contained exactly 25 General Finding related
records, if you scrolled through the General Findings in the left pane, the system performed an
infinite scroll. This issue has been resolved.
DE119768
226 © 2020 General Electric Company

Description Tracking ID
Previously, the Inspection Confidence value was incorrectly populated on an Inspection
Confidence Evaluation record, if you selected Ultrasonic Shear Wave Testing in the Type of
Inspection field, and selected one of the following values in the Extent field:
• UT shear wave 10% of all potential locations
• UT shear wave 25% of all potential locations
• UT shear wave 50% of all potential locations
• UT shear wave 100% of all potential locations
This issue has been resolved.
DE119766
Previously, in the Manage Inspection Profiles page, in the Sequence Definition window, the
values in the Item Category column were not properly localized. This issue has been resolved.
DE94113
Previously, in the Family Management page, Inspection Taxonomy Configuration family did not
have any defined ID Templates associated with it. This issue has been resolved.
DE91702
Table 4: Obsolete Features
The following features are no longer available.
Description Tracking ID
Time-Based Inspection (TBI) Settings functionality has been removed from Inspection
Management due to low adoption. This functionality has been replaced by Compliance
Management.
US376040
Fourth Quarter of 2019
Inspection ManagementThis topic provides a list of product changes released for this module on the specified dates.
Release Date: December 13, 2019
Table 5: Enhancements and New Features
The following enhancements and new features have been added.
Description Tracking ID
You can now manage API RBI Recommendations in the Inspection Plan page for the asset. The
Inspection Plan page of the Compliance Management module now supports viewing, managing,
approving, and implementing API RBI Recommendations. In addition, the Inspection PlanManagement page now supports managing Inspection plans with API RBI Recommendations in
bulk. To facilitate this enhancement, you must follow the steps in KBA: https://
digitalsupport.ge.com/communities/en_US/Article/V4-3-1-0-2-Compliance-Management-How-
to-Configure-API-RBI-Recommendations-for-Inspection-Plan.
Note: If you had previously performed the steps in a similar https://digitalsupport.ge.com/
communities/en_US/Article/V4-3-0-7-8-Compliance-Management-How-to-Configure-API-RBI-
Recommendations-for-Inspection-Plan for the V4.3.0.7.8 release, you must still perform the
steps in the KBA for the V4.3.1.0.2 release and ensure the attached queries are imported.
US373707
© 2020 General Electric Company 227

Table 6: Resolved Issues
The following issues, which existed in one or more previous versions, have been resolved.
Description Tracking ID
Previously, the Inspection Management Overview page was filtered based on the asset
hierarchy context, despite providing the unit key in the Uniform Resource Locator (URL). This
issue has been resolved. Now, the Inspection Management Overview page is filtered based on
the unit key you provide.
US376669
Release Date: November 8, 2019
Table 7: Resolved Issues
The following issues, which existed in one or more previous versions, have been resolved.
Description Tracking ID
Previously, in the Inspection Management Overview page, the master-detail sheet associated
with an Inspection family did not appear when the following conditions were met:
• You configured a family in the Event Configurations section in the InspectionConfiguration page so that the family appeared in the module navigation menu.
• You configured the master-detail sheet for the related family.
This issue has been resolved.
DE120247
Third Quarter of 2019
Inspection ManagementThis topic provides a list of product changes released for this module on the dates listed below.
Release Date: September 27, 2019
Table 8: Enhancements and New Features
The following enhancements and new features have been added.
228 © 2020 General Electric Company

Description Tracking ID
To enhance usability, when the Inspection Management (IM) Assets and Inspection Management
(IM) Functional Location data loaders are run, the following values are now updated in the
Interface Log record.
Field Note
Number of Records Processed Increased by one for each asset or functional location
displayed in the workbook.
Number of Records Rejected Increased by one for each Inspection record that
encounters an error when the record is created or
updated.
Number of Records Created Increased by one for each new Inspection record that is
successfully created.
Number of Records Updated Increased by one for each existing Inspection record
that is successfully updated.
US366047
To enhance usability when using a UOM conversion set, the values in the numeric fields are
rounded off according to the type of the numeric field as described in the following table.
Numeric Field Type Number of Decimal Places
SRV Set Pressure (Shell) 2
SRV Set Pressure (Tube) 2
Test Pressure (Shell) 2
Test Pressure (Tube) 2
SRV Set Pressure (Shell) 2
SRV Set Pressure (Tube) 2
Test Pressure (Shell) 2
Test Pressure (Tube) 2
This enhancement is applicable to the fields in the following families:
• Pressure Test Inspection
• Pressure Test Sub-Inspection
US358876
You can now implement Recommended Actions that belong to an Inspection Plan in:
• Asset Strategy Management.
• Inspection Plan as Inspection Task.
To facilitate this enhancement, a new option, Implement Recommended Actions to Tasks inASM, has been added to the Inspection Configuration section of the IM Admin Preferencespage.
US335134
Table 9: Resolved Issues
The following issues that existed in one or more previous versions have been resolved.
© 2020 General Electric Company 229
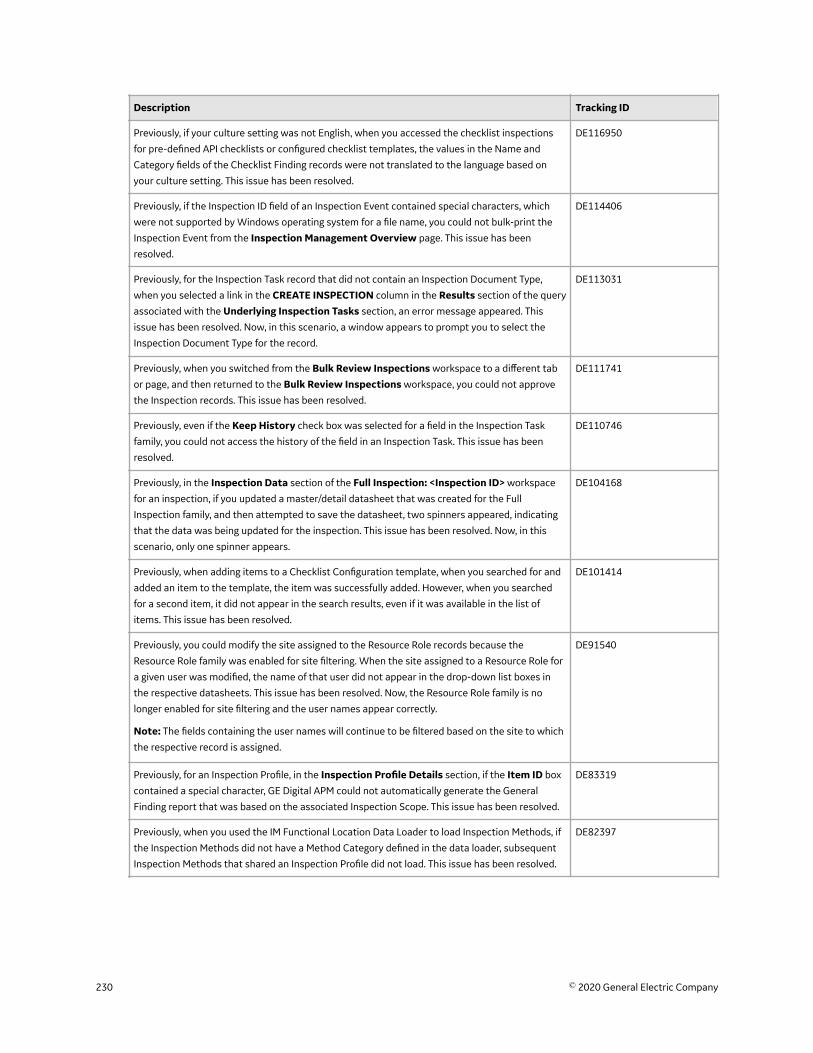
Description Tracking ID
Previously, if your culture setting was not English, when you accessed the checklist inspections
for pre-defined API checklists or configured checklist templates, the values in the Name and
Category fields of the Checklist Finding records were not translated to the language based on
your culture setting. This issue has been resolved.
DE116950
Previously, if the Inspection ID field of an Inspection Event contained special characters, which
were not supported by Windows operating system for a file name, you could not bulk-print the
Inspection Event from the Inspection Management Overview page. This issue has been
resolved.
DE114406
Previously, for the Inspection Task record that did not contain an Inspection Document Type,
when you selected a link in the CREATE INSPECTION column in the Results section of the query
associated with the Underlying Inspection Tasks section, an error message appeared. This
issue has been resolved. Now, in this scenario, a window appears to prompt you to select the
Inspection Document Type for the record.
DE113031
Previously, when you switched from the Bulk Review Inspections workspace to a different tab
or page, and then returned to the Bulk Review Inspections workspace, you could not approve
the Inspection records. This issue has been resolved.
DE111741
Previously, even if the Keep History check box was selected for a field in the Inspection Task
family, you could not access the history of the field in an Inspection Task. This issue has been
resolved.
DE110746
Previously, in the Inspection Data section of the Full Inspection: <Inspection ID> workspace
for an inspection, if you updated a master/detail datasheet that was created for the Full
Inspection family, and then attempted to save the datasheet, two spinners appeared, indicating
that the data was being updated for the inspection. This issue has been resolved. Now, in this
scenario, only one spinner appears.
DE104168
Previously, when adding items to a Checklist Configuration template, when you searched for and
added an item to the template, the item was successfully added. However, when you searched
for a second item, it did not appear in the search results, even if it was available in the list of
items. This issue has been resolved.
DE101414
Previously, you could modify the site assigned to the Resource Role records because the
Resource Role family was enabled for site filtering. When the site assigned to a Resource Role for
a given user was modified, the name of that user did not appear in the drop-down list boxes in
the respective datasheets. This issue has been resolved. Now, the Resource Role family is no
longer enabled for site filtering and the user names appear correctly.
Note: The fields containing the user names will continue to be filtered based on the site to which
the respective record is assigned.
DE91540
Previously, for an Inspection Profile, in the Inspection Profile Details section, if the Item ID box
contained a special character, GE Digital APM could not automatically generate the General
Finding report that was based on the associated Inspection Scope. This issue has been resolved.
DE83319
Previously, when you used the IM Functional Location Data Loader to load Inspection Methods, if
the Inspection Methods did not have a Method Category defined in the data loader, subsequent
Inspection Methods that shared an Inspection Profile did not load. This issue has been resolved.
DE82397
230 © 2020 General Electric Company
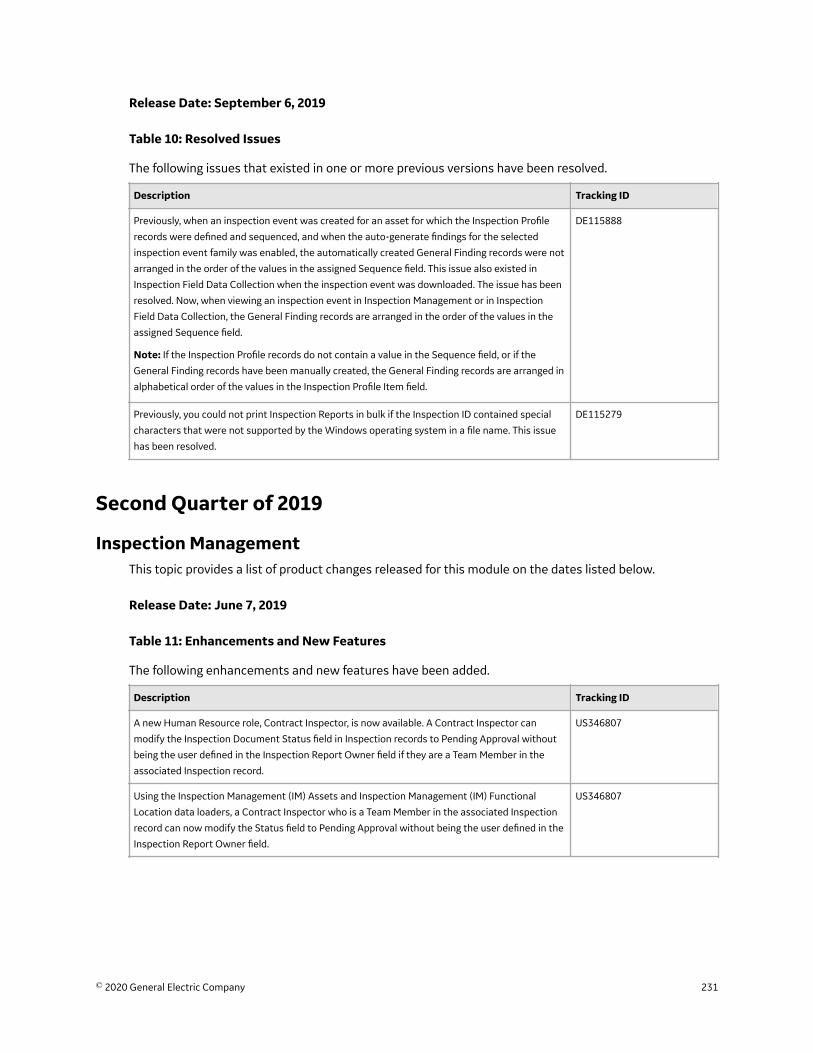
Release Date: September 6, 2019
Table 10: Resolved Issues
The following issues that existed in one or more previous versions have been resolved.
Description Tracking ID
Previously, when an inspection event was created for an asset for which the Inspection Profile
records were defined and sequenced, and when the auto-generate findings for the selected
inspection event family was enabled, the automatically created General Finding records were not
arranged in the order of the values in the assigned Sequence field. This issue also existed in
Inspection Field Data Collection when the inspection event was downloaded. The issue has been
resolved. Now, when viewing an inspection event in Inspection Management or in Inspection
Field Data Collection, the General Finding records are arranged in the order of the values in the
assigned Sequence field.
Note: If the Inspection Profile records do not contain a value in the Sequence field, or if the
General Finding records have been manually created, the General Finding records are arranged in
alphabetical order of the values in the Inspection Profile Item field.
DE115888
Previously, you could not print Inspection Reports in bulk if the Inspection ID contained special
characters that were not supported by the Windows operating system in a file name. This issue
has been resolved.
DE115279
Second Quarter of 2019
Inspection ManagementThis topic provides a list of product changes released for this module on the dates listed below.
Release Date: June 7, 2019
Table 11: Enhancements and New Features
The following enhancements and new features have been added.
Description Tracking ID
A new Human Resource role, Contract Inspector, is now available. A Contract Inspector can
modify the Inspection Document Status field in Inspection records to Pending Approval without
being the user defined in the Inspection Report Owner field if they are a Team Member in the
associated Inspection record.
US346807
Using the Inspection Management (IM) Assets and Inspection Management (IM) Functional
Location data loaders, a Contract Inspector who is a Team Member in the associated Inspection
record can now modify the Status field to Pending Approval without being the user defined in the
Inspection Report Owner field.
US346807
© 2020 General Electric Company 231

Description Tracking ID
If you are using Status to manage your Inspection Recommendation records and you are a Team
Member in the associated Inspection record, you can now transition the Inspection
Recommendation to the Pending Review status without being the user defined in the Author
field.
US346807
Previously, the Inspection Lock field was disabled unless you were the Inspection Report Owner.
This field is now enabled if you are a Team Member in the associated Inspection record.
US346807
First Quarter of 2019
Inspection ManagementThis topic provides a list of product changes released for this module on the dates listed below.
Release Date: March 29, 2019
Table 12: Enhancements and New Features
The following enhancements and new features have been added.
Description Tracking ID
You can now generate and download multiple Inspection Reports at a time. To facilitate this
enhancement, the following changes have been made:
• The Bulk Print Report option has been added to the Underlying Open Inspections section
to print multiple inspection reports. This feature is also available in the Inspection section in
the Asset Overview page.
• The View Bulk Printing Status option has been added to the Inspection ManagementOverview page to view the status of the print job. On selecting this option, the Downloadspage appears, displaying the status of all the print jobs.
US278869
Table 13: Resolved Issues
The following issues that existed in one or more previous versions have been resolved.
Description Tracking ID
Previously, if you used State Management and downloaded an inspection in offline mode along
with the Inspection History Report, the Inspection Recommendations did not appear in the
Recommendation History section of the report. This issue has been resolved. To facilitate this fix,
the MI_INSPHIST_RECINSP query has been modified to include the State column.
US292248
Previously, when you modified the queries in the Underlying Inspection Tasks and UnderlyingRecommendations sections in the Inspection Management Overview page, the counts in the
Inspection Management tabs did not appear. This issue has been resolved. Now, you can add or
delete columns from the Inspection Overview queries, but you cannot change the IDs of the
query parameters.
DE105398
Previously, when you configured an Inspection record to use a master/detail datasheet, an error
occurred when saving the Detail section of the datasheet. This issue has been resolved.
DE104166
232 © 2020 General Electric Company

Description Tracking ID
Previously, if the Asset Hierarchy was configured to use the Equipment Has Equipment
relationship, the Asset Hierarchy navigation links could not differentiate between a parent
Equipment and a child Equipment. This issue has been resolved.
DE103536
Previously, when you added a Bundle Sub-Inspection, General Finding, or Pressure Test Sub-
Inspection to a parent Inspection record, you were unable to navigate back to the parent record
without saving the new related record. This issue has been resolved. Now, when you navigate
back to the parent inspection without saving the related record, a message appears, asking you
to confirm whether you want to save the unsaved changes.
DE103287
When you used a Samsung Galaxy Tab Active 3 with Android version 5.1.1 to create an
Inspection, the Inspection Tasks drop-down list box did not appear within the visible portion of
the window.
DE102573
Previously, when you created a non-recurring Inspection Task using the Inspection Management
(IM) Assets or Inspection Management (IM) Functional Location data loader, an error message
appeared in the log even though the Desired Interval cell was blank or contained the value 0. This
issue has been resolved.
DE95976
Previously, when you saved a record in the Inspection Confidence Evaluation section and then
attempted to navigate to any other section (such as the Team Members or Inspection Datasections) quickly, an error occurred. This issue has been resolved.
Note: This issue occurred only if network connectivity was poor when using GE Digital APM.
DE93365
Previously, when you accessed an Inspection record and then attempted to navigate to any other
page within GE Digital APM quickly, an error occurred. This issue has been resolved.
Note: This issue occurred only if network connectivity was poor when using GE Digital APM.
DE93361
Previously, when you attempted to print a General Inspection Report or NR13 General Inspection
Report with blank values in the Commencement Date or Completion Date fields, the report did
not print. This issue has been resolved.
DE89775
Previously, when you attempted to select a value in the Type of Inspection drop-down list box
that contained more than 50 characters, an error occurred, and the value was not selected. This
issue has been resolved.
DE82361
Previously, when you attempted to create an inspection for equipment, the Inspection Tasks that
were associated with the functional location of the equipment did not appear in the InspectionTasks drop-down list box of the Create Inspection window. This issue has been resolved.
DE82621
Previously, when you created or updated an Inspection record using the Inspection Management
(IM) Assets or Inspection Management (IM) Functional Location data loader without any value in
the Final Inspection Lock column, the Inspection Lock check box was not selected even if you
set the value as True in the data loader template. This issue has been resolved.
DE81521
© 2020 General Electric Company 233
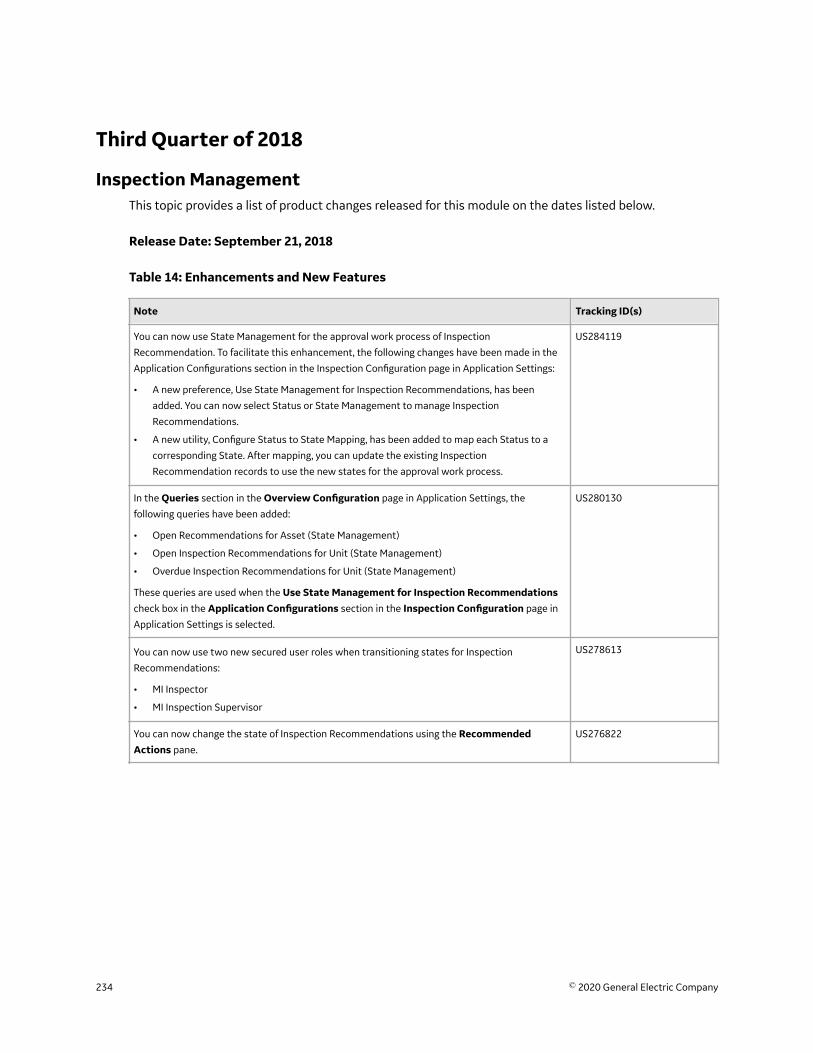
Third Quarter of 2018
Inspection ManagementThis topic provides a list of product changes released for this module on the dates listed below.
Release Date: September 21, 2018
Table 14: Enhancements and New Features
Note Tracking ID(s)
You can now use State Management for the approval work process of Inspection
Recommendation. To facilitate this enhancement, the following changes have been made in the
Application Configurations section in the Inspection Configuration page in Application Settings:
• A new preference, Use State Management for Inspection Recommendations, has been
added. You can now select Status or State Management to manage Inspection
Recommendations.
• A new utility, Configure Status to State Mapping, has been added to map each Status to a
corresponding State. After mapping, you can update the existing Inspection
Recommendation records to use the new states for the approval work process.
US284119
In the Queries section in the Overview Configuration page in Application Settings, the
following queries have been added:
• Open Recommendations for Asset (State Management)
• Open Inspection Recommendations for Unit (State Management)
• Overdue Inspection Recommendations for Unit (State Management)
These queries are used when the Use State Management for Inspection Recommendationscheck box in the Application Configurations section in the Inspection Configuration page in
Application Settings is selected.
US280130
You can now use two new secured user roles when transitioning states for Inspection
Recommendations:
• MI Inspector
• MI Inspection Supervisor
US278613
You can now change the state of Inspection Recommendations using the RecommendedActions pane.
US276822
234 © 2020 General Electric Company
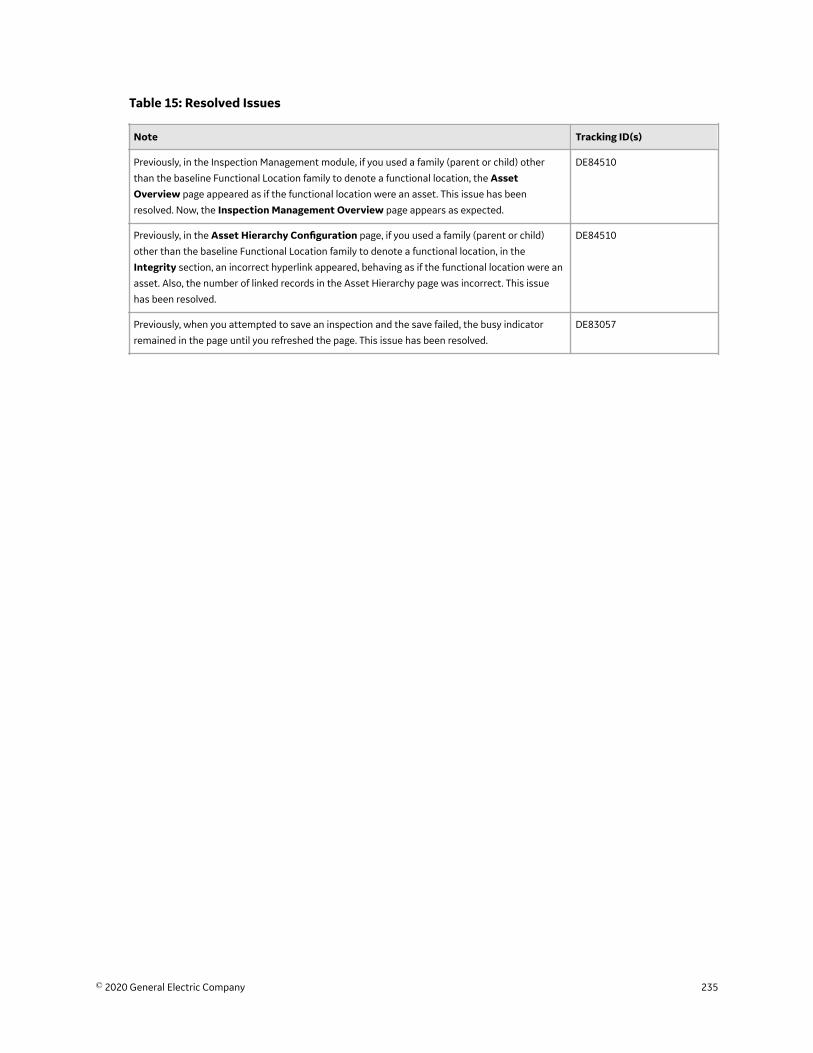
Table 15: Resolved Issues
Note Tracking ID(s)
Previously, in the Inspection Management module, if you used a family (parent or child) other
than the baseline Functional Location family to denote a functional location, the AssetOverview page appeared as if the functional location were an asset. This issue has been
resolved. Now, the Inspection Management Overview page appears as expected.
DE84510
Previously, in the Asset Hierarchy Configuration page, if you used a family (parent or child)
other than the baseline Functional Location family to denote a functional location, in the
Integrity section, an incorrect hyperlink appeared, behaving as if the functional location were an
asset. Also, the number of linked records in the Asset Hierarchy page was incorrect. This issue
has been resolved.
DE84510
Previously, when you attempted to save an inspection and the save failed, the busy indicator
remained in the page until you refreshed the page. This issue has been resolved.
DE83057
© 2020 General Electric Company 235


