172
FortiOS™ Handbook Install and System Administration for FortiOS 5.2

FortiOS™ Handbook Install and System Administration for FortiOS 5.2

Install and System Administration for FortiOS 5.2
July 4, 2014
01-502-142188-20130423
Copyright© 2014 Fortinet, Inc. All rights reserved. Fortinet®, FortiGate®, FortiCare® and
FortiGuard®, and certain other marks are registered trademarks of Fortinet, Inc., and other
Fortinet names herein may also be registered and/or common law trademarks of Fortinet. All
other product or company names may be trademarks of their respective owners. Performance
and other metrics contained herein were attained in internal lab tests under ideal conditions,
and actual performance and other resultsmay vary. Network variables, different network
environments and other conditions may affect performance results. Nothing herein represents
any binding commitment by Fortinet, and Fortinet disclaims all warranties, whether express or
implied, except to the extent Fortinet enters a binding written contract, signed by Fortinet’s
General Counsel, with a purchaser that expressly warrants that the identified product will
perform according to certain expressly-identified performance metrics and, in such event, only
the specific performance metrics expressly identified in such binding written contract shall be
binding on Fortinet. For absolute clarity, any such warranty will be limited to performance in the
same ideal conditions as in Fortinet’s internal lab tests. Fortinet disclaims in full any covenants,
representations,and guarantees pursuant hereto, whether express or implied. Fortinet reserves
the right to change, modify, transfer, or otherwise revise this publication without notice, and the
most current version of the publication shall be applicable.
Technical Documentation docs.fortinet.com
Knowledge Base kb.fortinet.com
Customer Service & Support support.fortinet.com
Training Services training.fortinet.com
FortiGuard fortiguard.com
Document Feedback [email protected]
Table of Contents
Change Log....................................................................................................... 9
Introduction..................................................................................................... 10How this guide is organized................................................................................... 10
Using the CLI .................................................................................................. 11Connecting to the CLI............................................................................................ 11
Connecting to the CLI using a local console ................................................... 11
Enabling access to the CLI through the network (SSH or Telnet) ................... 12
Connecting to the CLI using SSH.................................................................... 13
Connecting to the CLI using Telnet ................................................................. 14
Command syntax................................................................................................... 15
Terminology ..................................................................................................... 15
Indentation ....................................................................................................... 16
Notation ........................................................................................................... 16
Sub-commands ..................................................................................................... 18
Example of table commands ........................................................................... 20
Permissions ........................................................................................................... 21
Tips ........................................................................................................................ 22
Help.................................................................................................................. 22
Shortcuts and key commands......................................................................... 22
Command abbreviation ................................................................................... 23
Adding and removing options from lists .......................................................... 23
Environment variables...................................................................................... 24
Special characters ........................................................................................... 24
Using grep to filter get and show command output ........................................ 25
Language support and regular expressions .................................................... 26
Screen paging.................................................................................................. 28
Baud rate ......................................................................................................... 29
Editing the configuration file on an external host............................................. 29
Using Perl regular expressions ........................................................................ 29
Interfaces ........................................................................................................ 32Physical.................................................................................................................. 32
Interface settings ................................................................................................... 34
Interface configuration and settings ................................................................ 35
Software switch ..................................................................................................... 38
Soft switch example......................................................................................... 39
Virtual Switch ......................................................................................................... 40
Loopback interfaces .............................................................................................. 41
Redundant interfaces............................................................................................. 41
Page 3

One-armed sniffer .................................................................................................. 42
Aggregate Interfaces.............................................................................................. 43
DHCP addressing mode on an interface ............................................................... 44
PPPoE addressing mode on an interface.............................................................. 45
Administrative access............................................................................................ 47
Wireless ................................................................................................................. 47
Interface MTU packet size ..................................................................................... 48
Secondary IP addresses to an interface................................................................ 49
Virtual domains ...................................................................................................... 49
Virtual LANs ........................................................................................................... 50
Zones ..................................................................................................................... 51
Probing Interfaces.................................................................................................. 53
Central management...................................................................................... 54Adding a FortiGate to FortiManager ...................................................................... 54
FortiGate configuration .................................................................................... 54
FortiManager configuration.............................................................................. 55
Configuration through FortiManager ..................................................................... 56
Global objects .................................................................................................. 56
Locking the FortiGate web-based manager .................................................... 56
Firmware updates .................................................................................................. 56
FortiGuard.............................................................................................................. 57
Backup and restore configurations........................................................................ 57
Administrative domains ......................................................................................... 57
Monitoring....................................................................................................... 59Dashboard ............................................................................................................. 59
Widgets ............................................................................................................ 59
FortiClient software.......................................................................................... 60
sFlow...................................................................................................................... 60
Configuration ................................................................................................... 61
Monitor menus....................................................................................................... 61
Logging .................................................................................................................. 61
FortiCloud ........................................................................................................ 62
FortiGate memory ............................................................................................ 62
FortiGate hard disk .......................................................................................... 62
Syslog server ................................................................................................... 63
FortiAnalyzer .................................................................................................... 63
Sending logs using a secure connection ......................................................... 64
Packet Capture ...................................................................................................... 65
Alert email .............................................................................................................. 66
SNMP..................................................................................................................... 67
SNMP configuration settings ........................................................................... 68
Gigabit interfaces............................................................................................. 70
Table of Contents Page 4 Install and System Administration for FortiOS 5.0

SNMP agent..................................................................................................... 70
SNMP community ............................................................................................ 71
Enabling on the interface ................................................................................. 72
Fortinet MIBs.................................................................................................... 73
SNMP get command syntax.................................................................................. 74
VLANs .............................................................................................................. 76VLAN ID rules......................................................................................................... 77
VLAN switching and routing .................................................................................. 77
VLAN layer-2 switching.................................................................................... 77
VLAN layer-3 routing........................................................................................ 80
VLANs in NAT mode .............................................................................................. 83
Adding VLAN subinterfaces ............................................................................. 83
Configuring security policies and routing ........................................................ 85
Example VLAN configuration in NAT mode ........................................................... 86
General configuration steps............................................................................. 87
Configure the FortiGate unit ............................................................................ 88
Configure the VLAN switch.............................................................................. 94
Test the configuration ...................................................................................... 94
VLANs in transparent mode................................................................................... 95
VLANs and transparent mode.......................................................................... 95
Example of VLANs in transparent mode.......................................................... 97
General configuration steps............................................................................. 98
Configure the FortiGate unit ............................................................................ 98
Configure the Cisco switch and router .......................................................... 102
Test the configuration .................................................................................... 103
Troubleshooting VLAN issues.............................................................................. 103
Asymmetric routing........................................................................................ 104
Layer-2 and Arp traffic ................................................................................... 104
Forward-domain solution............................................................................... 106
NetBIOS ......................................................................................................... 107
STP forwarding .............................................................................................. 107
Too many VLAN interfaces ............................................................................ 108
PPTP and L2TP ............................................................................................. 109How PPTP VPNs work......................................................................................... 109
FortiGate unit as a PPTP server........................................................................... 111
Configuring user authentication for PPTP clients .......................................... 111
Enabling PPTP and specifying the PPTP IP address range ......................... 112
Adding the security policy ............................................................................. 113
Configuring the FortiGate unit for PPTP VPN...................................................... 114
Configuring the FortiGate unit for PPTP pass through........................................ 114
Configuring a virtual IP address..................................................................... 114
Configuring a port-forwarding security policy ............................................... 115
Testing PPTP VPN connections .......................................................................... 116
Table of Contents Page 5 Install and System Administration for FortiOS 5.0

Logging VPN events ............................................................................................ 116
Configuring L2TP VPNs ....................................................................................... 117
Network topology .......................................................................................... 118
L2TP infrastructure requirements ................................................................. 119
L2TP configuration overview .............................................................................. 119
Authenticating L2TP clients .......................................................................... 119
Enabling L2TP and specifying an address range ......................................... 120
Defining firewall source and destination addresses ..................................... 120
Adding the security policy ................................................................................... 121
Configuring a Linux client ............................................................................. 121
Monitoring L2TP sessions.............................................................................. 122
Testing L2TP VPN connections ..................................................................... 122
Logging L2TP VPN events ............................................................................. 122
Session helpers ............................................................................................ 123Viewing the session helper configuration ............................................................ 123
Changing the session helper configuration ......................................................... 124
Changing the protocol or port that a session helper listens on..................... 124
Disabling a session helper ............................................................................. 126
DCE-RPC session helper (dcerpc)....................................................................... 127
DNS session helpers (dns-tcp and dns-udp)....................................................... 127
File transfer protocol (FTP) session helper (ftp) ................................................... 127
H.245 session helpers (h245I and h245O)........................................................... 127
H.323 and RAS session helpers (h323 and ras) .................................................. 128
Alternate H.323 gatekeepers ......................................................................... 128
Media Gateway Controller Protocol (MGCP) session helper (mgcp)................... 128
ONC-RPC portmapper session helper (pmap) .................................................... 129
PPTP session helper for PPTP traffic (pptp) ........................................................ 129
Remote shell session helper (rsh) ........................................................................ 130
Real-Time Streaming Protocol (RTSP) session helper (rtsp) ............................... 131
Session Initiation Protocol (SIP) session helper (sip) ........................................... 131
Trivial File Transfer Protocol (TFTP) session helper (tftp) .................................... 131
Oracle TNS listener session helper (tns) .............................................................. 132
Advanced concepts...................................................................................... 133Dual internet connections (redundant Internet connections)............................... 133
Redundant interfaces..................................................................................... 133
Load sharing .................................................................................................. 136
Link redundancy and load sharing................................................................. 137
Single firewall vs. multiple virtual domains .......................................................... 137
Single firewall vs. vdoms................................................................................ 138
Modem................................................................................................................. 140
USB modem port ........................................................................................... 140
Modes ............................................................................................................ 140
Table of Contents Page 6 Install and System Administration for FortiOS 5.0
Additional modem configuration.................................................................... 143
Modem interface routing................................................................................ 143
FortiExtender ....................................................................................................... 143
Installing the 3G/4G modem.......................................................................... 143
Connecting the FortiExtender unit ................................................................. 143
Configuring the FortiExtender unit ................................................................. 144
Configuring the FortiGate unit........................................................................ 145
DHCP servers and relays..................................................................................... 146
DHCP Server configuration............................................................................ 146
DHCP in IPv6 ................................................................................................. 147
Service ........................................................................................................... 147
Lease time...................................................................................................... 147
DHCP options ................................................................................................ 148
Exclude addresses in DHCP a range............................................................. 148
DHCP Monitor................................................................................................ 148
Breaking a address lease............................................................................... 149
Assigning IP address by MAC address ............................................................... 149
DNS services ....................................................................................................... 149
DNS settings .................................................................................................. 149
Additional DNS CLI configuration .................................................................. 150
DNS server..................................................................................................... 150
Recursive DNS............................................................................................... 151
Dynamic DNS....................................................................................................... 152
FortiClient discovery and registration .................................................................. 152
FortiClient discovery ...................................................................................... 153
FortiClient Registration .................................................................................. 153
IP addresses for self-originated traffic................................................................. 153
Administration for schools ................................................................................... 154
Security policies............................................................................................. 154
DNS................................................................................................................ 155
Encrypted traffic (HTTPS) .............................................................................. 155
FTP................................................................................................................. 155
Example security policies .............................................................................. 155
UTM security profiles ..................................................................................... 156
Logging .......................................................................................................... 157
Replacement messages list ................................................................................. 157
Replacement message images...................................................................... 158
Adding images to replacement messages..................................................... 158
Modifying replacement messages ................................................................. 158
Alert Mail replacement messages.................................................................. 159
Authentication replacement messages.......................................................... 159
Captive Portal Default replacement messages.............................................. 160
Device Detection Portal replacement message............................................. 160
Email replacement messages ........................................................................ 160
Table of Contents Page 7 Install and System Administration for FortiOS 5.0

Endpoint Control replacement message ....................................................... 160
FTP replacement messages .......................................................................... 160
FortiGuard Web Filtering replacement messages ......................................... 161
HTTP replacement messages........................................................................ 161
IM replacement messages............................................................................. 161
NNTP replacement messages ....................................................................... 161
Spam replacement messages ....................................................................... 161
NAC quarantine replacement messages ....................................................... 161
SSL VPN replacement message.................................................................... 161
Web Proxy replacement messages ............................................................... 162
Traffic quota control replacement messages ................................................ 162
MM1 replacement messages......................................................................... 162
MM3 replacement messages......................................................................... 162
MM4 replacement messages......................................................................... 162
MM7 replacement messages......................................................................... 162
MMS replacement messages ........................................................................ 163
Replacement message groups ...................................................................... 163
Disk ...................................................................................................................... 163
Formatting the disk ........................................................................................ 163
Setting space quotas ..................................................................................... 163
CLI Scripts ........................................................................................................... 164
Uploading script files ..................................................................................... 164
Rejecting PING requests ..................................................................................... 164
Opening TCP 113 ................................................................................................ 165
Obfuscate HTTP responses................................................................................. 166
Index .............................................................................................................. 167
Table of Contents Page 8 Install and System Administration for FortiOS 5.0

Change Log
Date Change Description
Initial release.
Page 9
Introduction
Welcome and thank you for selecting Fortinet products for your network protection.
This guide explains how to get started with a FortiGate unit, as well as examining basic
configuration tasks, best practices, and more advanced configuration options.
How this guide is organized
This guide contains the following sections:
Using the CLI provides an overview of the command line interface (CLI) for FortiOS. If you are
new to the FortiOS CLI, this chapter provides a high level overview of how to use this method of
administration.
Interfaces describes the FortiGate interface options and configuration choices.
Central management describes how to configure the FortiGate unit to use FortiManager as a
method of maintaining the device and other features that FortiManager has to facilitate the
administration of multiple devices.
Monitoring describes various methods of collecting log data and tracking traffic flows and
tends.
VLANs discusses the implementation of virtual local area networks (VLANs) in FortiOS and how
to configure and use them.
PPTP and L2TP describes these virtual private network (VPN) types and how to configure them.
Session helpers describes what session helpers are and how to view and configure them.
Advanced concepts describes more involved administrative topics to enhance network security
and traffic efficiency.
Page 10
Using the CLI
The command line interface (CLI) is an alternative configuration tool to the web-based manager.
While the configuration of the web-based manager uses a point-and-click method, the CLI
requires typing commands or uploading batches of commands from a text file, like a
configuration script.
This section also explains common CLI tasks that an administrator does on a regular basis and
includes the topics:
• Connecting to the CLI
• Command syntax
• Sub-commands
• Permissions
• Tips
Connecting to the CLI
You can access the CLI in two ways:
• Locally — Connect your computer directly to the FortiGate unit’s console port. Local access
is required in some cases:
• If you are installing your FortiGate unit for the first time and it is not yet configured to
connect to your network, unless you reconfigure your computer’s network settings for
a peer connection, you may only be able to connect to the CLI using a local serial
console connection.
• Restoring the firmware utilizes a boot interrupt. Network access to the CLI is not
available until after the boot process has completed, making local CLI access the only
viable option.
• Through the network — Connect your computer through any network attached to one of the
FortiGate unit’s network ports. The network interface must have enabled Telnet or SSH
administrative access if you will connect using an SSH/Telnet client, or HTTP/HTTPS
administrative access if you will connect using the CLI Console widget in the web-based
manager.
Connecting to the CLI using a local console
Local console connections to the CLI are formed by directly connecting your management
computer or console to the FortiGate unit, using its DB-9 or RJ-45 console port. To connect to
the local console you need:
• A computer with an available serial communications (COM) port.
• The RJ-45-to-DB-9 or null modem cable included in your FortiGate package.
• Terminal emulation software such as HyperTerminal for Microsoft Windows.
Page 11
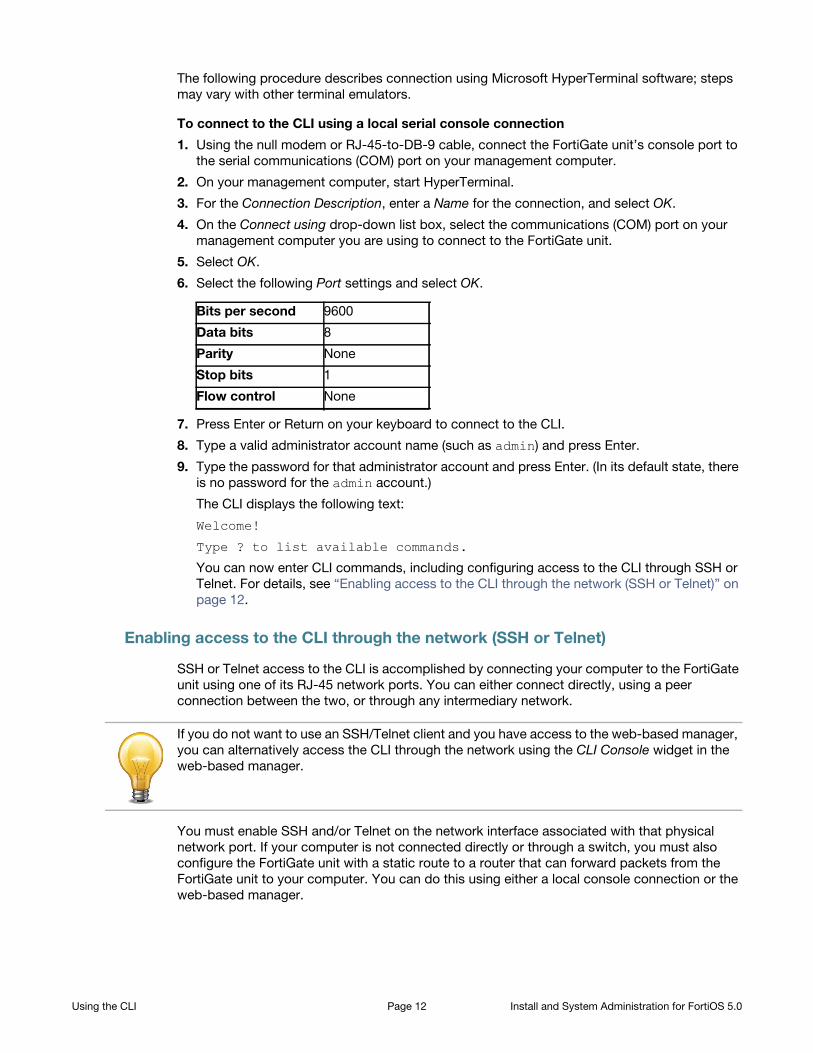
The following procedure describes connection using Microsoft HyperTerminal software; steps
may vary with other terminal emulators.
To connect to the CLI using a local serial console connection
1. Using the null modem or RJ-45-to-DB-9 cable, connect the FortiGate unit’s console port to
the serial communications (COM) port on your management computer.
2. On your management computer, start HyperTerminal.
3. For the Connection Description, enter a Name for the connection, and select OK.
4. On the Connect using drop-down list box, select the communications (COM) port on your
management computer you are using to connect to the FortiGate unit.
5. Select OK.
6. Select the following Port settings and select OK.
7. Press Enter or Return on your keyboard to connect to the CLI.
8. Type a valid administrator account name (such as admin) and press Enter.
9. Type the password for that administrator account and press Enter. (In its default state, there
is no password for the admin account.)
The CLI displays the following text:
Welcome!
Type ? to list available commands.
You can now enter CLI commands, including configuring access to the CLI through SSH or
Telnet. For details, see “Enabling access to the CLI through the network (SSH or Telnet)” on
page 12.
Enabling access to the CLI through the network (SSH or Telnet)
SSH or Telnet access to the CLI is accomplished by connecting your computer to the FortiGate
unit using one of its RJ-45 network ports. You can either connect directly, using a peer
connection between the two, or through any intermediary network.
If you do not want to use an SSH/Telnet client and you have access to the web-based manager,
you can alternatively access the CLI through the network using the CLI Console widget in the
web-based manager.
You must enable SSH and/or Telnet on the network interface associated with that physical
network port. If your computer is not connected directly or through a switch, you must also
configure the FortiGate unit with a static route to a router that can forward packets from the
FortiGate unit to your computer. You can do this using either a local console connection or the
web-based manager.
Bits per second 9600
Data bits 8
Parity None
Stop bits 1
Flow control None
Using the CLI Page 12 Install and System Administration for FortiOS 5.0
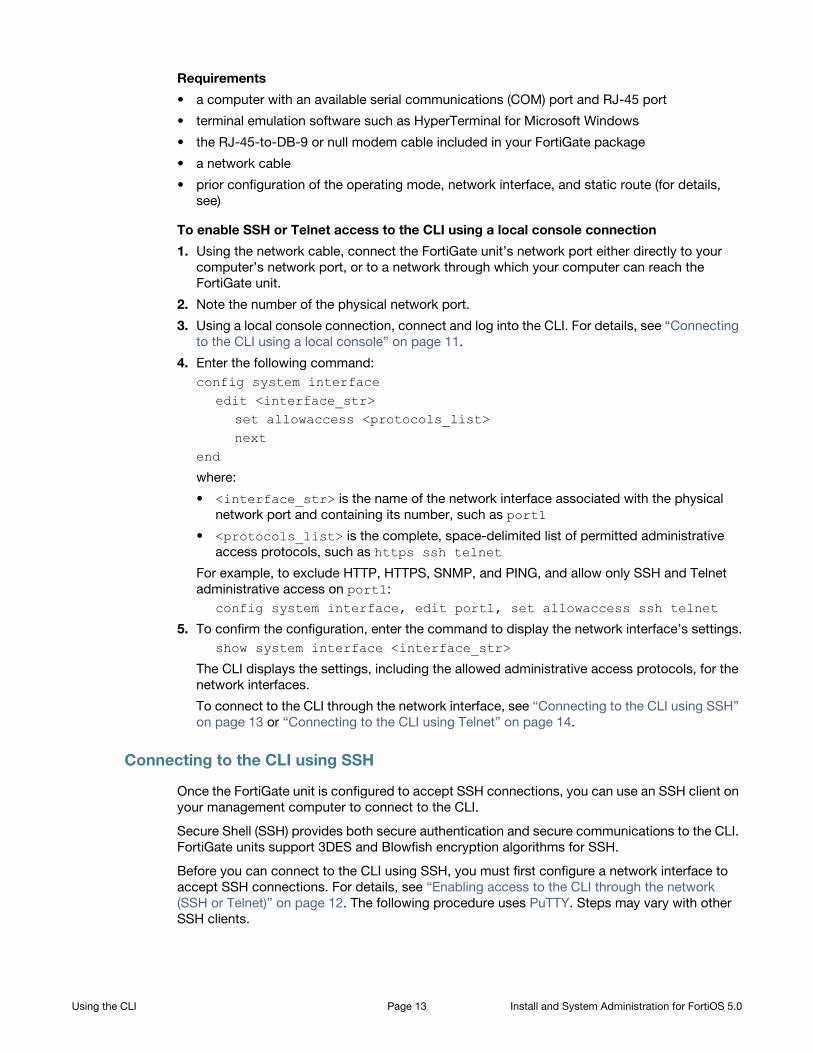
Requirements
• a computer with an available serial communications (COM) port and RJ-45 port
• terminal emulation software such as HyperTerminal for Microsoft Windows
• the RJ-45-to-DB-9 or null modem cable included in your FortiGate package
• a network cable
• prior configuration of the operating mode, network interface, and static route (for details,
see)
To enable SSH or Telnet access to the CLI using a local console connection
1. Using the network cable, connect the FortiGate unit’s network port either directly to your
computer’s network port, or to a network through which your computer can reach the
FortiGate unit.
2. Note the number of the physical network port.
3. Using a local console connection, connect and log into the CLI. For details, see “Connecting
to the CLI using a local console” on page 11.
4. Enter the following command:
config system interfaceedit <interface_str>
set allowaccess <protocols_list>next
end
where:
• <interface_str> is the name of the network interface associated with the physical
network port and containing its number, such as port1
• <protocols_list> is the complete, space-delimited list of permitted administrative
access protocols, such as https ssh telnet
For example, to exclude HTTP, HTTPS, SNMP, and PING, and allow only SSH and Telnet
administrative access on port1:
config system interface, edit port1, set allowaccess ssh telnet
5. To confirm the configuration, enter the command to display the network interface’s settings.
show system interface <interface_str>
The CLI displays the settings, including the allowed administrative access protocols, for the
network interfaces.
To connect to the CLI through the network interface, see “Connecting to the CLI using SSH”
on page 13 or “Connecting to the CLI using Telnet” on page 14.
Connecting to the CLI using SSH
Once the FortiGate unit is configured to accept SSH connections, you can use an SSH client on
your management computer to connect to the CLI.
Secure Shell (SSH) provides both secure authentication and secure communications to the CLI.
FortiGate units support 3DES and Blowfish encryption algorithms for SSH.
Before you can connect to the CLI using SSH, you must first configure a network interface to
accept SSH connections. For details, see “Enabling access to the CLI through the network
(SSH or Telnet)” on page 12. The following procedure uses PuTTY. Steps may vary with other
SSH clients.
Using the CLI Page 13 Install and System Administration for FortiOS 5.0
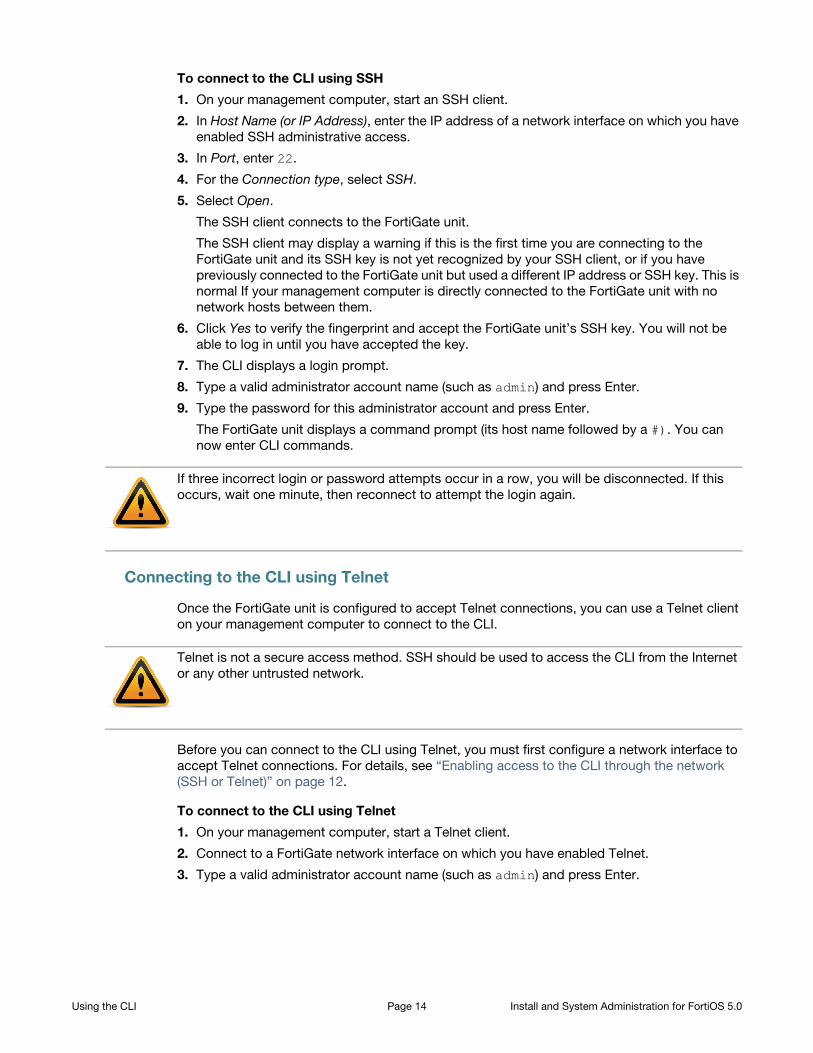
To connect to the CLI using SSH
1. On your management computer, start an SSH client.
2. In Host Name (or IP Address), enter the IP address of a network interface on which you have
enabled SSH administrative access.
3. In Port, enter 22.
4. For the Connection type, select SSH.
5. Select Open.
The SSH client connects to the FortiGate unit.
The SSH client may display a warning if this is the first time you are connecting to the
FortiGate unit and its SSH key is not yet recognized by your SSH client, or if you have
previously connected to the FortiGate unit but used a different IP address or SSH key. This is
normal If your management computer is directly connected to the FortiGate unit with no
network hosts between them.
6. Click Yes to verify the fingerprint and accept the FortiGate unit’s SSH key. You will not be
able to log in until you have accepted the key.
7. The CLI displays a login prompt.
8. Type a valid administrator account name (such as admin) and press Enter.
9. Type the password for this administrator account and press Enter.
The FortiGate unit displays a command prompt (its host name followed by a #). You can
now enter CLI commands.
Connecting to the CLI using Telnet
Once the FortiGate unit is configured to accept Telnet connections, you can use a Telnet client
on your management computer to connect to the CLI.
Telnet is not a secure access method. SSH should be used to access the CLI from the Internet
or any other untrusted network.
Before you can connect to the CLI using Telnet, you must first configure a network interface to
accept Telnet connections. For details, see “Enabling access to the CLI through the network
(SSH or Telnet)” on page 12.
To connect to the CLI using Telnet
1. On your management computer, start a Telnet client.
2. Connect to a FortiGate network interface on which you have enabled Telnet.
3. Type a valid administrator account name (such as admin) and press Enter.
If three incorrect login or password attempts occur in a row, you will be disconnected. If this
occurs, wait one minute, then reconnect to attempt the login again.
Using the CLI Page 14 Install and System Administration for FortiOS 5.0

4. Type the password for this administrator account and press Enter.
The FortiGate unit displays a command prompt (its host name followed by a #). You can
now enter CLI commands.
Command syntax
When entering a command, the command line interface (CLI) requires that you use valid syntax
and conform to expected input constraints. It will reject invalid commands.
Fortinet documentation uses the following conventions to describe valid command syntax
Terminology
Each command line consists of a command word that is usually followed by words for the
configuration data or other specific item that the command uses or affects:
get system admin
To describe the function of each word in the command line, especially if that nature has
changed between firmware versions, Fortinet uses terms with the following definitions.
Figure 1: Command syntax terminology
• command — A word that begins the command line and indicates an action that the
FortiGate unit should perform on a part of the configuration or host on the network, such as
config or execute. Together with other words, such as fields or values, that end when you
press the Enter key, it forms a command line. Exceptions include multiline command lines,
which can be entered using an escape sequence. (See “Shortcuts and key commands” on
page 22.)
Valid command lines must be unambiguous if abbreviated. (See “Command abbreviation”
on page 23.) Optional words or other command line permutations are indicated by syntax
notation. (See “Notation” on page 16.)
• sub-command — A kind of command that is available only when nested within the scope of
another command. After entering a command, its applicable sub-commands are available to
you until you exit the scope of the command, or until you descend an additional level into
If three incorrect login or password attempts occur in a row, you will be disconnected. If this
occurs, wait one minute, then reconnect to attempt the login again.
Option
ValueField
Command Sub-command
Table
set ip <interface_ipv4mask>
config system interface
edit <port_name>
set status {up | down}
next
end
Object
Using the CLI Page 15 Install and System Administration for FortiOS 5.0

another sub-command. Indentation is used to indicate levels of nested commands. (See
“Indentation” on page 16.)
Not all top-level commands have sub-commands. Available sub-commands vary by their
containing scope. (See “Sub-commands” on page 18.)
• object — A part of the configuration that contains tables and/or fields. Valid command lines
must be specific enough to indicate an individual object.
• table — A set of fields that is one of possibly multiple similar sets which each have a name
or number, such as an administrator account, policy, or network interface. These named or
numbered sets are sometimes referenced by other parts of the configuration that use them.
(See “Notation” on page 16.)
• field — The name of a setting, such as ip or hostname. Fields in some tables must be
configured with values. Failure to configure a required field will result in an invalid object
configuration error message, and the FortiGate unit will discard the invalid table.
• value — A number, letter, IP address, or other type of input that is usually your configuration
setting held by a field. Some commands, however, require multiple input values which may
not be named but are simply entered in sequential order in the same command line. Valid
input types are indicated by constraint notation. (See “Notation” on page 16.)
• option — A kind of value that must be one or more words from of a fixed set of options. (See
“Notation” on page 16.)
Indentation
Indentation indicates levels of nested commands, which indicate what other subcommittees are
available from within the scope. For example, the edit sub-command is available only within a
command that affects tables, and the next sub-command is available only from within the
edit sub-command:
config system interfaceedit port1
set status upnext
end
For information about available sub-commands, see “Sub-commands” on page 18.
Notation
Brackets, braces, and pipes are used to denote valid permutations of the syntax. Constraint
notations, such as <address_ipv4>, indicate which data types or string patterns are
acceptable value input.
Table 1: Command syntax notation
Convention Description
Square brackets [ ] A non-required word or series of words. For example:
[verbose {1 | 2 | 3}]
indicates that you may either omit or type both the verbose word
and its accompanying option, such as verbose 3.
Using the CLI Page 16 Install and System Administration for FortiOS 5.0

Angle brackets < > A word constrained by data type. The angled brackets contain a
descriptive name followed by an underscore ( _ ) and suffix that
indicates the valid data type. For example, <retries_int>,
indicates that you should enter a number of retries, such as 5.
Data types include:• <xxx_name>: A name referring to another part of the
configuration, such as policy_A.
• <xxx_index>: An index number referring to another part of the
configuration, such as 0 for the first static route.
• <xxx_pattern>: A regular expression or word with wild cards
that matches possible variations, such as *@example.com to
match all email addresses ending in @example.com.
• <xxx_fqdn>: A fully qualified domain name (FQDN), such as
mail.example.com.
• <xxx_email>: An email address, such as [email protected].
• <xxx_ipv4>: An IPv4 address, such as 192.168.1.99.
• <xxx_v4mask>: A dotted decimal IPv4 netmask, such as
255.255.255.0.
• <xxx_ipv4mask>: A dotted decimal IPv4 address and netmask
separated by a space, such as
192.168.1.99 255.255.255.0.
• <xxx_ipv4/mask>: A dotted decimal IPv4 address and
CIDR-notation netmask separated by a slash, such as
192.168.1.1/24.
• <xxx_ipv4range>: A hyphen ( - )-delimited inclusive range of
IPv4 addresses, such as 192.168.1.1-192.168.1.255.
• <xxx_ipv6>: A colon( : )-delimited hexadecimal IPv6 address,
such as 3f2e:6a8b:78a3:0d82:1725:6a2f:0370:6234.
• <xxx_v6mask>: An IPv6 netmask, such as /96.
• <xxx_ipv6mask>: A dotted decimal IPv6 address and netmask
separated by a space.
• <xxx_str>: A string of characters that is not another data type,
such as P@ssw0rd. Strings containing spaces or special
characters must be surrounded in quotes or use escape
sequences. See “Special characters” on page 24.
• <xxx_int>: An integer number that is not another data type,
such as 15 for the number of minutes.
Curly braces { } A word or series of words that is constrained to a set of options
delimited by either vertical bars or spaces. You must enter at least
one of the options, unless the set of options is surrounded by square
brackets [ ].
Table 1: Command syntax notation
Using the CLI Page 17 Install and System Administration for FortiOS 5.0

Sub-commands
Each command line consists of a command word that is usually followed by words for the
configuration data or other specific item that the command uses or affects:
get system admin
Sub-commands are available from within the scope of some commands.When you enter a
sub-command level, the command prompt changes to indicate the name of the current
command scope. For example, after entering:
config system admin
the command prompt becomes:
(admin)#
Applicable sub-commands are available to you until you exit the scope of the command, or until
you descend an additional level into another sub-command.
For example, the edit sub-command is available only within a command that affects tables;
the next sub-command is available only from within the edit sub-command:
config system interfaceedit port1
set status upnext
end
Sub-command scope is indicated by indentation. See “Indentation” on page 16.
Available sub-commands vary by command.From a command prompt within config, two
types of sub-commands might become available:
• commands affecting fields
• commands affecting tables
Options delimited by vertical bars |
Mutually exclusive options. For example:
{enable | disable}
indicates that you must enter either enable or disable, but must
not enter both.
Options delimited by spaces
Non-mutually exclusive options. For example:
{http https ping snmp ssh telnet}
indicates that you may enter all or a subset of those options, in any
order, in a space-delimited list, such as:
ping https ssh
Table 1: Command syntax notation
Using the CLI Page 18 Install and System Administration for FortiOS 5.0

Table 2: Commands for tables
clone <table> Clone (or make a copy of) a table from the current object.
For example, in config firewall policy, you could enter the
following command to clone security policy 27 to create security policy 30:
clone 27 to 30
In config antivirus profile, you could enter the following
command to clone an antivirus profile named av_pro_1 to create a new
antivirus profile named av_pro_2:
clone av_pro_1 to av_pro_2
clone may not be available for all tables.
delete <table> Remove a table from the current object.
For example, in config system admin, you could delete an
administrator account named newadmin by typing delete newadmin
and pressing Enter. This deletes newadmin and all its fields, such as
newadmin’s first-name and email-address.
delete is only available within objects containing tables.
edit <table> Create or edit a table in the current object.
For example, in config system admin:
• edit the settings for the default admin administrator account by typing
edit admin.
• add a new administrator account with the name newadmin and edit
newadmin‘s settings by typing edit newadmin.
edit is an interactive sub-command: further sub-commands are available
from within edit.
edit changes the prompt to reflect the table you are currently editing.
edit is only available within objects containing tables.
In objects such as security policies, <table> is a sequence number. To
create a new entry without the risk of overwriting an existing one, enter
edit 0. The CLI initially confirms the creation of entry 0, but assigns the
next unused number after you finish editing and enter end.
end Save the changes to the current object and exit the config command.
This returns you to the top-level command prompt.
get List the configuration of the current object or table.
• In objects, get lists the table names (if present), or fields and their
values.
• In a table, get lists the fields and their values.
For more information on get commands, see the CLI Reference.
Using the CLI Page 19 Install and System Administration for FortiOS 5.0

Example of table commands
From within the system admin object, you might enter:
edit admin_1
The CLI acknowledges the new table, and changes the command prompt to show that you are
now within the admin_1 table:
new entry 'admin_1' added(admin_1)#
purge Remove all tables in the current object.
For example, in config user local, you could type get to see the list
of user names, then type purge and then y to confirm that you want to
delete all users.
purge is only available for objects containing tables.
Caution: Back up the FortiGate unit before performing a purge. purge
cannot be undone. To restore purged tables, the configuration must be
restored from a backup.
Caution: Do not purge system interface or system admin tables.
purge does not provide default tables. This can result in being unable to
connect or log in, requiring the FortiGate unit to be formatted and restored.
rename <table> to <table>
Rename a table.
For example, in config system admin, you could rename admin3 to
fwadmin by typing rename admin3 to fwadmin.
rename is only available within objects containing tables.
show Display changes to the default configuration. Changes are listed in the
form of configuration commands.
Table 2: Commands for tables
Table 3: Commands for fields
abort Exit both the edit and/or config commands without saving the fields.
append Add an option to an existing list.
end Save the changes made to the current table or object fields, and exit the
config command. (To exit without saving, use abort instead.)
get List the configuration of the current object or table.
• In objects, get lists the table names (if present), or fields and their values.
• In a table, get lists the fields and their values.
move Move an object within a list, when list order is important. For example,
rearranging security policies within the policy list.
Using the CLI Page 20 Install and System Administration for FortiOS 5.0

Example of field commands
From within the admin_1 table, you might enter:
set password my1stExamplePassword
to assign the value my1stExamplePassword to the password field. You might then enter the
next command to save the changes and edit the next administrator’s table.
Permissions
Depending on the account that you use to log in to the FortiGate unit, you may not have
complete access to all CLI commands. Access profiles control which CLI commands an
administrator account can access. Access profiles assign either read, write, or no access to
each area of the FortiGate software. To view configurations, you must have read access. To
make changes, you must have write access.
Unlike other administrator accounts, the administrator account named admin exists by default
and cannot be deleted. The admin administrator account is similar to a root administrator
account. This administrator account always has full permission to view and change all FortiGate
configuration options, including viewing and changing all other administrator accounts. Its
name and permissions cannot be changed. It is the only administrator account that can reset
next Save the changes you have made in the current table’s fields, and exit the
edit command to the object prompt. (To save and exit completely to the root
prompt, use end instead.)
next is useful when you want to create or edit several tables in the same
object, without leaving and re-entering the config command each time.
next is only available from a table prompt; it is not available from an object
prompt.
select Clear all options except for those specified.
For example, if a group contains members A, B, C, and D and you remove all
users except for B, use the command select member B.
set <field> <value>
Set a field’s value.
For example, in config system admin, after typing edit admin, you
could type set password newpass to change the password of the admin
administrator to newpass.
Note: When using set to change a field containing a space-delimited list,
type the whole new list. For example, set <field> <new-value> will
replace the list with the <new-value> rather than appending <new-value>
to the list.
show Display changes to the default configuration. Changes are listed in the form of
configuration commands.
unselect Remove an option from an existing list.
unset <field> Reset the table or object’s fields to default values.
For example, in config system admin, after typing edit admin, typing
unset password resets the password of the admin administrator account
to the default (in this case, no password).
Table 3: Commands for fields
Using the CLI Page 21 Install and System Administration for FortiOS 5.0

another administrator’s password without being required to enter that administrator’s existing
password.
Set a strong password for the admin administrator account, and change the password
regularly. By default, this administrator account has no password. Failure to maintain the
password of the admin administrator account could compromise the security of your FortiGate
unit.
For complete access to all commands, you must log in with the administrator account named
admin.
Tips
Basic features and characteristics of the CLI environment provide support and ease of use for
many CLI tasks.
Help
To display brief help during command entry, press the question mark (?) key.
• Press the question mark (?) key at the command prompt to display a list of the commands
available and a description of each command.
• Type a word or part of a word, then press the question mark (?) key to display a list of valid
word completions or subsequent words, and to display a description of each.
Shortcuts and key commands
Table 4: Shortcuts and key commands
Action Keys
List valid word completions or subsequent words.
If multiple words could complete your entry, display all possible completions
with helpful descriptions of each.
?
Complete the word with the next available match.
Press the key multiple times to cycle through available matches.
Tab
Recall the previous command.
Command memory is limited to the current session.
Up arrow, or
Ctrl + P
Recall the next command. Down arrow,
or
Ctrl + N
Move the cursor left or right within the command line. Left or Right
arrow
Move the cursor to the beginning of the command line. Ctrl + A
Move the cursor to the end of the command line. Ctrl + E
Using the CLI Page 22 Install and System Administration for FortiOS 5.0
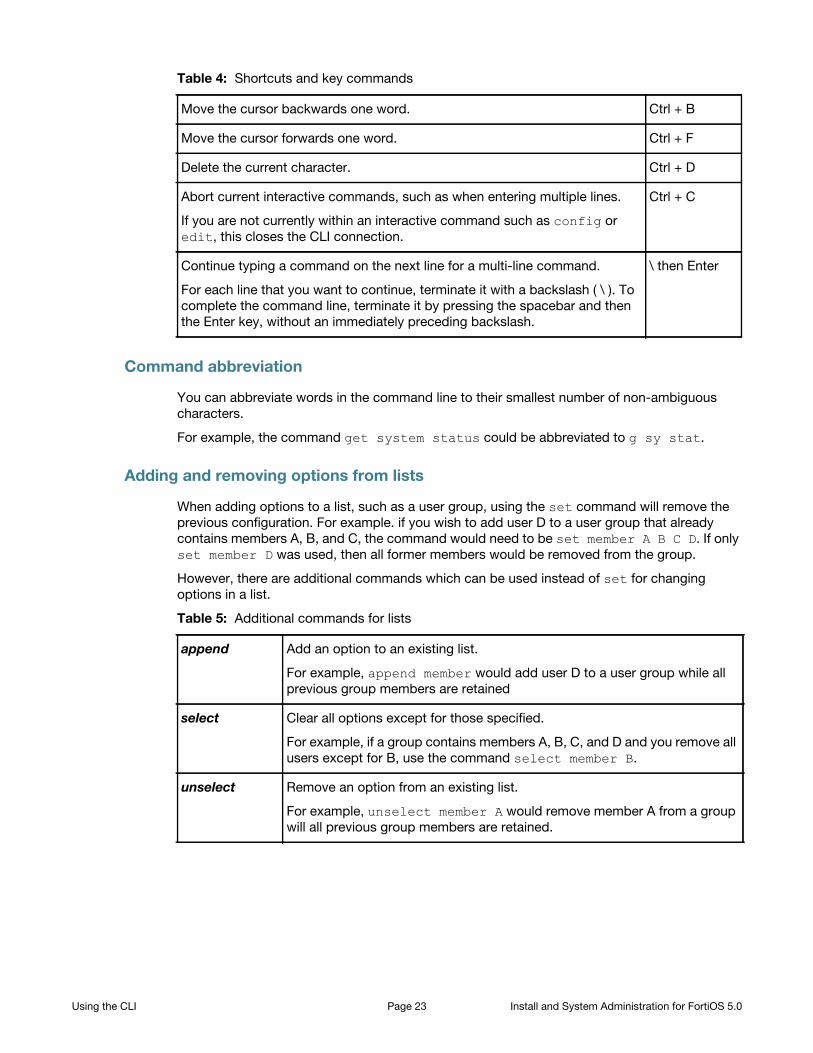
Command abbreviation
You can abbreviate words in the command line to their smallest number of non-ambiguous
characters.
For example, the command get system status could be abbreviated to g sy stat.
Adding and removing options from lists
When adding options to a list, such as a user group, using the set command will remove the
previous configuration. For example. if you wish to add user D to a user group that already
contains members A, B, and C, the command would need to be set member A B C D. If only
set member D was used, then all former members would be removed from the group.
However, there are additional commands which can be used instead of set for changing
options in a list.
append Add an option to an existing list.
For example, append member would add user D to a user group while all
previous group members are retained
select Clear all options except for those specified.
For example, if a group contains members A, B, C, and D and you remove all
users except for B, use the command select member B.
unselect Remove an option from an existing list.
For example, unselect member A would remove member A from a group
will all previous group members are retained.
Move the cursor backwards one word. Ctrl + B
Move the cursor forwards one word. Ctrl + F
Delete the current character. Ctrl + D
Abort current interactive commands, such as when entering multiple lines.
If you are not currently within an interactive command such as config or
edit, this closes the CLI connection.
Ctrl + C
Continue typing a command on the next line for a multi-line command.
For each line that you want to continue, terminate it with a backslash ( \ ). To
complete the command line, terminate it by pressing the spacebar and then
the Enter key, without an immediately preceding backslash.
\ then Enter
Table 4: Shortcuts and key commands
Table 5: Additional commands for lists
Using the CLI Page 23 Install and System Administration for FortiOS 5.0
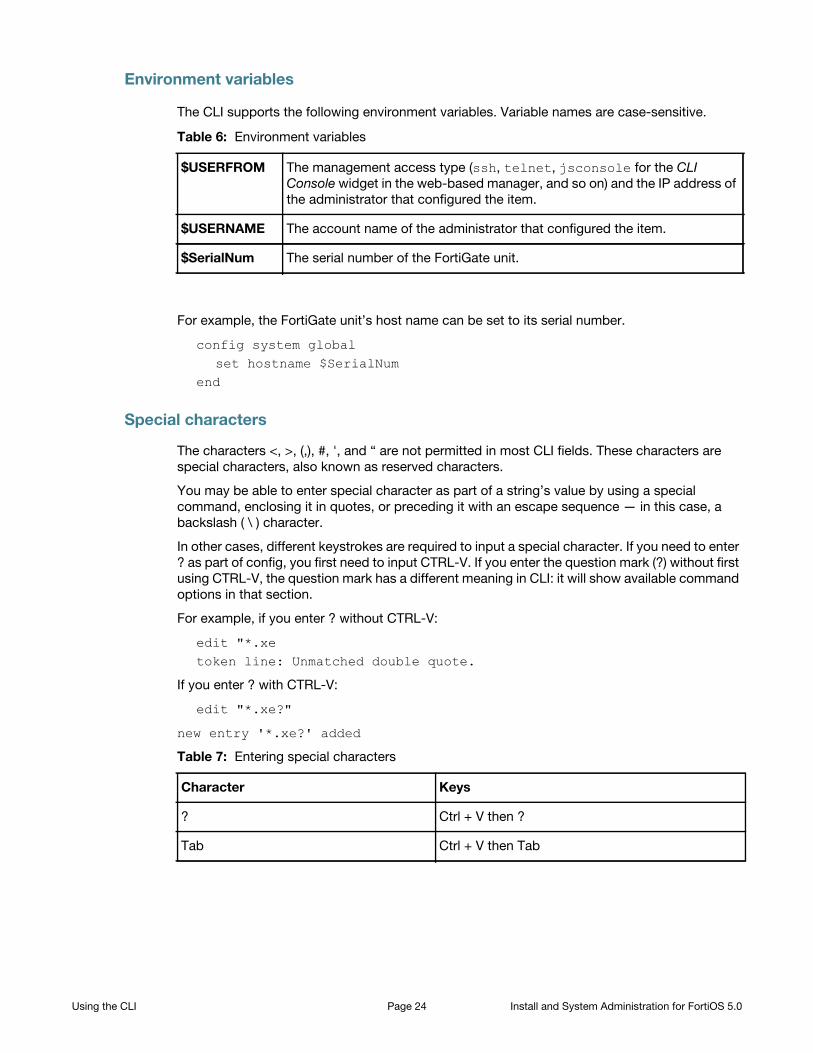
Environment variables
The CLI supports the following environment variables. Variable names are case-sensitive.
$USERFROM The management access type (ssh, telnet, jsconsole for the CLI
Console widget in the web-based manager, and so on) and the IP address of
the administrator that configured the item.
$USERNAME The account name of the administrator that configured the item.
$SerialNum The serial number of the FortiGate unit.
For example, the FortiGate unit’s host name can be set to its serial number.
config system globalset hostname $SerialNum
end
Special characters
The characters <, >, (,), #, ', and “ are not permitted in most CLI fields. These characters are
special characters, also known as reserved characters.
You may be able to enter special character as part of a string’s value by using a special
command, enclosing it in quotes, or preceding it with an escape sequence — in this case, a
backslash ( \ ) character.
In other cases, different keystrokes are required to input a special character. If you need to enter
? as part of config, you first need to input CTRL-V. If you enter the question mark (?) without first
using CTRL-V, the question mark has a different meaning in CLI: it will show available command
options in that section.
For example, if you enter ? without CTRL-V:
edit "*.xe token line: Unmatched double quote.
If you enter ? with CTRL-V:
edit "*.xe?"
new entry '*.xe?' added
Table 6: Environment variables
Table 7: Entering special characters
Character Keys
? Ctrl + V then ?
Tab Ctrl + V then Tab
Using the CLI Page 24 Install and System Administration for FortiOS 5.0
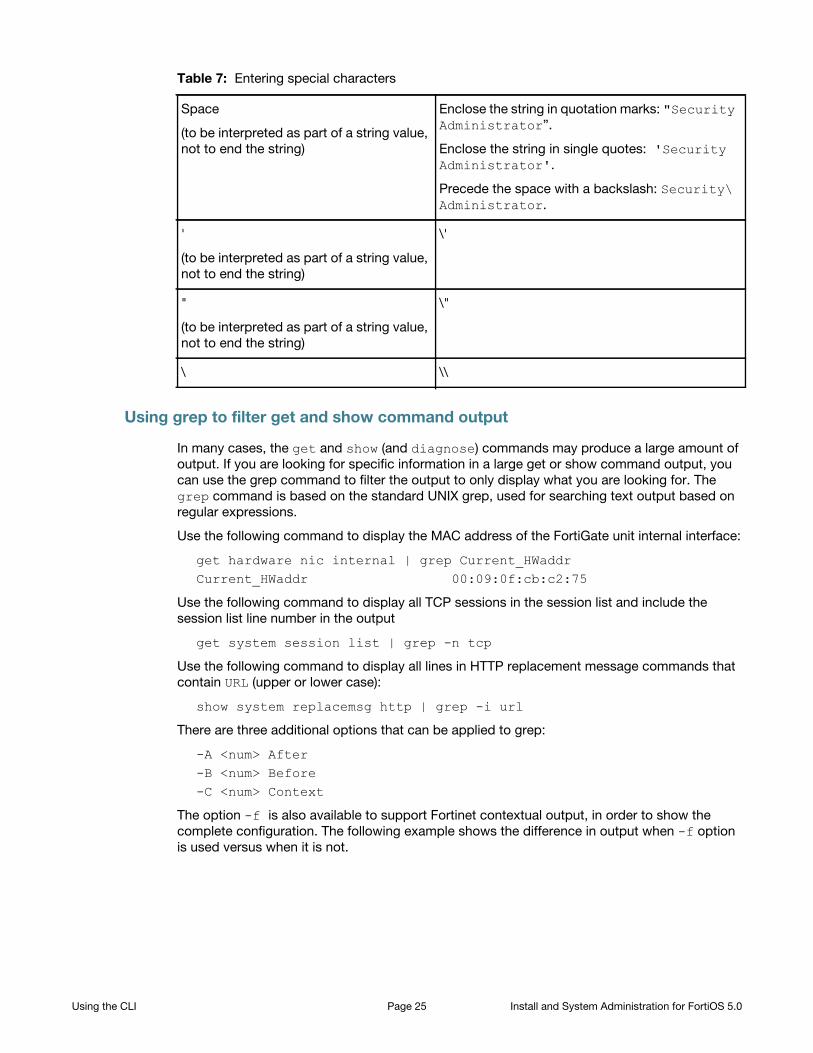
Using grep to filter get and show command output
In many cases, the get and show (and diagnose) commands may produce a large amount of
output. If you are looking for specific information in a large get or show command output, you
can use the grep command to filter the output to only display what you are looking for. The
grep command is based on the standard UNIX grep, used for searching text output based on
regular expressions.
Use the following command to display the MAC address of the FortiGate unit internal interface:
get hardware nic internal | grep Current_HWaddrCurrent_HWaddr 00:09:0f:cb:c2:75
Use the following command to display all TCP sessions in the session list and include the
session list line number in the output
get system session list | grep -n tcp
Use the following command to display all lines in HTTP replacement message commands that
contain URL (upper or lower case):
show system replacemsg http | grep -i url
There are three additional options that can be applied to grep:
-A <num> After-B <num> Before-C <num> Context
The option -f is also available to support Fortinet contextual output, in order to show the
complete configuration. The following example shows the difference in output when -f option
is used versus when it is not.
Space
(to be interpreted as part of a string value,
not to end the string)
Enclose the string in quotation marks: "Security Administrator”.
Enclose the string in single quotes: 'Security Administrator'.
Precede the space with a backslash: Security\ Administrator.
'
(to be interpreted as part of a string value,
not to end the string)
\'
"
(to be interpreted as part of a string value,
not to end the string)
\"
\ \\
Table 7: Entering special characters
Using the CLI Page 25 Install and System Administration for FortiOS 5.0

Using -f:
show | grep -f ldap-group1config user group
edit "ldap-group1"set member "pc40-LDAP"
nextendconfig firewall policy
edit 2set srcintf "port31"set dstintf "port32"set srcaddr "all"set action acceptset identity-based enableset nat enableconfig identity-based-policy
edit 1set schedule "always"set groups "ldap-group1"set dstaddr "all"set service "ALL"
nextend
nextend
Without using -f:
show | grep ldap-group1edit "ldap-group1"
set groups "ldap-group1"
Language support and regular expressions
Characters such as ñ, é, symbols, and ideographs are sometimes acceptable input. Support
varies by the nature of the item being configured. CLI commands, objects, field names, and
options must use their exact ASCII characters, but some items with arbitrary names or values
may be input using your language of choice. To use other languages in those cases, you must
use the correct encoding.
Input is stored using Unicode UTF-8 encoding but is not normalized from other encodings into
UTF-8 before it is stored. If your input method encodes some characters differently than in
UTF-8, your configured items may not display or operate as expected.
Regular expressions are especially impacted. Matching uses the UTF-8 character values. If you
enter a regular expression using another encoding, or if an HTTP client sends a request in an
encoding other than UTF-8, matches may not be what you expect.
For example, with Shift-JIS, backslashes ( \ ) could be inadvertently interpreted as the symbol
for the Japanese yen ( ¥ ) and vice versa. A regular expression intended to match HTTP
requests containing money values with a yen symbol therefore may not work it if the symbol is
entered using the wrong encoding.
Using the CLI Page 26 Install and System Administration for FortiOS 5.0

For best results, you should:
• use UTF-8 encoding, or
• use only the characters whose numerically encoded values are the same in UTF-8, such as
the US-ASCII characters that are also encoded using the same values in ISO 8859-1,
Windows code page 1252, Shift-JIS and other encodings, or
• for regular expressions that must match HTTP requests, use the same encoding as your
HTTP clients.
If you configure your FortiGate unit using other encodings, you may need to switch language
settings on your management computer, including for your web browser or Telnet/SSH client.
For instructions on how to configure your management computer’s operating system language,
locale, or input method, see its documentation.
If you choose to configure parts of the FortiGate unit using non-ASCII characters, verify that all
systems interacting with the FortiGate unit also support the same encodings. You should also
use the same encoding throughout the configuration if possible in order to avoid needing to
switch the language settings of the web-based manager and your web browser or Telnet/SSH
client while you work.
Similarly to input, your web browser or CLI client should usually interpret display output as
encoded using UTF-8. If it does not, your configured items may not display correctly in the
web-based manager or CLI. Exceptions include items such as regular expressions that you may
have configured using other encodings in order to match the encoding of HTTP requests that
the FortiGate unit receives.
To enter non-ASCII characters in the CLI Console widget
1. On your management computer, start your web browser and go to the URL for the FortiGate
unit’s web-based manager.
2. Configure your web browser to interpret the page as UTF-8 encoded.
3. Log in to the FortiGate unit.
4. Go to System > Dashboard > Status.
5. In title bar of the CLI Console widget, click Edit (the pencil icon).
6. Enable Use external command input box.
7. Select OK.
8. The Command field appears below the usual input and display area of the CLI Console
widget.
9. In Command, type a command.
HTTP clients may send requests in encodings other than UTF-8. Encodings usually vary by the
client’s operating system or input language. If you cannot predict the client’s encoding, you
may only be able to match any parts of the request that are in English, because regardless of
the encoding, the values for English characters tend to be encoded identically. For example,
English words may be legible regardless of interpreting a web page as either ISO 8859-1 or as
GB2312, whereas simplified Chinese characters might only be legible if the page is interpreted
as GB2312.
Using the CLI Page 27 Install and System Administration for FortiOS 5.0

Figure 2: Entering encoded characters (CLI Console widget)
10.Press Enter.
In the display area, the CLI Console widget displays your previous command interpreted into
its character code equivalent, such as:
edit \743\601\613\743\601\652
and the command’s output.
To enter non-ASCII characters in a Telnet/SSH client
1. On your management computer, start your Telnet or SSH client.
2. Configure your Telnet or SSH client to send and receive characters using UTF-8 encoding.
Support for sending and receiving international characters varies by each Telnet/SSH client.
Consult the documentation for your Telnet/SSH client.
3. Log in to the FortiGate unit.
4. At the command prompt, type your command and press Enter.
Figure 3: Entering encoded characters (PuTTY)
You may need to surround words that use encoded characters with single quotes ( ' ).
Depending on your Telnet/SSH client’s support for your language’s input methods and for
sending international characters, you may need to interpret them into character codes
before pressing Enter.
For example, you might need to enter:
edit '\743\601\613\743\601\652'
5. The CLI displays your previous command and its output.
Screen paging
You can configure the CLI to pause after displaying each page’s worth of text when displaying
multiple pages of output. When the display pauses, the last line displays --More--. You can
then either:
• press the spacebar to display the next page.
• type Q to truncate the output and return to the command prompt.
Using the CLI Page 28 Install and System Administration for FortiOS 5.0

This may be useful when displaying lengthy output, such as the list of possible matching
commands for command completion, or a long list of settings. Rather than scrolling through or
possibly exceeding the buffer of your terminal emulator, you can simply display one page at a
time.
To configure the CLI display to pause when the screen is full:
config system consoleset output more
end
Baud rate
You can change the default baud rate of the local console connection.
To change the baud rate enter the following commands:
config system consoleset baudrate {115200 | 19200 | 38400 | 57600 | 9600}
end
Editing the configuration file on an external host
You can edit the FortiGate configuration on an external host by first backing up the
configuration file to a TFTP server. Then edit the configuration file and restore it to the FortiGate
unit.
Editing the configuration on an external host can be timesaving if you have many changes to
make, especially if your plain text editor provides advanced features such as batch changes.
To edit the configuration on your computer
1. Use execute backup to download the configuration file to a TFTP server, such as your
management computer.
2. Edit the configuration file using a plain text editor that supports Unix-style line endings.
3. Use execute restore to upload the modified configuration file back to the FortiGate unit.
The FortiGate unit downloads the configuration file and checks that the model information is
correct. If it is, the FortiGate unit loads the configuration file and checks each command for
errors. If a command is invalid, the FortiGate unit ignores the command. If the configuration
file is valid, the FortiGate unit restarts and loads the new configuration.
Using Perl regular expressions
Some FortiGate features, such as spam filtering and web content filtering can use either
wildcards or Perl regular expressions.
See http://perldoc.perl.org/perlretut.html for detailed information about using Perl regular
expressions. For more information on using Perl expressions see the Security Profiles Guide.
Do not edit the first line. The first line(s) of the configuration file (preceded by a # character) contains information about the firmware version and FortiGate model. If you change the model number, the FortiGate unit will reject the configuration file when you attempt to restore it.
Using the CLI Page 29 Install and System Administration for FortiOS 5.0

Differences between regular expression and wildcard pattern matching
In Perl regular expressions, the period (‘.’) character refers to any single character. It is similar to
the question mark (‘?’) character in wildcard pattern matching. As a result:
• fortinet.com not only matches example.com but also matches exampleacom,
examplebcom, exampleccom and so on.
To match a special character such as the period ('.') and the asterisk (‘*’), regular expressions
use the slash (‘\’) escape character. For example:
• To match example.com, the regular expression should be example\.com.
In Perl regular expressions, the asterisk (‘*’) means match 0 or more times of the character
before it, not 0 or more times of any character. For example:
• exam*\.com matches exammmm.com but does not match eample.com.
To match any character 0 or more times, use ‘.*’ where ‘.’ means any character and the ‘*’
means 0 or more times. For example:
• the wildcard match pattern exam*.com is equivalent to the regular expression
exam.*\.com.
Word boundary
In Perl regular expressions, the pattern does not have an implicit word boundary. For example,
the regular expression “test” not only matches the word “test” but also matches any word that
contains the word “test” such as “atest”, “mytest”, “testimony”, “atestb”. The notation “\b”
specifies the word boundary. To match exactly the word “test”, the expression should be
\btest\b.
Case sensitivity
Regular expression pattern matching is case sensitive in the Web and Spam filters. To make a
word or phrase case insensitive, use the regular expression /i. For example, /bad language/i will block all instances of “bad language” regardless of case.
Table 8: Perl regular expression examples
Expression Matches
abc abc (that exact character sequence, but anywhere in the string)
^abc abc at the beginning of the string
abc$ abc at the end of the string
a|b either of a and b
^abc|abc$ the string abc at the beginning or at the end of the string
ab{2,4}c an a followed by two, three or four b's followed by a c
ab{2,}c an a followed by at least two b's followed by a c
ab*c an a followed by any number (zero or more) of b's followed by a c
ab+c an a followed by one or more b's followed by a c
ab?c an a followed by an optional b followed by a c; that is, either abc or ac
a.c an a followed by any single character (not newline) followed by a c
Using the CLI Page 30 Install and System Administration for FortiOS 5.0

a\.c a.c exactly
[abc] any one of a, b and c
[Aa]bc either of Abc and abc
[abc]+ any (nonempty) string of a's, b's and c's (such as a, abba, acbabcacaa)
[^abc]+ any (nonempty) string which does not contain any of a, b and c (such as
defg)
\d\d any two decimal digits, such as 42; same as \d{2}
/i makes the pattern case insensitive. For example, /bad language/i
blocks any instance of “bad language” regardless of case.
\w+ a "word": a nonempty sequence of alphanumeric characters and low lines
(underscores), such as foo and 12bar8 and foo_1
100\s*mk the strings 100 and mk optionally separated by any amount of white space
(spaces, tabs, newlines)
abc\b abc when followed by a word boundary (e.g. in abc! but not in abcd)
perl\B perl when not followed by a word boundary (e.g. in perlert but not in perl
stuff)
\x tells the regular expression parser to ignore white space that is neither
backslashed nor within a character class. You can use this to break up your
regular expression into (slightly) more readable parts.
Table 8: Perl regular expression examples
Using the CLI Page 31 Install and System Administration for FortiOS 5.0

Interfaces
Interfaces, both physical and virtual, enable traffic to flow to and from the internal network, and
the Internet and between internal networks. The FortiGate unit has a number of options for
setting up interfaces and groupings of subnetworks that can scale to a company’s growing
requirements.
This chapter includes:
• Physical
• Interface settings
• Software switch
• Virtual Switch
• Loopback interfaces
• Redundant interfaces
• One-armed sniffer
• Aggregate Interfaces
• DHCP addressing mode on an interface
• Administrative access
• Wireless
• Interface MTU packet size
• Secondary IP addresses to an interface
• Virtual domains
• Virtual LANs
• Zones
Physical
FortiGate units have a number of physical ports where you connect ethernet or optical cables.
Depending on the model, they can have anywhere from four to 40 physical ports. Some units
have a grouping of ports labelled as internal, providing a built-in switch functionality.
In FortiOS, the port names, as labeled on the FortiGate unit, appear in the web-based manager
in the Unit Operation widget, found on the Dashboard. They also appear when you are
configuring the interfaces, by going to System > Network > Interface. As shown below, the
FortiGate-100D (Generation 2) has 22 interfaces.
Two of the physical ports on the FortiGate-100D (Generation 2) are SFP ports. These ports
share the numbers 15 and 16 with RJ-45 ports. Because of this, when SFP port 15 is used,
RJ-45 port 15 cannot be used, and vice versa.
These ports also share the same MAC address.
Page 32

Figure 4: FortiGate-100D physical interfaces
Figure 5: FortiGate-100D interfaces on the Dashboard
Figure 6: Configuring the FortiGate-100D ports
Normally the internal interface is configured as a single interface shared by all physical interface
connections - a switch. The switch mode feature has two states - switch mode and interface
mode. Switch mode is the default mode with only one interface and one address for the entire
internal switch. Interface mode enables you to configure each of the internal switch physical
interface connections separately. This enables you to assign different subnets and netmasks to
each of the internal physical interface connections.
The larger FortiGate units can also include Advanced Mezzanine Cards (AMC), which can
provide additional interfaces (Ethernet or optical), with throughput enhancements for more
efficient handling of specialized traffic. These interfaces appear in FortiOS as port amc/sw1,
amc/sw2 and so on. In the following illustration, the FortiGate-3810A has three AMC cards
installed: two single-width (amc/sw1, amc/sw2) and one double-width (amc/dw).
Interfaces Page 33 Install and System Administration for FortiOS 5.0
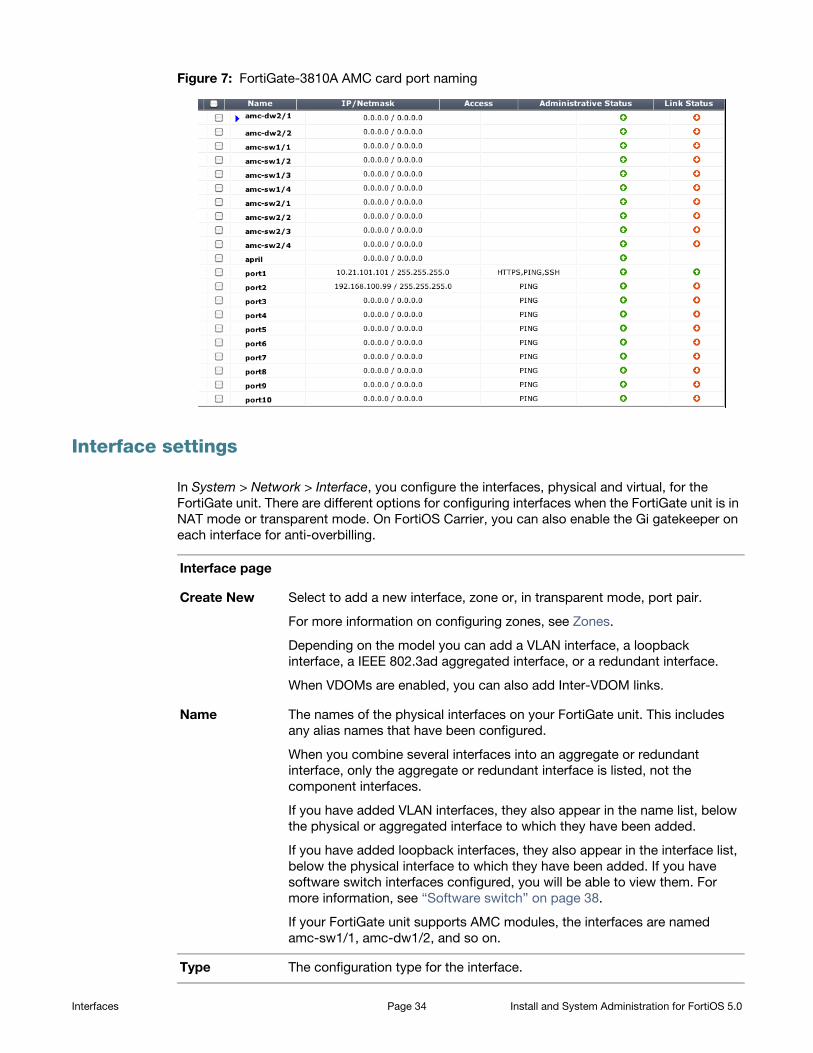
Figure 7: FortiGate-3810A AMC card port naming
Interface settings
In System > Network > Interface, you configure the interfaces, physical and virtual, for the
FortiGate unit. There are different options for configuring interfaces when the FortiGate unit is in
NAT mode or transparent mode. On FortiOS Carrier, you can also enable the Gi gatekeeper on
each interface for anti-overbilling.
Interface page
Create New Select to add a new interface, zone or, in transparent mode, port pair.
For more information on configuring zones, see Zones.
Depending on the model you can add a VLAN interface, a loopback
interface, a IEEE 802.3ad aggregated interface, or a redundant interface.
When VDOMs are enabled, you can also add Inter-VDOM links.
Name The names of the physical interfaces on your FortiGate unit. This includes
any alias names that have been configured.
When you combine several interfaces into an aggregate or redundant
interface, only the aggregate or redundant interface is listed, not the
component interfaces.
If you have added VLAN interfaces, they also appear in the name list, below
the physical or aggregated interface to which they have been added.
If you have added loopback interfaces, they also appear in the interface list,
below the physical interface to which they have been added. If you have
software switch interfaces configured, you will be able to view them. For
more information, see “Software switch” on page 38.
If your FortiGate unit supports AMC modules, the interfaces are named
amc-sw1/1, amc-dw1/2, and so on.
Type The configuration type for the interface.
Interfaces Page 34 Install and System Administration for FortiOS 5.0
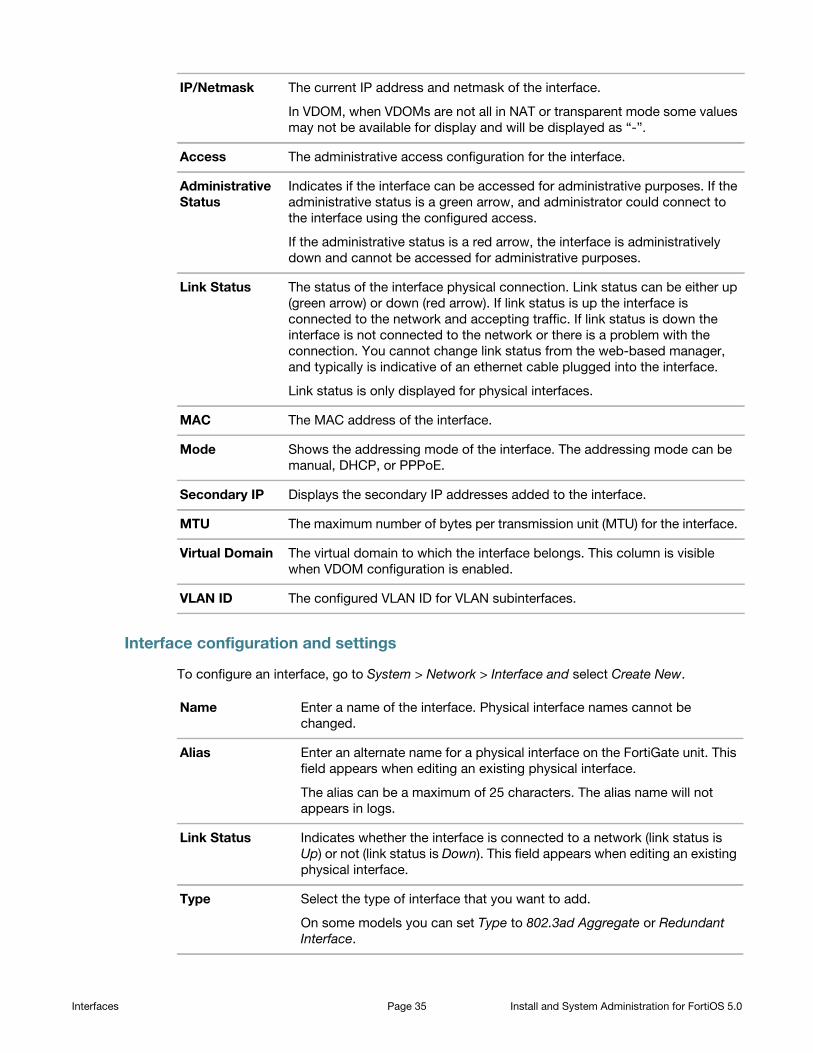
Interface configuration and settings
To configure an interface, go to System > Network > Interface and select Create New.
IP/Netmask The current IP address and netmask of the interface.
In VDOM, when VDOMs are not all in NAT or transparent mode some values
may not be available for display and will be displayed as “-”.
Access The administrative access configuration for the interface.
Administrative Status
Indicates if the interface can be accessed for administrative purposes. If the
administrative status is a green arrow, and administrator could connect to
the interface using the configured access.
If the administrative status is a red arrow, the interface is administratively
down and cannot be accessed for administrative purposes.
Link Status The status of the interface physical connection. Link status can be either up
(green arrow) or down (red arrow). If link status is up the interface is
connected to the network and accepting traffic. If link status is down the
interface is not connected to the network or there is a problem with the
connection. You cannot change link status from the web-based manager,
and typically is indicative of an ethernet cable plugged into the interface.
Link status is only displayed for physical interfaces.
MAC The MAC address of the interface.
Mode Shows the addressing mode of the interface. The addressing mode can be
manual, DHCP, or PPPoE.
Secondary IP Displays the secondary IP addresses added to the interface.
MTU The maximum number of bytes per transmission unit (MTU) for the interface.
Virtual Domain The virtual domain to which the interface belongs. This column is visible
when VDOM configuration is enabled.
VLAN ID The configured VLAN ID for VLAN subinterfaces.
Name Enter a name of the interface. Physical interface names cannot be
changed.
Alias Enter an alternate name for a physical interface on the FortiGate unit. This
field appears when editing an existing physical interface.
The alias can be a maximum of 25 characters. The alias name will not
appears in logs.
Link Status Indicates whether the interface is connected to a network (link status is
Up) or not (link status is Down). This field appears when editing an existing
physical interface.
Type Select the type of interface that you want to add.
On some models you can set Type to 802.3ad Aggregate or Redundant
Interface.
Interfaces Page 35 Install and System Administration for FortiOS 5.0

Interface Displayed when Type is set to VLAN.
Select the name of the physical interface to which to add a VLAN
interface. Once created, the VLAN interface is listed below its physical
interface in the Interface list.
You cannot change the physical interface of a VLAN interface except when
adding a new VLAN interface.
VLAN ID Displayed when Type is set to VLAN.
Enter the VLAN ID. You cannot change the VLAN ID except when adding a
new VLAN interface.
The VLAN ID can be any number between 1 and 4094 and must match the
VLAN ID added by the IEEE 802.1Q-compliant router or switch connected
to the VLAN subinterface.
Virtual Domain Select the virtual domain to add the interface to.
Admin accounts with super_admin profile can change the Virtual Domain.
Physical Interface Members
This section has two different forms depending on the interface type:
• Software switch interface - this section is a display-only field
showing the interfaces that belong to the software switch virtual
interface.
• 802.3ad aggregate or Redundant interface - this section includes
available interface and selected interface lists to enable adding or
removing interfaces from the interface. For more information, see
Redundant interfaces.
Select interfaces from this Available Interfaces list and select the right
arrow to add an interface to the Selected Interface list.
Addressing mode Select the addressing mode for the interface.
• Select Manual and add an IP/Netmask for the interface. If IPv6
configuration is enabled you can add both a IPv4 and an IPv6 IP
address.
• Select DHCP to get the interface IP address and other network settings
from a DHCP server. For more information, see DHCP addressing
mode on an interface
• Select PPPoE to get the interface IP address and other network
settings from a PPPoE server. For more information, see PPPoE
addressing mode on an interface.
• Select One-Arm Sniffer to enable the interface as a means to detect
possible traffic threats. This option is available on physical ports not
configured for the primary Internet connection. For more information
see One-armed sniffer.
• Select Dedicate to FortiAP/FortiSwitch to have a FortiAP unit or
FortiSwitch unit connect exclusively to the interface. This option is only
available when editing a physical interface, and it has a static IP
address. When you enter the IP address, the FortiGate unit
automatically creates a DHCP server using the subnet entered. This
option is not available on the ADSL interface.
The FortiSwitch option is currently only available on the
FortiGate-100D.
Interfaces Page 36 Install and System Administration for FortiOS 5.0

IP/Netmask If Addressing Mode is set to Manual, enter an IPv4 address/subnet mask
for the interface. FortiGate interfaces cannot have IP addresses on the
same subnet.
IPv6 Address If Addressing Mode is set to Manual and IPv6 support is enabled, enter an
IPv6 address/subnet mask for the interface. A single interface can have
both an IPv4 and IPv6 address or just one or the other.
Administrative Access
Select the types of administrative access permitted for IPv4 connections
to this interface.
HTTPS Allow secure HTTPS connections to the web-based manager through this
interface. If configured, this option will enable automatically when
selecting the HTTP option.
PING Interface responds to pings. Use this setting to verify your installation and
for testing.
HTTP Allow HTTP connections to the web-based manager through this
interface. If configured, this option will also enable the HTTPS option.
SSH Allow SSH connections to the CLI through this interface.
SNMP Allow a remote SNMP manager to request SNMP information by
connecting to this interface.
TELNET Allow Telnet connections to the CLI through this interface. Telnet
connections are not secure and can be intercepted by a third party.
FMG-Access Allow FortiManager authorization automatically during the communication
exchange between the FortiManager and FortiGate units.
FCT-Access You can configure a FortiGate interface as an interface that will accept
FortiClient connections. When configured, the FortiGate unit sends
broadcast messages which the FortiClient software running on a end user
PC is listening for.
CAPWAP Allows the FortiGate unit’s wireless controller to manage a wireless access
point, such as a FortiAP unit.
IPv6 Administrative Access
Select the types of administrative access permitted for IPv6 connections
to this interface. These types are the same as for Administrative Access.
Security Mode Select a captive portal for the interface. When selected, you can define the
portal message and look that the user sees when logging into the
interface. You can also define one or more user groups that have access
to the interface.
DHCP Server Select to enable a DHCP server for the interface. For more information on
configuring a DHCP server on the interface, see “DHCP servers and
relays” on page 146.
Detect and Identify Devices
Select to enable the interface to be used with BYOD hardware such as
iPhones. Define the device definitions by going to User & Device > Device.
Interfaces Page 37 Install and System Administration for FortiOS 5.0

Software switch
A software switch, or soft switch, is a virtual switch that is implemented at the software, or
firmware level, rather than the hardware level. A software switch can be used to simplify
communication between devices connected to different FortiGate interfaces. For example,
using a software switch, you can place the FortiGate interface connected to an internal network
on the same subnet as your wireless interfaces. Then devices on the internal network can
communicate with devices on the wireless network without any additional configuration such as
additional security policies, on the FortiGate unit.
Add New Devices to Vulnerability Scan List
This option appears when Detect and Identify Devices is enabled. When
enabled, the FortiGate unit performs a network vulnerability scan of any
devices detected or seen on the interface. The vulnerability scan occur as
configured, either on demand, or as scheduled.
Broadcast Discovery Messages
Available when FCT-Access is enabled for the Administrative Access.
Select to enable sends broadcast messages which the FortiClient
software running on a end user PC is listening for.
Once enabled, the FortiGate unit broadcasts a discovery message that
includes the IP address of the interface and listening port number to the
local network. All PCs running FortiClient on that network listen for this
discovery message.
Enable Explicit Web Proxy
Available when enabling explicit proxy on the System Information
Dashboard (System > Dashboard > Status).
This option is not available for a VLAN interface selection. Select to enable
explicit web proxying on this interface. When enabled, this interface will be
displayed on System > Network > Explicit Proxy under Listen on Interfaces
and web traffic on this interface will be proxied according to the Web
Proxy settings.
Enable STP With FortiGate units with a switch interface is in switch mode, this option
is enabled by default. It enables the single instance MSTP spanning tree
protocol.
Listen for RADIUS Accounting Messages
Select to use the interface as a listening port for RADIUS content.
Secondary IP Address
Add additional IPv4 addresses to this interface. Select the Expand Arrow
to expand or hide the section.
Comments Enter a description up to 63 characters to describe the interface.
Administrative Status
Select either Up (green arrow) or Down (red arrow) as the status of this
interface.
Up indicates the interface is active and can accept network traffic.
Down indicates the interface is not active and cannot accept traffic.
Gi Gatekeeper (FortiOS Carrier only)
For FortiOS Carrier, enable Gi Gatekeeper to enable the Gi firewall as part
of the anti-overbilling configuration. You must also configure Gi
Gatekeeper Settings by going to System > Admin > Settings.
Interfaces Page 38 Install and System Administration for FortiOS 5.0

It can also be useful if you require more hardware ports on for the switch on a FortiGate unit. For
example, if your FortiGate unit has a 4-port switch, WAN1, WAN2 and DMZ interfaces, and you
need one more port, you can create a soft switch that can include the 4-port switch and the
DMZ interface all on the same subnet. These types of applications also apply to wireless
interfaces and virtual wireless interfaces and physical interfaces such as those with FortiWiFi
and FortiAP unit.
Similar to a hardware switch, a software switch functions like a single interface. A software
switch has one IP address; all of the interfaces in the software switch are on the same subnet.
Traffic between devices connected to each interface are not regulated by security policies, and
traffic passing in and out of the switch are affected by the same policy.
There are a few things to consider when setting up a software switch:
• Ensure you create a back up of the configuration.
• Ensure you have at least one port or connection such as the console port to connect to the
FortiGate unit. If you accidentally combine too many ports, you will need a way to undo any
errors.
• The ports that you include must not have any link or relation to any other aspect of the
FortiGate unit. For example, DHCP servers, security policies, and so on.
• For increased security, you can create a captive portal for the switch, allowing only specific
user groups access to the resources connected to the switch.
To create a software switch - web-based manager
1. Go to System > Network > Interface and select Create New.
2. For Type, select Software Switch.
3. In the Physical Interface Members option, select the interfaces to include.
4. Configure the remaining interface settings
5. Select OK.
To create a software switch - CLI
config system switch-interfaceedit <switch-name>
set type switchset member <interface_list>
endconfig system interface
edit <switch_name>set ip <ip_address>set allowaccess https ssh ping
end
Soft switch example
For this example, the wireless interface (WiFi) needs to be on the same subnet as the DMZ1
interface to facilitate wireless syncing from an iPhone and a local computer. The synching
Interfaces Page 39 Install and System Administration for FortiOS 5.0
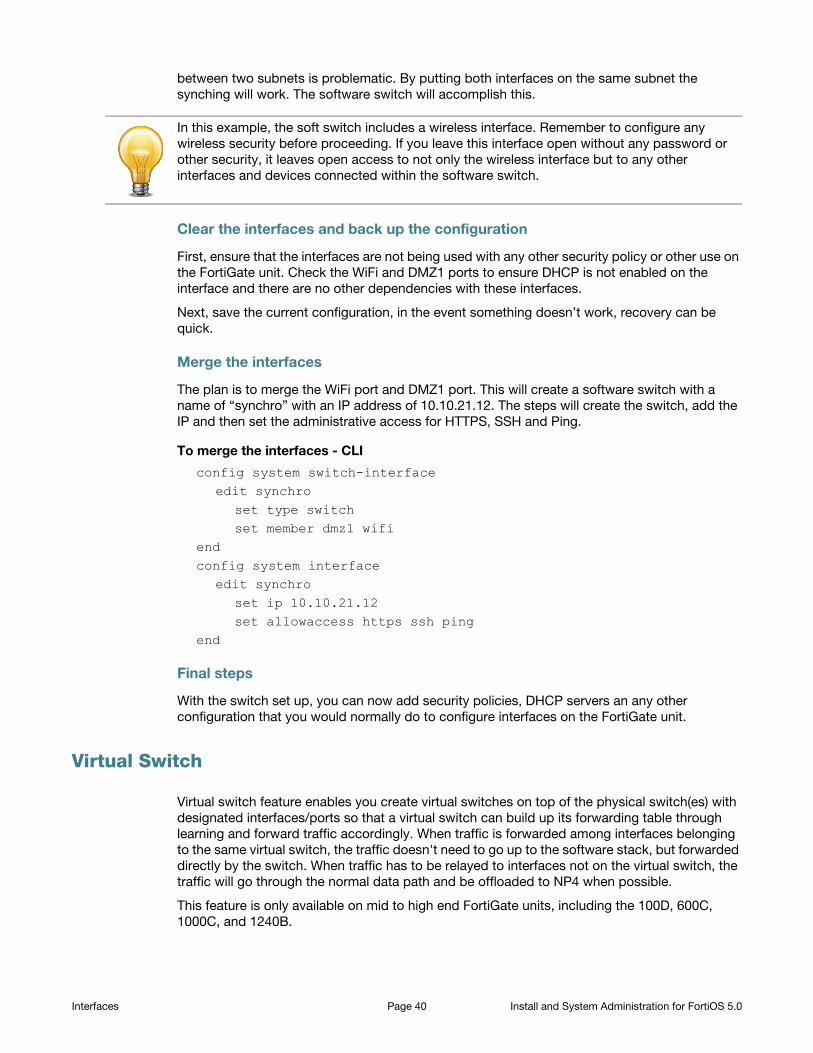
between two subnets is problematic. By putting both interfaces on the same subnet the
synching will work. The software switch will accomplish this.
In this example, the soft switch includes a wireless interface. Remember to configure any
wireless security before proceeding. If you leave this interface open without any password or
other security, it leaves open access to not only the wireless interface but to any other
interfaces and devices connected within the software switch.
Clear the interfaces and back up the configuration
First, ensure that the interfaces are not being used with any other security policy or other use on
the FortiGate unit. Check the WiFi and DMZ1 ports to ensure DHCP is not enabled on the
interface and there are no other dependencies with these interfaces.
Next, save the current configuration, in the event something doesn’t work, recovery can be
quick.
Merge the interfaces
The plan is to merge the WiFi port and DMZ1 port. This will create a software switch with a
name of “synchro” with an IP address of 10.10.21.12. The steps will create the switch, add the
IP and then set the administrative access for HTTPS, SSH and Ping.
To merge the interfaces - CLI
config system switch-interfaceedit synchro
set type switchset member dmz1 wifi
endconfig system interface
edit synchroset ip 10.10.21.12set allowaccess https ssh ping
end
Final steps
With the switch set up, you can now add security policies, DHCP servers an any other
configuration that you would normally do to configure interfaces on the FortiGate unit.
Virtual Switch
Virtual switch feature enables you create virtual switches on top of the physical switch(es) with
designated interfaces/ports so that a virtual switch can build up its forwarding table through
learning and forward traffic accordingly. When traffic is forwarded among interfaces belonging
to the same virtual switch, the traffic doesn't need to go up to the software stack, but forwarded
directly by the switch. When traffic has to be relayed to interfaces not on the virtual switch, the
traffic will go through the normal data path and be offloaded to NP4 when possible.
This feature is only available on mid to high end FortiGate units, including the 100D, 600C,
1000C, and 1240B.
Interfaces Page 40 Install and System Administration for FortiOS 5.0

To enable and configure the virtual switch, enter the CLI commands:
config system virtual-switchedit vs1
set physical-switch sw0config port
edit 1set port port1set speed xxset duplex xxset status [up|down]
edit 2set port port2 set ...
endend
end
Loopback interfaces
A loopback interface is a logical interface that is always up (no physical link dependency) and
the attached subnet is always present in the routing table.
The FortiGate's loopback IP address does not depend on one specific external port, and is
therefore possible to access it through several physical or VLAN interfaces. Multiple loopback
interfaces can be configured in either non-VDOM mode or in each VDOM.
Loopback interfaces still require appropriate firewall policies to allow traffic to and from this type
of interface.
A loopback interface can be used with:
• Management access
• BGP (TCP) peering
• PIM RP
Loopback interfaces are a good practice for OSPF. Setting the OSPF router ID the same as
loopback IP address troubleshooting OSPF easier, and remembering the management IP
addresses (telnet to “router ID”).
Dynamic routing protocols can be enabled on loopback interfaces
For black hole static route, use the black hole route type instead of the loopback interface.
Redundant interfaces
On some models you can combine two or more physical interfaces to provide link redundancy.
This feature enables you to connect to two or more switches to ensure connectivity in the event
one physical interface or the equipment on that interface fails.
In a redundant interface, traffic is only going over one interface at any time. This differs from an
aggregated interface where traffic is going over all interfaces for distribution of increased
bandwidth. This difference means redundant interfaces can have more robust configurations
with fewer possible points of failure. This is important in a fully-meshed HA configuration.
Interfaces Page 41 Install and System Administration for FortiOS 5.0

An interface is available to be in a redundant interface if:
• it is a physical interface, not a VLAN interface
• it is not already part of an aggregated or redundant interface
• it is in the same VDOM as the redundant interface
• it has no defined IP address
• is not configured for DHCP or PPPoE
• it has no DHCP server or relay configured on it
• it does not have any VLAN subinterfaces
• it is not referenced in any security policy, VIP, or multicast policy
• it is not monitored by HA
• it is not one of the FortiGate-5000 series backplane interfaces
When an interface is included in a redundant interface, it is not listed on the System > Network
> Interface page. You cannot configure the interface individually and it is not available for
inclusion in security policies, VIPs, or routing.
One-armed sniffer
A one-armed sniffer is used to configure a physical interface on the FortiGate unit as a one-arm
intrusion detection system (IDS). Traffic sent to the interface is examined for matches to the
configured IPS sensor and application control list. Matches are logged and then all received
traffic is dropped. Sniffing only reports on attacks. It does not deny or otherwise influence
traffic.
Using the one-arm sniffer, you can configure a FortiGate unit to operate as an IDS appliance by
sniffing network traffic for attacks without actually processing the packets. To configure
one-arm IDS, you enable sniffer mode on a FortiGate interface and connect the interface to a
hub or to the SPAN port of a switch that is processing network traffic.
To assign an interface as a sniffer interface, go to System > Network > Interface, edit the
interface and select One-Arm Sniffer.
If the check box is not available, the interface is in use. Ensure that the interface is not selected
in any firewall policies, routes, virtual IPs or other features in which a physical interface is
specified.
Enable Filters Select to include filters to define a more granular sniff of network
traffic. Select specific addresses, ports, VLANs and protocols.
In all cases, enter a number, or number range, for the filtering
type. For Protocol values, standard protocols are:
• UDP - 17
• TCP - 6
• ICMP - 1
Include IPv6 Packets If your network is running a combination of IPv4 and IPv6
addressing, select to sniff both addressing types. Otherwise, the
FortiGate unit will only sniff IPv4 traffic.
Interfaces Page 42 Install and System Administration for FortiOS 5.0

Aggregate Interfaces
Link aggregation (IEEE 802.3ad) enables you to bind two or more physical interfaces together to
form an aggregated (combined) link. This new link has the bandwidth of all the links combined.
If a link in the group fails, traffic is transferred automatically to the remaining interfaces with the
only noticeable effect being a reduced bandwidth.
This is similar to redundant interfaces with the major difference being that a redundant interface
group only uses one link at a time, where an aggregate link group uses the total bandwidth of
the functioning links in the group, up to eight.
Support of the IEEE standard 802.3ad for link aggregation is available on some models.
An interface is available to be an aggregate interface if:
• it is a physical interface, not a VLAN interface or subinterface
• it is not already part of an aggregate or redundant interface
• it is in the same VDOM as the aggregated interface. Aggregate ports cannot span multiple
VDOMs.
• it does not have an IP address and is not configured for DHCP or PPPoE
• it is not referenced in any security policy, VIP, IP Pool or multicast policy
• it is not an HA heartbeat interface
• it is not one of the FortiGate-5000 series backplane interfaces
Some models of FortiGate units do not support aggregate interfaces. In this case, the
aggregate option is not an option in the web-based manager or CLI. As well, you cannot create
aggregate interfaces from the interfaces in a switch port.
To see if a port is being used or has other dependencies, use the following diagnose command:
diagnose sys checkused system.interface.name <interface_name>
When an interface is included in an aggregate interface, it is not listed on the System > Network
> Interface page. Interfaces will still appear in the CLI, although configuration for those
interfaces will not take affect. You cannot configure the interface individually and it is not
available for inclusion in security policies, VIPs, IP pools, or routing.
Example
This example creates an aggregate interface on a FortiGate-3810A using ports 4-6 with an
internal IP address of 10.13.101.100, as well as the administrative access to HTTPS and SSH.
To create an aggregate interface - web-based manager
1. Go to System > Network > Interface and select Create New.
2. Enter the Name as Aggregate.
3. For the Type, select 802.3ad Aggregate.
If this option does not appear, your FortiGate unit does not support aggregate interfaces.
4. In the Available Interfaces list, select port 4, 5 and 6 and move it to the Selected Interfaces
list.
Include Non-IP Packets Select for a more intense scan of content in the traffic.
UTM Security Profiles IPS sensors, and application control lists enable you to select
specific sensors and application you want to identify within
the traffic.
Interfaces Page 43 Install and System Administration for FortiOS 5.0
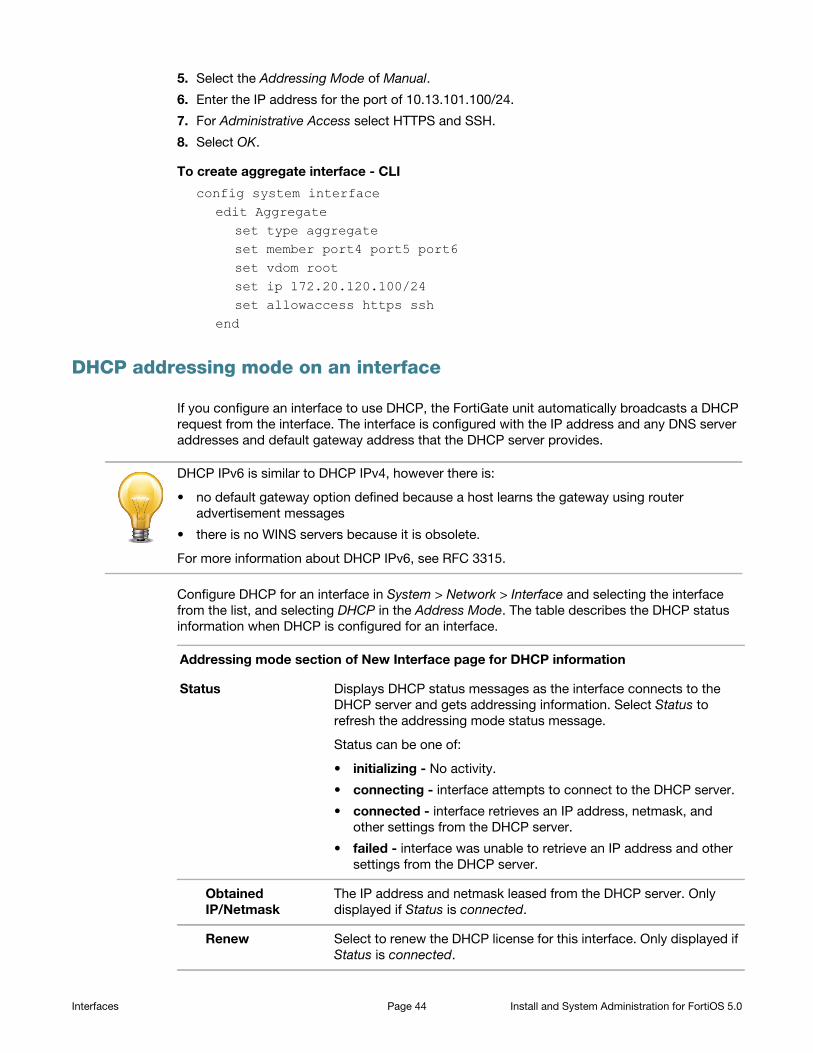
5. Select the Addressing Mode of Manual.
6. Enter the IP address for the port of 10.13.101.100/24.
7. For Administrative Access select HTTPS and SSH.
8. Select OK.
To create aggregate interface - CLI
config system interfaceedit Aggregate
set type aggregateset member port4 port5 port6set vdom rootset ip 172.20.120.100/24set allowaccess https ssh
end
DHCP addressing mode on an interface
If you configure an interface to use DHCP, the FortiGate unit automatically broadcasts a DHCP
request from the interface. The interface is configured with the IP address and any DNS server
addresses and default gateway address that the DHCP server provides.
DHCP IPv6 is similar to DHCP IPv4, however there is:
For more information about DHCP IPv6, see RFC 3315.
Configure DHCP for an interface in System > Network > Interface and selecting the interface
from the list, and selecting DHCP in the Address Mode. The table describes the DHCP status
information when DHCP is configured for an interface.
• no default gateway option defined because a host learns the gateway using router
advertisement messages
• there is no WINS servers because it is obsolete.
Addressing mode section of New Interface page for DHCP information
Status Displays DHCP status messages as the interface connects to the
DHCP server and gets addressing information. Select Status to
refresh the addressing mode status message.
Status can be one of:
• initializing - No activity.
• connecting - interface attempts to connect to the DHCP server.
• connected - interface retrieves an IP address, netmask, and
other settings from the DHCP server.
• failed - interface was unable to retrieve an IP address and other
settings from the DHCP server.
Obtained IP/Netmask
The IP address and netmask leased from the DHCP server. Only
displayed if Status is connected.
Renew Select to renew the DHCP license for this interface. Only displayed if
Status is connected.
Interfaces Page 44 Install and System Administration for FortiOS 5.0
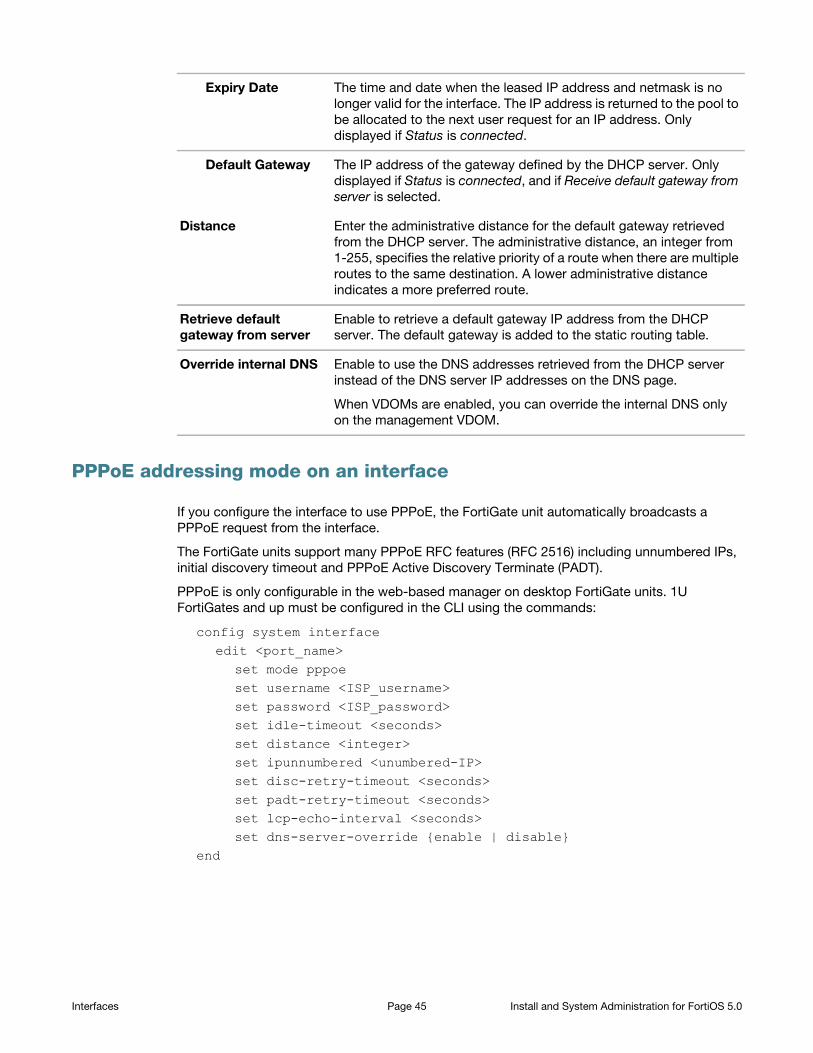
PPPoE addressing mode on an interface
If you configure the interface to use PPPoE, the FortiGate unit automatically broadcasts a
PPPoE request from the interface.
The FortiGate units support many PPPoE RFC features (RFC 2516) including unnumbered IPs,
initial discovery timeout and PPPoE Active Discovery Terminate (PADT).
PPPoE is only configurable in the web-based manager on desktop FortiGate units. 1U
FortiGates and up must be configured in the CLI using the commands:
config system interfaceedit <port_name>
set mode pppoeset username <ISP_username>set password <ISP_password>set idle-timeout <seconds>set distance <integer>set ipunnumbered <unumbered-IP>set disc-retry-timeout <seconds>set padt-retry-timeout <seconds>set lcp-echo-interval <seconds>set dns-server-override {enable | disable}
end
Expiry Date The time and date when the leased IP address and netmask is no
longer valid for the interface. The IP address is returned to the pool to
be allocated to the next user request for an IP address. Only
displayed if Status is connected.
Default Gateway The IP address of the gateway defined by the DHCP server. Only
displayed if Status is connected, and if Receive default gateway from
server is selected.
Distance Enter the administrative distance for the default gateway retrieved
from the DHCP server. The administrative distance, an integer from
1-255, specifies the relative priority of a route when there are multiple
routes to the same destination. A lower administrative distance
indicates a more preferred route.
Retrieve default gateway from server
Enable to retrieve a default gateway IP address from the DHCP
server. The default gateway is added to the static routing table.
Override internal DNS Enable to use the DNS addresses retrieved from the DHCP server
instead of the DNS server IP addresses on the DNS page.
When VDOMs are enabled, you can override the internal DNS only
on the management VDOM.
Interfaces Page 45 Install and System Administration for FortiOS 5.0
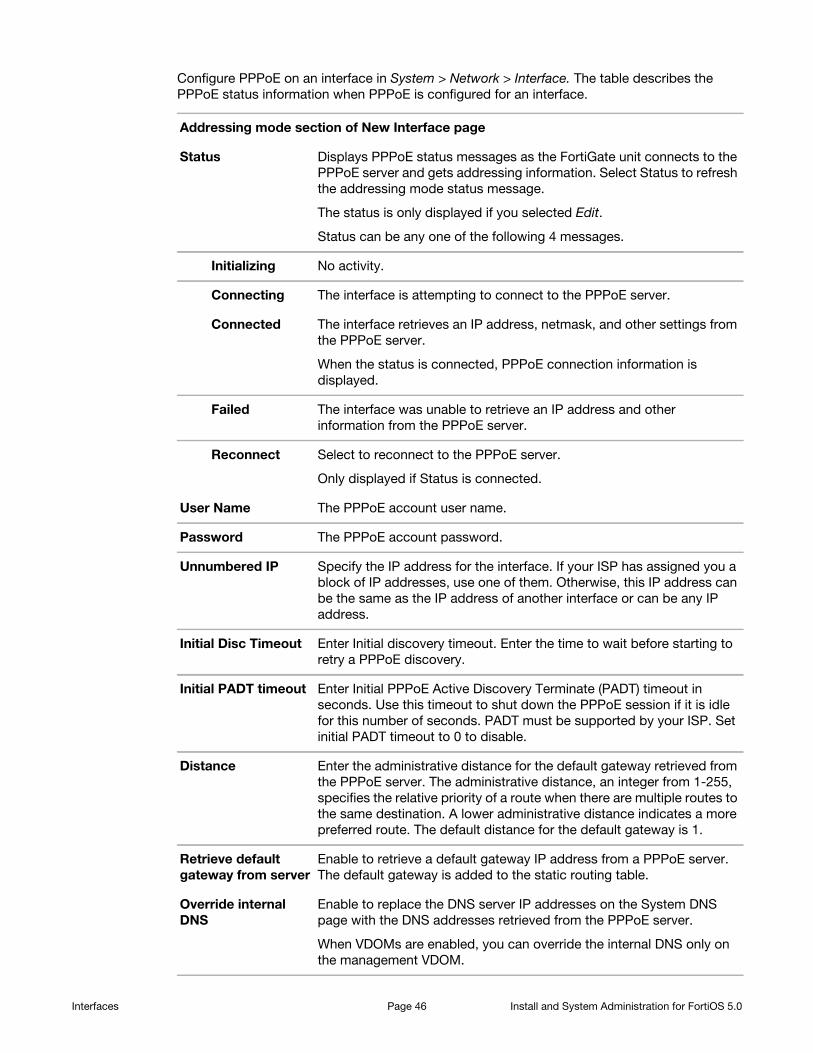
Configure PPPoE on an interface in System > Network > Interface. The table describes the
PPPoE status information when PPPoE is configured for an interface.
Addressing mode section of New Interface page
Status Displays PPPoE status messages as the FortiGate unit connects to the
PPPoE server and gets addressing information. Select Status to refresh
the addressing mode status message.
The status is only displayed if you selected Edit.
Status can be any one of the following 4 messages.
Initializing No activity.
Connecting The interface is attempting to connect to the PPPoE server.
Connected The interface retrieves an IP address, netmask, and other settings from
the PPPoE server.
When the status is connected, PPPoE connection information is
displayed.
Failed The interface was unable to retrieve an IP address and other
information from the PPPoE server.
Reconnect Select to reconnect to the PPPoE server.
Only displayed if Status is connected.
User Name The PPPoE account user name.
Password The PPPoE account password.
Unnumbered IP Specify the IP address for the interface. If your ISP has assigned you a
block of IP addresses, use one of them. Otherwise, this IP address can
be the same as the IP address of another interface or can be any IP
address.
Initial Disc Timeout Enter Initial discovery timeout. Enter the time to wait before starting to
retry a PPPoE discovery.
Initial PADT timeout Enter Initial PPPoE Active Discovery Terminate (PADT) timeout in
seconds. Use this timeout to shut down the PPPoE session if it is idle
for this number of seconds. PADT must be supported by your ISP. Set
initial PADT timeout to 0 to disable.
Distance Enter the administrative distance for the default gateway retrieved from
the PPPoE server. The administrative distance, an integer from 1-255,
specifies the relative priority of a route when there are multiple routes to
the same destination. A lower administrative distance indicates a more
preferred route. The default distance for the default gateway is 1.
Retrieve default gateway from server
Enable to retrieve a default gateway IP address from a PPPoE server.
The default gateway is added to the static routing table.
Override internal DNS
Enable to replace the DNS server IP addresses on the System DNS
page with the DNS addresses retrieved from the PPPoE server.
When VDOMs are enabled, you can override the internal DNS only on
the management VDOM.
Interfaces Page 46 Install and System Administration for FortiOS 5.0

Administrative access
Interfaces, especially the public-facing ports can be potentially accessed by those who you
may not want access to the FortiGate unit. When setting up the FortiGate unit, you can set the
type of protocol an administrator must use to access the FortiGate unit. The options include:
You can select as many, or as few, even none, that are accessible by an administrator.
This example adds an IPv4 address 172.20.120.100 to the WAN1 interface as well as the
administrative access to HTTPS and SSH. As a good practice, set the administrative access
when you are setting the IP address for the port.
To add an IP address on the WAN1 interface - web-based manager
1. Go to System > Network > Interface.
2. Select the WAN1 interface row and select Edit.
3. Select the Addressing Mode of Manual.
4. Enter the IP address for the port of 172.20.120.100/24.
5. For Administrative Access, select HTTPS and SSH.
6. Select OK.
To create IP address on the WAN1 interface - CLI
config system interfaceedit wan1
set ip 172.20.120.100/24set allowaccess https ssh
end
Wireless
A wireless interface is similar to a physical interface only it does not include a physical
connection. The FortiWiFi units enables you to add multiple wireless interfaces that can be
available at the same time (the FortiWiFi-30B can only have one wireless interface). On FortiWiFi
units, you can configure the device to be either an access point, or a wireless client. As an
access point, the FortiWiFi unit can have up to four separate SSIDs, each on their own subnet
for wireless access. In client mode, the FortiWiFi only has one SSID, and is used as a receiver,
to enable remote users to connect to the existing network using wireless protocols.
• HTTPS • SNMP
• HTTP • PING
• SSH • FortiManager Access (FMG-Access
• TELNET • FortiClient Access (FCT-Access)
When adding to, or removing a protocol, you must type the entire list again. For example, if you
have an access list of HTTPS and SSH, and you want to add PING, typing:
set allowaccess ping
...only PING will be set. In this case, you must type...
set allowaccess https ssh ping
Interfaces Page 47 Install and System Administration for FortiOS 5.0

Wireless interfaces also require additional security measures to ensure the signal does not get
hijacked and data tampered or stolen.
For more information on configuring wireless interfaces see the Deploying Wireless Networks
Guide.
Interface MTU packet size
You can change the maximum transmission unit (MTU) of the packets that the FortiGate unit
transmits to improve network performance. Ideally, the MTU should be the same as the smallest
MTU of all the networks between the FortiGate unit and the destination of the packets. If the
packets that the FortiGate unit sends are larger than the smallest MTU, they are broken up or
fragmented, which slows down transmission. You can easily experiment by lowering the MTU to
find an MTU size for optimum network performance.
To change the MTU, select Override default MTU value (1500) and enter the MTU size based on
the addressing mode of the interface
• 68 to 1 500 bytes for static mode
• 576 to 1 500 bytes for DHCP mode
• 576 to 1 492 bytes for PPPoE mode
• larger frame sizes if supported by the FortiGate model
Only available on physical interfaces. Virtual interfaces associated with a physical interface
inherit the physical interface MTU size.
Interfaces on some models support frames larger than the traditional 1500 bytes. Jumbo frames
are supported on FortiGate models that have either a SOC2 or NP4lite, except for the
FortiGate-30D, as well as on FortiGate-100D series models (for information about your
FortiGate unit’s hardware, see the Hardware Acceleration guide). For other models, please
contact Fortinet Customer Support for the maximum frame size that is supported.
If you need to enable sending larger frames over a route, you need all Ethernet devices on that
route to support that larger frame size, otherwise your larger frames will not be recognized and
are dropped.
If you have standard size and larger size frame traffic on the same interface, routing alone
cannot route them to different routes based only on frame size. However, you can use VLANs to
make sure the larger frame traffic is routed over network devices that support that larger size.
VLANs will inherit the MTU size from the parent interface. You will need to configure the VLAN to
include both ends of the route as well as all switches and routers along the route.
MTU packet size is changed in the CLI. If you select an MTU size larger than your FortiGate unit
supports, an error message will indicate this. In this situation, try a smaller MTU size until the
value is supported.
In Transparent mode, if you change the MTU of an interface, you must change the MTU of all
interfaces on the FortiGate unit to match the new MTU.
Interfaces Page 48 Install and System Administration for FortiOS 5.0

To change the MTU size, use the following CLI commands:
config system interfaceedit <interface_name>
set mtu-override enableset mtu <byte_size>
end
Secondary IP addresses to an interface
If an interface is configured with a manual or static IP address, you can also add secondary
static IP addresses to the interface. Adding secondary IP addresses effectively adds multiple IP
addresses to the interface. Secondary IP addresses cannot be assigned using DCHP or PPPoE.
All of the IP addresses added to an interface are associated with the single MAC address of the
physical interface and all secondary IP addresses are in the same VDOM as the interface that
are added to. You configure interface status detection for gateway load balancing separately for
each secondary IP addresses. As with all other interface IP addresses, secondary IP addresses
cannot be on the same subnet as any other primary or secondary IP address assigned to a
FortiGate interface unless they are in separate VDOMs.
To configure a secondary IP, go to System > Network > Interface, select Edit or Create New and
select the Secondary IP Address check box.
Virtual domains
Virtual domains (VDOMs) are a method of dividing a FortiGate unit into two or more virtual units
that function as multiple independent units. A single FortiGate unit is then flexible enough to
serve multiple departments of an organization, separate organizations, or to act as the basis for
a service provider’s managed security service.
VDOMs provide separate security domains that allow separate zones, user authentication,
security policies, routing, and VPN configurations. By default, each FortiGate unit has a VDOM
named root. This VDOM includes all of the FortiGate physical interfaces, modem, VLAN
subinterfaces, zones, security policies, routing settings, and VPN settings.
When a packet enters a VDOM, it is confined to that VDOM. In a VDOM, you can create security
policies for connections between Virtual LAN (VLAN) subinterfaces or zones in the VDOM.
Packets do not cross the virtual domain border internally. To travel between VDOMs, a packet
must pass through a firewall on a physical interface. The packet then arrives at another VDOM
on a different interface, but it must pass through another firewall before entering the VDOM.
Both VDOMs are on the same FortiGate unit. Inter-VDOMs change this behavior in that they are
internal interfaces; however their packets go through all the same security measures as on
physical interfaces.
This example shows how to enable VDOMs on the FortiGate unit and the basic and create a
VDOM accounting on the DMZ2 port and assign an administrator to maintain the VDOM. First
enable Virtual Domains on the FortiGate unit. When you enable VDOMs, the FortiGate unit will
log you out.
For desktop and low-end FortiGate units, VDOMs are enabled using the CLI. On larger
FortiGate units, you can enable on the web-based manager or the CLI. Once enabled all further
configuration can me made in the web-based manager or CLI.
To enable VDOMs - web-based manager
1. Go to System > Dashboard > Status.
Interfaces Page 49 Install and System Administration for FortiOS 5.0

2. In the System Information widget, select Enable for Virtual Domain.
The FortiGate unit logs you out. Once you log back in, you will notice that the menu structure
has changed. This reflects the global settings for all Virtual Domains.
To enable VDOMs - CLI
config system globalset vdom-admin enable
end
Next, add the VDOM called accounting.
To add a VDOM - web-based manager
1. Go to System > VDOM > VDOM, and select Create New.
2. Enter the VDOM name accounting.
3. Select OK.
To add a VDOM - CLI
config vdomedit <new_vdom_name>
end
With the Virtual Domain created, you can assign a physical interface to it, and assign it an IP
address.
To assign physical interface to the accounting Virtual Domain - web-based manager
1. Go to System > Network > Interface.
2. Select the DMZ2 port row and select Edit.
3. For the Virtual Domain drop-down list, select accounting.
4. Select the Addressing Mode of Manual.
5. Enter the IP address for the port of 10.13.101.100/24.
6. Set the Administrative Access to HTTPS and SSH.
7. Select OK.
To assign physical interface to the accounting Virtual Domain - CLI
config globalconfig system interface
edit dmz2set vdom accountingset ip 10.13.101.100/24set allowaccess https ssh
nextend
Virtual LANs
The term VLAN subinterface correctly implies the VLAN interface is not a complete interface by
itself. You add a VLAN subinterface to the physical interface that receives VLAN-tagged
packets. The physical interface can belong to a different VDOM than the VLAN, but it must be
connected to a network route that is configured for this VLAN. Without that route, the VLAN will
not be connected to the network, and VLAN traffic will not be able to access this interface.The
traffic on the VLAN is separate from any other traffic on the physical interface.
Interfaces Page 50 Install and System Administration for FortiOS 5.0

FortiGate unit interfaces cannot have overlapping IP addresses, the IP addresses of all
interfaces must be on different subnets. This rule applies to both physical interfaces and to
virtual interfaces such as VLAN subinterfaces. Each VLAN subinterface must be configured with
its own IP address and netmask. This rule helps prevent a broadcast storm or other similar
network problems.
Any FortiGate unit, with or without VDOMs enabled, can have a maximum of 255 interfaces in
Transparent operating mode. In NAT/Route operating mode, the number can range from 255 to
8192 interfaces per VDOM, depending on the FortiGate model. These numbers include VLANs,
other virtual interfaces, and physical interfaces. To have more than 255 interfaces configured in
Transparent operating mode, you need to configure multiple VDOMs with many interfaces on
each VDOM.
This example shows how to add a VLAN, vlan_accounting on the FortiGate unit internal
interface with an IP address of 10.13.101.101.
To add a VLAN - web-based manager
1. Go to System > Network > Interface and select Create New.
The Type is by default set to VLAN.
2. Enter a name for the VLAN to vlan_accounting.
3. Select the Internal interface.
4. Enter the VLAN ID.
The VLAN ID is a number between 1 and 4094 that allow groups of IP addresses with the
same VLAN ID to be associated together.
5. Select the Addressing Mode of Manual.
6. Enter the IP address for the port of 10.13.101.101/24.
7. Set the Administrative Access to HTTPS and SSH.
8. Select OK.
To add a VLAN - CLI
config system interfaceedit VLAN_1
set interface internalset type vlanset vlanid 100set ip 10.13.101.101/24set allowaccess https ssh
nextend
Zones
Zones are a group of one or more FortiGate interfaces, both physical and virtual, that you can
apply security policies to control inbound and outbound traffic. Grouping interfaces and VLAN
subinterfaces into zones simplifies the creation of security policies where a number of network
segments can use the same policy settings and protection profiles. When you add a zone, you
select the names of the interfaces and VLAN subinterfaces to add to the zone. Each interface
still has its own address and routing is still done between interfaces, that is, routing is not
affected by zones. Security policies can also be created to control the flow of intra-zone traffic.
For example, in the illustration below, the network includes three separate groups of users
representing different entities on the company network. While each group has its own set of
Interfaces Page 51 Install and System Administration for FortiOS 5.0
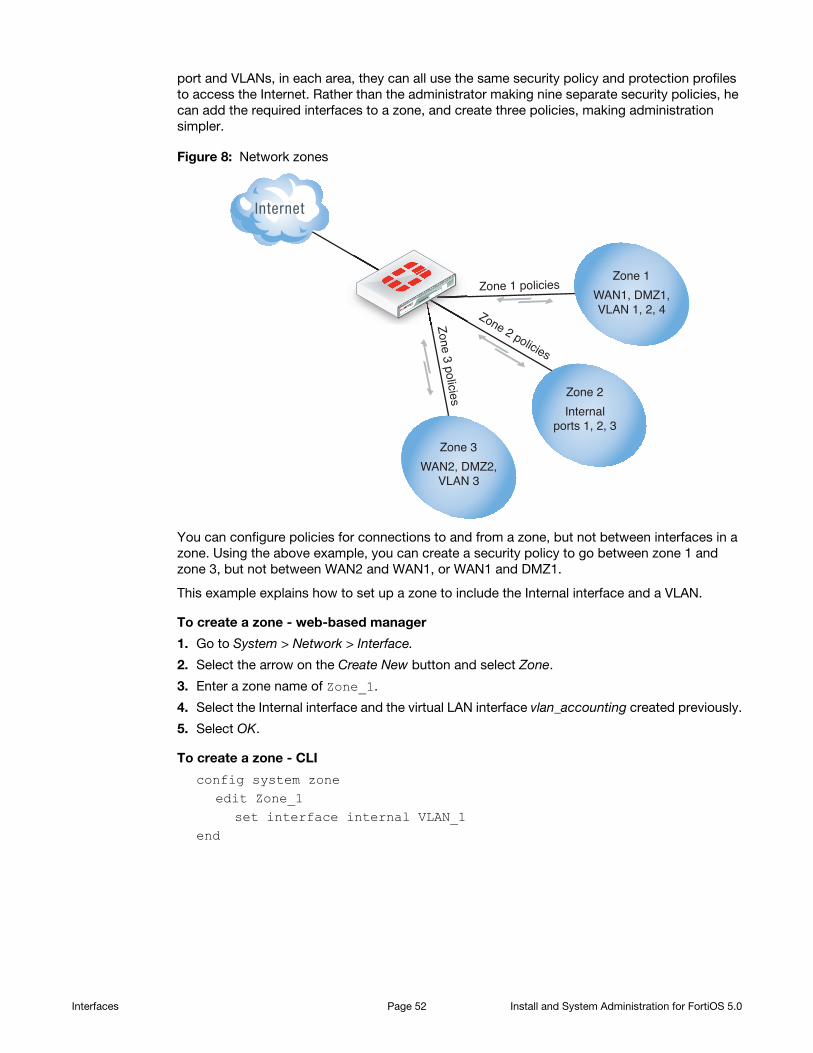
port and VLANs, in each area, they can all use the same security policy and protection profiles
to access the Internet. Rather than the administrator making nine separate security policies, he
can add the required interfaces to a zone, and create three policies, making administration
simpler.
Figure 8: Network zones
You can configure policies for connections to and from a zone, but not between interfaces in a
zone. Using the above example, you can create a security policy to go between zone 1 and
zone 3, but not between WAN2 and WAN1, or WAN1 and DMZ1.
This example explains how to set up a zone to include the Internal interface and a VLAN.
To create a zone - web-based manager
1. Go to System > Network > Interface.
2. Select the arrow on the Create New button and select Zone.
3. Enter a zone name of Zone_1.
4. Select the Internal interface and the virtual LAN interface vlan_accounting created previously.
5. Select OK.
To create a zone - CLI
config system zoneedit Zone_1
set interface internal VLAN_1end
Zone 1 policies
Zone 2 policies
Zone 3 policies
Zone 1
WAN1, DMZ1,VLAN 1, 2, 4
Zone 2
Internalports 1, 2, 3
Zone 3
WAN2, DMZ2,VLAN 3
Interfaces Page 52 Install and System Administration for FortiOS 5.0

Probing Interfaces
Server probes can be used on interfaces. In order for this to occur, the probe response mode
must first be configured, then the probe response must be allowed administrative access on the
interface. The probe response mode can be:
none Disable probe.
http-probe Http probe.
twamp Two way active measurement protocol.
Both steps must be done through the CLI.
Configuring the probe
config system probe-responseset mode http-probe
end
Allowing the probe response to have administrative access to the interface
config system interfaceedit <port>
set allowaccess probe-responseend
end
Interfaces Page 53 Install and System Administration for FortiOS 5.0

Central management
Administering one or two FortiGate units is fairly simple enough, especially when they are in the
same room or building. However, if you are administering many FortiGate units that may be
located in locations in a large geographical area, or in the world, you will need a more efficient
method of maintaining firmware upgrades, configuration changes, and updates.
The FortiManager family of appliances supply the tools needed to effectively manage any size
Fortinet security infrastructure, from a few devices to thousands of appliances. FortiManager
appliances provide centralized policy-based provisioning, configuration, and update
management, as well as end-to-end network monitoring for added control. Managers can
control administrative access and simplify policy deployment using role-based administration to
define user privileges for specific management domains and functions by aggregating
collections of Fortinet appliances and agents into independent management domains. By
locally hosting security content updates for managed devices and agents, FortiManager
appliances minimize web filtering rating request response time and maximize network
protection.
This chapter describes the basics of using FortiManager as an administration tool for multiple
FortiGate units. It describes the basics of setting up a FortiGate unit in FortiManager and some
key management features you can use within FortiManager to manage the FortiGate unit. For
full details and instructions on FortiManager, see the FortiManager Administration Guide.
This section includes the topics:
• Adding a FortiGate to FortiManager
• Configuration through FortiManager
• Firmware updates
• FortiGuard
• Backup and restore configurations
• Administrative domains
Adding a FortiGate to FortiManager
Before you can maintain a FortiGate unit using a FortiManager unit, you need to add it to the
FortiManager. This requires configuration on both the FortiGate and FortiManager. This section
describes the basics to configure management using a FortiManager device. For more
information on the interaction of FortiManager with the FortiGate unit, see the FortiManager
documentation.
FortiGate configuration
These steps ensure that the FortiGate unit will be able to receive updated antivirus and IPS
updates and allow remote management through the FortiManager system. You can add a
In order for the FortiGate unit and FortiManager unit to properly connect, both units must have
compatible firmware. To find out if your firmware is compatible, refer to the FortiOS or
FortiManager Release Notes.
Page 54

FortiGate unit whether it is running in either NAT mode or transparent mode. The FortiManager
unit provides remote management of a FortiGate unit over TCP port 541.
If you have not already done so, register the FortiGate unit by visiting http://support.fortinet.com
and select Product Registration. By registering your Fortinet unit, you will receive updates to
threat detection and prevention databases (Antivirus, Intrusion Detection, etc.) and will also
ensure your access to technical support.
You must enable the FortiGate management option so the FortiGate unit can accept
management updates to firmware, antivirus signatures, and IPS signatures.
To configure the FortiGate unit - web-based manager
1. Log in to the FortiGate unit.
2. Go to System > Admin > Settings.
3. Enter the IP address for the FortiManager unit.
4. Select Send Request.
The FortiManager ID now appears in the Trusted FortiManager table.
As an additional security measure, you can also select Registration Password and enter a
password to conconnect to the FortiManager.
To configure the FortiGate unit - CLI
config system central-mamagementset fmg <ip_address>
end
To use the registration password enter:
execute central-mgmt register-device <fmg-serial-no><fmg-register-password><fgt-usrname><fgt-password>
Configuring an SSL connection
An SSL connection can be configured between the two devices and an encryption level
selected. Use the following CLI commands in the FortiGate CLI to configure the connection:
config system central-managementset status enableset enc-algorithm {default* | high | low}
end
The default encryption automatically sets high and medium encryption algorithms. Algorithms
used for high, medium, and low follows openssl definitions:
• High - Key lengths larger than 128 bits, and some cipher suites with 128-bit keys.
Algorithms are: DHE-RSA-AES256-SHA:AES256-SHA: EDH-RSA-DES-CBC3-SHA:
DES-CBC3-SHA:DES-CBC3-MD5:DHE-RSA-AES128-SHA:AES128-SHA
• Medium - Key strengths of 128 bit encryption.
Algorithms are: RC4-SHA:RC4-MD5:RC4-MD
• Low - Key strengths of 64 or 56 bit encryption algorithms but excluding export cipher suites
Algorithms are: EDH-RSA-DES-CDBC-SHA; DES-CBC-SHA; DES-CBC-MD5.
FortiManager configuration
Once the connection between the FortiGate unit and the FortiManager unit has been
configured, you can add the FortiGate to the Device Manager in the FortiManager unit’s
Central management Page 55 Install and System Administration for FortiOS 5.0

web-based manager. For details on completing the configuration, see the FortiManager
Administration Guide.
Configuration through FortiManager
With the FortiManager system, you can monitor and configure multiple FortiGate units from one
location. Using the FortiManager’s Device Manager, you can view the FortiGate units and make
the usual configuration updates and changes, without having to log in and out of multiple
FortiGate units.
FortiManager enables you to complete the configuration, by going to the Device Manager,
selecting the FortiGate unit and using the same menu structure and pages as you would see in
the FortiGate web-based manager. All changes to the FortiGate configuration are stored locally
on the FortiManager unit until you synchronize with the FortiGate unit.
When a FortiGate unit is under control of a FortiManager system, administrators will not be able
to change the configuration using the FortiGate. When trying to change options, the unit
displays a message that it is configured through FortiManager, and any changes may be
reverted.
Global objects
If you are maintaining a number of FortiGate units within a network, many of the policies and
configuration elements will be the same across the corporation. In these instances, the adding
and editing of many of the same policies will be come a tedious and error-prone activity. With
FortiManager global objects, this level of configuration is simplified.
A global object is an object that is not associated specifically with one device or group. Global
objects includes security policies, a DNS server, VPN, and IP pools.
The Global Objects window is where you can configure global objects and copy the
configurations to the FortiManager device database for a selected device or a group of devices.
You can also import configurations from the FortiManager device database for a selected
device and modify the configuration as required.
When configuring or creating a global policy object the interface, prompts, and fields are the
same as creating the same object on a FortiGate unit using the FortiGate web-based manager.
Locking the FortiGate web-based manager
When you use the FortiManager to manager multiple FortiGate units, a local FortiGate unit
becomes locked from any configuration changes using the web-based manager for most
administrators. The super_admin will still be able to make changes to the configuration;
however, this is not recommended as it may cause conflicts with the FortiManager.
Firmware updates
A FortiManager unit can also perform firmware updates for multiple FortiGate units, saving time
rather than upgrading each FortiGate unit individually.
The FortiManager unit stores local copies of firmware images, either by downloading images
from the Fortinet Distribution Network (FDN) or by accepting firmware images that are uploaded
from the management computer.
If you are using the FortiManager unit to download firmware images, the FDN first validates
device licenses and support contracts and then provides a list of currently available firmware
Central management Page 56 Install and System Administration for FortiOS 5.0

images. For devices with valid Fortinet Technical Support contracts, you can download new
firmware images from the FDN and the firmware release notes.
After firmware images have been either downloaded from the FDN or imported to the firmware
list, you can either schedule or immediately upgrade/downgrade a device or group of device’s
firmware.
See the FortiManager Administration Guide for more information on updating the FortiGate
firmware using the FortiManager central management.
FortiGuard
FortiManager can also connect to the FortiGuard Distribution Network (FDN) to receive push
updates for IPS signatures and antivirus definitions. These updates can then be used to update
multiple FortiGate units throughout an organization. By using the FortiManager as the host for
updates, bandwidth use is minimized as updates are downloaded to one source instead of
many.
To receive IPS and antivirus updates from FortiManager, indicate an alternate IP address on the
FortiGate unit.
To configure updates from FortiManager
1. Go to System > Config > FortiGuard.
2. Select AntiVirus and IPS Options to expand the options.
3. Enable both Allow Push Update and Use override push IP.
4. Enter the IP address of the FortiManager unit.
5. Select Apply.
Backup and restore configurations
A FortiManager unit stores configuration files for backup and restore purposes. A FortiManager
also enables you to save revisions of configuration files. Configuration backups occur
automatically when the administrator logs out or the administrator login session expires.
FortiManager also enables you to view differences between different configurations to view
where changes have been made.
Administrative domains
FortiManager administrative domains enable the super_admin to create groupings of devices
for configured administrators to monitor and manage. FortiManager can manage a large
number of Fortinet appliances. This enables administrators to maintain managed devices
specific to their geographic location or business division. This also includes FortiGate units with
multiple configured VDOMs.
Each administrator is tied to an administrative domain (ADOM). When that particular
administrator logs in, they see only those devices or VDOMs configured for that administrator
and ADOM. The one exception is the super_admin account that can see and maintain all
administrative domains and the devices within those domains.
Administrative domains are not enabled by default and enabling and configuring the domains
can only be performed by the super_admin.
Central management Page 57 Install and System Administration for FortiOS 5.0

The maximum number of administrative domains you can add depends on the FortiManager
system model. See the FortiManager Administration Guide for information on the maximums for
each model.
Central management Page 58 Install and System Administration for FortiOS 5.0

Monitoring
With network administration, the first step is installing and configuring the FortiGate unit to be
the protector of the internal network. Once the system is running efficiently, the next step is to
monitor the system and network traffic, making configuration changes as necessary when a
threat or vulnerability is discovered.
This chapter discusses the various methods of monitoring both the FortiGate unit and the
network traffic through a range of different tools available within FortiOS.
This section includes the topics:
• Dashboard
• sFlow
• Monitor menus
• Logging
• Alert email
• SNMP
Dashboard
The FortiOS dashboard provides a location to view real-time system information. By default, the
dashboard displays the key statistics of the FortiGate unit itself, providing the memory and CPU
status, as well as the health of the ports, whether they are up or down and their throughput.
Widgets
Within the dashboard is a number of smaller windows, called widgets, that provide this status
information. Beyond what is visible by default, you can add a number of other widgets that
display other key traffic information including application use, traffic per IP address, top attacks,
traffic history and logging statistics.
You can add multiple dashboards to reflect what data you want to monitor, and add the widgets
accordingly. Dashboard configuration is only available through the web-based manager.
Administrators must have read and write privileges to customize and add widgets when in either
menu. Administrators must have read privileges if they want to view the information.
To add a dashboard and widgets
1. Go to System > Dashboard > Status.
2. Select the Dashboard menu at the top of the window and select Add Dashboard.
3. Enter a name.
4. Select the Widget menu at the top of the window.
5. From the screen, select the type of information you want to add.
6. When done, select the X in the top right of the widget.
Dashboard widgets provide an excellent method to view real-time data about the events
occurring on the FortiGate unit and the network. For example, by adding the Network Protocol
Usage widget, you can monitor the activity of various protocols over a selected span of time.
Based on that information you can add or adjust traffic shaping and/or security policies to
control traffic.
Page 59

FortiClient software
The License Information widget includes information for the FortiClient connections. It displays
the number of FortiClient connections allowed and the number of users connecting. By
selecting the Details link for the number of connections, you can view more information about
the connecting user, including IP address, user name, and type of operating system the user is
connecting with.
Included with this information is a link for Mac and Windows. Selecting these links automatically
downloads the FortiClient install file (.dmg or .exe) to the management computer.
sFlow
sFlow is a method of monitoring the traffic on your network to identify areas on the network that
may impact performance and throughput. FortiOS implements sFlow version 5.
sFlow uses packet sampling to monitor network traffic. The sFlow Agent captures packet
information at defined intervals and sends them to an sFlow Collector for analysis, providing
real-time data analysis. The information sent is only a sampling of the data for minimal impact
on network throughput and performance.
The sFlow Agent is embedded in the FortiGate unit. Once configured, the FortiGate unit sends
sFlow datagrams of the sampled traffic to the sFlow Collector, also called an sFlow Analyzer.
The sFlow Collector receives the datagrams, and provides real-time analysis and graphing to
indicate where potential traffic issues are occurring. sFlow Collector software is available from a
number of third party software vendors.
sFlow data captures only a sampling of network traffic, not all traffic like the traffic logs on the
FortiGate unit. Sampling works by the sFlow Agent looking at traffic packets when they arrive
on an interface. A decision is made whether the packet is dropped and allowed to be to its
destination or if a copy is forwarded to the sFlow Collector. The sample used and its frequency
are determined during configuration.
sFlow is not supported on virtual interfaces such as vdom link, ipsec, ssl.root or gre.
The sFlow datagram sent to the Collector contains the information:
• Packet header (e.g. MAC,IPv4,IPv6,IPX,AppleTalk,TCP,UDP, ICMP)
• Sample process parameters (rate, pool etc.)
• Input/output ports
• Priority (802.1p and TOS)
• VLAN (802.1Q)
• Source/destination prefix
• Next hop address
• Source AS, Source Peer AS
• Destination AS Path
• Communities, local preference
• User IDs (TACACS/RADIUS) for source/destination
• URL associated with source/destination
• Interface statistics (RFC 1573, RFC 2233, and RFC 2358)
sFlow agents can be added to any type of FortiGate interface. sFlow isn't supported on some
virtual interfaces such as VDOM link, IPsec, gre, and ssl.root.
For more information on sFlow, Collector software and sFlow MIBs, visit www.sflow.org.
Monitoring Page 60 Install and System Administration for FortiOS 5.0
Configuration
sFlow configuration is available only from the CLI. Configuration requires two steps: enabling
the sFlow Agent and configuring the interface for the sampling information.
Enable sFlow
config system sflowset collector-ip <ip_address>set collector-port <port_number>set source-ip <ip_address>
end
The default port for sFlow is UDP 6343. To configure in VDOM, use the commands:
config system vdom-sflowset vdom-sflow enableset collector-ip <ip_address>set collector-port <port_number>set source-ip <ip_address>
end
Configure sFlow agents per interface.
config system interfaceedit <interface_name>
set sflow-sampler enableset sample-rate <every_n_packets>set sample-direction [tx | rx | both]set polling-interval <seconds>
end
Monitor menus
The Monitor menus enable you to view session and policy information and other activity
occurring on your FortiGate unit. The monitors provide the details of user activity, traffic and
policy usage to show live activity. Monitors are available for DHCP, routing, security policies,
traffic shaping, load balancing, security features, VPN, users, WiFi, and logging.
Logging
FortiOS provides a robust logging environment that enables you to monitor, store, and report
traffic information and FortiGate events, including attempted log ins and hardware status.
Depending on your requirements, you can log to a number of different hosts.
To configure logging in the web-based manager, go to Log & Report > Log Config > Log
Settings.
To configure logging in the CLI use the commands config log <log_location>.
For details on configuring logging see the Logging and Reporting Guide.
If you will be using several FortiGate units, you can also use a FortiAnalyzer unit for logging. For
more information, see the FortiAnalyzer Administration Guide.
Monitoring Page 61 Install and System Administration for FortiOS 5.0
FortiCloud
The FortiCloud is a subscription-based hosted service. With this service, you can have
centralized management, logging, and reporting capabilities available in FortiAnalyzer and
FortiManager platforms, without any additional hardware to purchase, install or maintain. In
most cases, FortiCloud is the recommended location for saving and viewing logs.
This service includes a full range of reporting, analysis and logging, firmware management and
configuration revision history. It is hosted within the Fortinet global FortiGuard Network for
maximum reliability and performance, and includes reporting, and drill-down analysis widgets
makes it easy to develop custom views of network and security events.
The FortiGate unit sends log messages to the FortiCloud using TCP port 443. Configuration is
available once a user account has been set up and confirmed. To enable the account on the
FortiGate unit, go to System > Dashboard > Status, in the Licence Information widget select
Activate, and enter the account ID.
For FortiCloud traffic, you can identify a specific port/IP address for logging traffic.
Configuration of these services is performed in the CLI, using the command set source-ip.
When configured, this becomes the dedicated port to send this traffic over.
For example, to set the source IP of the FortiCloud server to be on the DMZ1 port with an IP of
192.168.4.5, the commands are:
config log fortiguard settingset status enableset source-ip 192.168.4.5
end
From the FortiGate unit, you can configure the connection and sending of log messages to be
sent over an SSL tunnel to ensure log messages are sent securely. To do this, use the CLI
commands to enable the encrypted connection and define the level of encryption.
config log fortiguard settingset status enableset enc-alogorithm {default | high | low | disable}
end
For more information on each encryption level see “Configuring an SSL connection” on
page 64.
FortiGate memory
Logs are saved to the internal memory by default. Inexpensive yet volatile, for basic event logs
or verifying traffic, AV or spam patterns, logging to memory is a simple option. However,
because logs are stored in the limited space of the internal memory, only a small amount is
available for logs. As such logs can fill up and be overridden with new entries, negating the use
of recursive data. This is especially true for traffic logs. Also, should the FortiGate unit be shut
down or rebooted, all log information will be lost.
FortiGate hard disk
For those FortiGate units with an internal hard disk or SDHC card, you can store logs to this
location. Efficient and local, the hard disk provides a convenient storage location. If you choose
to store logs in this manner, remember to backup the log data regularly.
Monitoring Page 62 Install and System Administration for FortiOS 5.0

Configure log disk settings is performed in the CLI using the commands:
config log disk settingset status enable
end
Further options are available when enabled to configure log file sizes, and uploading/backup
events.
As well, note that the write speeds of hard disks compared to the logging of ongoing traffic may
cause the dropping such, it is recommended that traffic logging be sent to a FortiAnalyzer or
other device meant to handle large volumes of data.
Syslog server
An industry standard for collecting log messages, for off-site storage. In the web-based
manager, you are able to send logs to a single syslog server, however in the CLI you can
configure up to three syslog servers where you can also use multiple configuration options. For
example, send traffic logs to one server, antivirus logs to another. The FortiGate unit sends
Syslog traffic over UDP port 514. Note that if a secure tunnel is configured for communication to
a FortiAnalyzer unit, then Syslog traffic will be sent over an IPSec connection, using UPD
500/4500, Protocol IP/50.
To configure a Syslog server in the web-based manager, go to Log & Report > Log Config > Log
Settings. In the CLI use the commands:
config log syslogd settingset status enable
end
Further options are available when enabled to configure a different port, facility and server IP
address.
For Syslog traffic, you can identify a specific port/IP address for logging traffic. Configuration of
these services is performed in the CLI, using the command set source-ip. When configured,
this becomes the dedicated port to send this traffic over.
For example, to set the source IP of a Syslog server to be on the DMZ1 port with an IP of
192.168.4.5, the commands are:
config log syslogd settingset status enableset source-ip 192.168.4.5
end
FortiAnalyzer
The FortiAnalyzer family of logging, analyzing, and reporting appliances securely aggregate log
data from Fortinet devices and other syslog-compatible devices. Using a comprehensive suite
of easily-customized reports, users can filter and review records, including traffic, event, virus,
attack, Web content, and email data, mining the data to determine your security stance and
assure regulatory compliance. FortiAnalyzer also provides advanced security management
functions such as quarantined file archiving, event correlation, vulnerability assessments, traffic
analysis, and archiving of email, Web access, instant messaging and file transfer content.
The FortiGate unit sends log messages over UDP port 514 or OFTP (TCP 514). If a secure
connection has been configured, log traffic is sent over UDP port 500/4500, Protocol IP/50. For
more information on configuring a secure connection see “Sending logs using a secure
connection” on page 64.
Monitoring Page 63 Install and System Administration for FortiOS 5.0

For FortiAnalyzer traffic, you can identify a specific port/IP address for logging traffic.
Configuration of these services is performed in the CLI, using the command set source-ip.
When configured, this becomes the dedicated port to send this traffic over.
For example, to set the source IP of a FortiAnalyzer unit to be on port 3 with an IP of
192.168.21.12, the commands are:
config log fortiguard settingset status enableset source-ip 192.168.21.12
end
Sending logs using a secure connection
From the FortiGate unit, you can configure the connection and sending of log messages over an
SSL tunnel to ensure log messages are sent securely. To do this, use the CLI commands below
to enable the encrypted connection and define the level of encryption.
This configuration is for FortiAnalyzer OS version 4.0 MR2 or lower. For version 40 MR3, see
“Configuring an SSL connection” on page 64.
To configure a secure connection to the FortiAnalyzer unit
On the FortiAnalyzer unit, enter the commands:
config log deviceedit <device_name>
set secure pskset psk <name_of_IPSec_tunnel>set id <fortigate_device_name_on_the_fortianalyzer>
end
To configure a secure connection on the FortiGate unit
On the FortiGate CLI, enter the commands:
config log fortianalyzer settingset status enableset server <ip_address>set localset localid <name_of_IPSec_tunnel>
end
Configuring an SSL connection
An SSL connection can be configured between the two devices, and an encryption level
selected.
Use the CLI commands to configure the encryption connection:
config log fortianalyzer settingset status enableset enc-algorithm {default* | high | low | disable}
end
You must configure the secure tunnel on both ends of the tunnel, the FortiGate unit and the
FortiAnalyzer unit.
Monitoring Page 64 Install and System Administration for FortiOS 5.0
The default encryption automatically sets high and medium encryption algorithms. Algorithms
used for high, medium, and low follows openssl definitions:
• High - Key lengths larger than 128 bits, and some cipher suites with 128-bit keys.
Algorithms are: DHE-RSA-AES256-SHA:AES256-SHA: EDH-RSA-DES-CBC3-SHA:
DES-CBC3-SHA:DES-CBC3-MD5:DHE-RSA-AES128-SHA:AES128-SHA
• Medium - Key strengths of 128 bit encryption.
Algorithms are: RC4-SHA:RC4-MD5:RC4-MD
• Low - Key strengths of 64 or 56 bit encryption algorithms but excluding export cipher suites
Algorithms are: EDH-RSA-DES-CDBC-SHA; DES-CBC-SHA; DES-CBC-MD5.
If you want to use an IPSec tunnel to connect to the FortiAnalyzer unit, you need to first disable
the enc-algorithm:
config log fortianalyzer setting set status enableset enc-algorithm disable
Then set the IPSec encryption:
set encrypt enableset psksecret <preshared_IPSec_tunnel_key>
end
Packet Capture
When troubleshooting networks, it helps to look inside the header of the packets. This helps to
determine if the packets, route, and destination are all what you expect. Packet capture can
also be called a network tap, packet sniffing, or logic analyzing.
To use the packet capture.
1. Go to System > Network > Packet Capture.
2. Select the interface to monitor and select the number of packets to keep.
3. Select Enable Filters.
4. Enter the information you want to gather from the packet capture.
5. Select OK.
To run the capture, select the play button in the progress column in the packet capture list. If not
active, Not Running will also appear in the column cell. The progress bar will indicate the status
of the capture. You can stop and restart it at any time.
When the capture is complete, select the Download icon to save the packet capture file to your
hard disk for further analysis.
Packet capture tells you what is happening on the network at a low level. This can be very
useful for troubleshooting problems, such as:
• finding missing traffic
• seeing if sessions are setting up properly
• locating ARP problems such as broadcast storm sources and causes
• confirming which address a computer is using on the network if they have multiple
addresses or are on multiple networks
• confirming routing is working as you expect
• wireless client connection problems
Monitoring Page 65 Install and System Administration for FortiOS 5.0
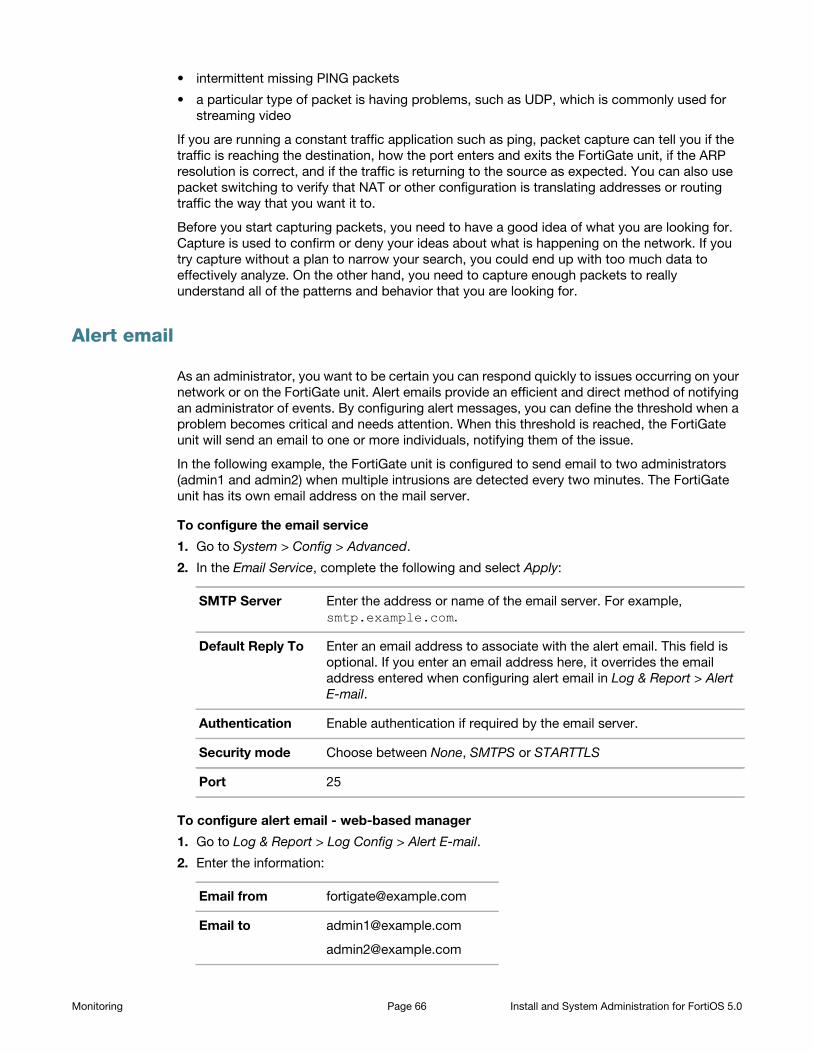
• intermittent missing PING packets
• a particular type of packet is having problems, such as UDP, which is commonly used for
streaming video
If you are running a constant traffic application such as ping, packet capture can tell you if the
traffic is reaching the destination, how the port enters and exits the FortiGate unit, if the ARP
resolution is correct, and if the traffic is returning to the source as expected. You can also use
packet switching to verify that NAT or other configuration is translating addresses or routing
traffic the way that you want it to.
Before you start capturing packets, you need to have a good idea of what you are looking for.
Capture is used to confirm or deny your ideas about what is happening on the network. If you
try capture without a plan to narrow your search, you could end up with too much data to
effectively analyze. On the other hand, you need to capture enough packets to really
understand all of the patterns and behavior that you are looking for.
Alert email
As an administrator, you want to be certain you can respond quickly to issues occurring on your
network or on the FortiGate unit. Alert emails provide an efficient and direct method of notifying
an administrator of events. By configuring alert messages, you can define the threshold when a
problem becomes critical and needs attention. When this threshold is reached, the FortiGate
unit will send an email to one or more individuals, notifying them of the issue.
In the following example, the FortiGate unit is configured to send email to two administrators
(admin1 and admin2) when multiple intrusions are detected every two minutes. The FortiGate
unit has its own email address on the mail server.
To configure the email service
1. Go to System > Config > Advanced.
2. In the Email Service, complete the following and select Apply:
To configure alert email - web-based manager
1. Go to Log & Report > Log Config > Alert E-mail.
2. Enter the information:
SMTP Server Enter the address or name of the email server. For example,
smtp.example.com.
Default Reply To Enter an email address to associate with the alert email. This field is
optional. If you enter an email address here, it overrides the email
address entered when configuring alert email in Log & Report > Alert
E-mail.
Authentication Enable authentication if required by the email server.
Security mode Choose between None, SMTPS or STARTTLS
Port 25
Email from [email protected]
Email to [email protected]
Monitoring Page 66 Install and System Administration for FortiOS 5.0
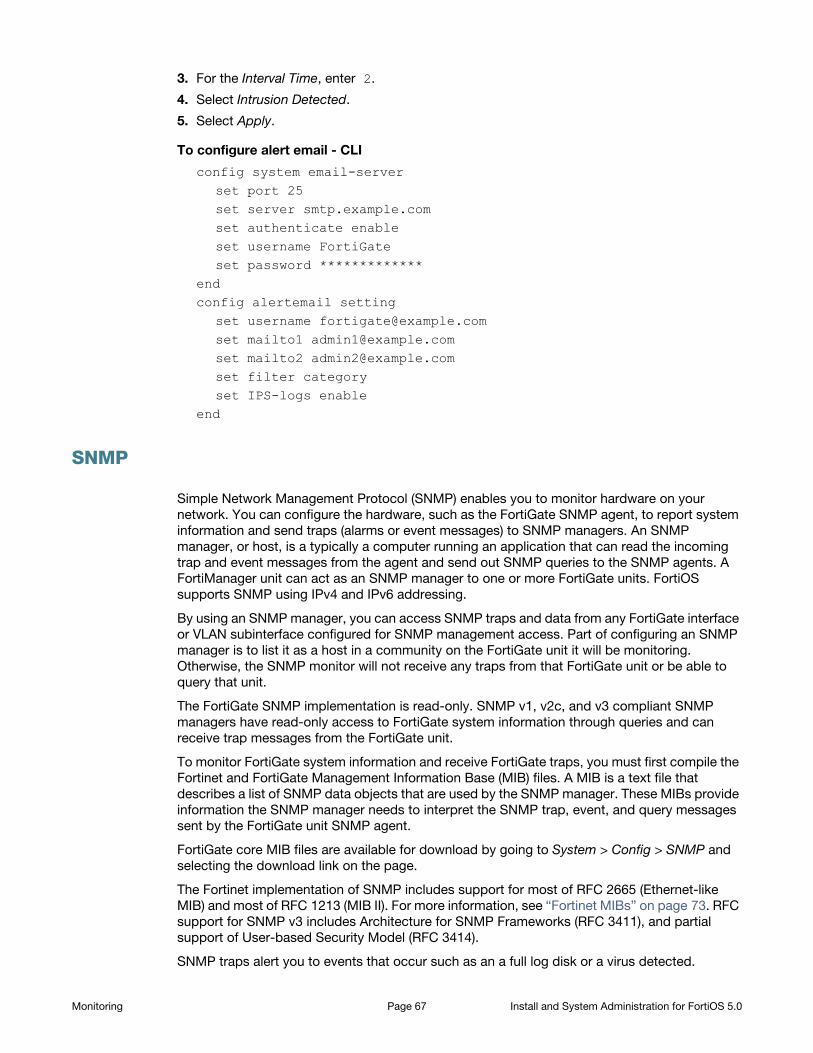
3. For the Interval Time, enter 2.
4. Select Intrusion Detected.
5. Select Apply.
To configure alert email - CLI
config system email-serverset port 25set server smtp.example.comset authenticate enableset username FortiGateset password *************
endconfig alertemail setting
set username [email protected] mailto1 [email protected] mailto2 [email protected] filter categoryset IPS-logs enable
end
SNMP
Simple Network Management Protocol (SNMP) enables you to monitor hardware on your
network. You can configure the hardware, such as the FortiGate SNMP agent, to report system
information and send traps (alarms or event messages) to SNMP managers. An SNMP
manager, or host, is a typically a computer running an application that can read the incoming
trap and event messages from the agent and send out SNMP queries to the SNMP agents. A
FortiManager unit can act as an SNMP manager to one or more FortiGate units. FortiOS
supports SNMP using IPv4 and IPv6 addressing.
By using an SNMP manager, you can access SNMP traps and data from any FortiGate interface
or VLAN subinterface configured for SNMP management access. Part of configuring an SNMP
manager is to list it as a host in a community on the FortiGate unit it will be monitoring.
Otherwise, the SNMP monitor will not receive any traps from that FortiGate unit or be able to
query that unit.
The FortiGate SNMP implementation is read-only. SNMP v1, v2c, and v3 compliant SNMP
managers have read-only access to FortiGate system information through queries and can
receive trap messages from the FortiGate unit.
To monitor FortiGate system information and receive FortiGate traps, you must first compile the
Fortinet and FortiGate Management Information Base (MIB) files. A MIB is a text file that
describes a list of SNMP data objects that are used by the SNMP manager. These MIBs provide
information the SNMP manager needs to interpret the SNMP trap, event, and query messages
sent by the FortiGate unit SNMP agent.
FortiGate core MIB files are available for download by going to System > Config > SNMP and
selecting the download link on the page.
The Fortinet implementation of SNMP includes support for most of RFC 2665 (Ethernet-like
MIB) and most of RFC 1213 (MIB II). For more information, see “Fortinet MIBs” on page 73. RFC
support for SNMP v3 includes Architecture for SNMP Frameworks (RFC 3411), and partial
support of User-based Security Model (RFC 3414).
SNMP traps alert you to events that occur such as an a full log disk or a virus detected.
Monitoring Page 67 Install and System Administration for FortiOS 5.0

SNMP fields contain information about the FortiGate unit, such as CPU usage percentage or
the number of sessions. This information is useful for monitoring the condition of the unit on an
ongoing basis and to provide more information when a trap occurs.
The FortiGate SNMP v3 implementation includes support for queries, traps, authentication, and
privacy. Authentication and encryption are configured in the CLI. See the system snmp user
command in the FortiGate CLI Reference.
SNMP configuration settings
Before a remote SNMP manager can connect to the FortiGate agent, you must configure one or
more FortiGate interfaces to accept SNMP connections by going to System > Network >
Interface. Select the interface and, in the Administrative Access, select SNMP.
For VDOMS, SNMP traps can only be sent on interfaces in the management VDOM. Traps
cannot be sent over other interfaces outside the management VDOM.
To configure SNMP settings, go to System > Config > SNMP.
SNMP Agent Select to enable SNMP communication.
Description Enter descriptive information about the FortiGate unit. The description
can be up to 35 characters.
Location Enter the physical location of the FortiGate unit. The system location
description can be up to 35 characters long.
Contact Enter the contact information for the person responsible for this
FortiGate unit. The contact information can be up to 35 characters.
SNMP v1/v2c section
To create a new SNMP community, see New SNMP Community page.
Community Name The name to identify the community.
Queries Indicates whether queries protocols (v1 and v2c) are enabled or
disabled. A green check mark indicates queries are enabled; a gray x
indicates queries are disabled. If one query is disabled and another one
enabled, there will still be a green check mark.
Traps Indicates whether trap protocols (v1 and v2c) are enabled or disabled. A
green check mark indicates traps are enabled; a gray x indicates traps
are disabled. If one query is disabled and another one enabled, there
will still be a green check mark.
Enable Select the check box to enable or disable the community.
SNMP v3 section To create a new SNMP community, see Create New SNMP V3 User.
User Name The name of the SNMPv3 user.
Security Level The security level of the user.
Notification Host The IP address or addresses of the host.
Queries Indicates whether queries are enabled or disabled. A green check mark
indicates queries are enabled; a gray x indicates queries are disabled
Monitoring Page 68 Install and System Administration for FortiOS 5.0

New SNMP Community page
Community Name Enter a name to identify the SNMP community
Hosts (section)
IP Address Enter the IP address and Identify the SNMP managers that can use the
settings in this SNMP community to monitor the FortiGate unit.
You can also set the IP address to 0.0.0.0 to so that any SNMP manager
can use this SNMP community.
Interface Optionally, select the name of the interface that this SNMP manager
uses to connect to the FortiGate unit. You only have to select the
interface if the SNMP manager is not on the same subnet as the
FortiGate unit. This can occur if the SNMP manager is on the Internet or
behind a router.
In virtual domain mode, the interface must belong to the management
VDOM to be able to pass SNMP traps.
Delete Removes an SNMP manager from the list within the Hosts section.
Add Select to add a blank line to the Hosts list. You can add up to eight
SNMP managers to a single community.
Queries (section)
Protocol The SNMP protocol. In the v1 row, this means that the settings are for
SNMP v1. In the v2c row, this means that the settings are for SNMP v2c.
Port Enter the port number (161 by default) that the SNMP managers in this
community use for SNMP v1 and SNMP v2c queries to receive
configuration information from the FortiGate unit. Select the Enable
check box to activate queries for each SNMP version.
Note: The SNMP client software and the FortiGate unit must use the
same port for queries.
Enable Select to enable that SNMP protocol.
Traps (section)
Protocol The SNMP protocol. In the v1 row, this means that the settings are for
SNMP v1. In the v2c row, this means that the settings are for SNMP v2c.
Local Enter the remote port numbers (port 162 for each by default) that the
FortiGate unit uses to send SNMP v1 or SNMP v2c traps to the SNMP
managers in this community. Select the Enable check box to activate
traps for each SNMP version.
Note: The SNMP client software and the FortiGate unit must use the
same port for traps.
Remote Enter the remote port number (port 162 is default) that the FortiGate unit
uses to send SNMP v1 or v2c traps to the SNMP managers in this
community.
Note: The SNMP client software and the FortiGate unit must use the
same port for queries.
Monitoring Page 69 Install and System Administration for FortiOS 5.0

Gigabit interfaces
When determining the interface speed of a FortiGate unit with a 10G interface, the
IF-MIB.ifSpeed may not return the correct value. IF-MIB.ifSpeed is a 32-bit gauge used to
report interface speeds in bits/second and cannot convert to a 64-bit value. The 32-bit counter
wrap the output too fast to be accurate.
In this case, you can use the value ifHighSpeed. It reports interface speeds in megabits/second.
This ensures that 10Gb interfaces report the correct value.
SNMP agent
You need to first enter information and enable the FortiGate SNMP Agent. Enter information
about the FortiGate unit to identify it so that when your SNMP manager receives traps from the
FortiGate unit, you will know which unit sent the information.
To configure the SNMP agent - web-based manager
1. Go to System > Config > SNMP.
2. Select Enable for the SNMP Agent.
3. Enter a descriptive name for the agent.
4. Enter the location of the FortiGate unit.
5. Enter a contact or administrator for the SNMP Agent or FortiGate unit.
6. Select Apply.
Enable Select to activate traps for each SNMP version.
SNMP Event Enable each SNMP event for which the FortiGate unit should send traps
to the SNMP managers in this community.
CPU Over usage traps sensitivity is slightly reduced, by spreading
values out over 8 polling cycles. This prevents sharp spikes due to CPU
intensive short-term events such as changing a policy.
Power Supply Failure event trap is available only on some models.
AMC interfaces enter bypass mode event trap is available only on
models that support AMC modules.
Enable Select to enable the SNMP event.
Create New SNMP V3 User
User Name Enter the name of the user.
Security Level Select the type of security level the user will have.
Notification Host Enter the IP address of the notification host. If you want to add more
than one host, after entering the IP address of the first host, select the
plus sign to add another host.
Enable Query Select to enable or disable the query. By default, the query is enabled.
Port Enter the port number in the field.
Events Select the SNMP events that will be associated with that user.
Monitoring Page 70 Install and System Administration for FortiOS 5.0

To configure SNMP agent - CLI
config system snmp sysinfoset status enableset contact-info <contact_information>set description <description_of_FortiGate>set location <FortiGate_location>
end
SNMP community
An SNMP community is a grouping of devices for network administration purposes. Within that
SNMP community, devices can communicate by sending and receiving traps and other
information. One device can belong to multiple communities, such as one administrator
terminal monitoring both a firewall SNMP and a printer SNMP community.
Add SNMP communities to your FortiGate unit so that SNMP managers can connect to view
system information and receive SNMP traps.
You can add up to three SNMP communities. Each community can have a different
configuration for SNMP queries and traps. Each community can be configured to monitor the
FortiGate unit for a different set of events. You can also add the IP addresses of up to 8 SNMP
managers to each community.
When the FortiGate unit is in virtual domain mode, SNMP traps can only be sent on interfaces in
the management virtual domain. Traps cannot be sent over other interfaces.
To add an SNMP v1/v2c community - web-based manager
1. Go to System > Config > SNMP.
2. In the SNMP v1/v2c area, select Create New.
3. Enter a Community Name.
4. Enter the IP address and Identify the SNMP managers that can use the settings in this
SNMP community to monitor the FortiGate unit.
5. Select the interface if the SNMP manager is not on the same subnet as the FortiGate unit.
6. Enter the Port number that the SNMP managers in this community use for SNMP v1 and
SNMP v2c queries to receive configuration information from the FortiGate unit. Select the
Enable check box to activate queries for each SNMP version.
7. Enter the Local and Remote port numbers that the FortiGate unit uses to send SNMP v1 and
SNMP v2c traps to the SNMP managers in this community.
8. Select the Enable check box to activate traps for each SNMP version.
9. Select OK.
Monitoring Page 71 Install and System Administration for FortiOS 5.0

To add an SNMP v1/v2c community - CLI
config system snmp communityedit <index_number>
set events <events_list>set name <community_name>set query-v1-port <port_number>set query-v1-status {enable | disable}set query-v2c-port <port_number>set query-v2c-status {enable | disable}set status {enable | disable}set trap-v1-lport <port_number>set trap-v1-rport <port_number>set trap-v1-status {enable | disable}set trap-v2c-lport <port_number>set trap-v2c-rport <port_number>set trap-v2c-status {enable | disable}
end
To add an SNMP v3 community - web-based manager
1. Go to System > Config > SNMP.
2. In the SNMP v3 area, select Create New.
3. Enter a User Name.
4. Select a Security Level and associated authorization algorithms.
5. Enter the IP address of the Notification Host SNMP managers that can use the settings in
this SNMP community to monitor the FortiGate unit.
6. Enter the Port number that the SNMP managers in this community use to receive
configuration information from the FortiGate unit. Select the Enable check box to activate
queries for each SNMP version.
7. Select the Enable check box to activate traps.
8. Select OK.
To add an SNMP v3 community - CLI
config system snmp useredit <index_number>
set security-level [auth-priv | auth-no-priv | no-auth-no-priv}set queries enableset query-port <port_number>set notify-hosts <ip_address>set events <event_selections>
end
Enabling on the interface
Before a remote SNMP manager can connect to the FortiGate agent, you must configure one or
more FortiGate interfaces to accept SNMP connections.
To configure SNMP access - web-based manager
1. Go to System > Network > Interface.
2. Choose an interface that an SNMP manager connects to and select Edit.
Monitoring Page 72 Install and System Administration for FortiOS 5.0

3. In Administrative Access, select SNMP.
4. Select OK.
To configure SNMP access - CLI
config system interfaceedit <interface_name>
set allowaccess snmpend
Fortinet MIBs
The FortiGate SNMP agent supports Fortinet proprietary MIBs as well as standard RFC 1213
and RFC 2665 MIBs. RFC support includes support for the parts of RFC 2665 (Ethernet-like
MIB) and the parts of RFC 1213 (MIB II) that apply to FortiGate unit configuration.
There are two MIB files for FortiGate units - the Fortinet MIB, and the FortiGate MIB. The
Fortinet MIB contains traps, fields and information that is common to all Fortinet products. The
FortiGate MIB contains traps, fields and information that is specific to FortiGate units. Each
Fortinet product has its own MIB. If you use other Fortinet products you will need to download
their MIB files as well. Both MIB files are used for FortiOS and FortiOS Carrier; there are no
additional traps for the Carrier version of the operating system.
The Fortinet MIB and FortiGate MIB along with the two RFC MIBs are listed in tables in this
section. You can download the two FortiGate MIB files from Fortinet Customer Support. The
Fortinet MIB contains information for Fortinet products in general. the Fortinet FortiGate MIB
includes the system information for The FortiGate unit and version of FortiOS. Both files are
required for proper SNMP data collection.
To download the MIB files, go to System > Config > SNMP and select a MIB link in the FortiGate
SNMP MIB section.
Your SNMP manager may already include standard and private MIBs in a compiled database
that is ready to use. You must add the Fortinet proprietary MIB to this database to have access
to the Fortinet specific information.
MIB files are updated for each version of FortiOS. When upgrading the firmware ensure that
you updated the Fortinet FortiGate MIB file as well.
If the interface you are configuring already has protocols that are allowed access, use the
command append allowaccess snmp instead, or else the other protocols will be replaced.
For more information, see “Adding and removing options from lists” on page 23.
There were major changes to the MIB files between v3.0 and v4.0. You need to use the new
MIBs for v4.0 or you may mistakenly access the wrong traps and fields.
Monitoring Page 73 Install and System Administration for FortiOS 5.0

SNMP get command syntax
Normally, to get configuration and status information for a FortiGate unit, an SNMP manager
would use an SNMP get commands to get the information in a MIB field. The SNMP get
command syntax would be similar to:
snmpget -v2c -c <community_name> <address_ipv4> {<OID> | <MIB_field>}
…where…
<community_name> is an SNMP community name added to the FortiGate configuration. You
can add more than one community name to a FortiGate SNMP configuration. The most
commonly used community name is public.
<address_ipv4> is the IP address of the FortiGate interface that the SNMP manager
connects to.
{<OID> | <MIB_field>} is the object identifier (OID) for the MIB field or the MIB field name
itself.
The SNMP get command gets firmware version running on the FortiGate unit. The community
name is public. The IP address of the interface configured for SNMP management access is
10.10.10.1. The firmware version MIB field is fgSysVersion and the OID for this MIB field is
Table 9: Fortinet MIBs
MIB file name or RFC Description
FORTINET-CORE-MIB.mib The Fortinet MIB includes all system configuration
information and trap information that is common to all
Fortinet products.
Your SNMP manager requires this information to monitor
FortiGate unit configuration settings and receive traps
from the FortiGate SNMP agent.
FORTINET-FORTIGATE-MIB.mib The FortiGate MIB includes all system configuration
information and trap information that is specific to
FortiGate units.
Your SNMP manager requires this information to monitor
FortiGate configuration settings and receive traps from
the FortiGate SNMP agent. FortiManager systems
require this MIB to monitor FortiGate units.
RFC-1213 (MIB II) The FortiGate SNMP agent supports MIB II groups with
these exceptions.
• No support for the EGP group from MIB II (RFC 1213,
section 3.11 and 6.10).
• Protocol statistics returned for MIB II groups
(IP/ICMP/TCP/UDP/etc.) do not accurately capture all
FortiGate traffic activity. More accurate information
can be obtained from the information reported by the
Fortinet MIB.
RFC-2665 (Ethernet-like MIB) The FortiGate SNMP agent supports Ethernet-like MIB
information. FortiGate SNMP does not support for the
dot3Tests and dot3Errors groups.
Monitoring Page 74 Install and System Administration for FortiOS 5.0

1.3.6.1.4.1.12356.101.4.1.1 The first command uses the MIB field name and the
second uses the OID:
snmpget -v2c -c public 10.10.10.1 fgSysVersion.0snmpget -v2c -c public 10.10.10.1 1.3.6.1.4.1.12356.101.4.1.1.0
The OIDs and object names used in these examples are dependent on the version of MIB and
are subject to change.
Monitoring Page 75 Install and System Administration for FortiOS 5.0
VLANs
Virtual Local Area Networks (VLANs) multiply the capabilities of your FortiGate unit, and can
also provide added network security. Virtual LANs (VLANs) use ID tags to logically separate
devices on a network into smaller broadcast domains. These smaller domains forward packets
only to devices that are part of that VLAN domain. This reduces traffic and increases network
security.
A Local Area Network (LAN) is a group of connected computers and devices that are arranged
into network broadcast domains. A LAN broadcast domain includes all the computers that
receive a packet broadcast from any computer in that broadcast domain. A switch will
automatically forward the packets to all of its ports; in contrast, routers do not automatically
forward network broadcast packets. This means routers separate broadcast domains. If a
network has only switches and no routers, that network is considered one broadcast domain,
no matter how large or small it is. Smaller broadcast domains are more efficient because fewer
devices receive unnecessary packets. They are more secure as well because a hacker reading
traffic on the network will have access to only a small portion of the network instead of the
entire network’s traffic.
Virtual LANs (VLANs) use ID tags to logically separate a LAN into smaller broadcast domains.
Each VLAN is its own broadcast domain. Smaller broadcast domains reduce traffic and increase
network security. The IEEE 802.1Q standard defines VLANs. All layer-2 and layer-3 devices
along a route must be 802.1Q-compliant to support VLANs along that route. For more
information, see “VLAN switching and routing” on page 77 and “VLAN layer-3 routing” on
page 80.
VLANs reduce the size of the broadcast domains by only forwarding packets to interfaces that
are part of that VLAN or part of a VLAN trunk link. Trunk links form switch-to-switch or
switch-to-router connections, and forward traffic for all VLANs. This enables a VLAN to include
devices that are part of the same broadcast domain, but physically distant from each other.
VLAN ID tags consist of a 4-byte frame extension that switches and routers apply to every
packet sent and received in the VLAN. Workstations and desktop computers, which are
commonly originators or destinations of network traffic, are not an active part of the VLAN
process. All the VLAN tagging and tag removal is done after the packet has left the computer.
For more information, see “VLAN ID rules” on page 77.
Any FortiGate unit without VDOMs enabled can have a maximum of 255 interfaces in
transparent operating mode. The same is true for any single VDOM. In NAT mode, the number
can range from 255 to 8192 interfaces per VDOM, depending on the FortiGate model. These
numbers include VLANs, other virtual interfaces, and physical interfaces. To have more than 255
interfaces configured in transparent operating mode, you need to configure multiple VDOMs
that enable you to divide the total number of interfaces over all the VDOMs.
One example of an application of VLANs is a company’s accounting department. Accounting
computers may be located at both main and branch offices. However, accounting computers
need to communicate with each other frequently and require increased security. VLANs allow
the accounting network traffic to be sent only to accounting computers and to connect
accounting computers in different locations as if they were on the same physical subnet.
This guide uses the term “packet” to refer to both layer-2 frames and layer-3 packets.
Page 76

VLAN ID rules
Layer-2 switches and layer-3 devices add VLAN ID tags to the traffic as it arrives and remove
them before they deliver the traffic to its final destination. Devices such as PCs and servers on
the network do not require any special configuration for VLANs. Twelve bits of the 4-byte VLAN
tag are reserved for the VLAN ID number. Valid VLAN ID numbers are from 1 to 4094, while 0 is
used for high priority frames, and 4095 is reserved.
On a layer-2 switch, you can have only one VLAN subinterface per physical interface, unless
that interface is configured as a trunk link. Trunk links can transport traffic for multiple VLANs to
other parts of the network.
On a FortiGate unit, you can add multiple VLANs to the same physical interface. However, VLAN
subinterfaces added to the same physical interface cannot have the same VLAN ID or have IP
addresses on the same subnet. You can add VLAN subinterfaces with the same VLAN ID to
different physical interfaces.
Creating VLAN subinterfaces with the same VLAN ID does not create any internal connection
between them. For example a VLAN ID of 300 on port1 and VLAN ID of 300 on port2 are
allowed, but they are not connected. Their relationship is the same as between any two
FortiGate network interfaces.
VLAN switching and routing
VLAN switching takes place on the OSI model layer-2, just like other network switching. VLAN
routing takes place on the OSI model layer-3. The difference between them is that during VLAN
switching, VLAN packets are simply forwarded to their destination. This is different from VLAN
routing where devices can open the VLAN packets and change their VLAN ID tags to route the
packets to a new destination.
VLAN layer-2 switching
Ethernet switches are layer-2 devices, and generally are 802.1Q compliant. Layer 2 refers to the
second layer of the seven layer Open Systems Interconnect (OSI) basic networking model; the
Data Link layer. FortiGate units act as layer-2 switches or bridges when they are in transparent
mode. The units simply tag and forward the VLAN traffic or receive and remove the tags from
the packets. A layer-2 device does not inspect incoming packets or change their contents; it
only adds or removes tags and routes the packet.
A VLAN can have any number of physical interfaces assigned to it. Multiple VLANs can be
assigned to the same physical interface. Typically two or more physical interfaces are assigned
to a VLAN, one for incoming and one for outgoing traffic. Multiple VLANs can be configured on
one FortiGate unit, including trunk links.
Layer-2 VLAN example
To better understand VLAN operation, this example shows what happens to a data frame on a
network that uses VLANs.
The network topology consists of two 8-port switches that are configured to support VLANs on
a network. Both switches are connected through port 8 using an 802.1Q trunk link. Subnet 1 is
connected to switch A, and subnet 2 is connected to switch B. The ports on the switches are
configured as follows.
VLANs Page 77 Install and System Administration for FortiOS 5.0
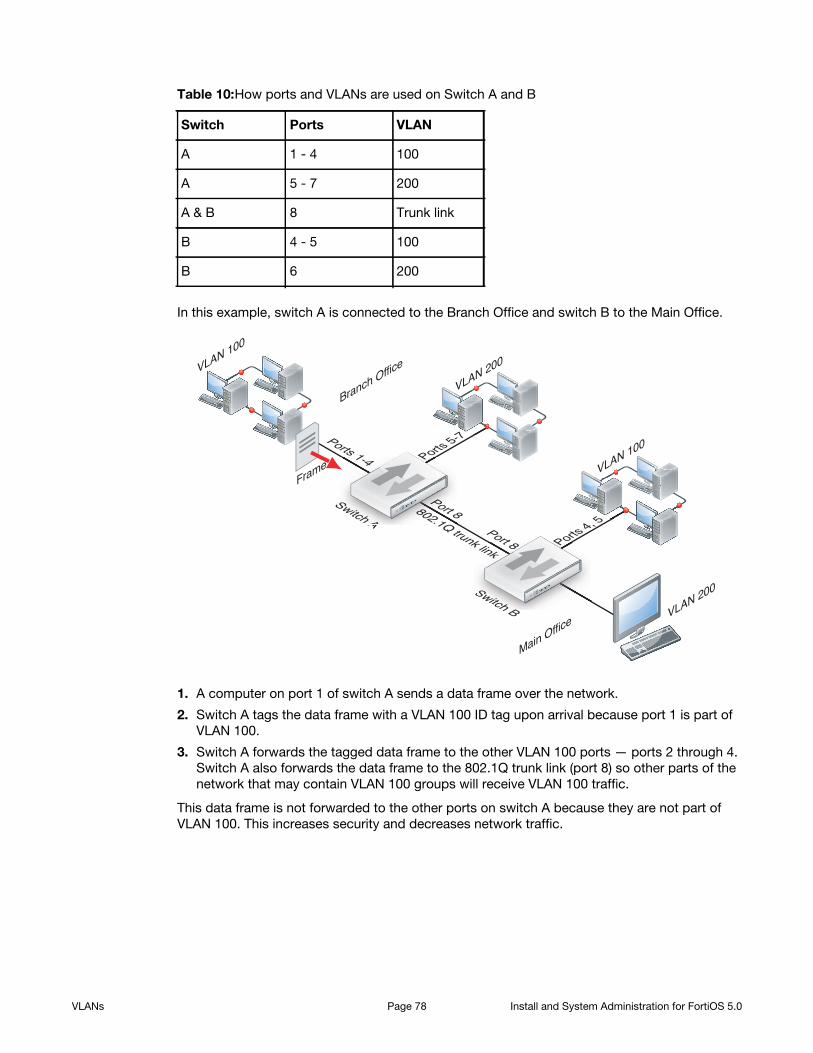
In this example, switch A is connected to the Branch Office and switch B to the Main Office.
Switch A
Switch B
Branch Office
Main Office
Frame VLAN 100
VLAN 200
VLAN 200VLAN 100
SwSwititchch AA
SwSwititchch
802.1Q trunk link
Ports 1-4 Ports 5-7
Ports 4, 5Port 8
Port 8
1. A computer on port 1 of switch A sends a data frame over the network.
2. Switch A tags the data frame with a VLAN 100 ID tag upon arrival because port 1 is part of
VLAN 100.
3. Switch A forwards the tagged data frame to the other VLAN 100 ports — ports 2 through 4.
Switch A also forwards the data frame to the 802.1Q trunk link (port 8) so other parts of the
network that may contain VLAN 100 groups will receive VLAN 100 traffic.
This data frame is not forwarded to the other ports on switch A because they are not part of
VLAN 100. This increases security and decreases network traffic.
Table 10:How ports and VLANs are used on Switch A and B
Switch Ports VLAN
A 1 - 4 100
A 5 - 7 200
A & B 8 Trunk link
B 4 - 5 100
B 6 200
VLANs Page 78 Install and System Administration for FortiOS 5.0

4. Switch B receives the data frame over the trunk link (port 8).
5. Because there are VLAN 100 ports on switch B (ports 4 and 5), the data frame is forwarded
to those ports. As with switch A, the data frame is not delivered to VLAN 200.
If there were no VLAN 100 ports on switch B, the switch would not forward the data frame
and it would stop there.
6. The switch removes the VLAN 100 ID tag before it forwards the data frame to an end
destination.
The sending and receiving computers are not aware of any VLAN tagging on the data frames
that are being transmitted. When any computer receives that data frame, it appears as a normal
data frame.
Switch A
Switch B
Branch Office
Main Office
Frame VLAN 100
VLAN 200
VLAN 200
VLAN 100
SwSwititchch AA
SwSwititchch
802.1Q trunk link
Ports 1-4 Ports 5-7
Ports 4, 5Port 8
Port 8
�
Switch A
Switch B
Branch Office
Main Office
Frame VLAN 100
VLAN 200
VLAN 200
VLAN 100
SwSwititchch AA
SwSwititchch
802.1Q trunk link
Ports 1-4 Ports 5-7
Ports 4, 5Port 8
Port 8
�
VLANs Page 79 Install and System Administration for FortiOS 5.0

VLAN layer-3 routing
Routers are layer-3 devices. Layer 3 refers to the third layer of the OSI networking model, the
Network layer. FortiGate units in NAT mode act as layer-3 devices. As with layer 2, FortiGate
units acting as layer-3 devices are 802.1Q-compliant.
The main difference between layer-2 and layer-3 devices is how they process VLAN tags.
Layer-2 switches just add, read and remove the tags. They do not alter the tags or do any other
high-level actions. Layer-3 routers not only add, read and remove tags but also analyze the data
frame and its contents. This analysis allows layer-3 routers to change the VLAN tag if it is
appropriate and send the data frame out on a different VLAN.
In a layer-3 environment, the 802.1Q-compliant router receives the data frame and assigns a
VLAN ID. The router then forwards the data frame to other members of the same VLAN
broadcast domain. The broadcast domain can include local ports, layer-2 devices and layer-3
devices such as routers and firewalls. When a layer-3 device receives the data frame, the device
removes the VLAN tag and examines its contents to decide what to do with the data frame. The
layer-3 device considers:
• Source and destination addresses
• Protocol
• Port number.
The data frame may be forwarded to another VLAN, sent to a regular non-VLAN-tagged
network or just forwarded to the same VLAN as a layer-2 switch would do. Or, the data frame
may be discarded if the proper security policy has been configured to do so.
Layer-3 VLAN example
In this example, switch A is connected to the Branch Office subnet, the same as subnet 1 in the
layer-2 example. In the Main Office subnet, VLAN 300 is on port 5 of switch B. The FortiGate
unit is connected to switch B on port 1 and the trunk link connects the FortiGate unit’s port 3 to
switch A. The other ports on switch B are unassigned.
This example explains how traffic can change VLANs originating on VLAN 100 and arriving at a
destination on VLAN 300. Layer-2 switches alone cannot accomplish this, but a layer-3 router
can.
1. The VLAN 100 computer at the Branch Office sends the data frame to switch A, where the
VLAN 100 tag is added.
VLANs Page 80 Install and System Administration for FortiOS 5.0

2. Switch A forwards the tagged data frame to the FortiGate unit over the 802.1Q trunk link,
and to the VLAN 100 interfaces on Switch A.
Up to this point everything is the same as in the layer-2 example.
3. The FortiGate unit removes the VLAN 100 tag, and inspects the content of the data frame.
The FortiGate unit uses the content to select the correct security policy and routing options.
4. The FortiGate unit’s security policy allows the data frame to go to VLAN 300 in this example.
The data frame will be sent to all VLAN 300 interfaces, but in the example there is only port 1
Switch A
Switch B
Branch Office
Main OfficePort 1
VLAN 300
Frame
VLAN 300
VLAN 200
VLAN 100
SwSwititchch AA
SwSwwSwSwititiitittchchchcchch BBB
802.1Q trunk link
Ports 1-4 Ports 5-7
Port 1
Port 5
Port 3
Port 8
Portt 11111130000000
rt 3
Switch A
Switch B
Branch Office
Main OfficePort 1
VLAN 300
Frame
VLAN 300
VLAN 200
VLAN 100
SwSwititchch AA
SwSwwSwSwititiitittchchchcchch BBB
802.1Q trunk link
Ports 1-4 Ports 5-7
Port 1
Port 5
Port 3
Port 8
Portt 11111130000000
rt 3
�
VLANs Page 81 Install and System Administration for FortiOS 5.0
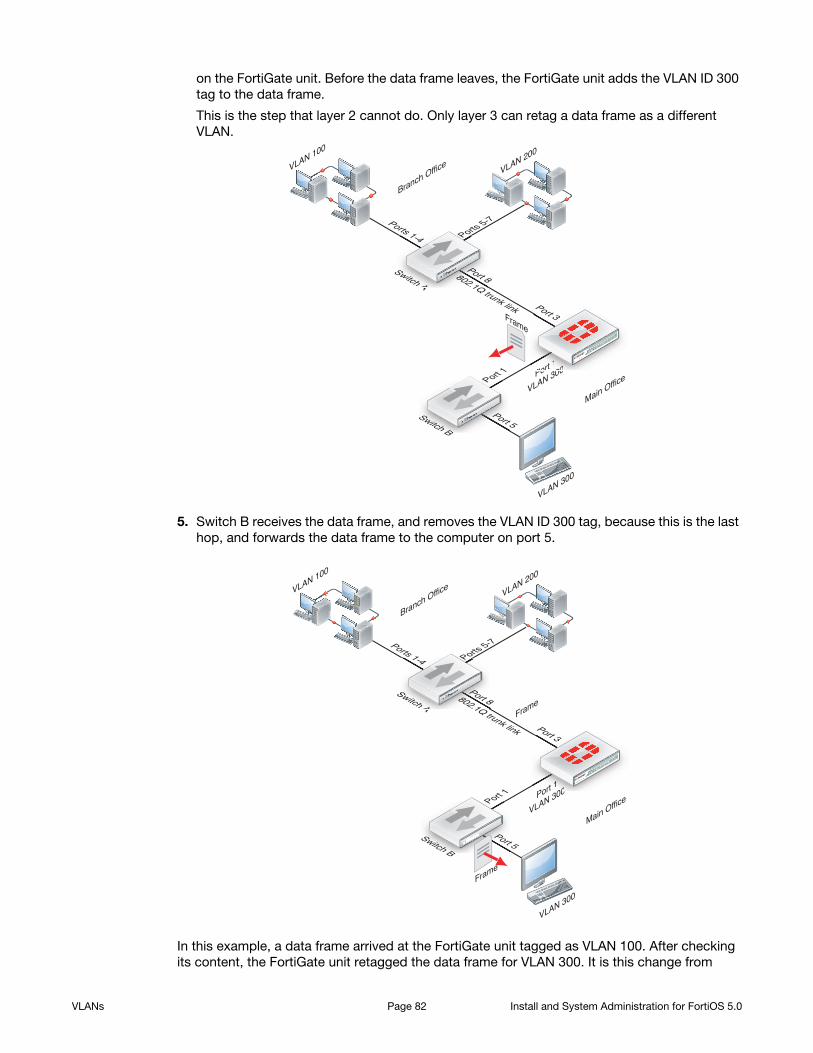
on the FortiGate unit. Before the data frame leaves, the FortiGate unit adds the VLAN ID 300
tag to the data frame.
This is the step that layer 2 cannot do. Only layer 3 can retag a data frame as a different
VLAN.
5. Switch B receives the data frame, and removes the VLAN ID 300 tag, because this is the last
hop, and forwards the data frame to the computer on port 5.
In this example, a data frame arrived at the FortiGate unit tagged as VLAN 100. After checking
its content, the FortiGate unit retagged the data frame for VLAN 300. It is this change from
Switch A
Switch B
Branch Office
Main OfficePort 1
VLAN 300
VLAN 300
VLAN 200
VLAN 100
SwSwititchch AA
SwSwwSwSwititiitittchchchcchch BBB
802.1Q trunk link
Ports 1-4 Ports 5-7
Port 1
Port 5
Port 3
Port 8
Portt 11111130000000
rt 3Frame
Switch A
Switch B
Branch Office
Main OfficePort 1
VLAN 300
Frame
VLAN 300
VLAN 200
VLAN 100
SwSwititchch AA
SwSwwSwSwititiitittchchchcchch BBB
802.1Q trunk link
Ports 1-4 Ports 5-7
Port 1
Port 5
Port 3
Port 8
Portt 11111130000000
rt 3
Frame
VLANs Page 82 Install and System Administration for FortiOS 5.0

VLAN 100 to VLAN 300 that requires a layer-3 routing device, in this case the FortiGate unit.
Layer-2 switches cannot perform this change.
VLANs in NAT mode
In NAT mode the FortiGate unit functions as a layer-3 device. In this mode, the FortiGate unit
controls the flow of packets between VLANs, but can also remove VLAN tags from incoming
VLAN packets. The FortiGate unit can also forward untagged packets to other networks, such
as the Internet.
In NAT mode, the FortiGate unit supports VLAN trunk links with IEEE 802.1Q-compliant
switches, or routers. The trunk link transports VLAN-tagged packets between physical subnets
or networks. When you add VLAN sub-interfaces to the FortiGate unit physical interfaces, the
VLANs have IDs that match the VLAN IDs of packets on the trunk link. The FortiGate unit directs
packets with VLAN IDs to sub-interfaces with matching IDs.
You can define VLAN sub-interfaces on all FortiGate physical interfaces. However, if multiple
virtual domains are configured on the FortiGate unit, you will have access to only the physical
interfaces on your virtual domain. The FortiGate unit can tag packets leaving on a VLAN
subinterface. It can also remove VLAN tags from incoming packets and add a different VLAN
tag to outgoing packets.
Normally in VLAN configurations, the FortiGate unit's internal interface is connected to a VLAN
trunk, and the external interface connects to an Internet router that is not configured for VLANs.
In this configuration the FortiGate unit can apply different policies for traffic on each VLAN
interface connected to the internal interface, which results in less network traffic and better
security.
Adding VLAN subinterfaces
A VLAN subinterface, also called a VLAN, is a virtual interface on a physical interface. The
subinterface allows routing of VLAN tagged packets using that physical interface, but it is
separate from any other traffic on the physical interface.
Adding a VLAN subinterface includes configuring:
• Physical interface
• IP address and netmask
• VLAN ID
• VDOM
Physical interface
The term VLAN subinterface correctly implies the VLAN interface is not a complete interface by
itself. You add a VLAN subinterface to the physical interface that receives VLAN-tagged
packets. The physical interface can belong to a different VDOM than the VLAN, but it must be
connected to a network router that is configured for this VLAN. Without that router, the VLAN
will not be connected to the network, and VLAN traffic will not be able to access this interface.
The traffic on the VLAN is separate from any other traffic on the physical interface.
When you are working with interfaces on your FortiGate unit, use the Column Settings on the
Interface display to make sure the information you need is displayed. When working with
VLANs, it is useful to position the VLAN ID column close to the IP address. If you are working
with VDOMs, including the Virtual Domain column as well will help you troubleshoot problems
more quickly.
To view the Interface display, go to System > Network > Interface.
VLANs Page 83 Install and System Administration for FortiOS 5.0

IP address and netmask
FortiGate unit interfaces cannot have overlapping IP addresses. The IP addresses of all
interfaces must be on different subnets. This rule applies to both physical interfaces and to
virtual interfaces such as VLAN subinterfaces. Each VLAN subinterface must be configured with
its own IP address and netmask pair. This rule helps prevent a broadcast storm or other similar
network problems.
If you are unable to change your existing configurations to prevent IP overlap, enter the CLI
command config system settings and set allow-subnet-overlap enable to
allow IP address overlap. If you enter this command, multiple VLAN interfaces can have an IP
address that is part of a subnet used by another interface. This command is recommended for
advanced users only.
VLAN ID
The VLAN ID is part of the VLAN tag added to the packets by VLAN switches and routers. The
VLAN ID is a number between 1 and 4094 that allow groups of IP addresses with the same
VLAN ID to be associated together. VLAN ID 0 is used only for high priority frames, and 4095 is
reserved.
All devices along a route must support the VLAN ID of the traffic along that route. Otherwise, the
traffic will be discarded before reaching its destination. For example, if your computer is part of
VLAN_100 and a co-worker on a different floor of your building is also on the same VLAN_100,
you can communicate with each other over VLAN_100, only if all the switches and routers
support VLANs and are configured to pass along VLAN_100 traffic properly. Otherwise, any
traffic you send your co-worker will be blocked or not delivered.
VDOM
If VDOMs are enabled, each VLAN subinterface must belong to a VDOM. This rule also applies
for physical interfaces.
Interface-related CLI commands require a VDOM to be specified, regardless of whether the
FortiGate unit has VDOMs enabled.
VLAN subinterfaces on separate VDOMs cannot communicate directly with each other. In this
situation, the VLAN traffic must exit the FortiGate unit and re-enter the unit again, passing
through firewalls in both directions. This situation is the same for physical interfaces.
A VLAN subinterface can belong to a different VDOM than the physical interface it is part of.
This is because the traffic on the VLAN is handled separately from the other traffic on that
interface. This is one of the main strengths of VLANs.
The following procedure will add a VLAN subinterface called VLAN_100 to the FortiGate internal
interface with a VLAN ID of 100. It will have an IP address and netmask of
172.100.1.1/255.255.255.0, and allow HTTPS, PING, and Telnet administrative access.
Note that in the CLI, you must enter “set type vlan” before setting the vlanid, and that the
allowaccess protocols are lower case.
To add a VLAN subinterface in NAT mode - web-based manager
1. If Current VDOM appears at the bottom left of the screen, select Global from the list of
VDOMs.
2. Go to System > Network > Interface.
VLANs Page 84 Install and System Administration for FortiOS 5.0

3. Select Create New to add a VLAN subinterface.
4. Enter the following:
5. Select OK.
To view the new VLAN subinterface, select the expand arrow next to the parent physical
interface (the internal interface). This will expand the display to show all VLAN subinterfaces on
this physical interface. If there is no expand arrow displayed, there are no subinterfaces
configured on that physical interface.
For each VLAN, the list displays the name of the VLAN, and, depending on column settings, its
IP address, the Administrative access you selected for it, the VLAN ID number, and which
VDOM it belongs to if VDOMs are enabled.
To add a VLAN subinterface in NAT mode - CLI
config system interfaceedit VLAN_100
set interface internalset type vlanset vlanid 100set ip 172.100.1.1 255.255.255.0set allowaccess https ping telnet
end
Configuring security policies and routing
Once you have created a VLAN subinterface on the FortiGate unit, you need to configure
security policies and routing for that VLAN. Without these, the FortiGate unit will not pass VLAN
traffic to its intended destination. Security policies direct traffic through the FortiGate unit
between interfaces. Routing directs traffic across the network.
Configuring security policies
Security policies permit communication between the FortiGate unit’s network interfaces based
on source and destination IP addresses. Interfaces that communicate with the VLAN interface
need security policies to permit traffic to pass between them and the VLAN interface.
VLAN Name VLAN_100
Type VLAN
Interface internal
VLAN ID 100
Addressing Mod Manual
IP/Netmask 172.100.1.1/255.255.255.0
Administrative Access HTTPS, PING, TELNET
VLANs Page 85 Install and System Administration for FortiOS 5.0

Each VLAN needs a security policy for each of the following connections the VLAN will be using:
• From this VLAN to an external network
• From an external network to this VLAN
• From this VLAN to another VLAN in the same virtual domain on the FortiGate unit
• From another VLAN to this VLAN in the same virtual domain on the FortiGate unit.
The packets on each VLAN are subject to antivirus scans and other UTM measures as they
pass through the FortiGate unit.
Configuring routing
As a minimum, you need to configure a default static route to a gateway with access to an
external network for outbound packets. In more complex cases, you will have to configure
different static or dynamic routes based on packet source and destination addresses.
As with firewalls, you need to configure routes for VLAN traffic. VLANs need routing and a
gateway configured to send and receive packets outside their local subnet just as physical
interfaces do. The type of routing you configure, static or dynamic, will depend on the routing
used by the subnet and interfaces you are connecting to. Dynamic routing can be routing
information protocol (RIP), border gateway protocol (BGP), open shortest path first (OSPF), or
multicast.
If you enable SSH, PING, Telnet, HTTPS and HTTP on the VLAN, you can use those protocols to
troubleshoot your routing and test that it is properly configured. Enabling logging on the
interfaces and using CLI diagnose commands such as diagnose sniff packet <interface_name> can also help locate any possible configuration or hardware issues.
Example VLAN configuration in NAT mode
In this example two different internal VLAN networks share one interface on the FortiGate unit,
and share the connection to the Internet. This example shows that two networks can have
separate traffic streams while sharing a single interface. This configuration could apply to two
departments in a single company, or to different companies.
There are two different internal network VLANs in this example. VLAN_100 is on the
10.1.1.0/255.255.255.0 subnet, and VLAN_200 is on the 10.1.2.0/255.255.255.0 subnet. These
VLANs are connected to the VLAN switch, such as a Cisco 2950 Catalyst switch.
The FortiGate internal interface connects to the VLAN switch through an 802.1Q trunk. The
internal interface has an IP address of 192.168.110.126 and is configured with two VLAN
subinterfaces (VLAN_100 and VLAN_200). The external interface has an IP address of
172.16.21.2 and connects to the Internet. The external interface has no VLAN subinterfaces.
VLANs Page 86 Install and System Administration for FortiOS 5.0

Figure 9: FortiGate unit with VLANs in NAT mode
When the VLAN switch receives packets from VLAN_100 and VLAN_200, it applies VLAN ID
tags and forwards the packets of each VLAN both to local ports and to the FortiGate unit across
the trunk link. The FortiGate unit has policies that allow traffic to flow between the VLANs, and
from the VLANs to the external network.
This section describes how to configure a FortiGate unit and a Cisco Catalyst 2950 switch for
this example network topology. The Cisco configuration commands used in this section are IOS
commands.
It is assumed that both the FortiGate unit and the Cisco 2950 switch are installed and
connected and that basic configuration has been completed. On the switch, you will need to be
able to access the CLI to enter commands. Refer to the manual for your FortiGate model as well
as the manual for the switch you select for more information.
It is also assumed that no VDOMs are enabled.
General configuration steps
The following steps provide an overview of configuring and testing the hardware used in this
example. For best results in this configuration, follow the procedures in the order given. Also,
note that if you perform any additional actions between procedures, your configuration may
have different results.
1. Configure the FortiGate unit
• Configure the external interface
• Add two VLAN subinterfaces to the internal network interface
• Add firewall addresses and address ranges for the internal and external networks
• Add security policies to allow:
• the VLAN networks to access each other
• the VLAN networks to access the external network.
2. Configure the VLAN switch
VLAN SwitchVLAN 200 Network
10.1.2.0
Untaggedpackets
Fa 0/9
Fa 0/3
Fa 0/24
802.1Q trunk
External172.16.21.2
Internal
192.168.110.126
VLAN 100
VLAN 200
VLAN 100 Network
10.1.1.0
l6.21.2
IIIIInntern1111111111111199992992.168 1
LVLVLVLVLNANANANANAN SSSSSSwiwiwiwiwitctctctct hhh
FaF
0/3/33333
0/24
VLANs Page 87 Install and System Administration for FortiOS 5.0
Configure the FortiGate unit
Configuring the FortiGate unit includes:
• Configure the external interface
• Add VLAN subinterfaces
• Add the firewall addresses
• Add the security policies
Configure the external interface
The FortiGate unit’s external interface will provide access to the Internet for all internal
networks, including the two VLANs.
To configure the external interface - web-based manager
1. Go to System > Network > Interface.
2. Select Edit for the external interface.
3. Enter the following information and select OK:
To configure the external interface - CLI
config system interfaceedit external
set mode staticset ip 172.16.21.2 255.255.255.0
end
Add VLAN subinterfaces
This step creates the VLANs on the FortiGate unit internal physical interface. The IP address of
the internal interface does not matter to us, as long as it does not overlap with the subnets of
the VLAN subinterfaces we are configuring on it.
The rest of this example shows how to configure the VLAN behavior on the FortiGate unit,
configure the switches to direct VLAN traffic the same as the FortiGate unit, and test that the
configuration is correct.
Adding VLAN subinterfaces can be completed through the web-based manager, or the CLI.
To add VLAN subinterfaces - web-based manager
1. Go to System > Network > Interface.
2. Select Create New.
3. Enter the following information and select OK:
Addressing mode Manual
IP/Network Mask 172.16.21.2/255.255.255.0
Name VLAN_100
Interface internal
VLAN ID 100
Addressing mode Manual
VLANs Page 88 Install and System Administration for FortiOS 5.0

4. Select Create New.
5. Enter the following information and select OK:
To add VLAN subinterfaces - CLI
config system interfaceedit VLAN_100
set vdom rootset interface internalset type vlanset vlanid 100set mode staticset ip 10.1.1.1 255.255.255.0set allowaccess https ping telnet
nextedit VLAN_200
set vdom rootset interface internalset type vlanset vlanid 200set mode staticset ip 10.1.2.1 255.255.255.0set allowaccess https ping telnet
end
Add the firewall addresses
You need to define the addresses of the VLAN subnets for use in security policies. The
FortiGate unit provides one default address, “all”, that you can use when a security policy
applies to all addresses as a source or destination of a packet. However, using “all” is less
secure and should be avoided when possible.
In this example, the “_Net” part of the address name indicates a range of addresses instead of a
unique address. When choosing firewall address names, use informative and unique names.
To add the firewall addresses - web-based manager
1. Go to Firewall Objects > Address > Addresses.
2. Select Create New.
IP/Network Mask 10.1.1.1/255.255.255.0
Administrative Access HTTPS, PING, TELNET
Name VLAN_200
Interface internal
VLAN ID 200
Addressing mode Manual
IP/Network Mask 10.1.2.1/255.255.255.0
Administrative Access HTTPS, PING, TELNET
VLANs Page 89 Install and System Administration for FortiOS 5.0

3. Enter the following information and select OK:
4. Select Create New.
5. Enter the following information and select OK:
To add the firewall addresses - CLI
config firewall addressedit VLAN_100_Net
set type ipmaskset subnet 10.1.1.0 255.255.255.0
nextedit VLAN_200_Net
set type ipmaskset subnet 10.1.2.0 255.255.255.0
end
Add the security policies
Once you have assigned addresses to the VLANs, you need to configure security policies for
them to allow valid packets to pass from one VLAN to another and to the Internet.
You can customize the Security Policy display by including some or all columns, and customize
the column order onscreen. Due to this feature, security policy screenshots may not appear the
same as on your screen.
If you do not want to allow all services on a VLAN, you can create a security policy for each
service you want to allow. This example allows all services.
To add the security policies - web-based manager
1. Go to Policy & Objects > Policy > IPv4 or Policy & Objects > Policy > IPv6 and select Create
New.
2. Leave the Policy Type as Firewall and the Policy Subtype as Address.
3. Enter the following information and select OK:
Name VLAN_100_Net
Type Subnet
Subnet / IP Range 10.1.1.0/255.255.255.0
Name VLAN_200_Net
Type Subnet
Subnet / IP Range 10.1.2.0/255.255.255.0
Incoming Interface VLAN_100
Source Address VLAN_100_Net
Outgoing Interface VLAN_200
VLANs Page 90 Install and System Administration for FortiOS 5.0

4. Select Create New.
5. Leave the Policy Type as Firewall and the Policy Subtype as Address.
6. Enter the following information and select OK:
7. Select Create New.
8. Leave the Policy Type as Firewall and the Policy Subtype as Address.
9. Enter the following information and select OK:
10.Select Create New.
11.Leave the Policy Type as Firewall and the Policy Subtype as Address.
Destination Address VLAN_200_Net
Schedule Always
Service ALL
Action ACCEPT
Enable NAT Enable
Incoming Interface VLAN_200
Source Address VLAN_200_Net
Outgoing Interface VLAN_100
Destination Address VLAN_100_Net
Schedule Always
Service ALL
Action ACCEPT
Enable NAT Enable
Incoming Interface VLAN_100
Source Address VLAN_100_Net
Outgoing Interface external
Destination Address all
Schedule Always
Service ALL
Action ACCEPT
Enable NAT Enable
VLANs Page 91 Install and System Administration for FortiOS 5.0

12.Enter the following information and select OK:
Incoming Interface VLAN_200
Source Address VLAN_200_Net
Outgoing Interface external
Destination Address all
Schedule Always
Service ALL
Action ACCEPT
Enable NAT Enable
VLANs Page 92 Install and System Administration for FortiOS 5.0

To add the security policies - CLI
config firewall policy or Config firewall policy6edit 1
set srcintf VLAN_100set srcaddr VLAN_100_Netset dstintf VLAN_200set dstaddr VLAN_200_Netset schedule alwaysset service ALLset action acceptset nat enableset status enable
nextedit 2
set srcintf VLAN_200set srcaddr VLAN_200_Netset dstintf VLAN_100set dstaddr VLAN_100_Netset schedule alwaysset service ALLset action acceptset nat enableset status enable
nextedit 3
set srcintf VLAN_100set srcaddr VLAN_100_Netset dstintf externalset dstaddr allset schedule alwaysset service ALLset action acceptset nat enableset status enable
nextedit 4
set srcintf VLAN_200set srcaddr VLAN_200_Netset dstintf externalset dstaddr allset schedule alwaysset service ALLset action acceptset nat enableset status enable
end
VLANs Page 93 Install and System Administration for FortiOS 5.0

Configure the VLAN switch
On the Cisco Catalyst 2950 Catalyst VLAN switch, you need to define VLANs 100 and 200 in the
VLAN database, and then add a configuration file to define the VLAN subinterfaces and the
802.1Q trunk interface.
One method to configure a Cisco switch is to connect over a serial connection to the console
port on the switch, and enter the commands at the CLI. Another method is to designate one
interface on the switch as the management interface and use a web browser to connect to the
switch’s graphical interface. For details on connecting and configuring your Cisco switch, refer
to the installation and configuration manuals for the switch.
The switch used in this example is a Cisco Catalyst 2950 switch. The commands used are IOS
commands. Refer to the switch manual for help with these commands.
To configure the VLAN subinterfaces and the trunk interfaces
Add this file to the Cisco switch:
!interface FastEthernet0/3switchport access vlan 100!interface FastEthernet0/9switchport access vlan 200!interface FastEthernet0/24switchport trunk encapsulation dot1qswitchport mode trunk!
The switch has the configuration:
Port 0/3 VLAN ID 100
Port 0/9 VLAN ID 200
Port 0/24 802.1Q trunk
To complete the setup, configure devices on VLAN_100 and VLAN_200 with default gateways.
The default gateway for VLAN_100 is the FortiGate VLAN_100 subinterface. The default
gateway for VLAN_200 is the FortiGate VLAN_200 subinterface.
Test the configuration
Use diagnostic commands, such as tracert, to test traffic routed through the FortiGate unit
and the Cisco switch.
Testing traffic from VLAN_100 to VLAN_200
In this example, a route is traced between the two internal networks. The route target is a host
on VLAN_200.
VLANs Page 94 Install and System Administration for FortiOS 5.0

Access a command prompt on a Windows computer on the VLAN_100 network, and enter the
following command:
C:\>tracert 10.1.2.2Tracing route to 10.1.2.2 over a maximum of 30 hops: 1 <10 ms <10 ms <10 ms 10.1.1.1 2 <10 ms <10 ms <10 ms 10.1.2.2Trace complete.
Testing traffic from VLAN_200 to the external network
In this example, a route is traced from an internal network to the external network. The route
target is the external network interface of the FortiGate-800 unit.
From VLAN_200, access a command prompt and enter this command:
C:\>tracert 172.16.21.2Tracing route to 172.16.21.2 over a maximum of 30 hops: 1 <10 ms <10 ms <10 ms 10.1.2.1 2 <10 ms <10 ms <10 ms 172.16.21.2Trace complete.
VLANs in transparent mode
In transparent mode, the FortiGate unit behaves like a layer-2 bridge but can still provide
services such as antivirus scanning, web filtering, spam filtering and intrusion protection to
traffic. There are some limitations in transparent mode in that you cannot use SSL VPN,
PPTP/L2TP VPN, DHCP server, or easily perform NAT on traffic. The limits in transparent mode
apply to IEEE 802.1Q VLAN trunks passing through the unit.
VLANs and transparent mode
You can insert the FortiGate unit operating in transparent mode into the VLAN trunk without
making changes to your network. In a typical configuration, the FortiGate unit internal interface
accepts VLAN packets on a VLAN trunk from a VLAN switch or router connected to internal
network VLANs. The FortiGate external interface forwards VLAN-tagged packets through
another VLAN trunk to an external VLAN switch or router and on to external networks such as
the Internet. You can configure the unit to apply different policies for traffic on each VLAN in the
trunk.
To pass VLAN traffic through the FortiGate unit, you add two VLAN subinterfaces with the same
VLAN ID, one to the internal interface and the other to the external interface. You then create a
security policy to permit packets to flow from the internal VLAN interface to the external VLAN
interface. If required, you create another security policy to permit packets to flow from the
external VLAN interface to the internal VLAN interface. Typically in transparent mode, you do
not permit packets to move between different VLANs. Network protection features, such as
spam filtering, web filtering and anti-virus scanning, are applied through the UTM profiles
specified in each security policy, enabling very detailed control over traffic.
When the FortiGate unit receives a VLAN-tagged packet at a physical interface, it directs the
packet to the VLAN subinterface with the matching VLAN ID. The VLAN tag is removed from the
packet, and the FortiGate unit then applies security policies using the same method it uses for
non-VLAN packets. If the packet exits the FortiGate unit through a VLAN subinterface, the
VLAN ID for that subinterface is added to the packet and the packet is sent to the
corresponding physical interface. For a configuration example, see “Example of VLANs in
transparent mode” on page 97.
VLANs Page 95 Install and System Administration for FortiOS 5.0

There are two essential steps to configure your FortiGate unit to work with VLANs in transparent
mode:
• Add VLAN subinterfaces
• Create security policies
You can also configure the protection profiles that manage antivirus scanning, web filtering and
spam filtering. For more information on UTM profiles, see the UTM Guide.
Add VLAN subinterfaces
The VLAN ID of each VLAN subinterface must match the VLAN ID added by the
IEEE 802.1Q-compliant router or switch. The VLAN ID can be any number between 1 and 4094,
with 0 being used only for high priority frames and 4095 being reserved. You add VLAN
subinterfaces to the physical interface that receives VLAN-tagged packets.
For this example, we are creating a VLAN called internal_v225 on the internal interface, with a
VLAN ID of 225. Administrative access is enabled for HTTPS and SSH. VDOMs are not enabled.
To add VLAN subinterfaces in transparent mode - web-based manager
1. Go to System > Network > Interface.
2. Select Create New.
3. Enter the following information and select OK.
The FortiGate unit adds the new subinterface to the interface that you selected.
Repeat steps 2 and 3 to add additional VLANs. You will need to change the VLAN ID, Name,
and possibly Interface when adding additional VLANs.
To add VLAN subinterfaces in transparent mode - CLI
config system interfaceedit internal_v225
set interface internalset vlanid 225set allowaccess HTTPS SSHset description “VLAN 225 on internal interface”set vdom root
end
Create security policies
In transparent mode, the FortiGate unit performs antivirus and antispam scanning on each
VLAN’s packets as they pass through the unit. You need security policies to permit packets to
pass from the VLAN interface where they enter the unit to the VLAN interface where they exit the
Name internal_v225
Type VLAN
Interface internal
VLAN ID 225
Administrative Access Enable HTTPS, and SSH. These are very secure
access methods.
Comments VLAN 225 on internal interface
VLANs Page 96 Install and System Administration for FortiOS 5.0
unit. If there are no security policies configured, no packets will be allowed to pass from one
interface to another.
To add security policies for VLAN subinterfaces - web based manager
1. Go to Policy & Objects > Objects > Addresses.
2. Select Create New to add firewall addresses that match the source and destination IP
addresses of VLAN packets.
3. Go to Policy & Objects > Policy > IPv4 or Policy & Objects > Policy > IPv6 and select Create
New.
4. From the Incoming Interface/Zone list, select the VLAN interface where packets enter the
unit.
5. From the Outgoing Interface/Zone list, select the VLAN interface where packets exit the unit.
6. Select the Source and Destination Address names that you added in step 2.
7. Select OK.
To add security policies for VLAN subinterfaces - CLI
config firewall addressedit incoming_VLAN_address
set associated-interface <incoming_VLAN_interface>set type ipmaskset subnet <IPv4_address_mask)
nextedit outgoing_VLAN_address
set associated-interface <outgoing_VLAN_interface>set type ipmaskset subnet <IPv4_address_mask>
nextendconfig firewall policy OR config firewall policy6
edit <unused_policy_number>set srcintf <incoming_VLAN_interface>set srcaddr incoming_VLAN_addressset destintf <outgoing_VLAN_interface>set destaddr outgoing_VLAN_addressset service <protocol_to_allow_on VLAN>set action ACCEPT
nextend
Example of VLANs in transparent mode
In this example, the FortiGate unit is operating in transparent mode and is configured with two
VLANs: one with an ID of 100 and the other with ID 200. The internal and external physical
interfaces each have two VLAN subinterfaces, one for VLAN_100 and one for VLAN_200.
The IP range for the internal VLAN_100 network is 10.100.0.0/255.255.0.0, and for the internal
VLAN_200 network is 10.200.0.0/255.255.0.0.
The internal networks are connected to a Cisco 2950 VLAN switch, which combines traffic from
the two VLANs onto one in the FortiGate unit internal interface. The VLAN traffic leaves the
FortiGate unit on the external network interface, goes on to the VLAN switch, and on to the
VLANs Page 97 Install and System Administration for FortiOS 5.0

Internet. When the FortiGate units receives a tagged packet, it directs it from the incoming
VLAN subinterface to the outgoing VLAN subinterface for that VLAN.
This section describes how to configure a FortiGate-800 unit, Cisco switch, and Cisco router in
the network topology shown in Figure 180.
Figure 10:VLAN transparent network topology
General configuration steps
The following steps summarize the configuration for this example. For best results, follow the
procedures in the order given. Also, note that if you perform any additional actions between
procedures, your configuration may have different results.
1. Configure the FortiGate unit which includes
• Adding VLAN subinterfaces
• Adding the security policies
2. Configure the Cisco switch and router
Configure the FortiGate unit
The FortiGate unit must be configured with the VLAN subinterfaces and the proper security
policies to enable traffic to flow through the FortiGate unit.
Add VLAN subinterfaces
For each VLAN, you need to create a VLAN subinterface on the internal interface and another
one on the external interface, both with the same VLAN ID.
To add VLAN subinterfaces - web-based manager
1. Go to System > Network > Interface.
2. Select Create New.
VLAN router
10.100.0.110.200.0.1
VLAN SwitchVLAN 200 Network
10.200.0.0Fa 0/9
Fa 0/3
Fa 0/24
802.1Q trunkVLAN 1, 2
External
Internal
VLAN 100
VLAN 200
VLAN 100 Network
10.100.0.0
ernal
IIIIInIInInInntterna
VLVLVLVLVANANANANANAN SSSSSSwwiwiwiwwitttctct hhh
FaF
0/3/3333
0/24
VLANs Page 98 Install and System Administration for FortiOS 5.0

3. Enter the following information and select OK:
4. Select Create New.
5. Enter the following information and select OK:
6. Select Create New.
7. Enter the following information and select OK:
8. Select Create New.
9. Enter the following information and select OK:
To add VLAN subinterfaces - CLI
config system interfaceedit VLAN_100_int
set status downset type vlanset interface internalset vlanid 100
nextedit VLAN_100_ext
set status downset type vlanset interface externalset vlanid 100
nextedit VLAN_200_int
set status downset type vlan
Name VLAN_100_int
Interface internal
VLAN ID 100
Name VLAN_100_ext
Interface external
VLAN ID 100
Name VLAN_200_int
Interface internal
VLAN ID 200
Name VLAN_200_ext
Interface external
VLAN ID 200
VLANs Page 99 Install and System Administration for FortiOS 5.0
set interface internalset vlanid 200
nextedit VLAN_200_ext
set status downset type vlanset interface externalset vlanid 200
end
Add the security policies
Security policies allow packets to travel between the VLAN_100_int interface and the
VLAN_100_ext interface. Two policies are required; one for each direction of traffic. The same is
required between the VLAN_200_int interface and the VLAN_200_ext interface, for a total of four
required security policies.
To add the security policies - web-based manager
1. Go to Policy & Objects > Policy > IPv4 or Policy & Objects > Policy > IPv6 and select Create
New.
2. Enter the following information and select OK:
3. Select Create New.
4. Enter the following information and select OK:
5. Go to Policy & Objects > Policy > IPv4 or Policy & Objects > Policy > IPv6 and select Create
New.
Incoming Interface VLAN_100_int
Source Address all
Outgoing Interface VLAN_100_ext
Destination Address all
Schedule Always
Service ALL
Action ACCEPT
Incoming Interface VLAN_100_ext
Source Address all
Outgoing Interface VLAN_100_int
Destination Address all
Schedule Always
Service ALL
Action ACCEPT
VLANs Page 100 Install and System Administration for FortiOS 5.0
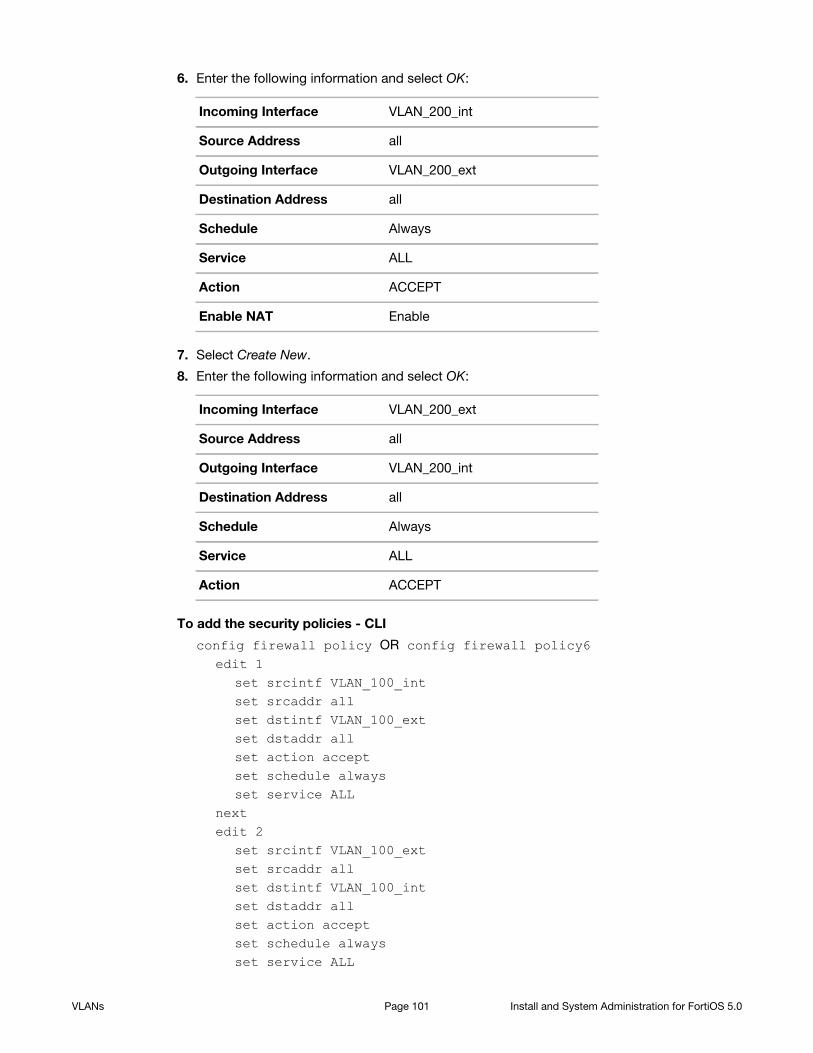
6. Enter the following information and select OK:
7. Select Create New.
8. Enter the following information and select OK:
To add the security policies - CLI
config firewall policy OR config firewall policy6edit 1
set srcintf VLAN_100_intset srcaddr allset dstintf VLAN_100_extset dstaddr allset action acceptset schedule alwaysset service ALL
nextedit 2
set srcintf VLAN_100_extset srcaddr allset dstintf VLAN_100_intset dstaddr allset action acceptset schedule alwaysset service ALL
Incoming Interface VLAN_200_int
Source Address all
Outgoing Interface VLAN_200_ext
Destination Address all
Schedule Always
Service ALL
Action ACCEPT
Enable NAT Enable
Incoming Interface VLAN_200_ext
Source Address all
Outgoing Interface VLAN_200_int
Destination Address all
Schedule Always
Service ALL
Action ACCEPT
VLANs Page 101 Install and System Administration for FortiOS 5.0

nextedit 3
set srcintf VLAN_200_intset srcaddr allset dstintf VLAN_200_extset dstaddr allset action acceptset schedule alwaysset service ALL
nextedit 4
set srcintf VLAN_200_extset srcaddr allset dstintf VLAN_200_intset dstaddr allset action acceptset schedule alwaysset service ALL
end
Configure the Cisco switch and router
This example includes configuration for the Cisco Catalyst 2900 ethernet switch, and for the
Cisco Multiservice 2620 ethernet router. If you have access to a different VLAN enabled switch
or VLAN router you can use them instead, however their configuration is not included in this
document.
Configure the Cisco switch
On the VLAN switch, you need to define VLAN_100 and VLAN_200 in the VLAN database and
then add a configuration file to define the VLAN subinterfaces and the 802.1Q trunk interface.
Add this file to the Cisco switch:
interface FastEthernet0/3 switchport access vlan 100!interface FastEthernet0/9 switchport access vlan 200!interface FastEthernet0/24 switchport trunk encapsulation dot1q switchport mode trunk!
The switch has the following configuration:
Port 0/3 VLAN ID 100
Port 0/9 VLAN ID 200
Port 0/24 802.1Q trunk
VLANs Page 102 Install and System Administration for FortiOS 5.0

Configure the Cisco router
You need to add a configuration file to the Cisco Multiservice 2620 ethernet router. The file
defines the VLAN subinterfaces and the 802.1Q trunk interface on the router. The 802.1Q trunk
is the physical interface on the router.
The IP address for each VLAN on the router is the gateway for that VLAN. For example, all
devices on the internal VLAN_100 network will have 10.100.0.1 as their gateway.
Add this file to the Cisco router:
!interface FastEthernet0/0!interface FastEthernet0/0.1 encapsulation dot1Q 100 ip address 10.100.0.1 255.255.255.0!interface FastEthernet0/0.2 encapsulation dot1Q 200 ip address 10.200.0.1 255.255.255.0!
The router has the following configuration:
Port 0/0.1 VLAN ID 100
Port 0/0.2 VLAN ID 200
Port 0/0 802.1Q trunk
Test the configuration
Use diagnostic network commands such as traceroute (tracert) and ping to test traffic routed
through the network.
Testing traffic from VLAN_100 to VLAN_200
In this example, a route is traced between the two internal networks. The route target is a host
on VLAN_200. The Windows traceroute command tracert is used.
From VLAN_100, access a Windows command prompt and enter this command:
C:\>tracert 10.1.2.2Tracing route to 10.1.2.2 over a maximum of 30 hops: 1 <10 ms <10 ms <10 ms 10.1.1.1 2 <10 ms <10 ms <10 ms 10.1.2.2Trace complete.
Troubleshooting VLAN issues
Several problems can occur with your VLANs. Since VLANs are interfaces with IP addresses,
they behave as interfaces and can have similar problems that you can diagnose with tools such
as ping, traceroute, packet sniffing, and diag debug.
VLANs Page 103 Install and System Administration for FortiOS 5.0
Asymmetric routing
You might discover unexpectedly that hosts on some networks are unable to reach certain other
networks. This occurs when request and response packets follow different paths. If the
FortiGate unit recognizes the response packets, but not the requests, it blocks the packets as
invalid. Also, if the FortiGate unit recognizes the same packets repeated on multiple interfaces,
it blocks the session as a potential attack.
This is asymmetric routing. By default, the FortiGate unit blocks packets or drops the session
when this happens. You can configure the FortiGate unit to permit asymmetric routing by using
the following CLI commands:
config system settingsset asymroute enable
end
If VDOMs are enabled, this command is per VDOM. You must set it for each VDOM that has the
problem as following:
config vdomedit <vdom_name>
config system settingsset asymroute enable
endend
If this solves your blocked traffic issue, you know that asymmetric routing is the cause. But
allowing asymmetric routing is not the best solution, because it reduces the security of your
network.
For a long-term solution, it is better to change your routing configuration or change how your
FortiGate unit connects to your network. The Asymmetric Routing and Other FortiGate Layer-2
Installation Issues technical note provides detailed examples of asymmetric routing situations
and possible solutions.
If you enable asymmetric routing, antivirus and intrusion prevention systems will not be
effective. Your FortiGate unit will be unaware of connections and treat each packet individually.
It will become a stateless firewall.
Layer-2 and Arp traffic
By default, FortiGate units do not pass layer-2 traffic. If there are layer-2 protocols such as IPX,
PPTP or L2TP in use on your network, you need to configure your FortiGate unit interfaces to
pass these protocols without blocking. Another type of layer-2 traffic is ARP traffic. For more
information on ARP traffic, see “ARP traffic” on page 105.
You can allow these layer-2 protocols using the CLI command:
config system interfaceedit <name_str>
set l2forward enableend
where <name_str> is the name of an interface.
VLANs Page 104 Install and System Administration for FortiOS 5.0

If VDOMs are enabled, this command is per VDOM. You must set it for each VDOM that has the
problem as following:
config vdomedit <vdom_name>
config system interfaceedit <name_str>set l2forward enable
endend
If you enable layer-2 traffic, you may experience a problem if packets are allowed to repeatedly
loop through the network. This repeated looping, very similar to a broadcast storm, occurs
when you have more than one layer-2 path to a destination. Traffic may overflow and bring your
network to a halt. You can break the loop by enabling Spanning Tree Protocol (STP) on your
network’s switches and routers. For more information, see “STP forwarding” on page 1262.
ARP traffic
Address Resolution Protocol (ARP) packets are vital to communication on a network, and ARP
support is enabled on FortiGate unit interfaces by default. Normally you want ARP packets to
pass through the FortiGate unit, especially if it is sitting between a client and a server or
between a client and a router.
ARP traffic can cause problems, especially in transparent mode where ARP packets arriving on
one interface are sent to all other interfaces including VLAN subinterfaces. Some layer-2
switches become unstable when they detect the same MAC address originating on more than
one switch interface or from more than one VLAN. This instability can occur if the layer-2 switch
does not maintain separate MAC address tables for each VLAN. Unstable switches may reset
and cause network traffic to slow down considerably.
Note that the default ARP timeout value is 300 seconds. This is not a configurable value.
Multiple VDOMs solution
By default, physical interfaces are in the root domain. If you do not configure any of your VLANs
in the root VDOM, it will not matter how many interfaces are in the root VDOM.
The multiple VDOMs solution is to configure multiple VDOMs on the FortiGate unit, one for each
VLAN. In this solution, you configure one inbound and one outbound VLAN interface in each
VDOM. ARP packets are not forwarded between VDOMs. This configuration limits the VLANs in
a VDOM and correspondingly reduces the administration needed per VDOM.
As a result of this configuration, the switches do not receive multiple ARP packets with
duplicate MACs. Instead, the switches receive ARP packets with different VLAN IDs and
different MACs. Your switches are stable.
However, you should not use the multiple VDOMs solution under any of the following
conditions:
• You have more VLANs than licensed VDOMs
• You do not have enough physical interfaces
Instead, use one of two possible solutions, depending on which operation mode you are using:
• In NAT mode, you can use the vlan forward CLI command.
• In transparent mode, you can use the forward-domain CLI command. But you still need to
be careful in some rare configurations.
VLANs Page 105 Install and System Administration for FortiOS 5.0
Vlanforward solution
If you are using NAT mode, the solution is to use the vlanforward CLI command for the
interface in question. By default, this command is enabled and will forward VLAN traffic to all
VLANs on this interface. When disabled, each VLAN on this physical interface can send traffic
only to the same VLAN. There is no cross-talk between VLANs, and ARP packets are forced to
take one path along the network which prevents the multiple paths problem.
In the following example, vlanforward is disabled on port1. All VLANs configured on port1
will be separate and will not forward any traffic to each other.
config system interfaceedit port1
set vlanforward disableend
Forward-domain solution
If you are using transparent mode, the solution is to use the forward-domain CLI command.
This command tags VLAN traffic as belonging to a particular collision group, and only VLANs
tagged as part of that collision group receive that traffic. It is like an additional set of VLANs. By
default, all interfaces and VLANs are part of forward-domain collision group 0. The many
benefits of this solution include reduced administration, the need for fewer physical interfaces,
and the availability of more flexible network solutions.
In the following example, forward-domain collision group 340 includes VLAN 340 traffic on
port1 and untagged traffic on port 2. Forward-domain collision group 341 includes VLAN 341
traffic on port 1 and untagged traffic on port 3. All other interfaces are part of forward-domain
collision group 0 by default. This configuration separates VLANs 340 and 341 from each other
on port 1, and prevents the ARP packet problems from before.
Use these CLI commands:
config system interfaceedit port1nextedit port2
set forward_domain 340nextedit port3
set forward_domain 341nextedit port1-340
set forward_domain 340set interface port1set vlanid 340
nextedit port1-341
set forward_domain 341set interface port1set vlanid 341
end
VLANs Page 106 Install and System Administration for FortiOS 5.0

You may experience connection issues with layer-2 traffic, such as ping, if your network
configuration has:
• Packets going through the FortiGate unit in transparent mode more than once
• More than one forwarding domain (such as incoming on one forwarding domain and
outgoing on another)
• IPS and AV enabled.
Now IPS and AV is applied the first time packets go through the FortiGate unit, but not on
subsequent passes. Only applying IPS and AV to this first pass fixes the network layer-2 related
connection issues.
NetBIOS
Computers running Microsoft Windows operating systems that are connected through a
network rely on a WINS server to resolve host names to IP addresses. The hosts communicate
with the WINS server by using the NetBIOS protocol.
To support this type of network, you need to enable the forwarding of NetBIOS requests to a
WINS server. The following example will forward NetBIOS requests on the internal interface for
the WINS server located at an IP address of 192.168.111.222.
config system interfaceedit internal
set netbios_forward enableset wins-ip 192.168.111.222
end
These commands apply only in NAT mode. If VDOMs are enabled, these commands are per
VDOM. You must set them for each VDOM that has the problem.
STP forwarding
The FortiGate unit does not participate in the Spanning Tree Protocol (STP). STP is an IEEE
802.1 protocol that ensures there are no layer-2 loops on the network. Loops are created when
there is more than one route for traffic to take and that traffic is broadcast back to the original
switch. This loop floods the network with traffic, reducing available bandwidth to nothing.
If you use your FortiGate unit in a network topology that relies on STP for network loop
protection, you need to make changes to your FortiGate configuration. Otherwise, STP
recognizes your FortiGate unit as a blocked link and forwards the data to another path. By
default, your FortiGate unit blocks STP as well as other non-IP protocol traffic.
Using the CLI, you can enable forwarding of STP and other layer-2 protocols through the
interface. In this example, layer-2 forwarding is enabled on the external interface:
config system interfaceedit external
set l2forward enableset stpforward enable
end
By substituting different commands for stpforward enable, you can also allow layer-2
protocols such as IPX, PPTP or L2TP to be used on the network. For more information, see
“Layer-2 and Arp traffic” on page 104.
VLANs Page 107 Install and System Administration for FortiOS 5.0

Too many VLAN interfaces
Any virtual domain can have a maximum of 255 interfaces in transparent mode. This includes
VLANs, other virtual interfaces, and physical interfaces. NAT mode supports from 255 to 8192
depending on the FortiGate model. This total number of interfaces includes VLANs, other virtual
interfaces, and physical interfaces.
Your FortiGate unit may allow you to configure more interfaces than this. However, if you
configure more than 255 interfaces, your system will become unstable and, over time, will not
work properly. As all interfaces are used, they will overflow the routing table that stores the
interface information, and connections will fail. When you try to add more interfaces, an error
message will state that the maximum limit has already been reached.
If you see this error message, chances are you already have too many VLANs on your system
and your routing has become unstable. To verify, delete a VLAN and try to add it back. If you
have too many, you will not be able to add it back on to the system. In this case, you will need to
remove enough interfaces (including VLANs) so that the total number of interfaces drops to 255
or less. After doing this, you should also reboot your FortiGate unit to clean up its memory and
buffers, or you will continue to experience unstable behavior.
To configure more than 255 interfaces on your FortiGate unit in transparent mode, you have to
configure multiple VDOMs, each with many VLANs. However, if you want to create more than
the default 10 VDOMs (or a maximum of 2550 interfaces), you must buy a license for additional
VDOMs. Only FortiGate models 3000 and higher support more than 10 VDOMs.
With these extra licenses, you can configure up to 500 VDOMs, with each VDOM containing up
to 255 VLANs in transparent mode. This is a theoretical maximum of over 127 500 interfaces.
However, system resources will quickly get used up before reaching that theoretical maximum.
To achieve the maximum number of VDOMs, you need to have top-end hardware with the most
resources possible.
In NAT mode, if you have a top-end model, the maximum interfaces per VDOM can be as high
as 8192, enough for all the VLANs in your configuration.
Your FortiGate unit has limited resources, such as CPU load and memory, that are divided
between all configured VDOMs. When running 250 or more VDOMs, you may need to monitor
the system resources to ensure there is enough to support the configured traffic processing.
VLANs Page 108 Install and System Administration for FortiOS 5.0

PPTP and L2TP
A virtual private network (VPN) is a way to use a public network, such as the Internet, as a
vehicle to provide remote offices or individual users with secure access to private networks.
FortiOS supports the Point-to-Point Tunneling Protocol (PPTP), which enables interoperability
between FortiGate units and Windows or Linux PPTP clients. Because FortiGate units support
industry standard PPTP VPN technologies, you can configure a PPTP VPN between a FortiGate
unit and most third-party PPTP VPN peers.
This section describes how to configure PPTP and L2TP VPNs as well as PPTP passthrough.
This section includes the topics:
• How PPTP VPNs work
• FortiGate unit as a PPTP server
• Configuring the FortiGate unit for PPTP VPN
• Configuring the FortiGate unit for PPTP pass through
• Testing PPTP VPN connections
• Logging VPN events
• Configuring L2TP VPNs
• L2TP configuration overview
How PPTP VPNs work
The Point-to-Point Tunneling Protocol enables you to create a VPN between a remote client and
your internal network. Because it is a Microsoft Windows standard, PPTP does not require
third-party software on the client computer. As long as the ISP supports PPTP on its servers,
you can create a secure connection by making relatively simple configuration changes to the
client computer and the FortiGate unit.
PPTP uses Point-to-Point protocol (PPP) authentication protocols so that standard PPP
software can operate on tunneled PPP links. PPTP packages data in PPP packets and then
encapsulates the PPP packets within IP packets for transmission through a VPN tunnel.
When the FortiGate unit acts as a PPTP server, a PPTP session and tunnel is created as soon as
the PPTP client connects to the FortiGate unit. More than one PPTP session can be supported
on the same tunnel. FortiGate units support PAP, CHAP, and plain text authentication. PPTP
clients are authenticated as members of a user group.
Traffic from one PPTP peer is encrypted using PPP before it is encapsulated using Generic
Routing Encapsulation (GRE) and routed to the other PPTP peer through an ISP network. PPP
packets from the remote client are addressed to a computer on the private network behind the
FortiGate unit. PPTP packets from the remote client are addressed to the public interface of the
FortiGate unit. See Figure 11 on page 110
Page 109

.
PPTP control channel messages are not authenticated, and their integrity is not protected.
Furthermore, encapsulated PPP packets are not cryptographically protected and may be read
or modified unless appropriate encryption software such as Secure Shell (SSH) or Secure File
Transfer Protocol (SFTP) is used to transfer data after the tunnel has been established.
As an alternative, you can use encryption software such as Microsoft Point-to-Point Encryption
(MPPE) to secure the channel. MPPE is built into Microsoft Windows clients and can be
installed on Linux clients. FortiGate units support MPPE.
Figure 11:Packet encapsulation
In Figure 11, traffic from the remote client is addressed to a computer on the network behind the
FortiGate unit. When the PPTP tunnel is established, packets from the remote client are
encapsulated and addressed to the FortiGate unit. The FortiGate unit forwards disassembled
packets to the computer on the internal network.
When the remote PPTP client connects, the FortiGate unit assigns an IP address from a
reserved range of IP addresses to the client PPTP interface. The PPTP client uses the assigned
IP address as its source address for the duration of the connection.
When the FortiGate unit receives a PPTP packet, the unit disassembles the PPTP packet and
forwards the packet to the correct computer on the internal network. The security policy and
protection profiles on the FortiGate unit ensure that inbound traffic is screened and processed
securely.
PPTP clients must be authenticated before a tunnel is established. The authentication process
relies on FortiGate user group definitions, which can optionally use established authentication
mechanisms such as RADIUS or LDAP to authenticate PPTP clients. All PPTP clients are
challenged when a connection attempt is made.
31
2
31
2
31
2
Traffic destination
192.168.20.2
Traffic destination
192.168.20.2
PPTP packets
destination 172.16.30.1
31
2PPTP packets
destination 172.16.30.1
172.16.30.1
PPTP and L2TP Page 110 Install and System Administration for FortiOS 5.0

FortiGate unit as a PPTP server
In the most common Internet scenario, the PPTP client connects to an ISP that offers PPP
connections with dynamically-assigned IP addresses. The ISP forwards PPTP packets to the
Internet, where they are routed to the FortiGate unit.
Figure 12:FortiGate unit as a PPTP server
If the FortiGate unit will act as a PPTP server, there are a number of steps to complete:
• Configure user authentication for PPTP clients.
• Enable PPTP.
• Specify the range of addresses that are assigned to PPTP clients when connecting
• Configure the security policy.
Configuring user authentication for PPTP clients
To enable authentication for PPTP clients, you must create user accounts and a user group to
identify the PPTP clients that need access to the network behind the FortiGate unit. Within the
user group, you must add a user for each PPTP client.
You can choose to use a plain text password for authentication or forward authentication
requests to an external RADIUS, LDAP, or TACACS+ server. If password protection will be
provided through a RADIUS, LDAP, or TACACS+ server, you must configure the FortiGate unit to
forward authentication requests to the authentication server.
This example creates a basic user/password combination.
Configuring a user account
To add a local user - web-based manager
1. Go to User & Device > User > User Definition and select Create New.
2. Select Local User
3. Enter a User Name.
4. Enter a Password for the user. The password should be at least six characters.
Internal Network
PPTP_Client_1
PPTP_Client_3
PPTP_Client_2
PPTP and L2TP Page 111 Install and System Administration for FortiOS 5.0

5. Select OK.
To add a local user - CLI
config user localedit <username>
set type passwordset passwd <password>
end
Configuring a user group
To ease configuration, create user groups that contain users in similar categories or
departments.
To create a user group - web-based manager
1. Go to User & Device > User > User Group and select Create New.
2. Enter a Name for the group.
3. Select the Type of Firewall.
4. From the Available Users list, select the required users and select the right-facing arrow to
add them to the Members list.
5. Select OK.
To create a user group - CLI
config user groupedit <group_name>
set group-type firewallset members <user_names>
end
Enabling PPTP and specifying the PPTP IP address range
The PPTP address range specifies the range of addresses reserved for remote PPTP clients.
When a PPTP client connects to the FortiGate unit, the client is assigned an IP address from
this range. Afterward, the FortiGate unit uses the assigned address to communicate with the
PPTP client.
The address range that you reserve can be associated with private or routable IP addresses. If
you specify a private address range that matches a network behind the FortiGate unit, the
assigned address will make the PPTP client appear to be part of the internal network.
PPTP requires two IP addresses, one for each end of the tunnel. The PPTP address range is the
range of addresses reserved for remote PPTP clients. When the remote PPTP client establishes
a connection, the FortiGate unit assigns an IP address from the reserved range of IP addresses
to the client PPTP interface or retrieves the assigned IP address from the PPTP user group. If
you use the PPTP user group, you must also define the FortiGate end of the tunnel by entering
the IP address of the unit in Local IP (web-based manager) or local-ip (CLI). The PPTP client
uses the assigned IP address as its source address for the duration of the connection.
PPTP and L2TP Page 112 Install and System Administration for FortiOS 5.0

PPTP configuration is only available through the CLI. In the example below, PPTP is enabled
with the use of an IP range of 182.168.1.1 to 192.168.1.10 for addressing.
The start and end IPs in the PPTP address range must be in the same 24-bit subnet, for
example, 192.168.1.1 - 192.168.1.254.
config vpn pptpset status enableset ip-mode rangeset eip 192.168.1.10set sip 192.168.1.1
end
In this example, PPTP is enabled with the use of a user group for addressing, where the IP
address of the PPTP server is 192.168.1.2 and the user group is hr_admin.
config vpn pptpset status enableset ip-mode rangeset local-ip 192.168.2.1set usrgrp hr_admin
end
Adding the security policy
The security policy specifies the source and destination addresses that can generate traffic
inside the PPTP tunnel and defines the scope of services permitted through the tunnel. If a
selection of services are required, define a service group.
To configure the firewall for the PPTP tunnel - web-based manager
1. Go to Policy & Objects > Policy > IPv4 or Policy & Objects > Policy > IPv6 and select Create
New.
2. Complete the following and select OK:
Incoming Interface The FortiGate interface connected to the Internet.
Source Address Select the name that corresponds to the range of addresses
that you reserved for PPTP clients.
Outgoing Interface The FortiGate interface connected to the internal network.
Destination Address Select the name that corresponds to the IP addresses
behind the FortiGate unit.
Schedule always
Service ALL
Action ACCEPT
PPTP and L2TP Page 113 Install and System Administration for FortiOS 5.0
To configure the firewall for the PPTP tunnel - CLI
config firewall policy OR config firewall policy6edit 1
set srcintf <interface to internet>set dstintf <interface to internal network>set srcaddr <reserved_range>set dstaddr <internal_addresses>set action acceptset schedule alwaysset service ALL
end
Configuring the FortiGate unit for PPTP VPN
To arrange for PPTP packets to pass through the FortiGate unit to an external PPTP server,
perform the following tasks in the order given:
• Configure user authentication for PPTP clients.
• Enable PPTP on the FortiGate unit and specify the range of addresses that can be assigned
to PPTP clients when they connect.
• Configure PPTP pass through on the FortiGate unit.
Configuring the FortiGate unit for PPTP pass through
To forward PPTP packets to a PPTP server on the network behind the FortiGate unit, you need
to perform the following configuration tasks on the FortiGate unit:
• Define a virtual IP address that points to the PPTP server.
• Create a security policy that allows incoming PPTP packets to pass through to the PPTP
server.
Configuring a virtual IP address
The virtual IP address will be the address of the PPTP server host.
To define a virtual IP for PPTP pass through - web-based manager
1. Go to Policy & Objects > Objects > Virtual IPs.
2. Select Create New.
3. Choose the VIP Type.
4. Enter the name of the VIP, for example, PPTP_Server.
5. Select the External Interface where the packets will be received for the PPTP server.
6. Enter the External IP Address for the VIP.
7. Select Port Forwarding.
The address range is the external (public) ip address range which requires access to the internal
PPTP server through the FortiGate virtual port-forwarding firewall.
IP addresses used in this document are fictional and follow the technical documentation
guidelines specific to Fortinet. Real external IP addresses are not used.
PPTP and L2TP Page 114 Install and System Administration for FortiOS 5.0

8. Set the Protocol to TCP.
9. Enter the External Service Port of 1723, the default for PPTP.
10.Enter the Map to Port to 1723.
11.Select OK.
To define a virtual IP for PPTP pass through - web-based manager
config firewall vip OR config firewall vip6 edit PPTP_Server
set extinf <interface>set extip <ip_address>set portforward enableset protocol tcpset extport 1723set mappedport 1723
end
You can also use config firewall vip46 to define a virtual IP from an IPv4 address to an
IPv6 address or config firewall vip64 to define a virtual IP from an IPv6 address to an
IPv4 address.
Configuring a port-forwarding security policy
To create a port-forwarding security policy for PPTP pass through you must first create an
address range reserved for the PPTP clients.
To create an address range - web-based manager
1. Go to Policy & Objects > Objects > Addresses and select Create New.
2. Select a Category.
3. Enter a Name for the range, for example, External_PPTP.
4. Select a Type of Subnet/IP Range.
5. Enter the IP address range.
6. Select the Interface to the Internet.
7. Select OK.
To create an address range - CLI
config firewall address OR config firewall address6edit External_PPTP
set iprange <ip_range>set start-ip <ip_address>set end-ip <ip_address>set associated-interface <internet_interface>
end
With the address set, you can add the security policy.
To add the security policy - web-based manager
1. Go to Policy & Objects > Policy > IPv4 or Policy & Objects > Policy > IPv6 and select Create
New.
PPTP and L2TP Page 115 Install and System Administration for FortiOS 5.0

2. Complete the following and select OK:
To add the security policy - CLI
config firewall policy OR config firewall policy6edit <policy_number>
set srcintf <interface to internet>set dstintf <interface to PPTP server>set srcaddr <address_range>set dstaddr <PPTP_server_address>set action acceptset schedule alwaysset service PPTP
end
Testing PPTP VPN connections
To confirm that a PPTP VPN between a local network and a dialup client has been configured
correctly, at the dialup client, issue a ping command to test the connection to the local network.
The PPTP VPN tunnel initializes when the dialup client attempts to connect.
Logging VPN events
PPTP VPN, activity is logged when enabling VPN logging. The FortiGate unit connection events
and tunnel status (up/down) are logged.
To log VPN events
1. Go to Log & Report > Log Config > Log Settings.
2. Enable the storage of log messages to one or more locations.
3. Select VPN activity event.
4. Select Apply.
To view event logs
1. Go to Log & Report > Event Log > VPN.
2. If the option is available from the Log Type list, select the log file from disk or memory.
Incoming Interface The FortiGate interface connected to the Internet.
Source Address Select the address range created in the previous step.
Outgoing Interface The FortiGate interface connected to the PPTP server.
Destination Address Select the VIP address created in the previous steps.
Schedule always
Service PPTP
Action ACCEPT
PPTP and L2TP Page 116 Install and System Administration for FortiOS 5.0

Configuring L2TP VPNs
This section describes how to configure a FortiGate unit to establish a Layer Two Tunneling
Protocol (L2TP) tunnel with a remote dialup client. The FortiGate implementation of L2TP
enables a remote dialup client to establish an L2TP tunnel with the FortiGate unit directly.
According to RFC 2661, an Access Concentrator (LAC) can establish an L2TP tunnel with an
L2TP Network Server (LNS). In a typical scenario, the LAC is managed by an ISP and located on
the ISP premises; the LNS is the gateway to a private network. When a remote dialup client
connects to the Internet through the ISP, the ISP uses a local database to establish the identity
of the caller and determine whether the caller needs access to an LNS through an L2TP tunnel.
If the services registered to the caller indicate that an L2TP connection to the LNS is required,
the ISP LAC attempts to establish an L2TP tunnel with the LNS.
A FortiGate unit can be configured to act as an LNS. The FortiGate implementation of L2TP
enables a remote dialup client to establish an L2TP tunnel with the FortiGate unit directly,
bypassing any LAC managed by an ISP. The ISP must configure its network access server to
forward L2TP traffic from the remote client to the FortiGate unit directly whenever the remote
client requires an L2TP connection to the FortiGate unit.
When the FortiGate unit acts as an LNS, an L2TP session and tunnel is created as soon as the
remote client connects to the FortiGate unit. The FortiGate unit assigns an IP address to the
client from a reserved range of IP addresses. The remote client uses the assigned IP address as
its source address for the duration of the connection.
More than one L2TP session can be supported on the same tunnel. FortiGate units can be
configured to authenticate remote clients using a plain text user name and password, or
authentication can be forwarded to an external RADIUS or LDAP server. L2TP clients are
authenticated as members of a user group.
FortiGate units support L2TP with Microsoft Point-to-Point Encryption (MPPE) encryption only.
Later implementations of Microsoft L2TP for Windows use IPSec and require certificates for
authentication and encryption. If you want to use Microsoft L2TP with IPSec to connect to a
FortiGate unit, the IPSec and certificate elements must be disabled on the remote client
Traffic from the remote client must be encrypted using MPPE before it is encapsulated and
routed to the FortiGate unit. Packets originating at the remote client are addressed to a
computer on the private network behind the FortiGate unit. Encapsulated packets are
addressed to the public interface of the FortiGate unit. See Figure 13.
When the FortiGate unit receives an L2TP packet, the unit disassembles the packet and
forwards the packet to the correct computer on the internal network. The security policy and
protection profiles on the FortiGate unit ensure that inbound traffic is screened and processed
securely.
PPTP and L2TP Page 117 Install and System Administration for FortiOS 5.0

Figure 13:L2TP encapsulation
FortiGate units cannot deliver non-IP traffic such as Frame Relay or ATM frames encapsulated
in L2TP packets — FortiGate units support the IPv4 and IPv6 addressing schemes only
Network topology
The remote client connects to an ISP that determines whether the client requires an L2TP
connection to the FortiGate unit. If an L2TP connection is required, the connection request is
forwarded to the FortiGate unit directly.
31
2
31
2
31
2
Traffic destination
192.168.20.2
Traffic destination
192.168.20.2
L2TP packets
destination 172.16.30.1
31
2L2TP packets
destination 172.16.30.1
172.16.30.1
PPTP and L2TP Page 118 Install and System Administration for FortiOS 5.0

Figure 14:Example L2TP configuration
L2TP infrastructure requirements
• The FortiGate unit must be operating in NAT mode and have a static public IP address.
• The ISP must configure its network access server to forward L2TP traffic from remote clients
to the FortiGate unit directly.
• The remote client must not generate non-IP traffic (Frame Relay or ATM frames).
• The remote client includes L2TP support with MPPE encryption. If the remote client includes
Microsoft L2TP with IPSec, the IPSec and certificate components must be disabled.
L2TP configuration overview
To configure a FortiGate unit to act as an LNS, you perform the following tasks:
• Create an L2TP user group containing one user for each remote client.
• Enable L2TP on the FortiGate unit and specify the range of addresses that can be assigned
to remote clients when they connect.
• Define firewall source and destination addresses to indicate where packets transported
through the L2TP tunnel will originate and be delivered.
• Create the security policy and define the scope of permitted services between the source
and destination addresses.
• Configure the remote clients.
Authenticating L2TP clients
L2TP clients must be authenticated before a tunnel is established. The authentication process
relies on FortiGate user group definitions, which can optionally use established authentication
mechanisms such as RADIUS or LDAP to authenticate L2TP clients. All L2TP clients are
challenged when a connection attempt is made.
To enable authentication, you must create user accounts and a user group to identify the L2TP
clients that need access to the network behind the FortiGate unit.
Internal Network
Remote_Client_1
Remote_Client_3
Remote_Client_2
PPTP and L2TP Page 119 Install and System Administration for FortiOS 5.0

You can choose to use a plain text password for authentication or forward authentication
requests to an external RADIUS or LDAP server. If password protection will be provided through
a RADIUS or LDAP server, you must configure the FortiGate unit to forward authentication
requests to the authentication server.
Enabling L2TP and specifying an address range
The L2TP address range specifies the range of addresses reserved for remote clients. When a
remote client connects to the FortiGate unit, the client is assigned an IP address from this
range. Afterward, the FortiGate unit uses the assigned address to communicate with the remote
client.
The address range that you reserve can be associated with private or routable IP addresses. If
you specify a private address range that matches a network behind the FortiGate unit, the
assigned address will make the remote client appear to be part of the internal network.
To enable L2TP and specify the L2TP address range, use the config vpn l2tp CLI
command.
The following example shows how to enable L2TP and set the L2TP address range using a
starting address of 192.168.10.80 and an ending address of 192.168.10.100 for an
existing group of L2TP users named L2TP_users:
config vpn l2tpset sip 192.168.10.80set eip 192.168.10.100set status enableset usrgrp L2TP_users
end
Defining firewall source and destination addresses
Before you define the security policy, you must define the source and destination addresses of
packets that are to be transported through the L2TP tunnel:
• For the source address, enter the range of addresses that you reserved for remote L2TP
clients (for example 192.168.10.[80-100]).
• For the destination address, enter the IP addresses of the computers that the L2TP clients
need to access on the private network behind the FortiGate unit (for example,
172.16.5.0/24 for a subnet, or 172.16.5.1 for a server or host, or
192.168.10.[10-15] for an IP address range).
To define the firewall source address
1. Go to Policy & Objects > Objects > Addresses and select Create New.
2. Select a Category
3. In the Address Name field, type a name that represents the range of addresses that you
reserved for remote clients (for example, Ext_L2TPrange).
4. In Type, select IP Range.
5. In the IP Range field, type the corresponding IP address range.
6. In Interface, select the FortiGate interface that connects to the clients.
7. This is usually the interface that connects to the Internet.
8. Select OK.
To define the firewall destination address
1. Go to Policy & Objects > Objects > Addresses and select Create New.
PPTP and L2TP Page 120 Install and System Administration for FortiOS 5.0
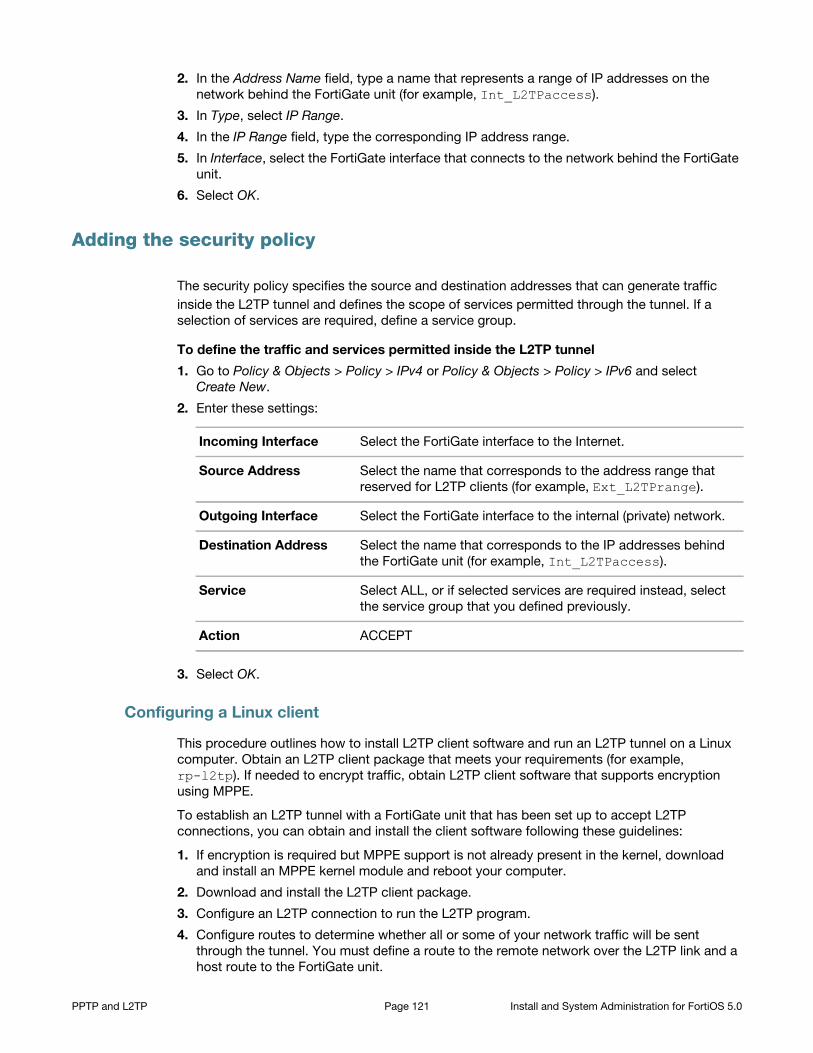
2. In the Address Name field, type a name that represents a range of IP addresses on the
network behind the FortiGate unit (for example, Int_L2TPaccess).
3. In Type, select IP Range.
4. In the IP Range field, type the corresponding IP address range.
5. In Interface, select the FortiGate interface that connects to the network behind the FortiGate
unit.
6. Select OK.
Adding the security policy
The security policy specifies the source and destination addresses that can generate traffic
inside the L2TP tunnel and defines the scope of services permitted through the tunnel. If a
selection of services are required, define a service group.
To define the traffic and services permitted inside the L2TP tunnel
1. Go to Policy & Objects > Policy > IPv4 or Policy & Objects > Policy > IPv6 and select
Create New.
2. Enter these settings:
3. Select OK.
Configuring a Linux client
This procedure outlines how to install L2TP client software and run an L2TP tunnel on a Linux
computer. Obtain an L2TP client package that meets your requirements (for example,
rp-l2tp). If needed to encrypt traffic, obtain L2TP client software that supports encryption
using MPPE.
To establish an L2TP tunnel with a FortiGate unit that has been set up to accept L2TP
connections, you can obtain and install the client software following these guidelines:
1. If encryption is required but MPPE support is not already present in the kernel, download
and install an MPPE kernel module and reboot your computer.
2. Download and install the L2TP client package.
3. Configure an L2TP connection to run the L2TP program.
4. Configure routes to determine whether all or some of your network traffic will be sent
through the tunnel. You must define a route to the remote network over the L2TP link and a
host route to the FortiGate unit.
Incoming Interface Select the FortiGate interface to the Internet.
Source Address Select the name that corresponds to the address range that
reserved for L2TP clients (for example, Ext_L2TPrange).
Outgoing Interface Select the FortiGate interface to the internal (private) network.
Destination Address Select the name that corresponds to the IP addresses behind
the FortiGate unit (for example, Int_L2TPaccess).
Service Select ALL, or if selected services are required instead, select
the service group that you defined previously.
Action ACCEPT
PPTP and L2TP Page 121 Install and System Administration for FortiOS 5.0

5. Run l2tpd to start the tunnel.
Follow the software supplier’s documentation to complete the steps.
To configure the system, you need to know the public IP address of the FortiGate unit, and the
user name and password that has been set up on the FortiGate unit to authenticate L2TP
clients. Contact the FortiGate administrator if required to obtain this information.
Monitoring L2TP sessions
You can display a list of all active sessions and view activity by port number. By default, port
1701 is used for L2TP VPN-related communications. If required, active sessions can be
stopped from this view. Use the Top Sessions Dashboard Widget.
Testing L2TP VPN connections
To confirm that a VPN between a local network and a dialup client has been configured
correctly, at the dialup client, issue a ping command to test the connection to the local network.
The VPN tunnel initializes when the dialup client attempts to connect.
Logging L2TP VPN events
You can configure the FortiGate unit to log VPN events. For L2TP VPNs, connection events and
tunnel status (up/down) are logged.
To log VPN events - web-based manager
1. Go to Log & Report > Log Config > Log Settings.
2. Enable the storage of log messages to one or more locations.
3. Select Enable, and then select VPN activity event.
4. Select Apply.
To log VPN events - CLI
config log memory settingset diskfull overrightset status enable
endconfig log eventfilter
set vpn enableend
PPTP and L2TP Page 122 Install and System Administration for FortiOS 5.0

Session helpers
The FortiOS firewall can analyze most TCP/IP protocol traffic by comparing packet header
information to security policies. This comparison determines whether to accept or deny the
packet and the session that the packet belongs to.
Some protocols include information in the packet body (or payload) that must be analyzed to
successfully process sessions for this protocol. For example, the SIP VoIP protocol uses TCP
control packets with a standard destination port to set up SIP calls. But the packets that carry
the actual conversation can use a variety of UDP protocols with a variety of source and
destination port numbers. The information about the protocols and port numbers used for a SIP
call is contained in the body of the SIP TCP control packets. To successfully process SIP VoIP
calls, FortiOS must be able to extract information from the body of the SIP packet and use this
information to allow the voice-carrying packets through the firewall.
FortiOS uses session helpers to analyze the data in the packet bodies of some protocols and
adjust the firewall to allow those protocols to send packets through the firewall.
This section includes the topics:
• Viewing the session helper configuration
• Changing the session helper configuration
• DCE-RPC session helper (dcerpc)
• DNS session helpers (dns-tcp and dns-udp)
• File transfer protocol (FTP) session helper (ftp)
• H.245 session helpers (h245I and h245O)
• H.323 and RAS session helpers (h323 and ras)
• Media Gateway Controller Protocol (MGCP) session helper (mgcp)
• ONC-RPC portmapper session helper (pmap)
• PPTP session helper for PPTP traffic (pptp)
• Remote shell session helper (rsh)
• Real-Time Streaming Protocol (RTSP) session helper (rtsp)
• Session Initiation Protocol (SIP) session helper (sip)
• Trivial File Transfer Protocol (TFTP) session helper (tftp)
• Oracle TNS listener session helper (tns)
Viewing the session helper configuration
You can view the session helpers enabled on your FortiGate unit in the CLI using the commands
below. The following output shows the first two session helpers. The number of session helpers
can vary to around 20.
show system session-helperconfig system session-helper
edit 1set name pptpset port 1723set protocol 6
Page 123

endnext
set name h323set port 1720set protocol 6
nextend..
The configuration for each session helper includes the name of the session helper and the port
and protocol number on which the session helper listens for sessions. Session helpers listed on
protocol number 6 (TCP) or 17 (UDP). For a complete list of protocol numbers see: Assigned
Internet Protocol Numbers.
For example, the output above shows that FortiOS listens for PPTP packets on TCP port 1723
and H.323 packets on port TCP port 1720.
If a session helper listens on more than one port or protocol the more than one entry for the
session helper appears in the config system session-helper list. For example, the pmap
session helper appears twice because it listens on TCP port 111 and UDP port 111. The rsh
session helper appears twice because it listens on TCP ports 514 and 512.
Changing the session helper configuration
Normally you will not need to change the configuration of the session helpers. However in some
cases you may need to change the protocol or port the session helper listens on.
Changing the protocol or port that a session helper listens on
Most session helpers are configured to listen for their sessions on the port and protocol that
they typically use. If your FortiGate unit receives sessions that should be handled by a session
helper on a non-standard port or protocol you can use the following procedure to change the
port and protocol used by a session helper. The following example shows how to change the
port that the pmap session helper listens on for Sun RPC portmapper TCP sessions. By default
pmap listens on TCP port 111.
To change the port that the pmap session helper listens on to TCP port 112
1. Confirm that the TCP pmap session helper entry is 11 in the session-helper list:
show system session-helper 11config system session-helper
edit 11set name pmapset port 111set protocol 6
nextend
2. Enter the following command to change the TCP port to 112.
config system session-helperedit 11
set port 112end
Session helpers Page 124 Install and System Administration for FortiOS 5.0

3. The pmap session helper also listens on UDP port 111. Confirm that the UDP pmap session
helper entry is 12 in the session-helper list:
show system session-helper 12config system session-helper
edit 12set name pmapset port 111set protocol 17
nextend
4. Enter the following command to change the UDP port to 112.
config system session-helperedit 12
set port 112end
end
Use the following command to set the h323 session helper to listen for ports on the UDP
protocol.
To change the protocol that the h323 session helper listens on
1. Confirm that the h323 session helper entry is 2 in the session-helper list:
show system session-helper 2config system session-helper
edit 2set name h323set port 1720set protocol 6
nextend
2. Enter the following command to change the protocol to UDP.
config system session-helperedit 2
set protocol 17end
end
If a session helper listens on more than one port or protocol, then multiple entries for the
session helper must be added to the session helper list, one for each port and protocol
combination. For example, the rtsp session helper listens on TCP ports 554, 7070, and 8554 so
there are three rtsp entries in the session-helper list. If your FortiGate unit receives rtsp packets
on a different TCP port (for example, 6677) you can use the following command to configure the
rtsp session helper to listen on TCP port 6677.
To configure a session helper to listen on a new port and protocol
config system session-helperedit 0
set name rtspset port 6677set protocol 6
end
Session helpers Page 125 Install and System Administration for FortiOS 5.0

Disabling a session helper
In some cases you may need to disable a session helper. Disabling a session helper just means
removing it from the session-helper list so that the session helper is not listening on a port. You
can completely disable a session helper by deleting all of its entries from the session helper list.
If there are multiple entries for a session helper on the list you can delete one of the entries to
prevent the session helper from listening on that port.
To disable the mgcp session helper from listening on UDP port 2427
1. Enter the following command to find the mgcp session helper entry that listens on UDP port
2427:
show system session-helper...
edit 19set name mgcpset port 2427set protocol 17
next...
2. Enter the following command to delete session-helper list entry number 19 to disable the
mgcp session helper from listening on UDP port 2427:
config system session-helperdelete 19
By default the mgcp session helper listens on UDP ports 2427 and 2727. The previous
procedure shows how to disable the mgcp protocol from listening on port 2427. The following
procedure completely disables the mgcp session helper by also disabling it from listening on
UDP port 2727.
To completely disable the mgcp session helper
1. Enter the following command to find the mgcp session helper entry that listens on UDP port
2727:
show system session-helper...
edit 20set name mgcpset port 2727set protocol 17
next...
2. Enter the following command to delete session-helper list entry number 20 to disable the
mgcp session helper from listening on UDP port 2727:
config system session-helperdelete 20
Session helpers Page 126 Install and System Administration for FortiOS 5.0
DCE-RPC session helper (dcerpc)
Distributed Computing Environment Remote Procedure Call (DCE-RPC) provides a way for a
program running on one host to call procedures in a program running on another host.
DCE-RPC (also called MS RPC for Microsoft RPC) is similar to ONC-RPC. Because of the large
number of RPC services, for example, MAPI, the transport address of an RPC service is
dynamically negotiated based on the service program's universal unique identifier (UUID). The
Endpoint Mapper (EPM) binding protocol in FortiOS maps the specific UUID to a transport
address.
To accept DCE-RPC sessions you must add a security policy with service set to any or to the
DEC-RPC pre-defined service (which listens on TCP and UDP ports 135). The dcerpc session
helper also listens on TCP and UDP ports 135.
The session allows FortiOS to handle DCE-RPC dynamic transport address negotiation and to
ensure UUID-based security policy enforcement. You can define a security policy to permit all
RPC requests or to permit by specific UUID number.
In addition, because a TCP segment in a DCE-RPC stream might be fragmented, it might not
include an intact RPC PDU. This fragmentation occurs in the RPC layer; so FortiOS does not
support parsing fragmented packets.
DNS session helpers (dns-tcp and dns-udp)
FortiOS includes two DNS session helpers, dns-tcp, a session helper for DNS over TCP, and
dns-udp, a session helper for DNS over UDP.
To accept DNS sessions you must add a security policy with service set to any or to the DNS
pre-defined service (which listens on TCP and UDP ports 53). The dns-udp session helper also
listens on UDP port 53. By default the dns-tcp session helper is disabled. If needed you can use
the following command to enable the dns-tcp session helper to listen for DNS sessions on TCP
port 53:
config system session-helperedit 0
set name dns-tcpset port 53set protocol 6
end
File transfer protocol (FTP) session helper (ftp)
The FTP session helper monitors PORT, PASV and 227 commands and NATs the IP addresses
and port numbers in the body of the FTP packets and opens ports on the FortiGate unit as
required.
To accept FTP sessions you must add a security policy with service set to any or to the FTP,
FTP_Put, and FTP_GET pre-defined services (which all listen on TCP port 21).
H.245 session helpers (h245I and h245O)
H.245 is a control channel protocol used for H.323 and other similar communication sessions.
H.245 sessions transmit non-telephone signals. H.245 sessions carry information needed for
multimedia communication, such as encryption, flow control jitter management and others.
Session helpers Page 127 Install and System Administration for FortiOS 5.0

FortiOS includes two H.245 sessions helpers, h245I which is for H.245 call in and h245O which
is for H.245 call out sessions. There is no standard port for H.245. By default the H.245 sessions
helpers are disabled. You can enable them as you would any other session helper. When you
enable them, you should specify the port and protocol on which the FortiGate unit receives
H.245 sessions.
H.323 and RAS session helpers (h323 and ras)
The H.323 session helper supports secure H.323 voice over IP (VoIP) sessions between terminal
endpoints such as IP phones and multimedia devices. In H.323 VoIP networks, gatekeeper
devices manage call registration, admission, and call status for VoIP calls. The FortiOS h323
session helper supports gatekeepers installed on two different networks or on the same
network.
To accept H.323 sessions you must add a security policy with service set to any or to the H323
pre-defined service (which listens on TCP port numbers 1720 and 1503 and on UDP port
number 1719). The h323 session helper listens on TCP port 1720.
The ras session helper is used with the h323 session helper for H.323 Registration, Admission,
and Status (RAS) services. The ras session helper listens on UDP port 1719.
Alternate H.323 gatekeepers
The h323 session helper supports using H.323 alternate gatekeepers. All the H.323 end points
must register with a gatekeeper through the Registration, Admission, and Status (RAS) protocol
before they make calls. During the registration process, the primary gatekeeper sends
Gatekeeper Confirm (GCF) and Registration Confirm (RCF) messages to the H.323 end points
that contain the list of available alternate gatekeepers.
The alternate gatekeeper provides redundancy and scalability for the H.323 end points. If the
primary gatekeeper fails the H.323 end points that have registered with that gatekeeper are
automatically registered with the alternate gatekeeper. To use the H.323 alternate gatekeeper,
you need to configure security policies that allow H.323 end points to reach the alternate
gatekeeper.
Media Gateway Controller Protocol (MGCP) session helper (mgcp)
The Media Gateway Control Protocol (MGCP) is a text-based application layer protocol used for
VoIP call setup and control. MGCP uses a master-slave call control architecture in which the
media gateway controller uses a call agent to maintain call control intelligence, while the media
gateways perform the instructions of the call agent.
To accept MGCP sessions you must add a security policy with service set to any or to the
MGCP pre-defined service (which listens on UDP port numbers 2427 and 2727). The h323
session helper also listens on UDP port numbers 2427 and 2727.
Session helpers Page 128 Install and System Administration for FortiOS 5.0

The MGCP session helper does the following:
• VoIP signalling payload inspection. The payload of the incoming VoIP signalling packet is
inspected and malformed packets are blocked.
• Signaling packet body inspection. The payload of the incoming MGCP signaling packet is
inspected according to RFC 3435. Malformed packets are blocked.
• Stateful processing of MGCP sessions. State machines are invoked to process the parsed
information. Any out-of-state or out-of-transaction packet is identified and properly handled.
• MGCP Network Address Translation (NAT). Embedded IP addresses and ports in packet
bodies is properly translated based on current routing information and network topology,
and is replaced with the translated IP address and port number, if necessary.
• Manages pinholes for VoIP traffic. To keep the VoIP network secure, the IP address and port
information used for media or signalling is identified by the session helper, and pinholes are
dynamically created and closed during call setup.
ONC-RPC portmapper session helper (pmap)
Open Network Computing Remote Procedure Call (ONC-RPC) is a widely deployed remote
procedure call system. Also called Sun RPC, ONC-RPC allows a program running on one host
to call a program running on another. The transport address of an ONC-RPC service is
dynamically negotiated based on the service's program number and version number. Several
binding protocols are defined for mapping the RPC program number and version number to a
transport address.
To accept ONC-RPC sessions you must add a security policy with service set to any or to the
ONC-RPC pre-defined service (which listens on TCP and UDP port number 111). The RPC
portmapper session helper (called pmap) handles the dynamic transport address negotiation
mechanisms of ONC-RPC.
PPTP session helper for PPTP traffic (pptp)
The PPTP session help supports port address translation (PAT) for PPTP traffic. PPTP provides
IP security at the Network Layer. PPTP consists of a control session and a data tunnel. The
control session runs over TCP and helps in establishing and disconnecting the data tunnel. The
data tunnel handles encapsulated Point-to-Point Protocol (PPP) packets carried over IP.
To accept PPTP sessions that pass through the FortiGate unit you must add a security policy
with service set to any or to the PPTP pre-defined service (which listens on IP port 47 and TCP
port 1723). The pptp session helper listens on TCP port 1723.
PPTP uses TCP port 1723 for control sessions and Generic Routing Encapsulation (GRE) (IP
protocol 47) for tunneling the encapsulated PPP data. The GRE traffic carries no port number,
making it difficult to distinguish between two clients with the same public IP address. PPTP
uses the source IP address and the Call ID field in the GRE header to identify a tunnel. When
multiple clients sharing the same IP address establish tunnels with the same PPTP server, they
may get the same Call ID. The call ID value can be translated in both the control message and
the data traffic, but only when the client is in a private network and the server is in a public
network.
PPTP clients can either directly connect to the Internet or dial into a network access server to
reach the Internet. A FortiGate unit that protects PPTP clients can translate the clients’ private
IP addresses to a pool of public IP addresses using NAT port translation (NAT-PT). Because the
GRE traffic carries no port number for address translation, the pptp session helper treats the
Call ID field as a port number as a way of distinguishing multiple clients.
Session helpers Page 129 Install and System Administration for FortiOS 5.0
After the PPTP establishing a TCP connection with the PPTP server, the client sends a start
control connection request message to establish a control connection. The server replies with a
start control connection reply message. The client then sends a request to establish a call and
sends an outgoing call request message. FortiOS assigns a Call ID (bytes 12-13 of the control
message) that is unique to each PPTP tunnel. The server replies with an outgoing call reply
message that carries its own Call ID in bytes 12-13 and the client’s call ID in bytes 14-15. The
pptp session helper parses the control connection messages for the Call ID to identify the call to
which a specific PPP packet belongs. The session helper also identifies an outgoing call
request message using the control message type field (bytes 8-9) with the value 7. When the
session helper receives this message, it parses the control message for the call ID field (bytes
12-13). FortiOS translates the call ID so that it is unique across multiple calls from the same
translated client IP. After receiving outgoing call response message, the session helper holds
this message and opens a port that accepts GRE traffic that the PPTP server sends. An
outgoing call request message contains the following parts:
• The protocol used for the outgoing call request message (usually GRE)
• Source IP address (PPTP server IP)
• Destination IP address (translated client IP)
• Destination port number (translated client call ID)
The session helper identifies an outgoing call reply message using the control message type
field (bytes 8-9) with the value 8. The session helper parses these control messages for the call
ID field (bytes 12-13) and the client’s call ID (bytes 14-15). The session helper then uses the
client’s call ID value to find the mapping created for the other direction, and then opens a
pinhole to accept the GRE traffic that the client sends.
An outgoing call reply message contains the following parts:
• Protocol used for the outgoing call reply message (usually GRE)
• Source IP address (PPTP client IP)
• Destination IP address (PPTP server IP)
• Destination port number (PPTP server Call ID)
Each port that the session opens creates a session for data traffic arriving in that direction. The
session helper opens the following two data sessions for each tunnel:
• Traffic from the PPTP client to the server, using the server’s call ID as the destination port
• Traffic from the PPTP server to the client, using the client’s translated call ID as the
destination port
The default timeout value of the control connection is 30 minutes. The session helper closes the
pinhole when the data session exceeds the timeout value or is idle for an extended period.
Remote shell session helper (rsh)
Using the remote shell program (RSH), authenticated users can run shell commands on remote
hosts. RSH sessions most often use TCP port 514. To accept RSH sessions you must add a
security policy with service set to any or to the RSH pre-defined service (which listens on TCP
port number 514).
FortiOS automatically invokes the rsh session helper to process all RSH sessions on TCP port
514. The rsh session helper opens ports required for the RSH service to operate through a
FortiGate unit running NAT or transparent and supports port translation of RSH traffic.
Session helpers Page 130 Install and System Administration for FortiOS 5.0
Real-Time Streaming Protocol (RTSP) session helper (rtsp)
The Real-Time Streaming Protocol (RTSP) is an application layer protocol often used by SIP to
control the delivery of multiple synchronized multimedia streams, for example, related audio
and video streams. Although RTSP is capable of delivering the data streams itself it is usually
used like a network remote control for multimedia servers. The protocol is intended for selecting
delivery channels (like UDP, multicast UDP, and TCP) and for selecting a delivery mechanism
based on the Real-Time Protocol (RTP). RTSP may also use the SIP Session Description
Protocol (SDP) as a means of providing information to clients for aggregate control of a
presentation consisting of streams from one or more servers, and non-aggregate control of a
presentation consisting of multiple streams from a single server.
To accept RTSP sessions you must add a security policy with service set to any or to the RTSP
pre-defined service (which listens on TCP ports 554, 770, and 8554 and on UDP port 554). The
rtsp session helper listens on TCP ports 554, 770, and 8554.
The rtsp session help is required because RTSP uses dynamically assigned port numbers that
are communicated in the packet body when end points establish a control connection. The
session helper keeps track of the port numbers and opens pinholes as required. In Network
Address Translation (NAT) mode, the session helper translates IP addresses and port numbers
as necessary.
In a typical RTSP session the client starts the session (for example, when the user selects the
Play button on a media player application) and establishes a TCP connection to the RTSP
server on port 554. The client then sends an OPTIONS message to find out what audio and
video features the server supports. The server responds to the OPTIONS message by
specifying the name and version of the server, and a session identifier, for example, 24256-1.
The client then sends the DESCRIBE message with the URL of the actual media file the client
wants to play. The server responds to the DESCRIBE message with a description of the media
in the form of SDP code. The client then sends the SETUP message, which specifies the
transport mechanisms acceptable to the client for streamed media, for example RTP/RTCP or
RDT, and the ports on which it receives the media.
In a NAT configuration the rtsp session helper keeps track of these ports and addresses
translates them as necessary. The server responds to the SETUP message and selects one of
the transport protocols. When both client and server agree on a mechanism for media transport
the client sends the PLAY message, and the server begins streaming the media.
Session Initiation Protocol (SIP) session helper (sip)
The sip session helper is described in VoIP Solutions: SIP Guide.
Trivial File Transfer Protocol (TFTP) session helper (tftp)
To accept TFTP sessions you must add a security policy with service set to any or to the TFTP
pre-defined service (which listens on UDP port number 69). The TFTP session helper also
listens on UTP port number 69.
TFTP initiates transfers on UDP port 69, but the actual data transfer ports are selected by the
server and client during initialization of the connection. The tftp session helper reads the
transfer ports selected by the TFTP client and server during negotiation and opens these ports
on the firewall so that the TFTP data transfer can be completed. When the transfer is complete
the tftp session helper closes the open ports.
Session helpers Page 131 Install and System Administration for FortiOS 5.0

Oracle TNS listener session helper (tns)
The Oracle Transparent Network Substrate (TNS) listener listens on port TCP port 1521 for
network requests to be passed to a database instance. The Oracle TNS listener session helper
(tns) listens for TNS sessions on TCP port 1521. TNS is a foundation technology built into the
Oracle Net foundation layer and used by SQLNET.
Session helpers Page 132 Install and System Administration for FortiOS 5.0
Advanced concepts
This chapter provides configuration concepts and techniques to enhance your network security.
This section includes the topics:
• Dual internet connections (redundant Internet connections)
• Single firewall vs. multiple virtual domains
• Modem
• FortiExtender
• DHCP servers and relays
• DHCP servers and relays
• Assigning IP address by MAC address
• DNS services
• Dynamic DNS
• FortiClient discovery and registration
• IP addresses for self-originated traffic
• Administration for schools
• Replacement messages list
• Replacement messages list
• Disk
• CLI Scripts
• Rejecting PING requests
• Opening TCP 113
• Obfuscate HTTP responses
Dual internet connections (redundant Internet connections)
Dual internet connection, dual WAN, or redundant internet connection refers to using two
FortiGate interfaces to connect to the Internet. Dual internet connections can be used in three
ways:
• Redundant interfaces, should one interface go down, the second automatically becomes the
main internet connection
• For load sharing to ensure better throughput.
• A combination of redundancy and load sharing.
Redundant interfaces
Redundant interfaces, ensures that should your internet access be no longer available through a
certain port, the FortiGate unit will use an alternate port to connect to the Internet.
Page 133

Figure 15:Configuring redundant interfaces
In this scenario, two interfaces, WAN1 and WAN2 are connected to the Internet using two
different ISPs. WAN1 is the primary connection. In an event of a failure of WAN1, WAN2
automatically becomes the connection to the Internet. For this configuration to function
correctly, you need to configure three specific settings:
• Configure a link health monitor to determine when the primary interface (WAN1) is down and
when the connection returns
• Configure a default route for each interface.
• Configure security policies to allow traffic through each interface to the internal network.
Link Health Monitor
Adding a link health monitor is required for routing fail over traffic. A link health monitor will
confirm the connectivity of the device’s interface
To add a link health monitor - web-based manager
1. Go to Router > Static > Settings and select Create New.
For low-end FortiGate units, go to System > Network > Routing and select Create New.
2. Choose a name.
3. Select the Interface that will send probe requests.
4. Specify the Gateway IP address if required, if not keep it set to 0.0.0.0.
5. Make sure that Health Check is enabled.
6. Set the Probe Type to Ping or HTTP.
7. For the Server field, enter the IP address of a server that the FortiGate unit will send ping or
http requests to.
8. For the Ping Interval, enter the number of seconds to send ping requests.
9. For the Failover Threshold, enter the number of lost pings or http requests is acceptable
before the port is determined to be down.
10.Make sure to enable Update Routing Table when Gateway Detection Status Changes.
11.Enable Bring Down (Up) and select WAN2 interface.
12.Select OK.
Backup ISP
Primary ISPComputers on
a private internal network
Internal
192.168.1.99
WAN1
172.20.120.12
WAN2
DHCP
Advanced concepts Page 134 Install and System Administration for FortiOS 5.0

To add a link health monitor - CLI
config system link-monitoredit “Example1”
set srcint <Interface_sending_probe>set server <ISP_IP_address>set protocol <Ping or http>set gateway-ip <the_gateway_IP_to_reach_the_server_if_required>set failtime <failure_count>set interval <seconds>set update-cascade-interface enableset update-static-route enableset status enable
end
Routing
You need to configure a default route for each interface and indicate which route is preferred by
specifying the distance. The lower distance is declared active and placed higher in the routing
table.
When you have dual WAN interfaces that are configured to provide fail over, you might not be
able to connect to the backup WAN interface because the FortiGate unit may not route traffic
(even responses) out of the backup interface. The FortiGate unit performs a reverse path lookup
to prevent spoofed traffic. If no entry can be found in the routing table which sends the return
traffic out the same interface, then the incoming traffic is dropped.
To configure the routing of the two interfaces - web-based manager
1. Go to Router > Static > Static Routes and select Create New Route or IPv6 Route.
For low-end FortiGate units, go to System > Network > Routing and select Create New
Route or IPv6 Route.
2. Set the Destination IP/Mask to the address and netmask of 0.0.0.0/0.0.0.0 if it’s an IPv4
route. If it’s an IPv6 route, set Destination IP/Mask to the address and netmask of ::/0
3. Select the Device to the primary connection, WAN1.
4. Enter the Gateway address.
5. Select Advanced.
6. Set the Distance to 10.
7. Select OK.
8. Repeat steps 1 through 7 setting the Device to WAN2 and a Distance of 20.
Advanced concepts Page 135 Install and System Administration for FortiOS 5.0

To configure the IPv4 routing of the two interfaces - CLI
config router staticedit 1
set dst 0.0.0.0 0.0.0.0set device WAN1set gateway <gateway_address>set distance 10
nextedit 1
set dst 0.0.0.0 0.0.0.0set device WAN2set gateway <gateway_address>set distance 20
nextend
To configure the IPv6 routing of the two interfaces - CLI
config router static6edit 1
set dst ::/0set device WAN1set gateway <gateway_address>set distance 10
nextedit 1
set dst ::/0set device WAN2set gateway <gateway_address>set distance 20
nextend
Security policies
When creating security policies, you need to configure duplicate policies to ensure that after
traffic fails over WAN1, regular traffic will be allowed to pass through WAN2 as it did with WAN1.
This ensures that fail-over will occur with minimal affect to users. For more information on
creating security policies see the Firewall Guide.
Load sharing
Load sharing enables you to use both connections to the internet at the same time, but do not
provide fail over support. When configuring for load sharing, you need to ensure routing is
configured for both external ports, for example, WAN1 and WAN2, have static routes with the
same distance and priority.
Further configuration can be done using Equal Cost Multiple Path (ECMP). For more information
on ECMP and load sharing, see the Advanced Routing Guide.
Advanced concepts Page 136 Install and System Administration for FortiOS 5.0

Link redundancy and load sharing
In this scenario, both links are available to distribute Internet traffic over both links. Should one
of the interfaces fail, the FortiGate unit will continue to send traffic over the other active
interface. Configuration is similar to the Redundant interfaces configuration, with the main
difference being that the configured routes should have equal distance settings.
This means both routes will remain active in the routing table. To make one interface the
preferred interface, use a default policy route to indicate the interface that is preferred for
accessing the Internet. If traffic matches the security policy, the policy overrides all entries in the
routing table, including connected routes. You may need to add a specific policy routes that
override these default policy routes.
To redirect traffic over the secondary interface, create policy routes to direct some traffic onto it
rather than the primary interface. When adding the policy route, only define the outgoing
interface and leave the gateway blank. This ensures that the policy route will not be active when
the link is down.
Single firewall vs. multiple virtual domains
A typical FortiGate setup, with a small to mid-range appliance, enables you to include a number
of subnets on your network using the available ports and switch interfaces. This can potentially
provide a means of having three or more mini networks for the various groups in a company.
Within this infrastructure, multiple network administrators have access to the FortiGate to
maintain security policies.
However, the FortiGate unit may not have enough interfaces to match the number of
departments in the organization. If the FortiGate unit it running in transparent mode however,
there is only one interface, and multiple network branches through the FortiGate are not
possible.
A FortiGate unit with Virtual Domains (VDOMs) enabled, provides a means to provide the same
functionality in transparent mode as a FortiGate in NAT mode. VDOMs are a method of dividing
a FortiGate unit into two or more virtual units that function as multiple independent units.
VDOMs can provide separate security policies and, in NAT mode, completely separate
configurations for routing and VPN services for each connected network. For administration, an
administrator can be assigned to each VDOM, minimizing the possibility of error or fouling
network communications.
By default, your FortiGate unit supports a maximum of 10 VDOMs. For FortiGate models 3000
and higher, you can purchase a license key to increase the number of VODMs to 25, 50, 100 or
250.
The FortiGate-20C and 30B and FortiWifi-20C and 30B do not support VDOMs.
Advanced concepts Page 137 Install and System Administration for FortiOS 5.0

Single firewall vs. vdoms
When VDOMs are not enabled, and the FortiGate unit is in transparent mode, all the interfaces
on your unit become broadcast interfaces. The problem is there are no interfaces free for
additional network segments.
WAN1
Internal
Gateway to public
network
DMZ
Inn
WAN1N1
DDDMZ
All interfaces on
the same subnet
A FortiGate with three interfaces means only limited network segments are possible without
purchasing more FortiGate devices.
WAN1
Gateway to public
networkInternalal
WAN1N1
IIIInnInnnInInntetern
DMZ
With multiple VDOMs you can have one of them configured in transparent mode, and the rest in
NAT mode. In this configuration, you have an available transparent mode FortiGate unit you can
drop into your network for troubleshooting, and you also have the standard.
This example shows how to enable VDOMs on the FortiGate unit and the basic and create a
VDOM accounting on the DMZ2 port and assign an administrator to maintain the VDOM. First
enable Virtual Domains on the FortiGate unit.
Advanced concepts Page 138 Install and System Administration for FortiOS 5.0

To enable VDOMs - web-based manager
1. Go to System > Dashboard > Status.
2. In the System Information widget, select Enable for Virtual Domain.
Note that on FortiGate-60 series and lower models, you need to enable VDOMs in the CLI only.
The FortiGate unit logs you out. Once you log back in, you will notice that the menu structure
has changed. This reflects the global settings for all Virtual Domains.
To enable VDOMs - CLI
config system globalset vdom-admin enable
end
Next, add the VDOM called accounting.
To add a VDOM - web-based manager
1. Go to Global > VDOM > VDOM, and select Create New.
2. Enter the VDOM name accounting.
3. Select OK.
To add a VDOM - CLI
config vdomedit <new_vdom_name>
end
With the Virtual Domain created, you can assign a physical interface to it, and assign it an IP
address.
To assign physical interface to the accounting Virtual Domain - web-based manager
1. Go to Global > Network > Interface.
2. Select the DMZ2 port row and select Edit.
3. For the Virtual Domain drop-down list, select accounting.
4. Select the Addressing Mode of Manual.
5. Enter the IP address for the port of 10.13.101.100/24.
6. Set the Administrative Access to HTTPS and SSH.
7. Select OK.
To assign physical interface to the accounting Virtual Domain - CLI
config globalconfig system interface
edit dmz2set vdom accountingset ip 10.13.101.100/24set allowaccess https ssh
nextend
Advanced concepts Page 139 Install and System Administration for FortiOS 5.0

Modem
FortiGate units support the use of wireless, 3G and 4G modems connected using the USB port
or, if available, the express card slot. Modem access provides either primary or secondary
(redundant) access to the Internet. For FortiGate units that do not include an internal modem
(those units with an “M” designation), the modem interface will not appear in the web-based
manager until enabled in the CLI. To enable the modem interface enter the CLI commands:
config system modemset status enable
end
You will need to log out of the FortiGate and log back in to see the modem configuration page at
System > Network > Modem. Once enabled, modem options become available by going to
System > Network > Interface.
Note that the modem interface is only available when the FortiGate unit is in NAT mode.
To configure modem settings, go to System > Network > Modem.
Configuring the modem settings is a matter of entering the ISP phone number, user name and
password. Depending on the modem, additional information may need to be supplied such as
product identifiers, and initialization strings.
The FortiGate unit includes a number of common modems within its internal database. You can
view these by selecting the Configure Modem link on the Modem Settings page. If your modem
is not on the list, select Create New to add the information. This information is stored on the
device, and will remain after a reboot.
Fortinet has an online database of modem models and configuration settings through
FortiGuard. A subscription to the FortiGuard services is not required to access the information.
As models are added, you can select the Configure Modem link and select Update Now to
download new configurations.
USB modem port
Each USB modem has a specific dial-out port. This will be indicated with the documentation for
your modem. To enable the correct USB port, use the CLI commands:
config system modemset wireless-port {0 | 1 | 2}
end
To test the port, use the diagnose command:
diagnose sys modem com /1
The 1 will be the value of your USB port selected. The response will be:
Serial port: /dev/1Press Ctrl+W to exit.
If the port does not respond the output will be:
Can not open modem device ‘/dev/1’ : Broken pipe
Modes
The FortiGate unit allows for two modes of operation for the modem; stand alone and
redundant. In stand alone mode, the modem connects to a dialup ISP account to provide the
connection to the Internet. In redundant mode, the modem acts as a backup method of
connecting to the Internet, should the primary port for this function fails.
Advanced concepts Page 140 Install and System Administration for FortiOS 5.0

Configuring either stand alone or redundant modes are very similar. The primary difference is
the selection of the interface that the modem will replace in the event of it failing, and the
configuration of a PING server to monitor the chosen interface.
Configuring stand alone mode
Configuring stand alone mode is a matter of configuring the modem information and the dialing
mode. The dial mode is either Always Connect or Dial on demand. Selecting Always Connect
ensures that once the modem has connected, it remains connected to the ISP. Selecting Dial on
Demand, the modem only calls the ISP if packets are routed to the modem interface. Once sent,
the modem will disconnect after a specified amount of time.
To configure standalone mode as needed - web-based manager
1. Go to System > Network > Modem.
2. Select the Mode of Standalone.
3. Select the Dial Mode of Dial on Demand.
4. Select the number of redials the modem attempts if connection fails to 5.
5. Select Apply.
To configure standalone mode as needed- CLI
config system modemset status enableset mode standaloneset auto-dial enableset redial 5
end
Configuring redundant mode
Redundant mode provides a backup to an interface, typically to the Internet. If that interface
fails or disconnects, the modem automatically dials the configured phone number(s). Once
connected, the FortiGate unit routes all traffic to the modem interface until the monitored
interface is up again. The FortiGate unit pings the connection to determine when it is back
online.
For the FortiGate to verify when the interface is back up, you need to configure a Ping server for
that interface. You will also need to configure security policies between the modem interface
and the other interfaces of the FortiGate unit to ensure traffic flow.
To configure redundant mode as needed - web-based manager
1. Go to System > Network > Modem.
2. Select the Mode of Redundant.
3. Select the interface the modem takes over from if it fails.
4. Select the Dial Mode of Dial on Demand.
5. Select the number of redials the modem attempts if connection fails to 5.
6. Select Apply.
Advanced concepts Page 141 Install and System Administration for FortiOS 5.0

To configure standalone mode as needed- CLI
config system modemset status enableset mode redundantset interface wan1set auto-dial enableset redial 5
end
Link Health Monitor
Adding a link health monitor is required for routing fail over traffic. A link health monitor will
confirm the connectivity of the device’s interface
To add a link health monitor - web-based manager
1. Go to Router > Static > Settings and select Create New.
For low-end FortiGate units, go to System > Network > Routing and select Create New.
2. Choose a name.
3. Select the Interface that will send probe requests which is the modem.
4. Specify the Gateway IP address if required, if not keep it set to 0.0.0.0.
5. Make sure that Health Check is enabled.
6. Set the Probe Type to Ping or HTTP.
7. For the Server field, enter the IP address of a server that the FortiGate unit will send ping or
http requests to.
8. For the Ping Interval, enter the number of seconds to send ping requests.
9. For the Failover Threshold, enter the number of lost pings or http requests is acceptable
before the port is determined to be down.
10.Make sure to enable Update Routing Table when Gateway Detection Status Changes.
11.Enable Bring Down (Up) and select the redundant interface.
12.Select OK.
To add a link health monitor - CLI
config system link-monitoredit “Example1”
set srcint <Interface_sending_probe>set server <ISP_IP_address>set protocol <Ping or http>set gateway-ip <the_gateway_IP_to_reach_the_server_if_required>set failtime <failure_count>set interval <seconds>set update-cascade-interface enableset update-static-route enableset status enable
end
Advanced concepts Page 142 Install and System Administration for FortiOS 5.0

Additional modem configuration
The CLI provides additional configuration options when setting up the modem options including
adding multiple ISP dialing and initialization options and routing. For more information, see the
CLI Reference.
Modem interface routing
The modem interface can be used in FortiOS as a dedicated interface. Once enabled and
configured, you can use it in security policies and define static and dynamic routing. Within the
CLI commands for the modem, you can configure the distance and priority of routes involving
the modem interface. The CLI commands are:
config sysetm modemset distance <route_distance>set priority <priority_value>
end
For more information on the routing configuration in the CLI, see the CLI Reference. For more
information on routing and configuring routing, see the Advanced Routing Guide.
FortiExtender
FortiGate units support the use of wireless, 3G and 4G modems connected to a FortiExtender
which will be connected to the FortiGate unit.
Installing the 3G/4G modem
Remove the housing cover of the FortiExtender and use the provided USB extension cable to
connect your 3G/4G modem to the device.
For more information on installing the 3G/4G modem, see the QuickStart Guide.
Connecting the FortiExtender unit
1. If you are using the provided PoE injector:
a. Plug the provided Ethernet cable into the Ethernet port of the FortiExtender and insert the
other end of the Ethernet cable into the AP/Bridge port on the injector, then plug the
injector into an electrical outlet.
b. Connect the LAN port of the PoE injector to a FortiGate, FortiWifi, or FortiSwitch device.
2. If you are not using the PoE injector:
a. Insert the other end of the Ethernet cable into a PoE LAN port on an appropriate
FortiGate, FortiWifi or FortiSwitch device.
For more information on connecting the FortiExtender unit, see the QuickStart Guide.
Once connected, your FortiGate appliance can automatically detect, connect with, and control
the FortiExtender and modem via a CAPWAP tunnel.To do this, FortiExtender and FortiGate
must be on the same Layer 2/3 subnet (or have DHCP relay between) and FortiGate must
respond to FortiExtender’s request. In this example FortiExtender is connected to the lan
interface of the FortiGate unit.
Advanced concepts Page 143 Install and System Administration for FortiOS 5.0

By default, FortiExtender is hidden and disabled.Enable it in FortiGate’s CLI:
config system global
set fortiextender enable
set wireless-cotnroller enable
end
The control and provisioning of Wireless Access Point (CAPWAP) service must be enabled on
the port to which the FortiExtender unit is connected (lan interface in this example) using the
following CLI commands:
config system interfaceedit lanset allowaccess capwap
end
Once enabled, it appears as a virtual WAN interface in the FortiGate, such as fext-wan1.
Configuring the FortiExtender unit
At this point, you can fully manage the FortiExtender from the FortiGate unit. To achieve this,
you need to authorize the FortiExtender by going to System > Network > FortiExtender and click
on Authorize. Once authorized, you can configure you device as required:
Link Status: Shows you if the link is Up or Down, click on Details to see the System and Modem
Status.
IP Address: Shows you the current FortiExtender’s IP address, click on the link of the IP address
to connect to the FortiExtender GUI.
OS Version: Shows the current FortiExtender’s build, click on Upgrade if you wish to upgrade
the Firmware.
Configure Settings: Allows you to configure the Modem Settings, PPP Authentication, General,
GSM / LTE, and CDMA.
Diagnostics: Allows you to diagnose the FortiExtender unit, you can choose a command form
the existing commands and click on Run. Existing commands are: Show device info, Show data session connection status, test connection, test disconnection, Get signal strength, AT Command.
Simple output of Show device info:
Manufacturer: Sierra Wireless, Incorporated
Model: AirCard 330U
Revision: SWI9200X_03.00.08.03AP R4019 CARMD-EN-10527 2011/12/07 18:43:13
IMEI: 359615040996060
IMEI SV: 7
FSN: CDU3153118210
3GPP Release 8
+GCAP: +CGSM
OK
Advanced concepts Page 144 Install and System Administration for FortiOS 5.0
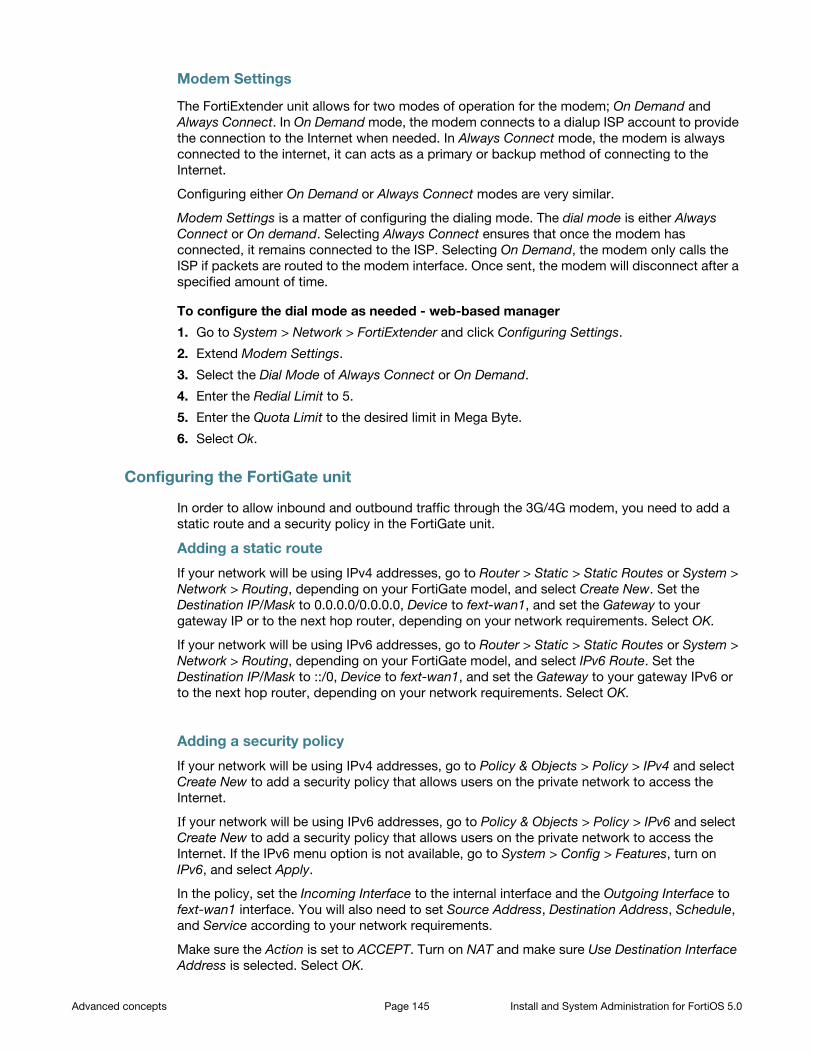
Modem Settings
The FortiExtender unit allows for two modes of operation for the modem; On Demand and
Always Connect. In On Demand mode, the modem connects to a dialup ISP account to provide
the connection to the Internet when needed. In Always Connect mode, the modem is always
connected to the internet, it can acts as a primary or backup method of connecting to the
Internet.
Configuring either On Demand or Always Connect modes are very similar.
Modem Settings is a matter of configuring the dialing mode. The dial mode is either Always
Connect or On demand. Selecting Always Connect ensures that once the modem has
connected, it remains connected to the ISP. Selecting On Demand, the modem only calls the
ISP if packets are routed to the modem interface. Once sent, the modem will disconnect after a
specified amount of time.
To configure the dial mode as needed - web-based manager
1. Go to System > Network > FortiExtender and click Configuring Settings.
2. Extend Modem Settings.
3. Select the Dial Mode of Always Connect or On Demand.
4. Enter the Redial Limit to 5.
5. Enter the Quota Limit to the desired limit in Mega Byte.
6. Select Ok.
Configuring the FortiGate unit
In order to allow inbound and outbound traffic through the 3G/4G modem, you need to add a
static route and a security policy in the FortiGate unit.
Adding a static route
If your network will be using IPv4 addresses, go to Router > Static > Static Routes or System >
Network > Routing, depending on your FortiGate model, and select Create New. Set the
Destination IP/Mask to 0.0.0.0/0.0.0.0, Device to fext-wan1, and set the Gateway to your
gateway IP or to the next hop router, depending on your network requirements. Select OK.
If your network will be using IPv6 addresses, go to Router > Static > Static Routes or System >
Network > Routing, depending on your FortiGate model, and select IPv6 Route. Set the
Destination IP/Mask to ::/0, Device to fext-wan1, and set the Gateway to your gateway IPv6 or
to the next hop router, depending on your network requirements. Select OK.
Adding a security policy
If your network will be using IPv4 addresses, go to Policy & Objects > Policy > IPv4 and select
Create New to add a security policy that allows users on the private network to access the
Internet.
If your network will be using IPv6 addresses, go to Policy & Objects > Policy > IPv6 and select
Create New to add a security policy that allows users on the private network to access the
Internet. If the IPv6 menu option is not available, go to System > Config > Features, turn on
IPv6, and select Apply.
In the policy, set the Incoming Interface to the internal interface and the Outgoing Interface to
fext-wan1 interface. You will also need to set Source Address, Destination Address, Schedule,
and Service according to your network requirements.
Make sure the Action is set to ACCEPT. Turn on NAT and make sure Use Destination Interface
Address is selected. Select OK.
Advanced concepts Page 145 Install and System Administration for FortiOS 5.0

DHCP servers and relays
Note that DHCP server options are not available in transparent mode.
A DHCP server provides an address to a client on the network, when requested, from a defined
address range.
An interface cannot provide both a server and a relay for connections of the same type (regular
or IPSec). However, you can configure a Regular DHCP server on an interface only if the
interface is a physical interface with a static IP address. You can configure an IPSec DHCP
server on an interface that has either a static or a dynamic IP address.
You can configure one or more DHCP servers on any FortiGate interface. A DHCP server
dynamically assigns IP addresses to hosts on the network connected to the interface. The host
computers must be configured to obtain their IP addresses using DHCP.
If an interface is connected to multiple networks via routers, you can add a DHCP server for
each network. The IP range of each DHCP server must match the network address range. The
routers must be configured for DHCP relay.
You can configure a FortiGate interface as a DHCP relay. The interface forwards DHCP requests
from DHCP clients to an external DHCP server and returns the responses to the DHCP clients.
The DHCP server must have appropriate routing so that its response packets to the DHCP
clients arrive at the unit.
DHCP Server configuration
To add a DHCP server, go to System > Network > Interface. Edit the interface, and select Enable
for the DHCP Server row.
DHCP Server IP This appears only when Mode is Relay. Enter the IP address of the
DHCP server where the FortiGate unit obtains the requested IP address.
Address Range By default, the FortiGate unit assigns an address range based on the
address of the interface for the complete scope of the address. For
example, if the interface address is 172.20.120.230, the default range
created is 172.20.120.231 to 172.20.120.254. Select the range and
select Edit to adjust the range as needed, or select Create New to add a
different range.
Netmask Enter the netmask of the addresses that the DHCP server assigns.
Default Gateway Select to either use the same IP as the interface or select Specify and
enter the IP address of the default gateway that the DHCP server
assigns to DHCP clients.
DNS Server Select to use the system’s DNS settings or select Specify and enter the
IP address of the DNS server.
Advanced
Mode Select the type of DHCP server the FortiGate unit will be. By default, it is
a server. Select Relay if needed. When Relay is selected, the above
configuration is replaced by a field to enter the DHCP Server IP address.
Type Select to use the DHCP in regular or IPsec mode.
Advanced concepts Page 146 Install and System Administration for FortiOS 5.0

DHCP in IPv6
You can use DHCP with IPv6 using the CLI. To configure DHCP, ensure IPv6 is enabled by going
to System > Config > Features and enable IPv6. Use the CLI command
config system dhcp6.
For more information on the configuration options, see the CLI Reference.
Service
On low-end FortiGate units, a DHCP server is configured, by default on the Internal interface:
IP Range192.168.1.110 to
192.168.1.210
Netmask 255.255.255.0
Default gateway 192.168.1.99
Lease time 7 days
DNS Server 1 192.168.1.99
These settings are appropriate for the default Internal interface IP address of 192.168.1.99. If
you change this address to a different network, you need to change the DHCP server settings to
match.
Alternatively, after the FortiGate unit assigns an address, you can go to System > Monitor >
DHCP Monitor, locate the particular user. Select the check box for the user and select Add to
Reserved.
Lease time
The lease time determines the length of time an IP address remains assigned to a client. Once
the lease expires, the address is released for allocation to the next client request for an IP
MAC Address Access Control List
Select to match an IP address from the DHCP server to a specific client
or device using its MAC address.
In a typical situation, an IP address is assigned ad hoc to a client, and
that assignment times out after a specific time of inactivity from the
client, known as the lease time. To ensure a client or device always has
the same IP address, that is, there is no lease time, use IP reservation.
For more information, see “Assigning IP address by MAC address” on
page 149.
Add from DHCP Client List
If the client is currently connected and using an IP address from the
DHCP server, you can select this option to select the client from the list.
Advanced concepts Page 147 Install and System Administration for FortiOS 5.0

address The default lease time is seven days. To change the lease time, use the following CLI
commands:
config system dhcp serveredit <server_entry_number>
set lease-time <seconds>end
To have an unlimited lease time, set the value to zero.
DHCP options
When adding a DHCP server, you have the ability to include DHCP codes and options. The
DHCP options are BOOTP vendor information fields that provide additional vendor-independent
configuration parameters to manage the DHCP server. For example, you may need to configure
a FortiGate DHCP server that gives out a separate option as well as an IP address. For example,
an environment that needs to support PXE boot with Windows images.
The option numbers and codes are specific to the particular application. The documentation for
the application will indicate the values to use. Option codes are represented in a option
value/HEX value pairs. The option is a value 1 and 255.
You can add up to three DHCP code/option pairs per DHCP server.
To configure option 252 with value http://192.168.1.1/wpad.dat - CLI
config system dhcp serveredit <server_entry_number>
set option1 252 687474703a2f2f3139322e3136382e312e312f777061642e646174
end
For detailed information about DHCP options, see RFC 2132, DHCP Options and BOOTP
Vendor Extensions.
Exclude addresses in DHCP a range
If you have a large address range for the DHCP server, you can block a range of addresses that
will not be included in the available addresses for the connecting users. To do this, go to the CLI
and enter the commands:
config system dhcp serveredit <server_entry_number>
config exclude-rangeedit <sequence_number>
set start-ip <address>set end-ip <address>
endend
end
DHCP Monitor
To view information about DHCP server connections, go to System > Monitor > DHCP Monitor.
On this page, you can also add IP address to the reserved IP address list.
Advanced concepts Page 148 Install and System Administration for FortiOS 5.0
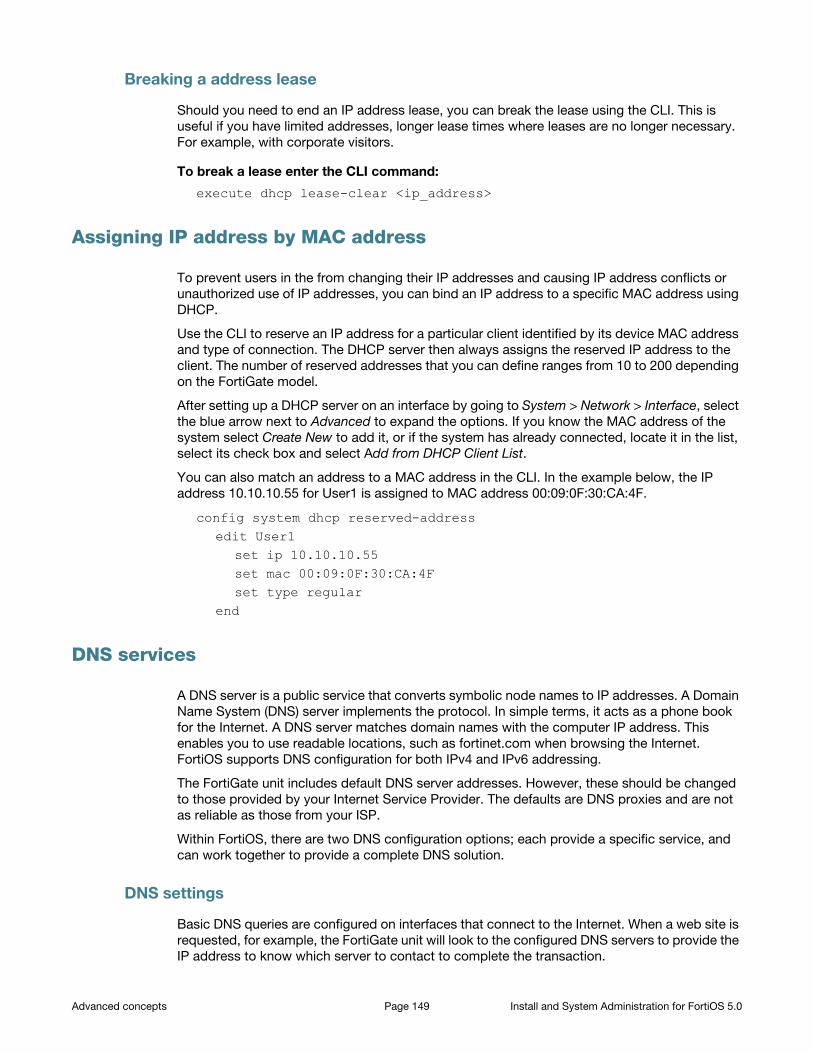
Breaking a address lease
Should you need to end an IP address lease, you can break the lease using the CLI. This is
useful if you have limited addresses, longer lease times where leases are no longer necessary.
For example, with corporate visitors.
To break a lease enter the CLI command:
execute dhcp lease-clear <ip_address>
Assigning IP address by MAC address
To prevent users in the from changing their IP addresses and causing IP address conflicts or
unauthorized use of IP addresses, you can bind an IP address to a specific MAC address using
DHCP.
Use the CLI to reserve an IP address for a particular client identified by its device MAC address
and type of connection. The DHCP server then always assigns the reserved IP address to the
client. The number of reserved addresses that you can define ranges from 10 to 200 depending
on the FortiGate model.
After setting up a DHCP server on an interface by going to System > Network > Interface, select
the blue arrow next to Advanced to expand the options. If you know the MAC address of the
system select Create New to add it, or if the system has already connected, locate it in the list,
select its check box and select Add from DHCP Client List.
You can also match an address to a MAC address in the CLI. In the example below, the IP
address 10.10.10.55 for User1 is assigned to MAC address 00:09:0F:30:CA:4F.
config system dhcp reserved-addressedit User1
set ip 10.10.10.55set mac 00:09:0F:30:CA:4Fset type regular
end
DNS services
A DNS server is a public service that converts symbolic node names to IP addresses. A Domain
Name System (DNS) server implements the protocol. In simple terms, it acts as a phone book
for the Internet. A DNS server matches domain names with the computer IP address. This
enables you to use readable locations, such as fortinet.com when browsing the Internet.
FortiOS supports DNS configuration for both IPv4 and IPv6 addressing.
The FortiGate unit includes default DNS server addresses. However, these should be changed
to those provided by your Internet Service Provider. The defaults are DNS proxies and are not
as reliable as those from your ISP.
Within FortiOS, there are two DNS configuration options; each provide a specific service, and
can work together to provide a complete DNS solution.
DNS settings
Basic DNS queries are configured on interfaces that connect to the Internet. When a web site is
requested, for example, the FortiGate unit will look to the configured DNS servers to provide the
IP address to know which server to contact to complete the transaction.
Advanced concepts Page 149 Install and System Administration for FortiOS 5.0
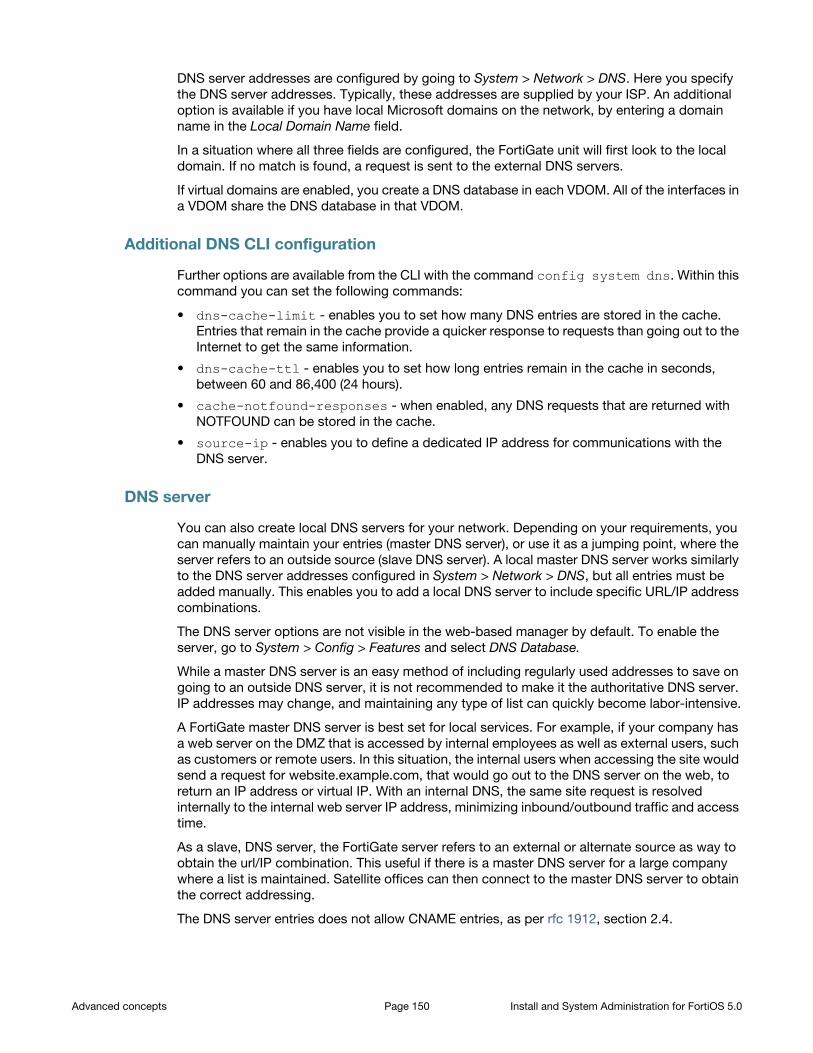
DNS server addresses are configured by going to System > Network > DNS. Here you specify
the DNS server addresses. Typically, these addresses are supplied by your ISP. An additional
option is available if you have local Microsoft domains on the network, by entering a domain
name in the Local Domain Name field.
In a situation where all three fields are configured, the FortiGate unit will first look to the local
domain. If no match is found, a request is sent to the external DNS servers.
If virtual domains are enabled, you create a DNS database in each VDOM. All of the interfaces in
a VDOM share the DNS database in that VDOM.
Additional DNS CLI configuration
Further options are available from the CLI with the command config system dns. Within this
command you can set the following commands:
• dns-cache-limit - enables you to set how many DNS entries are stored in the cache.
Entries that remain in the cache provide a quicker response to requests than going out to the
Internet to get the same information.
• dns-cache-ttl - enables you to set how long entries remain in the cache in seconds,
between 60 and 86,400 (24 hours).
• cache-notfound-responses - when enabled, any DNS requests that are returned with
NOTFOUND can be stored in the cache.
• source-ip - enables you to define a dedicated IP address for communications with the
DNS server.
DNS server
You can also create local DNS servers for your network. Depending on your requirements, you
can manually maintain your entries (master DNS server), or use it as a jumping point, where the
server refers to an outside source (slave DNS server). A local master DNS server works similarly
to the DNS server addresses configured in System > Network > DNS, but all entries must be
added manually. This enables you to add a local DNS server to include specific URL/IP address
combinations.
The DNS server options are not visible in the web-based manager by default. To enable the
server, go to System > Config > Features and select DNS Database.
While a master DNS server is an easy method of including regularly used addresses to save on
going to an outside DNS server, it is not recommended to make it the authoritative DNS server.
IP addresses may change, and maintaining any type of list can quickly become labor-intensive.
A FortiGate master DNS server is best set for local services. For example, if your company has
a web server on the DMZ that is accessed by internal employees as well as external users, such
as customers or remote users. In this situation, the internal users when accessing the site would
send a request for website.example.com, that would go out to the DNS server on the web, to
return an IP address or virtual IP. With an internal DNS, the same site request is resolved
internally to the internal web server IP address, minimizing inbound/outbound traffic and access
time.
As a slave, DNS server, the FortiGate server refers to an external or alternate source as way to
obtain the url/IP combination. This useful if there is a master DNS server for a large company
where a list is maintained. Satellite offices can then connect to the master DNS server to obtain
the correct addressing.
The DNS server entries does not allow CNAME entries, as per rfc 1912, section 2.4.
Advanced concepts Page 150 Install and System Administration for FortiOS 5.0

To configure a master DNS server - web-based manager
1. Go to System > Network > DNS Server, and select Create New.
2. Select the Type of Master.
3. Select the View as Shadow.
4. The view is the accessibility of the DNS server. Selecting Public, external users can access,
or use, the DNS server. Selecting Shadow, only internal users can use it.
5. Enter the DNS Zone, for example, WebServer.
6. Enter the domain name for the zone, for example example.com.
7. Enter the hostname of the DNS server, for example, Corporate.
8. Enter the contact address for the administrator, for example, [email protected].
9. Set Authoritative to Disable.
10.Select OK.
11.Enter the DNS entries for the server by selecting Create New.
12.Select the Type, for example, Address (A).
13.Enter the Hostname, for example web.example.com.
14.Enter the remaining information, which varies depending on the Type selected.
15.Select OK.
To configure a DNS server - CLI
config system dns-databaseedit WebServer
set domain example.comset type masterset view shadowset ttl 86400set primary-name corporateset contact [email protected] authoritative disable
config dns-entryedit 1
set hostname web.example.comset type Aset ip 192.168.21.12set status enable
endend
end
Recursive DNS
You can set an option to ensure these types of DNS server is not the authoritative server. When
configured, the FortiGate unit will check its internal DNS server (Master or Slave). If the request
cannot be fulfilled, it will look to the external DNS servers. This is known as a split DNS
configuration.
Advanced concepts Page 151 Install and System Administration for FortiOS 5.0
You can also have the FortiGate unit look to an internal server should the Master or Slave not
fulfill the request by using the CLI commands:
config system dns-databaseedit example.com
...set view shadow
end
For this behavior to work completely, for the external port, you must set the DNS query for the
external interface to be recursive. This option is configured in the CLI only.
To set the DNS query
config system dns-serveredit wan1
set mode recursiveend
Dynamic DNS
If your ISP changes your external IP address on a regular basis, and you have a static domain
name, you can configure the external interface to use a dynamic DNS service to ensure external
users and/or customers can always connect to your company firewall.
If you have a FortiGuard subscription, you can use FortiGuard as your DDNS server. To
configure dynamic DNS in the web-based manager, go to System > Network > DNS, select
Enable FortiGuard DDNS, and enter the relevant information for the interface communicating to
the server, and which server to use, and relevant information.
If you do not have a FortiGuard subscription, or want to use an alternate server, you can
configure dynamic DNS in the CLI use the commands below. Within the CLI you can configure a
DDNS for each interface. Only the first configured port appears in the web-based manager.
Additional commands vary with the DDNS server you select.
config system ddnsedit <instance_value>
set monitor-interface <external_interface>set ddns-server <ddns_server_selection>
end
You can also use FortiGuard (when subscribed) as a DDNS as well. To configure, use the CLI
commands:
config system fortiguardset ddns-server-ipset ddns-server-port
end
FortiClient discovery and registration
FortiOS provides a means of allowing users running FortiClient Endpoint Control software to
connect to specific interfaces when connecting to the FortiGate unit. As well as ensuring that
remote or local users have FortiClient Endpoint Control software installed on their PC or mobile
device.
Advanced concepts Page 152 Install and System Administration for FortiOS 5.0

FortiClient discovery
You can configure a FortiGate interface as an interface that will accept FortiClient connections.
When configured, the FortiGate unit sends broadcast messages which the FortiClient software
running on an end user PC is listening for.
To enable the broadcast message
1. Go to System > Network > Interface.
2. Edit the interface to send the broadcast messages.
3. Select FCT-Access.
4. In Device Management, select Broadcast Discovery Messages.
5. Select OK.
Once enabled, the FortiGate unit broadcasts a discovery message that includes the IP address
of the interface and listening port number to the local network. All PCs running FortiClient on
that network listen for this discovery message.
You also have the option of including a registration key. When the FortiClient discovers the
FortiGate unit, it is prompted to enter a registration key, defined by the administrator.
To add a registration key
1. Go to System > Config > Advanced.
2. Select Enable Registration Key for FortiClient, and enter the key.
3. Select Apply.
Ensure you distribute the key to the users that need to connect to the FortiGate unit.
FortiClient Registration
On the end user side, if FortiClient has not been registered with the FortiGate unit, it is
continually listening for the FortiGate discovery message. When this message is detected the
un-registered client will pop-up a FortiGate Detected message. The user can choose to either
register or ignore the message.
Clients that have registered with that FortiGate unit will not be listening for these messages and
will not display the message again.
If you enabled the registration key, the user is prompted to enter the key before a connection
can be completed.
For more information on FortiGate registration, see the FortiClient Administration Guide.
IP addresses for self-originated traffic
On the FortiGate unit, there are a number of protocols and traffic that is specific to the internal
workings of FortiOS. For many of these traffic sources, you can identify a specific port/IP
Advanced concepts Page 153 Install and System Administration for FortiOS 5.0
address for this self-originating traffic. The following traffic can be configured to a specific
port/IP address:
• SNMP
• Syslog
• alert email
• FortiManager connection IP
• FortiGuard services
• FortiAnalyzer logging
• NTP
• DNS
• Authorization requests such as RADIUS
• FSSO
Configuration of these services is performed in the CLI. In each instance, there is a command
set source-ip. For example, to set the source IP of NTP to be on the DMZ1 port with an IP of
192.168.4.5, the commands are:
config system ntpset ntpsync enableset syncinterval 5set source-ip 192.168.4.5
end
To see which services are configured with source-ip settings, use the get command:
get system source-ip status
The output will appear similar to the sample below:
NTP: x.x.x.xDNS: x.x.x.xSNMP: x.x.x.xCentral Management: x.x.x.xFortiGuard Updates (AV/IPS): x.x.x.xFortiGuard Queries (WebFilter/SpamFilter): x.x.x.x
Administration for schools
For system administrator in the school system it is particularly difficult to maintain a network
and access to the Internet. There are potential legal liabilities if content is not properly filtered
and children are allowed to view pornography and other non-productive and potentially
dangerous content. For a school, too much filtering is better than too little. This section
describes some basic practices administrators can employ to help maintain control without
being too draconian for access to the internet.
Security policies
The default security policies in FortiOS allow all traffic on all ports and all IP addresses. Not the
most secure. While applying UTM profiles can help to block viruses, detect attacks and prevent
spam, this doesn’t provide a solid overall security option. The best approach is a layered
approach; the first layer being the security policy.
Advanced concepts Page 154 Install and System Administration for FortiOS 5.0

When creating outbound security policies, you need to know the answer to the question “What
are the students allowed to do?” The answer is surf the web, connect to FTP sites, send/receive
email, and so on.
Once you know what the students need to do, you can research the software used and
determine the ports the applications use. For example, if the students only require web surfing,
then there are only two ports (80 - HTTP and 443 - HTTPS) needed to complete their tasks.
Setting the security policies to only allow traffic through two ports (rather than all 65,000), this
will significantly lower any possible exploits. By restricting the ports to known services, means
stopping the use of proxy servers, as many of them operate on a non-standard port to hide their
traffic from URL filtering or HTTP inspection.
DNS
Students should not be allowed to use whatever DNS they want. this opens another port for
them to use and potentially smuggle traffic on. The best approach is to point to an internal DNS
server and only allow those devices out on port 53. Its the same approach one would use for
SMTP. Only allow the mail server to use port 25 since nothing else should be sending email.
If there is no internal DNS server, then the list of allowed DNS servers they can use should be
restrictive. One possible exploit would be for them to set up their own DNS server at home that
serves different IPs for known hosts, such as having Google.com sent back the IP for
playboy.com.
Encrypted traffic (HTTPS)
Generally speaking, students should not be allowed to access encrypted web sites. Encrypted
traffic cannot be sniffed, and therefore, cannot be monitored. HTTPS traffic should only be
allowed when necessary. Most web sites a student needs to access are HTTP, not HTTPS. Due
to the nature of HTTPS protocol, and the fact that encryption is an inherent security risk to your
network, its use should be restricted.
Adding a security policy that encompasses a list of allowed secure sites will ensure that any
HTTPS sites that are required are the only sites a student can go to.
FTP
For the most part, students should not be using FTP. FTP is not HTTP or HTTPS so you cannot
use URL filtering to restrict where they go. This can be controlled with destination IPs in the
security policy. With a policy that specifically outlines which FTP addresses are allowed, all
other will be blocked.
Example security policies
Given these requirements, an example set of security policies could look like the following
illustration. In a large setup, all the IPs for the students are treated by one of these four policies.
Advanced concepts Page 155 Install and System Administration for FortiOS 5.0
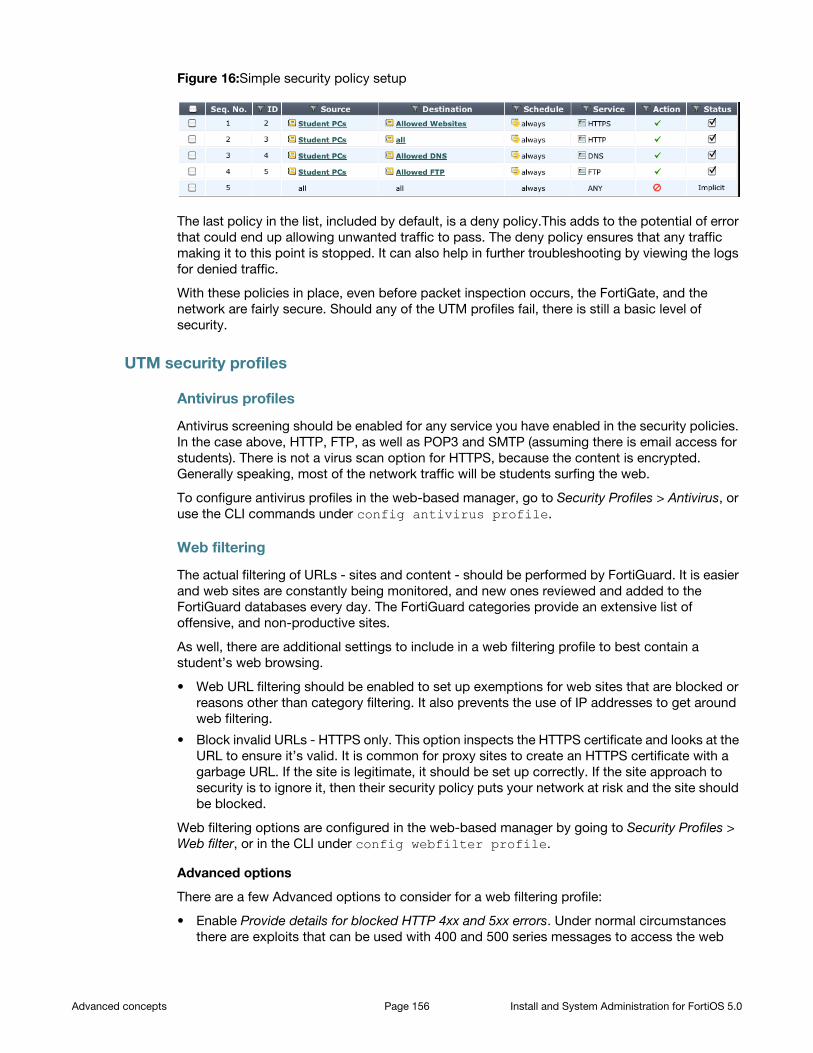
Figure 16:Simple security policy setup
The last policy in the list, included by default, is a deny policy.This adds to the potential of error
that could end up allowing unwanted traffic to pass. The deny policy ensures that any traffic
making it to this point is stopped. It can also help in further troubleshooting by viewing the logs
for denied traffic.
With these policies in place, even before packet inspection occurs, the FortiGate, and the
network are fairly secure. Should any of the UTM profiles fail, there is still a basic level of
security.
UTM security profiles
Antivirus profiles
Antivirus screening should be enabled for any service you have enabled in the security policies.
In the case above, HTTP, FTP, as well as POP3 and SMTP (assuming there is email access for
students). There is not a virus scan option for HTTPS, because the content is encrypted.
Generally speaking, most of the network traffic will be students surfing the web.
To configure antivirus profiles in the web-based manager, go to Security Profiles > Antivirus, or
use the CLI commands under config antivirus profile.
Web filtering
The actual filtering of URLs - sites and content - should be performed by FortiGuard. It is easier
and web sites are constantly being monitored, and new ones reviewed and added to the
FortiGuard databases every day. The FortiGuard categories provide an extensive list of
offensive, and non-productive sites.
As well, there are additional settings to include in a web filtering profile to best contain a
student’s web browsing.
• Web URL filtering should be enabled to set up exemptions for web sites that are blocked or
reasons other than category filtering. It also prevents the use of IP addresses to get around
web filtering.
• Block invalid URLs - HTTPS only. This option inspects the HTTPS certificate and looks at the
URL to ensure it’s valid. It is common for proxy sites to create an HTTPS certificate with a
garbage URL. If the site is legitimate, it should be set up correctly. If the site approach to
security is to ignore it, then their security policy puts your network at risk and the site should
be blocked.
Web filtering options are configured in the web-based manager by going to Security Profiles >
Web filter, or in the CLI under config webfilter profile.
Advanced options
There are a few Advanced options to consider for a web filtering profile:
• Enable Provide details for blocked HTTP 4xx and 5xx errors. Under normal circumstances
there are exploits that can be used with 400 and 500 series messages to access the web
Advanced concepts Page 156 Install and System Administration for FortiOS 5.0

site. While most students probably won’t know how to do this, there is no harm in being
cautious. It only takes one.
• Enable Rate Images by URL. This option only works with Google images. It examines the
URL that the images is stored at to get a rating on it, then blocks or allows the image based
on the rating of the originating URL. It does not inspect the image contents. Most image
search engines to a prefect and pass the images directly to the browser.
• Enable Block HTTP redirects by rating. An HTTP redirect is one method of getting around
ratings. Go to one web site that has an allowed rating, and it redirects to another web site
that may want blocked.
Categories and Classifications
For the selection of what FortiGuard categories and classifications that should be blocked, that
is purely based on the school system and its Internet information policy.
Email Filtering
Other than specific teacher-led email inboxes, there is no reason why a student should be able
to access, read or send personal email. Ports for POP3, SMTP and IMAP should not be opened
in a security policies.
IPS
The intrusion protection profiles should be used to ensure the student PCs are not vulnerable to
attacks, nor do you want students making attacks. As well, IPS can do more than simple
vulnerability scans. With a FortiGuard subscription, IPS signatures are pushed to the FortiGate
unit. New signatures are released constantly for various intrusions as they are discovered.
FortiOS includes a number of predefined IPS sensors that you can enable by default. Selecting
the all_default signature is a good place to start as it includes the major signatures.
To configure IPS sensors in the web-based manager, go to Security Profiles > Intrusion
Protection, on the CLI use commands under config ips sensor.
Application control
Application control uses IPS signatures to limit the use of instant messaging and peer-to-peer
applications which can lead to possible infections on a student’s PC. FortiOS includes a
number of pre-defined application categories. To configure and maintain application control
profiles in the web-based manager, go to Security Profiles > Application Control. In the CLI use
commands under config application list.
Some applications to consider include proxies, botnets, toolbars and P2P applications.
Logging
Turn on all logging - every option in this section should be enabled. This is not where you decide
what you are going to log. It is simply defining what the UTM profiles can log.
Logging everything is a way to monitor traffic on the network, see what student’s are utilizing
the most, and locate any potential holes in your security plan. As well, keeping this information
may help to prove negligence later in necessary.
Replacement messages list
The replacement message list in System > Config > Replacement Messages.
Advanced concepts Page 157 Install and System Administration for FortiOS 5.0

The replacement messages list enables you to view and customize replacement messages. Use
the expand arrow beside each type to display the replacement messages for that category.
Select the Edit icon beside each replacement message to customize that message for your
requirements.
Should you make a major error to the code, you can select the Restore Default to return to the
original message and code base.
If you are viewing the replacement messages list in a VDOM, any messages that have been
customized for that VDOM are displayed with a Reset icon that you can use to reset the
replacement message to the global version.
For connections requiring authentication, the FortiGate unit uses HTTP to send an
authentication disclaimer page for the user to accept before a security policy is in effect.
Therefore, the user must initiate HTTP traffic first in order to trigger the authentication disclaimer
page. Once the disclaimer is accepted, the user can send whatever traffic is allowed by the
security policy.
Replacement message images
You can add images to replacement messages to:
• Disclaimer pages
• Login pages
• Declined disclaimer pages
• Login failed page
• Login challenge pages
• Keepalive pages
Image embedding is also available to the endpoint NAC download portal and recommendation
portal replacement messages, as well as HTTP replacement messages.
Supported image formats are GIF, JPEG, TIFF and PNG. The maximum file size supported is
6000 bytes.
Adding images to replacement messages
To upload an image for use in a message
1. Go to System > Config > Replacement Messages.
2. Select Manage Images at the top of the page.
3. Select Create New.
4. Enter a Name for the image.
5. Select the Content Type.
6. Select Browse to locate the file and select OK.
The image that you include in a replacement message, must have the following html:
<img src=%%IMAGE: <config_image_name>%% size=<bytes> >
For example:
<img src=%%IMAGE: logo_hq%% size=4272>
Modifying replacement messages
Replacement messages can be modified to include a message or content that suits your
organization.
Advanced concepts Page 158 Install and System Administration for FortiOS 5.0
Use the expand arrows to view the replacement message list for a given category. Messages
are in HTML format. To change a replacement message, go to System > Config > Replacement
Messages select the replacement message that you want to modify. At the bottom pane of the
window, you can the message on one side and the HTML code on the other side. The message
view changes in real-time as you change the content.
A list of common replacement messages appears in the main window. To see the entire list and
all categories of replacement messages, in the upper-right corner of the window, select
Extended View.
Alert Mail replacement messages
The FortiGate unit adds the alert mail replacement messages listed in the following table to alert
email messages sent to administrators. If you enable the option Send alert email for logs based
on severity, whether or not replacement messages are sent by alert email depends on how you
set the alert email in Minimum log level.
Authentication replacement messages
The FortiGate unit uses the text of the authentication replacement messages for various user
authentication HTML pages that are displayed when a user is required to authenticate because
a security policy includes at least one identity-based policy that requires firewall users to
authenticate.
These replacement message pages are for authentication using HTTP and HTTPS. You cannot
customize the firewall authentication messages for FTP and Telnet.
The authentication login page and the authentication disclaimer include replacement tags and
controls not found on other replacement messages.
Users see the authentication login page when they use a VPN or a security policy that requires
authentication. You can customize this page in the same way as you modify other replacement
messages.
There are some unique requirements for these replacement messages:
• The login page must be an HTML page containing a form with ACTION="/" and
METHOD="POST"
• The form must contain the following hidden controls:
• <INPUT TYPE="hidden" NAME="%%MAGICID%%" VALUE="%%MAGICVAL%%">
• <INPUT TYPE="hidden" NAME="%%STATEID%%" VALUE="%%STATEVAL%%">
• <INPUT TYPE="hidden" NAME="%%REDIRID%%" VALUE="%%PROTURI%%">
• The form must contain the following visible controls:
• <INPUT TYPE="text" NAME="%%USERNAMEID%%" size=25>
• <INPUT TYPE="password" NAME="%%PASSWORDID%%" size=25>
Advanced concepts Page 159 Install and System Administration for FortiOS 5.0
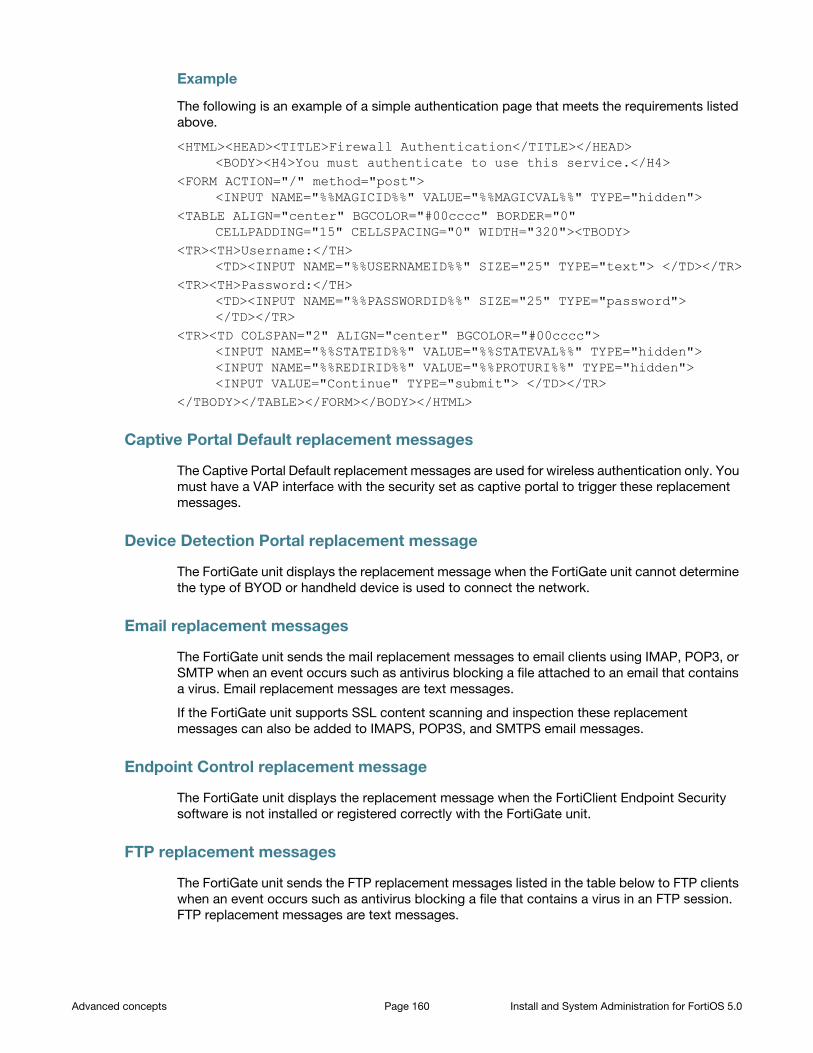
Example
The following is an example of a simple authentication page that meets the requirements listed
above.
<HTML><HEAD><TITLE>Firewall Authentication</TITLE></HEAD> <BODY><H4>You must authenticate to use this service.</H4>
<FORM ACTION="/" method="post"> <INPUT NAME="%%MAGICID%%" VALUE="%%MAGICVAL%%" TYPE="hidden">
<TABLE ALIGN="center" BGCOLOR="#00cccc" BORDER="0" CELLPADDING="15" CELLSPACING="0" WIDTH="320"><TBODY>
<TR><TH>Username:</TH> <TD><INPUT NAME="%%USERNAMEID%%" SIZE="25" TYPE="text"> </TD></TR>
<TR><TH>Password:</TH> <TD><INPUT NAME="%%PASSWORDID%%" SIZE="25" TYPE="password"> </TD></TR>
<TR><TD COLSPAN="2" ALIGN="center" BGCOLOR="#00cccc"> <INPUT NAME="%%STATEID%%" VALUE="%%STATEVAL%%" TYPE="hidden"> <INPUT NAME="%%REDIRID%%" VALUE="%%PROTURI%%" TYPE="hidden"> <INPUT VALUE="Continue" TYPE="submit"> </TD></TR>
</TBODY></TABLE></FORM></BODY></HTML>
Captive Portal Default replacement messages
The Captive Portal Default replacement messages are used for wireless authentication only. You
must have a VAP interface with the security set as captive portal to trigger these replacement
messages.
Device Detection Portal replacement message
The FortiGate unit displays the replacement message when the FortiGate unit cannot determine
the type of BYOD or handheld device is used to connect the network.
Email replacement messages
The FortiGate unit sends the mail replacement messages to email clients using IMAP, POP3, or
SMTP when an event occurs such as antivirus blocking a file attached to an email that contains
a virus. Email replacement messages are text messages.
If the FortiGate unit supports SSL content scanning and inspection these replacement
messages can also be added to IMAPS, POP3S, and SMTPS email messages.
Endpoint Control replacement message
The FortiGate unit displays the replacement message when the FortiClient Endpoint Security
software is not installed or registered correctly with the FortiGate unit.
FTP replacement messages
The FortiGate unit sends the FTP replacement messages listed in the table below to FTP clients
when an event occurs such as antivirus blocking a file that contains a virus in an FTP session.
FTP replacement messages are text messages.
Advanced concepts Page 160 Install and System Administration for FortiOS 5.0
FortiGuard Web Filtering replacement messages
The FortiGate unit sends the FortiGuard Web Filtering replacement messages listed in the table
to web browsers using the HTTP protocol when FortiGuard web filtering blocks a URL, provides
details about blocked HTTP 4xx and 5xx errors, and for FortiGuard overrides. FortiGuard Web
Filtering replacement messages are HTTP pages.
If the FortiGate unit supports SSL content scanning and inspection and if Protocol Recognition
> HTTPS Content Filtering Mode is set to Deep Scan in the antivirus profile, these replacement
messages can also replace web pages downloaded using the HTTPS protocol.
HTTP replacement messages
The FortiGate unit sends the HTTP replacement messages listed in the following table to web
browsers using the HTTP protocol when an event occurs such as antivirus blocking a file that
contains a virus in an HTTP session. HTTP replacement messages are HTML pages.
If the FortiGate unit supports SSL content scanning and inspection, and if under HTTPS in the
protocol option list has Enable Deep Scan enabled, these replacement messages can also
replace web pages downloaded using the HTTPS protocol.
IM replacement messages
The FortiGate unit sends the IM replacement messages listed in to IM clients using AIM, ICQ,
MSN, or Yahoo! Messenger when an event occurs such as antivirus blocking a file attached to
an email that contains a virus. IM replacement messages are text messages.
NNTP replacement messages
The FortiGate unit sends the NNTP replacement messages listed in the following table to NNTP
clients when an event occurs such as antivirus blocking a file attached to an NNTP message
that contains a virus. NNTP replacement messages are text messages.
Spam replacement messages
The FortiGate unit adds the Spam replacement messages listed in the following table to SMTP
server responses if the email message is identified as spam and the spam action is discard. If
the FortiGate unit supports SSL content scanning and inspection these replacement messages
can also be added to SMTPS server responses.
NAC quarantine replacement messages
The page that is displayed for the user depends on whether NAC quarantine blocked the user
because a virus was found, a DoS sensor detected an attack, an IPS sensor detected an attack,
or a DLP rule with action set to Quarantine IP address or Quarantine Interface matched a
session from the user.
The default messages inform the user of why they are seeing this page and recommend they
contact the system administrator. You can customize the pages as required, for example to
include an email address or other contact information or if applicable a note about how long the
user can expect to be blocked.
SSL VPN replacement message
The SSL VPN login replacement message is an HTML replacement message that formats the
FortiGate SSL VPN portal login page. You can customize this replacement message according
Advanced concepts Page 161 Install and System Administration for FortiOS 5.0

to your organization’s needs. The page is linked to FortiGate functionality and you must
construct it according to the following guidelines to ensure that it will work.
• The login page must be an HTML page containing a form with ACTION="%%SSL_ACT%%" and METHOD="%%SSL_METHOD%%"
• The form must contain the %%SSL_LOGIN%% tag to provide the login form.
• The form must contain the %%SSL_HIDDEN%% tag.
Web Proxy replacement messages
The FortiGate unit sends Web Proxy replacement messages listed in the table below when a
web proxy event occurs that is detected and matches the web proxy configuration. These
replacement messages are web pages that appear within your web browser.
The following web proxy replacement messages require an identity-based security policy so
that the web proxy is successful. You can also enable FTP-over-HTTP by selecting the FTP
option in System > Network > Explicit Proxy.
Traffic quota control replacement messages
When user traffic is going through the FortiGate unit and it is blocked by traffic shaping quota
controls, users see the Traffic shaper block message or the Per IP traffic shaper block message
when they attempt to connect through the FortiGate unit using HTTP.
The traffic quota HTTP pages should contain the %%QUOTA_INFO%% tag to display information
about the traffic shaping quota setting that is blocking the user.
MM1 replacement messages
MM1 replacement messages are sent when, during MMS content scanning, FortiOS Carrier
detects, for example a virus, using the MMS profile.
You must have Remove Blocked selected within the MMS profile if you want to remove the
content that is intercepted during MMS scanning on the FortiGate unit.
MM3 replacement messages
MM3 replacement messages are sent when, during MMS content scanning, FortiOS Carrier
detects, for example a virus, using the MMS profile.
You must have Remove Blocked selected within the MMS profile if you want to remove the
content that is intercepted during MMS scanning on the unit.
MM4 replacement messages
MM4 replacement messages are sent when, during MMS content scanning, FortiOS Carrier
detects, for example a virus, using the MMS profile.
MM7 replacement messages
MM7 replacement messages are sent when, during MMS content scanning, FortiOS Carrier
detects, for example a virus, using the MMS profile.
Advanced concepts Page 162 Install and System Administration for FortiOS 5.0

MMS replacement messages
The MMS replacement message is sent when a section of an MMS message has been replaced
because it contains a blocked file. This replacement message is in HTML format.
The message text is:
<HTML><BODY>This section of the message has been replaced because it contained a blocked file</BODY></HTML>
Replacement message groups
Replacement message groups enable you to view common messages in groups for large
carriers. Message groups can be configured by going to Config > Replacement Message
Group.
Using the defined groups, you can manage specific replacement messages from a single
location, rather than searching through the entire replacement message list.
If you enable virtual domains (VDOMs) on the FortiGate unit, replacement message groups are
configured separately for each virtual domain. Each virtual domain has its own default
replacement message group, configured from System > Config > Replacement Messages
Group.
When you modify a message in a replacement message group, a Reset icon appears beside the
message in the group. You can select this Reset icon to reset the message in the replacement
message group to the default version.
All MM1/4/7 notification messages for FortiOS Carrier (and MM1 retrieve-conf messages) can
contain a SMIL layer and all MM4 notification messages can contain an HTML layer in the
message. These layers can be used to brand messages by using logos uploaded to the
FortiGate unit via the 'Manage Images' link found on the replacement message group
configuration page.
Disk
To view the status and storage information of the local disk on your FortiGate unit, go to System
> Config > Advanced. The Disk menu appears only on FortiGate units with an internal hard or
flash disk.
Formatting the disk
The internal disk of the FortiGate unit (if available) can be formatted by going to System >
Config > Advanced and selecting Format.
Formatting the disk will erase all data on it, including databases for antivirus and IPS; logs,
quarantine files, and WAN optimization caches. The FortiGate unit requires a reboot once the
disk has been formatted.
Setting space quotas
If the FortiGate unit has an internal hard or flash disk, you can allocate the space on the disk for
specific logging and archiving, and WAN optimization. By default, the space is used on an as
required basis. As such, a disk can fill up with basic disk logging, leaving less potential space
for quarantine.
Advanced concepts Page 163 Install and System Administration for FortiOS 5.0

By going to System > Config > Advanced, you can select the Edit icon for Logging and
Archiving and WAN Optimization & Web Cache and define the amount of space each log,
archive and WAN optimization has on the disk.
CLI Scripts
To upload bulk CLI commands and scripts, go to System > Config > Advanced.
Scripts are text files containing CLI command sequences. Scripts can be used to deploy
identical configurations to many devices. For example, if all of your devices use identical
security policies, you can enter the commands required to create the security policies in a
script, and then deploy the script to all the devices which should use those same settings.
Use a text editor such as Notepad or other application that creates simple text files. Enter the
commands in sequence, with each line as one command, similar to examples throughout the
FortiOS documentation set.
If you are using a FortiGate unit that is not remotely managed by a FortiManager unit or the
FortiGuard Analysis and Management Service, the scripts you upload are executed and
discarded. If you want to execute a script more than once, you must keep a copy on your
management PC.
If your FortiGate unit is configured to use a FortiManager unit, you can upload your scripts to
the FortiManager unit, and run them from any FortiGate unit configured to use the FortiManager
unit. If you upload a script directly to a FortiGate unit, it is executed and discarded.
If your FortiGate unit is configured to use FortiGuard Analysis and Management Service, scripts
you upload are executed and stored. You can run uploaded scripts from any FortiGate unit
configured with your FortiGuard Analysis and Management Service account. The uploaded
script files appear on the FortiGuard Analysis and Management Service portal web site.
Uploading script files
After you have created a script file, you can then upload it through System > Config >
Advanced. When a script is uploaded, it is automatically executed.
Commands that require the FortiGate unit to reboot when entered in the command line will also
force a reboot if included in a script.
To execute a script
1. Go to System > Config > Advanced.
2. Verify that Upload Bulk CLI Command File is selected.
3. Select Browse to locate the script file.
4. Select Apply.
If the FortiGate unit is not configured for remote management, or if it is configured to use a
FortiManager unit, uploaded scripts are discarded after execution. Save script files to your
management PC if you want to execute them again later.
If the FortiGate unit is configured to use the FortiGuard Analysis and Management Service, the
script file is saved to the remote server for later reuse. You can view the script or run it from the
FortiGuard Analysis and Management Service portal web site.
Rejecting PING requests
The factory default configuration of your FortiGate unit allows the default external interface to
respond to ping requests. Depending on the model of your FortiGate unit the actual name of
Advanced concepts Page 164 Install and System Administration for FortiOS 5.0
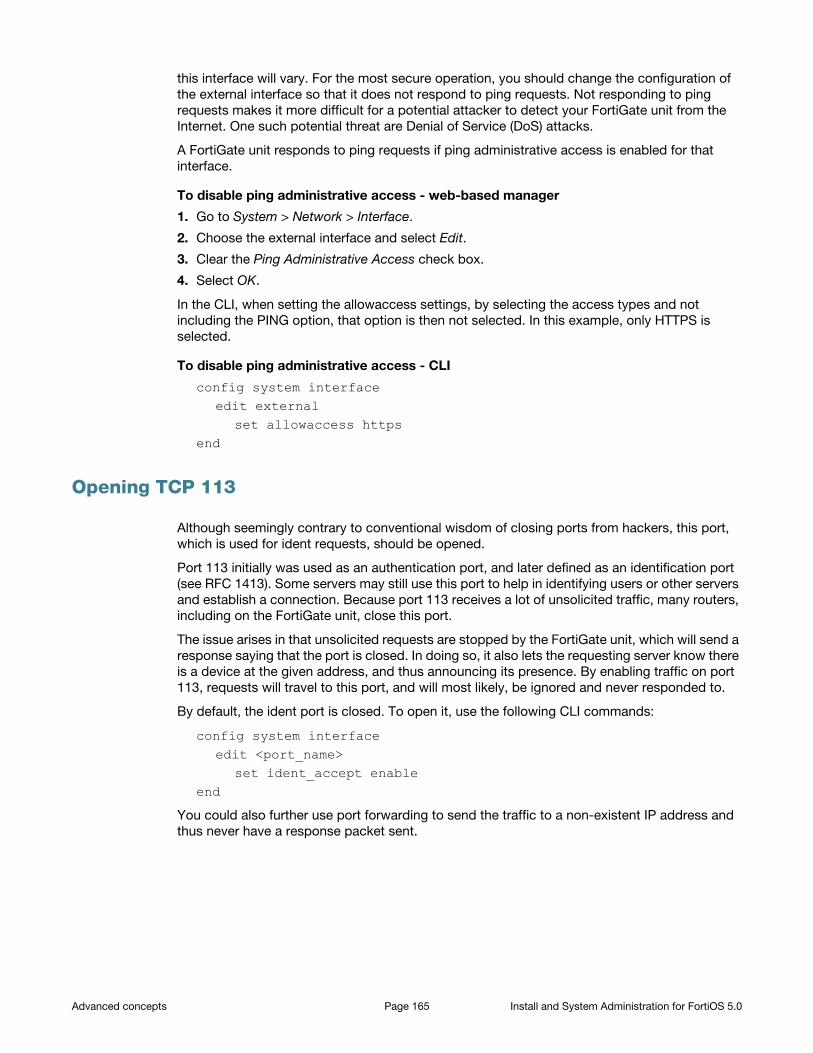
this interface will vary. For the most secure operation, you should change the configuration of
the external interface so that it does not respond to ping requests. Not responding to ping
requests makes it more difficult for a potential attacker to detect your FortiGate unit from the
Internet. One such potential threat are Denial of Service (DoS) attacks.
A FortiGate unit responds to ping requests if ping administrative access is enabled for that
interface.
To disable ping administrative access - web-based manager
1. Go to System > Network > Interface.
2. Choose the external interface and select Edit.
3. Clear the Ping Administrative Access check box.
4. Select OK.
In the CLI, when setting the allowaccess settings, by selecting the access types and not
including the PING option, that option is then not selected. In this example, only HTTPS is
selected.
To disable ping administrative access - CLI
config system interfaceedit external
set allowaccess httpsend
Opening TCP 113
Although seemingly contrary to conventional wisdom of closing ports from hackers, this port,
which is used for ident requests, should be opened.
Port 113 initially was used as an authentication port, and later defined as an identification port
(see RFC 1413). Some servers may still use this port to help in identifying users or other servers
and establish a connection. Because port 113 receives a lot of unsolicited traffic, many routers,
including on the FortiGate unit, close this port.
The issue arises in that unsolicited requests are stopped by the FortiGate unit, which will send a
response saying that the port is closed. In doing so, it also lets the requesting server know there
is a device at the given address, and thus announcing its presence. By enabling traffic on port
113, requests will travel to this port, and will most likely, be ignored and never responded to.
By default, the ident port is closed. To open it, use the following CLI commands:
config system interfaceedit <port_name>
set ident_accept enableend
You could also further use port forwarding to send the traffic to a non-existent IP address and
thus never have a response packet sent.
Advanced concepts Page 165 Install and System Administration for FortiOS 5.0
Obfuscate HTTP responses
The FortiGate unit can obfuscate the HTTP responses from the FortiGate admin GUI and SSL
VPN servers. By default this option is not enabled. To obfuscate HTTP headers, use the
following CLI command:
config system globalset http-obfucate {none | header-only | modified | no-error}
end
Where:
none — do not hide the FortiGate web server identity.
header-only — hides the HTTP server banner.
modified — provides modified error responses.
no-error — suppresses error responses.
Advanced concepts Page 166 Install and System Administration for FortiOS 5.0

IndexNumerics3DES 13
802.1Q 76, 80, 83
802.3ad 43
Aabort 20
access controls 21
adding, configuring definingDHCP interface settings 44DHCP relay agent 147DHCP server 146interface 35replacement message images 158replacement messages 158secondary IP address 49SNMP community 71uploading scripts 164
Address Resolution Protocol (ARP) 105
administrationschools 154
administrative access 47
ADSL 36
aggregate interfaces 43
allow access 47
ASCII 26
asymmetric routing 108
authenticatingL2TP clients 119PPTP clients 111
authentication server, externalfor L2TP 119for PPTP 111
Bbaud rate 29
bits per second (bps) 12
Blowfish 13
boot interrupt 11
border gateway protocol (BGP). See routing, BGP
broadcastdomains 76storm 105
Ccase sensitivity
Perl regular expressions 30
CHAP 109
CIDR 17
Ciscorouter configuration 87, 103switch configuration 87, 94, 102
CLIconnecting 11connecting to the 11Console widget 12
CNAME 150
command 15abbreviation 23completion 22help 22multi-line 23
configurationlocking 56
connectingto the CLI using SSH 13to the CLI using Telnet 14to the console 11
console 11
conventions 15
cp1252 27
DDB-9 11
DCE-RPC 127
dcerpssession helper 127
dedicated to FortiAP 36
default routeVLAN 86
definitions 15
delete, shell command 19
DHCPconfiguring on an interface 44exclude range 148IPv6 147lease breaking 149lease time 147servers and relays 146service 147
diagnostics, tracert 94, 95
disabling 126
disk status, viewing 163
Distributed Computing Environment Remote Procedure Call (DCE-RPC) 127
DNS 127, 149CNAME 150external servers 149loal domains 149master server 150public 151recursive 152server
server, DNS 150shadow 151slave 150split 151
Index Page 167 Install and System Administration for FortiOS 5.0
dns-tcp, session helper 127
dns-udp, session helper 127
domain name server 149
dotted decimal 17
dual internet connection 133
dual WANlink redundancy 133load sharing 136
duplicate MAC 105
Eedit, shell command 19
_email 17
end, shell command 19
Endpoint Mapper (EPM) 127
environment variables 24
escape sequence 24
exclude range, DHCP 148
Ffield 16
File transfer protocol (FTP) 127
firewall IP addresses, defining L2TP 120
flow control 12
FortiAP 36
Fortinet MIB 73
_fqdn 17
fully qualified domain name (FQDN) 17
GGB2312 27
Generic Routing Encapsulation (GRE) 109
getshell command 19
gigabit interfaces, SNMP 70
groupreplacement message 163
HH.245 127, 128
h245Isession helper 127
H323, session helper 128
hardware switch 40
IID tag 77, 80
IEEE 802.1Q 76, 80
ifHighSpeed 70
IF-MIB.ifSpeed 70
indentation 16
_index 17
index number 17
_int 17
interface802.1Q trunk 83, 94external, VLAN NAT example 88external, VLAN NAT/Route example 88maximum number 76, 108one-armed sniffer 42security mode 37software switch 38VLAN subinterface 83, 87, 88, 94
interfacesaggregate 43AMC card 33DHCP 44loopback 41MTU packet size 48physical 32PPPoE 45redundant 41secondary IP address 49virtual domains 49virtual LANs 50wireless 47zones 51
International characters 26
IP addressoverlapping 84
_ipv4 17
_ipv4/mask 17
_ipv4mask 17
_ipv4range 17
IPv6DHCP 147
_ipv6 17
_ipv6mask 17
IPX, layer-2 forwarding 104
ISO 8859-1 27
KK-12 154
key 14
LL2TP VPN
authentication method 119configuration steps 119enabling 120firewall IP addresses, defining 120infrastructure requirements 119network configuration 118security policy, defining 121VIP address range 120
layer-2 77, 80, 83example 77forwarding 104
layer-3 80
LDAP server, externalfor L2TP 119for PPTP 111
lease breakingDHCP 149
Index Page 168 Install and System Administration for FortiOS 5.0

lease time 147
line endings 29
link redundancy 133
load sharing 136
localconsole access 11domain name 149
locking configuration 56
loopback interfaces 41
MMAC address 105
maintenancedisk 163
Management Information Base (MIB) 67
master DNS server 150
memory 108
MGCP 128session helper 128
MIBFortiGate 73RFC 1213 73RFC 2665 73
Microsoft Point-to-Point Encryption (MPPE) 110
modem 140modes 140, 145routing 143
monitoringDHCP 148
more 28
MS RPC 127
MTU packet size, interface 48
multi-line command 23
multiple pages 28
N_name 17
NATport translation (NAT-PT) 129VLAN example 88
NetBIOS, for Windows networks 107
network instability 105
next 21
null modem 11, 13
Oobject 16
ONC-RPC 127, 129
one-armed sniffer 42
open shortest path first (OSPF). See routing, OSPF
Open Systems Interconnect (OSI) 77
option 16
Ppacket capture 65
packet header 60
packetslayer-3 routing 80VLAN-tagged 83
paging 28
PAP 109
parity 12
_pattern 17
pattern 17
Perl regular expressions, using 29
permissions 21
ping server 134, 142
pmapsession helper 129
Point-to-Point Tunneling Protocol (PPTP) 109
port 47 129
port, session helper 124
PPPoE interface 45
PPTPexternal server 114layer-2 forwarding 104session helper 129
PPTP VPNauthentication method 111configuring pass through 114enabling 112FortiGate implementation 109security policy, defining 113VIP address range 112
protocol, session helper 124
publis DNS server 151
purge, shell command 20
RRADIUS server, external
for L2TP 119for PPTP 111
RAS, session helper 128
recursive DNS 152
redundantinterfaces 41, 133modem mode 140, 145
Registration, Admission, and Status (RAS) 128
regular expression 17
relayDHCP 146, 147
remoteL2TP VPN client 121shell 130
rename, shell command 20
replacement message groups 163
Index Page 169 Install and System Administration for FortiOS 5.0

replacement messagesalert mail 159captive portal default 160Device Detection Portal 160Endpoint Control 160FortiGuard web filtering 161FTP 160HTTP 161IM, P2P 161images 158mail 160MM1 162MM3 162MM4 162MM7 162, 163modifying 158NAC quarantine 161NNTP 161spam 161SSL VPN 161traffic quota control 162user authentication 159viewing 157web proxy 162
reserved characters 24
RFC1213 67, 732516 452665 67, 73
RJ-45 11
RJ-45-to-DB-9 11, 13
routingasymmetric 108BGP 86default for VLAN 86modem 143OSPF 86RIP 86STP 107
routing information protocol (RIP). See routing, RIP
rsh, session helper 130
RTSP, session helper 131
Sschool administration 154
scriptsuploading 164
Secure Shell (SSH)key 14
security IP addressesdefining L2TP 120
security mode 37
security policydefining L2TP 120, 121defining PPTP 113VLAN 85VLAN example 90VLAN transparent mode 96, 100
serial communications (COM) port 11
serverDHCP 146
service, DHCP 147
session helper 126, 127, 128, 129, 130, 132
changing the configuration 124dcerpc 127DNS 127H.245 127h245O 127h323 128mgcp 128pmap 129port 124PPTP 129protocol 124ras 128rsh 130rtsp 131sip 131TFTP 131tns 132viewing 123
session-helper 123
set 21
setting administrative access for SSH or Telnet 12
shadow DNS server 151
shell commanddelete 19edit 19end 19get 19purge 20rename 20show 20
Shift-JIS 26, 27
show 21shell command 20
SIP, session helper 131
slave DNS server 150
sniffer 42, 65
SNMPAgent 68configuring community 71get command 74gigabit interfaces 70manager 67, 71MIBs 73queries 69, 71, 72RFC 12123 73RFC 2665 73v3 67, 68
soft-switch 38
Spanning Tree Protocol (STP) 105, 107
special characters 24
split DNS 151
SQLNETsession helper 132
Index Page 170 Install and System Administration for FortiOS 5.0

SSH 12, 13key 14
standalone mode 140, 145
STP, forwarding 107
_str 17
string 17
sub-command 15, 18
subinterfaceVLAN NAT/Route 83
switchhardware 40
syntax 15
systemsession-helper 123
Ttable 16
TCPport 111 124port 135 127port 1720 124port 1723 124, 129port 21 127port 512 124port 514 124
Telnet 12, 14
testingVDOM transparent mode 103VLAN 94
TFTPsession helper 131
TNS 132
tnssession helper 132
tracert 94, 95
transparent mode 95security policy 96, 100VDOM example 98, 102, 103VLAN example 97VLAN subinterface 96
troubleshooting 65
trunkinterface 83, 94links 77
UUDP
port 111 124port 135 127port 1719 128port 2427 128port 2727 128
Unicode 26
universal unique identifier (UUID) 127
unknown action 15
unset 21
uploading scripts 164
using the CLI 11
UTF-8 26
V_v4mask 17
_v6mask 17
value 16
VDOMlimited resources 108maximum interfaces 76, 108transparent mode 95
viewingdisk status 163
VIP addressL2TP clients 120PPTP clients 112
virtualdomains 49LANs 50
VLANapplication 76jumbo traffic frames 48maximum number 76, 108security policy 85subinterface 83, 87, 88, 94tagged packets 83transparent mode 95
VLAN ID 80range 77tag 77
VLAN subinterfacetransparent mode 96VDOM transparent mode example 98VLAN NAT example 88VLAN NAT/Route example 88
VoIP 129
VPN, configuring L2TP 119
Wweb-based manager, lock 56
wild cards 17
wildcard pattern matching 30
Windows networksenabling NetBIOS 107
WINS 107
wireless 47
word boundary, Perl regular expressions 30
Zzones 51
Index Page 171 Install and System Administration for FortiOS 5.0


