14
Install IBM Connections 4.5 Cognos on RedHat using Oracle Database step-by-step Guide part 1.
Install IBM Connections 4.5 Cognos on RedHat using Oracle Database
step-by-step Guidepart 1.

SummaryAUTHORS ................................................................................................................................................................. 2
ABSTRACT ................................................................................................................................................................ 2
CONTENT ................................................................................................................................................................. 2
PREPARATE ENVIRONMENT TO INSTALL ................................................................................................................... 3
CREATE WEBSPHERE 8.X PROFILE FOR COGNOS .......................................................................................................................... 3 INSTALLING THE DATABASE CLIENT FOR COGNOS TRANSFORMER ...................................................................................................... 3
INSTALL AND CONFIGURE COGNOS BUSINESS INTELLIGENCE COMPONENTS 10.1.1 ................................................... 5
VERIFY AND INSTALL REQUIRED PATCH FOR OS ........................................................................................................................... 5 INSTALL COGNOS ................................................................................................................................................................. 5 CONFIGURE COGNOS ........................................................................................................................................................... 8
FEDERATE COGNOS NODE INTO THE DMGR ............................................................................................................ 11
VALIDATING THE COGNOS SERVER INSTALLATION ................................................................................................... 12
VERIFY THE SERVLET MANAGER ............................................................................................................................................. 12
AuthorsAndrea Fontana IBM Champion for WebSphereDevloperWorks Contributor Authorcan be contact ed at : [email protected]
AbstractIn this guide I want to describe all necessary step tp install Cognos on IBM Connections environment on RedHat 6.4 Operating System using Oracle as data store.
ContentHow to install and configure Cognos Business Intelligence , in a dedicate server into the same cell of IBM Connections Cluster. This document is picked up after installing Connections from the connections wiki install doc:
http://www-10.lotus.com/ldd/lcwiki.nsf/xpDocViewer.xsp?lookupName=IBM+Connections+4.5+Documentation#action=openDocument&res_title=Installing_Cognos_Business_Intelligence_ic45&content=pdcontent

Preparate Environment to install IBM Connections requires a customized version of Cognos Business Intelligence, which is installed using the provided script. You cannot use previously deployed Cognos Business Intelligence components with the Metrics application. For best performance, use a separate computer for the customized version of Cognos Business Intelligence.
To install the Cognos Business Intelligence and its supporting software, complete these tasks:
Create WebSphere 8.x profile for CognosThis step involves setting up a WAS profiles for the Cognos server. If you were installing this on its own machine, you would install WebSphere, choosing the Application Server environment.
Form your <Was_Home>/bin tun manageprofile to create it.
./manageprofiles.sh -create -templatepath /opt/ibm/Websphere/AppServer/profileTemplates/default -adminUserName <wasAdmin> -adminPassword <Password> -profileName <ProfilesName> -nodeName <nodeName>
Installing the database client for Cognos Transformer
Install the standard 32-bit database client on the server where you will deploy Cognos Business Intelligence.Important: Be sure to install the standard 32-bit client rather than the Instant Client, which is not supported by Cognos. If you installed the 64-bit client, you must uninstall it before installing the 32-bit client.
Edit the Oracle_client_install_path/network/admin/tnsnames.ora file and add the following TNS settings into the file:
The TNS setting on the Oracle client should look like the example that follows:
Local_tns_name = (DESCRIPTION = (ADDRESS_LIST = (ADDRESS = (PROTOCOL = TCP)(HOST = Oracle_database_server_host_name)(PORT = Port)) ) (CONNECT_DATA = (SERVICE_NAME = Database_service_name) ) )
where:
Local_tns_name is the user -defined TNS alias for the remote Oracle database instance. It needs to match the value of the metrics.db.local setting in the cognos-setup.properties file that will be used during Cognos Business Intelligence installation.
Oracle_database_server_host_name is the host name of the server hosting the Oracle database server; for example: oradb.example.com.
Port is port on which the Oracle database server is listening; typically port 1521.

Database_service_name is the database service name; for example orcl
Set following environment variable:
PATH=$PATH:/opt/oracle/clientORACLE_BASE=/opt/oracleORACLE_HOME=/opt/oracle/clientTNS_ADMIN=/opt/oracle/clientLD_LIBRARY_PATH=/opt/oracle/client/:/usr/lib:/usr/lib64
Verify that the client can connect to the Metrics database.
In bin folder of oracle_home, run sqlplus [db_user]/[password]@[Local_tns_name] where:
db_user is the Metrics db user. password is the password of the db_user. Local_tns_name is the TNS alias you just created.
If the setting is correct, you will connect the database successfully.

Install and configure Cognos Business Intelligence components 10.1.1In this step we will install and configure Cognos Business Intelligence 10.1.1.Install IBM Cognos Business Intelligence on the computer where you previously installed IBM WebSphere Application Server Network Deployment and the database client. The Cognos product consists of two components (Cognos BI Server and Cognos Transformer); you must install both components as part of this deployment.
Verify and install Required Patch for OSReview the IBM technote for required patches for Cognos BI 10.1.1 Software Environments.
Note: Open Motif libraries are still required (as mentioned in the technote) for headless Linux™ systems.
Install the patches specified for your server environment. Restart the server to make sure all patches take effect.
Install Cognos1) From the IBM_Connections_Install directory, open the Cognos folder extract appropriate file :
Operating System
Cognos BI Server package name
Cognos Transformer package name
Linux™ IBM Cognos Business Intelligence Server 64-bit 10.1.1 Linux x86 Multilingual
IBM Cognos Business Intelligence Transformer 10.1.1 Linux x86 Multilingual
In ours case following files:bisrvr_linuxi8664h_10.1.1_ml.tar.gzbitrsfrmr_linuxi38632_10.1.1_ml.tar.gz
Expand it in /opt/setup/biserver11 for bisrvr_linuxi8664h_10.1.1_ml.tar.gzand /opt/setup/transformer for bitrsfrmr_linuxi38632_10.1.1_ml.tar.gz
2) Create a shared network folder where Cognos Transformer can publish metrics data (in the form of PowerCubes) for reports to access. The folder will be delegated to Cognos only for storing the PowerCube so it must be either a new folder or an existing empty folder.
3) Prepare the Cognos server setup package: CgnosConfig.tar can be found in the /Cognos folder within the Connections product media. Expand it in a specific Directory (/opt/setup/setupCognos)
4) Set up the JDBC driver:
a. Locate the type 4 JDBC driver provided by your database server product. b. Copy the JDBC driver to the following location: /CognosSetup/BI-Customization/JDBC
in ours case you must copy ojdbc6.jar file.
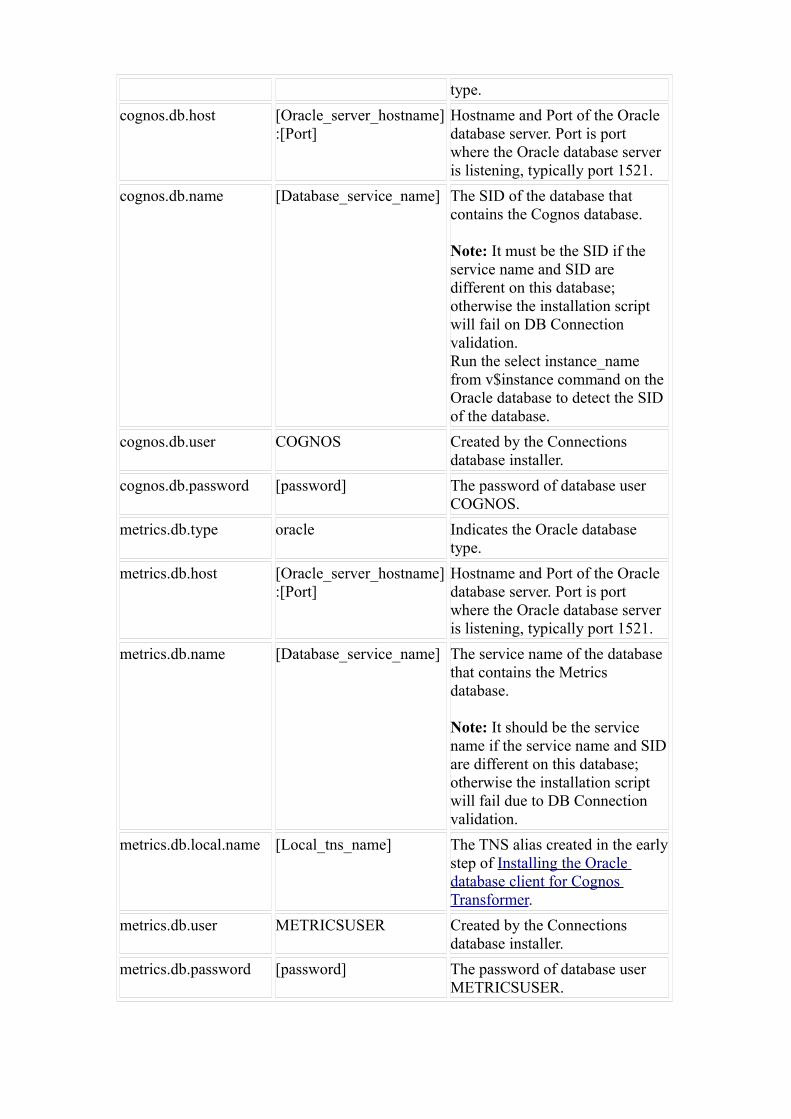
5) Prepare the cognos-setup.properties file by filling in a value for each property, CognosConfig\cognos-setup.properties in a text editor and set the following parameters:
Property Name Value Description
cognos.db.type oracle Indicates the Oracle database
type.
cognos.db.host [Oracle_server_hostname]:[Port]
Hostname and Port of the Oracle database server. Port is port where the Oracle database server is listening, typically port 1521.
cognos.db.name [Database_service_name] The SID of the database that contains the Cognos database.
Note: It must be the SID if the service name and SID are different on this database; otherwise the installation script will fail on DB Connection validation.Run the select instance_name from v$instance command on the Oracle database to detect the SID of the database.
cognos.db.user COGNOS Created by the Connections database installer.
cognos.db.password [password] The password of database user COGNOS.
metrics.db.type oracle Indicates the Oracle database type.
metrics.db.host [Oracle_server_hostname]:[Port]
Hostname and Port of the Oracle database server. Port is port where the Oracle database server is listening, typically port 1521.
metrics.db.name [Database_service_name] The service name of the database that contains the Metrics database.
Note: It should be the service name if the service name and SID are different on this database; otherwise the installation script will fail due to DB Connection validation.
metrics.db.local.name [Local_tns_name] The TNS alias created in the early step of Installing the Oracle database client for Cognos Transformer.
metrics.db.user METRICSUSER Created by the Connections database installer.
metrics.db.password [password] The password of database user METRICSUSER.

In my case
was.install.path=/opt/ibm/WebSphere/AppServerwas.profile.name=<profilesName>was.local.admin.username=localadminwas.local.admin.password=password
cognos.was.node.name=<nodeName>cognos.was.server.name=cognos_servercognos.biserver.issetup= opt/setup/biserver11/linuxi38664h/issetupcognos.transformer.issetup=opt/setup/transformer/linuxi38632/issetupcognos.biserver.install.path=/opt/ibm/CognosBIcognos.transformer.install.path=/opt/ibm/CognosTRcognos.locale=EN cognos.contextroot=cognoscognos.admin.username=cognosadmincognos.admin.password=password
NOTE: This username/password must be an ldap user already setup in your LDAP directory
cognos.namespace=IBMConnections
cognos.cube.path - set this to the location where Cognos Transformer can publish metrics data (in the form of PowerCubes) for reports to access. If you a cluster of multiple Cognos servers, then a network share should be used.
cognos.cube.path=/opt/ibm/PowerCubes
NOTE: This directory must be created prior to the install.
cognos.db.type=oraclecognos.db.host=dbStore.yourdoamin.com:1521cognos.db.name=<OracleSID>cognos.db.user=COGNOScognos.db.password=Pasword
metrics.db.type=oraclemetrics.db.host=dbStore.yourdoamin.com:1521metrics.db.name=<OracleSID>metrics.db.local.name=<OracleSID>metrics.db.user=METRICSmetrics.db.password=PaswordSave and Close the file
6) On RedHat Linux 6 64-bit systems Run the following command to preload libraries needed for the setup scripts used in the next stepRun cognos-setup.sh to execute your setup Any of the properties specified in the cognos-setup.properties file can be passed in as parameters when you run this script. In particular, you might want to supply passwords using this method rather than adding them into the properties file because they will be deleted from the file after it runs. For any properties you supply at run time, use the following syntax

7) On my system this took an hour to complete
after installation you can look in cognos-setup.log if are present some error, normally you can find:
[root]# grep -i error cognos-setup.logERROR: ld.so: object '/usr/lib64/libfreebl3.so' from LD_PRELOAD cannot be preloaded: ignored.####################################################################################################################################################################################################################################################################################################################################################################################################################ERROR: ld.so: object '/usr/lib64/libfreebl3.so' from LD_PRELOAD cannot be preloaded: ignored.ERROR: ld.so: object '/usr/lib64/libfreebl3.so' from LD_PRELOAD cannot be preloaded: ignored.// NOTE: Syntax errors in the policy files will cause the enterprise application FAIL to start.
During the installation, you might see the following message in the log file: ERROR: ld.so: object '/usr/lib64/libfreebl3.so' from LD_PRELOAD cannot be preloaded: ignored. You can ignore this message because it will not block installation or cause any issue.
[root]# grep -i exception cognos-setup.log[root]#
Note that the only value returned by either grep command can be safely ignored (per the above statement) or is from a comment in the script (indicated by //), so the log looks good!
Configure Cognos
1. Open CognosConfig\cognos-setup.properties in a text editor
2. Make sure all .password settings are set to the correct valuewas.local.admin.password=passwordcognos.admin.password=passwordcognos.db.password=passwordmetrics.db.password=password
3. Run ./cognos-configure.shOn my system, this took about 5 minutes to complete

Using Cognos setup properties file: /opt/ibm/setup/cognosSetup/cognos-setup.propertiesPerforming validation check ...JAR file(s) found in JDBC driver directory:/opt/ibm/setup/cognosSetup/BI-Customization/JDBCwas.install.path: WebSphere Application Server existsUsing profile: AppCognoscognos.was.node.name: Found node [IcCognos]cognos.biserver.issetup: Will use issetup to install Cognos BI Server/opt/ibm/setup/biserver1011/linuxi38664h/issetupcognos.transformer.issetup: Will use issetup to install Cognos Transformer/opt/ibm/setup/trasformer1011/linuxi38632/issetupUsing cognos.locale: ENAll properties provided for Cognos databaseAll properties provided for Metrics database/opt/ibm/setup/cognosSetup/lib /opt/ibm/setup/cognosSetup/opt/ibm/setup/cognosSetupJDBC Connection SuccessSuccess to verify the JDBC connection to Cognos Content Store database.JDBC Connection SuccessSuccess to verify the JDBC connection to Metrics database.... performing validation check completedConfiguring Cognos BI Server .../opt/ibm/setup/cognosSetup/bin/configBI.sh -setupProp=/opt/ibm/setup/cognosSetup/cognos-setup.properties -wasPath=/opt/ibm/WebSphere/AppServer -cognosDBPassword="***" -adminUser=waslocal -adminPassword="***"... configuring Cognos BI Server completed
Configuing Cognos Transformer .../opt/ibm/setup/cognosSetup/bin/configTransformer.sh -setupProp=/opt/ibm/setup/cognosSetup/cognos-setup.properties -cognosSrvLink=http://**************:9081/cognos -cognosCubePath="/opt/ibm/PowerCubes" -metricsDBType=oracle -metricsDBName=xxxxxxxxx -metricsDBLocalName=xxxxxxxxx -metricsDBHost=***********:1521 -metricsDBUser=METRICS -metricsDBPassword="***" -cognosAdminUserName="wpsadmin" -cognosAdminUserNS=Colloaboration -cognosAdminUserPW="***"... configuring Cognos Transformer completed
Now you can check Log file to verify if will be ok, as the same, you did in previous step, with the same consideration.
At this point Cognos is installed and configured. Next step is to federate it into the node and test that it's working correctly
4. Set the LD_PRELOAD variable to JVM environment variable list of the Cognos server.

The environment variable LD_PRELOAD needs to be set every time after a Linux system restart. To enable this, add this variable to JVM environment variable list as follows:
a. Start server1 of the WebSphere Application Server where you deployed the Cognos BI.b. Log into the administrative console of the WebSphere Application Server.c. Navigate to Servers -> Server Types -> WebSphere application servers.d. Click the cognos_server link.e. Click JAVA and then Process Management -> Process definition -> Environment
Entries.f. Click New to add the following entry:
LD_PRELOAD = /usr/lib64/libfreebl3.so
repete step f to add folowing variables
ORACLE_BASE=/opt/oracle (where you install Oracle Client)
ORACLE_HOME=/opt/oracle/client
TNS_ADMIN=/opt/oracle/client
add following value to LD_LIBRARY_PATH
:/usr/lib:/usr/lib64
at the end you must have following immage:

Save and Stop the Cognos server and server1 if they are running. You will start the Cognos server after federating it to the Deployment Manager in the next task.
Note: During the installation, you might see the following message: ERROR: The system cannot find the file specified. You can ignore this message because it will not block installation or cause any issue.
Note: During the installation, you might see the following message in the log file: ERROR: ld.so: object '/usr/lib64/libfreebl3.so' from LD_PRELOAD cannot be preloaded: ignored. You can ignore this message because it will not block installation or cause any issue.

Federate Cognos node into the DMGR
1. Before attempting to federate the Cognos node to the Deployment Manager, make sure that:• The Deployment Manager is running. • The Cognos server is stopped (if you started it after installation, stop it now by stopping the
IBM WebSphere® Application Server hosting it). • The system clock on the Cognos server is set to within 1 minute of the time (and time zone)
of the system clock on the Deployment Manager. • The Deployment Manager and the Cognos server are either both registered in the DNS or
are referenced in each other’s etc/hosts file. • For 64-bit Red Hat only: server1 of the Cognos profile is stopped.
2. If you enabled Java 2 security to restrict, disable it on DMGR ICS3. change directory to <WAS_Home>\bin and run the following command:
addNode.sh <dmgrHostName> 8882 -profileName <Profilename> -includeapps -username <WasAdmin> -password <Password>
In ours env, the command was:
addNode.sh cognos.ondemand.com 8882 -profileName AppCognos -includeapps -username localadmin -password password
4. Once this completes, sync the node:a. Open the browser to the Integrated Solution Console and login
(http://localhost:9060/ibm/console) an go to System Administration – Nodes, and verify if you new Cognos Node is Synchronized, if not Synchronize it.
5. Start the cognos application server from ICS, Expand “Servers” and “Server Types” and click on “WebSphere application servers”.
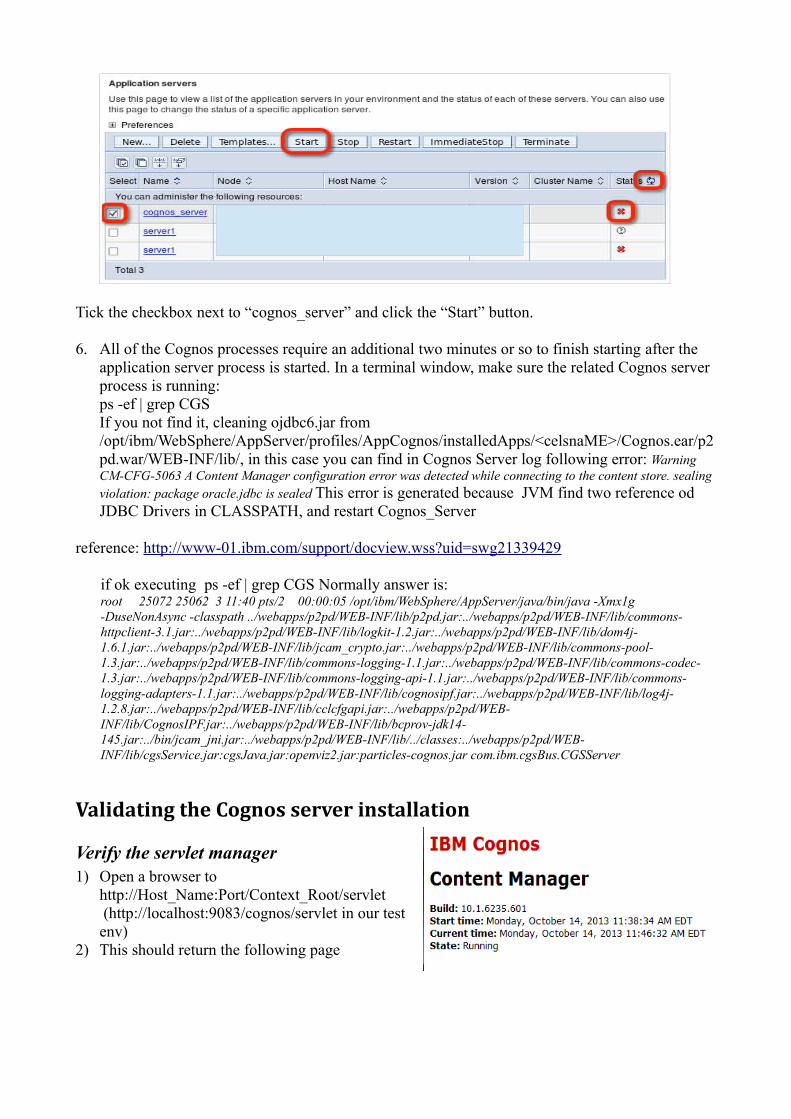
Tick the checkbox next to “cognos_server” and click the “Start” button.
6. All of the Cognos processes require an additional two minutes or so to finish starting after the application server process is started. In a terminal window, make sure the related Cognos server process is running:ps -ef | grep CGSIf you not find it, cleaning ojdbc6.jar from /opt/ibm/WebSphere/AppServer/profiles/AppCognos/installedApps/<celsnaME>/Cognos.ear/p2pd.war/WEB-INF/lib/, in this case you can find in Cognos Server log following error: Warning CM-CFG-5063 A Content Manager configuration error was detected while connecting to the content store. sealing violation: package oracle.jdbc is sealed This error is generated because JVM find two reference od JDBC Drivers in CLASSPATH, and restart Cognos_Server
reference: http://www-01.ibm.com/support/docview.wss?uid=swg21339429
if ok executing ps -ef | grep CGS Normally answer is:root 25072 25062 3 11:40 pts/2 00:00:05 /opt/ibm/WebSphere/AppServer/java/bin/java -Xmx1g -DuseNonAsync -classpath ../webapps/p2pd/WEB-INF/lib/p2pd.jar:../webapps/p2pd/WEB-INF/lib/commons-httpclient-3.1.jar:../webapps/p2pd/WEB-INF/lib/logkit-1.2.jar:../webapps/p2pd/WEB-INF/lib/dom4j-1.6.1.jar:../webapps/p2pd/WEB-INF/lib/jcam_crypto.jar:../webapps/p2pd/WEB-INF/lib/commons-pool-1.3.jar:../webapps/p2pd/WEB-INF/lib/commons-logging-1.1.jar:../webapps/p2pd/WEB-INF/lib/commons-codec-1.3.jar:../webapps/p2pd/WEB-INF/lib/commons-logging-api-1.1.jar:../webapps/p2pd/WEB-INF/lib/commons-logging-adapters-1.1.jar:../webapps/p2pd/WEB-INF/lib/cognosipf.jar:../webapps/p2pd/WEB-INF/lib/log4j-1.2.8.jar:../webapps/p2pd/WEB-INF/lib/cclcfgapi.jar:../webapps/p2pd/WEB-INF/lib/CognosIPF.jar:../webapps/p2pd/WEB-INF/lib/bcprov-jdk14-145.jar:../bin/jcam_jni.jar:../webapps/p2pd/WEB-INF/lib/../classes:../webapps/p2pd/WEB-INF/lib/cgsService.jar:cgsJava.jar:openviz2.jar:particles-cognos.jar com.ibm.cgsBus.CGSServer
Validating the Cognos server installation
Verify the servlet manager1) Open a browser to
http://Host_Name:Port/Context_Root/servlet (http://localhost:9083/cognos/servlet in our test env)
2) This should return the following page


