i Installation and Administration Guide Copyright Information Copyright 2001, Investment Intelligence Systems Corporation. All Rights Reserved. The information contained in this manual and accompanying software program is copyrighted and all its rights are reserved by Investment Intelligence Systems Corporation (IISC). IISC reserves the right to make periodic modifications of this product without obligation to notify any person or entity of such revision. Copying, duplicating, selling, or otherwise distributing any part of this product without the prior consent of an authorized representative of IISC is prohibited. JSheet and HyperSheet are registered trademarks of Investment Intelligence Systems Corporation. Disclaimer of Warranties The software and users manuals are provided “as is” and without express or limited warranty of any kind by either IISC or anyone who has been involved in the creation, production, or distribution of the software, including, but not limited to the implied warranties of the merchantability and fitness for a particular purpose. The entire risk as to quality and performance of the software and users manuals is with you. Should the software and users manuals prove defective, you (and IISC or anyone else who has been involved in the creation, production, or distribution of the software) assume the entire cost of all necessary servicing, repairs, or correction. Some states do not allow the exclusion of implied warranties, so the above exclusion may not apply to you. Limitation of Liability In no event will IISC or any other person involved in the creation, production, or distribution of the software be liable to you on account of any claim for any damages, including any lost profits, lost savings, or other special, incidental, consequential, or exemplary damages, including but not limited to any damages assessed against or paid by you to any third party, arising out of the use, inability to use, quality, or performance of such software and users manuals, even if IISC or any other such person or entity has been advised of the possibility for such damages, or for any claim by any party. In addition, IISC or any other person involved in the creation, production, or distribution of the
Transcript
iInstallation and Administration Guide
Copyright Information
Copyright 2001, Investment Intelligence Systems Corporation. All Rights Reserved.
The information contained in this manual and accompanying software program iscopyrighted and all its rights are reserved by Investment Intelligence SystemsCorporation (IISC). IISC reserves the right to make periodic modifications of thisproduct without obligation to notify any person or entity of such revision. Copying,duplicating, selling, or otherwise distributing any part of this product without the priorconsent of an authorized representative of IISC is prohibited.
JSheet and HyperSheet are registered trademarks of Investment Intelligence SystemsCorporation.
Disclaimer of Warranties
The software and users manuals are provided “as is” and without express or limitedwarranty of any kind by either IISC or anyone who has been involved in the creation,production, or distribution of the software, including, but not limited to the impliedwarranties of the merchantability and fitness for a particular purpose. The entire risk asto quality and performance of the software and users manuals is with you. Should thesoftware and users manuals prove defective, you (and IISC or anyone else who has beeninvolved in the creation, production, or distribution of the software) assume the entirecost of all necessary servicing, repairs, or correction.
Some states do not allow the exclusion of implied warranties, so the above exclusion maynot apply to you.
Limitation of Liability
In no event will IISC or any other person involved in the creation, production, ordistribution of the software be liable to you on account of any claim for any damages,including any lost profits, lost savings, or other special, incidental, consequential, orexemplary damages, including but not limited to any damages assessed against or paid byyou to any third party, arising out of the use, inability to use, quality, or performance ofsuch software and users manuals, even if IISC or any other such person or entity has beenadvised of the possibility for such damages, or for any claim by any party. In addition,IISC or any other person involved in the creation, production, or distribution of the
ii Installation and Administration Guide
software shall not be libel for any claim by you or any other party for damages arising outof the use, inability to use, quality, or performance of such software and users manuals,based upon principals of contract warranty, negligence, strict liability for the negligenceof IISC or other tort, breach of any statutory duty, principals of indemnity orcontribution, the failure of any remedy to achieve its essentials purpose, or otherwise.
Some states do not allow the limitation or exclusion of liability for incidental orconsequential damages, so the above limitation may not apply to you.
Installation and Administration Guide iii
TABLE OF CONTENTS
ABOUT THIS GUIDE ...................................................................1
Your Application Package ..................................................................... 2System Requirements ........................................................................... 5
Installing on Windows NT ..................................................................... 8Setting Up Your Web Server to Run JSheet Demos........................... 10Installing JSheet Documentation ........................................................ 10
Installing on Sun Solaris....................................................................... 10Setting Up Your Web Server to Run JSheet Demos........................... 12Installing JSheet Documentation ........................................................ 12
Installing on HP-UX ............................................................................. 13Setting Up Your Web Server to Run JSheet Demos........................... 14Installing JSheet Documentation ........................................................ 15
INTRODUCING JSSERVER ......................................................17The JSServer Menu Bar...................................................................... 17
The Connections Panel ......................................................................... 27Disconnecting a Connected Client...................................................... 28Messaging a Connected Client ........................................................... 29
The Users & Groups Panel .................................................................. 30The Users Panel .................................................................................. 30The Groups Panel ............................................................................... 32
iv Installation and Administration Guide
The Workbook Defaults Panel............................................................. 35
The Client Panel.................................................................................... 36
The Preferences Panel .......................................................................... 37
The Logging Panel ................................................................................ 38Editing the Logging Configuration..................................................... 39
The Auditing Panel ............................................................................... 40
USING THE JSHEET LOAD BALANCER .................................43How the Load Balancer Works........................................................... 45
1Installation and Administration Guide
About This GuideThis Guide contains information about:
• your application package, including media content, hardwarerequirements, and software requirements.
• how to install and configure JSheet Server, JSheet Builder,JSheet Client, Orbix, and ODBC.
• how to set up your web server to run JSheet demos.
• how to run JSServer/JSheet demos.
• the JSServer menu structure, as well as the various featuresof the JSServer interface.
• how to use JSServer Admin to administrate the JSServerconfiguration and preferences.
• server configuration and startup, as well as how to add auser.
• how to set up and run the load balancing application withinJSheet.
2 Installation and Administration Guide
Your Application PackageYour application package consists of the application installation CD-ROM and this Installation and Administration Guide. The installationprocess initializes the system configuration with defaults that areappropriate for most purposes.
To access the JSheet documentation, double-click the doc.htm file foundin the root directory of the CD-ROM. This file contains hyperlinks to theindividual user guides. For distribution purposes, this Guide and theother individual documents can be found on the CD-ROM in the docdirectory. For your convenience, the documentation is provided in twoformats: .htm and .pdf. The .htm format requires a browser and the .pdfformat requires Adobe Acrobat Reader.
If you are installing JSheet on the Windows platform, there is a windowsdirectory on the CD-ROM installation media that contains thesubdirectories listed in the following table.
Windows Directory Contains\ Install files for the Windows NT JSheet products.\builder Install files for JSBuilder only. Double-click setup.exe in this
directory and follow the installation prompts to install JSBuilder.\client Install files for JSClient only. Double-click setup.exe in this
directory and follow the installation prompts to install JSClient.\server Install files for JSServer only. Double-click setup.exe in this
directory and follow the installation prompts to install JSServer.
If you are installing JSheet on the Unix platform, there is a unix directoryon the CD-ROM installation media that contains the subdirectories listedin the following table.
Unix Directory Contains\solaris Install files for the Sun Solaris Unix platform. Execute solinst.bin
and follow the installation prompts to install the JSheet products.\hp Install files for the HP-UX Unix platform. Execute hpinst.bin and
follow the installation prompts to install the JSheet products.
3Installation and Administration Guide
The 3rdparty directory on the CD-ROM installation media contains thesubdirectories listed in the following table.
3rdparty Directory Contains\odbc\unix Install files for a 30-day product evaluation copy of Merant DataDirect
Connect ODBC 3.50 for the Unix platform. Execute install.sh and followthe installation prompts to install. For detailed information or supportregarding this software, please access the manufacturer’s web site:http://www.merant.com/products/. Merant DataDirect Connect ODBCdocumentation can be found at:http://www.merant.com/products/datadirect/download/docs/dochome.asp.Should you need the licensed version, please contact our Sales departmentat http://www.jsheet.com.
\odbc\windows Install files for a 30-day product evaluation copy of Merant DataDirectConnect ODBC 3.50 for Windows 9x and Windows NT. Double-clicksetup.exe and follow the installation prompts to install. For detailedinformation or support regarding this software, please access themanufacturer’s web site: http://www.merant.com/products/. MerantDataDirect Connect ODBC documentation can be found at:http://www.merant.com/products/datadirect/download/docs/dochome.asp.Should you need the licensed version, please contact our Sales departmentat http://www.jsheet.com.
\orbix\unix Install files for the optional CORBA installation. Execute orbinst.sh toinstall. Prior to installing, please view the readme.txt file in thisdirectory. For detailed information or support regarding this software,please access the manufacturer’s web site: http://www.iona.com/products/.Iona Orbix 3.0 documentation can be found at:http://www.iona.com/docs/orbix/orbix30.html.
\orbix\windows Install files for the optional CORBA installation. Double-click setup.exeand follow the installation prompts to install. For detailed information orsupport regarding this software, please access the manufacturer’s web site:http://www.iona.com/products/. Iona Orbix 3.0 documentation can befound at: http://www.iona.com/docs/orbix/orbix30.html.
4 Installation and Administration Guide
The doc directory on the CD-ROM installation media contains thesubdirectories listed in the following table.
Doc Directory Contains\doc\htm Includes all of the end-user product documentation in htm format.\doc\htm\jsbldrug The JSheet Builder User Guide. Provides a complete reference to
the functionality of JSheet Builder, the JSheet component that isused to open, edit, and save workbook files before they arepublished to web sites. Simple spreadsheet templates, dynamicdata analysis, and comprehensive analytical applications forenterprise-wide deployment are discussed in this book.
\doc\htm\jsfunctn The JSheet Functions manual. Includes all of the functions thatcan be used in JSheet to perform data calculations, return rangeinformation, and return information on settings, selections, andstatus. The JSheet functions are presented alphabetically,complete with syntax structures, return values, definitions,examples, and related functions.
\doc\htm\jsheetug The JSheet User Guide. Provides step-by-step instructions onhow to use the visual interface to the JSheet engine. The featuresand functionality of the spreadsheet matrix, menus, palettes, andoptional charting module are discussed.
\doc\htm\progrmgd The Programmer’s Guide. This book explains how to put theJSheet applet into a web page and how to call the API from Javaand JavaScript.
\doc\htm\instladm The Installation and Administration Guide. This book containsinformation about the hardware and software requirements andhow to install and configure your JSheet components.
\doc\pdf All of the end-user product documentation in pdf format.\doc\pdf\jsbldrug The JSheet Builder User Guide. Provides a complete reference to
the functionality of JSheet Builder, the JSheet component that isused to open, edit, and save workbook files before they arepublished to web sites. Simple spreadsheet templates, dynamicdata analysis, and comprehensive analytical applications forenterprise-wide deployment are discussed in this book.
\doc\pdf\jsfunctn The JSheet Functions manual. Includes all of the functions thatcan be used in JSheet to perform data calculations, return rangeinformation, and return information on settings, selections, andstatus. The JSheet functions are presented alphabetically,complete with syntax structures, return values, definitions,examples, and related functions.
5Installation and Administration Guide
\doc\pdf\jsheetug The JSheet User Guide. Provides step-by-step instructions onhow to use the visual interface to the JSheet engine. The featuresand functionality of the spreadsheet matrix, menus, palettes, andoptional charting module are discussed.
\doc\pdf\progrmgd The Programmer’s Guide. This book explains how to put theJSheet applet into a web page and how to call the API from Javaand JavaScript.
\doc\pdf\instladm The Installation and Administration Guide. Contains informationabout the hardware and software requirements and how to installand configure your JSheet components.
System RequirementsBefore you attempt to install JSheet, make certain your configurationmeets or exceeds the system requirements detailed in this section.Requirements are provided for Windows NT, Sun Solaris, and HP-UX.
Windows NT Hardware RequirementsThe following hardware represents the minimum requirements forinstalling and running JSheet on Windows NT:
• Intel Pentium-based personal computer
• Hard disk space: 40 MB for JSServer; 25 MB for JSBuilder,10 MB for JSheet Client
• 64 MB RAM available for JSheet Client (128 MBrecommended)
• 256 MB RAM available for JSServer (512 MBrecommended)
• CD-ROM drive
• Video display capable of 800x600 screen resolution
Your application runs in virtual memory; available RAM directly affectsthe speed of the program.
6 Installation and Administration Guide
Windows NT Software RequirementsBefore you run the application, the following software requirements mustbe met:
• JSServer: Microsoft Windows NT 4.0 and web server (ifsupporting browser-based clients)
• JSBuilder: Microsoft Windows NT 4.0
• JSClient: JDK/JRE 1.1.4 or greater (for running Client as aJava application or within appletviewer), or a web browsersupporting Java 1.1.4 or greater
• JSAdmin: JDK/JRE 1.2.2 or higher
IMPORTANT: JSheet is not supported on the Windows 2000platform. However, at the time of this writing, there are no known issueson this platform.
Sun Solaris Hardware RequirementsThe following hardware represents the minimum requirements forinstalling and running JSheet on Sun Solaris:
• Sparc-based computer
• Hard disk space: 40 MB for JSServer; 25 MB for JSBuilder;10 MB for JSheet Client
• 64 MB RAM; 56 MB free disk space
• CD-ROM drive
• Video display capable of 800x600 screen resolution
• System temp directory with 50 MB of free space
7Installation and Administration Guide
IMPORTANT: If more than a few users are to be served withJSServer, a minimum of 128 MB RAM is recommended.
Sun Solaris Software RequirementsBefore you run the application, the following software requirements mustbe met:
• JSServer: Solaris for Sparc, version 2.5 or greater and webserver (if supporting browser-based clients)
• JSBuilder: Solaris for Sparc, version 2.5 or greater
• JSClient: JDK/JRE 1.1.4 or greater (for running Client as aJava application or within appletviewer), or a web browsersupporting Java 1.1.4 or greater
HP-UX Hardware RequirementsThe following hardware represents the minimum requirements forinstalling and running JSheet on HP-UX:
• PA-RISC-based computer
• Hard disk space: 32 MB for JSServer; 15 MB for JSBuilder;5 MB for JSheet Client
• 64 MB RAM; 56 MB free disk space
• CD-ROM drive
• Video display capable of 800x600 screen resolution
• System temp directory with 50 MB of free space
IMPORTANT: If more than a few users are to be served withJSServer, a minimum of 128 MB RAM is recommended.
8 Installation and Administration Guide
HP-UX Software RequirementsBefore you run the application, the following software requirements mustbe met:
• JSServer: HP-UX 10.20 or greater and web server (ifsupporting browser-based clients)
• JSBuilder: HP-UX 10.20 or greater
• JSClient: JDK/JRE 1.1.4 or greater (for running Client as aJava application or within appletviewer), or a web browsersupporting Java 1.1.4 or greater
Installing on Windows NTThis section explains how to install the JSheet Server, Builder, andClient, as well as Orbix, the CORBA implementation on Windows NT.For information on installing these JSheet components on Sun Solaris orHP-UX, refer to the corresponding sections later in this Guide.
To install your JSheet applications on Windows NT:
1. Insert the JSheet Products CD. If the JSheet Installationdoes not load automatically, manually run autorun.exe in theroot directory of the JSheet Products CD.
2. Choose the product package to install: Server, Builder, orClient. You can customize your choice before completingthe installation.
3. Enter your name and company name.
9Installation and Administration Guide
4. Choose the installation type and location. To customizeyour installation selections, choose the Custom option.
5. Choose the Program folder for your JSheet Products.
6. Enter the name of the machine on which JSServer will run,followed by the network domain. For example, enter demoas the machine and jsheet.com as the domain to specifythat JSServer will run on the machine demo.jsheet.com.
7. Enter the ports for the Orbix daemon and Orbix server.(Retain the defaults 1570 and 1571, respectively, if you areunsure.)
8. If you are overwriting an existing installation of the JSheetproducts and want to retain the existing user and grouppermission files, choose the default Maintain ExistingInformation option when prompted.
9. Depending upon your distribution, there may be 30-dayevaluation license files on your CD-ROM. If you receivedan evaluation version, copy the jsserver.dat andjsbuilder.dat license files from the root directory of theinstallation CD to the directory where JSheet is installed.(This is typically C:/Program Files/.) If you purchasedJSheet, contact your sales representative to obtain yourpersonalized license files.
10. The programs can be run from the Start/Programs/JSheet1.0 program group.
10 Installation and Administration Guide
Setting Up Your Web Server to RunJSheet DemosThe Demos subdirectory of the JSHEET directory needs to be added asan available directory in your web server, either as a physical directory inyour default web path or as a virtual directory. To do this, reference thedirections for your specific web server software to ensure you add thedirectory according to the requirements of your web server. Once theDemos directory is available through your web server, opening theindex.html file will provide links to the JSheet demos.
IMPORTANT: If you are copying the JSheet demo files to anotherlocation, or creating .html files to work with JSServer, you mustreference the proper .jar and .js files. If you chose to install the Clientfiles, the .jar and .js files also will be placed in the JSHEET\Clientdirectory for your convenience. These .jar files can also be copied to theclass path of your local browser for faster loading of the JSheet applets.
Installing JSheet DocumentationIISC provides HTML documentation for the JSheet products in thedocumentation directory of the CD. The files and folders in this directorycan be accessed from the CD or copied to your hard drive for localaccess. Refer to the docs.htm file for information on the JSheetdocumentation.
Installing on Sun SolarisThis section explains how to install the JSheet Server, Builder, andClient on Sun Solaris. The JSServer executable can be run as a normaluser. It is recommended that a specific user, jsheet, be created for thispurpose.
IMPORTANT: You must be root to install JSheet Products.
11Installation and Administration Guide
To install your JSheet applications on Sun Solaris:
1. Run solinst.bin from the /unix/solaris directory.
2. Choose the installation location.
3. Choose the product package to install: Server, Builder, orClient. To customize your installation selections, choosethe Custom option.
4. Enter your user and company name, the owner and group,and the server name.
NOTE: The JSServer executable owner should be a userother than root. It is recommended that a specific user(jsheet) be created for this purpose. The owner will run theJSServer executable and will own all of the files created byJSClient. The group and owner setting is jsheet by default,but can be set to any valid group.
5. Enter the server name of the machine on which JSServerwill run, including the network domain. For example, enterdemo.jsheet.com as the server name to specify thatJSServer will run on the machine demo in the domainjsheet.com.
6. If you are overwriting an existing installation of the JSheetproducts and want to retain the existing user and grouppermission files, choose the Maintain ExistingInformation option when prompted.
7. Copy the jsserver.dat and jsbuilder.dat license files fromthe root directory of the installation CD to the locationwhere JSheet is installed. The environment variable
12 Installation and Administration Guide
JSHEET must be set to the installation directory beforerunning the JSheet Server.
After the environment is set up, use the command $JSHEET/bin/JSServerto start the JSheet Server. Run $JSHEET/bin/JSBuilder to start JSBuilder.
Setting Up Your Web Server to RunJSheet DemosThe Demos subdirectory of the $JSHEET directory needs to be added asan available directory in your web server, either as a physical directory inyour default web path or as a virtual directory. To do this, reference thedirections for your specific web server software to ensure you add thedirectory according to the requirements of your web server. Once theDemos directory is available through your web server, opening theindex.html file will provide links to the JSheet demos.
IMPORTANT: If you are copying the JSheet demo files to anotherlocation, or creating .html files to work with JSServer, you mustreference the proper .jar and .js files. If you chose to install the Clientfiles, the .jar and .js files also will be placed in the $JSHEET/Clientdirectory for your convenience. These .jar files also can be copied to theClass path of your local browser for faster loading of the JSheet applets.
Installing JSheet DocumentationIISC provides HTML documentation for the JSheet products in thedocumentation directory of the CD. The files and folders in this directorycan be accessed from the CD or copied to your hard drive for localaccess. Refer to the docs.htm file for information on the JSheetdocumentation.
13Installation and Administration Guide
Installing on HP-UXThis section explains how to install the JSheet Server, Builder, andClient on HP-UX. The JSServer executable should be run as a normaluser. It is recommended that a specific user, jsheet, be created for thispurpose. The JSServer user owns all of the files created by Clients.
IMPORTANT: You must be root to install JSheet Products.
To install your JSheet applications on HP-UX:
1. Run hpinst.bin from the /unix/hp directory.
2. Choose the installation location.
3. Choose the product package to install: Server, Builder, orClient. To customize your installation, choose Custom.
4. Enter your user and company name, the owner and group,and the server name.
NOTE: The JSServer executable owner should be a userother than root. It is recommended that a specific user(jsheet) be created for this purpose. The owner will run theJSServer executable and will own all of the files created byClients. The group setting is bin by default, but can be setto groups like other.
5. Enter the server name of the machine on which JSServerwill run, including the network domain. For example, enterdemo.jsheet.com as the server name to specify thatJSServer will run on the machine demo in the domainjsheet.com.
14 Installation and Administration Guide
6. If you are overwriting an existing installation of the JSheetproducts and want to retain the existing user and grouppermission files, choose the Maintain ExistingInformation option when prompted.
7. Copy the jsserver.dat and jsbuilder.dat license files fromthe root directory of the installation CD to the locationwhere JSheet is installed (the $JSHEET/JSServer and$JSHEET/JSBuilder directories, respectively). Theenvironment variable JSHEET must be set to theinstallation directory before running the JSheet Server.
After the environment is set up, use the command $JSHEET/bin/JSServerto start the JSheet Server. Run $JSHEET/bin/JSBuilder to start JSBuilder.
Setting Up Your Web Server to RunJSheet DemosThe HtmlDemo subdirectory of the $JSHEET directory needs to be addedas an available directory in your web server, either as a physicaldirectory in your default web path or as a virtual directory. To do this,reference the directions for your specific web server software to ensureyou add the directory according to the requirements of your web server.Once the HtmlDemo directory is available through your web server,running the index.html file will provide links to the JSheet demos.
IMPORTANT: If you are copying the JSheet demo files to anotherlocation, or creating .html files to work with JSServer, you mustreference the proper .jar and .js files. If you chose to install the Clientfiles, the .jar and .js files also will be placed in the $JSHEET/Clientdirectory for your convenience. These .jar files also can be copied to theclass path of your local browser for faster loading of the JSheet applets.
15Installation and Administration Guide
Installing JSheet DocumentationIISC provides HTML documentation for the JSheet products in thedocumentation directory of the CD. The files and folders in this directorycan be accessed from the CD or copied to your hard drive for localaccess. Refer to the docs.htm file for information on the JSheetdocumentation.
16 Installation and Administration Guide
17Installation and Administration Guide
Introducing JSServerJSServer is the calculation engine that resides on the server with the webserver. The JSServer interface is detailed in this section.
The JSServer Menu BarWhen JSServer is launched, the menu bar, illustrated in the followingfigure, is displayed.
The JSServer Menu Bar contains four menu items: Server,Administration, Window, and Help.
Figure 1
18
The Server MenuThe Server menu contains three menu items:
• Startup. Select Startup to start the server.
• Status. Select Status to display the Server Status dialogbox; information regarding connection and configuration iscontained in this dialog box.
• Shutdown. Select Shutdown to shut down JSServer. Ifusers are connected when you select Shutdown, additionalshutdown options (Graceful Shutdown, DelayedShutdown, and Immediate Shutdown) are presented.
When you select Graceful Shutdown, a warning is issued to allconnected users that the server will shut down in xx number ofminutes. Once all users have logged off, the server shuts down.
When you select Delayed Shutdown, a warning is issued to allconnected users that the server will shut down in xx number ofminutes. Once the designated number of minutes has expired,the server shuts down, regardless of whether or not all users havelogged off.
When you select Immediate Shutdown, the server shuts downwithout issuing a warning to connected users.
The Administration MenuThe Administration menu contains six menu items: Connections, Users& Groups, Logging, Auditing, RealTime, and Preferences.
• Connections. Select Administration/Connections todisplay open client connections, windows, and databaseconnections. When you selectAdministration/Connections, the Connections dialog boxis displayed.
19Installation and Administration Guide
The Connections dialog box contains three tabs: Clients,Windows, and ODBC Clients.
Click the Clients tab to display the Client Connections. Clickthe radio buttons at the bottom of the tab to display theconnections ordered by user, host, or time. Use the Terminatebutton to disconnect a user, or the Message button to send amessage to the connected user.
Click the Windows tab to display the Open Books. Click theShow or Hide button at the bottom of the tab to perform thespecified action on the selected book. Check the Apply OptionTo All Windows check box to view all of the open books.
Click the ODBC Clients tab to display the DatabaseConnections. To disconnect from a database, highlight thedatabase and click the Disconnect button.
• Users & Groups. Select Administration/Users & Groupsto add and remove users and groups. When you selectAdministration/Users & Groups, the Users & Groupsdialog box is displayed.
The Users & Groups dialog box contains two tabs: UserManagement and Group Management.
Click the User Management tab to add or delete a user, or to seta password for a user. Click the Group Management tab to add,delete, or edit a group or the members of a group.
IMPORTANT: When a user is deleted in JSBuilder, thesystem administrator must manually delete the correspondingfolder in the user directory.
• Logging. To define session-specific logging settings, selectAdministration/Logging/Configuration and indicate thedesired settings. Session-specific settings override the globaldefault logging settings that are defined using theAdministration/Preferences/Logging tab. Select
20
Administration/Logging/Start to initiate logging. SelectAdministration/Logging/Stop to cease logging. SelectAdministration/Logging/View to display the generated logfile.
When you select Administration/Logging/View, the View LogFile dialog box is displayed. Click the View The Whole LogFile radio button at the bottom right of the dialog box to displaythe entire log file. Click the View Last 100 Lines radio button atthe bottom left of the dialog box to display only the last 100 linesof the log file.
• Auditing. To define session-specific audit trail settings,select Administration/Audit Trail/Configuration andindicate the desired settings. Session-specific settingsoverride the global default audit trail settings that are definedusing the Administration/Preferences/Auditing tab. SelectAdministration/Auditing/Start to initiate auditing. SelectAdministration/Auditing/Stop to cease auditing. SelectAdministration/Auditing/View to display the generatedaudit file.
When you select Administration/Auditing/View, the ViewAudit Trail dialog box is displayed. Click the View The WholeLog File radio button at the bottom left of the dialog box to viewthe entire audit trail log file. Click the View Last 100 Linesradio button at the bottom right of the dialog box to display onlythe last 100 lines of the audit trail log file.
• RealTime. When you select Administration/RealTime,the RealTime dialog box is displayed. The Settings tabcontains configuration information and statistics regardingrealtime updates. The About tab contains information abouthow to contact Investment Intelligence Systems Corporation,as well as information about your JSheet product, includingthe version number, serial number, and license status.
21Installation and Administration Guide
• Preferences. Select Administration/Preferences todisplay the Preferences dialog box and set global defaultpreferences. The Preferences dialog box contains ten tabs:Format, Workbook, Paths, Logging, Auditing,Connection, Environment, Delimiters, Realtime, andClient.
The Format tab contains the options that control the appearanceof the data in your worksheets. Use the Font Name, Font Size,Font Color, Font Alignment, Font Bold, Font Italic, and FontUnderline settings to specify the font name, size, color,alignment, and style for all of the textual data you enter in yourworksheets. The text defaults also are used for row and columnheadings, text in the entry bar, and text in the current celladdress.
Use the Number Format, Precision, Hide Zero, ShowCommas, Show Parenthesis, and Negative Color settings onthe Format tab to specify the number format, attributes,precision, and negative number color for the numeric data youenter in your worksheets. Use the Book Background Colorcolor picker to select the color you want to use as thebackground color for your worksheet cell grid. The default iswhite (RGB(255,255,255)).
Use the Public Read, Public Write, and Public Save settings onthe Workbook tab to specify the default public workbookpermissions. Use the Number of Sheets option to specify howmany worksheets will be available in a workbook. A workbookcan contain a maximum of 256 sheets.
Use the Paths tab to specify settings for the location where alluser workbooks are located, where the configuration files are tobe stored, and where the on-line documentation is to be installed.
Use the Logging tab to specify settings that control the enablingof the log file, and whether or not to log serious errors, warnings,
22
connections, client requests, server responses, debug messages,and callbacks.
Use the Auditing tab to specify settings that control enabling ofthe audit file, and whether to audit connections, bookmanipulation, sheet manipulation, data manipulation, databaseactivity, and range observers.
Use the Connections tab to specify the service identifier andport, the number of client retries allowed, the bind port, and thelisten on port.
Use the Environment tab to specify the settings to customize thedisplay and behavior of the JSheet environment. Preferencesinclude settings that determine whether a new workbook iscreated at launch; whether column headings are labeled withnumbers or letters; the behavior of the DELETE key, the ENTER
key, and the LEFT, RIGHT, UP, and DOWN arrow keys; the style ofdialog boxes invoked; whether keyboard shortcut keys appear onthe JSheet menus; the location of the toolbar; the placement ofwindows on your desktop between JSheet sessions.
Use the Delimiters tab to specify how your text is delimited forexported files and the default end-of-line separator.
Use the Realtime tab to specify the length of time, in seconds,that a cell remains highlighted when it is updated due to a real-time value change.
Use the Client tab to control the display of the components ofthe workbook window (the format bar, formula bar, and statusbar). Select an option from the Cell Update Trackingdropdown to activate the tracking of numeric changes made toyour worksheets. Use the Broken Connection Timeout settingto select the number of seconds at which a broken connection istimed out. Use the Rollover Year option to specify the 100-yearperiod for which 2-digit year input is allowed.
23Installation and Administration Guide
The Window MenuThe Window menu contains three menu items: Show All, Hide All, andArrange Windows. In addition, a list of any open windows or dialogboxes is displayed at the bottom of the Window menu.
• Show All. Select Window/Show All to show all of theworkbooks that currently are open by users who areconnected to the server.
• Hide All. Select Window/Hide All to hide all of the shownworkbooks.
• Arrange Windows. Select Window/Arrange Windows todisplay the shown workbooks on the server in tiled, stacked,or side-by-side arrangements. Select a window from thewindow list to make that window the current window.
The Help MenuThe Help menu contains four menu items: Help, About JSServer,License Information, and License Configuration.
• Help. Select Help/Help to access the JSheet onlinedocumentation files.
• About JSServer. Select Help/About JSServer to displaythe JSheet product logo and copyright information.
• License Information. Select Help/License Information todisplay flex licensing and contact information. When youselect Help/License Information, the License Informationdialog box is displayed. This dialog box contains three tabs:Information, Contact IISC, and View License.
Click the Information tab to display flex licensing information.Click the Contact IISC tab to display contact information forIISC. Internet addresses and telephone numbers for the London,
24
New York, Kansas, Paris, and Toronto offices are listed. Clickthe View License tab to display the IISC license file.
• License Configuration. Select Help/LicenseConfiguration to display the License Configuration dialogbox. Use the controls in this dialog box to indicate theproduct license type, number of users, host id, authorizationcode, and license expiration date. Be certain you have noopen windows or workbooks, nor any connections with openworkbooks, before you select Help/License Configuration.If any open windows or workbooks exist, an error message isdisplayed when you select this menu command.
25Installation and Administration Guide
Introducing JSServer AdminJSServer Admin is a client tool for administrating the JSServerconfiguration preferences. Using JSServer Admin, the administration ofJSServer can be controlled from a remote location. This provides anextra layer of security, as well as increased extensibility to the product.
There are two methods of execution available to launch JSServer Admin.The first method is to double-click the JSAdmin.jar file icon. The secondmethod is to run the application from the command line. To runJSServer Admin from the command line, use the command:
java –jar JSAdmin.jar
NOTE: A JSDK or JRE of version 1.2.2 or higher must be used.
When JSServer Admin launches, the JSServer Admin window isdisplayed, followed by the Connection Information dialog box, anexample of which is shown in the following illustration.
26
To connect to the server:
1. Enter the server host address, your user name, and yourpassword into the Connection Information dialog box.
2. Press Connect. The status of the connection attempt isdisplayed in the status bar of the JSServer Admin window.
If a connection is made, logging on is attempted. When a successful log-on occurs, the tabbed panels become enabled for use, the Server panel isdisplayed, as shown in the following illustration, and the ConnectionStatus icon in the bottom right corner of the Status Bar becomes green,indicating a connected and logged on status.
If a connection or log-on attempt is unsuccessful, the reason for thefailure is displayed in the status bar and the Connection Status iconremains red.
Figure 2
27Installation and Administration Guide
The Connections PanelAfter a connection and successful log-on have been made, click theConnections tab to view the Connections panel; a list of clientconnections is displayed. Each client is a hierarchical tree structure ofinformation. The user name and host name are displayed for each client,as well as the connection time and connection ID. If a client hasworkbooks open, this information can be viewed by expanding the clienttree-node. The client details listed can be sorted by different attributes,such as By User, By Host, and By Time.
Status Bar
Server mode information
Connection status (i.e.,listening for connections)
Configuration status (number ofcurrent client connections,including user and configurationdirectories).
Figure 3
28
To display the open workbooks, select Open Workbooks from the Viewdropdown. In addition, you can select ODBC Connections from theView dropdown to display the current ODBC connections.
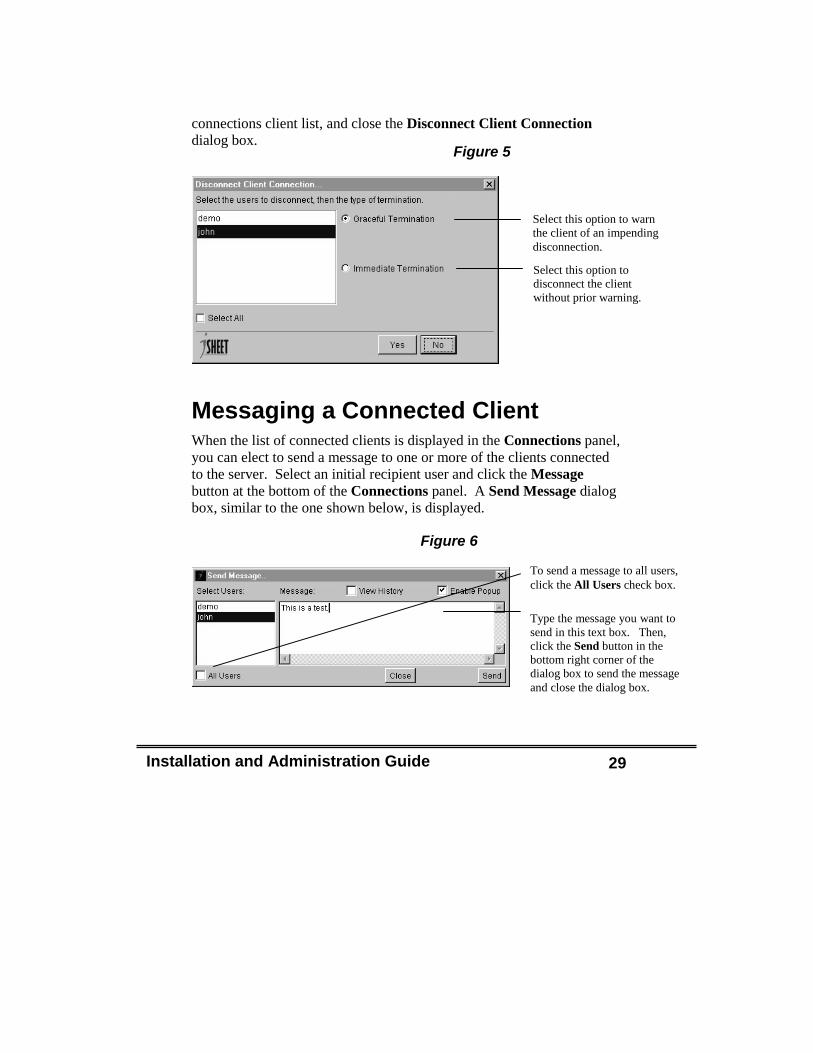
Disconnecting a Connected ClientWhen the list of connected clients is displayed in the Connections panel,you can elect to disconnect one or more of the clients from the server.Simply select any user and click the Disconnect button at the bottom ofthe Connections panel. A Disconnect Client Connection dialog box,similar to the one shown below, is displayed.
This dialog box is populated with a list of all of the connected clients.Select the user(s) to disconnect and indicate the type of disconnectionyou want performed by clicking the corresponding radio button. ClickYes to execute the disconnection, remove the user(s) from the
Figure 4
When Connections isselected from the Viewdropdown, the list ofclients currentlyconnected to the server isdisplayed in theConnection panel.
Click the View dropdownarrow to display differentdata in the Connectionspanel.
29Installation and Administration Guide
connections client list, and close the Disconnect Client Connectiondialog box.
Messaging a Connected ClientWhen the list of connected clients is displayed in the Connections panel,you can elect to send a message to one or more of the clients connectedto the server. Select an initial recipient user and click the Messagebutton at the bottom of the Connections panel. A Send Message dialogbox, similar to the one shown below, is displayed.
Figure 5
Select this option to warnthe client of an impendingdisconnection.
Select this option todisconnect the clientwithout prior warning.
Figure 6
To send a message to all users,click the All Users check box.
Type the message you want tosend in this text box. Then,click the Send button in thebottom right corner of thedialog box to send the messageand close the dialog box.
30
The Users & Groups PanelUsing JSServer Admin, you can easily maintain the users that areallowed to connect to the server, as well as the various groups to whichthe users may belong. To access the users and groups information, clickthe User & Groups tab in the JSServer Admin window.
The Users PanelTwo panels are available on the Users & Groups tab: the Users paneland the Groups panel. To indicate the panel you want to use, select thecorresponding option from the View dropdown list.
When Users is selected from theView dropdown list, a list ofusers registered on the server isdisplayed in the Users section ofthe panel.
Figure 7
Select a user from this list todisplay the correspondingmembership details.
The groups to which the usersbelong are displayed here.
31Installation and Administration Guide
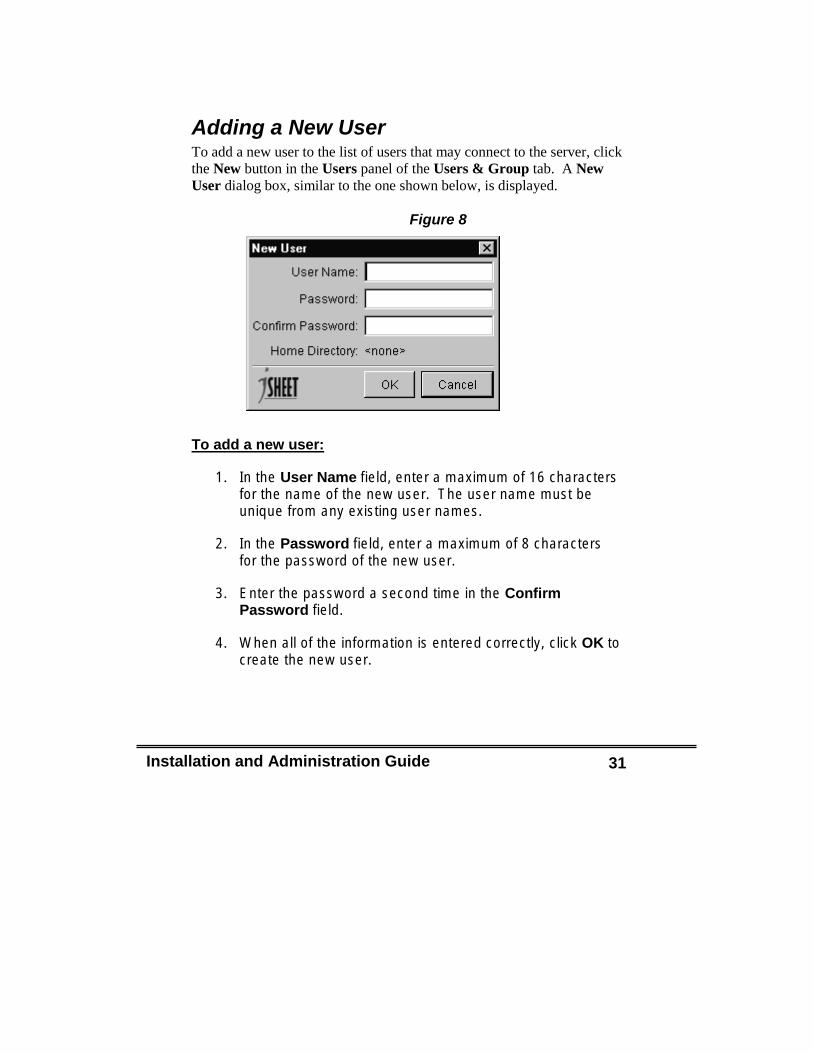
Adding a New UserTo add a new user to the list of users that may connect to the server, clickthe New button in the Users panel of the Users & Group tab. A NewUser dialog box, similar to the one shown below, is displayed.
To add a new user:
1. In the User Name field, enter a maximum of 16 charactersfor the name of the new user. The user name must beunique from any existing user names.
2. In the Password field, enter a maximum of 8 charactersfor the password of the new user.
3. Enter the password a second time in the ConfirmPassword field.
4. When all of the information is entered correctly, click OK tocreate the new user.
Figure 8
32
Removing a UserIt is very easy to remove a user. In the Users list in the Users panel ofthe Users & Groups tab, simply select the user you want to remove andclick the Remove button. The user is removed from the list.
The Groups PanelTo view the Groups panel on the Users & Groups tab, select Groupsfrom the View dropdown list. The Groups panel, similar to theillustration shown below, is displayed.
Adding a New GroupTo add a new group to the list of groups registered on the server, clickthe New button in the Groups panel of the Users & Group tab. A NewGroup dialog box, similar to the one shown below, is displayed.
Figure 9
The groups that areregistered on the serverare displayed in this list.
When a group is selected inthe list, all of the members ofthe group are listed here.
33Installation and Administration Guide
In the text field, enter a maximum of 16 alphanumeric characters for thename of the new group, and click OK to create the group. The groupname must be unique from any existing group names.
Removing a GroupIt is equally easy to remove a group. In the Groups list in the Groupspanel of the Users & Groups tab, simply select the group you want toremove and click the Remove button. The group is removed from thelist and all of the users assigned membership in the group are removed.
Editing a Group AccountThere may be instances where you need to add or delete one or moremembers from a group, but otherwise leave the group intact. Toaccomplish this, you can edit the properties of a group account.
To edit a group account:
1. From the Groups panel of the Users & Groups tab, selectthe group that you want to modify and click the Propertiesbutton. An Edit Group dialog box similar to the one shownbelow is displayed.
Figure 10
34
The Available Users list on the left side of the dialog boxprovides all of the registered users on the server that arenot currently in the selected group. The users listed on theright side of the dialog box are all of the registered userscurrently in the selected group.
2. To add a user to the group from the Available Users list,select the user and click the Add button. To add all of theusers to the group, click the Add All button.
3. To remove users from the group, select the user in theGroup list and click the Remove button. Likewise, toremove all of the users from the group, click the RemoveAll button.
4. When all of the required changes have been made to thegroup members, click OK to submit the changes to theserver and close the dialog box.
Figure 11
35Installation and Administration Guide
The Workbook Defaults PanelTo establish and maintain the default formatting that is used for all of thenew workbooks shared on the system, use the settings available in theWorkbook Defaults panel. To display this panel, click the WorkbookDefaults tab in the JSServer Admin window. A panel similar to the oneshown in the following illustration is displayed.
Click the dropdown menus to select a different font, a differentalignment, or to specify a different number format. Check or uncheckthe various check boxes to enable or disable the correspondingformatting values, such as boldfacing, underlining, displaying commas,
Figure 12
36
and hiding zeroes. Check or uncheck the Read, Write, and SavePermission check boxes to assign default permissions for workbooks.Click the Pick Me buttons to display the Color Pick dialog box andselect a different color for the book background color, font color, and thenegative value color.
When the property values are accurately set, click Submit. The changesare submitted to the server immediately.
The Client PanelTo establish and maintain the default view formatting for JSClient, usethe settings available in the Client panel. To display this panel, click theClient tab in the JSServer Admin window. A panel similar to the oneshown in the following illustration is displayed.
Figure 13
37Installation and Administration Guide
Check or uncheck the various check boxes to enable or disable thecorresponding formatting values, such as displaying the format bar, thestatus bar, and the formula bar. Enter the Rollover Year, theConnection Timeout information and the Duration information usingthe corresponding arrow keys. Indicate the cell tracking color that youwant to use, the row and column headings style, the end of line separator,and the text delimiter. When all of the values are entered correctly, clickSubmit. The changes are submitted to the server immediately.
The Preferences PanelTo establish and maintain the properties used to configure the JSheetServer, use the settings available in the Preferences panel. To displaythis panel, click the Preferences tab in the JSServer Admin window. Apanel similar to the one shown in the following illustration is displayed.
Figure 14
38
Check or uncheck the various check boxes to enable or disable thecorresponding properties, such as whether to begin the server on startup,bind to an Orbix daemon, and send output IOR to a file. Enter theservice identifier, the service port number, and the number of clientretries to allow. When the information is entered correctly, clickSubmit; the changes are sent to the server immediately.
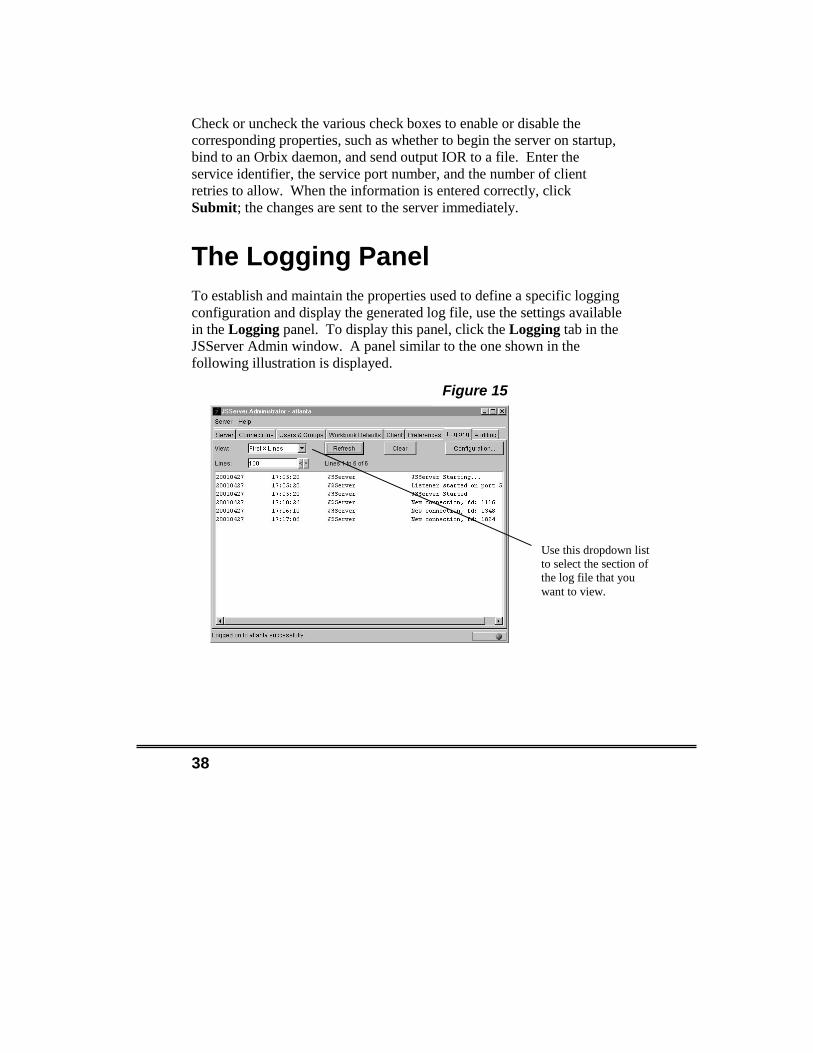
The Logging PanelTo establish and maintain the properties used to define a specific loggingconfiguration and display the generated log file, use the settings availablein the Logging panel. To display this panel, click the Logging tab in theJSServer Admin window. A panel similar to the one shown in thefollowing illustration is displayed.
Figure 15
Use this dropdown listto select the section ofthe log file that youwant to view.
39Installation and Administration Guide
Different sections of the log file can be viewed. To display a specificsection of the log file, select the corresponding value from the Viewdropdown list. The number of lines of the file that is displayed is set bythe Lines spinbox. The default value is 100 lines. The following optionsare available in the View dropdown list:
• First X Lines. Select this option to view the beginning ofthe log file.
• Last X Lines. Select this option to view the end of the logfile.
• Next X Lines. Select this option to view the next portion ofthe log file.
• Jump Forward. Select this option to go forward in the filex number of lines, equal to the previous number of linesviewed.
• Jump Back. Select this option to go backward in the file xnumber of lines, equal to the previous number of linesviewed.
When the appropriate number of lines are selected for viewing, clickRefresh to retrieve and display the requested log entries.
Clearing the Log FilePress Clear to clear the server-generated log file. A dialog box promptsyou for confirmation. Select Yes to submit a request to the server toclear its log file.
Editing the Logging ConfigurationThe settings that control the configuration for the JSServer Loggingfeatures are contained in the Edit Logging Configuration dialog box.To display this dialog box, click the Configuration button in the top
40
right corner of the Logging panel. An Edit Logging Configurationdialog box similar to the one shown below is displayed.
Check or uncheck the various check boxes to enable or disable thecorresponding properties. To modify the log file path, type a new valuepath in the Log File Path field. When all of the information is specifiedcorrectly, click OK to submit the changes to the server and close thedialog box.
The Auditing PanelThe Auditing panel of JSServer Admin provides an easy way to monitorthe activities on the server. To display this panel, click the Auditing tab
Figure 16
41Installation and Administration Guide
in the JSServer Admin window. A panel similar to the one shown in thefollowing illustration is displayed.
From this panel, you can clear the audit file or list the activity of aselected user. To update or refresh the audit information displayed, clickthe Refresh button on the Auditing panel. The User list is updated andthe User Activity list is cleared. To clear the audit file, click the Clearbutton on the Auditing panel.
To list the activity of a specific user, select the user from the User list inthe top portion of the panel. JSServer Admin displays the auditinginformation for the selected user in the User Activity portion of thepanel: when the user logged on, the workbook(s) the user has open, andthe worksheet(s) that the user has created or opened.
Figure 17
The User list isupdated each time theRefresh button is
This area of the paneldisplays auditinginformation specific tothe selected user.
42
43Installation and Administration Guide
Using the JSheet LoadBalancerThe JSheet Load Balancer is a Java application. All of the required Javaclasses are held within the LoadBalancer.jar file, which must be in theclasspath. To run the Load Balancer application from the command line,use the command:
The Load Balancer supports the following command line options:
Parameter Usage MinValue
MaxValue
Default
noquery The noquery option stops the LoadBalancer from listening on the control portfor control process connections.
N/A N/A N/A
clientport This defines the port that the Load Balanceruses to listen for client connections.
0 32768 5000
serverport This defines the port that the Load Balanceruses to listen for server connections.
0 32768 5001
controlport This defines the port that the Load Balancerusers to listen for controller processconnections.
0 32768 5002
ping The ping option allows the rate of pingmessages from the Load Balancer to theservers to be adjusted from the default offive seconds.
1 300 5
usage (or ?) These print out a list of the valid arguments. N/A N/A N/A
44
loglevel This defines the type of messages that arelogged by the system. The valid values are:0 – no logging; 1 – log errors; 2 – as forlevel 1 + log warnings; 3 – as for level 2 +log diagnostic messages; 4 – as for level 3 +log information messages.
0 4 1
logfile The name of the log file to which to outputmessages. If none is specified, output is tothe console.
N/A N/A N/A
timerdelay This defines how long, in milliseconds, thesystem pauses between each poll of theserver sockets for ping messages anddisconnect messages. Generally the shorterthe time, the more responsive the system isbut also the greater the processing power ituses.
5 5000 500
alivetime This is the maximum time that a server canremain in an alive state when it is notresponding to ping messages. The serverstate is checked once per ping period after80% of the ping period has expired. Settingthis value to less than the ping period meansthat the server must respond promptly toeach ping message.
0 3600 4
suspecttime This is the maximum time that the server ismarked as suspect when it is not respondingto ping messages. A suspect server IORwill only be given out to clients if noservers are currently alive. If a server doesnot respond within the suspect time, then itis marked as dead.
0 3600 30
deadtime This is the maximum amount of time, inseconds, that a server remains in the deadstate when it is not responding to pingmessages. Once the deadtime is exceeded,the connection to the server is closed.
0 3600 300
pendingtime This is the amount of time, in milliseconds,that a server or controller connection isallowed to remain open with a messagebeing received from it. Once this time isexceeded, the connection is closed.
0 30000 5000
45Installation and Administration Guide
Use the following command line options to start as many JSServerexecutables as are required for the load balancing:
The host and portnum parameters refer to the machine that is running theLoad Balancer and the server port of the Load Balancer, respectively.The master parameter indicates how the server is treated by the LoadBalancer. A server that indicates that it is the master is used by anyclients that want to use shared books or by any clients that do not want touse load balancing. A server with the master only setting is only used forthis; however, a server with the master yes setting is also used as a loadbalancing server. A server with a master no setting is used only for loadbalancing.
IMPORTANT: If a JSServer is being used for load balancing, it is nolonger possible for clients to connect to that server directly on port 5000.
In addition, clients can attach to the Load Balancer as if it were astandard server. To use load balancing, they must specify -loadbalancetrue on the command line.
How the Load Balancer WorksLoad balancing works in a cooperative fashion with both the servers andthe clients. The load balancing process sits between the clients andservers, intercepts IOR requests (defaults to port 5000), and providesIORs to the clients that redirect them to a particular server in the clusterof available servers.
In its simplest form, the Load Balancer sends the IOR of a serverrandomly selected from a list of active servers. Once the IOR has beensent to the client, the load balancing process then plays no further part in
46
the communications flow between client and server. This process isillustrated in the following drawing.
While this is a relatively simple process, it does have the significantdrawback that it is not possible to properly handle shared books. At thepoint that the client requests the IOR from the Load Balancer, the LoadBalancer does not know what books the client wants to open and whetherthey are to be shared or not. If the client wants to share a book alreadyopen on server x and the load balancer directs it to server y, then it willnot be able to use the book in a cooperative fashion.
Future releases of the Load Balancer will address this issue. However,for now, the Load Balancer provides two IORs to each client. The firstIOR always refers to the same server and can be used for shared books.The second IOR is a randomly selected server from the list of knownservers. If the client is aware of the load balancing and knows that thebooks are single-user, the second IOR can be used to open the book.This form of load balancing is designed to be used primarily in HTMLpages where a book to open is specified as a parameter to the applet andit is known at design time that the book is not shared. The designer canthen pass an additional parameter to the applet to tell it to use the secondIOR to open the book.
When the servers register with the load balancing process, one of themindicates that it should be used as the server for shared books; this server
Load Balancer JSheet Client
JSheet Server
(1) Client requests
(2) IORs sent to
(3) Client
Figure 20
47Installation and Administration Guide
is referred to as the master server. The master server can indicatewhether it is a potential candidate for the second IOR or whether itshould only be used for the first IOR.
The steps involved in load balancing are diagrammed in the followingdrawing.
In step 1, a JSServer process contacts the Load Balancer process toinform it that it is ready to accept incoming requests. It defines itself asthe “master” JSServer process. Therefore, the first IOR supplied to theclients will be the IOR of this process. It also indicates that it wishes tobe added to the list of load balancing servers, which means that it may beprovided as the second IOR, as well as always being the first IOR sent tothe client.
In step 2, a second JSServer process informs the Load Balancer that it isready to accept incoming requests.
JSServer
JSServer(master)
JSheet Client(non-load balancing)
JSheet Client(load balancing)
(1
(2
(3
(5 (4
(6
Figure 21
Load Balancer
48
In step 3, a JSheet client contacts the Load Balancer to request IORs.The Load Balancer returns the IOR of the master JSServer as the firstIOR and the IOR of the second server as the second IOR.
In step 4, the client is unaware of load balancing or specifically does notwant to use load balancing because it is opening a shared book. In thiscase, it uses the first IOR to make a connection to the master server. Ithas no further communication with the load balancer.
In step 5, a second client contacts the Load Balancer for IORs. The LoadBalancer returns the IOR of the master JSServer as the first IOR and theIOR of the second server as the second IOR.
In step 6, the client knows that the sheet it wants to open is not sharedand so it connects to the server given by the second IOR.
The Load Balancer attempts to monitor the state of each server that itknows about. If a server appears to have died, it attempts to route clientsto servers that are “alive.”