295
Installation and Configuration InForm TM ITM Release 4.6 SP3 Part number: DC-INF46-001-030

Installation and Configuration
InFormTM ITM Release 4.6 SP3
Part number: DC-INF46-001-030

Copyright © 1998 - 2011, Oracle and/or its affiliates. All rights reserved.
The Programs (which include both the software and documentation) contain proprietary information; they are provided under a license agreement containing restrictions on use and disclosure and are also protected by copyright, patent, and other intellectual and industrial property laws. Reverse engineering, disassembly, or decompilation of the Programs, except to the extent required to obtain interoperability with other independently created software or as specified by law, is prohibited.
The information contained in this document is subject to change without notice. If you find any problems in the documentation, please report them to us in writing. This document is not warranted to be error-free. Except as may be expressly permitted in your license agreement for these Programs, no part of these Programs may be reproduced or transmitted in any form or by any means, electronic or mechanical, for any purpose.
If the Programs are delivered to the United States Government or anyone licensing or using the Programs on behalf of the United States Government, the following notice is applicable:
U.S. GOVERNMENT RIGHTS Programs, software, databases, and related documentation and technical data delivered to U.S. Government customers are "commercial computer software" or "commercial technical data" pursuant to the applicable Federal Acquisition Regulation and agency-specific supplemental regulations. As such, use, duplication, disclosure, modification, and adaptation of the Programs, including documentation and technical data, shall be subject to the licensing restrictions set forth in the applicable Oracle license agreement, and, to the extent applicable, the additional rights set forth in FAR 52.227-19, Commercial Computer Software -- Restricted Rights (June 1987). Oracle USA, Inc., 500 Oracle Parkway, Redwood City, CA 94065.
The Programs are not intended for use in any nuclear, aviation, mass transit, medical, or other inherently dangerous applications. It shall be the licensee's responsibility to take all appropriate fail-safe, backup, redundancy and other measures to ensure the safe use of such applications if the Programs are used for such purposes, and we disclaim liability for any damages caused by such use of the Programs.
The Programs may provide links to Web sites and access to content, products, and services from third parties. Oracle is not responsible for the availability of, or any content provided on, third-party Web sites. You bear all risks associated with the use of such content. If you choose to purchase any products or services from a third party, the relationship is directly between you and the third party. Oracle is not responsible for: (a) the quality of third-party products or services; or (b) fulfilling any of the terms of the agreement with the third party, including delivery of products or services and warranty obligations related to purchased products or services. Oracle is not responsible for any loss or damage of any sort that you may incur from dealing with any third party.
Oracle is a registered trademark of Oracle Corporation and/or its affiliates. Other names may be trademarks of their respective owners.
This documentation may include references to materials, offerings, or products that were previously offered by Phase Forward Inc. Certain materials, offerings, services, or products may no longer be offered or provided. Oracle and its affiliates cannot be held responsible for any such references should they appear in the text provided.

InForm 4.6 iii
Contents
About this guide ix
Overview of this guide ......................................................................................................................................................... x Prerequisites.............................................................................................................................................................. x Audience ................................................................................................................................................................... x
Related information ............................................................................................................................................................. xi Documentation ....................................................................................................................................................... xi Cognos documentation ....................................................................................................................................... xiii Training .................................................................................................................................................................. xiv
If you need assistance......................................................................................................................................................... xv
Chapter 1 InForm overview 1
About the InForm application ........................................................................................................................................... 2 InForm users ......................................................................................................................................................................... 3 InForm system configuration ............................................................................................................................................. 4 Getting help ........................................................................................................................................................................... 5
Chapter 2 InForm software components 7
Overview of the InForm software architecture .............................................................................................................. 8 Four-tiered software design ................................................................................................................................... 8
Options for distributing software options ..................................................................................................................... 10 InForm development environments .................................................................................................................. 10 InForm QA and change control environments ............................................................................................... 12 InForm production environments ..................................................................................................................... 14
Summary of installation tasks ........................................................................................................................................... 17 Checklist—Determining server setup versus trial setup tasks....................................................................... 17 Checklist—Detailed installation tasks ................................................................................................................ 18
Chapter 3 InForm deployment options 21
Options for distributing software components ............................................................................................................. 22 Single server ............................................................................................................................................................ 22 Multiple servers ...................................................................................................................................................... 23 Externally hosted trials ......................................................................................................................................... 25
Selecting an InForm deployment option ........................................................................................................................ 26 Single trial on a single application server on a single computer .................................................................... 26 Multiple application servers with a single trial each on a single computer.................................................. 27
Chapter 4 Preparing to install 29
Checklist—Pre-installation ................................................................................................................................................ 30 Determining resources for multiple trials ....................................................................................................................... 31
Guidelines for determining resources ................................................................................................................ 31 Sizing the server ..................................................................................................................................................... 32 Distributed InForm trial tablespaces ................................................................................................................. 32 Installing Oracle software on the database server ........................................................................................... 33
Configuring Oracle database software ............................................................................................................................ 35 Creating InForm database and accounts ........................................................................................................... 36 About the InForm Admin DB in a multi-tier environment .......................................................................... 36 Setup parameters ................................................................................................................................................... 38

Contents
iv InForm 4.6
Creating Cognos 8 database and accounts ........................................................................................................ 42 Production environment considerations ........................................................................................................... 43 Configuring a database connection .................................................................................................................... 46 Oracle configuration for a multi-tier InForm environment .......................................................................... 47 Oracle instances for multi-application systems ................................................................................................ 47
Chapter 5 Installing and uninstalling the InForm core software 49
About the InForm core software installation ................................................................................................................ 50 Running the InForm software installation ..................................................................................................................... 51
Before beginning ................................................................................................................................................... 51 Installing the InForm software ........................................................................................................................... 51
Installing the InForm Server Adapter interface on the InForm server .................................................................... 57 Overview of the InForm Server Adapter interface installation on the InForm server ............................ 57 Adapter requirements on the InForm server ................................................................................................... 57 InForm Server Adapter user groups .................................................................................................................. 57
Uninstalling software components .................................................................................................................................. 58 Uninstalling the InForm software ...................................................................................................................... 58
Chapter 6 Setting up and removing InForm trials 59
Installing InForm trials ...................................................................................................................................................... 60 Types of InForm trials .......................................................................................................................................... 60 Base components ................................................................................................................................................... 62 Sample trials ............................................................................................................................................................ 62
Installing a trial designed with InForm Architect ......................................................................................................... 65 Before installing a trial .......................................................................................................................................... 65 Installing and setting up a trial ............................................................................................................................ 65
Starting the InForm service and trial ............................................................................................................................... 67 About site time zone settings............................................................................................................................................ 68 Verifying site time zone settings ...................................................................................................................................... 69 Restricting access to a trial ................................................................................................................................................ 70 Stopping an InForm trial ................................................................................................................................................... 71 Qualifying the installation.................................................................................................................................................. 72
Qualification prerequisites ................................................................................................................................... 72 Qualification process tests ................................................................................................................................... 72
Removing a trial .................................................................................................................................................................. 80 Removing the reporting database ....................................................................................................................... 80 Deleting the trial entry from Sun ONE Directory Server.............................................................................. 84 Deleting trial information from the Cognos 8 environment ......................................................................... 85 Removing a trial definition and data .................................................................................................................. 86
Chapter 7 Performing post-installation steps 89
Configuring IIS 6.0 for Windows 2003 .......................................................................................................................... 90 Configuring the Phase Forward AuthenticationFilter Registry Keys ........................................................................ 91 Configuring the Phase Forward ShowUnscheduled Registry Key ............................................................................ 93 Changing the PFDBAdmin password ............................................................................................................................ 94 Installing or re-installing the InForm Admin database after the initial installation of InForm ............................ 95
admindb command ............................................................................................................................................... 95 pfmqadmin command .......................................................................................................................................... 96
Configuring the browser .................................................................................................................................................... 98 Enabling pop-ups from the domain for your environment ........................................................................... 98 Enabling report downloads in Microsoft Excel ............................................................................................... 98 Modifying additional security settings.............................................................................................................. 100 Authentication and browser sessions ............................................................................................................... 101 Preventing automatic password completion ................................................................................................... 101

Installation and Configuration
InForm 4.6 v
Specifying whether to delete temporary files .................................................................................................. 102 Optimizing browser performance .................................................................................................................... 102 Viewing performance setting alerts .................................................................................................................. 102 Printing background graphics ........................................................................................................................... 102 Setting up tabbed browsing for Internet Explorer 7.0 ................................................................................. 102 Other InForm behaviors that need to be accommodated ........................................................................... 103
Enabling a secure socket layer (SSL) ............................................................................................................................. 104 Creating, setting up and installing a key certificate for SSL in IIS 6.0 ....................................................... 104 Configuring the Phase Forward ExternalLoginURL and ExternalLoginFailureURL Registry Keys... 106 Enabling the SSL system configuration option ............................................................................................. 107
Configuring a Customer Defined Database ................................................................................................................. 109 Overview of CDD creation ............................................................................................................................... 109 Populating a CDD ............................................................................................................................................... 110 Defining CDD mappings ................................................................................................................................... 110 Installing CDD mappings .................................................................................................................................. 111 Configuring the CDD ......................................................................................................................................... 112
Setting up custom home pages ....................................................................................................................................... 113 Setting up randomization ................................................................................................................................................ 114 Enabling email ................................................................................................................................................................... 115
Examining email notification ............................................................................................................................ 115 When to use email notification ......................................................................................................................... 115 Email notification requirements ....................................................................................................................... 116
Settings for Microsoft UrlScan 2.5 ................................................................................................................................ 117
Chapter 8 Installing the Cognos 8 Business Intelligence core software119
Prerequisites and installation tasks for Cognos 8 software ....................................................................................... 120 Prerequisites for Cognos 8 ................................................................................................................................. 120
Installing the Sun ONE Directory Server .................................................................................................................... 121 Ensure that Cognos 8 Content Store database schema and the CBI user have been created ............................ 123 Installing Cognos 8 software .......................................................................................................................................... 124
Installing the core software ................................................................................................................................ 124 Upgrading Cognos 8.4.1 to FP2 ....................................................................................................................... 125 Installing Cognos hot sites ................................................................................................................................. 126
Setting up the Oracle JDBC driver ................................................................................................................................ 128
Chapter 9 Configuring Cognos 8 Business Intelligence for the InForm ITM Environment 129
Running the customization wizards .............................................................................................................................. 130 Running the Cognos 8 Customization for InForm wizard .......................................................................... 130 Running the Cognos 8 Gateway Customization for InForm wizard ......................................................... 132 Running the InForm Reporting Addition wizard .......................................................................................... 132 Running the InForm ReportingDB wizard .................................................................................................... 133
Creating the PFWD namespace and the CRNSYSADMIN user name ................................................................. 134 Configuring Cognos 8 to use SSL in the Cognos Configuration utility .................................................................. 136 Configuring the Phase Forward AuthenticationFilter Registry Keys ...................................................................... 137 Customizing Cognos 8 BI email settings ...................................................................................................................... 139 Starting the Cognos 8 BI servers.................................................................................................................................... 140 Configuring settings for CSV report output ................................................................................................................ 141
Configuring the CSV settings for reports ....................................................................................................... 141 Configuring the Cognos 8 Gateway server to run the Cognos Application Firewall ........................................... 143
Chapter 10 Installing and configuring the Reporting and Analysis module in a trial 145
Comparing configuration scenarios ............................................................................................................................... 146

Contents
vi InForm 4.6
Creating the InForm reporting database ...................................................................................................................... 147 Creating the trial and reporting databases in the same instance ................................................................. 147 Creating the trial and reporting databases in separate instances ................................................................. 154 Installing the InForm reporting database in a multiple database environment........................................ 169
Installing the Reporting and Analysis module ............................................................................................................. 170 Installing the Reporting and Analysis module in a single database environment .................................... 170 Installing the Reporting and Analysis module in a multiple database environment ................................ 172
Using the LDAP configuration tool to configure the InForm trial and LDAP for the Reporting and Analysis module ................................................................................................................................................................................ 175 Using LDAPConfig.exe to configure the InForm trial and LDAP for the Reporting and Analysis module .. 177 Upgrading the InForm reporting database from Cognos ReportNet 1.1 .............................................................. 179
Upgrade assumptions and prerequisites .......................................................................................................... 179 Granting trial user privileges ............................................................................................................................. 180 Upgrading the InForm reporting database from Cognos ReportNet 1.1 ................................................. 180 Upgrading standard reports from Cognos ReportNet 1.1 ........................................................................... 181
Chapter 11 Configuring a trial for the Reporting and Analysis module187
Configuring an InForm trial for the Reporting and Analysis module ..................................................................... 188 Run the PFRINIT utility .................................................................................................................................... 188
Generating a clinical reporting package ........................................................................................................................ 190 Generating the initial clinical reporting package ............................................................................................ 190 Customizing a clinical reporting package ........................................................................................................ 193
Authorizing users for the Reporting and Analysis module ....................................................................................... 203 InForm access rights for reporting................................................................................................................... 203 Authorization on the reporting server ............................................................................................................. 203 Creating a custom reporting group .................................................................................................................. 204
Specifying a logo for InForm Standard Reports ......................................................................................................... 205
Chapter 12 Performance tuning 207
Overview ............................................................................................................................................................................ 208 Configuring an ODBC connection ............................................................................................................................... 209 Resizing virtual memory .................................................................................................................................................. 210 Removing preferential treatment from foreground applications ............................................................................. 211 Optimizing Windows for network applications .......................................................................................................... 212 Monitoring the Windows Event Logs .......................................................................................................................... 213 Moving locations for MS DTC logs .............................................................................................................................. 214 Clearing and enlarging MS DTC logs............................................................................................................................ 215
Appendix A Troubleshooting 217
Installation .......................................................................................................................................................................... 218 Disk space issues ................................................................................................................................................. 218 Insufficient software installed ........................................................................................................................... 218 Uninstalling MSXML 4.0 SP2 ........................................................................................................................... 218 Oracle MTS configuration is invalid ................................................................................................................ 219 XA Views: INVALID ........................................................................................................................................ 219 Database connectivity ......................................................................................................................................... 219 Rebooting .............................................................................................................................................................. 220 Final configuration fails ...................................................................................................................................... 220 Data Item reports for large trials ...................................................................................................................... 220
General Reporting troubleshooting ............................................................................................................................... 221 LDAP Server becomes corrupt ........................................................................................................................ 221 Reporting database fails with a duplicate column name error ..................................................................... 222
PFAdmin syntax................................................................................................................................................................ 223 About PFAdmin .................................................................................................................................................. 223 PFAdmin commands .......................................................................................................................................... 223

Installation and Configuration
InForm 4.6 vii
Additional Reporting installation, upgrade and configuration tasks ........................................................................ 231 Resetting reporting database.............................................................................................................................. 231 Replicating the reporting database—separate databases for trial and reporting ...................................... 232 Refreshing the reporting database .................................................................................................................... 237 Creating reports with Report Studio templates .............................................................................................. 241 Setting up reporting folders for multiple trials ............................................................................................... 250
Appendix B Scripts for InForm Reporting 267
Overview ............................................................................................................................................................................ 268 Prerequisites ....................................................................................................................................................................... 269 Scripts.................................................................................................................................................................................. 270
configaddsdiffdb.sql ............................................................................................................................................ 271 Export/import variables .................................................................................................................................... 271 streams_table_adds variable .............................................................................................................................. 272 streams_table_adds_postinstall and streams_table_drop_postinstall variables ....................................... 273 capture_chkpnt_ret_time variable .................................................................................................................... 274 Streams reset variables ........................................................................................................................................ 275 capture_build variable ......................................................................................................................................... 277 capture_first_scn and capture_start_scn variables ........................................................................................ 277

Contents
viii InForm 4.6

InForm 4.6 ix
In this preface Overview of this guide .......................................................................................................................... x
Related information .............................................................................................................................. xi
If you need assistance .......................................................................................................................... xv
About this guide

About this guide
x InForm 4.6
Overview of this guide The Installation and Configuration guide describes how to install the software and configure the environment for the InForm application and Cognos 8 Business Intelligence.
Prerequisites You should have experience with relevant operating systems.
Audience This guide is for system and database administrators responsible for setting up the InForm software and the InForm software trials.

Installation and Configuration
InForm 4.6 xi
Related information
Documentation All documentation is available from the Phase Forward Download Center.
Item Description Release Notes The Release Notes document describes enhancements introduced and problems
fixed in the current release, upgrade considerations, release history, and other late-breaking information.
Known Issues The Known Issues document provides detailed information about the known issues in this release, along with workarounds, if available.
Note: The most current list of known issues is available on the Phase Forward Extranet.
To sign in to the Extranet, go to www.phaseforward.com and click Customer Login. Enter your email address and password, and navigate to the Known Issues section. Select a product, and then enter your search criteria.
Installation and Configuration
The Installation and Configuration guide describes how to install the software and configure the environment for the InForm application and Cognos 8 Business Intelligence.
This document is also available from the Documentation CD.
Setting Up a Trial with InForm Architect and MedML
The Setting Up a Trial with InForm Architect and MedML describes how to design and implement trials in the InForm application using the InForm Architect application.
This document is also available from the Documentation CD.
Step by Step for CRCs and CRAs
The Step by Step for CRCs and CRAs Guide describes how to use the InForm application to:
• Screen and enroll patients.
• Enter, update, and monitor clinical data.
• Enter and respond to queries.
• Run trial management reports and clinical data listings.
This document is also available from the Documentation CD and the user interface.

About this guide
xii InForm 4.6
Item Description Reporting and Analysis Guide
The Reporting and Analysis Guide provides an overview of the Reporting and Analysis module. It includes a brief overview of the Reporting and Analysis interface, illustrates how to access the Ad Hoc Reporting feature, and describes the study management and clinical data packages available for reporting. It also provides detailed descriptions of each standard report that is included with your installation.
This document is also available from the Documentation CD and the user interface.
Utilities Guide The Utilities Guide provides information about and step-by-step instructions for using the following utilities:
• PFConsole utility
• MedML Installer utility
• InForm Data Import utility
• InForm Data Export utility
• InForm Performance Monitor utility
• InForm Report Folder Maintenance utility
This document is also available from the Documentation CD.
Reporting Database Schema
The Reporting Database Schema Guide describes the InForm reporting database schema.
This document is also available from the Documentation CD.
Portal Administration Guide
The Portal Administration Guide provides step-by-step instructions for setting up the InForm Portal software, and configuring and managing the InForm Portal application.
This document is also available from the Documentation CD.
Online Help The online Help describes how to use and administer the InForm application.
This document is available only from the user interface.
InForm Architect online Help
The InForm Architect online Help describes how to design and implement trials in the InForm application using the InForm Architect application.
This document is available only from the user interface.
MedML Installer utility online Help
The MedML Installer utility online Help provides information about, and step-by-step instructions for using, the MedML Installer utility, which is used to load XML that defines study components into the InForm database.
This guide also provides reference information for the MedML elements and scripting objects that are used to import and export data to and from the InForm application, as well as sample data import XML.
This document is available only from the user interface.
Installation and Configuration
InForm 4.6 xiii
Item Description InForm Data Export utility online Help
The InForm Data Export utility online Help provides information about and step-by-step instructions for using the InForm Data Export utility, which is used to export data from the InForm application to the following output formats:
• AutoCode.
• Customer-defined database (CDD).
• Name value pairs.
• Oracle Clinical.
This document is available only from the user interface.
InForm Data Import utility online Help
The InForm Data Import utility online Help provides information about and step-by-step instructions for using the InForm Data Import utility, which is used to import data into the InForm application.
This document is available only from the user interface.
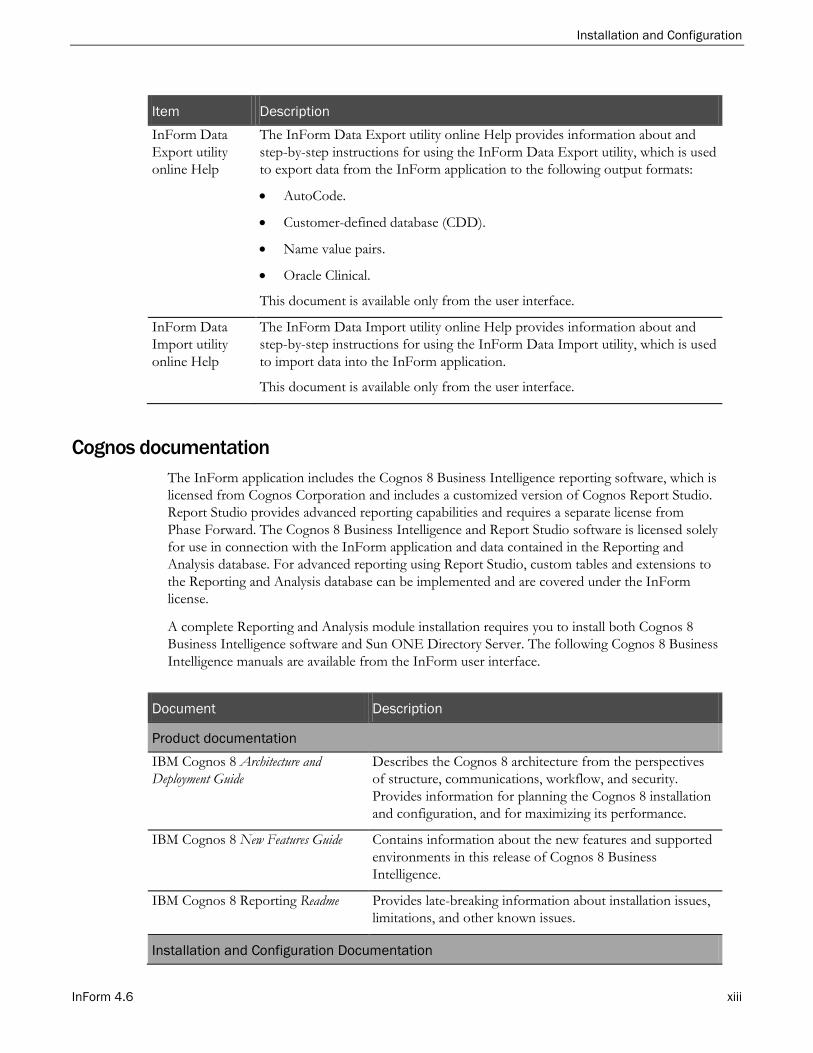
Cognos documentation The InForm application includes the Cognos 8 Business Intelligence reporting software, which is licensed from Cognos Corporation and includes a customized version of Cognos Report Studio. Report Studio provides advanced reporting capabilities and requires a separate license from Phase Forward. The Cognos 8 Business Intelligence and Report Studio software is licensed solely for use in connection with the InForm application and data contained in the Reporting and Analysis database. For advanced reporting using Report Studio, custom tables and extensions to the Reporting and Analysis database can be implemented and are covered under the InForm license.
A complete Reporting and Analysis module installation requires you to install both Cognos 8 Business Intelligence software and Sun ONE Directory Server. The following Cognos 8 Business Intelligence manuals are available from the InForm user interface.
Document Description
Product documentation IBM Cognos 8 Architecture and Deployment Guide
Describes the Cognos 8 architecture from the perspectives of structure, communications, workflow, and security. Provides information for planning the Cognos 8 installation and configuration, and for maximizing its performance.
IBM Cognos 8 New Features Guide Contains information about the new features and supported environments in this release of Cognos 8 Business Intelligence.
IBM Cognos 8 Reporting Readme Provides late-breaking information about installation issues, limitations, and other known issues.
Installation and Configuration Documentation
About this guide
xiv InForm 4.6
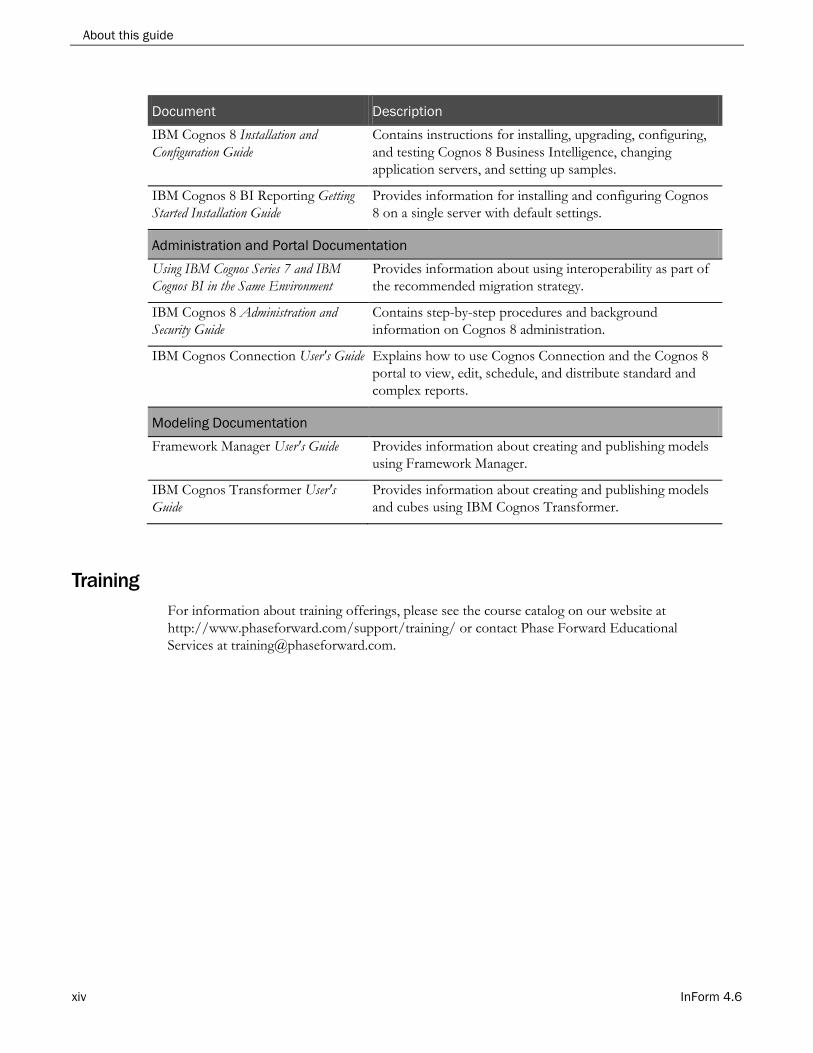
Document Description IBM Cognos 8 Installation and Configuration Guide
Contains instructions for installing, upgrading, configuring, and testing Cognos 8 Business Intelligence, changing application servers, and setting up samples.
IBM Cognos 8 BI Reporting Getting Started Installation Guide
Provides information for installing and configuring Cognos 8 on a single server with default settings.
Administration and Portal Documentation Using IBM Cognos Series 7 and IBM Cognos BI in the Same Environment
Provides information about using interoperability as part of the recommended migration strategy.
IBM Cognos 8 Administration and Security Guide
Contains step-by-step procedures and background information on Cognos 8 administration.
IBM Cognos Connection User's Guide Explains how to use Cognos Connection and the Cognos 8 portal to view, edit, schedule, and distribute standard and complex reports.
Modeling Documentation Framework Manager User's Guide Provides information about creating and publishing models
using Framework Manager.
IBM Cognos Transformer User's Guide
Provides information about creating and publishing models and cubes using IBM Cognos Transformer.
Training For information about training offerings, please see the course catalog on our website at http://www.phaseforward.com/support/training/ or contact Phase Forward Educational Services at [email protected].

Installation and Configuration
InForm 4.6 xv
If you need assistance If you are a Phase Forward customer with a maintenance agreement, you can contact the Global Support Center for assistance with product issues.
Your maintenance agreement indicates the type of support you are eligible to receive and describes how to contact Phase Forward. Additionally, the Phase Forward website lists the toll-free support number for your product, location, and support level:
http://www.phaseforward.com/support/
In the event that our toll-free telephone service is interrupted, please use either of the following methods to contact the Global Support Center:
• Telephone
In the US: 781-902-4900
Outside the US: +44 (0) 1628 640794
Phase Forward also provides assistance with User Management, Site Assessment, and Provisioning. Please refer to you Master Services Agreement and individual Statement of Work to determine if you are eligible to use these services.

About this guide
xvi InForm 4.6

InForm 4.6 1
In this chapter About the InForm application ............................................................................................................. 2
InForm users ........................................................................................................................................... 3
InForm system configuration ............................................................................................................... 4
Getting help ............................................................................................................................................. 5
C H A P T E R 1 InForm overview

Chapter 1 InForm overview
2 InForm 4.6
About the InForm application The InForm application is a data collection and trial management application that uses a secure web browser to provide access to clinical trial data and management of the clinical trial process.
Embedded within the InForm user interface is the Reporting and Analysis module, which is a reporting application that was developed by the Cognos Corporation, and that has been customized and integrated into the InForm application by Phase Forward. The Reporting and Analysis module provides a library of configurable reports, predefined reports, and ad hoc reporting and charting tools. Both clinical and operational data are available in real time from a database that can be accessed using the Internet.
Note: You can install the InForm software without the Reporting and Analysis module if you want to use the data collection features of the InForm application without the reporting features.

Installation and Configuration
InForm 4.6 3
InForm users The following are examples of InForm users:
User Description Clinical data manager (CDM)
A person who is responsible for preparing and maintaining a trial database and for reviewing data.
Clinical project manager
A person who is responsible for all aspects of one or more clinical trials or for the entire clinical plan for a drug, device, or procedure.
Clinical research associate (CRA)
A person who is hired by a sponsor to supervise and monitor the progress of sites that are participating in a trial.
Also called monitor, site monitor.
Clinical research coordinator (CRC)
An assistant to the investigator at a site.
Also called site coordinator, trial coordinator.
Principal investigator (PI)
The clinician who is responsible for treating subjects, executing the protocol of a study at a specific site, and filling out CRFs for subjects.
Also called clinical investigator, investigator, primary investigator.
Medical monitor A person who designs the trial protocol and reviews data.
Site user An InForm user, typically a CRC or PI, who performs the following tasks:
• Obtains an InForm site user name and password.
• Screens and enrolls subjects into a trial.
• Enters and changes clinical data in electronic case report forms.
• Answers queries on clinical data.
• Prepares for monitoring visits.
Sponsor user An InForm user, typically a CRA, CDM, or medical monitor, who performs the following tasks:
• Obtains an InForm sponsor user name and password.
• Reviews clinical data queries.
• Performs source verification.
• Transfers subjects from one site to another.
• Runs standard reports.
• Creates ad hoc (custom) reports.

Chapter 1 InForm overview
4 InForm 4.6
InForm system configuration The InForm system configuration consists of:
• Browser computers.
• Application server.
• Database server.

Installation and Configuration
InForm 4.6 5
Getting help The following types of Help are available with the InForm application:
• InForm application-specific on-line Help, created by Phase Forward.
To access the InForm application on-line Help:
• In the navigation pane, select Help > InForm and Trial Reporting.
• Cognos-specific on-line Help, created by Cognos.
To access the Cognos 8 on-line Help:
• In the navigation pane, select Help > Using Reporting Tools.
An HTML page appears with links to the complete Cognos 8 Business Intelligence documentation set.
• From the Ad Hoc Reporting workspace, click Ad Hoc Tools Help.
The Cognos Query Studio User Guide appears. Query Studio is the Cognos tool that provides Ad Hoc Reporting capability.
Additional help for reporting Two additional links provide reporting help.
• Report help—After you output any InForm Standard Report in HTML format, click the Report Help link to open detailed page-level help. This information is included on each Standard Report.
• Ad Hoc tools help—After you access Ad Hoc Reporting, click the Ad Hoc tools help link. This link provides access to the Cognos documentation for Query Studio. Query Studio is the Cognos application that provides Ad Hoc Reporting capability.

Chapter 1 InForm overview
6 InForm 4.6

InForm 4.6 7
In this chapter Overview of the InForm software architecture ................................................................................. 8
Options for distributing software options ........................................................................................ 10
Summary of installation tasks ............................................................................................................. 17
C H A P T E R 2 InForm software components

Chapter 2 InForm software components
8 InForm 4.6
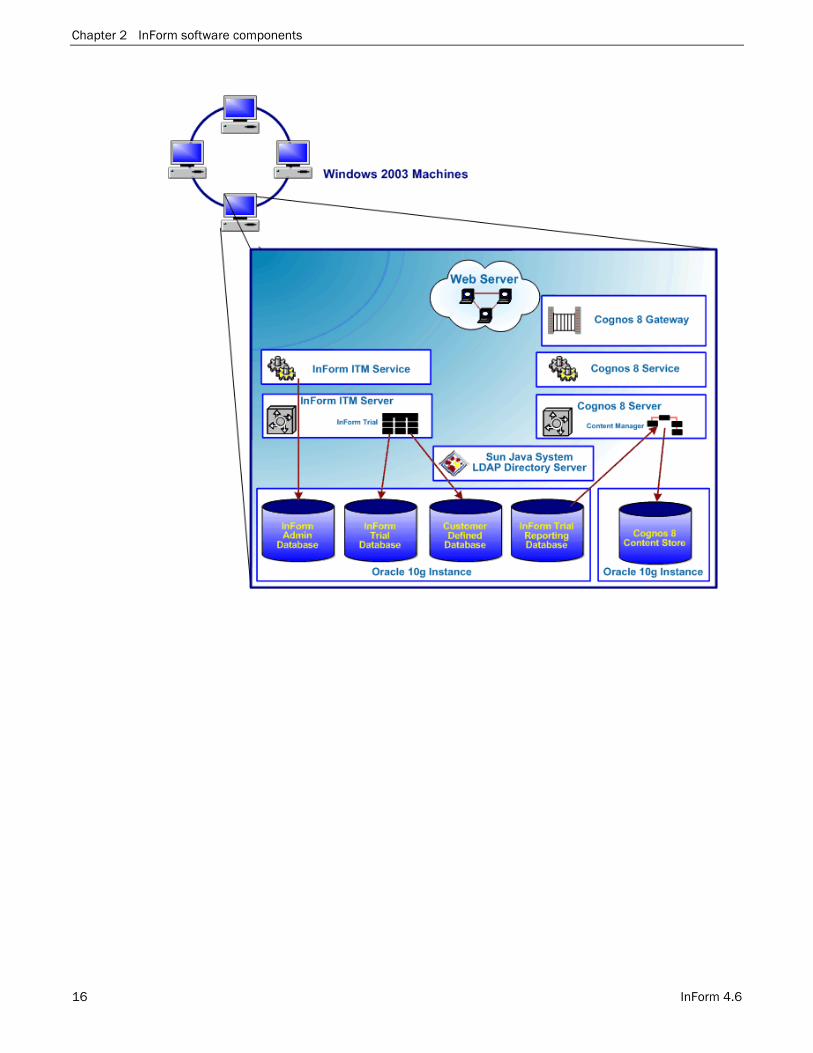
Overview of the InForm software architecture The InForm software architecture consists of the following:
• The InForm core software.
• Cognos 8 Business Intelligence software.
• Sun ONE Directory Server.
• Oracle database server.
Four-tiered software design The InForm software is a four-tiered software design:
• The Client tier can host the following:
• Web browser (Internet Explorer).
• The InForm Architect software (development server only).
• The Central Designer software (development server only).
• The Web tier hosts the following:
• The web server and gateway software (MS-IIS).
• The Cognos 8 Business Intelligence Gateway services.
• The Application tier hosts the following specific application-centric software logic and components:
• The InForm Service.
• The InForm Trial Application Server.
• Cognos 8 Business Intelligence Service.
• Cognos 8 Business Intelligence Content Manager.
• The Data tier hosts database storage and access:
• Two or three Oracle database instances, depending on the deployment.
• The InForm trial and admin databases.
• The InForm reporting databases.
• Cognos 8 Business Intelligence Content Store.

Installation and Configuration
InForm 4.6 9
The figure illustrates the four-tier software design.

Chapter 2 InForm software components
10 InForm 4.6
Options for distributing software options The figure below illustrates the following InForm software configuration options:
• The development environment is where the trial components, such as eCRFs (forms) and rules, are built. Either the Central Designer software or the InForm Architect software can be used to create a trial.
• After the trial is built and unit testing has taken place, the trial components are passed onto QA, QC or change control management for extensive testing and review. If the trial meets all requirements, it is ready to be put into production.
• When the trial is in production, it is made available to users, such as CRAs and CRCs. The InForm software is used to deliver and conduct the trial.
InForm development environments Each development PC is a stand-alone server computer (conforming to the InForm hardware and software requirements) that is configured as an InForm production server with additional software tools, including the Central Designer software or the InForm Architect software, to facilitate trial development. Development servers have the following characteristics:
• Central Designer software or the InForm Architect software—Provides a trial development environment to create every aspect of an InForm trial (eCRFs, rules, etc.).
• Microsoft web server services—Requests to and from the web browser (users and sites of the trial).
• Cognos 8 Business Intelligence Gateway—Provides secure access to the Cognos 8 Business Intelligence Server.
• InForm Service—Handles trial-related requests for operating system services. There is one InForm Service per physical server computer.
• InForm Server (an application server)—A logical server that exists under the InForm Service. This object acts as a transactional manager for InForm trials. The InForm Server handles caching and Microsoft Transaction Server (MTS) packages. Each trial is associated

Installation and Configuration
InForm 4.6 11
with an InForm Server.
• Cognos 8 Business Intelligence Service—Handles reporting-related requests for operating system services. There is one Cognos 8 Business Intelligence Service per physical server computer.
• Cognos 8 Business Intelligence Server (an application server)—A logical server that exists under the Cognos 8 Business Intelligence Service. This object acts as a transactional manager for the Reporting and Analysis module. There is one Cognos 8 Business Intelligence Server per server computer.
• Sun ONE Directory Server—Provides secure access to the InForm reporting database.
• InForm Admin database—Used by the InForm Service to manage all the trials on a physical computer. There is one InForm Admin database per InForm Service.
• InForm trial database—An Oracle database that stores the trial components and the clinical data. Trials typically share an Oracle database instance with the InForm Admin database.
• Customer-defined database—An optional Oracle database that stores a trial data extract. The custom-defined database typically shares an Oracle database instance with the InForm Admin and trial databases.
• InForm reporting database—An Oracle database consisting of materialized views for reporting via the Reporting and Analysis module. The InForm reporting database typically shares an Oracle database instance with the InForm Admin and trial databases in a development, QA or change control environment but usually occurs in a separate Oracle instance in a production environment.
• Cognos 8 Business Intelligence Content Store—An Oracle database that stores user-created reporting objects such as folders, saved reports, and saved views. The Content Store must be in a separate Oracle instance from the study and reporting database.

Chapter 2 InForm software components
12 InForm 4.6
InForm QA and change control environments The InForm QA or change control environment consists of a complete production environment (conforming to the InForm hardware and software requirements) where you can:
• Test complete trials or trial components.
• Deploy complete trials or trial components.
QA and change control servers have the following characteristics:
• Microsoft web server services—Requests to and from the web browser (users and sites of the trial).
• Cognos 8 Business Intelligence Gateway—Provides secure access to the Cognos 8 Business Intelligence Server.
• InForm Service—Handles trial-related requests for operating system services. There is one InForm Service per physical server computer.
• InForm Server (an application server)—A logical server that exists under the InForm

Installation and Configuration
InForm 4.6 13
Service. This object acts as a transactional manager for InForm trials. The InForm Server handles caching and Microsoft Transaction Server (MTS) packages. Each trial is associated with an InForm Server.
• Cognos 8 Business Intelligence Service—Handles reporting-related requests for operating system services. There is one Cognos 8 Business Intelligence Service per physical server computer.
• Cognos 8 Business Intelligence Server (an application server)—A logical server that exists under the Cognos 8 Business Intelligence Service. This object acts as a transactional manager for the Reporting and Analysis module. There is one Cognos 8 Business Intelligence Server per server computer.
• Sun ONE Directory Server—Provides secure access to the InForm reporting database.
• InForm Admin database—Used by the InForm Service to manage all the trials on a physical computer. There is one InForm Admin database per InForm Service.
• InForm trial database—An Oracle database that stores the trial components and the clinical data. Trials typically share an Oracle database instance with the InForm Admin database.
• Customer-defined database—An optional Oracle database that stores a trial data extract. The custom-defined database typically shares an Oracle database instance with the InForm Admin and trial databases.
• InForm reporting database—An Oracle database consisting of materialized views for reporting via the Reporting and Analysis module. The InForm reporting database typically shares an Oracle database instance with the InForm Admin and trial databases in a development, QA or change control environment but usually occurs in a separate Oracle instance in a production environment.
• Cognos 8 Business Intelligence Content Store—An Oracle database that stores user-created reporting objects such as folders, saved reports, and saved views. The Content Store must be in a separate Oracle instance from the study and reporting database.

Chapter 2 InForm software components
14 InForm 4.6
InForm production environments You deploy InForm clinical trials on production servers that gather and store clinical data from users on the web. The InForm production environment consists of one or more servers that have the following characteristics:
• Microsoft web server services—Requests to and from the web browser (users and sites of the trial).
• Cognos 8 Business Intelligence Gateway—Provides secure access to the Cognos 8 Business Intelligence Server.
• InForm Service—Handles trial-related requests for operating system services. There is one InForm Service per physical server computer.
• InForm Server (an application server)—A logical server that exists under the InForm Service. This object acts as a transactional manager for InForm trials. The InForm Server handles caching and Microsoft Transaction Server (MTS) packages. Each trial is associated with an InForm Server.
• Cognos 8 Business Intelligence Service—Handles reporting-related requests for operating system services. There is one Cognos 8 Business Intelligence Service per physical

Installation and Configuration
InForm 4.6 15
server computer.
• Cognos 8 Business Intelligence Server (an application server)—A logical server that exists under the Cognos 8 Business Intelligence Service. This object acts as a transactional manager for the Reporting and Analysis module. There is one Cognos 8 Business Intelligence Server per server computer.
• Sun ONE Directory Server—Provides secure access to the InForm reporting database.
• InForm Admin database—Used by the InForm Service to manage all the trials on a physical computer. There is one InForm Admin database per InForm Service.
• InForm trial database—An Oracle database that stores the trial components and the clinical data. Trials typically share an Oracle database instance with the InForm Admin database.
• Customer-defined database—An optional Oracle database that stores a trial data extract. The custom-defined database typically shares an Oracle database instance with the InForm Admin and trial databases.
• InForm reporting database—An Oracle database consisting of materialized views for reporting via the Reporting and Analysis module. The InForm reporting database typically shares an Oracle database instance with the InForm Admin and trial databases in a development, QA or change control environment but usually occurs in a separate Oracle instance in a production environment.
• Cognos 8 Business Intelligence Content Store—An Oracle database that stores user-created reporting objects such as folders, saved reports, and saved views. The Content Store must be in a separate Oracle instance from the study and reporting database.
Chapter 2 InForm software components
16 InForm 4.6

Installation and Configuration
InForm 4.6 17
Summary of installation tasks In order to set up a complete InForm development or production environment, you must complete the following major tasks:
1 Design the InForm ITM environment.
2 Prepare server computers for the InForm ITM environment.
3 Install the InForm software.
4 Install and set up the InForm trials.
5 Install and set up the optional InForm ITM trial components.
6 Install Cognos 8 Business Intelligence software.
7 Configure Cognos 8 Business Intelligence for the InForm ITM environment.
8 Install and configure the Reporting and Analysis module in a trial.
9 Configure a trial for the Reporting and Analysis module.
Checklist—Determining server setup versus trial setup tasks The following table identifies which tasks to complete for each server computer and which tasks to complete for each InForm trial.
Note: The table is expanded on the next page. When an area is expanded in this table at the beginning of a chapter, the expanded cell indicates where you are in the process.
Task For each environment For each trial 1 Design the InForm ITM environment.
2 Prepare server computers for the InForm ITM environment.
3 Install the InForm software.
4 Install and set up the InForm trials.
5 Install and set up the optional InForm ITM trial components.
6 Install Cognos 8 Business Intelligence software.
7 Configure Cognos 8 Business Intelligence for the InForm ITM environment.
8 Install and configure the Reporting and Analysis module in a trial.
9 Configure a trial for the Reporting and Analysis module.
Chapter 2 InForm software components
18 InForm 4.6
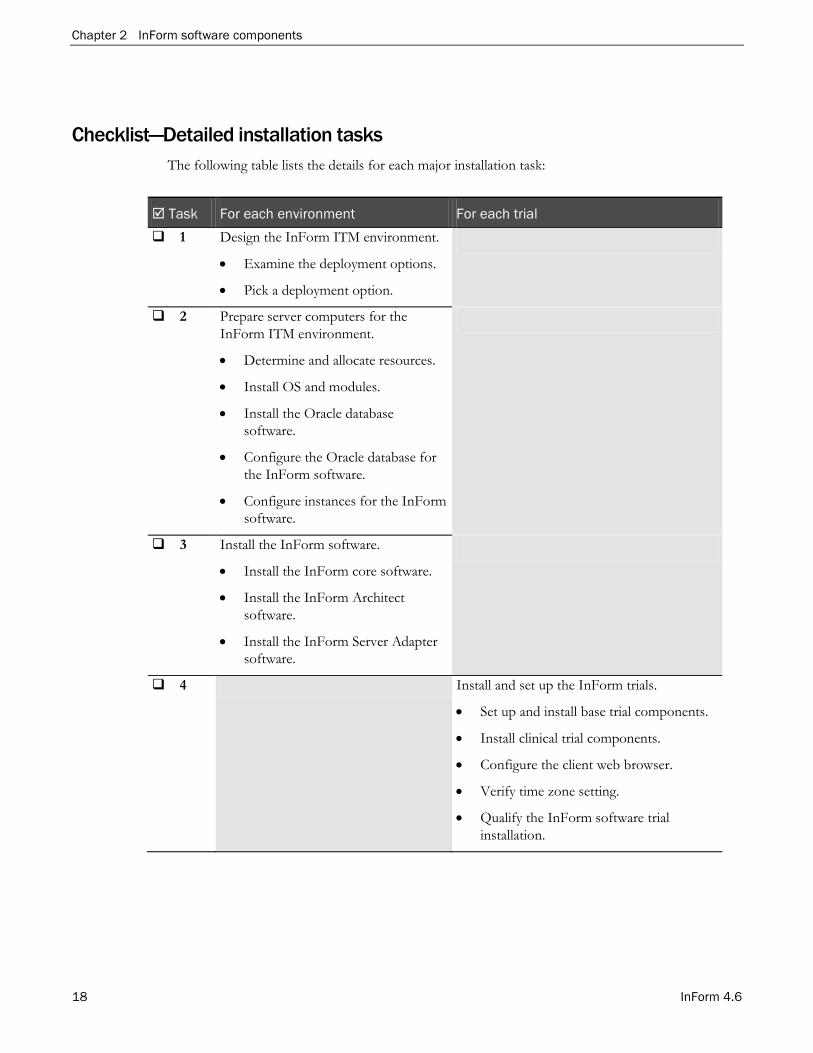
Checklist—Detailed installation tasks The following table lists the details for each major installation task:
Task For each environment For each trial 1 Design the InForm ITM environment.
• Examine the deployment options.
• Pick a deployment option.
2 Prepare server computers for the InForm ITM environment.
• Determine and allocate resources.
• Install OS and modules.
• Install the Oracle database software.
• Configure the Oracle database for the InForm software.
• Configure instances for the InForm software.
3 Install the InForm software.
• Install the InForm core software.
• Install the InForm Architect software.
• Install the InForm Server Adapter software.
4 Install and set up the InForm trials.
• Set up and install base trial components.
• Install clinical trial components.
• Configure the client web browser.
• Verify time zone setting.
• Qualify the InForm software trial installation.

Installation and Configuration
InForm 4.6 19
Task For each environment For each trial 5 Install and set up the optional InForm ITM
trial components.
• Change the PFDBAdmin password.
• Configure IIS (for Windows 2003).
• Configure the Phase Forward AuthenticationFilter Registry Key.
• Configure the Phase Forward ShowUnsheduled Registry Key.
• Configure the browser.
• Enable Secure Socket Layer (SSL).
• Set up a customer-defined database (CDD).
• Install custom home pages.
• Set up randomization.
• Enable email.
• Set up Microsoft URLScan 2.5.
6 Install Cognos 8 Business Intelligence software.
• Install Sun ONE Directory Server.
• Ensure that the Cognos 8 Content Store database schema and CBI user have been created.
• Install the core software.
• Upgrade Cognos 8.4.1 to FP2.
• Install Cognos hot sites.
• Set up the JDBC driver.

Chapter 2 InForm software components
20 InForm 4.6
Task For each environment For each trial 7 Configure Cognos 8 Business
Intelligence for the InForm ITM environment.
• Run the Cognos 8 Customization for InForm wizard.
• Run the Cognos 8 Gateway Customization for InForm wizard.
• Run the InForm Reporting Addition wizard.
• Run the InForm ReportingDB wizard.
• Set up the PFWD namespace in LDAP and Cognos 8.
• Configure Cognos 8 to use SSL
• Configure the Phase Forward AuthenticationFilter Registry Keys.
• Customize Cognos 8 email settings.
• Start the Cognos 8 servers.
• Configure settings for CSV report output.
8 Install and configure the Reporting and Analysis module in a trial.
• Create InForm trial and reporting databases.
• Install the Reporting and Analysis module in a trial.
• Configure InForm trials and LDAP for the Reporting and Analysis module.
9 Configure a trial for the Reporting and Analysis module.
• Run the PFRINIT.EXE utility.
• Generate a clinical reporting package (REFRESHREPCLIN).
• Authorize users for the Reporting and Analysis module.
• Specify a logo for InForm Standard Reports.

InForm 4.6 21
In this chapter Options for distributing software components ............................................................................... 22
Selecting an InForm deployment option .......................................................................................... 26
C H A P T E R 3 InForm deployment options

Chapter 3 InForm deployment options
22 InForm 4.6
Options for distributing software components You can deploy InForm trials using either of the following options:
• Single-tier on a single server computer for development.
• Multi-tier on multiple server computers for production.
Single server In a single-server deployment, the InForm server, the Cognos 8 Business Intelligence server, and all the trial and reporting databases are on a single server computer that conforms to the InForm hardware and software requirements. This configuration is supported only for development environments.
The following table lists the advantages and disadvantages of this configuration:
Advantages Disadvantages Lower equipment costs. Low bandwidth capabilities.
Reduced setup time. No scalability.
Smaller software footprint (two instances).

Installation and Configuration
InForm 4.6 23
Multiple servers In a multi-server deployment, the InForm server, the Cognos 8 Business Intelligence server, and the trial and reporting databases are on at least three separate server computers that conform to the InForm hardware and software requirements.
The following table lists the advantages and disadvantages of this configuration:
Advantages Disadvantages Higher bandwidth capabilities. Higher equipment costs.
Better performance. Extended setup time.
Higher scalability.
Note: In a multi-server deployment, the InForm application server(s) and the Cognos 8 server(s) must be in the same domain.
The following illustration shows three server computers configured as follows:
• One InForm server computer.
• One Cognos 8 server computer.
• One Oracle database server computer.
The following example shows a physical representation of several server machines configured as

Chapter 3 InForm deployment options
24 InForm 4.6
follows:
• One Cognos Gateway server computer.
• One Cognos 8 server computer.
• One InForm server computer.
• One Sun ONE Directory Server computer.
• Five dedicated Oracle database server computers:
• Customer-defined database.
• Trial data.
• InForm Admin.
• InForm reporting.
• Cognos 8 Content Store.

Installation and Configuration
InForm 4.6 25
Externally hosted trials Externally hosted trials must conform to the following requirements, or authentication issues will result.
• The InForm application server(s) and the Cognos 8 application server(s) must be in the same domain name.
• External hosting must share this same domain, because proxy redirection does not parse the html to change domains. This means that the internal and external domains must match.
• You must use the fully qualified machine name to access the site.

Chapter 3 InForm deployment options
26 InForm 4.6
Selecting an InForm deployment option On any single server computer, you can host InForm trials in the following configurations:
• One InForm server hosting a single trial on a single server computer.
• Multiple InForm servers hosting a single trial each on a single server computer.
Single trial on a single application server on a single computer You can limit InForm trial hosting on any server computer to a single trial on a single InForm application server. The following table lists the advantages and disadvantages of this production configuration:
Advantages Disadvantages Performance is maximized. Each InForm trial requires a separate production
server.
If there are any problems with a physical server, only the trial on that server is affected.
Costs are maximized with one computer per trial.
Note: Consider a single trial on a single InForm application server deployment for large, long-running trials that combine many subjects, many sites, and many forms.

Installation and Configuration
InForm 4.6 27
Multiple application servers with a single trial each on a single computer You can host multiple InForm application servers on any single server computer but limit the InForm trials to a single trial per InForm application server. The following table lists the advantages and disadvantages of this configuration:
Advantages Disadvantages Because existing resources are used, costs are minimized.
Each InForm server requires 40 to 50 MB of RAM.
If there is a problem with a trial, you can shutdown that trial or InForm server without affecting other trials.
Because all trials share the same resources, performance could be negatively affected.

Chapter 3 InForm deployment options
28 InForm 4.6
Advantages Disadvantages A single Cognos 8 Business Intelligence Environment may handle multiple trials.
If there are problems with the physical server, all trials on the server are affected.
If the InForm server computer is shut down, all trials on the server are also shut down.
Scalability must be assessed.

InForm 4.6 29
In this chapter Checklist—Pre-installation ................................................................................................................. 30
Determining resources for multiple trials ......................................................................................... 31
Configuring Oracle database software .............................................................................................. 35
C H A P T E R 4 Preparing to install

Chapter 4 Preparing to install
30 InForm 4.6
Checklist—Pre-installation Before you begin the installation, check to see that the items on the pre-installation checklist are complete.
Note: The Release Notes contain the most up-to-date hardware and software requirements, including required Oracle and Windows patches.
Task
The database and application servers meet the minimum hardware and software requirements.
You have downloaded the documentation and installation files for InForm 4.6 from the Download Center.
You have installed Oracle 11.2.0.1 and required patchsets.
You have installed Internet Explorer 6.0 SP1, 7.0, or 8.0.
Note: Cognos 8 Business Intelligence does not support IE 8.0.
You have installed all necessary service packs and patches for your Windows operating system.
If you are installing the Reporting and Analysis module, you must create a Unicode Oracle instance for Cognos 8. For more information, see Configuring Oracle (on page 35).
Note: Phase Forward does not support an in-place or direct upgrade of databases from Oracle 9i to 11g. If you are installing Oracle database software as part of an upgrade to this release of InForm 4.6, you must export trials from an Oracle 9i environment, import them into an 11g environment, and proceed with the rest of the upgrade.

Installation and Configuration
InForm 4.6 31
Determining resources for multiple trials You can install one or more studies on an InForm application server or on a physical server. Because all trials are different and have their own combinations of sites, users, subjects, and forms, specifics for setting up trials on servers cannot be given in documentation.
The Administrator (System Administrator and Database Administrator) should monitor the server usage and resources (metrics) to determine the demands that are placed on it, and use that information to decide how much a specific server can handle.
When deciding the load that you will place on a server, consider the:
• Number of InForm application servers on each physical server.
• Number of trials on each InForm application server.
Note: It is recommended that you install only one trial per InForm application server in a production environment.
• Size of the intended InForm application server (each server needs 40 to 50 megabytes of memory).
• Number of trials you intend to run on the server computer.
• System availability requirements.
• Geographic proximity of sites to the server.
Guidelines for determining resources Follow these basic guidelines for determining resources:
• Use separate server computers for production trials and trials that are used for testing and training.
• Consider using one server computer for multiple smaller trials (especially Phase 1 trials) that are in separate InForm application servers.
• Use a separate server computer for each large trial (especially Phase 3 trials). Although multiple servers may require additional resources and additional cost, they also provide increased dependability and stability.
Separate server computers can reduce risk. If you have more than one trial on a server computer and make an error in setup or configuration, all the trials on that server are affected.

Chapter 4 Preparing to install
32 InForm 4.6
Sizing the server When sizing an InForm application server, be aware of the resources that are already being used. Make sure that you monitor the server(s) during the trials.
When sizing your server, consider the average number of:
• Sites.
• Patients per site.
• CRFs.
• Data items.
• Users.
For each trial, consider the:
• GCP status of the trial (GCP or non-GCP).
• Phase that the trial is in (1, 2, 3).
• Duration of the study.
• Enrollment rate.
• Geographic proximity of server(s) to sites.
• System availability requirements.
• Number of sites.
• Number of users.
• Number of subjects.
• Number of unique forms.
• Maximum number of items per form.
• Average number of items per form.
• Maximum number of rules per form.
• Average number of rules per form.
• Total number of forms per subject.
Distributed InForm trial tablespaces In a production environment, Phase Forward recommends distributing tablespaces across multiple disks. The following table presents a suggested model. In each configuration, it is recommended that you use the C: partition for the operating system and distribute the database and application components across the remaining partitions. Monitor your system to determine the optimal configuration.
Note: For production systems, Phase Forward does not recommend using a single server for both the InForm software and the database.

Installation and Configuration
InForm 4.6 33
• C: and D: represent partitions on one disk.
• INFORM, SYSTEM, TEMPBIG refer to tablespaces.
Physical disks 0 1 2 3 4
Logical disks C: D: E: F: G: H:
1 disk Windows operating system
Oracle INFORM SYSTEM Trial Tables Trial Indexes TEMPBIG Redo logs UNDOTBS Archive logs
2 disks Windows operating system
Oracle INFORM SYSTEM Trial Tables Redo logs
Trial Indexes TEMPBIG Redo logs UNDOTBS Archive logs
3 disks Windows operating system
Oracle INFORM SYSTEM Redo logs
Trial Indexes TEMPBIG Redo logs UNDOTBS Archive logs
Trial Tables
4 disks Windows operating system
Oracle INFORM SYSTEM Redo logs
TEMPBIG Redo logs UNDOTBS Archive logs
Trial Tables
Trial Indexes
5 disks Windows operating system
Oracle SYSTEM Redo logs
INFORM Redo logs UNDOTBS
Trial Tables
Trial Indexes
TEMPBIG Archive logs
Installing Oracle software on the database server After the database server requirements have been met, install the Oracle 11g software and patches that are appropriate for your operating system from the list provided in the InForm 4.6 Release Notes.
Note: To install Oracle software on a Windows operating system, the InForm 4.6 software requires an instance of Oracle Services for Microsoft Transaction Server on the InForm Application Server.
For the most current list of supported platforms and required Oracle database and client patches,

Chapter 4 Preparing to install
34 InForm 4.6
see the InForm 4.6 Release Notes.
Obtain the patches you require through Oracle Support.

Installation and Configuration
InForm 4.6 35
Configuring Oracle database software You can install the InForm software on a production server or on development servers. Database configurations can vary depending on your environment.
Note: You must select the WE8MSWIN1252 character set.
The following sections describe the different Oracle configurations. Because every installation has different needs, you must monitor and make changes as necessary to improve your installation performance and workflow.
Note: The first two tasks of the next procedure require that you are proficient in creating and managing Oracle instances, as well as creating tablespaces, users, and schemas associated with database accounts. Consult your DBA or an Oracle database administrator manual if you are unfamiliar with these functions.
To create an InForm database:
1 Read the Setup parameters (on page 38).
2 Create the necessary Oracle instances for the InForm software.
Note: You can create up to three instances (trial, reporting, and Cognos). Each instance is self-contained, with its own setup and requirements.
For more information, see Initialization parameters for database instances (on page 38).
3 Create the InForm tablespaces.
For more information, see Multiple trial tablespaces (on page 43).
4 Create the InForm administrator database account.
For more information, see Creating InForm software database accounts (on page 36).
5 Follow any additional steps recommended for production environments.
For more information, see Production environment considerations (on page 43).
6 Configure the Oracle software.
7 Create and configure a reporting content store database for the InForm software.

Chapter 4 Preparing to install
36 InForm 4.6
Creating InForm database and accounts A PFDBADMIN user must be created to install the InForm software and to set up trials on the servers. Phase Forward provides the InFormPrepORA.vbs script for this purpose. If you select the Prep Oracle checkbox in the InForm installation wizard, this script runs automatically during installation. This is the recommended way to create the PFDBADMIN user.
If you do not select the Prep Oracle checkbox in the InForm installation wizard, you must run the script manually.
Note: Creating the PFDBADMIN user needs to be performed only once per installation.
To run InFormPrepORA.vbs manually to create the PFDBADMIN user:
1 Open a Windows command prompt, and navigate to the folder where the script is located.
The script is located in the InForm\InstallSupport folder on the product CD-ROM or at the Phase Forward Download Site.
Note: If you are installing from a CD-ROM, copy the InFormPrepORA.vbs and InFormPrepORA.sql files to a folder on your hard drive.
2 To suppress popup messages, set scripting to cscript.
The default, wscript, shows wscript.echo as a popup, whereas cscript shows wscript.echo as a console message.
3 To suppress the popup messages, type:
cscript //H:cscript
4 To run the InFormPrepORA.vbs script, type: InFormPrepORA.vbs <oracle_connection_string> <password_for_SYS_user> <PFDBADMIN_UserID> <password_for_PFDBADMIN user>
If you do not know the Oracle SYS user password, consult your DBA for assistance.
About the InForm Admin DB in a multi-tier environment You can only have one InForm service per computer. When you install the InForm service on a new computer, you must create a unique InForm administrator database. There must be a one-to-one relationship between each InForm service and each InForm Admin database.
During the installation of the InForm software, you are prompted to create the InForm Admin database. Type a unique name for the InForm AdminDB user ID and password.
Note: Phase Forward recommends that you use the application server name appended to admindb for the InForm Admin UID for a multi-tier installation.
If you choose not to create the admindb at the time of installation, or if the installation of the InForm Admin database fails, you must create the AdminDB schema manually.
A good reason not to create the admindb through the wizard when the rest of the software is being installed is that the PFMQ data is to be stored in a separate schema from InForm Admin.

Installation and Configuration
InForm 4.6 37
This may be the case when you are using CIS, for example, or when you are using Sync.
For more information, Installing or re-installing the InForm Admin database after the initial installation of InForm (on page 95).
The following diagram shows the InForm application servers. Notice the names of their corresponding InForm admin databases.
• APPSVR1
• APPSVR2.

Chapter 4 Preparing to install
38 InForm 4.6
Setup parameters You must verify the parameters and set up the appropriate instances.
Initialization parameters for database instances Depending on your environment, you may need one, two, or three database instances (the trial, the Reporting and Analysis module, and Cognos 8 each need one).
When creating an InForm Oracle Instance, use the following initialization parameters in the Init.ora file.
For more information, see the Oracle Database Reference.
Note: Additional parameter settings are required if your installation includes Cognos 8 and the Reporting and Analysis module and your study and reporting databases are in separate database instances.
For more information, see Adding and modifying trial database parameters in a single database environment (on page 149) or Adding and modifying trial database parameters in a multiple database environment (on page 161).
Parameter
Production server values Development server values
compatible 10.2.0 or 11.2.0 10.2.0 or 11.2.0
cursor_sharing similar similar
db_block_size See Note 1 See Note 1
db_cache_size See Note 2 0 0
db_files See Calculation for db_files and maxdatafiles (on page 40)
See Calculation for db_files and maxdatafiles (on page 40)
db_file_multiblock_read_count 16 8
deferred_segment_creation False False
job_queue_processes at least 4 at least 4
open_cursors See Note 3 150 150
optimizer_features_enable 10.2.0.3 or 11.2.0.1 10.2.0.3 or 11.2.0.1
pga_aggregate_target 300M (dependent on how much memory is available for Oracle software)
300M (dependent on how much memory is available for Oracle ,sw>)
processes See Note 3 150 (or maximum number of concurrent processes)
50
session_cached_cursors 150 150

Installation and Configuration
InForm 4.6 39
Parameter
Production server values Development server values
sga_target See Note 4
600M (dependent on how much memory is available for Oracle software)
150M (dependent on how much memory is available for Oracle software)
sec_case_sensitive_logon False
11.2.0.1 only
False
11.2.0.1 only
shared_pool_reserved_size 5M 3.5M
shared_pool_size See Note 2 0 0
streams_pool_size See Note 2 200M 200M
statistics_level Typical Typical
workarea_size_policy auto auto
_optimizer_cost_based_transformation See Note 5
Off Off
Note 1: If the trial schema and reporting schema are in separate databases on a development server, the trial schema database db_block_size is 8192, and the reporting schema database db_block_size is 16384. If the trial and reporting schemas share one database, the db_block_size is 16384. If no reporting schema is needed, the trial schema database db_block_size is 8192.
Note 2: These parameters can be changed if desired. Typing a value other than zero for these will enforce a minimum amount of memory which SGA_TARGET will use. Setting this value to something other than zero causes the minimum to be deducted from the total memory SGA_TARGET can dynamically allocate across the five memory settings it manages.
Note 3: These parameters may need to be adjusted depending on the demands on the database that are created by the InForm application and Streams.
Note 4: Java_pool_size and Large_pool_size are also automatically managed by sga_target. They are not specified in parameter list as they are not needed for the InForm software.
Note 5: Workaround provided by Oracle in 10g for bug 5382842.

Chapter 4 Preparing to install
40 InForm 4.6
Disk space allocation guidelines Setting up the database requires knowledge of resource and storage needs for each specific trial.
Disk space allocation depends on many factors, such as the:
• Number of sites.
• Number of subjects.
• Number of forms.
• Timeline for trial milestones, such as enrollment, and visits, etc.
Note: Phase Forward strongly recommends using multiple disks for production servers. The more disks used, the better Oracle performance will be. Each trial should have its own set of tablespaces. This improves the maintenance and scalability of the trial. Database objects are strategically placed onto separate tablespaces to improve the performance of particular operations.
Calculation for db_files and maxdatafiles The InForm tablespace alone is sufficient for development servers. For production servers, each InForm trial requires 12 tablespaces for tables and indexes, as determined by the following calculation:
N * 12 + INFORM + TEMPBIG + # of Non-InForm Tablespaces (System, RBS, etc.) = number of tablespaces needed where
• N—Number of trials.
• INFORM—Required InForm tablespace.
• TEMPBIG—Required temporary tablespace.
Note: You must set maxdatafiles during Oracle instance creation to a large enough value to accept the db_files parameter.
The catalog.sql and catproc.sql scripts must be run during instance creation, or you can use the Oracle Database Configuration Assistant. These scripts create all the necessary stored procedures and views for the InForm software. Remember to run these scripts for both the production and development environments.
These scripts can be found in:
%ORACLE_HOME%\RDBMS\ADMIN
Note: Oracle recommends running the UTLRP.SQL script after creating an Oracle instance.

Installation and Configuration
InForm 4.6 41
Setting up Oracle XA transaction support To support MTS transactional components, you must enable Oracle XA Transaction Support for both development and production environments.
1 Set scripting to cscript to suppress popup messages.
The default, wscript, shows wscript.echo as popup, whereas cscript shows wscript.echo as console message.
Type: cscript //H:cscript
2 In a multi-tier environment, on each InForm database server, run MTSORA112.vbs.
Note: When you run the InForm installation on each InForm application server, make sure to select the Prep Oracle checkbox.
3 Do one of the following:
• In a single-tier environment, during the installation, select the Prep Oracle checkbox.
For more information, see Running the InForm software installation (on page 51).
• From the InForm\Install Support folder of the installation download or CD, during or after the Oracle installation, run MTSORA112.vbs.
Note: You only need to run this file if you are manually setting up XA Transaction Support.
You must specify the KEY_<OracleClientHome> registry key optional parameter on the MTSORA112.vbs command line.
Usage: MTSORA102.vbs <OracleConnectionString> <UserSYSPassword> [OracleClientHomeKey]
Example: cscript mtsora112.vbs dev1 syspwd KEY_OraClient11g_CLIENT1
The MTSORA112.vbs file does the following:
1 Runs the XAVIEW.sql script as SYS to create the V$XATRANS$ view: %ORACLE_HOME%\RDBMS\ADMIN\XAVIEW.SQL
2 Grants SELECT access to the public on these views:
Grant Select on V$XATRANS$ to public. Grant Select on sys.dba_pending_transactions to public.
3 Modifies the following Registry keys in
HKEY_LOCAL_MACHINE\SOFTWARE\Microsoft\MSDTC\MTxOCI: "OracleXaLib"= "oraclient11.dll" "OracleSqlLib" = "orasql11.dll" "OracleOciLib" = "oci.dll"
4 Modifies the following Registry keys in
HKEY_LOCAL_MACHINE\SOFTWARE\Microsoft\MSDTC\Security for

Chapter 4 Preparing to install
42 InForm 4.6
Windows XP and Server 2003 only: "NetworkDtcAccess"=dword:00000001 "NetworkDtcAccessAdmin"=dword:00000001 "NetworkDtcAccessTransactions"=dword:00000001 "XaTransactions"=dword:00000001 "NetworkDtcAccessOutbound"=dword:00000001 "NetworkDtcAccessInbound"=dword:00000001
5 Modifies the following Registry key in
HKEY_LOCAL_MACHINE\SOFTWARE\Microsoft\MSDTC\XADLL for Windows XP and Server 2003 only (see note): "mtxoci.dll"="C:\\WINDOWS\\system32\\mtxoci.dll"
For a more complete description, refer to the following Microsoft Knowledge Base articles:
• Microsoft Knowledge Base—Q193893 – Info: Using Oracle with Microsoft Transaction Server and COM+.
• MSDN Online Library—Setting up MTS to Access Oracle.
• Microsoft KB Article 899191.
• Microsoft KB Article 817066 and 891801.
Note: You will have to restart your system if the script changes any of the MSDTC\Security or MSDTC\XADLL registry keys.
4 From the ...\oramts\admin folder of the Oracle Client home (where Oracle Services for Microsoft Transaction Server was installed), run ORAMTSADMIN.SQL against all Oracle instances connected to the InForm Application Server.
Note: You must run it as the SYS user with the SYSDBA role.
The InForm Software Installation Wizard does not perform this step, even if the Prep Oracle checkbox is selected.
Oracle Services for Microsoft Transaction Server requires that the INIT.ORA parameter JOB_QUEUE_PROCESSES be greater than 0.
For more information, see Initialization parameters for database instances (on page 38).
Creating Cognos 8 database and accounts 1 Make sure that an Oracle database instance is set up.
2 Verify the connection string in the tnsnames.ora file.
3 Create a database to store the content for Cognos 8 Business Intelligence.
For more information, see your Cognos documentation.
Note: Pay special attention to the Unicode character set Cognos recommends as this cannot be changed after the database is created.

Installation and Configuration
InForm 4.6 43
After creating the database:
1 Create a tablespace called CONTENT with 100M initial size, autoextend on and 50M increment extension.
2 Create a user called CBI and grant the user the following privileges:
• Roles
• CONNECT
• RESOURCE
• Privileges
• CREATE VIEW
• UNLIMITED TABLESPACE
3 Make sure that the instance can be seen by the Cognos server. (Aliases for database instances and their connection information are in tnsnames.ora.)
4 Make sure that the Content Store database is Unicode.
Note: Make sure that the following file has been copied from the ORACLE_HOME\jdbc\lib folder to the Cognos_location\webapps\p2pd\WEB-INF\lib folder:
For Oracle 11: ojdbc5.jar file.
For Oracle 10:ojdbc14.jar file.
Production environment considerations In an InForm production environment, consider the following:
• Setting up multiple trial tablespaces.
• Updating database statistics.
• Assigning one trial per InForm application server.
• Configuring for legacy custom reports.
• Controlling the load behavior.
Multiple trial tablespaces By default, all trial objects are created in the INFORM tablespace. In production, you should distribute each study across multiple tablespaces for improved performance and for maintenance and monitoring. Before you install your study on a production server, set up the study-specific tablespaces.
The following table lists the Oracle table and index tablespaces to create, along with the required parameters. All tablespaces should be locally managed.

Chapter 4 Preparing to install
44 InForm 4.6
Table tablespace Index tablespace Size (MB) %TRIAL_NAME%_REF %TRIAL_NAME%_REF_IDX 120
%TRIAL_NAME%_HIGH_TXN1 %TRIAL_NAME%_HIGH_TXN1_IDX 300
%TRIAL_NAME%_HIGH_TXN2 %TRIAL_NAME%_HIGH_TXN2_IDX 500
%TRIAL_NAME%_HIGH_TXN3 %TRIAL_NAME%_HIGH_TXN3_DX 600
%TRIAL_NAME%_HIGH_TXN4 %TRIAL_NAME%_HIGH_TXN4_IDX 500
%TRIAL_NAME%_TXN %TRIAL_NAME%_TXN_IDX 250
The remaining syntax for each of these tablespaces is:
AUTOEXTEND ON NEXT 50M EXTENT MANAGEMENT LOCAL AUTOALLOCATE;
Note: The TRIAL_NAME portion of the tablespace name must conform to Oracle name standards. It cannot start with a numeric character and cannot contain special characters. Additionally, because the Oracle software has an internal limitation of 30 characters for a tablespace name, the trial name must be 16 characters or fewer.
Phase Forward provides sample configurations for distributing your tablespaces using one disk to five disks.
For more information, see Distributed InForm trial tablespaces (on page 32).
Updating statistics in a production environment Phase Forward recommends that you analyze all tables and indexes for better performance. The trial setup process creates statistics for your trial. As you add subject data to the trial, it is important to refresh these statistics periodically. In a production environment, refreshing once per day during the maintenance window is usually sufficient.
You can run the updatec.sql script, located in the InForm_install_directory\bin\dbora directory, to update the statistics. Type the following at a Windows command prompt:
sqlplus pfdbadmin/pfdbadmin@<connect_string> @updatec.sql <trialUID>
Note: pfdbadmin is the default user name and password for the PFDBAdmin database account.
Do not use the dbms_utility.analyze_schema with the COMPUTE or the FOR TABLES option on any production servers. The recommended procedure is to analyze each table and index with the ESTIMATE option (35 percent is adequate).
InForm servers and trials For production servers, it is better to associate each trial with its own InForm server. This setup is helpful because if you ever have to stop an InForm server, you will be affecting only one trial.
Installation and Configuration
InForm 4.6 45
Configuring for legacy custom reports performance Use the following information for legacy custom reports in production.
Note: The following information does not apply to reports generated with the Reporting and Analysis module. Only an Oracle database administrator should change these settings.
To increase the amount of memory that the Oracle software uses for sorting and hashing during processing of InForm legacy custom reports, an Oracle database administrator can set the value of the following DWORD registry keys in the HKLM/Software/Phase Forward/InForm/PFMngrReport registry folder:
• LargeSessionSortBytes—Value for Oracle parameter sort_area_size.
The default is 20000000 (20 Meg).
• LargeSessionHashBytes—Value for Oracle parameter hash_area_size.
The default is 40000000 (40 Meg).
• UseLargeSessionForAllReports—Specifies whether all reports use these large session values. To specify that all reports use large session values, set this key to a non-zero value.
The default is zero.
By default, selected reports that require large amounts of sort and hash area use the values in LargeSessionSortBytes and LargeSessionHashBytes. All other reports use the values with which the Oracle instance was configured.
Controlling the load behavior Trials with a very large number of subjects can take a long time to start up, because all subjects are loaded into memory cache. To confirm whether this problem is occurring, check the InForm Performance Monitor utility.
To start the InForm Performance Monitor utility:
• Select Start > Programs > Phase Forward > InForm 4.6 > InForm Performance Monitor.
You will see that there are many SQL statements that contain the text
select * from DCV_PatientCRF where PatientID=xxxx
Note: You must start the InForm Performance Monitor utility before you start the trial to see trial startup activities.
You can modify registry settings to help alter the load behavior to make the trial startup more efficient. The settings are located in the following location:
HKEY_LOCAL_MACHINE\SOFTWARE\Phase Forward/InForm/PFMngrTrial/PatientCacheLoadingMode

Chapter 4 Preparing to install
46 InForm 4.6
The following registry settings control load behavior:
• sync—Subject cache is loaded in bulk instead of one subject at a time.
Use this setting if it is important to load all subjects before the trial becomes available.
This option takes the most time at trial startup.
• ondemand—Trial starts immediately and the subject data is loaded into cache only when an InForm user tries to access data for that subject.
This option provides the fastest trial startup, but results in slow performance the first time a subject is accessed.
Patients that are not accessed are not cached at all, which means they do not consume memory or require other server resources to load them.
• async—Trial starts immediately and the subject cache continues to load in the background.
When an InForm user tries to access data for a subject that is not yet loaded, the subject is loaded on demand.
Performance might be slow the first time the subject is accessed.
Configuring a database connection To configure the Oracle Client on the application server to connect with the database server, update the tnsnames.ora file located on the application server to contain an alias establishing a connection to the database server.
Note: When installing the InForm software, you enter the alias specified in the tnsnames.ora file as the database connect string.
For more information, see Validating the database connection (on page 46).
Validating the database connection To validate the database connection from the application server:
• Type the following statement at the Windows command prompt: sqlplus pfdbadmin/pfdbadmin@tnsnames_alias
Note: pfdbadmin is the default user name and password for the PFDBAdmin database account.
If the test is successful, a SQL prompt appears, showing that you have logged on to the database server as the pfdbadmin user. An unsuccessful test generates an ORA- error. Consult your DBA for help in troubleshooting errors.
Note: Problems with connections can sometimes be attributed to the database server that contains a single Ethernet card with two nodes. Disabling one of the ports from the card usually solves the problem. Consult your system administrator for help in resolving errors.

Installation and Configuration
InForm 4.6 47
Oracle configuration for a multi-tier InForm environment A multi-tier installation consists of a database server running the Oracle software, and more than one application server running the InForm software, the Oracle Client software, the Internet Information Server (IIS), and the Microsoft Transaction Server (MTS). The following diagram illustrates this configuration:
Oracle instances for multi-application systems When creating Oracle instances for multi-application systems, you can use multiple instances, or one instance for all application servers. The DBA should monitor performance and database

Chapter 4 Preparing to install
48 InForm 4.6
resource usage and make adjustments accordingly.

InForm 4.6 49
In this chapter About the InForm core software installation .................................................................................. 50
Running the InForm software installation ....................................................................................... 51
Installing the InForm Server Adapter interface on the InForm server ....................................... 57
Uninstalling software components .................................................................................................... 58
C H A P T E R 5 Installing and uninstalling the InForm core software

Chapter 5 Installing and uninstalling the InForm core software
50 InForm 4.6
About the InForm core software installation The InForm core software installation is controlled by an installation wizard.
During the installation, the installer is asked to choose whether to install:
• InForm online documentation.
• Sample trials.
• InForm Architect software (optional).
Also, the installation wizard prompts the installer to enter connection information, including usernames and passwords, so that the InForm software can access both the admin and trial databases.

Installation and Configuration
InForm 4.6 51
Running the InForm software installation
Before beginning Before you begin the InForm core software installation, you should:
• Have the product CD or the product image (available on the Phase Forward download center) available.
• Check the download center for the latest patches and any updated documentation (including Release Notes).
• Verify that all hardware and software requirements are met.
Installing the InForm software 1 Navigate to the location of the installation files (on the product CD) and double-click
setup.exe.
The Preparing Setup window appears, followed by the welcome screen.
2 Click Next.
The Customer Information window appears.
3 Type your User Name and Company Name in the appropriate fields and click Next.
The Choose Destination Location window appears.
4 Do one of the following:
• Accept the default location, or
• To install the InForm software in a different folder, click Change and browse to the new location.
5 Click Next.

Chapter 5 Installing and uninstalling the InForm core software
52 InForm 4.6
The Select Features window appears.
6 To see the list of products available for installation, expand the InForm node.
The core InForm software installation includes sample trials.
7 To install the InForm Architect software, select the Architect checkbox.
The Documentation checkbox is automatically selected.
Note: Typically, you should not install the InForm Architect software in a production environment. In a development environment, you can install the InForm Architect software on the same server as the InForm software.
8 Click Next.
If you chose to install the InForm Architect software, message appears, recommending that you do not install InForm Architect on a production server as this enables un-auditable trial changes.
9 To return to the Select Features window so you can clear the InForm Architect checkbox, click No.
Note: If you install the InForm Architect application after installing the InForm application and starting a study, you must stop and restart the InForm service before you can connect to the study through the InForm Architect application.
10 To continue to the next window, click Yes.

Installation and Configuration
InForm 4.6 53
The Select the Oracle Home for InForm window appears.
11 Select the entry for the Client Oracle Home registry key.
Any Oracle Homes that you configured during your Oracle installation appear in the window with the prefix KEY_ to indicate the Windows registry key.
If you chose a different home for the Oracle Client than the Oracle server, both are listed.
Note: Make sure you choose the key for the Client. You must select the Client Oracle Home registry key as listed in this window. This provides the correct Oracle Home registry key for use when running InForm scripts.
12 Click Next.
The Database Configuration window appears.
Note: The defaults on this window were set when you configured the Oracle software. The values for your installation may be different.

Chapter 5 Installing and uninstalling the InForm core software
54 InForm 4.6
13 Enter values (or accept the defaults) for the following configuration fields:
• Database Connection String—String that the InForm server uses to connect to the Oracle instance.
• Admin Database Username—User name that is required to access the Admin database. The default is INFORMADMIN. In a multi-tier installation. Phase Forward recommends that you include the server name in the user name ID of the INFORMADMIN account.
Notes: If users can access your production servers by using SQL*Plus, Phase Forward strongly recommends that you change the default Admin Database password during installation for security. If users cannot access production servers in this manner, normal firewall security should be sufficient.
Unlike the InForm Username and Password, the Admin Database Username and Password cannot be changed outside of the installation process.
• Admin Database Password—Password that is required to access the Admin database. The default is INFORMADMIN (not case sensitive).
• InForm System Username—User name for the pfdbadmin. The default is PFDBADMIN. If you change the user name from the default during the installation, select the Prep Oracle checkbox. This instructs the InForm software installation to create the InForm account using the username and password you specify.
• InForm System Password—Password for the pfdbadmin. The default is PFDBADMIN (not case sensitive).

Installation and Configuration
InForm 4.6 55
Note: When you install the InForm software on a production server, Phase Forward strongly suggests that you change the default InForm passwords. You can change this password on this window during the installation, or manually either before or after installing.
• Oracle SYS Password—Password of the Oracle SYS account. The default is oracle. This value is used only if you select the Prep Oracle checkbox to create the pfdbadmin account.
Note: If you do not know the Oracle SYS password, and the default password does not work, contact an administrator.
• Install Admin DB—If selected, creates the:
• informadmin user, using the Admin Database Username and Admin Database Password.
• InForm Admin database for non-clinical data, such as a list of trials, with trial database user names and passwords.
Note: Select Install Admin DB for new installations and for upgrades.
• Prep Oracle
If selected, runs the informprepora.vbs script, that:
• Creates the trial database user, using the InForm System Username and InForm System Password.
• Sets up Oracle XA Transaction Support.
• Sets the MTS Timeout to a minimum of 300 seconds.
If not selected:
• Verifies the study database user and password.
Note: You need to select the Prep Oracle checkbox only the first time you install the InForm software on an instance.
14 Click Next.
If any of the information is incorrect (for example, the Database Connection String or InForm Username is wrong), a Database Configuration Error window is appears, and you may get InForm software 4.6 Core Installer errors.
For more information, see Oracle MTS configuration is invalid (on page 219).
15 To return to this window to fix the incorrect information, click Back and click Next when changes are complete.
The installation checks both the .NET framework and ODAC, and if an upgraded version is required, a message appears.
The Ready to Install the Program window appears.
16 Do one of the following:

Chapter 5 Installing and uninstalling the InForm core software
56 InForm 4.6
• To begin the installation, click Install.
The Setup Status window appears, and the progress of the installation is indicated on the screen.
• To abort the installation, click Cancel.
If your system does not have the required hardware or software components, the Requirements Not Met window appears.
For more information, see the InForm 4.6 Release Notes.
17 To make the necessary corrections, click Cancel.
The Exit Setup window appears.
18 Click Yes.
19 After making the corrections, restart the installation.
The Phase Forward InForm 4.6 Reboot window appears. You must reboot the system if any of the following are true:
• ODAC was upgraded during the installation process.
• The PATH environment variable was modified.
• The installation tried to access a locked file.
20 Select Yes or No to indicate whether you want to reboot.
21 Click Finish.
After rebooting, the final configuration process begins.
Note: If the installation source is not available after reboot and log on, the Final Configuration step fails. For example, if you are installing from CD and you remove the CD, an error message appears.
For more information, see Final Configuration fails (on page 220).
When the system is finished, the InstallShield Wizard Complete window appears.
22 To exit the wizard, click Finish.

Installation and Configuration
InForm 4.6 57
Installing the InForm Server Adapter interface on the InForm server
Overview of the InForm Server Adapter interface installation on the InForm server
Install the InForm Server Adapter interface only if you are currently using, or plan to use InForm ITM 4.6 with products that require the InForm Adapter interface.
Note: Check with Phase Forward Customer Service to determine the availability of an InForm Adapter release that is compatible with this release of the InForm software.
The InForm Server Adapter interface, or ISA, provides an access point for communications between InForm trials and other applications, such as the Central Coding application.
The InForm Adapter software must be installed for all other applications that will interface with the InForm software. The InForm Server Adapter, which provides a secure web service interface for all interactions with the InForm server, must be installed on the InForm server to communicate with these other applications.
Note: The InForm Adapter software and the InForm Server Adapter software, as well as the documentation CD, which includes the InForm Adapter Installing InForm, are available from the Phase Forward Download Center.
Adapter requirements on the InForm server The InForm Adapter software requires that one interface, the InForm Server Adapter, be installed on the InForm server. The InForm server must meet the basic InForm hardware and software requirements.
For more information, see the Release Notes.
Note: The InForm Server Adapter interface requires Microsoft's Web Services Enhancements (WSE) 2.0 SP3 on the InForm server.
InForm Server Adapter user groups When the InForm Server Adapter is installed on the InForm server, the installation creates two security groups:
• InFormAdapterSrv
• InFormAdapterAdmin
These user groups should be edited in the InForm application to include the users that were specified during other InForm Adapter installations.

Chapter 5 Installing and uninstalling the InForm core software
58 InForm 4.6
Uninstalling software components
Uninstalling the InForm software 1 Stop all InForm servers and trials.
2 Stop the InForm service and the InForm Sync service.
3 Select Start > Control Panel > Add or Remove Programs.
4 Select Phase Forward InForm 4.6, and click Remove.
The confirmation dialog box appears.
5 Click Yes.
6 If a message appears and asks if you want to remove shared files, click No to All.
The following message appears:
7 Do one of the following:
• To stop uninstalling the software so that you can back up the customized files, click No.
• To continue, click Yes.
When the uninstallation process is complete, the Reboot page appears.
8 Click Finish.
The computer reboots.
Note: If you are uninstalling a previous version of the InForm software, follow the uninstall process for that version, and delete any remaining Phase Forward Registry keys. For example, you may be required to run Regedit and expand HKEY_CURRENT_USER. Expand Software and delete any keys left under Phase Forward.

InForm 4.6 59
In this chapter Installing InForm trials ........................................................................................................................ 60
Installing a trial designed with InForm Architect ........................................................................... 65
Starting the InForm service and trial ................................................................................................. 67
About site time zone settings ............................................................................................................. 68
Verifying site time zone settings ........................................................................................................ 69
Restricting access to a trial .................................................................................................................. 70
Stopping an InForm trial ..................................................................................................................... 71
Qualifying the installation ................................................................................................................... 72
Removing a trial .................................................................................................................................... 80
C H A P T E R 6 Setting up and removing InForm trials

Chapter 6 Setting up and removing InForm trials
60 InForm 4.6
Installing InForm trials 1 Create an InForm application server, or decide which existing application server to associate
with the trial.
2 Create the trial.
3 Do one of the following, depending on the design tool of the InForm trial.
• InForm Architect trials—Install the following:
• Base trial components that are provided with the InForm software.
• Components specific to the trial.
• Central Designer trials—Execute the deployment package for the trial that installs both Base and trial-specific components.
Before installing your own trial, you might want to install one or more of the sample trials provided with the InForm software. These trials contain examples of the types of trial components you can use when you design your own trial.
Types of InForm trials You can install the following types of InForm trials:
• Base trial—Contains elements that form the basis for all other trials.
The base trial is not really a trial, but the foundation upon which all other trials are built. It includes component definitions used by the InForm software, including:
• System resource definitions.
• System configuration settings.
• Predefined rights and default rights groups.
• Predefined users with rights to perform user administration tasks.
Note: These are typically deactivated for production trials.
• Default numeric sequences for screening, enrollment, and randomization.
• System form definitions (e.g., Audit Trail form).
• InForm online Help.
• User trials—Created from sponsor specifications.
• Sample trials—Provided with the InForm software to demonstrate how to use InForm features.
About installing trials Before you install any trial, you need to create the InForm application server. After the InForm service is started, you can create an application server for a trial manually or by using a script.

Installation and Configuration
InForm 4.6 61
InForm service
The InForm service must be started to create the application servers and load trials. To start or stop the InForm service, you must be a local administrator for the computer on which you are installing the trial.
InForm application servers
Every InForm trial must be associated with an InForm application server. Each application server can house one or more trials. For production servers, Phase Forward recommends associating each trial with its own application server in a one-to-one relationship.
Before creating a trial, you must do the following:
1 Start the InForm service.
2 Create an InForm application server.
Note: This application server must exist (but does not need to be running) before a trial can be associated with it.
Note: During the installation of a trial, the InForm software creates a virtual Web directory with the same name as the trial name. When choosing a trial name, make sure that you do not already have a virtual Web directory with the same name.
InForm trial installation tools Install InForm trials through the command prompt using the following Phase Forward commands:
• pfadmin setup trial—Sets up an InForm server and a trial in a production or development environment.
• dbsetup—Installs the Base trial components into the new trial that you set up with the pfadmin setup trial command.
The MedML Installer tool installs trial-specific components into the new trial that you set up with the pfadmin setup trial command.
Chapter 6 Setting up and removing InForm trials
62 InForm 4.6
Base components The InForm sample trial and any trials you might create and install using the InForm Architect application, need the following Base component elements:
• System resources, including images and HTML files used throughout the InForm application.
• System configuration settings.
• Predefined rights and default rights groups.
• Default query group.
• Predefined administrative users with rights to perform user administration tasks.
• Default numeric sequences for screening, enrollment, and randomization numbers.
• System form definitions (for example, definitions of Comment, Data Value(s), Query, Audit Trail, and administrative windows).
The Base components are the foundation on which the rest of the trials are built.
Before you install any trial, you need to create the InForm application server. After the InForm service is started, you can create a server for a trial manually, or by using a script. Instructions for both methods are included.
Note: During the installation of a trial, the InForm software creates a virtual web directory with the same name as the trial. When you choose a trial name, make sure that you do not already have a virtual web directory with the same name.
Sample trials The InForm software includes the components of sample trials that you can install to familiarize yourself with the software and the types of trial components that are available. During the InForm software installation you can select the sample trials to install.
The PFST46 sample trial, which comes with the InForm software, includes only trial metadata. You can install this version by using an installation script to obtain a complete set of trial components, including sample users that enable you to log on and add patients and patient data.
The PFST45 sample trial, which comes with the InForm software, includes components that illustrate the features of this release. PFST45 comes in the following forms:
• Trial metadata in XML format. You can install this version by using an installation script to obtain a complete set of trial components, including sample users that enable you to login and add patients and patient data. For more information, see Installing PFST45 trial using metadata in XML format (no sample data) (on page 63).
• An Oracle dump consisting of Base and PFST45-specific trial components and a collection of patients and sample clinical data. This version, which is also fully functional with sample users, enables you to learn about InForm features and to run reports without having to add patients and patient data. You can install this version by using a set of Oracle and InForm commands. For more information, see Installing PFST45 Trial using Oracle dump file

Installation and Configuration
InForm 4.6 63
(has sample data) (on page 64).
The installation procedure for PFST45 trial metadata and PFST46 trial metadata is the same.
Installing PFST45 trial using metadata in XML format (no sample data) To install either the PFST45 or PFST46 trial metadata, use the instructions below, and insert the release number of the trial you want to use.
For example, to install PFST45:
• Select Start > Programs > Oracle > InForm 4.6 > Install Sample Trial 4.5 for Oracle.
The sample trial setup program:
• Starts the InForm service, if it is not already started.
• Creates an InForm application server.
This happens automatically when you install this sample trial.
When you install your own trial, you must create the application server.
• Creates the PFST45 trial, ODBC data source, and virtual web directory.
• Loads Base components.
• Loads PFST45-specific components.
To access PFST45 user information after the installation is complete:
1 Start the server and trial from a Windows command prompt. Type: pfadmin start server <servername> pfadmin start trial pfst45
2 Log on with the user name system and password manager.
Note: User names and passwords must be at least six characters long for trials.
3 Click Admin.
The Users tab appears and displays a list of users.
The PFST45 sample trial includes the following users:
PI CRC CRA CDM • rrush
• awarren
• jsilverman
• mcarlson
• mdisilvio
• mmeyer
• pparker
• dobrien
• creilly
• aortega
• mlynch
• awalsh
• lhill
• swilson
Note: Usernames are case-sensitive.

Chapter 6 Setting up and removing InForm trials
64 InForm 4.6
Installing PFST45 Trial using Oracle dump file (has sample data) The PFST45 sample trial includes an Oracle dump file containing Base and PFST45-specific trial components, and a collection of patients and sample clinical data. The procedure described in this section:
• Creates an Oracle user (trial database).
• Imports the dump file to the trial database.
• Sets up the InForm software application server and trial.
To import data into your PFST45 trial:
1 Open a command window.
2 Go to the install_dir\InForm\bin\DBOra folder, where install_dir is the folder in which you installed the InForm software.
3 To run the dropDB.sql file as the PFDBAdmin user, type: sqlplus pfdbadmin_username/pfdbadmin_password@oracle_connection_string @dropDB.sql pfst45uid pfst45pid INFORM
The Oracle user is dropped and recreated.
4 To import the data into the sample trial, go to the install_dir\InForm\Sample_PFST45\ DUMP folder and type:
imp system/system_password@oracle_connection_string file=pfst45.DMP fromuser=pfst45uid touser=pfst45uid buffer=999999
5 To update statistics on the trial data, go to the install_dir\InForm\Bin\DBOra folder and type:
sqlplus pfdbadmin_username/pfdbadmin_password@oracle_connection_string @updatec.sql pfst45uid
6 To set up the application server and the trial, at the Windows command prompt, type the following commands:
pfadmin setup server servername pfadmin setup trial trialname servername /db oracle_connection_string newtrialuid newtrialpid pfadmin setserver site trialname computername pfadmin setserver medmlinstaller trialname computername
7 To start the application server and trial from the command line, type: pfadmin start server servername pfadmin start trial trialname
8 Log on to the InForm trial.

Installation and Configuration
InForm 4.6 65
Installing a trial designed with InForm Architect When you have finished designing and developing the XML components for a trial, you can install the trial in a trial database.
Before installing a trial 1 To see if the following services are started, select Administrative Tools > Services.
2 If the services are not started, start them in the following order:
a MSDTC.
b Oracle Service.
c OracleOraHome102TNSListener or OracleOraHome112TNSListener.
d IIS Admin service.
e InForm software Service.
f World Wide Web Publishing service.
3 Decide whether to associate the trial with an existing InForm application server or to create a new InForm server for the trial.
For production computers, Phase Forward recommends associating each trial with its own application server in a one-to-one relationship.
For more information, see Guidelines for determining resources (on page 31).
4 To create a new InForm server, open a command window and type: pfadmin setup server <servername>
This command creates the Microsoft COM+ Applications packages associated with the InForm application server.
Note: For a complete list of PFAdmin commands and their syntax, see About PFAdmin (on page 223).
Installing and setting up a trial 1 To install and set up the trial, at the Windows command prompt, type one of the following
commands:
• If a trial DSN does not exist: pfadmin setup trial trialname servername /DB oracle_connect_string uid pid
• If a trial DSN already exists: pfadmin setup trial trialname servername /DSN trialDSN uid pid

Chapter 6 Setting up and removing InForm trials
66 InForm 4.6
Note: The trial setup program, dbsetup.cmd, passes the tablespace names to the DDL scripts. The Oracle software has an internal limitation of 30 characters for a tablespace name. The trial name, therefore, needs to be limited to 16 characters, cannot start with a numeric character, and cannot contain special characters (%, *, - , etc). For more information, refer to the Oracle Database Reference.
2 To check the configuration, type: pfadmin view service
The InForm application server and the trial appear.
3 Go to the install_dir\InForm\bin\dbora folder and use one of the following commands:
• If your trial development team has created an RSP file that contains references to each XML component definition file to install, execute the following command, referencing the RSP file and the folder in which it is located: dbsetup trialname trial_folder\trialsetup_rsp_file
• If all trial components are not fully developed, you can use the following command to install the base components now, and then install the remaining components later. dbsetup trialname base
Installation and Configuration
InForm 4.6 67
Starting the InForm service and trial 1 To start the InForm service, at a Windows 2003 Command prompt, type:
net start pfservice 2 To verify that the service is running, at the command prompt, type:
pfadmin view service
3 Select Control Panel > Administrative Tools > Services.
4 Verify that the following services are started:
• IIS Admin service
• InForm service
• World Wide Web Publishing service
5 To start the InForm Server, type: pfadmin start <server> <servername>
6 To start the InForm trial, type: pfadmin start <trial> <trialname>

Chapter 6 Setting up and removing InForm trials
68 InForm 4.6
About site time zone settings For date and time functionality to work correctly, the time zone for a site must match the corresponding time zone description for the operating system. The checksitetimezones.vbs script compares the site time zones in a trial with the list of Microsoft Windows time zones and reports on the validity of the site time zones. Results appear in:
• A CSV file called AllSites.csv that contains comma-separated site time zone information in the format trial, status, site name, current time zone.
• A file that you specify. Each site used in the trial appears with one of the following states:
• BAD—Does not match any current Microsoft Windows time zone.
• VERIFY—Could be one of multiple time zones and should be verified. For example "(GMT-12:00) International Date Line West" or "(GMT-12:00) Eniwetok, Kwajalein".
• GOOD—Valid Microsoft Windows time zone.
Additionally, the file lists all current Microsoft Windows time zones.
Note: If the script finds any bad time zones, it changes the output file name you specified to bad_<output_filename>, for example, bad_sitetimes.txt.
You should run the checksitetimezones.vbs script after installing a trial and setting up site information.

Installation and Configuration
InForm 4.6 69
Verifying site time zone settings 1 Run the checksitetimezones.vbs script on the InForm application server.
2 Open a Command window and navigate to the <InForm_installation_folder>\inform\bin\DBora folder.
3 Type: checksitetimezones.vbs <connection_string> <trialdb_user> <trialdb_password> <output_filename>
For example: checksitetimezones.vbs trial1 pfst45uid pfst45pid sitetimes.txt
The script reports on site time zone status in the file that you specify and also in a CSV file called Allsites.csv.
Note: If the script finds any bad time zones, it changes the output file name you specified to bad_<output_filename>, for example, bad_sitetimes.txt.

Chapter 6 Setting up and removing InForm trials
70 InForm 4.6
Restricting access to a trial 1 Select Start > Programs > Administrative Tools > Internet Services Manager.
The Internet Information Services window appears.
2 Under the computer name listed, select the Default Website folder.
3 In that folder, right-click the name of the InForm trial.
4 Select Properties.
The Properties dialog box appears.
5 Select the Directory Security tab.
6 Change the settings for IP addresses and Domain name restrictions as appropriate.

Installation and Configuration
InForm 4.6 71
Stopping an InForm trial At a Windows command prompt, type:
pfadmin stop trial <trialname>
Note: For the complete listing of PFAdmin commands and their syntax, see PFAdmin syntax (on page 223).

Chapter 6 Setting up and removing InForm trials
72 InForm 4.6
Qualifying the installation Qualifying the installation verifies that the trial was installed successfully. Qualifying does not test every aspect of the trial, but it does run through key administrative functions to make sure that the trial behaves as expected.
Qualification prerequisites Before you begin the qualification process, you should:
1 Install the PFST45 sample trial.
2 Make sure that the trial is started, and that the server and trial are up and running.
3 Change the passwords for two of the users, dobrien and lhill, in the sample trial.
Use this procedure to change the passwords for the two users before performing the CRC/CRA tests:
1 Login to PFST45 as system/manager.
2 Click Admin.
3 For each user:
a Click the user Account Name.
b On the Users page, deselect the User Active checkbox.
c Click Submit, and in the message box, click OK.
d Click Change Password.
e On the Password Settings for User page, type InForm in the New password and Confirm new password fields.
f Click Submit, and in the message box, click OK.
g Click Return.
h On the Users page, select the User Active checkbox.
i Click Submit, and in the message box, click OK.
4 Log off.
Qualification process tests The qualification process consists of a set of tests that exercise the basic functionality of the InForm software. The tests are divided into Admin and CRC/CRA tests.
Admin - Users test
Pass/Fail Step Description
1 Click the Admin button.

Installation and Configuration
InForm 4.6 73
Pass/Fail Step Description
2 Select each of the following tabs: Users, Rights, Groups, Sites, Configuration, Events, Rules, System, and Synchronization.
3 Click the Users tab, and verify that the following users are active:
• lhill
• dobrien
• mcarlson
4 In the Users tab, click Add User.
5 Type X in the User Name field, and fill in additional user information.
Click Submit, and in the message box, click OK.
6 Click Return.
Verify that user X is shown in the list.
7 Click Properties for user X.
Assign a rights group and two user site associations.
Click Submit, and in the message box, click OK.
8 Click Return.
Click any links for user X except Properties.
9 Click Change Password.
Give user X a password with six characters or more.
Click Submit, and in the message box, click OK.
10 Click Return.
Select Activate User.
Click Submit, and in the message box, click OK.
Log off.
11 Log on as user X, using the password assigned in Step 9.
Click Patients.
Verify that the Sites drop-down list contains only All Sites and the sites chosen in Step 7.
12 Log off.
Admin - Rights test
Pass/Fail Step Description

Chapter 6 Setting up and removing InForm trials
74 InForm 4.6
Pass/Fail Step Description
1 Select the Rights tab.
Click Add Rights Group.
2 Fill in new rights group information.
Click Submit, and in the message box, click OK.
3 Click Return.
Verify that the rights group that you just created is in the list.
Admin - Sites test
Pass/Fail Step Description
1 Select the Sites tab.
Click Add Site.
Type the new site information.
Click Submit, and in the message box, click OK.
2 Click Return.
Verify that the site that you just created is in the list.
Admin - Groups test
Pass/Fail Step Description
1 Select the Groups tab.
Click Add Group.
Select Signature from the Group Type drop-down list, and type the group information.
Click Submit, and in the message box, click OK.
2 Click Return.
Verify that the signature group that you just created is in the list.
3 Select the Groups tab.
Click Add Group.
Choose Query from the Group Type drop-down list, and enter group information.
Click Submit, and in the message box, click OK.

Installation and Configuration
InForm 4.6 75
Pass/Fail Step Description
4 Click Return.
Verify that the query group just created is in the list.
Admin - Users and Groups test
Pass/Fail Step Description
1 Select the Groups tab.
Click Change for the signature group that was created in the previous section.
2 Select user X in the list on the right.
Click Add.
3 Verify that user X is in the list on the left.
Click Submit, and in the message box, click OK.
4 Click Return.
Verify that the Member count column shows 1 (not 0) for the signature group.
5 Select the Groups tab.
Click Change for the query group that was created in the previous section.
6 Click user X in the right-hand list.
Click Add.
7 Verify that user X is in the left-hand list.
Click Submit, and in the message box, click OK.
8 Click Return.
Verify that the Member Count column shows 1 (and not 0) for the query group.
CRC / CRA tests To perform the tests in this section, you need to have two browser sessions open, one as a CRC (dobrien) and the other as a CRA (lhill).
Note: It is acceptable to have two browser sessions open for running these tests, but in production trials, you should only have one browser session open at a time.
To run the CRC/CRA tests:
1 Open two browser windows, using the following URL:

Chapter 6 Setting up and removing InForm trials
76 InForm 4.6
http://computer_name/pfst45
2 Log on to one as dobrien (a CRC) and the other as lhill (a CRA).
3 Continue with the appropriate CRC/CRA tests.
As dobrien (CRC)
Pass/Fail Step Description
1 Click Enroll.
Click Add Candidate. A question window appears.
2 Enter patient information.
Click Submit.
3 Click the Screening Number for the patient that was just entered.
Edit one of the fields.
Click Submit, and in the message box, click OK.
4 Click Return.
Verify that the field you edited is changed.
5 Click Enroll.
6 Enter the subject number (site ID followed by a hyphen and a 3-digit number).
Click Submit. The System Enrollment page displays the heading Patient Meets All Criteria for Enrollment in Study.
7 Click Enroll.
Verify that a Patient Schedule page appears for the patient with a default baseline date of the current date.
8 Change the start date in the Visit calculator.
Verify that the associated dates are updated correctly.
9 Click Go To First Visit.
10 Complete the DOV form.
Click Submit, and in the message box, click OK. The tabs for the first visit's forms appear.
Click each of the forms in the first visit.
11 View the Time and Events Schedule to check all visits for the new patient (click the up arrow where the timeline is shown).
12 Click one of the traffic lights for the baseline visit (for example DEM).
Enter data in the form.
Click Submit, and in the message box, click OK.

Installation and Configuration
InForm 4.6 77
Pass/Fail Step Description
13 Click Return.
Click the traffic light for the VS form.
Enter a value of 200.5 degrees Fahrenheit in the Temperature item.
Click Submit, and in the message box, click OK.
Verify that an auto-query is generated. (The background for the question becomes pink and an error message is shown in red.)
14 Add a comment to an item (by clicking the dialog bubble to the right).
Click Submit, and in the message box, click OK.
15 Change the Temperature value to 98.6.
Click the cell that contains the item value and fill out the Data Value(s) form.
Click Submit, and in the message box, click OK.
16 Verify that the auto-query is answered. The background for the question changes from pink to gray.
17 Click any tab for the patient.
Select Mark SV Ready from the Select Action list and click Do.
18 Click the DEM tab for the patient.
Select Mark SV Ready from the Select Action list and click Do. Verify that the report shows.
Click Print.
19 Verify that the report prints with the correct information.
20 Click Help> InForm and Trial Reporting.
Verify that InForm Help is installed and functioning.
Note: Keep both browsers open to make the following steps easier to perform.

Chapter 6 Setting up and removing InForm trials
78 InForm 4.6
As dobrien (CRC) and lhill (CRA)
Pass/Fail Step Description
1 As lhill:
Click Patients.
Click the Patient link for dobrien, which was created in the CRC test.
Click the traffic light for the DEM form.
Create an open query on an item entered by dobrien:
Click the query flag for the item, click Create Query, select Create Query in Opened State in the Action list, and select a reason.
Click Submit, and in the message box, click OK.
Verify that the query appears with red text in a pink box under the item.
2 As dobrien:
Click Patients.
Click the Patient link for dobrien, which was created in the CRC test.
Click the traffic light for the DEM form.
Answer the query:
Click the yellow flag or the red query text and select a reason.
Click Submit, and in the message box, click OK.
Verify that the query disappears from the form.
3 As lhill:
Refresh the DEM form by clicking the DEM link in the CRF History.
Re-issue the answered query:
Click the yellow flag, select Reissue Query in Open State in the Action list, and select a reason.
Click Submit, and in the message box, click OK.
Verify that the query reappears.
4 As dobrien:
Refresh the DEM form by clicking the DEM link in the CRF History.
Re-answer the query.
Click Submit, and in the message box, click OK.
Verify that the query disappears from the form.

Installation and Configuration
InForm 4.6 79
Pass/Fail Step Description
5 As lhill:
Refresh the DEM form by clicking the DEM link in the CRF History.
Close the query:
Click the yellow flag, select Close Query in the Action list, and select a reason.
Click Submit, and in the message box, click OK.
Verify that the query disappears from the form.

Chapter 6 Setting up and removing InForm trials
80 InForm 4.6
Removing a trial When you remove a trial, you remove the trial definition and data from the InForm database.
If the Reporting and Analysis module is installed, you must first:
1 Deinstall the reporting schema.
2 Remove study-specific information from Sun ONE Directory Server.
3 Delete information about the trial from the Cognos 8 environment.
Removing the reporting database Reporting can be removed in the following ways:
• Remove a single Reporting and Analysis reporting schema only when the reporting schema is installed in a different database.
This leaves most of the trial objects, Streams, and other existing trial and reporting schemas installed.
This is the best option when a reset (which replaces the reporting data only) of the reporting schema is desired.
For more information, Uninstalling the reporting schema.
Note: The difference between this removal and the one described in Removing a single trial/reporting schema—separate databases for trial and reporting, is the number of components that are removed. The removal for the reporting schema only removes the reporting schema objects in the reporting database and table instantiation for the apply process in the reporting database and capture process in the trial database. The removal does not drop any users, grant any privileges, or remove any trial or Streams objects, and it can be run with the trial running. The removal described in the Removing a single trial/reporting schema—separate databases for trial and reporting section removes all Streams components and trial and reporting objects, and must be run with the trial down.
Installation and Configuration
InForm 4.6 81
• Remove a single Reporting and Analysis trial/reporting schema combination when the reporting schema is installed in a different database.
This leaves Streams and other existing trial/reporting schemas installed.
For more information, see Removing a single trial/reporting schema—separate databases for trial and reporting. (on page 81)
• Remove the Reporting and Analysis module when the reporting objects have been installed in the same database as the trial.
All reporting objects exist in the trial schema.
Use this to completely remove Reporting and Analysis from one database.
For more information, see Removing reporting—single database for trial and reporting (on page 82).
Note: Streams components are not installed when using the single database configuration.
• Completely remove the Reporting and Analysis module when the reporting schema is installed in a different database.
Use this to completely remove all InForm software trial/reporting schemas and Streams.
For more information, Completely removing InForm software reporting—separate databases for trial and reporting (on page 83)
Removing a single trial and reporting schema—separate databases for trial and reporting
Note: The InForm database installation and administration scripts are designed to be run using the InForm application server. You can also run the scripts from the InForm reporting Oracle database home on a Windows Server. Running them from a different Windows Oracle client or from a non-Windows Oracle client or database home might work, but is not supported.
1 Run the deinstall_reporting_diffdb.sql script.
Note: This script uses the configdiffdb.sql file, so make sure the correct one is in place.
The uninstall script does not remove tablespaces.
a To check for any errors, search for the word Error.
If any are found, correct the problem and run the script again.
b Rerun the script until it does not find anything to remove and does not have any errors.
In the log, all steps appear with the message No object… was found.
2 To make sure everything has been removed, run the configandcheckdiffdb.sql script.

Chapter 6 Setting up and removing InForm trials
82 InForm 4.6
If this completes successfully, the uninstall succeeded.
Note: This script checks for the existence of a tablespace. If the script fails because it cannot find a tablespace, adjust the tablespace variables in configdiffdb.sql to an existing tablespace in the database and run the script again.
3 Run the following command in both the trial database and the reporting database.
Note: Do not run this command until you are sure you have completely removed the trial/reporting schemas.
a From a Windows command prompt, log on to SQL*Plus with /nolog.
b Connect to the reporting database as STRMADMIN.
c At the SQL*Plus prompt, type: Delete from streams_setup_info where trial_username = '<trial_schema_owner>' and rep_username = '<rep_schema_owner>' and trial_db_global_name = '<global name of the trial database>' and rep_db_global_name = '<global name of the reporting database>'
Note: Enclose all of the above values in single quotes.
where:
• <trial_schema_owner> is the InForm trial owner in the trial database.
• <rep_schema_owner> is the reporting schema owner in the reporting database that corresponds to the InForm trial owner. This username is the same as the InForm trial owner.
4 To find the <global name of the trial database> in the trial database, type: 'Select global_name from global_name;'
5 To find <global name of the reporting database> in the reporting database, type:
'Select global_name from global_name;'
Removing reporting—single database for trial and reporting
Note: The InForm database installation and administration scripts are designed to be run using the InForm application server. You can also run the scripts from the InForm reporting Oracle database home on a Windows Server. Running them from a different Windows Oracle client or from a non-Windows Oracle client or database home might work, but is not supported.
Phase Forward provides a script called deinstall_reporting_samedb to uninstall a single reporting schema. This script removes all components associated with the Reporting and Analysis module for a single trial schema/reporting schema combination.
Note: The uninstall script does not remove tablespaces.
This script relies on the configsamedb file to perform the uninstall. Use the same

Installation and Configuration
InForm 4.6 83
configsamedb.sql file for the installation and the uninstallation. If this file is not available, set parameters in the configsamedb.sql file to uninstall the reporting schema.
1 From a Windows command prompt, set your default to the folder where the reporting software is located.
2 Log in to SQL*Plus with /nolog.
3 At the SQL*Plus prompt, type: @deinstall_reporting_samedb
Note: This script uninstalls the reporting environment for a single trial/reporting schema. It does not uninstall multiple reporting schemas and it does not remove underlying reporting infrastructure. You can run this script as many times as necessary.
If the script aborts with the message Reporting deinstallation aborted, nothing has been removed. This usually indicates a problem with the configsamedb.sql file settings.
4 To make sure everything has been removed, run the configandchecksamedb.sql script.
If this script completes successfully, the uninstall has succeeded.
Note: This script checks for the existence of a tablespace. If the script fails because it cannot find a tablespace, adjust the tablespace variables in configdiffdb.sql to an existing tablespace in the database and run the script again.
Completely removing InForm software reporting—separate databases for trial and reporting
Use this procedure to completely remove the Reporting and Analysis module and Streams in any database where they were installed.
Note: Be sure to execute this procedure on only the databases from which you are completely removing the Reporting and Analysis module.
Before proceeding, Phase Forward recommends that you shut down any trials and Streams processes, and make sure that there are no other users on the system.
1 Uninstall any existing Reporting and Analysis installations in the database first.
For more information, see Removing a single trial/reporting schema—separate databases for trial and reporting (on page 81).
Repeat that procedure as many times as necessary to remove all affected reporting schemas before proceeding.
2 Run the Oracle Streams remove procedure.
Connect to each database where Streams is to be completely removed as STRMADMIN and run the DBMS_STREAMS_ADM.REMOVE_STREAMS_CONFIGURATION procedure.
For more information, on this procedure, see the Oracle PL/SQL Packages and Types Reference.
The removal procedure leaves invalid SYS objects in the database.
3 To recompile them, under the ORACLE_HOME\rdbms\admin folder, run the utlrp.sql script.

Chapter 6 Setting up and removing InForm trials
84 InForm 4.6
4 Connect to the database as STRMADMIN and run the following command: Execute dbms_aqadm.drop_aq_agent(‘STRMADMIN’);
5 Remove the reporting infrastructure components from the reporting database:
a Open Enterprise Manager.
b Log on to the affected databases as RPTINSTALL.
c Run the appropriate set of steps (reporting database without other reporting schemas, or trial database without other reporting components required for other trials).
Note: Run these steps only for a reporting database that does not have other reporting schemas installed.
6 In the reporting database:
a Drop the public database link to the trial database.
b Drop the STRMADMIN user with the CASCADE option.
c Drop the PFREPORTING role.
Note: Run these steps only for a trial database that does not have reporting components required for other trials. Skip this step if other trial schemas will need the reporting components after uninstalling.
7 In the trial database:
a Drop the public database link to the reporting database.
b Drop the STRMADMIN user with the CASCADE option.
c Drop the PFREPORTING role.
d Drop the RPSTRMADMIN user with the CASCADE option.
You might need to completely remove the Reporting and Analysis module from only one trial/reporting database. Consider the following scenario, where the goal is to completely remove the Reporting and Analysis module from RPTDB2, while leaving it installed on RPTDB1.
Two trial/reporting schemas are installed:
• One trial schema resides in TRIALDB1, and its reporting schema resides in RPTDB1.
• One trial schema resides in TRIALDB1, and its reporting schema resides in RPTDB2.
In this scenario, run the first four steps to remove the second trial, leaving the first trial/reporting schema as is. Run the remaining steps on RPTDB2 only. Streams must remain installed on TRIALDB1 to support the first trial/reporting schema combination.
Deleting the trial entry from Sun ONE Directory Server On the server where Sun ONE Directory Server is installed, delete the entry for the study:
1 Select Start > All Programs > Sun Java(TM) System Server Products > Sun Java(TM) System Server Console 5.2.

Installation and Configuration
InForm 4.6 85
The Sun Java System Server Console utility starts.
2 Log on, using the password for the LDAP administrator user.
3 Expand the nodes for the LDAP server and the Server Group, and click the Directory Server node.
4 In the right pane, click Open.
5 In the Directory tab, expand the node for your domain.
6 Right-click the node for the study, and select Delete.
7 In the confirmation dialog box, click Yes.
The Delete Objects window appears and reports on the objects being deleted.
8 When the deletion is complete and the Close button appears, click Close.
9 Close the windows for the server and the Sun Java(TM) System Server Console.
Deleting trial information from the Cognos 8 environment To remove trial information from the Cognos 8 environment, you must be an InForm user with the following credentials:
• Member of a rights group that includes the Reports right.
• Member of the following Reporting groups:
• Either Site Users or Sponsor Users.
• Directory Administrators.
• Either Report Administrators or Server Administrators.
To delete trial information from the Cognos 8 environment:
1 Log in to the InForm trial.
2 Click Reporting.
3 Log on to the Reporting and Analysis module as a System Administrator:
a Click Logon.
b In the User field, type crnsysadmin.
c In the Password field, type the password for the crnsysadmin user.
d Click OK.
4 Select Launch > Reporting Administration.
5 Select the Configuration tab.
6 Click Data Source Connection.
7 Click the InFormRep link.
The connection for the trial appears (for example, pfst46 Connection).
8 In the list of Actions icons, click More.

Chapter 6 Setting up and removing InForm trials
86 InForm 4.6
The Perform an action page appears.
9 Click Delete, and when the confirmation dialog box appears, click Yes.
10 Click Return.
11 On the Public Folders tab, select the folders that are related to the trial (for example, InForm Trial Management for PFST46 and PFST45).
12 For each trial-related folder:
a In the list of Actions icons, click More.
The Perform an action page appears.
b Click Delete, and when the confirmation dialog box appears, click Yes.
c Click Return.
13 Select Launch > Reporting Administration.
14 Select the Configuration tab.
15 Select Content Administration.
The Administration page appears.
16 Select the Op package and reports entry for the trial (for example, pfst46 Op package and reports).
17 In the list of Actions icons, click More.
The Perform an action page appears.
18 Click Delete, and when the confirmation dialog box appears, click Yes.
19 Click Logoff.
Note: If you log off and then attempt to log on again, an Authentication Failed error appears. If this occurs, you must log off the InForm trial and then log in again. You can then log in to the Reporting and Analysis module as a System Administrator by performing Step 2 and Step 3 of this procedure.
Removing a trial definition and data 1 Stop the trial, using the following command:
pfadmin stop trial <trialname>
2 Remove the trial, using the following command: pfadmin remove trial <trialname>
To remove the DSNs from ODBC data source administration at the same time, use the following command:
pfadmin remove trial <trialname> /DSN
3 Remove the user from the database. As the PFDBAdmin user, issue the following command:

Installation and Configuration
InForm 4.6 87
Caution: When you execute this step, all trial data will be lost. In production, make sure you back up the trial database before removing the user.
drop user <trial_uid> cascade;
Note: A trial can be removed; a trial reporting package cannot.

Chapter 6 Setting up and removing InForm trials
88 InForm 4.6

InForm 4.6 89
In this chapter Configuring IIS 6.0 for Windows 2003 ............................................................................................ 90
Configuring the Phase Forward AuthenticationFilter Registry Keys........................................... 91
Configuring the Phase Forward ShowUnscheduled Registry Key ............................................... 93
Changing the PFDBAdmin password .............................................................................................. 94
Installing or re-installing the InForm Admin database after the initial installation of InForm 95
Configuring the browser ..................................................................................................................... 98
Enabling a secure socket layer (SSL) ............................................................................................... 104
Configuring a Customer Defined Database ................................................................................... 109
Setting up custom home pages ......................................................................................................... 113
Setting up randomization .................................................................................................................. 114
Enabling email .................................................................................................................................... 115
Settings for Microsoft UrlScan 2.5 .................................................................................................. 117
C H A P T E R 7 Performing post-installation steps

Chapter 7 Performing post-installation steps
90 InForm 4.6
Configuring IIS 6.0 for Windows 2003 If the InForm server is running Windows 2003 and Cognos 8 will be installed on its own dedicated server, you must configure IIS to work in this deployment scenario.
To configure IIS on the Cognos 8 Gateway server:
1 Navigate to Control Panel > Administrative Tools > Internet Information Services (IIS) Manager.
2 Expand the local computer.
3 Highlight Web Service Extensions.
4 Set All Unknown CGI Extensions, All Unknown ISAPI Extensions, ASP.NET v1.1.4322, ASP.NET v2.0.50727, and WebDAV to Allowed.
5 Ensure that Active Server Pages are Allowed.
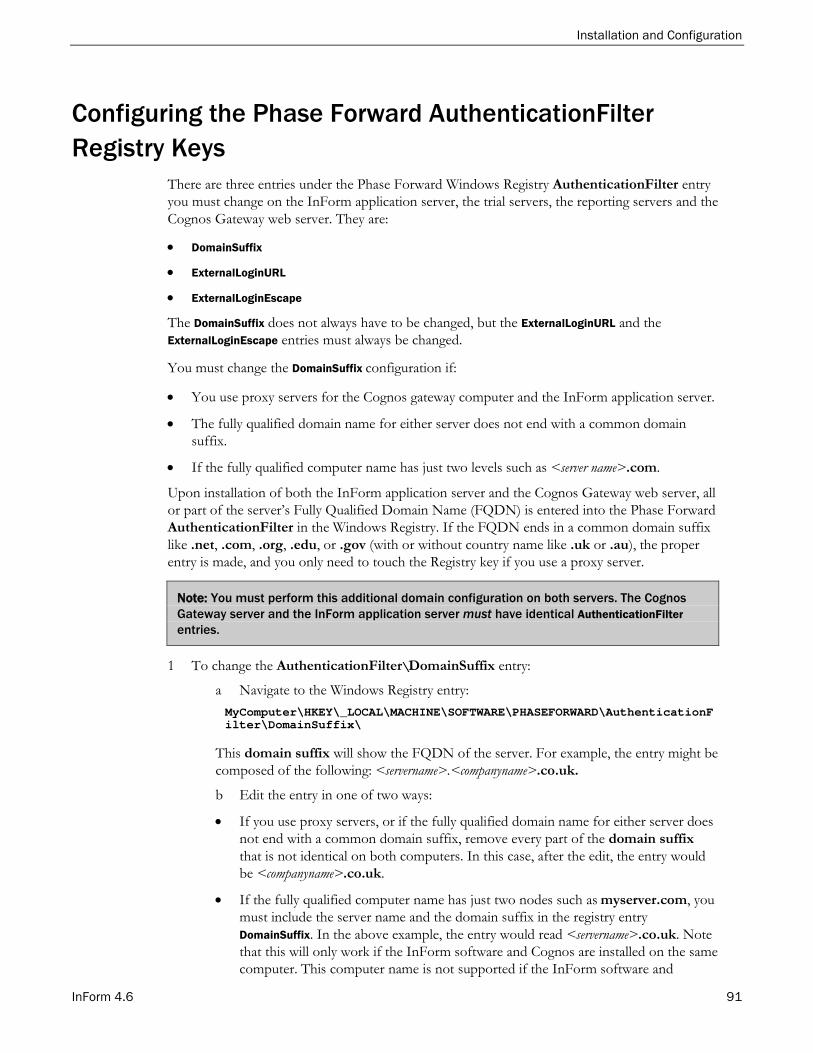
Installation and Configuration
InForm 4.6 91
Configuring the Phase Forward AuthenticationFilter Registry Keys
There are three entries under the Phase Forward Windows Registry AuthenticationFilter entry you must change on the InForm application server, the trial servers, the reporting servers and the Cognos Gateway web server. They are:
• DomainSuffix
• ExternalLoginURL
• ExternalLoginEscape
The DomainSuffix does not always have to be changed, but the ExternalLoginURL and the ExternalLoginEscape entries must always be changed.
You must change the DomainSuffix configuration if:
• You use proxy servers for the Cognos gateway computer and the InForm application server.
• The fully qualified domain name for either server does not end with a common domain suffix.
• If the fully qualified computer name has just two levels such as <server name>.com.
Upon installation of both the InForm application server and the Cognos Gateway web server, all or part of the server’s Fully Qualified Domain Name (FQDN) is entered into the Phase Forward AuthenticationFilter in the Windows Registry. If the FQDN ends in a common domain suffix like .net, .com, .org, .edu, or .gov (with or without country name like .uk or .au), the proper entry is made, and you only need to touch the Registry key if you use a proxy server.
Note: You must perform this additional domain configuration on both servers. The Cognos Gateway server and the InForm application server must have identical AuthenticationFilter entries.
1 To change the AuthenticationFilter\DomainSuffix entry:
a Navigate to the Windows Registry entry: MyComputer\HKEY\_LOCAL\MACHINE\SOFTWARE\PHASEFORWARD\AuthenticationFilter\DomainSuffix\
This domain suffix will show the FQDN of the server. For example, the entry might be composed of the following: <servername>.<companyname>.co.uk.
b Edit the entry in one of two ways:
• If you use proxy servers, or if the fully qualified domain name for either server does not end with a common domain suffix, remove every part of the domain suffix that is not identical on both computers. In this case, after the edit, the entry would be <companyname>.co.uk.
• If the fully qualified computer name has just two nodes such as myserver.com, you must include the server name and the domain suffix in the registry entry DomainSuffix. In the above example, the entry would read <servername>.co.uk. Note that this will only work if the InForm software and Cognos are installed on the same computer. This computer name is not supported if the InForm software and

Chapter 7 Performing post-installation steps
92 InForm 4.6
Cognos are installed on different computers.
Note: If you change the domain suffix for any reason at any time, you need to restart IIS and restart InForm service so that the changes will be picked up.
2 To change the AuthenticationFilter\ExternalLoginURL entry:
a Navigate to the Windows Registry entry:
b MyComputer\HKEY\_LOCAL\MACHINE\SOFTWARE\PHASEFORWARD\AuthenticationFilter
c Select ExternalLoginURL and right click to modify the value to be set to HTTPS: https://<servername>.<domainname>:<portnumber>/PFExternalLogin/ExternalLoginFrameset.html
Note: Be sure to change the port number to the port for HTTPS.
For example: https://APPSRV23.north.pf.com:443/PFExternalLogin/ExternalLoginFrameset.html
3 To change the AuthenticationFilter\ExternalLoginFailureURL entry:
a Navigate to the Windows Registry entry: MyComputer\HKEY\_LOCAL\MACHINE\SOFTWARE\PHASEFORWARD\AuthenticationFilter
b Select ExternalLoginFailureURL and right click to modify the value to be set to HTTPS:
https://<servername>.<domainname>:<portnumber>/PFExternalLogin/ExternalLoginEscape.html
Note: Be sure to change the port number to the port for HTTPS.
For example: https://APPSRV23.north.pf.com:443/PFExternalLogin/ExternalLoginEscape.html
4 Save your changes.
5 Restart IIS.
6 Restart the InForm service if the change is on the InForm application server.
7 Repeat steps 1 though 5 on the other servers.

Installation and Configuration
InForm 4.6 93
Configuring the Phase Forward ShowUnscheduled Registry Key
For trials designed with the Central Designer application, the InForm application includes a registry key for the InForm server that allows you to set whether to display the word Unscheduled in the title bar or in the associated form-level comment, query, audit trail and rule dependencies pages for forms for unscheduled visits.
The word Unscheduled appears by default.
To prevent the word Unscheduled from appearing, do the following on the InForm application server:
1 Navigate to HKEY_LOCAL_MACHINE\SOFTWARE\Phase Forward\InForm.
2 Create the following entry: ShowUnscheduled=<value>
Where <value> equals:
• No value or 1—Displays the word Unscheduled (default).
• 0—Does not display the word Unscheduled.
3 Save your changes.
4 Restart IIS.
5 Restart the InForm service on the InForm application server.

Chapter 7 Performing post-installation steps
94 InForm 4.6
Changing the PFDBAdmin password Note: When you install the InForm software on a production server, Phase Forward strongly suggests that you change the default InForm passwords. You can change this password on this window during the installation, or manually either before or after installing.
To run the InFormPrepORA.vbs script manually and register the new password:
1 Open a Windows command prompt window.
2 Execute the following command from the InForm\Bin\DBOra folder of the InForm software installation:
cscript InFormPrepORA.vbs oracle_connection_string password_for_SYS_user [PFDBAdmin_userid password_for_PFDBAdmin_user]
3 Enter the following command to put the new password in the Registry: pfadmin config service /sysdba PFDBAdmin_userid newpassword

Installation and Configuration
InForm 4.6 95
Installing or re-installing the InForm Admin database after the initial installation of InForm
If you did not set up the InForm Admin database during the initial installation of the InForm software, or if the installation failed, you must run the following commands at a command prompt:
• admindb—Creates the InForm Admin database
• pfmqadmin—Creates and configures the PFMQ tables.
Use these commands if you want to do either of the following:
• Relocate the InForm Admin database from its original location to a new one using the ADMINDB.CMD
or
• Locate the PFMQ tables in a separate database schema than InForm Admin.
Prerequisites
To run these commands, you can do either of the following:
• Create an Oracle user yourself, using Oracle Enterprise Manager Console, or
• Run the following command, which will drop a user (if it exists) and re-create it: pfmqadmin setup dbuser system [systempassword] [connectstring] [pfmquser] [pfmqpassword]
To set up PFMQ, run the following three commands from a command prompt. The first command creates tables for PFMQ. The next two commands tell PFMQ where these tables are located.
pfmqadmin setup dbusertable [AdminDBUID] [AdminDBPID] [connectstring] pfmqadmin config queueinfostore [AdminDBUID] [AdminDBPID] [connectstring] pfmqadmin config defaultmessagestore [AdminDBUID] [AdminDBPID] [connectstring]
Arguments:
• AdminDBUID—Database user name
• AdminDBPID—Database password
• connectstring—Database connection string
admindb command The admindb command installs the InForm Admin database. The command is located at
<installation_directory>\inform\bin\dbORA\admindb.cmd
Syntax
admindb [flag] [connection string] [pfdbadmin password] [informadmin UID]
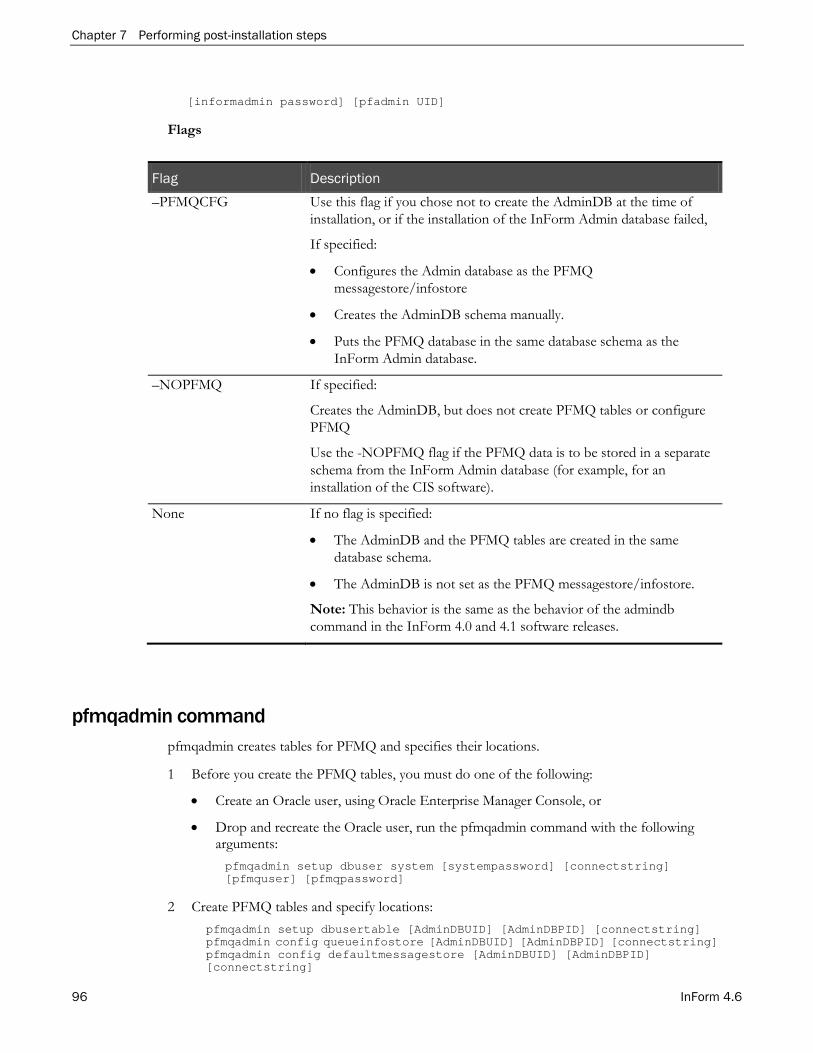
Chapter 7 Performing post-installation steps
96 InForm 4.6
[informadmin password] [pfadmin UID]
Flags
Flag Description –PFMQCFG Use this flag if you chose not to create the AdminDB at the time of
installation, or if the installation of the InForm Admin database failed,
If specified:
• Configures the Admin database as the PFMQ messagestore/infostore
• Creates the AdminDB schema manually.
• Puts the PFMQ database in the same database schema as the InForm Admin database.
–NOPFMQ If specified:
Creates the AdminDB, but does not create PFMQ tables or configure PFMQ
Use the -NOPFMQ flag if the PFMQ data is to be stored in a separate schema from the InForm Admin database (for example, for an installation of the CIS software).
None If no flag is specified:
• The AdminDB and the PFMQ tables are created in the same database schema.
• The AdminDB is not set as the PFMQ messagestore/infostore.
Note: This behavior is the same as the behavior of the admindb command in the InForm 4.0 and 4.1 software releases.
pfmqadmin command pfmqadmin creates tables for PFMQ and specifies their locations.
1 Before you create the PFMQ tables, you must do one of the following:
• Create an Oracle user, using Oracle Enterprise Manager Console, or
• Drop and recreate the Oracle user, run the pfmqadmin command with the following arguments: pfmqadmin setup dbuser system [systempassword] [connectstring] [pfmquser] [pfmqpassword]
2 Create PFMQ tables and specify locations: pfmqadmin setup dbusertable [AdminDBUID] [AdminDBPID] [connectstring] pfmqadmin config queueinfostore [AdminDBUID] [AdminDBPID] [connectstring] pfmqadmin config defaultmessagestore [AdminDBUID] [AdminDBPID] [connectstring]

Installation and Configuration
InForm 4.6 97
Arguments
• AdminDBUID—Database user name
• AdminDBPID—Database password
• connectstring—Database connection string
Chapter 7 Performing post-installation steps
98 InForm 4.6
Configuring the browser Use the following instructions to check your browser settings and change them if necessary.
Unless otherwise stated, the instructions in this chapter apply to Microsoft Internet Explorer 6.0 SP1. For information on other versions of Internet Explorer, refer to the browser documentation.
Enabling pop-ups from the domain for your environment Configure the pop-up blocking functionality of your browser to allow pop-ups from the InForm software.
Note: This configuration is required whether you have an InForm-only installation or an InForm installation with the Reporting and Analysis module.
1 Open Internet Explorer.
2 Select Tools > Pop-up Blocker. If the Pop-up Blocker Settings option is disabled, click Turn on Pop-up Blocker.
3 Select Tools > Pop-up Blocker > Pop-up Blocker Settings.
The Pop-up Blocker Settings dialog box appears.
4 In the Address of Web site to allow field, type the name of the domain used for accessing the study. Use the format *.<domain_name>, for example, *.pf.com. This allows pop-ups from both www.<domain_name>.net and reports.<domain_name>.net.
5 Select Add.
6 Click Close.
Enabling report downloads in Microsoft Excel Reporting and Analysis reports that are downloaded to a Microsoft Excel spreadsheet do not appear unless you configure the browser as follows:
1 Add the domain for your environment to the trusted sites list (on page 99).
2 Configure download settings (on page 99).
3 Allow saving encrypted pages to disk (on page 99).
4 If the pop-up blocker is enabled, add the domain for your environment to the list of sites from which to accept pop-ups.
For more information, Enabling pop-ups from the domain for your environment (on page 98).
5 If needed (if reports that are downloaded to a Microsoft Excel spreadsheet still do not appear after you have performed all of the preceding steps), see Configure download settings for additional zones if needed (on page 99).

Installation and Configuration
InForm 4.6 99
Add the domain for your environment to the trusted sites list 1 Select Tools > Internet Options.
2 Select the Security tab.
3 Click Trusted sites, and then click Sites.
The Trusted Sites dialog box appears.
4 In the Add this website to the zone field, type the name of the domain used for accessing the study. Use the format *.<domain_name>, for example, *.pf.com. This sets both www.<domain_name>.net and reports.<domain_name>.net as trusted sites for pop-up windows.
5 Deselect the Require server verification (https:) for all sites in this zone field, and then click Add.
6 Click Close.
7 Click OK.
Configure download settings 1 Select Tools > Internet Options.
2 Select the Security tab.
The Security Settings dialog box appears.
3 Click Trusted sites, and then click Custom level.
The Security Settings - Trusted Sites Zone dialog box appears.
4 In the Reset custom settings section, select Medium from the drop-down list.
5 In the Downloads section of the Settings field, click Enable in the Automatic prompting for file downloads and File download options.
6 Click OK.
7 Click OK.
Allow saving encrypted pages to disk Phase Forward requires that you allow the system to save encrypted pages to disk by not selecting the Do Not Save Encrypted Pages to Disk security option. When this option is selected, reports that are downloaded to a Microsoft Excel spreadsheet may not appear.
1 Open Internet Explorer.
2 Select Tools > Internet Options.
3 Click the Advanced tab and scroll down to the Security section.
4 Verify that Do Not Save Encrypted Pages to Disk is not selected.
5 Click OK.
Configure download settings for additional zones if needed If reports still disappear when downloaded to a Microsoft Excel spreadsheet after you have

Chapter 7 Performing post-installation steps
100 InForm 4.6
performed the configuration steps described in Enabling report downloads in Microsoft Excel (on page 98):
1 Select Tools > Internet Options.
2 Select the Security tab.
The Security Settings dialog box appears.
3 Click Internet, and then click Custom Level.
The Security Settings - Internet Zone dialog box appears.
4 In the Downloads section of the Settings field, click Enable in the Automatic prompting for file downloads and File download fields.
5 Click OK.
Modifying additional security settings 1 Select Tools > Internet Options.
2 Select the Security tab.
3 Select the type of connection. All users should select Internet, since a fully-qualified domain name (FQDN) is required to access the InForm application.
4 Click Custom Level.
5 Scroll to the Miscellaneous section.
6 Set Allow META REFRESH to Enable.
7 Scroll to the Scripting section.
8 Set Active scripting to Enable.
9 Click Apply to accept all changes.
10 Select the Privacy tab.
11 Move the slider to the bottom to select Accept All Cookies.
12 Click Apply.
13 Click OK.
Installation and Configuration
InForm 4.6 101
Authentication and browser sessions According to standard Internet Explorer behavior, multiple windows are considered to be part of the same session if they are created or launched in the following ways:
• Pop-ups launched from another window in the session.
• File > New > Window or <Ctrl+N> is used to create the new window(s).
Please be aware that your InForm session includes all Internet Explorer windows from the same session. Because of this, and to protect yourself against someone logging on to an unauthorized session, users need to exit their InForm sessions in one of the following ways:
• Explicitly log off of the InForm application.
• Close all the windows within that session.
For security reasons, Phase Forward strongly recommends that users are trained always to log out of the InForm application before closing the browser session. If a user exits the browser without logging out of the InForm application (i.e., click the X in the upper-right corner of the browser window), the InForm browser session closes, but other browser windows may still be open. If the user launches the trial again, a second browser window opens, but the user is not asked to re-authenticate.
Note: It is strongly recommended that you open only one browser sessions to InForm at a time. Opening multiple browser sessions to InForm trials may cause unexpected results.
Preventing automatic password completion To comply with federal regulations that govern electronic data capture in a clinical trial, your browser cannot be set to complete user names and passwords on forms.
To change the automatic password completion setting:
1 Select Tools > Internet Options.
The Internet Options dialog box appears.
2 Select the Content tab.
3 In the Personal information group, click AutoComplete.
The AutoComplete Settings dialog box appears.
4 In the Use AutoComplete for group field, clear the User name and passwords on forms checkbox.
5 In the Clear AutoComplete history group, click Clear Passwords.
6 Click OK on the AutoComplete Settings dialog box.
7 Click OK on the Internet Options dialog box.

Chapter 7 Performing post-installation steps
102 InForm 4.6
Specifying whether to delete temporary files It is recommended that you specify that all temporary files be deleted when the browser is closed. This action improves performance while also providing some level of security.
1 Open Internet Explorer.
2 Select Tools > Internet Options.
3 Click the Advanced tab and scroll down to the Security section.
4 Verify that Empty Temporary Internet File Folder When Browser is Closed is selected.
5 Click OK.
Optimizing browser performance Use the following settings to enhance browser performance:
1 Open Internet Explorer.
2 Select Tools > Internet Options.
3 On the General tab, click Settings.
4 In the Check for newer versions of stored pages radio group, select Automatically.
5 In the Amount of disk space to use input box, select 6 MB.
6 Click OK.
Viewing performance setting alerts If a browser computer is not configured to take advantage of HTTP 1.1 or SSL caching, the InForm log on window displays messages that alert users to either or both conditions, as follows:
Your browser or infrastructure does not support the following optimal settings for InForm:
• Configure your browser to support the HTTP 1.1 protocol.
Printing background graphics To set background graphics to print:
1 Select Tools > Internet Options > Advanced, and scroll down to the Printing section.
2 Select Background Colors and Images.
3 Click OK.
Setting up tabbed browsing for Internet Explorer 7.0 If you are using Internet Explorer 7, to make sure that the emailing of Cognos reports works as it does with Internet Explorer 6 Service Pack 1, you must do one of the following:
1 Select Tools > Internet Explorer Options > Tabbed Browsing Settings, and select Enable Tabbed

Installation and Configuration
InForm 4.6 103
Browsing.
Or
1 Select Tools > Internet Explorer Options > Advanced, and deselect Reuse windows for launching shortcuts.
2 Select Tools > Internet Explorer Options > Tabbed Browsing Settings, and deselect Enable Tabbed Browsing.
Phase Forward is not aware of any adverse effects for the rest of the settings nested in the Enable Tabbed Browsing setup screen.
Other InForm behaviors that need to be accommodated There are several known behaviors of the InForm software and Internet Explorer 6.0 and 7.0 that you should be aware of as you configure client browser settings.
Correcting degraded forms rendering Phase Forward has occasionally found that the rendering of InForm application forms in Internet Explorer can become degraded. If this happens, it may be beneficial to uninstall and reinstall Internet Explorer by using the Add/Remove Programs icon in the Control Panel.
Using large fonts The InForm application does not provide special support for displaying large fonts. If you run the InForm software with the Windows display configured to use large fonts, some of the text and buttons may overlap.

Chapter 7 Performing post-installation steps
104 InForm 4.6
Enabling a secure socket layer (SSL) To encrypt the transmission of data between the application server and the browser computer, you must enable Secure Socket Layers (SSL). This is required for production server installations only.
• If you are using the InForm Unplugged software to synchronize data between servers, SSL is required for synchronization.
• If you are not using the InForm Unplugged software to synchronize data between servers, SSL is optional.
To enable SSL, enable the InForm SSL system configuration option.
Creating, setting up and installing a key certificate for SSL in IIS 6.0
Creating and setting up a key certificate for SSL in IIS 6.0 1 Open Internet Information Services (IIS) Manager.
2 Open the <machine_name> node.
3 Open the Web Sites node.
4 Right-click Default Web Site, and select Properties.
5 Click the Directory Security tab.
6 Click Server Certificate.
The IIS Certificate Wizard starts.
7 Click Next.
8 Select Create a new certificate, and click Next.
9 Select Prepare the request now, but send it later, and click Next.
10 Click Next without changing any values.
11 Type the certificate information. Specify the name of the study server in the Common name field.
12 Enter the appropriate values and click Next.
13 Enter the FQDN (for example: app01.north.pf.com) of the server, and click Next.
14 Enter the appropriate values, and click Next.
15 Click Next to agree to save the certificate to c:\certreq.txt, and click Next.
16 Click Finish.
Installing a key certificate on the server machine in IIS 6.0 1 Open the browser and go to http://2k3crtsrv/certsrv/
2 Click Request a certificate.
3 Click Advanced certificate request.

Installation and Configuration
InForm 4.6 105
4 Click Submit a certificate request by using a base-64-encoded.
5 Copy all the text in certreq.txt file into the first text field of the saved request.
6 Click Submit.
7 Select Base 64 encoded.
8 Click Download certificate.
9 Save to c:\certnew.cer.
10 Click Download certificate chain.
11 Save to c:\certnew.cer.
12 Go to Internet Information Services Manager to complete the certificate request.
13 Right Click on Default Web Site and select Properties.
14 Click the Directory Security tab.
15 Click the Server Certificate button, and click Next.
16 Click Process the pending request, and click Next.
17 Browse to c:\certnew.cer, and click Next.
18 SSL port should be set to 443, and click Next.
19 Click Next, and click Finish.
20 Click the View Certificate button.
21 If you see a red exclamation mark on the certificate icon in the General tab, proceed to the next step. If not skip to Step 30.
22 Go to C:\ directory.
23 Right-click c:\certnew.p7b.
24 Select Install Certificate. Click Next.
25 Click Next again and then click Finish.
26 In the Security Warning dialog box, click Yes.
27 In the confirmation dialog box, click OK.
28 Go back to IIS and click View Certificate button.
29 Verify that the red exclamation mark no longer appears on the certificate icon.
30 Open Internet Information Services (IIS) Manager.
31 Open the <machine_name> node.
32 Open the Web Sites node.
33 Right click Default Web Site and select Properties.
34 Click the Directory Security tab.
35 In the Secure communications box, click Edit.
36 Select Require secure channel (SSL).
37 Click OK, and click OK again.
Chapter 7 Performing post-installation steps
106 InForm 4.6
Import the new key certificate to the local computer and the current user
1 Go to Start > Run, and type mmc.
2 From the Console screen, go to file > Add/Remove Snap-in.
3 Click Available snap-ins > Certificates > Add.
4 Select My user account, and select Finish.
5 Click Available snap-ins > Certificates > Add.
6 Select Computer account, select Next > Finish, and click OK.
7 Go to Certificates > Current User.
8 Expand Trusted Root Certificate Authorities.
9 Right-click Certificates and select Import.
10 Browse to the certificate you created, select it, and complete the wizard, using all defaults.
11 Repeat Step 8 through 10 for Certificates > Local Computer.
Note: Make sure 2k3crtsrv is listed in the trusted roots of the certificate store for both the current user and the local computer. If it is not there, export it from the current user, save it to the disk, and import it to the local computer.
Verify that the certificate is installed To verify that the key certificate is installed correctly:
1 Open a browser window.
2 Type: https://<computer_name.domain>_name.com
The Security Alert window appears.
3 Verify that the date and name for the certificate are valid.
Configuring the Phase Forward ExternalLoginURL and ExternalLoginFailureURL Registry Keys
In order to use SSL, you must set the ExternalLoginFailureURL to the proper HTTPS URL.
To change the ExternalLoginFailureURL entry:
1 Navigate to the Windows Registry entry on the server that will house trials using Reporting and Analysis:
MyComputer\HKEY\_LOCAL\MACHINE\SOFTWARE\PHASEFORWARD\AuthenticationFilter
2 Select ExternalLoginURL and right-click to modify the value to be set to HTTPS -
https://<servername>.<domainname>:<portnumber>/PFExternalLogin/ExternalLoginFrameset.html

Installation and Configuration
InForm 4.6 107
For example: https://APPSRV23.north.pf.com:443/PFExternalLogin/ExternalLoginFrameset.html
3 Select ExternalLoginFailureURL and right-click to modify the value to be set to HTTPS - https://<servername>.<domainname>:<portnumber>/PFExternalLogin/ExternalLoginEscape.html
For example: https://APPSRV23.north.pf.com:443/PFExternalLogin/ExternalLoginEscape.html
4 Save your changes.
5 Restart IIS.
6 Restart the InForm service if the change is on the server also running the InForm application.
7 Repeat steps 1 though 5 on any server running a trial using Reporting and Analysis.
Enabling the SSL system configuration option You can enable the SSL system configuration two ways:
• Use the InForm Admin user interface.
• Use the MedML Installer tool to install the appropriate MedML sysconfig tag.
Using the Admin user interface to enable SSL To enable SSL by using the InForm application Admin user interface:
1 Log on to the InForm application.
2 In the Navigation pane, click Admin.
3 Select the Configuration tab.
4 Set the Enable SSL option to on.
5 Click Submit.
6 Restart the trial.
7 If you are setting up the Reporting and Analysis module, change the Reporting Service Full URL to start with https://.
Note: If you are going to use Cognos 8 Business Intelligence, there is additional configuration that must be performed on the Cognos Gateway server. For more information, Configuring Cognos 8 to use SSL (on page 136).
Using MedML to enable SSL Use this procedure to enable SSL by setting the sysconfig MedML tag:
1 Create an XML file with the following entry: <MEDMLDATA> <SYSCONFIG CONFIGNAME="SSLFlag" TYPE="0" VALUE="1" /> <MEDMLDATA/>

Chapter 7 Performing post-installation steps
108 InForm 4.6
2 Install the configuration option with the MedML Installer tool.
3 Restart the trial. REVIEWERS: STOP TRIAL BEFORE THIS PROCEDURE?
4 If you are setting up the Reporting and Analysis module, change the Reporting Service Full URL to start with https://.

Installation and Configuration
InForm 4.6 109
Configuring a Customer Defined Database A Customer-Defined Database (CDD) is an extract of the trial database. A CDD gives sponsor personnel access to the clinical data that is collected before the trial is completed. Sponsors can review the data as needed, without shutting down the trial database, to find results that might require protocol adjustments or warrant early statistical analysis.
Note: A CDD is limited to clinical data, and is typically designed to organize this data in a way that is suited for delivery into customer statistical analysis tools or other external programs.
The Reporting and Analysis module uses a database similar to the CDD, with a few key differences. The Reporting and Analysis database structure is fixed based on the trial design, and cannot be adjusted as it can be with the CDD. Additionally, the Reporting and Analysis database contains status and derived operational metrics in addition to the clinical data.
You may wish to evaluate the Reporting and Analysis database as another possible data extract and delivery mechanism relative to the CDD, weighing its extended content but fixed structure relative to the more flexible, but limited content CDD.
Overview of CDD creation This section explains how to configure a CDD on a production server. For information on developing a CDD, see Setting Up a Trial with InForm Architect and MedML or the Central Designer User Guide. Remember that a CDD is trial-specific and applies to a single trial only.
To create a CDD:
• Create the mapping definitions.
• Install the mappings to the trial.
• Configure the CDD with pfadmin.

Chapter 7 Performing post-installation steps
110 InForm 4.6
Populating a CDD Clinical data maps from the trial to the CDD. The data submission is concurrent if the CDD is transactional (real-time). Otherwise, the data maps from the InForm trial database to the CDD, which you can update in one of two ways:
• Periodically using the InForm Data Export tool, an InForm utility that exports data from the trial database to a customer-defined database.
• Real-time updating, which is also referred to as an in-line or transactional CDD.
It may be necessary to use a combination of these options.
For example, assume that the sponsor wants to map data to the CDD in real-time mode (in-line CDD), but that the trial starts before the CDD is set up. In this case, the InForm Data Export tool would be used to populate the CDD with data collected to date. From that point forward, data will be captured in the CDD as it is collected.
Note: You can set up more than one CDD per InForm trial.
Defining CDD mappings CDD mapping definitions specify how to transfer data from a trial database to a CDD. They indicate:
• Where each mapped data point comes from in the source trial.
• Where each mapped data point goes in the CDD.
• How the data is organized in each CDD table.
• Optional supplemental text about the design of the components of the CDD definition.
• Optional label text that is transferred to the CDD along with data values.
You typically use the InForm Architect application or the Central Designer application to generate the CDD mappings. For more information, see Setting Up a Trial with InForm Architect and

Installation and Configuration
InForm 4.6 111
MedML or the Central Designer documentation.
Installing CDD mappings After the CDD mappings are generated, you need to install them.
• For trials developed with the InForm Architect software, use the MedML Installer tool to install the mappings to create the CDD tables. For more information, see Setting up a Trial with InForm Architect and MedML or Central Designer documentation.
• For trials developed with the Central Designer software, execute a Central Designer deployment package to install CDD mappings.
An application developer provides an XML file that contains the CDD definition for the trial. After the trial is set up, you can install the CDD definition using the MedML Installer tool. The key piece of information in this XML file is the CDD RefName.
Note: During a CDD data export, no transactional data should be added, deleted, or modified, as this may cause an inconsistency between the transactional database and the CDD.
To install the mappings XML file:
1 Select Start > Programs > Oracle > InForm 4.6 > MedML Installer.
2 Browse to the appropriate folder and select the mappings XML file that you created.
3 Make sure that the appropriate trial is selected.
4 Specify the path and name of the output file, and then click Process.
5 Upon successful completion, close the MedML Installer tool.
6 Start the target trial.
7 Open a Windows 2003 Command prompt, then execute the following command: pfadmin setup cdd <xml_mappings_filename> <trial_name> /db connectionstring <CDD_DSN> <CDD_UID> <CDD_PID> active
8 Upon successful completion, execute the following command: pfadmin config cdd <trial_name> enable
9 Export any existing clinical data from the InForm database to the CDD by using the InForm Data Export utility:
a Select Start > Programs > Oracle > InForm 4.6 > InForm Data Export.
b In the Books section, select Export All Books.
c From the Output Options section, select CDD.
d Type the trial name.
e Click Next.
The CDD Export Options window is displayed.
f Select the DSN from the drop-down list. User Name is populated with the name that you specified when you set up the CDD.

Chapter 7 Performing post-installation steps
112 InForm 4.6
g Enter the CDD password (<CDD_PID>).
h Click Next, then click Start.
10 Click Exit upon successful completion of the data export.
The following is a sample header in the XML file:
<?xml version="1.0"?> <!DOCTYPE MEDMLDATA SYSTEM "MedML.dtd"> <MEDMLDATA> <CDD REFNAME="PFSTCDD" ACTIVE="TRUE">
Configuring the CDD
Note: It is strongly recommended that the default tablespace for the CDD user should be something other than the InForm software tablespace.
To set up and configure CDD mappings for a trial database:
1 Ensure that the target trial is running.
2 Using the following command, create a CDD schema with the DSN name, DSN user, and DSN password:
pfadmin setup cdd <CDDRefName> <TrialName> /DB <oracle_connection_string> <DSN> <UID> <PID>
The UID and PID must:
• Contain alphanumeric or alphabetic characters.
• Begin with a letter (not a number).
For example: pfadmin setup cdd PFSTCDD pfst46 /DB testmachine_dev1 pfstcdd pfstcdduid pfstcddpid
3 Make the online CDD functionality transactional:
pfadmin config cdd <trialName> <CDD_DSN> [Active | Inactive] For example:
pfadmin config cdd pfst46 pfstcdd active
4 Enable online CDD functionality for the trial: pfadmin config cdd TrialName [Enable | Disable]
For example:
pfadmin config cdd pfst46 enable
For more information, see PFAdmin syntax (on page 223).

Installation and Configuration
InForm 4.6 113
Setting up custom home pages The clinical trial designer may have created custom home pages that are visible for each user. Each user can have his or her own home page. Home pages (html) must be accessible to the web server. A folder named Custom is automatically created when you install a trial that was designed in the InForm Architect or the Central Designer application. The virtual directory for each trial is located in the PF\InForm\Trials directory.
Note: Files contained in these custom directories are unsecured.
After installing a trial, you can copy the custom home pages into the custom folder for the trial, and to the virtual custom directory using the Windows Explorer or the following xcopy command:
xcopy <drive:\path to trial custom pages\*.* ><drive:\path to trial custom folder\ >/e
Where
• xcopy—is the Windows command.
• <drive:\path to trial custom pages\*.*> is the drive and path to the custom home pages created by the clinical trial developer.
• <drive:\path to trial custom folder\> is the drive and path to the \Custom folder for the InForm trial.
• /e is an option that indicates to copy directories and subdirectories, including empty ones.

Chapter 7 Performing post-installation steps
114 InForm 4.6
Setting up randomization Randomization in an InForm trial enables the trial to randomly assign drug kits or devices to patients.
• On the development side, the application engineer:
• Incorporates the randomization feature into a trial by using rules attached to items on a form.
• Implements the feature as a button on a randomization form using the appropriate UUIDs included on the form, section, and item of the randomization form or the form responsible for issuing randomized IDs.
• Creates a randomization database, which is usually a Microsoft Access database.
Note: A sample Microsoft Access database is included in the sample study. To use an Oracle randomization database, create an Oracle schema with a table structure that is identical to the sample Microsoft Access database.
• On the production side, you must configure the trial to use the randomization database.
1 Use this pfadmin command: pfadmin config trial <trialname> /rnd <pathfilename.dbextension>
where
• pfadmin is an InForm tool.
• config trial is the command you use to configure InForm trials.
• <trialname> is the name of the trial for which you are setting up the Randomization feature.
• /rnd is an option that does two things: creates a DSN for the randomization database; configures the trial to use the DSN.
Note: You can also use /RndDSN to configure a trial to use an existing DSN.
• <pathfilename.dbextension> is the filename of the datafile containing the Randomization database.
2 Restart pfservice to complete randomization configuration.

Installation and Configuration
InForm 4.6 115
Enabling email To use the InForm email notification feature, you must install the Microsoft SMTP service on the InForm software computer. For more information, see Before installing the InForm software (on page 30).
The routing option for mail delivery must be set in the SMTP service. In most configurations, either the smart host or the remote domain of the SMTP site must point to the email gateway for message transmissions. See your SMTP documentation for details about the routing configuration.
Note: For information on how to invoke email through the InForm software, see Setting up a Trial with InForm Architect and MedML or the Central Designer User's Guide.
Examining email notification The basic concepts of email notification are as follows:
1 When a user enters data into a form, the data is checked and processed according to the rules for the data item, the form, and the trial.
2 In some cases, the results returned by a rule trigger an event, which can open or close a query.
3 An event can alternatively identify an execution plan, which specifies the action to take.
Form rules can either open or close a query, or invoke an execution plan.
4 One of the actions available for an execution plan is email notification. This allows the trial to send an email or a fax based on the results of a rule.
For example, the trial could be set up to send an email if a serious adverse event occurs in a patient.
Note: Enabling email applies only to the production environment and affects all the trials running on the production server where email is enabled.
When to use email notification An InForm trial can use email notification only if:
• The rules for the trial are set up to trigger email notification.
• Email is enabled on the production server.
Chapter 7 Performing post-installation steps
116 InForm 4.6
Email notification requirements To enable email notification:
• Install Microsoft SMTP. Since this is a pre-installation requirement for the InForm software, SMTP should already be available.
• Set the routing option for mail delivery.
• Set the smart host or remote domain of the SMTP site to point to the email gateway for message transmissions.
Note: If your email notification is based on the example found in PFST45 or PFST46, you must apply the CDONTS.DLL to all Win2003 InForm servers. The epMail execution plans in PFST45 and PFST46 use a call to CDONTS.DLL to send email. CDONTS.DLL is no longer supported by Microsoft. Calls that use CDONTS.DLL will not send mail without this step.
Use this procedure to install CDONTS:
1 Install Microsoft SMTP server. Make sure it is running.
2 Download and unzip cdonts.dll to C:\Windows\System32 folder.
3 Register the CDONTS.DLL component on the server.
a Click Start > Run
b Type: regsvr32 c:\Windows\system32\cdonts.dll
c Click Enter.

Installation and Configuration
InForm 4.6 117
Settings for Microsoft UrlScan 2.5 It is recommended that you use Microsoft URLScan 2.5 to increase the security of your web server. Using URLScan with the InForm software requires several non-default settings in the urlscan.ini file. Edit the urlscan.ini file and perform these actions:
• Set the AllowDotInPath variable to 1.
• Add the verb PROPFIND to the [AllowVerbs] section of the file.
• In the [DenyExtensions] section of the file, under Deny ASP Requests, comment out asp. For example, ;asp.

Chapter 7 Performing post-installation steps
118 InForm 4.6

InForm 4.6 119
In this chapter Prerequisites and installation tasks for Cognos 8 software .......................................................... 120
Installing the Sun ONE Directory Server ...................................................................................... 121
Ensure that Cognos 8 Content Store database schema and the CBI user have been created 123
Installing Cognos 8 software ............................................................................................................ 124
Setting up the Oracle JDBC driver .................................................................................................. 128
C H A P T E R 8 Installing the Cognos 8 Business Intelligence core software

Chapter 8 Installing the Cognos 8 Business Intelligence core software
120 InForm 4.6
Prerequisites and installation tasks for Cognos 8 software
Prerequisites for Cognos 8 Verify that the prerequisites have been met. See the Release Notes for a complete list of prerequisites.
Note: Cognos does not support Internet Explorer 8.0.
Note: Ensure that the secure socket layer (SSL) is enabled. For more information, see Enabling a secure socket layer (SSL) (on page 104).

Installation and Configuration
InForm 4.6 121
Installing the Sun ONE Directory Server Install the Sun ONE Directory Server authentication server (LDAPHOST) using the instructions provided in the Cognos Series 7 Supplementary Software Installation Guide. This guide is included on the InForm documentation ISO image.
You must install Sun ONE Directory Server on a Cognos 8 Business Intelligence computer or on a separate dedicated computer.
To install Sun ONE Directory Server:
1 Download the SunONE_52_Patch4_install.zip file from the Phase Forward Extranet Download Center. You will find the setup.exe file in the root folder.
2 Click setup.exe, and then click Next.
3 Click Yes to accept software license.
4 Select Sun Java System Servers, and then click Next.
5 Select Typical, and click Next.
6 Select a folder in which to install the software, and then click Next.
7 Ensure that all products are selected, and then click Next.
8 If prompted to turn the SNMP service off, click OK.
9 Select The new instance will be the configuration Directory server, and then click Next.
10 Select Store data in the new Directory Server, and then click Next.
11 Enter the following values when prompted.
Field Value or Comments Server Identifier Type the physical name of the LDAP server.
Server port Use the default port number 389 that is listed.
Note: Using a specific port number could result in port conflicts with other applications. Using the default number eliminates port conflicts.
Suffix The network domain (for example, if the domain is pf.com, type: dc=pf,dc=com).
Config directory admin id admin.
Password Your password.
Password confirmation Your password.
Admin domain, type in y Your domain (if your domain is pf.com, type: pf.com).
Directory manager DN cn=admin.
Password Your password.
Admin port Use the default port listed.

Chapter 8 Installing the Cognos 8 Business Intelligence core software
122 InForm 4.6
12 Click Install Now.
13 Review Configuration Details, and then click Next.
14 Review Installation Summary, and then click Next.
15 When the installation is complete, restart the computer.

Installation and Configuration
InForm 4.6 123
Ensure that Cognos 8 Content Store database schema and the CBI user have been created
If you did not create the Cognos 8 database and accounts in Creating Cognos 8 database and accounts (on page 42), do so using these instructions:
1 Make sure that an Oracle database instance is set up.
2 Verify the connection string in the tnsnames.ora file.
3 Create a database to store the content for Cognos 8 Business Intelligence.
For more information, see your Cognos documentation.
Note: Pay special attention to the Unicode character set Cognos recommends as this cannot be changed after the database is created.
After creating the database:
1 Create a tablespace called CONTENT with 100M initial size, autoextend on and 50M increment extension.
2 Create a user called CBI and grant the user the following privileges:
• Roles
• CONNECT
• RESOURCE
• Privileges
• CREATE VIEW
• UNLIMITED TABLESPACE
3 Make sure that the instance can be seen by the Cognos server. (Aliases for database instances and their connection information are in tnsnames.ora.)
4 Make sure that the Content Store database is Unicode.
Note: Make sure that the following file has been copied from the ORACLE_HOME\jdbc\lib folder to the Cognos_location\webapps\p2pd\WEB-INF\lib folder:
For Oracle 11: ojdbc5.jar file.
For Oracle 10:ojdbc14.jar file.

Chapter 8 Installing the Cognos 8 Business Intelligence core software
124 InForm 4.6
Installing Cognos 8 software When installing Cognos 8 software, install the following components:
• The Application Tier Components.
• The Gateway.
• Content Manager.
You can install each component on a separate server, install all on the same server, or share computers between two or more components. For more information, see the Cognos Installation and Configuration Guide, which is included on the InForm documentation .ISO image.
The instructions in this manual cover installing all of the Cognos components on a single computer, along with the InForm server. These instructions may be generalized to cover a distributed Cognos installation.
If you install one or more Application Tier Components on a separate server, to insure that they can communicate with other Cognos reporting components, you must:
• Configure cryptographic properties.
• Specify all Content Manager URIs.
• Specify the Dispatcher URIs.
• Specify the Dispatcher URI for external applications.
In a multiserver environment, on a server where there are Application Tier Components installed (report servers) but no Content Manager, you must configure that server's Notification Store property to point to the Content Store. This is indicated in the on-screen Help notes in Cognos Configuration.
Installing the core software 1 Download the CZAG1ML.tar.gz file from the Phase Forward Extranet Download Center.
2 Extract the archive file and navigate to the issetup.exe file in the \Win32 folder.
3 Double-click issetup.exe.
The Welcome page of the installation wizard appears.
4 Select the language to use for the installation, and then click Next.
The License Agreement page appears.
5 Read the license agreement, select I accept, and then click Next.
The Installation Location page appears.
6 In the Destination folder field, type the drive and destination folder for Cognos 8 Business Intelligence (for example C:\cognos\c8), and then click Next.
7 If the Folder does not exist message appears, click Yes to create the folder.
The Component Selection page appears.
8 Make sure that all components are selected except for the Cognos Content Database, and then

Installation and Configuration
InForm 4.6 125
click Next.
The Shortcut Folder page appears.
9 Accept the default Program folder, and then click Next.
The Installation Summary page appears.
10 Review the installation summary, and then click Next.
The installation program installs the components that you selected. This takes several minutes.
An informational message appears, telling you where to get documentation if the installation is not in English. Click OK.
When the component installation is complete, the Finish page appears.
11 On the Finish page:
• To view the transfer log or the summary-error log, click the appropriate View button.
• To view the readme file, select View Cognos Readme.
• Verify that Start Cognos Configuration is not selected.
12 Click Finish.
Upgrading Cognos 8.4.1 to FP2 After you install the Cognos 8 core software, you must upgrade the Cognos 8 core software to FP2.
Use this procedure to install the Cognos 8 Business Intelligence FP2 update software:
1 Download the C8_BI_8_4_1_win32_FP002.tar.gz file from the Phase Forward Extranet Download Center.
2 Extract the archive file and navigate to the issetup.exe file in the \Win32 folder.
3 Double-click issetup.exe.
The Welcome page of the installation wizard appears.
4 Click Next.
The Installation Language Selection page appears.
5 Select the language to use for the update, and then click Next.
The License Agreement page appears.
6 Read the license agreement, select I accept, and then click Next.
The Installation Location page appears. The Destination folder field contains the drive and destination folder in which you installed Cognos 8 Business Intelligence.
7 Click Next.
An informational message appears, stating that the update will replace existing files, and gives you the opportunity to create a backup of the files that will be replaced.
8 Click Yes.

Chapter 8 Installing the Cognos 8 Business Intelligence core software
126 InForm 4.6
The Installation Summary page appears.
9 Review the installation summary, and then click Next.
The program installs the update. This takes several minutes.
When the component installation is complete, the Finish page appears.
10 On the Finish page:
• To view the transfer log or the summary-error log, click the appropriate View button.
• To view the readme file, select View Cognos Readme.
• Verify that Start Cognos Configuration is not selected.
11 Click Finish.
Installing Cognos hot sites In addition to the upgrade to FP2 of the Cognos 8 Business Intelligence software, you must install hot site updates that fix known problems.
Install the following Cognos 8.4 hot sites in the order below, using the issetup.exe files located in the \Win32 folder.
1 Install Hot Site 8.4.102.1059.
2 Install Hot Site 8.4.103.1012.
3 Install Hot Site 8.4.103.1013.
4 Install Hot Site 8.4.104.1017.
Note: These hot sites must be installed in the above order.
To install the hot sites:
1 Download the up_c8bisrvr_win32_8.4.nnn.nnnn_ml.tar.gz file (where nnn.nnnn equals the last seven numbers for each hot site) from the Phase Forward Extranet Download Center.
2 Extract the archive file into a different folder from the folder where you originally downloaded the Cognos 8 version software, and navigate to the folder containing the issetup.exe.
3 Double-click issetup.exe.
The Welcome page of the installation wizard appears.
The Installation Language Selection page appears.
4 Select the language to use for the update, and then click Next.
The License Agreement page appears.
5 Read the license agreement, select I accept, and then click Next.
The Installation Location page appears. The Destination folder field will contain the drive and destination folder in which you installed Cognos 8 Business Intelligence.
6 Click Next.

Installation and Configuration
InForm 4.6 127
An informational message appears, stating that the hot site will replace existing files, and gives you the opportunity to create a backup of the files that will be replaced.
7 Click Yes.
The Installation Summary page appears.
8 Review the installation summary, and click Next.
The program installs the hot site. This takes several minutes.
When the component installation is complete, the Finish page appears.
9 On the Finish page:
• To view the transfer log or the summary-error log, click the appropriate View button.
• To view the readme file, select View Cognos Readme.
• Verify that Start Cognos Configuration is not selected.
10 Click Finish.
11 Proceed to the next hot site until all four hot sites are installed.

Chapter 8 Installing the Cognos 8 Business Intelligence core software
128 InForm 4.6
Setting up the Oracle JDBC driver Before running the wizards that customize the Cognos 8 BI software for the InForm environment, you must set up the Oracle JDBC driver on every computer that has a Cognos 8 Business Intelligence Content Manager installed.
1 Navigate to one of the following directories, as appropriate for the version of the Oracle database software you are using:
• For Oracle 10.2.0 database software:
oracle\product\10.2.0\client_1\jdbc\lib
• For Oracle 11.2.0 database software
oracle\product\11.2.0\client_1\jdbc\lib
2 Copy the following file (as appropriate for your version of Oracle database software) to the <drive>/<cognos folder>/webapps/p2pd/WEB-INF/lib folder.
• For Oracle 10.2.0 database software—ojdbc14.jar
• For Oracle 11.2.0 database software—ojdbc5.jar

InForm 4.6 129
In this chapter Running the customization wizards ................................................................................................ 130
Creating the PFWD namespace and the CRNSYSADMIN user name .................................... 134
Configuring Cognos 8 to use SSL in the Cognos Configuration utility .................................... 136
Configuring the Phase Forward AuthenticationFilter Registry Keys......................................... 137
Customizing Cognos 8 BI email settings ........................................................................................ 139
Starting the Cognos 8 BI servers ..................................................................................................... 140
Configuring settings for CSV report output .................................................................................. 141
Configuring the Cognos 8 Gateway server to run the Cognos Application Firewall .............. 143
C H A P T E R 9 Configuring Cognos 8 Business Intelligence for the InForm ITM Environment

Chapter 9 Configuring Cognos 8 Business Intelligence for the InForm ITM Environment
130 InForm 4.6
Running the customization wizards Phase Forward provides the following wizards, which you can find on your InForm installation CD:
• Cognos 8 Customization for InForm wizard.
• Gateway Customization for InForm wizard.
• InForm Reporting Addition wizard.
• InForm ReportingDB wizard.
Running the Cognos 8 Customization for InForm wizard The Cognos 8 Customization for InForm wizard copies customization files and modifies files needed to customize the Cognos 8 software for the InForm software.
Perform this procedure one time per Cognos server installation.
1 Download the InForm_4.6_SP3.iso file from the Phase Forward Extranet Download Center.
2 Extract the archive file and copy the CRNConfig folder to the Content Manager computer.
3 Run the CRNConfig\setup.exe program file.
4 Specify the folder in which Cognos 8 is installed.
5 Click Next.
The Setup Type window appears.
6 Select the memory model (Small, Medium, or Large) that is most appropriate for your business, and then click Next.
Note: You can change this later if you select the wrong size.
7 For the Content Store, type the name of the Content Store database server where the Content Store database is installed.
8 Type the User Name and Password.
9 Type the Port and the SID.
10 Click Next.
The Cognos 8 Web Server (gateway or IIS server) window appears.
11 Type the fully qualified domain name of the Cognos 8 Gateway server, or click Browse to select it from the dialog box.
12 Click Next. If the server has not yet been installed, the system asks if it should continue using the server name provided.
13 Click OK.

Installation and Configuration
InForm 4.6 131
The LDAP Configuration window appears.
14 Type the name of the LDAP server.
15 Type the Administrator DN.
16 Type the Password.
17 Type the Parent Node DN.
18 Change the number of the LDAP port if necessary.
The Ready to Install the Program window appears.
Note: The Administrator DN is the Distinguished Name of the administrator of the server. This must be the user you created during the Sun ONE Directory Server installation where it was called the Directory Administrator. Use the format and values shown beneath the field.
Note: The Parent Node DN is also known as the Base Distinguished Name (BDN), which specifies the top level or root of the folder structure which will be the starting place for searches.
19 Click Install.
The Setup Status window appears.
The program copies the necessary files, and creates CRNSetup.xml in an InForm subfolder under the Cognos 8 installation folder (...\inform\Config). You need this file to run CRNGatewayConfig.
20 Click OK.
Changing or creating a new FocusSecurityProvider properties file The Cognos 8 Customization for InForm wizard also creates the FocusSecurityProvider_ldapcsp1.properties file. This information is necessary to configure the custom security provider’s connection to LDAP. If the LDAP configuration changes post install, the FocusSecurityProvider_ldapcsp1.properties file must be manually edited. If an additional new namespace is to be added after the Cognos 8 Business Intelligence configuration, the file must be copied and edited manually.
The first four lines of the file may be changed. The rest of the file must remain as is.
To create a new FocusSecurityProvider properties file:
1 Copy the existing FocusSecurityProvider_ldapcsp1.properties file and save it to the same folder as the original. Name the new copy FocusSecurityProvider_<new_namespace_name>.properties.
The first four lines of the new file must be changed.
2 On line 1, type the URL of the LDAP server. Change the number of the LDAP port if necessary.
Example: ldap.url=ldap://appsru02.north.pf.com:389
3 On line 2, type the Administrator Distinguished Name. This user name will be used by CSP to

Chapter 9 Configuring Cognos 8 Business Intelligence for the InForm ITM Environment
132 InForm 4.6
login into LDAP.
Example: ldap.bind.username=uid=admin,ou=Administrators,ou=TopologyManagement,o=NetscapeRoot
4 On line 3, change the word "encrypted” to “unencrypted” and set the password in plain text.
The password will be encrypted when Cognos starts up.
Example: ldap.bind.password=unencrypted:password
5 On line 4, type the Parent Node Distinguished Name.
Example: ldap.base.dn=dc=north,dc=pf,dc=com
6 Save the file.
Running the Cognos 8 Gateway Customization for InForm wizard The Cognos 8 Gateway Customization for InForm wizard configures the Cognos 8 Gateway component.
In each Cognos installation, run this procedure one time for each Cognos Gateway server.
1 Download the InForm_4.6_SP3.iso file from the Phase Forward Extranet Download Center.
2 Extract the archive file and copy the CRNConfig folder to the Content Manager computer.
3 Copy the CRNGatewayConfig folder from the InForm_4.6_SP3.iso to the Cognos Gateway computer.
4 Run the CRNGatewayConfig\setup.exe program file.
The Cognos 8 Welcome Screen appears.
5 Click Next.
The Cognos 8 Installation Location window appears.
6 Specify the path to the location of the Cognos 8 software.
The CRN Setup File window appears.
7 To locate the CRNSetup.xml file that was created in the previous task, click Browse.
8 Move the CRNSetup.xml file to the Cognos Gateway computer.
9 Click Next.
The Ready to Install the Program window appears.
10 Click Install.
The program installs, and then the world wide web Publishing Service restarts.
11 Click Finish.
Running the InForm Reporting Addition wizard The InForm Reporting and Analysis Addition wizard copies reporting-specific files that are not
Installation and Configuration
InForm 4.6 133
distributed to the InForm ITM software installation.
Perform this procedure on the InForm Application server.
1 Download the InForm_4.6_SP3.iso file from the Phase Forward Extranet Download Center.
2 Extract the archive file and copy the InFormCRNUpdate folder from the InForm_4.6_SP3.iso to the InForm application server computer.
3 Run the InFormCRNUpdate\setup.exe program file.
The InForm Reporting and Analysis Addition window appears.
4 Click Next on each window of the wizard until the Ready for Install window appears.
5 Click Install.
The installation starts.
6 Click Finish when the installation is complete.
Note: After installation of InForm Reporting and Analysis Addition on the InForm application server, restart the InForm service. If this is not done, an authentication error will occur when accessing the Reporting and Analysis module from within a trial.
Running the InForm ReportingDB wizard The InForm ReportingDB wizard copies several scripts to a location you specify. You later use these scripts to create and configure the reporting database schema for the trial you are setting up.
When you run the ReportingDB wizard, the destination location you specify must already exist.
1 Download and extract the InForm_4.6_SP3.iso file to a Windows computer.
2 Run the \ReportingDB\setup.exe program file.
The InForm Reporting Database Scripts window appears.
3 Click Next.
The Choose Destination window appears.
4 Accept the default location, or click Change and select a different location to put the scripts.
5 Click Next.
The Ready for Install window appears.
6 Click Install.
The installation starts.
7 When the installation is complete, click Finish.
8 Repeat the procedure for each trial you are setting up.

Chapter 9 Configuring Cognos 8 Business Intelligence for the InForm ITM Environment
134 InForm 4.6
Creating the PFWD namespace and the CRNSYSADMIN user name
You must create namespace in both Cognos 8 Business Intelligence and LDAP for the Reporting and Analysis module. To do this:
1 Download the SunONE_52_Patch4_Install.zip file from the Phase Forward Extranet Download Center.
2 Extract the archive file. The setup.exe file is in the root folder.
3 Ensure the Cognos Service is stopped.
4 Launch the Sun JAVA System LDAP Directory Server tool.
5 Expand the <computer name> node.
6 Expand the Server Group.
7 Select Directory Server, and then click Open in the right pane.
8 On the Directory tab, right-click the directory node that represents the target domain in the directory tree.
9 From the context menu, select New > Organizational Unit.
The Create New Organization Unit dialog box appears.
10 In the Name field, type PFWD (all UPPERCASE).
11 Click OK.
12 On the Directory tab, right-click PFWD in the directory tree.
13 From the context menu, select New > User.
The Create New User dialog appears.
14 Create a new user for the PFWD namespace as follows:
• User name—crnsysadmin
• Password—<password>
15 Click OK.
16 Close the Sun JAVA System Server Console tool.
17 On the Cognos Server, launch the Cognos Configuration utility.
The Cognos Configuration dialog appears.
18 In the Security tree, right-click Authentication.
19 Select New Resource > Namespace from the context menu.
The New Resource - Namespace dialog appears.
20 Create a new namespace in Cognos 8 as follows:
• Namespace—PFWD (all UPPERCASE)
• Type—LDAP

Installation and Configuration
InForm 4.6 135
21 Click OK.
22 Complete the parameters as follows:
• Namespace ID—PFWD
• Host and Port—<fullyqualifiedcomputername>: <LDAPServerPort> (example port number: 389)
• Base distinguished name—ou=PFWD, dc=pf, dc=com (Assuming the network domain is PF.COM. Use the actual domain name for your environment.)
• User lookup—(uid=${userID})
23 Save the Cognos 8 configuration.
24 Restart the Cognos 8 service.
Chapter 9 Configuring Cognos 8 Business Intelligence for the InForm ITM Environment
136 InForm 4.6
Configuring Cognos 8 to use SSL in the Cognos Configuration utility
1 Connect to Cognos Gateway server.
2 Navigate to the Windows Start menu.
3 Select All Programs > Cognos8 > Cognos Configuration.
4 After the Cognos Configuration utility is completely loaded, select Portal Services and set Web Content UrI to HTTPS using the following format:
https://<servername>.<domainname>:<portnumber>/COGNOS8
Note: Be sure to change the port number to the port for HTTPS.
For example: https://appsrv23.north.pf.com:443/cognos8
5 Select Environment and set Gateway URI entry.
https://<servername>.<domainname>:<portnumber>/cognos8/cgi-bin/cognosisapi.dll
Note: Be sure to change the port number to the port for HTTPS.
For example: https://APPSRV23.north.pf.com:443/cognos8/cgi-bin/cognosisapi.dll
6 Select File > Save.
The Cognos Configuration utility validates the settings and saves the configuration.
7 When the checks are complete (all items are marked with a green check mark), click Close.
8 Select Actions > Start.
The Cognos Configuration utility registers and starts the Cognos 8 BI Service.
9 Click Close.
Installation and Configuration
InForm 4.6 137
Configuring the Phase Forward AuthenticationFilter Registry Keys
If you did not make the changes necessary for the Authentication Filter registry keys after you installed the InForm core software, perform the following tasks if applicable.
There are three entries under the Phase Forward Windows Registry AuthenticationFilter entry you must change on the InForm application server, the trial servers, the reporting servers and the Cognos Gateway web server. They are:
• DomainSuffix
• ExternalLoginURL
• ExternalLoginEscape
The DomainSuffix does not always have to be changed, but the ExternalLoginURL and the ExternalLoginEscape entries must always be changed.
You must change the DomainSuffix configuration if:
• You use proxy servers for the Cognos gateway computer and the InForm application server.
• The fully qualified domain name for either server does not end with a common domain suffix.
• If the fully qualified computer name has just two levels such as <server name>.com.
Upon installation of both the InForm application server and the Cognos Gateway web server, all or part of the server’s Fully Qualified Domain Name (FQDN) is entered into the Phase Forward AuthenticationFilter in the Windows Registry. If the FQDN ends in a common domain suffix like .net, .com, .org, .edu, or .gov (with or without country name like .uk or .au), the proper entry is made, and you only need to touch the Registry key if you use a proxy server.
Note: You must perform this additional domain configuration on both servers. The Cognos Gateway server and the InForm application server must have identical AuthenticationFilter entries.
1 To change the AuthenticationFilter\DomainSuffix entry:
a Navigate to the Windows Registry entry: MyComputer\HKEY\_LOCAL\MACHINE\SOFTWARE\PHASEFORWARD\AuthenticationFilter\DomainSuffix\
This domain suffix will show the FQDN of the server. For example, the entry might be composed of the following: <servername>.<companyname>.co.uk.
b Edit the entry in one of two ways:
• If you use proxy servers, or if the fully qualified domain name for either server does not end with a common domain suffix, remove every part of the domain suffix that is not identical on both computers. In this case, after the edit, the entry would be <companyname>.co.uk.
• If the fully qualified computer name has just two nodes such as myserver.com, you must include the server name and the domain suffix in the registry entry

Chapter 9 Configuring Cognos 8 Business Intelligence for the InForm ITM Environment
138 InForm 4.6
DomainSuffix. In the above example, the entry would read <servername>.co.uk. Note that this will only work if the InForm software and Cognos are installed on the same computer. This computer name is not supported if the InForm software and Cognos are installed on different computers.
Note: If you change the domain suffix for any reason at any time, you need to restart IIS and restart InForm service so that the changes will be picked up.
2 To change the AuthenticationFilter\ExternalLoginURL entry:
a Navigate to the Windows Registry entry:
b MyComputer\HKEY\_LOCAL\MACHINE\SOFTWARE\PHASEFORWARD\AuthenticationFilter
c Select ExternalLoginURL and right click to modify the value to be set to HTTPS: https://<servername>.<domainname>:<portnumber>/PFExternalLogin/ExternalLoginFrameset.html
Note: Be sure to change the port number to the port for HTTPS.
For example: https://APPSRV23.north.pf.com:443/PFExternalLogin/ExternalLoginFrameset.html
3 To change the AuthenticationFilter\ExternalLoginFailureURL entry:
a Navigate to the Windows Registry entry: MyComputer\HKEY\_LOCAL\MACHINE\SOFTWARE\PHASEFORWARD\AuthenticationFilter
b Select ExternalLoginFailureURL and right click to modify the value to be set to HTTPS:
https://<servername>.<domainname>:<portnumber>/PFExternalLogin/ExternalLoginEscape.html
Note: Be sure to change the port number to the port for HTTPS.
For example: https://APPSRV23.north.pf.com:443/PFExternalLogin/ExternalLoginEscape.html
4 Save your changes.
5 Restart IIS.
6 Restart the InForm service if the change is on the InForm application server.
7 Repeat steps 1 though 5 on the other servers.

Installation and Configuration
InForm 4.6 139
Customizing Cognos 8 BI email settings The Cognos 8 BI installation sets up a feature that you can use to send links to report output using email. By default, the report links point to the server where the Cognos 8 Business Intelligence Gateway services are installed (the Gateway server).
If your environment is configured with an F5 switch, and you must use the generic URL to the switch, instead of pointing to the Gateway server, you must configure the SMTP mail server, using the Cognos Configuration utility.
1 Using the Cognos Configuration utility, configure the SMTP mail server.
For more information, see the Cognos 8 BI Reporting Quick Start Installation and Configuration Guide, Chapter 2.
2 Select File > Save.
The Cognos Configuration utility validates the settings and saves the configuration.
3 When the checks are complete (all items are marked with a green check mark), click Close.
4 Select Actions > Start.
The Cognos Configuration utility registers and starts the Cognos 8 BI Service.
5 Click Close, and close the Cognos Configuration utility window.

Chapter 9 Configuring Cognos 8 Business Intelligence for the InForm ITM Environment
140 InForm 4.6
Starting the Cognos 8 BI servers After completing the Cognos 8 BI installation and configuration steps, you can start the Cognos 8 BI servers. If you have distributed Cognos 8 BI application tier components across multiple servers, see the Cognos Installation & Configuration Guide for the specific order for starting the servers.
1 On the server where the Cognos 8 BI service is installed, select Start > All Programs > Cognos8 > Cognos Configuration.
The Cognos Configuration utility starts.
2 Select Actions > Start.
3 When the server is started, close the Cognos Configuration utility.
Installation and Configuration
InForm 4.6 141
Configuring settings for CSV report output The Reporting and Analysis module provides settings that allow you to use CSV report output files with applications such as the Excel spreadsheet application. Phase Forward applies these settings for hosted environments, and recommends that you apply them to your environments as well.
Note: You must have server administration rights to modify these settings.
• Delimiter—Comma-delimited files are widely accepted for use with several applications.
• Encoding—Using UTF-8 character encoding allows you to use your CSV output with a wide range of applications.
• Terminator—Using carriage return and line feed (CRLF) terminators ensures that the report output is properly organized into columns and rows.
Configuring the CSV settings for reports 1 Go to the Reporting and Analysis home page.
2 Click Launch > Reporting Administration.
The Administration page appears.
By default, the Status tab is selected.
3 In the pane on the left, click System.
4 In the Scorecard section, click the server name.
The full URL for the server appears below the server name.
5 Click the full URL for the server.
The available services for the server appear.
6 Select Report Service > Set Properties.
The Set properties - ReportService dialog box appears.
7 Select the Settings tab.
8 In the Category drop-down list, select Environment.
9 In the Environment category, in the Advanced settings row, click Edit.
The Set advanced settings dialog box appears.
10 Select the Override the settings acquired from the parent entry checkbox.
11 Type the following parameters and values:
Parameter Value Description RSVP.CSV.DELIMITER , Separates each data item in the report output with
a comma.

Chapter 9 Configuring Cognos 8 Business Intelligence for the InForm ITM Environment
142 InForm 4.6
Parameter Value Description RSVP.CSV.ENCODING UTF-8 Specifies UTF-8 character encoding for report
data.
RSVP.CSV.TERMINATOR CRLF Separates each row of data with a carriage return and line feed, so that the rows appear in ordered columns.
12 Select the checkbox next to each parameter.
13 Click OK.
The Set properties - ReportService page appears.
14 Click OK.

Installation and Configuration
InForm 4.6 143
Configuring the Cognos 8 Gateway server to run the Cognos Application Firewall
If all of your Cognos 8 servers are not on the same network or behind a system firewall, you should enable the Cognos Application Firewall (CAF) on the Cognos Gateway server.
To enable the Cognos Gateway server to use the CAF:
1 Connect to Cognos Gateway server.
2 Navigate to the Windows Start menu.
3 Select All Programs > Cognos8 > Cognos Configuration.
4 After the configuration is completely loaded, select Local Configuration\Security\IBM Cognos Application Firewall from the Explorer pane.
The Component Properties pane appears.
5 Set the property Enable CAF validation? to True.
6 For the property Valid domains or hosts, click on the pencil icon to the right of the Value cell.
The Valid domains or hosts page appears.
7 Click Add.
8 Fill in the hostnames or domain names that are valid for your environment.
The CAF will validate hostnames and domain names used or passed in a request, and not allow requests to pass unless the name is listed on this page. You can add as many hostnames or domain names as needed for your configuration or system topology.
9 Click OK when you have finished adding names.
10 Save the Cognos configuration.
11 Restart the Cognos service.
12 When the service is restarted, close the Cognos Configuration utility.

Chapter 9 Configuring Cognos 8 Business Intelligence for the InForm ITM Environment
144 InForm 4.6

InForm 4.6 145
In this chapter Comparing configuration scenarios ................................................................................................. 146
Creating the InForm reporting database ........................................................................................ 147
Installing the Reporting and Analysis module ............................................................................... 170
Using the LDAP configuration tool to configure the InForm trial and LDAP for the Reporting and Analysis module ....................................................................................................... 175
Using LDAPConfig.exe to configure the InForm trial and LDAP for the Reporting and Analysis module .................................................................................................................................. 177
Upgrading the InForm reporting database from Cognos ReportNet 1.1 ................................. 179
C H A P T E R 1 0 Installing and configuring the Reporting and Analysis module in a trial

Chapter 10 Installing and configuring the Reporting and Analysis module in a trial
146 InForm 4.6
Comparing configuration scenarios There are three major differences between installing the trial and reporting data into the same database and installing them into separate databases:
Single database (development) Separate databases (production) Oracle Streams is not required. Oracle Streams is required.
The trial schema owner owns all trial and reporting objects.
Separate schema owners own trial or reporting objects (and each schema is in a separate instance).
Running in archive log mode is not required. Running in archive log mode is required.
Note: When you install the Reporting and Analysis module into a different database from the trial, data is replicated using Oracle Streams. It is strongly recommended that you review the list of Oracle Streams Recommended References (on page 234). These documents provide detail on Streams, Streams operations, and Streams monitoring.
Note: Trial developers can use a single database for both reporting and the trial. However, this is not supported in a production environment.
Note: It is required that you install the reporting database separately from the trial database in a production environment for better system performance.

Installation and Configuration
InForm 4.6 147
Creating the InForm reporting database You can create the InForm trial and reporting databases using either of the following configurations:
• Both databases in one instance in a development environment. For more information, see Creating the trial and reporting databases in the same instance (on page 147).
• Each database in a separate instance in a production environment. For more information, see Creating the trial and reporting databases in separate instances (on page 154).
Creating the trial and reporting databases in the same instance You can install the reporting schema and the InForm trial schema in the same database instance to support a trial development (single-user) environment.
Note: When the trial and reporting schemas are in the same database instance/schema, there is no need to replicate trial data (Oracle Streams are not used) and reporting materialized views act directly on the trial schema PF tables.
Multiple reporting and trial combinations may be put in the same trial and reporting database instance.
Reviewing the hardware and software requirements for a reporting database in a single database environment
There are minimal hardware requirements for a configuration in which a single database is used for both the trial and reporting
Make sure that there is enough available disk space for the installation by allowing four times the size of the trial for reporting.
The Reporting and Analysis module runs on any operating system that is supported for the InForm trial database. The same database install for the Reporting and Analysis module requires that the Oracle software environment be Oracle Enterprise Edition or Oracle Personal Edition.
For more information, see the hardware and software requirements, as well as the Oracle patch requirements for the InForm software in the InForm 4.6 Release Notes.

Chapter 10 Installing and configuring the Reporting and Analysis module in a trial
148 InForm 4.6
Reviewing database architecture rules for a single database environment
Follow these rules when you install the reporting database into the same database used for the trial:
• There can be only one reporting environment per trial schema.
• A single database can hold multiple reporting schemas.
• The trial and reporting schema cannot be installed in the same database as the Content Store database for Cognos 8 Business Intelligence. No other Phase Forward products, such as CIS or Clintrial, should already reside in or be added to the trial and reporting database.
• The trial and reporting database must use a single-byte character set.
Note: The Reporting and Analysis module does not support Unicode character sets or double-byte character sets in either the reporting or the trial database. For more information, see Configuring Oracle Database Software (on page 35).
• The InForm trial and reporting database is not required to run in archive log mode.
Note: If you are installing reporting in a production environment, see Creating the trial and reporting databases in separate instances (on page 154) for instructions.
Note: The InForm database installation and administration scripts are designed to be run using the InForm application server. You can also run the scripts from the InForm reporting Oracle database home on a Windows Server. Running them from a different Windows Oracle client or from a non-Windows Oracle client or database home might work, but is not supported.
Preparing the trial database for the Reporting and Analysis module in a single database environment
To prepare the InForm trial database:
• Grant trial user privileges.
• Add or modify trial database parameters.
• Add tablespaces to the trial database.
Granting trial user privileges
1 Open a Windows command prompt.
2 Stop the InForm trial using the pfadmin command. pfadmin stop trial <trialname>
Note: The trial must not be running while you execute this script.
3 Identify the folder in which the reporting software is located, and set your default to this folder (For example, ...\InFormReporting\DBOra.)

Installation and Configuration
InForm 4.6 149
4 Login to SQL*Plus with /nolog.
5 Connect to the trial database as a user with the privilege to grant user database privileges, for example SYS.
6 Type the following at the SQL*Plus prompt: @grant_user_privs.sql <trial schema owner> Where the <trial schema owner> is the database user name that holds the trial schema.
This script should run to completion without further prompts. The script produces a log called grant_user_privs.log.
Adding and modifying trial database parameters in a single database environment
The Reporting and Analysis module requires some trial database parameter adjustments.
Parameter Value Comments cursor_sharing Exact. Changes from similar to
exact for reporting addition.
db_block_size 16384. The trial database must have been created with this already. This parameter cannot be changed once the database has been created.
job_queue_processes Five minimum. If the reporting infrastructure has been set up in the trial database previously, then add 3 to the job_queue_processes setting.
Three for each trial/reporting schema.
skip_unusable_indexes True. Needed for materialized view refresh.

Chapter 10 Installing and configuring the Reporting and Analysis module in a trial
150 InForm 4.6
Adding tablespaces to the trial database in a single database environment
You can create up to five optional tablespaces in the trial database in a single database environment. If you do not create optional tablespaces, use an existing tablespace to store trial objects that are needed for reporting.
The default installation puts all reporting objects into the same tablespace. To do this, expand the size of the trial tablespace by four times the trial size (or create a new one at four times the trial size) and set the trial_default_ts variable in configsamedb.sql to this tablespace name.
The optional tablespaces below allow for the separation of trial objects that are needed for reporting from the rest of the InForm trial objects.
Tablespace name
Initial size/ Autoextend size needed
File extent size/ file maximum size
Required
Comments
Chosen by customer
Example: trial_table_ts
Calculate initial size needed at: (2 * pf_comment table size) + (2 * pf_controldata table size) + (1 * pf_resourcedata table size) + (1 * pf_rules table size).
Chosen by customer. The size of these tables grow as the trial size grows.
Optional Holds trial tables that are used for reporting. Corresponds to the variable trial_table_ts variable in the Configsamedb.sql file.
Chosen by customer
Example: trial_index_ts
Calculate initial size needed at: (2 * pf_comment primary key index size) + (2 * pf_controldata primary key index size) + (1 * pf_resourcedata primary key index size) + (1 * pf_rules primary key index size).
Chosen by customer. The size of these tables grow as the trial size grows.
Optional Holds trial table indexes that are used for reporting. Corresponds to the variable trial_index_ts variable in the Configsamedb.sql file.
Chosen by customer
Example: rep_mv_ts
Three times the size of the trial.
Chosen by customer. The size of the materialized views grows as the data in the trial grows.
Optional Stores the materialized views. Also holds materialized view logs and indexes that are created on the materialized views. Corresponds to the variable rep_mv_ts in the Configsamedb.sql file.
Chosen by customer
Example: rep_index_ts
One-half the size of the trial.
Chosen by customer. The size of the indexes grow as the trial indexes grow.
Optional Stores indexes created on reporting tables. Corresponds to the variable rep_index_ts in the Configsamedb.sql file.

Installation and Configuration
InForm 4.6 151
Tablespace name
Initial size/ Autoextend size needed
File extent size/ file maximum size
Required
Comments
Chosen by customer
Example: rep_mvlog_ts
25M. Chosen by customer.
Optional Stores materialized view logs that are created on reporting tables. Corresponds to the variable rep_mvlog_ts in the Configdiffdb.sql file.
Creating the RPTINSTALL user for a single database environment for trials
The rptinstall command creates a dba user named rptinstall.
To create a new user with DBA privileges in the trial database:
1 Identify the folder where the Reporting and Analysis database is located.
2 From a Windows command prompt, set your default to this folder.
3 Log on to the trial database with a user that has sysdba privileges. Make sure that the connection is made with the “as sysdba” clause.
4 Run this command: create user rptinstall identified by rptinstall default tablespace <tablespace_name> temporary tablespace <tablespace name>
This command creates a dba user called rptinstall. This account is used only for all install and uninstall operations. This account has many privileges, including sysdba privilege.
The user name must be rptinstall. If it is not, the installation fails. Replace <tablespace_name> with a valid tablespace name from the trial database. It is recommended that the SYSTEM tablespace not be used for the default tablespace.
The default tablespace does not require additional room for objects because the rptinstall user does not own any objects.
5 Type the following at the SQL*Plus prompt: @grant_dba_privs rptinstall
The rptinstall account is not used for reporting operations and can be locked when not in use.
The rptinstall account can also be dropped after the installation is finished. However, you must recreate it before performing any installation or uninstallation activities.
Configuring the Reporting and Analysis installation for a single database environment
To configure the Reporting and Analysis installation:
• Configure the reporting variables.
• Check the variable settings.

Chapter 10 Installing and configuring the Reporting and Analysis module in a trial
152 InForm 4.6
Configuring the reporting variables for a single database environment
You must change the configsamedb.sql file. The installation and uninstallation scripts use this file for user name, password, tablespace, and connection information. This file is located in the reporting software folder.
The trial_default_ts variable is used to put all Reporting and Analysis objects into one tablespace. The value used for this variable is inherited by the following variables in the default configsamedb.sql file:
• trial_table_ts
• trial_index_ts
• rep_mv_ts
• rep_index_ts
• rep_mvlog_ts
To put all Reporting and Analysis objects into one tablespace, specify the value of a tablespace for the trial_default_ts variable and leave the five variables listed above defaulted to the trial_default_ts value.
If you want to use separate tablespaces, adjust the value of the five variables accordingly. The trial_default_ts value is used as the value for these variables only if the default is left in place. If all values for these variables are changed, the trial_default_ts variable is not used during the installation and has no effect.
Tablespace sizing is discussed in Adding tablespaces to the trial database in a single database environment (on page 150).
There are two sections in the configsamedb.sql script:
• The first section is for predefined variables, which you should NEVER change.
• The second section is for user-defined variables, most of which you need to change.
User-defined variable Value Comments trialdb_tnsnames_alias Tnsnames alias for the trial
database. Used for connection to the trial database. Also used as a part of the PUBLIC database link.
trialdbstring @&&trialdb_tnsnames_alias
Preset variable. Do not change.
Used for connection to the trial database.
trial_schema_owner InForm trial schema owner.
Oracle user name of the trial schema owner in the trial database.
trial_default_ts Existing InForm tablespace or a new one that has been created.
See comments above for usage.

Installation and Configuration
InForm 4.6 153
User-defined variable Value Comments trial_table_ts Existing InForm tablespace
or a new one that has been created.
Used to hold trial schema tables that are required for reporting. See comments above for usage.
trial_index_ts Existing InForm tablespace or a new one that has been created.
Used to hold trial schema indexes that are required for reporting. See comments above for usage.
trial_temp_ts Name of the trial temporary tablespace.
Temporary tablespace in the trial database.
dbauser_trial_password Password for RPTINSTALL.
Assigned when the rptinstall user is created. For more information, see Creating the RPTINSTALL user for a single database environment for trials (on page 151).
trial_schema_owner_password Password for the InForm trial schema owner.
rep_mv_ts Existing InForm tablespace or a new one that has been created.
Used to store the materialized views. Also holds materialized view logs and indexes that are created on the materialized views. See comments above for usage.
rep_index_ts Existing InForm tablespace or a new one that has been created.
Used to store indexes that are created on reporting tables. See comments above for usage.
rep_mvlog_ts Existing InForm tablespace or a new one that has been created.
Used to store materialized view logs that are created on reporting tables. See comments above for usage.
Checking the variable settings for a single database environment
Phase Forward provides a script called configandchecksamedb.sql to check the variable settings. The installation calls this same script to check the environment and variables before the installation.
Run the script manually, fix any error it finds, and run the script again. You can rerun the script as many times as necessary until it completes without errors.
1 Open a Windows command prompt.
2 Stop the InForm trial using the pfadmin command: pfadmin stop trial <trialname>

Chapter 10 Installing and configuring the Reporting and Analysis module in a trial
154 InForm 4.6
Note: The trial must not be running while you execute this script.
3 Identify the folder where the reporting software is located, and set your default to this folder.
Log on to SQL*Plus with /nolog.
4 Type the following at the SQL*Plus prompt: @configandchecksamedb
.
If the script finds an error, fix the error and run the script again
If this script passes with no errors, the variables are correct.
Note: Do not proceed with the installation if there are errors that need to be resolved.
Installing the InForm reporting database in a single database environment
This checklist provides an overview of the steps that you need to perform in order to install the reporting database into the same database that is used for the InForm trial.
1 Review the InForm reporting hardware and software requirements (on page 147) for installing reporting into the same database.
2 Review the InForm reporting database architecture rules (on page 148).
3 Extract the InForm reporting software.
4 Prepare the trial database for InForm reporting (on page 148).
a Add/modify parameters.
b Create RPTINSTALL user.
c Add tablespaces for reporting.
5 Configure the InForm reporting installation (on page 151).
a Configure reporting variables.
b Check the variable settings.
Note: When trials are started, a process is begun which recalculates the trial's form state. The time needed for the recalculation of the form state is proportionate to the size of your trial. For trials that are being upgraded to InForm 4.6, be sure the recalc process has completed before installing the reporting database.
Creating the trial and reporting databases in separate instances You can install the reporting schema in a separate database instance from the InForm trial schema to support a trial production (multi-user) environment.
Note: When the trial and reporting schemas are in separate database instances/schemas, it is necessary to replicate trial data (Oracle Streams are used) in reporting materialized views.

Installation and Configuration
InForm 4.6 155
Database architecture rules in a multiple database environment Follow these rules when installing the reporting database into the a separate database from the one used for the trial:
• You must install the Reporting and Analysis environment (reporting schema) in a database that is different from the one that holds the trial.
• The reporting schema Oracle user name in the reporting database must be the same name as the trial schema Oracle user name in the trial database. Because the users are in different databases, the user names may have different passwords.
• There can be only one reporting environment per trial schema.
• A single reporting database can hold multiple reporting schemas. The trial schemas that are associated with these reporting schemas might exist in the same or different trial databases.
• The reporting schema cannot be installed in the same database as Cognos 8 Business Intelligence and cannot be put into the same database as the trial. No other Phase Forward products should already reside in or be added to the reporting database.
• The reporting database must be created using a single-byte character set. The trial database must use a single-byte character set.
Note: The Reporting and Analysis module does not support Unicode character sets or double-byte character sets in either the reporting or the trial database. For more information, see Configuring Oracle Database Software (on page 35).
Note: The InForm database installation and administration scripts are designed to be run using the InForm application server. You can also run the scripts from the InForm reporting Oracle database home on a Windows Server. Running them from a different Windows Oracle client or from a non-Windows Oracle client or database home might work, but is not supported.
If you are installing reporting in a development environment, see Creating the trial and reporting databases in the same instance (on page 147) for instructions.
Reviewing the hardware and software requirements for a reporting database in a multiple database environment
The hardware requirements for the Reporting and Analysis module are the same as the requirements for an InForm trial production database server or development database server. The Reporting and Analysis module runs on any operating system that is supported for the InForm trial database. Oracle Enterprise Edition must be used for the reporting database.
For more information, see the hardware and software requirements, as well as the Oracle patch requirements for the InForm software in the InForm 4.6 Release Notes.

Chapter 10 Installing and configuring the Reporting and Analysis module in a trial
156 InForm 4.6
Creating an InForm reporting database in a multiple database environment
You must complete the following tasks in order to create a separate InForm reporting database:
• Configure the required database parameters.
• Create tablespaces for reporting.
• Create the rptinstall users.
• Set up communication between the trial and reporting databases.
Configuring required reporting database parameters in a multiple database environment
The database parameters listed below are required for the Reporting and Analysis installation.
Parameter Value Comments aq_tm_processes <default>
compatible 10.2.0 or 11.2.0
cursor_sharing Exact
db_block_size 16384 Once the instance is created, this cannot be changed.
db_domain <domain_of_database>
db_file_multiblock_read_count
16
db_cache_size (See Note 1)
0 This is automatically managed by Oracle when it is set to zero and sga_target is specified.
db_files See Calculation for db_files and maxdatafiles (on page 40)
global_names TRUE
job_queue_processes Four minimum, which includes 2 for the first reporting schema.
Two minimum recommended by Oracle for Streams. Add 2 for each reporting schema (for 2 refresh jobs).
open_cursors 150
open_links Four minimum.
optimizer_features_enable 10.2.0.3 or 11.2.0.1
parallel_max_servers Two for each apply. Two are required for each apply process.

Installation and Configuration
InForm 4.6 157
Parameter Value Comments pga_aggregate_target 300M (dependent
on how much memory is available for Oracle)
processes 150 For more information, see the Oracle Streams Recommended Configuration document on Metalink (reference below).
sec_case_sensitive_logon FALSE Oracle 11.2.0.1 only
session_cached_cursors 150
sga_target (See Note 3) 1000M System dependent.
shared_pool_reserved_size 5M
shared_pool_size (See Note 1)
0 This is automatically managed by the Oracle software when it is set to zero and sga_target is specified.
skip_unusable_indexes TRUE Required to run refresh jobs.
statistics_level typical This is necessary for Automatic Shared Memory Management (ASMM) to function.
streams_pool_size (See Note 1)
200M Minimum value.
timed_statistics TRUE Recommended for collecting elapsed time information for Streams.
workarea_size_policy auto
_job_queue_interval 1 Not required, but recommended by Oracle for Streams.
_optimizer_cost_based_transformation
Off
Note 1: These parameters can be changed if desired. Putting a value other than zero in for these will enforce a minimum amount of memory that SGA_TARGET uses. Setting this value to something other than zero causes the minimum to be deducted from the total memory. SGA_TARGET can dynamically allocate across the five memory settings it manages.
Note 2: Java_pool_size and Large_pool_size are also automatically managed by sga_target. They are not specified in a parameter list because they are not needed for InForm.
Note 3: These parameters may need to be adjusted depending on the demands on the database that are created by the InForm application and Streams.

Chapter 10 Installing and configuring the Reporting and Analysis module in a trial
158 InForm 4.6
Phase Forward recommends that you review the parameters below, which are not mandatory for the reporting installation.
Parameter Review recommendation sessions For more information, see the Oracle Streams Recommended Configuration
document on Metalink (reference below).
undo_retention 900 (minimum value) For more information, see the Oracle Streams Recommended Configuration document on Metalink (reference below).
For more information, see Oracle Streams Recommendations document.
Creating the reporting tablespaces in a multiple database environment
Tablespaces need to be created to hold Reporting and Analysis objects.
• STRMADMIN_TS is the only tablespace that is required for Reporting and Analysis installation.
Use the following syntax: CREATE TABLESPACE <tsname> DATAFILE ‘blah’ SIZE (see table below) AUTOEXTEND ON NEXT (see table below) EXTENT MANAGEMENT LOCAL AUTOALLOCATE;
• The SYSAUX tablespace is used to store LOGMNR objects by default in the Oracle database. No tablespace needs to be created for Logminer objects.
• The UNDO tablespace size and growth will be influenced by the UNDO_RETENTION database parameter setting and Streams needs in addition to normal InForm reporting operations.
• For more information about Streams, see the Oracle 10.2 Streams Recommendations document - Note: 418755.1.
• For more information about the UNDO_RETENTION parameter and UNDO tablespace, see the Oracle Database Administrator's Guide.
Note: If the optional tablespaces that are listed in the following table are not created, space must be available in existing tablespaces.

Installation and Configuration
InForm 4.6 159
Tablespace name
Initial size/autoextend size needed
File extent size/file maximum size
Required
Comments
STRMADMIN_TS
25M Make the initial size 25 megabytes, set AUTOEXTEND on and set MAXSIZE to UNLIMITED.
Yes The name STRMADMIN_TS is required for this tablespace. This tablespace is used to hold spillover from streams queues into streams_queue_tables. Streams queue tables reside in this tablespace.
Size recommendation is taken from the Streams Recommended Configuration note mentioned above.
Chosen by customer – see comments
Three times the size of the trial
Chosen by customer. The size of the materialized views grows as the data in the trial grows.
Optional Stores the materialized views. Also holds materialized view logs and indexes that are created on the materialized views. Corresponds to the variable rep_mv_ts in the Configdiffdb.sql file.
Chosen by customer – see comments
One-half the size of the trial
Chosen by customer. The size of the indexes grows as the trial indexes grow.
Optional Used to store indexes that are created on reporting tables. Corresponds to the variable rep_index_ts in the Configdiffdb.sql file.
Chosen by customer – see comments
25M Chosen by customer.
Optional Used to store materialized view logs that are created on reporting tables. Corresponds to the variable rep_mvlog_ts in the Configdiffdb.sql file.
Chosen by customer – see comments
Size of the trial
Chosen by customer. The size of the reporting base tables grows as the trial tables grow.
Optional Used to store reporting tables. Corresponds to the variable rep_table_ts in the Configdiffdb.sql file.
Creating the RPTINSTALL user in a multiple database environment for reports
To create a new user with DBA privileges in the report database:
1 Identify the folder where the Reporting and Analysis database is located.

Chapter 10 Installing and configuring the Reporting and Analysis module in a trial
160 InForm 4.6
2 From a Windows command prompt, set your default to this folder.
3 Log on to the report database with a user that has sysdba privileges. Make sure that the connection is made with the “as sysdba” clause.
4 Run this command: create user rptinstall identified by rptinstall default tablespace <tablespace_name> temporary tablespace <tablespace name>
This command creates a dba user called rptinstall. This account is used only for all install and uninstall operations. This account has many privileges, including sysdba privilege.
The user name must be rptinstall. If it is not, the installation fails. Replace <tablespace_name> with a valid tablespace name from the trial database. It is recommended that the SYSTEM tablespace not be used for the default tablespace.
The default tablespace does not require additional room for objects because the rptinstall user does not own any objects.
5 Type the following at the SQL*Plus prompt: @grant_dba_privs rptinstall
The rptinstall account is not used for reporting operations and can be locked when not in use.
6 The rptinstall account can also be dropped after the installation is finished. However, you must recreate it before performing any installation or uninstallation activities.
Preparing the trial database for Reporting and Analysis in a multiple database environment
To prepare the InForm trial database:
• Grant trial user privileges.
• Add or modify trial database parameters.
• Add tablespaces to the trial database.
• Verify that the trial database is running in Archivelog mode.
Granting trial user privileges 1 Open a Windows command prompt.
2 Stop the InForm trial using the pfadmin command. pfadmin stop trial <trialname>
Note: The trial must not be running while you execute this script.
3 Identify the folder in which the reporting software is located, and set your default to this folder (For example, ...\InFormReporting\DBOra.)
4 Login to SQL*Plus with /nolog.
5 Connect to the trial database as a user with the privilege to grant user database privileges, for example SYS.
Installation and Configuration
InForm 4.6 161
6 Type the following at the SQL*Plus prompt: @grant_user_privs.sql <trial schema owner> Where the <trial schema owner> is the database user name that holds the trial schema.
This script should run to completion without further prompts. The script produces a log called grant_user_privs.log.
Adding and modifying trial database parameters in a multiple database environment The Reporting and Analysis module requires you to add or modify some trial database parameters. Below is a list of adjustments that must be made to these parameters. All settings are necessary for both production and development servers. Oracle recommendations are taken from the Oracle Note: 418755.1 - 10.2 Streams Recommendations.
The database character set chosen must be a single-byte character set. Double-byte and Multi-byte character sets are not supported. The database character set for the reporting database must be the same as the trial database.
The trial database needs to be created with archive log mode enabled. If you create the database with scripts, specify ARCHIVELOG as a part of the CREATE DATABASE statement (see the Oracle Database SQL Reference for more information about the CREATE DATABASE statement). If you create the database with the Oracle Database Configuration Assistant, on the Archive tab, select the Archive Log Mode checkbox during the Initialization Parameters step.
Note: For more information about the Oracle Database Configuration Assistance tool, see the Oracle Database Administrator's Guide for your platform. For more information on archive logging and other archive log parameters, see the information on Managing Archived Redo Logs in the Oracle Database Administrator's Guide.
Parameter Value Comments compatible 11.2.0
deferred_segment_creation
false Oracle 11g only.
global_names true
job_queue_processes See Comments. 1 job for each trial (the job to update PF_HEARTBEAT table every minute in each trial schema) and 1 job for propagation, plus streams’ minimum requirement of 2 and Oracle MTS’s requirement of 1)
log_archive_dest See Comments. This is the destination where the archive logs will be written. You must enter at least one destination. For more information, see the Oracle Database Reference.
log_archive_dest_state_1
enable This enables the archive log destination (log_archive_dest_1). You must enter a state for every destination. For more information, see the Oracle Database Reference.

Chapter 10 Installing and configuring the Reporting and Analysis module in a trial
162 InForm 4.6
Parameter Value Comments open_links Four minimum. Four minimum is recommended by Oracle for
Streams. Add one for each reporting schema.
parallel_max_servers 10 Minimum: 3, dependent on the number of parallel apply and/or capture processes.
streams_pool_size 200M Minimum value.
timed_statistics true Recommended for collecting elapsed time information for Streams.
undo_retention 900 (minimum value)
See the Oracle Streams Recommended Configuration document on Metalink (reference below).
_job_queue_interval one Not required, but recommended by Oracle for Streams.
Phase Forward recommends that you review the parameters below, which are not mandatory for the reporting installation.
Parameter Review recommendation processes See the Oracle Streams Recommended Configuration document on Metalink
(reference below).
sessions For more information, see the Oracle Streams Recommended Configuration document on Metalink (reference below).
See the Oracle 10.2 Streams Recommendations document - Note:418755.1.
Adding tablespaces to the trial database in a multiple database environment The only tablespace below that is required for InForm Reporting and Analysis installation is the STRMADMIN_TS tablespace. The other three tablespaces are not required, but are highly recommended. If these tablespaces are not created, existing tablespaces must be used to store these objects.
The SYSAUX tablespace is used to store LOGMNR objects by default in the Oracle database. No tablespace needs to be created for Logminer objects.
The SYSAUX tablespace size and growth is influenced by a number of Oracle tools. The Streams capture process writes checkpoint information, among other things, to this tablespace. The checkpoint information can grow quickly depending on the settings which affect checkpoint retention and frequency. These can be adjusted as necessary.
The checkpoint retention time is an attribute of the capture process and can be changed with the DBMS_CAPTURE_ADM.ALTER_CAPTURE Oracle-supplied procedure. If the checkpoint retention time is changed, then the capture_ckpnt_ret_time variable setting in the configaddsdiffdb.sql file should also be changed. The default value for the “capture_ckpnt_ret_time” variable is 60 days, which is Oracle’s default. The checkpoint frequency is a capture process parameter and is called _CHECKPOINT_FREQUENCY. This can be changed with the DBMS_CAPTURE_ADM.SET_PARAMETER procedure. See the Oracle PLSQL Packages and Types Reference and Oracle Concepts and Administration manuals for more information. Also see Oracle Metalink Note: 418755.1 for Streams

Installation and Configuration
InForm 4.6 163
recommendations.
The UNDO tablespace size and growth are influenced by the UNDO_RETENTION database parameter setting (For more information, see the Oracle 10.2 Streams Recommendations document - Note: 418755.1.) and Streams needs in addition to normal InForm reporting operations. For information about the UNDO_RETENTION parameter and UNDO tablespace, see the Oracle Database Administrator's Guide.
Tablespace name
Initial size/ Autoextend size needed
File extent size/ file maximum size
Required
Comments
STRMADMIN_TS
25M Make the initial size 25 megabytes, set AUTOEXTEND on and set MAXSIZE to UNLIMITED.
Yes The name STRMADMIN_TS is required for this tablespace. This tablespace is used to hold spillover from streams queues into streams_queue_tables. Streams queue tables reside in this tablespace.
Size recommendation is taken from the Streams Recommended Configuration note mentioned above.
Chosen by customer
Example: trial_table_ts
Calculate initial size needed at: (2 * pf_comment table size) + (2 * pf_controldata table size) + (1 * pf_resourcedata table size) + (1 * pf_rules table size).
Chosen by customer. The size of these tables grow as the trial size grows.
Optional Holds trial tables used for reporting. Corresponds to the trial_table_ts variable in the Configsdiffdb.sql file.

Chapter 10 Installing and configuring the Reporting and Analysis module in a trial
164 InForm 4.6
Tablespace name
Initial size/ Autoextend size needed
File extent size/ file maximum size
Required
Comments
Chosen by customer
Example: trial_index_ts
Calculate initial size at: Calculate initial size needed at: (2 * pf_comment primary key index size) + (2 * pf_controldata primary key index size) + (1 * pf_resourcedata primary key index size) + (1 * pf_rules primary key index size).
Chosen by customer. The size of these tables grow as the trial size grows.
Optional Holds trial table indexes that are used for reporting. Corresponds to the trial_index_ts variable in the configdiffdb.sql file.
Creating the RPTINSTALL user in a multiple database environment for trials To create a new user with DBA privileges in the trial database:
1 Identify the folder where the Reporting and Analysis database is located.
2 From a Windows command prompt, set your default to this folder.
3 Log on to the trial database with a user that has SYSDBA privileges. Make sure that the connection is made with the “AS SYSDBA” clause.
4 Run this command: create user rptinstall identified by rptinstall default tablespace <tablespace_name> temporary tablespace <tablespace name>
This command creates a dba user called rptinstall. This account is used only for all install and uninstall operations. This account has many privileges, including sysdba privilege.
The user name must be rptinstall. If it is not, the installation fails. Replace <tablespace_name> with a valid tablespace name from the trial database. It is recommended that the SYSTEM tablespace not be used for the default tablespace.
The default tablespace does not require additional room for objects because the rptinstall user does not own any objects.
5 Type the following at the SQL*Plus prompt: @grant_dba_privs rptinstall
The rptinstall account is not used for reporting operations and can be locked when not in use.
The rptinstall account can also be dropped after the installation is finished. However, you must recreate it before performing any installation or uninstallation activities.

Installation and Configuration
InForm 4.6 165
Configuring the Reporting and Analysis installation in a multiple database environment To configure the Reporting and Analysis installation:
• Configure the reporting variables.
• Check the variable settings.
Configuring reporting variables in a multiple database environment To configure the reporting installation to store objects in separate tablespaces, change the CONFIGDIFFDB.SQL script. This file is used by the installation and uninstallation scripts for user name, password, tablespace, and database link and connection information. This file is located in the reporting software folder.
There are two sections in this file:
• The Predefined variables, which you should NEVER change.
• The user-defined variables (see below), most of which you should change.
User-defined variable Value Comments
trialdb_tnsnames_alias Tnsnames alias for the trial database.
Used for connection to the trial database. Also used as a part of the PUBLIC database link.
trialdbstring @&&trialdb_tnsnames_alias Preset variable. Do not change.
Used for connection to the trial database.
trial_schema_owner InForm trial schema owner. Oracle user name of the trial schema owner in the trial database.
rep_proxy_user
New user. Prepend RP to the InForm trial schema owner.
Oracle user name in the trial database that serves as a proxy user for reporting database connections.
trial_table_ts Existing InForm tablespace or a new one that has been created.
Used to hold trial schema tables that are required for reporting. See comments above for usage.
trial_index_ts Existing InForm tablespace or a new one that has been created.
Used to hold trial schema indexes that are required for reporting. See comments above for usage.
trial_temp_ts Name of the trial temporary tablespace.
Temporary tablespace in the trial database.

Chapter 10 Installing and configuring the Reporting and Analysis module in a trial
166 InForm 4.6
User-defined variable Value Comments
trial_to_rep_dblink_name Global name of the reporting database.
Connect to the reporting database and run the command Select global_name from global_name. Use the value returned from this command for this variable. Name of all database links in the trial database.
trial_dblink_name_select @&&trial_to_rep_dblink_name
Preset variable. Do not change. Used for connection to remote objects in the reporting database.
dbauser_trial_password Password for RPTINSTALL.
Assigned when the rptinstall user is created. For more information, see Creating the rptinstall user in a multiple database environment for trials (on page 164).
trial_schema_owner_password Password for the InForm trial schema owner.
rep_proxy_user_password
Password for the user created in the “REP_PROXY_USER” variable.
Proxy user is a trial user name created to act as the proxy user for the reporting user.
streams_admin_user_trial_pwd Password for the STRMADMIN user.
STRMADMIN is a new user in the trial database created for Streams, which will be created during reporting setup.
streams_proxy_user_password Password for the RPSTRMADMIN user.
RPSTRMADMIN is a proxy user created for the STRMADMIN account in the reporting database.
repdb_tnsnames_alias Tnsnames alias for the reporting database.
Used for connection to the reporting database. Also used as a part of the PUBLIC database link.
repdbstring @&&repdb_tnsnames_alias Preset variable. Do not change.
Used for connection to the reporting database.
rep_schema_owner &&trial_schema_owner Preset variable. Do not change.
rep_table_ts Existing InForm software tablespace or new one that was created earlier (on page 158).
Used to store reporting tables.

Installation and Configuration
InForm 4.6 167
User-defined variable Value Comments
rep_mv_ts Existing InForm tablespace or a new one that has been created.
Used to store the materialized views. Also holds materialized view logs and indexes that are created on the materialized views. See comments above for usage.
rep_index_ts Existing InForm tablespace or a new one that has been created.
Used to store indexes that are created on reporting tables. See comments above for usage.
rep_mvlog_ts Existing InForm tablespace or a new one that has been created.
Used to store materialized view logs that are created on reporting tables. See comments above for usage.
rep_temp_ts Name of the reporting db temporary tablespace.
Temporary tablespace in the report database.
rep_to_trial_dblink_name Global name of the trial database.
Connect to the trial database and run the command: Select global_name from global_name. Use the value returned from this command for this variable. Name of all database links in the reporting database.
rep_dblink_name_select @&&rep_to_trial_dblink_name
Preset variable. Do not change. Used for connection to remote objects in the trial database.
dbauser_rep_password Password for RPTINSTALL.
Assigned when the rptinstall user is created. For more information, see Creating the RPTINSTALL user in a multiple database environment for reports (on page 159)
rep_schema_owner_password Password for the reporting schema owner.
The reporting schema owner must have the same name as the trial schema owner.
streams_admin_user_rep_passwd
Password for the strmadmin user in the reporting database instance.
STRMADMIN is a user in the study database for Streams that will be created during reporting setup.

Chapter 10 Installing and configuring the Reporting and Analysis module in a trial
168 InForm 4.6
Checking the variable settings in a multiple database environment Phase Forward provides a script named configandcheckdiffdb.sql to check the variable settings. The installation calls this script to check the environment and variables before the installation.
Run the script manually, fix any error it finds, and run the script again. You can rerun the script as many times as necessary until it completes without errors.
1 Open a Windows command prompt.
2 Stop the InForm trial using the pfadmin command: pfadmin stop trial <trialname>
Note: The trial must not be running while you execute this script.
3 Identify the folder where the reporting software is located, and set your default to this folder.
4 Log on to SQL*Plus with /nolog.
5 Type the following at the SQL*Plus prompt: @configandcheckdiffdb
If the script finds an error, fix the error and run the script again
If this script passes with no errors, the variables are correct.
Note: Do not proceed with the installation if there are errors that need to be resolved.
Setting up communication between the trial and reporting databases in a multiple database environment
The InForm trial database and reporting database communicate through database links. Entries into the tnsnames.ora file(s) on the trial database and reporting database servers are required. Create two tnsnames aliases:
• On the reporting server to connect to the trial instance on the trial server.
• On the trial server to connect to the reporting instance on the reporting server.
Verifying Archivelog mode in the trial database in a multiple database environment
You must run the InForm trial database in archivelog mode. This is a requirement for Oracle Streams. To determine if the InForm database is being run in archivelog mode:
1 Log into a privileged Oracle account, for example, SYS, using SQL*Plus.
2 Run the following command: archive log list
You should see the following values:
• The database log mode value should be Archive mode.
• The automatic archival value should be Enabled.

Installation and Configuration
InForm 4.6 169
Note: For more information, see the information about managing archived Redo logs in the Oracle Database Administrator's Guide.
Installing the InForm reporting database in a multiple database environment
1 Review the Reporting and Analysis hardware and software requirements (on page 155) for installing reporting into a different database.
2 Review Reporting and Analysis database architecture rules (on page 155).
3 Extract the Reporting and Analysis software.
4 Prepare the trial database for Reporting and Analysis (on page 160).
a Add/modify parameters.
b Add tablespaces for reporting.
c Create RPTINSTALL user.
d Verify ARCHIVELOG mode.
5 Create an InForm reporting database (on page 156).
a Configure required database parameters.
b Create tablespaces for reporting.
c Create RPTINSTALL user.
d Setup communication between the trial and reporting databases.
6 Configure the Reporting and Analysis installation (on page 165).
a Configure reporting variables.
b Check the variable settings.

Chapter 10 Installing and configuring the Reporting and Analysis module in a trial
170 InForm 4.6
Installing the Reporting and Analysis module You can install the Reporting and Analysis module in either a single-database environment or a multiple database environment.
For more information, see:
• Installing the Reporting and Analysis module in a single database environment (on page 170).
• Installing the Reporting and Analysis module in a multiple database environment (on page 172).
Installing the Reporting and Analysis module in a single database environment
If you are installing reporting in a development environment, Phase Forward recommends that you install reporting in the same database as the trial. If you Install the Reporting and Analysis module in a single database environment, you must run the install_reporting_samedb script.
Note: The InForm database installation and administration scripts are designed to be run using the InForm application server. You can also run the scripts from the InForm reporting Oracle database home on a Windows Server. Running them from a different Windows Oracle client or from a non-Windows Oracle client or database home might work, but is not supported.
Installing the Reporting and Analysis module in a single database Phase Forward provides a script called install_reporting_samedb for installing the Reporting and Analysis module in a single database development environment.
1 Open a Windows command prompt.
2 Stop the InForm trial using the pfadmin command: pfadmin stop trial <trialname>
Note: The trial must not be running while you execute this script.
3 Identify the folder where the reporting software is located, and set your default to this folder.
4 Modify parameters in the configsamedb.sql to reference specific trial information. For more information, see Configuring the Reporting and Analysis installation for a single database environment (on page 151).
5 Log on to SQL*Plus with /nolog.
6 Type the following at the SQL*Plus prompt: @configandchecksamedb.sql
7 Type the following at the SQL*Plus prompt:
@install_reporting_samedb.sql

Installation and Configuration
InForm 4.6 171
No log on is required to run this script, because the script uses information provided in the configsamedb.sql file to log on. This script should run to completion without prompts.
8 After the installation is complete, copy configsamedb.sql to a different location with a different name.
You will need this file in the future if you want to uninstall or re-install the Reporting and Analysis module.
9 Start the InForm trial.
Note: The script produces a log called install_reporting_samedb.log, which contains any installation messages. Search the log for the word Error. No errors should be found.
In case of installation failures in a single-database configuration Phase Forward provides a script called deinstall_reporting_samedb to remove all components associated with the Reporting and Analysis module for a single trial schema and reporting schema combination.
Note: The InForm database installation and administration scripts are designed to be run using the InForm application server. You can also run the scripts from the InForm reporting Oracle database home on a Windows Server. Running them from a different Windows Oracle client or from a non-Windows Oracle client or database home might work, but is not supported.
This script uses settings in the configsamedb.sql to uninstall the schema. Use the same configsamedb.sql file to uninstall as the one you initially used for the installation.
Note: If the original is not available, set the parameters in configsamedb.sql for the reporting schema that you want to remove.
1 Open a Windows command prompt.
2 Stop the InForm trial using the pfadmin command: pfadmin stop trial <trialname>
Note: The trial must not be running while you execute this script.
3 Identify the folder where the reporting software is located, and set your default to this folder.
4 Verify that the configsamedb.sql parameters reference specific trial information.
5 Log on to SQL*Plus with /nolog.
6 Type the following at the SQL*Plus prompt: @deinstall_reporting_samedb

Chapter 10 Installing and configuring the Reporting and Analysis module in a trial
172 InForm 4.6
This script uninstalls the InForm Reporting and Analysis environment for a single trial/reporting schema. It does not remove multiple reporting schemas or the underlying reporting infrastructure. You can re-run this script if necessary.
Note: If the error message Reporting deinstallation aborted appears, nothing has been removed. This usually indicates a problem with the configsamedb.sql settings.
You can run the configandchecksamedb.sql script to make sure everything has been removed. If this script completes successfully, the uninstall succeeded.
Note: This script checks the existence of tablespaces, but the uninstall does not remove tablespaces. If the script fails because it cannot find a tablespace, change the tablespace variables in configsamedb.sql to an existing tablespace in the database and run the script again.
Installing the Reporting and Analysis module in a multiple database environment
If you are installing reporting in a production environment, Phase Forward recommends that you install reporting in a different database from the trial. If you install the Reporting and Analysis module in a multiple database environment, you must run the install_reporting_diffdb script.
There are two installation options available for InForm reporting into multiple databases. The following sections will install reporting in one step but require the trial to be down until the installation script has finished. The other installation option is described in Appendix B. This option is composed of two scripts, one that needs to be run while the trial is down and one that can be run with the trial running. The advantage to this approach is that the trial can be used sooner. To save time, this option allows the reporting schema to be created during the installation.
Installing the Reporting and Analysis module in multiple databases
Note: The InForm database installation and administration scripts are designed to be run using the InForm application server. You can also run the scripts from the InForm reporting Oracle database home on a Windows Server. Running them from a different Windows Oracle client or from a non-Windows Oracle client or database home might work, but is not supported.
Phase Forward provides a script called install_reporting_diffdb.sql for installing the Reporting and Analysis module in a multiple database production environment.
1 Open a Windows command prompt.
2 Stop the InForm trial using the pfadmin command: pfadmin stop trial <trialname>
Note: The trial must not be running while you execute this script.
Installation and Configuration
InForm 4.6 173
3 Identify the folder where the reporting software is located, and set your default to this folder.
4 Modify the parameters in the configdiffdb.sql to reference specific trial information (see Configuring required reporting database parameters in a multiple database environment (on page 156)).
5 Login to SQL*Plus with /nolog.
6 Type the following at the SQL*Plus prompt: @configandcheckdiffdb.sql
7 Type the following at the SQL*Plus prompt:
@install_reporting_diffdb.sql This script should run to completion without prompts. The script produces two logs called pre-install_reportingschema_diffdb.log and install_reportingschema_diffdb.log, which contains any installation messages. Search the log for the word Error. No errors should be found.
8 After the installation is complete, copy configdiffdb.sql to a different location with a different name.
You will need this file in the future if you want to uninstall or reinstall InForm Reporting and Analysis.
9 Start the InForm trial.
10 Phase Forward strongly recommends that you review Oracle Streams Recommended References (on page 234).
These documents provide information about Streams, Streams operations, and Streams monitoring.
In case of installation failures in a multiple database environment In the event that an installation fails, follow these steps to remove components of the Reporting and Analysis module that have already been installed.
Note: The InForm database installation and administration scripts are designed to be run using the InForm application server. You can also run the scripts from the InForm reporting Oracle database home on a Windows Server. Running them from a different Windows Oracle client or from a non-Windows Oracle client or database home might work, but is not supported.
1 Check the install_reporting_diffdb.log that is produced by the install_reporting_diffdb.sql script.
A section is written to this log to let you know what needs to be performed when you uninstall reporting. Search the log for the string end of infrastructure setup. This is surrounded by several rows of asterisks (*) above and below it in the log.
Note: If you do not find the end of infrastructure setup string, skip the next step.
2 Run the script deinstall_reporting_diffdb.sql. This script uses the configdiffdb.sql file, so make sure the correct one is in place. Run this script as many times as necessary.
a After the script is run, check for any errors by searching for the word Error. Correct any problems and run the script again.

Chapter 10 Installing and configuring the Reporting and Analysis module in a trial
174 InForm 4.6
b Rerun the script until it does not find anything to remove and does not find any errors.
You can run the configandcheckdiffdb.sql script to make sure everything has been removed. If this completes successfully, then the uninstall has succeeded.
Note: This script checks the existence of tablespaces. The uninstall does not remove tablespaces. If the script fails to find a tablespace, adjust the tablespace variables in configdiffdb.sql to those that match an existing tablespace in the database and rerun it.
3 Run the following command in both the trial and reporting databases. Do not run this command until you are sure that you have completely removed the trial and reporting schemas.
a Open a Windows command prompt.
b Stop the InForm trial using the pfadmin command.
Note: The trial should not be running while this is performed.
c Identify the folder where the trial database is located.
d Set your default to this folder.
e Login to SQL*Plus with /nolog.
f Connect to the reporting database as strmadmin.
g Type the following at the SQL*Plus prompt: Delete from streams_setup_info where trial_username = '<trial_schema_owner>'
and rep_username = '<rep_schema_owner>' and trial_db_global_name = '<global name of the trial database>' and rep_db_global_name = '<global name of the reporting database>'
Note: Enclose all of these values in single quotes.
where:
• <trial-schema-owner>—The InForm trial owner in the trial database.
• <rep_schema_owner>—The reporting schema owner in the reporting database that corresponds to the InForm trial owner. This user name is the same as the InForm trial owner.
• <global name of the trial database>—Can be found using the command 'Select global_name from global_name;' in the trial database.
• < global name of the reporting database>—Can be found using the command 'Select global_name from global_name;' in the reporting database.
h Exit SQL*Plus.
i Identify the folder where the reporting database is located.
j Set your default to this folder.
k Repeat steps e - h for the reporting database.

Installation and Configuration
InForm 4.6 175
Using the LDAP configuration tool to configure the InForm trial and LDAP for the Reporting and Analysis module
Phase Forward provides the LDAP Configuration tool that you use to configure LDAP to work with the Reporting and Analysis module and to configure the InForm trial to work with Cognos 8.
1 From the InForm server, select Start > Programs > Oracle > InForm 4.6 > LDAPConfig.
2 Click Next.
The LDAP Connectivity Parameters window appears.
3 Specify the following for the trial:
• (LDAP) Server name—machine_name.
• (LDAP) Server port—example: 389.
• Directory Manager CN (Common Name)—admin.
• Directory Manager Password—adminpassword.
• Directory Manager Password confirmation—adminpassword.
4 Click Next.
The OU Parameters window appears.
5 If the InForm service is not running, a dialog asking whether you want the service started appears. Click Yes and a drop-down list of trial names appears.
6 Select the trial name from the list. Click Next, and the InForm server that contains this trial starts.
7 Specify the Trial Organization Unit by typing the trial name.
8 Specify the Parent Node Distinguished Name by typing the domain (dc=pf dc=com assuming that the network domain is pf.com. Use your actual network domain name).
9 Click Next.
The Cognos parameters window appears.
10 Specify the following:
• Cognos namespace—The default is ldapcsp1. This is the namespace created by CRNConfig installer. ldapcsp1 is the Custom Security Provider (CSP) namespace that can be shared by many trials, it should not typically need to be changed. Users can create additional namespaces manually in the Cognos Configuration tool. In this case, the name of the newly created namespace should be used in this field.
• Gateway URI—This is a Cognos parameter that is set when running the CRNGateway installer. For internet use, it is the external public URI that communicates to the Cognos gateway from the end users browser. This information can be found in the cogstartup.xml file. Example: http://appsru02.north.pf.com/cognos8
• Dispatcher URI—This is a Cognos parameter that is set when running the CRNConfig

Chapter 10 Installing and configuring the Reporting and Analysis module in a trial
176 InForm 4.6
installer. It is an internal URI that the InForm server uses to communicate to the Cognos server. The information can be found in cogstartup.xml. Example: http://appsru02.north.pf.com:9300/p2pd/servlet/dispatch.
The cogstartup.xml file is located in the Cognos server in the E:\Program Files\cognos\c8\configuration directory.
• User Root—The default is /content/folder[@name=’trialname’]
11 Click Next.
The Verification window appears.
The summary window appears to report the configuration results. If the Cognos server is down at the time of running this tool, the namespace and URIs will have warnings. This means that LDAPConfig was not able to validate the results and you will have to validate manually.
12 Click Next.
The Trial Organization Unit is verified. If the unit does not exist, the tool suggests creating the unit.
13 In the Non-existent organization unit window, answer Yes to Organization Unit does not exist. Do you wish to create it?
LDAP configuration is complete.
14 Click Finish.
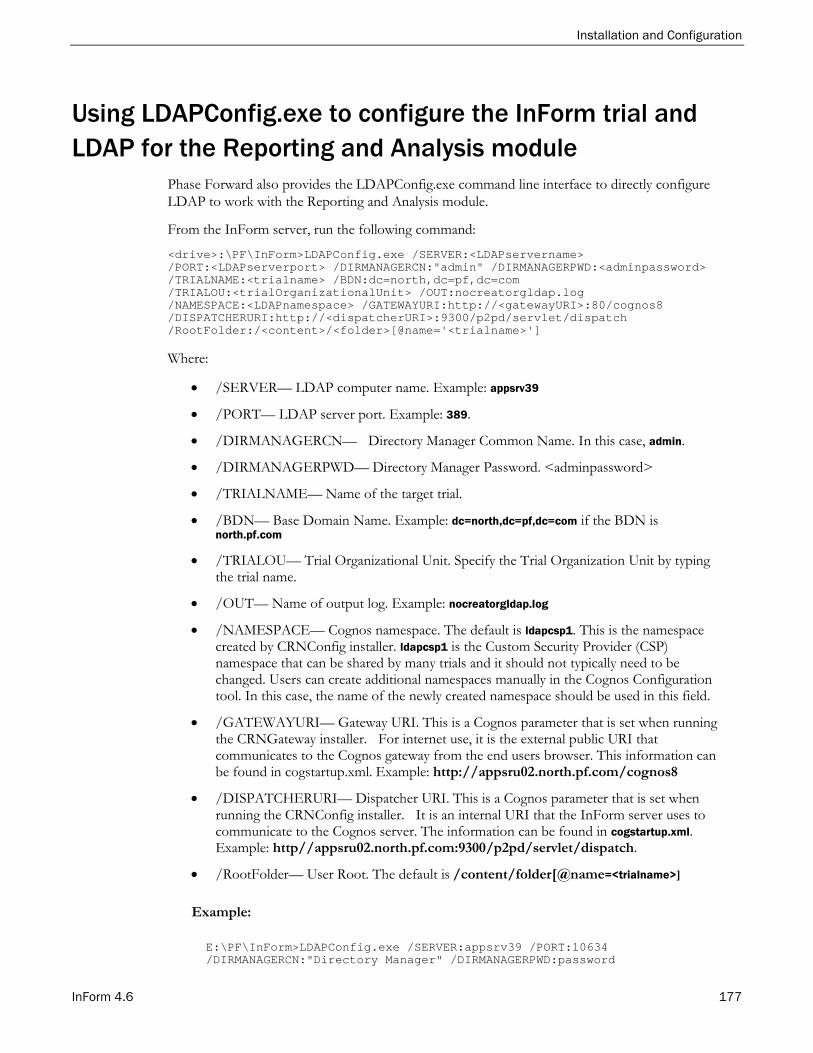
Installation and Configuration
InForm 4.6 177
Using LDAPConfig.exe to configure the InForm trial and LDAP for the Reporting and Analysis module
Phase Forward also provides the LDAPConfig.exe command line interface to directly configure LDAP to work with the Reporting and Analysis module.
From the InForm server, run the following command:
<drive>:\PF\InForm>LDAPConfig.exe /SERVER:<LDAPservername> /PORT:<LDAPserverport> /DIRMANAGERCN:"admin" /DIRMANAGERPWD:<adminpassword> /TRIALNAME:<trialname> /BDN:dc=north,dc=pf,dc=com /TRIALOU:<trialOrganizationalUnit> /OUT:nocreatorgldap.log /NAMESPACE:<LDAPnamespace> /GATEWAYURI:http://<gatewayURI>:80/cognos8 /DISPATCHERURI:http://<dispatcherURI>:9300/p2pd/servlet/dispatch /RootFolder:/<content>/<folder>[@name='<trialname>'] Where:
• /SERVER— LDAP computer name. Example: appsrv39
• /PORT— LDAP server port. Example: 389.
• /DIRMANAGERCN— Directory Manager Common Name. In this case, admin.
• /DIRMANAGERPWD— Directory Manager Password. <adminpassword>
• /TRIALNAME— Name of the target trial.
• /BDN— Base Domain Name. Example: dc=north,dc=pf,dc=com if the BDN is north.pf.com
• /TRIALOU— Trial Organizational Unit. Specify the Trial Organization Unit by typing the trial name.
• /OUT— Name of output log. Example: nocreatorgldap.log
• /NAMESPACE— Cognos namespace. The default is ldapcsp1. This is the namespace created by CRNConfig installer. ldapcsp1 is the Custom Security Provider (CSP) namespace that can be shared by many trials and it should not typically need to be changed. Users can create additional namespaces manually in the Cognos Configuration tool. In this case, the name of the newly created namespace should be used in this field.
• /GATEWAYURI— Gateway URI. This is a Cognos parameter that is set when running the CRNGateway installer. For internet use, it is the external public URI that communicates to the Cognos gateway from the end users browser. This information can be found in cogstartup.xml. Example: http://appsru02.north.pf.com/cognos8
• /DISPATCHERURI— Dispatcher URI. This is a Cognos parameter that is set when running the CRNConfig installer. It is an internal URI that the InForm server uses to communicate to the Cognos server. The information can be found in cogstartup.xml. Example: http//appsru02.north.pf.com:9300/p2pd/servlet/dispatch.
• /RootFolder— User Root. The default is /content/folder[@name=<trialname>]
Example:
E:\PF\InForm>LDAPConfig.exe /SERVER:appsrv39 /PORT:10634 /DIRMANAGERCN:"Directory Manager" /DIRMANAGERPWD:password

Chapter 10 Installing and configuring the Reporting and Analysis module in a trial
178 InForm 4.6
/TRIALNAME:PFST /BDN:dc=north,dc=pf,dc=com /TRIALOU:PFST /OUT:nocreatorgldap.log /NAMESPACE:ldapcsp1 /GATEWAYURI:http://APPSRV39.north.pf.com:80/cognos8 /DISPATCHERURI:http://appsrv39.north.pf.com:9300/p2pd/servlet/dispatch /RootFolder:/content/folder[@name='PFST']

Installation and Configuration
InForm 4.6 179
Upgrading the InForm reporting database from Cognos ReportNet 1.1
Install reporting software prior to upgrading. This installation is covered in Running the Customization wizards (on page 130).
You must run the upgrade scripts for the Reporting and Analysis environment. The scripts are available in the reporting software folder.
These upgrade scripts use variables previously set up for reporting in the InForm 4.5 software. The variables that are used vary according to the reporting setup.
Note: When trials are started immediately after being upgraded, a process is begun which recalculates the states of all the forms in the trials. The time needed for the recalculation is proportionate to the size of your trial. Be sure the recalc process has completed prior to starting the upgrade of the InForm Reporting database.
Upgrade assumptions and prerequisites
Note: The InForm trial upgrade to the Oracle database software must be performed and completed prior to installing reporting for the InForm software.
The instructions and scripts in this section remove leftover reporting components that might have been imported into the Oracle database. The scripts use the configuration file values from the configuration files that were used to set up reporting for the InForm 4.5 software. If reporting was not installed on the trial prior to exporting the trial, then this section can be skipped. However, it is recommended that you read the section Post-upgrade actions (on page 181) before proceeding.
The instructions assume the trial has been imported into a new Oracle 11.2.0.1 database (that is, the database was created in a new Oracle home instead of the previous database software being upgraded to 11.2.0.1) and all steps to upgrade the InForm trial have been completed.
The trial database and the reporting database must be Oracle release 11.2, and must meet the software requirements in the InForm 4.6 Release Notes.
The InForm software must have been upgraded to InForm 4.6 prior to upgrading reporting databases. For more information, see Installing and uninstalling the InForm core software (on page 49).
This upgrade does not support different Oracle releases on the trial and reporting databases.
For example, the following scenarios are not supported:
• The trial database at Oracle 10.2 (or lower) and the reporting database at 11.2.
• The trial database at Oracle 11.2 and the reporting database at Oracle 10.2 (or lower)
• The trial database at Oracle 10.2 (or lower) and the reporting database at 11.2.

Chapter 10 Installing and configuring the Reporting and Analysis module in a trial
180 InForm 4.6
Granting trial user privileges To prepare InForm reporting, you must first grant trial user privileges.
1 Open a Windows command prompt.
2 Stop the InForm trial using the pfadmin command. pfadmin stop trial <trialname>
Note: The trial must not be running while you execute this script.
3 Identify the folder in which the reporting software is located, and set your default to this folder (For example, ...\InFormReporting\DBOra.)
4 Login to SQL*Plus with /nolog.
5 Connect to the trial database as a user with the privilege to grant user database privileges, for example SYS.
6 Type the following at the SQL*Plus prompt: @grant_user_privs.sql <trial schema owner> Where the <trial schema owner> is the database user name that holds the trial schema.
This script should run to completion without further prompts. The script produces a log called grant_user_privs.log.
Upgrading the InForm reporting database from Cognos ReportNet 1.1
Upgrading the InForm reporting database in a multiple database environment
If the Reporting and Analysis module was installed in a different database from the trial in the InForm 4.5 software:
1 Open a Windows command prompt.
2 Stop the InForm trial using the pfadmin command.
Note: The trial should not be running while you execute this script.
3 Identify the folder where the reporting software is located, and set your default to this folder.
4 Rename the configdiffdb.sql file in the InForm reporting software folder.
5 Copy the configdiffdb.sql file that was used to install reporting in Oracle 9.2 or a previous release of Oracle 10.2 to the InForm reporting software folder, and verify that the variables are filled in. The upgrade script does not perform any checks on these variables, so make sure it is the right file and the variables are correct.
6 Log on to SQL*Plus with /nolog.
7 Type the following at the SQL*Plus prompt: @upgrade_reporting_to_inform_itm_46.sql

Installation and Configuration
InForm 4.6 181
This script should run to completion without prompts. The script produces a log called upgrade_reporting_configdiffdb_to_inform_itm_46.log.
If the Reporting and Analysis database was installed in the same database as the trial in the InForm 4.5 software:
1 Open a Windows command prompt.
2 Stop the InForm trial using the pfadmin command.
Note: The trial must not be running while you execute this script.
3 Identify the folder where the reporting software is located, and set your default to this folder.
4 Rename the configsamedb.sql file in the InForm reporting software folder.
5 Copy the configsamedb.sql file that was used to install reporting in Oracle 9.2 or a previous release of Oracle 10.2 to the InForm reporting software folder, and verify that the variables are filled in. The upgrade script does not perform any checks on these variables, so make sure it is the right file and the variables are correct.
6 Log on to SQL*Plus with /nolog.
7 Type the following at the SQL*Plus prompt: @upgrade_reporting_samedb to_inform_itm_46.sql
This script should run to completion without prompts. The script produces a log called upgrade_reporting_samedb_to_inform_itm_46.log.
Post-upgrade actions After running the upgrade, you can review this chapter and use it to do a new reporting install. See the note below for configsamedb.sql or configdiffdb.sql file adjustments.
Note: Adjust the configsamedb.sql or configdiffdb.sql variable values as necessary for the new 10.2 or 11.2 databases. No changes were made to the variables in the configsamedb.sql and configdiffdb.sql variables for InForm 4.6 reporting – the configsamedb.sql or configdiffdb.sql file that was used for Oracle 9.2 and InForm 4.5 reporting can be used for Oracle 10.2 or 11.2 and InForm 4.6. Verify that the variable values are what they should be.
Upgrading standard reports from Cognos ReportNet 1.1 This section describes upgrading the Cognos software and associating Oracle databases with Cognos metadata.
Currently, InForm delivers 34 standard reports in 5 folders – CRF Reports, Item Reports, Query Reports, Subject Reports, and Audit Trail Reports. Only reports that correspond to these 34 reports are upgraded in trial folders. The report upgrade leaves schedules, report views, and versions intact.
You upgrade standard reports by first running the native Cognos 8 Business Intelligence upgrade, then running the PRFInit utility to change the InForm standard reports specification.
Cognos Reporting authentication has been enhanced with the addition of a Custom Security Provider (CSP). The CSP provides operational flexibility so that many trials can be supported by

Chapter 10 Installing and configuring the Reporting and Analysis module in a trial
182 InForm 4.6
a common, single Cognos namespace. This supports the ability to add trials to Cognos reporting without having to restart the Cognos services since no trial-specific configuration data needs to be added to Cognos. By convention, we have added a default namespace which is configured to use the CSP. The name of this namespace is ldapcsp1. We still use LDAP as the Directory server and the structure of the Directory sever has not changed.
In this process, you move from Cognos ReportNet 1.1 to a new Cognos 8 Business Intelligence environment using a single, shared namespace, ldapcsp1, where you create a new Cognos 8 environment. You then export your existing Cognos 8 ReportNet 1.1 reports and import them to the new Cognos 8 environment.
Prerequisites Before you perform this upgrade, make sure that the appropriate versions of Microsoft .NET are installed on all computers that are involved in the Cognos installation. For more information, see the System Requirements in the InForm 4.6 SP3 Release Notes.
Part 1—Create the Cognos 8 environment Perform this procedure one time:
1 Create Cognos 8 environment as described in:
• Installing the Cognos 8 core software (on page 119).
• Configuring Cognos 8 for the InForm ITM Environment (on page 129).
2 On the existing ReportNet 1.1 server, all trial users must move any content from their My Folders area to a folder in the public area within InForm 4.5.
The recommended procedure is that a folder is created for each user inside the trial folder. The content in My Folders and personal preferences is not migrated during export and import steps in Part 2 of this process.
Part 2—Create an export package Perform Part 2 and Part 3 for each trial.
1 On the existing ReportNet 1.1 server, create and run the export deployment package in the current environment that contains the trial folder, clinical package, and operational package.
The export deployment package must have the following settings:
a Public folders content
• Disable after import—selected for both trial folder and clinical package
b Options
• Include report output version—selected.
• Include run history—selected.
• Include schedules—selected.
c Directory content

Installation and Configuration
InForm 4.6 183
• Include Cognos groups and roles—deselected.
• Include distribution lists and contacts—deselected.
• Include data sources and connections—deselected.
d Access permissions
• Include access permissions—deselected.
e External Namespaces
• Do not include references to external namespaces—selected.
f Entry ownership
• Set the owner to:—Select The user performing the import.
• Apply to:—Select New entries only.
2 Move the export package you created to the <cognos_8_location>/deployment_folder in the Cognos 8.4 environment.
Part 3—Import the export package to the Cognos 8.4 environment Perform Part 2 and Part 3 for each trial.
1 Log in to the Cognos 8.4 BI server as a System Administrator.
2 Select Launch > Reporting Administration.
The Administration page appears.
3 Click the Configuration tab.
4 Left-click Content Administration, and then select New Import.
The Select a deployment archive page appears.
5 Select the archive that was created above, and then click Next.
The Specify a name and description page appears.
6 Click Next.
The Select the public folders content page appears.
7 Select the trial folder, operational package, and clinical package that are present in the export package.
8 Verify that the Disable after import option is selected.
9 Update the settings in next pages if needed. The options that are shown are the options that were selected when you created the export package.
10 On the last page, click Finish.
The Run with options page appears.
11 In the Time section, select Now.
12 On the same page, under the Report specification upgrade section, select Upgrade all report specifications to the latest version option.
13 Click Run.

Chapter 10 Installing and configuring the Reporting and Analysis module in a trial
184 InForm 4.6
14 Ensure the import has successfully completed.
Ignore any warnings or errors related to schedules and credentials.
15 Run the PFRInit utility.
For more information, see Run the PFRINIT utility (on page 188).
16 Revalidate the custom reports and modify the reports to the new operational package (if needed).
17 Enable the <trialname> Clinical package and trial folder.
On the Properties page of the clinical package and trial folder, deselect Disable this entry.
18 Regenerate the clinical package by using the refreshrepclin.bat file. Use M for refresh type.
For more information, see Run REFRESHREPCLIN to import changes to a clinical reporting package (on page 199).
19 After the upgrade, schedules and jobs will attempt to run in the new environment, but will fail with a credentials error unless you follow these two steps in Reporting and Analysis:
a Go to Tools > My Preferences > Personal and click Renew the credentials.
b Modify and Save all listed schedules and jobs. Any modification will suffice, such as changing the start time by a minute.
To access active schedules and jobs, go to Tools > Schedule Management > Schedule. From there you can view and change all the schedules.
Example of a modified PFRSetupTrial.xml file for the move to a new Cognos 8 server with a single namespace
The changes required for this upgrade method are in bold.
Note: Do not perform this procedure by copying this page of the guide. This is only an example. Instead, modify the PFRSetupTrial.xml, which is located in the Cognos folder.
<crn> <Section name="Directory">
<Cognos membership="Authors"> <usergroup>Authors</usergroup>
</Cognos> <Cognos membership="Directory Administrators">
<usergroup>Directory Administrators</usergroup> </Cognos> <Cognos membership="Publishers">
<usergroup>Publishers</usergroup> </Cognos> <Cognos membership="Query Users">
<usergroup>Ad Hoc Users</usergroup> </Cognos> <Cognos membership="Report Administrators">
<usergroup>Report Administrators</usergroup> </Cognos> <Cognos membership="Server Administrators">
<usergroup>Server Administrators</usergroup> </Cognos> <Cognos membership="Site Users">
<usergroup>Site Users</usergroup> </Cognos> <Cognos membership="Sponsor Users">
<usergroup>Sponsor Users</usergroup>

Installation and Configuration
InForm 4.6 185
</Cognos> <Cognos membership="User Admin Info Data Users">
<usergroup>User Admin Info Data Users</usergroup> </Cognos> <Cognos membership="User Info Data Users">
<usergroup>User Admin Info Data Users</usergroup> <usergroup>Sponsor Users</usergroup> <usergroup>User Info Data Users</usergroup>
</Cognos> <Cognos membership="Portal Administrators">
<usergroup>Report Administrators</usergroup> </Cognos>
</Section> <Section name="Data Sources">
<DataSource> <Connection connectionstring="connectionstring">
<Permissions policy="Site Users"> <Permission>Read</Permission> <Permission>Execute</Permission> <Permission>Traverse</Permission>
</Permissions> <Permissions policy="Sponsor Users">
<Permission>Read</Permission> <Permission>Execute</Permission> <Permission>Traverse</Permission>
</Permissions> <Permissions policy="Directory Administrators">
<Permission>Write</Permission> <Permission>Set Policy</Permission>
</Permissions> <Signon>
<DBUID>dbuid</DBUID> <DBPWD>dbpid</DBPWD>
</Signon> </Connection>
</DataSource> </Section> <Section name="Import">
<Archive name="Op package and reports" packageonly="false"> <Package source="InForm Trial Management">
<Permissions policy="Report Administrators"> <Permission>Set Policy</Permission>
</Permissions> <Permissions policy="Publishers">
<Permission>Write</Permission> </Permissions> <Permissions policy="Site Users">
<Permission>Read</Permission> <Permission>Execute</Permission> <Permission>Traverse</Permission>
</Permissions> <Permissions policy="Sponsor Users">
<Permission>Read</Permission> <Permission>Execute</Permission> <Permission>Traverse</Permission>
</Permissions> </Package>
</Archive> </Section> <Section name="TrialFolder">
<SourceFolders path="/content"> <Folder>CRF Reports</Folder> <Folder>Item Reports</Folder> <Folder>Subject Reports</Folder> <Folder>Query Reports</Folder>
</SourceFolders> < ReportsUpgrade path="/content">
<Permissions policy="Report Administrators"> <Permission>Set Policy</Permission>

Chapter 10 Installing and configuring the Reporting and Analysis module in a trial
186 InForm 4.6
</Permissions> <Permissions policy="Publishers">
<Permission>Write</Permission> </Permissions>
<Permissions policy="Site Users"> <Permission>Read</Permission> <Permission>Execute</Permission> <Permission>Traverse</Permission>
</Permissions> <Permissions policy="Sponsor Users"> <Permission>Read</Permission> <Permission>Execute</Permission> <Permission>Traverse</Permission> </Permissions>
</ReportsUpgrade> </Section> </crn>

InForm 4.6 187
In this chapter Configuring an InForm trial for the Reporting and Analysis module ....................................... 188
Generating a clinical reporting package .......................................................................................... 190
Authorizing users for the Reporting and Analysis module ......................................................... 203
Specifying a logo for InForm Standard Reports ........................................................................... 205
C H A P T E R 1 1 Configuring a trial for the Reporting and Analysis module

Chapter 11 Configuring a trial for the Reporting and Analysis module
188 InForm 4.6
Configuring an InForm trial for the Reporting and Analysis module
Configuring a trial for the Reporting and Analysis module involves establishing communications between the InForm trial and the Cognos 8 server, as well as setting up the objects that are needed for reporting.
In this section, you will:
• Run the PFRINIT utility to set up objects, object access, permissions for reporting.
• Run the REFRESHREPCLIN utility to generate a clinical reporting package for a trial, create the clinical data materialized views, or import changes and refresh the InForm reporting database.
• Authorize users for the Reporting and Analysis module.
• Specify a logo for InForm standard reports.
Note: In order to run the PFRINIT and REFRESHREPCLIN utilities, you need an InForm user who is a member of the Publishers group, as well as a member of either the Sponsors Users or the Site Users group. This user is referred to as <InFormTrialUser>. The <InFormTrialUser> must also have access to each trial for which you run the PFRINIT or REFRESHREPCLIN utility.
Run the PFRINIT utility The PFRINIT utility performs the following tasks:
• Modify the default Cognos capabilities to fit the InForm reporting environment.
• Create new Cognos groups that match InForm reporting requirements.
• Set permissions on Public folders so that only Publishers can write to this public area.
• Import the InForm Trial Management (ITM) archive and prepare for new trial setup.
• Map trial-specific reporting groups to the Cognos groups and roles.
• Create A trial-specific data connection and set permissions so that it is restricted for the use of trial members only.
• Import the ITM package from the ITM archive, and rename it as a trial-specific ITM package.
• Create a trial folder that contains all the standard folders and reports that point to the trial-specific package. Relative paths within reports are modified to reflect the new location.
• Validate all copied reports so that all successfully validated reports are syntactically correct and able to run against the trial-specific packages.
• Set up the CRNSYSADMIN user.
To run the PFRINIT utility:
1 In Windows Explorer, navigate to the \cognos\c8\bin folder.

Installation and Configuration
InForm 4.6 189
2 Using a text editor, open the PFRsetupTrial.xml file, and then make the following changes:
• Connectionstring—Oracle connection string for the reporting database (in a single database configuration, use the trial database connection string).
• DBUID—Trial user id (for example, pfstprduid).
Note: The DBUID must be the same Oracle user name as the trial owner in the InForm trial database.
• DBPWD—Trial user password (for example, pfstprdpid).
Note: The DBPWD can be different from the password for the trial owner in the InForm trial database. You must enter the password for the reporting instance, which was specified in configdiffdb.sql parameter rep_schema_owner_password.
3 Save and close the PFRsetupTrial.xml file.
4 Open a Windows Command prompt, and then type the following command to run the pfrinit utility:
pfrinit PFWD crnsysadmin <crnsysadmin_password> <Namespace> <InFormTrialUser> <InFormTrialUserPassword> <internal dispatcher uri> <trialname>
where
• <crnsysadmin_password>—The password you have chosen for the CRNSYSADMIN user.
• <Namespace>—The default is ldapcsp1, which is the Custom Security Provider (CSP) namespace. The case of the value you enter here must be the same case as the entry in the Cognos Configuration. For example, if the entry in the Cognos Configuration is in lower case: ldapcsp1, you must enter the name in lower case: ldapcsp1, for this option. For an in-place upgrade of Reporting, use the LDAP namespace for the trial.
• <InFormTrialUser>—The target trial InForm user who is a member of the Publishers users, as well as a member of either the Sponsors users or the Site users.
• <InFormTrialUserPassword>—The InForm trial user's password.
• <internal dispatcher uri>—This is found in InForm Configuration tab and usually looks like http://<machine’s FQDN>:9300/p2pd/servlet/dispatch.
• <trialname>—The name of the InForm trial.
5 When the utility completes, close the Command prompt.
Note: If a logon error occurs when running the pfrinit utility, the most likely issue is in the FocusSecurityProvider_ldapcsp1.properties file in the Cognos c8\configuration folder. Verify that the first four LDAP parameters are correct. If you make a change to this file, you will need to restart the Cognos service. Another possibility is in the LDAP Directory Server itself. Open the Sun JAVA System Admin server, choose the Directory Server, and verify that the Organization Unit (OU) exists with the Users and Groups. For more information, see Changing or creating a new FocusSecurityProvider properties file (on page 131).
Chapter 11 Configuring a trial for the Reporting and Analysis module
190 InForm 4.6
Generating a clinical reporting package After you have completed all installations and configurations, you must create a clinical reporting package. The clinical package makes clinical data available to users of InForm Ad Hoc Reporting. You can:
• Generate the initial clinical reporting package and deploy it as is.
• Customize the initial clinical reporting package to include improved topic labels in the InForm Ad Hoc Reporting tree.
Generating the initial clinical reporting package To be able to access clinical data in the InForm Ad Hoc Reporting module, you must generate a clinical reporting package that is unique to an InForm trial.
To generate a clinical reporting package for a trial, run the refreshrepclin.bat file.
Before running REFRESHREPCLIN.BAT Before you run refreshrepclin.bat, consider the following:
• The Oracle client must be installed and configured to connect to the trial and reporting database(s). If the client cannot connect, contact your database administrator.
• To run the script, you must have access to the c8\bin folder.
• The gcr.vbs script must be installed in the c8\InForm\bin folder.
• The InFormRep.cpf files must be installed in the c8\inform\model\operational folder.
• You must provide application-specific information such as server names and ports to connect to the reporting database, the Sun ONE Directory Server database, and Cognos 8. If you do not have this information, contact the appropriate administrator.
Run REFRESHREPCLIN to generate a clinical reporting package for a trial
To generate the initial default reporting package for a trial:
1 Open a Windows Command prompt on any server where a Cognos 8 Business Intelligence application tier component is installed.
2 Navigate to the \c8\inform\bin folder.
3 Set scripting to cscript to suppress popup messages. The default, wscript, shows wscript.echo as popup, whereas cscript shows wscript.echo as console message. Type:
cscript //H:cscript
4 Type the following command: refreshrepclin.bat <ReportDB Connection> <ReportDB UserID> <ReportDB UserPwd> <Namespace> drive:\cognos\c8\bin <Trial Name> m drive:\cognos\c8\inform\model\operational\informrep.cpf <InFormTrialUser> <InFormTrialUserPassword> <LDAP Administrator Password> <Authentication Provider>
Installation and Configuration
InForm 4.6 191
where
• <ReportDB Connection>—The ReportDB connection you want to use to connect to the database. For example, REP.WORLD.
• <ReportDB UserID>—The ReportDB User ID. This ID is not case-sensitive.
• <ReportDB UserPwd>—The ReportDB User Password. This password is not case-sensitive.
• <Namespace>—The default is ldapcsp1, which is the Custom Security Provider (CSP) namespace. The case of the value you enter here must be the same case as the entry in the Cognos Configuration. For example, if the entry in the Cognos Configuration is in lower case: ldapcsp1, you must enter the name in lower case: ldapcsp1, for this option. For an in-place upgrade of Reporting, use the LDAP namespace for the trial.
• <Trial Name>—The name of the target trial. For example, PFST45.
• <Refresh Type>—Identifies the type or refresh you want to perform. To generate the initial package, you use the M (Model) option. This option generates and publishes the clinical model. Use this option when the reporting database was just installed or re-installed, and the trial design has not changed since.
The files generated for the package are placed in a folder created by the refreshrepclin.bat script. The folder is created under InForm\bin and has the name <trialname>_Clinical, where <trialname> is the name you entered for your trial.
This is the complete list of options for <Refresh Type>:
• D—Data Refresh.
When to use—To update the reporting database with data that has been added in the trial. Use this option to capture additions to operational data, which does not require a study version revision. For example, use this option to add a new site to the reporting database.
What it does—Incrementally refreshes the operational and clinical materialized views in the reporting database from the trial database. It does not generate and publish the reporting model.
• F—Full Refresh.
When to use—When new data items or new forms are added to the trial design, revising the study version, and you want to keep the existing data dictionary (you have not performed any data dictionary customizations, such as changing report column names).
Note: When you use this option, only new trial design objects are added to an existing data dictionary. If you change existing items, these changes are not reflected in the data dictionary, and as a result are not reflected in the clinical model. To include changes to existing items, you must use select the R (Reset Refresh) option.
Chapter 11 Configuring a trial for the Reporting and Analysis module
192 InForm 4.6
What it does:
Refreshes the database operational and clinical materialized views in the reporting database from the trial database.
Recreates the clinical views.
Rebuilds the reporting model.
• G—Generate Clinical.
When to use—To update the reporting data dictionary, for example, when you customize column names by importing a CSV file.
What it does:
Refreshes the reporting data dictionary.
Recreates the clinical views.
Rebuilds the reporting model.
• M—Model.
When to use—When the reporting database has just been installed or re-installed, and the trial design has not changed since the installation.
What it does—Generates and publishes the clinical model.
• R—Reset Refresh.
When to use—To import a custom data dictionary and create the clinical model using an updated trial design that includes changed trial design objects.
What it does: This is the most complete refresh option. It performs the same tasks as the F option and additionally rebuilds the data dictionary:
Drops the data dictionary.
Imports the new data dictionary.
Refreshes the database operational and clinical materialized views in the reporting database from the trial database.
Recreates the clinical views.
Rebuilds the reporting model.
• <InFormTrialUser>—The target trial InForm user who is a member of the Publishers users, as well as a member of either the Sponsors users or the Site users.
• <InFormTrialUserPassword>—The InForm trial user password.
• <LDAP Administrator Password>—The LDAP Administrator Password. This parameter is required to accommodate a CSP-related change in behavior when assigning object permissions in Cognos. This is the same LDAP Administrator password you provided in Running the Cognos 8 Business Intelligence Customization for InForm wizard (on page 130).

Installation and Configuration
InForm 4.6 193
Note: If LDAP parameters change in any way, manually change the refreshrepclin_ldapcsp1.parameters file. If another namespace besides the default one – ldapcsp1 is used, create a new file, refreshrepclin_newnamespacename.parameters. This file resides in inform\bin folder.
• <Authentication Provider>—This parameter is optional. It is used for backward compatibility with the InForm 4.5 software. It defaults to CSP. If you have upgraded to InForm 4.6 Reporting using the upgrade-in-place option (using the 4.5 trial-based LDAP namespace name), this parameter must be set to LDAP.
After you generate this package, you can use the Reporting and Analysis Ad Hoc Reporting module to view the reporting tree. After viewing the package, you can customize some of the labels in the Ad Hoc viewing tree.
Note: Some of the file names that make up the clinical package have the same names as the files that make up the InForm Trial Management (operational) package. However, the operational files are placed in a folder named operational. You should not move the files between the Clinical and Operational directories. If you do, the file content is overwritten.
Note: Text controls in an InForm trial can be set to accept more than 4000 characters. However, be aware that clinical views generated for reporting are truncated. If the text is longer than 4000 characters, the first 3986 characters are shown and **TRUNCATED** appears at the beginning of the text in Ad Hoc Reporting.
Customizing a clinical reporting package You can customize the labels for clinical report topics and elements that appear in the ad hoc reporting tree to improve the presentation and to provide users with more meaningful descriptions in the ad hoc reporting tree.
Note: Phase Forward recommends that only the trial designer or someone with a strong understanding of the trial design make changes to these column labels.
To modify column values and update the reporting database, perform the following tasks in this order:
1 Create a CSV file (on page 194) of the current clinical reporting package.
2 Open the CSV file (on page 194) for editing.
3 Change column values and save them in a CSV file (on page 195).
4 Import the changes and update the reporting database (on page 198).
Chapter 11 Configuring a trial for the Reporting and Analysis module
194 InForm 4.6
Create a CSV file To export data from the reporting database so that you can modify column values, create a CSV file that you can use to change column values.
Note: Although you can open the CSV file in any text editor, it is recommended that you use Microsoft Excel spreadsheet software to view and change column values in a spreadsheet.
To export data from the reporting database to create a CSV file, you must run the command from a computer:
• Where gcr.vbs is located.
• Where the database client that connects to the reporting database is installed.
• That has <servername> registered in tnsnames.ora.
To export data and create a CSV file:
1 Open a Windows Command prompt.
2 Execute the following command: gcr.vbs export <filename> <servername> <username> <password>
where
• <filename>—The name of the CSV file that you want to create. The filename should include the full path. For example, ...\spreadsheets\datadict.csv.
• <servername>—The name of the database server for the reporting database. For example, server_dev1.
• <username>—The user name that is used to access the database schema. For example, pfst45uid.
• <password>—The password that is used to access the database schema. For example, pfst45pid.
Example: gcr.vbs export datadict.csv server_dev1 pfst45uid pfst45pid
Open the CSV file After creating the CSV file, you can open it using Microsoft Excel spreadsheet software to view the column information in a spreadsheet. In this spreadsheet, you can modify selected column labels, and then import the customized labels back into the reporting database.

Installation and Configuration
InForm 4.6 195
Modify the spreadsheet You can modify the spreadsheet to change the values for selected columns. The values that you enter replace the default values for labels in the InForm Ad Hoc Reporting tree. When you make changes to the spreadsheet:
• Back up the original spreadsheet.
• Back up the spreadsheet after you make changes and before you import it back into the reporting database.
• Establish a way of tracking any changes that you make so that you have a record of those changes.
This section provides information about:
• The default values for a column.
• Columns that you cannot change.
• Columns that you can change.
• Things to consider when making changes.
Default values for a column
Default labels for clinical report elements come from properties that are established in the trial design code. Trial designers specified different pieces of information to identify each form, itemset, or control in your trial. The InForm application retrieves the text in these properties and uses it for default labeling of the clinical report elements.
The InForm application creates default labels for elements that appear in the Clinical Data by Forms folder as follows:
optional prefix~ control reference~ item reference
The following table describes each portion of the default label.
Report element label portion Description

Chapter 11 Configuring a trial for the Reporting and Analysis module
196 InForm 4.6
Report element label portion Description Optional prefix Defines the type of element. Possible prefixes include:
• None
• Code
• Unit
• Unit Code
• Normalized
• Date
• Time
• Month Yr
• YYYY/MM/DD
• HH24:MM:SS
• Month
• Year
Control reference Text that identifies the specific control for the item.
If the control is not a checkbox control, the InForm application uses text that is in these properties for the second part of the control reference:
• Caption property for the control, if it exists.
• RefName property for the control, if no caption exists.
If the control is a checkbox, the InForm application uses text entered into these properties for this portion of the report element label:
• Label property of the child control element, if it exists.
• Caption property of the child control element, if no Label exists.
• RefName property for the child control element, if no Label or Caption exists.
Item reference Text that identifies the item, as it appears in the trial. The InForm application uses text entered into these properties for this portion of the report element label:
• Itemset Column Header property for the item, if it exists and is not the default.
• Question property for the item, if no Itemset Column Header exists.

Installation and Configuration
InForm 4.6 197
Note: Trial designers should ensure that Itemset Column Header definitions are unique within a trial. If duplicate Itemset Column Header values exist, the Reporting and Analysis module combines the items into one row in reports.
Columns that you cannot change
Do not change the values in any of the columns beginning with the column labeled RID through the column labeled ItemOrder.
Note: If you make changes to these columns, especially if the column is a key column, all of your changes might be invalidated and discarded when you import the spreadsheet back into the reporting database.
Columns that you can change
Initially, the column labels in the InForm Ad Hoc Reporting tree might be very long and contain a description that is not meaningful when using these reports to analyze information. Therefore, you can change the values for the following columns to improve the presentation and to provide users with a more meaningful description of some of the topics and elements in the ad hoc reporting tree:
Column Name Description Columndesc Column description in the reporting database.
Columnenable If value is 0, this column is suppressed from clinical view and the clinical report topic.
Use this column to filter the amount of information that you want to appear in ad hoc reporting tree.
Columnfolder Folder in the Ad Hoc reporting tree in which this clinical report element should reside.
Clinical report elements appear in one of the following folders:
• Basic Data
• Additional Data
• Incomplete Data Reasons
Columnlabel Label used for the report topic in the ad hoc reporting tree.
Columnname Name of the column in the reporting database.
Columnvalue One of a set of values that pertain to the Clinical View column/Clinical report element.
Viewdesc Description of the clinical view in the reporting database.
Viewlabel Label used for the report element in the ad hoc reporting tree.
Viewname Name of the clinical view in the reporting database.

Chapter 11 Configuring a trial for the Reporting and Analysis module
198 InForm 4.6
Considerations when making changes
Consider the following when you change values:
• In the following columns, you must change the values in all of the rows in the column:
• Columnname
• Columnlabel
• Columndesc
For example, if you change the label of an item that matches a gender control, you would need to change two rows. If you want to change the label for Demographics, you must change all the rows for the relevant columns and views.
• For columnfolder, you can move an item from and to the predefined folders: Basic, Additional, and Not Done. You cannot rename a columnfolder or move the same item into two different folders.
• In the viewname column, if you change your viewnames, you might want to remove the old views to manage the size of the database. You can remove old views using the refreshrepclin.bat file. For more information, see Importing changes and refreshing the reporting database (on page 198).
• Do not use special characters such as ?, /, *, ? \, and so on, when you change the column values.
Importing changes and refreshing the InForm Reporting Database After making changes to the spreadsheet and creating a CSV file, you must import the CSV file into the reporting database. After importing the CSV file, you can refresh the reporting database and recreate the database clinical views and the reporting clinical model.
After you complete these tasks:
• Customizations are placed in the database and remain in the database.
• If changes are made to the database, and you export the database again, the modifications that you made previously are retained.
To import information and update the reporting database, run the refreshrepclin.bat file.
Before running REFRESHREPCLIN.BAT
Before you run refreshrepclin.bat, consider the following:
• The Oracle client must be installed and configured to connect to the trial and reporting database(s). If the client cannot connect, contact your database administrator.
• To run the script, you must have access to the c8\bin folder.
• The gcr.vbs script must be installed in the c8\InForm\bin folder.
• The InFormRep.cpf files must be installed in the c8\inform\model\operational folder.
• You must provide application-specific information such as server names and ports to connect to the reporting database, the Sun ONE Directory Server database, and Cognos 8.

Installation and Configuration
InForm 4.6 199
If you do not have this information, contact the appropriate administrator.
Run REFRESHREPCLIN to import changes to a clinical reporting package
To import changes to a clinical reporting package for a trial:
1 Open a Windows Command prompt on the server where Cognos 8 Business Intelligence Dispatcher is installed, then navigate to the \c8\inform\bin folder.
2 Turn off WSH messages, then type the following command: refreshrepclin.bat <ReportDB Connection> <ReportDB UserID> <ReportDB UserPwd> <Namespace> <C8 Bin Folder> <Trial Name> <Refresh Type> <Operational model location> <InForm user name> <InForm user password> <LDAP Administrator Password> <Authentication Provider> <locale> <DataDictionary Import File>
where
• <ReportDB Connection>—The ReportDB connection you use to connect to the database. For example, REP.WORLD.
• <ReportDB UserID>—The ReportDB User ID. This ID can be lower or upper case.
• <ReportDB UserPwd>—The ReportDB User Password. This password can be lower or upper case.
• <Namespace>—The default is ldapcsp1, which is the Custom Security Provider (CSP) namespace. The case of the value you enter here must be the same case as the entry in the Cognos Configuration. For example, if the entry in the Cognos Configuration is in lower case: ldapcsp1, you must enter the name in lower case: ldapcsp1, for this option. In case of an in-place upgrade of Reporting, use the LDAP namespace for the trial.
• <C8 Bin folder>—The location of the C8 Bin folder. For example, c8\bin.
• <Trial Name>—The name of the trial. For example, PFST45.
• <Refresh Type>—Identifies the specific type of refresh you want to perform. You can specify the following options:
• D—Data Refresh.
When to use—To update the reporting database with data that has been added in the trial. Use this option to capture additions to operational data, which does not require a study version revision. For example, use this option to add a new site to the reporting database.
What it does—Incrementally refreshes the operational and clinical materialized views in the reporting database from the trial database. It does not generate and publish the reporting model.
• F—Full Refresh.
When to use—When new data items or new forms are added to the trial design, revising the study version, and you want to keep the existing data dictionary (you have not performed any data dictionary customizations, such as changing report column names).
Note: When you use this option, only new trial design objects are added to an existing data dictionary. If you change existing items, these changes are not reflected in the data dictionary, and as a result are not reflected in the

Chapter 11 Configuring a trial for the Reporting and Analysis module
200 InForm 4.6
clinical model. To include changes to existing items, you must use select the R (Reset Refresh) option.
What it does:
Refreshes the database operational and clinical materialized views in the reporting database from the trial database.
Recreates the clinical views.
Rebuilds the reporting model.
• G—Generate Clinical.
When to use—To update the reporting data dictionary, for example, when you customize column names by importing a CSV file.
What it does:
Refreshes the reporting data dictionary.
Recreates the clinical views.
Rebuilds the reporting model.
• M—Model.
When to use—When the reporting database has just been installed or re-installed, and the trial design has not changed since the installation.
What it does—Generates and publishes the clinical model.
• R—Reset Refresh.
When to use—To import a custom data dictionary and create the clinical model using an updated trial design that includes changed trial design objects.
What it does: This is the most complete refresh option. It performs the same tasks as the F option and additionally rebuilds the data dictionary:
Drops the data dictionary.
Imports the new data dictionary.
Refreshes the database operational and clinical materialized views in the reporting database from the trial database.
Recreates the clinical views.
Rebuilds the reporting model.
• <Op. model location>—The full path to an operational model file. For example, \c8\model\Operational\InFormRep.cpf.
• <InForm user name>—An active InForm user that has report publishing rights.
• <InForm user pass>—The password for the InForm user.
• <LDAP Administrator Password>—the LDAP Administrator Password. This parameter is required to accommodate a CSP-related change in behavior when assigning object permissions in Cognos. This is the same password you typed in for Step 14 in Running the Cognos 8 Business Intelligence Customization for InForm wizard (on page 130).
Installation and Configuration
InForm 4.6 201
Note: If LDAP parameters change in any way, manually change the refreshrepclin_ldapcsp1.parameters file. If another namespace other than the default– ldapcsp1 is used, create a new file, refreshrepclin_newnamespacename.parameters. This file resides in the c8\InForm\bin folder.
• <Authentication Provider>—This parameter is optional. It is used for backward compatibility with InForm 4.5. It defaults to CSP. If you have upgraded to InForm 4.6 Reporting using the upgrade-in-place (using the 4.5 trial-based LDAP namespace name), this parameter must be set to LDAP.
• <locale>—This should always be set to en.
• <Data Dictionary Import File>—The name and location of the CSV that contains the new column values that you want to import into the reporting database. The file location must be an absolute path.
Note: If you are importing a data dictionary file, you must also include <locale> and <authentication provider>.
The files generated for the package are placed in a folder created by refreshrepclin.bat. The folder is created under c8\InForm\bin and has the name <trialname>_Clinical, where <trialname> is the name you typed for your trial.
Note: Some of the file names that make up the clinical package have the same names as the files that make up the operational package. However, the operational files are placed in a folder named Operational. You should not move the files between the Clinical and Operation directories. If you do, the file content is overwritten.
For more information about creating and working with ad hoc reports, see Reporting and Analysis, or the InForm online help.
Refreshing the InForm reporting database in an InForm multi-release environment
With release InForm 4.6 SP2a, a new script that augments the refreshrepclin.bat script has been made available. The new script is refresh_reporting_diffdb.sql. Run this script in conjunction with the refreshrepclin.bat script with the M option.
The refresh_reporting_diffdb.sql script is to be used only under these conditions:
• You are running in an environment where one Cognos and Reporting installation supports multiple InForm trials with different InForm 4.6 releases.
• All InForm releases are InForm 4.6 SP1a and later.
Running refresh_reporting_diffdb.sql and then RefreshRepClin.bat with an M option is equivalent to running the RefreshRepClin.bat script with an F option in a single InForm version environment, except that you cannot provide a custom data dictionary file when you run refresh_reporting_diffdb.sql. Therefore, options D, R and G are not available when there is a mix of versions between releases of InForm, hosted by a single version of Reporting and Cognos.
The refresh_reporting_diffdb.sql script is installed by the ReportingDB installer when you upgrade to

Chapter 11 Configuring a trial for the Reporting and Analysis module
202 InForm 4.6
InForm 4.6 Sp2a or higher. The refresh_reporting_diffdb script does the following:
• Sets the reporting schema refresh job schedule dates to future dates.
• Stops the apply process.
• Removes reporting schema owner jobs (refresh jobs) from the job queue.
• Refreshes operational materialized views.
• Recreates clinical objects with new trial design changes.
• Starts the apply process.
• Submits refresh jobs to queue.
• Starts the refresh job. The script gives an error in case the refresh job fails to start.
To get trial design (metadata) changes in clinical model:
1 Run the following at a command prompt: CmdPrompt>sqlplus /nolog sql>@refresh_reporting_diffdb
The script now invokes sql scripts installed with the version on which the reporting database was built.
2 Run RefreshRepClin.bat with the M option.
To see the changes with blinding and unblinding items, as well as operational and clinical data changes:
Note: You do not need to run refresh_reporting_diffdb.sql to see these changes.
1 Run the refresh job either manually or wait for the hourly refresh.
2 Generate the clinical model by running RefreshRepClin.bat with the M option.
The refresh_reporting_diffdb script does the following:
• Sets the reporting schema refresh job schedule dates to future dates.
• Stops the apply process.
• Removes reporting schema owner jobs (refresh jobs) from the job queue.
• Refreshes operational materialized views.
• Recreates clinical objects with new trial design changes.
• Starts the apply process.
• Submits refresh jobs to queue.
• Starts the refresh job. The script gives an error in case the refresh job fails to start.

Installation and Configuration
InForm 4.6 203
Authorizing users for the Reporting and Analysis module
InForm access rights for reporting
Note: Regardless of reporting rights, data access rights in the Reporting and Analysis module are inherited from the InForm trial, and adhere to the site associations and item blinding permissions that are in place for each user.
All InForm users who must access the Reporting and Analysis module must be assigned to a rights group that has the InForm Reports right selected. The InForm Reports right gives users access to the Reporting and Analysis module. In addition, to run reports, a user must be a member of either the Sponsor Users or Site Users reporting group. This conveys the Cognos Consumer permissions that allow users only to run reports.
You can give users access to additional reporting rights by making sure that the users are assigned to one of the Default reporting groups (on page 203) installed with the InForm software.
Note: The InForm system user is not by default part of Site or Sponsor Users reporting group. It must be added to one of these in order to access reporting objects.
Authorization on the reporting server Reporting authorizations on the reporting server rely on permissions that are defined in authorization namespaces on the reporting server.
All rights to create or run reports are governed by reporting authorizations in the LDAP folder service referenced by Cognos 8 Business Intelligence. These authorizations are defined in a set of authorization namespaces.
The Cognos namespace Each reporting server references one master namespace that controls authorization for all trials. This namespace, the Cognos namespace, contains the Cognos objects, such as groups, roles, distribution lists, and contacts. During the Cognos 8 Content Store initialization, built-in and predefined security entries that control access to specific Cognos features are created in this namespace.
Default reporting groups As part of the initial reporting setup, the pfrinit utility imports a deployment archive file that loads the following predefined reporting groups into the Cognos namespace for an InForm trial.
Cognos Namespace Role/Group
Trial-specific InForm Group
Description

Chapter 11 Configuring a trial for the Reporting and Analysis module
204 InForm 4.6
Cognos Namespace Role/Group
Trial-specific InForm Group
Description
User Admin Info Data Users
User Admin Info Data Users
Access to all administration data about InForm users, including User Name and contact information.
Membership in this group or the User Info Data Users group is required to run all by User InForm Standard Reports.
This group also has the same rights as User Info Data Users.
User Info Data Users User Info Data Users
Access to the User Name and rights group for all users.
Membership in this group or the User Admin Data Users group is required to run all by User InForm Standard Reports.
Note: Each time that you add a user to a reporting group on the InForm server, the user is automatically created within the corresponding group in LDAP, and become accessible to Cognos 8 Business Intelligence. Be aware that there is sometimes a delay between when you add the user in the InForm trial and when the change is visible in Cognos 8 Business Intelligence.
Creating a custom reporting group To create a custom Reporting InForm group:
1 In the navigation pane, click Admin.
2 Click the Groups tab.
3 Click Add Group.
4 On the Groups page, from the Group Type list, select Reporting.
5 In the Group Name field, type the name of the group.
6 In the Group Description field, type a description of the group.
7 Click Submit.
Once you have created the new reporting group, depending on your expected usage of this group, you may need to establish the group as a member of a reporting group in the Cognos namespace. If you are simply referencing this group in permission settings for public content, setting up members in the Cognos namespace is not necessary.

Installation and Configuration
InForm 4.6 205
Specifying a logo for InForm Standard Reports You can specify a company logo to appear in your InForm Standard Reports.
To specify a logo file:
1 Create a file called logo.gif.
2 Copy logo.gif to the following location on the Cognos Gateway Web Server: <c8 install folder>\webcontent\<study name>
For example: d:\c8\webcontent\Depression Study\logo.gif.
If you do not want a logo to appear in InForm Standard Reports
If you do not want a logo to appear in the InForm Standard Reports, you must place a blank image in the location that is specified above. If you do not include the blank graphic file, a missing graphic icon appears on your InForm Standard Reports.

Chapter 11 Configuring a trial for the Reporting and Analysis module
206 InForm 4.6

InForm 4.6 207
In this chapter Overview .............................................................................................................................................. 208
Configuring an ODBC connection ................................................................................................. 209
Resizing virtual memory .................................................................................................................... 210
Removing preferential treatment from foreground applications ................................................ 211
Optimizing Windows for network applications ............................................................................ 212
Monitoring the Windows Event Logs ............................................................................................ 213
Moving locations for MS DTC logs ................................................................................................ 214
Clearing and enlarging MS DTC logs.............................................................................................. 215
C H A P T E R 1 2 Performance tuning

Chapter 12 Performance tuning
208 InForm 4.6
Overview This chapter explains the settings that are recommended for the InForm software to perform to its capacity on the server where it is installed. The topics in this chapter are not necessarily related to each other. You can choose the settings to change based on how you use the InForm software. These are the topics covered in this chapter:
• Configuring an ODBC connection.
• Resizing virtual memory.
• Removing preferential treatment from foreground applications.
• Optimizing Windows for network applications.
• Monitoring the Windows Event Logs.
• Moving locations for MS DTC logs.
• Clearing and enlarging MS DTC logs.

Installation and Configuration
InForm 4.6 209
Configuring an ODBC connection Note: Do not make this change to the Microsoft ODBC for Oracle Driver. Previous versions of InForm used this Microsoft driver, but InForm 4.6 uses the Oracle-supplied ODBC driver.
To configure ODBC connection pooling by changing the Timeout value to provide a longer connection time:
1 Select Start > Programs > Administrative Tools > Data Sources.
The ODBC Data Source Administrator window appears.
2 Select the Connection Pooling tab.
3 Double-click Oracle in <ORACLE_HOME>
where <ORACLE_HOME> is your Oracle Client Home.
Note: Be careful not to double-click Microsoft ODBC for Oracle.
The Set Connection Pooling Attributes dialog box appears.
4 Make sure that the Pool connections to this driver radio button is selected and that the value is moderately long (about 450 seconds*). If it is too short, the connection will constantly be refreshing itself; if it is too long, the connection will consume too many resources.
The recommended Pooling Timeout = 1.5 x MSDTC Timeout Value
5 Click OK, and then OK again to close the ODBC Data Source Administrator.

Chapter 12 Performance tuning
210 InForm 4.6
Resizing virtual memory The InForm software uses virtual memory (disk space simulated as memory) aggressively. Phase Forward recommends that you create a large paging file in a location that is different from the default location (C:); particularly on a drive with lots of disk space.
To resize virtual memory in Windows 2003:
1 Select Control Panel > System.
2 In the System Properties dialog box, click the Advanced tab.
3 Click Performance > Settings.
4 In the Performance Options dialog box, click the Advanced tab.
5 Click Change.
6 Highlight a drive in which to place the virtual memory in the Drive (Volume Label) section.
7 Type a value in the Initial Size (MB) field (the sum of physical RAM plus 11 is recommended, or you can use the Recommended size).
8 Type a value in the Maximum Size (MB) field (the minimum * 1.5 or 2).
9 Click Set.
10 Click OK until all the dialog boxes close.

Installation and Configuration
InForm 4.6 211
Removing preferential treatment from foreground applications
To provide more resources for background applications in Windows 2003:
1 Select Control Panel > System.
2 In the System Properties dialog box, click the Advanced tab.
3 Click Performance > Settings.
4 In the Performance Options dialog box, click the Advanced tab.
5 Select Background applications.
6 Click OK until all dialog boxes close.

Chapter 12 Performance tuning
212 InForm 4.6
Optimizing Windows for network applications To optimize Windows for network applications in Windows 2003:
1 Click Start > Control Panel > Network Connections > Local Area Connection.
2 Click Properties.
3 On the General tab, select File and Print Sharing for Microsoft Networks, and then click Properties.
4 To tune the Server service to reduce paging activity, click Maximize Throughput for Network Applications.
5 Click OK, and then Close.

Installation and Configuration
InForm 4.6 213
Monitoring the Windows Event Logs The InForm application logs events to the Application Event log. For optimum performance, make sure to manually clear the log periodically, or wrap events.
To monitor event logs in Windows 2003:
To access the log, in the Event Viewer window select Log > Log Settings.
You can:
• Overwrite events as needed.
• Overwrite events older than n days.
• Clear the log manually.
Phase Forward recommends that you overwrite events as needed.
Note: The Application Event log holds a record of all InForm log on attempts. Be aware of this when you choose a setting for event logs, because you may not want to lose any of the InForm log on information.
For production servers, Phase Forward recommends that you save event logs periodically.

Chapter 12 Performance tuning
214 InForm 4.6
Moving locations for MS DTC logs The MS DTC logs are generated by default in the %SYSTEMROOT%\SYSTEM32\DTClog folder. Phase Forward recommends that you place the logs on a different disk, and increase the log file size.
To move locations for MS DTC logs in Windows 2003:
1 In Windows Explorer, create a new folder for the DTC logs.
2 At a Windows command prompt, stop the MS DTC service.
3 Open Microsoft Component Services by selecting Start > Programs > Administrative Tools > Component Services.
a Expand Component Services.
b Expand Computers.
c Right-click My Computer and select Properties.
d Select the MS DTC tab.
e In the Log Information group box, change the Capacity to 16 MB or higher.
4 Click Reset log.
5 To reset the existing log file, in the dialog box, click Yes.
6 In the dialog box, type a new drive location.
7 Click Reset.
8 Click OK.
9 Start the MS DTC service.
10 Delete the original MS DTC folder through Windows Explorer.

Installation and Configuration
InForm 4.6 215
Clearing and enlarging MS DTC logs If you experienced an MS DTC log problem, for example if you received the following error message, you can reset the log size:
The MS DTC log file is full and cannot accept new log records. To reset the log size:
1 At a command prompt, use the pfadmin command to stop the InForm application.
2 At a command prompt, stop the MS DTC service.
3 To open the Microsoft Component Services, select Start > Programs > Administrative Tools > Component Services.
4 Expand My Computer.
5 Right-click My Computer, and select Properties.
6 Select the MS DTC tab.
7 In the Capacity section, increase the capacity of the log file to 100 MB.
8 Click Reset log.
9 Click OK.
10 Right-click My Computer, and select Start MS DTC.
11 Close the Component Services.
12 Click YES to save the settings.

Chapter 12 Performance tuning
216 InForm 4.6

InForm 4.6 217
In this appendix Installation ........................................................................................................................................... 218
General Reporting troubleshooting ................................................................................................. 221
PFAdmin syntax ................................................................................................................................. 223
Additional Reporting installation, upgrade and configuration tasks .......................................... 231
A P P E N D I X A Troubleshooting

Appendix A Troubleshooting
218 InForm 4.6
Installation
Disk space issues
Responding to disk space warnings If you get a disk space warning:
• Check the disk space availability of the software destination location you chose in step 8 of the installation procedure (on page 51).
• Look in the location defined by the Temp variable. You need about 35 MB.
Handling trace files You should periodically search for the trace files that are created by the InCert tracing function. These files are located in the InForm/InCert folder. There are three kinds of trace files:
• Files with the .tbz extension—These are zipped log files that are created when an error occurs. They contain information about the status of the InForm server.
If you see files with this extension, contact Phase Forward support. These files must be sent to Phase Forward for analysis. After you have sent the files to Phase Forward, you can safely delete them from your computer.
• Files with the .tbh and .tbx extensions—These are temporary files that typically appear when the InForm server is started or stopped. You can safely delete them any time you need space.
Insufficient software installed If you get a warning about missing software, install all the software that is listed in the Requirements Not Met window before installing the InForm software again.
Uninstalling MSXML 4.0 SP2 To uninstall MSXML 4.0 SP2, run:
Remove_MSXML4.cmd
This script is in the InForm InstallSupport folder.

Installation and Configuration
InForm 4.6 219
Oracle MTS configuration is invalid If the Oracle registry settings are not correct, you may get the following InForm 4.6 Core Installer errors during the installation process:
• Oracle MTS configuration is invalid.
• Registry Settings: INVALID.
• XA Views: INVALID.
Possible solutions • If the installation browser window is still open:
1 Click Back to display the Database Configuration window.
2 Select the Prep Oracle checkbox.
3 Click Next to proceed.
This runs the InFormPrepORA and MTS0RA112 applications.
• If the installation browser window has been closed, run MTSORA112.vbs from the command line.
XA Views: INVALID If you have tried the solution that is recommended in Oracle MTS configuration is invalid (on page 219) and still get this error, or if you run MTSORA102 from the command line and get a warning, XAVIEW.SQL may not be installed.
Note: This can happen for some Oracle client-only installations (multi-tier setup).
Possible solution 1 Copy the XAVIEW.SQL file from another machine (running same Oracle version) to your
Oracle rdbms\admin folder.
2 Log in as SYS on a machine with XAVIEW.SQL.
3 Run XAVIEW.SQL against your InForm software core instance.
4 Run MTSORA102 from the command line.
Database connectivity If you get a warning about database connectivity, check that:
• The connect string value is correct.
• The PFDBAdmin password is valid.
If you get a message that the PFDBAdmin user does not exist, see Creating InForm software database accounts (on page 36).

Appendix A Troubleshooting
220 InForm 4.6
Rebooting Rebooting occurs when certain DLLs have been overwritten.
• Reboot the server.
• When you log back in, the installation resumes.
Final configuration fails The installation process expects to be able to access the installation source drive (for example, the CD) or UNC path. If the CD is removed from the drive during the installation process, or if the network goes down and the UNC path cannot be accessed, an error message appears.
Execute the final configuration step manually:
1 Place the InForm 4.6 CD in the CD-ROM drive, or verify the network connections.
2 At the Windows command prompt, type: Run [path]\setup.exe InFormFinalConfig
Data Item reports for large trials If a Data Item report is generated for a trial with a large number of patients, a time out can occur if the maximum amount of time that is allowed for script execution is exceeded.
To increase the time allowed before a time out occurs:
1 Select Start > Programs > Administrative Tools > Internet Services Manager.
The Internet Information Services window opens.
2 In the window where computer names are listed, select the Default Website folder.
3 In that folder, right-click the name of the InForm trial.
4 Select Properties.
A Properties dialog box appears for the trial.
5 Select the Virtual Directory tab.
6 Click Configuration.
The Application Configuration dialog box appears.
7 Select the App Options tab.
8 Increase the ASP Script Timeout settings to 600 seconds. This should enable Data Item reports to be executed for a trial with a large number of patients.
9 Click OK until all dialog boxes close.

Installation and Configuration
InForm 4.6 221
General Reporting troubleshooting
LDAP Server becomes corrupt If the LDAP server becomes corrupt, or the InForm user or user groups become out of sync with the LDAP server, run <install>\InForm\bin\LDAPmigrate.exe. This rebuilds the LDAP data from the InForm database.
Syntax:
LDAPMigrate [/S(ilent)] <trialname> <LDAPServer:Port> <BaseDN> Example:
LDAPMigrate pfst45 MyLDAPServer:389 "ou=pfst45,ou=Trials,dc=pf,dc=com"
Appendix A Troubleshooting
222 InForm 4.6
Reporting database fails with a duplicate column name error If the setup of the reporting database fails with an ORA-00957: duplicate column name error, the study design might include an item or control RefName that is used for key column names in CV views. The key column names used for CV views are reserved. To resolve the problem, update the study design so that it does not include any reserved words as item or control RefNames.
The following names are reserved and cannot be used as RefNames:
• CD_COUNT
• AFROWID
• SUBJECTID
• SITEID
• STUDYVERSIONID
• SUBJECTVISITID
• SUBJECTVISITREV
• VISITID
• VISITINDEX
• FORMID
• FORMREV
• FORMINDEX
• SUBJECTINITIALS
• SITEMNEMONIC
• VISITMNEMONIC
• FORMMNEMONIC
• VISITORDER
• SITENAME
• SITECOUNTRY
• SECTIONID
• ITEMSETID
• ITEMSETINDEX
• ITEMSETIDX
• DELETEDITEM
• DELETEDFORM
• FORMIDX

Installation and Configuration
InForm 4.6 223
PFAdmin syntax
About PFAdmin The PFAdmin utility is used to set up the InForm software server environment. The parameters are stored in the registry. Therefore, you need local administrator privileges to run the utility.
The PFAdmin utility has the following command options:
pfadmin [ CHECKREG | CONFIG | HELP | INSTALL | KILLSERVER | PING | REMOVE | SETSERVER | SETUP | START | STOP | SYNC | UNINSTALL | VIEW ]
Note: Before using PFAdmin, make sure that Default Authentication Level in Default Properties is set to Connect.
PFAdmin commands
Note: Any arguments containing commas, equal signs, or spaces must be enclosed within double quotes.
Command Purpose and Syntax
CHECKREG [/Del] [/DelAll] Displays the current InForm Server COM and MTS components in the NT registry.
WARNING: Be careful to remove the server(s) or uninstall the service before using either of the delete options:
• [/Del]—Removes obsolete settings.
• [/DelAll]—Removes the settings of all servers.

Appendix A Troubleshooting
224 InForm 4.6
Command Purpose and Syntax
CONFIG Service [/AdminDB DBServer UID PID] | [/AdminDSN DsnName UID PID] | [/LDAPMngr LDAPServer:Port AdminDN AdminPwd] [/PfUser Password] | [/SysDBA UID PID]
Configures an existing service.
• [/AdminDB DBServer UID PID [SQL]]—Sets the ODBC DSN for the InFormAdmin database. Make sure that DBServer, UID, and PID are the same ones that were used to create the InFormAdmin database. Use alphabetic or alphanumeric characters for the UID and PID, and begin them with a letter; do not use all numeric characters.
• [/AdminDSN DsnName UID PID]—Creates the ODBC DSN InForm software with the default database server, using the specified user name and password. Use alphabetic or alphanumeric characters for the UID and PID, and begin them with a letter; do not use all numeric characters.
• [/LDAPMngr LDAPServer:Port "AdminDN" AdminPwd]—Save Administrator Distinguish Name and password for a particular LDAP server. Use this command after installing Sun ONE Directory Server to pass the LDAP administrator credentials to the Reporting and Analysis module.
• [/PfUser Password]—Creates the PfUser_computername account during the InForm software installation. The account is for Microsoft MTS packages used by InForm servers. In general, you do not need to configure the account. If you change the password through NT User Manager, you must reconfigure the InForm Service with the new password.
• [/SysDBA UID PID]—Sets the InForm Service DBA user name and password. The default username and password is pfdbadmin, which is set during the InForm installation. You can use this command to change the pfdbadmin password as needed. If you want to change the InForm Service DBA name, modify the provided SQL script InFormPrepORA.sql with the new user name and password, then run the script as SYS. After running the script, use this command option to configure the InForm Service to use the new InForm Service DBA. Use alphabetic or alphanumeric characters for the UID and PID, and begin them with a letter; do not use all numeric characters.
CONFIG Server ServerName [Automatic|Manual]
Configures the startup mode for an existing server as either Automatic or Manual.

Installation and Configuration
InForm 4.6 225
Command Purpose and Syntax
CONFIG Trial TrialName [Automatic | Manual] | [/TriDSN DSN UID PID] | [/RndDSN DSN] | [/Rnd [MDBFilePath ]] | [/Host ServerName] |
Configures an existing trial.
• [Automatic | Manual]—Configures the trial startup mode.
• [/TriDSN DSN UID PID]—Configures the trial ODBC DSN. Use alphabetic or alphanumeric characters for the UID and PID, and begin them with a letter; do not use all numeric characters.
• [/RndDSN DSN]—Configures the trial randomization source dataset name.
• [/Rnd [MDBFilePath]]—Creates a trial randomization source dataset name to use the given Microsoft Access database file.
• [/Host ServerName]—Moves the trial from current host server to another server in the InForm Service.
CONFIG CDD TrialName [Enable | Disable] | [DSN [Active | Inactive]] | [DSN UID PID]
Configures an existing CDD:
• [Enable | Disable]—Enables or disables the CDD for a particular trial.
• [DSN [Active | Inactive]]—Makes a CDD DSN active or inactive for a particular trial.
• [DSN UID PID]—Configures an existing CDD DSN with the User ID and password specified. Use alphabetic or alphanumeric characters for the UID and PID, and begin them with a letter; do not use all numeric characters.
HELP Lists all the options of the pfdamin command.
INSTALL Creates PfUser_computername and other settings, and installs the MTS library package InFormTrial.
The InForm service does not have to be running for the command to work.
KILLSERVER ServerName Stops server MTS packages without stopping trials on the server.
PING MachineName 1 | 2 | 3:ServerName | 4:ServerName | 5:ServerName [Port#]
Pings the InForm Service or a particular server. The ping levels are:
• 1—Ping the InForm Service.
• 2—Ping the InForm Service and all InForm server(s).
• 3—Ping the specified server.
• 4—Ping and get information about the specified server.
• 5—Ping the specified server and dump the user session to a server-side file.
• [Port#]—Allows you to specify the port number the echo server is listening on, if you changed it.

Appendix A Troubleshooting
226 InForm 4.6
Command Purpose and Syntax
REMOVE [Server ServerName] | [Trial TrialName [/DSN]] | [CDD TrialName [/All | DSN] [SYNC TrialName [DestinationComputer]]
Removes an existing server, trial, or CDD.
• [Server ServerName]—Removes an InForm server from the InForm Service. Trials should be either reconfigured to other servers or removed before this command is run.
• [Trial TrialName [/DSN]]—Deletes the named trial from the InForm Service. The Web virtual directories and folders for the trial are physically removed. Use the /DSN option to remove the trial-related DSNs.
• [CDD TrialName [/All | DSN]—Removes either all CDD DSNs in the specified trial or the given CDD by DSN.
• [SYNC TrialName [DestinationComputer]]—Removes the connection from the trial to the remote trial instance on destination computer.
Note: Before using the PFADMIN REMOVE command, verify that IIS is running.

Installation and Configuration
InForm 4.6 227
Command Purpose and Syntax
SETSERVER [Site TrialName ComputerName] | [MedMLInstaller TrialName ComputerName] | [REPORTING TrialName ReportingUrl] | [REPORTINGAN TrialName AuthenticationNamespace] | [REPORTINGUR TrialName UserRoot] | [LDAPSERVER TrialName LDAPServer:Port] | [LDAPBDN TrialName LDAPBaseDistinguishName]
Changes the MedML and Site servers and sets the Reporting configuration settings
• [Site TrialName ComputerName]
• [MedMLInstaller TrialName ComputerName]
• [REPORTING TrialName ReportingUrl]—Set Cognos 8 URL for trial.
• [REPORTINGAN TrialName AuthenticationNamespace]—Set Cognos 8 AuthenticationNamespace for trial.
• [REPORTINGUR TrialName UserRoot]—Set Cognos 8 UserRoot for trial.
• [LDAPSERVER TrialName LDAPServer:Port]—Set LDAPServer:Port for trial.
• [LDAPBDN TrialName LDAPBaseDistinguishName]—Set LDAP Base Distinguish Name for trial.
Note: Before using SETSERVER MedMLInstaller, put the trial in design mode. To do this, use the pfadmin start trial /design command.
Note: The SETSERVER command requires that you set the Default Authentication Level property of the InForm server to Connect:
To set this property:
• Select Administrative Tools > Component Services > My Computer - Properties.
• Set the Default Properties - Default distributed communication properties - Default Authentication Level value to Connect.
SETUP Server ServerName [Automatic]
Creates a new InForm server in the InForm Service.
• [Automatic]—The server is automatically started with the InForm Service. Manual startup is the default.
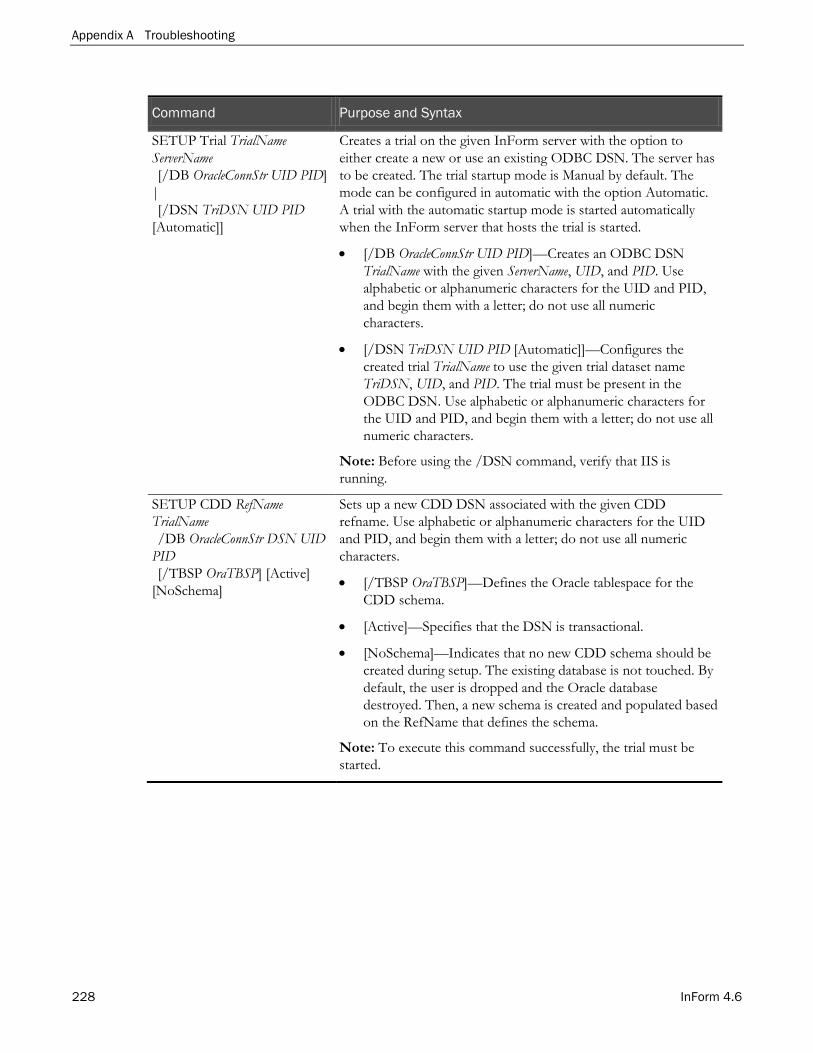
Appendix A Troubleshooting
228 InForm 4.6
Command Purpose and Syntax
SETUP Trial TrialName ServerName [/DB OracleConnStr UID PID] | [/DSN TriDSN UID PID [Automatic]]
Creates a trial on the given InForm server with the option to either create a new or use an existing ODBC DSN. The server has to be created. The trial startup mode is Manual by default. The mode can be configured in automatic with the option Automatic. A trial with the automatic startup mode is started automatically when the InForm server that hosts the trial is started.
• [/DB OracleConnStr UID PID]—Creates an ODBC DSN TrialName with the given ServerName, UID, and PID. Use alphabetic or alphanumeric characters for the UID and PID, and begin them with a letter; do not use all numeric characters.
• [/DSN TriDSN UID PID [Automatic]]—Configures the created trial TrialName to use the given trial dataset name TriDSN, UID, and PID. The trial must be present in the ODBC DSN. Use alphabetic or alphanumeric characters for the UID and PID, and begin them with a letter; do not use all numeric characters.
Note: Before using the /DSN command, verify that IIS is running.
SETUP CDD RefName TrialName /DB OracleConnStr DSN UID PID [/TBSP OraTBSP] [Active] [NoSchema]
Sets up a new CDD DSN associated with the given CDD refname. Use alphabetic or alphanumeric characters for the UID and PID, and begin them with a letter; do not use all numeric characters.
• [/TBSP OraTBSP]—Defines the Oracle tablespace for the CDD schema.
• [Active]—Specifies that the DSN is transactional.
• [NoSchema]—Indicates that no new CDD schema should be created during setup. The existing database is not touched. By default, the user is dropped and the Oracle database destroyed. Then, a new schema is created and populated based on the RefName that defines the schema.
Note: To execute this command successfully, the trial must be started.

Installation and Configuration
InForm 4.6 229
Command Purpose and Syntax
SETUP CDD RefName TrialName /DSN DSN UID PID [/TBSP OraTBSP] [Active] [NoSchema]
Sets up an existing DSN associated with the given CDD RefName. Use alphabetic or alphanumeric characters for the UID and PID, and begin them with a letter; do not use all numeric characters.[/TBSP OraTBSP]—Defines the Oracle tablespace for the CDD schema.
• [Active]—Makes the DSN transactional.
• [NoSchema]—Indicates that no new CDD schema should be created during setup. The existing database is not touched. By default, the user is dropped and the Oracle database destroyed. Then, a new schema is created and populated based on the RefName that defines the schema.
Note: To execute this command successfully, the trial must be started.
START [Server ServerName] | [Trial TrialName]
Starts an existing InForm server or trial.
• [Server ServerName]—Starts an existing InForm server by server name.
• [Trial TrialName]—Starts an existing trial by trial name.
START [Trial TrialName [/Design]]
Starts the trial in design mode. This means you can install trial components that are not completely designed (strict checking is not in force). By default, the trial starts in production mode.
STOP [Server ServerName [/Trials]] | [Trial TrialName [/Anyway]]
Stops an existing InForm server or trial.
• [Server ServerName [/Trials]]—Stops an existing InForm server by server name. By default, a running server can be stopped if there is no trial running and no other application connected to it. The Trials keyword stops all running trials, and then stops the server.
• [Trial TrialName [/Anyway]]—Stops the named trial. The Anyway keyword stops a trial regardless of any connections or HTTP requests.
SYNC Path Path specifies the location of the XML files to be transferred to another server using file-based transfer. This command results in inbound synchronization.
UNINSTALL Removes all InForm servers and trials, and then removes the InForm service settings PfUser_computername and the MTS library package.
Note: The InForm service must be running for the command to work.

Appendix A Troubleshooting
230 InForm 4.6
Command Purpose and Syntax
VIEW [Service] | [Server ServerName] | [Trial TrialName] | [CDD TrialName]
Displays a monitoring list of all servers in the InForm service, all trials in servers, or all RefNames for CDD DSNs configured for a trial.
• [Service]—Lists all the servers and trials in the InForm service.
• [Server ServerName]—Lists each server by server name and trials hosted on that server.
• [Trial TrialName]—Lists a trial by its name.
• [CDD TrialName]—Lists the RefNames for each CDD DSN configured for the specified trial.

Installation and Configuration
InForm 4.6 231
Additional Reporting installation, upgrade and configuration tasks
Resetting reporting database
Overview To reset reporting, you must uninstall the Reporting and Analysis module, and then reinstall it.
The procedure for resetting the Reporting and Analysis module depends on whether it is installed in:
• A different database than the one in which the trial resides.
• The same database as the trial.
Resetting the Reporting and Analysis module—separate databases for trial and reporting
There are two sets of scripts for an install and uninstall of this type. One set of scripts completely removes a reporting for a trial and must be run with the trial down. The other set of scripts removes only the reporting schema and can be run with the trial up.
To reset the Reporting and Analysis module when it is installed in a different database than the trial, and completely remove the reporting for a trial:
1 Follow the steps in Removing a single trial/reporting schema—separate databases for trial and reporting (on page 81).
2 Follow the steps in Installing the Reporting and Analysis module in a multiple database environment (on page 172).
To reset the Reporting and Analysis module when it is installed in a different database than the trial and remove the reporting schema only:
1 Follow the steps in Appendix A -Uninstalling the reporting schema.
2 Follow the steps in Appendix A -Installing the reporting schema.
Resetting the Reporting and Analysis module—single database for trial and reporting
To reset the Reporting and Analysis module when it is installed in the same database as the trial:
1 Follow the steps in Removing reporting—single database for trial and reporting (on page 82)
2 Follow the steps in Creating the InForm reporting database (on page 147).

Appendix A Troubleshooting
232 InForm 4.6
Replicating the reporting database—separate databases for trial and reporting
The InForm reporting replication
Note: The information in this section only applies to a Reporting and Analysis installation that is using a different database from the one in which the trial resides. For more information, see Installing the Reporting and Analysis module in a multiple database environment (on page 172).
Oracle Streams are used to replicate data from the InForm trial to the reporting schema. Only DML data is replicated (DDL data is not replicated).
Oracle Streams captures data changes in the InForm trial database and replicates them in the reporting schema tables in the reporting database. Data changes to the reporting schema tables are recorded in materialized view logs for use by the Materialized View/Refresh Operations (on page 238).
STREAMS_SETUP_INFO table A table called STREAMS_SETUP_INFO is created in both the trial and reporting databases when you run the installation. The STRMADMIN user owns this table in both databases. This table has one row written to it for each Reporting and Analysis installation that is run and will only have one row per trial and reporting schema at any time. (Uninstalls require that the row is removed and installations require that the row not be there before proceeding with installation.)
Each row in the table contains information about the Oracle Streams environment for a given trial and reporting schema:
• Trial and reporting schema owner names.
• Their database global names.
• Streams capture, propagation, and apply processes names.
• Names of the associated rule sets.
• Reporting proxy usernames from the trial database.
Note: The tables in the trial and reporting databases have the same information.
This information is used by the uninstall process. If any information is incorrect in these tables, then the uninstall process may fail and may not remove everything.
In the unlikely event that an Oracle Streams capture, propagation, or apply process is re-created, the name of the process and rule set from this table should be used. If the names of any of these processes or rule sets must be changed, then the information in the STREAMS_SETUP_INFO table must be updated in both databases to reflect the new information. This does not include a reporting reinstallation, because the reporting installation adds all necessary information to the table. This only covers an event where the decision is made to re-create one or more of these processes, rather than to uninstall and reinstall the Reporting and Analysis module.
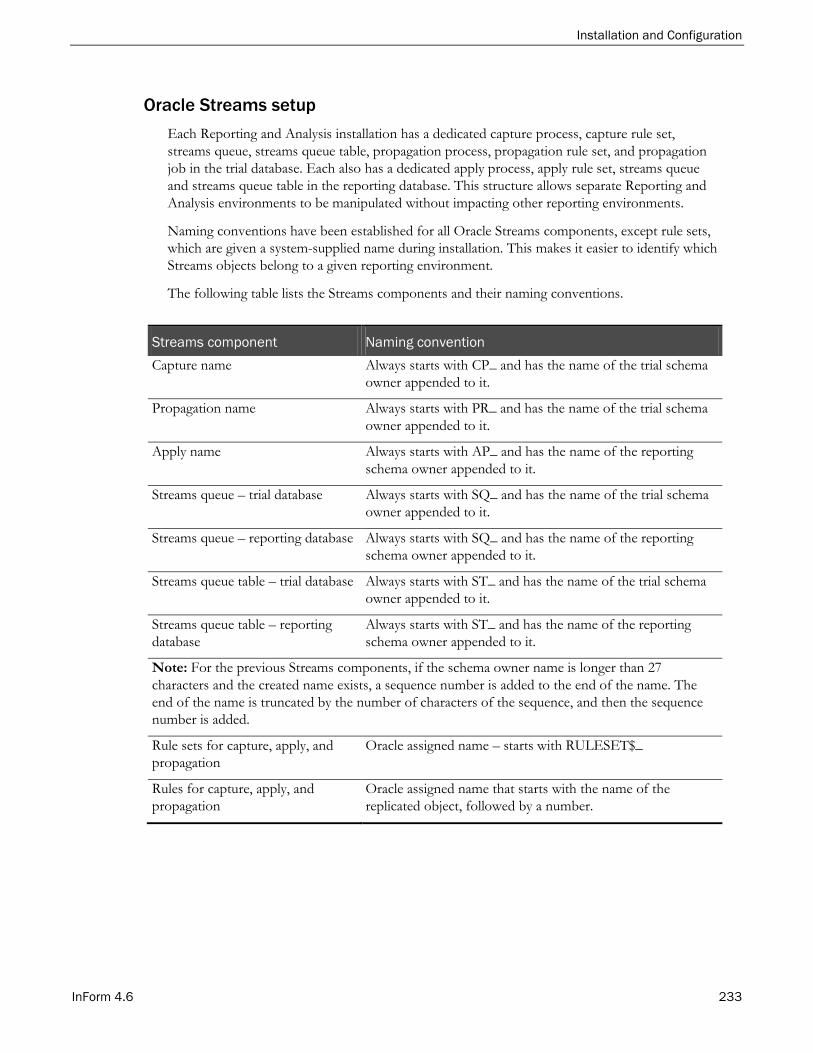
Installation and Configuration
InForm 4.6 233
Oracle Streams setup Each Reporting and Analysis installation has a dedicated capture process, capture rule set, streams queue, streams queue table, propagation process, propagation rule set, and propagation job in the trial database. Each also has a dedicated apply process, apply rule set, streams queue and streams queue table in the reporting database. This structure allows separate Reporting and Analysis environments to be manipulated without impacting other reporting environments.
Naming conventions have been established for all Oracle Streams components, except rule sets, which are given a system-supplied name during installation. This makes it easier to identify which Streams objects belong to a given reporting environment.
The following table lists the Streams components and their naming conventions.
Streams component Naming convention Capture name Always starts with CP_ and has the name of the trial schema
owner appended to it.
Propagation name Always starts with PR_ and has the name of the trial schema owner appended to it.
Apply name Always starts with AP_ and has the name of the reporting schema owner appended to it.
Streams queue – trial database Always starts with SQ_ and has the name of the trial schema owner appended to it.
Streams queue – reporting database Always starts with SQ_ and has the name of the reporting schema owner appended to it.
Streams queue table – trial database Always starts with ST_ and has the name of the trial schema owner appended to it.
Streams queue table – reporting database
Always starts with ST_ and has the name of the reporting schema owner appended to it.
Note: For the previous Streams components, if the schema owner name is longer than 27 characters and the created name exists, a sequence number is added to the end of the name. The end of the name is truncated by the number of characters of the sequence, and then the sequence number is added.
Rule sets for capture, apply, and propagation
Oracle assigned name – starts with RULESET$_
Rules for capture, apply, and propagation
Oracle assigned name that starts with the name of the replicated object, followed by a number.
Appendix A Troubleshooting
234 InForm 4.6
Oracle Streams Recommended References The following Oracle documents are recommended for Oracle Streams:
• Oracle Streams Advanced Queuing User’s Guide and Reference— information on Streams usage of advanced queuing.
• Oracle Streams Concepts and Administration—information on Streams concepts and setup.
• Oracle Streams Replication Administrator’s Guide—information on Streams setup, troubleshooting and monitoring.
• Oracle Database PL/SQL Packages and Types Reference—contains information on a new procedure for Streams removal: DBMS_STREAMS_ADM.REMOVE_STREAMS_CONFIGURATION.
These four manuals are available on Oracle software media or on the Oracle website at http://www.oracle.com/technology/documentation/index.html http://www.authorit.jumbahost.com/. These manuals might have been updated since they were issued on the software media, so it is best to use the latest manuals from the Oracle website.
The documents below are available on Metalink: http://metalink.oracle.com (http://metalink.oracle.com):
• Note 418755.1 – contains Streams recommendations with respect to database setup, privileges, and configuration.
• Note 273674.1 – contains a Streams health check script and detail on what script output means.
• Note 335516.1 – contains Streams performance recommendations.
Capture and apply process parameters The capture and apply processes are installed with a set of default parameters that you can easily change. For more information, see the Oracle Database PL/SQL Packages and Types Reference.
• Change capture parameters with the DBMS_CAPTURE_ADM.SET_PARAMETER procedure.
• Change apply parameters with the DBMS_APPLY_ADM.SET_PARAMETER procedure.
As recommended by Oracle Metalink Note: 418755.1, which contains Streams recommendations, some parameters should start with an underscore.
Note: Do not change the apply procedure COMMIT_SERIALIZATION parameter (set to FULL by default). This setting disables the apply process when an error is found, which is necessary because transactions have to be applied in order of occurrence from the trial database. This setting should never be changed as it allows transactions to be applied out of order if there is an apply error.
Replication frequency Replication frequency is controlled by the propagation job in the job queue, which is created

Installation and Configuration
InForm 4.6 235
during installation with default settings.
To change the propagation schedule, modify the next_date, latency, and duration parameters for the propagation. These parameters are described in the Oracle Database PL/SQL Packages and Types Reference under the DBMS_AQADM.ALTER_PROPAGATION_SCHEDULE procedure.
Streams monitoring and troubleshooting The Oracle Streams Concepts and Administration documentation provides comprehensive chapters on monitoring and troubleshooting:
• Part III - Monitoring Streams (multiple chapters).
• Chapter 18, Troubleshooting a Streams Environment.
One particularly useful section in the Streams Concepts and Administration manual contains a set of scripts that you can use to create procedures allowing the display of apply errors. These scripts are located in the Monitoring Streams Apply Processes chapter.
Use the Oracle Enterprise Manager, Database Control, or Grid Control for monitoring and adjusting things in a Streams environment. You can also use SQL*Plus as a tool for this purpose.
Replication status Oracle Metalink Note: 418755.1 recommends that you use a heartbeat table to check the replication status.
The installation program creates:
• A table called PF_HEARTBEAT in each trial schema. The table is created in the reporting environment and included in the Streams replication for each Reporting and Analysis installation. The table consists of two fields and one row.
• The first field is the global name of the trial database, which never changes.
• The second field is a character field that contains a date/time, using the format “YYYYMMDD HH24:MI:SS”.
• A job owned by the trial schema user in the job queue for each Reporting and Analysis installation.
The job that is created runs the PULSE procedure in the TRIAL_PROCS package, which updates the PF_HEARTBEAT table with the current date and time. The job is set to run every minute, which can be changed. You can also disable the job with no effect on the Streams replication process.
To get a quick replication status, connect to the trial database as the trial owner and to the reporting database as the reporting owner. Run this query in both databases:
Select * from pf_heartbeat; The result should return one row in both databases and the UPDATEDATETIME field value in the reporting database should be close or equal to the value reported in the trial database. If it is not, then the Streams replication process is behind or there is a problem somewhere in the replication process.

Appendix A Troubleshooting
236 InForm 4.6
Datatype conversions for Streams Reporting and Analysis information from several InForm trial tables with LONG and LONG RAW datatypes is required for reporting. These datatypes are converted to CLOB and BLOB datatypes prior to being replicated.
A job owned by the trial schema owner is created by the installation in the job queue to convert these datatypes. The job runs the procedure LOAD_AND_CONVERT_LONGS in the TRIAL_PROCS package every fifteen minutes. You can change the frequency, but you should not disable the job as this will impede the replication of information for the affected fields.
Data replication/refresh troubleshooting If the # Failures is more than zero, the Oracle alert log for the reporting database instance needs to be examined to determine the cause of the failure(s). The refresh error will appear somewhat like the following:
ORA-12012: error on auto execute of job 1216 ORA-20500: Refresh of materialized views failed. See error stack for error. ORA-06512: at "PFLIB.REFRESH_PROCS", line 65 ORA-30439: refresh of 'PFIB.IRM_AF_CONTEXT' failed because of ORA-12008: error in materialized view refresh path ORA-30036: unable to extend segment by 4 in undo tablespace 'UNDOTBS1' ORA-06512: at line 1 After the underlying cause of the error is corrected, or the error is determined to be of an intermittent nature, a complete refresh should then be run by following the instructions in Refreshing the reporting database (on page 237).
To change the Schedule Interval for the normal refresh job:
1 Highlight the job.
2 Click Edit.
The Edit Job dialog box appears.
3 Click Interval Set.
The Set Time Interval dialog box appears.
4 Enter the desired Interval and click OK.
5 In the Edit Job dialog box, click OK.
6 At the bottom right corner of the window, click Apply.
Now the currently scheduled refresh job will run based upon the original interval, and all subsequent refresh jobs will be scheduled using the new interval. Do not schedule the refresh job to run more frequently than the DURATIONs seen in the REFRESH_STATUS query for Scheduled Refresh jobs.
If new InForm software updates do not seem to be refreshed but none of the previous steps indicate any problems with the refresh process and the most recent refresh jobs from the REFRESH_STATUS query are No Updates for Scheduled Refresh and STALE is 0, the problem may be with the Streams process for replicating InForm data.
1 Using EMC, expand the plus sign (+) before the reporting database in the left side pane.
2 Select Distributed > Streams, then click Apply.

Installation and Configuration
InForm 4.6 237
3 Highlight the AP process for the trial.
4 Under the General tab, verify that the Status is Enabled.
If the Status is Disabled or Arborted, click Start.
5 Check the Errors tab:
If any errors are listed, investigate the Error Number with its Error Message and when the problem is resolved, highlight the error row and click Execute.
6 Next, using EMC,
a Connect to the Trial database as the schema owner user and expand the plus sign (+) before the trial database in the left side pane.
b Select Distributed > Streams > Capture, then highlight the CP process for the trial.
c Under the General tab check that the Status is Enabled:
If the Status is Disabled or Aborted click Start to enable the Capture process. Also under Propagate, highlight the PR process for the trial in question. Under the Schedule tab check that it is Enabled.
Refreshing the reporting database
About refreshing the reporting schema The reporting installation builds a copy of the current InForm trial database in the reporting database that is owned by the same schema user as the trial. You must regularly refresh the reporting schema with updated data from the InForm trial database. This is done with materialized views that are:
• Used to transform the data for reporting.
• Refreshed with new, replicated InForm trial data.
Overview of the materialized view data transformation process The reporting installation builds a copy of the current InForm trial database in the reporting database that is owned by the same schema user as the trial. The reporting installation then creates a series of nested materialized views in groups that correspond to each category of operational data that is exposed in the operational model for reporting.
Materialized views are prefixed by IRM_. The lowest level group of nested materialized views is derived directly from the PF_ tables in the reporting database. Each subsequent level is built on the previous materialized views and tables.
The installation process keeps track (in the IRT_MVIEWS table) of the order in which the materialized views were created during the installation. This enables all subsequent data refreshes to occur in the same order.
How the materialized view refresh process works Oracle Streams replicate updated InForm data asynchronously from the InForm trial database schema PF_ tables to the identical table definitions in the Reporting and Analysis database

Appendix A Troubleshooting
238 InForm 4.6
schema.
• Data changes are captured and propagated by the InForm trial database from Redo and Archive log files.
• All propagated updates are applied by the InForm reporting database, causing the reporting schema to be replicated asynchronously.
This process is described more fully in Replicating the reporting database (on page 231).
This ongoing replication of the base data does not change the view of data visible in Cognos 8 Business Intelligence. Only the refresh of the materialized views causes the view of data for reporting users to change. The frequency that the refresh process runs (refresh interval) can be customized. The installation default for the Oracle Job Queue is to run every 60 minutes.
Materialized View/Refresh Operations The goal of the materialized views refresh process is to make new and updated trial data available to the Cognos 8 Business Intelligence model on a regular basis, with little or no intervention required after installing.
Oracle jobs for refresh operations
The Reporting and Analysis installation sets up two Oracle jobs for refresh operations for each trial that is installed.
• REFRESH_WITH_STREAMS_DELAY—The normal refresh job. The default interval for this job is one hour (60 minutes or 1/24 of a day).
• REFRESH_PROCS.REFRESH_MVIEWS_COMPLETE—To be run on demand. The interval is 10 years (3650 days).
For these jobs, use Oracle Enterprise Manager Console (OEM) to:
• Check the status.
• Run refresh on demand.
• Change the default interval.
1 In the left pane, expand the plus sign (+) before the reporting database, then select Distributed > Advanced Replication > Choose Administration.
2 In the right pane, click the DBMS Jobs tab.
The first Oracle job that is installed is for a normal refresh. If all is well, then the status is Normal and # Failures is 0.
There are two jobs for each trial schema owner user, so make sure that User is for the desired trial. If a complete refresh is running, a status of Broken for the normal refresh job is expected (this is to prevent the two jobs from running simultaneously).
3 To request a refresh job to run immediately, highlight the desired job and click Run. When the job completes, the next run will be scheduled for the interval period.
If # Failures is greater than zero, see Data replication/refresh troubleshooting (on page 236).

Installation and Configuration
InForm 4.6 239
Monitoring the refresh process
You can monitor the refresh process using the Oracle Enterprise Manager Console (OEM - Launch standalone). Other tools are also available for monitoring, but they are not discussed here.
The procedures in this section assume that the OEM is connected to the Reporting DB as the desired trial schema owner user. Query step examples use OEM SQL Scratchpad. You can open the specified file with the Load SQL List option, or you can copy and paste the SQL from this document.
Use the REFRESH_STATUS.sql query to get an overall look at the refresh process and ascertain if there might be any problems that need more in-depth troubleshooting:
SELECT REFRESH_NUM, REFRESH_COMMENT, STALE, REFRESH_START, REFRESH_END, DURATION, REFRESHES, REFRESHED, MVIEWS, LEVELS, FRESH, FAST, UPDATES_THRU UPDATES_ASOF, TRANSACTIONS FROM IRV_REFRESH_STATUS; The figure shows an example of the results of this query.

Appendix A Troubleshooting
240 InForm 4.6
This query reports on information from the IRT_REFRESH_HISTORY table and the columns that are returned make available the following information:
• REFRESH_NUM is the relative number of times the refresh process has been run. The rows that are returned are in descending order, so that the most recent is the first row that is returned. Whenever any number of consecutive refresh runs has no updated data to process, then there is no new REFRESH_NUM assigned and the existing relative refresh number record is updated with this information.
• REFRESH_COMMENT indicates the type of refresh process that was run. The last row (first entry in the IRT_REFRESH_HISTORY) is always either Installation Refresh or Complete Refresh. All other rows have either Scheduled Refresh (when the refresh job has run and updates exist to process) or No Updates for Scheduled Refresh (when the refresh job runs and there are no updates to process). All subsequent consecutive refreshes without updates will be reflected in these rows.
• STALE is not historical information. It shows the current state of this reporting database. If the STALE value is not 0, there are updates to be processed the next time the refresh job runs. Note that all rows have the same value.
• REFRESH_START is the date/time that the refresh job started. If REFRESH_COMMENT is No Updates for Scheduled Refresh, then this is when the first job in the consecutive series started.
• REFRESH_END is the date/time that the refresh job ended. If REFRESH_COMMENT is No Updates for Scheduled Refresh, then this is when the last job in the consecutive series ended. If the value is Null, either a refresh job is currently running or that refresh job terminated unexpectedly.
• DURATION is the number of seconds the refresh job took to refresh all materialized views affected directly or indirectly by any InForm software updates.
• REFRESHES is either the number of materialized views needed to refresh if there were any updates, or the number of times the refresh job was invoked consecutively without updates to process.
• REFRESHED is either the number of materialized views actually refreshed if there were any updates, or 1 for the IRM_REFRESH materialized view if the refresh job was invoked without updates to process. When there are updates, but REFRESHED is not equal to REFRESHES, either a refresh job is currently running or the refresh job terminated unexpectedly.
• MVIEWS is the count of unique materialized view names that were refreshed. LEVELS indicates the number of times that a refresh was requested for a list of materialized views that are not fresh (stale) as a result of either InForm software updates or the previous level of materialized views refresh.
• FRESH is the count of materialized views that became fresh after their refresh process.
• FAST is the count of materialized views that were fast refreshed.
• UPDATES_ASOF is the date/time of the updates that were processed by this refresh job.
• TRANSACTIONS is the count of rows from PF_TRANSACTIONHISTORY that were processed by this refresh job.

Installation and Configuration
InForm 4.6 241
To find out what kind of transactions were processed by a refresh job, run the following query:
SELECT * FROM IRV_REFRESH_UPDATES WHERE REFRESH_NUM=n; Where
• n—Is the REFRESH_NUM from the REFRESH_STATUS query for a refresh job that processed updates/transactions:
• OWNER—Is the trial schema owner user.
• REFRESH_NUM – TRANSACTIONS—Are the same information as described for REFRESH_STATUS. Each row in the results has the same value for the same refresh job.
• REASON—Is the value filled in by the Reporting and Analysis module in the PF_REVISIONHISTORY table for all revisions with the same TRANSACTIONID as the transactions processed by the refresh job.
• REVISIONS—Is the count of rows added by the Reporting and Analysis module for each reason from the PF_REVISIONHISTORY table for all revisions with the same TRANSACTIONID as the transactions processed by the refresh job.
Creating reports with Report Studio templates This section describes the templates and tools that you can use to create InForm reports using Cognos Report Studio.
Note: Report Studio must be purchased separately from the Reporting and Analysis module. Contact your account representative for more information.
This section describes the templates and tools provided by Phase Forward. It does not describe Report Studio functionality. For information on how to use the features of Cognos Report Studio:
1 On the InForm Navigation pane, click Help.
2 Select Using Reporting Tools.
3 Click the link for the Cognos Report Studio User Guide.
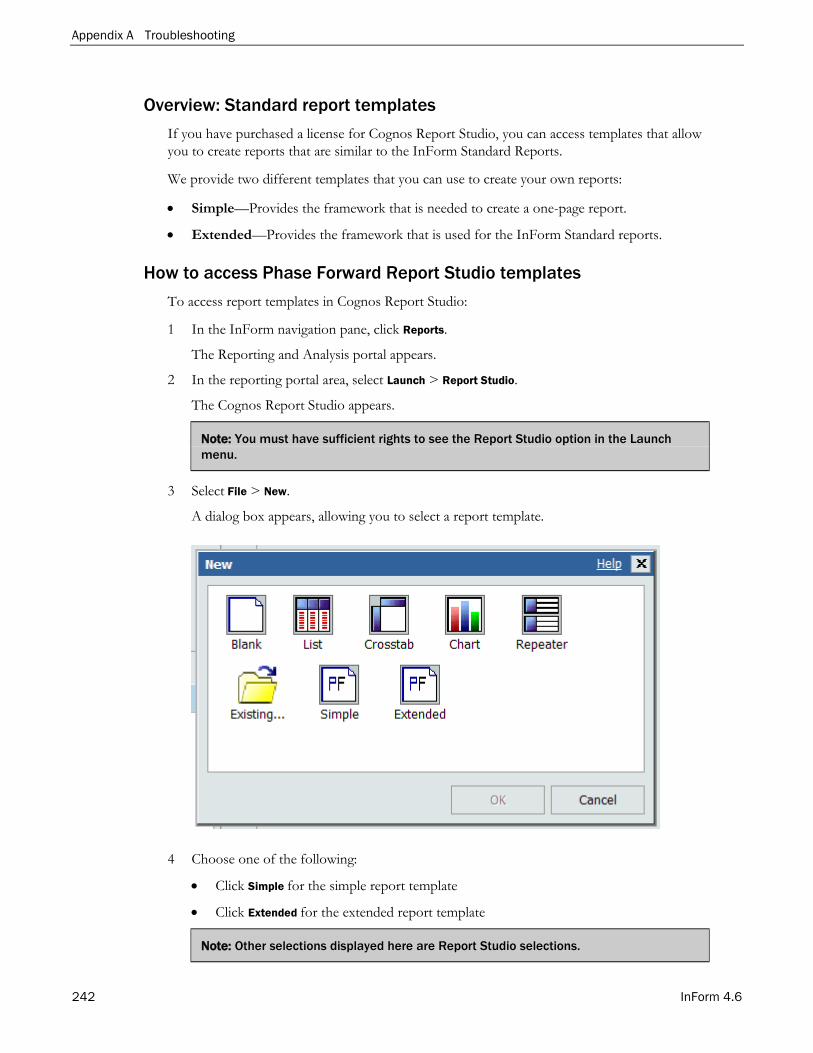
Appendix A Troubleshooting
242 InForm 4.6
Overview: Standard report templates If you have purchased a license for Cognos Report Studio, you can access templates that allow you to create reports that are similar to the InForm Standard Reports.
We provide two different templates that you can use to create your own reports:
• Simple—Provides the framework that is needed to create a one-page report.
• Extended—Provides the framework that is used for the InForm Standard reports.
How to access Phase Forward Report Studio templates To access report templates in Cognos Report Studio:
1 In the InForm navigation pane, click Reports.
The Reporting and Analysis portal appears.
2 In the reporting portal area, select Launch > Report Studio.
The Cognos Report Studio appears.
Note: You must have sufficient rights to see the Report Studio option in the Launch menu.
3 Select File > New.
A dialog box appears, allowing you to select a report template.
4 Choose one of the following:
• Click Simple for the simple report template
• Click Extended for the extended report template
Note: Other selections displayed here are Report Studio selections.

Installation and Configuration
InForm 4.6 243
5 Click OK.
6 Associate the new report with a package.
About the simple template The Simple template provides the framework that is needed to create a one-page report. In addition to generic report title and body sections, this template provides a template for the report footer. Reports that are created using this template contain the following information in their footer:
Footer label Description Run at The date and time the report was run.
Page Page number appears centered in the footer, as follows:
• In HTML versions of reports, the page number displays.
• In PDF versions of reports, the page number and total pagecount display.
Data as of The date and time that data was last replicated to the InForm Reporting database.
The Simple template appears below:

Appendix A Troubleshooting
244 InForm 4.6
About the extended template The extended template provides the framework that is used to create the InForm Standard Reports, available in the Reporting and Analysis module, including the report prompt page.
The extended template consists of these pages:
• Prompt page
• Graph page
• Columns page
• Summary page
Page 1: Prompt page template Page 1 of the extended template allows you to create a prompt page for your report. Use this page to create cascading prompts and to define sort options for your report. The prompt page template appears below:
Page 2: Graph page template Page 2 of the extended template allows you to create a page that will include a chart in the final report. The graph page template contains the framework to create a Show/Hide Report Selections section. Users who run this report can toggle on and off a list of the selection criteria

Installation and Configuration
InForm 4.6 245
and sort selections specified on the prompt page. The graph page template appears below:

Appendix A Troubleshooting
246 InForm 4.6
Page 3: Data page Page 3 of the extended template allows you to create a page to display the columns of data that are returned by the report. This template page also allows you to include a Show/Hide Report Selections section of the report. The data page appears below:

Installation and Configuration
InForm 4.6 247
Page 4: Summary page template Page 4 of the extended template is the framework for the report summary page. The summary page summarizes selection criteria for the report. The summary page template appears below:

Appendix A Troubleshooting
248 InForm 4.6
Using Phase Forward insertable objects Phase Forward provides toolbox objects that you can insert into reports to build specific InForm functionality. These are called Insertable Objects in Report Studio, and they appear on the Toolbox tab of the Report Studio interface:
The following table describes the Phase Forward Insertable Objects:
Object Description
PF Link InForm Column Begin Tag
Allows you to identify the beginning of a drill-through column in a report. Drill-through columns link back to InForm.
You can see examples of this functionality by viewing these InForm Standard Reports:
• CRF Item Listing
• Source Verification Listing

Installation and Configuration
InForm 4.6 249
PF Link InForm Column End Tag
Allows you to identify the end of a drill-through column in a report.
You can see examples of this functionality by viewing these InForm Standard Reports:
• CRF Item Listing
• Source Verification Listing
Note: The PF Tree and PF Master Detail Column tools are reserved for future use.
Creating drill-through reports
Drill-through reports are reports that users can click to link back to specific forms, items, or queries in the InForm application. Creating a drill-through report requires these Phase Forward components:
• Phase Forward Toolbox items.
• Special report elements from the reporting package to specify the URL of the target link.
Phase Forward Toolbox items The PF Link InForm Column Begin Tag and the PF Link InForm Column End Tag appear in the Report Studio toolbox. Use these insertable objects to define the beginning and end of a column that users can click to link back to an InForm form, item, or query.
Report elements for linking back to InForm Each reporting package contains special report elements that you can use to create drill-through reports, including:
Report element Description Location
INFORMPARTIALURL_CRFVIEW Specifies a partial URL for a form.
Forms-->Internal IDs
Items-->Internal IDs
INFORMPARTIALURL_QUERY Specifies a partial URL for a query.
Queries-->Internal IDs
When you wrap either of these elements with the column begin and end tags, the URLs become hyperlinks that enable users to link back to specific forms or queries in the InForm trial.
You can find details for creating Report Studio reports in the Cognos Report Studio User Guide. The steps that follow provide a general overview of the process that you must follow to create a report with a drill-through report:
1 Create a new report in Report Studio. Be sure to connect to the appropriate reporting model.
2 Drag the desired report elements onto the report palette. For example, to create a link to a particular form, you might use the Form Mnemonic element and the

Appendix A Troubleshooting
250 InForm 4.6
INFORMPARTIALURL_CRFVIEW. element.
3 Unlock the columns.
4 Drag the PF Link InForm Column Begin Tag to the position immediately before the INFORMPARTIALURL_CRFVIEW column.
5 Drag the PF Link InForm Column End Tag to the position immediately after the INFORMPARTIALURL_CRFVIEW column.
6 Lock the columns and continue building your report.
7 Save the report.
Determining folder paths When you copy reporting folders from a source location to a target location, do the following to obtain the source path:
1 Log on to the trial as the InForm System Administrator.
2 Click Reports.
3 Click Set Properties for the folder you want to copy.
4 Click View the search path.
A dialog displays the search path.
5 Copy the path from the dialog and paste it into the Path field in the InForm Report Folder Maintenance utility.
Setting up reporting folders for multiple trials The PFRInit utility sets up the reporting folder structure for multiple trials. Use the InForm Report Folder Maintenance utility to create the reporting folder structure necessary to support reporting for several trials and sponsors on one server.
Overview: Folder structure for multiple trials or sponsors This section describes the default reporting folder structure that is used for a single trial. It also describes a suggested folder structure to use for hosting multiple trials or sponsors on one server.

Installation and Configuration
InForm 4.6 251
Initial folder setup
To set up the initial folder structure:
• Import the standard reports archive. This archive includes all standard reports, as well as the InForm Trial Management package.
• Publish a trial-specific clinical package for clinical reports.
After you complete these steps, the InForm Report Folder Maintenance utility creates folders on the reporting server for the standard reports, legacy ASP reports, and the reporting packages. These folders appear in the Public Folders tab of the Reporting and Analysis portal. The following illustration shows the folders that appear after the initial setup of a single trial.
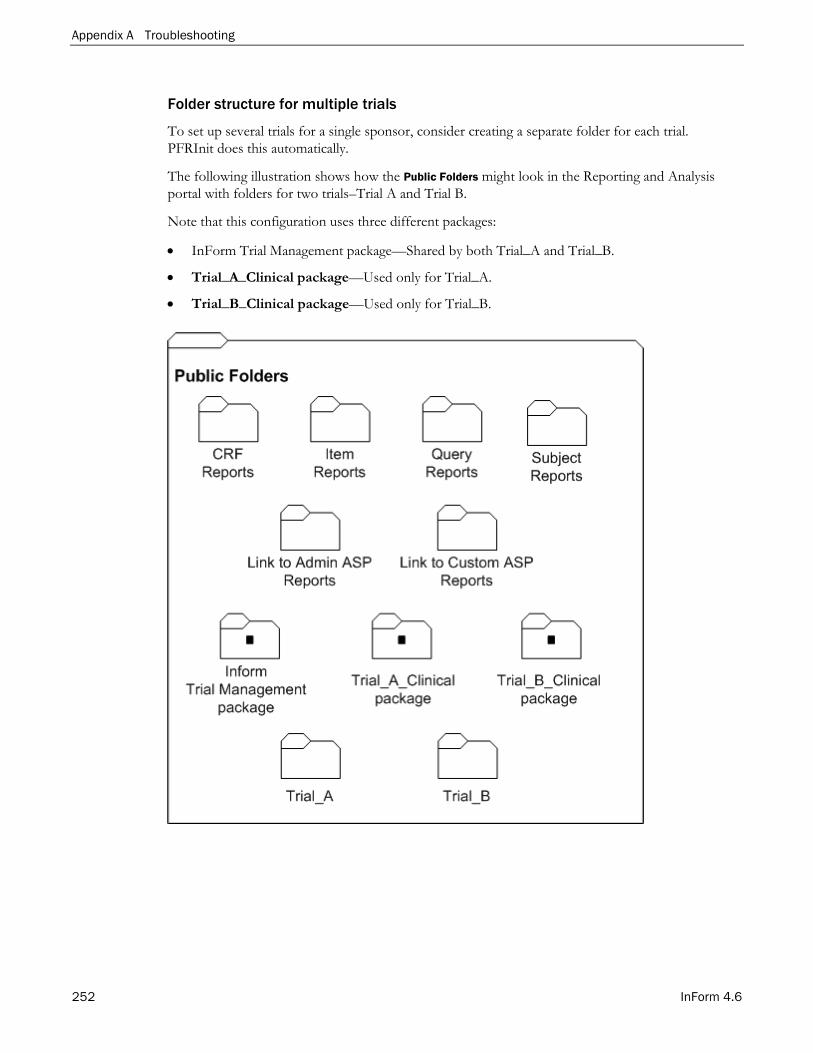
Appendix A Troubleshooting
252 InForm 4.6
Folder structure for multiple trials
To set up several trials for a single sponsor, consider creating a separate folder for each trial. PFRInit does this automatically.
The following illustration shows how the Public Folders might look in the Reporting and Analysis portal with folders for two trials–Trial A and Trial B.
Note that this configuration uses three different packages:
• InForm Trial Management package—Shared by both Trial_A and Trial_B.
• Trial_A_Clinical package—Used only for Trial_A.
• Trial_B_Clinical package—Used only for Trial_B.

Installation and Configuration
InForm 4.6 253
The contents of each trial-specific folder are set up to include the default reporting folder structure. The following illustration shows the contents of the Trial_A folder.
This structure ensures that you can save trial-specific properties, such as prompt values and report schedules, for a specified report.

Appendix A Troubleshooting
254 InForm 4.6
Folder structure for multiple sponsors, multiple trials
To set up folders for several sponsors on one reporting server, consider creating subfolders for each sponsor under the Public Folders tab. You can only do this if you use InForm Report Folder Maintenance utility to perform all the configuration steps.
The following illustration shows how the Public Folders might look in the Reporting and Analysis portal with folders for two different sponsors, each hosting two different trials.
The following example shows:
• Four clinical packages: two for Sponsor 1 and two for Sponsor 2.
• Two InForm Trial Management packages: one for Sponsor 1 and one for Sponsor 2.

Installation and Configuration
InForm 4.6 255
The contents of each sponsor-specific folder are set up to include the default reporting structure for a single trial. The following illustration shows the contents of the Sponsor 1 folder:
The Trial_A folder contains all of the default standard report folders.
Setting up a folder structure for multiple sponsors or trials
Setting up reporting packages
All reporting packages must reside at the Public Folders level only; you cannot add a package to a subfolder. Therefore, if you are using several packages for different sponsors and trials, folders for each of these packages will appear in the Public Folders tab of the Reporting and Analysis portal.
InForm Trial Management package
Trials that share a sponsor can share an InForm Trial Management package. This way, any revisions or updates to the package automatically apply to all trials for the sponsor.
You import the InForm Trial Management package by importing the Op model and Reports

Appendix A Troubleshooting
256 InForm 4.6
deployment archive. When you imported this archive as part of your installation, you imported both the standard reports folders and the InForm Trial Management package.
However, to be able to apply revisions to packages for individual trials, import a trial management package for each trial.
To import InForm Trial Management packages for different sponsors or trials:
1 Log on to the trial as the InForm system administrator.
2 Click Reports.
3 Select Launch > Reporting Administration > Configuration tab > Content Administration.
4 Click the Import tab.
5 In the Op package and reports entry, click Set properties.
6 Click the Deployment tab.
7 Click the InForm Trial Management checkbox. Make sure that all other options are deselected.
8 Click the pencil icon next to InForm Trial Management.
9 Change the name of the InForm Trial Management package to reflect the sponsor or trial that will be using the package.
10 Click OK.
11 Click Import Now.
12 Click Finish.
The Import screen appears.
Trial-specific clinical package
Each trial uses a unique trial-specific clinical package. For details on how to publish a trial-specific clinical package, see the Installation and Configuration Guide.
Creating new folders for multiple trials or sponsors
About the InForm Report Folder Maintenance tool The InForm Report Folder Maintenance utility is a Windows application that can do the following:
• Copy reporting folders and their contents to target folders.
• Define and create folder structures when using a single reporting server for
• Multiple trials
• Multiple sponsors, or
• Multiple trials within multiple sponsors.
Only users with System Administrator privileges can run the InForm Report Folder Maintenance utility.
Note: This includes saved reports as well as standard report definitions.

Installation and Configuration
InForm 4.6 257
The InForm Report Folder Maintenance is installed on the reporting (Cognos 8 Business Intelligence) server as part of the InForm and InForm Reporting and Analysis installation and configuration. You can find it at this path:
\c8\bin\PFMTRSetupUtil.exe During the copy operation, the tool:
• Automatically updates any links to drill-down reports in InForm Standard Reports copied to a target location.
• Allows you to associate any reports with a new reporting package at the target location.
The InForm Report Folder Maintenance tool copies only reports and report definitions. It does not copy the folders containing links to legacy ASP reports, the InForm Trial Management package, or any published trial-specific clinical package. For more information about the association between reports and report packages, see Report package association (on page 258).
Note: The running of this utility does not produce a log file.
About copying reports from one trial to another The InForm Report Folder Maintenance utility is a Windows application that can do the following:
• Copy reporting folders and their contents to target folders.
• Define and create folder structures when using a single reporting server for
• Multiple trials
• Multiple sponsors, or
• Multiple trials within multiple sponsors.
Only users with System Administrator privileges can run the InForm Report Folder Maintenance utility.
Note: This includes saved reports as well as standard report definitions.
The InForm Report Folder Maintenance is installed on the reporting (Cognos 8 Business Intelligence) server as part of the InForm and InForm Reporting and Analysis installation and configuration. You can find it at this path:
\c8\bin\PFMTRSetupUtil.exe During the copy operation, the tool:
• Automatically updates any links to drill-down reports in InForm Standard Reports copied to a target location.
• Allows you to associate any reports with a new reporting package at the target location.
The InForm Report Folder Maintenance tool copies only reports and report definitions. It does not copy the folders containing links to legacy ASP reports, the InForm Trial Management package, or any published trial-specific clinical package. For more information about the association between reports and report packages, see information about Report package
Appendix A Troubleshooting
258 InForm 4.6
association in the Utilities Guide.
Report/package association
Report/package association Each report is associated with the package that is used to create it. That is, a report created with the InForm Trial Management package is associated with that package; a report created with the trial-specific clinical package is associated with that package.
A report that you have copied to a new location must be associated with the package that is to be used by the trial or sponsor working with the report. When you copy reports using the InForm Report Folder Maintenance tool, you can specify the package name to be used, if necessary.
For reports that you have created with the trial-specific clinical package, you must always specify a new package name for the target location. (Clinical package names are unique for each trial.)
Report validation The InForm Report Folder Maintenance tool ensures that a report is validated against the associated package when you copy the report to a new location. Therefore, the package must exist before you begin the copy operation. For more information, see Setting up reporting packages (on page 255).
The InForm Report Folder Maintenance tool stops whenever it encounters any error, and you must correct the error, delete all objects within the target folder, and run the tool again to copy all reports. For example, although you can copy report definitions that contain clinical report elements from one trial to another, the schema of the clinical portion of the reporting database is unique to each trial; therefore, the clinical package generated for each trial is unique. If a clinical report contains a report element that does not exist in the target package, the report cannot be validated after it is copied.
Clinical reports and report validation Though you can copy report definitions that contain clinical report elements from one trial to another, keep in mind that the schema of the clinical portion of the reporting database is unique to each trial; therefore, the clinical package generated for each trial is unique.
If a clinical report contains a report element that does not exist in the target package, the report cannot be validated when copied. The InForm Report Folder Maintenance utility stops when it cannot validate the report against the new package. To successfully copy the report, you must alter the report to remove the report element before copying the report.

Installation and Configuration
InForm 4.6 259
Report copy considerations summary: Single sponsor, multiple trials
Source Package
Type of data in report
New package name required?
Report modifications required at the target location?
InForm Trial Management
Trial management data only.
No No
Trial-specific clinical Trial management data only.
Yes (The package must exist before you can copy the folders.)
No
Trial-specific clinical Clinical data, or a mixture of clinical and trial management data.
Yes (The package must exist before you can copy the folders.)
You may. Clinical packages and their elements are specific to each trial. You may have to alter the report to ensure the report can be validated and copied to the target location.
Report copy considerations summary: Multiple sponsor, multiple trials
Source Package
Type of data in report
New package name required?
Report modifications required at the target location?
InForm Trial Management
Trial management data only.
Yes (Each sponsor folder should have its own InForm Trial Management package).
No
Trial-specific clinical Trial management data only.
Yes (The package must exist before you can copy the folders.)
No
Trial-specific clinical Clinical data, or a mixture of clinical and trial management data.
Yes (The package must exist before you can copy the folders.)
You may. Clinical packages and their elements are specific to each trial. You may have to alter the report to ensure the report can be validated and copied to the target location.

Appendix A Troubleshooting
260 InForm 4.6
Copying standard reporting folders for a new trial To create a reporting folder for a new trial:
Note: The running of this utility does not produce a log file.
1 On the reporting server, double-click this file: \c8\bin\PFMTRSetupUtil.exe
The InForm Report Folder Maintenance window appears.
2 In the Log In Information portion of the window, enter:
• The User Name and Password used to log in to the reporting server.
Note: Credentials for the login user are created per the steps in Create the PFWD namespace and the username CRNSYSADMIN (on page 134). User and namespace are typically crnsysadmin and PFWD, however, they could be different based on what was done during installation.
• The name of the LDAP namespace used for authentication by Sun ONE Directory Server.
3 In the Source portion of the window, verify that Standard Report folders is selected in the Copy from field. Note that the report or folder to be copied should be within a folder that is at root level in Public Folders.
Example: If folder A in Trial A is to be copied to Trial B, first a folder, for example RootFolder1 should be created at public root level and Folder A should be coped to RootFolder1 using Cognos 8 folder copy feature. Use RootFolder1 as the value for the Path parameter in the Source section. Once copying is completed to Trial B, the user will see Folder A under the Trial B folder.
4 Complete the Target portion of the window as follows:
• Path—Enter the target path for the folder, or the search path of the Content Store folder that contains the report folders to be copied. Do not enter a folder name. To create a folder at the public folder area, enter \content in the path field.
Example: If the report is to be copied to PFST46 trial then it is /content/folder[@name='pfst46'] this can be obtained in the same way as the steps mentioned in the ‘Determining folder path’ section
• New Folder prefix—Specify a prefix for the target folder name. For instance, if you are creating the folder structure for Trial 2, you might enter T2 as the prefix for the new folder.
Note: This field is optional.
• New Folder name—Enter the name of the target folder, if you want to create a new folder with a name that is different from the source folder name. Enter the name of an existing folder if you want to copy folders to it.
Note: This field is optional. If left blank, it will use the name of the folder under the source folder.

Installation and Configuration
InForm 4.6 261
• Package name—Enter the name of the new package that should be associated with any trial-specific reports. This package must exist before you perform the copy.
Examples: InForm Trial Management for PFST46 or PFST46 clinical for PFST46 trials operational and clinical packages.
5 Click Create.
The utility begins copying the folder structure to the new location. The Status area of the window displays ongoing status and notifies you when the copy is complete.
This is a sample of the output seen in the Status window from a successful copy:
Reading system information...
Contacting reporting service...
Found: http://localhost:9300/p2pd/servlet/dispatch
User logon in progress... Successful
Verifying package InForm Trial Management for cl316257067...
Model for new reports: /content/package[@name='InForm Trial Management for cl316257067']/model[@name='model']
Copying...
Getting source location information...
Folder copied: /content/folder[@name='report_to_exprt']/folder[@name='rprtfrm_pfst46']
Validating: Test - CRF Aging by Site Validation Completed! Updating the Reports... Report is updated.
**** Copying completed successfully****
User logoff in progress... Successful
++++++ Process Ended ++++++
6 On the InForm Server, identify the top level reporting folder for the trial in the InForm Administration user interface. See the InForm online Help for more information on setting system configuration options.
Copying custom reporting folders for a new trial To create a reporting folder for a new trial:
Note: The running of this utility does not produce a log file.
1 On the reporting server, double-click this file: \c8\bin\PFMTRSetupUtil.exe

Appendix A Troubleshooting
262 InForm 4.6
The InForm Report Folder Maintenance window appears.
2 In the Log In Information portion of the window, enter:
• The User Name and Password used to log in to the reporting server.
Note: Credentials for the login user are created per the steps in Create the PFWD namespace and the username CRNSYSADMIN (on page 134). User and namespace are typically crnsysadmin and PFWD, however, they could be different based on what was done during installation.
• The name of the LDAP namespace used for authentication by Sun ONE Directory Server.
3 Complete the Source portion of the window as follows:
• Copy from—Click the Custom radio button.
• Path—Enter the path for the existing folder structure that you want to copy. Do not include folder name here.
Note: You can copy the source path from the source folder properties. For more information, see Determining folder path (on page 250).
• Folder prefix—Specify any folder name prefix that identifies the folders that you want to copy. For example, you may have used T1 as a prefix for all folders belonging to Trial 1. Specifying T1 in the Folder prefix field ensures only those T1 folders are copied.
Note: This field is optional.
4 Complete the Target portion of the window as follows:
• Path—Enter the target path for the folder, or the search path of the Content Store folder that contains the report folders to be copied. Do not enter a folder name. To create a folder at the public folder area, enter \content in the path field.
Example: If the report is to be copied to PFST46 trial then it is /content/folder[@name='pfst46'] this can be obtained in the same way as the steps mentioned in the ‘Determining folder path’ section
• New Folder prefix—Specify a prefix for the target folder name. For instance, if you are creating the folder structure for Trial 2, you might enter T2 as the prefix for the new folder.
Note: This field is optional.
• New Folder name—Enter the name of the target folder, if you want to create a new folder with a name that is different from the source folder name. Enter the name of an existing folder if you want to copy folders to it.
Note: This field is optional. If left blank, it will use the name of the folder under the source folder.
• Package name—Enter the name of the new package that should be associated with

Installation and Configuration
InForm 4.6 263
any trial-specific reports. This package must exist before you perform the copy.
Examples: InForm Trial Management for PFST46 or PFST46 clinical for PFST46 trials operational and clinical packages.
5 Click Create.
The utility begins copying the folder structure to the new location. The Status area of the window displays ongoing status and notifies you when the copy is complete.
This is a sample of the output seen in the Status window from a successful copy:
Reading system information...
Contacting reporting service...
Found: http://localhost:9300/p2pd/servlet/dispatch
User logon in progress... Successful
Verifying package InForm Trial Management for cl316257067...
Model for new reports: /content/package[@name='InForm Trial Management for cl316257067']/model[@name='model']
Copying...
Getting source location information...
Folder copied: /content/folder[@name='report_to_exprt']/folder[@name='rprtfrm_pfst46']
Validating: Test - CRF Aging by Site Validation Completed! Updating the Reports... Report is updated.
**** Copying completed successfully****
User logoff in progress... Successful
++++++ Process Ended ++++++
Determining folder paths When you copy reporting folders from a source location to a target location, do the following to obtain the source path:
1 Log on to the trial as the InForm System Administrator.
2 Click Reports.
3 Click Set Properties for the folder you want to copy.
4 Click View the search path.
A dialog displays the search path.
5 Copy the path from the dialog and paste it into the Path field in the InForm Report Folder

Appendix A Troubleshooting
264 InForm 4.6
Maintenance utility.
InForm Report Folder Maintenance utility field reference
Use the InForm Report Folder Maintenance tool to create reporting folders for multiple sponsors or for multiple trials. Run this tool after you set up the initial reporting structure for a given reporting server.
Field descriptions: Log on information
Field Description
User Name User name used to log on to the Cognos 8 server.

Installation and Configuration
InForm 4.6 265
Field Description
Password Password used to log on to the Cognos 8 server.
LDAP Namespace Type the Cognos 8 trial namespace that is used for authentication by Sun ONE Directory Server. This is the same namespace name that is identified in the InForm Administration Configuration tab.
Field descriptions: Source
Field Description
Copy from The type of folders you want to copy. Choose one of the following:
• Standard folders—To copy ONLY InForm Standard Reports folders.
• Custom folders—To copy trial-specific custom reporting folders.
Path The path for the existing folder structure you want to copy. Do not include a folder name.
For example, to copy all folders that exist at the Public root, type \content, the path for the Public root folder.
For more information, see Determining folder paths (on page 250).
Folder prefix A folder name prefix that identifies the folders you want to copy. For example, you may have used T1 as a prefix for all folders belonging to Trial 1. Specifying T1 in the Folder prefix field ensures only those T1 folders are copied.
Leave this field blank to copy all folders at the specified path.
Field descriptions: Target
Field Description
Path The target path for the folder. Do not include a folder name here.
New folder prefix A prefix for the target folder name. For example, if you are creating the folder structure for Trial 2, you might type T2 as the prefix for the new folder.
New folder name The name of the target folder if you want to create a new folder with a name that is different from the source folder name. Type the name of an existing folder if you want to copy folders to it.
Package name The name of the new package that will be associated with any trial-specific reports. Because each trial clinical package is unique, reports that contain clinical (trial-specific) data must be associated with a new clinical package when you copy the reports to a new location.

Appendix A Troubleshooting
266 InForm 4.6
Field Description
Status Displays the status of the copy operation.
The messages Package connection updated or Spec updated may appear among the messages displayed here. This indicates that the tool has updated the report definition at the target location to reflect a new package name or a new link to a drill-down report.

InForm 4.6 267
In this appendix Overview .............................................................................................................................................. 268
Prerequisites ........................................................................................................................................ 269
Scripts ................................................................................................................................................... 270
A P P E N D I X B Scripts for InForm Reporting

Appendix B Scripts for InForm Reporting
268 InForm 4.6
Overview This appendix lists the scripts that are used during the installation and configuration of the Reporting and Analysis module.
For installation instructions, see the chapter Installing and configuring the Reporting and Analysis module in a trial (on page 145).

Installation and Configuration
InForm 4.6 269
Prerequisites Before any of the scripts in this Appendix can be run, the following conditions apply:
• Oracle software requirements must be met. For more information, see the InForm ITM hardware and software requirements. in the Release Notes.
• Reporting must be in a separate database from the trial database. For more information, see Creating the trial and reporting databases in separate instances (on page 154).
• Reporting architecture requirements are met. For more information, see InForm reporting database architecture rules (on page 148).
• The reporting database must exist with the appropriate parameters and tablespaces. For more information, see Preparing the trial database for Reporting and Analysis in a multiple database environment (on page 160).
• The configdiffdb.sql file variables must be configured. For more information, see Configuring the Reporting and Analysis installation in a multiple database environment (on page 165).

Appendix B Scripts for InForm Reporting
270 InForm 4.6
Scripts
• preinstall_reportingschema_diffdb.sql
Creates the reporting infrastructure, users, privileges, and trial objects necessary to support reporting.
This script:
• Must be run with the trial down. Phase Forward recommends running this script with all trials down in a maintenance window to avoid conflicts and errors.
• Only needs to be run once per trial and reporting installation. It must be rerun if reporting is completely uninstalled (that is, the deinstall_reporting_diffdb.sql script was run.
• To check the environment prior to running this script, run the configandcheckdiffdb.sql script.
• This script uses the configdiffdb.sql and the configaddsdiffdb.sql files; the correct ones must be in place.
• configandcheckdiffdb.sql
Checks the environment and variable settings. This script is run by the installation program; it can also be run manually.
• configandcheckreportingschemadiffdb.sql
Checks the environment before running the install_reportingschema_diffdb.sql script. This can run at any time and can be rerun as necessary.
• install_reportingschema_diffb.sql
Installs a reporting schema without bringing the trial down.
Before running this script:
• Run the preinstall_reportingschema-diffdb.sql script. (Required.)
• Disable all Streams processes (capture, propagation and apply)
• Disallow access to the reporting database. Reporting database users should not be allowed to access the reporting schema while this script is running.
• To check the environment, run the configandcheckreportingschemadiffdb.sql script (Optional.)
• deinstall_reportingschema_diffdb.sql
Uninstalls a reporting schema without bringing the trial down. All Streams processes (capture, propagation and apply) must be disabled prior to running this script.
remove_streams_setup_info_diffdb.sql
Deletes the STREAMS_SETUP_INFO row in the study and reporting databases.
When you install the Reporting and Analysis module, a table called STREAMS_SETUP_INFO is created in both the study and reporting databases. The STRMADMIN user owns this table in both databases. This table has one row per study and

Installation and Configuration
InForm 4.6 271
reporting schema. When you remove a study and reporting schema, you must delete the row in the STREAMS_SETUP_INFO table for the study and the reporting schema.
Do not run remove_streams_setup_info_diffdb.sql until you are sure that:
• You have completely removed the study and reporting schemas.
• The configdiffdb.sql file is correctly set up for the study and its reporting environment.
Run this script with SQL*Plus with /nolog.
You must be connected as STRMADMIN.
configaddsdiffdb.sql
Configures optional variables, all of which depend on user requirements. No changes to the variables in this file are required; any changes are optional.
add_table_diffdb.sql
Adds tables to the list of tables streamed to the Reporting database after Reporting has been completely installed.
For information about specifying table names, see streams_table_adds_postinstall and streams_table_drop_postinstall variables (on page 273).
drop_table_diffdb.sql
Drops tables from the list of tables streamed to the Reporting database after Reporting has been completely installed.
For information about specifying table names, see streams_table_adds_postinstall and streams_table_drop_postinstall variables (on page 273).
configaddsdiffdb.sql Configaddsdiffdb.sql file contains variables for managing streams processes and adding tables for replication.
Any changes to variable values are optional. The installation is unaffected if default values are used.
There should be one copy of this file per trial and reporting schema. If values in this file have been changed, then make a copy of the file after the installation for later use.
Export/import variables
Variable name Description and Comments Exp_var Name of the export executable. Default is "exp".
The executable name can be preceded by a full hardcoded folder path (for example, C:\oracle\product\10.2.0\db_1\bin\) or a variable (for example, $ORACLE_HOME\bin\).

Appendix B Scripts for InForm Reporting
272 InForm 4.6
Variable name Description and Comments Imp_var Name of the import executable. Default is "imp".
The executable name can be preceded by a full hardcoded folder path (for example, C:\oracle\product\10.2.0\db_1\bin\) or a variable (for example. $ORACLE_HOME\bin\).
export_parfile Filename for the export parameter file.
Format is the trial schema name concatenated to the trial database tnsnames alias concatenated to expparams.par.
See Considerations.
import_parfile Filename for the import parameter file.
Format is the trial schema name concatenated to the trial database tnsnames alias concatenated to impparams.par.
See Considerations
expimp_dumpfile Filename for the export data file.
Format is the trial schema name concatenated to the trial database tnsnames alias concatenated to datafile.dmp.
See Considerations
Considerations Files created by export_parfile, import_parfile, and expimp_dumpfile are not removed after the installation is complete. The files are overwritten each time a reporting installation is run for the same trial schema, so there will be only one copy of each file per trial schema.
streams_table_adds variable
Description The streams_table_adds variable is used to specify additional tables for replication. Table names you specify must exist in the trial schema in the trial database.
Values The default value for this variable is null (no value). To add tables to this variable, surround table names with single quotes, put a comma after each table name (including the last one) and do not use spaces between the table names.
Examples streams_table_adds = 'PF_TABLEONE,' streams_table_adds = 'PF_TABLEONE,PF_TABLETWO,PF_TABLETHREE,'
Considerations • The configandcheckdiffdb.sql and configandcheckreportingschemadiffdb.sql scripts

Installation and Configuration
InForm 4.6 273
verify the following:
• The table(s) added to this variable exist in the trial schema. An error is generated if they do not.
• The tables do not have primary keys.
• The table does not have an unconditional supplemental log (configandcheckreportingschemadiffdb.sql only).
• Table names added to this variable should not be removed unless they are being removed from replication.
• Tables added prior to running the preinstall_reportingschema_diffdb.sql or install_reportingschema_diffdb.sql script will have a supplemental log automatically added to them.
• Tables added after running the preinstall_reportingschema_diffdb.sql and prior to running the install_reportingschema_diffdb.sql script need to have a supplemental log added to them manually, using the command below:
• Run this command after logging into the trial database as the trial schema owner alter table <table_name> add supplemental log data (all) columns;
• Table rules added to the capture, propagation, and apply processes are generic and specify that the entire table and all rows in the table be replicated to reporting.
streams_table_adds_postinstall and streams_table_drop_postinstall variables
Description • streams_table_adds_postinstall is used by the add_table_diffdb.sql script when adding tables
after Reporting is installed.
• streams_table_drop_postinstall is used by the drop_table_diffdb.sql script when dropping tables after Reporting has been installed.
Values For each variable, specify the values shown in the table.
• TABLEONE and TABLETWO represent names of tables to be added or dropped.
• To specify one table, use a single quote before and after the table name.
• To specify more than one table name:
• Use a single quote before the first table name, and a single quote after the last table name in the series. (Do not use any other single quotes in the table names.)
• Use a comma between the table names. Do not use a space.
• Do not use a comma after the last table name in the series.

Appendix B Scripts for InForm Reporting
274 InForm 4.6
Number of tables Setting in configaddsdiffdb.sql 1 table streams_table_adds_postinstall = 'TABLEONE'
streams_table_drop_postinstall = 'TABLEONE'
2 or more tables streams_table_adds_postinstall = 'TABLEONE,TABLETWO'
streams_table_drop_postinstall = 'TABLEONE,TABLETWO'
capture_chkpnt_ret_time variable
Description The capture_chkpnt_ret_time variable is used to set the number of days for which capture checkpoints are retained. This variable value is passed to the dbms_capture_adm.create_capture procedure when the capture process is created.
Values The default is 60 (This is the same as the default Oracle provides with the dbms_capture_adm.create_capture procedure). This parameter cannot be null.
Note: A large of number of days specified for this parameter can cause a large number of capture checkpoints to be retained and cause the SYSAUX tablespace in the trial database to grow significantly. This setting along with the capture parameter _checkpoint_frequency influence the amount of checkpoints retained.
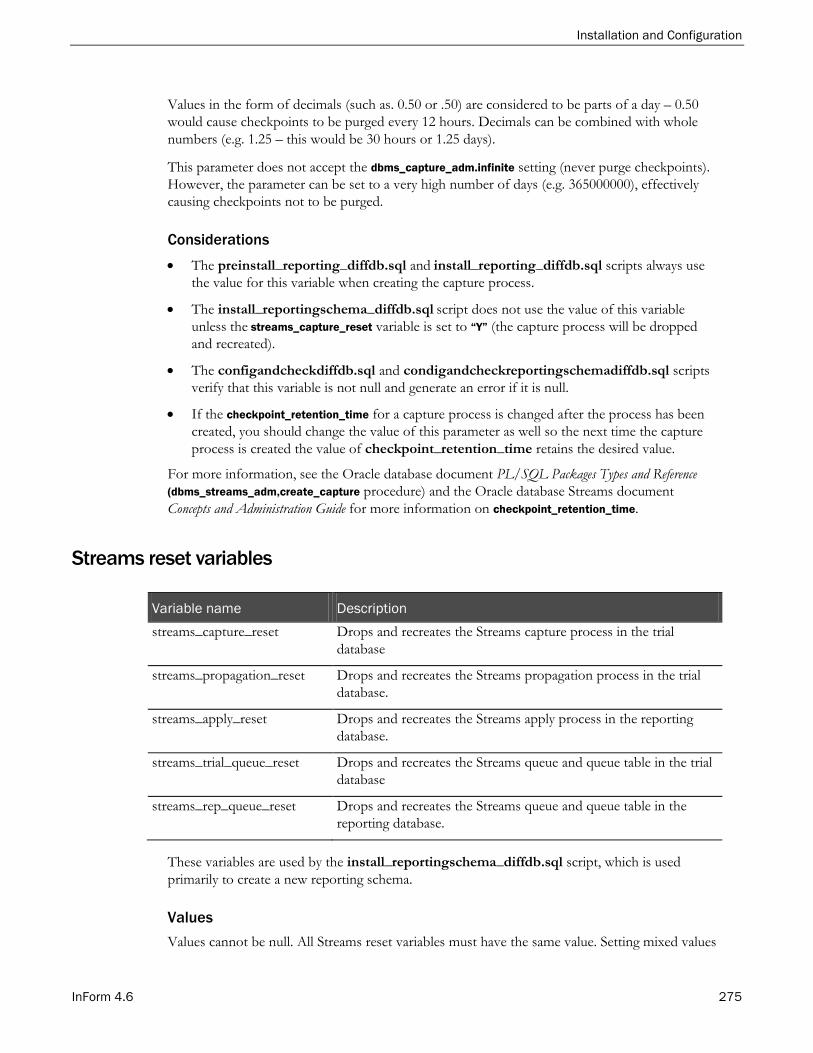
Installation and Configuration
InForm 4.6 275
Values in the form of decimals (such as. 0.50 or .50) are considered to be parts of a day – 0.50 would cause checkpoints to be purged every 12 hours. Decimals can be combined with whole numbers (e.g. 1.25 – this would be 30 hours or 1.25 days).
This parameter does not accept the dbms_capture_adm.infinite setting (never purge checkpoints). However, the parameter can be set to a very high number of days (e.g. 365000000), effectively causing checkpoints not to be purged.
Considerations • The preinstall_reporting_diffdb.sql and install_reporting_diffdb.sql scripts always use
the value for this variable when creating the capture process.
• The install_reportingschema_diffdb.sql script does not use the value of this variable unless the streams_capture_reset variable is set to “Y” (the capture process will be dropped and recreated).
• The configandcheckdiffdb.sql and condigandcheckreportingschemadiffdb.sql scripts verify that this variable is not null and generate an error if it is null.
• If the checkpoint_retention_time for a capture process is changed after the process has been created, you should change the value of this parameter as well so the next time the capture process is created the value of checkpoint_retention_time retains the desired value.
For more information, see the Oracle database document PL/SQL Packages Types and Reference (dbms_streams_adm,create_capture procedure) and the Oracle database Streams document Concepts and Administration Guide for more information on checkpoint_retention_time.
Streams reset variables
Variable name Description streams_capture_reset Drops and recreates the Streams capture process in the trial
database
streams_propagation_reset Drops and recreates the Streams propagation process in the trial database.
streams_apply_reset Drops and recreates the Streams apply process in the reporting database.
streams_trial_queue_reset Drops and recreates the Streams queue and queue table in the trial database
streams_rep_queue_reset Drops and recreates the Streams queue and queue table in the reporting database.
These variables are used by the install_reportingschema_diffdb.sql script, which is used primarily to create a new reporting schema.
Values Values cannot be null. All Streams reset variables must have the same value. Setting mixed values

Appendix B Scripts for InForm Reporting
276 InForm 4.6
could cause the installation to fail.
• "N" (default) causes the script to do nothing. No Streams processes or objects are dropped and recreated.
• "Y" causes the streams processes to be dropped and recreated.
Considerations • These variables are used by the install_reportingschema_diffdb.sql script only. They are
not used by the preinstall_reportingschema_diffdb.sql script.
• Setting values to "Y" can be useful in the following situation:
If preinstall_reportingschema_diffdb.sql has been run separately and the capture process it created has existed for some time, that capture process might need access to an archive log that is no longer on disk. The archive log must be restored. To avoid the need to restore archive logs, the capture (and other streams processes) can be dropped and recreated using these variables.
Dropping and recreating the capture process does not necessarily remove the need for older archive logs, so it is recommended that the capture_build variable also be set to “Y” in this circumstance so that a new Logminer data dictionary is created and used by the capture process.
• If you are running the install_reporting_diffdb.sql script, it is recommended that the Streams reset variables be set to "N".
Setting the values to "Y" caused the installation program to do more work and take longer to complete, because the following occurs when install_reporting_diffdb.sql calls both the preinstall_reportingschema_diffdb.sql and the install_reportingschema_diffdb.sql scripts.
• preinstall_reportingschema_diffdb.sql creates Streams processes and objects.
• install_reportingschema_diffdb.sql script drops the Streams processes and objects and recreates them.
Although this does not cause problems, it causes the installation to do more work and take longer to complete.
• The configandcheckdiffdb.sql and configandcheckreportingschemadiffdb.sql scripts verify the variable values, and generate an error if any variable has a value other than "N" or "Y".

Installation and Configuration
InForm 4.6 277
capture_build variable
Description This variable is used to extract a copy of the data dictionary to the redo logs.
The Oracle database dbms_capture_adm.build procedure is invoked to extract a copy of the data dictionary to the redo logs. This procedure returns a scn that is used as the "first scn" for the capture process. As a result, the capture process uses a new Logminer data dictionary.
Values Value cannot be null.
• "N" (default) causes the script to do nothing. No extract is done.
• "Y" causes an extract to be done.
Considerations • The install_reporting_diffdb.sql and preinstall_reportingschema_diffdb.sql scripts
always use the value of this variable.
• The install_reportingschema_diffdb.sql script uses the value of capture_build only if the streams_capture_reset variable is set to "Y" (the capture process will be dropped and recreated).
• The configandcheckdiffdb.sql and configandcheckreportingschemadiffdb.sql scripts verify the variable value and generate an error if the variable has a value other than "N" or "Y".
capture_first_scn and capture_start_scn variables
Variable Description capture_first_scn Sets the first scn for the capture process
capture_start_scn Sets the start scn for the capture process.

Appendix B Scripts for InForm Reporting
278 InForm 4.6
Values • Default is 1. This value is interpreted as a null value by the installation scripts. Do not set the
value to null directly.
• Values for both variables must be greater than or equal to 1.
• Value for capture_start_scn must be greater than or equal to the value for capture_first_scn
• Values for both variables can also be set valid scn numbers from the trial database, subject to some restrictions described in Value assignments. The values for both variables cannot be set to a scn that is greater than the current scn number for the database.
Value assignments are based on the following hierarchy:
• capture_first_scn value assignment:
• If no capture processes exist in the trial database, assign a null (Oracle requirement).
• If the value of the capture_build variable is set to “Y”, use the scn number returned from the dbms_capture_adm.build procedure.
• If the value is 1 from the condigaddsdiffdb.sql file, assign a null.
• Otherwise, use the scn value assigned (cannot be greater than the current database scn) from the condigaddsdiffdb.sql file.
• capture_start_scn value assignment:
• If no capture processes exist in the trial database, assign a null (Oracle requirement).
• If capture processes exist in the trial database but no capture checkpoints have been taken, assign a null (Oracle requirement).
• If the value is 1 from the condigaddsdiffdb.sql file, assign a null.
• Otherwise, use the scn value assigned (cannot be greater than the current database scn) from the condigaddsdiffdb.sql file.
Considerations • The install_reporting_diffdb.sql and preinstall_reportingschema_diffdb.sql scripts
always use the value of these variables.
• The install_reportingschema_diffdb.sql script does not use the values of these variables unless the streams_capture_reset variable is set to “Y” (the capture process will be dropped and recreated).
• The configandcheckdiffdb.sql and configandcheckreportingschemadiffdb.sql scripts verify that all of the following conditions are met:
• Both variables are not null.
• Both variables are set to a value of 1 or greater,
• Value of both variables is not greater than the current scn for the trial database.
• The value of capture_start_scn is greater than or equal to the value of capture_first_scn.

Installation and Configuration
InForm 4.6 279
An error is generated if these conditions are not met.
• The capture_first_scn can be changed so that a particular existing Logminer dictionary can be used.
• The capture_start_scn can be changed to set the starting scn for the capture process.
For more information on setting “first scn” and “start scn” for the capture process, see the Oracle Streams Concepts and Administration Guide, Chapter 2.


