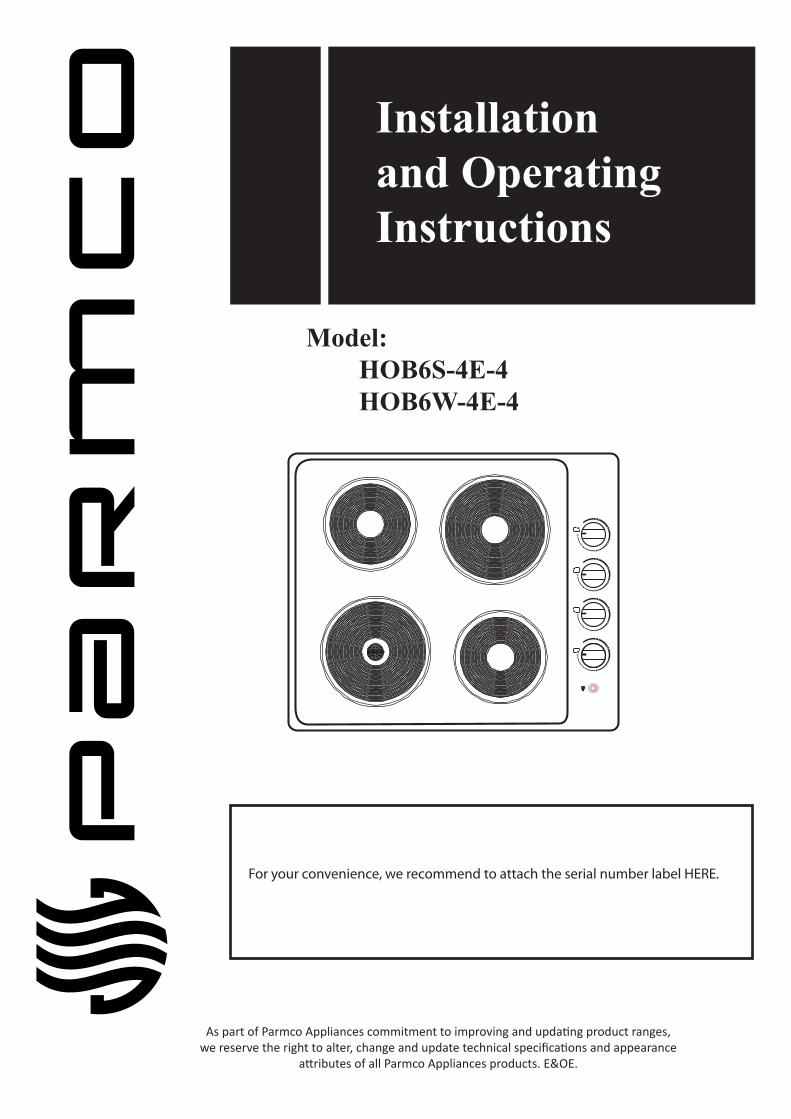
Installation and Operating Instructions As part of Parmco Appliances commitment to improving and updang product ranges, we reserve the right to alter, change and update technical specificaons and appearance aributes of all Parmco Appliances products. E&OE. Model: HOB6S-4E-4 HOB6W-4E-4 For your convenience, we recommend to attach the serial number label HERE.
Transcript
Installationand OperatingInstructions
As part of Parmco Appliances commitment to improving and updating product ranges,we reserve the right to alter, change and update technical specifications and appearance
attributes of all Parmco Appliances products. E&OE.
Model: HOB6S-4E-4HOB6W-4E-4
For your convenience, we recommend to attach the serial number label HERE.
elena
Typewritten Text
727626122014
elena
Typewritten Text
Dear Valued Customer,
Thank you and congratulations on purchasing your new Parmco appliance.
All Parmco products are made to the highest quality and design standards. We are
sure you will enjoy your new appliance.
As a note, please read through these instructions carefully, as these will assist you
in gaining a complete understanding of the functions and features o"ered by your
appliance.
Please take special note of all detailed technical information and installation
instructions. It is essential that you only allow a quali#ed technician to install this
appliance to ensure the safety and reliability of this appliance.
Furthermore, not using appropiate personnel to install this appliance may a"ect any
future warranty claims lodged, so please check with Parmco Appliances before any
installation is carried out.
We hope you enjoy your new appliance. If you would like to #nd out more about
this product or any other products in Parmco’s extensive range, visit us on the web
at www.parmco.co.nz.
Regards,
The Parmco Team
3
Congratulations on the purchase of your new appliance. Now that you have your new cooktop, please take the time to do a couple of very simple tasks. Read the user instructions contained in the first section of this booklet. Your new appliance has been designed and manufactured to the highest standards and incorporates a host of innovative styling and technical features. The time invested in studying this booklet will familiarize you with these features and help you to achieve the best results and get the most enjoyment from your appliance. It could also spare you the inconvenience of any unnecessary service faults. THIS APPLIANCE MUST BE INSTALLED ONLY BY QUALIFIED PERSONNEL IN COMPLIANCE WITH THE INSTRUCTIONS PROVIDED. THE MANUFACTURER DECLINES ALL RESPONSIBILITY FOR IMPROPER INSTALLATION. THE APPLIANCE MUST BE USED ONLY FOR THE PURPOSE FOR WHICH IT WAS DESIGNED. ANY OTHER USE (eg. HEATING ROOMS) IS CONSIDERED TO BE IMPROPER AND CONSEQUENTLY DANGEROUS. THE MANUFACTURER DECLINES ALL RESPONSIBILITY FOR DAMAGE RESULTING FROM IRRESPONSIBLE USE.
Index Safety Instructions 4
Description of the appliance 5
Use 6
Operation of the electric plates 6
Advice on the use of cooking tops 6
Utensils 7
Cleaning and Maintenance 7
Troubleshooting 8
Installation 9
Electrical connection 9
Ensuring adequate ventilation 10
Fastening the fixing brackets 11
Technical specifications 12
4
Safety Instructions Your safety is important. Please read these instructions carefully before installing or using this appliance.
Inflammable materials or products should not be placed on this appliance at any time.
Installation of the appliance and its connection to the electrical mains must only be carried out by a QUALIFIED PERSONNEL. Before any procedure, it is important to check that the appliance is DISCONNECTED from the electrical mains.
Do not attempt to modify the characteristics of this product to avoid personal injuries, damages or void the warranty.
After removing the appliance from the packaging, make sure that it is undamaged and that the electrical lead is in perfect condition. Otherwise, contact your dealer before putting the appliance into operation.
This appliance should be connected to a circuit incorporating an isolating switch which provides full disconnection from the mains power supply.
To prevent electric shock hazard, please ensure the appliance is disconnected from the main electricity supply before caring out any work or maintenance.
Connection to a good earth wiring system is essential and mandatory. Failure to install the appliance incorrectly will invalidate the warranty and any
other liability claims. This product is designed for domestic and non-professional use purposes. It
should not be used for any other purpose. After using the appliance, make sure that all controls are in the “0” position. Do not use the hob if it is broken or cracked, to avoid the possibility of electric
shock or other hazards. This appliance complies with the electromagnetic safety standards. During use, accessible parts of the hob will become hot; to prevent burns, do not
touch the hob during use or immediately after until the surface is cooled down. Do not place empty pans or leave kitchen utensils on the hob as they can become
hot very quickly. This appliance must only be used by adults. Make sure that children do not touch
the controls or play with the appliance. Do not allow children to play, sit, stand or climb on the appliance. This appliance is not intended for use by people (including children) with reduced
physical, sensory or mental capabilities, or lack of experience and knowledge, unless they have been given supervision or instructions regarding the use of the appliance by a person responsible for their safety.
The exposed parts of this appliance heat up during cooking and remain hot for some time even after it is switched off. Keep children well away until the appliance has cooled down.
Keep the appliance thoroughly cleaned. Food residues may cause fire risks. Do not use a steam cleaner to clean your electric cooktop.
5
Do not leave the appliance unattended when in use. Boilover or greasy spillovers may cause fire.
Do not use the appliance for warming or heating the room.
If malfunctions occur do not attempt to repair the appliance yourself. First refer
to the troubleshooting section of this manual. If you do not find the necessary information, contact a service agent or the Parmco's Service Department. Servicing work on this appliance must be carried out by a qualified technician only. Always request the use of original spare parts.
Do not use your electric hob by the means of an external timer or as an
remote-control system. Appliances which are no longer used or usable are not worthless waste. Through
environmentally friendly disposal, a number of materials used in the production of your appliance can be recovered.
Find out about the current disposal options from your local city council. Before scrapping the appliances, cut the power supply lead and make it unusable.
Description of the heat plates
1. Heat plate 1000W 2. Rapid heat plate (Red spot) 2000W and Large heat plate 1500W 3. Control knobs 4. Power indicator light
4
6
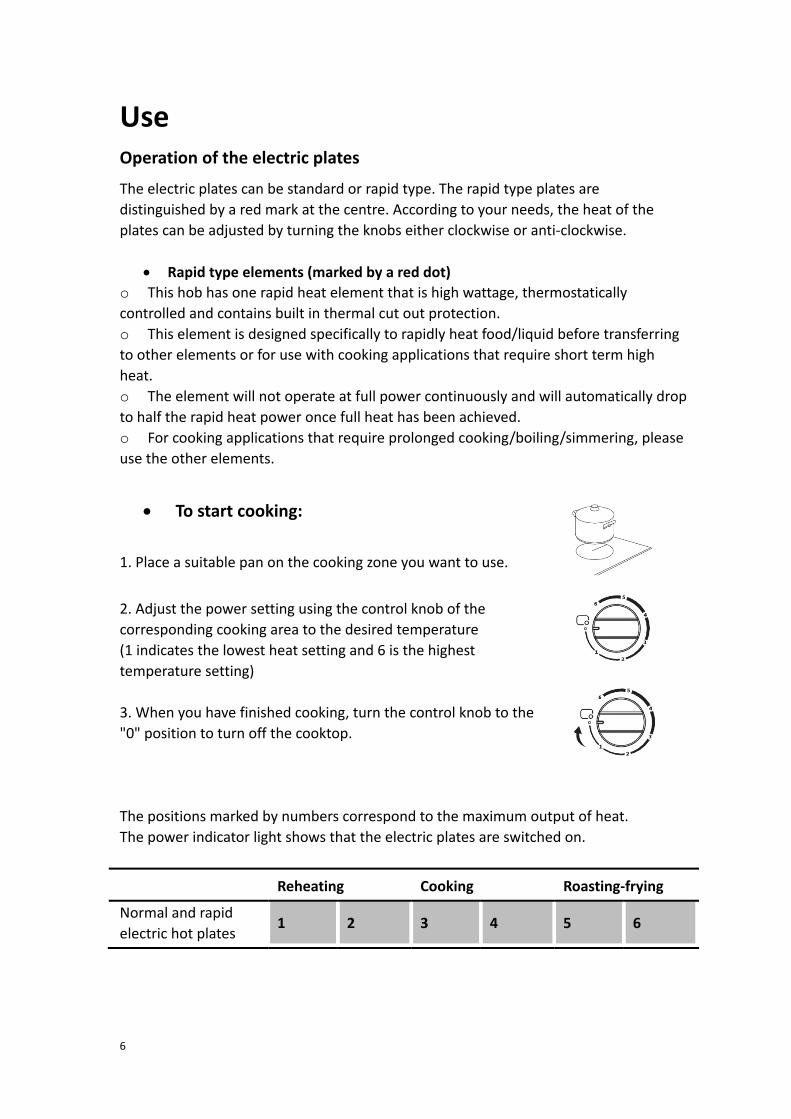
Use Operation of the electric plates
The electric plates can be standard or rapid type. The rapid type plates are distinguished by a red mark at the centre. According to your needs, the heat of the plates can be adjusted by turning the knobs either clockwise or anti-clockwise.
Rapid type elements (marked by a red dot) o This hob has one rapid heat element that is high wattage, thermostatically controlled and contains built in thermal cut out protection. o This element is designed specifically to rapidly heat food/liquid before transferring to other elements or for use with cooking applications that require short term high heat. o The element will not operate at full power continuously and will automatically drop to half the rapid heat power once full heat has been achieved. o For cooking applications that require prolonged cooking/boiling/simmering, please use the other elements.
To start cooking:
1. Place a suitable pan on the cooking zone you want to use.
2. Adjust the power setting using the control knob of the corresponding cooking area to the desired temperature (1 indicates the lowest heat setting and 6 is the highest temperature setting) 3. When you have finished cooking, turn the control knob to the "0" position to turn off the cooktop. The positions marked by numbers correspond to the maximum output of heat. The power indicator light shows that the electric plates are switched on.
Reheating Cooking Roasting-frying
Normal and rapid electric hot plates
1 2 3 4 5 6
Adv
Ute
Good
Cl
vice on th
To save enwith flat bplates. MaAlways cenAlways lift Care must Never leavthe tops toSwitch off Once switc
ensils
Use pans wto cook. Use pans sDo not usecomponenUse only dDo not useDo not opeDo not use
d BAD
(rec
bas
eanin Switch
cool do We adv
dry usin Do not
graphic Do not Clean th
he use of c
ergy and toottom and w
ake sure thentre your pathe pots ofbe taken th
ve the tops oo heat the pthe heating
ched off, the
with flat bot
slightly largee oversized nts and can ry utensils.
e pots and perate the coe cookware
D
cessed
se)
B
(c
ng andoff the mainwn.
vise using lung a soft clouse abrasiv
cs. use a steamhe element
cooking to
o extend thewith a diam
e base of yoan on the coff the electrhat fluids doon without
place. Switcg element be plates rem
ttoms. Unev
er than the pans. Morecause fine cDo not plac
pans that arooktop withwith jagged
BAD
convex base)
d Mainns to the co
ukewarm waoth. ve products
m cleaner tots with wate
ops
e life of the meter not le
ur pan is smooking zoneric cooktop o not spill opans on thh on the pla
before remomain warm
ven or thin
hotplates. Se than 50mmcracks in thece wet or stre unsteadyhout pans od edges or a
BAD
(undersize)
ntenanooktop befo
ater and det
to prevent
o clean the her and dry u
electric coosser than th
mooth and se. to prevent n the electrem or with ates after hoving the pafor a while.
bottoms wi
Smaller panm overhange enamel hoteamy parts
y and likely tn the hotplaa curved ba
BAD
(oversize)
nce ore carrying
tergents to
scratching t
hob. using a soft
oktop, we ahe diametersits flat agai
scratching tric plates. empty panaving set th
ans. .
ill waste en
ns will wasteg can overheob which ws (eg. lids) oto rock or oate. se.
BAD
(moisture o
hotplate)
out any wo
clean enam
the surface
cloth.
dvise usingr of the heainst the surf
the surface.
s, and nevehe pans on t
ergy and ar
e energy. eat cooktop
will trap dirt.on the hotplverbalance
on
BAD
(no utens
ork and wait
meled tops a
and remov
7
pans ating face.
.
er use them.
re slow
p . lates. .
sil)
t for it
and
ving
8
Turn the element on briefly to ensure it is totally dry. When using sponges or a moist cloth to clean the tops, remember that excess
water can damage the electric elements. Clean hard stains using non abrasive detergents, special products that can be
found in the supermarkets, or warm vinegar. After the element has been cleaned and dried, apply solid hotplate protector
(available in the supermarkets) or a light coat of cooking oil to the element.
Important Notice
After use, a discolouration of the stainless steel hot plate rims is to be expected and cannot be avoided. This does not affect the operation of the cooktop.
Failure to correctly clean and maintain these elements may result in rusting
and pitting of the elements. Damage to the elements caused by incorrect maintenance is not covered under warranty.
Troubleshooting Issue Possible cause Action
The cooktop does not turn on.
No power Make sure the cooktop is connected to the power supply and the power switch is turned on.
Check if there is an power outage. If you've checked everything and the
problem persists, call a qualified electrician or Parmco's Service Department.
The surface is scratched
Use of improper cookware. Unsuitable, abrasive cleaning products have been used for cleaning.
Use cookware with flat, smooth base. See "Choosing the correct cookware" section.
Refer to the "Cleaning and
Maintenance" section. These recommendations are guidelines only. Do not attempt to disassemble the appliance yourself to avoid damaging the electric cooktop and any personal injuries.
9
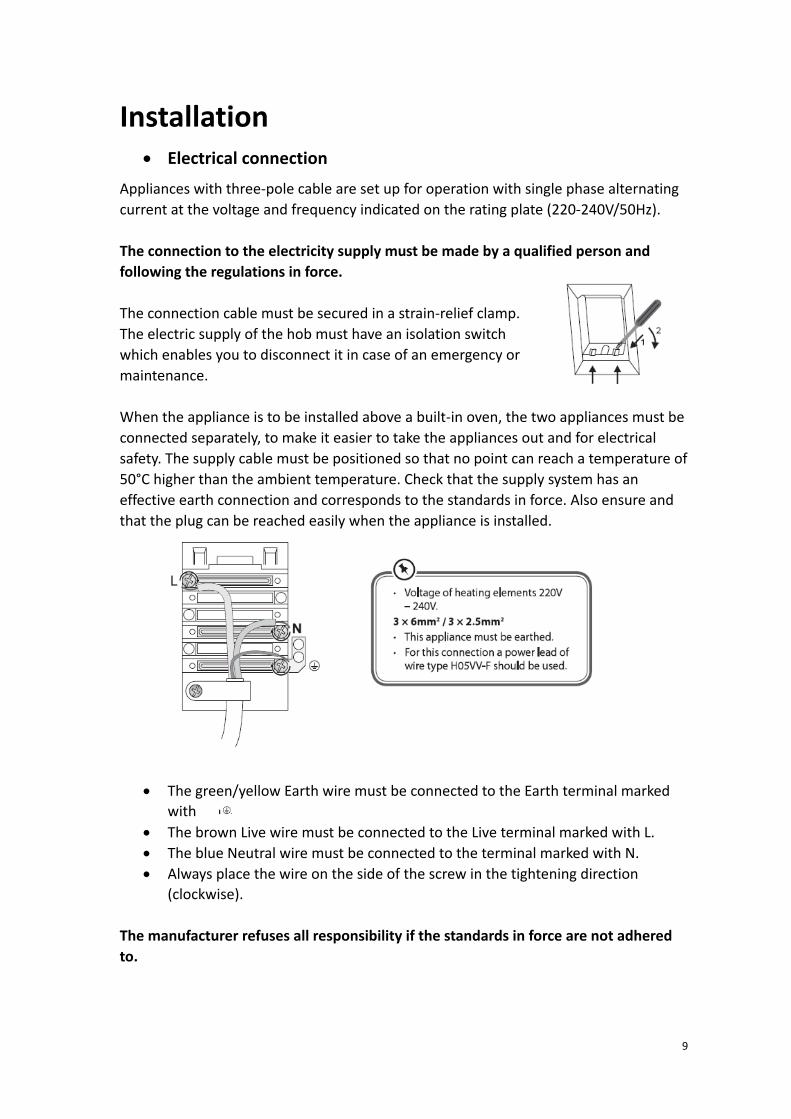
Installation Electrical connection
Appliances with three-pole cable are set up for operation with single phase alternating current at the voltage and frequency indicated on the rating plate (220-240V/50Hz). The connection to the electricity supply must be made by a qualified person and following the regulations in force. The connection cable must be secured in a strain-relief clamp. The electric supply of the hob must have an isolation switch which enables you to disconnect it in case of an emergency or maintenance. When the appliance is to be installed above a built-in oven, the two appliances must be connected separately, to make it easier to take the appliances out and for electrical safety. The supply cable must be positioned so that no point can reach a temperature of 50°C higher than the ambient temperature. Check that the supply system has an effective earth connection and corresponds to the standards in force. Also ensure and that the plug can be reached easily when the appliance is installed.
The green/yellow Earth wire must be connected to the Earth terminal marked with
The brown Live wire must be connected to the Live terminal marked with L. The blue Neutral wire must be connected to the terminal marked with N. Always place the wire on the side of the screw in the tightening direction
(clockwise). The manufacturer refuses all responsibility if the standards in force are not adhered to.
10
TECHNICAL INFORMATION FOR INSTALLATION PERSONNEL
This appliance must only be installed only an authorised personnel and in accordance with the regulations in force. The wall and bench surfaces must be capable of sustaining temperatures of 75°C. All laminates, fixing adhesive and surfacing materials should be certified suitable for this temperature.
Cut out dimensions
Please ensure you strictly follow the cut out dimension as shown below.
A minimum distance of 55mm must be left around the cut out for installation and use purposes.
The thickness of the bench should be at least 20mm. Use only heat-resistant bench/work surface material to avoid deformation caused by the heat from the hob.
Never leave the packing components (plastic bags, nails, foamed polystyrene, etc.) within the reach of the children since they are a source of potential danger.
Ensuring adequate ventilation
Always ensure the electric cooktop is well ventilated and the air inlet/outlet are not blocked. The base of the hob must have direct unrestricted ventilation to the room where the hob is installed. Please follow the requirements below:
11
Fastening the fixing brackets
The unit should be first placed on a stable, smooth surface then: 1. Turn the cooktop upside down and place it on a soft surface. Fasten the brackets to the appropriate holes. DO NOT tighten the screws at this stage.
2. Apply the sealing strips around the edge of the cooktop. 3. Insert the hob into the cut out and position it correctly.
4. Tighten the screws to secure the hob to the bench.
12
Notes: The hob must be installed by authorised, qualified personnel only. The hob should not be installed above cooling equipment, dishwashers or
dryers. All surfaces around the hob should be able to withstand the heat generated by
the hob. Do not use a silicon sealant to seal the appliance against the aperture. This will
make it difficult to remove the hob requires servicing.
Technical specifications
Cooking Hob HOB6S-4E-4, HOB6W-4E-4 Supply Voltage 220 – 240V/ 50-60Hz Installed Electric Power 5500W
Liability under this warranty will not be accepted for:• Wearandtearfromnormaldomesticuse.• Damageintransport.• Damagecausedtotheproductbyneglect,abuse,negligence,wilfulactormisuse.